

Makita SKR300 Service Manual

SKR300 (version 1-12-03)
SKR300 Service Manual

SKR300 (version 1-12-03)
Page 1
Table of Contents
1. Introduction
a. SKR300 Specifications Page 3
b. LDR180,TL25 Specifications Page 4
c. Overview Page 5
d. Keypad overview Page 6
2. Operation
a. Horizontal setup Page 9
b. Vertical setup Page 10
c. Using the laser chalk line Page 10
d. Using the scanning Page 11
e. Power Page 11
f. Self test mode Page 12
3. Disassembly
a. Remove lower housing, X/Y motor Page 14
b. Remove PCB Page 15
c. Two versions PCB Page 16
d. Inner module Page 17 & 18
4. Rotating head disassembly Page 19
5. Housing disassembly Page 20
6. Battery pack disassembly Page 21
7. LDR180 Remote disassembly Page 22
8. Calibration
a. X-axis calibration Page 23
b. Y-axis calibration Page 24
c. Z-axis calibration Page 26
9. Troubleshooting
a. Laser light and motor failures Page 28
b. Laser light problem Page 29
c. X / Y Motor failure Page 30
d. Excessive rotation noise Page 31
e. Accuracy out of specification Page 32
10. Spare Parts lists Page 33
11. Tools Page 40

SKR300 (version 1-12-03)
Page 2
1. Introduction
The SKR300 is an automatic visible laser that can be used for levelling, vertical
alignment, plumbing and squaring.
The SKR300 laser has these advanced features:
• Automatic self-levelling in both horizontal and vertical modes
• Choice of beams: rotation plane, scanning, chalk line, single point or constant
squaring
• Square shot that’s left / right adjustable

SKR300 (version 1-12-03)
Page 3
a. SKR300 Specifications
- 20° to + 60°C.Storage temperature
Ni-cadRechargeable batteries
Standard 5/8 - IITripod mount
Build-in receiverRemote control
60 to 530 rpmRotation speed
Rain and dustproof (IP64)Weatherproof
635nm <2mW (Class IIIR)Laser beam
6” x 6 ½” x 6 ¾” (15 x 16 x 17 cm)Size
3 lbs / 1.3 kgWeight
2 x (LR20 or D) alkaline batteries or rechargeable batteriesPower
160 hours with alkaline batteries
40 hours with rechargeable batteries
Battery life
15 hoursBattery charging time
- 10° to + 50°C.Operating temperature
10° to 48°
Scanning angle
10 mm at 100 mPlump/square laser spot
10 mm at 30 mChalk line accuracy
30” or 3/16” at 100 ft. or 10mm at 100m (5 mm cone)levelling accuracy horizontal & vertical
5.7° or 10%
levelling range
1,000 ft. (300m) with detectorOperational range (diameter)

SKR300 (version 1-12-03)
Page 4
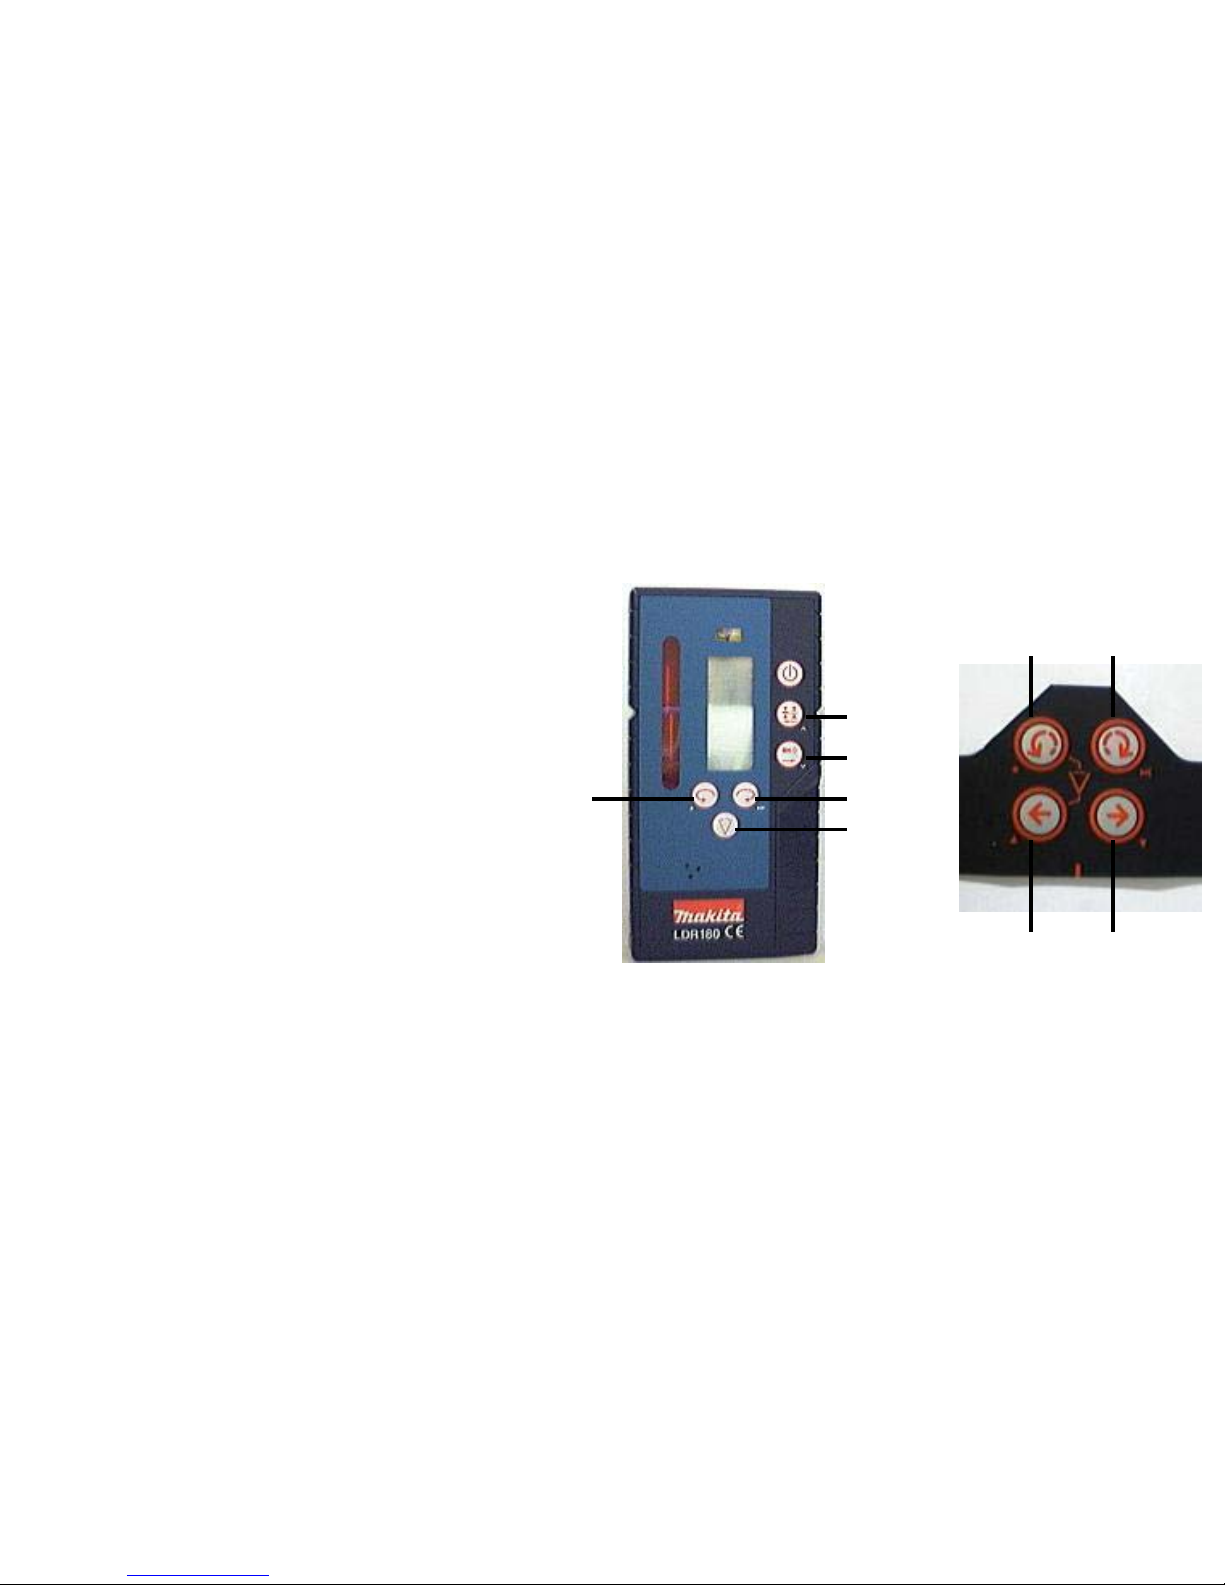
b. Specifications
LDR180
Build-in receiverRemote control
Standard 5/8 - IITripod mount
0.5 lbs / 0.3 kgWeight
6 x 3” x 1” (14.5 x 7 x 2.5 cm)Size
IP64Weatherproof
50 hoursBattery life
9v alkaline battery (LR6)Power
LCD (front and back)Displays
3 different tones high, normal and muteSound
2.5” (4cm)Capture window
Coarse 5mm / Fine 2mmAccuracy
500 ft. (150m)
Operational Range
3.3 ” x 2” x 0.8” (85 x 50 x 20 mm)
Size
16 hoursBattery life
IP61Weatherproof
45 gWeight
1,5v alkaline battery (AA)Power
30m interior (150 ft.) / 15m exteriorOperational Range
TL25
SKR300 (version 1-12-03)
Page 5
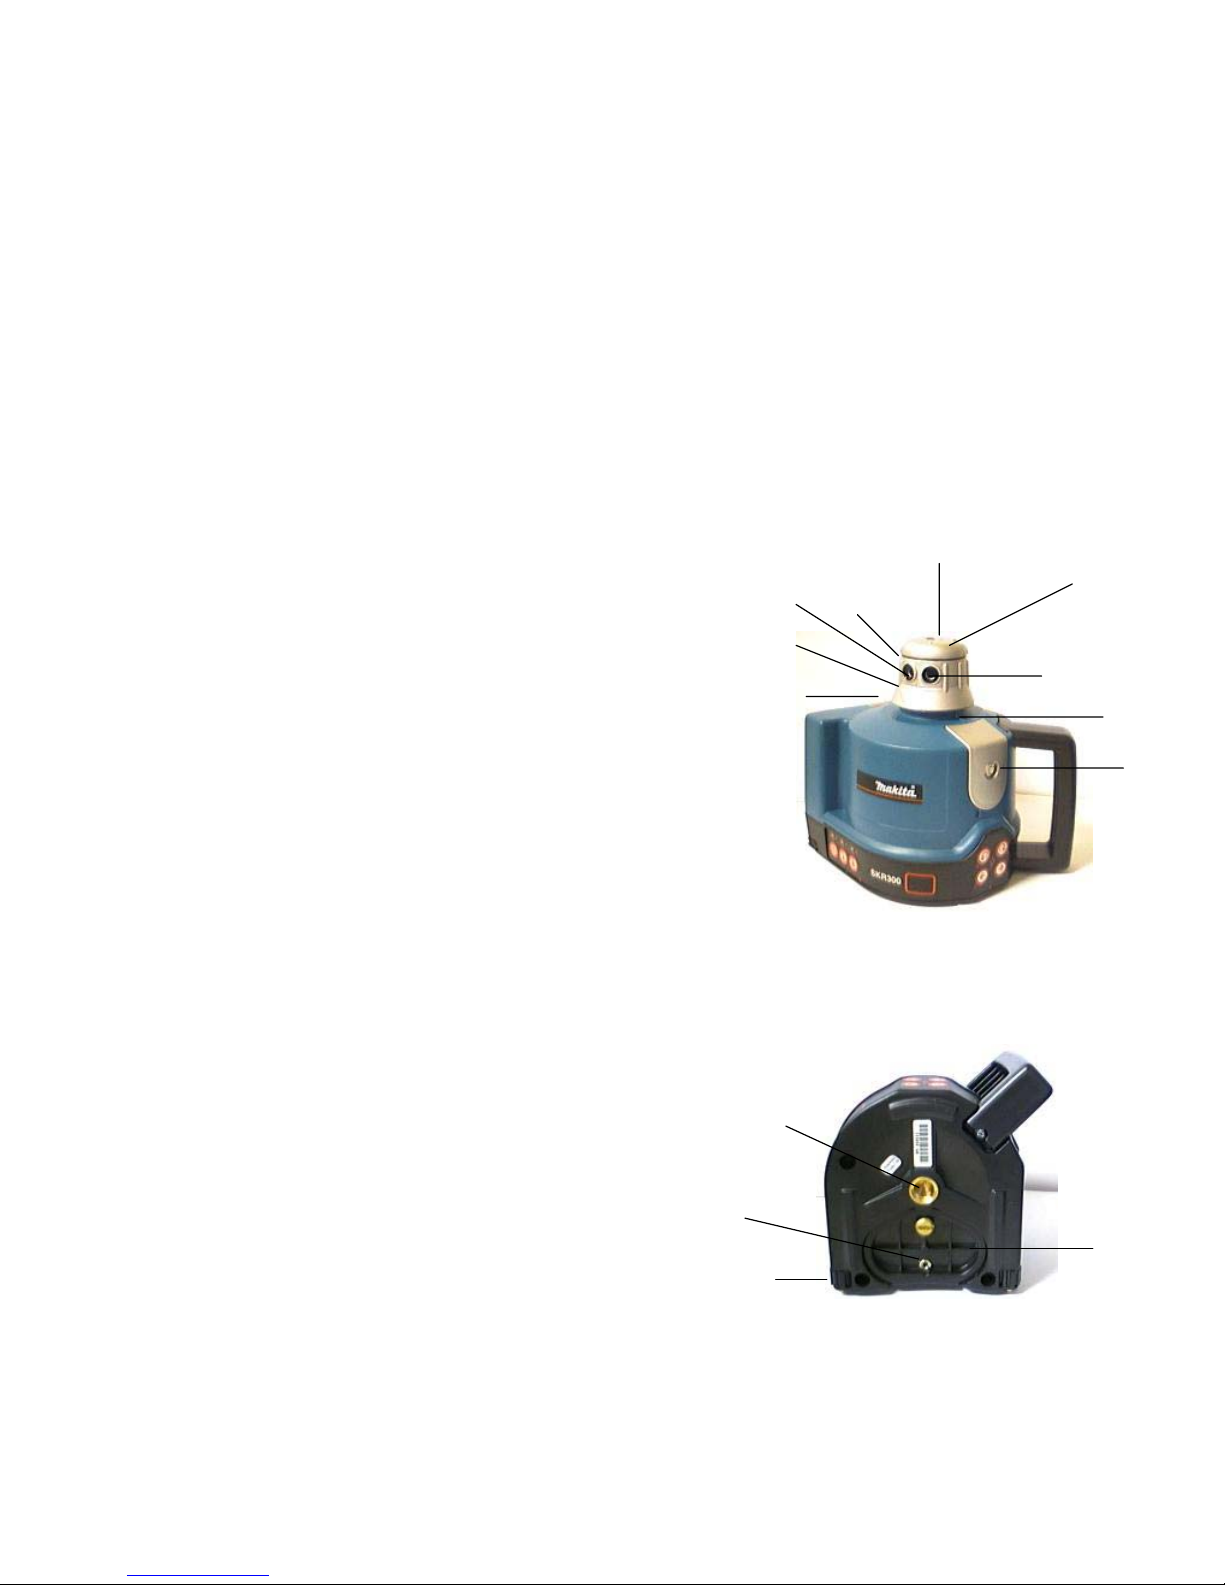
Overview
2.
1.
3.
4.
5.
7.
12.
1. Rotating head
2. Plumb / square laser beam
aperture
3. Laser beam aperture
4. Laser chalk line aperture
5. Arrow (align with 90° index
mark)
6. 90° index mark (X1,X2,Y1,Y2)
7. Retractable foot for vertical
setup
8. Adjustable feet for vertical
setup
9. Batteries (rechargeable or
alkaline)
10. Jack for rechargeable battery
11. 5/8 – 11 mount
12. Top cover
13. Vial for vertical rough levelling
6.
13.
11.
10.
9.
8.

SKR300 (version 1-12-03)
Page 6
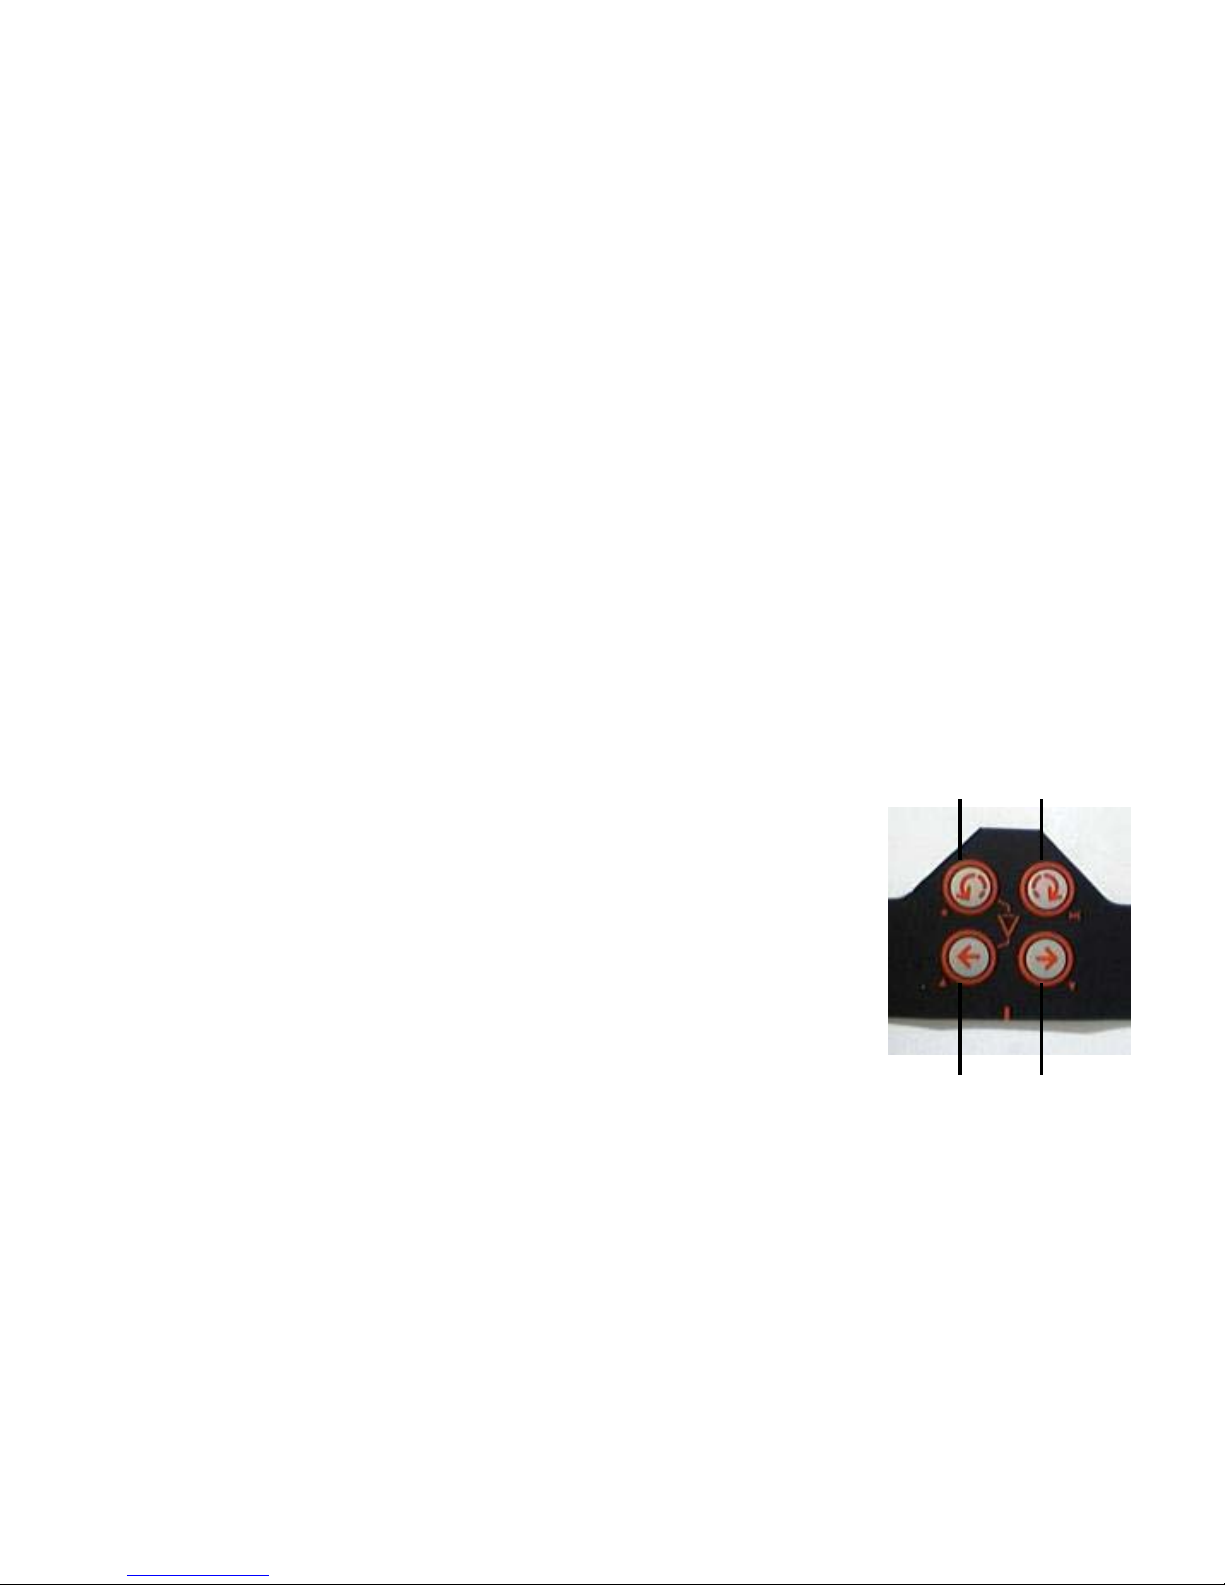
Keypad overview
14. Laser rotation control to the left + speed control &
scanning direction
Save calibration data
15. Laser rotation control to the right + speed control &
scanning direction
Change calibration axis
16. Decrease scanning angle. In vertical mode, move
plane to the right
Move beam down
17. Increase scanning angle. In vertical mode, move
plane to the left
Move beam up
18. Capture window for remote control
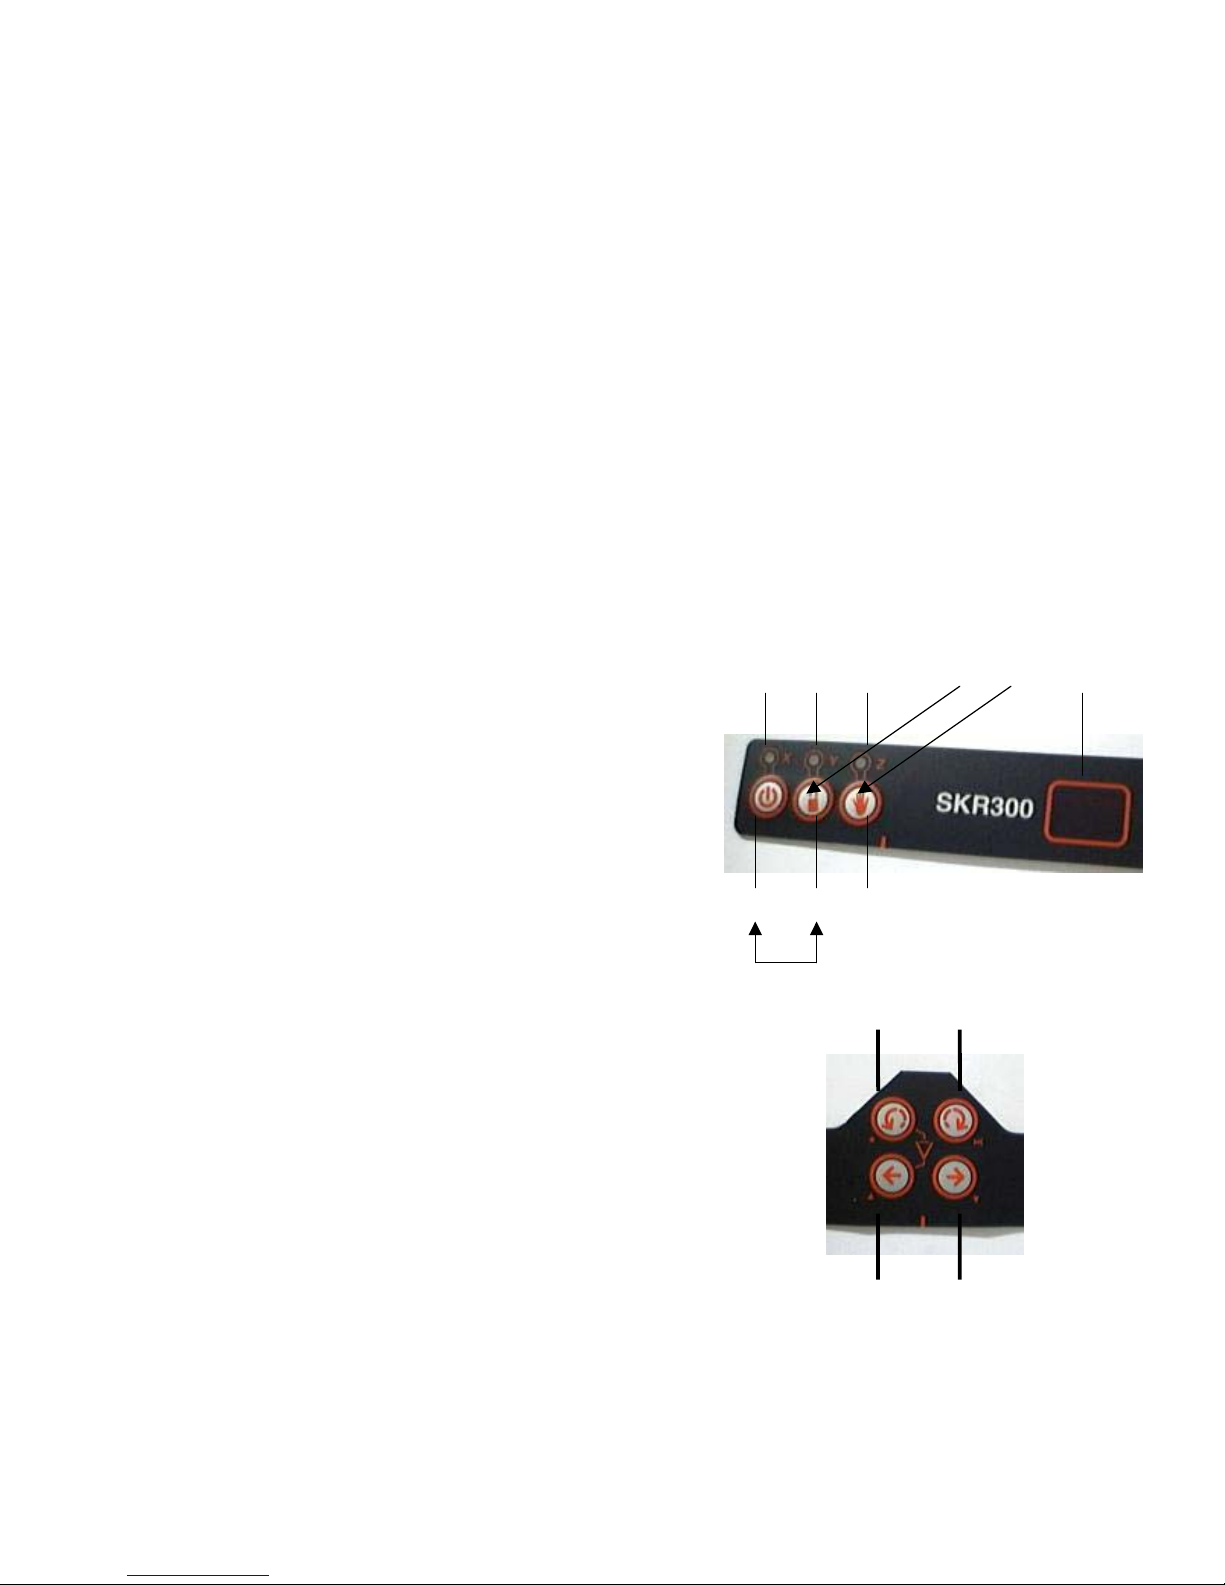
19. Manual mode light / Z Axis calibration indicator
20. Manual / Automatic
21. H. I. Alert light / Y Axis calibration indicator
22. H. I. Alert (Tilt)
23. Battery low light / X Axis calibration indicator
24. On / Off
14. 15.
16.17.
23. 21. 19.
18.
24. 22. 20.

SKR300 (version 1-12-03)
Page 7
2. Operation
On / Off Key
Press the On/Off key to switch the laser on or off. It will
start automatic levelling.
Tilt Key
Tilt: H.I. – Alert mode. Will work only when selected. The
Tilt function is also known as the H.I. (Height of
Instrument) Alert. This feature stops the laser
automatically if the laser is jarred or moved. This
function is only available in Automatic mode. Press the
Tilt key after turning the instrument on. The H.I. Alert
feature is ON (H.I. light blink) after the instrument has
self-leveled for 30 seconds.
If the laser is disturbed, the head will stop rotating, laser
beam shut off and the H.I. light will be solid on. You
have to restart the instrument and check the reference.
Works with 3 beams mode (Normal, Chalk Line,
Scanning).
Automatic / Manual Key

SKR300 (version 1-12-03)
Page 8
Auto : Automatic levelling.
Default mode when laser is switched on
Man : Manual use.
The SKR300 laser is always in the automatic self-levelling mode (auto) when
turned on. Once the instrument has self-leveled, the laser head will start
rotating.
You can choose to have constant rotation by using the Manual mode. This way, the
beam will rotate even if the instrument is not leveled. The red light above the
Auto / Manual button will blink to indicate the instrument is in manual mode.
SKR300 (version 1-12-03)
Page 9
2a. Horizontal Setup
The SKR300 can be used directly on the ground or
mount on a standard tripod (5/8-11).
Press the On/Off key to switch the laser on. It will
start automatic levelling.
To stop the rotation, press once on opposite
direction Left (14) or Right (15).
When the head stop briefly press 14 or 15 to move
the laser beam to a specific point.
You can also manually spot the beam by rotating the
laser head with your hand.
To adjust the rotation speed, press Left (14) or Right
(15) continuously according to the direction you
wish.
16.17.
14. 15.

SKR300 (version 1-12-03)
Page 10
2b. Vertical Setup
Flip the retractable foot. Place the instrument in vertical position, resting on this
foot. Use the adjustable feet to rough level the laser to adjust the top bubble vial
in order to achieve best accuracy for long distance.
Press the On/Off key to switch the laser on. It will start automatic levelling.
2c. Using the Laser Chalk Line
Hold the head and rotate the top cover (12) so
that the beam comes out the laser line
aperture (4). This gives a precise and stable
laser line for viewing at short distances. You
can move the line by rotating the head
manually or by using the remote control.
Note : The LDR180 detector will not work with
the chalk line
SKR300 (version 1-12-03)
Page 11
2d. Using the Scanning
(2)
(3)
(4)(5)
(SC)
16.17.
14. 15.
Turn the laser on, press (SC) or
simultaneously (14),(17) to start scan.
Press (4) or (5), (14) or (15) to aim the
scan.
To adjust the scanning angle (10° to
48°), press (2) or (3), (17) or (16).
2e. Power
When the battery power is low, the laser head will stop rotating, the On/Off led
indicator (23) blink and then stay on.
Recharge battery pack or replace both alkaline batteries at the same time.
The SKR300 can be charged while working. If electricity is available on the job site,
simply plug in the charger and keep on working.
SKR300 (version 1-12-03)
Page 12
2f. Self-test mode
For burn-in and movement test only.
1. Press and hold H.l. tilt (22)
2. Press On / Off (24) once to switch on
the SKR300
3. Wait until LED X,Y, Z stays on, then
release H.l. tilt
4. Press H.l. tilt (22) once
5. Press Auto / Man (20) once
6. Press “Turn Left” (14) once
7. Press “UP” (17) once
8. Press “Turn Right” (15) once
9. Press “Down” (16) once
Step 4 Step 5
23. 21. 19.
18.
24. 22. 20.
14. 15.
( Step 6 ) ( Step 8 )
( Step 7) ( Step 9 )
The laser beam should be on and the
head will turn and levelling motors will
move to end of X,Y axis. The test will
not stop until power off.
17. 16.
 Loading...