

GB Cordless Brad Nailer Instruction manual
F Cloueur Brad Sans Fil Manuel d’instructions
D Gasnagler Betriebsanleitung
I Chiodatrice pneumatica Istruzioni per l’uso
senza fili
NL Accunagelpistool Gebruiksaanwijzing
E Clavadora Inalámbrica Manual de instrucciones
P Pinador a Bateria Manual de instruções
DK Ledningsfri dykkerpistol Brugsanvisning
GR Ασύρματο καρφωτικό πιστόλι Οδηγίες χρήσης
TR Akülü Çivi Çakma Makinesi Kullanım kılavuzu
GF600
012803
1 000114
2
3
9
4
1
8
10
5
6
7
2 012804
11
3 012805 4 012806
2
12
13
15
14
5 012822 6 012807
7 009446 8 009447
9 012808 10 012809
11 009450 12 012811
3
13 012812 14 012813
16
A
B
17
5
18
15 012814 16 012815
18
17 012816 18 012892
19
19 012894 20 012947
4
21 012948 22 012817
19
20
3
21
22
23
23 012818 24 012819
23
24
25 012893 26 012820
5
ENGLISH (Original instructions)
Cd
Ni-MH
Li-ion
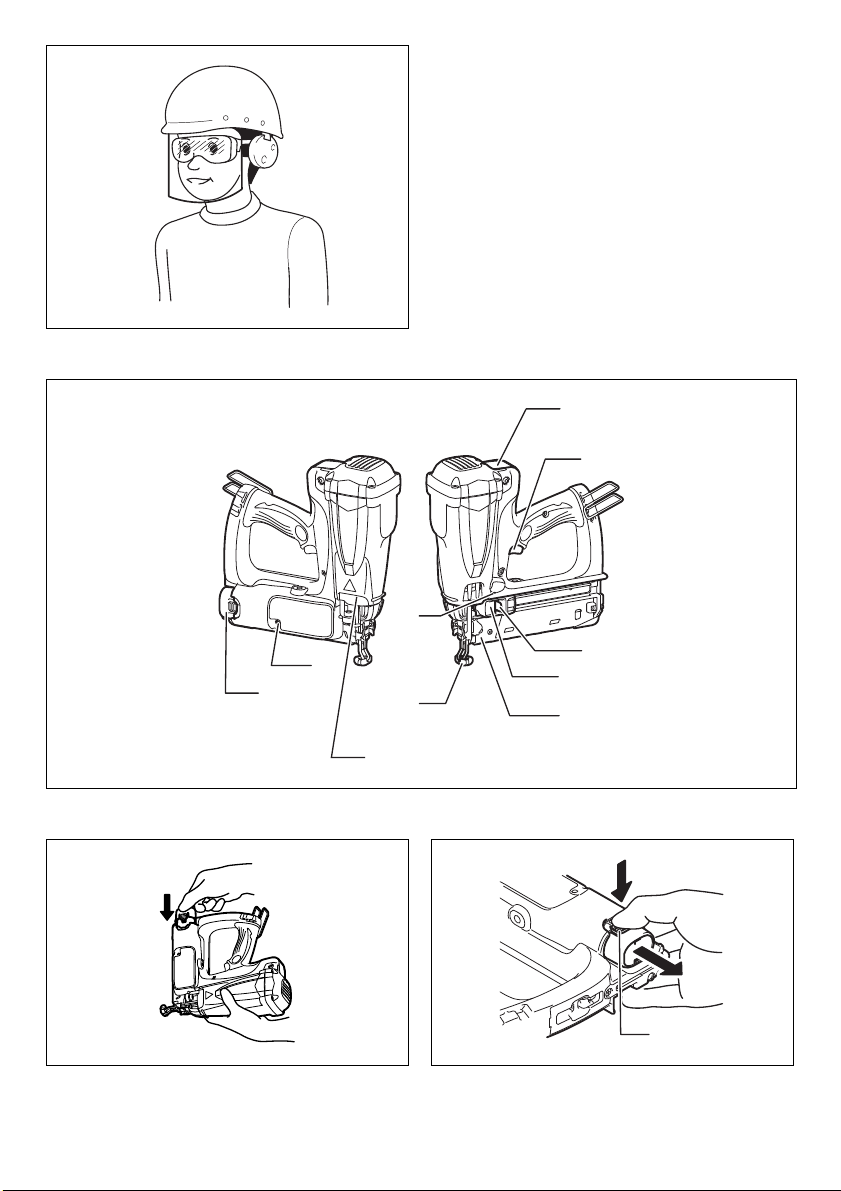
Explanation of general view
1. Battery cartridge
2. Fuel cover
3. Trigger
4. Indication lamp
5. Pusher button
6. Pusher lever
7. Magazine
8. Contact element
9. Lamp
10. Exhaust vent
11. Bu tto n
12. Lamp button
13. Metering valve
14. Cap
15. Jet nozzle
16. Adjuster
17. Hook
18. Nose adapter
19. Short nail adapter
20. Bolt
21. Latch
22. Door
23. Filter cover
24. Filter
SPECIFICATIONS
Model GF600
Nail length Nail Gauge 16Ga: 15 mm - 65 mm
Nail capacity 100 nails (2 strip)
Dimensions (L x W x H) 266 mm x 90 mm x 305 mm
Net weight 2.2 kg
Rated voltage D.C. 7.2 V
• Due to our continuing program of research and development, the specifications herein are subject to change without
notice.
• Specifications and battery cartridge may differ from country to country.
Symbols
The following show the symbols used for the equipment.
Be sure that you understand their meaning before use.
...... Read instruction manual.
.................. Container under pressure, keep away
from temperatures over 50°C (for ex.
sun radiation). Keep container in a well
ventilated place.
................. Use only outside or well ventilated
rooms. Do not breathe gas.
................. Do not use near flames or sprays on
heated surfaces. In use, may form
flammable/explosive vapour-air
mixture.
................. Do not damage, puncture or burn even
after use.
.......... Wear safety glasses.
.......... Wear ear protection.
................... Keep fingers away from trigger when
not driving fasteners to avoid accidental
firing.
................. Use only in ventilated area to avoid
nausea and unconsciousness. Never
use tool in combustible atmospheres.
END107-8
................... Do not use on scaffoldings, ladders.
................... Warning: hot surface!
Intended use
The tool is intended for fastening on interior work and
furniture work.
The tool is for high-volume professional application only.
Do not use it for any other purpose. It is not designed to
drive fasteners on a hard surface like steel and concrete.
The tool exhaust may ignite flammable
materials.
Do not touch around this symbol.
Touching the surface may cause burns
or injuries.
............. Only for EU countries
Do not dispose of electric equipment or
battery pack together with household
waste material!
In observance of the European
Directives, on Waste Electric and
Electronic Equipment and Batteries
and Accumulators and Waste Batteries
and Accumulators and their
implementation in accordance with
national laws, electric equipment and
batteries and battery pack(s) that have
reached the end of their life must be
collected separately and returned to an
environmentally compatible recycling
facility.
ENE073-3
6

Gas nailer safety warnings ENB111-5
WARNING: Read all safety warnings and all
instructions. Failure to follow the warnings and
instructions may result in serious injury, electric shock
and/or fire.
Save all warnings and instructions for
future reference.
For personal safety and proper operation and
maintenance of the tool, read this instruction manual
before using the tool.
General safety
1. Any other use except for intended use of this tool
is forbidden. Fastener driving tools with continual
contact actuation or contact actuation shall only
be used for production applications.
2. Keep fingers away from trigger when not
operating this tool and when moving from one
operating position to another.
3. Multiple hazards. Read and understand the safety
instructions before connecting, disconnecting,
loading, operating, maintaining, changing
accessories on, or working near the tool. Failure
to do so can result in serious bodily injury.
4. Keep all body parts such as hands and legs etc.
away from firing direction and ensure fastener
cannot penetrate workpiece into parts of the body.
5. When using the tool, be aware that the fastener
could deflect and cause injury.
6. Hold the tool with a firm grasp and be prepared to
manage recoil.
7. Only technically skilled operators should use the
fastener driving tool.
8. Do not modify the fastener driving tool.
Modifications may reduce the effectiveness of
safety measures and increase the risks to the
operator and/or bystander.
9. Do not discard the instruction manual.
10. Do not use a tool if the tool has been damaged.
11. Be careful when handling fasteners, especially
when loading and unloading, as the fasteners
have sharp points which could cause injury.
12. Always check the tool before use for broken,
misconnected or worn parts.
13. Do not overreach. Only use in a safe working
place. Keep proper footing and balance at all
times.
14. Keep bystanders away (when working in an area
where there is a likelihood of through traffic of
people). Clearly mark off your operating area.
15. Never point the tool at yourself or others.
16. Do not rest your finger on the trigger when picking
up the tool, moving between operating areas and
positions or walking, as resting finger on trigger
can lead to inadvertent operation. For tools with
selective actuation, always check the tool before
use to ascertain the correct mode is selected.
17. Only wear gloves that provide adequate feel and
safe control of triggers and any adjusting devices.
18. When resting the tool, lay it down on the flat
surface. If you use the hook equipped with the
tool, hook the tool securely on the stable surface.
19. Do not operate when under the influence of
alcohol, drugs or the like.
Projectile hazards
1. The fastener driving tool shall be disconnected
when unloading fasteners, making adjustments,
clearing jams or changing accessories.
2. During operation be careful that fasteners
penetrate material correctly and cannot be
deflected/misfired towards operator and/or any
bystanders.
3. During operation, debris from workpiece and
fastening/collation system may be discharged.
4. Always wear protective goggles to protect your
eyes from injury when using power tools.The
goggles must comply with ANSI Z87.1 in the USA,
EN 166 in Europe, or AS/NZS 1336 in Australia/
New Zealand. In Australia/New Zealand, it is
legally required to wear a face shield to protect
your face, too. (Fig. 1)
It is an employer's responsibility to enforce the
use of appropriate safety pr
by the tool operators and by other persons in the
immediate working area.
5. The risks to others shall be assessed by the
operator.
6. Be careful with tools without workpiece contact as
they can be fired unintentionally and injure
operator and/or bystander.
7. Ensure tool is always safely engaged on the
workpiece and cannot slip.
8. Wear hearing protection to protect your ears
against exhaust noise and head protection. Also
wear light but not loose clothing. Sleeves should
be buttoned or rolled up. No necktie should be
worn.
Operating hazards
1. Hold the tool correctly: be ready to counteract
normal or sudden movements such as recoil.
2. Maintain a balanced body position and secure
footing.
3. Appropriate safety glasses shall be used and
appropriate gloves and protective clothing are
recommended.
4. Appropriate hearing protection shall be worn.
5. Use the correct energy supply as directed in the
instruction manual.
6. Do not use the tool on moving platforms or back
of trucks. Sudden movement of the platform may lose
control of the tool and cause injury.
7. Always assume that the tool contains fasteners.
8. Do not rush the job or force the tool. Handle the
tool carefully.
9. Watch your footing and maintain your balance
with the tool. Make sure there is no one below when
working in high locations.
10. On rooftops and other high locations, drive
fasteners as you move forward. It is easy to lose
your footing if you drive fasteners while inching
backward. When driving fasteners against
perpendicular surface, work from the top to the
bottom. You can perform driving operations with less
fatigue by doing so.
otective equi
pments
7

11. A fastener will be bent or the tool can become
jammed if you mistakenly drive fastener on top of
another fastener or strike a knot in the wood. The
fastener may be thrown and hit someone, or the
tool itself can react dangerously. Place the
fasteners with care.
12. Never attempt to drive fasteners from both the
inside and outside at the same time. Fasteners may
rip through and/or fly off, presenting a grave danger.
Repetitive motions hazards
1. When using a tool for long periods, the operator
may experience discomfort in the hands, arms,
shoulders, neck, or other parts of the body.
2. While using a tool, the operator should adopt a
suitable but ergonomic posture. Maintain secure
footing and avoid awkward or off-balanced
postures.
3. If the operator experiences symptoms such as
persistent or recurring discomfort, pain,
throbbing, aching, tingling, numbness, burning
sensation, or stiffness, do not ignore these
warning signs. The operator should consult a
qualified health professional regarding overall
activities.
4. The continuous use of the tool may cause
repetitive strain injury due to recoil produced by
the tool.
5. To avoid repetitive strain injury, the operator
should not overreach or use excessive force.
Additionally, the operator should take a rest when
feeling fatigue.
6. Conduct a risk assessment regarding repetitive
motion hazards. It should focus on muscularskeletal disorders and be preferentially based on
the assumption that decreasing fatigue during
work is effective in reducing disorders.
Accessory and consumable hazards
1. Remove the gas container and battery before
changing/replacing accessories such as
workpiece contact, or making any adjustments.
2. Use only the sizes and types of accessories that
are provided by the manufacturer.
3. Use only lubricants recommended in this manual.
Workplace hazards
1. Slips, trips and falls are major causes of
workplace injury. Be aware of slippery surfaces
caused by use of the tool and also of trip hazards
caused by the air line hose.
2. Proceed with additional care in unfamiliar
surroundings. Hidden hazards may exist, such as
electricity or other utility lines.
3. This tool is not intended for use in potentially
explosive atmospheres and is not insulated from
coming into contact with electric power.
4. Make sure there are no electrical cables, gas pipes
etc. that could cause a hazard if damaged by use
of the tool.
5. Keep work area clean and well lit. Cluttered or dark
areas invite accidents.
6. There may be local regulations concerning noise
which must be complied with by keeping noise
levels within prescribed limits. In certain cases,
shutters should be used to contain noise.
8
Dust and exhaust hazards
1. Always check your surroundings. The exhaust
from the tool may blow dust or objects and hit
operator and/or bystanders.
2. Direct the exhaust so as to minimize disturbance
of dust in a dust filled environment.
3. If dust or objects are emitted in the work area,
reduce the emission as much as possible to
reduce the health hazards and risk of injury.
Noise hazards
1. Unprotected exposure to high noise levels can
cause permanent, disabling, hearing loss and
other problems such as tinnitus (ringing, buzzing,
whistling or humming in the ears).
2. Conduct a risk assessment regarding noise
hazards in the work area and implement
appropriate controls for these hazards.
3. Appropriate controls to reduce the risk may
include actions such as damping materials to
prevent workpieces from "ringing".
4. Use
ap
5. Operate and maintain the tool as recommended in
6. Take noise reduction measures, for example
Vibration hazards
1. The vibration emission during operation depends
2. Exposure to vibration can cause disabling
3. Wear warm clothing when working in cold
4. If you experience numbness, tingling, pain or
5. Operate and maintain the tool as recommended in
6. Hold the tool with a light, but safe, grip because
Additional safety instructions for gas tools
1. Use the tool only with the Makita genuine gas
2. Be careful when using gas tools, as the tool can
3. Gas fastener driving tools shall be used in
4. In the case that liquid combustible gas comes into
5. Gas containers shall be marked according to the
6. Handle gas containers carefully and check for
propriate hearing protection.
these instructions, to prevent an unnecessary
increase in noise levels.
placing workpieces on sound damping supports.
on the gripping force, the contact pressure force,
the working direction, the adjustment of energy
supply, the workpiece, the workpiece support.
Conduct a risk assessment regarding vibration
hazards and implement appropriate controls for
these hazards.
damage to the nerves and blood supply of the
hands and arms.
conditions, keep your hands warm and dry.
whitening of the skin in your fingers or hands,
seek medical advice from a qualified occupational
health professional regarding overall activities.
these instructions, to prevent an unnecessary
increase in vibration levels.
the risk from vibration is generally greater when
the grip force is higher.
container.
become hot, affecting grip and control.
ventilated spaces.
contact with human skin, injuries may occur.
required transport regulation.
damages. Damaged gas containers can explode
and cause injury.

7. Read and follow the instructions supplied with the
gas container.
8. Ensure combustible materials are not exposed to
hot exhaust gases.
9. Do not use gas tools in explosive areas as the
sparks generated in the tool may cause fire or
explosion.
10. Gas containers should not be stored carelessly or
at high temperature. Follow the local regulations
and gas container's instructions for handling and
disposal of gas containers and batteries or
accumulators.
11. For gas tools, a small release of gas might be
generated by regular operations.
Battery tool use and care
1. Recharge only with the charger specified by the
manufacturer. A charger that is suitable for one type
of battery pack may create a risk of fire when used
with another battery pack.
2. Use power tools only with specifically designated
battery packs. Use of any other battery packs may
create a risk of injury and fire.
3. When battery pack is not in use, keep it away from
other metal objects, like paper clips, coins, keys,
nails, screws or other small metal objects, that can
make a connection from one terminal to another.
Shorting the battery terminals together may cause
burns or a fire.
4. Under abusive conditions, liquid may be ejected
from the battery; avoid contact. If contact
accidentally occurs, flush with water. If liquid
contacts eyes, additionally seek medical help.
Liquid ejected from the battery may cause irritation or
burns.
5. Do not use a battery pack or tool that is damaged
or modified. Damaged or modified batteries may
exhibit unpredictable behaviour resulting in fire,
explosion or risk of injury.
6. Do not expose a battery pack or tool to fire or
excessive temperature. Exposure to fire or
temperature above 130°C may cause explosion.
7. Follow all charging instructions and do not charge
the battery pack or tool outside the temperature
range specified in the instructions. Charging
improperly or at temperatures outside the specified
range may damage the battery and increase the risk
of fire.
Safety devices
1. Make sure all safety systems are in working order
before operation. The tool must not operate if only
the trigger is pulled or if only the contact arm is
pressed against the wood. It must work only when
both actions are performed. Test for possible faulty
operation with fasteners unloaded and the pusher in
fully pulled position.
2. Securing the trigger in the ON position is very
dangerous. Never attempt to fasten the trigger.
3. Do not attempt to keep the contact element
depressed with tape or wire. Death or serious injury
may occur.
4. Always check contact element as instructed in
this manual. Fasteners may be driven accidentally if
the safety mechanism is not working correctly.
Service
1. Perform cleaning and maintenance right after
finishing the job. Keep the tool in tip-top condition.
Lubricate moving parts to prevent rusting and
minimize friction-related wear. Wipe off all dust from
the parts.
2. Ask Makita authorized service center for
periodical inspection of the tool.
3. To maintain product SAFETY and RELIABILITY,
maintenance and repairs should be performed by
Makita Authorized Service Centers, always using
Makita replacement parts.
4. Follow local regulations when disposing of the
tool.
SAVE THESE INSTRUCTIONS.
WARNING: DO NOT let comfort or familiarity with
product (gained from repeated use) replace strict
adherence to safety rules for the subject product.
MISUSE or failure to follow the safety rules stated in
this instruction manual may cause serious personal
injury.
IMPORTANT SAFETY
INSTRUCTIONS FOR BATTERY
CARTRIDGE
1. Before using battery cartridge, read all
instructions and cautionary markings on (1)
battery charger, (2) battery, and (3) product using
battery.
2. Do not disassemble battery cartridge.
3. If operating time has become excessively shorter,
stop operating immediately. It may result in a risk
of overheating, possible burns and even an
explosion.
4. If electrolyte gets into your eyes, rinse them out
with clear water and seek medical attention right
away. It may result in loss of your eyesight.
5. Do not short the battery cartridge:
(1) Do not touch the terminals with any
conductive material.
(2) Avoid storing battery cartridge in a container
with other metal objects such as nails, coins,
etc.
(3) Do not expose battery cartridge to water or
rain.
A battery short can cause a large current flow,
overheating, possible burns and even a
breakdown.
6. Do not store the tool and battery cartridge in
locations where the temperature may reach or
exceed 50 °C (122 °F).
7. Do not incinerate the battery cartridge even if it is
severely damaged or is completely worn out. The
battery cartridge can explode in a fire.
8. Be careful not to drop or strike battery.
9. Do not use a damaged battery.
10. The contained lithium-ion batteries are subject to
the Dangerous Goods Legislation requirements.
For commercial transports e.g. by third parties,
forwarding agents, special requirement on packaging
and labeling must be observed.
ENC009-6
9

For preparation of the item being shipped, consulting
an expert for hazardous material is required. Please
also observe possibly more detailed national
regulations.
Tape or mask off open contacts and pack up the
battery in such a manner that it cannot move around in
the packaging.
11. When disposing the battery cartridge, remove it
from the tool and dispose of it in a safe place.
Follow your local regulations relating to disposal
of battery.
12. Use the batteries only with the products specified
by Makita. Installing the batteries to non-compliant
products may result in a fire, excessive heat,
explosion, or leak of electrolyte.
13. If the tool is not used for a long period of time, the
battery must be removed from the tool.
SAVE THESE INSTRUCTIONS.
CAUTION: Only use genuine Makita batteries. Use
of non-genuine Makita batteries, or batteries that have
been altered, may result in the battery bursting causing
fires, personal injury and damage. It will also void the
Makita warranty for the Makita tool and charger.
Tips for maintaining maximum battery life
1. Charge the battery cartridge before completely
discharged. Always stop tool operation and
charge the battery cartridge when you notice less
tool power.
2. Never recharge a fully charged battery cartridge.
Overcharging shortens the battery service life.
3. Charge the battery cartridge with room
temperature at 10 °C - 40 °C (50 °F - 104 °F). Let a
hot battery cartridge cool down before charging it.
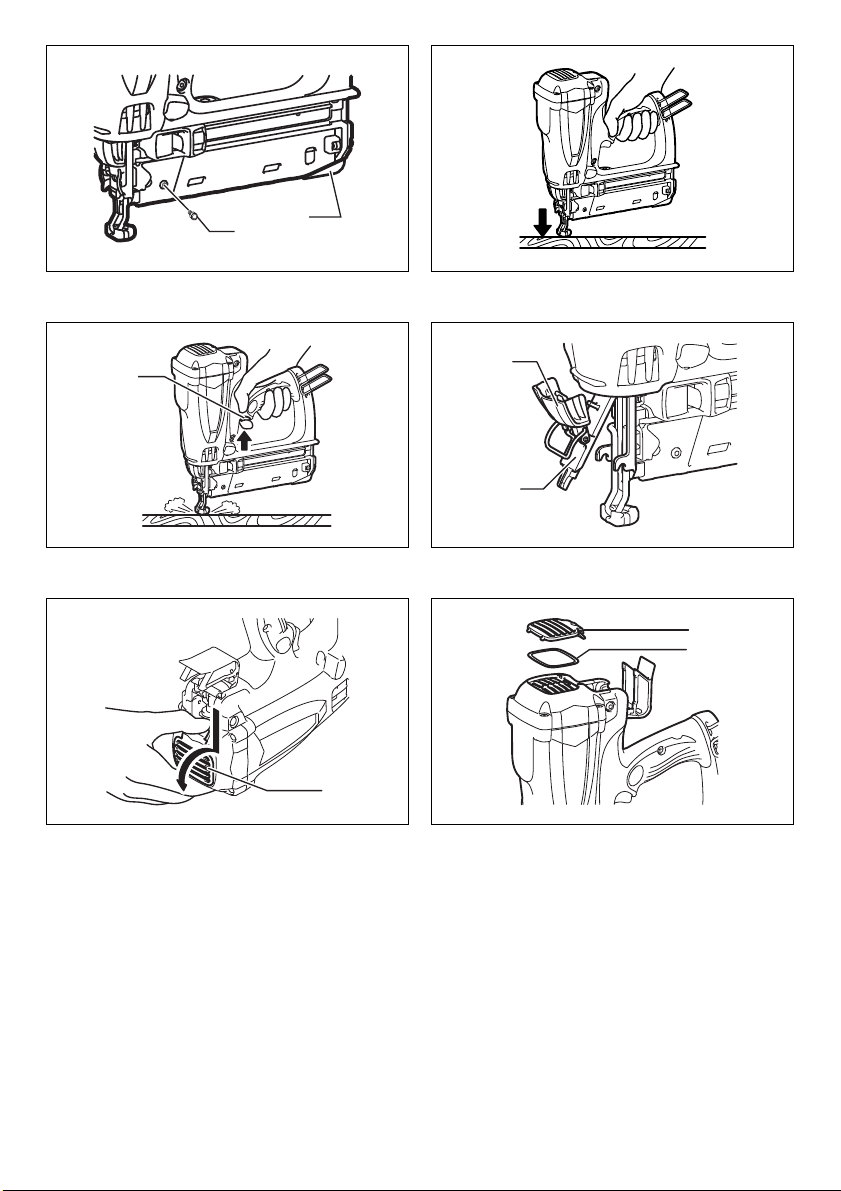
Overview of the nailer (Fig. 2)
FUNCTIONAL DESCRIPTION
CAUTION:
• Always be sure to remove the fuel cell, the battery
cartridge and nails before adjusting or checking
function on the tool.
Installing or removing battery cartridge
CAUTION:
• Always switch off the tool before installing or removing
of the battery cartridge.
• Hold the tool and the battery cartridge firmly when
installing or removing battery cartridge. Failure to
hold the tool and the battery cartridge firmly may cause
them to slip off your hands and result in damage to the
tool and battery cartridge and a personal injury. (Fig. 3)
To install the battery cartridge, hold it so that the battery
cartridge front shape fits to that of the battery installment
opening and slip it into place. Insert it all the way until it
locks in place with a little click. (Fig. 4)
To remove the battery cartridge, withdraw it from the tool
while pressing the buttons on the side of the cartridge as
shown in the figure.
CAUTION:
• Always insert the battery cartridge all the way until it
locks in place. If not, it may accidentally fall out of the
tool, causing injury to you or someone around you.
• Do not install the battery cartridge forcibly. If the
cartridge does not slide in easily, it is not being inserted
correctly.
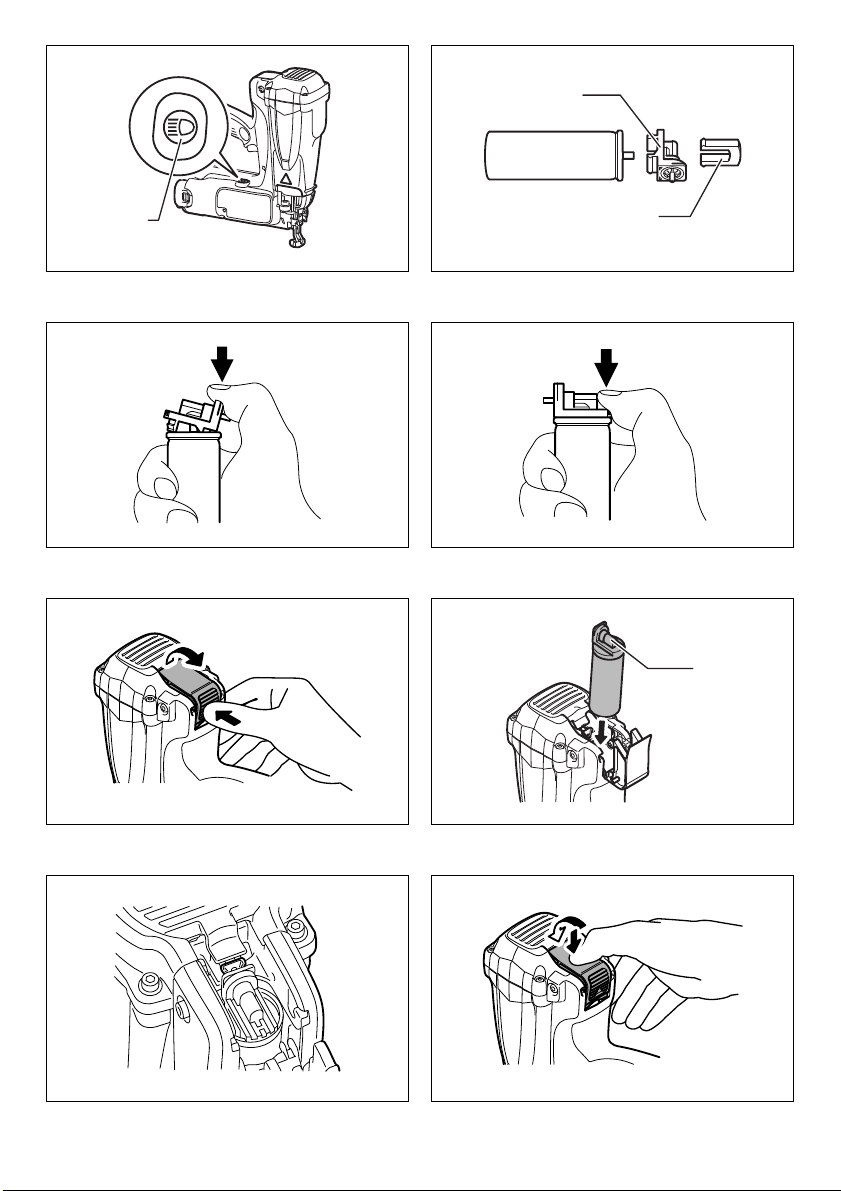
Lighting up the lamp
CAUTION:
• Do not look in the light or see the source of light
directly. (Fig. 5)
• To switch on the Lamp, press the lamp button. To
switch off the lamp, press the lamp button again.
Fuel cell
Attaching the metering valve to the fuel cell (Fig. 6)
Detach the cap (in case the metering valve is provided
with the cap). (Fig. 7)
Push in the front edge. (Fig. 8)
Push in the rear edge until it seats.
Inserting the fuel cell (Fig. 9)
Push up and pull the fuel cover to open. (Fig. 10)
Insert the fuel cell directing the jet nozzle of the metering
valve toward the adaptor. (Fig. 11)
Insert the jet nozzle into the small hole of the adapter
properly. (Fig. 12)
Put the fuel cover over the metering valve and push it
down to latch.
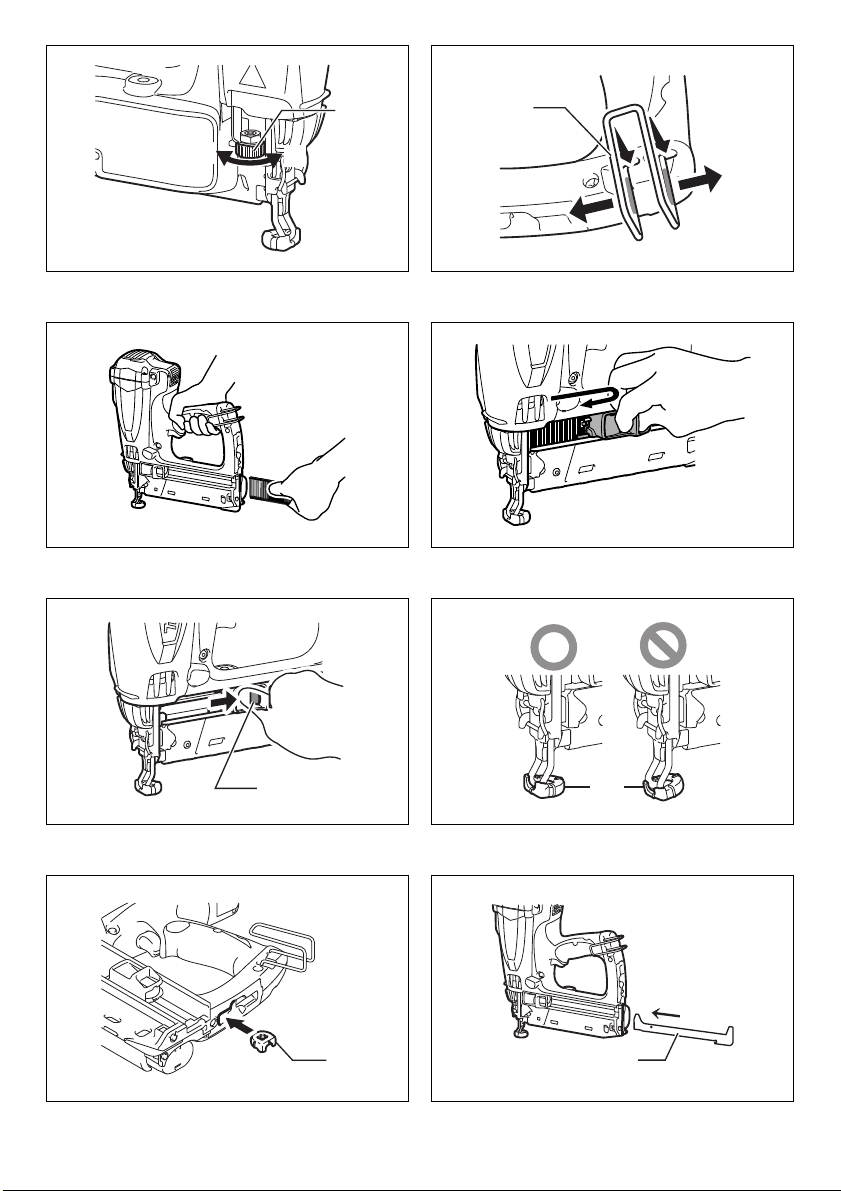
Adjusting the nailing depth
CAUTION:
• Remove the fuel cell, the battery cartridge and nails
before adjusting the depth of nailing. (Fig. 13)
To get shallower depth, turn the adjuster to A direction
shown in the figure. To get deeper depth, turn the adjuster
to B direction. Do not turn the adjuster too much, or the
contact element may come off from the adjuster, or it gets
stuck.
Indication lamp
Color of the indication lamp means the followings.
Blinking green: Normal status
Blinking red: Need to recharge the battery cartridge
Lighting-up-red: Recharge the battery cartridge. Nailing
cannot be performed due to no remaining battery
capacity.
Blinking orange: Thoroughly cleaning is recommended.
Refer to the section “MAINTENANCE” to clean inside of
the tool thoroughly. To reset the orange blinking of the
indicator lamp, push the contact element for five seconds,
and then push the contact element five times.
Blinking orange after blinking green and red
alternately: Fault detection is running. Remove and
reinsert the battery cartridge to reset. If fault detection is
running again, it is malfunction condition. Ask your local
Makita service center to repair it.
10

Installing the hook (Fig. 14)
The hook is convenient for temporarily hanging the tool.
You can install it on either side of the tool. It can be
removed without using any tool.
To install the hook, expand the upper part of the hook, and
insert it in the tool. To remove the hook, expand the upper
part of the hook in both directions and pull the hook from
the tool.
ASSEMBLY
CAUTION:
• Always remove the fuel cell and the battery cartridge
before carrying out any work on the tool.
Loading the nailer (Fig. 15)
Insert a strip of nails into the slit in the rear of the
magazine. (Fig. 16)
Pull the pusher lever with pressing the pusher button all
the way to the rear of the magazine. Then release the
pusher button, and return the pusher lever to the end of
the strip gently.
Removing nails (Fig. 17)
Pull the pusher lever and push the pusher button to
release the nail supporter, and then return the pusher
lever to the top with pushing the pusher button.
Slide the nails toward the rear of the magazine and
remove them out.
Nose adapter (Fig. 18)
The nose adapter prevents the surface of workpiece from
being scratched or damaged. Place the nose adapter
correctly.
Store the nose adapter in place when not in use. The
place for storage is on the bottom sides of the tool.
(Fig. 19)
Short nail adapter (Fig. 20 & 21)
Attach the short nail adapter to prevent the short nails
from being jammed when you use nails shorter than
25 mm (1”).
Insert the short nail adapter into the slit in the rear of the
magazine. Then fix the adapter by tightening the bolt.
OPERATION
WARNING:
• Do not touch around the exhaust vent. The surface
will be very hot during or after an operation. Touching
around the exhaust vent may cause burns or injuries.
CAUTION:
• Make sure all safety systems are in working order
before operation.
Checking proper action before operation
Before operation, always check following points.
– Make sure that the tool does not operate only by
installing the battery cartridge and fuel cell.
– Make sure that the tool does not operate only by pulling
the trigger.
– Make sure that the tool does not operate only by
placing the contact element against the workpiece
without pulling the trigger.
– Make sure that the tool does not operate when pulling
the trigger first and then placing the contact element
against the workpiece.
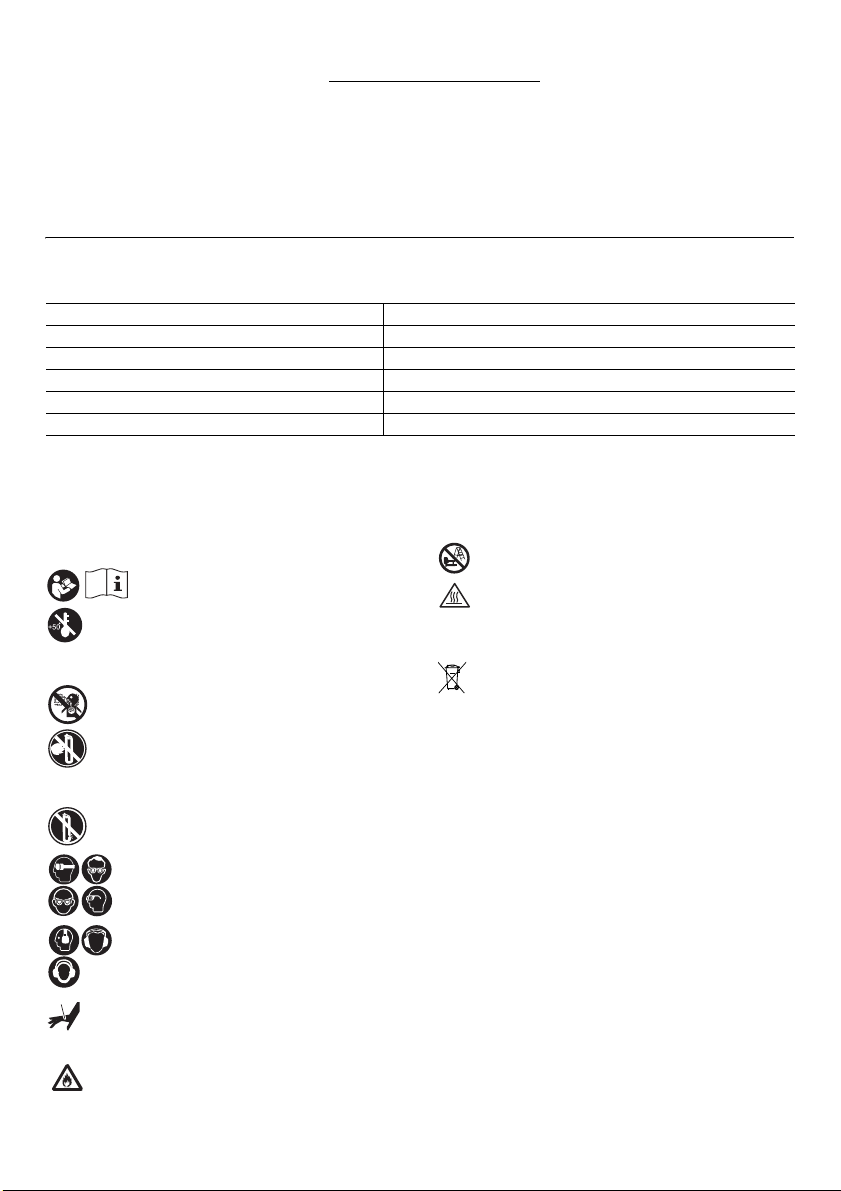
Driving nails (Fig. 22)
1. To drive a nail, place the contact element against the
workpiece.
The fan motor is activated, fuel gas is injected into
combustion chamber and mixed with air by the fan.
(Fig. 23)
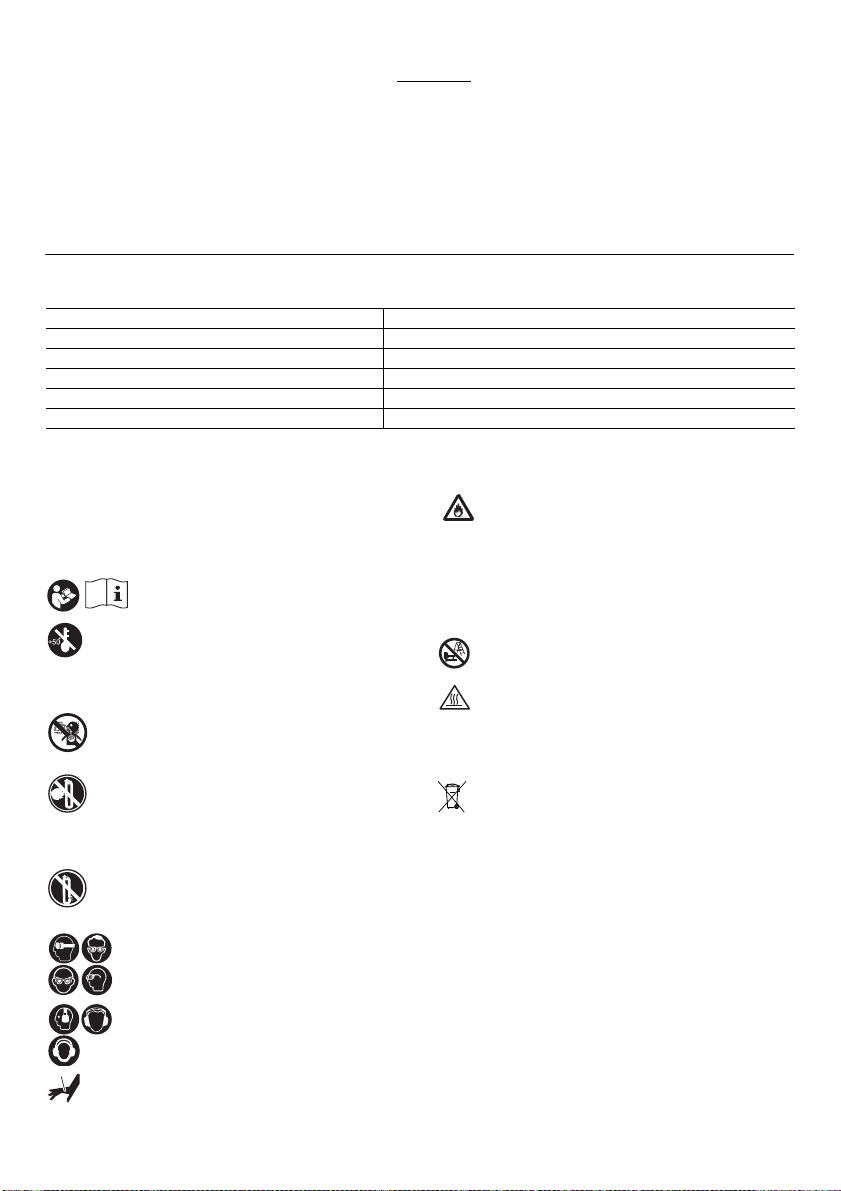
2. Hold the contact element pressing firmly and pull the
trigger.
Fuel gas is combusted and the nail is driven.
3. Further driving can be initiated only after both the
contact element and the trigger are released.
Anti dry fire mechanism
This mechanism prevents the tool from firing without nail.
Dry fire prevention automatically functions when the rest
of nails get to the last 9-11 pieces.
Jammed nailer
WARNING:
• Always be sure to remove the fuel cell and the battery
cartridge before clearing a jam.
CAUTION:
• Do not use deformed nails or nail strip. Failure to do so
causes poor nail feeding.
Follow the removing nail procedure and remove the nails
in the magazine. (Fig. 24)
Open the latch and release the door, then remove the
jammed nail.
MAINTENANCE
CAUTION:
• Always remove the fuel cell, the battery cartridge and
nails before attempting to perform inspection or
maintenance.
• Never use gasoline, benzine, thinner, alcohol or the
like. Discoloration, deformation or cracks may result.
Maintenance after daily work
Always check the tool for its overall condition and loose
screws before operation. Tighten as required.
At the end of daily work, conduct an end-of-workday
routine.
These simple steps are based on maintaining the safety
and performance of the tool.
Before leaving the work site:
• Remove the battery cartridge and store in a tool-
carrying case. Always use the tool-carrying case for
transporting and storing the tool.
• Dispose of all empty cells where they will not be found
by children, crushed, punctured or burned.
When you get home:
• Place the battery cartridge in its charger if it needs
charging as indicated by the red indication lamp.
• Wipe the tool with a clean, soft cloth.
11

• Check the filter and clean if it is dusty.
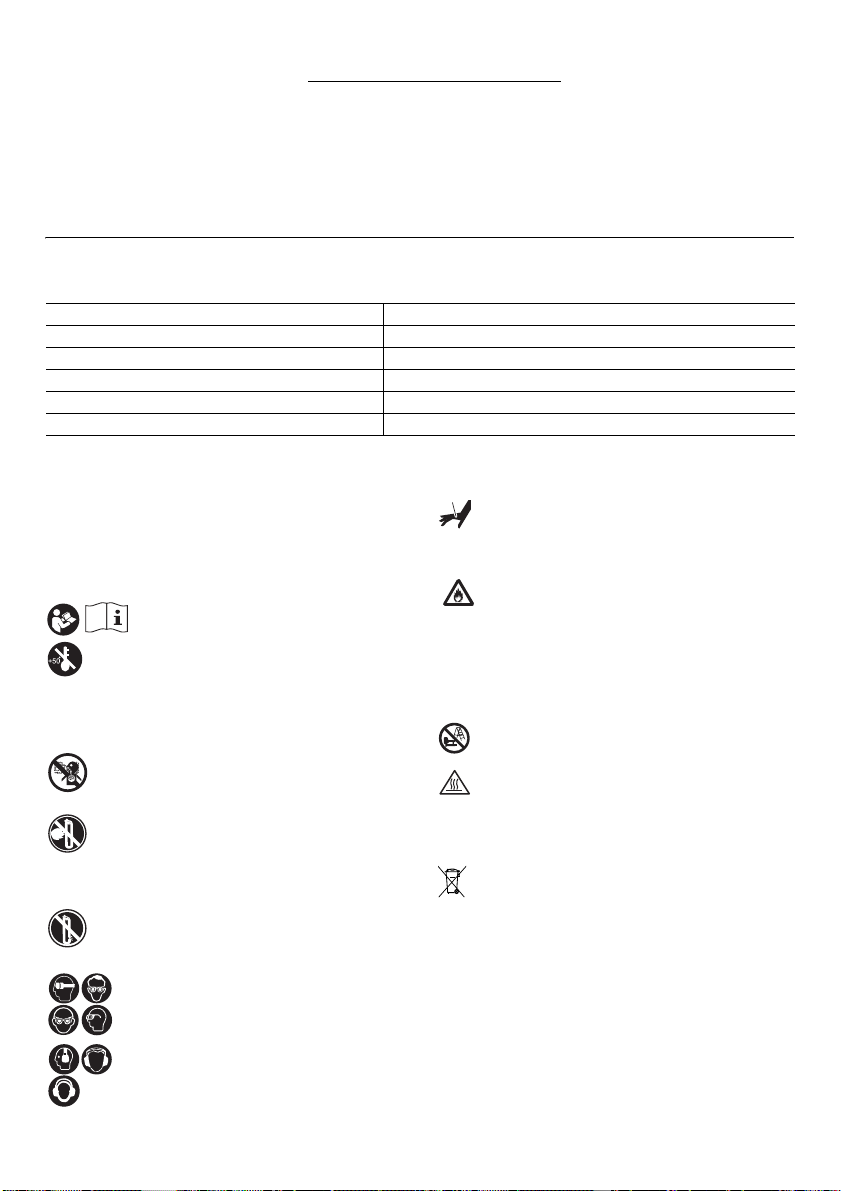
Cleaning the air filter (Fig. 25 & 26)
Press slightly up the filter cover and remove it. And then
simply lift out the filter.
Tap the filter lightly to remove any dust. Soap and water
restores the filter to an almost new condition
To maintain product SAFETY and RELIABILITY, repairs,
any other maintenance or adjustment should be
performed by Makita Authorized Service Centers, always
using Makita replacement parts.
Thoroughly cleaning
If dry fires occur frequently, which means the tool is
needed to be cleansed thoroughly.
See the accompanying cleaning guide for detail, and
perform the cleaning.
If you have any questions regarding to cleaning, please
ask your local Makita Service Center.
OPTIONAL ACCESSORIES
CAUTION:
• These accessories or attachments are recommended
for use with your Makita tool specified in this manual.
The use of any other accessories or attachments might
present a risk of injury to persons. Only use accessory
or attachment for its stated purpose.
If you need any assistance for more details regarding
these accessories, ask your local Makita Service Center.
• Nails
• Safety goggles
• Fuel cell
• Cleaning kit
• Makita genuine battery and charger
NOTE:
• Some items in the list may be included in the tool
package as standard accessories. They may differ from
country to country.
Noise
The typical A-weighted noise level determined according
to EN ISO 11148-13:
Sound pressure level (L
Sound power level (L
Uncertainty (K): 3 dB (A)
): 93 dB (A)
pA
): 106 dB (A)
WA
Wear ear protection.
Vibration
The vibration total value determined according to
EN ISO 11148-13:
Vibration emission (a
Uncertainty (K): 1.5 m/s
h
): 3.5 m/s
2
2
• The declared vibration emission value has been
measured in accordance with the standard test method
and may be used for comparing one tool with another.
• The declared vibration emission value may also be
used in a preliminary assessment of exposure.
WARNING:
• The vibration emission during actual use of the power
tool can differ from the declared emission value
depending on the ways in which the tool is used.
ENG905-1
ENG904-2
ENG901-1
• Be sure to identify safety measures to protect the
operator that are based on an estimation of exposure in
the actual conditions of use (taking account of all parts
of the operating cycle such as the times when the tool
is switched off and when it is running idle in addition to
the trigger time).
EC Declaration of Conformity
For European countries only
The EC declaration of conformity is included as Annex A
to this instruction manual.
12
FRANÇAIS (Instructions d’origine)
Cd
Ni-MH
Li-ion
Descriptif
1. Batterie
2. Capuchon du réservoir de
carburant
3. Gâchette
4. Voyant
5. Bouton-poussoir
6. Levier poussoir
7. Magasin
8. Dispositif de contact
9. Lampe
10. Sortie d’air
11. Bouton
12. Bouton de lampe
13. Soupape de dosage
14. Coiffe
15. Tuyère d’éjection
16. Bague de réglage
17. Crochet
18. Adaptateur de bec
19. Adaptateur pour clous courts
20. Boulon
21. Verrou
22. Trappe
23. Couvercle du filtre
24. Filtre
SPÉCIFICATIONS
Modèle GF600
Longueur de clou Calibre des clous 16Ga : 15 à 65 mm
Capacité de clouage 100 clous (2 bandes)
Dimensions (L x P x H) 266 mm x 90 mm x 305 mm
Poids net 2,2 kg
Tension nominale 7,2 V C.C.
• Étant donné l’évolution constante de notre programme de recherche et de développement, les spécifications
contenues dans ce manuel sont sujettes à des modifications sans préavis.
• Les spécifications et la batterie peuvent varier d’un pays à l’autre.
Symboles
Les symboles utilisés pour l’appareil sont indiqués cidessous. Assurez-vous d’avoir bien compris leur
signification avant d’utiliser l’appareil.
...... Reportez-vous au manuel
d’instructions.
.................. Récipient sous pression, éloignez-le
................. Utilisez ce produit uniquement en
................. N’utilisez pas le produit près de
................. N’endommagez pas, ne perforez pas et
................... Pour éviter tout déclenchement
des températures supérieures à 50°C
(par ex., les rayons du soleil).
Conservez le récipient dans un lieu
bien ventilé.
extérieur ou dans des pièces bien
ventilées. Ne respirez pas les gaz.
flammes ou d’aérosols sur des
surfaces chaudes, au risque de
provoquer un mélange d’air et de
vapeurs inflammable/explosif.
ne brûlez pas l’outil, même après
utilisation.
.......... Portez des lunettes de sécurité.
.......... Portez un dispositif de protection
auditive.
accidentel, éloignez les doigts de la
gâchette lorsque vous n’insérez pas de
clous.
END107-8
.................Utilisez l’outil uniquement dans des
zones ventilées pour éviter tout risque
de nausées et de perte de
connaissance. N’utilisez jamais l’outil
dans des atmosphères combustibles.
L’échappement de l’outil peut entraîner
la combustion de matériaux
inflammables.
...................N’utilisez pas l’outil sur un échafaudage
ou une échelle.
................... Avertissement : surface chaude !
Ne touchez pas les surfaces sur
lesquelles figure ce symbole. Vous
risqueriez de vous brûler ou de vous
blesser.
.............Pour les pays européens uniquement
Ne pas jeter les appareils électriques et
les bloc-batteries dans les ordures
ménagères !
Conformément aux directives
européennes relatives aux déchets
d’équipements électriques ou
électroniques (DEEE) ainsi qu’aux
batteries, aux accumulateurs et aux
batteries et accumulateurs usagés et à
leur transposition dans la législation
nationale, les appareils électriques, les
batteries et les bloc-batteries doivent
être collectés à part et être soumis à un
recyclage respectueux de
l’environnement.
13

Utilisations
Cet outil est destiné aux travaux d’intérieur et
d’ameublement.
L’outil est conçu pour des applications professionnelles à
grande échelle uniquement. Ne l’utilisez pas à d’autres
fins. Il n’est pas conçu pour enfoncer des fixations dans
une surface dure comme l’acier ou le béton.
ENE073-3
Consignes de sécurité pour
cloueuse à gaz ENB111-5
AVERTISSEMENT : Lisez toutes les consignes de
sécurité et toutes les instructions. Ignorer les
avertissements et les instructions peut entraîner de
graves blessures, une électrocution et/ou un incendie.
Conservez toutes les mises en garde et
instructions pour référence ultérieure.
Pour votre propre sécurité et pour un fonctionnement et
un entretien adéquats de l’outil, veuillez lire ce mode
d’emploi avant d’utiliser l’outil.
Sécurité générale
1. Toute autre utilisation que celle prévue pour cet
outil est interdite. Les outils destinés à enfoncer
des fixations avec commande par contact en
continu ou commande par contact ne doivent être
utilisés que pour les applications productiques.
2. Éloignez les doigts de la gâchette lorsque vous
n’utilisez pas l’outil et lorsque vous vous déplacez
d’un point à un autre.
3. Risques multiples. Lisez et comprenez les
consignes de sécurité avant de brancher,
débrancher, charger, utiliser, entretenir l’outil ou
de changer des accessoires ou travailler à
proximité de l’outil. Le non-respect de cette
consigne peut entraîner de graves blessures
corporelles.
4. Éloignez les parties du corps comme les mains ou
les jambes du sens d’éjection des fixations et
assurez-vous qu’elles ne peuvent pas pénétrer par
la pièce dans des parties de votre corps.
5. Lorsque vous utilisez l’outil, soyez conscient que
la fixation peut dévier et vous blesser.
6. Maintenez fermement l’outil et soyez prêt à
affronter un mouvement de recul.
7. Seuls les utilisateurs aux compétences
techniques avancées doivent utiliser un outil
destiné à enfoncer des fixations.
8. Ne modifiez pas un outil destiné à enfoncer des
fixations. Les modifications peuvent réduire
l’efficacité des mesures de sécurité et augmenter
les risques pour l’utilisateur et/ou les badauds.
9. Ne jetez pas le manuel d’instructions.
10. N’utilisez pas l’outil s’il est endommagé.
11. Prenez garde lorsque vous manipulez des
fixations, particulièrement lors de leur insertion et
retrait, étant donné qu’elles présentent des bouts
pointus susceptibles de vous blesser.
12. Inspectez toujours l’outil avant de l’utiliser pour
s’assurer qu’il n’a pas de pièces cassées, mal
branchées ou usées.
13. Ne vous penchez pas trop loin. N’utilisez l’outil
que dans un lieu de travail sécuritaire. Maintenez
constamment une bonne assise et un bon
équilibre.
14. Écartez les badauds (lorsque vous travaillez dans
un endroit au flux incessant de personnes).
Marquez clairement votre zone de travail.
15. Ne dirigez jamais l’outil vers vous-même ou
quelqu’un d’autre.
16. Ne posez pas le doigt sur la gâchette lorsque vous
ramassez l’outil, vous déplacez d’une zone ou
position de travail à une autre ou en marchant,
étant donné que cela peut entraîner un
déclenchement inopiné. Pour les outils avec
commande sélective, inspectez toujours l’outil
avant utilisation afin de vous assurer que le bon
mode est sélectionné.
17. Portez uniquement des gants garantissant une
sensation adéquate et une maîtrise sûre des
gâchettes et de tout autre dispositif de réglage.
18. Lorsque vous posez l’outil, placez-le sur une
surface plane. Si vous utilisez le crochet prévu sur
l’outil, accrochez solidement l’outil à une surface
stable.
19. N’utilisez pas l’outil si vous avez consommé de
l’alcool, des drogues ou des médicaments, etc.
Risques de projection
1. Un outil destiné à enfoncer des fixations doit être
débranché lorsque vous retirez les fixations,
effectuez des réglages, enlevez les fixations
coincées ou changez d’accessoires.
2. Pendant le fonctionnement, assurez-vous que les
fixations pénètrent correctement le matériau et ne
peuvent pas être déviées ou éjectées en direction
de l’utilisateur et/ou des badauds.
3. Pendant le fonctionnement, des débris provenant
de la pièce et du système de serrage/
collationnement peuvent être expulsés.
4. P
protéger vos yeux des blessures lorsque
our
vous utilisez un outil électrique, portez toujours
des lunettes de protection, lesquelles doivent être
conformes à ANSI Z87.1 aux États-Unis, EN 166 en
Europe ou AS/NZS 1336 en Australie/NouvelleZélande. En Australie/Nouvelle-Zélande, la loi
exige également le port d’un écran facial pour se
protéger le visage. (Fig. 1)
L’employeur est responsable d’imposer le port
d’équipements de sécurité appropriés par les
utilisateurs de l’outil et par les autres personnes
se trouvant à proximité de la zone de travail.
5. Les risques pour autrui doivent être évalués par
l’utilisateur.
6. Prenez garde avec les outils sans contact de la
pièce, car ils peuvent être déclenchés
brusquement et blesser l’utilisateur et/ou les
badauds.
7. Assurez-vous que l’outil est toujours bien engagé
sur la pièce et ne peut pas glisser.
8. Portez des protège-tympans pour protéger vos
oreilles contre le bruit d’échappement et portez un
casque de sécurité. En outre, les vêtements portés
doivent être légers et ne doivent pas être amples.
Boutonnez ou retroussez vos manches. Ne portez
pas de cravate.
14

Risques liés au fonctionnement
1. Tenez correctement l’outil : soyez prêt à
neutraliser des mouvements habituels ou
brusques comme un recul.
2. Conservez un bon équilibre général et une bonne
assise.
3. Des lunettes de sécurité appropriées doivent être
utilisées et il est recommandé de porter des gants
et des vêtements de protection adéquats.
4. Portez des protège-tympans adéquats.
5. Utilisez une source d’énergie correcte comme
indiqué dans le manuel d’instructions.
6. N’utilisez pas l’outil sur une plateforme mobile ou
à l’arrière d’un camion. Un mouvement brusque de
la plateforme pourrait vous faire perdre le contrôle de
l’outil et vous blesser.
7. Supposez toujours que l’outil contient des vis.
8. Ne travaillez pas trop vite, ni ne forcez l’outil.
Manipulez l’outil avec précaution.
9. Regardez où vous posez les pieds et maintenez un
bon équilibre pendant l’utilisation de l’outil.
Assurez-vous que personne ne se trouve dessous
lorsque vous utilisez l’outil en hauteur.
10. Sur les toits et sur d’autres emplacements en
hauteur, procédez au vissage tout en avançant. Il
est facile de perdre l’équilibre en procédant au
vissage en reculant. Si vous procédez au vissage sur
une surface perpendiculaire, travaillez de haut en bas.
De cette façon, le travail de vissage sera moins
fatigant.
11. La vis se pliera ou l’outil peut se bloquer si vous
vissez par inadvertance sur une autre vis ou
heurtez un nœud dans le bois. La vis peut être
projetée et frapper quelqu’un, ou bien l’outil luimême peut réagir de manière dangereuse.
Choisissez l’emplacement des vis avec soin.
12. Ne tentez jamais de visser de l’intérieur et de
l’extérieur simultanément. Les vis pourraient se
fendre et/ou voler en éclats, ce qui présente un
danger grave.
Risques de mouvements répétitifs
1. Lors de l’utilisation d’un outil pendant des
périodes prolongées, l’utilisateur peut ressentir
une gêne dans les mains, les bras, les épaules, le
cou ou d’autres parties du corps.
2. Pendant qu’il se sert d’un outil, l’utilisateur doit
adopter une posture à la fois adéquate et
ergonomique. Conservez une bonne assise et
évitez les postures incommodes ou
déséquilibrées.
3. Si vous ressentez des symptômes comme une
gêne persistante ou récurrente, une douleur, des
palpitations, des courbatures, des fourmillements,
un engourdissement, une sensation de brûlure ou
une raideur, n’ignorez pas ces signes avantcoureurs. L’utilisateur doit consulter un
professionnel des soins de santé qualifié
concernant l’ensemble des activités.
4. L’utilisation continue de l’outil peut provoquer des
microtraumatismes répétés en raison du recul
produit par l’outil.
5. Pour éviter des microtraumatismes répétés,
l’utilisateur ne doit pas se pencher trop loin ou
utiliser une force excessive. De plus, l’utilisateur
doit faire une pause lorsqu’il se sent fatigué.
6. Réalisez une évaluation du risque à propos des
dangers liés aux mouvements répétitifs. Elle doit
se concentrer sur les troubles musculosquelettiques et reposer de préférence sur
l’hypothèse que la réduction de la fatigue pendant
le travail diminue efficacement les troubles.
Risques présentés par les accessoires et les pièces
consommables
1. Retirez le réservoir de gaz et la batterie avant de
changer/remplacer des accessoires comme un
contact de la pièce ou avant d’effectuer des
réglages.
2. Utilisez uniquement les tailles et types
d’accessoires fournis par le fabricant.
3. Utili
sez uniquement les lubrifiants recommandés
dans ce manuel
Risques sur le lieu de travail
1. Glisser, trébucher et tomber sont les principales
causes de blessures sur le lieu de travail. Prenez
garde aux surfaces glissantes résultant de
l’utilisation de l’outil et prenez soin également de
ne pas trébucher dans le tuyau de la ligne d’air.
2. Redoublez de précaution dans les
environnements inconnus. Des dangers cachés
comme les lignes électriques ou d’autres services
publics peuvent exister.
3. Cet outil n’est pas conçu pour être utilisé dans
des atmosphères potentiellement explosives et
n’est pas isolé en cas de contact avec le courant
électrique.
4. Assurez-vous qu’il n’y a pas de câbles électriques,
de conduites de gaz, etc., présentant un risque
s’ils sont endommagés suite à l’utilisation de
l’outil.
5. Conservez la zone de travail propre et bien
éclairée. Les zones de travail en désordre ou mal
éclairées sont propices aux accidents.
6. Il se peut que des réglementations locales
s’appliquent concernant les niveaux de bruit
permis. Veuillez les respecter. Dans certains cas,
des volets doivent être installés pour réduire le
bruit.
Risques présentés par la poussière et les
dégagements
1. Soyez toujours vigilant à ce qui vous entoure. Le
dégagement de l’outil peut souffler de la
poussière ou des objets et frapper l’utilisateur et/
ou les badauds.
2. Dirigez le dégagement de sorte à minimiser la
perturbation des poussières dans un
environnement poussiéreux.
3. Si de la poussière ou des objets sont soufflés
dans la zone de travail, réduisez autant que
possible les émissions pour diminuer les dangers
pour la santé et les risques de blessures.
Risques liés au bruit
1. L’exposition non protégée à des niveaux de bruit
élevés peut entraîner une perte auditive
permanente handicapante et d’autres problèmes
.
15

comme des acouphènes (tintement, sifflement ou
bourdonnement dans les oreilles).
2. Réalisez une évaluation du risque à propos des
risques liés au bruit dans la zone de travail et
mettez en place des contrôles adéquats pour ces
dangers.
3. Des contrôles appropriés pour réduire le risque
peuvent inclure des mesures comme des
matériaux amortissant pour empêcher les pièces
de « tinter ».
4. Utilisez des protège-tympans appropriés.
5. Faites fonctionner et entretenez l’outil comme
recommandé dans ces instructions pour éviter
une hausse inutile des niveaux de bruit.
6. Prenez des mesures de réduction du bruit, par
exemple en plaçant les pièces à travailler sur des
supports atténuant le bruit.
Risques liés aux vibrations
1. L’émission de vibration pendant le
fonctionnement dépend de la tension
d’adhérence, de la force de pression par contact,
du sens de travail, du réglage de l’alimentation, de
la pièce à travailler et de son support. Réalisez
une évaluation du risque à propos des risques liés
aux vibrations et mettez en place des contrôles
adéquats pour ces dangers.
2. L’exposition à des vibrations peut provoquer des
lésions nerveuses handicapantes et nuire à
l’approvisionnement en sang des mains et des
bras.
3. Portez des vêtements chauds lorsque vous
travaillez dans un environnement froid et
maintenez vos mains au chaud et au sec.
4. Si vous ressentez un engourdissement, des
fourmillements, une douleur ou remarquez un
blanchiment de la peau de vos doigts ou mains,
demandez conseil à un professionnel des soins de
santé qualifié concernant l’ensemble des activités.
5. Faites fonctionner et entretenez l’outil comme
recommandé dans ces instructions pour éviter
une hausse inutile des niveaux de vibration.
6. Serrez légèrement l’outil en le tenant bien en main,
car le risque de vibration est généralement plus
important lorsque la force de préhension est plus
élevée.
Consignes de sécurité supplémentaires pour outils à
gaz
1. Utilisez l’outil uniquement avec le réservoir de gaz
Makita d’origine.
2. Prenez garde lorsque vous utilisez un outil à gaz,
étant donné que l’outil peut devenir chaud,
affectant la prise et la maîtrise.
3. Un outil à gaz destiné à enfoncer des fixations doit
être utilisé dans un endroit aéré.
4. Le contact avec la peau du gaz combustible
liquide présente un risque de blessure.
5. Un réservoir de gaz doit être marqué
conformément à la réglementation des transports
requise.
6. Manipulez avec soin le réservoir de gaz et vérifiez
l’absence de dommages. Un réservoir de gaz
endommagé peut exploser et provoquer des
blessures.
7. Lisez et suivez les instructions accompagnant le
réservoir de gaz.
8. Assurez-vous que des matériaux combustibles ne
sont pas exposés à des gaz d’échappement
chauds.
9. N’utilisez pas un outil à gaz dans un
environnement explosif, car les étincelles
produites dans l’outil pourraient déclencher un
incendie ou une explosion.
10. Un réservoir de gaz ne doit pas être rangé sans
précaution ou à une température élevée. Suivez
les réglementations locales et les instructions du
réservoir de gaz pour la manipulation et
l’élimination des réservoirs de gaz et des batteries
ou accumulateurs.
11. Un outil à gaz peut dégager une petite quantité de
gaz lors d’opérations habituelles.
Utilisation et entretien des outils fonctionnant sur
batterie
1. Rec
chargeur spécifié par le fabricant. Un chargeur qui
est adapté à un type spécifique de batterie peut
présenter un risque d’incendie s’il est utilisé avec un
autre type de batterie.
2. Utilisez un outil électrique uniquement avec la
batterie spécifiquement indiquée. L’utilisation de
toute autre batterie peut présenter un risque de
blessure et d’incendie.
3. Lorsque vous n’utilisez pas la batterie, tenez-la à
l’écart des objets métalliques, comme des
trombones, pièces de monnaie, clés, clous, vis ou
autres petits objets métalliques, susceptibles de
créer une connexion entre deux bornes. Court-
circuiter les bornes d’une batterie entre elles peut
provoquer des brûlures ou un incendie.
4. Dans des conditions d’utilisation inadéquate, il
peut y avoir une fuite de l’électrolyte de la batterie.
Le cas échéant, évitez tout contact avec ce liquide.
En cas de contact accidentel, rincez à l’eau. Si le
liquide pénètre dans les yeux, consultez par
ailleurs un médecin. Le liquide s’échappant de la
batterie peut provoquer une irritation ou des brûlures.
5. N’utilisez pas une batterie ou un outil s’ils sont
endommagés ou modifiés. Une batterie
endommagée ou modifiée peut avoir un
comportement imprévisible susceptible d’entraîner un
incendie, une explosion ou des blessures.
6. N’exposez pas la batterie ou l’outil au feu ou à une
température excessive. L’exposition au feu ou à une
température supérieure à 130°C peut provoquer une
explosion.
7. Respectez toutes les instructions de charge et ne
chargez pas la batterie ou l’outil en dehors de la
plage de température indiquée dans les
instructions. Une charge incorrecte ou à une
température en dehors de la plage indiquée peut
endommager la batterie et augmenter le risque
d’incendie.
Dispositifs de sécurité
1. Assurez-vous que tous les systèmes de sécurité
sont en état de marche avant d’utiliser l’outil.
L’outil ne doit pas fonctionner si vous enclenchez
uniquement la gâchette ou si vous appuyez
la batterie uniquement avec le
hargez
16

simplement le bras de contact contre le bois. Il ne doit
fonctionner que si ces deux actions sont réalisées.
Faites un essai pour détecter un possible
fonctionnement défectueux en retirant les vis de l’outil
et en tirant à fond l’enfonceur.
2. Bloquer la gâchette sur la position marche est très
dangereux. N’essayez jamais de serrer la gâchette.
3. N’essayez pas de maintenir en position enfoncée
l’élément de contact avec du ruban adhésif ou un
fil de fer. Cela présente un risque de blessures
graves voire mortelles.
4. Vérifiez toujours l’élément de contact, tel
qu’indiqué dans ce manuel. Des vis peuvent être
projetées accidentellement si le mécanisme de
sécurité ne fonctionne pas correctement.
Dépannage
1. Procédez au nettoyage et à l’entretien juste après
avoir terminé la tâche. Maintenez l’outil en parfait
état. Lubrifiez les pièces mobiles pour éviter qu’elles
ne rouillent et pour limiter l’usure due à la friction.
Retirez toute la poussière déposée sur les pièces.
2. Sollicitez une inspection régulière de l’outil
auprès d’un centre de service après-vente Makita
agréé.
3. Pour conserver la SÉCURITÉ et la FIABILITÉ du
produit, l’entretien et les réparations doivent être
réalisés par un centre de service après-vente
Makita agréé, exclusivement avec des pièces de
rechange Makita.
4. Suivez les réglementations locales lors de la mise
au rebut de l’outil.
CONSERVEZ CES
INSTRUCTIONS.
AVERTISSEMENT : NE vous laissez PAS tromper
(au fil d’une utilisation répétée) par un sentiment
d’aisance et de familiarité avec le produit, en
négligeant le respect rigoureux des consignes de
sécurité qui accompagnent le produit en question. La
MAUVAISE UTILISATION de l’outil ou l’ignorance des
consignes de sécurité indiquées dans ce mode
d’emploi peut entraîner de graves blessures.
CONSIGNES DE SÉCURITÉ
IMPORTANTES POUR LA
BATTERIE
1. Avant d’utiliser la batterie, lisez toutes les
instructions et précautions relatives (1) au
chargeur de batterie, (2) à la batterie, et (3) au
produit utilisant la batterie.
2. Ne démontez pas la batterie.
3. Cessez immédiatement l’utilisation si le temps de
fonctionnement devient excessivement court. Il y
a risque de surchauffe, de brûlures, voire
d’explosion.
4. Si l’électrolyte pénètre dans vos yeux, rincez-les à
l’eau claire et consultez immédiatement un
médecin. Il y a risque de perte de la vue.
5. Ne court-circuitez pas la batterie :
(1) Ne touchez les bornes avec aucun matériau
conducteur.
ENC009-6
(2) Évitez de ranger la batterie dans un
conteneur avec d’autres objets métalliques,
par exemple des clous, des pièces de
monnaie, etc.
(3) N’exposez pas la batterie à l’eau ou à la pluie.
Un court-circuit de la batterie peut provoquer une
intensité de courant élevée, une surchauffe,
parfois des brûlures et même une panne.
6. Ne rangez pas l’outil et la batterie dans un endroit
où la température risque d’atteindre ou de
dépasser 50 °C.
7. Ne jetez pas la batterie au feu même si elle est
sérieusement endommagée ou complètement
épuisée. La batterie peut exploser au contact du
feu.
8. Évitez de laisser tomber ou de cogner la batterie.
9. N’utilisez pas la batterie si elle est endommagée.
10. Les batteries au lithium-ion contenues sont
soumises aux exigences de la législation sur les
marchandises dangereuses.
Lors du transport commercial par des tierces parties
ou des transitaires par exemple, des exigences
spécifiques en matière d’étiquetage et d’emballage
doivent être respectées.
Pour la préparation de l’article expédié, il est
nécessaire de consulter un expert en matériau
dangereux. Veuillez également respecter les
réglementations nationales susceptibles d’être plus
détaillées.
Recouvrez les contacts exposés avec du ruban
adhésif ou du ruban de masquage et emballez la
batterie de telle sorte qu’elle ne puisse pas bouger
dans l’emballage.
11. Lors de la mise au rebut de la batterie, retirez-la de
l’outil et jetez-la en lieu sûr. Suivez les
réglementations locales en matière de mise au
rebut des batteries.
12. Utilisez les batteries uniquement avec les produits
spécifiés par Makita. L’insertion de batteries dans
des produits non conformes peut provoquer un
incendie, une chaleur excessive, une explosion ou
une fuite de l’électrolyte.
13. Lorsque vous n’utilisez pas l’outil pendant une
période prolongée, la batterie doit être retirée de
l’outil.
CONSERVEZ CES
INSTRUCTIONS.
ATTENTION : N’utilisez que des batteries Makita
d’origine. L’utilisation de batteries de marque autre que
Makita ou de batteries modifiées peut provoquer
l’explosion des batteries, ce qui présente un risque
d’incendie, de dommages matériels et corporels. Cela
annulera également la garantie Makita pour l’outil et le
chargeur Makita.
Conseils pour assurer la durée de vie
optimale de la batterie
1. Chargez la batterie avant qu’elle ne soit
complètement déchargée. Arrêtez toujours l’outil
et rechargez la batterie quand vous remarquez
que la puissance de l’outil diminue.
17

2. Ne rechargez jamais une batterie complètement
chargée. La surcharge réduit la durée de service
de la batterie.
3. Chargez la batterie à une température ambiante
comprise entre 10 °C et 40 °C. Avant de charger
une batterie chaude, laissez-la refroidir.
Vue d’ensemble du cloueur
(Fig. 2)
DESCRIPTION DU
FONCTIONNEMENT
ATTENTION :
• Veillez toujours à retirer la pile combustible, la batterie
et les clous avant d’utiliser la fonction de réglage ou de
contrôle de l’outil.
Installation ou retrait de la batterie
ATTENTION :
• Éteignez toujours l’outil avant d’installer ou de déposer
la batterie.
• Tenez fermement l’outil et la batterie lors de
l’installation ou du retrait de la batterie. Si vous ne
tenez pas fermement l’outil et la batterie, ils risquent de
glisser et de s’abîmer ou de vous blesser. (Fig. 3)
Pour installer la batterie, tenez-la de sorte que la forme de
la partie avant de la batterie s’ajuste à celle de l’ouverture
aménagée de la batterie et faites-la glisser en position.
Insérez-la toujours bien à fond, jusqu’à ce qu’elle se
verrouille en émettant un léger clic. (Fig. 4)
Pour retirer la batterie, sortez-la de l’outil tout en appuyant
sur le bouton situé sur le côté de la batterie, comme
indiqué sur la figure.
ATTENTION :
• Insérez toujours la batterie bien à fond, jusqu’à ce
qu’elle se verrouille en place. Sinon, elle risque de
tomber accidentellement de l’outil, en vous blessant ou
en blessant une personne située près de vous.
• Ne forcez pas lors de l’installation de la batterie: Si la
batterie ne glisse pas aisément, c’est qu’elle n’est pas
insérée correctement.
Allumage de la lampe
ATTENTION :
• Ne regardez pas directement la lumière ou la source
lumineuse. (Fig. 5)
• Pour allumer la lampe, appuyez sur le bouton de celle-
ci. Pour éteindre la lampe, appuyez à nouveau sur le
bouton de celle-ci.
Pile combustible
Fixation de la soupape de dosage à la pile
combustible (Fig. 6)
Détachez la coiffe (si la soupape de dosage est fournie
avec une coiffe). (Fig. 7)
Appuyez sur le bord avant. (Fig. 8)
Appuyez sur le bord arrière jusqu’à ce qu’il se mette en
place.
18
Insertion de la pile combustible (Fig. 9)
Soulevez et tirez sur le capuchon du réservoir de
carburant pour l’ouvrir. (Fig. 10)
Insérez la pile combustible en orientant la tuyère
d’éjection de la soupape de dosage vers l’adaptateur.
(Fig. 11)
Insérez correctement la tuyère d’éjection dans le petit
orifice de l’adaptateur. (Fig. 12)
Placez le capuchon du réservoir de carburant sur la
soupape de dosage et enfoncez-le complètement pour
qu’il s’enclenche.
Réglage de la profondeur de clouage
ATTENTION :
• Retirez la pile combustible, la batterie et les clous
avant de régler la profondeur du clouage. (Fig. 13)
Pour réduire la profondeur, tournez la bague de réglage
dans le sens A indiqué sur la figure. Pour augmenter la
profondeur, tournez la bague de réglage dans le sens B.
Ne tournez pas trop la bague de réglage, au risque
d’entraîner l’expulsion du dispositif de contact situé sur la
bague de réglage ou de coincer celui-ci.
Voy ant
Signification de la couleur du voyant :
Vert clignotant : état normal
Rouge clignotant : la batterie doit être rechargée
Rouge allumé : rechargez la batterie. Il n’est pas
possible de procéder au clouage car la batterie est
déchargée.
Orange clignotant : un nettoyage en profondeur est
recommandé. Reportez-vous à la section
« MAINTENANCE » pour nettoyer l’intérieur de l’outil en
profondeur. Pour que le voyant orange cesse de clignoter,
appuyez sur le dispositif de contact pendant cinq
secondes, puis appuyez cinq fois sur le dispositif de
contact.
Orange clignotant après vert et rouge clignotant en
alternance : la détection des pannes est activée. Retirez
et réinsérez la batterie pour réinitialiser l’outil. Si la
détection des pannes se déclenche à nouveau, il s’agit
d’un dysfonctionnement. Demandez à votre centre de
service Makita le plus proche de le corriger.
Installation du crochet (Fig. 14)
L’outil est équipé d’un crochet pratique qui permet de le
suspendre temporairement. Vous pouvez l’installer d’un
côté comme de l’autre de l’outil. Il peut être retiré sans
utiliser d’outil.
Pour installer le crochet, étirez la partie supérieure du
crochet et insérez-le dans l’outil. Pour retirer le crochet,
étirez la partie supérieure du crochet dans les deux sens
et tirez sur le crochet pour l’extraire de l’outil.
ASSEMBLAGE
ATTENTION :
• Retirez toujours la pile combustible et la batterie avant
d’intervenir sur l’outil.
Chargement du cloueur (Fig. 15)
Insérez une bande de clous dans la fente à l’arrière du
magasin. (Fig. 16)

Tirez sur le levier poussoir tout en appuyant à fond sur le
bouton-poussoir à l’arrière du magasin. Relâchez ensuite
le bouton-poussoir et replacez avec précaution le levier
poussoir à l’extrémité de la bande.
Retrait des clous (Fig. 17)
Tirez sur le levier poussoir et appuyez sur le boutonpoussoir pour libérer le support du cloueur, puis laissez le
levier poussoir revenir dans la partie supérieure en
appuyant sur le bouton-poussoir.
Faites coulisser les clous vers l’arrière du magasin et
retirez-les.
Adaptateur de bec (Fig. 18)
L’adaptateur de bec protège la surface de la pièce à
travailler contre les éraflures et les détériorations. Placez
correctement l’adaptateur de bec.
Remettez l’adaptateur de bec en place après l’utilisation.
L’adaptateur de bec doit être rangé dans la partie
inférieure de l’outil. (Fig. 19)
Adaptateur pour clous courts (Fig. 20 et
21)
Pour éviter que les clous courts d’une longueur inférieure
à 25 mm se coincent, fixez l’adaptateur pour clous courts.
Insérez l’adaptateur pour clous courts dans la fente à
l’arrière du magasin. Fixez ensuite l’adaptateur en serrant
le boulon.
FONCTIONNEMENT
AVERTISSEMENT :
• Ne touchez pas la surface située autour de la sortie
d’air. Elle est très chaude pendant et après l’utilisation
de l’appareil. Si vous touchez la surface située autour
de la sortie d’air, vous risquez de vous brûler ou de
vous blesser.
ATTENTION :
• Assurez-vous que tous les dispositifs de sécurité sont
en état de fonctionner avant d’utiliser l’outil.
Vérification du bon fonctionnement avant
utilisation
Avant utilisation, vérifiez toujours les points suivants.
– Assurez-vous que l’outil ne démarre pas uniquement
en insérant la batterie et le réservoir de gaz.
– Assurez-vous que l’outil ne démarre pas uniquement
en enclenchant la gâchette.
– Assurez-vous que l’outil ne démarre pas uniquement
en plaçant l’élément de contact contre la pièce sans
enclencher la gâchette.
– Assurez-vous que l’outil ne démarre pas en
enclenchant d’abord la gâchette, puis en plaçant
l’élément de contact contre la pièce.
Pour enfoncer les clous (Fig. 22)
1. Pour insérer un clou, placez le dispositif de contact
contre la pièce à travailler.
Le moteur du ventilateur est activé, le gaz de chauffe est
injecté dans la chambre de combustion et mélangé à l’air
par le ventilateur. (Fig. 23)
2. Appuyez fermement sur le dispositif de contact et tirez
sur la gâchette.
Le gaz de chauffe est brûlé et le clou est enfoncé.
3. Vous pouvez l’enfoncer davantage uniquement après
avoir relâché le dispositif de contact et la gâchette.
Mécanisme de déclenchement antisiccatif
Ce mécanisme empêche le déclenchement de l’outil
lorsqu’il ne contient pas de clou.
La prévention antisiccative fonctionne lorsqu’il reste entre
9 et 11 clous.
Cloueur bloqué
AVERTISSEMENT :
• Veillez toujours à retirer la pile combustible et la
batterie avant de débloquer un cloueur.
ATTENTION :
• N’utilisez pas les clous ou bandes de clous déformés.
L’alimentation en clous risquerait d’être médiocre.
Suivez la procédure de retrait des clous et retirez les
clous du magasin. (Fig. 24)
Ouvrez le verrou et relâchez la trappe, puis retirez le clou
coincé.
MAINTENANCE
ATTENTION :
• Retirez toujours la pile combustible, la batterie et les
clous avant de tenter de procéder au contrôle ou à la
maintenance de l’outil.
• N’utilisez jamais d’essence, de benzine, de diluant,
d’alcool ou de produit similaire. Ces produits risquent
de provoquer des décolorations, des déformations ou
des fissures.
Maintenance suite au travail effectué
Inspectez toujours l’état général de l’outil et les vis
desserrées avant utilisation. Serrez au besoin.
Une fois le travail terminé, procédez aux tâches
habituelles suivantes.
L’objectif de ces étapes simples est de garantir la sécurité
et les performances de l’outil.
Avant de quitter le lieu dans lequel vous travaillez :
• Retirez la batterie et rangez-la dans la valise de
transport de l’outil. Utilisez toujours la valise de
transport de l’outil pour transporter et ranger l’outil.
• Débarrassez-vous de toutes les piles usagées, de
sorte qu’elles ne soient pas découvertes par des
enfants, écrasées, perforées ou brûlées.
Lorsque vous rentrez chez vous :
• Si la batterie doit être rechargée, comme indiqué par le
voyant rouge, placez-la dans son chargeur.
• Essuyez l’outil avec un chiffon propre et doux.
• Vérifiez le filtre et nettoyez-le s’il est poussiéreux.
Nettoyage du filtre à air (Fig. 25 et 26)
Appuyez légèrement sur le couvercle du filtre et retirez-le.
Soulevez ensuite simplement le filtre.
Tapez légèrement sur le filtre pour en retirer la poussière.
Utilisez du savon et de l’eau pour redonner son éclat au
filtre.
19

Pour garantir la SÉCURITÉ et la FIABILITÉ du produit, les
réparations ainsi que tout autre travail d’entretien ou de
réglage doivent être effectués dans un centre d’entretien
Makita agréé, exclusivement avec des pièces de
rechange Makita.
Nettoyage en profondeur
En cas de tirs à vide fréquents, l’outil doit être nettoyé en
profondeur.
Pour plus de détails, consultez le guide de nettoyage qui
accompagne l’outil et procédez au nettoyage.
Pour toute question relative au nettoyage, contactez votre
centre de service Makita le plus proche.
ACCESSOIRES FOURNIS EN
OPTION
ATTENTION :
• Ces accessoires ou pièces complémentaires sont
recommandés pour être utilisés avec l’outil Makita
spécifié dans ce mode d’emploi. L’utilisation de tout
autre accessoire ou pièce complémentaire peut
comporter un risque de blessure. N’utilisez les
accessoires ou pièces qu’aux fins auxquelles ils ont été
conçus.
Pour obtenir plus de détails sur ces accessoires,
contactez votre Centre de service local Makita.
• Clous
• Lunettes de sécurité
• Pile combustible
• Kit de nettoyage
• Batterie et chargeur Makita authentiques
REMARQUE :
• Certains éléments de la liste peuvent être inclus en tant
qu’accessoires standard dans le coffret de l’outil
envoyé. Ils peuvent varier suivant les pays.
Bruit
Le niveau de bruit pondéré A typique a été mesuré selon
la norme EN ISO 11148-13 :
Niveau de pression sonore (L
Niveau de puissance sonore (L
Incertitude (K) : 3 dB (A)
) : 93 dB (A)
pA
) : 106 dB (A)
WA
Portez des protections auditives.
Vibrations
La valeur totale des vibrations a été mesurée selon la
norme EN ISO 11148-13 :
Émission de vibrations (a
Incertitude (K) : 1,5 m/s
) : 3,5 m/s
h
2
• La valeur de l’émission des vibrations déclarée a été
mesurée conformément à la méthode de test standard
et peut être utilisée afin de comparer des outils entre
eux.
• La valeur de l’émission des vibrations déclarée peut
également être utilisée lors d’une évaluation
préliminaire de l’exposition.
AVERTISSEMENT:
• Selon la manière dont l’outil est utilisé, il est possible
que l’émission des vibrations pendant l’utilisation réelle
de l’outil électrique diffère de la valeur de l’émission
déclarée.
ENG905-1
ENG904-2
2
ENG901-1
• Veillez à identifier les mesures de sécurité destinées à
protéger l’opérateur et établies en fonction de
l’estimation de l’exposition dans les conditions réelles
d’utilisation (en prenant en compte toutes les étapes du
cycle de fonctionnement, telles que les périodes de
mise hors tension de l’outil, les périodes de
fonctionnement au ralenti et les périodes de mise en
route).
Déclaration de conformité CE
Pour les pays d’Europe uniquement
La Déclaration de conformité CE figure en Annexe A du
présent mode d’emploi.
20
DEUTSCH (Originalanweisungen)
Cd
Ni-MH
Li-ion
Erklärung der Gesamtdarstellung
1. Akkublock
2. Kraftstoffabdeckung
3. Auslöser
4. Anzeigelampe
5. Drucktaste
6. Druckhebel
7. Magazin
8. Kontaktfuß
9. Leuchte
10. Lüftungsschlitz
11. Tas te
12. Lampentaste
13. Dosierventil
14. Kappe
15. Strahldüse
16. Einsteller
17. Haken
18. Adapternase
19. Adapter für kurze Nägel
20. Schraube
21. Riegel
22. Klappe
23. Filterkappe
24. Filter
TECHNISCHE DATEN
Modell GF600
Nagellänge Nagelmaß 16Ga: 15 bis 65 mm
Max. Anzahl Nägel 100 Nägel (2 Streifen)
Abmessungen (L x B x H) 266 mm x 90 mm x 305 mm
Nettogewicht 2,2 kg
Nennspannung 7,2 V Gleichspannung
• Aufgrund unserer beständigen Forschungen und Weiterentwicklungen sind Änderungen an den hier angegebenen
Technischen Daten ohne Vorankündigung vorbehalten.
• Die Technischen Daten und der Akkublock können in den einzelnen Ländern Abweichungen aufweisen.
Symbole
Im Folgenden sind die im Zusammenhang mit diesem
Werkzeug verwendeten Symbole dargestellt. Machen Sie
sich vor der Benutzung des Werkzeugs unbedingt mit
diesen Symbolen vertraut!
...... Lesen Sie die Bedienungsanleitung!
.................. Behälter steht unter Druck. Setzen Sie
................. Verwenden Sie das Werkzeug nur im
................. Verwenden Sie in der Nähe weder
................. Beschädigen, durchstechen oder
den Behälter keinen Temperaturen
über 50°C (z. B. direkte
Sonneneinstrahlung) aus. Lagern Sie
den Behälter an einem gut belüfteten
Ort.
Freien oder in gut belüfteten Räumen.
Atmen Sie das Gas nicht ein.
Flammen noch Sprays auf erhitzten
Flächen. Bei Nichtbeachtung kann sich
ein brennbares bzw. explosives DampfLuft-Gemisch bilden.
verbrennen Sie den Behälter nach der
Verwendung nicht.
.......... Tragen Sie eine Schutzbrille.
.......... Einen Gehörschutz tragen.
END107-8
...................Nehmen Sie Ihre Finger vom Auslöser,
wenn Sie keine Nägel eintreiben, um
ein versehentliches Auslösen zu
vermeiden.
.................Verwenden Sie das Werkzeug nur in
belüfteten Bereichen, um Übelkeit und
Bewusstlosigkeit zu vermeiden.
Verwenden Sie das Werkzeug niemals
in Umgebungen mit brennbaren
Materialien. Die Werkzeugabgase
können die brennbaren Materialien
entzünden.
...................Verwendeten Sie das Werkzeug nicht
auf Gerüsten oder Leitern!
................... Warnung: Heiße Fläche!
Bereich um dieses Symbol nicht
berühren! Bei Berührung dieser Fläche
kann es zu Verbrennungen oder
Verletzungen kommen.
.............Nur für EU-Länder
Entsorgen Sie Elektrowerkzeuge,
Batterien und Akkus nicht über den
Hausmüll!
Gemäß der Europäischen Richtlinie
über Elektro- und Elektronik- Altgeräte
und über Batterien und Akkumulatoren
sowie Altbatterien und
Altakkumulatoren und ihrer Umsetzung
in nationales Recht müssen
verbrauchte Elektrowerkzeuge sowie
Altbatterien und Altakkumulatoren
getrennt gesammelt und einer
umweltgerechten Wiederverwertung
zugeführt werden.
21

Verwendungszweck
Dieses Werkzeug wurde für das Befestigen beim
Innenausbau und Aufstellen von Möbeln entwickelt.
Das Werkzeug ist nur für professionelle
Massenanwendung vorgesehen. Benutzen Sie es nicht
für andere Zwecke. Es ist nicht dazu ausgelegt,
Befestigungselemente auf einer harten Oberfläche, wie z.
B. Stahl und Beton, einzutreiben.
ENE073-3
Sicherheitswarnungen für
Gasnagler ENB111-5
WARNUNG: Lesen Sie alle Sicherheitshinweise
und Anweisungen durch. Die Nichtbeachtung der
Warnungen und Anweisungen kann zu schweren
Verletzungen, Stromschlag und/oder Feuer führen.
Bewahren Sie alle Warnungen und
Anweisungen für spätere Bezugnahme
auf.
Lesen Sie vor dem Gebrauch des Werkzeugs diese
Bedienungsanleitung, um die Personensicherheit und die
richtige Bedienung und Wartung des Werkzeugs
sicherzustellen.
Allgemeine Sicherheitshinweise
1. Jeder andere Gebrauch außer dem beabsichtigten
Gebrauch dieses Werkzeugs ist verboten.
Eintreibgeräte mit ständiger Kontaktauslösung
oder Kontaktauslösung dürfen nur für
Produktionsanwendungen verwendet werden.
2. Halten Sie die Finger vom Auslöser fern, wenn Sie
dieses Werkzeug nicht benutzen, und wenn Sie
von einer Arbeitsposition zu einer anderen
wechseln.
3. Mehrfache Gefahren. Lesen und verstehen Sie die
Sicherheitsanweisungen, bevor Sie Zubehör am
Werkzeug anschließen, abtrennen, laden,
betreiben, das Werkzeug warten, oder Zubehör am
Werkzeug wechseln. Anderenfalls kann es zu
schweren Körperverletzungen kommen.
4. Halten Sie alle Körperteile, wie Hände und Beine
usw., aus der Schussrichtung fern, und stellen Sie
sicher, dass das Befestigungselement nicht durch
das Werkstück hindurch in Teile des Körpers
eindringen kann.
5. Beachten Sie bei Benutzung des Werkzeugs, dass
das Befestigungselement abgelenkt werden und
Verletzungen verursachen kann.
6. Halten Sie das Werkzeug mit festem Griff, und
richten Sie sich darauf ein, Rückstoß abzufangen.
7. Nur technisch versierte Bediener sollten das
Eintreibgerät benutzen.
8. Unterlassen Sie jegliche Abänderung des
Eintreibgeräts. Abänderungen können die
Effektivität der Sicherheitsmaßnahmen verringern
und die Gefahren für den Bediener und/oder
Umstehende erhöhen.
9. Werfen Sie die Betriebsanleitung nicht weg.
10. Benutzen Sie ein Werkzeug nicht, wenn es
beschädigt worden ist.
11. Lassen Sie bei der Handhabung von
Befestigungselementen, besonders beim Beladen
und Entladen, Vorsicht walten, da die
22
Befestigungselemente scharfe Spitzen aufweisen,
die Verletzungen verursachen können.
12. Überprüfen Sie das Werkzeug vor Gebrauch
immer auf beschädigte, falsch angeschlossene
oder verschlissene Teile.
13. Strecken Sie sich bei der Arbeit nicht zu weit vor.
Benutzen Sie das Werkzeug nur an einem
sicheren Arbeitsplatz. Achten Sie stets auf
sicheren Stand und gute Balance.
14. Halten Sie Umstehende fern (wenn Sie in einem
Bereich arbeiten, wo die Wahrscheinlichkeit von
Passanten-Durchgangsverkehr hoch ist). Grenzen
Sie Ihren Arbeitsbereich klar ab.
15. Richten Sie das Werkzeug niemals auf sich selbst
oder andere Personen.
16. Legen Sie Ihren Finger nicht auf den Auslöser,
wenn Sie das Werkzeug aufheben, sich zwischen
Arbeitsbereichen und -positionen bewegen oder
gehen, weil das zu einer unbeabsichtigten
Betätigung führen kann. Werkzeuge mit selektiver
Betätigung sind vor Gebrauch stets zu
überprüfen, um sicherzustellen, dass der korrekte
Modus gewählt ist.
17. Tragen Sie nur Handschuhe, die ein
angemessenes Gefühl und sichere Kontrolle von
Auslösern und Einstellvorrichtungen gewähren.
18. Legen Sie das Werkzeug im Ruhezustand auf
einer ebenen Fläche ab. Wenn Sie den am
Werkzeug angebrachten Aufhänger verwenden,
hängen Sie das Werkzeug sicher an einer stabilen
Oberfläche auf.
19. Unter dem Einfluss von Alkohol, Drogen oder
dergleichen nicht in Betrieb nehmen.
Gefahren von Geschossen
1. Das Eintreibgerät ist grundsätzlich von der
Druckluftquelle zu trennen, wenn
Befestigungselemente entladen, Einstellungen
vorgenommen, Nagelstaus beseitigt oder
Zubehörteile gewechselt werden.
2. Acht
Befestigungselemente das Material korrekt
durchdringen und nicht fälschlicherweise auf den
Bediener und/oder Umstehende abgelenkt/
abgeschossen werden können.
3. Während der Arbeit können Bruchstücke vom
Werkstück und Befestigungs-/Sammelsystem
abgegeben werden.
4. Tragen Sie stets eine Schutzbrille, um Ihre Augen
bei Verwendung von Elektrowerkzeugen vor
Verletzung zu schützen. Die Brille muss den
Vorschriften ANSI Z87.1 in den USA, EN 166 in
Europa oder AS/NZS 1336 in Australien/
Neuseeland entsprechen. In Australien/
Neuseeland ist das Tragen eines
Gesichtsschutzes gesetzlich vorgeschrieben, um
auch Ihr Gesicht zu schützen. (Abb. 1)
Der Arbeitgeber ist dafür verantwortlich, den
Gebrauch von angemessener Schutzausrüstung
für die Werkzeugbenutzer und andere Personen
im unmittelbaren Arbeitsbereich durchzusetzen.
5. Die Gefahren für andere Personen sind vom
Bediener zu beurteilen.
6. Lassen Sie bei Werkzeugen ohne
Werkstückkontakt Vorsicht walten, weil sie
während der Arbeit darauf, dass die
en Sie

unbeabsichtigt ausgelöst werden können und den
Bediener und/oder Umstehende verletzen können.
7. Vergewissern Sie sich stets, dass das Werkzeug
sicher auf dem Werkstück aufsitzt und nicht
abrutschen kann.
8. Tragen Sie einen Gehörschutz, um Ihre Ohren vor
dem Auslassgeräusch zu schützen, und einen
Kopfschutz. Tragen Sie außerdem leichte, aber
keine weite Kleidung. Ärmel müssen zugeknöpft
oder hochgerollt sein. Das Tragen einer Krawatte
ist unzulässig.
Gefahren beim Betrieb
1. Halten Sie das Werkzeug korrekt: richten Sie sich
darauf ein, normalen oder plötzlichen
Bewegungen, wie z. B. Rückstoß,
entgegenzuwirken.
2. Behalten Sie eine ausbalancierte Körperhaltung
und sicheren Stand bei.
3. Tragen Sie eine geeignete Schutzbrille; außerdem
wird das Tragen geeigneter Handschuhe und
Schutzkleidung empfohlen.
4. Tragen Sie einen geeigneten Gehörschutz.
5. Verwenden Sie die korrekte Energiequelle gemäß
den Anweisungen in der Betriebsanleitung.
6. Benutzen Sie das Werkzeug nicht auf beweglichen
Plattformen oder auf der Ladefläche von
Lastwagen. Eine plötzliche Bewegung der Plattform
kann zum Verlust der Kontrolle über das Werkzeug
führen und Verletzungen verursachen.
7. Gehen Sie stets davon aus, dass sich
Befestigungsmittel im Werkzeug befinden.
8. Arbeiten Sie nicht überhastet, und verwenden Sie
das Werkzeug nicht mit zu hohem Kraftaufwand.
Gehen Sie mit dem Werkzeug sorgfältig um.
9. Achten Sie beim Arbeiten mit dem Werkzeug auf
sicheren Stand und Gleichgewicht. Vergewissern
Sie sich bei Arbeiten an hohen Orten, dass sich
niemand unterhalb aufhält.
10. Bewegen Sie sich beim Eintreiben von
Befestigungsmitteln auf Dächern und anderen
hochgelegenen Orten in Vorwärtsrichtung. Wenn
Sie sich beim Arbeiten rückwärts bewegen, können
Sie leicht den Stand verlieren. Arbeiten Sie beim
Eintreiben von Befestigungsmitteln an senkrechten
Flächen von oben nach unten. Das Arbeiten auf diese
Weise ist weniger ermüdend.
11. Wenn Sie versehentlich auf ein anderes
Befestigungsmittel oder auf einen Ast im Holz
treffen, kann sich das Befestigungsmittel
verbiegen oder im Werkzeug verklemmen. Das
Befestigungsmittel kann herausgeschleudert
werden und Personen treffen, oder das Werkzeug
selbst kann gefährliche Bewegungen machen.
Setzen Sie die Befestigungsmittel mit Sorgfalt.
12. Treiben Sie Befestigungsmittel niemals
gleichzeitig von innen und außen ein. Die
Befestigungsmittel können durchschießen und/oder
umher fliegen und stellen eine große Gefahr dar.
RSI-Syndrom verursachende Gefahren
1. Wird ein Werkzeug über längere Zeitspannen
benutzt, kann der Bediener Beschwerden in
Händen, Armen, Schultern, Nacken oder anderen
Körperteilen verspüren.
2. Bei der Benutzung eines Werkzeugs sollte der
Bediener eine geeignete, aber ergonomische
Haltung annehmen. Behalten Sie sicheren Stand
bei, und vermeiden Sie unbehagliche oder
unausbalancierte Haltungen.
3. Falls der Bediener Symptome, wie z. B. anhaltende
oder immer wiederkehrende Beschwerden,
Schmerzen, Pochen, Reißen, Kribbeln, Taubheit,
Brennen oder Steifigkeit verspürt, sollten diese
Warnzeichen nicht ignoriert werden. Der Bediener
sollte einen qualifizierten Gesundheitsexperten in
Bezug auf allgemeine Aktivitäten konsultieren.
4. Fortgesetzter Gebrauch des Werkzeugs kann RSISyndrom durch den vom Werkzeug erzeugten
Rückstoß verursachen.
5. Um RSI-Syndrom zu vermeiden, sollte sich der
Bediener nicht übernehmen oder übermäßige
Kraft anwenden. Darüber hinaus sollte der
Bedi
ener e
verspürt.
6. Führen Sie eine Gefährdungsabschätzung
bezüglich Gefahren durch wiederholte
Beanspruchung durch. Diese sollte sich auf
Muskel-Skelett-Erkrankungen konzentrieren und
vorzugsweise auf der Annahme basieren, dass
geringere Ermüdung während der Arbeit effektiv
zur Reduzierung von Erkrankungen ist.
Durch Zubehör und Verbrauchsmaterial verursachte
Gefahren
1. Entfernen Sie den Gasbehälter und den Akku,
bevor Sie Zubehörteile, wie z. B. den
Werkstückkontakt, wechseln/austauschen oder
Einstellungen vornehmen.
2. Verwenden Sie nur Zubehörteile der vom
Hersteller gelieferten Größen und Typen.
3. Verwenden Sie nur die in dieser Anleitung
empfohlenen Schmiermittel.
Gefahren am Arbeitsplatz
1. Ausrutschen, Stolpern und Stürzen sind
Hauptursachen für Verletzungen am Arbeitsplatz.
Achten Sie auf schlüpfrige Oberflächen, die durch
den Gebrauch des Werkzeugs verursacht werden,
und auch auf Stolpergefahren, die durch den
Druckluftschlauch verursacht werden.
2. Lassen Sie in fremden Umgebungen zusätzliche
Sorgfalt walten. Verborgene Gefahren, wie z. B.
Stromkabel oder andere Versorgungsleitungen,
können vorhanden sein.
3. Dieses Werkzeug ist nicht für den Einsatz in
potenziell explosiven Atmosphären vorgesehen
und ist nicht gegen Kontakt mit Strom isoliert.
4. Vergewissern Sie sich, dass keine Stromkabel,
Gasrohre usw. vorhanden sind, die bei
Beschädigung durch den Einsatz des Werkzeugs
eine Gefahr darstellen können.
5. Der Arbeitsplatz muss sauber, aufgeräumt und gut
beleuchtet sein. Unordnung und Dunkelheit am
Arbeitsbereich bringen Unfallgefahren mit sich.
6. Befolgen Sie etwaige örtliche
Lärmschutzvorschriften, und halten Sie die
vorgeschriebenen Grenzen für Geräuschpegel ein.
In bestimmten Fällen muss der Lärmpegel mit
ine Pause einlegen, wenn er Müdigkeit
23

Hilfe von Schallschutzwänden/-lamellen gedämpft
werden.
Durch Staub und Abgase verursachte Gefahren
1. Überprüfen Sie stets Ihre Umgebung. Das Abgas
vom Werkzeug kann Staub oder Objekte
aufwirbeln und den Bediener und/oder
Umstehende treffen.
2. Lenken Sie die Abluft so, dass Aufwirbelung von
Staub in einer staubgefüllten Umgebung minimiert
wird.
3. Werden Staub oder Objekte im Arbeitsbereich
emittiert, reduzieren Sie die Emissionen so weit
wie möglich, um Gesundheitsrisiken und
Verletzungsgefahr zu verringern.
Gefahren durch Lärm
1. Ungeschützte Einwirkung von hohen
Geräuschpegeln kann permanente, behindernde
Gehörschädigung und andere Probleme wie
Tinnitus (Klingeln, Sausen, Pfeifen oder Brummen
in den Ohren) verursachen.
2. Führen Sie eine Gefährdungsabschätzung
bezüglich Lärmgefahren im Arbeitsbereich durch,
und realisieren Sie angemessene Kontrollen für
diese Gefahren.
3. Geeignete Kontrollen zur Verringerung des
Risikos können Maßnahmen, wie
Dämpfungsmaterial, beinhalten, um „Klingeln“
von Werkstükken zu verhindern.
4. Verwenden Sie einen geeigneten Gehörschutz.
5. Betreiben und warten Sie das Werkzeug gemäß
den Empfehlungen in dieser Anleitung, um eine
unnötige Zunahme von Geräuschpegeln zu
verhindern.
6. Ergreifen Sie Lärmreduzierungsmaßnahmen,
indem Sie beispielsweise Werkstücke auf
Schalldämpfungsstützen legen.
Gefahren durch Vibrationen
1. Die Schwingungsemission während der Arbeit
hängt von der Greifkraft, der Anpresskraft, der
Arbeitsrichtung, der Einstellung der
Energieversorgung, dem Werkstück und der
Werkstückauflage ab. Führen Sie eine
Gefährdungsabschätzung bezüglich
Vibrationsgefahren durch, und realisieren Sie
angemessene Kontrollen für diese Gefahren.
2. Einwirkung von Vibrationen kann behindernde
Schäden an den Nerven und Blutgefäßen der
Hände und Arme verursachen.
3. Tragen Sie beim Arbeiten unter kalten
Bedingungen warme Kleidung, und halten Sie Ihre
Hände warm und trocken.
4. Wenn Sie Taubheit, Kribbeln, Schmerzen oder
Bleichwerden der Haut an Ihren Fingern oder
Händen erleben, holen Sie sich medizinischen Rat
von einem qualifizierten Berufsmediziner in Bezug
auf allgemeine Aktivitäten.
5. Betreiben und warten Sie das Werkzeug gemäß
den Empfehlungen in dieser Anleitung, um eine
unnötige Zunahme von Vibrationspegeln zu
verhindern.
6. Halten Sie das Werkzeug mit leichtem, aber
sicherem Griff, weil die Gefährdung durch
Vibrationen bei höherer Greifkraft im Allgemeinen
größer ist.
Zusätzliche Sicherheitsanweisungen für
Gaswerkzeuge
1. Verwenden Sie das Werkzeug nur mit dem
Original-Makita-Gasbehälter.
2. Lassen Sie bei der Benutzung von
Gaswerkzeugen Vorsicht walten, weil das
Werkzeug heiß werden kann, wodurch Griff und
Kontrolle beeinflusst werden.
3. Gaseintreibgeräte sind in belüfteten Räumen zu
benutzen.
4. Falls brennbares Flüssiggas mit menschlicher
Haut in Kontakt kommt, können Verletzungen
auftreten.
5. Gasbehälter sind gemäß der erforderlichen
Transportverordnung zu markieren.
6.
Behandeln Sie Gasbehälter sorgfältig, und
über
Beschädigte Gasbehälter können explodieren und
Verletzungen verursachen.
7. Lesen und befolgen Sie die mit dem Gasbehälter
gelieferten Anweisungen.
8. Stellen Sie sicher, dass keine brennbaren
Materialien den heißen Abgasen ausgesetzt
werden.
9. Benutzen Sie Gaswerkzeuge nicht in explosiven
Bereichen, da die in dem Werkzeug erzeugten
Funken einen Brand oder eine Explosion
verursachen können.
10. Gasbehälter sollten nicht sorglos oder bei hoher
Temperatur gelagert werden. Befolgen Sie die
örtlichen Vorschriften und die Anweisungen auf
dem Gasbehälter für die Handhabung und
Entsorgung von Gasbehältern und Batterien oder
Akkumulatoren.
11. Bei Gaswerkzeugen besteht die Möglichkeit, dass
eine geringe Freisetzung von Gas durch regulären
Betrieb erzeugt wird.
Gebrauch und Pflege von Akkuwerkzeugen
1. Laden Sie den Akku nur mit dem vom Hersteller
vorgeschriebenen Ladegerät. Ein Ladegerät, das für
einen Akkutyp geeignet ist, kann bei Verwendung mit
einem anderen Akku eine Brandgefahr darstellen.
2. Benutzen Sie Elektrowerkzeuge nur mit den
ausdrücklich vorgeschriebenen Akkus. Bei
Verwendung irgendwelcher anderer Akkus besteht
Verletzungs- und Brandgefahr.
3. Bewahren Sie den Akku bei Nichtgebrauch nicht
zusammen mit Metallgegenständen, wie
Büroklammern, Münzen, Schlüsseln, Nägeln,
Schrauben, und anderen kleinen Metallteilen auf,
welche die Kontakte kurzschließen können.
Kurzschließen der Akkukontakte kann Verbrennungen
oder einen Brand verursachen.
4. Bei Missbrauch kann Flüssigkeit aus dem Akku
austreten. Vermeiden Sie Kontakt mit dieser
Flüssigkeit. Falls Sie versehentlich mit der
Flüssigkeit in Berührung kommen, spülen Sie die
betroffenen Stellen mit Wasser ab. Falls die
Flüssigkeit in die Augen gelangt, suchen Sie
zusätzlich ärztliche Hilfe auf. Die vom Akku
e sie auf Beschädigungen.
prüfen Si
24

austretende Flüssigkeit kann Hautreizungen oder
Verätzungen verursachen.
5. Verwenden Sie keinen Akku und auch kein
Werkzeug, der (das) beschädigt oder modifiziert
ist. Beschädigte oder modifizierte Akkus können
unvorhersehbares Verhalten zeigen, das zu einem
Brand, einer Explosion oder Verletzungsgefahr führen
kann.
6. Setzen Sie einen Akku oder ein Werkzeug nicht
Feuer oder übermäßigen Temperaturen aus. Bei
Einwirkung von Feuer oder Temperaturen über 130°C
kann es zu einer Explosion kommen.
7. Befolgen Sie alle Ladeanweisungen, und laden Sie
den Akku bzw. das Werkzeug nicht außerhalb des
in den Anweisungen angegebenen
Temperaturbereichs. Wird der Ladevorgang
unsachgemäß oder bei Temperaturen außerhalb des
angegebenen Bereichs durchgeführt, kann es zu einer
Beschädigung des Akkus und erhöhter Brandgefahr
kommen.
Sicherheitsvorrichtungen
1. Stellen Sie vor der Benutzung des Werkzeugs
sicher, dass alle Sicherheitssysteme in
funktionsfähigem Zustand sind. Das Werkzeug darf
nicht auslösen, wenn nur der Ein-Aus-Schalter
betätigt oder nur der Kontaktarm gegen das Holz
gedrückt wird. Es darf nur dann auslösen, wenn
beides gleichzeitig erfolgt. Überprüfen Sie das
Werkzeug ohne Befestigungsmittel und bei voll
angezogenem Drücker auf mögliche Funktionsfehler.
2. Die Arretierung des Auslösers in der EIN-Stellung
ist sehr gefährlich. Versuchen Sie niemals, den
Auslöser zu arretieren.
3. Versuchen Sie nicht, das Kontaktelement mit
Klebeband oder Draht in gedrücktem Zustand zu
fixieren. Es besteht Verletzungs- und Lebensgefahr.
4. Überprüfen Sie stets das Kontaktelement
entsprechend der Vorgaben in dieser Anleitung.
Wenn der Sicherheitsmechanismus nicht
ordnungsgemäß funktioniert, können unbeabsichtigt
Befestigungsmittel aus dem Werkzeug geschossen
werden.
Wartung
1. Reinigen und warten Sie das Werkzeug direkt
nach Beendigung der Arbeiten. Halten Sie das
Werkzeug in einwandfreiem Zustand. Schmieren Sie
bewegliche Teile, um Rostbildung zu verhindern und
reibungsbedingten Verschleiß zu minimieren.
Wischen Sie sämtlichen Staub von den Teilen ab.
2. Lassen Sie das Werkzeug regelmäßig bei einem
autorisierten Makita-Servicecenter überprüfen.
3. Um die SICHERHEIT und die ZUVERLÄSSIGKEIT
des Produkts zu gewährleisten, dürfen Reparaturund Wartungsarbeiten ausschließlich von
autorisierten Makita-Servicecentern durchgeführt
werden. Es dürfen nur Original-Ersatzteile von
Makita verwendet werden.
4. Befolgen Sie die örtlichen Vorschriften zur
Entsorgung des Werkzeugs.
DIESE ANWEISUNGEN
AUFBEWAHREN.
WARNUNG: Lassen Sie sich NICHT durch
Bequemlichkeit oder Vertrautheit mit dem Produkt
(durch wiederholten Gebrauch erworben) von der
strikten Einhaltung der Sicherheitsregeln für das
vorliegende Produkt abhalten. MISSBRAUCH oder
Missachtung der Sicherheitsvorschriften in dieser
Anleitung können schwere Personenschäden
verursachen.
WICHTIGE
SICHERHEITSANWEISUNGEN
FÜR AKKU
1. Lesen Sie vor der Benutzung des Akkus alle
Anweisungen und Warnhinweise, die an (1)
Ladegerät, (2) Akku und (3) Akkuwerkzeug
angebracht sind.
2. Unterlassen Sie ein Zerlegen des Akkus.
3. Falls die Betriebszeit beträchtlich kürzer
geworden ist, stellen Sie den Betrieb sofort ein.
Anderenfalls besteht die Gefahr von Überhitzung,
möglichen Verbrennungen und sogar einer
Explosion.
4. Falls Elektrolyt in Ihre Augen gelangt, waschen
Sie sie mit sauberem Wasser aus, und begeben
Sie sich unverzüglich in ärztliche Behandlung.
Anderenfalls können Sie Ihre Sehkraft verlieren.
5. Der Akku darf nicht kurzgeschlossen werden:
(1) Die Kontakte dürfen nicht mit leitfähigem
Material berührt werden.
(2) Lagern Sie den Akku nicht in einem Behälter
zusammen mit anderen Metallgegenständen,
wie z. B. Nägel, Münzen usw.
(3) Setzen Sie den Akku weder Wasser noch
Regen aus.
Ein Kurzschluss des Akkus verursacht starken
Stromfluss, der Überhitzung, mögliche
Verbrennungen und einen Defekt zur Folge haben
kann.
6. Lagern Sie das Werkzeug und den Akku nicht an
Orten, an denen die Temperatur 50 °C erreichen
oder überschreiten kann.
7. Versuchen Sie niemals, den Akku zu verbrennen,
selbst wenn er stark beschädigt oder vollkommen
verbraucht ist. Der Akku kann im Feuer
explodieren.
8. Achten Sie darauf, dass der Akku nicht fallen
gelassen oder Stößen ausgesetzt wird.
9. Benutzen Sie keine beschädigten Akkus.
10. Die enthaltenen Lithium-Ionen-Akkus unterliegen
den Anforderungen der GefahrengutGesetzgebung.
Für kommerzielle Transporte, z. B. durch Dritte oder
Spediteure, müssen besondere Anforderungen zu
Verpackung und Etikettierung beachtet werden.
Zur Vorbereitung des zu transportierenden Artikels ist
eine Beratung durch einen Experten für Gefahrengut
erforderlich. Bitte beachten Sie möglicherweise
ausführlichere nationale Vorschriften.
Überkleben oder verdecken Sie offene Kontakte, und
ENC009-6
25

verpacken Sie den Akku so, dass er sich in der
Verpackung nicht umher bewegen kann.
11. Entfernen Sie den Akku zum Entsorgen vom
Werkzeug, und entsorgen Sie ihn an einem
sicheren Ort. Befolgen Sie die örtlichen
Bestimmungen bezüglich der Entsorgung von
Akkus.
12. Verwenden Sie die Akkus nur mit den von Makita
angegebenen Produkten. Das Einsetzen der Akkus
in nicht konforme Produkte kann zu einem Brand,
übermäßiger Hitzebildung, einer Explosion oder
Auslaufen von Elektrolyt führen.
13. Soll das Werkzeug längere Zeit nicht benutzt
werden, muss der Akku vom Werkzeug entfernt
werden.
DIESE ANWEISUNGEN
AUFBEWAHREN.
ACHTUNG: Verwenden Sie nur Original-Makita-
Akkus. Die Verwendung von Nicht-Original-Makita-Akkus
oder von Akkus, die abgeändert worden sind, kann zum
Bersten des Akkus und daraus resultierenden Bränden,
Personenschäden und Beschädigung führen. Außerdem
wird dadurch die Makita-Garantie für das MakitaWerkzeug und -Ladegerät ungültig.
Hinweise zur Aufrechterhaltung der
maximalen Akku-Nutzungsdauer
1. Laden Sie den Akku, bevor er vollkommen
erschöpft ist. Schalten Sie das Werkzeug stets
aus, und laden Sie den Akku, wenn Sie ein
Nachlassen der Werkzeugleistung feststellen.
2. Unterlassen Sie erneutes Laden eines voll
aufgeladenen Akkus. Überladen führt zu einer
Verkürzung der Nutzungsdauer des Akkus.
3. Laden Sie den Akku bei Raumtemperatur
zwischen 10 – 40 °C. Lassen Sie einen heißen
Akku abkühlen, bevor Sie ihn laden.
Gesamtdarstellung des Naglers
(Abb. 2)
FUNKTIONSBESCHREIBUNG
ACHTUNG:
• Entfernen Sie stets die Kraftstoffzellen, den Akkublock
und die Nägel, bevor Sie Einstellungen oder eine
Funktionsprüfung des Werkzeugs vornehmen.
Einbauen und Ausbauen des Akkublocks
ACHTUNG:
• Schalten Sie das Werkzeug stets aus, bevor Sie den
Akkublock einsetzen oder abnehmen.
• Halten Sie das Werkzeug und den Akkublock
sicher fest, wenn Sie den Akkublock einsetzen
oder herausnehmen. Andernfalls könnte Ihnen das
Werkzeug oder der Akkublock aus den Händen fallen,
sodass das Werkzeug oder der Akkublock beschädigt
werden oder diese Verletzungen verursachen. (Abb. 3)
Zum Einsetzen des Akkublocks setzen Sie den Akkublock
mit der Vorderseite passgerecht auf die Öffnung des
26
Akkufachs auf und schieben Sie den Akkublock in seine
Position. Setzen Sie den Akkublock ganz ein, bis er mit
einem Klick einrastet. (Abb. 4)
Zum Entfernen des Akkublocks müssen Sie diesen aus
dem Werkzeug herausziehen, während Sie die Taste an
der Seite des Blocks verschieben (siehe Abbildung).
ACHTUNG:
• Schieben Sie den Akkublock stets vollständig ein, bis
er einrastet. Andernfalls kann der Akkublock
versehentlich aus dem Werkzeug fallen und Sie oder
Personen in Ihrem Umfeld verletzen.
• Wenden Sie beim Einsetzen des Akkublocks keine
übermäßige Kraft an. Wenn der Akkublock nicht leicht
hineingleitet, ist er nicht richtig angesetzt.
Einschalten der Leuchte
ACHTUNG:
• Schauen Sie nicht direkt in das Licht oder in die
Lichtquelle. (Abb. 5)
• Zum Einschalten der Leuchte drücken Sie die
Lampentaste. Zum Ausschalten der Leuchte drücken
Sie die Lampentaste erneut.
Kraftstoffzelle
Befestigen des Dosierventils an der Kraftstoffzelle
(Abb. 6)
Trennen Sie die Kappe ab (falls das Dosierventil mit
Kappe geliefert wird). (Abb. 7)
Drücken Sie die vordere Kante ein. (Abb. 8)
Drücken Sie die hintere Kante bis zum Einrasten ein.
Einsetzen der Kraftstoffzelle (Abb. 9)
Ziehen Sie die Kraftstoffabdeckung zum Öffnen nach
vorn. (Abb. 10)
Setzen Sie die Kraftstoffzelle in Richtung Strahldüse des
Dosierventils Richtung Adapter ein. (Abb. 11)
Setzen Sie die Strahldüse ordnungsgemäß in die kleine
Öffnung des Adapters ein. (Abb. 12)
Setzen Sie die Kraftstoffabdeckung auf das Dosierventil
und drücken Sie diese zum Einrasten nach unten.
Einstellen der Nageltiefe
ACHTUNG:
• Entfernen Sie die Brennstoffzelle, den Akkublock sowie
alle Nägel, bevor Sie die Tiefe der Nagelung einstellen.
(Abb. 13)
Zum Erreichen einer flacheren Tiefe drehen Sie den
Einsteller in die Richtung A, wie in der Abbildung
dargestellt. Zum Erreichen einer größeren Tiefe drehen
Sie den Einsteller in Richtung B. Drehen Sie den
Einsteller nicht zu weit. Andernfalls kann sich der
Kontaktfuß vom Einstellknopf lösen oder verklemmen.
Anzeigelampe
Die Farbe der Anzeigelampe hat die folgende Bedeutung.
Grün blinkend: Normaler Status
Rot blinkend: Akkublock muss geladen werden
Rot leuchtend: Laden Sie den Akkublock auf. Mit der
verbleibenden Akkuleistung kann keine Nagelung
vorgenommen werden.
Orange blinkend: Eine gründliche Reinigung ist
angesagt. Hinweise zu einer gründlichen Reinigung der

Innenseite des Werkzeugs entnehmen Sie bitte dem
Abschnitt „WARTUNG“. Um eine orange blinkende
Anzeigelampe zurückzusetzen, drücken Sie den
Kontaktfuß fünf Sekunden lang und dann drücken sie
denselben fünfmal.
Orange blinkend, nach abwechselnd grün und rot
blinkend: Fehlererkennung wird durchgeführt. Zum
Zurücksetzen entnehmen Sie den Akkublock und setzen
ihn wieder ein. Falls die Fehlererkennung erneut
ausgeführt wird, liegt eine Fehlfunktion vor. Wenden Sie
sich zwecks Reparatur an Ihr örtliches, autorisiertes
Makita-Servicecenter.
Anbringen des Hakens (Abb. 14)
Der Haken dient zum kurzzeitigen Aufhängen des
Werkzeugs. Sie können den Haken an jeder Seite des
Werkzeugs befestigen. Der Haken kann ohne ein
Werkzeug entfernt werden.
Zum Befestigen des Hakens ziehen Sie den oberen Teil
des Hakens heraus und setzen Sie das obere Teil in das
Werkzeug ein. Zum Entfernen des Haken ziehen Sie den
oberen Teil des Hakens in beide Richtungen und ziehen
Sie den Haken vom Werkzeug ab.
ZUSAMMENBAU
ACHTUNG:
• Nehmen Sie immer die Kraftstoffzelle und den
Akkublock heraus, bevor Sie Arbeiten am Werkzeug
ausführen.
Laden des Naglers (Abb. 15)
Setzen Sie eine Nagelleiste in den Schlitz an der
Rückseite des Magazins ein. (Abb. 16)
Ziehen Sie den Druckhebel und drücken Sie gleichzeitig
die Drucktaste ganz bis zur Rückseite des Magazins.
Lassen Sie dann die Drucktaste los und bringen Sie den
Druckhebel vorsichtig wieder an das Ende der
Nagelleiste.
Entfernen der Nägel (Abb. 17)
Ziehen Sie den Druckhebel und drücken Sie die
Drucktaste, um den Nagelträger freizugeben; bringen Sie
den Druckhebel zurück zum Anfang, indem Sie die
Drucktaste drücken.
Schieben Sie die Nägel Richtung Rückseite des Magazins
und nehmen Sie diese heraus.
Adapternase (Abb. 18)
Die Adapternase verhindert Kratzer und Schäden am
Werkstück. Bringen Sie die Adapternase ordnungsgemäß
an.
Bewahren Sie die Adapternase bei Nichtgebrauch am
dafür vorgesehenen Ort auf. Die Adapternase wird an der
Unterseite des Werkzeugs aufbewahrt. (Abb. 19)
Adapter für kurze Nägel (Abb. 20 und 21)
Wenn Sie Nägel kürzer als 25 mm (1”) verwenden,
bringen Sie den Adapter für kurze Nägel an, um ein
Verklemmen der Nägel zu vermeiden.
Setzen Sie den Adapter für kurze Nägel in den Schlitz an
der Rückseite des Magazins ein. Befestigen Sie den
Adapter anschließend, indem Sie die Schraube
festziehen.
BETRIEB
WARNUNG:
• Bereich um den Lüftungsschlitze nicht berühren!
Dieser Bereich ist bei und kurz nach dem Betrieb sehr
heiß. Bei Berührung des Bereichs um den
Lüftungsschlitz kann es zu Verbrennungen oder
Verletzungen kommen.
ACHTUNG:
• Stellen Sie vor der Benutzung des Werkzeugs sicher,
dass alle Sicherheitssysteme in funktionsfähigem
Zustand sind.
Funktionsprüfung vor dem Betrieb
Überprüfen Sie vor dem Betrieb stets die folgenden
Punkte.
– Vergewissern Sie sich, dass das Werkzeug nicht durch
bloßes Einsetzen des Akkus und des Gasbehälter
betätigt wird.
– Vergewissern Sie sich, dass das Werkzeug nicht durch
bloßes Ziehen des Auslösers betätigt wird.
– Vergewissern Sie sich, dass das Werkzeug nicht durch
bloßes Drücken des Kontaktelements gegen das
Werkstück betätigt wird, ohne den Auslöser zu ziehen.
– Vergewissern Sie sich, dass das Werkzeug nicht
betätigt wird, wenn zuerst der Auslöser gezogen und
dann das Kontaktelement gegen das Werkstück
gehalten wird.
Eintreiben von Nägeln (Abb. 22)
1. Zum Eintreiben eines Nagels setzen Sie den
Kontaktfuß auf das Werkstück.
Der Ventilatormotor wird ausgelöst, Kraftstoffgas wird in
die Verbrennungskammer eingespritzt und mit dem
Ventilator mit Luft gemischt. (Abb. 23)
2. Halten Sie den Kontaktfuß durch Drücken sicher fest
und betätigen Sie anschließend den Auslöser.
Kraftstoffgas wird verbrannt und der Nagel wird
eingetrieben.
3. Ein weiterer Eintreibvorgang kann nur ausgelöst
werden, wenn sowohl Kontaktfuß als auch Auslöser
freigegeben werden.
Auslösemechanismus mit
Schutzvorrichtung
Dieser Mechanismus verhindert, dass das Werkzeug
ohne Nagel auslöst.
Diese Auslöseschutzvorrichtung wird automatisch
aktiviert, wenn nur noch 9 bis 11 Nägel im Magazin sind.
Blockierter Nagler
WARNUNG:
• Entfernen Sie stets die Kraftstoffzelle und den
Akkublock, bevor Sie eine Blockade lösen.
ACHTUNG:
• Verwenden Sie keine verformten Nägel oder
Nagelstreifen. Andernfalls wird die Nagelzufuhr
beeinträchtigt.
27

Nehmen Sie die Nägel anhand des Verfahrens für das
Entnehmen von Nägeln aus dem Magazin. (Abb. 24)
Öffnen Sie den Riegel und die Klappe; entnehmen Sie
anschließend den verklemmten Nagel.
WARTUNG
ACHTUNG:
• Entfernen Sie stets die Brennstoffzelle, den Akkublock
sowie alle Nägel, bevor Sie Überprüfungen oder
Wartungen vornehmen.
• Verwenden Sie zum Reinigen niemals Kraftstoffe,
Benzin, Verdünner, Alkohol oder ähnliches. Dies kann
zu Verfärbungen, Verformungen oder Rissen führen.
Wartungsarbeiten nach der täglichen
Arbeit
Überprüfen Sie das Werkzeug vor der Benutzung stets
auf seinen Allgemeinzustand und auf lockere Schrauben.
Ziehen Sie diese gegebenenfalls fest.
Führen Sie am Ende der täglichen Arbeiten eine
Reinigungsroutine durch.
Diese einfachen Schritte dienen zum Aufrechterhalten der
Sicherheit und der Leistungsfähigkeit des Werkzeugs.
Vor Verlassen des Arbeitsplatzes:
• Entfernen Sie den Akkublock und lagern Sie ihn im
Werkzeugkoffer. Transportieren und lagern Sie das
Werkzeug immer im Werkzeugkoffer.
• Entsorgung Sie leere Zellen immer so, dass diese nicht
in Kinderhände gelangen oder zerdrückt, durchstochen
oder verbrannt werden könnten.
Nach Beendigung der Arbeiten:
• Setzen Sie den Akkublock bei Bedarf in das Ladegerät
ein; dies wird durch die rote Anzeigelampe angezeigt.
• Wischen Sie das Werkzeug mit einem sauberen,
weichen Tuch ab.
• Überprüfen Sie den Filter und reinigen Sie diesen bei
Verschmutzung.
Reinigen des Luftfilters (Abb. 25 und 26)
Drücken Sie die Filterkappe leicht nach oben und nehmen
Sie diese ab. Nehmen Sie dann den Filter einfach heraus.
Klopfen Sie den Filter vorsichtig aus. Nach der
Behandlung mit Wasser und Seife wird der Filter wieder
wie neu.
Zur Gewährleistung von SICHERHEIT und
ZUVERLÄSSIGKEIT des Produkts sollten Reparaturen,
Wartungsarbeiten und Einstellungen nur durch von Makita
autorisierte Servicecenter durchgeführt und
ausschließlich Makita-Ersatzteile verwendet werden.
Gründliche Reinigung
Wenn beim Auslösen öfters kein Nagel ausgeschossen
wird, muss das Werkzeug gründlich gereinigt werden.
Nehmen Sie eine Reinigung vor. Detaillierte Anweisungen
finden Sie in der beiliegenden Reinigungsanleitung.
Wenn Sie Fragen bezüglich der Reinigung haben,
wenden Sie sich an Ihr örtliches Makita-Servicecenter.
SONDERZUBEHÖR
ACHTUNG:
• Für das in diesem Handbuch beschriebene MakitaGerät werden die folgenden Zubehör- und Zusatzteile
empfohlen. Bei Verwendung anderer Zubehör- und
Zusatzteile kann es zu Verletzungen kommen.
Verwenden Sie Zubehör- und Zusatzteile nur für den
vorgesehenen Zweck.
Informationen zu diesem Zubehör erhalten Sie von Ihrem
Makita-Servicecenter.
• Nägel
• Schutzbrille
• Kraftstoffzelle
• Reinigungssatz
• Original-Akku und Original-Ladegerät von Makita
HINWEIS:
• Einige der in der Liste aufgeführten Elemente sind dem
Werkzeugpaket als Standardzubehör beigefügt. Diese
können in den einzelnen Ländern voneinander
abweichen.
Schallpegel
Typischer A-bewerteter Schallpegel nach EN ISO 1114813:
Schalldruckpegel (L
Schallleistungspegel (L
Abweichung (K): 3 dB (A)
Tragen Sie Gehörschutz.
Schwingung
Die Gesamtschwingungsbelastung wird gemäß
EN ISO 11148-13 bestimmt:
Schwingungsbelastung (a
Abweichung (K): 1,5 m/s
• Der hier angegebene Wert für die erzeugten
Schwingungen wurde gemäß dem genormten
Testverfahren ermittelt und kann als Vergleich zu
anderen Werkzeugen herangezogen werden.
• Der angegebene Wert für die erzeugten Schwingungen
ist außerdem für eine vorbeugende Bewertung der
Belastung zu verwenden.
WARNUNG:
• Die Schwingungsbelastung kann bei tatsächlichem
Gebrauch des Elektrowerkzeugs in Abhängigkeit von
der Handhabung des Elektrowerkzeugs von dem hier
aufgeführten Wert abweichen.
• Stellen Sie sicher, dass Schutzmaßnahmen für den
Bediener getroffen werden, die auf den unter den
tatsächlichen Arbeitsbedingungen zu erwartenden
Belastungen beruhen (beziehen Sie alle Bestandteile
des Arbeitsablaufs ein, also zusätzlich zu den
Arbeitszeiten auch Zeiten, in denen das Werkzeug
ausgeschaltet ist oder ohne Last läuft).
EG-Konformitätserklärung
Nur für europäische Länder
Die EG-Konformitätserklärung liegt dieser
Betriebsanleitung als Anhang A bei.
): 93 dB (A)
pA
): 106 dB (A)
WA
): 3,5 m/s
h
2
ENG905-1
ENG904-2
2
ENG901-1
28

ITALIANO (Istruzioni originali)
Cd
Ni-MH
Li-ion
Spiegazione della vista generale
1. Batteria
2. Copricella
3. Grilletto
4. Spia luminosa
5. Pulsante a pressione
6. Leva del dispositivo di spinta
7. Scomparto
8. Elemento di contatto
9. Lampada
10. Apertura di ventilazione
11. Pulsante
12. Pulsante della lampada
13. Valvola di misurazione
14. Coperchio
15. Ugello
16. Regolatore
17. Gancio
18. Adattatore esterno
19. Adattatore per chiodi piccoli
20. Bullone
21. Dispositivo di chiusura
22. Sportello
23. Coperchio del filtro
24. Filtro
CARATTERISTICHE TECNICHE
Modello GF600
Lunghezza chiodi Spessore chiodi 16Ga: 15 mm - 65 mm
Capacità chiodi 100 chiodi (2 nastri)
Dimensioni (L × P × A) 266 mm × 90 mm × 305 mm
Peso netto 2,2 kg
Tensione nominale CC 7,2 V
• Le caratteristiche tecniche riportate di seguito sono soggette a modifiche senza preavviso in virtù del nostro
programma continuo di ricerca e sviluppo.
• Le caratteristiche tecniche e le batterie possono differire da paese a paese.
Simboli
Di seguito sono riportati i simboli utilizzati per
l’apparecchio. È importante comprenderne il significato
prima dell’uso.
...... Leggere il manuale di istruzioni.
.................. Contenitore sotto pressione, evitare le
................. Usare solo all’esterno o in ambienti
................. Non usare in prossimità di fiamme né
................. Non danneggiare, forare o bruciare
................... Per evitare l’attivazione accidentale,
temperature superiori ai 50°C (es.
radiazione solare). Tenere il contenitore
in un luogo ben ventilato.
adeguatamente ventilati. Non inalare il
gas.
spruzzare su superfici calde. Durante
l’uso è possibile che si formi una
miscela vapore/aria infiammabile o
esplosiva.
anche dopo l’uso.
.......... Indossare gli occhiali di protezione.
.......... Indossare protezioni per le orecchie.
tenere le dita lontane dal grilletto
quando non si utilizza l’utensile.
END107-8
................. Utilizzare solo in ambienti ventilati, per
evitare nausea e perdita di
conoscenza. Non utilizzare in ambienti
saturi di gas combustibili. Lo scarico
dell’utensile può incendiare materiali
infiammabili.
................... Non utilizzare su impalcature o scale a
pioli.
................... Avvertenza: superficie calda!
Non toccare l’area intorno a questo
simbolo. Toccare la superficie potrebbe
causare ustioni o ferite.
............. Solo per Paesi UE
Non gettare le apparecchiature
elettriche o le batterie tra i rifiuti
domestici.
Secondo le Direttive Europee sui rifiuti
di apparecchiature elettriche ed
elettroniche, su batterie e accumulatori
e sui rifiuti di batterie e di accumulatori,
e la sua attuazione in conformità alle
norme nazionali, le apparecchiature
elettriche e le batterie esauste devono
essere raccolte separatamente, al fine
di essere riciclate in modo ecocompatibile.
Uso previsto
L’utensile è progettato per operazioni di fissaggio in lavori
interni e lavori di falegnameria.
L’utensile è destinato esclusivamente ad applicazioni
professionali per volumi elevati. Non utilizzarlo per altri
scopi di alcun genere. Non è progettato per applicare
elementi di fissaggio su superfici dure, quali acciaio e
calcestruzzo.
ENE073-3
29

Avvertenze di sicurezza relative
alla chiodatrice a gas
AVVERTENZA: Leggere tutte le avvertenze di
sicurezza e tutte le istruzioni. La mancata osservanza
delle avvertenze e delle istruzioni potrebbe risultare in
lesioni personali gravi, scosse elettriche e/o incendi.
Conservare tutte le avvertenze e le
istruzioni come riferimento futuro.
Per la sicurezza personale e il funzionamento e la
manutenzione corretti dell’utensile, leggere il presente
manuale d’uso prima di utilizzare l’utensile.
Sicurezza generale
1. Qualsiasi altro utilizzo eccettuato quello a cui è
destinato questo utensile è vietato. Gli utensili di
applicazione di elementi di fissaggio con
azionamento a contatto continuo o con
azionamento a contatto vanno utilizzati solo per
applicazioni di produzione.
2. Tenere le dita lontane dal grilletto quando non si
utilizza il presente utensile e quando si intende
passare da una posizione di utilizzo a un’altra.
3. Pericoli multipli. Leggere e comprendere le
istruzioni di sicurezza prima di collegare,
scollegare, caricare, utilizzare e sottoporre a
manutenzione l’utensile, nonché prima di
sostituire gli accessori o lavorare in prossimità
dell’utensile. La mancata osservanza di questa
indicazione potrebbe risultare in gravi lesioni
corporee.
4. Tenere tutte le parti del corpo, quali mani, gambe,
e così via, lontane dalla direzione di sparo, e
assicurare che l’elemento di fissaggio non possa
trapassare il pezzo in lavorazione penetrando in
parti del corpo.
5. Quando si utilizza l’utensile, tenere presente che
l’elemento di fissaggio potrebbe venire deviato e
causare lesioni personali.
6. Mantenere l’utensile con una presa salda ed
essere preparati a gestire un contraccolpo.
7. Solo operatori dotati di esperienza tecnica
dovrebbero utilizzare l’utensile di applicazione di
elementi di fissaggio.
8. Non modificare l’utensile di applicazione di
elementi di fissaggio. Le modifiche potrebbero
ridurre l’efficacia delle misure di sicurezza e
incrementare i rischi nei confronti dell’operatore e/
o degli astanti.
9. Non smaltire il manuale d’uso.
10. Non utilizzare un utensile qualora quest’ultimo sia
stato danneggiato.
11. Fare attenzione nel maneggiare i elementi di
fissaggio, specialmente quando nel caricarli e
scaricarli, in quanto i elementi di fissaggio hanno
delle punte acuminate che possono causare
lesioni personali.
12. Controllare sempre l’utensile prima dell’uso alla
ricerca di parti rotte, collegate male o usurate.
13. Non sporgersi. Utilizzare solo in un luogo di
lavoro sicuro. Mantenere una posizione corretta
sui piedi e l’equilibrio in qualsiasi momento.
30
ENB111-5
14. Tenere lontani gli astanti (quando si lavora in
un’area in cui sussiste la probabilità di traffico di
passaggio di persone). Contrassegnare in modo
chiaro l’area di utilizzo.
15. Non puntare mai l’utensile verso se stessi o altri.
16. Non tenere appoggiato il dito sul grilletto quando
si prende l’utensile, quando ci si sposta tra aree e
posizioni operative o quando si cammina, in
quanto l’appoggio del dito sul grilletto può portare
a un funzionamento accidentale. Per gli utensili
con azionamento selettivo, controllare sempre
l’utensile prima di utilizzarlo per verificare che la
modalità corretta sia selezionata.
17. Indossare solo guanti che forniscano una
sensibilità adeguata e un controllo sicuro dei
grilletti e di qualsiasi dispositivo di regolazione.
18. Quando si intende appoggiare l’utensile,
appoggiarlo sulla superficie piatta. Se si utilizza il
gancio in dotazione con l’utensile, agganciare
l’utensile saldamente a una superficie stabile.
19. Non utilizzare l’utensile sotto l’effetto di alcool,
droghe o simili.
Pericoli propulsivi
1. L’utensile per l’applicazione di elementi di
fissaggio va scollegato quando si intende
scaricare elementi di fissaggio, effettuare
regolazi
oni, elimi
accessori.
2. Durante il funzionamento, fare attenzione affinché
i elementi di fissaggio penetrino correttamente nel
materiale e non possano venire deviati o sparati
per errore verso l’operatore e/o eventuali astanti.
3. Durante il funzionamento, potrebbero venire
scaricati detriti dal pezzo in lavorazione e dal
sistema di fissaggio/raccolta.
4. Indossare sempre occhialoni protettivi per
proteggere gli occhi da lesioni personali, quando
si utilizzano utensili elettrici. Gli occhialoni
devono essere conformi allo standard ANSI Z87.1
negli Stati Uniti, allo standard EN 166 in Europa o
allo standard AS/NZS 1336 in Australia/Nuova
Zelanda. In Australia/Nuova Zelanda, è
obbligatorio per legge indossare anche una
visiera per proteggere il volto. (Fig. 1)
È responsabilità del datore di lavoro far rispettare
l’utilizzo delle attrezzature protettive di sicurezza
appropriate da parte degli operatori degli utensili e
di altre persone nell’area di lavoro e nelle
immediate vicinanze.
5. I rischi nei confronti di altre persone devono
essere valutati dall’operatore.
6. Fare attenzione agli utensili privi di elemento di
contatto con il pezzo in lavorazione, in quanto
possono sparare accidentalmente e causare
lesioni all’operatore e/o agli astanti.
7. Accertarsi che l’utensile sia sempre saldamente in
contatto con il pezzo in lavorazione e non possa
scivolare.
8. Indossare protezioni per l’udito, per proteggere le
orecchie dal rumore dello scarico, e una
protezione per la testa. Inoltre, indossare
indumenti leggeri ma non abbondanti. Le maniche
vanno abbottonate o arrotolate sul braccio. Non
indossare cravatte.
nare inceppamenti o sostituire

Pericoli d’uso
1. Mantenere correttamente l’utensile: prepararsi a
contrastare movimenti normali o improvvisi, ad
esempio i contraccolpi.
2. Mantenere una posizione del corpo bilanciata e
una posizione salda sui piedi.
3. È necessario utilizzare occhiali di protezione
appropriati, ed è consigliato l’utilizzo di guanti e
indumenti protettivi appropriati.
4. È necessario utilizzare protezioni per l’udito
appropriate.
5. Utilizzare la fonte di energia corretta, come
illustrato nel manuale d’uso.
6. Non utilizzare l’utensile su piattaforme mobili o sul
retro dei camion. Un movimento improvviso della
piattaforma potrebbe far perdere il controllo
dell’utensile e causare lesioni personali.
7. Dare sempre per scontato che l’utensile contenga
elementi di fissaggio.
8. Non affrettare il lavoro né forzare l’utensile.
Maneggiare l’utensile con attenzione.
9. Fare attenzione all’appoggio sui piedi e mantenere
l’equilibrio con l’utensile. Quando si intende
lavorare in ubicazioni elevate, accertarsi che non
siano presenti persone sotto di sé.
10. Sui tetti e su altre ubicazioni elevate, avvitare gli
elementi di fissaggio man mano che si procede in
avanti. È facile perdere l’appoggio con i piedi se si
avvitano gli elementi di fissaggio mentre si procede
poco a poco all’indietro. Quando si intende avvitare
elementi di fissaggio su una superficie perpendicolare,
lavorare dall’alto verso il basso. In tal modo è possibile
effettuare operazioni di avvitatura con uno sforzo
fisico minore.
11. Qualora per errore si avviti un elemento di
fissaggio al di sopra di un altro elemento di
fissaggio o si colpisca un nodo nel legno, un
elemento di fissaggio verrà piegato o l’utensile
potrebbe incepparsi. L’elemento di fissaggio
potrebbe venire scagliato via e colpire qualcuno,
oppure l’utensile stesso potrebbe reagire in modo
pericoloso. Posizionare gli elementi di fissaggio
con cura.
12. Non tentare mai di avvitare gli elementi di
fissaggio sia dall’interno che dall’esterno allo
stesso tempo. Gli elementi di fissaggio potrebbero
distruggere il materiale e/o volare via, costituendo un
grave pericolo.
Pericoli dovuti ai movimenti ripetuti
1. Quando si utilizza un utensile per periodi di tempo
prolungati, l’operatore potrebbe provare disagio
alle mani, alle braccia, alle spalle, al collo o in altre
parti del corpo.
2. Quando si utilizza un utensile, l’operatore
dovrebbe adottare una postura idonea ma
ergonomica. Mantenere un equilibrio saldo sui
piedi ed evitare posture innaturali o sbilanciate.
3. Qualora l’operatore provi sintomi quali disagi
persistenti o ricorrenti, dolori, palpitazioni,
dolenzie, formicolii, intorpidimenti, sensazioni di
bruciore o rigidità, non ignorare questi segni di
avvertimento. L’operatore dovrebbe consultare un
operatore sanitario qualificato relativamente alle
attività nel loro complesso.
4. L’uso continuo dell’utensile potrebbe causare
lesioni personali da tensione ripetuta, dovute al
contraccolpo prodotto dall’utensile.
5. Per evitare lesioni personali da sforzo ripetuto,
l’operatore non dovrebbe sporgersi
eccessivamente né applicare forza eccessiva.
Inoltre, l’operatore dovrebbe fare una pausa
quando avverte affaticamento.
6. Eseguire una valutazione dei rischi relativa ai
pericoli riguardanti i movimenti ripetitivi. Tale
valutazione dovrebbe concentrarsi sui disturbi
muscolo-scheletrici ed essere basata
preferibilmente sul presupposto che una riduzione
dell’affaticamento durante il lavoro sia efficace nel
rid
disturbi.
urre i
Pericoli relativi agli accessori e ai materiali di
consumo
1. Prima di cambiare o sostituire accessori, quali
l’elemento di contatto con il pezzo in lavorazione,
o di effettuare qualsiasi regolazione, rimuovere il
contenitore del gas e la batteria.
2. Utilizzare esclusivamente le dimensioni e i tipi di
accessori forniti dal produttore.
3. Utilizzare esclusivamente i lubrificanti consigliati
nel presente manuale.
Pericoli relativi al posto di lavoro
1. Scivolamenti, passi falsi e cadute sono cause
principali di lesioni personali sul posto di lavoro.
Fare attenzione alle superfici scivolose causate
dall’utilizzo dell’utensile e anche ai pericoli di
inciampare causati dal tubo flessibile del condotto
d’aria.
2. Procedere con ulteriore attenzione in ambienti
circostanti non familiari. Potrebbero essere
presenti pericoli nascosti, ad esempio linee
elettriche o di altri servizi pubblici.
3. Il presente utensile non è destinato all’uso in
atmosfere potenzialmente esplosive, e non è
isolato dall’entrare in contatto con l’energia
elettrica.
4. Accertarsi che non siano presenti cavi elettrici,
tubi del gas, e così via, che potrebbero causare un
pericolo qualora vengano danneggiati dall’utilizzo
dell’utensile.
5. Mantenere l’area di lavoro pulita e ben illuminata.
Aree di lavoro ingombre o buie favoriscono gli
incidenti.
6. Potrebbero sussistere normative locali da
rispettare relativamente al rumore, mantenendo i
livelli di rumore entro i limiti prescritti. In certi
casi, vanno utilizzate delle serrande per contenere
il rumore.
Pericoli relativi alle polveri e allo scarico
1. Controllare sempre l’ambiente circostante. Lo
scarico dall’utensile potrebbe soffiare polveri
oppure oggetti e colpire l’operatore e/o gli astanti.
2. Indirizzare lo scarico in modo da ridurre al minimo
i turbinii di polveri in ambienti pieni di polveri.
3. Qualora nell’area di lavoro vengano emesse
polveri oppure oggetti, ridurre al minimo tali
emissioni per quanto possibile, per ridurre i
pericoli relativi alla salute e il rischio di lesioni
personali.
31

Pericoli relativi al rumore
1. L’esposizione non protetta a livelli elevati di
rumore può causare perdite di udito permanenti e
invalidanti, nonché altri problemi quali il tinnito
(tintinnii, ronzii, o fischi nelle orecchie).
2. Eseguire una valutazione dei rischi relativa ai
pericoli riguardanti i rumori nell’area di lavoro e
implementare controlli appropriati relativi a tali
pericoli.
3. Controlli appropriati per ridurre il rischio
potrebbero includere azioni quali l’uso di materiali
fonoassorbenti per evitare che i pezzi in
lavorzione di lavoro producano suoni squillanti.
4. Utilizzare protezioni per l’udito appropriate.
5. Utilizzare e sottoporre a manutenzione l’utensile
come consigliato nelle presenti istruzioni, per
evitare un aumento non necessario dei livelli di
rumore.
6. Adottare delle misure per la riduzione dei rumori,
ad esempio il posizionamento dei pezzi in
lavorazione su supporti fonoassorbenti.
Pericoli relativi alle vibrazioni
1. L’emissione di vibrazioni durante l’uso dipende
dalla forza di impugnatura, dalla forza della
pressione di contatto, dalla direzione di lavoro,
dalla regolazione della fonte di energia, dal pezzo
in lavorazione e dal supporto del pezzo in
lavorazione. Eseguire una valutazione dei rischi
relativa ai pericoli riguardanti le vibrazioni e
implementare controlli appropriati relativi a tali
pericoli.
2. L’esposizione alle vibrazioni può causare danni
invalidanti ai nervi e alla circolazione del sangue
alle mani e alle braccia.
3. Indossare indumenti caldi quando si intende
lavorare in condizioni di freddo, e tenere le mani
calde e asciutte.
4. Qualora si avvertano intorpidimenti, formicolii,
dolori o sbiancamenti della pelle delle dita o delle
mani, cercare assistenza medica da parte di un
operatore sanitario specializzato in medicina del
lavoro relativamente alle attività nel loro
complesso.
5. Utilizzare e sottoporre a manutenzione l’utensile
come consigliato nelle presenti istruzioni, per
evitare un aumento non necessario dei livelli delle
vibrazioni.
6. Mantenere l’utensile con una presa leggera ma
salda, poiché il rischio dovuto alle vibrazioni in
genere aumenta quando la forza di impugnatura è
più elevata.
Istruzioni di sicurezza aggiuntive per gli utensili a gas
1. Utilizzare l’utensile esclusivamente con il
contenitore del gas originale Makita.
2. Fare attenzione quando si utilizzano utensili a gas,
in quanto l’utensile può diventare molto caldo,
influenzando l’impugnatura e il controllo.
3. Gli utensili a gas per l’applicazione di elementi di
fissaggio vanno utilizzati in spazi ventilati.
4. Qualora il gas combustibile liquido entri in
contatto con la pelle umana, potrebbero verificarsi
lesioni personali.
5. I contenitori del gas vanno contrassegnati in base
alle normative sui trasporti richieste.
6. Maneggiare con attenzione i contenitori del gas e
verificare l’eventuale presenza di danni.
Contenitori del gas danneggiati possono
esplodere e causare lesioni personali.
7. Leggere e attenersi alle istruzioni fornite in
dotazione con il contenitore del gas.
8. Accertarsi che materiali combustibili non vengano
esposti a gas di scarico molto caldi.
9. Non utilizzare utensili a gas in aree esplosive, in
quanto le scintille generate nell’utensile
potrebbero causare un incendio o un’esplosione.
10. I contenitori del gas non vanno conservati con
disattenzione o a temperature elevate. Attenersi
alle normative locali e alle istruzioni del
contenitore del gas per informazioni su come
maneggiare e smaltire contenitori del gas e
batterie o accumulatori.
11.
Per gli utensili a gas, una piccola emissione di gas
potrebbe venir
Uso e manutenzione degli strumenti a batterie
1. Ricaricare solo con il caricabatterie specificato dal
produttore. Un caricabatterie appropriato per un tipo
di batteria potrebbe creare un rischio di incendio, se
utilizzato con un’altra batteria.
2. Utilizzare gli utensili elettrici solo con le batterie
specificamente designate. L’uso di qualsiasi altra
batteria potrebbe creare un rischio di lesioni personali
e incendi.
3. Quando la batteria non è in uso, tenerla lontana da
altri oggetti metallici, quali graffette, monete,
chiavi, chiodi, viti o altri piccoli oggetti metallici,
che potrebbero fare contatto tra terminali diversi.
Il cortocircuito dei terminali della batteria può causare
ustioni o incendi.
4. In condizioni di uso improprio, la batteria potrebbe
emettere un liquido: evitare il contatto con tale
liquido. Qualora si verifichi un contatto
accidentale con il liquido, lavare
abbondantemente con acqua. Qualora il liquido
entri in contatto con gli occhi, richiedere anche
assistenza medica. Il liquido espulso dalla batteria
può causare irritazioni o ustioni.
5. Non utilizzare una batteria o un utensile che siano
danneggiati o che siano stati modificati. Batterie
danneggiate o modificate potrebbero mostrare un
comportamento imprevedibile che può risultare in
incendi, esplosioni o nel rischio di lesioni personali.
6. Non esporre una batteria o un utensile al fuoco o a
temperature eccessive. L’esposizione al fuoco o a
temperature superiori ai 130°C potrebbe causare
un’esplosione.
7. Attenersi a tutte le istruzioni relative alla carica e
non caricare la batteria o l’utensile al di fuori della
gamma di temperature specificata nelle istruzioni.
Una carica inappropriata o a temperature al di fuori
della gamma specificata potrebbe danneggiare la
batteria e incrementare il rischio di incendio.
Dispositivi di sicurezza
1. Accertarsi che tutti i sistemi di sicurezza siano
perfettamente funzionanti prima dell’uso. L’utensile
non deve attivarsi se si preme solo l’interruttore a
e generata
dalle normali operazioni.
32

grilletto o se si preme solo il braccio di contatto contro
il legno. L’utensile deve funzionare solo quando si
eseguono entrambe queste azioni. Verificare il
possibile funzionamento difettoso senza caricare gli
elementi di fissaggio e con il dispositivo di spinta in
posizione completamente tirata.
2. Il fissaggio del grilletto sulla posizione ACCESO è
estremamente pericoloso. Non tentare mai di fissare
il grilletto.
3. Non tentare di mantenere l’elemento di contatto
premuto con nastro o fil di ferro. In caso contrario,
sussiste il pericolo di morte o di gravi lesioni personali.
4. Controllare sempre l’elemento di contatto come
indicato nel presente manuale. Gli elementi di
fissaggio potrebbero venire avvitati accidentalmente,
qualora il meccanismo di sicurezza non funzioni
correttamente.
Assistenza
1. Effettuare la pulizia e la manutenzione subito dopo
aver terminato il lavoro. Mantenere l’utensile in
condizioni ottimali. Lubrificare le parti mobili per
evitare che si arrugginiscano e ridurre al minimo
l’usura relativa alla frizione. Pulire tutte le polveri dalle
parti.
2. Richiedere a un centro di assistenza autorizzato
Makita l’ispezione a intervalli regolari dell’utensile.
3. Per preservare la SICUREZZA e l’AFFIDABILITÀ
del prodotto, la manutenzione e la riparazione
vanno eseguite da parte di centri di assistenza
autorizzati Makita, utilizzando sempre pezzi di
ricambio Makita.
4. Attenersi alle normative locali quando si intende
smaltire l’utensile.
CONSERVARE LE PRESENTI
ISTRUZIONI.
AVVERTENZA: NON lasciare che comodità o la
familiarità d’utilizzo con il prodotto (acquisita con
l’uso ripetuto) sostituisca la stretta osservanza delle
norme di sicurezza per il prodotto in questione.
L’USO IMPROPRIO o la mancata osservanza delle
norme di sicurezza indicate nel presente manuale di
istruzioni potrebbero causare gravi lesioni personali.
ISTRUZIONI DI SICUREZZA
IMPORTANTI PER LA CARTUCCIA
DELLA BATTERIA
1. Prima di utilizzare la cartuccia della batteria,
leggere tutte le istruzioni e le avvertenze riportate
(1) sul caricabatteria, (2) sulla batteria e (3) sul
prodotto che utilizza la batteria.
2. Non smontare la cartuccia della batteria.
3. Qualora il tempo di utilizzo si riduca
eccessivamente, interrompere immediatamente
l’utilizzo dell’utensile. In caso contrario, si può
incorrere nel rischio di surriscaldamento, possibili
ustioni e persino un’esplosione.
4. Qualora l’elettrolita entri in contatto con gli occhi,
sciacquarli con acqua pulita e richiedere
ENC009-6
immediatamente assistenza medica. Questa
eventualità può risultare nella perdita della vista.
5. Non cortocircuitare la cartuccia della batteria:
(1) Non toccare i terminali con alcun materiale
conduttivo.
(2) Evitare di conservare la cartuccia della
batteria in un contenitore insieme ad altri
oggetti metallici quali chiodi, monete, e così
via.
(3) Non esporre la cartuccia della batteria
all’acqua o alla pioggia.
Un cortocircuito della batteria può causare un
grande flusso di corrente, un surriscaldamento,
possibili ustioni e persino un guasto.
6. Non conservare l’utensile e la cartuccia della
batteria in ubicazioni in cui la temperatura possa
raggiungere o superare i 50°C.
7. Non incenerire la cartuccia della batteria anche
qualora sia gravemente danneggiata o
completamente esaurita. La cartuccia della
batteria può esplodere se a contatto con il fuoco.
8. Fare attenzione a non far cadere e a non colpire la
batteria.
9. Non utilizzare una batteria danneggiata.
10. Le batterie a ioni di litio contenute sono soggette
ai requisiti del regolamento sul trasporto di merci
pericolose (Dangerous Goods Legislation).
Per trasporti commerciali, ad esempio da parte di terzi
o spedizionieri, è necessario osservare dei requisiti
speciali sull’imballaggio e sull’etichetta.
Per la preparazione dell’articolo da spedire, è richiesta
la consulenza di un esperto in materiali pericolosi.
Attenersi anche alle normative nazionali, che
potrebbero essere più dettagliate.
Nastrare o coprire i contatti aperti e imballare la
batteria in modo tale che non si possa muovere
liberamente all’interno dell’imballaggio.
11. Quando si intende smaltire la cartuccia della
batteria, rimuoverla dall’utensile e smaltirla in un
luogo sicuro. Attenersi alle normative locali
relative allo smaltimento della batteria.
12. Utilizzare le batterie esclusivamente con i prodotti
specificati da Makita. L’installazione delle batterie in
prodotti non compatibili potrebbe risultare in incendi,
calore eccessivo, esplosioni o perdite di liquido
elettrolitico.
13. Se l’utensile non viene utilizzato per un periodo di
tempo prolungato, la batteria deve essere rimossa
dall’utensile.
CONSERVARE LE PRESENTI
ISTRUZIONI.
ATTENZIONE: Utilizzare solo batterie originali
Makita. L’utilizzo di batterie Makita non originali, o di
batterie che siano state alterate, potrebbe risultare nello
scoppio della batteria, causando incendi, lesioni personali
e danni. Inoltre, ciò potrebbe invalidare la garanzia Makita
per l’utensile e il caricabatterie Makita.
33

Suggerimenti per preservare la durata
massima della batteria
1. Caricare la cartuccia della batteria prima che si
scarichi completamente. Smettere sempre di
utilizzare l’utensile e caricare la cartuccia della
batteria quando si nota che la potenza
dell’utensile è diminuita.
2. Non ricaricare mai una cartuccia della batteria
completamente carica. La sovraccarica riduce la
vita utile della batteria.
3. Caricare la cartuccia della batteria a una
temperatura ambiente compresa tra 10°C e 40°C.
Lasciar raffreddare una cartuccia della batteria
prima di caricarla.
Informazioni generali sulla
chiodatrice (Fig. 2)
Cella a combustibile
Collegamento della valvola di misurazione alla cella a
combustibile (Fig. 6)
Rimuovere il coperchio (se la valvola di misurazione ne è
provvista). (Fig. 7)
Spingere dentro l’estremità anteriore. (Fig. 8)
Spingere dentro l’estremità posteriore finché questa non
scivola in posizione.
Inserimento della cella a combustibile (Fig. 9)
Per aprire, spingere verso l’alto e tirare il copricella.
(Fig. 10)
Inserire la cella a combustibile dirigendo l’ugello della
valvola di misurazione verso l’adattatore. (Fig. 11)
Inserire correttamente l’ugello nel piccolo foro
dell’adattatore. (Fig. 12)
Disporre il copricella sulla valvola di misurazione e
spingerlo in basso per chiuderlo.
DESCRIZIONE FUNZIONALE
ATTENZIONE:
• Prima di regolare o controllare il funzionamento
dell’utensile, rimuovere la cella a combustibile, la
batteria e i chiodi.
Inserimento e rimozione della batteria
ATTENZIONE:
• Prima di installare o rimuovere la batteria, spegnere
sempre l’utensile.
• Tenere saldamente l’utensile e la batteria durante
l’inserimento o la rimozione della batteria. In caso
contrario potrebbero scivolare dalle mani, con
conseguenti danni all’utensile, alla batteria o lesioni
personali. (Fig. 3)
Per installare la batteria, tenerla in modo tale che la sua
forma anteriore si adatti a quella dell’apertura per
l’installazione della batteria e scivoli in posizione. Inserire
a fondo la batteria fino a bloccarla in posizione con un
piccolo scatto. (Fig. 4)
Per rimuovere la batteria, estrarla dall’utensile premendo i
pulsanti sul lato della batteria, come illustrato in figura.
ATTENZIONE:
• Inserire la batteria completamente fino a bloccarla in
posizione con uno scatto. In caso contrario potrebbe
fuoriuscire accidentalmente dall’utensile e provocare
danni all’operatore o a eventuali osservatori.
• Non inserire la batteria a forza. Se la batteria non
scorre agevolmente, la manovra di inserimento non è
corretta.
Accensione della lampada
ATTENZIONE:
• Non osservare direttamente la luce o la sorgente
luminosa. (Fig. 5)
• Per accendere la lampada, premere l’apposito
pulsante. Per spegnere la lampada, premere di nuovo
l’apposito pulsante.
Regolazione della profondità di
chiodatura
ATTENZIONE:
• Prima di regolare la profondità di chiodatura rimuovere
la cella a combustibile, la batteria e i chiodi. (Fig. 13)
Ruotare il regolatore in direzione A come mostrato in
figura per ottenere una profondità minore. Ruotare il
regolatore in direzione B per ottenere una profondità
maggiore. Non ruotare troppo il regolatore, altrimenti
l’elemento di contatto potrebbe staccarsi dal regolatore o
incepparsi.
Spia luminosa
Il colore della spia luminosa ha il seguente significato.
Verde lampeggiante: stato normale
Rosso lampeggiante: la batteria deve essere ricaricata
Rosso: ricaricare la batteria. Non è possibile eseguire la
chiodatura per mancanza di carica della batteria.
Arancione lampeggiante: Si raccomanda una pulizia
accurata. Far riferimento alla sezione “MANUTENZIONE”
per una pulizia accurata all’interno dell’utensile. Per
interrompere l’arancione lampeggiante della spia
luminosa, spingere l’elemento di contatto per cinque
secondi, poi spingerlo per cinque volte.
Arancione lampeggiante dopo verde e rosso
lampeggianti alternativamente: è in corso la ricerca di
guasti. Per ripristinare, estrarre e reinserire la batteria. Se
viene di nuovo avviata la ricerca di guasti, si tratta di una
condizione di malfunzionamento. Rivolgersi al centro di
assistenza Makita di zona per la riparazione.
Installazione del gancio (Fig. 14)
Il gancio è utile per appendere temporaneamente
l’utensile. Si può installare su entrambi i lati dell’utensile.
Si può rimuovere senza utilizzare nessuno strumento.
Per installare il gancio, allargare la parte superiore del
gancio e inserirlo nell’utensile. Per rimuovere il gancio,
allargare la parte superiore del gancio in entrambe le
direzioni ed estrarlo dall’utensile.
34

MONTAGGIO
ATTENZIONE:
• Rimuovere sempre il copricella e la batteria prima di
eseguire qualsiasi operazione sull’utensile.
Caricamento della chiodatrice (Fig. 15)
Inserire un nastro di chiodi nella fessura posteriore dello
scomparto. (Fig. 16)
Tirare la leva del dispositivo di spinta e premere il
pulsante a pressione fino a raggiungere l’estremità
posteriore dello scomparto, quindi rilasciare il pulsante a
pressione e riposizionare delicatamente la leva del
dispositivo di spinta alla fine del nastro.
Rimozione dei chiodi (Fig. 17)
Tirale la lev a del d ispos itivo di spi nta e premere il pulsant e
a pressione per rilasciare il supporto dei chiodi, quindi
riportare in alto la leva del dispositivo di spinta tenendo
premuto il pulsante a pressione.
Far scorrere i chiodi verso l’estremità posteriore dello
scomparto e rimuoverli.
Adattatore esterno (Fig. 18)
L’adattatore esterno previene graffi e danneggiamenti
sulla superficie del pezzo. Posizionare correttamente
l’adattatore esterno.
Quando non è utilizzato, conservare l’adattatore esterno
in un luogo sicuro. La posizione di stoccaggio è sui lati
inferiori dell’utensile. (Fig. 19)
Adattatore per chiodi piccoli (Fig. 20 e 21)
Fissare l’adattatore per chiodi piccoli in modo da evitare
l’inceppamento dei chiodi con dimensioni inferiori a
25 mm (1’’).
Inserire l’adattatore per chiodi piccoli nella fessura
posteriore dello scomparto, quindi fissare l’adattatore
stringendo il bullone.
USO
AVVERTENZA:
• Non toccare l’area dell’apertura di ventilazione. La
superficie diventa molto calda durante o dopo il
funzionamento. Toccare l’area intorno all’apertura di
ventilazione potrebbe causare ustioni o ferite.
ATTENZIONE:
• Accertarsi che tutti i sistemi di sicurezza funzionino
correttamente prima dell’uso.
Controllo del funzionamento corretto
prima dell’uso
Prima dell’uso, controllare sempre i punti seguenti.
– Accertarsi che l’utensile non si attivi mediante la sola
installazione della cartuccia della batteria e del
contenitore del gas.
– Accertarsi che l’utensile non funzioni mediante la sola
pressione del grilletto.
– Accertarsi che l’utensile non funzioni mediante il solo
appoggio dell’elemento di contatto contro il pezzo in
lavorazione senza aver premuto il grilletto.
– Accertarsi che l’utensile non funzioni quando si preme
prima il grilletto e poi si appoggia l’elemento di contatto
contro il pezzo in lavorazione.
Applicazione dei chiodi (Fig. 22)
1. Per inserire un chiodo, disporre l’elemento di contatto
contro il pezzo.
Il motore della ventola viene attivato, il gas viene iniettato
nella camera di combustione e miscelato con l’aria dalla
ventola. (Fig. 23)
2. Premere con forza l’elemento di contatto e premere il
grilletto.
Il gas viene bruciato, espellendo il chiodo.
3. Per attivare un’altra espulsione occorre rilasciare sia
l’elemento di contatto che il grilletto.
Meccanismo contro l’azionamento in
bianco
Questo meccanismo evita l’azionamento a vuoto quando
l’utensile è privo di chiodi.
La prevenzione contro il funzionamento a vuoto entra
automaticamente in funzione quando rimangono 9-11
chiodi.
Inceppamento della chiodatrice
AVVERTENZA:
• Prima di rimuovere un inceppamento rimuovere
sempre la cella a combustibile e la batteria.
ATTENZIONE:
• Non utilizzare chiodi deformati o nastri di chiodi. In
caso contrario si potrebbe verificare un’alimentazione
insufficiente dei chiodi.
Seguire la procedura di rimozione dei chiodi e rimuovere i
chiodi nello scomparto. (Fig. 24)
Aprire il dispositivo di chiusura e rilasciare lo sportello,
quindi rimuovere il chiodo inceppato.
MANUTENZIONE
ATTENZIONE:
• Prima di ogni controllo o manutenzione rimuovere
sempre la cella a combustibile, la batteria e i chiodi.
• Evitare assolutamente di usare benzina, diluenti,
solventi, alcol o sostanze simili. In caso contrario,
potrebbero verificarsi scoloriture, deformazioni o
incrinature.
Manutenzione giornaliera.
Prima dell’uso, controllare sempre la condizione generale
dell’utensile e l’eventuale presenza di viti allentate.
Serrare queste ultime, se necessario.
Alla fine dell’uso giornaliero occorre svolgere le normali
operazioni di manutenzione giornaliera.
Questi semplici passi contribuiscono a preservare la
sicurezza e il rendimento dell’utensile.
Prima di lasciare il luogo di lavoro:
• Rimuovere la batteria e riporla in una custodia per
l’utensile. Utilizzare sempre la custodia per il trasporto
e lo stoccaggio dell’utensile.
• Smaltire tutte le celle vuote, rotte, forate o bruciate in
punti non accessibili ai bambini.
35

Arrivati a casa:
• Inserire la batteria nel caricabatteria se la spia rossa
indica un basso livello di carica.
• Strofinare l’utensile con un panno morbido e pulito.
• Ispezionare il filtro e pulirlo se presenta residui di
polvere.
Pulizia del filtro dell’aria (Fig. 25 e 26)
Premere leggermente verso l’alto il coperchio del filtro e
rimuoverlo, quindi estrarre il filtro.
Scuotere leggermente il filtro per rimuovere le impurità. Il
filtro viene riportato quasi a nuovo con acqua e sapone.
Per preservare la SICUREZZA e l’AFFIDABILITÀ del
prodotto, qualsiasi riparazione o intervento di
manutenzione e regolazione deve essere eseguito dai
centri assistenza autorizzati Makita utilizzando sempre
ricambi Makita originali.
Pulizia accurata
Se si verificano funzionamenti a vuoto frequenti, l’utensile
deve essere pulito con cura.
Per ulteriori dettagli e per eseguire la pulizia, consultare
l’apposita guida.
Per ogni dubbio riguardo la pulizia, si prega di rivolgersi al
centro di assistenza Makita di zona.
ACCESSORI OPZIONALI
ATTENZIONE:
• Si consiglia l’uso dei seguenti accessori per l’utensile
Makita descritto in questo manuale. L’uso di qualsiasi
altro accessorio potrebbe provocare lesioni personali.
Utilizzare gli accessori esclusivamente per l’uso
dichiarato.
Per l’assistenza e per ulteriori informazioni su tali
accessori, rivolgersi al centro assistenza Makita di zona.
• Chiodi
• Occhiali di sicurezza
• Cella a combustibile
• Kit di pulizia
• Batteria e caricabatteria originali Makita
NOTA:
• Alcuni degli accessori elencati potrebbero essere
inclusi nella confezione dell’utensile come accessori
standard. Gli accessori standard possono differire da
paese a paese.
Rumore
Il tipico livello di rumore ponderato A è determinato in
conformità alla norma EN ISO 11148-13:
Livello di pressione sonora (L
Livello di potenza sonora (L
Variazione (K): 3 dB (A)
): 93 dB (A)
pA
): 106 dB (A)
WA
Indossare una protezione acustica.
Vibrazioni
Il valore totale delle vibrazioni è determinato in conformità
alla norma EN ISO 11148-13:
Emissione di vibrazioni (a
Variazione (K): 1,5 m/s
h
2
): 3,5 m/s
• Il valore di emissione delle vibrazioni dichiarato è stato
misurato in conformità con il metodo di test standard e
può essere utilizzato per confrontare tra loro diversi
utensili.
36
ENG905-1
ENG904-2
2
ENG901-1
• Il valore dell’emissione delle vibrazioni dichiarato può
anche essere usato per stime preliminari
dell’esposizione.
AVVERTENZA:
• L’emissione delle vibrazioni durante l’uso effettivo
dell’utensile elettrico può risultare diversa rispetto al
valore dichiarato, in base alla modalità d’uso
dell’utensile.
• Assicurarsi di individuare le necessarie misure di
sicurezza per proteggere l’operatore in base a una
stima dell’esposizione nelle condizioni reali di utilizzo
(prendendo in considerazione tutte le fasi del ciclo
operativo, come quante volte l’utensile viene spento e i
periodi in cui rimane inattivo, oltre al tempo di
avviamento).
Dichiarazione di conformità CE
Solo per i paesi europei
La dichiarazione di conformità CE è inclusa nell’Allegato
A di questo manuale di istruzioni.

NEDERLANDS (Originele instructies)
Cd
Ni-MH
Li-ion
Verklaring van het onderdelenoverzicht
1. Accu
2. Deksel van brandstofpatroon
3. Trekker
4. Indicatorlampje
5. Aandrukkerknop
6. Aandrukkerhendel
7. Magazijn
8. Contactschoen
9. Lampje
10. Luchtuitlaatopening
11. Knop
12. Lampknop
13. Meetklep
14. Dop
15. Spuitmond
16. Stelknop
17. Haak
18. Neusadapter
19. Korte-nageladapter
20. Bout
21. Vergrendeling
22. Nagelgeleiderplaat
23. Filterkap
24. Luchtfilter
TECHNISCHE GEGEVENS
Model GF600
Nagellengte Nagelmaat 16Ga: 15 mm - 65 mm
Nagelcapaciteit 100 nagels (2 strip)
Afmetingen (l x b x h) 266 mm x 90 mm x 305 mm
Nettogewicht 2,2 kg
Nominale spanning 7,2 V gelijkstroom
• Als gevolg van ons doorlopende onderzoeks- en ontwikkelingsprogramma, zijn de technische gegevens van dit
gereedschap onderhevig aan veranderingen zonder voorafgaande kennisgeving.
• Specificaties en accu’s kunnen van land tot land verschillen.
Symbolen
Hieronder staan de symbolen die voor het gereedschap
worden gebruikt. Zorg ervoor dat u weet wat ze
betekenen alvorens de accu te gebruiken.
...... Lees de gebruiksaanwijzing.
.................. De houder staat onder druk. Houd deze
................. Gebruik alleen buiten of in een goed
................. Gebruik niet in de buurt van open vuur
................. Ook na gebruik mag u de houder niet
................... Houd uw vingers uit de buurt van de
uit de buurt van temperaturen hoger
dan 50°C (bijv. zonnestralen). Bewaar
de houder in een goed geventileerde
ruimte.
geventileerde ruimte. Adem het gas
niet in.
of spuitvloeistoffen op warme
oppervlakken. Tijdens het gebruik kan
een brandbaar of explosief dampluchtmengsel worden gevormd.
beschadigen, doorboren of verbranden.
.......... Draag een veiligheidsbril
.......... Draag gehoorbescherming.
trekker wanneer u niet wilt nagelen om
het per ongeluk afschieten van nagels
te voorkomen.
END107-8
.................Gebruik uitsluitend op geventileerde
plaatsen om misselijkheid en
flauwvallen te voorkomen. Gebruik het
gereedschap nooit in een omgeving
met brandbare materialen. De uitlaat
van het gereedschap kan de brandbare
materialen doen ontbranden.
...................Gebruik het gereedschap niet op een
steiger of ladder.
................... Waarschuwing: heet oppervlak!
Raak het gereedschap niet aan rond dit
symbool. Door het oppervlak aan te
raken kunnen brandwonden ontstaan.
............. Alleen voor EU-landen
Geef elektrisch gereedschap en accu’s
niet met het huisvuil mee!
Volgens de Europese richtlijn inzake
oude elektrische en elektronische
apparaten, en inzake batterijen en
accu’s en oude batterijen en accu’s, en
de toepassing daarvan binnen de
nationale wetgeving, dienen elektrisch
gereedschap, accu’s en batterijen die
het einde van hun levensduur hebben
bereikt, gescheiden te worden
ingezameld en te worden afgevoerd
naar een recyclebedrijf dat voldoet aan
de geldende milieu-eisen.
Gebruiksdoeleinden
Dit gereedschap is bedoeld voor bevestigingen bij
werkzaamheden binnenshuis en aan meubilair.
Het gereedschap is uitsluitend bedoeld voor professionele
toepassingen met hoge volumes. Gebruik het niet voor
enig ander doel. Het is niet bedoeld om
bevestigingsmiddelen in een hard oppervlak, zoals staal
of beton, te schieten.
ENE073-3
37

Veiligheidswaarschuwingen voor
een gasnagelpistool
WAARSCHUWING: Lees alle
veiligheidswaarschuwingen en alle instructies. Het
niet volgen van de waarschuwingen en instructies kan
leiden tot elektrische schokken, brand en/of ernstig letsel.
Bewaar alle waarschuwingen en
instructies om in de toekomst te kunnen
raadplegen.
Omwille van uw persoonlijke veiligheid en de juiste
werking en onderhoud van het gereedschap, leest u deze
gebruiksaanwijzing alvorens het gereedschap te
gebruiken.
Algemene veiligheidswaarschuwingen
1. Al het overige gebruik buiten het beoogde gebruik
van dit gereedschap is verboden.
Gereedschappen die bevestigingsmiddelen
aanbrengen door middel van continu herhaaldelijk
schieten of herhaaldelijk schieten mogen
uitsluitend worden gebruikt in
productietoepassingen.
2. Houd uw vingers uit de buurt van de trekker
wanneer u het gereedschap niet gebruikt en
wanneer u het verplaatst van de ene werkplek naar
de andere.
3. Meerdere gevaren. U moet de
veiligheidsinstructies lezen en begrijpen voordat u
het gereedschap aansluit, loskoppelt, laadt,
bedient, onderhoudt, van accessoires voorziet of
in de buurt ervan werkt. Als u dit niet doet, kan dat
leiden tot ernstig lichamelijk letsel.
4. Houd alle lichaamsdelen, zoals handen, benen,
enz., uit de schietrichting en verzeker u ervan dat
het bevestigingsmiddel niet door het werkstuk
heen in een lichaamsdeel kan schieten.
5. Wees bij gebruik van het gereedschap erop
bedacht dat het bevestigingsmiddel kan afketsen
en letsel kan veroorzaken.
6. Houd het gereedschap stevig vast en wees
voorbereid om de terugslag op te vangen.
7. Alleen vakbekwame gebruikers mogen het
bevestigingsgreedschap bedienen.
8. Wijzig het bevestigingsgreedschap niet.
Wijzigingen kunnen de effectiviteit van de
veiligheidsvoorzieningen verlagen en de risico’s
voor de gebruiker en/of omstanders vergroten.
9. Gooi de gebruiksaanwijzing niet weg.
10. Gebruik het gereedschap niet als het gereedschap
beschadigd is.
11. Wees voorzichtig bij het hanteren van de
bevestigingsmiddelen, met name bij het laden en
verwijderen, omdat de bevestigingsmiddelen
scherpe punten hebben die letsel kunnen
veroorzaken.
12. Controleer het gereedschap altijd vóór gebruik op
kapotte, verkeerd aangesloten of versleten
onderdelen.
13. Reik niet te ver. Gebruik uitsluitend op een veilige
werkplek. Zorg altijd voor een stevige stand en
goede lichaamsbalans.
ENB111-5
14. Houd omstanders uit de buurt (bij het werken op
een plaats waar waarschijnlijk mensen voorbij
komen). Zet uw werkgebied duidelijk af.
15. Richt het gereedschap nooit op uzelf of anderen.
16. Plaats uw vinger nooit om de trekker wanneer u
het gereedschap oppakt, wanneer u naar een
andere werkplek of -positie gaat, en wanneer u
met het gereedschap loopt omdat de vinger om de
trekker tot onbedoelde bediening van het
gereedschap kan leiden. Voor gereedschappen
waarop de bedieningsfunctie kan worden
gekozen, controleert u altijd het gereedschap vóór
gebruik om er zeker van te zijn dat de correcte
bedieningsfunctie is gekozen.
17. Draag uitsluitend handschoenen die voldoende
gevoel en een veilige bediening van de trekker en
alle afstelmogelijkheden bieden.
18. Als u het gereedschap neerlegt, legt u het neer op
een vlakke ondergrond. Als u de haak van het
gereedschap gebruikt, hangt u het gereedschap
veilig op een stabiel oppervlak op.
19. Bedien het gereedschap niet onder invloed van
alcohol, drugs en dergelijke.
Gevaren door projectielen
1. Het bevestigingsgereedschap moet worden
losgekoppeld wanneer bevestigingsmiddelen
worden verwijderd, afstellingen worden gemaakt,
vastgelopen bevestigingsmiddelen worden
verwijderd en accessoires worden verwisseld.
2. Let er tijdens gebruik op dat de
bevestigingsmiddelen het materiaal correct
penetreren en niet kunnen afketsen of per ongeluk
in de richting van de gebruiker en/of omstanders
worden geschoten.
3.
Tijdens gebruik kan afval vanaf het werkstuk en
het
bevesti
weggeworpen.
4. Draag tijdens het gebruik van elektrisch
gereedschap altijd een veiligheidsbril om uw ogen
te beschermen tegen letsel. De bril moet voldoen
aan ANSI Z87.1 in de Verenigde Staten, aan EN 166
in Europa, en aan AS/NZS 1336 in Australië en
Nieuw-Zeeland. In Australië en Nieuw-Zeeland is
het wettelijk verplicht om tevens een spatscherm
te dragen om uw gezicht te beschermen. (zie
afb. 1)
Het is de verantwoordelijkheid van de werkgever
om ervoor te zorgen dat geschikte
beschermingsmiddelen gebruikt worden door de
gebruikers van het gereedschap en anderen in de
onmiddellijke omgeving van de werkplek.
5. De risico’s voor anderen moeten worden
beoordeeld door de gebruiker.
6. Wees voorzichtig met gereedschappen zonder
contactschoen omdat deze onbedoeld kunnen
worden afgeschoten en letsel kunnen veroorzaken
bij de gebruiker en/of omstanders.
7. Zorg er altijd voor dat het gereedschap veilig op
het werkstuk is geplaatst en niet kan wegglijden.
8. Draag gehoorbescherming om uw oren te
beschermen tegen het uitlaatgeluid en draag
hoofdbescherming. Draag tevens lichte maar geen
losse kleding. Manchetten moeten dichtgeknoopt
gings-/verzamelsysteem worden
38

zijn of de mouwen moeten worden opgerold.
Draag geen stropdas.
Gevaren bij gebruik
1. Houd het gereedschap correct vast: wees
voorbereid om normale of plotselinge
bewegingen, zoals terugslag, op te vangen.
2. Zorg voor een goede lichaamsbalans en stevige
stand.
3. Een geschikte veiligheidsbril moet worden
gebruikt en geschikte handschoenen en
beschermende kleding worden aanbevolen.
4. Geschikte gehoorbescherming moet worden
gedragen.
5. Gebruik de correcte voeding, zoals beschreven in
de gebruiksaanwijzing.
6. Gebruik het gereedschap niet op bewegende
platformen of in de laadruimte van vrachtwagens.
Door een plotselinge beweging van het platform kunt u
de controle over het gereedschap verliezen en kan
letsel worden veroorzaakt.
7. Ga er altijd vanuit dat in het gereedschap
bevestigingsmiddelen zitten.
8. Werk niet gehaast en forceer het gereedschap
niet. Hanteer het gereedschap voorzichtig.
9. Zorg ervoor dat u tijdens het gebruik van het
gereedschap stevig staat en uw evenwicht goed
bewaart. Controleer of er zich niemand beneden u
bevindt wanneer u op hoge plaatsen gaat werken.
10. Op daken en andere hoge plaatsen schroeft u
bevestigingsmiddelen erin terwijl u voorwaarts
beweegt. U glijdt gemakkelijk weg als u
bevestigingsmiddelen erin schroeft terwijl u
achterwaarts kruipt. Als u bevestigingsmiddelen in
een rechtopstaande ondergrond schroeft, werkt u van
boven naar beneden. U kunt op deze manier
schroeven zonder snel vermoeid te raken.
11. Een bevestigingsmiddel zal krom gaan of het
gereedschap kan vastlopen als u per ongeluk
bovenop een ander bevestigingsmiddel of in een
knoest in het hout schroeft. Het
bevestigingsmiddel kan wegschieten en iemand
raken, of het gereedschap zelf kan gevaarlijk
terugslaan. Kies de plaats voor het
bevestigingsmiddel met zorg.
12. Probeer nooit tegelijkertijd van binnenuit en van
buitenaf bevestigingsmiddelen erin te schroeven.
De bevestigingsmiddelen kunnen er dwars doorheen
schieten of afketsen en een groot gevaar opleveren.
Gevaren door herhalende bedieningen
1. Wanneer een gereedschap gedurende een lange
tijd wordt gebruikt, kan de gebruiker een
oncomfortabel gevoel ervaren in de handen,
armen, schouders, nek of andere lichaamsdelen.
2. Bij gebruik van een gereedschap moet de
gebruiker een geschikte en ergonomische
houding aannemen. Zorg ervoor dat u stevig staat
en vermijd lastige en ongebalanceerde houdingen.
3. Als de gebruiker symptomen ervaart, zoals
aanhoudende of terugkerende ongemakken, pijn,
kloppingen, tintelen, gevoelloosheid, brandend
gevoel of stijfheid, mag u deze tekenen niet
negeren. De gebruiker dient een vakbekwame
zorgmedewerker te raadplegen aangaande zijn
algemene activiteiten.
4. Het ononderbroken gebruik van het gereedschap
kan leiden tot RSI (Repetitive Strain Injury) als
gevolg van de terugslag van het gereedschap.
5. Om RSI (Repetitive Strain Injury) te voorkomen,
mag de gebruiker niet te ver reiken of
buitensporige kracht uitoefenen. Bovendien moet
de gebruiker rusten wanneer hij/zij zich moe voelt.
6. Voer een risicobeoordeling uit met betrekking tot
het gevaar van zich herhalende bewegingen. Deze
moet zich richten op skelet-spieraandoeningen en
dient bij voorkeur te zijn gebaseerd op de
aanname dat een afname van de vermoeidheid
t
ens het werken effectief is in het verminderen
ijd
van de aandoeningen.
Gevaren door accessoires en verbruiksartikelen
1. Verwijder de gaspatroon en accu alvorens
accessoires zoals de contactschoen te
verwisselen/vervangen, of het gereedschap af te
stellen.
2. Gebruik uitsluitend de grootte en het type
accessoires die door de fabrikant worden
geleverd.
3. Gebruik uitsluitend smeermiddelen aanbevolen in
deze handleiding.
Gevaren door de werkplek
1. Uitglijden, struikelen en vallen zijn de
hoofdoorzaken van letsel op de werkplek. Wees
bedacht op gladde oppervlakken veroorzaakt door
het gebruik van het gereedschap en tevens op
struikelgevaar veroorzaakt door de
persluchtslang.
2. Wees extra voorzichtig in een onbekende
omgeving. Er kunnen verborgen gevaren zijn,
zoals elektriciteits- of andere nutsleidingen.
3. Dit gereedschap is niet voor gebruik in
omgevingen met explosiegevaar en is niet
geïsoleerd tegen aanraking van stroomvoerende
kabels.
4. Verzeker u ervan dat er geen elektriciteitskabels,
gasleidingen, enz. zijn die een gevaarlijke situatie
zouden kunnen veroorzaken als ze worden
beschadigd door het gebruik van dit gereedschap.
5. Houd uw werkplek schoon en zorg voor goede
verlichting. Op een rommelige of donkere werkplek
gebeuren vaker ongevallen.
6. Er kunnen plaatselijk regels gelden met betrekking
tot geluid, waaraan u zich dient te houden door de
geluidsproductie onder het voorgeschreven
niveau te houden. In bepaalde gevallen moeten
geluidsschermen worden gebruikt om het
geluidsniveau te beperken.
Gevaren door stof en uitlaatgassen
1. Controleer altijd de omgeving. De uitlaat van het
gereedschap kan stof of voorwerpen wegblazen
die de gebruiker en/of omstanders kunnen raken.
2. Richt de uitlaat zodanig dat in een zeer stoffige
omgeving het opwerpen van stof minimaal is.
3. Als stof of voorwerpen worden uitgestoten in de
werkomgeving, vermindert u de uitstoot zo veel
mogelijk om de gezondheidsrisico’s en kans op
letsel te verkleinen.
39

Gevaren door geluid
1. Onbeschermde blootstelling aan hoge
geluidsniveaus kan leiden tot permanente en
onherstelbare gehoorschade en andere
problemen zoals tinnitus (sis-, fluit-, brom- of
pieptonen in het oor).
2. Voer een risicobeoordeling uit met betrekking tot
gevaren door geluid op de werkplek en tref
geschikte beheersmaatregelen voor deze gevaren.
3. Geschikte methoden om het risico te verkleinen
zijn onder andere het gebruik van
dempingsmaterialen die voorkomen dat
werkstukken ‘meezingen’.
4. Gebruik geschikte gehoorbescherming.
5. Bedien en onderhoud het gereedschap zoals
aanbevolen in deze instructies om een onnodige
toename van het geluidsniveau te voorkomen.
6. Tref geluidsverminderende maatregelen,
bijvoorbeeld door het werkstuk op
geluiddempende ondersteuning te plaatsen.
Gevaren door trillingen
1. De trillingsemissie tijdens gebruik is afhankelijk
van de grijpkracht, de contactdruk, de
werkrichting, de afstelling van de voeding, het
werkstuk en de ondersteuning van het werkstuk.
Voer een risicobeoordeling uit met betrekking tot
gevaren door trillingen en tref geschikte
beheersmaatregelen voor deze gevaren.
2. Blootstelling aan trillingen kan onherstelbare
schade aanrichten aan de zenuwen en bloedvaten
van de handen en armen.
3. Draag warme kleding tijdens het werken onder
koude omstandigheden, en houd uw handen warm
en droog.
4. U kunt gevoelloosheid, tintelen, pijn of verdroging
van de huid van uw vingers of handen ervaren.
Vraag een vakbekwame bedrijfsarts om medisch
advies aangaande uw algemene activiteiten.
5. Bedien en onderhoud het gereedschap zoals
aanbevolen in deze instructies om een onnodige
toename van de trillingsniveaus te voorkomen.
6. Houd het gereedschap vast met een lichte, maar
veilige greep omdat het risico door trillingen
doorgaans groter is wanneer de grijpkracht hoger
is.
Aanvullende veiligheidsinstructies voor
gasgereedschappen
1. Gebruik het gereedschap uitsluitend met een
originele gaspatroon van Makita.
2. Wees voorzichtig bij het gebruik van
gasgereedschappen aangezien het gereedschap
heet kan worden waardoor de grip en controle
kunnen afnemen.
3. Een gasgereedschap dat bevestigingsmiddelen
schiet, moet worden gebruikt in een geventileerde
ruimte.
4. In het geval dat vloeibaar brandbaar gas in
aanraking komt met de menselijke huid, kan letsel
optreden.
5. Gaspatronen moeten zijn gemarkeerd conform de
vereiste transportvoorschriften.
6. Hanteer gaspatronen voorzichtig en controleer ze
op beschadigingen. Beschadigde gaspatronen
kunnen exploderen en letsel veroorzaken.
7. Lees en volg de instructies die bij de gaspatroon
werden geleverd.
8. Verzeker u ervan dat brandbare materialen niet
worden blootgesteld aan de uitlaatgassen.
9. Gebruik gasgereedschappen niet in explosieve
omgevingen aangezien de vonken die in het
gereedschap worden gegenereerd brand of een
explosie kunnen veroorzaken.
10. Gaspatronen mogen niet onzorgvuldig of bij hoge
temperatuur worden opgeslagen. Houdt u aan de
lokale regelgeving en de instructies van de
gaspatroon bij het hanteren en weggooien van
gaspatronen en accu’s of accumulatoren.
11. Voor gasgereedschappen geldt dat tijdens
normaal gebruik een kleine hoeveelheid gas kan
worden gegenereerd.
Gebruik en verzorging van gereedschap dat op een
accu werkt
1. Laad alleen op met de acculader aanbevolen door
de fabrikant. E
bepaald type accu, kan brandgevaar opleveren indien
gebruikt met een ander type accu.
2. Gebruik elektrisch gereedschap uitsluitend met de
daarvoor bestemde accu. Gebruik van andere
accu’s kan gevaar voor letsel of brandgevaar
opleveren.
3. Als de accu niet wordt gebruikt, houdt u deze uit
de buurt van metalen voorwerpen, zoals
paperclips, muntgeld, sleutels, spijkers,
schroeven en andere kleine metalen voorwerpen
die een kortsluiting kunnen veroorzaken tussen de
accupolen. Kortsluiting tussen de accupolen kan
leiden tot brandwonden of brand.
4. Onder zware gebruiksomstandigheden kan
vloeistof uit de accu komen. Voorkom aanraking!
Als u er per ongeluk mee in aanraking komt,
spoelt u het er met water af. Als de vloeistof in uw
ogen komt, raadpleegt u tevens een arts. Vloeistof
uit de accu kan irritatie en brandwonden veroorzaken.
5. Gebruik geen accu of gereedschap dat
beschadigd of gewijzigd is. Beschadigde of
gewijzigde accu’s kunnen onvoorspelbaar gedrag
vertonen dat kan leiden tot brand, explosie of gevaar
van letsel.
6. Stel een accu of gereedschap niet bloot aan vuur
of buitensporige temperaturen. Blootstelling aan
vuur of temperaturen hoger dan 130°C kunnen een
explosie veroorzaken.
7. Volg alle oplaadinstructies en laad de accu of het
gereedschap niet op buiten het temperatuurbereik
opgegeven in de instructies. Verkeerd opladen of bij
een temperatuur buiten het opgegeven bereik kan de
accu beschadigen en de kans op brand vergroten.
Veiligheidsvoorzieningen
1. Controleer voor gebruik dat alle
veiligheidssystemen goed werken. Het
gereedschap mag niet werken als alleen de
trekkerschakelaar wordt ingeknepen of als alleen de
contactschoen op het hout wordt gedrukt. Het
gereedschap mag alleen werken als beide
en acculader d
ie geschikt is voor een
40

handelingen tegelijkertijd worden uitgevoerd. Test op
mogelijke defecte werking wanneer geen
bevestigingsmiddelen zijn geladen en de aandrukker
helemaal uitgetrokken is.
2. De trekker vastzetten in de AAN-stand is zeer
gevaarlijk. Probeer nooit de trekker vast te zetten.
3. Probeer niet de contactschoen voortdurend
ingedrukt te houden met tape of draad. Dit kan
leiden tot de dood of ernstig letsel.
4. Controleer altijd de contactschoen volgens de
instructies in deze gebruiksaanwijzing. Als het
veiligheidsmechanisme niet goed werkt, kunnen
bevestigingsmiddelen per ongeluk worden ingedraaid.
Service
1. Voer reinigings- en onderhoudswerkzaamheden
onmiddellijk uit nadat u klaar bent met werken.
Houd het gereedschap in optimale conditie. Smeer
bewegende delen om roesten te voorkomen en
slijtage door wrijving te minimaliseren. Veeg alle stof
van de onderdelen af.
2. Vraag een erkend Makita-servicecentrum
regelmatig het gereedschap te inspecteren.
3. Om de VEILIGHEID en BETROUWBAARHEID van
het gereedschap te handhaven, dienen onderhoud
en reparaties te worden uitgevoerd door een
erkend Makita-servicecentrum, en altijd met
gebruikmaking van originele Makitavervangingsonderdelen.
4. Houd u aan de plaatselijke regelgeving bij het
verwerken van het gereedschap.
BEWAAR DEZE INSTRUCTIES.
WAARSCHUWING: Laat u NIET misleiden door
een vals gevoel van comfort en bekendheid met het
gereedschap (na veelvuldig gebruik) en neem alle
veiligheidsvoorschriften van het betreffende
gereedschap altijd strikt in acht. VERKEERD
GEBRUIK of het niet naleven van de
veiligheidsvoorschriften in deze gebruiksaanwijzing
kan leiden tot ernstig persoonlijk letsel.
BELANGRIJKE
VEILIGHEIDSINSTRUCTIES VOOR
EEN ACCU
1. Lees alle voorschriften en waarschuwingen op (1)
de acculader, (2) de accu, en (3) het product
waarvoor de accu wordt gebruikt, alvorens de
accu in gebruik te nemen.
2. Neem de accu niet uit elkaar.
3. Als de gebruikstijd van een opgeladen accu
aanzienlijk korter is geworden, moet u het gebruik
ervan onmiddellijk stopzetten. Voortgezet gebruik
kan oververhitting, brandwonden en zelfs een
ontploffing veroorzaken.
4. Als elektrolyt in uw ogen is terechtgekomen,
spoelt u uw ogen met schoon water en roept u
onmiddellijk de hulp van een dokter in. Elektrolyt
in de ogen kan blindheid veroorzaken.
5. Voorkom kortsluiting van de accu:
(1) Raak de accuklemmen nooit aan met een
geleidend materiaal.
ENC009-6
(2) Bewaar de accu niet in een bak waarin
andere metalen voorwerpen zoals spijkers,
munten e.d. worden bewaard.
(3) Stel de accu niet bloot aan water of regen.
Kortsluiting van de accu kan oorzaak zijn van een
grote stroomafgifte, oververhitting, brandwonden,
en zelfs defecten.
6. Bewaar het gereedschap en de accu niet op
plaatsen waar de temperatuur kan oplopen tot
50°C of hoger.
7. Werp de accu nooit in het vuur, ook niet wanneer
hij zwaar beschadigd of volledig versleten is. De
accu kan ontploffen in het vuur.
8. Wees voorzichtig dat u de accu niet laat vallen en
hem niet blootstelt aan schokken of stoten.
9. Gebruik nooit een beschadigde accu.
10. De bijgeleverde lithium-ionbatterijen zijn
onderhevig aan de vereisten in de wetgeving
omtrent gevaarlijke stoffen.
Voor commercieel transport en dergelijke door derden
en transporteurs moeten speciale vereisten ten
aanzien van verpakking en etikettering worden
nageleefd.
Als voorbereiding van het artikel dat wordt
getransporteerd is het noodzakelijk een expert op het
gebied van gevaarlijke stoffen te raadplegen. Houd u
tevens aan mogelijk strengere nationale regelgeving.
Blootliggende contactpunten moeten worden afgedekt
met tape en de accu moet zodanig worden verpakt dat
deze niet kan bewegen in de verpakking.
11. Wanneer u de accu wilt weggooien, verwijdert u de
accu vanaf het gereedschap en gooit u hem op
een veilige manier weg. Volg bij het weggooien
van de accu de plaatselijke voorschriften.
12. Gebruik de accu’s uitsluitend met de
gereedschappen die door Makita zijn aanbevolen.
Als de accu’s worden aangebracht in niet-compatibele
gereedschappen, kan dat leiden tot brand,
buitensporige warmteontwikkeling, een explosie of
lekkage van elektrolyt.
13. Als u het gereedschap gedurende een lange tijd
niet denkt te gaan gebruiken, moet de accu vanaf
het gereedschap worden verwijderd.
BEWAAR DEZE INSTRUCTIES.
LET OP: Gebruik uitsluitend originele Makita
accu’s. Het gebruik van niet-originele accu’s, of accu’s
die zijn gewijzigd, kan ertoe leiden dat de accu ontploft en
brand, persoonlijk letsel en schade veroorzaakt. Ook
vervalt daarmee de garantie van Makita op het
gereedschap en de lader van Makita.
Tips voor een maximale levensduur van
de accu
1. Laad de accu op voordat hij volledig ontladen is.
Stop het gebruik van het gereedschap en laad de
accu op telkens wanneer u vaststelt dat het
vermogen van het gereedschap is afgenomen.
2. Laad een volledig opgeladen accu nooit opnieuw
op. Te lang opladen verkort de levensduur van de
accu.
41

3. Laad de accu op bij een omgevingstemperatuur
tussen 10°C en 40°C. Laat een warme accu
afkoelen alvorens hem op te laden.
Overzicht van het nagelpistool
(zie afb. 2)
Plaats de brandstofpatroon in het gereedschap met de
spuitmond van de meetklep in de richting van de adapter
(zie afb. 11).
Steek de spuitmond stevig in de kleine opening van de
adapter (zie afb. 12).
Plaats het deksel van de brandstofpatroon over de
meetklep en druk het omlaag om het vast te zetten.
BESCHRIJVING VAN DE
FUNCTIES
LET OP:
• Verwijder altijd de brandstofpatroon, de accu en alle
nagels alvorens het gereedschap in te stellen of de
werking ervan te controleren.
De accu aanbrengen of verwijderen
LET OP:
• Schakel het gereedschap altijd uit voordat u de accu
aanbrengt of verwijdert.
• Houd het gereedschap en de accu stevig vast
tijdens het aanbrengen of verwijderen van de accu.
Als u het gereedschap en de accu niet stevig
vasthoudt, kunnen deze uit uw handen glippen en
beschadigd raken, of kan persoonlijk letsel worden
veroorzaakt (zie afb. 3).
Om de accu aan te brengen, houdt u de accu zodanig
vast dat de vorm aan de voorkant van de accu past in de
accuplaatsingsopening, en schuift u de accu op zijn
plaats. Steek de accu zo ver mogelijk erin tot u een
klikgeluid hoort (zie afb. 4).
Om de accu te verwijderen, druk u op de knoppen aan de
zijkant van de accu en trekt u de accu uit het
gereedschap, zoals aangegeven in de afbeelding.
LET OP:
• Steek de accu altijd zo ver mogelijk in het gereedschap
totdat deze met een klik wordt vergrendeld. Als u dit
niet doet, kan de accu per ongeluk uit het gereedschap
vallen en u of anderen in uw omgeving verwonden.
• Breng de accu niet met kracht aan. Als de accu niet
gemakkelijk erin kan worden geschoven, wordt deze
niet goed aangebracht.
De lamp inschakelen
LET OP:
• Kijk niet rechtstreeks in de lamp of naar de bron van
het licht (zie afb. 5).
• Druk op de lampknop om de lamp in te schakelen.
Druk nogmaals op de lampknop om de lamp uit te
schakelen.
Brandstofpatroon
De meetklep op de brandstofpatroon aanbrengen (zie
afb. 6)
Verwijder de dop (in het geval de meetklep met een dop
wordt geleverd) (zie afb. 7).
Duw de voorrand omlaag (zie afb. 8).
Duw de achterrand omlaag tot deze op zijn plaats vastzit.
De brandstofpatroon aanbrengen (zie afb. 9)
Duw omhoog en trek aan het deksel van de
brandstofpatroon om deze te verwijderen (zie afb. 10).
42
De nageldiepte instellen
LET OP:
• Verwijder altijd de brandstofpatroon, de accu en alle
nagels alvorens de nageldiepte in te stellen (zie
afb. 13).
Voor een geringere nageldiepte, draait u de stelknop in de
richting A, zoals aangegeven in de afbeelding. Voor een
grotere nageldiepte, draait u de stelknop in de richting B.
Draai de stelknop niet te ver omdat anders de
contactschoen los kan raken van de stelknop, of vast kan
lopen.
Indicatorlampje
De kleur van het indicatorlampje heeft de volgende
betekenis:
Knippert groen: Dit is de normale toestand.
Knippert rood: De accu moet worden opgeladen.
Brandt rood: Laad de accu op. U kunt niet meer nagelen
omdat de accu leeg is.
Knippert oranje: Een grondige reiniging wordt
aanbevolen. Raadpleeg het hoofdstuk “ONDERHOUD”
om de binnenkant van het gereedschap grondig te
reinigen. Om het oranje knipperen van het indicatorlampje
terug te stellen, houdt u de contactschoen gedurende vijf
seconden ingedrukt en vervolgens drukt u de
contactschoen vijf keer in.
Knippert oranje na afwisselend groen en rood te
hebben geknipperd: De storingsdetectie is in werking
getreden. Haal de accu uit het gereedschap en plaats
deze weer terug om terug te stellen. Als de
storingsdetectie opnieuw in werking treedt, is een storing
opgetreden. Vraag uw plaatselijke Makita-servicecentrum
om hem te repareren.
De haak aanbrengen (zie afb. 14)
De haak is handig om het gereedschap tijdelijk aan op te
hangen. U kunt hem aan beide kanten van het
gereedschap bevestigen. Hij kan worden verplaatst
zonder dat u daarvoor gereedschap nodig hebt.
Om de haak aan te brengen, spreidt u het bovenste deel
van de haak en steekt u dit in het gereedschap. Om de
haak te verwijderen, spreidt u het bovenste deel van de
haak en trekt u hem van het gereedschap af.
ONDERDELEN AANBRENGEN/
VERWIJDEREN
LET OP:
• Verwijder altijd de brandstofpatroon en de accu
alvorens enige werkzaamheden aan het gereedschap
uit te voeren.
Nagels laden (zie afb. 15)
Plaats een strip nagels in de gleuf in de achterkant van
het magazijn (zie afb. 16).

Duw de aandrukkerknop in en trek tegelijkertijd de
aandrukkerhendel helemaal naar de achterkant van het
magazijn. Laat dan de aandrukkerknop los en duw daarna
de aandrukkerhendel voorzichtig tegen de achterkant van
de strip nagels.
Nagels verwijderen (zie afb. 17)
Duw de aandrukkerknop in en trek tegelijkertijd aan de
aandrukkerhendel om de nagelsteun te ontgrendelen, en
duw daarna de aandrukkerhendel terug naar de voorkant
van het magazijn terwijl u de aandrukkerknop ingedrukt
houdt.
Schuif de nagels naar de achterkant van het magazijn en
haal ze eruit.
Neusadapter (zie afb. 18)
De neusadapter voorkomt dat het oppervlak van het
werkstuk wordt bekrast of beschadigd. Breng de
neusadapter correct aan.
Bewaar de neusadapter op zijn plaats wanneer deze niet
in gebruik is. De plaats waar hij wordt bewaard is op de
onderkant van het gereedschap (zie afb. 19).
Korte-nageladapter (zie afb. 20 en 21)
Breng de korte-nageladapter aan om te voorkomen dat
korte nagels vastlopen wanneer u nagels gebruikt die
korter zijn dan 25 mm.
Plaats de korte-nageladapter in de gleuf in de achterkant
van het magazijn. Zet de adapter vervolgens vast met de
bout.
BEDIENING
WAARSCHUWING:
• Raak het gebied rondom de luchtuitlaatopening
niet aan. Het oppervlak zal erg heet zijn tijdens en vlak
na het gebruik. Door het oppervlak rondom de
luchtuitlaatopening aan te raken kunnen brandwonden
ontstaan.
LET OP:
• Controleer voor gebruik dat alle beveiligingssystemen
goed werken.
De correcte werking controleren vóór
gebruik
Controleer vóór gebruik altijd de volgende punten.
– Verzeker u ervan dat het gereedschap niet in werking
treedt enkel doordat de accu en gaspatroon worden
aangebracht.
– Verzeker u ervan dat het gereedschap niet gaat
werken door alleen de trekker in te knijpen.
– Verzeker u ervan dat het gereedschap niet gaat
werken door alleen de contactschoen tegen het
werkstuk te drukken zonder de trekker in te knijpen.
– Zorg ervoor dat het gereedschap niet werkt als eerst de
trekker wordt ingeknepen en daarna de contactschoen
tegen het werkstuk wordt gedrukt.
Nagels schieten (zie afb. 22)
1. Om te nagelen, plaatst u de contactschoen op het
werkstuk.
De ventilatormotor wordt ingeschakeld, gasvormige
brandstof wordt in de verbrandingskamer gespoten en
door de ventilator met lucht gemengd (zie afb. 23).
2. Houd de contactschoen stevig op het werkstuk
gedrukt en knijp de trekker in.
Het brandstof-luchtmengsel wordt ontstoken en de nagel
wordt in het werkstuk geschoten.
3. De volgende nagel kan pas worden geschoten nadat
eerst de contactschoen en de trekker zijn losgelaten.
Anti-droogschietmechanisme
Dit mechanisme voorkomt dat het gereedschap afgaat
zonder dat een aanwezig is.
De droogschietpreventie treedt automatisch in werking
wanneer slechts 9 tot 11 nagels resteren.
Vastgelopen nagelpistool
WAARSCHUWING:
• Verwijder altijd de brandstofpatroon en accu alvorens
een verstopping op te heffen.
LET OP:
• Gebruik geen vervormde nagels of nagelstrippen. Als u
dit toch doet, worden de nagels niet goed aangevoerd.
Volg de procedure voor het verwijderen van de nagels en
verwijder de nagels uit het magazijn (zie afb. 24).
Maak de vergrendeling los en open de nagelgeleiderplaat,
en verwijder vervolgens de vastgelopen nagel.
ONDERHOUD
LET OP:
• Verwijder altijd de brandstofpatroon, de accu en alle
nagels alvorens inspectie- of
onderhoudswerkzaamheden uit te voeren.
• Gebruik nooit benzine, wasbenzine, thinner, alcohol,
enz. Dit kan leiden tot verkleuren, vervormen of
barsten.
Dagelijkse onderhoudswerkzaamheden
Controleer voor gebruik het gereedschap altijd eerst op
algehele conditie en loszittende schroeven. Draai deze zo
nodig vast.
Aan het einde van de werkdag, voert u de dagelijkse
onderhoudswerkzaamheden uit.
Deze simpele stappen zijn bedoeld om de veiligheid en
prestaties van het gereedschap te garanderen.
Alvorens u het werkterrein verlaat:
• Verwijder de accu uit het gereedschap en berg deze op
in de draagdoos van het gereedschap. Gebruik altijd
de draagdoos van het gereedschap om het
gereedschap te vervoeren en op te bergen.
• Gooi alle brandstofpatronen zodanig weg dat ze niet
kunnen worden gevonden door kinderen, geplet,
doorboord of verbrand.
Nadat u thuis bent:
• Doe de accu in de acculader als deze opgeladen moet
worden volgens het rode indicatorlampje.
• Veeg het gereedschap af met een schone, droge doek.
• Controleer het luchtfilter en reinig dit als het stoffig is.
43

Het luchtfilter reinigen (zie afb. 25 en 26)
Druk licht op het filterkap en verwijder het. En haal daarna
het luchtfilter uit het gereedschap.
Tik zachtjes tegen het luchtfilter om het stof eruit te
kloppen. Met zeepsop kunt u het luchtfilter tot bijna in
nieuwstaat reinigen.
Om de VEILIGHEID en BETROUWBAARHEID van het
gereedschap te handhaven, dienen alle reparaties,
onderhoud en afstellingen te worden uitgevoerd door een
erkend Makita-servicecentrum, en altijd met
gebruikmaking van originele Makitavervangingsonderdelen.
Grondig reinigen
Als droogschieten vaak voorkomt, betekent dit dat het
gereedschap grondig moet worden schoongemaakt.
Raadpleeg de bijgevoegde reinigingsrichtlijn voor meer
informatie en reinig het gereedschap grondig.
Als u vragen hebt over het reinigen, neemt u contact op
met uw plaatselijk Makita-servicecentrum.
VERKRIJGBARE ACCESSOIRES
LET OP:
• Deze accessoires of hulpstukken worden aanbevolen
voor gebruik met het Makita-gereedschap dat in deze
gebruiksaanwijzing wordt beschreven. Het gebruik van
andere accessoires of hulpstukken kan gevaar voor
persoonlijk letsel opleveren. Gebruik de accessoires of
hulpstukken uitsluitend voor de aangegeven
gebruiksdoeleinden.
Mocht u meer informatie willen hebben over deze
accessoires, dan kunt u contact opnemen met uw
plaatselijke Makita-servicecentrum.
• Nagels
• Veiligheidsbril
• Brandstofpatroon
• Reinigingsset
• Originele Makita-accu en -lader
OPMERKING:
• Sommige items op de lijst kunnen zijn inbegrepen in de
doos van het gereedschap als standaard toebehoren.
Zij kunnen van land tot land verschillen.
Geluid
De typische, A-gewogen geluidsniveaus zijn gemeten
volgens EN ISO 11148-13:
Geluidsdrukniveau (L
Geluidsvermogenniveau (L
Onzekerheid (K): 3 dB (A)
): 93 dB (A)
pA
WA
): 106 dB (A)
Draag gehoorbescherming.
Trilling
De trillingstotaalwaarde is bepaald volgens
EN ISO 11148-13:
Trillingsemissie (a
Onzekerheid (K): 1,5 m/s
h
): 3,5 m/s
2
2
• De opgegeven trillingsemissiewaarde is gemeten
volgens de standaardtestmethode en kan worden
gebruikt om dit gereedschap te vergelijken met andere
gereedschappen.
• De opgegeven trillingsemissiewaarde kan ook worden
gebruikt voor een beoordeling vooraf van de
blootstelling.
44
ENG905-1
ENG904-2
ENG901-1
WAARSCHUWING:
• De trillingsemissie tijdens het gebruik van het elektrisch
gereedschap in de praktijk kan verschillen van de
opgegeven trillingsemissiewaarde afhankelijk van de
manier waarop het gereedschap wordt gebruikt.
• Zorg ervoor dat veiligheidsmaatregelen worden
getroffen ter bescherming van de operator die zijn
gebaseerd op een schatting van de blootstelling onder
praktijkomstandigheden (rekening houdend met alle
fasen van de bedrijfscyclus, zoals de tijdsduur
gedurende welke het gereedschap is uitgeschakeld en
stationair draait, naast de ingeschakelde tijdsduur).
EU-verklaring van conformiteit
Alleen voor Europese landen
De EU-verklaring van conformiteit is opgenomen als
Bijlage A in deze instructiehandleiding.

ESPAÑOL (Instrucciones originales)
Cd
Ni-MH
Li-ion
Explicación de los dibujos
1. Cartucho de la batería
2. Cubierta de combustible
3. Disparador
4. Luz indicadora
5. Botón empujador
6. Palanca empujadora
7. Depósito alimentador
8. Elemento de contacto
9. Lámpara
10. Orificio de ventilación
11. Bo tón
12. Botón de la lámpara
13. Válvula dosificadora
14. Tapa
15. Boquilla
16. Regulador
17. Gancho
18. Adaptador de boquilla
19. Adaptador de clavo corto
20. Perno
21. Pestillo
22. Puerta
23. Cubierta del filtro
24. Filtro
ESPECIFICACIONES
Modelo GF600
Longitud del clavo Calibre de clavos 16Ga: 15 mm - 65 mm
Capacidad de clavos 100 clavos (2 tiras)
Dimensiones (La x An x Al) 266 mm x 90 mm x 305 mm
Peso neto 2,2 kg
Tensión nominal CC 7,2 V
• Debido a nuestro programa continuo de investigación y desarrollo, las especificaciones aquí descritas están sujetas a
cambios sin previo aviso.
• Las especificaciones y el cartucho de la batería pueden variar de un país a otro.
Símbolos
Se utilizan los siguientes símbolos para el equipo.
Asegúrese de que comprende su significado antes del
uso.
...... Lea el manual de instrucciones.
.................. Depósito bajo presión, manténgase
alejado de lugares con temperaturas
superiores a los 50°C (como los
sometidos a radiación solar). Mantenga
el depósito en un lugar bien ventilado.
................. Utilícese sólo en exteriores o
habitaciones bien ventiladas. No aspire
gas.
................. No utilizar cerca de llamas o esprays
en superficies calientes. Durante el uso
se puede formar una mezcla de aire y
vapor inflamable/explosiva.
................. No dañar, perforar ni quemar, ni
siquiera después del uso.
.......... Utilice gafas de seguridad.
.......... Póngase protección para los oídos.
................... Si no está clavando clavos o grapas,
mantenga los dedos alejados del
disparador para evitar un disparo
accidental.
END107-8
................. Utilícese sólo en un área ventilada para
evitar náuseas y la pérdida del
conocimiento. Nunca utilice la
herramienta en atmósferas
inflamables. Las emisiones de la
herramienta pueden encender
materiales inflamables.
...................No utilizar en andamios o escaleras de
mano.
...................Advertencia: ¡superficie caliente!
No toque alrededor de este símbolo. Si
toca la superficie puede sufrir
quemaduras o lesiones.
............. Sólo para países de la Unión Europea
¡No deseche el aparato eléctrico o la
batería junto con los residuos
domésticos!
De conformidad con la Directiva
Europea sobre residuos de aparatos
eléctricos y electrónicos, y sobre
baterías y acumuladores y el desecho
de baterías y acumuladores y su
aplicación de acuerdo con la
legislación nacional, la herramienta
eléctrica y las baterías y paquetes de
baterías cuya vida útil haya llegado a
su fin se deberán recoger por separado
y trasladar a una planta de reciclaje
que cumpla con las exigencias
ecológicas.
45

Uso previsto
La herramienta está diseñada para el clavado o grapado
en trabajos en interiores y trabajos en mobiliario.
La herramienta es solamente para aplicación profesional
de volumen alto. No la utilice para ningún otro propósito.
No ha sido diseñada para clavar fijadores en una
superficie dura como acero y cemento.
ENE073-3
Advertencias de seguridad para la
clavadora a gas ENB111-5
ADVERTENCIA: Lea todas las advertencias de
seguridad y todas las instrucciones. En caso de no
seguir las advertencias e instrucciones podrá resultar en
heridas graves, descarga eléctrica y/o incendio.
Guarde todas las advertencias e
instrucciones para futuras referencias.
Por seguridad personal y operación y mantenimiento
apropiados de la herramienta, lea este manual de
instrucciones antes de utilizar la herramienta.
Seguridad general
1. Cualquier otro uso de esta herramienta excepto
para el uso previsto está prohibido. Las
herramientas de clavar fijadores de accionamiento
por contacto continuo o accionamiento por
contacto deben ser utilizadas solamente para
aplicaciones de producción.
2. Mantenga los dedos alejados del gatillo cuando
no esté operando esta herramienta y cuando se
mueva de una posición de operación a otra.
3. Riesgos múltiples. Lea y entienda las
instrucciones de seguridad antes de conectar,
desconectar, cargar, operar la herramienta; hacer
mantenimiento o cambiar accesorios, o trabajar
cerca de la herramienta. No hacerlo puede resultar
en heridas corporales graves.
4. Mantenga todas las partes del cuerpo, tales como
las manos y las piernas, etc., alejadas de la
dirección de disparo y asegúrese de que los
fijadores no pueden atravesar la pieza de trabajo y
clavarse en partes del cuerpo.
5. Cuando utilice la herramienta, sea consciente de
que el fijador se puede desviar y ocasionar
heridas.
6. Sujete la herramienta agarrándola firmemente y
esté preparado para controlar el culatazo.
7. La herramienta de clavar fijadores solamente debe
ser utilizada por operarios expertos.
8. No modifique la herramienta de clavar fijadores.
Las modificaciones pueden reducir la eficacia de
los medios de seguridad e incrementar los riesgos
para el operario y/o los transeúntes.
9. No deseche el manual de instrucciones.
10. No utilice una herramienta si ha sido dañada.
11. Tenga cuidado cuando maneje fijadores,
especialmente cuando los cargue y descargue,
porque los fijadores tienen puntas afiladas que
podrán ocasionar heridas.
12. Compruebe siempre la herramienta antes de
utilizarla por si tiene piezas rotas, mal conectadas
o desgastadas.
46
13. No trabaje donde no alcance. Utilice solamente en
un lugar de trabajo seguro. Mantenga los pies
sobre suelo firme y el equilibrio en todo momento.
14. Mantenga a los transeúntes alejados (cuando
trabaje en un área donde haya la posibilidad de
que transite gente). Marque claramente su área de
operación.
15. No apunte la herramienta hacia usted o hacia
otros.
16. No apoye el dedo en el gatillo cuando recoja la
herramienta, se mueva entre áreas de operación y
posiciones de trabajo o camine, porque apoyar el
dedo en el gatillo puede dar lugar a una operación
inadvertida. Para herramientas con accionamiento
selectivo, compruebe siempre la herramienta
antes de utilizarla para asegurarse de que está
seleccionado el modo correcto.
17. Utilice solamente guantes que proporcionen una
sensación táctil adecuada y un control seguro de
los gatillos y cualquier dispositivo de ajuste.
18. Cuando repose la herramienta, apóyela sobre una
superficie plana. Si utiliza el gancho equipado con
la herramienta, enganche la herramienta
firmemente en una superficie estable.
19. No la utilice cuando esté bajo la influencia de
alcohol, drogas o por el estilo.
Riesgos relativos al proyectil
1. La herramienta de clavar fijadores deberá ser
desconectada cuando cargue fijadores, haga
ajustes, despeje atascos o cambie accesorios.
2. Durante la operación tenga cuidado de que los
fijadores penetren el material correctamente y no
se puedan desviar o errar el disparo hacia el
operario y/o cualquier transeúnte.
3. Durante la operación, podrán salir despedidos
restos de la pieza de trabajo y del sistema de
fijación/sujeción.
4. Póngase siempre gafas de protección para
proteger sus ojos de heridas cuando utilice
herramientas eléctricas. Las gafas de protección
deben cumplir con las normas ANSI Z87.1 en los
Estados Unidos de América, EN 166 en Europa, o
AS
/NZS 1336 e
Australia/Nueva Zelanda, se requiere, también,
legalmente ponerse pantalla facial para proteger la
cara. (Fig. 1)
Es una responsabilidad del empresario imponer a
los operarios de la herramienta y a otras personas
en las inmediaciones del área de trabajo el uso de
equipos de protección de seguridad apropiados.
5. Los riesgos para otras personas deberá
evaluarlos el operario.
6. Tenga cuidado con las herramientas sin el
contacto para pieza de trabajo porque pueden
dispararse involuntariamente y herir al operario y/
o transeúntes.
7. Asegúrese de que la herramienta está siempre
apoyada de forma segura en la pieza de trabajo y
que no se puede deslizar.
8. Póngase protección auditiva para proteger sus
oídos del ruido de escape y protección para la
cabeza. Además, póngase ropa ligera pero no
holgada. Las mangas deberán estar abotonadas o
arremangadas. No se deberá llevar corbata.
n Australia/Nueva Zelanda. En

Riesgos relativos a la operación
1. Sujete la herramienta correctamente: asegúrese
de contrarrestar los movimientos normales o
repentinos tales como un culetazo.
2. Mantenga una posición equilibrada del cuerpo y
los pies sobre suelo firme.
3. Se deben utilizar gafas de seguridad apropiadas y
guantes apropiados y se recomienda el uso de
ropa de protección.
4. Ha de ponerse protección para los oídos
apropiada.
5. Utilice el suministro de energía correcto como se
indica en el manual de instrucciones.
6. No utilice la herramienta en plataformas en
movimiento o detrás de camiones. Un movimiento
repentino de la plataforma puede hacerle perder el
control de la herramienta y ocasionar heridas.
7. Asuma siempre que la herramienta contiene
fijadores.
8. No apresure el trabajo o fuerce la herramienta.
Maneje la herramienta con cuidado.
9. Observe el suelo donde pisa y mantenga su
equilibrio con la herramienta. Asegúrese de que no
haya nadie debajo cuando trabaje en lugares altos.
10. En tejados y otros lugares altos, coloque los
fijadores a medida que se mueve hacia delante. Es
fácil perder el equilibrio si coloca fijadores mientras se
mueve hacia atrás. Cuando coloque fijadores contra
una superficie perpendicular, trabaje de arriba abajo.
Haciéndolo así podrá realizar las operaciones de
atornillar con menos fatiga.
11. Un fijador se torcerá o la herramienta se podrá
atascar si coloca un fijador erróneamente encima
de otro fijador o si golpea un nudo en la madera.
El fijador podrá ser lanzado y golpear a alguien, o
la propia herramienta podrá reaccionar
peligrosamente. Coloque los fijadores con
cuidado.
12. No intente nunca colocar fijadores desde el
interior y exterior al mismo tiempo. Los fijadores
podrán atravesar y/o salir disparados, presentando un
grave peligro.
Riesgos relativos a movimientos repetitivos
1. Cuando se utilice una herramienta durante largos
periodos, el operario podrá sentir molestias en las
manos, brazos, hombros, cuello, u otras partes
del cuerpo.
2. Mientras utilice una herramienta, el operario
deberá adoptar una postura apropiada pero
ergonómica. Mantenga los pies sobre suelo firme
y evite posturas incómodas o desequilibradas.
3. Si el operario experimenta síntomas tales como
molestias persistentes o recurrentes, dolor,
palpitación, achaque, hormigueo,
entumecimiento, sensación de ardor, o
agarrotamiento, no ignore estas señales de
advertencia. El operario deberá consultar con un
profesional sanitario cualificado acerca de las
actividades en general.
4. La utilización continuada de la herramienta puede
ocasionar lesión por esfuerzo repetido debido al
culatazo producido por la herramienta.
5. Para evitar heridas por esfuerzo repetitivo, el
operario no deberá trabajar donde no alcance o
utilizar fuerza excesiva. Además, el operario
deberá descansar cuando sienta fatiga.
6. Realice una valoración de riesgo acerca de los
riesgos relativos a movimientos repetitivos. Esta
deberá enfocarse en desórdenes esqueleto
musculares y basarse preferentemente en la
premisa de que la disminución de la fatiga durante
el trabajo es eficaz para reducir los desórdenes.
Riesgos relativos a accesorios y consumibles
1. Retire el recipiente de gas y la batería antes de
cambiar/reemplazar accesorios tal como el
contacto para pieza de trabajo, o hacer cualquier
ajuste.
2. Utilice solamente los tamaños y tipos de
accesorios que provee el fabricante.
3.
Utilice solamente lubricantes recomendados en
es
te m
anual.
Riesgos relativos al lugar de trabajo
1. Los resbalones, los tropiezos y las caídas son las
principales causas de heridas en el lugar de
trabajo. Sea consciente de las superficies
resbaladizas ocasionadas por el uso de la
herramienta y también de los riesgos relativos a
los tropiezos ocasionados por la manguera de
conducto de aire.
2. Proceda con cuidado adicional en entornos con
los que no esté familiarizado. Pueden existir
riesgos ocultos, tales como conductos de
electricidad o de otros suministros.
3. Esta herramienta no ha sido prevista para ser
utilizada en atmósferas potencialmente
explosivas y no está aislada contra un contacto
con energía eléctrica.
4. Asegúrese de que no hay cables eléctricos,
tuberías de gas, etc., que puedan ocasionar un
riesgo si se dañan al utilizar la herramienta.
5. Mantenga el área de trabajo limpia y bien
iluminada. Las áreas de trabajo atestadas u oscuras
son una invitación a accidentes.
6. Es posible que existan reglamentos locales
concernientes al ruido que deberán ser cumplidos
manteniendo los niveles de ruido dentro de los
límites prescritos. En ciertos casos, se deberán
utilizar persianas para contener el ruido.
Riesgos relativos al polvo y el escape
1. Compruebe siempre su entorno. El escape de la
herramienta puede soplar el polvo u objetos y
golpear al operario y/o los transeúntes.
2. Dirija el escape de forma que en un entorno de
mucho polvo la perturbación del polvo se reduzca
al mínimo.
3. Si en el área de trabajo se emite polvo u objetos,
reduzca la emisión en lo máximo posible para
reducir los riesgos para la salud y el riesgo de
heridas.
Riesgos relativos al ruido
1. Una exposición sin protección a niveles de ruido
altos, puede ocasionar una pérdida, incapacidad,
permanente de la audición y otros problemas tales
como ruido en los oídos (campaneo, ronroneo,
silbido o zumbido en los oídos).
47

2. Realice una valoración de riesgos acerca del ruido
en el área de trabajo e implemente los controles
apropiados para estos riesgos.
3. Los controles apropiados para reducir el riesgo
pueden incluir acciones tales como amortiguar los
materiales para evitar que las piezas de trabajo
“campaneen”.
4. Utilice protección para los oídos apropiada.
5. Opere la herramienta y hágale el mantenimiento
como se recomienda en estas instrucciones, para
evitar un aumento innecesario de los niveles de
ruido.
6. Tome medidas de reducción de ruido, por
ejemplo, colocando las piezas de trabajo sobre
soportes que amortigüen el sonido.
Riesgos relativos a la vibración
1. La emisión de vibración durante la operación
depende de la fuerza de asimiento, la fuerza de
presión de contacto, la dirección de trabajo, el
ajuste del suministro de energía, la pieza de
trabajo, el apoyo de la pieza de trabajo. Realice
una valoración de riesgos acerca de la vibración e
implemente los controles apropiados para estos
riesgos.
2. La exposición a la vibración puede ocasionar
daño incapacitante a los nervios y el suministro
de sangre a las manos y brazos.
3. Póngase ropa cálida cuando trabaje en
condiciones frías, mantenga sus manos calientes
y secas.
4. Si siente entumecimiento, hormigueo, dolor o
emblanquecimiento de la piel en sus dedos o
manos, solicite consejo médico de un profesional
sanitario cualificado acerca de las actividades en
general.
5. Opere la herramienta y hágale el mantenimiento
como se recomienda en estas instrucciones, para
evitar un aumento innecesario de los niveles de
vibración.
6. Sujete la herramienta con un asimiento ligero,
pero seguro, porque el riesgo de la vibración es
generalmente mayor cuando la fuerza de
asimiento es más fuerte.
Instrucciones de seguridad adicionales para las
herramientas a gas
1. Utilice la herramienta solamente con el recipiente
de gas genuino de Makita.
2. Tenga cuidado cuando utilice herramientas a gas,
porque la herramienta podrá calentarse, afectando
al asimiento y el control.
3. Las herramientas a gas para clavar fijadores
deberán ser utilizadas en espacios ventilados.
4. En el caso de que gas combustible licuado entre
en contacto con la piel de una persona, podrán
producirse heridas.
5. Los recipientes de gas deberán ser marcados de
acuerdo con los reglamentos de transporte
requeridos.
6. Maneje los recipientes de gas con cuidado y
compruebe por si están dañados. Los recipientes
de gas dañados pueden explotar y ocasionar
heridas.
7. Lea y siga las instrucciones suministradas con el
recipiente de gas.
8. Asegúrese de no exponer materiales
combustibles a los gases de escape calientes.
9. No utilice herramientas a gas en áreas explosivas
porque las chispas generadas en la herramienta
pueden ocasionar un incendio o una explosión.
10. Los recipientes de gas no deben ser almacenados
descuidadamente ni a altas temperaturas. Siga los
reglamentos locales y las instrucciones del
recipiente de gas para el manejo y el desecho de
los recipientes de gas y las baterías o
acumuladores.
11. Para las herramientas a gas, puede que se genere
una pequeña liberación de gas en las operaciones
normales.
Utilización y cuidado de la herramienta a batería
1. Cargue la batería solamente con el cargador
especificado por el fabricante.
a
propiado p
riesgo de incendio cuando se utiliza con otra batería.
2. Utilice las herramientas eléctricas solamente con
las baterías designadas específicamente para
ellas. La utilización de cualquier otra batería puede
crear un riesgo de heridas o incendio.
3. Cuando la batería no esté siendo utilizada,
guárdela alejada de otros objetos metálicos, como
sujetapapeles, monedas, llaves, clavos, tornillos u
otros objetos metálicos pequeños, que puedan
hacer conexión entre un terminal y el otro. Si se
cortocircuitan entre sí los terminales de la batería
podrán producirse quemaduras o un incendio.
4. En condiciones abusivas, es posible que salga
expulsado líquido de la batería; evite el contacto
con él. Si se produce un contacto accidental,
enjuague con agua. Si el líquido entra en los ojos,
además de enjuagarlos, solicite asistencia
médica. El líquido expulsado de la batería puede
ocasionar irritación y quemaduras.
5. No utilice una batería o herramienta que esté
dañada o modificada. Las baterías dañadas o
modificadas pueden comportarse de forma
impredecible resultando en un incendio, explosión o
riesgo de heridas.
6. No exponga una batería o herramienta al fuego o a
temperatura excesiva. La exposición al fuego o a
una temperatura superior a los 130°C puede
ocasionar una explosión.
7. Siga todas las instrucciones de carga y no cargue
la batería o la herramienta fuera del rango de
temperatura especificado en las instrucciones.
Cargar incorrectamente o a temperaturas fuera del
rango especificado puede dañar la batería y aumentar
el riesgo de incendio.
Dispositivos de seguridad
1. Asegúrese siempre de que todos los sistemas de
seguridad están en buen estado de
funcionamiento antes de la operación. La
herramienta no deberá funcionar si solamente se
aprieta el gatillo interruptor o si solamente el brazo de
contacto es presionado contra la madera. Deberá
funcionar solamente cuando se realizan ambas
acciones. Haga una prueba por si se produce una
ara un tipo de batería puede crear un
Un cargador que es
48

posible operación defectuosa sin haber cargado
fijadores y con el impulsor en posición completamente
presionada.
2. Sujetar el gatillo en la posición activada es muy
peligroso. No intente nunca fijar el gatillo.
3. No intente mantener el elemento de contacto
presionado con cinta o alambre. Podría ocasionar
la muerte o heridas graves.
4. Compruebe siempre el elemento de contacto
como se instruye en este manual. Los fijadores
podrán atornillarse accidentalmente si el mecanismo
de seguridad no está funcionando correctamente.
Servicio
1. Realice la limpieza y el mantenimiento justo
después de terminar el trabajo. Mantenga la
herramienta en excelentes condiciones. Lubrique las
partes móviles para evitar oxidación y minimizar el
desgaste relacionado con la fricción. Limpie todo el
polvo de las partes.
2. Pida a un centro de servicio autorizado por Makita
para que le hagan la inspección periódica de la
herramienta.
3. Para mantener la SEGURIDAD y FIABILIDAD del
producto, el mantenimiento y las reparaciones
deberán ser realizados en centros de servicio
autorizados por Makita, utilizando siempre piezas
de repuesto de Makita.
4. Siga los reglamentos locales cuando deseche la
herramienta.
GUARDE ESTAS
INSTRUCCIONES.
ADVERTENCIA: NO deje que la comodidad o
familiaridad con el producto (a base de utilizarlo
repetidamente) sustituya la estricta observancia de
las normas de seguridad para el producto en
cuestión. El MAL USO o el no seguir las normas de
seguridad establecidas en este manual de
instrucciones podrá ocasionar graves heridas
personales.
INSTRUCCIONES DE SEGURIDAD
IMPORTANTES PARA EL
CARTUCHO DE BATERÍA
1. Antes de utilizar el cartucho de batería, lea todas
las instrucciones e indicaciones de precaución
sobre (1) el cargador de baterías, (2) la batería, y
(3) el producto con el que se utiliza la batería.
2. No desarme el cartucho de batería.
3. Si el tiempo de uso se acorta demasiado, cese la
operación inmediatamente. Podría resultar en un
riesgo de recalentamiento, posibles quemaduras e
incluso una explosión.
4. Si entra electrólito en sus ojos, aclárelos con agua
limpia y acuda a un médico inmediatamente.
Existe el riesgo de poder perder la vista.
5. No cortocircuite el cartucho de batería:
(1) No toque los terminales con ningún material
conductor.
ENC009-6
(2) Evite guardar el cartucho de batería en un
cajón junto con otros objetos metálicos,
como clavos, monedas, etc.
(3) No exponga el cartucho de batería al agua ni
a la lluvia.
Un cortocircuito en la batería puede producir una
gran circulación de corriente, un recalentamiento,
posibles quemaduras e incluso una rotura de la
misma.
6. No guarde la herramienta y el cartucho de batería
en lugares donde la temperatura pueda alcanzar o
exceder los 50 °C.
7. Nunca incinere el cartucho de batería incluso en el
caso de que esté dañado seriamente o ya no sirva
en absoluto. El cartucho de batería puede explotar
si se tira al fuego.
8. Tenga cuidado de no dejar caer ni golpear el
cartucho de batería.
9. No utilice una batería dañada.
10. Las baterías de litio-ion contenidas están sujetas
a los requisitos de la Legislación para Materiales
Peligrosos.
Para transportes comerciales, p.ej., por terceras
personas y agentes de transportes, se deberán
observar requisitos especiales para el empaquetado y
etiquetado.
Para la preparación del artículo que se va a enviar, se
requiere consultar con un experto en materiales
peligrosos. Por favor, observe también la posibilidad
de reglamentos nacionales más detallados.
Cubra con cinta aislante o enmascare los contactos
expuestos y empaquete la batería de tal manera que
no se pueda mover alrededor dentro del embalaje.
11. Para desechar el cartucho de batería, retírelo de la
herramienta y deséchelo en un lugar seguro. Siga
los reglamentos locales referentes al desecho de
la batería.
12. Utilice las baterías solamente con los productos
especificados por Makita. La instalación de las
baterías en productos no compatibles puede resultar
en un incendio, calor excesivo, explosión, o fuga de
electrolito.
13. Si la herramienta no va a ser utilizada durante un
periodo de tiempo largo, la batería deberá ser
retirada de la herramienta.
GUARDE ESTAS
INSTRUCCIONES.
PRECAUCIÓN: Utilice solamente baterías
genuinas de Makita. La utilización de baterías no
genuinas de Makita, o baterías que han sido alteradas,
puede resultar en una explosión de la batería
ocasionando incendios, heridas personales y daños.
También anulará la garantía de Makita para la
herramienta y el cargador de Makita.
Consejos para alargar al máximo la vida
de servicio de la batería
1. Cargue el cartucho de batería antes de que se
descargue completamente. Detenga siempre la
operación y cargue el cartucho de batería cuando
note menos potencia en la herramienta.
49

2. No cargue nunca un cartucho de batería que esté
completamente cargado. La sobrecarga acortará
la vida de servicio de la batería.
3. Cargue el cartucho de batería a temperatura
ambiente de 10 °C - 40 °C. Si un cartucho de
batería está caliente, déjelo enfriar antes de
cargarlo.
Visión general de la clavadora
(Fig. 2)
DESCRIPCIÓN DEL
FUNCIONAMIENTO
PRECAUCIÓN:
• Asegúrese siempre de extraer la pila de combustible,
el cartucho de la batería y los clavos antes de ajustar la
herramienta o de comprobar su funcionamiento.
Instalación o extracción del cartucho de
la batería
PRECAUCIÓN:
• Apague siempre la herramienta antes de instalar o
extraer el cartucho de la batería.
• Sujete la herramienta y el cartucho de la batería
firmemente cuando instale o extraiga el cartucho
de la batería. Si no sujeta la herramienta y el cartucho
de la batería firmemente, pueden resbalar de sus
manos y se pueden provocar daños en la herramienta
y el cartucho de la batería y lesiones personales.
(Fig. 3)
Para instalar el cartucho de la batería, sujételo de manera
que la forma de la parte frontal del cartucho de la batería
encaje en la forma de la abertura de instalación de la
batería y deslícelo hasta que encaje en su lugar. Insértela
completamente hasta que quede firmemente sujeta y se
bloquee con un clic. (Fig. 4)
Para extraer el cartucho de la batería, quítelo de la
herramienta al mismo tiempo que presiona los botones
situados en el lateral del cartucho, tal como se muestra en
la figura.
PRECAUCIÓN:
• Inserte siempre el cartucho de la batería hasta que
quede completamente sujeto. De lo contrario, el
cartucho puede desprenderse accidentalmente de la
herramienta y causar lesiones al operario o a alguna
persona que se encuentre cerca.
• No fuerce la instalación del cartucho de la batería. Si
no se inserta suavemente, significa que no lo está
instalando correctamente.
Encender la lámpara
PRECAUCIÓN:
• No mire hacia la luz ni mire directamente hacia la
fuente de luz. (Fig. 5)
• Para encender la lámpara, pulse el botón de la
lámpara. Para apagar la lámpara, vuelva a pulsar el
botón de la lámpara.
Pila de combustible
Colocación de la válvula dosificadora en la pila de
combustible (Fig. 6)
Quite la tapa (en caso de que la válvula dosificadora
disponga de tapa). (Fig. 7)
Presione el extremo delantero. (Fig. 8)
Presione el extremo trasero hasta que se asiente.
Inserción de la pila de combustible (Fig. 9)
Empuje hacia arriba la cubierta de combustible y tire de
ella para abrirla. (Fig. 10)
Inserte la pila de combustible con la boquilla de la válvula
dosificadora orientada hacia el adaptador. (Fig. 11)
Inserte la boquilla correctamente en el pequeño orificio
del adaptador. (Fig. 12)
Coloque la cubierta de combustible sobre la válvula
dosificadora y presiónela para enclavarla.
Ajuste de la profundidad de clavado
PRECAUCIÓN:
• Extraiga la pila de combustible, el cartucho de la
batería y los clavos antes de ajustar la profundidad de
clavado. (Fig. 13)
Para obtener una menor profundidad, gire el regulador en
la dirección A que se muestra en la figura. Para obtener
una mayor profundidad, gire el regulador en la dirección
B. No gire el regulador demasiado o el elemento de
contacto puede desprenderse del regulador o atascarse.
Luz indicadora
El color de la luz indicadora tiene los siguientes
significados.
Verde intermitente: Estado normal
Rojo intermitente: Se debe recargar el cartucho de la
batería.
Rojo fijo: Recargue el cartucho de la batería. No puede
utilizarse la clavadora, porque la batería está descargada.
Naranja intermitente: Se recomienda realizar una
limpieza completa. Consulte la sección
“MANTENIMIENTO” para limpiar el interior de la
herramienta completamente. Para restablecer la luz
indicadora naranja intermitente, pulse el elemento de
contacto durante cinco segundos y, a continuación, pulse
el elemento de contacto cinco veces.
Naranja intermitente después de verde y rojo
intermitente alternado: Se está ejecutando la detección
de fallos. Extraiga el cartucho de la batería y vuelva a
insertarlo para restablecer la herramienta. Si se ejecuta
de nuevo la detección de fallos, hay una avería. Solicite a
su centro de servicio Makita local una reparación.
Instalación del gancho (Fig. 14)
El gancho es útil para colgar la herramienta. Puede
instalarse en cualquier lado de la herramienta. Se puede
quitar sin utilizar ninguna herramienta.
Para instalar el gancho, expanda la parte superior del
gancho e insértela en la herramienta. Para extraer el
gancho, expanda la parte superior del gancho en ambas
direcciones y retire el gancho de la herramienta.
50

MONTAJE
PRECAUCIÓN:
• Extraiga siempre la pila de combustible y el cartucho
de la batería antes de realizar cualquier trabajo en la
herramienta.
Carga de la clavadora (Fig. 15)
Inserte una tira de clavos en la ranura de la parte
posterior del depósito alimentador. (Fig. 16)
Tire de la palanca empujadora mientras presiona el botón
empujador completamente hasta la parte posterior del
depósito alimentador. A continuación, suelte el botón
empujador y devuelva la palanca empujadora al final de la
tira suavemente.
Extracción de los clavos (Fig. 17)
Tire de la palanca empujadora y presione el botón
empujador para soltar el soporte de clavos; luego
devuelva la palanca empujadora a su posición inicial
empujando el botón empujador.
Deslice los clavos hacia la parte posterior del depósito
alimentador y extráigalos.
Adaptador de boquilla (Fig. 18)
El adaptador de boquilla evita que la superficie de la pieza
de trabajo sufra arañazos o se dañe. Coloque el
adaptador de boquilla correctamente.
Guarde el adaptador de boquilla cuando no lo utilice. El
lugar de almacenamiento se encuentra en los lados
inferiores de la herramienta. (Fig. 19)
Adaptador de clavos cortos (Fig. 20 y 21)
Acople el adaptador de clavos cortos para evitar que se
atasquen los clavos cortos cuando utilice clavos más
cortos que 25 mm (1”).
Inserte el adaptador de clavos cortos en la ranura de la
parte posterior del depósito alimentador. A continuación
fije el adaptador apretando el perno.
– Asegúrese de que la herramienta no funciona
únicamente colocando el elemento de contacto contra
la pieza de trabajo sin apretar el gatillo.
– Asegúrese de que la herramienta no funciona cuando
se aprieta el gatillo primero y después se coloca el
elemento de contacto contra la pieza de trabajo.
Para clavar clavos (Fig. 22)
1. Para clavar un clavo, coloque el elemento de contacto
contra la pieza de trabajo.
Se activa el motor del ventilador, se inyecta gas
combustible en la cámara de combustión y se mezcla con
el aire producido por el ventilador. (Fig. 23)
2. Presione firmemente el elemento de contacto y
accione el disparador.
El gas combustible se quema y se clava el clavo.
3. Sólo puede clavar otro clavo tras haber soltado el
elemento de contacto y el disparador.
Mecanismo contra el disparo en vacío
Este mecanismo impide que la herramienta se dispare sin
un clavo.
La prevención contra el disparo en vacío se activa
automáticamente cuando sólo quedan entre 9 y 11
clavos.
Atasco en la clavadora de clavos
ADVERTENCIA:
• Asegúrese siempre de extraer la pila de combustible y
el cartucho de la batería antes de desatascar la
herramienta.
PRECAUCIÓN:
• No utilice clavos deformados o tiras de clavos. De lo
contrario, la alimentación de clavos no será la idónea.
Siga el procedimiento de extracción de clavos y retire los
clavos del depósito alimentador. (Fig. 24)
Abra el pestillo, libere la puerta y, a continuación, retire el
clavo atascado.
FUNCIONAMIENTO
ADVERTENCIA:
• No toque la zona alrededor del orificio de
ventilación de salida de gases. La superficie estará
muy caliente durante o después de una operación. Si
toca la superficie alrededor del orificio de ventilación
de salida de gases puede sufrir quemaduras o
lesiones.
PRECAUCIÓN:
• Asegúrese de que todos los sistemas de seguridad
estén en condiciones de funcionamiento antes de su
utilización.
Comprobación del accionamiento
correcto antes de la operación
Antes de la operación, compruebe siempre los puntos
siguientes.
– Asegúrese de que la herramienta no funciona
únicamente instalando el cartucho de batería y el
recipiente de gas.
– Asegúrese de que la herramienta no funciona
únicamente apretando el gatillo.
MANTENIMIENTO
PRECAUCIÓN:
• Extraiga siempre la pila de combustible, el cartucho de
la batería y los clavos antes de realizar trabajos de
inspección o mantenimiento.
• Nunca utilice gasolina, benceno, disolvente, alcohol o
un producto similar. Se puede provocar una
decoloración, una deformación o grietas.
Mantenimiento tras una jornada de
trabajo
Compruebe siempre la herramienta para observar su
condición general y por si hay tornillos flojos antes de la
operación. Apriete según se requiera.
Al final de una jornada de trabajo, realice una rutina de
mantenimiento.
Esos sencillos pasos pretenden mantener la seguridad y
el rendimiento de la herramienta.
Antes de salir del lugar de trabajo:
• Extraiga el cartucho de la batería y guárdelo en una
caja portaherramientas. Utilice siempre la caja
51

portaherramientas para transportar y almacenar la
herramienta.
• Deseche las pilas vacías en lugares donde ningún niño
las pueda encontrar y donde no se puedan aplastar,
perforar o quemar.
Cuando llegue a casa:
• Coloque el cartucho de la batería en el cargador si es
necesario, lo cual es indicado por la luz indicadora roja.
• Limpie la herramienta con un paño suave y limpio.
• Compruebe el estado del filtro y límpielo si tiene polvo.
Limpieza del filtro de aire (Fig. 25 y 26)
Presione ligeramente hacia arriba la cubierta del filtro y
extráigala. A continuación, solamente tiene que levantar
el filtro para extraerlo.
Dé unos golpecitos al filtro para quitar el polvo que pueda
tener. Con jabón y agua puede dejarse el filtro casi como
nuevo.
Para mantener la SEGURIDAD y la FIABILIDAD del
producto, las reparaciones y cualquier otra tarea de
mantenimiento o ajuste deberán ser realizadas en centros
de servicio autorizados por Makita, utilizando siempre
repuestos Makita.
Limpieza minuciosa
Si se producen con frecuencia disparos en vacío, la
herramienta se debe limpiar minuciosamente.
Consulte la guía de limpieza que se proporciona con el
producto para obtener información detallada y realice la
limpieza.
Si tiene preguntas acerca de la limpieza, consulte con su
centro de servicio Makita local.
ACCESORIOS OPCIONALES
PRECAUCIÓN:
• Se recomienda el uso de estos accesorios o
complementos con la herramienta Makita especificada
en este manual. El uso de otros accesorios o
complementos puede conllevar el riesgo de ocasionar
daños corporales. Utilice los accesorios o
complementos solamente para su fin establecido.
Si necesita cualquier ayuda para obtener más
información relativa a estos accesorios, pregunte a su
centro de servicio Makita local.
• Clavos
• Gafas de seguridad
• Pila de combustible
• Kit de limpieza
• Batería y cargador originales de Makita
NOTA:
• Algunos elementos de la lista se pueden incluir en el
paquete de la herramienta como accesorios estándar.
Pueden ser diferentes de un país a otro.
Ruido
Niveles típicos de ruido ponderado A determinados de
conformidad con EN ISO 11148-13:
Nivel de presión de sonido (L
Nivel de potencia de sonido (L
Incertidumbre (K): 3 dB (A)
): 93 dB (A)
pA
): 106 dB (A)
WA
Utilice protección para los oídos.
ENG905-1
Vibración
ENG904-2
Valor de total de vibraciones determinado de acuerdo con
EN ISO 11148-13:
Emisión de vibraciones (a
Incertidumbre (K): 1,5 m/s
h
2
): 3,5 m/s
2
ENG901-1
• El valor de emisión de vibraciones se ha medido de
acuerdo con el método de prueba estándar y se puede
utilizar para comparar herramientas.
• El valor de emisión de vibraciones declarado también
se puede usar en una evaluación preliminar de la
exposición.
ADVERTENCIA:
• La emisión de vibraciones durante el uso de la
herramienta eléctrica puede diferir del valor de
emisiones declarado, dependiendo de las formas en
que se utiliza la herramienta.
• Asegúrese de identificar las mediciones correctas para
proteger al operario, que se basan en una estimación
de la exposición en condiciones de uso reales
(teniendo en cuenta todas las partes del ciclo de
operaciones, como los momentos en los que la
herramienta está apagada y cuando funciona al ralentí
además del tiempo en que está activado el
disparador).
Declaración de conformidad de la CE
Sólo para países europeos
La Declaración de conformidad de la CE se incluye como
Anexo A en este manual de instrucciones.
52

PORTUGUÊS (Instruções de origem)
Cd
Ni-MH
Li-ion
Descrição geral
1. Bateria
2. Tampa de combustível
3. Gatilho
4. Luz indicadora
5. Botão do impulsor
6. Alavanca do impulsor
7. Carregador
8. Elemento de contacto
9. Luz
10. Ventilador de saída
11. Bo tão
12. Botão de luz
13. Válvula doseadora
14. Tampa
15. Bocal de jacto
16. Regulador
17. Gancho
18. Adaptador de ponta
19. Adaptador de prego curto
20. Parafuso
21. Lingueta
22. Porta
23. Tampa do filtro
24. Filtro
ESPECIFICAÇÕES
Modelo GF600
Comprimento dos pregos Calibre de prego 16Ga: 15 mm - 65 mm
Capacidade de pregos 100 pregos (2 tiras)
Dimensões (C x L x A) 266 mm x 90 mm x 305 mm
Peso líquido 2,2 kg
Tensão nominal C.C. 7,2 V
• Devido à pesquisa e desenvolvimento constantes, estas especificações estão sujeitas a alteração sem aviso prévio.
• As especificações e o cartucho da bateria podem ser diferentes consoante o país.
Símbolos
Descrição dos símbolos utilizados no equipamento.
Certifique-se de que compreende o seu significado, antes
da utilização.
...... Leia o manual de instruções.
.................. Recipiente sob pressão, manter
................. Utilizar apenas no exterior ou em
................. Não utilizar perto de chamas, nem
................. Não danificar, perfurar ou queimar,
................... Manter os dedos afastados do gatilho
................. Utilizar apenas em áreas ventiladas de
afastado de temperaturas superiores
50°C (por ex.: radiação solar). Colocar
o recipiente num local bem ventilado.
divisões bem ventiladas. Não respirar o
gás.
pulverizar sobre superfícies quentes.
Ao utilizar, poderá ser formada uma
mistura de vapor-ar inflamável/
explosiva.
mesmo após a utilização.
.......... Use óculos de segurança.
.......... Utilize proteção auditiva.
quando não estiver a pregar de forma a
evitar disparos acidentais.
forma a evitar náuseas e desmaios.
END107-8
...................Não utilizar em andaimes ou escadas.
...................Aviso: superfície quente!
Utilização prevista
A ferramenta destina-se a apertar em trabalhos de
interiores e móveis.
A ferramenta destina-se exclusivamente a aplicação
profissional de elevado volume. Não utilize a ferramenta
para outras finalidades. Não foi concebida para apertar
fixadores numa superfície dura como aço e betão.
Nunca utilizar a ferramenta em
atmosferas combustíveis. O escape da
ferramenta pode incendiar materiais
inflamáveis.
Não toque na zona em torno deste
símbolo. Tocar na superfície pode
provocar queimaduras ou ferimentos.
.............Apenas para países da UE
Não deite equipamentos eléctricos ou a
bateria no lixo doméstico!
De acordo com as directivas europeias
sobre ferramentas eléctricas e
electrónicas usadas e baterias,
acumuladores e baterias usadas e a
sua aplicação para as leis nacionais, as
ferramentas eléctricas, as baterias e
conjuntos usados devem ser
recolhidos em separado e
encaminhados a uma instalação de
reciclagem dos materiais ecológicos.
ENE073-3
53

Avisos de segurança do pinador a
gás
AVISO: Leia todos os avisos de segurança e
todas as instruções. Se não seguir todos os avisos e
instruções pode provocar ferimentos graves, choques
elétricos e/ou incêndios.
Guarde todos os avisos e instruções para
futuras referências.
Para segurança pessoal e para o funcionamento e
manutenção corretos da ferramenta, leia este manual de
instruções antes de utilizar a ferramenta.
Segurança geral
1. É proibida qualquer outra utilização, exceto a
utilização prevista desta ferramenta. As
ferramentas de aparafusar com fixador com
atuação de contacto contínua ou atuação de
contacto apenas devem ser utilizadas para
aplicações de produção.
2. Mantenha os dedos afastados do gatilho quando
não estiver a operar esta ferramenta e quando
mudar de uma posição operacional para outra.
3. Múltiplos riscos. Leia e compreenda as instruções
de segurança antes de ligar, desligar, carregar,
operar, manter, substituir acessórios na
ferramenta ou trabalhar junto desta. Caso não o
faça pode resultar em lesões graves.
4. Mantenha todas as partes do corpo, tais como as
mãos e as pernas, etc. afastadas da direção de
disparo e assegure que o fixador não consegue
penetrar a peça de trabalho nas partes do corpo.
5. Quando utilizar esta ferramenta, tenha em
consideração que o fixador pode desviar-se e
causar lesões.
6. Segure a ferramenta firmemente e esteja
preparado para lidar com o recuo.
7. Apenas operadores tecnicamente qualificados
devem utilizar a ferramenta de aparafusar com
fixador.
8. Não modifique a ferramenta de aparafusar com
fixador. As modificações poderão reduzir a
eficácia das medidas de segurança e aumentar os
riscos para o operador e/ou espectador.
9. Não elimine o manual de instruções.
10. Não utilize a ferramenta se esta tiver sofrido
danos.
11. Tenha cuidado quando manusear fixadores,
especialmente quando carregar e descarregar,
dado que os fixadores têm pontas afiadas que
podem causar lesões.
12. Verifique sempre a ferramenta apresenta peças
partidas, mal conectadas ou gastas antes de
utilizar a ferramenta.
13. Não tente alcançar um lugar à distância. Utilize a
ferramenta apenas num local de trabalho seguro.
Mantenha sempre uma posição e equilíbrio
apropriados.
14. Mantenha os espectadores afastados (quando
estiver a trabalhar numa área na qual existe a
probabilidade de tráfego de pessoas). Delimite
claramente a sua área de operação.
ENB111-5
15. Nunca aponte a ferramenta na sua direção ou na
direção de outras pessoas.
16. Não deixe o dedo pousado no gatilho quando
pegar na ferramenta, mover-se entre as áreas e as
posições de operação ou quando andar, pois o
dedo pousado no gatilho pode causar o
funcionamento inadvertido da ferramenta. Para as
ferramentas com atuação seletiva, verifique
sempre a ferramenta antes de utilizá-la, de modo a
assegurar que o modo selecionado é o correto.
17. Use luvas que apenas proporcionem a sensação
adequada e o controlo seguro de gatilhos e de
quaisquer dispositivos de regulação.
18. Quando pousar a ferramenta, coloque-a numa
superfície plana. Se utilizar o gancho equipado
com a ferramenta, enganche a ferramenta
fixamente à superfície estável.
19. Não a utilize quando estiver sob a influência do
álcool, drogas ou outros semelhantes.
Riscos de projeção
1. A ferramenta de aparafusar com fixador deve estar
desligada quando descarregar fixadores, realizar
ajustes, desimpedir encravamentos ou substituir
acessórios.
2. Durante o funcionamento, assegure que os
fixadores penetram o material corretamente e que
não podem ser desviados/disparados
incorretamente em direção ao operador e/ou a
quaisquer espectadores.
3. Durante o funcionamento, os resíduos da peça de
trabalho e do sistema de fixação/disposição
podem se
4. Us
seus olhos contra lesões quando utilizar
ferramentas elétricas. Os óculos de proteção
devem cumprir os requisitos da ANSI Z87.1 nos
EUA, EN 166 na Europa ou AS/NZS 1336 na
Austrália/Nova Zelândia. Na Austrália/Nova
Zelândia, é legalmente obrigatório o uso de um
protetor facial para proteger o seu rosto também.
(Fig. 1)
Cabe ao empregador a responsabilidade de impor
o uso de equipamentos de proteção e segurança
apropriados por parte dos operadores de
ferramentas e por parte de outras pessoas na área
de trabalho imediata.
5. Os riscos para outras pessoas devem ser
avaliados pelo operador.
6. Tenha cuidado com as ferramentas sem contacto
com a peça de trabalho, pois podem ser
disparadas inadvertidamente e ferir o operador e/
ou espectadores.
7. Assegure que a ferramenta está sempre engatada
em segurança na peça de trabalho e que não
desliza.
8. Utilize proteção auricular para proteger os
ouvidos contra ruído de escape e proteção para a
cabeça. Use ainda vestuário leve, mas não largo.
As mangas devem ser abotoadas ou estar
enroladas. Não deve usar gravatas.
r descarregados.
e sempre óculos de proteção para proteger os
54

Riscos de operação
1. Segure a ferramenta corretamente: esteja
preparado para reagir a movimentos normais e
repentinos, tais como recuo.
2. Mantenha uma postura corporal equilibrada e uma
posição segura.
3. Devem ser utilizados óculos de proteção
apropriados e recomenda-se o uso de luvas e
vestuário de proteção apropriados.
4. Deve ser usada proteção auditiva apropriada.
5. Utilize a fonte de alimentação correta conforme
indicado no manual de instruções.
6. Não utilize a ferramenta em plataformas móveis ou
traseira de camiões. O movimento súbito da
plataforma poderá perder o controlo da ferramenta e
causar lesões.
7. Assuma sempre que a ferramenta contém os
fixadores.
8. Não apresse o trabalho nem force a ferramenta.
Manuseie a ferramenta com cuidado.
9. Tenha cuidado e mantenha-se numa posição firme
e equilibrada ao utilizar a ferramenta. Certifique-se
de que ninguém está por baixo quando trabalha em
locais altos.
10. Nos telhados e outros locais altos, aparafuse os
fixadores à medida que vai avançando. É fácil
perder o equilíbrio se aparafusar os fixadores quando
está a andar para trás. Quando aparafusar os
fixadores contra uma superfície perpendicular,
trabalhe de cima para baixo. Pode realizar operações
de aparafusamento com menos esforço se o fizer
desta forma.
11. Se aparafusar por engano um fixador sobre outro,
ou se atingir um nó da madeira, o fixador pode
dobrar-se ou a ferramenta pode encravar. O
fixador pode ser atirado para longe e acertar em
alguém ou a própria ferramenta pode reagir de
forma perigosa. Coloque os fixadores com
cuidado.
12. Nunca tente aparafusar os fixadores a partir de
dentro e de fora ao mesmo tempo. Os fixadores
podem ser arrancados e/ou serem arremessados
para longe, apresentando um perigo grave.
Riscos de movimentos repetitivos
1. Quando utiliza uma ferramenta por períodos
prolongados, o operador poderá experimentar
desconforto nas mãos, braços, ombros, pescoço
ou outras partes do corpo.
2. Enquanto utiliza uma ferramenta, o operador deve
adotar uma postura cómoda mas ergonómica.
Mantenha uma posição segura e evite posturas
estranhas ou desequilibradas.
3. Se o operador experienciar sintomas, tais como
desconforto persistente ou recorrente, dor,
palpitações, dormência, entorpecimento,
sensação de queimadura ou rigidez, não ignore
estes sinais de aviso. O operador deve consultar
um profissional de saúde qualificado no que diz
respeito a atividades em geral.
4. A utilização contínua da ferramenta poderá causar
a lesão por esforço repetitivo devido ao recuo
produzido pela ferramenta.
5. Para evitar lesões decorrentes de esforço
repetitivo, o operador não deve tentar chegar a
locais de difícil acesso ou utilizar força excessiva.
Além disso, o operador deve fazer uma pausa para
descansar quando sentir fadiga.
6. Realize uma avaliação de risco relativamente aos
perigos de movimento repetitivo. Esta deve
concentrar-se nas desordens músculoesqueléticas e basear-se preferencialmente no
pressuposto de que a diminuição da fadiga
durante o trabalho é eficaz na redução das
desordens.
Riscos relacionados com acessórios e consumíveis
1. Remova o recipiente de gás e a bateria antes de
trocar/substituir os acessórios, tais como o
contacto com a peça de trabalho, ou realizar
quaisquer ajustes.
2. Utili
ze apenas os tamanhos e os tipos
acessórios que são fornecidos pelo fabricante.
3. Utilize apenas os lubrificantes recomendados
neste manual.
Riscos no local de trabalho
1. Os escorregões, tropeções e quedas são as
principais causas de lesão no local de trabalho.
Tenha cuidado com superfícies escorregadias
causadas pela utilização da ferramenta e também
com os riscos de tropeções causados pela
mangueira da linha de ar.
2. Proceda com cuidado redobrado em ambientes
com os quais não está familiarizado. Poderão
existir riscos ocultos, tais como linhas de
eletricidade ou outra utilidade.
3. Esta ferramenta não se destina à utilização em
atmosferas potencialmente explosivas e não está
isolada contra o contacto com a corrente elétrica.
4. Certifique-se de que não existem cabos elétricos,
tubos de gás, etc. que possam causar um risco
caso sejam danificados pela utilização da
ferramenta.
5. Mantenha a área de trabalho limpa e bem
iluminada. As áreas obstruídas ou escuras dão
origem a acidentes.
6. Podem existir regulamentos locais referentes ao
ruído, que têm de ser cumpridos, mantendo os
níveis de ruído dentro dos limites indicados. Em
determinados casos, devem ser utilizadas
persianas para conter o ruído.
Riscos relacionados com pó e exaustão
1. Verifique sempre ambiente em seu redor. O
escape da ferramenta poderá soprar pó ou objetos
e atingir o operador e/ou os espectadores.
2. Direcione o escape de modo a minimizar
perturbações devidas a poeira num ambiente
repleto de poeira.
3. Se for emitida poeira ou objetos na área de
trabalho, reduza a emissão o máximo possível
para reduzir os perigos de saúde e o risco de
lesão.
Riscos relacionados com ruído
1. A exposição desprotegida a elevados níveis de
ruído pode causar a perda permanente e
incapacitante da audição e outros problemas, tais
como tinido (zumbido, zunido, assobio ou
murmúrio nos ouvidos).
de
55

2. Realize uma avaliação de risco relativamente aos
perigos de ruído na área de trabalho e implemente
os controlos apropriados para estes perigos.
3. Os controlos apropriados para reduzir o risco
poderão incluir ações, tais como materiais de
isolamento para prevenir o zumbido das peças de
trabalho.
4. Utilize proteção auditiva apropriada.
5. Opere e mantenha a ferramenta conforme
recomendado nestas instruções, de modo a
prevenir o aumento desnecessário dos níveis de
ruído.
6. Adote medidas de redução do ruído, por exemplo,
ao colocar as peças de trabalho sobre suportes
amortecedores de som.
Riscos relacionados com vibração
1. A emissão de vibração durante o funcionamento
depende da força de aderência, da força da
pressão de contacto, da direção de trabalho, do
ajuste do fornecimento de energia, da peça de
trabalho, do suporte da peça de trabalho. Realize
uma avaliação de risco relativamente aos perigos
de vibração e implemente os controlos
apropriados para estes perigos.
2. A exposição à vibração pode causar danos
incapacitantes nos nervos e suprimento
sanguíneo das mãos e braços.
3. Use vestuário quente quando trabalhar em
condições atmosféricas frias, mantenha as mãos
quentes e secas.
4. Se experienciar entorpecimento, dormência, dor
ou palidez da pele nos seus dedos ou mãos,
procure aconselhamento médico de um
profissional de saúde ocupacional no que diz
respeito a atividades em geral.
5. Opere e mantenha a ferramenta conforme
recomendado nestas instruções, de modo a
prevenir o aumento desnecessário dos níveis de
vibração.
6. Segure a ferramenta com um aperto leve mas
seguro, porque o risco de vibração é geralmente
superior quando a força de aperto é superior.
Instruções de segurança adicionais para ferramentas
a gás
1. Utilize a ferramenta apenas com o recipiente de
gás genuíno da Makita.
2. Tenha cuidado quando utilizar ferramentas a gás,
dado que a ferramenta pode aquecer, afetando a
aderência e o controlo.
3. As ferramentas de aparafusar com fixador a gás
devem ser utilizadas em espaços ventilados.
4. No caso de o gás combustível líquido entrar em
contacto com a pele humana, podem ocorrer
ferimentos.
5. Os recipientes de gás devem ser marcados de
acordo com a regulamentação dos transportes
obrigatória.
6. Manuseie os recipientes de gás com cuidado e
verifique se existem danos. Os recipientes de gás
danificados podem explodir e causar ferimentos.
7. Leia e cumpra as instruções fornecidas com o
recipiente de gás.
8. Assegure que os materiais combustíveis não são
expostos a gases de escape quentes.
9. Não utilize ferramentas a gás em áreas explosivas
uma vez que as faíscas geradas na ferramenta
podem causar um incêndio ou uma explosão.
10. Os recipientes de gás não devem ser
armazenados descuidadamente ou a altas
temperaturas. Cumpra os regulamentos locais e
as instruções do recipiente de gás para o
manuseamento e eliminação dos recipientes de
gás e baterias ou acumuladores.
11. No caso das ferramentas a gás, uma pequena
libertação de gás pode ser gerada pelas
operações regulares.
Utilização e cuidados com a ferramenta a bateria
1. Recarregue apenas com o carregador
especificado pelo fabricante. Um carregador
adequado para um tipo de bateria pode criar um risco
de incêndio quando utilizado com outra bateria.
2. Uti
3. Quando a bateria não está a ser utilizada,
4. Em condições abusivas, o líquido pode ser
5. Não utilize um conjunto de baterias ou uma
6. Não exponha um conjunto de baterias ou uma
7. Siga todas as instruções de carregamento e não
Dispositivos de segurança
1. Certifique-se de que todos os sistemas de
as ferramentas elétricas apenas com as
lize
baterias especificamente designadas. A utilização
de uma bateria diferente pode criar um risco de
ferimentos e de incêndio.
mantenha-a afastada de outros objetos metálicos,
como clipes, moedas, chaves, pregos, parafusos
ou outros objetos metálicos pequenos que
possam fazer a ligação entre os dois terminais.
Colocar os terminais da bateria em curto-circuito um
com o outro pode provocar queimaduras ou um
incêndio.
ejetado da bateria; evite o contacto com o mesmo.
Se ocorrer um contacto acidental, lave com água.
Se o líquido entrar em contacto com os olhos,
procure também assistência médica. O líquido
ejetado da bateria pode provocar irritações ou
queimaduras.
ferramenta que se encontrem danificados ou
modificados. As baterias danificadas ou modificadas
poderão exibir um comportamento imprevisível,
resultando em incêndio, explosão ou risco de lesão.
ferramenta a incêndio ou temperatura excessiva.
A exposição a incêndio ou a uma temperatura
superior a 130°C poderá causar uma explosão.
carregue o conjunto de baterias ou ferramenta
fora da amplitude de temperaturas especificada
nas instruções. O carregamento impróprio ou a
temperaturas fora da amplitude especificada poderá
danificar a bateria e aumentar o risco de incêndio.
segurança estão em boas condições de trabalho
antes da utilização. A ferramenta não pode ser
utilizada se só o gatilho estiver puxado ou se só o
braço de contacto estiver pressionado contra a
madeira. Só pode funcionar quando as duas ações
são realizadas. Testar quanto a possível
funcionamento deficiente com os fixadores
56

descarregados e o empurrador na posição de
totalmente puxado.
2. Segurar o gatilho na posição LIGADO é muito
perigoso. Nunca tente apertar o gatilho.
3. Não tente manter fixo o elemento de contacto por
meio de fita-cola ou de um fio. Pode ocorrer morte
ou ferimentos graves.
4. Verifique sempre os elementos de contacto como
indicado neste manual. Os fixadores podem ser
acidentalmente aparafusados se o mecanismo de
segurança não estiver a funcionar corretamente.
Assistência
1. Realize uma limpeza e manutenção logo após
terminar o trabalho. Mantenha a ferramenta nas
melhores condições. Lubrifique as peças móveis para
evitar a ferrugem e para minimizar o desgaste
relacionado com a fricção. Limpe todo o pó das
peças.
2. Solicite uma inspeção periódica da ferramenta
num centro de assistência autorizado da Makita.
3. Para manter a SEGURANÇA e FIABILIDADE do
produto, as manutenções e reparações devem ser
realizadas pelos centros de assistência
autorizados da Makita, utilizando sempre peças de
substituição Makita.
4. Respeite os regulamentos locais quando eliminar
a ferramenta.
GUARDE ESTAS INSTRUÇÕES.
AVISO: NÃO permita que o conforto ou
familiaridade com o produto (adquirido com o uso
repetido) substitua o cumprimento estrito das regras
de segurança da ferramenta. A MÁ INTERPRETAÇÃO
ou o não seguimento das regras de segurança
estabelecidas neste manual de instruções pode
provocar ferimentos pessoais graves.
INSTRUÇÕES DE SEGURANÇA
IMPORTANTES PARA A BATERIA
ENC009-6
1. Antes de utilizar a bateria, leia todas as instruções
e etiquetas de precaução no (1) carregador de
bateria (2) bateria e (3) produto que utiliza a
bateria.
2. Não abra a bateria.
3. Se o tempo de funcionamento se tornar
excessivamente curto, pare o funcionamento
imediatamente. Pode resultar em
sobreaquecimento, possíveis queimaduras e
mesmo explosão.
4. Se entrar eletrólito nos seus olhos, lave-os com
água e consulte imediatamente um médico. Pode
resultar em perca de visão.
5. Não coloque a bateria em curto-circuito:
(1) Não toque nos terminais com qualquer
material condutor.
(2) Evite guardar a bateria juntamente com
outros objetos metálicos tais como pregos,
moedas, etc.
(3) Não exponha a bateria à água ou chuva.
Um curto-circuito pode ocasionar um enorme
fluxo de corrente, sobreaquecimento, possíveis
queimaduras e mesmo estragar-se.
6. Não guarde a ferramenta e a bateria em locais
onde a temperatura pode atingir ou exceder 50°C.
7. Não queime a bateria mesmo que esteja estragada
ou completamente gasta. A bateria pode explodir
no fogo.
8. Tenha cuidado para não deixar cair ou dar
pancadas na bateria.
9. Não utilize uma bateria danificada.
10. As baterias de iões de lítio contidas na ferramenta
são sujeitas aos requisitos da DGL (Dangerous
Goods Legislation - Legislação de bens
perigosos).
Para o transporte comercial, por exemplo, por
terceiros ou agentes de expedição, têm de ser
observados os requisitos referentes à embalagem e
etiquetagem.
Para preparação do artigo a ser expedido, é
necessário consultar um perito em materiais
perigosos. Tenha ainda em conta a possibilidade de
existirem regulamentos nacionais mais detalhados.
Coloque fita-cola ou tape os contactos abertos e
embale a bateria de tal forma que não possa moverse dentro da embalagem.
11. Quando eliminar a bateria, remova-a da
ferramenta e elimine-a num local seguro. Siga os
regulamentos locais relacionados com a
eliminação de baterias.
12. Utilize as baterias apenas com os produtos
especificados pela Makita. Instalar as baterias em
produtos não-conformes poderá resultar num
incêndio, calor excessivo, explosão ou fuga de
eletrólito.
13. Se a ferramenta não for utilizada durante um
período de tempo prolongado, a bateria deve ser
removida da ferramenta.
GUARDE ESTAS INSTRUÇÕES.
PRECAUÇÃO: Utilize apenas baterias genuínas
da Makita. A utilização de baterias não genuínas da
Makita ou de baterias que foram alteradas, pode resultar
no rebentamento da bateria provocando incêndios,
ferimentos pessoais e danos. Além disso, anulará da
garantia da Makita no que se refere à ferramenta e ao
carregador Makita.
Conselhos para manter a máxima vida útil
da bateria
1. Carregue a bateria antes que esteja
completamente descarregada. Pare sempre o
funcionamento da ferramenta e carregue a bateria
quando notar menos poder na ferramenta.
2. Nunca carregue uma bateria completamente
carregada. Carregamento excessivo diminui a
vida útil da bateria.
3. Carregue a bateria à temperatura ambiente de
10°C – 40°C. Deixe que uma bateria quente
arrefeça antes de a carregar.
57

Visão geral da máquina de pregar
(Fig. 2)
DESCRIÇÃO DO
FUNCIONAMENTO
PRECAUÇÃO:
• Certifique-se sempre de que retira a célula de
combustível, a bateria e os pregos antes de ajustar ou
verificar funções na ferramenta.
Instalar ou retirar a bateria
PRECAUÇÃO:
• Desligue sempre a ferramenta antes de instalar ou
retirar a bateria.
• Segure bem a ferramenta e a bateria quando
instalar ou retirar a bateria. Se não segurar bem a
ferramenta e a bateria, pode fazer com que caiam das
mãos e provoquem danos na ferramenta e na bateria e
ferimentos pessoais. (Fig. 3)
Para colocar a bateria, segure-a de maneira a que a
forma dianteira da bateria encaixe na abertura do orifício
da bateria. Insira-a completamente até fixar em posição
com um clique. (Fig. 4)
Para remover a bateria, puxe-a para fora ao mesmo
tempo que prime o botão de segurança no lado do
cartucho, conforme indicado na imagem.
PRECAUÇÃO:
• Introduza sempre o cartucho da bateria até ao fundo,
até que encaixe. Caso contrário, pode cair da
ferramenta e causar ferimentos em si, ou em alguém
que esteja perto de si.
• Não instale a bateria forçosamente. Se não encaixar
facilmente é porque não está correctamente
posicionada.
Acender a luz
PRECAUÇÃO:
• Não olhe directamente para a luz da ferramenta.
(Fig. 5)
• Para ligar a luz, prima o botão de luz. Para desligar a
luz, prima novamente o botão de luz.
Célula de combustível
Fixar a válvula doseadora à célula de combustível
(Fig. 6)
Separe a tampa (no caso de a válvula doseadora ser
fornecida com a tampa). (Fig. 7)
Empurre a extremidade dianteira. (Fig. 8)
Empurre a extremidade traseira até assentar.
Inserir a célula de combustível (Fig. 9)
Empurre para cima e puxe a tampa de combustível para a
abrir. (Fig. 10)
Insira a célula de combustível direccionando o bocal de
jacto da válvula doseadora no sentido do adaptador.
(Fig. 11)
Insira o bocal de jacto correctamente no pequeno orifício
do adaptador. (Fig. 12)
Coloque a tampa de combustível sobre a válvula
doseadora e empurre-a para baixo para trancar.
Ajustar a profundidade de colocação dos
pregos
PRECAUÇÃO:
• Retire a célula de combustível, a bateria e os pregos
antes de ajustar a profundidade de colocação dos
pregos. (Fig. 13)
Para obter um profundidade mais superficial, rode o
regulador no sentido A mostrado na figura. Para obter
uma profundidade mais profunda, rode o regulador no
sentido B. Não rode demasiadamente o regulador ou o
elemento de contacto pode sair do regulado ou ficar
preso.
Luz indicadora
A cor da luz indicadora significa o seguinte.
Verde intermitente: Estado normal
Vermelho intermitente: Necessidade de recarregar a
bateria
Vermelha acesa: Recarregue a bateria. Não é possível
pregar porque não existe capacidade de bateria restante.
Cor-de-laranja intermitente: É recomendada uma
limpeza minuciosa. Consulte a secção “MANUTENÇÃO”
para limpar minuciosamente o interior da ferramenta.
Para repor a intermitência cor-de-laranja da luz
indicadora, pressione o elemento de contacto durante
cinco segundos e, de seguida pressione o elemento de
contacto cinco vezes.
Cor-de-laranja intermitente após verde e vermelho
intermitentes alternadamente: Está a ser executada a
detecção de falhas. Retire e volte a colocar a bateria para
proceder à reposição. Se a detecção de falhas voltar a
ser executada, trata-se de um estado de mau
funcionamento. Consulte o seu centro de assistência
Makita local para reparar.
Instalar o gancho (Fig. 14)
O gancho é muito útil para pendurar a ferramenta quando
necessário. Pode instalá-lo em qualquer um dos lados da
ferramenta. Pode ser removido sem utilizar qualquer
ferramenta.
Para instalar o gancho, expanda a parte superior do
mesmo e introduza-o na ferramenta. Para remover o
gancho, expanda a parte superior do mesmo em ambos
os sentidos e retire-o da ferramenta.
MONTAGEM
PRECAUÇÃO:
• Remova sempre a célula de combustível e a bateria
antes de efectuar qualquer trabalho na ferramenta.
Carregar o pregador (Fig. 15)
Insira uma tira de pregos na ranhura na parte traseira do
carregador. (Fig. 16)
Puxe a alavanca do impulsor sem pressionar
completamente o botão do impulsor para a parte traseira
do carregador. De seguida, solte o botão do impulsor e
coloque suavemente a alavanca na extremidade da tira.
Retirar pregos (Fig. 17)
Puxe a alavanca do impulsor e empurre o botão do
impulsor para libertar o suporte de pregos, depois faça
58

regressar a alavanca ao topo empurrando o botão do
impulsor.
Faça deslizar os pregos em direcção à parte traseira do
carregador e retire-os.
Adaptador de ponta (Fig. 18)
O adaptador de ponta impede que a superfície da peça
de trabalho fique arranhada ou danificada. Coloque
correctamente o adaptador de ponta.
Guarde o adaptador de ponta quando não o utilizar. O
local de armazenamento encontra-se nos lados inferiores
da ferramenta. (Fig. 19)
Adaptador de prego curto (Fig. 20 e 21)
Instale o adaptador de prego curto para impedir que os
pregos curtos fiquem encravados quando utiliza pregos
mais pequenos do que 25 mm (1”).
Insira o adaptador de prego curto na ranhura na parte
traseira do carregador. De seguida, fixe o adaptador ao
apertar o parafuso.
FUNCIONAMENTO
AVISO:
• Não toque na zona em torno do ventilador de saída.
A superfície estará muito quente durante ou depois do
funcionamento. Tocar na zona em torno do ventilador
de saída pode provocar queimaduras ou ferimentos.
PRECAUÇÃO:
• Certifique-se de que todos os sistemas de segurança
estão a funcionar adequadamente antes de utilizar a
ferramenta.
Verificar a ação adequada antes da
operação
Antes da operação, verifique sempre os pontos
seguintes.
– Certifique-se de que a ferramenta não funciona
instalando apenas a bateria e o recipiente de gás.
– Certifique-se de que a ferramenta não funciona
puxando apenas o gatilho.
– Certifique-se de que a ferramenta não funciona
colocando apenas o elemento de contacto contra a
peça de trabalho sem puxar o gatilho.
– Certifique-se de que a ferramenta não funciona
quando se puxa, primeiro, o gatilho e depois se coloca
o elemento de contacto contra a peça de trabalho.
Pregar pregos (Fig. 22)
1. Para pregar um prego, coloque o elemento de
contacto contra a peça de trabalho.
É activado o motor do ventilador e é injectado gás
combustível no câmara de combustão, sendo misturado
com ar pelo ventilador. (Fig. 23)
2. Segure o elemento de contacto premindo-o
firmemente e prima o gatilho.
O gás combustível entra em combustão e o prego é
colocado.
3. Para colocar um outro prego terá de libertar o
elemento de contacto e o gatilho.
Mecanismo anti-accionamento
Este mecanismo impede que a ferramenta dispare sem
pregos.
A prevenção anti-accionamento funciona
automaticamente quando os pregos chegam às últimas 9
a 11 peças.
Máquina de pregar encravada
AVISO:
• Certifique-se sempre de que retira a célula de
combustível e a bateria antes de eliminar qualquer
obstrução.
PRECAUÇÃO:
• Não utilize pregos deformados ou arrancados. Não
respeitar esta instrução pode causar mau
reabastecimento de pregos.
Siga o processo de remoção de pregos e remova os
pregos no carregador. (Fig. 24)
Abra a lingueta e solte a porta, de seguida, remova o
prego encravado.
MANUTENÇÃO
PRECAUÇÃO:
• Retire sempre a célula de combustível, a bateria e os
pregos antes de tentar efectuar a inspecção ou
manutenção.
• Nunca utilize gasolina, benzina, diluente, álcool ou
semelhante. Podem formar-se descolorações,
deformações ou fissuras.
Manutenção após trabalho diário
Verifique sempre a ferramenta quanto ao seu estado
geral e para ver se existem parafusos soltos antes da
operação. Aperte conforme necessário.
No final do trabalho diário, efectue uma rotina de fim de
dia trabalho.
Estes simples passos destinam-se a manter a segurança
e o desempenho da ferramenta.
Antes de abandonar o local de trabalho:
• Retire a bateria e guarde-a na bolsa de transporte da
ferramenta. Utilize sempre a bolsa de transporte da
ferramenta para transportar e armazenar a ferramenta.
• Eliminação de todas as células vazias num local onde
não sejam encontradas por crianças, esmagadas,
perfuradas ou queimadas.
Ao chegar a casa:
• Se necessário, coloque a bateria no carregador
conforme indicado pela luz indicadora vermelha.
• Limpe a ferramenta com um pano limpo e suave.
• Verifique o filtro e limpe-o se tiver pó.
Limpar o filtro de ar (Fig. 25 e 26)
Prima a tampa do filtro ligeiramente para cima e removaa. E, de seguida, simplesmente retire o filtro.
Sacuda-o ligeiramente para eliminar qualquer pó. A
utilização de sabão e água permite fazer o filtro voltar a
um estado quase novo
Para manter os níveis de SEGURANÇA e FIABILIDADE
definidos para este produto, as reparações e os
procedimentos de manutenção ou ajustes devem ser
executados por centros de assistência Makita
59

autorizados, utilizando sempre peças de substituição
Makita.
Limpeza minuciosa
Se disparos em vazio ocorrerem frequentemente,
significa que a ferramenta necessita de ser limpa
minuciosamente.
Consulte a o guia de limpeza acompanhante para
informações e efectue a limpeza.
Se tiver dúvidas relativamente à limpeza, consulte o
centro de assistência Makita local.
ACESSÓRIOS OPCIONAIS
PRECAUÇÃO:
• Os seguintes acessórios ou extensões são os
recomendados para utilizar com a ferramenta Makita
especificada neste manual. A utilização de quaisquer
outros acessórios poderá representar um risco de
ferimento para as pessoas. Apenas utilize o acessório
para o fim indicado.
Se precisar de informações adicionais relativas aos
acessórios, contacte o centro local de assistência Makita.
•Pregos
• Óculos protectores
• Célula de combustível
• Kit de limpeza
• Bateria e carregador genuínos da Makita
NOTA:
• Alguns itens na lista podem estar incluídos no pacote
de ferramentas como acessórios de série. Podem
diferir de país para país.
Ruído
Os níveis acústicos ponderados A típicos foram
determinados segundo a EN ISO 11148-13:
Nível de pressão sonora (L
Nível de potência sonora (L
Incerteza (K): 3 dB (A)
): 93 dB (A)
pA
): 106 dB (A)
WA
Use protecção para os ouvidos.
Vibração
O valor total das vibrações determinado de acordo com a
EN ISO 11148-13:
Emissão de vibração (a
Incerteza (K): 1,5 m/s
h
2
): 3,5 m/s
2
• O valor da emissão de vibração declarado foi medido
de acordo com o método de teste padrão e pode ser
utilizado para comparar uma ferramenta com outra.
• O valor da emissão de vibração declarado pode
também ser utilizado numa avaliação preliminar de
exposição.
AVISO:
• A emissão de vibração durante a utilização real da
ferramenta eléctrica pode ser diferente do valor de
emissão declarado, dependendo da forma como a
ferramenta é utilizada.
• Certifique-se de que identifica medidas de segurança,
para proteger o operador, que são baseadas numa
estimativa de exposição nas condições reais de
utilização (tendo em conta todas as partes do ciclo de
funcionamento, como as vezes que a ferramenta é
ENG905-1
ENG904-2
ENG901-1
desligada e quando está a trabalhar ao ralenti, além do
tempo de utilização).
Declaração de conformidade CE
Apenas para os países europeus
A declaração de conformidade CE está incluída como
Anexo A neste manual de instruções.
60

DANSK (Originalvejledning)
Cd
Ni-MH
Li-ion
Forklaring til generel oversigt
1. Batteripakke
2. Gaspatrondæksel
3. Afbryderkontakt
4. Indikatorlampe
5. Trykknap
6. Håndtag til trykanordning
7. Magasin
8. Kontaktelement
9. Lampe
10. Udstødningsåbning
11. Knap
12. Lampeknap
13. Doseringsventil
14. Hætte
15. Dyse
16. Justeringsenhed
17. Krog
18. Spidsadapter
19. Adapter til korte søm
20. Bolt
21. Låsemekanisme
22. Dør
23. Filterdæksel
24. Filter
SPECIFIKATIONER
Model GF600
Sømlængde Sømmål 16Ga: 15 mm - 65 mm
Sømkapacitet 100 søm (2 bånd)
Størrelse (L x B x H) 266 mm x 90 mm x 305 mm
Nettovægt 2,2 kg
Nominel spænding 7,2 V jævnstrøm
• På grund af vores løbende forsknings- og udviklingsprogram kan specifikationerne heri ændres uden forudgående
varsel.
• Specifikationerne og batteripakken kan variere fra land til land.
Symboler
Her vises de symboler, der benyttes til udstyret. Vær
sikker på, at du forstår deres betydning, før du bruger
udstyret.
...... Læs brugsanvisningen.
.................. Beholder under tryk som skal holdes
................. Må kun bruges udenfor og i rum med
................. Må ikke bruges i nærheden af flammer
................. Må ikke beskadiges, punkteres eller
................... Hold fingrene væk fra
væk væk fra temperaturer over 50°C
(fx solstråler). Opbevar beholderen på
et sted med ordentlig ventilation.
ordentlig ventilation. Undlad at indånde
gas.
eller sprøjtes på varme overflader.
Under brug kan der dannes en
brandfarlig/eksplosiv dampluftblanding.
brændes, selv efter brug.
.......... Bær beskyttelsesbriller.
.......... Bær høreværn.
afbryderkontakten, når du ikke slår søm
i, for at undgå utilsigtet affyring.
END107-8
.................Må kun bruges på steder med ordentlig
ventilation for at undgå kvalme og tab
af bevidsthed. Brug aldrig værktøjet i
brandfarlige atmosfærer. Værktøjets
udstødning kan antænde brandfarlige
materialer.
...................Anvend ikke enheden på stilladser eller
stiger.
...................Advarsel: varm overflade!
Rør ikke omkring dette symbol.
Berøring af overfladen kan medføre
forbrændinger eller personskader.
............. Kun for EU-lande
Elektrisk udstyr eller batteripakke må
ikke bortskaffes sammen med
almindeligt affald!
I henhold til det europæiske direktiv om
bortskaffelse af elektriske og
elektroniske produkter og om batterier
og akkumulatorer og bortskaffelse af
batterier og akkumulatorer og deres
implementering under gældende
national lovgivning skal brugt elektrisk
udstyr, batterier og batteripakke(r), der
har udtjent deres levetid, indsamles
separat og returneres til miljøgodkendt
genindvinding.
Tilsigtet brug
Værktøjet er beregnet til fastgørelse indendørs og på
møbler.
Maskinen er kun beregnet til professionel anvendelse
med stor arbejdsmængde. Brug den ikke til noget andet
formål. Den er ikke beregnet til at drive fastgørelsesmidler
ind i en hård overflade som stål og beton.
ENE073-3
61

Sikkerhedsadvarsler for
gassømpistol
ADVARSEL: Læs alle sikkerhedsadvarsler og alle
instruktioner. Hvis De ikke følger advarslerne og
instruktionerne, kan det medføre alvorlig personskade,
elektrisk stød og/eller brand.
Gem alle advarsler og instruktioner til
fremtidig reference.
Af hensyn til Deres personlige sikkerhed samt for korrekt
betjening og vedligeholdelse af maskinen skal De læse
denne brugsanvisning, før De bruger maskinen.
Generel sikkerhed
1. Al anden brug end den tilsigtede brug er forbudt.
Maskiner til idrivning af fastgørelsesmidler med
kontinuerlig kontaktaktivering eller
kontaktaktivering må kun bruges til
produktionsformål.
2. Hold fingrene på afstand af udløseren, når
maskinen ikke bruges, og når den flyttes fra ét
arbejdssted til et andet.
3. Flere risici. Du skal læse og forstå
sikkerhedsinstruktionerne, før du tilslutter,
frakobler, isætter, betjener, vedligeholder, skifter
tilbehør på eller arbejder i nærheden af maskinen.
Hvis du ikke overholder dette, kan det resultere i
alvorlig legemsbeskadigelse.
4. Hold alle kropsdele som f.eks. hænder og ben osv.
væk fra affyringsretningen, og sørg for, at
fastgørelsesmidler ikke kan trænge igennem
arbejdsemnet og ind i dele af kroppen.
5. Ved brug af maskinen skal du være opmærksom
på, at fastgørelsesmidlet kan blive slynget tilbage
og forårsage personskade.
6. Hold maskinen med et fast greb, og vær forberedt
på at håndtere tilbageslag.
7. Kun teknisk uddannede operatører må bruge
maskinen til idrivning af fastgørelsesmidler.
8. Undlad at ændre maskinen til idrivning af
fastgørelsesmidler. Ændringer kan reducere
sikkerhedsforanstaltningernes effektivitet og øge
risikoen for operatøren og/eller omkringstående.
9. Undlad at smide brugsanvisningen væk.
10. Undlad at bruge en maskine, hvis maskinen er
beskadiget.
11. Vær forsigtig ved håndtering af
fastgørelsesmidler, især i forbindelse med
indsætning og fjernelse, da fastgørelsesmidler har
skarpe spidser, som kan forårsage personskade.
12. Kontroller altid maskinen før brug for knækkede,
forkert tilkoblede eller slidte dele.
13. Stræk dig ikke for langt. Brug kun på et sikkert
arbejdssted. Oprethold til enhver tid sikkert
fodfæste og balance.
14. Hold omkringstående på afstand (ved arbejde på
et sted, hvor det er sandsynligt, at personer vil
færdes). Afmærk brugsområdet tydeligt.
15. Ret aldrig maskinen mod dig selv eller andre.
16. Lad ikke fingeren hvile på udløseren, når du tager
maskinen op, flytter dig mellem arbejdsområder
og positioner eller går, da en finger på udløseren
kan medføre utilsigtet funktion. For maskiner med
ENB111-5
selektiv aktiveringstilstand skal du altid
kontrollere maskinen før brugen for at sikre dig, at
den korrekte tilstand er valgt.
17. Bær kun handsker, der giver tilstrækkelig følelse
og sikker kontrol med udløsere og andre
justeringsmekanismer.
18. Læg maskinen på en flad overflade, når den ikke
bruges. Hvis du bruger den krog, der følger med
maskinen, skal du fastgøre maskinen forsvarligt
på den stabile overflade.
19. Undlad brug, hvis De er påvirket af alkohol,
narkotika eller lignende.
Risici i forbindelse med projektiler
1. Maskinen til idrivning af fastgørelsesmidler skal
være taget ud af forbindelse, når du tager
fastgørelsesmidler ud, foretager justeringer,
fjerner fastklemte emner eller skifter tilbehør.
2. Under brugen skal du sørge omhyggeligt for, at
fastgørelsesmidler trænger korrekt ind i
materialet, og at de ikke kan slynges tilbage eller
affyres utilsigtet mod operatøren og/eller
eventuelle omkringstående.
3. Under brugen kan der frigøres rester fra
arbejdsemnet og fastgørelses-/
sorteringssystemet.
4. Bær altid beskyttelsesbriller for at beskytte dine
øjne mod skader, når du bruger maskiner.
Beskyttelsesbrillerne skal overholde ANSI Z87.1 i
USA, EN 166 i Europa eller AS/NZS 1336 i
Australien/New Zealand. I Australien/New Zealand
e
r det desuden påbud
ansigtsskærm for at beskytte dit ansigt. (Fig. 1)
Det er arbejdsgiverens ansvar at påbyde brugerne
af maskinen samt andre personer i det
umiddelbare arbejdsområde at bære passende
sikkerhedsbeskyttelsesudstyr.
5. Operatøren skal vurdere risikoen for andre.
6. Vær forsigtig med maskiner uden kontakt med
arbejdsemnet, da de kan udløses utilsigtet og
skade operatøren og/eller omkringstående.
7. Sørg for, at maskinen altid har sikker kontakt med
arbejdsemnet, og at den ikke kan glide.
8. Brug høreværn for at beskytte Deres ører mod
udstødningsstøj og som hovedværn. Bær også
let, men ikke løst tøj. Ærmer skal være knappet
eller rullet op. Undlad at bære halstørklæde.
Risici ved brug
1. Hold maskinen korrekt: Vær klar til at imødegå
normale eller pludselige bevægelser som f.eks.
tilbageslag.
2. Oprethold en velafbalanceret kropsstilling og
sikkert fodfæste.
3. Der skal benyttes passende sikkerhedsbriller, og
passende handsker og beskyttelsestøj anbefales.
4. Der skal bæres passende høreværn.
5. Anvend kun den korrekte energiforsyning som
angivet i brugsanvisningen.
6. Anvend ikke maskinen på bevægelige platforme
eller bag på lastbiler. Hvis platformen bevæger sig
pludseligt, kan det medføre tab af kontrollen med
maskinen og forårsage personskade.
7. Gå altid ud fra, at der er fastgøringsmidler i
maskinen.
t ved lov at bære
62

8. Undlad at arbejde for hurtigt eller at bruge magt på
maskinen. Håndter maskinen forsigtigt.
9. Sørg for solidt fodfæste, og hold altid balancen
med maskinen. Sørg for, at der ikke befinder sig
nogen under dig, når du arbejder på højtliggende
steder.
10. På tage og andre højtliggende steder skal De drive
fastgøringsmidler, efterhånden som De arbejder
Dem fremad. Det er let at miste fodfæstet, hvis De
driver fastgøringsmidler, mens De kryber baglæns.
Ved drivning af fastgøringsmidler mod en lodret flade
skal De arbejde fra toppen mod bunden. De bliver
mindre træt under udførelsen af drivarbejdet ved at
gøre dette.
11. Et fastgøringsmiddel kan bøjes, eller der kan
opstå stop i maskinen, hvis De ved en fejltagelse
driver et fastgøringsmiddel oven i et andet
fastgøringsmiddel eller rammer en knude i træet.
Fastgøringsmidlet kan slynges ud og ramme
personer, eller selve maskinen kan reagere på
farlig vis. Placer fastgøringsmidlerne
omhyggeligt.
12. Forsøg aldrig at drive fastgøringsmidler fra både
indersiden og ydersiden på samme tid.
Fastgøringsmidler kan gå igennem og/eller flyve væk
og forårsage alvorlig fare.
Risici i forbindelse med gentagne bevægelser
1. Ved brug af en maskine i længere tidsrum kan
operatøren opleve ubehag i hænderne, armene,
skuldrene, nakken eller andre dele af kroppen.
2. Ved brug af en maskine skal operatøren indtage en
passende, men ergonomisk stilling. Oprethold
sikkert fodfæste, og undgå akavede stillinger eller
stillinger, hvor du er ude af balance.
3. Hvis operatøren oplever symptomer som
vedvarende eller gentagen ubehag, smerte,
dunken, ømhed, prikken, følelsesløshed,
brændende fornemmelse eller stivhed, må disse
advarselstegn ikke ignoreres. Operatøren skal
konsultere en kvalificeret sundhedsspecialist
vedrørende de overordnede aktiviteter.
4. Kontinuerlig brug af maskinen kan forårsage
gentagen belastningsskade på grund af det
tilbageslag, som maskinen udvikler.
5. For at undgå gentagen belastningsskade må
operatøren ikke strække sig for langt eller bruge
overdreven magt. Operatøren skal desuden tage et
hvil, når han eller hun føler sig træt.
6. Foretag en risikovurdering vedrørende risici i
forbindelse med gentagne bevægelser. Den bør
fokusere på muskel- og skeletlidelser og
fortrinsvis være baseret på den antagelse, at
reduktion af træthed under arbejdet er effektiv for
at reducere lidelser.
Risici i forbindelse med tilbehør og forbrugsstoffer
1. Fjern gasbeholderen og akkuen før du skifter/
udskifter tilbehør som f.eks. kontakt med
arbejdsemnet eller foretager justeringer.
2. Brug kun de størrelser og typer af tilbehør, som
producenten leverer.
3. Brug kun de smøremidler, der anbefales i denne
brugsvejledning.
Risici i forbindelse med arbejdsstedet
1. Glid, snublen og fald er hyppige årsager til
personskader på arbejdspladsen. Vær
opmærksom på glatte overflader, der fremkommer
ved brugen af maskinen, og også på snublefarer
på grund af luftslangen.
2. Vær ekstra forsigtig i uvante omgivelser. Der kan
være skjulte farer, for eksempel elledninger eller
andre forsyningsledninger.
3. Denne maskine er ikke beregnet til brug i
potentielt eksplosive atmosfærer, og den er ikke
isoleret, hvis den kommer i kontakt med elektrisk
strøm.
4. Sørg for, at der ikke er nogen elledninger, gasrør
osv., der kan udgøre en fare, hvis de beskadiges
ved brug af maskinen.
5. Hold arbejdsområdet rent og veloplyst.
e
ller mørke område
6. Der kan være lokale regler for støj, som skal
overholdes ved at holde støjniveauet inden for de
foreskrevne grænser. I nogle tilfælde skal der
benyttes skodder for at holde støj inde.
Risici i forbindelse med støv og udstødning
1. Kontroller altid dine omgivelser. Udstødningen fra
maskinen kan muligvis blæse støv eller
genstande, som kan ramme operatøren og/eller
omkringstående.
2. Ret udstødningen, så forstyrrelsen af støv i
støvfyldte omgivelser minimeres.
3. Hvis støv eller genstande slynges ud i
arbejdsområdet, skal du reducere emissionen så
meget som muligt for at reducere sundhedsrisici
og risiko for personskade.
Risici i forbindelse med støj
1. Ubeskyttet udsættelse for høje støjniveauer kan
forårsage permanent, invaliderende tab af
hørelsen og andre problemer som f.eks. tinnitus
(ringen, summen, fløjten eller brummen i ørerne).
2. Foretag en risikovurdering vedrørende risici i
forbindelse med støj i arbejdsområdet, og træf
passende forholdsregler vedrørende disse risici.
3. Passende kontroller for at mindske risikoen kan
omfatte foranstaltninger som f.eks. dæmpende
materialer for at forhindre arbejdsemner i at
“ringe”.
4. Anvend passende høreværn.
5. Betjen og vedligehold maskinen som anbefalet i
disse instruktioner for at forhindre unødig
forøgelse af støjniveauet.
6. Træf forholdsregler for at reducere støj, for
eksempel ved at placere arbejdsemner på
lyddæmpende støtter.
Risici i forbindelse med vibrationer
1. Vibrationsafgivelsen under brug afhænger af
gribekraften, kontakttrykkraften, arbejdsretningen,
justeringen af energiforsyningen, arbejdsemnet
og understøttelsen af arbejdsemnet. Foretag en
risikovurdering vedrørende risici i forbindelse
med vibration, og træf passende forholdsregler
vedrørende disse risici.
2. Udsættelse for vibration kan forårsage
invaliderende skader på nerverne og
blodforsyningen til hænderne og armene.
r forårsager ulykker.
Rodede
63

3. Bær varmt tøj, når du arbejder i kolde omgivelser,
så du holder hænderne varme og tørre.
4. Hvis du oplever følelsesløshed, prikken, smerte,
eller at huden på fingrene eller hænderne bliver
bleg, skal du søge medicinsk rådgivning fra en
kvalificeret professionel sundhedsspecialist
vedrørende dine overordnede aktiviteter.
5. Betjen og vedligehold maskinen som anbefalet i
disse instruktioner for at forhindre unødig
forøgelse af vibrationsniveauet.
6. Hold maskinen med et let, men sikkert greb, da
risikoen for vibration generelt er større, når
gribekraften er stærkere.
Yderligere sikkerhedsinstruktioner for gasmaskiner
1. Brug kun maskinen med den originale
gasbeholder fra Makita.
2. Vær forsigtig ved brug af gasmaskiner, da
maskinen kan blive varm, hvilket påvirker grebet
og styringen.
3. Gasmaskiner til idrivning af fastgørelsesmidler
skal anvendes på steder med ventilation.
4. Hvis brændbar gas i væskeform kommer i kontakt
med menneskers hud, kan der opstå skader.
5. Gasbeholdere skal være mærket i henhold til den
gældende transportbestemmelse.
6. Håndter gasbeholdere forsigtigt og se efter for
skader. Beskadigede gasbeholdere kan
eksplodere og forårsage personskade.
7. Læs og følg instruktionerne som følger med
gasbeholderen.
8. Sørg for, at letantændelige materialer ikke
udsættes for varme udstødningsgasser.
9. Brug ikke gasmaskiner på eksplosive områder,
eftersom gnister genereret i maskinen muligvis
kan forårsage brand eller eksplosion.
10. Gasbeholdere må ikke opbevares uforsigtigt eller
ved høj temperatur. Følg de lokale bestemmelser
og gasbeholderens instruktioner angående
håndtering og bortskaffelse af gasbeholdere og
akkuer eller akkumulatorer.
11. Gasmaskiner afgiver muligvis en lille smule gas,
der genereres ved almindelige anvendelser.
Brug og vedligeholdelse af batteriet
1. Oplad kun med den oplader, som producenten
angiver En oplader, der passer til én type batteri, kan
forårsage brand, hvis den anvendes med et andet
batteri.
2. Brug kun el-værktøjer sammen med de tilhørende
batteripakker. Brug af andre batteripakker kan
forårsage personskade og brand.
3. Når batteripakker ikke anvendes, skal de holdes
borte fra andre metalgenstande som papirclips,
mønter, nøgler, søm, skruer og andre små
metalgenstande, der kan skabe forbindelse
mellem terminalerne. Hvis batteriets terminaler
kortsluttes, kan det forårsage brand.
4. I tilfælde af misbrug kan der sprøjte væske ud fra
batteriet. Undgå kontakt. Skyl med vand, hvis De
kommer i kontakt med væsken. Søg læge, hvis De
får væske i øjet. Væske, der sprøjter ud fra batteriet,
kan medføre irritation eller forbrændinger.
5. Undlad at bruge en akku eller maskine, der er
beskadiget eller ændret. Beskadigede eller ændrede
64
batterier kan fungere uforudsigeligt og medføre brand,
eksplosion eller risiko for personskade.
6. Undlad at udsætte en akku eller maskine for brand
eller høje temperaturer. Udsættelse for brand eller
temperaturer på over 130°C kan medføre eksplosion.
7. Følg alle instruktioner vedrørende opladning, og
undlad at oplade akkuen eller maskinen uden for
det temperaturinterval, der er angivet i
instruktionerne. Opladning, der udføres forkert eller
ved temperaturer uden for det angivne
t
emperaturinterval, kan beskadige batteriet og
medføre øget risiko for brand.
Sikkerhedsenheder
1. Sørg for, at alle sikkerhedssystemer fungerer, før
brugen. Maskinen må ikke kunne køre, hvis der kun
trykkes på afbryderknappen, eller hvis kun
kontaktarmen trykkes mod træet. Den må kun
fungere, når begge handlinger udføres. Test for
eventuel fejlfunktion uden fastgøringsmidler og
udstøderen i fuldt trukket position.
2. Det er meget farligt at fastlåse udløseren i TIL-
stillingen. Forsøg aldrig at fastlåse udløseren.
3. Forsøg ikke at holde kontaktelementet trykket ned
med tape eller ståltråd. Dette kan medføre dødsfald
eller alvorlig personskade.
4. Kontrollér altid kontaktelementet som beskrevet i
denne brugsanvisning. Fastgøringsmidler kan blive
drevet ved et uheld, hvis sikkerhedsmekanismen ikke
fungerer korrekt.
Service
1. Udfør rengøring og vedligeholdelse umiddelbart
efter, at De afslutter arbejdet. Hold maskinen i
bedste stand. Smør bevægelige dele for at undgå rust
og minimere friktionsrelateret slid. Tør alt støv af
delene.
2. Bed et Makita autoriseret servicecenter om
periodisk inspektion af maskinen.
3. For at opretholde produktets SIKKERHED og
PÅLIDELIGHED skal vedligeholdelse og
reparation udføres af Makita autoriserede
servicecentre, og der skal altid benyttes Makita
reservedele.
4. Følg de lokale regulativer ved bortskaffelse af
maskinen.
GEM DISSE FORSKRIFTER.
ADVARSEL: LAD IKKE bekvemmelighed eller
kendskab til produktet (opnået gennem gentagen
brug) forhindre, at sikkerhedsforskrifterne for
produktet nøje overholdes. MISBRUG eller
forsømmelse af at følge de i denne brugsvejledning
givne sikkerhedsforskrifter kan medføre alvorlig
personskade.
VIGTIGE
SIKKERHEDSINSTRUKTIONER
FOR AKKUEN
1. Læs alle instruktioner og advarselsmærkater på
(1) akku-opladeren, (2) akkuen og (3) produktet,
som anvender akku.
2. Lad være med at skille akkuen ad.
ENC009-6

3. Hold straks op med anvendelsen, hvis brugstiden
er blevet stærkt afkortet. Fortsat anvendelse kan
resultere i risiko for overophedning,
forbrændinger og endog eksplosion.
4. Hvis De har fået elektrolytvæske i øjnene, skal De
straks skylle den ud med rent vand og derefter
øjeblikkeligt søge lægehjælp. I modsat fald kan De
miste synet.
5. Vær påpasselig med ikke at komme til at kortslutte
akkuen:
(1) Rør ikke ved terminalerne med noget ledende
materiale.
(2) Undgå at opbevare akkuen i en beholder
sammen med andre genstande af metal, for
eksempel søm, mønter og lignende.
(3) Udsæt ikke akkuen for vand eller regn.
Kortslutning af akkuen kan forårsage en kraftig
øgning af strømmen, overophedning, mulige
forbrændinger og endog værktøjstop.
6. Opbevar ikke værktøjet og akkuen på et sted, hvor
temperaturen kan nå eller overstige 50 °C.
7. Lad være med at brænde akkuen, selv ikke i
tilfælde, hvor den har lidt alvorlig skade eller er
fuldstændig udtjent. Akkuen kan eksplodere, hvis
man forsøger at brænde den.
8. Lad være med at brænde akkuen eller udsætte
den for stød.
9. Anvend ikke en beskadiget akku.
10. De indbyggede litium-ion-batterier er underlagt
lovkrav vedrørende farligt gods.
Ved kommerciel transport, f.eks. af tredjeparts
transportselskaber, skal særlige krav til forpakning og
mærkning overholdes.
Ved forberedelse af udstyret til forsendelse skal du
kontakte en ekspert i farligt gods. Overhold også
eventuel mere detaljeret national lovgivning.
Tape eller tildæk åbne kontakter, og pak batteriet på
en måde, så det ikke kan flytte sig rundt i pakningen.
11. Når akkuen bortskaffes, skal du fjerne den fra
maskinen og bortskaffe den på et sikkert sted.
Følg de lokale love vedrørende bortskaffelsen af
batterier.
12. Brug kun batterierne med de produkter, som
Makita specificerer. Hvis batterierne installeres i
ikke-kompatible produkter, kan det medføre brand,
kraftig varme, eksplosion eller udsivning af elektrolyt.
13. Hvis maskinen ikke skal bruges i længere tid ad
gangen, skal du fjerne batteriet fra maskinen.
GEM DENNE BRUGSANVISNING.
FORSIGTIG: Brug kun originale batterier fra
Makita. Brug af uoriginale Makita-batterier, eller batterier
som er blevet ændret, kan muligvis medføre brud på
batteriet, hvilket kan forårsage brand, personskade eller
beskadigelse. Det ugyldiggør også Makita-garantien for
Makita-maskinen og opladeren.
Tips til opnåelse af maksimal akku-levetid
1. Oplad akkuen, inden den er helt afladet. Stop altid
værktøjet, og oplad akkuen, hvis De bemærker, at
værktøjeffekten er aftagende.
2. Genoplad aldrig en fuldt opladet akku.
Overopladning vil afkorte akkuens levetid.
3. Oplad akkuen ved stuetemperatur ved 10 °C 40 °C. Lad altid en varm akku få tid til at køle af,
inden den oplades.
Oversigt over sømpistolen (Fig. 2)
FUNKTIONSBESKRIVELSE
FORSIGTIG:
• Sørg altid for at fjerne gaspatronen, batteripakken og
sømmene, inden du justerer eller kontrollerer
funktionen af værktøjet.
Montering eller afmontering af
batteripakke
FORSIGTIG:
• Sluk altid for maskinen inden montering eller
afmontering af batteripakken.
• Hold godt fast i maskinen og batteripakken, når du
monterer eller afmonterer batteripakken. Hvis
maskinen og batteripakken ikke holdes ordentligt fast,
kan de glide ud af hænderne og resultere i skader på
maskinen og batteripakken samt personskade. (Fig. 3)
Når du monterer batteripakken, skal du holde den sådan,
at forkanten på batteripakken passer ind i
batteriåbningen, og skubbe den ind på plads. Sæt den
hele vejen ind, indtil den låses på plads med et lille klik.
(Fig. 4)
Ved afmontering af batteripakken trækkes den ud af
værktøjet, mens der trykkes på knapperne på siden af
pakken, som vist på figuren.
FORSIGTIG:
• Sæt altid batteripakken helt ind, indtil den låses på
plads. Ellers kan den falde ud af maskinen og skade
dig eller andre personer i nærheden.
• Anvend ikke kræfter til installering af batteripakken.
Hvis den ikke glider let ind, er den ikke indsat korrekt.
Tænding af lampen
FORSIGTIG:
• Se ikke direkte ind i lyset eller lyskilden. (Fig. 5)
• Tryk på lampeknappen for at tænde for lampen. Tryk
på lampeknappen igen for at slukke for lampen.
Gaspatron
Monter doseringsventilen på gaspatronen (Fig. 6)
Løsn hætten (hvis doseringsventilen er udstyret med en
hætte). (Fig. 7)
Tryk ind på den forreste kant. (Fig. 8)
Tryk ind på den bagerste kant indtil den sidder på plads.
Isætning af gaspatronen (Fig. 9)
Tryk op og og træk i gaspatrondækslet for at åbne det.
(Fig. 10)
Isæt gaspatronen med dysen på doseringsventilen
vendende mod adapteren. (Fig. 11)
Sæt dysen ordentligt ind i det lille hul i adapteren.
(Fig. 12)
Placer gaspatrondækslet over doseringsventilen og tryk
ned for at låse det fast.
65

Justering af sømdybden
FORSIGTIG:
• Fjern gaspatronen, batteripakken og sømmene, inden
du justerer sømdybden. (Fig. 13)
For at få en mindre dybde skal du dreje
justeringsenheden hen i A-retningen som vist på figuren.
For at få en større dybde skal du dreje justeringsenheden
hen i B-retningen. Juster ikke justeringsenheden for
meget, ellers kan kontaktelementet skrues af
justeringsenheden, eller sætte sig fast.
Indikatorlampe
Farven på indikatorlampen har følgende betydninger.
Blinker grønt: Normal status
Blinker rødt: Du er nødt til at genoplade batteripakken
Lyser rødt: Genoplad batteripakken. Kan ikke sømme
pga. mangel på strøm på batteriet.
Blinker orange: Grundig rengøring anbefales. Se
afsnittet “VEDLIGEHOLDELSE” angående grundig
indvendig rengøring af maskinen. For at nulstille den
orange blinken af indikatorlampen skal du skubbe
kontaktelementet i fem sekunder, og derefter skubbe
kontaktelementet fem gange.
Blinker orange efter at have blinket henholdsvist
grønt og rødt. Fejldetektion kører. Tag batteripakken ud
og sæt den i igen for at nulstille værktøjet. Hvis
fejldetektionen kører igen, er der funktionsfejl på
værktøjet. Henvend dig til dit lokale Makita-servicecenter
angående reparation.
Montering af krogen (Fig. 14)
Krogen er nyttig til midlertidig ophængning af maskinen.
Du kan montere den på begge sider af værktøjet. Den kan
fjernes uden brug af noget værktøj.
For at montere krogen skal du udvide den øverste del af
krogen og indsætte den i værktøjet. For at afmontere
krogen skal du udvide den øverste del af krogen i begge
retninger og trække krogen af værktøjet.
MONTERING
FORSIGTIG:
• Fjern altid gaspatronen og batteripakken inden du
udfører noget arbejde på værktøjet.
Isætning af søm i sømpistolen (Fig. 15)
Indsæt en strimmel søm i sprækken bagerst i magasinet.
(Fig. 16)
Træk håndtaget til trykanordningen hele vejen ned til
bagenden af magasinet med trykknappen trykket ind. Slip
derefter trykknappen og returner forsigtigt håndtaget til
trykanordningen til enden af båndet.
Udtagning af søm (Fig. 17)
Træk i håndtaget til trykanordningen og tryk på
trykknappen for at frigøre sømfremføreren og returner
håndtaget til trykanordningen til toppen ved at trykke på
trykknappen.
Skub sømmene bagud i magasinet og tag dem ud.
Spidsadapter (Fig. 18)
Spidsadapteren forhindrer arbejdsemnets overflade i at
blive ridset eller beskadiget. Placer spidsadapteren
ordentligt.
Opbevar spidsadapteren på sin plads, når den ikke
benyttes. Dens opbevaringsplads findes i bunden af
værktøjet. (Fig. 19)
Adapter til korte søm (Fig. 20 og 21)
Monter adapteren til korte søm for at forhindre at korte
søm sætter sig fast, når du anvender søm, der er kortere
end 25 mm.
Indsæt en adapter til korte søm i sprækken bagerst i
magasinet. Fastgør derefter adapteren ved at stramme
bolten.
BETJENING
ADVARSEL:
• Rør ikke omkring denne udstødningsåbning.
Overfladen bliver meget varm under og efter
anvendelse. Berøring omkring udstødningsåbningen
kan medføre forbrændinger eller personskader.
FORSIGTIG:
• Sørg for, at alle sikkerhedssystemer fungerer, før
anvendelsen.
Kontrol af korrekt funktion inden
anvendelse
Kontroller altid følgende punkter inden anvendelse.
– Sørg for, at maskinen ikke aktiveres blot ved
installering af akkuen og gasbeholderen.
– Sørg for, at maskinen ikke aktiveres blot ved at trykke
på afbryderen.
– Sørg for, at maskinen ikke aktiveres blot ved at sætte
kontaktelementet mod arbejdsemnet, uden at der
trykkes på afbryderen.
– Sikr dig, at maskinen ikke fungerer, når der først
trykkes på afbryderen, hvorefter kontaktelementet
placeres mod arbejdsemnet.
Idrivning af søm (Fig. 22)
1. For at slå søm i skal du først placere kontaktelementet
på arbejdsemnet.
Ventilatormotoren aktiveres, der sprøjtes gas ind i
forbrændingskammeret, og det blandes med luft vha.
ventilatoren. (Fig. 23)
2. Hold kontaktelementet trykket ordentligt ned og træk i
afbryderkontakten.
Gassen forbrændes, og sømmet slås i.
3. Yderligere islåning af søm kan kun udføres ved at
både kontaktelementet og afbryderkontakten udløses.
Mekanisme til forhindring af affyring uden
søm
Denne mekanisme forhindrer værktøjet i at affyre uden
søm.
Mekanismen til forhindring af affyring uden søm fungerer
automatisk, når der kun er 9-11 søm tilbage.
66

Blokering i sømpistolen
ADVARSEL:
• Sørg altid for at fjerne gaspatronen og batteripakken,
inden du afhjælper fastklemning.
FORSIGTIG:
• Anvend ikke søm eller sømbeholder, som er
deformeret. Undladelse af dette medfører en dårlig
sømfremføring.
Foretag den følgende procedure til fjernelse af søm og
fjern sømmene i magasinet. (Fig. 24)
Åbn låsemekanismen og frigør døren, og fjern derefter det
fastklemte søm.
VEDLIGEHOLDELSE
FORSIGTIG:
• Sørg altid for at fjerne gaspatronen, batteripakken og
sømmene, før du udfører eftersyn eller
vedligeholdelse.
• Brug aldrig benzin, benzen, fortynder, alkohol eller
lignende. Det kan muligvis medføre misfarvning,
deformation eller revner.
Vedligeholdelse efter dagligt arbejde
Kontrollér altid maskinens overordnede tilstand, og se
efter løse skruer før brugen. Stram til efter behov.
Udfør en afslutningsrutine ved arbejdsdagens ophør.
Disse enkle trin er baseret på bevaring af værktøjets
sikkerhed og ydelse.
Inden du forlader arbejdsstedet:
• Tag batteripakken ud og læg værktøjet ned i en
værktøjskuffert. Anvend altid værktøjskufferten til
transport og opbevaring af værktøjet.
• Bortskaf alle disse tomme gaspatroner således, at de
ikke bliver fundet af børn, knust, punkteret eller brændt.
Når du kommer hjem:
• Placer batteripakken i opladeren, hvis den behøver at
oplades, som indikeret vha. den røde indikatorlampe.
• Tør værktøjet af med en ren, blød klud.
• Kontroller filteret og rengør det, hvis det er støvet.
Rengøring af luftfilteret (Fig. 25 og 26)
Tryk en lille smule op på filterdækslet og fjern det. Og løft
derefter blot filteret ud.
Bank let på filteret for at fjerne støv. Vand og sæbe
genopretter filteret, så det næsten bliver som nyt
For at holde produktet SIKKERT og PÅLIDELIGT skal
reparationer samt al anden vedligeholdelse eller justering
udføres af autoriserede Makita-servicecentre, og der skal
altid benyttes Makita-reservedele.
Grundig rengøring
Hvis der ofte affyres uden søm, betyder det, at værktøjet
trænger til at blive gjort grundigt rent.
Se den medfølgende rengøringsvejledning angående
detaljer og udfør rengøringen.
Hvis du har nogen spørgsmål angående rengøring, skal
du henvende dig til dit lokale Makita-servicecenter.
EKSTRAUDSTYR
FORSIGTIG:
• Dette tilbehør eller ekstraudstyr anbefales til brug med
det Makita-værktøj, som er beskrevet i denne
brugsanvisning. Brug af andet tilbehør eller
ekstraudstyr kan forårsage personskade. Brug kun
tilbehør eller ekstraudstyr til det formål, det er beregnet
til.
Henvend dig til dit lokale Makita-servicecenter, hvis du har
brug for hjælp eller yderligere oplysninger vedrørende
tilbehøret.
•Søm
• Sikkerhedsbriller
• Gaspatron
• Rengøringssæt
• Originalt batteri og oplader fra Makita
BEMÆRK:
• Visse dele på listen er muligvis indeholdt
maskinindpakningen som standardtilbehør. De kan
variere fra land til land.
Støj
Det typiske A-vægtede støjniveau bestemt i
overensstemmelse med EN ISO 11148-13:
Lydtryksniveau (L
Lydeffektniveau (L
Usikkerhed (K): 3 dB (A)
Vibration
Den samlede vibrationsemissionsværdi er bestemt i
henhold til EN ISO 11148-13:
Vibrationsemission (a
Usikkerhed (K): 1,5 m/s
• Den opgivne vibrationsemissionsværdi er målt i
overensstemmelse med standardtestmetoden og kan
bruges til at sammenligne et værktøj med et andet.
• Den opgivne vibrationsemissionsværdi kan muligvis
også bruges til en indledende eksponeringsvurdering.
ADVARSEL:
• Vibrationsemissionen under den faktiske brug af
maskinen kan afvige fra den opgivne emissionsværdi
afhængigt af den måde, maskinen anvendes på.
• Sørg for at bestemme sikkerhedsforanstaltninger for
beskyttelse af operatøren, som er baseret på en
eksponeringsvurdering for brug under faktiske forhold
(hvor alle anvendelsescyklussens dele inddrages, som
f.eks. antal gange maskinen slukkes, og når den kører i
tomgang ud over triggertiden).
EF-overensstemmelseserklæring
Kun for europæiske lande
EF-overensstemmelseserklæringen er inkluderet som
appendiks A til denne betjeningsvejledning.
): 93 dB (A)
pA
): 106 dB (A)
WA
Bær høreværn.
): 3,5 m/s
h
2
2
ENG905-1
ENG904-2
ENG901-1
67

ΕΛΛΗΝΙΚΑ (Πρωτογενείς οδηγίες)
Cd
Ni-MH
Li-ion
Περιγραφή γενικής όψης
1. Κασέτα μπαταρίας
2. Κάλυμμα καυσίμου
3. Σκανδάλη
4. Ενδεικτική λυχνία
5. Κουμπί ωθητή
6. Μοχλός ωθητή
7. Γεμιστήρας
8. Στοιχείο επαφής
9. Λυχνία
10. Οπή εξάτμησης
11. Κο υμπ ί
12. Κουμπί λυχνίας
13. Δοσιμετρική βαλβίδα
14. Καπάκι
15. Ακροφύσιο εκροής
16. Ρυθμιστής
17. Γάντζος
18. Προσαρμογέας μύτης
19. Προσαρμογέας κοντών καρφιών
20. Μπουλόνι
21. Μάνδαλο
22. Θύρα
23. Κάλυμμα φίλτρου
24. Φίλτρο
ΠΡΟΔΙΑΓΡΑΦΕΣ
Μοντέλο GF600
Μήκος καρφιού Διάμετρος καρφιού 16Ga: 15 mm - 65 mm
Χωρητικότητα καρφιών 100 καρφιά (2 λωρίδες)
Διαστάσεις (Μ x Π x Υ) 266 mm x 90 mm x 305 mm
Καθαρό βάρος 2,2 kg
Ονομαστική τιμή τάσης D.C. 7,2 V
• Λόγω του συνεχόμενου προγράμματος που εφαρμόζουμε για έρευνα και ανάπτυξη, τα τεχνικά χαρακτηριστικά στο
παρόν έντυπο υπόκεινται σε αλλαγή χωρίς προειδοποίηση.
• Τα τεχνικά χαρακτηριστικά και η μπαταρία ενδέχεται να διαφέρουν από χώρα σε χώρα.
Σύμβολα
Παρακάτω παρουσιάζονται τα σύμβολα που
χρησιμοποιούνται για τον εξοπλισμό. Βεβαιωθείτε ότι
κατανοείτε τη σημασία τους πριν από τη χρήση.
...... Διαβάστε το εγχειρίδιο οδηγιών.
.................. Δοχείο υπό πίεση, κρατήστε το μακριά
................. Χρησιμοποιήστε το μόνο σε εξωτερικό
................. Μην το χρησιμοποιείτε κοντά σε φλόγες
................. Μην προκαλέσετε φθορά, τρύπημα ή
................... Κρατήστε τα δάκτυλά σας μακριά από
68
από θερμοκρασίες μεγαλύτερες των
50°C (π.χ. ηλιακή ακτινοβολία).
Διατηρήστε το δοχείο σε ένα χώρο με
καλό αερισμό.
χώρο ή σε καλά αεριζόμενα δωμάτια.
Μην αναπνεύσετε το αέριο.
ή το ψεκάσετε σε θερμαινόμενες
επιφάνειες. Κατά τη χρήση μπορεί να
σχηματίσει εύφλεκτο/εκρηκτικό μίγμα
ατμού-αέρα.
το κάψετε μετά από τη χρήση.
.......... Να φοράτε γυαλιά προστασίας.
.......... Φοράτε ωτοασπίδες.
τη σκανδάλη όταν δεν καρφώνετε
συνδετήρες για την αποφυγή της
τυχαίας εκπυρσοκρότησης.
END107-8
................. Χρησιμοποιήστε το μόνο σε καλά
αεριζόμενους χώρους για την αποφυγή
της πρόκλησης της ναυτίας και της
λιποθυμίας. Ποτέ να μην
χρησιμοποιήσετε το εργαλείο σε
εύφλεκτα περιβάλλοντα. Η εξάτμιση του
εργαλείου μπορεί να προκαλέσει την
ανάφλεξη των εύφλεκτων υλικών.
................... Μη χρησιμοποιείτε σε σκαλωσιές ή
σκάλες.
................... Προειδοποίηση: θερμή επιφάνεια!
Μην αγγίζετε γύρω από αυτό το
σύμβολο. Το άγγιγμα της επιφάνειας
μπορεί να προκαλέσει εγκαύματα ή
τραυματισμούς.
............. Μόνο για τις χώρες της ΕΕ
Μην απορρίπτετε τον ηλεκτρικό
εξοπλισμό ή την μπαταρία μαζί με τα
οικιακά απορρίμματα!
Σύμφωνα με την Ευρωπαϊκή Οδηγία
περί απορριμμάτων ηλεκτρικών,
ηλεκτρονικών συσκευών, μπαταριών
και συσσωρευτών και των
απορριμμάτων μπαταριών και
συσσωρευτών και την ενσωμάτωσή
τους στην εθνική νομοθεσία, οι
ηλεκτρικές συσκευές, οι μπαταρίες και
οι κασέτες μπαταριών, των οποίων έχει
παρέλθει ο χρόνος ωφέλιμης ζωής
τους, πρέπει να συλλέγονται ξεχωριστά
και να επιστρέφονται σε εγκαταστάσεις
περιβαλλοντικής ανακύκλωσης.

Προοριζόμενη χρήση
Το εργαλείο προορίζεται για εργασίες στερέωσης
εσωτερικού χώρου ή επίπλων.
Το εργαλείο προορίζεται μόνο για επαγγελματική
εφαρμογή υψηλού όγκου. Μην το χρησιμοποιήσετε για
οποιονδήποτε άλλο σκοπό. Δεν έχει σχεδιαστεί για το
κάρφωμα συνδετήρων σε σκληρές επιφάνειες, όπως
ατσάλι και τσιμέντο.
ENE073-3
Προειδοποιήσεις ασφαλείας για
το καρφωτικό αερίου ENB111-5
ΠΡΟΕΙΔΟΠΟΙΗΣΗ: Διαβάστε όλες τις
προειδοποιήσεις ασφαλείας και όλες τις οδηγίες. Η
μη τήρηση των προειδοποιήσεων και των οδηγιών μπορεί
να οδηγήσει σε σοβαρό τραυματισμό, ηλεκτροπληξία και/
ή πυρκαγιά.
Φυλάξτε όλες τις προειδοποιήσεις και τις
οδηγίες για μελλοντική παραπομπή.
Για την προσωπική σας ασφάλεια και για τη σωστή
λειτουργία και συντήρηση του εργαλείου, διαβάστε το
παρόν εγχειρίδιο οδηγιών προτού χρησιμοποιήσετε το
εργαλείο.
Γενική ασφάλεια
1. Απαγορεύεται οποιαδήποτε άλλη χρήση αυτού
του εργαλείου εκτός από την προοριζόμενη. Τα
εργαλεία καρφώματος συνδετήρων με
συνεχόμενη ενεργοποίηση επαφής ή
ενεργοποίηση επαφής θα πρέπει να
χρησιμοποιούνται μόνο για εφαρμογές
παραγωγής.
2. Κρατήστε τα δάκτυλά σας μακριά από τη
σκανδάλη όταν δεν θέτετε αυτό το εργαλείο σε
λειτουργία και όταν το μετακινείτε από τη μία θέση
λειτουργίας σε άλλη.
3. Πολλαπλοί κίνδυνοι. Διαβάστε και κατανοήστε τις
οδηγίες ασφάλειας πριν συνδέσετε,
αποσυνδέσετε, φορτώσετε, θέσετε σε λειτουργία,
συντηρήσετε, αλλάξετε εξαρτήματα ή εργάζεστε
κοντά στο εργαλείο. Αν δεν το κάνετε αυτό, μπορεί
να έχει ως αποτέλεσμα σοβαρό σωματικό
τραυματισμό.
4. Κρατήστε όλα τα μέρη του σώματός σας, όπως
χέρια και πόδια, κτλ. μακριά από την κατεύθυνση
πυροδότησης και φροντίστε ο συνδετήρας να μην
μπορεί να διεισδύσει το τεμάχιο εργασίας σε μέρη
του σώματος.
5. Όταν χρησιμοποιείτε το εργαλείο, να γνωρίζετε ότι
ο συνδετήρας μπορεί να εκτραπεί και να
προκαλέσει τραυματισμό.
6. Κρατήστε το εργαλείο πολύ καλά και
προετοιμαστείτε να διαχειριστείτε την ανατύλιξη.
7. Μόνο τεχνικά ειδικευμένοι χειριστές θα πρέπει να
χρησιμοποιούν το εργαλείο καρφώματος
συνδετήρων.
8. Μην τροποποιείτε το εργαλείο καρφώματος
συνδετήρα. Οι τροποποιήσεις μπορεί να
μειώσουν την αποτελεσματικότητα των μέτρων
ασφαλείας και να αυξήσουν τους κινδύνους για
τον χειριστή ή/και τους παρευρισκόμενους.
9. Μην απορρίψετε το εγχειρίδιο οδηγιών.
10. Μην χρησιμοποιήσετε ένα εργαλείο αν το
εργαλεία παρουσιάζει ζημιά.
11. Προσέχετε όταν χειρίζεστε συνδετήρες, ιδιαίτερα
όταν τους φορτώνετε και εκφορτώνετε, επειδή οι
συνδετήρες έχουν αιχμηρές μύτες που μπορούν
να προκαλέσουν τραυματισμό.
12. Πριν από τη χρήση, να ελέγχετε πάντα το
εργαλείο για σπασμένα, λανθασμένα συνδεδεμένα
ή φθαρμένα εξαρτήματα.
13. Μην τεντώνεστε υπερβολικά. Χρησιμοποιήστε
μόνο σε ασφαλή χώρο εργασίας. Κρατάτε πάντα
σταθερό πάτημα και την ισορροπία σας.
14. Κρατάτε τους παρευρισκόμενους μακριά (όταν
εργάζεστε σε μια περιοχή όπου υπάρχει η
πιθανότητα να περνούν άνθρωποι από εκεί).
Επισημάνετε με σαφήνεια ότι απαγορεύεται η
είσοδος στην περιοχή εργασίας σας.
15. Μη στρέφετε ποτέ το εργαλείο προς το μέρος σας
ή προς οποιοδήποτε άλλο άτομο.
16. Μην ακουμπάτε το δάκτυλό σας στη σκανδάλη
όταν σηκώνετε το εργαλείο, το μετακινείτε μεταξύ
περιοχών ή θέσεων λειτουργίας ή όταν
περπατάτε, επειδή ένα δάκτυλο που ακουμπάει
στη σκανδάλη μπορεί να οδηγήσει σε αθέλητη
λειτουργία. Για εργαλεία με επιλεκτική
ενεργοποίηση, να ελέγχετε πάντα το εργαλείο
πριν από τη χρήση, για να σιγουρευτείτε ότι
επιλέχτηκε ο σωστός τρόπος λειτουργίας.
17. Να φοράτε μόνο γάντια που παρέχουν επαρκή
αίσθηση, ασφάλεια και έλεγχο της σκανδάλης και
οποιωνδήποτε ρυθμιστικών διατάξεων.
18. Όταν δεν χρησιμοποιείτε το εργαλείο,
τοποθετήστε το σε μια επίπεδη επιφάνεια. Αν
χρησιμοποιήσετε το γάντζο που υπάρχει στο
εργαλείο, να γαντζώστε το εργαλείο με ασφάλεια
σε μια σταθερή επιφάνεια.
19. Μην το χρησιμοποιείτε όταν βρίσκεστε υπό την
επήρεια αλκοόλ, φαρμάκων ή παρόμοιων ουσιών.
Κίνδυνοι εκτόξευσης
1. Τ
ο εργαλείο καρφώματος συνδετήρων θα πρέπει
αι αποσυνδεδεμένο κατά την εκφόρτωση
να είν
συνδετήρων, την πραγματοποίηση ρυθμίσεων,
την εκκαθάριση εμπλοκών ή την αλλαγή
εξαρτημάτων.
2. Κατά τη διάρκεια της λειτουργίας, να προσέχετε
ώστε οι συνδετήρες να διεισδύουν το υλικό σωστά
και να μην μπορούν να εκτραπούν/πυροδοτηθούν
λανθασμένα προς το χειριστή ή/και τους
παρευρισκόμενους.
3. Κατά τη διάρκεια της λειτουργίας, μπορεί να
εκκενωθούν θραύσματα από το τεμάχιο εργασίας
και το σύστημα καρφώματος/συρραφής.
4. Να φοράτε πάντα προστατευτικά γυαλιά για να
προστατεύετε τα μάτια σας από τραυματισμό όταν
χρησιμοποιείτε ηλεκτρικά εργαλεία. Τα
προστατευτικά γυαλιά πρέπει να
συμμορφώνονται με το πρότυπο ANSI Z87.1 στις
ΗΠΑ, το πρότυπο EN 166 στην Ευρώπη ή το
πρότυπο AS/NZS 1336 στην Αυστραλία/Νέα
Ζηλανδία. Στην Αυστραλία/Νέα Ζηλανδία,
απαιτείται από το νόμο να φοράτε και προσωπίδα
για την προστασία του προσώπου σας. (Εικ. 1)
Ο εργοδότης έχει την ευθύνη να επιβάλλει τη
χρήση κατάλληλου προστατευτικού εξοπλισμού
69

ασφαλείας από τους χειριστές του εργαλείου και
από άλλα άτομα που βρίσκονται στην άμεση
περιοχή εργασίας.
5. Ο χειριστής θα πρέπει να αξιολογήσει τους
κινδύνους για άλλους.
6. Προσέχε τε με εργα λεία που δεν έχουν επαφή με το
τεμάχιο εργασίας επειδή μπορεί να
πυροδοτηθούν κατά λάθος και να τραυματίσουν
τον χειριστή ή/και τους παρευρισκόμενους.
7. Βεβαιωθείτε ότι το εργαλείο είναι πάντα
δεσμευμένο με ασφάλεια στο τεμάχιο εργασίας και
δεν μπορεί να γλιστρήσει.
8. Φοράτε προστατευτικά ακοής για να
προστατεύετε τα αυτιά σας από το θόρυβο του
αέρα εξαγωγής, καθώς και προστατευτικό
κεφαλής. Φοράτε επίσης ελαφριά, αλλά όχι
φαρδιά ρούχα. Τα μανίκια θα πρέπει να είναι
κουμπωμένα ή γυρισμένα προς τα πάνω. Μην
φοράτε γραβάτα.
Κίνδυνοι λειτουργίας
1. Κρατήστε το εργαλείο σωστά: ετοιμαστείτε να
αντιδράσετε στις φυσιολογικές ή αιφνίδιες
κινήσεις όπως η ανατύλιξη.
2. Διατηρήστε μια ισορροπημένη θέση σώματος και
ασφαλές πάτημα.
3. Θα πρέπει να χρησιμοποιείτε κατάλληλα γυαλιά
ασφαλείας και συνιστώνται κατάλληλα γάντια και
προστατευτικός ρουχισμός.
4. Θα πρέπει να φοράτε κατάλληλη προστασία της
ακοής.
5. Να χρησιμοποιείτε τη σωστή ενεργειακή παροχή,
όπως υποδεικνύεται στο εγχειρίδιο οδηγιών.
6. Μη χρησιμοποιήσετε το εργαλείο σε κινούμενες
πλατφόρμες ή το πίσω μέρος φορτηγών. Με την
αιφνίδια κίνηση της πλατφόρμας, μπορεί να χαθεί ο
έλεγχος του εργαλείου και να προκληθεί
τραυματισμός.
7. Να θεωρείτε πάντοτε ότι το εργαλείο περιέχει
συνδετήρες.
8. Μην εκτελείτε βιαστικά την εργασία και μην
πιέζετε υπερβολικά το εργαλείο. Χειρίζεστε το
εργαλείο προσεκτικά.
9. Προσέχετε το στήριγμα των ποδιών σας και
διατηρείτε την ισορροπία σας με το εργαλείο.
Βεβαιωθείτε ότι δεν υπάρχει κανείς από κάτω όταν
εργάζεστε σε υψηλές τοποθεσίες.
10. Σε στέγες και άλλες τοποθεσίες σε ύψος, βιδώνετε
τους συνδετήρες καθώς μετακινείστε προς τα
εμπρός. Είναι εύκολο να παραπατήσετε αν βιδώνετε
τους συνδετήρες κάνοντας μικρά βήματα προς τα
πίσω. Κατά το βίδωμα συνδετήρων σε κατακόρυφη
επιφάνεια, εργάζεστε από πάνω προς τα κάτω. Με
αυτόν τον τρόπο, το βίδωμα γίνεται λιγότερο
κουραστικό.
11. Αν βιδώσετε κατά λάθος έναν συνδετήρα πάνω σε
έναν άλλο ή αν χτυπήσετε κάποιο ρόζο στο ξύλο,
ο συνδετήρας μπορεί να στραβώσει ή το εργαλείο
να πάθει εμπλοκή. Ο συνδετήρας μπορεί να
τιναχτεί και να χτυπήσει κάποιον ή το ίδιο το
εργαλείο να αντιδράσει επικίνδυνα. Τοποθετείτε
τους συνδετήρες με προσοχή.
12. Μην επιχειρείτε ποτέ να βιδώσετε συνδετήρες
από μέσα και από έξω ταυτόχρονα. Οι συνδετήρες
70
μπορεί να σχίσουν το εσωτερικό και/ή να πεταχτούν
προς τα έξω και να διατρέξετε σοβαρό κίνδυνο.
Κίνδυνοι επανειλημμένων κινήσεων
1. Κατά τη χρήση ενός εργαλείου για μεγάλη χρονική
περίοδο, ένας χειριστής μπορεί να βιώσει
δυσφορία στα χέρια, τους βραχίονες, τους ώμους,
τον αυχένα και άλλα μέρη του σώματός του.
2. Ενώ χρησιμοποιεί ένα εργαλείο, ο χειριστής θα
πρέπει να υιοθετήσει μια κατάλληλη και
εργονομική στάση. Διατηρήστε ασφαλές πάτημα
και αποφύγετε τις αδέξιες και ανισόρροπες
στάσεις.
3. Αν ο χειριστής βιώσει συμπτώματα όπως επίμονη
και επαναλαμβανόμενη δυσφορία, πόνο, κτύπο,
άλγος, μυρμήγκιασμα, μούδιασμα, αίσθηση
καύσου ή ακαμψία, δεν πρέπει να αγνοήσει αυτά
τα προειδοποιητικά σημάδια. Ο χειριστής πρέπει
να συμβουλευτεί έναν αρμόδιο επαγγελματία στο
χώρο της υγείας, για τις συνολικές
δραστηριότητές του.
4. Η συν
5. Για να αποφευχθεί ο τραυματισμός λόγω
6. Διεξαγάγετε αξιολόγηση κινδύνων σχετικά με τους
Κίνδυνοι με τα εξαρτήματα και αναλώσιμα
1. Αφαιρέστε το δοχείο αερίου και την μπατα ρία πριν
2. Να χρησιμοποιείτε μόνο τα μεγέθη και τύπους των
3. Να χρησιμοποιείτε μόνο λιπαντικά που
Κίνδυνοι στο χώρο εργασίας
1. Το γλίστρημα, το σκόνταμμα και οι πτώσεις είναι
2. Σε άγνωστο περιβάλλον, να προχωράτε με
3. Αυτό το εργαλείο δεν προορίζεται για χρήση σε
εχόμενη χρήση του εργαλ
προκαλέσει κακώσεις λόγω επαναλαμβανόμενης
καταπόνησης που οφείλονται στην ανατύλιξη που
παράγει το εργαλείο.
επαναλαμβανόμενης καταπόνησης, ο χειριστής
δεν πρέπει να τεντώνετε υπερβολικά ή να
χρησιμοποιεί υπερβολική δύναμη. Επιπλέον, ο
χειριστής θα πρέπει να ξεκουράζεται όταν νιώθει
κουρασμένος.
κινδύνους της επαναλαμβανόμενης κίνησης. Θα
πρέπει να επικεντρωθεί σε μυοσκελετικές
διαταραχές και, κατά προτίμηση, να βασίζεται
στην υπόθεση ότι η μείωση κόπωσης κατά τη
διάρκεια της εργασίας είναι αποτελεσματική στη
μείωση των διαταραχών.
αλλάξετε/αντικαταστήσετε εξαρτήματα όπως την
επαφή τεμαχίου εργασίας ή πραγματοποιήσετε
οποιαδήποτε ρύθμιση.
εξαρτημάτων που παρέχονται από τον
κατασκευαστή.
συνιστώνται σε αυτό το εγχειρίδιο.
οι κύριες αιτίες για τραυματισμό στο χώρο
εργασίας. Προσέχετε για ολισθηρές επιφάνειες
που δημιουργούνται από τη χρήση του εργαλείου
και επίσης για κινδύνους ολίσθησης που
προκαλούνται από τον εύκαμπτο σωλήνα της
γραμμής αέρα.
περισσότερη προσοχή. Μπορεί να υπάρχουν
κρυφοί κίνδυνοι, όπως ηλεκτρικές γραμμές ή
γραμμές άλλων παροχών.
δυνητικώς εκρηκτικές ατμόσφαιρες και δεν είναι
μονωμένο για την περίπτωση επαφής με
ηλεκτρικό ρεύμα.
είου μπορεί να

4. Βεβαιωθείτε ότι δεν υπάρχουν ηλεκτρικά καλώδια,
σωλήνες αερίου, κτλ. που θα μπορούσαν να
προκαλέσουν κίνδυνο στην περίπτωση που
υποστούν ζημιά από τη χρήση του εργαλείου.
5. Διατηρείτε την περιοχή εργασίας καθαρή και
επαρκώς φωτισμένη. Οι ακατάστατοι ή σκοτεινοί
χώροι προσελκύουν τα ατυχήματα.
6. Πιθανώς να υφίστανται τοπικοί κανονισμοί
αναφορικά με το θόρυβο, με τους οποίους και θα
πρέπει να συμμορφώνεστε διατηρώντας τη
στάθμη θορύβου εντός των προδιαγεγραμμένων
ορίων. Σε ορισμένες περιπτώσεις, θα πρέπει να
χρησιμοποιούνται πετάσματα για τον περιορισμό
του θορύβου.
Κίνδυνοι σκόνης και εξάτμισης
1. Να ελέγχετε πάντα το περιβάλλον σας. Η εξάτμιση
του εργαλείου μπορεί να φυσήξει σκόνη ή
αντικείμενα και να χτυπήσουν τον χειριστή ή/και
τους παρευρισκόμενους.
2. Κατευθύνετε την εξάτμιση με τρόπο ώστε να
ελαχιστοποιηθεί η διατάραξη της σκόνης σε ένα
περιβάλλον με πολλή σκόνη.
3. Αν εκλύεται σκόνη ή αντικείμενα στην περιοχή
εργασίας, μειώστε την εκπομπή όσο το δυνατό
περισσότερο, για να μειωθούν οι κίνδυνοι υγείας
καθώς και ο κίνδυνος τραυματισμού.
Κίνδυνοι θορύβου
1. Η απροστάτευτη έκθεση σε υψηλά επίπεδα
θορύβου μπορεί να προκαλέσει μόνιμη απώλεια
ακοής και άλλα προβλήματα όπως εμβοή
(κουδούνισμα, βούισμα, σφύριγμα ή φύσημα στα
αυτιά).
2. Διεξαγάγετε αξιολόγηση κινδύνων σχετικά με τους
κινδύνους θορύβου στην περιοχή εργασίας και
υλοποιήστε τους κατάλληλους ελέγχους για
αυτούς τους κινδύνους.
3. Οι κατάλληλοι έλεγχοι για τη μείωση του κινδύνου
μπορεί να περιλαμβάνουν ενέργειες όπως την
απόσβεση υλικών ώστε να αποτραπεί το
«κουδούνισμα» των τεμαχίων εργασίας.
4. Να χρησιμοποιείτε κατάλληλη προστασία ακοής.
5. Χρησιμοποιήστε και συντηρήστε το εργαλείο
όπως συνιστάται στις παρούσες οδηγίες, για να
αποτραπεί η περιττή αύξηση των επιπέδων
θορύβου.
6. Λάβετε μέτρα για τη μείωση του θορύβου, για
παράδειγμα την τοποθέτηση των τεμαχίων
εργασίας σε στηρίγματα απόσβεσης θορύβων.
Κίνδυνοι δόνησης
1. Η εκπομπή δονήσεων κατά τη λειτουργία
εξαρτάται από τη δύναμη κρατήματος, την πίεση
επαφής, την κατεύθυνση εργασίας, τη ρύθμιση της
ενεργειακής παροχής, το τεμάχιο εργασίας και τη
στήριξη του τεμαχίου εργασίας. Διεξαγάγετε
αξιολόγηση κινδύνων σχετικά με τους κινδύνους
δονήσεων και υλοποιήστε τους κατάλληλους
ελέγχους για αυτούς τους κινδύνους.
2. Η έκθεση στη δόνηση μπορεί να προκαλέσει ζημιά
στα νεύρα και τη παροχή αίματος στα χέρια και
βραχίονες.
3. Να φοράτε ζεστά ρούχα όταν εργάζεστε σε κρύες
συνθήκες, να διατηρείτε τα χέρια σας ζεστά και
στεγνά.
4. Αν βιώσετε μούδιασμα, μυρμήγκιασμα, πόνο ή
λεύκανση στο δέρμα των δακτύλων ή των χεριών
σας, αναζητήστε ιατρική συμβουλή από αρμόδιο
επαγγελματία στο χώρο της υγείας, αναφορικά με
τις συνολικές δραστηριότητες.
5. Χρησιμοποιήστε και συντηρήστε το εργαλείο
όπως συνιστάται στις παρούσες οδηγίες, για να
αποτραπεί η περιττή αύξηση των επιπέδων
δόνησης.
6. Να κρατάτε το εργαλείο ελαφρά, αλλά με
ασφάλεια, επειδή ο κίνδυνος από τη δόνηση είναι
γενικά μεγαλύτερος όταν η δύναμη κρατήματος
είναι υψηλότερη.
Πρόσθετες οδηγίες ασφάλειας για εργαλεία αερίου
1. Να χρησιμοποιείτε το εργαλείο μόνο με το γνήσιο
δοχείο αερίου της Makita.
2. Προσέχετε όταν χρησιμοποιείτε εργαλεία αερίου,
επειδή το εργαλείο μπορεί να γίνει ζεστό,
ε
οντας το κράτημα και τον έλεγχο.
πηρεάζ
3. Τα εργαλεία καρφώματος συνδετήρων πρέπει να
χρησιμοποιούνται σε χώρους με εξαερισμό.
4. Στην περίπτωση που ένα υγροποιημένο καύσιμο
αέριο έρθει σε επαφή με το ανθρώπινο δέρμα,
μπορεί να συμβούν τραυματισμοί.
5. Τα δοχεία αερίου πρέπει να επισημαίνονται
ανάλογα με τον απαιτούμενο κανονισμό
μεταφοράς.
6. Να χειρίζεστε τα δοχεία αερίου προσεκτικά και να
ελέγχετε για ζημιές. Τα κατεστραμμένα δοχεία
αερίου μπορούν να εκραγούν και να προκαλέσουν
τραυματισμό.
7. Διαβάστε και ακολουθήστε τις οδηγίες που
παρέχονται με το δοχείο αερίου.
8. Βεβαιωθείτε ότι τα καύσιμα υλικά δεν έχουν
εκτεθεί σε ζεστά καυσαέρια.
9. Μην χρησιμοποιείτε εργαλεία αερίου σε
εκρηκτικές ατμόσφαιρες επειδή οι σπίθες που
παράγονται στο εργαλείο μπορεί να προκαλέσουν
πυρκαγιά ή έκρηξη.
10. Τα δοχεία αερίου δεν πρέπει να αποθηκεύονται
απρόσεκτα ή σε υψηλή θερμοκρασία.
Ακολουθήστε τους τοπικούς κανονισμούς και τις
οδηγίες του δοχείου αερίου για τον χειρισμό και τη
διάθεση των δοχείων αερίου και των μπαταριών ή
συσσωρευτών.
11. Για εργαλεία αερίου, μπορεί να συμβεί μια μικρή
απελευθέρωση αερίου από τις κανονικές
εργασίες.
Χρήση και φροντίδα μπαταριών
1. Να επαναφορτίζετε τις μπαταρίες μόνο με το
φορτιστή που καθορίζεται από τον κατασκευαστή.
Ένας φορτιστής που είναι κατάλληλος για μια
συγκεκριμένη μπαταρία μπορεί να δημιουργήσει
κίνδυνο πυρκαγιάς όταν χρησιμοποιείται με μια άλλη
μπαταρία.
2. Να χρησιμοποιείτε ηλεκτρικά εργαλεία μόνο με
ειδικά καθορισμένες μπαταρίες. Η χρήση κάθε
άλλης μπαταρίας μπορεί να δημιουργήσει κίνδυνο
τραυματισμού ή πυρκαγιάς.
3. Όταν δεν χρησιμοποιείται η κασέτα μπαταριών,
διατηρήστε τη μακριά από άλλα μεταλλικά
αντικείμενα, όπως συνδετήρες, κέρματα, κλειδιά,
καρφιά, βίδες ή άλλα μικρά μεταλλικά αντικείμενα,
71

με τα οποία μπορεί να δημιουργηθεί σύνδεση από
τον έναν ακροδέκτη στον άλλον. Το βραχυκύκλωμα
των ακροδεκτών της μπαταρίας μπορεί να προκαλέσει
εγκαύματα ή πυρκαγιά.
4. Υπό συνθήκες κατάχρησης, μπορεί να εξαχθεί
υγρό από την μπαταρία. Να αποφεύγετε την
επαφή. Εάν συμβεί επαφή κατά λάθος, εκπλύνετε
με νερό. Εάν το υγρό έρθει σε επαφή με τα μάτια,
αναζητήστε και ιατρική βοήθεια. Το υγρό που
εξάγεται από την μπαταρία μπορεί να προκαλέσει
ερεθισμό ή εγκαύματα.
5. Μη χρησιμοποιείτε μια κασέτα μπαταριών ή
εργαλείο που έχει καταστραφεί ή τροποποιηθεί. Οι
κατεστραμμένες ή τροποποιημένες μπαταρίες μπορεί
να παρουσιάζουν απρόβλεπτη συμπεριφορά που έχει
ως αποτέλεσμα πυρκαγιά, έκρηξη ή κίνδυνο
τραυματισμού.
6. Μην εκθέτετε την κασέτα μπαταριών ή το εργαλείο
σε πυρκαγιά ή υπερβολικά υψηλή θερμοκρασία. Η
έκθεση στην πυρκαγιά ή στη θερμοκρασία άνω των
130°C μπορεί να προκαλέσει έκρηξη.
7. Ακολουθήστε όλες τις οδηγίες φόρτισης και μην
φορτίσετε την κασέτα μπαταριών ή το εργαλείο
εκτός του θερμοκρασιακού εύρους που
καθορίζεται στις οδηγίες. Η λανθασμένη φόρτιση ή η
φόρτιση σε θερμοκρασίες εκτός του καθορισμένου
εύρους μπορεί να προκαλέσει ζημιά στην μπαταρία
και να αυξήσει τον κίνδυνο πυρκαγιάς.
Συσκευές ασφαλείας
1. Βεβαιωθείτε ότι όλα τα συστήματα ασφαλείας είναι
σε κατάσταση λειτουργίας πριν από τη χρήση. Αν
τραβήξετε μόνο τη σκανδάλη διακόπτη ή αν πιέσετε
μόνο το βραχίονα επαφής πάνω στο ξύλο, το εργαλείο
δεν θα πρέπει να λειτουργήσει. Πρέπει να λειτουργεί
μόνο όταν εκτελείτε και τις δύο ενέργειες. Ελέγχετε για
τυχόν ελαττωματική λειτουργία με το εργαλείο χωρίς
συνδετήρες και τον προωθητή τελείως τραβηγμένο.
2. Είναι πολύ επικίνδυνο να ασφαλίζετε τη
σκανδάλη στην ανοικτή θέση (ON). Ποτέ μην
επιχειρήσετε να ασφαλίσετε τη σκανδάλη.
3. Μην επιχειρείτε να κρατήσετε το στοιχείο επαφής
πατημένο με κολλητική ταινία ή σύρμα. Μπορεί να
προκληθεί θάνατος ή σοβαρός τραυματισμός.
4. Ελέγχετε πάντοτε το στοιχείο επαφής σύμφωνα με
τις οδηγίες του παρόντος εγχειριδίου. Αν ο
μηχανισμός ασφαλείας δεν λειτουργεί σωστά, μπορεί
να πραγματοποιηθεί κατά λάθος βίδωμα των
συνδετήρων.
Σέρβις
1. Εκτελείτε καθαρισμό και συντήρηση αμέσως μετά
το τέλος της εργασίας. Διατηρείτε το εργαλείο σε
άριστη κατάσταση. Λιπαίνετε τα κινούμενα εξαρτήματα
για να αποφύγετε τη σκουριά και να ελαχιστοποιήσετε
τη φθορά από την τριβή. Σκουπίζετε όλη τη σκόνη από
τα εξαρτήματα.
2. Απευθυνθείτε στο εξουσιοδοτημένο κέντρο σέρβις
της Makita για την περιοδική επιθεώρηση του
εργαλείου.
3. Για να διατηρήσετε την ΑΣΦΑΛΕΙΑ και την
ΑΞΙΟΠΙΣΤΙΑ του εργαλείου, η συντήρηση και οι
επισκευές πρέπει να διενεργούνται από τα
Εξουσιοδοτημένα Κέντρα Σέρβις της Makita,
χρησιμοποιώντας πάντα ανταλλακτικά της Makita.
72
4. Τηρήστε τους τοπικούς κανονισμούς κατά τη
διάθεση του εργαλείου.
ΦΥΛΑΞΕΤΕ ΑΥΤΕΣ ΤΙΣ ΟΔΗΓΙΕΣ.
ΠΡΟΕΙΔΟΠΟΙΗΣΗ: ΜΗΝ επιτρέψετε στην άνεση ή
στην εξοικείωσή σας με το προϊόν (που αποκτήθηκε
από επανειλημμένη χρήση) να αντικαταστήσει την
αυστηρή τήρηση των κανόνων ασφαλείας του
παρόντος εργαλείου. Η ΛΑΝΘΑΣΜΕΝΗ ΧΡΗΣΗ ή η
αμέλεια να ακολουθήσετε τους κανόνες ασφάλειας
που διατυπώνονται στο παρόν εγχειρίδιο οδηγιών
μπορεί να προκαλέσει σοβαρό προσωπικό
τραυματισμό.
ΣΗΜΑΝΤΙΚΈΣ ΟΔΗΓΊΕΣ
ΑΣΦΆΛΕΙΑΣ ΓΙΑ ΚΑΣΈΤΑ
ΜΠΑΤΑΡΙΏΝ
1. Πριν χρησιμοποιήσετε την κασέτα μπαταριών,
διαβάστε όλες τις οδηγίες και σημειώσεις
προφύλαξης (1) στον φορτιστή μπαταριών, (2)
στην μπαταρία και (3) στο προϊόν που
χρησιμοποιεί την μπαταρία.
2. Μην αποσυναρμολογήσετε την κασέτα
μπαταριών.
3. Εάν ο χρόνος λειτουργίας έχει γίνει υπερβολικά
βραχύς, σταματήστε τη λειτουργία αμέσως.
Αλλιώς, μπορεί να έχει ως αποτέλεσμα κίνδυνο
υπερθέρμανσης, πιθανά εγκαύματα ή ακόμη και
έκρηξη.
4. Εάν ηλεκτρολύτης μπει στα μάτια σας, ξεπλύνετέ
τα με καθαρό νερό και ζητήστε ιατρική φροντίδα
αμέσως. Αλλιώς, μπορεί να έχει ως αποτέλεσμα
απώλεια της όρασης σας.
5. Μη βραχυκυκλώνετε την κασέτα μπαταριών:
(1) Μην αγγίζετε τους πόλους με οτιδήποτε
αγώγιμο υλικό.
(2) Αποφεύγετε να αποθηκεύετε την κασέτα
μπαταριών μέσα σε ένα δοχείο μαζί με άλλα
μεταλλικά αντικείμενα όπως καρφιά,
νομίσματα, κλπ.
(3) Μην εκθέτετε την κασέτα μπαταριών στο
νερό ή στη βροχή.
Ένα βραχυκύκλωμα μπαταρίας μπορεί να
προκαλέσει μεγάλη ροή ρεύματος,
υπερθέρμανση, πιθανά εγκαύματα ακόμη και
σοβαρή βλάβη.
6. Μην αποθηκεύετε το εργαλείο και την κασέτα
μπαταριών σε τοποθεσίες όπου η θερμοκρασία
μπορεί να φτάσει ή να ξεπεράσει τους 50°C.
7. Μην καίτε την κασέτα μπαταριών ακόμη και εάν
έχει σοβαρή ζημιά ή είναι εντελώς φθαρμένη. Η
κασέτα μπαταριών μπορεί να εκραγεί στη φωτιά.
8. Προσέχετε να μη ρίξετε κάτω ούτε να χτυπήσετε
την μπαταρία.
9. Μη χρησιμοποιείτε μπαταρία που έχει υποστεί
ζημία.
10. Οι μπαταρίες ιόντων λιθίου που περιέχονται
υπόκεινται στις απαιτήσεις της νομοθεσίας για
επικίνδυνα αγαθά.
Για εμπορικές μεταφορές, για παράδειγμα από τρίτα
μέρη, πρέπει να τηρούνται οι διαμεταφορείς, οι ειδικές
απαιτήσεις στη συσκευασία και η επισήμανση.
ENC009-6

Για προετοιμασία του στοιχείου που αποστέλλεται,
είναι απαραίτητο να συμβουλευτείτε έναν ειδικό για
επικίνδυνα υλικά. Επίσης, τηρήστε τους πιθανούς, πιο
αναλυτικούς εθνικούς κανονισμούς.
Καλύψτε με αυτοκόλλητη ταινία ή κρύψτε τις ανοικτές
επαφές και συσκευάστε την μπαταρία με τρόπο που
να μην μπορεί να μετακινείται μέσα στη συσκευασία.
11. Όταν απορρίπτετε την κασέτα μπαταριών,
αφαιρέστε την από το εργαλείο και διαθέστε την
σε ένα ασφαλές μέρος. Τηρήστε τους τοπικούς
κανονισμούς που σχετίζονται με τη διάθεση της
μπαταρίας.
12. Χρησιμοποιήστε τις μπαταρίες μόνο με τα
προϊόντα που καθορίζει η Makita. Αν τοποθετήσετε
τις μπαταρίες σε μη συμβατά προϊόντα μπορεί να έχει
ως αποτέλεσμα πυρκαγιά, υπερβολική θερμότητα,
έκρηξη ή διαρροή ηλεκτρολύτη.
13. Αν δεν χρησιμοποιείτε το εργαλείο για μεγάλο
χρονικό διάστημα, πρέπει να βγάλετε την
μπαταρία από το εργαλείο.
ΦΥΛΑΞΤΕ ΤΙΣ ΟΔΗΓΙΕΣ ΑΥΤΕΣ.
ΠΡΟΣΟΧΗ: Να χρησιμοποιείτε μόνο γνήσιες
μπαταρίες της Makita. Η χρήση μη γνήσιων μπαταριών
Makita, ή μπαταριών που έχουν τροποποιηθεί, μπορεί να
έχει ως αποτέλεσμα τη ρήξη της μπαταρίας, προκαλώντας
πυρκαγιά, προσωπικό τραυματισμό και βλάβη. Επίσης,
θα ακυρωθεί η εγγύηση της Makita για το εργαλείο και
φορτιστή Makita.
Συμβουλές για τη διατήρηση της μέγιστης
ζωής μπαταρίας
1. Φορτίζετε την κασέτα μπαταριών πριν από την
πλήρη αποφόρτισή της. Πάντοτε να σταματάτε τη
λειτουργία του εργαλείου και να φορτίζετε την
κασέτα μπαταριών όταν παρατηρείτε μειωμένη
ισχύ εργαλείου.
2. Ποτέ μην επαναφορτίζετε μια πλήρως φορτισμένη
κασέτα μπαταριών. Η υπερφόρτιση μειώνει την
ωφέλιμη ζωή της μπαταρίας.
3. Να φορτίζετε την κασέτα μπαταριών σε
θερμοκρασία δωματίου, δηλαδή στους 10°C έως
40°C. Αφήστε μια θερμή κασέτα μπαταριών να
κρυώσει πριν την φορτίσετε.
Περιγραφή του καρφωτικού
εργαλείου (Εικ. 2)
ΠΕΡΙΓΡΑΦΗ ΛΕΙΤΟΥΡΓΙΑΣ
ΠΡΟΣΟΧΗ:
• Να βεβαιώνεστε πάντοτε ότι έχετε αφαιρέσει το
στοιχείο καυσίμου, τη μπαταρία και τα καρφιά πριν
ρυθμίσετε ή ελέγξετε κάποια λειτουργία του εργαλείου.
Τοποθέτηση ή αφαίρεση της μπαταρίας
ΠΡΟΣΟΧΗ:
• Πάντοτε να απενεργοποιείτε το εργαλείο πριν από την
τοποθέτηση ή την αφαίρεση της κασέτας μπαταρίας.
• Κρατήστε το εργαλείο και την μπαταρία γερά κατά
την τοποθέτηση ή την αφαίρεση της μπαταρίας.
Εάν δεν κρατήσετε το εργαλείο και την μπαταρία καλά
μπορεί να γλιστρήσουν από τα χέρια σας και να
προκληθεί ζημιά στο εργαλείο και στη μπαταρία αλλά
και προσωπικός τραυματισμός. (Εικ. 3)
Για να τοποθετήσετε τη κασέτα μπαταρίας, κρατήστε τη
έτσι ώστε το μπροστινό σχήμα της μπαταρίας να ταιριάζει
στο άνοιγμα στο οποίο τοποθετείται η μπαταρία και
ολισθήστε την στη θέση της. Τοποθετήστε τη έως το
τέρμα, δηλαδή έως ότου ασφαλίσει στη θέση και ακουστεί
ένας χαρακτηριστικός ήχος “κλικ”. (Εικ. 4)
Για να αφαιρέσετε τη μπαταρία, σύρετέ τη από το εργαλείο
καθώς πιέζετε το κουμπί στο πλάι της μπαταρίας όπως
δείχνεται στην εικόνα.
ΠΡΟΣΟΧΗ:
• Να εισάγετε πάντοτε την μπαταρία πλήρως, μέχρι να
ασφαλίσει στη θέση της. Σε αντίθετη περίπτωση,
μπορεί να πέσει κατά λάθος από το εργαλείο και να
τραυματίσει εσάς ή κάποιον παρευρισκόμενο.
• Μην εισάγετε με τη βία την κασέτα μπαταρίας. Αν η
κασέτα δεν ολισθαίνει με ευκολία, δεν την εισήγατε
σωστά.
Άναμμα της λυχνίας
ΠΡΟΣΟΧΗ:
• Μην κοιτάτε κατευθείαν μέσα στο φως ή στην πηγή του
φωτός. (Εικ. 5)
• Για να ενεργοποιήσετε τη λυχνία, πατήστε το κουμπί
της λυχνίας. Για να απενεργοποιήσετε τη λυχνία,
πατήστε το κουμπί της λυχνίας ξανά.
Στοιχείο καυσίμου
Σύνδεση της δοσιμετρικής βαλβίδας στο στοιχείο
καυσίμου (Εικ. 6)
Αποσυνδέστε το καπάκι (στην περίπτωση που η
δοσιμετρική βαλβίδα παρέχεται με καπάκι). (Εικ. 7)
Σπρώξτε προς τα μέσα το μπροστινό άκρο. (Εικ. 8)
Σπρώξτε προς τα μέσα το πίσω άκρο έως ότου να καθίσει.
Εισαγωγή του στοιχείου καυσίμου (Εικ. 9)
Σπρώξτε προς τα επάνω και τραβήξτε το κάλυμμα του
καυσίμου για να ανοίξει. (Εικ. 10)
Εισάγετε το στοιχείο καυσίμου στρέφοντας το ακροφύσιο
εκροής της δοσιμετρικής βαλβίδας προς τον
προσαρμογέα. (Εικ. 11)
Εισάγετε κατάλληλα το ακροφύσιο εκροής μέσα στην
μικρή τρύπα του προσαρμογέα. (Εικ. 12)
Τοποθετήστε το κάλυμμα του καυσίμου πάνω στην
δοσιμετρική βαλβίδα και πιέστε το προς τα κάνω για να
κλειδώσει.
Προσαρμογή του βάθους καρφώματος
ΠΡΟΣΟΧΗ:
• Αφαιρέστε το στοιχείο καυσίμου, τη μπαταρία και τα
καρφιά πριν την προσαρμογή του βάθους
καρφώματος. (Εικ. 13)
Για να αποκτήσετε το χαμηλό βάθος, γυρίστε το ρυθμιστή
προς την κατεύθυνση Α που φαίνεται στην εικόνα. Για να
γίνει το βάθος μεγαλύτερο, γυρίστε το ρυθμιστή προς την
κατεύθυνση Β. Μην γυρίστε τον ρυθμιστή πάρα πολύ,
διαφορετικά το στοιχείο επαφής μπορεί να βγει από τον
ρυθμιστή ή να κολλήσει.
73

Ενδεικτική λυχνία
Το χρώμα της ενδεικτικής λυχνίας δηλώνει τα παρακάτω.
Πράσινο που αναβοσβήνει: Κανονική κατάσταση
Κόκκινο που αναβοσβήνει: Απαιτείται η επαναφόρτιση
της κασέτας μπαταρίας
Ανάβει στο κόκκινο: Επαναφορτίστε τη μπαταρία. Δεν
μπορεί να εκτελεστεί το κάρφωμα λόγω έλλειψης
χωρητικότητας της μπαταρίας.
Αναβοσβήνει πορτοκαλί: Συνιστάται σχολαστικός
καθαρισμός. Ανατρέξτε στην ενότητα “ΣΥΝΤΗΡΗΣΗ” για
τον σχολαστικό καθαρισμό του εσωτερικού του εργαλείου.
Για να ακυρώσετε το πορτοκαλί αναβόσβημα της
ενδεικτικής λυχνίας, πιέστε το στοιχείο επαφής για πέντε
δευτερόλεπτα και στη συνέχεια πιέστε το στοιχείο επαφής
πέντε φορές.
Αναβοσβήνει στο πορτοκαλί αφότου είχε
αναβοσβήσει εναλλακτικά από το πράσινο στο
κόκκινο: Εκτελείται ανίχνευση σφάλματος. Αφαιρέστε και
επανατοποθετήστε τη μπαταρία για την επαναφορά. Εάν
εκτελεστεί ξανά η ανίχνευση του σφάλματος τότε
πρόκειται για μια κατάσταση δυσλειτουργίας.
Απευθυνθείτε στο τοπικό σας κέντρο σέρβις της Makita
για την επισκευή.
Τοποθέτηση του γάντζου (Εικ. 14)
Ο γάντζος χρησιμεύει για το προσωρινό κρέμασμα του
εργαλείου. Μπορείτε να το εγκαταστήσετε σε κάθε πλευρά
του εργαλείου. Μπορεί να αφαιρεθεί χωρίς τη χρήση
εργαλείου.
Για να εγκαταστήσετε το γάντζο, επεκτείνετε το πάνω
μέρος του γάντζου και στη συνέχεια, τοποθετήστε τον στο
εργαλείο. Για να αφαιρέσετε το γάντζο, επεκτείνετε το
πάνω μέρος του γάντζου και στις δύο κατευθύνσεις και
τραβήξτε το γάντζο από το εργαλείο.
ΣΥΝΑΡΜΟΛΟΓΗΣΗ
ΠΡΟΣΟΧΗ:
• Βγάζετε πάντα το στοιχείο καυσίμου και την κασέτα
μπαταρίας πριν από την εκτέλεση οποιασδήποτε
εργασίας για το εργαλείο.
Φόρτωση του καρφωτικού εργαλείου
(Εικ. 15)
Εισάγετε μια λωρίδα από καρφιά μέσα στη σχισμή στο
πίσω μέρος του γεμιστήρα. (Εικ. 16)
Τραβήξτε το μοχλό του ωθητή με το πάτημα του κουμπιού
του ωθητή προς όλη τη διαδρομή ως το πίσω μέρος του
γεμιστήρα. Στη συνέχεια αφήστε το κουμπί του ωθητή, και
να επιστρέψει απαλά ο μοχλός του ωθητή στο άκρο της
λωρίδας.
Αφαίρεση καρφιών (Εικ. 17)
Τραβήξτε το μοχλό του ωθητή και σπρώξτε το κουμπί του
ωθητή για να ελευθερωθεί το στήριγμα των καρφιών, και
στη συνέχεια επαναφέρετε το μοχλό του ωθητή στην
κορυφή σπρώχνοντας το κουμπί του ωθητή.
Σπρώξτε τα καρφιά προς το πίσω μέρος του γεμιστήρα
και βγάλτε τα έξω.
74
Προσαρμογέας μύτη (Εικ. 18)
Ο προσαρμογέας μύτης εμποδίζει την επιφάνεια του
τεμαχίου εργασίας από το να γρατσουνιστεί ή να υποστεί
ζημιά. Τοποθετήστε σωστά τον προσαρμογέα μύτης.
Να φυλάσσ ετε τον προσ αρμο γέα μ ύτης στη θ έση του όταν
δεν τον χρησιμοποιείτε. Ο χώρος για την αποθήκευση
βρίσκεται στις κάτω πλευρές του εργαλείου. (Εικ. 19)
Προσαρμογέας κοντών καρφιών (Εικ. 20
και 21)
Συνδέστε τον προσαρμογέα κοντών καρφιών για την
πρόληψη του μπλοκαρίσματος των κοντών καρφιών, όταν
χρησιμοποιείτε καρφιά μικρότερα των 25 mm (1”).
Τοποθετήστε τον προσαρμογέα κοντών καρφιών στη
σχισμή στο πίσω μέρος του γεμιστήρα. Στη συνέχεια,
στερεώστε τον προσαρμογέα σφίγγοντας το μπουλόνι.
ΛΕΙΤΟΥΡΓΙΑ
ΠΡΟΕΙΔΟΠΟΙΗΣΗ:
• Μην αγγίζετε γύρω από την οπή της εξάτμισης. Η
επιφάνεια θα είναι πάρα πολύ ζεστή κατά τη διάρκεια ή
μετά το τέλος της λειτουργίας. Το άγγιγμα γύρω από
την οπή της εξάτμισης μπορεί να προκαλέσει
εγκαύματα ή τραυματισμούς.
ΠΡΟΣΟΧΗ:
• Βεβαιωθείτε ότι όλα τα συστήματα ασφάλειας
βρίσκονται σε καλή κατάσταση πριν από τη λειτουργία.
Ελέγξτε τη σωστή δράση πριν τη
λειτουργία
Πριν τη λειτουργία, να ελέγχετε πάντα τα ακόλουθα
σημεία.
– Βεβαιωθείτε ότι το εργαλείο δεν λειτουργεί μόνο με την
τοποθέτηση της κασέτας μπαταριών και του δοχείου
αερίου.
– Βεβαιωθείτε ότι το εργαλείο δεν λειτουργεί μόνο με το
τράβηγμα της σκανδάλης.
– Βεβαιωθείτε ότι το εργαλείο δεν λειτουργεί μόνο με την
τοποθέτηση του στοιχείου επαφής επάνω στο τεμάχιο
εργασίας χωρίς το τράβηγμα της σκανδάλης.
– Βεβαιωθείτε ότι το εργαλείο δεν λειτουργεί όταν
τραβάτε πρώτα τη σκανδάλη και μετά τοποθετείτε το
στοιχείο επαφής επάνω στο τεμάχιο εργασίας.
Κάρφωμα καρφιών (Εικ. 22)
1. Για να καρφώ σετε ένα καρ φί, τοποθετ ήσετ ε το στοιχ είο
επαφής επάνω στο τεμάχιο εργασίας.
Το μοτέρ του ανεμιστήρα ενεργοποιείται, το αέριο καύσιμο
εκχύεται μέσα στο θάλαμο καύσης και αναμειγνύεται με
τον αέρα μέσω του ανεμιστήρα. (Εικ. 23)
2. Πιέστε καλά κρατώντας το στοιχείο επαφής και
τραβήξετε τη σκανδάλη.
Το αέριο καύσιμο αναφλέγεται και καρφώνεται το καρφί.
3. Επιπρόσθετα το κάρφωμα μπορεί να ξεκινήσει μόνο
αφότου ελευθερωθούν το στοιχείο επαφής και η
σκανδάλη.
Μηχανισμός προστασίας από τη
συρραφή χωρίς καρφιά
Ο μηχανισμός αυτός αποτρέπει το εργαλείο από την
εκπυρσοκρότηση χωρίς να υπάρχουν καρφιά.

Ο μηχανισμός προστασίας από το κάρφωμα χωρίς
καρφιά ενεργοποιείται αυτόματα όταν τα εναπομένοντα
καρφιά μείνουν στα 9-11 κομμάτια.
Εμπλοκή του καρφωτικού εργαλείου
ΠΡΟΕΙΔΟΠΟΙΗΣΗ:
• Να φροντίζετε πάντοτε να αφαιρείτε το στοιχείο
καυσίμου και την κασέτα μπαταρία πριν από την
αποκατάσταση της εμπλοκής.
ΠΡΟΣΟΧΗ:
• Μη χρησιμοποιείτε παραμορφωμένα καρφιά ή
παραμορφωμένη λωρίδα καρφιών. Αν κάνετε κάτι
τέτοιο θα προκληθεί ανεπαρκής τροφοδοσία καρφιών.
Ακολουθήστε τη διαδικασία αφαίρεσης καρφιών και
αφαιρέστε τα καρφιά από το γεμιστήρα. (Εικ. 24)
Ανοίξτε το μάνταλο και ελευθερώστε τη θύρα και στη
συνέχεια αφαιρέστε το μπλοκαρισμένο καρφί.
επαναφέρει το φίλτρο σε μια σχεδόν καινούργια
κατάσταση.
Για να διατηρείται η ΑΣΦΑΛΕΙΑ και η ΑΞΙΟΠΙΣΤΙΑ του
προϊόντος, οι εργασίες επισκευής, καθώς και
οποιαδήποτε άλλη εργασία συντήρησης ή ρύθμισης, θα
πρέπει να εκτελούνται σε εξουσιοδοτημένα κέντρα
εξυπηρέτησης της Makita, και πάντοτε με τη χρήση
ανταλλακτικών της Makita.
Λεπτομερής καθαρισμός
Εάν συμβαίνουν συχνά εκπυρσοκροτήσεις χωρίς την
έξοδο καρφιών αυτό σημαίνει ότι είναι απαραίτητος ο
σχολαστικός καθαρισμός του εργαλείου.
Δείτε το συνοδευτικό οδηγό καθαρισμού για λεπτομέρειες
και εκτελέστε τον καθαρισμό.
Αν έχετε οποιαδήποτε απορία σχετικά με τον καθαρισμό,
παρακαλούμε απευθυνθείτε στο τοπικό κέντρο
εξυπηρέτησης της Makita.
ΣΥΝΤΗΡΗΣΗ
ΠΡΟΣΟΧΗ:
• Πάντοτε να αφαιρείτε το στοιχείο καυσίμου, τη
μπαταρία και τα καρφιά πριν προσπαθήσετε να
εκτελέσετε έλεγχο ή συντήρηση στο εργαλείο.
• Μην χρησιμοποιήσετε βενζίνη, βενζόλη, διαλυτικό,
αλκοόλη ή κάτι παρόμοιο. Μπορεί να προκληθεί
αποχρωματισμός, παραμόρφωση ή ρωγμές.
Συντήρηση μετά από την ημερήσια
εργασία
Πριν από τη λειτουργία, να ελέγχετε πάντα τη γενική
κατάσταση του εργαλείου, αλλά και αν οι βίδες είναι
χαλαρές. Σφίξτε όπως απαιτείται.
Στο τέλος της ημερήσιας εργασίας εκτελέστε το
πρόγραμμα της ημερήσιας συντήρησης.
Αυτά τα απλά βήματα βασίζονται στη διατήρηση της
ασφάλειας και των επιδόσεων του εργαλείου.
Πριν αποχωρήσετε από το χώρο εργασίας:
• Αφαιρέστε την κασέτα μπαταρίας και αποθηκεύστε την
στη θήκη μεταφοράς του εργαλείου. Πάντα να
χρησιμοποιείτε την θήκη μεταφοράς του εργαλείου για
τη μεταφορά και την αποθήκευση του εργαλείου.
• Πετάξτε όλα τα κενά στοιχεία σε χώρο όπου δεν
μπορούν να βρεθούν από τα παιδιά, να συνθλιβούν, να
τρυπηθούν ή να καούν.
Όταν επιστρέψετε στο σπίτι:
• Τοποθετήστε την κασέτα μπαταρίας μέσα στο φορτιστή
της εάν χρειάζεται φόρτιση όπως υποδεικνύεται από
την κόκκινη ενδεικτική λυχνία.
• Σκουπίστε το εργαλείο με ένα καθαρό, μαλακό πανί.
• Ελέγξτε το φίλτρο και καθαρίστε το εάν είναι
σκονισμένο.
Καθαρισμός του φίλτρου αέρα (Εικ. 25 και
26)
Πιέστε ελαφρά προς τα πάνω το κάλυμμα του φίλτρου και
αφαιρέστε το. Και μετά απλά βγάλτε ανασηκώνοντας το
φίλτρο.
Κτυπήστε ελαφρά το φίλτρο για να αφαιρέσετε την
οποιαδήποτε σκόνη. Το πλύσιμο με σαπούνι και νερό
ΠΡΟΑΙΡΕΤΙΚΑ ΑΞΕΣΟΥΑΡ
ΠΡΟΣΟΧΗ:
• Συνιστάται η χρήση αυτών των αξεσουάρ ή
εξαρτημάτων με το εργαλείο της Makita, όπως
περιγράφεται στο παρόν εγχειρίδιο. Αν
χρησιμοποιήσετε άλλα αξεσουάρ ή εξαρτήματα μπορεί
να παρουσιαστεί κίνδ υνος για πρόκληση τραυματισ μού
προσώπων. Να χρησιμοποιείτε τα αξεσουάρ και τα
εξαρτήματα μόνο για το σκοπό για τον οποίο
προορίζονται.
Αν χρειάζεστε κάποια βοήθεια ή περισσότερες
πληροφορίες σχετικά με τα αξεσουάρ αυτά, απευθυνθείτε
στο πλησιέστερο κέντρο εξυπηρέτησης της Makita.
•Καρφιά
• Γυαλιά προστασίας
• Στοιχείο καυσίμου
• Εξοπλισμός καθαρισμού
• Αυθεντική μπαταρία Makita και φορτιστής
ΣΗΜΕΙΩΣΗ:
• Ορισμένα από τα στοιχεία της λίστα μπορεί να
περιέχονται στην συσκευασία του εργαλείου ως
κανονικά αξεσουάρ. Αυτά ενδέχεται να διαφέρουν από
χώρα σε χώρα.
Θόρυβος
Το σύνηθες σταθμισμένο επίπεδο θορύβου που έχει
καθοριστεί σύμφωνα με την EN ISO 11148-13:
Επίπεδο ηχητικής πίεσης (L
Επίπεδο ηχητικής ισχύος (L
Αβεβαιότητα (Κ): 3 dB (A)
Να φοράτε ωτοασπίδες.
Δόνηση
Η συνολική τιμή δόνησης έχει καθοριστεί σύμφωνα με το
EN ISO 11148-13:
Εκπομπή δόνησης (a
Αβεβαιότητα (Κ): 1,5 m/s
• Η δηλωθείσα τιμή των παραγομένων κραδασμών έχει
καταμετρηθεί σύμφωνα με την τυποποιημένη μέθοδο
δοκιμασίας και μπορεί να χρησιμοποιηθεί για την
σύγκριση ενός εργαλείου με ένα άλλο.
• Η δηλωθείσα τιμή των παραγομένων κραδασμών
μπορεί επίσης να χρησιμοποιηθεί για μια
): 3,5 m/s
h
2
): 93 dB (A)
pA
): 106 dB (A)
WA
2
ENG905-1
ENG904-2
ENG901-1
75

προκαταρκτική αξιολόγηση της έκθεσης στους
κραδασμούς.
ΠΡΟΕΙΔΟΠΟΙΗΣΗ:
• Η εκπομπή κραδασμών κατά τη διάρκεια της
πραγματικής χρήσης του ηλεκτρικού εργαλείου μπορεί
να διαφέρει από τη δηλωθείσα τιμή των εκπομπών,
ανάλογα με τον τρόπο με τον οποίο χρησιμοποιείται το
εργαλείο.
• Φροντίστε να λάβετε τα μέτρα ασφαλείας που
απαιτούνται για την προστασία του χρήστη που
βασίζον ται σε μ ια εκ τίμηση της έ κθεσ ης σε πραγ ματι κές
συνθήκες χρήσης (λαμβάνοντας υπόψη όλα τα μέρη
του κύκλου λειτουργίας, όπως είναι οι περιπτώσεις
κατά τις οποίες το εργαλείο είναι απενεργοποιημένο και
όταν λειτουργεί στο ρελαντί επιπροσθέτως του χρόνου
κατά τον οποίο το εργαλείο βρίσκεται σε χρήση).
ΕΚ Δήλωση συμμόρφωσης
Για Ευρωπαϊκές χώρες μόνο
Η δήλωση συμμόρφωσης ΕΚ περιλαμβάνεται ως
παράρτημα Α σε αυτό το εγχειρίδιο οδηγιών.
76

TÜRKÇE (Orijinal talimatlar)
Cd
Ni-MH
Li-ion
Genel görünüm
1. Akü
2. Yakıt kapağı
3. Açma/kapama düğmesi
4. Gösterge lambası
5. İttirici düğmesi
6. İttirici mandalı
7. Hazne
8. Temas elemanı
9. Lamba
10. Hava çıkış kanalı
11. Dü ğme
12. Lamba düğmesi
13. Ölçüm vanası
14. Kapak
15. Püskürtme nozülü
16. Ayar düğmesi
17. Kanca
18. Uç adaptörü
19. Kısa çivi adaptörü
20. Cıvata
21. Kilit
22. Kapak
23. Filtre kapağı
24. Filtre
TEKNİK ÖZELLİKLER
Model GF600
Çivi uzunluğu Çivi Aralığı 16Ga: 15 mm - 65 mm
Çivi kapasitesi 100 çivi (2 şerit)
Boyutlar (U x G x Y) 266 mm x 90 mm x 305 mm
Net ağırlık 2,2 kg
Anma gerilimi D.C. 7,2 V
• Sürekli yapılan araştırma ve geliştirmelerden dolayı, burada belirtilen özellikler önceden bildirilmeksizin değiştirilebilir.
• Özellikler ve akü ülkeye göre farklılıklar gösterebilir.
Simgeler
Makine için kullanılan simgeler aşağıda gösterilmiştir.
Makineyi kullanmaya başlamadan önce bu simgelerin ne
anlama geldiğini öğrenin.
...... Kullanım kılavuzunu okuyun.
.................. Basınçlı kap; 50°C’nin üzerindeki
sıcaklıklara (örneğin; güneş ışınlarına)
maruz bırakmayın. Kabı iyi
havalandırılan bir yerde muhafaza
edin.
................. Yalnızca açık yerlerde veya iyi
havalandırılan odalarda kullanın. Gazı
solumayın.
................. Sıcak yüzeylerin yakınında ateş veya
sprey kullanmayın. Aksi takdirde,
tutuşabilir/patlayıcı buhar hava karışımı
açığa çıkabilir.
................. Kullandıktan sonar dahi zarar
vermeyin, delmeyin veya ateşe
atmayın.
.......... Koruyucu gözlük kullanın.
.......... Kulak koruyucuları takın.
................... Kazara çalışmasını önlemek için,
makineyi kullanmıyorken
parmaklarınızı açma/kapama
düğmesinden uzak tutun.
END107-8
................. Baş ağrısı ve bilinç kaybını önlemek
................... Kalıp veya merdiven üzerindeyken
................... Uyarı: sıcak yüzey!
Kullanım amacı
Makine iç tasarımlar ve mobilyalar üzerine sabitleme
yapılması için tasarlanmıştır.
Alet, yalnızca yüksek hacimli profesyonel uygulama
içindir. Başka amaçlarla kullanmayın. Tespit elemanlarını
çelik veya beton gibi sert yüzeylere çakmak için
tasarlanmamıştır.
için yalnızca iyi havalandırılan bir
alanda kullanın. Bu makineyi kesinlikle
tutuşabilir ortamlarda kullanmayın.
Makine egzozu, tutuşabilir maddeleri
tutuşturabilir.
kullanmayın.
Bu simgenin etrafına dokunmayın. Bu
yüzeye dokunulması, yanıklara veya
yaralanmalara yol açabilir.
.............Sadece AB ülkeleri için
Elektrik cihazları ve pilleri ev çöpüyle
birlikte atmayın!
Elektrikli ve Elektronik Cihaz Atıkları,
Piller ve Aküler ve Pil ve Akü Atıkları
Hakkındaki Avrupa Yönergeleri ve
bunların ulusal kanunlara göre
uygulanışı uyarınca kullanım ömrünü
tamamlayan elektrikli cihazlar ve piller
mutlaka ayrı olarak toplanmalı ve çevre
şartlarına uygun bir geri dönüşüm
tesisine gönderilmelidir.
ENE073-3
77

Gazlı çivi çakma tabancası
güvenlik uyarıları
UYARI: Tüm güvenlik uyarılarını ve tüm talimatları
okuyun. Uyarı ve talimatlara uyulmaması ciddi
yaralanmalara, elektrik çarpması ve/veya yangına neden
olabilir.
Tüm uyarıları ve talimatları ileride
başvurmak için saklayın.
Kişisel güvenlik ve aletin doğru çalıştırılması ve bakımı
için, aleti kullanmadan önce bu kullanım kılavuzunu
okuyun.
Genel güvenlik
1. Bu aletin kullanım amacı dışındaki işler için
kullanılması yasaktır. Sürekli temasla
etkinleştirme ya da temasla etkinleştirme moduyla
kullanılabilen tespit elemanı vidalama aletleri
sadece üretim uygulamasında kullanılmalıdır.
2. Aleti kullanmadığınız zaman ve bir çalışma
alanından başka bir alana geçerken parmaklarınızı
tetikten uzak tutun.
3. Çeşitli tehlikeler. Aletin bağlantısını yapmadan ya
da bağlantısını kesmeden, yüklemeden,
çalıştırmadan, bakım yapmadan ya da
aksesuarlarını değiştirmeden ve alet yakınında
çalışmadan önce güvenlik talimatlarını okuyup
anlamalısınız. Bunun yapılmaması ciddi fiziksel
yaralanmalara neden olabilir.
4. Eller ve ayaklar gibi tüm organları aletin atış
yönünden uzak tutun ve tespit elemanının iş
parçasını bedenin kısımlarına girmesine neden
olmadığından emin olun.
5. Aleti kullanırken, tespit elemanı sekebilir ve
yaralanmaya sebep olabilir.
6. Aleti sıkıca kavrayın ve geri tepmeye karşı
hazırlıklı olun.
7. Tespit elemanı vidalama aletini sadece teknik
yeteneğe sahip operatör kullanmalıdır.
8. Tespit elemanı vidalama aletinde değişiklik
yapmayın. Değişiklik yapmak güvenlik
tedbirlerinin etkinliğini azaltabilir ve operatör ve/
veya yakındakiler için riskleri artırabilir.
9. Kullanım kılavuzunu atmayın.
10. Alet hasarlı ise aleti kullanmayın.
11. Tespit elemanlarını tutarken, özellikle de yükleme
ve boşaltma sırasında, dikkatli olun, çünkü tespit
elemanlarında yaralanmaya sebep olabilecek
keskin noktalar bulunur.
12. Kullanmadan önce aleti kırık, yanlış bağlanmış ya
da aşınmış parçalara karşı daima kontrol edin.
13. Fazla ileriye uzanmaya çalışmayın. Sadece güvenli
çalışma alanlarında kullanın. Her zaman yere
sağlam basın ve dengenizi koruyun.
14. Civardaki kişileri uzağınızda tutun (insanların gelip
geçme ihtimalinin yüksek olduğu yerlerde
çalışırken). Çalışma alanınızı net bir şekilde
işaretleyin.
15. Aleti asla kendinize ya da başkalarına
doğrultmayın.
16. Aleti tutarken, çalışma alanı ya da konum
değiştirirken veya yürürken parmağınızı tetiğin
üstünde tutmayın; çünkü parmağın tetik üzerinde
78
ENB111-5
tutulması istenmeyen çalışmaya neden olabilir.
Etkinleştirme modu seçilebilir olan aletlerde,
doğru modun seçili olduğundan emin olmak için
kullanmadan önce daima aleti kontrol edin.
17. Sadece, tetiği ve diğer ayar cihazlarını yeterli bir
şekilde hissedip güvenli bir şekilde kullanmanızı
sağlayacak türde eldivenler kullanın.
18. Aleti bırakırken düz bir yüzeye yerleştirin. Aletle
birlikte sağlanan kancayı kullanıyorsanız aleti
sağlam bir şekilde düz bir yere kancayla asın.
19. Alkollüyken, uyuşturucu ya da benzeri bir
maddenin etkisindeyken çalışmayın.
Fırlama ile ilişkili tehlikeler
1. Tespit elemanları boşaltılırken, ayarlama
yapılırken, sıkışıklıklar giderilirken veya
aksesuarlar değiştirilirken, tespit elemanı
vidalama aletinin bağlantısı kesilmelidir.
2. Çalışma sırasında, tespit elemanlarının
malzemeye doğru bir şekilde girdiğinden ve
sekerek/yanlış ateşlenerek kullanıcıya ve/veya
civardakilere yönlenmeyeceğinden emin olun.
3. Çalışma sırasında, iş parçasından ve tespit
elemanı/istifleme sisteminden çıkan birikintiler
boşaltılabilir.
4. Elektrikli aletleri kullanırken gözlerinizi korumak
için daima koruyucu gözlük kullanın. Gözlüklerin
ABD’de ANSI Z87.1 ile, Avrupa’da EN 166 ile ya da
Avustralya/Yeni Zelanda’da AS/NZS 1336 ile
uyumlu olması gereklidir. Avustralya/Yeni
Zelanda’da, yüzünüzü korumanız için yüz
k
yucu maske kullanılması da yasal olarak
oru
gereklidir. (Şekil 1)
Alet operatörlerinin ve çalışma alanının yakınında
çalışan diğer kişilerin uygun koruyucu güvenlik
ekipmanlarını kullanmasının sağlanması,
işverenin yükümlülüğündedir.
5. Diğer kişilere gelebilecek riskler operatör
tarafından değerlendirilmelidir.
6. İş parçasıyla temas halinde olmayan aletleri
kullanırken dikkatli olun, zira bu aletler
istenmeyen bir şekilde ateşlenebilir ve operatörün
ve/veya civardakilerin yaralanmasına sebep
olabilir.
7. Aletin daima güvenli bir şekilde iş parçasına
kenetlendiğinden ve kaymadığından emin olun.
8. Kulaklarınızı çıkan gürültüye karşı korumak için
koruyucu kulaklık ve baret kullanın. Ayrıca hafif,
ancak bol olmayan kıyafetler giyin. Kıyafetlerin
kolları düğmeli olmalı veya yukarı kıvrılmalıdır.
Kravat takılmamalıdır.
Çalışma sırasında oluşabilecek tehlikeler
1. Aleti doğru bir şekilde tutun, normal ve ani
hareketlere (örn. geri tepme) karşı koymaya
hazırlıklı olun.
2. Vücudunuzu dengeli bir konumda tutun ve
ayağınızı yere sağlam basın.
3. Uygun emniyet gözlükleri kullanılmalıdır, uygun
eldivenler ve koruyucu giysi kullanılması tavsiye
edilir.
4. Uygun işitme koruması kullanılmalıdır.
5. Kullanma kılavuzunda belirtildiği gibi doğru bir
enerji kaynağı kullanın.

6. Aleti hareketli platformlarda veya kamyonların
arkasında kullanmayın. Ani platform hareketi aletin
kontrolünün kaybedilmesine ve yaralanmaya neden
olabilir.
7. Aletin her zaman bağlantı elemanıyla dolu
olduğunu varsayın.
8. Çalışırken acele etmeyin ve aleti zorlamayın. Aleti
dikkatli bir şekilde tutun.
9. Çalışırken yere sağlam basın ve aleti kullanırken
dengenizi koruyun. Yüksek yerlerde çalışırken
aşağıda kimse olmadığından emin olun.
10. Çatıda ve benzeri yüksek yerlerde çalışırken
bağlantı elemanı vidalama işlemini ilerlediğiniz
yönde gerçekleştirin. Bağlantı elemanı vidalama
işlemini geriye doğru hareket ederken uygulamanız
durumunda dengenizi kolayca kaybedebilirsiniz.
Düşey yüzeylere bağlantı elemanı vidalarken, üst
taraftan başlayarak alt tarafa doğru ilerleyin. Bu
şekilde vidalama işlemini daha az yorularak
gerçekleştirebilirsiniz.
11. Yanlışlıkla mevcut bir bağlantı elemanın üzerine
vidalarsanız veya ahşap içerisinde bir budağa
denk gelirseniz, bağlantı elemanı eğilebilir veya
alette sıkışma oluşabilir. Bağlantı elemanı
fırlayabilir ve birisine isabet edebilir veya aletin
kendisi tehlikeli bir şekilde geri tepebilir. Bağlantı
elemanlarını dikkatli bir şekilde yerleştirin.
12. Aynı anda hem iç hem dış taraftan bağlantı
elemanı vidalamaya çalışmayın. Bağlantı elemanları
karşı tarafa geçerek ve/veya sıçrayarak ciddi tehlike
oluşturabilir.
Yinelenen hareketler ile ilgili tehlikeler
1. Bir alet uzun bir dönem boyunca kullanıldığında
operatör ellerinde, kollarında, omuzlarında,
boynunda ya da vücudunun diğer bölümlerinde
rahatsızlık hissedebilir.
2. Bir aleti kullanırken, operatör uygun ama
ergonomik bir duruş seçmelidir. Ayaklarınızı yere
sağlam basın ve tuhaf veya dengesiz duruşlardan
kaçının.
3. Operatör sürekli ya da tekrarlayan rahatsızlık, ağrı,
çarpıntı, acı, karıncalanma, uyuşma, yanma hissi
veya sertleşme gibi belirtiler yaşarsa bu uyarı
sinyallerini göz ardı etmemelidir. Operatör, genel
faaliyetleri ile ilgili olarak nitelikli bir sağlık
profesyoneline danışmalıdır.
4. Aletin sürekli kullanılması aletin oluşturduğu geri
tepme nedeniyle tekrarlayıcı gerilerek zorlama
yaralanmasına neden olabilir.
5. Tekrarlayan gerilme yaralanmasını engellemek
için operatör ileriye uzanmamalı veya aşırı güç
kullanmamalıdır. İlaveten operatör kendini yorgun
hissettiğinde dinlenmelidir.
6. Tekrarlayan hareket tehlikelerine yönelik bir risk
değerlendirmesi yapın. Bu değerlendirme kasiskelet sistemi hastalıklarına odaklanmalı ve
tercihen, çalışma sırasında yorgunluğun
azaltılmasının hastalıkları azaltmada etkili olduğu
varsayımını baz almalıdır.
Aksesuar ve sarf malzemeleriyle ilgili tehlikeler
1. İş parçası temas elemanı gibi aksesuarları
değiştirilmesi ya da ayarlamalar yapılması gibi
işlemlerden önce gaz tüpünü ve bataryayı çıkarın.
2. Daima sadece üretici tarafından temin edilen
boyut ve türdeki aksesuarları kullanın.
3. Sadece bu kılavuzda belirtilen yağları kullanın.
Çalışma yeri ile ilişkili tehlikeler
1. Kayma, takılma ve düşmeler iş yeri
yaralanmalarının önde gelen sebeplerindendir.
Aletin kullanılmasından dolayı kayganlaşan
yüzeylere ve hava hattı hortumuna takılma
nedeniyle oluşabilecek tehlikelere karşı dikkatli
olun.
2. Alışık olmadığınız ortamlarda çalışırken ekstra
dikkatli olun. Elektrik ya da diğer tesisat hatları
gibi gizli tehlikeler mevcut olabilir.
3. Bu alet potansiyel olarak patlayıcı atmosferlerde
kullanım için tasarlanmamıştır ve elektrik
hatlarıyla temasa karşı yalıtıma sahip değildir.
4. Aletin kullanımı nedeniyle hasar görerek tehlikeye
neden olabilecek elektrik kabloları, gaz boruları
vb. olmadığından emin olun.
5. Çalışma alanını temiz tutun ve iyi aydınlatın.
Karmakarışık veya karanlık alanlar kazalara davetiye
çıkarır.
6. Gürültü seviyelerinin belirli sınırlar dahilinde
tutulmasını gerektiren yerel yönetmelikler mevcut
olabilir. Belirli durumlarda gürültünün absorbe
e
i için gürültü önleyici muhafazalar
dilmes
kullanılmalıdır.
Toz ve çıkan gazlarla ilgili tehlikeler
1. Etrafınızdakileri daima kontrol edin. Aletten çıkan
gaz, toz ve nesneleri atabilir ve bunlar operatöre
ve/veya etraftakilere çarpabilir.
2. Egzozu, toz dolu bir ortamda toz müdahalesini en
aza indirecek şekilde yönlendirin.
3. Çalışma alanına toz veya cisimler yayılıyorsa
sağlık tehlikelerini ve yaralanma riskini azaltmak
için yayılımı mümkün olduğunca azaltın.
Gürültü ile ilgili tehlikeler
1. Yüksek gürültü seviyelerine hiçbir koruyucu
ekipman olmadan maruz kalmak kalıcı, sakat
bırakıcı, işitme kayıplarına ve kulak çınlaması
(kulaklarda çınlama, vızıldama, ıslık sesi,
uğuldama) gibi başka problemlere neden olabilir.
2. Çalışma alanındaki gürültü tehlikelerine yönelik
bir risk değerlendirmesi yapın ve bu tehlikeler için
uygun kontrolleri uygulayın.
3. Bu riski azaltmaya yönelik uygun önlemler
arasında iş parçalarının “çınlamasını” önlemek
için tampon malzemeler kullanılması gibi eylemler
de sayılabilir.
4. Uygun bir işitme koruması kullanın.
5. Gürültü seviyesinin gereksiz yere artmasını
önlemek için aleti bu talimatlarda tavsiye edilen
şekilde kullanın ve aletin bakımını yapın.
6. İş parçalarını ses sönümleyici desteklerin üzerine
koymak gibi gürültü azaltma önlemleri alın.
Titreşim ile ilgili tehlikeler
1. Çalışma sırasında titreşim emisyonu, kavrama
gücü, temas basıncının gücü, çalışma yönü, enerji
kaynağının ayarları, iş parçası ve iş parçası
desteğine bağlıdır. Titreşim tehlikelerine yönelik
bir risk değerlendirmesi yapın ve bu tehlikeler için
uygun kontrolleri uygulayın.
79

2. Titreşime maruziyet sinirlerde ve el ve kolların kan
akışında vazifeden alıkoyan hasara neden olabilir.
3. Soğuk koşullarda çalışırken ılık tutacak giysiler
giyin, ellerinizi sıcak ve kuru tutun.
4. Uyuşma, karıncalanma, ağrı, parmaklarda veya
ellerde ciltte beyazlaşma görülmesi gibi belirtiler
yaşarsanız, genel faaliyetlerle ilgili olarak hemen
nitelikli bir sağlık profesyonelinden tıbbi tavsiye
alın.
5. Titreşim seviyesinin gereksiz yere artmasını
önlemek için aleti bu talimatlarda tavsiye edilen
şekilde kullanın ve aletin bakımını yapın.
6. Aleti hafif ama sağlam bir şekilde tutun; çünkü
kavrama gücü çok yüksek olduğunda oluşabilecek
titreşim riski de daha yüksek olur.
Gazlı aletler için ek güvenlik kuralları
1. Aleti sadece orijinal Makita gaz tüpü ile kullanın.
2. Gazlı aletleri kullanırken, alet ısınarak kavrama ve
kontrolü etkileyebileceğinden dolayı dikkatli olun.
3. Gazlı tespit elemanı çakma aletleri havalandırılan
yerlerde kullanılmalıdır.
4. Sıvı yanıcı gazın insan cildine temas etmesi
durumunda yaralanma olabilir.
5. Gaz tüpleri, gerekli taşımacılık mevzuatına göre
etiketlenmelidir.
6. Gaz tüplerini dikkatli kullanın ve hasarlara karşı
kontrol edin. Hasarlı gaz tüpleri patlayabilir ve
yaralanmaya neden olabilir.
7. Gaz tüpü ile verilen talimatları okuyun ve bunlara
uyun.
8. Yanıcı malzemelerin, çıkan sıcak gazlara maruz
kalmadığından emin olun.
9. Alette üretilen kıvılcımlar yangın veya patlamaya
neden olabileceğinden gazlı aletleri patlayıcı
alanlarda kullanmayın.
10. Gaz tüpleri dikkatsizce veya yüksek sıcaklıkta
saklanmamalıdır. Gaz tüpleri ve bataryalar veya
akülerin kullanımı ve bertarafı için yerel
düzenlemeleri ve gaz tüpünün talimatlarını izleyin.
11. Gazlı aletler için, normal çalışma sonucu az
miktarda gaz salımı olabilir.
Bataryalı aletin kullanımı ve bakımı
1. Sadece üretici tarafından belirtilen şarj aleti ile şarj
edin. Bir batarya kutusu için uygun olan şarj cihazı
başka bir batarya kutusu ile kullanıldığında yangın
riski oluşturabilir.
2. Elektrikli aletleri sadece özel olarak belirtilen
batarya kutuları ile kullanın. Başka batarya
kutularının kullanımı yaralanma ve yangın riski
oluşturabilir.
3. Batarya kutusu kullanılmadığında; iki terminal
arasında bağlantı kurulmasına sebep olabilecek
ataç, bozuk para, anahtar, çivi, vida gibi metal
nesnelerden ya da küçük metal objelerden uzak
tutun. Batarya terminallerine kısa devre yaptırmak
yanıklara ya da yangına yol açabilir.
4. Kötü koşullarda bataryadan sıvı sızabilir; bu sıvıya
temas etmeyin. Eğer istemeden bir temas
oluşursa suyla yıkayın. Sıvı göze temas ederse,
suyla yıkadıktan sonra tıbbi yardım alın.
Bataryadan çıkan sıvı tahrişe ya da yanıklara neden
olabilir.
5. Batarya kutusu ya da alet hasar görmüşse ya da
üzerinde değişiklik yapılmışsa batarya kutusunu
kullanmayın. Hasar görmüş ya da üzerinde değişiklik
yapılmış batarya kutuları yangın, patlama ya da
yaralanma riski ile sonuçlanan beklenmedik
davranışlar sergileyebilir.
6. Batarya kutusunu veya aleti ateşe ya da aşırı
sıcaklıklara maruz bırakmayın. Ateşe ya da
130°C’nin üzerindeki sıcaklıklara maruz bırakmak
patlamaya neden olabilir.
7.
Tüm şarj talimatlarına uyun ve batarya kutusunu
y
a da aleti
aralığının dışındaki sıcaklıklarda şarj etmeyin.
Uygun olmayan bir şekilde ya da belirtilen sıcaklık
aralığının dışında şarj etmek bataryaya zarar verebilir
ve yangın riskini artırabilir.
Güvenlik aygıtları
1. Çalışmaya başlamadan önce tüm güvenlik
sistemlerinin çalışır durumda olduğundan emin
olun. Alet yalnızca anahtar tetik çekilerek veya
yalnızca temas kolu ahşap malzemeye dayanılarak
çalıştırılmamalıdır. Aleti çalıştırmak için iki işlem aynı
anda uygulanmalıdır. Aletin doğru şekilde çalışıp
çalışmadığını bağlantı elemanları tamamen
boşaltılmış ve itici tam çekilmiş konumdayken test
edin.
2. Tetiğin AÇIK konuma sabitlenmesi de oldukça
tehlikelidir. Tetiği asla sabitlemeye çalışmayın.
3. Bant veya tel kullanarak temas elemanını basılı
durumda sabitlemeye çalışmayın. Ölüm veya ciddi
yaralanmalar meydana gelebilir.
4. Temas elemanını daima bu kılavuzda açıklandığı
şekilde kontrol edin. Güvenlik mekanizması doğru
şekilde çalışmazsa bağlantı elemanları kazara
fırlatılabilir.
Servis
1. Temizleme ve bakım işlemlerini alet ile çalışmanız
bittikten hemen sonra gerçekleştirin. Aleti daima en
iyi durumda tutun. Paslanmayı önlemek ve
sürtünmeye bağlı aşınmayı minimum seviyeye
düşürmek için hareketli parçaları yağlayın.
Parçalardaki tüm tozu temizleyin.
2. Aletin periyodik kontrolü için Makita yetkili servis
merkezinden yardım isteyin.
3. Ürünün EMNİYET ve GÜVENİLİRLİĞİNİ muhafaza
etmek için bakım ve tamir işlemleri daima Makita
yedek parçaları kullanılarak Makita yetkili servis
merkezleri tarafından yapılmalıdır.
4. Aleti elden çıkarırken yerel düzenlemelere uyunuz.
yönergelerde belirtilen sıcaklık
BU TALİMATLARI MUHAFAZA
EDİNİZ.
UYARI: Ürünü kullanırken (defalarca kullanınca
kazanılan) rahatlık ve tanıdıklık duygusunun ilgili
ürünün güvenlik kurallarına sıkı sıkıya bağlı kalmanın
yerine geçmesine İZİN VERMEYİN. YANLIŞ KULLANIM
veya bu kullanma kılavuzunda belirtilen emniyet
kurallarına uymama ciddi yaralanmaya neden olabilir.
80

Batarya kartuşu hakkında önemli
güvenlik talimatları
1. Batarya kartuşunu kullanmadan önce, tüm
talimatları ve (1) batarya kartuşu, (2) batarya ve (3)
ürün üzerindeki tüm uyarı işaretlerini okuyun.
2. Batarya kartuşunu demonte etmeyin.
3. Çalışma süresi aşırı derecede kısalmışsa
kullanmayı derhal bırakın. Aşırı ısınma, yanma
riski hatta patlamaya neden olabilir.
4. Gözünüze elektrolit kaçarsa, gözlerinizi temiz
suyla durulayın ve hemen tıbbi yardım alın. Görme
kaybına yol açabilir.
5. Batarya kartuşuna kısa devre yaptırmayın:
(1) Terminallere herhangi bir iletken madde
değdirmeyin.
(2) Batarya kartuşunu çiviler, madeni paralar, vb.
gibi başka metal nesnelerle aynı kaba
koymaktan kaçının.
(3) Batarya kartuşunu yağmura ya da suya
maruz bırakmayın.
Kısa devre, büyük bir akım akışına, aşırı ısınmaya,
olası yanıklara hatta bataryanın bozulmasına yol
açabilir.
6. Aleti ve batarya kartuşunu sıcaklığın 50°C ya da
daha yükseğe ulaştığı yerlerde saklamayın.
7. Aşırı derecede hasar görmüş ya da tamamen
kullanılamaz durumda olsa bile batarya kartuşunu
yakmayın. Batarya kartuşu ateşe atılırsa
patlayabilir.
8. Bataryayı düşürmemeye ve çarpmamaya dikkat
edin.
9. Hasarlı bataryayı kullanmayın.
10. Aletin içerdiği lityum-iyon bataryalar Tehlikeli
Eşyalar Yönetmeliğinin gereksinimlerine tabidir.
Ticari nakliye işlemleri için, örneğin üçüncü taraflar,
nakliye acenteleri tarafından yapılan nakliyelerde,
paketleme ve etiketleme gereksinimlerine uyulmalıdır.
Nakliyesi yapılacak ürünün hazırlanması için, tehlikeli
maddeler konusunda uzman bir kişiye danışın. Lütfen
muhtemelen daha ayrıntılı olan ulusal yönetmeliklere
de uyun.
Açık kontakları bantlayın ya da maskeleyin ve
bataryayı paketin içinde hareket etmeyecek şekilde
paketleyin.
11. Batarya kartuşunu bertaraf ederken aletten çıkarın
ve güvenli bir yerde bertaraf edin. Bataryanın
bertaraf edilmesi ile ilgili yerel düzenlemelere
uyunuz.
12. Bataryaları sadece Makita tarafından belirtilen
ürünlerle kullanın. Bataryaların uyumsuz ürünlere
takılması; yangın, aşırı ısınma, patlama ya da
elektrolit sızıntısına neden olabilir.
13. Alet uzun süre kullanılmayacaksa batarya aletten
çıkarılmalıdır.
ENC009-6
BU TALİMATLARI MUHAFAZA
EDİNİZ.
DİKKAT: Sadece orijinal Makita bataryalarını
kullanın. Orijinal olmayan Makita bataryaları ya da
üzerine değişiklik yapılmış bataryaların kullanımı
bataryanın patlamasına ve sonuç olarak yangın, kişisel
yaralanma ve hasara neden olabilir. Ayrıca Makita aleti ve
şarj aletinin Makita tarafından sunulan garantisi de
geçersiz olur.
Maksimum batarya ömrü için ipuçları
1. Batarya kartuşunu tamamen boşalmadan önce
şarj edin. Aletin gücünün zayıflamaya başladığını
fark ettiğinizde aleti durdurun ve batarya
kartuşunu şarj edin.
2. Tam dolu bir batarya kartuşunu asla yeniden şarj
etmeyin. Aşırı şarj etme bataryanın hizmet ömrünü
kısaltır.
3. Batarya kartuşunu 10°C - 40°C oda sıcaklığında
şarj edin. Sıcak bir batarya kartuşunu şarj
etmeden önce soğumasını bekleyin.
Çivi çakma makinesinin genel
görünümü (Şekil 2)
KULLANIMA İLİŞKİN TANIMLAR
DİKKAT:
• Makineyi ayarlamadan veya çalışmasını kontrol
etmeden önce mutlaka yakıt pilini, aküsünü ve çivileri
çıkarttığınızdan emin olun.
Akünün takılması ve çıkartılması
DİKKAT:
• Aküyü takmadan ve çıkarmadan önce mutlaka
makineyi kapalı konuma getirin.
• Aküyü takarken ve çıkartırken makineyi ve aküyü
sıkıca tutun. Aksi takdirde, makine ve akü elinizden
kayarak düşebilir ve neticesinde makine ve akü
hasarları ve yaralanmalar meydana gelebilir. (Şekil 3)
Aküyü yerine takmak için aküyü, ön kısmı akü montaj
aralığına denk gelecek şekilde tutun ve yerine kaydırarak
yerleştirin. Adaptörün tam yerine oturduğunu klik
sesinden anlayabilirsiniz. (Şekil 4)
Aküyü çıkarmak için, şekilde gösterildiği gibi aküyü yan
tarafında bulunan düğmelere bastırarak çekin.
DİKKAT:
• Akü mutlaka tam olarak yerine oturacak şekilde
takılmalıdır. Aksi takdirde, adaptör makineden kayıp
düşebilir ve operatörün veya çevredeki kişilerin
yaralanmasına neden olabilir.
• Aküyü zorlayarak takmaya çalışmayın. Akünün
makineye rahatça takılamaması, akünün yanlış
takıldığını gösterir.
Lambanın açılması
DİKKAT:
• Doğrudan lambaya veya ışık kaynağına bakmayın.
(Şekil 5)
• Lambayı açmak için, lamba düğmesine basın. Lambayı
kapatmak için, lamba düğmesine tekrar basın.
Yakıt pili
Ölçüm vanasının yakıt piline takılması (Şekil 6)
Kapağı çıkartın (ölçüm vanasıyla birlikte bir kapak
verilmişse). (Şekil 7)
Ön kenarı bastırın. (Şekil 8)
Yerine oturana kadar arka kenarı bastırın.
81

Yakıt pilinin takılması (Şekil 9)
Açmak için yakıt kapağını yukarı itin ve ardından çekin.
(Şekil 10)
Yakıt pilini, ölçüm vanasının püskürtme nozülü, adaptöre
bakacak şekilde takın. (Şekil 11)
Püskürtme nozülünü adaptörün küçük deliğine doğru
şekilde takın. (Şekil 12)
Yakıt kapağını ölçüm vanasının üzerine takın ve kilitlemek
için üzerine bastırın.
Çivi çakma derinliğinin ayarlanması
DİKKAT:
• Çivi çakma derinliğini ayarlamadan önce yakıt pilini,
aküyü ve çivileri çıkartın. (Şekil 13)
Daha sığ bir derinlik elde etmek için, ayar düğmesini
şekilde gösterildiği gibi A tarafına çevirin. Daha derin bir
derinlik elde etmek için ise ayar düğmesini B yönünde
çevirin. Ayar düğmesini çok fazla çevirmeyin, aksi
takdirde temas elemanı ayar düğmesinden çıkar veya
sıkışabilir.
Gösterge lambası
Farklı renklerde farklı şekillerde yanan gösterge
lambasının anlamları aşağıda açıklanmıştır.
Yeşil yanıp sönüyorsa: Normal durum
Kırmızı yanıp sönüyorsa: Akünün değiştirilmesi gerekir
Sabit kırmızı yanıyorsa: Aküyü şarj edin. Akü kapasitesi
kalmadığından çivi çakma işlemi gerçekleştirilemiyor.
Turuncu yanıp sönüyorsa: Detaylı bir temizlik yapılması
önerilir. Makinenin içini doğru ve detaylı şekilde
temizlemek için “BAKIM” bölümüne bakın. Turuncu yanıp
sönen gösterge lambasını sıfırlamak için temas elemanını
beş saniye basılı tutun ve ardından temas elemanına beş
defa basın.
Sırasıyla yeşil ve kırmızı yanıp söndükten sonra
turuncu yanıp sönüyorsa: Arıza tespit işlemi devam
ediyordur. Sıfırlamak üzere, aküyü çıkartın ve geri takın.
Arıza tespit işlemi tekrar yürütülürse, bir arıza vardır.
Onarması için size en Makita servis merkezine başvurun.
Kancanın takılması (Şekil 14)
Kanca, makinenin kısa süreli asılması için kullanılabilir.
Makinenin her iki tarafına da takılabilir. Herhangi bir alet
kullanılmadan çıkartılabilir.
Kancayı takmak için, kancanın üst parçasını açın ve
makineye geçirin. Kancayı çıkarmak için, kancanın üst
parçasını her iki yönde açın ve kancayı makineden
çekerek çıkartın.
MONTAJ
DİKKAT:
• Makine üzerinde herhangi bir işlem gerçekleştirmeden
önce daima yakıt pilini ve aküyü çıkartın.
Çivi çakma makinesinin yüklenmesi
(Şekil 15)
Bir çivi şeridini haznenin arka tarafındaki yarıktan
yerleştirin. (Şekil 16)
İttirici düğmesini haznenin arkasına doğru gitti yere kadar
bastırarak ittirici mandalını çekin. Arından, ittirici
düğmesini serbest bırakın ve ittirici mandalını yavaş bir
şekilde şeridin sonuna getirin.
82
Çivilerin çıkartılması (Şekil 17)
Çivi destek parçasını serbest bırakmak için ittirici
mandalını çekin ve ittirici düğmesine basın ve ardından
ittirici düğmesine basarak ittirici mandalını üst konuma
geri getirin.
Çivileri haznenin arka tarafına doğru kaydırın ve bu
bölümden çıkartın.
Uç adaptörü (Şekil 18)
Uç adaptörü, işparçası yüzeyinin çizilmesini veya hasar
görmesini engeller. Uç adaptörünü doğru şekilde
yerleştirin.
Kullanmıyorken, uç adaptörünü yerine takın. Saklama
konumu, makinenin alt tarafındadır. (Şekil 19)
Kısa çivi adaptörü (Şekil 20 ve 21)
25 mm’den (1”) kısa çiviler kullanılırken bu çivilerin
sıkışmasını önlemek için, kısa çivi adaptörünü kullanın.
Kısa çivi adaptörünü haznenin arka tarafındaki yarıktan
yerleştirin. Ardından, cıvatayı sıkarak adaptörü sabitleyin.
ÇALIŞTIRMA
UYARI:
• Hava çıkış kanalının etrafına dokunmayın. Çalışma
sırasında veya sonrasında yüzey çok sıcak olacaktır.
Hava çıkış kanalının etrafına dokunulması, yanıklara
veya yaralanmalara yol açabilir.
DİKKAT:
• Çalışmaya başlamadan önce tüm güvenlik
sistemlerinin doğru çalıştığından emin olun.
Kullanmadan önce aletin doğru
çalıştığının kontrol edilmesi
Kullanmadan önce, daima aşağıdaki noktaları kontrol
edin.
– Aletin sadece batarya kartuşu ve gaz tüpü takılınca
çalışmadığından emin olun.
– Aletin sadece tetik çekilince çalışmadığından emin
olun.
– Aletin tetik çekilmeden sadece temas elamanı iş
parçasının üzerine yerleştirilince çalışmadığından emin
olun.
– Aletin önce tetik çekilip ardından da temas elemanı iş
parçasının üzerine yerleştirilince çalışmadığından emin
olun.
Çivilerin çakılması (Şekil 22)
1. Bir çivi çakmak için, temas elemanını işparçasına
dayayın.
Fan motoru devreye girer ve yanma odasına yakıt gazı
enjekte edilir ve burada fan tarafından oluşturulan havayla
karışır. (Şekil 23)
2. Temas elemanını işparçasına sağlam şekilde bastırın
ve açma/kapama düğmesine basın.
Yakıt gazı yanar ve çiviler çakılmaya başlar.
3. Bir sonraki çakma işlemine ancak hem temas
elemanı, hem de açma/kapama düğmesi serbest
bırakıldıktan sonra başlanılabilir.
Boş ateşleme önleme mekanizması
Bu mekanizma, makinenin çivi olmadan ateşleme
yapmasını engeller.
Son 9-11 parça çivi kaldığında, boş ateşleme koruması
otomatik olarak devreye girer.

Çivi çakma makinesinin tıkanması
UYARI:
• Bir tıkanıklığı açmaya çalışmadan önce daima yakıt
pilini ve aküyü çıkartın.
DİKKAT:
• Deforme olmuş çivileri veya çivi şeritlerini kullanmayın.
Aksi takdirde, çivi beslemesi gerektiği şekilde
gerçekleşmez.
Çivi çıkarma prosedürünü takip edin ve haznedeki çivileri
çıkartın. (Şekil 24)
Kilidi ve kapağı açın ve ardından sıkışan çiviyi çıkartın.
BAKIM
DİKKAT:
• Herhangi bir kontrol veya bakım işlemi
gerçekleştirmeye başlamadan önce mutlaka yakıt pilini,
aküyü ve çivileri çıkartın.
• Kesinlikle gazolin, benzin, tiner, alkol veya benzeri bir
madde kullanmayın. Aksi takdirde renk bozulması,
deformasyon veya çatlaklar meydana gelebilir.
Günlük çalışma sonrası bakım
Çalıştırmadan önce aletin genel durumunu ve gevşemiş
vida olup olmadığını kontrol edin. Gerekirse, gevşeyen
vidaları sıkın.
Günlük çalışma sonunda bir çalışma günü sonu bakımı
gerçekleştirin.
Bu basit adımlar makinenin güvenliğinin ve
performansının korunması içindir.
Çalışma alanından ayrılmadan önce:
• Aküyü çıkartın ve bir alet taşıma çantasına kaldırın.
Makineyi taşımak ve muhafaza etmek için daima bir
alet taşıma çantası kullanın.
• Tüm boş pilleri çocuklar tarafından bulunmayacak,
ezilmeyecek, delinmeyecek veya ateşe atılmayacak
şekilde bertaraf edin.
Eve geldiğinizde:
• Kırmızı gösterge lambası tarafından şarj edilmesi
gerektiği gösteriliyorsa, şarj cihazını kullanarak aküyü
şarj edin.
• Makineyi temiz ve yumuşak bir bezle silin.
• Filtreyi kontrol edin ve tozluysa temizleyin.
Hava filtresinin temizlenmesi (Şekil 25 ve
26)
Filtre kapağını hafifçe yukarı doğru ittirerek çıkartın.
Ardından, kaldırarak filtreyi çıkartın.
Tozlarını dökmesi için hafifçe vurarak filtreyi temizleyin.
Su ve sabunla temizlenmesi, filtreyi neredeyse yeni
konumuna getirir.
Ürünün EMNİYETLİ ve GÜVENİLİR durumda kalmasını
sağlamak için tüm onarımlar, bakım ve ayarlar Makita
yetkili servisleri veya fabrika servis merkezleri tarafından
Makita yedek parçaları kullanılarak yapılmalıdır.
Kapsamlı temizlik
Sık sık boş ateşleme meydana gelmesi, makinenin
kapsamlı şekilde temizlenmesi gerektiğini gösterir.
Ayrıntılı bilgi için ürünle verilen temizleme kılavuzuna
bakın ve temizlik çalışmasını belirtildiği gibi gerçekleştirin.
Temizleme çalışmasıyla ilgili herhangi bir sorunuz
olduğunda, lütfen size en yakın Makita Servis Merkezine
danışın.
OPSİYONEL AKSESUARLAR
DİKKAT:
• Bu kullanım kılavuzunda tanıtılan Makita marka
makineyle aşağıdaki aksesuarların ve parçaların
kullanılması önerilir. Bunların dışında başka
aksesuarların veya parçaların kullanılması
yaralanmalara yol açabilir. Aksesuarlar ve parçalar
doğru şekilde ve öngörüldükleri işlevler için
kullanılmalıdır.
Aksesuarlara ilişkin daha ayrıntılı bilgi almak için size en
yakın yetkili Makita servisine başvurabilirsiniz.
•Çiviler
• Koruyucu gözlük
• Yakıt pili
•Temizleme kiti
• Orijinal Makita akü ve şarj cihazı
NOT:
• Listedeki bazı parçalar makineyle birlikte standart
aksesuar olarak verilebilir. Ürünle verilen aksesuarlar
ülkeden ülkeye farklılıklar gösterebilir.
Gürültü
EN ISO 11148-13 uyarınca belirlenen tipik A ağırlıklı
gürültü seviyesi:
Ses basıncı seviyesi (L
Ses gücü seviyesi (L
Belirsizlik (K): 3 dB (A)
Koruyucu kulaklık kullanın.
Titreşim
EN ISO 11148-13 uyarınca belirlenen toplam titreşim
değeri:
Titreşim emisyonu (a
Belirsizlik (K): 1,5 m/s
• Belirtilen titreşim emisyonu değeri, standart test
yöntemine göre ölçülmüştür ve makinenin diğer
makinelerle karşılaştırılması için kullanılabilir.
• Belirtilen titreşim emisyonu değeri ayrıca maruziyetin
ön değerlendirilmesinde de kullanılabilir.
UYARI:
• Elektrikli aletin gerçek kullanımı sırasında ortaya
çıkacak titreşim emisyonu, aletin kullanılma şekline
bağlı olarak belirtilen emisyon değerinden farklı olabilir.
• Gerçek kullanım koşullarındaki maruziyeti tahmin
ederek (örneğin, aletin açılma süresine ek olarak kapalı
konuma getirildiği ve rölantide çalıştığı süreler gibi
çalışma döngüsünün tüm bileşenlerini dikkate alın),
kullanıcıyı korumak için gerekli güvenlik önlemlerinin
alındığından emin olun.
AT Uygunluk Beyanı
Sadece Avrupa ülkeleri için
AT uygunluk beyanı bu kullanım kılavuzunun Ek A’sında
verilmiştir.
): 93 dB (A)
pA
): 106 dB (A)
WA
): 3,5 m/s
h
2
2
ENG905-1
ENG904-2
ENG901-1
83

www.makita.com
Makita Europe N.V.
Makita Corporation
3-11-8, Sumiyoshi-cho,
Anjo, Aichi 446-8502 Japan
Jan-Baptist Vinkstraat 2,
3070 Kortenberg, Belgium
885078C999
ALA
 Loading...