

Page 1
ENGLISH: Original instructions
INSTRUCTION MANUAL
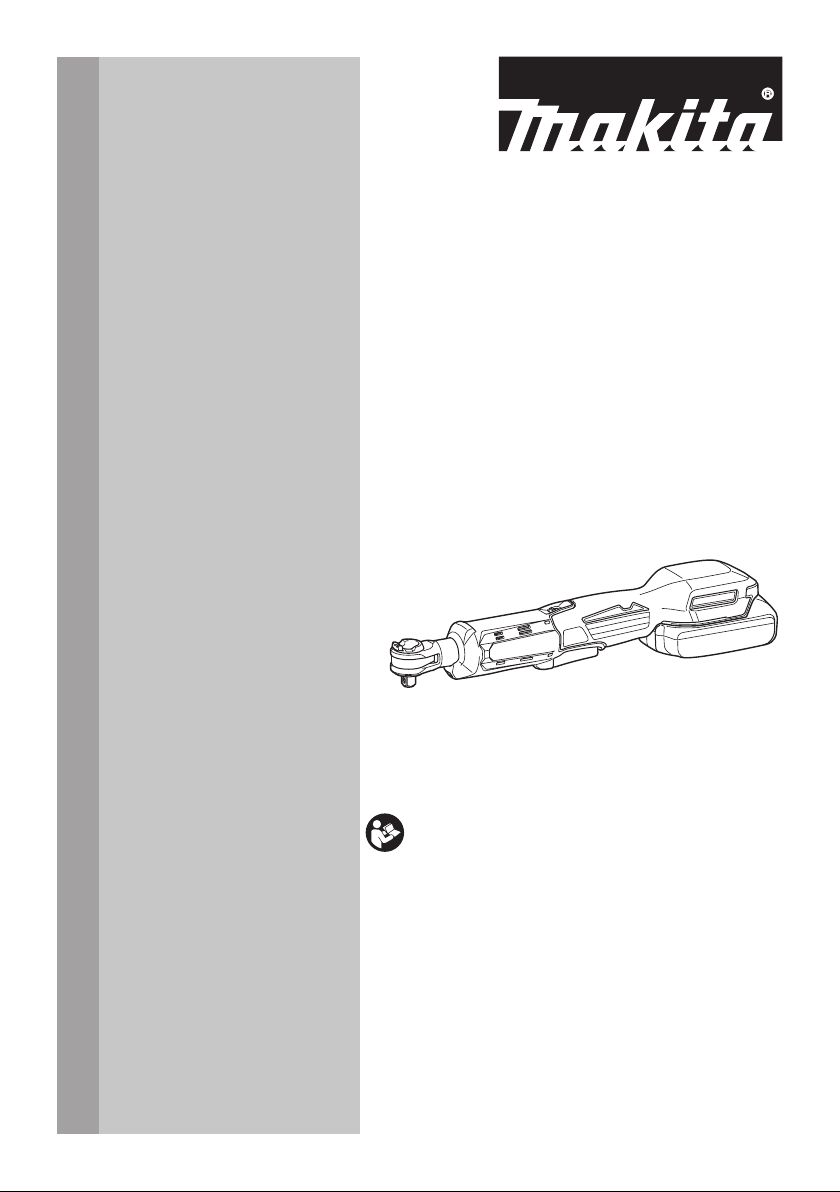
Cordless Ratchet Wrench
DWR180
Read before use.
Page 2
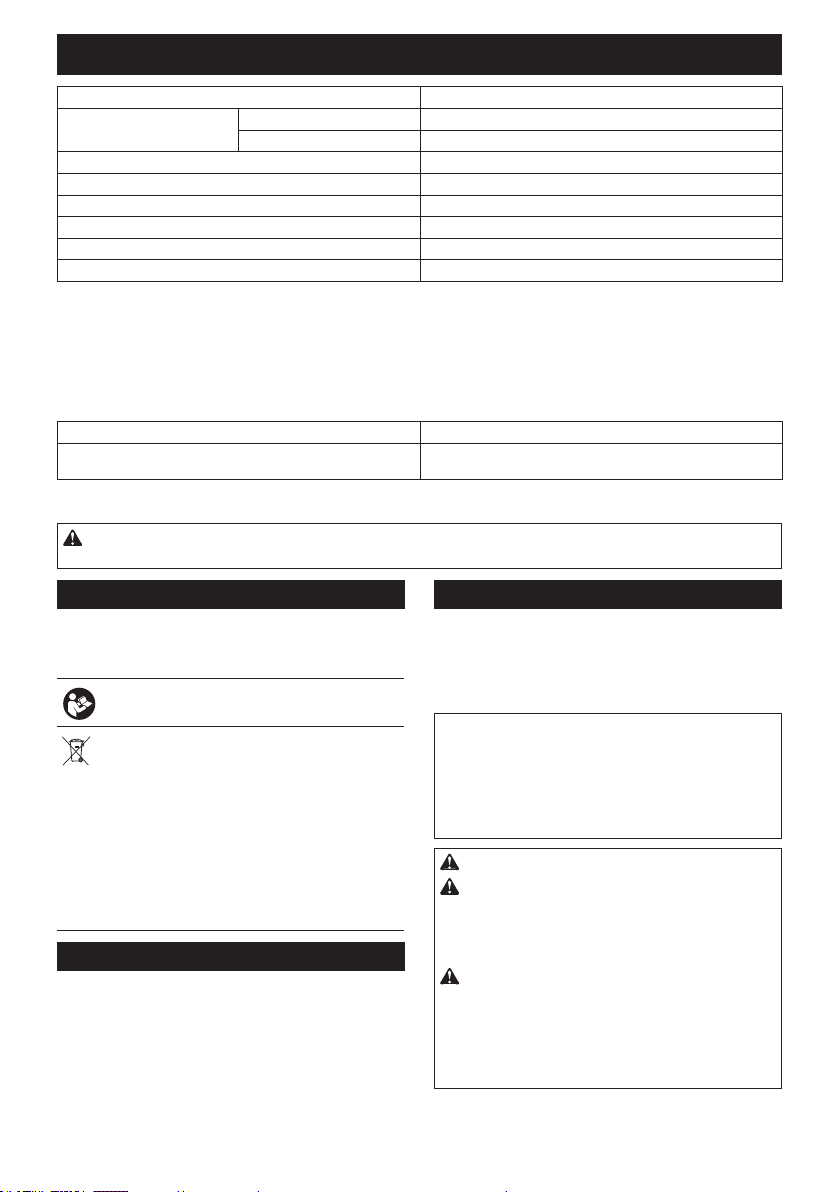
SPECIFICATIONS
Ni-MH
Model: DWR180
Fastening capacities (with
manual retightening)
Square drive 6.35 mm, 9.5 mm
No load speed 0 - 800 min
Maximum fastening torque 47.5 N•m
Overall length 369 mm
Rated voltage D.C. 18 V
Net weight 1.2 - 1.6 kg
• Duetoourcontinuingprogramofresearchanddevelopment,thespecicationshereinaresubjecttochange
without notice.
• Specicationsandbatterycartridgemaydierfromcountrytocountry.
• Theweightmaydierdependingontheattachment(s),includingthebatterycartridge.Thelightestandheavi-
est combinations, according to EPTA-Procedure 01/2014, are shown in the table.
Applicable battery cartridge and charger
Batterycartridge BL1815N / BL1820B / BL1830B / BL1840B / BL1850B / BL1860B
Charger DC18RC / DC18RD / DC18RE / DC18SD / DC18SE / DC18SF /
• Someofthebatterycartridgesandchargerslistedabovemaynotbeavailabledependingonyourregionof
residence.
WARNING: Only use the battery cartridges and chargers listed above.Useofanyotherbatterycartridges
andchargersmaycauseinjuryand/orre.
Standard bolt M5 - M12
High tensile bolt M5 - M10
-1
DC18SH
Symbols
Thefollowingsshowthesymbolswhichmaybeused
fortheequipment.Besurethatyouunderstandtheir
meaning before use.
Read instruction manual.
OnlyforEUcountries
Do not dispose of electric equipment or
batterypacktogetherwithhouseholdwaste
material!
In observance of the European Directives,
on Waste Electric and Electronic
Equipment and Batteries and Accumulators
and Waste Batteries and Accumulators
and their implementation in accordance
with national laws, electric equipment and
batteriesandbatterypack(s)thathave
reached the end of their life must be col-
lectedseparatelyandreturnedtoanenvironmentallycompatiblerecyclingfacility.
Li-ion
Intended use
The tool is intended for fastening bolts and nuts.
Noise
ThetypicalA-weightednoiseleveldeterminedaccording to EN62841-2-2:
Sound pressure level (L
Uncertainty(K):3dB(A)
Thenoiselevelunderworkingmayexceed80dB(A).
NOTE: The declared noise emission value(s) has
been measured in accordance with a standard test
methodandmaybeusedforcomparingonetoolwith
another.
NOTE: The declared noise emission value(s)
mayalsobeusedinapreliminaryassessmentof
exposure.
WARNING: Wear ear protection.
WARNING: The noise emission during actual
use of the power tool can dier from the declared
value(s) depending on the ways in which the
tool is used especially what kind of workpiece is
processed.
WARNING: Be sure to identify safety mea-
sures to protect the operator that are based on an
estimation of exposure in the actual conditions of
use (taking account of all parts of the operating
cycle such as the times when the tool is switched
o and when it is running idle in addition to the
trigger time).
2 ENGLISH
) : 74 dB(A)
pA
Page 3
Vibration
The vibration total value (tri-axial vector sum) determined according to EN62841-2-2:
Work mode: fastening
Vibration emission (ah) : 2.5 m/s
Uncertainty(K):1.5m/s
NOTE: The declared vibration total value(s) has been
measured in accordance with a standard test method
andmaybeusedforcomparingonetoolwithanother.
NOTE:Thedeclaredvibrationtotalvalue(s)mayalso
beusedinapreliminaryassessmentofexposure.
2
2
WARNING: The vibration emission during
actual use of the power tool can dier from the
declared value(s) depending on the ways in which
the tool is used especially what kind of workpiece
is processed.
WARNING: Be sure to identify safety mea-
sures to protect the operator that are based on an
estimation of exposure in the actual conditions of
use (taking account of all parts of the operating
cycle such as the times when the tool is switched
o and when it is running idle in addition to the
trigger time).
EC Declaration of Conformity
For European countries only
TheECdeclarationofconformityisincludedasAnnexA
to this instruction manual.
SAFETY WARNINGS
General power tool safety warnings
WARNING: Read all safety warnings, instruc-
tions, illustrations and specications provided
with this power tool. Failure to follow all instructions
listedbelowmayresultinelectricshock,reand/or
seriousinjury.
Save all warnings and instructions for future reference.
Theterm"powertool"inthewarningsreferstoyour
mains-operated(corded)powertoolorbattery-operated
(cordless) power tool.
Work area safety
1. Keep work area clean and well lit. Cluttered or
dark areas invite accidents.
2. Do not operate power tools in explosive atmo-
spheres, such as in the presence of ammable
liquids, gases or dust. Power tools create sparks
whichmayignitethedustorfumes.
3. Keep children and bystanders away while
operating a power tool. Distractions can cause
youtolosecontrol.
Electrical safety
1. Power tool plugs must match the outlet. Never
modify the plug in any way. Do not use any
adapter plugs with earthed (grounded) power
tools. Unmodiedplugsandmatchingoutletswill
reduce risk of electric shock.
2. Avoid body contact with earthed or grounded
surfaces, such as pipes, radiators, ranges and
refrigerators. There is an increased risk of elec-
tricshockifyourbodyisearthedorgrounded.
3. Do not expose power tools to rain or wet conditions. Water entering a power tool will increase
the risk of electric shock.
4. Do not abuse the cord. Never use the cord for
carrying, pulling or unplugging the power tool.
Keep cord away from heat, oil, sharp edges
or moving parts. Damaged or entangled cords
increase the risk of electric shock.
5. When operating a power tool outdoors, use an
extension cord suitable for outdoor use. Use of
a cord suitable for outdoor use reduces the risk of
electric shock.
6. If operating a power tool in a damp location
is unavoidable, use a residual current device
(RCD) protected supply. Use of an RCD reduces
the risk of electric shock.
7.
Power tools can produce electromagnetic elds
(EMF) that are not harmful to the user. However,
users of pacemakers and other similar medical
devices should contact the maker of their device and/
or doctor for advice before operating this power tool.
Personal safety
1. Stay alert, watch what you are doing and use
common sense when operating a power tool.
Do not use a power tool while you are tired or
under the inuence of drugs, alcohol or medication. A moment of inattention while operating
powertoolsmayresultinseriouspersonalinjury.
2. Use personal protective equipment. Always
wear eye protection. Protective equipment such
asadustmask,non-skidsafetyshoes,hardhator
hearing protection used for appropriate conditions
willreducepersonalinjuries.
3. Prevent unintentional starting. Ensure the
switch is in the o-position before connecting
to power source and/or battery pack, picking
up or carrying the tool.Carryingpowertoolswith
yourngerontheswitchorenergisingpowertools
that have the switch on invites accidents.
4. Remove any adjusting key or wrench before
turning the power tool on.Awrenchorakeyleft
attachedtoarotatingpartofthepowertoolmay
resultinpersonalinjury.
5. Do not overreach. Keep proper footing and
balance at all times. This enables better control
of the power tool in unexpected situations.
6. Dress properly. Do not wear loose clothing or
jewellery. Keep your hair and clothing away
from moving parts.Looseclothes,jewelleryor
long hair can be caught in moving parts.
7. If devices are provided for the connection of
dust extraction and collection facilities, ensure
these are connected and properly used. Use of
dust collection can reduce dust-related hazards.
3 ENGLISH
Page 4
Do not let familiarity gained from frequent use
8.
of tools allow you to become complacent and
ignore tool safety principles. A careless action can
causesevereinjurywithinafractionofasecond.
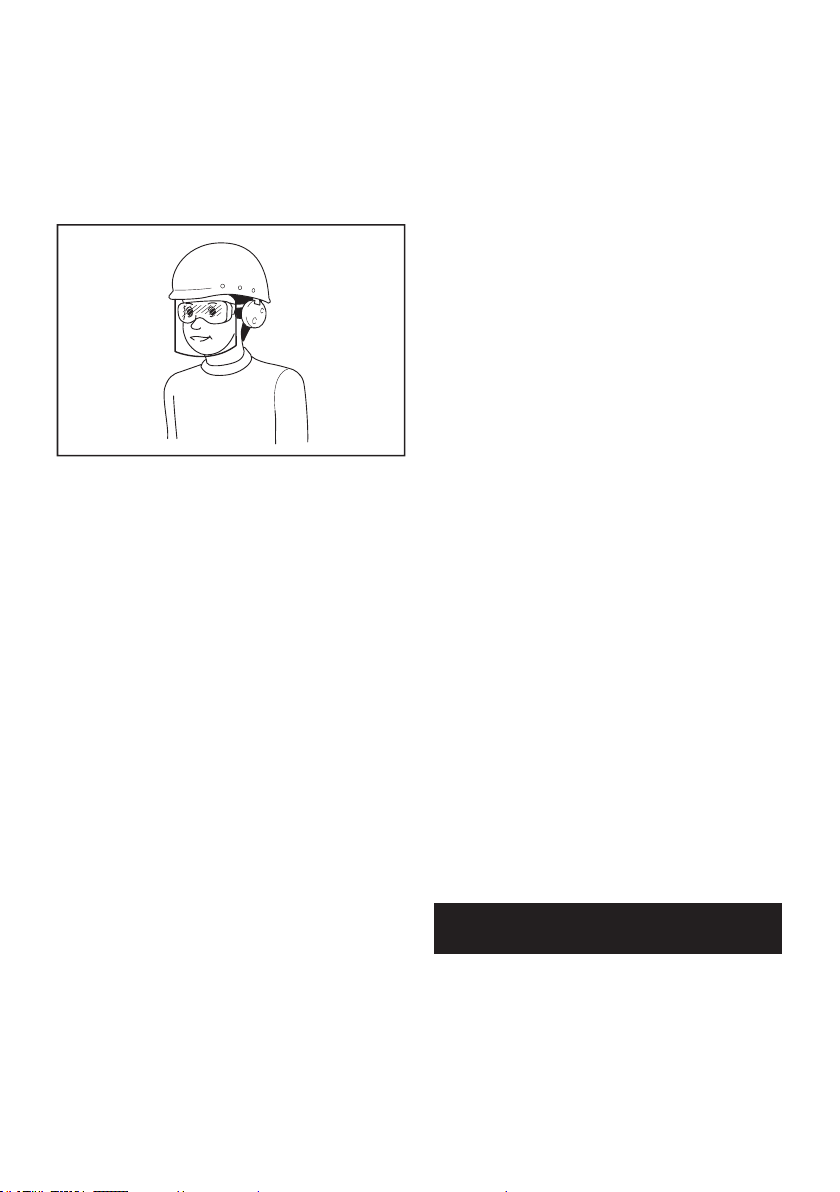
9. Always wear protective goggles to protect
your eyes from injury when using power tools.
The goggles must comply with ANSI Z87.1 in
the USA, EN 166 in Europe, or AS/NZS 1336
in Australia/New Zealand. In Australia/New
Zealand, it is legally required to wear a face
shield to protect your face, too.
It is an employer's responsibility to enforce
the use of appropriate safety protective equipments by the tool operators and by other persons in the immediate working area.
Power tool use and care
1. Do not force the power tool. Use the correct
power tool for your application. The correct
powertoolwilldothejobbetterandsaferatthe
rate for which it was designed.
2. Do not use the power tool if the switch does
not turn it on and o.Anypowertoolthatcannot
be controlled with the switch is dangerous and
must be repaired.
3. Disconnect the plug from the power source
and/or remove the battery pack, if detachable,
from the power tool before making any adjustments, changing accessories, or storing power
tools.Suchpreventivesafetymeasuresreduce
theriskofstartingthepowertoolaccidentally.
4. Store idle power tools out of the reach of children and do not allow persons unfamiliar with
the power tool or these instructions to operate
the power tool. Power tools are dangerous in the
hands of untrained users.
5. Maintain power tools and accessories. Check
for misalignment or binding of moving parts,
breakage of parts and any other condition that
may aect the power tool’s operation. If damaged, have the power tool repaired before use.
Manyaccidentsarecausedbypoorlymaintained
power tools.
6. Keep cutting tools sharp and clean.Properly
maintained cutting tools with sharp cutting edges
arelesslikelytobindandareeasiertocontrol.
7. Use the power tool, accessories and tool bits
etc. in accordance with these instructions, taking into account the working conditions and
the work to be performed. Use of the power tool
foroperationsdierentfromthoseintendedcould
result in a hazardous situation.
8.
Keep handles and grasping surfaces dry, clean
and free from oil and grease.Slipperyhandlesand
grasping surfaces do not allow for safe handling and
control of the tool in unexpected situations.
9. When using the tool, do not wear cloth work
gloves which may be entangled. The entangle-
mentofclothworkglovesinthemovingpartsmay
resultinpersonalinjury.
Battery tool use and care
1. Recharge only with the charger specied by
the manufacturer. A charger that is suitable for
onetypeofbatterypackmaycreateariskofre
whenusedwithanotherbatterypack.
2. Use power tools only with specically desig-
nated battery packs.Useofanyotherbattery
packsmaycreateariskofinjuryandre.
3. When battery pack is not in use, keep it away
from other metal objects, like paper clips,
coins, keys, nails, screws or other small metal
objects, that can make a connection from one
terminal to another.Shortingthebatterytermi-
nalstogethermaycauseburnsorare.
4.
Under abusive conditions, liquid may be ejected
from the battery; avoid contact. If contact accidentally occurs, ush with water. If liquid contacts eyes, additionally seek medical help. Liquid
ejectedfromthebatterymaycauseirritationorburns.
5. Do not use a battery pack or tool that is dam-
aged or modied.Damagedormodiedbatteries
mayexhibitunpredictablebehaviourresultingin
re,explosionorriskofinjury.
6. Do not expose a battery pack or tool to re or
excessive temperature.Exposuretoreortemperatureabove130°Cmaycauseexplosion.
7. Follow all charging instructions and do not
charge the battery pack or tool outside the
temperature range specied in the instructions.Chargingimproperlyorattemperatures
outsidethespeciedrangemaydamagethe
batteryandincreasetheriskofre.
Service
1. Have your power tool serviced by a qualied
repair person using only identical replacement
parts.Thiswillensurethatthesafetyofthepower
tool is maintained.
2. Never service damaged battery packs. Service
ofbatterypacksshouldonlybeperformedbythe
manufacturer or authorized service providers.
3. Follow instruction for lubricating and chang-
ing accessories.
Cordless Ratchet Wrench safety
warnings
1. Hold the power tool by insulated gripping
surfaces, when performing an operation
where the fastener may contact hidden wiring.
Fastenerscontactinga"live"wiremaymake
exposed metal parts of the power tool "live" and
could give the operator an electric shock.
2. Hold the tool rmly.
3. Always be sure you have a rm footing.
Be sure no one is below when using the tool in
high locations.
4 ENGLISH
Page 5
4. Wear ear protectors.
5. Check the impact socket carefully for wear,
cracks or damage before installation.
6. Keep hands away from rotating parts.
7. Do not touch the ratchet head, impact socket,
bolt, nut or the workpiece immediately after
long time operation.Theymaybeextremelyhot
andcouldburnyourskin.
SAVE THESE INSTRUCTIONS.
WARNING: DO NOT let comfort or familiarity
with product (gained from repeated use) replace
strict adherence to safety rules for the subject
product.
MISUSE or failure to follow the safety rules stated
in this instruction manual may cause serious
personal injury.
Important safety instructions for
battery cartridge
1.
Before using battery cartridge, read all instructions and cautionary markings on (1) battery
charger, (2) battery, and (3) product using battery.
2. Do not disassemble or tamper the battery
cartridge.Itmayresultinare,excessiveheat,
or explosion.
3. If operating time has become excessively
shorter, stop operating immediately. It may
result in a risk of overheating, possible burns
and even an explosion.
4. If electrolyte gets into your eyes, rinse them
out with clear water and seek medical attention right away. It may result in loss of your
eyesight.
5. Do not short the battery cartridge:
(1) Do not touch the terminals with any con-
ductive material.
(2) Avoid storing battery cartridge in a con-
tainer with other metal objects such as
nails, coins, etc.
(3) Do not expose battery cartridge to water
or rain.
A battery short can cause a large current
ow, overheating, possible burns and even a
breakdown.
6. Do not store and use the tool and battery cartridge in locations where the temperature may
reach or exceed 50 °C (122 °F).
7. Do not incinerate the battery cartridge even if
it is severely damaged or is completely worn
out. The battery cartridge can explode in a re.
8. Do not nail, cut, crush, throw, drop the battery
cartridge, or hit against a hard object to the
battery cartridge.Suchconductmayresultina
re,excessiveheat,orexplosion.
9. Do not use a damaged battery.
10. The contained lithium-ion batteries are subject
to the Dangerous Goods Legislation requirements.
Forcommercialtransportse.g.bythirdparties,
forwarding agents, special requirement on packaging and labeling must be observed.
For preparation of the item being shipped, consulting an expert for hazardous material is required.
Pleasealsoobservepossiblymoredetailed
national regulations.
Tapeormaskoopencontactsandpackupthe
batteryinsuchamannerthatitcannotmove
around in the packaging.
11. When disposing the battery cartridge, remove
it from the tool and dispose of it in a safe
place. Follow your local regulations relating to
disposal of battery.
12. Use the batteries only with the products
specied by Makita. Installing the batteries to
non-compliantproductsmayresultinare,excessiveheat,explosion,orleakofelectrolyte.
13. If the tool is not used for a long period of time,
the battery must be removed from the tool.
14. During and after use, the battery cartridge may
take on heat which can cause burns or low
temperature burns. Pay attention to the handling of hot battery cartridges.
15. Do not touch the terminal of the tool imme-
diately after use as it may get hot enough to
cause burns.
16. Do not allow chips, dust, or soil stuck into the
terminals, holes, and grooves of the battery
cartridge.Itmayresultinpoorperformanceor
breakdownofthetoolorbatterycartridge.
17. Unless the tool supports the use near
high-voltage electrical power lines, do not use
the battery cartridge near high-voltage electrical power lines.Itmayresultinamalfunctionor
breakdownofthetoolorbatterycartridge.
18. Keep the battery away from children.
SAVE THESE INSTRUCTIONS.
CAUTION: Only use genuine Makita batteries.
Use of non-genuine Makita batteries, or batteries that
havebeenaltered,mayresultinthebatterybursting
causingres,personalinjuryanddamage.Itwill
alsovoidtheMakitawarrantyfortheMakitatooland
charger.
Tips for maintaining maximum
battery life
1. Charge the battery cartridge before completely
discharged. Always stop tool operation and
charge the battery cartridge when you notice
less tool power.
2. Never recharge a fully charged battery car-
tridge. Overcharging shortens the battery
service life.
3. Charge the battery cartridge with room tem-
perature at 10 °C - 40 °C (50 °F - 104 °F). Let
a hot battery cartridge cool down before
charging it.
4. When not using the battery cartridge, remove
it from the tool or the charger.
5. Charge the battery cartridge if you do not use
it for a long period (more than six months).
5 ENGLISH
Page 6
FUNCTIONAL DESCRIPTION
CAUTION: Always be sure that the tool is
switched o and the battery cartridge is removed
before adjusting or checking function on the tool.
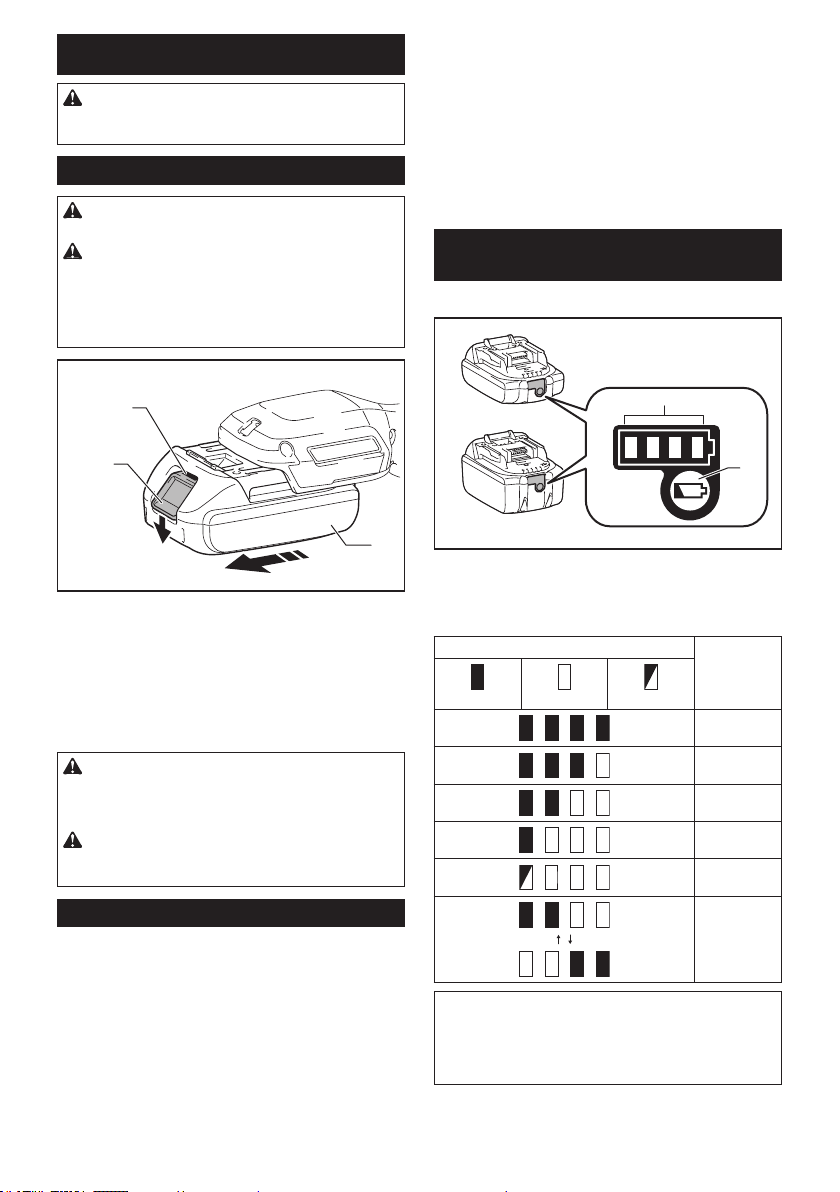
Installing or removing battery cartridge
CAUTION: Always switch o the tool before
installing or removing of the battery cartridge.
CAUTION: Hold the tool and the battery car-
tridge rmly when installing or removing battery
cartridge.Failuretoholdthetoolandthebattery
cartridgermlymaycausethemtoslipoyourhands
andresultindamagetothetoolandbatterycartridge
andapersonalinjury.
Overheat protection
When the tool is overheated, the tool stops automat-
icallyandthelampstartsblinking.Inthissituation,
letthetoolandbatterycoolbeforeturningthetoolon
again.
Overdischarge protection
Thisprotectionworkswhentheremainingbattery
capacitygetslow.Inthissituation,removethebattery
fromthetoolandchargethebattery.
Indicating the remaining battery
capacity
Only for battery cartridges with the indicator
1
2
3
►1. Red indicator 2. Button 3.Batterycartridge
Toremovethebatterycartridge,slideitfromthetool
while sliding the button on the front of the cartridge.
Toinstallthebatterycartridge,alignthetongueonthe
batterycartridgewiththegrooveinthehousingandslip
itintoplace.Insertitallthewayuntilitlocksinplace
withalittleclick.Ifyoucanseetheredindicatoronthe
uppersideofthebutton,itisnotlockedcompletely.
CAUTION: Always install the battery cartridge
fully until the red indicator cannot be seen. If not,
itmayaccidentallyfalloutofthetool,causinginjuryto
youorsomeonearoundyou.
CAUTION: Do not install the battery cartridge
forcibly.Ifthecartridgedoesnotslideineasily,itis
notbeinginsertedcorrectly.
Tool / battery protection system
Thetoolisequippedwithatool/batteryprotectionsystem.Thissystemautomaticallycutsothepowerto
extendtoolandbatterylife.Thetoolwillautomatically
stopduringoperationifthetoolorbatteryisplaced
under one of the following conditions:
Overload protection
This protection works when the tool is operated in a manner
thatcausesittodrawanabnormallyhighcurrent.Inthissituation,turnthetooloandstoptheapplicationthatcausedthe
tool to become overloaded. Then turn the tool on to restart.
1
►1. Indicator lamps 2. Check button
Pressthecheckbuttononthebatterycartridgetoindicatetheremainingbatterycapacity.Theindicatorlamps
light up for a few seconds.
Indicator lamps Remaining
Lighted O Blinking
75% to 100%
50% to 75%
25% to 50%
0% to 25%
Charge the
Thebattery
malfunctioned.
NOTE: Depending on the conditions of use and the
ambienttemperature,theindicationmaydierslightly
fromtheactualcapacity.
NOTE:Therst(farleft)indicatorlampwillblinkwhen
thebatteryprotectionsystemworks.
6 ENGLISH
2
capacity
battery.
mayhave
Page 7
Switch action
Lighting up the front lamp
CAUTION: Before installing the battery car-
tridge into the tool, always check to see that the
switch lever actuates properly and returns to the
"OFF" position when released.
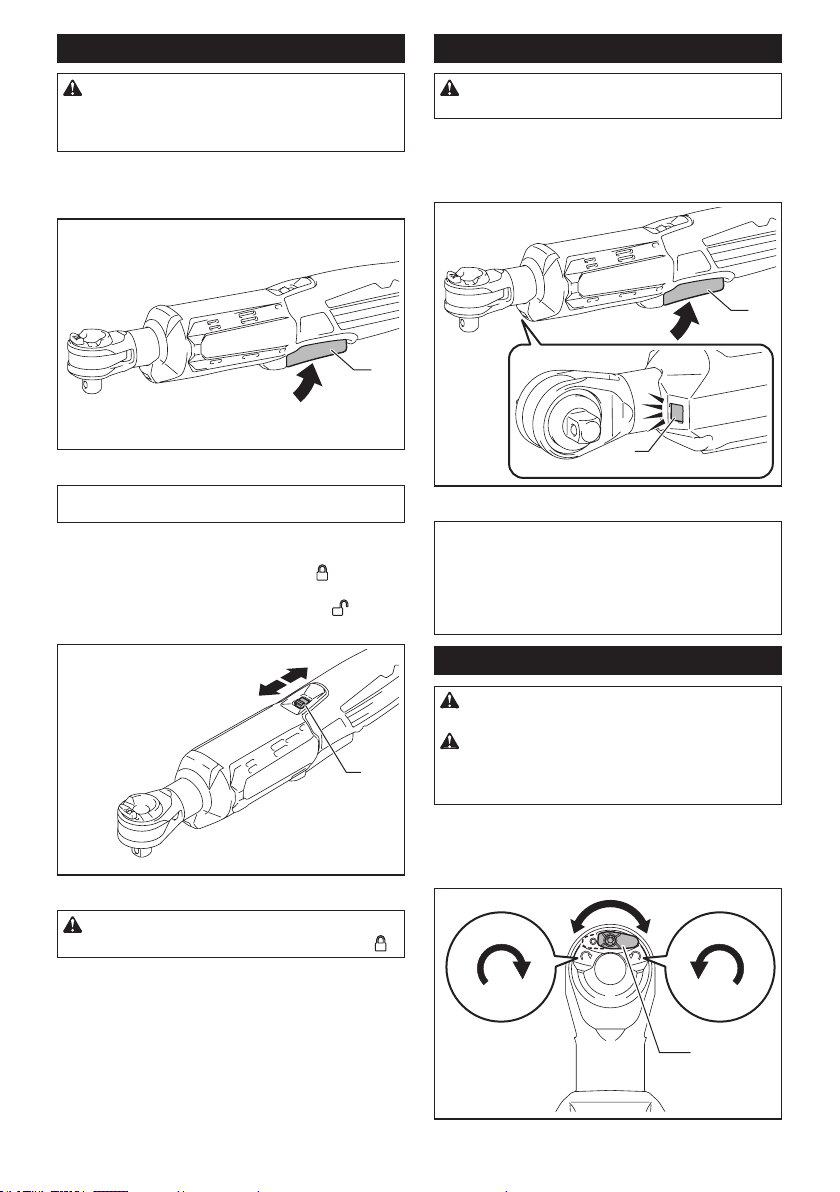
Tostartthetool,simplypulltheswitchlever.Toolspeed
isincreasedbyincreasingpressureontheswitchlever.
Release the switch lever to stop.
1
►1. Switch lever
NOTE:Thetoolautomaticallystopswhenyoukeep
pulling the switch trigger for about 1 minute.
Topreventtheswitchleverfromaccidentallypulled,the
lock lever is provided.
When the lock lever is in the lock position , the switch
lever cannot be actuated.
When the lock lever is in the unlock position , the
switch lever can be actuated.
3
2
1
►1. Lock lever 2. Lock 3. Unlock
CAUTION: Do not look in the light or see the
source of light directly.
Pull the switch lever to light up the lamp. The lamp
keeps on lighting while the switch lever is being pulled.
Thelightautomaticallygoesoutapproximately10seconds after the switch lever is released.
1
2
►1. Switch lever 2. Lamp
NOTICE: When the tool is overheated, the lamp
blinks.Cooldownthetoolfullybeforeoperatingthe
tool again.
NOTICE:Useadryclothtowipethedirtothelens
of the lamp. Be careful not to scratch the lens of lamp,
oritmaylowertheillumination.
Reversing lever action
CAUTION: Always check the direction of
rotation before operation.
CAUTION: Use the reversing lever only after
the tool comes to a complete stop. Changing the
directionofrotationbeforethetoolstopsmaydamage the tool.
This tool has a reversing lever to change the direction of
rotation. Turn the reversing lever to the A side for clockwise rotation or to the B side for counterclockwise rotation.
Makesurethatthereversingleverisfullyturnedwithaclick.
CAUTION: When not operating the tool,
always slide the lock lever to the lock position .
►1. Reversing lever
7 ENGLISH
A
B
1
Page 8
ASSEMBLY
CAUTION: Always be sure that the tool is
switched o and the battery cartridge is removed
before carrying out any work on the tool.
Installing or removing socket
adaptor
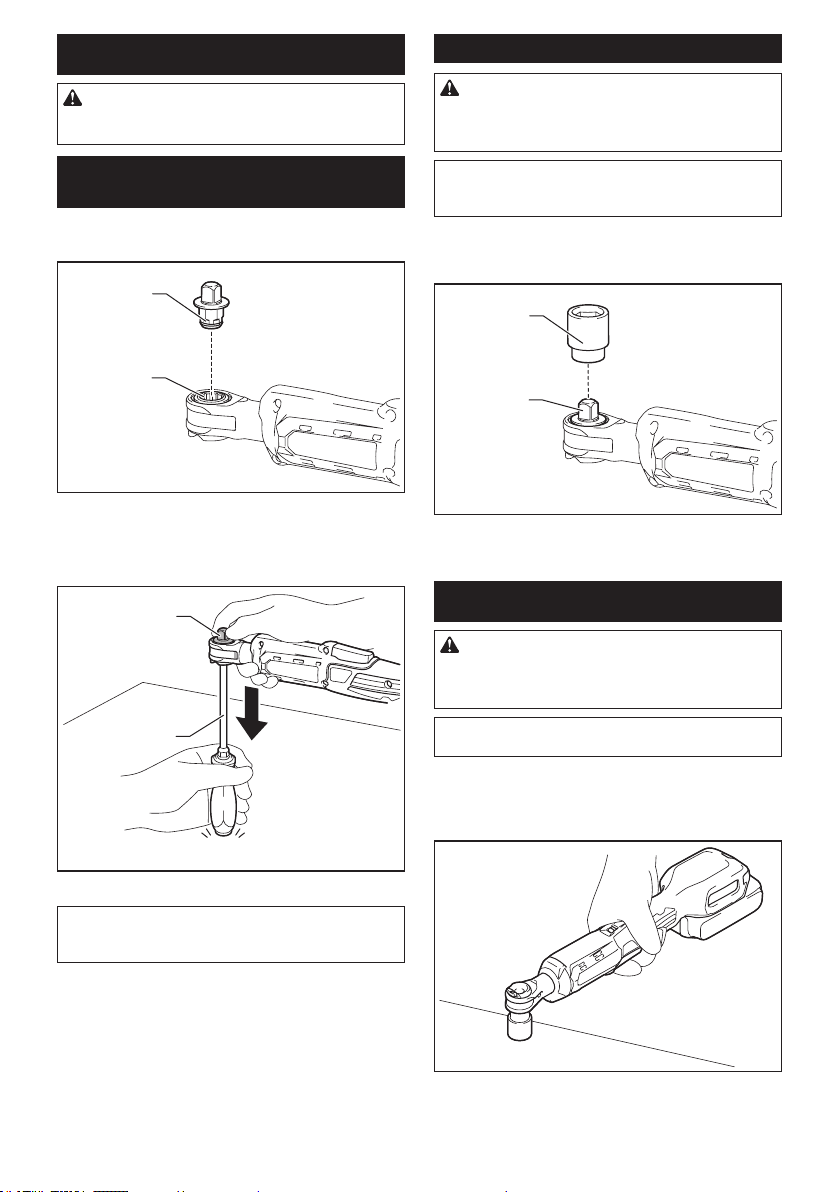
To install the socket adaptor, push it into the adaptor
hole until it locks into place.
1
2
►1. Socket adaptor 2. Adaptor hole
To remove the socket adaptor, insert a stick like a
screwdriver into the backside of the socket adaptor, and
thentapitgently.
Installing or removing socket
CAUTION: Before operation, make sure that
the socket is properly locked onto the socket
adaptor.Incompleteattachmentofthesocketmay
causeinjury.
NOTICE:Alwaysusethecorrectsizesocketforbolt/
nut. An incorrect size socket will result in inconsistent
fastening torque and/or damage to the bolt/nut.
To install the socket, push it onto the socket adaptor
untilitlocksintoplace.Toremovethesocket,simply
pullito.
1
2
►1. Socket 2. Socket adaptor
1
2
►1. Socket adaptor 2. Screwdriver
NOTICE: During removal procedure, keep holding
thesocketadaptortopreventitfromfallingofrom
the tool.
OPERATION
CAUTION: Hold the tool rmly especially
when the bolt/nut reaches the seating position.
The socket stops rotating and the motor reaction
generate instant backlash to rotate the tool.
NOTICE: Hold the tool pointed straight at the
bolt/nut.
Holdthetoolrmlyandplacethesocketoverthe
bolt/nut. Turn the tool on and fasten. When the bolt/
nut reaches the seating position, the tool stops
automatically.
8 ENGLISH
Page 9

The tool also works without socket. The adaptor hole
can fasten M8 (5/16") bolt/nut. (works as 13mm socket)
Using as hand tool
Youcanusethetoolasahandratchetwrenchby
turning the tool in the direction arrows as illustrated. In
particularwhenlooseningastibolt/nut,loosenitby
handrstthenturnthetoolon.
OPTIONAL
ACCESSORIES
CAUTION: These accessories or attachments
are recommended for use with your Makita tool
specied in this manual.Theuseofanyother
accessories or attachments might present a risk of
injurytopersons.Onlyuseaccessoryorattachment
for its stated purpose.
Ifyouneedanyassistanceformoredetailsregardingtheseaccessories,askyourlocalMakitaService
Center.
• Socket
• Socket adaptor
• Makitagenuinebatteryandcharger
NOTE:Someitemsinthelistmaybeincludedinthe
toolpackageasstandardaccessories.Theymay
dierfromcountrytocountry.
NOTICE:Excessivefasteningtorquemaydamage
the bolt/nut, the socket or the tool.
MAINTENANCE
CAUTION: Always be sure that the tool is
switched o and the battery cartridge is removed
before attempting to perform inspection or
maintenance.
NOTICE: Never use gasoline, benzine, thinner,
alcohol or the like. Discoloration, deformation or
cracks may result.
To maintain product SAFETY and RELIABILITY,
repairs,anyothermaintenanceoradjustmentshould
beperformedbyMakitaAuthorizedorFactoryService
Centers,alwaysusingMakitareplacementparts.
9 ENGLISH
Page 10

10
Page 11

11
Page 12

Makita Europe N.V.
Makita Corporation
n
Jan-Baptist Vinkstraat 2,
www.makita.com
3070 Kortenberg, Belgium
3-11-8, Sumiyoshi-cho,
Anjo, Aichi 446-8502 Japa
885834-226
EN
20200824
 Loading...