

Page 1

ENGLISH: Original instructions
INSTRUCTION MANUAL
Cordless Grass Trimmer
DUR193
Read before use.
Read before use.
Page 2
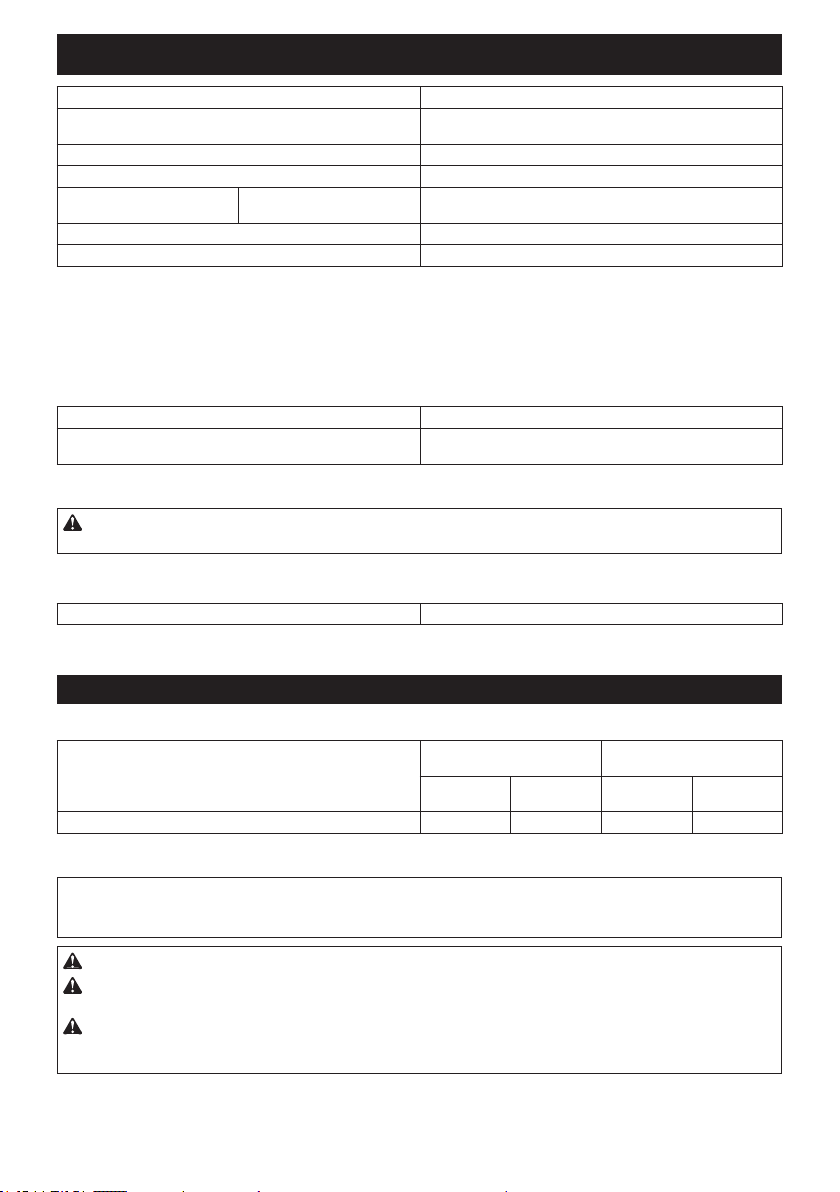
SPECIFICATIONS
Model: DUR193
No load speed
(without cutting tool)
Overall length 1,228 - 1,436 mm
Nylon cord diameter 1.65 mm
Applicable cutting tool and
cutting diameter
Rated voltage D.C. 18 V
Net weight 2.3 - 2.6 kg
Nylon cutting head (P/N:
191Y39-5)
7,800 min
260 mm
-1
• Duetoourcontinuingprogramofresearchanddevelopment,thespecicationshereinaresubjecttochange
without notice.
• Specicationsandbatterycartridgemaydierfromcountrytocountry.
• Theweightmaydierdependingontheattachment(s),includingthebatterycartridge.Thelightestandheavi-
est combinations, according to EPTA-Procedure 01/2014, are shown in the table.
Applicable battery cartridge and charger
Battery cartridge BL1815N / BL1820B / BL1830B / BL1840B / BL1850B / BL1860B
Charger DC18RC / DC18RD / DC18RE / DC18SD / DC18SE / DC18SF /
DC18SH / DC18WC
• Some of the battery cartridges and chargers listed above may not be available depending on your region of
residence.
WARNING: Only use the battery cartridges and chargers listed above. Use of any other battery cartridges
andchargersmaycauseinjuryand/orre.
Recommended cord connected power source
Portable power pack PDC01
• The cord connected power source(s) listed above may not be available depending on your region of residence.
• Before using the cord connected power source, read instruction and cautionary markings on them.
Noise
Applicable standard : EN50636-2-91
Cutting tool Sound pressure level (LpA)
Nylon cutting head 73.2 2.1 83.1 3.9
L
dB(A)
pA
dB(A)
Uncertainty (K)
dB(A)
• Even if the sound pressure level listed above is 80 dB (A) or less, the level under working may exceed 80 dB
(A). Wear ear protection.
NOTE: The declared noise emission value(s) has been measured in accordance with a standard test method and
may be used for comparing one tool with another.
NOTE: The declared noise emission value(s) may also be used in a preliminary assessment of exposure.
Sound power level (LWA) dB(A)
LWA dB(A)
Uncertainty (K)
dB(A)
WARNING: Wear ear protection.
WARNING: The noise emission during actual use of the power tool can dier from the declared val-
ue(s) depending on the ways in which the tool is used especially what kind of workpiece is processed.
WARNING: Be sure to identify safety measures to protect the operator that are based on an estimation
of exposure in the actual conditions of use (taking account of all parts of the operating cycle such as the
times when the tool is switched o and when it is running idle in addition to the trigger time).
2 ENGLISH
Page 3
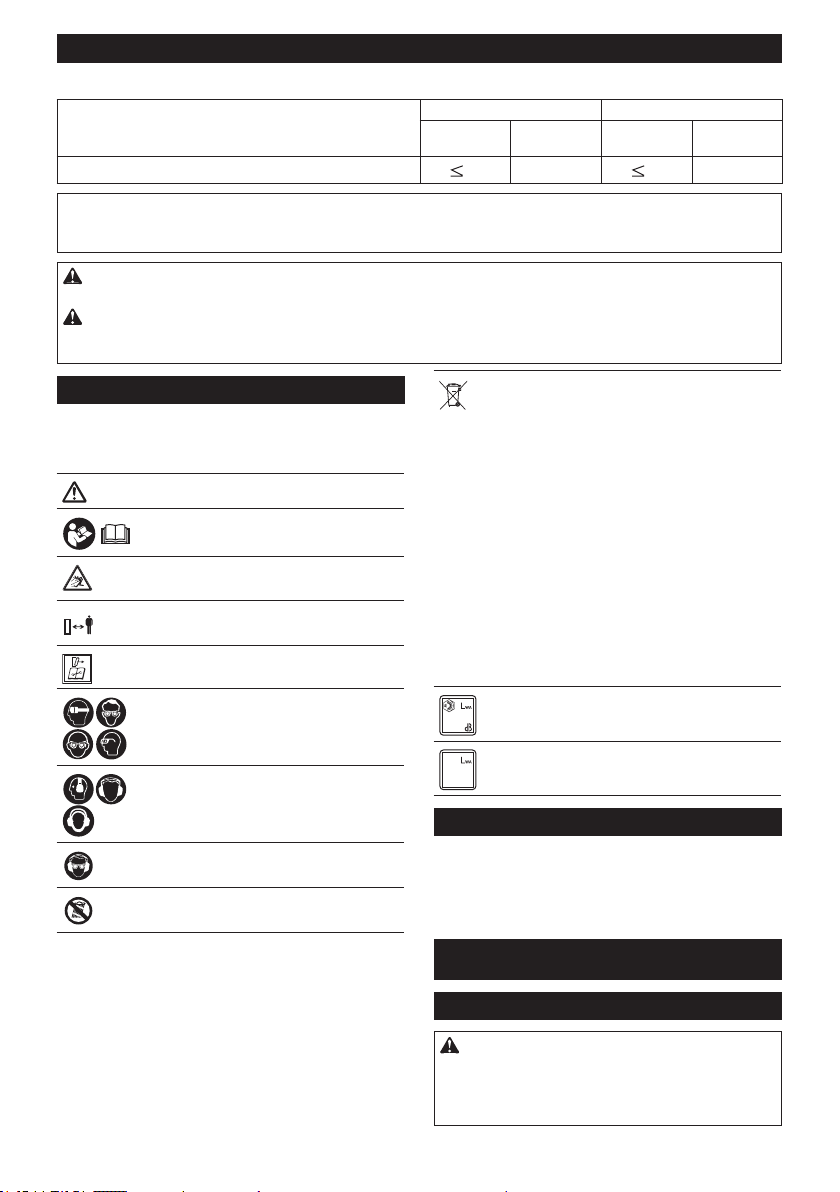
Vibration
Ni-MH
Applicable standard : EN50636-2-91
Type Left hand Right hand
a
(m/s2) Uncertainty K
Nylon cutting head
h,W
2.5
(m/s2)
1.5
NOTE: The declared vibration total value(s) has been measured in accordance with a standard test method and
may be used for comparing one tool with another.
NOTE: The declared vibration total value(s) may also be used in a preliminary assessment of exposure.
WARNING: The vibration emission during actual use of the power tool can dier from the declared
value(s) depending on the ways in which the tool is used especially what kind of workpiece is processed.
WARNING: Be sure to identify safety measures to protect the operator that are based on an estimation
of exposure in the actual conditions of use (taking account of all parts of the operating cycle such as the
times when the tool is switched o and when it is running idle in addition to the trigger time).
Symbols
The followings show the symbols which may be used
for the equipment. Be sure that you understand their
meaning before use.
Take particular care and attention.
Read instruction manual.
Danger;beawareofthrownobjects.
The distance between the tool and
bystanders must be at least 15 m.
Warning; Disconnect battery before
maintenance.
Wear safety glasses.
Li-ion
Only for EU countries
Due to the presence of hazardous components in the equipment, waste electrical and
electronic equipment, accumulators and
batteries may have a negative impact on the
environment and human health.
Do not dispose of electrical and electronic
appliances or batteries with household waste!
In accordance with the European Directive
on waste electrical and electronic equipment and on accumulators and batteries
and waste accumulators and batteries,
as well as their adaptation to national law,
waste electrical equipment, batteries and
accumulators should be stored separately
and delivered to a separate collection point
for municipal waste, operating in accordance with the regulations on environmental protection.
This is indicated by the symbol of the
crossed-out wheeled bin placed on the
equipment.
Guaranteed sound power level according
to EU Outdoor Noise Directive.
a
(m/s2) Uncertainty K
h,W
2.5
(m/s2)
1.5
Wear ear protection.
Wear eye and ear protection.
Do not expose to moisture.
Sound power level according to Australia
NSW Noise Control Regulation.
EC Declaration of Conformity
For European countries only
The EC declaration of conformity is included as Annex A
to this instruction manual.
SAFETY WARNINGS
General power tool safety warnings
WARNING: Read all safety warnings, instruc-
tions, illustrations and specications provided
with this power tool. Failure to follow all instructions
listedbelowmayresultinelectricshock,reand/or
seriousinjury.
3 ENGLISH
Page 4
Save all warnings and instructions for future reference.
The term "power tool" in the warnings refers to your
mains-operated (corded) power tool or battery-operated
(cordless) power tool.
Work area safety
1. Keep work area clean and well lit. Cluttered or
dark areas invite accidents.
2. Do not operate power tools in explosive atmo-
spheres, such as in the presence of ammable
liquids, gases or dust. Power tools create sparks
which may ignite the dust or fumes.
3. Keep children and bystanders away while
operating a power tool. Distractions can cause
you to lose control.
Electrical safety
1. Power tool plugs must match the outlet. Never
modify the plug in any way. Do not use any
adapter plugs with earthed (grounded) power
tools. Unmodiedplugsandmatchingoutletswill
reduce risk of electric shock.
2. Avoid body contact with earthed or grounded
surfaces, such as pipes, radiators, ranges and
refrigerators. There is an increased risk of elec-
tric shock if your body is earthed or grounded.
3. Do not expose power tools to rain or wet con-
ditions. Water entering a power tool will increase
the risk of electric shock.
4. Do not abuse the cord. Never use the cord for
carrying, pulling or unplugging the power tool.
Keep cord away from heat, oil, sharp edges
or moving parts. Damaged or entangled cords
increase the risk of electric shock.
5.
When operating a power tool outdoors, use an
extension cord suitable for outdoor use. Use of a cord
suitable for outdoor use reduces the risk of electric shock.
6. If operating a power tool in a damp location
is unavoidable, use a residual current device
(RCD) protected supply. Use of an RCD reduces
the risk of electric shock.
7.
Power tools can produce electromagnetic elds
(EMF) that are not harmful to the user. However,
users of pacemakers and other similar medical
devices should contact the maker of their device and/
or doctor for advice before operating this power tool.
Personal safety
1.
Stay alert, watch what you are doing and use common
sense when operating a power tool. Do not use a power
tool while you are tired or under the inuence of drugs,
alcohol or medication. A moment of inattention while
operatingpowertoolsmayresultinseriouspersonalinjury.
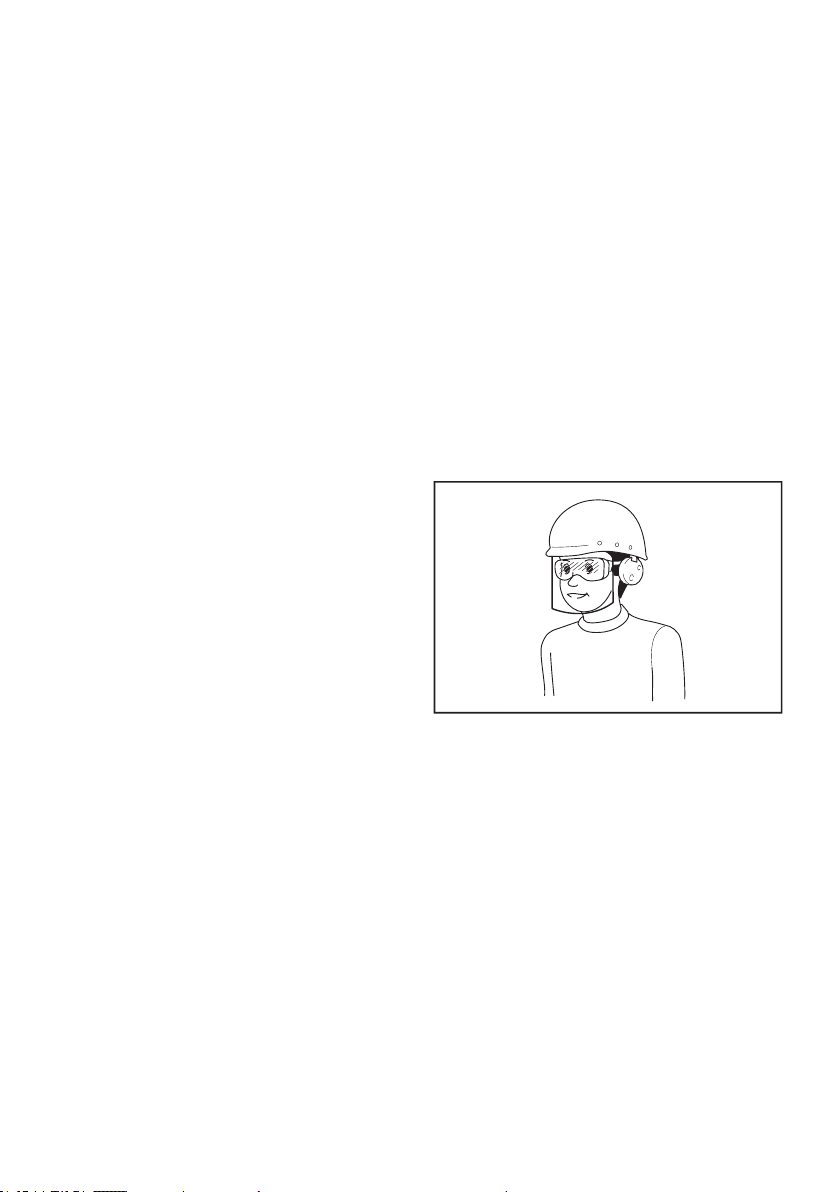
2. Use personal protective equipment. Always
wear eye protection. Protective equipment such
as a dust mask, non-skid safety shoes, hard hat or
hearing protection used for appropriate conditions
willreducepersonalinjuries.
3. Prevent unintentional starting. Ensure the
switch is in the o-position before connecting
to power source and/or battery pack, picking
up or carrying the tool. Carrying power tools with
yourngerontheswitchorenergisingpowertools
that have the switch on invites accidents.
4. Remove any adjusting key or wrench before
turning the power tool on. A wrench or a key left
attached to a rotating part of the power tool may
resultinpersonalinjury.
5. Do not overreach. Keep proper footing and
balance at all times. This enables better control
of the power tool in unexpected situations.
6. Dress properly. Do not wear loose clothing or
jewellery. Keep your hair and clothing away
from moving parts.Looseclothes,jewelleryor
long hair can be caught in moving parts.
7. If devices are provided for the connection of
dust extraction and collection facilities, ensure
these are connected and properly used. Use of
dust collection can reduce dust-related hazards.
8.
Do not let familiarity gained from frequent use of
tools allow you to become complacent and ignore
tool safety principles. A careless action can cause
severeinjurywithinafractionofasecond.
9. Always wear protective goggles to protect
your eyes from injury when using power tools.
The goggles must comply with ANSI Z87.1 in
the USA, EN 166 in Europe, or AS/NZS 1336
in Australia/New Zealand. In Australia/New
Zealand, it is legally required to wear a face
shield to protect your face, too.
It is an employer's responsibility to enforce
the use of appropriate safety protective equipments by the tool operators and by other persons in the immediate working area.
Power tool use and care
1. Do not force the power tool. Use the correct
power tool for your application. The correct
powertoolwilldothejobbetterandsaferatthe
rate for which it was designed.
2.
Do not use the power tool if the switch does not turn
it on and o. Any power tool that cannot be controlled
with the switch is dangerous and must be repaired.
3. Disconnect the plug from the power source
and/or remove the battery pack, if detachable,
from the power tool before making any adjustments, changing accessories, or storing power
tools. Such preventive safety measures reduce
the risk of starting the power tool accidentally.
4. Store idle power tools out of the reach of chil-
dren and do not allow persons unfamiliar with
the power tool or these instructions to operate
the power tool. Power tools are dangerous in the
hands of untrained users.
4 ENGLISH
Page 5

Maintain power tools and accessories. Check for
5.
misalignment or binding of moving parts, breakage
of parts and any other condition that may aect the
power tool’s operation. If damaged, have the power
tool repaired before use. Many accidents are caused
by poorly maintained power tools.
6. Keep cutting tools sharp and clean. Properly
maintained cutting tools with sharp cutting edges
are less likely to bind and are easier to control.
7.
Use the power tool, accessories and tool bits etc.
in accordance with these instructions, taking into
account the working conditions and the work to be
performed.Useofthepowertoolforoperationsdierent
from those intended could result in a hazardous situation.
8.
Keep handles and grasping surfaces dry, clean and
free from oil and grease. Slippery handles and grasp-
ing surfaces do not allow for safe handling and control
of the tool in unexpected situations.
9. When using the tool, do not wear cloth work
gloves which may be entangled. The entanglement of cloth work gloves in the moving parts may
resultinpersonalinjury.
Battery tool use and care
1. Recharge only with the charger specied by
the manufacturer. A charger that is suitable for
onetypeofbatterypackmaycreateariskofre
when used with another battery pack.
2. Use power tools only with specically desig-
nated battery packs. Use of any other battery
packsmaycreateariskofinjuryandre.
3. When battery pack is not in use, keep it away
from other metal objects, like paper clips,
coins, keys, nails, screws or other small metal
objects, that can make a connection from one
terminal to another. Shorting the battery termi-
nalstogethermaycauseburnsorare.
4.
Under abusive conditions, liquid may be ejected
from the battery; avoid contact. If contact acciden-
tally occurs, ush with water. If liquid contacts eyes,
additionally seek medical help.Liquidejectedfrom
the battery may cause irritation or burns.
5. Do not use a battery pack or tool that is dam-
aged or modied.Damagedormodiedbatteries
may exhibit unpredictable behaviour resulting in
re,explosionorriskofinjury.
6. Do not expose a battery pack or tool to re or
excessive temperature.Exposuretoreortem-
perature above 130 °C may cause explosion.
7. Follow all charging instructions and do not
charge the battery pack or tool outside the
temperature range specied in the instructions. Charging improperly or at temperatures
outsidethespeciedrangemaydamagethe
batteryandincreasetheriskofre.
Service
1. Have your power tool serviced by a qualied
repair person using only identical replacement
parts. This will ensure that the safety of the power
tool is maintained.
2. Never service damaged battery packs. Service
of battery packs should only be performed by the
manufacturer or authorized service providers.
3. Follow instruction for lubricating and chang-
ing accessories.
IMPORTANT SAFETY
INSTRUCTIONS
WARNING: Read all safety warnings and
all instructions. Failure to follow the warnings and
instructionsmayresultinelectricshock,reand/or
seriousinjury.
Save all warnings and instructions for future reference.
1. Be familiar with the controls and proper use of
the equipment.
2. Cutting elements continue to rotate after the
motor is switched o.
3. Never allow children or people unfamiliar with
the instructions to use the machine. Local regulations may restrict the age of the operator.
4. Stop using the machine while people, espe-
cially children, or pets are nearby.
5. Only use the machine in daylight or good
articial light. Avoid using the machine in bad
weather conditions especially when there is a
risk of lightning.
6. Before using the machine and after any
impact, check for signs of wear or damage and
repair as necessary.
7. Take care against injury from any device
tted for trimming the lament line length.
After extending new cutter line always return
the machine to its normal operating position
before switching on.
8. Never t metal cutting elements.
9. This appliance is not intended for use by
persons (including children) with reduced
physical, sensory or mental capabilities, or
lack of experience and knowledge, unless they
have been given supervision or instruction
concerning use of the appliance by a person
responsible for their safety. Children should be
supervised to ensure that they do not play with
the appliance.
10. Use the tool with the utmost care and
attention.
11. Operate the tool only if you are in good phys-
ical condition. Perform all work calmly and
carefully. Use common sense and keep in mind
that the operator or user is responsible for
accidents or hazards occurring to other people
or their property.
12. Never operate the tool when tired, feeling ill or
under the inuence of alcohol or drugs.
13. The tool should be switched o immediately if
it shows any signs of unusual operation.
14. Keep ngers away from switch trigger when
not operating the tool and when moving from
one operating position to another.
Intended use of the tool
1. Use right tool. The cordless grass trimmer is
only intended for cutting grass, light weeds. It
should not be used for any other purpose such
as hedge cutting as this may cause injury.
5 ENGLISH
Page 6
Personal protective equipment
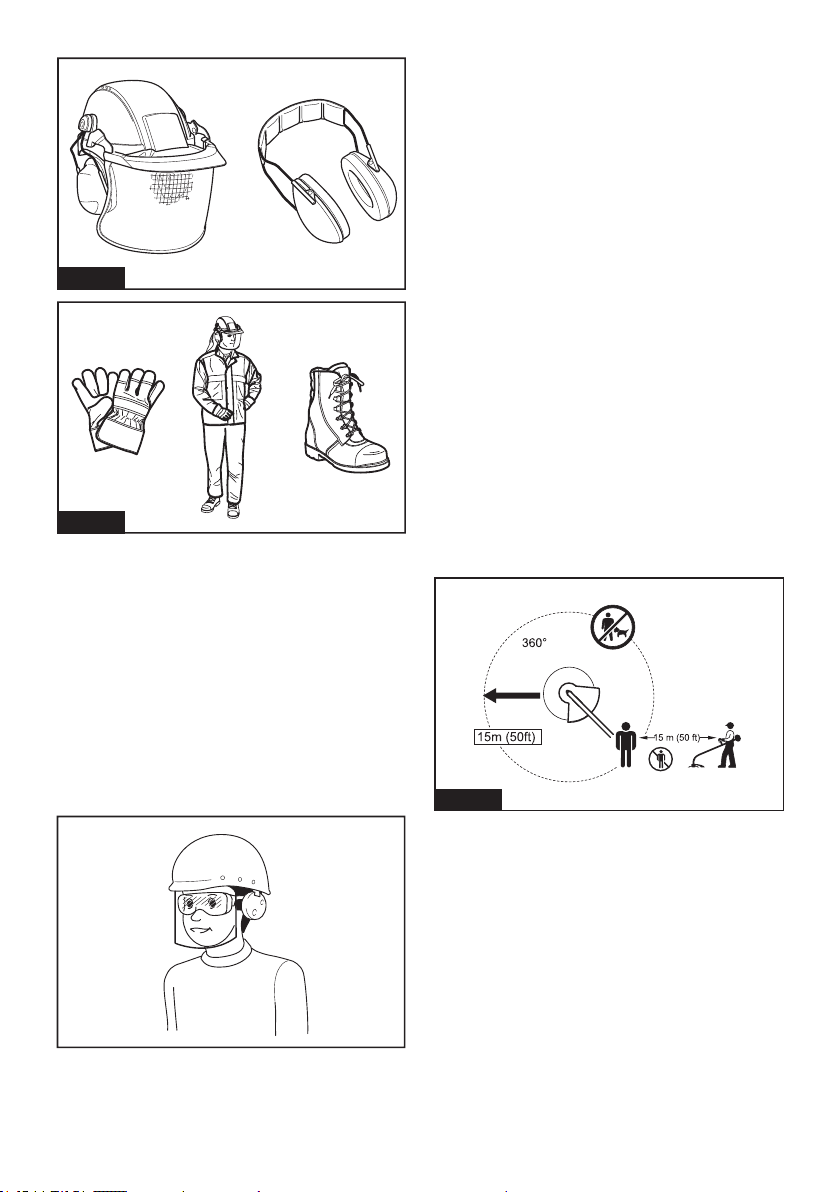
Fig.1
Fig.2
1. Dress Properly. The clothing worn should be
functional and appropriate, i.e. it should be
tight-tting but not cause hindrance. Do not
wear either jewelry or clothing which could
become entangled with high grass. Wear protective hair covering to contain long hair.
2. When using the tool, always wear sturdy shoes
with a non-slip sole. This protects against
injuries and ensures a good footing.
3. Always wear protective goggles to protect
your eyes from injury when using power tools.
The goggles must comply with ANSI Z87.1 in
the USA, EN 166 in Europe, or AS/NZS 1336
in Australia/New Zealand. In Australia/New
Zealand, it is legally required to wear a face
shield to protect your face, too.
It is an employer's responsibility to enforce
the use of appropriate safety protective equipments by the tool operators and by other persons in the immediate working area.
Electrical and battery safety
1. Avoid dangerous environment. Don't use the
tool in damp or wet locations or expose it to
rain. Water entering the tool will increase the
risk of electric shock.
2. Recharge only with the charger specied by
the manufacturer. A charger that is suitable for
one type of battery pack may create a risk of
re when used with another battery pack.
3. Use power tools only with specically desig-
nated battery packs. Use of any other battery
packs may create a risk of injury and re.
4. When battery pack is not in use, keep it away
from other metal objects, like paper clips,
coins, keys, nails, screws or other small metal
objects, that can make a connection from one
terminal to another. Shorting the battery termi-
nals together may cause burns or a re.
5.
Under abusive conditions, liquid may be ejected
from the battery; avoid contact. If contact
accidentally occurs, ush with water. If liquid
contacts eyes, seek medical help. Liquid ejected
from the battery may cause irritation or burns.
6. Do not dispose of the battery(ies) in a re. The
cell may explode. Check with local codes for
possible special disposal instructions.
7.
Do not open or mutilate the battery(ies). Released
electrolyte is corrosive and may cause damage to
the eyes or skin. It may be toxic if swallowed.
8.
Do not charge battery in rain, or in wet locations.
Starting up the tool
Fig.3
1. Make sure that there are no children or other
people within a working range of 15 meters
(50 ft), also pay attention to any animals in the
working vicinity. Otherwise stop using the tool.
2.
Before use always check that the tool is safe for
operation. Check the security of the cutting tool and
the guard and the switch trigger/lever for easy and
proper action. Check for clean and dry handles and
test the on/o function of the switch.
3.
Check damaged parts before further use of the tool.
A guard or other part that is damaged should be
carefully checked to determine that it will operate
properly and perform its intended function. Check
for alignment of moving parts, binding of moving
parts, breakage of parts, mounting, and any other
condition that may aect its operation. A guard
or other part that is damaged should be properly
repaired or replaced by our authorized service
center unless indicated elsewhere in this manual.
6 ENGLISH
Page 7

4. Switch on the motor only when hands and feet
are away from the cutting tool.
5.
Before starting make sure that the cutting tool has no
contact with hard objects such as branches, stones
etc. as the cutting tool will revolve when starting.
6. Make sure there are no electrical cables, water
pipes, gas pipes etc. that could cause a hazard
if damaged by use of the tool.
Method of operation
1. Never operate the machine with damaged
guards or without the guards in place.
2. Only use the tool in good light and visibility.
During the winter season beware of slippery
or wet areas, ice and snow (risk of slipping).
Always ensure a safe footing.
3. Take care against injury to feet and hands from
the cutting tool.
4. Keep hands and feet away from the cutting
means at all times and especially when switching on the motor.
5. Never cut above waist height.
6. Never stand on a ladder and run the tool.
7. Never work on unstable surfaces.
8. Don't overreach. Keep proper footing and
balance at all times.
9. Remove sand, stones, nails etc. found within
the working range. Foreign particles may
damage the cutting tool and can cause to be
thrown away, resulting in a serious injury.
10. Should the cutting tool hit stones or other hard
objects, immediately switch o the motor and
inspect the cutting tool.
11. Before commencing cutting, the cutting tool
must have reached full working speed.
12. During operation always hold the tool with
both hands. Never hold the tool with one hand
during use. Always ensure a safe footing.
13.
All protective equipment such as guards supplied
with the tool must be used during operation.
14. Except in case of emergency, never drop
or cast the tool to the ground or this may
severely damage the tool.
15. Never drag the tool on the ground when moving from place to place, the tool may become
damaged if moved in this manner.
16.
Always remove the battery cartridge from the tool:
— whenever leaving the tool unattended;
— before clearing a blockage;
— before checking, cleaning or working on
the tool;
— before making any adjustments, chang-
ing accessories or storing;
— whenever the tool starts vibrating
unusually;
— whenever transporting the tool.
17. Don't force the tool. It will do the job better and
with less likelihood of a risk of injury at the
rate for which it was designed.
18. Do not operate power tools in explosive atmo-
spheres, such as in the presence of ammable
liquids, gases or dust. Power tools create sparks
which may ignite the dust or fumes.
19. Take a rest to prevent loss of control caused
by fatigue. We recommend to take a 10 to
20-minute rest every hour.
20. Do not use the tool on steep slopes.
21. The shoulder harness must be used during
operation, if supplied with the tool.
Maintenance instructions
1. The condition of the cutting tool, protective devices and shoulder harness must be
checked before commencing work.
2.
Turn o the motor and remove the battery cartridge
before carrying out maintenance, replacing the
cutting tool and cleaning the tool.
3. After use, disconnect the battery cartridge
from the tool and check for damage.
4. Check for loose fasteners and damaged parts
such as nearly halfway cut-o state in the
cutting tool.
5.
When not in use store the equipment in a dry location that is locked up or out of children's reach.
6. Use only the manufacturer's recommended
replacement parts and accessories.
7. Always ensure that ventilation openings are
kept clear of debris.
8. Inspect and maintain the tool regularly, especially before/after use. Have the tool repaired
only by our authorized service center.
9. Keep handles dry, clean and free from oil and
grease.
SAVE THESE INSTRUCTIONS.
WARNING: DO NOT let comfort or familiarity
with product (gained from repeated use) replace
strict adherence to safety rules for the subject
product. MISUSE or failure to follow the safety
rules stated in this instruction manual may cause
serious personal injury.
Important safety instructions for
battery cartridge
1.
Before using battery cartridge, read all instructions
and cautionary markings on (1) battery charger, (2)
battery, and (3) product using battery.
2. Do not disassemble or tamper with the battery
cartridge.Itmayresultinare,excessiveheat,
or explosion.
3. If operating time has become excessively
shorter, stop operating immediately. It may
result in a risk of overheating, possible burns
and even an explosion.
4.
If electrolyte gets into your eyes, rinse them out
with clear water and seek medical attention right
away. It may result in loss of your eyesight.
5. Do not short the battery cartridge:
(1) Do not touch the terminals with any con-
ductive material.
(2) Avoid storing battery cartridge in a con-
tainer with other metal objects such as
nails, coins, etc.
(3) Do not expose battery cartridge to water
or rain.
7 ENGLISH
Page 8
A battery short can cause a large current
12
ow, overheating, possible burns and even a
breakdown.
6. Do not store and use the tool and battery car-
tridge in locations where the temperature may
reach or exceed 50 °C (122 °F).
7. Do not incinerate the battery cartridge even if
it is severely damaged or is completely worn
out. The battery cartridge can explode in a re.
8. Do not nail, cut, crush, throw, drop the battery
cartridge, or hit against a hard object to the
battery cartridge. Such conduct may result in a
re,excessiveheat,orexplosion.
9. Do not use a damaged battery.
10. The contained lithium-ion batteries are subject
to the Dangerous Goods Legislation requirements.
For commercial transports e.g. by third parties,
forwarding agents, special requirement on packaging and labeling must be observed.
For preparation of the item being shipped, consulting an expert for hazardous material is required.
Please also observe possibly more detailed
national regulations.
Tapeormaskoopencontactsandpackupthe
battery in such a manner that it cannot move
around in the packaging.
11. When disposing the battery cartridge, remove
it from the tool and dispose of it in a safe
place. Follow your local regulations relating to
disposal of battery.
12. Use the batteries only with the products
specied by Makita. Installing the batteries to
non-compliantproductsmayresultinare,excessive heat, explosion, or leak of electrolyte.
13. If the tool is not used for a long period of time,
the battery must be removed from the tool.
14. During and after use, the battery cartridge may
take on heat which can cause burns or low
temperature burns. Pay attention to the handling of hot battery cartridges.
15. Do not touch the terminal of the tool imme-
diately after use as it may get hot enough to
cause burns.
16. Do not allow chips, dust, or soil stuck into the
terminals, holes, and grooves of the battery
cartridge.Itmaycauseheating,catchingre,
burst and malfunction of the tool or battery car-
tridge,resultinginburnsorpersonalinjury.
17. Unless the tool supports the use near
high-voltage electrical power lines, do not use
the battery cartridge near high-voltage electrical power lines. It may result in a malfunction or
breakdown of the tool or battery cartridge.
18. Keep the battery away from children.
SAVE THESE INSTRUCTIONS.
CAUTION: Only use genuine Makita batteries.
Use of non-genuine Makita batteries, or batteries that
have been altered, may result in the battery bursting
causingres,personalinjuryanddamage.Itwill
also void the Makita warranty for the Makita tool and
charger.
Tips for maintaining maximum
battery life
1. Charge the battery cartridge before completely
discharged. Always stop tool operation and
charge the battery cartridge when you notice
less tool power.
2. Never recharge a fully charged battery cartridge. Overcharging shortens the battery
service life.
3. Charge the battery cartridge with room temperature at 10 °C - 40 °C (50 °F - 104 °F). Let
a hot battery cartridge cool down before
charging it.
4. When not using the battery cartridge, remove
it from the tool or the charger.
5. Charge the battery cartridge if you do not use
it for a long period (more than six months).
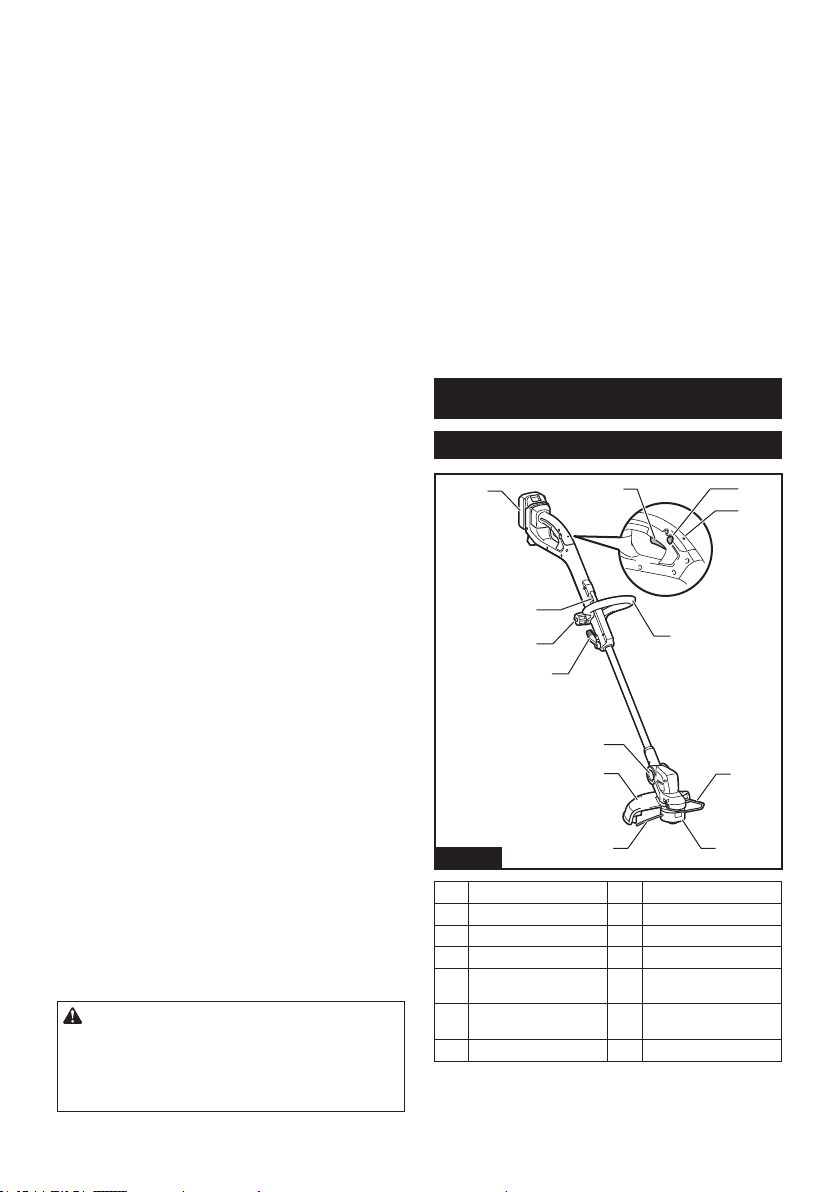
PARTS DESCRIPTION
Parts description
13
3
12
11
10
9
8
Fig.4
1 Switch trigger 2 Lock-obutton
3 Indication lamp 4 Loop handle
5 Wire guard 6 Nylon cutting head
7 Nylon cord 8 Protector
9 Angleadjustment
button
11 Thumb nut 12 Hanger for shoulder
13 Battery cartridge - -
7
4
5
6
10 Lock lever
harness
8 ENGLISH
Page 9

ASSEMBLY
CAUTION: Always be sure that the tool is
switched o and the battery cartridge is removed
before carrying out any work on the tool.
CAUTION: Never start the tool unless it is
completely assembled. Operation of the tool in a
partially assembled state may result in serious per-
sonalinjuryfromaccidentalstart-up.
Installing the loop handle
Attach the loop handle to the tool by securing it with a
hexboltandthethumbnutasshowninthegure.
Installing the wire guard
NOTICE: Do not expand the wire guard outward
too much. Otherwise it may break.
1
2
3
Fig.5
►1. Loop handle 2. Thumb nut 3. Hex bolt
Theangleofloophandleisadjustable.Toadjustthe
angle of loop handle, loosen the thumb nut, then set the
loop handle at a proper angle according to your work,
andthentightenthethumbnutrmly.
Installing the protector
CAUTION: While installing the protector, be
careful not to contact the nylon cord cutter on
the protector. Contact with the cutter could result in
personalinjury.
32
1
Fig.7
Toreducetheriskofdamagingtheobjectsinfrontofthe
cutting head, attach the wire guard to the motor housing
so that it controls the cutting range.
Slightly expand the wire guard outward and then insert
it into the holes of the motor housing.
Fig.8
►1. Wire guard 2. Hole
When wire guard is not in use, lift it for the idle position.
1 2
1
Fig.6
►1. Protector 2. Nylon cord cutter 3. Screw
Mounttheprotectorbyttingitontothemotorhousing,
and then secure it with the screw.
Fig.9
►1. Wire guard
9 ENGLISH
Page 10
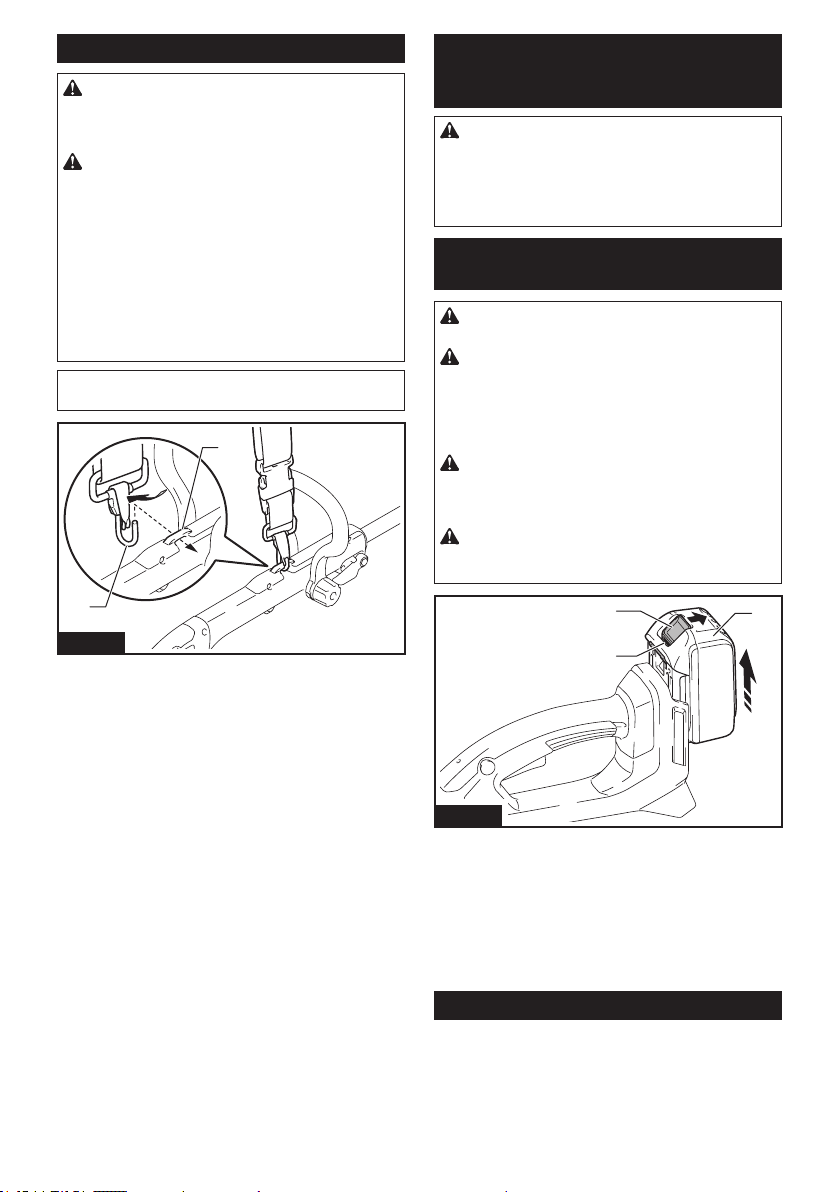
Attaching the shoulder harness
CAUTION: Be sure to attach the hook of
shoulder harness to the tool securely. If the hook
is attached incompletely, it may come o and
cause an injury.
CAUTION: When you use the tool in combi-
nation of the backpack-type power supply such
as portable power pack, do not use the shoulder
harness included in the tool package, but use the
hanging band recommended by Makita.
If you put on the shoulder harness included in the
tool package and the shoulder harness of the backpack-type power supply at the same time, removing
thetoolorbackpack-typepowersupplyisdicultin
case of an emergency, and it may cause an accident
orinjury.Fortherecommendedhangingband,ask
Makita Authorized Service Centers.
NOTICE: Before operation, adjust the shoulder
harness to the proper length to prevent fatigue.
2
FUNCTIONAL
DESCRIPTION
WARNING: Always be sure that the tool is
switched o and the battery cartridge is removed
before adjusting or checking function on the tool.
Failuretoswitchoandremovethebatterycartridge
mayresultinseriouspersonalinjuryfromaccidental
start-up.
Installing or removing battery
cartridge
CAUTION: Always switch o the tool before
installing or removing of the battery cartridge.
CAUTION: Hold the tool and the battery car-
tridge rmly when installing or removing battery
cartridge. Failure to hold the tool and the battery
cartridgermlymaycausethemtoslipoyourhands
and result in damage to the tool and battery cartridge
andapersonalinjury.
CAUTION: Always install the battery cartridge
fully until the red indicator cannot be seen. If not,
itmayaccidentallyfalloutofthetool,causinginjuryto
you or someone around you.
CAUTION: Do not install the battery cartridge
forcibly. If the cartridge does not slide in easily, it is
not being inserted correctly.
1
Fig.10
►1. Hook 2. Hanger
Attach the hook of shoulder harness to the tool as
showninthegure.
1
2
Fig.11
►1. Button 2. Red indicator 3. Battery cartridge
To remove the battery cartridge, slide it from the tool
while sliding the button on the front of the cartridge.
To install the battery cartridge, align the tongue on the
battery cartridge with the groove in the housing and slip
it into place. Insert it all the way until it locks in place
with a little click. If you can see the red indicator as
showninthegure,itisnotlockedcompletely.
Battery protection system
The tool is equipped with a battery protection system.
Thissystemautomaticallycutsopowertothemotorto
extend battery life.
The tool will automatically stop during operation if the
tool and/or battery are placed under one of the following
conditions:
10 ENGLISH
3
Page 11
Overloaded:
The tool is operated in a manner that causes it to draw
an abnormally high current.
Inthissituation,turnthetooloandstoptheapplication
that caused the tool to become overloaded. Then turn
the tool on to restart.
If the tool does not start, the battery is overheated. In
this situation, let the battery cool before turning the tool
on again.
Low battery voltage:
The remaining battery capacity is too low and the tool
will not operate. If you turn the tool on, the motor runs
again but stops soon. In this situation, remove and
recharge the battery.
Indicating the remaining battery
capacity
Only for battery cartridges with the indicator
Switch action
WARNING: Before installing the battery car-
tridge into the tool, always check to see that the
switch trigger actuates properly and returns to
the "OFF" position when released.
WARNING: For your safety, this tool is
equipped with the lock-o button which prevents
the tool from unintended starting. Never use the
tool if it starts when you pull the switch trigger
without pressing the lock-o button. Ask your local
Makita Service Center for repairs.
WARNING: Never disable the lock function or
tape down the lock-o button.
NOTICE: Do not pull the switch trigger forcibly
without pressing the lock-o button. The switch
may break.
1
2
Fig.12
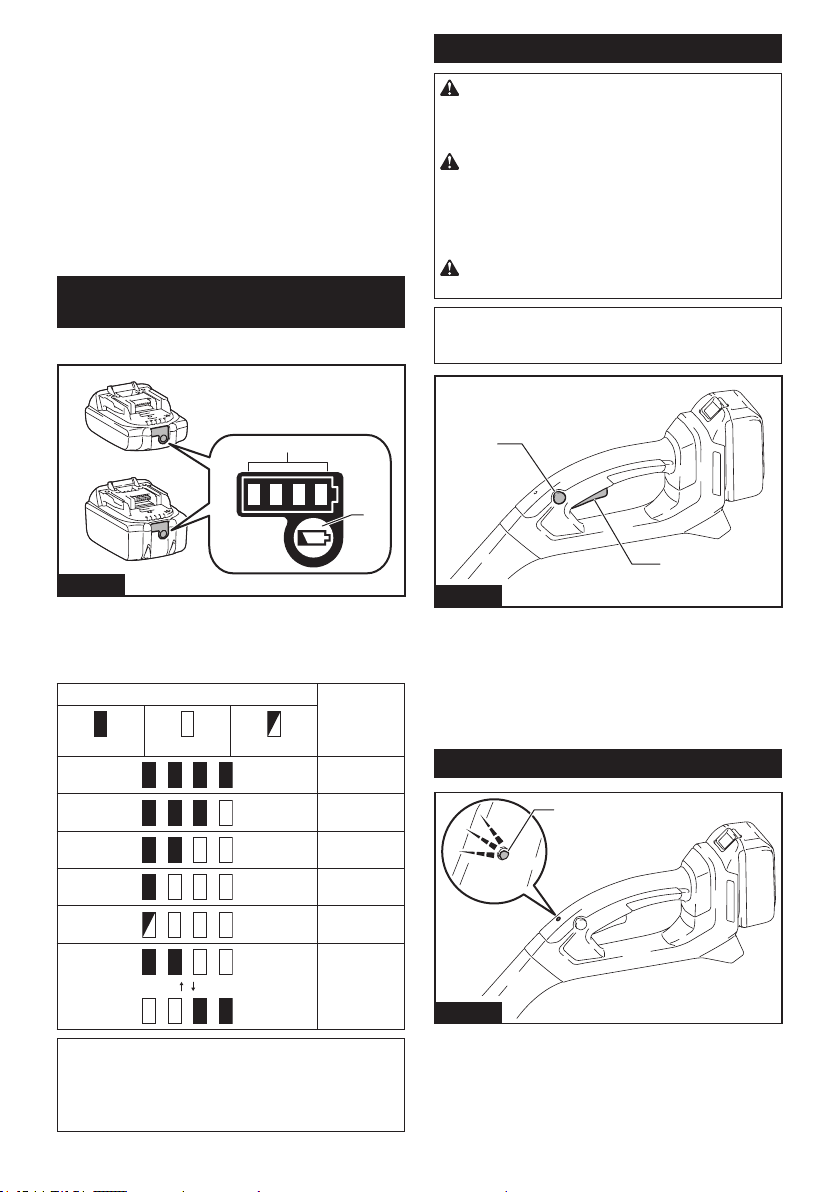
►1. Indicator lamps 2. Check button
Press the check button on the battery cartridge to indicate the remaining battery capacity. The indicator lamps
light up for a few seconds.
Indicator lamps Remaining
Lighted O Blinking
NOTE: Depending on the conditions of use and the
ambienttemperature,theindicationmaydierslightly
from the actual capacity.
NOTE:Therst(farleft)indicatorlampwillbrink
when the battery protection system works.
capacity
75% to 100%
50% to 75%
25% to 50%
0% to 25%
Charge the
battery.
The battery
may have
malfunctioned.
1
2
Fig.13
►1.Lock-obutton2. Switch trigger
To prevent the switch trigger from being accidentally
pulled,alock-obuttonisprovided.
Tostartthetool,pressthelock-obuttonandpullthe
switch trigger. Release the switch trigger to stop. The
lock-obuttoncanbepressedfromeithertherightor
left side.
Indication lamp
1
Fig.14
►1. Indication lamp
11 ENGLISH
Page 12
The indication lamp blinks or lights up when the battery
becomes low or the tool is overloaded. Refer to the
following table for the status and action to be taken.
Indication lamp Status Action to be taken
The lamp blinks
in red.
The lamp lights up
in red.
NOTE: The time at which the indication lamp blinks or
lights up varies by the temperature around the work
area and the battery cartridge conditions.
The remaining
battery is low.
The remaining
battery is empty.
The tool has
stopped due to
overload.
Recharge the
battery, or replace
the battery with a
charged one.
Recharge the
battery, or replace
the battery with a
charged one.
Turnothetool,
and remove the
cause of overload.
Nylon cutting head
NOTICE: Do not bump the tool to the concrete or
asphalt surface. Bumping to this kind of objects
may cause the tool damage.
NOTE: If the nylon cord does not feed out while
bumping the head, rewind or replace the nylon cord
by following the procedures in this manual.
NOTE: The bump and feed mechanism will not work
properly if the nylon cutting head is not rotating.
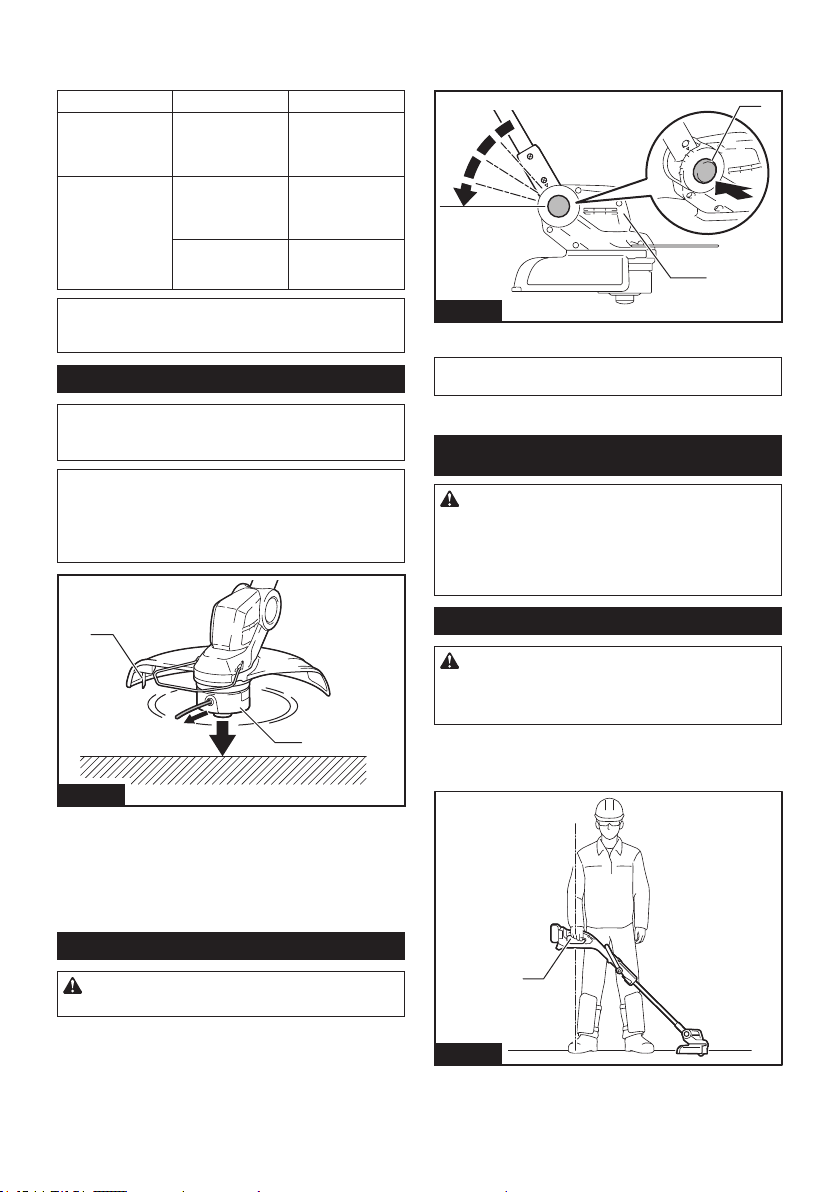
Thecuttinganglecanbeadjustedin5steps.Tochange
the cutting angle, change the angle of the motor hous-
ingwhilepressingtheangleadjustmentbutton.
1
2
Fig.16
►1.Angleadjustmentbutton2. Motor housing
NOTE: Make sure that the motor housing is securely
locked before operating the tool.
OPERATION
CAUTION: If the nylon cutting head acciden-
tally impacts a rock or hard object during operation, stop the tool and inspect for any damage.
If the nylon cutting head is damaged, replace it
immediately. Use of a damaged cutting tool could
resultinseriouspersonalinjury.
1
2
Fig.15
►1. Nylon cord cutter 2. Nylon cutting head
The nylon cutting head has a bump and feed mechanism. To feed the nylon cord, bump the cutting head
against the ground while the tool is running. As the
nylon cord is feeding out, it will automatically be cut to
the proper length by the cutter.
Adjusting the cutting angle
CAUTION: Always be sure that the tool is
switched o before adjusting the cutting angle.
Adjusting the handle position
CAUTION: Before adjusting the shaft length,
be sure to switch o the tool and remove the
battery cartridge from the tool. Failure to do so may
causeapersonalinjury.
Adjustthelengthoftheshaftandthecuttingangleso
thatthenyloncuttingheadisattothegroundwhen
you hold the handle with your right hand.
1
Fig.17
►1. Handle
12 ENGLISH
Page 13
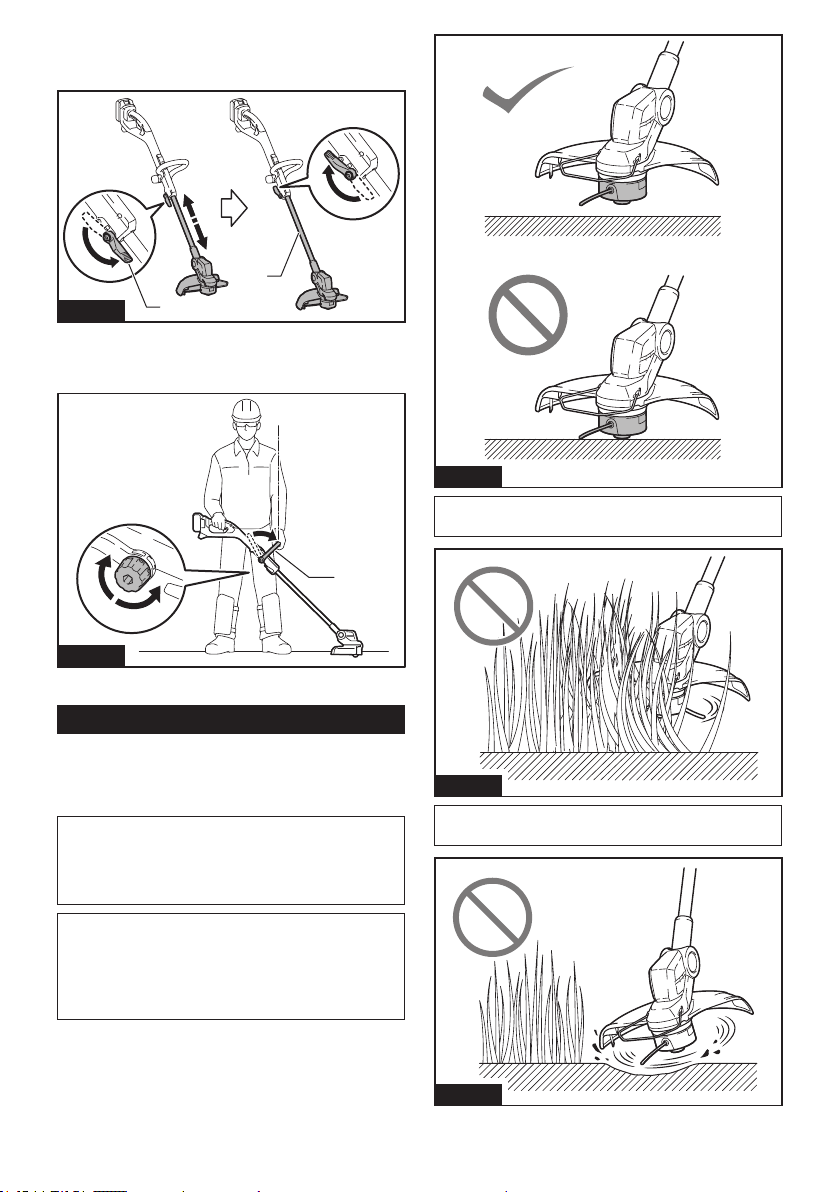
Toadjusttheshaftlength,openthelocklever,then
adjustthelengthoftheshaft,andthenclosethelock
lever.
2
Fig.18
►1. Lock lever 2. Shaft
Adjustthepositionoftheloophandlesothatyoucan
hold the loop handle when lowering your left hand.
1
1
Fig.20
NOTICE: Do not force the trimmer in densely
growing grass.
Fig.19
►1. Loop handle
Cutting the grass
Hold the grass trimmer with both hands, and move the
grass trimmer from right to left slowly. Cut the grass a
few times from the top of the grass at the tip of the nylon
cord.
NOTICE: Do not cut high grass at a time. Cutting
the high grass at a time near the root may cause the
nylon cutting head to be entangled by grass. This
may cause the motor overload, resulting in damage to
the grass trimmer.
NOTICE: Use the grass trimmer without get-
ting the nylon cutting head into a contact with
the ground surface. Using the nylon cutting head
contacting the ground surface may cause the motor
under overload resulting in damage to the grass
trimmer.
Fig.21
NOTICE: Do not use the trimmer as if you dig out
the ground.
Fig.22
13 ENGLISH
Page 14
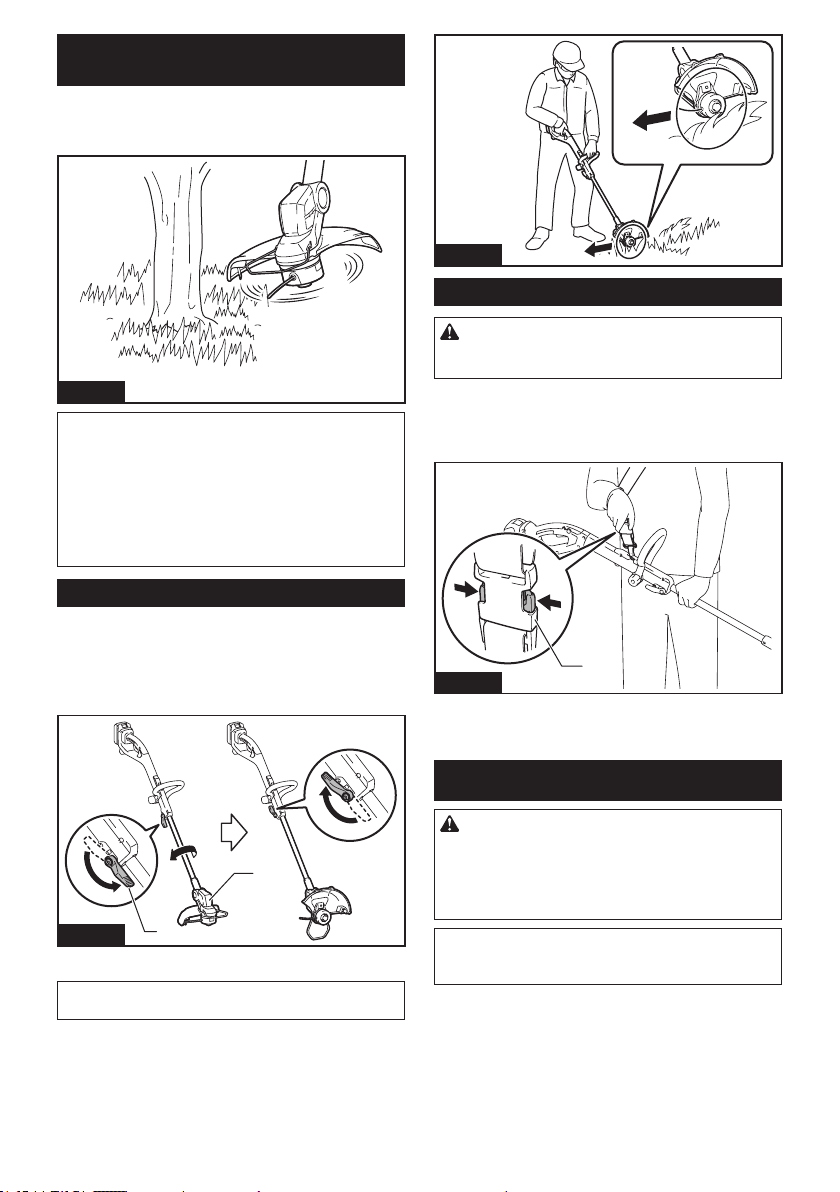
Cutting the grass near tree, block,
brick, or stone
Hold and tilt the grass trimmer at a height where the
nylon cutting head does not touch the ground. Cut the
grass using the nylon cord tip like knocking the ground.
Fig.23
NOTICE: When cutting the grass, move the
grass trimmer around the tree or blocks so that
the nylon cord does not touch the tree or blocks.
It is recommended to keep the tool more than 5 cm
away from the tree or block. If the nylon cord touch
the tree or block, the nylon cord may be torn. If the
nylon cord is torn in the nylon cutting head, set the
nylon cord again referring to the replacement procedure in this manual.
Using the grass trimmer as an edger
Using the grass trimmer as an edger is suitable for
cutting the grass growing along the bricks or blocks.
Open the lock lever, then extend the shaft to the maximum length, then rotate the motor housing 180°, and
then close the lock lever.
Fig.25
Detaching the shoulder harness
WARNING: Be extremely careful to maintain
control of the machine when detaching the shoulder harness.
The shoulder harness features a means of quick
release. Simply squeeze the sides of the buckle while
holding the tool to release the tool from the shoulder
harness.
1
Fig.26
►1. Buckle
2
Fig.24
►1. Lock lever 2. Motor housing
NOTE: You can also rotate the motor housing 180°
when you shorten the shaft to the minimum length.
Lift up the wire guard, and move the grass trimmer as
shownintheguretocutthegrass.Youcancutthe
grassecientlybywalkinginparallelalongthebricks
or blocks.
1
MAINTENANCE
WARNING: Always be sure that the tool is
switched o and battery cartridge is removed
before attempting to perform inspection or maintenance on the tool.Failuretoswitchoandremove
the battery cartridge may result in serious personal
injuryfromaccidentalstart-up.
NOTICE: Never use gasoline, benzine, thinner,
alcohol or the like. Discoloration, deformation or
cracks may result.
To maintain product SAFETY and RELIABILITY,
repairs,anyothermaintenanceoradjustmentshould
be performed by Makita Authorized or Factory Service
Centers, always using Makita replacement parts.
14 ENGLISH
Page 15
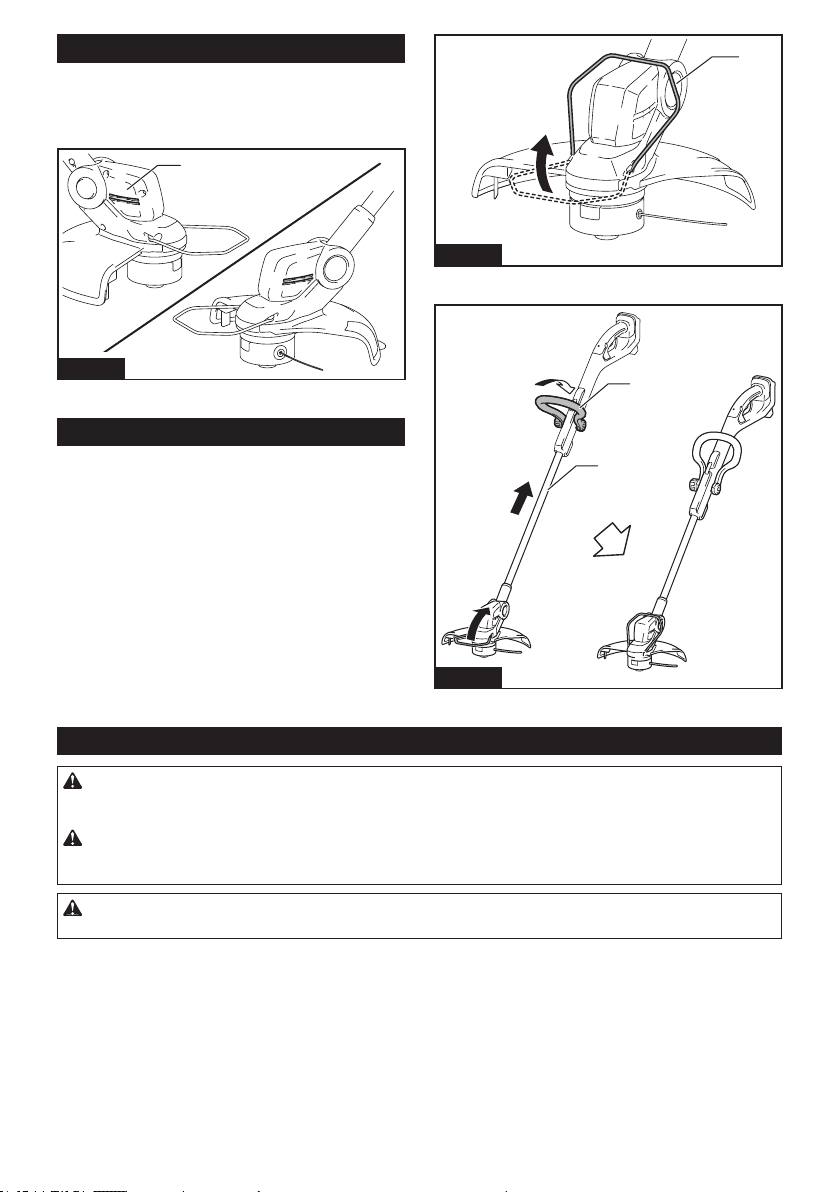
Cleaning the tool
Cleanthetoolbywipingodust,dirt,orcutograss
with a dry cloth or one dipped in soapy water and wrung
out.Ifthecutograssisadheredtothemotorhousing,
be sure to remove it.
1
1
Fig.28
►1. Wire guard
Fig.27
►1. Motor housing
1
Storage
When storing the tool, raise the wire guard, shorten the
shaft, and then fold the loop handle.
Fig.29
►1. Loop handle 2. Shaft
2
Replacing the nylon cord
WARNING: Use nylon cord with diameter specied in “SPECIFICATIONS” only. Never use heavier line,
metal wire, rope or the like. Use recommended nylon cord only, otherwise it may cause damage to the tool and
resultinseriouspersonalinjury.
WARNING: Make sure that the cover of the nylon cutting head is secured to the housing properly as
described below.Failuretoproperlysecurethecovermaycausethenyloncuttingheadtoyapartresultingin
seriouspersonalinjury.
CAUTION: When installing or removing the nylon cord, be careful not to contact the nylon cord cutter
on the protector.Contactwiththecuttermayresultinpersonalinjury.
15 ENGLISH
Page 16
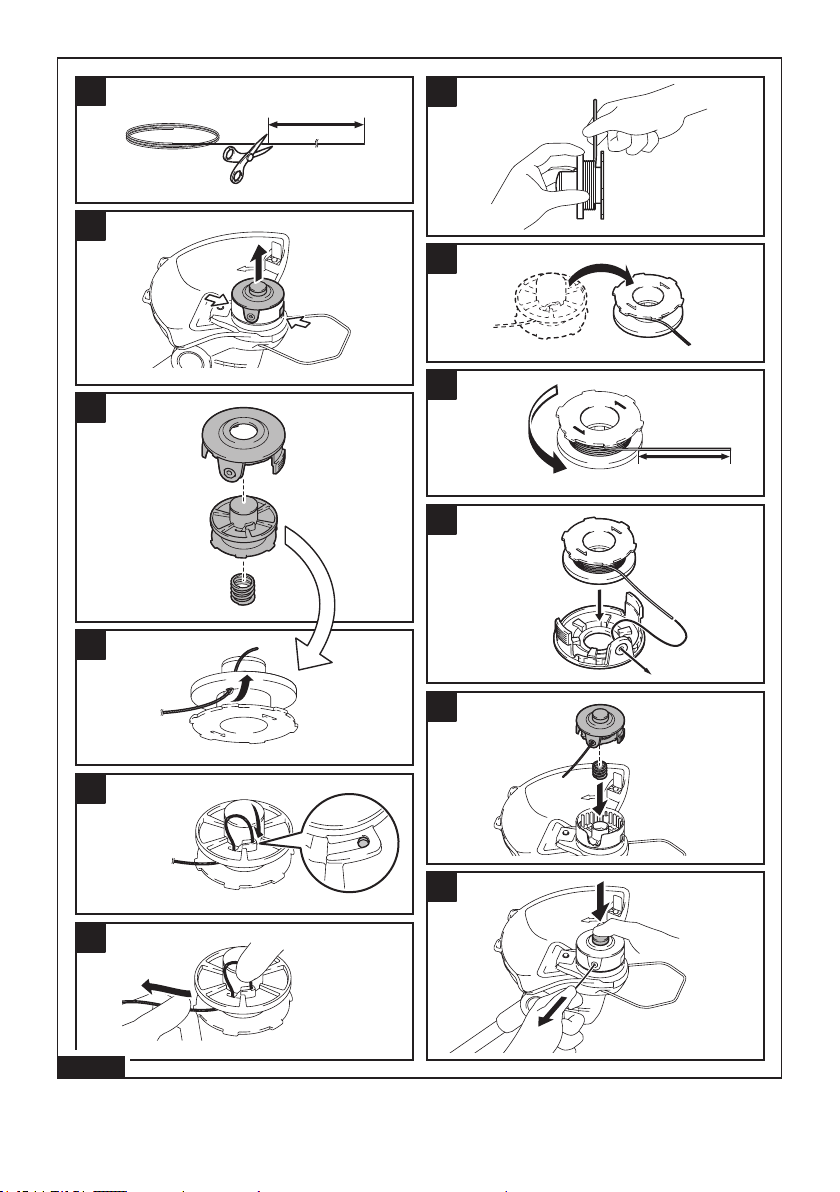
Replace the nylon cord if the cord is not feeding any more.
1
(1)
7
2
8
9
3
(2)
10
4
4
5
6
Fig.30
►(1) Up to 8 m (2) 70 - 80 mm
11
12
8
16 ENGLISH
Page 17
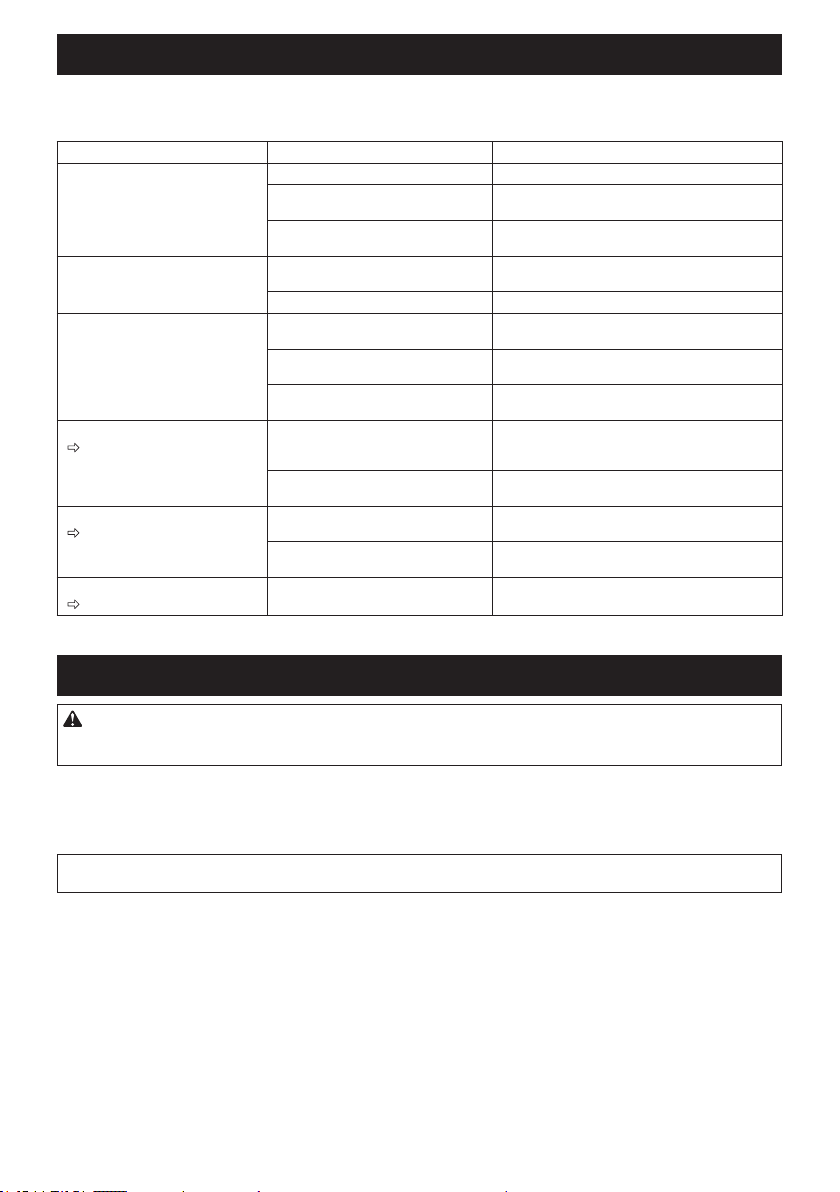
TROUBLESHOOTING
Beforeaskingforrepairs,conductyourowninspectionrst.Ifyoundaproblemthatisnotexplainedinthemanual,
do not attempt to dismantle the tool. Instead, ask Makita Authorized Service Centers, always using Makita replacement parts for repairs.
State of abnormality Probable cause (malfunction) Remedy
Motor does not run. Battery cartridge is not installed. Install the battery cartridge.
Battery problem (under voltage) Rechargethebattery.Ifrechargingisnoteective,
The drive system does not work
correctly.
Motor stops running after a little use. Battery's charge level is low. Rechargethebattery.Ifrechargingisnoteective,
Overheating. Stop using of tool to allow it to cool down.
It does not reach maximum RPM. Battery is installed improperly. Install the battery cartridge as described in this
Battery power is dropping. Rechargethebattery.Ifrechargingisnoteective,
The drive system does not work
correctly.
Cutting tool does not rotate:
stop the machine immediately!
Abnormal vibration:
stop the machine immediately!
Cutting tool and motor cannot stop:
Remove the battery immediately!
Foreignobjectsuchasabranchis
jammedbetweentheguardandthe
cutting tool.
The drive system does not work
correctly.
One end of the nylon cord has been
broken.
The drive system does not work
correctly.
Electric or electronic malfunction. Remove the battery and ask your local authorized
replace battery.
Ask your local authorized service center for repair.
replace battery.
manual.
replace battery.
Ask your local authorized service center for repair.
Removetheforeignobject.
Ask your local authorized service center for repair.
Tap the nylon cutting head against the ground while
it is rotating to cause the cord to feed.
Ask your local authorized service center for repair.
service center for repair.
OPTIONAL ACCESSORIES
CAUTION: These accessories or attachments are recommended for use with your Makita tool spec-
ied in this manual.Theuseofanyotheraccessoriesorattachmentsmightpresentariskofinjurytopersons.
Only use accessory or attachment for its stated purpose.
If you need any assistance for more details regarding these accessories, ask your local Makita Service Center.
• Nylon cutting head
• Nylon cord (cutting line)
• Makita genuine battery and charger
NOTE:Someitemsinthelistmaybeincludedinthetoolpackageasstandardaccessories.Theymaydierfrom
country to country.
17 ENGLISH
Page 18

18
Page 19

19
Page 20

Makita Europe N.V.
Makita Corporation
n
Jan-Baptist Vinkstraat 2,
www.makita.com
3070 Kortenberg, Belgium
3-11-8, Sumiyoshi-cho,
Anjo, Aichi 446-8502 Japa
885961A229
EN
20211116
 Loading...