

Page 1

EN Job Site Radio Instruction manual 4
FR Radio de chantier Manuel d’utilisation 13
DE Baustellenradio Bedienungsanleitung 23
IT Radio per luoghi di lavoro Manuale delle istruzioni 33
NL Bouwradio Handleiding 43
ES Radio de Trabajo Manual de instrucciones 53
PT Rádio a Bateria Manual de instruções 63
DA Byggepladsradio Brugsanvisning 73
EL Ραδιόφωνο εργοταξίου Εγχειριδιο οδηγιων 83
TR İşyeri Radyosu Kullanma Kilavuzu 93
DMR112
Page 2

2
1
3
4
5
6
789
10
17
16
11
12
18
19
19
19
19
20
13
15
14
1
2
Page 3

21
21
32
21
4
5
21
3
Page 4

ENGLISH
(Original instructions)
EXPLANATION OF GENERAL
VIEW (Fig. 1~5)
1. Soft bended rod antenna
2. Battery compartment locker
3. Handle
4. Battery compartment cover
(covering battery cartridge)
5. DC IN socket
6. Speaker
7. Power button
8. Band button
9. Advanced setting button
10. Info button
11. Preset 2-5
12. Auto tune button
13. Volume/Tuning Control/Select knob
14. USB power supply port
15. AUX IN 1
16. Preset 1/Bluetooth pairing button
17. LCD display
18. Input terminal (AUX IN 2)
19. Battery compartment
20. Micro USB port for software upgrade
21. Battery cartridge
SYMBOLS
The following show the symbols used for the equipment.
Be sure that you understand their meaning before use.
Read instruction manual.
Only for EU countries.
Do not dispose of electric equipment or
battery pack together with household
waste material!
In observance of the European
Directives, on Waste Electric and
Electronic Equipment and Batteries and
Accumulators and Waste Batteries and
Accumulators and their implementation
in accordance with national laws, electric
equipment and batteries and battery
pack(s) that have reached the end
their life must be collected separately
and returned to an environmentally
compatible recycling facility.
4 ENGLISH
IMPORTANT SAFETY
INSTRUCTIONS
WARNING:
When using electric tools, basic safety precautions should
always be followed to reduce the risk of re, electric
shock, and personal injury, including the following:
1. Read this instruction manual and the charger
instruction manual carefully before use.
2. Clean only with dry cloth.
3. Do not install near any heat sources such as
radiators, heat registers, stoves, or other apparatus
(including ampliers) that produce heat.
4. Only use attachments/accessories specied by the
manufacturer.
5. Unplug this apparatus during lighting storms or when
unused for long periods of time.
6. A battery operated radio with integral batteries or a
separate battery pack must be recharged only with
the specied charger for the battery. A charger that
may be suitable for one type of battery may create a
risk of re when used with another battery.
7. Use battery operated radio only with specically
designated battery packs. Use of any other batteries
may create a risk of re.
8. When battery pack is not in use, keep it away from
other metal objects like: paper clips, coins, keys, nails,
screws, or other small metal objects that can make a
connection from one terminal to another. Shorting the
battery terminals together may cause sparks, burns,
or a re.
9. Avoid body contact with grounded surfaces such
as pipes, radiators, ranges and refrigerators. There
is an increased risk of electric shock if your body is
grounded.
10. Under abusive conditions, liquid may be ejected from
the battery; avoid contact. If contact accidentally
occurs, ush with water. If liquid contacts eyes,
additionally seek medical help. Liquid ejected from the
battery may cause irritation or burns.
11. Do not use a battery pack or tool that is damaged or
modied. Damaged or modied batteries may exhibit
unpredictable behaviour resulting in re, explosion or
risk of injury.
12. Do not expose a battery pack or tool to re
or excessive temperature. Exposure to re or
temperature above 130 °C may cause explosion.
13. Follow all charging instructions and do not charge the
battery pack or tool outside the temperature range
specied in the instructions. Charging improperly
or at temperatures outside the specied range may
damage the battery and increase the risk of re.
14. The MAINS plug is used as the disconnect device,
and it shall remain readily operable.
Page 5

15. Do not use the product at a high volume for any
extended period. To avoid hearing damage, use the
product at moderate volume level.
16. (For products with LCD display only) LCD displays
include liquid which may cause irritation and
poisoning. If the liquid enters the eyes, mouth or skin,
rinse it with water and call a doctor.
17. Do not expose the product to rain or wet conditions.
Water entering the product will increase the risk of
electric shock.
18. This product is not intended for use by persons
(including children) with reduced physical, sensory
or mental capabilities, or lack of experience and
knowledge, unless they have been given supervision
or instruction concerning use of the product by a
person responsible for their safety. Children should
be supervised to ensure that they do not play with the
product. Store the product out of the reach of children.
SAVE THESE INSTRUCTIONS
SPECIFIC SAFETY RULES
FOR BATTERY CARTRIDGE
1. Before using battery cartridge, read all instructions
and cautionary markings on (1) battery charger, (2)
battery, and (3) product using battery.
2. Do not disassemble battery cartridge.
3. If operating time has become excessively shorter,
stop operating immediately. It may result in a risk of
overheating, possible burns and even an explosion.
4. If electrolyte gets into your eyes, rinse them out with
clear water and seek medical attention right away. It
may result in loss of your eyesight.
5. Do not short the battery cartridge:
(1) Do not touch the terminals with any conductive
material.
(2) Avoid storing battery cartridge in a container
with other metal objects such as nails, coins,
etc.
(3) Do not expose battery cartridge to water or
rain. A battery short can cause a large current
ow, overheating, possible burns and even a
breakdown.
6. Do not store the tool and battery cartridge in locations
where the temperature may reach or exceed 50°C
(122°F).
7. Do not incinerate the battery cartridge even if it is
severely damaged or is completely worn out. The
battery cartridge can explode in a re.
8. Be careful not to drop or strike battery.
9. Do not use a damaged battery.
10. To avoid risk, the manual of replaceable the battery
should be read before use. And the max discharging
current of the battery should be greater than or equal
to 8A.
11. The contained lithium-ion-batteries are subject to
the Dangerous Goods Legislation requirements. For
commercial transports e.g. by third parties, forwarding
agents, special requirement on packaging and
labeling must be observed.
For preparation of the item being shipped, consulting
an expert for hazardous material is required. Please
also observe possibly more detailed national
regulations.
Tape or mask off open contacts and pack up the
battery in such a manner that it cannot move around
in the packaging.
12. Follow your local regulations relating to disposal of
battery.
13. Use the batteries only with the products specied
by Makita. Installing the batteries to non-compliant
products may result in a re, excessive heat,
explosion, or leak of electrolyte.
CAUTION:
● Danger of explosion if battery is incorrectly
replaced.
●Replace only with the same or equivalent type.
● Only use genuine Makita batteries. Use of nongenuine Makita batteries, or batteries that have
been altered, may result in the battery bursting
causing res, personal injury and damage. It will
also void the Makita warranty for the Makita tool
and charger.
Tips for maintaining maximum battery life
1. Charge the battery cartridge before completely
discharged. Always stop tool operation and charge the
battery cartridge when you notice less tool power.
2. Never recharge a fully charged battery cartridge.
Overcharging shortens the battery service life.
3. Charge the battery cartridge with room temperature at
10°C - 40°C (50°F - 104°F). Let a hot battery cartridge
cool down before charging it.
4. Charge the battery cartridge if you do not use it for a
long period (more than six months).
5 ENGLISH
Page 6
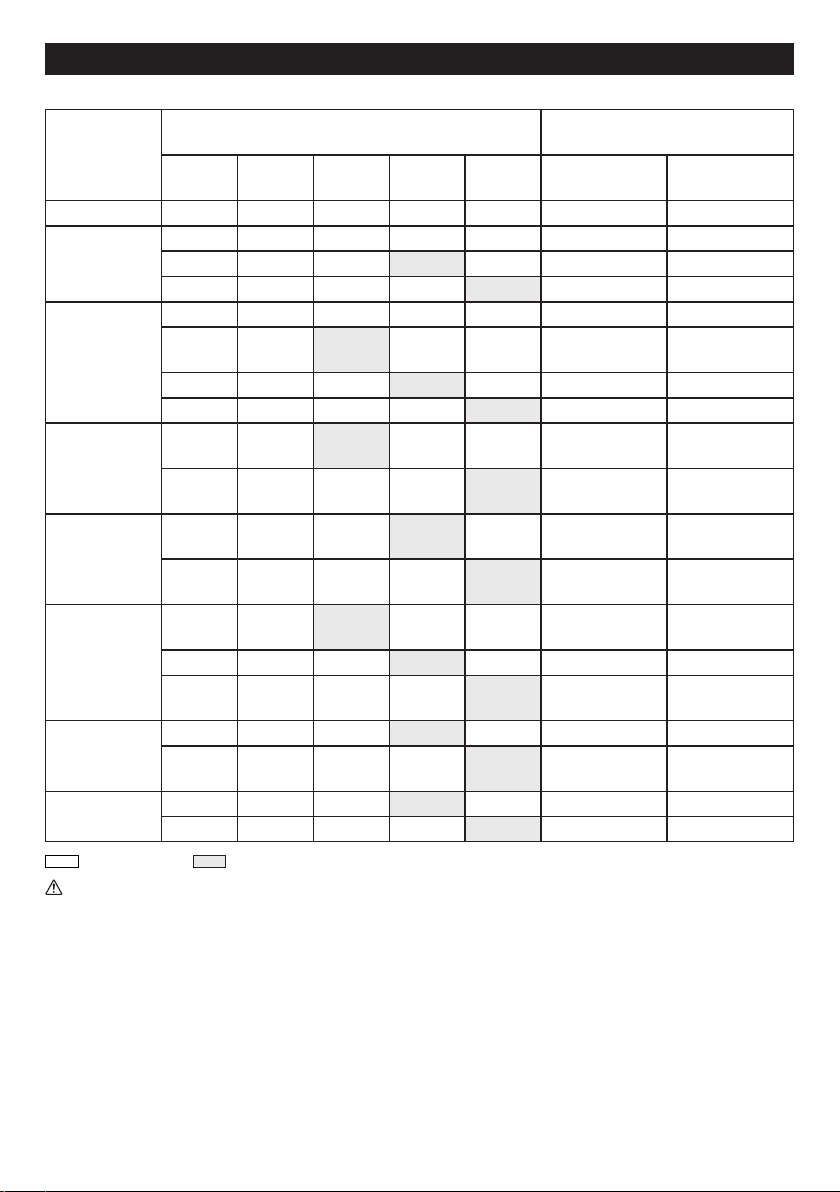
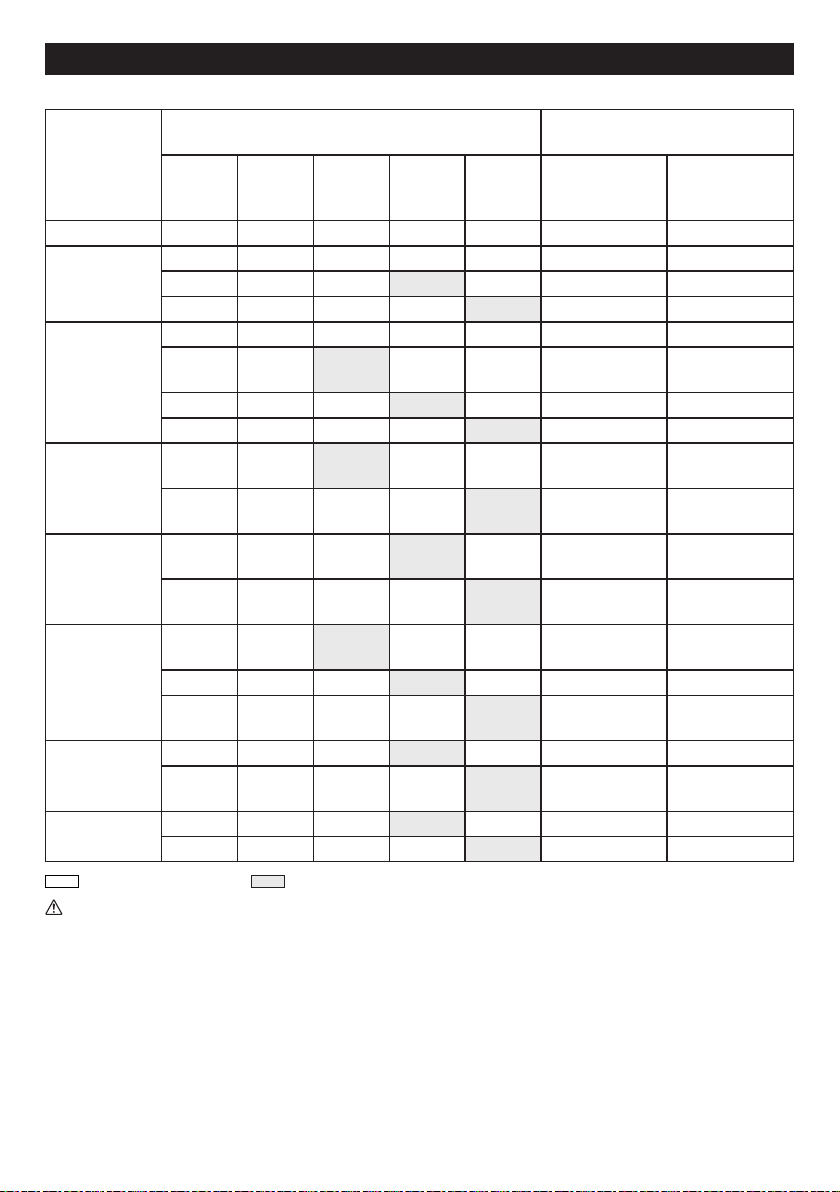
OPERATING TIME
* The following table indicates the operating time on a single charge.
Battery cartridge voltage
Battery capacity
7.2 V 10.8 V
1.0 Ah BL7010 5.0 0.7
BL1013 7.0 0.9
1.3 Ah
BL0715 7.5 1.0
1.5 Ah
2.0 Ah
3.0 Ah
4.0 Ah
5.0 Ah
6.0 Ah
: Cluster battery : Slide battery
WARNING:
Only use the battery cartridges listed above. Use of any other battery cartridges may cause injury and/or re.
NOTE:
Table regarding to the battery operating time above is for reference. The actual operating time may differ with the type of
the battery, charging condition, or usage environment.
10.8 V –
12Vmax
BL1015
BL1016
BL1020B
BL1021B
BL1040B
BL1041B
14.4 V 18 V In radio or AUX
BL1415 5.5 1.7
BL1815 6.0 1.9
BL1415N 7.0 2.0
BL1815N 7.5 2.0
BL1820
BL1820B
BL1430
BL1430B
BL1830
BL1830B
BL1440 19 5.5
BL1840
BL1840B
BL1450 23 6.5
BL1850
BL1850B
BL1460B 25 7.5
BL1860B 31 9.5
AT SPEAKER OUTPUT = 100mW
Unit: Hour (Approximately)
In radio with USB
charging (1.0A)
8.5 1.7
11 2.0
10 3.0
12 3.5
14 4.0
21 4.0
20 6.0
26 8.0
6 ENGLISH
Page 7
INSTALLATION AND POWER
SUPPLY
CAUTION:
● Be careful not to pinch your ngers when opening
and closing the battery cover.
● Return the battery compartment locker to the original
position, after installing or removing battery cartridge.
If not, battery cartridge may accidentally fall out of the
radio, causing injury to you or someone around you.
● Always close and lock the battery compartment
locker before moving the radio.
● Always switch off the radio before installing or
removing the battery cartridge.
● Be careful not to drop or strike the radio. Broken
shell may slash your nger or stab your body.
Damaged radio may exhibit unpredictable behaviour
resulting in re, explosion or risk of injury.
IMPORTANT:
● Reduced power, distortion, “stuttering sound” or when
“POWERFAIL” appears on the display are all the signs
that the main battery pack needs to replace.
● The battery cartridge can’t be charged via the supplied
AC power adaptor.
● The battery cartridge is not included as standard
accessories.
Installing or removing Slide battery
cartridge (Fig. 2 & 3)
1. To install the battery cartridge, align the tongue on the
battery cartridge with the groove in the housing and slip
it into place. Always insert it all the way until it locks in
place with a little click.
2. If you can see the red indicator on the upper side of the
button, it is not locked completely. Install it fully until the
red indicator cannot be seen. If not, it may accidentally
fall out of the radio, causing injury to you or someone
around you.
3. Do not use force when installing the battery cartridge.
If the cartridge does not slide in easily, it is not being
inserted correctly.
4. To remove the battery cartridge, slide it from the radio
while sliding the button on the front of the cartridge.
Installing or removing Cluster battery
cartridge (Fig. 4 & 5)
1. To insert the battery cartridge, align the tongue on the
battery cartridge with the groove in the housing and slip
it into place.
2. To remove the battery cartridge, take the battery out of
the terminal while pressing the buttons on the side of
cartridge.
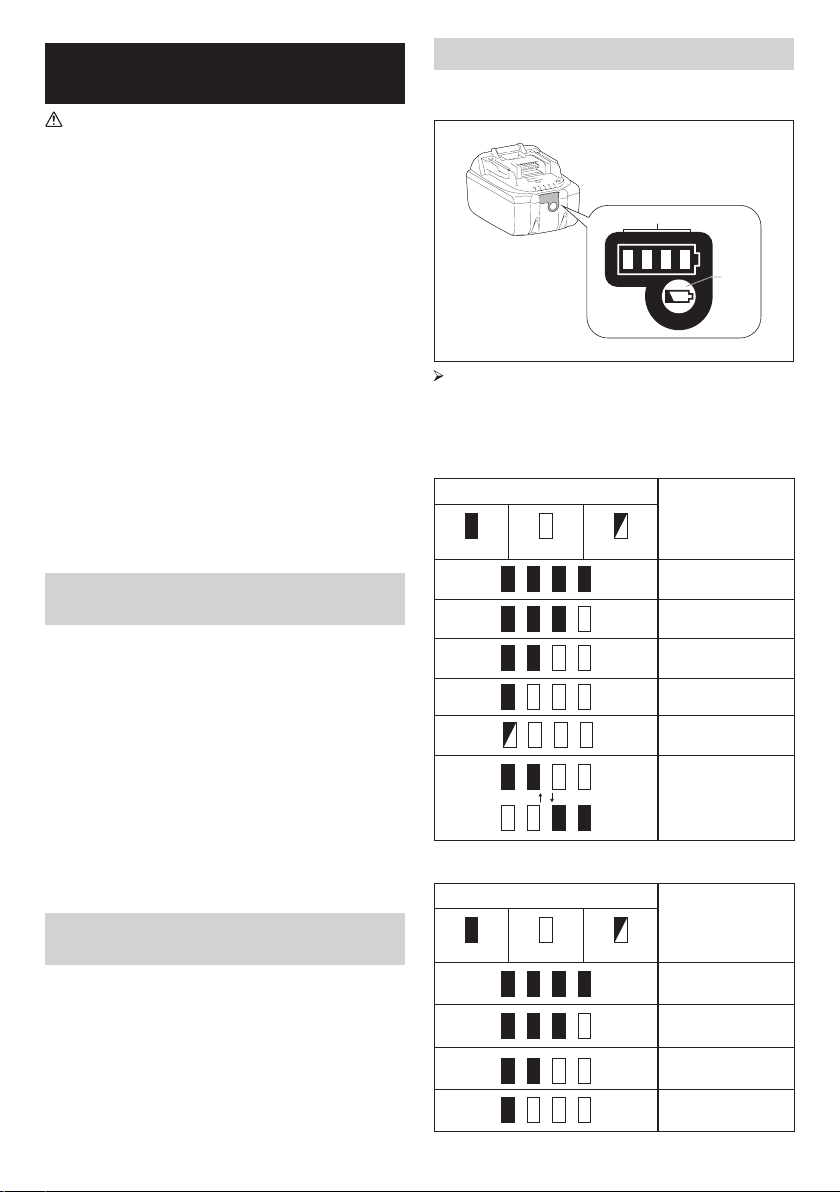
Indicating the remaining battery capacity
* Only for battery cartridges with “B” at the end of the
model number.
1
2
1. Indicator lamps 2. Check button
Press the check button on the battery cartridge to indicate
the remaining battery capacity. The indicator lamps light
up for few seconds.
● 14.4V/18V batteries
Indicator or lamps
Remaining Capacity
Lighted Off Blinking
75% ~ 100%
50% ~ 75%
25% ~ 50%
0% ~ 25%
● 10.8V-12V max batteries
Indicator or lamps
Lighted Off Blinking
Charge the battery
The battery may
have malfunctioned
Remaining Capacity
75% ~ 100%
50% ~ 75%
25% ~ 50%
0% ~ 25%
7 ENGLISH
Page 8
NOTE:
Depending on the conditions of use and the ambient
temperature, the indication may differ slightly from the
actual capacity.
Using the soft bended rod antenna
(Fig. 1)
Straight up the soft bended rod antenna as shown in the
gure.
Using supplied AC power adaptor
Remove the rubber protector and insert the adaptor plug
into the DC socket on the right hand side of the radio.
Plug the adaptor into a standard mains socket outlet.
Whenever the adaptor is used, the battery pack is
automatically disconnected.
CAUTION:
● Always disconnected the AC power adapter
completely before moving the radio. If the AC adapter
is not removed, it may cause an electric shock.
● Never pulling and dragging the cord of the adapter.
If not, the radio may accidentally fall down, causing
injury to you or someone around you.
IMPORTANT:
● The mains adaptor is used as the means of connecting
the radio to the mains supply. The mains socket used
for the radio must remain accessible during normal
use.
● In order to disconnect the radio, the mains adaptor
should be removed from the mains outlet completely.
● Use the AC power adaptor supplied with the product or
specied by Makita only.
● Do not hold the power supply cable and plug by your
mouth. Doing so might cause an electric shock.
● Do not touch the power plug with wet or greasy hands.
● Damaged or entangled cords increase the risk of
electric shock. If the cord is damaged, have it replaced
by our authorized service center in order to avoid a
safety hazard. Do not use it before repair.
● After use, always store AC power adaptor out of the
reach of children. If Children play with the cord, they
may suffer injury.
Charging with USB power supply port
There is the USB port at the front side of the radio. You
can charge USB device through the USB port.
1. Connect the USB device, such as iPod, MP3, or CD
player, with USB cable available in the market.
2. Press the Power button to switch on your radio.
3. No matter if the radio is AC powered or battery
powered, the radio can charge the USB device when
the radio is switched on and in FM/DAB radio mode, or
BT mode, or AUX mode, which is appeared when an
external audio source is connected.
8 ENGLISH
NOTE:
● The maximum volume of the output power speaker will
decrease when your USB is charging.
● The USB socket can provide max 1A5V of electrical
current.
IMPORTANT:
● Before connecting USB device to the USB port, always
backup your data of USB device. Otherwise your data
may lose by any possibility.
● The radio may not supply power to some USB devices.
● When not using or after charging, remove the USB
cable and close the cover.
● Do not connect power source to USB port. Otherwise
there is risk of re. The USB port is only intended for
charging lower voltage device. Always place the cover
onto the USB port when not charging the lower voltage
device.
● Do not insert a nail, wire, etc. into USB power supply
port. Otherwise a circuit short may cause smoke and
re.
● Do not connect this USB socket with your PC USB port,
as it is highly possible that it may cause breakdown of
the units.
LISTENING TO THE RADIO
This radio has three tuning methods- Scan tuning, Manual
tuning and Memory presets recall.
Selecting a station – DAB
1. Press the Power button to switch on your radio.
2. Select the DAB mode by pressing the Band button.
3. Press the Advanced setting button and rotate the
Volume/Tuning Control/Select knob until “Station List”
is ashing on the screen. Press the Volume/Tuning
Control/Select knob to enter the list of the stations.
4. Rotate the Volume/Tuning Control/Select knob to scroll
through the list of available stations. Press the knob to
select the station.
5. Adjust the desired volume by rotating the Volume/
Tuning Control/Select knob.
Display modes – DAB
Your radio has a range of display options in the DAB
mode.
Press the Info button to cycle through the various options
shown in the following letters (a. to g.)
a. Station name Indicates the station name being
listened to.
b. Program type Indicates the type of station being
listened to. E.g. Pop, Classics,
News, etc.
c. Multiplex name Indicates the name of the DAB
multiplex to which the current station
belongs.
Page 9

d. Time & date Indicates the current time and date.
e. Frequency
and channel
f . Bit rate/
Audio type
g. Signal strength Indicates the signal strength for the
Indicates the frequency and channel
number for the currently tuned DAB
station.
Indicates the digital audio bit rate
and audio type for the currently
tuned DAB station.
currently tuned DAB station.
Finding new stations – DAB
From time to time, new DAB radio stations may become
available. Or you may have moved to a different part of
the country. In this case you may need to activate your
radio to scan for new stations.
To allow the radio to nd the available stations, it is
recommended to carry out a full scan of the entire DAB
Band III frequencies.
1. Press the Auto tune button.
2. Your radio will perform a full scan of the DAB
frequencies. As new stations are found, the station
counter on the left side in the display will increase and
stations will be added to the list.
Manual tuning – DAB
Manual tuning allows you to tune your radio to a particular
DAB frequency in Band III. This function can also be used
to assist the positioning of the antenna or the radio so as
to optimize reception for a specic channel or frequency.
1. Press the Advanced setting button and rotate the
Volume/Tuning Control/Select knob until “Manual
Tune” shown on the display. Press the Volume/Tuning
Control/Select knob to enter the manual tuning mode.
2. Rotate the Volume/Tuning Control/Select knob to
select the desired DAB channel. Press Volume/Tuning
Control/Select knob to conrm the chosen frequency.
Station order setup – DAB
Your radio has 3 station order settings from which you
can choose. The station order settings are alphanumeric,
ensemble and valid station.
1. Press the Advanced setting button.
2. Rotate the Volume/Tuning Control/Select knob until
“Station order” appearing on the display, then press the
Volume/Tuning Control/Select knob to enter the setting.
3. Rotate the Volume/Tuning Control/Select knob to select
the following options and press the knob to conrm the
setting.
Alphanumeric Sorts the station list alpha-numerically
Ensemble Organizes the station list by DAB
Valid Shows only those stations for which a
0...9 A...Z
multiplex
signal can be found
9 ENGLISH
Dynamic Range Control (DRC) – DAB
DRC feature can make quieter sounds easier to hear
when your radio is used in a noisy environment by
reducing the dynamic range of the audio signal. There are
three levels of compression:
DRC 0 No compression applied.
DRC 1/2 Medium compression applied.
DRC 1 Maximum compression applied.
1. Press the Power button to switch on your radio.
2. Press the Band button to select the DAB band.
3. Press the Advanced setting button and rotate the
Volume/Tuning Control/Select knob until “DRC Value”
shown on the display. Then press the Volume/Tuning
Control/Select knob to enter the setting. The display
will show the current DRC value.
4. Rotate the Volume/Tuning Control/Select knob to select
desired DRC setting.
5. Press the Volume/Tuning Control/Select knob to
conrm the setting.
Scan Tuning – FM
1. Press the Power button to turn on the radio.
2. Select the desired waveband by pressing the Band
button. Make sure the soft bended rod antenna has
been well placed for best FM reception. Try to avoid
operating the radio next to a computer screen and
other equipment which will cause interference to the
radio.
3. Press the Auto tune button and the radio will search
and stop automatically when it nds a radio station.
The radio will continue searching for the next available
station unless the operator presses the Auto tune
button to stop the scanning.
4. Rotate the Volume/Tuning Control/Select knob to get
the desired sound level. The LCD display will show
sound level changes.
5. To turn off the radio, press the Power button.
FM scan zone
When using FM mode, your radio can be set to scan
either local stations or to scan all stations including distant
radio stations.
1. Press the Power button to turn on the radio.
2. Press the Band button to select the FM band.
3. Press the Advanced setting button and then rotate the
Volume/Tuning Control/Select knob until “FM Scan
Zone” shows on the display. Press the Volume/Tuning
Control/Select knob to enter the setting.
4. Rotate the Volume/Tuning Control/Select knob to
switch between “Local” (Strong stations only) and
“Distant” (All stations) options on the lower line of the
display. The Distant option will allow the radio to nd
weaker signals when scanning.
5. Press the Volume/Tuning Control/Select knob to
Page 10

conrm your selection. The Local or Distant setting is
stored in the radio and remains in force until changed
or until a System Reset.
Manual Tuning – FM
1. Press the Power button to turn on the radio.
2. Press the Band button to select desired waveband.
Adjust the antenna as described above.
3. Rotate the Volume/Tuning Control/Select knob will
change the frequency in the following increment: FM:
50 kHz.
NOTE:
In order to use the Volume/Tuning Control/Select knob
4. Keep rotating the Volume/Tuning Control/Select knob
5. Rotate the Volume/Tuning Control/Select knob to get
6. To turn off the radio, press the Power button.
to nd your desired station, press the Volume/Tuning
Control/Select knob to switch to the tuning control
mode.
until desired frequency is shown on the display.
the desired sound level.
Display modes – FM (RDS)
Your radio has a range of display options for FM radio
mode.
Repeatedly press the Info button to view the RDS (Radio
Data System) information of the station you are listening
to.
a. Program station Indicates the name of the station
b. Frequency Indicates the frequency of the FM
c. Radio text Indicates text message such as
d. Program type Indicates the type of station being
e. Time & date Indicates the current time and
being listened to.
signal.
new items, etc.
listened to such as Pop, Classic,
News, etc.
date.
Storing stations in preset memories
(DAB and FM)
There are 5 memory presets for each waveband.
1. Press the Power button to turn on the radio.
2. Tune to the desired station using one of the methods
previously described.
3. Press and hold the desired Preset button until the
preset number shown on the display, for example,
“P2 Saved”. The station is then stored in the selected
Preset button.
4. Repeat this procedure for the remaining presets.
5. Stations stored in the preset memories can be overwritten
by following the procedures described above.
10 ENGLISH
Recall stations from the preset
memories (DAB and FM)
1. Press the Power button to turn on the radio.
2. Press the Band button to select your desired
waveband.
3. Press the desired Preset button momentarily. The
preset number and station frequency will appear in the
display.
LISTENING TO MUSIC VIA
BLUETOOTH STREAMING
You need to pair your Bluetooth device with the radio
before you can auto-link to play/stream Bluetooth music
through the radio. Pairing creates a ‘bond' so two devices
can recognize each other.
NOTE:
To have the better sound quality, we recommend
setting the volume to more than two-thirds level on your
Bluetooth device and then adjust the volume on the radio
as required.
Pairing your Bluetooth device for the
rst time
1. Press the Power button to turn on the radio. Press the
Band button to select Bluetooth mode. The Bluetooth
indicator on the Preset buttons ashes blue to show the
radio is discoverable.
2. Activate Bluetooth on your device according to the
device's user manual to link to the radio. Locate the
Bluetooth device list and select the device named
‘DMR112’ with some mobiles (which are equipped with
earlier versions than BT2.1 Bluetooth device), you may
need to input the pass code “0000”.
3. Once connected, there will be a conrmation tone
sound and the Bluetooth indicator on the Preset
buttons will remain in solid blue. You can simply select
and play any music from your source device. Volume
control can be adjusted from your source device, or
directly from the radio.
4. Use the controls on your Bluetooth-enabled device or
on the radio to play/pause and navigate tracks.
NOTE:
1. If 2 Bluetooth devices, pairing for the rst time, both
search for the radio, it will show its availability on both
devices. However, if one device links with this unit rst,
then the other Bluetooth device won't nd it on the list.
2. If your Bluetooth device is temporarily disconnected to
the radio, then you need to manually reconnect your
device again to the radio.
3. If ‘DMR112’ shows in your Bluetooth device list but your
device cannot connect with it, please delete the item
from your list and pair the device with the radio again
following the steps described previously.
Page 11

4. Optimum Bluetooth streaming range is roughly 10
meters (30 feet) (line of sight) to the radio but distance
up to 30 meters (100 feet) are possible.
5. If Bluetooth connection is lost due to exceeding time of
separation, exceeding the optimum distance, obstacles
or otherwise, reconnecting your device with the radio
may be necessary.
6. Physical obstacles, other wireless devices or
electromagnetic devices may affect the connection
quality.
7. Bluetooth connectivity performance may vary
depending on the connected Bluetooth devices.
Please refer to the Bluetooth capabilities of your device
before connecting to the radio. All features may not be
supported on some paired Bluetooth devices.
Playing audio les in Bluetooth mode
When you have successfully connected the radio with the
chosen Bluetooth device you can start to play your music
using the controls on your connected Bluetooth device.
1. Once playing has started adjust the volume to the
required setting using the Volume knob on the radio or
on your enabled Bluetooth device.
2. Use the controls on your device to play/pause and
navigate tracks.
NOTE:
1. That not all player applications or devices may respond
to all of these controls.
2. Some mobile phones may temporarily disconnect
from the radio when you make or receive calls. Some
devices may temporarily mute their Bluetooth audio
streaming when they receive text messages, emails or
for other reasons unrelated to audio streaming. Such
behaviour is a function of the connected device and
does not indicate a fault with the radio.
Playing a previously-paired Bluetooth
source device
The radio can memorize up to 8 sets of paired device,
when the memory exceed this amount, the oldest
pairing history will be over written. If your Bluetooth
device already paired with the radio previously, the unit
will memorize your Bluetooth device and it attempts
to reconnect with a device in memory which is last
connected. If the last connected device is not available,
the radio will be discoverable.
Disconnecting your Bluetooth device
Press and hold the Bluetooth pairing button for 2-3
seconds to disconnect with your Bluetooth device. The
Bluetooth indicator on the Preset buttons ashes in blue
indicating the radio is discoverable again for pairing.
11 ENGLISH
AUXILIARY INPUT SOCKET
Two 3.5 mm stereo Auxiliary Input sockets are provided.
One is at the front of your radio (AUX IN 1); the other is
located in the battery compartment (AUX IN 2).
1. Connect an external audio source (for example, iPod,
MP3 or CD player) to the Auxiliary Input socket by
audio cord.
2. Repeatedly press and release the Band button until
“AUX IN 1” or “AUX IN 2” is displayed, then AUX
function is activated.
3. To have the better sound quality, we recommend
setting the volume to more than two-thirds level on your
audio device and then adjust the volume on the radio
as required.
NOTE:
Audio cord is not included as standard accessories.
MISCELLANEOUS SETTINGS
Language options
There are eight language options available in the
radio: English, German, Italian, French, Dutch, Danish,
Norwegian and Spanish.
1. Press Advanced setting button.
2. Rotate the Volume/Tuning Control/Select knob until
“Language” shown on the display. Press the Volume/
Tuning Control/Select knob to enter the setting.
3. Rotate the Volume/Tuning Control/Select knob to
choose your desired language. Press the Volume/
Tuning Control/Select knob to conrm your setting.
Brightness control
The button Light can be adjusted.
1. Press the Advanced setting button.
2. Rotate the Volume/Tuning Control/Select knob until
“Button Light” is shown on the display. Press the
Volume/Tuning Control/Select knob to enter the setting.
3. Rotate the Volume/Tuning Control/Select knob to
choose "On" or "Off" to enable or disable the button
light function, then press the Volume/Tuning Control/
Select knob to conrm the setting.
System reset
If your radio fails to work correctly, or some digits on the
display are missing or incomplete, carry out the following
procedure.
1. Press the Advanced setting button.
2. Rotate the Volume/Tuning Control/Select knob until
“Factory Reset” shown on the display. Press the
Volume/Tuning Control/Select knob to enter the setting.
3. Rotate the Volume/Tuning Control/Select knob to choose
“Yes”. Press the Volume/Tuning Control/Select knob to
conrm the setting and a full reset will be performed.
Page 12
Software version
1. Press the Advanced setting button.
2. Rotate the Volume/Tuning Control/Select knob until
“SW Version” shown on the display. Press the Volume/
Tuning Control/Select knob to view the software version
installed in the radio.
Micro USB port for software upgrade
Software updates for your radio may be available in the
future.
As software updates become available software and
information on how to update your radio can be found at
Makita website
.
MAINTENANCE
CAUTION:
Never use gasoline, benzine, thinner, alcohol or the
like. Discoloration, deformation or cracks may result.
SPECIFICATIONS
Power requirements
AC power adaptor
Battery
Frequency coverage
DAB/DAB+ Channel block DAB (Band III) 5A-13F
Compatible standard DAB/DAB+
Bluetooth
(The Bluetooth® word mark and logos are registered
trademarks owned by Bluetooth SIG, Inc.)
Bluetooth version 4.0
Bluetooth Proles A2DP/SCMS-T
Transmission Power Power Class2
Transmission Range
Supported codec SBC,AAC
Compatible Bluetooth
prole
Maximum radio-frequency
power
Operating Frequency 2402MHz~2480MHz
®
DC 12 V 1.2A, center pin
positive
Cluster battery:
7.2 V - 10.8 V
Slide battery: 10.8 V - 18 V
FM 87.50 - 108 MHz
DAB/DAB+
174.928-239.200 MHz
Optimum:
Max.10 meters (33 feet)
Possible:
Max. 30 meters (100 feet)
(varies according to usage
conditions)
A2DP
BT EDR: 3.12dBm
BT LE: 2.31dBm
Circuit feature
Loudspeaker 3.5 inches 32 ohm x 2
Output power
Input terminal
Antenna system
Dimensions
(L x W x H)
Weight 4.3KG (without battery)
12 ENGLISH
7.2 V: 0.6 W X 2
12Vmax: 1.7 W X 2
14.4 V: 3 W X 2
18 V: 4.9 W X 2
3.5 mm dia.
(AUX IN1/AUX IN2)
DAB/FM: soft bended rod
antenna
282 × 163 × 294 mm
Page 13
FRANÇAIS
(Instructions d’origine)
INTERPRETATION DE LA VUE
GENERALE (Fig. 1~5)
1. Antenne tige souple courbée
2. Loquet du compartiment de la batterie
3. Poignée
4. Clapet du compartiment de la batterie
(Recouvrant la cartouche de batterie)
5. Prise DC IN
6. Haut-parleur
7. Bouton d'alimentation Power
8. Bouton BAND
9. Bouton Paramètres avancés
10. Bouton Info
11. Présélection 2-5
12. Bouton Auto Tune
13. Bouton de sélection/commande de syntonisation/
volume
14. Port d'alimentation USB
15. Prise AUX IN 1
16. Bouton de présélection 1/couplage Bluetooth
17. Écran LCD
18. Borne d'entrée (AUX IN 2)
19. Compartiment de la batterie
20. Port micro-USB pour la mise à niveau du logiciel
21. Cartouche de batterie
SYMBOLES
Les symboles utilisés pour l'équipement sont afchés
ci-dessous. Soyez sûr de tout comprendre avant toute
utilisation.
Lisez le manuel d’utilisation.
Uniquement pour les pays de l'UE
Ne jetez pas le matériel électrique ou le
regroupement de batteries d'accumulateurs avec
les déchets ménagers !
Conformément aux directives européennes,
sur les déchets d'équipements électriques et
électroniques, des batteries et accumulateurs
mais aussi des batteries et accumulateurs usagés,
ainsi que leur mise en œuvre conformément aux
lois nationales, aux équipements électriques et
aux batteries et aux regroupements de batteries
d'accumulateurs qui ont atteint leur n de vie,
doivent être collectés séparément et être renvoyé
à une installation de recyclage suivant les
directives pour l'environnement.
INSTRUCTIONS
IMPORTANTES DE SECURITE
AVERTISSEMENT:
Lorsque vous utilisez des outils électriques, des
précautions de base devraient toujours être suivies
pour réduire le risque d'incendie, d'électrocution et de
blessures, notamment les précautions suivantes:
1. Lisez ce manuel d'utilisation attentivement ainsi que
le manuel d'utilisation du chargeur avant de l'utiliser.
2. Nettoyez avec un chiffon sec.
3. N’installez pas à proximité de sources de chaleur
telles que radiateurs, registre de chaleur, poêle ou
autres appareils (y compris les amplicateurs) qui
produisent de la chaleur.
4. N’utilisez que les extensions/accessoires spéciés
par le fabricant.
5. Débranchez cet appareil lors des orages ou lorsqu’il
est inutilisé pendant une longue période.
6. Les batteries utilisées pour les radios, qu’elles soient
intégrées ou séparées, doivent être rechargées
uniquement à l’aide du chargeur de batterie spécié. Un
chargeur qui convient à un type de batterie peut créer un
risque d’incendie s’il est utilisé avec une autre batterie.
7. Les radios fonctionnant à l’aide de batteries
doivent être utilisées uniquement avec les batteries
désignées. L’utilisation d’autres batteries peut créer
un risque d’incendie.
8. Lorsque la batterie externe n’est pas utilisée, veuillez
le tenir éloigner des autres objets métalliques tels que:
les trombones, les pièces de monnaie, les clés, les
clous, les vis ou les autres petits objets métalliques qui
peuvent établir une connexion d'une borne à un autre.
Court-circuiter les bornes de la batterie peut provoquer
des étincelles, des brûlures ou un incendie.
9. Évitez tout contact corporel avec des surfaces reliées
à la terre telles que les tuyaux, les radiateurs, les
cuisinières et les réfrigérateurs. Il y a un risque accru
de choc électrique si votre corps est relié à la terre.
10. Dans des conditions extrêmes, du liquide peut être
éjecté depuis la batterie; évitez tout contact avec le
liquide. En cas de contact accidentel, rincez avec de
l'eau. Si le liquide rentre en contact avec les yeux,
consultez un médecin. Le liquide éjecté depuis la
batterie peut causer des irritations ou des brûlures.
11. N'utilisez pas le regroupement de batteries
d'accumulateurs ou un outil qui a été endommagé
voire même modié. Les batteries endommagées
ou modiées peuvent présenter un comportement
imprévisible entraînant un incendie, une explosion ou
un risque de blessure.
12. N'exposez pas une batterie ou un outil au feu ou à
une température excessive. L'exposition au feu ou à
une température supérieure à 130 °C peut provoquer
une explosion.
13. Suivez toutes les instructions de charge et ne
chargez pas la batterie ou l'outil en dehors de la plage
de température spéciée dans les instructions. La
charge incorrecte ou à des températures en dehors
13 FRANÇAIS
Page 14

de la plage spéciée peut endommager la batterie et
augmenter le risque d'incendie.
14. Les prises SECTEUR sont utilisées comme dispositif
de déconnexion, et elles doivent rester facilement
accessibles.
15. N'utilisez pas le produit à un volume élevé durant une
période prolongée. Pour éviter les dommages auditifs,
utilisez-le produit à un niveau de volume modéré.
16. (pour les produits avec afchage à cristaux liquides
seulement) les afchages à cristaux liquides incluent le
liquide qui peut causer de l'irritation et un empoisonnement.
Si le liquide pénètre dans les yeux, la bouche ou la peau,
rincez avec de l'eau et appelez un médecin.
17. N'exposez pas le produit à la pluie ou à des
environnements humides. L'eau pénétrant dans le
produit augmente le risque de choc électrique.
18. Ce produit n'est pas destiné à être utilisé par des
personnes (y compris des enfants) ayant des
capacités physiques, sensorielles ou mentales
réduites, ou un manque d'expérience et de
connaissances, à moins qu'elles aient reçu une
supervision ou une formation concernant l'utilisation
du produit par une personne responsables pour
leur sécurité. Les enfants doivent être surveillés
pour s'assurer qu'ils ne jouent pas avec le produit.
Entreposez le produit hors de la portée des enfants.
ENREGISTRER SES INSTRUCTIONS
REGLES SPECIFIQUES DE
SECURITE
POUR LA CARTOUCHE DE BATTERIE
1. Avant d'utiliser la cartouche de batterie, lire toutes les
instructions et les avertissements concernant (1) le
chargeur de batterie, (2) la batterie, et (3) l’équipement
utilisant la batterie.
2. Ne démontez pas la cartouche de batterie
3. Si le temps de fonctionnement devient excessivement
court, cessez immédiatement l’utilisation. Il peut en
résulter un risque de surchauffe, de brûlures et même
d’explosion.
4. Si l'électrolyte pénètre dans vos yeux, rincez-les à
l'eau claire et consultez un médecin immédiatement.
Cela peut entraîner une perte de la vue.
5. Ne court-circuitez pas la cartouche de la batterie:
1) Ne touchez pas les bornes avec un matériau
conducteur.
2) Évitez de ranger la cartouche de la batterie
dans un conteneur avec d'autres objets
métalliques tels que des clous, des pièces de
monnaie, etc.
3) N’exposez pas la cartouche de la batterie
à l'eau ou à la pluie. Un court-circuit de la
batterie peut provoquer un fort courant, une
surchauffe, des brûlures et même une panne.
6. Ne rangez pas l'outil ou la cartouche de la batterie
dans des endroits où la température peut atteindre ou
dépasser 50 ° C (122 ° F)
7. N’incinérez pas la cartouche de la batterie même si
elle est sérieusement endommagée ou complètement
usée. La cartouche de la batterie peut exploser dans
un feu.
8. Veillez ne pas laisser tomber ou heurter la batterie.
9. N’utilisez pas de batterie endommagée.
10. Pour éviter tout risque, le manuel de la batterie
de remplacement de la batterie doit être lu avant
utilisation. Le courant de décharge maximal de la
batterie doit être supérieur ou égal à 8A
11. Les batteries lithium-ion sont soumises aux exigences
de la législation sur les marchandises dangereuses.
Pour les transports commerciaux, par ex. par
des tiers, des agents de livraison, des exigences
particulières en matière de conditionnement et
d'étiquetage doivent être respectées.
Pour la préparation de l'article à expédier, il est nécessaire
de consulter un expert pour les matières dangereuses.
Veuillez également observer des réglementations
nationales éventuellement plus détaillées.
Recouvrez par du scotch ou masquez les contacts
ouverts et emballez la batterie de telle manière qu'elle
ne puisse pas bouger dans l'emballage.
12. Suivez les réglementations locales relatives à
l'élimination des batteries.
13. Utilisez les batteries uniquement avec les produits
spéciés par Makita. L'installation des batteries
dans des produits non conformes peut entraîner un
incendie, une chaleur excessive, une explosion ou
une fuite d'électrolyte.
MISE EN GARDE:
● Risque d'explosion si la batterie est incorrectement
remplacée.
● Remplacez uniquement avec le même type ou
équivalent.
● n'utilisez que des batteries Makita authentiques.
L'utilisation de batteries Makita non authentiques,
ou des batteries qui ont été modiées, peut
provoquer une explosion de la batterie provoquant
des incendies, des blessures et des dégâts. Cela
annulera également la garantie Makita pour l'outil
Makita et le chargeur.
Conseils pour maintenir la durée de vie
de la batterie au maximum
1. Chargez la cartouche de la batterie avant qu’elle
ne soit complètement déchargée. Arrêtez toujours
le fonctionnement de l'équipement et rechargez la
cartouche de la batterie lorsque vous remarquez que la
puissance de l'équipement est faible.
2. Rechargez jamais une cartouche de batterie qui est
déjà complètement chargée. La surcharge réduit la
durée de vie de la batterie.
3. Rechargez la cartouche de batterie à une température
ambiante de 10°C à 40°C (50°F - 104°F). Laissez la
cartouche de batterie chaude se refroidir avant de la charger.
4. Rechargez la cartouche de batterie si vous ne l'utilisez
pas pendant une longue période (plus de six mois).
14 FRANÇAIS
Page 15
TEMPS DE FONCTIONNEMENT
* Le tableau suivant indique le temps de fonctionnement sur une seule charge.
Tension de la batterie
Capacité de la
batterie
1,0 Ah BL7010 5,0 0,7
1,3 Ah
1,5 Ah
2,0 Ah
3,0 Ah
4,0 Ah
5,0 Ah
6,0 Ah
: batterie de type « bloc » : batterie coulissante
AVERTISSEMENT:
n'utilisez que les cartouches de batterie énumérées ci-dessus. L'utilisation de toute autre cartouche de batterie
peut causer des blessures et/ou des incendies.
Remarque:
le tableau concernant la durée de fonctionnement de la batterie ci-dessus est présenté comme référence. Le temps de
fonctionnement réel peut différer du type de la batterie, de la condition de la charge ou de l'environnement d'utilisation.
7,2 V 10,8 V
BL1013 7,0 0,9
BL0715 7,5 1,0
10,8 V –
12Vmax
BL1015
BL1016
BL1020B
BL1021B
BL1040B
BL1041B
14,4 V 18 V
BL1415 5,5 1,7
BL1815 6,0 1,9
BL1415N 7,0 2,0
BL1815N 7,5 2,0
BL1820
BL1820B
BL1430
BL1430B
BL1830
BL1830B
BL1440 19 5,5
BL1840
BL1840B
BL1450 23 6,5
BL1850
BL1850B
BL1460B 25 7,5
BL1860B 31 9,5
SORTIE DU HAUT-PARLEUR = 100mW
Unité: Heures (Approximative)
En mode Radio
ou AUX
8,5 1,7
11 2,0
10 3,0
12 3,5
14 4,0
21 4,0
20 6,0
26 8,0
En mode Radio
avec chargement
USB (1,0 A)
15 FRANÇAIS
Page 16

INSTALLATION ET
ALIMENTATION FOURNIE
ATTENTION:
● Veuillez faire attention à ne pas vous pincer les
doigts en ouvrant ou fermant le clapet de la batterie.
● Remettez le loquet du compartiment de la batterie
dans sa position initiale après l’ajout ou le retrait
de la batterie. À défaut, elle risque de tomber
accidentellement de la radio et de vous blesser ou
de blesser une personne située près de vous.
● Fermez et verrouillez le compartiment de la batterie
avant tout déplacement de la radio.
● Éteignez toujours la radio avant d’installer et de
retirer la batterie.
● Prenez garde de ne pas laisser tomber ou cogner
la radio. Le boîtier cassé pourrait vous entailler un
doigt ou provoquer de plus graves blessures. La
radio endommagée pourrait fonctionner de manière
imprévisible, provoquant des risques de blessures,
d’explosion ou d’incendie.
IMPORTANT:
● Une baisse de puissance, une distorsion sonore, un
son saccadé ou l’afchage de « POWERFAIL » sur
l'écran sont les signes que la batterie a besoin d'être
remplacée.
● La batterie ne peut être chargée via l’adaptateur
d’alimentation secteur fourni.
● La batterie n’est pas incluse dans les accessoires de
base.
Installation et retrait d’une batterie
coulissante (Fig. 2 et 3)
1. Pour installer la batterie, alignez sa languette sur la
rainure qui se trouve à l’intérieur du logement, puis
faites glisser la batterie pour la mettre en place.
Insérez-la toujours bien à fond, jusqu’à ce qu’elle se
verrouille en émettant un léger déclic.
2. Si vous voyez le voyant rouge sur la face supérieure du
bouton, la batterie n’est pas parfaitement verrouillée.
Installez-la à fond, jusqu’à ce que le voyant rouge
ne soit plus visible. À défaut, elle risque de tomber
accidentellement de la radio et de vous blesser ou de
blesser une personne située près de vous.
3. N’appliquez pas une force excessive lors de l’insertion
de la batterie. Si la batterie ne glisse pas aisément, elle
n’est pas insérée correctement.
4. Pour retirer la batterie, faites-la glisser hors de la radio
tout en faisant glisser le bouton à l'avant de la cartouche.
Installation et retrait d’une batterie de
type « bloc » (Fig. 4 et 5)
1. Pour insérer la batterie, alignez sa languette sur la
rainure qui se trouve à l’intérieur du logement, puis
16 FRANÇAIS
faites glisser la batterie pour la mettre en place.
2. Pour retirer la batterie, dégagez-la de la borne tout en
appuyant sur les boutons situés de chaque côté de la
batterie.
Indication de l’autonomie restante de la
batterie
* Uniquement pour les batteries dont le numéro de
modèle se termine par la lettre « B »
1
2
1. Voyant des Lampes 2. Bouton de vérication
Appuyez sur le bouton de vérication pour indiquer
l’autonomie restante de la batterie. Les voyants s’allument
alors pendant quelques secondes.
● Batteries de 14,4 V/18 V
Voyant des lampes
Capacité restante
Allumés Eteintes Clignotant
75% ~ 100%
50% ~ 75%
25% ~ 50%
0% ~ 25%
Rechargez la
batterie
La batterie semble
mal fonctionnée
Page 17

● Batteries de 10,8 V-12 V max
Voyant des lampes
Capacité restante
Allumés Eteintes Clignotant
75% ~ 100%
50% ~ 75%
25% ~ 50%
0% ~ 25%
REMARQUE:
Selon les conditions d'utilisation et la température
ambiante, le voyant peut différer légèrement de la
capacité réelle.
Utilisation de l’antenne tige souple
courbée (Fig. 1)
Redressez l’antenne tige souple courbée comme illustré
sur la gure.
Utilisation de l'adaptateur secteur fourni
Retirez la protection en caoutchouc et insérez la che de
l'adaptateur dans la prise CC située sur le côté droit de la
radio.
Branchez l'adaptateur dans une prise secteur standard.
Chaque fois que l'adaptateur est utilisé, la batterie est
automatiquement déconnectée.
ATTENTION:
● Déconnectez toujours complètement l'adaptateur
secteur avant de déplacer la radio. Si l'adaptateur
secteur n'est pas retiré, cela peut provoquer un
risque d’électrocution.
● Ne jamais tirer et trainer le cordon de l'adaptateur.
Si vous le faites, la radio risque de tomber
accidentellement, vous blessant ou blessant les
gens situés autour de vous.
IMPORTANT:
● L'adaptateur secteur est utilisé pour connecter la radio
à l'alimentation secteur. La prise secteur utilisée pour la
radio doit rester accessible pendant l'utilisation normale.
● Pour déconnecter la radio, débranchez complètement
l'adaptateur secteur de la prise de courant.
● Utilisez l'adaptateur secteur fourni avec le produit ou
uniquement celui spécié par MAKITA.
● Ne tenez pas le câble d'alimentation et ne le mettez
pas dans votre bouche. Cela peut provoquer un choc
électrique.
● Ne touchez pas le câble d'alimentation avec les mains
mouillées ou grasses.
● Les cordons endommagés ou emmêlés augmentent
17 FRANÇAIS
le risque d’électrocution. Si le cordon est endommagé,
faites-le remplacer par notre centre de service autorisé
an d'éviter tout risque de sécurité. Ne l'utilisez surtout
pas avant la réparation.
● Après utilisation, rangez toujours l'adaptateur secteur
hors de la portée des enfants. Si les enfants jouent
avec le cordon d’alimentation, ils encourent des risques
de blessures.
Rechargement à partir du port USB
Le port USB se trouve sur la façade de la radio. Vous
pouvez charger l’appareil USB à partir du port USB.
1. Branchez l’appareil USB, par exemple un iPod, un
lecteur MP3 ou un lecteur CD, à l’aide d’un câble USB
vendu dans le commerce.
2. Appuyez sur le bouton d’alimentation pour allumer
votre radio.
3. Peu importe que la radio soit branchée sur secteur ou
alimentée par batterie, elle est en mesure de charger
l’appareil USB lorsqu’elle est allumée et en mode radio
FM/DAB, en mode BT ou en mode AUX, lesquels
apparaissent lorsqu’une source audio externe est
raccordée.
Remarque:
● Le volume maximum du haut-parleur émettant la
puissance de sortie diminue lors du rechargement à
partir du port USB.
● La prise USB peut fournir un courant électrique
maximum de 1 A ou 5 V.
Important:
● Avant de brancher votre appareil USB au port USB,
sauvegardez toujours vos données enregistrées sur
l’appareil USB. Dans le cas contraire, vous risquez de
les perdre par accident
● Il est possible que la radio ne puisse pas alimenter
certains appareils USB.
● Retirez le câble USB et fermez le couvercle lorsque vous
ne l’utilisez pas ou lorsque le chargement est terminé.
● Ne branchez pas une source d’alimentation dans le
port USB. Il y a risque d’incendie. Le port USB est
destiné uniquement au rechargement d’appareils de
faible tension. Placez toujours le couvercle sur le port
USB lorsque vous ne rechargez pas d’appareils de
faible tension.
● N’insérez pas de clou, l, etc., dans le port USB. Vous
pourriez provoquer un court-circuit et déclencher un
incendie et la formation de fumée.
● Ne branchez pas cette prise USB dans le port USB de
votre PC, au risque de provoquer une panne des appareils.
ÉCOUTER LA RADIO
Cette radio dispose de trois méthodes de syntonisation: la
syntonisation par balayage, la syntonisation manuelle et
le rappel des présélections en mémoire.
Page 18

Sélection d’une station – DAB
1. Appuyez sur le bouton d’alimentation pour allumer
votre radio.
2. Appuyez sur le bouton BAND pour sélectionner le
mode DAB.
3. Appuyez sur le bouton Paramètres avancés et tournez
le bouton de sélection/commande de syntonisation/
volume jusqu’à ce que « Liste de stations » clignote sur
l’écran. Appuyez sur le bouton de sélection/commande
de syntonisation/volume pour afcher la liste des
stations.
4. Tournez le bouton de sélection/commande de
syntonisation/volume pour faire déler la liste des
stations disponibles. Appuyez sur ce bouton pour
sélectionner la station.
5. Réglez le volume souhaité en tournant le bouton de
sélection/commande de syntonisation/volume.
Modes d’afchages – DAB
Votre radio possède plusieurs options d’afchage pour le
mode DAB:
Appuyez sur le bouton Info pour parcourir les différentes
options indiquées aux points suivants (a. à g.).
a. Nom de la
station
b. Type de
programme
c. Nom du
multiplex
d. Heure et date Indique l’heure et la date actuelles.
e. Fréquence et
canal
f . Débit binaire/
Format audio
g. Force du signal Indique la force du signal de
Afche le nom de la station écoutée.
Afche le type de la station
écoutée. Par ex., Pop, Classique,
Informations, etc.
Indique le nom du multiplex DAB
auquel appartient la station actuelle.
Indique la fréquence et le numéro
de canal de la station DAB
actuellement syntonisée.
Indique le débit binaire de l’audio
numérique et le format audio
de la station DAB actuellement
syntonisée.
la station DAB actuellement
syntonisée.
Trouver de nouvelles stations – DAB
Il arrive que de nouvelles stations radio DAB soient
disponibles. Ou bien vous vous êtes peut-être déplacé
dans une autre partie du pays. Dans ce cas, vous devez
activer votre radio pour balayer et trouver de nouvelles
stations.
Pour permettre à la radio de trouver les stations
disponibles, il est recommandé d’effectuer un balayage
complet de toutes les fréquences DAB Bande III.
1. Appuyez sur le bouton Auto Tune.
2. Votre radio effectuera un balayage complet des
fréquences DAB. À mesure que de nouvelles stations
18 FRANÇAIS
sont trouvées, le compteur de stations, situé à gauche
de l’afchage, augmentera et des stations s’ajouteront
à la liste.
Syntonisation manuelle – DAB
La syntonisation manuelle vous permet de syntoniser
votre radio sur une fréquence DAB particulière en Bande
III. Cette fonction peut également être utilisée pour faciliter
le positionnement de l’antenne ou la radio an d’optimiser
la réception d’un canal ou d’une fréquence spécique.
1. Appuyez sur le bouton Paramètres avancés et tournez
le bouton de sélection/commande de syntonisation/
volume jusqu’à ce que « Syntonisation manuelle
» s’afche sur l’écran. Appuyez sur le bouton de
sélection/commande de syntonisation/volume pour
sélectionner le mode de syntonisation manuelle.
2. Tournez le bouton de sélection/commande de
syntonisation/volume pour sélectionner le canal
DAB souhaité. Appuyez sur le bouton de sélection/
commande de syntonisation/volume pour conrmer la
fréquence choisie.
Création de l’ordre des stations – DAB
Votre radio dispose de 3 réglages d’ordre de stations que
vous pouvez choisir. Les réglages d’ordre de stations
sont le réglage alphanumérique, d’ensemble et de station
valide.
1. Appuyez sur le bouton Paramètres avancés.
2. Tournez le bouton de sélection/commande de
syntonisation/volume jusqu’à ce que « Ordre des
stations » apparaisse sur l’afchage, puis appuyez sur
ce bouton pour sélectionner le paramètre.
3. Tournez le bouton de sélection/commande de
syntonisation/volume pour sélectionner les options
suivantes, puis appuyez sur ce bouton pour conrmer
le paramètre.
Alphanumérique Trie la liste des stations dans
l’ordre alphanumérique de 0 à 9
et de A à Z
D’ensemble Organise la liste des stations par
multiplex DAB
Station valide Afche uniquement les stations
pour lesquelles un signal peut
être trouvé
Contrôle de la gamme dynamique
(DRC) – DAB
La fonction DRC peut vous aider à mieux entendre
les sons faibles lorsque vous utilisez la radio dans
un environnement bruyant, en réduisant la gamme
dynamique du signal audio. Il y a trois niveaux de
compression:
DRC 0 Aucune compression appliquée.
DRC 1/2 Compression moyenne appliquée.
DRC 1 Compression maximale appliquée.
Page 19

1. Appuyez sur le bouton d’alimentation pour allumer
votre radio.
2. Appuyez sur le bouton BAND pour sélectionner la
bande DAB.
3. Appuyez sur le bouton Paramètres avancés et tournez
le bouton de sélection/commande de syntonisation/
volume jusqu’à ce que « Valeur DRC » s’afche sur
l’écran. Puis, appuyez sur le bouton de sélection/
commande de syntonisation/volume pour sélectionner
le paramètre. L’écran afchera la valeur DRC actuelle.
4. Tournez le bouton de sélection/commande de
syntonisation/volume pour sélectionner le paramètre
DRC souhaité.
5. Appuyez sur le bouton de sélection/commande de
syntonisation/volume pour conrmer le paramètre.
Syntonisation par balayage – FM
1. Appuyez sur le bouton d’alimentation pour allumer la
radio.
2. Appuyez sur le bouton BAND pour sélectionner la
gamme d’ondes souhaitée. Assurez-vous que l’antenne
tige souple courbée est correctement placée pour
optimiser la réception FM. Évitez de faire fonctionner
la radio près de l’écran d’un ordinateur ou d’un autre
appareil susceptible de provoquer des interférences
avec la radio.
3. Appuyez sur le bouton Auto Tune pour que la radio
cherche une station radio et s’arrête automatiquement
lorsqu’elle en trouve une. La radio continue de chercher
la station suivante disponible, sauf si l’opérateur appuie
sur le bouton Auto Tune pour arrêter le balayage.
4. Tournez le bouton de sélection/commande de
syntonisation/volume pour obtenir le niveau
audio souhaité. Sur l’écran LCD sont afchés les
changements de niveau audio.
5. Pour éteindre la radio, appuyez sur le bouton
d’alimentation.
Zone de balayage FM
Lorsque vous utilisez le mode FM, vous pouvez régler
votre radio pour qu’elle balaie les stations locales ou pour
qu’elle balaie toutes les stations, y compris les stations
radio éloignées.
1. Appuyez sur le bouton d’alimentation pour allumer la
radio.
2. Appuyez sur le bouton BAND pour sélectionner la
bande FM.
3. Appuyez sur le bouton de Paramètres avancés, puis
tournez la molette de volume/réglage/sélection jusqu'à
ce que « Zone de scan FM » apparaisse sur l'écran.
Appuyez sur le bouton de sélection/commande de
syntonisation/volume pour entrer le paramètre.
4. Tournez le bouton de sélection/commande de
syntonisation/volume pour basculer entre les options
« Locale » (stations puissantes uniquement) et «
Distante » (toutes les stations) sur la ligne inférieure de
l'écran. L'option Distante permet à la radio de trouver
des signaux plus faibles lors du scan.
5. Appuyez sur le bouton de sélection/commande de
syntonisation/volume pour conrmer votre sélection.
L’option Locale ou Distante est mémorisée dans
la radio et restera par défaut jusqu'à ce qu'elle soit
modiée ou jusqu'à une réinitialisation du système.
Syntonisation manuelle – FM
1. Appuyez sur le bouton d’alimentation pour allumer la
radio.
2. Appuyez sur le bouton BAND pour sélectionner la
gamme d’ondes souhaitée. Réglez l’antenne comme
décrit ci-dessus.
3. Tournez le bouton de sélection/commande de
syntonisation/volume pour modier la fréquence selon
les incréments suivants: FM: 50 kHz
Remarque:
An d’utiliser le bouton de sélection/commande
de syntonisation/volume pour trouver votre station
souhaitée, appuyez sur ce bouton pour passer en
mode de commande de syntonisation.
4. Continuez de tourner le bouton de sélection/commande
de syntonisation/volume jusqu’à ce que vous obteniez
la fréquence souhaitée à l’écran.
5. Tournez le bouton de sélection/commande de
syntonisation/volume pour obtenir le niveau audio
souhaité.
6. Pour éteindre la radio, appuyez sur le bouton
d’alimentation.
Modes d’afchage – FM (RDS)
Votre radio possède plusieurs options d’afchage pour le
mode radio FM.
Appuyez à plusieurs reprises sur le bouton Info pour
afcher les informations RDS (Système radioélectrique de
diffusion de données) de la station que vous écoutez.
a. Station de
programme
b. Fréquence Indique la fréquence du signal FM.
c. Texte radio Indique le message textuel, tel que
d. Type de
programme
e. Heure et date Indique l’heure et la date actuelles.
Indique le nom de la station
écoutée.
de nouveaux éléments, etc.
Indique le type de station écoutée,
par exemple Pop, Classique,
Informations, etc.
Enregistrement des stations dans des
mémoires présélectionnées (DAB et FM)
Il existe 5 présélections mémorisées pour chaque gamme
d’ondes.
1. Appuyez sur le bouton d’alimentation pour allumer la
19 FRANÇAIS
Page 20

radio.
2. Syntonisez la radio jusqu’à la station souhaitée selon
l’une des méthodes décrites précédemment.
3. Maintenez enfoncé le bouton de Présélection souhaité
jusqu’à ce que le numéro présélectionné s’afche sur
l’écran, par exemple, « P2 sauvegardé ». La station
est alors enregistrée dans le bouton de Présélection
sélectionné.
4. Répétez cette procédure pour les présélections
restantes.
5. Pour remplacer les stations enregistrées dans les
mémoires présélectionnées, procédez comme indiqué
précédemment.
Rappel des stations des mémoires
présélectionnées (DAB et FM)
1. Appuyez sur le bouton d’alimentation pour allumer la
radio.
2. Appuyez sur le bouton BAND pour sélectionner votre
gamme d’ondes souhaitée.
3. Appuyez brièvement sur le bouton de Présélection
souhaité. Le numéro et la fréquence de la station
présélectionnés apparaissent sur l’écran.
Écouter de la musique via le
streaming Bluetooth
Vous devez coupler votre appareil Bluetooth avec la
radio avant que vous puissiez le relier automatiquement
pour lire/diffuser de la musique Bluetooth via la radio. Le
couplage crée un « lien » an que deux appareils puissent
se reconnaître mutuellement.
Remarque:
Pour avoir une meilleure qualité sonore, nous vous
conseillons de régler le volume à plus des deux tiers sur
votre appareil Bluetooth, puis ajustez le volume sur la
radio au besoin.
Coupler votre appareil Bluetooth pour
la première fois
1. Appuyez sur le bouton d'alimentation pour allumer la
2. Activez le Bluetooth sur votre appareil conformément
3. Une fois connecté, il y aura une tonalité de conrmation
radio. Appuyez sur le bouton BAND pour sélectionner
le mode Bluetooth. L'indicateur Bluetooth sur les
boutons de présélection clignote en bleu pour indiquer
que la radio est détectable.
au manuel d’instruction pour le relier à votre radio.
Situez la liste des appareils Bluetooth et choisissez
l'appareil nommé « DMR112. ». Avec certains
portables (équipés de versions antérieures aux
appareils Bluetooth BT2.1), vous devrez saisir un mot
de passe « 0000 ».
et l'indicateur Bluetooth sur les boutons de présélection
restera allumés en bleu. Vous pouvez maintenant
simplement sélectionner et lire n'importe quelle
musique de votre périphérique source. Le volume
peut être réglé à partir de votre appareil source, ou
directement à partir de la radio.
4. Utilisez les commandes de l'appareil avec la fonction
Bluetooth ou de votre radio pour lire/mettre en pause et
naviguer entre les pistes.
Remarque:
1. Si 2 appareils Bluetooth, effectuent le couplage pour la
première fois, les deux à la fois recherchent la radio,
il sera afché la disponibilité sur les deux appareils.
Toutefois, si l'un des d'appareils se lie avec cet appareil
d'abord, l'autre appareil Bluetooth ne la trouvera pas
sur la liste.
2. Si votre périphérique Bluetooth est temporairement
déconnecté de votre radio, alors vous devez
reconnecter manuellement votre appareil à nouveau
avec la radio.
3. Si « DMR112 » est afché dans votre liste d'appareils
Bluetooth, mais que votre appareil ne peut pas se
connecter avec elle, veuillez supprimer l'élément de
votre liste et couplez de nouveau l'appareil avec la
radio en suivant les étapes décrites précédemment.
4. La portée de fonctionnement optimale du Bluetooth est
d'environ 10 mètres (30 pieds) (ligne de visée) vers
la radio, mais une distance de jusqu'à 30 mètres (100
pieds) est possible.
5. Si la connexion Bluetooth est perdue en raison d'une
durée de séparation trop longue, d'un dépassement de
la portée, de présence d'obstacles ou autres il peut être
nécessaire de reconnecter votre appareil à la radio.
6. Les obstacles physiques, les autres appareils sans l
ou les appareils électromagnétiques peuvent affecter la
qualité de la connexion.
7. La performance de connectivité Bluetooth peut varier
en fonction des appareils Bluetooth connectés.
Référez-vous aux fonctionnalités Bluetooth de votre
appareil avant de connecter votre radio. Toutes les
fonctions ne seront peut-être pas compatibles sur
certains appareils Bluetooth.
Lire des chiers audio en mode
Bluetooth
Lorsque vous avez correctement connecté votre radio
avec l'appareil Bluetooth de votre choix, vous pouvez
commencer à lire votre musique en utilisant les contrôles
sur votre appareil Bluetooth connecté.
1. Une fois que la lecture a commencé, réglez le volume
sur la valeur souhaitée en utilisant les boutons de
volume de votre radio ou sur votre appareil avec
Bluetooth activé.
2. Utilisez les commandes de votre appareil pour la
lecture/pause et naviguez parmi les pistes.
20 FRANÇAIS
Page 21

Remarque:
1. Toutes les applications de lecture ou périphériques
peuvent répondre à l'ensemble de ces contrôles.
2. Certains téléphones mobiles peuvent se déconnecter
temporairement de votre radio lorsque vous donnez ou
recevez des appels. Certains appareils peuvent couper
temporairement leur streaming audio Bluetooth quand ils
reçoivent des messages texte, e-mails ou pour d'autres
raisons non liées au comportement du streaming
audio. Ce comportement est une fonction de l'appareil
connecté et ne constitue pas un défaut de votre radio.
Lecture d'un périphérique source
Bluetooth précédemment couplé
Votre radio peut mémoriser jusqu'à 8 appareils couplés,
lorsque la mémoire dépasse ce nombre, le premier
appareil couplé sera remplacé. Si votre appareil Bluetooth
a déjà été couplé avec la radio précédemment, l'unité
mémorisera votre appareil Bluetooth et essaiera de se
reconnecter avec l'appareil qui a été le dernier connecté
enregistré en mémoire. Si le dernier appareil connecté
n'est pas disponible, la radio ne sera pas détectable.
Déconnecter votre appareil Bluetooth
Appuyez sur le bouton de couplage Bluetooth et
maintenez-le enfoncé pendant 2-3 secondes pour vous
déconnecter de votre périphérique Bluetooth. L'indicateur
Bluetooth sur les boutons de présélection clignote en bleu
pour indiquer que la radio est à nouveau détectable pour
le couplage.
PRISE D'ENTRÉE AUXILIAIRE
Deux prises d'entrée auxiliaire stéréo de 3,5 mm sont
fournies. L'un est à l'avant de votre radio (AUX IN 1); l'autre
est situé dans le compartiment de la batterie (AUX IN 2).
1. Connectez une source audio externe (par exemple,
un iPod, un lecteur MP3 ou CD) à la prise d'entrée
auxiliaire à l'aide d'un cordon audio.
2. Appuyez à plusieurs reprises sur le bouton BAND et
relâchez-le jusqu'à ce que « AUX IN 1» ou « AUX IN 2
» s'afche. La fonction AUX est alors activée.
3. Pour avoir une meilleure qualité sonore, nous vous
conseillons de régler le volume à plus des deux tiers
sur votre appareil Bluetooth, puis ajustez le volume sur
la radio au besoin.
REMARQUE:
le cordon audio n'est pas inclus en tant qu'accessoires
standard.
PARAMÈTRES DIVERS
Langues
Huit langues sont disponibles dans la radio:
l’anglais, l’allemand, l’italien, le français, le néerlandais, le
danois, le norvégien et l’espagnol.
1. Appuyez sur le bouton Paramètres avancés.
2. Tournez le bouton de sélection/commande de
syntonisation/volume jusqu’à ce que « Langue »
apparaisse sur l’écran. Appuyez sur le bouton de
sélection/commande de syntonisation/volume pour
sélectionner le paramètre.
3. Tournez le bouton de sélection/commande de
syntonisation/volume pour sélectionner votre langue.
Appuyez sur le bouton de sélection/commande de
syntonisation/volume pour conrmer votre paramètre.
Réglage de la luminosité
L’éclairage des touches peut être réglé.
1. Appuyez sur le bouton Paramètres avancés.
2. Tournez le bouton de sélection/commande de
syntonisation/volume jusqu'à ce que « Eclairage
des touches » apparaisse sur l'écran. Appuyez sur
le bouton de sélection/commande de syntonisation/
volume pour entrer le paramètre.
3. Tournez le bouton de sélection/commande de
syntonisation/volume pour choisir entre « Oui »
ou « Non » pour activer ou désactiver la fonction
d'éclairage des touches, puis appuyez le bouton de
sélection/commande de syntonisation/volume pour
conrmer le réglage.
Réinitialisation du système
Si votre radio ne fonctionne pas correctement ou si
certains chiffres afchés sont manquants ou incomplets,
procédez comme suit.
1. Appuyez sur le bouton Paramètres avancés.
2. Tournez le bouton de sélection/commande de
syntonisation/volume jusqu’à ce que « Réinitialisation
» apparaisse sur l’écran. Appuyez sur le bouton de
sélection/commande de syntonisation/volume pour
sélectionner le paramètre.
3. Tournez le bouton de sélection/commande de
syntonisation/volume pour sélectionner « Oui ».
Appuyez sur le bouton de sélection/commande de
syntonisation/volume pour conrmer le paramètre. Une
réinitialisation complète sera effectuée.
Version du logiciel
1. Appuyez sur le bouton Paramètres avancés.
2. Tournez le bouton de sélection/commande de
syntonisation/volume jusqu’à ce que « Version logiciel
» apparaisse sur l’écran. Appuyez sur le bouton de
sélection/commande de syntonisation/volume pour
afcher la version du logiciel installé sur la radio.
21 FRANÇAIS
Page 22

Port micro-USB pour mise à jour de
logiciel
Les mises à jour de logiciel pour votre radio peuvent être
disponibles à l’avenir.
Puisque des mises à jour de logiciel sont disponibles,
vous pouvez trouver le logiciel et des informations sur la
manière de mettre à jour votre radio sur le
de Makita
.
site internet
ENTRETIEN
ATTENTION:
N’utilisez jamais d’essence, de benzine, de diluant,
d’alcool ou de produit similaire. Ces produits risquent
de provoquer des décolorations, des déformations ou
des ssures.
SPÉCIFICATIONS
Puissance consommée
Adaptateur secteur
Batteries
Gamme de fréquences
Blocage des canaux
DAB/DAB+
Norme compatible DAB/DAB+
12 V C.C. 1,2A, broche
centrale positive
Batterie de type « bloc »:
7,2 V à 10,8 V
Batterie coulissante:
10,8 V à 18 V
FM 87,50 - 108 MHz
DAB/DAB+
174,928-239,200 MHz
DAB (Band III) 5A-13F
Bluetooth
(La marque verbale et les logos Bluetooth® sont des
marques déposées de Bluetooth SIG, Inc.)
Version Bluetooth 4,0
Prols Bluetooth A2DP/SCMS-T
Puissance d’émission Classe 2 de puissance
Portée d’émission
Codec pris en charge SBC,AAC
Prol Bluetooth
compatible
Puissance maximale de la
radiofréquence:
Plage de fréquences de
fonctionnement
Fonction du circuit
Haut-parleur 3,5 pouces 32 ohms x 2
Puissance de sortie
Borne d’entrée
Système d’antenne
Dimensions (L x P x H) 282 × 163 × 294 mm
Poids 4,3KG (sans la batterie)
22 FRANÇAIS
®
Optimale: 10 mètres max.
(33 pieds)
Possible: 30 mètres max.
(100 pieds)
(varie en fonction des
conditions d'utilisation)
A2DP
BT EDR: 3,12dBm
BT LE: 2,31dBm
2402MHz~2480MHz
7,2 V: 0,6 W X 2
12Vmax: 1,7 W X 2
14,4 V: 3 W X 2
18 V: 4,9 W X 2
Diamètre 3,5 mm
(AUX IN 1/AUX IN 2)
DAB/FM: antenne tige
souple courbée
Page 23

DEUTSCH
(Originalanweisungen)
Erläuterung der
Gesamtdarstellung (Abb. 1~5)
1. Flexible Antenne
2. Verriegelung Batteriefach
3. Griff
4. Batteriefachabdeckung
(Schutz der Batteriehalterung)
5. DC-Eingang
6. Lautsprecher
7. Betriebstaste
8. Frequenzbandtaste
9. Einstellungstaste
10. Info-Taste
11. Speicherplätze 2-5
12. Automatische Sendersuche
13. Lautstärke/Tuning/Auswahl-Regler
14. USB-Ladeanschluss
15. AUX-Eingang 1
16. Speicherplatz 1/Bluetooth-Kopplung
17. LCD-Anzeige
18. Eingang (AUX 2)
19. Batteriefach
20. Micro-USB-Port für Softwareaktualisierung
21. Batteriehalterung
SYMBOLE
Im Folgenden sind die im Zusammenhang mit diesem
Gerät verwendeten Symbole dargestellt. Machen Sie
sich vor der Benutzung des Geräts unbedingt mit diesen
Symbolen vertraut!
Lesen Sie die Betriebsanleitung.
Nur für EU-Länder.
Entsorgen Sie Elektrowerkzeuge,
Batterien und Akkus nicht über den
Hausmüll!
Gemäß der Europäischen Richtlinie über
Elektro- und Elektronik- Altgeräte und
über Batterien und Akkumulatoren sowie
Altbatterien und Altakkumulatoren und
ihrer Umsetzung in nationales Recht
müssen verbrauchte Elektrowerkzeuge
sowie Altbatterien und Altakkumulatoren
getrennt gesammelt und einer
umweltgerechten Wiederverwertung
zugeführt werden.
WICHTIGE
SICHERHEITSHINWEISE
WARNUNG:
Bei der Verwendung von Elektrogeräten müssen stets
grundlegende Sicherheitsmaßnahmen befolgt werden, zu
denen auch die im Folgenden genannten gehören, um die
Gefahr von Verletzungen, Stromschlägen und Bränden zu
verringern.
1. Lesen Sie vor der Verwendung des Geräts
die vorliegende Betriebsanleitung sowie die
Betriebsanleitung zum Ladegerät aufmerksam durch.
2. Reinigen Sie dieses Gerät lediglich mit einem
trockenen Tuch.
3. Stellen Sie dieses Gerät nicht in der Nähe von
Wärmequellen wie etwa Radiatoren, Heizregistern,
Öfen oder anderen wärmeerzeugenden Apparaturen
(einschließlich Verstärker) auf.
4. Verwenden Sie ausschließlich vom Hersteller
vorgegebene Anbaugeräte bzw. Zubehörteile.
5. Ziehen Sie bei einem Gewitter, oder wenn Sie
das Gerät für längere Zeit nicht verwenden, den
Netzstecker dieses Geräts.
6. Ein akkubetriebenes Radio mit eingebauten Akkus
oder einem herausnehmbaren Akkupack darf nur mit
dem angegebenen Ladegerät geladen werden. Ein für
einen bestimmten Akkutyp vorgesehenes Ladegerät
kann Feuer verursachen, wenn es für andere Akkus
verwendet wird.
7. Ein akkubetriebenes Radio darf nur mit den dafür
speziell vorgesehenen Akkupacks verwendet werden.
Bei Verwendung anderer Akku besteht Brandgefahr.
8. Wenn sich der Akkupack nicht im Werkzeug bendet,
dann halten Sie ihn fern von metallenen Objekten,
wie etwa: Büroklammern, Münzen, Schlüssel, Nägel,
Schrauben oder anderen kleinen Metallgegenständen,
die eine Verbindung zwischen den Akkuanschlüssen
herstellen können. Ein Kurzschluss der Akkukontakte
kann Funken oder Verbrennungen verursachen und
stellt eine Brandgefahr dar.
9. Vermeiden Sie Körperkontakt mit geerdeten Flächen
wie Rohren, Radiatoren, Herdplatten und Heiz- und
Kühlelementen. Wenn Ihr Körper geerdet ist, besteht
bei einem elektrischen Schlag eine erhöhte Gefahr.
10. Bei unsachgemäßem Gebrauch kann Flüssigkeit
aus dem Akku austreten; vermeiden Sie in diesem
Fall jeglichen Kontakt mit der Flüssigkeit. Wenn Sie
versehentlich mit Flüssigkeit aus dem Akku in Berührung
geraten, waschen Sie die betroffene Stelle gründlich mit
Wasser ab. Wenn die Flüssigkeit in die Augen geraten
ist, suchen Sie anschließen umgehend einen Arzt
auf. Die aus dem Akku austretende Flüssigkeit kann
Hautreizungen und Verbrennungen verursachen.
11. Enden Sie Akkus oder Werkzeuge nicht, falls
diese beschädigt sind. Mit beschädigten oder
modizierten Batterien können unvorhergesehene
Situationen auftreten, die wiederum Explosionen oder
Verletzungen verursachen könnten.
12. Schützen Sie Akkus und Instrumente vor Feuer bzw.
23 DEUTSCH
Page 24

übermäßigen Temperaturen. Temperaturen über 130
°C können Explosionen verursachen.
13. Befolgen Sie alle Anleitungen zum Auaden; laden
Sie den Akku oder das Instrument nicht außerhalb
des vorgegebenen Temperaturbereichs auf. Falls Sie
den Akku unsachgemäß oder außerhalb der richtigen
Temperatur auaden, besteht erhöhte Brandgefahr.
14. Der NETZSTECKER ist die Trennvorrichtung und
muss immer zugänglich sein.
15. Verwenden Sie das Produkt nicht über längere Zeiträume
mit hoher Lautstärke. Wählen Sie eine moderate
Lautstärkeeinstellung, um Gehörschäden zu vermeiden.
16. (Nur für Produkte mit LCD) LCD-Bildschirme
enthalten Flüssigkeit, die Hautreizungen und
Vergiftung verursachen kann. Falls die Flüssigkeit in
Augen, Mund oder auf die Haut gelangt, spülen Sie
die betroffenen Stellen mit Wasser ab und wenden
Sie sich an einen Arzt.
17. Schützen Sie das Produkt vor Regen oder
Feuchtigkeit. Eindringendes Wasser kann die Gefahr
von Stromschlägen erhöhen.
18. Dieses Produkt ist nicht geeignet für Personen
(einschließlich Kinder) mit eingeschränkten
körperlichen, sensorischen oder geistigen
Fähigkeiten, oder ohne Erfahrung und Wissen, es
sei denn sie werden von einer für ihre Sicherheit
zuständigen Person beaufsichtigt oder angeleitet.
Kinder müssen beaufsichtigt werden, damit sie nicht
mit dem Produkt spielen. Bewahren Sie das Produkt
außer Reichweite von Kindern auf.
BEWAHREN SIE DIESE ANLEITUNG
SORGFÄLTIG AUF.
SPEZIELLE
SICHERHEITSREGELN FÜR AKKUBLOCK
1. Lesen Sie vor der Verwendung des Akkublocks
alle Anweisungen und Sicherheitshinweise für das
Akkuladegerät (1), den Akku (2) und das Produkt (3),
für das der Akku verwendet wird, sorgfältig durch.
2. Der Akkublock darf nicht zerlegt werden.
3. Falls die Betriebsdauer erheblich kürzer wird, beenden
Sie den Betrieb umgehend. Andernfalls besteht die
Gefahr einer Überhitzung sowie das Risiko möglicher
Verbrennungen und sogar einer Explosion.
4. Wenn Elektrolyt in Ihre Augen gerät, waschen
Sie diese mit klarem Wasser aus und suchen Sie
sofort einen Arzt auf. Andernfalls können Sie Ihre
Sehfähigkeit verlieren.
5. Vermeiden Sie einen Kurzschluss des Akkublocks:
(1) Die Kontakte dürfen nicht mit leitendem
Material in Berührung kommen.
(2) Der Akkublock darf nicht in einem Behälter
aufbewahrt werden, in dem sich andere
metallische Gegenstände wie beispielsweise
Nägel, Münzen usw. benden.
(3) Der Akkublock darf weder Feuchtigkeit noch
Regen ausgesetzt werden. Ein Kurzschluss des
Akkus kann zu hohem Kriechstrom, Überhitzung,
24 DEUTSCH
möglichen Verbrennungen und sogar zu einer
Zerstörung des Werkzeugs führen.
6. Werkzeug und Akkublock dürfen nicht an Orten
aufbewahrt werden, an denen Temperaturen von
50°C oder darüber erreicht werden können.
7. Beschädigte oder verbrauchte Akkus dürfen nicht
verbrannt werden. Der Akkublock kann in den
Flammen explodieren.
8. Lassen Sie den Akku nicht fallen und vermeiden Sie
Schläge gegen den Akku.
9. Verwenden Sie niemals einen beschädigten Akku.
10. Lesen Sie die Anleitung zum Austauschen des Akkus
sorgfältig durch, um Gefahren zu vermeiden. Und
der max. Entladestrom des Akkus muss größer oder
gleich 8 A sein.
11. Enthaltenen Lithium-Ion-Batterien unterliegen den
Vorschriften des Gefahrgutrechts. Während des
Transports, z.B. durch Dritte oder Spediteure, sind
spezielle Anforderungen auf der Verpackung und
den Etiketten zu beachten. Vor dem Versand des
Produkts muss ein Experte für Gefahrstoffe konsultiert
werden. Beachten Sie außerdem national geltende
Vorschriften. Kleben Sie freiliegende Kontakte ab und
verpacken Sie die Batterie so, dass sie nicht in der
Verpackung herumrutscht.
12. Hten Sie alle örtlich geltenden Vorschriften bzgl. der
Entsorgung von Batterien.
13. Verwenden Sie die Batterien nur mit den von Makita
vorgegebenen Produkten. Falls Sie die Batterien
in nicht kompatiblen Produkten installieren, können
Feuer, Überhitzung und Explosion verursacht werden
oder Batterieüssigkeit austreten.
ACHTUNG:
● Bei unsachgemäßer Verwendung von Ersatzakkus
besteht Explosionsgefahr.
● Als Ersatzteile dürfen nur Akkus des gleichen Typs
verwendet werden.
● Verwenden Sie nur echte Makita Batterien. Unechte
Makita Batterien oder modizierte Batterien können
zum Zerplatzen der Batterie führen und dadurch
Feuer, Verletzungen und Schäden verursachen. In
solch einem Fall wird außerdem die Makita Garantie
für Makita Instrumente und Ladegeräte nichtig.
Tipps für eine maximale Nutzungsdauer
der Batterie
1. Laden Sie die Batterie auf, bevor diese vollständig
entladen ist. Beenden Sie den Betrieb und laden Sie die
Batterie auf, wenn die Leistung des Geräts nachlässt.
2. Laden Sie eine vollständig geladene Batterie nicht
weiter auf. Überladung verkürzt die Lebensdauer.
3. Laden Sie die Batterie bei einer Umgebungstemperatur
von 10 °C - 40 °C (50 °F - 104 °F) auf. Lassen Sie ein
heißes Batteriegehäuse vor dem Auaden abkühlen.
4. Laden Sie die Batterie, falls Sie das Gerät längere Zeit
(länger als 6 Monate) nicht verwenden werden.
Page 25

BETRIEBSDAUER
* Die nachfolgende Tabelle ist eine Übersicht mit der jeweiligen Betriebsdauer pro Batterieladung.
Nennspannung des Akkublocks
Akkuladung
7,2 V 10,8 V
1,0 Ah BL7010 5,0 0,7
BL1013 7,0 0,9
1,3 Ah
BL0715 7,5 1,0
1,5 Ah
2,0 Ah
3,0 Ah
4,0 Ah
5,0 Ah
6,0 Ah
: Aufsteckakku : Einschubakku
WARNUNG:
Verwenden Sie nur die oben aufgeführten Batteriekarten. Die Verwendung anderer Batteriekarten kann
Verletzungen und/oder Feuer verursachen.
Hinweis:
Die Nutzungsdauern in der obigen Tabelle sind nur Richtwerte. Die tatsächliche Nutzungsdauer kann je nach BatterieTyp, Ladebedingungen bzw. Gebrauchsumgebung variieren.
10,8 V –
12Vmax
BL1015
BL1016
BL1020B
BL1021B
BL1040B
BL1041B
14,4 V 18 V
BL1415 5,5 1,7
BL1815 6,0 1,9
BL1415N 7,0 2,0
BL1815N 7,5 2,0
BL1820
BL1820B
BL1430
BL1430B
BL1830
BL1830B
BL1440 19 5,5
BL1840
BL1840B
BL1450 23 6,5
BL1850
BL1850B
BL1460B 25 7,5
BL1860B 31 9,5
BEI LAUTSPRECHERAUSGABE = 100mW
Einheit: Stunden (Ca.)
Im Radiobetrieb
oder über AUX-
Buchse
8,5 1,7
11 2,0
10 3,0
12 3,5
14 4,0
21 4,0
20 6,0
26 8,0
Im Radiobetrieb mit
USB-Auadung
(1,0A)
25 DEUTSCH
Page 26
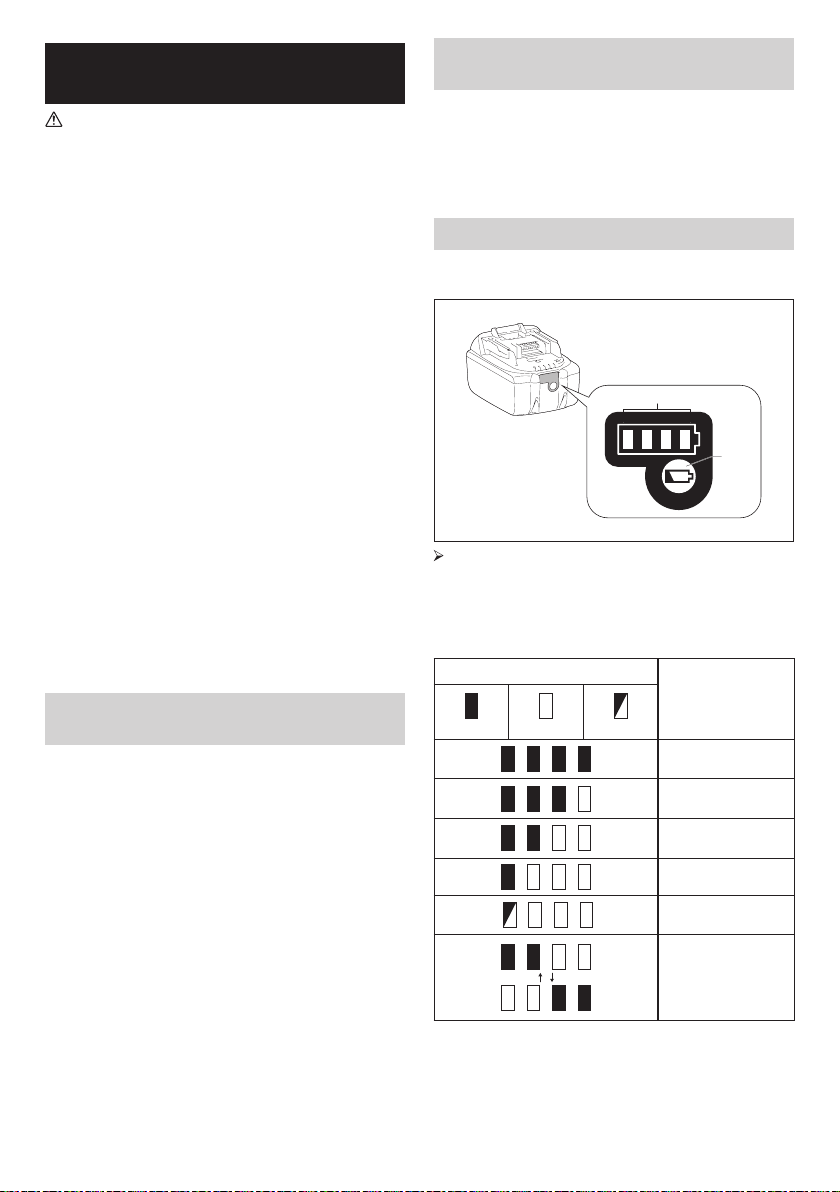
INSTALLATION UND
STROMVERSORGUNG
VORSICHT:
● Achten Sie beim Öffnen und Schließen der
Batteriefachabdeckung darauf, Ihre Finger nicht
einzuklemmen.
● Bringen Sie die Verriegelung des Batteriefachs
nach der Installation oder Entnahme der
Batteriehalterung wieder zur Ausgangsposition
zurück. Anderenfalls könnte die Batteriehalterung
versehentlich aus dem Radio herausfallen und
dadurch Verletzungen verursachen.
● Schließen und sichern Sie die Verriegelung des
Batteriefachs, bevor Sie das Radio umstellen.
● Schalten Sie das Radio immer aus, bevor Sie die
Batteriehalterung installieren oder entfernen.
● Lassen Sie das Radio nicht herunterfallen und
schützen Sie es vor Aufprällen. Ein kaputtes
Gehäuse könnte Verletzungen an Fingern und
Körper verursachen. Ein beschädigtes Radio kann
unvorhersehbar reagieren und als Folge Feuer,
Explosionen oder Verletzungen verursachen.
WICHTIG:
● Eine verminderte Leistung, Verzerrungen, „stotternde“
Geräusche oder die Anzeige „POWERFAIL“ sind alle
Anzeichen dafür, dass die Batterie ersetzt werden
muss.
● Die Batteriehalterung kann nicht über den mitgelieferten
AC-Netzadapter aufgeladen werden.
● Die Batteriehalterung ist kein Standardzubehör des
Produkts.
Einschubakku einsetzen bzw. entfernen
(Abb. 2 & 3)
1. Zum Einsetzen des Akkublocks müssen Sie die
Akkublockzunge zur inneren Gehäusenut ausrichten
und den Akkublock in Position schieben. Setzen Sie
den Akkublock unbedingt vollständig ein, bis er mit
einem Klick einrastet.
2. Ist weiterhin der oben auf der Taste bendliche rote
Bereich sichtbar, dann ist der Akkublock nicht ganz
eingerastet. Setzen Sie den Akkublock vollständig ein,
bis der rote Bereich nicht mehr sichtbar ist. Andernfalls
kann der Block versehentlich aus dem Gerät fallen und
Sie oder Personen in Ihrem Umfeld verletzen.
3. Wenden Sie keine Gewalt beim Einsetzen des
Akkublocks an. Wenn der Akkublock nicht leicht
hineingleitet, dann haben Sie ihn nicht richtig
ausgerichtet.
4. Um die Batterie zu entfernen, schieben Sie diese
aus dem Radio heraus, während Sie die Taste an der
Vorderseite der Halterung verschieben.
Aufsteckakku einsetzen bzw. entfernen
(Abb. 4 & 5)
1. Zum Einsetzen des Akkublocks müssen Sie die
Akkublockzunge an der inneren Gehäusenut ausrichten
und den Akkublock hineinschieben.
2. Drücken Sie zum Entfernen des Akkublocks die an
der Akkuseite bendlichen Knöpfe und ziehen Sie den
Akkublock heraus.
Anzeigen der Restladung des Akkus
* Nur für Akkublöcke mit einem „B“ am Ende der
Modellnummer
1
2
1. Anzeigelampen 2. Test-Taste
Drücken Sie zum Anzeigen der Restladung des Akkus die
Akkuprüftaste. Die Anzeigenlampen leuchten dann
wenige Sekunden lang auf.
● 14,4V/18V Batterien
Anzeigelampen
Leuchtet Aus Blinkt
Verbleibende
Kapazität
75% ~ 100%
50% ~ 75%
25% ~ 50%
0% ~ 25%
Batterie auaden
Mögliche
Fehlfunktion der
Batterie
26 DEUTSCH
Page 27

● Max. 10,8V-12V Batterien
Anzeigelampen
Leuchtet Aus Blinkt
HINWEIS:
Je nach Gebrauchsbedingungen und
Umgebungstemperatur können die Anzeigen leicht von
der tatsächlichen Kapazität abweichen.
Verbleibend
Kapazität
75% ~ 100%
50% ~ 75%
25% ~ 50%
0% ~ 25%
Betrieb mit exibler Stabantenne (Abb. 1)
Richten Sie die exible Stabantenne wie in der Abbildung
dargestellt auf.
Betrieb mit mitgeliefertem Netzadapter
Entfernen Sie die Gummiabdeckung und schließen Sie
den Adapterstecher an die DC-Buchse rechts am Radio
an.
Schließen Sie den Netzadapter an eine herkömmliche
Steckdose an.
Während des Gebrauchs des Netzadapters wird die
Batterie automatisch getrennt.
VORSICHT:
● Trennen Sie den AC-Netzadapter immer vollständig,
bevor Sie das Radio umstellen. Anderenfalls besteht
Stromschlaggefahr.
● Ziehen Sie niemals am Kabel des Netzadapters.
Anderenfalls könnte das Radio herunterfallen und
dadurch Verletzungen verursachen.
WICHTIG:
● Der Netzadapter ist die Trennvorrichtung des
Radios vom Netzstrom. Die verwendete Steckdose
muss während des normalen Gebrauchs immer frei
zugänglich sein.
● Ziehen Sie den Netzadapter vollständig aus der
Steckdose heraus, um das Radio vom Netzstrom zu
trennen.
● Verwenden Sie nur das im Lieferumfang enthaltene
bzw. ein von Makita empfohlenes AC-Netzteil.
● Halten Sie weder das Netzkabel noch den Netzstecker
an Ihren Mund. Es besteht Stromschlaggefahr.
● Berühren Sie den Netzstecker nicht mit nassen oder
fettigen Händen.
● Beschädigte oder verhedderte Kabel erhöhen die
Stromschlaggefahr. Falls das Kabel beschädigt ist,
27 DEUTSCH
lassen sie es von einem autorisierten Kundendienst
ersetzen, um Gefahrensituationen zu vermeiden.
Benutzen Sie es erst wieder nach der Reparatur.
● Bewahren Sie das AC-Netzteil nach dem Gebrauch
außer Reichweite von Kindern auf. Kinder können sich
verletzen, falls sie mit dem Kabel spielen.
Ladevorgang über
USBStromversorgungsanschluss
Der USB-Port bendet sich an der Vorderseite des
Radios. Sie können ein USB-Gerät über den USB-Port
auaden.
1. Schließen Sie das USB-Gerät, z. B. einen iPod, MP3-
oder CD-Spieler, über ein handelsübliches USB-Kabel
an.
2. Drücken Sie die Ein/Aus-Taste, um Ihr Radio
einzuschalten.
3. Das Radio ist sowohl im Netzbetrieb, als auch im
Batteriebetrieb in der Lage, das USB-Gerät aufzuladen,
sofern das Radio eingeschaltet ist und sich im FM/DAB
-Modus, BT-Modus oder bei angeschlossener externer
Audio-Quelle im AUX-Modus bendet.
Hinweis:
● Beim aktiven USB-Ladevorgang steht nur eine
eingeschränkte Lautsprecherleistung zur Verfügung.
● Der USB-Port kann max. 5 V/1 A zur Verfügung stellen.
Wichtig:
● Vor dem Anschluss Ihres USB-Geräts an den USB-Port
müssen Sie immer ein Daten-Backup Ihres USB-Geräts
ausführen! Ihre Daten könnten sonst möglicherweise
durch unvorhersehbare Umstände verloren gehen.
● Das Radio kann möglicherweise einige USB- Geräte
nicht mit Elektrizität versorgen.
● Schließen Sie die USB-Abdeckung und ziehen Sie das
USB-Kabel ab, wenn Sie den USB-Port nicht benutzen.
● Schließen Sie am USB-Port keine
Versorgungsspannung an! Es besteht ansonsten
Brandgefahr! Der USB-Port ist ausschließlich zum
Laden von Niederspannungsgeräten geeignet.
Schließen Sie immer die Abdeckung des USB-Ports,
wenn Sie kein Niederspannungsgerät laden.
● Niemals Fremdkörper (Nägel, Draht etc.) in den USB-
Stromversorgungsanschluss einführen! Es könnte
ein Kurzschluss entstehen und einen Brand mit
Rauchentwicklung verursachen.
● Schließen Sie niemals den USB-Port des Radios am
USB-Port eines PCs an, weil dadurch beide Geräte
beschädigt werden können!
RADIOBETRIEB
Dieses Radio verfügt über drei Möglichkeiten der
Sendereinstellung: Sendersuchlauf, manuelle
Sendereinstellung und Aufrufen zuvor gespeicherter Sender.
Page 28

Auswählen eines Senders – DAB
1. Schalten Sie das Radio durch Drücken der Ein/AusTaste ein.
2. Wählen Sie durch Drücken der Taste BAND den DABModus aus.
3. Drücken Sie auf die Einstelltaste ADVANCED
(Erweiterte Einstellungen), und drehen Sie den
Drehknopf VOLUME für Lautstärke/Sendereinstellung/
Auswahl, bis im Display „Station List“ (Senderliste)
blinkt. Drücken Sie auf den Drehknopf VOLUME
für Lautstärke/Sendereinstellung/Auswahl, um die
Senderliste aufzurufen.
4. Drehen den Drehknopf VOLUME für Lautstärke/
Sendereinstellung/Auswahl, um die Senderliste zu
durchblättern. Drücken Sie auf den Drehknopf, um den
Sender auszuwählen.
5. Stellen Sie die gewünschte Lautstärke ein, indem
Sie den Drehknopf VOLUME für Lautstärke/
Sendereinstellung/Auswahl drehen.
Displaymodi – DAB
Das Radio verfügt im DAB-Modus über verschiedene
Displayoptionen:
Drücken Sie auf die Taste INFO, um durch die
verschiedenen Optionen zu blättern. Die einzelnen
Optionen werden unter den folgenden Buchstaben (a bis
g) erläutert:
a. Station name
(Sendername)
b. Program type
(Programmgenre)
c. Mulitplex name
(Multiplex-Name)
d. Time & date
(Uhrzeit und
Datum)
e. Frequency and
channel
(Frequenz und
Kanal)
f . Bit rate/Audio
type (Bitrate/
Audio-Typ)
g. Signal strength
(Signalstärke)
Zeigt den Namen des eingestellten
Senders an.
Zeigt das Genre des eingestellten
Senders an (z. B. Pop, Klassik,
Nachrichten usw.).
Zeigt den Namen des DAB-
Multiplex an, zu dem der
eingestellte Sender gehört.
Zeigt das aktuelle Datum und die
aktuelle Uhrzeit an.
Zeigt die Frequenz und die
Kanalnummer des eingestellten
DAB-Senders an.
Zeigt die Bitrate und den Audio-Typ
des Digital Audio des eingestellten
DAB-Senders an.
Zeigt die Signalstärke des
eingestellten DAB-Senders an.
Suchen neuer Stationen – DAB
Von Zeit zu Zeit können neue DAB-Rundfunkstationen
empfangbar werden. Möglicherweise sind Sie auch in
einen anderen Teil des Landes gewechselt. In diesem Fall
möchten Sie möglicherweise, dass das Radio nach neuen
Sendern sucht.
28 DEUTSCH
Damit das Radio alle empfangbaren Sender nden
kann, wird empfohlen, dass Sie einen vollständigen
Sendersuchlauf über alle Frequenzen des DAB-Band III
ausführen.
1. Drücken Sie auf die Taste AUTOTUNE (Automatische
Sendereinstellung).
2. Das Radio führt daraufhin einen Sendersuchlauf
über alle DAB-Frequenzen hinweg aus. Immer wenn
ein neuer Sender gefunden wird, erhöht sich der
Senderzähler links im Display, und die Station wird in
die Liste eingetragen.
Manuelle Sendereinstellung – DAB
Mit der manuellen Sendereinstellung können Sie am
Radio eine ganz konkrete DAB-Frequenz in BAND III
einstellen. Diese Funktion kann auch für das Ausrichten
der Antenne bzw. des Radios auf den optimalen Empfang
eines bestimmten Kanals oder einer bestimmten Frequenz
genutzt werden.
1. Drücken Sie auf die Einstelltaste ADVANCED
(Erweiterte Einstellungen), und drehen Sie den
Drehknopf VOLUME für Lautstärke/Sendereinstellung/
Auswahl, bis im Display „Manual Tune“ (Manuelle
Sendereinstellung) blinkt. Drücken Sie auf den
Drehknopf VOLUME für Lautstärke/Sendereinstellung/
Auswahl, um die manuelle Sendereinstellung zu
aktivieren.
2. Drehen Sie den Drehknopf VOLUME für Lautstärke/
Sendereinstellung/Auswahl, um den gewünschten
DAB-Kanal auszuwählen. Drücken Sie auf den
Drehknopf VOLUME für Lautstärke/Sendereinstellung/
Auswahl, um die ausgewählte Frequenz zu
übernehmen.
Festlegen der Reihenfolge der
Sender – DAB
Das Radio verfügt über 3 Einstellungen für die
Reihenfolge der Sender, von der eine ausgewählt werden
kann. Die Einstellungen für die Reihenfolge der Sender
sind „Alphanumeric“ (Alphanumerisch), „Ensemble“ und
„Valid station“ (Gültiger Sender).
1. Drücken Sie auf die Einstelltaste ADVANCED
(Erweiterte Einstellungen).
2. Drehen Sie den Drehknopf VOLUME für Lautstärke/
Sendereinstellung/Auswahl, bis im Display „Station
order“ (Senderreihenfolge) angezeigt wird, und
drücken Sie anschließend auf den Drehknopf VOLUME
für Lautstärke/Sendereinstellung/Auswahl, um den
Einstellungsmodus zu aktivieren.
3. Drehen Sie den Drehknopf VOLUME für Lautstärke/
Sendereinstellung/Auswahl, um eine der folgenden
Möglichkeiten auszuwählen, und drücken Sie
anschließend auf den Drehknopf, um die ausgewählte
Einstellung zu übernehmen.
Page 29

Alphanumeric
(Alphanumerisch)
Ensemble Organisiert die Senderliste nach
Valid (Gültig) Zeigt nur jene Sender an, deren
Sortiert die Senderliste
alphanumerisch
0...9 A...Z
DAB- Multiplex
Signal empfangen wird
Dynamic Range Control (DRC) – DAB
Die Funktion DRC sorgt dafür, dass leisere Passagen
besser zu hören sind, wenn das Radio in einer lautstarken
Umgebung genutzt wird, indem der Dynamikbereich des
Audiosignals eingeengt wird. Es sind drei Stufen der
Komprimierung möglich:
DRC 0 Keine Komprimierung
DRC 1/2 Mittelstarke Komprimierung
DRC 1 Maximale Komprimierung
1. Schalten Sie das Radio durch Drücken der Ein/AusTaste ein.
2. Drücken Sie auf die Taste BAND, um das DAB-Band
auszuwählen.
3. Drücken Sie auf die Einstelltaste ADVANCED
(Erweiterte Einstellungen), und drehen Sie den
Drehknopf VOLUME für Lautstärke/Sendereinstellung/
Auswahl, bis im Display „DRC Value“ (DRC-Wert)
blinkt. Drücken Sie anschließend auf den Drehknopf
VOLUME für Lautstärke/Sendereinstellung/Auswahl,
um den Einstellungsmodus zu aktivieren. Im Display
wird der derzeitig eingestellte DRC-Wert angezeigt.
4. Drehen Sie den Drehknopf VOLUME für Lautstärke/
Sendereinstellung/Auswahl, um die gewünschte DRC-
Einstellung auszuwählen.
5. Drücken Sie anschließend auf den Drehknopf
VOLUME für Lautstärke/Sendereinstellung/Auswahl,
um die Einstellung zu übernehmen.
Sendersuchlauf – FM
1. Drücken Sie die Ein/Aus-Taste, um das Radio
einzuschalten.
2. Wählen Sie das gewünschte Frequenzband durch
Drücken der Taste BAND. Achten Sie darauf, dass die
exible Stabantenne eingesetzt wurde, damit ein guter
FM-Empfang gegeben ist. Betreiben Sie das Radio
möglichst nicht in der Nähe eines Computerbildschirms
oder anderer Geräte, die den Radioempfang stören
könnten.
3. Drücken Sie auf die Taste AUTOTUNE (Automatische
Sendereinstellung). Das Radio beginnt, nach Sendern
zu suchen. Wenn ein Rundfunksender gefunden wurde,
stoppt das Radio die Suche automatisch. Das Radio
setzt die Suche nach den nächsten empfangbaren
Sendern solange fort, bis der Benutzer auf die Taste
AUTOTUNE drückt, um den Sendersuchlauf zu
beenden.
4. Drehen Sie den Drehknopf VOLUME für Lautstärke/
29 DEUTSCH
Sendereinstellung/Auswahl, um die gewünschte
Lautstärke einzustellen. Die Änderung der Lautstärke
wird im LCD-Display angezeigt.
5. Schalten Sie das Radio durch Drücken der Ein/AusTaste aus.
Sendersuchbereich für FM
Im FM-Modus kann das Radio so eingestellt werden,
dass es entweder nur Sender in der Nähe oder nach allen
Sendern, auch weiter entfernten, sucht.
1. Drücken Sie die Ein/Aus-Taste, um das Radio
einzuschalten.
2. Drücken Sie die Frequenzbandtaste zur Auswahl des
UKW-Bands.
3. Drücken Sie die Einstellungstaste und drehen Sie den
Lautstärke/Tuning/Auswahl-Regler, bis im Display die
Anzeige „FM Scan Zone“ erscheint. Drücken Sie den
Lautstärke/Tuning/Auswahl-Regler erneut, um die
Einstellungen aufzurufen.
4. Drehen Sie den Lautstärke/Tuning/Auswahl-Regler,
um in der unteren Zeile des Displays zwischen „Local“
(nur Sender mit starkem Signal) und „Distant“ (alle
Sender) zu wechseln. Mit der Option Distant ist es
möglich, auch nach Sendern mit schwächerem Signal
zu suchen.
5. Drücken Sie den Lautstärke/Tuning/Auswahl-Regler
zum Bestätigen. Die jeweilige ausgewählte Einstellung
wird im Radio gespeichert und bleibt erhalten, bis
sie geändert oder eine Rückstellung des Geräts
durchgeführt wird.
Manuelle Sendereinstellung – FM
1. Drücken Sie die Ein/Aus-Taste, um das Radio
einzuschalten.
2. Wählen Sie durch Drücken der Taste BAND das
gewünschte Frequenzband aus. Richten Sie die
Antenne wie bereits oben erläutert aus.
3. Durch Drehen des Drehknopfs VOLUME für Lautstärke/
Sendereinstellung/Auswahl wird die Frequenz in
folgenden Schritten geändert: FM: 50 kHz.
Hinweis:
Wenn Sie den gewünschten Sender anhand des
„Sendereinstellung“ zu wechseln.
4. Drehen Sie den Drehknopf VOLUME für Lautstärke/
5. Drehen Sie den Drehknopf VOLUME für Lautstärke/
6. Schalten Sie das Radio durch Drücken der Ein/Aus-
Drehknopfs VOLUME für Lautstärke/Sendereinstellung/
Auswahl suchen möchten, drücken Sie den Drehknopf
VOLUME für Lautstärke/Sendereinstellung/Auswahl,
um zum Modus
Sendereinstellung/Auswahl weiter, bis die gewünschte
Frequenz im Display angezeigt wird.
Sendereinstellung/Auswahl, um die gewünschte
Lautstärke einzustellen.
Page 30

Taste aus.
Displaymodi – FM (RDS)
Das Radio bietet im FM-Modus eine Vielzahl an
Displayoptionen.
Drücken Sie wiederholt die Info-Taste, um die RDSInformationen (Radio Data System) des wiedergegebenen
Senders anzuzeigen.
a. Program station
(Sendername)
b. Frequency
(Frequenz)
c. Radio text
(Radio-Text)
d. Program type
(Programmgenre)
e. Time & date
(Uhrzeit und Datum)
Zeigt den Namen des
eingestellten Senders an.
Zeigt die Frequenz des
eingestellten FM-Signals an.
Zeigt Textmeldungen wie z. B.
Nachrichten usw. an.
Zeigt das Genre des
eingestellten Senders an,
beispielsweise Pop, Classic,
News usw.
Zeigt das aktuelle Datum und
die aktuelle Uhrzeit an.
Speichern von Sendern im
Senderspeicher (DAB und FM)
Für jeden Frequenzbereich stehen 5
Senderspeicherplätze zur Verfügung.
1. Drücken Sie die Ein/Aus-Taste, um das Radio
einzuschalten.
2. Stellen Sie anhand einer der oben beschriebenen
Methoden den gewünschten Sender ein.
3. Drücken und halten Sie die gewünschte Taste unter
PRESETS (Senderspeicher), bis die Nummer des
Senderspeicherplatzes im Display angezeigt wird,
beispielsweise „P2 Saved“ (P2 gespeichert). Der
Sender ist nun unter der ausgewählten Taste unter
PRESETS gespeichert.
4. Wiederholen Sie diese Schritte für die verbleibenden
Senderspeicher.
5. Durch Ausführen der oben angegebenen Schritte
können im Senderspeicher gespeicherte Sender
überschrieben werden.
Aufrufen von Sendern aus dem
Senderspeicher (DAB und FM)
1. Drücken Sie die Ein/Aus-Taste, um das Radio
einzuschalten.
2. Wählen Sie durch Drücken der Taste BAND das von
Ihnen gewünschte Frequenzband aus.
3. Drücken Sie die gewünschte Taste für voreingestellte
Sender. Die Nummer des Senderspeichers und die
Frequenz des Senders erscheinen in der Anzeige.
30 DEUTSCH
MUSIKWIEDERGABE
VIA BLUETOOTHÜBERTRAGUNG
Sie müssen zunächst Ihr Bluetooth-Gerät mit dem radio
koppeln, bevor Sie mit diesem radio Musik via Bluetooth
abspielen/übertragen können. Durch die Kopplung
entsteht eine “Verbindung”, damit sich beide Geräte
gegenseitig erkennen.
Hinweis:
Für eine bessere Sound-Qualität empfehlen wir,
die Lautstärke an Ihrem Bluetooth-Gerät mit einer
Einstellung von zwei Dritteln und am radio je nach Bedarf
einzustellen.
Erstmalige Kopplung mit Ihrem
Bluetooth-Gerät
1. Drücken Sie die Ein/Aus-Taste, um das
Radio einzuschalten. Drücken Sie dann die
Frequenzbandtaste zur Auswahl des Bluetooth-Modus.
Die Bluetooth-Anzeige der Speicherplatztasten blinkt
blau und weist somit darauf hin, dass das Radio
sichtbar ist.
2. Aktivieren Sie an Ihrem externen Gerät gemäß dessen
Bedienungsanleitung die Bluetooth-Funktion, um es
mit dem radio zu koppeln. Öffnen Sie die BluetoothGeräteliste und wählen Sie das Gerät „DMR112.“.
Einige Handys (mit älteren Versionen als BT2.1
Bluetooth) erfordern möglicherweise die Eingabe eines
Passworts. Geben Sie in solch einem Fall „0000“ ein.
3. Nach der Verbindung ertönt ein Signalton zur
Bestätigung und die Bluetooth-Anzeige der
Speicherplatztasten leuchtet stetig blau. Sie können
nun an Ihrem externen Gerät Musik auswählen und
abspielen. Die Lautstärke können Sie am externen
Gerät oder am radio einstellen.
4. Verwenden Sie die Tasten an Ihrem Bluetooth-
fähigen Gerät oder am radio, um Titel abzuspielen/zu
unterbrechen bzw. zu suchen.
Hinweis:
1. Bei der erstmaligen Kopplung von 2 Bluetooth-Geräten
suchen beide Geräte nach dem radio; an beiden
Geräten wird dessen Verfügbarkeit angezeigt. Sobald
jedoch ein Gerät mit dem radio verbunden ist, erscheint
es nicht mehr in der Geräteliste des zweiten Bluetooth-
Geräts.
2. Falls Ihr Bluetooth-Gerät vorübergehend vom radio
getrennt ist, müssen Sie es erneut manuell mit dem
radio verbinden.
3. Falls „DMR112“ in der Geräteliste Ihres Bluetooth-
Geräts erscheint, jedoch nicht verbunden werden
kann, löschen Sie es aus der Liste und führen Sie die
Kopplung erneut anhand der vorher beschriebenen
Vorgehensweise durch.
Page 31

4. Die optimale Bluetooth-Übertragungsreichweite zum
Radio beträgt ungefähr 10 Meter (30 Fuß) (Sichtlinie),
wobei jedoch Reichweiten von bis zu 30 Metern (100
Fuß) möglich sein können.
5. Falls die Bluetooth-Verbindung aufgrund einer zu lange
andauernden Trennung, einer Überschreitung der
optimalen Reichweite oder aufgrund von Hindernissen
oder ähnlichem getrennt wurde, müssen das Gerät und
das Radio möglicherweise erneut verbunden werden.
6. Gegenstände, schnurlose Geräte oder
elektromagnetische Geräte können die
Verbindungsqualität beeinussen.
7. Bluetooth-Verbindungsfähigkeit kann je nach
verbundenem Bluetooth-Gerät variieren. Informieren
Sie sich über die Bluetooth-Fähigkeit Ihres
externen Geräts, bevor Sie Ihr Radio verbinden.
Einige gekoppelte Bluetooth-Geräte unterstützen
möglicherweise nicht alle Funktionen.
Wiedergabe von Audiodateien im
Bluetooth-Modus
Nachdem Sie Ihren radio erfolgreich mit einem BluetoothGerät verbunden haben, können Sie Musik unter
Verwendung der Tasten am verbundenen Bluetooth-Gerät
abspielen.
1. Nach dem Start der Wiedergabe können Sie die
Lautstärke mit den Lautstärketasten an Ihrem radio
oder Ihrem aktivierten Bluetooth-Gerät einstellen.
2. Verwenden Sie die Tasten an Ihrem Gerät, um die
Wiedergabe zu starten/zu unterbrechen und um Titel
auszuwählen.
Hinweis:
1. Möglicherweise reagieren nicht alle Anwendungen oder
Geräte auf das Drücken der Tasten.
2. Bei einigen Handys wird möglicherweise
vorübergehend die Verbindung mit dem radio getrennt,
während Sie Anrufe tätigen oder entgegennehmen.
An einigen Geräten wird die Bluetooth-Übertragung
stumm geschaltet, wenn Textnachrichten und E-Mails
eingehen oder andere Gründe auftreten, die nicht im
Zusammenhang mit der Audioübertragung stehen. Dies
liegt am externen Gerät und ist keine Fehlfunktion Ihres
radio.
Wiedergabe eines bereits früher
gekoppelten Bluetooth-Geräts
Der radio kann bis zu 8 gekoppelte Geräte speichern.
Bei Überschreitung der Anzahl dieses Speichers wird der
älteste Speichereintrag überschrieben. Falls Ihr Bluetooth-
Geräts bereits zu einem früheren Zeitpunkt mit dem
radio gekoppelt wurde, erkennt der radio das BluetoothGerät und wird immer versuchen, die Verbindung mit dem
zuletzt verbundenen Gerät wieder herzustellen. Falls das
zuletzt verbundene Gerät nicht verfügbar ist, ist der radio
nicht erkennbar.
31 DEUTSCH
Bluetooth-Gerät trennen
Halten Sie die Bluetooth-Kopplungstaste 2-3 Sekunden
lang gedrückt, um das Bluetooth-Gerät zu trennen. Die
Bluetooth-Anzeige der Speicherplatztasten blinkt blau
und weist somit darauf hin, dass das Radio wieder für die
Bluetooth-Kopplung verfügbar ist.
AUX-EINGANGSBUCHSE
Das Radio verfügt über zwei 3,5 mm Aux-
Stereoeingangsbuchsen – eine an der Vorderseite des
Radios (AUX IN 1) und die andere am Batteriefach (AUX
IN 2).
1. Verbinden Sie ein externes Audiogerät (z.B. iPod, MP3-
oder CD-Player) unter Verwendung eines Audiokabels
mit dem Aux-Eingang.
2. Drücken Sie wiederholt die Frequenzbandtaste, bis
im Display die Anzeige „AUX IN 1“ bzw. „AUX IN 2“
erscheint; die AUX-Funktion ist dann aktiviert.
3. Im Hinblick auf eine bessere Soundqualität wird
empfohlen, am Audiogerät die Lautstärke mit ungefähr
zwei Dritteln und dann entsprechend am Radio
einzustellen.
HINWEIS:
Das Audiokabel ist kein Standardzubehör des Produkts.
ANDERE EINSTELLUNGEN
Sprachoptionen
Das Radio verfügt über acht Auswahlmöglichkeiten für die
Sprache:
Englisch, Deutsch, Italienisch, Französisch,
Niederländisch, Dänisch, Norwegisch und Spanish.
1. Drücken Sie auf die Einstelltaste ADVANCED
(Erweiterte Einstellungen).
2. Drehen Sie den Drehknopf VOLUME für Lautstärke/
Sendereinstellung/Auswahl weiter, bis „Language“
(Sprache) im Display angezeigt wird. Drücken
Sie auf den Drehknopf VOLUME für Lautstärke/
Sendereinstellung/Auswahl, um den Einstellungsmodus
zu aktivieren.
3. Drehen Sie den Drehknopf VOLUME für Lautstärke/
Sendereinstellung/Auswahl, um die gewünschte
Sprache auszuwählen. Drücken Sie anschließend
auf den Drehknopf VOLUME für Lautstärke/
Sendereinstellung/Auswahl, um die Einstellung zu
übernehmen.
Regelung der Helligkeit
Die Helligkeit der Tastenbeleuchtung kann verändert
werden.
1. Drücken Sie auf die Einstelltaste ADVANCED
(Erweiterte Einstellungen).
2. Drehen Sie den Lautstärke/Tuning/Auswahl-Regler,
Page 32

bis im Display die Anzeige „Button Light“ erscheint.
Drücken Sie den Lautstärke/Tuning/Auswahl-Regler
erneut, um die Einstellungen aufzurufen.
3. Drehen Sie den Lautstärke/Tuning/Auswahl-Regler zur
Auswahl von „On“ oder „Off“, um die Tastenbeleuchtung
zu aktivieren oder zu deaktivieren. Drücken Sie dann
den Lautstärke/Tuning/Auswahl-Regler erneut zum
Bestätigen.
Zurücksetzen des Systems
Falls das Radio nicht ordnungsgemäß funktionieren sollte
oder wenn im Display Stellen fehlen oder unvollständig
sind, führen Sie die folgenden Schritte aus.
1. Drücken Sie auf die Einstelltaste ADVANCED
(Erweiterte Einstellungen).
2. Drehen Sie den Drehknopf VOLUME für Lautstärke/
Sendereinstellung/Auswahl weiter, bis „Factory Reset“
(Auf werkseitige Einstellungen zurücksetzen) im
Display angezeigt wird. Drücken Sie auf den Drehknopf
VOLUME für Lautstärke/Sendereinstellung/Auswahl,
um den Einstellungsmodus zu aktivieren.
3. Drehen Sie den Drehknopf VOLUME für Lautstärke/
Sendereinstellung/Auswahl, um „Yes“ (Ja)
auszuwählen. Drücken Sie auf den Drehknopf
VOLUME für Lautstärke/Sendereinstellung/Auswahl,
um die Einstellung zu übernehmen. Dadurch wird ein
vollständiges Zurücksetzen ausgeführt.
Softwareversion
1. Drücken Sie auf die Einstelltaste ADVANCED
(Erweiterte Einstellungen).
2. Drehen Sie den Drehknopf VOLUME für Lautstärke/
Sendereinstellung/Auswahl weiter, bis „SW Version“
im Display angezeigt wird. Drücken Sie auf den
Drehknopf VOLUME für Lautstärke/Sendereinstellung/
Auswahl, um die im Radio installierte Softwareversion
anzuzeigen.
Micro-USB-Anschluss für
Softwareaktualisierung
Zukünftig werden möglicherweise
Softwareaktualisierungen für das Radio zur Verfügung
gestellt.
Wenn Softwareaktualisierungen verfügbar werden und
wie Sie eine Aktualisierung der Software Ihres Radios
vornehmen können, erfahren Sie auf der
Makita
.
Website von
WARTUNG
ACHTUNG:
Verwenden Sie zum Reinigen niemals Kraftstoffe,
Benzin, Verdünner, Alkohol oder ähnliches. Dies kann
zu Verfärbungen, Verformungen oder Rissen führen.
Technische Daten
Elektrische Daten
Gleichspannung 12 V
Netzadapter
Akku
Frequenzbereich
DAB/DAB+ Kanalblock DAB (Band III) 5A-13F
Kompatibler Standard DAB/DAB+
Bluetooth
(Die Bluetooth®-Wortmarke und die Bluetooth®-Logos
sind eingetragene Marken von Bluetooth SIG, Inc.)
Bluetooth-Version 4,0
Bluetooth-Prole A2DP/SCMS-T
Übertragungsleistung Leistungsklasse 2
Übertragungsbereich
Unterstützter Bluetooth-
Codec
Kompatibles Bluetooth-
Prol
Maximale
Radiofrequenzleistung:
Betriebsfrequenz 2402MHz-2480MHz
Elektrische Daten
Lautsprecher 3,5 Zoll, 32 Ohm x 2
Ausgangsleistung
Eingangsbuchse
Antennensystem
Abmessungen (L x B x H) 282 × 163 × 294 mm
Gewicht 4,3KG (ohne Akku)
®
1,2A;
mittlerer Stift Pluspol
Aufsteckakku: 7,2V - 10,8V
Einschubakku: 10,8V - 18V
FM 87,50 - 108 MHz
DAB/DAB+
174,928-239,200 MHz
Optimum: Max.10 Meter
(33 Fuß))
Möglich: Max. 30 Meter
(100 Fuß)
(abhängig von den
Gebrauchsbedingungen)
SBC,AAC
A2DP
BT EDR: 3,12dBm
BT LE: 2,31dBm
7,2 V: 0,6 W X 2
12Vmax: 1,7 W X 2
14,4 V: 3 W X 2
18 V: 4,9 W X 2
Durchmesser 3,5 mm
(AUX IN1/AUX IN2)
DAB/FM: Flexible
Stabantenne Stabantenne
32 DEUTSCH
Page 33

ITALIANO (Istruzioni originali)
DESCRIZIONE DEL
PRODOTTO (Fig. 1~5)
1. Antenna morbida a stelo pieghevole
2. Vano batteria
3. Maniglia
4. Pannello vano batteria
(copre la cartuccia batteria)
5. Presa DC IN
6. Altoparlante
7. Tasto di accensione
8. Selettore banda
9. Tasto impostazioni avanzate
10. Tasto informazioni
11. Preselezione 2~5
12. Tasto sintonizzazione automatica
13. Manopola Volume/Sintonizzazione
14. Porta alimentazione USB
15. Ingresso AUX IN 1
16. Preselezione 1/Tasto abbinamento Bluetooth
17. Quadrante LCD
18. Terminale ingresso AUX IN 2
19. Vano batteria
20. Porta Micro-USB per aggiornamento del software
21. Cartuccia batteria
LEGENDA
Qui di seguito vengono descritti i simboli usati per
l’apparecchio, il cui signicato va compreso prima
dell’uso.
Leggere il manuale delle istruzioni.
Solo per i paesi della UE
Non gettare batterie o dispositivi elettrici
con i riuti domestici ordinari!
Nel rispetto delle Direttive Europee
sui Dispositivi Elettrici ed Elettronici di
Scarto e sulle Batterie e Accumulatori e
sulle Batterie ed Accumulatori di Scarto
e la loro implementazione in accordo con
le leggi nazionali, i dispositivi elettrici e
le batterie al termine del loro ciclo vitale
devono essere raccolte separatamente e
consegnate a una struttura di riciclaggio
nel rispetto dell’ambiente.
33 ITALIANO
IMPORTANTI ISTRUZIONI
PER LA SICUREZZA
AVVERTENZE:
Quando si usa un apparecchio elettrico, è necessario
seguire alcune semplici precauzioni per ridurre il rischio di
incendi, scosse elettriche e infortuni, incluse le seguenti:
1. Prima dell’uso, studiare bene il presente manuale e il
manuale delle istruzioni del caricabatteria.
2. Pulire solo con un panno asciutto.
3. Non installare nei pressi di fonti di calore, quali stufe,
termosifoni, radiatori o altri apparecchi che producano
calore (amplicatori inclusi).
4. Usare esclusivamente gli accessori specicati dal
produttore.
5. Staccare la spina dell’apparecchio durante i temporali
o se non intende usarlo per lunghi periodi.
6. Le radio con batteria integrata o separata devono
essere ricaricate solo con il caricabatteria specico
per quel tipo di batteria. Un caricabatteria destinato ad
un determinato tipo di batteria potrebbe comportare il
pericolo di incendio se utilizzato con batterie diverse.
7. Utilizzare la radio a batteria solo con le batterie
speciche. L’utilizzo di batterie diverse potrebbe
esporre al rischio di incendio.
8. Quando il pacco di batterie non è in uso, va tenuto
separato da altri oggetti in metallo, quali fermagli,
monete, chiavi, viti e altri oggetti metallici minuti,
che potrebbero mettere in cortocircuito i due poli
della batteria, con il rischio di causare scintille, e
conseguenti incendi o ustioni.
9. Evitare il contatto tra il proprio corpo e altri materiali
conduttori, quali tubi, termosifoni, fornelli, frigoriferi e
simili. Il rischio di scossa elettrica aumenta di molto
se è il proprio corpo è in contatto con tali materiali.
10. L’abuso delle batterie può causare perdite di elettroliti,
il contatto con i quali va evitato. In caso di contatto
accidentale, sciacquare abbondantemente con acqua
pulita. In caso di contatto con gli occhi, rivolgersi
immediatamente ad un medico. Gli elettroliti espulsi
dalle batterie possono causare ustioni chimiche e
irritazioni.
11. Non usare batterie o strumenti danneggiati o alterati.
Le batterie danneggiate o alterate potrebbero
comportarsi in maniera imprevedibile, causando
incendi, esplosioni e lesioni.
12. Non esporre le batterie al fuoco o a temperature
sopra i 130°C, o potrebbero esplodere.
13. Seguire tutte le istruzioni per la ricarica e non caricare
le batterie e gli strumenti a temperature che eccedano
le speciche tecniche indicate nelle istruzioni. La
ricarica inappropriata o a temperature non consentite
può danneggiare la batteria e aumentare il rischio di
incendi.
Page 34

14. La spina dell’apparecchio funge da dispositivo
di scollegamento di emergenza, e come tale va
mantenuta prontamente accessibile.
15. Non usare il prodotto ad alto volume per lunghi periodi
di tempo. Per preservare l’udito, usare il prodotto a
volume moderato.
16. (Solo per prodotti con quadrante LCD) I quadranti
LCD contengono sostanze liquide tossiche ed irritanti.
Se il liquido entra in contatto con gli occhi, la bocca o
la pelle, sciacquare con acqua pulita e contattare un
medico.
17. Non esporre il prodotto a pioggia o umidità. L’ingresso
di acqua nel prodotto può aumentare il rischio di
scossa elettrica.
18. Questo prodotto non è adatto ad essere usato
da persone, bambini inclusi, con ridotte capacità
siche, mentali o sensoriali, o prive della necessaria
esperienza e perizia, a meno che non siano istruite e
supervisionate da un tutore responsabile per la loro
incolumità. I bambini devono essere supervisionati
per accertarsi che non giochino con il prodotto.
Conservare il prodotto fuori della portata dei bambini.
CONSERVARE QUESTE
ISTRUZIONI
AVVERTENZE PER LA
SICUREZZA
SPECIFICHE PER IL PACCO BATTERIA
1. Prima di usare il pacco batteria, leggere tutte le
istruzioni e i contrassegni di avvertenza sul pacco
stesso (1), sulle batterie (2) e sul prodotto a cui sono
destinate (3).
2. Non smontare il pacco batterie.
3. Se la durata delle batterie dovesse ridursi
drasticamente, interrompere subito l’uso, così da
prevenire il rischio di surriscaldamenti, ustioni ed
esplosioni.
4. Nel caso di contatto tra gli elettroliti della batteria e gli
occhi, sciacquare con acqua pulita e rivolgersi subito
ad un medico. Rischio di danni alla vista.
5. Non mettere il pacco batteria in cortocircuito:
(1) Non toccare i poli con materiali conduttori;
(2) Non riporre il pacco delle batterie in contenitori
con altri oggetti metallici, quali chiodi, monete
e simili;
(3) Non esporre la batteria ad acqua o umidità.
Un cortocircuito della batteria può causare
sovraccarichi di tensione, surriscaldamenti,
ustioni ed anche guasti.
6. Non riporre l’apparecchio e il pacco delle batterie in
luoghi con temperature vicine o superiori ai 50°C.
7. Non bruciare il pacco batteria, anche se severamente
34 ITALIANO
danneggiato o completamente usurato, o potrebbe
incendiarsi ed anche esplodere.
8. Non sottoporre le batterie a urti o cadute.
9. Non usare le batterie se danneggiate.
10. Per evitare rischi, leggere il manuale delle batterie
sostituibili prima dell’uso. L’emissione massima della
batteria dovrebbe essere pari o superiore a 8A.
11. Le incluse batterie agli ioni di litio sono soggette ai
requisiti della Legislazione sulle Merci Pericolose. È
necessario osservare i requisiti speciali riguardanti
il confezionamento e l’etichettatura per il trasporto
commerciale da parte di terzi e di spedizionieri.
Per approntare tali articoli alla spedizione è richiesta
la consulenza di un esperto in materiali pericolosi.
Osservare inoltre qualsiasi altra legge locale.
Isolare con nastro o mascherare i contatti esposti, ed
imballare la batteria così che non si muova all’interno
del pacco.
12. Rispettare le leggi locali in materia di smaltimento
delle batterie usate.
13. Usare le batterie solo con i prodotti specicati da
Makita. Installando le batterie su prodotti non conformi
ci si espone al rischio di incendi, surriscaldamento,
esplosioni o perdite di elettroliti.
ATTENZIONE:
● Pericoloso di esplosione se la batteria non è
sostituita correttamente.
● Sostituire solo con batterie dello stesso modello o
equivalenti.
● Usare solo batterie Makita originali. L’uso di
batterie non originali o alterate comporta il
rischio di esplosioni, lesioni personali e danni, ed
incerebbe la garanzia Makita per lo strumento e il
caricabatteria Makita.
Suggerimenti per estendere al massimo
la durata complessiva della batteria
1. Ricaricare il pacco della batteria prima che sia del tutto
scarico. Se si nota un calo di potenza, cessare sempre
l’uso dell’apparecchio e ricaricarne le batterie.
2. Non ricaricare mai delle batterie già completamente
cariche. L’eccesiva ricarica può compromettere la
durata complessiva delle batterie.
3. Ricaricare le batterie a temperatura ambiente (10°C
~ 40°C). Se calde, lasciarle raffreddare prima di
ricaricarle.
4. Ricaricare le batterie se non si intende usarle per
lunghi periodi (superiori ai sei mesi).
Page 35

AUTONOMIA OPERATIVA
* La seguente tabella indica l’autonomia per le singole ricariche.
Tensione della batteria
Capacità della
batteria
1,0 Ah BL7010 5,0 0,7
1,3 Ah
1,5 Ah
2,0 Ah
3,0 Ah
4,0 Ah
5,0 Ah
6,0 Ah
: Pacco batteria : Batteria a scorrimento
ATTENZIONE:
Usare solo le cartucce per batteria sopra elencate. L’uso di qualsiasi altra cartuccia per batteria espone l’utente
al rischio di incendi e lesioni gravi.
Nota:
La presente tabella relativa all’autonomia delle batterie vale come semplice riferimento. L’autonomia reale può variare a
seconda del tipo di batteria, delle condizioni di ricarica e dell’ambiente operativo.
7,2 V 10,8 V
BL1013 7,0 0,9
BL0715 7,5 1,0
10,8 V –
12Vmax
BL1015
BL1016
BL1020B
BL1021B
BL1040B
BL1041B
14,4 V 18 V
BL1415 5,5 1,7
BL1815 6,0 1,9
BL1415N 7,0 2,0
BL1815N 7,5 2,0
BL1820
BL1820B
BL1430
BL1430B
BL1830
BL1830B
BL1440 19 5,5
BL1840
BL1840B
BL1450 23 6,5
BL1850
BL1850B
BL1460B 25 7,5
BL1860B 31 9,5
USCITA ALTOPARLANTE = 100mW
Unità: Ora (circa)
In modalità radio o
AUX
8,5 1,7
11 2,0
10 3,0
12 3,5
14 4,0
21 4,0
20 6,0
26 8,0
In modalità radio
con ricarica USB
(1,0A)
35 ITALIANO
Page 36

INSTALLAZIONE ED
ALIMENTAZIONE
PERICOLO:
● Fare attenzione a non pizzicarsi le dita quando si
apre e richiude lo sportello del vano batteria.
● Dopo aver installato o rimosso il pacco batteria,
rimettere il pannello del vano batteria nella sua
posizione originale, o il pacco batteria potrebbe
accidentalmente fuoriuscire dalla radio, con
possibile rischio di danni a cose e persone.
● Richiudere sempre e bloccare il pannello del vano
batteria prima di spostare la radio.
● Spegnere sempre la radio prima di installare o
rimuovere il pacco batteria.
● Non esporre la radio ad urti e cadute. Se rotto o
spezzato, il materiale dell’involucro del prodotto
potrebbe causare ferite all’utente. Se danneggiata,
la radio potrebbe esibire un comportamento
anormale e imprevedibile, con rischio di incendio,
esplosione e lesioni personali.
IMPORTANTE:
● Riduzioni di potenza, distorsioni, suono spezzettato
o la scritta “POWERFAIL” sul quadrante, sono segni
indicanti la necessità di sostituire il pacco batteria.
● Il pacco batteria non può essere ricaricato usando il
l’adattatore AC incluso nella confezione.
● Il pacco batteria non è incluso come accessorio
standard.
Inserimento o rimozione della batteria a
scorrimento (Fig. 2 e 3)
1. Per inserire la batteria, allineare la linguetta sulla
batteria con la scanalatura nell’alloggiamento e farla
scorrere in posizione. Inserire a fondo la batteria no a
bloccarla in posizione con uno scatto.
2. Se l’indicatore rosso sul lato superiore del tasto rimane
visibile, la batteria non è stata bene inserita. Installarla
del tutto, no alla scomparsa dell’indicatore rosso, o
la batteria potrebbe accidentalmente fuoriuscire dalla
radio, esponendo l’utente e i terzi al rischio di lesioni.
3. Non forzare l’inserimento della batteria. Se la batteria
non dovesse scorrere agevolmente, signica che non
la si sta inserendo correttamente.
4. Per rimuovere il pacco batteria, estrarlo dalla radio
mentre si fa scorrere il tasto sul davanti del pacco.
Inserimento o rimozione della batteria
cluster (Fig. 4 e 5)
1. Inserire la batteria allineandone la linguetta alla
scanalatura nel vano, e quindi farla scorrere in
posizione.
2. Per rimuovere la batteria estrarla dal terminale mentre si
tengono premuti i pulsanti sul lato della batteria stessa.
36 ITALIANO
Indicazione della capacità residua della
batteria
* Solo per modelli di batteria il cui codice termina in
“B”.
1
2
1. Indicatore luminoso 2. Tasto di controllo
Premere il tasto di controllo sulla batteria per visualizzarne
il livello residuo accendendo per qualche secondo gli
indicatori.
● Batterie 14,4~18V
Indicatore luminoso
Livello residuo
Acceso Spento Lampeggiante
75% ~ 100%
50% ~ 75%
25% ~ 50%
0% ~ 25%
Ricaricare le
batterie
Batterie in
possibile
avaria
Page 37

● Batterie 10,8~12V massimo
Indicatore luminoso
Livello residuo
Acceso Spento Lampeggiante
75% ~ 100%
50% ~ 75%
25% ~ 50%
0% ~ 25%
NOTA:
Il valore indicato potrebbe variare leggermente dalla
capacità effettiva, a seconda delle condizioni d’uso e della
temperatura ambientale.
Utilizzo dell’antenna morbida (Fig. 1)
Posizionare in verticale lo stelo dell’antenna morbida,
come mostrato nella gura.
USO DELL’ADATTATORE AC INCLUSO
Rimuovere la protezione in gomma ed inserire la spina
dell’adattatore nella presa DC posta sul lato destro
della radio. Collegare l’adattatore ad una presa elettrica
standard. Collegando l’adattatore, il pacco batteria viene
automaticamente scollegato.
ATTENZIONE:
● Scollegare sempre del tutto l’adattatore AC prima di
spostare la radio, per prevenire il rischio di scossa
elettrica.
● Non tirare o strattonare il cavo dell’adattatore,
o la radio potrebbe accidentalmente cadere e
danneggiarsi, rischiando di ferire l’utente e i terzi.
IMPORTANTE:
● L’adattatore collega la radio alla rete elettrica, e deve
rimanere sempre accessibile durante l’uso normale.
● Per scollegare the radio, l’adattatore deve essere
completamente staccato dalla presa elettrica.
● Usare esclusivamente l’adattatore AC in dotazione con
il prodotto o uno specicatamente indicato da Makita.
● Non mettere in bocca il cavo di alimentazione o la
spina, o si rischierebbe una scossa elettrica.
● Non toccare la spina con mani umide o unte.
● Un cavo danneggiato o ingarbugliato aumenta il rischio
di scossa elettrica. Se il cavo di alimentazione dovesse
subire danni, andrà sostituito da un nostro centro di
assistenza autorizzato, così da evitare rischi per la
sicurezza. Non usare il cavo prima di ripararlo.
● Dopo l’uso, riporre l’adattatore AC al di fuori della
portata dei bambini. I bambini non devono giocare con
il cavo, o potrebbero farsi male.
37 ITALIANO
Caricare via porta di alimentazione USB
Il dispositivo USB può essere ricaricato tramite la porta
USB posta sul pannello frontale della radio.
1. Collegare il dispositivo USB (iPod, lettore MP3 o CD)
con un cavo USB disponibile in commercio.
2. Premere il pulsante di accensione per attivare la radio.
3. Che la radio sia alimentata con corrente alternata o a
batteria, la ricarica di un dispositivo USB dalla radio
è possibile quando la radio è accesa e nelle modalità
FM/DAB, BT o AUX (fonte audio esterna).
Nota:
● Il volume massimo dell’altoparlante diminuisce durante
una ricarica via USB.
● La presa USB fornisce elettricità con massimo 1A-5V.
Importante:
● Prima di connettere il dispositivo USB alla porta USB,
effettuare sempre una copia dei dati contenuti nel
dispositivo USB, per evitare che vadano perduti.
● La radio potrebbe non ricaricare alcuni dispositivi USB.
● Quando non è in uso o dopo il caricamento, rimuovere
il cavo USB e richiudere il coperchio.
● Non collegare fonti di alimentazione alla porta USB o
si rischierebbe un incendio. La porta USB è destinata
solo al caricamento di dispositivi a basso voltaggio.
Rimettere sempre il gommino sulla porta USB quando
non è in uso.
● Non inserire chiodi, cavi, ecc. nella porta USB.
Ciò potrebbe causare un cortocircuito, con rischio
d’incendio.
● Non collegare la presa USB alla porta USB di un PC,
onde evitare il rischio elevato di guasto delle unità.
ASCOLTO DELLA RADIO
Questa radio è dotata di tre modalità di sintonizzazione:
ricerca automatica, ricerca manuale e preselezione.
Selezione di una stazione – DAB
1. Premere il pulsante di accensione e attivare la radio.
2. Selezionare la modalità DAB premendo il pulsante
Band (banda).
3. Premere il pulsante Advanced (impostazioni avanzate)
e ruotare la manopola Volume/Tuning/Select (volume/
sintonizzazione/selezione) no a quando sullo schermo
non lampeggia l’indicazione “Station List” (Elenco
stazioni). Premere la manopola Volume/Tuning/Select
(volume/sintonizzazione/selezione) per accedere
all’elenco delle stazioni.
4. Ruotare la manopola Volume/Tuning/Select (volume/
sintonizzazione/selezione) per scorrere l’elenco delle
stazioni disponibili. Premere la stessa manopola per
selezionare la stazione.
5. Regolare il volume sul livello desiderato ruotando
la manopola Volume/Tuning/Select (volume/
Page 38

sintonizzazione/selezione)
Modalità di visualizzazione – DAB
La radio presenta diverse opzioni di visualizzazione in
modalità DAB:
Premere il pulsante Info (informazioni) per scorrere le
varie opzioni descritte di seguito (lettere da a. a g.).
a. Nome della
stazione
b. Tipo di
programma
c. Nome multiplex Indica il nome del multiplex DAB a
d. Ora e data Indica data e ora corrente.
e. Frequenza e
canale
f . Velocità in bit/
Tipo di audio
g. Intensità del
segnale
Indica il nome della stazione che si
sta ascoltando.
Indica il tipo di stazione che si sta
ascoltando. Esempi: Pop, Classici,
Notizie, ecc.
cui appartiene la stazione corrente.
Indica la frequenza e il
numero di canale della
stazione DAB corrente.
Indica la velocità in bit dell’audio
digitale e il tipo di audio per
la stazione DAB attualmente
sintonizzata.
Indica l’intensità del segnale per
la stazione DAB attualmente
sintonizzata.
Ricerca di nuove stazioni – DAB
Di tanto in tanto potrebbero essere disponibili nuove
stazioni radio DAB, o la radio potrebbe essere usata in
una zona diversa. In tal caso potrebbe essere necessario
attivare la radio per eseguire la ricerca di nuove stazioni.
Per consentire alla radio di trovare le stazioni disponibili,
si consiglia di eseguire una scansione completa di tutte le
frequenze DAB Banda III.
1. Premere il tasto Auto Tune (ricerca automatica).
2. La radio eseguirà una ricerca completa sulle frequenze
DAB, aggiungendo le stazioni rilevate all’elenco nale.
Il contatore sulla sinistra del quadrante mostra il
numero di stazioni aggiunte.
Ricerca manuale – DAB
La ricerca manuale consente di sintonizzare la radio
su una particolare frequenza DAB in Banda III. Questa
funzione serve anche a coadiuvare il posizionamento
dell’antenna o della radio in modo da ottimizzare la
ricezione di uno specico canale o frequenza.
1. Premere il pulsante Advanced (impostazioni avanzate)
e ruotare la manopola Volume/Tuning/Select (volume/
sintonizzazione/selezione) no a quando sul quadrante
non si legga “Manual Tune” (ricerca manuale).
Premere la manopola Volume/Tuning/Select (volume/
sintonizzazione/selezione) per passare alla modalità di
ricerca manuale.
2. Ruotare la manopola Volume/Tuning/Select (volume/
38 ITALIANO
sintonizzazione/selezione) per selezionare il canale
DAB desiderato. Premere la manopola Volume/
Tuning/Select (volume/sintonizzazione/selezione) per
confermare la frequenza selezionata.
Congurare l’ordine delle stazioni – DAB
La radio permette di catalogare le stazioni nei seguenti tre
differenti ordini: alfanumerico, ensemble e stazione valida.
1. Premere il tasto Advanced (impostazioni avanzate).
2. Ruotare la manopola Volume/Tuning/Select (volume/
sintonizzazione/selezione) no a quando sul quadrante
non si legga “Station order” (Ordine stazioni), quindi
premere la manopola Volume/Tuning/Select (volume/
sintonizzazione/selezione) per accedere.
3. Ruotare la manopola Volume/Tuning/Select (volume/
sintonizzazione/selezione) per selezionare una tra le
seguenti opzioni, e premerla per confermare.
Alfanumerico Le stazioni vengono elencate in
ordine alfanumerico (0~9 A~Z).
Ensemble L’elenco delle stazioni viene
organizzato per multiplex DAB.
Stazioni valide Visualizza soltanto le stazioni con
segnale sufcientemente potente.
Funzione DRC (Dynamic Range
Control) – DAB
La funzione DRC (Dynamic Range Control) facilita
l’ascolto dei suoni a basso volume quando la radio viene
utilizzata in ambienti rumorosi, riducendo la gamma
dinamica del segnale audio. Sono disponibili tre livelli di
compressione:
DRC 0 Nessuna compressione.
DRC 1/2 Compressione media.
DRC 1 Compressione massima.
1. Premere il pulsante di accensione e attivare la radio.
2. Premere il pulsante Band (banda) per selezionare la
banda DAB.
3. Premere il pulsante Advanced (impostazioni avanzate)
e ruotare la manopola Volume/Tuning/Select (volume/
sintonizzazione/selezione) no a quando sul quadrante
non si legga “DRC Value” (valore DRC). Premere
quindi la manopola Volume/Tuning/Select (volume/
sintonizzazione/selezione) per accedere. Sul quadrante
apparirà il valore DRC corrente.
4. Ruotare la manopola Volume/Tuning/Select
(volume/sintonizzazione/selezione) per selezionare
l’impostazione DRC desiderata.
5. Premere la manopola Volume/Tuning/Select (volume/
sintonizzazione/selezione) per confermare.
Ricerca automatica – FM
1. Premere il pulsante di accensione e attivare la radio.
2. Selezionare la banda di frequenza desiderata con il
pulsante Band (banda). Per una migliore ricezione
in FM, assicurarsi che l’antenna a stelo morbida sia
Page 39

posizionata correttamente. Evitare di utilizzare la
radio accanto allo schermo di un computer o ad altri
apparecchi che potrebbero causare interferenze.
3. Premere il pulsante Auto Tune (ricerca automatica) per
sintonizzarsi automaticamente sulla prima stazione
radio rilevabile. La radio proseguirà in questo modo la
ricerca no alla pressione del tasto Auto Tune (ricerca
automatica).
4. Ruotare la manopola Volume/Tuning/Select (volume/
sintonizzazione/selezione) per impostare il volume
desiderato per l’audio. Il quadrante LCD indicherà le
modiche al volume.
5. Per spegnere la radio, premere il tasto di accensione.
Zona di ricerca FM
In modalità FM, la radio può essere impostata per
la ricerca o delle stazioni locali o di tutte le stazioni,
comprese le più distanti.
1. Premere il pulsante di accensione e attivare la radio.
2. Selezionare la banda FM con il tasto Band (banda).
3. Premere il tasto Advanced Settings (impostazioni
avanzate) e ruotare la manopola Volume/Tuning/
Select (volume/sintonizzazione/selezione) nché sul
quadrante non appaia “FM Scan Zone” (zona di ricerca
FM). Premere la manopola Volume/Tuning/Select
(volume/sintonizzazione/selezione) per accedere.
4. Ruotare la manopola Volume/Tuning/Select (volume/
sintonizzazione/selezione) e scegliere tra le opzioni
“Locale” (solo stazioni con segnale potente) e “Distante”
(qualsiasi stazione) offerte in basso sul quadrante.
Selezionando l’opzione “Distante” la radio considererà
anche le stazioni con segnale più debole.
5. Premere la manopola Volume/Tuning/Select (volume/
sintonizzazione/selezione) per confermare la propria
selezione. Le impostazioni saranno salvate ed usate
per istruire le ricerche della stazioni, n quando
modicate o nel caso di un ripristino del sistema.
Sintonizzazione manuale – FM
1. Premere il pulsante di accensione e attivare la radio.
2. Premere il pulsante Band (banda) per selezionare la
banda di frequenza desiderata. Regolare l’antenna
come precedentemente descritto.
3. Ruotare la manopola Volume/Tuning/Select (volume/
sintonizzazione/selezione) per cambiare la frequenza
con i seguenti incrementi: FM: 50 kHz
Nota:
Per trovare una stazione usando la manopola Volume/
Tuning/Select (volume/sintonizzazione/selezione),
premere la manopola stessa per passare alla modalità
di controllo della sintonizzazione.
4. Continuare a ruotare la manopola Volume/Tuning/
Select (volume/sintonizzazione/selezione) nché sul
quadrante non appaia la frequenza desiderata.
5. Ruotare la manopola Volume/Tuning/Select (volume/
sintonizzazione/selezione) per impostare il volume
audio sul livello desiderato.
6. Per spegnere la radio, premere il pulsante di
accensione.
Modalità di visualizzazione – FM (RDS)
La radio presenta diverse opzioni di visualizzazione per la
modalità FM:
Premere più volte il tasto Info per visualizzare le seguenti
informazioni RDS (Radio Data System) pertinenti alla
stazione corrente.
a. Stazione programma Indica il nome della stazione
che si sta correntemente
ascoltando.
b. Frequenza Indica la frequenza del
segnale FM.
c. Testo della radio Mostra i messaggi di testo della
radio (es. nuove proposte,
ecc.).
d. Tipo di programma Indica il tipo di stazione che si
sta ascoltando (ad esempio
Pop, Classics, News, ecc.)
e. Ora e data Indica la data e ora corrente.
Preselezione delle stazioni (DAB e FM)
Sono disponibili 5 memorie di preselezione per ogni
banda.
1. Premere il pulsante di accensione e accendere la radio.
2. Sintonizzarsi sulla stazione desiderata utilizzando uno
dei metodi sopra descritti.
3. Tenere premuto il pulsante Preset (preselezione) no
a leggere sul quadrante il numero di preselezione
desiderato, ad esempio “P2 Saved” (P2 salvato). La
stazione viene quindi salvata ed abbinata al numero di
preselezione scelto.
4. Ripetere la procedura per le rimanenti preselezioni.
5. Le stazioni salvate nelle memorie di preselezione
possono essere sovrascritte attenendosi alle procedure
sopra descritte.
Richiamare una stazione in
preselezione (DAB e FM)
1. Premere il pulsante di accensione e accendere la radio.
2. Premere il pulsante Band (banda) per selezionare la
banda di frequenza desiderata.
3. Premere brevemente il pulsante Preset (preselezione),
e sul quadrante apparirà il numero della preselezione
con la stazione abbinata.
ASCOLTO DI MUSICA IN
STREAMING BLUETOOTH
Per riprodurre brani musicali con la radio via Bluetooth, si
39 ITALIANO
Page 40

dovrà prima sincronizzare il proprio dispositivo Bluetooth
con la radio stessa, in modo che i due dispositivi possano
riconoscersi l’un l’altro.
Nota:
Per una migliore qualità audio, si consiglia di regolare il
volume del proprio dispositivo ad almeno due terzi del
massimo, e quindi di regolare il volume della radio sul
livello desiderato.
SINCRONIZZARE UN NUOVO
DISPOSITIVO BLUETOOTH
1. Premere il tasto di accensione e attivare la radio.
Premere il tasto Band (banda) per selezionare la
modalità Bluetooth. L’indicatore Bluetooth sui tasti della
preselezione lampeggerà in blu a conferma che la
radio è rilevabile.
2. Attivare Bluetooth sul proprio dispositivo secondo le
istruzioni per collegare la radio contenute nel manuale.
Nella lista dei dispositivi Bluetooth rilevati selezionare
“DMR112”. Alcuni dispositivi, dotati di una versione
precedete alla BT2.1, richiedono di inserire la password
“0000”.
3. Un segnale acustico e l’indicatore Bluetooth sui tasti
della preselezione con luce blu ssa confermeranno
l’avvenuta connessione. Basterà ora selezionare
un brano dal proprio dispositivo per riprodurlo. Il
volume può essere regolato dal proprio dispositivo o
direttamente dalla radio.
4. Usare i controlli del dispositivo Bluetooth esterno o
quelli della radio per avviare la riproduzione, metterla in
pausa e navigare i brani.
Nota:
1. Sincronizzando per la prima volta due dispositivi
Bluetooth, entrambi riporteranno la radio nell’elenco
dei dispositivi rilevati. Tuttavia, collegando uno dei
dispositivi, la radio sparirà dall’elenco dell’altro.
2. Se un dispositivo viene temporaneamente scollegato
dalla radio, si dovrà ricollegarlo manualmente.
3. Nel caso l’apparecchio DMR112 appaia nell’elenco dei
dispositivi Bluetooth rilevati, ma sia impossibile stabilire
la connessione con esso, cancellarlo dall’elenco e
ripetere la sincronizzazione seguendo le istruzioni
precedenti.
4. Il raggio d’azione ottimale di Bluetooth è di circa 10
metri senza ostacoli, ma può raggiungere i 30 metri.
5. Nel caso la connessione Bluetooth venga interrotta
a causa dell’eccessivo tempo di separazione, della
troppa distanza, della presenza di ostacoli o altro,
potrebbe essere necessario ripetere la connessione.
6. La qualità della connessione può dipendere dalla
presenza di ostacoli sici, dispositivi Wi-Fi e dispositivi
elettromagnetici.
7. Le prestazioni della connessione Bluetooth possono
variare a seconda dei dispositivi connessi. Fare
40 ITALIANO
riferimento alle capacità Bluetooth del dispositivo
esterno prima di collegarlo alla radio. Non è possibile
garantire il supporto di tutte le funzioni su alcuni
dispositivi Bluetooth sincronizzati.
Riproduzione di le audio in modalità
Bluetooth
Una volta completata la connessione tra la radio e il
dispositivo Bluetooth esterno, sarà possibile usare i
controlli di quest’ultimo per avviare l’ascolto.
1. Una volta avviato l’ascolto, regolare il volume dalla
radio o del dispositivo Bluetooth esterno.
2. Usare i controlli del dispositivo esterno per avviare,
mettere in pausa e navigare i brani.
Nota:
1. Non tutte le applicazioni e i dispositivi rispondono a
questi controlli.
2. Alcuni cellulari potrebbero disconnettersi
temporaneamente dalla radio per ricevere o
effettuare una chiamata. Alcuni dispositivi potrebbero
interrompere temporaneamente il loro segnale audio
Bluetooth al ricevimento di messaggi di testo, email o
per altre ragioni non relative al segnale audio. Ciò è
dovuto a una funzione del dispositivo esterno, e non ad
un’avaria della radio.
COLLEGAMENTO BLUETOOTH CON
DISPOSITIVI NOTI
La radio può memorizzare no a otto dispositivi a cui
sincronizzarsi. Ogni dispositivo in eccesso della memoria
sarà sovrascritto sul dispositivo meno recente. Se si è
già sincronizzata la radio con un dispositivo Bluetooth
esterno, la sincronizzazione sarà automatica. Nel caso
l’ultimo dispositivo connesso non sia disponibile, la radio
apparirà nell’elenco dei dispositivi rilevati.
Scollegare il Dispositivo Bluetooth
Esterno
Per disconnettere un dispositivo Bluetooth, tenere premuto
per 2~3 secondi il tasto di sincronizzazione Bluetooth.
L’indicatore Bluetooth sui tasti della preselezione
lampeggerà in blu, a confermare che la connessione è
stata interrotta e che la radio è ora nuovamente rilevabile.
INGRESSI AUSILIARI
Sono disponibili due ingressi ausiliari da 3,5mm. “AUX IN
1” si trova sul pannello anteriore della radio, “AUX IN 2” si
trova nel vano batteria.
1. Collegare una fonte audio esterna (es. iPod, lettore
MP3 o CD) ad un ingresso ausiliario usando l’apposito
cavo audio.
2. Premere e rilasciare più volte il tasto Band (banda) no
a leggere “AUX IN 1” o “AUX IN 2” sul quadrante, e la
funzione AUX sarà così attivata.
Page 41

3. Per ottimizzare la qualità audio, si imposti il volume del
dispositivo esterno sopra i 2/3 del livello massimo, per
poi regolarlo direttamente dalla radio.
NOTA:
Il cavo audio non è incluso come accessorio standard.
ALTRE IMPOSTAZIONI
Opzioni per la lingua
Sono disponibili otto lingue per la radio:
inglese, tedesco, italiano, francese, olandese, danese,
norvegese e spagnolo.
1. Premere il pulsante Advanced (impostazioni avanzate).
2. Ruotare la manopola Volume/Tuning/Select (volume/
sintonizzazione/selezione) nché sul quadrante non
si legga “Language” (lingua). Premere la manopola
Volume/Tuning/Select (volume/sintonizzazione/
selezione) per accedere.
3. Ruotare la manopola Volume/Tuning/Select (volume/
sintonizzazione/selezione) per scegliere la lingua
desiderata. Premere la manopola Volume/Tuning/
Select (volume/sintonizzazione/selezione) per
confermare l’impostazione.
Controllo della luminosità
La luce dei tasti è regolabile.
1. Premere il pulsante Advanced (impostazioni avanzate).
2. Ruotare la manopola Volume/Tuning/Select (volume/
sintonizzazione/selezione) no a leggere “Button
Light” (luce tasti) sul quadrante. Premere la manopola
Volume/Tuning/Select (volume/sintonizzazione/
selezione) per accedere.
3. Ruotare la manopola Volume/Tuning/Select (volume/
sintonizzazione/selezione) per scegliere se attivare
(ON) o disattivare (OFF) la luce dei tasti, quindi
premere la manopola stessa per confermare.
Ripristino del sistema
Se la radio non dovesse funzionare correttamente,
oppure se alcune cifre sul quadrante dovessero mancare
o essere incomplete, è possibile provare a eseguire la
seguente procedura.
1. Premere il pulsante Advanced (impostazioni avanzate).
2. Ruotare la manopola Volume/Tuning/Select (volume/
sintonizzazione/selezione) nché sul quadrante non
si legga “Factory Reset” (ripristino impostazioni di
fabbrica). Premere la manopola Volume/Tuning/Select
(volume/sintonizzazione/selezione) per accedere
all’impostazione.
3. Ruotare la manopola Volume/Tuning/Select (volume/
sintonizzazione/selezione) per scegliere “Yes”
(sì). Premere la manopola Volume/Tuning/Select
(volume/sintonizzazione/selezione) per confermare
l’impostazione ed eseguire un ripristino completo.
41 ITALIANO
Versione del software
1. Premere il pulsante Advanced (impostazioni avanzate).
2. Ruotare la manopola Volume/Tuning/Select (volume/
sintonizzazione/selezione) nché sul quadrante non
appaia “SW Version” (versione software). Premere
la manopola Volume/Tuning/Select (volume/
sintonizzazione/selezione) per visualizzare la versione
del software installato nella radio.
Porta Micro-USB per aggiornamento
software
In futuro potrebbero essere disponibili degli aggiornamenti
del software per la radio.
Gli aggiornamenti del software disponibili sono reperibili
sito Internet di Makita
nel
come aggiornare la radio.
insieme alle informazioni su
MANUTENZIONE
ATTENZIONE:
Evitare assolutamente l’uso di benzine, diluenti,
solventi, alcol o sostanze simili. In caso contrario,
potrebbero vericarsi scoloriture, deformazioni e
incrinature.
Page 42

SPECIFICHE TECNICHE
Alimentazione
Adattatore AC
Batteria
Frequenza radio
Blocco canali DAB/DAB+ DAB (Band III) 5A-13F
Standard compatibile DAB/DAB+
DC 12 V 1,2A, ago
centrale positivo
Pacco batteria: 7,2~10,8 V
Batteria a scorrimento:
10,8~18V
FM 87.50 - 108 MHz
DAB/DAB+
174,928-239,200 MHz
Bluetooth
(Il marchio Bluetooth® e il relativi logo sono proprietà
registrata di Bluetooth SIG, Inc.)
Versione Bluetooth 4,0
Proli Bluetooth A2DP/SCMS-T
Potenza trasmissione Classe di Potenza 2
Raggio trasmissione
Codec supportati SBC,AAC
Prolo Bluetooth
compatibile
Potenza massima in radiofrequenza:
Frequenze Operative 2402MHz~2480MHz
Circuito
Altoparlante 3,5 pollici 32 ohm x 2
Potenza in uscita
Terminale di ingresso
Sistema antenna
Dimensioni (LxPxA) 282x163x294mm
Peso 4,3KG (senza batterie)
®
Ottimale: Max.10 metri
Possibile: Max. 30 metri
(varia a seconda delle
condizioni)
A2DP
BT EDR: 3,12dBm
BT LE: 2,31dBm
7,2 V: 0,6Wx2
12V max: 1,7Wx2
14,4V: 3Wx2
18 V: 4,9Wx2
3,5 mm
(AUX IN 1/AUX IN 2)
DAB/FM: antenna morbida
a stelo
42 ITALIANO
Page 43

NEDERLANDS
(Originele instructies)
UITLEG ALGEMEEN
OVERZICHT (Fig. 1~5)
1. Flexibele staafantenne
2. Vergrendeling accuvak
3. Handgreep
4. Deksel Accuvak
(denkt accu-cartridge af)
5. DC-ingang
6. Luidspreker
7. Aan-uitknop
8. Band-knop
9. Advanced-instelknop
10. Info-knop
11. Voorkeurzender 2-5
12. Auto tune-knop
13. Volumeknop/Afstemknop/Keuzeknop
14. USB-voedingspoort
15. AUX-ingang 1
16. Voorkeurzender 1/Bluetooth-koppelknop
17. LCD-display
18. Ingangsaansluiting (AUX-ingang 2)
19. Accuvak
20. Micro-USB-poort voor software-upgrade
21. Accu-cartridge
SYMBOLEN
Hieronder worden de symbolen getoond die worden
gebruikt voor de apparatuur. Zorg ervoor dat u de
betekenis van de symbolen begrijpt voordat u het
apparaat gebruikt.
Lees de handleiding.
Alleen voor EU-landen
Gooi elektrische apparatuur of accu’s
niet weg met het huisvuil!
Volgens Europese richtlijnen inzake
afgedankte elektrische en elektronische
apparaten, batterijen, accu’s en
wegwerpbatterijen en de toepassing
daarvan binnen de nationale wetgeving,
dienen gebruikte elektrische apparaten
en accu's die het einde van hun
levensduur hebben bereikt, gescheiden
te worden ingezameld en te worden
teruggebracht naar een recyclebedrijf dat
voldoet aan de geldende milieueisen.
BELANGRIJKE
VEILIGHEIDSINSTRUCTIES
WAARSCHUWING:
Bij het gebruik van elektrisch gereedschap moeten altijd
elementaire veiligheidsmaatregelen worden gevolgd, om
het risico op brand, elektrische schokken en persoonlijk
letsel te beperken, waaronder de volgende:
1. Lees deze handleiding en de handleiding van de
oplader vóór gebruik zorgvuldig door.
2. Alleen reinigen met een droge doek.
3. Niet installeren in de buurt van warmtebronnen, zoals
radiatoren, kachels of andere apparaten (inclusief
versterkers) die warmte produceren.
4. Gebruik alleen accessoires/hulpstukken die door de
fabrikant zijn gespeciceerd.
5. Haal de stekker van het apparaat uit het stopcontact
tijdens onweer of als het apparaat voor lange tijd niet
wordt gebruikt.
6. Een radio op batterijen met inwendige batterijen of
een losse accu mag alleen worden opgeladen met
de aanbevolen batterij-/acculader. Een acculader die
geschikt is voor een bepaald type accu, kan brandgevaar
opleveren indien gebruikt met een ander type accu.
7. Gebruik de radio op batterijen uitsluitend met de
speciek daarvoor bedoelde accu’s. Door een ander
type accu’s te gebruiken, kan brandgevaar ontstaan.
8. Als de accu niet wordt gebruikt, houd deze dan uit de
buurt van andere metalen voorwerpen zoals: paperclips,
muntjes, sleutels, spijkers, schroeven of andere kleine
metalen objecten die contactpunten van de accu kunnen
verbinden. Het kortsluiten van de accupolen kan leiden
tot vonken, brandwonden of brand.
9. Vermijd lichamelijk contact met geaarde oppervlakken
zoals leidingen, radiotoren en koelkasten. Er bestaat
een verhoogd risico op elektrische schokken als uw
lichaam geaard is.
10. Bij verkeerd gebruik kan vloeistof vrijkomen uit de
accu; vermijd contact. Als u per ongeluk in contact
komt met deze vloeistof, spoel dan met water. Als er
vloeistof in contact komt met de ogen, raadpleeg dan
bovendien een arts. Vloeistof die vrijkomt uit de accu
kan irritatie of brandwonden veroorzaken.
11. Gebruik geen accu’s of gereedschap dat beschadigd
of gewijzigd is. Beschadigde of aangepaste accu’s
kunnen onvoorspelbaar gedrag vertonen, wat kan
leiden tot brand, explosies of letsel.
12. Stel accu’s of gereedschap niet bloot aan vuur of extreme
temperaturen. Blootstelling aan vuur of temperaturen
boven 130 °C kan een explosie veroorzaken.
13. Volg alle instructies m.b.t. het opladen op en laad de
accu of het gereedschap nooit op buiten het in de
handleiding aangegeven temperatuurbereik. Foutief
opladen of opladen bij temperaturen buiten het
43 NEDERLANDS
Page 44

toegestane temperatuurbereik kan leiden tot schade
aan de accu en de kans op brand verhogen.
14. De stekker wordt gebruikt om het apparaat los te
koppelen van het lichtnet en moet altijd eenvoudig
bereikbaar blijven.
15. Gebruik het product niet gedurende een lange periode
op een hoog volume. Gebruik het product op een
gematigd volumeniveau.
16. (Alleen voor producten met LCD-display) LCD-displays
bevatten vloeistof die irritatie en vergiftiging kan
veroorzaken. Als de vloeistof in of op de ogen, mond of
huid komt, spoel dan met water en raadpleeg een arts.
17. Stel het product niet bloot aan regen of vochtige
omstandigheden. Als er water in het product komt,
verhoogt dit de kans op elektrische schokken.
18. Dit product is niet bedoeld voor gebruik door
personen (inclusief kinderen) met verminderde
lichamelijke, zintuiglijke of mentale vermogens of
personen die geen ervaring en/of kennis hebben
m.b.t. het apparaat, tenzij zij onder toezicht staan van
een voor hun veiligheid verantwoordelijke persoon of
instructies m.b.t. het gebruik van het apparaat hebben
ontvangen. Houd toezicht op kinderen om ervoor te
zorgen dat ze niet met het product spelen. Bewaar
het product buiten het bereik van kinderen.
BEWAAR DEZE INSTRUCTIES
SPECIFIEKE
VEILIGHEIDSVOORSCHRIFTEN
VOOR ACCU
1. Lees, voordat u de accu gebruikt, alle instructies en
waarschuwingen op de (1) acculader, de (2) accu en
het (3) product dat gebruik maakt van de accu.
2. Demonteer de accu niet.
3. Als de gebruiksduur extreem veel korter is geworden,
stop het gebruik dan onmiddellijk. Dit kan leiden tot
een risico op oververhitting, mogelijke brandwonden
en zelfs een explosie.
4. Als er elektrolyt in uw ogen komt, spoel ze dan met
schoon water en raadpleeg onmiddellijk een arts. Het
kan leiden tot het verlies van uw gezichtsvermogen.
5. Sluit de accu niet kort:
1) Raak de contactpunten niet aan met
geleidende materialen.
2) Bewaar de accu niet in een doos met andere
metalen voorwerpen, zoals spijkers, muntjes,
etc.
3) Stel de accu niet bloot aan water of regen.
Kortsluiting van de accu kan leiden tot een
grote stroomafgifte, oververhitting, mogelijke
brandwonden en zelfs een defect.
6. Bewaar het gereedschap en de accu niet op plaatsen
waar de temperatuur kan oplopen tot of hoger kan zijn
44 NEDERLANDS
dan 50 °C(122°F)
7. Verbrand de accu niet, zelfs als de accu ernstig
beschadigd of volledig versleten is. De accu kan
exploderen in vuur.
8. Wees voorzichtig en laat de accu niet vallen of stoot
niet te hard tegen de accu.
9. Maak geen gebruik van beschadigde accu’s.
10. Om risico’s te voorkomen, moet de handleiding
omtrent het vervangen van de accu worden gelezen
vóór gebruik. En de maximale stroomontlading van de
accu moet groter dan of gelijk aan 8A zijn.
11. De meegeleverde lithium-ion-accu’s zijn onderhevig
aan de vereisten in de wetgeving omtrent gevaarlijke
stoffen. Voor commercieel transport, bijv. door derden
en transporteurs moeten speciale vereisten ten aanzien
van verpakking en etikettering worden nageleefd.
Voor het voorbereiden van het te verzenden artikel
is het noodzakelijk een expert op het gebied van
gevaarlijke stoffen te raadplegen. U moet zich
daarnaast aan eventueel strengere nationale
regelgeving houden.
Blootliggende contactpunten moeten worden afgedekt
met tape en de accu moet zodanig worden verpakt
dat deze niet kan bewegen in de verpakking.
12. Volg de plaatselijke regelgeving met betrekking tot de
verwijdering van accu’s.
13. Gebruik de accu alleen in combinatie met de door
Makita gespeciceerde producten. Als de accu wordt
geïnstalleerd in een niet-conform product, kan dit
leiden tot brand, extreme warmte, een explosie of het
lekken van elektrolyt.
LET OP:
● Ontplofngsgevaar als de accu onjuist wordt
vervangen.
● Alleen vervangen door accu van hetzelfde of
soortgelijk type.
● Gebruik alleen originele accu’s van Makita. Het
gebruik van niet-originele accu’s of accu’s die zijn
aangepast kan ertoe leiden dat de accu barst en
brand, lichamelijk letsel of schade veroorzaakt.
Het zal er bovendien toe leiden dat de garantie van
Makita op het gereedschap en op oplader vervalt.
Tips voor het behoud van een maximale
levensduur van de accu
1. Laad de accu op voordat deze volledig is ontladen.
Stop altijd het gebruik van het gereedschap en laad de
accu op als u merkt dat er minder vermogen is.
2. Laad nooit een volledig opgeladen accu op.Overladen
verkort de levensduur van de accu.
3. Laad de accu op bij een kamertemperatuurvan 10 °C 40 °C (50 °F - 104 °F). Laat een warme accu afkoelen
alvorens hem op te laden.
4. Laad de accu op als u deze niet gebruikt voor een
lange periode (meer dan zes maanden).
Page 45

BEDRIJFSTIJD
* De volgende tabel geeft een indicatie van de gebruiksduur op een enkele lading.
Accuspanning
Accucapaciteit
7.2 V 10.8 V
1.0 Ah BL7010 5.0 0.7
BL1013 7.0 0.9
1.3 Ah
BL0715 7.5 1.0
1.5 Ah
2.0 Ah
3.0 Ah
4.0 Ah
5.0 Ah
6.0 Ah
: Blokaccu : Schuifaccu
WAARSCHUWING:
Gebruik alleen de hierboven vermelde accu-cartridges. Gebruik van andere accu-cartridges kan leiden tot letsel
en/of brand.
Opmerking:
De tabel betreffende gebruiksduur hierboven dient ter referentie. De werkelijke gebruiksduur kan variëren, afhankelijk
van het soort accu, de oplaadomstandigheden en de gebruiksomgeving.
10.8 V –
12Vmax
BL1015
BL1016
BL1020B
BL1021B
BL1040B
BL1041B
14.4 V 18 V In radio of AUX
BL1415 5.5 1.7
BL1815 6.0 1.9
BL1415N 7.0 2.0
BL1815N 7.5 2.0
BL1820
BL1820B
BL1430
BL1430B
BL1830
BL1830B
BL1440 19 5.5
BL1840
BL1840B
BL1450 23 6.5
BL1850
BL1850B
BL1460B 25 7.5
BL1860B 31 9.5
BIJ LUIDSPREKERVERMOGEN = 100mW
Eenheid: Uur (bij benadering)
In radio met USB-
opladen (1.0A)
8.5 1.7
11 2.0
10 3.0
12 3.5
14 4.0
21 4.0
20 6.0
26 8.0
45 NEDERLANDS
Page 46

INSTALLATIE EN VOEDING
LET OP:
● Pas op dat uw vingers niet bekneld raken bij het
openen en sluiten van het accudeksel.
● Plaats de vergrendeling van het accuvak terug
in de oorspronkelijke stand na het installeren of
verwijderen van de accu-cartridge. Als u dit niet
doet, kan de accu-cartridge per ongeluk uit de radio
vallen en letsel veroorzaken bij u of anderen in uw
omgeving.
● Sluit en vergrendel het de vergrendeling van het
accuvak altijd voordat u de radio verplaatst.
● Schakel de radio altijd uit voordat u de accucartridge plaatst of verwijdert.
● Wees voorzichtig en zorg ervoor dat u de radio
niet per ongeluk laat vallen of een klap geeft. Een
kapotte behuizing kan in uw vinger of lichaam
snijden. Een beschadigde radio kan onvoorspelbaar
gedrag vertonen en leiden tot brand, explosies en
letselgevaar.
BELANGRIJK:
● Verminderd vermogen, vervorming, “stotterend geluid”
en de melding “POWERFAIL” die verschijnt op het
display zijn allemaal tekenen dat de hoofdaccu moet
worden vervangen.
● De accu-cartridge kan niet worden opgeladen met de
meegeleverde netadapter.
● De accu-cartridge wordt niet meegeleverd als
standaardaccessoire.
De schuifaccu aanbrengen en
verwijderen (Fig. 2 en 3)
1. Om de accu aan te brengen, lijnt u de lip op de accu
uit met de groef in de behuizing en duwt u de accu
op zijn plaats. Steek de accu zo ver mogelijk in het
gereedschap tot u een klikgeluid hoort.
2. Als u het rode deel aan de bovenkant van de knop
kunt zien, is de accu niet goed aangebracht. Breng
de accu zo ver mogelijk aan tot het rode deel niet
meer zichtbaar is. Als u dit niet doet, kan de accu per
ongeluk uit de radio vallen en letsel veroorzaken bij u
of anderen in uw omgeving.
3. Oefen geen grote kracht uit bij het aanbrengen van
de accu. Als de accu niet gemakkelijk erin kan worden
geschoven, wordt deze niet goed aangebracht.
4. U kunt de accu-cartridge verwijderen door deze uit de
radio te schuiven terwijl u de knop aan de voorkant van
de cartridge indrukt.
De blokaccu aanbrengen en
verwijderen (Fig. 4 en 5)
1. Om de accu aan te brengen, lijnt u de lip op de accu uit
met de groef in de behuizing en duwt u de accu op zijn
plaats.
2. Om de accu te verwijderen, haalt u de accu uit de
aansluiting terwijl u de knoppen op de zijkant van de
accu ingedrukt houdt.
Aanduiding van de resterende
acculading
* Alleen voor accu’s met een “B” aan het einde van
het modelnummer.
1
2
1. Indicatorlampjes 2. Controleknop
Druk op de testknop op de accu om de resterende
accucapaciteit af te lezen. De indicatorlampjes branden
gedurende enkele seconden.
● 14.4V/18V-accu’s
Indicatorlampjes
Opgelicht Uit Knippert
Resterende
capaciteit
75% ~ 100%
50% ~ 75%
25% ~ 50%
0% ~ 25%
Laad de accu op
Er heeft mogelijk
een storing
opgetreden in de
accu
46 NEDERLANDS
Page 47

● 10.8V-12V max accu’s
Indicatorlampjes
Opgelicht Uit Knippert
OPMERKING:
Afhankelijk van de gebruiksomstandigheden en de
omgevingstemperatuur kan de indicatie enigszins afwijken
van de werkelijke capaciteit.
Resterende
capaciteit
75% ~ 100%
50% ~ 75%
25% ~ 50%
0% ~ 25%
De exibele staafantenne aanbrengen
(Fig. 1)
Trek de exibele staafantenne uit zoals aangegeven in de
afbeelding.
De meegeleverde netadapter gebruiken
Verwijder de rubberen beschermer en plaats de stekker
van de adapter in de DC-ingang op de rechterkant van de
radio.
Steek de adapter in een standaard stopcontact.
Als de adapter wordt gebruikt, wordt de accu automatisch
losgekoppeld.
LET OP:
● Trek de netadapter altijd volledig uit het stopcontact
alvorens de radio te verplaatsen. Als de netadapter
niet uit het stopcontact wordt getrokken, kan dit
leiden tot elektrische schokken.
● Trek nooit aan snoer van de netadapter. Als u dit toch
doet, kan de radio per ongeluk omvallen en letsel
veroorzaken bij u of anderen in uw omgeving.
BELANGRIJK:
● De netadapter wordt gebruikt om de radio te verbinden
met het lichtnet. Het stopcontact dat wordt gebruikt
voor de radio moet bereikbaar blijven tijdens normaal
gebruik.
● Om de radio los te koppelen van het lichtnet moet
de netadapter volledig uit het stopcontact worden
getrokken.
● Gebruik uitsluitend de netadapter die met het product
is meegeleverd of een netadapter die voldoet aan de
specicaties van Makita.
● Houd het netsnoer en de stekker niet vast met uw
mond. Als u dit toch doet, kan dit leiden tot een
elektrische schok.
● Raak de stekker niet aan met natte of vette handen.
47 NEDERLANDS
● Beschadigde of verstrikte snoeren verhogen de
kans op elektrische schokken. Als het netsnoer is
beschadigd, laat het dan vervangen door ons erkende
servicecentrum om veiligheidsgevaar te vermijden.
Gebruik het netsnoer niet alvorens het te laten
repareren.
● Bewaar de netadapter na gebruik altijd buiten het
bereik van kinderen. Als kinderen spelen met het
netsnoer, kan dit leiden tot letsel.
Opladen met de USB-voedingspoort
Er zit een USB-poort op de voorkant van de radio. Met de
USB-poort kunt u een USB-apparaat opladen.
1. Sluit het USB-apparaat, zoals een iPod, MP3-speler
of CD-speler, aan met behulp van een in de winkel
verkrijgbare USB-kabel.
2. Druk op de aan-uitknop om de radio in te schakelen.
3. Ongeacht of de radio wordt gevoed met netstroom of
door batterijen, de radio kan het USB-apparaat opladen
wanneer de radio is ingeschakeld en is afgestemd op
de FM/DAB -frequentieband, of in de BT- modus of
AUX-modus staat, welke wordt afgebeeld wanneer de
externe audiobron is aangesloten.
Opmerking:
● Het maximumvolumeniveau van de luidspreker wordt
lager wanneer uw USB-apparaat wordt opgeladen.
● De USB-poort kan een stroom van maximaal 1 A en 5V
leveren.
Belangrijk:
● Alvorens een USB-apparaat aan te sluiten op de USB-
poort, maakt u altijd eerst een reservekopie van de
gegevens op het USB-apparaat. Als u dat niet doet,
kunnen uw gegevens per ongeluk verloren gaan.
● Mogelijk levert de radio geen stroom aan sommige
USB-apparaten.
● Als u de voedingspoort niet gebruikt en nadat het
opladen klaar is, trekt u de USB-kabel eruit en sluit u
de afdekking.
● Sluit geen stroombron aan op de USB-poort. Als u
dat toch doet, bestaat de kans op brand. De USBpoort is alleen bedoeld voor het opladen van een
laagspanningsapparaat. Plaats altijd de afdekking terug
op de USB-poort wanneer geen laagspanningsapparaat
wordt opgeladen.
● Steek geen spijker, draad, enz. in de USB-
voedingspoort. Als u dat toch doet, kan kortsluiting
leiden tot rookontwikkeling en brand.
● Sluit deze USB-poort niet aan op de USB-poort van
een computer aangezien het zeer waarschijnlijk is dat
hierdoor de apparaten defect raken.
LUISTEREN NAAR DE RADIO
Deze radio heeft drie afstemmethoden - automatisch
afstemmen, handmatig afstemmen en voorkeurzenders
Page 48

oproepen.
Een zender selecteren – DAB
1. Druk op de aan-uitknop om de radio in te schakelen.
2. Kies de gewenste DAB-functie door op de Band-knop
te drukken.
3. Druk op de Advanced-instelknop en draai de
Volumeknop/Afstemknop/Keuzeknop totdat “Station
List” (Zenderlijst) knippert op het display. Druk op de
Volumeknop/Afstemknop/Keuzeknop om de lijst met
zenders op te roepen.
4. Draai de Volumeknop/Afstemknop/Keuzeknop om de
lijst met zenders te doorlopen. Druk op de knop om een
zender te selecteren.
5. Stel het gewenste volumeniveau in door de
Volumeknop/Afstemknop/Keuzeknop te draaien.
Displayweergave – DAB
Uw radio heeft meerdere displayweergavemogelijkheden
in de DAB-functie:
Druk op de Info-knop om de diverse mogelijkheden te
doorlopen met de volgende letteraanduiding (a. t/m g.).
a. Zendernaam Geeft de zendernaam aan
b. Programmatype Geeft het type zender aan waarnaar
c. Multiplexnaam Geeft de naam van de
d. Tijd en datum Geeft de huidige tijd en datum aan.
e. Frequentie en
kanaal
f . Bitsnelheid/
audiotype
g. Signaalsterkte Geeft de signaalsterkte aan van de
waarnaar u luistert.
u luistert. Bijvoorbeeld Pop,
Klassiek, Nieuws, enz.
DAB-multiplex aan waartoe de
huidige zender behoort.
Geeft de frequentie en het
kanaalnummer aan van de DAB-
zender waarop momenteel is
afgestemd.
Geeft de bitsnelheid van de digitale
audio en het audiotype aan van de
DAB-zender waarop momenteel is
afgestemd.
DAB-zender waarop momenteel is
afgestemd.
Nieuwe zenders zoeken – DAB
Af en toe kunnen nieuwe DAB-zenders beschikbaar
komen. Of misschien bent u verhuisd naar een ander deel
van het land. In dergelijke gevallen kunt u met uw radio
automatisch zoeken naar nieuwe zenders.
Om de radio de beschikbare zenders te kunnen laten
vinden, adviseren wij u alle frequenties van de DAB Band
III af te zoeken.
1. Druk op de Auto Tune-knop.
2. Uw radio zoekt alle DAB-frequenties af. Naarmate
nieuwe zenders worden gevonden, loopt de
48 NEDERLANDS
zenderteller aan de linkerkant van het display op en
worden zenders toegevoegd aan de lijst.
Handmatig afstemmen – DAB
Met handmatig afstemmen kunt u uw radio afstemmen op
een bepaalde DAB-frequentie van Band III. Deze functie
kan ook worden gebruikt om te helpen bij het positioneren
van de antenne of de radio voor de beste ontvangst van
een bepaald kanaal of een bepaalde frequentie.
1. Druk op de Advanced-instelknop en draai de
Volumeknop/Afstemknop/Keuzeknop totdat “Manual
Tune” (handmatig afstemmen) wordt afgebeeld op
het display. Druk op de Volumeknop/Afstemknop/
Keuzeknop om de handmatig-afstemfunctie op te
roepen.
2. Draai de Volumeknop/Afstemknop/Keuzeknop om
het gewenste DAB-kanaal te selecteren. Druk op
de Volumeknop/Afstemknop/Keuzeknop om de
geselecteerde frequentie vast te leggen.
Zendervolgorde instellen – DAB
Uw radio heeft 3 zendervolgorde-instellingen waaruit u
kunt kiezen. De instellingen voor de zendervolgorde zijn
alfanumeriek, ensemble en geldige zender.
1. Druk op de Advanced-instelknop.
2. Draai de Volumeknop/Afstemknop/Keuzeknop totdat
“Station order” (zendervolgorde) wordt afgebeeld
op het display, en druk daarna op de Volumeknop/
Afstemknop/Keuzeknop om de instelling op te roepen.
3. Draai de Volumeknop/Afstemknop/Keuzeknop om een
van de volgende instellingen te selecteren en druk op
de knop om de instelling vast te leggen.
Alfanumeriek Sorteert de zenderlijst op
alfanumerieke volgorde: 0 t/m 9 en A
t/m Z
Ensemble Organiseert de zenderlijst op
DAB-multiplex
Geldig Beeldt alleen die zenders af waarvan
een signaal wordt ontvangen
Dynamisch-bereikregeling (DRC) – DAB
De DRC-functie kan zachtere geluiden gemakkelijker
verstaanbaar maken wanneer de radio wordt gebruikt
in een luidruchtige omgeving door het dynamisch
bereik van het geluidssignaal te verkleinen. Er zijn drie
compressieniveaus:
DRC 0 Er wordt geen compressie toegepast.
DRC 1/2 Er wordt een gemiddelde compressie
toegepast.
DRC 1 Er wordt maximale compressie
toegepast.
1. Druk op de aan-uitknop om de radio in te schakelen.
2. Druk op de Band-knop om de DAB-band te selecteren.
3. Druk op de Advanced-instelknop en draai de
Volumeknop/Afstemknop/Keuzeknop totdat “DRC
Page 49

Value” (DRC-waarde) wordt afgebeeld op het
display. Druk daarna op de Volumeknop/Afstemknop/
Keuzeknop om de instelling op te roepen. Het display
beeldt de huidige DRC-waarde af.
4. Draai de Volumeknop/Afstemknop/Keuzeknop om de
gewenste DRC-instelling te selecteren.
5. Druk daarna op de Volumeknop/Afstemknop/
Keuzeknop om de instelling vast te leggen.
Automatisch afstemmen – FM
1. Druk op de aan-uitknop om de radio in te schakelen.
2. Selecteer de gewenste frequentieband door op
de Band-knop te drukken. Zorg dat de exibele
staafantenne in de juiste richting is geplaatst voor de
beste FM-ontvangst. Probeer te vermijden dat de radio
wordt gebruikt naast een computerscherm of andere
apparatuur die storing veroorzaakt op de radio.
3. Druk op de Auto Tune-knop zodat de radio begint te
zoeken en automatisch stopt wanneer een radiozender
is gevonden. De radio blijft zoeken naar de volgende
beschikbare zender tot de gebruiker weer op de Auto
Tune-knop drukt om het zoeken te stoppen.
4. Draai de Volumeknop/Afstemknop/Keuzeknop om
het gewenste volumeniveau te selecteren. Op het
display worden de veranderingen in het volumeniveau
afgebeeld.
5. Druk op de aan-uitknop om de radio uit te schakelen.
FM-zoekbereik
In de FM-band kan de radio worden ingesteld op het
zoeken naar lokale zenders of het zoeken naar alle
zenders, inclusief radiozenders op grote afstand.
1. Druk op de aan-uitknop om de radio in te schakelen.
2. Druk op de Band-knop om de FM-band te selecteren.
3. Druk op de Advanced-instelknop en draai daarna aan
de Volumeknop/Afstemknop/Keuzeknop totdat “FM
Scan Zone” wordt getoond op het display. Druk op de
Volumeknop/Afstemknop/Keuzeknop om de instelling
te openen.
4. Draai aan de Volumeknop/Afstemknop/Keuzeknop om
te schakelen tussen de opties “Local” (alleen zenders
met een sterk signaal) en “Distant” (alle zenders) op de
onderste regel van het display. De optie “Distant” zorgt
ervoor dat de radio ook zwakkere signalen kan vinden
tijdens het scannen.
5. Druk op de Volumeknop/Afstemknop/Keuzeknop om
uw keuze te bevestigen. De optie “Local” of “Distant”
wordt opgeslagen in het geheugen van de radio en
blijft van kracht tot deze wordt gewijzigd of er een
systeemreset wordt uitgevoerd.
Handmatig afstemmen – FM
1. Druk op de aan-uitknop om de radio in te schakelen.
2. Druk op de Band-knop om de gewenste frequentieband
te selecteren. Richt de antenne zoals hierboven
beschreven.
3. Draai de Volumeknop/Afstemknop/Keuzeknop om de
frequentie te veranderen met de volgende stapgrootte:
FM: 50 kHz
Opmerking:
Om een gewenste zender te zoeken met behulp van
de Volumeknop/Afstemknop/Keuzeknop, drukt u op
de Volumeknop/Afstemknop/Keuzeknop om over te
schakelen naar de afstembediening.
4. Blijf de Volumeknop/Afstemknop/Keuzeknop draaien
totdat de gewenste frequentie wordt afgebeeld op het
display.
5. Draai de Volumeknop/Afstemknop/Keuzeknop om het
gewenste volumeniveau te selecteren.
6. Druk op de aan-uitknop om de radio uit te schakelen.
Displayweergave – FM (RDS)
Uw radio heeft meerdere displayweergavemogelijkheden
voor FM-zenders:
Druk herhaaldelijk op de Info-knop om de RDS-informatie
(Radio Data System) van de zender die wordt beluisterd
te bekijken.
a. Zendernaam Geeft de naam aan van de zender
waarnaar u luistert.
b. Frequentie Geeft de frequentie aan van het
FM-signaal.
c. Radiotekst Geeft een tekstbericht aan, zoals
nieuwsberichten, enz.
d. Programmatype d.Geeft het type zender aan
waarnaar u luistert, bijvoorbeeld
Pop, Klassiek, Nieuws, enz.
e. Tijd en datum Geeft de huidige tijd en datum
aan.
Zenders opslaan in het
voorkeurzendergeheugen (DAB en FM)
Voor elke frequentieband kunnen 5 voorkeurzenders
worden opgeslagen.
1. Druk op de aan-uitknop om de radio in te schakelen.
2. Stem op de gewenste zender af door middel van één
van de hierboven beschreven methoden.
3. Houd de gewenste voorkeurzenderknop ingedrukt tot
het voorkeurzendernummer wordt afgebeeld op het
display, bijvoorbeeld “P2 Saved” (P2 opgeslagen).
De zender wordt vervolgens opgeslagen onder de
geselecteerde voorkeurzenderknop.
4. Herhaal deze procedure voor de overige
voorkeurzenderknoppen.
5. Zenders die als voorkeurzender zijn opgeslagen
kunnen worden overschreven door de hierboven
beschreven procedure opnieuw te volgen.
49 NEDERLANDS
Page 50

Zenders oproepen uit het
voorkeurzendergeheugen (DAB en FM)
1. Druk op de aan-uitknop om de radio in te schakelen.
2. Druk op de Band-knop om de gewenste frequentieband
te selecteren.
3. Druk kort op de gewenste voorkeurzenderknop. Het
voorkeurzendernummer en de zenderfrequentie
worden afgebeeld op het display.
LUISTEREN NAAR MUZIEK
VIA BLUETOOTH-STREAMING
U moet uw Bluetooth-apparaat koppelen met de radio
voordat u automatisch verbinding kunt maken en
Bluetooth-muziek kunt afspelen/streamen via de radio.
Koppelen creëert een ‘band’, zodat twee apparaten elkaar
kunnen herkennen.
Opmerking:
Voor een betere geluidskwaliteit raden we aan het
volume op uw Bluetooth-apparaat op minimaal twee-
derde van het maximale niveau in te stellen en daarna de
volumeregeling van de radio te gebruiken om het volume
naar wens in te stellen.
Uw Bluetooth-apparaat voor het eerst
koppelen met de radio
1. Druk op de aan-uitknop om de radio in te schakelen.
Druk op de Band-knop om de Bluetooth-modus
te selecteren. De Bluetooth-indicator op de
voorkeurzenderknoppen knippert blauw om aan te
geven dat de radio detecteerbaar is.
2. Activeer de Bluetooth® op uw apparaat, zie hiervoor de
handleiding van uw apparaat. Zoek naar beschikbare
apparaten voor koppeling. Uw radio zal zich melden als
“DMR112.” op uw apparaat. Indien uw apparaat over
een oudere versie van Bluetooth® beschikt dan versie
BT2.1, is het mogelijk dat uw apparaat vraagt om een
wachtwoord. Voer dan “0000” in.
3. Zodra de verbinding tot stand is gekomen, zal er een
bevestigingstoon klinken en de Bluetooth-indicator op
de voorkeurzenderknoppen blijft blauw branden. U kunt
nu simpelweg op uw bronapparaat muziek selecteren
en deze muziek afspelen. U kunt het volume instellen
op uw bronapparaat of rechtstreeks op de radio.
4. Gebruik de bediening op uw apparaat of op de radio
om de door u gewenste muziek te kiezen.
Opmerking:
1. Als er voor de eerste keer wordt gekoppeld en er 2
Bluetooth-apparaten naar uw radio zoeken, dan wordt
de radio op beide apparaten als beschikbaar getoond.
Als er echter één apparaat verbinding maakt met de
radio, zal het andere Bluetooth-apparaat de radio niet
meer vinden in de lijst.
2. Als uw Bluetooth-apparaat tijdelijk de verbinding met
50 NEDERLANDS
de radio verliest, dan moet u handmatig de verbinding
tussen uw apparaat en de radio
3. Als ‘DMR112” wordt getoond in uw Bluetoothapparaatlijst, maar uw Bluetooth-apparaat geen
verbinding kan maken met de radio, verwijder het item
dan uit uw lijst en koppel nogmaals met de radio door
de hierboven beschreven stappen te volgen.
4. Het optimale Bluetooth-streambereik is ongeveer 10
meter (30 voet) (zichtlijn) naar de radio, maar afstanden
tot 30 meter (100 voet) zijn mogelijk.
5. Het is mogelijk dat u opnieuw verbinding moet maken
indien de Bluetooth-verbinding wordt verbroken
door het overschrijden van de scheidingstijd, het
overschrijden van de optimale afstand, obstakels of
vanwege andere redenen.
6. Fysieke obstakels, andere draadloze apparaten
of elektromagnetische apparaten kunnen de
verbindingskwaliteit beïnvloeden.
7. Bluetooth® verbindingen prestaties kunnen variëren
afhankelijk van de verbonden apparaten. Raadpleeg
deBluetooth® mogelijkheden van uwapparaat voordat
u deze aansluit op uw radio. Voor sommige verbonden
Bluetooth® apparaten kan het zijn dat niet alle functies
ondersteund worden.
Het afspelen van geluidsbestanden
in de Bluetooth® modus
Indien de verbinding tussen de radio en uw Bluetooth®
apparaat succesvol tot stand gebracht is, kunt u de
muziek van uw apparaat afspelen door middel van de
bedieningstoetsen op uw verbonden apparaat.
1. Stel het volume, zodra het afspelen is gestart, naar
wens in met behulp van de volumeknoppen op uw
radio of op uw Bluetooth-apparaat.
2. Gebruik de bedieningselementen op uw apparaat om
het afspelen te starten/pauzeren en om de gewenste
track te selecteren.
Opmerking:
1. Het is mogelijk dat niet alle afspeelapplicaties of
apparaten reageren op alle bedieningselementen.
2. Sommige mobiele telefoons kunnen de verbinding
met de radio verbreken wanneer er oproepen worden
gemaakt of ontvangen. Sommige apparaten kunnen
het geluid van de Bluetooth-audiostream tijdelijk
uitschakelen wanneer er sms’jes of emails worden
ontvangen of omwille van andere redenen die niets met
het streamen van audio te maken hebben. Dergelijk
gedrag is een functie van het Bluetooth-apparaat en
duidt niet op een fout met uw radio.
Afspelen met een eerder gekoppeld
Bluetooth-apparaat
Uw radio kan tot acht verschillende gekoppelde apparaten
onthouden. Wanneer daarna een nieuw apparaat
Page 51

gekoppeld zal worden zal de oudst bekende koppeling
overschreven worden. Als uw Bluetooth® apparaat al
eerder gekoppeld was met de radio, dan zal de radio dit
herkennen, en gewoon verbinden met dit apparaat. Als
deze verbinding niet zal slagen, zal de radio in detectie
modus schakelen.
Loskoppelen van uw Bluetooth®
apparaat
Houd de Bluetooth-koppelknop voor 2-3 seconden
ingedrukt om de verbinding met uw Bluetoothapparaat te verbreken. De Bluetooth-indicator op de
voorkeurzenderknoppen knippert blauw om aan te geven
dat de radio weer detecteerbaar is en opnieuw kan
koppelen.
AUX-INGANG
Die radio is uitgerust met twee 3,5 mm stereo auxingangen. Een van deze uitgangen zit op de voorkant
van uw radio (AUX-ingang 1); de ander zit in het accuvak
(AUX-ingang 2).
1. Sluit een externe audiobron (bijvoorbeeld, iPod, MP3-
of CD-speler) aan op de aux-ingang met behulp van
een audiokabel.
2. Druk herhaaldelijk op de Band-knop tot “AUX IN 1”
of “AUX IN 2” wordt getoond op het display, de AUXfunctie is nu ingeschakeld.
3. Voor de beste geluidskwaliteit wordt aanbevolen het
volume op uw audioapparaat te verhogen tot meer dan
tweederde van het maximale niveau en daarna het
volume op de radio naar wens in te stellen.
OPMERKING:
Audiokabel wordt niet meegeleverd als
standaardaccessoire.
OVERIGE INSTELLINGEN
Taalkeuze
Er zijn acht taalkeuzemogelijkheden beschikbaar in de
radio:
Engels, Duits, Italiaans, Frans, Nederlands, Deens, Noors
en Spaans.
1. Druk op de Advanced-instelknop.
2. Draai de Volumeknop/Afstemknop/Keuzeknop totdat
“Language” (taal) wordt afgebeeld op het display. Druk
op de Volumeknop/Afstemknop/Keuzeknop om de
instelling op te roepen.
3. Draai de Volumeknop/Afstemknop/Keuzeknop om
de gewenste taal te selecteren. Druk daarna op de
Volumeknop/Afstemknop/Keuzeknop om de instelling
vast te leggen.
Helderheidsregeling
De knopverlichting kan worden aangepast.
1. Druk op de Advanced-instelknop.
2. Draai aan de Volumeknop/Afstemknop/Keuzeknop tot
“Button Light” wordt getoond op het display. Druk op de
Volumeknop/Afstemknop/Keuzeknop om de instelling
te openen.
3. Draai aan de Volumeknop/Afstemknop/Keuzeknop
om "On" (aan) of "Off" (uit) te selecteren en de
knopverlichtingsfunctie in te schakelen of uit te
schakelen en druk tot slot op de Volumeknop/
Afstemknop/Keuzeknop ter bevestiging van uw keuze.
De radio terugstellen
Als de radio niet juist werkt, of enkele tekens op het
display geheel of gedeeltelijk ontbreken, voert u de
volgende procedure uit.
1. Druk op de Advanced-instelknop.
2. Draai de Volumeknop/Afstemknop/Keuzeknop totdat
“Factory Reset” (terugstellen op fabrieksinstellingen)
wordt afgebeeld op het display. Druk op de
Volumeknop/Afstemknop/Keuzeknop om de instelling
op te roepen.
3. Draai de Volumeknop/Afstemknop/Keuzeknop om “Yes”
(ja) te selecteren. Druk op de Volumeknop/Afstemknop/
Keuzeknop om de instelling vast te leggen, waarna de
radio volledig wordt teruggesteld.
Softwareversie
1. Druk op de Advanced-instelknop.
2. Draai de Volumeknop/Afstemknop/Keuzeknop totdat
“SW Version” (softwareversie) wordt afgebeeld op
het display. Druk op de Volumeknop/Afstemknop/
Keuzeknop om de softwareversie die in de radio is
geïnstalleerd af te beelden op het display.
Micro-USB-poort voor
software-upgradee
In de toekomst komt mogelijk nieuwe software voor uw
radio beschikbaar.
Wanneer nieuwe software beschikbaar komt, zal de
software en informatie over het installeren ervan op uw
radio worden gepubliceerd op de
Makita-website
.
ONDERHOUD
LET OP:
Gebruik nooit benzine, wasbenzine, thinner, alcohol,
enz. Dit kan leiden tot verkleuren, vervormen of
barsten.
51 NEDERLANDS
Page 52

TECHNISCHE GEGEVENS
Voedingsvereisten
Netspanningsadapter
Batterij
Frequentiebereik
DAB/DAB+
Kanaalblokkering
Compatibele norm DAB/DAB+
12 V DC 1.2A, middenpen
positief
Blokaccu: 7.2 V - 10.8 V
Schuifaccu:10.8 V - 18 V
FM 87.50 - 108 MHz
DAB/DAB+ 174.928-
239.200 MHz
DAB (Band III) 5A-13F
Bluetooth
(Het Bluetooth®-woordmerk en -logo’s zijn
gedeponeerde handelsmerken in eigendom van
Bluetooth SIG, Inc.)
Bluetooth-versie 4.0
Bluetooth-proelen A2DP/SCMS-T
Zendvermogen Vermogensklasse 2
Zendbereik
Ondersteunde codec SBC,AAC
Compatibel Bluetooth-
proel
Maximaal
radiofrequentievermogen
Bedrijfsfrequentie 2402MHz~2480MHz
Circuitfunctie
Luidspreker 3,5 inch, 32 ohm x 2
Uitgangsvermogen
Ingangsaansluiting
Antennesysteem
Afmetingen (l x b x h) 282 × 163 × 294 mm
Gewicht 4.3KG (zonder accu)
®
Optimaal: Max.10 meter
(33 voet)
Mogelijk: Max. 30 meter
(100 voet)
(varieert afhankelijk van
gebruiksomstandigheden)
A2DP
BT EDR: 3.12dBm
BT LE: 2.31dBm
7.2 V: 0.6 W X 2
12Vmax: 1.7 W X 2
14.4 V: 3 W X 2
18 V: 4.9 W X 2
Diameter 3,5 mm
(AUX IN1/AUX IN2)
DAB/FM: exibele
staafantenne
52 NEDERLANDS
Page 53

ESPAÑOL
(Instrucciones originales)
EXPLICACIÓN DE LA VISTA
GENERAL (Fig. 1~5)
1. Antena de varilla curva
2. Compartimento de la batería
3. Asa
4. Cubierta del compartimento de la batería
(cubriendo la batería)
5. Toma de entrada de CC
6. Altavoz
7. Botón de encendido
8. Botón de banda
9. Botón de ajustes avanzados
10. Botón de información
11. Presintonías 2-5
12. Botón de sintonización automática
13. Control de volumen/sintonización/selección
14. Puerto de fuente de alimentación USB
15. Entrada auxiliar 1
16. Presintonía 1/botón de vinculación Bluetooth
17. Pantalla LCD
18. Terminal de entrada (entrada auxiliar 2)
19. Compartimento de la batería
20. Puerto microUSB para actualización de software
21. Batería
SÍMBOLOS
Lo siguiente muestra los símbolos usados por el equipo.
Asegúrese de que entiende su signicado, antes de usar
el equipo.
Lea el manual de instrucciones.
Solo para países de la UE
No se deshaga del equipo eléctrico o del
paquete de baterías junto con la basura
doméstica.
De acuerdo con las directivas europeas
sobre Residuos de Aparatos y Baterías y
Acumuladores Eléctricos y Electrónicos
y sobre Residuos de Baterías y
Acumuladores y su aplicación conforme
las legislaciones nacionales, las
baterías y los paquetes de baterías que
lleguen al nal de su vida útil deben ser
recolectados por separado y devueltos
a una instalación de reciclaje compatible
con el medio ambiente.
53 ESPAÑOL
INSTRUCCIONES
IMPORTANTES DE SEGURIDAD
ADVERTENCIA:
Cuando utilice herramientas eléctricas, para reducir
el riesgo de incendio, descarga eléctrica y lesiones
personales, siga siempre las precauciones básicas de
seguridad, incluyendo lo siguiente:
1. Lea el manual de instrucciones y el manual de
instrucciones del cargador detenidamente antes de usarlos.
2. Limpie el equipo solo con un paño seco.
3. No instale cerca de fuentes de calor, como radiadores,
estufas, fuegos de cocina u otros aparatos (incluyendo
amplicadores) que produzcan calor.
4. Utilice únicamente accesorios especicados por el
fabricante.
5. Desenchufe este aparato durante las tormentas o
cuando no vaya a usarlo por un periodo prolongado.
6. Una radio a batería con baterías integrales o un
paquete de baterías independiente se debe recargar
solamente con el cargador especicado para la
batería. Un cargador que puede ser adecuado para
un tipo de batería puede crear un riesgo de incendio
cuando se usa con otra batería.
7. Utilice la radio a batería únicamente con los paquetes
de batería designados especícamente. El uso de
cualquier otra batería puede crear un riesgo de incendio.
8. Cuando la batería no esté en uso, manténgala alejada
de otros objetos metálicos como: clips, monedas, llaves,
clavos, tornillos u otros objetos metálicos pequeños
que pudieran crear conexiones de un terminal a otro.
El contacto entre sí de los terminales de las baterías
puede provocar chispas, quemaduras o fuego.
9. Evite contacto corporal con supercies conectadas
a tierra como tuberías, radiadores, estufas y
refrigeradores. Hay un incremento del riesgo de
descarga eléctrica si su cuerpo está conectado a tierra.
10. En condiciones abusivas, puede que de la batería
se expulse líquido, evite el contacto. Si de forma
accidental entra en contacto con el líquido, enjuague
con agua. Si el líquido entrase en contacto con los
ojos, busque ayuda médica. El líquido expulsado de
la batería puede causar irritación o quemaduras.
11. No use una batería o una herramienta dañada o
modicada. Las baterías dañadas o modicadas puede
presentar un comportamiento impredecible causando
incendios, explosiones y riesgos de lesiones.
12. No exponga la batería o herramienta al fuego o a
temperaturas excesivas. La exposición al fuego o a
temperaturas mayores que 130 ºC podrían causar
una explosión.
13. Siga todas las instrucciones de carga y no cargue
la batería o la herramienta fuera del rango de
temperatura especicado en las instrucciones. Cargar
Page 54

incorrectamente o a temperaturas fuera del rango
especicado podrían dañar la batería e incrementar
el riesgo de fuego.
14.
El enchufe principal de la red eléctrica se utiliza como
dispositivo de desconexión, y debe estar siempre
disponible.
15. No use este producto a volumen alto durante un
periodo prolongado. Para evitar daños auditivos, use
este producto a un nivel de volumen moderado.
16. (Solo para productos con pantalla LCD) Las pantallas
LCD incluyen líquidos que pueden causar irritación y
envenenamiento. Si el líquido entrase en contacto con los
ojos, boca o piel, enjuague con agua y llame a un médico.
17. No exponga el producto a condiciones de lluvia o
humedad. El agua que entre al producto incrementará
el riesgo de descarga eléctrica.
18. Este aparato no es apto para su uso por personas
(niños incluidos) con las capacidades físicas,
sensoriales o mentales disminuidas, o por personas
que carezcan de experiencia y conocimiento, a no ser
que alguien que sea responsable de su seguridad,
les esté supervisando o les explique cómo deben
usar el aparato. Los niños deben ser supervisados
para asegurarse de que no jueguen con el producto.
Guarde el producto lejos del alcance de los niños.
GUARDE ESTAS INSTRUCCIONES
REGLAS ESPECÍFICAS DE
SEGURIDAD
PARA EL CARTUCHO DE BATERÍA
1. Antes de utilizar el cartucho de batería, lea todas las
instrucciones y advertencias en (1) el cargador de la
batería, (2) la baterías, (3) el producto que usa la batería.
2. No desmonte el cartucho de batería.
3. Si el tiempo de funcionamiento se ha vuelto
excesivamente corto, pare inmediatamente Puede
haber riesgo de sobrecalentamiento, posibles
quemaduras o incluso una explosión.
4. Si el electrolito entra en contacto con los ojos, lávelos
con agua limpia y busque atención médica de inmediato.
Podría dar como resultado la pérdida de visión.
5. No haga un cortocircuito con el cartucho de batería.
1) No toque los terminales con un material
conductor.
2) Evite almacenar el cartucho de batería en
recipientes con otros objetos metálicos como
clavos, monedas, etc.
3) No exponga la batería al agua o lluvia. Un
cortocircuito en la batería puede producir
un gran ujo, sobrecalentamiento, posibles
quemaduras e incluso una avería.
6. No guarde la herramienta ni el cartucho de batería
54 ESPAÑOL
en lugares donde la temperatura pueda llegar a o
superar los 50 °C (122 °F).
7. No incinere el cartucho de batería incluso si está muy
dañado o completamente desgastado. El cartucho de
batería podría explotar en el fuego.
8. Tenga cuidado de no dejar caer o golpear la batería.
9. No use una batería dañada.
10. Para evitar riesgos, lea antes de su uso el manual
de la batería reemplazable. Y la corriente máxima de
descarga de la batería debe ser igual o mayor a 8 A..
11. Las baterías de iones de litio están sujetas a los
requisitos de la Legislación de mercancías peligrosas.
Para su transporte comercial, como por ejemplo
por terceros o transportistas, deben respetarse los
requisitos especiales del embalaje y etiquetado.
Para la preparación del artículo para su envío,
se requiere consultar a un experto en materiales
peligrosos. Acate también las, posiblemente más
detalladas, regulaciones nacionales.
Cubra los contactos abiertos y empaquete la batería
de tal manera que no se pueda mover en el embalaje.
12. Siga las regulaciones locales en lo relacionado a la
eliminación de baterías.
13. Use las baterías solo con los productos especicados
por Makita. La instalación de las baterías con
productos no conformes podría resultar en un incendio,
calor excesivo, explosión o fuga de electrolitos.
PRECAUCIÓN:
● Peligro de explosión si la batería se coloca
incorrectamente.
● Reemplace solo con una del mismo tipo o uno
equivalente.
● Use solo baterías originales Makita. El uso de
baterías Makita no originales o de baterías que
hayan sido alteradas podría provocar la explosión
de la batería causando incendios, lesiones
personales y daños. También anulará la garantía de
Makita para la herramienta de Makita y el cargador.
Consejos para mantener al máximo la
vida útil de la batería
1. Cargue el cartucho de batería antes de que se
descargue completamente. Deje de usar la herramienta
y cargue la batería cuando note que la batería tiene
menos potencia.
2. Nunca cargue un cartucho de batería que esté
totalmente cargado. La sobrecarga reduce la vida útil
de la batería.
3. Cargue el cartucho de batería con una temperatura
ambiente de entre 10 y 40 grados centígrados (50 °F104 °F). Antes de cargarla, deje que una batería que
esté caliente se enfríe.
4. Cargue el cartucho de batería si no lo usa durante un
largo periodo de tiempo (más de seis meses).
Page 55

TIEMPO DE FUNCIONAMIENTO
* La siguiente tabla indica el tiempo de uso con una sola carga.
CON LA SALIDA DEL
Capacidad de la
batería
7,2 V 10,8 V
1,0 Ah BL7010 5,0 0,7
1,3 Ah
BL0715 7,5 1,0
1,5 Ah
2,0 Ah
3,0 Ah
4,0 Ah
5,0 Ah
6,0 Ah
: Batería de clúster : Batería deslizante
ADVERTENCIA:
Solo use las baterías indicadas anteriormente. El uso de cualquier otra batería podría causar lesiones o fuego.
Nota:
La tabla sobre el tiempo de funcionamiento de la batería es para referencia. El tiempo de funcionamiento real puede
diferir según el tipo de batería, condiciones de carga o entorno de uso.
Tensión del cartucho de batería
10,8 V –
12Vmáx
BL1013 7,0 0,9
BL1015
BL1016
BL1020B
BL1021B
BL1040B
BL1041B
14,4 V 18 V En radio o AUX
BL1415 5,5 1,7
BL1815 6,0 1,9
BL1415N 7,0 2,0
BL1815N 7,5 2,0
BL1820
BL1820B
BL1430
BL1430B
BL1830
BL1830B
BL1440 19 5,5
BL1840
BL1840B
BL1450 23 6,5
BL1850
BL1850B
BL1460B 25 7,5
BL1860B 31 9,5
ALTAVOZ = 100 mW
Unidad: hora (aproximadamente)
En radio con
carga USB (1,0 A)
8,5 1,7
11 2,0
10 3,0
12 3,5
14 4,0
21 4,0
20 6,0
26 8,0
55 ESPAÑOL
Page 56

INSTALACIÓN Y
ALIMENTACIÓN
PRECAUCIÓN:
● Tenga cuidado de no pellizcarse los dedos al abrir
y cerrar la tapa de la batería.
● Tras instalar o retirar la batería, devuelva el
compartimento de la batería a su posición
inicial. De lo contrario la batería podría caerse
accidentalmente de la radio y causar lesiones a
usted o a gente a su alrededor.
● Antes de mover la radio cierre y boquee siempre el
compartimento de la batería.
● Antes de instalar o retirar la batería apague siempre
la radio.
● Tenga cuidado de no dejar caer o golpear la radio.
Una carcasa rota podría cortarle los dedos o
clavarse en su cuerpo. Una radio dañada puede
tener un comportamiento impredecible que podría
resultar en fuego, explosiones o riesgo de lesiones.
IMPORTANTE:
● Potencia reducida, distorsión, cortes en el sonido
o cuando "POWERFAIL" aparece en la pantalla,
son señales de que la batería principal necesita ser
remplazada.
● La batería no puede cargarse mediante el adaptador
de alimentación de CA suministrado.
● La batería no se incluye como accesorio estándar.
Instalación o extracción del cartucho de
la batería deslizante (Fig. 2 y 3)
1. Para instalar el cartucho de la batería, alinee la
lengüeta situada en el cartucho de la batería con la
ranura del chasis e insértelo. Insértelo completamente
hasta que quede rmemente encajado con un clic.
2. Si puede ver el indicador rojo de la zona superior
del botón, signica que el cartucho no está encajado
completamente. Instálelo completamente hasta que
el indicador rojo no esté visible. De lo contrario, el
cartucho puede desprenderse accidentalmente de la
radio y causar lesiones al operario o a alguna persona
que se encuentre cerca.
3. No haga fuerza al insertar el cartucho de la batería. Si
el cartucho no entra con suavidad, signica que no lo
está instalando correctamente.
4. Para retirar la batería, deslícela de la radio mientras
desliza el botón en la parte frontal de la radio.
Instalación o extracción del cartucho de
la batería de clúster (Fig. 4 y 5)
1. Para insertar el cartucho de la batería, alinee la
lengüeta situada en el cartucho de la batería con la
ranura del alojamiento e insértela.
2. Para quitar el cartucho de la batería, extraiga la batería
56 ESPAÑOL
del terminal mientras presiona los botones del lateral
del cartucho.
Indicación de la capacidad restante
de la batería
* Soloparacartuchosdelabateríacon“B”alnaldel
número de modelo.
1
2
1. Luces indicadoras 2. Botón de comprobación
Pulse el botón de comprobación del cartucho de la batería
para indicar la capacidad restante de la batería. Las luces
indicadoras se encienden durante unos segundos.
● Baterías 14,4 V/18 V
Luces indicadoras
Iluminado Apagado Parpadeando
Capacidad
restante
75% ~ 100%
50% ~ 75%
25% ~ 50%
0% ~ 25%
Cargue la
batería
La batería
puede haber
funcionado mal
Page 57

● Baterías 10,8 V-12 V máx.
Luces indicadoras
Iluminado Apagado Parpadeando
NOTA:
Dependiendo de las condiciones de uso y de la
temperatura ambiente, la indicación puede diferir
ligeramente de la capacidad real.
Capacidad
restante
75% ~ 100%
50% ~ 75%
25% ~ 50%
0% ~ 25%
Uso de la antena de varilla exible
(Fig. 1)
Ponga la antena de varilla exible en posición vertical tal
y como se muestra en la gura.
USO DEL ADAPTADOR DE
ALIMENTACIÓN DE CA SUMINISTRADO
Retire el protector de goma e inserte el enchufe del
adaptador en la toma de CC en la parte derecha de la
radio. Enchufe el adaptador a una toma de la red eléctrica
estándar. Cuando se usa el adaptador, la batería se
desconecta automáticamente.
PRECAUCIÓN:
● Desconecte siempre completamente el adaptador
de alimentación de CA antes de mover la radio. Si
no se retira el adaptador de CA, podría causar una
descarga eléctrica.
● Nunca tire o arrastre el cable del adaptador. De lo
contrario, la radio podría caerse de forma accidental
causándole lesiones a usted o a gente a su
alrededor.
IMPORTANTE:
● El adaptador de la red eléctrica se usa como medio
para conectar la radio al suministro de la red eléctrica.
La toma de corriente usada por la radio debe
permanecer accesible durante el uso normal.
● Para desconectar la radio, el adaptador de la red
eléctrica debe retirarse por completo de la toma de
corriente.
● Use solo el adaptador de alimentación de CA
suministrado con el producto o especicado por
Makita.
● No sujete el cable de alimentación y enchufe con la
boca. Hacerlo podría causar una descarga eléctrica.
● No toque el enchufe de corriente con las manos
57 ESPAÑOL
mojadas o grasosas.
● Unos cables dañados o enredados incrementan el
riesgo de descarga eléctrica. Si el cable está dañado,
haga que su centro de servicio autorizado lo reemplace
para evitar riesgos para la seguridad. No lo use antes
de la reparación.
● Tras el uso, guarde siempre el adaptador de
alimentación de CA fuera del alcance de los niños. Si
los niños jugasen con el cable, podrían sufrir lesiones.
Carga mediante el puerto de suministro
de alimentación USB
Existe un puerto USB en la parte frontal de la radio.
Puede cargar el dispositivo USB mediante el puerto USB.
1. Conecte el dispositivo USB, por ejemplo un iPod, MP3
o reproductor de CD, con un cable USB disponible en
el mercado.
2. Pulse el botón de encendido para encender la radio.
3. Independientemente de si la radio recibe alimentación
de corriente alterna o de baterías, la radio puede
cargar el dispositivo USB cuando está encendida y en
el modo de radio FM/DAB, el modo BT o el modo AUX,
que aparece cuando se conecta una fuente de audio
externa.
NOTA:
● Durante la carga USB, el volumen máximo del altavoz
de salida se reducirá.
● La ranura USB puede suministrar una corriente
eléctrica máxima de 1A5V.
Importante:
● Antes de conectar el dispositivo USB al puerto USB,
realice siempre una copia de seguridad de los datos
del dispositivo USB. De lo contrario, puede que los
datos del dispositivo se pierdan.
● Puede que la radio no suministre alimentación a
algunos dispositivos USB.
● Cuando no lo utilice, o bien después de una carga,
retire el cable USB y cierre la cubierta.
● No conecte una fuente de alimentación al puerto
USB. Existe riesgo de que se produzca un incendio.
El puerto USB está diseñado únicamente para cargar
dispositivos de bajo voltaje. Cuando no cargue un
dispositivo de bajo voltaje, coloque siempre la cubierta
en el puerto USB.
● No inserte un clavo, un cable, etc. en el interior del
puerto de suministro de alimentación USB. Existe
el riesgo de que se produzca un cortocircuito que
provoque humo o incluso un incendio.
● No conecte esta ranura USB con el puerto USB de
un ordenador, ya que es muy posible que las dos
unidades se averíen.
ESCUCHAR LA RADIO
Esta radio dispone de tres sistemas de sintonización:
Page 58

escaneado, manual y recuperación de presintonías en
memoria.
Selección de una emisora – DAB
1. Pulse el botón de encendido para encender la radio.
2. Seleccione el modo DAB que desee pulsando el botón
de banda.
3. Pulse el botón de conguración avanzada y gire el
mando de volumen/control de sintonización/selección
hasta que “Station List” (Lista de emisoras) parpadee
en la pantalla. Pulse el mando de volumen/control de
sintonización/selección para seleccionar en la lista de
emisoras.
4. Gire el mando de volumen/control de sintonización/
selección para desplazarse por la lista de emisoras
disponibles. Pulse el mando para seleccionar una
emisora.
5. Ajuste el volumen que desee girando el mando de
volumen/control de sintonización/selección.
Modos de visualización – DAB
La radio tiene diferentes opciones de visualización en el
modo DAB:
Pulse el botón de información para cambiar entre las
distintas opciones correspondientes a las siguientes letras
(a. - g.).
a. Station name
(Nombre de la
emisora)
b. Program type
(Tipo de
programa)
c. Multiplex name
(Nombre
multiplex)
d. Time & date
(Fecha y hora)
e. Frequency
and channel
(Frecuencia y
canal)
f . Bit rate/Audio
type (Velocidad
de bits/Tipo de
audio)
g. Signal strength
(Intensidad de la
señal)
Indica el nombre de la emisora que
se está escuchando.
Indica el tipo de emisora que se está
escuchando. P. ej. Pop, Clásica,
Noticias, etc.
Indica el nombre del multiplex DAB
al que pertenece la emisora actual.
Indica la hora y la fecha actuales.
Indica el número de frecuencia
y de canal de la emisora DAB
actualmente sintonizada.
Indica la velocidad de bits de
audio digital y el tipo de audio
de la emisora DAB actualmente
sintonizada.
Indica la intensidad de señal de
la emisora DAB actualmente
sintonizada.
Búsqueda de nuevas emisoras – DAB
De vez en cuando se crean nuevas emisoras de radio
DAB. O puede que deba trasladarse a otra parte del país.
En ambos casos, deberá congurar la radio para que
detecte nuevas emisoras.
58 ESPAÑOL
Para que la radio pueda encontrar todas las emisoras
disponibles, se recomienda realizar un escaneado
completo de todas las frecuencias DAB en la banda III.
1. Pulse el botón de sintonización automática.
2. La radio realizará un escaneado completo de las
frecuencias DAB. A medida que se encuentren
emisoras nuevas, el contador de emisoras del lado
izquierdo de la pantalla irá aumentando y las emisoras
se añadirán a la lista.
Sintonización manual – DAB
La sintonización manual permite sintonizar la radio en una
frecuencia DAB determinada en la banda III. Esta función
también se puede usar para ayudar a orientar la antena
o la radio a n de optimizar la recepción de un canal o
frecuencia especícos.
1. Pulse el botón de conguración avanzada y gire el
mando de volumen/control de sintonización/selección
hasta que “Manual Tune” (Sintonización manual)
aparezca en la pantalla. Pulse el mando de volumen/
control de sintonización/selección para entrar en el
modo de sintonización manual.
2. Gire el mando de volumen/control de sintonización/
selección para seleccionar el canal DAB que desee.
Pulse el mando de volumen/control de sintonización/
selección para conrmar la frecuencia elegida.
Conguración del orden de las
emisoras – DAB
La radio cuenta con 3 ajustes que puede seleccionar
para ordenar las emisoras. Los ajustes de orden
permiten organizar las emisoras alfanuméricamente
(Alphanumeric), por mutiplex DAB (Ensemble) y por señal
válida (Valid).
1. Pulse el botón de conguración avanzada.
2. Gire el mando de volumen/control de sintonización/
selección hasta que “Station order” (Orden de las
emisoras) aparezca en pantalla y, a continuación,
pulse de nuevo el mando de volumen/control de
sintonización/selección para seleccionar el ajuste.
3. Gire el mando de volumen/control de sintonización/
selección para seleccionar las siguientes opciones y
púlselo para conrmar el ajuste.
Alphanumeric
(Alfanuméricamente)
Ensemble (por
multiplex DAB)
Valid (Señal válida) Muestra solo las emisoras para
Ordena la lista de emisoras
alfanuméricamente 0...9 A...Z
Organiza la lista de emisoras
por multiplex DAB
las que se puede encontrar
una señal
Control de gama dinámica (DRC) – DAB
La característica DRC permite que los sonidos más
tenues sean audibles cuando la radio se utiliza en un
entorno ruidoso, ya que reduce el rango dinámico de la
Page 59

señal de audio. Hay tres niveles de compresión:
DRC 0 No se aplica ninguna compresión.
DRC 1/2 Se aplica una compresión media.
DRC 1 Se aplica la compresión máxima.
1. Pulse el botón de encendido para encender la radio.
2. Pulse el botón de banda para seleccionar la banda
DAB.
3. Pulse el botón de conguración avanzada y gire el
mando de volumen/control de sintonización/selección
hasta que “DRC Value” (Valor DRC) aparezca en la
pantalla. A continuación, pulse el mando de volumen/
control de sintonización/selección para introducir el
ajuste. La pantalla mostrará el valor DRC actual.
4. Gire el mando de volumen/control de sintonización/
selección para seleccionar el ajuste DRC que desee.
5. Pulse el mando de volumen/control de sintonización/
selección para conrmar el ajuste.
Escaneado – FM
1. Pulse el botón de encendido para encender la radio.
2. Seleccione la banda de ondas que desee pulsando el
botón de banda. Para lograr la mejor recepción de FM,
asegúrese de que la antena de varilla exible esté bien
colocada. Evite usar la radio cerca de una pantalla
de ordenador y otros equipos que puedan causar
interferencias en la radio.
3. Pulse el botón de sintonización automática. La radio
buscará y se detendrá automáticamente cuando
encuentre una emisora de radio. La radio seguirá
buscando la siguiente emisora disponible a menos que
el operario pulse el botón de sintonización automática
para detener el escaneado.
4. Gire el mando de volumen/control de sintonización/
selección para obtener el nivel de sonido que desee.
La pantalla LCD mostrará los cambios de nivel de
sonido.
5. Para apagar la radio, pulse el botón de encendido.
Zona de escaneado FM
Cuando se utiliza el modo FM, la radio puede congurarse
para escanear las emisoras locales o todas las emisoras,
incluidas las que se encuentran a mucha distancia.
1. Pulse el botón de encendido para encender la radio.
2. Presione el botón de banda para seleccionar la banda
FM.
3. Presione el botón de ajustes avanzados y a
continuación gire el control de volumen/sintonización/
selección hasta que en pantalla se muestre "FM Scan
Zone". Presione el control de volumen/sintonización/
selección para entrar a los ajustes.
4. Gire el control de volumen/sintonización/selección
para cambiar entre las opciones "Local" (solo emisoras
fuertes) o "Distant" (todas las emisoras) en la línea
inferior de la pantalla. La opción "Distant" permitirá a
la radio encontrar señales más débiles al realizar el
escaneo.
5. Presione el control de volumen/sintonización/selección
para conrmar la selección. El ajuste de "Local"
o "Distant" se guarda en la radio y permanece en
vigencia hasta que se cambie o se restablezca el
sistema.
Sintonización manual – FM
1. Pulse el botón de encendido para encender la radio.
2. Pulse el botón de banda para seleccionar la banda
de onda que desee. Ajuste la antena tal y como se ha
descrito anteriormente.
3. Al girar el mando de volumen/control de sintonización/
selección la frecuencia cambiará en los incrementos
siguientes: FM: 50 kHz
Nota:
Para usar el mando de volumen/control de
sintonización/selección a n de encontrar la emisora
que desee, presione el mando de volumen/control
de sintonización/selección para cambiar al modo de
control de sintonización.
4. Siga girando el mando de volumen/control de
sintonización/selección hasta que se muestre en
pantalla la frecuencia que desee.
5. Gire el mando de volumen/control de sintonización/
selección para obtener el nivel de sonido que desee.
6. Para apagar la radio, pulse el botón de encendido.
Modos de visualización – FM (RDS)
La radio tiene diferentes opciones de visualización para el
modo de radio FM:
Presione repetidamente el botón de información para ver
la información RDS (Sistema de datos por radio) de la
emisora que está escuchando.
a. Program station
(Emisora de
programa)
b. Frequency
(Frecuencia)
c. Radio text
(Texto de radio)
d. Program type
(Tipo de programa)
e. Time & date
(Fecha y hora)
Indica el nombre de la emisora
que se está escuchando.
Indica la frecuencia de la señal
FM.
Indica un mensaje de texto,
tales como nuevos elementos,
etc.
Indica el tipo de emisora que se
está escuchando, por ejemplo,
Pop, Classic, News (Pop,
Clásica, Noticias), etc.
Indica la hora y la fecha
actuales.
Almacenamiento de emisoras en
presintonías (DAB y FM)
Existen 5 presintonías para cada banda de frecuencia.
1. Pulse el botón de encendido para encender la radio.
59 ESPAÑOL
Page 60

2. Sintonice la emisora que desee mediante uno de los
métodos descritos previamente.
3. Mantenga pulsado el botón de presintonía que desee
hasta que el número de la presintonía aparezca en
la pantalla, por ejemplo, “P2 Saved” (P2 guardado).
La emisora se guarda en el botón de presintonía
seleccionada.
4. Repita este procedimiento para las presintonías
restantes.
5. Las emisoras guardadas en presintonías en memoria
se pueden sobrescribir mediante los procedimientos
anteriores.
Recuperación de emisoras en
presintonías (DAB y FM)
1. Pulse el botón de encendido para encender la radio.
2. Pulse el botón de banda para seleccionar la banda de
onda que desee.
3. Pulse el botón de presintonía que desee
momentáneamente. El número de presintonía y la
frecuencia de la emisora aparecerán en la pantalla.
ESCUCHAR MÚSICA A
TRAVÉS DE TRANSMISIÓN
BLUETOOTH
Antes de poder enlazarse automáticamente para
reproducir/transmitir música Bluetooth a través de la radio,
necesita vincular su dispositivo Bluetooth con la radio. La
vinculación crea un "vínculo" para que dos dispositivos se
reconozcan mutuamente.
Nota:
Para tener una mejor calidad de sonido, recomendamos
que ajuste el volumen en su dispositivo Bluetooth a más
de dos tercios y a continuación, ajuste el volumen en la
radio como necesite.
Pairing your Bluetooth device for the
rst time
1. Presione el botón de encendido para encender la
radio. Presione el botón de banda para seleccionar el
modo Bluetooth. El indicador Bluetooth en los botones
de presintonías parpadeará en color azul para mostrar
que la radio es visible.
2. Active el Bluetooth de su dispositivo según su manual
del usuario para enlazar con la radio. Localice la lista
de dispositivos Bluetooth y seleccione el que lleve
por nombre "DMR112". Algunos dispositivos móviles
(equipados con versiones de Bluetooth anteriores
a la BT2.1), puede que sea necesario introducir las
contraseña “0000”.
3. Una vez conectado, habrá un tono de conrmación y el
indicador de Bluetooth en los botones de presintonías
permanecerá encendido en color azul. Seleccione
60 ESPAÑOL
y reproduzca cualquier música desde su dispositivo
fuente. El control de volumen se puede ajustar desde
su dispositivo fuente o directamente desde la radio.
4. Use los controles de su dispositivo con función de
Bluetooth o los de la radio para reproducir/dejar en
pausa y navegar por las pistas.
Nota:
1. Si dos dispositivos Bluetooth, vinculándose por primera
vez, buscan la radio, este se mostrará disponible para
ambos dispositivos. Sin embargo, si un dispositivo
se enlaza con esta unidad primero, entonces el otro
dispositivo Bluetooth no lo encontrará en la lista.
2. Si su dispositivo Bluetooth se desconecta
temporalmente de su radio, entonces, deberá
reconectar su dispositivo a la radio de forma manual.
3. Si "DMR112" aparece en la lista de su dispositivo
Bluetooth, pero no puede conectarse a él, borre
el elemento de la lista y vincule de nuevo el
dispositivo con la radio, siguiendo los pasos descritos
anteriormente.
4. El rango óptimo de transmisión Bluetooth es de
aproximadamente 10 metros (30 pies) (campo visual)
a la radio, pero una distancia de hasta 30 metros (100
pies) es posible.
5. Si se pierde la conexión Bluetooth debido a un exceso
del tiempo de separación, de la distancia óptima,
obstáculos u otros motivos, puede que sea necesario
volver a conectar el dispositivo con la radio.
6. Objetos físicos, otros dispositivos inalámbricos o
dispositivos electromagnéticos pueden afectar la
calidad de la conexión.
7. La capacidad de la conectividad Bluetooth podría variar
dependiendo del dispositivo Bluetooth que se haya
conectado. Por favor, consulte las especicaciones
Bluetooth de su dispositivo antes de conectarlo a su
radio. Puede que no todas las funciones estuvieran
disponibles en algunos dispositivos Bluetooth.
Reproducción de archivos de audio en
el modo Bluetooth
Cuando haya conectado su radio con el dispositivo
Bluetooth que haya elegido, ya podrá comenzar a
reproducir su música usando los controles del dispositivo
Bluetooth al que se haya conectado.
1. Una vez que la reproducción haya comenzado, ajuste
el volumen al nivel deseado usando los botones de
volumen en su radio o en su dispositivo Bluetooth.
2. Use los controles en su dispositivo para reproducir,
pausar y navegar por las pistas.
Tenga en cuenta:
1. Que puede que no todos los reproductores o
dispositivos respondan a todos los controles.
2. Algunos teléfonos móviles puede que se desconecten
temporalmente de su radio al realizar o recibir
Page 61

llamadas. Algunos dispositivos puede que silencien
temporalmente su transmisión de audio por Bluetooth
cuando reciben mensajes de texto, correos electrónicos
o por otros motivos ajenos a la transmisión de audio.
Ese comportamiento es una función del dispositivo
conectado y no indica un fallo en su radio.
Playing a previously-paired Bluetooth
source device
DMR112 puede memorizar hasta 8 dispositivos
emparejados. Cuando la memoria exceda esta
cantidad, el primero de los dispositivos emparejados
será sobrescrito. Si su dispositivo Bluetooth hubiera
sido emparejado con la radio anteriormente, la unidad
memorizará su dispositivo Bluetooth e intentará
reconectarse con el dispositivo de la memoria con el que
se conectó por última vez. Si el último dispositivo con
el que se conectó no estuviera disponible, la radio será
reconocible.
Desconexión de su dispositivo
Bluetooth
Mantenga presionado el botón de vinculación Bluetooth
durante 2-3 segundos para desconectarse del dispositivo
Bluetooth. El indicador Bluetooth en los botones de
presintonías parpadeará en color azul para indicar que la
radio está disponible de nuevo para la vinculación.
TOMA DE ENTRADA AUXILIAR
Se proporcionan dos tomas de entrada auxiliar estéreo de
3,5 mm. Una está en la parte delantera de la radio (entrada
auxiliar 1) y la otra en el compartimento de la batería
(entrada auxiliar 2).
1. Conecte una fuente de audio externa (por ejemplo
un iPod o un reproductor de MP3 o CD) a la toma de
entrada auxiliar mediante un cable de audio.
2. Presione y suelte repetidamente el botón de banda
hasta que se muestre "AUX IN 1" o "AUX IN 2". A
continuación la función auxiliar se activará.
3. Para tener una mejor calidad de sonido,
recomendamos poner el volumen a más de dos tercios
en su dispositivo de audio y a continuación, ajustar el
volumen de la radio según necesite.
NOTA:
El cable de audio no está incluido como accesorio
estándar.
OTRAS CONFIGURACIONES
Opciones de idioma
La radio dispone de ocho opciones de idioma:
Inglés, alemán, italiano, francés, neerlandés, danés,
noruego y español.
1. Pulse el botón de conguración avanzada.
2. Gire el mando de volumen/control de sintonización/
selección hasta que se muestre en pantalla “Language”
(Idioma). Pulse el mando de volumen/control de
sintonización/selección para seleccionar el ajuste.
3. Gire el mando de volumen/control de sintonización/
selección para elegir el idioma que desee. Pulse el
mando de volumen/control de sintonización/selección
para conrmar el ajuste.
Control del brillo
El botón de luz se puede ajustar.
1. Pulse el botón de conguración avanzada.
2. Gire el control de volumen/sintonización/selección
hasta que "Botón de luz" se muestre en pantalla.
Presione el control de volumen/sintonización/selección
para entrar a los ajustes.
3. Gire el control de volumen/sintonización/selección para
elegir "On" (encendido) o "Off" (apagado) para activar
o desactivar la función de botón de luz. A continuación,
presione el control de volumen/sintonización/selección
para conrmar los ajustes.
Reinicialización del sistema
Si la radio no funciona correctamente, o si faltan algunos
dígitos de la pantalla o están incompletos, siga este
procedimiento.
1. Pulse el botón de conguración avanzada.
2. Gire el mando de volumen/control de sintonización/
selección hasta que se muestre en pantalla “Factory
Reset” (Restablecimiento de valor de fábrica). Pulse el
mando de volumen/control de sintonización/selección
para seleccionar el ajuste.
3. Gire el mando de volumen/control de sintonización/
selección para elegir “Yes” (Sí). Pulse el mando de
volumen/control de sintonización/selección para
conrmar el ajuste. Se realizará una reinicialización
completa.
Versión de software
1. Pulse el botón de conguración avanzada.
2. Gire el mando de volumen/control de sintonización/
selección hasta que se muestre en pantalla “SW
Version” (Versión de software). Pulse el mando de
volumen/control de sintonización/selección para ver la
versión de software instalada en la radio.
Puerto micro USB para actualización
de software
En un futuro es posible que haya disponibles
actualizaciones de software.
A medida que las actualizaciones de software vayan
estando disponibles, en el
encontrará el software y la información necesaria para
sitio web de Makita
61 ESPAÑOL
Page 62

actualizar la radio.
MANTENIMIENTO
PRECAUCIÓN:
Nunca utilice gasolina, benceno, disolvente, alcohol
o un producto similar. Se puede provocar una
decoloración, una deformación o grietas.
ESPECIFICACIONES
Requisitos de alimentación
Adaptador de
alimentación CA
Batería
Cobertura de frecuencias
Bloque de canales DAB/
DAB+
Estándar compatible DAB/DAB+
DC 12 V 1,2A, clavija
central positiva
Batería de clúster:
7,2 V - 10,8 V
Batería deslizante:
10,8 V - 18 V
FM 87,50 - 108 MHz
DAB/DAB+
174,928-239,200 MHz
DAB (Band III) 5A-13F
Bluetooth
(La palabra Bluetooth® y los logotipos son marcas
comerciales registradas propiedad de Bluetooth SIG, Inc.)
Versión de Bluetooth 4,0
Perles Bluetooth A2DP/SCMS-T
Alimentación de
transmisión
Alcance de transmisión
Códec admitido SBC,AAC
Perl Bluetooth compatible A2DP
Potencia máxima de
radiofrecuencia:
Frecuencia de
funcionamiento
Característica del circuito
Altavoz 3,5 pulgadas 32 ohms x 2
Alimentación de salida
Terminal de entrada
Sistema de antena
Dimensiones
(Largo x Ancho x Alto)
Peso 4,3KG (sin batería)
62 ESPAÑOL
®
Power Class2
Óptima: 10 metros máximo
(33 pies)
Posible: 30 metros máximo
(100 pies)
(varía en función de las
condiciones de uso)
BT EDR: 3,12dBm
BT LE: 2,31dBm
2402MHz~2480MHz
7,2 V: 0,6 W X 2
12Vmáx: 1,7 W X 2
14,4 V: 3 W X 2
18 V: 4,9 W X 2
3,5 mm diámetro
(AUX IN1/AUX IN2)
DAB/FM: antena de varilla
exible
282 × 163 × 294 mm
Page 63

PORTUGUÊS
(Instruções de origem)
EXPLICAÇÃO DO ASPETO
GERAL (Fig. 1~5)
1. Antena exível de haste regulável
2. Puxador do compartimento da bateria
3. Pega
4. Tampa do compartimento da bateria
(cobre a bateria)
5. Tomada DC IN
6. Coluna de som
7. Botão de alimentação
8. Botão de banda
9. Botão de denição avançada
10. Botão de informação
11. Predenição 2-5
12. Botão de sintonização automática
13. Manípulo de Volume/Comando Sintonização/
Seletor
14. Porta da fonte de alimentação USB
15. AUX IN 1
16. Predenição 1/Botão de emparelhamento
Bluetooth
17. Visor LCD
18. Terminal de entrada (AUX IN 2)
19. Compartimento da bateria
20. Porta micro-USB para atualização de software
21. Cartucho da bateria
SÍMBOLOS
O seguinte mostra os símbolos usados para o
equipamento. Certique-se que compreende o seu
signicado antes de usar.
Leia o manual de instruções.
Apenas para países da UE
Não descarte o equipamento eletrónico ou
pilhas juntamente com o lixo doméstico!
Em conformidade com as Diretivas
Europeias, sobre os Resíduos de
Equipamentos Elétricos e Eletrónicos
e Baterias e Acumuladores e Resíduos
de Pilhas e Acumuladores e a sua
implementação de acordo com as leis
nacionais, equipamentos elétricos e
baterias e pilhas gastas devem ser
recolhidas separadamente e devolvidas
para uma instalação de reciclagem
compatível com o meio ambiente.
63 PORTUGUÊS
SEGURANÇA IMPORTANTE
INSTRUÇÕES
ADVERTÊNCIA:
Quando utiliza ferramentas elétricas, deve seguir sempre
as precauções de segurança básicas para reduzir o risco
de incêndio, choque elétrico e danos pessoais, incluindo
o seguinte:
1. Leia cuidadosamente o manual de instruções e o
manual de instruções do carregador antes de usar.
2. Limpe apenas com um pano seco.
3. Não instale o aparelho junto de fontes de calor como
radiadores, registos de calor, fogões ou outros aparelhos
(incluindo amplicadores) que produzam calor.
4. Utilize apenas as ligações/acessórios especicados
pelo fabricante.
5. Desligue este aparelho quando houver trovoada ou
quando não seja usado por um longo período de tempo.
6. Um rádio a bateria com bateria integrada ou uma
bateria separada tem de ser recarregado apenas
com o carregador especicado para a bateria. Um
carregador que pode ser adequado para um tipo
de bateria pode criar um risco de incêndio quando
utilizado com outra bateria.
7. Utilize o rádio a bateria apenas com baterias
especicamente concebidas. A utilização de qualquer
outra bateria pode criar um risco de incêndio.
8. Quando o conjunto da bateria não se encontra a
uso, mantenha-o afastado de outros objetos de
metal como: clips de papel, moedas, chaves, pregos,
parafusos, ou outros objetos pequenos de metal que
possam fazer a ligação entre dois terminais. Colocar
em curto-circuito os terminais da bateria pode causar
faíscas, queimaduras ou um incêndio.
9. Evitar contacto do corpo com superfícies ligadas à
terra como tubos, radiadores, fogões e frigorícos.
Há um risco acrescido de choque elétrico se o corpo
estiver ligado à terra.
10. Em condições de mau uso, poderá ser ejetado líquido
da bateria, evite o contacto. Se ocorrer um contacto
acidental, lave abundantemente com água. Se o
líquido entrar em contacto com os olhos, procure
também ajuda médica. O líquido ejetado da bateria
pode causar irritação ou queimaduras.
11. Não utilize uma bateria ou ferramenta danicada
ou modicada. Baterias danicadas ou modicadas
podem exibir comportamentos imprevisíveis que
resultam em incêndio, explosão ou risco de ferimentos.
12.
Não exponha uma bateria ou ferramenta ao fogo ou
temperatura excessiva. A exposição ao fogo ou a
temperatura acima de 130°C pode provocar uma explosão.
13. Siga todas as instruções de carregamento e não
carregue a bateria ou a ferramenta fora do intervalo
de temperatura especicado nas instruções. Carregar
Page 64

incorretamente ou em temperaturas fora do intervalo
especicado pode danicar a bateria e aumentar o
risco de incêndio.
14. A cha do CABO PRINCIPAL é usada para desligar o
aparelho e permanecerá pronta a operar.
15. Não utilize o produto com o volume alto em nenhuma
circunstância. Para evitar danos auditivos, utilize o
produto com um nível de volume moderado.
16. (Apenas para produtos com visor LCD) Os visores
LCD incluem líquidos que podem causar irritação e
envenenamento. Se o líquido entrar nos olhos, na boca
ou na pele, enxaguar com água e chamar um médico.
17. Não exponha o produto à chuva ou em condições
húmidas. A entrada de água no produto aumentará o
risco de choque elétrico.
18. Este produto não está destinado a ser utilizado
por pessoas (incluindo crianças) com capacidades
físicas, sensoriais ou mentais reduzidas, ou falta de
experiência e conhecimento, a menos que tenham
sido supervisionadas ou instruídas sobre o uso
do produto por uma pessoa responsável pela sua
segurança. As crianças devem ser supervisionadas
para garantir que elas não brincam com o produto.
Armazene o produto fora do alcance das crianças.
GUARDE ESTAS INSTRUÇÕES
NORMAS DE SEGURANÇA
ESPECÍFICAS
PARA O CARTUCHO DA BATERIA
1. Antes de usar o cartucho da bateria, leia todas as
instruções e marcas de advertência no (1) carregador
da bateria, (2) bateria e (3) produto que usa a bateria.
2. Não desmonte o cartucho da bateria.
3. Se o período de funcionamento se tornar excessivamente
curto, pare imediatamente o funcionamento. Pode
provocar um riso de sobreaquecimento, possíveis
queimaduras ou mesmo explosão.
4. Se o eletrólito entrar para os olhos, lave-os com água
limpa e procure um médico imediatamente. Pode
originar perda de visão.
5. Não faça curto circuito com a bateria:
1) Não toque nos terminais com qualquer
material condutor.
2) Evite guardar o cartucho da bateria num
recipiente com outros objetos de metal como
pregos, moedas, etc.
3) Não exponha o cartucho de bateria à água ou à
chuva. Um curto circuito na bateria pode causar
um grande uxo de corrente, sobreaquecimento,
possíveis queimaduras e mesmo avaria.
6. Não guarde a ferramenta e o cartucho da bateria
em locais em que a temperatura possa chegar ou
64 PORTUGUÊS
ultrapassar os 50 °C (122°F)
7. Não incinere o cartucho da bateria mesmo que se
encontre muito danicado ou esteja completamente
gasto. O cartucho da bateria pode explodir num incêndio.
8. Tenha cuidado para não deixar cair a bateria ou bater
com a bateria.
9. Não use uma bateria danicada.
10. Para evitar riscos, o manual de substituição da bateria
deve ser lido antes de usar. E a corrente de descarga
máxima da bateria deve ser maior ou igual a 8A.
11. As baterias que contêm iões de lítio estão sujeitas aos
requisitos da Legislação de Mercadorias Perigosas.
Para transportes Comerciais, por exemplo, por terceiros,
agentes de encaminhamento, requisitos especiais de
embalamento e rotulagem devem ser observados.
Para a preparação do item que está a ser enviado,
é necessário consultar um especialista em materiais
perigosos. Observe também as regulamentações
nacionais mais detalhadamente.
Fita ou cobrir os contatos abertos e arrumar a bateria
de tal maneira que não pode se mover na embalagem.
12. Siga as regulamentações locais relativas à eliminação
da bateria.
13. Use as baterias apenas com os produtos especicados
pela Makita. A instalação das baterias em produtos
não conformes pode resultar em incêndio,
superaquecimento, explosão ou vazamento de eletrólito.
CUIDADO:
● Perigo de explosão se a bateria for substituída
incorretamente.
● Substitua apenas pelo mesmo tipo ou equivalente.
● utilize apenas baterias Makita genuínas. O uso
de baterias Makita não genuínas, ou baterias que
tenham sido alteradas, pode resultar na explosão
da bateria causando incêndios, danos pessoais
e materiais. Também anulará a garantia da Makita
para a ferramenta Makita e o carregador.
Conselhos para a manutenção prolongada
da bateria
1. Carregue o cartucho da bateria antes de estar
completamente descarregado. Pare sempre o
funcionamento da ferramenta e carregue o cartucho da
bateria quando notar uma menor potência da ferramenta.
2. Nunca recarregue um cartucho de bateria
completamente carregado. O sobrecarregamento
diminui a duração da bateria.
3. Carregue o cartucho da bateria à temperatura
ambiente entre 10 °C e 40 °C (50 °F e 104 °F). Deixe
que o cartucho da bateria quente arrefeça antes de o
carregar.
4. Carregue o cartucho da bateria se não o usar por um
longo período de tempo (mais de seis meses).
Page 65

TEMPO DE FUNCIONAMENTO
* A tabela seguinte indica o tempo de funcionamento com um único carregamento.
Tensão da bateria
Capacidade da
bateria
1,0 Ah BL7010 5,0 0,7
1,3 Ah
1,5 Ah
2,0 Ah
3,0 Ah
4,0 Ah
5,0 Ah
6,0 Ah
: Bateria de grupo : Bateria de deslize
AVISO:
Utilize apenas as baterias listadas acima. O uso de qualquer outra bateria pode causar ferimentos e/ou
incendiar.
Nota:
A tabela relativa ao tempo de operação da bateria acima é para referência. O tempo de operação real pode diferir com o
tipo de bateria, condição de carregamento ou ambiente de utilização.
7,2 V 10,8 V
BL1013 7,0 0,9
BL0715 7,5 1,0
10,8 V –
12Vmáx
BL1015
BL1016
BL1020B
BL1021B
BL1040B
BL1041B
14,4 V 18 V Em rádio ou AUX
BL1415 5,5 1,7
BL1815 6,0 1,9
BL1415N 7,0 2,0
BL1815N 7,5 2,0
BL1820
BL1820B
BL1430
BL1430B
BL1830
BL1830B
BL1440 19 5,5
BL1840
BL1840B
BL1450 23 6,5
BL1850
BL1850B
BL1460B 25 7,5
BL1860B 31 9,5
SAÍDA ALTIFALANTE = 100mW
Unidade: Hora (Aproximadamente)
Em rádio com
carregamento
USB (1,0A)
8,5 1,7
11 2,0
10 3,0
12 3,5
14 4,0
21 4,0
20 6,0
26 8,0
65 PORTUGUÊS
Page 66

INSTALAÇÃO E FONTE DE
ALIMENTAÇÃO
CUIDADO:
● Tenha cuidado para não entalar os dedos ao abrir e
fechar a tampa da bateria.
● Volte a colocar o compartimento da bateria
na posição original, após instalar ou remover
a bateria. Caso contrário, a bateria pode cair
acidentalmente do rádio e causar ferimentos a si
ou em alguém que esteja perto de si.
● Feche e tranque sempre o compartimento da
bateria antes de mover o rádio.
● Desligue sempre o rádio antes de instalar ou
remover a bateria.
● Tenha cuidado para não deixar cair ou dar uma
pancada no rádio. Se o cartuxo partir pode cortar
o dedo ou o corpo. Rádio danicado pode exibir
um comportamento imprevisível e resultar em
incêndio, explosão ou risco de lesão.
IMPORTANTE:
● Potência reduzida, distorção, som intermitente ou
quando “POWERFAIL” aparecer no visor são sinais em
que a bateria principal precisa de ser substituída.
● A bateria não pode ser carregada por meio do
adaptador de alimentação CA fornecido.
● A bateria não está incluída como acessório padrão.
Instalar ou retirar a bateria de deslize
(Fig. 2 & 3)
1. Para colocar a bateria, alinhe a respetiva saliência com
a calha do compartimento e encaixe-a suavemente.
Insira-a completamente até xar em posição com um
clique.
2. Se ainda estiver visível o indicador vermelho na
parte superior do botão, não estará bem encaixado.
Coloque-a completamente, até deixar de ver o
indicador vermelho. Caso contrário, pode cair do rádio
e causar ferimentos em si, ou em alguém que esteja
perto de si.
3. Não exerça força ao introduzir a bateria. Se não
encaixar facilmente é porque não está corretamente
posicionada.
4. Para remover a bateria, deslize-a do rádio enquanto
desliza o botão da frente da bateria.
Instalar ou retirar a bateria de grupo
(Fig. 4 & 5)
1. Para colocar a bateria, alinhe a respetiva saliência com
a calha do compartimento e encaixe-a suavemente.
2. Para retirar a bateria, retire-a do terminal e, ao mesmo
tempo, prima os botões na parte lateral da mesma.
Indicar a carga restante da bateria
* Apenasparabateriascom“B”nonaldonúmero
de modelo.
1
2
1. Lâmpadas do indicador 2. Botão de vericação
Prima o botão de vericação na bateria para indicar
a carga restante da bateria. As lâmpadas indicadoras
acendem-se durante alguns segundos.
● Baterias de 14.4V/18V
Lâmpadas indicadoras
Aceso Desligado A Piscar
● Baterias de 10.8V-12V máx
Lâmpadas indicadoras
Aceso Desligado A Piscar
Capacidade
restante
75% ~ 100%
50% ~ 75%
25% ~ 50%
0% ~ 25%
Carregue a bateria
A bateria pode estar
avariada
Capacidade
restante
75% ~ 100%
50% ~ 75%
25% ~ 50%
0% ~ 25%
66 PORTUGUÊS
Page 67

NOTA:
Dependendo das condições de utilização e da
temperatura ambiente, a indicação pode diferir
ligeiramente da capacidade efetiva.
Utilizar a antena exível de haste
regulável (Fig. 1)
Endireite a antena exível de haste regulável, conforme
indicado na gura.
Utilizar o adaptador de alimentação
CA fornecido
Remova o protetor de borracha e insira a cha do
adaptador na tomada DC no lado direito do rádio.
Conecte o adaptador a uma tomada convencional.
Sempre que o adaptador for usado, a bateria é
desconectada automaticamente.
CUIDADO:
● Desconecte sempre completamente o adaptador
de alimentação CA antes de mover o rádio. Se o
adaptador CA não for removido, pode causar um
choque elétrico.
● Nunca puxe ou arraste o cabo do adaptador. Caso
contrário, o rádio pode cair acidentalmente e causar
danos a si ou em alguém que esteja perto de si.
IMPORTANTE:
● A nalidade do adaptador é ser usado como meio
de ligação entre o rádio e a rede elétrica. A tomada
utilizada para o rádio deve permanecer acessível
durante o uso normal.
● Para desconectar o rádio, o adaptador deve ser
removido completamente da tomada.
● Utilizar o adaptador de alimentação CA fornecido com
o produto ou especicado apenas pela Makita.
● Não segure o cabo de alimentação na boca. Pode
causar choque elétrico.
● Não toque na cha de alimentação com as mãos
molhadas ou gordurosas.
● Cabos danicados ou emaranhados aumentam o
risco de choque elétrico. Se o cabo estiver danicado,
substitua-o no nosso centro de assistência autorizado
por questões de segurança. Não utilize antes de o
reparar.
● Após a utilização, armazene sempre o adaptador de
alimentação CA fora do alcance das crianças. Se as
crianças brincarem com o cabo, podem sofrer lesões.
Carregamento através da porta da
fonte de alimentação USB
Existe uma porta USB na parte frontal do rádio. Pode
carregar o dispositivo USB através da porta USB.
1. Ligue o dispositivo USB, como iPod, MP3 ou leitor de
CD, com um cabo USB disponível comercialmente.
2. Prima o botão Alimentação para ligar o rádio.
67 PORTUGUÊS
3. Independentemente de o rádio ser alimentado por CA
ou bateria, o rádio pode carregar o dispositivo USB
quando o rádio é ligado e no modo de rádio FM/DAB,
modo BT ou modo AUX, que aparece quando é ligada
uma fonte de áudio externa.
Nota:
● O volume máximo do altifalante vai diminuir quando o
USB está a carregar.
● A tomada USB pode proporcionar, no máximo, 1A 5V
de corrente elétrica.
Importante:
● Antes de ligar o dispositivo USB à porta do USB, efetue
sempre cópias de segurança dos dados do dispositivo
USB. Caso contrário, os dados podem ser perdidos.
● O rádop pode não fornecer alimentação a alguns
dispositivos USB.
● Quando não está em utilização ou após o
carregamento, retire o cabo USB e feche a tampa.
● Não ligue a fonte de alimentação à porta USB. Caso
contrário, existe um risco de incêndio. A porta USB só
se destina a carregar dispositivos de tensão inferior.
Coloque sempre a tampa na porta USB quando não
estiver a carregar um dispositivo de tensão inferior.
● Não introduza um prego, arame, etc., na porta da fonte
de alimentação USB. Caso contrário, um curto-circuito
pode causar fumo e incêndios.
● Não ligue esta tomada USB à porta USB do
computador, uma vez que é altamente possível que
cause a avaria das unidades.
OUVIR RÁDIO
Este rádio tem três métodos de sintonia – pesquisa de
sintonia, sintonia manual e chamada de pré-sintonias de
memória.
Selecionar uma estação – DAB
1. Prima o botão de alimentação para ligar o rádio.
2. Selecione o modo DAB premindo o botão de banda.
3. Prima o botão de denição avançada e rode o
manípulo de Volume/Comando Sintonização/Seletor
até que a indicação “Station List” (Lista de estações)
seja apresentada intermitentemente no ecrã. Prima o
manípulo de Volume/Comando Sintonização/Seletor
para entrar na lista de estações.
4. Rode o manípulo de Volume/Comando Sintonização/
Seletor para percorrer a lista de estações disponíveis.
Prima o manípulo para selecionar a estação.
5. Ajuste o volume pretendido rodando o manípulo de
Volume/Comando Sintonização/Seletor.
Modos de apresentação – DAB
O rádio tem uma gama de opções de apresentação no
modo DAB:
Prima o botão de informação para percorrer as várias
Page 68

opções apresentadas nas letras que se seguem (a. a g.).
a. Station name
(Nome da estação)
b. Program station
(Tipo de estação)
c. Multiplex name
(Nome do multiplex)
d. Time & date
(Hora e data)
e. Frequency and
channel
(Frequência e canal)
f . Bit rate/Audio type
(Taxa de bits/
Tipo de áudio)
g. Signal strength
(Força do sinal)
Indica o nome da estação que
está a ouvir.
Indica o tipo de estação que
está a ouvir. Por exemplo, Pop,
Clássicos, Notícias, etc.
Indica o nome do multiplex
DAB a que pertence a estação
atual.
Indica a hora e data atuais.
Indica a frequência e o número
do canal para a estação DAB
atualmente sintonizada.
Indica a taxa de bits de áudio
digital e o tipo de áudio para
a estação DAB atualmente
sintonizada.
Indica a força do sinal para
a estação DAB atualmente
sintonizada.
Encontrar novas estações – DAB
De vez em quando, podem ser disponibilizadas novas
estações de rádio DAB. Ou pode mudar-se para outra
região do país. Neste caso, pode ter de ativar o rádio
para pesquisar novas estações.
Para que o rádio encontre as estações disponíveis, é
recomendável realizar uma pesquisa completa de todas
as frequências DAB Banda III.
1. Prima o botão de sintonização automática.
2. O rádio realiza uma pesquisa completa das frequências
DAB. À medida que as novas estações são
encontradas, o contador de estações no lado esquerdo
do visor aumenta e as estações são adicionadas à
lista.
Sintonia manual – DAB
A sintonização manual permite-lhe sintonizar o rádio
para uma determinada frequência DAB na Banda III.
Esta função também pode ser utilizada para auxiliar
no posicionamento da antena ou do rádio, de modo
a otimizar a receção para um canal ou frequência
especícos.
1. Prima o botão de denição avançada e rode o
manípulo de Volume/Comando Sintonização/Seletor
até que a indicação “Manual Tune” (Sintonização
Manual) seja apresentada no visor. Prima o manípulo
de Volume/Comando Sintonização/Seletor para entrar
no modo de sintonização manual.
2. Rode o manípulo de Volume/Comando Sintonização/
Seletor para selecionar o canal DAB pretendido. Prima
o manípulo de Volume/Comando Sintonização/Seletor
para conrmar a frequência pretendida.
68 PORTUGUÊS
Conguração da ordem de
estações – DAB
O rádio tem 3 denições de ordem de estações à escolha.
As denições de ordem de estações são alphanumeric
(alfanumérica), ensemble (conjunto) e valid (estação válida).
1. Prima o botão de denição avançada.
2. Rode o manípulo de Volume/Comando Sintonização/
Seletor até que a indicação “Station order” (Ordem de
estações) seja apresentada no visor e, de seguida,
prima o manípulo de Volume/Comando Sintonização/
Seletor para introduzir a denição.
3. Rode o manípulo de Volume/Comando Sintonização/
Seletor para selecionar as opções que se seguem e
prima o manípulo para conrmar a denição.
Alphanumeric
(Alfanumérica)
Ensemble
(Conjunto)
Valid
(Estação válida)
Ordena a lista de estações
alfanumericamente 0...9 A...Z
Organiza a lista de estações por
multiplex DAB
Apresenta apenas as estações
para as quais é possível encontrar
um sinal
Controlo de gama dinâmica
(Dynamic Range Control, DRC) – DAB
A funcionalidade DRC pode fazer com que seja mais fácil
ouvir os sons mais silenciosos quando o rádio for utilizado
num ambiente ruidoso, reduzindo a gama dinâmica do
sinal de áudio. Existem três níveis de compressão:
DRC 0 Nenhuma compressão aplicada.
DRC 1/2 Compressão média aplicada.
DRC 1 Compressão máxima aplicada.
1. Prima o botão de alimentação para ligar o rádio.
2. Prima o botão de banda para selecionar a banda DAB.
3. Prima o botão de denição avançada e rode o
manípulo de Volume/Comando Sintonização/Seletor
até que a indicação “DRC Value” (Valor DRC) seja
apresentada no visor. De seguida, prima o manípulo de
Volume/Comando Sintonização/Seletor para introduzir
a denição. O visor apresenta o valor DRC atual.
4. Rode o manípulo de Volume/Comando Sintonização/
Seletor para selecionar a denição DRC pretendida.
5. Prima o manípulo de Volume/Comando Sintonização/
Seletor para conrmar a denição.
Pesquisa de sintonia – FM
1. Prima o botão de alimentação para ligar o rádio.
2. Selecione a onda pretendida premindo o botão de
banda. Certique-se de que a antena exível de haste
regulável foi bem colocada para a melhor receção
FM. Tente evitar utilizar o rádio perto de um ecrã
de computador e outro equipamento que provoque
interferências no rádio.
3. Prima o botão de sintonização automática para que
o rádio pesquise e pare automaticamente quando
Page 69

encontrar uma estação de rádio. O rádio continuará a
pesquisar a estação disponível seguinte a não ser que
o operador prima o botão de sintonização automática
para parar a pesquisa.
4. Rode o manípulo de Volume/Comando Sintonização/
Seletor para obter o nível do som pretendido. O visor
LCD mostra as alterações do nível do som.
5. Para desligar o rádio, prima o botão de alimentação.
Zona de pesquisa FM
Ao utilizar o modo FM, o rádio pode ser denido para
pesquisar estações locais ou para pesquisar todas as
estações, incluindo estações de rádio distantes.
1. Prima o botão de alimentação para ligar o rádio.
2. Prima o Botão de banda para selecionar a frequência
FM.
3. Prima o Botão de denição avançada e, em seguida,
gire o Manípulo de Volume/Comando Sintonização/
Seletor até que “FM Scan Zone” apareça no visor.
Prima o Manípulo de Volume/Comando Sintonização/
Seletor para entrar na conguração.
4. Gire o Manípulo de Volume/Comando Sintonização/
Seletor para alternar entre as opções “Local” (apenas
estações com sinal forte) e “Distante” (todas as
estações) na linha inferior do visor. A opção Distante
irá permitir que o rádio encontre sinais mais fracos ao
sintonizar.
5. Prima o Manípulo de Volume/Comando Sintonização/
Seletor para conrmar a sua seleção. A conguração
Local ou Distante é armazenada no rádio e permanece
em vigor até ser alterada ou se o sistema for reiniciado.
Sintonia manual – FM
1. Prima o botão de alimentação para ligar o rádio.
2. Prima o botão de banda para selecionar a onda
pretendida. Regule a antena como se descreve acima.
3. Rode o manípulo de Volume/Comando Sintonização/
Seletor para alterar a frequência com o incremento
seguinte: FM: 50 kHz
Nota:
Para utilizar o manípulo de Volume/Comando
Sintonização/Seletor para encontrar a estação
pretendida, prima o manípulo de Volume/Comando
Sintonização/Seletor para passar ao modo de controlo
de sintonização.
4. Mantenha a rotação do manípulo de Volume/Comando
Sintonização/Seletor até que a frequência pretendida
seja apresentada no visor.
5. Rode o manípulo de Volume/Comando Sintonização/
Seletor para obter o nível do som pretendido.
6. Para desligar o rádio, prima o botão de alimentação.
Modos de apresentação – FM (RDS)
O rádio tem uma gama de opções de apresentação para
o modo de rádio FM:
Prima repetidamente o Botão de informação para
visualizar as informações RDS (RÁDIO DO SISTEMA DE
DADOS) da estação está a ouvir.
a. Program station
(Tipo de estação)
b. Frequency
(Frequência)
c. Radio text
(Mensagem de rádio)
d. Program type
(Tipo de programa)
e. Time & date
(Hora e data)
Indica o nome da estação que
está a ouvir.
Indica a frequência do sinal
FM.
Indica mensagens de texto,
tais como novos itens, etc.
Indica o tipo de estação que
está a ouvir tal como Pop,
Clássicos, Notícias, etc.
Indica a hora e data atuais.
Memorizar estações em memórias
predenidas (DAB e FM)
Existem 5 memorizações para cada banda de onda.
1. Prima o botão de alimentação para ligar o rádio.
2. Sintonize a estação pretendida, usando um dos
métodos anteriormente descritos.
3. Prima continuamente o botão de memorização
pretendido até que o número de memorização seja
apresentado no visor, por exemplo, “P2 Saved”.
A estação é depois memorizada no botão de
memorização selecionado.
4. Repita este procedimento para as memorizações
restantes.
5. As estações memorizadas podem ser substituídas
seguindo os procedimentos descritos acima.
Chamar estações nas memórias
predenidas (DAB e FM)
1. Prima o botão de alimentação para ligar o rádio.
2. Prima o botão de banda para selecionar a onda
pretendida.
3. Prima momentaneamente o botão de memorização
pretendido. O número da memorização e a frequência
da estação serão apresentadas no visor.
OUVIR MÚSICA A PARTIR
DO SISTEMA BLUETOOTH
Precisa emparelhar o seu dispositivo Bluetooth com o
rádio antes de poder se conectar automaticamente para
reproduzirtransmitir música Bluetooth através do rádio.
O emparelhamento cria uma "ligação" para que os dois
dispositivos possam se reconhecer.
Nota:
Para obter a melhor qualidade de som, recomendamos
congurar o volume para mais de dois terços no seu
dispositivo Bluetooth e, em seguida, ajuste o volume no
rádio conforme necessário.
69 PORTUGUÊS
Page 70

Emparelhar o seu dispositivo Bluetooth
pela primeira vez
1. Prima o Botão de alimentação para ligar o rádio. Prima
o Botão de banda para selecionar o modo Bluetooth. O
indicador de Bluetooth nos Botões predenidos pisca
em azul para mostrar que o rádio pode ser detetável.
2. Ative o Bluetooth no seu dispositivo de acordo com o
manual do utilizador do dispositivo para fazer a ligação
ao rádio. Localize a lista de dispositivos Bluetooth
e selecione o dispositivo designado ‘DMR112.’Com
alguns telemóveis (que estão equipados com versões
anteriores ao dispositivo Bluetooth BT2.1), pode
necessitar de introduzir a palavra-passe “0000”.
3. Uma vez conectado, haverá um som de conrmação
e o indicador de Bluetooth nos botões predenidos
permanecerá em azul. Agora pode simplesmente
selecionar e tocar qualquer música do seu dispositivo.
O controlo de volume pode ser ajustado a partir do seu
dispositivo, ou diretamente do rádio.
4. Use os controlos do seu dispositivo com Bluetooth ou
do rádio para tocar/pausar e procurar faixas.
Nota:
1. Se 2 dispositivos Bluetooth, forem emparelhados pela
primeira vez, ambos procuram o seu rádio, mostrando
a sua disponibilidade em ambos os dispositivos.
Porém, se um dispositivo se ligar a esta unidade
primeiro, o outro dispositivo de Bluetooth não o
encontrará na lista.
2. Se o dispositivo Bluetooth estiver temporariamente
desligado do rádio, então necessita de religar
manualmente o seu dispositivo de novo ao rádio.
3. Se aparecer ‘DMR112” na sua lista de dispositivos
Bluetooth mas o seu dispositivo não puder ligar-se ao
mesmo, apague o item da sua lista e emparelhe, de
novo, o dispositivo com o rádio seguindo os passos
descritos previamente.
4. O melhor alcance de Bluetooth é de aproximadamente
10 metros (linha de visão) para o rádio, mas a distância
de até 30 metros (100 pés) é possível.
5. Se a conexão Bluetooth for perdida devido ao
tempo excedido de desconexão, a distância ideal
foi ultrapassada, obstáculos ou outros, talvez seja
necessário restabelecer a ligação entre o seu
dispositivo e o rádio.
6. Obstáculos físicos, outros dispositivos sem o ou
dispositivos eletromagnéticos podem afetar a qualidade
da conexão.
7. O desempenho da conectividade do Bluetooth
pode variar dependendo dos dispositivos Bluetooth
ligados. Consulte as capacidades de Bluetooth do seu
dispositivo antes de o ligar ao rádio. Nem todas as
funcionalidades são suportadas nalguns dispositivos
Bluetooth emparelhados.
Tocar cheiros áudio em Modo
Bluetooth
Depois de ter ligado com sucesso o seu rádio ao
dispositivo Bluetooth escolhido pode começar a tocar a
sua música usando os controlos do dispositivo Bluetooth
ligado.
1. Depois de começar a tocar ajuste o volume de acordo
com o desejado, usando os botões de volume do seu
rádio, ou os do dispositivo com capacidade Bluetooth.
2. Use os controlos do seu dispositivo para tocar/pausar
e procurar faixas.
Nota:
1. Nem todas as aplicações do aparelho ou dispositivo
respondem a estes controlos.
2. Alguns telemóveis podem car temporariamente
desligados do rádio quando faz ou recebe chamadas.
Alguns dispositivos podem silenciar temporariamente
o streaming áudio do Bluetooth quando recebem
mensagens de texto, emails, ou por outras razões
não relacionadas com o streaming áudio. Esse
comportamento é uma função do dispositivo ligado e
não indica uma avaria no seu rádio.
Reproduzir um dispositivo Bluetooth
previamente emparelhado
O seu rádio pode memorizar até 8 conjuntos de
dispositivos emparelhados, quando a memória excede
este valor, o histórico do emparelhamento mais antigo
será substituído. Se o seu dispositivo Bluetooth já
tiver sido emparelhado anteriormente com o rádio, a
unidade memorizará o seu dispositivo Bluetooth e esta
tenta restabelecer a ligação com um dispositivo na
memória que tenha sido ligado da última vez. Se o último
dispositivo ligado não estiver disponível, o rádio ca
disponível.
Desligar o Dispositivo Bluetooth
Prima e segure o botão de emparelhamento Bluetooth
durante 2-3 segundos para desconectar o seu dispositivo
Bluetooth. O indicador de Bluetooth nos botões
predenidos pisca em azul, indicando que o rádio está
novamente detetável para o emparelhamento.
ENTRADA AUXILIAR
Duas Entradas auxiliares estéreo de 3,5 mm são
fornecidas. Uma está na frente do rádio (AUX IN 1); a
outra está localizada no compartimento da bateria (AUX
IN 2).
1. Conecte uma fonte de áudio externa (por exemplo,
iPod, MP3 ou Leitor de CDs) na entrada auxiliar pelo
cabo de áudio.
2. Prima repetidamente e solte o botão de banda até que
“AUX IN 1” ou “AUX IN 2” seja exibido e, em seguida,
70 PORTUGUÊS
Page 71

a função AUX está ativada.
3. Para obter a melhor qualidade de som, recomendamos
que ajuste o volume para mais de dois terços no
seu dispositivo de áudio e ajuste o volume no rádio,
conforme o necessário.
NOTA:
O cabo de áudio não está incluído como acessório
padrão.
CONFIGURAÇÕES DIVERSAS
Opções de idioma
Estão disponíveis oito opções de idioma no rádio:
Inglês, Alemão, Italiano, Francês, Holandês,
Dinamarquês, Norueguês e Espanhol.
1. Prima o botão de denição avançada.
2. Rode o manípulo de Volume/Comando Sintonização/
Seletor até que a indicação “Language” (Idioma) seja
apresentada no visor. Prima o manípulo de Volume/
Comando Sintonização/Seletor para introduzir a
denição.
3. Rode o manípulo de Volume/Comando Sintonização/
Seletor para selecionar o idioma pretendido. Prima o
manípulo de Volume/Comando Sintonização/Seletor
para conrmar a denição.
Controlo do brilho
A Luz do fundo pode ser ajustada.
1. Prima o botão de denição avançada.
2. Gire o manípulo de Volume/Comando Sintonização/
Seletor até “Light Button” aparecer no visor. Prima o
manípulo de Volume/Comando Sintonização/Seletor
entrar na conguração
3. Gire o manípulo de Volume/Comando Sintonização/
Seletor para selecionar "On" ou "Off" para ativar ou
desativar a função da luz do fundo, depois prima o
manípulo de Volume/Comando Sintonização/Seletor
para conrmar a conguração.
Reiniciação do sistema
Se o rádio não funcionar corretamente, ou se alguns
dígitos no visor estiverem em falta ou incompletos, efetue
o procedimento seguinte.
1. Prima o botão de denição avançada.
2. Rode o manípulo de Volume/Comando Sintonização/
Seletor até que a indicação “Factory Reset” (Reposição
de fábrica) seja apresentada no visor. Prima o
manípulo de Volume/Comando Sintonização/Seletor
para introduzir a denição.
3. Rode o manípulo de Volume/Comando Sintonização/
Seletor para selecionar “Yes”. Prima o manípulo de
Volume/Comando Sintonização/Seletor para conrmar
a denição e realizar uma reposição total.
Versão de software
1. Prima o botão de denição avançada.
2. Rode o manípulo de Volume/Comando Sintonização/
Seletor até que a indicação “SW Version” (Versão de
software) seja apresentada no visor. Prima o manípulo
de Volume/Comando Sintonização/Seletor para ver
qual é a versão de software instalada no rádio.
Porta Micro USB para atualização
do software
No futuro, poderão ser disponibilizadas atualizações de
software para o rádio.
À medida que as atualizações de software cam
disponíveis, o software disponível e as informações sobre
como atualizar o rádio podem encontrar-se no
da Makita
.
website
MANUTENÇÃO
PRECAUÇÃO:
Nunca utilize gasolina, benzina, diluente, álcool
ou semelhante. Podem formar-se descolorações,
deformações ou ssuras.
71 PORTUGUÊS
Page 72

ESPECIFICAÇÕES
Requisitos de alimentação
Adaptador de alimentação CACC12 V 1,2A, pino central
positivo
Bateria de grupo:
Pilhas
Cobertura de frequências
Bloqueio de canais DAB/
DAB+
Norma compatível DAB/DAB+
7,2 V - 10,8 V
Bateria de deslize:
10,8 V - 18 V
FM 87,50 - 108 MHz
DAB/DAB+
174,928-239,200 MHz
DAB (Banda III) 5A-13F
Bluetooth
(A marca e o logótipo Bluetooth® são marcas comerciais
registadas da Bluetooth SIG, Inc.)
Versão de Bluetooth 4,0
Pers de Bluetooth A2DP/SCMS-T
Potência de transmissão Classe de Potência 2
Intervalo de transmissão
Codec suportado SBC,AAC
Perl Bluetooth compatível A2DP
Potência máxima de
radiofrequência:
Frequência de operação 2402MHz~2480MHz
Característica de circuito
Altifalante 3,5 polegadas 32 ohm x 2
Potência de saída
Terminal de entrada
Sistema de antena
Dimensões (C x L x A) 282 × 163 × 294 mm
Peso 4,3KG (sem bateria)
®
Ótimo: Máx.10 metros (33
pés)
Possível: Máx. 30 metros
(100 pés)
(varia de acordo com as
condições de utilização)
BT EDR: 3,12dBm
BT LE: 2,31dBm
7,2 V: 0,6 W X 2
12Vmáx: 1,7 W X 2
14,4 V: 3 W X 2
18 V: 4,9 W X 2
3,5 mm diâ.
(AUX IN1/AUX IN2)
DAB/FM: antena exível
de haste regulável
72 PORTUGUÊS
Page 73

DANSK (Originalvejledning)
FORKLARING AF GENEREL
OVERSIGT (Fig. 1~5)
1. Blød drejbar stangantenne
2. Batterirum
3. Håndtag
4. Batterirumsdæksel (batteripatron dæksel)
5. DC indgangsstik
6. Højttaler
7. Tænd-/sluk-knap
8. Bånd-knap
9. Knap til avancerede indstillinger
10. Info-knap
11. Forudindstilling 2-5
12. Knap til automatisk valg af frekvens
13. Lydstyrke/frekvensjustering/valgknap
14. USB-strømforsyningsport
15. AUX IN 1
16. Forudindstilling 1 /Bluetooth-parringsknap
17. LCD-display
18. Indgangsterminal (AUX IN 2)
19. Batterirum
20. Mikro USB-port til softwareopgradering
21. Batteri
SYMBOLER
I det efterfølgende vises de symboler, der anvendes for
udstyret. Sørg for at du forstår deres betydning før brug.
Læs brugsanvisningen.
Kun for EU-lande
Smid ikke elektrisk udstyr eller batterier
ud sammen med husholdningsaffald!
Under overholdelse af de europæiske
direktiver om elektrisk og elektronisk
udstyr og batterier og akkumulatorer
og opbruge batterier og akkumulatorer
og deres gennemførelse i
overensstemmelse med national
lovgivning skal elektrisk udstyr og
batterier og batteripakker, der er nået
til enden af deres levetid, indsamles
separat og returneres til et miljømæssigt
egnet genvindingsanlæg.
73 DANSK
VIGTIGE
SIKKERHEDSINSTRUKTIONER
ADVARSEL:
Ved brug af elektriske maskiner skal de grundlæggende
sikkerhedsforholdsregler altid overholdes for at reducere
risikoen for brand, elektrisk stød og personskade,
inklusive de følgende:
1. Læs denne brugsanvisning og brugsanvisningen til
opladeren omhyggeligt igennem inden brug.
2. Foretag kun rengøring med en ren klud.
3. Installer ikke udstyret i nærheden af varmekilder
som f.eks. radiatorer, indblæsningsriste, kakkelovne
eller andre apparater (inklusive forstærkere) der
producerer varme.
4. Brug kun ekstraudstyr/tilbehør som er speciceret af
producenten.
5. Tag stikket til dette apparat ud under tordenvejr, eller
når det ikke skal anvendes i længere tidsperioder.
6. En batteridrevet radio med indbygget batteri eller
en separat batteripakke må kun oplades med den
specicerede oplader til batteriet. En oplader, der
muligvis passer til én type batteri, kan medføre risiko
for brand, hvis den anvendes med et andet batteri.
7. Anvend kun batteridrevne radioer sammen med
særligt designerede batteripakker. Brug af andre
batterier kan muligvis medføre en risiko brand.
8. Når batteripakken ikke er i brug, skal den holdes
væk fra andre metalgenstande som f.eks.: papirclips,
mønter, søm, nøgler, skruer eller andre små
metalgenstande, som kan forbinde den ene terminal
med den anden. Kortslutning af batteriterminalerne
kan medføre gnister, forbrændinger eller brand.
9. Undgå kropskontakt med jordforbundne overader
som rør, radiatorer, overader og køleskabe. Hvis
kroppen er jordforbundet, forøges risikoen for elektrisk
stød.
10. Ved forkert behandling kan der sive væske ud fra
batteriet; undgå kontakt. Hvis der opstår utilsigtet
kontakt, skal du skylle med vand. Hvis du får væske i
øjnene, skal du desuden søge lægehjælp. Væske fra
batteriet kan forårsage irritation eller forbrændinger.
11. Brug ikke en batteripakke eller et værktøj, som er
beskadiget eller modiceret. Beskadigede eller
ændrede batterier kan udvise uforudsigelig adfærd,
der resulterer i brand, eksplosion eller risiko for skade.
12. Udsæt ikke en batteripakke eller et værktøj for brand
eller overdrevent høj temperatur. Hvis det udsættes
for ild eller temperatur over 130 °C, kan det forårsage
eksplosion.
13. Følg alle opladningsinstruktioner, og oplad
ikke batteriet eller værktøjet uden for det
temperaturområde, der er angivet i vejledningen.
Ukorrekt opladning eller ved temperaturer uden for
Page 74

det angivne område kan beskadige batteriet og øge
risikoen for brand.
14. NETSTIKKET bruges som afbryder, og det skal derfor
være let og hurtigt tilgængeligt
15. Brug ikke produktet ved høj lydstyrke i længere tid.
For at undgå høreskader, brug produktet ved moderat
lydstyrke.
16. (Kun for produkter med LCD-skærm) LCD-skærme
indeholder væske, der kan forårsage irritation og
forgiftning. Hvis væsken kommer i øjnene, munden
eller huden, skal man området med vand og kontakte
en læge.
17. Udsæt ikke produktet for regn eller våde forhold.
Vand, der kommer ind i produktet, øger risikoen for
elektrisk stød.
18. Dette produkt er ikke beregnet til brug af personer
(herunder børn) med nedsatte fysiske, sensoriske
eller mentale evner eller manglende erfaring og
viden, medmindre de er under opsyn eller har fået
instruktioner vedrørende brugen af produktet af en
person, der er ansvarlig for deres sikkerhed. Børn
skal overvåges for at sikre, at de ikke leger med
produktet. Opbevar produktet utilgængeligt for børn.
GEM DISSE INSTRUKTIONER
OPBEVAR DISSE INSTRUKTIONER
SÆRLIGE SIKKERHEDSREGLER
VEDR. BATTERIPAKKE
1. Før du bruger batteripakken, skal du læse alle
instruktioner og advarselsmarkeringer på (1)
batterioplader, (2) batteri og (3) produktet, som batteri
skal bruges i.
2. Adskil ikke batteripakken.
3. Hvis driftstiden er blevet væsentligt kortere, skal man
standse driften med det samme. Det kan medføre
risiko for overophedning, forbrændinger og endda
eksplosion.
4. Hvis du får elektrolyt i øjnene, skal du skylle dem med
rent vand og søge læge med det samme. Det kan
resultere i tab af synet.
5. Man må ikke kortslutte batteripakken:
1) Berør ikke terminalerne med nogen som helst
elektrisk ledende materialer.
2) Undgå at opbevare batteripakken i
en beholder, som indeholder andre
metalgenstande såsom søm, mønter, osv.
3) Udsæt ikke batteripakken for vand eller regn.
En eventuel kortslutning af batteriet kan
medføre at der opstår en stor strømstyrke,
overophedning, mulige forbrændinger og
endog sammenbrud.
6. Opbevar ikke værktøjet og batteripakken på steder,
hvor temperaturen kan nå eller overstige 50°C (122°F)
7. Man må ikke brænde batteripakken, selv om den er
alvorligt beskadiget eller helt slidt op. Batteripakken
kan eksplodere, hvis den udsættes for ild.
8. Pas på ikke at tabe batteri eller udsætte det for stød.
9. Brug ikke et beskadiget batteri.
10. For at undgå risikoen skal man læse manualen
vedrørende udskiftning af batteriet inden brug. Og
batteriens maksimale udløbsstrøm skal være større
end eller lig med 8A.
11. Det indeholder lithium-ion-batterier, som er
underlagt kravene i lovgivningen om farligt gods.
For erhvervsmæssig transport, f.eks. via tredjeparter
eller fremsendelsesagenter skal særlige krav til
emballering og mærkning overholdes.
Ved forberedelse af forsendelse af varen er det
nødvendigt at konsultere en ekspert i farligt materiale.
Vær også opmærksom på mere detaljerede nationale
bestemmelser.
Blottede kontakter skal isoleres med tape eller andre
midler, og batteriet skal pakkes på en sådan måde, at
det ikke kan bevæge sig rundt i emballagen.
12. Følg de lokale forskrifter vedrørende bortskaffelse af
batterier.
13. Brug kun batterierne sammen med de produkter, der
er speciceret af Makita. Installation af batterier i ikke-
kompatible produkter kan resultere i brand, ekstrem
varmeudvikling, eksplosion eller lækage af elektrolyt.
ADVARSEL:
● Fare for eksplosion, hvis batteriet udskiftes forkert.
● Udskift kun med samme eller tilsvarende type.
● Brug kun ægte Makita-batterier. Brug af uægte
Makita-batterier eller batterier, der er modicerede,
kan resultere i, at batteriet sprænges og forårsager
brand, kvæstelser og andre skader. Det vil også
ugyldiggøre Makita-garantien for Makita-værktøjet
og opladeren.
Tips til at opretholde maksimal
batterilevetid
1. Oplad batteripakken igen inden den er helt aadet. Hold
op med at bruge værktøjet og oplad batteripakken, når
du bemærker at værktøjets styrke mindskes.
2. Oplad aldrig en batteripakke, som allerede er fuldt
opladet. Overopladning forkorter batteriets levetid.
3. Oplad batteripakken i omgivelser, der har en
temperatur på 10 °C - 40 °C (50 °F - 104 °F). Lad en
varm batteripakke køle ned, før den oplades.
4. Oplad batteripakken, hvis du ikke bruger den i en
længere periode (mere end seks måneder).
74 DANSK
Page 75

DRIFTSTID
* Nedenstående tabel viser hvor lang tid enheden kan fungere på en enkelt opladning.
Batterispænding
Batterikapacitet
7,2 V 10,8 V
1,0 Ah BL7010 5,0 0,7
BL1013 7,0 0,9
1,3 Ah
BL0715 7,5 1,0
1,5 Ah
2,0 Ah
3,0 Ah
4,0 Ah
5,0 Ah
6,0 Ah
: Klyngebatter : Skydebatteri
ADVARSEL:
Brug kun de batterier, der angives ovenfor. Brug af andre batterikassetter kan forårsage skade og/eller brand.
Bemærk:
Tabel vedrørende batteridriftstiden ovenfor er kun vejledende. Den faktiske driftstid kan afvige alt efter batteritypen,
opladningsbetingelserne eller brugsmiljøet.
10,8 V –
12V maks
BL1015
BL1016
BL1020B
BL1021B
BL1040B
BL1041B
14,4 V 18 V I radio eller AUX
BL1415 5,5 1,7
BL1815 6,0 1,9
BL1415N 7,0 2,0
BL1815N 7,5 2,0
BL1820
BL1820B
BL1430
BL1430B
BL1830
BL1830B
BL1440 19 5,5
BL1840
BL1840B
BL1450 23 6,5
BL1850
BL1850B
BL1460B 25 7,5
BL1860B 31 9,5
VED HØJTTALER-OUTPUT = 100mW
Enhed: Time (ca.)
I radio med
USB-opladning
(1,0A)
8,5 1,7
11 2,0
10 3,0
12 3,5
14 4,0
21 4,0
20 6,0
26 8,0
75 DANSK
Page 76

INSTALLATION OG
STRØMFORSYNING
ADVARSEL:
● Pas på ikke at klemme ngrene, når du åbner og
lukker batteridækslet.
● Sæt batterirummets dæksel tilbage i den
oprindelige position, efter at du har installeret eller
fjernet batteripakken. Hvis ikke, kan batteripakken
ved et uheld falde ud af radioen og forårsage skade
på dig eller andre omkringstående personer.
● Luk og lås altid låget til batterirummet inden du
ytter radioen.
● Sluk altid radioen, inden du tager batteripatkken ud
eller sætter den i.
● Pas på ikke at tabe radioen eller udsætte den for
slag. Du risikere at skære dig på kabinettet, hvis
det er revnet eller knækket. En beskadiget radio
kan udvise uforudsigelig adfærd, der resulterer i
brand, eksplosion eller risiko for kvæstelser.
VIGTIGT:
● Reduceret effekt, forvrængning, "hakkende lyd"
ellervisning af "POWERFAIL" på displayet, er alt
sammen tegn på, at hovedbatteriet skal udskiftes.
● Batteripakken kan ikke oplades via den medfølgende
netadapter.
● Batteripakken er ikke inkluderet som standardtilbehør.
Montering eller fjernelse af
skydebatteripakken (Fig. 2 og 3)
1. Ved montering af batteripakken justeres tungen på
batteripakken med rillen i huset, hvorefter pakken
skubbes ind på plads. Sæt den altid hele vejen ind,
indtil den låses på plads med et lille klik.
2. Hvis den røde indikator øverst på knappen er synlig,
er batteripakken ikke låst helt fast. Sæt den helt ind,
indtil den røde indikator ikke er synlig. Ellers kan den
falde ud af radioen og skade dig eller andre personer i
nærheden.
3. Brug ikke magt ved isætning af batteripakken. Hvis den
ikke glider let ind, er den ikke indsat korrekt.
4. For at fjerne batteripakken skal du skyde den ud af
radioen, mens du benytter knappen på forsiden af
pakken.
Montering eller fjernelse af
klyngebatteripakken (Fig. 4 og 5)
1. Ved indsætning af batteripakken justeres tungen på
batteripakken med rillen i huset, hvorefter pakken
skubbes på plads.
2. Fjern batteripakken ved at tage batteriet ud af
terminalen, mens du trykker på knapperne på siden af
pakken.
Angivelse af den resterende
batterikapacitet
* Kun for batteripakker med “B” til sidst i
modelnummeret.
1
2
1. Indikatorlamper 2. Kontrolknap
Tryk på kontrolknappen på batteripakken for at få angivet
den resterende batterikapacitet. Indikatorlamperne lyser i
nogle få sekunder.
● 14,4V/18V batterier
Indikatorlamper
Tændt Slukket Blinker
Resterende
kapacitet
75% ~ 100%
50% ~ 75%
25% ~ 50%
0% ~ 25%
Lad batteriet op
Batteriet kan være
defekt
76 DANSK
Page 77

● 10,8V-12V maks. batterier
Indikatorlamper
Tændt Slukket Blinker
BEMÆRK:
Afhængigt af betingelserne for anvendelse og den
omgivende temperatur, kan indikationen dog afvige lidt fra
den faktiske kapacitet.
Resterende
kapacitet
75% ~ 100%
50% ~ 75%
25% ~ 50%
0% ~ 25%
Brug af den bløde bøjede stavantenne
(Fig. 1)
Ret den bløde bøjede stavantenne lige op som vist på
guren.
Brug af den medfølgende
vekselstrømsadapter
Fjern gummibeskyttelsen og sæt adapterstikket i
jævnstrømsstikket på højre side af radioen.
Sæt adapteren i en stikkontakt med netstrøm.
Når adapteren bruges, afbrydes forbindelsen til
batteripakken automatisk.
ADVARSEL:
● Afbryd altid forbindelsen til netadapteren helt,
inden du ytter radioen. Hvis forbindelsen til
vekselstrømsadapteren ikke er fuldstændigt afbrudt,
kan det forårsage elektrisk stød.
● Træk aldrig i adapterens ledning. Hvis man gør det
kan radioen ved et uheld falde ned og forårsage
skade på dig eller andre i nærheden.
VIGTIGT:
● Strømadapteren bruges til at forbinde radioen til
strømforsyningsnettet. Den stikkontakt, der sluttes til
radioen, skal forblive tilgængelig under normal brug.
● For at afbryde radioen, skal netadapteren fjernes helt
fra stikkontakten.
● Brug udelukkende den netadapter der følger med
produktet, eller som er angivet af Makita.
● Undlad at komme forsyningskabel eller stik i munden.
Det kan medføre elektrisk stød.
● Undlad at berøre stikket med våde eller fedtede
hænder.
● Beskadigede eller sammenltrede ledninger øger
risikoen for elektrisk stød. Hvis ledningen er beskadiget,
skal den udskiftes af vores autoriserede servicecenter
77 DANSK
for at undgå en sikkerhedsrisiko. Brug den ikke før
reparation.
● Efter brug skal du altid placere lysnetadapteren uden
for børns rækkevidde. Hvis børn leger med ledningen,
kan de komme til skade.
Opladning med
USB-strømforsyningsport
Der er en USB-port foran på radioen. Du kan oplade en
USB-enhed via USB-porten.
1. Tilslut en USB-enhed, som f.eks. en iPod, MP3- eller
CD-afspiller, med et USB-kabel, der fås i handlen.
2. Tryk på tænd/sluk-knappen for at tænde for din radio.
3. Uanset om radioen strømforsynes med vekselstrøm
eller er batteridrevet, kan radioen oplade USBenheden, når radioen er tændt og i FM/DAB -indstilling
eller BT-indstilling, eller AUX-indstillingen der
fremkommer, når der er tilsluttet en eksterm lydkilde.
Bemærk:
● Den maksimale lydstyrke for højttalerens udgangseffekt
reduceres, når din USB oplader.
● USB-stikket kan maksimalt levere en elektrisk strøm på
1A 5V.
Vigtigt:
● Inden du tilslutter USB-enheden til USB-porten, skal
du altid sikkerhedskopiere dataene på USB-enheden.
Ellers er der mulighed for, at du kan miste dine data.
● Radioen forsyner muligvis ikke strøm til visse USB-
enheder.
● Når den ikke anvendes eller efter opladning, skal du
fjerne USB-kablet og lukke dækslet.
● Tilslut ikke nogen strømkilde til USB-porten. Ellers er
der risiko for brand. USB-porten er kun beregnet til
opladning af lavspændingsenhed. Placer altid dækslet
på USB-porten, når lavspændingsenheden ikke oplades.
● Stik ikke søm, wire e.l. ind i USB-
strømforsyningsporten. Ellers kan en kortslutning
medføre røgudvikling og brand.
● Forbind ikke dette USB-stik med USB-porten på
din computer, da det højst sandsynligt vil medføre
sammenbrud på begge enheder.
LYTTE TIL RADIOEN
Radioen har tre kanalsøgningsmetoder - automatisk
kanalsøgning, manual kanalsøgning og forprogrammerede
kanaler.
Valg af en station – DAB
1. Tryk på tænd/sluk-knappen for at tænde for radioen.
2. Vælg DAB-indstillingen ved at trykke på knappen til
valg af bånd.
3. Tryk på avanceret indstilling-knappen og drej
på lydstyrke-/kanalsøgnings-/valgknappen indtil
“Station List” blinker på skærmen. Tryk på lydstyrke-/
Page 78

kanalsøgnings-/valgknappen for at komme ind til listen
over stationerne.
4. Drej på lydstyrke-/kanalsøgnings-/valgknappen for at
rulle gennem listen over tilgængelige stationer. Tryk på
knappen for at vælge stationen.
5. Juster den ønskede lydstyrke ved at dreje på
lydstyrke-/kanalsøgnings-/valgknappen.
Displayindstillinger – DAB
Radioen har en række visningsmuligheder i
DAB-indstillingen:
Tryk på info-knappen for at bevæge dig igennem de
forskellige valgmuligheder, som vises under de følgende
bogstaver (a. til g.).
a. Navn på station Angiver navnet på den station
der lyttes til.
b. Program type F.eks. pop, klassisk, nyheder
osv.
c. Multiplex-navn Angiver navnet på det DAB-
multiplex, som den aktuelle
station tilhører.
d. Tidspunkt og dato Angiver det aktuelle tidspunkt
og dato.
e. Frekvens og kanal Angiver frekvensen og
kanalnummeret for den DABstation, der aktuelt er stillet ind
på.
f . Bithastighed/lydtype Angiver bithastigheden for
digitallyden og lydtypen for
den DAB-station, der aktuelt er
stillet ind på.
g. Signalstyrke Angiver signalstyrken for den
DAB-station, der aktuelt er
stillet ind på.
Sådan nder du nye stationer – DAB
Fra tid til anden kommer der muligvis nye
DAB-radiostationer til. Eller du er måske yttet til en
anden del af landet. I dette tilfælde er du muligvis nødt til
at aktivere din radio til at scanne efter nye stationer.
For at give radioen mulighed for at nde alle de
tilgængelige stationer anbefales det, at du udfører en fuld
scanning af samtlige DAB-bånd III-frekvenser.
1. Tryk på automatisk kanalsøgningsknappen.
2. Radioen udfører en fuld scanning af DAB-frekvenserne.
Efterhånden som der ndes nye stationer, forøges
stationstælleren til venstre i displayet, og der tilføjes
stationer til listen.
Manuel kanalsøgning – DAB
Manuel kanalsøgning giver dig mulighed for at indstille
radioen på en bestemt DAB-frekvens på bånd III. Denne
funktion kan også anvendes til at rette antennen eller
radioen ind for at optimere modtagelsen af en særlig
78 DANSK
kanal eller frekvens.
1. Tryk på avanceret indstilling-knappen og drej
på lydstyrke-/kanalsøgnings-/valgknappen indtil
“Manual Tune” vises på displayet. Tryk på lydstyrke-/
kanalsøgnings-/valgknappen for at komme ind i den
manuelle kanalsøgningsindstilling.
2. Drej på lydstyrke-/kanalsøgnings-/valgknappen for at
vælge den ønskede DAB-kanal. Tryk på lydstyrke-/
kanalsøgnings-/valgknappen for at bekræfte den valgte
frekvens.
Opsætning af stationsrækkefølge – DAB
Radioen er udstyret med 3 indstillinger for
stationsrækkefølge, som du kan vælge imellem.
Indstillingerne for stationsrækkefølge er alfanumerisk,
ensemble og gyldig station.
1. Tryk på avanceret indstilling-knap.
2. Drej på lydstyrke-/kanalsøgnings-/valgknappen indtil
der vises “Station order” i displayet, og tryk derefter på
lydstyrke-/kanalsøgnings-/valgknappen for at komme
ind i indstillingen.
3. Drej på lydstyrke-/kanalsøgnings-/valgknappen for at
vælge de følgende valgmuligheder og tryk på knappen
for at bekræfte indstillingen.
Alfanumerisk Sorterer stationlisten alfanumerisk
0...9 A...Z
Ensemble Organiserer stationlisten efter
DAB-multiplex
Gyldig Viser kun de stationer, som der kan
ndes et signal for
Dynamisk områdekontrol (DRC) – DAB
DRC-funktionen kan gøre svage lyde nemmere at
høre, når radioen anvendes i et støjfyldt miljø, ved at
reducere lydsignalets dynamiske område. Der er tre
komprimeringsniveauer:
DRC 0 Der anvendes ingen komprimering.
DRC 1/2 Der anvendes medium komprimering.
DRC 1 Der anvendes maksimal komprimering.
1. Tryk på tænd/sluk-knappen for at tænde for radioen.
2. Tryk på knappen til valg af bånd for at vælge DABbåndet.
3. Tryk på avanceret indstilling-knappen og drej på
lydstyrke-/kanalsøgnings-/valgknappen indtil “DRC
Value” vises på displayet. Tryk derefter på lydstyrke-/
kanalsøgnings-/valgknappen for at komme ind i
indstillingen. Displayet viser den aktuelle DRC-værdi.
4. Drej på lydstyrke-/kanalsøgnings-/valgknappen for at
vælge den ønskede DRC-indstilling.
5. Tryk på lydstyrke-/kanalsøgnings-/valgknappen for at
bekræfte indstillingen.
Automatisk kanalsøgning – FM
1. Tryk på tænd/sluk-knappen for at tænde for radioen.
2. Vælg det ønskede frekvensbånd ved at trykke på
Page 79

knappen til valg af bånd. Kontroller, at den bløde
bøjede stavantenne er placeret optimalt for den
bedst mulige FM-signalmodtagelse. Prøv at undgå at
anvende radioen i nærheden af en computerskærm og
andet udstyr, der kan forårsage interferens på radioen.
3. Tryk på automatisk kanalsøgningsknappen og radioen
søger og stopper automatisk, når den nder en
radiostation. Radioen fortsætter med at søge efter
den næste tilgængelige station, medmindre brugeren
trykker på den automatiske kanalsøgningsknap for at
stoppe scanningen.
4. Drej på lydstyrke-/kanalsøgnings-/valgknappen for
at få det ønskede lydniveau. LCD-displayet viser
ændringerne i lydniveauet.
5. For at slukke for radioen skal du trykke på tænd/slukknappen.
FM-scanningszone
Når du anvender FM-indstillingen, kan radioen indstilles
til at scanne enten lokale stationer eller til at scanne alle
stationer inklusive fjerne radiostationer.
1. Tryk på tænd/sluk-knappen for at tænde for radioen.
2. Tryk på bånd-knappen for at vælge det ønskede FMbånd.
3. Tryk på knappen for avanceret indstilling, og drej
derefter knappen lydstyrke/frekvensjustering/valg,
indtil "FM Scan Zone" vises på displayet. Tryk på
knappen lydstyrke/frekvensjustering/valg for at åbne
indstillingen.
4. Drej knappen lydstyrke/frekvensjustering/valg for at
skifte mellem "Local" (kun stærke signaler) og "Distant"
(Alle signaler) i den nederste linje på displayet.
Indstillingen Distant gør det muligt for radioen at nde
svagere signaler, når der scannes.
5. Tryk på knappen lydstyrke/frekvensjustering/valg for at
bekræfte dit valg. Indstillingen Local eller Distant (Lokal
eller Fjern) gemmes i radioen og forbliver i kraft, indtil
den ændres eller indtil systemet nulstilles.
Manuel kanalsøgning – FM
1. Tryk på tænd/sluk-knappen for at tænde for radioen.
2. Tryk på knappen til valg af bånd for at vælge det
ønskede frekvensbånd. Juster antennen som beskrevet
ovenfor.
3. Drejer du på lydstyrke-/kanalsøgnings-/valgknappen
ændres frekvensen i følgende intervaller: FM: 50 kHz
Bemærk:
For at kunne bruge lydstyrke-/kanalsøgnings-/
valgknappen til at nde din ønskede station, skal du
trykke på lydstyrke-/kanalsøgnings-/valgknappen for at
skifte til kanalsøgningsindstillingen.
4. Bliv ved med at dreje på lydstyrke-/kanalsøgnings-/
valgknappen indtil den ønskede frekvens vises i
displayet.
5. Drej på lydstyrke-/kanalsøgnings-/valgknappen for at få
det ønskede lydniveau.
6. For at slukke for radioen skal du trykke på tænd/slukknappen.
Displayindstillinger – FM (RDS)
Radioen har en række displayfunktioner i FMradioindstillingen:
Tryk gentagne gange på Info-knappen for at se
oplysninger vedrørende RDS (Radiodatasystem) for den
station, du lytter til.
a. Programstation Angiver navnet på den station der
lyttes til.
b. Frekvens Angiver frekvensen for FM-
signalet.
c. Radiotekst Angiver tekstmeddelelser som
f.eks. nye emner osv.
d. Programtype Angiver den type station der
lyttes til som f.eks. pop, klassisk,
nyheder osv.
e. Tidspunkt og dato Angiver det aktuelle tidspunkt og
dato.
Lagring af stationer som
forhåndsindstillinger (DAB og FM)
Der er 5 forhåndsindstillinger for hvert frekvensbånd.
1. Tryk på tænd/sluk-knappen for at tænde for radioen.
2. Stil ind på den ønskede station ved hjælp af en af de
tidligere beskrevne metoder.
3. Tryk og hold på den ønskede forhåndsindstillingsknap
indtil forhåndsindstillingsnummeret vises på displayet,
for eksempel “P2 Saved”. Stationen gemmes derefter
på den valgte forhåndsindstillingsknap.
4. Gentag denne procedure for de resterende
forhåndsindstillinger.
5. Stationer, der er gemt som forhåndsindstillinger, kan
overskrives vha. de procedurer, som er beskrevet
ovenfor.
Genkald stationer fra
forhåndsindstillingerne (DAB og FM)
1. Tryk på tænd/sluk-knappen for at tænde for radioen.
2. Tryk på knappen til valg af bånd for at vælge det
ønskede frekvensbånd.
3. Tryk midlertidigt på den ønskede
forhåndsindstillingsknap. Forhåndsindstillingsnummeret
og stationsfrekvensen vises i displayet.
LYTTE TIL MUSIK VIA
BLUETOOTH-STREAMING
Du skal parre din Bluetooth-enhed med radio, før du
automatisk kan oprette forbindelse og afspille/streame
Bluetooth-musik gennem radio. Parring skaber en
79 DANSK
Page 80

'tilknytning', så to enheder kan genkende hinanden.
Bemærk:
For at få bedre lydkvalitet anbefaler vi, at man indstiller
lydstyrken til mere end to tredjedele af fuld lydstyrke
på Bluetooth-enheden og derefter juster lydstyrken på
radioen efter behov.
Parring af din Bluetooth-enhed for
første gang
1. Tryk på tænd/sluk-knappen for at tænde for radioen.
Tryk på båndknappen for at vælge Bluetooth-tilstand.
Bluetooth-indikatoren på Preset-knapperne blinker blåt
for at vise, at radioen kan opdages.
2. Aktivér Bluetooth på enheden i henhold til enhedens
brugermanual for at oprette forbindelse til radio. Find
Bluetooth-enhedslisten og vælg enheden med navnet
' DMR112'. Med nogle mobiler (som er udstyret med
versioner, der er tidligere end BT2.1 Bluetooth-enhed),
skal du muligvis indtaste koden "0000".
3. Når den er tilsluttet, lyder der en bekræftelsestone,
og Bluetooth-indikatoren på Preset-knapperne lyser
konstant blåt. Du kan nu vælge og afspille musik fra din
kildeenhed. Lydstyrken kan justeres fra din kildeenhed
eller direkte på radio.
4. Brug knapperne på din Bluetooth-aktiverede enhed
eller på radioen til at afspille/pause og navigere mellem
numre.
Bemærk:
1. Hvis der er tale om 2 Bluetooth-enheder, som skal
parres for første gang, kan du søge efter radioen
på dem begge, den vil være tilgængelig på begge
enheder. Men hvis den ene enhed opretter forbindelse
med denne enhed først, vil den ikke være at nde den
på listen på den anden Bluetooth-enhed.
2. Hvis din Bluetooth-enheds forbindelse til din radio
midlertidigt afbrydes, skal du genoprette enhedens
forbindelse til radioen manuelt.
3. Hvis ' DMR112' vises i din Bluetooth-enheds liste,
men enheden ikke kan oprette forbindelse til den, skal
du slette elementet fra listen og parre enheden med
radioen igen ved at følge de trin, som er beskrevet
ovenfor.
4. Den optimale Bluetooth-rækkevidde er ca. 10 meter
(uden hindringer) til radioen, men en afstand på op til
30 meter er mulig.
5. Hvis Bluetooth-forbindelsen går tabt på grund af
overskridelse af den optimale rækkevidde, forhindringer
eller andre årsager, kan det være nødvendigt at tilslutte
enheden til radioen igen.
6. Fysiske hindringer, andre trådløse enheder
eller elektromagnetiske enheder kan påvirke
forbindelseskvaliteten.
7. Bluetooth-forbindelsens ydelse kan variere afhængigt
af de tilsluttede Bluetooth-enheder. Undersøg
80 DANSK
enhedens Bluetooth-funktionalitet, inden du slutter
den til din radio. Det er måske ikke alle funktioner der
understøttes på visse parrede Bluetooth-enheder.
Afspilning af lydler i Bluetooth-tilstand
Når du har oprettet forbindelse mellem radioen og den
valgte Bluetooth-enhed, kan du begynde at afspille din
musik ved hjælp af knapperne på din tilsluttede Bluetoothenhed.
1. Når afspilning er begyndt, kan man justere lydstyrken
til det ønskede niveau med lydstyrke-knapperne på
radioen eller på den aktiverede Bluetooth-enhed.
2. Brug knapperne på din enhed til at afspille/pause og
navigere mellem numre.
Bemærk:
1. Det er ikke alle afspilnings-apps eller -enheder der
reagerer på disse kontroller.
2. Nogle mobiltelefoner afbryder midlertidigt forbindelsen
til din radio, når du foretager eller modtager opkald.
Nogle enheder dæmper midlertidigt deres Bluetoothlydafspilning, når de modtager SMS-beskeder, e-mails
eller af andre grunde, som ikke er relateret til lyd
streaming. Sådanne effekter stammer fra den tilsluttede
enhed, og indikerer ikke at der er noget i vejen med din
radio.
Afspilning af en tidligere parret
Bluetooth-kildeenhed
Din radio kan huske op til 8 sæt af parrede enheder.
Når antallet overstige dette, vil den først parrede enhed
blive slettet fra hukommelsen. Hvis din Bluetoothenhed allerede er blevet parret med radioen tidligere, vil
enheden huske din Bluetooth-enhed, og den vil forsøge
at genoprette forbindelsen med en enhed i hukommelsen,
som tidligere er blevet tilsluttet. Hvis den senest tilsluttede
enhed ikke er tilgængelig, vil radioen være synlig for
andre Bluetooth-enheder.
Afbrydelse af forbindelsen til din
Bluetooth-enhed
Tryk på Bluetooth-parringsknappen og hold den inde i
2-3 sekunder for at afbryde forbindelsen til din Bluetoothenhed. Bluetooth-indikatoren på de Preset-knapperne
blinker blåt, hvilket viser, at radioen igen kan opdages
med henblik på parring.
AUX-INDGANGSSTIK
Enheden har to 3,5 mm aux-stereoindgange. Den ene er
placeret på forsiden af radioen (AUX IN 1); den anden er
placeret i batterirummet (AUX IN 2).
1. Tilslut en ekstern lydkilde (f.eks. iPod, MP3 eller CD-
afspiller) til aux-stikket ved hjælp af en audio-ledning.
2. Tryk på og slip gentagne gange Bånd-knappen, indtil
"AUX IN 1" eller "AUX IN 2" vises, hvorefter AUX-
Page 81

funktionen aktiveres.
3. For at få bedre lydkvalitet anbefaler vi, at man indstiller
lydstyrken til mere end to tredjedele af fuld lydstyrke på
enheden og juster derefter lydstyrken på radioen efter
behov.
BEMÆRK:
Lydkablet er ikke inkluderet som standardtilbehør.
DIVERSE INDSTILLINGER
Sprogindstillinger
Der er otte sprogindstillinger til rådighed i radioen:
Engelsk, tysk, italiensk, fransk, hollandsk, dansk, norsk og
spansk.
1. Tryk på avanceret indstilling-knap.
2. Drej på lydstyrke-/kanalsøgnings-/valgknappen indtil
“Language” vises i displayet. Tryk på lydstyrke-/
kanalsøgnings-/valgknappen for at komme ind i
indstillingen.
3. Drej på lydstyrke-/kanalsøgnings-/valgknappen for
at vælge det ønskede sprog. Tryk på lydstyrke-/
kanalsøgnings-/valgknappen for at bekræfte
indstillingen.
Lysstyrkekontrol
Knappen Lys kan justeres.
1. Tryk på avanceret indstilling-knap.
2. Drej knappen lydstyrke/frekvensjustering/valg
indtil "Button Light" vises på displayet. Tryk på
knappen lydstyrke/frekvensjustering/valg for at åbne
indstillingen.
3. Drej knappen lydstyrke/frekvensjustering/valg for at
vælge "On" eller "Off" for at aktivere eller deaktivere
knappens lysfunktion, og tryk derefter på knappen
lydstyrke/frekvensjustering/valg for at bekræfte
indstillingen.
Nulstilling af system
Hvis din radio ikke fungerer ordentligt, eller der er cifre på
displayet, som mangler eller er ukomplette, skal du udføre
den følgende procedure.
1. Tryk på avanceret indstilling-knap.
2. Drej på lydstyrke-/kanalsøgnings-/valgknappen indtil
“Factory Reset” vises i displayet. Tryk på lydstyrke-/
kanalsøgnings-/valgknappen for at komme ind i
indstillingen.
3. Drej på lydstyrke-/kanalsøgnings-/valgknappen for
at vælge “Yes”. Tryk på lydstyrke-/kanalsøgnings-/
valgknappen for at bekræfte indstillingen, hvorefter der
udføres en komplet nulstilling.
Softwareversion
1. Tryk på avanceret indstilling-knap.
2. Drej på lydstyrke-/kanalsøgnings-/valgknappen indtil
81 DANSK
“SW Version” vises i displayet. Tryk på lydstyrke-/
kanalsøgnings-/valgknappen for at få vist den
softwareversion, som er installeret i radioen.
Mikro-USB-port til softwareopgradering
Der er muligvis softwareopdateringer til rådighed for din
radio i fremtiden.
Efterhånden som der bliver softwareopdateringer til
rådighed, kan du nde software og information, om
hvordan du opdaterer radioen, på
Makitas webside
.
VEDLIGEHOLDELSE
FORSIGTIG:
Brug aldrig benzin, benzen, fortynder, alkohol eller
lignende. Det kan muligvis medføre misfarvning,
deformation eller revner.
Page 82

SPECIFIKATIONER
Strømkrav
Vekselstrømsadapter
Batteri
Frekvensdækning
DAB/DAB+ Kanalblok DAB (Bånd III) 5A-13F
Kompatibel standard DAB/DAB+
DC 12 V 1,2A, centerben
positivt
Klyngebatteri:
7,2 V - 10,8 V
Skydebatteri: 10,8 V - 18 V
FM 87,50 - 108 MHz
DAB/DAB+
174,928-239,200 MHz
Bluetooth
(Bluetooth®-ordmærket og logoerne er registrerede
varemærker ejet af Bluetooth SIG, Inc.)
Bluetooth-version 4,0
Bluetooth-proler A2DP/SCMS-T
Sendekraft Effektklasse 2
Senderækkevidde
Understøttet codec SBC,AAC
Understøttet codec
Kompatibel Bluetooth-prol
Maksimal radiofrekvenseffekt:
Driftsfrekvens 2402MHz~2480MHz
Kredsløbsfunktion
Højttaler 3,5 tommer 32 ohm x 2
Udgangseffekt
Indgangsterminal
Antennesystem
Mål (L x B x H) 282 × 163 × 294 mm
Vægt 4,3KG (uden batteri)
®
Optimal: Maks. 10 meter
(33 fod)
Mulig: Maks. 30 meter
(100 fod)
(varierer afhængigt af
brugsbetingelserne)
A2DP
BT EDR: 3,12dBm
BT LE: 2,31dBm
7,2 V: 0,6 W X 2
12Vmax: 1,7 W X 2
14,4 V: 3 W X 2
18 V: 4,9 W X 2
3,5 mm dia.
(AUX IN1/AUX IN2)
DAB/FM: blød bøjet
stangantenne
82 DANSK
Page 83

ΕΛΛΗΝΙΚΑ
(Πρωτογενείς οδηγίες)
ΕΠΕΞΗΓΗΣΗ ΤΗΣ ΓΕΝΙΚΗΣ
ΟΨΗΣ (Εικ. 1~5)
1. Μαλακή ευλύγιστη κεραία
2. Ντουλάπι θήκης μπαταρίας
3. Λαβή
4. Κάλυμμα χώρου μπαταρίας
(φυσίγγιο μπαταρίας με κάλυμμα)
5. Υποδοχή DC IN
6. Ηχείο
7. Κουμπί τροφοδοσίας
8. Κουμπί μπάντας
9. Κουμπί σύνθετης ρύθμισης
10. Κουμπί πληροφοριών
11. Προεπιλογή 2-5
12. Κουμπί αυτόματου συντονισμού
13. Κουμπί Έντασης ήχου/Συντονισμού/Επιλογής
14. Θύρα τροφοδοσίας USB
15. AUX IN 1
16. Προεπιλογή 1/Κουμπί αντιστοίχισης Bluetooth
17. Οθόνη LCD
18. Ακροδέκτης εισόδου (AUX IN 2)
19. Χώρος μπαταρίας
20. Θύρα Micro USB για αναβάθμιση λογισμικού
21. Φυσίγγιο μπαταρίας
Σύμβολα
Τα παρακάτω παρουσιάζουν τα σύμβολα που
χρησιμοποιούνται για τη συσκευή. Βεβαιωθείτε ότι
κατανοείτε τη σημασία τους πριν από τη χρήση.
∆ιαβάστε το εγχειρίδιο οδηγιών.
Μόνο για τις χώρες της ΕΕ
Μην πετάτε ηλεκτρικό εξοπλισμό
ή μπαταρίες μαζί με τα οικιακά
απορρίμματα!
Σε συμμόρφωση με τις Ευρωπαϊκές οδηγίες,
σχετικά με τα απόβλητα ηλεκτρικού και
ηλεκτρονικού εξοπλισμού και μπαταριών και
συσσωρευτών και αποβλήτων μπαταριών
και συσσωρευτών και την εφαρμογή τους
σύμφωνα με τις εθνικές νομοθεσίες, ο
ηλεκτρικός εξοπλισμός και οι μπαταρίες
και οι συστοιχίες συσσωρευτών που έχουν
φθάσει στο τέλος της ζωής τους πρέπει να
συλλέγονται χωριστά και να επιστρέφονται
σε Περιβαλλοντικά συμμορφούμενη
εγκατάσταση ανακύκλωσης.
83 ΕΛΛΗΝΙΚΑ
ΣΗΜΑΝΤΙΚΕΣ ΟΔΗΓΙΕΣ
ΑΣΦΑΛΕΙΑΣ
ΠΡΟΕΙ∆ΟΠΟΙΗΣ:
Όταν χρησιμοποιείτε ηλεκτρικά εργαλεία, πρέπει πάντοτε
να ακολουθείτε όλες τις βασικές προφυλάξεις ασφαλείας,
για να μειώσετε τον κίνδυνο πυρκαγιάς, ηλεκτροπληξίας
ή ατομικού τραυματισμού, περιλαμβανομένων αυτών που
περιγράφονται στη συνέχεια:
1. ∆ιαβάστε προσεκτικά αυτό το εγχειρίδιο οδηγιών και το
εγχειρίδιο οδηγιών του φορτιστή πριν από τη χρήση.
2. Καθαρίστε μόνο με στεγνό πανί.
3. Μην εγκαταστήσετε κοντά σε πηγές θερμότητας όπως
καλοριφέρ, ανοίγματα εκροής θερμού αέρα, σόμπες ή
άλλες συσκευές (συμπεριλαμβανομένων ενισχυτών)
που παράγουν θερμότητα.
4. Χρησιμοποιείτε μόνο εξαρτήματα/αξεσουάρ που
καθορίζονται από τον κατασκευαστή.
5. Αποσυνδέετε τη συσκευή κατά τη διάρκεια
καταιγίδων με κεραυνούς ή όταν δεν πρόκειται να τη
χρησιμοποιήσετε για μεγάλο χρονικό διάστημα.
6. Ένα ραδιόφωνο που λειτουργεί με ενσωματωμένες
μπαταρίες ή με ξεχωριστή κασέτα μπαταρίας,
πρέπει να επαναφορτίζεται μόνο με τον καθορισμένο
φορτιστή για την μπαταρία. Ένας φορτιστής
που είναι κατάλληλος για ένα τύπο μπαταρίας
μπορεί να προκαλέσει τον κίνδυνο πυρκαγιάς εάν
χρησιμοποιηθεί σε ένα άλλο τύπο μπαταρίας.
7. Όταν το ραδιόφωνο λειτουργεί με μπαταρίες
χρησιμοποιήστε μόνο τις ειδικά καθορισμένες κασέτες
μπαταριών. Η χρήση οποιονδήποτε άλλων μπαταριών
μπορεί να δημιουργήσει τον κίνδυνο πυρκαγιάς.
8. Όταν η κασέτα μπαταρίας δεν χρησιμοποιείται, φυλάξτε
τη μακριά από άλλα μεταλλικά αντικείμενα, όπως
συνδετήρες, νομίσματα, κλειδιά, καρφιά, βίδες ή άλλα
μικρά μεταλλικά αντικείμενα, τα οποία μπορούν να
δημιουργήσουν σύνδεση από τον ένα πόλο στον άλλο.
Το βραχυκύκλωμα των ακροδεκτών της μπαταρίας
μπορεί να προκαλέσει εγκαύματα ή πυρκαγιά.
9. Αποφεύγετε την επαφή του σώματος με γειωμένες
επιφάνειες, όπως σωλήνες, καλοριφέρ, φούρνους και
ψυγεία. Υπάρχει αυξημένος κίνδυνος για πρόκληση
ηλεκτροπληξίας εάν το σώμα σας είναι γειωμένο.
10. Σε ακραίες συνθήκες μπορεί να πεταχτεί έξω το υγρό
της μπαταρίας, αποφύγετε την επαφή μαζί του. Εάν
συμβεί τυχαία επαφή, ξεπλύνετε με νερό. Αν το υγρό
έρθει σε επαφή με τα μάτια, επιπλέον ζητήστε ιατρική
βοήθεια. Το υγρό που εκτοξεύεται από την μπαταρία
μπορεί να προκαλέσει ερεθισμό ή εγκαύματα.
11. Μην χρησιμοποιείτε το πακέτο μπαταριών ή
εργαλείο που έχει καταστραφεί ή τροποποιηθεί.
Οι κατεστραμμένες ή τροποποιημένες μπαταρίες
ενδέχεται να παρουσιάζουν απρόβλεπτη
συμπεριφορά με αποτέλεσμα πυρκαγιά, έκρηξη ή
κίνδυνο τραυματισμού.
12. Μην εκθέτετε ένα πακέτο μπαταριών ή εργαλείο
σε φωτιά ή υπερβολική θερμοκρασία. Η έκθεση σε
φωτιά ή θερμοκρασία άνω των 130 °C μπορεί να
Page 84

προκαλέσει έκρηξη.
13. Ακολουθήστε όλες τις οδηγίες φόρτισης και μην
φορτίζετε το πακέτο μπαταριών ή το εργαλείο εκτός του
εύρους θερμοκρασίας που καθορίζεται στις οδηγίες.
Η λανθασμένη φόρτιση ή σε θερμοκρασίες εκτός του
καθορισμένου εύρους μπορεί να καταστρέψει την
μπαταρία και να αυξήσει τον κίνδυνο φωτιάς.
14. Το βύσμα κεντρικής τροφοδοσίας χρησιμοποιείται ως
συσκευή αποσύνδεσης, και θα παραμείνει λειτουργική.
15. Μην χρησιμοποιείτε το προϊόν σε υψηλή ένταση για
μεγάλο χρονικό διάστημα. Για να αποφύγετε βλάβες
της ακοής, χρησιμοποιήστε το προϊόν σε μέτρια
επίπεδα έντασης ήχου.
16. (Για προϊόντα με οθόνη LCD μόνο) Οι οθόνες LCD
περιλαμβάνουν υγρό που μπορεί να προκαλέσει ερεθισμό
και δηλητηρίαση. Εάν το υγρό εισχωρήσει στα μάτια, το
στόμα ή το δέρμα, ξεπλύνετε με νερό και καλέστε γιατρό.
17. Μην εκθέτετε το προϊόν σε βροχή ή σε υγρές
συνθήκες. Η διείσδυση νερού στο προϊόν θα αυξήσει
τον κίνδυνο ηλεκτροπληξίας.
18. Το προϊόν αυτό δεν προορίζεται για χρήση από
άτομα (συμπεριλαμβανομένων παιδιών) με μειωμένες
σωματικές, αισθητηριακές ή διανοητικές ικανότητες
ή έλλειψη εμπειρίας και γνώσης, εκτός εάν τους
παρασχεθούν επίβλεψη ή οδηγίες σχετικά με τη
χρήση του προϊόντος από άτομο υπεύθυνο για την
ασφάλειά τους. Τα παιδιά θα πρέπει να επιβλέπονται
για να βεβαιωθείτε ότι δεν παίζουν με το προϊόν.
Αποθηκεύστε το προϊόν μακριά από παιδιά.
ΦΥΛΑΞΤΕ ΑΥΤΕΣ ΤΙΣ ΟΔΗΓΙΕΣ
ΕΙΔΙΚΟΙ ΚΑΝΟΝΕΣ
ΑΣΦΑΛΕΙΑΣ
ΓΙΑ ΤΗΝ ΜΠΑΤΑΡΙΑ
1. Πριν χρησιμοποιήσετε την μπαταρία, διαβάστε όλες
τις οδηγίες και τις ενδείξεις προφύλαξης (1) στο
φορτιστή μπαταρίας, (2) τη μπαταρία, και (3) στο
προϊόν που χρησιμοποιεί την μπαταρία.
2. Μην αποσυναρμολογείτε την μπαταρία.
3. Αν ο χρόνος λειτουργίας έχει γίνει υπερβολικά
σύντομος, διακόψτε αμέσως τη λειτουργία. Καθώς
αυτό μπορεί να οδηγήσει σε κίνδυνο υπερθέρμανσης,
πιθανά εγκαύματα και ακόμη και μια έκρηξη.
4. Σε περίπτωση επαφής ηλεκτρολύτη με τα μάτια σας,
ξεπλύνετέ τα με καθαρό νερό και ζητήστε αμέσως
ιατρική βοήθεια. Η επαφή ηλεκτρολύτη με τα μάτια
μπορεί να οδηγήσει σε απώλεια όρασης.
5. Μην βραχυκυκλώνετετην μπαταρία:
1) Μην αγγίζετε τους ακροδέκτες με αγώγιμα υλικά.
2) Μην αποθηκεύετε την μπαταρία σε κιβώτιο
με άλλα μεταλλικά αντικείμενα, όπως καρφιά,
νομίσματα, κλπ.
3) Μην εκθέτετε την μπαταρία σε νερό ή βροχή. Ενα
βραχυκύκλωμα μπαταρίας μπορεί να προκαλέσει
μεγάλη ροή ρεύματος, υπερθέρμανση, πιθανά
εγκαύματα ή ακόμη και βλάβη.
84 ΕΛΛΗΝΙΚΑ
6. Μην αποθηκεύετε το εργαλείο και την μπαταρία σε
μέρη όπου η θερμοκρασία μπορεί να φτάσει ή να
ξεπεράσει τους 50°C (122°F)
7. Μην καίτε την μπαταρία, ακόμη και εάν έχει σοβαρή
ζημιά ή είναι εντελώς αποφορτισμένη. Η μπαταρία
μπορεί να εκραγεί σεφωτιά.
8. Προσέχετε να μην ρίχνετε ή χτηπάτε τη μπαταρία.
9. Μην χρησιμοποιείτε μια μπαταρία που έχει υποστεί ζημιά.
10. Προς αποφυγή κινδύνων, πρέπει να διαβάσετε το
εγχειρίδιο των ανταλλακτικών μπαταριών πριν από
τη χρήση. Και το μέγιστο ρεύμα αποφόρτισης της
μπαταρίας πρέπει να είναι μεγαλύτερο ή ίσο με 8Α.
11. Οι περιεχόμενες μπαταρίες ιόντων λιθίου υπόκεινται
στις απαιτήσεις της νομοθεσίας περί επικίνδυνων
εμπορευμάτων. Για τις εμπορικές μεταφορές, π.χ.
από τρίτους, μεταφορείς, πρέπει να τηρούνται ειδικές
απαιτήσεις στη συσκευασία και την επισήμανση.
Για την προετοιμασία του αντικειμένου που
μεταφέρεται, απαιτείται να συμβουλευτείτε
εμπειρογνώμονα για επικίνδυνα υλικά. Παρακαλούμε
επίσης να τηρείτε την ενδεχομένως λεπτομερέστερη
εθνική νομοθεσία.
Καλύψτε με ταινία ή απομονώστε τις ανοιχτές επαφές
και συσκευάστε την μπαταρία με τέτοιον τρόπο ώστε
να μην μπορεί να μετακινηθεί στη συσκευασία.
12. Ακολουθήστε τους τοπικούς κανονισμούς σχετικά με
τη διάθεση των μπαταριών.
13. Χρησιμοποιείτε τις μπαταρίες μόνο με τα προϊόντα
που ορίζει η Makita. Η τοποθέτηση των μπαταριών σε
μη συμμορφούμενα προϊόντα ενδέχεται να προκαλέσει
πυρκαγιά, υπερβολική έκλυση θερμότητας, έκρηξη, ή
διαρροή ηλεκτρολύτη.
ΠΡΟΣΟΧΗ:
● Κίνδυνος έκρηξης αν η μπαταρία αντικατασταθεί
εσφαλμένα.
● Αντικαταστήστε μόνο με τον ίδιο ή ισοδύναμο τύπο.
● Χρησιμοποιείτε μόνο γνήσιες μπαταρίες Makita.
Η χρήση μπαταριών που δεν είναι γνήσιες Makita
ή μπαταριών που έχουν αλλοιωθεί μπορεί να
έχει ως αποτέλεσμα την έκρηξη της μπαταρίας με
πρόκληση πυρκαγιάς, τραυματισμό και βλάβη.
Θα ακυρώσει επίσης την εγγύηση Makita για το
εργαλείο Makita και τον φορτιστή.
Συμβουλές για τη διατήρηση της μέγιστης
ζωής της μπαταρίας
1. Φορτίστε την μπαταρία πριν αποφορτιστεί εντελώς.
Πάντοτε να διακόπτετε τη λειτουργία του εργαλείου και
να φορτίζετε την μπαταρία όταν παρατηρείται μειωμένη
ισχύ του εργαλείου.
2. Ποτέ μην επαναφορτίζετε μια πλήρως φορτισμένη
μπαταρία. Η υπερφόρτιση μειώνει τη διάρκεια ζωής της
μπαταρίας.
3. Φορτίστε την μπαταρία σε θερμοκρασία περιβάλλοντος
10°C - 40°C (50°F - 104°F). Αν η μπαταρία είναι ζεστή
αφήστε τη να κρυώσει πριν τη φορτίσετε.
4. Φορτίστε την μπαταρία εάν δεν τη χρησιμοποιείσετε για
μεγάλο χρονικό διάστημα (περισσότερο από έξι μήνες).
Page 85

OPERATING TIME
*Ο παρακάτω πίνακας δείχνει το χρόνο λειτουργίας με μία μόνο φόρτιση.
Τάση κασέτας μπαταρίας
Χωρητικότητα
μπαταρίας
1,0 Ah BL7010 5,0 0,7
1,3 Ah
1,5 Ah
2,0 Ah
3,0 Ah
4,0 Ah
5,0 Ah
6,0 Ah
: Συστοιχία μπαταρίας : Συρόμενη μπαταρία
ΠΡΟΕΙΔΟΠΟΙΗΣΗ:
Χρησιμοποιείτε μόνο τις κασέτες μπαταρίας που αναφέρονται παραπάνω. Η χρήση οποιωνδήποτε άλλων
κασετών μπαταρίας μπορεί να προκαλέσει τραυματισμό ή/και πυρκαγιά.
Σημείωση:
Ο πίνακας σχετικά με τον χρόνο λειτουργίας της μπαταρίας παραπάνω είναι μόνο για αναφορά. Ο πραγματικός χρόνος
λειτουργίας μπορεί να διαφέρει ανάλογα με τον τύπο της μπαταρίας, την κατάσταση φόρτισης ή το περιβάλλον χρήσης.
7,2 V 10,8 V
BL1013 7,0 0,9
BL0715 7,5 1,0
10,8 V –
12Vμεγ.
BL1015
BL1016
BL1020B
BL1021B
BL1040B
BL1041B
14,4 V 18 V
BL1415 5,5 1,7
BL1815 6,0 1,9
BL1415N 7,0 2,0
BL1815N 7,5 2,0
BL1820
BL1820B
BL1430
BL1430B
BL1830
BL1830B
BL1440 19 5,5
BL1840
BL1840B
BL1450 23 6,5
BL1850
BL1850B
BL1460B 25 7,5
BL1860B 31 9,5
ΣΕ ΕΞΟΔΟ ΗΧΟΥ = 100mW
Μονάδα: Ώρα (περίπου)
Στο ραδιόφωνο ή
στο AUX
8,5 1,7
11 2,0
10 3,0
12 3,5
14 4,0
21 4,0
20 6,0
26 8,0
Στο ραδιόφωνο με
Φόρτιση USB
(1,0Α)
85 ΕΛΛΗΝΙΚΑ
Page 86

ΕΓΚΑΤΑΣΤΑΣΗ ΚΑΙ ΠΑΡΟΧΗ
ΕΝΕΡΓΕΙΑΣ
ΠΡΟΣΟΧΗ:
● Προσέξτε να μην πιέζετε τα δάχτυλά σας όταν
ανοίγετε και κλείνετε το κάλυμμα της μπαταρίας.
● Επαναφέρετε το ντουλάπι της θήκης μπαταριών
στην αρχική θέση, αφού εγκαταστήσετε ή
αφαιρέσετε το φυσίγγιο μπαταρίας. Εάν όχι, το
φυσίγγιο μπαταρίας μπορεί να πέσει κατά λάθος
από το ραδιόφωνο, προκαλώντας τραυματισμό σε
εσάς ή σε κάποιον γύρω σας.
● Κλείνετε πάντα και ασφαλίζετε το ντουλάπι θήκης
μπαταρίας πριν μετακινήσετε το ραδιόφωνο.
● Σβήνετε πάντα το ραδιόφωνο πριν τοποθετήσετε ή
αφαιρέσετε το φυσίγγιο μπαταρίας.
● Προσέξτε να μην πέσει ή χτυπήσει το ραδιόφωνο.
Το σπασμένο περίβλημα μπορεί να κόψει το
δάχτυλό σας ή να καρφωθεί στο σώμα σας. Το
ραδιόφωνο με ζημία μπορεί να παρουσιάσει
απρόβλεπτη συμπεριφορά με αποτέλεσμα
πυρκαγιά, έκρηξη ή κίνδυνο τραυματισμού.
ΣΗΜΑΝΤΙΚΟ:
● Μειωμένη ισχύς, παραμόρφωση, "διακοπές ήχου" ή
όταν εμφανίζεται το μήνυμα "POWERFAIL" στην οθόνη
είναι όλα ενδείξεις ότι το πακέτο κύριας μπαταρίας
πρέπει να αντικατασταθεί.
● Το φυσίγγιο μπαταρίας δεν μπορεί να φορτιστεί μέσω
του παρεχόμενου μετασχηματιστή AC.
● Το φυσίγγιο μπαταρίας δεν περιλαμβάνεται ως στάνταρ
αξεσουάρ.
Τοποθέτηση ή αφαίρεση της συρόμενης
κασέτας μπαταρίας (Εικ. 2 και 3)
1. Για να τοποθετήσετε την κασέτα μπαταρίας,
ευθυγραμμίστε τη γλωττίδα της κασέτας μπαταρίας με
την εγκοπή στο περίβλημα και σύρτε τη στη θέση της.
Πάντοτε να την τοποθετείτε έως το τέρμα έως ότου
ασφαλίζει στη θέση της και ακουστεί ένας απλός ήχος
“κλικ”.
2. Αν μπορείτε να δείτε την κόκκινη ένδειξη στην πάνω
πλευρά του κουμπιού, η μπαταρία δεν είναι πλήρως
ασφαλισμένη. Τοποθετήστε την πλήρως έως ότου να
μη φαίνεται η κόκκινη ένδειξη. Σε αντίθετη περίπτωση,
μπορεί να πέσει κατά λάθος από το ραδιόφωνο και να
τραυματίσει εσάς ή κάποιον παρευρισκόμενο.
3. Να μη χρησιμοποιείτε δύναμη όταν εισαγάγετε την
κασέτα μπαταρίας. Αν η κασέτα δεν ολισθαίνει με
ευκολία αυτό σημαίνει ότι δεν την εισαγάγατε σωστά.
4. Για να αφαιρέσετε το φυσίγγιο μπαταρίας, βγάλτε το
συρταρωτά από το ραδιόφωνο ένω σύρετε το κουμπί
στο εμπρός μέρος του φυσιγγγίου.
Τοποθέτηση ή αφαίρεση της κασέτας
συστοιχίας μπαταρίας (Εικ. 4 και 5)
1. Για να εισαγάγετε την κασέτα μπαταρίας,
ευθυγραμμίστε τη γλωττίδα της κασέτας μπαταρίας με
την εγκοπή στο περίβλημα και σύρτε τη στη θέση της.
Για να αφαιρέσετε την κασέτα μπαταρίας, βγάλτε την
2. μπαταρία έξω από το τερματικό πατώντας ταυτόχρονα
τα κουμπιά στο πλάι της κασέτας.
Ένδειξη της εναπομένουσας
χωρητικότητας της μπαταρίας
* Μόνογιατιςκασέτεςμπαταρίαμε“Β”στοτέλοςτου
αριθμούμοντέλου.
1
2
1. Ενδεικτικέςλυχνίες 2. Κουμπί ελέγχου
Πατήστε το κουμπί ελέγχου στην κασέτα μπαταρίας
για ναεμφανιστεί η υπολειπόμενη χωρητικότητα της
μπαταρίας. Οι ενδεικτικές λυχνίες θα ανάψουν για μερικά
δευτερόλεπτα.
● Μπαταρίες 14,4V/18V
Ενδεικτικέςλυχνίες
Αναμμένη Ανενεργή Αναβοσβήνει
Εναπομένουσα
χωρητικότητα
75% ~ 100%
50% ~ 75%
25% ~ 50%
0% ~ 25%
Φορτίστετην
μπαταρία
Πιθανή
δυσλειτουργία
μπαταρίας
86 ΕΛΛΗΝΙΚΑ
Page 87

● 10,8V-12V max batteries
Ενδεικτικέςλυχνίες
Αναμμένη Ανενεργή Αναβοσβήνει
ΣΗΜΕΙΩΣΗ:
Ανάλογα με τις συνθήκες χρήσης και τη θερμοκρασία
περιβάλλοντος, η ένδειξη ενδέχεται να διαφέρει ελαφρώς
από την πραγματική χωρητικότητα.
Εναπομένουσα
χωρητικότητα
75% ~ 100%
50% ~ 75%
25% ~ 50%
0% ~ 25%
Εγκατάσταση της μαλακής λυγισμένης
ράβδου κεραίας (Εικ. 1)
Εγκαταστήστε τη μαλακή λυγισμένη ράβδο κεραίας όπως
φαίνεται στην εικόνα.
Χρήση του παρεχόμενου
μετασχηματιστή εναλλασσόμενου
ρεύματος
Αφαιρέστε το προστατευτικό καουτσούκ και τοποθετήστε
το βύσμα του προσαρμογέα στην υποδοχή DC στη δεξιά
πλευρά του ραδιοφώνου.
Συνδέστε τον προσαρμογέα σε μια κανονική πρίζα
ρεύματος.
Όποτε χρησιμοποιείται ο προσαρμογέας, αποσυνδέεται
αυτόματα η μπαταρία.
ΠΡΟΣΟΧΗ:
● Αποσυνδέετε πάντα τον προσαρμογέα ρεύματος
AC πριν μετακινήστε το ραδιόφωνο.αν ο
μετασχηματιστής AC δεν αφαιρεθεί, μπορεί να
προκληθεί ηλεκτροπληξία.
● Ποτέ μην τραβάτε και σύρετε το καλώδιο του
προσαρμογέα. Αν όχι, το ραδιόφωνο μπορεί να
πέσει κατά λάθος, προκαλώντας τραυματισμό σε
εσάς ή σε κάποιον γύρω σας.
ΣΗΜΑΝΤΙΚΟ:
● Ο προσαρμογέας δικτύου χρησιμοποιείται ως
μέσο σύνδεσηςτου ραδιοφώνου στην τροφοδοσία
ρεύματος. Η πρίζα ρεύματοςπου χρησιμοποιείται για το
ραδιόφωνο πρέπει να παραμείνει προσβάσιμη κατά τη
διάρκεια της κανονικής χρήσης.
● Για να αποσυνδέσετε το ραδιόφωνο, ο προσαρμογέας
δικτύου πρέπει να βγει από την πρίζα.
● Χρησιμοποιήστε το τροφοδοτικό εναλλασσόμενου
ρεύματος που παρέχεται μαζί με το προϊόν ή που
ορίζεται μόνο από τη Makita.
87 ΕΛΛΗΝΙΚΑ
● Μην κρατάτε το καλώδιο τροφοδοσίας και το βύσμα
με το στόμα σας. Κάτι τέτοιο μπορεί να προκαλέσει
ηλεκτροπληξία.
● Μην αγγίζετε το βύσμα με βρεγμένα ή λιπαρά χέρια.
● Τα χαλασμένα ή μπλεγμένα καλώδια αυξάνουν
τον κίνδυνο ηλεκτροπληξίας. Εάν το καλώδιο
είναι κατεστραμμένο, αντικαταστήστε το από το
εξουσιοδοτημένο κέντρο σέρβις μας, προκειμένου
να αποφύγετε κίνδυνο για την ασφάλεια. Μην το
χρησιμοποιείτε πριν από την επισκευή.
● Μετά τη χρήση, να αποθηκεύετε πάντοτε το
τροφοδοτικό εναλλασσόμενου ρεύματος μακριά από
παιδιά. Εάν τα παιδιά παίζουν με το καλώδιο, μπορεί
να τραυματιστούν.
Φόρτιση με τη θύρα τροφοδοσίας USB
Η θύρα USB υπάρχει στην μπροστινή πλευρά του
ραδιοφώνου. Μπορείτε να φορτίσετε μια συσκευή USB
μέσω της θύρας USB.
1. Συνδέστε τη συσκευή USB, όπως iPod, MP3 ή CD
player, με ένα διαθέσιμο στην αγορά καλώδιο USB.
2. Πατήστε το κουμπί τροφοδοσίας για να ενεργοποιήσετε
το ραδιόφωνό σας.
3. Ανεξαρτήτως από το αν το ραδιόφωνό σας
τροφοδοτείται από πηγή εναλλασσόμενου ρεύματος
ή από μπαταρία, το ραδιόφωνο μπορεί να φορτίσει τη
συσκευή USB όταν ενεργοποιηθεί το ραδιόφωνο και
βρεθεί στη μπάντα ραδιοφώνουFM/DAB ή στη μπάντα
BT ή στη μπάντα AUX, η οποία εμφανίζεται όταν έχει
συνδεθεί μια εξωτερική πηγή ήχου.
Σημείωση:
● Η μέγιστη ένταση ήχου από το ηχείο εξόδου θα μειωθεί
όταν φορτίζει το USB.
● Η υποδοχή USB μπορεί να παράσχει το μέγιστο
ηλεκτρικό ρεύμα του 1A5V.
Σημαντικό:
● Πριν από τη σύνδεση της συσκευής USB στη θύρα
USΒ, πάντοτε να κρατάτε αντίγραφα ασφαλείας των
δεδομένων σας της συσκευής USB. ∆ιαφορετικά τα
δεδομένα σας μπορεί χαθούν λόγω οποιασδήποτε
περίπτωσης.
● Το ραδιόφωνο μπορεί να μην παράσχει ρεύμα σε
ορισμένες συσκευές USB.
● Αποσυνδέστε το καλώδιο USB και κλείστε το κάλυμμα
όταν δεν το χρησιμοποιείτε ή μετά τη φόρτιση.
● Μην συνδέετε πηγή ρεύματος στη θύρα USB.
∆ιαφορετικά υπάρχει κίνδυνος πυρκαγιάς. Η θύρα
USB προορίζεται μόνο για φόρτιση συσκευών χαμηλής
τάσης. Να τοποθετείτε πάντοτε το κάλυμμα πάνω
στη θύρα USB όταν δεν εκτελείτε φόρτιση συσκευής
χαμηλής τάσης.
● Μην εισαγάγετε κάποιο καρφί, σύρμα κ.λπ. μέσα
στη θύρα τροφοδοσίας USB. ∆ιαφορετικά ένα
βραχυκύκλωμα μπορεί να προκαλέσει καπνό και
Page 88

φωτιά.
● Μην συνδέετε ποτέ αυτή η υποδοχή USB με τη θύρα
USB του υπολογιστή σας, καθώς είναι πολύ πιθανό να
προκαλέσει βλάβη των μονάδων.
ΑΚΡΟΑΣΗ ΤΟΥ ΡΑΔΙΟΦΩΝΟΥ
Η συσκευή αυτή είναι εφοδιασμένη με τρεις μεθόδους
συντονισμού- Συντονισμός με σάρωση, Χειροκίνητος
συντονισμός και Ανάκτηση προεπιλεγμένης μνήμης.
Η επιλογή ενός σταθμού – DAB
1. Πατήστε το κουμπί τροφοδοσίας για να ενεργοποιήσετε
το ραδιόφωνο σας.
2. Επιλέξτε τη λειτουργία DAB πατώντας το κουμπί
μπάντας.
3. Πατήστε το κουμπί προηγμένων ρυθμίσεων και
περιστρέψτε το κουμπί έντασης/ελέγχου συντονισμού/
επιλογής έως ότου η “Λίστα σταθμών” να αναβοσβήνει
στην οθόνη. Πατήστε το κουμπί έντασης/ελέγχου
συντονισμού/επιλογής για να μεταβείτε στη λίστα των
σταθμών.
4. Περιστρέψτε το κουμπί έντασης/ελέγχου συντονισμού/
επιλογής για να μετακινηθείτε μέσα στη λίστα των
διαθέσιμων σταθμών. Πατήστε το κουμπί για να
επιλέξετε το σταθμό.
5. Ρυθμίστε την επιθυμητή ένταση περιστρέφοντας το
κουμπί έντασης/ελέγχου συντονισμού/επιλογής.
Λειτουργίες προβολής – DAB
Το ραδιόφωνό σας έχει μια σειρά από επιλογές ένδειξης
της λειτουργίας DAB:
Πατήστε το κουμπί πληροφοριών για να μεταβείτε στις
διάφορες επιλογές που εμφανίζονται στα παρακάτω
γράμματα (a. έως g.).
a. Όνομα σταθμού Δείχνει το όνομα του σταθμού που
b. Τύπος
προγράμματος
c. Πολυπλεξικό
όνομα
d. Ώρα &
ημερομηνία
e. Συχνότητα και
κανάλι
f . Ρυθμός μπιτ/
Τύπος ήχου
g. Ισχύς σήματος Δείχνει την ισχύ σήματος για τον
ακούτε.
Δείχνει τον τύπο του σταθμού
που ακούτε. Π.χ. Ποπ, Κλασικά,
Ειδήσεις, κ.λπ.
Δείχνει το όνομα του πολυπλεξικού
DAB στο οποίο ανήκει ο τρέχων
σταθμός.
Δείχνει την τρέχουσα ώρα και
ημερομηνία.
Δείχνει τη συχνότητα και τον
αριθμό καναλιού για τον τρέχοντα
συντονισμένο σταθμό DAB.
Δείχνει το ρυθμό μπιτ του ψηφιακού
ήχου και τον τύπο ήχου για τον
τρέχοντα συντονισμένο σταθμό
DAB.
τρέχοντα συντονισμένο σταθμό
DAB.
88 ΕΛΛΗΝΙΚΑ
Ανεύρεση νέων σταθμών – DAB
Από καιρό σε καιρό, μπορούν να καταστούν διαθέσιμοι
νέοι ραδιοφωνικοί σταθμοί DAB. Ή μπορεί να την έχετε
μετακινηθεί σε διαφορετικό μέρος της χώρας. Σε αυτή την
περίπτωση μπορεί να χρειαστεί να ενεργοποιήσετε το
ραδιόφωνο για να εκτελέσετε σάρωση νέων σταθμών. Για
να επιτρέψετε το ραδιόφωνο για να βρει τους διαθέσιμους
σταθμούς, συνιστάται να πραγματοποιήσετε μια πλήρη
σάρωση του συνόλου των συχνοτήτων της μπάντας III
DAB.
1. Πατήστε το κουμπί του αυτόματου συντονισμού.
2. Το ραδιόφωνό σας θα εκτελέσει μια πλήρη σάρωση
των συχνοτήτων DAB. Καθώς βρίσκονται νέοι σταθμοί,
ο μετρητής σταθμών στην αριστερή πλευρά της οθόνης
θα αυξάνει και σταθμοί θα προστίθενται στη λίστα.
Χειροκίνητος συντονισμός – DAB
Ο χειροκίνητος συντονισμός σας επιτρέπει να συντονίσετε
το ραδιόφωνό σας σε μια συγκεκριμένη συχνότητα
DAB στη μπάντα III. Αυτή η λειτουργία μπορεί επίσης
να χρησιμοποιηθεί για να βοηθήσει στην εύρεση της
σωστής θέσης της κεραίας ή του ραδιοφώνου ώστε να
βελτιστοποιηθεί η λήψη για ένα συγκεκριμένο κανάλι ή
συχνότητα.
1. Πατήστε το κουμπί προηγμένων ρυθμίσεων και
περιστρέψτε το κουμπί έντασης/ελέγχου συντονισμού/
επιλογής έως ότου να εμφανιστεί στην οθόνη ο
“Χειροκίνητος συντονισμός”. Πατήστε το κουμπί
έντασης/ελέγχου συντονισμού/επιλογής για να
μεταβείτε στη λειτουργία χειροκίνητου συντονισμού.
2. Περιστρέψτε το κουμπί έντασης/ελέγχου συντονισμού/
επιλογής για να επιλέξετε το επιθυμητό κανάλι DAB.
Πατήστε το κουμπί έντασης/ελέγχου συντονισμού/
επιλογής για να μεταβείτε στη λειτουργία χειροκίνητου
συντονισμού.
Ρύθμιση σειράς σταθμών – DAB
Το ραδιόφωνό σας διαθέτει 3 ρυθμίσεις σειράς σταθμών
από τις οποίες μπορείτε να επιλέξετε. Οι ρυθμίσεις σειράς
σταθμών είναι αλφαριθμητικός, συγκρότημα και έγκυρος
σταθμός.
1. Πατήστε το κουμπί προηγμένων ρυθμίσεων.
2. Περιστρέψτε το κουμπί έντασης/ελέγχου συντονισμού/
επιλογής μέχρι να εμφανιστεί στην οθόνη το “Σειρά
σταθμών”, στη συνέχεια πατήστε το κουμπί έντασης/
ελέγχου συντονισμού/επιλογής για να εισάγετε τη
ρύθμιση.
3. Περιστρέψτε το κουμπί έντασης/ελέγχου συντονισμού/
επιλογής για να επιλέξετε τις παρακάτω ρυθμίσεις και
πατήστε το κουμπί για να επιβεβαιώσετε τη ρύθμιση.
Αλφαριθμητικό Ταξινομεί την λίστα των σταθμών
αλφαβητικά-αριθμητικά 0...9 A...Z
Συγκρότημα Οργανώνει τη λίστα των σταθμών
κατά πολυπλεξικό DAB
Page 89

Έγκυρο Δείχνει μόνο τους σταθμούς για τους
οποίους μπορεί να βρεθεί σήμα
Έλεγχος δυναμικού εύρους (DRC) – DAB
Το χαρακτηριστικό DCR μπορεί να κάνει ευκολότερο το
άκουσμα των ήχων χαμηλής έντασης όταν το ραδιόφωνο
χρησιμοποιείται σε θορυβώδες περιβάλλον, μειώνοντας
το δυναμικό εύρος του ηχητικού σήματος. Υπάρχουν τρία
επίπεδα συμπίεσης:
DRC 0 Δεν εφαρμόζεται συμπίεση.
DRC 1/2 Εφαρμόζεται ενδιάμεση συμπίεση.
DRC 1 Εφαρμόζεται μέγιστη συμπίεση.
1. Πατήστε το κουμπί τροφοδοσίας για να ενεργοποιήσετε
το ραδιόφωνο σας.
2. Πατήστε το κουμπί μπάντας για να επιλέξετε την
επιθυμητή μπάντα DAB.
3. Πατήστε το κουμπί προηγμένων ρυθμίσεων και
περιστρέψτε το κουμπί έντασης/ελέγχου συντονισμού/
επιλογής έως ότου να εμφανιστεί στην οθόνη η
“Τιμή DRC”. Πατήστε το κουμπί έντασης/ελέγχου
συντονισμού/επιλογής για να εισάγετε τη ρύθμιση. Η
οθόνη θα εμφανίσει την τρέχουσα τιμή DRC.
4. Περιστρέψτε το κουμπί έντασης/ελέγχου συντονισμού/
επιλογής για να επιλέξετε την επιθυμητή ρύθμιση DAB.
5. Πατήστε το κουμπί έντασης/ελέγχου συντονισμού/
επιλογής για να εισάγετε τη ρύθμιση.
Σάρωση Συντονισμός – FM
1. Πατήστε το κουμπί τροφοδοσίας του ραδιοφώνου για
να ενεργοποιήσετε το ραδιόφωνο.
2. Επιλέξτε την επιθυμητή μπάντα συχνοτήτων πατώντας
το κουμπί μπάντας. Βεβαιωθείτε ότι η μαλακή
λυγισμένη ράβδος κεραίας έχει τοποθετηθεί σε καλή
θέση για την καλύτερη λήψη FM. Προσπαθήστε
να λειτουργείτε το ραδιόφωνο μακριά από οθόνη
υπολογιστή και από άλλες συσκευές που μπορούν να
προκαλέσουν παρεμβολή στο ραδιόφωνο.
3. Πατήστε το κουμπί αυτόματου συντονισμού και το
ραδιόφωνο θα πραγματοποιήσει αναζήτηση και θα
σταματήσει αυτόματα όταν εντοπίσει ένα ραδιοφωνικό
σταθμό. Το ραδιόφωνο θα συνεχίσει να αναζητά τον
επόμενο διαθέσιμο σταθμό εκτός εάν ο χειριστής
πατήσει το κουμπί αυτόματου συντονισμού για να
σταματήσει τη σάρωση.
4. Περιστρέψτε το κουμπί έντασης/ελέγχου συντονισμού/
επιλογής για να αποκτήσετε την επιθυμητή ένταση
ήχου. Η οθόνη LCD θα εμφανίσει τις αλλαγές στην
ένταση του ήχου.
5. Για να απενεργοποιήσετε το ραδιόφωνο, πατήστε το
κουμπί τροφοδοσίας.
Ζώνη σάρωσης FM
Όταν χρησιμοποιείται τη λειτουργία FM, το ραδιόφωνό
σας μπορεί να ρυθμιστεί για σάρωση είτε των τοπικών
σταθμών είτε για τη σάρωση όλων των σταθμών
συμπεριλαμβανομένων των μακρινών ραδιοφωνικών
σταθμών.
1. Πατήστε το κουμπί τροφοδοσίας του ραδιοφώνου για
να ενεργοποιήσετε το ραδιόφωνο.
2. Πατήστε το κουμπί μπάντας για να επιλέξετε τη ζώνη
FM.
3. Πατήστε το κουμπί σύνθετης ρύθμισης έπειτα
περιστρέψτε το κουμπί Έντασης/ΣυντονισμούΕλέγχου/
Επιλογήςμέχρι να εμφανιστεί "Ζώνη σάρωσης FM"
στην οθόνη. Πατήστε το Κουμπί Έντασης ήχου/
Συντονισμού/Επιλογής για να μπείτε στις ρυθμίσεις
4. Περιστρέψτε το κουμπί Ελέγχου έντασης/Συντονισμού/
Επιλογής για εναλλαγή μεταξύ "Τοπικών" (Ισχυροί
σταθμοί μόνο) και "Μακρινών" (Όλοι οι σταθμοί) στην
κάτω γραμμή της οθόνης. Η επιλογή "Μακρινών" θα
επιτρέψει στο ραδιόφωνο να βρει ασθενέστερα σήματα
κατά τη σάρωση.
5. Πατήστε το Κουμπί Έντασης ήχου/Συντονισμού/
Επιλογής για να επιβεβαιώσετε την επιλογή σας.
Η ρύθμιση Τοπικών ή Μακρινών αποθηκεύεται στο
ραδιόφωνο και παραμένει σε ισχύ έως ότου αλλάξει ή
μέχρι να γίνει επαναφορά συστήματος.
Χειροκίνητη σάρωση – FM
1. Πατήστε το κουμπί τροφοδοσίας του ραδιοφώνου για
να ενεργοποιήσετε το ραδιόφωνο.
2. Πατήστε το κουμπί μπάντας για να επιλέξετε την
επιθυμητή μπάντα συχνοτήτων. Ρυθμίστε την κεραία,
όπως περιγράφεται παραπάνω.
3. Η περιστροφή του κουμπιού έντασης/ελέγχου
συντονισμού/επιλογής θα αλλάζει τη συχνότητα με την
παρακάτω προσαύξηση: FM: 50
Σημείωση:
Για να χρησιμοποιήσετε το κουμπί έντασης/ελέγχου
συντονισμού/επιλογής για να βρείτε τον επιθυμητό
σταθμό σας, πιέστε το κουμπί έντασης/ελέγχου
συντονισμού/επιλογής για να μεταβείτε στη ρύθμιση
λειτουργίας ελέγχου συντονισμού.
4. Συνεχίστε να περιστρέφετε το κουμπί έντασης/ελέγχου
συντονισμού/επιλογής μέχρι να εμφανιστεί στην οθόνη
η απαιτούμενη συχνότητα.
5. Περιστρέψτε το κουμπί έντασης/ελέγχου συντονισμού/
επιλογής για να αποκτήσετε την επιθυμητή ένταση
ήχου.
6. Για να απενεργοποιήσετε το ραδιόφωνο, πατήστε το
κουμπί τροφοδοσίας.
Λειτουργίες ενδείξεων – FM (RDS)
Ραδιόφωνο σας έχει μια σειρά από επιλογές ένδειξης για
τη λειτουργία ραδιοφώνου FM:
Πατήστε επανειλημμένα το κουμπί Πληροφοριών για
να δείτε τις πληροφορίες RDS (Σύστημα ραδιοφωνικών
δεδομένων) του σταθμού που ακούτε.
89 ΕΛΛΗΝΙΚΑ
Page 90

a. Σταθμός
προγράμματος
b. Συχνότητα Δείχνει τη συχνότητα του
c. Ραδιοφωνικό
κείμενο
d. Τύπος
προγράμματος
e. Ώρα & ημερομηνία Δείχνει την τρέχουσα ώρα και
Εμφανίζει το όνομα του σταθμού
που ακούγεται.
σήματος FM.
Εμφανίζει μήνυμα κειμένου,
όπως νέα στοιχεία κλπ.
Εμφανίζει το είδος τουσταθμού
που ακούγεται, όπως Ποπ,
Κλασικός, Ειδήσεις, κ.α.
ημερομηνία.
Αποθήκευση σταθμών σε
προκαθορισμένες μνήμες (DAB και FM)
Υπάρχουν 5 προεπιλεγμένες μνήμες για κάθε μπάντα
κύματος.
1. Πατήστε το κουμπί τροφοδοσίας του ραδιοφώνου για
να ενεργοποιήσετε το ραδιόφωνο.
2. Συντονιστείτε με τον επιθυμητό σταθμό
χρησιμοποιώντας μια μέθοδο από αυτές που
αναφέρθηκαν προηγουμένως.
3. Πατήστε και κρατήστε πατημένο το επιθυμητό
κουμπί προεπιλογής μέχρι να εμφανιστεί ο αριθμός
προεπιλογής στην οθόνη, για παράδειγμα, “P2
Αποθηκευμένο”. Ο σταθμός στη συνέχεια αποθηκεύεται
στο επιλεγμένο κουμπί προεπιλογής.
4. Επαναλάβετε αυτή τη διαδικασία για τις εναπομένουσες
προεπιλογές.
5. Οι αποθηκευμένοι σταθμοί στις προεπιλεγμένες μνήμες
μπορούν να αντικατασταθούν ακολουθώντας τις
παραπάνω διαδικασίες.
Ανάκτηση σταθμών από τις
προκαθορισμένες μνήμες (DAB και FM)
1. Πατήστε το κουμπί τροφοδοσίας του ραδιοφώνου για
να ενεργοποιήσετε το ραδιόφωνο.
2. Πατήστε το κουμπί μπάντας για να επιλέξετε την
επιθυμητή μπάντα συχνοτήτων.
3. Πιέστε το επιθυμητό κουμπί προεπιλογής στιγμιαία.
Πατήστε τον αριθμό προεπιλογής και η συχνότητα του
σταθμού θα εμφανιστεί στην ένδειξη.
ΑΚΡΟΑΣΗ ΜΟΥΣΙΚΗΣ ΜΕΣΩ
ΡΟΗΣ BLUETOOTH
Πρέπει να αντιστοιχίσετε τη συσκευή Bluetooth με το
ραδιόφωνο προτού μπορέσετε να συνδεθείτε αυτόματα
για αναπαραγωγή/ροή μουσικής Bluetooth
μέσω του ραδιοφώνου. Η αντιστοίχιση δημιουργεί
έναν "δεσμό" ώστε οι δύοσυσκευές να μπορούν να
αναγνωρίσουν η μία την άλλη.
ΣΗΜΕΙΩΣΗ:
Για να έχετε την καλύτερη ποιότητα ήχου, συνιστούμε τη
ρύθμισητης έντασης σε περισσότερο από τα δύο τρίτα του
επιπέδου στο Bluetooth σας και να ρυθμίστε την ένταση
του ήχου στο ραδιόφωνο όπως απαιτείται.
Αντιστοίχιση της συσκευής Bluetooth
σας για πρώτη φορά
1. Πατήστε το κουμπί τροφοδοσίας για να ενεργοποιήσετε
το ραδιόφωνο. Πατήστε το κουμπί μπάντας για να
επιλέξετε τη λειτουργία Bluetooth. Η ένδειξη Bluetooth
στα κουμπιά προεπιλογών ρύθμισης αναβοσβήνει με
μπλε χρώμα υποδεικνύοντας ότι το ραδιόφωνο μπορεί
να ανιχνευθεί.
2. Ενεργοποιήστε το Bluetooth στη συσκευή σας
σύμφωνα με το εγχειρίδιο χρήσης της συσκευής
για σύνδεση με το ραδιόφωνο. Εντοπίστε τη λίστα
συσκευών Bluetooth και επιλέξτε τη συσκευή με την
ονομασία "DMR112" σε μερικά κινητά τηλέφωνα (τα
οποία είναι εξοπλισμένα μεπαλαιότερες εκδόσεις
συσκευής Bluetooth BT2.1), μπορεί να χρειαστεί να
εισαγάγετε τον κωδικό πρόσβασης "0000".
3. Αφού συνδεθείτε, θα υπάρξει τόνος επιβεβαίωσης
και η ένδειξη Bluetooth στα κουμπιά Προεπιλογής θα
παραμείνει σταθερά σε μπλε χρώμα. Μπορείτε απλά να
επιλέξτε και αναπαράγετε οποιαδήποτε μουσική από τη
συσκευή προέλευσής σας. Ο έλεγχος έντασης μπορεί
να ρυθμιστεί από την συσκευή πηγής σας ή απευθείας
από το ραδιόφωνο.
4. Χρησιμοποιήστε τα χειριστήρια ελέγχου της συσκευής
με δυνατότητα Bluetooth ή στο ραδιόφωνο για
αναπαραγωγή/παύση και πλοήγηση κομματιών.
ΣΗΜΕΙΩΣΗ:
1. Εάν 2 συσκευές Bluetooth, συνδέονται για πρώτη
φορά, και οι δύο σε αναζήτηση το ραδιόφωνο, θα δείξει
τη διαθεσιμότητά τουκαι στις δύο συσκευές. Ωστόσο,
εάν μια συσκευή συνδεθεί με αυτή τη μονάδα πρώτα,
τότε η άλλη συσκευή Bluetooth δεν θα τη βρει στη
λίστα.
2. Αν η συσκευή Bluetooth σας αποσυνδεθεί προσωρινά
από το ραδιόφωνο, τότε πρέπει να επανασυνδεθείτε με
μη αυτόματο τρόπο ξανά στο ραδιόφωνο.
3. Αν το "DMR112" εμφανίζεται στη λίστα συσκευών
Bluetooth σας, αλλά η συσκευή σας δεν μπορεί
να συνδεθεί με αυτό, διαγράψτε το στοιχείο από
τη λίστα σας και αντιστοιχίστε τη συσκευή με
το ραδιόφωνοακολουθώντας τα βήματα που
περιγράφηκαν προηγουμένως.
4. Η βέλτιστη περιοχή ροής Bluetooth είναι περίπου 10
μέτρα (γραμμή θέασης) στο ραδιόφωνο, αλλά είναι
εφικτή απόσταση μέχρι 30 μέτρα.
5. Σε περίπτωση απώλειας της σύνδεσης Bluetooth λόγω
υπέρβασης του χρόνου διαχωρισμού, υπέρβασης της
βέλτιστης απόστασης, εμποδίων ή με άλλο τρόπο,
μπορεί να χρειαστεί να επανασυνδεθεί η συσκευή σας
με το ραδιόφωνο.
6. Τα φυσικά εμπόδια, άλλες ασύρματες συσκευές ή
90 ΕΛΛΗΝΙΚΑ
Page 91

ηλεκτρομαγνητικές συσκευές ενδέχεται να επηρεάσουν
την ποιότητα της σύνδεσης.
7. Η απόδοση σύνδεσης Bluetooth μπορεί να διαφέρει
ανάλογα με τις συνδεδεμένες συσκευές Bluetooth.
Παρακαλούμε ανατρέξτε στις δυνατότητες Bluetooth
της συσκευής σας πριν τη σύνδεση με το ραδιόφωνο.
Όλα τα χαρακτηριστικά μπορεί να μην υποστηρίζονται
σε ορισμένες συσκευές.
Αναπαραγωγή αρχείων ήχου σε
λειτουργία Bluetooth
Όταν έχετε συνδέσει με επιτυχία το ραδιόφωνο μετην
επιλεγμένη συσκευή Bluetooth μπορείτε να αρχίσετε να
αναπαραγάγετε μουσική χρησιμοποιώντας τα χειριστήρια
της συνδεδεμένης συσκευής Bluetooth.
1. Αφού αρχίσει η αναπαραγωγή, ρυθμίστε την ένταση
στοαπαιτούμενο επίπεδο χρησιμοποιώντας το
κουμπί έντασης του ήχου στοραδιόφωνο ή στην
ενεργοποιημένη συσκευή Bluetooth.
2. Χρησιμοποιήστε τα στοιχεία ελέγχου στη συσκευή σας
για αναπαραγωγή/παύση και πλοήγηση στα κομμάτια.
ΣΗΜΕΙΩΣΗ:
1. Μπορεί να μην ανταποκρίνονται όλες οι εφαρμογές ή
συσκευές αναπαραγωγήςσε όλα αυτά τα χειριστήρια.
2. Ορισμένα κινητά τηλέφωνα ενδέχεται να αποσυνδεθούν
προσωρινά από το ραδιόφωνο όταν πραγματοποιείτε ή
λαμβάνετε κλήσεις. Ορισμένες συσκευές ενδέχεται να
απενεργοποιήσουν προσωρινά τον ήχο ροής Bluetooth
όταν λαμβάνουν μηνύματα κειμένου, μηνύματα
ηλεκτρονικού ταχυδρομείου ή για άλλους λόγους
που δεν σχετίζονται με την μετάδοση ήχου. Αυτή η
συμπεριφορά εξαρτάται από τη συνδεδεμένη συσκευή
και δεν υποδεικνύει σφάλμα στο ραδιόφωνο.
Αναπαραγωγή μιας προηγουμένως
συνδεδεμένης συσκευής πηγής
Bluetooth
Το ραδιόφωνο μπορεί να απομνημονεύσει έως και 8
σετ συνδεδεμένων συσκευών, όταν η μνήμη υπερβαίνει
αυτό το πλήθος, το παλαιότερο ζεύγος στο ιστορικό
θα αντικατασταθεί. Εάν η συσκευή Bluetooth σας έχει
ήδη αντιστοιχιστεί με το ραδιόφωνο προηγουμένως, η
μονάδα θα απομνημονεύσει τη συσκευή Bluetooth και
θα προσπαθήσει να επανασυνδεθεί με τη συσκευή στη
μνήμη με την οποία συνδέθηκε τελευταία. Εάν η τελευταία
συνδεδεμένη συσκευή δεν είναι διαθέσιμη, το ραδιόφωνο
θα είναι ανιχνεύσιμο.
Αποσύνδεση της συσκευής Bluetooth
Πατήστε και κρατήστε πατημένο το κουμπί αντιστοίχισης
Bluetooth για 2-3 δευτερόλεπτα για να αποσυνδεθείτε
από τη συσκευή Bluetooth. Η ένδειξη Bluetooth στα
κουμπιά προεπιλογών αναβοσβήνει με μπλε χρώμα και
υποδεικνύει ότι το ραδιόφωνο μπορεί να εντοπιστεί και
91 ΕΛΛΗΝΙΚΑ
πάλι για αντιστοίχιση.
ΒΟΗΘΗΤΙΚΗ ΥΠΟΔΟΧΗ
ΕΙΣΟΔΟΥ
Παρέχονται δύο βοηθητικές στερεοφωνικές υποδοχές
εισόδου 3,5 mm. Η μια είναι στο μπροστινό μέρος του
ραδιοφώνου σας (AUX IN 1)· η άλλη βρίσκεται στο
διαμέρισμα των μπαταριών (AUX IN 2).
1. Συνδέστε μια εξωτερική πηγή ήχου (για παράδειγμα,
συσκευή αναπαραγωγής iPod,MP3 ή CD) στην
Βοηθητική υποδοχή με καλώδιο ήχου.
2. Πιέστε επανειλημμένα και αφήστε το κουμπί
μπάνταςέως ότου εμφανιστεί στην οθόνη η ένδειξη
"AUX IN 1" ή "AUX IN 2", τότε ενεργοποιείται η
λειτουργία AUX.
3. Για να έχετε την καλύτερη ποιότητα ήχου, συνιστούμε
τη ρύθμιση της έντασης σε περισσότερο από τα δύο
τρίτα του επιπέδου στο Bluetooth σας και να ρυθμίστε
την ένταση του ήχου στο ραδιόφωνο όπως απαιτείται.
ΣΗΜΕΙΩΣΗ:
Το καλώδιο ήχου δεν περιλαμβάνεται ως στάνταρ
αξεσουάρ.
ΔΙΑΦΟΡΕΣ ΡΥΘΜΙΣΕΙΣ
Επιλογές γλώσσας
Υπάρχουν διαθέσιμες οκτώ επιλογές γλώσσας στο
ραδιόφωνο:
Αγγλικά, Γερμανικά, Ιταλικά, Γαλλικά, Ολλανδικά, Δανικά,
Νορβηγικά και Ισπανικά.
1. Πατήστε το κουμπί προηγμένων ρυθμίσεων.
2. Περιστρέψτε το κουμπί έντασης/ελέγχου συντονισμού/
επιλογής μέχρι να εμφανιστεί στην οθόνη το “Γλώσσα”.
Πατήστε το κουμπί έντασης/ελέγχου συντονισμού/
επιλογής για να εισάγετε τη ρύθμιση.
3. Περιστρέψτε το κουμπί έντασης/ελέγχου συντονισμού/
επιλογής για να επιλέξετε την επιθυμητή γλώσσα.
Πατήστε το κουμπί έντασης/ελέγχου συντονισμού/
επιλογής για να επιβεβαιώσετε τη ρύθμισή σας.
Έλεγχος φωτεινότητας
Η φωτεινή ένδειξη κουμπιού μπορεί να προσαρμοστεί.
1. Πατήστε το κουμπί προηγμένων ρυθμίσεων.
2. Περιστρέψτε το Κουμπί Έντασης ήχου/Συντονισμού/
Επιλογής μέχρι να εμφανιστεί η "Φωτεινή ένδειξη
κουμπιού" στην οθόνη. Πατήστε το Κουμπί Έντασης
ήχου/Συντονισμού/Επιλογής για να επιβεβαιώσετε τη
ρύθμιση.
3. Περιστρέψτε το Κουμπί Έντασης ήχου/Συντονισμού/
Επιλογής για να επιλέξετε "On" ή "Off" για να
ενεργοποιήσετε ή να απενεργοποιήσετε τη λειτουργία
Φωτεινής ένδειξης κουμπιού, στη συνέχεια πατήστε το
Κουμπί Έντασης ήχου/Συντονισμού/Επιλογής για να
Page 92

επιβεβαιώσετε τη ρύθμιση.
Επαναφορά συστήματος
Αν το ραδιόφωνό σας δεν λειτουργεί σωστά ή αν δεν
εμφανίζονται κάποια ψηφία στην ένδειξη ή εμφανίζονται
ατελώς, εκτελέστε την παρακάτω διαδικασία.
1. Πατήστε το κουμπί προηγμένων ρυθμίσεων.
2. Περιστρέψτε το κουμπί έντασης/ελέγχου συντονισμού/
επιλογής μέχρι να εμφανιστεί στην οθόνη το
“Εργοστασιακή επαναφορά”. Πατήστε το κουμπί
έντασης/ελέγχου συντονισμού/επιλογής για να εισάγετε
τη ρύθμιση.
3. Περιστρέψτε το κουμπί έντασης/ελέγχου συντονισμού/
επιλογής για να επιλέξετε το “Ναι”. Πατήστε το κουμπί
έντασης/ελέγχου συντονισμού/επιλογής για να
επιβεβαιώσετε τη ρύθμιση και θα εκτελεστεί μια πλήρη
επαναφορά.
Έκδοση λογισμικού
1. Πατήστε το κουμπί προηγμένων ρυθμίσεων.
2. Περιστρέψτε το κουμπί έντασης/ελέγχου συντονισμού/
επιλογής μέχρι να εμφανιστεί στην οθόνη το “Έκδοση
λογισμικού”. Πατήστε το κουμπί έντασης/ελέγχου
συντονισμού/επιλογής για να δείτε την έκδοση
λογισμικού που είναι εγκαταστημένη στο ραδιόφωνο.
Θύρα μικρο-USB για αναβάθμιση
λογισμικού
Μελλοντικές ενημερώσεις λογισμικού για το ραδιόφωνό
σας μπορεί να είναι διαθέσιμες.
ιστοσελίδα Makita
Στην
διαθέσιμες ενημερώσεις λογισμικού και οι πληροφορίες
για το πως θα γίνει η ενημέρωση του ραδιοφώνου σας.
μπορούν να βρεθούν οι
ΣΥΝΤΗΡΗΣΗ
ΠΡΟΣΟΧΗ:
Μην χρησιμοποιήσετε βενζίνη, βενζόλη, διαλυτικό,
αλκοόλη ή κάτι παρόμοιο. Μπορεί να προκληθεί
αποχρωματισμός, παραμόρφωση ή ρωγμές.
Προδιαγραφές
Απαιτήσεις ηλεκτρικού ρεύματος
Μετασχηματιστής
ρεύματος AC
Μπαταρία
Συχνότητας κάλυψης
DAB/DAB+ Μπλοκ
καναλιού
Συμβατό πρότυπο DAB/DAB+
Bluetooth
(Το λεκτικό σήμα Bluetooth® και τα λογότυπα αποτελούν
εμπορικά σήματα της Bluetooth SIG, Inc.)
Έκδοση Bluetooth 4,0
Προφίλ Bluetooth A2DP/SCMS-T
Ισχύς μετάδοσης Κατηγορία ισχύος2
Εύρος μετάδοσης
Υποστηριζόμενη
κωδικοποίηση
Συμβατό προφίλ Bluetooth A2DP
Μέγιστη ισχύς
ραδιοσυχνοτήτων:
Συχνότητα λειτουργίας 2402MHz~2480MHz
Χαρακτηριστικό κυκλώματος
Ηχείο 3,5 ιντσών 32 ohm x 2
Ισχύς εξόδου
Τερματικό εισόδου
Σύστημα κεραίας
Διαστάσεις (Μ x Π x Υ) 282 × 163 × 294 mm
Βάρος 4,3KG (χωρίς μπαταρία)
®
DC 12 V 1,2A, θετικός
πόλος η κεντρική ακίδα
Συστοιχία μπαταρίας:
7,2 V - 10,8 V
Συρόμενη μπαταρία:
10,8 V - 18 V
FM 87,50 - 108 MHz
DAB/DAB+
174,928-239,200 MHz
DAB (Μπάντα III) 5A-13F
Βέλτιστο: Μέγιστο 10
μέτρα (33 πόδια)
Δυνατότητα: Μέγ. 30 μέτρα
(100 πόδια)
(ποικίλλει ανάλογα με τις
συνθήκες χρήσης)
SBC,AAC
BT EDR: 3,12dBm
BT LE: 2,31dBm
7,2 V: 0,6 W X 2
12Vμεγ.: 1,7 W X 2
14,4 V: 3 W X 2
18 V: 4,9 W X 2
∆ιαμ. 3,5 mm
(AUX IN1/AUX IN2)
DAB/FM: Μαλακή
λυγισμένη ράβδος κεραίας
92 ΕΛΛΗΝΙΚΑ
Page 93

TÜRKÇE (Orijinal talimatlar)
GENEL GÖRÜNÜM
AÇIKLAMASI (Resim 1~5)
1. Yumuşak bükülebilir çubuk anten
2. Pil bölmesi kilitli yuvası
3. Sap
4. Pil bölmesi kapağı (Pil kartuşunu kapatır)
5. DC giriş yuvası
6. Hoparlör
7. Güç düğmesi
8. Bant düğmesi
9. Gelişmiş ayar düğmesi
10. Bilgi düğmesi
11. Ön ayar 2-5
12. Otomatik ayar düğmesi
13. Ses/Ayar Kontrol/Seçim Düğmesi
14. USB güç kaynağı bağlantı noktası
15. AUX GİRİŞİ 1
16. Ön ayar 1/Bluetooth eşleştirme düğmesi
17. LCD ekran
18. Giriş terminali (AUX GİRİŞİ 2)
19. Pil bölmesi
20. Yazılım yükseltme için Mikro USB bağlantı noktası
21. Pil kartuşu
SEMBOLLER
Aşağıdakiler ekipman için kullanılan simgeleri
göstermektedir. Kullanmadan önce anlamlarını
anladığınızdan emin olun.
Kullanma kılavuzunu okuyun.
Yalnızca AB ülkeleri için
Elektrikli ekipmanı veya pil takımını ev
atık malzemeleriyle birlikte çöpe atmayın!
Elektrikli ve Elektronik Ekipmanların ve
Piller ve Akümülatörlerin ve Atık Pillerin
ve Akümülatörlerin Çöpe Atılmasında
Avrupa Direktierinin yerine getirilmesi
ve Avrupa Direktierinin ulusal kanunlara
uygun olarak ömrünün sonuna gelmiş
elektrikli ekipmanlar ve piller ile pil
takımlarının ayrı olarak toplanması ve
çevreye uyumlu bir geri dönüşüm tesisine
iade edilmesinde uygulanması.
93 TÜRKÇE
ÖNEMLİ GÜVENLİK
TALİMATLARI
UYARI:
Elektrikli aletler kullanılırken, yangın, elektrik çarpması,
aşağıdakiler de dahil olmak üzere kişisel yaralanma
risklerinin azaltılması için temel güvenlik önlemlerine
sürekli uyulmalıdır:
1. Kullanmadan önce bu kullanma kılavuzu ile şarj cihazı
kullanma kılavuzunu dikkatle okuyun.
2. Yalnızca kuru bezle temizleyin.
3. Radyatörler, kalorifer ızgaraları, soba veya ısı üreten
diğer cihazlar (amplikatörler de dahil) gibi herhangi
bir ısı kaynağının yakınına kurmayın.
4. Yalnızca üretici tarafından belirtilen eklentileri/
aksesuarları kullanın.
5. Şimşekli fırtınalar sırasında veya çok uzun bir süre
boyunca kullanılmadığında bu cihazı şten çıkarın.
6. İçinde bulunan pillerle veya ayrı bir pil takımıyla
çalışan bir radyo, ancak ilgili pile ait özel şarj cihazı ile
şarj edilmelidir. Herhangi bir pil türü için uygun olan bir
şarj cihazı, başka bir pille kullanıldığında yangın riski
oluşturabilir.
7. Pille çalışan radyoyu özel olarak tasarlanmış pil
takımlarıyla birlikte kullanın. Başka pillerin kullanımı
yangın riski oluşturabilir.
8. Pil takımı kullanımda değilken pil takımını; kağıt ataçı,
bozuk para, anahtar, çivi, cıvata veya diğer küçük
metal nesneler gibi bir kutuptan diğerine bağlantı
yapabilecek diğer metal nesnelerden uzak tutun. Pil
kutuplarının bir arada kısa devre yaptırılması kıvılcım,
yanık veya yangına neden olabilir.
9. Boru, radyatör, ocak ve buzdolabı gibi topraklanmış
yüzeylerle vücut temasından kaçının. Vücudunuzun
toprakla temas etmesi halinde yüksek derece elektrik
çarpması riski bulunmaktadır.
10. Kötü koşullar altında pilden sıvı boşalabilir; temas
etmekten kaçının. Kaza ile temasta bulunulması
durumunda su ile yıkayın. Sıvının gözle temas etmesi
halinde tıbbi yardıma başvurun. Pilden çıkan sıvı
tahrişe veya yanmaya neden olabilir.
11. Bozuk veya değiştirilmiş pil takımı veya araçlar
kullanmayın. Bozuk veya değiştirilmiş piller; yangın,
patlama veya yaralanma riskiyle sonuçlanan
beklenmedik davranışlar sergileyebilirler.
12. Pil takımını veya aracı ateşe ya da aşırı sıcaklığa
maruz bırakmayın. Ateşe veya 130°C derecenin
üzerinde sıcaklığa maruz kalması patlamaya neden
olabilir.
13. Tüm şarj talimatlarını izleyin ve pil takımı ya da aracı
talimatlarda belirtilen sıcaklık aralıklarının dışında şarj
etmeyin. Uygun olmayan koşullarda veya belirtilen
sıcaklık aralıklarının dışında şarj etmek pile zarar
verebilir ve yangın riskini artırabilir.
Page 94

14. Cihazın bağlantısının kesilmesi için ANA ŞEBEKE şi
kullanılır ve cihaz kolayca çalışır durumda kalır.
15. Ürünü hiç bir zaman uzun süre boyunca yüksek seste
kullanmayın. Herhangi bir duyma bozukluğundan
kaçınmak için ürünü orta ses seviyesinde kullanın.
16. (Yalnızca LCD ekranlı ürünler için) LCD ekranlar,
tahriş ve zehirlenmeye neden olabilecek sıvı
içermektedir. Sıvı maddenin gözler, ağız veya ciltle
temas etmesi durumunda suyla yıkayın ve bir doktor
çağırın.
17. Ürünün yağmur veya ıslak koşullara maruz kalmasına
izin vermeyin. Ürüne giren su elektrik çarpması riskini
artırır.
18. Bu ürün, kendilerine güvenliklerinden sorumlu bir kişi
tarafından ürünün kullanımına ilişkin olarak gözetim
ve talimatlar verilmediği sürece, ziksel, duyusal veya
zihinsel kabiliyetleri sınırlı veya deneyimsiz ve bilgisi
olmayan kişilerin (çocuklar da dahil) kullanımı amaçlı
değildir. Çocukların ürünle oynamadıklarından emin
olunması için kontrol edilmesi gerekmektedir. Ürünü
çocukların ulaşamayacağı bir yerde muhafaza edin.
BU TALİMATLARI KAYDEDİN
ÖZEL GÜVENLİK KURALLARI
PİL KARTUŞU İÇİN
1. Pil kartuşu kullanmadan önce (1) pil şarj cihazı, (2)
pil ve (3) pil kullanan ürün üzerinde bulunan tüm
talimatları ve uyarı işaretlerini okuyun.
2. Pil kartuşunu sökmeyin.
3. Çalışma süresinin aşırı kısa olması durumunda,
hemen çalışmayı durdurun. Bu durum aşırı ısınma,
olası yanıklar ve hatta patlama riskine neden olabilir.
4. Gözlerinize elektrolit kaçması durumunda, temiz su ile
gözlerinizi yıkayın ve derhal tıbbi yardıma başvurun.
Aksi takdirde görme kaybı yaşayabilirsiniz.
5. Pil kartuşunu kısa devre yaptırmayın:
(1) Kutuplara herhangi bir iletken malzeme ile
dokunmayın.
(2) Pil kartuşunu; çivi, bozuk para vb. gibi
diğer metal nesnelerle birlikte aynı kutuda
bulundurmaktan kaçının.
(3) Pil kartuşunu suya veya yağmura maruz
bırakmayın. Pilin kısa devre yapması büyük
bir akıma, aşırı ısınmaya, olası yanıklara ve
hatta arızaya neden olabilir.
6. Aracı ve pil kartuşunu sıcaklığın 50 °C(122°F)
dereceye ulaştığı veya geçtiği yerlerde muhafaza
etmeyin
7. Pil kartuşunu ciddi şekilde tahrip olmuş veya tamamen
yıpranmış olsa bile yakmayın. Pil kartuşu herhangi bir
yangın sırasında patlayabilir.
8. Pili düşürmemeye veya çarpmamaya dikkat gösterin.
9. Hasarlı pili kullanmayın.
10. Riski ortadan kaldırmak için, kullanmadan önce
değiştirilen pilin kullanım kılavuzu okunmalıdır. Ve pilin
maksimum deşarj akımı 8A eşit veya büyük olmalıdır.
11. İçerisinde lityum-iyon bulunan piller Tehlikeli Maddeler
Mevzuat gereksinimlerine tabidir. Ticari taşımalar için,
yani üçüncü taraar, nakliye acenteleri için, ambalaj
ve etiketlemede özel gereksinimlerin yerine getirilmesi
gerekir.
Sevk edilen malzemenin hazırlanması için, tehlikeli
madde uzmanına danışılması gerekir. Lütfen ayrıca
muhtemelen daha ayrıntılı bilgiler içeren ulusal
düzenlemeleri de dikkate alın.
Açık temas noktalarını bantlayın veya kapatın ve
pili ambalaj içerisinde hareket etmeyecek şekilde
ambalajlayın.
12. Pilin atılmasıyla ilgili, yerel düzenlemelere uygun
hareket edin.
13. Pilleri, yalnızca Makita tarafından belirtilen ürünlerle
kullanın. Pillerin, uyumlu olmayan ürünlere takılması
yangın, aşırı ısınma, patlama veya elektrolit
sızıntısına neden olabilir.
DİKKAT:
● Pilin yanlış takılması durumunda patlama
tehlikesiyle karşı karşıya kalınabilir.
● Pili, aynı türden veya eşdeğer bir pille değiştirin.
● Yalnızca orijinal Makita pilleri kullanım, kullanın.
Orijinal olmayan Makita pilleri veya değiştirilmiş
piller kullanılması, yangın, kişisel yaralanma
ve hasara neden olabilecek pil patlamasıyla
sonuçlanabilir. Bu aynı zamanda Makita aracı
ve şarj cihazı için Makita garantisini de geçersiz
kılacaktır.
Maksimum pil ömrü elde etmek için
ipuçları
1. Tamamen şarjı bitmeden önce pil kartuşunu şarj edin.
Araçta enerjinin az olduğunu farkettiğinizde daima
aracın çalışmasını durdurun ve pil kartuşunu şarj edin.
2. Tam şarj edilmiş pil kartuşunu hiç bir zaman yeniden
şarj etmeyin. Aşırı şarj pilin çalışma ömrünü kısaltır.
3. Pil kartuşunu 10 °C - 40 °C (50 °F - 104 °F) derece
oda sıcaklığında şarj edin. Isınmış pil kartuşunu şarj
etmeden önce soğumasını bekleyin.
4. Uzun süre kullanmadığınız durumlarda (altı aydan fazla
süredir) pil kartuşunu şarj edin.
94 TÜRKÇE
Page 95

ÇALIŞMA SÜRESİ
* Aşağıdaki tabloda tek bir şarjla çalışma süresi gösterilmektedir.
Pil Kartuşu Voltajı
Pil Kapasitesi
7.2 V 10.8 V
1.0 Ah BL7010 5.0 0.7
BL1013 7.0 0.9
1.3 Ah
BL0715 7.5 1.0
1.5 Ah
2.0 Ah
3.0 Ah
4.0 Ah
5.0 Ah
6.0 Ah
: Paket pil : Kayar pil
UYARI:
Yalnızca yukarıda listelenen pil kartuşlarını kullanın. Başka pil kartuşlarının kullanılması yaralanma ve/veya
yangına neden olabilir.
Not:
Yukarıdaki pil çalışma süresine ilişkin tablo, bilgi amaçlıdır. Gerçek çalışma süresi pil türü, şarj koşulu veya kullanma
ortamına göre farklılık gösterebilir.
10.8 V –
12Vmax
BL1015
BL1016
BL1020B
BL1021B
BL1040B
BL1041B
14.4 V 18 V
BL1415 5.5 1.7
BL1815 6.0 1.9
BL1415N 7.0 2.0
BL1815N 7.5 2.0
BL1820
BL1820B
BL1430
BL1430B
BL1830
BL1830B
BL1440 19 5.5
BL1840
BL1840B
BL1450 23 6.5
BL1850
BL1850B
BL1460B 25 7.5
BL1860B 31 9.5
HOPARLÖR ÇIKIŞINDA = 100mW
Birim: Saat (Yaklaşık)
Radyoda ya da
AUX’de
8.5 1.7
11 2.0
10 3.0
12 3.5
14 4.0
21 4.0
20 6.0
26 8.0
Radyoda
USB şarj ile (1.0A)
95 TÜRKÇE
Page 96

PİLLERİN TAKILMASI VE ÜÇ
KAYNAĞ
DİKKAT:
● Pil kapağını açarken veya kapatırken parmaklarınızı
sıkıştırmamak için dikkat edin.
● Pil kartuşunu taktıktan veya çıkardıktan sonra pil
bölmesi kilidini orijinal konumuna getirin. Yerine
tam olarak yerleştirilmediği takdirde pil kartuşu
kaza ile radyodan dışarı düşebilir ve size veya
çevrenizdeki başka kişilere zarar verebilir.
● Radyoyu taşımadan önce her zaman pil yuvası
kilidini kapatın ve kilitleyin.
● Pil kartuşunu takmadan veya çıkarmadan önce her
zaman radyoyu kapatın.
● Radyoyu düşürmemeye veya çarpmamaya dikkat
gösterin. Kırık gövde parmağınızı kesebilir veya
vücudunuza batabilir. Bozuk radyo; yangın, patlama
veya yaralanma riskiyle sonuçlanan beklenmedik
davranışlar sergileyebilir.
ÖNEMLİ:
● Düşük güç, bozulma, “kesik kesik ses” veya “GÜÇ
ARIZASI” gibi şeylerin ekranda görünmesi durumunda
tüm bunlar ana pil paketinin değiştirilmesi gerektiğini
gösterir.
● Pil kartuşu verilen AC güç adaptörüyle şarj edilemez.
● Pil kartuşu standart aksesuarlara dahil değildir.
Kayan pil kartuşunun takılması ve
çıkarılması (Resim 2 ve 3)
1. Pil kartuşunu takmak için pil kartuşundaki dili muhafaza
içindeki yivle aynı hizaya getirin ve yerine doğru
kaydırın. Her zaman küçük bir tık sesiyle yerine tam
olarak oturana kadar yerleştirin.
2. Düğmenin üst tarafında kırmızı göstergeyi
görebiliyorsanız tamamen oturmamış demektir. Kırmızı
gösterge görünmeyene kadar tam olarak yerine
yerleştirin. Yerine tam olarak yerleştirilmediği takdirde
pil kaza ile radyodan dışarı düşebilir ve size veya
çevrenizdeki başka kişilere zarar verebilir.
3. Pil kartuşunu yerleştirirken güç kullanmayın. Kartuş
içeride kolayca kaymıyorsa doğru yerleştirilmemiş
demektir.
4. Pil kartuşunu çıkarmak için, kartuşun ön kısmındaki
düğmeyi kaydırırken pil kartuşunu radyodan kaydırarak
çıkarın.
Paket pil kartuşunun takılması ve
çıkarılması (Resim 4 ve 5)
1. 1.Pil kartuşunu takmak için pil kartuşundaki dili
muhafaza içindeki yivle aynı hizaya getirin ve yerine
doğru kaydırın.
2. Pil kartuşunu çıkarmak için, kartuşun yanındaki düğmelere
basarken pili kutuplarından tutarak dışarı çıkarın.
96 TÜRKÇE
Kalan pil kapasitesinin gösterilmesi
* Yalnızcamodelnumarasınınsonunda"B"harolan
pilkartuşlarıiçin.
1
2
1. Gösterge lambaları 2. Kontrol düğmesi
Kalan pil kapasitesinin gösterilmesi için pil kartuşundaki
kontrol düğmesine basın. Gösterge lambaları birkaç
saniye süre ile yanacaktır.
● 14.4V/18V piller
Gösterge veya lambalar
Kalan Kapasite
Yanıyor Kapalı Yanıp sönüyor
75% ~ 100%
50% ~ 75%
25% ~ 50%
0% ~ 25%
● 10.8V-12V maks piller
Gösterge veya lambalar
Yanıyor Kapalı Yanıp sönüyor
Pili şarj et
Pil arızalanmış
Kalan Kapasite
75% ~ 100%
50% ~ 75%
25% ~ 50%
0% ~ 25%
Page 97

NOT:
Kullanım koşulları ve ortam sıcaklığına bağlı olarak,
gösterge gerçek kapasiteden biraz farklı olabilir.
Yumuşak, bükülebilir çubuk antenin
kullanılması (Resim 1)
Yumuşak, bükülebilir çubuk anteni, şekilde gösterildiği gibi
doğrultun.
Birlikte verilen AC güç adaptörünün
kullanılması
Lastik koruyucuyu çıkarın ve adaptör şini radyonun sağ
tarafından bulunan DC yuvasına takın.
Adaptörü standart ana şebeke şi çıkışına takın.
Adaptörü her kullandığınızda pil takımının bağlantısı
otomatik olarak kesilir.
DİKKAT:
● Radyoyu taşımadan önce her zaman AC güç
adaptörü bağlantısını kesin. AC adaptörü
çıkarılmazsa elektrik çarpmasına neden olabilir.
● Hiç bir zaman adaptörün kablosunu çekmeyin veya
sürüklemeyin. Yerine tam olarak yerleştirilmediği
takdirde pil kaza ile düşebilir ve size veya
çevrenizdeki başka kişilere zarar verebilir.
ÖNEMLİ:
● Radyonun ana şebeke güç kaynağına bağlantısını
sağlama aracı olarak şebeke adaptörü kullanılır. Radyo
için kullanılan ana şebeke yuvası normal kullanım
sırasında her zaman erişilebilir olmalıdır.
● Radyonun bağlantısının tamamen kesilmesi için,
ana şebeke adaptörü ana şebeke çıkış noktasından
tamamen çıkarılmalıdır.
● Yalnızca ürünle birlikte verilen veya Makita tarafından
belirtilen AC güç adaptörü kullanın.
● Güç kablosunu ağzınızla tutup takmayın. Böyle
yaptığınızda elektrik çarpmasına neden olabilir.
● Güç kablosuna ıslak veya yağlı ellerle dokunmayın.
● Zarar görmüş veya düğümlenmiş kablolar elektrik
çarpması riskini artırır. Kablo hasar gördüğünde,
herhangi bir güvenlik tehlikesini önlemek için yetkili
servis merkezimizde kablonuzu değiştirin. Onarmadan
önce onu kullanmayın.
● Kullandıktan sonra AC güç adaptörünü her zaman
çocukların erişemeyeceği bir yerde muhafaza edin.
Çocukların kabloyla oynaması yaralanmalarına neden
olabilir.
USB güç kaynağı bağlantı noktası
ile şarj etme
Radyonun ön kısmında bir USB bağlantı noktası vardır.
USB cihazınızı USB bağlantı noktası aracılığıyla şarj
edebilirsiniz.
1. iPod, MP3, veya CD çalar gibi cihazlarınızı piyasada
bulunan USB kablolarıyla bağlayabilirsiniz.
2. Radyonuzu açmak için Power (Güç) düğmesine basın.
3. Radyonuz ister AC güce, isterse pile bağlı olsun; açık
olduğunda, FM/DAB radyo modunda, BT modunda,
harici bir ses kaynağı bağlandığında görünecek AUX
modunda olduğunda, USB cihazı şarj edebilir.
NOT:
● USB ile şarj edildiği esnada hoparlörün maksimum ses
çıkışı azalacaktır.
● USB soketi maksimum 1A5V elektrik akımı sağlayabilir.
ÖNEMLİ:
● USB cihazını USB bağlantı noktasına bağlamadan
önce her zaman USB cihazınızdaki verileri yedekleyin.
Aksi takdirde verilerinizi kaybetme olasılığıyla karşı
karşıya kalabilirsiniz.
● Radyo bazı USB cihazlarına güç sağlamayabilir.
● Kullanmadığınızda veya şarjdan sonra USB kablosunu
çıkarın ve kapağını kapatın.
● USB bağlantı noktasına güç kaynağı bağlamayın. Aksi
takdirde yangın riski olabilir. USB bağlantı noktası
yalnızca düşük voltaj cihazların şarj edilmesi amaçlıdır.
Düşük voltajlı cihazı şarj etmediğiniz zamanlarda daima
kapağı USB bağlantı noktasına takın.
● USB güç kaynağı bağlantı noktasına çivi, tel vb. gibi
cisimler sokmayın. Aksi takdirde olabilecek bir kısa
devre dumana ve yangına neden olacaktır.
● Büyük ihtimalle ünitelerin arızalanmasına neden
olabileceğinden bu USB yuvası ile Bilgisayarınızın USB
bağlantı noktası arasında bağlantı yapmayın.
RADYO DİNLEME
Bu radyoda üç ayar yöntemi vardır - Tarama ile ayarlama,
Manüel ayarlama ve Hafızadaki ön ayarların yüklenmesi.
Bir istasyon seçimi – DAB
1. Radyonuzu açmak için Power (Güç) düğmesine basın.
2. Bant düğmesine basarak DAB modu seçin.
3. Gelişmiş ayar düğmesine basın ve ekranda “İstasyon
Listesi” yanıp sönene kadar Ses/Ayar Kontrol/Seçim
düğmesini döndürün. İstasyon listesini girmek için Ses/
Ayar Kontrol/Seçim düğmesine basın.
4. Dinlenebilir istasyonlar listesi arasında gezinmek için
Ses/Ayar Kontrol/Seçim düğmesini çevirin. İstasyon
seçmek için düğmeye basın.
5. Ses/Ayar Kontrol/Seçim düğmesini çevirerek istediğiniz
ses seviyesini ayarlayın.
Ekran modlar – DAB
Radyonuzun DAB modunda bir dizi ekran seçeneği vardır.
Aşağıdaki harerde (a.’dan g.’ye) gösterilen farklı
seçenekler arasında geçiş yapmak için Info düğmesine
basın.
a. İstasyon adı Dinlenmekte olan istasyonun adını
gösterir.
97 TÜRKÇE
Page 98

b. Program türü Dinlenmekte olan istasyonun
türünü gösterir. Örn. Pop, Klasik,
Haberler, vb.
c. Çoğullama adı Mevcut istasyonun ait olduğu
çoğullama adını gösterir.
d. Saat & tarih Şu andaki saati ve tarihi gösterir.
e. Frekans ve kanal Şu anda ayarlanan DAB istasyonu
için frekans ve kanal numarasını
gösterir.
f . Bit hızı/Ses türü Şu anda ayarlanan DAB istasyonu
için dijital ses bit hızı ve ses türünü
gösterir.
g. Sinyal gücü Şu anda ayarlanan DAB istasyonu
için sinyal gücünü gösterir.
Yeni istasyonlar bulunması – DAB
Zaman zaman, dinlenebilir yeni DAB radyo istasyonları
çıkabilir. Veya ülkenin başka bir yerine gidebilirsiniz.
Bu durumda yeni istasyonları taraması için radyonuzu
etkinleştirmeniz gerekebilir.
Radyonun dinlenebilen istasyonları bulmasını sağlamak
için, DAB Bant III frekanslarının tamamının bir taramasının
yapılması önerilir.
1. Otomatik ayar düğmesine basın.
2. Radyonuz DAB frekanslarının tam bir taramasını
gerçekleştirecektir. Yeni istasyonlar bulunduğunda
ekranın sol tarafındaki istasyon sayacı artacak ve
istasyonlar listeye artacaktır.
Manüel ayarlama – DAB
Manüel ayarlama ile radyonuzu Bant III’de belirli bir DAB
frekansına ayarlayabilirsiniz. Bu işlev ayrıca antenin veya
radyonun belirli bir kanalı veya frekansı yakalamasını en
iyi hale getirecek şekilde konumlandırılmasına yardım
etmek için de kullanılabilir.
1. Gelişmiş ayar düğmesine basın ve ekranda “Manüel
Ayar” gösterilene kadar Ses/Ayar Kontrol/Seçim
düğmesini çevirin. Manuel ayar moduna girmek için
Ses/Ayar Kontrol/Seçim düğmesine basın.
2. İstenilen DAB kanalını seçmek için Ses/Ayar Kontrol/
Seçim düğmesini çevirin. Seçilen frekansı onaylamak
için Ses/Ayar Kontrol/Seçim düğmesine basın.
İstasyon sırası ayarlama – DAB
Radyonuzda seçebileceğiniz 3 istasyon sırası ayarı vardır.
İstasyon sırası ayarları; alfasayısal, toplama ve geçerli
istasyon şeklindedir.
1. Gelişmiş ayar düğmesine basın.
2. Ekranda “İstasyon sırası” görünene kadar, Ses/Ayar
Kontrol/Seçim düğmesini çevirin ve daha sonra ayarı
girmek için Ses/Ayar Kontrol/Seçim düğmesine basın.
3. Aşağıdaki seçeneklerden seçim yapmak için Ses/Ayar
Kontrol/Seçim düğmesini çevirin ve ayarı onaylamak
için düğmeye basın.
Alfasayısal İstasyon istesini alfa-sayısal olarak
0...9 A...Z arasında sıralar
Toplama İstasyon listesini DAB çoğullamaya
göre düzenler
Geçerli Yalnızca herhangi bir sinyalin
bulunabildiği istasyonları gösterir
Dinamik Aralık Kontrolü (DRC) – DAB
DRC özelliği; radyonuz gürültülü bir ortamda
kullanıldığında, ses sinyalinin dinamik aralığını azaltarak
daha sessiz seslerin kolay duyulabilmesini sağlar. Üç
sıkıştırma seviyesi vardır:
DRC 0 Hiç sıkıştırma uygulanmaz.
DRC 1/2 Orta sıkıştırma uygulanır.
DRC 1 Maksimum sıkıştırma uygulanır.
1. Radyonuzu açmak için Power (Güç) düğmesine basın.
2. DAB bandı seçmek için Bant düğmesine basın.
3. Gelişmiş ayar düğmesine basın ve ekranda “DRC
Değeri” gösterilene kadar Ses/Ayar Kontrol/Seçim
düğmesini çevirin. Daha sonra ayarlara girmek için
Ses/Ayar Kontrol/Seçim düğmesine basın. Ekranda
geçerli DRC değeri gösterilir.
4. İstenilen DRC ayarlarını seçmek için Ses/Ayar Kontrol/
Seçim düğmesini çevirin.
5. Ayarları onaylamak için Ses/Ayar Kontrol/Seçim
düğmesine basın.
Tarama Ayarı – FM
1. Radyoyu açmak için Güç düğmesine basın.
2. Bant düğmesine basarak istenilen dalga bandını
seçin. En iyi FM yakalaması için yumuşak bükülebilir
çubuk antenin düzgün yerleştirildiğinden emin olun.
Radyonuzu, bir bilgisayar ekranı ve diğer ekipmanlar
gibi radyoya parazit oluşturabilecek cihazların yanında
çalıştırmaktan kaçının.
3. Otomatik ayar düğmesine bastığınızda radyonuz
arama yapacak ve bir istasyon bulduğunda otomatik
olarak duracaktır. Radyo, operatör taramayı durdurmak
için Otomatik arama düğmesine basana kadar sonraki
dinlenebilir istasyonu aramaya devam edecektir.
4. İstenilen ses seviyesini elde etmek için Ses/Ayar
Kontrol/Seçim düğmesini çevirin. LCD ekranda ses
düzeyi değişiklikleri gösterilir.
5. Radyoyu kapatmak için Güç düğmesine basın.
FM tarama bölgesi
FM modunu kullanırken, radyonuzda yerel ya da
uzak radyo istasyonları da dahil hiç bir istasyonu
ayarlayamazsınız.
1. Radyoyu açmak için Güç düğmesine basın.
2. FM bandı seçmek için Bant düğmesine basın.
3. Gelişmiş ayar düğmesine basın ve daha sonra ekranda
“FM Tarama Bölgesi” gösterilene kadar Ses/Ayar
Kontrol/Seçim düğmesini çevirin. Ayarlara girmek için
98 TÜRKÇE
Page 99

Ses/Ayar Kontrol/Seçim düğmesine basın.
4. Ekranın alt satırındaki “Yerel” (yalnızca güçlü
istasyonlar) ve “Uzak” (Tüm istasyonlar) seçenekleri
arasında geçiş yapmak için Ses/Ayar Kontrol/Seçim
düğmesini çevirin. Uzak seçeneği, tarama sırasında
radyonun daha zayıf sinyalleri bulmasını sağlayacaktır.
5. Seçiminizi onaylamak için Ses/Ayar Kontrol/Seçim
düğmesine basın. Yerel veya Uzak ayarı radyoda
kaydedilir ve değiştirilene veya Sistem Sıfırlamasına
kadar geçerli kalır.
Manüel Ayarlama – FM
1. Radyoyu açmak için Güç düğmesine basın.
2. İstenilen dalga bandını seçmek için Bant düğmesine
basın. Yukarıda belirtildiği gibi anteni ayarlayın.
3. Ses/Ayar Kontrol/Seçim düğmesini çevirdiğinizde
frekans aşağıdaki artış aralığında değiştirilecektir: FM:
50 kHz
NOT:
İstediğiniz istasyonu bulmak amacıyla Ses/Ayar
Kontrol/Seçim düğmesini kullanmak için, Ses/Ayar
Kontrol/Seçim düğmesine basın ve arama kontrol
moduna geçiş yapın.
4. Ekranda istenilen frekans gösterilene kadar Ses/Ayar
Kontrol/Seçim düğmesini çevirmeye devam edin.
5. İstenilen ses seviyesini elde etmek için Ses/Ayar
Kontrol/Seçim düğmesini çevirin.
6. Radyoyu kapatmak için Güç düğmesine basın.
Ekran modları – FM (RDS)
Radyonuzun FM radyo modunda bir dizi ekran seçeneği
vardır.
Dinlediğiniz istasyonun RDS (Radyo Veri Sistemi) bilgisini
görmek için üst üste Info düğmesine basın.
a. Program istasyonu Dinlenmekte olan istasyonun
b. Frekans FM sinyalinin frekansını gösterir.
c. Radyo metni Yeni şeyler vb gibi metin
d. Program türü Pop, Klasik, Haber vb gibi
e. Saat & tarih Şu andaki saati ve tarihi gösterir.
adını gösterir.
mesajlarını gösterir.
dinlenmekte olan istasyonun
türünü gösterir.
İstasyonların ön ayarlı hafızalara
kaydedilmesi (DAB ve FM)
Her dalga bandı için 5 hafıza ön ayarı vardır.
1. Radyoyu açmak için Güç düğmesine basın.
2. Daha önceden anlatılan yöntemlerden birisini
kullanarak istenilen istasyona ayarlayın.
3. Ekranda ön ayar numarası görünene kadar istenilen Ön
ayar düğmesine basılı tutun, örneğin “P2 Kaydedildi”
gibi. İstasyon daha sonra seçilen Ön ayar düğmesine
kaydedilir.
4. Geri kalan ön ayarlarda da bu prosedürü tekrarlayın.
5. Yukarıdaki prosedürleri izleyerek Ön ayar hafızalarında
kaydedilen istasyonların üzerine başka istasyonlar
kaydedilebilir.
Ön ayarlı hafızalardan istasyonların
getirilmesi (DAB ve FM)
1. Radyoyu açmak için Güç düğmesine basın.
2. İstediğiniz dalga bandını seçmek için Bant düğmesine
basın.
3. Anlık olarak istenilen Ön ayar düğmesine basın.
Ekranda, Ön ayar numarası ve istasyon frekansı
görünecektir.
BLUETOOTH YAYIN İLE
MÜZİK DİNLEME
Radyo aracılığıyla Bluetooth müzik oynatma/yürütme
otomatik bağlantısı yapmadan önce Bluetooth cihazınızın
radyoyla bağlantısını yapmanız
gerekmektedir. Eşleştirme bir 'Bağ’ oluşturacağından iki
cihaz daha sonra birbirini tanıyabilecektir.
NOT:
Daha iyi bir ses kalitesi elde etmek için Bluetooth
cihazınızdaki ses seviyesini üçte ikiden daha yükseğe
ayarlamanızı ve daha sonra radyodaki sesi de gerektiği
gibi ayarlamanızı öneririz.
Bluetooth cihazınızın ilk kez
eşleştirilmesi
1. Radyoyu açmak için Güç düğmesine basın. Bluetooth
modu seçmek için Bant düğmesine basın. Radyonun
görülebilir olduğunu göstermek için Ön ayar
düğmelerindeki Bluetooth göstergesi mavi yanıp söner.
2. Cihazın kullanım kılavuzuna göre radyoya bağlanması
için cihazınızda Bluetooth özelliğini etkinleştirin.
Bluetooth cihaz listesini bulun ve ‘DMR112’ adlı cihazı
seçin, bazı mobil cihazlarda (BT2.1 Bluetooth cihazı
önceki sürümüne sahip olanlar) şifre olarak “0000”
girmeniz gerekebilir.
3. Bağlantı kurduktan sonra bir onay tonu sesi
duyacaksınız ve Ön ayar düğmeleri üzerindeki
Bluetooth göstergesi sürekli mavi renkte yanıp
kalacaktır. Tek yapmanız gereken kaynak cihazınızdan
herhangi bir müziği seçmek ve oynatmak olacaktır. Ses
kontrolü kaynak cihazınızdan veya doğrudan radyodan
ayarlanabilir.
4. Parçaları oynatmak/durdurmak ve parça listesinde
gezinmek için Bluetooth etkinleştirilmiş cihazınızda
veya radyoda bulunan kontrolleri kullanın.
NOT:
1. Şayet ilk kez 2 Bluetooth cihazı eşleştiriliyorsa, her
ikisi de radyoyu arayacak, her bir cihazda uygun olup
olmadıkları gösterilecektir. Ancak, cihazlardan biri bu
99 TÜRKÇE
Page 100

üniteye ilk olarak bağlandığında, diğer Bluetooth cihazı
diğer cihazı listede bulamayacaktır.
2. Bluetooth cihazınızın radyo bağlantısının geçici olarak
kesilmesi durumunda, cihazınızı yeniden elle radyoya
bağlamanız gerekecektir.
3. Bluetooth cihazınızın listesinde ‘DMR112’
görüntüleniyor ancak cihazınız araca bağlanamıyorsa,
lütfen cihazı listenizden silin ve burada daha önce
belirtilen adımları takip ederek cihazı radyo ile yeniden
eşleştirin.
4. En iyi Bluetooth yayını kapsama alanı yaklaşık olarak
radyo ile 10 metre mesafedir (30 feet) (görüş mesafesi)
anca 30 metreye (100 feet) kadar mesafelerde de
çekmesi mümkündür.
5. Ayırma zamanının aşılması, en uygun mesafenin
aşılması, engeller veya başka şeyler nedeniyle
Bluetooth bağlantısının kesilmesi durumunda,
cihazınızın tekrar radyoya bağlanması gerekebilir.
6. Fiziksel engeller, diğer kablosuz cihazlar veya
elektromanyetik cihazlar da bağlantı kalitesini
etkileyebilir.
7. Bluetooth bağlantı performansı bağlanan Bluetooth
cihazlarına bağlı olarak değişiklik gösterebilir. Lütfen
radyo bağlantısı yapmadan önce cihazınızın Bluetooth
özelliklerine göz atın. Eşleştirilen bazı Bluetooth
cihazlarında tüm özellikler desteklenmeyebilir.
Bluetooth modunda ses dosyalarını
oynatma
Radyoyu seçmiş olduğunuz Bluetooth cihazına başarılı
bir şekilde bağladığınızda, bağlamış olduğunuz Bluetooth
cihazınızdaki kontrolleri kullanarak müziklerinizi
oynatmaya başlayabilirsiniz.
1. Oynatmaya başladıktan sonra radyo veya
etkinleştirdiğiniz Bluetooth cihazınız üzerindeki
Ses düğmesini kullanarak sesi istediğiniz ayara
getirebilirsiniz.
2. Parçaları oynatmak/durdurmak ve parça listesinde
gezinmek için cihazınızdaki kontrolleri kullanın.
NOT:
1. Bu kontrollerin tamamına medya oynatıcı uygulamalar
veya cihazların tamamının yanıt vermeyebileceğini
aklınızda bulundurun.
2. Arama yaparken veya cevaplarken bazı mobil
telefonların radyo ile bağlantısı kesilebilir. Bazı cihazlar,
kısa mesaj, e-posta alırken veya ses ortamı yürütmeye
bağlı olmayan başka nedenlerle Bluetooth ses ortamı
yürütme özelliğini geçici olarak sessize alabilir. Bu
davranış bağlanan cihazın bir özelliğidir ve radyoda
herhangi bir arıza olduğunu göstermez.
Daha önceden eşleştirilen bir Bluetooth
kaynak cihazından oynatma
Radyo, 8 takım eşleşmiş cihaza kadar hafızada tutabilir,
bu bellek aşıldığında ise, en eski eşleştirme geçmişi
silinerek yenisi üzerine yazılır. Bluetooth cihazınız
radyoyla önceden eşleşmiş ise, ünite Bluetooth cihazınızı
hafızaya alır ve hafızada son olarak bağlanan cihaza
yeniden bağlanmayı dener. En son bağlanılan cihaza
ulaşılamıyorsa, radyo görünür duruma gelecektir.
Bluetooth cihazınızın bağlantısını kesme
Bluetooth cihazınızla bağlantıyı kesmek için, Bluetooth
eşleştirme düğmesine 2-3 saniyeliğine basılı tutun.
Radyonun eşleştirme için yeniden görünür duruma
geldiğini göstermek için Ön ayar düğmeleri üzerindeki
Bluetooth göstergesi mavi renkte yanıp söner.
YARDIMCI GİRİŞ YUVASI
İki adet 3.5 mm stereo Yardımcı Giriş yuvası
bulunmaktadır. Bunlardan birisi radyonuzun önünde
(AUX GİRİŞ 1); diğeri ise pil yuvasında (AUX GİRİŞ 2)
bulunmaktadır.
1. Ses kablosuyla Yardımcı Giriş yuvasına harici
ses kaynağı (örneğin iPod, MP3 veya CD Çalar)
bağlayabilirsiniz.
2. “AUX GİRİŞ 1” veya “AUX GİRİŞ 2” gösterilene kadar
Bant düğmesine üst üste basın ve bırakın, daha sonra
AUX fonksiyonu etkinleşecektir.
3. Daha iyi bir ses kalitesi elde etmek için ses
cihazınızdaki ses seviyesini üçte ikiden daha yükseğe
ayarlamanızı ve daha sonra radyodaki sesi de gerektiği
gibi ayarlamanızı öneririz.
NOT:
Ses kablosu standart aksesuarlara dahil değildir.
ÇEŞİTLİ AYARLAR
Dil seçenekleri
Radyoda kullanılabilir sekiz dil seçeneği vardır:
İngilizce, Almanca, İtalyanca, Fransızca, Hollandaca,
Danca, Norveççe ve İspanyolca.
1. Gelişmiş ayar düğmesine basın.
2. Ekranda “Dil” gösterilene kadar Ses/Ayar Kontrol/
Seçim düğmesini çevirin. Ayarlara girmek için Ses/Ayar
Kontrol/Seçim düğmesine basın.
3. İstediğiniz dili seçmek için Ses/Ayar Kontrol/Seçim
düğmesini çevirin. Ayarlarınızı onaylamak için Ses/Ayar
Kontrol/Seçim düğmesine basın.
Parlaklık kontrolü
Düğme Işığı ayarlanabilir.
1. Gelişmiş ayar düğmesine basın.
2. Ekranda “Düğme Işığı” gösterilene kadar Ses/Ayar
Kontrol/Seçim düğmesini çevirin. Ayarlara girmek için
Ses/Ayar Kontrol/Seçim düğmesine basın.
3. Düğme ışığı fonksiyonunu etkinleştirmek veya devre
100 TÜRKÇE
 Loading...