

Makita DA30ID, DA391D, DA30IDW, DA39IDW, DA301DB Instruction Manual
...
Kao/?.o
14
Ø
^;;;tess
Anste
Dritl
lnstruction
Manual
Akku-Wi nkel bohrmasch
i ne
B etriebsa
n le itu ng
Bezprzewodowa
wiertarka
kqtowa
lnstrukcja obslugi
EecnpoBoAHaH
yrnoBan
Apefl
b
14xcrpyxqnn
no
oKcnnyaraqHlt
DA3OID/DA3OIDW
DA391D/DA39IDW
DA3O1 DB / DA3O1
DWB
DA39I
DB
/
DA39I DWB
DA3O1 D/DA3O1
DB
DA391D/DA391DB
1
2
.
Ecfln Bbr He oKcnjryarøpyúTe
Aepxøre
HehlpanbHo¡,,r nonoxeHø11.
ycraHoBgrre
npF¡ro
cropoHy
crpenKe ønø B
npol4B
r4Hcrpy¡ eHTa npocro HaxMHre
MexaHø3M.
MexaHø3M.
Haxo.qnTcF B
r4HcrpyMeHT
Hax¡rere nycroaoü MexaHø3M.
Onepaqnn cBepneHrÂ
.
CgepneHne B
Bo apeuR
pe3ynbrarbr
cHa6xennurn¡ø HanpaBnnþult4M
HanpaBnFÐuløü B14Hr
nyre¡¡r BTFrøBaHøF
.
CsepneHøe B Meranne.
AnF
Haqane
yrny6neHøe
TOqKe,
fìo¡¡ecrøre
HaqHøTe cBepfleHøe npø
øcnonb3yøTe
r¡HcrpyMeHToB. 14cKnrcqeHhe
r¿
NPEÃYNPEXAEHl/IE:
o
Vlsnøu+ee
cKopocrb cBepneHøF. Hao6opol
.qaBIeHøe
noBpexAeH14to
noHø3r4rb
coKparørb
.
Bo
cBepno
ycnnÂe.
co6nÐAaúre
HaqøHaer
.
V4anenøe
ycraHoBKr4
oõparHoe BpauleHøe
O¡saxo ec¡ø Bur He
KpenKo,
.
Bcer4a
B
ycTpo14cTBax.
3
4
5
6
7
I
O Charging
(_{
¡t å15'"iå1,3"'"0"'
tr
3apn4xa
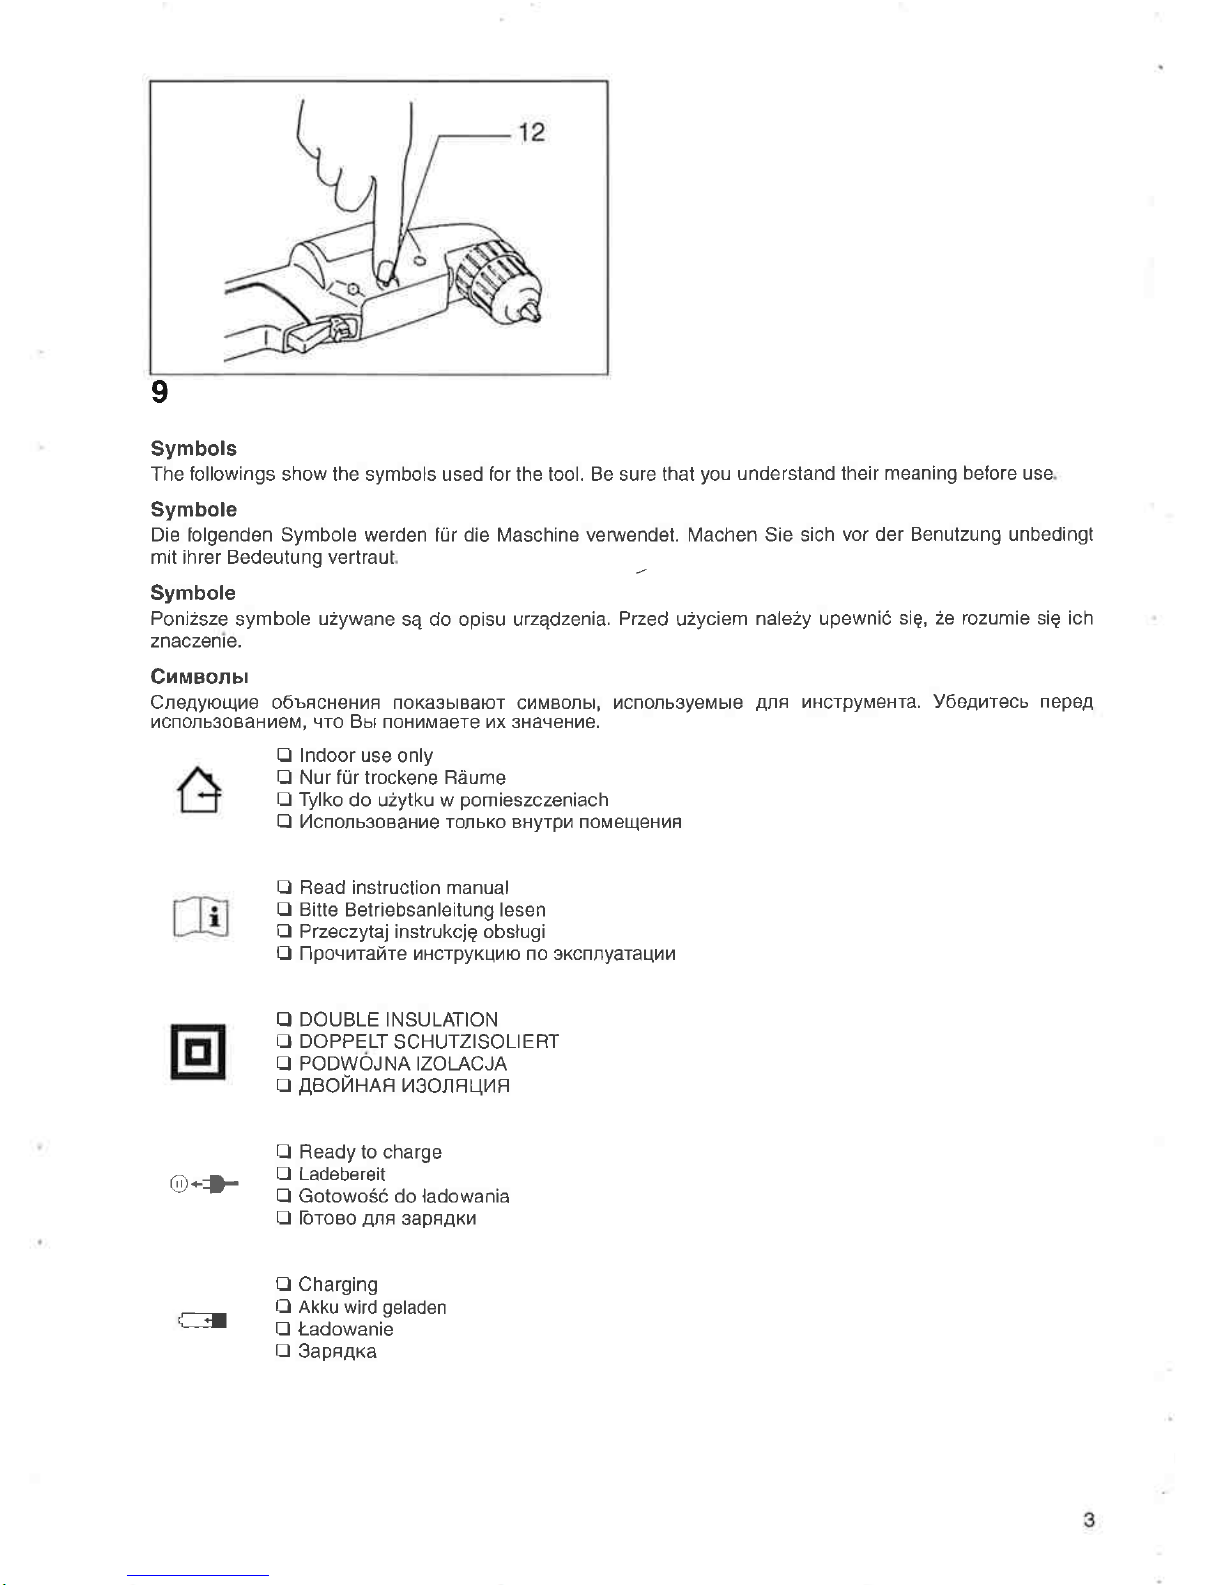
Symbols
The followings show the symbols used for the tool. Be sure that
you
understand their meaning
before
use
Symbole
Die folgenden Symbole werden für d¡e Maschine verwendet. lvlachen S¡e sich
vor der Benutzung unbedingt
m¡t ihrer Bedeutung vertraut
Symbole
Poni2sze
symbole
uzywane
sq do opisu urzqdzenia.
Przed
u2yciem
nalezy upewnió
siq, 2e rozumie siç ich
znaczente.
Cui¡sonur
Cne,qyrcqøe o6ÈFcHeHøF noKa3brBaÐT
cøMBonbr,
øcnonb3yeMbte
AnF
nHcrpyr\,reHTa.
yóe4øTecb
nepeg
!4cnonb3oBaHøe¡¡,
qro
Bul noH!4Maere r4x 3HaqeH!4e.
@-ù
tr lndoor use
only
tr Nur für trockene Räume
tr Tylko
do u2ytku w
pomieszczeniach
Q l4cnonugosaHr4e ronbKo BHyrpø noMe[]eHøH
tr Read instruction manual
tr Bitte
Betriebsanleitung lesen
Q
Przeczylaj instrukcjç obslugi
O npo,+4raúre nHcrpyKqrto no sKcn¡yaraqrrø
O DOUBLE INSULATION
O DOPPELT
SCHUTZISOLIERT
A PODWOJNA IZOLACJA
tr
ABOT,4HAF
r/3oflFUr1F
tr Ready to charge
tr Ladebereit
tr Gotowoéó do ladowania
E foroBo.qng
3apFAKr4
9
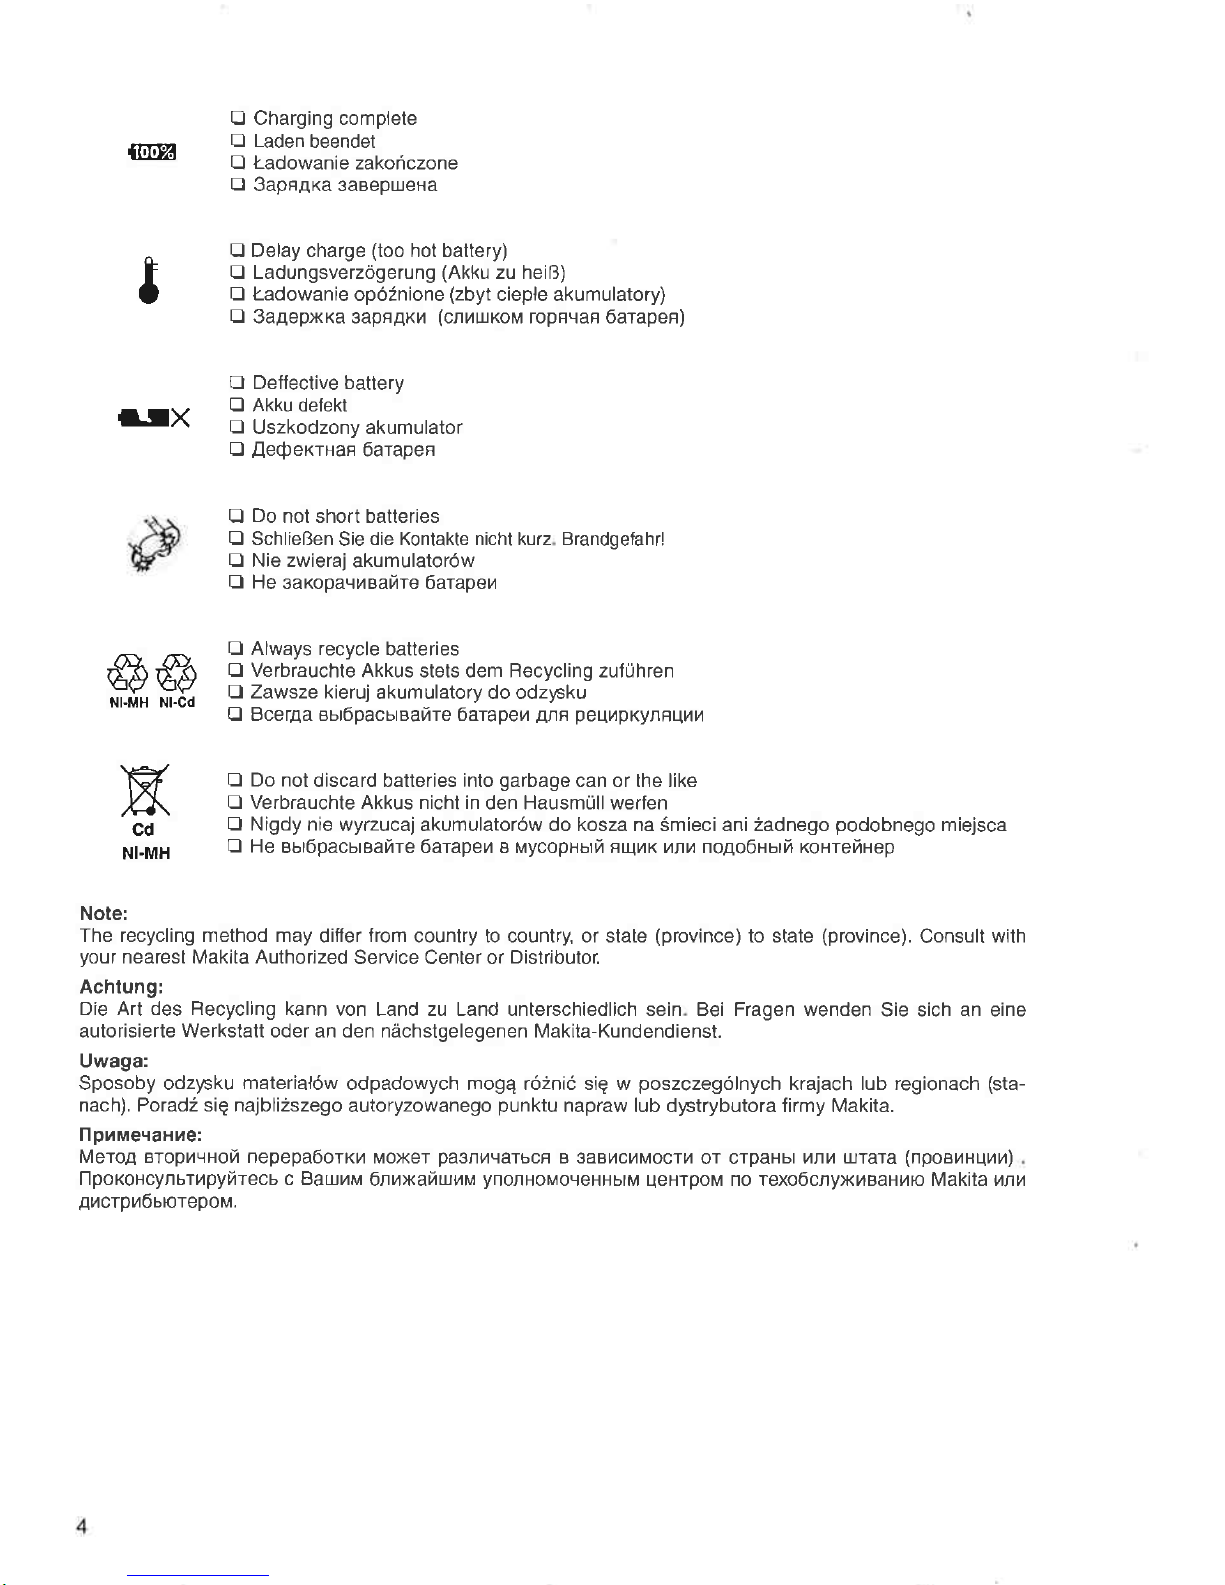
tr Charging complete
tr Laden
beendet
Q
Ladowanie
zakoriczone
tr
3apFAKa 3aBepueHa
tr Delay charge
(too
hot battery)
tr Ladungsverzögerung
(Akku
zu heiB)
tr Ladowanie
opó2nione
(zbyt
cieple akumulatory)
tr
3a4epxra 3apn¡ror
(cnøuxonr
ropnqan 6arapen)
tr Deffective battery
tr Akku defekt
tr
Uszkodzony akumulator
D
leQerrHan
6arapen
Q
Do
not short batteries
tr Schließen
Sie
die Kontakte nicht kurz Brandoefahr!
tr Nie zwieraj
akumulatorów
E He
saroparnBaúTe 6arapeø
tr Always recycle
batteries
E Verbrauchte
Akkus stets dem Fìecycling zuführen
¿ Zawsze kieruj
akumulatory do odzpku
O Bcer¿a Bbr6pacbrBar¡re 6arapeø
A¡F
peqøpKynÊqhø
tr Do not
discard batteries into
garbage
can or the like
tr Verbrauchte Akkus nicht in
den Hausmüll werfen
tr Nigdy nie
wyrzucaj akumulatorów do kosza na Smieci ani 2adnego
podobnego
miejsca
tr He
Bbr6pacbrBaúre óarapeø B MycopHbrú c.tlvtK ønn no4o6surñ roureñuep
5, npx cBepneHíh s
@
I.IX
ffi-eg
X
cd
NI.MH
Note:
The recycling method may
differ
from
counlry to country, or state
(province)
to state
(province).
Consult
with
your
nearest Makita Authorjzed
Service Center or
Distr¡butor.
Achtung:
Die Art des Recycling kann
von Land zu Land unterschiedlich sein Bei Fragen wenden
Sie sich an eine
autoris¡erte Werkstatt oder an den nächstgelegenen Makita-Kundendienst.
Uwaga:
Sposoby odzysku
materialów
odpadowych mogq ró2nió siç w
poszczególnych
krajach lub regionach
(sta-
nach). Porad2 siç najbli2szego
autoryzowanego
punktu
napraw lub dystrybutora firmy Makita.
np14Me,{aHr,re:
Mero4 BTopt4,rHoù nepepa6orxø
Moxer
pa3¡øqarbcn
B 3aB!4cr¡Mocrø
or crpaHbr
vnv u.tra¡a
(npoaøHqøn)
npoKoHcynbrøpyúrecb c Bauø¡¡
6¡øxaüuøM
ynoflHoMorreHHbrM
UeHrpoM
no rexoócnyxrlBaHøo Makita ørh
A14crp14õbnrepoM.
¡
6. He
z He
coxPAHl4TE 3T14 14 HCTPyKT.¡H 14.
14 HCTPyKqI4F nO
Vcraxoera
KaprplrAxa
.
BcerAa s¡rxnþqaúre 14HcrpyMeHr
øn14
.
AnF
nnøry
cTopoHbr
l,lHCTpyr\¡reHTa.
.
ÃJrF
coBMecrhre F3br.toK Ha
c KaHaBKOt4 B KOpnyCe ø 3a.qBhHbTe
3aqe¡KHøre nfløry
C¡teAyer nonHoclbto 3aKpbtrb nnøry
nepeà øcnonb3oBaHøeM
npeAoTBpauleHhH cnyqaíHoro Bbrna,qeHøF
6arapeúHoro Kaprpr4AXa ø3 øHcrpyMeHTa.
.
He øcno¡ugyñre
Kaprpr4AXa. Ecnø raprpøgx
oH 6brn
3apngxa
Il¡n
1 TloÄKnÐ.{,rre sapFÄHoe
2. BcraBbre 6arapeúHbrñ Kaprp!4¡qx raK,
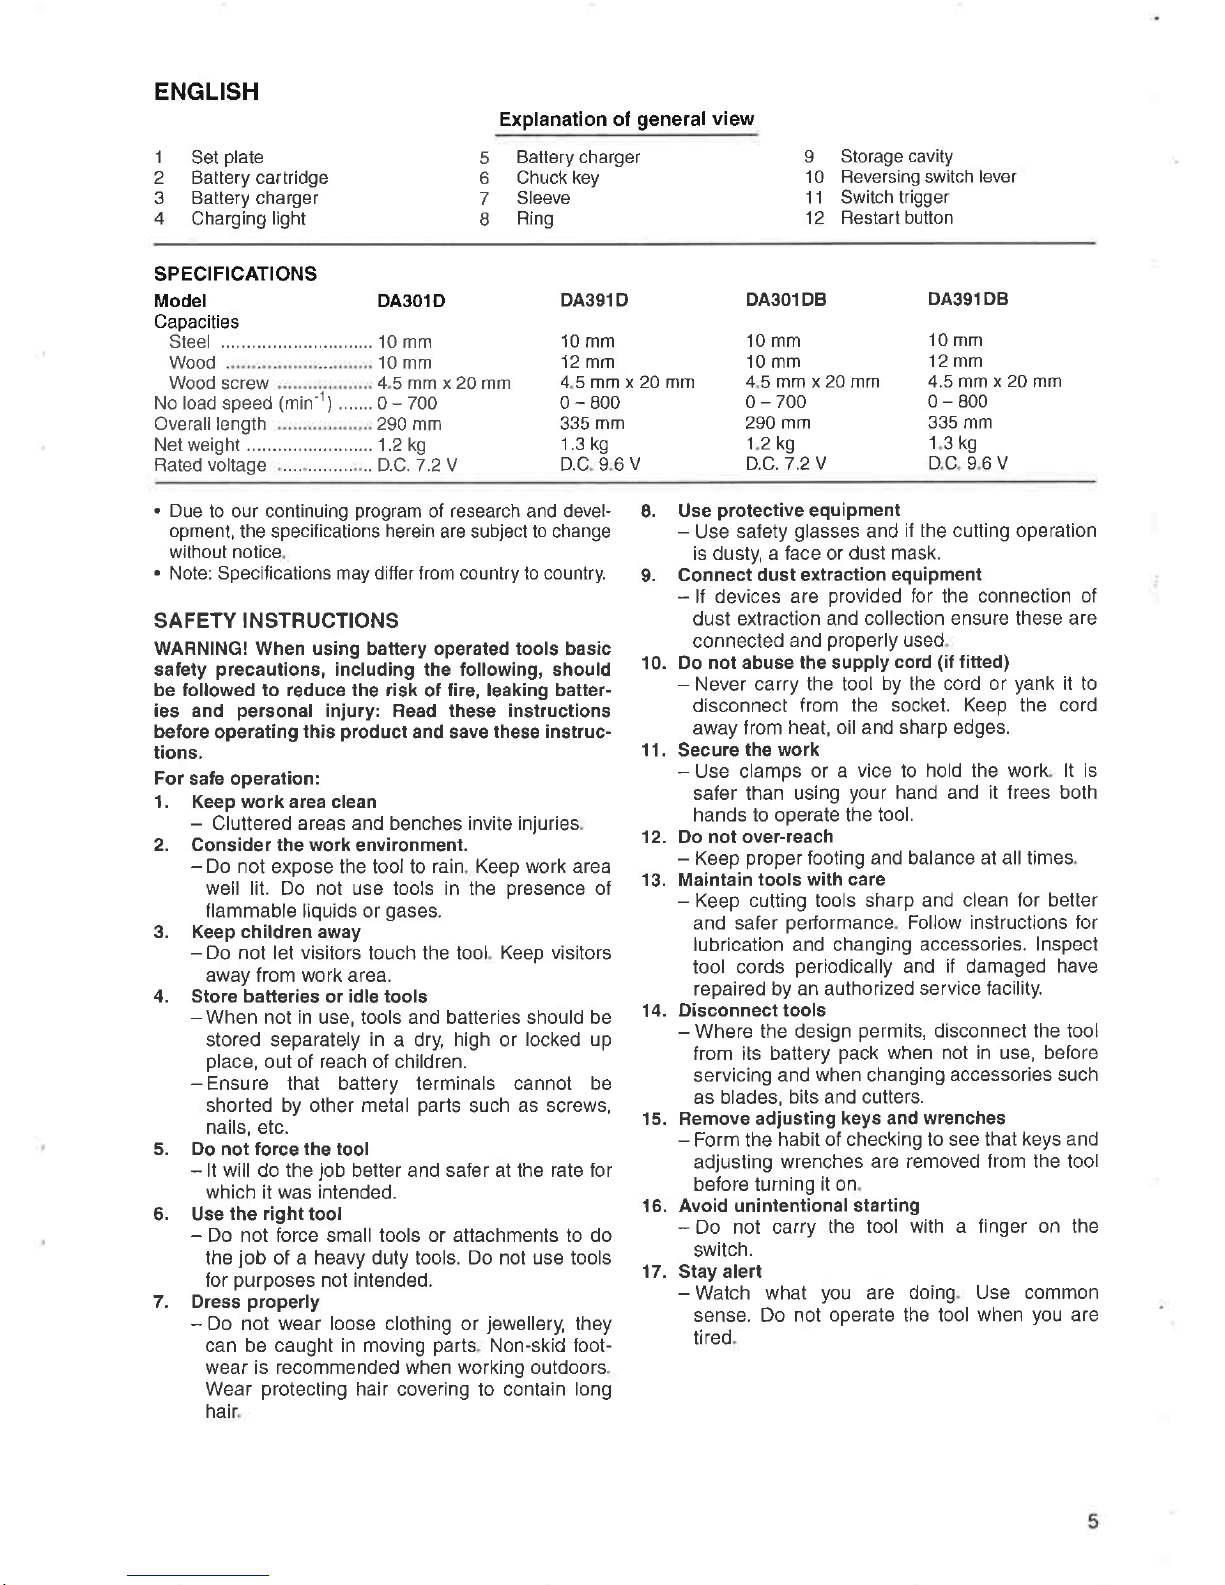
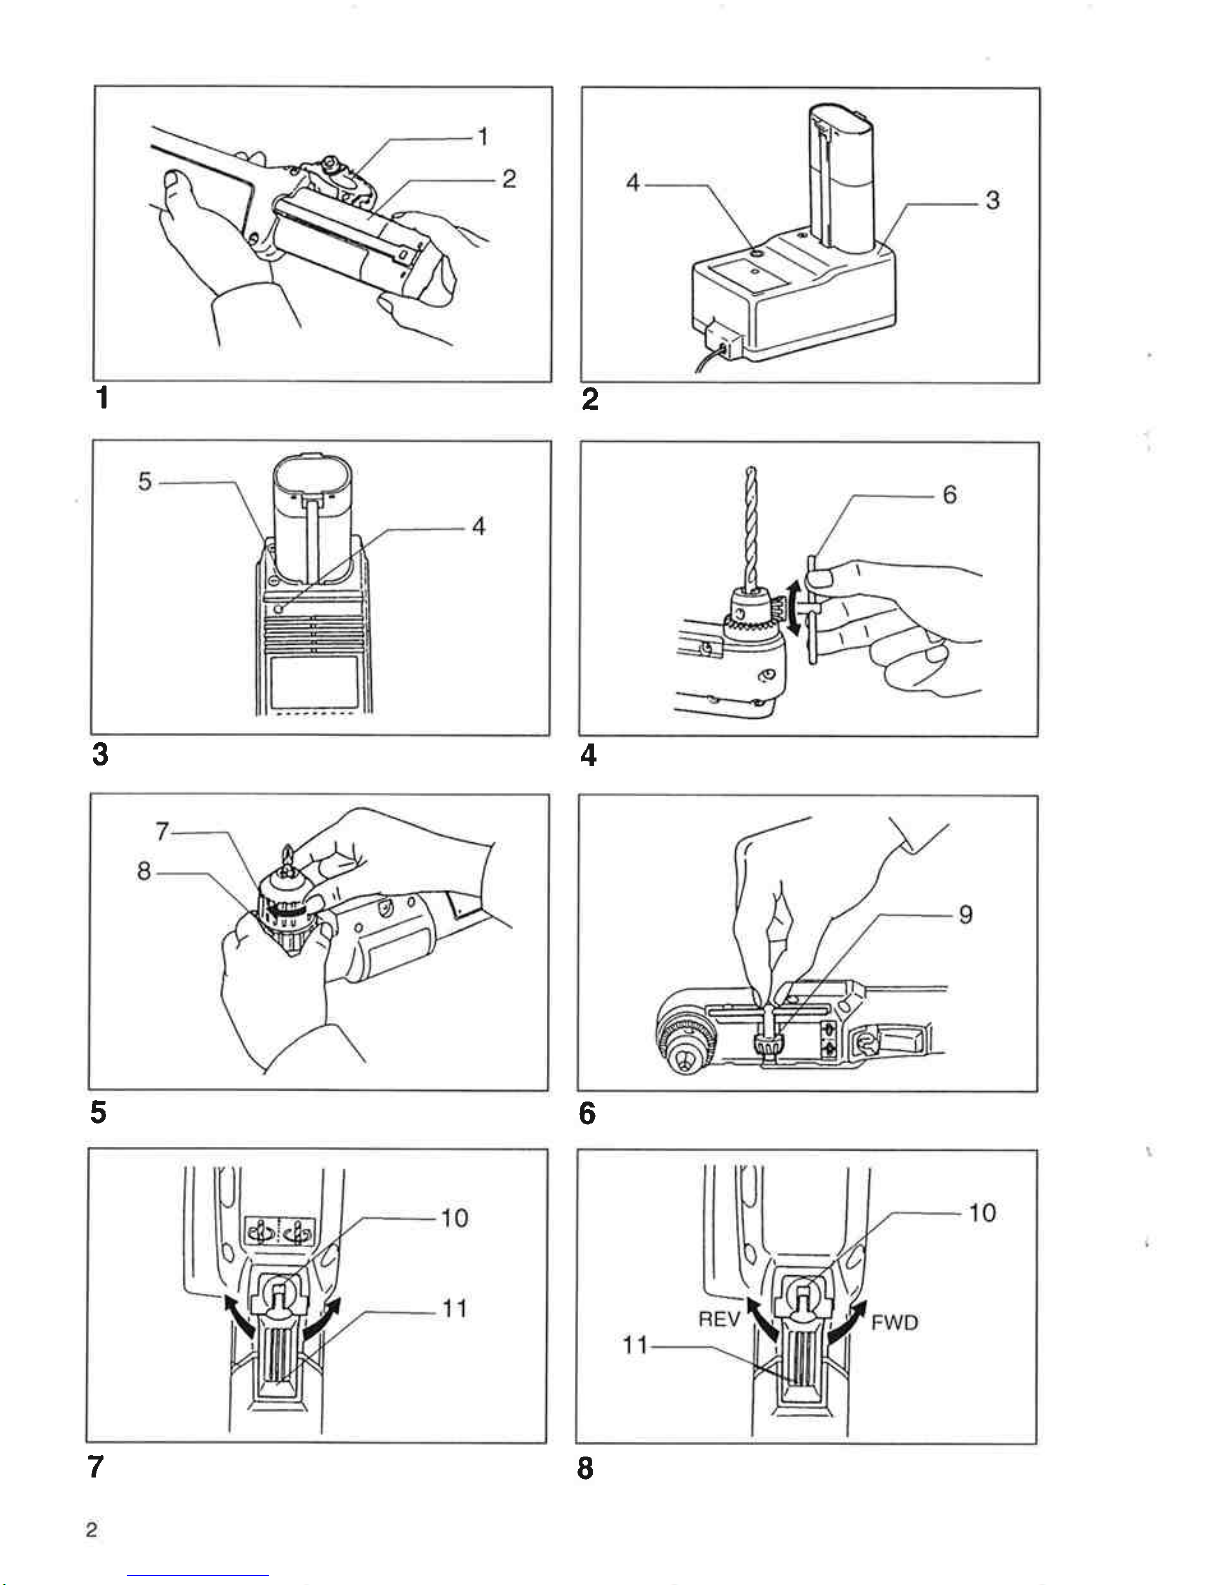
ENGLISH
Set
plate
Battery cartridge
Battery charger
Charging
light
Explanation of
general
view
Battery charger
Chuck key
Sleeve
Ring
9 Storage
cavity
10 Reversing switch
lever
11 Switch trigger
12 Restart button
5
b
7
I
1
3
SPECIFICATIONS
Model
Capacities
DA3O1D
Stee1 ...................,.......... 10 mm
Wood . ... 10
mm
Wood
screw
4 5 mm x 20 mm
No load speed
(m¡n-1)
....... O
-
700
Overall
length
290
mm
Net weight ......................... 1.2 kg
Rated
voltage
.. D.C. 7 .2 V
D4391 D
'10
mm
12 mm
45mmx20mm
0-800
335
mm
1.3 kg
D.C 96V
DA3O1 DB
10 mm
10 mm
45mmx20mm
0-700
290
mm
12kg
D.C.7.2V
DA391 DB
10 mm
12 mm
4.5 mm
x 20
mm
0-800
335 mm
13kg
DC 96V
.
Due
to our continuing
program
of research and devel-
opment,
the specifications
herein
are subjecl lo change
without nolice
.
Note: Specifications may differ from country to country.
SAFETY INSTRUCTIONS
WARNING! When using battery operated tools basic
safety
precaut¡ons,
including the follow¡ng, should
be followed to reduce the risk
of
fire, leek¡ng batter-
ies and
personal
injury: Bead these instructions
before
operating
th¡s
product
and save
these instruc-
t¡ons,
For
safe operation:
1. Keep work area clean
-
Cluttered areas and benches invite injuries
2. Consider the work
env¡Íonment.
-Do
not
expose the tool to
rain Keep work
area
well lit. Do not use tools in the Dresence of
flammable l¡quids or
gases.
3. Keep children away
-Do
not
let
visitors
touch the tool
Keep v¡sitors
away from work area.
4. Store batte¡ies
or
idle tools
-When
not
in
use, tools and batteries should be
stored separately
in
a dry, high or
locked up
Dlace,
out of reach of children.
-
Ensu re that battery terminals cannot be
shorted by other metal
parts
such
as screws,
nails, etc.
5. Do not force the tool
-
lt wi¡l do the
job
better and safer at the rate for
which
it
was intended.
6. Use
the righttool
-
Do not force small tools or attachments to do
the
job
of a heavy duty tools. Do not use tools
for
purposes
not intended.
7. Dress
properly
-
Do not wear loose clothing or
jewellery,
they
can be caught in mov¡ng
parts
Non-skid foot-
wear is recommended when working outdoors
Wear
protecting
hair
cover¡ng to conlain
long
hair
8.
Use
protect¡ve
equipment
-
Use
safety
glasses
and
if the cutting operat¡on
is dusty, a face or
dust mask.
9.
Connect dust extraction
equipment
-
lf devices are
orovided
for
the
connection of
dust extraction and
collection ensure these are
connected
and
properly
used
10.
Do not abuse lhe supply
cord
(¡f
f¡tted)
-
Never carry the tool
by the cord or
yank
it to
disconnect from
the socket. Keep the cord
away from
heat, oil and sharp edges.
1 I . Secure
the work
-
Use clamps
or a
vice
to
hold
the
work lt is
safer than using
your
hand and ¡t frees both
hands to ooerate the tool,
12. Do not over-reach
-
Keep
proper
footing and balance at all times
13. Maintain
lools with care
-
Keep cutting tools sharp and
clean for better
and safer oeformance
Follow instructrons for
lubrication and changing accessories.
lnspect
tool cords
periodically
and if damaged
have
repaired by an authorized
service facility.
14.
D¡sconnecttools
-
Where the design
permits,
disconnect the tool
from its battery
pack
when not in use, before
servicing and
when
changing
accessories such
as blades,
bits and cutters.
15. Remove ad¡usting
keys and wrenches
-
Form the
habit of checking to see that
keys and
adjusting wrenches
are removed from the tool
before turning
it
on
16. Avoid unintent¡onal start¡ng
-
Do not carry
the tool w¡th a finger on the
switch.
17. Stay alert
-
Watch what
you
are
doing Use common
sense. Do not
operate the tool when
you
are
t¡red
 Loading...