

Page 1

GB
F
D
I
Instruction Manual
(Page 15 – 22)
Manuel d’instructions
Betriebsanleitung
Istruzioni per l’uso
(Seite 32 – 40)
(Pagina 41 – 49)
(Page 23 – 31)
NL
DK
SF
Gebruiksaanwijzing
E
Manual de instrucciones
P
Manual de instruções
Brugsanvisning
S
Bruksanvisning
N
Bruksanvisning
Käyttöohje
(Sivu 101 – 108)
(Side 77 – 84)
(Sida 85 – 92)
(Side 93 – 100)
GR Οδηγίες χρήσεως
DCS230T
DCS231T
(Pagina 50 – 58)
(Página 68 – 76)
(
á 109 – 117)
Σελίδ
(Página 59 – 67)
Page 2

Important:
Read this instruction manual carefully before putting the chain saw into operation and strictly observe the safety regulations! Only persons who have completed
training in working from elevated platforms (cherry pickers, lifts), from platforms mounted on ladders or who are proficient in climbing with ropes are permitted to
operate this chain saw.
Keep this Instruction Manual!
Attention:
Lire attentivement ce manuel avant la première mise en service et observer absolument les prescriptions de sécurité! C'est pourquoi ces tronçonneuses ne peuvent
être manipulées que par des opérateurs ayant reçu une formation complémentaire pour travailler en nacelle ou pour utiliser la technique de la descente en rappel!
Garder avec soins le manuel des instructions d’emploi!
Achtung:
Lesen Sie vor der ersten Inbetriebnahme diese Betriebsanleitung gründlich durch und befolgen Sie unbedingt die Sicherheitsvorschriften! Diese Motorsäge darf nur
von „Motorsägenführern mit Zusatzausbildung für Arbeiten in Hub- oder Leiterkörben bzw. Seilklettertechnik” bedient werden!
Betriebsanleitung sorgfältig aufbewahren!
Attenzione:
Osservare attentamente le norme di sicurezza. Errori nell’uso della motosega possono essere causa di incidenti! Questa motosega va utilizzata esclusivamente da
“operatori appositamente addestrati per eseguire lavori con motoseghe e addestrati inoltre per eseguire lavori in ceste sollevabili o di conduzione e con impianti
ascensionali con funi”.
Conservare accuratamente le istruzioni d’impiego!
Belangrijk:
Voordat u de machine de eerste keer in gebruik neemt moet u deze gebruiksaanwijzing zorgvuldig doornemen. U dient er vooral op te letten dat u alle veiligheidsvoorschriften goed heeft begrepen zodat u die strikt in acht kunt nemen! Deze motorzaag mag uitsluitend door „motorzaagbestuurders met extra scholing voor het
werken in hef- of ladderkooien, resp. bekend zijn met de touwklimtechniek“ worden bediend.
Berg de gebruiksaanwijzing goed op!
Atención:
Es indispensable leer con mucha atención las instrucciones de manejo antes de utilizar la motosierra por primera vez. ¡Preste especial atención a las recomendaciones de seguridad!
Esta motosierra sólo podrá ser manejada por „usuarios de motosierra con formación complementaria” para realizar trabajos con cestos de elevación o de escaleras
o bien técnica de trepar con cuerdas.
Conservar cuidados los instrucciones de manejo.
Atenção:
Antes da primeira colocação em serviço, ler atentamente estas instruções de serviço e seguir sem falta as normas de segurança! Essa moto-serra deve somente
ser utilizada por „condutores de moto-serra com formação extra para trabalhos em caixa elevadora, em caixa de escada ou em técnica de escalar com cordas“!
Guardar bem as instruções de serviço!
Obs:
Læs venligst denne betjeningsvejledning omhyggeligt igennem, inden maskinen tages i brug, og overhold under alle omstændigheder sikkerhedsreglerne. Denne
motorsav må kun betjenes af "kædesavsførere, der er specialuddannede til arbejde ved hjælp af tovklatringsteknik"! Savtypen må kun bruges, når man foretager
topbeskæring ved klatring. Den må ikke bruges ved beskæringsopgaver, hvor personen står på jorden eller i en liftkurv.
Opbevar betjeningsvejledning omhyggeligt.
Obs!
Läs noga igenom denna instruktionsbok innan du startar motorsågen och följ sedan exakt säkerhetsföreskrifterna! Denna motorsåg får användas endast av „Motorsågsförare med extra utbildning för arbeten i lyft- eller stegkorgar och som är insatta i linklättringsteknik”!
Förvara instruktionsboken omsorgsfullt.
OBS!
Les grundig gjennom denne bruksanvisningen før du tar maskinen i bruk og følg sikkerhetsforskriftene nøye! Denne motorsagen må kun brukes av „motorsagførere
med ekstra utdannelse for arbeid i løfte- eller stigekurver hhv. tauklatringsteknikk“!
Ta godt vare på bruksanvisningen.
Tärkeää:
Lue tarkkaan tämä käyttöohje ennen ensimmäistä käyttöönottoa ja noudata ehdottomasti turvallisuusohjeita! Vain ”lisäkoulutuksen nosto- ja tikaskorissa sekä
köysikiipeilytekniikassa suoritettavasta työstä saaneet moottorisahan käyttäjät” saavat käyttää tätä moottorisahaa!
Säilytä käyttöohje huolellisesti.
Σηµαντικ:
∆ιαβάστε αυτ το εγχειρίδιο οδηγιών προσεκτικά πριν βάλετε το πρινι αλυσίδας σε λειτουργία και τηρείτε αυστηρά τις οδηγίες ασφάλειας! Μνο άτοµα που
έχουν εκπαιδευτεί σε εργασία απ ανυψωµένες πλατφρµες (συλλέκτες κερασιών, ανυψωτήρες), απ πλατφρµες τοποθετηµένες σε σκάλες ή που είναι ικανοί
σε αναρριχήσεις µε σχοινιά, επιτρέπεται να λειτουργούν αυτ το πρινι αλυσίδας.
Κρατείστε αυτ το εγχειρίδιο Οδηγιών.
2
Page 3
12
1
4
3
7
5
2
6
34
3 meters
56
78
3
Page 4
910
11 12
13 14
15 16
4
B
A
B
Page 5
o
45
2 1/
2
o
45
= Cutting down area
17 18
19 20
STOP
21 22
SERVICE
23 24
5
Page 6
STOP
25 26
5
1
2
3
4
6
27 28
7
29 30
12
9
10
9
11
4
2
31 32
6
3
8
13
9
Page 7
STOP
5
2
33 34
SERVICE
35 36
1
Gasoline
OIL
1000 cm
5000 cm
10000 cm
2
(1 litre)
2
(5 litre)
2
(10 litre)
200 cm
400 cm
40 cm
3
3
3
37 38
Fuel/oil mixture
waste oil
1
Chain oil
39 40
7
Page 8
2
3
41 42
3
2
1
43 44
6
45 46
Cold start
Warm star t
11
4
5
47 48
8
a
min.
3 mm (0.11")
0.65 mm
(.025")
0.65 mm
(.025")
a
a
Page 9
49 50
30
51 52
STOP
3
2
1312
1
5
6
4
53 54
10
55 56
12
9
Page 10
15
13
14
57 58
0.6 – 0.5 mm
59 60
1
3
4
2
11
61 62
13
14
15
16
10
Page 11

Symbols
You will notice the following symbols on the chain saw and in the instruction manual:
Symboles
Vous rencontrerez les symboles suivants sur l’appareil et dans le instructions d’emploi:
Symbole
Sie werden auf der Motorsäge und beim Lesen der Betriebsanleitung auf folgende Symbole stoßen:
Simboli
Sulla macchina e nelle istruzioni d’impiego incontrerete i seguenti simboli:
Symbolen
De kettingzaag is voorzien van stickers met symbolen die ook in de handleiding gebruikt worden. Hier volgt de lijst van symbolen die voor dit apparaat gebruikt
worden:
Símbolos
En el equipo y durante la lectura de las instrucciones de manejo, Ud. se encontrará con los siguientes símbolos:
Símbolos
A moto-serra e as instruções de serviço apresentam os seguintes símbolos:
Symboler
På maskinen og i betjeningsvejledningen vil de støde på følgende symboler:
Symboler
På maskinen och i instruktionsboken används följande symboler:
Symboler
Du ser følgende symboler på maskinen og i bruksanvisningen:
Tunnusmerkit
Tulet törmäämään seuraaviin merkkeihin koneessa ja käyttöohjetta lukiessasi:
Σύµβολα
Θα σηµειώσετε τα ακλουθα σύµβολα στο πρινι αλυσίδας και στο εγχειρίδιο οδηγιών:
• Read instruction manual and follow the warning- and safety precautions!
• Lire instructions d’emploi et suivre les consignes de sécurité et d’avertissement!
• Betriebsanleitung lesen und Warn- und Sicherheits-hinweise befolgen!
• Leggere le istruzioni d’impiego e seguire le indicazioni di pericolo e di sicurezza!
• Lees de handleiding en volg de waarschuwings- en veiligheidsinstructies op!
• ¡Leer las instrucciones de manejo y observar las advertencias e instrucciones de seguridad!
• Ler as instruções de serviço e seguir as indicações de advertência e segurança!!
• Betjeningsvejledning skal gennemlæses, advarsels- og sikkerhedshenvisningerne overholdes!
• Läs noga igenom instruktionsboken och följ varnings- och säkerhetsanvisningarna!
• Les bruksanvisningen og følg advarsels- og sikker-hetsforskrifter!
• Lue käyttöohje ja noudata varoitus- sekä turvaohjeita!
• ∆ιαβάστε το εγχειρίδιο οδηγιών και ακολουθείστε τις προειδοποιήσεις και προφυλάξεις ασφάλειας.
• Warning: This saw is to be used by properly trained operators only.
• Attention ! Cette tronçonneuse ne peut être utilisée que par des opérateurs dûment formés !
• Warnung! Diese Säge darf nur von ausgebildeten Motorsägen-führern bedient werden!
• Avvertenza! Questa sega deve essere utilizzata esclusivamente da operatori di motoseghe addestrati!
• Waarschuwing! Deze zaag mag uitsluitend door geschoolde motorzaag-bestuurders worden bediend!
• ¡Advertencia! Esta sierra sólo podrá ser manejada por usuarios de motosierras con formación!
• Cuidado! Essa serra só deve ser utilizada por condutores de moto-serras com formação adequada!
• Advarsel! Denne sav må kun betjenes af uddannede motorsavsførere!
• Varning! Denna såg får användas endast av utbildade motorsågsförare!
• Advarsel! Denne sagen må kun brukes av utdannede motorsagførere!
• Varoitus! Tätä sahaa saa käyttää vain koulutetut moottorisahan käyttäjät!
• Προειδοποίηση: Αυτ το πρινι είναι για να χρησιµοποιηθεί µνο απκατάλληλα εκπαιδευµένους χειριστές.
• Particular care and caution!
• Danger et attention particulirs!
• Besondere Vorsicht und Aufmerksamkeit!
• Qui viene richiesta un’attenzione particolare!
• Pas heel goed op!
• ¡Cuidado y atención especiales!
• Cuidado e atenção especial!
• Vær særlig forsigtig og opmærksom!
• Varning-försiktigt!
• Forsiktig!
• Osoita erityistä varovaisuutta!
• Ιδιαίτερη φροντίδα και προσοχή!
• Forbidden!
• Interdit!
• Verboten!
• Proibito!
• Verboden!
• ¡Prohibido!
• Proibido!
•Forbudt!
• Förbjudet!
•Forbudt!
• Kielletty!
• Απαγορεύεται!
11
Page 12

STOP
STOP
• Wear protective helmet, eye and ear protection!
• Porter le casque, les lunettes et acoustiques de protection!
• Helm, Augen- und Gehörschutztragen!
• Indossare un casko prottetivo, la protezione per gli occhi e per gli orecchi!
• Veiligheidshelm, ogen- en ge-hoorbescherming dragen!
• ¡Usar del casco de seguridad, la protección de ojos y del oído!
• Portar capacete e protector para os olhos e os ouvidos!
• Bær sikkerhedshjelm, øjen- og høreværn!
• Använd skyddshjälm,ögon-och hörselskydd!
• Bruk vernehjelm, øye- og hørselvern!
• Käytä suojakypärää, näkö- ja kuulosuojaimia!
• Φοράτε προστατευτικ κράνος, και προστατευτικά µατιών και αυτιών!
• Wear protective gloves!
• Porter des gants de protection!
• Schutzhandschuhe tragen!
• Mettetevi i guanti di protezione!
• Draag veiligheidshand-schoenen!
• ¡Llevar guantes protectores!
• Calçar luvas de protecção!
• Bær arbejdshandsker!
• Använd skyddshandskar!
• Bruk beskyttelseshansker!
• Käytä suojakäsineitä!
• Φοράτε προστατευτικά γάντια!
• No smoking!
• Interdiction de fumer!
• Rauchen verboten!
• Vietato fumare!
• Verboden te roken!
• ¡Prohibido fumar!
• Proibido fumar!
• Rygning forbudt!
• Rökning förbjuden!
• Røyking forbudt!
• Tupakanpoltto kielletty!
• Απαγορεύεται το κάπνισµα!
• No open fire!
• Pas de feu ouvert!
• Kein offenes Feuer!
• Vietati fuochi aperti!
• Verboden vuur te maken!
• ¡Prohibido fuego abierto!
• Fogo aberto proibido!
• Brug afåben ild forbudt!
• Använd ejöppen låga!
• Ikke brukåpen ild!
• Ei avotulta!
• Απαγορεύεται το άναµµα φωτιάς!
• I/STOP-switch (short-circuit switch)
• Bouton de MARCHE/ ARRÊT (Commutateur de magnéto)
• Start/Stop-Schalter (Kurzschlussschalter)
• Interruttore start/stop (interruttore di corto circuito)
• Start/stopschakelaar (Kortsluitschakelaar)
• Interruptor de marcha/ paro (Interruptor de cortocircuito)
• Interruptor start/stop (interruptor de curto-circuito)
• Start/Stop kontakt (kortslutningsafbryder)
• Start/Stopp strömställare (kortslutningsbrytare)
• Start-/stopp-bryter (kortslutningsbryter)
• Käynnistys/pysäytys katkaisin (oikosulkukytkin)
• I/STOP-διακπτης(διακπτης βραχυκυκλώµατος)
• Stop engine!
• Arrêter le moteur!
• Motor ausschalten!
• Arresto motore!
• Stop de motor!
• ¡Parar el motor!
• Desligar o motor!
•Stands motor!
• Stäng av motorn!
• Slå av motoren!
• Sammuta moottori!
• Σβήσιµο µηχανής!
• Engine -manual start
• Démarrer le moteur
• Motor starten
• Avviamento motore
• Motor starten
• Arrancar el motor
• Arrancar o motor
• Sart motor
• Starta motorn
• Start motoren
• Käynnistä moottori
• Μηχανή - χειροκίνητη εκκίνηση
12
Page 13

• Choke lever
• Levier choke
• Chokehebel
• Leva della valvola dell’aria
• Hendel voor de choke
• Palanca del choke
• Alavanca do afogador
• Chokerhåndtag
• Chokearm
•Choke
• Rikastinvipu
• Μοχλς τσοκ
• Direction of chain movement
• Sens de la chaîne de sciage
• Laufrichtung der Sägekette
• Direzione di scorri-mento della catena della sega
• Draairichting van de zaagketting
• Sentido de marcha de la cadena de sierra
• Sentido de operação da corrente da serra
• Kædens løberetning
• Sågkedjans löpriktning
• Sagkjedets løpe-retning
• Ketjun liikesuunta
• ∆ιεύθυνση κίνησης αλυσίδας
• CAUTION: Kickback!
• Choc de recul! (Kickback)
• Achtung, Rückschlag! (Kickback)
• ATTENZIONE! Rinculo (Kickback)
• OPPASSEN: Gevaar voor „Kickback“
• ¡Repulsiones! (Kickback)
• Atenção, contragolpe (kickback)
• Kast! (kickback)
• Kast! (Kickback)
• Tilbakeslag! (Kickback)
• Takapotku! (kickback)
• ΠΡΟΣΟΧΗ: Οπισθολάκτισµα
• Hold the saw with both hands while working! One-handed use is extremely hazardous!
• La tronçonneuse doit être tenueà deux mains pendant le travail! Si-non risque de blessure!
• Bei der Arbeit ist die Motorsäge mit beiden Händen festzuhalten! Sonst Verletzungs-gefahr!
• Durante i lavori la moto-sega deve essere tenuta con entrambe le mani! Altrimenti si incorre il pericolo di ferirsi!
• Houd de kettingzaag tij-dens het zagen met bei-de handen vast! Met één hand werken is ui-terst gevaarlijk!
• ¡Al trabajar con la moto-sierra, asirla siempre con ambas manos. Caso contrario habrá peligro de serias lesiones!
• A moto-serra deve ser segura durante o trabalho com as duas mãos! Do contrário há perigo de ferimento!
• Under arbejdet skal motorsaven holdes med begge hænder! Ellers er der risiko for kvæstelse!
• Under arbetet skall motorsågen hållas stadigt med båda händerna! I annat fall finns risk för kroppsskada!
• Ved arbeidet må motor-sagen holdes fast med begge hender! Ellers er det fare for skader!
• Työn aikana on moottorisahaa pidettävä kaksin käsin! Muuten on olemassa loukkaantumisvaara!
• Κρατάτε το πρινι και µε τα δύο χέρια ενώ λειτουργεί! Χρήση µε το ένα χέρι είναι εξαιρετικά επικίνδυνη!
• Chain brake
• Frein de chaîne
• Kettenbremse
• Freno di catena
• Kettingrem
• Freno de cadena
• Travão de corrente
• Kædebremse
• Kedjebroms
• Kjedebrems
•Ketjujarru
• Φρένο αλυσίδας
• Fuel and oil mixture
• Mélange carburant
• Kraftstoffgemisch
• Miscela carburante
• Olie en brandstof-mengsel
• Mezcla de combustible
• Mistura de combustí-vel
• Brændstofblanding
• Bränsleblandning
• Drivstoffblanding
• Polttoainesekoitus
• Καύσιµο και µίγµα ελαίου
• Chain oil
• Huile de chaîne de sciage
• Sägekettenöl
• Olio della catena della sega
• Kettingolie
• Aceite para cadenas de sierra
• Óleo de corrente de serra
• Savkædeolie
• Sågkedjeolja
• Sagkjedeolje
• Ketjuöljy
• Ελαιο αλυσίδας
13
Page 14

RE Y
• Saw chain oil adjustment screw
• Vis de réglage pour l’huile de chaîne de sciage
• Einstellschraube für Sägekettenöl
• Vite di regolazione per l’olio della catena della sega
• Schroef voor het afstellen van het oliedebiet voor de zaagketting
• Tornillo de ajuste para el aceite de la cadena de sierra
• Parafuso de regulagem doóleo da corrente de serra
• Justerskrue for savkædeolie
• Ställskruv för sågkedjeolja
• Justeringsskrue for sagkjedeolje
• Teräöljyn säätöruuvi
• Βίδα ρύθµισης ελαίου αλυσίδας πριονιού
• First aid
• Premier secours
• Erste Hilfe
• Pronto soccorso
• Eerste hulp (EHBO)
• Los primeros auxilios
• Primeiros socorros
• Førstehjælp
• Första hjälpen
• Førstehjelp
• Ensiapu
• Πρώτες βοήθειες
• Recycling
• Recyclage
• Recycling
• Riciclaggio
• Recycling
• Reciclaje
• Reciclagem
• Genbrug
• Återvinning
• Resirkulering
• Kierrätys
• Ανακύκλωση
• CE-Marking
• Marquage CE
• CE-Kennzeichnung
• Marchio-CE
• CE-markering
• Signo CE
•Marca CE
• CE-Mærke
• CE-Märke
• CE-merke
• CE-Tunnus
• CE-Σήµανση
14
Page 15

ENGLISH
Thank you for purchasing a MAKITA product!
Congratulations on choosing a MAKITA chain saw! We are confident that you will be
satisfied with this modern piece of equipment.
The DCS230T/DCS231T (Tophandle) is a very light and handy chain saw with the
handle on the top. This model was developed especially for tree surgery and care.
Only persons who have completed training in working from elevated platforms (cherry
pickers, lifts), from platforms mounted on ladders or who are proficient in climbing
with ropes are permitted to operate this chain saw.
The automatic chain lubrication with variable-flow oil pump and maintenance-free
electronic ignition ensure trouble-free operation, while the hand-saving anti-vibration
system and ergonomic grips and controls make work easier, safer, and less tiring for
the user.
The safety features of the DCS230T/DCS231T are state of the art and meet all German and international safety standards.
They include handguards on both grips, grip safety, chain catch, safety saw chain,
and chain brake. The chain brake can be actuated manually, and is also inertia-actuated automatically in case of kickback.
EU Conformity Declaration
The undersigned, Kanzaki, as authorized by, declare that the MAKITA machines,
Type: 023 EU prototype test certificate No.
DCS230T/DCS231T M6 04 10 24243 059
manufactured by Makita Corporation, 3-11-8, Sumiyoshi-cho, Anjo, Aichi, Japan, conforms to the basic safety and health requirements of the applicable EU guidelines:
EU Machine guideline 98/37/EG,
EU EMC guideline 89/336/EWG (modified by 91/263/EWG, 92/31/EWG and 93/68/
EWG),
Noise emission 2000/14/EG.
The most important standards applied to properly meet the requirements of the
above EU guidelines were: EN 14982, EN ISO 11681-2, EN 61000-4-2, EN 61000-43, CISPR 12.
The conformity assessment procedure 2000/14/EG was performed per Annex V. The
measured noise level (Lwa) is 106 dB (A). The guaranteed noise level (Ld) is
107 dB (A).
The EG Type-Examination per 98/37/EG was performed by: TÜV Product Service
GmbH, Zertifizierstelle, Ridlerstr. 31, D-80339 Munich.
In order to ensure the proper functioning and performance of your
new chain saw, and to safeguard your own personal safety, it is
imperative that you read this instruction manual thoroughly before
operation. Be especially careful to observe all safety precautions!
Failure to observe these precautions can lead to severe injury or
death!
Table of contents Page
EU Conformity Declaration.....................................................................................15
Packing.....................................................................................................................15
SAFETY PRECAUTIONS
General precautions ............................................................................................16
Protective equipment...........................................................................................16
Fuels / Refuelling.................................................................................................16
Putting into operation ..........................................................................................16
Kickback ..............................................................................................................16
Working behavior/Method of working ............................................................ 16-17
Transport and storage .........................................................................................17
Maintenance ........................................................................................................17
First aid................................................................................................................17
Technical data..........................................................................................................17
Denomination of components................................................................................18
PUTTING INTO OPERATION
Mounting the guide bar and saw chain................................................................18
Tightening the saw chain .....................................................................................18
Chain brake .........................................................................................................18
Fuels / Refuelling........................................................................................... 18-19
Adjusting the chain lubrication.............................................................................19
Checking the chain lubrication ............................................................................19
Starting the engine ..............................................................................................19
Cold start .............................................................................................................19
Warm start ...........................................................................................................19
Stopping the engine ............................................................................................19
CDOLMARhecking the chain brake.....................................................................19
Adjusting the carburetor........................................................................................ 19
MAINTENANCE
Sharpening the saw chain................................................................................... 20
Cleaning the guide bar, lubricating the sprocket nose......................................... 20
Replacing the saw chain......................................................................................20
Replacing the suction head .................................................................................20
Cleaning the air filter ........................................................................................... 20
Replacing the spark plug .....................................................................................20
Cleaning the muffler ............................................................................................20
Cleaning the cylinder space ................................................................................20
Instructions for periodic maintenance..................................................................21
Service, spare parts and guarantee ......................................................................21
Trouble shooting .....................................................................................................22
Packing
Your MAKITA chain saw will be delivered in a protective cardboard box to prevent
transport damage.
Cardboard is a basic raw material and is consequently reuse-able or suitable for recycling (waste paper recycling).
RE Y
Yasuhiko Kanzaki
CE 2004
Director
MAKITA INTERNATIONAL EUROPE LTD.
Michigan Drive, Tongwell, Milton Keynes, Bucks MK15 8JD, ENGLAND
Responsible manufacturer:
Makita Corporation Anjo Aichi Japan
15
Page 16

SAFETY PRECAUTIONS
CAUTION:
This chain saw is designed especially for tree care and surgery. All work with
this chain saw is to be carried out by properly trained persons only. Observe all
literature, procedures and recommendations from the relevant professional
organisation. Failure to do so constitutes a high accident risk! We recommend
always using a rising platform (cherry picker, lift) for sawing in trees. Rappelling techniques are extremely dangerous and require special training! The
operator must be trained in and familiar with the use of safety equipment and
working and climbing techniques! Always use the appropriate belts, ropes and
carabiners when working in trees. Always use restraining equipment for both
the operator and the saw!
General precautions (Fig. 1 & 2)
- To ensure correct operation the user has to read this instruction manual to
make himself familiar with the characteristics of the chain saw. Users insufficiently
informed will endanger themselves as well as others due to improper handling.
- Lend this chain saw only to persons with training and experience in the use of treesurgery saws. Always hand over the instruction manual.
- Children and young persons aged under 18 years must not be allowed to operate
the chain saw. Persons over the age of 16 years may, however, use the chain saw
for the purpose of being trained as long as they are under the supervision of a
qualified trainer.
- Use chain saws always with the utmost care and attention.
- Operate the chain saw only if you are in good physical condition. If you are tired,
your attention will be reduced. Be especially careful at the end of a working day.
Perform all work calmly and carefully. The user has to accept liability for others.
- Never work under the influence of alcohol, drugs or medication.
- A fire extinguisher must be available in the immediate vicinity when working in easily inflammable vegetation or when it has not rained for a long time (danger of fire).
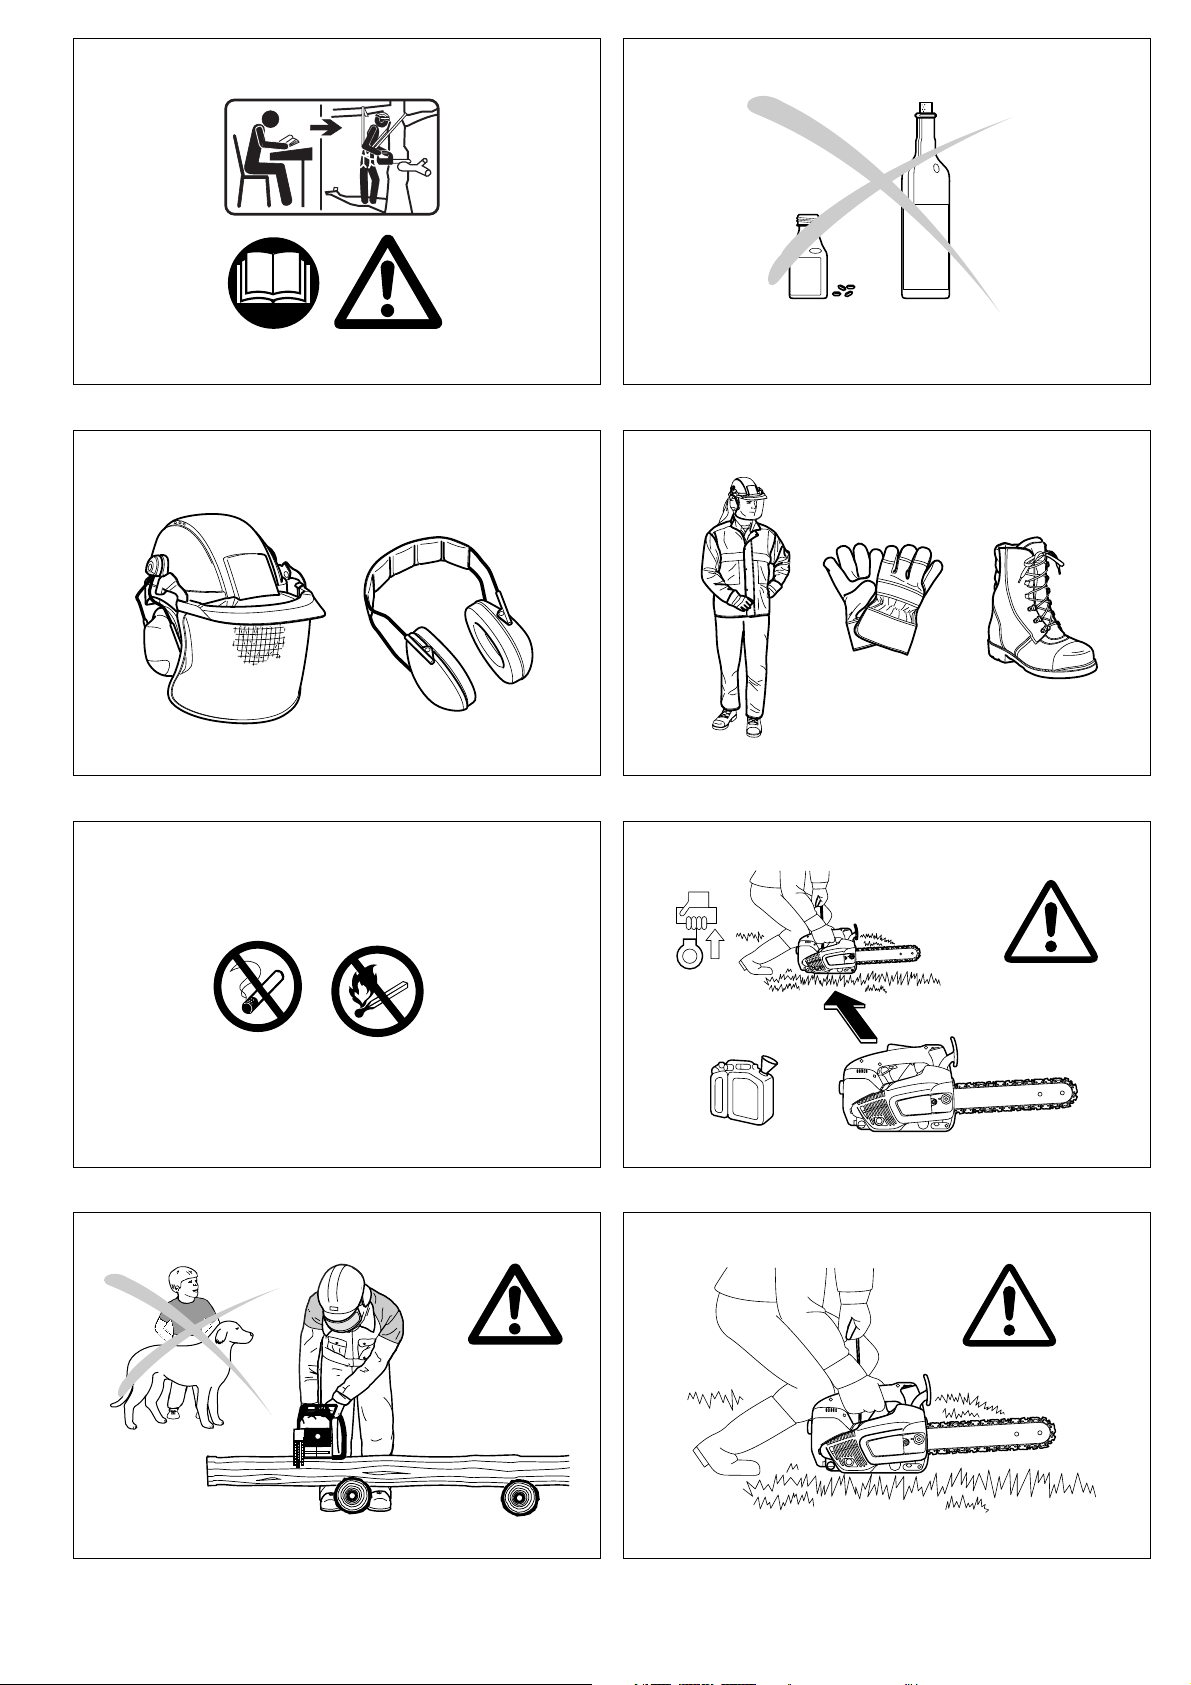
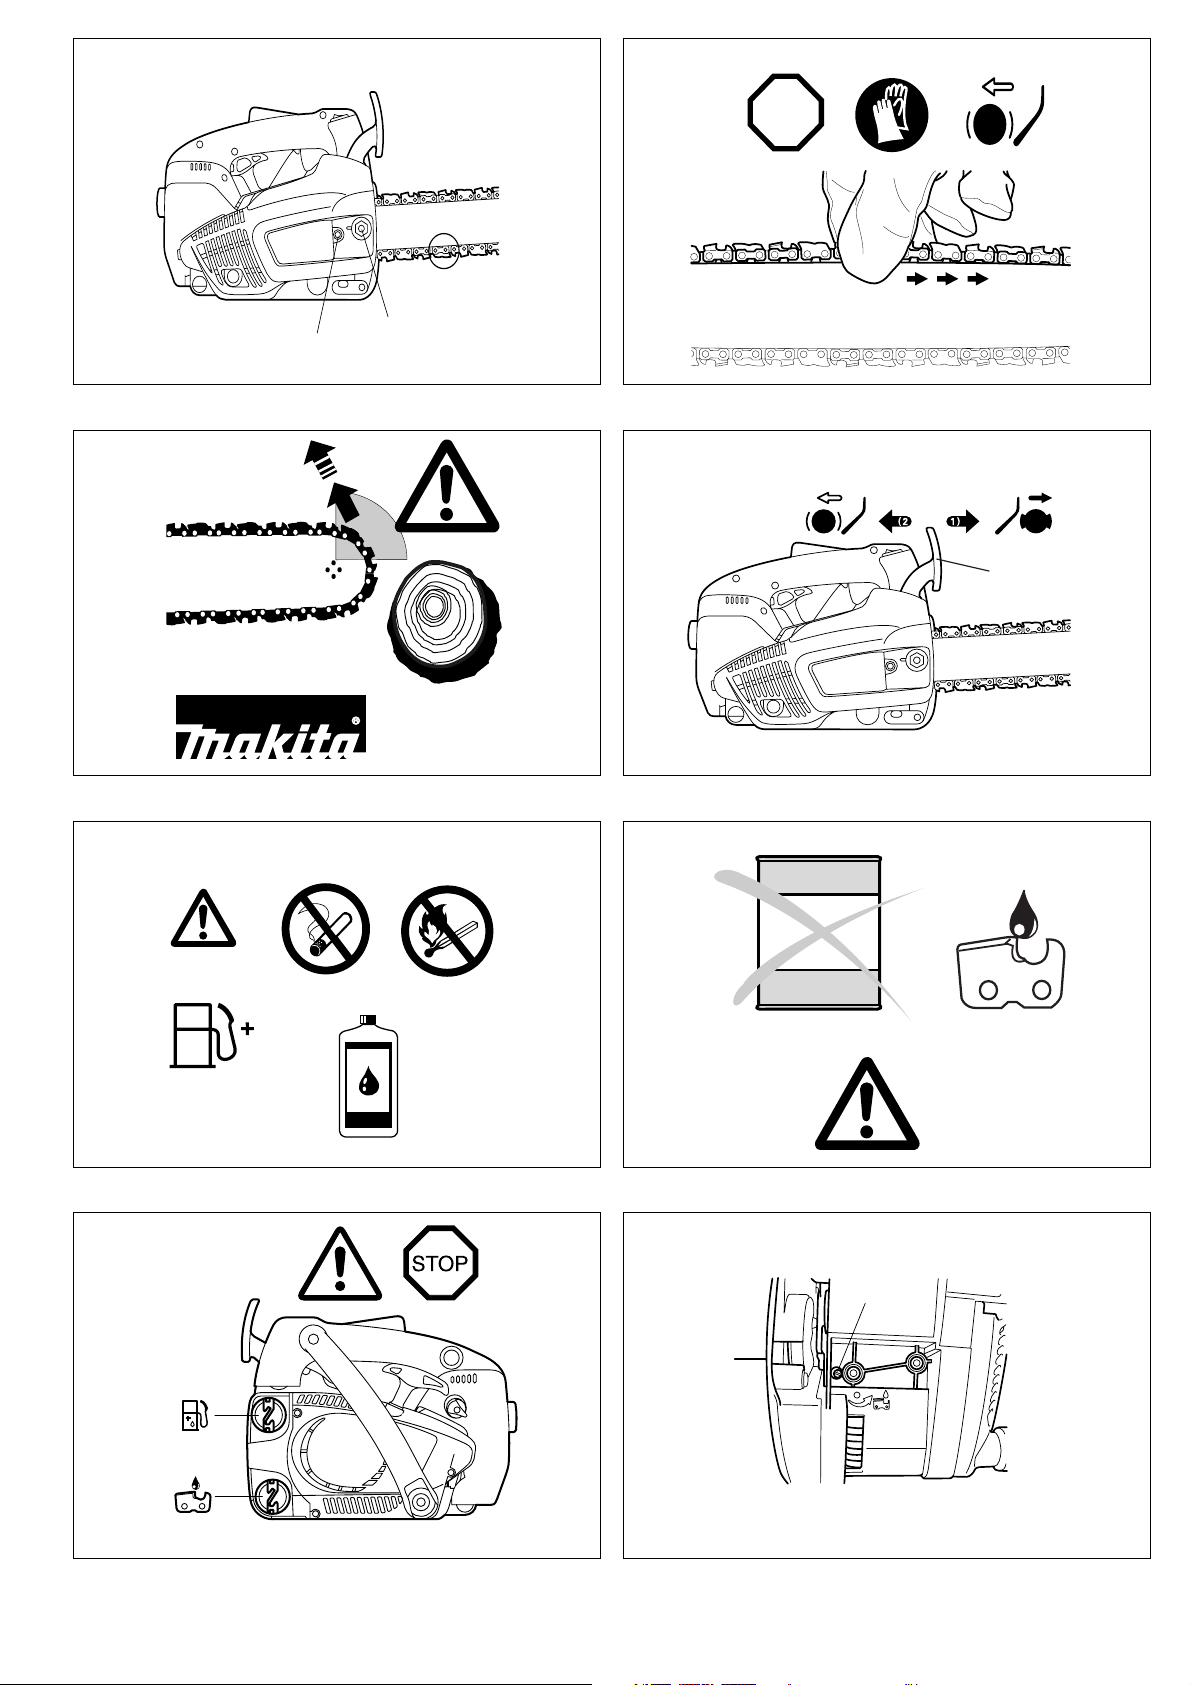
Protective equipment (Fig. 3 & 4)
- In order to avoid head, eye, hand or foot injuries as well as to protect your
hearing the following protective equipment must be used during operation of
the chain saw:
- The kind of clothing should be appropriate, i. e. it should be tight-fitting but not be a
hindrance. Do not wear jewellery or clothing which could become entangled with
bushes or shrubs. If you have long hair, always wear a hairnet!
- It is necessary to wear a protective helmet whenever working with the chain saw.
The protective helmet (1) is to be checked in regular intervals for damage and is
to be replaced after 5 years at the latest. Use only approved protective helmets.
- The face shield (2) of the protective helmet (or the goggles) protects against sawdust and wood chips. During operation of the chain saw always wear a goggle or a
face shield to prevent eye injuries.
- Wear adequate noise protection equipment (ear muffs (3), ear plugs, etc.).
- The protective jacket (4) consists of 22 layers of nylon and protects the operator
against cuts. It is always to be worn when working from elevated platforms (cherry
pickers, lifts), from platforms mounted on ladders or when climbing with ropes.
- The protective brace and bib overall (5) is made of a nylon fabric with 22 layers
and protects against cuts. We strongly recommend its use.
- Protective gloves (6) made of thick leather are part of the prescribed equipment
and must always be worn during operation of the chain saw.
- During operation of the chain saw safety shoes or safety boots (7) fitted with anti
skid sole, steel toe caps and protection for the leg must always to be worn. Safety
shoes equipped with a protective layer provide protection against cuts and ensure
a secure footing. For working in trees the safety boots must be suitable for climbing
techniques.
Fuels / Refuelling
- Stop the engine before refuelling the chain saw.
- Do not smoke or work near open fires (Fig. 5).
- Let the engine cool down before refuelling.
- Fuels can contain substances similar to solvents. Eyes and skin should not come
in contact with mineral oil products. Always wear protective gloves when refuelling.
Frequently clean and change protective clothes. Do not breathe in fuel vapors.
- Do not spill fuel or chain oil. When you have spilt fuel or oil immediately clean the
chain saw. Fuel should not come in contact with clothes. If your clothes have come
in contact with fuel, change them at once.
- Ensure that no fuel or chain oil oozes into the soil (environmental protection). Use
an appropriate base.
- Refuelling is not allowed in closed rooms. Fuel vapors will accumulate near the
floor (explosion hazard).
- Ensure to firmly tighten the screw caps of the fuel and oil tanks.
- Change the place before starting the engine (at least 3 m from the place of refuelling) (Fig. 6).
- Fuel cannot be stored for an unlimited period of time. Buy only as much as will be
consumed in the near future.
- Use only approved and marked containers for the transport and storage of fuel and
chain oil. Ensure children have no access to fuel or chain oil.
Putting into operation
- Do not work on your own. There must be someone around in case of an
emergency.
- Ensure that there are no children or other people within the working area. Pay
attention to any animals in the working area, as well (Fig. 7).
- Before starting work the chain saw must be checked for perfect function and
operating safety according to the prescriptions.
Check especially the function of the chain brake, the correct mounting of the guide
bar, the correct sharpening and tightening of the chain, the firm mounting of the
sprocket guard, the easy motion of the throttle lever and the function of the throttle
lever lock, the cleanliness and dryness of the handles, and the function of the ON/
OFF switch.
- Put the chain saw only into operation if it is completely assembled. Never use the
chain saw when it is not completely assembled.
- Before starting the chain saw ensure that you have a safe footing.
- Put the chain saw into operation only as described in this instruction manual
(Fig. 8). Other starting methods are not allowed.
- When starting the chain saw it must be well supported and securely held. The
guide bar and chain must not be in contact with any object.
- When working with the chain saw always hold it with both hands. Take the
rear handle with the right hand and the tubular handle with the left hand. Hold the
handles tightly with your thumbs facing your fingers. It is extremely dangerous to
work with one hand, as the saw can fall through the completed cut uncontrolled
(high risk of injury). Furthermore, it is impossible to control kickback with one hand.
- CAUTION: When releasing the throttle lever the chain will keep on running
for a short period of time (free-wheeling).
- Continuously ensure that you have a safe footing.
- Hold the chain saw such that you will not breathe in the exhaust gas. Do not work
in closed rooms (danger of poisoning).
- Switch off the chain saw immediately if you observe any changes in its oper-
ating behavior.
- The engine must be switched off before checking the chain tension, tightening the chain, replacing it or clearing malfunctions (Fig. 9).
- When the sawing device is hit by stones, nails or other hard objects, switch off the
engine immediately and check the sawing device.
- When stopping work or leaving the working place switch off the chain saw (Fig. 9)
and put it down such that nobody is endangered.
- Do not put the overheated power chain saw in dry grass or on any inflammable
objects. The muffler is very hot (danger of fire).
- CAUTION: Oil dropping from the chain or guide bar after having stopped the saw
chain will pollute the soil. Always use an appropriate base.
Kickback
- When working with the chain saw dangerous kickbacks may occur.
- Kickback occurs when the upper part of the end of the guide bar inadvertently
touches wood or other hard objects (Fig. 10).
- Before the saw chain enters the cut, it can slip to the side or jump (caution: high
risk of kickback).
- This causes the saw to be thrown back toward the user with great force and out of
control. Risk of injury!
In order to prevent kickback, follow these rules:
- Only specially-trained persons should perform plunge cuts, i.e., piercing timber or
wood with the tip of the saw!
- Always observe the end of the guide bar. Be careful when continuing an already
started cut.
- When starting to cut the chain must be running.
- Ensure that the chain is always sharpened correctly. Pay special attention to the
height of the depth limiter.
- Never cut several branches at the same time. When cutting a branch ensure that
no other branch is touched.
- When crosscutting a trunk be aware of the trunks next to it.
Working behavior/Method of working
- Only use the chain saw during good light and visibility periods. Be aware of slippery or wet areas, and of ice and snow (risk of slipping). The risk of slipping is
extremely high when working on recently peeled wood (bark).
- Never work on unstable surfaces. Make sure that there are no obstacles in the
working area, risk of stumbling. Always ensure that you have a safe footing.
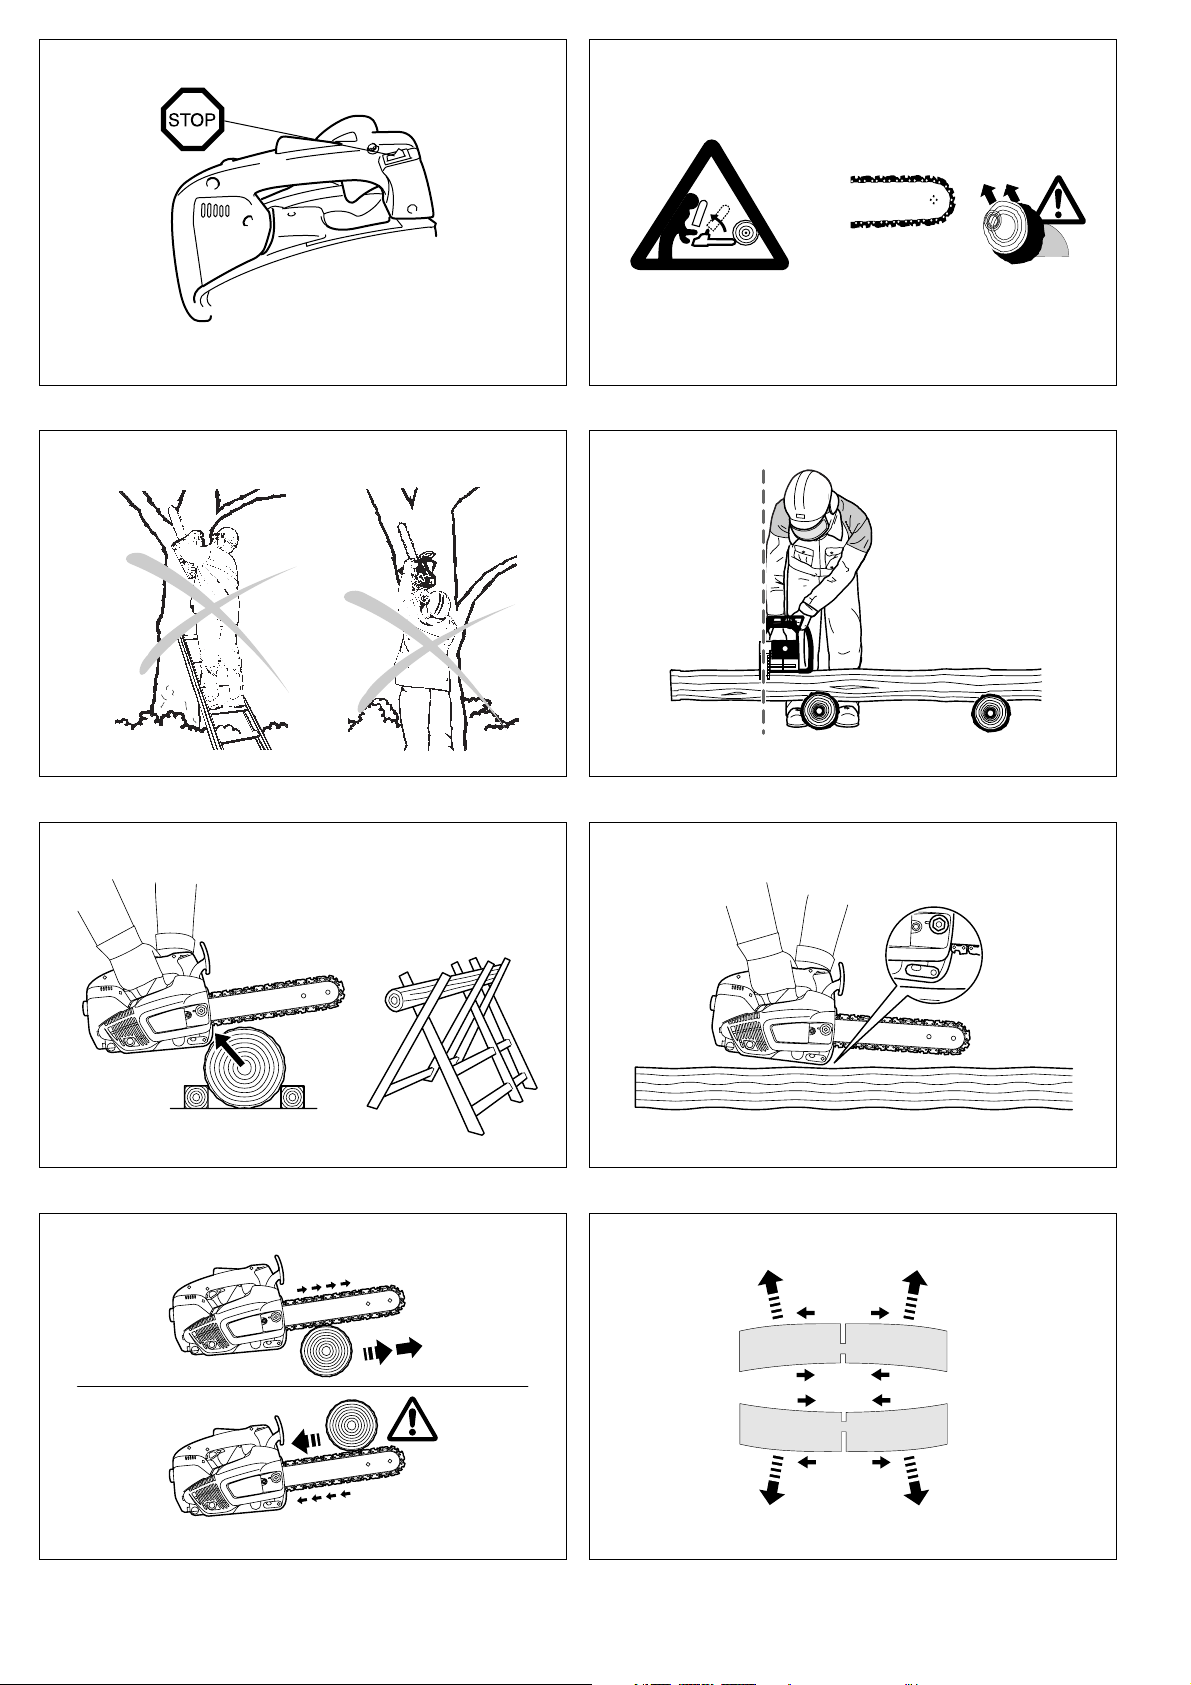
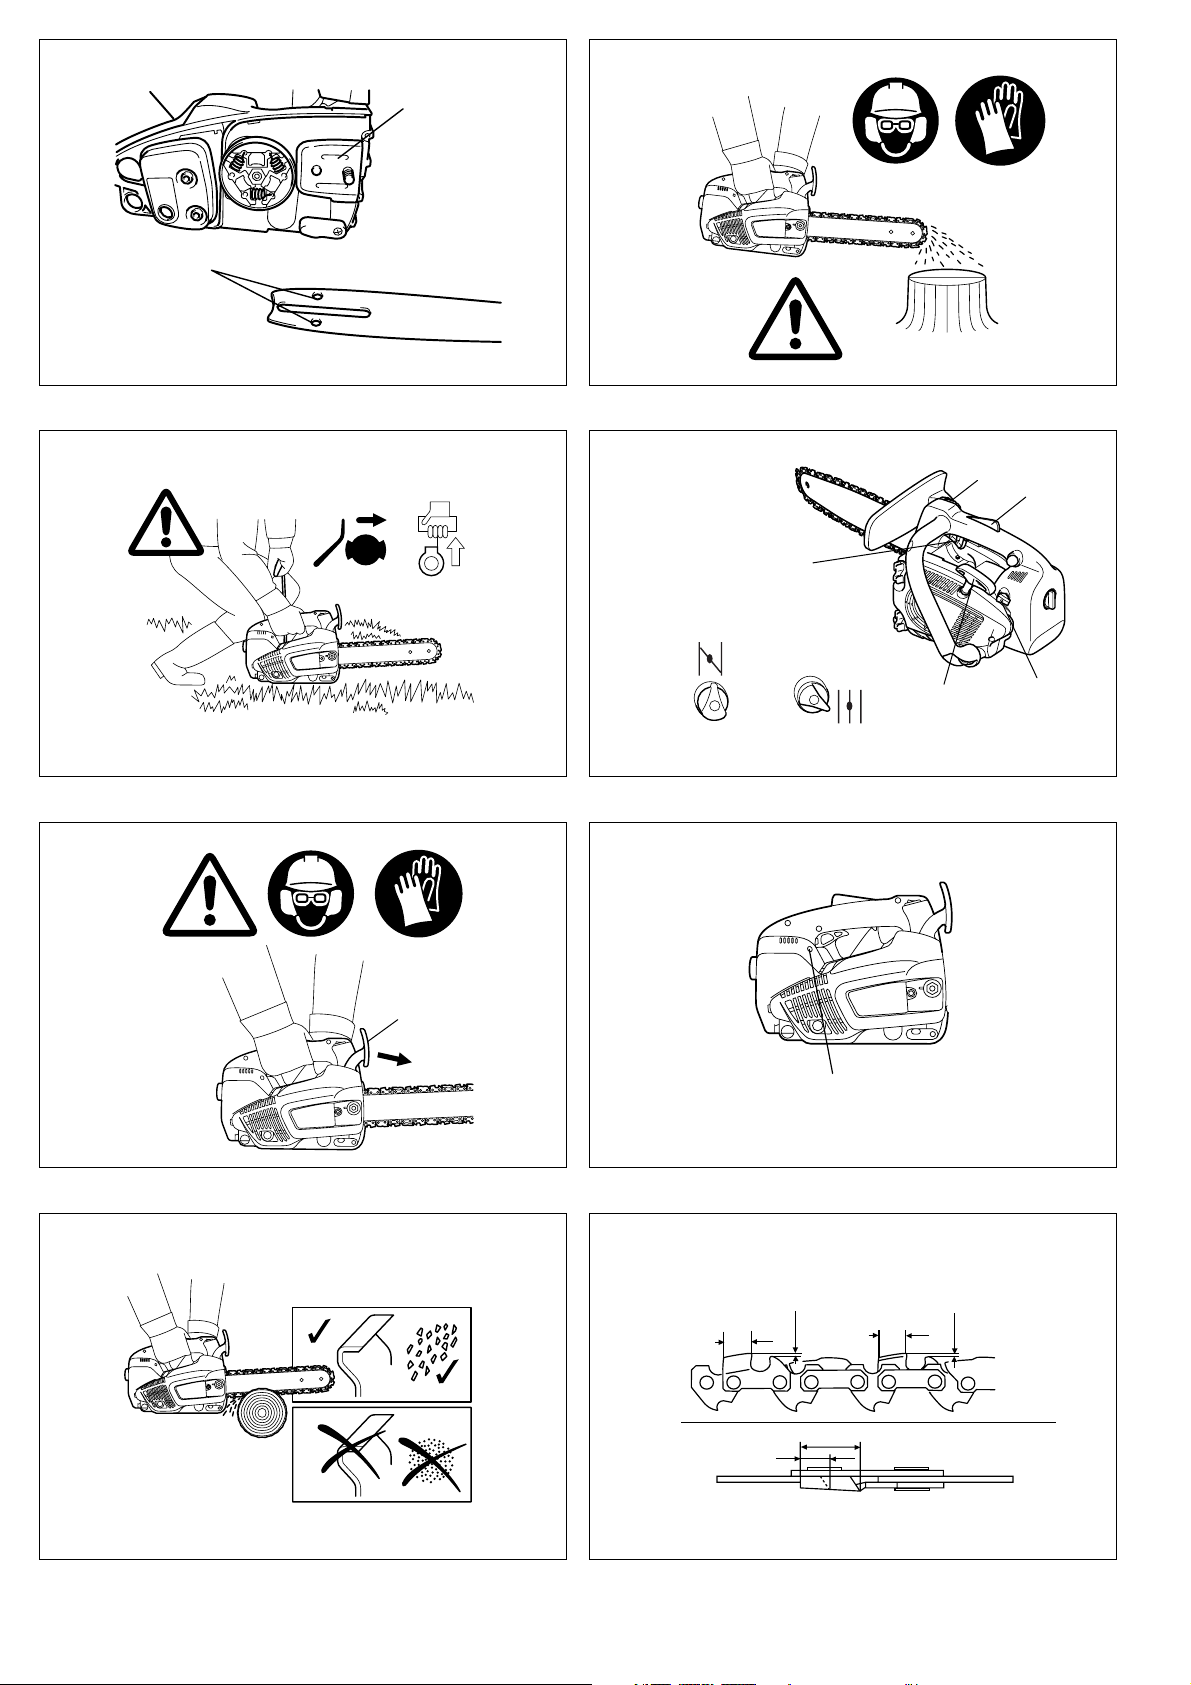
- Never saw above your shoulder height (Fig. 11).
- Never saw while standing on a ladder (Fig. 11).
- Never climb a tree and work without the appropriate restraining systems for the
operator and the saw. We recommend always working from a rising platform
(cherry picker, lift).
- Do not work leaning too far over.
- Guide the chain saw in such a way that no part of your body is within the elongated
swivelling range of the saw (Fig. 12).
- Use the chain saw for sawing wood only.
- Avoid touching the ground with the chain saw while it is still running.
- Never use the chain saw for lifting up or removing pieces of wood or other objects.
- Remove foreign objects such as sand, stones and nails found within the working
area. Foreign objects may damage the sawing device and can cause dangerous
kickback.
- When sawing precut timber use a safe support (sawing jack, (Fig. 13)). Do not
steady the workpiece with your foot, and do not allow anyone else to hold or steady
it.
- Secure round pieces against rotation.
- Before performing a crosscut firmly apply the front of the body to the timber, only
then can the timber be cut with the chain running. For this the chain saw is lifted at
the rear handle and guided with the tubular handle. The front of the body serves as
a centre of rotation. Continue by slightly pressing down the tubular handle and
simultaneously pulling back the chain saw. Apply the front of the body a little bit
deeper and once again lift the rear handle.
- When the timber must be pierced for cutting or longitudinal cuts are to be
performed it is urgently recommended to have this carried out by specially
trained persons only (high risk of kickback).
-Do longitudinal - lengthwise - cuts at the lowest possible angle (Fig. 14). Be
very careful when doing this type of cut, as the front body cannot grip.
- The saw must be running whenever you remove the chain saw from the wood.
- When performing several cuts the throttle lever must be released in between.
- Be careful when cutting splintery wood. Cut pieces of wood may be pulled along
(risk of injuries).
- When cutting with the upper edge of the guide bar, the chain saw may be pushed
in the direction of the user if the chain gets clamped. For this reason use the lower
edge of the bar whenever possible. The chain saw will then be pushed away from
you (Fig. 15).
- If the timber is under tension (Fig. 16), first cut the pressure side (A). Then the
crosscut can be performed on the tension side (B). Thus clamping of the guide bar
can be avoided.
16
Page 17

CAUTION:
People felling trees or cutting of branches must be specially trained. High risk
of injuries!
- When cutting of branches, the chain saw should be supported on the trunk. Do not
use the end of the bar for cutting (risk of kickback).
- Be aware of branches under tension. Do not cut free branches from below.
- Never perform detensioning cuts while standing on the trunk.
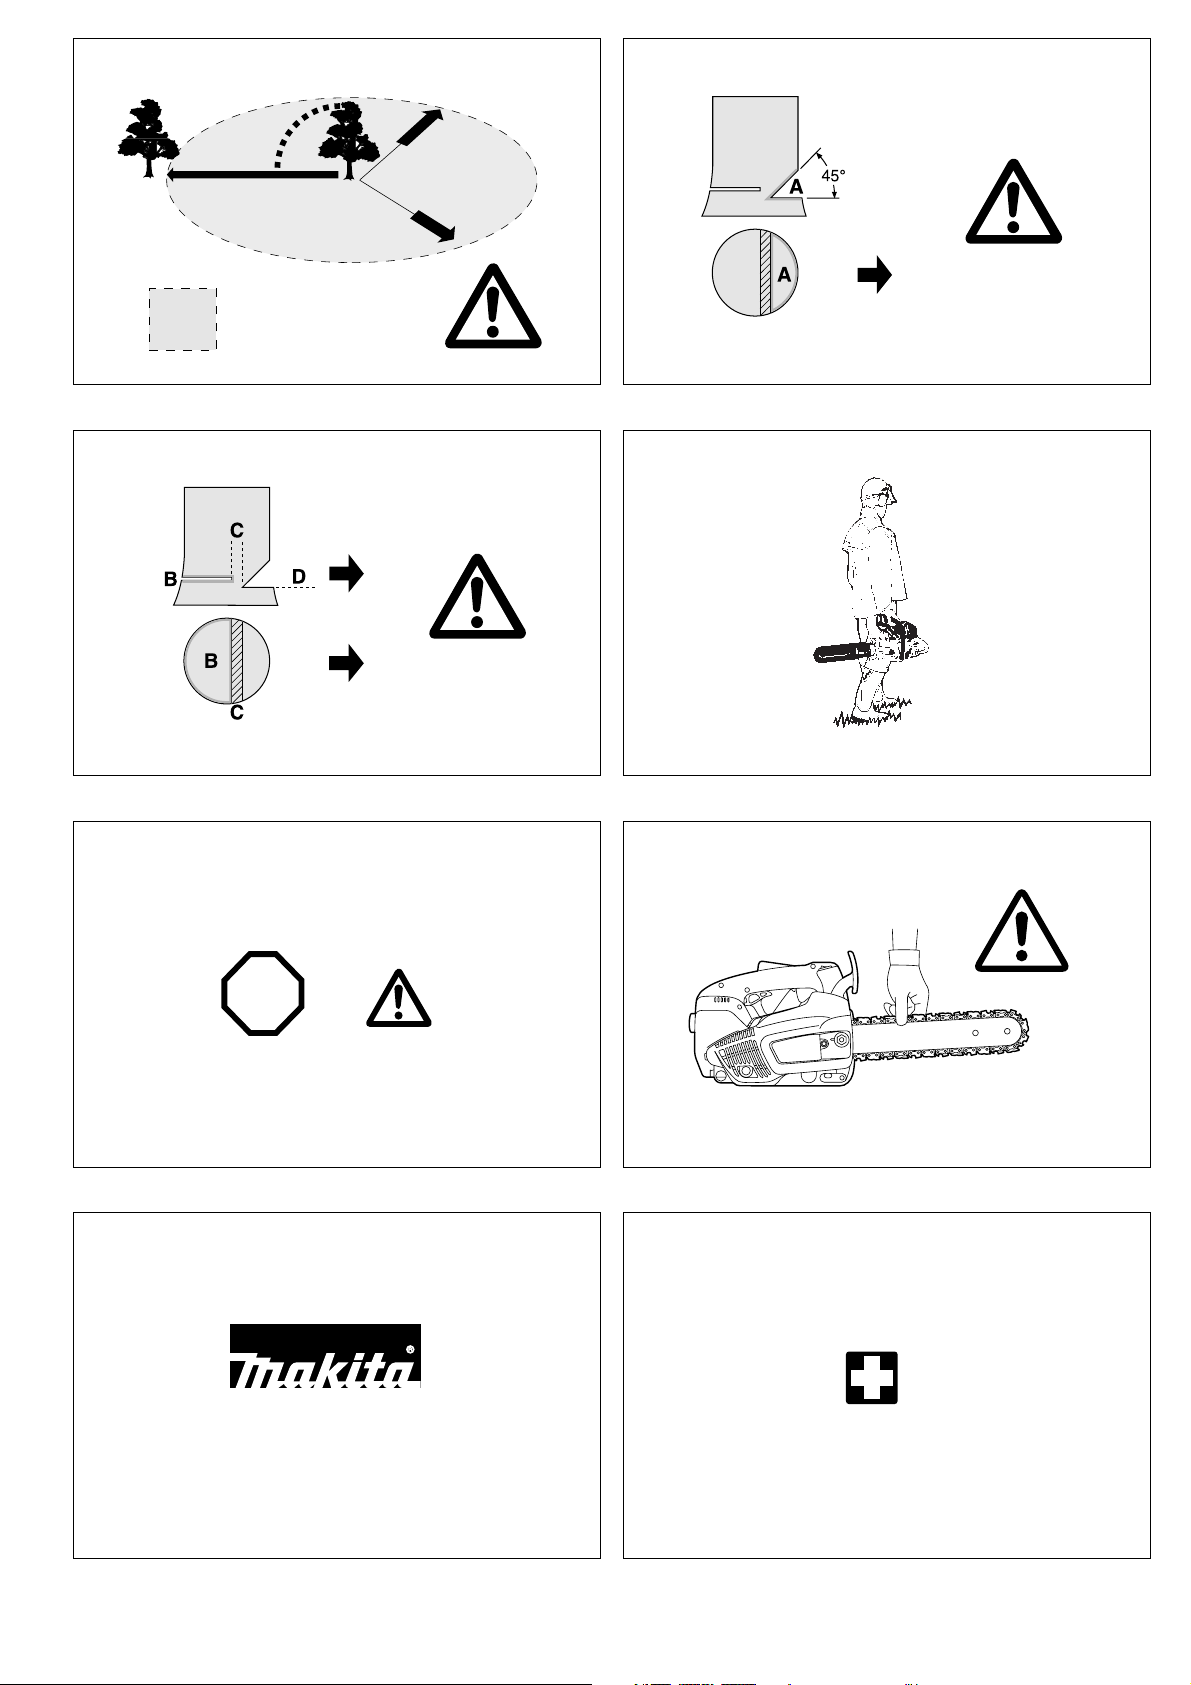
- Before cutting down a tree ensure that
a) only those people are within the working area which are actually involved in
cutting down the tree.
b) every worker involved can withdraw without stumbling (the people should with-
draw backwards in a diagonal line, i. e. at a degree of 45°).
c) the bottom part of the trunk is free from foreign objects, underbrush and
branches. Make sure to have a safe footing (risk of stumbling).
d) the next working place is at least 2 1/2 tree lengths away (Fig. 17). Before cut-
ting down the tree check the direction of fall and make sure that there are neither people nor objects within a distance of 2 1/2 tree lengths.
- Judging the tree:
Direction of hanging - loose or dry branches - height of the tree - natural overhang
- is the tree rotten?
- Take into account the direction and speed of the wind. If strong gusts are occurring, do not do any felling. Avoid sawdust (pay attention to the direction the wind is
blowing)!
- Cutting the roots:
Start with the strongest root. First do the vertical and then the horizontal cut.
- Notching the trunk (Fig. 18, A):
The notch determines the direction of fall and guides the tree. The trunk is notched
perpendicular to the direction of fall and penetrates 1/3 – 1/5 of the trunk diameter.
Perform the cut near the ground.
- When correcting the cut, always do so over the whole width of the notch.
- Cut down the tree (Fig. 19, B) above the bottom edge of the notch (D). The cut
must be exactly horizontal. The distance between both cuts must be approx. 1/10
of the trunk diameter.
-The material between both cuts (C) serves as a hinge. Never cut it through, oth-
erwise the tree will fall without any control. Insert felling wedges in time.
- Secure the cut only with wedges made of plastic or aluminium. Do not use iron
wedges. If the saw hits an iron wedge the chain can be seriously damaged or torn.
- When cutting down a tree always stay sidewards of the falling tree.
- When withdrawing after having performed the cut, be alert for falling branches.
- When working on sloping ground the user of the chain saw must stay above or
sidewards of the trunk to be cut or the tree already cut down.
- Be alert for trunks which may roll towards you.
Transport and storage
- When changing your location during work switch off the chain saw and actuate the
chain brake in order to prevent an inadvertent start of the chain.
- Never carry or transport the chain saw with the chain running.
- When transporting the chain saw over long distances the guide bar protection
- Carry the chain saw with the tubular handle. The guide bar points backwards
(Fig. 20). Avoid coming in contact with the muffler (danger of burns).
- Ensure safe positioning of the chain saw during car transportation to avoid fuel or
chain oil leakage.
- Store the chain saw safely in a dry place. It must not be stored outdoors. Keep the
chain saw away from children.
- Before storing the chain saw over a long period of time or shipping it the fuel and
oil tanks must be completely emptied.
Maintenance
- Before performing maintenance work switch off the chain saw (Fig. 21) and
pull out the plug cap.
- Before starting work always check the operating safety of the chain saw, in particular the function of the chain brake. Make sure the saw chain is properly sharpened
and tensioned (Fig. 22).
- Operate the chain saw only at a low noise and emission level. For this ensure the
carburetor is adjusted correctly.
- Regularly clean the chain saw.
- Regularly check the tank cap for tightness.
Observe the accident prevention instructions issued by trade associations and
insurance companies. Do not perform any modifications on the chain saw. You
will put your safety at risk.
Perform only the maintenance and repair works described in the instruction manual.
All other work must be carried out by MAKITA Service. (Fig. 23)
Use only original MAKITA spare parts and accessories.
Using spare parts other than original MAKITA parts or accesories and guide bar/
chain combinations or lengths which are not approved bring a high risk of accidents.
We cannot accept any responsibility for accidents and damage resulting from using
sawing devices or accesories which have not been approved.
First aid (Fig. 24)
For the event of a possible accident, please make sure that a first aid kit is always
immediately available close by. Immediately replace any items used from the first aid
box.
When calling for help, give the following information:
- Place of the accident
- What happened
- Number of injured people
- Kind of injuries
- Your name!
NOTE:
Individuals with poor circulation who are exposed to excessive vibration may experience injury to blood vessels or the nervous system.
Vibration may cause the following symptoms to occur in the fingers, hands or wrists:
“Falling asleep” (numbness), tingling, pain, stabbing sensation, alteration of skin
colour or of the skin.
If any of these symptoms occur, see a physician!
cover (delivered with the chain saw) must be applied.
Technical data
Stroke volume cm
3
22.2
Bore mm 33
Stroke mm 26
Max. power at speed kW/min
Max. torque at speed Nm/min
Idling speed / max. engine speed with bar and chain min
Coupling speed min
Sound pressure level at the workplace L
Sound power level L
Vibration acceleration a
per ISO/CD 22868
WA av
per ISO 7505
h,w av
per ISO/CD 22868
pA av
1)
1)
1)
- Tubular handle m/s
- Rear handle m/s
-1
-1
dB (A) 95.0
dB (A) 104.1
2
2
-1
-1
0.74/8,000
0.97/6,500
3,000/11,500 (DCS230T),
3,000/10,500 (DCS231T)
4,500
4.3
5.6
Carburetor (diaphragm carburetor) Type Walbo WYL
Ignition system Type electronic
Spark plug Type NGK CMR 6A
Electrode gap mm 0.6–0.7
Fuel consumption at max. load per ISO 7293 kg/h 0.41
Specific consumption at max. load per ISO 7293 g/kWh 561
Fuel tank capacity cm
Chain oil tank capacity cm
3
3
200
190
Mix ratio (fuel/two-stroke oil) 25:1
Chain brake Actuation manually or by kickback
Chain speed
2)
m/s 14.9 (91VG) 13.6 (25AP)
Sprocket pitch inch 3/8 (91VG) 1/4 (25AP)
Number of teeth Z 6 (91VG) 8 (25AP)
Pitch / Driving element strength inch 3/8 /0.050 (91VG) 1/4 /0.050 (25AP)
Guide bar, length of a cut cm 25
Weight (fuel tank empty, without chain and guide bar) kg 2.5
1) Figures derived in equal part from idle, full-load, and top-speed operation.
2) At max. power
17
Page 18

Denomination of components
1. Rear handle
2. Safety locking button (throttle lock)
3. Throttle lever
4. Hand guard (release for chain brake)
5. Chain
6. Guide bar
7. Guide bar case
8. Retaining nuts
9. Chain catch (safety device)
10. Sprocket cover
11. Muffler
12. Spark plug
13. Front grip (tubular handle)
14. Starter grip
15. I/STOP-switch (short-circuit switch)
16. Carabiner or rope attachment point
17. Oil tank cap
18. Fan housing with starting assembly
19. Fuel tank cap
20. Air filter cover
21. Choke lever
22. Primar pump
3
4
2
1
12
16
10
11
19
17
5
15
7
6
8
9
13
15
14
22
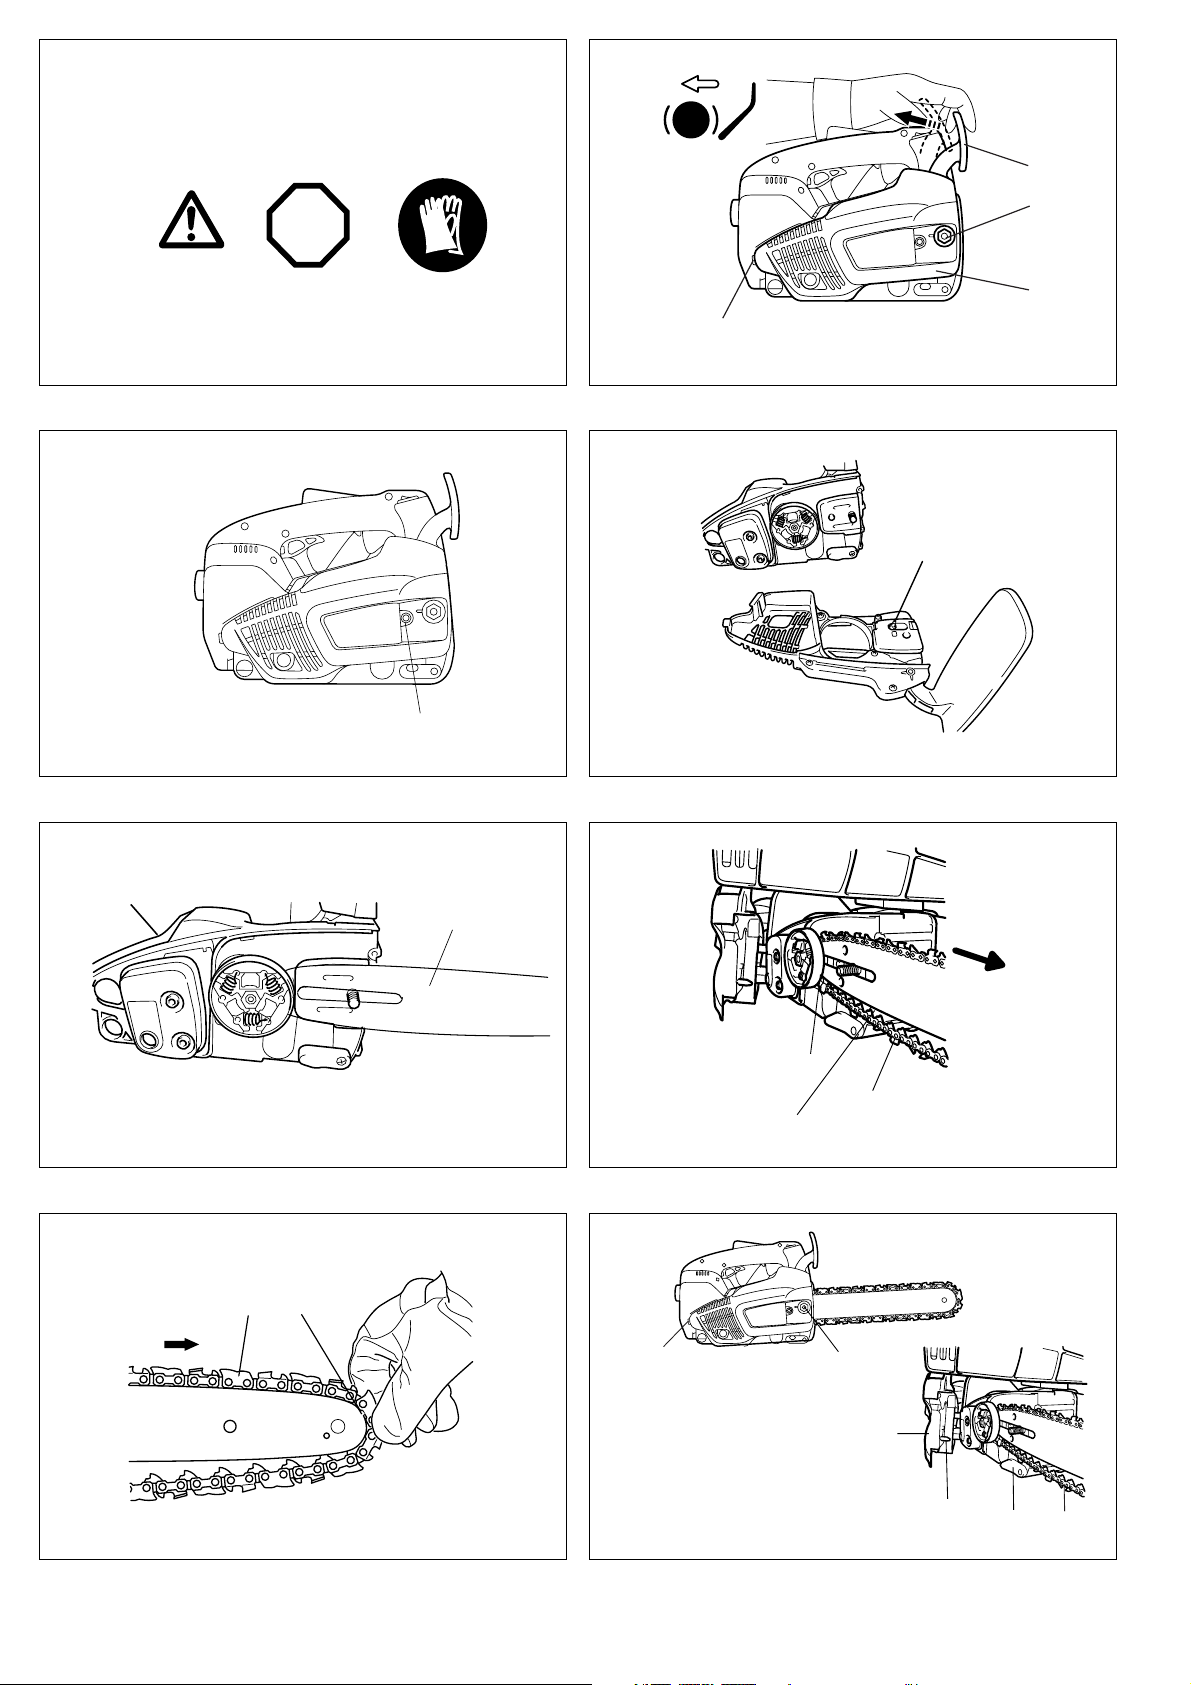
PUTTING INTO OPERATION (Fig. 25)
CAUTION:
Before doing any work on the guide bar or chain, always switch off the engine
and pull the plug cap off the spark plug (see “Replacing the spark plug”).
Always wear protective gloves!
CAUTION:
Do not start the saw until it has been completely assembled and inspected!
Mounting the guide bar and saw chain (Fig. 26)
Use the universal wrench delivered with the chain saw for the following work.
Put the chain saw on a stable surface and carry out the following steps for mounting
the guide bar and chain:
Disengage the chain brake by pulling the hand guard (1) in the direction of the arrow.
Unscrew retaining nut (2).
Carefully spread the sprocket cover (3), pull it from its fixture (4) and remove it.
Turn the chain adjusting screw (5) to the left (counterclockwise) until the pin (6) is at
the right stop. (Fig. 27 & 28)
Position the guide bar (7). (Fig. 29)
Lift the chain (9) over the sprocket (10). Using your right hand, guide the chain into
the top guide groove (11) on the guide bar. (Fig. 30)
Note that the cutting edges along the top of the chain must point in the direction of the arrow!
Pull the chain (9) around the nose (12) of the guide bar in the direction of the arrow.
Pull the guide bar by hand fully toward its nose. Make sure that the chain blade fits
the grooves of the guide bar. (Fig. 31)
First, push the sprocket cover (3) into its fixture (4). Make sure that the pin (8) of the
chain tightener is in the hole on the guide bar. Then push it over the retaining bolt
while lifting the saw chain (9) over the chain catch (13).
Manually tighten the retaining nut (2). (Fig. 32)
Tightening the saw chain
Turn the chain adjusting screw (5) to the right (clockwise) until the chain engages the
guide groove of the bottom side of the bar (see circle).
Slightly lift the end of the guide bar and turn the chain adjusting screw (5) to the right
(clockwise) until the chain rests against the bottom side of the guide bar.
While still holding up the tip of the guide bar, tighten the retaining nuts (2) with the universal wrench. (Fig. 33)
Checking the chain tension (Fig. 34)
The tension of the chain is correct if the chain rests against the bottom side of the
guide bar and can still be easily turned by hand.
While doing so the chain brake must be released.
Check the chain tension frequently - new chains tend to get longer during use!
When checking the chain tension the engine must be switched off.
NOTE:
It is recommended to use 2 – 3 chains alternatively.
In order to guarantee uniform wear of the guide bar the bar should be turned over
whenever replacing the chain.
Chain brake (Fig. 35)
The DCS230T/DCS231T comes with an inertia chain brake as standard equipment. If
kickback occurs due to contact of the guide-bar tip with wood (see “SAFETY PRECAUTIONS”), the chain brake will stop the chain through inertia if the kickback is sufficiently strong.
The chain will stop within a fraction of a second.
The chain brake is installed to block the saw chain before starting it and to stop
it immediately in case of an emergency.
18
IMPORTANT: NEVER run the saw with the chain brake activated! Doing so can
very quickly cause extensive engine damage!
ALWAYS release the chain brake before starting the work!
NOTE:
The chain brake is a very important safety device and like any other component
subject to normal wear and tear. Regular inspection and maintenance are
important for your own safety and must be done by a MAKITA service centre.
Engaging the chain brake
If the kickback is strong enough the sudden acceleration of the guide bar combined
with the inertia of the hand guard (1) will automatically actuate the chain brake.
To engage the chain brake manually, simply push the hand guard (1) forward
(towards the tip of the saw) with your left hand (arrow 1).
Releasing the chain brake
Pull the hand guard (1) towards you (arrow 2) until you feel it catch. The brake is now
released.
(braking)
20
21
(Fig. 36)
Fuel (Fig. 37)
CAUTION:
This saw is powered by mineral-oil products (gasoline (petrol) and oil).
Be especially careful when handling gasoline (petrol).
Avoid all flame or fire. Do not smoke (explosion hazard).
Fuel mixture
The engine of the chain saw is a high-efficiency two-stroke engine. It runs on a mixture of gasoline and two-stroke engine oil.
The engine is designed for unleaded regular gasoline with a min. octane value of 91
ROZ. In case no such fuel is available, you can use fuel with a higher octane value.
This will not affect the engine.
In order to obtain an optimum engine output and to protect your health and the
environment use unleaded fuel only.
For lubricating the engine use a two-stroke engine oil (quality grade: JASO FC, ISO
EGO), which is added to the fuel.
Caution: Do not use ready-mixed fuel from petrol stations.
The correct mixture ratio:
25:1 i.e. mix 25 parts gasoline with 1 part oil.
NOTE:
For preparing the fuel-oil mixture first mix the entire oil quantity with half of the fuel
required, then add the remaining fuel. Shake the mixture thoroughly before pouring it
into the tank.
It is not wise to add more engine oil than specified to ensure safe operation.
This will only result in a higher production of combustion residues which will
pollute the environment and clog the exhaust channel in the cylinder as well as
the muffler. In addition, fuel consumption will rise and performance will
decrease.
The Storage of Fuel
Fuels have a limited storage life. Fuel and fuel mixtures age. Therefore fuel and fuel
mixtures, which have been stored for too long, can cause starting problems. Purchase only that amount of fuel, which will be consumed over the next few months.
Store fuel safely in a dry place in approved containers only.
18
Page 19

AVOID SKIN AND EYE CONTACT
Mineral oil products degrease your skin. If your skin comes in contact with these substances repeatedly and for an extended period of time, it will desiccate. Various skin
deseases may result. In addition, allergic reactions are known to occur. Eyes can be
irritated by contact with oil. If oil comes into your eyes, immediately wash them with
clear water.
If your eyes are still irritated, see a doctor immediately!
Chain oil
Use an oil with adhesive additive for lubricating the chain and guide
bar. The adhesive additive prevents the oil from being flung off the
chain too quickly.
We recommend the use of chain oil which is bio-degradable in order to
protect the environment. The use of bio-degradable oil may even be
required by local regulations.
The chain oil BIOTOP sold by MAKITA is made of special vegetable oils and is 100%
bio-degradable. BIOTOP has been granted the “blue angel” (Blauer UmweltschutzEngel) for being particularly environment-friendly (RAL UZ 48).
Important note on bio-degradable chain oils:
If you are not planning to use the saw again for an extended period of time, empty the
oil tank and put in a small amount of regular engine oil (SAE 30), and then run the
saw for a time. This is necessary to flush out all remaining bio-degradable oil from the
oil tank, oil-feed system, chain and guide bar, as many such oils tend to leave sticky
residues over time, which can cause damage to the oil pump or other parts.
The next time you use the saw, fill the tank with BIOTOP chain oil again. In case of
damage caused by using waste oil or inappropriate chain oil the product guarantee
will be null and void.
Your salesman will inform you about the use of chain oil.
NEVER USE WASTE OIL (Fig. 38)
Waste oil is very dangerous for the environment.
Waste oil contains high amounts of carcinogenic substances. Residues in waste oil
result in a high degree of wear and tear at the oil pump and the sawing device.
In case of damage caused by using waste oil or unappropriate chain oil the product
guarantee will be null and void.
Your salesman will inform you about the use of chain oil.
AVOID SKIN AND EYE CONTACT
Mineral oil products degrease your skin. If your skin comes in contact with these substances repeatedly and for an extended period of time, it will desiccate. Various skin
deseases may result. In addition, allergic reactions are known to occur. Eyes can be
irritated by contact with oil. If oil comes into your eyes, immediately wash them with
clear water.
If your eyes are still irritated, see a doctor immediately!
BIOTOP chain oil is available in the following sizes:
1 l order number 980 008 210
5 l order number 980 008 211
Bio-degradable oil is stable only for a limited period of time. It should
be used within 2 years from the date of manufacture (printed on the
container).
Refuelling (Fig. 39)
Checking the chain lubrication (Fig. 42)
Never work with the chain saw without sufficient chain lubrication. Otherwise the service life of the chain and guide bar will be reduced.
Before starting work check the oil level in the tank and the oil feed.
Check the oil feed rate as described below: Start the chain saw (see “Starting the
engine”).
Hold the running chain saw approx. 15 cm above a trunk or the ground (use an appropriate base).
If the lubrication is sufficient, you will see a light oil trace because oil will be flung off
the sawing device. Pay attention to the direction the wind is blowing and avoid unnecessary exposure to the oil spray!
NOTE:
After the saw has been turned off it is normal for residual chain oil to drip from the oil
feed system, the guide bar and the chain for a time. This does not constitute a defect!
Place the saw on a suitable surface.
Starting the engine (Fig. 43)
Do not start the saw until it has been completely assembled and inspected!
Move at least 3 m away from the place where you fuelled the saw.
Make sure you have a good footing, and place the saw on the ground in such a way
that the chain is not touching anything.
Engage the chain brake (lock).
Grasp the rear handle firmly in one hand and hold the saw firmly against the ground.
Press with one knee on the rear handle.
IMPORTANT: The choke lever (5) is coupled to the throttle lever (1). It will revert to its
original position automatically once the throttle lever has been pressed.
If the throttle lever is pressed before the engine starts, then the choke lever (5) will
have to be reset to the appropriate position. (Fig. 44)
Cold start:
Push the short-circuit switch (3) forward.
Turn the choke lever (5) to position . Push primer pump 7-10 times.
Slowly pull out the starter cable (4) until you notice resistance (the piston is positioned
before the top dead centre). (Fig. 44)
Now continue to pull quickly and powerfully. The engine will start after 2 to 4
attempts and will continue to run (at low temperatures, several starting pulls might be
necessary).
CAUTION: Do not pull out the starter cable more than approx. 50 cm, and lead it back
by hand. For efficient starting, it is important to pull the starter cable quickly and powerfully.
As soon as the engine is running smoothly, gently press the throttle lever (1) once
(grasp the handle, the safety locking button (2) will release the throttle lever) this will
cause the choke lever (5) to spring back to its original position and the engine will
then run at idling speed. (Fig. 44)
Now release the chain brake
Warm start:
Proceed as described under cold start, but place the choke lever (5) to
position
. (Fig. 44)
.
FOLLOW THE SAFETY PRECAUTIONS!
Be careful and cautious when handling fuels.
The engine must be switched off!
Thoroughly clean the area around the caps, to prevent dirt from getting into the fuel or
oil tank.
Unscrew the cap and fill the tank with fuel (fuel/oil mixture) or chain oil as the case
may be. Fill up to the bottom edge of the filler neck. Be careful not to spill fuel or chain
oil!
Tighten the fuel caps far as it will go.
Clean screw cap and tank after refuelling.
Lubricating the chain
During operation there must always be sufficient chain oil in the
chain-oil tank to provide good chain lubrication. One filling is sufficient for about one half-hour of continuous operation. When working,
check that there is still sufficient chain oil in the tank and top up if
necessary. Check only when the engine is switched off!
1 fuel/oil mixture
2 chain oil
Adjusting the chain lubrication (Fig. 40)
The engine must be switched off.
You can adjust the oil pump feed rate with the adjusting screw (1).
The amount of oil can be adjusted using the universal wrench.
To ensure troublefree operation of the oil pump the oil guide groove
at the housing (2) and the oil inlet bore in the guide bar (3) must be
cleaned regularly. (Fig. 41)
Important: If the fuel tank has been completely emptied and the engine has stopped
due to lack of fuel, press the primer pump 7 – 10 times. (Fig. 44)
Stopping the engine
Put the short-circuiting switch (3) in position “STOP”. (Fig. 44)
Checking the chain brake (Fig. 45)
Do not work with the chain saw without first checking the chain brake!
Start the engine as described (make sure you have a good footing, and place the
chain saw on the ground in such a way that the guide bar is free of contact).
Grasp the tubular handle firmly with one hand and hold the grip with the other.
With the engine running at moderate speed, press the hand guard (6) in the direction
of the arrow with the back of your hand until the chain brake engages. The chain
should stop immediately.
Immediately release the throttle and release the chain brake.
IMPORTANT: If the chain does not stop immediately in this test, do not under
any circumstances proceed with work. Contact a MAKITA service center.
Adjusting the carburetor (Fig. 46)
The carburetor eliminates the need to adjust the idle and main nozzles, and no such
adjustment is possible.
If necessary, the idle speed can be adjusted using the adjustment screw (11).
As installed, the carburetor has fixed nozzles for the air pressure at sea level.
Before undertaking the adjustment, run the engine for 3 – 5 minutes to warm it up, but
not at high speed!
Set idle speed
Turning the adjusting screw (11) in (clockwise): increases the idle speed.
Turning it out (counterclockwise): lowers the idle speed.
Caution: In no case should the chain move.
At heights above 1000 m/3300 feet it may be necessary to
replace the carburetor nozzles.
Adjust the carburettor using the screwdriver (7, which has a blade
width of 4 mm).
19
Page 20

MAINTENANCE (Fig. 47)
Sharpening the saw chain
CAUTION: Before doing any work on the guide bar or chain, always switch off
the engine and pull the plug cap off the spark plug (see “Replacing the spark
plug”). Always wear protective gloves!
The chain needs sharpening when:
The sawdust produced when sawing damp wood looks like wood flour.
The chain penetrates the wood only under great pressure. The cutting edge is visibly
damaged.
The saw is pulled to the left or right when sawing. This is caused by uneven sharpening of the chain.
Important: Sharpen frequently, but without removing too much metal!
Generally, 2 or 3 strokes of the file will be enough.
Have the chain resharpened at a service centre when you have already sharpened it
yourself several times.
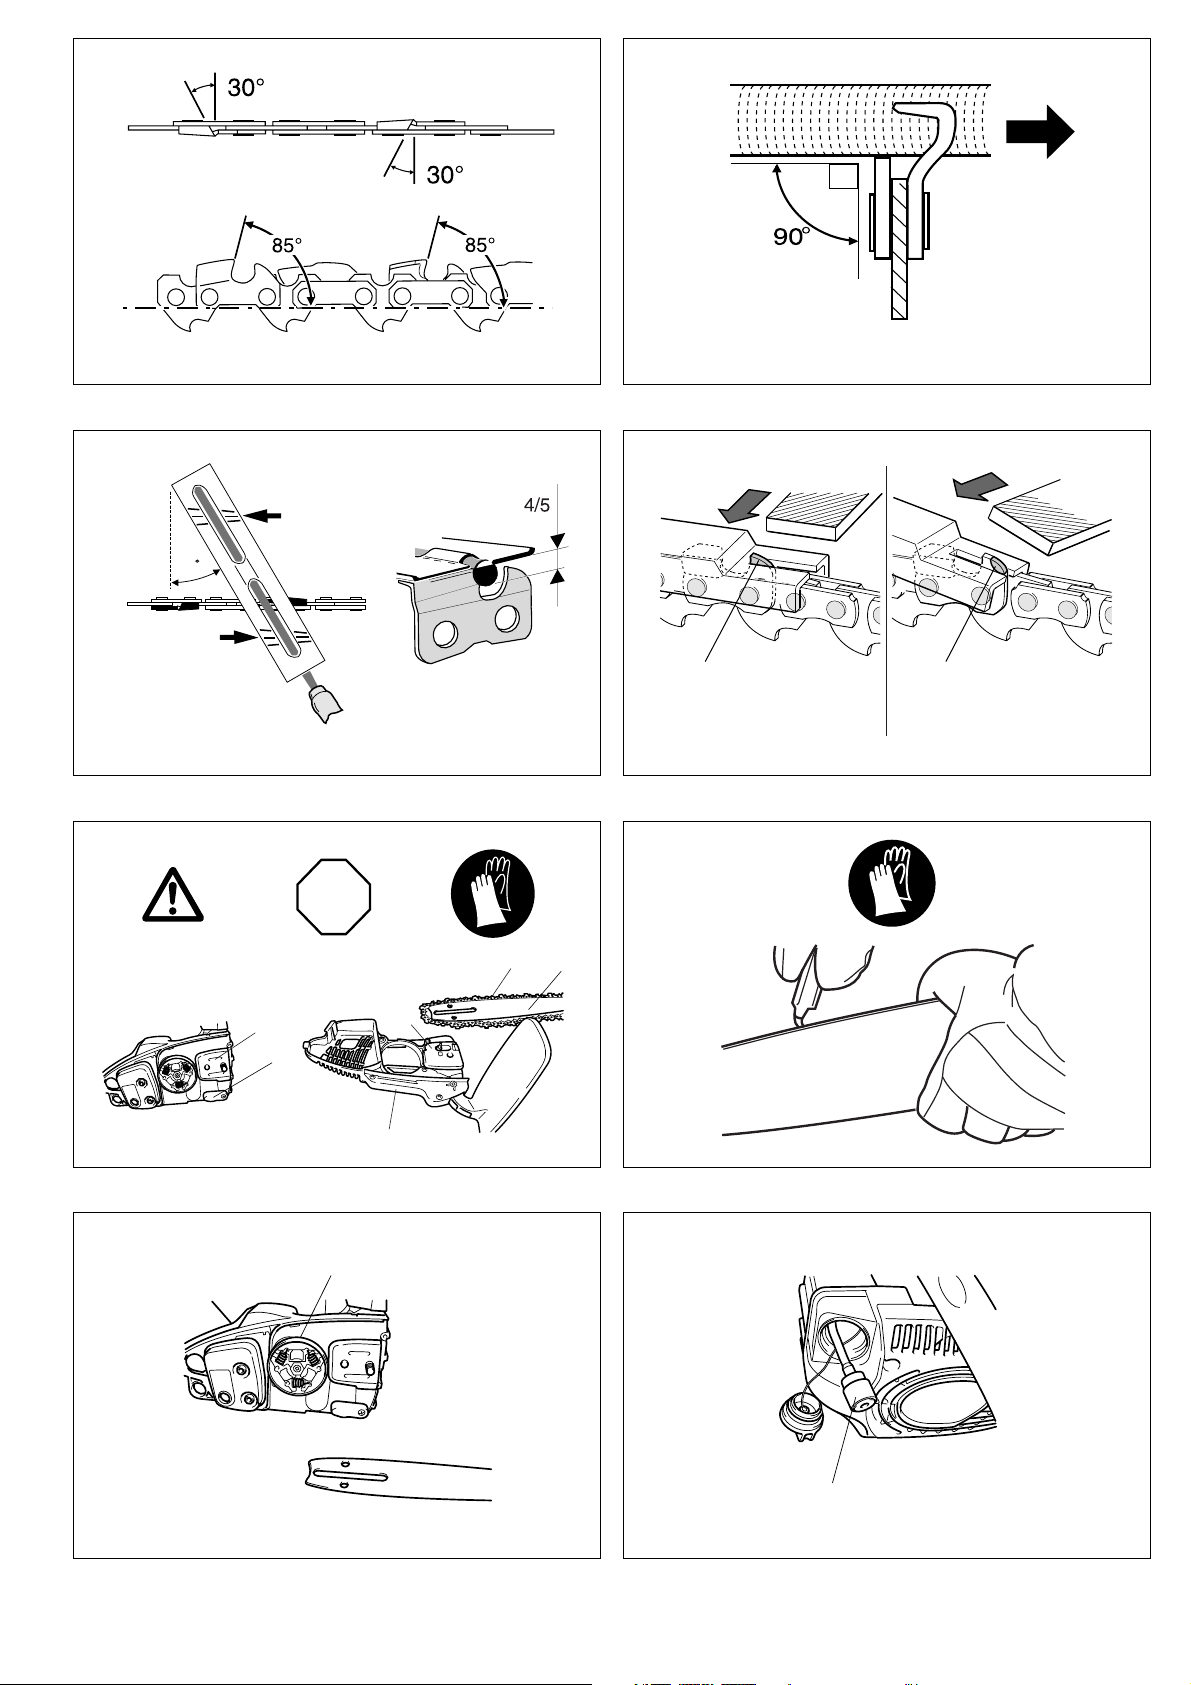
Proper sharpening: (Fig. 48)
CAUTION: Use only chains and guide bars designed for this saw.
All cutters must be of the same length (dimension a). Cutters with different lengths
result in rough running of the chain and can cause cracks in the chain.
Minimum cutter length is 3 mm. Do not resharpen the chain when the minimum cutter
length has been reached; at this point, the chain must be replaced.
The depth of the cut is determined by the difference in height between the depth limiter (round nose) and the cutting edge.
The best results are obtained with a depth-limiter depth of 0.65 mm (.025”).
CAUTION: Excessive depth increases the risk of kickback!
All cutters must be sharpened to the same angle, 30°. Different angles result in a
roughly, irregularly running chain, increase wear and tear and cause chain beakage.
The 85° front rake of the cutter results from the cut depth of the round file. If the
proper file is used in the right manner, the correct front rake will be obtained automatically. (Fig. 49)
Files and how to work with them (Fig. 50)
Use a special round file for chains (dia. 4 mm) for sharpening the chain. Normal
round files are not appropriate for this work.
The file should cut only when pushed forwards (arrow). Lift the file when leading it
backwards.
First sharpen the shortest cutter. The length of this cutter is then the standard for all
other cutters of the chain.
Always guide the file horizontally (90° to the guide bar).
The file holder makes file guidance easier. It is marked for the correct 30° sharpening
angle (keep the marks parallel with the chain when filing, see illustration) and limits
the cut depth to the correct 4/5 of the file diameter. (Fig. 51)
After having sharpened the chain, the height of the depth limiter must be checked by
means of a chain gauge.
Correct even the smallest excess height with a special flat file (12).
Round off the front of the depth limiter (13). (Fig. 52)
STOP
Cleaning the sprocket interior, checking and replacing the chain catcher
(Fig. 53)
CAUTION: Before doing any work on the guide bar or chain, always switch off
the engine and pull the plug cap off the spark plug (see “Replacing the spark
plug”). Always wear protective gloves!
CAUTION: Do not start the saw until it has been completely assembled and
inspected!
Remove the sprocket cover (4) (see section on “PUTTING INTO OPERATION”) and
clean the interior with a brush.
Remove the chain (3) and guide bar (2).
NOTE:
Make sure that no residue or contaminants remain in the oil guide groove (1) and the
chain tightener (6).
For replacing the guide bar, chain, and sprocket, see “PUTTING INTO OPERATION”.
Chain catcher
Visually inspect the chain catcher (5) for damage and replace if necessary.
Cleaning the guide bar, lubricating the sprocket nose (Fig. 54)
CAUTION: Protective gloves must be worn.
Regularly inspect the bearing surfaces of the guide bar for damage, and clean them
with a suitable tool.
Sprocket nose type:
If the saw is used intensively it will be necessary to lubricate the return sprocket bearings regularly (once a week). To do this, first thoroughly clean the 2 mm hole at the tip
of the guide bar, and then press in a small amount of multi-purpose grease.
Multi-purpose grease and grease guns are available as accessories.
Multi-purpose grease 944 360 000
Grease guns 944 350 000
Replacing the saw chain (Fig. 55)
CAUTION: Use only chains and guide bars designed for this saw.
Check the sprocket (10) before mounting a new chain.
CAUTION: Worn out sprockets may damage the new chain and must therefore be
replaced.
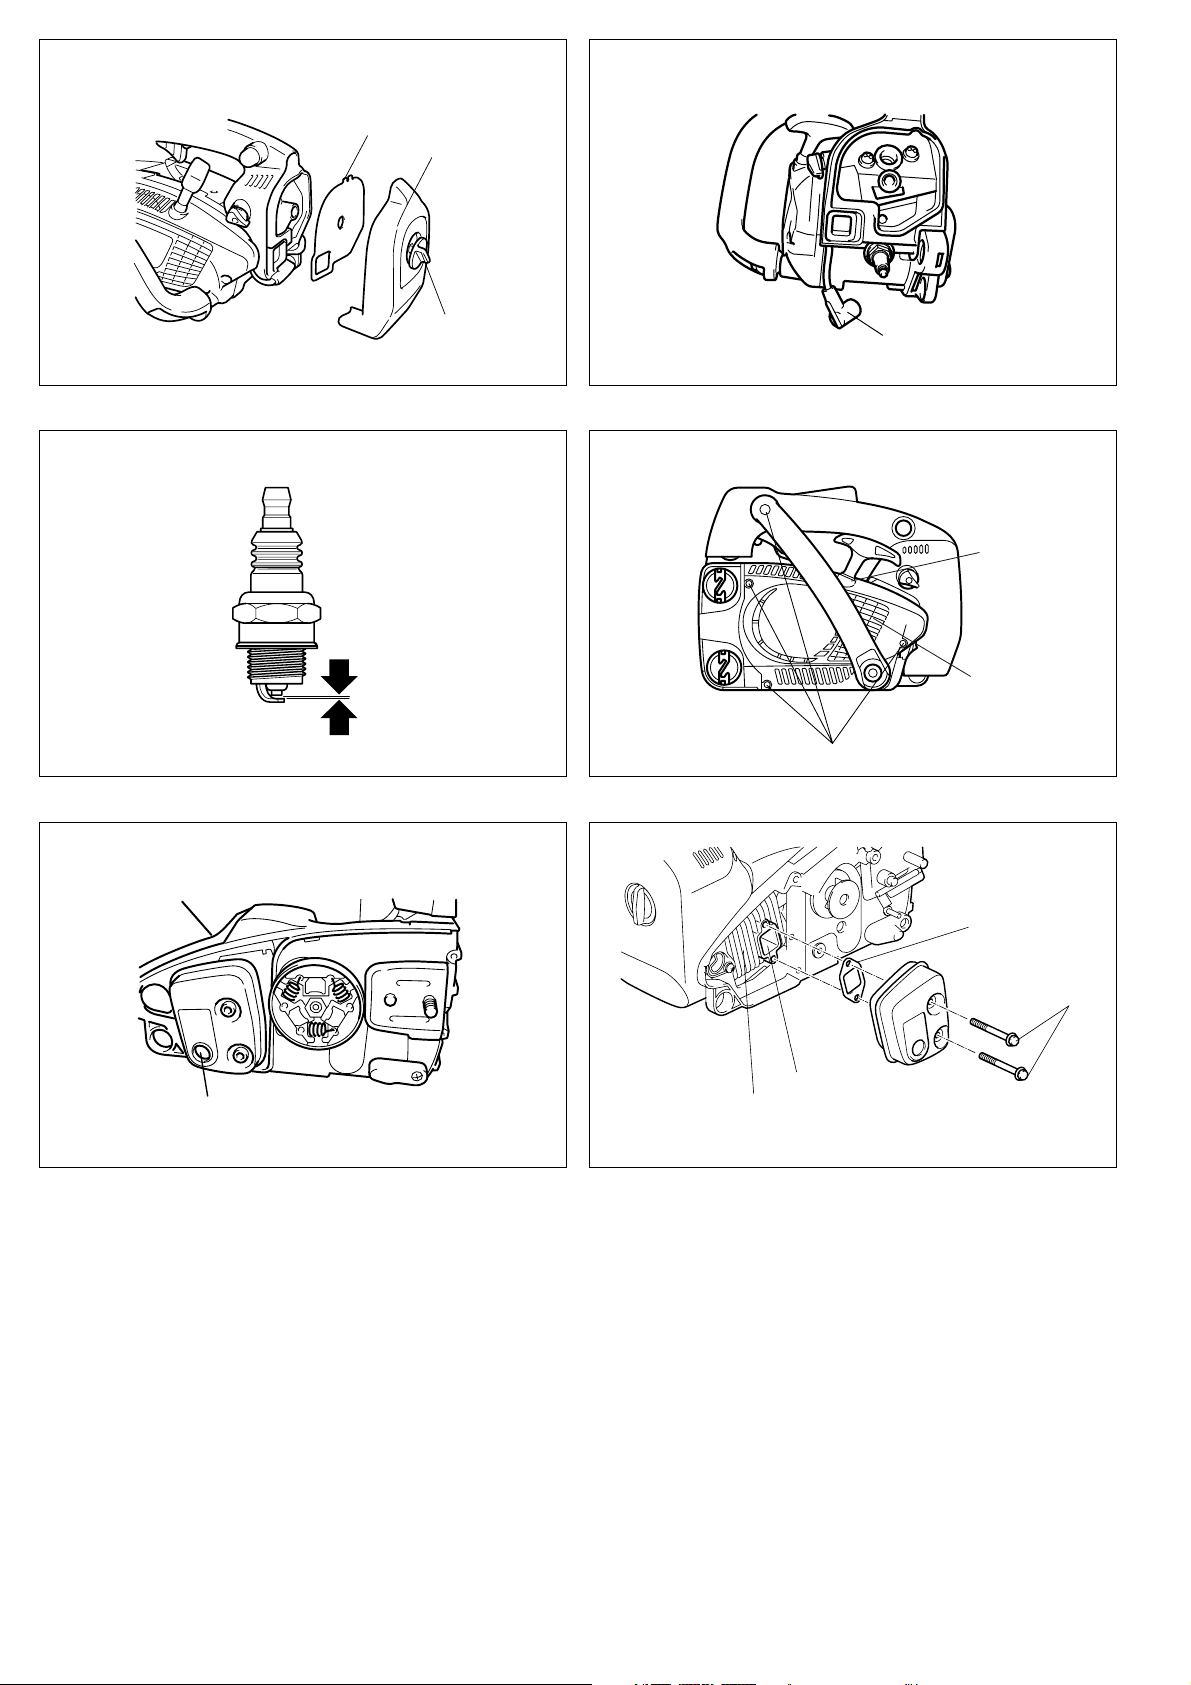
Replacing the suction head (Fig. 56)
The felt filter (12) of the suction head can become clogged. It is recommended to
replace the suction head once every three months in order to ensure unimpeded fuel
flow to the carburetor.
To remove the suction head for replacement, pull it out through the tank filler neck
using a piece of wire bent at one end to form a hook.
Cleaning the air filter (Fig. 57)
Unscrew screw (14) and remove the cleaner case cover (13).
IMPORTANT: Cover the intake opening with a clean cloth in order to prevent dirt par-
ticles from falling into the carburetor. Remove the air filter (15).
CAUTION: To prevent injury to the eyes, do NOT blow out dirt particles! Do not
use fuel to clean the air filter.
Clean the air filter with a soft brush.
If the filter is very dirty, clean it in lukewarm water with dishwashing detergent.
Let the air filter dry completely.
If the filter is very dirty, clean it frequently (several times a day), because only a clean
air filter provides full engine power.
CAUTION:
Replace damaged air filters immediately.
Pieces of cloth or large dirt particles can destroy the engine!
Replacing the spark plug (Fig. 58)
CAUTION:
Do not touch the spark plug or plug cap if the engine is running (high voltage).
Switch off the engine before starting any maintenance work. A hot engine can
cause burns. Wear protective gloves!
The spark plug must be replaced in case of damage to the insulator, electrode erosion (burn) or if the electrodes are very dirty or oily.
Remove the cleaner case cover (see “Cleaning the air filter”).
Pull the plug cap (1) off the spark plug. Use only the combination wrench supplied
with the saw to remove the spark plug.
CAUTION: Use only the following spark plugs: NGK CMR6A.
Electrode gap (Fig. 59)
The electrode gap must be 0.6 – 0.7 mm.
Cleaning the inlet port of the cooling air (Fig. 60)
Unscrew four screws (2). Remove recoil starter (3).
Clean the inlet port (4) and the cylinder fins.
Cleaning the muffler (Fig. 61)
CAUTION: If the engine is hot there is a risk of burning. Wear protective gloves.
Remove the sprocket cover (see “PUTTING INTO OPERATION”).
Remove deposits of carbon from the exhaust outlets (11) of the muffler.
STOP
STOP
STOP
Cleaning the cylinder space (Fig. 62)
Remove the sprocket cover (see “PUTTING INTO OPERATION”).
If necessary remove muffler by loosening and removing the two screws (14).
Stuff a rag into the cylinder port (15).
Use a suitable tool (wooden scraper) to clean out the cylinder space (16), especially
the cooling fins.
Remove the rag from the cylinder port and refit the muffler according to the diagram.
Replace the gasket (13) if necessary. Carefully remove any pieces of the old gasket
from the muffler.
Ensure correct mounting position.
The cowling should follow the contour of the cylinder to ensure correct heat transfer.
Tighten screws (14) to 10 Nm while the engine is cold.
20
Page 21

Instructions for periodic maintenance
To ensure long life, prevent damage and ensure the full functioning of the safety features the following maintenance must be performed regularly. Guarantee claims can be recognized only if this work is performed regularly and properly. Failure to perform the prescribed maintenance work can lead to accidents!
The user of the chain saw must not perform maintenance work which is not described in the instruction manual. All such work must be carried out by a MAKITA service centre.
General Chain saw Clean exterior, check for damage. In case of damage, have repaired by a qualified service centre
Saw chain Sharpen regularly, replace in good time.
Chain brake Have inspected regularly at an authorized service centre.
Guide bar Turn over to ensure even wear of bearing surfaces.
Before each start Saw chain Inspect for damage and sharpness.
Guide bar Check for damage.
Chain lubrication Functional check.
Chain brake Functional check.
OFF switch, Safety locking button,
Throttle lever
Fuel/oil tank plug Check for tightness.
Every day Air filter Clean.
Guide bar Check for damage, clean oil intake bore.
Guide bar support Clean, in particular the oil guide groove.
Idle speed Check (chain must not run).
Every week Fan housing Clean to ensure proper air cooling.
Cylinder space Clean.
Spark plug Check and replace if necessary.
Muffler Check tightness of mounting.
Chain catch sleeve Check for damage, replace if necessary.
Every 3 months Suction head Replace.
Fuel, oil tanks Clean.
Storage Chain saw Clean exterior, check for damage. In case of damage, have repaired by a qualified service centre
Guide bar/chain Demount, clean and oil slightly.
Fuel, oil tanks Empty and clean.
Carburetor Run empty.
immediately.
Replace in good time.
Check chain tension.
Functional check.
immediately.
Clean the guide groove of the guide bar.
Service, spare parts and guarantee
Maintenance and repair
The maintenance and repair of modern engines as well as all safety devices require
qualified technical training and a special workshop equipped with special tools and
testing devices.
We therefore recommend that you consult a MAKITA service centre for all work not
described in this instruction manual.
The MAKITA service centres have all the necessary equipment and skilled and experienced personnel, who can work out cost-effective solutions and advise you in all
matters.
Please contact your nearest service centre.
Spare parts
Reliable long-term operation, as well as the safety of your chain saw, depend among
other things on the quality of the spare parts used. Use only original MAKITA parts.
Only original spare parts and accessories guarantee the highest quality in material,
dimensions, functioning and safety.
Original spare parts and accessories can be obtained from your local dealer. He will
also have the spare part lists to determine the required spare part numbers, and will
be constantly informed about the latest improvements and spare part innovations.
Please bear in mind that if parts other than original MAKITA spare parts are used, this
will automatically invalidate the MAKITA product guarantee.
Guarantee
MAKITA guarantees the highest quality and will therefore reimburse all costs for
repair by replacement of damaged parts resulting from material or production faults
occurring within the guarantee period after purchase. Please note that in some countries particular guarantee conditions may exist. If you have any questions, please contact your salesman, who is responsible for the guarantee of the product.
Please note that we cannot accept any responsibility for damage caused by:
• Disregard of the instruction manual.
• Non-performance of the required maintenance and cleaning.
• Incorrect carburetor adjustment.
• Normal wear and tear.
• Obvious overloading due to permanent exceeding of the upper performance limits.
• Use of guide bars and chains which have not been approved.
• Use of guide bar and chain lengths which have not been approved.
• Use of force, improper use, misuse or accidents.
• Damage from overheating due to dirt on the recoil starter.
• Work on the chain saw by unskilled persons or inappropriate repairs.
• Use of unsuitable spare parts or parts which are not original MAKITA parts, insofar
as they have caused the damage.
• Use of unsuitable or old oil.
• Damage related to conditions arising from lease or rent contracts.
Cleaning, servicing and adjustment work is not covered by the guarantee. All repairs
covered by the guarantee must be performed by a MAKITA service centre.
21
Page 22

Trouble shooting
Malfunction System Observation Cause
Chain does not run Chain brake Engine runs Chain brake actuated.
Engine does not star t or
only with difficulty
Warm start difficulties Carburetor Fuel tank is filled
Engine starts, but dies
immediately
Insufficient power Several systems may be
No chain lubrication Oil tank/pump No oil on the chain Oil tank empty.
Ignition system Ignition spark Malfunction in fuel supply system, compression system, mechanical malfunction.
No ignition spark Switch on STOP, fault or short-circuit in the wiring, plug cap or spark plug defective.
Fuel supply Fuel tank is filled Choke in wrong position, carburetor defective, suction head dirty, fuel line bent or
Compression system Inside Faulty crankcase gasket, radial shaft packings defective, cylinder or piston rings
Outside Spark plug does not seal.
Mechanical malfunction Starter does not engage Spring in starter broken, broken parts inside the engine.
Ignition spark
Fuel supply Fuel tank is filled Wrong idling adjustment, suction head or carburetor dirty. Tank venting defective,
Engine is idling Air filter dirty, wrong carburetor adjustment, muffler clogged, exhaust channel in cyl-
involved simultaneously
interrupted.
defective.
Wrong carburetor adjustment.
fuel line interrupted, cable defective, STOP switch defective.
inder clogged.
Oil guide groove dirty.
22
Page 23

NEDERLANDS
Dank u voor de aankoop van dit MAKITA product!
Gefeliciteerd met uw keuze van deze MAKITA kettingzaag! Wij zijn ervan overtuigd
dat u tevreden zult zijn met dit geavanceerde gereedschap.
De DCS230T/DCS231T (Tophandle) is een uiterst lichte en handige kettingzaag met
het handvat bovenop de zaag gemonteerd. Dit model is speciaal voor boomchirurgie
en boomverzorging ontwikkeld. Deze kettingzaag mag enkel worden bediend door
personen die geschoold zijn voor het werken vanaf een verhoogd platform (kraankooi, hijskooi) of ladderkooien, of die vertrouwd zijn met de touwklimtechniek.
De kettingzaag kan zonder problemen worden bediend omdat de toevoer van
smeerolie voor de ketting automatisch wordt geregeld en de elektronische ontsteking
geen onderhoud vereist. Bovendien is de zaag uitgerust met een trillingabsorberend
systeem ter bescherming van de polsgewrichten en met ergonomische handgrepen
en bedieningselementen. Deze voorzieningen maken het werk eenvoudiger, veiliger
en minder vermoeiend.
De DCS230T/DCS231T is voorzien van de allernieuwste veiligheidsinrichtingen die
voldoen aan alle nationale en internationale veiligheidsnormen.
De veiligheidsinrichtingen omvatten onder meer handbeschermers op beide handgrepen, handgrepen met een veilige grip, een kettingvanger, een veiligheidszaagketting en een kettingrem. De kettingrem kan niet alleen handmatig bediend worden,
maar treedt ook automatisch in werking door de terugslagkracht (inertie) in geval van
terugslag.
EU-conformiteitsverklaring
De ondergetekenden, Kanzaki gevolmachtigd door, verklaren hiermede dat de
MAKITA gereedschappen,
Type: 023 EU-modelkeuringsattest Nr.
DCS230T/DCS231T M6 04 10 24243 059
vervaardigd door Makita Corporation, 3-11-8, Sumiyoshi-cho, Anjo, Aichi, Japan, voldoen aan de veiligheids- en gezondheidseisen van de toepasselijke EU-richtlijnen:
EU-machinerichtlijn 98/37/EG,
EU EMC richtlijn 89/336/ EWG (gewijzigd door 91/263/ EWG, 92/31/ EWG en 93/68/
EWG),
Geluidsemissie 2000/14/EG.
Om te voldoen aan de vereisten van deze EU-richtlijnen werden hoofdzakelijk de vol-
gende normen toegepast: EN 14982, EN ISO 11681-2, EN 61000-4-2, EN 61000-43, CISPR 12.
Het conformiteitsbeoordelingsprocédé 2000/14/EG is volgens Appendix V uitgevoerd. Het gemeten geluidsniveau (Lwa) bedraagt 106 dB(A). Het gegarandeerde
geluidsniveau (Ld) is 107 dB(A).
De EG-bouwmodelkeuring conform 98/37/EG werd uitgevoerd door: TÜV Product
Service GmbH, Zertifizierstelle, Ridlerstr. 31, D-80339 Munich.
Om een optimale werking en optimale prestaties van uw nieuwe
kettingzaag te garanderen en uw persoonlijke veiligheid te waarborgen, is het absoluut noodzakelijk dat u deze gebruiksaanwijzing aandachtig leest alvorens het gereedschap voor de eerste
keer te gebruiken. Let vooral op dat u alle veiligheidsvoorschriften
in acht neemt! Niet-inachtneming kan levensgevaarlijke verwondingen veroorzaken!
Inhoudsopgave Pagina
EU-conformiteitsverklaring....................................................................................50
Verpakking............................................................................................................... 50
VEILIGHEIDSVOORSCHRIFTEN
Algemene voorzorgsmaatregelen .......................................................................51
Beschermingsuitrusting....................................................................................... 51
Brandstoffen / Bijtanken ...................................................................................... 51
Ingebruikneming..................................................................................................51
Terugslag (“kickback”) ......................................................................................... 51
Werkomstandigheden / Werktechnieken........................................................51-52
Transport en opslag............................................................................................. 52
Onderhoud ..........................................................................................................52
Eerste hulp (EHBO) ............................................................................................ 52
Technische gegevens ............................................................................................. 53
Benaming van de onderdelen ................................................................................54
INGEBRUIKNEMING
De kettinggeleider en de zaagketting monteren.................................................. 54
De zaagketting spannen ..................................................................................... 54
Kettingrem........................................................................................................... 54
Brandstoffen / Bijtanken .................................................................................54-55
De kettingsmering afstellen ................................................................................. 55
De kettingsmering controleren ............................................................................ 55
De motor starten ................................................................................................. 55
Koud starten........................................................................................................ 55
Warm starten.......................................................................................................55
De motor afzetten................................................................................................55
De kettingrem controleren ................................................................................... 55
De carburator afstellen........................................................................................... 56
ONDERHOUD
De zaagketting slijpen .........................................................................................56
De kettinggeleider reinigen, het kettingwiel smeren............................................ 56
De zaagketting vervangen................................................................................... 56
De zuigkop vervangen......................................................................................... 56
Het luchtfilter reinigen ......................................................................................... 56
De bougie vervangen .......................................................................................... 56
De knaldemper reinigen ...................................................................................... 56
De cilinderruimte reinigen ................................................................................... 57
Instructies voor periodiek onderhoud .................................................................. 57
Service, reserveronderdelen en garantie ............................................................. 57
Problemen oplossen............................................................................................... 58
Verpakking
Ter bescherming tegen transportschade wordt uw MAKITA kettingzaag in een doos
uit versterkt karton geleverd.
Karton is een basisgrondstof en is derhalve opnieuw bruikbaar of geschikt voor recycling (oudpapierhandel).
RE Y
Yasuhiko Kanzaki
CE 2004
Directeur
MAKITA INTERNATIONAL EUROPE LTD.
Michigan Drive, Tongwell, Milton Keynes, Bucks MK15 8JD, ENGLAND
Verantwoordelijke fabrikant:
Makita Corporation, Anjo Aichi Japan
50
Page 24

VEILIGHEIDSVOORSCHRIFTEN
LET OP:
Deze kettingzaag is speciaal ontworpen voor de verzorging en chirurgie van
bomen. Alleen deskundig geschoolde personen mogen met deze zaag werken. Volg alle relevante literatuur, procedures en aanbevelingen van de betreffende beroepsorganisaties op. Als u dat niet doet, loopt u een verhoogd risico
op ongevallen! Wij raden u aan om voor het zagen in boomkruinen steeds een
verhoogplatform (kraankooi, hijskooi) te gebruiken. Werken in een hangende
positie (bergbeklimmerstechniek) is uiterst gevaarlijk en vergt speciale opleiding! Als er op deze manier wordt gewerkt, dient de gebruiker van het gereedschap getraind te zijn in het gebruik van klimveiligheidsuitrusting en
klimtechnieken! Gebruik bij het werken in boomkruinen altijd de geschikte riemen, touwen en beschermingsmiddelen. Gebruik altijd de vereiste uitrusting
voor het ondersteunen en opvangen van zowel de gebruiker als de zaag zelf!
Algemene voorzorgsmaatregelen (Afb. 1 en 2)
- Om een correcte bediening te verzekeren dient de gebruiker deze gebruiksaanwijzing grondig te lezen om zich vertrouwd te maken met de kenmerken en
werking van de kettingzaag. Slecht geïnformeerde gebruikers stellen zichzelf en
anderen in gevaar door verkeerd gebruik van het gereedschap.
- U mag de kettingzaag alleen uitlenen aan personen die ervaring hebben met kettingzagen voor boomchirurgie. Geef altijd ook de gebruiksaanwijzing mee wanneer
u het gereedschap uitleent.
- Het gebruik van de kettingzaag door kinderen of personen onder de 18 jaar is verboden. Jongeren boven de 16 jaar mogen de kettingzaag bedienen in het kader
van een opleiding, maar uitsluitend onder het toezicht van een bevoegde opleider.
- Het werken met een kettingzaag vergt altijd een hoge mate van voorzichtigheid en
concentratie.
- Gebruik de kettingzaag alleen wanneer u in goede lichamelijke conditie verkeert.
Bij vermoeidheid verslapt de aandacht. Wees vooral op uw hoede tegen het einde
van een dag hard werken. Voer alle werkzaamheden rustig en zorgvuldig uit. De
gebruiker is namelijk verantwoordelijk voor schade toegebracht aan derden.
- Werk nooit onder de invloed van alcohol, drugs of medicamenten.
- U moet een brandblusser bij de hand hebben wanneer u werkt in de buurt van
gemakkelijk ontvlambare vegetatie of wanneer het al geruime tijd niet meer geregend heeft (brandgevaar).
Beschermingsuitrusting (Afb. 3 en 4)
- Tijdens het werken met de kettingzaag moet de hieronder beschreven
beschermingsuitrusting worden gedragen om verwondingen aan het hoofd,
ogen, handen of voeten te voorkomen en uw gehoor te beschermen:
- Draag aangepaste kleding, d.w.z. goed aansluitend maar zonder te hinderen.
Draag geen sieraden of kleding die aan takken of struiken kunnen haken. Als u
lang haar heeft, draag dan altijd een haarnetje!
- Wanneer u met de kettingzaag werkt, moet u altijd een veiligheidshelm dragen. De
veiligheidshelm (1) moet regelmatig op beschadiging gecontroleerd worden en
dient na maximaal 5 jaar gebruik te worden vervangen. Gebruik uitsluitend goedgekeurde veiligheidshelmen.
-De doorzichtige beschermkap (2) van de veiligheidshelm (eventueel een veilig-
heidsbril) beschermt de gebruiker tegen rondvliegend zaagsel en houtsplinters.
Draag tijdens het werken met de kettingzaag altijd een beschermkap of een veiligheidsbril om oogletsel te voorkomen.
- Draag gepaste gehoorbescherming (oorbeschermers (3), oordopjes, enz.).
-Het veiligheidsvest (4) is gemaakt uit 22 lagen nylon en biedt bescherming tegen
snijwonden. Draag altijd een veiligheidsvest wanneer u werkt vanaf een verhoogd
platform (kraankooi, hijskooi) of werkt met klimtouwen.
-De veiligheidsgordel en het beschermende werkpak (5) zijn gemaakt uit een
nylonweefsel van 22 lagen en bieden bescherming tegen snijwonden. Het dragen
van deze kleding wordt ten zeerste aangeraden.
- Werkhandschoenen (6) van dik leder behoren tot de verplicht voorgeschreven
uitrusting bij het werken met de kettingzaag.
- Tijdens het werken met de kettingzaag is het dragen van veiligheidsschoenen of
veiligheidslaarzen (7) met antislip profielzolen, stalen neuzen en beenbeschermers verplicht. Dit soort veiligheidsschoeisel biedt bescherming tegen snijwonden en geeft vaste steun voor de voeten. Bij het werken in boomkruinen dient het
schoeisel eveneens aangepast te zijn voor het nodige klimwerk.
Brandstoffen / Bijtanken
- Zet de motor af voordat u de kettingzaag bijtankt.
- Rook niet en tank niet bij in de buurt van een open vuur (Afb. 5).
- Laat de motor afkoelen alvorens bij te tanken.
- Brandstoffen kunnen oplosmiddelen bevatten. Vermijd huid- en oogcontact met
minerale oliën. Tijdens het bijtanken moet u steeds veiligheidshandschoenen dragen. Reinig en vervang uw beschermende kleding regelmatig. Adem geen brandstofdampen in.
- Mors geen brandstof of kettingolie. Als u toch brandstof of olie gemorst heeft,
maak dan de kettingzaag onmiddellijk schoon. Zorg dat er geen brandstof op uw
kleding terechtkomt. Als dat toch gebeurd is, kleed u dan onmiddellijk om.
- Zorg dat er geen brandstof of kettingolie in de grond wegloopt (bescherming van
het milieu). Gebruik een geschikte onderplaat wanneer u bijtankt.
- Bijtanken in een gesloten ruimte is verboden. Brandstofdampen zullen zich namelijk bij de vloer verzamelen (explosiegevaar!).
- Draai na het bijtanken de doppen van de brandstof- en olietank goed vast.
- Start de kettingzaag niet op dezelfde plaats waar u getankt heeft (verwijder u tenminste 3 meter van de plaats van bijtanken) (Afb. 6).
- Brandstoffen zijn maar voor beperkte tijd houdbaar. Koop daarom nooit meer dan
het geschatte verbruik voor een redelijke periode.
- Vervoer en bewaar de brandstof en kettingolie alleen in goedgekeurde en gewaarmerkte jerrycans. Sla brandstof en kettingolie buiten het bereik van kinderen op.
Ingebruikneming
- Werk nooit alleen. In geval van nood moet er iemand in de buurt zijn.
- Zorg dat er zich geen kinderen of andere personen in de werkomgeving bevinden.
Let ook op dat er geen dieren in de werkomgeving komen (Afb. 7).
- Voordat u met het werk begint, moet u controleren of de kettingzaag goed
functioneert en of alle veiligheidsvoorschriften zijn nageleefd.
Controleer in het bijzonder of de kettingrem goed werkt, of de kettinggeleider juist
gemonteerd is, of de zaagketting correct geslepen en gespannen is, of de
beschermkap van het kettingwiel stevig vastzit, of de gashendel soepel beweegt
en zijn veiligheidsschakelaar goed werkt, of de handgrepen droog en schoon zijn,
en of de ON/OFF schakelaar functioneert.
- Neem de kettingzaag pas in gebruik wanneer deze volledig gemonteerd is.
Gebruik de kettingzaag nooit wanneer deze niet volledig gemonteerd is.
- Zorg ervoor dat u stevige steun voor de voeten hebt voordat u begint met zagen.
- Start de kettingzaag uitsluitend op de manier die in deze gebruiksaanwijzing is
beschreven (Afb. 8). Het gebruik van andere startmethoden is verboden.
- Bij het starten moet u de kettingzaag goed ondersteunen en stevig vasthouden.
De kettinggeleider en de ketting mogen met geen enkel voorwerp in aanraking
komen.
- Tijdens het zagen moet u de kettingzaag altijd met beide handen vasthou-
den. Houd de hoofdhandgreep vast met de rechterhand, en de beugelgreep met
de linkerhand. Houd de handgrepen stevig vast met uw duimen eromheen in de
richting van de vingers. Het werken met één hand is uiterst gevaarlijk, omdat u dan
bij het doorzagen van een tak de controle over het gereedschap kunt verliezen
(gevaar van zware verwondingen!). Bovendien is het niet mogelijk om het gevaar
van terugslag met één hand op te vangen.
- LET OP: Wanneer u de gashendel loslaat, zal de ketting nog een tijdje vrij
doorlopen (freewheelen).
- Zorg dat u stevig op beide voeten staat.
- Houd de kettingzaag zodanig dat u geen uitlaatgassen zult inademen. Werk niet
in gesloten ruimten (vergiftigingsgevaar!).
- Schakel de kettingzaag onmiddellijk uit wanneer u een abnormale verande-
ring in de werking ervan vaststelt.
- Zet altijd eerst de motor uit voordat u de kettingspanning controleert, de ketting aanspant of vervangt, of probeert om storingen op te lossen (Afb. 9).
- Als de zaag met harde voorwerpen (stenen, spijkers, enz.) is aanraking is gekomen, moet u de motor onmiddellijk uitzetten en controleren of de zaag niet
beschadigd is.
- Wanneer u het werk stopzet of onderbreekt en de werkplaats verlaat, moet u de
kettingzaag uitschakelen (Afb. 9) en dusdanig opbergen dat niemand gevaar kan
lopen.
- Laat de nog hete kettingzaag nooit in droog gras of op een brandbare ondergrond
achter. De knaldemper is namelijk zeer heet (brandgevaar!).
- LET OP: Na het afzetten van de kettingzaag kan er olie van de ketting of kettinggeleider druppelen met als gevolg bodemverontreiniging. Zorg voor een gepaste
opvangmogelijkheid.
Terugslag (“kickback”)
- Bij het werken met een kettingzaag bestaat er gevaar voor gevaarlijke terugslag.
- Terugslag ontstaat wanneer het bovenste uiteinde van de kettinggeleider door
onoplettendheid in aanraking komt met hout of andere harde voorwerpen
(Afb. 10).
- Voordat de zaag “de snede inzet” kan hij ongewild zijwaarts slippen of wegspringen (let op: in dit geval is er groot gevaar voor terugslag!).
- In beide situaties kan de zaag ongecontroleerd en met grote kracht in de richting
van de gebruiker worden teruggeslagen. Gevaar voor lichamelijk letsel!
Om terugslag te voorkomen, dient u de volgende regels in acht te nemen:
- Invalzaagwerk, d.w.z. het uiteinde van de zaag direct op het hout aanzetten, mag
uitsluitend door speciaal daarvoor opgeleid personeel worden uitgevoerd!
- Houd het uiteinde van de kettinggeleider altijd goed in het oog. Wees vooral voorzichtig wanneer u in een reeds aangezette snede verder wilt zagen.
- De ketting moet lopen wanneer u een snede inzet.
- Zorg dat de ketting altijd goed geslepen is. Let vooral goed op de hoogte van de
dieptebegrenzing.
- Probeer nooit om meerdere takken tegelijk door te zagen. Let op dat u bij het
zagen van een tak niet per toeval een andere tak raakt.
- Bij het dwarszagen van een stam moet u op andere nabije stammen letten.
Werkomstandigheden / Werktechnieken
- Werk alleen bij goed zicht en goede verlichting. Let in het bijzonder op gladheid,
nattigheid, ijs en sneeuw (slipgevaar!). Er is vooral groot slipgevaar wanneer u
werkt op vers ontbast hout (schilhout).
- Werk nooit op een onstabiele ondergrond. Zorg dat er geen obstakels zijn in de
werkomgeving (gevaar voor struikelen!). Zorg dat u altijd vaste en veilige steun
voor de voeten hebt.
- Zaag nooit boven schouderhoogte (Afb. 11).
- Zaag nooit vanop een ladder (Afb. 11).
- Klim nooit in een boom om er te werken zonder de nodige steun- en veiligheidsvoorzieningen voor uzelf en voor de zaag. Wij raden u aan om steeds vanaf een
hoogteplatform (kraankooi, hijskooi) te werken.
- Buig tijdens het werk niet te ver voorover.
- Houd de kettingzaag zodanig dat geen enkel deel van uw lichaam zich in het verlengde van het zwenkbereik van de zaag bevindt (Afb. 12).
- Gebruik de kettingzaag uitsluitend voor het zagen van hout.
- Zorg dat de kettingzaag de grond niet raakt terwijl de ketting nog loopt.
- Gebruik de kettingzaag nooit voor het optillen of verwijderen van stukken hout of
andere voorwerpen.
- Verwijder vreemde voorwerpen zoals zand, stenen, spijkers e.d. uit de werkomgeving. Vreemde voorwerpen kunnen de zaag beschadigen en gevaarlijke terugslag
veroorzaken.
- Voor het inkorten van reeds gezaagde stukken hout moet u een stevige steun
(zaagbok, (Afb. 13)) gebruiken. Probeer niet om het werkstuk met uw voet op zijn
plaats te houden en laat het niet door iemand anders vasthouden.
- Zet ronde stukken goed vast om te voorkomen dat ze kunnen draaien.
51
Page 25

- Om dwars door te zagen, dient u de voorkant van het zaaghuis eerst stevig tegen
het stuk hout te drukken. Pas daarna kunt u de snede inzetten met de lopende
zaagketting. U doet dit door de kettingzaag met de hoofdhandgreep omhoog te
halen terwijl u met de beugelgreep leidt. De voorkant van het zaaghuis dient hierbij
als het scharnierpunt. Met een lichte druk op de beugelgreep zaagt u nu dieper
terwijl u tegelijk de kettingzaag met de hoofdhandgreep een weinig achteruit trekt.
Zet vervolgens de voorkant van het zaaghuis iets dieper aan en breng de hoofdhandgreep opnieuw iets verder omhoog.
- Wanneer invalzaagsneden of langssneden nodig zijn, is het ten zeerste aan
te raden dat deze alleen door speciaal geschoold personeel worden uitgevoerd (vanwege het groot gevaar voor terugslag).
- Langssneden moeten onder de kleinst mogelijke hoek ingezet worden (Afb. 14).
Wees bij dit soort sneden uiterst voorzichtig, omdat de voorkant van het zaaghuis
geen greep op het werkstuk heeft.
- De zaagketting moet lopen wanneer u de zaag uit het hout haalt.
- Als u meerdere zaagsneden maakt, moet u de gashendel tussendoor loslaten.
- Let op bij het zagen van gesplinterd hout. Rondvliegende houtsplinters kunnen
meegetrokken worden (gevaar voor lichamelijk letsel!).
- Als u zaagt met de bovenkant van de kettinggeleider en de zaagketting komt klem
te zitten, dan kan de kettingzaag teruggestoten worden in de richting van de
gebruiker. Zaag daarom, in de mate van het mogelijke, altijd met de onderkant van
de kettinggeleider. Als de zaagketting klem komt te zitten, zal de zaag dan van u
weg worden gestoten (Afb. 15).
- Bij hout dat onder spanning staat (Afb. 16), moet u altijd eerst inzetten aan de
zijde van de drukspanning (A). Pas daarna kunt u doorzagen vanaf de zijde van de
trekspanning (B). Op deze manier wordt voorkomen dat de kettinggeleider ingeklemd raakt.
LET OP:
Alleen speciaal getrainde personen mogen bomen vellen of takken uit boomkruinen afzagen. Groot gevaar voor persoonlijk letsel!
- Bij het afzagen van takken dient de kettingzaag op de stam ondersteund te worden. Gebruik voor dit soort werk nooit het vooreinde van de kettinggeleider (gevaar
voor terugslag).
- Pas goed op bij het zagen van takken die onder spanning staan. Zaag nooit vrijhangende takken vanaf de onderkant.
- Ga nooit op de stam staan om takken die onder spanning staan door te zagen.
- Voordat u begint met het vellen van een boom, dient u er zeker van te zijn dat
a) enkel de personen, die bij het vellen betrokken zijn, zich op de werkplek bevin-
den.
b) ongehinderd uitwijken mogelijk is voor iedere werkman die bij het vellen
betrokken is (d.w.z. dat iedere werkman schuin naar achteren bij een hoek van
ongeveer 45° moet kunnen uitwijken).
c) de voet van de stam vrij is van vreemde voorwerpen, struikgewas en takken.
Zorg dat u stevige steun voor de voeten hebt (struikelgevaar!).
d) de volgende werkplek tenminste 2 1/2 boomlengtes verwijderd is (Afb. 17).
Voordat u de boom gaat vellen, moet u de valrichting bepalen en ervoor zorgen
dat er zich geen personen of voorwerpen binnen een afstand van 2 1/2 boomlengtes bevinden.
- Beoordeling van de boom:
Richting van overhelling? Losse of dorre takken? Hoogte van de boom?
Natuurlijke overhanging? Is de boom rot?
- Houd rekening met de windrichting en windsnelheid. Bij sterke windstoten mogen
er geen bomen worden geveld. Vermijd dat het zaagsel door de wind wordt meegenomen (houd rekening met de windrichting!).
- Inzagen van de worteluitlopers:
Begin bij de grootste worteluitloper. Breng eerst een zaagsnede in verticale en vervolgens in horizontale richting aan.
- De valkerf aanbrengen (Afb. 18, A):
De valkerf bepaalt de valrichting en dwingt de boom in de gewenste richting. De
valkerf wordt haaks op de valrichting aangebracht tot een zaagdiepte van 1/3 tot
1/5 van de stamdoorsnede. Breng de valkerf zo dicht mogelijk bij de grond aan.
- Eventuele correcties van de valkerf moeten over de gehele breedte van de valkerf
aangebracht worden.
- De valzaagsnede (Afb. 19, B) moet hoger dan de valkerfbasis (D) worden aange-
bracht. De valzaagsnede moet helemaal horizontaal zijn. Het breukvlak (het niet
doorgezaagde deel tussen beide zaagsneden) moet ongeveer 1/10 van de stamdiameter bedragen.
-Het breukvlak (C) werkt als valscharnier. Zaag dit gedeelte nooit door, daar de
boom anders ongecontroleerd zal vallen. Breng tijdig velspieën aan.
- Gebruik uitsluitend kunststof of aluminium spieën om de zaagsnede te borgen.
Gebruik geen ijzeren spieën. Als de zaag een ijzeren spie raakt, kan de zaagketting zwaar beschadigd raken of scheuren.
- Wanneer u een boom velt, moet u altijd zijdelings staan van de plaats waar de
boom gaat vallen.
- Wanneer de boom gaat vallen en u zich terugtrekt, moet u oppassen voor vallende
takken.
- Wanneer er op een helling wordt gewerkt, moet de gebruiker van de kettingzaag
altijd bergopwaarts of zijwaarts van de te vellen boom of reeds gevelde boom
staan.
- Pas op dat de gevelde boomstam niet naar u toe rolt.
Transport en opslag
- Als u tijdens het werken van werkplek verandert, moet u de kettingzaag afzetten
en de kettingrem aanzetten om ongewild starten van de kettingzaag te voorkomen.
- Draag of vervoer de kettingzaag nooit terwijl de zaagketting loopt.
- Als u de kettingzaag over een lange afstand vervoert, moet u de beschermkap
(meegeleverd) over de kettinggeleider aanbrengen.
- Draag de kettingzaag altijd bij de beugelgreep met de kettinggeleider naar achteren (Afb. 20). Pas op dat u de nog hete knaldemper niet aanraakt (gevaar voor
brandwonden!).
- Zet de kettingzaag tijdens transport met een voertuig goed vast om lekkage van
brandstof of kettingolie te voorkomen.
- Bewaar de kettingzaag op een veilige en droge plaats. De kettingzaag mag niet in
de buitenlucht bewaard worden. Houd de kettingzaag buiten het bereik van kinderen.
- Voordat u de kettingzaag gedurende langere tijd gaat opslaan of met een vervoerfirma meegeeft, moet u de brandstoftank en de olietank helemaal leeg maken.
Onderhoud
- Voordat u met onderhoudswerkzaamheden begint, moet u de kettingzaag uitzetten (Afb. 21) en de bougiedop eruit trekken.
- Controleer voordat u met het werk begint of de zaagketting veilig werkt, en let
vooral op het juist functioneren van de kettingrem. Controleer ook of de zaagketting goed geslepen en gespannen is (Afb. 22).
- Gebruik de kettingzaag alleen bij een laag geluidsniveau en emissieniveau. U kunt
dit bereiken door de carburator juist af te stellen.
- Reinig de kettingzaag regelmatig.
- Controleer regelmatig of de tankdoppen goed sluiten.
Volg de voorschriften ter voorkoming van ongevallen, uitgevaardigd door de
betreffende handelsverenigingen en verzekeringsmaatschappijen, strict op.
Breng nooit veranderingen aan in de constructie van de kettingzaag. Als u dat
doet, brengt u uw eigen veiligheid in gevaar.
Voer alleen de onderhouds- en reparatiewerkzaamheden uit die in deze gebruiksaanwijzing zijn beschreven. Alle andere werkzaamheden moeten door een MAKITA Servicecentrum worden uitgevoerd. (Afb. 23)
Gebruik uitsluitend originele vervangstukken en accessoires van MAKITA.
Het gebruik van andere dan originele MAKITA vervangstukken of accessoires en nietgoedgekeurde kettinggeleider/ketting combinaties of lengtes verhoogt het risico op
ongevallen. MAKITA wijst iedere aansprakelijkheid af voor ongevallen en schade die
voortvloeien uit het gebruik van niet-goedgekeurde onderdelen of accessoires.
Eerste hulp (EHBO) (Afb. 24)
Wees voorbereid op eventuele ongelukken en zorg dat er steeds een verbandtrommel op de werkplek voorhanden is. Eventueel gebruikt materiaal moet onmiddellijk
aangevuld worden.
Als u om hulp vraagt, geef dan de volgende informatie:
- Plaats van het ongeluk
- Aard van het ongeluk
- Aantal gewonden
- Soort verwondingen
- Uw naam!
OPMERKING
Personen met bloedcirculatiestoornissen kunnen door herhaalde sterke vibraties
beschadiging van de bloedvaten of van het zenuwstelsel oplopen.
Overdreven vibraties kunnen aan vingers, handen of polsen de volgende symptomen
veroorzaken: gevoelloosheid, tintelen, pijn of pijnlijke steken, verandering van de
huidskleur of van de huid.
Als u een van deze symptomen waarneemt, raadpleeg dan een dokter!
52
Page 26

Technische gegevens
Cilinderinhoud cm
3
22,2
Boring mm 33
Slag mm 26
Maximaal vermogen bij toerental kW/min
Maximaal koppel bij toerental Nm/min
Stationair toerental/max. motortoerental met kettinggeleider en ketting min
Koppeltoerental min
Geluidsdrukniveau op de werkplek L
Geluidsniveau L
Trilversnelling a
vlgs. ISO/CD 22868
WA av
vlgs. ISO 7505
h,w av
vlgs. ISO/CD 22868
pA av
1)
1)
1)
- Beugelgreep m/s
- Hoofdhandgreep m/s
-1
-1
dB (A) 95,0
dB (A) 104,1
2
2
-1
-1
0,74/8 000
0,97/6 500
3 000/11 500 (DCS230T), 3 000/10 500 (DCS231T)
4500
4,3
5,6
Carburator (membraancarburator) Type Walbo WYL
Ontstekingssysteem Type elektronisch
Bougie Type NGK CMR 6A
Elektrodenafstand mm 0,6 – 0,7
Brandstofverbruik bij max. vermogen vlgs. ISO 7293 kg/h 0,41
Specifiek verbruik bij max. vermogen vlgs. ISO 7293 g/kWh 561
Inhoud brandstoftank cm
Inhoud olietank cm
3
3
200
190
Mengverhouding (brandstof/2-taktolie) 25:1
Kettingrem Activering met de hand of door terugslag
Kettingsnelheid
2)
m/s 14,9 (91VG) 13,6 (25AP)
Steek van kettingwiel duim (inch) 3/8 (91VG) 1/4 (25AP)
Aantal tanden Z 6 (91VG) 8 (25AP)
Steek/Sterkte aandrijfelement duim (inch) 3/8 /0,050 (91VG) 1/4 /0,050 (25AP)
Snijlengte kettinggeleider cm 25
Gewicht (brandstoftank leeg, zonder ketting en kettinggeleider) kg 2,5
1) De opgegeven waarden houden in gelijke mate rekening met stationair toerental, volle belasting en maximaal toerental.
2) Bij max. vermogen
53
Page 27

Benaming van de onderdelen
1. Hoofdhandgreep
2. Veiligheidsschakelaar (gashendel vergrendelen)
3. Gashendel
4. Handbescherming (ontkoppeling voor kettingrem)
5. Zaagketting
6. Kettinggeleider
7. Beschermkap van kettinggeleider
8. Borgmoeren
9. Kettingvanger (veiligheidsinrichting)
10. Kettingwielbeschermkap
11. Knaldemper
12. Bougie
13. Beugelgreep (voorste greep)
14. Starterhendel
15. I/STOP schakelaar (kortsluitschakelaar)
16. Bevestigingsoog voor veiligheidstouw of veiligheidshaak
17. Olietankdop
18. Ventilatorkast met starterblok
19. Brandstoftankdop
20. Luchtfilterdeksel
21. Chokehendel
22. Voorinspuitpomp
3
2
1
12
16
4
5
15
7
6
8
9
10
11
19
17
13
15
14
22
INGEBRUIKNEMING (Afb. 25)
LET OP:
Voordat u begint te werken aan de kettinggeleider of ketting, moet u altijd de
motor afzetten en de bougiedop eraf trekken (zie “De bougie vervangen”).
Draag altijd veiligheidshandschoenen!
LET OP:
Start de kettingzaag pas nadat deze volledig ineengezet en geïnspecteerd is!
De kettinggeleider en de zaagketting monteren (Afb. 26)
Gebruik voor de onderstaande werkzaamheden de bijgeleverde combinatiesleutel.
Plaats de kettingzaag op een stabiele ondergrond en monteer de kettinggeleider en
de zaagketting als volgt:
Ontkoppel de kettingrem door de handbeschermingshendel (1) in de richting van de
pijl te trekken.
Draai de borgmoer (2) los.
Trek de kettingwielbeschermkap (3) voorzichtig los van zijn bevestiging (4) en verwijder hem.
Draai de kettingspanschroef (5) linksom (tegen de klok in) totdat de pen (6) tegen de
rechter aanslag zit. (Afb. 27 en 28)
Monteer de kettinggeleider (7). (Afb. 29)
Leg de zaagketting (9) op het kettingwiel (10). Voer de zaagketting met uw rechterhand in de bovenste geleidegroef (11) van de kettinggeleider. (Afb. 30)
De snijkanten bovenaan de zaagketting moeten in de richting van de pijl wijzen!
Trek de zaagketting (9) in de richting van de pijl over de neus (12) van de kettinggeleider. Trek de kettinggeleider met de hand volledig naar zijn neus toe. Zorg dat de kettingmesjes goed in de groeven van de kettinggeleider zitten. (Afb. 31)
Druk eerst de kettingwielbeschermkap (3) in zijn bevestiging (4). Controleer of de pen
(8) van de kettingspanner in het gat in de kettinggeleider zit. Duw daarna de kap over
de borgbout terwijl u tegelijk de zaagketting (9) over de kettingvanger (13) naar
omhoog brengt.
Draai de borgmoer (2) handvast aan. (Afb. 32)
De zaagketting spannen
Draai de kettingspanschroef (5) rechtsom (met de klok mee) tot de zaagketting in de
geleidegroef op de onderzijde van de kettinggeleider zit (zie detail in de cirkel).
Breng het vooreinde van de kettinggeleider iets omhoog en draai de kettingspanschroef (5) rechtsom (met de klok mee) tot de zaagketting weer tegen de onderzijde
van de kettinggeleider aanligt.
Houd het vooreinde van de kettinggeleider nog steeds omhoog en draai de borgmoeren (2) vast met de combinatiesleutel. (Afb. 33)
De kettingspanning controleren (Afb. 34)
De zaagketting is juist gespannen indien hij nog gemakkelijk met de hand kan worden
bewogen terwijl hij tegen de onderzijde van de kettinggeleider aanligt.
Hierbij moet de kettingrem ontkoppeld zijn.
Controleer regelmatig de kettingspanning, omdat nieuwe zaagkettingen na verloop
van tijd uitrekken en langer worden!
Wanneer u de kettingspanning controleert, moet de motor afgezet zijn.
OPMERKING:
Het is aan te raden dat u 2 tot 3 zaagkettingen afwisselend gebruikt.
Om een gelijkmatige slijtage van de kettinggeleider te krijgen, moet u hem omkeren
(onderzijde boven en bovenzijde onder) telkens wanneer u de ketting verwisselt.
18
20
21
Kettingrem (Afb. 35)
De DCS230T/DCS231T is standaard uitgerust met een traagheidsbestuurde kettingrem. Als er terugslag optreedt doordat het vooreinde van de kettinggeleider met
het hout in aanraking komt (zie “VEILIGHEIDSVOORSCHRIFTEN”), zal de kettingrem bij voldoende sterke terugslag door traagheidskracht in werking treden.
De zaagketting wordt dan in een fractie van een seconde stilgezet.
De kettingrem is aangebracht om de zaagketting vóór het starten te blokkeren
en om hem onmiddellijk stop te zetten in noodgevallen.
BELANGRIJK: Bedien de kettingzaag NOOIT terwijl de kettingrem is aangezet!
Als u dat toch doet, kan de motor na zeer korte tijd zwaar beschadigd raken!
Zet ALTIJD de kettingrem vrij alvorens met het werk te beginnen!
OPMERKING:
De kettingrem is een zeer belangrijke veiligheidsinrichting en is zoals ieder
ander onderdeel onderhevig aan slijtage. Laat voor uw eigen veiligheid de kettingrem regelmatig inspecteren en nazien door een MAKITA servicecentrum.
De kettingrem aanzetten
Als de terugslagkracht sterk genoeg is, zal de plotselinge versnelling van de kettinggeleider in combinatie met de inertie van de handbeschermingshendel (1) de kettingrem automatisch aanzetten.
Om de kettingrem handmatig aan te zetten, drukt u met de linkerhand de handbeschermingshendel (1) gewoo n naar voren (pijl 1) (naar het vooreinde van de zaag
toe).
De kettingrem lossen
Trek de handbeschermingshendel (1) naar u toe (pijl 2) tot u voelt dat de hendel aangrijpt. De kettingrem is nu gelost.
(remming)
(Afb. 36)
Brandstoffen (Afb. 37)
LET OP:
Deze zaag werkt op aardolieproducten (benzine en olie).
Wees vooral voorzichtig bij het omgaan met benzine.
Vermijd vlammen of open vuur. Rook niet (ontploffingsgevaar!).
Brandstofmengsel
De motor van de kettingzaag is een hoogvermogen tweetaktmotor. Hij werkt op een
mengsel van benzine en tweetaktmotorolie.
De motor is ontworpen voor gebruik op loodvrije normale benzine met een minimaal
octaangetal van 91 ROZ. Als deze brandstof niet beschikbaar is, mag u ook brandstof
met een hoger octaangetal gebruiken. Dit heeft geen nadelig effect op de motor.
Gebruik uitsluitend loodvrije brandstof om optimale motorprestaties te krijgen
en om zowel uw gezondheid als het leefmilieu te beschermen.
Voor de smering van de motor wordt tweetaktmotorolie (kwaliteitsklasse JASO FC,
ISO EGO) gebruikt, die bij de benzine wordt gevoegd.
Let op: Gebruik nooit een kant-en-klaar brandstofmengsel van benzinestations.
Juiste mengverhouding:
25:1 d.w.z. 25 delen brandstof mengen met 1 deel olie.
OPMERKING:
Om het benzine/olie mengsel gereed te maken, meng eerst de totale hoeveelheid olie
met de helft van de benodigde hoeveelheid benzine en voeg daarna de rest van de
benzine toe. Schud het mengsel goed voordat u het in de tank doet.
54
Page 28

Het is niet aan te raden dat u uit veiligheidsoverwegingen meer dan de voorgeschreven hoeveelheid motorolie gebruikt. Dit zal enkel leiden tot meer verbrandingsresten die het milieu vervuilen en het uitlaatkanaal in de cilinder evenals
de knaldemper verstoppen. Bovendien zal het brandstofverbruik daardoor stijgen en zullen de prestaties minder goed zijn.
Opslag van brandstof
Brandstoffen kunnen enkel voor een beperkte tijd worden opgeslagen. Brandstof en
brandstofmengsels verouderen. Het gebruik van te lang opgeslagen brandstof en
brandstofmengsels kan daarom leiden tot problemen bij het starten. Koop niet meer
brandstof in dan in enkele maanden wordt verbruikt.
Sla brandstof uitsluitend op een droge en veilige plaats en in goedgekeurde
containers op!
VERMIJD HUID- EN OOGCONTACT
Aardolieproducten ontvetten de huid. Bij herhaaldelijk en langdurig contact van de
huid met dergelijke producten, zal de huid uitdrogen. Verschillende huidziekten kunnen hiervan het gevolg zijn. Ook allergische reacties kunnen worden veroorzaakt.
Contact van de ogen met olie kan oogirritaties veroorzaken. Als er olie in uw ogen is
terechtgekomen, spoel dan uw ogen onmiddellijk met schoon water.
Bij aanhoudende irritatie onmiddellijk een dokter raadplegen!
Zaagkettingolie
Gebruik olie met lijmadditief voor het smeren van de zaagketting en de
kettinggeleider. Het lijmadditief voorkomt dat de olie te snel van de ketting wordt weggeslingerd.
Ter bescherming van het milieu wordt het gebruik van biologisch
afbreekbare zaagkettingolie aangeraden. In sommige landen is het
gebruik van biologisch afbreekbare olie wettelijk verplicht.
De door MAKITA aangeboden zaagkettingolie BIOTOP wordt vervaardigd op basis
van speciale plantaardige oliën en is 100% biologisch afbreekbaar. BIOTOP werd
bekroond met de “Blauwe Milieu-Engel” prijs omwille van zijn grote milieuvriendelijkheid (RAL UZ 48).
BIOTOP zaagkettingolie is beschikbaar in de volgende hoeveelheden:
1 l Bestelnummer 980 008 210
5 l Bestelnummer 980 008 211
Biologisch afbreekbare olie is slechts beperkt houdbaar. Dergelijke
olie dient binnen 2 jaar na de fabricagedatum (gedrukt op de verpakking) te worden opgebruikt.
Belangrijke opmerking betreffende afbreekbare kettingoliën:
Als u de zaag voor geruime tijd niet gaat gebruiken, moet u de olietank leegmaken,
een kleine hoeveelheid gewone motorolie (SAE 30) erin doen, en dan de zaag een
tijdje laten lopen. Op deze manier worden alle resten afbreekbare olie uit de olietank,
de olieleidingen, de ketting en de kettinggeleider weggespoeld. Deze maatregel is
nodig omdat vele afbreekbare oliën na verloop van tijd plakkerige resten nalaten die
schadelijk kunnen zijn voor de oliepomp of andere onderdelen.
Vul de tank weer met BIOTOP kettingolie voordat u de zaag later opnieuw in gebruik
neemt. Bij schade veroorzaakt door het gebruik van afgewerkte of ongeschikte
kettingolie vervalt iedere aanspraak op garantie.
Uw handelaar of verkoper zal u graag informeren over het gebruik van geschikte kettingolie.
GEBRUIK NOOIT AFGEWERKTE OLIE (Afb. 38)
Afgewerkte olie is zeer schadelijk voor het milieu.
Afgewerkte olie bevat hoge concentraties van kankerverwekkende stoffen. De vervuiling in afgewerkte olie veroorzaakt snelle slijtage van de oliepomp en het zaagmechanisme.
Bij schade veroorzaakt door het gebruik van afgewerkte of ongeschikte kettingolie
vervalt iedere aanspraak op garantie.
Uw handelaar of verkoper zal u graag informeren over het gebruik van geschikte kettingolie.
VERMIJD HUID- EN OOGCONTACT
Aardolieproducten ontvetten de huid. Bij herhaaldelijk en langdurig contact van de
huid met dergelijke producten, zal de huid uitdrogen. Verschillende huidziekten kunnen hiervan het gevolg zijn. Ook allergische reacties kunnen worden veroorzaakt.
Contact van de ogen met olie kan oogirritaties veroorzaken. Als er olie in uw ogen is
terechtgekomen, spoel dan uw ogen onmiddellijk met schoon water.
Bij aanhoudende irritatie onmiddellijk een dokter raadplegen!
Bijtanken (Afb. 39)
Smering van de ketting
Om de zaagketting goed te kunnen smeren moet de kettingolietank
tijdens het gebruik altijd voldoende gevuld zijn. Met een volledig
gevulde tank kunt u ongeveer een half uur continu werken. Controleer tijdens het werk of er nog voldoende kettingolie in de tank is en
vul desnoods bij. Controleer de olie alleen terwijl de motor is
afgezet!
1 brandstof/olie mengsel
2 kettingolie
De kettingsmering afstellen (Afb. 40)
Zet de motor af!
U kunt de olietoevoer van de oliepomp instellen met de afstelschroef
(1). Gebruik de combinatiesleutel om de hoeveelheid olietoevoer in te
stellen.
Om een probleemloze werking van de oliepomp te verzekeren, dienen de olieleigroef bij het huis (2) en het olie-inlaatgat in de kettinggeleider (3) regelmatig te worden gereinigd. (Afb. 41)
De kettingsmering controleren (Afb. 42)
Zaag nooit met onvoldoende kettingsmering. Als u dit doet, zullen de ketting en de
kettinggeleider minder lang meegaan.
Controleer vóór het begin van het werk altijd het oliepeil in de tank en ook de olietoevoer.
Controleer de olietoevoer als volgt: Start de kettingzaag (zie “De motor starten”).
Houd de lopende kettingzaag ongeveer 15 cm boven een boomstam of de grond (leg
er iets onder als bescherming).
Als de smering voldoende is, zult u een licht oliespoor zien dat ontstaat doordat er
olie van de ketting afspat. Let op de windrichting en vermijd onnodige blootstelling
aan de oliemist!
Opmerking:
Na het uitschakelen van de zaag is het normaal dat resten van kettingolie nog een
tijdje uit het olietoevoersysteem, de kettinggeleider en de ketting lopen. Dit is geen
defect!
Leg de zaag op een geschikte onderlegger.
De motor starten (Afb. 43)
Start de kettingzaag pas nadat deze volledig ineengezet en geïnspecteerd is!
Verwijder u tenminste 3 meter van de plaats waar getankt werd.
Zorg dat u stabiel staat en leg de zaag zo op de grond dat de zaagketting en de kettinggeleider de grond niet raken.
Zet de kettingrem aan (blokkeren).
Pak de hoofdhandgreep met één hand goed vast en druk de kettingzaag stevig tegen
de grond. Zet daarbij ook uw knie op het achterste van de handgreep.
BELANGRIJK: De chokehendel (5) is aan de gashendel (1) gekoppeld. Hij keert
automatisch terug naar zijn uitgangspositie zodra de gashendel wordt ingedrukt.
Als de gashendel wordt ingedrukt voordat de motor is gestart, moet de chokehendel
(5) weer naar de geschikte positie worden gedraaid. (Afb. 44)
Koud starten:
Druk de kortsluitschakelaar (3) naar voren.
Draai de chokehendel (5) naar de positie .
Druk de voorinspuitpomp 7–10 maal in.
Trek de starterhendel (4) langzaam uit tot u weerstand voelt (de zuiger staat dan net voor het bovenste dode punt). (Afb. 44)
Trek vervolgens snel en krachtig. Na 2 tot 4 pogingen zal de motor starten en blijven draaien (bij lage temperaturen kan het nodig zijn om meermaals te trekken).
LET OP: Trek de starterkabel niet meer dan ca. 50 cm uit en breng hem altijd langzaam terug met de hand. Voor een goede start is het belangrijk dat de starterkabel
snel en krachtig wordt doorgetrokken.
Zodra de motor soepel draait, drukt u eenmaal zachtjes op de gashendel (1) (houd
daarbij de beugelgreep vast, de veiligheidsschakelaar (2) zal de gashendel vrijzetten). Hierdoor zal de chokehendel (5) naar zijn uitgangspositie terugspringen, waarna
de motor onbelast zal lopen. (Afb. 44)
Los nu de kettingrem
.
Warm starten
Ga te werk zoals bij koud starten, maar zet de chokehendel (5) in de positie .
(Afb. 44)
Belangrijk: Als de brandstoftank helemaal leeg gewerkt is en de motor bij gebrek
aan brandstof tot stilstand is gekomen, moet u de voorinspuitpomp 7 – 10 maal
indrukken. (Afb. 44)
NEEM DE VEILIGHEIDSVOORSCHRIFTEN IN ACHT!
Wees voorzichtig en oplettend bij het omgaan met brandstoffen.
Zet de motor af!
Maak de omgeving rond de vuldoppen goed schoon, zodat er geen vuil in de brandstof- of olietank kan komen.
Draai de vuldop los en vul de tanks respectievelijk met brandstof (brandstof/olie
mengsel) of zaagkettingolie. Vul bij tot aan de onderrand van de vulhals. Pas op dat u
geen brandstof of kettingolie morst!
Draai de vuldop zo stevig mogelijk weer vast.
Veeg de vuldop en de tank na het bijvullen schoon.
De motor afzetten
Zet de kortsluitschakelaar (3) in de “STOP” stand. (Afb. 44)
De kettingrem controleren (Afb. 45)
Begin nooit te werken met de kettingzaag zonder dat u eerst de kettingrem hebt
gecontroleerd!
Start de motor zoals beschreven op de vorige pagina (zorg dat u stabiel staat en leg
de zaag zo op de grond dat de zaagketting en de kettinggeleider de grond niet raken).
Houd de beugelgreep stevig vast met één hand en de hoofdhandgreep met uw
andere hand.
Laat de motor op halve snelheid lopen en druk de handbescherming (6) met de rug
van uw hand in de richting van de pijl tot de kettingrem is aangezet. De zaagketting
moet nu onmiddellijk stoppen.
Laat de gashendel onmiddellijk los en zet de kettingrem weer los.
BELANGRIJK: Indien de zaagketting in deze controle niet onmiddellijk stopt,
mag u in geen geval met het werk beginnen. Neem contact op met een MAKITA
servicecentrum.
55
Page 29

De carburator afstellen (Afb. 46)
De carburator is een injectiecarburator met vaste sproeiers. Afstelling van de vrijloopen hoofdsproeier is dus overbodig en kan ook niet worden uitgevoerd.
Indien nodig kunt u het onbelaste toerental afstellen met de afstelschroef (11).
Laat de motor 3 tot 5 minuten warm lopen (niet met hoog toerental!) voordat u afstelt.
Het stationair toerental afstellen
Wanneer u de afstelschroef (11) rechtsom indraait: het stationair toerental vermeerdert.
Wanneer u hem linksom uitdraait: het stationair toerental vermindert.
Let op: De zaagketting mag in geen geval meelopen.
De carburator is in de fabriek uitgerust met vaste sproeiers voor
luchtdrukwaarden op zeeniveau. Bij hoogten boven de 1000
meter kan het noodzakelijk zijn om de carburatorsproeiers te vervangen.
Stel de carburator af met een schroevendraaier (7, klingbreedte).
ONDERHOUD (Afb. 47)
De zaagketting slijpen
LET OP: Voordat u begint te werken aan de kettinggeleider of ketting, moet u
altijd de motor afzetten en de bougiedop eraf trekken (zie “De bougie vervan-
gen”). Draag altijd veiligheidshandschoenen!
De zaagketting moet worden geslepen wanneer:
Meelachtig zaagsel ontstaat bij het zagen van vochtig hout.
De ketting trekt enkel bij grote druk in het hout. De snijkant is zichtbaar beschadigd.
De zaag trekt naar links of rechts tijdens het zagen. Dit is te wijten aan een ongelijkmatige scherpte van de zaagketting.
Belangrijk: Slijp de ketting regelmatig, maar zonder te veel metaal eraf te slijpen!
Normaal zijn 2 tot 3 streken van de vijl voldoende.
Laat de ketting in een servicecentrum naslijpen nadat u hem al meerdere malen zelf
nageslepen heeft.
Juiste manier van slijpen: (Afb. 48)
LET OP: Gebruik uitsluitend kettingen en kettinggeleiders die voor deze zaag
zijn ontworpen!
Alle zaagtanden moeten even lang zijn (maat a). Zaagtanden van ongelijke lengte
zijn oorzaak van een ongelijkmatige kettingloop en kunnen ook kettingbreuk veroorzaken.
De minimumlengte van de zaagtanden is 3 mm. Slijp de ketting niet meer wanneer
deze minimumlengte is bereikt; u dient dan een nieuwe ketting op te leggen.
De zaagdiepte wordt bepaald door het hoogteverschil tussen de dieptebegrenzer
(ronde neus) en de snijkant.
De beste resultaten worden verkregen bij een begrenzerdiepte van 0,65 mm (,025”).
LET OP:
Een te grote zaagdiepte verhoogt het gevaar voor terugslag!
Alle zaagtanden moeten met dezelfde hoek van 30° worden geslepen. Verschil in de
hoeken veroorzaakt een ruwe en onregelmatige kettingloop, vergroot de slijtage en
kan leiden tot kettingbreuk.
De 85° hoek van de zaagtand volgt uit de indringdiepte van de rondvijl. Als de voorgeschreven vijl op de juiste manier wordt gebruikt, zal de correcte hoek automatisch
worden verkregen. (Afb. 49)
STOP
Geschikte vijlen en hun gebruik (Afb. 50)
Slijp de ketting met een speciale ronde vijl (4 mm diameter) voor zaagkettingen. Normale ronde vijlen zijn niet geschikt voor dit soort werk.
De vijl mag alleen bij de voorwaartse streek (pijl) vijlen. Breng de vijl bij het terughalen omhoog.
Slijp eerst de kortste zaagtand. De lengte van deze tand is dan de maatstaf voor alle
andere tanden van de ketting.
Houd de vijl altijd horizontaal (90° ten opzichte van de kettinggeleider).
De vijlhouder vergemakkelijkt de vijlgeleiding. Hij is voorzien van markeringen voor
de correcte slijphoek van 30° (houd de markeringen tijdens het vijlen evenwijdig met
de ketting, zoals afgebeeld) en begrenst ook de insteekdiepte tot de correcte 4/5 van
de vijldoorsnee. (Afb. 51)
Na het naslijpen van de ketting, moet u de hoogte van de dieptebegrenzers controleren met een kettingmaat.
Zelfs de geringste uitsteekhoogte dient met een speciale platte vijl (12) te worden
verwijderd.
Rond de voorzijde van de dieptebegrenzer (13) af. (Afb. 52)
Het binnenste van het kettingwiel reinigen, de kettingvanger controleren
en vervangen (Afb. 53)
LET OP: Voordat u begint te werken aan de kettinggeleider of ketting, moet u
altijd de motor afzetten en de bougiedop eraf trekken (zie “De bougie vervan-
gen”). Draag altijd veiligheidshandschoenen!
LET OP: Start de kettingzaag pas nadat deze volledig ineengezet en geïnspecteerd is!
Verwijder de kettingwielbeschermkap (4) (zie het hoofdstuk “INGEBRUIKNEMING”)
en reinig de binnenruimte met een borstel.
Verwijder de ketting (3) en de kettinggeleider (2).
OPMERKING:
Zorg dat er geen vuilresten achterblijven in de olieleigroef (1) en de kettingspanner
(6).
Voor het opnieuw monteren van de kettinggeleider, ketting en kettingwiel, zie het
hoofdstuk “INGEBRUIKNEMING”.
Kettingvanger
Inspecteer de kettingvanger (5) op zichtbare beschadiging en vervang deze indien
nodig.
De kettinggeleider reinigen, het kettingwiel smeren (Afb. 54)
LET OP: U moet veiligheidshandschoenen dragen.
Controleer regelmatig de loopvlakken van de kettinggeleider op beschadiging, en
maak deze schoon met een geschikt gereedschap.
Kettingwielneustype:
Als de zaag intensief wordt gebruikt, moeten de lagers van het voorste tandwiel
(keerrol) regelmatig (eens per week) worden gesmeerd. Hiertoe dient u eerst het 2mm gaatje aan het vooreind van de kettinggeleider grondig schoon te maken. Spuit
daarna een kleine hoeveelheid universeelvet in het gaatje.
Universeelvet en vetspuiten zijn beschikbaar als accessoires.
Universeelvet 944 360 000
Vetspuiten 944 350 000
De zaagketting vervangen (Afb. 55)
LET OP: Gebruik uitsluitend kettingen en kettinggeleiders die voor deze zaag
zijn ontworpen!
Controleer eerst het kettingwiel (10) alvorens een nieuwe ketting te monteren.
LET OP: Versleten kettingwielen kunnen de nieuwe zaagketting beschadigen en dienen daarom vervangen te worden.
De zuigkop vervangen (Afb. 56)
Het vilten filter (12) van de zuigkop kan verstopt raken. Om een onbelemmerde
brandstoftoevoer naar de carburator te garanderen, is het aan te bevelen dat de zuigkop eens per drie maanden wordt vervangen.
Om de oude zuigkop te verwijderen, trekt u hem met een draadhaak door de tankvulhals.
Het luchtfilter reinigen (Afb. 57)
Draai de schroef (14) los en verwijder het deksel van de filterkast (13).
BELANGRIJK: Dek de inlaatopening af met een schone doek om te voorkomen dat
er vuil in de carburator kan vallen. Verwijder het luchtfilter (15).
LET OP: Blaas de vuildeeltjes NIET eruit, omdat u anders uw ogen kunt verwonden! Gebruik geen brandstof om het luchtfilter te reinigen.
Reinig het luchtfilter met een zachte borstel.
Als het filter erg vuil is, was het dan in lauw water met een gewoon afwasschoonmaakmiddel.
Laat het luchtfilter volledig drogen.
Als het filter erg vuil is, dient u het vaak (meermaals per dag) te reinigen, omdat het
volle motorvermogen alleen met een schoon luchtfilter wordt verkregen.
LET OP:
Een beschadigd luchtfilter dient onmiddellijk te worden vervangen!
Afgescheurde stukken weefsel en grof vuil kunnen de motor onherstelbaar
beschadigen!
De bougie vervangen (Afb. 58)
LET OP:
Raak de bougie of de bougiedop niet aan terwijl de motor loopt (hoogspanning!).
Zet de motor af voordat u met de onderhoudswerkzaamheden begint. Een hete
motor kan brandwonden veroorzaken. Draag veiligheidshandschoenen!
De bougie moet vervangen worden wanneer de isolator beschadigd is, de elektroden
verbrand zijn, of de elektroden erg vuil of vettig zijn.
Verwijder het deksel van de filterkast (zie “Het luchtfilter reinigen”).
Trek de bougiedop (1) af van de bougie. Gebruik uitsluitend de meegeleverde combinatiesleutel om de bougie te verwijderen.
LET OP: Gebruik uitsluitend de volgende bougies: NGK CMR6A.
STOP
STOP
Elektrodenafstand (Afb. 59)
De elektrodenafstand moet 0,6 – 0,7 mm zijn.
De inlaatopening voor koellucht reinigen (Afb. 60)
Verwijder vier schroeven (2). Verwijder de terugloopstarter (3).
Reinig de inlaatopening (4) en de koelribben.
De knaldemper reinigen (Afb. 61)
LET OP: Zolang de motor nog heet is, bestaat er gevaar voor brandwonden.
Draag veiligheidshandschoenen.
Verwijder de kettingwielbeschermkap (zie “INGEBRUIKNEMING”).
Verwijder koolaanslag uit de uitlaatopeningen (11) van de knaldemper.
STOP
56
Page 30

De cilinderruimte reinigen (Afb. 62)
Verwijder de kettingwielbeschermkap (zie “INGEBRUIKNEMING”).
Verwijder desnoods de knaldemper door de twee schroeven (14) los te draaien en te verwijderen.
Sluit de cilinderopening (15) af met een lap.
Gebruik een geschikt werktuig (houten schraper) om de cilinderruimte (16), in het bijzonder de koelribben, schoon te maken.
Verwijder de lap uit de cilinderopening en breng de knaldemper weer aan, zoals getoond op het schema.
Vervang zo nodig de pakking (13). Verwijder alle eventuele resten van de oude pakking voorzichtig van de knaldemper.
Let goed op de juiste montagepositie.
De warmtegeleiplaat moet overeenkomen met de contouren van de cilinder, om een correcte warmte-overdracht te verzekeren.
Draai de schroeven (14) met 10 Nm vast terwijl de motor koud is.
Instructies voor periodiek onderhoud
De onderstaande onderhoudswerkzaamheden moeten regelmatig worden uitgevoerd om een lange levensduur te verzekeren, schade te voorkomen, en het optimaal functioneren van de veiligheidsinrichtingen te waarborgen. Garantieclaims worden alleen in overweging genomen indien dit onderhoudswerk regelmatig en correct werd uitgevoerd.
Het niet uitvoeren van de voorgeschreven onderhoudswerkzaamheden kan leiden tot ongelukken!
De gebruiker van de kettingzaag mag geen onderhoudswerk uitvoeren dat niet in deze gebruiksaanwijzing is beschreven. Alle dergelijk werk mag alleen door een MAKITA servicecentrum worden uitgevoerd.
Algemeen Kettingzaag De buitenkant schoonmaken en op beschadiging controleren. In geval van beschadiging, direct
Zaagketting Regelmatig naslijpen, tijdig vernieuwen.
Kettingrem Regelmatig in een erkend servicecentrum laten inspecteren.
Kettinggeleider Omkeren om gelijkmatige slijtage van de draagvlakken te verzekeren.
Telkens vóór het starten Zaagketting Inspecteren op beschadiging en juiste scherpte.
Kettinggeleider Controleren op beschadiging.
Kettingsmering Werking controleren.
Kettingrem Werking controleren.
OFF-schakelaar,
Veiligheidsschakelaar, Gashendel
Dop van brandstof/olie tank Controleren op goede afsluiting.
Dagelijks Luchtfilter Reinigen.
Kettinggeleider Controleren op beschadiging, olie-inlaatgat reinigen.
Steun van kettinggeleider Reinigen, in het bijzonder de oliegeleigroef.
Stationair toerental Controleren (ketting mag niet meelopen).
Wekelijks Ventilatorhuis Reinigen om ongehinderde toevoer van koellucht te waarborgen.
Cilinderruimte Reinigen.
Bougie Controleren en desnoods vervangen.
Knaldemper Controleren op stevige bevestiging.
Beschermhuls van kettingvanger Controleren op beschadiging, desnoods vervangen.
Iedere 3 maanden Zuigkop Vervangen.
Brandstoftank, olietank Reinigen.
Opslag Kettingzaag De buitenkant schoonmaken en op beschadiging controleren. In geval van beschadiging, direct
Kettinggeleider/ketting Verwijderen, reinigen en licht oliën.
Brandstoftank, olietank Leegmaken en reinigen.
Carburator Leeg draaien.
laten repareren door een erkend servicecentrum.
Tijdig vernieuwen.
Kettingspanning controleren.
Werking controleren.
laten repareren door een erkend servicecentrum.
Geleidingsgroef van kettinggeleider reinigen.
Service, resrveronderdelen en garantie
Onderhoud en reparaties
Het onderhoud en de reparatie van een geavanceerde motor en van alle veiligheidsinrichtingen vereisen een gediplomeerde technische opleiding en een gespecialiseerde werkplaats die voorzien is van speciaal gereedschap en testapparatuur.
MAKITA adviseert daarom dat u alle werkzaamheden die niet in deze gebruiksaanwijzing zijn beschreven laat uitvoeren door een MAKITA servicecentrum.
De MAKITA servicecentra beschikken over al de nodige apparatuur en over
geschoold en ervaren personeel om u steeds met zo weinig mogelijk kosten een
oplossing te bieden en met raad en daad bij te staan.
Aarzel niet om contact op te nemen met het dichtstbijzijnde servicecentrum.
Reserveronderdelen
De betrouwbaarheid, lange levensduur en veiligheid van uw kettingzaag zijn onder
meer ook afhankelijk van de kwaliteit van de gebruikte resrveronderdelen. Gebruik
uitsluitend originele MAKITA resrveronderdelen.
Alleen originele reserveonderdelen en accessoires garanderen de beste kwaliteit van
materiaal, nauwkeurigheid van afmetingen, feilloze werking en veiligheid.
Originele reserveonderdelen en accessoires zijn bij uw plaatselijke vakhandelaar verkrijgbaar. Deze beschikt ook over de lijsten van reserveonderdelen om de juiste
onderdeelnummers te bepalen, en wordt doorlopend op de hoogte gehouden van
verbeteringen en veranderingen in het aanbod van reserveonderdelen.
Houdt u er tevens rekening mee dat de garantie van het MAKITA product automatisch
ongeldig wordt wanneer andere dan originele MAKITA reserveonderdelen worden
gebruikt.
Garantie
MAKITA garandeert de hoogste kwaliteit en vergoedt daarom alle reparatiekosten
voor het vervangen van beschadigde onderdelen ten gevolge van materiaal- of fabricagefouten die binnen de garantieperiode na de datum van aankoop optreden. Houdt
u er rekening mee dat in sommige landen specifieke garantievoorwaarden gelden.
Voor vragen of twijfels, gelieve u te wenden tot de verkoper die verantwoordelijk is
voor de garantie van het product.
Beschadiging die voortvloeit uit een van de volgende oorzaken valt buiten de garantie:
• Het niet opvolgen van de gebruiksaanwijzing.
• Het niet uitvoeren van de voorgeschreven onderhouds- en reinigingswerkzaamheden.
• Onjuiste afstelling van de carburator.
• Normale slijtage.
• Duidelijke overbelasting door aanhoudende overschrijding van de maximaal toegestane belasting.
• Gebruik van niet-goedgekeurde kettinggeleiders en zaagkettingen.
• Het gebruik van kettinggeleiders en zaagkettingen waarvan de lengte niet is goedgekeurd.
• Gebruik van geweld, verkeerd gebruik, misbruik of ongevallen.
• Schade door oververhitting als gevolg van vervuiling van de terugloopstarter.
• Werk aan de kettingzaag door onbevoegde personen of slechte reparaties.
• Gebruik van ongeschikte reserveonderdelen die geen originele MAKITA onderdelen zijn, voorzover deze de schade hebben voortgebracht.
• Gebruik van ongeschikte of oude olie.
• Schade die betrekking heeft op de voorwaarden van een verhuurcontract e.d.
Reinigings-, onderhouds- en afstelwerkzaamheden vallen niet onder de garantie. Alle
reparaties die onder de garantie vallen, moeten door een MAKITA servicecentrum
worden uitgevoerd.
57
Page 31

Problemen oplossen
Storing Systeem Waarneming Oorzaak
Ketting loopt niet Kettingrem Motor loopt Kettingrem is ingeschakeld.
Motor start niet of start
moeizaam
Problemen bij warm starten Carburator Brandstoftank is gevuld
Motor slaat aan, maar slaat
direct weer af
Onvoldoende vermogen Er kunnen meerdere
Geen kettingsmering Olietank, oliepomp Geen olie op de ketting Olietank is leeg.
Ontstekingssysteem Ontstekingsvonk aanwezig Fout in brandstoftoevoer, compressiesysteem, mechanisch defect.
Geen ontstekingsvonk STOP-schakelaar ingedrukt, fout of kortsluiting in de bedrading, bougiedop of
Brandstoftoevoer Brandstoftank is gevuld Choke in onjuiste stand, carburator defect, zuigkop vuil, brandstofleiding geknikt of
Compressiesysteem Binnenin de zaag Pakking van krukkast defect, afdichtingen van radiaalas beschadigd, cilinder- of
Buitenzijde van de zaag Bougie niet goed afgedicht.
Mechanisch defect Starter grijpt niet aan Veer in de starter gebroken, kapotte onderdelen binnenin de motor.
Ontstekingsvonk aanwezig
Brandstoftoevoer Brandstoftank is gevuld Stationair toerental slecht afgesteld, zuigkop of carburator vervuild. Tankontluchting
De motor loopt stationair Luchtfilter vervuild, foute carburatorafstelling, knaldemper verstopt, uitlaatkanaal in
systemen tegelijkertijd
betrokken zijn
bougie defect.
onderbroken.
zuigerringen beschadigd.
Foute carburatorafstelling.
defect, brandstofleiding onderbroken, kabel beschadigd, STOP-schakelaar defect.
cilinder verstopt.
Oliegeleidegroef vervuild.
58
Page 32

Makita Corporation
Anjo, Aichi Japan
884570B992
 Loading...