

Page 1
INSTRUCTION MANUAL
MANUEL D'INSTRUCTION
MANUAL DE INSTRUCCIONES
Cordless Stapler
Agrafeuse sans fil
Engrapadora inalámbrica
BST221
009164
WARNING:
For your personal safety, READ and UNDERSTAND before using.
SAVE THESE INSTRUCTIONS FOR FUTURE REFERENCE.
AVERTISSEMENT:
Pour votre propre sécurité, prière de lire attentivement avant l'utilisation.
GARDER CES INSTRUCTIONS POUR RÉFÉRENCE ULTÉRIEURE.
ADVERTENCIA:
Para su seguridad personal, LEA DETENIDAMENTE este manual antes de usar la
herramienta.
GUARDE ESTAS INSTRUCCIONES PARA FUTURA REFERENCIA.
1
Page 2

ENGLISH
SPECIFICATIONS
Model BST221
Staple width 10 mm (3/8")
Applicable staples length 10 mm (3/8") - 22 mm (7/8")
Staple magazine capacity 84 pcs
Overall length 251 mm (9-7/8")
Net weight 2.3 kg (5.1lbs)
Rated voltage D.C. 18V
• Due to our continuing programme of research and development, the specifications herein are subject to change without notice.
• Note: Specifications may differ from country to country.
GENERAL SAFETY RULES
(FOR ALL BATTERY OPERATED
TOOLS)
WARNING! Read and understand all instructions.
Failure to follow all instructions listed below, may result
in electric shock, fire and/or serious personal injury.
SAVE THESE INSTRUCTIONS.
Work Area
1. Keep your work area clean and well lit.
Cluttered benches and dark areas invite
accidents.
2. Do not operate power tools in explosive
atmospheres, such as in the presence of
flammable liquids, gases or dust. Power tools
create sparks which may ignite the dust or fumes.
3. Keep bystanders, children, and visitors away
while operating a power tool. Distractions can
cause you to lose control.
Electrical Safety
4. A battery operated tool with integral batteries
or a separate battery pack must be recharged
only with the specified charger for the battery.
A charger that may be suitable for one type of
battery may create a risk of fire when used with
another battery.
5. Use battery operated tool only with
specifically designated battery pack. Use of
any other batteries may create a risk of fire.
Personal Safety
6. Stay alert, watch what you are doing and use
common sense when operating a power tool.
Do not use tool while tired or under the
influence of drugs, alcohol, or medication. A
moment of inattention while operating power tools
may result in serious personal injury.
Standard battery cartridges BL1830
USA003-2
7. Dress properly. Do not wear loose clothing or
jewelry. Contain long hair. Keep your hair,
clothing, and gloves away from moving parts.
Loose clothes, jewelry, or long hair can be caught
in moving parts.
8. Avoid accidental starting. Be sure switch is in
the locked or off position before inserting
battery pack. Carrying tools with your finger on
the switch or inserting the battery pack into a tool
with the switch on invites accidents.
9. Remove adjusting keys or wrenches before
turning the tool on. A wrench or a key that is left
attached to a rotating part of the tool may result in
personal injury.
10. Do not overreach. Keep proper footing and
balance at all times. Proper footing and balance
enables better control of the tool in unexpected
situations.
11. Use safety equipment. Always wear eye
protection. Dust mask, non-skid safety shoes,
hard hat, or hearing protection must be used for
appropriate conditions.
Tool Use and Care
12. Use clamps or other practical way to secure
and support the workpiece to a stable platform.
Holding the work by hand or against your body is
unstable and may lead to loss of control.
13. Do not force tool. Use the correct tool for your
application. The correct tool will do the job better
and safer at the rate for which it is designed.
14. Do not use tool if switch does not turn it on or
off. Any tool that cannot be controlled with the
switch is dangerous and must be repaired.
15. Disconnect battery pack from tool or place the
switch in the locked or off position before
making any adjustments, changing
accessories, or storing the tool. Such
preventive safety measures reduce the risk of
starting the tool accidentally.
2
Page 3
16. Store idle tools out of reach of children and
other untrained persons. Tools are dangerous in
the hands of untrained users.
17. When battery pack is not in use, keep it away
from other metal objects like: paper clips,
coins, keys, nails, screws, or other small metal
objects that can make a connection from one
terminal to another. Shorting the battery
terminals together may cause sparks, burns, or a
fire.
18. Maintain tools with care. Keep cutting tools
sharp and clean. Properly maintained tools with
sharp cutting edges are less likely to bind and are
easier to control.
19. Check for misalignment or binding of moving
parts, breakage of parts, and any other
condition that may affect the tool’s operation.
If damaged, have the tool serviced before
using. Many accidents are caused by poorly
maintained tools.
20. Use only accessories that are recommended
by the manufacturer for your model.
Accessories that may be suitable for one tool may
create a risk of injury when used on another tool.
SERVICE
21. Tool service must be performed only by
qualified repair personnel. Service or
maintenance performed by unqualified personnel
could result in a risk of injury.
22. When servicing a tool, use only identical
replacement parts. Follow instructions in the
Maintenance section of this manual. Use of
unauthorized parts or failure to follow
Maintenance instructions may create a risk of
shock or injury.
USB074-2
SPECIFIC SAFETY RULES
DO NOT let comfort or familiarity with product
(gained from repeated use) replace strict adherence
to cordless stapler safety rules. If you use this tool
unsafely or incorrectly, you can suffer serious
personal injury.
1. Hold power tools by insulated gripping
surfaces when performing an operation where
the cutting tool may contact hidden wiring or
its own cord. Contact with a "live" wire will make
exposed metal parts of the tool "live" and shock
the operator.
2. Always wear safety goggles or safety glasses
with side shield, and a full face shield when
needed.
3. Do not point the ejection port at anyone in the
vicinity (especially his face). Keep hands and
feet away from the ejection port area.
4. Always remove the battery cartridge before
loading the staples, adjustment, inspection,
maintenance or after operation is over.
5. Make sure no one is nearby before operation.
Never attempt to drive staples from both the
inside and outside of wall at the same time.
Staples may rip through and/or fly off,
presenting a grave danger.
6. Watch your footing and maintain your balance
with the tool. Make sure there is no one below
when working in high locations.
7. Check walls, ceilings, floors, roofing and the
like carefully to avoid possible electrical shock,
gas leakage, explosions, etc. caused by
stapling into live wires, conduits or gas pipes.
8. Use only staples specified in this manual. The
use of any other staples may cause
malfunction of the tool.
9. Do not tamper with the tool or attempt to use it
for other than driving staples.
10. Do not operate the tool without staples. It
shortens the service life of the tool.
11. Stop driving operations immediately if you
notice something wrong or out of the ordinary
with the tool.
12. Never staple into any materials which may
allow the staple to puncture and fly through as
a projectile.
13. Never actuate the switch trigger and safety
lever at the same time until you are prepared
to staple workpieces. Allow the workpiece to
depress the safety lever. Never defeat its
purpose by securing the safety lever back or
by depressing it by hand.
14. Never tamper with the safety lever. Check the
safety lever frequently for proper operations.
SAVE THESE INSTRUCTIONS.
WARNING:
MISUSE or failure to follow the safety rules stated in
this instruction manual may cause serious personal
injury.
Symbols
The followings show the symbols used for tool.
3
・ Read and understand tool labels and
manual.
・ Operators and others in work area must
wear safety glasses with side shields.
・ Keep fingers away from trigger when
not driving fasteners to avoid accidental
firing.
USD501-3
Page 4

・ volts
・ direct current
ENC007-2
IMPORTANT SAFETY
INSTRUCTIONS
FOR BATTERY CARTRIDGE
1. Before using battery cartridge, read all
instructions and cautionary markings on (1)
battery charger, (2) battery, and (3) product
using battery.
2. Do not disassemble battery cartridge.
3. If operating time has become excessively
shorter, stop operating immediately. It may
result in a risk of overheating, possible burns
and even an explosion.
4. If electrolyte gets into your eyes, rinse them
out with clear water and seek medical
attention right away. It may result in loss of
your eyesight.
5. Do not short the battery cartridge:
(1) Do not touch the terminals with any
conductive material.
(2) Avoid storing battery cartridge in a
container with other metal objects such as
nails, coins, etc.
(3) Do not expose battery cartridge to water
or rain.
A battery short can cause a large current
flow, overheating, possible burns and
even a breakdown.
6. Do not store the tool and battery cartridge in
locations where the temperature may reach or
exceed 50 ゚ C (122 ゚ F).
7. Do not incinerate the battery cartridge even if
it is severely damaged or is completely worn
out. The battery cartridge can explode in a fire.
8. Be careful not to drop or strike battery.
SAVE THESE INSTRUCTIONS.
Tips for maintaining maximum battery life
1. Charge the battery cartridge before completely
discharged.
Always stop tool operation and charge the
battery cartridge when you notice less tool
power.
2. Never recharge a fully charged battery
cartridge.
Overcharging shortens the battery service life.
3. Charge the battery cartridge with room
temperature at 10 ゚ C - 40 ゚ C (50 ゚ F - 104 ゚ F).
Let a hot battery cartridge cool down before
charging it.
FUNCTIONAL DESCRIPTION
CAUTION:
• Always be sure that the tool is switched off and the
battery cartridge is removed before adjusting or
checking function on the tool.
Installing or removing battery cartridge
1
2
009148
• Always switch off the tool before insertion or
removal of the battery cartridge.
• To remove the battery cartridge, withdraw it from
the tool while sliding the button on the front of the
cartridge.
• To insert the battery cartridge, align the tongue on
the battery cartridge with the groove in the housing
and slip it into place. Always insert it all the way
until it locks in place with a little click. If you can
see the red part on the upper side of the button, it
is not locked completely. Insert it fully until the red
part cannot be seen. If not, it may accidentally fall
out of the tool, causing injury to you or someone
around you.
• Do not use force when inserting the battery
cartridge. If the cartridge does not slide in easily, it
is not being inserted correctly.
Safety system
1
009151
2
1. Red part
2. Button
3. Battery cartridge
3
1. Trigger
2. Safety lever
4
Page 5
Make sure all safety systems are in working order before
operation. The tool must not operate if only the switch
trigger is pulled or if only the safety lever is pressed
against the wood. It must work only when both actions
are performed. Test for possible faulty operation with a
tool unloaded and pointed well away from yourself or
any bystanders.
NOTE:
• There is a possibility that the tool may operate for
an instant when only the trigger is pulled. This does
not indicate a problem. If this occurs, point the tool
well away from yourself or any bystanders.
Release and pull the trigger again to make sure the
safety systems are in working order.
ASSEMBLY
CAUTION:
• Always make sure that your fingers are not placed
on the trigger and the battery cartridge is removed
before carrying out any work on the stapler.
Staples
• Handle the staples and their box carefully. If the
staples have been handled roughly, they may be
bent out of shape, causing poor staple feed or
jamming.
• Avoid storing the staples in a very humid or hot
place or place exposed to direct sunlight.
CAUTION:
• Do not use staples other than designated in this
manual or staples that appear to be damaged, bent,
rusty or corroded.
• Do not insert staples of which size is different each
other at the same time inside the magazine ,
causing poor staple feed or jamming.
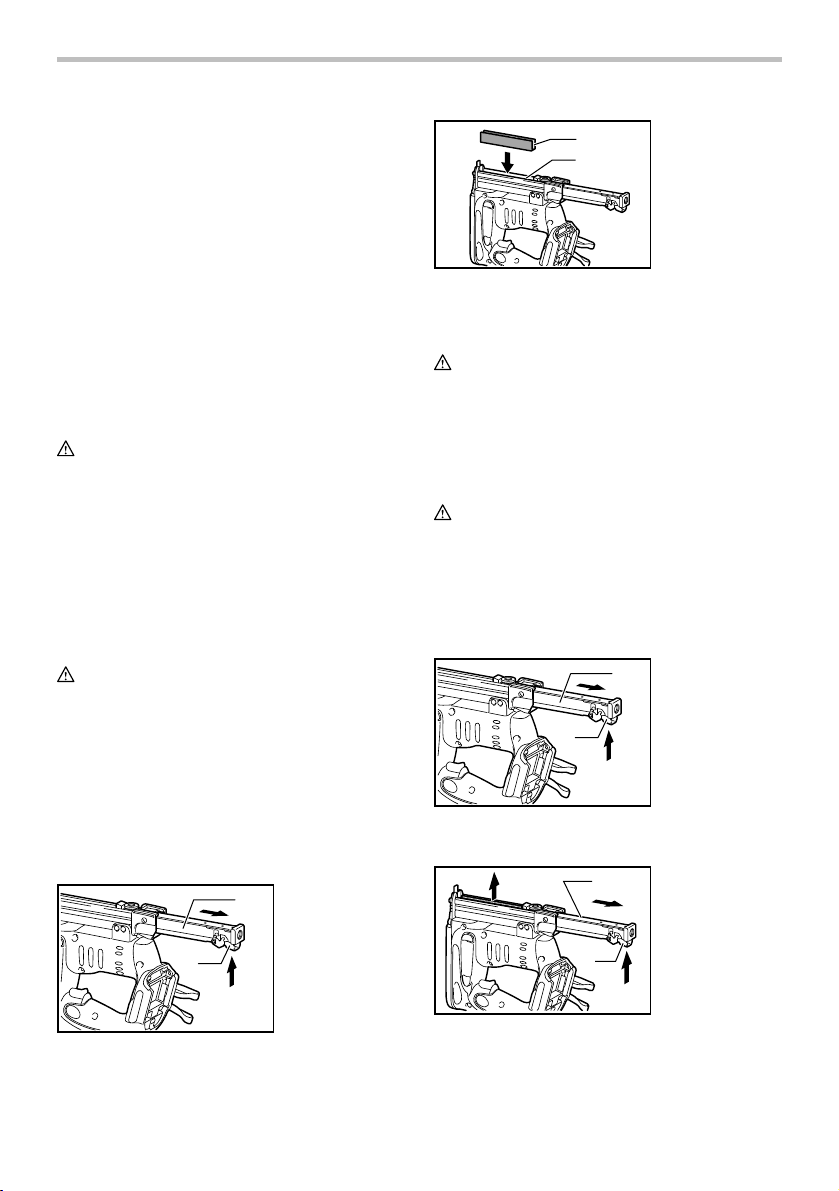
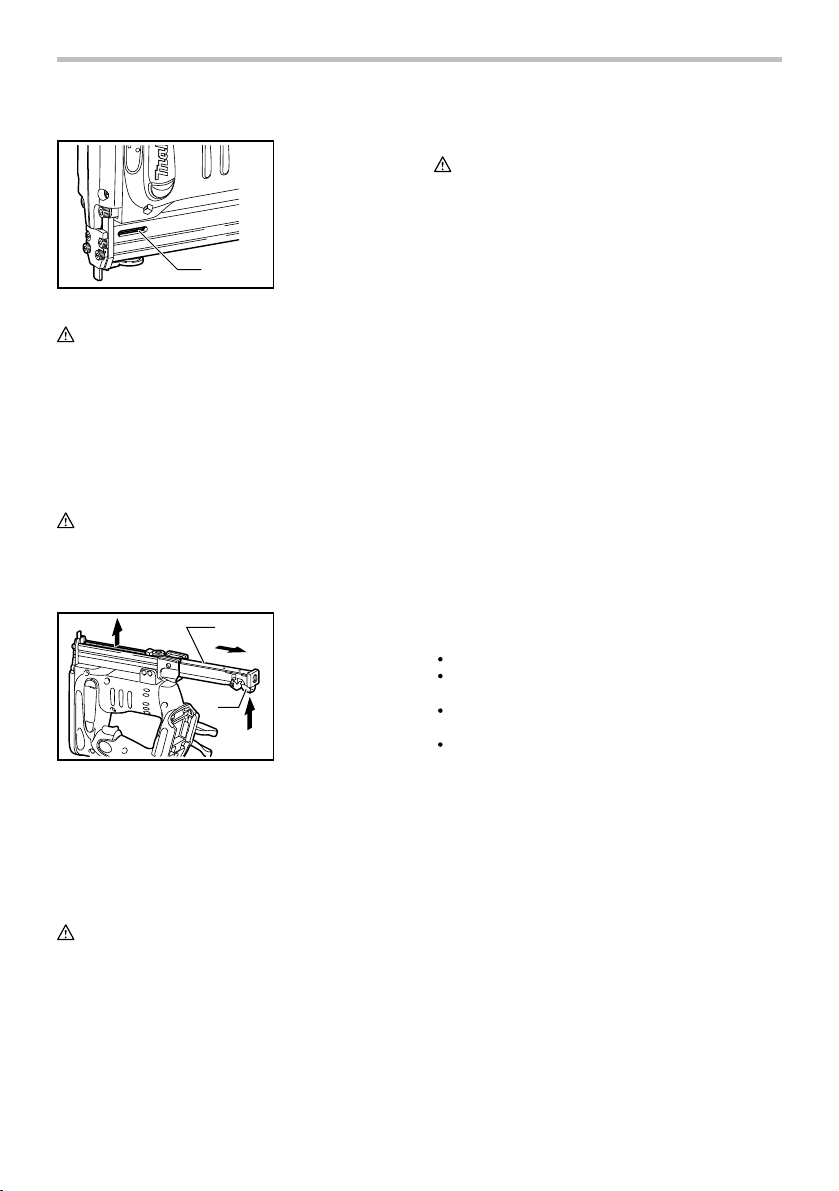
Loading staples
Remove the battery cartridge.
Press the locking lever on the rear of the sub magazine
and slide the sub magazine backward.
1. Sub magazine
1
2. Locking lever
1
2
009153
1. Staples
2. Main magazine
To secure the sub magazine in place, hook the locking
lever on the rear of the sub-magazine.
CAUTION:
• With the magazine loaded, if the tool is held
downward and the sub-magazine is opened, the
staples can fall out and present a danger to anyone
or anything below. Keep this in mind especially
when working in high locations.
Unloading staples
CAUTION:
• When removing staples, make sure that your
fingers are not placed on the trigger or the lever
and the battery cartridge is removed from the
stapler. Misfiring may cause personal injuries and
property damage.
Remove the battery cartridge.
Press the locking lever and slide the magazine back.
1. Sub magazine
1
2. Locking lever
2
009152
Take out staples from the magazine slit.
1
1. Sub magazine
2. Locking lever
2
009152
Load staples into the main magazine with their feet
facing up. Slide the sub-magazine forward.
5
009162
2
Page 6
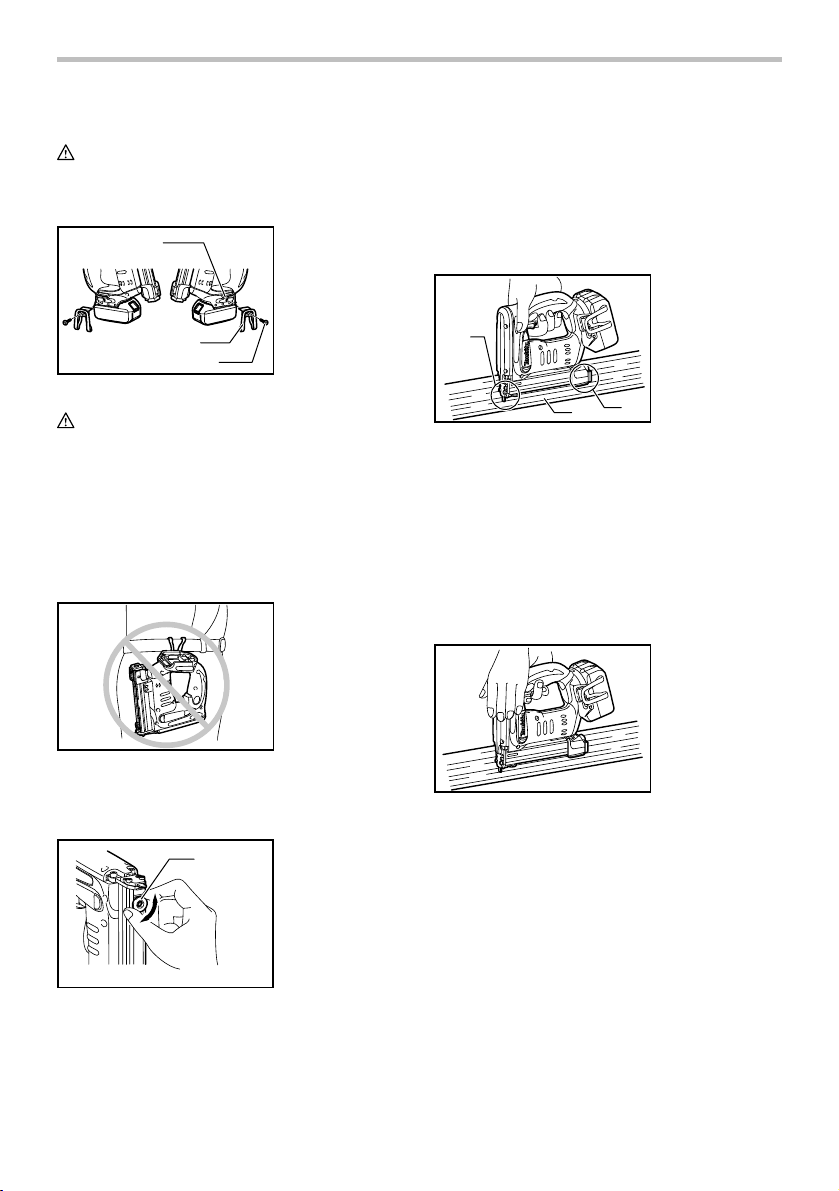
Hook
CAUTION:
• Always make sure that your fingers are not placed
on the trigger or the lever and the battery cartridge
is removed before using the hook.
1
2
3
009156
CAUTION:
• Do not hang the hook from the waist belt. Dropping
the stapler, which is caused by the hook
accidentally coming out of place, may cause
misfiring and personal injuries.
The hook is convenient for temporarily hanging the tool.
This can be installed on either side of the tool.
To install the hook, insert it into a groove in the tool
housing on either side and then secure it with a screw.
To remove, loosen the screw and then take it out.
1. Groove
2. Hook
3. Screw
If the staples are driven too deep or too shallow, adjust
the driving depth by turning the nut on the bottom of the
tool. For deeper driving of staples, turn the nut clockwise.
For shallower driving, turn the nut counterclockwise.
Please note the nut must be turned in increments of 90°
(1/4 turn) so that the groove on the nut runs parallel to
the magazine.
Driving staples
1. Front
2. Workpiece
3. Rear
1
3
009158
2
Place flat the opening of the tool from which staples are
fired on the material to be fastened and hold the tool
firmly against the material. Then pull the lever and then
pull the trigger fully to drive the staples. The grip is
shaped so that the tool head can be held down securely
with index finger and thumb. After driving a staple, be
sure to release the trigger fully.
When the head of driven staple remains above the
surface of material to be fastened, drive the staple while
holding the stapler head firmly.
009154
OPERATION
Depth adjustment
009163
009160
1
1. Nut
NOTE:
• Using the stapler continuously with the head of
driven staples remaining above the surface of
material to be fastened may cause damage to the
driver of the stapler and stapler jamming etc..
6
Page 7
Checking remaining staples
1. Sight window
1
009161
CAUTION:
• Do not operate the tool without staples. It shortens
the service life of the tool.
There is a convenient sight window on the right side of
the tool (when viewing the tool from the front). Use this
sight window to check if there are staples in the
magazine. When staples are not visible through the
window, load staples into the magazine.
Removing jammed staples
WARNING:
• Always make sure that the trigger are released and
the battery cartridge is removed before removing
jammed staples .
Remove the battery cartridge from the stapler.
1
1. Sub magazine
2. Locking lever
2
009162
Press the locking lever on the rear of the sub magazine
and slide the sub magazine backward.
Take out stuck staples that remain inside the opening
that staples are fired from as it appears.
MAINTENANCE
CAUTION:
• Always be sure that the tool is switched off and the
battery cartridge is removed before attempting to
perform inspection or maintenance.
To maintain product SAFETY and RELIABILITY, repairs,
any other maintenance or adjustment should be
performed by Makita Authorized or Factory Service
Centers, always using Makita replacement parts.
ACCESSORIES
CAUTION:
• These accessories or attachments are
recommended for use with your Makita tool
specified in this manual. The use of any other
accessories or attachments might present a risk of
injury to persons. Only use accessory or
attachment for its stated purpose.
If you need any assistance for more details regarding
these accessories, ask your local Makita Service Center.
• Staples
• Various type of Makita genuine batteries and
chargers
• Safety goggles
MAKITA LIMITED ONE YEAR WARRANTY
Warranty Policy
Every Makita tool is thoroughly inspected and tested
before leaving the factory. It is warranted to be free of
defects from workmanship and materials for the period
of ONE YEAR from the date of original purchase.
Should any trouble develop during this one year period,
return the COMPLETE tool, freight prepaid, to one of
Makita’s Factory or Authorized Service Centers. If
inspection shows the trouble is caused by defective
workmanship or material, Makita will repair (or at our
option, replace) without charge.
This Warranty does not apply where:
repairs have been made or attempted by others:
repairs are required because of normal wear and
tear:
the tool has been abused, misused or improperly
maintained:
alterations have been made to the tool.
IN NO EVENT SHALL MAKITA BE LIABLE FOR ANY
INDIRECT, INCIDENTAL OR CONSEQUENTIAL
DAMAGES FROM THE SALE OR USE OF THE
PRODUCT. THIS DISCLAIMER APPLIES BOTH
DURING AND AFTER THE TERM OF THIS
WARRANTY.
MAKITA DISCLAIMS LIABILITY FOR ANY IMPLIED
WARRANTIES, INCLUDING IMPLIED WARRANTIES
OF "MERCHANTABILITY" AND "FITNESS FOR A
SPECIFIC PURPOSE," AFTER THE ONE YEAR TERM
OF THIS WARRANTY.
This Warranty gives you specific legal rights, and you
may also have other rights which vary from state to
state. Some states do not allow the exclusion or
limitation of incidental or consequential damages, so
the above limitation or exclusion may not apply to you.
Some states do not allow limitation on how long an
implied warranty lasts, so the above limitation may not
apply to you.
EN0006-1
7
Page 8

FRANÇAIS
SPÉCIFICATIONS
Modèle BST221
Épaisseur de l’agrafeuse 10 mm (3/8")
Longueur d’agrafe applicable 10 mm (3/8") - 22 mm (7/8")
Capacité du chargeur d’agrafes 84 agrafes.
Longueur totale 251 mm (9-7/8")
Poids net 2.3 kg (5.1lbs)
Tension nominale C.C. 18V
Batteries standard BL1830
• Étant donné l'évolution constante de notre programme de recherche et de développement, les spécifications contenues dans ce
manuel sont sujettes à modification sans préavis.
• Note : Les spécifications peuvent varier suivant les pays.
Règles de sécurité générales
(POUR TOUS LES OUTILS
ALIMENTÉS PAR BATTERIE)
MISE EN GARDE ! Assurez-vous d'avoir lu et
compris toutes les instructions. Il y a risque de choc
électrique, d'incendie et/ou de blessure grave si les
instructions ci-dessous ne sont pas respectées.
CONSERVEZ CE MODE
D'EMPLOI.
Zone de travail
1. Maintenez votre aire de travail propre et bien
éclairée. Les établis encombrés et les aires de
travail sombres ouvrent la porte aux accidents.
2. N'utilisez pas les outils électriques dans les
atmosphères explosives, par exemple en
présence de liquides, gaz ou poussières
inflammables. Les outils électriques produisent
des étincelles au contact desquelles la poussière
ou les vapeurs peuvent s'enflammer.
3. Tenez à distance les curieux, les enfants et les
visiteurs pendant que vous travaillez avec un
outil électrique. Ils pourraient vous distraire et
vous faire perdre la maîtrise de l'outil.
Sécurité en matière d'électricité
4. Un outil alimenté par des batteries intégrées
ou par un bloc-piles séparé doit toujours être
rechargé au moyen du chargeur spécifié pour
la batterie en question. L'utilisation d'un
chargeur conçu pour un type donné de batterie
peut comporter un risque d'incendie avec un autre
type de batterie.
USA003-2
5. En utilisant un outil alimenté par batterie,
servez-vous uniquement du bloc-piles
spécialement conçu à cet effet. L'emploi
d'autres batteries risquerait de provoquer un
d'incendie.
Sécurité personnelle
6. Restez alerte, attentif à vos gestes, et faites
preuve de bon sens lorsque vous utilisez un
outil électrique. Évitez d'utiliser l'outil lorsque
vous êtes fatigué ou sous l'influence de
drogues, d'alcool ou de médicaments. Tout
moment d'inattention pendant l'utilisation d'un
outil électrique comporte un risque de blessure
grave.
7. Habillez-vous convenablement. Ne portez ni
vêtements flottants ni bijoux. Confinez les
cheveux longs. N'approchez jamais les
cheveux, les vêtements ou les gants des
pièces en mouvement. Des vêtements flottants,
des bijoux ou des cheveux longs risquent d'être
happés par des pièces en mouvement.
8. Prévenez tout démarrage accidentel.
Assurez-vous que l'interrupteur est en positon
d'arrêt ou en position verrouillée avant
d'insérer le bloc-piles. En transportant l'outil
avec le doigt sur l'interrupteur ou en insérant le
bloc-piles alors que l'interrupteur est en position
de marche, vous ouvrez toute grande la porte aux
accidents.
9. Enlevez les clés de réglage ou de serrage
avant de démarrer l'outil. Une clé laissée dans
une pièce tournante de l'outil peut provoquer des
blessures.
10. Ne vous penchez pas trop en avant. Maintenez
un bon appui et restez en équilibre en tout
temps. Un bonne stabilité vous permet de mieux
réagir à une situation inattendue.
8
Page 9

11. Utilisez des accessoires de sécurité. Portez
toujours un protecteur pour la vue. Selon les
conditions, portez aussi un masque antipoussière,
des bottes de sécurité antidérapantes, un casque
protecteur et/ou une protection d'oreille.
Utilisation et entretien des outils
12. Immobilisez le matériau sur une surface stable
au moyen de brides ou de toute autre façon
adéquate. Le fait de tenir la pièce avec la main ou
contre votre corps offre une stabilité insuffisante
et peut entraîner une perte de maîtrise de l'outil.
13. Ne forcez pas l'outil. Utilisez un outil qui
convient au travail à effectuer. Si vous utilisez le
bon outil et respectez le régime pour lequel il a été
conçu, il effectuera un travail de meilleure qualité
et de façon plus sûre.
14. N'utilisez pas un outil si son interrupteur est
bloqué. Un outil que vous ne pouvez pas
commander par son interrupteur est dangereux et
doit être réparé.
15. Retirez le bloc-piles de l'outil ou placez
l'interrupteur en position de verrouillage ou
d'arrêt avant d'effectuer tout réglage, de
changer d'accessoire ou de ranger l'outil. De
telles mesures préventives réduisent les risques
de démarrage accidentel de l'outil.
16. Une fois l'utilisation de l'outil terminée,
rangez-le hors de portée des enfants et
personnes qui en ignorent le fonctionnement.
Les outils représentent un danger entre les mains
de personnes qui n'en connaissent pas le mode
d'utilisation.
17. Lorsque vous n'utilisez pas le bloc-piles,
rangez-le à l'écart des objets tels que les
trombones, pièces de monnaie, clés, clous, vis
et autres petits objets métalliques qui risquent
d'établir la connexion entre les bornes. Il y a
risque d'étincelles, de brûlures et d'incendie si les
bornes de la batterie sont court-circuitées.
18. Prenez soin de bien entretenir les outils. Les
outils de coupe doivent être toujours bien
affûtés et propres. Des outils bien entretenus,
dont les arêtes sont bien tranchantes, sont moins
susceptibles de coincer et plus faciles à diriger.
19. Assurez-vous que les pièces mobiles ne sont
pas désalignées ou coincées, qu'aucune pièce
n'est cassée et que l'outil n'a subi aucun
dommage affectant son bon fonctionnement.
Le cas échéant, faites réparer l'outil avant de
l'utiliser. De nombreux accidents sont causés par
des outils mal entretenus.
20. Utilisez uniquement les accessoires
recommandés par le fabricant pour le modèle
utilisé. Des accessoires qui conviennent à un
outil donné peuvent comporter un risque de
blessure lorsque utilisés sur un autre outil.
SERVICE
21. La réparation des outils électriques doit être
confiée à un réparateur qualifié. La réparation
ou l'entretien effectué par du personnel non
qualifié risque d'entraîner des blessures.
22. Seules des pièces de rechange identiques aux
pièces originales doivent être utilisées lors de
la réparation d'un outil. Suivez les instructions
de la section Entretien du présent manuel.
L'utilisation de pièces non spécifiées ou
l'ignorance des instructions d'entretien comporte
un risque de choc électrique ou de blessure.
USB074-2
RÈGLES DE SÉCURITÉ
PARTICULIÈRES
NE vous laissez PAS tromper (au fil d'une utilisation
répétée) par un sentiment d'aisance et de familiarité
avec le produit, en négligeant le respect rigoureux
des règles de sécurité qui accompagnent l'agrafeuse
sans fil. L'utilisation non sécuritaire ou incorrecte de
cet outil comporte un risque de blessure grave.
1. Tenez l'outil électrique par ses surfaces de
prise isolées pendant toute opération où l'outil
de coupe pourrait venir en contact avec un
câblage dissimulé ou avec son propre cordon.
En cas de contact avec un conducteur sous
tension, les pièces métalliques à découvert de
l'outil transmettraient un choc électrique à
l'utilisateur.
2. Portez toujours des lunettes à coques ou des
lunettes de sécurité avec une visière, ainsi
qu'un écran facial lorsque nécessaire.
3. Ne pointez jamais le port d’éjection sur une
personne à proximité (plus particulièrement
vers le visage). Gardez les mains et les pieds
hors de portée de la zone du port d'éjection.
4. Avant de charger des agrafes, de procéder à
un réglage, de faire une inspection, d’effectuer
un entretien ou lorsque l’utilisation est
terminée, retirez toujours la batterie.
5. Assurez-vous que personne ne se trouve à
proximité avant de l’utiliser. Ne tentez jamais
de fixer des agrafes de l’intérieur et de
l’extérieur d’un mur simultanément. Les
agrafes pourraient passer à travers et/ou voler
au hasard, ce qui pourrait représenter un
danger grave.
9
Page 10

6. Regardez où vous mettez les pieds et
assurez-vous d'une prise équilibrée sur l'outil.
Assurez-vous qu'il n'y a personne en bas
lorsque vous travaillez dans des endroits
élevés.
7. Vérifiez soigneusement les murs, plafonds,
planchers, toits et surfaces similaires pour
éviter les risques de choc électrique, de fuite
de gaz, d'explosion, etc., causés par le
clouage sur des fils exposés, des conduits ou
des tuyaux de gaz.
8. Utilisez uniquement les agrafes spécifiées
dans ce manuel. L'utilisation de toute autre
type d'agrafes peut causer le
dysfonctionnement de l'outil.
9. Ne modifiez pas l’outil et ne tentez pas de
l’utiliser pour autre chose que fixer des
agrafes.
10. N’utilisez pas l’outil sans agrafe. Cela réduit la
durée de vie de l’outil.
11. Cessez immédiatement le clouage si vous
notez une anomalie ou un fonctionnement
inhabituel de l'outil.
12. N’agrafez jamais un matériau qui permettrait à
l’agrafe de traverser et de s’envoler comme un
projectile.
13. N’actionnez jamais le déclencheur et le levier
de sécurité simultanément si vous n’êtes pas
prêt à agrafer. Laissez la pièce faire en sorte
que le levier de sécurité s’abaisse. N’évitez
jamais son fonctionnement en remettant le
levier de sécurité ou en l’abaissant
manuellement.
14. Ne modifiez jamais le levier de sécurité.
Vérifiez régulièrement le bon fonctionnement
du levier de sécurité.
CONSERVEZ CE MODE
D'EMPLOI.
AVERTISSEMENT:
Une MAUVAISE UTILISATION de l'outil ou
l'ignorance des consignes de sécurité du présent
manuel d'instructions peuvent entraîner une grave
blessure.
USD501-3
Symboles
Les symboles utilisés pour l'outil sont indiqués
ci-dessous.
・ Veuillez lire les étiquettes et le manuel,
en vous assurant d'en avoir bien
compris le contenu.
・ L'utilisateur et toute personne présente
dans la zone de travail doivent porter
des lunettes de sécurité avec
protecteurs latéraux.
・ Pour éviter le déclenchement
accidentel de l'outil, ne placez pas les
doigts près de la gâchette lorsque vous
n'êtes pas en train de clouer.
・ volts
・ courant continu
ENC007-2
CONSIGNES DE SÉCURITÉ
IMPORTANTES
POUR LA BATTERIE
1. Avant d'utiliser la batterie, lisez toutes les
instructions et précautions relatives (1) au
chargeur de batterie, (2) à la batterie, et (3) à
l'outil utilisant la batterie.
2. Ne démontez pas la batterie.
3. Cessez immédiatement l'utilisation si le temps
de fonctionnement devient excessivement
court. Il y a risque de surchauffe, de brûlures,
voire d'explosion.
4. Si l'électrolyte pénètre dans vos yeux,
rincez-les à l'eau claire et consultez
immédiatement un médecin. Il y a risque de
perte de la vue.
5. Ne court-circuitez pas la batterie :
(1) Ne touchez les bornes avec aucun
matériau conducteur.
(2) Évitez de ranger la batterie dans un
conteneur avec d'autres objets
métalliques, par exemple des clous, des
pièces de monnaie, etc.
(3) N'exposez pas la batterie à l'eau ou à la
pluie.
Un court-circuit de la batterie pourrait
provoquer un fort courant, une surchauffe,
6. Ne rangez pas l'outil ou la batterie dans des
7. Ne jetez pas la batterie au feu même si elle est
8. Prenez garde d'échapper ou de heurter la
parfois des brûlures et même une panne.
endroits où la température risque d'atteindre
ou de dépasser 50 ゚ C (122 ゚ F).
sérieusement endommagée ou complètement
épuisée. La batterie peut exploser au contact
du feu.
batterie.
10
Page 11

CONSERVEZ CE MODE
D'EMPLOI.
Conseils pour obtenir la durée de service
maximale de la batterie
1. Rechargez la batterie avant qu'elle ne soit
complètement déchargée.
Arrêtez toujours l'outil et rechargez la batterie
quand vous remarquez que la puissance de
l'outil diminue.
2. Ne rechargez jamais une batterie
complètement chargée.
La surcharge réduit la durée de service de la
batterie.
3. Rechargez la batterie à une température
ambiante comprise entre 10 ゚ C et 40 ゚ C (50 ゚
F - 104 ゚ F). Si la batterie est chaude, laissez-la
refroidir avant de la recharger.
DESCRIPTION DU
FONCTIONNEMENT
ATT EN TI ON :
• Assurez-vous toujours que l'outil est hors tension
et que sa batterie est retirée avant de l'ajuster ou
de vérifier son fonctionnement.
Installation ou retrait de la batterie
1
2
009148
• Mettez toujours l'outil hors tension avant d'insérer
ou de retirer la batterie.
• Pour retirer la batterie, sortez-la de l'outil tout en
faisant glisser le bouton à l'avant de la batterie.
• Pour insérer la batterie, alignez sa languette sur
l'entaille qui se trouve à l'intérieur du carter, puis
glissez la batterie pour la mettre en place.
Insérez-la toujours bien à fond, jusqu'à ce qu'elle
se verrouille en émettant un léger clic. Si vous
pouvez voir la partie rouge de la face supérieure
du bouton, la batterie n'est pas parfaitement
verrouillée. Insérez-la à fond, jusqu'à ce que la
partie rouge ne soit plus visible. Sinon, elle risque
de tomber accidentellement de l'outil, en vous
blessant ou en blessant une personne se trouvant
près de vous.
1. Partie rouge
2. Bouton
3. Batterie
3
• N'appliquez pas une force excessive lors de
l'insertion de la batterie. Si la batterie ne glisse pas
aisément, c'est qu'elle n'est pas insérée
correctement.
Dispositif de sécurité
1
2
009151
Assurez-vous que tous les dispositifs de sécurité
fonctionnent correctement avant d’utiliser l’appareil.
L’outil ne doit pas être utilisé si un seul des deux
dispositifs (le déclencheur est relâché ou le levier de
sécurité est appuyé contre le bois) est actif. L’agrafeuse
ne doit être utilisée que si ces deux actions sont
réalisées. Vérifiez les défaillances possibles lorsque
l’outil est déchargé et pointé dans une autre direction
que la vôtre ou celle de spectateurs.
NOTE:
• Il existe une possibilité que l’outil fonctionne
pendant un instant lorsqu’uniquement le
déclencheur est relâché. Cela n’indique pas un
problème. Si cela se produit, pointez l’outil loin de
vous ou des spectateurs. Relâchez et appuyez à
nouveau sur le déclencheur afin de vous assurer
que les systèmes de sécurité fonctionnent
correctement.
1. Gâchette
2. Levier de
sécurité
ASSEMBLAGE
ATT EN TI ON :
• Assurez-vous toujours que vos doigts ne sont pas
placés sur le déclencheur et que la batterie est
enlevée avant d’effectuer un travail sur l’agrafeuse.
Agrafes
• Manipulez les agrafes et leur boîte avec soin. Si
les agrafes ont été manipulées durement, il est
possible qu’elles soient déformées, ce qui peut
provoquer une mauvaise alimentation ou un
bourrage.
• Évitez de ranger les agrafes dans un endroit très
humide, chaud ou exposé directement au
rayonnement solaire.
11
Page 12

ATT EN TI ON :
• N’utilisez pas d’autres agrafes que celles
indiquées dans ce manuel. N’employez pas non
plus des agrafes semblant endommagées, pliées,
rouillées ou corrodées.
• N’insérez pas simultanément des agrafes d’une
dimension différente dans le chargeur. Cela
pourrait provoquer une mauvaise alimentation et
des bourrages.
Chargement des agrafes
Retirez la batterie.
Appuyez sur le levier de verrouillage se trouvant à
l’arrière du chargeur secondaire et glissez-le vers
l’arrière.
1. Chargeur
1
secondaire
2. Levier de
verrouillage
2
009152
Chargez les agrafes dans le chargeur principal, les
pieds vers le haut. Glissez le chargeur secondaire vers
l’avant.
1
2
009153
1. Agrafes
2. Chargeur
principal
Pour fixer le chargeur secondaire en place, accrochez le
levier de verrouillage se trouvant à l’arrière du chargeur
secondaire.
ATT EN TI ON :
• Si vous tenez l’outil vers le bas et que le chargeur
secondaire est ouvert lorsque le chargeur est
chargé, les agrafes peuvent tomber et
représenter un danger pour n’importe qui ou
n’importe quoi se trouvant au-dessous. Soyez-en
conscient, plus particulièrement lorsque vous
travaillez en hauteur.
Déchargement des agrafes
ATT EN TI ON :
• Lorsque vous enlevez des agrafes, assurez-vous
que vos doigts ne sont pas placés sur le
déclencheur ou le levier et que la batterie est
retirée de l’agrafeuse. Un déclenchement
accidentel pourrait causer des blessures et des
dommages matériels.
Retirez la batterie.
Appuyez sur le levier de verrouillage et glissez le
chargeur à nouveau.
1. Chargeur
1
secondaire
2. Levier de
verrouillage
2
009152
Enlevez les agrafes de la fente du chargeur.
1
1. Chargeur
secondaire
2. Levier de
verrouillage
2
009162
Crochet
ATT EN TI ON :
• Avant d'utiliser le crochet, assurez-vous toujours
que vous n'avez pas le doigt sur la gâchette ou le
levier et que la batterie est retirée.
1
1. Rainure
2. Crochet
3. Vis
2
009156
3
12
Page 13

ATT EN TI ON :
• Ne laissez pas pendre le crochet à la ceinture. Si
vous échappez l’agrafeuse, ce qui pourrait se
produire si le crochet se déplace accidentellement,
cela pourrait causer un déclenchement involontaire
provoquant des blessures.
L'outil est équipé d'un crochet pratique qui permet de le
suspendre temporairement. Il s'installe d'un côté comme
de l'autre de l'outil.
Pour installer le crochet, insérez-le dans les rainures
situées de chaque côté du carter de l'outil, puis serrez-le
avec une vis. Pour le retirer, desserrez la vis et
enlevez-la.
009154
UTILISATION
Réglage de la profondeur
1
1. Écrou
Enfoncer des agrafes
1. Avant
2. Pièce
3. Arrière
1
3
009158
2
Placez l’ouverture (d’où sortent les agrafes) de l’outil à
plat sur le matériau à fixer et tenez l’outil fermement
contre le matériau. Ensuite, relâchez le levier et tirez
complètement le déclencheur pour enfoncer les agrafes.
La poignée est faite de manière à ce que la tête de l’outil
puisse être maintenue sécuritairement vers le bas à
l’aide de l’index et du pouce. Après avoir enfoncé une
agrafe, assurez-vous de relâcher complètement le
déclencheur.
Lorsque la tête de l’agrafe enfoncée demeure au-dessus
de la surface du matériau à fixer, enfoncez l’agrafe tout
en appuyant fermement sur la tête de l’agrafeuse.
009163
Si les agrafes sont enfoncées trop ou trop peu
profondément, réglez la profondeur en tournant l’écrou
se trouvant à la base de l’outil. Pour plus de
profondeur, tournez l’écrou dans les sens des aiguilles
d’une montre. Pour moins de profondeur, tournez l’écrou
dans le sens contraire des aiguilles d’une montre.
Veuillez noter que l’écrou doit être tourné par incrément
de 90 ° (1/4 de tour) de manière à ce que la rainure de
l’écrou soit parallèle au chargeur.
009160
NOTE:
• L’utilisation continue de l’agrafeuse lorsque la tête
des agrafes enfoncées demeure au-dessus de la
surface du matériau à fixer peut endommager
l’organe de commande, bourrer l’agrafeuse, etc.
Vérification du nombre d’agrafes restantes
1. Fenêtre de
viseur
1
009161
ATT EN TI ON :
• N’utilisez pas l’outil sans agrafe. Cela réduit la
durée de vie de l’outil.
13
Page 14

Une fenêtre pratique se trouve du côté droit de l’outil
A
À
A
(lorsque l’on regarde l’outil depuis l’avant). Utilisez cette
fenêtre pour vérifier s’il y a encore des agrafes dans le
chargeur. Lorsqu’aucune agrafe n’est visible par la
fenêtre, chargez des agrafes dans le chargeur.
Retrait des agrafes coincées
AVERTISSEMENT:
• Assurez-vous toujours que le déclencheur est
relâché et que la batterie est enlevée avant de
retirer les agrafes coincées.
Enlevez la batterie de l’agrafeuse.
1
1. Chargeur
2. Levier de
2
009162
Appuyez sur le levier de verrouillage se trouvant à
l’arrière du chargeur secondaire et glissez-le vers
l’arrière.
Enlevez les agrafes coincées à l’intérieur de l’ouverture
d’où elles sont éjectées.
ENTRETIEN
ATT EN TI ON :
• Assurez-vous toujours que l'outil est hors tension
et que la batterie est retirée avant d'y effectuer tout
travail d'inspection ou d'entretien.
Pour maintenir la SÉCURITÉ et la FIABILITÉ du produit,
les réparations, tout autre travail d'entretien ou de
réglage doivent être effectués dans un centre de service
Makita agréé ou un centre de service de l'usine Makita,
exclusivement avec des pièces de rechange Makita.
ACCESSOIRES
ATT EN TI ON :
• Ces accessoires ou pièces complémentaires sont
recommandés pour l'utilisation avec l'outil Makita
spécifié dans ce mode d'emploi. L'utilisation de
tout autre accessoire ou pièce complémentaire
peut comporter un risque de blessure. N'utilisez les
accessoires ou pièces qu'aux fins auxquelles ils
ont été conçus.
Si vous désirez obtenir plus de détails concernant ces
accessoires, veuillez contacter le centre de service
après-vente Makita le plus près.
secondaire
verrouillage
• Agrafes
• Les divers types de batteries et chargeurs Makita
authentiques
• Lunettes de sécurité
GARANTIE LIMITÉE D’UN AN MAKITA
Politique de garantie
Chaque outil Makita est inspecté rigoureusement et
testé avant sa sortie d’usine. Nous garantissons qu’il
sera exempt de défaut de fabrication et de vice de
matériau pour une période d’UN AN à partir de la date
de son achat initial. Si un problème quelconque devait
survenir au cours de cette période d’un an, veuillez
retourner l’outil COMPLET, port payé, à une usine ou à
un centre de service après-vente Makita. Makita
réparera l’outil gratuitement (ou le remplacera, à sa
discrétion) si un défaut de fabrication ou un vice de
matériau est découvert lors de l’inspection.
Cette garantie ne s’applique pas dans les cas où:
des réparations ont été effectuées ou tentées par
un tiers:
des réparations s’imposent suite à une usure
normale:
l’outil a été malmené, mal utilisé ou mal entretenu:
l’outil a subi des modifications.
MAKITA DÉCLINE TOUTE RESPONSABILITÉ POUR
TOUT DOMMAGE ACCESSOIRE OU INDIRECT LIÉ À
LA VENTE OU À L’UTILISATION DU PRODUIT. CET
VIS DE NON-RESPONSABILITÉ S’APPLIQUE À LA
FOIS PENDANT ET APRÈS LA PÉRIODE COUVERTE
PAR CETTE GARANTIE.
MAKITA DÉCLINE TOUTE RESPONSABILITÉ QUANT
TOUTE GARANTIE TACITE, INCLUANT LES
GARANTIES TACITES DE “QUALITÉ MARCHANDE”
ET “ADÉQUATION À UN USAGE PARTICULIER”
PRÈS LA PÉRIODE D’UN AN COUVERTE PAR
CETTE GARANTIE.
Cette garantie vous donne des droits spécifiques
reconnus par la loi, et possiblement d’autres droits, qui
varient d’un État à l’autre. Certains États ne permettant
pas l’exclusion ou la limitation des dommages
accessoires ou indirects, il se peut que la limitation ou
exclusion ci-dessus ne s’applique pas à vous. Certains
États ne permettant pas la limitation de la durée
d’application d’une garantie tacite, il se peut que la
limitation ci-dessus ne s’applique pas à vous.
EN0006-1
14
Page 15

ESPAÑOL
ESPECIFICACIONES
Modelo BST221
Anchura de grapa 10 mm (3/8")
Longitud aplicable de grapas 10 mm (3/8") - 22 mm (7/8")
Capacidad del cartucho de grapas 84 piezas.
Longitud total 251 mm (9-7/8")
Peso neto 2,3 kg (5,1lbs)
Tensión nominal 18 V c.d.
Cartuchos de batería estándar BL1830
• Debido a nuestro programa continuo de investigación y desarrollo, las especificaciones aquí dadas están sujetas a cambios sin
previo aviso.
• Nota: Las especificaciones pueden ser diferentes de país a país.
Règles de sécurité générales
(POUR TOUS LES OUTILS
ALIMENTÉS PAR BATTERIE)
MISE EN GARDE ! Assurez-vous d'avoir lu et
compris toutes les instructions. Il y a risque de choc
électrique, d'incendie et/ou de blessure grave si les
instructions ci-dessous ne sont pas respectées.
CONSERVEZ CE MODE
D'EMPLOI.
Zone de travail
1. Maintenez votre aire de travail propre et bien
éclairée. Les établis encombrés et les aires de
travail sombres ouvrent la porte aux accidents.
2. N'utilisez pas les outils électriques dans les
atmosphères explosives, par exemple en
présence de liquides, gaz ou poussières
inflammables. Les outils électriques produisent
des étincelles au contact desquelles la poussière
ou les vapeurs peuvent s'enflammer.
3. Tenez à distance les curieux, les enfants et les
visiteurs pendant que vous travaillez avec un
outil électrique. Ils pourraient vous distraire et
vous faire perdre la maîtrise de l'outil.
Sécurité en matière d'électricité
4. Un outil alimenté par des batteries intégrées
ou par un bloc-piles séparé doit toujours être
rechargé au moyen du chargeur spécifié pour
la batterie en question. L'utilisation d'un
chargeur conçu pour un type donné de batterie
peut comporter un risque d'incendie avec un autre
type de batterie.
USA003-2
5. En utilisant un outil alimenté par batterie,
servez-vous uniquement du bloc-piles
spécialement conçu à cet effet. L'emploi
d'autres batteries risquerait de provoquer un
d'incendie.
Sécurité personnelle
6. Restez alerte, attentif à vos gestes, et faites
preuve de bon sens lorsque vous utilisez un
outil électrique. Évitez d'utiliser l'outil lorsque
vous êtes fatigué ou sous l'influence de
drogues, d'alcool ou de médicaments. Tout
moment d'inattention pendant l'utilisation d'un
outil électrique comporte un risque de blessure
grave.
7. Habillez-vous convenablement. Ne portez ni
vêtements flottants ni bijoux. Confinez les
cheveux longs. N'approchez jamais les
cheveux, les vêtements ou les gants des
pièces en mouvement. Des vêtements flottants,
des bijoux ou des cheveux longs risquent d'être
happés par des pièces en mouvement.
8. Prévenez tout démarrage accidentel.
Assurez-vous que l'interrupteur est en positon
d'arrêt ou en position verrouillée avant
d'insérer le bloc-piles. En transportant l'outil
avec le doigt sur l'interrupteur ou en insérant le
bloc-piles alors que l'interrupteur est en position
de marche, vous ouvrez toute grande la porte aux
accidents.
9. Enlevez les clés de réglage ou de serrage
avant de démarrer l'outil. Une clé laissée dans
une pièce tournante de l'outil peut provoquer des
blessures.
10. Ne vous penchez pas trop en avant. Maintenez
un bon appui et restez en équilibre en tout
temps. Un bonne stabilité vous permet de mieux
réagir à une situation inattendue.
15
Page 16

11. Utilisez des accessoires de sécurité. Portez
toujours un protecteur pour la vue. Selon les
conditions, portez aussi un masque antipoussière,
des bottes de sécurité antidérapantes, un casque
protecteur et/ou une protection d'oreille.
Utilisation et entretien des outils
12. Immobilisez le matériau sur une surface stable
au moyen de brides ou de toute autre façon
adéquate. Le fait de tenir la pièce avec la main ou
contre votre corps offre une stabilité insuffisante
et peut entraîner une perte de maîtrise de l'outil.
13. Ne forcez pas l'outil. Utilisez un outil qui
convient au travail à effectuer. Si vous utilisez le
bon outil et respectez le régime pour lequel il a été
conçu, il effectuera un travail de meilleure qualité
et de façon plus sûre.
14. N'utilisez pas un outil si son interrupteur est
bloqué. Un outil que vous ne pouvez pas
commander par son interrupteur est dangereux et
doit être réparé.
15. Retirez le bloc-piles de l'outil ou placez
l'interrupteur en position de verrouillage ou
d'arrêt avant d'effectuer tout réglage, de
changer d'accessoire ou de ranger l'outil. De
telles mesures préventives réduisent les risques
de démarrage accidentel de l'outil.
16. Une fois l'utilisation de l'outil terminée,
rangez-le hors de portée des enfants et
personnes qui en ignorent le fonctionnement.
Les outils représentent un danger entre les mains
de personnes qui n'en connaissent pas le mode
d'utilisation.
17. Lorsque vous n'utilisez pas le bloc-piles,
rangez-le à l'écart des objets tels que les
trombones, pièces de monnaie, clés, clous, vis
et autres petits objets métalliques qui risquent
d'établir la connexion entre les bornes. Il y a
risque d'étincelles, de brûlures et d'incendie si les
bornes de la batterie sont court-circuitées.
18. Prenez soin de bien entretenir les outils. Les
outils de coupe doivent être toujours bien
affûtés et propres. Des outils bien entretenus,
dont les arêtes sont bien tranchantes, sont moins
susceptibles de coincer et plus faciles à diriger.
19. Assurez-vous que les pièces mobiles ne sont
pas désalignées ou coincées, qu'aucune pièce
n'est cassée et que l'outil n'a subi aucun
dommage affectant son bon fonctionnement.
Le cas échéant, faites réparer l'outil avant de
l'utiliser. De nombreux accidents sont causés par
des outils mal entretenus.
20. Utilisez uniquement les accessoires
recommandés par le fabricant pour le modèle
utilisé. Des accessoires qui conviennent à un
outil donné peuvent comporter un risque de
blessure lorsque utilisés sur un autre outil.
SERVICE
21. La réparation des outils électriques doit être
confiée à un réparateur qualifié. La réparation
ou l'entretien effectué par du personnel non
qualifié risque d'entraîner des blessures.
22. Seules des pièces de rechange identiques aux
pièces originales doivent être utilisées lors de
la réparation d'un outil. Suivez les instructions
de la section Entretien du présent manuel.
L'utilisation de pièces non spécifiées ou
l'ignorance des instructions d'entretien comporte
un risque de choc électrique ou de blessure.
USB074-2
RÈGLES DE SÉCURITÉ
PARTICULIÈRES
NE vous laissez PAS tromper (au fil d'une utilisation
répétée) par un sentiment d'aisance et de familiarité
avec le produit, en négligeant le respect rigoureux
des règles de sécurité qui accompagnent l'agrafeuse
sans fil. L'utilisation non sécuritaire ou incorrecte de
cet outil comporte un risque de blessure grave.
1. Tenez l'outil électrique par ses surfaces de
prise isolées pendant toute opération où l'outil
de coupe pourrait venir en contact avec un
câblage dissimulé ou avec son propre cordon.
En cas de contact avec un conducteur sous
tension, les pièces métalliques à découvert de
l'outil transmettraient un choc électrique à
l'utilisateur.
2. Portez toujours des lunettes à coques ou des
lunettes de sécurité avec une visière, ainsi
qu'un écran facial lorsque nécessaire.
3. Ne pointez jamais le port d’éjection sur une
personne à proximité (plus particulièrement
vers le visage). Gardez les mains et les pieds
hors de portée de la zone du port d'éjection.
4. Avant de charger des agrafes, de procéder à
un réglage, de faire une inspection, d’effectuer
un entretien ou lorsque l’utilisation est
terminée, retirez toujours la batterie.
5. Assurez-vous que personne ne se trouve à
proximité avant de l’utiliser. Ne tentez jamais
de fixer des agrafes de l’intérieur et de
l’extérieur d’un mur simultanément. Les
agrafes pourraient passer à travers et/ou voler
au hasard, ce qui pourrait représenter un
danger grave.
16
Page 17

6. Regardez où vous mettez les pieds et
assurez-vous d'une prise équilibrée sur l'outil.
Assurez-vous qu'il n'y a personne en bas
lorsque vous travaillez dans des endroits
élevés.
7. Vérifiez soigneusement les murs, plafonds,
planchers, toits et surfaces similaires pour
éviter les risques de choc électrique, de fuite
de gaz, d'explosion, etc., causés par le
clouage sur des fils exposés, des conduits ou
des tuyaux de gaz.
8. Utilisez uniquement les agrafes spécifiées
dans ce manuel. L'utilisation de toute autre
type d'agrafes peut causer le
dysfonctionnement de l'outil.
9. Ne modifiez pas l’outil et ne tentez pas de
l’utiliser pour autre chose que fixer des
agrafes.
10. N’utilisez pas l’outil sans agrafe. Cela réduit la
durée de vie de l’outil.
11. Cessez immédiatement le clouage si vous
notez une anomalie ou un fonctionnement
inhabituel de l'outil.
12. N’agrafez jamais un matériau qui permettrait à
l’agrafe de traverser et de s’envoler comme un
projectile.
13. N’actionnez jamais le déclencheur et le levier
de sécurité simultanément si vous n’êtes pas
prêt à agrafer. Laissez la pièce faire en sorte
que le levier de sécurité s’abaisse. N’évitez
jamais son fonctionnement en remettant le
levier de sécurité ou en l’abaissant
manuellement.
14. Ne modifiez jamais le levier de sécurité.
Vérifiez régulièrement le bon fonctionnement
du levier de sécurité.
CONSERVEZ CE MODE
D'EMPLOI.
AVERTISSEMENT:
Une MAUVAISE UTILISATION de l'outil ou
l'ignorance des consignes de sécurité du présent
manuel d'instructions peuvent entraîner une grave
blessure.
USD501-3
Símbolos
A continuación se muestran los símbolos utilizados para
la herramienta.
・ Lea y entienda el manual y las
etiquetas de la herramienta.
・ Los operarios y demás personas que
se encuentran en el área de trabajo
deben usar gafas de seguridad con
protección lateral.
・ Mantenga los dedos alejados del gatillo
cuando no esté clavando las grapas a
fin de evitar un disparo accidental.
・ volts o voltios
・ corriente directa
ENC007-2
INSTRUCCIONES IMPORTANTES
DE SEGURIDAD
PARA CARTUCHO DE BATERÍA
1. Antes de utilizar el cartucho de batería, lea
todas las instrucciones e indicaciones de
precaución sobre (1) el cargador de baterías,
(2) la batería, y (3) el producto con el que se
utiliza la batería.
2. No desarme el cartucho de batería.
3. Si el tiempo de operación se ha acortado en
exceso, deje de operar de inmediato. Podría
correrse el riesgo de sobrecalentamiento,
posibles quemaduras e incluso explosión.
4. En caso de que ingresen electrolitos en sus
ojos, enjuáguelos bien con agua limpia y
consulte de inmediato a un médico. Podría
perder la visión.
5. No cortocircuite el cartucho de batería:
(1) No toque las terminales con ningún
material conductor.
(2) Evite guardar el cartucho de batería en un
cajón junto con otros objetos metálicos,
tales como clavos, monedas, etc.
(3) No exponga la batería al agua o a la lluvia.
Si la batería entra en cortocircuito, puede
causar sobrecalentamiento, un flujo de
corriente mayor, quemaduras posibles e
6. No guarde la herramienta ni el cartucho de
7. Nunca incinere el cartucho de batería incluso
8. Tenga cuidado de no dejar caer ni golpear el
incluso una falla.
batería en lugares donde la temperatura pueda
alcanzar o exceder los 50 ゚ C (122 ゚ F).
en el caso de que esté dañado seriamente o ya
no sirva en absoluto. El cartucho de batería
puede explotar si se tira al fuego.
cartucho de batería.
17
Page 18

GUARDE ESTAS
INSTRUCCIONES.
Consejos para alargar al máximo la vida útil
de la batería
1. Cargue el cartucho de batería antes de que se
descargue completamente.
Pare siempre la operación y cargue el
cartucho de batería cuando note menos
potencia en la herramienta.
2. No cargue nunca un cartucho de batería que
esté completamente cargado.
La sobrecarga acortará la vida de servicio de
la batería.
3. Cargue el cartucho de batería a temperatura
ambiente de 10 ゚ C - 40 ゚ C (50 ゚ F - 104 ゚ F). Si
un cartucho de batería está caliente, déjelo
enfriar antes de cargarlo.
DESCRIPCIÓN DEL
FUNCIONAMIENTO
PRECAUCIÓN:
• Asegúrese siempre de que la herramienta esté
apagada y el cartucho de batería extraído antes de
realizar cualquier ajuste o comprobación en la
herramienta.
Instalación o desmontaje del cartucho de
batería
1
2
009148
• Apague siempre la herramienta antes de insertar o
desmontar el cartucho de bateria.
• Para extraer la batería, retírela de la herramienta
deslizando el botón que se encuentra en el frente
de la batería.
• Para colocar la batería, alinee la lengüeta de la
batería con la canaleta de la carcasa y colóquela
en su lugar. Asegúrese siempre de que está
insertando la batería hasta el final, en donde hace
tope y emite un pequeño chasquido. Si todavía
puede ver la parte roja en la parte de arriba del
botón, significa que no está completamente
trabada. Empújela suavemente hacia adentro
1. Parte roja
2. Boton
3. Cartucho de
batería
3
hasta que no pueda ver la parte roja. Si esto no
sucede, puede que accidentalmente se caiga de la
herramienta ocasionando daños personales a
usted o a terceros.
• No emplee fuerza cuando inserte el cartucho de
batería. Si el cartucho no se desliza al interior
fácilmente, será porque no se está insertando
correctamente.
Sistema de seguridad
1
2
009151
Asegúrese que los sistemas de seguridad estén
funcionando antes de la operación. La herramienta no
debe accionarse si sólo se jala el gatillo o si sólo la
palanca de seguridad se oprime contra la madera. Sólo
debe activarse cuando ambas acciones sean
ejecutadas. Realice pruebas para detectar posibles
fallas con la herramienta descargada y asegúrese de
que esté apuntada alejada de usted o alguna otra
persona.
NOTA:
• Existe la posibilidad de que la herramienta se
accione por un instante sólo cuando se jale el
gatillo. Esto no indica que haya un problema. Si
esto ocurre, asegúrese de que la herramienta esté
apuntada alejada de usted o de alguna otra
persona. Suelte y jale el gatillo de nuevo para
asegurarse que los mecanismos de seguridad
están funcionando correctamente.
1. Gatillo
2. Palanca de
seguridad
ENSAMBLE
PRECAUCIÓN:
• Siempre asegúrese de que sus dedos no estén
colocados sobre el gatillo y que el cartucho de la
batería no esté puesto antes de realizar cualquier
servicio para la engrapadora.
Grapas
• Tenga un cuidadoso manejo de las grapas y de la
caja en donde están contenidas. Si se tiene un
manejo descuidado de las grapas, puede que
éstas se hayan deformado, ocasionando una
operación deficiente en la alimentación de grapas
y atascamiento.
18
Page 19

• Evite almacenar las grapas en un lugar muy
húmedo o caliente, así como dejarlas expuestas a
la luz directa del sol.
PRECAUCIÓN:
• No use otras grapas que no sean las indicadas en
este manual, ni grapas que luzcan dañadas,
dobladas, oxidadas o carcomidas.
• No inserte grapas de distintos tamaños a la vez
dentro del cartucho, lo cual causaría una
alimentación deficiente de grapas o atascamiento.
Resuministro de grapas
Retire el cartucho de la batería.
Presione la palanca de bloqueo sobre la sección trasera
del cartucho secundario y deslícelo hacia atrás.
1. Cartucho
1
secundario
2. Palanca de
bloqueo
2
009152
Resuministre las grapas en el cartucho principal con las
patas de las grapas hacia arriba. Deslice el cartucho
secundario hacia adelante.
1
2
009153
1. Grapas
2. Cartucho
principal
Para fijar el cartucho secundario en su lugar, enganche
la palanca de bloqueo sobre la sección trasera del
cartucho secundario.
PRECAUCIÓN:
• Con el cartucho resuministrado, si la herramienta
se sujeta en dirección hacia abajo y el cartucho
secundario se abre, las grapas podrán salirse y
presentar un peligro para cualquier persona que se
encuentre por debajo. Tenga esto en cuenta
especialmente al estar trabajando en lugares
elevados.
Extracción de grapas
PRECAUCIÓN:
• Al retirar las grapas, asegúrese de que sus dedos
no estén colocados sobre el gatillo ni la palanca, y
que el cartucho de la batería se haya quitado de la
herramienta. Puede que le disparado accidental
ocasione lesiones personales y daños materiales.
Retire el cartucho de la batería.
Presione la palanca de bloqueo y deslice el cartucho
hacia atrás.
1. Cartucho
1
secundario
2. Palanca de
bloqueo
2
009152
Quite las grapas de la apertura del cartucho.
1
1. Cartucho
secundario
2. Palanca de
bloqueo
2
009162
Gancho
PRECAUCIÓN:
• Siempre asegúrese de que sus dedos no estén
colocados sobre el gatillo ni la palanca, y que el
cartucho de la batería no esté puesto antes de
usar el gancho.
1
1. Ranura
2. Gancho
3. Tornillo
2
009156
3
PRECAUCIÓN:
• No cuelgue el gancho del cinturón. Dejar caer la
engrapadora debido a que el gancho se soltó
accidentalmente, puede causar el disparado
accidental y ocasionar lesiones personales.
19
Page 20

El gancho resulta útil para colgar temporalmente la
herramienta. Se puede instalar en cualquiera de los
lados de la herramienta.
Para instalar el gancho, insértelo en una ranura del
alojamiento de la herramienta de cualquiera de los lados
y después sujételo con un tornillo. Para quitarlo, afloje
el tornillo y después sáquelo.
Coloque la apertura de la herramienta de forma plana
para que los grapas se disparen sobre el material a ser
fijado y sostenga la herramienta con firmeza contra el
material. Después jale la palanca y luego el gatillo por
completo para insertar las grapas. La empuñadura está
de tal forma que la cabeza de la herramienta pueda
sostenerse firmemente hacia abajo con el dedo índice y
el pulgar. Tras la inserción de las grapas, asegúrese de
soltar el gatillo por completo.
Cuando la cabeza de una grapa insertada queda por
encima de la superficie del material a ser fijado, inserte
la grapa mientras sujeta la cabeza de la engrapadora
con firmeza.
009154
OPERACIÓN
Ajuste de la profundidad
1
009163
Si las grapas están siendo insertadas muy profunda o
superficialmente, ajuste la profundidad de inserción al
girar la tuerca sobre la parte inferior de la herramienta.
Para una inserción más profunda, gire en dirección de
las agujas del reloj. Para una inserción más superficial,
gire en dirección contraria a las agujas del reloj. Tenga
en cuenta que la tuerca debe girarse en incrementos de
90° (1/4 de giro) para que la ranura en la tuerca quede
paralela con el cartucho.
Inserción de grapas
1
009158
2
1. Tuerca
1. Sección
delantera
2. Pieza de trabajo
3. Sección trasera
3
009160
NOTA:
• Usar la grapadora con la cabeza disparadora de
grapas continuamente permaneciendo por encima
de la superficie a ser fijada puede causar daños a
la herramienta, así como atascamiento de las
grapas, etc.
Comprobación de las grapas restantes
1. Ventana visual
1
009161
PRECAUCIÓN:
• No opere la herramienta sin grapas. Esto acorta el
tiempo de vida útil de la herramienta.
La herramienta cuenta con una ventana de visión sobre
su costado derecho (en relación al estarla viendo de
frente). Use esta ventana de visión para ver si quedan
grapas en el cartucho. Cuando no se divisen grapas por
la ventana, resuministre grapas al cartucho.
20
Page 21

Extracción de grapas atascadas
ADVERTENCIA:
• Siempre asegúrese de que el gatillo se haya
soltado y que el cartucho de la batería se haya
retirado antes de quitar los grapas atascadas.
Retire el cartucho de la batería de la grapadora.
1
1. Cartucho
secundario
2. Palanca de
bloqueo
2
009162
Presione la palanca de bloqueo sobre la sección trasera
del cartucho secundario y deslícelo hacia atrás.
Retire las grapas atascadas que quedaron por dentro de
la apertura cuando fueron disparadas según se
detecten.
MANTENIMIENTO
PRECAUCIÓN:
• Asegúrese siempre de que la herramienta esté
apagada y el cartucho de batería extraído antes de
intentar realizar una inspección o mantenimiento.
Para mantener la SEGURIDAD y FIABILIDAD del
producto, las reparaciones, y cualquier otra tarea de
mantenimiento o ajuste deberán ser realizadas en
Centros de Servicio Autorizados por Makita, empleando
siempre repuestos Makita.
ACCESORIOS
PRECAUCIÓN:
• Estos accesorios o aditamentos están
recomendados para utilizar con su herramienta
Makita especificada en este manual. El empleo de
cualesquiera otros accesorios o acoplamientos
conllevará un riesgo de sufrir heridas personales.
Utilice los accesorios o acoplamientos solamente
para su fin establecido.
Si necesita cualquier ayuda para más detalles en
relación con estos accesorios, pregunte a su centro de
servicio Makita local.
• Grapas
• Diferentes tipos de baterías y cargadores genuinos
de Makita
• Gafas de seguridad
GARANTÍA LIMITADA MAKITA DE UN AÑO
Ésta Garantía no aplica para México
Política de garantía
Cada herramienta Makita es inspeccionada y probada
exhaustivamente antes de salir de fábrica. Se
garantiza que va a estar libre de defectos de mano de
obra y materiales por el periodo de UN AÑO a partir de
la fecha de adquisición original. Si durante este
periodo de un año se desarrollase algún problema,
retorne la herramienta COMPLETA, porte pagado con
antelación, a una de las fábricas o centros de servicio
autorizados Makita. Si la inspección muestra que el
problema ha sido causado por mano de obra o
material defectuoso, Makita la reparará (o a nuestra
opción, reemplazará) sin cobrar.
Esta garantía no será aplicable cuando:
se hayan hecho o intentado hacer reparaciones
por otros:
se requieran reparaciones debido al desgaste
normal:
la herramienta haya sido abusada, mal usada o
mantenido indebidamente:
se hayan hecho alteraciones a la herramienta.
EN NINGÚN CASO MAKITA SE HARÁ
RESPONSABLE DE NINGÚN DAÑO INDIRECTO,
FORTUITO O CONSECUENCIAL DERIVADO DE LA
VENTA O USO DEL PRODUCTO.
ESTA RENUNCIA SERÁ APLICABLE TANTO
DURANTE COMO DESPUÉS DEL TÉRMINO DE
ESTA GARANTÍA.
MAKITA RENUNCIA LA RESPONSABILIDAD POR
CUALQUIER GARANTÍA IMPLÍCITA, INCLUYENDO
GARANTÍAS IMPLÍCITAS DE “COMERCIALIDAD” E
“IDONEIDAD PARA UN FIN ESPECÍFICO”, DESPUÉS
DEL TÉRMINO DE UN AÑO DE ESTA GARANTÍA.
Esta garantía le concede a usted derechos legales
específicos, y usted podrá tener también otros
derechos que varían de un estado a otro. Algunos
estados no permiten la exclusión o limitación de daños
fortuitos o consecuenciales, por lo que es posible que
la antedicha limitación o exclusión no le sea de
aplicación a usted. Algunos estados no permiten
limitación sobre la duración de una garantía implícita,
por lo que es posible que la antedicha limitación no le
sea de aplicación a usted.
EN0006-1
21
Page 22

22 23 24
Page 23

Page 24

< USA only >
WARNING
Some dust created by power sanding, sawing, grinding, drilling, and other
construction activities contains chemicals known to the State of California
to cause cancer, birth defects or other reproductive harm. Some examples
of these chemicals are:
• lead from lead-based paints,
• crystalline silica from bricks and cement and other masonry products, and
• arsenic and chromium from chemically-treated lumber.
Your risk from these exposures varies, depending on how often you do this
type of work. To reduce your exposure to these chemicals: work in a well
ventilated area, and work with approved safety equipment, such as those
dust masks that are specially designed to filter out microscopic particles.
< USA solamente >
ADVERTENCIA
Algunos tipos de polvo creados por el lijado, serrado, amolado, taladrado, y
otras actividades de la construccion contienen sustancias quimicas
reconocidas por el Estado de California como causantes de cancer, defectos
de nacimiento y otros peligros de reproduccion. Algunos ejemplos de estos
productos quimicos son:
• plomo de pinturas a base de plomo,
• silice cristalino de ladrillos y cemento y otros productos de albanileria, y
• arsenico y cromo de maderas tratadas quimicamente.
El riesgo al que se expone variara, dependiendo de la frecuencia con la que
realice este tipo de trabajo. Para reducir la exposicion a estos productos
quimicos: trabaje en un area bien ventilada, y pongase el equipo de seguridad
indicado, tal como esas mascaras contra el polvo que estan especialmente
disenadas para filtrar particulas microscopicas.
Makita Corporation
3-11-8, Sumiyoshi-cho,
Anjo, Aichi 446-8502 Japan
884841C947 BST221-1
 Loading...