

Page 1

GB Cordless Stapler Instruction manual
F Agrafeuse sans fil Manuel d’instructions
D Akku-Tacker Betriebsanleitung
I Graffettatrice Istruzioni per l’uso
NL Accunietpistool Gebruiksaanwijzing
E Grapadora sin cable Manual de instrucciones
P Agrafador sem fios Manual de instruções
DK Kabelfri hæftepistol Brugsanvisning
GR Συρραπτικό μπαταρίας Οδηγίες χρήσης
BST220
BST221
Page 2
12
1
2
3
4
5
6
7
8
9
6
7
6
7
10
11
12
34
56
78
2
Page 3

910
13
14
15
16
17
6
7
11 12
13
3
Page 4

ENGLISH
Explanation of general view
1. Red part
2. Button
3. Battery cartridge
4. Trigger
5. Safety lever
6. Sub magazine
7. Locking lever
8. Staples
9. Main magazine
10. Groove
11. H ook
12. Screw
13. Nut
14. Front
15. Workpiece
16. Rear
17. Sight window
SPECIFICATIONS
Model BST220 BST221
Staple width 10 mm 10 mm
Applicable staples length 10 mm - 22 mm 10 mm - 22 mm
Staple magazine capacity 84 pcs 84 pcs
Overall length 247 mm 251 mm
Net weight 2.3 kg 2.4 kg
Rated voltage D.C. 14.4 V D.C. 18 V
• Due to our continuing program of research and development, the specifications herein are subject to change without
notice.
• Specifications may differ from country to country.
• Weight, with battery cartridge, according to EPTA-Procedure 01/2003
Intended use
The tool is intended for pressing staples into construction
materials such as timbers.
ENE054-1
ADDITIONAL SAFETY RULES
FOR TOOL ENB069-1
1. Always wear safety goggles or safety glasses with
side shield, and a full face shield when needed.
2. Do not point the ejection port at anyone in the
vicinity (especially his face). Keep hands and feet
away from the ejection port area.
3. Always remove the battery cartridge before
loading the staples, adjustment, inspection,
maintenance or after operation is over.
4. Make sure no one is nearby before operation.
Never attempt to drive staples from both the inside
and outside of wall at the same time. Staples may
rip through and/or fly off, presenting a grave
danger.
5. Watch your footing and maintain your balance
with the tool. Make sure there is no one below
when working in high locations.
6. Check walls, ceilings, floors, roofing and the like
carefully to avoid possible electrical shock, gas
leakage, explosions, etc. caused by stapling into
live wires, conduits or gas pipes.
7. Use only staples specified in this manual. The use
of any other staples may cause malfunction of the
tool.
8. Do not tamper with the tool or attempt to use it for
other than driving staples.
9. Do not operate the tool without staples. It shortens
the service life of the tool.
10. Stop driving operations immediately if you notice
something wrong or out of the ordinary with the
tool.
11. Never staple into any materials which may allow
the staple to puncture and fly through as a
projectile.
12. Never actuate the switch trigger and safety lever
at the same time until you are prepared to staple
workpieces. Allow the workpiece to depress the
safety lever. Never defeat its purpose by securing
the safety lever back or by depressing it by hand.
13. Never tamper with the safety lever. Check the
safety lever frequently for proper operations.
SAVE THESE INSTRUCTIONS.
IMPORTANT SAFETY
INSTRUCTIONS
ENC007-4
FOR BATTERY CARTRIDGE
1. Before using battery cartridge, read all
instructions and cautionary markings on (1)
battery charger, (2) battery, and (3) product using
battery.
2. Do not disassemble battery cartridge.
3. If operating time has become excessively shorter,
stop operating immediately. It may result in a risk
of overheating, possible burns and even an
explosion.
4. If electrolyte gets into your eyes, rinse them out
with clear water and seek medical attention right
away. It may result in loss of your eyesight.
5. Do not short the battery cartridge:
4
Page 5

(1) Do not touch the terminals with any
conductive material.
(2) Avoid storing battery cartridge in a container
with other metal objects such as nails, coins,
etc.
(3) Do not expose battery cartridge to water or
rain. A battery short can cause a large current
flow, overheating, possible burns and even a
breakdown.
6. Do not store the tool and battery cartridge in
locations where the temperature may reach or
exceed 50°C (122°F).
7. Do not incinerate the battery cartridge even if it is
severely damaged or is completely worn out. The
battery cartridge can explode in a fire.
8. Be careful not to drop or strike battery.
9. Do not use dropped or struck battery.
SAVE THESE INSTRUCTIONS.
Tips for maintaining maximum battery life
1. Charge the battery cartridge before completely
discharged. Always stop tool operation and
charge the battery cartridge when you notice less
tool power.
2. Never recharge a fully charged battery cartridge.
Overcharging shortens the battery service life.
3. Charge the battery cartridge with room
temperature at 10°C - 40°C (50°F - 104°F). Let a hot
battery cartridge cool down before charging it.
FUNCTIONAL DESCRIPTION
CAUTION:
• Always be sure that the tool is switched off and the
battery cartridge is removed before adjusting or
checking function on the tool.
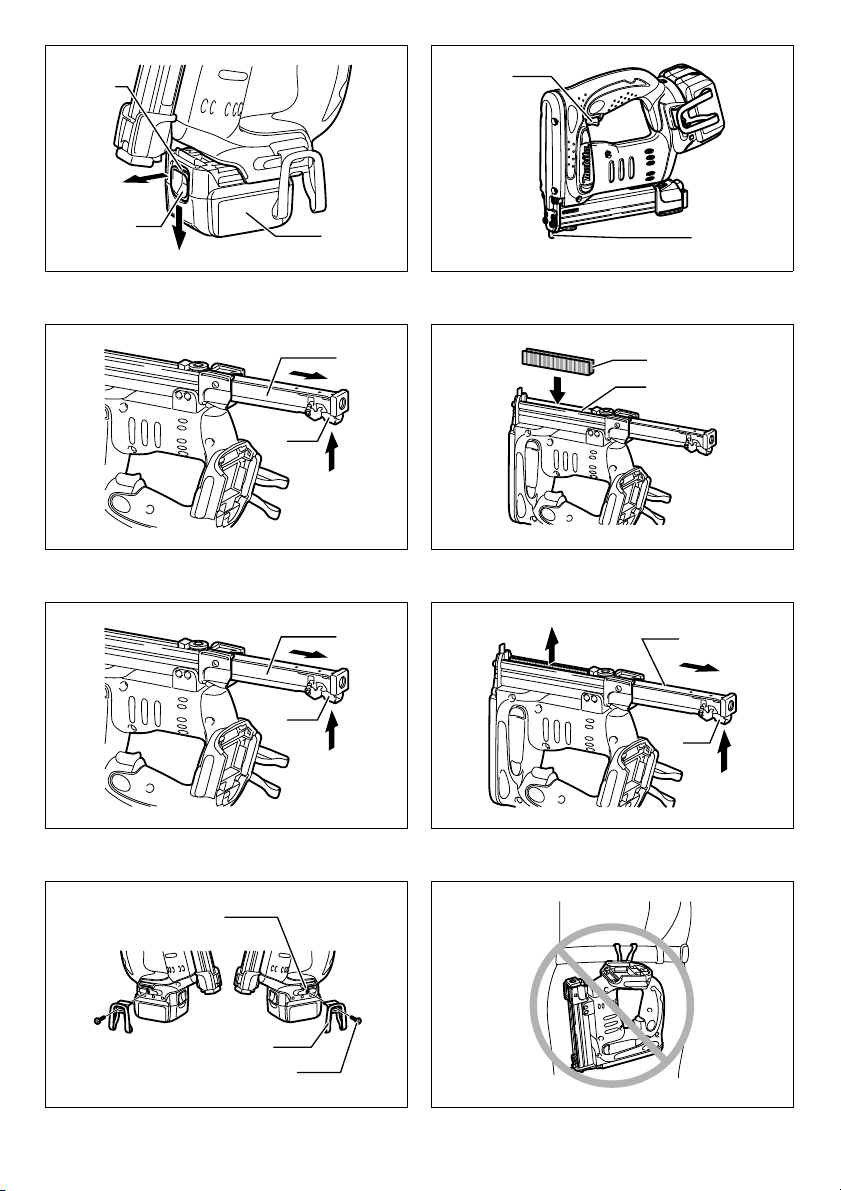
Installing or removing battery cartridge
(Fig. 1)
• Always switch off the tool before insertion or removal of
the battery cartridge.
• To remove the battery cartridge, withdraw it from the
tool while sliding the button on the front of the cartridge.
• To insert the battery cartridge, align the tongue on the
battery cartridge with the groove in the housing and slip
it into place. Always insert it all the way until it locks in
place with a little click. If you can see the red part on
the upper side of the button, it is not locked completely.
Insert it fully until the red part cannot be seen. If not, it
may accidentally fall out of the tool, causing injury to
you or someone around you.
• Do not use force when inserting the battery cartridge. If
the cartridge does not slide in easily, it is not being
inserted correctly.
Safety system (Fig. 2)
Make sure all safety systems are in working order before
operation. The tool must not operate if only the switch
trigger is pulled or if only the safety lever is pressed
against the wood. It must work only when both actions are
performed. Test for possible faulty operation with a tool
unloaded and pointed well away from yourself or any
bystanders.
NOTE:
• There is a possibility that the tool may operate for an
instant when only the trigger is pulled. This does not
indicate a problem. If this occurs, point the tool well
away from yourself or any bystanders.
Release and pull the trigger again to make sure the
safety systems are in working order.
ASSEMBLY
CAUTION:
• Always make sure that your fingers are not placed on
the trigger and the battery cartridge is removed before
carrying out any work on the stapler.
Staples
• Handle the staples and their box carefully. If the staples
have been handled roughly, they may be bent out of
shape, causing poor staple feed or jamming.
• Avoid storing the staples in a very humid or hot place or
place exposed to direct sunlight.
CAUTION:
• Do not use staples other than designated in this
manual or staples that appear to be damaged, bent,
rusty or corroded.
• Do not insert staples of which size is different each
other at the same time inside the magazine , causing
poor staple feed or jamming.
Loading staples
Remove the battery cartridge.
Press the locking lever on the rear of the sub magazine
and slide the sub magazine backward. (Fig. 3)
Load staples into the main magazine with their feet facing
up. Slide the sub-magazine forward. (Fig. 4)
To secure the sub magazine in place, hook the locking
lever on the rear of the sub-magazine.
CAUTION:
• With the magazine loaded, if the tool is held downward
and the sub-magazine is opened, the staples can fall
out and present a danger to anyone or anything below.
Keep this in mind especially when working in high
locations.
Unloading staples
CAUTION:
• When removing staples, make sure that your fingers
are not placed on the trigger or the lever and the
battery cartridge is removed from the stapler. Misfiring
may cause personal injuries and property damage.
Remove the battery cartridge.
Press the locking lever and slide the magazine back.
(Fig. 5)
Take out staples from the magazine slit. (Fig. 6)
Hook
CAUTION:
• Always make sure that your fingers are not placed on
the trigger or the lever and the battery cartridge is
removed before using the hook. (Fig. 7)
5
Page 6

CAUTION:
• Do not hang the hook from the waist belt. Dropping the
stapler, which is caused by the hook accidentally
coming out of place, may cause misfiring and personal
injuries.
The hook is convenient for temporarily hanging the tool.
This can be installed on either side of the tool.
To install the hook, insert it into a groove in the tool
housing on either side and then secure it with a screw.
To remove, loosen the screw and then take it out. (Fig. 8)
MAINTENANCE
CAUTION:
• Always be sure that the tool is switched off and the
battery cartridge is removed before attempting to
perform inspection or maintenance.
• To maintain product SAFETY and RELIABILITY,
repairs, any other maintenance or adjustment should
be performed by Makita Authorized Service Centers,
always using Makita replacement parts.
OPERATION
Depth adjustment (Fig. 9)
If the staples are driven too deep or too shallow, adjust the
driving depth by turning the nut on the bottom of the tool.
For deeper driving of staples, turn the nut clockwise. For
shallower driving, turn the nut counterclockwise. Please
note the nut must be turned in increments of 90° (1/4 turn)
so that the groove on the nut runs parallel to the
magazine.
Driving staples (Fig. 10)
Place flat the opening of the tool from which staples are
fired on the material to be fastened and hold the tool firmly
against the material. Then pull the lever and then pull the
trigger fully to drive the staples. The grip is shaped so that
the tool head can be held down securely with index finger
and thumb. After driving a staple, be sure to release the
trigger fully.
When the head of driven staple remains above the
surface of material to be fastened, drive the staple while
holding the stapler head firmly. (Fig. 11)
NOTE:
• Using the stapler continuously with the head of driven
staples remaining above the surface of material to be
fastened may cause damage to the driver of the stapler
and stapler jamming etc.
Checking remaining staples (Fig. 12)
CAUTION:
• Do not operate the tool without staples. It shortens the
service life of the tool.
There is a convenient sight window on the right side of the
tool (when viewing the tool from the front). Use this sight
window to check if there are staples in the magazine.
When staples are not visible through the window, load
staples into the magazine.
Removing jammed staples
WARNING:
• Always make sure that the trigger are released and the
battery cartridge is removed before removing jammed
staples .
Remove the battery cartridge from the stapler. (Fig. 13)
Press the locking lever on the rear of the sub magazine
and slide the sub magazine backward.
Take out stuck staples that remain inside the opening that
staples are fired from as it appears.
ACCESSORIES
CAUTION:
• These accessories or attachments are recommended
for use with your Makita tool specified in this manual.
The use of any other accessories or attachments might
present a risk of injury to persons. Only use accessory
or attachment for its stated purpose.
If you need any assistance for more details regarding
these accessories, ask your local Makita Service Center.
• Staples
• Various type of Makita genuine batteries and chargers
• Safety goggles
For European countries only
Noise
The typical A-weighted noise level determined according
to EN792:
Sound pressure level (L
Uncertainty (K): 3 dB (A)
The noise level under working may exceed 80 dB (A).
Wear ear protection.
Vibration
The vibration emission value determined according to
EN792:
Work mode: stapling wood
Vibration emission (a
Uncertainty (K): 1.5 m/s
EC Declaration of Conformity ENH101-12
We Makita Corporation as the responsible
manufacturer declare that the following Makita
machine(s):
Designation of Machine: Cordless Stapler
Model No./ Type: BST220, BST221
are of series production and
Conforms to the following European Directives:
98/37/EC until 28th December 2009 and then with
2006/42/EC from 29th December 2009
And are manufactured in accordance with the following
standards or standardised documents:
EN60745
): 79 dB (A)
pA
): 4.0 m/s
h
2
2
ENG104-1
ENG233-1
6
Page 7

The technical documentation is kept by our authorised
representative in Europe who is:
Makita International Europe Ltd,
Michigan, Drive, Tongwell,
Milton Keynes, MK15 8JD, England
30th January 2009
Tomoyasu Kato
Director
Makita Corporation
3-11-8, Sumiyoshi-cho,
Anjo, Aichi, JAPAN
7
Page 8

FRANÇAIS
Descriptif
1. Partie rouge
2. Bouton
3. Batterie
4. Gâchette
5. Levier de sécurité
6. Magasin inférieur
7. Levier de verrouillage
8. Agrafes
9. Magasin principal
10. Rainure
11. C roc het
12. Vis
13. Écrou
14. Avant
15. Pièce à travailler
16. Arrière
17. Lunette
SPÉCIFICATIONS
Modèle BST220 BST221
Largeur d'agrafe 10 mm 10 mm
Longueur applicable des agrafes 10 mm à 22 mm 10 mm à 22 mm
Capacité du magasin d'agrafes 84 clous 84 clous
Longueur totale 247 mm 251 mm
Poids net 2,3 kg 2,4 kg
Tension nominale C.C. 14,4 V C.C. 18 V
• Étant donné l’évolution constante de notre programme de recherche et de développement, les spécifications
contenues dans ce manuel sont sujettes à modification sans préavis.
• Les spécifications peuvent varier d’un pays à l’autre.
• Poids, batterie incluse, selon la procédure EPTA 01/2003
Utilisations
L'outil est conçu pour l’insertion d'agrafes dans des
matériaux de construction tels que le bois.
ENE054-1
CONSIGNES DE SÉCURITÉ
ADDITIONNELLES POUR L'OUTIL
ENB069-1
1. Portez toujours un masque de protection ou des
lunettes de sécurité avec des écrans latéraux,
ainsi qu’une visière de protection intégrale si
nécessaire.
2. Ne pointez jamais la sortie d'éjection vers une
personne se trouvant à proximité
(particulièrement vers le visage). Gardez les mains
et les pieds à l'écart de la zone de la sortie
d'éjection.
3. Retirez toujours la cartouche de batterie avant
d’introduire les agrafes, avant toute opération de
réglage, d’inspection, d’entretien ou à la fin de
l’utilisation.
4. Avant d’utiliser l’outil, assurez-vous que personne
ne se trouve à proximité. Ne tentez jamais
d’enfoncer des agrafes en même temps depuis
l’intérieur et l’extérieur d’un mur. Cela est très
dangereux, puisque les agrafes risquent alors de
défoncer la pièce et/ou d'être projetées.
5. Regardez où vous posez les pieds et assurez-vous
d'un bon équilibre pendant l'utilisation de l'outil.
Si vous travaillez en hauteur, assurez-vous que
personne ne se trouve dessous.
6. Pour éviter tout risque de choc électrique, de fuite
de gaz, d'explosion, etc., provoqué par le contact
avec des fils dénudés, des conduites ou des
8
tuyaux de gaz, vérifiez les murs, le plafond, le
plancher, le toit, etc.
7. N’utilisez que les agrafes spécifiées dans ce
manuel. L'outil risque de mal fonctionner si vous
utilisez tout autre type d'agrafe.
8. N'altérez pas l'outil ou ne tentez pas de l'utiliser
pour d'autres applications que l'insertion
d'agrafes.
9. N’utilisez pas l’outil sans y insérer des agrafes.
Vous réduiriez sa durée de service.
10. Cessez immédiatement de vous en servir si vous
notez une anomalie ou un fonctionnement
inhabituel de l'outil.
11. N'agrafez jamais dans des matériaux où les
agrafes risquent de percer et d'être projetées.
12. N’activez jamais la gâchette et le levier de sécurité
en même temps avant d’être prêt à enfoncer les
agrafes sur les pièces à travailler. Laissez la pièce
à travailler relâcher le levier de sécurité. Ne
modifiez jamais son rôle en fixant le levier de
sécurité ou en l’enfonçant avec la main.
13. Ne manipulez jamais le levier de sécurité. Vérifiez
régulièrement son bon fonctionnement.
CONSERVEZ CES
INSTRUCTIONS.
CONSIGNES DE SÉCURITÉ
IMPORTANTES
POUR LA BATTERIE
1. Avant d’utiliser la batterie, veuillez lire toutes les
instructions et tous les avertissements inscrits
ENC007-4
Page 9

sur (1) le chargeur, (2) la batterie et (3) l’appareil
alimenté par la batterie.
2. Ne démontez pas la batterie.
3. Cessez immédiatement l’utilisation si le temps de
fonctionnement devient excessivement court. Il y
a risque de surchauffe et de brûlures, voire
d’explosion.
4. Si l’électrolyte pénètre dans vos yeux, rincez-les à
l’eau claire et consultez immédiatement un
médecin. Il y a risque de perte de la vue.
5. Évitez de court-circuiter la batterie :
(1) Ne touchez les bornes avec aucun matériau
conducteur.
(2) Évitez de ranger la batterie dans un contenant
où se trouvent d'autres objets métalliques tels
que clous, pièces de monnaie, etc.
(3) N’exposez pas la batterie à l’eau ou à la pluie.
Un court-circuit de la batterie risque de
provoquer un fort courant, une surchauffe,
parfois des brûlures et même une panne.
6. Ne rangez pas l’outil et la batterie dans des
endroits où la température risque d’atteindre ou
de dépasser 50°C (122°F).
7. Ne jetez pas la batterie au feu même si elle est
sérieusement endommagée ou complètement
épuisée. La batterie peut exploser au contact du
feu.
8. Prenez garde d’échapper ou de heurter la batterie.
9. N’utilisez pas une batterie tombée ou heurtée.
CONSERVEZ CES
INSTRUCTIONS.
Conseils pour assurer la durée de vie
optimale de la batterie
1. Rechargez la batterie avant qu’elle soit
complètement épuisée. Arrêtez toujours l'outil et
rechargez la batterie quand vous constatez que la
puissance de l'outil diminue.
2. Ne rechargez jamais une batterie complètement
chargée. La surcharge réduit la durée de service
de la batterie.
3. Chargez la batterie alors que la température de la
pièce se trouve entre 10°C et 40°C (50°F et 104°F).
Avant de charger une batterie chaude, laissez-la
refroidir.
DESCRIPTION DU
FONCTIONNEMENT
ATT ENTI ON :
• Veillez toujours à ce que l’appareil soit éteint et la
batterie déposée avant d'effectuer des réglages ou des
contrôles sur le fonctionnement de l'appareil.
Installation et retrait de la batterie (Fig. 1)
• Mettez toujours l’outil hors tension avant d’insérer ou
de retirer la batterie.
• Pour retirer la batterie, sortez-la de l’outil tout en faisant
glisser le bouton à l’avant de la batterie.
• Pour insérer la batterie, alignez sa languette sur la
rainure qui se trouve à l’intérieur du carter, puis glissez
la batterie pour la mettre en place. Insérez-la toujours
bien à fond, jusqu’à ce qu’elle se verrouille en émettant
un léger clic. Si vous pouvez voir la partie rouge sur la
face supérieure du bouton, la batterie n’est pas
parfaitement verrouillée. Insérez-la à fond, jusqu’à ce
que la partie rouge ne soit plus visible. Sinon, la
batterie risque de tomber accidentellement de l’outil, en
vous blessant ou en blessant une personne se trouvant
près de vous.
• N’appliquez pas une force excessive lors de l’insertion
de la batterie. Si la batterie ne glisse pas aisément,
c’est qu’elle n’est pas insérée correctement.
Dispositif de sécurité (Fig. 2)
Assurez-vous que tous les dispositifs de sécurité sont en
état de fonctionner avant d'utiliser l'outil. Il ne faut pas que
l'outil s'active lorsque vous appuyez uniquement sur la
gâchette ou appuyez simplement le levier de sécurité
contre le bois. Il ne doit s'activer que lorsque ces deux
actions sont exécutées. Recherchez un éventuel
dysfonctionnement à l'aide d'un outil déchargé que vous
tenez éloigné de vous et des autres personnes à
proximité.
REMARQUE :
• Il est possible que l'outil fonctionne un court instant
lorsque vous appuyez uniquement sur la gâchette.
Cela est normal. Dans ce cas, éloignez l'outil de vous
et des autres personnes à proximité.
Relâchez puis appuyez à nouveau sur la gâchette pour
vous assurer que les dispositifs de sécurité
fonctionnent correctement.
ASSEMBLAGE
ATT ENTI ON :
• Assurez-vous toujours que vos doigts ne sont pas
posés sur la gâchette et que la batterie est retirée
avant d’effectuer toute intervention sur l'agrafeuse.
Agrafes
• Manipulez les agrafes et leur boîte avec soin. Si les
agrafes ont été manipulées sans précaution, elles
risquent de se tordre, entraînant une mauvaise
alimentation en agrafes, voire un blocage.
• Évitez de ranger les agrafes dans un endroit très
humide, très chaud ou exposé directement aux rayons
du soleil.
ATT ENTI ON :
• N'utilisez pas d'autres agrafes que celles qui sont
indiquées dans ce manuel, ni des agrafes qui
apparaissent endommagées, tordues, rouillées ou
corrodées.
• N'insérez pas des agrafes de tailles différentes en
même temps dans le magasin, cela entraînerait une
mauvaise alimentation en agrafes, voire un blocage.
Chargement des agrafes
Retrait de la batterie.
Enfoncez le levier de sécurité à l'arrière du magasin
inférieur et faites-le coulisser vers l'arrière. (Fig. 3)
9
Page 10

Chargez les agrafes dans le magasin principal, leur base
tournée vers le haut. Faites glisser le magasin inférieur
vers l'avant. (Fig. 4)
Pour sécuriser le magasin inférieur en place, accrochez le
levier de sécurité à l'arrière du magasin inférieur.
ATT ENTI ON :
• Avec le magasin chargé, si l'outil est tenu tourné vers
le bas et si le magasin inférieur est ouvert, les agrafes
risquent de tomber et de représenter un danger pour
quiconque ou tout ce qui peut se trouver en dessous.
Ne perdez pas ceci de vue, particulièrement quand
vous travaillez dans des lieux élevés.
Déchargement des agrafes
ATT ENTI ON :
• Lors du retrait des agrafes, assurez-vous que vos
doigts ne sont pas posés sur la gâchette ou le levier et
que la cartouche de batterie est retirée de l'agrafeuse.
Une maladresse peut causer des blessures graves et
des dommages matériels.
Retirez la batterie.
Enfoncez le levier de sécurité et faites coulisser le
magasin en place. (Fig. 5)
Enlevez les agrafes de la partie saillante du magasin.
(Fig. 6)
Crochet
ATT ENTI ON :
• Assurez-vous toujours que vos doigts ne sont pas
posés sur la gâchette ou le levier et que la batterie est
retirée avant d’utiliser le crochet. (Fig. 7)
ATT ENTI ON :
• Ne suspendez pas le crochet au ceinturon. La chute de
l'agrafeuse, due au déplacement accidentel du crochet,
peut engendrer un mauvais démarrage et causer des
blessures.
L’outil est équipé d’un crochet pratique qui permet de le
suspendre temporairement.
Il s’installe d’un côté comme de l’autre de l’outil.
Pour installer le crochet, insérez-le dans une rainure du
carter de l’outil d’un côté ou de l’autre puis serrez-le avec
une vis.
Pour le retirer, desserrez la vis et enlevez-le. (Fig. 8)
UTILISATION
Réglage de la profondeur (Fig. 9)
Si les agrafes sont enfoncées trop profondément ou pas
suffisamment, réglez la profondeur d'insertion en tournant
l'écrou sur la partie inférieure de l'outil. Pour enfoncer
davantage les agrafes, tournez l'écrou dans le sens
horaire. Pour que les agrafes restent davantage en
surface, tournez l'écrou dans le sens anti-horaire. Notez
que vous devez tourner l'écrou selon des incréments de
90° (1/4 de tour) de sorte que la rainure de l'écrou soit
parallèle au magasin.
Insertion des agrafes (Fig. 10)
Placez l’orifice d’éjection des agrafes bien à plat sur le
matériau à fixer et maintenez fermement l’outil sur le
matériau. Puis tirez le levier et appuyez sur la gâchette
pour enfoncer les agrafes. La poignée est conçue pour
10
que la tête de l’outil soit maintenue en place en toute
sécurité avec l’index et le pouce. Après avoir enfoncé une
agrafe, assurez-vous de relâcher complètement la
gâchette.
Lorsque la tête de l'agrafe enfoncée reste au-dessus de la
surface du matériau à fixer, enfoncez l'agrafe tout en
maintenant fermement la tête de l'agrafeuse. (Fig. 11)
REMARQUE :
• Une utilisation prolongée de l'agrafeuse sur la tête des
agrafes restant au-dessus de la surface du matériau à
fixer risque d’endommager l’embout de l'agrafeuse et
d’engendrer un blocage, etc.
Vérification des agrafes restantes
(Fig. 12)
ATT ENTI ON :
• N’utilisez pas l’outil sans y insérer des agrafes. Vous
réduiriez sa durée de service.
Une lunette pratique se trouve sur le côté droit de l'outil
(vue de face). Utilisez cette lunette pour vérifier la
présence ou l'absence d'agrafes dans le magasin. Si
aucune agrafe n'est visible à travers la fenêtre, chargezen dans le magasin.
Retrait des agrafes coincées
AVERTISSEMENT :
• Avant de retirer les agrafes coincées, assurez-vous
toujours que la gâchette est relâchée et que la
cartouche de batterie est retirée.
Retirez la cartouche de batterie de l'agrafeuse. (Fig. 13)
Enfoncez le levier de sécurité à l'arrière du magasin
inférieur et faites-le coulisser vers l'arrière.
Sortez les agrafes bloquées qui restent à l'intérieur de
l'ouverture qui éjecte les agrafes dès l'apparition du
problème.
MAINTENANCE
ATT ENTI ON :
• Assurez-vous toujours que l’outil est hors tension et
que la batterie est retirée avant d’y effectuer tout travail
d’inspection ou d’entretien.
• Pour assurer la SÉCURITÉ et la FIABILITÉ du produit,
toute réparation et tout travail d’entretien ou de réglage
doivent être effectués par un Centre de service aprèsvente agréé Makita, avec des pièces de rechange
Makita.
ACCESSOIRES
ATT ENTI ON :
• Ces accessoires ou pièces complémentaires sont
recommandés pour l’utilisation avec l’outil Makita
spécifié dans ce manuel. L’utilisation de tout autre
accessoire ou pièce complémentaire comporte un
risque de blessures. Utilisez uniquement l’accessoire
ou la pièce complémentaire dans le but spécifié.
Pour obtenir plus de détails sur ces accessoires,
contactez un Centre de service après-vente local Makita.
• Agrafes
• Divers types de batteries et chargeurs de marque
Makita.
• Lunettes de sécurité
Page 11

Pour l’Europe uniquement
Bruit
ENG104-1
Les niveaux de bruit pondéré A typiques ont été mesurés
selon la norme EN792 :
Niveau de pression sonore (L
Incertitude (K) : 3 dB (A)
) : 79 dB (A)
pA
Le niveau de bruit peut dépasser 80 dB (A) lors de
l’utilisation.
Portez des protections auditives.
Vibration
ENG233-1
Valeur d’émission vibratoire déterminée selon la norme
EN792 :
Application : agrafage de bois
Émission de vibrations (a
Incertitude (K) : 1,5 m/s
) : 4,0 m/s
h
2
2
Déclaration de conformité CE ENH101-12
Nous, Makita Corporation, en tant que fabricant
responsable, déclarons que les machines Makita
suivantes :
Désignation de l’appareil : Agrafeuse sans fil
N° de modèle/ Type : BST220, BST221
sont fabriquées en série et
sont conformes aux directives européennes
suivantes :
98/37/CE jusqu’au 28 décembre 2009 puis 2006/42/
CE à partir du 29 décembre 2009
et sont produites conformément aux normes ou
documents de normalisation suivants :
EN60745
La documentation technique est disponible auprès de
notre représentant en Europe qui est :
Makita International Europe Ltd,
Michigan, Drive, Tongwell,
Milton Keynes, MK15 8JD, Angleterre
Le 30 janvier 2009
Tomoyasu Kato
Directeur
Makita Corporation
3-11-8, Sumiyoshi-cho,
Anjo, Aichi, JAPAN
11
Page 12

DEUTSCH
Erklärung der Gesamtdarstellung
1. Roter Bereich
2. Taste
3. Akkublock
4. Schalter
5. Sicherheitshebel
6. Submagazin
7. Verriegelungshebel
8. Klammern
9. Hauptmagazin
10. Rille
11. Einhängeclip
12. Schraube
13. Mutter
14. Vorderseite
15. Werkstück
16. Rückseite
17. Sichtfenster
TECHNISCHE DATEN
Modell BST220 BST221
Klammerbreite 10 mm 10 mm
Anwendbare Klammerlänge 10 mm bis 22 mm 10 mm bis 22 mm
Klammer-Magazinkapazität 84 St. 84 St.
Gesamtlänge 247 mm 251 mm
Nettogewicht 2,3 kg 2,4 kg
Nennspannung 14,4 V Gleichspannung 18 V Gleichspannung
• Aufgrund unserer weiterführenden Forschungen und Entwicklungen sind Änderungen an den hier angegebenen
Technischen Daten ohne Vorankündigung vorbehalten.
• Die Angaben können sich je nach Land unterscheiden.
• Gewicht, mit Akkublock, ermittelt gemäß EPTA-Verfahren 01/2003
Verwendungszweck
Das Werkzeug wurde für das Eintreiben von Klammern in
Baumaterial wie z.B. Bauholz entwickelt.
ENE054-1
ZUSÄTZLICHE
SICHERHEITSREGELN FÜR DAS
WERKZEUG ENB069-1
1. Tragen Sie stets eine Schutzbrille oder
Sicherheitsgläser mit Seitenschutz und – falls
erforderlich – einen Gesichtsschutz.
2. Zeigen Sie mit der Auswurföffnung nicht auf
Personen in Ihrer Umgebung (vor allem nicht auf
das Gesicht). Halten Sie Hände und Füße vom
Bereich der Auswurföffnung fern.
3. Entnehmen Sie stets den Akkublock vor dem
Laden der Klammern, vor der Einstellung,
Inspektion, Wartung oder nach Beendigung des
Betriebs.
4. Vergewissern Sie sich, dass keine Personen in der
Nähe sind, bevor Sie mit dem Nageln beginnen.
Versuchen Sie niemals, Klammern von innerhalb
und von außerhalb der Wand gleichzeitig zu
nageln. Klammern können durchlagen und/oder
herausfliegen, was eine große Gefahr darstellt.
5. Achten Sie beim Arbeiten mit dem Werkzeug auf
sicheren Stand und Gleichgewicht. Vergewissern
Sie sich, dass sich bei Arbeiten an hochgelegenen
Arbeitsplätzen keine Personen unterhalb
aufhalten.
6. Überprüfen Sie Wand, Decke, Fußboden, Dach
und dergleichen sorgfältig, um durch das
Eintreiben in Strom führende Kabel, Isolierrohre
oder Gasrohre verursachte mögliche elektrische
Schläge, Gaslecks, Explosionen usw. zu
vermeiden.
7. Verwenden Sie nur die in diesem Handbuch
aufgeführten Klammern. Die Verwendung anderer
Klammern kann eine Funktionsstörung des
Werkzeugs verursachen.
8. Missbrauchen Sie das Werkzeug nicht, sondern
verwenden Sie es ausschließlich für das
Einschlagen von Klammern.
9. Nehmen Sie das Werkzeug nicht ohne eingelegte
Klammern in Betrieb. Dies verkürzt die
Lebensdauer des Werkzeugs.
10. Brechen Sie den Betrieb sofort ab, wenn Sie einen
Defekt oder etwas Ungewöhnliches am Werkzeug
feststellen.
11. Treiben Sie keine Klammern in Materialien, welche
die Klammern durchschlagen können und dann zu
einem Projektil werden.
12. Betätigen Sie erst bei korrekter Positionierung des
Werkzeugs am Werkstück gleichzeitig den Ein/
Aus-Schalter und den Sicherheitshebel. Lassen
Sie das Werkstück den Sicherheitshebel
herunterdrücken. Der Sicherheitshebel darf weder
in entsicherter Stellung arretiert noch per Hand
betätigt werden.
13. Spielen Sie niemals mit dem Sicherheitshebel.
Prüfen Sie regelmäßig den einwandfreien Betrieb
des Sicherheitshebels.
BEWAHREN SIE DIESE
ANWEISUNGEN SORGFÄLTIG
AUF.
12
Page 13

WICHTIGE SICHERHEITSREGELN
ENC007-4
FÜR AKKUBLOCK
1. Lesen Sie vor der Verwendung des Akkublocks
alle Anweisungen und Sicherheitshinweise für das
Akkuladegerät (1), den Akku (2) und das Produkt
(3), für das der Akku verwendet wird.
2. Der Akkublock darf nicht zerlegt werden.
3. Falls die Betriebsdauer erheblich kürzer wird,
beenden Sie den Betrieb umgehend. Andernfalls
besteht die Gefahr einer Überhitzung sowie das
Risiko möglicher Verbrennungen und sogar einer
Explosion.
4. Wenn Elektrolyt in Ihre Augen gerät, waschen Sie
diese mit klarem Wasser aus und suchen Sie
sofort einen Arzt auf. Andernfalls können Sie Ihre
Augenlicht verlieren.
5. Vermeiden Sie einen Kurzschluss des
Akkublocks:
(1) Die Kontakte dürfen nicht mit leitendem
Material in Berührung kommen.
(2) Der Akkublock darf nicht in einem Behälter
aufbewahrt werden, in dem sich andere
metallische Gegenstände wie beispielsweise
Nägel, Münzen usw. befinden.
(3) Der Akkublock darf weder Feuchtigkeit noch
Regen ausgesetzt werden. Ein Kurzschluss
des Akkus kann zu hohem Kriechstrom,
Überhitzung, möglichen Verbrennungen und
sogar zu einer Zerstörung des Geräts führen.
6. Werkzeug und Akkublock dürfen nicht an Orten
aufbewahrt werden, an denen Temperatur von
50°C (122°F) oder höher erreicht werden.
7. Selbst wenn der Akkublock schwer beschädigt
oder völlig verbraucht ist, darf er nicht angezündet
werden. Der Akkublock kann in den Flammen
explodieren.
8. Lassen Sie den Akku nicht fallen und vermeiden
Sie Schläge gegen den Akku.
9. Verwenden Sie heruntergefallene Akkus oder
Akkus, die Stößen ausgesetzt waren, nicht mehr.
BEWAHREN SIE DIESE
ANWEISUNGEN SORGFÄLTIG
AUF.
Tipps für den Erhalt der maximalen AkkuNutzungsdauer
1. Laden Sie den Akkublock auf, bevor er ganz
entladen ist. Beenden Sie stets den Betrieb des
Werkzeugs und laden Sie den Akkublock auf,
sobald Sie eine verringerte Werkzeugleistung
bemerken.
2. Ein voll aufgeladener Akkublock darf niemals
erneut geladen werden. Durch Überladungen wird
die Lebensdauer des Akkus verkürzt.
3. Laden Sie den Akkublock bei einer
Zimmertemperatur von 10°C - 40°C (50°F - 104°F)
auf. Lassen Sie einen heißen Akkublock vor dem
Aufladen abkühlen.
FUNKTIONSBESCHREIBUNG
ACHTUNG:
• Schalten Sie das Werkzeug stets aus und entfernen
Sie den Akkublock, bevor Sie Einstellungen oder eine
Funktionsprüfung des Werkzeugs vornehmen.
Montage und Demontage des Akkublocks
(Abb. 1)
• Schalten Sie das Werkzeug stets aus, bevor Sie den
Akkublock einsetzen oder entfernen.
• Zum Entfernen des Akkublocks müssen Sie diesen aus
dem Gerät herausziehen, während Sie die Taste auf
der Vorderseite des Blocks schieben.
• Zum Einsetzen des Akkublocks müssen Sie die Zunge
des Akkublocks an der Rille im Gehäuse ausrichten
und in die gewünschte Position schieben. Setzen Sie
den Block immer ganz ein, bis er mit einem Klick
einrastet. Wenn Sie den roten Bereich oben auf der
Taste sehen können, ist der Block nicht ganz
eingerastet. Setzen Sie den Akku ganz ein, bis der rote
Bereich nicht mehr zu sehen ist. Andernfalls kann der
Block versehentlich aus dem Werkzeug fallen und Sie
oder Personen in der Nähe verletzen.
• Wenden Sie beim Einsetzen des Akkublocks keine
Gewalt an. Wenn der Block nicht leicht hineingleitet,
wird er nicht richtig eingesetzt.
Sicherheitssystem (Abb. 2)
Vergewissern Sie sich vor der Benutzung, dass alle
Sicherheitssysteme in gutem Betriebszustand sind. Das
Werkzeug darf nicht auslösen, wenn nur der
Auslöseschalter gezogen oder nur der Sicherheitshebel
gegen das Holz gedrückt wird. Es darf nur auslösen,
wenn beide Aktionen durchgeführt werden. Überprüfen
Sie das Werkzeug mit leerem Magazin auf möglichen
fehlerhaften Betrieb, wobei Sie es nicht auf sich selbst
oder auf umstehende Personen richten.
HINWEIS:
• Es besteht die Möglichkeit, dass das Werkzeug einen
Moment lang funktioniert, wenn ur der Auslöser
gezogen wird. Dies ist kein Anzeichen für eine
Fehlfunktion. Wenn dies der Fall ist, richten Sie das
Werkzeug nicht auf sich oder andere Personen in Ihrer
Umgebung.
Lösen und betätigen Sie den Auslöser noch einmal, um
sich zu vergewissern, dass die Sicherheitssysteme in
gutem Betriebszustand sind.
MONTAGE
ACHTUNG:
• Achten Sie stets darauf, dass Sie Ihre Finger nicht am
Schalter halten und dass Sie den Akkublock
entnehmen, bevor Sie Arbeiten am Werkzeug
ausführen.
Klammern
• Behandeln Sie Klammern und ihre Schachteln
sorgfältig. Bei grober Behandlung der Klammern
13
Page 14

können sich diese verformen und der Stapel rutscht
schwer nach oder verklemmt.
• Vermeiden Sie die Lagerung von Klammern an sehr
feuchten oder heißen Orten oder an Orten, die
direktem Sonnenlicht ausgesetzt sind.
ACHTUNG:
• Verwenden Sie keine anderen als die in diesem
Handbuch aufgeführten Klammern; verwenden Sie
auch keine Klammern, die beschädigt, verbogen, rostig
oder angegriffen sind.
• Verwenden Sie im Magazin immer nur Klammern
gleicher Größe, sonst rutscht der Stapel schwer nach
oder verklemmt.
Laden von Klammern
Entnehmen Sie den Akkublock.
Drücken Sie den Sicherungshebel auf der Rückseite des
Submagazins und schieben Sie dieses nach hinten.
(Abb. 3)
Laden Sie die Stapel mit den Füßen nach oben in das
Hauptmagazin. Schieben Sie das Submagazin vor.
(Abb. 4)
Haken Sie zum Sichern des Submagazins den
Sicherungshebel an der Rückseite des Submagazins ein.
ACHTUNG:
• Wenn das Werkzeug bei geladenem Magazin nach
unten gehalten und das Submagazin geöffnet wird,
können die Klammern herausfallen und eine Gefahr für
alles und jeden darunter darstellen. Beachten Sie dies
besonders bei Arbeiten an hochgelegenen
Arbeitsplätzen.
Entladen der Klammern
ACHTUNG:
• Achten Sie vor dem Entfernen von Klammern darauf,
dass Sie Ihre Finger nicht am Schalter oder Hebel
halten und Sie den Akkublock entnehmen. Ein
versehentlicher Auswurf kann Personen- und
Sachschäden verursachen.
Entnehmen Sie den Akkublock.
Drücken Sie den Verriegelungshebel und schieben Sie
das Magazin nach hinten. (Abb. 5)
Entnehmen Sie die Klammern aus dem Magazinschlitz.
(Abb. 6)
Haken
ACHTUNG:
• Achten Sie stets darauf, dass Sie Ihre Finger nicht am
Schalter oder Hebel halten und Sie den Akkublock
entnehmen, bevor Sie den Haken verwenden. (Abb. 7)
ACHTUNG:
• Hängen Sie den Haken immer an den Gürtel. Falls sich
der Haken verschiebt, kann der Klammerer
herunterfallen und Fehlauswürfe und
Personenschäden verursachen.
Der Haken ist nützlich, wenn Sie das Werkzeug
vorübergehend aufhängen möchten.
Er kann an jeder Seite des Werkzeugs befestigt werden.
Setzen Sie zur Montage den Haken in eine Rille am
Werkzeuggehäuse (die Seite ist beliebig) und befestigen
Sie diesen mit einer Schraube.
Zur Entfernung müssen Sie nur die Schraube lösen und
den Haken herausnehmen. (Abb. 8)
BETRIEB
Tiefeneinstellung (Abb. 9)
Wenn die Klammern zu tief oder zu flach eingetrieben
werden, stellen Sie die Eintriebstiefe durch Drehen der
Mutter unten am Werkzeug ein. Drehen Sie die Mutter im
Uhrzeigersinn, um die Klammern tiefer einzutreiben.
Drehen Sie die Mutter gegen den Uhrzeigersinn, um die
Klammern flacher einzutreiben. Beachten Sie, dass die
Mutter jeweils um 90° (1/4 Umdrehung) gedreht werden
muss, so dass die Kerbe auf der Mutter parallel zum
Magazin verläuft.
Einschlagen von Klammern (Abb. 10)
Positionieren Sie die Klammerauslassöffnung des
Werkzeugs flach auf dem Werkstück und drücken Sie es
fest gegen das Werkstück. Ziehen Sie anschließend den
Hebel und den Auslöser, um die Klammer einzuschlagen.
Der Griff ist so geformt, dass Sie den Werkzeugkopf mit
dem Zeigefinger und Daumen sicher nach unten halten
können. Nach dem Einschlagen der Klammer lassen Sie
den Auslöser vollständig los.
Wenn der Klammerkopf an der Oberfläche blieb, schlagen
Sie die Klammer ein, während Sie den Werkzeugkopf fest
halten. (Abb. 11)
HINWEIS:
• Wenn während des Einschlagvorgangs der
Klammerkopf fortwährend an der Oberfläche des
Werkstücks bleibt, kann dies die Führung des
Werkzeugs beschädigen und zu Verklemmungen usw.
führen.
Überprüfen der restlichen Klammern
(Abb. 12)
ACHTUNG:
• Nehmen Sie das Werkzeug nicht ohne eingelegte
Klammern in Betrieb. Dies verkürzt die Lebensdauer
des Werkzeugs.
Auf der rechten Seite des Werkzeugs (von vorn
betrachtet) befindet sich ein praktisches Sichtfenster. In
diesem Sichtfenster können Sie nachsehen, ob sich
Klammern im Magazin befinden. Wenn im Sichtfenster
keine Klammern zu sehen sind, laden Sie Klammern in
das Magazin.
Entfernen verklemmter Klammern
WARNUNG:
• Stellen Sie sicher, dass der Auslöser gelöst ist und
dass Sie den Akkublock entnehmen, bevor Sie
verhakte Klammern entfernen.
Entfernen Sie den Akkublock aus dem Werkzeug.
(Abb. 13)
Drücken Sie den Sicherungshebel auf der Rückseite des
Submagazins und schieben Sie dieses nach hinten.
Entnehmen Sie verklemmte Klammern aus der Öffnung,
sodass die Klammern wieder richtig ausgeworfen werden
können.
14
Page 15

WARTUNG
ACHTUNG:
• Schalten Sie das Werkzeug stets aus und entfernen
Sie den Akkublock, bevor Sie Inspektionen oder
Wartungsarbeiten am Werkzeug vornehmen.
• Um die SICHERHEIT und ZUVERLÄSSIGKEIT des
Produkts zu gewährleisten, sollten Reparaturen,
Wartungsarbeiten und Einstellungen nur durch von
Makita autorisierte Servicecenter durchgeführt und
immer Makita-Ersatzteile verwendet werden.
ZUBEHÖR
ACHTUNG:
• Für das in diesem Handbuch beschriebene MakitaWerkzeug werden die folgenden Zubehör- und
Zusatzteile empfohlen. Die Verwendung anderer
Zubehör- und Zusatzteile kann zu Personenschäden
führen. Verwenden Sie Zubehör- und Zusatzteile nur
für den vorgesehenen Zweck.
Informationen zu diesem Zubehör erhalten Sie bei einem
Makita-Servicecenter in Ihrer Nähe.
• Klammern
• Verschiedene Arten von Makita-Originalakkus und Ladegeräten
• Sicherheitsschutzbrille
Nur für europäische Länder
Schall
ENG104-1
Typischer A-bewerteter Schallpegel nach EN792:
Schalldruckpegel (L
Abweichung (K): 3 dB (A)
): 79 dB (A)
pA
Unter Arbeitsbedingungen kann der Schallpegel 80 dB (A)
überschreiten.
Tragen Sie Gehörschutz.
Schwingung
ENG233-1
Die Schwingungsbelastung wird gemäß EN792 bestimmt:
Arbeitsmodus: Klammern von Holz
Schwingungsbelastung (a
Abweichung (K): 1,5 m/s
h
2
): 4,0 m/s
2
EU-Konformitätserklärung ENH101-12
Wir, Makita Corporation als verantwortlicher
Hersteller, erklären, dass die folgenden Geräte der
Marke Makita:
Bezeichnung des Geräts: Akku-Tacker
Nummer / Typ des Modells: BST220, BST221
in Serienfertigung hergestellt werden und
den folgenden Richtlinien der Europäischen Union
genügen:
98/37/EC bis 28. Dezember 2009 und 2006/42/EC ab
dem 29. Dezember 2009
Außerdem werden die Geräte gemäß den folgenden
Standards oder Normen gefertigt:
EN60745
Die technische Dokumentation erfolgt durch unseren
Bevollmächtigten in Europa:
Makita International Europe Ltd.
Michigan, Drive, Tongwell,
Milton Keynes, MK15 8JD, England
30. Januar 2009
Tomoyasu Kato
Direktor
Makita Corporation
3-11-8, Sumiyoshi-cho,
Anjo, Aichi, JAPAN
15
Page 16

ITALIANO
Spiegazione della vista generale
1. Parte rossa
2. Pulsante
3. Batteria
4. Grilletto
5. Leva di sicurezza
6. Scomparto secondario
7. Levetta di blocco
8. Punti metallici
9. Scomparto principale
10. Scanalatura
11. Gancio
12. Vite
13. Dado
14. Parte frontale
15. Pezzo in lavorazione
16. Parte posteriore
17. Finestra ci controllo
CARATTERISTICHE TECNICHE
Modello BST220 BST221
Larghezza del punto 10 mm 10 mm
Lunghezza di applicazione dei punti 10 mm - 22 mm 10 mm - 22 mm
Capacità dello scomparto punti 84 pz. 84 pz.
Lunghezza totale 247 mm 251 mm
Peso netto 2,3 kg 2,4 kg
Tensione nominale 14,4 V CC 18 V CC
• Le caratteristiche tecniche riportate di seguito sono soggette a modifiche senza preavviso in virtù del nostro
programma continuo di ricerca e sviluppo.
• Le caratteristiche tecniche possono differire da paese a paese.
• Peso, comprensivo di batterie, calcolato in base alla Procedura EPTA 01/2003
Uso previsto
L’utensile è ideale per l'applicazione di punti metallici su
materiali da costruzione, come il legname.
ENE054-1
REGOLE DI SICUREZZA
AGGIUNTIVE PER L'UTENSILE
ENB069-1
1. Indossare sempre gli occhiali di protezione, con
schermature ai lati e uno schermo facciale
completo, se necessario.
2. Non puntare il foro di espulsione su persone nelle
vicinanze (in particolare verso il volto). Tenere le
mani e i piedi lontani dall’area del foro di
espulsione.
3. Rimuovere sempre la batteria prima di procedere
al caricamento dei punti metallici, effettuare le
regolazioni, effettuare un controllo, manutenzione
o qualsivoglia operazione.
4. Prima dell’utilizzo, accertarsi che non vi siano
persone in prossimità. Non tentare di applicare
punti contemporaneamente su entrambi i lati,
interno ed esterno, della parete. I punti potrebbero
trapassare e/o volare via, con grave pericolo.
5. Quando si utilizza l’utensile, prestare estrema
attenzione alla posizione dei piedi, cercando di
mantenere sempre l’equilibrio. In caso di utilizzo
dell’utensile in posizioni elevate, controllare che
non siano presenti persone al di sotto.
6. Controllare con cura le pareti, i soffitti, i pavimenti
e i tetti per evitare potenziali scosse elettriche,
perdite di gas, esplosioni, ecc., causate dal
contatto di fili elettrici sotto tensione, condutture
o tubi del gas.
7. Usare soltanto i punti metallici specificati in
questo manuale. L’utilizzo di qualsiasi altro tipo di
punti potrebbe causare il malfunzionamento
dell’utensile.
8. Non compromettere l’utilizzo dell’utensile, né
utilizzarlo per qualsiasi altro scopo diverso da
quello specificato.
9. Non azionare l’utensile senza punti. Questo
potrebbe provocare un deterioramento
dell’utensile stesso.
10. Arrestare immediatamente la spillatura nel caso in
cui l’operatore noti nell’utensile qualcosa di errato
o fuori dall’ordinario.
11. Non applicare i punti su materiali che non sono in
grado di accettare la spillatura, in quanto i punti
potrebbero volare e trasformarsi in proiettili.
12. Non attivare mai il grilletto e la leva di sicurezza
contemporaneamente, tranne nel caso in cui
l’utensile sia posizionato correttamente sul pezzo.
Consentire la pressione del pezzo in lavorazione
sulla leva di sicurezza. Non compromettere mai
l’utilizzo dell’utensile agendo direttamente sulla
leva di sicurezza, manualmente.
13. Non manomettere la leva di sicurezza. Controllare
periodicamente il corretto funzionamento della
leva di sicurezza.
CONSERVARE QUESTE
ISTRUZIONI.
16
Page 17

ISTRUZIONI IMPORTANTI PER LA
SICUREZZA
ENC007-4
RELATIVE ALLA BATTERIA
1. Prima di utilizzare la batteria, leggere tutte le
istruzioni e gli avvisi di sicurezza relativi a (1)
caricabatteria, (2) batteria e (3) prodotto utilizzato
con la batteria.
2. Non disassemblare la batteria.
3. Se il tempo di funzionamento è diventato
eccessivamente breve, non utilizzare l'utensile.
Potrebbero verificarsi surriscaldamenti, ustioni o
esplosioni.
4. In caso di contatto dell'elettrolita della batteria con
gli occhi, sciacquare con acqua fresca e rivolgersi
immediatamente a un medico. Potrebbero
verificarsi danni permanenti alla funzionalità
visiva.
5. Non cortocircuitare la batteria.
(1) Non toccare i terminali della batteria con
materiale in grado di condurre elettricità.
(2) Evitare di conservare le batterie a contatto con
oggetti metallici quali chiodi, monete e così
via.
(3) Non esporre le batterie all'acqua o alla pioggia.
Un cortocircuito può provocare un elevato
flusso di corrente, surriscaldamento, ustioni o
rotture.
6. Non conservare l'utensile e la batteria a una
temperatura superiore a 50 °C (122 °F).
7. Evitare di smaltire le batterie danneggiate o
esaurite bruciandole. Se esposte al fuoco, le
batterie possono esplodere.
8. Evitare di far cadere o di colpire la batteria.
9. Non utilizzare la batteria se è caduta o ha urtato
contro altri oggetti.
CONSERVARE QUESTE
ISTRUZIONI.
Suggerimenti per il prolungamento della
durata della batteria
1. Caricare le batterie prima di scaricarle
completamente. Se si nota una diminuzione di
potenza dell'utensile, interrompere il lavoro e
caricare la batteria.
2. Non ricaricare una batteria già completamente
carica. In caso contrario, la durata operativa della
batteria potrebbe ridursi.
3. Caricare la batteria in ambienti con temperatura
compresa tra 10°C e 40°C (50°F - 104°F). Prima di
caricare una batteria surriscaldata, lasciarla
raffreddare.
DESCRIZIONE FUNZIONALE
ATT EN ZIO NE:
• Accertarsi sempre che l’utensile sia spento e che la
batteria sia stata rimossa prima di regolare o
controllare le funzioni dell'utensile.
Installazione o rimozione della batteria
(Fig. 1)
• Prima di inserire o rimuovere la batteria, spegnere
sempre l'utensile.
• Per rimuovere la batteria, estrarla dall'utensile facendo
scorrere il pulsante sulla parte frontale della batteria.
• Per inserire la batteria, allineare la linguetta sulla
batteria con la scanalatura dell'alloggiamento e farla
scorrere fino a raggiungere la posizione corretta.
Inserire sempre la batteria fino a quando si blocca in
posizione con uno scatto. Se l'area rossa del lato
superiore del pulsante è ancora visibile, la batteria non
è completamente inserita. Inserire la batteria fino a
quando l'area rossa non è più visibile. In caso contrario
la batteria può fuoriuscire accidentalmente e provocare
lesioni all'operatore o a chi si trova nello spazio vicino.
• Non applicare una forza eccessiva per inserire la
batteria. Se la batteria non scorre agevolmente, la
manovra di inserimento non è corretta.
Sistema di sicurezza (Fig. 2)
Accertarsi che tutti i sistemi di sicurezza funzionino
correttamente prima dell’uso. L’utensile non deve
funzionare se si tira soltanto l'interruttore di accensione o
se si preme soltanto la leva di sicurezza contro il legno.
Esso deve funzionare soltanto quando si eseguono
entrambe queste operazioni. Per accertarsi che non vi
siano anomalie nel funzionamento, fare una prova con un
utensile non caricato e puntato ben distante da se stessi o
da eventuali persone presenti nello spazio circonstante.
NOTA:
• Vi è la possibilità che l'utensile possa funzionare per un
istante quando viene tirato solo il grilletto. Non si tratta
di un problema di funzionamento. In questo caso,
puntare l'utensile ben distante da se stessi e da
eventuali persone presenti nello spazio circostante.
Rilasciare e tirare di nuovo il grilletto per accertarsi che
i sistemi di sicurezza funzionino correttamente.
MONTAGGIO
ATT EN ZIO NE:
• Prima di effettuare una qualsiasi operazione con la
spillatrice, fare sempre attenzione a non posizionare le
dita sul grilletto e verificare che la batteria sia stata
rimossa.
Punti metallici
• Maneggiare con cura i punti metallici e la relativa
scatola. Se i punti vengono maneggiati in modo non
corretto, potrebbero essere piegati e provocare un
errato caricamento dei punti o il loro inceppamento.
• Non conservare i punti in un luogo molto umido o
caldo. Non esporli alla luce diretta del sole.
17
Page 18

ATT EN ZIO NE:
• Non utilizzare punti diversi da quelli indicati nel
presente manuale o punti che appaiono danneggiati,
piegati, arrugginiti o corrosi.
• Non inserire punti di dimensione differente nello stesso
scomparto, onde evitare un errato caricamento dei
punti o il loro inceppamento.
Caricamento dei punti
Rimuovere la batteria.
Premere la leva di bloccaggio sul retro dello scomparto
secondario e far scorrere indietro tale scomparto. (Fig. 3)
Caricare i punti nello scomparto principale, con i piedini
rivolti verso l'alto. Far scorrere avanti lo scomparto
secondario. (Fig. 4)
Per collocare lo scomparto secondario in posizione,
agganciare la leva di blocco sul retro di tale scomparto.
ATT EN ZIO NE:
• Una volta caricato lo scomparto, se l'utensile viene
tenuto in verticale con lo scomparto secondario aperto,
è possibile che i punti cadano e provochino pericoli per
oggetti e persone nelle vicinanze. Tenere presente
questa situazione soprattutto in caso di utilizzo
dell’utensile in posizioni elevate.
Rimozione dei punti
ATT EN ZIO NE:
• Prima di rimuovere i punti dall’utensile, fare sempre
attenzione a non posizionare le dita sul grilletto o sulla
leva senza avere rimosso la batteria. Lo sparo
accidentale può provocare lesioni personali e danno
alla proprietà.
Rimuovere la batteria.
Premere la leva di bloccaggio e fare scorrere indietro lo
scomparto. (Fig. 5)
Estrarre i punti dallo scomparto. (Fig. 6)
Gancio
ATT EN ZIO NE:
• Prima di caricare l'utensile, fare sempre attenzione a
non posizionare le dita sul grilletto o sulla leva senza
avere rimosso la batteria. (Fig. 7)
ATT EN ZIO NE:
• Non appendere il gancio alla cintura. La caduta della
spillatrice, causata dal gancio fuoriuscito
incidentalmente dalla posizione, può provocare
l’espulsione accidentale di chiodi e conseguenti lesioni
personali.
Il gancio è utile per appendere temporaneamente
l'utensile.
Può essere installato su entrambi i lati dell'utensile.
Per installare il gancio, inserirlo in una delle scanalature
presenti su ambo i lati dell'alloggiamento dell'utensile e
fissarlo con una vite.
Per rimuovere il gancio, allentare la vite ed estrarlo.
(Fig. 8)
USO
Regolazione di profondità (Fig. 9)
Se i punti vengono inseriti troppo in profondità o troppo in
superficie, regolare la profondità di lavorazione ruotando il
18
dado posto sul lato inferiore dell'utensile. Per inserire i
punti a profondità maggiori, ruotare il dado in senso
orario. Per inserire i punti più in superficie, ruotare in dado
in senso antiorario. Nota: il dado deve essere ruotato con
incrementi di 90° (1/4 di giro), in modo tale che la
scanalatura sul dado sia parallela allo scomparto.
Inserimento dei punti (Fig. 10)
Posizionare l’apertura di sparo dei punti sul materiale da
fissare e tenere saldamente l’utensile a stretto contatto
con il materiale. Quindi, tirare la leva e tirare il grilletto per
sparare i punti. L’impugnatura è ergonomica, in modo tale
da permettere il sostegno della testa dell’utensile per
mezzo di indice e pollice. Dopo aver sparato un punto,
rilasciare totalmente il grilletto.
Quando la testa dei punti rimane sopra la superficie da
fissare, applicare di nuovo il punto tenendo saldamente la
testa della spillatrice. (Fig. 11)
NOTA:
• Qualora la spillatrice venga utilizzata in modalità
continua e la testa dei punti risulti sempre fuoriuscire
dalla superficie del materiale da fissare, l’utensile
potrebbe essere danneggiato nella parte relativa
all’avvitatore, con relativo incastro di punti, ecc.
Verifica dei punti rimanenti (Fig. 12)
ATT EN ZIO NE:
• Non azionare l’utensile senza punti. Questo potrebbe
provocare un deterioramento dell’utensile stesso.
Sul lato destro dell'utensile è presente una comoda
finestra di controllo (quando si guarda l'utensile dal lato
frontale). Utilizzare questa finestra di controllo per
verificare se vi sono punti all'interno dello scomparto. Se
dalla finestra non si vedono punti, caricarli nello
scomparto.
Rimozione di punti inceppati
AVVERTENZA:
• Prima di procedere alle operazioni di rimozione di punti
incastrati, verificare sempre che il grilletto sia rilasciato
e che la batteria sia stata rimossa.
Rimuovere la batteria dalla spillatrice. (Fig. 13)
Premere la leva di bloccaggio sul retro dello scomparto
secondario e far scorrere indietro tale scomparto.
Estrarre i punti inceppati rimasti all'interno dell'apertura di
sparo.
MANUTENZIONE
ATT EN ZIO NE:
• Prima di effettuare controlli o operazioni di
manutenzione, verificare sempre di aver spento
l'utensile e di aver rimosso la batteria.
• Per mantenere la SICUREZZA e l'AFFIDABILITÀ del
prodotto, le riparazioni e qualsiasi altra operazione di
manutenzione o regolazione devono essere eseguiti
dai centri di assistenza autorizzati Makita utilizzando
sempre parti di ricambio Makita.
Page 19

ACCESSORI
ATT EN ZIO NE:
• Si raccomanda di usare questi accessori per l'utensile
Makita descritto in questo manuale. L'uso di qualsiasi
altro accessorio potrebbe provocare lesioni personali.
Utilizzare gli accessori esclusivamente per l'uso
dichiarato.
Per l'assistenza e ulteriori informazioni su tali accessori,
rivolgersi al centro di assistenza Makita più vicino.
• Punti metallici
• Diversi modelli di batterie e caricabatteria originali
Makita
• Occhiali di protezione
Solo per i paesi europei
Rumore
Il tipico livello di rumore ponderato “A” è determinato in
conformità con la norma EN792:
Livello di pressione sonora (L
Variazione (K): 3 dB (A)
): 79 dB (A)
pA
Il livello acustico in funzionamento può superare 80 dB
(A).
Indossare una protezione acustica.
Vibrazione
Il valore dell'emissione delle vibrazioni è determinato in
conformità con la norma EN792:
Modalità di lavoro: spillatura del legno
Emissione di vibrazioni (a
Variazione (K): 1,5 m/s
h
2
): 4,0 m/s
Dichiarazione di conformità CE ENH101-12
Makita Corporation, in qualità di produttore
responsabile, dichiara che gli utensili Makita indicati
di seguito:
Denominazione dell'utensile: Graffettatrice
N. modello /Tipo: BST220, BST221
appartengono a una produzione in serie e
sono conformi alle seguenti direttive europee:
98/37/CE fino al 28 dicembre 2009 e
successivamente alla direttiva 2006/42/CE a partire
dal 29 dicembre 2009
Sono inoltre prodotti in conformità con gli standard o i
documenti standardizzati riportati di seguito:
EN60745
La documentazione tecnica viene conservata dal
rappresentante autorizzato Makita in Europa, ovvero:
Makita International Europe Ltd,
Michigan, Drive, Tongwell,
Milton Keynes, MK15 8JD, Inghilterra
ENG104-1
ENG233-1
2
30 gennaio 2009
Tomoyasu Kato
Direttore
Makita Corporation
3-11-8, Sumiyoshi-cho,
Anjo, Aichi, JAPAN
19
Page 20

NEDERLANDS
Verklaring van algemene gegevens
1. Rode deel
2. Knop
3. Accu
4. Trekker
5. Veiligheidspal
6. Submagazijn
7. Vergrendelhendel
8. Nieten
9. Hoofdmagazijn
10. Groef
11. H aak
12. Schroef
13. Moer
14. Voorkant
15. Werkstuk
16. Achterkant
17. Kijkvenster
TECHNISCHE GEGEVENS
Model BST220 BST221
Nietbreedte 10 mm 10 mm
Toepasselijke nietlengte 10 mm t/m 22 mm 10 mm t/m 22 mm
Capaciteit van nietmagazijn 84 stuks 84 stuks
Totale lengte 247 mm 251 mm
Netto gewicht 2,3 kg 2,4 kg
Nominale spanning 14,4 V gelijkstroom 18 V gelijkstroom
• Als gevolg van ons doorlopende onderzoeks- en ontwikkelingsprogramma, zijn de technische gegevens van dit
gereedschap onderhevig aan veranderingen zonder voorafgaande kennisgeving.
• De technische gegevens kunnen van land tot land verschillen.
• Gewicht, inclusief de accu, volgens de EPTA-procedure 01/2003
Gebruiksdoeleinden
Het gereedschap is bedoeld om nieten in
constructiematerialen, zoals houtsoorten, te bevestigen.
ENE054-1
AANVULLENDE
VEILIGHEIDSVOORSCHRIFTEN
VOOR GEREEDSCHAP ENB069-1
1. Gebruik altijd een beschermende bril of een
veiligheidsbril met zijstukken en een
gezichtsscherm als dat nodig is.
2. Richt de schietmond nooit op iemand in de buurt,
en zeker niet op het gezicht. Houd handen en
voeten uit de buurt van de schietmond.
3. Verwijder altijd de accu voordat u nieuwe nieten
laadt, tijdens afstellen, inspectie, onderhoud of
nadat het werk is voltooid.
4. Controleer voor het nagelen dat niemand dichtbij
staat. Probeer nooit tegelijkertijd van binnenuit en
van buitenaf in een muur te nieten. De nieten
kunnen er dwars doorheen schieten of afketsen en
een groot gevaar opleveren.
5. Zorg ervoor dat u tijdens het gebruik van het
gereedschap stevig staat en uw evenwicht goed
bewaart. Zorg ervoor dat niemand onder u staat
als u op hogere locaties werkt.
6. Controleer muren, plafonds, vloeren en dergelijke
grondig om te voorkomen dat door het nagelen in
elektrische draden, pijpen of gasleidingen een
elektrische schok, gaslek, explosie, enz. kan
ontstaan.
7. Gebruik uitsluitend nieten die in deze
gebruiksaanwijzing worden aangegeven. Door een
ander soort nieten te gebruiken, kan een storing in
het gereedschap worden veroorzaakt.
20
8. Knoei niet aan het gereedschap en gebruik het
niet voor een ander doeleinde dan voor het nieten.
9. Bedien het gereedschap niet zonder dat nieten zijn
geplaatst. De levensduur van het gereedschap zal
hierdoor verkorten.
10. Stop onmiddellijk met nagelen als u een probleem
of iets vreemds opmerkt aan het gereedschap.
11. Niet nooit in materialen waarvan de nieten het
materiaal kunnen doorboren en er doorheen
kunnen vliegen.
12. Activeer nooit op hetzelfde moment de trekker en
de veiligheidspal tot u er klaar voor bent om te
nieten in materiaal. Laat het werkstuk de
veiligheidspal indrukken. Doe het doel van het
apparaat niet teniet door de veiligheidspal terug te
duwen of door handmatig de druk eraf te halen.
13. Knoei nooit aan de veiligheidspal. Controleer de
veiligheidspal regelmatig voor een juiste
toepassing.
BEWAAR DEZE INSTRUCTIES.
BELANGRIJKE
VEILIGHEIDSINSTRUCTIES
VOOR ACCU’S
1. Alvorens de accu in gebruik te nemen, leest u
eerst alle instructies en
waarschuwingsopschriften op (1) de acculader, (2)
de accu en (3) het apparaat waarin de accu wordt
aangebracht.
2. Haal de accu niet uit elkaar.
ENC007-4
Page 21

3. Als de gebruikstijd aanzienlijk korter is geworden,
stopt u onmiddellijk met het gebruik. Anders kan
dit leiden tot kans op oververhitting, mogelijke
brandwonden en zelfs een explosie.
4. Als de elektrolyt in uw ogen komt, wast u deze uit
met schoon water en raadpleegt u onmiddellijk
een arts. Dit kan leiden tot verlies van
gezichtsvermogen.
5. Sluit de accu niet kort:
(1) Raak de accupolen niet aan met enig geleidend
materiaal.
(2) Bewaar de accu niet op een plaats waar deze in
aanraking kan komen met andere metalen
voorwerpen, zoals spijkers, munten, enz.
(3) Stel de accu niet bloot aan water of regen.
Kortsluiting van de accu kan leiden tot een
hoge stroomsterke, oververhitting, mogelijke
brandwonden en zelfs een defect.
6. Bewaar het gereedschap en de accu niet op
plaatsen waar de temperatuur kan oplopen tot
50°C of hoger.
7. Werp de accu niet in een vuur, zelfs niet als deze
al ernstig beschadigd of helemaal versleten is. De
accu kan in een vuur exploderen.
8. Wees voorzichtig dat u de accu niet laat vallen of
ergens tegenaan stoot.
9. Gebruik een accu die is gevallen of gestoten niet
meer.
BEWAAR DEZE INSTRUCTIES
Tips voor een lange levensduur van de
accu
1. Laad de accu op voordat deze volledig leeg is.
Wanneer u merkt dat het gereedschap minder
vermogen heeft, stopt u met het gebruik ervan en
laadt u eerst de accu op.
2. Laad nooit een volledig opgeladen accu op. Te
lang opladen verkort de levensduur van de accu.
3. Laad de accu op bij een omgevingstemperatuur
van 10 °C t/m 40 °C. Laat een warme accu eerst
afkoelen voordat u deze oplaadt.
BESCHRIJVING VAN DE
FUNCTIES
LET OP:
• Zorg ervoor dat het gereedschap is uitgeschakeld en
dat de accu is verwijderd voordat u de werking van het
gereedschap aanpast of controleert.
De accu aanbrengen en verwijderen (zie
afb. 1)
• Schakel het gereedschap altijd uit voordat u de accu
aanbrengt of verwijdert.
• Om de accu te verwijderen verschuift u de knop aan de
voorkant van de accu en trekt u tegelijkertijd de accu
uit het gereedschap.
• Om de accu aan te brengen lijnt u de lip op de accu uit
met de groef in de behuizing en duwt u de accu op zijn
plaats. Steek de accu zo ver mogelijk in het
gereedschap tot u een klikgeluid hoort. Als u het rode
deel aan de bovenkant van de knop kunt zien, is de
accu niet goed aangebracht. Steek de accu zo ver
mogelijk erin tot het rode deel niet meer zichtbaar is.
Als u dit niet doet, kan de accu per ongeluk uit het
gereedschap vallen en u of anderen in uw omgeving
verwonden.
• Oefen geen grote kracht uit bij het aanbrengen van de
accu. Als de accu niet gemakkelijk in het gereedschap
kan worden gestoken, wordt deze niet goed
aangebracht.
Veiligheidssysteem (zie afb. 2)
Controleer voor gebruik dat alle veiligheidssystemen goed
werken. Het gereedschap mag niet werken als alleen de
trekker wordt ingeknepen of als alleen de veiligheidspal
op het hout wordt gedrukt. Het gereedschap mag alleen
werken als beide handelingen tegelijkertijd worden
uitgevoerd. Test op mogelijk verkeerde werking terwijl er
geen nieten in het gereedschap zitten en dit niet op uzelf
of omstanders is gericht.
OPMERKING:
• De kans bestaat dat het gereedschap kortstondig in
werking treedt wanneer alleen de trekker wordt
ingeknepen. Dit duidt niet op een defect. Als dit
gebeurt, richt u het gereedschap weg van uzelf en
omstanders.
Laat de trekker los en knijp deze opnieuw in om er
zeker van te zijn dat de veiligheidssystemen goed
werken.
ONDERDELEN AANBRENGEN/
VERWIJDEREN
LET OP:
• Zorg er altijd voor dat uw vingers niet zijn geplaatst op
de trekker en dat de accu is verwijderd voordat u enige
werkzaamheden aan het nietpistool gaat uitvoeren.
Nieten
• Wees voorzichtig bij het hanteren van de nieten en de
doos ervan. Als ruw met de nieten wordt omgegaan,
kunnen deze verbuigen waardoor de nieten niet goed
worden aangevoerd of vastlopen.
• Voorkom dat de nieten worden opgeslagen in een zeer
vochtige of warme ruimte of op een plek die is
blootgesteld aan direct zonlicht.
LET OP:
• Gebruik geen nieten anders dan die beschreven in
deze gebruiksaanwijzing of nieten die beschadigd,
verbogen, roestig of gecorrodeerd lijken.
• Plaats geen nieten van verschillende afmetingen
tegelijkertijd in het magazijn omdat hierdoor de nieten
niet goed worden aangevoerd of vastlopen.
Nieten bijvullen
Verwijder de accu.
Duw tegen de vergrendelhendel op de achterkant van het
submagazijn en schuif het submagazijn naar achteren
eruit (zie afb. 3).
Plaats de nieten in het hoofdmagazijn met de punten
omhoog gericht. Schuif het submagazijn naar voren (zie
afb. 4).
21
Page 22

Om het submagazijn op zijn plaats te vergrendelen, haakt
u de vergrendelhendel op de achterkant van het
submagazijn vast.
LET OP:
• Wanneer er nieten in het hoofdmagazijn zitten en het
nietpistool omlaag wordt gehouden terwijl het
submagazijn wordt geopend, kunnen nieten eruit vallen
en een gevaar opleveren voor iets of iemand eronder.
Denk hieraan, met name wanneer u op grote hoogte
werkt.
Nieten eruit halen
LET OP:
• Zorg er altijd voor dat uw vingers niet zijn geplaatst op
de trekker of pal en dat de accu van het nietpistool af is
gehaald bij het verwijderen van de nieten. Verkeerd
schieten kan resulteren in persoonlijk letsel en
beschadiging aan eigendommen.
Verwijder de accu.
Druk op de vergrendelhendel en schuif het submagazijn
naar achteren eruit (zie afb. 5).
Verwijder de nieten uit het hoofdmagazijn (zie afb. 6).
Haak
LET OP:
• Zorg er altijd voor dat uw vingers niet zijn geplaatst op
de trekker of pal en dat de accu is verwijderd voordat u
de haak gebruikt (zie afb. 7).
LET OP:
• Hang de haak niet aan de tailleriem. Als u het
nietpistool laat vallen, bijvoorbeeld doordat de haak per
ongeluk verschuift, kunnen nieten per ongeluk worden
afgeschoten en persoonlijk letsel worden veroorzaakt.
De haak is handig om het gereedschap tijdelijk aan op te
hangen.
De haak kan aan beide kanten van het gereedschap
worden bevestigd.
U bevestigt de haak door deze in een groef in de
behuizing van het gereedschap te steken en vast te
zetten met een schroef.
Om de haak te verwijderen, draait u de schroef los en
haalt u de haak van het gereedschap af (zie afb. 8).
BEDIENING
Diepteregeling (zie afb. 9)
Als de nieten te diep of niet diep genoeg worden
geschoten, stelt u de nietdiepte in door de moer op de
onderkant van et gereedschap te draaien. Om de nieten
dieper te schieten, draait u de moer rechtsom. Om de
nieten ondieper te schieten, draait u de moer linksom. Let
erop dat de moer in stappen van 90° (1/4 slag) wordt
gedraaid zodat de groef in de moer parallel loopt aan het
magazijn.
Nieten schieten (zie afb. 10)
Plaats de opening van het gereedschap vanwaaruit de
nieten worden geschoten, vlak tegen het materiaal en
houd het gereedschap stevig tegen het materiaal gedrukt.
Haal de pal naar achteren en knijp daarna de trekker
volledig in om de nieten te schieten. De handgreep is zo
gevormd dat het gereedschapskop veilig naar beneden
22
kan worden gehouden met de wijsvinger en de duim.
Nadat u een niet hebt geschoten, moet u de trekker
volledig loslaten.
Als de bovenkant van een geschoten niet boven het
oppervlak van het materiaal blijft uitsteken, schiet u de
nieten door de gereedschapskop stevig aangedrukt te
houden (zie afb. 11).
OPMERKING:
• Door het nietpistool continu te gebruiken terwijl de
bovenkant van de nieten boven het oppervlak van het
materiaal blijven uitsteken, kan de stoter van het
nietpistool worden beschadigd, kunnen nieten
vastlopen, enz.
Resterende nieten controleren (zie
afb. 12)
LET OP:
• Bedien het gereedschap niet zonder dat nieten zijn
geplaatst. De levensduur van het gereedschap zal
hierdoor verkorten.
Aan de rechterkant van het gereedschap (vanaf de
voorkant bezien) bevindt zich een handig kijkvenster.
Gebruik dit kijkvenster om te controleren of er nieten in
het magazijn zitten. Als geen nieten zichtbaar zijn door
het kijkvenster, vult u het magazijn met nieten.
Vastgelopen nieten verwijderen
WAARSCHUWING:
• Zorg er altijd voor dat de trekker los is en dat de accu is
verwijderd voordat u vastgelopen nieten verwijdert.
Verwijder de accu uit het nietpistool (zie afb. 13).
Duw tegen de vergrendelhendel op de achterkant van het
submagazijn en schuif het submagazijn naar achteren
eruit.
Verwijder eventueel vastgelopen nieten die zijn
achtergebleven in de schietmond vanwaaruit de nieten
worden geschoten.
ONDERHOUD
LET OP:
• Zorg er altijd voor dat de machine is uitgeschakeld en
de accu is verwijderd, voordat u een inspectie of
onderhoud uitvoert.
• Om de VEILIGHEID en BETROUWBAARHEID van het
gereedschap te handhaven, dienen alle reparaties,
onderhoud en afstellingen te worden uitgevoerd door
een erkend Makita-servicecentrum, en altijd met
gebruikmaking van originele Makitavervangingsonderdelen.
Page 23

ACCESSOIRES
LET OP:
• Deze accessoires of hulpstukken worden aanbevolen
voor gebruik met het Makita-gereedschap dat in deze
gebruiksaanwijzing wordt beschreven. Het gebruik van
andere accessoires of hulpstukken kan gevaar voor
persoonlijk letsel opleveren. Gebruik de accessoires of
hulpstukken uitsluitend voor de aangegeven
gebruiksdoeleinden.
Mocht u meer informatie willen hebben over deze
accessoires, dan kunt u contact opnemen met uw
plaatselijke Makita-servicecentrum.
•Nieten
• Diverse types originele Makita-accu’s en acculaders
• Veiligheidsbril
Alleen voor Europese landen
Geluid
De typische, A-gewogen geluidsniveaus zijn gemeten
volgens EN792:
Geluidsdrukniveau (L
Onzekerheid (K): 3 dB (A)
): 79 dB (A)
pA
Het geluidsniveau kan tijdens gebruik hoger worden dan
80 dB (A).
Draag gehoorbescherming.
Trilling
De trillingsemissiewaarde zoals vastgesteld volgens
EN792:
Gebruikstoepassing: nieten van hout
Trillingsemissie (a
Onzekerheid (K): 1,5 m/s
h
): 4,0 m/s
2
2
EU-verklaring van conformiteit ENH101-12
Wij, Makita Corporation, als de verantwoordelijke
fabrikant, verklaren dat de volgende Makitamachine(s):
Aanduiding van de machine: Accunietpistool
Modelnr./Type: BST220, BST221
in serie is geproduceerd en
Voldoen aan de volgende Europese richtlijnen:
98/37/EC tot en met 28 december 2009 en daarna
aan 2006/42/EC vanaf 29 december 2009
En zijn gefabriceerd in overeenstemming met de
volgende normen of genormaliseerde documenten:
EN60745
De technische documentatie wordt bewaard door onze
erkende vertegenwoordiger in Europa, te weten:
Makita International Europe Ltd.,
Michigan Drive, Tongwell,
Milton Keynes, MK15 8JD, Engeland
30 januari 2009
ENG104-1
ENG233-1
Tomoyasu Kato
Directeur
Makita Corporation
3-11-8, Sumiyoshi-cho,
Anjo, Aichi, JAPAN
23
Page 24

ESPAÑOL
Descripción y visión general
1. Parte roja
2. Botón
3. Cartucho de la batería
4. Disparador
5. Palanca de seguridad
6. Depósito alimentador secundario
7. Palanca de bloqueo
8. Grapas
9. Depósito alimentador principal
10. Canal de guía
11. Gancho
12. Tornillo
13. Tuerca
14. Parte frontal
15. Pieza de trabajo
16. Parte posterior
17. Mirilla
ESPECIFICACIONES
Modelo BST220 BST221
Ancho de grapa 10 mm 10 mm
Longitud de grapas aplicable 10 mm - 22 mm 10 mm - 22 mm
Capacidad del depósito alimentador de grapas 84 piezas 84 piezas
Longitud total 247 mm 251 mm
Peso neto 2,3 kg 2,4 kg
Tensión nominal CC de 14,4 V CC de 18 V
• Debido a nuestro programa continuo de investigación y desarrollo, las especificaciones aquí descritas están sujetas a
cambios sin previo aviso.
• Las especificaciones pueden ser diferentes de un país a otro.
• Peso, con el cartucho de la batería, de acuerdo con el procedimiento EPTA 01/2003
Uso previsto
La herramienta está diseñada para clavar grapas en
materiales de construcción tales como la madera.
ENE054-1
REGLAS DE SEGURIDAD
ADICIONALES PARA LA
HERRAMIENTA ENB069-1
1. Póngase siempre gafas de seguridad o gafas de
seguridad con protectores laterales y una careta
protectora completa cuando sea necesario.
2. No apunte con el puerto de expulsión a nadie de
su alrededor (especialmente a la cara). Mantenga
las manos y pies alejados del área del puerto de
expulsión.
3. Extraiga siempre el cartucho de la batería antes de
cargar las grapas, realizar ajustes, inspecciones,
mantenimiento o tras finalizar su uso.
4. Asegúrese de que no haya nadie cerca antes de
su uso. No intente nunca clavar grapas desde el
interior y exterior de la pared al mismo tiempo.
Las grapas podrían atravesar los materiales y/o
salir disparadas, presentando un grave peligro.
5. Observe el suelo donde pisa y mantenga su
equilibrio con la herramienta. Cuando trabaje en
una ubicación elevada asegúrese de que nadie se
encuentre debajo.
6. Compruebe las paredes, techos, suelos,
techumbres y elementos similares con cuidado
para evitar descargas eléctricas, fugas de gas,
explosiones, etc., ocasionadas por la perforación
de cables con tensión, conductos o tuberías de
gas.
7. Utilice solamente las grapas especificadas en este
manual. La utilización de otras grapas puede
24
ocasionar un mal funcionamiento de la
herramienta.
8. No manipule la herramienta ni intente utilizarla
para ningún otro fin que no sea clavar grapas.
9. No utilice la herramienta sin grapas. Se acortará la
vida útil de la herramienta.
10. Pare inmediatamente la operación de clavado si
nota algo incorrecto o fuera de lo normal en la
herramienta.
11. Nunca grape materiales que puedan permitir que
la grapa los perfore y salga despedida como un
proyectil.
12. Nunca accione el interruptor disparador y la
palanca de seguridad al mismo tiempo hasta que
esté preparado para grapar piezas de trabajo. Deje
que la pieza de trabajo ejerza presión sobre la
palanca de seguridad. Nunca impida su
funcionamiento fijando la palanca de seguridad
hacia atrás ni tirando de ella con la mano.
13. No manipule nunca la palanca de seguridad.
Compruebe el funcionamiento correcto de la
palanca de seguridad frecuentemente.
GUARDE ESTAS
INSTRUCCIONES.
Page 25

INSTRUCCIONES DE SEGURIDAD
IMPORTANTES
ENC007-4
PARA EL CARTUCHO DE LA
BATERÍA
1. Antes de utilizar el cartucho de la batería, lea
todas las instrucciones y referencias de
precaución que se encuentran en (1) el cargador
de baterías, (2) la batería y (3) el producto que
utiliza la batería.
2. No desmonte el cartucho de la batería.
3. Si el tiempo de funcionamiento es excesivamente
corto, deje de utilizar la herramienta de inmediato.
De lo contrario, existe el riesgo de
sobrecalentamiento, quemaduras e incluso
explosión.
4. Si se produce contacto ocular con electrolito,
enjuáguese los ojos con agua limpia y acuda de
urgencia al médico. Corre el riesgo de perder la
visión.
5. No cortocircuite el cartucho de la batería:
(1) No toque los terminales con material
conductor.
(2) Evite guardar el cartucho de la batería en un
recipiente con otros objetos metálicos, como
clavos, monedas, etc.
(3) No exponga el cartucho de la batería al agua o
a la lluvia. Un cortocircuito puede provocar un
elevado flujo de corriente, sobrecalentamiento,
quemaduras o incluso una avería.
6. No almacene la herramienta ni el cartucho de la
batería en lugares donde la temperatura supere
los 50 °C (122 °F).
7. No queme el cartucho de la batería aunque esté
gravemente dañado o completamente gastado. El
cartucho de la batería puede explotar si entra en
contacto con fuego.
8. Procure que la batería no sufra golpes ni caídas.
9. Durante el uso, procure que la batería no sufra
golpes ni caídas.
GUARDE ESTAS
INSTRUCCIONES.
Consejos para conseguir una mayor
duración de la batería
1. Cargue la batería antes de que se descargue por
completo. Deje de utilizar siempre la herramienta y
cargue el cartucho de la batería cuando observe
que tiene menos potencia.
2. No recargue nunca un cartucho de batería
completamente cargado. La sobrecarga acorta la
vida útil de la batería.
3. Cargue el cartucho de la batería a una temperatura
ambiente que oscile entre 10 °C y 40 °C (50°F 104°F). Antes de cargar un cartucho de batería
caliente, deje que se enfríe.
DESCRIPCIÓN DEL
FUNCIONAMIENTO
PRECAUCIÓN:
• Antes de ajustar o de comprobar la herramienta,
asegúrese siempre de que está apagada y de que la
batería ha sido extraída.
Instalación o extracción del cartucho de
la batería (Fig. 1)
• Apague siempre la herramienta antes de insertar o
extraer el cartucho de la batería.
• Para extraer el cartucho de la batería, quítelo de la
herramienta al mismo tiempo que desliza el botón
situado en la parte frontal del cartucho.
• Para insertar el cartucho de la batería, alinee la
lengüeta situada en el cartucho de la batería con la
ranura del alojamiento e insértela. Insértela
completamente hasta que quede firmemente sujeta y
se bloquee con un clic. Si puede ver la parte roja de la
zona superior del botón, significa que el cartucho no
está completamente bloqueado. Insértelo
completamente hasta que la parte roja quede oculta.
De lo contrario, el cartucho puede desprenderse
accidentalmente de la herramienta y causar lesiones al
operario o a alguna persona que se encuentre cerca.
• No haga fuerza al insertar el cartucho de la batería. Si
no se inserta suavemente, significa que no lo está
instalando correctamente.
Sistema de seguridad (Fig. 2)
Asegúrese de que todos los sistemas de seguridad están
en condiciones de funcionamiento antes de su utilización.
La herramienta no debe funcionar si sólo se tira del
disparador o si sólo se presiona la palanca de seguridad
contra la madera. Solamente debe funcionar cuando se
realicen ambas acciones. Pruebe si el funcionamiento es
incorrecto con una herramienta descargada y apuntada
en la dirección opuesta a usted y a cualquier otra persona
que pueda estar a su alrededor.
NOTA:
• Existe la posibilidad de que la herramienta funcione un
instante cuando sólo se tira del disparador. Esto no
indica un problema. En ese caso, apunte la
herramienta en la dirección opuesta a usted y a
cualquier persona que pudiera estar alrededor.
Libere i tire del disparador de nuevo para asegurarse
de que los sistemas de seguridad funcionan
correctamente.
MONTAJE
PRECAUCIÓN:
• Asegúrese siempre de que sus dedos no estén sobre
el disparador o la palanca y que el cartucho de la
batería se haya extraído antes de realizar cualquier
trabajo en la grapadora.
Grapas
• Maneje las grapas y su caja con cuidado. Si las grapas
se han manipulado bruscamente, pueden estar
deformadas, lo que causaría una mala alimentación de
grapas o atascos.
25
Page 26

• Evite almacenar grapas en un lugar muy húmedo o
caluroso o en un lugar expuesto a la luz solar directa.
PRECAUCIÓN:
• No utilice grapas diferentes de las indicadas en este
manual o grapas que parecen dañadas, dobladas,
oxidadas o corroídas.
• No inserte grapas de tamaño diferente
simultáneamente en el depósito alimentador, ya que se
provocaría una mala alimentación o atascos.
Carga de grapas
Extraiga el cartucho de la batería.
Pulse la palanca de bloqueo en la parte posterior del
depósito alimentador secundario y deslice el depósito
alimentador secundario hacia atrás. (Fig. 3)
Cargue grapas en el depósito alimentador principal con
sus patas mirando hacia arriba. Deslice el depósito
alimentador secundario hacia delante. (Fig. 4)
Para fijar el depósito alimentador secundario en su lugar,
enganche la palanca de bloqueo en la parte posterior del
depósito alimentador secundario.
PRECAUCIÓN:
• Con el depósito alimentador cargado, si la herramienta
se sujeta hacia abajo y se abre el depósito alimentador
secundario, las grapas pueden caer y ser un peligro
para cualquier persona u objeto que esté debajo.
Tenga esto en cuenta especialmente cuando trabaje
en ubicaciones elevadas.
Descarga de grapas
PRECAUCIÓN:
• Cuando extraiga grapas, asegúrese siempre de que
sus dedos no estén sobre el disparador o la palanca y
el cartucho de la batería se haya extraído de la
grapadora. Un disparo incorrecto puede provocar
daños personales y materiales.
Extraiga el cartucho de la batería.
Pulse la palanca de bloqueo y deslice el depósito
alimentador hacia atrás. (Fig. 5)
Retire las grapas de la apertura del depósito alimentador.
(Fig. 6)
Gancho
PRECAUCIÓN:
• Asegúrese siempre de que sus dedos no estén sobre
el disparador o la palanca y que el cartucho de la
batería se haya extraído antes de usar el gancho.
(Fig. 7)
PRECAUCIÓN:
• No cuelgue el gancho del cinturón. Si la grapadora se
cae, lo que puede suceder si el gancho se sale de su
lugar accidentalmente, se puede provocar un disparo
accidental y lesiones personales.
El gancho es útil para colgar la herramienta.
Puede instalarse en cualquier lado de la herramienta.
Para instalar el gancho, insértelo en una de las ranuras
situadas a ambos lados de la herramienta y, a
continuación, fíjelo con un tornillo.
Para extraerlo, afloje el tornillo y quítelo. (Fig. 8)
MANEJO
Ajuste de profundidad (Fig. 9)
Si las grapas se clavan demasiado o demasiado poco,
ajuste la profundidad de clavado girando la tuerca de la
parte inferior de la herramienta. Para una mayor
profundidad de clavado de las grapas, gire la tuerca en el
sentido de las agujas del reloj. Para una menor
profundidad de clavado, gire la tuerca en el sentido
contrario a las agujas del reloj. Tenga en cuenta que la
tuerca debe girarse en incrementos de 90° (1/4 de giro)
de forma que la ranura de la tuerca quede paralela con el
depósito alimentador.
Grapado (Fig. 10)
Coloque la abertura de la herramienta por la que se
disparan las grapas plana sobre el material que se debe
fijar y sujete la herramienta firmemente contra el material.
A continuación tire de la palanca y después tire
completamente del disparador para grapar. La
empuñadura tiene una forma que permite sujetar la
herramienta firmemente con el dedo índice y el pulgar.
Tras clavar una grapa, asegúrese de soltar totalmente el
disparador.
Si la cabeza de la grapa sobresale de la superficie del
material que desea grapar, grape mientras sujeta el
cabezal de la grapadora firmemente. (Fig. 11)
NOTA:
• El uso continuo de la grapadora con la cabeza de las
grapas clavadas sobresaliendo del material que se
grapa puede causar daños en el resorte de empuje de
la grapadora y atascos en la grapadora, etc.
Comprobación de las grapas restantes
(Fig. 12)
PRECAUCIÓN:
• No utilice la herramienta sin grapas. Se acortará la vida
útil de la herramienta.
Existe una útil mirilla en el lado derecho de la herramienta
(cuando se mira la herramienta desde la parte frontal).
Utilice esta mirilla para comprobar si hay grapas en el
depósito alimentador. Cuando no se puedan ver grapas a
través de la mirilla, cargue grapas en el depósito
alimentador.
Extracción de grapas atascadas
ADVERTENCIA:
• Asegúrese siempre de que el disparador se haya
soltado y que el cartucho de la batería se haya
extraído antes de retirar las grapas atascadas.
Extraiga el cartucho de la batería de la grapadora.
(Fig. 13)
Pulse la palanca de bloqueo en la parte posterior del
depósito alimentador secundario y deslice el depósito
alimentador secundario hacia atrás.
Retire las grapas atascadas que permanecen dentro de la
apertura desde la que se disparan grapas, tal como se
muestra.
26
Page 27

MANTENIMIENTO
PRECAUCIÓN:
• Asegúrese de apagar siempre la herramienta y extraer
el cartucho de la batería antes de intentar realizar
cualquier trabajo de inspección o mantenimiento en
ella.
• Para conservar la SEGURIDAD y la FIABILIDAD del
producto, los trabajos de reparación y otros trabajos de
mantenimiento y ajuste deberán ser realizados en
centros de servicio autorizados de Makita, utilizando
siempre repuestos Makita.
ACCESORIOS
PRECAUCIÓN:
• Se recomienda el uso de estos accesorios o
complementos con la herramienta Makita especificada
en este manual. El uso de otros accesorios o
complementos puede conllevar el riesgo de ocasionar
daños corporales. Utilice los accesorios o
complementos solamente para su fin establecido.
Si necesita cualquier ayuda para obtener más
información relativa a estos accesorios, pregunte al
centro de servicio Makita local.
•Grapas
• Diversos tipos de baterías y cargadores originales de
Makita
• Gafas de seguridad
Sólo para los países europeos
Ruido
ENG104-1
Niveles típicos de ruido ponderado A determinados
conforme a EN792:
Nivel de presión de sonido (L
Incertidumbre (K): 3 dB (A)
): 79 dB (A)
pA
El nivel de ruido durante el trabajo puede superar los
80 dB (A).
Utilice protección para los oídos.
Vibración
ENG233-1
Valor de emisión de vibraciones determinado de acuerdo
con EN792:
Modo de trabajo: grapado de madera
Emisión de vibraciones (a
Incertidumbre (K): 1,5 m/s
h
2
): 4,0 m/s
2
Declaración de conformidad de la CE ENH101-12
Nosotros, Makita Corporation, en calidad de
fabricante responsable, declaramos que las
siguientes máquinas Makita:
Designación de la máquina: Grapadora sin cable
Nº de modelo/ Tipo: BST220, BST221
son de producción serie y
Cumplen con las siguientes Directivas europeas:
98/37/EC hasta el 28 de diciembre de 2009 y
después con 2006/42/EC desde el 29 de diciembre
de 2009
Y se han fabricado de acuerdo con los siguientes
estándares o documentos estandarizados:
EN60745
La documentación técnica la conserva nuestro
representante autorizado en Europa, que es:
Makita International Europe Ltd,
Michigan, Drive, Tongwell,
Milton Keynes, MK15 8JD, Inglaterra
30 de enero de 2009
Tomoyasu Kato
Director
Makita Corporation
3-11-8, Sumiyoshi-cho,
Anjo, Aichi, JAPAN
27
Page 28

PORTUGUÊS
Descrição geral
1. Peça vermelha
2. Botão
3. Bateria
4. Gatilho
5. Alavanca de segurança
6. Sub carregador
7. Alavanca de bloqueio
8. Agrafos
9. Carregador principal
10. Encaixe
11. Gancho
12. Parafuso
13. Porca
14. Frente
15. Peça de trabalho
16. Traseira
17. Visor
ESPECIFICAÇÕES
Modelo BST220 BST221
Largura do agrafo 10 mm 10 mm
Comprimento dos agrafos aplicáveis 10 mm - 22 mm 10 mm - 22 mm
Capacidade do carregador de agrafos 84 unidades 84 unidades
Comprimento total 247 mm 251 mm
Peso líquido 2,3 kg 2,4 kg
Voltagem nominal CC 14,4 V CC 18 V
• Devido à pesquisa e desenvolvimento constantes, estas especificações estão sujeitas a alteração sem aviso prévio.
• Estas especificações podem diferir de país para país.
• Peso, com a bateria, de acordo com o procedimento EPTA de 01/2003
Utilização prevista
Esta ferramenta destina-se a colocar agrafos em
materiais de construção tais como, por exemplo,
madeiras.
ENE054-1
REGRAS ADICIONAIS DE
SEGURANÇA PARA A
FERRAMENTA ENB069-1
1. Use sempre óculos protectores ou óculos de
segurança com protecção lateral e um visor de
protecção completo quando necessário.
2. Não aponte a porta de ejecção a ninguém que se
encontre nas proximidades (especialmente para a
cara). Mantenha as mãos e os pés afastados da
área da porta de ejecção.
3. Retire sempre a bateria antes de carregar os
agrafos, efectuar ajustes, inspecção, manutenção
ou após a operação estar concluída.
4. Assegure-se de que não há ninguém nas
proximidades antes de utilizar. Nunca tente inserir
agrafos do lado de dentro e do lado de fora da
parede ao mesmo tempo. Os agrafos podem
atravessar a madeira e/ou sair disparados,
representando um perigo muito grave.
5. Tenha cuidado e mantenha-se numa posição firme
e equilibrada durante a utilização da ferramenta.
Certifique-se de que não se encontra ninguém por
baixo ao trabalhar em locais altos.
6. Inspeccione cuidadosamente as paredes, tectos,
pisos e telhados para evitar o risco de choque
eléctrico, fuga de gás, explosões, etc., que podem
ser causados se ao pregar encontrar fios ligados,
condutas ou canos de gás.
7. Utilize apenas agrafos especificados neste
manual. A utilização de agrafos diferentes pode
causar o mau funcionamento da ferramenta.
8. Não modifique a ferramenta nem tente usá-la para
além de inserir agrafos.
9. Não utilize a ferramenta sem agrafos. Tal diminui
o tempo de vida funcional da ferramenta.
10. Pare de pregar imediatamente se notar qualquer
problema ou algo anormal com a ferramenta.
11. Nunca agrafe em materiais que possam permitir
que o agrafo perfure ou atravesse como um
projéctil.
12. Nunca accione o gatilho e a alavanca de
segurança ao mesmo tempo até estar preparado
para agrafar nas peças de trabalho. Permita que a
peça de trabalho empurre a alavanca de
segurança. Nunca tente contrariar o objectivo da
alavanca mantendo-a puxada para trás ou
premindo-a manualmente.
13. Nunca adultere a alavanca de segurança.
Verifique frequentemente a alavanca de
segurança para assegurar o funcionamento
correcto.
GUARDE ESTAS INSTRUÇÕES.
INSTRUÇÕES DE SEGURANÇA
IMPORTANTES
ENC007-4
RELATIVAS À BATERIA
1. Antes de utilizar a bateria leia as instruções e
chamadas de atenção de: (1) o carregador da
bateria, (2) a bateria e, (3) o produto que utiliza a
bateria.
28
Page 29

2. Não desmonte a bateria.
3. Se o tempo de utilização com bateria se tornar
demasiado curto, deve parar imediatamente. Se
continuar, pode causar sobreaquecimento, fogo e
mesmo explosão.
4. Se o electrólito entrar em contacto com os olhos,
enxagúe-os com água limpa e consulte
imediatamente um médico. Os riscos incluem
perda de visão.
5. Não provoque um curto-circuito na bateria:
(1) Não deixe que quaisquer materiais condutores
entrem em contacto com os terminais da
bateria.
(2) Evite guardar a bateria juntamente com outros
objectos de metal como moedas, por exemplo.
(3) Não exponha a bateria a água ou chuva. Um
curto-circuito na bateria pode criar uma
grande carga eléctrica, sobreaquecimento,
fogo e uma quebra da corrente.
6. Não guarde a ferramenta e a bateria em locais
onde a temperatura possa atingir ou exceder 50ºC
(122ºF).
7. Não incinere a bateria, nem mesmo que esta se
tenha avariado irremediavelmente ou se tenha
gasto completamente com o uso. Pode explodir e
causar fogo.
8. Não a deixe cair e evite o choque com outros
objectos.
9. Não utilize baterias que tenham caído ou sofrido
choques.
• Para inserir a bateria alinhe-a com a calha recolhida e
encaixe-a suavemente. Insira-a completamente até
sentir um clique de encaixe. Se ainda estiver visível a
peça vermelha na parte superior do botão, não estará
bem encaixada. Insira-a completamente, até deixar de
ver a peça vermelha. Caso contrário, pode cair da
ferramenta e causar ferimentos em si, ou em alguém
que esteja perto de si.
• Não exerça força ao inserir a bateria. Se não encaixar
facilmente é porque não está correctamente
posicionada.
Sistema de segurança (Fig. 2)
Certifique-se de que todos os sistemas de segurança
estão a funcionar adequadamente antes de utilizar a
ferramenta. A ferramenta não deve funcionar caso prima
apenas o gatilho ou pressione apenas a alavanca de
segurança contra a madeira. Esta deve funcionar apenas
ao executar ambas as acções. Teste um possível
funcionamento incorrecto com a ferramenta
descarregada e apontada para longe de si ou quaisquer
pessoas presentes.
NOTA:
• Existe a possibilidade de a ferramenta funcionar
durante um breve período, quando apenas é premido o
gatilho. Isto não constitui um problema. Se tal ocorrer,
aponte a ferramenta para longe de si ou quaisquer
pessoas presentes.
Solte e puxe novamente o gatilho, para garantir que os
sistemas de segurança estão a funcionar
correctamente.
GUARDE ESTAS INSTRUÇÕES.
Dicas para o máximo de tempo de vida da
bateria
1. Não espere que a bateria se gaste completamente
para voltar a carregá-la. Pare a ferramenta e
carregue a bateria sempre que detectar um baixo
nível de energia.
2. Nunca volte a carregar uma bateria já
completamente carregada. O carregamento
excessivo diminui o tempo de vida das baterias.
3. Carregue a bateria em locais onde a temperatura
se situe entre 10 ºC e 40 ºC. Se a bateria estiver
quente, deixe-a arrefecer antes de iniciar o
carregamento.
DESCRIÇÃO DO
FUNCIONAMENTO
PRECAUÇÃO:
• Certifique-se sempre de que a ferramenta está
desligada e a bateria foi removida antes de proceder a
ajustamentos ou testar acessórios.
Inserir ou retirar a bateria (Fig. 1)
• Sempre que for inserir ou remover a bateria, desligue a
ferramenta.
• Para retirar a bateria, puxe-a para fora ao mesmo
tempo que desliza o botão localizado na parte frontal.
MONTAGEM
PRECAUÇÃO:
• Antes de proceder a qualquer intervenção no
agrafador, certifique-se sempre de que os seus dedos
não se encontram no gatilho e que a bateria não se
encontra no agrafador.
Agrafos
• Manuseie os agrafos e a respectiva caixa com
cuidado. Se os agrafos não forem manuseados com
cuidado, podem deformar-se, fazendo com que o
agrafador encrave.
• Evite guardar os agrafos em lugares muito húmidos ou
muito quentes ou em lugares expostos à luz solar
directa.
PRECAUÇÃO:
• Não use agrafos além dos designados neste manual
ou agrafos que demonstram estar danificados,
dobrados, enferrujados ou corroídos.
• Não insira agrafos com tamanhos diferentes
simultaneamente no carregador, pois pode encravar o
agrafador.
Carregar agrafos
Retire a bateria.
Prima a alavanca de bloqueio na parte de trás do sub
carregador e deslize o sub carregador para trás. (Fig. 3)
Carregue os agrafos na carregador principal com os
pernos para cima. Deslize o sub carregador para a frente.
(Fig. 4)
29
Page 30

Para engatar bem o sub carregador, engate a alavanca
de bloqueio na parte de trás do sub carregador.
PRECAUÇÃO:
• Com o carregador carregado, se a ferramenta for
segurada para baixo e o sub carregador for aberto, os
agrafos podem cair e criar perigo a quem estiver em
baixo. Lembre-se disto, especialmente quando
trabalhar em locais altos.
Descarregar agrafos
PRECAUÇÃO:
• Ao retirar os agrafos, certifique-se de que os seus
dedos não se encontram no gatilho ou na alavanca e
que a bateria não se encontra no agrafador. Disparos
acidentais podem causar ferimentos e danos
materiais.
Retire a bateria.
Prima a alavanca de bloqueio e deslize o carregador para
trás. (Fig. 5)
Retire os agrafos da ranhura do carregador. (Fig. 6)
Gancho
PRECAUÇÃO:
• Antes de utilizar o gancho, certifique-se sempre de que
os seus dedos não se encontram no gatilho ou na
alavanca e que a bateria não se encontra na
ferramenta. (Fig. 7)
PRECAUÇÃO:
• Não pendure o gancho no cinto. Deixar cair o
agrafador, o que pode acontecer caso o gancho se
desencaixe acidentalmente, pode causar um disparo
acidental e ferimentos.
O gancho é muito útil para pendurar a ferramenta quando
necessário.
Pode ser instalado de qualquer dos lados.
Para instalar o gancho, insira-o numa das ranhuras do
corpo da ferramenta, em qualquer dos lados e, em
seguida, fixe-o com um parafuso.
Para o remover, basta desapertar o parafuso. (Fig. 8)
FUNCIONAMENTO
Ajuste da profundidade (Fig. 9)
Se os agrafos forem agrafados demasiado ou pouco
profundamente, ajuste a profundidade de agrafamento
rodando a porca no fundo da ferramenta. Para agrafar
com maior profundidade, rode a porca para a direita. Para
agrafar com menor profundidade, rode a porca para a
esquerda. Note que a porca deve ser rodada em
incrementos de 90° (1/4 de volta), de forma a que a
ranhura na porca fique paralela ao carregador.
Agrafar (Fig. 10)
Encoste a abertura por onde os agrafos são disparados
no material a pregar e segure firmemente a ferramenta
contra o material. De seguida, puxe a alavanca e depois
prima completamente o gatilho para inserir os agrafos. A
pega está configurada de forma a que a cabeça da
ferramenta possa ser segurada com o dedo indicador e o
polegar. Após a inserção de um agrafo, solte
completamente o gatilho.
Quando a cabeça do agrafo inserido permanece acima
da superfície do material a pregar, insira o agrafo
enquanto segura firmemente a cabeça do agrafador.
(Fig. 11)
NOTA:
• A utilização contínua do agrafador em casos em que a
cabeça de agrafos disparados permanece acima da
superfície do material a pregar pode causar danos no
agrafador, bem como encravamento de agrafos, etc..
Verificar os restantes agrafos (Fig. 12)
PRECAUÇÃO:
• Não utilize a ferramenta sem agrafos. Tal diminui o
tempo de vida funcional da ferramenta.
Existe um visor conveniente no lado direito da ferramenta
(quando olha para a ferramenta de frente). Utilize este
visor para verificar se existem agrafos no carregador.
Quando não forem visíveis agrafos através do visor,
carregue agrafos no carregador.
Retirar os agrafos encravados
AVI SO :
• Antes de retirar agrafos encravados, certifique-se
sempre de que o gatilho está libertado e de que a
bateria não se encontra na ferramenta.
Retire a bateria do agrafador. (Fig. 13)
Prima a alavanca de bloqueio na parte de trás do sub
carregador e deslize o sub carregador para trás.
Retire os agrafos presos que permanecem dentro da
abertura por onde são disparados à medida que aparece.
MANUTENÇÃO
PRECAUÇÃO:
• Certifique-se sempre de que a ferramenta está
desligada e a bateria removida antes de efectuar
operações de inspecção ou de manutenção.
• Para manter os níveis de SEGURANÇA e
FIABILIDADE definidos para este produto, reparações,
operações de manutenção ou ajustes devem ser
executados por centros de assistência Makita
autorizados e, no caso de substituição de peças, estas
devem ser igualmente Makita.
ACESSÓRIOS
PRECAUÇÃO:
• Os seguintes acessórios ou extensões são os
recomendados para utilizar com a ferramenta Makita
especificada neste manual. A utilização de outros
acessórios ou extensões podem provocar ferimentos.
Utilize cada acessório ou extensão apenas para o fim
indicado.
Se precisar de informações adicionais relativas aos
acessórios, contacte o centro local de assistência Makita.
• Agrafos
• Vários tipos de baterias e carregadores Makita
genuínos.
• Óculos protectores
30
Page 31

Apenas para os países europeus
Ruído
ENG104-1
Os níveis acústicos ponderados A típicos foram
determinados segundo a EN792:
Nível de pressão sonora (L
Imprecisão (K): 3 dB (A)
): 79 dB (A)
pA
O nível de ruído quando em funcionamento pode exceder
os 80 dB (A).
Use protecção para os ouvidos.
Vibração
ENG233-1
O valor de emissão de vibrações é determinado de
acordo com a EN792:
Modo de trabalho: agrafar madeira
Emissão de vibração (a
Imprecisão (K): 1,5 m/s
h
2
): 4,0 m/s
2
Declaração de conformidade EC ENH101-12
A Makita Corporation, na qualidade do fabricante
responsável, declara que a(s) máquina(s) Makita
seguinte(s):
Designação da máquina: Agrafador sem fios
N.º de modelo/Tipo: BST220, BST221
são produzidas em série e
estão em conformidade com as Directivas Europeias
seguintes:
98/37/EC até 28 de Dezembro de 2009 e, de
seguida, com a 2006/42/EC a partir de 29 de
Dezembro de 2009
E são fabricadas de acordo com as normas ou os
documentos padronizados seguintes:
EN60745
A documentação técnica é mantida pelo nosso
representante autorizado na Europa, que é:
Makita International Europe Ltd,
Michigan, Drive, Tongwell,
Milton Keynes, MK15 8JD, Inglaterra
30 de Janeiro de 2009
Tomoyasu Kato
Director
Makita Corporation
3-11-8, Sumiyoshi-cho,
Anjo, Aichi, JAPAN
31
Page 32

DANSK
Forklaring til generel oversigt
1. Rød del
2. Knap
3. Batteripakke
4. Aftrækker
5. Sikkerhedshåndtag
6. Undermagasin
7. Låsearm
8. Hæfteklammer
9. Hovedmagasin
10. Rille
11. Kro g
12. Skrue
13. Møtrik
14. Forside
15. Arbejdsemne
16. Bagside
17. Vindue til tjek af hæfteklammer
SPECIFIKATIONER
Model BST220 BST221
Bredde på hæfteklammer 10 mm 10 mm
Gældende bredde på hæfteklammer 10-22 mm 10-22 mm
Kapacitet af hæfteklammemagasin 84 stk. 84 stk.
Længde i alt 247 mm 251 mm
Nettovægt 2,3 kg 2,4 kg
Nominel spænding 14,4 V DC 18 V DC
• På grund af vores løbende forsknings- og udviklingsprogram kan specifikationerne heri ændres uden forudgående
varsel.
• Specifikationerne kan variere fra land til land.
• Vægt, inklusive batteripakken, i henhold til EPTA-Procedure 01/2003
Tilsigtet brug
Værktøjet er beregnet til at skyde hæfteklammer ind i
byggematerialer såsom tømmer.
ENE054-1
YDERLIGERE
SIKKERHEDSREGLER FOR
VÆRKTØJET ENB069-1
1. Bær altid sikkerhedsbriller med sideskjold samt et
komplet visir, hvis det er påkrævet.
2. Ret ikke udstødsporten mod personer i nærheden
(især ikke mod ansigtet). Hold hænder og fødder
borte fra området omkring udstødsporten.
3. Fjern altid batteripakken, før De lader
hæfteklammerne eller justerer, inspicerer eller
vedligeholder hæftepistolen.
4. Sørg for, at der ikke er andre i nærheden, før
arbejdet påbegyndes. Forsøg aldrig at hæfte fra
både indersiden og ydersiden af væggen
samtidigt. Hæfteklammer kan gå igennem og/eller
flyve væk og udgøre en alvorlig fare.
5. Vær opmærksom på fodfæstet, og hold balancen
med værktøjet. Sørg for, at der ikke er nogen
under Dem, når De benytter værktøjet på
højtliggende steder.
6. Kontroller vægge, lofter, gulve, tage og lignende
omhyggeligt for at undgå risiko for elektrisk stød,
gasudsivning, eksplosioner osv. ved at hæfte
strømførende ledninger, vandledninger eller
gasrør.
7. Brug kun de hæfteklammer, der er angivet i denne
brugsanvisning. Brug af andre hæfteklammer kan
beskadige værktøjet.
8. Pil ikke ved værktøjet, og forsøg ikke at bruge det
til andet end til affyring af hæfteklammer.
32
9. Anvend ikke værktøjet uden hæfteklammer. Dette
forkorter værktøjets levetid.
10. Stop arbejdet øjeblikkeligt, hvis De bemærker
fejlfunktion eller noget unormalt ved værktøjet.
11. Affyr aldrig hæfteklammer i materiale, hvor
hæfteklammen kan gennemtrænge det og gå
igennem som et projektil.
12. Aktiver aldrig aftrækkeren og
sikkerhedshåndtaget på samme tid, medmindre
De er klar til at hæfte hæfteklammer på
arbejdsemnet. Giv arbejdsemnet mulighed for at
trykke sikkerhedshåndtaget ned.
Sikkerhedshåndtaget må aldrig fastgøres i
tilbagepositionen eller nedtrykkes med hånd.
13. Pil aldrig ved sikkerhedshåndtaget. Kontroller ofte
sikkerhedshåndtaget for at sikre korrekt brug.
GEM DISSE INSTRUKTIONER.
VIGTIGE
SIKKERHEDSINSTRUKTIONER
ENC007-4
FOR BATTERIPAKKEN
1. Før brugen af batteripakken skal De læse alle
instruktioner og advarsler på (1) batteriopladeren,
(2) batteriet og (3) det produkt, som batteriet
anvendes i.
2. Skil ikke batteripakken ad.
3. Hvis driftstiden bliver betydeligt kortere, skal De
straks ophøre med brugen. Brug kan medføre
risiko for overophedning, mulige forbrændinger
eller endog eksplosion.
Page 33

4. Hvis De får elektrolyt i øjnene, skal De med det
samme rense øjnene med rent vand og søge læge.
Dette kan medføre tab af synet.
5. Kortslut ikke batteripakken:
(1) Undgå at røre ved terminalerne med ledende
materiale.
(2) Undgå at opbevare batteripakken i en beholder
med andre metalgenstande som f.eks. søm,
mønter osv.
(3) Udsæt ikke batteripakken for vand eller regn.
Hvis batteriet kortsluttes, kan det medføre
voldsom strøm, overophedning, mulige
forbrændinger og endog nedbrud.
6. Undgå at opbevare værktøjet og batteripakken på
steder, hvor temperaturen kan komme op på eller
overstige 50 °C.
7. Sæt ikke ild til batteripakken, selvom den er
alvorligt beskadiget eller helt udtjent.
Batteripakken kan eksplodere ved brand.
8. Undgå at tabe eller slå på batteriet.
9. Brug ikke et batteri, der har været tabt eller slået
på.
GEM DISSE INSTRUKTIONER.
Tip til, hvordan De forlænger batteriets
levetid
1. Udskift batteripakken, før den bliver helt afladet.
Ophør med at bruge værktøjet, og oplad
batteripakken, hvis strømmen til værktøjet aftager.
2. Oplad aldrig en fuldt opladet batteripakke.
Overopladning forkorter batteriets levetid.
3. Oplad batteripakken ved stuetemperatur på 1040 °C. Lad batteripakken køle ned, før den
oplades, hvis den er varm.
FUNKTIONSBESKRIVELSE
FORSIGTIG:
• Sørg altid for, at værktøjet er slukket, og at
batteripakken er taget ud, før De justerer værktøjet
eller kontrollerer dets funktion.
Montering eller afmontering af
batteripakken (Fig. 1)
• Sluk altid for værktøjet, før De monterer eller
afmonterer batteripakken.
• Ved afmontering af batteripakken trækkes den ud af
værktøjet, mens der trykkes på knappen foran på
pakken.
• Ved montering af batteripakken justeres tungen på
batteripakken med rillen i huset, hvorefter pakken
skubbes på plads. Sæt den altid hele vejen ind, indtil
den låses på plads med et lille klik. Hvis den røde del
øverst på knappen er synlig, er batteripakken ikke låst
helt fast. Sæt den helt ind, indtil den røde del ikke er
synlig. Ellers kan den falde ud af værktøjet og skade
Dem eller andre personer i nærheden.
• Brug ikke magt ved indsætning af batteripakken. Hvis
den ikke glider let ind, er den ikke indsat korrekt.
Sikkerhedssystem (Fig. 2)
Sørg for, at alle sikkerhedssystemer fungerer før
anvendelsen. Værktøjet må ikke betjenes, når der kun
trækkes i aftrækkeren, eller hvis kun kontaktarmen
trykkes mod træet. Det må kun fungere, når begge disse
handlinger udføres. Tjek værktøjet for fejl, mens det ikke
er ladet, og mens det peger væk fra Dem selv og andre.
BEMÆRK:
• Det er muligt, at værktøjet kan fungere i et kort øjeblik,
selvom der kun trækkes i aftrækkeren. Det betyder
ikke, at der er et problem. Skulle dette ske, skal De
pege værktøjet væk fra Dem selv og andre personer.
Slip og træk i aftrækkeren igen for at sikre, at
sikkerhedssystemerne fungerer, som de skal.
MONTERING
FORSIGTIG:
• Kontroller altid, at Deres fingre ikke er placeret på
aftrækkeren, og at batteripakken er fjernet, før
hæftepistolen vedligeholdes.
Hæfteklammer
• Håndter hæfteklammer og æsken med dem forsigtigt.
Hvis hæfteklammerne håndteres for hårdt, kan de blive
bøjede, hvilket kan give en dårlig fremføring af
hæfteklammer eller fastklemning.
• Undgå at opbevare hæfteklammer på fugtige eller
varme steder eller på steder, der er udsat for direkte
sollys.
FORSIGTIG:
• Brug ikke andre hæfteklammer end dem, der er angivet
i denne brugsanvisning, eller hæfteklammer, der ser ud
til at være beskadigede, bøjede, mærkede af rust eller
korroderede.
• Sæt ikke hæfteklammer af forskellig størrelse i
magasinet samtidigt, da det kan forringet fremføring af
hæfteklammer eller fastklemning.
Isætning af hæfteklammer
Fjern batteripakken.
Tryk på låsehåndtaget bag på undermagasinet, og skyd
undermagasinet bagud. (Fig. 3)
Sæt hæfteklammer i hovedmagasinet, så benene peger
opad. Skyd undermagasinet fremad. (Fig. 4)
For at sætte undermagasinet på plads fastgøres
låsehåndtaget til bagsiden af undermagasinet.
FORSIGTIG:
• Når magasinet er fyldt, og hvis værktøjet holdes nedad,
og magasinet er åbnet, kan der være risiko for, at
hæfteklammerne falder ud og udgør en fare for, hvad
der måtte befinde sig nedenfor. Husk især på dette, når
der arbejdes i højden.
Udtagning af hæfteklammer
FORSIGTIG:
• Kontroller altid, at Deres fingre ikke er placeret på
aftrækkeren eller håndtaget, og at batteripakken er
fjernet, før hæftepistolen tømmes. Affyring ved uheld
kan forårsage personlige skader og skader på inventar.
Fjern batteripakken.
33
Page 34

Tryk låsehåndtaget ned, og skub magasinet tilbage.
(Fig. 5)
Fjern hæfteklammerne fra magasinet. (Fig. 6)
Krog
FORSIGTIG:
• Kontroller altid, at Deres fingre ikke er placeret på
aftrækkeren eller håndtaget, og at batteripakken er
fjernet, før krogen anvendes. (Fig. 7)
FORSIGTIG:
• Hæng ikke krogen i livremmen. Hvis hæftepistolen
tabes, hvilket kan ske, hvis krogen ved et uheld løsnes,
kan det forårsage forkert affyring og personlige skader.
Krogen er nyttig til midlertidig ophængning af værktøjet.
Den kan monteres i begge sider af værktøjet.
For at montere krogen indsættes den i en rille i værktøjet
på en af siderne, hvorefter den fastgøres med en skrue.
Den afmonteres ved at løsne skruen og tage den ud.
(Fig. 8)
BETJENING
Dybdejustering (Fig. 9)
Affyringsdybden kan indstilles ved at dreje møtrikken i
bunden af værktøjet, hvis hæfteklammerne ikke affyres til
den rigtige dybde. Møtrikken skal drejes med uret, hvis
hæfteklammerne skal længere ind. Hvis hæfteklammerne
ikke skal affyres helt så dybt, skal møtrikken drejes mod
uret. Bemærk, at møtrikken skal drejes 90° (1/4 omgang),
så møtrikkens rille løber parallelt med magasinet.
Affyring af hæfteklammer (Fig. 10)
Placer mundingen af hæftepistolen fladt mod materialet,
der skal hæftes, og hold værktøjet fast mod materialet.
Aktiver derefter håndtaget, og tryk på aftrækkeren for at
affyre hæfteklammerne. Grebet er udformet således, at
værktøjshovedet kan holdes sikkert ned med pege- og
tommelfingrene. Efter affyring af en hæfteklamme skal
aftrækkeren slippes helt.
Når hovedet af en hæfteklamme forbliver over overfladen
af materialet, der skal fastgøres, skal hæfteklammen
affyres, samtidig med at hæfteklammens top holdes fast.
(Fig. 11)
BEMÆRK:
• Vedvarende brug af hæftepistolen, hvor toppen af
affyrede klammer forbliver over den overflade, der skal
hæftes, kan forårsage skader på hæftepistolen og
fastklemning af klammer osv.
Kontrol af resterende hæfteklammer
(Fig. 12)
FORSIGTIG:
• Anvend ikke værktøjet uden hæfteklammer. Dette
forkorter værktøjets levetid.
På højre side af værktøjet er der et brugervenligt vindue
(når man ser værktøjet forfra). Brug dette vindue til at
tjekke, om der er flere hæfteklammer i magasinet. Hvis
hæfteklammerne ikke kan ses gennem vinduet, skal
magasinet lades.
Fjernelse af fastklemte hæfteklammer
ADVARSEL:
• Kontroller altid, at aftrækkeren er frakoblet, og at
batteripakken er fjernet, før fastklemte klammer
fjernes.
Fjern batteripakken fra hæftepistolen. (Fig. 13)
Tryk på låsehåndtaget bag på undermagasinet, og skyd
undermagasinet bagud.
Fjern fastklemte hæfteklammer, der er forblevet inden i
den åbning, hvor hæfteklammerne fyres ud igennem, når
de dukker op.
VEDLIGEHOLDELSE
FORSIGTIG:
• Sørg altid for, at værktøjet er slukket, og at
batteripakken er taget ud, før De forsøger at udføre
inspektion eller vedligeholdelse.
• For at holde produktet SIKKERT og PÅLIDELIGT skal
reparationer samt al anden vedligeholdelse eller
justering udføres af autoriserede Makita-servicecentre,
og der skal altid benyttes Makita-reservedele.
TILBEHØR
FORSIGTIG:
• Dette tilbehør eller ekstraudstyr anbefales til brug med
det Makita-værktøj, som er beskrevet i denne
brugsanvisning. Brug af andet tilbehør eller
ekstraudstyr kan forårsage personskade. Brug kun
tilbehør eller ekstraudstyr til det formål, det er beregnet
til.
Henvend Dem til Deres lokale Makita-servicecenter, hvis
De har brug for hjælp eller yderligere oplysninger
vedrørende tilbehøret.
• Hæfteklammer
• Forskellige typer af originale batterier og opladere fra
Makita
• Sikkerhedsbriller
Kun for lande i Europa
Støj
Det typiske A-vægtede støjniveau bestemt i
overensstemmelse med EN792:
Lydtryksniveau (L
Usikkerhed (K): 3 dB (A)
Støjniveauet under arbejdet kan være større end
80 dB (A).
Vibration
Vibrationsemissionsværdien bestemt i henhold til EN792:
Arbejdstilstand: hæftning af træ
Vibrationsemission (a
Usikkerhed (K): 1,5 m/s
EC-erklæring vedrørende overholdelse af standarder
Vi, Makita Corporation, erklærer som ansvarlig
producent at følgende Makita-maskine(r):
Maskinens betegnelse: Kabelfri hæftepistol
Modelnummer/ type: BST220, BST221
er en produktionsserie og
): 79 dB (A)
pA
Bær høreværn.
): 4,0 m/s
h
2
2
ENG104-1
ENG233-1
ENH101-12
34
Page 35

Overholder følgende europæiske direktiver:
98/37/EC indtil den 28. december 2009 og derefter
2006/42/EC fra den 29. december 2009
Og er produceret i overensstemmelse med følgende
standarder eller standardiserede dokumenter:
EN60745
Den tekniske dokumentation findes hos vores
autoriserede repræsentant i Europa:
Makita International Europe Ltd,
Michigan, Drive, Tongwell,
Milton Keynes, MK15 8JD, England
30. januar 2009
Tomoyasu Kato
Direktør
Makita Corporation
3-11-8, Sumiyoshi-cho,
Anjo, Aichi, JAPAN
35
Page 36

ΕΛΛΗΝΙΚΑ
Περιγραφή γενικής όψης
1. Κόκκινο τμήμα
2. Κουμπί
3. Μπαταρία
4. Σκανδάλη
5. Μοχλός ασφαλείας
6. Έμβολο γεμιστήρα
7. Μοχλός κλειδώματος
8. Συνδετήρες
9. Κύριος γεμιστήρας
10. Εγκοπή
11. Γάντζος
12. Βίδα
13. Παξιμάδι
14. Μπροστά
15. Τεμ ά χ ι ο εργασίας
16. Πίσω
17. Παράθυρο παρακολούθησης
ΠΡΟΔΙΑΓΡΑΦΕΣ
Μοντέλο BST220 BST221
Πλάτος συνδετήρων 10 χιλ 10 χιλ
Εφαρμόσιμο μήκος συνδετήρων 10 χιλ - 22 χιλ 10 χιλ - 22 χιλ
Χωρητικότητα συνδετήρων του γεμιστήρα 84 τεμ. 84 τεμ.
Ολικό μήκος 247 χιλ 251 χιλ
Καθαρό βάρος 2,3 κιλά 2,4 κιλά
Ονομαστική τιμή τάσης
• Λόγω του συνεχιζόμενου προγράμματός μας για έρευνα και ανάπτυξη, τα τεχνικά χαρακτηριστικά στο παρόν έντυπο
υπόκεινται σε αλλαγή χωρίς προειδοποίηση.
• Σημείωση: Τα τεχνικά χαρακτηρ ιστικά ενδέχεται να διαφέρουν ανάλογα με τη χώρα .
• Βάρος μαζί με την μπαταρία σύμφωνα με τη διαδικασία της EPTA 01/2003
Προοριζόμενη χρήση
Το εργαλείο προορίζεται για την πίεση συνδετήρων σε
υλικά κατασκευής όπως κορμούς.
ENE054-1
ΠΡΟΣΘΕΤΟΙ ΚΑΝΟΝΕΣ
ΑΣΦΑΛΕΙΑΣ ΓΙΑ ΤΟ ΕΡΓΑΛΕΙΟ
ENB069-1
1. Να φοράτε πάντα προστατευτικά γυαλιά ή γυαλιά
με πλαϊν ό προστατευτικό και προστατευτικό
προσώπου όταν είναι απαραίτητο.
2. Μη στρέφετε τη θύρα εκτίναξης προς
οποιοδήποτε άτομο βρίσκεται κοντά (ειδικότερα
στο πρόσωπό του). Να κρατάτε τα χέρια και τα
πόδια σας μακριά από την περιοχή της θύρας
εκτίναξης.
3. Να αφαιρείτε πάντα τη
του μηχανήματος με συνδετήρες, πριν από τη
ρύθμιση, εξέταση ή συντήρηση του μηχανήματος
ή μετά το τέλος της χρήσης του.
4. Να βεβαιώνεστε ότι δεν βρίσκεται κανένας κοντά
πριν από τη χρήση. Ποτέ μην επιχειρήσετε να
καρφώσετε συνδετήρες ταυτόχρονα από την
εσωτερική και από την εξωτερική πλευρά
τοίχου. Οι συνδετήρες μπορεί να διαπεράσουν το
μέσο ή/και να εκτιναχθούν, γεγονός που προκαλεί
σοβαρό κίνδυνο.
5. Να προσέχετε ώστε να στέκεστε καλά και να
διατηρείτε την ισορροπία σας όταν
χρησιμοποιείτε το εργαλείο. Βεβαιωθείτε πως δεν
υπάρχει κανένας από κάτω όταν εργάζεστε σε
ψηλό μέρος.
6. Να ελέγχετε προσεχτικά τους
τα πατώματα, τις στέγες και παρόμοιες
κατασκευές για να αποφεύγετε πιθανή
36
μπαταρία πριν το γέμισμα
του
τοίχους , τις οροφές,
D.C. 14,4 V D.C. 18 V
ηλεκτροπληξία, διαρροή αερίου, εκρήξεις, κτλ.
που προκαλούνται από συρραφή σε
ηλεκτροφόρα καλώδια, αγωγούς ή σωλήνες
αερίου.
7. Να χρησιμοποιείτε μόνο συνδετήρες που
καθορίζονται στο εγχειρίδιο αυτό. Αν
χρησιμοποιήσετε άλλους συνδετήρες, μπορεί να
προκληθεί δυσλειτουργία του εργαλείου.
8.
Μην παίζετε με το εργαλείο και μην επιχειρήσετε
να το χρησιμοποιήσετε για άλλο σκοπό εκτός
από το κάρφωμα συνδετήρων.
9. Μη θέτετε το εργαλείο σε λειτουργία χωρίς
συνδετήρες. Μειώνει τη διάρκεια ζωής του
εργαλείου.
10. Σταματήστε αμέσως τις λειτουργίες καρφώμ ατος
αν παρατηρήσετε ότι κάτι δεν πάει καλά ή είναι
ασυνήθιστο για το
11. Ποτέ να μην καρφώσετε συνδετήρες σε
οποιαδήποτε υλικό το οποίο μπορεί να
προκαλέσει το σπάσιμο του συνδετήρα και την
εκτόξευσή του ως βλήμα.
12. Ποτέ μην ενεργοποιείτε ταυτόχρονα το διακόπτη
της σκανδάλης και το μοχλό ασφαλείας μέχρι τη
στιγμή που είστε έτοιμοι να καρφώσ ετε το υς
συνδετήρες σε τεμάχια εργασίας.
τεμάχιο εργασίας να πιέσει το μοχλό ασφαλείας.
Ποτέ μην παραβιάζετε το σκοπό του
ασφαλίζοντας το μοχλό ασφαλείας προς τα πίσω
ή πιέζοντάς τον με το χέρι.
13. Ποτέ μην πειράζετε το μοχλό ασφαλείας. Ελέγχετε
τακτικά το μοχλό ασφαλείας για να δείτε πως
λειτουργεί σωστά.
εργαλείο.
Επιτρέψετε στο
ΦΥΛΑΞΤΕ ΑΥΤ ΕΣ ΤΙΣ ΟΔΗΓΙΕΣ.
Page 37

ΣΗΜΑΝΤΙΚΕΣ ΟΔΗΓΙΕΣ
ΑΣΦΑΛΕΙΑΣ
ENC007-4
ΓΙΑ ΤΗΝ ΜΠΑΤΑΡΙΑ
1. Πριν χρησιμοποιήσετε την μπαταρία, διαβάστε
όλες τις οδηγίες και τις ενδείξεις προφύλαξης στο
(1) φορτιστή μπαταρίας, (2) την μπαταρία και (3)
το προϊόν στο οποίο χρησιμοποιείται η μπαταρία.
2. Μην αποσυναρμολογείτε τη μπαταρία.
3. Αν ο χρόνος λειτουργίας της μπαταρίας είναι
υπερβολικά σύντομος, διακόψτε αμέσως τη
λειτουργία. Αν συνεχίσετε, μπορεί να έχει ως
αποτέλεσμα
πιθανών εγκαυμάτων κι ακόμη έκρηξης.
4. Αν μπει στα μάτια σας ηλεκτρολύτης, ξεπλύνετε
με καθαρό νερό και αναζητήστε αμέσως ιατρική
βοήθεια. Μπορεί να χάσετε την όρασή σας.
5. Μη βραχυκυκλώνετε την μπαταρία:
(1) Μην αγγίζετε τους ακροδέκτες με αγώγιμο
(2) Μην αποθηκεύετε την μπαταρία σε δοχείο με
(3) Μην εκθέτετε την μπαταρία σε νερό ή βροχή.
6. Μην αποθηκεύετε το εργαλείο και τη μπαταρία σε
μέρη όπου η θερμοκρασία μπορεί να φτάσει ή
ξεπεράσει τους 50°C (122°F).
7. Μην αποτεφρώνετε την μπαταρία ακόμη κι αν
παρουσιάζει σοβαρή ζημιά ή είναι εντελώς
φθαρμένη. Η μπαταρία μπορεί να εκραγεί σε
φωτιά.
8. Να προσέχετε να μη σας πέσει η μπαταρία και να
μη συγκρουστεί με κάποιο αντικείμενο.
9. Μη χρησιμοποιήσετε μια μπαταρία που έχει πέσει
κάτω ή είναι
τον κίνδυνο υπερθέρμανσης,
υλικό.
άλλα
μεταλλικά αντικείμενα, όπως καρ φιά ,
νομίσματα, κτλ.
Αν βραχυκυκλωθεί η μπαταρία, μπορεί να
προκληθεί μεγάλη ροή ηλεκτρικού ρεύματος,
υπερθέρμανση, πιθανά εγκαύματα και ακόμη
και καταστροφή της μπαταρίας.
να
χτυπημένη.
ΦΥΛΑΞΤΕ ΑΥΤ ΕΣ ΤΙΣ ΟΔΗΓΙΕΣ.
Συμβουλές για τη διατήρηση της μέγιστης
ζωή ς της μπαταρίας
1. Να φορτίζετε την μπαταρία πριν αποφορτιστεί
εντελώς. Πάντοτε να διακόπτετε τη λειτουργία του
εργαλείου και να φορτίζετε την μπαταρία όταν
παρατηρείται μειωμένη ισχύ του εργαλείου.
2. Ποτέ μην επαναφορτίζετε μια πλήρω ς φορτισμένη
μπαταρία. Αν υπερφορτίσετε την μπαταρία,
μειώνεται η ωφέλιμη διάρκεια ζωής της.
3. Να φορτίζετε την μπαταρία σε θερμοκρασία
δωματίου,
104°F). Αν η μπαταρία είναι θερμή, αφήστε την να
ψυχθεί πριν τη φορτίσετε.
δηλαδή στους 10°C έως 40°C (50°F έως
ΠΕΡΙΓΡΑΦΗ ΛΕΙΤΟΥΡΓΙΑΣ
ΠΡΟΣΟΧΗ:
• Να βεβαιώνεστε πάντοτε ότι έχετε σβήσει το εργαλείο
και έχετε βγάλει την μπαταρία πριν ρυθμίσετε ή
ελέγξετε κάποια λειτουργία του εργαλείου.
Τοποθέτηση ή αφαίρεση της μπαταρίας
(Εικ. 1)
• Πάντοτε να σβήνετε το εργαλείο πριν βάζετε ή βγάζετε
την μπαταρία.
• Για να βγάλετε την μπαταρία, τραβήξτε την από το
εργαλείο καθώς σύρετε το κουμπί στο μπροστινό
τμήμα της μπαταρίας.
• Για να τοποθετήσετε την μπαταρία, ευθυγραμμίστε τη
γλωττίδα στην μπαταρία με την εγκοπή στο περίβλημα
και ολισθήστε τη στη
τοποθετείτε έως το τέρμα, δηλαδή έως ότου ασφαλίζει
στη θέση και ακουστεί ένας χαρακτηριστικός ήχος
(«κλικ»). Αν φαίνεται το κόκκινο τμήμα στην άνω
πλευρά του κουμπιού, η μπαταρία δεν είναι πλήρως
ασφαλισμένη. Εισάγετέ την πλήρως για να μη φαίνεται
το κόκκινο τμήμα. Σε αντίθετη περίπτωση,
πέσει κατά λάθος από το εργαλείο και να τραυματίσει
εσάς ή κάποιον παρευρισκόμενο.
• Να μη χρησιμοποιείτε δύναμη όταν τοποθετείτε την
μπαταρία. Αν η μπαταρία δεν ολισθαίνει με ευκολία,
δεν την εισήγατε σωστά.
θέση της. Πάντοτε να την
μπορεί να
Σύστημα ασφαλείας (Εικ.2)
Να βεβαιώνεστε ότι όλα τα συστήματα ασφάλειας
βρίσκονται σε καλή κατάσταση πριν από τη λειτουργία. Το
εργαλείο δεν πρέπει να λειτουργεί αν πιεστεί μόνο η
σκανδάλη διακόπτης ή αν μόνο πατηθεί ο μοχλός
ασφαλείας επάνω στο ξύλο. Πρέπει να λειτουργεί μόνο
όταν εκτελούνται και οι δύο ενέργειες. Ελέγξτε για πιθανή
δυσλειτουργία
κατευθύνεται μακριά από εσάς ή τους παρευρισκόμενους.
ΣΗΜΕΙΩΣΗ:
• Υπάρχει η πιθανότητα το εργαλείο να λειτουργήσει για
μια στιγμή με το πάτημα μόνο της σκανδάλης. Αυτό δεν
είναι ενδεικτικό προβλήματος. Εάν αυτό συμβεί,
κατευθύνετε το εργαλείο μακριά από εσάς ή τους
παρευρισκόμενους.
Ελευθερώστε και τραβήξτε
βεβαιωθείτε ότι τα συστήματα ασφαλείας βρίσκονται σε
λειτουργική κατάσταση.
με ένα εργαλείο χωρίς συνδετήρες που
ξανά τη σκανδάλη για να
ΣΥΝΑΡΜΟΛΟΓΗΣΗ
ΠΡΟΣΟΧΗ:
• Να βεβαιώνεστε πάντα πως τα δάκτυλά σας δεν έχουν
τοποθετηθεί στη σκανδάλη και πως έχει αφαιρεθεί η
μπαταρία πριν να πραγματοποιήσετε εργασίες στο
συρραπτικό.
Συνδετήρες
• Να χειρίζεστε τους συνδετήρες και το κουτί τους
προσεχτικά. Εάν γίνει απρόσεκτος χειρισμός των
συνδετήρων, μπορούν λυγίζοντας να
παραμορφωθούν, προκαλώντας την ελάττωση της
ταχύτητας τροφοδοσίας ή το μπλοκάρισμα.
37
Page 38

• Αποφύγετε να αποθηκεύετε τους συνδετήρες σε μέρη
με πολύ υγρασία ή υψηλή θερμοκρασία ή σε μέρη που
είναι εκτεθειμένα στο άμεσο ηλιακό φως.
ΠΡΟΣΟΧΗ:
• Μην χρησιμοποιήσετε συνδετήρες διαφορετικούς από
αυτούς που ορίζονται σε αυτό το εγχειρίδιο ή
συνδετήρες που φαίνονται ότι έχουν υποστεί ζημιά,
έχουν λυγίσει, είναι σκουριασμένοι ή
• Μην τοποθετήσετε ταυτόχρονα συνδετήρες
διαφορετικού μεγέθους μέσα στο γεμιστήρα,
προκαλώντας την μειωμένη ταχύτητα τροφοδοσίας ή
το μπλοκάρισμα.
έχουν διαβρωθεί.
Φόρτωση συνδετήρων
Αφαιρέστε τη μπαταρία.
Πατήστε το μοχλό κλειδώματος στο πίσω μέρος του
εμβόλου του γεμιστήρα και ολισθήστε το προς τα πίσω.
(Εικ.3)
Φορτώστε συνδετήρες μέσα στο γεμιστήρα με τα κάτω
άκρα να βλέπουν προς τα επάνω. Ολισθήστε το έμβολο
προς τα εμπρός. (Εικ.4)
Για να στερεώσετε στη θέση του το έμβολο
αγκιστρώστε το μοχλό κλειδώματος στο πίσω μέρος του
εμβόλου του γεμιστήρα.
ΠΡΟΣΟΧΗ:
• Με φορτωμένη το γεμιστήρα, εάν το εργαλείο κρατηθεί
προς τα κάτω και βγει το έμβολο, οι συνδετήρες
μπορούν να πέσουν έξω προκαλώντας κίνδυνο για τον
οποιονδήποτε ή οτιδήποτε που βρίσκεται από κάτω.
Προσέξετε αυτό το σημείο
υψηλές τοποθεσίες.
ειδικά όταν εργάζεστε σε
του γεμιστήρα,
Ξεφόρτωμα συνδετήρων
ΠΡΟΣΟΧΗ:
• Όταν αφαιρείτε τους συνδετήρες, να βεβαιώνεστε πως
τα δάκτυλά σας δεν έχουν τοποθετηθεί στη σκανδάλη ή
στο μοχλό και πως έχει αφαιρεθεί η μπαταρία από το
εργαλείο. Η αφλογιστία μπορεί να προκαλέσει
τραυματισμό και ζημιές.
Αφαιρέστε τη μπαταρία.
Πατήστε το μοχλό κλειδώματος και κυλήστε το γεμιστήρα
πίσω. (Εικ.5)
Αφαιρέστε
γεμιστήρα. (Εικ.6)
τους συνδετήρες από τη σχισμή του
Γάντζος
ΠΡΟΣΟΧΗ:
• Να βεβαιώνεστε πάντα πως τα δάκτυλά σας δεν έχουν
τοποθετηθεί στη σκανδάλη ή στο μοχλό και πως έχει
αφαιρεθεί η μπαταρία πριν να χρησιμοποιήσετε το
γάντζο. (Εικ.7)
ΠΡΟΣΟΧΗ:
• Μη κρεμάτε το γάντζο από τη ζώνη της μέσης. Αν ο
γάντζος φύγει τυχαία από τη θέση του και προκαλέσει
το πέσιμο του συρραπτικού, μπορεί να υπάρξει κατά
λάθος εκτόξευση και να προκληθεί τραυματισμός.
Ο γάντζος χρησιμεύει για το προσωρινό κρέμασμα του
εργαλείου.
Μπορείτε να τον τοποθετήσετε σε οποιαδήποτε πλευρά
του εργαλείου.
Για να τοποθετήσετε το γάντζο, βάλτε τον σε μια εγκοπή
στο περίβλημα του εργαλείου σε οποιαδήποτε πλευρά
του και
κατόπιν ασφαλίστε τον με μια βίδα.
Για να τον βγάλετε, χαλαρώστε τη βίδα και κατόπιν
αφαιρέστε τον. (Εικ.8)
ΛΕΙΤΟΥΡΓΙΑ
Ρύθμιση βάθους (Εικ.9)
Εάν οι συνδετήρες καρφωθούν πολύ βαθιά ή πολύ
επιφανειακά, ρυθμίστε το βάθος καρφώματος
περιστρέφοντας το παξιμάδι στη βάση του εργαλείου. Για
βαθύτερο κάρφωμα των συνδετήρων περιστρέψετε το
παξιμάδι προς τα δεξιά. Για επιφανειακότερο κάρφωμα,
περιστρέψετε το παξιμάδι αριστερόστροφα. Παρακα λώ
σημειώστε ότι το παξιμάδι πρέπει να περιστρέφεται κατά
διαστήματα των 90° (1/4 περιστροφή) έτσι
του παξιμαδιού να γυρνά παράλληλα με το γεμιστήρα.
Κάρφωμα συνδετήρων (Εικ.10)
Τοποθε τ ή σ τ ε επίπεδο το άνοιγμα του εργαλείου από το
οποίο εκτοξεύονται οι συνδετήρες στο υλικό που θα δεθεί
και κρατήστε καλά το εργαλείο ενάντια στο υλικό. Έπειτα,
τραβήξτε το μοχλό και πατήστε τελείως τη σκανδάλη για
να εκτοξευτούν οι συνδετήρες. Η λαβή έχει τέτοιο σχήμα
ώστε η κεφαλή του εργαλείου να μπορεί
ασφάλεια προς τα κάτω με το δείκτη και τον αντίχειρα.
Μετά την εκτόξευση ενός συνδετήρα, βεβαιωθείτε πως
έχετε αφήσει τελείως τη σκανδάλη.
Όταν η κεφαλή του συνδετήρα που καρφώθηκε
παραμένει πάνω από την επιφάνεια του υλικού που
πρόκειται να δεθεί, καρφώστε το συνδετήρα κρατώντας
γερά την κεφαλή
ΣΗΜΕΙΩΣΗ:
• Η συνεχής χρήση του συρραπτικού με την κεφαλή των
εκτοξευμένων συνδετήρων να παραμένει πάνω από
την επιφάνεια του υλικού που θα δεθεί ενδέχεται να
προκαλέσει ζημιά στον οδηγό του συρραπτικού,
κόλλημα των συνδετήρων, κτλ.
του συρραπτικού. (Εικ.11)
Έλεγχος εναπομενόντων συνδετήρων
(Εικ.12)
ΠΡΟΣΟΧΗ:
• Μη θέτετε το εργαλείο σε λειτουργία χωρίς συνδετήρες.
Μειώνει τη διάρκεια ζωή ς του εργαλείου.
Υπάρχει ένα βολικό παράθυρο παρακολούθησης στη
δεξιά πλευρά του εργαλείου (όταν βλέπετε το εργαλείο
από μπροστά). Χρησιμοποιείστε αυτό το παράθυρο
παρακολούθησης για να ελέγξετε εάν υπάρχουν
συνδετήρες στο γεμιστήρα. Όταν οι συνδετήρες δεν είναι
ορατοί
από το παράθυρο, φορτώστε συνδετήρες στο
γεμιστήρα.
Αφαίρεση μπλοκαρισμένων συνδετήρων
ΠΡΟΕΙΔΟΠΟΙΗΣΗ:
• Να βεβαιώνεστε πάντα πως έχει ελευθερωθεί ο μοχλός
και πως έχει αφαιρεθεί η μπαταρία πριν από την
αφαίρεση μπλοκαρισμένων συνδετήρων.
Αφαιρέστε τη μπαταρία από το συρραπτικό. (Εικ. 13)
Πατήστε το μοχλό κλειδώματος στο πίσω μέρος του
εμβόλου του γεμιστήρα και ολισθήστε το προς τα πίσω.
ώστε η εγκοπή
να κρατηθεί με
38
Page 39

Βγάλτε έξω τους τυχόν μπλοκαρισμένους συνδετήρες
που παραμένουν στο άνοιγμα από το οποίο εκτοξεύονται
οι συνδετήρες.
ΣΥΝΤΗΡΗΣΗ
ΠΡΟΣΟΧΗ:
• Να βεβαιώνεστε πάντοτε ότι έχετε σβήσει το εργαλείο
και έχετε βγάλει την μπαταρία πριν εκτελέσετε
οποιαδήποτε εργασία ελέγχου ή συντήρησης σε αυτό.
• Για να διατηρείται η ΑΣΦΑΛΕΙΑ και η ΑΞΙΟΠΙΣΤΙΑ του
προϊόντος, οι εργασίες επισκευής, καθώς και
οποιαδήποτε άλλη εργασία συντήρησης ή ρύθμισης,
θα πρέπει να εκτελούνται σε εξουσιοδοτημένα
κέντρα
εξυπηρέτησης της Makita, και πάντοτε με τη χρήση
ανταλλακτικών της Makita.
ΑΞΕΣΟΥΑΡ
ΠΡΟΣΟΧΗ:
• Συνιστάται η χρήση των παρακάτω αξεσουάρ και
εξαρτημάτων με το εργαλείο της Makita μόνο όπως
καθορίζεται στο παρόν εγχειρίδιο. Αν χρησιμοποιήσετε
άλλα αξεσουάρ ή εξαρτήματα μπορεί να παρουσιαστεί
κίνδυνος για πρόκληση ατομικού τραυματισμού. Να
χρησιμοποιείτε τα αξεσουάρ και τα εξαρτήματα μόνο
για το σκοπό για τον οποίο προορίζονται.
Αν χρειάζεστε
πληροφορίες σχετικά με τα αξεσουάρ αυτά, απευθυνθείτε
στο πλησιέστερο κέντρο εξυπηρέτησης της Makita.
• Συνδετήρες
• Διάφοροι τύποι γνήσιων μπαταριών και φορτιστών της
Makita
• Γυαλιά προστασίας
κάποια βοήθεια ή περισσότερες
EC Δήλωση Συμμόρφωσης ENH101-12
Η Εταιρία Makita ως υπεύθυνος κατασκε υασ τής ,
δηλώνει ότι το παρακάτω μηχάνημα ή μηχανήματα
της Makita:
Ονομασία Μηχανήματος: Συρραπτικό μπαταρίας
Αρ. Μοντέλου/ Τύπ ο ς: BST220, BST221
αποτελούν παραγωγή σε σειρά και
Συμμορφώνονται με τις ακόλουθες Ευρωπαϊκές
Οδηγίες:
98/37/ΕΚ έως στην 28η Δεκεμβρίου 2009 και
επακόλουθα με την 2006/42/ΕΚ από την 29η
Δεκεμβρίου 2009
Και κατασκευάζονται σύμφωνα με τα παρακάτω
πρότυπα
ή τυποποιημένα έγγραφα:
EN60745
Ο εξουσιοδοτημένος μας αντιπρόσωπος στην Ευρώπη
διατηρεί τα τεχνικά έγγραφα, ο οποίος είναι:
Makita International Europe Ltd,
Michigan, Drive, Tongwell,
Milton Keynes, MK15 8JD, England
30η Ιανουαρίου 2009
Tomoyasu Kato
Διευθυντής
Makita Corporation
3-11-8, Sumiyoshi-cho,
Anjo, Aichi, JAPAN
Για τις Ευρωπαϊκές Χώρες μόνο
Θόρυβος
ENG104-1
Το σύνηθες σταθμισμένο επίπεδο θορύβου που έχει
καθοριστεί σύμφωνα με την EN792:
Επίπεδο ηχητικής πίεσης (L
Αβεβαιότητα (Κ): 3 dB (A)
): 79 dB (A)
pA
Το επίπεδο θορύβου κατά τη λειτουργία ενδέχεται να
υπερβεί τα 80 dB (A).
Να φοράτε ωτοασπίδες .
Δόνηση
ENG233-1
Η τιμή εκπομπής δόνησης έχει καθοριστεί σύμφωνα με το
EN792:
Κατάσταση λειτουργίας: Συρραφή ξύλου
Εκπομπή δόνησης (a
Αβεβαιότητα (Κ): 1,5 m/s
h
): 4,0 m/s
2
2
39
Page 40

Makita Corporation
Anjo, Aichi, Japan
884841B997
 Loading...