

Makita BST110 User Manual
GB Cordless Stapler Instruction manual
F Agrafeuse sans fil Manuel d’instructions
D Akku-Tacker Betriebsanleitung
I Graffettatrice Istruzioni per l’uso
NL Accunietpistool Gebruiksaanwijzing
E Grapadora sin cable Manual de instrucciones
P Agrafador sem fios Manual de instruções
DK Kabelfri hæftepistol Brugsanvisning
GR Συρραπτικό μπαταρίας Οδηγίες χρήσης
BST110
12
1
2
3
4
5
5
4
8
6
7
9
10
34
56
78
2
910
11
12
13
4
14
15
16
10
6
7
8
11 12
13
3

ENGLISH
Explanation of general view
1. Red part
2. Button
3. Battery cartridge
4. Trigger
5. Lever
6. Sub magazine
7. Locking lever
8. Press
9. Main magazine
10. Staples
11. Groove
12. Hook
13. Screw
14. Material
15. View window
16. Pusher
SPECIFICATIONS
Model BST110
Staple width 10 mm
Applicable staples length 7 mm - 10 mm
Staple magazine capacity 125 pcs
Dimensions (L x W x H) 245 mm x 79 mm x 191 mm
Net weight 2.0 kg
Rated voltage D.C. 14.4V
• Due to our continuing program of research and development, the specifications herein are subject to change without
notice.
• Specifications may differ from country to country.
• Weight, with battery cartridge, according to EPTA-Procedure 01/2003
Intended use
The tool is intended for pressing staples into construction
materials such as timbers.
ENE054-1
ADDITIONAL SAFETY RULES
FOR TOOL
1. Always wear safety goggles or safety glasses with
side shield, and a full face shield when needed.
2. Do not point the ejection port at anyone in the
vicinity (especially his face). Keep hands and feet
away from the ejection port area.
3. Always remove the battery cartridge before
loading the staples, adjustment, inspection,
maintenance or after operation is over.
4. Make sure no one is nearby before operation.
Never attempt to drive staples from both the
inside and outside of wall at the same time.
Staples may rip through and/or fly off, presenting
a grave danger.
5. Watch your footing and maintain your balance
with the tool. Make sure there is no one below
when working in high locations.
6. Check walls, ceilings, floors, roofing and the like
carefully to avoid possible electrical shock, gas
leakage, explosions, etc. caused by stapling into
live wires, conduits or gas pipes.
7. Use only staples specified in this manual. The use
of any other staples may cause malfunction of the
tool.
8. Do not tamper with the tool or attempt to use it for
other than driving staples.
9. Do not operate the tool without staples. It
shortens the service life of the tool.
10. Stop driving operations immediately if you notice
something wrong or out of the ordinary with the
tool.
4
ENB069-1
11. Never staple into any materials which may allow
the staple to puncture and fly through as a
projectile.
12. Never actuate the switch trigger and safety lever
at the same time until you are prepared to staple
workpieces. Allow the workpiece to depress the
safety lever. Never defeat its purpose by securing
the safety lever back or by depressing it by hand.
13. Never tamper with the safety lever. Check the
safety lever frequently for proper operations.
SAVE THESE INSTRUCTIONS.
IMPORTANT SAFETY
INSTRUCTIONS
ENC007-4
FOR BATTERY CARTRIDGE
1. Before using battery cartridge, read all
instructions and cautionary markings on (1)
battery charger, (2) battery, and (3) product using
battery.
2. Do not disassemble battery cartridge.
3. If operating time has become excessively shorter,
stop operating immediately. It may result in a risk
of overheating, possible burns and even an
explosion.
4. If electrolyte gets into your eyes, rinse them out
with clear water and seek medical attention right
away. It may result in loss of your eyesight.
5. Do not short the battery cartridge:
(1) Do not touch the terminals with any
conductive material.
(2) Avoid storing battery cartridge in a container
with other metal objects such as nails, coins,
etc.

(3) Do not expose battery cartridge to water or
rain. A battery short can cause a large current
flow, overheating, possible burns and even a
breakdown.
6. Do not store the tool and battery cartridge in
locations where the temperature may reach or
exceed 50 °C (122 °F).
7. Do not incinerate the battery cartridge even if it is
severely damaged or is completely worn out. The
battery cartridge can explode in a fire.
8. Be careful not to drop or strike battery.
9. Do not use dropped or struck battery.
SAVE THESE INSTRUCTIONS.
Tips for maintaining maximum battery life
1. Charge the battery cartridge before completely
discharged. Always stop tool operation and
charge the battery cartridge when you notice less
tool power.
2. Never recharge a fully charged battery cartridge.
Overcharging shortens the battery service life.
3. Charge the battery cartridge with room
temperature at 10 °C - 40 °C (50 °F - 104 °F).
Let a hot battery cartridge cool down before
charging it.
4. Charge the Lithium-ion battery cartridge when you
do not use it for more than six months.
FUNCTIONAL DESCRIPTION
CAUTION:
• Always be sure that the tool is switched off and the
battery cartridge is removed before adjusting or
checking function on the tool.
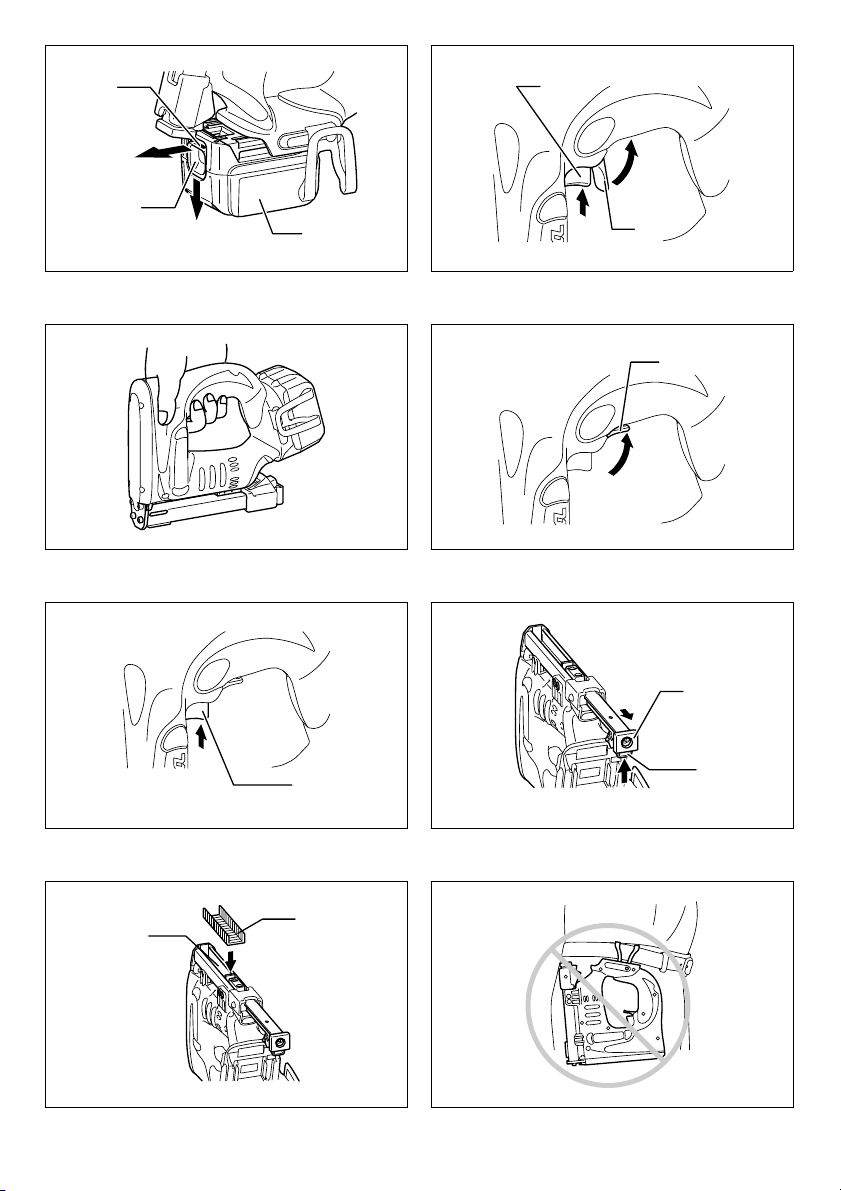
Installing or removing battery cartridge
(Fig. 1)
• Always switch off the tool before insertion or removal of
the battery cartridge.
• To remove the battery cartridge, withdraw it from the
tool while sliding the button on the front of the cartridge.
• To insert the battery cartridge, align the tongue on the
battery cartridge with the groove in the housing and slip
it into place. Always insert it all the way until it locks in
place with a little click. If you can see the red part on
the upper side of the button, it is not locked completely.
Insert it fully until the red part cannot be seen. If not, it
may accidentally fall out of the tool, causing injury to
you or someone around you.
• Do not use force when inserting the battery cartridge. If
the cartridge does not slide in easily, it is not being
inserted correctly.
Safety system
WARNING:
• Make sure all safety systems are in working order
before operation. Failure to do so may cause personal
injuries. (Fig. 2 & 3)
Test safety systems for possible faulty operation before
stapling as follows.
1. Make sure that the tool is not loaded with staples
before the test.
2. The tool accidentally operates if only the trigger is
pulled although the lever is not pulled.
3. The tool does not operate when the trigger is pulled
with the lever pulled.
In case of 2 and 3 above, the safety systems are faulty.
Trigger and lever
WARNING:
• Always be sure that the tool is switched off before
inserting the battery cartridge on the tool. (Fig. 4 & 5)
The tool is provided with lever as a safety system in
addition to the usual trigger.
To fire staples, first pull the lever and then pull the trigger.
ASSEMBLY
CAUTION:
• Always make sure that your fingers are not placed on
the trigger or the lever and the battery cartridge is
removed before carrying out any work on the pin nailer.
Staples
• Handle the staples and their box carefully. If the staples
have been handled roughly, they may be bent out of
shape, causing poor staple feed or jamming.
• Avoid storing the staples in a very humid or hot place or
place exposed to direct sunlight.
CAUTION:
• Do not use staples other than designated in this
manual or staples that appear to be damaged, bent,
rusty or corroded.
• Do not insert staples of which size is different each
other at the same time inside the magazine, causing
poor staple feed or jamming.
Loading staples
Remove the battery cartridge.
Press the locking lever on the rear of the sub magazine
and slide the sub magazine backward. (Fig. 6)
Load staples into the main magazine with their feet facing
up. Slide the sub-magazine forward. (Fig. 7)
To secure the sub magazine in place, hook the locking
lever on the rear of the sub-magazine.
CAUTION:
• With the magazine loaded, if the tool is held downward
and the sub-magazine is opened, the staples can fall
out and present a danger to anyone or anything below.
Keep this in mind especially when working in high
locations.
Unloading staples
CAUTION:
• When removing staples, make sure that your fingers
are not placed on the trigger or the lever and the
battery cartridge is removed from the stapler. Misfiring
may cause personal injuries and property damage.
Remove the battery cartridge.
Press the locking lever and slide the magazine back.
Take out staples from the magazine slit.
5

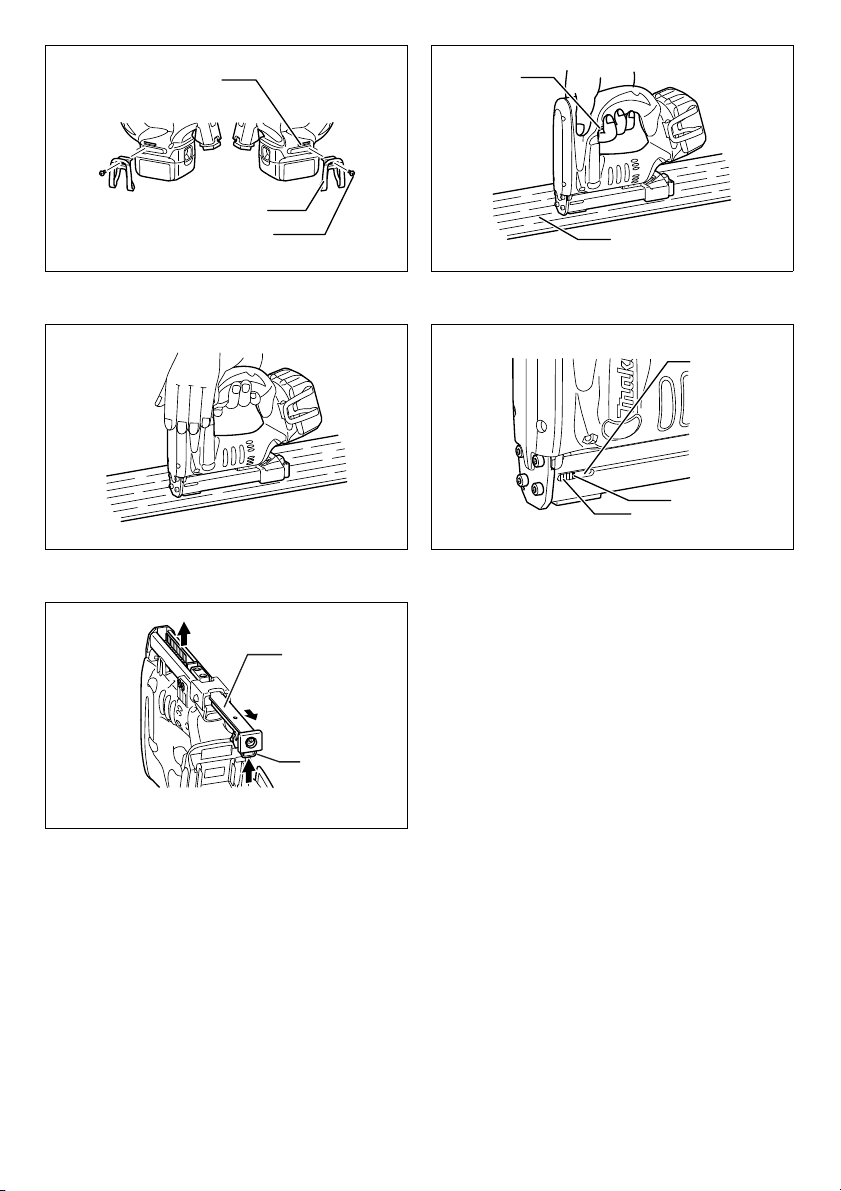
Hook
CAUTION:
• Always make sure that your fingers are not placed on
the trigger or the lever and the battery cartridge is
removed before using the hook. (Fig. 8)
CAUTION:
• Do not hang the hook from the waist belt. Dropping the
stapler, which is caused by the hook accidentally
coming out of place, may cause misfiring and personal
injuries.
The hook is convenient for temporarily hanging the tool.
This can be installed on either side of the tool.
To install the hook, insert it into a groove in the tool
housing on either side and then secure it with a screw.
To remove, loosen the screw and then take it out. (Fig. 9)
OPERATION
Driving staples
WARNING:
• Before pulling the trigger, always make sure that the
opening from which staples are fired contacts material
to be fastened. Just pulling the trigger fires staples.
Misfiring may cause personal injuries. (Fig. 10)
Place flat the opening of the tool from which staples are
fired on the material to be fastened and hold the tool firmly
against the material. Then pull the lever and then pull the
trigger fully to drive the staples. The grip is shaped so that
the tool head can be held down securely with index finger
and thumb. After driving a staple, be sure to release the
trigger fully.
When the head of driven staple remains above the
surface of material to be fastened, drive the staple while
holding the stapler head firmly. (Fig. 11)
NOTE:
• When the trigger is pulled after a quick trigger action,
the stapler may do nothing but operates momentarily
and may not fire staples. This is not a trouble. At this
time, release the trigger once, pull it again and the
staples can be fired.
• Using the stapler continuously with the head of driven
staples remaining above the surface of material to be
fastened may cause damage to the driver of the stapler
and stapler jamming etc.
Checking remaining staples (Fig. 12)
Remaining staples can be checked through the view
window.
New staples can be loaded when the pusher is seen in the
center of the view window.
Removing jammed staples
WARNING:
• Always make sure that the lever and trigger are
released and the battery cartridge is removed before
removing jammed staples.
Remove the battery cartridge from the stapler. (Fig. 13)
Press the locking lever on the rear of the sub magazine
and slide the sub magazine backward.
Take out stuck staples that remain inside the opening that
staples are fired from as it appears.
MAINTENANCE
CAUTION:
• Always be sure that the tool is switched off and the
battery cartridge is removed before attempting to
perform inspection or maintenance.
• To maintain product SAFETY and RELIABILITY,
repairs, any other maintenance or adjustment should
be performed by Makita Authorized Service Centers,
always using Makita replacement parts.
ACCESSORIES
CAUTION:
• These accessories or attachments are recommended
for use with your Makita tool specified in this manual.
The use of any other accessories or attachments might
present a risk of injury to persons. Only use accessory
or attachment for its stated purpose.
If you need any assistance for more details regarding
these accessories, ask your local Makita Service Center.
• Staples
• Various type of Makita genuine batteries and chargers
• Safety goggles
For European countries only
Noise
The typical A-weighted noise level determined according
to EN792:
Sound pressure level (L
Uncertainty (K): 3 dB (A)
The noise level under working may exceed 80 dB (A).
Wear ear protection.
Vibration
The vibration emission value determined according to
EN792:
Work mode: stapling wood
Vibration emission (a
Uncertainty (K): 1.5 m/s
EC Declaration of Conformity ENH101-12
We Makita Corporation as the responsible
manufacturer declare that the following Makita
machine(s):
Designation of Machine: Cordless Stapler
Model No./ Type: BST110
are of series production and
Conforms to the following European Directives:
98/37/EC until 28th December 2009 and then with
2006/42/EC from 29th December 2009
And are manufactured in accordance with the following
standards or standardised documents:
EN60745
): 73 dB (A)
pA
): 2.5 m/s2 or less
h
2
ENG104-1
ENG232-1
6

The technical documentation is kept by our authorised
representative in Europe who is:
Makita International Europe Ltd,
Michigan, Drive, Tongwell,
Milton Keynes, MK15 8JD, England
30th January 2009
Tomoyasu Kato
Director
Makita Corporation
3-11-8, Sumiyoshi-cho,
Anjo, Aichi, JAPAN
7

FRANÇAIS
Descriptif
1. Partie rouge
2. Bouton
3. Batterie
4. Gâchette
5. Levier
6. Magasin inférieur
7. Levier de verrouillage
8. Appuyer
9. Magasin principal
10. Agrafes
11. Rainure
12. Crochet
13. Vis
14. Matériel
15. Fenêtre de visualisation
16. Pousseur
SPÉCIFICATIONS
Modèle BST110
Largeur d'agrafe 10 mm
Longueur applicable des agrafes 7 mm à 10 mm
Capacité du magasin d'agrafes 125 clous
Dimensions (L x P x H) 245 mm x 79 mm x 191 mm
Poids net 2,0 kg
Tension nominale C.C. 14,4 V
• Étant donné l’évolution constante de notre programme de recherche et de développement, les spécifications
contenues dans ce manuel sont sujettes à modification sans préavis.
• Les spécifications peuvent varier d’un pays à l’autre.
• Poids, batterie incluse, selon la procédure EPTA 01/2003
Utilisations
L'outil est conçu pour l’insertion d'agrafes dans des
matériaux de construction tels que le bois.
ENE054-1
CONSIGNES DE SÉCURITÉ
ADDITIONNELLES POUR L'OUTIL
1. Portez toujours un masque de protection ou des
lunettes de sécurité avec des écrans latéraux,
ainsi qu’une visière de protection intégrale si
nécessaire.
2. Ne pointez jamais la sortie d'éjection vers une
personne se trouvant à proximité
(particulièrement vers le visage). Gardez les mains
et les pieds à l'écart de la zone de la sortie
d'éjection.
3. Retirez toujours la cartouche de batterie avant
d’introduire les agrafes, avant toute opération de
réglage, d’inspection d’entretien ou à la fin de
l’utilisation.
4. Avant d’utiliser l’outil, assurez-vous que personne
ne se trouve à proximité. Ne tentez jamais
d’enfoncer des agrafes en même temps depuis
l’intérieur et l’extérieur d’un mur. Cela est très
dangereux, puisque les agrafes risquent alors de
défoncer la pièce et/ou d'être projetées.
5. Regardez où vous posez les pieds et assurez-vous
d'un bon équilibre pendant l'utilisation de l'outil.
Si vous travaillez en hauteur, assurez-vous que
personne ne se trouve dessous.
6. Pour éviter tout risque de choc électrique, de fuite
de gaz, d'explosion, etc., provoqué par le contact
avec des fils dénudés, des conduites ou des
tuyaux de gaz, vérifiez le mur ou le plafond, le
plancher, le toit, etc.
ENB069-1
7. N’utilisez que les agrafes spécifiées dans ce
manuel. L'outil risque de mal fonctionner si vous
utilisez tout autre type d'agrafe.
8. N'altérez pas l'outil ou ne tentez pas de l'utiliser
pour d'autres applications que l'insertion
d'agrafes.
9. N’utilisez pas l’outil sans y insérer des agrafes.
vous réduiriez sa durée de service.
10. Cessez immédiatement de vous en servir si vous
notez une anomalie ou un fonctionnement
inhabituel de l'outil.
11. N'agrafez jamais dans des matériaux où les
agrafes risquent de percer et d'être projetées.
12. N’activez jamais la gâchette et le levier de sécurité
en même temps avant d’être prêt à enfoncer les
agrafes sur les pièces à travailler. Laissez la pièce
à travailler relâcher le levier de sécurité. Ne
modifiez jamais son rôle en fixant le levier de
sécurité ou en l’enfonçant avec la main.
13. Ne manipulez jamais le levier de sécurité. Vérifiez
régulièrement son bon fonctionnement.
CONSERVEZ CES
INSTRUCTIONS.
CONSIGNES DE SÉCURITÉ
IMPORTANTES
POUR LA BATTERIE
1. Avant d’utiliser la batterie, lisez toutes les
instructions et tous les avertissements inscrits
sur (1) le chargeur, (2) la batterie et (3) l’appareil
alimenté par la batterie.
2. Ne démontez pas la batterie.
ENC007-4
8

3. Cessez immédiatement d’utiliser l’appareil si la
durée de fonctionnement devient excessivement
courte. Il y a risque de surchauffe et de brûlures,
voire d’explosion.
4. Si l’électrolyte pénètre dans vos yeux, rincez-les à
l’eau claire et consultez immédiatement un
médecin. Il y a risque de perte de la vue.
5. Évitez de court-circuiter la batterie :
(1) Ne touchez les bornes avec aucun matériau
conducteur.
(2) Évitez de ranger la batterie dans un contenant
où se trouvent d’autres objets métalliques tels
que clous, pièces de monnaie, etc.
(3) N’exposez pas la batterie à l’eau ou à la pluie.
Un court-circuit de la batterie peut provoquer
un fort courant, une surchauffe, des brûlures
et même une panne.
6. Ne rangez pas l’outil ou la batterie dans des
endroits où la température risque d’atteindre ou
de dépasser 50 °C (122 °F).
7. Ne jetez pas la batterie au feu même si elle est
sérieusement endommagée ou complètement
épuisée. La batterie peut exploser au contact du
feu.
8. Prenez garde de laisser tomber ou heurter la
batterie.
9. N’utilisez pas une batterie tombée ou heurtée.
CONSERVEZ CES
INSTRUCTIONS.
Conseils pour prolonger la durée de vie de la batterie
1. Rechargez la batterie avant qu’elle soit
complètement épuisée. Arrêtez toujours l’outil et
rechargez la batterie quand vous constatez que la
puissance de l’outil diminue.
2. Ne rechargez jamais une batterie complètement
chargée. La surcharge réduit la durée de service
de la batterie.
3. Chargez la batterie alors que la température de la
pièce se trouve à l'intérieur d’une plage de 10 °C à
40 °C (50 °F à 104 °F).
Avant de charger une cartouche de batterie
chaude, laissez-la refroidir.
4. Chargez la batterie au lithium-ion si elle est restée
inutilisée pendant plus de six mois.
DESCRIPTION DU
FONCTIONNEMENT
ATT ENTI ON :
• Veillez toujours à éteindre l’outil et déposer la batterie
avant de régler ou vérifier le fonctionnement de
l'appareil.
Installation ou dépose de la batterie
(Fig. 1)
• Mettez toujours l’outil hors tension avant d’insérer ou
de déposer la batterie.
• Pour retirer la batterie, sortez-la de l’outil tout en faisant
glisser le bouton à l’avant de la batterie.
• Pour insérer la batterie, alignez sa languette sur la
rainure qui se trouve à l’intérieur du carter, puis glissez
la batterie pour la mettre en place. Insérez-la toujours
bien à fond, jusqu’à ce qu’elle se verrouille en émettant
un léger déclic. Si vous pouvez voir la partie rouge sur
la face supérieure du bouton, la batterie n’est pas
parfaitement verrouillée. Insérez-la à fond, jusqu’à ce
que la partie rouge ne soit plus visible. Dans le cas
contraire, la batterie risque de tomber accidentellement
de l’outil et de vous blesser ou de blesser une
personne se trouvant près de vous.
• N’appliquez aucune force excessive lors de l’insertion
de la batterie. Si la batterie ne glisse pas aisément,
c’est qu’elle n’est pas insérée correctement.
Dispositif de sécurité
AVERTISSEMENT :
• Assurez-vous que tous les dispositifs de sécurité sont
en état de fonctionner avant d'utiliser l'outil. Autrement
il y a risque de blessures. (Fig. 2 et 3)
Avant l'agrafage, vérifiez l’absence de tout vice de
fonctionnement du dispositif de sécurité en procédant
comme suit :
1. Avant de procéder à la vérification, assurez-vous que
l’outil ne contient pas d'agrafes.
2. L’outil peut fonctionner accidentellement si la gâchette
est enfoncée alors que le levier n’est pas tiré.
3. L’outil ne fonctionne pas quand la gâchette est
enfoncée et que le levier est tiré.
Dans les cas 2 et 3 ci-dessus, les dispositifs de sécurité
sont défaillants.
Gâchette et levier
AVERTISSEMENT :
• Assurez-vous toujours que l'outil est hors tension avant
d’y insérer la batterie. (Fig. 4 et 5)
L’outil est doté d’un levier en guise de dispositif de
sécurité, en sus de la gâchette habituelle.
Pour enfoncer les agrafes, tirez tout d’abord le levier, puis
enfoncez la gâchette.
ASSEMBLAGE
ATT ENTI ON :
• Assurez-vous toujours que vos doigts ne sont pas
posés sur la gâchette ou le levier et que la batterie est
retirée avant d’effectuer toute intervention sur le
cloueur.
Agrafes
• Manipulez les agrafes et leur boîte avec soin. Si les
agrafes ont été manipulées sans précaution, elles
risquent de se tordre, entraînant une mauvaise
alimentation en agrafes, voire un blocage.
• Évitez de ranger les agrafes dans un endroit très
humide, très chaud ou exposé directement aux rayons
du soleil.
ATT ENTI ON :
• N'utilisez pas d'autres agrafes que celles qui sont
indiquées dans ce manuel, ni des agrafes qui
apparaissent endommagées, tordues, rouillées ou
corrodées.
• N'insérez pas des agrafes de tailles différentes en
même temps dans le magasin, cela entraînerait une
mauvaise alimentation en agrafes, voire un blocage.
9

Chargement des agrafes
Retrait de la batterie.
Enfoncez le levier de sécurité à l'arrière du magasin
inférieur et faites-le coulisser vers l'arrière. (Fig. 6)
Chargez les agrafes dans le magasin principal, leur base
tournée vers le haut. Faites glisser le magasin inférieur
vers l'avant. (Fig. 7)
Pour sécuriser le magasin inférieur en place, accrochez le
levier de sécurité à l'arrière du magasin inférieur.
ATT ENTI ON :
• Avec le magasin chargé, si l'outil est tenu tourné vers
le bas et si le magasin est ouvert, les agrafes risquent
de tomber et de représenter un danger pour quiconque
ou tout ce qui peut se trouver en dessous. Ne perdez
pas ceci de vue, particulièrement quand vous travaillez
dans des lieux élevés.
Déchargement des agrafes
ATT ENTI ON :
• Lors du retrait des agrafes, assurez-vous que vos
doigts ne sont pas posés sur la gâchette ou le levier et
que la cartouche de batterie est retirée de l'agrafeuse.
Une maladresse peut causer des blessures graves et
des dommages matériels.
Retrait de la batterie.
Enfoncez le levier de sécurité et faites coulisser le
magasin en place.
Enlevez les agrafes de la partie saillante du magasin.
Crochet
ATT ENTI ON :
• Assurez-vous toujours que vos doigts ne sont pas
posés sur la gâchette ou le levier et que la batterie est
retirée avant d’utiliser le crochet. (Fig. 8)
ATT ENTI ON :
• Ne suspendez pas le crochet au ceinturon. La chute de
l'agrafeuse, due au déplacement accidentel du crochet,
peut engendrer un mauvais démarrage et causer des
blessures.
L’outil est équipé d’un crochet pratique qui permet de le
suspendre temporairement.
Il s’installe d’un côté comme de l’autre de l’outil.
Pour installer le crochet, insérez-le dans une fente du
logement de l'outil de chaque côté, puis sécurisez-le à
l'aide d'une vis.
Pour le retirer, desserrez la vis et enlevez-le. (Fig. 9)
UTILISATION
Enfoncement des agrafes
AVERTISSEMENT :
• Avant d’appuyer sur la gâchette, assurez-vous toujours
que l’orifice d’éjection des agrafes est en contact avec
le matériau à fixer. Appuyez simplement sur la
gâchette pour extraire les agrafes. Une maladresse
peut causer des blessures. (Fig. 10)
Placez l’orifice d’éjection des agrafes bien à plat sur le
matériau à fixer et maintenez fermement l’outil sur le
matériau. Puis tirez le levier et appuyez sur la gâchette
pour enfoncer les agrafes. La poignée est conçue pour
que la tête de l’outil soit maintenue en place en toute
sécurité avec l’index et le pouce. Après avoir enfoncé une
agrafe, assurez-vous de relâcher complètement la
gâchette.
Lorsque la tête de l'agrafe enfoncée reste au-dessus de la
surface du matériau à fixer, enfoncez l'agrafe tout en
maintenant fermement la tête de l'agrafeuse. (Fig. 11)
REMARQUE :
• Quand la gâchette est enfoncée après une action
rapide, l'agrafeuse peut s’arrêter un instant et se
remettre à fonctionner mais sans enfoncer d'agrafes.
Ce n’est pas une anomalie. Si cela se produit, relâchez
la gâchette une fois, enfoncez-la à nouveau et les
agrafes peuvent être enfoncées.
• Une utilisation prolongée de l'agrafeuse sur la tête des
agrafes restant au-dessus de la surface du matériau à
fixer risque d’endommager l’embout de l'agrafeuse et
d’engendrer un blocage etc.
Vérification des agrafes restantes
(Fig. 12)
Les agrafes restantes peuvent être contrôlées à travers la
fenêtre de visualisation.
Il est possible de charger de nouvelles agrafes quand le
pousseur est visible au centre de la fenêtre de
visualisation.
Retrait des agrafes coincées
AVERTISSEMENT :
• Avant de retirer les agrafes lous coincées, assurezvous toujours que le levier est relâché et que la
cartouche de batterie est retirée.
Retirez la cartouche de batterie de l'agrafeuse. (Fig. 13)
Enfoncez le levier de sécurité à l'arrière du magasin
inférieur et faites-le coulisser vers l'arrière.
Sortez les agrafes bloquées qui restent à l'intérieur de
l'ouverture qui éjecte les agrafes dès que l'apparition du
problème.
MAINTENANCE
ATT ENTI ON :
• Assurez-vous toujours que l’outil est hors tension et
que la batterie est retirée avant d’y effectuer tout travail
d’inspection ou d’entretien.
• Pour assurer la SÉCURITÉ et la FIABILITÉ du produit,
toute réparation et tout travail d’entretien ou de réglage
doivent être effectués par un Centre de service aprèsvente agréé Makita, avec des pièces de rechange
Makita.
ACCESSOIRES
ATT ENTI ON :
• Ces accessoires ou pièces complémentaires sont
recommandés pour l’utilisation avec l’outil Makita
spécifié dans ce manuel. L’utilisation de tout autre
accessoire ou pièce complémentaire comporte un
risque de blessures. Utilisez uniquement l’accessoire
ou la pièce complémentaire dans le but spécifié.
Pour obtenir plus de détails sur ces accessoires,
contactez un Centre de service après-vente local Makita.
• Agrafes
10

• Divers types de batteries et chargeurs de marque
Makita.
• Lunettes de sécurité
Pour l’Europe uniquement
Bruit
ENG104-1
Les niveaux de bruit pondéré A typiques ont été mesurés
selon la norme EN792 :
Niveau de pression sonore (L
Incertitude (K) : 3 dB (A)
) : 73 dB (A)
pA
Le niveau de bruit peut dépasser 80 dB (A) lors de
l’utilisation.
Portez des protections auditives.
Vibration
ENG232-1
Valeur d’émission vibratoire déterminée selon la norme
EN792 :
Application : agrafage de bois
Émission de vibrations (a
Incertitude (K) : 1,5 m/s
) : 2,5 m/s2 ou moins
h
2
Déclaration de conformité CE ENH101-12
Nous, Makita Corporation, en tant que fabricant
responsable, déclarons que les machines Makita
suivantes :
Désignation de l’appareil : Agrafeuse sans fil
N° de modèle/ Type : BST110
sont fabriquées en série et
sont conformes aux directives européennes
suivantes :
98/37/CE jusqu’au 28 décembre 2009 puis 2006/42/
CE à partir du 29 décembre 2009
et sont produites conformément aux normes ou
documents de normalisation suivants :
EN60745
La documentation technique est disponible auprès de
notre représentant en Europe qui est :
Makita International Europe Ltd,
Michigan, Drive, Tongwell,
Milton Keynes, MK15 8JD, Angleterre
Le 30 janvier 2009
Tomoyasu Kato
Directeur
Makita Corporation
3-11-8, Sumiyoshi-cho,
Anjo, Aichi, JAPAN
11

DEUTSCH
Erklärung der Gesamtdarstellung
1. Roter Bereich
2. Taste
3. Akkublock
4. Schalter
5. Hebel
6. Submagazin
7. Verriegelungshebel
8. Drücken
9. Hauptmagazin
10. Klammern
11. Rille
12. Einhängeclip
13. Schraube
14. Material
15. Sichtfenster
16. Drücker
TECHNISCHE DATEN
Modell BST110
Klammerbreite 10 mm
Anwendbare Klammerlänge 7 bis 10 mm
Klammer-Magazinkapazität 125 St.
Abmessungen (L x B x H) 245 mm x 79 mm x 191 mm
Nettogewicht 2,0 kg
Nennspannung 14,4 V Gleichspannung
• Aufgrund unserer weiterführenden Forschungen und Entwicklungen sind Änderungen an den hier angegebenen
Technischen Daten ohne Vorankündigung vorbehalten.
• Die Angaben können sich je nach Land unterscheiden.
• Gewicht, mit Akkublock, ermittelt gemäß EPTA-Verfahren 01/2003
Verwendungszweck
Das Werkzeug wurde für das Eintreiben von Klammern in
Baumaterial wie z.B. Bauholz entwickelt.
ENE054-1
ZUSÄTZLICHE
SICHERHEITSREGELN FÜR DAS
WERKZEUG
1. Tragen Sie stets eine Schutzbrille oder
Sicherheitsgläser mit Seitenschutz und – falls
erforderlich – einen Gesichtsschutz.
2. Zeigen Sie mit der Auswurföffnung nicht auf
Personen in Ihrer Umgebung (vor allem nicht auf
das Gesicht). Halten Sie Hände und Füße vom
Bereich der Auswurföffnung fern.
3. Entnehmen Sie stets den Akkublock vor dem
Laden der Klammern, vor der Einstellung,
Inspektion, Wartung oder nach Beendigung des
Betriebs.
4. Vergewissern Sie sich, dass keine Personen in der
Nähe sind, bevor Sie mit dem Nageln beginnen.
Versuchen Sie niemals, Klammern von innerhalb
und von außerhalb der Wand gleichzeitig zu
nageln. Klammern können durchlagen und/oder
herausfliegen, was eine große Gefahr darstellt.
5. Achten Sie beim Arbeiten mit dem Werkzeug auf
sicheren Stand und Gleichgewicht. Vergewissern
Sie sich, dass sich bei Arbeiten an hochgelegenen
Arbeitsplätzen keine Personen unterhalb
aufhalten.
6. Überprüfen Sie Wand, Decke, Fußboden, Dach
und dergleichen sorgfältig, um durch das
Eintreiben in Strom führende Kabel, Isolierrohre
oder Gasrohre verursachte mögliche elektrische
Schläge, Gaslecks, Explosionen usw. zu
vermeiden.
ENB069-1
7. Verwenden Sie nur die in diesem Handbuch
aufgeführten Klammern. Die Verwendung anderer
Klammern kann eine Funktionsstörung des
Werkzeugs verursachen.
8. Missbrauchen Sie das Werkzeug nicht, sondern
verwenden Sie es ausschließlich für das
Einschlagen von Klammern.
9. Nehmen Sie das Werkzeug nicht ohne eingelegte
Klammern in Betrieb. Dies verkürzt die
Lebensdauer des Werkzeugs.
10. Brechen Sie den Betrieb sofort ab, wenn Sie einen
Defekt oder etwas Ungewöhnliches am Werkzeug
feststellen.
11. Treiben Sie keine Klammern in Materialien, welche
die Klammern durchschlagen können und dann zu
einem Projektil werden.
12. Betätigen Sie erst bei korrekter Positionierung des
Werkzeugs am Werkstück gleichzeitig den Ein/
Aus-Schalter und den Sicherheitshebel. Lassen
Sie das Werkstück den Sicherheitshebel
herunterdrücken. Der Sicherheitshebel darf weder
in entsicherter Stellung arretiert noch per Hand
betätigt werden.
13. Spielen Sie niemals mit dem Sicherheitshebel.
Prüfen Sie regelmäßig den einwandfreien Betrieb
des Sicherheitshebels.
BEWAHREN SIE DIESE
ANWEISUNGEN SORGFÄLTIG
AUF.
12
 Loading...