

Przenośna pilarka taśmowa
̚ךÞþ¹Þ˛Č=ÝšÞ²þ₣Þ˛Č=−¦Ý˛
2106
Portable Band Saw
Instruction Manual
Tragbare Bandsäge
Betriebsanleitung
Instrukcja obsługi
ÊÞ¹²×³ð¾¦ć=−þ=Ćð¹−ݳ˛²˛¾¦¦
1
2
3
12
4
6
7
5
8
34
10
8
9
7
13
12
7
10
14
9
8
56
15
13
7
78
2
16
7
910
9
17
18
19
11 12
20 21
13
3

ENGLISH
Explanation of general view
1. Switch trigger
2. Lock button
3. Speed change switch
4. Blade tightening lever
5. Protrusion
6. Bearing
7. Blade
8. Blade guide
9. Wheel
10. Blade guard
11. Pu sh
12. Hex wrench
13. Stopper plate
14. Bolt
15. Triangular rule
16. Cutting wax
17. Tire
18. Lip
19. Limit mark
20. Screwdriver
21. Brush holder cap
SPECIFICATIONS
Model 2106
Max. cutting
capacity
Blade speed (min
Overall dimensions H x W x L 235 mm x 230 mm x 500 mm
• Due to our continuing program of research and development, the specifications herein are subject to change without
notice.
• Note: Specifications may differ from country to country.
Symbols
The following show the symbols used for the tool. Be sure
that you understand their meaning before use.
............... Read instruction manual.
................ DOUBLE INSULATION
Blade size
Rectangular
workpiece
Round workpiece 115 mm dia.
Without optional stand 115 mm x 115 mm
With optional stand 75 mm x 110 mm
-1
)
Net weight 5.5 kg
Safety class /II
High 80 m
Low 60 m
Length 1,140 mm
Width 13 mm
Thickness 0.5 mm
Intended use
The tool is intended for cutting in wood, plastic and ferrous materials.
Power supply
The tool should be connected only to a power supply of
the same voltage as indicated on the nameplate, and can
only be operated on single-phase AC supply. They are
double-insulated in accordance with European Standard
and can, therefore, also be used from sockets without
earth wire.
Only for EU countries
Do not dispose of electric equipment together with house-
hold waste material!
In observance of European Directive 2002/96/EC on
waste electrical and electronic equipment and its implementation in accordance with national law, electric equipment that have reached the end of their life must be
collected separately and returned to an environmentally
compatible recycling facility.
4

SAFETY INSTRUCTIONS
WARNING:
When using electric tools, basic safety precautions,
including the following, should always be followed to
reduce the risk of fire, electric shock and personal
injury. Read all these instructions before operating
this product and save these instructions.
For safe operations:
1. Keep work area clean.
Cluttered areas and benches invite injuries.
2. Consider work area environment.
Do not expose power tools to rain. Do not use power
tools in damp or wet locations. Keep work area well lit.
Do not use power tools where there is risk to cause
fire or explosion.
3. Guard against electric shock.
Avoid body contact with earthed or grounded surfaces
(e.g. pipes, radiators, ranges, refrigerators).
4. Keep children away.
Do not let visitors touch the tool or extension cord. All
visitors should be kept away from work area.
5. Store idle tools.
When not in use, tools should be stored in a dry, high
or locked up place, out of reach of children.
6. Do not force the tool.
It will do the job better and safer at the rate for which it
was intended.
7. Use the right tool.
Do not force small tools or attachments to do the job of
a heavy duty tool. Do not use tools for purposes not
intended; for example, do not use circular saws to cut
tree limbs or logs.
8. Dress properly.
Do not wear loose clothing or jewellery, they can be
caught in moving parts. Rubber gloves and non-skid
footwear are recommended when working outdoors.
Wear protecting hair covering to contain long hair.
9. Use safety glasses and hearing protection.
Also use face or dust mask if the cutting operation is
dusty.
10. Connect dust extraction equipment.
If devices are provided for the connection of dust
extraction and collection facilities ensure these are
connected and properly used.
11. Do not abuse the cord.
Never carry the tool by the cord or yank it to disconnect it from the socket. Keep the cord away from heat,
oil and sharp edges.
12. Secure work.
Use clamps or a vice to hold the work. It is safer than
using your hand and it frees both hands to operate the
tool.
13. Do not overreach.
Keep proper footing and balance at all times.
14. Maintain tools with care.
Keep cutting tools sharp and clean for better and safer
performance. Follow instructions for lubrication and
changing accessories. Inspect tool cord periodically
and if damaged have it repaired by an authorized service facility. Inspect extension cords periodically and
replace, if damaged. Keep handles dry, clean and free
from oil and grease.
15. Disconnect tools.
When not in use, before servicing and when changing
accessories such as blades, bits and cutters.
16. Remove adjusting keys and wrenches.
Form the habit of checking to see that keys and
adjusting wrenches are removed from the tool before
turning it on.
17. Avoid unintentional starting.
Do not carry a plugged-in tool with a finger on the
switch. Ensure switch is off when plugging in.
18. Use outdoor extension leads.
When tool is used outdoors, use only extension cords
intended for outdoor use.
19. Stay alert.
Watch what you are doing. Use common sense. Do
not operate tool when you are tired.
20. Check damaged parts.
Before further use of the tool, a guard or other part
that is damaged should be carefully checked to determine that it will operate properly and perform its
intended function. Check for alignment of moving
parts, free running of moving parts, breakage of parts,
mounting and any other conditions that may affect its
operation. A guard or other part that is damaged
should be properly repaired or replaced by an authorized service center unless otherwise indicated in this
instruction manual. Have defective switches replaced
by an authorized service facility. Do not use the tool if
the switch does not turn it on and off.
21. Warning.
The use of any accessory or attachment, other than
those recommended in this instruction manual or the
catalog, may present a risk of personal injury.
22. Have your tool repaired by a qualified person.
This electric tool is in accordance with the relevant
safety requirements. Repairs should only be carried
out by qualified persons using original spare parts,
otherwise this may result in considerable danger to
the user.
ADDITIONAL SAFETY RULES
FOR TOOL
1. Use only blades which are 1,140 mm long, 13 mm
wide, and 0.5 mm thick.
2. Check the blade carefully for cracks or damage
before operation. Replace cracked or damaged
blade immediately.
3. Secure the workpiece firmly. When cutting a bundle of workpieces, be sure that all workpieces are
secured together firmly before cutting.
4. Cutting workpieces covered with oil can cause the
blade to come off unexpectedly. Wipe off all
excess oil from workpieces before cutting.
5. Never use the cutting oil as a cutting lubricant.
Use only Makita cutting wax.
6. Do not wear gloves during operation.
7. Hold the tool firmly with both hands.
8. Keep hands away from rotating parts.
5

9. When cutting metal, be cautious of hot flying
chips.
10. Do not leave the tool running unattended.
11. Do not touch the blade or workpiece immediately
after operation; they are extremely hot and could
burn your skin.
SAVE THESE INSTRUCTIONS
FUNCTIONAL DESCRIPTION
CAUTION:
• Always be sure that the tool is switched off and
unplugged before adjusting or checking function on the
tool.
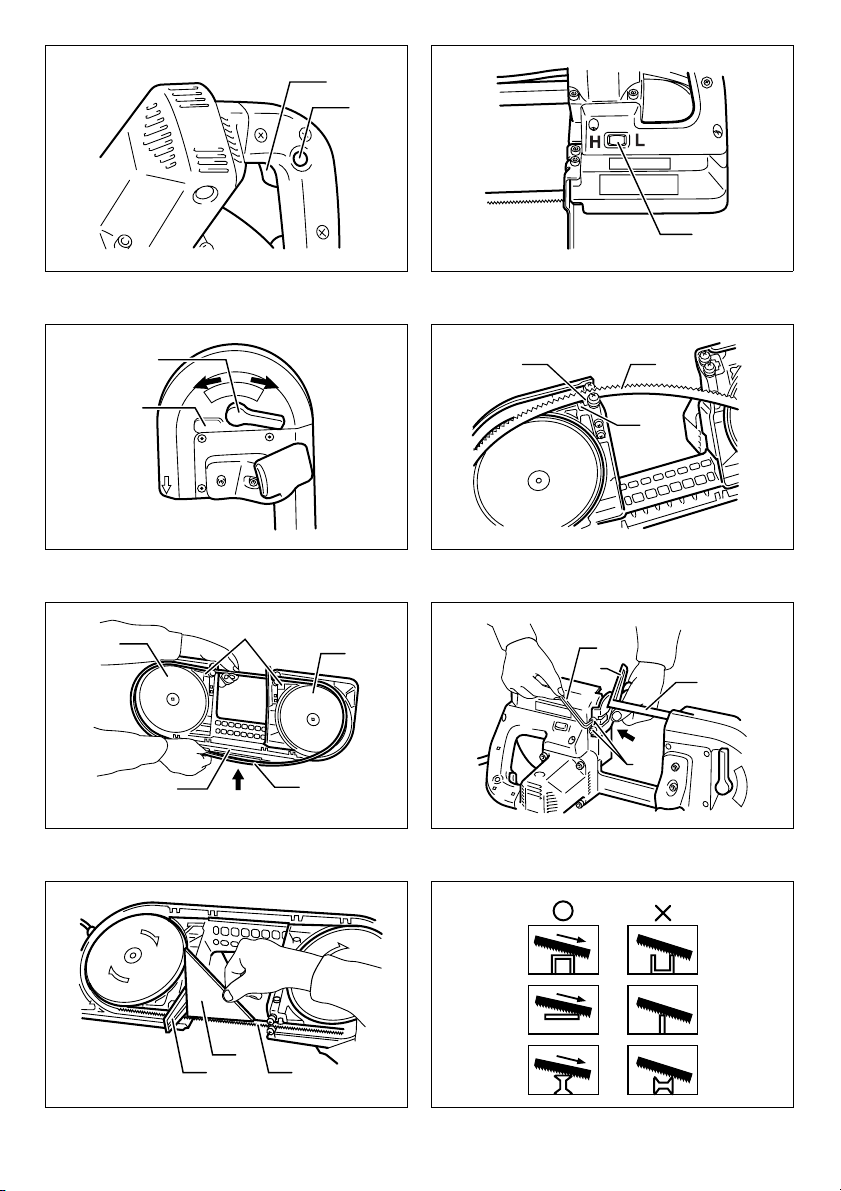
Switch action (Fig. 1)
CAUTION:
• Before plugging in the tool, always check to see that
the switch trigger actuates properly and returns to the
“OFF” position when released.
To start the tool, simply pull the switch trigger. Release the
switch trigger to stop.
For continuous operation, pull the switch trigger and then
push in the lock button.
To stop the tool from the locked position, pull the switch
trigger fully, then release it.
Speed change (Fig. 2)
To change the tool speed, press the “H” side of the speed
change switch for high speed or the “L” side for low
speed.
CAUTION:
• Do not use the speed change switch while the tool is
running. The tool may be damaged.
ASSEMBLY
CAUTION:
• Always be sure that the tool is switched off and
unplugged before carrying out any work on the tool.
Installing or removing the blade
CAUTION:
• Oil on the blade can cause the blade to slip or come off
unexpectedly. Wipe off all excess oil with a cloth before
installing the blade.
• Use caution when handling the blade so that you are
not cut by the sharp edge of the blade teeth.
Turn the blade tightening lever clockwise until it hits
against the protrusion on the frame. Match the direction of
the arrow on the blade to that of the arrow on the wheels.
(Fig. 3)
Insert the blade between the bearings of one blade guide
first and then into the other blade guide. The blade back
should contact the bearings in the lower portion of the
blade guides. (Fig. 4)
Position the blade around the wheels and insert the other
side of the blade within the blade guard until the blade
back contacts the bottom of the blade guard.
Hold the blade in place and turn the blade-tightening lever
counterclockwise until it hits against the protrusion on the
frame. This places proper tension on the blade. Make
sure that the blade is correctly positioned within the blade
guard and around the wheels.
Start and stop the tool two or three times to make sure
that the blade runs properly on the wheels. (Fig. 5)
CAUTION:
• While making sure that the blade runs on the wheels
properly, keep your body away from the blade area.
To remove the blade, follow the installation procedure in
reverse.
CAUTION:
• When turning the blade tightening lever clockwise to
release the tension on the blade, the blade come off
unexpectedly. Be careful.
Installing stopper plate
This tool is shipped from the factory without the stopper
plate installed. Install the stopper plate as follows.
Install the stopper plate on the frame so that the blade can
run through the slot in the stopper plate. While pressing
the stopper plate against the frame, secure the stopper
plate with the bolts using the hex wrench. (Fig. 6)
Use the triangular rule to make sure that the side of the
blade is square with the side of the stopper plate. If not
square, loosen the bolts securing the stopper plate and
adjust the stopper plate accordingly. (Fig. 7)
OPERATION
It is important to keep at least two teeth in the cut. Select
the proper cutting position for your workpiece by referring
to the figure. (Fig. 8)
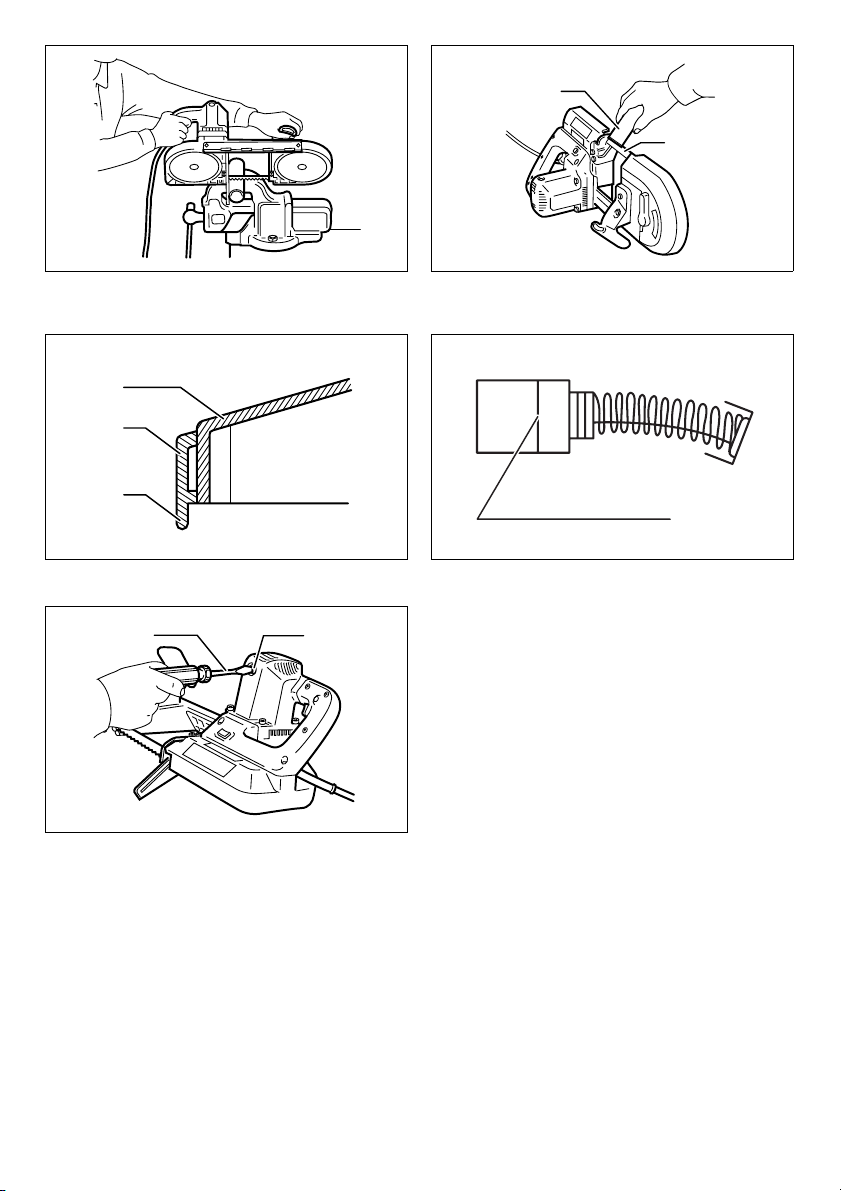
Hold the tool as shown in the figure with the stopper plate
contacting the workpiece and the blade clear of the workpiece.
Turn the tool on and wait until the blade attains full speed.
Gently lower the blade into the cut. The weight of the tool
or slightly pressing the tool will supply adequate pressure
for the cutting. Do not force the tool.
As you reach the end of a cut, release pressure and, without actually raising the tool, lift it slightly so that it will not
fall against the workpiece. (Fig. 9)
CAUTION:
• Applying excessive pressure to the tool or twisting of
the blade may cause bevel cutting or damage to the
blade.
• When not using the tool for a long period of time,
remove the blade from the tool.
Cutting lubricant
When cutting metals, use Makita cutting wax as a cutting
lubricant. To apply the cutting wax to the blade teeth, start
6

the tool and cut in to the cutting wax as shown in the figure. (Fig. 10)
CAUTION:
• Never use cutting oil or apply excessive amount of wax
to the blade. It may cause the blade to slip or come off
unexpectedly.
• When cutting cast iron, do not use any cutting lubricant.
MAINTENANCE
CAUTION:
• Always be sure that the tool is switched off and
unplugged before attempting to perform inspection or
maintenance.
Cleaning
After use, remove wax, chips and dust from the tool,
wheel tires and blade.
CAUTION:
• Never use solvents such as turpentine, gasoline, lacquer, etc. to clean plastic parts.
• Wax and chips on the tires may cause the blade to slip
and come off unexpectedly. Use a dry cloth to remove
wax and chips from the tires.
Replacing tires on wheels (Fig. 11)
When the blade slips or does not track properly because
of badly worn tires, or the lip of the tire on motor side gets
damaged, the tires should be replaced.
Replacing carbon brushes
Remove and check the carbon brushes regularly. Replace
when they wear down to the limit mark. Keep the carbon
brushes clean and free to slip in the holders. Both carbon
brushes should be replaced at the same time. Use only
identical carbon brushes. (Fig. 12)
Use a screwdriver to remove the brush holder caps. Take
out the worn carbon brushes, insert the new ones and
secure the brush holder caps. (Fig. 13)
To maintain product SAFETY and RELIABILITY, repairs,
any other maintenance or adjustment should be performed by Makita Authorized Service Centers, always
using Makita replacement parts.
For European countries only
Noise and Vibration
The typical A-weighted noise levels are
sound pressure level: 92 dB (A)
sound power level: 105 dB (A)
– Wear ear protection. –
The typical weighted root mean square acceleration value
is not more than 2.5 m/s
EC-DECLARATION OF CONFORMITY
We declare under our sole responsibility that this product
is in compliance with the following standards of standardized documents, HD400, EN50144, EN55014, EN61000
in accordance with Council Directives, 73/23/EEC,
89/336/EEC, 98/37/EC.
MAKITA INTERNATIONAL EUROPE LTD.
Michigan Drive, Tongwell, Milton Keynes, Bucks MK15
8JD, ENGLAND
2
.
Yasuhiko Kanzaki CE 2005
Director
ACCESSORIES
CAUTION:
• These accessories or attachments are recommended
for use with your Makita tool specified in this manual.
The use of any other accessories or attachments might
present a risk of injury to persons. Only use accessory
or attachment for its stated purpose.
If you need any assistance for more details regarding
these accessories, ask your local Makita service center.
• Band saw blades
• Triangular rule
•Hex wrench 4
•Cutting wax
• Portable band saw stand
7

DEUTSCH
Erklärung der Gesamtdarstellung
1. Ein/Aus-Schalter
2. Arretiertaste
3. Drehzahlschalter
4. Sägeblatt-Spannhebel
5. Vorsprung
6. Lager
7. Sägeblatt
8. Blattführung
9. Rad
10. Blattschutz
11. Dr ück en
12. Sechskantschlüssel
13. Anschlagplatte
14. Bolzen
15. Einstelldreieck
16. Schneidwachs
17. Reifen
18. Lippe
19. Verschleißgrenze
20. Schraubendreher
21. Bürstenhalterkappe
TECHNISCHE ANGABEN
Modell 2106
Rundes Werkstück 115 mm Durchm.
Max. Schnitttiefe
Sägeblattgeschwindigkeit (min
Sägeblattgröße
Gesamtabmessungen H x B x L 235 mm x 230 mm x 500 mm
• Aufgrund unserer fortschreitenden Forschungen und Entwicklungen sind Änderungen an den hier wiedergegebenen
Angaben ohne Vorankündigung vorbehalten.
• Hinweis: Die Angaben können sich je nach Land unterscheiden.
Symbole
Im Folgenden sind die Symbole dargestellt, die im
Zusammenhang mit dem Werkzeug verwendet werden.
Es ist wichtig, dass Sie deren Bedeutung vor dem Einsatz
des Werkzeugs kennen.
....Lesen Sie die vorliegende Betriebsanleitung.
.....DOPPELISOLIERUNG
Rechteckiges
Werkstück
Nettogewicht 5,5 kg
Sicherheitsklasse /II
Ohne optional verwendbares
Mit optional verwendbarem
-1
)
Gestell
Gestell
Hoch 80 m
Niedrig 60 m
Länge 1.140 mm
Breite 13 mm
Stärke 0,5 mm
Vorgesehene Verwendung
Das Werkzeug wurde für das Sägen von Holz, Kunststoff
und Eisenmaterial entwickelt.
Stromversorgung
Das Gerät darf nur an Stromquellen mit der auf dem
Typenschild angegebenen Spannung und einphasigem
Wechselstrom betrieben werden. Aufgrund der
Doppelisolierung nach europäischem Standard kann es
auch an Steckdosen ohne Erdungskabel betrieben
werden.
115 mm x 115 mm
75 mm x 110 mm
Nur für EU-Länder
Werfen Sie Elektrowerkzeuge nicht in den Hausmüll!
Gemäss Europäischer Richtlinie 2002/96/EG über
Elektro- und Elektronik- Altgeräte und Umsetzung in
nationales Recht müssen verbrauchte Elektrowerkzeuge
getrennt gesammelt und einer umweltgerechten
Wiederverwertung zugeführt werden.
8
 Loading...