

Page 1
16
48
49
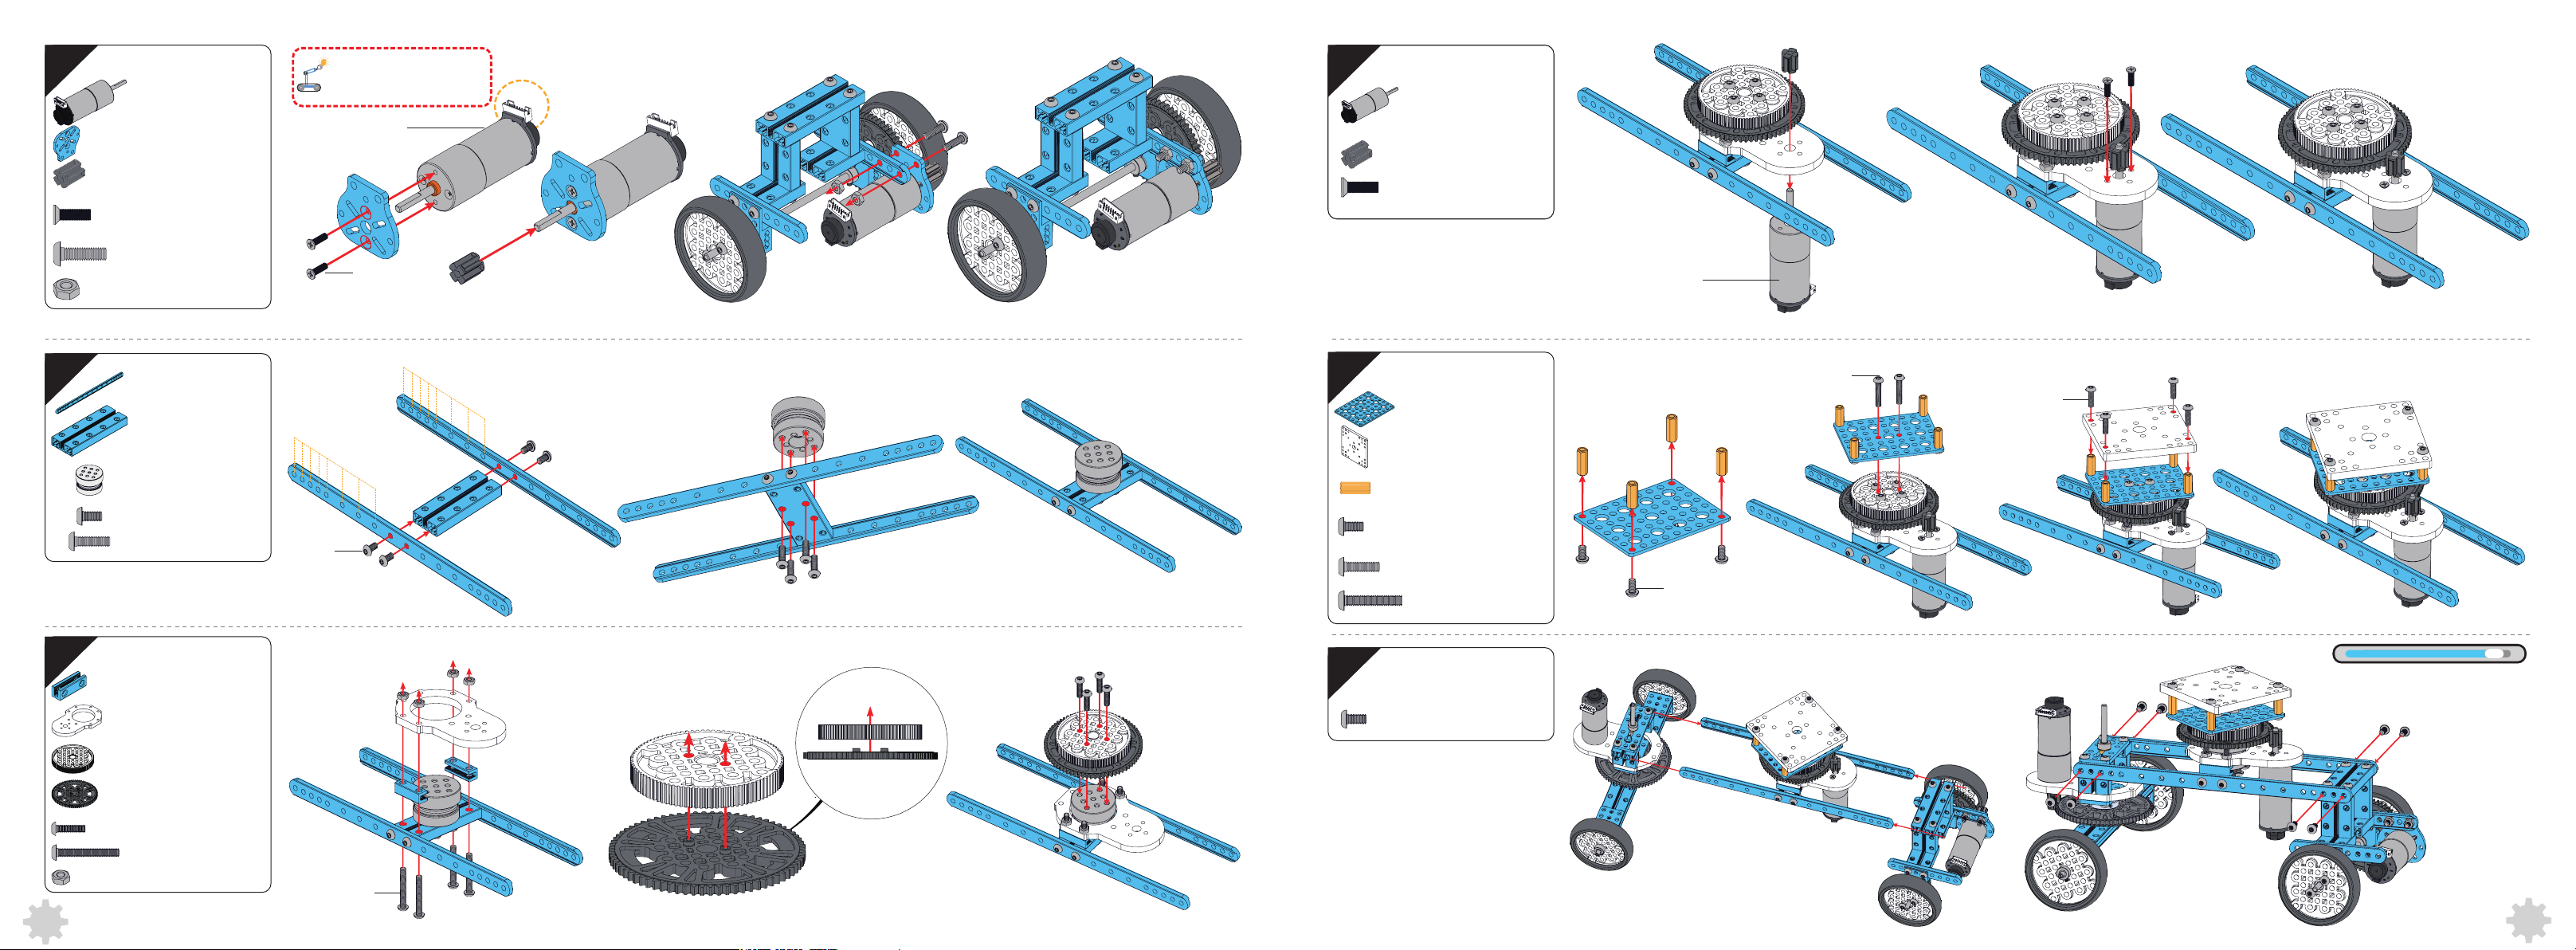
Encoder Motor
185RPM
25mm DC Motor
Bracket
8T
Countersunk
M3×8
Screw
(1)
(1)
(1)
(2)
Pay attention to direction
of the motor interface.
Encoder Motor
185RPM
19
Encoder Motor
185RPM
Countersunk
M3×10
Screw
8T
(1)
(1)
(2)
17
18
M4×14
Nut M4
0412-220
0824-64
Plane Bearing
Turntable
M4×8
M4×14
0808-24
25mm Motor
Bracket-72T
(2)
(2)
(2)
(1)
(1)
(4)
(4)
(2)
(1)
1
2
3
M4×8
M3×8
1
2
3
4
5
6
7
8
4
5
6
7
8
20
7×9-B
Quick Release Plate
Brass Stud M4x16
M4×8
M4×14
M4×22
Encoder Motor 185RPM
(1)
(1)
(4)
(4)
(4)
(2)
M4×22
M4×14
M4×8
90%
21
You have finished 90%
M4×8
(8)
of the assembly.
90T
72T
M4×16
M4×30
Nut M4
(1)
(1)
(4)
(4)
(4)
M4×30
Page 2
22
Assemble mobile phone onto the robot
100%
100% Completed!
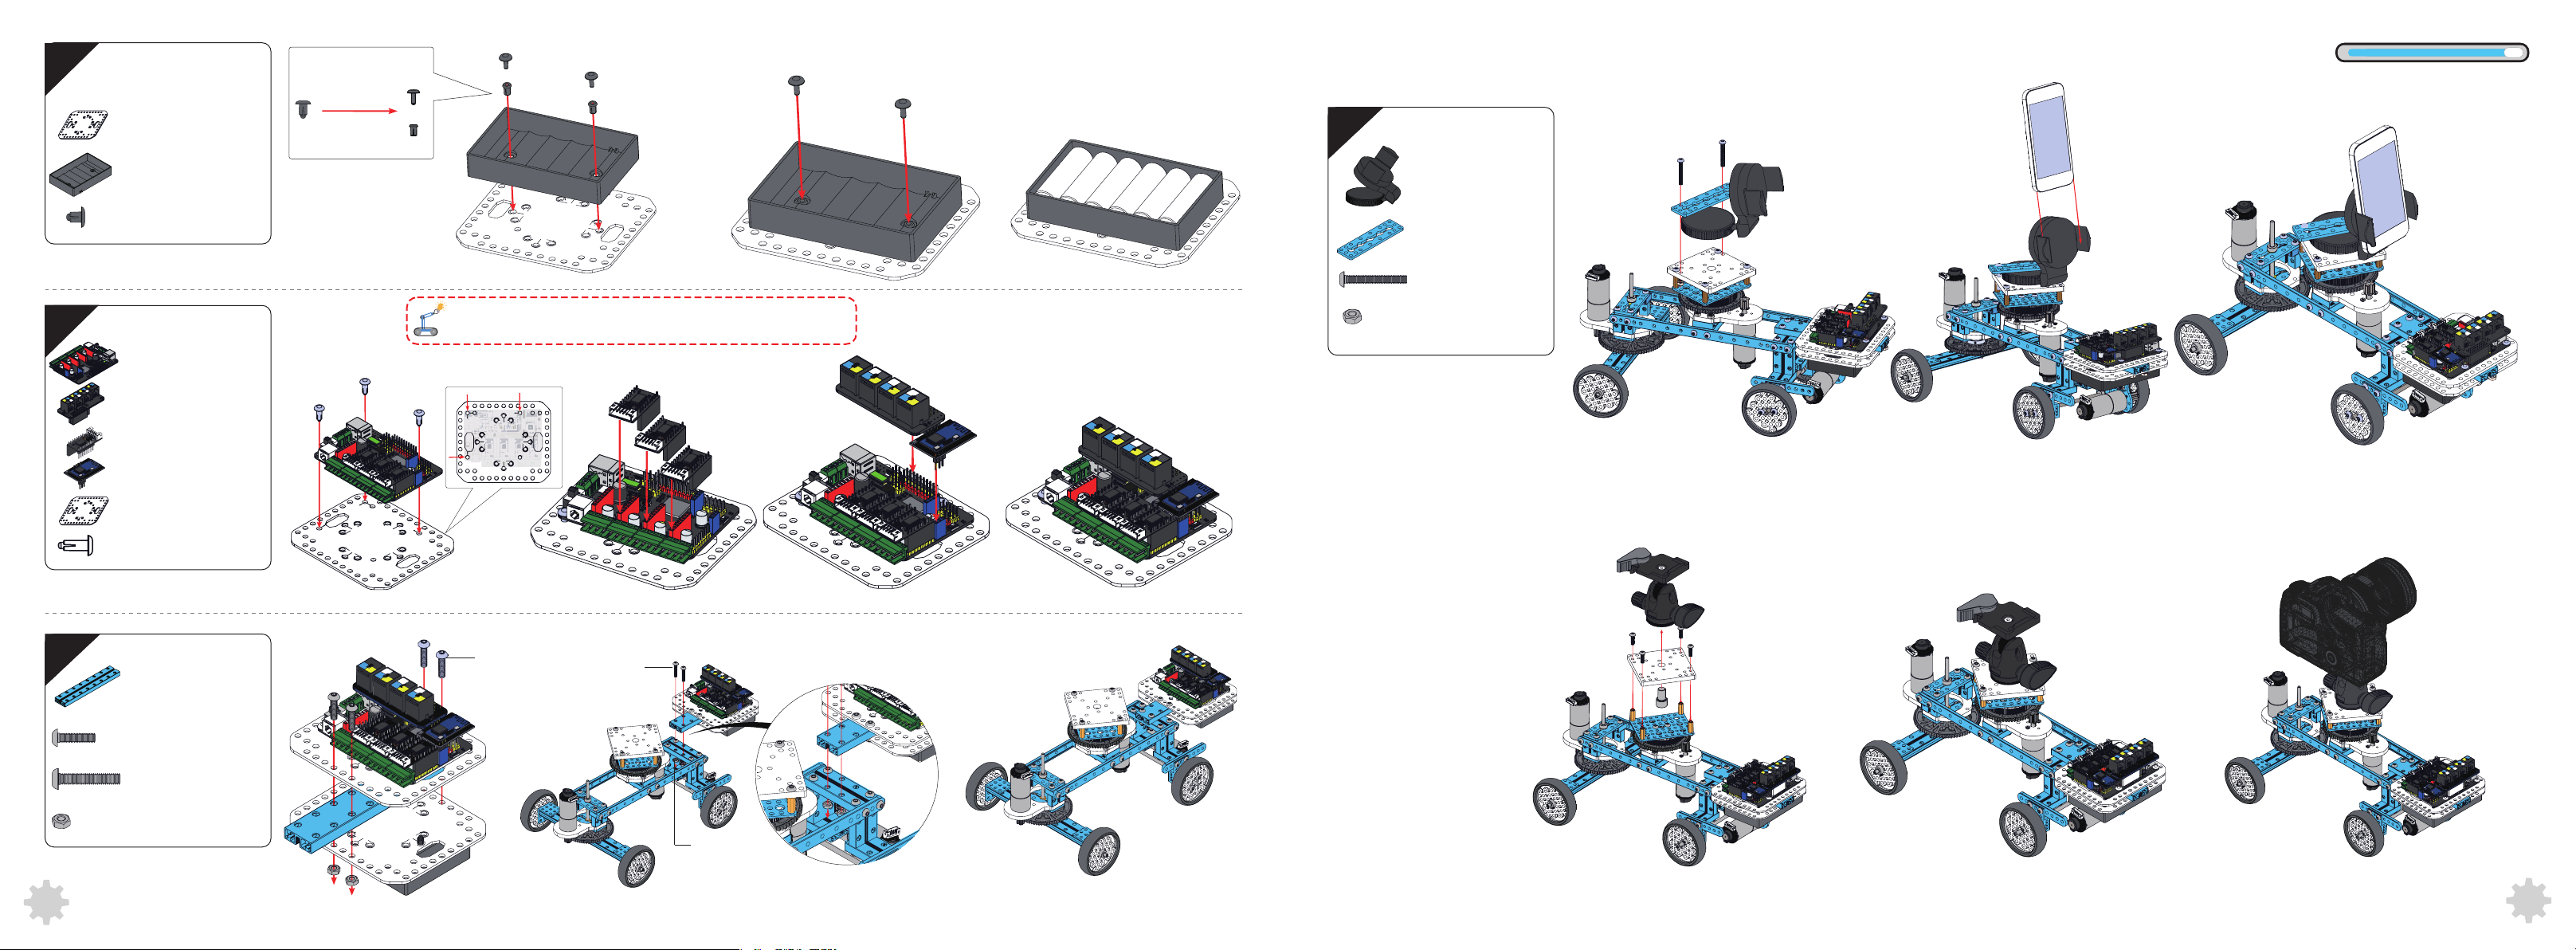
23
MegaPi Acrylic
Bracket
Battery Holder
Plastic Rivet
Shield for RJ25
Encoder/DC Motor
Driver
Bluetooth Module
MegaPi Acrylic
Bracket
Plastic Rivet 4100
4060
MegaPi
(1)
(1)
(2)
To correctly assemble the main board onto the acrylic bracket,
please pay attention to the direction of the arrows on the bracket.
(1)
(1)
(3)
(1)
(1)
25
Mobile Phone
Bracket
0324-88
M4×30
Nut M4
(1)
(1)
(2)
(2)
Assemble camera onto the robot
(3)
50
24
0824-128
M4×16
M4×22
Nut M4
(1)
(4)
(2)
(6)
M4×16
M4×22
Nut M4
Note: The camera and the ball head are not included in this kit.
51
Page 3
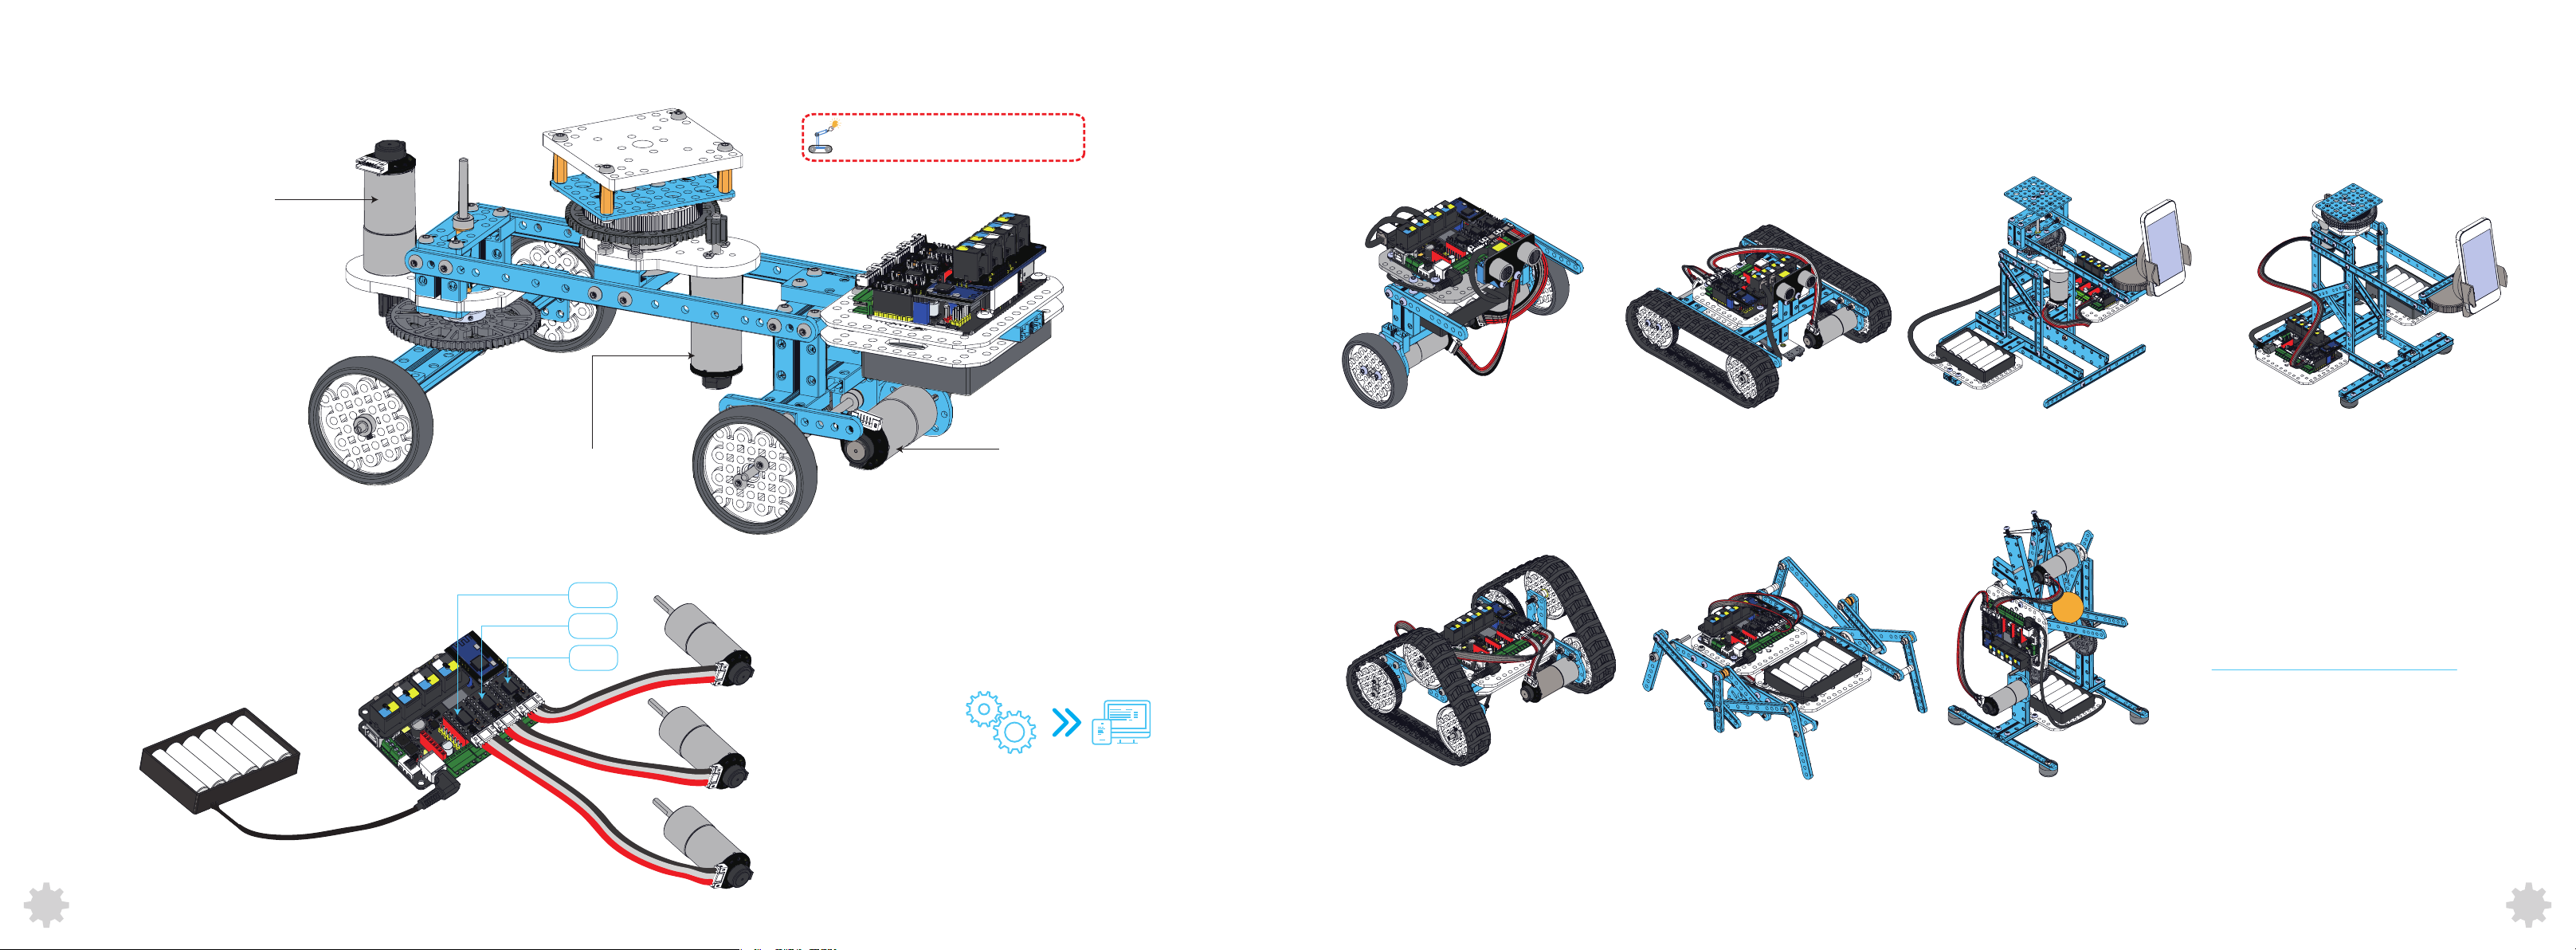
Assembled Diagram
Motor A (86RPM)
Other Building Forms
NOTE:Please check whether the screw is
tightened according to the instruction.
Wiring
52
Motor C (185RPM)
Port 3
Port 2
Port 1
Motor A (86RPM)
Motor B (185RPM)
Motor C (185RPM)
Motor B (185RPM)
After assembly, please skip to page 54 for
software instruction.
Self-Balancing Robot
Rolling Tank
Detecting Robot
Robotic Ant
3D Capture A 3D Capture B
Visit learn.makeblock.com/ultimate2/
for detailed assembling instructions and 3D
models of other forms.
Catapult Ram
53
Page 4

App
1. App Download. Not all devices are compatible now. Check d.makeblock.com/c/ on your smart device's browser for confirmation, then download on App store
or Google play.
2. Bluetooth Connection. Turn on your robot and the Bluetooth of your smart device; tap on the Robot ID in the search list to pair your smart device with the robot. When
the connection indicator LED is solid on, it means that they have been paired successfully.
Programming
Further Learning -- Graphical Programming
Introduction to mBlock
mBlock is an easy-to-use graphical programming environment based on Scratch 2.0 Open
Source Code. It provides a quick way for you to program Arduino projects and create
interesting interactions. It is the ideal software to learn programming, control the robot,
and realize multiple functions from the robot.
The Ultimate 2.0 Robot Kit supports mBlock perfectly, allowing you to program your
robot by simply dragging and dropping blocks.
More Info: www.makeblock.com
Required System: Windows/Mac
Connection indicator LED
3. Get to know how to use the Makeblock App with Ultimate 2.0, please visit learn.makeblock.com/ultimate2-play-with-app/
54
Advanced Learning -- Arduino Programming (C Language)
Introduction to Arduino
Arduino is an open-source electronics prototyping platform based on flexible,
easy-to-use hardware and software. The Arduino software consists of a development
environment (IDE) and the core libraries. The IDE is written in Java and based on the
Processing Development Environment.
More Info: www.arduino.cc
Required System: Windows/Mac/Linux
Online Arduino Tutorials
This online tutorial is great for beginners who want to learn about the basics of writing code
while having fun playing with Ultimate 2.0.
Online tutorials: learn.makeblock.com/ultimate2-arduino-programming/
55
Page 5

FAQ
Further Exploration -- Electronic Modules
Q1. Why doesn't the robot work after powered on? The main board suddenly restarts when I try to drive motors.
a. The robot might be running out of battery. Please charge the batteries or use new batteries. (Note: Please use batteries with low internal resistance which can
supply enough power for the robot.)
b. Make sure you've downloaded related program or firmware for the robot. Otherwise, it won't be running.
c. Please check if the motors on the robot are wired correctly.
Q2. When I try to turn the robot to the left, it turns to the right. Why and how to fix this problem?
a. You may need to switch the order of two wires (Port 1, Port 2) to correct the rotation direction.
Q3. Why there is noise after I got the robot tank running?
a. Please check if the driven wheels are correctly installed.
b. Please adjust the bearings of the driven wheel to make sure they are not too tight or too loose.
c. Please make sure encoder disk and the interface of the photoelectric switch are separated from each other.
Q4. Why can
X
’t I connect the app with the robot via Bluetooth?
X
O
a. Please visit d.makeblock.com to check if your smartphone is compatible with the app.
b. Please try restarting the app or reset the main control board on the robot.
Q5. How to upgrade MegaPi firmware?
a. Visit learn.makeblock.com/ultimate2-play-with-app/ to download the latest firmware and upgrade it for MegaPi via Micro USB.
Ultrasonic Module is able
to measure distance from
3cm to 400cm.
Me 7-Segment Display is a
display module with four digit
tubes that can show data like
speed, time, score, and etc.
Me RGB LED Module contains
four programmable RGB
LEDs. The color of each LED
can be set by editing
components of red, green,
and blue.
Me Sound Sensor is designed
to measure volume. It is
suitable for some sound
interactive projects, such as
an voice-operated switch.
MeTemperature Sensor is a
stainless steel tube sensor
which is used for measuring
temperature.
3
Me PIR Motion Sensor
is able to detect infrared ray from
animals and humans within 6
meters.
Q6. Where can I find the instruction for other building forms?
a. Visit learn.makeblock.com/ultimate2/ for more building instructions of Ultimate 2.0 robot kit.vt
Me Joystick
Visit learn.makeblock.com/ultimate2-faq/ for more FAQs.
is normally used to control
the moving direction.
See more on Makeblock platform
www.makeblock.com
56 57
Page 6

Further exploration -- More Kits
mBot Educational Robot Kit
mBot Ranger Robot Kit
Codey Rocky
FCC Ultimate 2.0
FCC Information
This device complies with part 15 of the FCC Rules. Operation is subject to the following two conditions:
(1) This device may not cause harmful interference, and
(2) this device must accept any interference received, including interference that may cause undesired operation.
Any Changes or modifications not expressly approved by the party responsible for compliance could void the user's authority to operate the equipment.
Note: This equipment has been tested and found to comply with the limits for a Class B digital device, pursuant to part 15 of the FCC Rules. These limits are designed to provide reasonable protection against
harmful interference in a residential installation. This equipment generates uses and can radiate radio frequency energy and, if not installed and used in accordance with the instructions, may cause harmful
interference to radio communications. However, there is no guarantee that interference will not occur in a particular installation. If this equipment does cause harmful interference to radio or television
reception, which can be determined by turning the equipment off and on, the user is encouraged to try to correct the interference by one or more of the following measures:
●
Reorient or relocate the receiving antenna.
●
Increase the separation between the equipment and receiver.
●
Connect the equipment into an outlet on a circuit different from that to which the receiver is connected.
●
Consult the dealer or an experienced radio/TV technician for help.
“This equipment complies with FCC radiation exposure limits set forth for an uncontrolled environment. This equipment should be installed and operated with minimum distance 20cm between the
radiator & your body.”
FCC ID:2AH9Q-ULTIMATE2
Product
Model
Ultimate 2.0
90040
COMPLIANT
Limited Warranty
This product is warranted against defects in materials and workmanship under normal use by the original purchaser for 90 days after the date of purchase from an authorized retailer. THERE ARE NO OTHER
EXPRESS WARRANTIES.
This warranty does not cover: (a) damage or failure caused by or attributable to abuse, misuse, failure to follow instructions, improper installation or maintenance, alteration, accident, Acts of God (such as
floods or lightning), or excess voltage or current; (b) improper or incorrectly performed repairs by non-authorized service facilities; (c) consumables such as fuses or batteries; (d) ordinary wear and tear or
cosmetic damage; (e) transportation, shipping or insurance costs; (f) costs of product removal, installation, set-up service, adjustment or reinstallation; and (g) claims by persons other than the original
purchaser.
Should a problem occur that is covered by this warranty, take the product and the original sales receipt as proof of purchase date to the place of purchase. The product, at the warrantor's option, unless
LaserBot
Maker Space kit
AirBlock
otherwise provided by law: (a) be repaired without charge for parts and labor; (b) be replaced with the same or a comparable product; or (c) a refund of the purchase price will be provided. All replaced parts and
products, and product son which are fund is made, become the property of the warrantor. New or reconditioned parts and products may be used in the performance of warranty service. Repaired or replaced
parts and products are warranted for the remainder of the original warranty period. You will be charged for repair or replacement of the product made after the expiration of the warranty period.
58 59
Page 7

ALL IMPLIED WARRANTIES, INCLUDING THE IMPLIED WARRANTY OF MERCHANT ABILITY AND, IF APPLICABLE, THE IMPLIED WARRANTY OF FITNESS FOR APARTICULAR PURPOSE, SHALL EXPIRE ON THE EXPIRATION OF
THE STATED WARRANTY PERIOD.
EXCEPT AS DESCRIBED ABOVE, THE WARRANTOR SHALL HAVE NO LIABI LITY OR RESPONSIBILITY TO THE PURCHASER OF THE PRODUCT OR ANY OTHER PERSON OR ENTITY WITH RESPECT TO ANY LIABILITY , LOSS OR
DAMAGE CAUSED DIRECTLY OR INDIRECTLY BY USE OR PERFORMANCE OF THE PRODUCT OR ARISING OUT OF ANY BREACH OF THIS WARRANTY , INCLUDING, BUT NOT LIMITED TO, ANY DAMAGES RESULTING FROM
INCONVENIENCE AND ANY LOSS OF TIME, DATA, PROPERTY , REVENUE, OR PROFIT AND ANY INDIRECT , SPECIAL, INCIDENTAL, OR CONSEQUENTIAL DAMAGES, EVEN IF THE WARRANTOR HAS BEEN ADVISED OF THE
POSSIBILITY OF SUCH DAMAGES. BEEN ADVISED OF THE POSSIBILITY OF SUCH DAMAGES.
Warnings
• Adult supervision and assistance are required.
• CHOKING HAZARD — This product contains small parts and functional sharp points on components. Keep away from children under age 3.
• Read and follow all instructions in the user guide before using.
• Retain this user guide for future reference.
Battery Notes
• Use only fresh batteries of the required size and type. Do not mix old and new batteries, different types of batteries (standard, alkaline, or rechargeable), or rechargeable batteries of different capacities.
• Dispose of batteries promptly and properly. Do not burn or bury them.
• If you do not plan to play with the robot for an extended period of time, remove the batteries.
Caution
• Do not insert the wires into telecommunication or network socket outlets.
• As an extra precaution, check this product regularly for signs of wear or damage.
• Ensure all wiring connections are correct before inserting batteries and switching on the product .
Failure to do so may result in damage to components and the product.
• Ensure all wires are correctly connected to the battery terminals and other connectors. If the circuit does not work, make sure the plastic insulation of the wire is not obstructing the connection to the
connector.
• When you have finished playing, remove the batteries and switch off the unit before you disconnect the wires. Do not apply any components or parts to the unit other than those provided with this kit.
• To prevent overheating and damage, do not short - circuit the battery terminals and connectors. Do not block or cover the motor or other moving parts.
60
 Loading...