

Page 1

Owner's Manual
MDR557H
HDD & DVD R
ECORDER
WITH DIGITAL TUNER
THANK YOU FOR CHOOSING MAGNAVOX.
EED HELP FAST?
N
READ YOUR QUICK GUIDE AND/OR OWNER'S MANUAL FIRST FOR QUICK TIPS THAT MAKE USING
YOUR MAGNAVOX PRODUCT MORE ENJOYABLE.
IF YOU HAVE READ YOUR INSTRUCTIONS AND STILL NEED ASSISTANCE,
YOU MAY ACCESS OUR ONLINE HELP AT WWW.MAGNAVOX.COM/SUPPORT
OR CALL 1-866-341-3738 WHILE WITH YOUR PRODUCT.
The model and serial numbers of this unit may be found on the cabinet.
You should record and retain those numbers for future reference.
Please refer to the back cover of the manual for more Limited Warranty information.
INSTRUCCIONES LIMITADAS EN ESPAÑOL INCLUIDAS.
Recording Playback EditingIntroduction Connections Basic Setup Function Setup Others
Model No.:
Serial No.:
© 2014 Funai Electric Co., Ltd.
Español
Page 2
2
G
T
f
f
.
CE
T
f
y
g
f
y
:
.
.
)
ble.
Safety Instructions
W
:
TO
.
:
TO
(
O Q
.
ON
T
t
T
f
f
t
cabinet.
UC
S
ead these
uctions.
.
.
4
.
.
.
ypg
yp
h
yy
g
g
.
pp
yp pyp p
g g yp p g p
ggyppgggyppg
the third prong are provided for your safety. If
ggpgggpg
the provided plug does not fit into your outlet,
pg p y y
pg p y y
ppg y
pg y
outlet.
pg
p
pp ypg
pypg
the apparatus.
p
the manufacturer.
y
y
yp
y
py
py
pp
g
p g pp g g g
gpp gg
gq p
qp
gq pp
gq
gyy pgyy p
pp y p g g q
pp y p g g q
the apparatus has been exposed to rain or
pj pp
pj
pp p
p
d.
T
)
SAFETY INFORMATION
ARNING
REDUCE THE RISK OF FIRE OR ELECTRIC SHOCK, DO NOT EXPOSE THIS
PPARATUS TO RAIN OR MOISTURE
PPARATUS SHALL NOT BE EXPOSED TO DRIPPING OR SPLASHING AND NO OBJECTS
ILLED WITH LIQUIDS, SUCH AS VASES, SHALL BE PLACED ON THE APPARATUS.
AUTI
RISK OF ELECTRIC SHOCK
DO NOT OPEN
CAUTION
REDUCE THE RISK OF ELECTRIC SHOCK, DO NOT
REMOVE COVER
PARTS INSIDE. REFER SERVICING T
ERVICE PERSONNEL
mportant notes and ratings are located on the rear or
m of the
OR BACK). NO USER SERVICEABLE
UALIFIED
he lightning flash with arrowhead symbol, within an
quilateral triangle, is intended to alert the user to the
presence o
product’s enclosure that may be o
o constitute a risk of electric shock to persons.
he exclamation point within an equilateral triangle is
ntended to alert the user to the presence of important
perating and maintenance (servicing) instructions in
he literature accompanying the appliance.
he symbol for CLASS ll (Double Insulation
IMPORTANT SAFETY INSTR
R
. Keep these instructions
eed all warnings
.
ollow all instructions
. Do not use this apparatus near water
Clean only with dry cloth
7. Do not block any ventilation openings. Install in
. Do not install near any heat sources suc
eat
9. Do not defeat the safety purpose of the
ug has two blades with one wider than the
instr
10.
.
12.
anufacturer, or sold with the
aution when moving the cart/
13.
.
een damaged in any way, such as power-
uninsulated “dangerous voltage” within the
sufficient magnitude
TION
FCC WARNIN
his equipment may generate or use radio frequency energy. Changes or modifications to this equipment may
cause harm
authority to operate this equipment i
RADIO-TV INTERFEREN
his equipment has been tested and found to comply with the limits for a Class B digital device, pursuant to Part
15 of the FCC Rules. These limits are designed to provide reasonable protection against harmful interference in a
residential installation. This equipment generates, uses, and can radiate radio
and used in accordance with the instructions, ma
there is no
inter
is encouraged to tr
1)Reorient or relocate the receiving antenna
4
Disconnect the mains(AC) plug to shut off when find trouble or not in use. The mains(AC) plug shall remain readily
opera
ul interference unless the modifications are expressly approved in the manual. The user could lose the
uarantee that interference will not occur in a particular installation. If this equipment does cause harmful
erence to radio or television reception, which can be determined by turning the equipment off and on, the user
Increase the separation between the equipment and receiver
Connect the equipment into an outlet on a circuit different from that to which the receiver is connected.
Consult the dealer or an experienced radio/TV technician for help.
to correct the interference by one or more of the following measures
an unauthorized change or modification is made
een droppe
cause harmful interference to radio communications. However,
requency energy and, if not installed
Page 3
SAFETY INFORMATION
.
.
Y
T
T
h
.
y
e
ON
d d
d.
.
T
.
e
.
.
.
.
.
.
.
g
y.
-
.
-
y.
- Af
.
g
y
.
.
m
y
p
.
AUTION:
WARNING:
LASER SAFET
his apparatus is classified as a CLASS 1 LASER PRODUCT.
his apparatus employs a laser. Only a qualified service person should remove the cover or attempt
to service t
AUTION: Use of controls or adjustments or performance of procedures other than those specified
IMPORTANT COPYRIGHT INFORMATI
Unauthorized copying, broadcasting, public performance and lending of discs are prohibited. This item incorporates
opy protection technology that is protected by U.S. patents and other intellectual property rights of Rovi Corporation.
Reverse engineering an
Do not place the unit on the furniture that is capable of being tilted by a child and an adult leaning, pulling, standing
r climbing on it. A falling unit can cause serious injury or even death
Never use a gas duster on this unit.
he gas trapped inside of this unit may cause ignition and explosion
anger of explosion if battery is incorrectly replaced. Replace only with the same or equivalent type
atteries (Battery pack or battery installed) shall not be exposed to excessive heat such as sunshine, fire or the like
is apparatus, due to possible eye injury
herein ma
result in hazardous radiation exposur
isassembly are prohibite
Introduction
To Avoid the Hazards of Electrical Shock and Fir
• Do not handle the power cord with wet hands
Do not pull on the power cord when disconnecting it from an AC outlet. Grasp it by the plug
• Do not put your fingers or objects into the unit
Location and Handling
• Do not install the unit in direct sunlight, near strong magnetic fields or in a place subject to dust or strong vibration
Avoid a place with drastic temperature changes
• This apparatus should not be placed in a built-in installation such as a bookcase or rack unless proper ventilation is
rovided. Make sure to leave a space of 3.9 inches (10cm) or more around this apparatus
Depending on the environment, the temperature of this unit may increase slightly. This is not a malfunction
• Be sure to remove the disc and unplug the AC power cord from the outlet before carrying the unit.
ew Condensation Warnin
• Dew condensation may form inside the unit in the following conditions. If so, do not use this unit at least for a few
ours until its inside gets dr
The unit is moved from a cold place to a warm place
Under conditions of high humidit
ter heating a cold room
ote(s) about Recyclin
• This unit’s packaging materials are recyclable and can be reused. Please dispose of any materials in
accordance with
Batteries should never be thrown away or incinerated but disposed of in accordance with your local
egulations concerning chemical wastes
•
or product recycling information, please visit - www.magnavox.co
our local recycling regulations
Notice for Progressive Scan Output
• Consumers should note that not all high definition television sets are fully compatible with this product and ma
cause artifacts to be displayed in the picture. In case of picture problems with 480 progressive scan output, it
is recommended that the user switch the connection to the ‘standard definition’ out
egarding your TV set compatibility with this 480p DVD recorder, please contact our customer service center
ut. If there are questions
Recording Playback EditingConnections Basic Setup Function Setup Others
Español
Page 4

SAFETY INFORMATION
g
g
g
f
y y
y
g
g
.
t
g
.
t
y
.
s
g
p
wip
y
y
ecords.
g
y
h
l
f
g of
.
g
g
f
.
d.
g
g
t
th
b
d
f
d
.
th
with
.
k
g
t
with
).
T
.
t
.
th
l
g.
-
frared filter.
)
/
s
l
l
ble
)
Supplied Accessories
Remote Control (NC003UH
with AA (1.5 V) battery x2
RF coaxia
RCA audio
Owner’s Manua
Quick Start Guide
ca
video cable
Owner’s Manual
Maintenance
Servicin
• Please refer to relevant topics on “TROUBLESHOOTING”
on pa
• I
es 113-117 before returning the product.
this unit becomes inoperative, do not try to correct
the problem b
parts inside. Turn the unit to the standb
the power plu
on the front pa
nter
ourself. There are no user-serviceable
mode, unplug
and please call our help line mentioned
e to locate an Authorized Service
Cleaning the cabine
Wipe the front panel and other exterior surfaces of the
nit with a soft cloth
Never use a solvent, thinner, benzene or alcohol to clean
he unit. Do not spray insecticide liquid near the unit.
Such chemicals ma
nit
discolor the surface or damage the
Cleaning disc
When a disc becomes dirty, clean it with a cleaning
cloth. Wi
Do not use solvents such as benzine, thinner,
commerciall
cleaning agents or antistatic spra
r
e the disc from the center to out. Do not
e in a circular motion.
available cleaners, detergent, abrasive
intended for analog
Cleaning the disc lens
If this unit still does not perform properly
although
“TROUBLESHOOTING” in t
optica
or an Authorized Service Center
cleanin
ou refer to the relevant sections and to
is owner's manual, the laser
pickup unit may be dirty. Consult your dealer
or inspection and
the laser optical pickup unit
isc handlin
Handle the discs so that fingerprints and dust do not
adhere to the sur
Always store the disc in its protective case when it is
not use
aces of the discs
DD handlin
HDD is a precision apparatus that is susceptible
o vibration, strong impact or dirt. Depending on
e installation environment or handling, the unit
may
ecome partially damaged or in the worst
case, recor
specially while the HDD is in motion, do not subject
t to vibration or strong impact or pull out the power
plug. And i
recor
HDD rotates at high speed when in operation. Be sure
at rotation has stopped and then move the unit
ing or replaying may not be available.
a power failure occurs, the content of the
ing / replaying program may be lost
out subjecting it to strong impact or vibration
IR signal chec
the remote control does not work properly, you can
est if the remote control sends out the infrared signal
a digital camera or cell phone that includes built-in
amera(s
urn On the digital camera
irect a digital camera to remote control,
hen press and hold a button on the remote
ntrol
the Remote Control’s infrared light(s) flash
rough the digital camera screen, the remote
contro
is workin
Some cell phone camera’s may not work due to an
in
Note(s
• Cannot guarantee about 3rd party’s remote controls.
Please contact the remote manufacturer if you have
any problem with it.
Page 5
p
.
.
A
f
y
d.
.
Trademark Information
the KO
ade dress are
trademarks o
odak used unde
se.
f
.
r
y
y
g
g f
g
-
V
”
ecordable
scs.
T
es.
SAFETY INFORMATION
Introduction
KODAK and
anufactured under license from Dolby Laboratories.
Dolby and the double-D symbol are trademarks o
aboratories
f K
DAK tr
r licen
Dolby
Dolby® Digital Stereo Creato
“Dolby® Digital Stereo Creator enables consumers to
create stereo DVD-Videos with stunning Dolb
sound tracks at home. The technolog
instead of PCM recordin
space, allowin
ecording time on each DVD. DVDs mastered usin
Dolby Digital Stereo Creator will play back on all DVD
ideo players.
ote(s): This is true when the players are compatible with
or higher video resolution or extended
l r
, also saves recordable disc
DVD di
, when utilized
Digital
he terms HDMI and HDMI High-Definition
Multimedia Interface, and the HDMI Logo are
trademarks or registered trademarks of HDMI
Licensing LLC in the United States and other
ntri
Recording Playback EditingConnections Basic Setup Function Setup Others
Co., Ltd. and Funai Cor
© 2014 Funai Electric Co., Ltd
the express prior written consent o
an
nformation in this document is subject to change without notice. Funai reserves the right to change the content
AGNAVOX is a registered trademark of Philips Electronics North America Corporation and is used by Funai Electric
oration, Inc. under license from Philips Electronics North America
ll rights reserved. No part of this manual may be disseminated or transcribed, in any form or for any purpose without
Funai. Furthermore, any unauthorized commercial distribution of this manual or
revision hereto is strictly prohibite
erein without the obligation to notify any person or organization of such changes
Español
Page 6

CONTENTS
.
.
e
. . . . . . . . . . . . . . . . . . . . . . . . . . . . . . . . . . . .
4
T
.
eatures
.
.
0Rea
.
ote Control
.
.
6
6
7
7
9
.
.
.
uto Channel Scan
.
.
.
.
ection
.
.
yle
3
3
3
2
.
.
.
.
.
.
.
A
.
SAFETY INFORMATION . . . . . . . . . . . .2
afety Instructions . . . . . . . . . . . . . . . . . . . . . . . . . . . . .
upplied Accessories . . . . . . . . . . . . . . . . . . . . . . . . . . .
Maintenanc
rademark Information . . . . . . . . . . . . . . . . . . . . . . . .
FEATURES . . . . . . . . . . . . . . . . . . . . . . . .8
F
. . . . . . . . . . . . . . . . . . . . . . . . . . . . . . . . . . . . . . .
mbols Used in this Owner’s Manual . . . . . . . . . .
FUNCTIONAL OVERVIEW . . . . . . . . 10
Front Panel . . . . . . . . . . . . . . . . . . . . . . . . . . . . . . . . . . .1
r Panel . . . . . . . . . . . . . . . . . . . . . . . . . . . . . . . . . . .
Rem
Front Panel Display . . . . . . . . . . . . . . . . . . . . . . . . . .
. . . . . . . . . . . . . . . . . . . . . . . . . . . . . . .
CONNECTION . . . . . . . . . . . . . . . . . . . 15
Antenna Connection (Required) . . . . . . . . . . . . . . .
verview . . . . . . . . . . . . . . . . . . . . . . . . . . . . . . . . . . . .
Connecting to a TV Using Audio / Video jacks . .1
onnecting to a TV Using the S-Video Out jack .1
onnecting to a TV
sing Component Video Out jacks . . . . . . . . . . .1
onnecting to a TV
with an HDMI Compatible Port . . . . . . . . . . . . . . .1
Connecting to a Cable / Satellite Box . . . . . . . . . . . 1
Connecting to a TV
without Audio / Video jacks . . . . . . . . . . . . . . . . . . .
Digital Audio Connection . . . . . . . . . . . . . . . . . . . . .1
BEFORE YOU START . . . . . . . . . . . . . 22
Finding the Viewing Channel on your TV
Guide to On-Screen Display / Menu . . . . . . . . . . . .
Main Menu . . . . . . . . . . . . . . . . . . . . . . . . . . . . . . . . . .
witching HDD / DVD Mode . . . . . . . . . . . . . . . . . .
How to Insert a Disc . . . . . . . . . . . . . . . . . . . . . . . . . . .
. . . . .
INFORMATION ON RECORDING . . 41
BEFORE RECORDING . . . . . . . . . . . . 43
etting for Auto Chapter . . . . . . . . . . . . . . . . . . . . . .4
ecording the DTV Closed Caption . . . . . . . . . . . .4
ecording from a Cable Box or Satellite . . . . . . . .4
BASIC RECORDING & ONE-TOUCH
TIMER RECORDING. . . . . . . . . . . . . 44
AUTOSTART RECORDING . . . . . . . . 46
TIMER RECORDING. . . . . . . . . . . . . . 47
ints for Timer Recording . . . . . . . . . . . . . . . . . . . . .
1
SPECIAL RECORDING . . . . . . . . . . . . 52
ints for Overwriting . . . . . . . . . . . . . . . . . . . . . . . . . .5
DUBBING. . . . . . . . . . . . . . . . . . . . . . . 53
nformation on Dubbing . . . . . . . . . . . . . . . . . . . . .
etting for an External Device . . . . . . . . . . . . . . . .
ecording from an External Device . . . . . . . . . . .
nformation on DV Dubbing . . . . . . . . . . . . . . . . . .
VC to HDD / DVD Dubbing . . . . . . . . . . . . . . . . . .
elected Title Dubbing . . . . . . . . . . . . . . . . . . . . . . . .
ne Title Dubbing . . . . . . . . . . . . . . . . . . . . . . . . . . .
PROTECTING A DISC . . . . . . . . . . . . 63
0
PLAYING THE DISCS
ON OTHER DVD PLAYERS. . . . . . . 64
inalizing a Disc . . . . . . . . . . . . . . . . . . . . . . . . . . . . . .
uto Finalizing . . . . . . . . . . . . . . . . . . . . . . . . . . . . . . . .
INITIAL SETTING . . . . . . . . . . . . . . . . 28
CHANNEL SETTING. . . . . . . . . . . . . . 29
A
Adding / Deleting Channels
. . . . . . . . . . . . . . . . . . . . . . . . . . .
SETTING THE CLOCK . . . . . . . . . . . . 32
Auto Clock Setting . . . . . . . . . . . . . . . . . . . . . . . . . . .
Manual Clock Setting . . . . . . . . . . . . . . . . . . . . . . . . .4
Daylight Saving Time
TUNER SETTINGS . . . . . . . . . . . . . . . 35
witching Analog Mode / Digital Mode
hannel Sel
electing TV Audio . . . . . . . . . . . . . . . . . . . . . . . . . . .
DTV Closed Caption . . . . . . . . . . . . . . . . . . . . . . . . . . .
Closed Caption St
. . . . . . . . . . . . . . . . . . . . . . . . . . . .
. . . . . . . . . . . . . . . . . .
. . . . . . . . . . . . . . . . . . . . . . . . .4
. . . . . . .
. . . . . . . . . . . . . . . . . . . . . . . . . .
8
Continued on the next page
Page 7
CONTENTS
.
1
2
3
. . . . . . . . . . .
3
3
3
. . . . . . . . . . . . . . . . . . . . . . . . .
.
.
Zoom
5
5
6 . . . . . . . . . . . . . . . . . . . . . . . . . . . . .
6
6
. . . . . . . . . . . . . . . . . . . . . . . . . . . . .
.
8Track Search
8
Search
9
.
.
.
.
.
.
.
.
.
.
.
.
0
.
3
.
.
.
8
02
06Video . . . . . . . . . . . . . . . . . . . . . . . . . . . . . . . . . . . . . . . .
09
1
.
1
.
sco
abable
1
sco no
abable
.
.
3
.
abació
5
Introduction
INFORMATION ON PLAYBACK . . . 66
BASIC PLAYBACK . . . . . . . . . . . . . . . 68
Direct Playback . . . . . . . . . . . . . . . . . . . . . . . . . . . . . .
Playback from the Title List . . . . . . . . . . . . . . . . . . . .
Playing Audio Discs and Picture Discs . . . . . . . . .7
Using the Title / Disc Menu . . . . . . . . . . . . . . . . . . . .7
. . . . . . . . . . . . . . . . . . . . . . . . . . . . . . . . . . . . . . . . .
SPECIAL PLAYBACK . . . . . . . . . . . . . 73
Resume Playback . . . . . . . . . . . . . . . . . . . . . . . . . . . . .7
7
Variable Skip / Variable Replay . . . . . . . . . . . . . . . . .7
Rapid Playback . . . . . . . . . . . . . . . . . . . . . . . . . . . . . . .7
. . . . . . . . .
hasing Playback during Recording . . . . . . . . . .
Simultaneous Playback and Recording . . . . . . .
. . . . . . . . . . . . . . . . . . . . . . . . . . . . . . . . . . . . . . . . . 7
arker Setting . . . . . . . . . . . . . . . . . . . . . . . . . . . . . . . .7
Repeat Playback . . . . . . . . . . . . . . . . . . . . . . . . . . . . . .7
7
Slide Show . . . . . . . . . . . . . . . . . . . . . . . . . . . . . . . . . . . . 7
Playing Back the Autostart Recording . . . . . . . .
SEARCH . . . . . . . . . . . . . . . . . . . . . . . . 78
Title / Chapter Search . . . . . . . . . . . . . . . . . . . . . . . . . . 7
. . . . . . . . . . . . . . . . . . . . . . . . . . . . . . . . . . 7
Time
. . . . . . . . . . . . . . . . . . . . . . . . . . . . . . . . . .7
SELECTING THE FORMAT FOR
INFORMATION ON EDITING. . . . . . 82
Guide to a Title List . . . . . . . . . . . . . . . . . . . . . . . . . .
Edit Menu . . . . . . . . . . . . . . . . . . . . . . . . . . . . . . . . . . .
How to Access the Edit Menu . . . . . . . . . . . . . . . .
EDITING . . . . . . . . . . . . . . . . . . . . . . . . 84
Deleting a Title
Deleting Selected Titles . . . . . . . . . . . . . . . . . . . . . .
Putting Names on Titles . . . . . . . . . . . . . . . . . . . . . .
Chapter Marks (Add) . . . . . . . . . . . . . . . . . . . . . . . . .
Chapter Marks (Delete) . . . . . . . . . . . . . . . . . . . . . . .
etting or Clearing All Chapter Marks at Once .9
Dividing a Title . . . . . . . . . . . . . . . . . . . . . . . . . . . . . . . .
Combining Titles . . . . . . . . . . . . . . . . . . . . . . . . . . . . .
Deleting a Scene on a Title . . . . . . . . . . . . . . . . . . . . 9
Protecting a Title . . . . . . . . . . . . . . . . . . . . . . . . . . . . .
rmat . . . . . . . . . . . . . . . . . . . . . . . . . . . . . . . . . . . . . .
Choosing the Recording Format for
Blank DVD-RW Disc . . . . . . . . . . . . . . . . . . . . . . . .
Deleting All Titles in HDD . . . . . . . . . . . . . . . . . . . . .9
. . . . . . . . . . . . . . . . . . . . . . . . . . . . . .
LIST OF SETTINGS . . . . . . . . . . . . . . . 99
SETUPS. . . . . . . . . . . . . . . . . . . . . . . . 102
. . . . . . . . . . . . . . . . . . . . . . . . . . . . . . . . . . . . .1
Display . . . . . . . . . . . . . . . . . . . . . . . . . . . . . . . . . . . . . .1
1
HDMI . . . . . . . . . . . . . . . . . . . . . . . . . . . . . . . . . . . . . . . .11
Recording Playback EditingConnections Basic Setup Function Setup Others
AUDIO AND VIDEO . . . . . . . . . . . . . 80
Switching Subtitles . . . . . . . . . . . . . . . . . . . . . . . . . .
Switching Audio Soundtrack . . . . . . . . . . . . . . . . .
Switching Camera Angles . . . . . . . . . . . . . . . . . . . .
Reducing Block Noise . . . . . . . . . . . . . . . . . . . . . . . .
TROUBLESHOOTING . . . . . . . . . . . 113
Error Message . . . . . . . . . . . . . . . . . . . . . . . . . . . . . .
LANGUAGE CODE . . . . . . . . . . . . . . 118
GLOSSARY . . . . . . . . . . . . . . . . . . . . 119
SPECIFICATIONS . . . . . . . . . . . . . . . 120
ESPAÑOL. . . . . . . . . . . . . . . . . . . . . . 121
Discos Reproducibles . . . . . . . . . . . . . . . . . . . . . . . .12
Códigos de Región . . . . . . . . . . . . . . . . . . . . . . . . . .
Di
Gr
Di
nexión Básica . . . . . . . . . . . . . . . . . . . . . . . . . . . .
nexión a un Televisor con un
Puerto Compatible con HDMI . . . . . . . . . . . . . . .
Configuración Inicial . . . . . . . . . . . . . . . . . . . . . . . . .12
Reproducción Directa . . . . . . . . . . . . . . . . . . . . . . .
Gr
Copiado Básica . . . . . . . . . . . . . . . . . . . . . . . . . . . . . .12
. . . . . . . . . . . . . . . . . . . . . . . . . . . . . .12
Gr
n Básica . . . . . . . . . . . . . . . . . . . . . . . . . . . . .
. . . . . . . . . . . . . . . . . . . . . . . . . .
LIMITED WARRANTY . . . . Back cover
Español
Page 8
FEATURES
T
f
.
T
.
g:
Y
w
g
.
Y
time
t
y
y
.
A
:
A
g:
T
f
g:
This unit ca
ecord the sound of the left channe
y
.
k:
Th
d
ecord fo
d
)
A
g:
y
y
f
w
.
g
g
.
:
g
.
g:
y
y
.
:
d
.
:
f
h
.
g:
y
g
.
-
ecordable disc
t
-
g
-
ecorded on a
-
y
T
g.
o
.
m
y
y
y
y
y
y
pp
y
p
.
.
Please refer to “GLOSSARY” on page 119 for the terms used in this owner’s manual
Features
his unit not only plays back the contents on internal HDD, DVD or CD, but also offers features for you to record on
HDD or DVD and edit them a
Recordin
his unit allows you to record on the HDD, a DVD-RW
rewritable) and a DVD-R (one-time write). You can choose
ny one for your convenience
p to 36 program recordin
ou can program the unit to record up to 36 programs
ithin a one-month period. Daily or weekly program
recordin
ou can easily set a recording time as you prefer. Every
ime will be increased by 30 minutes up to 8 hours. The
recording automaticall
ou set is reached or the disc is full
utomatic chapter mark setting
Chapter marks will be put on recordings as you set before
ttempting to record.
utomatic title list makin
he unit makes a title list with the index automatically.
Le
monaural input as left and right channels automaticall
(the input from the L2 jacks only)
TB hard dis
you to recor
recor
utostart recordin
Every time you turn on this unit, this unit automatically
records the channel currentl
tores the recorded content to the HDD. By using this
unction, you can pause or go back to the TV program you
re currently watching, and you can also start recording the
s are also available
ne-touch timer recording (OTR):
REC] is pressed during recording, the recording
t channel stereo recordin
n r
is unit is equipped with a 1TB hard disk which allows
up to 1252 hours (with SLP mode). You
n r
hole TV program even at the middle of the TV program
r 12 hours maximum at a time with timer
ing. (6 hours when one-touch recording
ter that. The following features are offered with this unit
HDD DVD
stops when the recording time
l
HDD
viewed and temporaril
DVD
Automatic title finalizing (DVD-RW/-R only)
You can finalize discs automatically after finishing all
timer recordings or at the end o
t
is in the main menu
Alternate recordin
n the following cases, the unit will detect it and
automaticall
selected as the recordin
If there is no r
If the disc does not have enough space to complete the
recordin
If the material is “copy-once” program and prohibited to
r
If the disc is not available because the repairing process
is cancelled halfwa
his feature is available only for timer recording. Not
available for one-touch timer recordin
All high definition (HD) pictures will be converted
own to Standard Definition, when recording on the
HDD
r DVD
Copyright protection syste
To play back the digital video images of a DVD via
an HDMI connection, it is necessar
pla
er and the display device (or an AV amplifier)
support a cop
(high-bandwidth digital content protection s
HDCP is cop
data encr
AV device. This unit su
operating instructions of
am
lifier) for more information
Dubbin
With this unit, you can enjoy bi-directional Dubbing
ween HDD and DVD
High speed Dubbing (HDD
If you dub a title recorded in SLP mode to DVD-R,
Dubbin
Auto recording mode Dubbin
When Dubbing, if you set the recording mode to “Auto”,
the recording mode will automaticall
titles will fit nicel
DV Dubbing
This function helps you to easily dub the contents of the
DVC (
speed will be 24 times at the maximum
igital video camcorder) to HDD/DVD
the disc space if you set
record to the HDD even when DVD is
media
in the uni
DVD
that both the
right protection system called HDCP
stem).
protection technology that comprises
ption and authentication of the connected
orts HDCP. Please read the
our display device (or AV
HDD DVD
DVD only)
be adjusted so the
in the remaining space of the disc
Page 9
A
.
You may delete a recorded title.
g
g
:
Y
.
:
Y
.
:
You can d
tle
e.
:
Y
.
g
k
:
lay
h
th
.
y
:
f
g
.
y
y
p
.
s
T
f
te.
ecorded
the mode other tha
deo is not
ecordable on this unit.
FEATURES
Th
W
y
f
d
.
:
Y
y
p
.
:
Y
layback
k.
:
Y
layback
k.
layback
Y
:
,
/
aybac
HDD DVD
eater surround sound in your home:
hen connecting the unit to an amplifier or a decoder
which is compatible with Dolb
experience the theater surround sound
surroun
Quick search for what you want to watch
search functions. You can search for a desired point b
title, cha
Variable skip
in “P
Variable replay
“P
Chasing playback during recording and simultaneous
p
ecording or another title during recording.
Playing back JPEG/KODAK Picture CD files
You can enjoy JPEG files which are recorded on DVD-RW/-R
and CD-RW/-R
recorded on CD-RW
sound system
ou can easily find the part you want to watch using the
ter or time
ou can skip forward a certain time, which is specified
” menu in advance, with one-touch while
aybac
ou can skip back a certain time, which is specified in
” menu in advance, with one-touch while
aybac
and recording:
ou can play back the already recorded part of the current
and KODAK Picture CD files which are
-R.
Editin
vailable for a disc that is not finalized
Deleting a title:
Putting names on titles
ou can put your favorite names on titles
Setting / clearing chapter marks
ou can set / clear chapter marks on titles
Dividing titles
ivide a ti
Deleting a scene of a title (HDD/VR mode on DVD-RW only)
ou can delete a scene from a title as you like
into 2 or mor
Digital, you can
rom discs with
HDD
DVD
HDD DVD
Compatibilit
DVD
Recorded DVDs are able to play in other DVD Players
Recorded discs can be played back on regular DVD
p
ers, including computer DVD drives compatible wit
DVD-video playback. For DVD-RW/-R, you need to finalize
e recorded discs to play back on other DVD players
Other
Progressive scan system
Unlike conventional interlace scanning, the progressive
scan system provides less
resolution than that of traditional television si
HDMI (High-Definition Multimedia Interface)
You can enjo
connecting this unit to a displa
com
atible port
clearer audio/video output when
lickering and images in higher
HDD DVD
nals
device with an HDMI-
Symbols Used in this Owner’s Manual
o specify for which media type each function is, we put
the
ollowing symbols at the beginning of each item to
opera
* DVD-R r
r
Symbol
For Recording, Playing Back, and Editing
For Playback only
If you do not nd any of the symbols listed above under the
function heading, the operation is applicable to all media.
in
Description
Description refers to HDD
Description refers to DVD-RW (Video Mode)
Description refers to DVD-RW (VR Mode)
Description refers to DVD-R (Video Mode)
Description refers to DVD-video
Description refers to audio CD
Description refers to discs with JPEG les
(KODAK Picture CD les included)
n Vi
Introduction
Recording Playback EditingConnections Basic Setup Function Setup Others
Español
Page 10
FUNCTIONAL OVERVIEW
)
.
n
ess to tu
e
y
)
y
y.
3.
A
o
y
5.
ess to select the
ode.
ess to select the
ode.
.
C
on
8.
B
on
.
.
I
on
g.
s
j
)
cable.
(
Use to connect
audio
e.
(
Use to connect
deo
e.
Use to connect the S-
V
with an S
V
cable.
dow
stance.
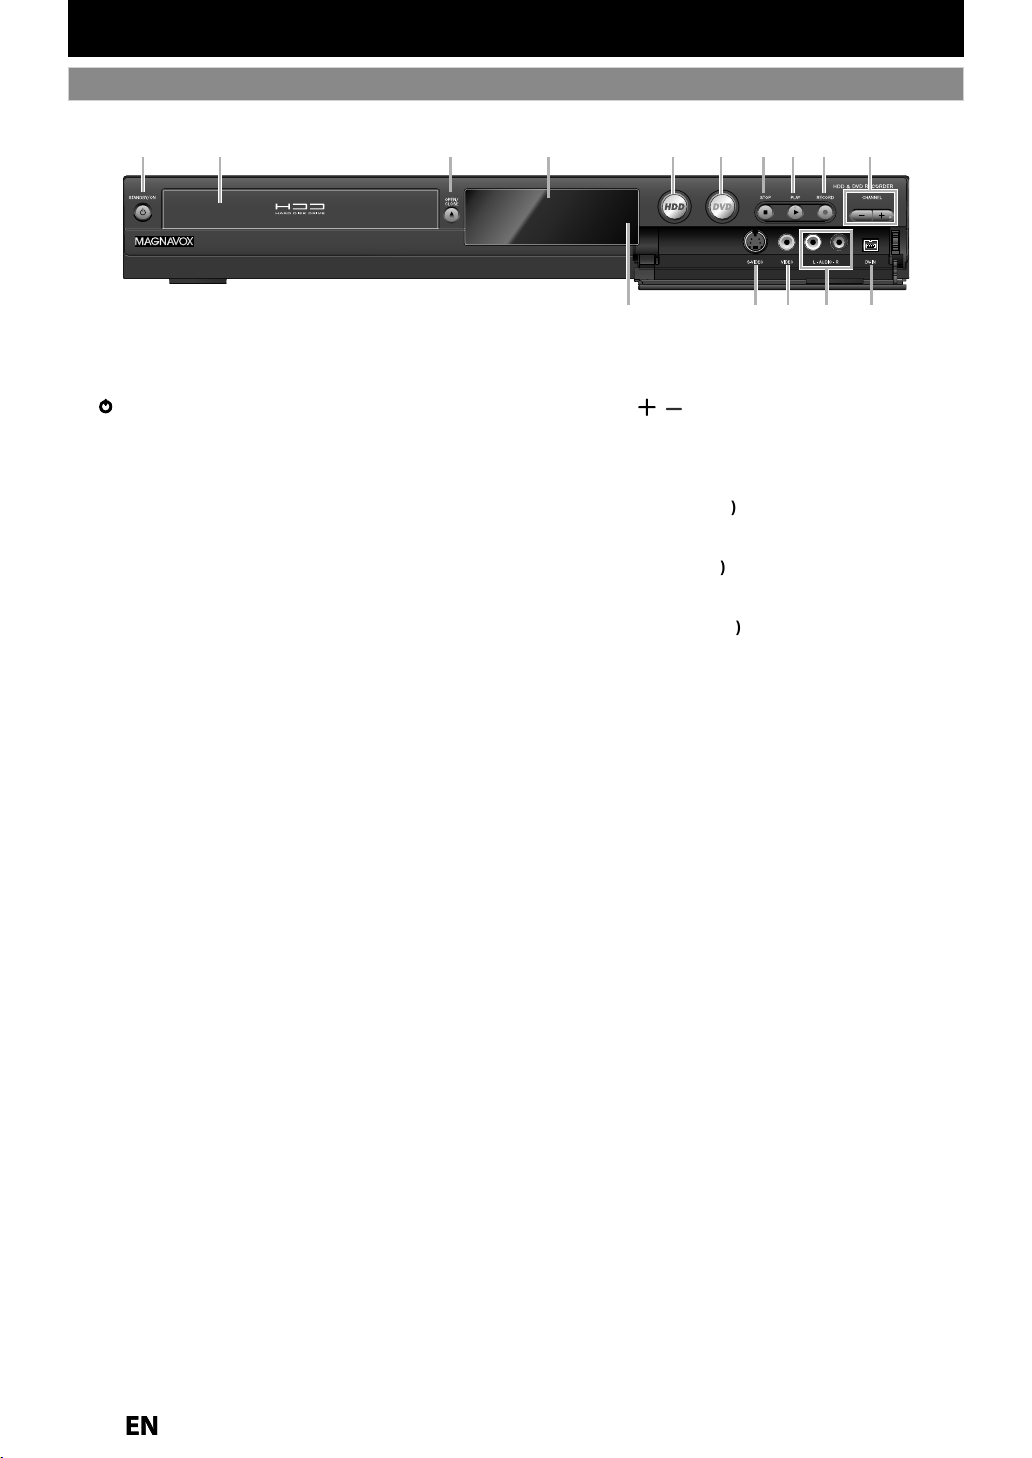
Front Panel
21 3* 5 6 7 8* 9104
The unit can also be turned on by pressing these buttons
1213 111415
1.STANDBY/ON butto
Pr
standby mode. (To completely shut down the unit,
ou must unplug the AC power cord.
2. Disc tra
Place a Disc after opening the disc tra
OPEN/CLOSE butt
Press to Open or Close the disc tray.
4. Displa
Refer to “Front Panel Display” on page 14.
HDD button
Pr
6. DVD button
Pr
7
STOP butt
Press to Stop Playback or Recording.
Press to Start or Resume playback
9
Press once to start a Recording. Press repeatedly to
start One-Touch Timer Recordin
rn on the unit or to turn the unit to th
HDD m
DVD m
LAY butt
ECORD butt
10. CHANNEL/ button
Press to change the Channel up and down.
11. DV-IN
Use to connect the DV output of External device with
12. AUDIO input jacks
13. VIDEO input jack
14. S-VIDEO input jack (
15. Infrared sensor win
Receive signals from your Remote control so that you
ack (L3
DV
External device with an RCA
l
External device with an RCA vi
l
deo output of External device
-
n control the unit from a di
Page 11

k
f
.
Use to connect
deo
.
k
.
k
bl
.
d
this unit.
y
the unit.
k
h
h
k
h
.
ks
h
.
ks
f
.
)
ble.
d
.
k
l
f
.
N
)
.
.
Rear Panel
FUNCTIONAL OVERVIEW
Introduction
4
COAXIAL
ANTENNA
21
AUDIO IN
(L1)
3 5
VIDEO
L
R
IN
S-VIDEO
VIDEO
OUT
IN
Y
L
R
AUDIO OUT
9
810 712 11 6
OUT
S-VIDEO
1. ANTENNA IN jac
Use to connect an Antenna / Cable Box / Satellite
Receiver
or RF Pass Through only
2. VIDEO IN jack (1
External device with an RCA vi
cable
3. VIDEO OUT jac
Use to connect a TV monitor, AV receiver or other
evice with an RCA video cable
4. HDMI OUT jac
Use an HDMI cable to connect to a display with an
HDMI compati
e port
5. AC Power Cor
• Connect to a standard AC outlet to supply power to
• Unplug this cord from the AC outlet to completel
down
6. DIGITAL AUDIO OUTPUT (COAXIAL) jac
Use to connect an AV receiver, Dolby Digital decoder
or ot
er device with a digital audio coaxial input jack
wit
a digital audio coaxial cable.
7. S-VIDEO OUT jac
Use to connect the S-Video input on a TV monitor, AV
receiver or ot
er device with an S-Video cable
AC plug
8. COMPONENT VIDEO OUTPUT jac
Use to connect a TV monitor with component video
inputs wit
a component video cable
9. AUDIO OUT jac
Use to connect a TV monitor, AV Receiver or other
devices with a set o
RCA audio cables
10. S-VIDEO IN jack (L1
Use to connect an External device, by an S-Video
ca
11. AUDIO IN jacks (
1
Use to connect an External device with a set of RCA
au
io cables
12. ANTENNA OUT jac
Use to connect an RF coaxial cable to pass the signa
rom the ANTENNA IN to your TV
ote(s
Do not touch the inner pins of the jacks on the rear
anel. Electrostatic discharge may cause permanent
amage to the unit
This unit does not have an RF modulator
Recording Playback EditingConnections Basic Setup Function Setup Others
Español
Page 12

l
ol:
obstacles between the remote
t.
g
t.
ote controls for d
ces ca
e
ces located close to the unit.
g
.
ollows.
side o
:
°
ow:
l.
)
ect use of batteries ca
esult
such as
g:
.
).
.
.
y
.
l
area.
sassemble batteries.
l
.
.
atch
the batteries to
y
.
.
Remote Control
.
FUNCTIONAL OVERVIEW
Installing the Batteries in the Remote Contro
Install the 2 AA (1.5 V) batteries by matching the symbols
as displayed in the Remote Contro
Open the cover
1
2
Insert batteries
sure to m
the marks indicated in the batter
+ and - on
compartment
Close the cover
Using a Remote Contro
Keep in mind the following when using the remote
ntr
• Make sure that there are no
ntrol and the infrared sensor window on the uni
• Remote operation may become unreliable if strong
sunli
ht or fluorescent light is shining on the infrared
nsor window on the uni
• Rem
with each other. Avoid using remote controls for other
vi
• Replace the batteries when you notice a fall off in the
operatin
• The maximum operable ranges from the unit are as
f
- Line of sight approx. 23 feet (7m)
- Either
approx. 16 feet (5m) within 30
- Above:approx. 16 feet (5m) within 15°
- Bel
range of the remote control
f the center
approx. 10 feet (3m) within 30°
1
2
3
ifferent devi
30˚30˚
16feet (5m) 23feet (7m)
n interfer
16feet (5m)
18
19*
20
21
1
2
Note(s
Incorr
eakage and bursting. Please observe the followin
Lithium or ni-cad and ni-mh rechargeable batteries
are not recommended to use for remote control
Do not mix different types of batteries such as
alkaline and standard (carbon-zinc
Do not mix new and old batteries together
Do not use different kinds of batteries together.
Although they may look similar, different batteries
may have different voltages
Make sure that the + and - ends of each batter
match the indications in the battery compartment
Remove batteries from battery compartment that is
not going to be used for a month or more.
When disposing of used batteries, please comply
with governmental regulations or environmenta
public instruction’s rules that apply in your country
Do not recharge, short-circuit, heat, burn or
i
n r
in hazards
4
5
6
7
8
9
10
11
12
13*
14
15
16
17
Instructions continue on the next page
22
23
25
26
27
28
29
30
31
32
33
34
24
Page 13
FUNCTIONAL OVERVIEW
.
n
.
on
ess to tu
e
dby
y
)
3. AUDIO button
.
.
s
ess to select Channel numbers.
y.
ess to ente
es.
n
•
de b
]
n
b
n
.
8.
on
.
K/L
/
/
B
s
.
d
.
d
h
.
s
R
n
k.
h
k.
B
b
*
. PR
f
f
.
h
.
C
b
n
.
.
F
b
n
.
n
.
d
.
n
.
A
butto
l
.
n
.
on
g th
.
on
h
g
f
.
on
.
ess to select the
ode.
on
6. OK button
ess to Conf
ect Menu items.
n
b
y
.
f
.
FFW
D
n
d
k.
.
G
n
track or file.
d th
.
on
l
h
b
n
y.
b
dl
.
)
f
.
.
() The unit can also be turned on by pressing these buttons
Introduction
1. DTV/TV butto
• Press to switch between Digital TV (DTV) mode and
Analog TV (TV) mode
2. STANDBY/ON
• Pr
Stan
ou must unplug the AC power cord.
• Press to switch the Audio language for digital TV
• Press to display the Audio menu during playback
4. Number/Character button
• Pr
• Press to select a title/chapter/track/file on displa
• Press to enter values for the settings in the Main
•Pr
5. Decimal ( • ) butto
Digital mode:
ress to confirm the major / minor channel selection
ma
6. DISPLAY butto
• Press to turn the Display Menu on or off.
7. HDD
• Press to select the HDD mode
DISC MENU butt
• Press to display the Disc Menu
9. Cursor
• Press to select items or settings
10. MENU button
• Press to
• During playback, press and hold for more than 3
secon
to t
1. CHANNEL / button
• Press to change the Channel Up and Down.
12.
EWE butto
• During playback, press to Fast Reverse the playbac
• When playback is in pause, press to Slow Reverse
t
e playbac
13. PLAY
• Press to start Playback or Resume playback.
14
EVH button
• During playback, press to return to the Beginning o
the current chapter, track or
• When playback is in Pause, press repeatedly to
Reverse t
15. STOP
• Press to stop Playback or Recording
• Press to exit from the Title list
6. PAUSE
• Press to pause Playback or Recording
17. REC butto
• Press once to start a Recording
• Press repeatedly to start the One-Touch Timer
Recor
18. SOURCE butto
• Press to select the appropriate Input
rn On the unit or to turn the unit to th
mode. (To completely shut down the unit,
y
the Number buttons
utto
isplay the Main Menu
s to switch the Progressive Scanning mode
e Interlace mode
utton
e playback step by step
utto
utto
ing
tt
r Title nam
button
ile
19. OPEN/CLOSE
• Press to Open or C
20. REPEAT butto
• Press to display the Repeat menu
21. HDMI butt
• Press to set the HDMI Display mode-Only when
usin
22. CLEAR butt
• Press to clear the information once entered, to clear
t
TIMER PROG. butt
• Press to display the Timer Programming list.
24
DVD button
• Pr
25. TITLE butt
• Press to display the Title list.
2
• Pr
27. RETURNutto
• Press to return to the previously displayed menu
28. SKIP
• Skips b
29. REPLAY button
• Replays by the amount o
30.
•During playback, press to Fast Forward the playback.
• When playback is in pause, press to Slow Forwar
the playbac
31
• During playback, press to Skip to the next chapter,
• When playback is in pause, press repeatedly to
Forwar
32. RAPID PLAY butt
• During playback, press to Play Back in a slightly
S
Keeping t
33. DUBBING
• During playback, press to start Dubbing right awa
• In stop mode, press to display “Dubbing” menu.
34. REC MODE
• Press repeate
e HDMI connection
e marker settings or to cancel the programmin
or CD, etc
irm or Sel
utton
the amount of Time Set in Advance
butto
butto
e playback step by step
ower-0.8x/Faster-1.3x/Normal mode while
e Sound output.
utto
utton
n*
ose the Disc tray
DVD m
Time Set in Advance
y to switch the Recording mode
Note(s
• If using a universal remote, please check for any
dditional remote code or contact the manufacturer
or additional assistances
• Cannot guarantee about 3rd party’s remote controls.
lease contact the remote manufacturer if you have
ny problem with it
Recording Playback EditingConnections Basic Setup Function Setup Others
Español
Page 14

PM
DTV BS CS DR CD
VCR
HDDDB
DVD
1
5
3
4
2
.
PM
w
g
g.)
V
ode.
k
t
p
.
4. Cu
t
d.
d
h
.
:
g
.
g
.
y:
g
.
this unit.
de.
de.
g
e
umber
Clock
Channel numbe
f
ding
t
A
g
ded on a disc.
App
y.
A
g.
A
g.
e
d.
d.
.
.
Front Panel Display
FUNCTIONAL OVERVIEW
1
: Appears in the afternoon
ith the clock display.
(Nothin
mornin
: Appears when the channel
DT
. Title / track / file and chapter mar
: Appears when indicating a
itle / track / file number.
: Appears when indicating a
cha
appears in the
in DTV m
ter number
Display Messag
rrent status of the uni
Appears when playback is
pause
Appears when playing back
an HDD or
Appears when the timer
programming or OTR
een set and is proceeding
ntire Display
Flashes when timer
pro
Appears during recordin
rocess
ntire Displa
Flashes when a recordin
auses
Appears when a disc is in
Appears during Dubbing.
DB
Appears when the unit is in
HDD
HDD mo
Appears when the unit is in
DVD
DVD mo
isc.
ramming was not executed
of some error
. Displays the followin
• Elapsed playback tim
• Current title / chapter / track /file
n
• Recording time / remaining time
•
as
•
• Remaining time
timer recor
• Selected HDMI outpu
r
or one-touch
ppears when the disc tray is
penin
ppears when the disc tray is
losin
ears when a disc is loaded
n the disc tra
ppears when data is bein
r
Appears when HDMI output
(480p) is selected
Appears when HDMI output
(720p) is selecte
Appears when HDMI output
1080i) is selected
Appears when HDMI output
(1080p) is selecte
Page 15

CONNECTION
:
.
ection as
ustrated below.
.
)
.
y
.
W
.
Read this first
1) Disconnect the AC power cords of the devices from the AC outlet
2) Make the conn
3) After making all the connections, connect the AC power cords of the devices
• Connect this unit directly to the TV. If the RCA audio/video cables are connected to a VCR, pictures may be
distorted due to the cop
hen “Progressive Scan” is set to “ON”, no video signal will be output from the VIDEO OUT or S-VIDEO OUT jack.
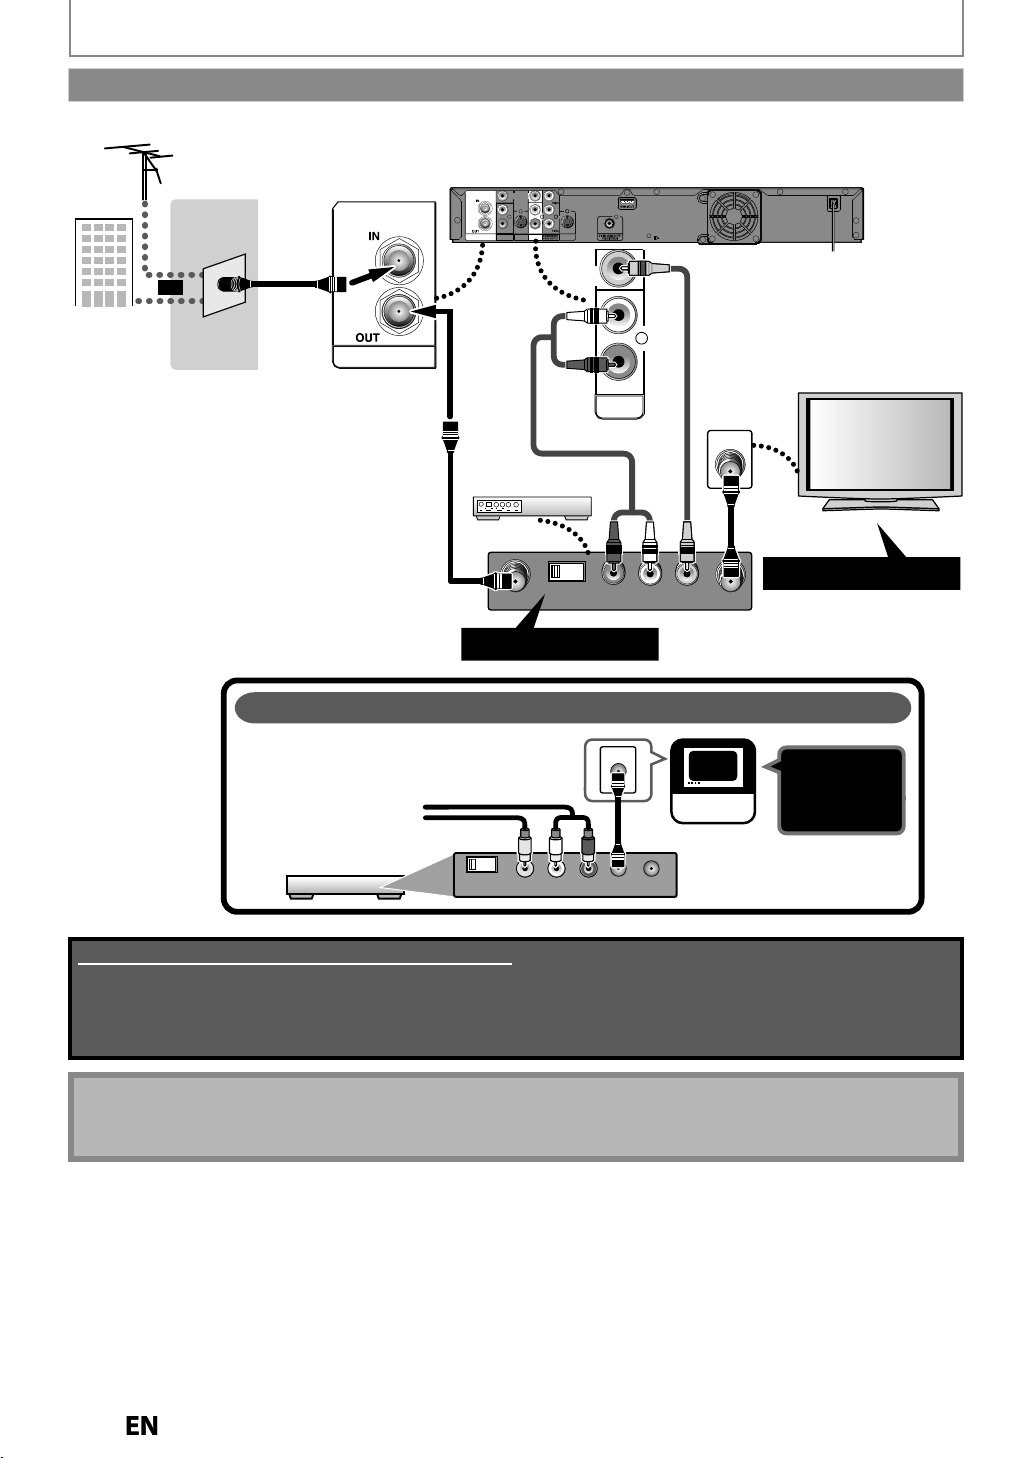
Antenna Connection (Required)
ill
protection system
Connections
rear of this unit
VIDEO
VIDEO
IN
OUT
L
R
IN
AUDIO IN
ANTENNA
S-VIDEO
(L1)
AUDIO OUT
Y
L
R
OUT
COAXIAL
S-VIDEO
This connection is for
TV pass through only
RF coaxial
cable
ANT. IN
ANTENNA
RF coaxial
cable
VHF / UHF
antenna
or
cable TV
company
Choose one of the following connections
epending on the jacks on your TV.
Note(s
• For your safety and to avoid damage to the device, please unplug the RF coaxial cable from the ANTENNA IN jack before
moving the unit.
• If you use an antenna to receive analog TV, it should also work for DTV reception. Outdoor or attic antennas will be
more effective than set-top versions
• ANTENNA OUT jack is for tuner pass through only. HDD / DVD playback through the RF is not possible.
Supplied cables used in this connection are as follows:
• RF coaxial cable x 1
Please purchase the rest of the necessary cables at your local store.
Basic Setup Function Setup Others
Recording Playback EditingIntroduction
Overview
If Your TV has
Higher
HDMI IN
Quality
COMPONENT VIDEO IN
S-VIDEO IN
Standard
Quality
AUDIO INLRVIDEO IN
Refer to
page
17
page
17
page
16
page
16
If you are using
cable / satellite box
page
19
If your device has
only an ANT. IN jack
ANT. IN
page
20
Español
Continued on the next page
Page 16

6
CONNECTION
Connecting to a TV Using Audio / Video jacks
VIDEO
OUT
ANTENNA
AUDIO OUT
VIDEO
VIDEO
IN
OUT
L
R
IN
AUDIO IN
S-VIDEO
AUDIO OUT
(L1)
RCA video cable
L
RCA audio cable
VIDEO IN
AUDIO IN
L
R
R
Y
L
R
OUT
COAXIAL
S-VIDEO
This connection is for
TV pass through only
rear of this unit
RF coaxial
cable
ANT. IN
ANTENNA
RF coaxial
cable
or
VHF / UHF
antenna
cable TV
company
Supplied cables used in this connection are as follows:
• RF coaxial cable x 1
• RCA audio cable (L/R) x 1
• RCA video cable x 1
Please purchase the rest of the necessary cables at your local store.
Connecting to a TV Using the S-Video Out jack
VIDEO
OUT
AUDIO OUT
AUDIO IN
ANTENNA
(L1)
L
R
OUT
RCA audio cable
S-Video cable
S-VIDEO
VIDEO
VIDEO
Y
IN
OUT
L
L
R
R
IN
OUT
S-VIDEO
AUDIO OUT
COAXIAL
S-VIDEO
rear of this unit
AUDIO IN
L
R
S-VIDEO IN
RF coaxial
cable
ANT. IN
ANTENNA
This connection is for
TV pass through only
RF coaxial
cable
VHF / UHF
antenna
or
cable TV
company
1
Page 17

CONNECTION
q
.
.
.
Connecting to a TV Using Component Video Out jacks
AUDIO IN
RCA audio cable
COMPONENT
VIDEO IN
VIDEO
OUT
(Green)
Y
L
RCA component
(Blue)
video cable
(Red)
(Green)
(Blue)
(Red)
R
AUDIO OUT
VIDEO
L
R
AUDIO IN
ANTENNA
(L1)
VIDEO
Y
IN
OUT
L
R
IN
OUT
S-VIDEO
S-VIDEO
AUDIO OUT
COMPONENT
VIDEO OUTPUT
rear of this unit
COAXIAL
RF coaxial
cable
Supplied cables used in this connection are as follows:
• RF coaxial cable x 1
• RCA audio cable (L/R) x 1
Please purchase the rest of the necessary cables at your local store.
L
R
Y
B
P
/CB
PR
/CR
ANT. IN
This connection is for
TV pass through only
RF coaxial
cable
VHF / UHF
antenna
Connections
Basic Setup Function Setup Others
Recording Playback EditingIntroduction
or
cable TV
ANTENNA
company
Connecting to a TV with an HDMI Compatible Port
• HDMI outputs the video / audio signals without converting to analog signals.
• No audio connection is re
• High Speed HDMI cable (also known as HDMI category 2 cable) is recommended for better compatibility
• Use an HDMI cable with the HDMI logo (a certified HDMI cable) for this connection
VIDEO
VIDEO
Y
IN
OUT
L
L
R
R
IN
AUDIO IN
ANTENNA
(L1)
Do not tilt the connector when inserting it into the HDMI jack, and make sure the
shapes of the jack and the connector are matched.
OUT
S-VIDEO
S-VIDEO
AUDIO OUT
Supplied cables used in this connection are as follows:
• RF coaxial cable x 1
Please purchase the rest of the necessary cables at your local store.
uired
cable
HDMI IN
ANT. IN
ANTENNA
This connection is for
TV pass through only
RF coaxial
cable
or
HDMI cable
HDMI OUT
rear of this unit
COAXIAL
RF coaxial
VHF / UHF
antenna
cable TV
company
Español
Page 18
CONNECTION
s
ess
d.
.
y
Vid
l
e
]
e
]
080
d
]
e
]
d.
*
e
m
.
N
)
.
y.
.
d.
f
.
.
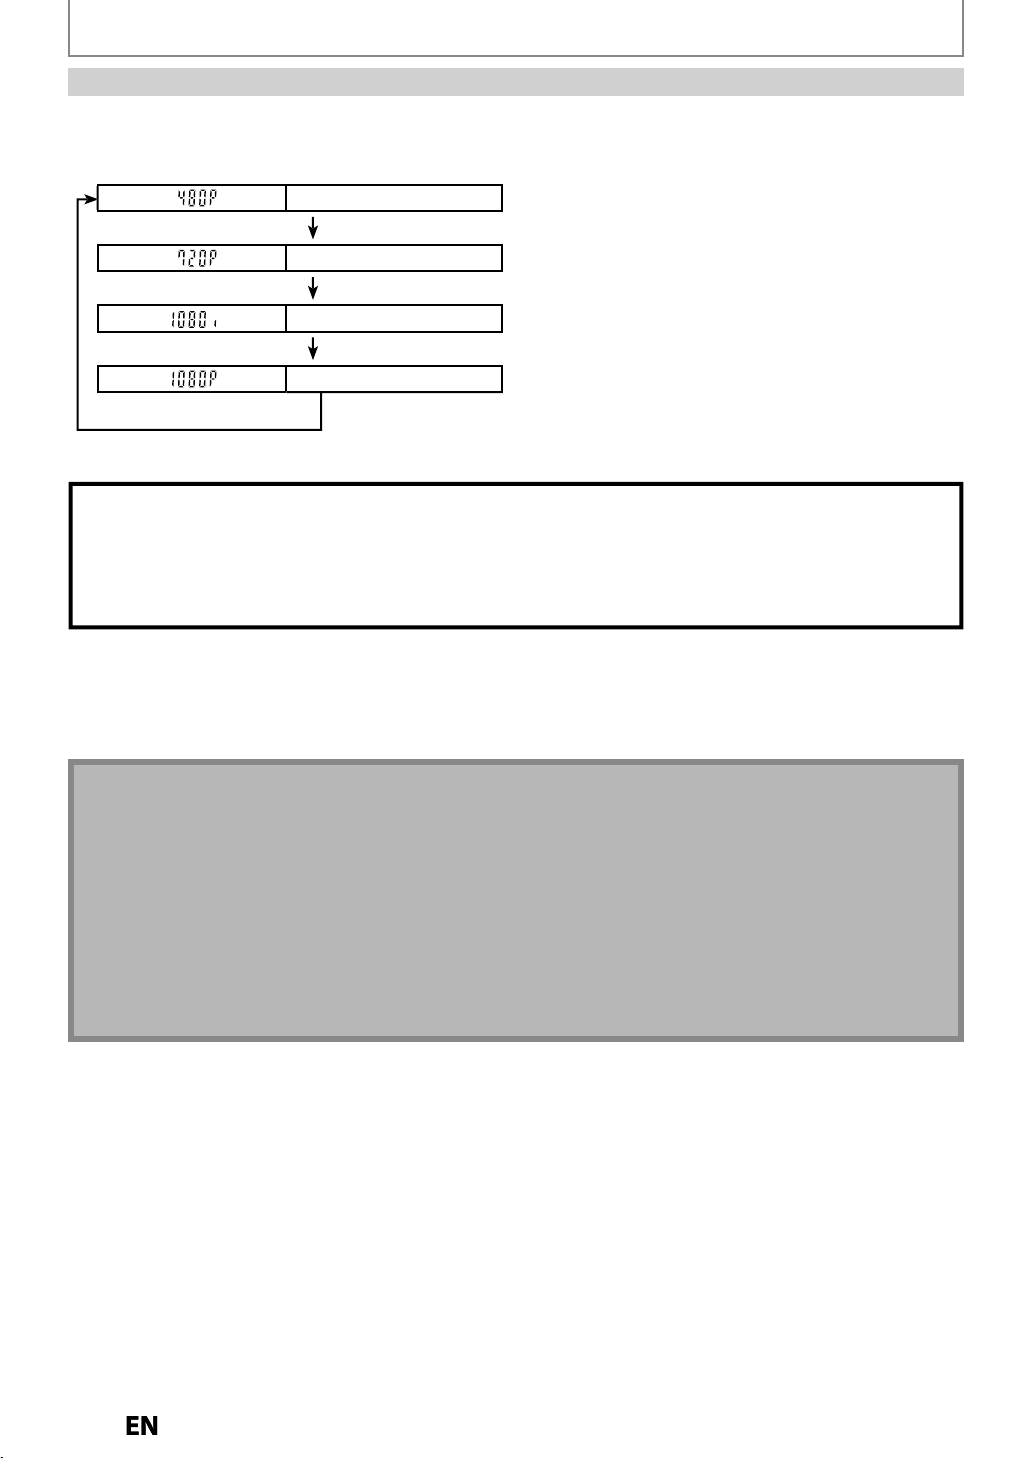
HDMI Mode and Actual Output Signal
r
HDMI]to select the HDMI output mode. The output mode changes as follows every time
HDMI connection makes this unit automatically output the most suitable resolution for your TV
Front Panel Displa
eo Output Signa
480 Progressiv
Press [HDMI
720 Progressiv
Press [HDMI
1
interlace
Press [HDMI
1080 Progressiv
Press [HDMI
• The HDMI mode that is not supported by the display device will be skippe
Copyright protection syste
To play back the digital video images on a DVD via an HDMI connection, it is necessary that both the player and the display
device (or an AV amplifier) support a copyright protection system called HDCP (high-bandwidth digital content protection
stem). HDCP is a copy protection technology that comprises data encryption and authentication of the connected AV
device. This unit supports HDCP. Please read the operating instructions of your display device (or AV amplifier) for more
information
HDMI] is presse
HDMI: High Definition Multimedia Interfac
ote(s
Some devices with an HDMI input may not operate properly with this unit
When using an HDCP-incompatible display device, the image will not be viewed properl
Among the devices that support HDMI, some devices can control other devices via the HDMI connector; this unit can be controlled
by another device via the HDMI connector
The audio signals from the HDMI connector (including the sampling frequency, the number of channels and bit length) may be
imited by the device that is connecte
Among the monitors that support HDMI, some do not support audio output (
uch as this unit, audio signals are not output from the HDMI output connector
When this unit’s HDMI connector is connected to a DVI-D compatible monitor (HDCP compatible) with an HDMI-DVI converter cable,
the signals are output in digital RGB
When a power failure occurs, or when you unplug the unit, some problems with the HDMI setting might occur. Please check and set
the HDMI setting again.
or example, projectors). In connections with device
Page 19

CONNECTION
.
j
.
:
.
.
Connecting to a Cable / Satellite Box
RCA video cable
RCA audio cable
Connections
VIDEO IN
AUDIO IN
RF coaxial
cable
L
R
ANT. IN
This connection is for
TV pass through only
ANTENNA
VIDEO
L
R
AUDIO IN
(L1)
AUDIO IN
AUDIO IN
(L1)
(L1)
VIDEO
IN
OUT
L
R
IN
S-VIDEO
AUDIO OUT
VIDEO
VIDEO
L
L
R
R
Y
S-VIDEO
IN
IN
OUT
VIDEO
VIDEO
OUT
OUT
IN
IN
S-VIDEO
S-VIDEO
COAXIAL
L
L
R
R
AUDIO OUT
AUDIO OUT
RCA video cable
RCA audio
cable
rear of this unit
*Connection only made with a Set-top Box that has an ANTenna (RF) OUTput jack
Supplied cables used in this connection are as follows:
• RF coaxial cable x 1
• RCA audio cable (L/R) x 1
• RCA video cable x 1
Please purchase the rest of the necessary cables at your local store.
ANTENNA
RF coaxial
cable
LR
cable/satellite box*
ANT. INANT.OUT
RF coaxial cable
VIDEO OUTAUDIO OUT
Basic Setup Function Setup Others
satellite
dish
Recording Playback EditingIntroduction
or
cable TV
company
• Required cables and connecting methods differ depending on the cable/satellite box.
For more information, please contact your cable/satellite provider
• Instead of using VIDEO OUT jack on this unit, you can also use S-VIDEO OUT jack, COMPONENT VIDEO OUTPUT
ack or HDMI OUT jack for connecting to your TV
With this setup
• You can record any unscrambled non-copy protected program by selecting the channel on the cable/satellite box.
e sure that the cable/satellite box is turned on
You cannot record one channel while watching another channel
Español
Page 20
CONNECTION
)
.
Connecting to a TV without Audio / Video jacks
VHF / UHF
antenna
cable TV
company
rear of this unit
RF coaxial
or
cable
ANTENNA
RF coaxial cable
VIDEO
VIDEO
Y
IN
OUT
L
L
R
R
OUT
ANTENNA
IN
AUDIO IN
S-VIDEO
AUDIO OUT
(L1)
S-VIDEO
VIDEO
COAXIAL
OUT
AUDIO OUT
RCA audio cable
rear of your RF modulator
(not supplied)
43
RCA video
L
R
cable
ANT. IN
RF coaxial cable
Set channel 3 or 4
AUDIO IN TO TVANT. INLRCHANNEL
VIDEO IN
Set channel 3 or 4
No Antenna (RF) Output!
If your TV only has an Antenna input
(no A/V inputs), you will need a
RF modulator (NOT INCLUDED) to
connect this player.
ANT. IN
TV
No A/V
Inputs
RF modulator
CHANNEL
43
VIDEO IN
AUDIO IN
RL
TO TV
ANT. IN
Supplied cables used in this connection are as follows:
• RF coaxial cable x 1
• RCA audio cable (L/R) x 1
• RCA video cable x 1
Please purchase the rest of the necessary cables at your local store.
Note(s
• RF modulator is not supplied with this unit. You need to purchase it at your local store.
The quality of picture may become poor if this unit is connected to an RF modulator
Page 21

)
k.
sound as
eaters.
.
.
.
Digital Audio Connection
CONNECTION
Dolby Digital decoder
COAXIAL
digital audio
coaxial input jack
digital audio
coaxial cable
COAXIAL
ANTENNA
VIDEO
VIDEO
Y
IN
OUT
L
L
R
R
OUT
IN
AUDIO IN
S-VIDEO
AUDIO OUT
(L1)
COAXIAL
S-VIDEO
HDMI Audio Connection
AV receiver / amplier with an HDMI input jack
VIDEO
VIDEO
Y
IN
OUT
L
HDMI IN
HDMI cable
ANTENNA
HDMI OUT
To set up “HDMI Audio” refer to pages 101 and 111
To set up “Dolby Digital” refer to pages 99 and 104
Audio format (disc) HDMI Digital Output
Dolby Digital
LPCM
Dolby Digital
Setting for this unit
PCM
Stream
PCM
Stream
2 channel PCM
Dolby Digital
2 channel PCM
L
R
R
OUT
IN
AUDIO IN
S-VIDEO
AUDIO OUT
(L1)
COAXIAL
S-VIDEO
2 channel PCM
Dolby Digital
rear of this unit
Connections
Basic Setup Function Setup Others
rear of this unit
Recording Playback EditingIntroduction
Actual Output
Cables not included.
Please purchase the necessary cables at your local store.
Note(s
• The audio source on a disc in a Dolby Digital multi channel surround format cannot be recorded as digital sound
y an MD or DAT dec
• By connecting this unit to a Dolby Digital decoder, you can enjoy high-quality Dolby Digital multi channel
rround
in movie th
• Playing back a DVD using incorrect digital audio settings may generate noise distortion and also damage speakers
2 Channel Analog Audio Connection
stereo system
analog audio
input jacks
AUDIO IN
LR
RCA audio cable
Supplied cables used in these connections are as follows:
• RCA audio cable (L/R) x 1
ANTENNA
VIDEO
VIDEO
Y
IN
OUT
L
L
R
R
IN
AUDIO IN
S-VIDEO
AUDIO OUT
(L1)
VIDEO
OUT
OUT
COAXIAL
S-VIDEO
L
L
R
R
AUDIO OUT
AUDIO OUT
rear of this unit
Español
Page 22

BEFORE YOU START
.
y
.
ff
d
.
s
p
y
s
.
y:
de.
.
,
p
p
h
.
”
.
)
.
.
l
AUX
O
sMathis
,
3
O
hi
X
O
JVC
,
3
p
ood
UX
y
,
O3
s
Toshib
E
L
Zenit
:
.
Finding the Viewing Channel on your TV
After you have completed all the connections, you must find the viewing channel (external input channel) on your TV
After you have made all the
necessar
STANDBY/ON
Turn on your TV.
• If connected to your VCR make sure it is
switched O
procee
Locate the Video/Input button on the
TV’
external In
ou see the “Initial Setup” menu on
the
Initial Setup
connections, press
] to turn on the unit
or in Standby mode before
ing
remote control that access the
ut Channel. Press until
creen
Language
English
Français
Español
Input Mode Names for Common TV Brands (Example)
Admira
rti
Hitac
Kenw
LXI-Serie
MagnavoxAUX CHANNE
LINE1, LINE2,
00, 90, 91, 92, 93
INPUT, TV/VCR,
00, 90, 91, 92, 93
INPUT, AU
VIDEO, VIDEO 1
VIDEO 2, VIDEO
A
anasonic TV/VIDE
A INPUT, TV/VCR
amsungTV/VIDE
anyo VIDE
har
on
00, 90, 91, 92, 9
VIDEO1, VIDEO2
VIDE
a TV/GAM
h
You may try to access the Video/Input mode b
-Locate the input button on the TV’s Front, Top
or Si
-Locate the Input Mode in the TV’s Setup Menu
If you cannot locate the Video/Input button on
the TV’s remote control
Manual or “In
Brands (Exam
If more than 10 minutes has passed, you may
see t
e MAGNAVOX screen saver
ut Mode Names for Common TV
le)”.
refer to the TV’s user
Proceed to step 2 in “INITIAL
SETTING
WARNING
•
lease finish the Initial Setup before attempting to
se the device. The Device may not function
orrectly without an Initial Setup
on page 28
Note(s
• Video input selection varies for different brand’s
models of TVs
• Consult your TV manufacturer if none of the above is
successful
Page 23
B
i
p
T
.
T
T
BEFORE YOU START
d)
)
)
4.
)
6.
g
Channel numbe
9
n
N
)
L
to scroll.
.
T
.
g
g
V
B
oadcasted
4. C
e
g
6.
g
f
T
a
].
F
A
n
)
u
T
n
on
layback)
n
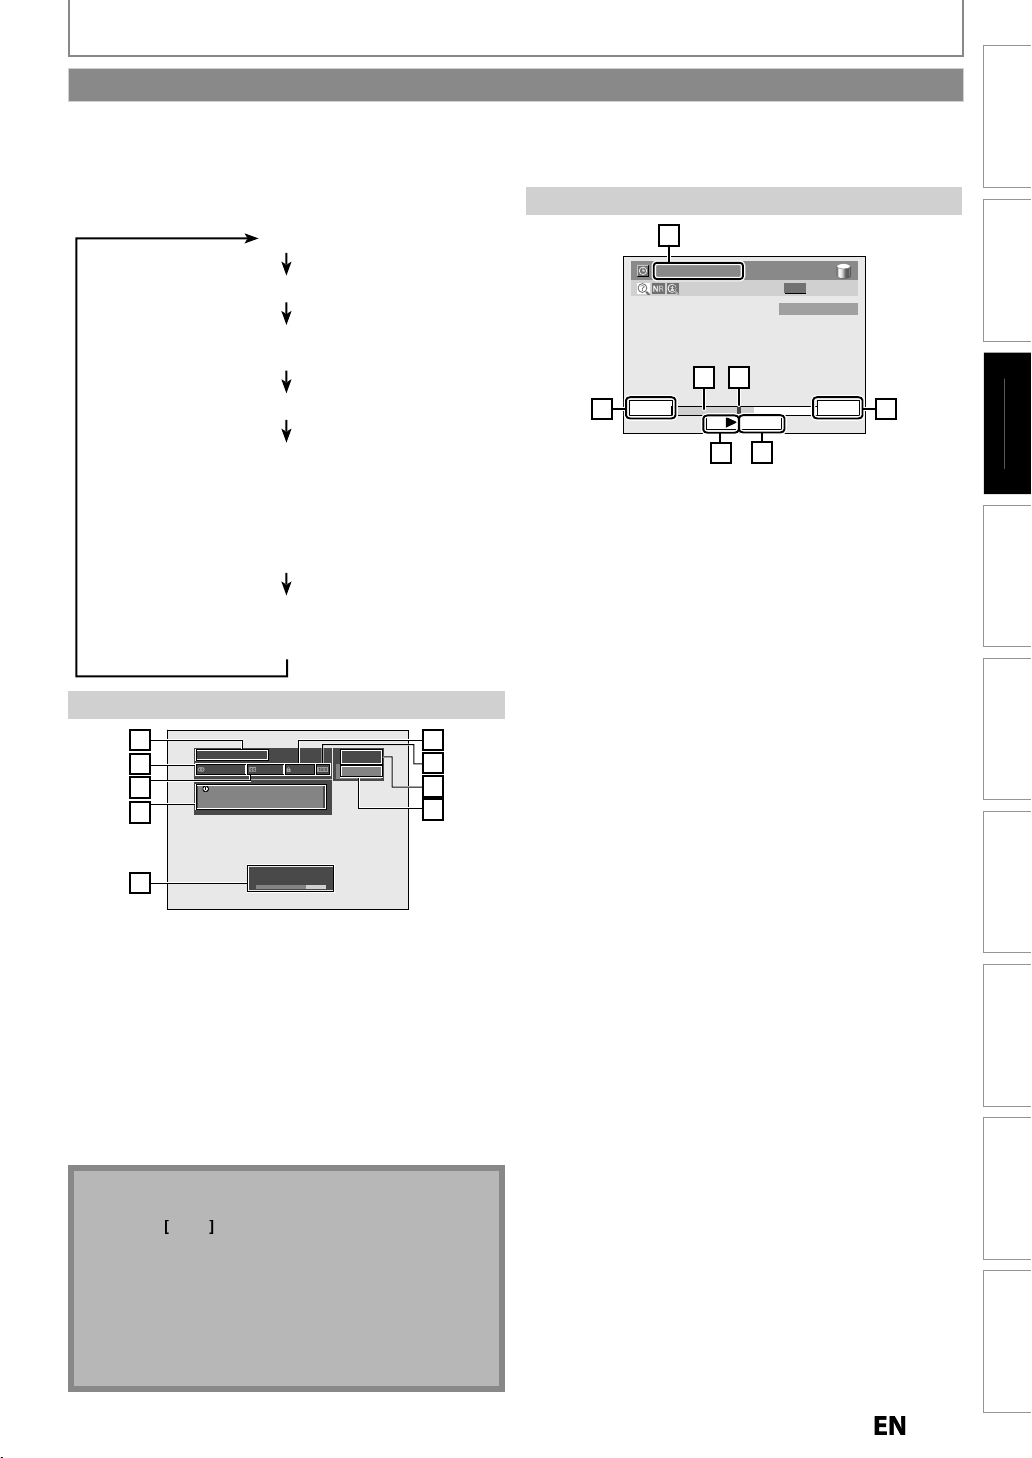
Guide to On-Screen Display / Menu
his unit uses the following on-screen displays and menus to guide you to the easy operations
he on-screen displays give you the information on the loaded disc or the disc/file in playback or the HDMI status, etc.
he menus allow you to change the various kinds of settings for playing back, recording or editing to suit your preference.
he on-screen display changes in the following order
s you press [DISPLAY
F
DTV Program Guide(only in DTV mode)
utostart Recording Informatio
(only in HDD mode when no titles are playing back
HDD / DVD Information/Men
itle Name Informatio
(only when DVD-RW/DVD-R or HDD is in playback)
r
ile Name Informati
only when a disc with JPEG/KODAK Picture CD files
is in p
HDMI Informatio
(only for the images output through the HDMI output)
DTV Program Guide
1
2
3
4
A Day of Memories
Multilingual Caption
A quarter-century ago, which may now qualify
as the good old days of newspapering,
run-of-paper sales accounted for 80 percent
of the industry's advertising revenues.
TV-PG
DTV
KABC
11.1
6
7
8
9
Autostart Recording Information
7
2:59:44 / 3:31:31
ORG
CH 10
65
7:10AM
441
10:10AM
443
442
Starting time of the autostart recordin
Status of the time autostart recordin
Live : Indicates when watching live T
: Indicates when playing back the autostart recording.
The time that the picture currently displayed on the
reen is br
urrent tim
The progress of the autostart recordin
Current point of the playback of the autostart recordin
Elapsed time of the playback of the autostart
recording / total time o
the autostart recording
10:42AM
444
Connections
Connections
Basic Setup
Basic Setup
as
c Setu
Recording Playback EditingIntroduction Function Setup Others
Recording Playback EditingIntroduction Function Setup Others
Program Title(1 line displaye
. Audio Information (Indicates that the program being
roadcasted is available in multi-languages.
Closed Caption (Indicates that the program being
roadcasted is available with closed captioning.
Program Guide (Max. 4 lines displayed)
. Signal strength (Indicates the signal strength of the
urrent channel.
Program Ratin
. Aspect Ratio of the selected program
. Broadcast statio
ote(s
When the program guide is displayed in more than 4
lines, useK /
No description is displayed when the program guide
ata is not provided
In some cases, DTV closed caption function on the
unit may not work even when the closed caption
icon is shown. In such case, check the closed caption
setting on your TV (Only if the unit is connected to a
V with the RCA Video Cable)
Signal
5
Bad Good
r
Español
Español
Page 24

5
2
t.1.
.
.
g
.
T
y
y
y
the
deo.
.
Used:
)
)
)
)
)
6.
p
y
/
total duration of the title.
BEFORE YOU START
3
.
.
cates the
audio format.
4.Indicates current disc status.
f
.
u
HDD / DVD Information / Men
6
1/ 5 1/ 5
5
512
0:01:00 / 1:23:45
112
DVD SP(2Hr) 1h53m
4
Displayed items may vary depending on the disc you
nser
Indicates the file type or a disc type and format mode
(DVD mode only)
Indicates a channel number or selected external input
hannel
Indicates the component in use, a recording mode and
possible recordin
he on-screen indication of the possible recording time
eft on HDD / DVD may differ from the actual recordable
time as this unit emplo
s
stem which varies the recording (storage) amount of
data in conformit
vi
4.Indicates an operation status
Icons
search. (Refer to page 78-79
Audio: to switch audio soundtracks. (Refer to page 80.)
Subtitle: to switch subtitles. (Refer to page 80.
Angle to switch camera angles. (Refer to page 81.
time left
s the variable bit rate encoding
with the amount of information on
: for title / chapter search, track search and time
-RW
7
Video
CH 10
3
Title / File Name Information
Title Name
My Title
File Name
My File
HDMI Information
**
21
Video Info. : 480p / YCbCr
Audio Info. : Bitstream
*
3
3
4
1. Indicates the resolution of the HDMI output image
Indicates the HDMI video format
Indi
“- - -” will be displayed, when it does not have any
in
ormation
HDMI
epeat: to repeat playback. (Refer to page 76.
Marker: to add markers to a title. (Refer to page 75.)
Noise Reduction: to reduce noise in the playback
picture. (Refer to page 81.
: to zoom screen. (Refer to page 75.)
Indicates the current title number/total number of
titles, the current cha
chapters, and time lapse of the current title pla
Indicates the currently active unit.
: HDD
: DVD
ter number/total number of
back
Page 25
B
i
p
BEFORE YOU START
ess
K
/
select a menu and
g:
i
:
:
dit:
DD
:
T
g.
g:
.
d.
he d
.
f
d
.
1
2
3
4
5
2
3
k:
lay:
.
:
)
:
.
k:
h
l:
.
:
.
u
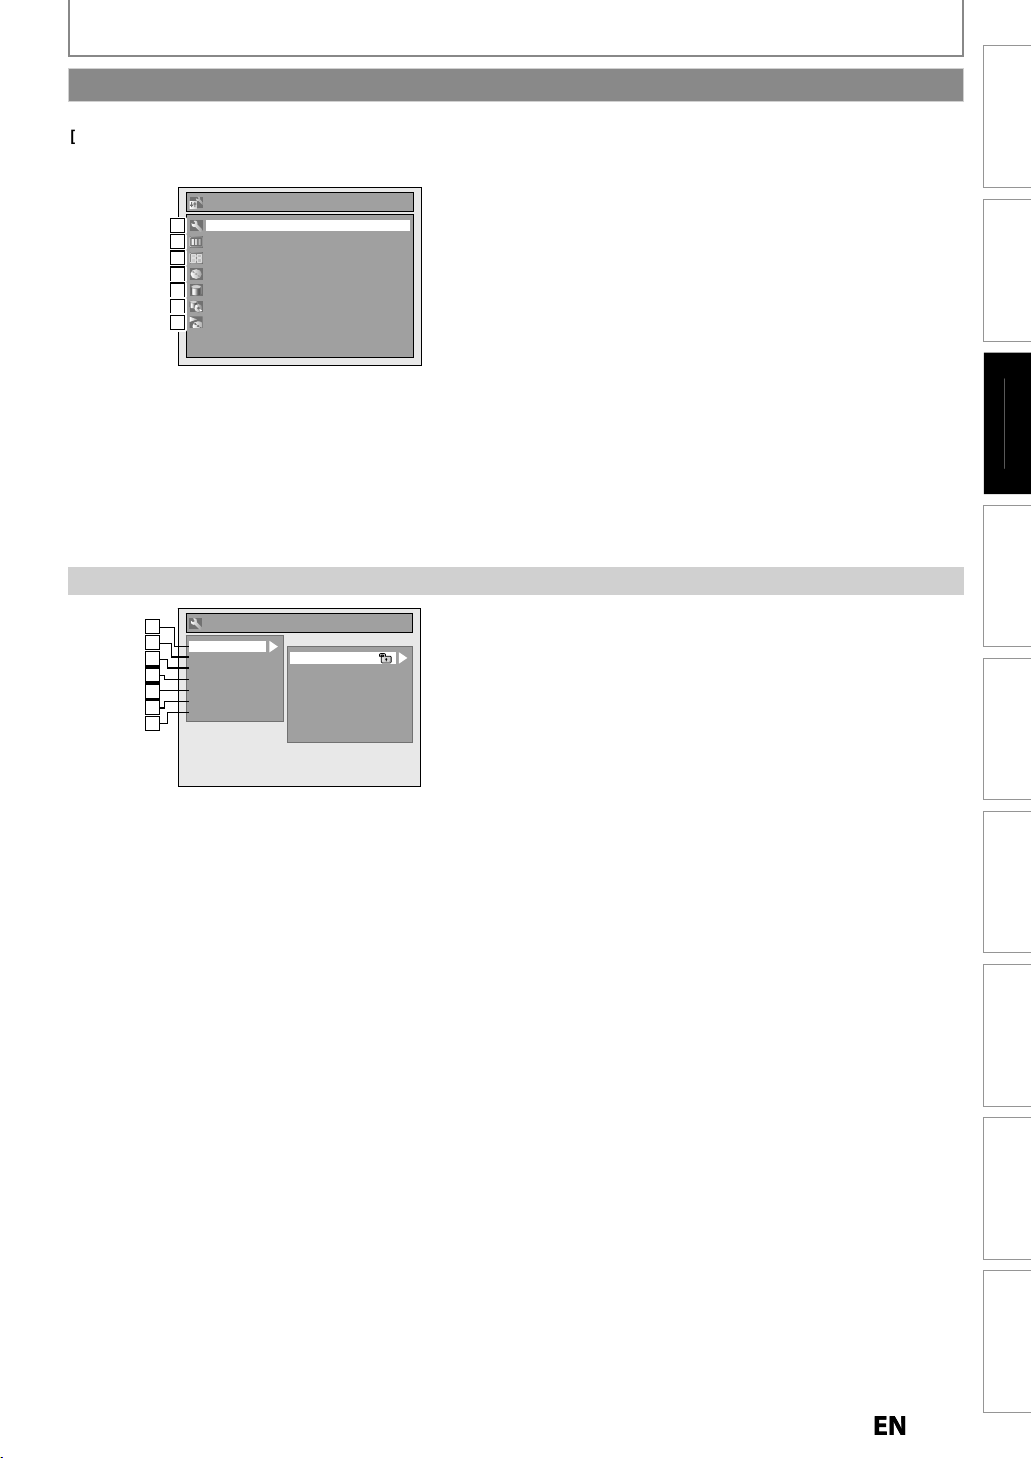
Main Menu
Pr
MENU]to display the main menu. Then
L to
K]to display the
menu. These menus provides entries to all main settings.
Menu
General Setting
111
Timer Programming
222
Title List
333
Disc Edit
444
HDD Menu
445
Dubbing
446
DISC Playback Mode
447
General Setting Men
General Setting
1
1
2
2
Playback
Display
3
3
Video
4
4
Recording
Clock
5
5
Channel
6
2
HDMI
7
3
Parental Lock
Disc Audio
Disc Menu Language
Audio Language
Subtitle Language
Angle Icon
Still Mode
Variable Skip / Replay
1. General Settin
To go to general setting menu.
2. T
mer Programming
To program a timer recording.
. Title List
To call up the title list.
4. Disc E
To set up the DVD setting.
5. H
Menu
o set up the HDD settin
6. Dubbin
To dub the content on the HDD to DVD or vice versa
“Dubbing” is available only when a recordable disc is
oade
7. DISC Playback Mode:
To set up t
isc playback setting
• “DISC Playback Mode” is available only when, an audio
CD and a disc with JPEG / KODAK Picture CD
inserte
into the unit
iles is
1. Playbac
To set up the unit to play back discs as you prefer.
2. Disp
To set up the screen as you prefer
. Video
To set up the video setting. (Refer to page 110 for TV
Aspect setting.
4. Recording
To set up the unit to record to discs as you prefer
5. Cloc
To set up the clock on the unit as you need.
6. C
anne
To adjust the channel setting on the unit as you prefer
7. HDMI
To set up the HDMI connection setting
Connections
Connections
Basic Setup
Basic Setup
as
c Setu
Recording Playback EditingIntroduction Function Setup Others
Recording Playback EditingIntroduction Function Setup Others
Español
Español
Page 26

BEFORE YOU START
y)
.
ly
)
.
:
d
.
f
.
)
.
6
y)
ode.
:
le l
.
:
l
.
9
)
DD
D:
.
DD:
.
1
2
4
1
2
(
Vid
)
3
u
1
2
u
)
)
ed.
de
1
2
3
4
)>
Disc Edit / HDD Menu / Dubbing / DISC Playback Mo
<Disc Edit menu (VR mode DVD-RW
Disc Edit
1
1
Format
2
2
Finalize
Disc Protect OFF ON
3
3
Delete All Playlists
9
4
<Disc Edit menu
Disc Edit
1
1
Format
2
2
Finalize
eo mode DVD-RW/-R
<DISC Playback Mode menu (audio CD)>
DISC Playback Mode
1
4
Random Play
5
2
Program Play
4
DISC Playback Mode menu (JPEG/KODAK Picture CD
DISC Playback Mode
Photo
224
226
Random Play
Slide Show
DD Men
HDD Menu
7
Delete All Unprotected Titles
Delete All Titles
8
Delete All Playlists
9
1. Fromat:VD-RW onl
Allows you to erase all contents in the disc and format it
2.Finalize:DVD-RW/-R on
Allows you to finalize a disc containing recorded titles
3. Disc Protect
Allows you to protect a disc from accidental editing or
recor
ing
4. Random Play:
Allows you to activate the random playback
eature
. Program Play: (audio CD only
Allows you to activate the program playback feature
. Slide Show: (JPEG/KODAK Picture CD files onl
Allows you to select the display time of the slide show
m
. Delete All Unprotected Titles
Allows you to delete all unprotected titles in the HDD
tit
ist
8. Delete All Titles
Allows you to delete all titles, including the protected
tit
es, in the HDD title list
. Delete All Playlists:
HDD/VR mode DVD-RW only
Allows you to delete all playlists in the title list.
10. H
DV
Allows you to dub from HDD to DVD
11. DVD H
Allows you to dub from DVD to HDD
Dubbing men
Dubbing
1
10
HDD DVD
DVD HDD
2
11
Note(s
• Disc edit is available for a disc which is not finaliz
Page 27
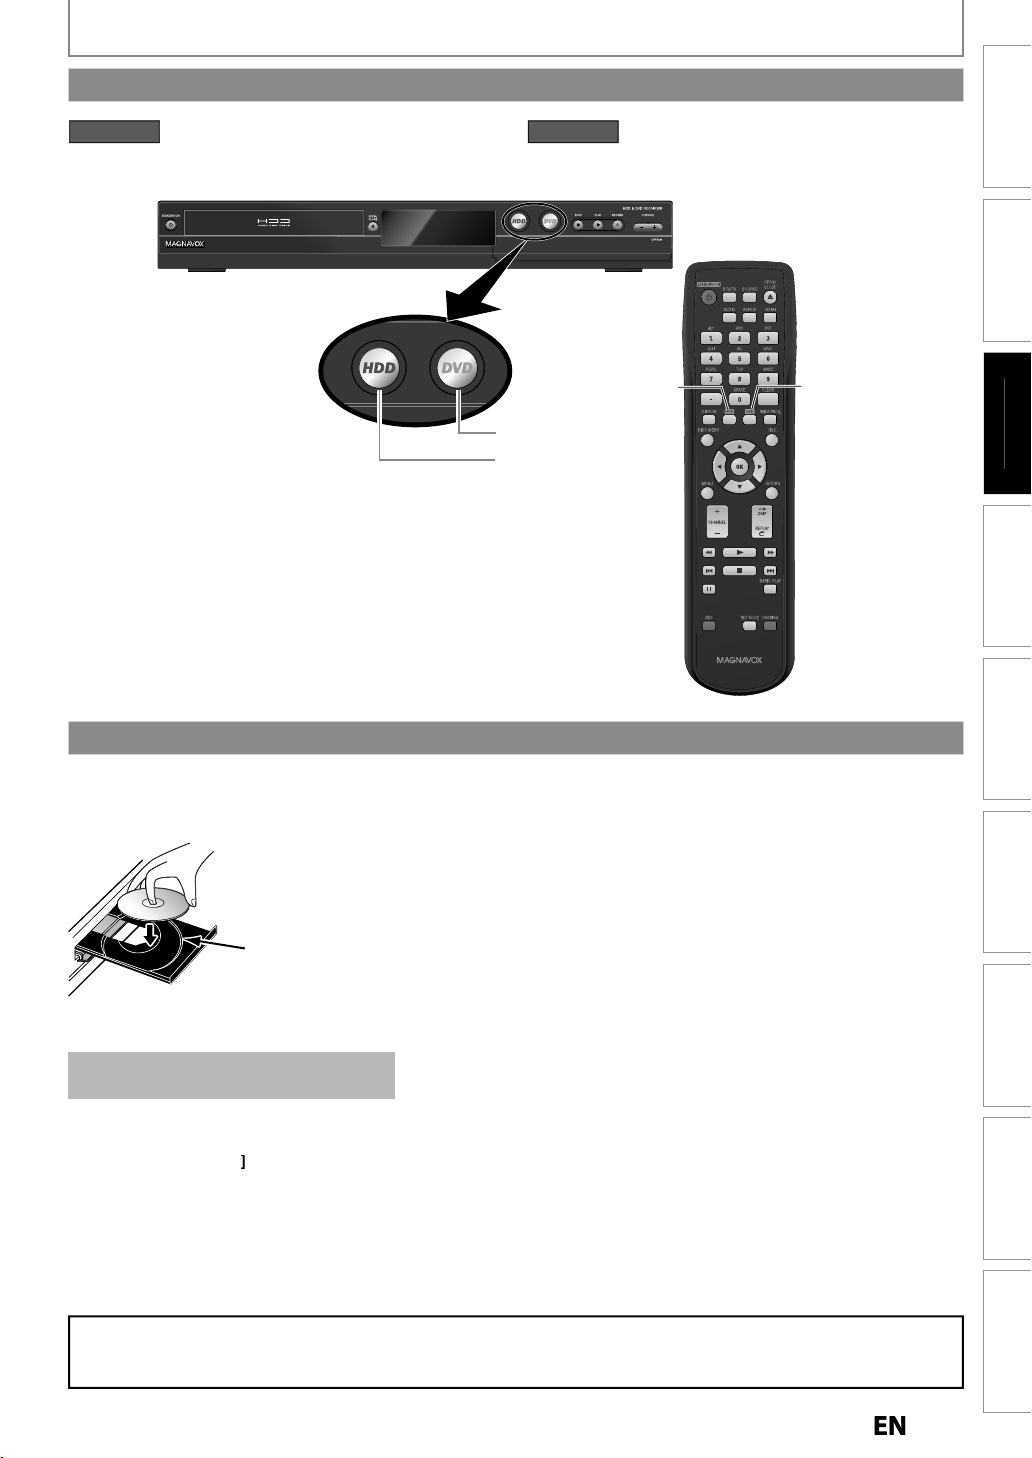
B
i
p
HDD button
DVD button
HDD button
DVD button
y.
y.
.
T
:
h
lly
.
f
97
)
ess
]
to activate the
ode.
ess
]
to activate the
ode.
Switching HDD / DVD Mode
W
G:
p.
BEFORE YOU START
HDD mode
r
HDD
HDD m
DVD mode
r
DVD
DVD m
Connections
Connections
Basic Setup
Basic Setup
as
c Setu
Recording Playback EditingIntroduction Function Setup Others
Recording Playback EditingIntroduction Function Setup Others
How to Insert a Disc
1) Press [OPEN/CLOSE A] to open the disc tra
2) Place the disc on the disc tray with its label side facing up.
Align the disc to
the disc tray guide.
3) Press [OPEN/CLOSE A] to close the disc tra
It may take a while to load the disc
data after the disc tray closes
o eject the disc
ress
PEN/CLOSEAto open the disc tray, then remove the disc before turning the unit to the standby mode.
• W
en inserting a brand-new DVD-RW disc, the unit automatica
DVD-RW disc will be formatted either Video or VR mode according to the recording format mode setting of the unit.
Be
ore inserting a brand-new DVD-RW disc, you need to set the recording format to the desired mode. (Refer to page
ARNIN
• Please finish the Initial Setup before attempting to use the device. The Device may not function correctly without
n Initial Setu
starts to initialise the disc
Español
Español
Page 28
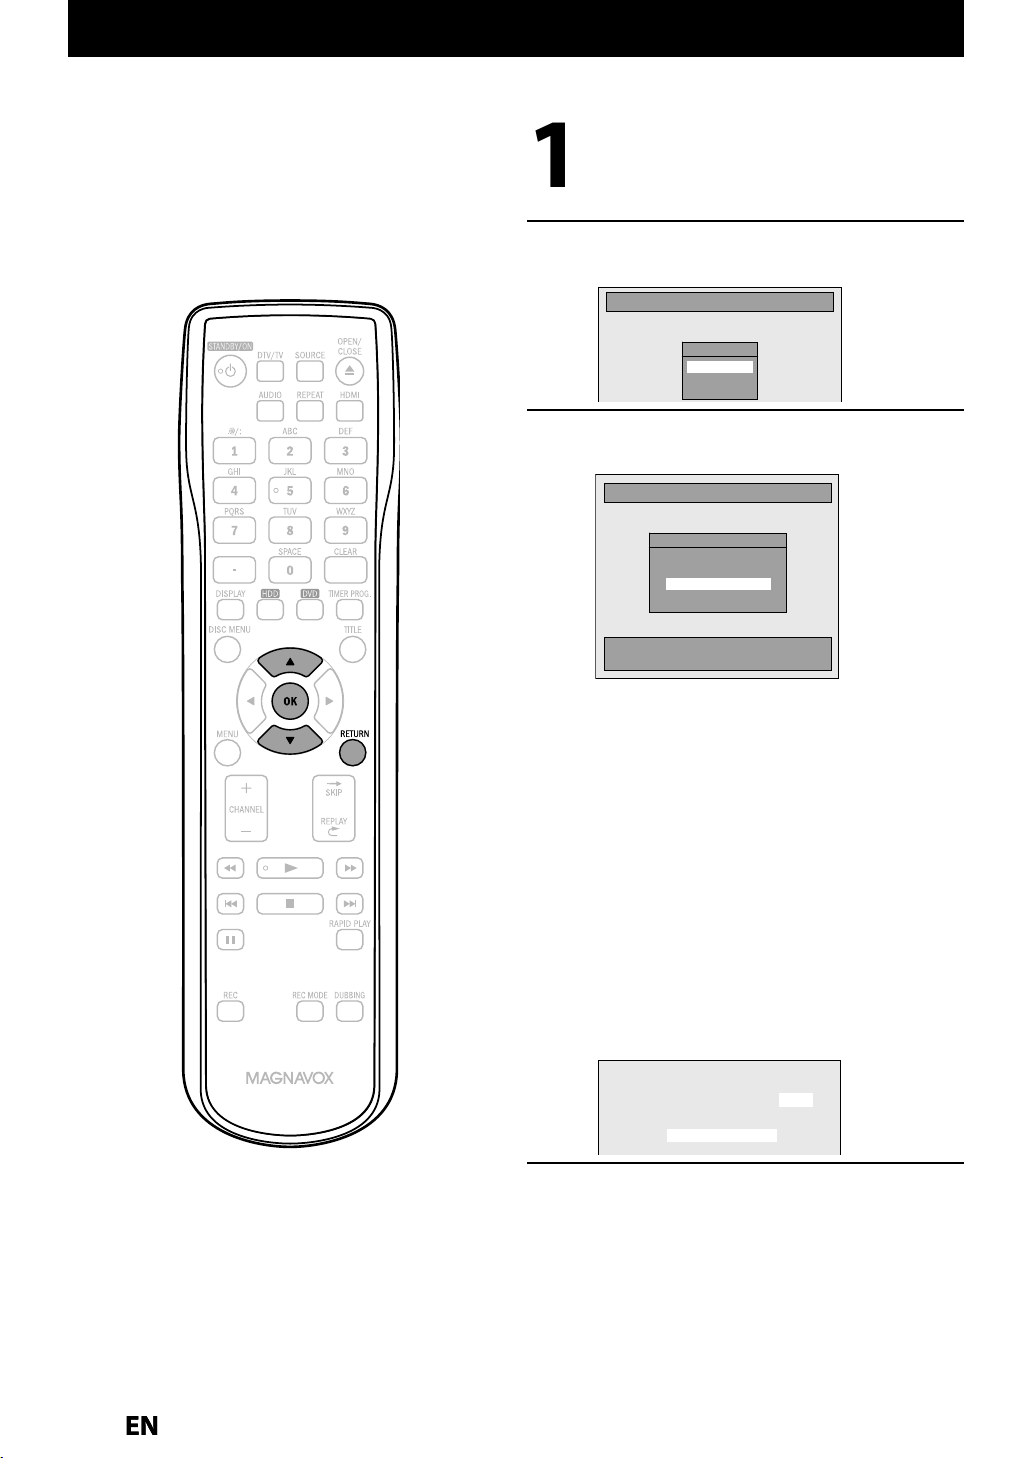
INITIAL SETTING
.
y
d
u.
[
K
/
L
d
.
[
K
/
L
g
your area.
A
:
)
y
y
ed.
:
)
y
.
:
)
y
ed.
y
y
g
.
.
.
labl
d
.
You need to follow these steps when you turn on this unit for the first time
Follow the procedure in “Finding the
Viewing Channel on
page 22 to
men
our TV” on
isplay “Initial Setup”
Use
] to select your desire
anguage, then press [OK]
Initial Setup
Language
English
Français
Español
Use
broadcastin
The unit will start getting channels available in
(When using an Antenna
The channels broadcasted in Analog TV and
Digital TV are automaticall
memorized. Onl
Cable (Analog)
(When using basic cable
The channels broadcasted in Analog Cable TV
are automaticall
Cable (Analog / Digital)
(When using basic cable
The channels broadcasted in Analog Cable TV
and Digital Cable TV are automaticall
] to select the type of
signal, then press [OK].
Initial Setup
Channel Preset
Make sure the antenna is
connected to “ANTENNA IN” jack.
Antenna
Cable (Analog)
Cable (Analog / Digital)
Auto Preset will scan all terrestrial channels.
This may take a while to complete.
ntenna
the receivable channels in the
rea will be memoriz
scanned and memorized
nd memoriz
scanned and
scanned
CH 1
Auto Presetting Now
If a PBS (public broadcasting station) is available
in
our area, clock setting may automatically be
performed and the correct clock will be displa
followin
Initial setting is then complete
ress
If a PBS (public broadcasting station) is not
avai
to step 5 in “Manual Clock Setting” on page 34
the channel preset procedure
RETURN] to exit
e in your area, press
OK]. Then procee
ed
Page 29
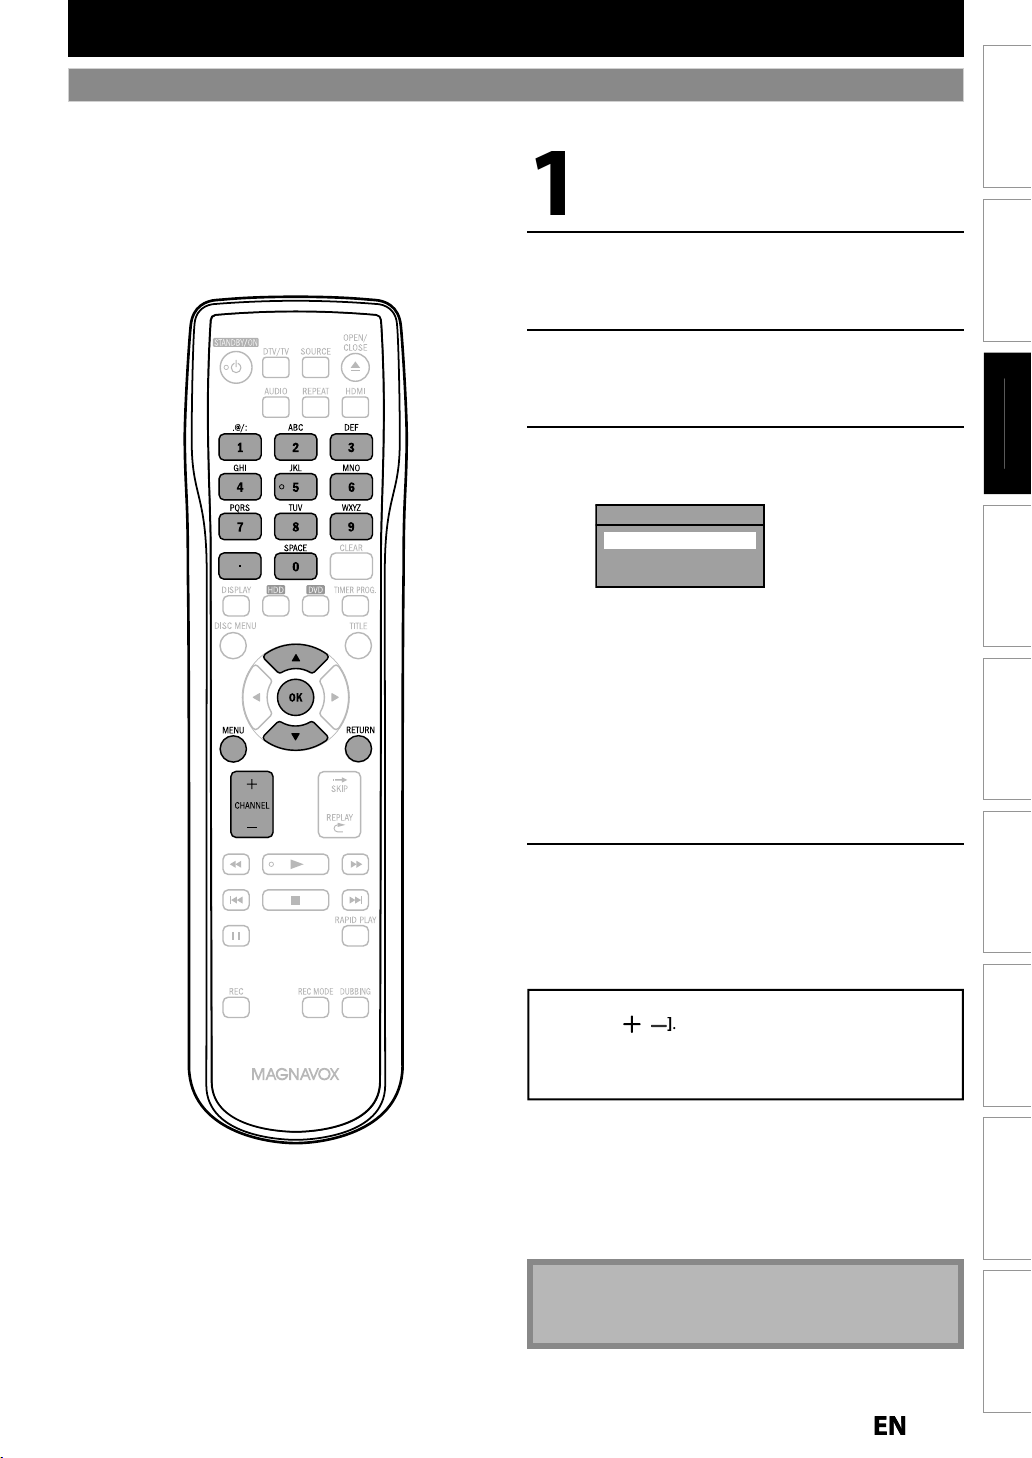
B
i
p
CHANNEL SETTING
f
.
[
K
/
l
.
.
[
K
/
L
.
.
[
K
/
L
l
.
[
K
/
L
your area.
h th
h th
.
g
.
g
:
r
]
to cancel.
o
.
/
,
d
[
g
.
)
d.
Auto Channel Scan
you have changed antenna connection, we recommend that you program available channels in your area with the
ollowing procedures
Press [MENU] and use
“Genera
“General Setting” menu will appear
Setting”, then press [OK]
L to select
Connections
Connections
Use
] to select “Channel”, then
ress [OK]
“Channel” menu will appear
Use
] to select “Auto Channe
Preset”, then press [OK]
Use
] to select the type of
roadcasting signal, then press [OK].
Auto Channel Preset
Antenna
Cable (Analog)
Cable (Analog / Digital)
The unit will start getting channels available in
• When using Antenna, Cable Box or Satellite
Receiver wit
scan wit
• When connected to Cable TV, select “Cable
(Analo
)” or “Cable (Analog / Digital)”
To cancel the auto channel preset durin
scanning
ress
RETURN] to go the previous screen o
MENU
e RF Coaxial cable, you would
e “Antenna”
Basic Setup
Basic Setup
as
c Setu
Recording Playback EditingIntroduction Function Setup Others
Recording Playback EditingIntroduction Function Setup Others
When scanning is over, press [MENU]
exit
t
To cycle through only the memorized channels, use
CHANNEL
To select a channel directly (including the ones not
memorized)
di
ital TV channels)
use
the Number buttons]n
• ]
for
Note(s
Español
• If Auto Scan is cancelled during the scanning, some
channels will not be programme
Español
Page 30

y
/
.
[
K
/
l
.
.
[
K
/
L
].
.
[
K
/
L
p
.
h
OG
ue.
h
L
.
CHANNEL SETTING
T
.
:
.
.
Adding / Deleting Channels
his feature allows you to manually Add or Delete Channels for any adjustments to your Channel Lineup
Make sure
• You perform the “Auto Channel Scan” before adding or deleting the channels
Press [DTV/TV] to select the mode
(DTV or TV) to/from which
to add
delete channels
ou want
Press [MENU] and use
“Genera
“General Setting” menu will appear
Use
Setting”, then press [OK]
] to select “Channel”, then
L] to select
ress [OK
“Channel” menu will appear
Use
Preset”, then
• If you are adding or deleting Analog TV/Cable
• If you are adding or deleting Digital TV/Cable
to select “Manual Channel
Auto Channel Preset
Manual Channel Preset
TV Audio Select
c
annels, go to
c
annels, go to
ress [OK]
ANAL
DIGITA
to contin
to continue
Instructions continue on the next page
Page 31

B
i
p
OG
add o
.
Use
ly
.
/
B
lud
d.
Use
ect a channe
y.
g
.
l
f
.
[
K
/
p
.
Y
ll
dd
.
L
add o
.
l
ber)
th
.
use
/
B
ection.
ly.
en an unmemo
ected
t.
[
K
/
L
l
h
add or
.
]
t
.
d.
G:
.
CHANNEL SETTING
ANAL
Select the channel number to
elete
•
CHANNEL / to cycle through on
the memorized channels
• Use
inc
•
directl
• When a memorized channel is selected, “Add”
is checked and hi
• When an unmemorized channel is selected
“De
ete” is checked and highlighted as a
de
ault
Use
“Delete”, then
Manual Channel Preset
our setting will be activated and it wi
utomatically switch to the next channel so that
you can continue a
to cycle through all the channels
ing the ones not memorize
the Number buttons] to sel
hlighted as a default
L to select “Add” or
ress [OK]
CH 2
Add
Delete
ing or deleting channels
Press [MENU] to exit.
DIGITA
r
Select the channel number to
r
elete
• Only the major channel is displayed in “Manua
annel Preset” menu. (The channel number
isplayed in the parenthesis is a virtual channel
num
• Use
l
CHANNEL / to cycle through only
e memorized channels
• You cannot
hannel sel
• Use
the Number buttons] to select a channel
irect
• When a memorized channel is selected, “Add”
s checked and highlighted as a default.
• Wh
Delete” is checked and highlighted as a
faul
Use
“De
t
• If the setting is complete, press [RETURN
] to select “Add” or
ete”, then press [OK]. Then select
e next channel to
ctivate “Manual Channel Preset”
Manual Channel Preset
DTV 2 (CH - - - )
Add
Delete
for the digital TV
rized channel is sel
elete
o
Connections
Connections
Basic Setup
Basic Setup
as
c Setu
Recording Playback EditingIntroduction Function Setup Others
Recording Playback EditingIntroduction Function Setup Others
Your setting will be activate
WARNIN
• For the Digital TV channels, you cannot recover the
eleted channels once they are deleted unless you
erform the Auto Channel preset again
Press [MENU] to exit.
Español
Español
1
Page 32

SETTING THE CLOCK
)
d.
T
y
”
.
e
cable
ections are correct.
)
g
[
K
/
l
.
.
[
K
/
L
[OK].
.
[
K
/
L
g
.
[
K
/
L
.
h
dby
.
h
f
h
h
f
f
h
h
.
Auto Clock Setting
his unit can set the time and date automatically by referring to a channel that carries a clock information. If a PBS
(public broadcasting station) is available in
Setting
Make sur
• The
• Channels are set. (Refer to page 29.
on page 34
TV conn
our area, follow “Auto Clock Setting” below. If not, follow “Manual Clock
Analog Auto Clock Settin
Press [MENU] and use
“Genera
“General Setting” menu will appear
Use
Setting”, then press [OK]
] to select “Clock”, then
L to select
press
“Clock” menu will appear
Use
Settin
Use
to select “Auto Clock
”, then press [OK]
] to select “Auto”, then
ress [OK]
Auto Clock Setting
OFF
Auto
Manual
Press [MENU] to exit.
Press [STANDBY/ON
unit to t
This unit will search for the time only when the
power is in t
standby mode
unit time to set t
unit receives t
when unit is in standby mode. Check the time a
the Auto Clock was set, i
t
e “Auto Clock Setting“ to “OFF” in step 4 above.
T
en try “Manual Clock Setting“ on page 34
e stan
e standby mode. Initially leave it in
or at least 15 minutes to give this
e clock. Once the clock is set, the
e clock data at 12:00 am & 12:00 pm
to turn the
mode
ter
it is incorrect time then set
Note(s
• The clock may set itself automatically after you
connect the Antenna/Cable signal and plug in the AC
Power cor
• For Analog auto clock setting, incorrect time may be
obtained depending on the broadcast information. If
this occurs, set the “Auto Clock Setting” to “OFF” at
step 4 above and try “Manual Clock Setting” on
2
Page 33

B
i
p
SETTING THE CLOCK
g
ly.
.
4
g
ooses a
ect
Cable
.
lock
[OK].
[
K
/
t
h
.
h
.
g
[
K
l
.
.
[
K
/
.
.
[
K
/
g
.
[
K
/
].
.
[
] to highlight “CH”. Press
K
.
[
K
/
t
l
,
t
.
T
tlantic
s
n
s
al
s
n
s
c
s
a
s
i
s
[
K
/
L
h
.
y
.
y
y
h
h
y
, if
h
h
.
.
anual Auto Clock Settin
the unit ch
TV, set the PBS channel manually by following the steps
low
n incorr
PBS channel on
Select “Manual” at step 4 in “Analog
Auto C
Setting” on page 32, then
press
Use [the Number buttons] or
L
o enter your Cable TV Analog PBS
annel number, then press [OK]
c
Set Channel No.
CH 1
Press [MENU] to exit and turn the
unit to t
Digital Auto Clock Settin
Press [MENU] and use
“Genera
General Setting” menu will appear
Use
e standby mode
/ L] to select
Setting”, then press [OK]
L to select “Clock”, then
ress [OK]
Clock” menu will appear
Use
Settin
Use
L to select “Auto Clock
”, then press [OK]
L to select “Manual”, then
ress [OK
Auto Clock Setting
OFF
Auto
Manual
Enable Manual operation to select the DTV
hannel for receiving the Clock Data and
selecting your Time Zone below
Press
/ L] to select “DTV”, then press
B
Set Channel No.
DTV 1
Use
zone, t
Time Zone
Atlantic
Eastern
Central
Mountain
Pacific
Alaska
Hawaii
to select the desired time
en press [OK]
Press [MENU] to exit and turn the
unit to the standb
This unit will search for the time only when the
power is in the standb
standb
mode for at least 15 minutes to give this
unit time to set t
unit receives t
when unit is in standb
the Auto Clock was set
t
e “Auto Clock Setting“ to “OFF” in step 4 above.
T
en try “Manual Clock Setting“ on page 34
e clock data at 12:00 am & 12:00 pm
mode
mode. Initially leave it in
e clock. Once the clock is set, the
mode. Check the time after
it is incorrect time then set
Note(s) for auto clock settin
• The clock may set itself automatically after this unit
receives the antenna/cable signal and plug in the
ower cord.
• If the clock is not set correctly, timer recording does
not work proper
• Analog off the air broadcasts have ended. Analog
auto clock setting will no longer be available except
via Analog Cable TV. Try digital auto clock setting in
this case.
• For Digital auto clock setting, incorrect time may be
obtained depending on the broadcast information
If this occurs, set the “Auto Clock Setting“ to “OFF” at
step 4 and try “Manual Clock Setting“ on page 3
ime adjustment for each time zone
A
r
ntr
ntai
ifi
Alask
wai
MT (Greenwich Mean Time ) - 4 hour
MT (Greenwich Mean Time ) - 5 hour
MT (Greenwich Mean Time ) - 6 hour
MT (Greenwich Mean Time ) - 7 hour
MT (Greenwich Mean Time ) - 8 hour
MT (Greenwich Mean Time ) - 9 hour
MT (Greenwich Mean Time ) - 10 hour
Connections
Connections
Basic Setup
Basic Setup
as
c Setu
Recording Playback EditingIntroduction Function Setup Others
Recording Playback EditingIntroduction Function Setup Others
Use [the Number buttons] or
o enter the desired major channe
number to receive the Clock Data
hen press [OK]
L
Español
Español
Instructions continue on the next page
Page 34

SETTING THE CLOCK
[
K
/
g
.
.
[
K
/
L
[OK].
.
[
K
/
L
h
.
[
K
/
L
p
.
):
.
):
A
.
W
y
.
[
K
.
.
[
K
/
.
.
[
K
/
p
.
[
K
/
p
[
/
B
d
[
K
/
y
y
ontents.
d.
T
]
.
)
]
.
f
lly.
.
)
.
Manual Clock Setting Daylight Saving Time
Press [MENU] and use
/ L to select
“General Setting”, then press [OK]
“General Setting” menu will appear
hen “Daylight Saving Time” is “ON”, the unit clock will
automaticall
saving time period
“ON (MAR - NOV)” has been selected as the default.
adjust the time in order to fit the daylight
Use
L to select “Clock”, then
ress [OK]
“Clock” menu will appear
Use
then
Use
then
Clock Setting
JAN / 01 / 2014 ( WED )
Use
an
to suit
[OK] when
L to select “Clock Setting”,
ress [OK]
L to select calendar or time,
ress [OK].
12 : 00 AM
to select an item to set,
use
L to select the contents
our preference, then press
ou finish setting all the
c
Clock Setting
JAN / 01 / 2014 ( WED )
Your setting will be activate
he clock starts counting when you press
12 : 00 AM
Press [MENU] to exit
OK
Press [MENU] and use
“General Settin
“General Setting” menu will appear
Use
] to select “Clock”, then
”, then press [OK]
L to select
press
“Clock” menu will appear
Use
Time”, t
Use
] to select “Daylight Saving
en press [OK]
] to select “ON (MAR -
OV)”, “ON (APR - OCT)” or “OFF”,
then
ON (MAR - NOV
ON (APR - OCT
ress [OK]
Daylight Saving Time
ON (MAR - NOV)
ON (APR - OCT)
OFF
ove forward one hour on the second Sunday in
arch and move back one hour on the first
unday in November
ove forward one hour on the first Sunday in
pril and move back one hour on the last
unday in October
Note(s
• Your setting will be cancelled if you press
before pressingOK]at step 5
• Your clock setting will be lost if either there is a power
ailure or this unit has been unplugged for more than
1 hour when you set the clock manua
• For setting the day, year, hour, and minute,
[the Number buttons]can also be used.
• You can set the built-in calendar from the year 2012
up to 2061
MENU
4
Press [MENU] to exit.
Note(s
• Though it appears in the OSD, “APR - OCT” daylight
saving time is no longer in use as of 2007 in the U.S
Page 35

B
i
p
TUNER SETTINGS
Y
l.
.
y.
Ab
:
W
d
y.
Wha
?
l
t
y.
T
y
k.
]
f
.
.
]
ess the channe
]
to
l
h.
>
the channel numbe
]
to
h.
r
]
,
or
seconds.
g
]
+
]
>
atch.
r
h:
]
+
]
o
]
+
]
]
+
]
,
]
+
]
.
.
]
+
]
+
]
]
j
j
yed.
N
)
TV channels.
l.
Switching Analog Mode / Digital Mode
ou can easily switch the analog TV (NTSC) and digital TV
ATSC) with the remote contro
Press [DTV/TV] on the remote control
• The Analog mode and Digital mode switch alternatel
Channel Selection
Select channels by using
the Number buttons
CHANNEL/
CHANNEL/
the Number buttons
Pr
se
ect a channel you want to watc
l number with
Analog TV Channels
nter
select a channel you want to watc
For 1-digit numbe
e.g.) 2 ch:
For 2-digit number
e.
.) 12ch:
Digital TV Channels
nter the major and minor channel number with
the Number buttons]to select a channel you want to
w
For 1-digit numbe
e.g.) 2.1 c
major channel
minor channel
For 2-digit number
f 2 channel numbers are pressed consecutively, that
umber will become the major channel
e.g.) 35.1ch:
ajor channel
minor channel
• If you enter 1 or 2 digit for major channel and leave it for
2 seconds, the number will be taken as the ma
channel and lowest minor channel of the ma
will be displa
CHANNEL/ or
ound on remote control
to change the channel
the Number buttons
r with[the Number buttons
0]+
2
2]+
•]
2] + leave it for 2
1
2
0
2
r
2
•
0
1
1
•] or
+ leave it for 2 seconds
3
5
•
1
or
or channel
out digital TV broadcasting
ith its high definition broadcast, digital broadcasting far
urpasses analog broadcasting in both its picture an
ound qualit
t is the minor channel
By using high compression technology, digita
broadcasting offers a service that enables multiple signals
o send simultaneousl
herefore, you can select more than one program per
major channel since digital broadcasting technolog
istinguishes between multiple channels broadcast by a
ingle networ
[Air Time]
18:00
18:30
CH4
19:00
19:30
20:00
ATSC (digital mode)NTSC (analog mode)
CH4-1
CH4-1
CH4-1
major channel
smallestCHsmallest
CH4-2
smallest
CH
smallest
CH4-2CH4-1
minor channel
: change automatically
: change manually by using [CHANNEL / ] or
[the Number buttons]
CH
CH4-3
CH4-3
CH
Connections
Connections
Basic Setup
Basic Setup
as
c Setu
Recording Playback EditingIntroduction Function Setup Others
Recording Playback EditingIntroduction Function Setup Others
It may take up to 5 to 7 seconds to switch the digital
In digital TV broadcasting, 2 or more channels, called
ote(s
minor channels, are simultaneously broadcast on one
main channel, called major channe
Español
Español
Page 36

guages.
ll be d
.
be switched.
n
.
lly d
.
y
ecorded.
N
)
.
does not control external device
o.
y
.
TUNER SETTINGS
Th
ded.
V
Selecting TV Audio
is section describes how to switch the TV audio. When you record a TV program, only the audio selected here will be
recor
Digital T
Press [AUDIO] to cycle through
available audio lan
English
• When you press
wi
• Every time you press
will
e.g.) English
• Available languages differ depending on the
• The language information display will
automatica
• When you record digital TV broadcasting, the
audio language
r
isplayed on the TV screen
roadcast
AUDIO], selected language
AUDIO], the language
Spanish
isappear
ou have selected will be
Unknow
ote(s
You cannot change the audio language for the
recording of digital TV broadcasting
PressingAUDIO]
i
When there is only one audio channel on the
broadcast, pressingAUDIO] does not displa
anything
Page 37

B
i
p
[
K
/
l
.
.
[
K
/
L
.
.
[
K
/
L
l
.
[
K
/
L
h
.
o:
.
:
.
o
.
o
o
Aud
t
o
P
O
O
O
O
O
P
OMONOMONONOMONOAP
P
P
O
O
O
P
PMONONOMONO
Analog T
V
TUNER SETTINGS
Press [MENU] and use
“Genera
“General Setting” menu will appear
Use
Setting”, then press [OK]
] to select “Channel”, then
ress [OK]
“Channel” menu will appear
Use
Se
Use
“SAP”, t
Outputs main-audio
SAP (secondary audio program)
Outputs sub-audio
] to select “TV Audio
ect”, then press [OK]
] to select “Stereo” or
en press [OK]
TV Audio Select
Stereo
SAP
tere
Press [MENU] to exit.
L to select
Connections
Connections
Basic Setup
Basic Setup
as
c Setu
Recording Playback EditingIntroduction Function Setup Others
Recording Playback EditingIntroduction Function Setup Others
Note(s) on recording analog TV audi
• When you record an analog TV program available in
second audio or stereo, you have to select either
“Stereo” or “SAP” in “General Setting” menu
beforehand. Refer to the following table to check an
appropriate setting
elected
audi
tere
Broadcast
audi
STEREO+SA
STERE
MONO+SA
STEREO+SA
STERE
MONO+SA
isc
ecording
TERE
TERE
N
AP
TERE
AP
utpu
STERE
STERE
A
STERE
A
io
Español
Español
7
Page 38

TUNER SETTINGS
.
[
K
/
g
.
.
[
K
/
L
[OK].
[
K
/
L
.
[
K
.
[
K
/
L
d
.
:
f
o
6:
h
Se
stances.
V
DTV Closed Caption
Digital T
Digital TV has its own closed captions called DTV CC. Use this menu to change the settings for DTV CC
Press [MENU] and use
“General Settin
“General Setting” menu will appear
Use
] to select “Display”, then
”, then press [OK]
L to select
press
Use
] to select “DTV CC”, then
ress [OK]
Language
Screen Saver
FL Dimmer
DTV CC
CC Style
V-Chip
Use
/ L] to select “Caption Service”,
then press [OK]
DTV CC
Caption Service
Recording
Use
to the desired DTV close
caption, then press [OK]
Caption Service
OFF
Service1
Service2
Service3
Service4
Service5
Service6
FF
Select if you do not want DTV CC. This is the
de
ault.
Service 1 t
Select one of these before changing any other
item in t
“
rvice 1” under normal circum
Service
e closed caption menu. Choose
Press [MENU] to exit.
Page 39

B
i
p
[
K
/
g
.
.
[
K
/
L
[OK].
[
K
/
L
].
[
K
/
L
h
.
[
K
/
L
].
TUNER SETTINGS
.
.
V
Closed Caption Style
Digital T
Digital TV can also change the style of its closed caption such as font, color or size, etc
Press [MENU] and use
“General Settin
“General Setting” menu will appear
L to select
”, then press [OK]
Connections
Connections
Use
press
Use
ress [OK
Language
Screen Saver
FL Dimmer
DTV CC
CC Style
V-Chip
Use
t
Use
en press [OK]
CC Style
User Setting
Font Size
Font Style
Font Opacity
Font Color
Edge Type
Edge Color
Back Opacity
Back Color
OK
User Setting
ON
OFF
] to select “Display”, then
] to select “CC Style”, then
] to select “User Setting”,
] to select “ON”, then press
Basic Setup
Basic Setup
as
c Setu
Recording Playback EditingIntroduction Function Setup Others
Recording Playback EditingIntroduction Function Setup Others
Español
Español
Instructions continue on the next page
9
Page 40

0
[
K
/
f
h
.
f
ll be d
d.
.
>
tched as below.
>
tched as below.
y>
d
.
>
.
>
.
>
tched as below.
y>
.
Color>
.
7
TUNER SETTINGS
Use
switch the setting
want to set, t
L to select the item and
or each item you
en press [OK]
• When “User Setting” is set to “ON”, you can set
the
ollowing items. CC style set by “User
Setting” wi
isplaye
• The setting description for each item is shown
elow
Font Size
ont size on the displayed caption can be
wi
Font Size
Large
Middle
Small
Font Style
ont style on the displayed caption can be
wi
Font Style
Style1
Style2
Style3
Style4
Style5
Style6
Style7
Style8
Font Opacit
ont transparency (Opacity) on the displaye
caption can be switched as below
Font Opacity
Solid
Transparent
Translucent
Flash
Font Color
ont color on the displayed caption can be
witched as below
Font Color
White
Black
Red
Green
Blue
Yel lo w
Magenta
Cyan
<Edge Type
Edge type on the displayed caption can be
witched as below
Edge Type
None
Raised
Depressed
Uniform
L.Shadow
R.Shadow
<Edge Color
Edge color on the displayed caption can be
wi
Edge Color
White
Black
Red
Green
Blue
Yel lo w
Magenta
Cyan
<Back Opacit
Background transparency (Opacity) on the
isplayed caption can be switched as below
Back Opacity
Solid
Transparent
Translucent
Flash
<Back
Background color on the displayed caption can
switched as below
Back Color
White
Black
Red
Green
Blue
Yel lo w
Magenta
Cyan
Press [MENU] to exit.
4
Page 41

INFORMATION ON RECORDING
This unit ca
ecord to
.
ded
.
d
h
h
.
x
JVC
y
.
dabl
s
ded
g
format is not recordable.
ecorded
ode is not recordable on this
t.
dabl
s
:
600 titles
:
hap
)
)
s
Before you make a recording, read the following information.
Recor
DVD-R can only be recorded to once. DVD-RW can be
recor
DVD-RW DVD-R
The following discs are recommended for good
recor
t
is unit. However, depending on the media condition
t
e unit may not read the disc properly
Verbatim DVD-R 8x, DVD-RW 2
DVD-RW 4x
Maxell DVD-R 8x/16x
Performance of an
e Disc
n r
to and erased many times
Logos
ing quality and are proven to be compatible with
DVD-RW and DVD-R
Attributes
8cm/12cm, single-sided,
single layer disc
Approx. max. recording time
(SLP mode):
480 minutes (4.7GB) (for 12cm)
142 minutes (1.4GB) (for 8cm)
other discs are not guaranteed
nrecor
• DVD-RW recore
• DVD-R r
ni
e Disc
in the non compatible recordin
in VR m
aximum recordable numbers of title / chapter
HDD
VD
99 chapters per title
99 titles per disc
999 c
99 chapters per title (Video mode
ters per disc (VR mode
Basic SetupConnections Playback EditingIntroduction Function Setup Others
Recording
Español
Page 42

y
.
y
.
b
.
)
N
)
.
.
.
)
.
.
D.
e
INFORMATION ON RECORDING
y
y
ld
d
.
:
y
y
them to a
.
b
:
h
f
d
f
f
f
.
:
f
h
y
f
deo.
h
d
.
bou
Recording Mod
You can select a recording mode among 6 options, and
the recording time will depend on the recording mode
ou select as follows
(1 TB)
Recording
mode
Disc size
8cm Disc
12cm Disc
HDD
(Internal)
• The recording time is only an estimate. The actual
recording time ma
• The audio and video quality gets poorer as the recording
time
ecomes longer
• Each time
REC MODE]is pressed, recording mode and
ts allowed recording time will be displayed. (Refer to
page 24.
HQ
SP
LP
EP
SLP
HQ
SP
LP
EP
SLP
HQ
SP
LP
EP
SLP
differ
Recording
time
17 min
35 min
71 min
106 min
142 min
60 min
120 min
240 min
360 min
480 min
211 hrs
423 hrs
846 hrs
1269 hrs
1693 hrs
Video/sound
quality
(best)
(good)
(best)
(good)
(best)
(good)
A
t HDD
HDD is a special device which has high recording densit
and is suited for long-time recording or high-speed
cueing but b
contrast, has many factors which can cause
reakage. Use HDD on the assumption that you shou
ub the recorded programs to a DVD to protect your
precious vi
eos
HDD is a temporary storage location
HDD is not a permanent storage location for the recorded
contents. Be sure to use it as a temporar
until
ou watch the programs once, edit them or dub
storage location
DVD
Be sure to dub (back up) data promptly if you find
a
normalities in HDD
If there is mechanical trouble with the HDD, grinding or
ot
er sounds may be heard or blocky noise may appear
on the image. I
may continue an
at all. I
you notice these symptoms on a failing HDD,
promptly dub the data to a DVD. When an HDD
recovery o
you continue to use as it is, deterioration
eventually the HDD may not be usable
ails,
recorded content (data) may be impossible
About the remaining capacity for HDD recording time
The on-screen indication of the possible recording time
le
t on HDD / DVD may differ from the actual recordable
time as t
s
data in con
is unit employs the variable bit rate encoding
stem which varies the recording (storage) amount of
ormity with the amount of information on the
vi
Before recording to the HDD, ensure there is sufficient
space on t
a
vance
e HDD by deleting unnecessary titles in
ote(s
This unit cannot record to CD-RW or CD-R
All high definition pictures will be down
onverted to the standard definition pictures
when they are recorded on this unit
DVD-RW/-R and CD-RW/-R recorded on a personal
computer or a DVD or CD recorder may not be
played back if the disc is damaged or dirty or if there
is condensation on the player’s lens
If you record a disc using a personal computer, even
if it is recorded in a compatible format it may not be
played back because of the settings of the
application software used to create the disc. (Check
with the software publisher for more detailed
information.
Since the recording is made by the VBR (variable bit
rate) method, depending on the picture you are
recording, the actual remaining time for recording
may be a little shorter than the remaining time
isplayed on the TV screen
You cannot record a copy-protected program
using this unit. (Copy-protected signal is included
in DVD-video, some satellite and cable
broadcasts.) Please contact your programming
provider for type of copy protection applied to
program
You cannot record “copy-once only” program’s on
V
Page 43

BEFORE RECORDING
Y
g
p
p
.
K/L
l
.
[
K/L
)
K/L
)
K/L
.
ding”.
[
K/L
.
6)
.
N
)
d.
Y
)
[
K
/
L
.
.
[
K/L
.
K/L
.
[
K/L
[OK].
.
)
.
.
f
Setting for Auto Chapter Recording from a Cable Box or Satellite
ou can set a specified time for chapter marks.
1
Press [MENU] and use
etting”, then press [OK]
General Setting” menu will appear
2) Use
Recording” menu will appear
3) Use [
4) Use
press
5) Press [MENU] to exit
] to select “Recording”, then press [OK].
to select “Auto Chapter”, then press [OK]
] to select a desired time option, then
Auto Chapter
OFF
5 minutes
10 minutes
15 minutes
30 minutes
60 minutes
to select “General
Note(s
• The interval for auto chapter may be up to two
minutes different from the time option you set
• A blank chapter may be created depending on the
remaining time on the disc
When recording from an external tuner like cable/satellite
ox, the box will need to be turned on and set to the
annel you wish to record. You will not be able to watch
another program
ecording the channel the cable/satellite box is set to.
rom the box as the recorder will be
Basic SetupConnections Playback EditingIntroduction Function Setup Others
Recording
Recording the DTV Closed Caption
ou can record the DTV Closed Caption as the part of the
ima
e for the recording program and see the recorded
closed ca
com
1) Press [MENU] and use [
Setting”, then press [OK]
2) Use
3
Use [
4
Use [
• If “Caption Service” is set to “OFF”, you cannot select
5) Use
Press [MENU] to exit
tion even with the TV that is not closed caption
liant
] to select “Genera
] to select “Display”, then press [OK].
to select “DTV CC”, then press [OK].
to select “Recording”, then press [OK]
“Recor
to select “ON”, then press [OK]
Recording
ON
OFF
ote(s
• If “Caption Service” is set to “OFF”, the caption will
not be recorde
Español
Page 44

BASIC RECORDING & ONE-TOUCH TIMER RECORDING
.
st.
i
g
)
d
t
.
y
g
)
y
C
to exit the
title
st.
l
.
.
h
g
g
(f
g
d.
d
.
.
)
)
.
y.
ollow the steps to record TV programs
If you are recording to the HDD, press
roceed to step 2
If you are recording to a disc, press
Insert a recordable disc (refer to
“How to Insert a D
* Make sure the disc is compatible with this unit.
(Refer to pa
he disc data after the disc tray closes
• When inserting a brand-new DVD-RW, the unit
automaticall
Except when HDD is recording or when there
is a timer pro
• If titles have been recorded on the disc, the
title list is displa
li
e 41 for the list of compatible discs.
It may take a while to loa
starts to format.
ram which starts in 15 minutes.
sc“ on page 27).
Align the disc to
the disc tray guide.
ed. Press
HDD]first, then
DVD] fir
STOP
Note(s
• When playback of a recorded program is blocked by
the V-chip setting, “PROTECTED PROGRAM by
PG-13*” appears on the screen. In such case, check
the V-chip setting. (Please refer to page 107 for more
etails.
Press [REC MODE] repeatedly to
ect a recording mode
se
Refer to “Recording Mode” on page 42
DVDSP(2Hr) 0h58m
Select the appropriate external input
annel by pressing [SOURCE] or
c
CHANNEL /
Press [DTV/TV] to select Analo
ital TV, then use [CHANNEL/
Di
or [the Number buttons] and [ • ]
ital TV channels) to select a
Di
.
TV or
or
esired channel to recor
Refer to “Switching Analog Mode/Digital Mode”
an
“Channel Selection“ on page 35
CH 12
*The Rating may var
Instructions continue on the next page
Page 45

BASIC RECORDING & ONE-TOUCH TIMER RECORDING
f
)
R
d.
g.
I
“
I
D
ess
ess
g.
.
f
.
ess
pp
.
.
T
-
:
ess
.
T
f
:
ess
C
Wh
y
d
.
.
-
.
-
y
.
)
]
,
.
.
.
.
.
]
or
]
d
.
]
F
or
.
g
.
.
]
or
l.
g.
Press [REC] to start recordin
HDD” or
.g.) DV
I
DVD
Pr
Pr
recordin
DVD” will be displayed for 4 seconds.
SP(2Hr) 2h00m
PAUSEFto pause recording.
PAUSEF] r
REC]again to restart
To set one-touch timer recording (OTR)..
This is a simple way to set the recording time in blocks
o
30 minutes
Pr
REC] repeatedly until the desired recording time
(30 minutes to 8 hours) a
One-touch timer recording will start
I
0h30m
(normal recording)
o change the recording length during the one
touch timer recording
r
REC] repeatedly until the desired length appear
o cancel the one-touch timer recording within the
speci
ied time
Pr
STOP
en the recording is completed, the unit will ask
ou whether to turn the unit to the standby mode
except un
er conditions listed below
- If a timer recording is programmed to start in 5 minutes
During playback of HDD or DVD
While displaying menus or information on the screen.
• The unit will be turned to the standby mode automatically if
ou select “Yes” or if you do not reply in 1 minute
ears on the TV screen
0h30m 1h00m
7h30m8h00m
Press [STOP C to stop recording.
The recorded title will appear in the title list.
(Re
er to “Guide to a Title List” on page 82.
e.g.) DVD-
Writing to Disc 90%
• This operation may take awhile to be
omplete
Basic SetupConnections Playback EditingIntroduction Function Setup Others
Recording
Note(s
When you press
HDD or you stop recording
When the unit clock has not been set, the space for a date and time of title names will be blank.
When you record a TV program, you have to select the TV channel audio beforehand. Only the selected channel
audio will be recorded. Refer to “Selecting TV Audio” on pages 36-37 for more details
This unit cannot record in both stereo and SAP (secondary audio program) at the same time
You cannot change the recording mode during the recording pause mode
You can change a channel to be recorded during the recording pause mode
You can play back a title on one component while making a recording on other. To do so, simply select the
omponent (HDD or DVD) you like to use for the playback by pressing
recording. And then follow the normal playback procedure
If playback and recording are in progress at the same time, select the appropriate component by pressing
DVD]before you press[PAUSE
REC
ecording starts immediately and continues until the HDD or disc is full, record 12 hours to
Note(s) for one-touch timer recordin
The remaining recording time will be displayed on the front panel display during one-touch timer recording. Press
DISPLAY] to see it on the TV screen
Unlike the timer recording, you can perform the following operations during one-touch timer recording
- Turning the power to the standby mode to stop one-touch timer recording.
- Using
You cannot use the pause function during one-touch timer recordin
REC
STOPCon the remote contro
HDD
DVD
uring HDD / DVD
HDD
STOPC to pause or stop the operation
Español
Page 46

6
AUTOSTART RECORDING
h
[
H
E
Y
.
g
d
h
f
.
ding.
g
.
T
.
y
y
T
.
)
.
y
t
.
.
.
g
y
g
l
ly)
g
ls
”
oadable
g”
uto Channe
eset”
eset”
g
g
.
very time you turn on this unit, this unit automatically records the channel currently viewed and temporarily stores
the recorded content to the HDD (Autostart recording). B
program
V program. The temporary recording can only be made for up to a range of 6 hours of time. If the recording exceeds 6
ours, the earliest recording will be overwritten
ou are currently watching, and you can also start recording the whole TV program even at the middle of the
Recording the Contents of the Autostart Recordin
or how to playback the autostart recording, refer to “Playing Back the Autostart Recording” on page 77
using this function, you can pause or go back to the TV
When watching TV programs
rough this unit’s tuner, use
t
or [REPLA
to locate your
esired point to start recording
• The autostart recording information will
appear. Refer to pa
2:59:44 / 3:31:31
e 23.
ORG
DTV 17.1
,
The autostart recording will be stopped and cleared
in followin
- Turning the power to the standb
- Start recordin
- Editing titles or goes into editing menu
- De
- Start Dubbin
- Changing input channe
- Using any functions in “Disc Edit” or “HDD Menu
- Selecting following menus:
“General Setting”
Ratin
General Setting”
General Setting”
Pr
• The autostart recording will automatically resume for
a new recordin
cases:
eting titles (DVD on
“Display”
“Channel”
“Channel”
mode
“V-Chip”
“Downl
“A
“Manual Channel
l Pr
Note(s
In the autostart recording, when you display the DTV
program information, the information will be
recorded as the part of the picture
If there is not enough recordable space on the HDD
to record from the selected point to current point,
ou cannot record the content of autostar
recording
When you record the content of the autostart
recording, the recording mode will be SP
When you are recording the contents of the autostart
recording, if you record the part that is copy-protected
then “Copy guard detected.” appears and you are not
able to watch that part
7:10AM
10:10AM
10:42AM
Press [REC] to start recording.
100/100
1/ 1 0:00:34 / 0:32:34
I
HDD
From the selected point, the contents of the
autostart recor
t
e HDD while the unit continues to record the
current content o
ORG
HDD SP 1h53m
ing become a recording title in
the channel
Press [STOP C twice to stop
recor
The recording stops and new
egins
• If you press
V screen goes back to current content of the
annel while the recording continues
STOPConce, the image on the
rt recordin
4
Page 47

TIMER RECORDING
].
[
K
/
t
.
H
/
[
K
/
[
B
[
K
/
/s/
B
[
B
.
that exceeds
s.
Y
kly
also available.
e
y
.
y
)
date and time
g
t
)
))
at
ollows.
t
.
ou can program the unit to record up to 36 programs within a month in advance. Daily or wee
re
Before recording, make sur
• Set the clock before setting a timer programming.
ou are recording to a disc, insert a recordable disc with enough recordable space
• If
Press [TIMER PROG.
program recordings
Use
L to select “New Program”,
hen press [OK]
Timer Programming
Skip Date Start End CH
New Program
SUN FEB/09 11:30AM
1/1
If there are 6 or more programs, use
Gto change pages.
Use
L to enter the date, then
ress
SkipCHDate
OFF
DTV 69.1
JAN/01
Daily
MON-SAT
MON-FRI
SAT
FRI
FEB/10
REC To
HDD
Start End
- - : - -
- - : - -
Mode
SP
SP 2h00m
When pressingL
the current date, the
ate will change as
f
e.g.) January 1s
Basic SetupConnections Playback EditingIntroduction Function Setup Others
Recording
Guide to Timer Programming Displa
Title of a timer program (Contains date, time, channel,
Current
3 Recording mode and length of the recordin
4 Timer program lis
5 Total number of pages and current page (6 pages
6 Recording media (“” (HDD) or “ (DVD
3
Timer Programming
FEB/10/14 10:30 AM 69.1 SP
SP (1:00)
Skip Date Start End CH
FEB/10 10:30AM 11:30AM DTV69. 1
New Program
1
SUN FEB/09 11:30AM
4
recording mode of the program
maximum
SUN
2
Use
6
1/1
JAN/31
L
or
the Number buttons] to enter the
tart and end time, then press
SkipCHDate
OFF
DTV 69.1
FEB/10
REC To
HDD
Start End
10 : 30AM
Mode
SP
SP 2h00m
- - : - -
]
5
You cannot make a Timer Recording program
12 hour
Español
nstructions continue on the next page
Page 48

8
[
K
/
s/B
g
l
B
.
[
K/L
h
B
j
or Cha
g
g
.
de
[
K
/
d
B
D
[
K
/
ode.
.
uch time is available on the disc and
lly
.
.
.
ll
l
.
ecordable disc
t
g
g
y
f
.
8
d.
.
.
]
o
]
g
l
.
heck
.
TIMER RECORDING
)
:
g.
Use
s
/
B
to move the cursor to the left and the
g
.
.
Use
L /
] to select Analo
“- - -”) / Digital (“DTV”) mode or
Externa
e.g.) external input mode
L1
satellite box), select L1 or L2
Use
t
e Channel Number to Record, then press
For Digital mode, select both Ma
Min
Channel Number for the Timer Recordin
pa
e.g.) analog mo
SkipCHDate
OFF
- - - 10
SkipCHDate
OFF
DTV 69.1
Use
me
e.g.) recording to DV
SkipCHDate
OFF
DTV 69.1
Use
SkipCHDate
OFF
DTV 69.1
• You can check the remaining recordable space
n the disc when you select the Recording
m
DTV 69.1
input (L1 / L2), then press
SkipCHDate
OFF
.
e 49 for more details
FEB/10
REC To
HDD
FEB/10
REC To
HDD
Start End
10 : 30AM
Mode
SP
11 : 30AM
SP 1h00m
FEB/10
REC To
HDD
] or [the Number buttons] to select
or and
nnels. Refer to “How to Select a
Start End
10 : 30AM
11 : 30AM
Mode
SP
SP 1h00m
Start End
10 : 30AM
11 : 30AM
Mode
SP
SP 1h00m
L to select the Recording
ia (“HDD” or “DVD”), then press
Start End
10 : 30AM
Mode
SP
11 : 30AM
SP 1h00m
FEB/10
REC To
DVD
L to select a Recording mode.
Start End
10 : 30AM
Mode
SP
SP 1h00m
Start End
10 : 30AM
Mode
SP
SP 1h00m
11 : 30AM
11 : 30AM
FEB/10
REC To
DVD
SkipCHDate
OFF
FEB/10
REC To
DVD
” on
Auto Recording mode select..
When “Auto” is selected as a Recording mode, the unit
how m
selects the Best Recording mode available
automatica
to complete Recording the program
FEB/10
REC To
DVD
Start End
10 : 30AM
Mode
Auto
Auto 1h00m
11 : 30AM
SkipCHDate
OFF
DTV 69.1
• “Auto” is only available for One program in the Timer
rogram list
Alternate recording (DVD only)..
In the following cases, the unit will detect it and
automatica
ected as the recording media
se
- If there is no r
- If the disc does not have enough space to complete the
ecordin
- If the material is “copy-once” program and prohibited to
e recorded on a DVD
- If the disc is not available because the repairin
ancelled halfwa
This feature is available only for Timer Recording. Not
available
y record to the HDD even when DVD is
in the uni
process is
or One-Touch Timer Recording
Press [OK] when all items are
entere
will appear on the front panel display.
Timer Programming
FEB/10/14 10:30 AM 69.01 SP
Skip Date Start End CH
FEB/10 10:30AM 11:30AM DTV69. 1
New Program
SUN FEB/09 11:30AMSP (1:00)
1/1
Your program setting is now stored
• To set another program, repeat steps 2 to 8
• To exit, press
TIMER PROG.
r
MENU
• When 2 or more programs are overlapped,
“Timer pro
over
ram overlapped” appears, and the
apped program will be displayed in blue
• To correct the timer program refer to
“C
ing, cancelling or correcting the Timer
rogramming information” on page 49
Note(s
• If you have not set the clock yet
ntry screen for the clock setting will appear instead
of the Timer Programming list at step 1. Continue
with the step 5 in “Manual Clock Setting” on page 34
before setting a Timer Programmin
•
right in the entry screen for the Timer Programmin
• You cannot make a Timer Recording program that
exceeds 12 hours
4
Instructions continue on the next page
Page 49

g
Analog TV
B
or
y
.
Analog
TV
B
or
-
.
V
B
o
y
.
B
o
-
.
s
B
o
y
.
t>
g.)
]
h
K
/
B
or
decide the channel number.
/
L
K
TIMER RECORDING
.
.
:
[
K
/
L
.
[
K
/
L
.
[
K
/
L
.
:
[
K
/
L
.
[
K
/
L
h
K
/
/
B
)
.
)
].
C
.
N
)
A
d
kly
ly.
.
w
[
K
/
L
)
[
K
/
L
)
[
/
B
th
[
K/L
a
“
.
.
s
.
[
K
/
L
d
e
, th
.
[
K
/
L
]
A
d
7
]
6)
[
K
/
L
]
d.
.
How to Select a Channel Number for the Timer Recordin
or channel number 2-6 press, press
the channel will be decided as soon as
Cable
or channel number 1-12 press, press
25), the channel will be decided as soon as you enter the channel number
Digital T
or channel number 1-9 press, press
the channel will be decided as soon as
Digital Cable TV
or channel number 1-13 press, press
35), the channel will be decided as soon as you enter the channel number
Minor channel
or channel number 1-9 press, press
the channel will be decided as soon as
<Hin
• You can decide the 1-digit channel number by pressing 0 first , then enter desired 1-digit channel number.
e.
“5”:
0]5
• For selecting the channels wit
• For selecting the minor channels with K
/ L does not skip the non-existing minor channels.
Lyou need to press
, please make sure the minor channel you are selecting exists.
• ]to decide the channels. For other channels (7-69),
ou enter the channel number
• ] to decide the channels. For other channels (13
r
• ]to decide the channels. For other channels (10-99),
ou enter the channel number
r
• ] to decide the channels. For other channels (14
r
• ]to decide the channels. For other channels (10-99),
ou enter the channel number
• ] to
Basic SetupConnections Playback EditingIntroduction Function Setup Others
To stop the Timer Recording in progress
1) Press [STOPC on the Remote control.
2
nfirmation message will appear. Select “Yes”, then
ress [OK
To Stop the Timer Recording immediately, press
STOP ] on the unit
Checking, cancelling or correcting the Timer
rogramming information
1) Press [TIMER PROG.]
2) Check the information
Timer Programming
FEB/10/14 10:30 AM 69.01 SP
Skip Date Start End CH
FEB/10 10:30AM 11:30AM DTV69. 1
New Program
SUN FEB/09 11:30AMSP (1:00)
3-A) To Delete the Timer program
1 Use
to select the program you want to
delete, then press [OK]
Use
to select “Delete”, then press [OK]
Confirmation window will appear.
3 Use
to select “Yes”, then press [OK]
3-B) To Correct the Timer program
1 Use
to select the Program you want to
correct, then press [OK]
Use
to select “Program Change”, then
press [OK].
3 Correct t
4
Press [TIMER PROG.] to exit
e Timer program by using
L /
, then press [OK].
ote(s
ress
TIMER PROG.] to check the Timer Recording in
s to the Timer Recording in progress (which is shown in red
in the timer program list), you only can edit the end time.
The changes made during recording will be recognized as
only specific to that recording in progress and it will not
affect the daily or the weekly recording setting.
Skip the Timer Recording Perio
You can deactivate the Timer Recording Period (Daily,
MON-SAT, MON-FRI or Wee
) temporari
1) In Stop mode, press [TIMER PROG.]
2)
elect the Periodical Timer Recording program you
ant to skip using
3
elect “Program Change” using
, then press [OK].
, then press
K].
4
ove the cursor to the “Skip” field using
en select “ON” using
] and then press [OK] to
ctivate the setting.
•
” will be displayed on the left side of the timer
program
• The setting will go back to “OFF” after the program
is skipped once
utting Names on Timer Program
1) In Stop mode, press [TIMER PROG.]
se
e
se
window for entering a title name will appear.
4) To enter a Title Name, follow the steps of “Guide to
E
5) After entering a Title Name, press [OK
se
The program name is now update
] to select the Program that you want to
it the timer program nam
] to select “Edit Title Name”, then press
en press [OK]
K
Program Change
Delete
Edit Title Name
Timer Programming
FEB/10/14 10:30 AM 69.01 SP
Skip Date Start End CH
FEB/10 10:30AM 11:30AM DTV69. 1
New Program
ABC
abc
123
@! ?
SUN FEB/09 11:30AMSP (1:00)
it Title Name” on page 8
] to select “Yes”, then press [OK
nstructions continue on the next page
1/1
Recording
Español
Page 50

TIMER RECORDING
th
.
:
22
39
than below
4
d
9
d
l35
1
6
c
0
bee
ecorded
start time.
ed
2
3
d
A
ecorded
A
ecorded on the
D
9
g.
.
.
d.
g
.
y
.
p
If the Timer Program did not complete correctly,
e Error number appears in the Timer
rogramming list
Timer Programming
Skip Date Start End CH
E41 FEB/10 10:30AM 11:30AM DTV69. 1
New Program
Each error number means
-
Recording error other
7-
2
25-26Copy prohibite
2
3
4
4
4
*1 PCA is a disc's space reserved for recording test
nrecordable disc
Disc protecte
Disc ful
PCA full *
Already finalized
video format dis
Some portion has
not
n r
because of program
overlapping.
Recording did not
rt at the
Power fail
No disc when
recording
Already 99 titles
recorde
• E23, E27, E28, E31, E32, E33 and E34 are not displaye
• A program with the error number is grayed in the timer
pro
ramming list
• Timer program with an error number will be cleared
once the entr
screen for the program is displayed
SUN FEB/09 11:30AM
lready 999 chapters
r
45 Copy prohibited
46
t is impossible to
record additionally
n a disc recorded
y other units
when setting
“Make Recording
Compatible” to “OFF”.
lready 600 titles
r
4
There was no disc
space on the HDD
at the starting time
for the HDD timer
recordin
50
DD recording is
ancelled due to the
nsufficient disc space
n the HDD
HD
Page 51

TIMER RECORDING
g
.
f
y
y if
y.
g
.
).
d
-
.
-
y
g
g.
8.
.
.
.
.
g
.
d.
s
g
t
t
ff.
t
.
Hints for Timer Recording
• If there is a power failure or this unit has been unplugged for more than 1 hour, the clock setting and all timer
pro
ramming will be lost
• When recording to a DVD, if a disc is not inserted, the unit will perform the alternate recording to the HDD (refer to
page 48
• When a timer recording is completed, the unit will ask you whether to turn the unit to the standby mode if there is no
timer recor
During playback of HDD or DVD
While displaying menus or information on the screen.
• The unit will be turned to the standb
• When the pro
and be cleared for redoin
• If the starting time is earlier and the ending time is later than the current time, the recording will start right after you
• You cannot change the audio language for the timer recording of a digital TV broadcasting
• Timer recording whose recording time exceeds 12 hours cannot be made
• It is prohibited to turn the unit to the standby mode from 4 minutes before the programmed starting time
• It is prohibited to change channel from 15 seconds before the programmed starting time
•
REC]does not work from 2 minutes before the programmed starting time. If it comes to 2 minutes before the
startin
• Playback of DVD/CD is prohibited from 2 minutes before the programmed starting time when the recording media is
VD. If it comes to 2 minutes before the programmed starting time during DVD playback, the playback will be
stoppe
ing which starts within 5 minutes, except under conditions listed below.
mode automatically if you select “Yes” or if you do not reply in 1 minute.
rammed starting and ending time are earlier than the current time, the setting will not be accepted
K]at step 8 on page 4
time during regular or one-touch timer recording, the recording in progress will be stopped
Basic SetupConnections Playback EditingIntroduction Function Setup Others
Recording
The Priority of Overlapped Setting
• Timer program which has the earlier start time will be placed first in the timer program list, and be given priority over
the pro
rams with the later start time when timer programs overlap
• When timer programs overlap, the first 2 minutes (at the longest) of the later recording will be cut off.
• When 2 or more timer programs have the same start time, the program set
• A timer recording of lower priorit
will be cancelled or start from the middle.
• Check the overlapped timer programmings and change the priorit
When the starting time is the same:
A program set previously (PROG. A) has priority.
PROG. A
PROG. B
actual
recording
The rst 2 minutes (at the longest) will be cut o.
PROG. A
PROG. A
PROG. B
irst will be given priority.
necessar
Note(s) for DVD recordin
When the recording time of 2 programs are overlapped or
he end time of a program and the start time of another
program is the same, the first 2 minutes (at the longest) of
he subsequent program will be cut o
If the cut-off portion comes up to 3 minute or more, this
program will be displayed with error number E40 in the
imer programming list
When the end time of the program
currently being recorded and the start time
of the subsequent program are the same:
The beginning of the PROG. B may be cut o.
PROG. A
PROG. B
actual
recording
The rst 2 minutes (at the longest) will be cut o.
PROG. BPROG. A
Español
1
Page 52

SPECIAL RECORDING
y
)
.
.
.
Hints for Overwriting
When you overwrite on an unnecessary title, there are various circumstances such as follows. Please note that
following cases onl
please check if there is no important title after the overwriting point.
When overwriting a title that is shorter than the existing title:
(overwriting from the beginning of the title)
describe the overwriting without any recording mode discrepancy. To avoid accidental deletion
overwrite
recording : A
existing title : B
When overwriting a title that is longer than the existing title:
(overwriting from the beginning of the title)
overwrite
recording : A
existing title : B
overwrite
recording : A
existing title : B
existing title : C
after
overwriting
after
overwriting
after
overwriting
30 - 180 seconds will be cut o.
title name : A
title name : A
30 - 180 seconds will be cut o.
title name : A
title name : B
title name : C
When overwriting in the middle of the title:
overwrite
recording : A
existing title : B
after
overwriting
30 - 180 seconds will be cut o.
title name : B*
Overwritten section and the rest of the sections will
*
have the same title name as the original existing
title (B).
Note(s
• When a title name is overwritten, its index picture is also overwritten
• “Auto Chapter” interval time is reset at the overwriting start point
• A chapter mark is put at the beginning of the overwritten title when overwriting in the middle of the title
2
title name : B
Page 53

”
DD
D.
bbing
f
h
l
.
g
.
;
.
.
.
C
C
f
ll be
d.
“
”
ates ho
d
y.
.
g
.
.
.
ote control.
.
Y
d
.
g
DUBBING
n
ected title
bbing
dabl
g
t
s
.
.
Information on Dubbing
ou can dub the contents of the HDD to DVD or vice versa. Before you start Dubbing, refer to pages 41-42 to see the
recor
ing compatibility
Guide to Dubbing Menu Display
HDD DVD
1
ABCDE
2
XP (1Hr) (0:30:00) JAN/ 9/2014
Add
Delete All
3
Dubbing Start
Dubbing List
1.ABCDE
2.JAN/ 9/14 1:00AM CH22
3.JAN/12/14 11:00AM CH96
Dubbing directio
2 Sel
3 Du
4 Remaining recor
5 Dubbin
information
menu
e space
lis
6 Current page number / total number of pages
3000 MB
1/1
Recording Mode for Dubbin
“High
4
5
6
This unit is compatible with the high speed Dubbing from
H
to DV
If you dub a title recorded in SLP mode to DVD-R,
Du
per
to “Hig
speed will be 24 times at the maximum. To
orm the high speed Dubbing, set the recording mode
”. Dubbing speed will vary depending on origina
recording mode
• Duration of high speed Dubbing will vary depending on
the recordin
mode or the title amount
• High speed Dubbing is not available when
- recording mode is set to other than “High”
- Dubbing from a DVD to the HDD
- there is not enough space in the disc
• During Dubbing (except for high speed Dubbing), you can
STOP] on the front panel or press and hold
STOP
or 2 seconds on the remote control and any other buttons
wi
invali
Auto
When “Auto” is selected as a recording mode, the unit
lcul
w much time is available on the disc an
selects the best recording mode available automaticall
• The recording may be cut short when the available
recording space on the disc is too limited
Basic SetupConnections Playback EditingIntroduction Function Setup Others
Recording
Note(s) on Dubbin
• During normal Dubbing, you can watch the playback
picture of the title being dubbed (the audio cannot
be changed). During high speed Dubbing, however,
the playback picture will not appear
• Dubbing of a “copy-once only” program is not
possible with this unit
• If you stop the Dubbing halfway, the contents will be
ubbed up to the point where you stop the Dubbing
(except for the high speed Dubbing). With high
speed Dubbing, nothing will be dubbed if you stop it
halfway
• To stop the Dubbing in progress, pressCTOP] on
the front panel or press and hold
nds on the rem
To dub from a finalized DVD to HDD, please refer
to “One-touch Dubbing...” on page 61
ther mode
Refer to page 42 for the information on other modes
Instructions continue on the next page
STOPC for 2
Español
Page 54

.
Wh
.
Wh
S
O
O
O
OUT
V
O
VIDEO
IN
DUBBING
.
Setting for an External Device
Connect the external device properly to the unit by using either L2 and L3 (Front) or L1 (Rear) input jacks
en connecting an external device with a monaural output to this unit, use AUDIO L jack L2 (Front) or L1 (Rear).
se S-Video or the RCA audio/video cables for this connection
en connecting a DVC (digital video camcorder), use DV-IN jack L3 (Front).
S-VIDEO
-VIDE
OUT
UT
RCA audio cable
RCA video cable
ANTENNA
front of this unit
VIDEO
VIDEO
Y
IN
OUT
L
L
R
R
OUT
IN
AUDIO IN
S-VIDEO
S-VIDEO
AUDIO OUT
(L1)
L1
VIDEO
VIDEO
IN
IN
L
L
L2
or
COAXIAL
rear of this unit
Connecting to an External Device
Using the RCA cables
external device
(camcorder, VCR etc.)
RCA video cable
VIDEO
OUT
AUDIO OUT
LR
RCA audio cable
Supplied cables used in this connection are as follows:
• RCA audio cable (L/R) x 1
• RCA video cable x 1
Connecting to an External Device
Using an S-Video cable
AUDIO OUT
VIDEO
VIDE
OUT
external device
(camcorder, VCR etc.)
R
R
AUDIO IN
(L1)
RCA audio cable
S-Video cable
L2
front of this unit
S-VIDEO
OUT
LR
VIDEO
VIDEO
IN
OUT
L
L
R
R
IN
AUDIO IN
ANTENNA
S-VIDEO
AUDIO OUT
(L1)
L1
VIDEO
VIDEO
IDE
IN
IN
L
L
or
Y
OUT
COAXIAL
S-VIDEO
rear of this unit
RCA audio cable
AUDIO IN
(L1)
R
R
IN
IN
S-VIDEO
S-VIDEO
S-Video cable
Supplied cables used in this connection are as follows:
• RCA audio cable (L/R) x 1
Please purchase the rest of the necessary cables at your local store.
Instructions continue on the next page
4
Page 55

DUBBING
1
[
K
g
.
.
[
K
/
].
.
[
K
/
th
.
[
K
/
p
.
/
L
y
.
.
S
deo
.
V
O
OUTS
O
OUT
ease contact the external device manufacture
y
.
Connecting to an External Device
Using a DV cable
external device
(camcorder, VCR etc.)
Supplied cables used in this connection are as follows:
• RCA audio cable (L/R) x 1
Please purchase the rest of the necessary cables at your local store.
S-VIDEO
-VIDE
OUT
VIDEO
IDE
OUT
AUDIO OUT DV-OUT
LR
DV cable (4-pin)
RCA audio cable
L3
front of this unit
Basic SetupConnections Playback EditingIntroduction Function Setup Others
Recording
Press [MENU] and use
“General Settin
General Setting” menu will appear
Use
L to select “Video”, then
”, then press [OK]
ress [OK
Submenu will appear
Use
L to select “Video Input”,
en press [OK]
/ L to select
Use [K
pe to connect, then press [OK]
t
If you want to use VIDEO IN, select “Video In”
If you want to use S-VIDEO IN, select
“
-Vi
L1 (Rear)
Video In
S-Video In
] to select the input jack
In”
Press [MENU] to exit.
• Pl
ou have any problem with it
r if
Use
in
Video Input
L1 (Rear)
L2 (Front)
L to select desired external
ut, then press [OK]
Español
Page 56

DUBBING
.
.
g
.
h
h
.
ected to the
t
.
p
g
9.
]
]
,
]
,
]
]
,
]
,
]
]
,
]
,
]
dly
g
.
.
[
I
g.
o
.
[
C
p
g.
whil
d.
.
Recording from an External Device
Before recording from an external device, refer to the instructions for the connection on page 54
If you are recording to the HDD, press
proceed to step 2
If you are recording to a disc, press
Insert a recordable disc (refer to
“How to Insert a Disc“ on pa
It may take a while to load the disc
ata after the disc tray closes
Select the appropriate external input
annel (L1, L2 or L3) by pressing
c
SOURCE] or [CHANNEL /.
• If the external device is connected to the rear
on t
is unit, select L1
• If the external device is conn
on this unit, select L2 or L3
• If you are connecting the digital video
camcorder to the DV-IN in
to pa
es 57-5
• You can also select L1 or L2 channel by using
the Number buttons
.g.) For L1, press
or L2, press
or L3, press
0
0
1
0
0
2
0
0
3
Press [REC MODE] repeate
select a recordin
Refer to “Recording Mode” on page 42
mode
HDD]first, then
DVD] first
e 27).
fron
ut on this unit, refer
to
Press
ECORD] on the unit to start
recordin
Start playback on the external device
record from
t
Press
TOP] on the unit to sto
recordin
This operation may take a
e to be complete
Page 57

DUBBING
D.
Y
y
]
o
g
.
on
e
ection. Use
K
/
L
tolect the
]
to activate.
this unit.
C.
e
udio” can be selected.
ess
use
K
ect the
.
d.
ect “Stereo
dub the sound
w
.
ect
dub the stereo
stereo2.
4
n
bb
.
pp
.
n
i
]
or
/
,
will
.
Th
the current
ode.
f
C is
...
...
C
d.
and
r
T
.
.
.
.
)
)
)
d)
)
)
)
)
d)
)
)
k.
g.
h
:
Information on DV Dubbing
Guide to DV and On-Screen Display
This function helps you to easily dub the contents of the DVC
ou can control basic operations of the DVC from the remote control for this unit such as playback, fast forward or
everse and stop all operations if the DVC is in video mode. Use the DV cable that has 4-pin input jack and is
compliance with the IEEE1394 standards. When
osition by using
SOURCE
r
CHANNEL / on the remote control and press
ou connect to DV-IN jack on the front of this unit, select “L3(DV-IN)”
information for the operation of your DVC
Digital Video Camcorder) to HDD or DV
DISPLAY] to show the DV Dubbin
1
2
3
When the DV
in video mode
1/ 1 1/ 1
Control DVD
DV Audio Stereo1
Start Rec
4
-RW Video
L3 (DV-IN)
AB-1234
0:12:34
DVD SP(2Hr) 1h00m
e menu changes according to
witch the mode on the DVC to
playback mode
DVC m
or the Dubbing
nformation.
When the DVC is not
n camera mode
1/ 1 1/ 1
he following instructions are described with the operations using the remote control for this unit
1. DV ic
2. Indicator for the active devic
• When “Control” is highlighted,
ress
OK]to display the item
l
device you wish to operate, then
ress
OK
• Select “HDD” / “DVD” to control
• Select “DV Input” to control your
DV
3. Recording audio mod
• With DVC in stop mode while
ther sources are available, then
“DV A
Pr
K]to display the item selection
nd then
/ L to sel
audio you wish to output. Press
K]again to activate
• Select “Stereo1” to dub the stereo
oun
• Sel
2” to
ith after recording sound
• Sel
“Mix” to
nd
.
ndicator for the Dubbing functio
• When the unit is ready for
Du
ing, “Start Rec” will appear
6. Product name of your DV
• If the unit cannot recognize the
nput signal from the DVC or the
nknown product, “No Device” or
****” will appear instea
7. Status of the current operation
the time counte
icon means (Available icons may vary depending on the DVC)
Eac
DVC is in stop mode
DVC is in playback mode
DVC is in pause mode
DVC is fast forwarding.
standard speed
DVC is fast forwarding.
faster than above
DVC is fast forwarding.
aster than above
DVC is slow forwarding.
standard spee
1
DVC is slow forwarding.
faster than above
DVC is slow forwarding.
aster than above
DVC is fast forwarding.
DVC is fast reversing.
DVC is fast reversing.
DVC is fast reversing.
DVC is fast reversing.
DVC is in slow reverse
DVC is recordin
DVC is in recording pause
• When the unit is Dubbing, “Pause
Rec” will a
ear
5. Channel positio
• When you select “L3(DV-IN)” by
us
ng
SOURCE
CHANNEL
“L3(DV-IN)”
appear
-RW Video
L3 (DV-IN)
AB-1234
0:12:34
DVD SP(2Hr) 1h00m
in stop mode
in stop mode
standard spee
faster than above
faster than above
aybac
ode.
5
Basic SetupConnections Playback EditingIntroduction Function Setup Others
67
Recording
Español
7
Page 58

DUBBING
:
.
:
ecordable
.
.
]
f
st.
l
.
dly
l
.
)
].
[
K
/
p
.
g
g.
.
.
DVC to HDD / DVD Dubbing
Before recording from DVC, see page 54 for connection instructions
Preparing for DV Dubbing (DVC to HDD)
• Make sure your DVC is in video mode
Preparing for DV Dubbing (DVC to DVD)
• Insert a r
• Make sure your DVC is in video mode
DVD
If you are recording to the HDD, press
If you are recording to a disc, press
Use [SOURCE] or [CHANNEL/
ect “L3(DV-IN)”
se
L3 (DV-IN)
AB-1234
0:00:00
Press [REC MODE] repeate
ect a recording mode
se
(Refer to page 42.
Press [DISPLAY
Press [OK] to display the item
selection. Use
“DV In
ut”, then press [OK]
1/ 1 1/ 1
DVD
DV Input
L to select
-RW Video
L3 (DV-IN)
AB-1234
0:12:34
HDD
DVD] fir
irst.
to
to
DVD HQ(1Hr) 1h00m
Press [PLAYB to find where you
wish to start Dubbin
. Then, press
STOPC where you wish to start
Dubbin
Instructions continue on the next page
Page 59

g
.
.
ect more tha
C.
I
.
.
.
.
dub
bot
e.
DUBBING
[
K
/
.
Th
.
)
r
[
K
/
t
[
K
/
p
.
C
Use
L to select “Start Rec”, then
press [OK]
e Dubbing will start
To stop Dubbing;
Press [C
A
B) Use
TOP] on the unit. o
L to select “Control”,
hen press [OK].
Use
“DVD”, then
L to select “HDD” /
ress [OK]
Then press [STOP
Note(s) for DV Dubbin
• If you press
aused point.
When you press
• The unit does not send out the output signal to DVC
• For the proper operation, connect DVC to the unit directly. Do not connect this unit and DVC via any other unit.
• Do not conn
• The unit can only accept DVC. Other DV device such as cable/satellite box or D-VHS VCR cannot be recognized.
• If no video signal is detected from the DVC during DVC to HDD or DVD Dubbing, the recording will be paused and
” will flash on the TV screen. The recording will resume when the unit detects the video signal again
• When the DVC is in camera mode, refer to “Guide to DV and On-Screen Display” on page 57
• Date / time and cassette memory data will not be recorded
• Pictures with a copy-guard signal cannot be recorded.
• A DV terminal is a terminal that can use the transmission mode conforming to the IEEE 1394 standards called “Fire
Wire”. It serves as the interface that connects the PC and peripheral device such as “i.LINK” (registered trademark
of SONY). It enables digital Dubbing between DV devices with little degradation
• You cannot
• Please contact the DVC manufacturer if you have any problem with it.
PAUSEFat step 5, the Memory card will go in reverse to a point a few seconds preceding the
OK] at step 6, then, it will start Dubbing when it comes to the paused point
n 1 DV
from DVC to
h HDD and DVD at the same tim
Basic SetupConnections Playback EditingIntroduction Function Setup Others
Recording
Español
9
Page 60

:
ecordable
.
:
dubbed.
[
K
/
L
[OK].
[
K
/
L
”,
.
[
K
/
L
,
.
D
[
K
/
L
].
y
.
Selected Title Dubbing
.
DUBBING
Preparing for Dubbing (HDD to DVD)
• Insert a r
Preparing for Dubbing (DVD to HDD)
• Insert a disc to be
DVD
Press [MENU] in stop mode.
Use
] to select “Dubbing”, then
press
Menu
General Setting
Timer Programming
Title List
Disc Edit
HDD Menu
Dubbing
HDD to DVD
Use
] to select “HDD DVD
then press [OK]
DVD to HDD
Use
to select “DVD HDD”
then press [OK]
e.g.) HDDDV
Dubbing
HDD DVD
DVD HDD
Use
to select “Add”, then press
K
HDD DVD
Add
Delete All
Dubbing Start
• If you have registered any Dubbing before,
the
will be listed in the Dubbing list
Instructions continue on the next page
Dubbing List
3000 MB
1/1
Page 61

[
K
/
L
/
s/B
titl
.
pp
n
.
by
]
t
].
D
.
W
l
.
:
/
L
to
]
Use
/
L
]
Use
/
L
]
To mo
:
/
L
to
]
Use
/
L
]
Use
/
L
p
]
T
:
bb
]
]
d
s
/
B
[
K/L
h
].
[
s
/
B
d
.
D
.
.
.
[
K
/
L
].
.
.
:
[
C
C
fo
seconds on the Remote
ol.
g
es”.
DUBBING
.
h
h.
dub the contents
,
.
].
h
.
y.
h
k.
y
(
3
)
y
.
Use
to select a desired
e, then press [OK]
At the upper left of each title, the number will
a
ear in the order of selectio
• You can change original and playlist on the TV
screen
pressing
DISC MENU
Repeat step 5 until you register all
he titles to be dubbed, then press
DUBBING
.g.) HD
Title List
PL
ABCDE
12:00AM (10:00:00) MON JAN/ 6/14 CH10 SP
1
4 5 6
2 5 4
Press ‘DUBBING’ to confirm.
The titles are now registered in the Dubbing list
hen you go back to the title list to add another
tit
e, titles already registered are shown with a
heck mark
To delete a title
Go to the Dubbing List, then use K
elect a title. Then press
K
OK
K
ve a title
Go to the Dubbing List, then use K
elect a title. Then press
K
K
then
ress
o erase all the titles in the Dubbing title list
Use K / L to select “Delete All” in the
Du
ing Menu, then press
Use K / L to select “Yes”, then press
• To go back and forth between Dubbing menu
an
Dubbing list, use
2 3
1 3
1 / 6
OK
to select “Delete”, then press
to select “Yes”, then press
OK
to select “Move”, then press
to select a desired insert point,
OK
K
After adding all the titles you want,
use
in t
to select “Dubbing Start”
e Dubbing Menu, then press
K
K
OK
K
Use
to select a desire
recording mode, then press [OK]
e.g.) HDDDV
HDD DVD
Please select REC MODE.
LP EP SLP AutoHigh HQ SP
500 MBDubbing Titles
3000 MB
Confirmation message will appear
• Depending on the Dubbing direction, the
vailable recording mode varies
• When Dubbing from HDD to DVD, you can
elect “High” to perform the high speed
ubbing (refer to “Recording Mode for
ubbing” on page 53 for more details)
Use
] to select “Yes”, then press
K
Start Dubbing?
Yes
No
Dubbing will start
• It may take awhile to prepare for the Dubbing
To Stop the Dubbing in progress
ress
TOP]on the front panel or press and
[STOP
ntr
When you are Dubbing from HDD to DVD, the
confirmation messa
“Y
r 2
e will appear, then select
One-touch Dubbing..
With one-touch Dubbing, you can start Dubbing right
away wit
To
other unit
During playback of the title you want to dub, press
DUBBING
If you are playing back a DVD, DVD to HDD Dubbing will
start rig
If you are playing back HDD, HDD to DVD Dubbing will
start right awa
• The Dubbing will start from the beginning of the title
• T
• When Dubbing from HDD to DVD, recording mode will
automaticall
are met
recording mode will automaticall
just one touc
in a DVD which is finalized on
use this function
t away
eing played back.
e unit will dub only the title being played bac
be set to “High” whenever the conditions
refer to
page 5
. Otherwise, the last selected
be applied
Basic SetupConnections Playback EditingIntroduction Function Setup Others
Recording
Español
1
Page 62

g:
ecordable
.
.
[
K
/
L
/s/
p
.
[
K
/
L
.
[
K
/
L
].
.
:
[
C
C
fo
seconds on the Remote
l.
DUBBING
T
.
One Title Dubbing
his function lets you select one specific title from the title list for Dubbing
Preparing for Dubbin
• Insert a r
Press [HDD] first
Press [TITLE].
DVD
Use
title to dub, then
Use
B to select a desired
ress [OK]
] to select “Dubbing”, then
ress [OK]
Resume Playback
Play From Start
Edit
Title Delete
Add to Playlist
Delete Multiple Titles
Dubbing
Use
] to select “Yes”, then press
K
Start Dubbing?
Yes
No
Dubbing of the selected title will start
To Stop the Dubbing in progress
ress
TOP]on the front panel or press and
[STOP
contro
r 2
2
Page 63

PROTECTING A DISC
[
K
/
L
[OK].
[
K
/
L
W
[
K
].
d.
.
.
N
)
T
:
“
otect O
To prevent accidental recording, editing or erasing of the titles, you can protect them from the “Disc Edit” menu
Press [MENU].
Use
] to select “Disc Edit”, then
press
Use
to select “Disc Protect OFF
ON”, then press [OK].
e.g.) VR mode DVD-R
Disc Edit
Format
Finalize
Disc Protect OFF ON
Delete All Playlists
Use
/ L] to select “Yes”, then press
OK
Protect this disc?
Yes
No
The disc is now protecte
This operation may take a
while to be completed
Basic SetupConnections Playback EditingIntroduction Function Setup Others
Recording
ote(s
o cancel the disc protection
When you insert a disc protected with this unit,
Disc Protect ON OFF” will appear instead of “OFF
ON” at step 3.
Disc Edit
Format
Finalize
Disc Protect ON OFF
Delete All Playlists
Español
To release the protection for the disc, select “Disc
Pr
N OFF” at step 3, then follow rest of the
rocedures.
Page 64

PLAYING THE DISCS ON OTHER DVD PLAYERS
[
K
/
L
[OK].
.
[
K
/
L
].
[
K
].
.
.
)
C
,
es
K
/
C
,
f
i
.
]
,
g
.
ted.
w
.
[
.
.
)
g
ode.
ease wait unt
.
.
.
.
Finalizing a Disc
You will need to finalize DVD-RW or DVD-R to play them back on other DVD players
inalizing may take several minutes up to an hour
A shorter recording period on the disc will require a longer time period for finalization. Please do not Unplug
the Power cord, power Off or place unit in Standby mode during finalization, this will result in a malfunction.
Press [MENU].
Use
] to select “Disc Edit”, then
press
“Disc Edit” menu will appear
Use
] to select “Finalize”, then
ress [OK
Use
/ L] to select “Yes”, then press
OK
Finalize disc?
Yes
No
Finalizing will start
Finalizing 90%
To cancel finalizing..
(DVD-RW only
• To cancel finalizing at step 4, press
“Y
” with
ancelled and the unit will be in stop mode.
L, then press
STOP
OK]. Finalizing is
select
Note(s
Once you started finalization, no controls are
available. You cannot cancel or stop the finalizin
m
Pl
rocess
When you insert a DVD-RW finalized with this unit,
“Undo Finalize” will appear instead of “Finalize”
Disc Edit
Format
Undo Finalize
Disc Protect ON OFF
Delete All Playlists
To release the finalizing for the disc, select “Undo
Finalize” at step 3
* Please DO NOT turn the Power Off or place unit in
Standby mode during finalization, this will result in a
malfunction
il it finishes the finalization
4
Do you want to cancel ?
Yes
No
Finalizing 5%
• If appears when pressing
cancel
inalizing because the finalizing has been in
certa
n progress
• When selecting “No” and pressingOK] or
finalizin
• You cannot cancel finalizing a DVD-R disc once it has
will be continued
r
This operation may take a
hile to be completed
STOP
you cannot
RETURN
Finalizing is completed.
Press
STOPC to exit.
Page 65

PLAYING THE DISCS ON OTHER DVD PLAYERS
[
K
/
g
.
.
[
K
/
L
h
.
.
[
K
/
L
,
.
[
K
/
L
p
.
[
K
/
L
].
ll”
d.
Y
.
N
)
.
w
.
Auto Finalizing
ou can finalize discs automatically using this function. You can use this function to finalize discs after finishing timer
ecordings and at the end of the disc space
Press [MENU] and use
“General Settin
“General Setting” menu will appear
Use
t
“Recording” menu will appear
Use
] to select “Recording”,
en press [OK]
] to select “Auto Finalize”
”, then press [OK]
then press [OK]
Use
to select “Disc Full” or
“End of Timer Rec”, then
Auto Finalize
Disc Full
End of Timer Rec
Use
] to select “ON”, then press
K
e.g.) “Disc Fu
Disc Full
ON
OFF
Your setting will be activate
L to select
Basic SetupConnections Playback EditingIntroduction Function Setup Others
Recording
ress [OK]
Press [MENU] to exit.
ote(s
This function is available only when selecting Video
ode
This function is not available after finishing a daily or
eekly Program Recording
Español
Page 66

)
ecorders.
INFORMATION ON PLAYBACK
.
T
.
T
y
y
f
y
.
h
.
Th
ded
ded
.
Th
f
f
h
f
bols d
l
.
T
orld.
g
.
d
d
U
sc
s
f
t
D
D
.
.
Before you play back a DVD, read the following information
Playable Discs and Files
his unit is compatible to play back the following discs
o play back a DVD, make sure that it meets the
requirements for region codes and color s
described below. You can pla
ollowing logos. Other disc types are not guaranteed to
pla
back
DVD-video
DVD-RW
(VR or Video mode)
DVD-R
(Video mode)
CD-DA (audio CD)
CD-RW
CD-R
KODAK Picture CD
JPEG
back discs that have the
stems as
LogosPlayable discs
MediaPlayable les
DVD-RW/-R
CD-RW/-R
Unplayable Discs
• CD-ROM • Compact Disc-Interactive (CD-I)
• DVD-RAM • Vi
• DVD-ROM • DVD-au
nfinalized di
•
DVD or CD contains MP3/Windows Media™ Audio/DivX® file
• DVD-R or DVD-RW recorded in non compatible
recording
• Blu-ray Disc • HD DV
• Video CD • Super Video C
On the following disc, the sound may not be heard
• Super Audio CD - Only the sound on the CD layer can be
eard. The sound on the high-density super audio CD
ayer cannot be heard
orma
eo Single Disc (VSD)
io
Color Systems
DVD is recorded in different color systems throughout
t
e world. The most common color system is NTSC
which is used primarily in the United States and Canada)
is unit uses NTSC, so a DVD you play back must be
recor
DVD recor
in the NTSC system. You cannot play back a
in other color systems
Region Codes
is unit has been designed to play back a DVD
with region 1. A DVD must be labeled
regions or
t
e unit. You cannot play back DVDs that are
labeled
n the right on your DVD. If these region
sym
p
ay back the DVD in this unit
he number inside the globe refers to region of the
w
A DVD labeled for a specific region can only play back on
the unit with the same re
or region 1 in order to play back on
or other regions. Look for the symbols
o not appear on your DVD, you cannot
ion code
or ALL
is a trademark of DVD Format/Logo Licensing Corporation.
Note(s
This unit may not be able to play back discs recorded
n PC’s or other r
Page 67

T
f
.
title 1
title 2
3
track 1
trac
track 3
trac
5
JPEG
folder 1
folder 2
file
2
3
file 4file 5
INFORMATION ON PLAYBACK
Hint for HDD / DVD Playback
he contents of an HDD / DVD are generally divided into
titles. Titles may be
urther subdivided into chapters
hapter 1 chapter 2chapter 1
k 2
1 file
file
hapter 2hapter
k 4track
Connections EditingIntroduction Function Setup Others Español
Basic Setup
Recording
Playback
7
Page 68

]
f
.
st.
i
.
g
)
af
.
y
.
y.
.
)
.
]
Direct Playback
BASIC PLAYBACK
If you are playing back the titles in HDD, press
irst, then proceed to step 2
If you are playing back the titles in DVD, press
Insert a disc (refer to “How to Insert a
sc“ on page 27)
D
Align the disc to
the disc tray guide.
* Make sure the disc is compatible with this unit.
(Refer to pa
It may take a while to load the disc data
e 66 for the list of compatible discs.
ter the disc tray closes
Press [PLAY B to start playback.
If you are playing back a DVD-video, a menu
ma
appear
Refer to “Using the Title / Disc Menu” on page 72.
Press [STOP C once to stop playback
temporaril
• Refer to “Resume Playback” on page 73
HDD
DVD] fir
Note(s
• Some discs may start playback automatically
• If you insert a disc when the unit is in HDD mode,
playback will start automatically when you press
DVD
Page 69

]
f
.
]
first.
i
.
*
)
a
.
le l
ll
d
[
].
C
]
[
K
/L/
s
/
d
st>
>
G
H
N
)
.
B
stead of
Playback from the Title List
.
BASIC PLAYBACK
If you are playing back the titles in HDD, press
irst, then proceed to step 2
If you are playing back the titles in DVD, press
Insert a disc (refer to “How to Insert a
sc“ on page 27)
D
Make sure the disc is compatible with this unit.
Refer to page 66 for the list of compatible discs.
It may take a while to load the disc data
fter the disc tray closes
For HDD, press [TITLE] to call up the
ist. For DVD, the title list wi
tit
utomatically appear when you
insert a
or
To exit the title list, press
To resume the title list, press
Use
isc. Otherwise, press [TITLE]
DISC MENU
STOP
/
B] to select a desire
TITLE
title, then press [OK].
HDD title li
Title List
PL
JAN/ 9/14 12:00AM CH10 SP
12:00AM (1:00:00) THU JAN/ 9/14 CH10 SP
1
2 3
HDD
DVD
Connections EditingIntroduction Function Setup Others Español
Basic Setup
Recording
Playback
ote(s
Some discs may start playback automatically
You can also start playback by pressing
in
OK]at step 3.
PLAY
4 5 6
DVD title list
Title List
Video
JAN/ 9/14 12:00AM CH10 SP
12:00AM (1:00:00) THU JAN/ 9/14 CH10 SP
1
4 5 6
to display the previous page.
2 3
to display the next page, and press
1 / 6
1 / 6
Instructions continue on the next page
9
Page 70

[
K
y
].
D
.
ly.
.
BASIC PLAYBACK
se
/ L] to select “Play from Start”
or “Resume Pla
ress [OK
e.g.) DV
Title List
Video
JAN/ 9/14 12:00AM CH10 SP
12:00AM (1:00:00) THU JAN/ 9/14 CH10 SP
1
Play From Start
4 5 6
Playback will start
Press [STOPC] once to stop playback
temporari
• Refer to “Resume Playback” on page 73
back” (for HDD), then
2 3
Edit
Title Delete
Dubbing
1 / 6
Page 71

BASIC PLAYBACK
)
d.
.
.
f
.
.
i
66
f
.
.
.
C
]
[
K
/
L
f
.
t
W
y
.
W
T
.
K
/
L
]
B
,
]
or
.
ess
s
o
y.
audio C
s:
.
.
.
.
.
:
G>
.
.
.
Playing Audio Discs and Picture Discs
Press [DVD] first
Insert a playable disc (refer to “How
to Insert a D
* Make sure the disc is compatible with this unit.
Refer to page
t may take a while to load the disc data
When an audio CD is inserted, the track list will
appear
When a disc with JPEG files is inserted, the file
ist will appear
• To exit the track/file list, press
• To resume the track/file list, press
sc“ on page 27).
or the list of compatible discs.)
after the disc tray closes
STOP
TITLE
Connections EditingIntroduction Function Setup Others Español
Basic Setup
Note(s
• Files whose extension is other than “.jpg / .jpeg(JPEG)”
will not be liste
• Some unplayable folders or files may be listed due to
the recording status
• High-resolution JPEG files take longer to be displayed
• Progressive JPEG files (JPEG files saved in progressive
ormat) cannot be played back on this unit
Use
or track/
e.g.) File lis
hen selecting track/file:
back will start
Pla
hen selecting the folder (Not available for audio CD):
he files in the folder will appear
back, then press
• Press
PLAY
ierarchies
• Pr
hierarch
Hints for
• Folders are shown by
• Audio CD tracks are shown by
• JPEG files are shown by
• The system can recognize up to 255 folders, up to 99
tracks/999 files
• If the letters in a file/folder name overflow the given
space then they will be displayed as “...”. Unrecognizable
characters will be replaced with asterisks
• If there are no files in the folder, “No Files” will be displayed
It is recommended that files to be played back in this
nit are recorded under the following specifications
JPE
• Upper limit : 6,300 x 5,100 dots
• Lower limit : 32 x 32 dots
• File size of maximum image : 12 MB
] to select a desired folder
ile, then press [OK]
File List
DISC NAME
Folder1
Folder2
JPEG file1
JPEG file2
JPEG file3
JPEG file4
JPEG file5
JPEG file6
1/ 2
to select the file or folder you want to play
OK
K
Bto move to any lower
r
RETURN] to move back to the previous
D tracks and JPEG file
Recording
Playback
Page 72

BASIC PLAYBACK
f
f
.
.
to
66
f
.
d
.
[
K
/L/ /
B
bl
.
.
F
d.
F
)
h
.
.
with all
.
)
)
CD
Th
y
the d
.
g
.
.
RN
C
i
/
B
b
H
[
G
[
K/L
/
/
B
l
].
g
.
Press
.
N
:
k.
B
o
y.
)
KODAK Picture
e Picture CD is a service to convert photographs taken
b
a conventional film camera into digital data and write
ata on a CD. You can enjoy picture images on the TV
et by playing back the Picture CDs
For details of KODAK Picture CD, contact a shop that
provides developin
service for Kodak Inc
Press [TITLE]
Picture CD
Image 1
1 2 3
4 5 6
1 / 2
• To exit the Picture CD thumbnail List, press
ETU
STOP
Arrow icons mean the title list includes a next or
prev
ous page. Use
in the direction of the
con you wish to follow. You can also quick review the
ix thumbnails at once between the first and last
pages
y pressing
Use
p
ayed back, then press [PLAYB or [OK
/
] to select a desired track to be
An image will be played back from the selected track
and
o to the next one in turn
3) Press [STOPC to stop playback.
TITLE] to display the thumbnail again
•
ote(s) on JPEG and KODAK Picture CD
After track is displayed for 5 seconds or 10 seconds
(set in “Slide Show” on page 76) the display moves to
the next trac
During JPEG or KODAK Picture CD playback, press
r
to rotate a picture 90 degrees clockwise
or counterclockwise respectivel
(Not available when the display menu appears.
Using the Title / Disc Menu
DVD may contain a title list, which describes the contents
the disc, or a disc menu, which guides you through the
available
Press [DVD]
unctions in the disc.
irst
1)Insert a disc (refer to “How to Insert a Disc“ on page 27)
* Make sure the disc is compatible with this unit. (Refer
age
or the list of compatible discs.)
It may take a while to load the disc
ata after the disc tray closes
) Press [TITLE] or [DISC MENU] to call up the title list
or
isc menu
Use
press [OK] to ena
4) Press [
TOPC] to exit
to make a selection, and then
e your selection
Note(s
• You can select a numbered menu wit
the Number buttons] also
• Menus vary among discs. Refer to the information
ccompanying the disc for details
TITLE] orDISC MENU] will not always be active
DVD
Pause
) During playback, press [PAUSE
ayback will be pause
F
Press [PLAYB to return to the normal playback.
Note(s
• On DVD, set “Still Mode” to “Field” in “Playback”
enu if pictures in pause mode are blurred. (Refer to
age 105.
Page 73

SPECIAL PLAYBACK
y
the amount of time you set in “Playback” menu. To set
.
P
[
d.
Y
.
Th
.
B
k
will resume from the point
y
at
t
d
.
T
y
and start playing back
t
whil
y
is stopped.
DD:
.
:
.
N
)
.
)
s.
)
:
:
d)
: 20x: 40
[
D
[
E
D
o
g
.
d (ind
).
B
.
y
.
y
/
.
.
B
ess
k.
y
.
B
ess
]
t
.
y
.
B
ess
l speed.
effects.
.
)
.
.
.
.
.
Resume Playback
ou can play back from where you last stopped the disc
1) During playback, press [STOPC.
e resume message will appear
Resume ON
2) Press [PLAY
In a few seconds, playac
at which it stopped last. You can resume pla
he same point even if you turn the unit to the standby
mo
e (HDD/DVD only)
o cancel the resume pla
he disc from the beginning, press
e the pla
For H
You can set a resume point per every title
For DVD-RW/-R, Audio CD and JPEG files
You can set only one resume point per disc
STOPC again
ote(s
For JPEG files, playback will resume from the
beginning of the file where playback was stopped
Fast Forward / Fast Reverse Playback
) During playback, press
very time you press
will be chan
ast forward or fast reverse playback across titles (for
DD/DVD) is not possible
ed as follows.
20x
or audio CD, approximate speed is fixed at 8x with
soun
Press [
icated with /
] to return to the normal playback
or
r E, approximate speed
normal
speed
playback
2x 20x5x 40x40x
Note(s
• Forward/reverse speed will be indicated with icons
follow
forward (approx. speed
2x:
20x
40x
reverse (approx. spee
5x
x:
Variable Skip / Variable Replay
During playback, you can skip forward or backward b
the time amount, refer to “
age 105
During playback, press [SKI
forward. Press
ckwar
REPLAY if you want to skip
Variable Skip / Replay” on
if you want to skip
Rapid Playback
Rapid playback function is available only during
pla
back
This function is available only on discs recorded in the
Dolb
Digital format, and plays back in a slightly faster
slower speed while keeping the sound output
1) During playback, press [RAPID PLAY]
Pr
x
x
APID PLAY]nce during playbac
Plays back approximately at 0.8 times of normal
pla
back
r
APID PLAY
Plays back approximately at 1.3 times of normal
pla
back
r
APID PLAY]rd time to play back in
norma
No
wice during playback
Connections EditingIntroduction Function Setup Others Español
Basic Setup
Recording
Playback
2) Press [PLAYB] to return to the normal playback
Note(s
• Audio (language) setting cannot be changed while
using this mode
• This feature may not work at some point in a disc
• Audio is PCM during rapid playback mode except
when using digital audio connection
• When using digital audio connection (COAXIAL), the
LPCM sound (2 channel) will be output
Instructions continue on the next page
Page 74

SPECIAL PLAYBACK
F
d.
[
G
y.
h
G
the sound muted.
T
d:
ess
H
y.
y
.
H
[
G
ly.
)
s.
)
)
D
[
E
D
or
E
,
f
d.)
.
y
g
g.
l d
y.
T
l
.
.
With
.
T
y
B
)
T
ab
)
.
N
)
E
,
D
.
.
.
Step by Step Playback Chasing Playback during Recording
1) During playback, press [PAUSE
Playback will be paused and sound will be mute
Press
Playback will advance one frame (or step) at a time
w
o play back step by step backwar
Pr
Every time you press the button, the playback will go
backward b
• Press and hold
continuous
Press [PLAYB to return to the normal playback.
] repeatedl
en you press
repeatedl
one frame
with
/
to reverse / advance
Slow Forward / Slow Reverse Playback
1) During playback, press [PAUSEF]. Then press
or
very time you press
will be changed as
mute
ollows. (The sound will remain
1/8x
2) Press [PLAYB to return to the normal playback.
pause
approximate speed
1/16x 1/8x1/16x 1/3x1/4x
Note(s
• Forward/reverse speed will be indicated with icons
follow
forward (approx. speed
1/16x:
1/8x:
1/3x:
reverse (approx. speed
1/16x:
1/8x:
1/4x:
You can play back a title being recorded from the
eginning while recording continues
1) During recording, press [PLAYB.
back of the title you are recording will start from
Pla
the be
innin
Elapsed playback time will be displayed in the front
pane
ispla
Press [STOPCnceto stop the playback, .
he front panel display will switch back to show the
e
apsed recording time
If you press
STOPC twice, it will stop the recording
ote(s
• You can also use the special playback functions such
REC] is invalid during chasing playback
• You can no longer fast forward the playback when it
omes to a few seconds before the current recording
oint
etc. during chasing playback mode.
Simultaneous Playback and Recording
regard to HDD, you can continue recording a
rogram while playing back another title
o do so, press
ou like to play back, and then press
You can also start the playback from the title list menu.
efer to page 72.
o playback a title being recorded while continuing to
ecord, refer to “Chasing Playback during Recording”
ove (available only with HDD).
TITLE] during recording and select a title
PLAY
Note(s
• Audio CD, JPEG files recorded on a disc can also be
layed back during HDD recording
Instructions continue on the next page
Page 75

SPECIAL PLAYBACK
N
)
.
dly
K
/
.
esume the slide show and the zoo
.
.
[
/
B
u.
o
[
K
/
,
t
.
Z
.
T
d
d
.
Z
.
4)
[
K
/
L
/
B
p
.
Z
.
to be called bac
ater.
.
.
[
/
B
.
o
[
K
/
L
p
T
.
:
[
K
/
L
t
s
[OK]
)
]
.
y)
dby
ly)
y)
y)
ly)
)
y)
.
.
Zoom Marker Setting
) During playback, press [DISPLAY]
Use
to select
men
e.g.) DVD-vide
3)
1/ 5 1/ 5
se
L] to select a desired zoom factor to zoom to
0:01:00 / 1:23:45
hen press [OK]
1/ 5 1/ 5
0:01:00 / 1:23:45
× 1.2
× 1.5
× 2.0
oom menu will appear
here are four options
(x1.0, x1.2, x1.5 an
x2.0), these are displaye
excluding the current zoom rate
oom area will be displayed
Use
/
then
ress [OK]
] to select a desired zoom position,
DVD
DVD
Video
Video
This feature allows you to assign a specific point on a title
k l
1) During playback, press [DISPLAY] to bring up the
isplay menu
If the display menu is already shown, skip to step 2
2) Use
to select to display the marker list
.g.) DVD-vide
1/ 5 1/ 5
3) Use
to select a desired marker number.
When it reaches the desired
1/ 5 1/ 5
1
2
3
4
5
6
---
---
---
---
---
---
0:01:00 / 1:23:45
0:01:00 / 1:23:45
DVD
Video
oint, press [OK].
DVD
Video
he title (track) number and the time will be displayed
4) To return to the marker later
se
to select the desired marker number,
hen pres
.
Connections EditingIntroduction Function Setup Others Español
Basic Setup
Recording
Playback
oom playback will start
ote(s
• When selecting a smaller factor than the current one,
the zoom area will not be displayed
• To exit the zoom menu, press
at step 3.
• To cancel the zoom function, select “x1.0” using
L, then press [OK]at step 3
• When you zoom a picture during a slide show, the
slide show will be put in the pause mode. Press
PLAYB to r
function will be turned off
Note(s
• To clear a marker, select the marker number to be
cleared, then press
• All markers will be erased when you operate these
operations listed below
– opening the disc tray (DVD/CD onl
– turning the unit to the stan
– make additional recording on the disc (DVD onl
– editing any title (DVD onl
– dividing the title (HDD on
RETURN]repeate
– deleting a scene on the title (HDD only
– changing original and playlist (DVD-RW VR mode
onl
• You can mark up to 6 points
m
CLEAR
mode (DVD/ CD on
Instructions continue on the next page
Page 76

A
.
.
.
[
/
B
.
K/L
.
D
D
s
T
.
:
T
y.
:
T
:
.
:
y.
]
.
.
:
T
.
:
T
Y
.
.
[OK]
layback
.
]
d
.
)
)
.
.
.
SPECIAL PLAYBACK
Y
seconds.
.
.
4
.
)
d.
.
Repeat Playback
vailable repeat function may vary depending on discs
) During playback press [DISPLAY], then proceed to
step 2) or press [REPEAT], then proceed to step 3)
• If the display menu is already shown, skip to step 2
Use
enu
ress [OK]
e.g.) HDD/DV
e.g.) audio C
e.g.) JPEG file
he selected repeat playback will start
Title (HDD/DVD only)
he current title will be played back repeatedl
Chapter (HDD/DVD only)
he current chapter will be played back repeatedly.
All (DVD/Audio CD/disc with JPEG)
All titles in the media will be played back repeatedly
A-B (HDD/DVD/Audio CD only)
Desired section can be played back repeatedl
1) UseK / L to select “A-B”, then press
2) Press
3) Press
Track (Audio CD/JPEG files only)
he current track or file will be played back repeatedly
Group (JPEG files only)
he current folder will be played back repeatedly.
] to select to display the selection
1/ 5 1/ 5
0:01:00 / 1:23:45
-RW
Video
] to select a desired repeat type, then
1/ 5 1/ 5
1/ 5CD0:00:15 / 0:05:00
OFF
Track
All
A – B
1/ 5 0:00:05
OFF
Track
All
Group
1/ 5 1/ 5 0:01:00 / 1:23:45
OFF
Title
Chapter
A – B
0:01:00 / 1:23:45
-RW
JPEG
-RW
Repeat
Title
Video
Video
OK
OK] at the desired starting point A
OK] at the desired ending point B
Note(s
• Point B for the repeat A-B playback should be set
within the same title or track as point A
• To cancel the repeat playback, select “OFF” at step 3.
The repeat setting will also be cancelled when you
stop playback
• You cannot select “Group” during the random
playback
Random Playback
ou can play back a disc randomly instead of playing
ack in the original order
Press [MENU]
Use [K / L to select “DISC Playback Mode”, then
press
“DISC P
or JPEG, useK / Lto select “Photo”, then press
.
Mode” menu will appear
K
Use [K / L to select “Random Play”, then press [OK].
om playback will start
Ran
Note(s
• To cancel random playback, press
uring random playback. “OFF” appears on the TV
STOPCtwice
Slide Show
ou can select the display time between 5 seconds and
) Follow steps 1 and 2 in “Random Playback” on page
Use [K / L] to select “Slide Show”, then press [OK]
Use [K / L] to select the display time, then press [OK]
) Press [MENU] to exit
Note(s
• Large-size JPEG files take a few moments to be
isplaye
Instructions continue on the next page
Page 77

)
.
y.
g
d
.
.
[
K
[OK].
.
[
K
/
L
].
[
K
/
L
[
B
d
tracks.
B
.
SPECIAL PLAYBACK
back th
g
.
:
[
F
T
.
f
.
:
p
[
H
[
D
P
H
or
G
f
.
:
h
.
K
/
L
/ /
B
p
.
.
tostart
h
A
.
eduction and zoo
e
g.
)
.
.
.
.
Program Playback Playing Back the Autostart Recording
You can program the disc to play back in your desire
rder
Press [MENU]
Use
/ L] to select “DISC Playback Mode”, then
press
“DISC Playback Mode” menu will appear
3) Use
] to select “Program Play”, then press
K
4) Use
] to select a desired track, then press [OK]
r
.
DISC Playback Mode
Program Play
--
-- -- -- -- -- -- -- -- --
-- -- -- -- -- -- -- -- -- --
-- -- -- -- -- -- -- -- -- --
-- -- -- -- -- -- -- -- -- --
-- -- -- -- -- -- -- -- -- --
0:00:00Total
Repeat this step until you program all the desire
Press [PLAY
DISC Playback Mode
Program Play
09
04 10 06 -- -- -- -- -- --
-- -- -- -- -- -- -- -- -- --
-- -- -- -- -- -- -- -- -- --
-- -- -- -- -- -- -- -- -- --
-- -- -- -- -- -- -- -- -- --
0:31:07Total
Program playback will start
Note(s
• To erase tracks you selected, press
• You can program up to 50 tracks.
• To cancel program playback, press
uring program playback. “OFF” appears on the TV
• Program information will be retained until you turn
the unit to the standby mode or open the disc tra
• You may also select a desired track usin
the Number buttons]at step 4.
CLEAR] at step 4
STOPC twice
By playing back the autostart recording, you can pause
or go
e TV program you are currently watching.
or the autostart recording refer to “AUTOSTART
RECORDING” on pa
e 46
To pause and resume the TV program
1) When watching TV program through this unit’s
tuner, press
PAUSE
V program will be paused and sound will be muted
2) Press [PLAYB] to resume the TV program you were
watching
rom where you have paused
To rewind or fast forward the TV program
When watching TV program through this unit’s
tuner,
ress
], [E], [REPLAY], [G,
or
SKI
• While playing back the autostart recording, pressing
backward or
skips playback point 5 minutes
orward
To go back to the specific time
1) When watching a TV program through this unit’s
tuner, press [DISPLAY], t
2) Use [
or [the Number buttons] to enter
a desired time, then
• While playing back the
en press [OK]
ress [OK]
rt recording, press
STOPC to cancel the playback
• When watching TV program or while playing back the
au
t
recording, press
DISPLAY] once to display
eautostart recording information. Refer to
utostart Recording Information” on page 23
• Noise r
while playing back the
m functions are availabl
rt recordin
Note(s
• While playing back the autostart recording, you
annot change the channels
• While playing back the autostart recording, you
annot change the DTV audio language
• If you change to DVD mode or if the timer recording
tarts while playing back the autostart recording, the
playback will be stopped
• When this unit turns on for the timer recordings, the
utostart recording will not be performed.
• For the contents of the autostart recording, you
annot change the TV audio
Connections EditingIntroduction Function Setup Others Español
Basic Setup
Recording
Playback
Page 78

SEARCH
[
G
[
G
h
.
T
.
T
h
H
T
.
.
[
/
B
o
Th
:
[
K
/
].
Title searc
start.
:
[
B
p
[
K
/
h
, th
y
y.
[
G
[
G
/
.
f
H
/
g
)
.
.
.
[
/
B
D
will be highlighted.
[
K
/
L
.
y.
)
.
s
s
total time
e
1
V
)
H
.
.
Title / Chapter Search Track Search
Using [H] /
1) During playback, press
or c
apter and move to the next
he title or chapter will move forward one at a time
• If there is no chapter in one title, the current title will
e skipped.
o go back to the beginning of the current title or
c
apter, press
Press it repeatedly to go to the previous title or chapter.
he title or chapter will move backward one at a time
] to skip the current title
Note(s
• With regard to HDD, chapter search using
/ G is available only within the same title
Using [DISPLAY]
1) During playback, press [DISPLAY]
Use
e.g.) DVD-vide
to select
1/ 5 1/ 5
0:01:00 / 1:23:45
DVD
Video
Using [H /
1) During playback, press
track
file and move to the next
The track/file will move forward one at a time.
To go back to the beginning o
Press it repeatedly to go to the previous track/file. The
track
file will move backward one at a time.
For JPEG files, press it once to
] to skip the current
the current track/file,
o to the previous file.
Using [DISPLAY]
1) During playback, press [DISPLAY] to bring up the
isplay menu
If the display menu is already shown, skip to step 2
2) Use
e.g.) audio C
The number next to
3) Use
esired track/file number to search, then press [OK]
After the search, playback will start automaticall
to select
1/ 5CD0:00:15 / 0:05:00
or [the Number buttons] to enter a
e number next to will be highlighted.
) Title
Use
L or [the Number buttons] to enter a
esired title number to search, then press[OK
h will
Chapter
Press
cha
Use
esired chapter number to searc
After the search, pla
to move to the number next to for
ter.
L] or [the Number buttons] to enter a
en press[OK].
back will start automaticall
Note(s
• In search mode display, total numbers for each
earch content (title/chapter/time) are shown as a
enominator
1/ 5 1/ 5 0:01:00 / 1:23:45
total number
of title
total number
of chapter
DVD
Video
f the titl
Note(s
• During CD playback you can enter a track number
irectly using [the Number buttons] for track search
without displaying the menu
Instructions continue on the next page
Page 79

.
.
[
/
B
o
D
The numbe
.
T
[
B
W
and time
yed.
[
K
/
L
/
B
p
f
.
N
)
title.
SEARCH
Time Search
)During playback, press [DISPLAY] to bring up the
isplay menu
If the display menu is already shown, skip to step 2
Connections EditingIntroduction Function Setup Others Español
Use
] to select
e.g.) DVD-vide
1/ 5 1/ 5 0:01:00 / 1:23:45
DVD
Video
e.g.) audio C
1/ 5CD0:00:15 / 0:05:00
r next to will be highlighted
o move to the number next to , press
hen time search is not available,
counter are not displa
3) Use
a desired time to search, then
/
ter the search, playback will start automatically
A
or [the Number buttons] to enter
ress [OK].
ote(s
Time search is available only in the same track, file or
Basic Setup
Recording
Playback
Page 80

guag
y
y
.
.
[
/
B
.
o
[
K/L
p
.
.
.
SELECTING THE FORMAT FOR AUDIO AND VIDEO
N
)
ess
]
to
.
.
Y
.
W
y
W
g
.
p
.
.
[
/
B
to display the selection
.
[
K
/
L
d
.
deo
h.
f
b
.
audio C
channel
tch.
)
]
or
.
ou can select the format for audio and video as you prefer depending on the contents of the disc you are playing back
Switching Subtitles Switching Audio Soundtrack
DVD-video may have subtitles in 1 or more languages.
Available subtitle lan
case. You can switch subtitle languages an
pla
back
es can be found on the disc
time during
) During playback, press [DISPLAY]
Use
] to selectto display the selection
enu
e.g.) DVD-vide
3) Use
then
1/ 5 1/ 5
] to select a desired subtitle language,
ress [OK]
1/ 5 1/ 5
OFF
1.English
0:01:00 / 1:23:45
DVD
0:01:00 / 1:23:45
DVD
Video
Video
Subtitle will be displayed in the selected language
When selecting “OFF”, subtitle will disappear
ote(s
Some discs will only allow you to change the subtitle
from the disc menu. Pr
display the disc menu
If a 4-digit language code appears in the subtitle
menu, refer to “LANGUAGE CODE” on page 118
TITLE] or
DISC MENU
hen playing back a DVD-video recorded with 2 or more
soundtracks (these are often in different languages),
an switch them during playback.
hen playing back audio CD you can switch
“L/R”(stereo), “L”(left) or “R”(ri
ht)
1) During playback press [DISPLAY], then proceed to
ste
2) or press [AUDIO], then proceed to step 3)
If the display menu is already shown, skip to step 2
Use
to select
enu
Use
au
to select a desired audio soundtrack or
io channel, then press [OK]
For DVD-vi
Audio soundtrack will switc
1/ 5 1/ 5
1.Dolby Digital 5.1ch English
2.Dolby Digital 2ch English
0:01:00 / 1:23:45
DVD
Video
If the title contains both main and sub audio, you can
urther select “L” (main), “R” (sub) or “L/R” (main and
su
mixed)
For
Audio
D
will swi
e.g.) audio CD
1/ 5CD0:00:15 / 0:05:00
1. L/R
2. L
3. R
ou
Note(s
• Some discs will only allow you to change the
soundtrack from the disc menu. Press
DISC MENU] to display the disc menu
TITLE
Page 81

SELECTING THE FORMAT FOR AUDIO AND VIDEO
deos have scenes shot fro
he d
.
.
[
/
B
o
Ang
lable.
A
].
T
.
.
[
/
B
u.
o
[
K
/
L
].
Y
.
such as
deo.
T
d
.
Ty
)
y
.
Switching Camera Angles Reducing Block Noise
me DVD-vi
m 2 or more
ngles. Angle information should be on the disc case if
t
isc contains multi-angle scenes
1) During playback, press [DISPLAY]
Use
to select , then press [OK].
.g.) DVD-vide
1/ 5 1/ 5
0:01:00 / 1:23:45
DVD
Video
le icon appears when a switching camera angle is
vai
ngle will switch each time you press
OK
Note(s
• Angle icon does not appear on the TV screen in case
ou set “Angle Icon” to “OFF” in the “Playback” menu.
Refer to page 105
his function reduces noise in the playback picture
) During playback, press [DISPLAY]
Use
to select to display the selection
men
e.g.) DVD-vide
Use
1/ 5 1/ 5
to select a desired option, then press
0:01:00 / 1:23:45
DVD
Video
K
1/ 5 1/ 5
OFF
Type 1
Type 2
0:01:00 / 1:23:45
DVD
Video
our setting will be activated
FF : When playing back titles with a very small
mount of noise
DVD-vi
ype 1 : For the titles recorded in compressed video
mo
e such as SLP mode
pe 2 :Same as type 1, only more effective.
Connections EditingIntroduction Function Setup Others Español
Basic Setup
Recording
Playback
1
Page 82

INFORMATION ON EDITING
l
d
.
,
g
ch the title was recorded.
3.
ecorded on the
l
y be d
.
k.
.
I
“
I
f
l
d.
.
b
.
e
(
g
.
layback.
ected title is
.
ected title.
.
T
y
.
.
.
Guide to a Title List
itle list allows you to check the titles recorded on the HDD or the disc easily. You can choose a title to play back from
this list and easil
edit the titles as you prefer
2 1
Title List
ORG
JAN/ 9/14 12:00AM CH10 SP
12:00AM (1:00:00) THU JAN/ 9/14 CH10 SP
1
2 3
Press [DVD], then press [TITLE]
DVD modeHDD mode
2 1
Title List
Video
JAN/ 9/14 12:00AM CH10 SP
12:00AM (1:00:00) THU JAN/ 9/14 CH10 SP
1
2 3
4 5 6
1 / 6
3
4 45
e.g.) DVD
Edit
ORG
NOV/26/14 11:35AM CH13 EP
9
10
8
1. Title name(editable) Recording date, time, channe
and the recording mode will be assigne
automatically as the title name until you edit it
2.Title information:Time at which the recording of
the title was started
recorded, channel recorded, and the recordin
duration of the title, date
mode
in whi
Title List: List of titles r
tit
e is indicated by its index picture. Following icons
ma
isplayed on the index picture
HDD. Each
Indicating the title has never been played bac
Indicating the title is protected
Indicating the title is a copy-protected title.
: If you call up the title list while recording,
will be displayed on the index picture o
tit
e currently being recorde
the
4. Arrow: Indicating there is a previous / next page
5. Title list page number: Current page / total pages.
menu: Submenus for the selected menu are
6. Su
isplayed here
7. Title nam
editable) If you do not name the title,
the recorded date, time, channel, and the recordin
mode are displayed here
4 5
3
4 45
Scene Delete
2
Edit Title Name
Chapter Mark
Protect
1 : 05 : 00
7
6
8. Progress bar: Indicating the progress of the
p
9. Preview window: Preview of the sel
displayed here
10. Playback status: Indicating the current playback
of the sel
ress [STOPC] to exit the title list
1 / 6
2
Instructions continue on the next page
Page 83

Availab
s
*2
.
.
.
[
K
0
/
1
t
.
.
d
.
[
K
/
/
0
t
K
/
e
: Not available
Edit Menu
DDVD
)
f
.
title to a
s
e.
ly
INFORMATION ON EDITING
: Availabl
le Feature
MediaHDD HDD DVD-RW (VR Mode)
ORG Playlist ORG Playlist
DVD-R/RW
(Video Mode)
Putting names on titles
Deleting a title
Deleting selected titles
Adding / deleting
chapter marks
Setting / deleting
all chapter marks*1
Protecting a title
Dividing a title
Finalizing a disc
Setting or Releasing disc protect
Deleting a scene from a title
Combining a title
Note(s
• Once you have
inalized a DVD-R,
you cannot edit or
record anything on
that disc
• While recording a
n HDD or a
DVD, only deleting
HDD titles i
vailabl
Adding a playlist
*1 In Video Mode, you can select the time interval from OFF/5 minutes/10 minutes/15 minutes/20 minutes/30 minutes/60 minutes.
*2 DVD-RW on
How to Access the Edit Menu
H
ress [HDD] first
Press [TITLE]
) Press [DISC MENU] to change original and playlist
Use
/ L /
to select a desired title, then press [OK].
HDD Playlis
Title List
PL
JAN/ 9/14 12:00AM CH10 SP
12:00AM (1:00:00) THU JAN/ 9/14 CH10 SP
1
4 5 6
2 3
Press [DVD] first
1) Press [TITLE]
2) Press [DISC MENU] to change original and playlist
(VR mo
3)Use
e DVD-RW only)
L
/ 1 to select a desired title, then press [OK].
DVD-RW Playlis
Title List
PL
JAN/ 9/14 12:00AM CH10 SP
12:00AM (1:00:00) THU JAN/ 9/14 CH10 SP
1
4 5 6
2 3
ConnectionsIntroduction Function Setup Others Español
Basic Setup
Recording
Playback
Editing
4) Use [K / L to select “Edit”, then press [OK].
1 / 6
Resume Playback
Play From Start
Edit
Title Delete
Add to Playlist
Delete Multiple Titles
Dubbing
Edit
PL
Scene Delete
1
Edit Title Name
Chapter Mark
Title Dividing
Title Combinig
JAN/ 9/14 12:00AM CH10 SP
1 : 05 : 00
4) Use [
L to select “Edit”, then press [OK].
Play From Start
Edit
Title Delete
Dubbing
Edit
PL
1
NOV/25/14 11:00AM CH12 SP
Scene Delete
Edit Title Name
Chapter Mark
Title Dividing
Title Combining
1 : 05 : 00
1 / 6
Page 84

EDITING
.
k.
st.
.
[
K
/
L
/
/
B
p
.
.
.
ode
ode
ected.
.
.
Deleting a Title
You can delete a title which you do not need anymore
Please be advised that the title once deleted cannot be brought bac
If you are editing the titles on HDD, press
If you are editing the titles on DVD, press
Press [TITLE].
Use
title to delete, then
If you are editing the titles on HDD, proceed to step 4
If you are editing the titles on DVD, proceed to step 3
HDD m
DVD m
Title List
ORG
Title 1
12:00AM (1:00:00) THU JAN/ 9/14 CH10 SP
1
4 5 6
Title List
PL
JAN/ 9/14 12:00AM CH10 SP
12:00AM (1:00:00) THU JAN/ 9/14 CH10 SP
1
to select a desired
2 3
2 3
ress [OK]
1 / 1
HDD] fir
DVD] first
For DVD-RW, the available disc space will increase
nly when the last recorded title in the title list is
deleted. For DVD-R, the disc space will not be
ff
When part of the titles are deleted the capacity
indicator changes color
For DVD, it may take a while to write the data to the
disc after you press
OK]at step 5.
4 5 6
1 / 6
Instructions continue on the next page
4
Page 85

EDITING
[
K
/
t
.
ode
ode
4
[
K
/
].
The title is now deleted.
Use
L to select “Title Delete”,
hen press [OK]
HDD m
Resume Playback
Play From Start
Edit
Title Delete
Add to Playlist
Delete Multiple Titles
Dubbing
DVD m
Play From Start
Edit
Title Delete
Add To Playlist
Dubbing
Use
L to select “Yes”, then press
K
Title List
ORG
Title 2
12:00AM (1:00:00) THU JAN/ 9/14 CH10 SP
1
4 5
2 3
ConnectionsIntroduction Function Setup Others Español
Basic Setup
Recording
Playback
Title List
ORG
JAN/ 9/14 12:00AM CH10 SP
12:00AM (1:00:00) THU JAN/ 9/14 CH10 SP
1
4 5
2 3
1 / 1
Editing
1 / 6
Page 86

EDITING
[
K
/
L
/
/
B
y
.
f
.
l
.
.
[
K
/
L
].
eted.
:
]
.
k.
.
[
K
/
L
/ /
B
h
.
[
K
/
p
.
Deleting Selected Titles
You can delete titles which you do not need anymore
Please be advised that the titles once deleted cannot be brought bac
Press [HDD], then press [TITLE]
Use
to select the title
ou want to delete, then press [OK]
Title List
ORG
Title 1
12:00AM (1:00:00) THU JAN/ 9/14 CH10 SP
1
4 5 6
2 3
1 / 1Press ‘CLEAR’ to confirm.
Trash mark will appear indicating the title is
marked
or deletion
Repeat step 4 until you select all the
es you want to delete
tit
Title List
ORG
Title 2
12:00AM (1:00:00) THU JAN/ 9/14 CH10 SP
1
4 5 6
Press ‘CLEAR’ to confirm.
2 3
1 / 1
Press [CLEAR].
Confirmation message will appear
Use
t
Title 1
12:00AM (1:00:00) THU JAN/ 9/14 CH10 SP
Use
Titles”, then
to select any title,
en press [OK]
Title List
ORG
1
4 5 6
2 3
1 / 1
L to select “Delete Multiple
ress [OK]
Resume Playback
Play From Start
Edit
Title Delete
Add To Playlist
Delete Multiple Titles
Dubbing
Use
] to select “Yes”, then press
K
Titles are now del
Title List
ORG
Title 1
12:00AM (1:00:00) THU JAN/ 9/14 CH10 SP
1
4
To remove the trash mark from the title
Select the title with the trash mark, then press
K
2 3
1 / 1
Page 87

EDITING
.
.
back
.
y.
whil
d.
Y
.
[
K
/
L
[OK].
y
.
W
.
ess
,
y
to
p
.
lding
delete all letters.
s
/
p
N
)
y
other character.
.
]
three times to choose the lette
.
e
y
u.
[
K
p
.
D
p
g
.
t
s
Putting Names on Titles
ou can put title names on the titles and change the names from this menu
Use [K / L] to select “Yes”, then press
[OK]
PL
Edit - Edit Title Name
ConnectionsIntroduction Function Setup Others Español
Yes
1
No
Follow steps in “How to Access the
Edit Menu” on page 83 to displa
Edit” men
Use
Name”, then
e.g.) DV
/ L to select “Edit Title
ress [OK]
Edit
PL
Scene Delete
1
Edit Title Name
Chapter Mark
Title Dividing
Title Combining
NOV/25/14 11:00AM CH12 SP
1 : 05 : 00
To enter a title name, follow the
s in “Guide to Edit Title Name”
ste
on pa
e 87
Edit - Edit Title Name
PL
ABC
1
abc
123
@! ?
character se
MY FAVORITE
1 : 05 : 00
The title name is now updated
Press [RETURN] once or repeatedly to
go
For DVD, the data will be written onto the disc
momentaril
This operation may take a
Guide to Edit Title Nam
1) Use
) Follow the list below, use [the Number buttons]
*1 Pr
• To delete letters, press
Ho
• Use
• You can enter u
press
repeatedl
hen you finish entering a title name, press [OK]
Select
Press
mode automaticall
the
revious character set
CLEAR] will
Bto move the cursor to the left and right.
to the title list
e to be complete
to select a desired character set, then
until the desired letter appears
ABC
<space> <space> <space>
(*1) (*1)
ABC
DEF
GHI
JKL
MNO
PQRS
TUV
WXYZ
character set will be changed to “ @!? ”
to 30 letters.
abc @ ! ?
abc
def
ghi
jkl
mno
pqrs
tuv
wxyz
. Press
123
0
1
2
3
4
5
6
7
8
9
to go back to
CLEAR] repeatedly.
! ” # $ % & ’ ( )
+ , - . / : ; < = >
*
? @ [ ] ^ _ { | }
Basic Setup
Recording
Playback
Editing
M
ote(s
1 : 05 : 00
area for entering title name
Undefined letters in a title name are shown by “*”. If
ou delete them, adjoining letters may change to “*”
r
Press the corresponding number key repeatedly to
oose the available letters
e.g.) Press
2
r “C”
7
Page 88

EDITING
y
u.
[
K
/
L
h
.
.
h
ark.
F
[
K
].
D
[
K
].
d.
.
dly
back
.
y.
whil
d.
.
N
s
.
.
.
G
,
D
.
Chapter Marks (Add)
You can put chapter marks in each title. Once a chapter is marked, you can use it for the chapter search feature
To add a chapter mark:
Follow steps in “How to Access the
Edit Menu” on page 83 to displa
“Edit” men
ote(s) for adding or deleting chapter mark
Maximum number of chapter marks in a title is 99
(for HDD/DVD) and the maximum number of chapter
marks in total is no limit (for HDD) / 999 (for DVD).
If the number of the chapter marks exceed the limit,
you cannot add any more chapter marks
Only with regard to DVD editing, you may not be
able to add chapter marks depending on the
duration of the title or the number of chapters
Only with regard to DVD editing, remaining time on
the disc may decrease when adding chapter marks or
increase when clearing chapter marks depending on
the recording time or edited contents
When you search for a point at step 3, you can also
use the special playback functions such as
etc
Use
t
Submenu will appear
] to select “Chapter Mark”,
en press [OK]
Play back the title up to the point
ere you want to set a new chapter
w
m
When it comes to the desired point, press
PAUSE
Use
/ L] to select “Add”, then press
OK
e.g.) DV
Edit - Chapter Mark
PL
Add
1
Delete
Chapter 2/ 3
NOV/25/14 11:00AM CH12 SP
Use
/ L] to select “Yes”, then press
1 : 05 : 00
OK
Edit - Chapter Mark - Add
PL
Yes
1
No
Chapter 2/ 3
F
NOV/25/14 11:00AM CH12 SP
A new chapter mark is now adde
To add more chapter marks, repeat steps 3 to 5
1 : 05 : 00
Press [RETURN] once or repeate
go
For DVD, the data will be written onto the disc
momentaril
This operation may take a
to the title list
e to be complete
to
Page 89

To del
d
y
u.
[
K
/
L
h
.
.
[
H
[
G
h th
del
F
i
.
D
[
K
/
L
[OK].
[
K
].
.
back
.
y.
whil
d.
N
)
.
Chapter Marks (Delete)
EDITING
ete a chapter mark:
Follow steps in “How to Access the
it Menu” on page 83 to displa
E
“Edit” men
ConnectionsIntroduction Function Setup Others Español
Use
t
Submenu will appear
Use
wit
want to
Chapter mark number is displayed on the
prev
e.g.) DV
Use
] to select “Chapter Mark”,
en press [OK]
] /
to go to the chapter
e chapter mark number you
ete, then press [PAUSE
ew screen
Edit - Chapter Mark
PL
Add
1
Delete
Chapter 2/ 3
NOV/25/14 11:00AM CH12 SP
] to select “Delete”, then
1 : 05 : 00
press
Use
/ L] to select “Yes”, then press
K
Edit - Chapter Mark - Delete
PL
Yes
1
No
Chapter 1/ 2
F
NOV/25/14 11:00AM CH12 SP
1 : 05 : 00
Basic Setup
Recording
Playback
Editing
ote(s
You cannot delete the first chapter mark
The selected chapter mark is now deleted
To delete more chapter marks, repeat steps 3 to
Press [RETURN] once or repeatedly to
go
For DVD, the data will be written onto the disc
momentaril
This operation may take a
to the title list
e to be complete
9
Page 90

EDITING
y
u.
[
K
/
L
h
.
[
K
/
L
p
.
[
K
].
.
r
d.
w
.
ark’s too.
l
)
.
.
.
.
Setting or Clearing All Chapter Marks at Once
or titles in video mode DVD-RW, you can set or edit
apters at every time interval. You can clear the chapter
m
You can specify the interval between chapter marks for
tit
es that last more than 5 minutes.
Follow steps in “How to Access the
Edit Menu” on page 83 to displa
“Edit” men
Use
t
] to select “Chapter Mark”,
en press [OK]
Edit
Video
Edit Title Name
1
Chapter Mark
NOV/25/14 11:00AM CH12 SP
Use
to select the desired
interval, then
Edit - Chapter Mark
Video
NOV/25/14 11:00AM CH12 SP
Use
/ L] to select “Yes”, then press
ress [OK]
1
1 : 05 : 00
OFF
5 minutes
10 minutes
15 minutes
30 minutes
60 minutes
1 : 05 : 00
OK
Chapter marks are added
If you select “OFF” at step 3, all the chapte
marks are erase
Press [RETURN] and then [RETURN] or
STOPC to exit.
This operation may take a
hile to be completed
Note(s
• You cannot select a chapter mark interval that
exceeds the length of a title
• The length of chapters may slightly deviate from the
one specified at the step 3.
• A chapter mark may be delayed depending on the
recording content
• Maximum number of chapter for video mode DVD is
99 chapters per title
• The interval for auto chapter may be up to two
minutes different from the time option you set
Page 91

d
d
.
.
F
[
K
/
L
p
.
[
K
/
L
].
ll
lly
f
f
.
You can d
tle
tles.
)
k.
.
.
G,D
etc.
Dividing a Title
Playlist
EDITING
ivide one ti
into 2 new ti
Follow steps in “How to Access the
it Menu” on page 83 to display
E
it” menu
“E
Play back the title up to the point
where you want to divide the title
When it comes to the desired point, press
PAUSE
Use
then
Use
] to select “Title Dividing”,
ress [OK]
] to select “Yes”, then press
OK
The title is now divided into 2 new titles, and it
wi
go back to the title list automatica
name’s o
index pictures are reset to the
oint
the divided titles are identical, and
irst scene at this
. Title
ConnectionsIntroduction Function Setup Others Español
Basic Setup
Recording
Playback
Editing
Note(s
• Once a title has been split up, it is not possible to
merge them bac
• If an internal HDD or a DVD contains the maximum
number of titles (HDD: 600, DVD-RW: 99), you cannot
ivide any titles
• With DVD-RW, you cannot divide the titles if the total
number of chapters has already reached 999
• When you search for a point at step 2, you can also
se the special playback functions such as
• For DVD, it may start writing data to the disc as you
complete the editing procedure.
1
Page 92

y
u.
[
K
/
L
b
.
y
y
.
[
K
/
L
/0/
1
p
.
.
[
K
].
.
[
C
.
ly.
a
.
.
)
eted.
Combining Titles
EDITING
Playlist
Playlist
You can combine two titles into a single title
Follow steps in “How to Access the
Edit Menu” on page 83 to displa
“Edit” men
Use
Com
Title combining setting window will appear.
Selected title gra
next title becomes
] to select “Title
ining”, then press [OK]
Edit
PL
Scene Delete
1
Edit Title Name
Chapter Mark
Title Dividing
Title Combining
JAN/ 9/14 12:00AM CH10 LP
Edit - Title Combining
PL
JAN/ 9/14 12:00AM CH10 SP
12:00AM (1:00:00) THU JAN/ 9/14 CH10 SP
1
1 +
4 5 6
1 : 05 : 00
s out, and the frame of the
ellow
2
3
1 / 1
Note(s
You cannot select the same title twice and combine
it into a single title.
If either one of the two original titles is deleted, the
mbined new title is also del
Use
title to combine, then
to select another
ress [OK]
Selection menu will appear
Use
/ L] to select “Yes”, then press
K
Combine selected titles?
Yes
No
The two titles will combine into a single title
Title List
PL
JAN/ 9/14 12:00AM CH10 SP
12:00AM (1:00:00) THU JAN/ 9/14 CH10 SP
1
4 5
Press [RETURN] or
Data will be written onto the disc momentari
This operation may take
while to be completed
2
3
1 / 1
to exit
2
Page 93

.
d
d
.
[
K
/
L
,
.
h
f
[OK].
E
,
]
ll
.
y
p
.
D
]
d
f
.
y
.
f
.
N
)
y
G,D
etc.
Deleting a Scene on a Title
.
EDITING
You can delete a specific part of a title
Follow steps in “How to Access the
it Menu” on page 83 to display
E
it” menu
“E
Use
] to select “Scene Delete”
then press [OK]
Edit
PL
Scene Delete
1
Edit Title Name
Chapter Mark
Title Dividing
Title Combining
JAN/ 9/14 12:00AM CH10 LP
1 : 05 : 00
Play back the title up to the point
ere you want to set a start point
w
or the scene to be deleted, then
press
To set a start point at the beginning of the title,
ress
PL
ORG
then press
Edit - Scene Delete
OK
Start
1
End
Preview
Delete
ConnectionsIntroduction Function Setup Others Español
Basic Setup
Recording
Playback
ote(s
When you search for the start/end point at step 3/4,
ou can also use the special playback functions such
JAN/ 9/14 12:00AM CH10 LP
1 : 20 : 00
Start point is now set, and the highlight
automatica
y moves to “End”
Play back the title up to the point
where
then
To set an end point at the end of the title, press
At the end of a title, playback will be in pause
mo
the beginning o
PL
End point is now set, and the highlight
automaticall
The portion for deletion is indicated in red in the
progress bar at the bottom o
ou want to set an end point,
ress [OK]
, then press
e. Press
Edit - Scene Delete
JAN/ 9/14 12:00AM CH10 LP
Instructions continue on the next page
OK
LAYBto resume playback from
the title
Start
1
End
Preview
Delete
1 : 30 : 00
moves to “Preview”
the screen
Editing
Page 94

EDITING
ghlighted
p
.
ll b
f
.
K/L
g
.
6.
Before
editing
Edited
start point end point
[
K
/
[OK].
[
K
/
L
].
ected scene is now deleted.
back
.
With “Preview” hi
[OK] to
very time
wi
seconds be
review the result
K] is pressed, the deleted scene
e shown including scene material 5
ore and after the deleted scene
, press
• If you are not satisfied with the result, use
to go back to “Start” or “End”, and try
settin
them again
• If you are satisfied with the result, proceed to
step
Use
L to select “Delete” then
press
Edit - Scene Delete
PL
Start
1
End
Preview
Delete
Use
to select “Yes” then press
K
Edit - Scene Delete
PL
Yes
1
No
JAN/ 9/14 12:00AM CH10 LP
1 : 30 : 00
The sel
Press [RETURN] once or repeatedly to
go
to the title list
JAN/ 9/14 12:00AM CH10 LP
1 : 30 : 00
4
Page 95

EDITING
d
y
u.
[
K
/
L
.
].
d.
]
,
f
.
.
back
.
y
.
Protecting a Title
Original Original
To prevent the accidental editing or erasing of the titles,
ou can protect them using the “Edit” menu
Follow steps in “How to Access the
it Menu” on page 83 to displa
E
“Edit” men
ConnectionsIntroduction Function Setup Others Español
Use
to select “Protect”, then
ress [OK]
Edit
ORG
Scene Delete
1
Edit Title Name
Chapter Mark
Protect
JAN/ 6/14 12:00AM CH10 LP
1 : 30 : 00
With “OFF ON” selected, press
OK
Edit - Protect
ORG
OFF ON
1
JAN/ 6/14 12:00AM CH10 LP
The title is now protecte
• If the title is already protected, “ONOFF” will
ear instead. Press
rom protection
• The protected title will be marked with
n
1 : 30 : 00
OK
to release the title
Basic Setup
Recording
Playback
Editing
Press [RETURN] once or repeatedly to
go
to the title list
Page 96

.
[
K
/
L
[OK].
[
K
/
L
[OK].
t
[
K
/
L
.
f
.
[
K
/
L
].
data
tten onto the disc
y.
whil
d.
ase all titles on a disc.
N
)
ased.
Format
You can er
EDITING
ress
STOPC if you are playing back a disc
Press [MENU].
Use
] to select “Disc Edit”, then
press
Use
] to select “Format”, then
press
e.g.) VR mode DVD-RW playlis
Disc Edit
Format
Finalize
Disc Protect OFF ON
Delete All Playlists
Use
] to select “Start”, then
ress [OK]
A pop up window will appear and prompt you
to con
irm
Use
] to select “Yes”, then press
OK
Are you sure?
Yes
No
Format
momentaril
This operation may take a
will be wri
e to be complete
Formatting is complete.
ote(s
When you select “Yes” at step 5, all contents of the
isc will be er
Page 97

y
.
f
f
f
f
d.
EDITING
ess
.
].
[
K
[OK].
[
K
].
[
K
,
t
.
[
K
.
䂔
䂔
䂔
䂔
䂔
䂔
.
.
.
.
d.
)
g
format for a
sc.
ats on one
sc. If
y
.
Choosing the Recording Format for a Blank DVD-RW Disc
When inserting a brand-new DVD-RW disc, the unit
automaticall
DVD-RW disc will be formatted either Video or VR mode
according to the recording
unit. Be
need to set the recording
You can also manually
een use
starts to initialise the disc
ormat mode setting on the
ore inserting a brand-new DVD-RW disc, you
ormat to the desired mode.
ormat a DVD-RW disc once it has
r
STOPC if you are playing back a disc
Press [MENU
ConnectionsIntroduction Function Setup Others Español
Use
/ L to select “Disc Edit”, then
press
Use
/ L] to select “Format”, then
ress [OK
Disc Edit
Format
Finalize
Disc Protect OFF ON
Delete All Playlists
Use
/ L] to select “Format Mode”
hen press [OK]
Use
/ L to select “Video mode” or
VR mode”, then press [OK]
Format Mode
Format Mode
Format Mode
䂔
Video mode
Video mode
Video mode
Video mode
Video mode
VR mode
VR mode
VR mode
Video mode
Video mode
DVD Player Compatibility mode.
DVD Player Compatibility mode.
VR mode
VR mode
Editing possibility mode.
Editing possibility mode.
Basic Setup
Recording
Playback
Editing
Note(s
The recording format setting is effective only for
DVD-RW discs. You cannot change the recordin
DVD-R di
You cannot mix two form
ou insert a disc that has been recorded before, the
recording format cannot be changed even if you
hange it in “Setup” menu
DVD-RW di
Press [MENU] to exit
Insert a blank disc
ormatting will start
Formatting is complete
100%” is indicate
7
Page 98

ess
.
[
K
/
L
,
.
[
K
/
L
f
.
y
.
elete All
tles” to delete all titles
.
.
[
K
/
L
].
d.
Deleting All Titles in HDD
EDITING
r
STOPC if you are playing back a disc
Press [MENU].
Use
] to select “HDD Menu”
then press [OK]
Use
o
Select “Delete All Unprotected Titles” to delete
onl
including protected titles
Select “Delete All Playlists” to delete all playlists
Use
] to select the desired type
deletion, then press [OK]
unprotected titles
“D
HDD Menu
Delete All Unprotected Titles
Delete All Titles
Delete All Playlists
Ti
] to select “Yes”, then press
K
Delete entire titles?
Yes
No
All titles are now delete
Page 99

LIST OF SETTINGS
T
.
l
g
05
F
]
.
o
F
z96kHz
.
CM
eam
f
.
e
h
ch
h
Other
.
ge
l
h
h
h
r
F
h
ch
h
Other
l
OFF
.
ode
AutoField
F
e
y
.
V
y
p
e
5
utes
y
seconds
s
Y
08
h
s
.
OFF
ute
5
utes
utes
ts.
r
Auto
t
k
CC
8
F
S
1
S
S
S
4
S
S
6
.
3
ONFF
.
0
g
ONFF
ective.nt Size
e
ll
.
he following table is the contents which you can set and the default setting. Refer to the following table for useful operation
Menu Items (highlight is the default) Contents
Playback
pages 102-1
rental Lock
isc Audi
isc Menu Languag
namic Range
ntrol
M
Dolby Digital P
F
level 8 [Adult] to 1 [Kid Safe
OF
48kH
r
Englis
Fren
Spanis
et the parental level for DVD playback
ompressing the sound volume range.
et whether the sound recorded in 96kHz will
e down sampled in 48kHz
et the type of sound signal which outputs
rom the digital audio output jack
et the Language for disc menu Language
ConnectionsIntroduction Others Español
Audio Langua
ubtitle Language
Ang
e Icon
ill M
ariable Skip / Repla
Settin
Genera
Display
pages 106-1
anguage
reen Saver
L Dimme
TV
C Style
pages 39-4
aption Service
page 3
ecording
page 4
ser Settin
Origina
Englis
Frenc
Spanis
Othe
F
Englis
Fren
Spanis
ram
Variable Ski
seconds
15 seconds
30 seconds
1 minut
min
Variable Repla
15 seconds
30 seconds
1 minute
5 minute
Englis
Françai
Español
1 min
min
10 minutes
15 min
Brigh
Dar
F
ervice
ervice2
ervice3
ervice
ervice5
ervice
arge
Middl
Sma
et the Language for Audio.
et the Language for Subtitles.
et whether or not to display the Angle Icon
et the type of Still Image when pausing
pla
back
et the amount of Skip time when you press
SKIP
et the amount of Rewind time when you
ress
REPLA
et the Language for OSD (On-Screen
isplay)
et the Idling time before the Screen Saver
r
et the Brightness of the Front panel display.
et the type of the DTV Closed Caption
et whether to Record the DTV Closed
aption or not
et the CC Style setting whether or not it is
ff
et Font size of the displayed Caption.
Basic Setup
PlaybackRecording
Editing
Function Setup
Instructions continue on the next page
Page 100

LIST OF SETTINGS
l
g
08
0
le
1
2
3
4
6
7
8
.
y
d
t
slucent
h
r
te
ack Red
een
ue Yellow
a
n
e
e
d
d
m
w
.
r
e
ack
d G
n Blue
w
a
n
.
y
d
t
t
h
Color
te
ack
d Green Blue
w
a
n
V-Ch
g
X
7
R
3
G G
R
TV R
g
4
G
G
Y7 TV-Y
e
.
8+
G G
C8+
C
E
s+ 16
+
+
s+
G
E
.
.
Menu Items (highlight is the default) Contents
Display
pages 106-1
Settin
enera
C Style
pages 39-4
ont Sty
ont Opacit
ont Colo
dge Typ
ge Colo
ack Opacit
Style
Style
Style
Style
Style5
Style
Style
Style
Soli
Transparen
Tran
Flas
Whi
Bl
Gr
Bl
Magent
Cya
on
Raise
Depresse
Unifor
L.Shadow
R.Shado
Whit
Bl
Re
ree
Yello
Magent
Cya
li
Transparen
Translucen
Flas
Whi
Bl
Re
et Font Style of the displayed Caption
et the Font Transparency (Opacity) of the
isplayed Caption.
et the Font Color of the displayed Caption.
et Edge Type of the displayed Caption
et Edge Color of the displayed Caption
et Background Transparency (Opacity) of the
isplayed Captioning box.
et Background Color of the displayed
aption box.
Yello
Magent
Cya
ip
AA Ratin
atin
nadian
nglish Rating
nadian French
ating
NC-1
PG-1
P
N
TV-1
TV-P
TV TV-
Non
1
P
18an
ans
13ans
8an
et the viewing limitation according to US
ovie Ratings.
et the viewing limitation according to US TV
rogram Ratings
et the viewing limitation according to
anadian English Language Ratings.
et the viewing limitation according to
anadian French Language Ratings
Instructions continue on the next page
 Loading...