

Magnavox DVD501AT Owner’s Manual

Once your purchase is registered, you're eligible to receive all the privileges of owning this prod-
uct. So complete and return the Warranty Registration Card enclosed with your purchase at once.
And take advantage of these important benefits.
Warranty
Verification
Registeringyourproduct within
10daysconfirms your right to
maximumprotection underthe
terms andconditions of your
warranty,
Smart. _ry smart.
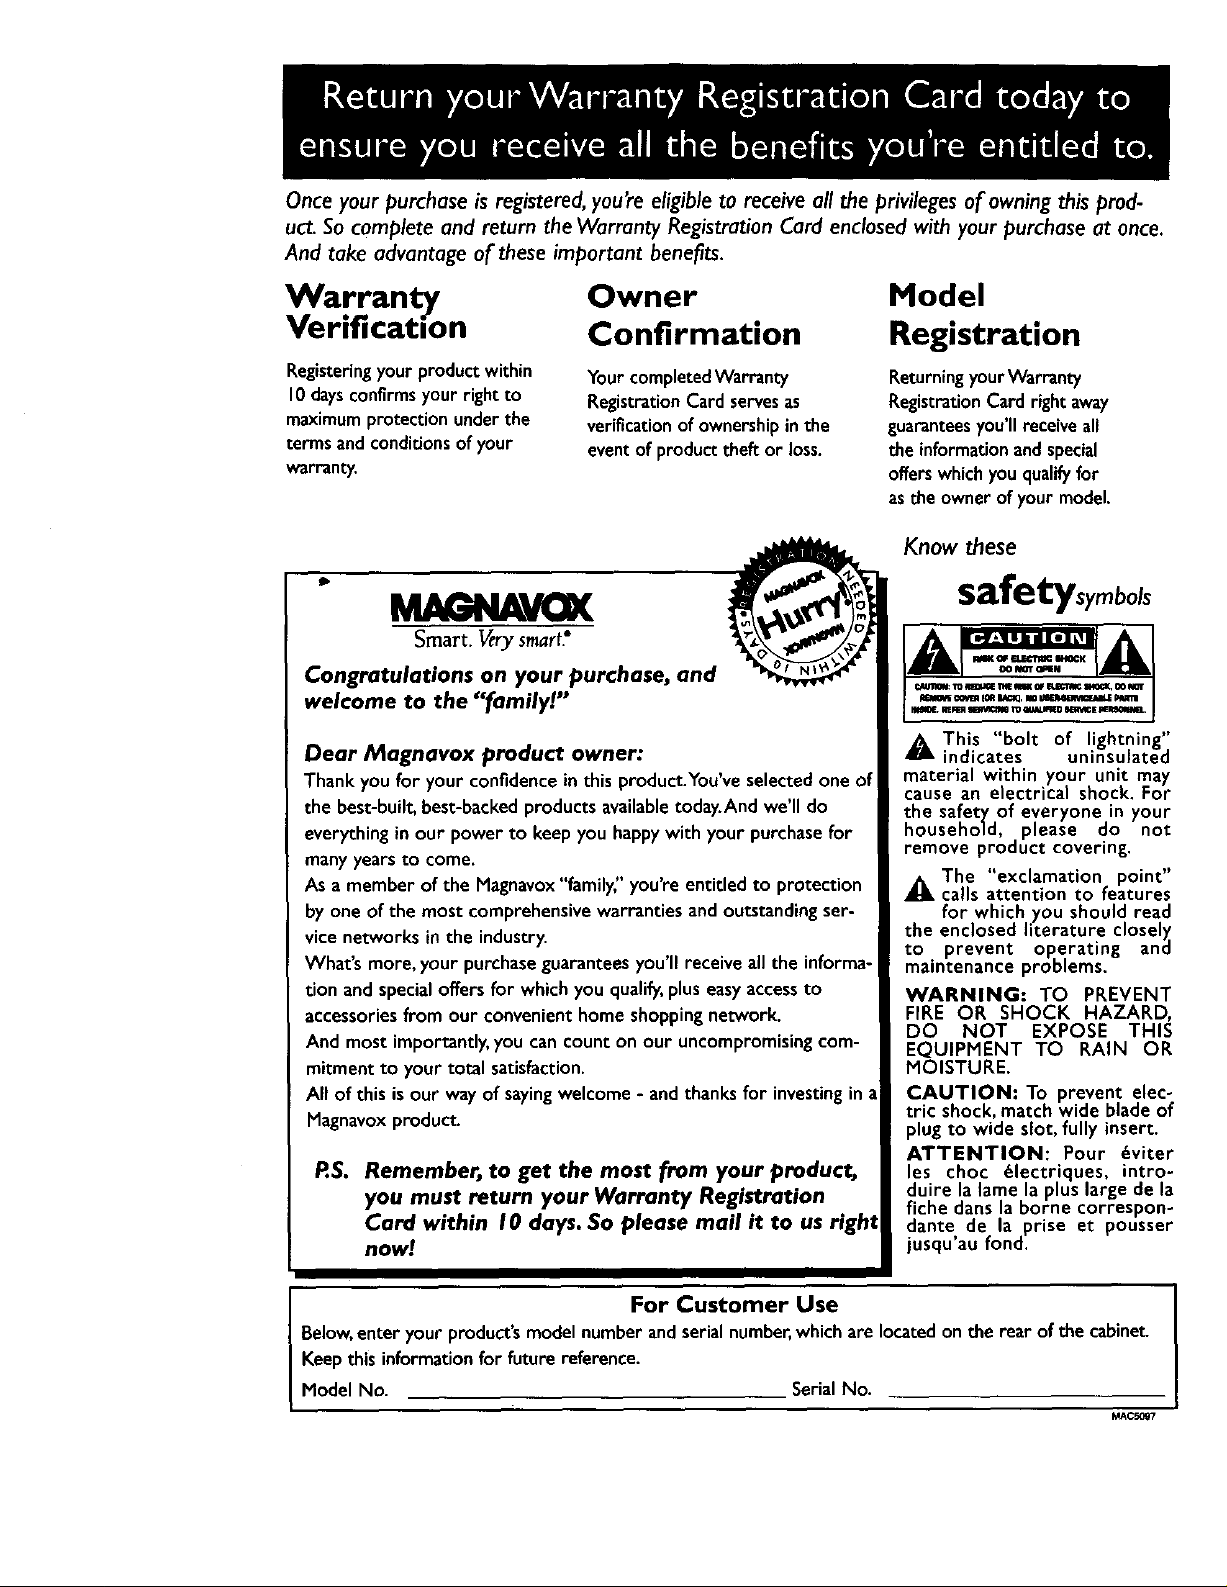
Congrotulations on your purchase, and
welcome to the "family!"
Dear Magnavox product owner:
Thank youfor your confidencein this product.You'veselectedone of
the best-built,best-backedproductsavailabletoday.And we'll do
everythinginour power to keepyou happywith your purchasefor
manyyearsto come.
As a member of the Magnavox"family;' you'reentitled to protection
byone of the most comprehensivewarrantiesandoutstandingser-
vicenetworks in the industry.
What's more, your purchaseguaranteesyou'llreceive allthe informa-
tion andspecialoffersfor which you qualify,pluseasyaccessto
accessoriesfrom our convenienthome shopping network.
And most importantly,you can count on our uncompromising com-
mitment to your total satisfaction.
All of this isour way of sayingwelcome- andthanks for investingin a
Magnavoxproduct.
RS. Remember, to get the most from your product,
you must return your Warranty Registration
Card within I0 days. So please mail it to us right
now!
Owner
Confirmation
Your completedWarranty
RegistrationCard servesas
verificationof ownershipin the
eventof product theft or loss.
@
Model
Registration
Returningyour Warranty
RegistrationCardright away
guaranteesyou'll receiveall
the informationand special
offers which you qualifyfor
asthe owner of your model.
Know these
safetysymbols
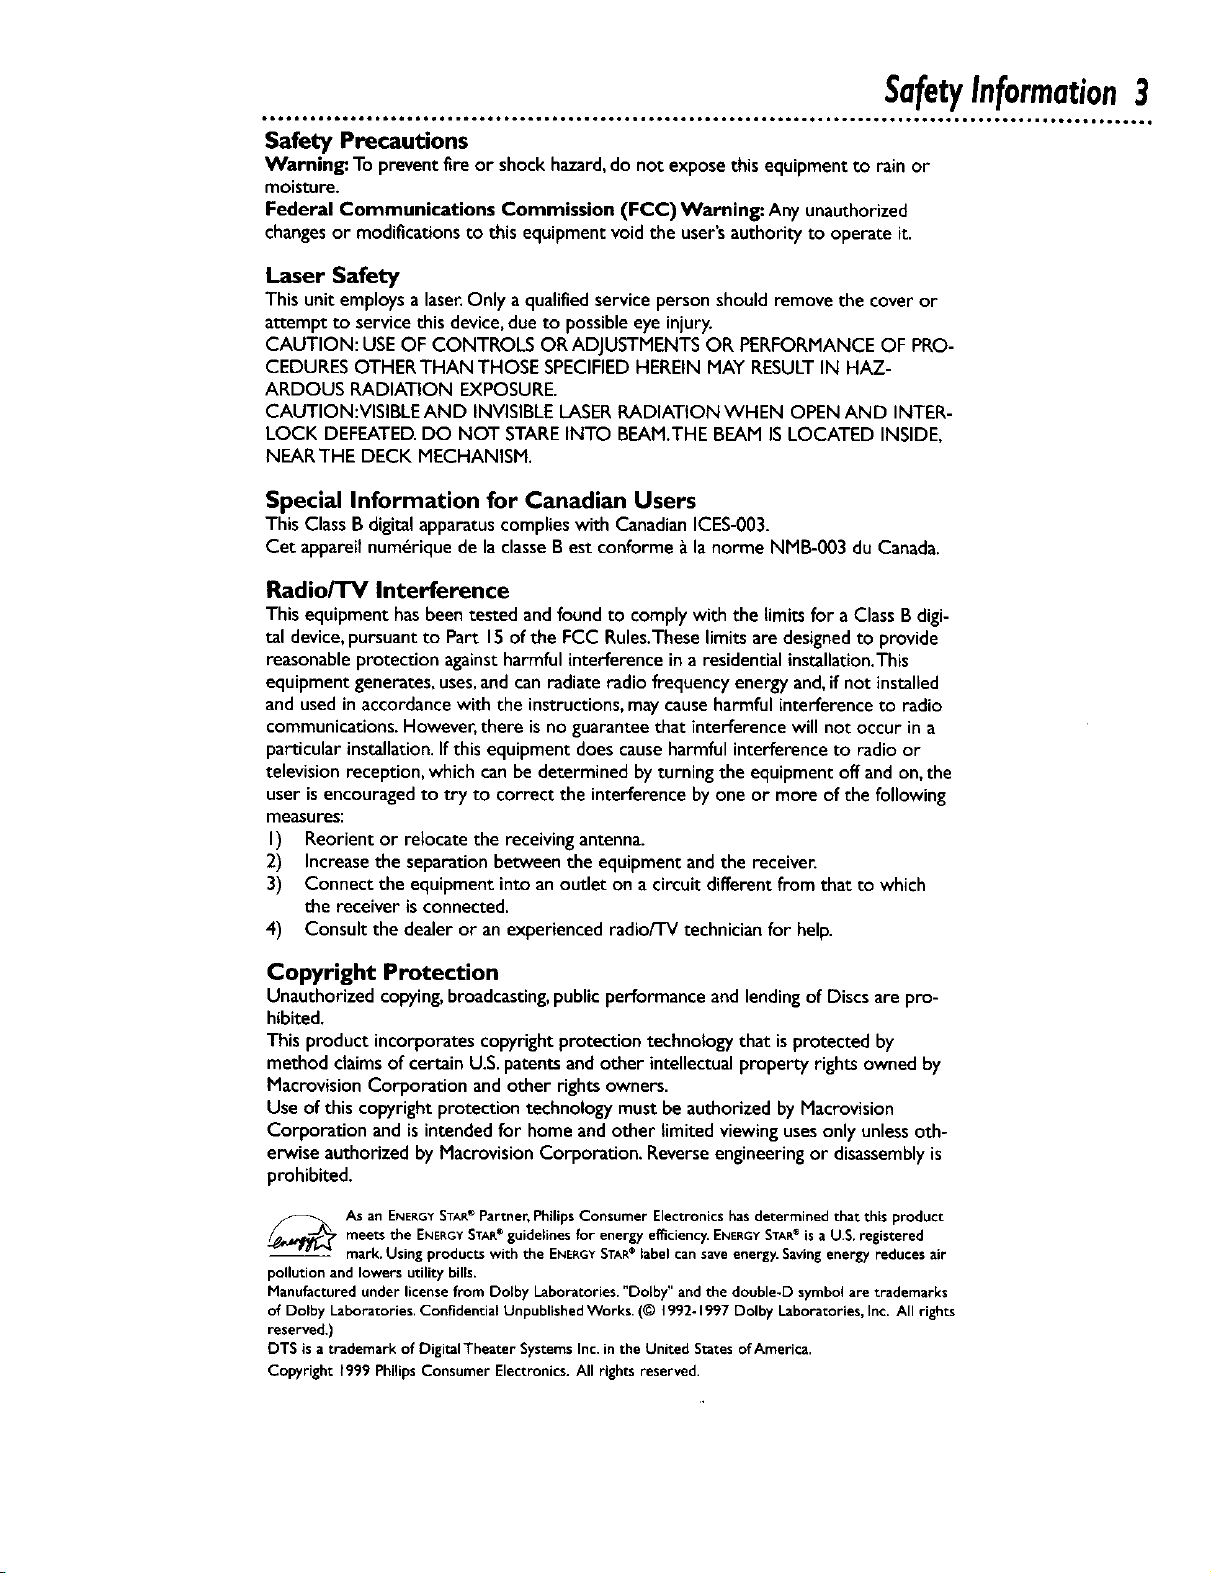
_OBThis "bolt of lightning"
indicates uninsulated
material within your unit may
cause an electrical shock. For
the safety of everyone in your
household, please do not
remove product covering,
_iThe "exclamation point"
calls attention to features
for which you should read
the enclosed literature closel)_
to prevent operating and
maintenance problems.
WARNING: TO PREVENT
FIRE OR SHOCK HAZARD,
DO NOT EXPOSE THIS
EQUIPMENT TO RAIN OR
MOISTURE.
CAUTION: To prevent elec-
tric shock, match wide blade of
plug to wide slot, fully insert.
ATTENTION: Pour _viter
les choc 61ectriques, intro-
duire la lame la plus large de la
fiche dans la borne correspon-
dante, de la prise et pousser
jusqu au fond.
For Customer Use
Below,enter your product'smodel number andserialnumber,whicharelocatedon the rear of the cabinet
Keepthis informationforfuturereference.
Model No. Serial No.
MAC5097
SafetyInformation3
Safety Precautions
Warning: To prevent fire or shock hazard,do not exposethisequipment to rain or
moisture.
Federal Communications Commission (FCC)Warning: Any unauthorized
changesor modificationsto this equipment voidthe user'sauthorityto operateit.
Laser Safety
Thisunit employsalaser.Only a qualified servicepersonshould remove the cover or
attemptto service thisdevice,due to possibleeye injury.
CAUTION: USEOF CONTROLS ORADJUSTMENTS OR PERFORMANCEOF PRO-
CEDURESOTHERTHAN THOSE SPECIFIEDHEREIN MAY RESULTIN HAZ-
ARDOUS RADIATION EXPOSURE.
CAUTION:VISIBLE AND INVISIBLELASERRADIATION WHEN OPENAND INTER-
LOCK DEFEATED.DO NOT STAREINTO BEAM.THE BEAM ISLOCATED INSIDE,
NEARTHE DECK MECHANISM.
Special Information for Canadian Users
This ClassB digital apparatuscomplieswith CanadianICES-003.
Cet appareilnum_rique de laclasseB est conforme _ la norme NMB-003 du Canada.
Radio/TV Interference
Thisequipmenthasbeentested andfoundto complywith the limits for a Class B digi-
tal device,pursuantto Part 15ofthe FCC Rules.Theselimitsaredesignedto provide
reasonableprotectionagainstharmful interferenceina residentialinstallatlon.This
equipment generates,uses,andcan radiateradio frequencyenergyand,ifnot installed
and usedinaccordancewith the instructions,may causeharmfulinterferenceto radio
communications.However,there is noguaranteethat interference will not occur in a
particular installation.If this equipment doescauseharmful interference to radio or
television reception, which canbe determined byturning the equipment off and on,the
user is encouragedto try to correct the interference by one or more of the following
measures:
I) Reorient or relocate the receivingantenna.
2) Increasethe separationbetween the equipment and the receiver.
3) Connect the equipment into an outlet on a circuit different from that to which
the receiver is connected.
4) Consult the dealer or anexperiencedradio/TVtechnicianfor help.
Copyright Protection
Unauthorized copying,broadcasting,publicperformanceandlendingof Discs arepro-
hibited.
This product incorporatescopyright protectiontechnology that isprotected by
method claimsof certain U.S.patentsand other intellectual property rights owned by
Macrovision Corporation and other rights owners.
Use of this copyright protection technology must be authorized by Macrovision
Corporation and is intendedfor home and other limited viewing usesonly unlessoth-
erwise authorized by Macrovision Corporation. Reverseengineeringor disassemblyis
prohibited.
._TAs an ENERGYSTAR® Partner, Philips Consumer Electronics has determined that this product
-- mark. Using products with the ENERGYSTAR® label can save energy. Saving energy reduces air
pollution and lowers utility bills.
Manufactured under license from Dolby Laboratories. "DoLby" and the double-D symbol are trademarks
of Dolby Laboratories. Confidential Unpublished Works. (© 1992-1997 Dolby Laboratories, Inc. All rights
reserved.)
DTS is a trademark of Digital Theater Systems Inc. in the United States of America.
Copyright 1999 Philips Consumer Electronics. All rights reserved.
meets the ENERGY STARe guidelines for energy efficiency. ENERGYSTAR® isa U.S. registered
4 TableofContents
General Information
Safety Information ...................................................... 3
Table of Contents ...................................................... 4
Introduction ........................................................... 5
Playable Discs .......................................................... 6
Getting Started
Remote Control Setup ................................................... 7
Hookups ........................................................... 8-12
DVD Player Display .................................................... 13
Front Panel .......................................................... 14
Rear Panel ........................................................... 15
Remote Control Buttons ............................................. 16-17
Disc Playback and Features
Playing a Disc ......................................................... 18
Disc Menus .......................................................... 19
PauSing Playback ....................................................... 20
Step by Step Playback ................................................... 21
Fast Forward/Reverse Search ............................................. 22
Slow Motion .......................................................... 23
Track Playback ........................................................ 24
Title/Chapter Playback .................................................. 25
Specific Time Playback .................................................. 26
Repeat Playback ....................................................... 27
A-B Repeat Playback ................................................... 28
Programmed Playback .................................................. 29
Random Playback ...................................................... 30
Audio Language/Sound Mode ............................................. 31
Subtitle Language ...................................................... 32
Camera Angles ........................................................ 33
Parental Lock Password ................................................. 34
Parental Lock Levels .................................................... 35
DVD Player Setup and Features
Status Display ......................................................... 36
Video Settings ........................................................ 37
Audio Settings ...................................................... 38-39
Language Settings ................................................... 40-42
Other Menu Settings ................................................... 43
Information You May Need
Helpful Hints ....................................................... 44-45
Care and Maintenance .................................................. 46
Glossary ............................................................. 47
Specifications ......................................................... 48
Limited Warranty ...................................................... 49
Index ............................................................... 50
Supplied Accessories ................................................... 52

Introduction5
• lOt..... ° ..I,... .° .Jeto... °° e...... °° .oeotl .° o,e... °. Jt.e... ° mQ.. °°°, o... ,o° o.e. °°° .Jots, o°° 1.., • J.. ° .el ° ,,.1.
Welcome!
This DigitalVideo Disc Player will allow you to enjoy better picture quality, clearer
sound, and endless playback features available on Digital Video Discs (DVDs).
Expanding technology allows you to add options to your viewing - watch a direc-
tor's cut of a movie, listen to the producer's comments, or play your favorite scene
over and over again.Hear a movie in different languages,or listen only to the
soundtrack.The possibilities are limited only by your choices and the materials avail-
able on the DVD.
Of course, you can listen to your favorite Audio Compact Discs on this DVD Player
as well. Determine the order in which you want to hear the songs, or play the Disc
repeatedly - all while seeing the status of the CD on your television.
We hope you enjoy this DVD Player and learn to use all of its features.To get the
most out of the DVD Player, read this owner's manual carefully. It will describe how
you can access all the features listed below.
Features
• Audio Language/SoundMode Choices
•Automatic Detection of Disc Type
(Audio CD or DVD)
• Dolby Digital Sound
• DVD Menus in a Desired Language*
• On-Screen Display for DVD Player
• Parental Lock
• Paused/Fast/Slow/Step-by-StepPlayback
• Program Playback (Audio CD only)
• Random Playback (Audio CD only)
• Screen Saver
• Selecting a Camera Angle *
• Subtitles in a Desired Language *
* If available on the Disc
When referring to this manual, remember...
_ Indicatesthat the feature described is availableon some DigitalVideo Discs.
jAUDIO CD Indicatesthat the feature describedisavailableon someAudio Compact
Discs.
Disc Menus...
Someexplanations in this manualare intendedto describethe Disc Menus.These
menusare set bythe movie producers or by the music industry,and the menuswill
vary amongDiscs.Furthermore, not all Discsare guaranteedto havemenus.However,
if the Disc hasa menu,you canaccessthe Disc Menu by pressingthe MENU button
on the remote controJ.
DVD Player Menus...
Someinstructionsexplainhow to usethe DVD Player'smenuto set upfeaturesof
the DVD Playeror the Disc.Yougetto the DVD PlayerMenu by pressingthe SETUP
button on the remote controlwhenplaybackisstopped.Evenifa featureisset upin
the DVD Player'smenu,it may not beavailableif the current Discdoesnot include
that feature.
Not allof the featuresdescribedin this manualmay beavailableon every
_ Available Disc Features...
not availableon the currentDisc or not availableatthe currenttime.
DVD or AudioCD. ifthe featureisnot availableon the Disc,you cannot
usethe DVD Playerto makethese featuresavailable.The"No feature"
symbolwillappearontheTV screenifyou try to set upa featurethat is
6 PlayableDiscs
Playable Discs
ThisDVD Playerwill playDigitalVideo Discs(DVDs) andAudio CDs.In order to playa
DVD or Audio CD on this DVD Player,makesure the Disc meets the requirements for
RegionCodes and Color Systemsasdescribed on this page.Also,the Discs should be
labelledwith the following Iogosand shouldmeet these standards.
Disc Type
Digital
Video
Disc
Audio
CD
Logo
DI_RIU, AIJOIO
Contents
Sound
and
Pictures
Sound
Disc Size
12cm
8 cm
12cm
8 cm
(singles)
Maximum
Playback Time
Approx. 4 hours
(single-sided)
Approx. 8 hours
(double-sided)
Approx. 80 minutes
(single-sided)
Approx. 160 minutes
(double-sided)
74rninutes
20minutes
into numberedTracks, i.e.,
a track may beone song.
Region Codes
DVDs alsomust be labelledforALL regionsor for Region I in order to be playedon
this DVD Player.Youcan not playDiscs that arelabelledfor other regions.
Lookfor the symbols belowonyour DVDs. Ifthese region symbolsdo not appearon
your DVD, you cannot playthe DVD inthis DVD PlayeE
Disc
Segments
DVDs are
divided into Tides,
which are divided
into Chapters.
Titles and Chapters
are numbered.
AudioCDs are divided
@@
The number insidethe globerefers to a region of the world.Region I represents the
United States,Canada,upper regionsof North America,Bermuda,the U.S.Virgin
Islands,and smallregions nearAustralia.
A Disc encodedin a specific region format canonly be playedon DVD Playerswith the
sameregion code. For example, ifa Disc is labelledfor Region2,you can not playthe
DVD on this DVD Player.
Color Systems
Different color systemsare availablethroughout the world.The most common color
systemsare NTSC, which is used primarily in the United Statesand North America,
PAL,andSECAM.
This DVD Playerusesthe NTSC color system.Therefore,the Discs that you playmust
be recorded in the NTSC system.Youcannotplay Discs recorded in other formats.The
color systemof the DVD may be listed on the DVD or on the Disc jacket.
Unacceptable Discs
The followingDiscs cannot be played on this DVD Player.
• CD-ROM
• Compact Disc-Interactive(CD-I)
• Compact Disc-Recordable(CD-R)
• DigitalVideo Disc-VideoRecordable
(DVD-VR)
The following discs may be played,but only the audio will be available.There will be
no picture.
• Compact Disc-Graphic(CD-G) • Compact Disc-Video(CD-V)
• DVD-RAM
• DVD-ROM
• Photo CD
• Video CD
• Video SingleDisc (VSD)
• •• °°.,°° °.°°.. .°° ,.°° • °
ItooQte,eoo,ll6 • OmJOO,e,OO_e•O6OO,•O OIJJOO_e•6Ol, JlO_OOOOe••6Ol • I,•,oe• ••_OIO•_I,_••_O •
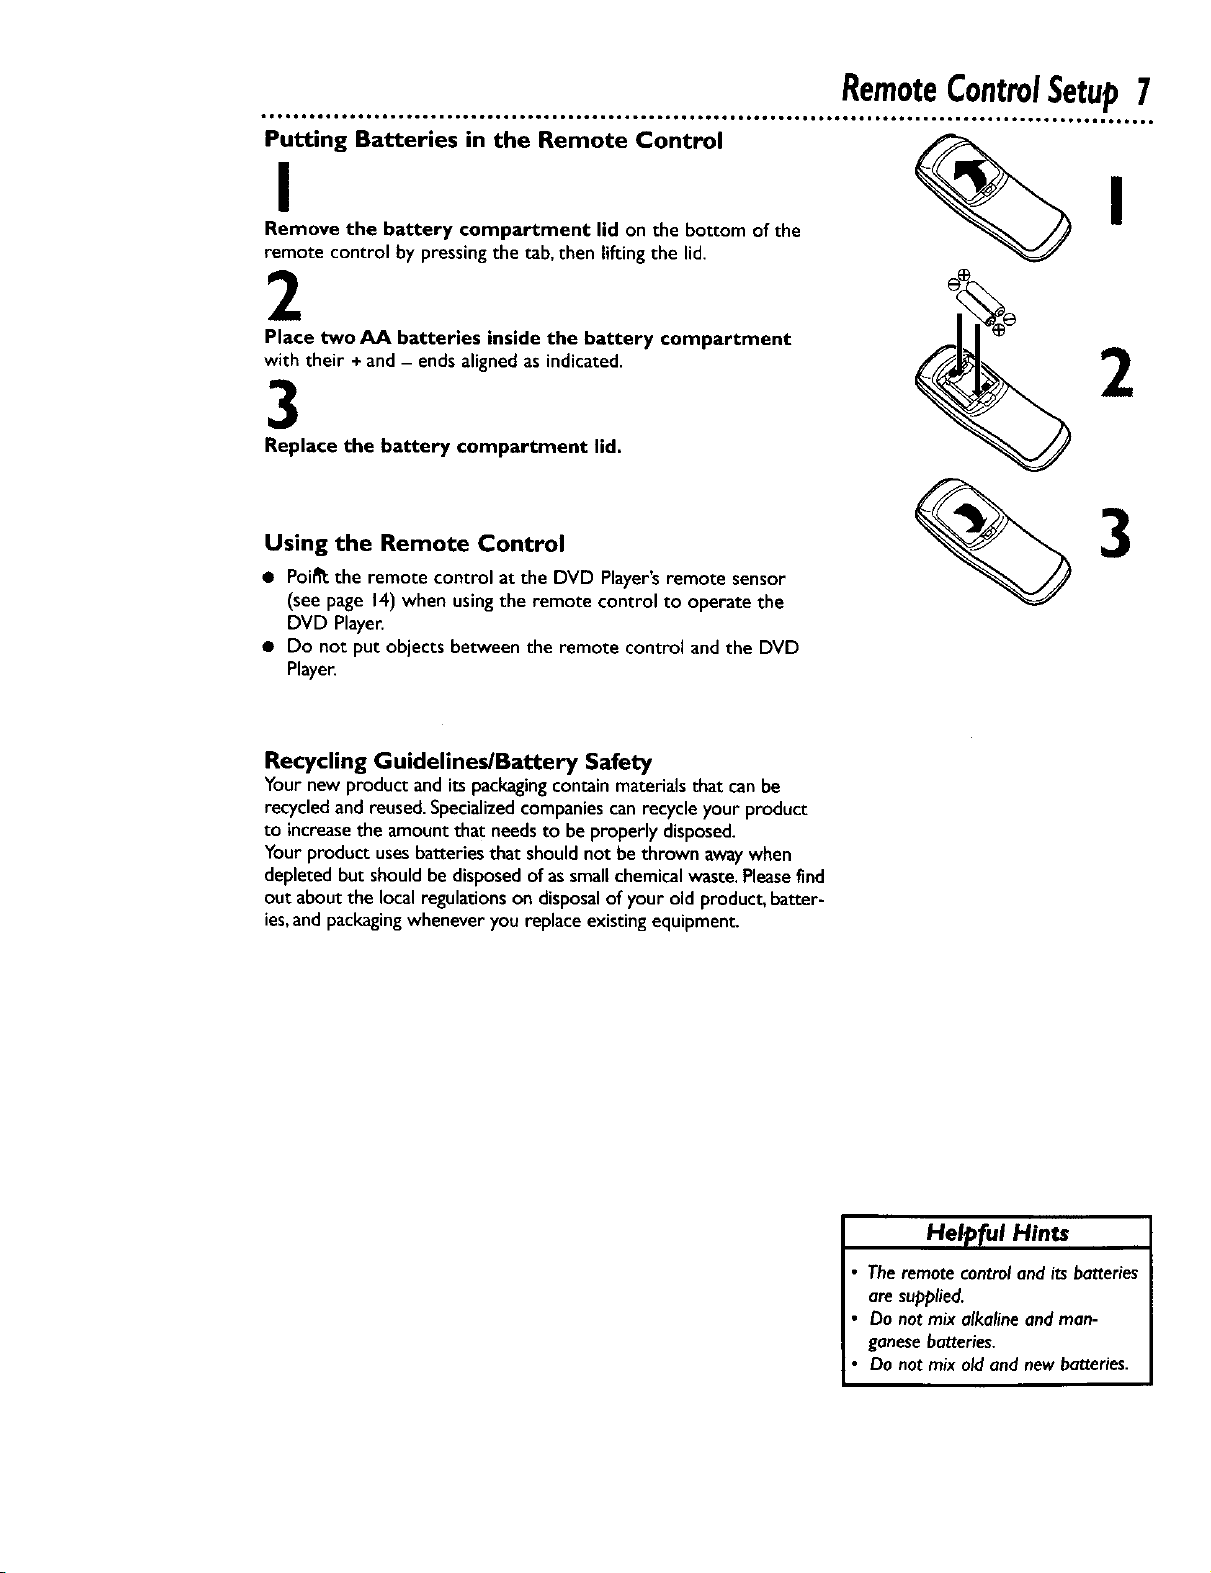
Putting_ Batteries in the Remote Control __
Remove the battery compartment lid on the bottom of the
remote control by pressingthe tab, then lifting the lid.
2
RemoteControlSetup7
Place two AA batteries inside the battery compartment
with their + and- endsalignedas indicated.
3
Replace the battery compartment lid.
Using the Remote Control
• Poi_ the remote control at the DVD Player'sremote sensor
(see page 14)when using the remote control to operate the
DVD Player.
• Do not put objects between the remote control and the DVD
Player.
Recycling Guidelines/Battery Safety
Your new product andits packagingcontain materialsthat canbe
recycledand reused.Specializedcompaniescan recycle your product
to increasethe amount that needsto be properly disposed.
Your product usesbatteries that shouldnot be thrown awaywhen
depleted but shouldbe disposedof assmallchemicalwaste. Pleasefind
out about the local regulationson disposalof your old product, batter-
ies,and packagingwhenever you replace existingequipment
Helpful Hints
Theremotecontrol and its batteries
aresupplied.
Do not mix alkalineand man-
ganesebatteries.
Do not mix old and newbatteries.
8 Hookups
• •or • too• •.°l, .Do• • •6•1 • °°°, ot_• • t•• • °°ill • ,o• •o•1 • mid • oeQ• • too°ml ot6•• • i°too• •teoi• •DID• • ioe•°o •, oDd,o,•°•• I,i
You mayconnect the DVD Playerseveraldifferent ways,dependingon your existingequipment andyour prefer-
encesfor soundandpicture quality.Todetermine which hookup is best for you,examine the optionson the fol-
lowing pages,then seewhich best matchesyour situation. Before you hook up the DVD Player,remember:
• Connect the DVD Playerdirectly to a'l_ tf you connect the DVD Playerto aVCR, then connect theVCR to
theT_, the picture may be distorted by the copyright protection system.
• Turn off the power ofall equipment before makinganyconnections.
• Refer to the owner's manualsof your other equipment for additional information.
• Dependingon your connection, you mayneed to purchaseadditional cables.
• If you do not connect the DVD Playerto a Dolby Digital or DTS Decoder,setDOLBY DIGITAL and DTSto
OFF on the DVD Player.Detailsareon pagesI I and3839. Ifyou playaDVD when the settingsare wrong,
the sound will be distorted or you maydamagethe speakers.
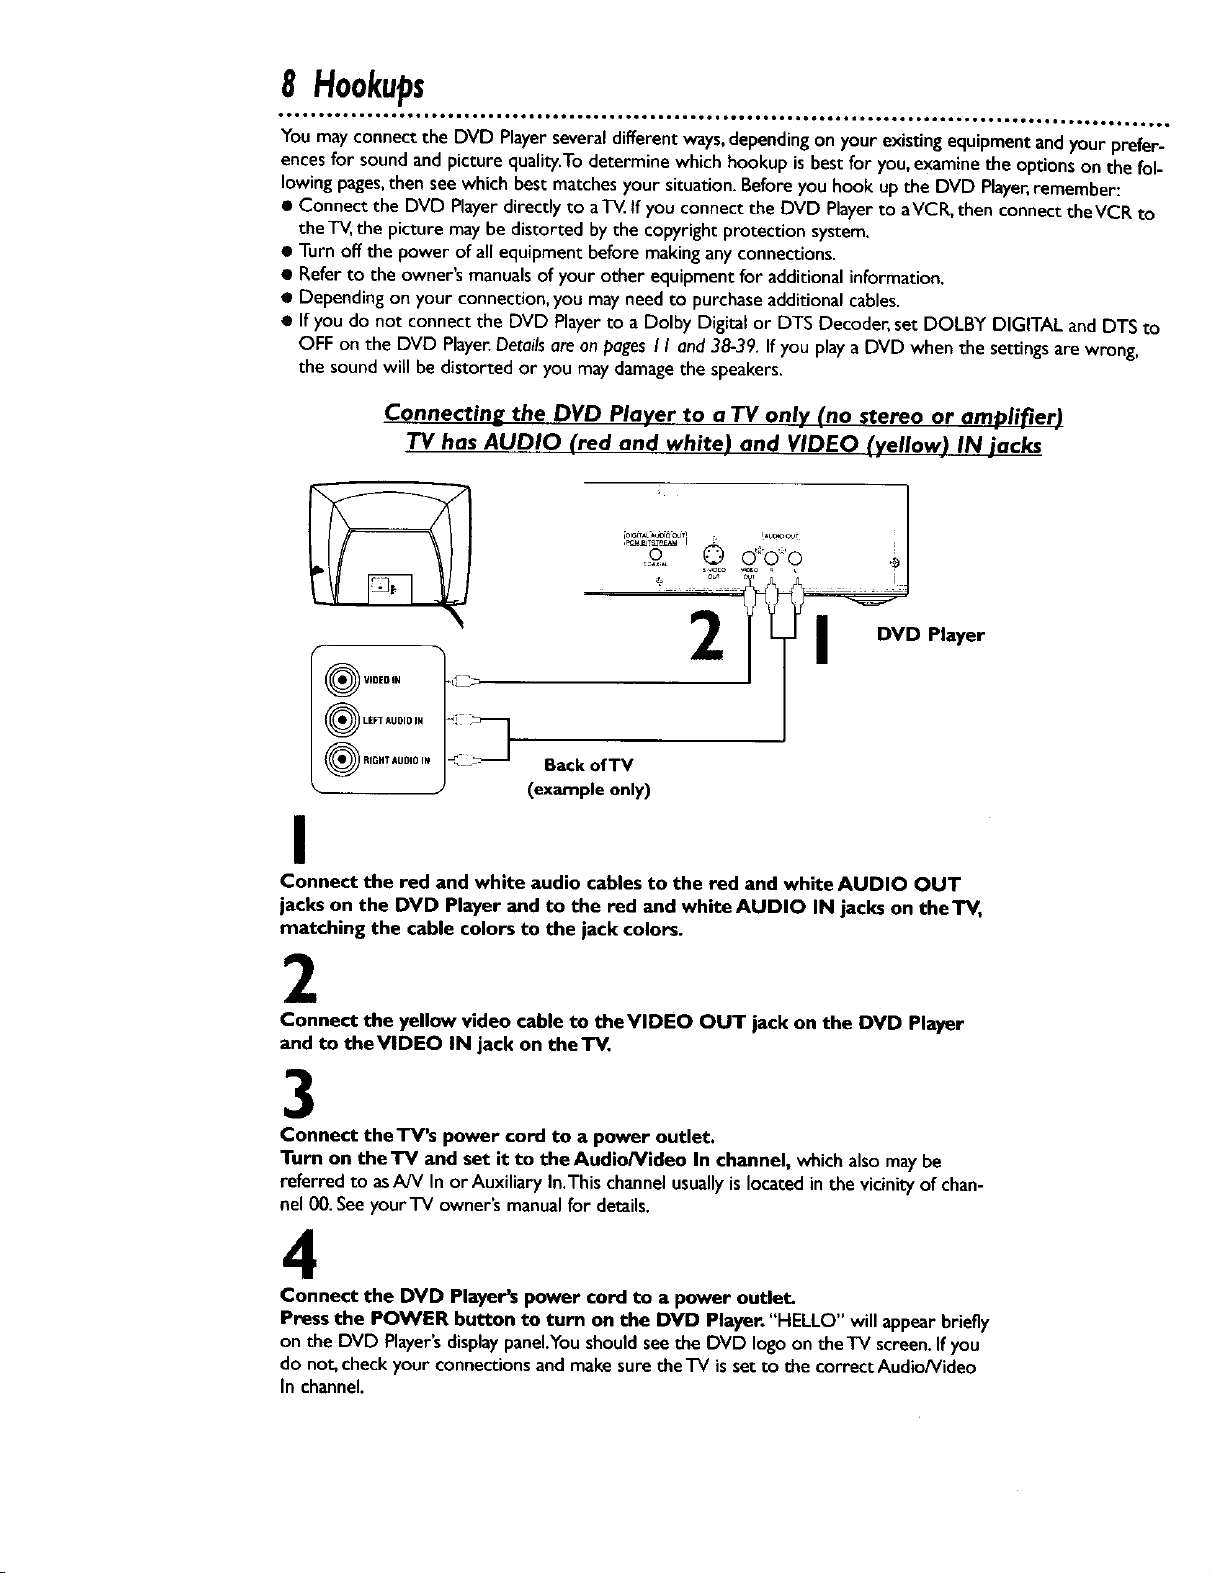
Connecting the DVD Player to a TV only (no stereo or amplifier)
TV has AUDIO (red and white) and VIDEO (yellow) IN jack_
VIDEDIN i_
®L,°.u°°.
RIGHT AUDIO IN Back ofTV
(example only)
I
Connect the red and white audio cables to the red and white AUDIO OUT
jacks on the DVD Player and to the red and white AUDIO IN jacks on theTV,
matching the cable colors to the jack colors.
2
Connect the yellow video cable to theVIDEO OUT jack on the DVD Player
and to theVIDEO IN jack on theTV,
3
Connect theTV's power cord to a power outlet.
Turn on the TV and set it to the Audio/Video In channel, whichalsomay be
referred to asA/V In or Auxiliary In.This channelusuallyis located in the vicinityof chan-
nel 00.SeeyourTV owner's manualfor details.
4
Connect the DVD Player's power cord to a power outlet.
Press the POWER button to turn on the DVD Player. "HELLO" will appearbriefly
on the DVD Player'sdisplaypanel.Youshouldseethe DVD logoon theTV screen.Ifyou
do not, checkyour connectionsand makesure the'IV is set to thecorrectAudio/Video
In channel.
• •• • • • . • • • .
Hookups(cont'd)9
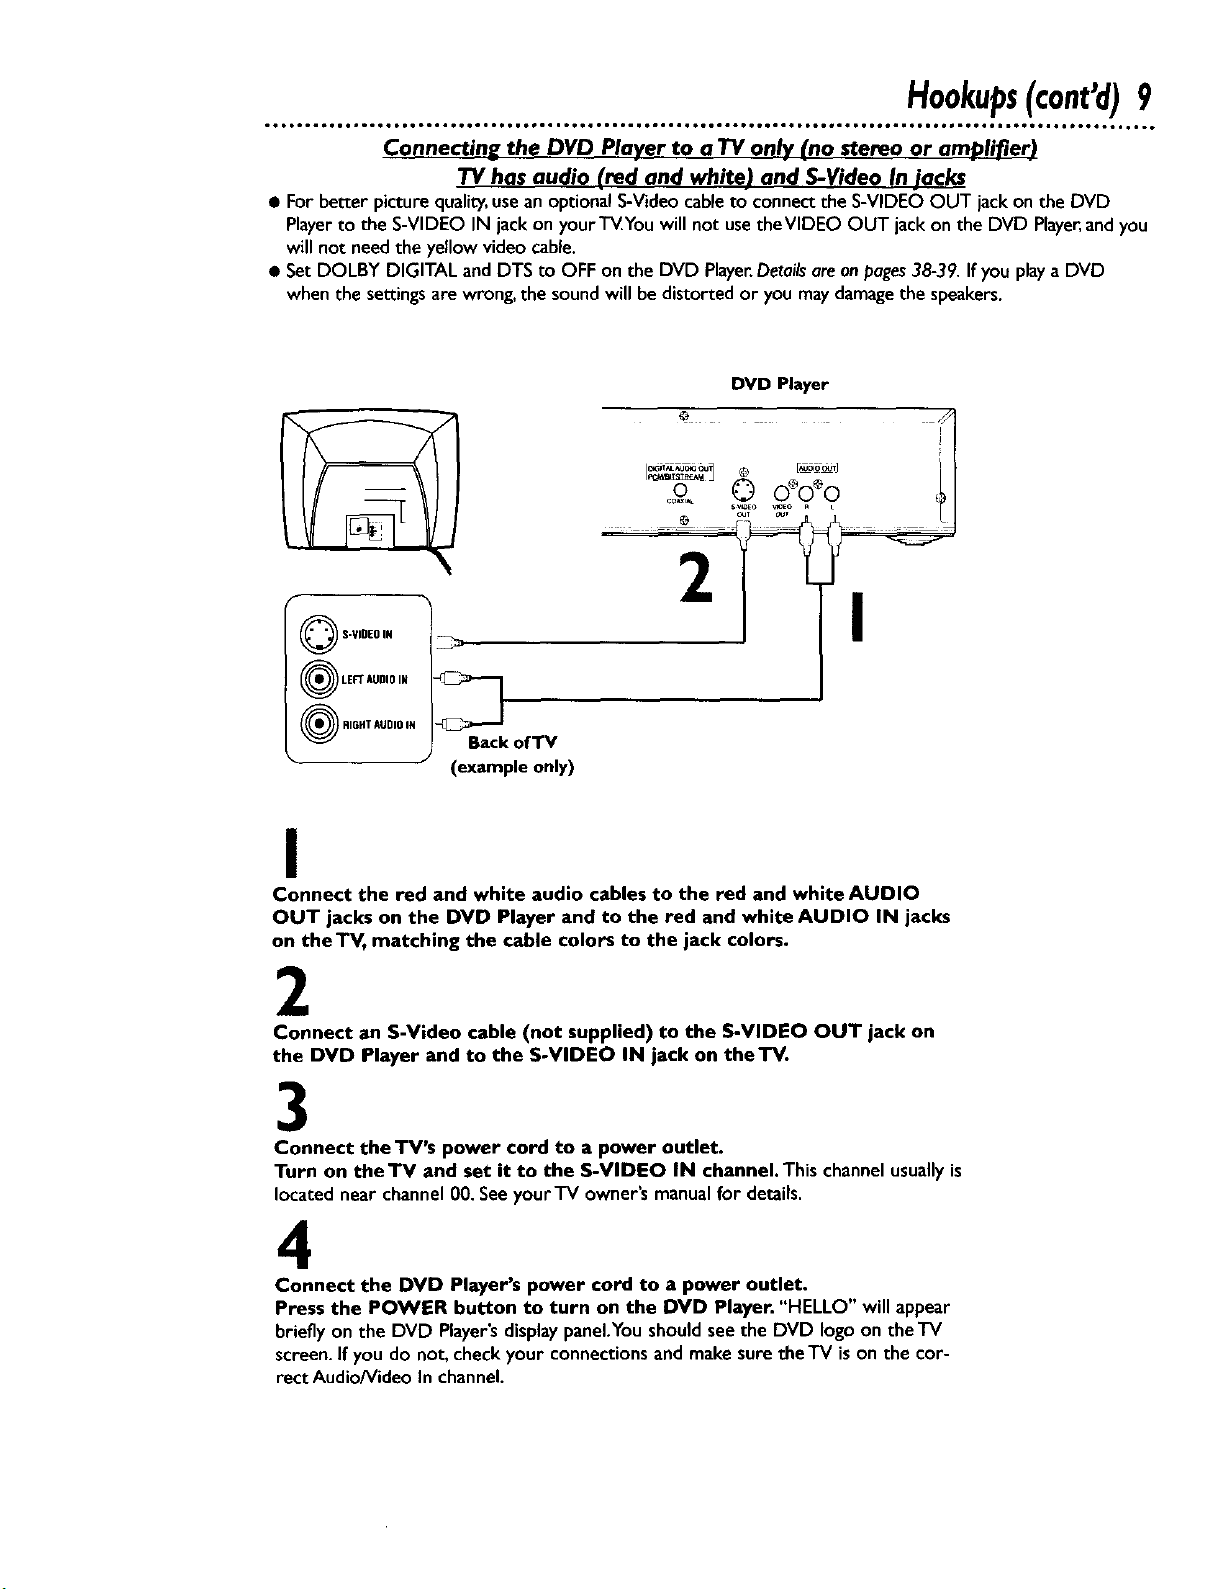
Connectine the DVD Player to a TV only (no stereo or amplifier)
TV has audio (red and white) and S-Video In jacks
• For better picture quality,usean optional S-Video cableto connect the S-VIDEO OUT jack on the DVD
Playerto the S-VIDEO IN jack on your TVYou will not use theVIDEO OUT jack on the DVD Player,andyou
will not needthe yellow video cable.
• SetDOLBY DIGITAL and DTS to OFF on the DVD Player.Detailsareon pages38-39.If you playa DVD
when the settings are wrong, the soundwill be distorted or you maydamagethe speakers.
DVD Player
0o 0 ooo &l
Q S-VIDEO I#
LEFT AUDIO IN
RIGHT AUDIO IN
BackofTV
• (example only)
I
Connect the red and white audio cables to the red and white AUDIO
OUT jacks on the DVD Player and to the red and white AUDIO IN jacks
on theTV, matching the cable colors to the jack colors.
2
Connect an S-Video cable (not supplied) to the S-VIDEO OUT jack on
the DVD Player and to the S-VIDEO IN jack on theTV.
3
Connect the TV's power cord to a power outlet.
Turn on the "IV and set it to the S-VIDEO IN channel. This channelusuallyis
locatednear channel00. Seeyour'iV owner'smanualfor details.
4
Connect the DVD Player's power cord to a power outlet.
Press the POWER button to turn on the DVD Player. "HELLO" will appear
brieflyon the DVD Player'sdisplaypanel,Youshouldsee the DVD logoon theTV
screen.If you do not, checkyour connectionsandmake suretheTV ison the cor-
rectAudio/Video In channel.
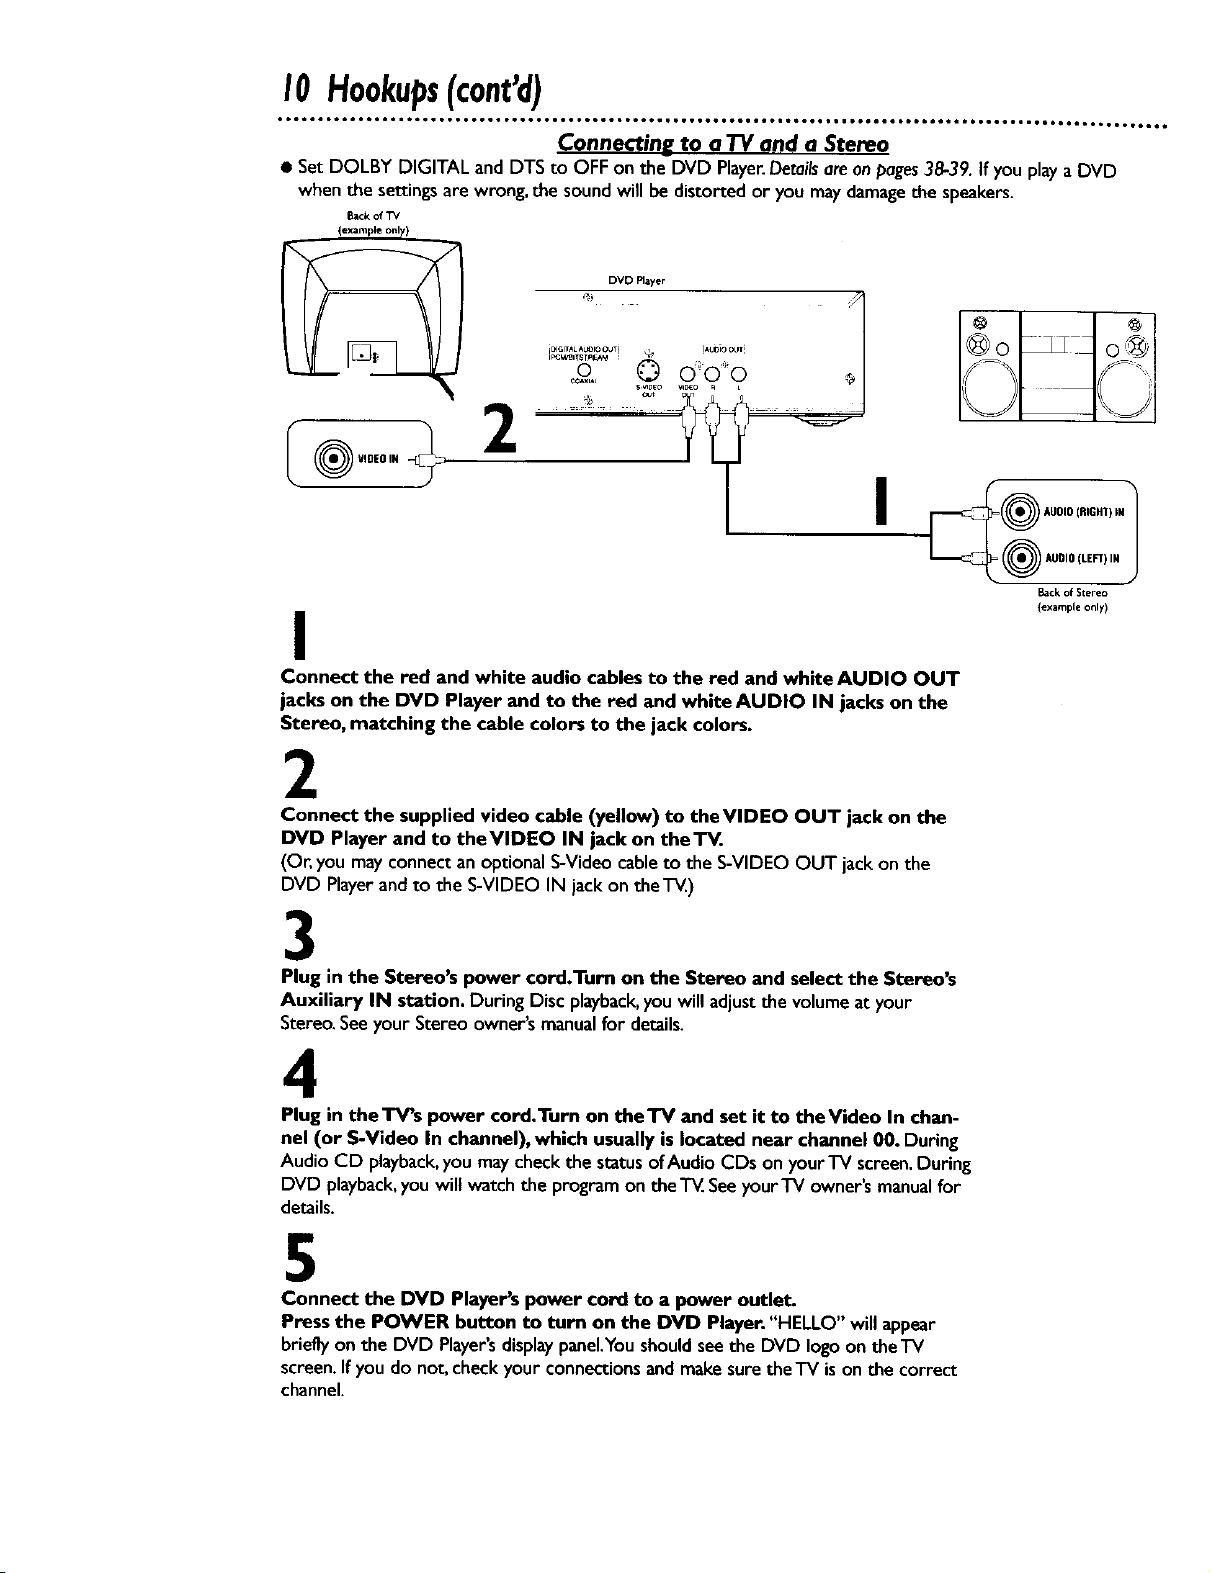
Connecting to a TV and a Stereo
• SetDOLBY DIGITAL andDTS to OFF on the DVD Player.Detailsare onpages38-39. If youplaya DVD
whenthe settingsarewrong,the soundwill be distortedor you maydamagethe speakers.
Back of TV
{exampleonly)
iE)IGITAL AL_F_ OUTj • !A4JDiO OUT
DVD Flayer ii
© o'o"o
S_DEO _0 L
.... ._J ........
VIDEOIN
....?l
I
I
Connect the red and white audio cables to the red and white AUDIO OUT
jacks on the DVD Player and to the red and white AUDIO IN jacks on the
Stereo, matching the cable colors to the jack colors.
2
Connect the supplied video cable (yellow) to theVIDEO OUT jack on the
DVD Player and to theVIDEO IN jack on theTV.
(Or, you may connectanoptionalS-Videocableto the S-VIDEO OUT jack on the
DVD Playerandto the S-VIDEO IN jack on theTV)
o Ao,t
@.oo.o,..,..j
Back o[ Stereo
(example only)
3
Plug in the Stereo's power cord.Turn on the Stereo and select the Stereo's
Auxiliary IN station. During Disc playback,youwill adjustthe volumeat your
Stereo.SeeyourStereo owner'smanualfor details.
4
Plug in theTV's power cord.Turn on theTV and set it to theVideo In chan-
nel (or S-Video In channel), which usually is located near channel 00. During
Audio CD playback,youmaycheck the statusofAudio CDs on yourTV screen.During
DVD playback,youwilt watchthe programon theT_. SeeyourTV owner'smanualfor
details.
5
Connect the DVD Player's power cord to a power outlet.
Press the POWER button to turn on the DVD Player."HELLO" will appear
brieflyon the DVD Player'sdisplaypanel.Youshouldseethe DVD logoon theTV
screen.If you do not. checkyourconnectionsand makesure the'iV ison the correct
channel.
6.., IOOOO,, tO6OO,.OOQQ_ _OOOOO .°°Om, OtOOO _Ot _OOtl • OOOt • too6n IOOQtOI • t,tt,, O_O,6*t • IOOQO • tOOO • • tO • • tJ°t_.. Ot°°_6
Hookups(cont'd)II
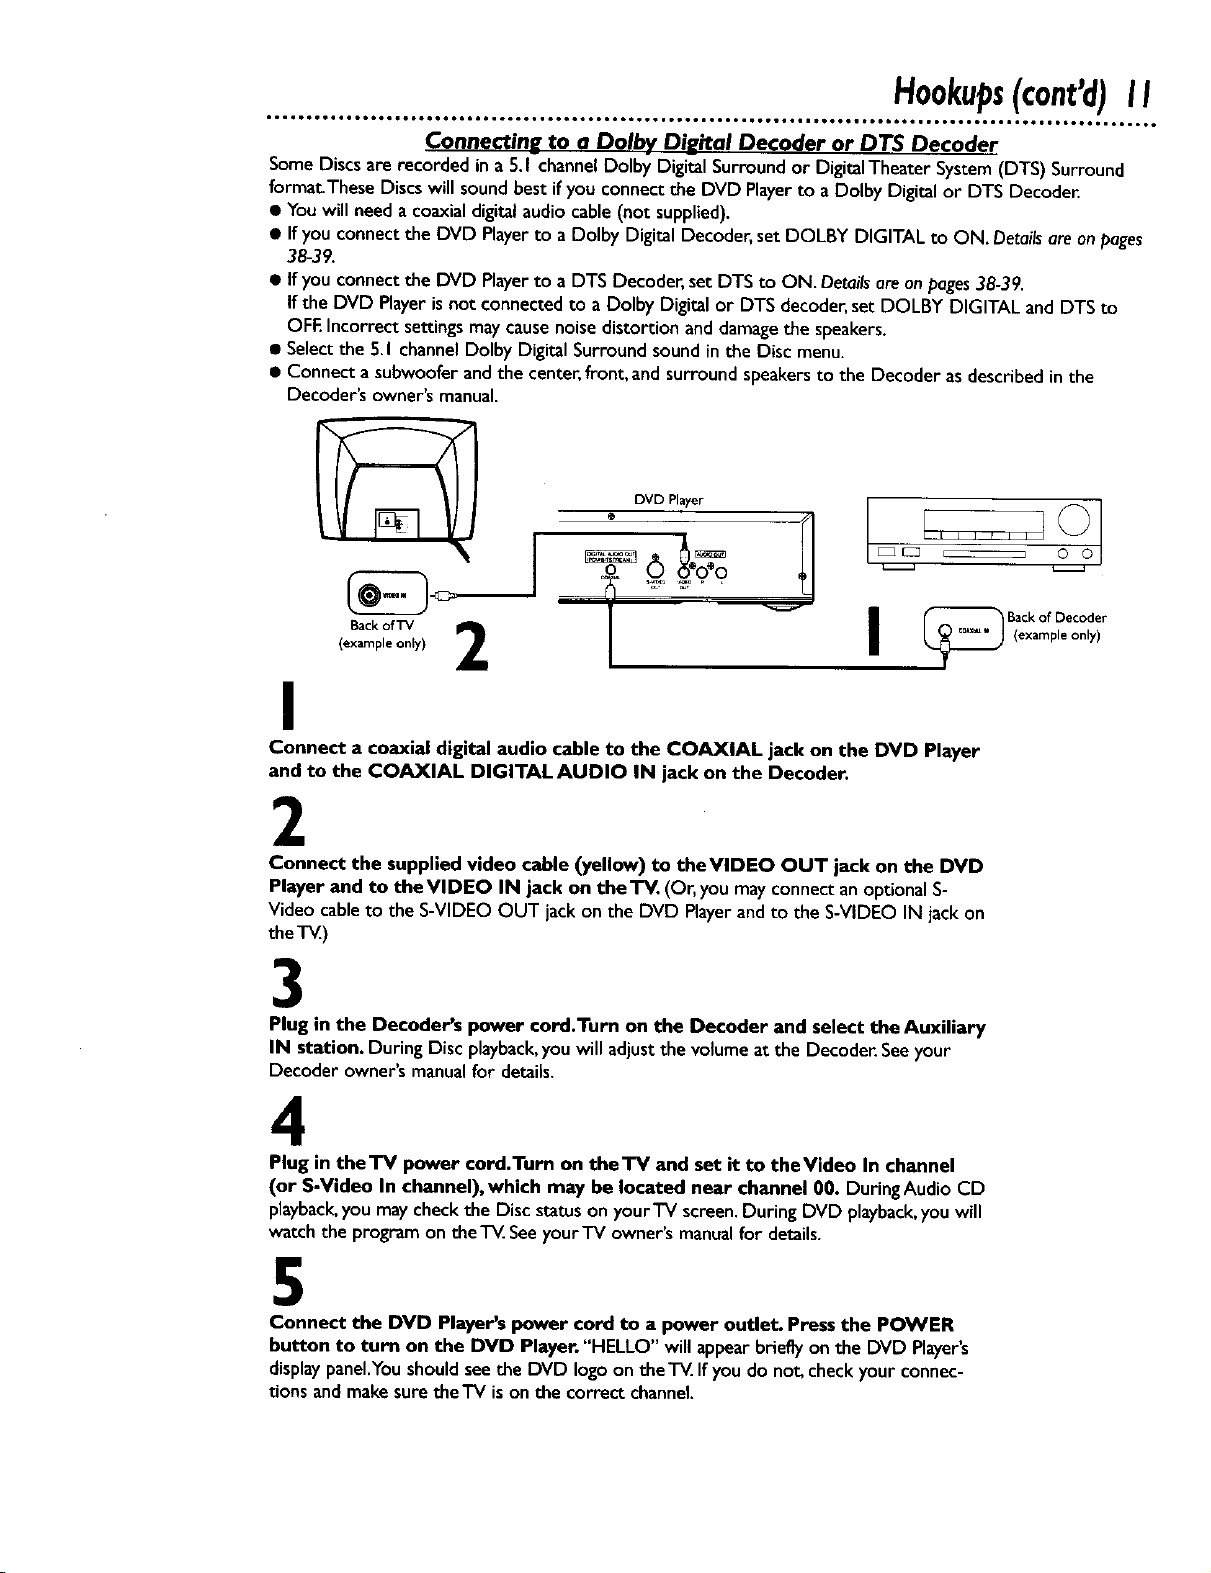
Connecting to a Dolbv Di__ital Decoder or D TS Decoder
SomeDiscsare recorded in a 5.1 channelDolby Digital Surround or DigitalTheater System(DTS) Surround
formatThese Discswill sound bestifyou connectthe DVD Playerto a Dolby Digital or DTS Decode_
• Youwill needa coaxialdigitalaudiocable(not supplied).
• Ifyou connect the DVD Playerto a Dolby Digital Decoder,setDOLBY DIGITAL to ON. Detailsare on pages
38-39.
• If you connect the DVD Playerto a DTS Decoder,set DTS to ON. Detailsareonpages38-39.
If the DVD Playeris not connected to a Dolby Digital or DTS decoder,set DOLBY DIGITAL and DTS to
OFEIncorrect settingsmaycausenoisedistortion and damagethe speakers.
• Selectthe 5.1channel Dolby Digital Surround sound inthe Disc menu.
• Connect a subwoofer and the center,front, and surround speakersto the Decoder as described in the
Decoder's owner's manual.
DVD Player O_ O
..... o.'9
" I, , F
(example only)
Back of TV 2
I
I
Connect a coaxial digital audio cable to the COAXIAL jack on the DVD Player
and to the COAXIAL DIGITAL AUDIO IN jack on the Decoder.
2
Connect the supplied video cable (yellow) to theVIDEO OUT jack on the DVD
Player and to theVIDEO IN jack on the TV. (Or, you mayconnectanoptionalS-
Video cableto the S-VIDEO OUT jack on the DVD Playerand to the S-VIDEO IN jack on
the T_.)
3
Plug in the Decoder's power cord.Turn on the Decoder and select the Auxiliary
IN station. During Disc playback,youwill adjustthe volumeat the Decoder.Seeyour
Decoder owner'smanualfor details.
4
Plug in theTV power cord.Turn on theTV and set it to theVideo In channel
(or S-Video In channel), which may be located near channel 00. During Audio CD
playback,you maycheckthe Discstatusonyour'IV screen.During DVD playback,youwill
watch the program ontheTV.Seeyour'iV owner'smanualfor details.
5
Connect the DVD Player's power cord to a power outlet. Press the POWER
button to turn on the DVD Player. "HELLO" will appearbrieflyon the DVD Player's
displaypanel.Youshould seethe DVD logoon theT_.Ifyou do not, checkyourconnec-
tions andmakesuretheTV is on the correct channel.
12Hookups(cont'd)
otolg ioQo, ttooo,i JJ,QI • oo.., • ,oo, i o_,g io,Qg • ,o,, ,_,Q • ioQ,, • ,,_t • • oe., • • ,_,, • • ,o,,, • ,,,,, o,,°, • • °,,, e, o,°,,° • •. •
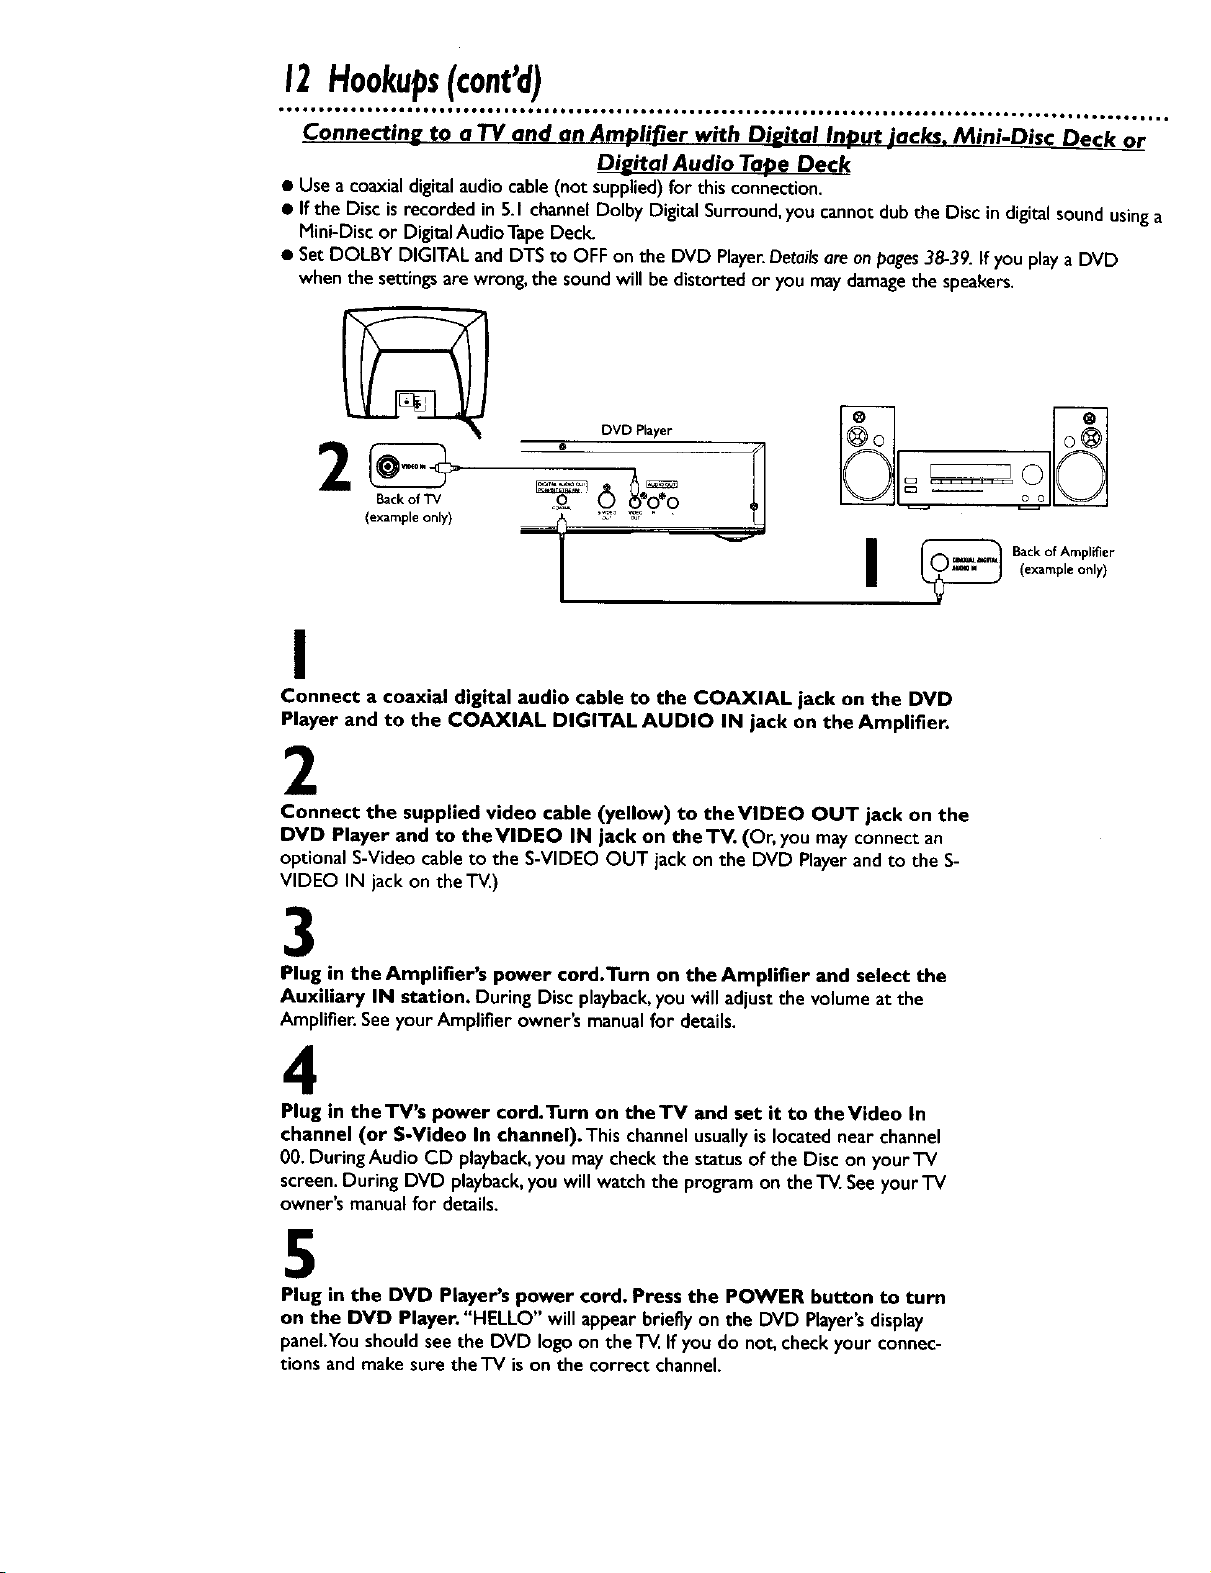
Connectin_ to a TV and an Amplifier with Di__ital Input jacks, Mini-Disc Deck or
Digital Audio Tape Deck
• Use a coaxial digitalaudiocable(not supplied)for this connection.
• If the Disc isrecorded in 5.I channel Dolby Digital Surround,you cannot dub the Disc in digital soundusinga
Mini-Disc or DigitalAudio TapeDecl_
• SetDOLBY DIGITAL and DTS to OFF on the DVD Player.Detailsare on pages38-39. If you playa DVD
when the settingsare wrong, the soundwill be distorted or you maydamagethe speakers.
DVD Player
(example only) '!_ _ T__ "
,_ 0'_o
I
_ Back of Amplifier
I
Connect a coaxial digital audio cable to the COAXIAL jack on the DVD
Player and to the COAXIAL DIGITAL AUDIO IN jack on the Amplifier.
2
Connect the supplied video cable (yellow) to the VIDEO OUT jack on the
DVD Player and to the VIDEO IN jack on the TV. (Or, you may connect an
optionalS-Video cable to the S-VIDEO OUT jack on the DVD Playerandto the S-
VIDEO IN jack on the T_.)
3
Plug in the Amplifier's power cord.Turn on the Amplifier and select the
Auxiliary IN station. During Disc playback,you will adjustthe volumeat the
Amplifier. Seeyour Amplifier owner's manualfor details.
4
(example only)
Plug in the TV's power cord.Turn on theTV and set it to theVideo In
channel (or S-Video In channel). This channelusuallyis locatednear channel
00.During Audio CD playback,you may check the status of the Disc on your TV
screen.During DVD playback,you will watch the program on theTV.Seeyour'IV
owner's manualfor details.
5
Plug in the DVD Player's power cord. Press the POWER button to turn
on the DVD Player. "HELLO" will appearbrieflyon the DVD Player's display
panel.Youshould seethe DVD logo on the T_. If you do not. checkyour connec-
tions andmakesure theTV is on the correct channel.
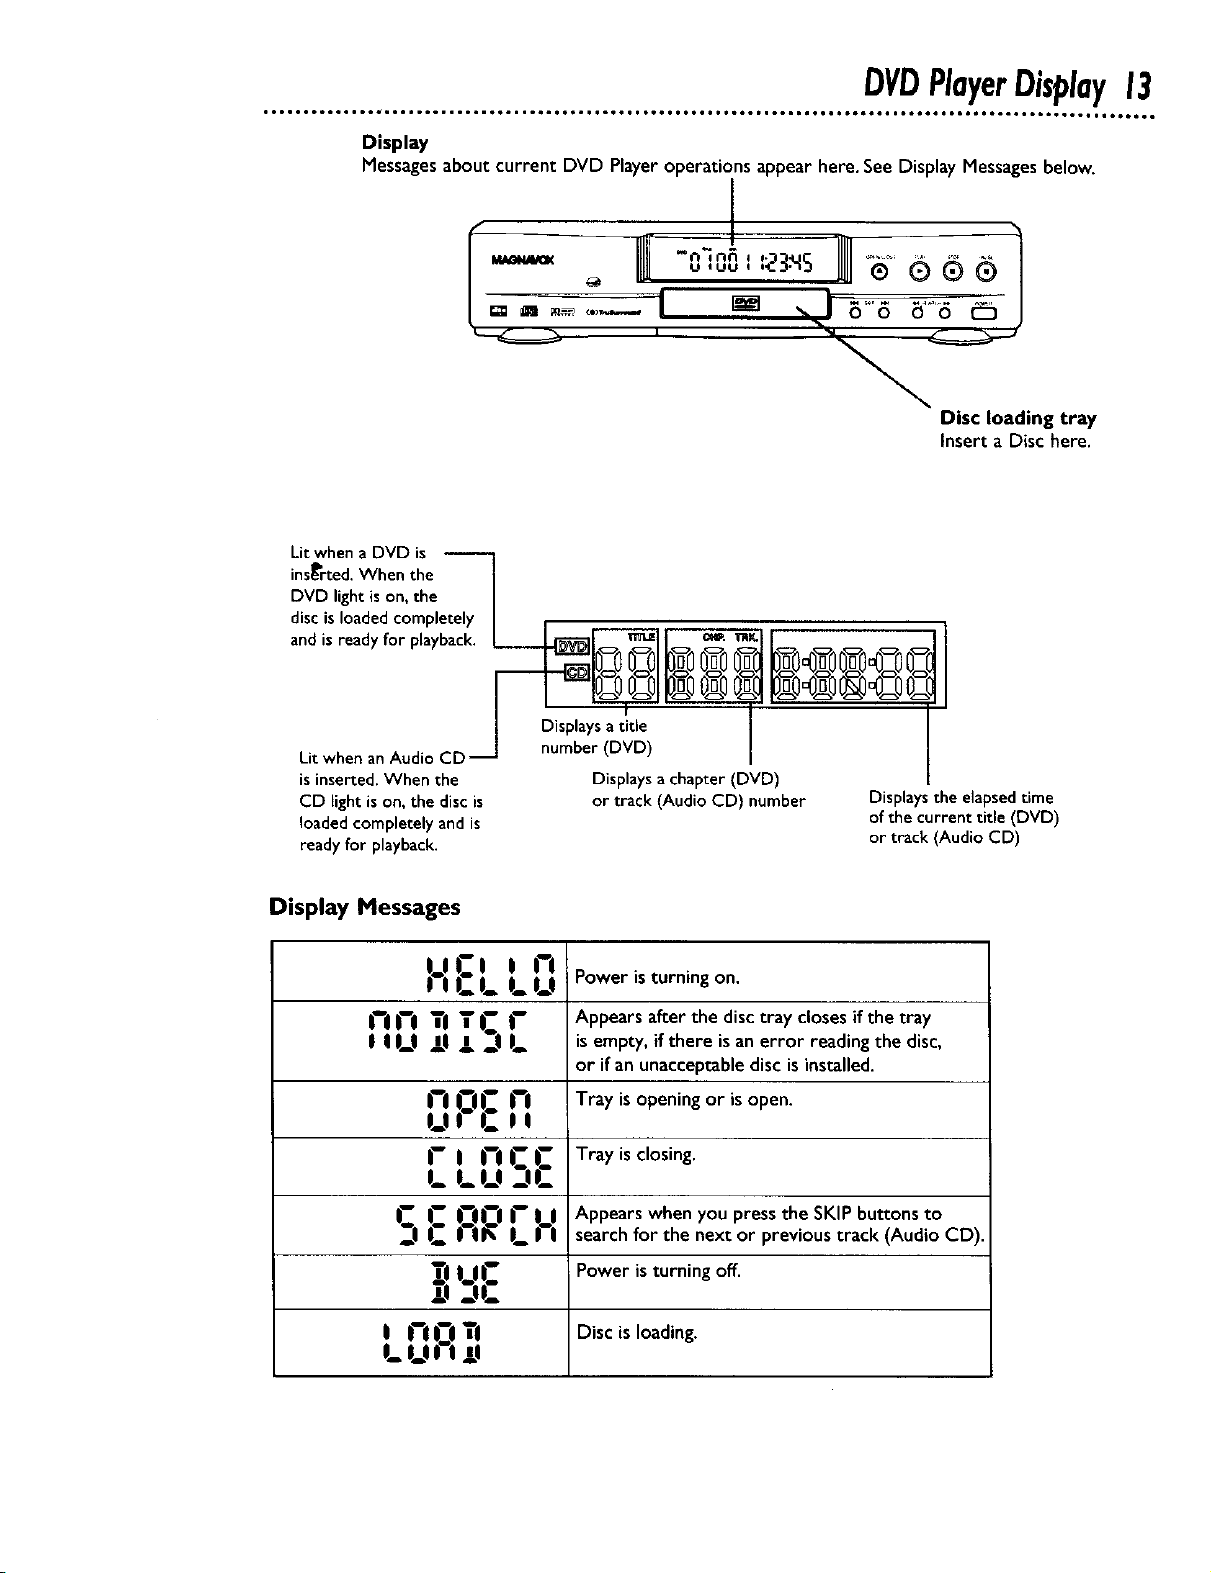
DVDPlayerDisplay13
Display
Messagesaboutcurrent DVD Playeroperations appearhere. See Display Messagesbelow.
Litwhen a DVD is
ins_'rted. When the l
DVD light ison, the J
disc s oaded competely J
andis ready for playbacl_. L _-,_1 _l i e_. _l i I I
Disc loading tray
Insert a Disc here.
!o2o,o2olI@o%o@1
I Disp,a satit,oI I
Lit when an Audio CD _ number (DVD) I
is inserted, When the Disp aysa chapter (DVD)
CD light is on, the disc is or track (Audio CD) number Displays the elapsedtime
loaded completely and is of the current title (DVD)
ready for playback, or track (Audio CD)
Display Messages
L!l:i i ri
| | |_. 18 |==U Power is turning on.
I--I !--I Appears after the disc tray closes if the tray
IIIJ TJ ii2lf" isernpty, if there is an error reading the disc,
or if an unacceptable disc is installed.
I'1 0!: |"1 Tray is opening or iSopen.
UI l_.ll
C I |"I C |: Tray is closing.
LU _-IL-
!:!0 I" U Appears when you press the SKiP buttons to
S _. I II_ LII search for the next or previous track (Audio CD).
i_ |_ _ Power is turning off
Disc
r.:!
I_ I_! ! ! !l
TI
is
loading.
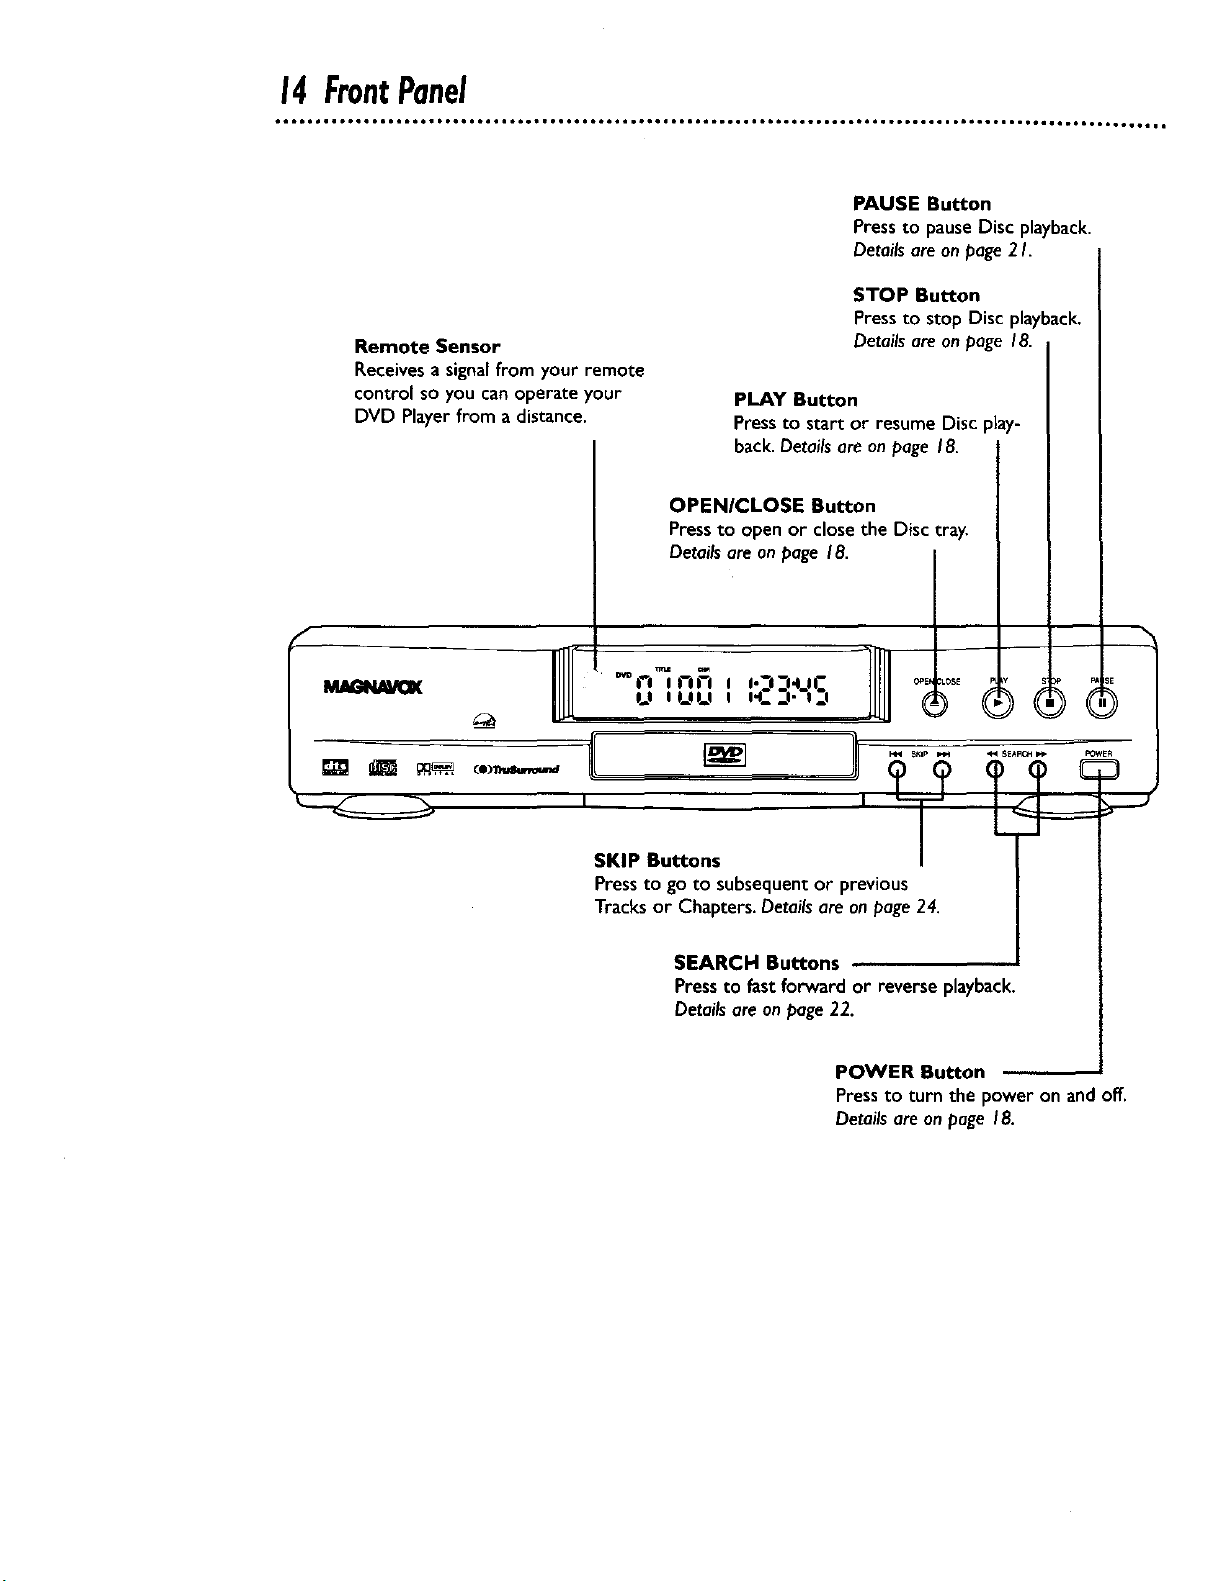
14FrontPanel
Remote Sensor
Receives a signal from your remote
control so you can operate your
DVD Player from a distance.
PAUSE Button
Pressto pauseDisc playback.
Detailsare on page2 I.
STOP Button
Press to stop Disc playback.
Detailsare on page 18.
PLAY Button
Pressto start or resume Disc play-
back.Details are on page 18.
OPEN/CLOSE Button
Pressto open or closethe Disc tray.
Detailsareon page 18.
"%
CO)Tta_kq,v_L,m_
I'I I1--1_-I I I'°I--I'IIC OPEN
0_0'UU i H--I.-I.I
SKIP Buttons
Press to go to subsequent or previous
Tracks or Chapters. Details are on page 24.
SEARCH Buttons
Pressto fastforward or reverse playback.
Detailsare on page22.
POWER Button
Pressto turn the power on andoff.
Detailsare on page 18.
_LOSE I
_E
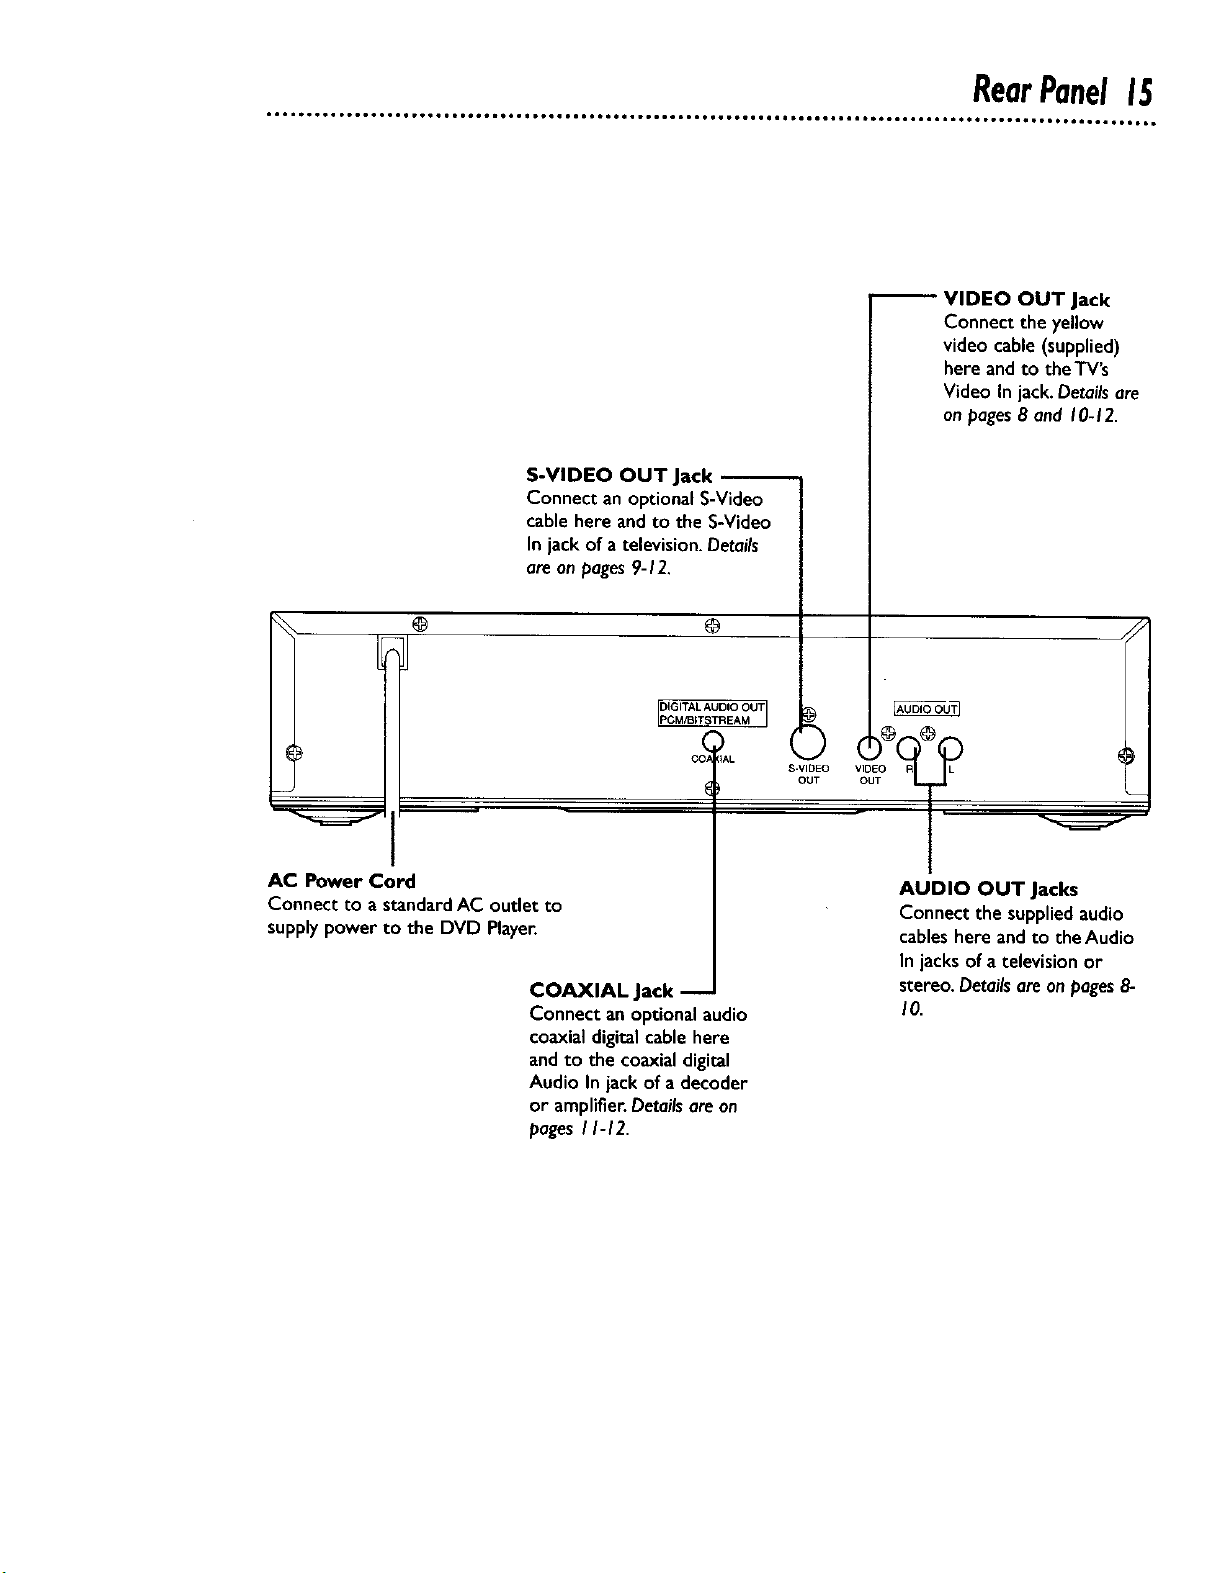
S-VIDEO OUT Jack
Connect anoptional S-Video
cable here and to the S-Video
In jack of a television. Details
are on pages9-12,
RearPanel15
VIDEO OUT Jack
Connect the yellow
videocable(supplied)
here and to theTV's
Video In jack. Detailsare
on pages8 and 10-12.
@
AC Power Cor
Connect to a standard AC outlet to
supply power to the DVD Player.
COAXIAL Jack
Connect an optionalaudio
coaxial digitalcablehere
andto the coaxialdigital
Audio In jack of a decoder
or amplifier.Detailsareon
pages//-12.
@
S-VI_O
OUT
AUDIO OUT Jacks
Connect the supplied audio
cables here andto the Audio
In jacks of a televisionor
stereo, Detailsare onpages8-
10.
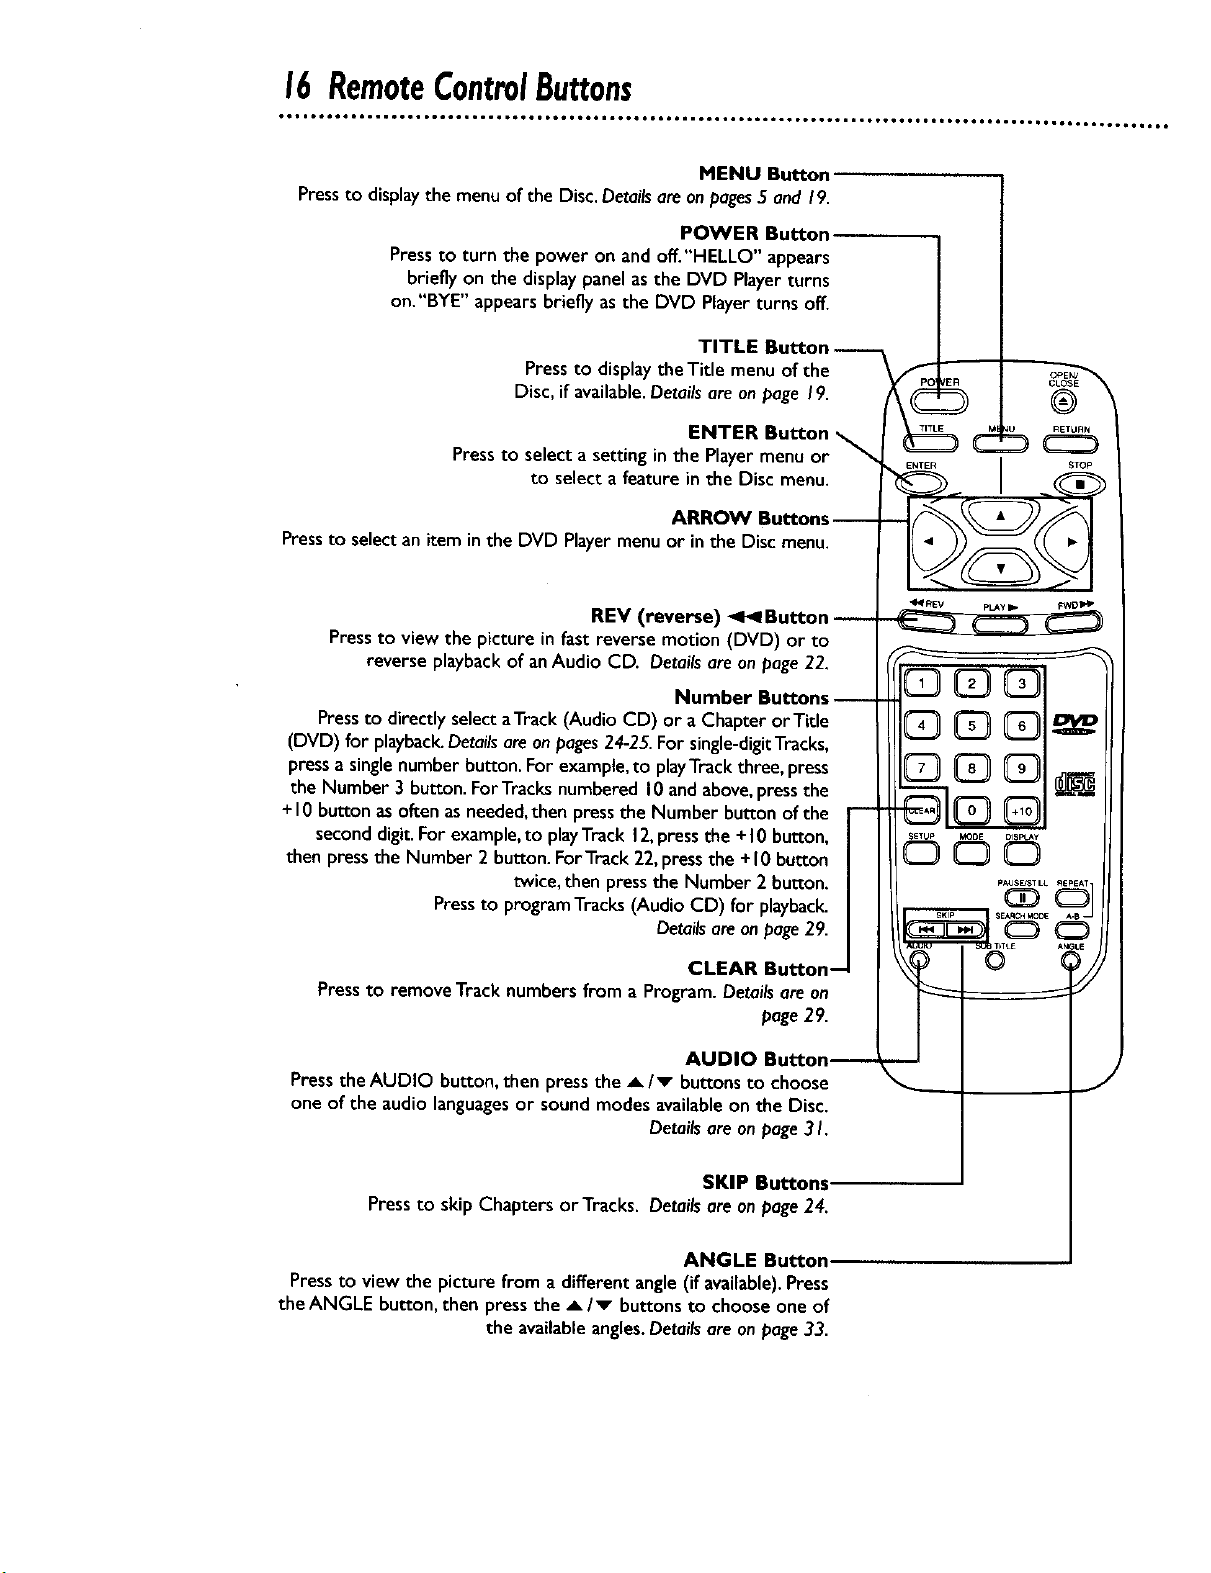
MENU Button
Press to display the menu of the Disc. Details are on pages 5 and 19.
POWER Button
Pressto turn the power on and off."HELLO" appears
briefly on the display panel asthe DVD Playerturns
on."BYE" appears briefly as the DVD Playerturns off.
TITLE Button
Press to display the Title menu of the
Disc, if available. Details are on page 19.
ENTER Button
Pressto select a setting in the Playermenu or _,
to select a feature in the Disc menu.
ARROW Buttons-
Pressto select an item in the DVD Playermenuor inthe Disc menu.
REV (reverse) _ Button
Pressto view the picture in fast reverse motion (DVD) or to
reverse playbackof anAudio CD. Detailsareonpage22.
Number Buttons-
Pressto directly selectattack (AudioCD) or a Chapter or Title
(DVD) for playback.Detailsare onpages24-25.For single-digitTracks,
pressa singlenumber button. For example,to playTrackthree, press
the Number 3 button.ForTracksnumbered 10andabove,pressthe
+10 buttonas oftenasneeded,then pressthe Number buttonof the
seconddigit. Forexample,to playTrack12,pressthe + I0 button,
then pressthe Number 2 button.ForTrack 22,pressthe +10 button
twice, then pressthe Number 2 button.
Pressto programTracks (Audio CD) for playback.
Detailsareonpage29.
®
d S
STOp
CLEAR Button-
Pressto remove Track numbers from a Program. Detailsare on
page29.
AUDIO Button_
Press the AUDIO button, then press the A/v buttons to choose
one of the audio languagesor sound modes available on the Disc.
Details are on page 3 I.
SKIP Buttons
Pressto skip Chapters orTracks. Details are on page24.
ANGLE Button
Pressto view the picture from adifferent angle(if available).Press
the ANGLE button, then press the A/v buttonsto chooseone of
the availableangles.Detailsare onpage33.
 Loading...