

Page 1
C
U
O
S
U
C
O
S
p
l
800-605-8610
at
ote contro
)
(
l
)
r
8B
wner’s Man
ual
.
S
...............................................................................................
..............................................................
3
.........................................................................
ectrical Shock and
...........................
g
......................................................
t
s
...............................................
.............................................................
.............................................................................................
s
.........................................................................
s
...........................................................................................
.....................................................................................
UP
..............................................................................
.................................................................................
..................
.......................................................
...................................................................
..........................................................................................
.............................................................................
...............................................................................................
......................................................................................
0
..........................
0
S
1
JPEG Playback
.........................................................................
2
oda
cture C
.....................................................................
......................................................................
3
......................................................
3
...................................................................
.....................................................................
................................................................................
h
..............................................................
.................................................................................
g
.........................................................................................
............................
6
.....................................................................................
6
.............................................................................
6
..................................................................................
6
.........................................................................
6
s
.......................................................................
e
.....................................................................................
........................................................................................
..............................................................................
.....................................................................................
8
g
................................................................................
8
g
......................................................................................
9
.........................................................................................
0
g
.................................................................................
g
3
ON
...........................................................
23
..........................................................................
24
.................................................................
24
................................................................
24
....................................................................................
27
de
y
)
et.
.
y
g
odulator.
.
h
f
odulator.
)
:
ected to a
odulator.
s
ts
.
Please read before using this unit
DVD/CD Playe
170MW
Supplied Accessorie
rem
NA475UD
AAA
attery x 2
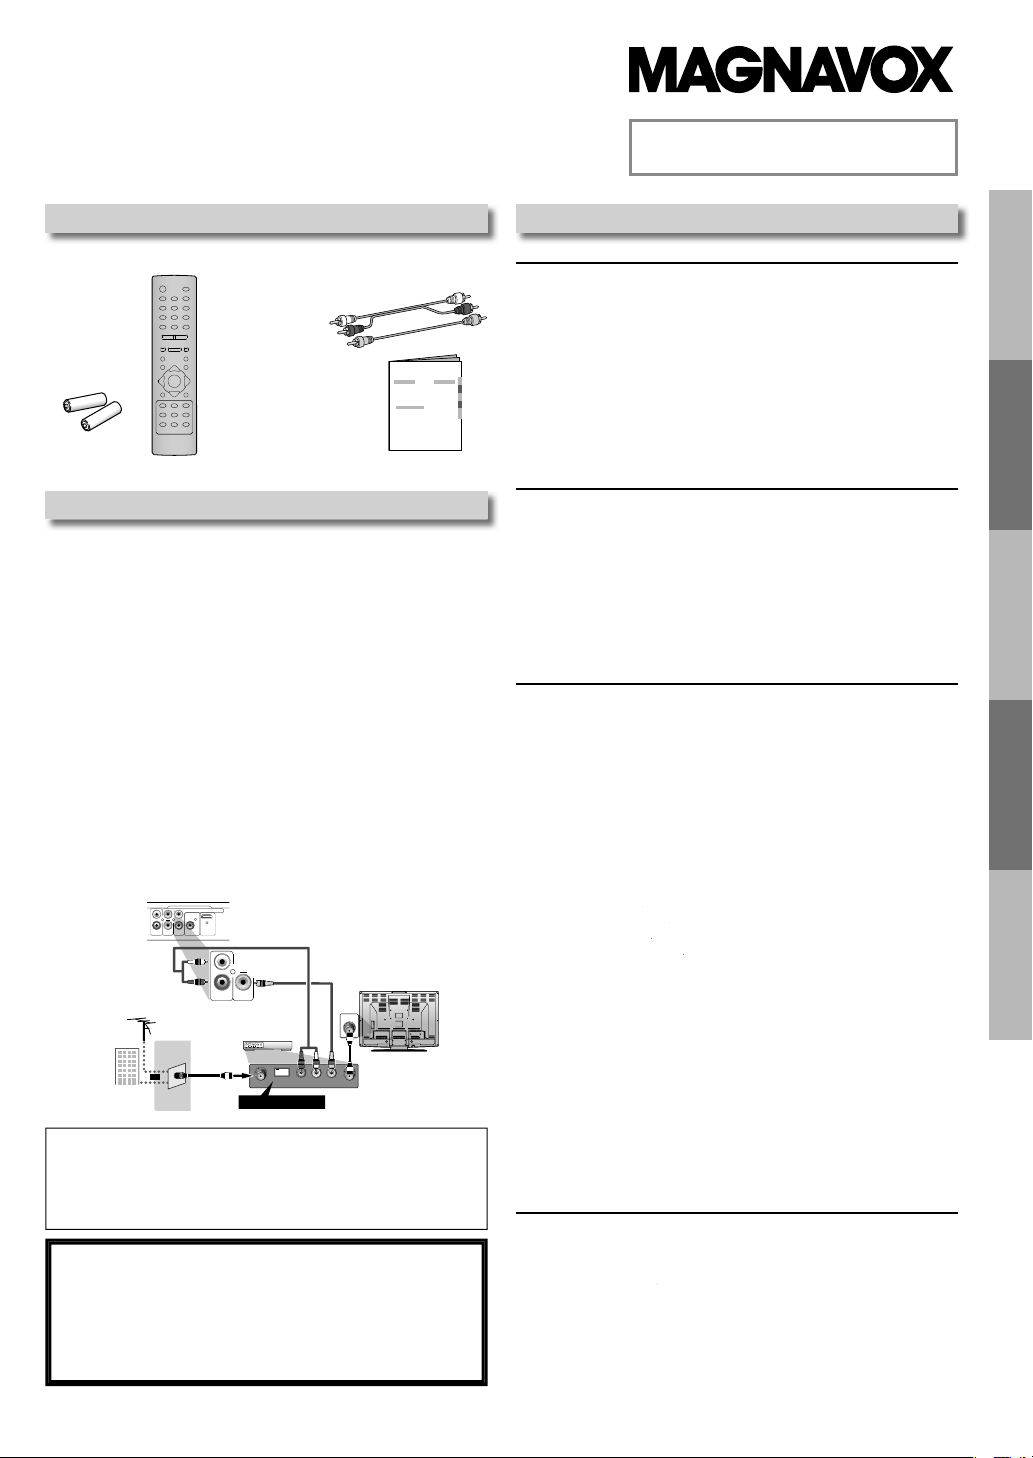
Connecting to RF Modulator (Not Supplied
If your TV has antenna in jack only, it is still possible to
connect this unit to
his case, follow the instructions below.
Disconnect the power cords of the devices from the AC
1
2) Make the connection as illustrated below
3)et your RF modulator’s channel 3/4 switch to either
or 4
area. If
switch, set it accordin
RF m
4) Plug in the power cords of the devices to the AC outlet
5)Turn on your TV and choose the same channel as
you set t
more details,
m
ote
RF modulator is not supplied with this unit. You need to
purchase it at your local store.
The quality of picture may become poor if this unit is
nn
f you need additional operating assistance after
© 2009 Funai Electric Co., Ltd
l
1.5V)
RCA audio/video cables
WPZ0102TM018 /
WPZ0102LTE01)
owner’s manua
1VMN28597
our TV by using an RF modulator. In
l
whichever the TV channel is least used in your
our RF modulator has a modulator/antenna
to the manual supplied with the
e RF modulator’s channel 3/4 switch to.For
ollow the manual supplied with the RF
rear of this unit
L
Y
R/PR
C
COMPONENT VIDEO OUT
COAXIAL
R
DIGITAL
AUDIO
VIDEO
HDMI OUT
C
B/PB
AUDIO OUT
OUT
OUT
L
VHF / UHF
antenna
cable TV
company
or
n RF m
R
AUDIO
OUT
RF coaxial
cable
VIDEO
OUT
RCA audio cable
rear of your RF
modulator
Set channel 3 or 4
RCA video cable
ANT. IN
RF coaxial cable
AUDIO IN TO TVANT. INLRCHANNEL43VIDEO IN
reading this owner’s manual, please cal
LL FREE : 1-
r visit our web site
www.magnavox.com/support
Owner’s Manual
rear of TV
INSTRUCCIONES EN
ESPAÑOL INCLUIDAS.
nten
PRECAUTION
Laser Safety
Important Safeguards
Location and Handling
Avoid the Hazards of El
Moisture Condensation Warnin
About Copyrigh
Notice for Progressive Scan Output
Symbols Used in this Manual
Maintenance
About the Disc
Playable Disc
Unplayable Discs
SET
Connections
Connection to a TV with an HDMI Compatible Port
Connection to an Audio System
Rear Terminals
Front Panel Indicator
HDMI Setup
Remote Control
Installing the Batteries for the Remote Control
DVD FUNCTION
..................................................................................
K
k Pi
Transition Mode
Adjustment of Picture Size
Search Functions
Using Track Search
Using Title / Chapter Searc
Using Time Search
Marker Settin
Special Setting
Subtitle Languag
Audio Language
Camera Angles
Black Level Setting
Stereo Sound Mode
Virtual Surround
DVD Setting
LANGUAGE Settin
DISPLAY Settin
AUDIO Setting
PARENTAL Settin
OTHERS Settin
Reset to the Default Setting (Except for PARENTAL Setting)2
D
INFORMATI
Troubleshooting Guide
Specifications
Quick Use Gui
Fire
Back Cover
N
TI
A
RE
SETUP
N
TI
N
1
1
VD F
1
1
1
1
INFORMATION
1
1
1
1
1
añol
s
1
1
1
2
Page 2
C
U
O
S
2
S
ARNIN
G:
TO PREVENT FIRE OR ELECTRICAL SHOCK, DO NOT EXPOSE THIS PRODUCT TO RAIN OR
.
T
.
Th
.
ON
ON
.
T
.
T
bl
y.
JUS
.
.
CE
T
T
:
.
.
.
y
-
:
n
future reference.
ode
________________________
________________________
.
.
.
G
T
y
.
-
.
RECAUTION
ISTURE
PRE
A
TI
N
AUTI
RISK OF ELECTRIC SHOCK
DO NOT OPEN
AUTI
TO REDUCE THE RISK OF ELECTRIC SHOCK, DO NOT
REMOVE COVER (OR BACK). NO USER SERVICEABLE
PARTS INSIDE. REFER SERVICING TO QUALIFIED SERVICE
PERSONNEL
he caution marking is located on the rear of the cabinet
he lightning ash with arrowhead symbol,
ithin an equilateral triangle, is intended to
lert the user to the presence of uninsulated
dangerous voltage” within the product’s
nclosure that may be of su cient magnitude
o constitute a risk of electric shock to persons
e exclamation point within an equilateral
riangle is intended to alert the user to the
resence of important operating and
aintenance (servicing) instructions in the
iterature accompanying the appliance
Laser Safety
his unit employs a laser. Only a qualified service person should remove the cover or attempt to service this device, due
to possi
AUTION: USE OF CONTROLS OR AD
e eye injur
TMENTS OR PERFORMANCE OF PROCEDURES OTHER THAN THOSE
PECIFIED HEREIN MAY RESULT IN HAZARDOUS RADIATION EXPOSURE
AUTION: VISIBLE AND INVISIBLE LASER RADIATION WHEN OPEN AND INTERLOCKS DEFEATED. DO NOT
TARE INTO BEAM
ATION: INSIDE, NEAR THE DECK MECHANISM.
FCC WARNING- This equipment ma
ment may cause harmful interference unless the modifications are expressly approved in the manual. The user could lose
he authority to operate this equipment if an unauthorized change or modification is made.
generate or use radio frequency energy. Changes or modifications to this equip
ADIO-TV INTERFEREN
his equipment has been tested and found to comply with the limits for a Class B digital device, pursuant to Part 15 of the FCC Rules.
hese limits are designed to provide reasonable protection against harmful interference in a residential installation. This equipment
generates, uses, and can radiate radio frequency energy and, if not installed and used in accordance with the instructions, may cause
harmful interference to radio communications. However, there is no guarantee that interference will not occur in a particular installation.
If this equipment does cause harmful interference to radio or television reception, which can be determined by turning the equipment
off and on, the user is encouraged to try to correct the interference by one or more of the following measures
) Reorient or relocate the receiving antenna
2) Increase the separation between the equipment and receiver.
3) Connect the equipment into an outlet on a circuit different from that to which the receiver is connected
4) Consult the dealer or an experienced radio/TV technician for help
A NOTE ABOUT RECYCLIN
his product’s packaging materials are recyclable and can be reused. Please dispose of any materials in accordance with
our local recycling regulations
atteries should never be thrown away or incinerated but disposed of in accordance with your local regulations concern
ng chemical wastes
Make your contribution to the environment!!!
• Used up batteries do not belong in the dust bin
• You can dispose of them at a collection point for used up batteries or special wastes
Contact your council for details
For Customer Use
Read carefully the information located at the back of this unit and enter below the Model No. and the Serial No. Retain this informatio
r
M
l No.
erial No.
Page 3

C
U
O
S
3
etained fo
uture reference.
.
ed.
y
5.
.
e.
y
-
.
acturer's
uctions have been adhered to.
y
.
-
.
.
.
esult
ectric shock.
.
y
.
.
.
.
PORTABLE CART WARNING
(Symbol provided by RETAC)
S3125A
Important Safeguard
s
y
.
1. Read Instructions - All the safety and operating instructions
should be read before the appliance is operated.
2. Retain Instructions- The safety and operating instructions
hould be r
3. Heed Warnings - All warnings on the appliance and in the
perating instructions should be adhered to
. Follow Instructions - All operating and use instructions should
follow
5. Cleaning - Unplug this video product from the wall outlet
before cleaning. Do not use liquid cleaners or aerosol
leaners. Use a damp cloth for cleaning.
XCEPTION: A product that is meant for uninterrupted service
and, that for some specific reason, such as the possibility of
the loss of an authorization code for a CATV converter, is not
ntended to be unplugged by the user for cleaning or an
ther purpose, may exclude the reference to unplugging the
appliance in the cleaning description otherwise required in
m
. Attachments - Do not use attachments not recommended by
the video product manufacturer as they may cause hazards
7. Water and Moisture- Do not use this video product near
water, for example, near a bath tub, wash bowl, kitchen sink,
r laundry tub, in a wet basement, or near a swimming pool,
nd the lik
8. Accessories - Do not place this video
roduct on an unstable cart, stand, tripod,
bracket, or table. The video product ma
all, causing serious injury to a child or
adult, and serious damage to the appliance.
Use only with a cart, stand, tripod, bracket,
r table recommended by the manufac
turer, or sold with the video product. Any mounting of the
appliance should follow the manufacturer's instructions
and should use a mounting accessory recommended by the
manufacturer. An appliance and cart combination should be
moved with care. Quick stops, excessive force, and uneven
surfaces may cause the appliance and cart combination to
verturn
9. Ventilation - Slots and openings in the cabinet are provided
or ventilation and to ensure reliable operation of the video
product and to protect it from overheating, and these
penings must not be blocked or covered.
The openings should never be blocked by placing the video
product on a bed, sofa, rug, or other similar surface. This video
roduct should not be placed in a built-in installation such
as a bookcase or rack unless proper ventilation is provided or
he manuf
10. Power Sources - This video product should be operated onl
rom the type of power source indicated on the marking
label. If you are not sure of the type of power supply to your
home, consult your appliance dealer or local power company.
or products intended to operate from battery power, or
ther sources, refer to the operating instructions
11. Grounding or Polarization - This video product is equipped
with a polarized alternating-current line plug (a plug having
ne blade wider than the other). This plug will fit into the
power outlet only one way. This is a safety feature. If you are
unable to insert the plug fully into the outlet, try reversing the
plug. If the plug should still fail to fit, contact your electri
ian to replace your obsolete outlet. Do not defeat the safety
purpose of the polarized plug.
r f
instr
2. Power Cord Protection - Power supply cords should be
outed so that they are not likely to be walked on or pinched
items placed upon or against them, paying particular
ttention to cords at plugs, convenience receptacles, and the
oint where they exit from the appliance
3. Lightning - For added protection for this video product
during a lightning storm, or when it is left unattended and
nused for long periods of time, unplug it from the wall
utlet. This will prevent damage to the video product due to
ightning and power-line surges
4. Power Lines - An outside antenna system should not be
ocated in the vicinity of overhead power lines or other
lectric light or power circuits, or where it can fall into such
ower lines or circuits. When installing an outside antenna
stem, extreme care should be taken to keep from touching
uch power lines or circuits as contact with them might be
l
5. Overloading - Do not overload wall outlets and extension
rds as this can r
6. Object and Liquid Entry - Never push objects of any kind into
his video product through any openings as they may touch
dangerous voltage points or short-out parts that could result
n a fire or electric shock. Never spill liquid of any kind on the
ideo product
7. Servicing - Do not attempt to service this video product
ourself as opening or removing covers may expose you to
dangerous voltage or other hazards. Refer all servicing to
ualified service personnel.
8. Damage Requiring Service - Unplug this video product
rom the wall outlet and refer servicing to qualified service
ersonnel under the following conditions:
a. When the power-supply cord or plug is damaged
b. If liquid has been spilled, or objects have fallen into the
video product.
c. If the video product has been exposed to rain or water
d. If the video product does not operate normally by
ollowing the operating instructions. Adjust only those
ontrols that are covered by the operating instructions
as an improper adjustment of other controls may result
n damage and will often require extensive work by a
ualified technician to restore the video product to its
ormal operation.
e. If the video product has been dropped or damaged in any
ay.
f. When the video product exhibits a distinct change in
erformance this indicates a need for service.
9. Replacement Parts - When replacement parts are required,
e sure the service technician has used replacement parts
pecified by the manufacturer or have the same characterisics as the original part. Unauthorized substitutions may result
n fire, electric shock or other hazards
20. Safety Check - Upon completion of any service or repairs
o this video product, ask the service technician to perform
afety checks to determine that the video product is in proper
perating condition.
21. Heat - This video product should be situated away from heat
ources such as radiators, heat registers, stoves, or other
roducts (including amplifiers) that produce heat
in a risk of fire or el
N
TI
A
RE
Do not place the unit on the furniture that is capable of being tilted by a child and an adult leaning, pulling, standing or
climbing on it. A falling unit can cause serious injur
or even death
Page 4
C
U
O
S
4
Location and Handlin
g
y
T
t.
.
.
.
.
.
ectrical Shock and
e
.
g.
g
:
.
.
t.
y.
t
Th
bly
s
g
y
.
l
T
.
.
.
es.
ce
g
g
T
autho
.
t
g
.
.
g
-
s
g
y
g
g
.
.
ufactured unde
.
oducts that have earned
e
gp y
py
pp
p
yg
y
yyppyypp
pp y
p
d.
jgj
gg
g
.
g
g
design is a registered trademark of
gg
gg
yyyyy
p
p
pp y
p
pg
pg
ggyp
ggyp
ygy
yg
py y
py y
yyp
yyp
gg y
gg y
o not stand this unit up vertically. Install this unit in a horizontal
and stable position. Do not place anything directly on top of this
nit. Do not place this unit directly on top of the TV.
• Depending on the TV, noise or disturbance of the picture and/or
sound ma
V. In this case, please ensure enough space between your TV
PRE
A
TI
N
nd this uni
• Do not cover or place this unit in enclosed spaces to prevent
xcessive temperature build up
Do not place this unit in direct sunlight, or near heat sources
• Depending on the environment, the temperature of this unit
ay increase slightly. This is not a malfunction.
• Keep this unit away from strong magnetic objects
• Do not place any object containing water or other liquids on
is unit. In the event that liquid should enter the cabinet,
unplug this unit immediately and contact the retailer or an
authorized service center immediately
• Do not remove this unit cabinet. Touching parts inside the
abinet could result in electric shock and/or damage to this unit.
or service and adjustment inside the cabinet, call a qualified
ealer or an authorized service center
• Be sure to remove disc and unplug the AC power cord from the
utput before carrying this unit.
be generated if this unit is placed too close to your
Avoid the Hazards of El
• Do not handle the power cord with wet hands
• Do not pull on the power cord when disconnecting it from AC
utlet. Grasp it by the plug.
• If, by accident, water is spilled on this unit, unplug the power
ord immediately and take the unit to our authorized service
enter for servicin
oisture Condensation Warnin
Moisture may form inside this unit under the following conditions
• Immediately after a heater is turned on
• In a steamy or humid room
• When this unit is suddenly moved from a cold to warm
nvironmen
If moisture forms inside this unit, it may not operate properly or
damage the disc. In such case, do not use this unit at least for 2
hours until its inside gets dr
About Copyrigh
nauthorized copying, broadcasting, public performance and
lending of discs are prohibited.
is product incorporates copyright protection technology that
is protected by U.S. patents and other intellectual property rights.
se of this copyright protection technology must be authorized by
Macrovision, and is intended for home and other limited viewing
ses only unless otherwise authorized by Macrovision. Reverse
engineering or disassem
is prohibited.
Notice for Progressive Scan Output
Consumers should note that not all high definition television sets
re fully compatible with this product and may cause artifacts
to be displayed in the picture. In case of picture problems with
ressive scan output, it is recommended that the user
525 pro
witch the connection to the ‘standard definition’ output. If
there are questions regarding your TV set compatibility with this
525p DVD pla
er, please contact our customer service center
Symbols Used in this Manua
he following symbols appear in some headings in this manual
escription refers to DVD-video
: Description refers to audio CD
: Dscription refers to
D-RW/-R with JPEGfil
Fir
Maintenan
Servicin
Please refer to relevant topics on the “Troubleshooting Guide”
n page 23 before returning the product.
If this unit becomes inoperative, do not try to correct the
roblem by yourself. There are no user-serviceable parts inside.
urn off, unplug the power plug, and please call our toll free
ustomer support line found on the cover of this manual to
an
rized service center
Cleaning the Cabine
Wipe the front panel and other exterior surfaces of the unit with
soft cloth
Never use a solvent, thinner, benzene or alcohol to clean the
nit. Do not spray insecticide liquid near the unit.
uch chemicals may discolor the surface or damage the unit
Cleaning Discs
When a disc becomes dirty, clean it with a cleaning cloth. Wipe
the disc from the center to out. Do not wipe in a circular motion.
Do not use solvents such as benzine, thinner, commercially
vailable cleaners, detergent, abrasive cleaning agents or anti
tatic spray intended for analog records.
Cleaning the Disc Len
If this unit continues to perform improperly even after
ou have referred to the relevant sections and to the
Troubleshooting Guide” in this manual, the laser optical pickup
nit may be dirty. Consult your dealer or an authorized service
enter for inspection and cleaning of the laser optical pickup
nit.
isc Handlin
When you handle a disc, hold it by its edge and try not to touch
the surface of the disc
Always store the disc in its protective case when not in use
© 2009 Funai Electric Co., Ltd.
eproduced, copied, transmitted, disseminated,
unauthorized commercial distribution of this manual or
any revision hereto is strictly prohibite
Information in this document is subject to change
erson or organization of such changes
with the
n
Dolby Laboratories. Dolby and the
le-D symbol are trademarks
of Dolby Laboratories
r license from
Pr
designed to protect the environment through
superior energy efficiency.
ENERGY STAR® ar
Page 5
C
U
O
S
5
A
bou
s
s
Ty
f
a
ded
ls
deo
o
)
)
s
)
WVD-R
0
RWVD+R
9
o
ches
)
es
)
WD-R
o
JPEGPicture C
JPEG
.
k.
-
.
.
.
f
.
y.
s
!
.
ed.
s
t the Disc
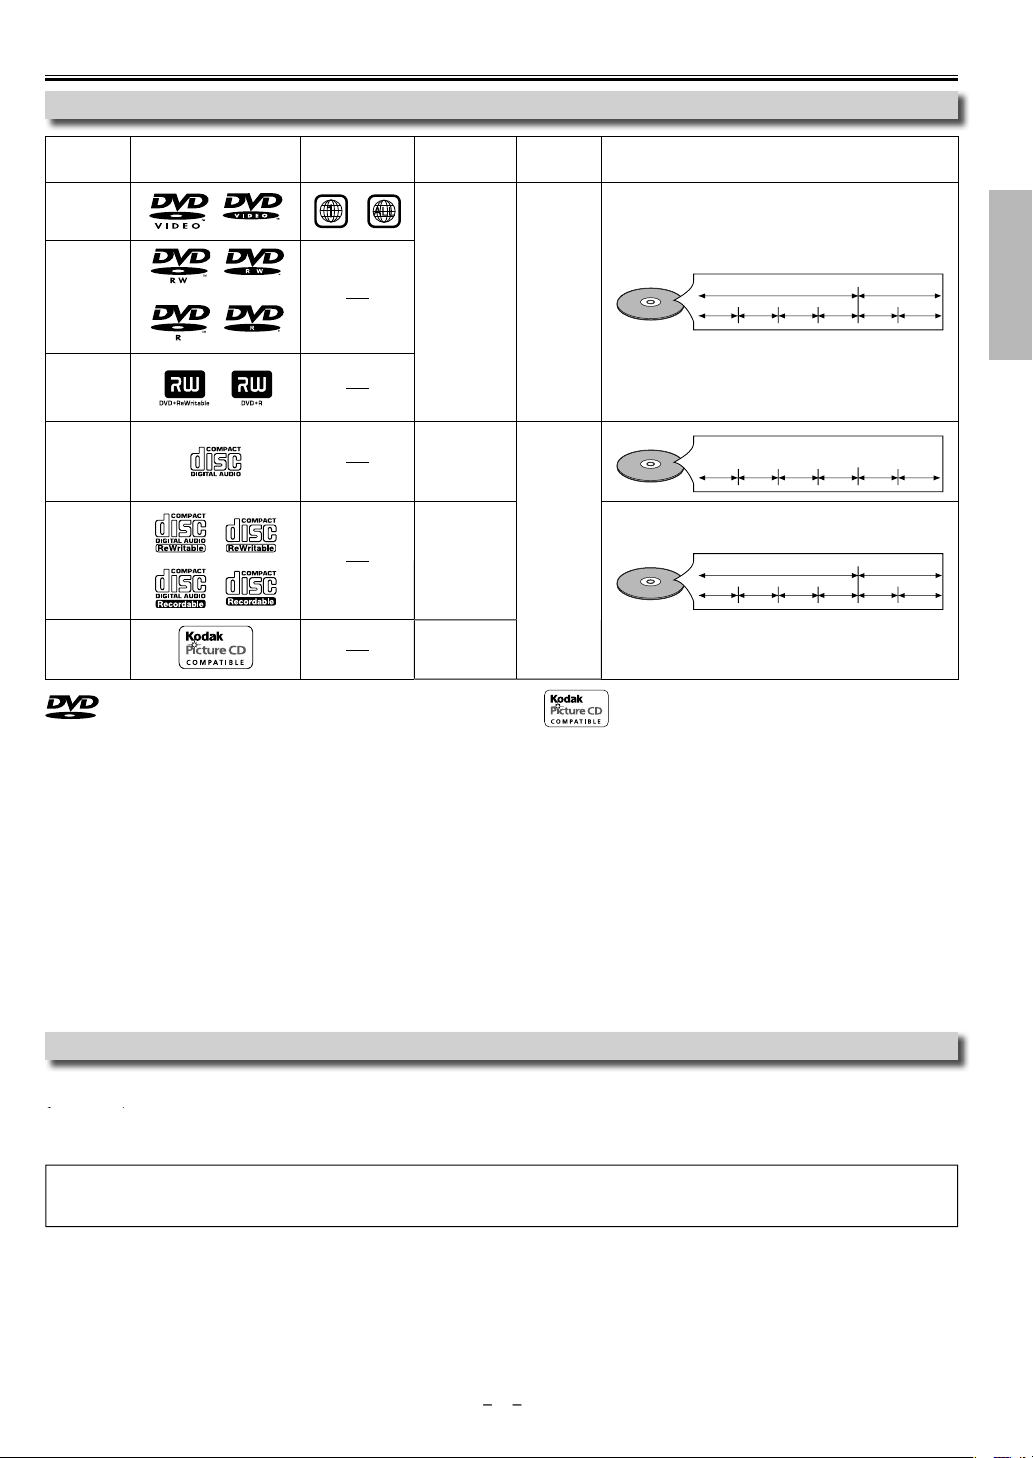
Playable Disc
pe o
medi
DVD-vi
1, 2, 3, 5, 9
VD-R
1, 3, 4, 5, 6,
, 8, 9, 1
VD+
1, 3, 4, 5, 8,
io CD
*3, 5, 9
D-R
3, 4, 5, 8, 9
3, 4, 5, 8, 9
D
Mark (logo)
egion code
or
is a trademark of DVD Format/Logo Licensing Corporation.
r
igna
igital vide
MPEG2
igital audi
igital audi
r
edia size
5 inches
12 cm
3 inche
8 cm
in
12 cm
inch
8 cm
isc types
audio CD
JPEG
e.g.)
chapter 1 chapter 2 chapter 1
e.g.)
e.g.)
title 1 title 2
chapter 3 chapter 4
track 1 track 2 track 5 track 6track 3 track 4
folder 1 folder 2
le 1 le 2 le 5 le 6le 3 le 4
s trademark of Eastman Kodak Compan
chapter 2
N
TI
A
RE
If you cannot play back a disc which bears one of the marks above, check the following
*1: This unit conforms to the NTSC color system. Discs recorded in other color systems such as PAL cannot be played back.
*2: Certain DVD-video does not operate as described in this manual due to the intentions of the disc’s producers.
*3: Scratched or stained discs may not be played bac
*4: Some discs cannot be played back because of incompatible recording conditions, characteristics of the recorder or special prop
erties of discs
*5: You can play back discs which bear the marks above. If you use nonstandardized discs, this unit may not play them back. Even if
they are played back, the sound or video quality will be compromised.
*6: You may play back the unfinalized DVD-RW/-R recorded in the video format on our brand’s DVD recorder. However, depending
on the recording status of a disc, the disc may not be played back at all or normally (the picture or sound may not be smooth,
etc.). In this case, you need to finalize the disc with the DVD recorder. Refer to the manual accompanying the DVD recorder.
*7: Only discs recorded in the video format and finalized can be played back.
nfinalized discs cannot be played back. Depending on the recording status of a disc, the disc may not be played back at all (the
picture or sound may not be smooth, etc.)
*8: If the recorded portion of the disc is too small (less than 2-3/16 inches (55 mm) across), it may not play back properly
*9: Do not glue paper or put stickers on to the disc. These may damage the disc, and the unit may not read it correctly.
*10: Discs recorded in the VR (video recording)
ormat cannot be played back
Unplayable Disc
NEVER play back the following discs as malfunction may result
On the following disc, the sound MAY NOT be heard
super audio CD
Only the sound recorded on the normal CD layer can be delivered. The sound recorded on the high density super audio CD layer
nnot be deliver
ny other discs without compatibility indication
Page 6

6
o
e
e
e
T
V
T
O OUT
al:
U
h
/VC
X
O3
L
O
O
O
Toshib
00
UP
nnection
s
.
ection to a
:
.
:
.
d
;
.
;
seconds.
deo cable
audio cable
deo cable
ble
AUDIO IN
VIDEO IN
L
R
AUDIO IN
L
R
VIDEO
OUT
Y
C
B
/P
AUDIO
OUT
R
L
AUDIO
OUT
VIDEO
OUT
COAXIAL
R
L
Y
COMPONENT VIDEO OUT
C
R/PR
DIGITAL
AUDIO OUT
C
B/PB
HDMI OUT
VIDEO IN
AUDIO
OUT
VIDEO
OUT
R
L
Y
C
B/PB
S-VIDEO
OUT
S-VIDEO IN
HDMI OUT
COAXIAL
DIGITAL
AUDIO OUT
AUDIO
OUT
VIDEO
OUT
R
L
Y
COMPONENT VIDEO OUT
C
R/PR
CB/P
B
COMPONENT
VIDEO IN
COMPONENT
VIDEO IN
or
P
B
P
R
Y
C
B
C
R
Y
SET
SETUP
nn
nalog audi
TV
standard pictur
TV
n
RCA
RCA vi
-vi
This unit
AUDIO OU
IDEO OUT
Supplied cables used in this connection are as follows:
• RCA audio cable (L/R) x 1
• RCA video cable x 1
Please purchase the rest of the necessary cables at your local store.
ood pictur
-VIDEO OU
better pictur
omponent video ca
MPONENT
VIDE
Connect this unit directly to your TV. If RCA audio/video cables are connected to a VCR, pictures may be distorted due to the copy
protection system
If your TV is compatible with 525 (480) progressive scanning and you want to enjoy that high quality picture
You must select the connection COMPONENT VIDEO OUT above and progressive scanning mode. To set the mode, set
PROGRESSIVE” to “ON” in “DISPLAY” menu. Refer to pages 18-20 for more details.
• When “PROGRESSIVE” is “ON”, video signals from the unit’s VIDEO OUT and S-VIDEO OUT jacks will be distorted or not be output at
ll
If your TV is not compatible with progressive scanning
Use this unit in interlace mode and set “PROGRESSIVE” to “OFF” either in “DISPLAY” menu or by pressing and holding
he front of the unit for more than 5
fter connecting to your TV
You will need to switch to video input on your TV. This is usually marked TV/VIDEO, INPUT or AUX
Please refer to your TV’s owner’s manual for details.
Input modes for common TV brands
Listed below are inputs for common brand name TV’s
Admir
A
Curtis Mat
GE: INPUT, TV
JVC: VIDEO, VIDEO1, VIDEO2, VIDE
XI-Series: 00
itachi: INPUT, AU
enwood: AUX
is: LINE1, LINE2, 00, 90, 91, 92, 93
Magnavox: AUX CHANNE
X
anasonic: TV/VIDE
A: INPUT, TV/VCR, 00, 90, 91, 92, 93
R, 00, 90, 91, 92, 93
amsung: TV/VIDE
anyo: VIDE
arp: 00
ony: VIDEO1, VIDEO2, VIDEO3
a: TV/GAME
nith:
PLAYB on
Page 7
7
.
.
a
py
g
1
CM
deo
l
l
CM2ch
M
channe
CM
.
m
T
ly.
ected.
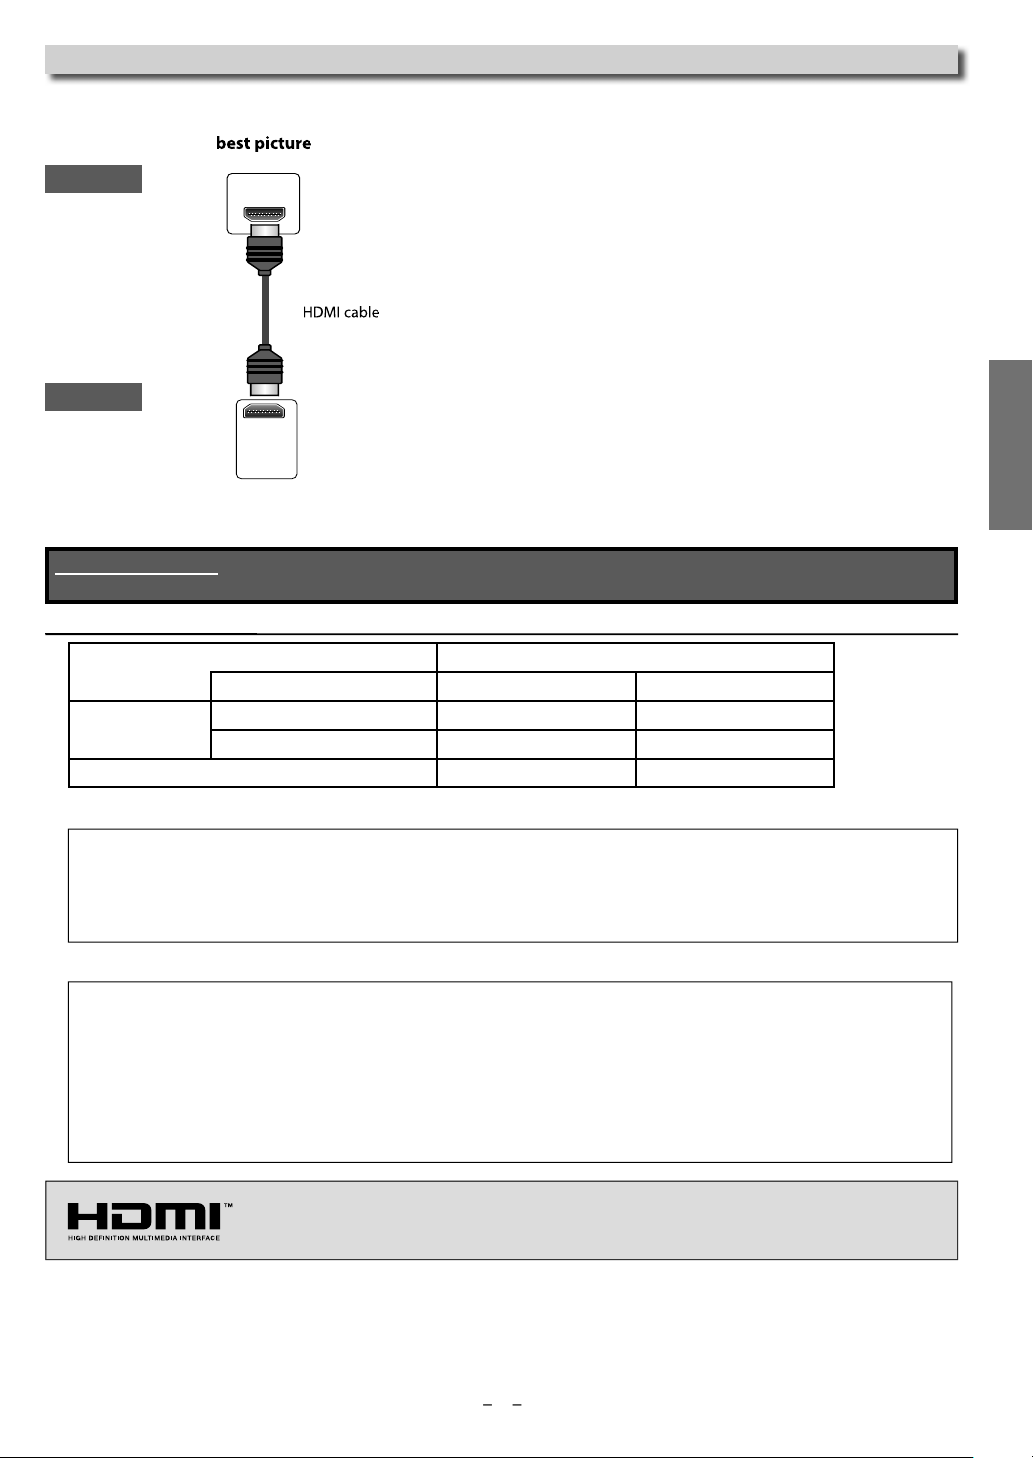
Connection to a TV with an HDMI Compatible Por
t
.
A simple 1-cable connection with a device having an HDMI (High-Definition Multimedia Interface) connector allows digital transfer of
the digital images of DVD-video and other devices
TV
HDMI IN
This unit
HDMI OUT
When connecting with an HDMI cable, the audio signal will be output as the digital audio signal simultaneously, so you
o not need the analog audio connection described on page 6
Cables not included.
Please purchase the necessary cables at your local store.
Actual output modes by medi
LBY DIGITAL Settin
Audio Recording Format BITSTREAM *
DVD-vi
io CD2
Dolby Digita
LP
Dolby Digita
annel PC
l P
P
channel PCM
channel PCM
hannel PCM
SETUP
*1 If the connected device is not compatible with HDMI BITSTREAM, signals are output on PCM
Copyright protection syste
o play back the digital video images of a DVD via an HDMI connection, it is necessary that both the player and the display device
(or an AV amplifier) support a copyright protection system called HDCP (high-bandwidth digital content protection system). HDCP
is copy protection technology that comprises data encryption and authentication of the connected AV device.
This unit supports HDCP. Please read the operating instructions of your display device (or AV amplifier) for more information.
*HDMI: High Definition Multimedia Interface
When using an HDCP-incompatible display device, the image will not be viewed proper
Among the devices that support HDMI, some devices can control other devices via the HDMI connector; however, this unit cannot
e controlled by another device via the HDMI connector.
The audio signals from the HDMI connector (including the sampling frequency and bit length) may be limited by the device that is
nn
Among the monitors that support HDMI, some do not support audio output (for example, projectors). In connections with device
such as this, audio signals are not output from the HDMI output connector.
When the set’s HDMI connector is connected to a DVI-D compatible monitor (HDCP compatible) with an HDMI-DVI converter cable,
the signals are output in digital RGB.
HDMI, the HDMI logo and High-Definition Multimedia Interface are trademarks or registered
trademarks of HDMI Licensing LLC
Page 8
8
OUT
OUT
.
l
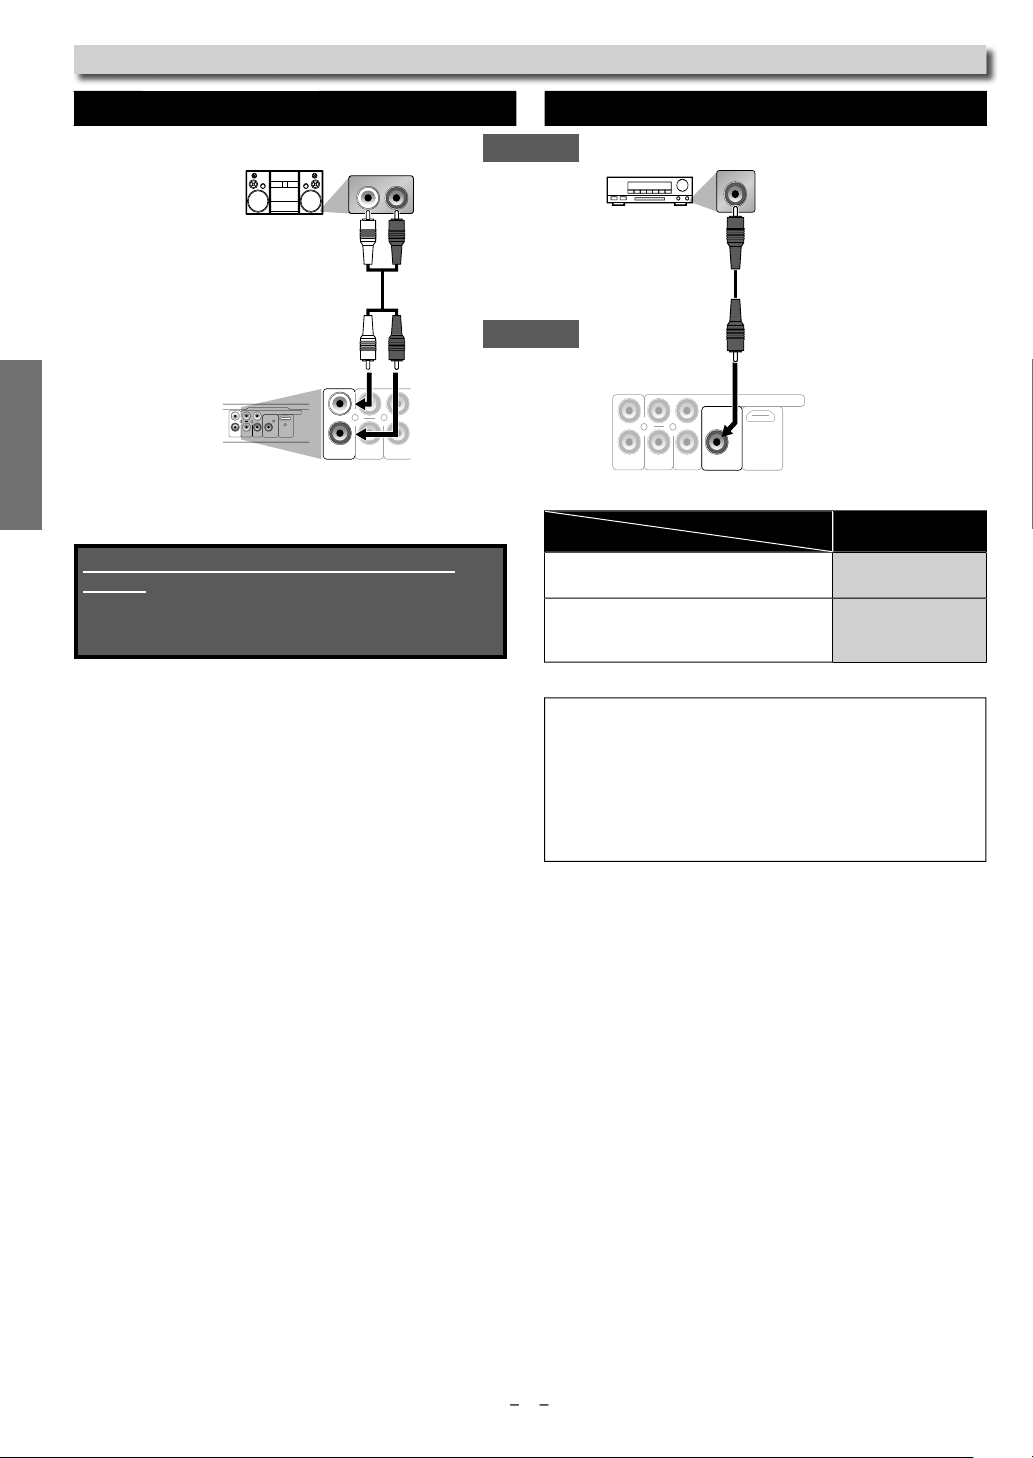
onnection to an Audio Syste
m
:
el
deck.
.
ble
k
ble
m
deck o
dec
LR
VIDEO
OUT
Y
C
B/PB
AUDIO
OUT
R
L
AUDIO
OUT
VIDEO
OUT
COAXIAL
R
L
Y
COMPONENT VIDEO OUT
C
R/PR
DIGITAL
AUDIO OUT
C
B/PB
HDMI OUT
AUDIO
OUT
VIDEO
OUT
COAXIAL
R
L
Y
COMPONENT VIDEO OUT
C
R/PR
DIGITAL
AUDIO OUT
C
B/PB
HDMI OUT
COAXIAL
Analog Audio Connection Digital Audio Connection
stereo syste
nalog audio
nput jacks
Audio
olby Digital decoder,
MD
r DAT
k
igital audio
input jac
SETUP
RCA audio ca
DIO
Supplied cables used in this connection are as
follows:
• RCA audio cable (L/R) x 1
Please purchase the rest of the necessary cables at
your local store.
igital audio coaxial ca
This unit
DIGITAL AUDIO
Connection
onnecting to a Dolby Digital decoder
or Dolby Digital audio output
onnecting to other device (an MD deck
r DAT deck etc.) without Dolby Digita
ecoder.
* To complete these settings, refer to pages 18-20.
Setting
ote
The audio source on a disc in a Dolby Digital multi chann
urround format cannot be recorded as digital sound by an MD
r DAT
By hooking this unit up to a Dolby Digital decoder, you can
njoy high-quality Dolby Digital multi channel surround sound
as heard in the movie theaters
Playing back a DVD using incorrect settings may generate
oise distortion and may also damage the speakers.
SETUP > QUICK >
DOLBY DIGITAL
ITSTREAM
M
Page 9
9
S-VIDEO
OUT
AUDIO
OUT
VIDEO
OUT
COAXIAL
R
L
Y
COMPONENT VIDEO OUT
C
R/PR
DIGITAL
AUDIO OUT
C
B/PB
HDMI OUT
Function Overvie
w
r
s
s
y
.
k
y
.
k
.
k
.
y
2
ote:
.
)
.
heck th
).
.
.
r
2
cator
k.
3
r
2
3
.
e
p
e
p
aced
080i
e
p
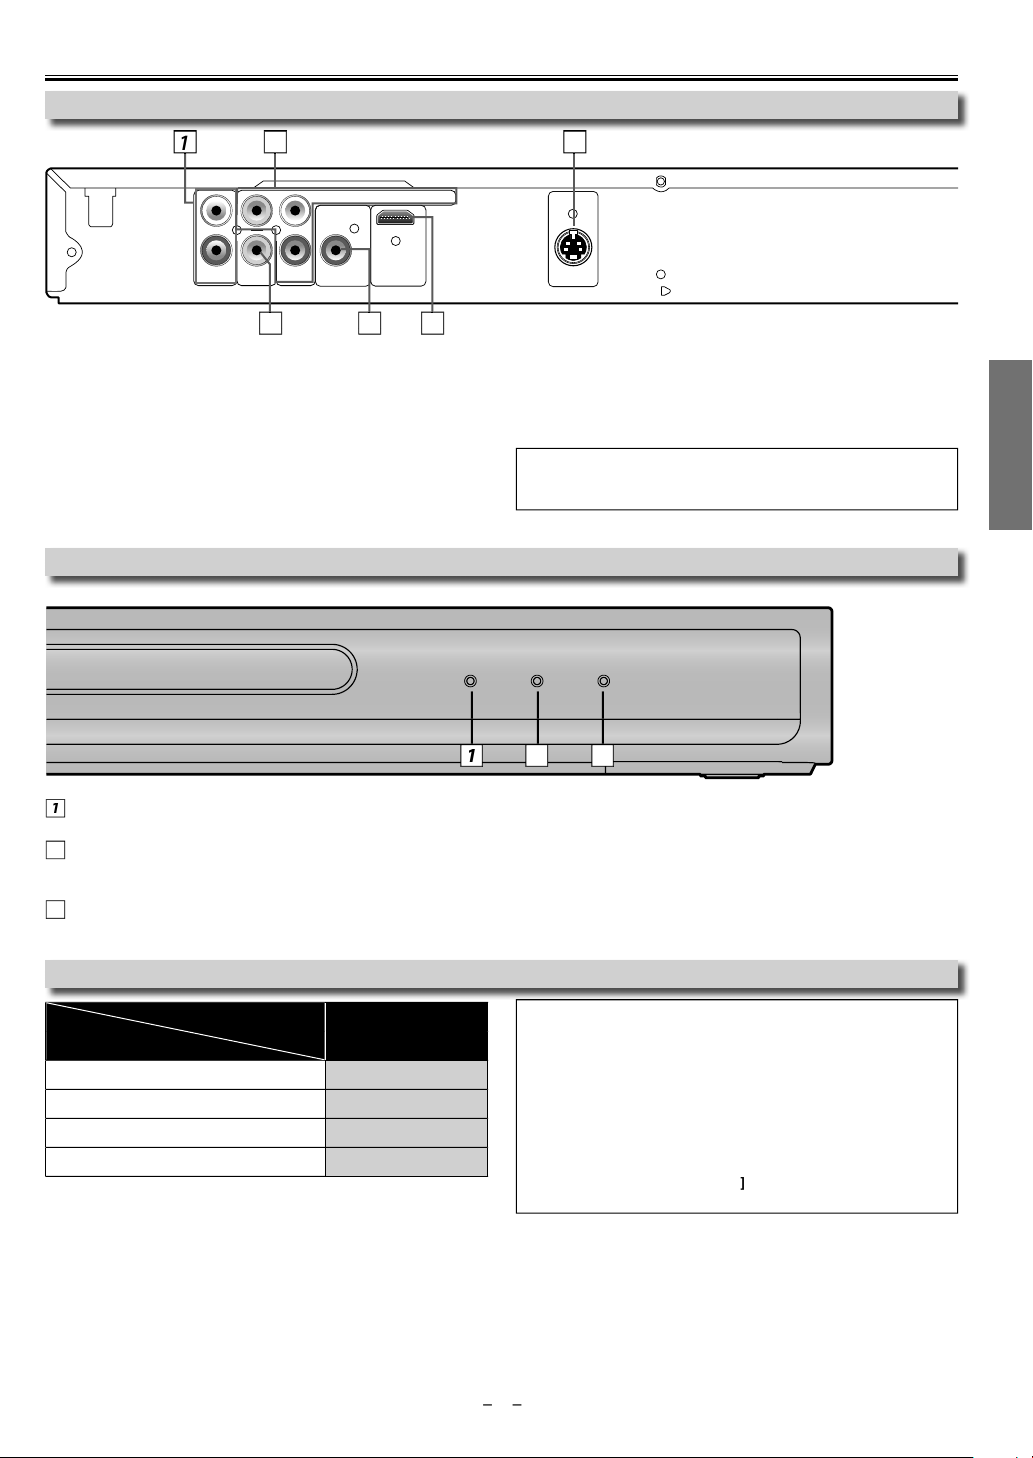
Rear Terminal
1: AUDIO OUT jack
5: DIGITAL AUDIO OUT COAXIAL jac
Connect an RCA audio cable from here to the audio input jack of
our television or audio device
2: COMPONENT VIDEO OUT jacks
6: VIDEO OUT jack
Connect a component video cable from here to the component
video input jacks of your television.
3: S-VIDEO OUT jac
Connect an S-video cable from here to the S-video input jack of
our television
4: HDMI OUT jac
Connect an HDMI cable from here to the HDMI compatible port
of a television or other display device
Front Panel Indicato
POWER PLAY HDMI
POWER indicato
Lights up when power is on.
PLAY indi
Lights up when inserted disc is being played bac
Blinks when an unplayable disc is inserted.
HDMI indicato
Lights up when there is video signal output from the HDMI OUT jack.
Connect a digital audio coaxial cable from here to the digital
udio input jack of your digital audio receiver
Connect an RCA video cable from here to the video input jack of
our television.
N
ease purchase the necessary cables at your local store
(Refer to pages 6-8.
SETUP
HDMI Setup
Setting
Video Output Signal
80 Progressiv
720 Progressiv
Interl
080 Progressiv
To complete these settings, refer to pages 18-19
SETUP > QUICK>
HDMI MODE
480
720
1
1080
• Video and audio signals may distorted temporarily when
changing to/from the HDMI output mode
• Use a display with an HDMI-compatible port.
• You can c
DISPLAY] during playback with the HDMI output mode (refer
e HDMI connection status by pressing
o page 14
• The HDMI mode that is not supported by display device is
grayed in the settings
• If the TV is not compatible with newly selected HDMI output
mode, press and hold
PLAY Bon the front of the unit for
more than 5 seconds to reset the setting to default
Page 10

STANDBY-ON
OPEN/CLOSE
1
4
7
2
5
8
0
+10
3
6
9
CLEAR
PREV
NEXT
PLAY
STOP
PAUSE
TITLE
RETURN
DISC
MENU
SETUP
ZOOM REPEAT REPEAT
A-B
AUDIO SUBTITLE ANGLE
OK
MODE DISPLAY SEARCH
l
.
STANDBY-ON
PREV PLAY NEXT STOP
OPEN/CLOSE
POWER PLAY HDMI
ote control:
obstacles
ote control and the
ed
t.
f
.
Rem
ote Control
ote:
es.
batteries.
ote contro
used fo
y.
y.
.
.
.
.
.
.
)
.
)
clear the markers.
ed
y.
y
)
status numbe
ed
y
)
.
)
.
ff.
ly.
yy
)
)
.
.
.
y
e.
.
.
.
.
.
.
.
.
dly
y
.
.
.
k.
)
)
.
.
the unit on or to tu
the
y
)
the unit on or to tu
the
y
)
k.
ect subtitles on a disc.
y
)
)
)
sc
i
2
1
3
5
4
6
8
7
0
• To select chapter or title directl
9
+10
• To select track or file directl
SETUP
Installing the Batteries for
the Remote Contro
Install 2 AAA (1.5V) batteries matching the
polarity indicated inside battery compartment of the remote control
1
Keep in mind the following when using the
rem
•
Make sure that there are no
ween the rem
nsor window on the uni
• The maximum operable ranges from the
unit are as
Line of sight: approx. 23 feet (7m)
Either side of center
ove
Below
N
Do not mix alkaline and manganese
Do not mix old and new
Always remove batteries from remote
control if they are dead or if the
rem
an extended period of time. This will
prevent battery acid from leaking into
the battery compartment.
2
ollows
pprox. 16 feet (5m) within 30°
pprox. 16 feet (5m) within 15°
x.
10 feet (3m) within 30°
ri
l is not to be
OK
A-B
REPEAT
ANGLE
AUDIO
CLEAR
• To move the cursor and determine
ts position
• To search forward/backward
through a disc
• To begin slow forward/reverse
playback in the pause mode
• To repeat between your chosen
oint A and B
• To select camera angles on a disc
• To select audio languages on a disc
• To
• To clear the numbers enter
incorrectl
• To move the cursor and determine
ts position
• To search forward/backward
hrough a disc.
• To repeat between your chosen
oint A and B. (CD)
• To rotate a picture of JPEG files.
JPEG
• To select “STEREO”, “L-ch” or
R-ch”. (CD
• To clear the markers. (CD
• To remove
rogram input.
• To clear the numbers enter
ncorrectly.
r in
CD
DISC
MENU
DISPLAY
3
infrar
MODE
OPEN/CLOSE
PAUSE
PLAY
PREV
REPEAT
RETURN
SEARCH
SETUP
STANDBY-ON
STOP
SUBTITLE
TITLE
r
ZOOM
• To call up the menu on a disc
• To display the current disc or HDMI
mode
• To call up the file list. (JPEG
• To display the current disc or HDMI
• To arrange the playing order or
• To set black level on/off.
• To set virtual surround on/o
• To open or close the disc tray
• To turn the unit on.
im
• To begin disc playback
• To turn the unit on
NEXT
• To skip chapters
• To play back a chapter or title
repeatedly
• To return to the previous operation
n menu.
• To search chapter, title or time
• To set or search the markers
• To call up the setup menu
• To turn
unit into the standby mode. (To
rn
• To activate the slide show mode.
• To open or close the disc tray
• To turn the unit on
• To pause disc playback
• To begin disc playback
• To turn the unit on
• To skip tracks or files
• To play back a track or disc
• To return to the previous operation
• To search trac
• To search time. (CD
• To set or search the markers. (CD
• To call up the setup menu
• To turn
must unplug the AC power cord.
• To stop playback. • To stop playbac
• To sel
• To call up the top menu on a disc.
• To magnify part of a picture. (2x/4x
• To return to the top file of the
• To magnify part of a picture. (2x
ode.
ay random
CD
JPEG
epeate
. (CD)
epeatedly. (JPEG)
n menu
nit into the standby mode. (To
rn
ust unplug the AC power cord.
JPEG
10
Page 11

U
C
O
S
11
STANDBY-ON
OPEN/CLOSE
1
4
7
2
5
8
0
+10
3
6
9
CLEAR
PREV
NEXT
PLAY
STOP
PAUSE
y
STANDBY-ON
PREV PLAY NEXT STOP
OPEN/CLOSE
POWER PLAY HDMI
2
ote:
2
x
0
x
0
x
8
x
x
k
py p y
ess
k.
B
.
B
h
g[h
dly d
k
.
.
B
k
y
ess
.
ess
Press 'PLAY' to play from here.
To play the beginning,
press 'STOP' first and then 'PLAY'.
Resume ON
.
ote:
.
.
e:
k
h
g
[
h
.
H
,
G
o
G
on this unit
.
B
:
de.
hich playback
d.
.
:
.
H
G
t
E
1
1
T
2
h
.
T
k
k
PLAY
STOP
STANDBY-ON
OPEN/CLOSE
2
S
Pl
ease note : most
uctions
ote control use.
u
K
/
s
/
]
k
gp g y
.
.
:
.
y
instr
in this manual refer to rem
Befor
Turn on the TV, amplifier and any other
omponents which are connected to this
unit. Ma
e sure the TV and audio receiver
(not supplied) are set to the
orrect channel.
on page 1
o open the disc
ray
o start playbac
Insert a disc wit
label facing up
To stop playbac
Disc Men
DVD FUNCTION
Note
may appear at the top-right on the TV screen when the operation is prohibited by
e disc or this unit
Some DVD may be played back from title 2 or 3 due to specific programs.
During the playback of a 2-layered disc, pictures may stop for a moment. This happens while the 1st
ayer is being switched to the 2nd layer. This is not a malfunction.
You can change the on-screen language for DVD function in “PLAYER MENU” menu. Refer to page 18.
When the unit is connected with an HDMI cable, a revocation list update screen may appear when
ou try to play back the DVD-video containing a revocation list.
If the unit is connected to the unauthorized display device with an HDMI cable, the audio/video signal
ay not be output when playing back a commercial DVD-video.
Paused and Step-by-Step Playbac
N
Some discs contain menus which allow you to customize DVD
playback. Use
or
PLAY B.
L /
Bto select an item, then press
OK
Calling Up a Menu Screen during Playbac
Press
DISC MENU]to call up the disc menu
Press
TITLE]to call up the title menu
ote
Menu operations may vary depending on the disc. Refer to the
manual accompanying the disc for details
Resume Playbac
Pr
STOP C during playback. Resume message will appear on
he TV screen
Pr
PLAYB, playback will resume
from the point at which playback was
stopped.
ote
To cancel resume, press
mo
For JPEG, playback will resume from the beginning of the track
at w
The resume playback information stays on even when the
power is turned off, as long as the disc stays in the unit
STOPC one more time in the stop
was stoppe
r
PAUSE F
To continue playback, press
uring playbac
PLAY
The disc goes forward by one frame each time[PAUSE F
ressed in the pause mode
To continue playback, press
PLAY
• For DVD, set “STILL MODE” to “FIELD” in “DISPLAY” menu if
pictures in the pause mode are blurred. Refer to pages 18-19
To use
PREV
[NEXT
on this uni
Press once to skip chapters, tracks or titles to a desired point.
Fast Forward / Reverse Searc
select the required forward or reverse speed
repeate
o use
PREVH, [NEXTGon this unit
Pressing and holding
PREV H or
change forward or reverse playback speed
To continue playback, press
uring playbac
NEXT G on this unit will also
PLAY
N
or DVD, fast forward or reverse search speed is different depending
n the disc. Approximate speed is 1(
• For audio CD, approximate speed is 1(2x 2(
Slow Forward / Reverse Searc
2(8x), 3(2
3(30
4(50x), 5(10
TI
N
VD F
ress
repeatedly in the pause mode to
select the required forward or reverse speed
To use
PREV
Pressing and holding
[NEXT
PREV H or
n this unit
NEXT
in the
pause mode will also change forward or reverse playback speed
To continue playback, press
PLAY
N
• Slow forward or reverse speed is different depending on the
disc. Approximate speed is 1(1/16x), 2(1/8x), 3(1/2x)
• Set “STILL MODE” to “FIELD” in “DISPLAY” menu if pictures in
he slow playback mode are blurred. Refer to pages 18-19
Page 12

U
C
O
S
12
stored o
oda
cture CD.
e
f
:
k
.
ess
k.
G
“
H
.
“
G
G
t
“
H
V
H
d
.
JPEG Playback
y
.
.
2
ess
y.
STOP
d.
folder name 4
folder name 1
folder name 3
folder name 2
folder name 1
DISC NAME
FILE LIST
OK
PLAY
file name 3
file name 2
file name 1
1/ 2
:
.
ess
etu
.
sc.
.
PLAY
T
g
e
ks
k
B
.
Picture 4
Picture 1 Picture 2 Picture 3
Picture 5 Picture 6
Current track number /
the number of total tracks
1/32
does not wo
scs.
m
ff.
PLAY
.
.
x2 x4
[
K
/L/
/
B
reen
ff.
Picture CD
1) Pre ZOOM]
2) Press
ZOOM] repeatedly to select the required zoom factor:
uring playback.
x, 4x or o
3) Press
4) To exit zoom mode, press
Zoom function
c
s
.
o slide the zoomed picture across the TV
ZOOM] to select o
rk while the disc menu is
displayed.
4x zoom is not available on some di
Only 2x zoom is available on JPEG.
You cannot slide the zoomed picture on some JPEG files.
JPEG is a method of compressing files. You can copy JPEG files on
CD-RW/-R from the computer and play back the files on this unit.
DVD F
Insert a CD-RW/-R with JPEG files, the file list will automatically
appear on the TV screen. Press
call up the file list again while
N
nserte
TI
When selecting the folder:
N
DISC MENU]when you want to
D-RW/-R with JPEG files is already
OK
This unit can also run JPEG files
n K
k Pi
Th
picture CD is a service to convert photographs taken by a
conventional film camera into digital data and write the data
on a CD. The user can enjoy picture images on the television set
by playing back the picture CD. For details o
Kodak Picture CD,
contact a shop that deals with developing service of Kodak Inc.
hen selecting the file
To play bac
OK
• If a Kodak Picture CD file is selected, an image will be
layed back from the selected track and go to next one
n turn
• Pr
STOPC to stop playbac
• If all menu items cannot be displayed in the TV screen,
appears at the right bottom of the screen,
ndicating that the user can view remaining items on the
ext page.
” appears, it indicates that the user can
iew other items on the previous page. The track number
the currently highlighted item and the total tracks are
hown at the center bottom of the screen
• If
” is shown at the right bottom, use
iew the next page. If
PRE
to view the previous page.
” is shown at the left bottom,
NEXT
o
• It may take some time until all menu items are displaye
n the menu screen
• Press Bwhen you want to go to the next hierarchy
• Press s when you want to go back to the previous
hierarchy (except for the top hierarchy)
Pr
playback temporaril
his unit recommends the files recorded under the followin
circumstances:
Applicable JPEG fil
Normal playbac
pper limit: 6,300 x 5,100
Pixel lower limit: 32 x 32 pixel
File size: Max. 7 M
ote
Depending on some sections, it may take a while to be
recognized
Pr
TITLE] to r
Folders and JPEG files are displayed respectively as and
A maximum of 255 folders or 999 files may be recognized on
ne di
Up to 8 hierarchies can be recognized in one folder. File in the
9th or deeper hierarchies cannot be played back.
STOPConce to stop
rn to the first item
Refer to “Resume
Playback” on page 11
Remar
• A JPEG image that extends
eyond the screen is
reduced so that it will be
isplayed within the screen
track is displayed for 5 seconds and then the next track is
isplayed
Every press on
ANGLE]will turn the image clockwise by 90
egrees when an image is displayed
Page 13

U
C
O
S
3
e
j
reen.
dly
“
2
tch
.
:
:
ess
it.
PLAY
NORMAL
SMALL
Th
.
.
.
Transition M
ode
.
dly
.
2
:
.
:
.
ess
[
it.
PLAY
CUT IN/OUT
FADE IN/OUT
ote:
Th
.
.
Adjustment of Picture Siz
You can switch to the transition mode for JPEG files during
playback
During playback, press
appears
To switch “CUT IN/OUT” or “FADE IN/OUT”.
r
OK
UT IN/OUT
The entire image appears in one time
FADE IN/OUT
The image appears gradually and then disappears
r
RETURN] to ex
RETURN
MODE]repeate
MODE
until “
N
e transition mode cannot be switched when it is stopped, or
rom the file list screen or the picture CD menu screen
• The default setting is “CUT IN/OUT”
Depending on the TV connected to this unit, the overall picture
cannot be displayed and the edge of the picture can be cut off. In
this case, you can adjust the size of the JPEG playback image on
c
During playback, press
To swi
NORMAL
To display the image at 100% of the picture size.
To display the image at 95% of the picture size.
e setting screen will not be displayed while in the stop mode
r from the file list
This feature may have no effect on some files (e.g. Files with
small picture size)
The default setting is “NORMAL”
“NORMAL” or “SMALL”
r
OK
MALL
r
[RETURN] to ex
RETURN
MODE] repeate
MODE
until
N
TI
N
VD F
1
Page 14

U
C
O
S
14
You can check the information about the current disc by pressing [DISPLAY
]
on the remote control.
DISPLAY
4/12 0:03:21 - 0:02:15
T
4/12 0:13:45 - 0:45:40
T
:
ks
T
t
t
:
s
TRACK 01
1/36
T
T
t
t
t
:
p
k
g
k
c
s
s
2
2
)
s
TT(
s
e.
T
t
11/16 0:00:00 - 0:03:30
1/3 0:00:00 - 1:23:45
TL1
ate: the amount of audio and
d
0
e
e
ly
sc.
k
k
s
.
2
py
DISPLAY
DISPLAY
DISPLAY
DISPLAY
DISPLAY
DISPLAY
DISPLAY
DISPLAY
DISPLAY
DISPLAY
:
2
VIDEO INFO. :
YCbCr/1080i
AUDIO INFO. :
BITSTREAM
MAX CHANNEL
: 2ch
DISPLAY
status
e
els
VIDEO INFO. :
YCbCr/1080i
AUDIO INFO. :
BITSTREAM
MAX CHANNEL
: 2ch
s
ge
t
ls
DISPLAY
VIDEO INFO. :
YCbCr/1080i
AUDIO INFO. :
BITSTREAM
MAX CHANNEL
: 2ch
status
e
t
audio
ls
DISPLAY
appears only in a case
ulti-angle is available on the
DVD
urrent playback statu
emaining time of the current
apter
lapsed time of the current
apter
H(Chapter):
urrent chapter number /
total chapter
emaining time of the current titl
lapsed time of the current titl
Title):
urrent title number / total title
ayer numbers, appears on
DVD F
when playing back a 2-layered
i
L0: Layer 0 is in playbac
L1: Layer 1 is in playbac
N
TI
N
current repeat setting, appears
only when the repeat setting is
v
C: Chapter repeat
: Title repeat
B: A-B repea
it r
ideo data currently being rea
current playback statu
remaining time of the current trac
elapsed time of the current trac
TR(Track)
current track number / total trac
ALL
current track number / total track
current repeat setting, if active
: Track repea
: All Tracks repeat
: A-B repea
remaining time of the entire dis
elapsed time of the entire disc
current HDMI statu
•image output / resolution of ima
• sound output forma
• maximum number of audio
anne
ote
mode,PROGRAM (or RANDOM) will be displayed instead of
rrent HDMI
image output / resolution of imag
sound output format
maximum number of audio
nn
current playback statu
the name of the file currently in
playback will be displayed.
TR(Track)
current track number / total tracks
current repeat setting, if active
: Track repea
: Group (folder) repea
: Disc repea
PROGRAM
RANDOM
or
Only when you are playing back a disc in program or random
ode.
rrent HDMI
• image output / resolution of imag
• sound output forma
• maximum number of
anne
Page 15

U
C
O
S
5
ess
]
2
ect the marker.
3
G
k.
ess
2
ect a marker.
3
]
ess
y
.
2
]
.
ess
.
.
2
seconds.
ess
]
2
30nds.
Search Function
s
1:29:00
TOTAL
etu
the marker later
the marker screen
/29
/29
H
], [
T
G
]
H
], [
T
G
]
1:29:00
TOTAL
ote:
For example, “0: 0_: _ _” appears in the time search display if the
ess tha
utes.
.
k.
ote:
py
p
p
]
s.
pg
ill al
gp
gp
SEARCH
SEARCH
RETURN
.
:
,
y
.
d
k.
.
h
h
g
bac
ater.
r
.
h
PLAY
PLAY
SEARCH
PLAY
SEARCH
PLAY
1
4
7
2
5
8
0
+10
3
6
9
1
4
7
2
5
8
0
+10
3
6
9
1
4
7
2
5
8
0
+10
3
6
9
SEARCH
PLAY
OK
OK
TR 1 TR 2 TR 3 TR 4
Current Track
(TR)
PREV
NEXT
CH 1 CH 2 CH 3 CH 4
Current Chapter
(CH)
or
PREV
TT 1 TT2 TT3 TT4
Current Title
(TT)
PREV
NEXT
NEXT
Search function does not work during programmed or random playback
Using Track Searc
r
SEARCH
elect track number by using
• For the disc with less than 10 tracks, press the track number directly.
• For discs with more than 10 but less than 99 tracks, to play back
single-digit track, press
ress
0], [3]). To play back a double-digit track, press the track number.
• For discs with more than 100 tracks, to play back a single or a
double-digit track, press
ress
0], [0], [3] and for track 26, press [0], [2], [6]. To play back a
triple-digit track, press the track number
0]first, then the track number (e.g., for track 3,
EV
ress
PREVH, [NEXT
PREV
the Number buttons] within
0]first, then the track number (e.g., for track 3,
NEX
uring playbac
NEXT
ote
+10] can also bring the track search display, except for the disc
with less than 10 tracks. For such a disc
b
just pressing track number
For audio CD, JPEG track search is not available for programmed
an
random playbac
track search can be done
sing Time Searc
r
SEARCH] repeatedly until the time search displa
appears
Select a desired disc time by using [theNumber buttons
within 30 seconds
N
l time of the title or track is l
Press
CLEAR] to erase the incorrect input at step 2
For audio CD, time search is not available for programmed and
andom playbac
arker Settin
lled
k l
n 10 min
To set a marke
r
SEARCH]repeatedly until the marker display
N
TI
N
VD F
Using Title / Chapter Searc
ress
SEARCH] once for the chapter search.
ress [SEARCH]twice for the title search
/12
Select title/chapter number by using
buttons] within 30
EV
Pr
PREVH], [NEXT Gduring playback
Depending on the disc being played back, this function can
also be performed by directly entering the desired chapter
number with
accompanying the disc
the Number buttons] Refer to the manual
NEX
NEXT
PREV
the Number
/12
If the disc has no chapters)
1
l
ress
OK
To r
rn to
ress
SEARCH] repeatedly until the marker display
.
l
ress
OK]at the desired marker.
To exit
r
RETURN
N
ere is no output.
nd then press
marker
o return to the marker later” w
CLEAR
so erase all markers.
Page 16

U
C
O
S
ess
ce.
K
L
ect desired
ess
]
G
to see a
s.
ess
B
ess
s
3
ess
.
ess
ce.
2
ess
.
2
ess
.
.
ess
.
pgy
A-
A-B
PLAY
CD-DA TOTAL 0:45:55
RANDOM PROGRAM
--no indication--
RANDOM
CD-DA TOTAL 0:00:00
OK
CD-DA TOTAL 1:03:30
2/3
1 3:30
5 5:10
10 4:20
11 3:00
12 3:20
17 4:10
22 2:50
OK
k.
:
ess
.
2.
)
pp
p
B
next, so that playback
py
your programmed playback can be restarted when you
g
g
)
ppg
ppg
]
dly
p
’
appears during playback.
pg p
gp
k.
ppgp
pg p
]
.
REPEAT
A-B
PLAY
:
.
.
PLAY
REPEAT
PLAY
Repeat Playbac
k
k
k.
k
T
k
.
ff
)
)
ffrrent track
)
)
)
)
REPEAT
A-B
PLAY
MODE
MODE
OK
STOP
STOP
Repeat function is available only during playback.
Pr
REPEAT] during playback
Each time you press [REPEAT], repeat function changes as
example below
repeat o
urrent chapter repeat
urrent title repeat
repeat o
ntire discepeat)
repeat
rrent file repeat
DVD F
N
TI
FF
HAPTER
FF
RACK
FF
RACK
.g.) DVD
repeat
r
MODE]twi
.g.) CD
Press
PLAY Bto start random playback.
epeatedly until “ TRACK” appears during playback.
ntil “
During random playback, you cannot go back to the previous
ALL” appears during playback.
rack
REPEAT
REPEAT]repeatedly
rogrammed Playbac
You may determine the order in which tracks will play bac
r
MODE] on
N
ROUP
rrent folder repeat
ntire disc repeat
Repeat setting (except “ALL”) will be cleared when moving to
another title, chapter, track/file or folder.
This function is not available with some discs or during repeat
A-B playbac
Repeat A-B Playbac
r
A-B REPEAT]at your desired starting point (A)
r
A-B REPEAT]at your desired ending point (B)
• Point B should be in the same title or track as point A
ote
To exit the sequence, press
To cancel point A, press
This function is not available in the other repeat modes
Random Playbac
his function shuffles the playing order of tracks instead of
playback in sequence.
A-B REPEAT] so that “OFF”
CLEAR] at step 1
16
Using
rack. Pr
to sel
OK
• Up to 99 tracks can be programmed.
• If eight or more tracks were in a program, use
PREVH], [NEXT
ll the track
While an JPEG folder is open:
– Pr
– Pr
when you want to go to the next hierarchy.
when you want to go back to the previous
ierarchy (except for the top hierarchy).
r
PLAY B to start programmed playback
ote
Pr
CLEAR] at step 2 to erase the most recently entered
rack
and press
ollows;
- Press
- Press
repeate
OK] at step
STOPCworks as
STOP Cand
rogrammed playback restarts. (CD playback restarts
PLAY Bnext, so that the
eginning of the current file.
STOP Ctwice and
PLAY
either the disc tray is open or power is turned off.
until
ALL’’ appears during playbac
TRACK’
REPEAT] repeatedly until
.g.) CD
REPEAT
Page 17

U
C
O
S
17
g
Sound Mode
.
2
.
atural effect
t
)
3
ess
]
to exit.
ess
.
.
ess
]
o
s
B
ess
k.
2
ess
.
.
.
3
ess
t.Press
ess
.
2
s
B
.
ess
]
d
Special Settin
gs
pg
1.ENG Dolby D 3/2.1ch 48k/3
O
)
)
Th
k.
STEREO
1 / 8
OFF
T
.
OFF
1
cel subtitle
1.ENG/6
OFF
,
guag
g
)
ecorded on the scene.
y
y
.
y
.
:
Sound Mode”.
y
OK
:
l
)
.
.
)
)
1.ENG/6
Th
.
g
.
set to “O
.
V
d
T
k.
RETURN
SUBTITLE
PLAY
SUBTITLE
PLAY
AUDIO
PLAY
ANGLE
PLAY
MODE
PLAY
AUDIO
PLAY
MODE
PLAY
RETURN
OK
Subtitle Language
is unit allows you to select a subtitle language
during DVD playback
r
SUBTITLE
Each time you press
uring playback.
SUBTITLE] subtitle language
changes as example below.
FF
NG
no subtitles
(English subtitles)
French subtitles
if available)
can
Pr
SUBTITLE] during playback
Press
• If your language is not shown after pressing
the disc may not have that language. However, some discs have the
subtitle lan
on the discs, so refer to the manual along with the disc.
• When “NOT AVAILABLE” appears on the TV screen, it means no subtitle
r
• If you choose a language that has a 3-letter language code, the code will
• Some discs will only allow you to change the subtitle from the disc
ed every time you change the subtitle language setting. If you
be displa
choose an
menu. Refer to the manual accompan
other languages, ‘---’ will be displayed instead. Refer to page 24
udio Language
to set subtitle to “OFF”
SUBTITLE] several times
e setting on the disc menu. (Operation varies dependin
ing the discs for details
amera Angles
Some DVD may contain scenes which have been shot
simultaneously from various angles. You can change
the camera an
If the “ANGLE ICON” is
le if appears on the TV screen
FF” in “OTHERS”
menu, will not appear. Refer to pages 18-22
r
ANGLE]during playback.
ach time you press
ANGLE
r
camera angle
hanges.
ack Level Settin
djust the black level to make the dark areas of the
V picture brighter
r
MODE] during playbac
Pr
OK] to adjust
ON
he black level
ON: makes the dark areas brighter
OFF: shows the original picture as recorded
Pr
RETURN] to exi
reo
is unit allows you to select a sound mode during
D playbac
Pr
AUDIO] during CD playback
Each time you press
AUDIO], sound mode changes as example below
TERE
-ch
right and left channels are active
left channel is active
N
TI
N
VD F
his unit allows you to select an audio language (if multiple
anguages are available) during DVD playbac
AUDIO]to change audio language.
Each time you press
AUDIO], the audio language changes
as example below.
NG
PA
E
ote
If your language is not shown after pressing
times, the disc may not have that language. However, some discs
allow audio language setting on the disc menu. (Operation varies
depending on the disc, so refer to the manual along with the disc.
When “OFF” appears on the TV screen, it means audio language is
not available
Some discs will only allow you to change the audio setting from the
disc menu. Refer to the manual accompanying the discs for details
(English audio)
(Spanish audio)
(French audio)
AUDIO] severa
-ch
right channel is active)
irtual Surroun
channel stereo system.
ress
MODE] twice (once for CD) during playback
ress
OK] for the desired effect
1: n
2: emphasized effec
OFF: no effects (original sound
Pr
RETURN
ote
For audio CD, virtual surround will not be effective if the
ound mode is set to something other than “STEREO”. Refer to
reo
unction, the sound will be down sampled to 48kHz.
Page 18

DVD F
U
C
O
S
8
ect the desired item.
OK
AUDIO ORIGINAL
SUBTITLE OFF
DISC MENU ENGLISH
PLAYER MENU ENGLISH
LANGUAGE
the desired item.
2
CUSTOM”.
ess
.
.
.
QUICK SETUP
OK
PLAYER MENU ENGLISH
TV ASPECT
4:3 LETTER BOX
PROGRESSIVE OFF
HDMI MODE 480p
DOLBY DIGITAL BITSTREAM
g
g
1
,
selected.
O”nd
scs.
use
d
.
g
.
To exit the menu
2
)
audio
.
.
)
u.
)
.
STOP
u
AUDIO
ORIGINAL
ENGLISH
FRENCH
SUBTITLE
OFF
ENGLISH
FRENCH
DISC MENU
ENGLISH
FRENCH
SPANISH
PLAYER MENU
ENGLISH
FRANÇAIS
ESPAÑOL
u
8
Step 5
Step 5
20
labl
f
f
“
OKOKOK
OK
QUICK SETUP
OK
PLAYER MENU ENGLISH
TV ASPECT
4:3 LETTER BOX
PROGRESSIVE OFF
HDMI MODE 480p
DOLBY DIGITAL BITSTREAM
OK
AUDIO ORIGINAL
SUBTITLE OFF
DISC MENU ENGLISH
PLAYER MENU ENGLISH
LANGUAGE
QUICK SETUP
PLAYER MENU ENGLISH
TV ASPECT
4:3 LETTER BOX
PROGRESSIVE OFF
HDMI MODE 480p
DOLBY DIGITAL BITSTREAM
OK
QUICK SETUP
PLAYER MENU ENGLISH
TV ASPECT
4:3 LETTER BOX
PROGRESSIVE OFF
HDMI MODE 480p
DOLBY DIGITAL BITSTREAM
OK
u
.
.
u
u
u
u
u
8ag
20
20age 22
u
OK
OK
OTHERS
OK
ANGLE ICON ON
AUTO POWER OFF
ON
SLIDE SHOW
5sec
OK
AUDIO ORIGINAL
SUBTITLE OFF
DISC MENU ENGLISH
PLAYER MENU ENGLISH
LANGUAGE
OK
PASSWORD
Enter current password.
AUDIO
DRC
ON
DOWN SAMPLING
ON
DOLBY DIGITAL
BITSTREAM
HDMI AUDIO ON
OK
DISPLAY
TV ASPECT 4:3 LETTER BOX
STILL MODE AUTO
PROGRESSIVE OFF
HDMI MODE 480㨜
241)4'55+8'/1&'#761
FORMAT RGB
RGB RANGE NORMAL
OK
SETUP
STOP
SETUP
SETUP
DVD Settin
UICK Men
You can select the “PLAYER MENU”, “TV ASPECT”, “PROGRESSIVE”, “HDMI MODE” or “DOLBY DIGITAL” from “QUICK” menu quickly.
ress
SETUP] in the stop mode
ETUP menu
onfirm that “QUICK” is selected.
CUSTOM Men
You can change the settings of the unit
QUICK
on pages 18-20 indicates DVD setting menus also accessible from “QUICK” menu
Pr
SETUP] in the stop mode
Select the desired item
r
age 1
age 19
age
Refer to the sections “PLAYER MENU”, “TV ASPECT”,
PROGRESSIVE”, “HDMI MODE” or “DOLBY DIGITAL” section on pages 18-20
“
Step 5
N
TI
N
LANGUAGE men
Follow steps 1 to 3 in the “CUSTOM Menu” section above
• In “QUICK” menu, “PLAYER
ENU”, “TV ASPECT”,
PROGRESSIVE”, “HDMI MODE” or
“DOLBY DIGITAL” are avai
“QUICK “ menu consists o
setting menu
QUICK
in
ETUP men
page 1
ANGUAGE Settin
l
LANGUAGE men
requently used,
. You can make all settings
CUSTOM” menu.
the
e.
DISPLAY men
es 19-
AUDIO: *1 *
Default: ORIGINAL
anguage
UBTITLE:
(Default: OFF)
Sets the subtitle
anguage
DISC MENU:
Default: ENGLISH
ets the language for
DVD men
LAYER MENU:
Default: ENGLISH
Sets the language for
the on-screen display.
AUDIO men
page
elect the desired language.
the
QUICK
1
ARENTAL men
page 21
*
• Language options are not available
• If “OTHER” is selected on “AUDIO”
SUBTITLE” or “DISC MENU” screen,
or the desired language. Refer to the
Language Code List” on page 24.
• Only the languages supported by the
• “LANGUAGE” setting for “AUDI
SUBTITLE]. Refer to page 17
THERS men
ith some discs.
ress 4-digit number to enter the code
isc can be
“
BTITLE” are not available with
me di
Then
AUDIO]n
Page 19

U
C
O
S
9
TV ASPECT
4:3
LETTER BOX
4:3
PAN & SCAN
16:9
WIDE
16:9
SQUEEZE
TV ASPECT
4:3 LETTERBOX
STILL MODE
AUTO
PROGRESSIVE
OFF
HDMI MODE 480p
PROGRESSIVE MODE
AUTO 1
FORMAT RGB
RGB RANGE NORMAL
OK
OK
h
TV ASPECT
4:3 LETTERBOX
STILL MODE
AUTO
PROGRESSIVE
OFF
HDMI MODE 480p
PROGRESSIVE MODE
AUTO 1
FORMAT RGB
RGB RANGE NORMAL
STILL MODE
AUTO
FIELD
FRAME
ect the
g.
To exit the menu
OK
OK
OK
OK
OK
OK
the
g.
DISPLAY Settin
g
.
DISPLAY
TV ASPECT 4:3 LETTER BOX
STILL MODE AUTO
PROGRESSIVE OFF
HDMI MODE 480p
PROGRESSIVE MODE
AUTO1
FORMAT RGB
RGB RANGE NORMAL
OK
.
u
)
:
:
y
y
d.
ect
de-
ected to this
t.
TV screen is too large horizontally
y
:
y.
-
)
-
)
ode
stab
ed.
.
.
d
due to the
data charac-
cs.
:
p
p
i
p
.
B
e
seconds to reset the
.
:
ect a mode belo
.
ode suitable fo
aterial.
.
ode fo
deo
aterial.
:
CbC
.
ected device
g.
wh
-
.
:
d
”.
ect
ast is not clear.
.
)
TV ASPECT
4:3 LETTERBOX
STILL MODE
AUTO
PROGRESSIVE
OFF
HDMI MODE 480p
PROGRESSIVE MODE
AUTO 1
FORMAT RGB
RGB RANGE NORMAL
PROGRESSIVE MODE
AUTO1
AUTO2
VIDEO
)
4:3 LETTERBOX
AUTO
OFF
480p
AUTO1
YCbCr
NORMAL
TV ASPECT
4:3 LETTERBOX
STILL MODE
AUTO
PROGRESSIVE
OFF
HDMI MODE 480p
PROGRESSIVE MODE
AUTO 1
FORMAT RGB
RGB RANGE NORMAL
)
4:3 LETTERBOX
AUTO
OFF
480p
AUTO1
RGB
ENHANCED
TV ASPECT
4:3 LETTERBOX
STILL MODE
AUTO
PROGRESSIVE
OFF
HDMI MODE 480p
PROGRESSIVE MODE
AUTO 1
FORMAT RGB
RGB RANGE NORMAL
ect the
.
SETUP
0
OK
OK
)
TV ASPECT
4:3 LETTERBOX
STILL MODE
AUTO
PROGRESSIVE OFF
HDMI MODE 480p
PROGRESSIVE MODE
AUTO 1
FORMAT RGB
RGB RANGE NORMAL
HDMI MODE
480p
780p
1080i
1080p
ect the
g.
You can change the display functions. Follow steps 1 to 3 in the “CUSTOM Menu” section on page 18
elect the desired item
TV ASPECT:
QUICK
Default: 4:3 LETTER BOX
or
See note on the right.
desired
ettin
DISPLAY men
STILL MODE: (Default: AUTO)
See note on t
age 2
(Default: 480p
See note on the right.
PROGRESSIVE MODE: (Default: AUTO1
See note on the right.
FORMAT: (Default: RGB
See note on the right.
RGB RANGE: (Default: NORMAL
See note on the right.
e right.
QUICK
l
ired
ettin
l
ired
ettin
l
desired
etting
1
ote
TV ASPECT
• Select “4:3 LETTER BOX”, so that
ack bars may appear on the
• Select “4:3 PAN & SCAN” for a
ull height picture with both
ides adjuste
• Sel
“16:9 WIDE” if a wi
reen TV is conn
ni
• Select “16:9 SQUEEZE” when the
t “16:9 WIDE” setting and when
t is possible to adjust the screen
ize using the TV’s controls.
TILL MODE
• Select “AUTO” usuall
• If you select “AUTO”, it automat
cally selects the best resolution
etting (“FRAME” or “FIELD”
ased on the data characteris
ics of the pictures. (default
• If you select “FIELD”, the picture
n the still m
• If you select “FRAME”, the
icture in the still mode will be
ighly defined
• An individual picture on TV
creen is called a “frame”, which
onsists of two separate images
lled as “field”
• Some pictures may be blurre
t the “AUTO” setting in the still
risti
HDMI MODE
• 480p: Video output from the
• 720p: Video output from the
• 1080i: Video output from the
• 1080p: Video output from the
• When the HDMI/DVI video can
e output, the setting change
an be done
• If the TV is not compatible with
ewly selected HDMI output
ode, press and hold
n the front of the unit for mor
han 5
etting to default
PROGRESSIVE MODE
• You can sel
or the progressive scan output
• AUTO1: m
• AUTO2: mode for images on the
• VIDEO: m
FORMAT
• Select an HDMI output mode
ween “Y
• When the conn
s not compatible with YCbCr,
DMI signal is output as RGB
egardless of the settin
his setting is effective only
en you use the HDMI con
ection
RGB RANGE
• Select a HDMI picture mode
etween “NORMAL” an
ENHANCED
• Sel
hite contr
• This setting is effective only for
DMI RGB output
will be
iliz
ir
DMI OUT jack at 480
DMI OUT jack at 720
DMI OUT jack at 1080
DMI OUT jack at 1080
PLAY
w
images on the film
m
material of 30-frame
ilm
r
r vi
m
r” and “RGB”
“ENHANCED” if the black-
N
TI
N
VD F
Page 20

U
C
O
S
0
g
g
ect the desired item.
AUDIO
DRC
ON
DOWN SAMPLING
ON
DOLBY DIGITAL
BITSTREAM
HDMI AUDIO ON
OK
u
)
y
ds.DO
:
)
lby
l
.
.
lby
.
DRC ON
DOWN SAMPLING
ON
DOLBY DIGITAL BITSTREAM
HDMI AUDIO
ON
OFF
ON
BITSTREAM
ON
)
DRC ON
DOWN SAMPLING
ON
DOLBY DIGITAL BITSTREAM
HDMI AUDIO
ON
ON
ON
PCM
ON
DRC ON
DOWN SAMPLING
ON
DOLBY DIGITAL BITSTREAM
HDMI AUDIO
ON
ON
OFF
BITSTREAM
ON
C:
e
y
.
:
e
tual surround is
set to “O
.
the
sound
g
.
l
.
O:
d
.
To exit the menu
SETUP
OKOKOK
:
u.
)
.
d.
d.
DRC ON
DOWN SAMPLING
ON
DOLBY DIGITAL BITSTREAM
HDMI AUDIO
ON
ON
ON
BITSTREAM
OFF
OK
OKOKOK
)
.
TV ASPECT
4:3 LETTERBOX
STILL MODE
AUTO
PROGRESSIVE OFF
HDMI MODE 480p
PROGRESSIVE MODE
AUTO 1
FORMAT RGB
RGB RANGE NORMAL
4:3 LETTERBOX
AUTO
ON
480p
AUTO 1
RGB
NORMAL
NO
YESNOYES
Confirm again to use progressive scan.
If Picture is good, Select “YES”.
SELECT: K / L
SET:OK
y
.
Before proceeding…
1. Make sure your TV has progressive scan.
2. Connect with component video cable
NOTE: If there is no picture or picture is
distorted after selecting “YES”,
wait about 15 seconds for auto recovery.
Activate Progressive?
SELECT: K / L SET:OK
NO
YES
SETUP
:
set “PRO
”
the
b
d
Y
B
eront of the unit fo
e
.
f
d
k
ll.
Follow steps 1 to 3 in the “CUSTOM menu” section on page 18 and step 4 on page 19
.
ROGRESSIVE:
(Default: OFF
See note on the right
To complete the
QUICK
f there is no picture or you
o not press any buttons
n will switch to “OFF”
f “PROGRESSIVE” is “ON”,
is message appears:
elect “YES”.
r
elect “YES”.
“PROGRESSIVE”
ettin
UDIO Settin
Choose the appropriate audio setting for your device. It only affects during the playback of DVD. Follow steps 1 to 3 in the
CUSTOM Menu” section on page 18.
DVD F
l
DRC (Dynamic Range Control): (Default: ON
n
N
TI
N
AUDIO men
ote
In “QUICK” menu, “PLAYER
MENU”, “TV ASPECT”,
PROGRESSIVE” “HDMI
MODE” or “DOLBY DIGITAL”
are available. “QUICK” menu
consists of the setting menu
frequently used, and they
are accompanied with
. You can make all settings in
TOM” men
QUICK
DOWN SAMPLING: (Default: ON
Set to “ON” when outputting in 48kHz.
Set to “OFF” when outputting the original sound.
LBY DIGITAL
QUICK
(Default: BITSTREAM
Set to “BITSTREAM” when the unit is connected to a Do
r
• BITSTREAM: outputs Dolby Digital signals
• PCM: converts the Do
Digital into PCM (2 channel)
HDMI AUDIO:
(Default: ON
This function is only available when you use an HDMI
connection
• ON: to output the HDMI soun
• OFF: not to output the HDMI soun
Digita
PROGRESSIVE
• You can
“OFF” ei
menu or
holding
GRESSIVE
r in “DISPLAY”
y pressing an
PLA
n th
r mor
than 5 seconds
• When “PROGRESSIVE” is
“ON”, video signals
VIDEO OUT an
s will be distorted or not
jac
e output at a
rom
S-VIDEO OUT
DR
• This function is availabl
only on the discs which
are recorded in the Dolb
Digital format
DOWN SAMPLING
• When playing back a
96kHz disc with th
copyright protection, or
when vir
set to “1” or “2”, the sound
will be down sampled at
48kHz even if the “DOWN
AMPLING” is
• When
HDMI
can be output, the settin
change cannot be done
This function is available
only on digita
outputting of a disc
recorded in 96kHz
HDMI AUDI
• When the HDMI soun
cannot be output the
setting change cannot be
one
FF”
2
Page 21

U
C
O
S
21
S
.
k.
y
y
hibited.
ypy
ypy
S
[R]:
;
l
d
g
d
e
n
).
.
y
,
d
.
ect
.
PARENTAL Settin
g
.
tal Levels
.
s
.
u
u
Select the desired
.
PARENTAL LEVEL
ALL
8 [ADULT]
7 [NC-17]
6 [R]
”.
PASSWORD CHANGE
PARENTAL LEVEL ALL
To exit the menu
u
:
.
.
1
4
7
2
5
8
0
+10
3
6
9
OKOKOKOKOK
1
4
7
2
5
8
0
+10
3
6
9
1
4
7
2
5
8
0
+10
3
6
9
OK
PASSWORD
OK
OK
PASSWORD
OK
SETUP
SETUP
u
This function prevents unit from playing material inappropriate for children
Paren
arental level allows you to set the rating levels of your DVD software. Playback will stop if the ratings exceed the levels you set. Follow
teps 1 to 3 in the “CUSTOM Menu” section on page 18
Enter your desired 4-digit
assword (expect for 4737).
l
“PARENTAL
LEVEL”
PARENTAL LEVEL ALL
PASSWORD CHANGE
vel
ARENTAL men
NTROL LEVEL
• ALL: all parental locks are canceled
ack.
• Levels 7 to 2:
ac
ose intended for adult and general use pro
If you have set a password
lready, enter the current 4-digit
assword
PARENTAL men
TIPS FOR LEVEL
ack.
• 7 [NC-17]: no one under 17 admitted
• 6
restricted
• 5 [PGR]: parenta
under 17 requires accompanying parent or adult guardian
guidance recommende
• 4 [PG13]: unsuitable for children under 13
• 3 [PG]: parental
uidance suggeste
• 2 [G]: general audienc
• 1 [KID SAFE]: suitable for childre
ote
Some DVD-video may not respond to “PARENTAL“ setting. Make sure this function
orks with your DVD-video
The resume information will be cleared if you change the parental level when the
me information is on
To Change the Password for Parental Control
You can change your password for parental controls. Follow steps 1 to 3 in the “CUSTOM Menu” section on page 18
Enter current 4-digit
password.
Select “PASSWORD
CHANGE
Enter your new 4-digit
password (except for
4737
To exit the men
N
TI
N
VD F
ARENTAL men
• Record the password
in case you forget it.
ou forget the
• If
assword, press [4]
[7], [3], [7] at step 4,
hen enter your new
assword. Password
ill be cleared an
arental levels will be
to “ALL”
Page 22

U
C
O
S
22
ect the desired item.
OTHERS
OK
ANGLE ICON ON
AUTO POWER OFF
ON
SLIDE SHOW
5sec
OTHERS Settin
g
u
u
)
)
utes o
use.
ANGLE ICON ON
AUTO POWER OFF
ON
ON
OFF
ANGLE ICON ON
AUTO POWER OFF
ON
OFF
ON
OK
OK
ANGLE ICON ON
AUTO POWER OFF
ON
SLIDE SHOW 5sec
SLIDE SHOW
5sec
10sec
)
OK
SETUP
OK
theired
You can change the other functions. Follow steps 1 to 3 in the “CUSTOM Menu” section on page 18.
l
NGLE ICON: (Default: ON
et to “ON” to display when multiple camera
ngles are available during DVD playback.
THERS men
TO POWER OFF:Default: ON
et to “ON” to turn this unit off automatically after 30
in
f no
LIDE SHOW: (Default: 5sec
et the display time of each JPEG file for slide show
DVD F
N
TI
etting.
To exit the men
r
N
Page 23

3
de
g
:
emrrective action
.
.
.
l.
.
l.
f
.
.
.
.
.
.
.
y
.
)
.
.
.
.
.
.
.
sc.
Clean the disc.
.
.
.
d.
.
.
.
.
.
.
.
g.
.
.
d.
.
.
d.
.
.
.
.
ON
h
.
2
ect
.
To exit the menu
ect
.
ess
e
Reset to the Default Setting (Except for PARENTAL Setting)
u
ice.
STOP
OK
OK
.
.
INITIALIZE
Initialize?
NO
YES
OK
QUICK SETUP
PLAYER MENU ENGLISH
TV ASPECT
4:3 LETTER BOX
PROGRESSIVE OFF
HDMI MODE 480p
DOLBY DIGITAL BITSTREAM
OK
QUICK SETUP
PLAYER MENU ENGLISH
TV ASPECT
4:3 LETTER BOX
PROGRESSIVE OFF
HDMI MODE 480p
DOLBY DIGITAL BITSTREAM
OK
SETUP
SETUP
r
SETUP] in th
“INITIALIZE”
l
“YES”
l
stop mode.
r
ETUP men
Press
tw
When you do not wis
to initialize, select
NO” at step 3
NFORMATI
Troubleshooting Gui
If this unit does not perform properly when operated as instructed in this manual. Refer to the following
robl
o power
This unit does not respond to
the remote contro
oor picture or noise
o picture
o sound/image from HDMI
onnection
istorted picture
isc cannot be played back.• Insert the di
o soun
o DTS audio is output
Audio or subtitle language
does not match the settin
The camera angle cannot be
ange
Audio or subtitle language
annot be change
appears on the TV screen,
prohibiting an operation.
Some functions are not available in specific modes, but this is not a malfunction. Read the description in this manual for details on
correct operations.
Playback from a desired track and random playback are not available during programmed playback
Some functions are prohibited on some discs
• Make sure the power plug is connected to an AC outlet
• Make sure the power is turned on
• Check if the power plug is connected to an AC outlet
• Check the batteries in the remote contro
• Aim the remote control directly at the infrared sensor window. If necessary, remove all the obstacles
etween the sensor and the remote control.
• You have to be within 23
• Tune your radio to an empty AM station so that you hear a lot of static. Turn up the volume, then
you hear some signal sound from the radio in response to your pressing buttons on the remote
ontrol, the remote control is working
• Press and hold any button on remote control toward a digital camera. The remote control is working
you confirm infrared light through the digital camera.
eet (7m) of this unit
• Interference signal may be received. Change the position and direction of the unit
• Connect the video cable firmly
• Insert a correct video disc that can be played back on this unit
• Set “PROGRESSIVE” correctly in “DISPLAY” menu. Turn it on only if your TV has progressive scan and
ou are using the component video connections between the unit and the TV. Disable progressive
can for all other connections. Refer to pages 6-7.
• Check the HDMI connection. (Check the status of the HDMI related indications.
• Check whether the connected monitor device or other device supports HDCP. (This unit will not
utput a video signal unless the other device supports HDCP.)
• Check the setting of HDMI
• Check whether the output format of this unit (HDMI FORMAT) matches the supported input format of
ther connected device
• If the unit is connected to the unauthorized display device with an HDMI cable, the audio/video signal
ay not be output when playing back a commercial DVD-video.
• Connect this unit directly to the TV
• There are some cases where pictures may be slightly distorted, and those are not a sign of a malfunction
• Although pictures may stop for a moment, this is not a malfunction. Refer to page 11
• Check if “PROGRESSIVE” is set correctly according to your TV. Refer to pages 18-20
•
• Place the disc correctly with the label side up
• Cancel the parental lock or change the control levels
• Handle a disc with special care so that it does not have fingerprints, scratches, or dusts on its surface
• Connect the audio cables firmly
• Turn on the power of the audio component
• Correct the audio output settings
• Correct the input settings on the audio component
• This unit does not support DTS audio
-This is not a malfunction
• The selected language is not available for audio or subtitles on the DVD
-This is not a malfunction
• The DVD does not contain sequences recorded from different camera angles
-This is not a malfunction
• The DVD does not contain audio source or subtitles in the selected language
-This is not a malfunction
• That operation is prohibited by this unit or the disc
-This is not a malfunction
INFORMATION
2
Page 24

24
Specification
s
p
:
source :
%
:
)
:
(
)
(
)
(
)
:
j
.
f
.
Y
:
y.
.
S:
T
T
.
T
used
ted States.
T
.
THIS
SSO
S.
OCCASIO
,
.
:
THIS
T
:
.
S:
T
f
ON
800-605-8610
t
5
t
gg
B
8
7
52
6563
59
64
5471
ssamese
65
1
2
7
7
0
uta
5072
854
855
eto
864
3
ese
5971
1
Embodia
5759
7
4
61
oatia
5464
5
7
8
0
1
stonia
5166
H
oese
5261
6
5
4
5271
5358
7
1
8
5758
5360
7
ausa
5447
5569
5455
7
K
5
5560
7
1
7
7
6
7
Javanese
5669
ada
5760
5765
5757
9
1
6460
1
5767
N
aothia
5861
5847
8
0
5866
5957
3
5
8
tese
5966
5955
5964
5961
0
6047
1
1
Rita
6149
4
9
7
5
5247
8
6
7
aeto-Romance
6459
1
7
6559
3
6547
5350
6564
oatia
6554
6566
6660
6560
6550
5
6565
7
6558
6561
5
ese
6567
6569
8
Tag
8
Taj
3
Ta
6647
Tata
6666
T
1
Tha
6654
Tibeta
861
T
5
Tong
1
T
5
T
4
Tu
6657
T
6669
6757
6764
6772
Vietnamese
6855
V
1
1
6961
osa
054
Yiddis
5655
Yoruba
61
67
gg
gg
gg
gg
If you choose a language that has a 3-letter language code, the code will be displayed every time you change the audio or subtitle
ygg gg pyyyg
ygg gg pyyyg
gg
gg
)
Output signal format
NTSC color
wer
120 V AC +/- 10%, 60 Hz +/- 0.5
ower consumption :
10W (standby : 0.8W)
Language Code Lis
Abkhazian 474
Afar 474
Afrikaans 47
Albanian
Amharic 47
Arabic 47
Armenian
A
47
Aymara 477
Azerbaijani 477
Bashkir 484
Basque 516
Bengali;Bangla 486
Bh
ni
Bihari 4
Bislama 4
Br
n 4
Bulgarian [BUL] 485
Burm
Byelorussian 485
n
lan 494
Chinese [CHI] 725
rsican 49
r
n
Czech [CZE] 496
Danish [DAN] 504
Dutch [DUT] 605
English [ENG] 516
INFORMATION
Esperanto 516
E
n
Far
Fiji 525
Finnish [FIN] 525
perating temperature
41°F (5°C) to 104°F (40°C
imensions
W : 17.2”
H : 2.1”
D : 8.4”
435mm
51mm
211mm
• Designs and specifications are sub
change without notice
• If there is a discrepancy between
languages, the de
ault language will be
English
ect to
eight
Approx 3.8lbs (1.7kg)
-
-
-
French [FRE] 526
Frisian
Galician
Georgian 574
German [GER] 505
Greek [GRE] 515
Greenlandic
Guarani
Gujarati 536
H
Hebrew
Hindi
Hungarian [HUN] 546
Icelandic [ICE] 556
Indonesian
Interlingua 554
Interlingue 555
Inupiak 555
Irish [IRI] 534
Italian [ITA] 556
Japanese [JPN] 564
Kann
Kashmiri
Kazakh
Kinyarwanda 646
Kirghiz 577
Kirundi
Korean [KOR] 576
Kurdish
L
Latin
Latvian;Lettish 586
Lingala 586
Lithuanian
-
-
n
nian
alagasy 595
alay 596
alayalam 595
l
ri
rathi
ldavian
ongolian 596
ru
epali 605
orwegian [NOR] 606
n
riya 616
romo(Afan) 615
anjabi 624
ashto;Pushto 626
rsian
olish [POL] 625
ortuguese [POR] 626
uechua 636
h
omanian [RUM] 646
ussian [RUS] 646
moan
angho 655
nskrit
Gaelic
rbian
rbo-Cr
ho
wana
hona
indhi
inghalese 655
-
n
iswat
lovak [SLO] 655
lovenian
mali
anish [SPA] 516
ndan
wahili
wedish [SWE] 656
alog 665
ik 665
mil
r
elugu 665
i
n 4
igrinya 665
a 666
songa 666
urkish [TUR] 666
rkmen
wi
krainian
rdu
zbek
olapuk 686
lsh 497
lof
Xh
7
h
71
lu 72
-Z
IMITED WARRANT
FUNAI CORP. will repair this product, free of charge in the USA in the event of defect
in materials or workmanship as follows:
DURATION
PARTS: FUNAI CORP. will provide parts to replace defective parts without
LABOR: FUNAI CORP. will provide the labor without charge for a period of
LIMITS AND EXCLUSION
altered, replaced, defaced, missing or if service was attempted by an unauthorized
service center. This limited warranty does not apply to any product not purchased
alterations or product not supplied by FUNAI CORP., or damage which results from
accident, misuse, abuse, mishandling, misapplication, alteration, faulty installation,
improper maintenance, commercial use such as hotel, rental or office use of this
product or damage which results from fire, flood, lightning or other acts of God
DEMO OR FLOOR MODEL
FUNAI CORP. AND ITS REPRESENTATIVES OR AGENTS SHALL IN NO EVENT BE
LIABLE FOR ANY GENERAL, INDIRECT OR CONSEQUENTIAL DAMAGES ARISING
PRODUCT. THIS WARRANTY IS MADE IN LIEU OF ALL OTHER WARRANTIES
EXPRESS OR IMPLIED, AND OF ALL OTHER LIABILITIES ON THE PART OF FUNAI,
charge for one (1) year from the date of original retail purchase. Certain
parts are excluded from this warrant
ninety (90) days from the date of original retail purchase
his warranty is extended only to the original retail purchaser. A purchase receipt
r other proof of original retail purchase will be required together with the product
o obtain service under this warranty.
his warranty shall not be extended to any other person or transferee
his warranty is void and of no effect if any serial numbers on the product are
nd
in the Uni
his product is produced for home use and this warranty only covers failures due
o defects in material or workmanship which occurs during normal use. It does not
over damage which occurs in shipment, or failures which are caused by repairs,
WARRANTY DOES NOT COVER PACKING MATERIALS, ANY ACCE
EXCEPT REMOTE CONTROL), ANY COSMETIC PARTS, COMPLETE ASSEMBLY PARTS,
T OF OR
NED BY THE USE OF OR THE INABILITY TO USE THIS
RIES
LL OTHER WARRANTIES INCLUDING THE WARRANTY OF MERCHANTABILITY,
ND FITNESS FOR A PARTICULAR PURPOSE, ARE HEREBY DISCLAIMED BY FUNAI
ND ITS REPRESENTATIVES IN THE UNITED STATES. ALL WARRANTY INSPECTIONS
ND REPAIRS MUST BE PERFORMED BY AN AUTHORIZED SERVICE CENTER. THIS
ARRANTY IS VALID WHEN THE UNIT IS CARRIED-IN TO AN AUTHORIZED SERVICE
ENTER
MPORTANT
LIMITED WARRANTY GIVES YOU SPECIFIC LEGAL RIGHTS. YOU MAY HAVE
THER RIGHTS THAT VARY FROM STATE TO STATE. IF, AT ANY TIME DURING
HE WARRANTY PERIOD, YOU ARE UNABLE TO OBTAIN SATISFACTION WITH THE
EPAIR OF THIS PRODUCT, PLEASE CONTACT FUNAI CORP.
TTENTION
NAI CORP. RESERVES THE RIGHT TO MODIFY ANY DESIGN OF THIS PRODUCT
ITHOUT PRIOR NOTICE
ARRANTY STATEMENT REGARDING NON AUTHORIZED REPAIR
o obtain warranty service, you must take the product, or deliver the product
reight prepaid, in either its original packaging or packaging affording an equal
egree of protection, to any AUTHORIZED SERVICE CENTER. FUNAI CORP. will not
eimburse you for any service done by unauthorized service providers without
rior written approval.
o locate your nearest AUTHORIZED SERVICE CENTER or for general service
nquiries, please contact us at:
UNAI SERVICE CORPORATI
Tel :1-
www.magnavox.com/suppor
2200 Spiegel Drive, Groveport, OH 4312
Page 25

5
EM
O
INFORMATION
2
Page 26

6
MEM
O
INFORMATION
2
Page 27

p
S
27
la
sco
.
n
n
es
n
/
deo vea la secció
ection to
g
.
Antes:
ectados a esta
ecto.
PLAY
STOP
STANDBY-ON
OPEN/CLOSE
seleccionar directamente la canción.
.
-
.
.
.
)
cadores.
ados.
.
)
-
.
sco.
)
odo de disco actual o modo de
.
odo de disco actual o modo de
.
g
.
)
)
p()
dad.
dad.
.
.
.
.
d.
d
.
.
.
)
)
.
ocar o busca
cadores.
buscar una canción.
(CD)
.
.
g
ppgp
g
ppgp
.
.
.
)
j
pj
)
)
otón
)
e
te
aquí
Español
.
STANDBY-ON
STOP
QUICK SETUP
PLAYER MENU ENGLISH
TV ASPECT
4:3 LETTER BOX
PROGRESSIVE OFF
HDMI MODE 480p
DOLBY DIGITAL BITSTREAM
OK
OK
2
.
QUICK SETUP
PLAYER MENU ENGLISH
TV ASPECT
4:3 LETTER BOX
PROGRESSIVE OFF
HDMI MODE 480p
DOLBY DIGITAL BITSTREAM
OK
OK
.
PLAYER MENU
ENGLISH
FRANÇAIS
ESPAÑOL
OK
STANDBY-ON
OPEN/CLOSE
1
4
7
2
5
8
0
+10
3
6
9
CLEAR
PREV
NEXT
PLAY
STOP
PAUSE
TITLE
RETURN
3
SETUP
SETUP
1
nexion
Si su televisor tiene entradas de audio
vi
n “Conn
a TV” en la página 6 en el manual de
manejo. En caso contrario, vea la sección
“Connectin
to RF Modulator (Not
Supplied)” en la página del frente en el
manual de manejo
Instalación de las pilas
2
en el control remoto
1
3
2
Para cambiar el idioma
3
en la pantalla
Confirme que ha
seleccionado “QUICK”
Confirme que ha seleccionado
r
“PLAYER MENU”
Seleccione el idioma deseado para
as indicaciones en la pantalla
Para salir del menú.
eproducció
4
Encienda el televisor,
mplificador y
tros equipos
ra abrir
andeja del
i
Ponga un disco con la
etiqueta hacia arriba
ue puedan estar
n
unidad. Asegúrese
ue el televisor y el
sintoamplificador de
udio (no provisto)
Para empezar la
reproducció
Para parar la
reproducció
n en el canal
rr
1
2
5
4
8
7
0
OK
A-B
REPEAT
ANGLE
AUDIO
CLEAR
DISC
MENU
DISPLAY
MODE
OPEN/CLOSE
PAUSE
PLAY
PREV
REPEAT
RETURN
SEARCH
SETUP
STANDBY-ON
Soport
3
6
• Para seleccionar directamente el capítulo o título.• Para
9
+10
• Para mover el cursor y determinar la posición.• Para mover el cursor y determinar la posición.
• Para buscar en avance/retroceso por un disco
• Para empezar la reproducción en avance lento/ret
oceso durante el modo de pausa
• Para repetir entre su punto A y B seleccionado.• Para repetir entre su punto A y B seleccionado. (CD)
• Para seleccionar los ángulos de cámara en un disco.• Para girar la imagen. (JPEG)
• Para seleccionar idiomas de audio en un disco
• Para borrar los mar
• Para borrar los números mal entr
• Para borrar el punto para la repetición A-B
• Para llamar el menú en un di
• Para indicar el m
DMI
• Para encender la uni
• Para hacer una pausa en la reproducción
• Para avanzar la reproducción un cuadro cada vez
• Para empezar la reproducción del disco
• Para encender la unida
NEXT
• Para saltar capítulos
• Para reproducir repetidamente un capítulo o título
• Para volver a la operación anterior en el menú.• Para volver a la operación anterior en el menú.
• Para buscar un capítulo, título o tiempo
• Para col
• Para llamar el menú de ajustes de DVD
• Para encender o para pasar la unidad al modo de
r los mar
• Para buscar en avance/retroceso por un disco.
• Para seleccionar “ESTÉREO”, “L-ch” o “R-ch”.
CD
• Para borrar los marcadores. (CD
• Para eliminar el Nº de estado en la entrada de pro
rama
• Para borrar el punto para la repetición A-B.(CD)
• Para llamar la lista de archivo. (JPEG
• Para indicar el m
HDMI
• Para disponer el orden de reproducción o la repro-
ucción aleatoria
• Para activar/desactivar el ambiental virtual. (CD
• Para activar el modo carrusel de diapositivas. (JPEG
• Para encender la uni
• Para hacer una pausa en la reproducción
• Para empezar la reproducción del disco.
• Para encen
• Para saltar canciones
• Para reproducir repetidamente una canción o
• Para
• Para buscar el tiempo.(CD)
• Para colocar o buscar los marcadores.
• Para llamar el menú de ajustes de DVD
• Para encender o para pasar la unidad al modo de
er la unidad.
isco.(CD
o disco. (JPEG
añol
s
B
Orden alfavético
STOP
SUBTITLE
TITLE
ZOOM
• Para parar la reproducción
• Para seleccionar subtítulos en un disco
• Para llamar el menú inicial en un disco
• Para ampliar parte de la imagen. (2x/4x
• Para parar la reproducción.
alta en el programa y en la lista de archivo. (JPEG
• Para ampliar parte de la imagen. (2x) (JPEG
E
Page 28

6UD
VMN
7
uick Use Gui
de
cut
he
e
ections
k
the sectio
ection to a
g
.
e:
T
ch
ected to
e
ect channel.
y.
.
.
.
)
)
)
clear the markers.
l
)
.
.
)
)
.
h
.
)
)
l
.
.
y
.
.
.
.
.
l
)
)
.
set or search the markers.
search track.
)
)
.
y
g
)
e
)
.
f
)
)
sc
ote Contro
ge
s
d.
QUICK SETUP
PLAYER MENU ENGLISH
TV ASPECT
4:3 LETTER BOX
PROGRESSIVE OFF
HDMI MODE 480p
DOLBY DIGITAL BITSTREAM
OK
OK
2
d.
QUICK SETUP
PLAYER MENU ENGLISH
TV ASPECT
4:3 LETTER BOX
PROGRESSIVE OFF
HDMI MODE 480p
DOLBY DIGITAL BITSTREAM
OK
OK
y.
PLAYER MENU
ENGLISH
FRANÇAIS
ESPAÑOL
OK
T
STANDBY-ON
STOP
y
2
label
k
T
k
PLAY
STOP
STANDBY-ON
OPEN/CLOSE
STANDBY-ON
OPEN/CLOSE
1
4
7
2
5
8
0
+10
3
6
9
CLEAR
PREV
NEXT
PLAY
STOP
PAUSE
TITLE
RETURN
3
SETUP
SETUP
ted
a
1
If your TV has audio/video input jacks,
page 6 of the owner’s manual. If not, see
the section “Connecting to RF Modulator
(Not Supplied)” on the front pa
2
1
3
E6E7
1
*1VMN28597*
nn
wner’s manual
n “Conn
TV” on
e of the
nstalling the Batteries
for the Rem
2
3
o Change the
On-Screen Langua
Confirm that “QUICK” i
selecte
Confirm that “PLAYER MENU” is
selecte
Select the desired language for the
on-screen displa
o exit the menu.
2859
Playbac
4
r
urn on the TV,
mplifier and any
To open the disc
ra
nsert a disc with
acing up.
r device whi
re conn
his unit. Mak
re the TV and
udio receiver (not
l
upplied) are set to
he corr
i
1
2
3
5
4
6
8
7
0
OK
A-B
REPEAT
ANGLE
AUDIO
CLEAR
DISC
MENU
DISPLAY
MODE
OPEN/CLOSE
PAUSE
PLAY
PREV
REPEAT
RETURN
SEARCH
SETUP
STANDBY-ON
STOP
SUBTITLE
TITLE
ZOOM
To select chapter or title directly. • To select track of file directl
9
+10
To move the cursor and determine its position. • To move the cursor and determine its position
To search forward/backward through a disc.
To begin slow forward/reverse playback in the
To repeat between your chosen point A and B. • To repeat between your chosen point A and B. (CD
To select camera angles on a disc. • To rotate a picture of JPEG files. (JPEG
To select audio languages on a disc. • To select “STEREO”, “L-ch” or “R-ch”. (CD
To
To clear the numbers entered incorrectly.
To cancel the point for A-B repeat.
To call up the menu on a disc. • To call up the file list. (JPEG
To display the current disc or HDMI mode. • To display the current disc or HDMI mode
To set black level on/off.
To set virtual surround on/off.
To open or close the disc tray.
To turn the unit on.
To pause disc playback.
To advance playback one frame at a time.
To begin disc playback.
To turn the unit on
NEXT
To skip chapters. • To skip tracks or files
To play back a chapter or title repeatedly.
To return to the previous operation in menu. • To return to the previous operation in menu
To search chapter, title or time.
To
To call up the setup menu. • To call up the setup menu
To turn the unit on or to turn the unit into the
To stop playback. • To stop playback
To select subtitles on a disc.
To call up the top menu on a disc.
To magnify part of a picture. (2x/4x) • To magnify part of a picture. (2x) (JPEG
ause mode
standb
mode. (To completely turn off the unit, you
must unplu
the AC power cord.
To start playbac
• To search forward/backward through a disc
• To c
ear the markers. (CD
• To remove status number in program input
• To clear the numbers entered incorrectly
• To cancel the point for A-B repeat. (CD
• To arrange t
• To set virtual surround on/off. (CD
• To activate the slide show mode. (JPEG
• To open or c
• To turn the unit on
• To pause disc pla
• To begin disc playback
• To turn the unit on
• To p
• To play back a file, folder or disc repeatedly. (JPEG
• To
• To search time. (CD
• To set or search the markers. (CD
• To turn the unit on or to turn the unit into th
• To return to the top
e playing order or play randomly
ose the disc tray
back
ay back a track or disc repeatedly. (CD
tandby mode. (To completely turn off the unit, you
ust unplug the AC power cord.
he program and file list. (JPEG
ile of the highest hierarchy in
o stop playbac
Prin
in Chin
r
 Loading...