

Page 1

Supp
s
AC
outlets
Plug in
4
5
From TV
From DVD/VCR
Please refer to “Connections” on page 6.
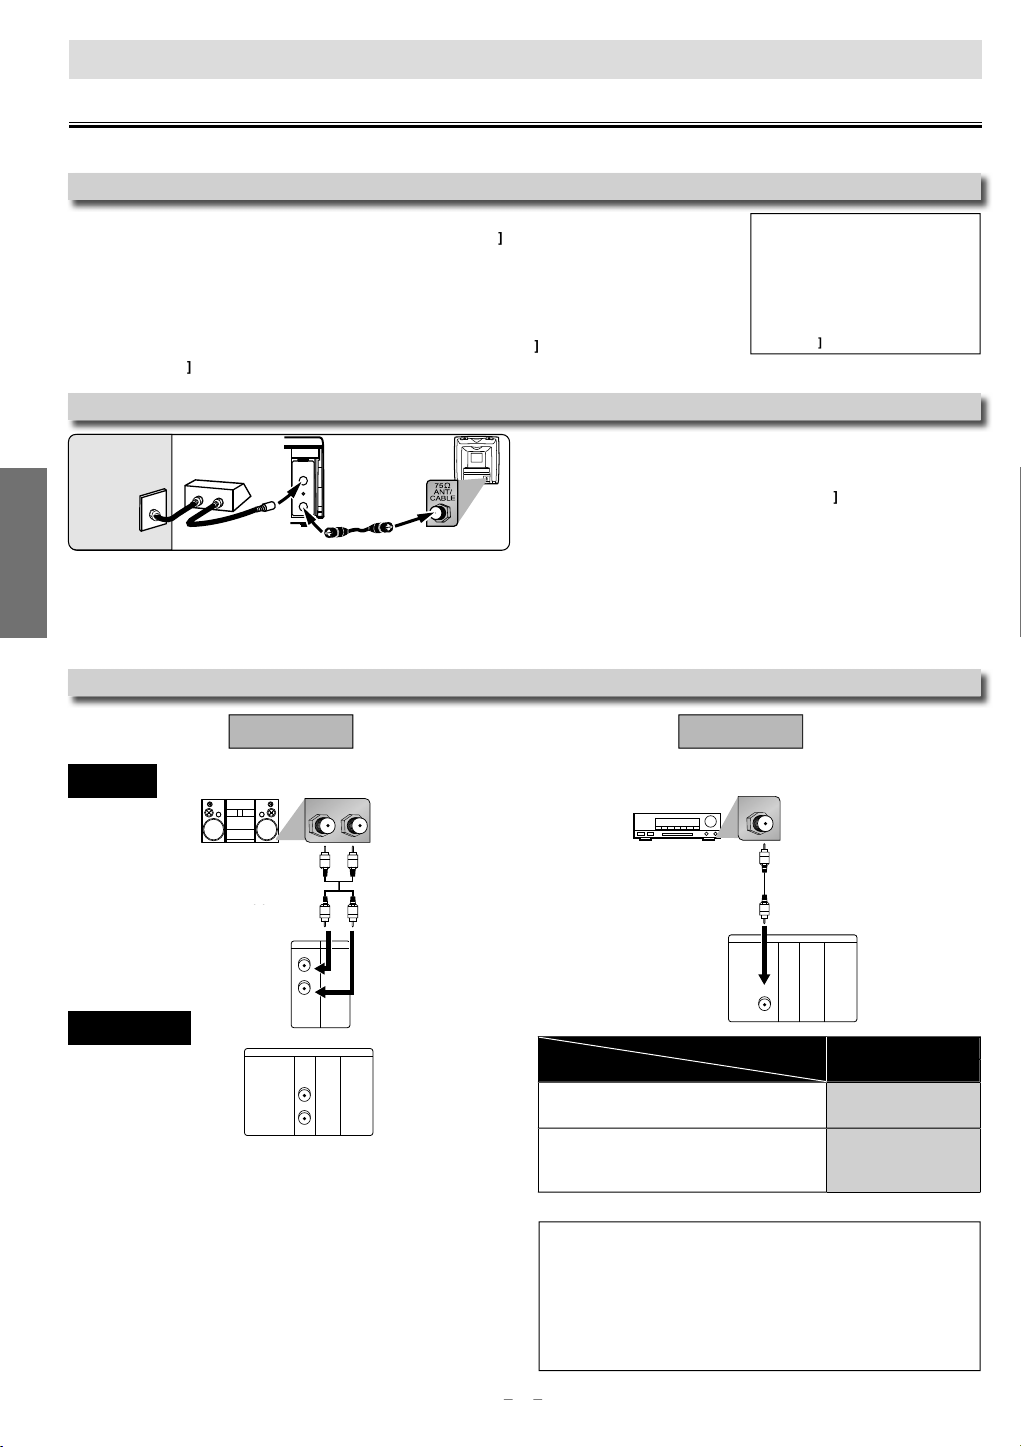
Cable TV
signal
ANT-OUT
ANT-IN
RF cable (supplied)
(Back of DVD/VCR)
(Back of TV)
or
AntennaAntenna
2
Connect
3
Connect
(Back of TV)
or
Disconnect
Cable TV
signal
1
Basic
ection
l
0
o
t
C
s
(
)
)
b
s
(
)
s
(
)
)
Owner’s Manual
PLAYDISC IN
DVDVCR
OPEN/CLOSESTANDBY-ON
POWER ON
AUDIO
REC
RECORDF.FWDREW STOP/EJECT
TIMER REC
IR
CHANNEL SOURCE PREV STOP PLAY NEXT
VIDEO
REC
RECORD
TIMER REC
PLAY
DVD PLAYER / VCR CMWD 2206
r
06
wner’s Man
ual
.
s
s
..............................................................................
2
.......................................................................
4
.......................................................................................................
4
l
..............................................................................
4
..............................................................................................................
4
About the
deo Cassettes and
scs
..................................................
5
.......................................................................................
s
............................................................................................................
......................................................................................................
p
p
s
.........................................................................................
..................................................................................................
.....................................................................
m
.........................................................................
..................................................................................................
e
.............................................................................
8
e
....................................................................
ete Channels
...................................................................................
p
.................................................................................................................
Function Overview
..............................................................................
cator
..............................................................................................
V
g
..............................................................................................
...........................................................................................
ote Control
........................................................................................................
l
...........................................
V
s
Playback
.............................................................................................
...............................................................................
Search
..............................................................................................................
h
...............................................................................................................
...............................................................................................................
R
g
............................................................................................
g)
......................................................
g
......................................................................................................
g
..................................................................
3
...........................................................................................
s
Playback
.............................................................................................
Searc
s
................................................................................
6
..................................................................................................
6
................................................................................
6
..................................................................................................
6
..............................................................................
Repeat / Random / Programmed Playback
.......................................
8
.........................................................
8
..................................................
8
S
gs
..................................................................................
9
9
...............................................................
9
9
D
p
...........................................................................................
20
g
.................................................................................................
g
.......................................................................................................
g
..........................................................................................................
g
...................................................................................................
g
........................................................................................................
..................
on
e
......................................................................
3
S
.....................................................................................
24
Language Code List
............................................................................
24
Limited Warranty
...............................................................................
4
de
.................................................................................
25
i
p
i
i
s
f
n
d.
Please read before using this unit
DVD/CD Player with Video Cassette Recorde
MWD22
A
If you need additional operating assistance after
reading this owner’s manual, please cal
TOLL FREE : 1-800-605-861
r visit our web site at
www.magnavox.com/suppor
ontent
recaution
Safety Instruction
Moisture Condensation Warning
About Copyright
ymbols Used in This Manua
Maintenance
Vi
Playable Video Cassettes
Playable Disc
nplayable Discs
etu
Connection
RF Output Channel
Hint for Cable Box or Satellite Box
onnection to an Audio Syste
Preparation for Us
Turn on the Unit for the First Tim
To Add or Del
lock Setu
Front Panel Indi
CR / DVD Switchin
Front & Rear Terminals
Rem
Installing the Batteries for the Remote Contro
CR Function
Other Operations
Index
Time Searc
Auto Repeat
Di
lied Accessorie
Remote control
NB179UD
with two AA (1.5V
atterie
Audio/Video cable
WPZ0102TM018 /
WPZ0102LTE01 /
WPZ102SCP001
ecordin
Recording & OTR (One Touch Recordin
Timer Recordin
Hints for OTR and Timer Recordin
Copying a Video Tape
RF cable
WPZ0901TM002 /
WPZ0901TM005
Owner’s Manual (1VMN28734
DVD Function
h Function
Using Track Search
Using Title / Chapter Search
Using Time Search
pecial Settin
Subtitle Language / Audio Language
Camera Angles / Black Level Setting
Stereo Sound Mode / Virtual Surround
VD Setu
LANGUAGE Settin
DISPLAY Settin
AUDIO Settin
PARENTAL Settin
THERS Settin
Reset to the Default Setting (Except for PARENTAL Setting)
Informati
roubleshooting Guid
pecifications
uick Use Gui
ons
recaut
etu
1
onsDVD Funct
1
1
1
1
1
1
1
1
1
1
1
2
2
CR Funct
on
ormatio
In
TV Conn
© 2009 Funai Electric Co., Lt
Page 2
2
au
io
s
s
.
ecord and reta
ose numbers for future reference.
o.: No.:
,
.
.
:
,
Q
SO
.
.
.
S
ead these
uctions.
.
ollow all
uctions.
h.
ufacturer’s
uctions.
with
t
.
ufacturer.
.
.
T
.
.
recaution
s
T
.
T
)
afety Instruction
The model and serial numbers of this unit may be found on the cabinet
You should r
in th
rial N
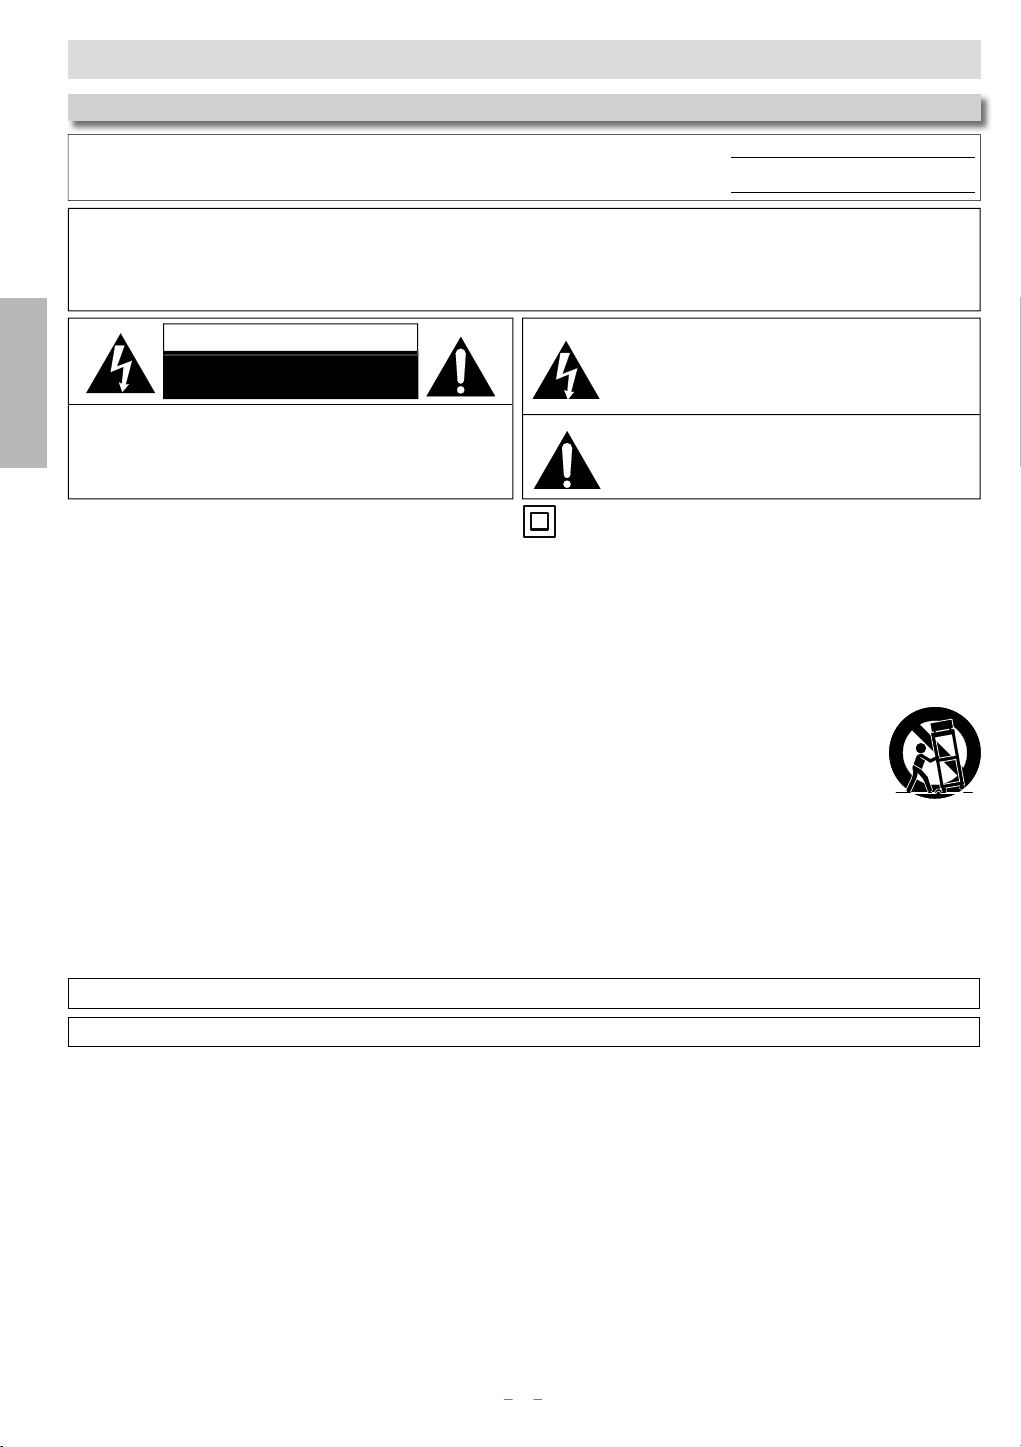
WARNING: TO REDUCE THE RISK OF FIRE OR ELECTRIC SHOCK
DO NOT EXPOSE THIS APPARATUS
TO RAIN OR MOISTURE
APPARATUS SHALL NOT BE EXPOSED TO DRIPPING OR SPLASHING AND NO OBJECTS
FILLED WITH LIQUIDS, SUCH AS VASES, SHALL BE PLACED ON THE APPARATUS
Prec
AUTION
t
n
AUTION
DO NOT REMOVE COVER (OR BACK). NO USER SERVICEABLE
PARTS INSIDE. REFER SERVICING TO
PER
he important note is located on the rear or bottom of
the cabinet
RISK OF ELECTRIC SHOCK
DO NOT OPEN
TO REDUCE THE RISK OF ELECTRIC SHOCK
UALIFIED SERVICE
NNEL
The lightning flash with arrowhead symbol, within an
equilateral triangle, is intended to alert the user to the
presence of uninsulated “dangerous voltage” within the
product’s enclosure that may be of sufficient magnitude
to constitute a risk of electric shock to persons
The exclamation point within an equilateral triangle is
intended to alert the user to the presence of important
operating and maintenance (servicing) instructions in the
iterature accompanying the appliance
he symbol for CLASS ll (Double Insulation
IMPORTANT SAFETY INSTRUCTION
R
Keep these instructions.
Heed all warnings
F
Do not use this apparatus near water.
Clean only with dry clot
7. Do not block any ventilation openings. Install in
Do not install near any heat sources such as radiators, heat
egisters, stoves, or other apparatus (including amplifiers)
that produce heat.
Do not defeat the safety purpose of the polarized or
rounding-type plug. A polarized plug has two blades
as two blades and a third grounding prong. The wide
blade or the third prong are provided for your safety. If
he provided plug does not fit into your outlet, consult an
lectrician for replacement of the obsolete outlet
instr
instr
rdance with the man
one wider than the other. A grounding type plug
instr
Protect the power cord from being walked on or
pinched particularly at plugs, convenience receptacles,
and the point where they exit from the apparatus.
Only use attachments/accessories specified by the
man
Use only with the cart, stand, tripod,
bracket, or table specified by the
manufacturer, or sold with the apparatus.
When a cart is used, use caution when
moving the cart/apparatus combination
to avoid injury from tip-over
Unplug this apparatus during lightning storms or when
unused for long periods of time
4. Refer all servicing to qualified service personnel.
Servicing is required when the apparatus has been
amaged in any way, such as power-supply cord or
plug is damaged, liquid has been spilled or objects
have fallen into the apparatus, the apparatus has been
exposed to rain or moisture, does not operate normally,
or has been dropped.
his Class B digital apparatus complies with Canadian ICES-003
Disconnect the mains plug to shut off when find trouble or not in use. The mains plug shall remain readily operable
Page 3
3
i
AUTION: Danger of explosion if battery is incorrectly replaced. Replace only with the same or equivalent type
.
W
.
Y
T
s
.
.
:
V
.
.
ON
y
.
.
e
.
.
g
.
.
y
g
.
g
f
.
.
.
g
T
d
.
.
y
p
s
.
ARNING:Batteries (Battery pack or battery installed) shall not be exposed to excessive heat such as sunshine, fire, or the like
ASER SAFET
his apparatus employs a laser. Only a qualified service person should remove the cover or attempt to service thi
pparatus, due to possible eye injury
AUTION: Use of controls or adjustments or performance of procedures other than those specified herein may result
azardous radiation exposure
AUTION
ATION: Inside, near the deck mechanism
MPORTANT COPYRIGHT INFORMATI
nauthorized copying, broadcasting, public performance and lending of discs are prohibited. This product
incorporates cop
se of this copyright protection technology must be authorized by Macrovision, and is intended for home and
ther limited viewing uses only unless otherwise authorized by Macrovision. Reverse engineering or disassembly is
rohibited
isible and invisible laser radiation when open and interlocks defeated. Do not stare into beam
right protection technology that is protected by U.S. patents and other intellectual property rights.
ons
Do not place the unit on the furniture that is capable of being tilted by a child and an adult leaning, pulling, standing
r climbing on it. A falling unit can cause serious injury or even death
To Avoid the Hazards of Electrical Shock and Fir
Do not handle the power cord with wet hands
Do not pull on the power cord when disconnecting it from an AC outlet. Grasp it by the plug
Do not put your fingers or objects into the unit.
Location and Handlin
Do not install the unit in direct sunlight, near strong magnetic fields, or in a place subject to dust or strong vibration
Avoid a place with drastic temperature changes
Install the unit in a horizontal and stable position. Do not place anything directly on top or bottom of the unit.
Depending on
placed too close to them. In this case, please ensure enou
Depending on the environment, the temperature of this unit may increase slightly. This is not a malfunction.
Be sure to remove the disc and unplug the AC power cord from the outlet before carrying the unit.
our external devices, noise or disturbance of the picture and/or sound may be generated if the unit is
h space between the external devices and the unit
Dew Condensation Warnin
Dew condensation may form inside the unit in the following conditions. If so, do not use this unit at least for a few
ours until its inside gets dry.
- The unit is moved
- Under conditions of high humidity
- After heating a cold room
rom a cold place to a warm place
Note about Recyclin
his unit’s packaging materials are recyclable and can be reused. Please dispose of any materials in
accor
ance with your local recycling regulations
Batteries should never be thrown away or incinerated but disposed of in accordance with your local
regulations concerning chemical wastes
recaut
Notice for Progressive Scan Output
onsumers should note that not all high definition television sets are fully compatible with this product and ma
cause artifacts to be displayed in the picture. In case of picture problems with 525(480) progressive scan output,
it is recommended that the user switch the connection to the ‘standard de nition’ out
regarding your TV set compatibility with this 525p(480p) DVD player, please contact our customer service center
ut. If there are question
Page 4
4
au
io
s
d.
.
-
oisture Condensation Warnin
g
:
.
t.
t
bli
d
d.
l
The followi
l.
.
.
r
T
-
-
.
ce
g
g
ocate an autho
.
t
g
soft cloth.
g
t
.
lly
s
g
g
g
t
.
g
g
.
T
.
d
.
ocate an autho
.
t
.
oisture may form inside this unit under the following conditions
• Immediately after a heater is turned on
• In a steamy or humid room.
• When this unit is suddenly moved from a cold to warm
nvironmen
f moisture forms inside this unit, it may not operate properly or
amage the cassette tape. In such case, do not use this unit at
least for 2 hours until its inside gets dry.
About Copyrigh
nauthorized copying, broadcasting, pu
lending of discs are prohibited.
This product incorporates copyright protection technology that
s protected by U.S. patents and other intellectual property rights.
Prec
Use of this copyright protection technology must be authorized by
Macrovision, and is intended for home and other limited viewing
uses only unless otherwise authorized by Macrovision. Reverse
ngineering or disassembly is prohibite
t
n
mbols Used in This Manua
ng symbols appear in some headings in this manua
: Description refers to video cassette tapes
Description refers to DVD-Video
: Description refers to Audio CD.
c performance an
leaning Discs
When a disc becomes dirty, clean it with a cleaning cloth. Wipe
he disc from the center to out. Do not wipe in a circular motion
Do not use solvents such as benzine, thinner, commercia
vailable cleaners, detergent, abrasive cleaning agents or
ntistatic spray intended for analog records.
eaning the Disc Len
If this unit continues to perform improperly even after you have
eferred to the relevant sections and to the “Troubleshooting
uide” in this manual, the laser optical pickup unit may be dirty.
onsult your dealer or an authorized service center for inspection
nd cleaning of the laser optical pickup unit.
Disc Handlin
When you handle a disc, hold it by its edge and try not to touch
he surface of the disc
Always store the disc in its protective case when not in use.
Auto Head Cleanin
Automatically cleans video heads as you insert or remove a
assette tape, so you can see a clear picture
Playback picture may become blurred or interrupted while the
V program reception is clear. Dirt accumulated on the video
eads after a long period of use, or the usage of rental or worn
assette tapes can cause this problem. If a streaky or snowy
icture appears during playback, the video heads in your unit
ay need to be cleaned
. Please visit your local audio/video store and purchase a goo
quality VHS video head cleaner
.
If a Video head cleaner does not solve the problem, please call
our toll free customer support line found on the cover of this
manual to l
rized service center
Note to CATV system installe
his reminder is provided to call the CATV system install
r’s attention to Article 820-40 of the NEC that provides
uidelines for proper grounding and, in particular, speci
fies that the cable ground should be connected to the
rounding system of the building, as close to the point
f cable entry as practical
intenan
Servicin
• Please refer to relevant topics on the “Troubleshooting Guide”
n page 23 before returning the product.
• If this unit becomes inoperative, do not try to correct the
problem by yourself. There are no user-serviceable parts inside.
Turn off, unplug the power plug, and please call our toll free
ustomer support line found on the cover of this manual to
l
rized service center
Cleaning the Cabine
• Wipe the front panel and other exterior surfaces of the unit with
• Never use a solvent, thinner, benzene or alcohol to clean the
unit. Do not spray insecticide liquid near the unit. Such chemi-
als may discolor the surface or damage the unit.
n
Remember to read the instructions along with the video head cleaner
efore use
Clean video heads only when problems occur.
2009 Funai Electric Co., Ltd.
All rights reserved. No part of this manual may be reproduced,
copied, transmitted, disseminated, transcribed, downloaded or
stored in any storage medium, in any form or for any purpose
without the express prior written consent of Funai. Furthermore,
any unauthorized commercial distribution of this manual or any
revision hereto is strictly prohibite
Information in this document is subject to change without notice.
Funai reserves the right to change the content herein without the
obligation to notify any person or organization of such changes
Electric Co., Ltd. and may not be used in any way without the
express written consent of Funai. All other trademarks used
herein remain the exclusive property of their respective owners.
Nothing contained in this manual should be construed as
granting, by implication or otherwise, any license or right to use
any of the trademarks displayed herein. Misuse of any
trademarks or any other content in this manual is strictly
prohibited. Funai shall aggressively enforce its intellectual prop
erty rights to the fullest extent of the law.
with the design is a registered trademark of Funai
anufactured under license from Dolby Laboratories. “Dolby”
nd the
le-Dsymbol are trademarks of Dolby Laboratories.
Page 5
5
i
A
bou
s
s
s
!
s
p
D
.
A
s
t.
s
.
f
.
.
y
f
y
ecorder.
.
)
.
y.
e
discs
e
s
sc size
s
o
*1, 2, 4, 6, 10
o
)
cm
WVD-R
*
0
RWVD+R
,
0
*
o
cm
WD-R
0
o
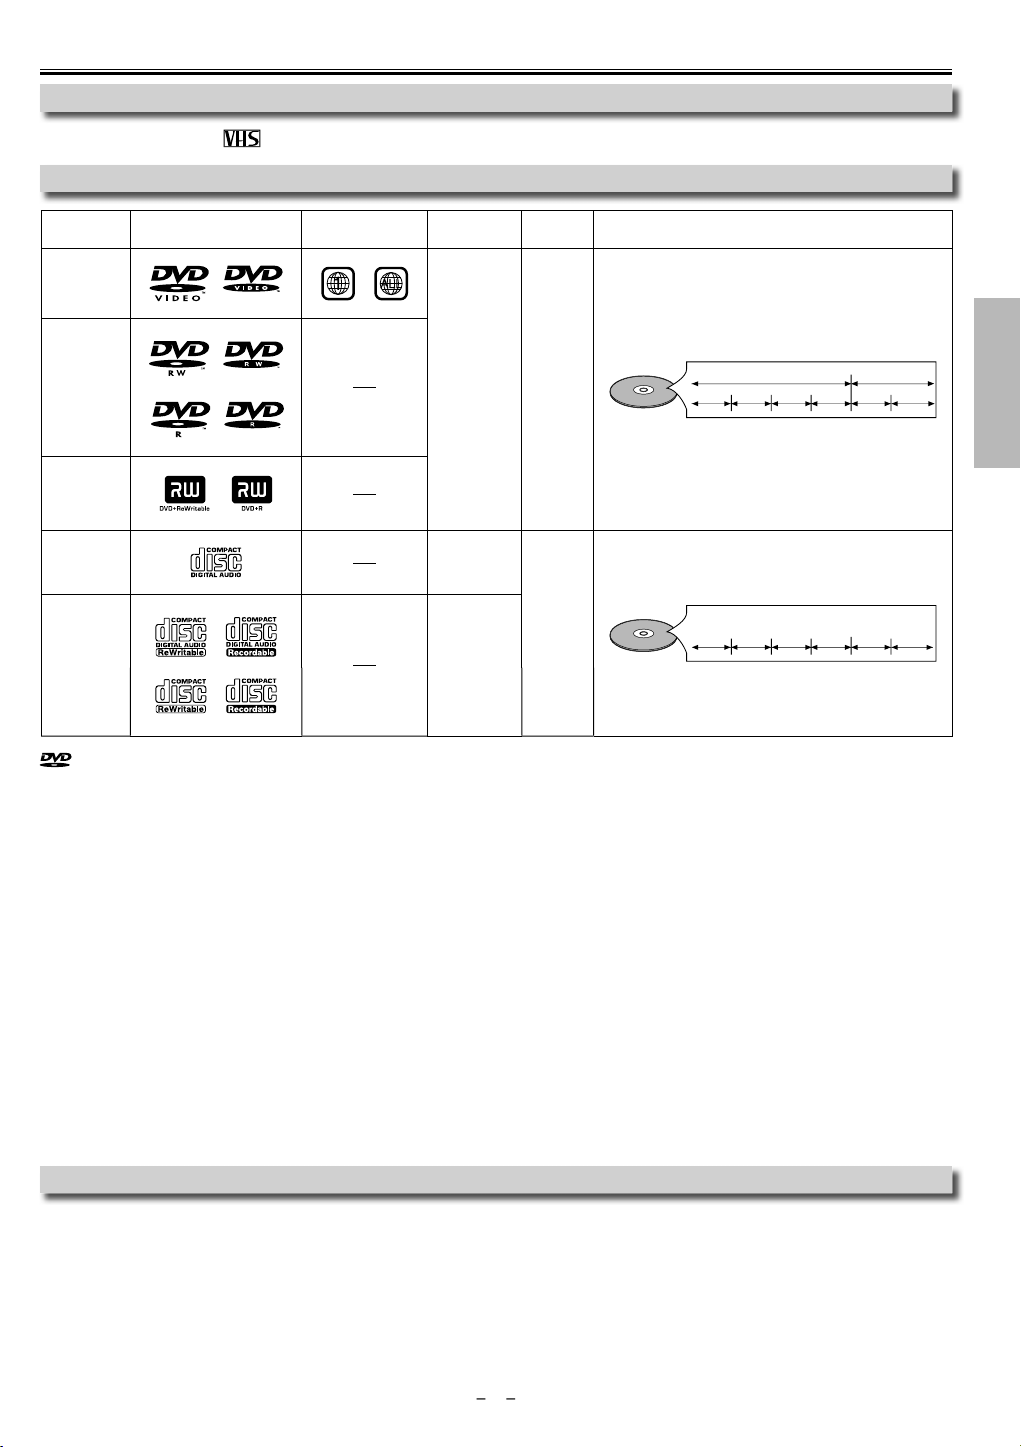
is a trademark of DVD Format/Logo Licensing Corporation.
t the Video Cassettes and Disc
Playable Video Cassette
Use only cassettes marked with this uni
ayable Disc
Playabl
VD-Vide
VD-R
1, 3, 4, 5, 6, 7,
, 9, 1
VD+
*1, 3, 4, 5, 6, 8
9, 1
Audio CD
4, 6, 10
D-R
*4, 5, 6, 9, 1
ark (logo)
egion cod
or
ecorded
ignals
Digital vide
MPEG2
igital audi
igital audi
Di
12
r
cm
12
r
cm
Disc type
e.g.)
e.g.)
title 1 title 2
chapter 1 chapter 2 chapter 1
track 1 track 2 track 5 track 6track 3 track 4
chapter 3 chapter 4
If you cannot play back a disc which bears one of the marks above, check the following notes
*1: This unit conforms to the NTSC color system. Discs recorded in other color systems such as PAL cannot be played back.
*2: Certain DVD-Video discs do not operate as described in this manual due to the intentions o
the disc’s producers
*3: Discs Recorded in the VR (Video Recording) format cannot be played back
*4: Scratched or stained discs may not be played back.
*5: Some discs cannot be pla
ed back because of incompatible recording conditions, characteristics of the recorder or special
roperties of discs.
*6: You can play back discs which bear the marks above. I
you use non-standardized discs, this unit may not play them back. Even if
they are played back, the sound or video quality will be compromised.
*7: You ma
play back the unfinalized DVD-R/RW disc recorded in the video format on our brand’s DVD recorder. However,
depending on the recording status of a disc, the disc may not be played back at all or normally (the picture or sound may not
be smooth, etc.). In this case, you need to finalize the disc with the DVD recorder. Refer to the manual accompanying the DVD
r
*8: Only the discs recorded in the video format and finalized can be played back
Unfinalized discs cannot be played back. Depending on the recording status of a disc, the disc may not be played back at all. (the
picture or sound may not be smooth, etc.
*9:
If the recorded portion of the disc is too small (less than 2 3/16 inches (55 mm) across), it may not play back properly
*10: Do not glue paper or put stickers on to the disc. These may damage the disc, and the unit may not read it correctl
ons
chapter 2
recaut
nplayable Disc
NEVER play back the following discs. Otherwise, malfunction may result
DVD-RAM / DVD-Audio / CD-i / Photo CD / Video CD / DVD with region codes other than 1 or ALL / DTS-CD / DVD-ROM for personal
computers / CD-ROM for personal computer
n the following disc, the sound MAY NOT be heard.
Su
er Audio C
NOTE: Only the sound recorded on the normal CD layer can be delivered.
The sound recorded on the high density Super Audio CD layer cannot be delivered
ny other discs without compatibility indication
Page 6
6
S
p
f
M
CM
Cable Box or Sate
ox
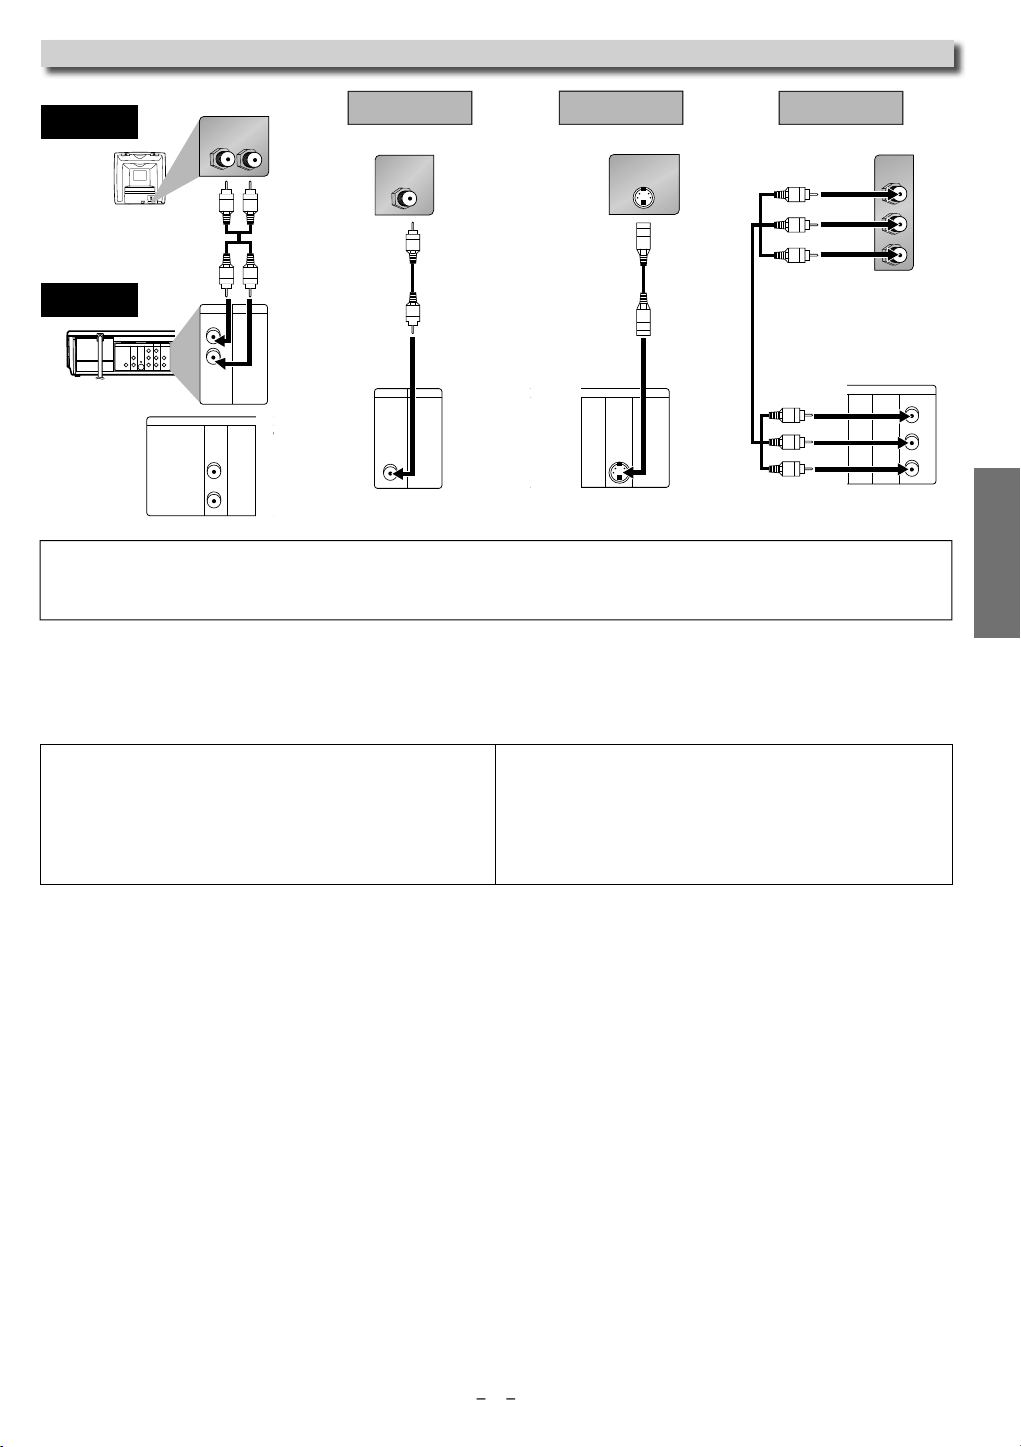
LR
VCRDVD/VCR
AUDIO OUT
L
R
DIGITAL
AUDIO OUT
or
AUDIO
OUT
DVD
S-VIDEO
OUT
COMPONENT
VIDEO OUT
L
R
m
1
Anal
ks
A
T
m
Audio cable
pp
pplied)
.
t
f
.
eaters.
.
y)
k
AUDIO OUT
Aud
)
2
deck o
deck
Setu
p
g,
.
l.
e.
seconds.
•
-
.
•
k.
l
s
t
B
on the unit for 3 seconds.
ected on the cable box or the sate
.
While y
d.
T
y
]
,
G
/
K
,
H
/
L
select channel 3
).
.
.
to
ecord.
ANT-OUT
ANT-IN
RF cable
(supplied)
(Back of DVD/VCR)
IN
OUT
(Back of TV)
Satellite or
Cable TV
signal
(Cable box or
Satellite box)
DIGITAL
AUDIO OUT
COAXIAL
AUDIO
OUT
DVD
S-VIDEO
OUT
COMPONENT
VIDEO OUT
COAXIAL
Connection
lease refer to “Basic TV Connection” on the front page before you use this unit.
F Output Channe
f channel 3 has been already occupied for
roadcastin
1) Set your TV to channel 4.
2) Insert a pre-recorded tape into this unit.
Press
SOURCE]on the unit so that the VCR
SOURCE light is lit
•
noise appears on the TV screen, press
VCR/TV]on the remote contro
4) Press
PLAY B onc
) After a few seconds, press and hold
PLAY B on the unit for 3
The RF output channel will change to chan
nel 4 from channel 3 and you will see a
playback picture
When a picture does not appear on the TV
screen, repeat step 4.
Press
STOPC to stop playbac
in
The RF output channel does not
ange when you adjust tracking
uring playback. In case RF output
annel changes, you can easily
witch it back. Start the playback
gain then press and hold
PLAY
int for
llite B
etu
elect this connection when you want to view or record a
crambled channel. With this connection, channels cannot be
anged on the unit. You can view or record ONLY the channels you
ve sel
ou are recording, only the recorded channel can be viewe
Connection to an Audio Syste
Audio
tereo syste
(su
UDIO OU
(Analog)
llite box
hod
og audio
nput jac
o select channels of the cable box or satellite box
1) Turn on the unit b
pressing
STANDBY-ON
then press
VCR/TV] The STANDBY-ON indicator on the front panel will
ight, then press
SKIP/CH.
to
r 4 (the same channel as the output channel of the cable box
r satellite box
• If you use the channel 4, you need to change the unit’s RF
output to channel 4. Refer to “RF Output Channel”
2) At the TV, select channel 3 or 4 (the same channel as you have
selected at step 1)
3) On the cable box or satellite box, select the channel you want
view or r
Method
olby Digital decoder,
MD
r DAT
Digital audio
input jac
io Coaxial Digital cable
(commercially available
IGITAL
DVD/VCR
SETUP > AUDIO >
DOLBY DIGITAL
ITSTREA
P
(DVD mode onl
Connection
Setting
Connecting to a Dolby Digital decoder
or Dolby Digital audio output.
Connecting to other equipment (an MD
eck or DAT deck etc.)
without Dolby Digital decoder.
* To complete these settings, refer to pages 20-21
n
The audio source on a disc in a Dolby Digital Multi channel surround
ormat cannot be recorded as digital sound by an MD or DAT deck
By hooking this unit up to a Multi channel Dolby Digital decoder, you
an enjoy high-quality Dolby Digital Multi channel surround sound as
rd in the movie th
Playing a DVD using incorrect settings may generate noise distortion
nd may also damage the speakers
Page 7
7
p
al:
U
h
,
3
X
3
ood:
U
Series:
00
L
O
O
O
0
3
Toshib
E
th:
00
DIGITAL
AUDIO OUT
COAXIAL
ANT-OUT
ANT-IN
AUDIO
OUT
DVD VCR
DVD/VCR
S-VIDEO
OUT
COMPONENT
VIDEO OUT
AUDIO IN
VIDEO IN
AUDIO OUT
VIDEO OUT
L
LY
C
B
C
R
R
R
AUDIO IN
LR
VCRDVD/VCR
AUDIO OUT
L
R
DIGITAL
AUDIO OUT
AUDIO
OUT
DVD
S-VIDEO
OUT
COMPON
VIDEO O
L
R
or
VIDEO IN
VCRDVD/VCR
VIDEO OUT
S-VIDEO IN
DIGITAL
AUDIO OUT
COAXIAL
AUDIO
OUT
DVD
S-VIDEO
OUT
COMPONENT
VIDEO OUT
DIGITAL
AUDIO OUT
C
B
Y
C
R
COMPONENT
VIDEO IN
COAXIAL
AUDIO
OUT
DVD
S-VIDEO
OUT
COMPONENT
VIDEO OUT
Y
C
B
C
R
V
1
e
o
ethod
3
e
e
OUT
T
Vid
d)
Audio cable
ble
)
)
nn
ection to a
t
tem.
.
.
S
TV
TV
DVD/VCR
(supplied)
ic Audi
Good pictur
eo cable
supplie
M
etter pictur
-Video ca
(commercially
vailable
2
Best pictur
Component Video cable
(commercially available
AUDIO OUT
(Analog)
IDEO OUT
-VIDEO
MPONENT VIDEO OU
Hin
Connect this unit directly to the TV. If the Audio/Video cables are connected to a VCR, pictures may be distorted due to the copy protection
sys
• The COAXIAL, DVD AUDIO OUT, S-VIDEO OUT and COMPONENT VIDEO OUT jacks are only useful in DVD mode
After you have completed connections
Press the input selector button (usually TV/VIDEO, INPUT or AUX) on your TV to switch an appropriate external input channel (usually
near channel 0) for viewing the picture from this unit. If the picture does not appear, also refer to the manual accompanying your TV
NPUT MODES FOR COMMON TV BRAND
Listed below are inputs for common brand name TV’s.
etu
Admir
A
Curtis Mat
GE: INPUT
Hitachi: INPUT, AU
is: LINE1, LINE2, 00, 90, 91, 92, 93
X
TV/VCR, 00, 90, 91, 92, 9
JVC: VIDEO, VIDEO1, VIDEO2, VIDEO
Kenw
LXI-
A
X
agnavox: AUX CHANNE
Panasonic: TV/VIDE
RCA: INPUT, TV/VCR, 00, 90, 91, 92, 93
amsung: TV/VIDE
anyo: VIDE
arp: 0
ony: VIDEO1, VIDEO2, VIDEO
a: TV/GAM
ni
Page 8
8
S
p
Tu
the
set it to channel 3.
h
2
.
Th
.
3
o
STANDBY-ON
ess
]
to select “C
.
Th
B
to go t
2
.
Th
3
d.
4
.
5
To exit the menu
T
n
g
K/L
, th
B
]
K/L
[
B
]
g
T
ge
ggg
ess
.
K/L
, then
B
S
”
OL
”
K/L
]
l
buttons
G
/
K
,
H
/
L
:
]
)
)
.
C
R/C
SE
T
Preparation for Us
e
p
t
gg
.
l.
G
/
K
,
H
/
L
(
K
/
L
)
-
.
s
.
?
t
.
.
oror
MENU
or
ororororor
MENU
o
CT
B
]
S ES
OL
C
AUTO S
-
G
]
B
T
CT
C
P
B
)
ADD
)
E
]
C
B
T
CLOCK SET
CLOCK SETMO
CLOCK S
/
CLOCK SETMO
Th
B
t
2
ect the current month.
T
3
Th
B
t
4
T
5
ect the current hour.
T
ect the current
ute.
Th
B
to go t
ect
.
8
T
n
CLOCK S
B
ororo
OYES
e
VCR
p
VCR
t
choose S
ess
B
]
G
/
K
,
H
/
L
butto
w
,
K/L
.
ete Channels
VCR
CLOCK SETMO
Turn on the Unit for the First Tim
erations described in this manual are
mainly based on the remote control.
rn on
If channel 3 has been already occupied for broadcasting,
Select your language when turning this unit on for the first time
TV and
see “RF Output C
annel” section on page 6.
en press [B to go to next step
r
ANGUAGE SELE
ENGLISH [ON
FRANCAI
PAÑ
o Preset the Channel Agai
1) Press [MENU] until the main menu appears.
2)
elect “CHANNEL SET UP” by using
3)
elect “AUTO SET UP” by using
, the tuner stops on the lowest memorized channel.
nin
, then press
o Change the On-Screen Langua
1)
r
2) Select “LANGUAGE SELECT”
3) Select
MENU]ntil the main menu appears
ress
NGLISH” , “FRANCAI
then press
CLEAR/C.RESET
using
r
ESPAÑ
en press
. After scan-
by using
ressB to start Auto Set Up.
Do you connect the cable from the cable box or the satellite box to the
unit’s ANT-IN jack
e
Press
• Refer to “Hint for Cable Box or Satellite Box” section on page 6
etu
o
MENU]to exit.
Please wait for a few minutes.
After scanning...
The tuner stops on the lowest memorized channe
You can select only the channels memorized in this unit by using
SKIP/CH.
//
or
CHANNEL
/
.
If “AUTO SET UP” appears on the TV screen again, check the cable con
nections. Then, pressB once again
Hin
Repeat these steps only if either there was a power failure or this unit
has been unplu
To Select a Channe
You can select a channel by using thember
SKIP/CH.
Notes for using the number buttons
• When selecting cable channels which are higher than 99, enter
channel numbers as a three-digit number.
for example: 117, press
• You must precede single-digit channel numbers with a zero. (for
example: 02, 03, 04 and so on
To Add or Del
ed for more than 30 seconds
1], [1], [7
ET UP
or
H 01
in
If you accidentally select Spanish or French and need English: Press
MENU] and
nd select ENGLISH. Finally, press
To add or delete channels in this unit,
orks on the channel number memorized in this unit
ELEC. IDIOMA or SELECTION LANGUE. Pr
CLEAR/C.RESET
SKIP/CH.
works on
n
ll
N
Clock Setu
ress
MENU]and select “CLOCK SET”.
en press
o go to next step.
- M E N U -
TIMER PROGRAMMING
AUTO REPEAT [OFF
HANNEL SET UP
CLOCK SE
LANGUAGE SELECT
• If the clock is not set, the CLOCK SET screen appears when you
MENU]. In this case, go to step 2
l
hen pressBto go to next step.
elect the current day.
en press
o go to next step.
elect the current year.
hen pressBto go to next step.
MONTH DAY YEAR
1 0 / – – – – – –
HOUR MINUTE AM/PM
– – : – – – –
NTH DAY YEAR
1 0 / 0 5 – – – –
HOUR MINUTE AM/PM
– – : – – – –
NTH DAY YEAR
1 0 / 0 5 2 0 0 9
HOUR MINUTE AM/PM
– – : – – – –
Pr
MENU
en press
• If the clock is not set, the “CLOCK SET” screen appears when you
MENU]. In this case, press
“MANUAL SET UP”
en pressBto go to next step.
elect the channel to be added or delete
“ADD” or “DELETE”
HANNEL SET UP”
o next step.
r
r
LEA
. RE
MENU]again.
r
- M E N U
TIMER PROGRAMMIN
AUTO REPEAT [OFF
CHANNEL SET UP
CLOCK SE
LANGUAGE SELE
HANNEL SET UP
AUTO SET U
MANUAL SET UP
ANUAL SET UP
CHANNEL 30 (CATV
ANUAL SET UP
CHANNEL 30 (CATV
ELET
l
hen pressBto go to next step.
l
en press
l
“AM” or “PM”
min
o next step.
MONTH DAY YEAR
1 0
HOUR MINUTE AM/PM
0 5 : – – – –
1 0 / 0 5 MON 2 0 0 9
HOUR MINUTE AM/PM
0 5 : 4 0 – –
MONTH DAY YEAR
1 0 / 0 5 MON 2 0 0 9
HOUR MINUTE AM/PM
0 5 : 4 0 P M AM
o exit the CLOCK SET scree
in
To go back one step, press s (during steps 2 to 7)
Your clock setting will be lost if either there is a power failure or this
nit has been unplugged for more than 30 seconds
ET
0 5 MON 2 0 0 9
NTH DAY YEAR
ET
Page 9

9
p
k
d
.
f
television.
s
-
y)
k
y)
k
l
)
nction Overvie
w
.
DVDVCR
SOURCE
STANDBY-ON
DISPLAY VCR DVD PAUSE
SLOW
VCR/TV
SKIP/CH.
PLAY
STOP
RECORD
MENU
SETUP TOP MENU
MODE ZOOM
SUBTITLE
T-SET
ANGLE
ENTER
RETURN
SEARCH
MODE
REPEAT A-B
OPEN/CLOSE
/EJECT
SPEED AUDIO
C
/
C.RESET
123
456
789
0
+10
PLAYDISC IN
DVDVCR
OPEN/CLOSE
CHANNEL SOURCE PREV STOP PLAY NEXT
DVD PLAYER / VCR CMWD 2206
SOURCE button
DVD SOURCE light
VCR SOURCE light
DVD button
VCR button
l.
ess
ote control.
t
ote control. You MUST select the correct mode on the remote
.
g
cator
PLAYDISC IN
DVDVCR
OPEN/CLOSESTANDBY-ON
POWER ON
AUDIO
REC
RECORDF.FWDREW STOP/EJECT
TIMER REC
IR
CHANNEL SOURCE PREV STOP PLAY NEXT
VIDEO
REC
RECORD
TIMER REC
PLAY
DVD PLAYER / VCR CMWD 2206
.
.
d.
.
.
DIGITAL
AUDIO OUT
COAXIAL
ANT-OUT
ANT-IN
AUDIO
OUT
DVD VCR
DVD/VCR
S-VIDEO
OUT
COMPONENT
VIDEO OUT
AUDIO IN
VIDEO IN
AUDIO OUT
VIDEO OUT
L
LY
R
R
C
B
C
R
ANT-OUT
ANT-IN
DIGITAL
AUDIO OUT
COAXIAL
AUDIO
OUT
DVD
DVD/VCR
VCR
S-VIDEO
OUT
COMPONENT
VIDEO OUT
AUDIO OUT
VIDEO OUT
AUDIO IN
VIDEO IN
L
Y
C
B
C
R
L
R
R
AUDIO
REC
RECORDF.FWDREW STOP/EJECT
TIMER REC
VIDEO
REC
RECORD
TIMER REC
PLAY
]
]
j
y)
ks
quip
.
k
audio source here.
k
.
k
l
.
328
345
.
ront Panel Indi
ights up during a recording
inks when a recording is pause
Lights up when the disc is inserted
Lights up when the inserted disc
is being played back.
Blinks when an unacceptable
isc is inserted.
Lights up when power is on
ights up when the Timer Recording or
n OTR recording has been set
VCR / DVD Switchin
You must first select which component you wish to operate with
SOURCE], as this product is a combination of a VCR and a DVD
player
VCR MODE
ress
VCR] on the remote contro
(Verify that the VCR SOURCE light is lit.)
DVD MODE
Pr
DVD] on the rem
(Verify that the DVD SOURCE light is lit.)
n
Pressing only
f the rem
ntrol
Front & Rear Terminals
SOURCE]on the front panel DOES NOT switch the mode
Lights up when this unit is in the DVD mode
ights up when this unit is in the VCR mode.
etu
LEAR
ment
1: DVD AUDIO OUT (analog) jacks
Connect the supplied audio cable here through the audio in
television or other audio equipment. (DVD onl
: DVD/VCR AUDIO OUT jac
Connect the supplied audio cable here through the audio in jacks of a
television or other audio e
: AUDIO IN jac
Connect audio cable coming from the audio out jack of a camcorder,
nother VCR or an
4: ANT-IN jac
Connect your antenna or cable box here
: ANT-OUT jac
Connect the supplied RF cable to the antenna input jack of a
evision
te
Rear Panel
acks of a
Front Panel
6: VIDEO IN jac
Connect a cable coming from the video out jack of a camcorder, another
VCR or an au
ere
io-visual source (laser disc player, video disc player, etc.)
7: DVD/VCR VIDEO OUT jack
Connect the supplied video cable here through the video in jack o
8: COMPONENT VIDEO OUT jack
Connect optional COMPONENT VIDEO cables here through the COMPO
NENT VIDEO in jacks of a television. (DVD onl
9: S-VIDEO OUT jac
Connect an optional S-VIDEO cable here through the S-VIDEO in jack of a
television. (DVD onl
10: DIGITAL AUDIO OUT COAXIAL jac
Connect an optional coaxial digital audio cable here through the coaxia
digital audio in jack of a decoder or audio receiver. (DVD only
a
Page 10

0
S
p
STANDBY-ON
DISPLAY VCR DVD PAUSE
SLOW
VCR/TV
SKIP/CH.
PLAY
STOP
RECORD
MENU
SETUP TOP MENU
MODE ZOOM
SUBTITLE
T-SET
ANGLE
ENTER
RETURN
SEARCH
MODE
REPEAT A-B
OPEN/CLOSE
/EJECT
SPEED AUDIO
C
/
C.RESET
123
456
789
0
+10
ote Control
pplied
.
PLAYDISC IN
DVDVCR
OPEN/CLOSESTANDBY-ON
POWER ON
AUDIO
REC
RECORDF.FWDREW STOP/EJECT
TIMER REC
IR
CHANNEL SOURCE PREV STOP PLAY NEXT
VIDEO
REC
RECORD
TIMER REC
PLAY
DVD PLAYER / VCR CMWD 2206
that there is no obstacle betwee
th
.
s.
°
Above
°
w
°
m
ote Control
3
t
es.
.
used for an extended
y
t.
ode
ode
.
ly.
select channel.
d
.
layback
.
t
-
.
sc.
d
.
C
/
C.
status numbe
g
.
ed
y.
.
status numbe
o clear the numbers entered
T
u.
ode.
d ch
l.
activate the remote
ode.
.
activate the remote
ode.
the cursor and deter-
.
the cursor and deter-
.
and
.
.
y
y.
.
y
T
.
y.
.
.
ame at a time.
.
g.
ame at a time.
k.
k.
T
.
dly.
-
i
h
time. To set or search the markers.
search track.
search time.
set or search the markers.
u.
.
.
lly d
k.
ion.
h
ff
d.)
th
t
A
h
ff
d
.
g.
f
.
sc.
T
.
.
ition.
ition.
)
)
e
etu
Installing the Batteries for the
Rem
Install two AA (1.5V) batteries (su
matching the polarity indicated inside
battery compartment of the remote
ntrol
eep in mind the following when using the
emote control:
sure
e remote control and the remote sensor
n the unit
• The maximum operable ranges from the
nit are as follow
Line of sight: approx. 23 feet (7m)
Either side of center
Belo
Hin
Do not mix alkaline, standard (carbon-
zinc), or rechargeable (ni-cad, ni-mh, etc)
ri
Do not mix old and new batteries
Always remove batteries from remote
ontrol if they are dead or if the remote
ntrol is not to be
period of time. This will prevent batter
cid from leaking into the battery comartmen
LEAR
pprox. 16 feet (5m) within 30
pprox. 16 feet (5m) within 15
x.
0 feet (3m) within 30
)
(Alphabetical order
n
123
456
789
0
A-B
ANGLE
AUDIO
LEAR
RESET
DISPLAY
DVD
ENTER
MENU
MODE
OPEN/CLOSE
/EJECT
PAUSE
PLAY
RECORD
REPEAT
RETURN
SEARCH
MODE
SETUP
SKIP/CH.
SKIP/CH.
SLOW
SPEED
STANDBY-ON
STOP
SUBTITLE
T-SET
TOP MENU
VCR
VCR/TV
ZOOM
isc/Tap
To select chapter or title
directly
+10
To search forward/backward
through a disc
To begin slow forward
in the pause mode
p
To repeat between your cho
sen point of A and B
To select camera angles on a
i
To select audio languages on
isc
a
To remove
ram input
pro
To clear the numbers enter
incorrectl
To cancel the point for A-B repeat
To display the current disc
m
To select the DVD output mode.
To
ntrol in DVD m
To move
mine its position
• To select track direct
• To search forward/backward
hrough a disc.
To repeat between your
hosen point of A and B.
• To select STEREO, L-ch or R-ch.
r in
• To remove
rogram input.
• T
ncorrectly.
o cancel the point for A-B repeat.
•
• To display the current disc
•To select the DVD output mode
• To
ntrol in DVD m
• To move
ne its position.
To call up the Menu on a disc
VD m
To arrange the playing order
randoml
or pla
To set black level on/off
To set virtual surround on/off.
• To arrange the pla
r play randomly.
o set virtual surround on/off
•
To open or close the disc tray. • To open or close the disc tra
To pause disc playback
To advance playback one
fr
To begin disc playbac
To play a chapter or title
repeate
To return to the previous
on in menu.
operat
To search chapter, title or
To call up the DVD setup
u
• To pause disc playback
• To begin disc playbac
• To play a track or disc repeat
.
• To return to t
peration in menu.
• To
• To
• To
• To call up the DVD setup
u.
To skip chapters or titles. • To skip tracks
To turn the unit on or to turn
e unit into the standby
t
mode. (To completely turn o
the unit, you must unplug the
AC power cor
• To turn the unit on or to turn
e unit into the standby
ode. (To completely turn off
he unit, you must unplug the
C power cord.)
To stop playback. • To stop playback
To select subtitles on a disc.
To call up the Top Menu on a
i
To select DVD position or TV
pos
To magnify part of a picture.
x2 / x4
• To select CD position or TV
osition.
1
ing order
e previous
VCR m
To
The +10 button has no effect
in VCR mo
e.
To forward/backward a tape.
r in
To exit the VCR Men
To reset the tape counter.
To display the current time,
tape counter, an
To select an item
To advance to the
To go back one
tep during clock
To call up the VCR Menu.
To eject the video
from the VCR
To pause tape playback or
recordin
To advance playback one
fr
To begin tape playback.
To start a recording or One
ouch Recording
To call up the index or time
rch men
To change channels.
To adjust the tracking manu-
uring playbac
a
To view the tape in slow
mot
To select the recording speed.
To turn the unit on or to turn
e unit into the standby
t
mode. (To completely turn o
the unit, you must unplug the
AC power cor
To stop playback or
recordin
To put the VCR into standby
or a Timer Recording
mode
o select the VCR output mode
To activate the remote
ontrol in VCR mode
To select VCR position or TV
pos
anne
n the VCR Menu.
ext VCR Menu
timer setting
.)
Page 11

11
i
e.2To select
k
3
4
y
k.
.
2
g.
3
4
Af
deo cassette
t.
2
T
k
3
T
k
4
T
t
,
the unit
start
y.
ll
d
d
ll
/
G
/
K
,
H
/
L
r
K/L
) dur-
k.
y
STANDBY-ON
POWER ON
AUDIO
REC
RECORDF.FWDREW STOP/EJECT
TIMER REC
IR
VIDEO
REC
RECORD
TIMER REC
PLAY
efore:
T
.
PLAY
STOP
OPEN/CLOSE
/EJECT
s
p
t
y
VCR Function
s
.
h
SEARCH
MODE
Pro.1 Pro.2 Pro. 3 Pro. 4 Pro.5
02 01 01 02 03
Beginning
of the tape
End of
the tape
CURRENT PROGRAM
INDEX MARK
B
t
.
,
.
To re
d
To f
d
Search &
Searc
.
ess
g
g.
T
h
You
.
3
INDEX SEARCH
– –
ss
BB
or
SEARCH
MODE
TIME SEARCH
:
– –
B
or
)
d
d
ss
BB
t
]
)
py
ess
.
G
/
K
,
H
/
L
K/L
).
d
-
.
VCR
VCR
.
VCR
.
CH
0
:59
3
STANDBY-ON
DISPLAY VCR DVD PAUSE
SLOW
VCR/TV
SKIP/CH.
PLAY
STOP
OPEN/CLOSE
/EJECT
SPEED AUDIO
123
456
789
0
+10
2
434
)
pgpy
g[h
D
g
h
).
y)
)
pgpy
ess
ll
.
G
/
K
,
H
/
L
K/L
).
B
urn on the TV and set it to channel 3
• If channel 3 has been already occupied for broadcasting, see “RF Output Channel” section on page 6.
Insert a vi
into this uni
o stop playbac
Other Operation
To cue or review picture during playback (Picture Search
• Press it again and the unit will search in super high speed. (in the
SLP mode onl
To freeze the picture on TV screen during playback (Still mode
Pr
PAUSE F. Each time you press the button, the picture wi
be forwarded by one frame
• If the picture begins to vibrate vertically in the still mode,
stabilize the picture by using
or [CHANNEL
• If the picture is distorted or rolling vertically, adjust the vertical
hold control on your TV if equipped.
Hin
• Still/Slow mode will be automatically canceled after 5 minutes to prevent damage to the tape and the video head.
• To return to pla
ndex Searc
You can skip the program backward and forward by the Index
Mark
ress
back from the Picture Search/Still/Slow mode, press
SEARCH MODE] onc
o start playbac
o eject the cassette
F.FW
[REW
SKIP/CH.
• Insert a tape into this unit
nter Rese
ress
CLEAR/C.RESET
To play back in slow motion (Slow mode
r
SLOW] during playback or the still mode
• If the noise bars appear on the TV screen, you can reduce it by
using
KIP/CH.
Auto Rewin
When a tape reaches its end during playback, fast-forward or record
ing (except Timer Recording and One Touch Recording), the tape
will automatically rewind to the beginning. After rewinding finishes,
the unit will eject the tape
PLAYB.
ime Searc
can search backward and forward a specific length of time
a tape
• Insert a tape into this unit
ress
SEARCH MODE]twice
or [CHANNEL
Hin
•
When a tape without
record tab is inserted
will
playback automaticall
Tracking will be
automatica
upon playback.
To a
manua
H.
ing playbac
y adjuste
just the tracking
y, press
HANNEL
SKIP
o
ons
CR Funct
Index Mar
win
ast forwar
After searching, it automaticall
starts playbac
Hin
The Index Mark will be made automatically at the beginning of each recording
The time gap between Index Marks should be greater than 1 minute for
2 minutes for LP mode and 3 minutes for SLP mode
SP mode
INDEX SEARCH
0
LAY
elect the desired length of time for fast forwarding or
ewindin
To rewin
To fast forwar
ter searching, it automatically starts playback.
Hint for Index
These functions are not available during recording
Pr
[STOPCto stop the search.
If a tape ends during a search, your search will be canceled and the tape
will rewind to the be
innin
TIME SEAR
2 : 5
1~ 9
1 minute~9 hours and 59 minutes
Time
h
Page 12

2
V
u
io
ess
]
,
.
2
.
3
.
2
”.
4
the desired date.
Th
B
to go t
.
5
)
Th
B
to go t
.
cassette
tab
t.
2
ect the channe
to record.
3
ess
.
4
h.
5
ding
h
d-
cassette
.
g
g
n
C
Type of tape
T60 T120 T160
SP mode 1hour 2hours 2-2/3hours
SLP mode 3hours 6hours 8hours
Recording/Playback TimeTape Speed
123
456
789
0
REC OTR(0:30) OTR(1:00).....
(Normal recording)
OTR(8:00) OTR(7:30)
STOP
OPEN/CLOSE
/EJECT
DISC IN
DVDVCR
OPEN/CLOSESTANDBY-ON
POWER ON
AUDIO
REC
RECORDF.FWDREW STOP/EJECT
TIMER REC
IR
CHANNEL SOURCE PREV STOP P
VIDEO
REC
RECORD
TIMER REC
PLAY
STANDBY-ON
DISPLAY VCR DVD PAUSE
SLOW
VCR/TV
SKIP/CH.
PLAY
STOP
RECORD
MENU
SETUP TOP MENU
ENTER
RETURN
OPEN/CLOSE
/EJECT
SPEED AUDIO
123
456
789
0
+10
5
4
SKIP/CH.
Y
.
T
)
pgpy
ess
F
ute.
th
g)
-
B
]
CLOCK S
Auto Repea
t
t
t.
s
[
it.
1
–
–
–
–
–
T
g
.
f y
i
.
MENU
or
8
E
L
y
.
-
G
B
]
P
T
CT
MENU
o
M
S
C
or
or
M
1
N
–
–
–
–
set it to channel 3.
g
-
B
G
]
UP
T
CT
1
B
Y
WEEKLY
VCR
VCR
VCR
5
242
or
or
A
.
3
This function will playback a tape repeatedly from the beginning when the tape reaches the end.
Press
MENU], and choose
“AUTO REPEAT” during pla
back
- M E N U
TIMER PROGRAMMIN
AUTO REPEAT [OFF
CHANNEL SET U
CLOCK SE
r
LANGUAGE SELE
[B for
AUTO REPEAT”, “ON” or “OFF
Hin
To cancel Auto Repeat, follow step 1 above. Then, press Bso that “OFF” appears beside “AUTO REPEAT”. Press
If menu remains on the TV screen after step 2, pres
CLEAR/C.RESET] to ex
The Auto Repeat playback will start automatically if you select “AUTO REPEAT” to “ON” in the stop mode.
Recordin
ecording & OTR (One Touch Recordin
fore: Turn on the TV and
If channel 3 has been already occupied for broadcasting,
see “RF Output Channel” section on pa
nsert a
with
into this uni
r
CR F
SPEED] to select the desired tape speed
SPEED
nct
ns
ress
RECORD] repeatedly to select the
esired recording lengt
RECORD
RE
To stop recor
To eject t
e 6.
l
l
Accidental erasure preventio
To prevent accidental recording on a recorded
cassette, remove its record tab. To record on it
ater, cover the hole with adhesive tape.
ou
ANNOTdub a DVD to a videotape
o stop recording temporarily (Pause mode
r
PAUSE
During the rec-pause mode, five Cmarks appear on the TV screen. Each Cmark rep-
nts one min
Press it again to resume recording.
Pause mode will be automatically canceled after 5 minutes to prevent damage to
e tape and the video head.
e recor
nt
• If you want to watch one channel while recording another..
1) If noise appears on the TV screen, press
2) You cannot record one channel while watching another i
ver
rece
- M E N U
TIMER PROGRAMMING
AUTO REPEAT [ON
CHANNEL SET UP
LANGUAGE SELECT
CLEAR/C.RESET] to exi
VCR/TV]to put the unit in TV position.
ou have a cable box or satellite
ET
Record tab
imer Recordin
r
[MENU
then select “TIMER PROGRAMMING”
elect an empty program number
Then pressB to go to next step.
or
elect “ONCE”, “DAILY” (Mon-Fri), or “WEEKLY”
Then pressB to go to next step.
Insert a tape with its record tab into the unit.
- M E N U
TIMER PROGRAMMIN
AUTO REPEAT [OFF
CHANNEL SET
CLOCK SE
LANGUAGE SELE
TIMER PROGRAMMING
PROG 1234567
DAT
START TIME
END TIME
CHANNE
REC SPEED
vailable program number flashes
PROGRAM NUMBER
DATE – – / –
START TIME – – : – – –
END TIME – – : – – –
CHANNEL –
REC SPEED –
PROGRAM NUMBER
DAIL
ONCE
en press
o next step
ONE TIME PROGRA
PROGRAM NUMBER
DATE 1 0 / 0 5 MO
START TIME – – : – – –
END TIME – – : – – –
CHANNEL –
REC SPEED –
• You can set a program one year in advance
Select the desired start time (hour
en press
o next step
ONE TIME PROGRA
PROGRAM NUMBER 1
DATE 1 0 / 0 5 MON
TART TIME 0 7 : 3 0 – –
END TIME – – : – – – –
HANNEL – –
REC SPEED – –
1
Page 13

i
0
.
“AM” or “PM”
.
Th
.
8
the desired channel.
Th
.
a
p
cable box or sate
cable box o
g.
]
p
t
.
g
ote control.
]
K/L
B
4
K/L
.
s/B
K/L
th
.
.
.
s
gpg
ess
C
A
t.
O
O
DATE 1 0 / 0 5 MON
START TIME 0 7 : 3 0 PM
PM
END TIME – – : – – – –
B
O
S
C
6
B
S
SUBTITLE
T-SET
g
o
or
O
ON
S
C
or
C
R/C.RESE
T
].
.
Af
gp
the remote
C
A
dby
]
on the remote control o
C
A
.
.
.
gp
uto Power O
OT
been activated, the unit switches to the DVD mode and all the VCR functions will be unavailable.
A
.
ess
C
A
]
on the remote control to use the VC
.
ess
C
A
]
ote control.
ypygg pg
ess
]
to tu
ess
eatures as described
.
:
.
en pressBto go to next step
r
Repeat the procedure in steps 5 and 6 to set the end time.
NE TIME PROGRAM
GRAM NUMBER 1
PR
CHANNEL – –
REC SPEED – –
ress
1
SUBTITLE/T-SET]to set timer standby mode.
TIMER indicator on the front panel lights up. The unit will
ange to the DVD mode
n
To go back one step, press s
uring steps 3 to 9
en pressBto go to next step
•
f you have connected the unit to a cable box or satellite box
s the connection on page 6, select the VCR to channel 3 or
4 (the RF out
hannel at the
satellite box on for Timer Recordin
Select the desired recording speed, then press
CLEAR/C.RESET
• To set another program after step 9, press B
Then, continue with ste
ut channel of the VCR).Then, select the desired
LEA
2.
NE TIME PROGRAM
PROGRAM NUMBER 1
DATE 1 0 / 0 5 M
TART TIME 0 7 : 3 0 PM
END TIME 0 8 : 3 0 PM
HANNEL 1 6
REC SPEED – –
llite box. Leave the
NE TIME PROGRAM
PROGRAM NUMBER 1
DATE 1 0 / 0 5 MON
TART TIME 0 7 : 3 0 PM
END TIME 0 8 : 3 0 PM
HANNEL 1
REC SPEED SP
P
SLP
1) Press
SUBTITLE/T-SET] then, [VCR] on the rem
2) Select main menu by pressing [MENU
) Select “TIMER PROGRAMMING” by using
) Select the program number which you want to check by
sing
The details of the program you selected will
ppear on the TV screen
• Go to the digit you want to change by using
r
nter correct numbers by using
• You may cancel the entire program by pressing swhile
e program number blinks
Press
6) Press
CLEAR/C.RESET] to exit
SUBTITLE/T-SET] to return to timer standby mode
To cancel a Timer Recording in progres
Pr
STOP/EJECT
on the uni
, then press
. Then,
ints for OTR and Timer Recordin
To Check, Correct or Cancel a Timer Program
Press [VCR] on the remote control before you set Timer Recording. Make sure the remote control is in the VCR mode, then
press [SUBTITLE/T-SET
• If a tape is not in the unit or does not have the record tab, TIMER indicator on the front panel blinks and Timer Recording cannot be
performed. Please insert a recordable tape
• When Timer Recordings are set, TIMER indicator on the front panel lights up. To use the VCR as usual until the time for the recording,
SUBTITLE/T-SET] so thatTIMER indicator light turns off. Press
VCR/TV] to choose the VCR position. Select either VCR or DVD
mode, then continue with the other features as described in this manual.
ter an OTR or a Timer Recording has been set, this unit operates as follows:
• If a tape runs out before an OTR or a Timer Recording is finished, the unit ejects the tape. Press
control or
• Once the unit turns to the timer standby mode, no VCR functions are available until
• To cancel the timer stan
STOP/EJECT
on the unit, then press
mode, press
SUBTITLE/T-SET
VCR]to activate the VCR function again.
SUBTITLE/T-SET] is pressed.
r
STOP/EJECT
[VCR] to activate the VCR function again
• The mode of the unit and the remote control may differ (VCR mode or DVD mode) when you set Timer Recording or after you canceled Timer Recording. Press
VCR] orDVD] on the remote control to select your desired mode before you operate
SUBTITLE/T-SET] on
on the unit, then press
When an OTR or a Timer Recording is completed..
• If Auto Power Off for DVD has been activated and there are Timer Recordings on standby, the unit turns off automatically, and TIMER
indicator on the front panel lights to indicate the unit is in the timer standby mode.
• TIMER indicator on the front panel flashes if there are no more Timer Recordings on standby.
• If A
ff for DVD has N
ll the DVD functions are available during OTR, timer standby mode and Timer Recording
• Pr
STOP/EJECT
• Pr
SOURCE]on the front panel or
standby mode, press
on the front panel or
on the front panel or
STOP/EJECT
VCR] on the rem
SUBTITLE/T-SET
R when the unit is off
VCR]on the remote control to use the VCR when the unit is on. In case Timer Recording is in
on the front panel or
SUBTITLE/T-SET] on the remote control, and then press
SOURCE
If you want to use the DVD player during a Timer Recording or while TIMER indicator on the front panel is on or blinking.
• Pr
STANDBY-ON
DVD f
OTE (for Timer Recording)
• If there is a power failure or the unit is unplugged for more than 30 seconds, clock and all timer settings will be lost
rn on the unit. Pr
in this manual
DVD]on the remote control to choose DVD mode, then continue with the other
ons
CR Funct
13
Page 14

14
V
u
io
W
DIGITAL
AUDIO OUT
COAXIAL
ANT-OUT
ANT-IN
AUDIO
OUT
DVD DVD/VCR VCR
S-VIDEO
OUT
COMPONENT
VIDEO OUT
AUDIO OUT
VIDEO OUT
AUDIO IN
VIDEO IN
L
Y
C
B
C
R
L
R
ANT-OUT
ANT-IN
VCRDVD/VCR
COMPONENT
VIDEO OUT
AUDIO IN
VIDEO IN
AUDIO OUT
VIDEO OUT
Y
C
B
C
R
L
R
R
AUDIO OUT
VIDEO OUT
Connect
1
Audio/Video cables
(commercially available)
RF cable
(supplied)
(Back of TV)
(Back of DVD/VCR*)
(Back of another source)
or
2
Connect
*Front input jacks are also available
.
g.
.
.
ote
K/L
t.
ote
K/L
t.
C
A
d-
t
ff
.
audio cables are not recommended.
h
o
est memo
)
Copying a Video Tap
e
arning: Unauthorized recordings of copyrighted video tapes may be an infringement of copyright laws.
1) Insert a pre-recorded tape into another VCR for playing
) Insert a tape with its record tab into this unit for recordin
3) Press
SPEED] on the remote control of the recording unit to
select the desired recording speed (SP/SLP)
4) Select the “L1” or “L2” position on the recording unit
• To use the input jacks on the back of this unit, select “L1”
position by pressing [0], [0], [1] on the rem
ntrol or
CHANNEL
on this uni
• To use the input jacks on the front of this unit, select “L2”
position by pressing [0], [0], [2]
ntrol or
CHANNEL
5) Press
RECORD]on the recording unit.
n the rem
on this uni
6) Begin playback of the tape in another source.
7) To stop recording, press
STOP/EJECT
ing unit, then stop playback of the tape in another source.
CR F
nct
ns
on the recor
Hin
• For best results during dubbing, use the front panel controls whenever
possible. The remote control might a
• Always use video-quality shielded cables with RCA-type connectors.
ndard
• You can use a video disc player, satellite receiver or other audio/video
component wit
• “L1”
r “L2” is found below the low
Audio / Video outputs.
Example: CH02
• “L2” input jacks are on the front of this unit.
ect another source’s operation
rized channel.
Page 15

i
s
STANDBY-ON
DISPLAY VCR DVD PAUSE
SLOW
VCR/TV
SKIP/CH.
PLAY
STOP
OPEN/CLOSE
/EJECT
SPEED AUDIO
123
456
789
0
+10
DVD Function
s
.
y
h
DVD
t
y
t.
.
y
y
.
4
3
PLAYDISC IN
DVDVCR
OPEN/CLOSESTANDBY-ON
POWER ON
AUDIO
REC
RECORDF.FWDREW STOP/EJECT
TIMER REC
IR
CHANNEL SOURCE PREV STOP PLAY NEXT
VIDEO
REC
RECORD
TIMER REC
PLAY
TIP
)
Press
]
to tu
e
2
ess
a
3
ess
.
4
ess
.
2
.
e
DVD
TV screen. Press
e
DVD
g
or
h
layback
B
k
py p y
DVD
k.
T
B
DVD
s
T
B
t
d
.
f
)
DVD
g
h
.
B
1
E
1
f
)
t
f
.
Press 'PLAY' to play from here.
To play the beginning,
press 'STOP' first and then 'PLAY'.
Resume ON
t
.
.
t
.
.
t
scs.
h
g
oom
DVD
x2 x4
s
/
.
.
u
DVD
K/L
/s/
B
B
).
k
gp g y
DVD
.
.
2
T
D
/
t
DVD
.
.
3
4
2
Operations described in this section are mainly based on the remote control use. Some operations can be carried out on main unit
Before: Turn on the TV, amplifier and any
er equipment which are connected to this
ot
unit. Make sure the TV and audio receiver
(commercially available) are set to the correct
channel.
ights up when power is on
STANDBY-ON
VD/CD Player.
Pr
OPEN/CLOSE A and insert
disc with label facing up.
Pr
PLAY B to start playback
Pr
STOPC to stop playback
rn on th
in
• A “prohibited icon” may appear at the top-right on the TV
screen when the operation is prohibited b
ni
• Some DVDs may start playback from title 2 or 3 due to specific programs
• During the playback of a two-layered disc, pictures may stop for a
moment. This happens while the 1st la
er. This is not a malfunction
2nd la
the disc or this
er is being switched to the
VD men
playback. Use
ENTER] (or
PLAY
to select an item, then press
Calling Up a Menu Screen during Playbac
MENU]to call up the DVD menu
Press
TOP MENU] to call up the title menu
Hin
Menu operations may vary depending on the disc. Refer to the manual
accompanying the disc
esum
ress
STOP Curing playback.
Resume message will appear on the
will resume from the point at which
playback was stopped.
or more details
PLAY B, playback
Hin
To cancel resume, press
The resume information will be kept even when unit is in standby mode
aused and Step-by-Step Playbac
STOPC one more time in the stop mode
You can change the On-Screen language in “PLAYER MENU” setting.
(Refer to page 20.
Fast Forward / Reverse Search
or
repeatedly during playback
to select the required forward or reverse speed
To continue playback, press
PLAY
Hin
For DVDs, fast forward or reverse search speed is different depending
n the disc. Approximate speed is 1(x2), 2(x8), 3(x20), 4(x50), 5(x100)
For Audio CDs, approximate speed is 1(x2), 2(x8), 3(x30)
Slow Forward Revers
mode to select the required forward speed.
To continue p
repeatedly in the pause
, press
PLAY
Hin
Slow forward speed is different depending on the disc.
Approximate spee
Set “STILL MODE” to “FIELD” in the DISPLAY menu if pictures in the slow
playback mode are blurred. (Re
Z
ZOOM] repeatedly during playback to select the
required zoom factor: x2, x4 or OFF.
is 1(1/16), 2(1/8) and 3(1/2)
er to pages 20-21.
on
DVD Funct
ress
PAUSE Furing playbac
o continue playback, press
PLAY
ressed in the pause mode.
o continue playback, press
Set “STILL MODE” to “FIELD” in the DISPLAY menu if pictures in the
pause mode are blurred. (Re
o use
PREVH / E, [NEXT
Press once to skip chapters or tracks to a desired point
Press and hold to change forward or reverse playback speed
PLAY
er to pages 20-21.
G on this uni
PAUSEF i
2) UseK / L /
3) To exit zoom function, press
B to slide the zoomed picture across the screen
ZOOM]repeatedly to select O
F
Hin
Zooming function does not work while the disc menu is displayed.
x4 zoom is not available on some di
The picture may be distorted when you press
repeatedly in the zoom mode.
In the zoom mode, it automatically changes x2 (x4) to the zoomed
15
position
uide.
PAUSEF or
Page 16

6
D
u
io
Search Function
s
t
time of the title or trac
ess tha
utes.
.
h
DVD
h
DVD
DVD
/29
SEARCH
MODE
2
seconds
/29
123
456
789
0
+10
.
]
f
]
,
track number.
-
]
f
]
,
]
,
]
,
]
,
.
PLAY
TR 1 TR 2 TR 3 TR 4
Current Track
SKIP
SKIP
/
K
,
H
/
L
]
t
h
.
/12
ess
.
ess
search.
SEARCH
MODE
PLAY
2
seconds
/12
123
456
789
0
+10
/
K
,
H
/
L
]
t
f
b
.
PLAY
CH 1 CH 2 CH 3 CH 4
Current Chapter
SKIP
SKIP
or
TT 1 TT2 TT3 TT4
Current Title
(TT)
SKIP
SKIP
1:29:00
TOTAL
PLAY
SEARCH
MODE
wit
seconds
1:29:00
TOTAL
123
456
789
0
p
DVD
T
e
.
PLAY
SEARCH
MODE
h
2
ENTER
3
ENTER
ENTER
ENTER
r
SEARCH
MODE
.
2
ENTER
3
ENTER
ENTER
ENTER
.
een
RETURN
ess
]
t
set a marke
etu
ate
]
th
.
SEARCH MODE does not work during Programmed or Random Playback.
sing Track Searc
erations described in this manual are
mainly based on the remote control.
within 30
• For the disc with less than 10 tracks, press the track number
irectly
• For discs with more than 10 but less than 99 tracks, to play
singledigit track, press
track 3, press
0
0
irst, then the track number (e.g. for
3]). To play a double-digit track, press the
• For discs with more than 100 tracks, to play a single or a double
igit track, press
, press
0
0
irst, then the track number (e.g. for track
0
3], and for track 26, press
0
2
6]). To play a
triple-digit track, press the track number
Using [SKIP/CH.G/
SKIP/CH.
SKIP/CH.
Hin
+10]can also bring the Track search display, except for the disc with
ess than 10 tracks. For such a disc, track search can be done by just
pressing t
e track number
Using Time Searc
SEARCH MODE]repeatedly until the Time Searc
isplay appears.
hin 30
in
When there is no need to enter a number, “0” appears automatically.
or example, “0: 0_: _ _” appears in the Time Search display if the total
Press
CLEAR/C.RESET] to erase the incorrect input at step 2
k is l
n 10 min
Marker Setu
his feature allows you to assign a specific point on a disc to b
called back later
To set a marker
ress
SEARCH MODE] repeatedly until the marker display
.
sing Title / Chapter Search
VD F
nct
Pr
ns
Using [SKIP/CH.G/
Hin
Depending on the disc being played, this function can also be
per
num
ormed by directly entering the desired chapter number with the
SEARCH MODE] once for the chapter search
r
SEARCH MODE] twice for the title
within 30
SKIP/CH.SKIP/CH.
er buttons. Refer to the manual accompanying the disc
To return to the marker late
SEARCH MODE]repeatedly until the marker display
appears
ress
ENTER] at the desired marker
To exit the marker scr
Pr
RETURN
in
The Marker display will disappear in about 30 seconds when there is no output.
To clear a marker, select the marker to be cleared at step 2 in the
ion “To
ress
CLEAR/C.RESET
Opening the disc tray or turning off the power will erase all markers.
Selecting “AC” at step 2 in the section “To set a marker” or “To return to
e marker later” will also erase all markers
1
r” or “To r
rn to the marker l
r” and then
Page 17

17
i
s
py
You can check the information about the current disc by pressing
the remote control.
DVD
DVD
11/16 0:00:00 - 0:03:30
1/3 0:00:00 - 1:23:45
TL1
2
4
3
TR(
4/12 0:13:45 - 0:45:40
4/12 0:03:21 - 0:02:15
T
T
c
s
track
2
3
y
active.
t
t
A
t
:
s
l
.
r
e
e
T
:
:
The amount of audio and
deo
wh
.
t
T
t
A
t
:
s
t
2
s
track
DISPLAY] on
DISPLAY
DISPLAY
DISPLAY
CH(Chapter)
Current chapter number / Total chapter
emaining time of the current chapter
urrent playback statu
Angle icon appears only in a case
mu
ti-angel is available on the DVD
lapsed time of the current chapte
T(Title)
urrent title number / Total titles
emaining time of the current titl
lapsed time of the current titl
IT RATE
ata currently being read
ayer numbers appears only when
aying a two-layered disc.
0: Layer 0 is playing
1: Layer 1 is playing
urrent repeat setting appears only
en the repeat setting is active
: Chapter repea
: Title repea
: A-B repea
vi
Track):
urrent track number / Total tracks
emaining time of the current
Current playback statu
DISPLAY
DISPLAY
Elapsed time of the current
ALL
Current track number / Total track
emaining time of the entire disc
urrent repeat setting appears
onl
when the repeat setting
T: Track repea
A: All Tracks repea
: A-B repea
lapsed time of the entire dis
in
PROGRAM (or RANDOM) will be displayed instead of
on
DVD Funct
Page 18

8
D
u
io
2
2
ess
ode.ress
.
pgy
O
C
R
TITLE
)
)
.
epeat Playbac
k
DVD
k.
k
DVD
k
DVD
Y
h
REPEAT
ALL
f
)
)
A-B
A-B
CHAPTER
A-
A-B
2
K
/
]
3
PLAY
CD-DA TOTAL 0:45:55
RANDOM PROGRAM
--no indication--
RANDOM
k
DVD
MODE
CD-DA TOTAL 0:00:00
t
t
wh
t
k.
d
k.
t
p
T
.
d
k.
p
.
t
ess
t
.
;
ess
C
and
t
y
)
ess
C
twice and
t
y
w
g
’’
k.
k.
t
at
.
does not wo
p
.
PLAY
PLAY
MODE
.
G
/
K
,
H
/
L
to see all the tracks.
CD-DA TOTAL 1:03:30
2/3
1 3:30
5 5:10
10 4:20
11 3:00
12 3:20
17 4:10
22 2:50
>
ENTER
ENTER
ENTER
PLAY
PLAY
or
epeat A-B Playbac
Programmed Playbac
epeat function is available only during
playbac
<Example : DVD
Each time you press
REPEAT], repeat
function changes as example below
FF
HAPTE
FF
TRACK
re
urrent chapter
(repeat
current track repeat
Hin
Repeat setting (except “ALL”) will be cleared
en moving to another title, chapter or
rac
Repeat playback may not function with
iscs or during repeat A-B playbac
some
VD F
nct
ns
eat
ff)
epeat
rrent titlerepeat
f
ntire discepeat)
at your desired starting point (A)
at your desired ending point (B)
• Point B should be in the same title or
rack as point A.
in
• To exit the sequence, press
• To cancel Point A, press
step 1
• This function
eat modes
re
andom Playbac
This function shuffles the playing order
of chapters or tracks instead of play-
ack in sequence.
Pr
[MODE] twice duringstop
m
A-B]so that OFF
CLEAR/C.RESET]
rk in the other
n
• To repeat the current track in the random
selections,
• To repeat the entire random selections,
appears
• During random playback, you cannot go
back to the
ress
RACK” appears during playback
REPEAT]repeatedly until “ ALL”
REPEAT]repeatedly until
uring playbac
revious track
ou may determine the order in whic
chapters or tracks will play.
MODE]
se
nce during stop mode
L to select desired track. Press
ENTER
• Up to 99 tracks can be ordered
• If eight or more tracks were in a
rogram, use
SKIP/CH.
in
Pr
CLEAR/C.RESET] at step 2 to erase
he most recently entered track
To erase all programs at once, select
ALL CLEAR’’ and press
While a program is being played back,
STOPCworks as follows
Pr
STOP
hat the programmed playback restarts.
back restarts from the current
(CD pla
oint.
Pr
STOP
o that playback restarts from the first
rack in the original order. However, your
programmed pla
hen you follow the above steps. (Your
rams are still stored until either the
pro
isc is removed or the power is turned off.)
To repeat the current track in the program,
REPEAT]repeatedly until “ TRACK
ppears during playbac
To repeat the entire program,
ress
REPEAT]repeatedly until “ ALL’’
ppears during playbac
ENTER]at step 2.
PLAYB next, so
[PLAYB] next,
back can be restarted
1
Page 19

i
s
Special Settin
gs
pg
Aud
e
DVD
-
k.
1. ENG Dolby D 5.1ch 48k/3
]
, th
Sound Mode
DVD
k.
STEREO
]
,
e
DVD
Th
-
t
.
1. ENG/6
)
G
)
]
,
.
OFF
d
DVD
y
2
.
1
t
t
)
3
MODE
F
2
OFF
ENTER
t
y
)
b
.
-
y
g
)
f
f
.
ess twice.
)
t
ly
tual Surround
ective
e
Stereo Sound Mode”.
f
l
l
.
PLAY
PLAY
PLAY
PLAY
RETURN
PLAY
t
g
y
ls.
d
.
guag
guag
g
)
)
)
)
)
ENTER
ENTER
ENTER
1. ENG/6
SUBTITLE
T-SET
SUBTITLE
T-SET
s
DVD
y
scenes
)
1/8
ANGLE
ON
g
DVD
.
2
OFF
.
.
3
RETURN
PLAY
PLAY
MODE
ENTER
ENTER
ENTER
Subtitle Languag
is unit allows you to select a subti
le language (if available) during DVD
layback
Each time you press
SUBTITLE/T-SET
subtitle language changes as example
w
FF
no subtitles
EN
English subtitles)
French subtitles
To set subtitle ON/OF
Hin
If your language is not shown after pressing
SUBTITLE/T-SET] several times, the disc
not have that language. However, some
ma
discs have the subtitle language setting on
the disc menu. (Operation varies depending
n the disc, so refer to the manual along
with the disc.
When “ NOT AVAILABLE ” appears on the TV screen,
it means no su
If you choose a language that has a three
etter-language code, the code will be
displa
anguage setting. If you choose any other
anguages, ‘---’ will be displayed instead.
(Refer to pa
Some discs will only allow you to change
the subtitle
manual accompanying the discs
title is recorded on the scene
ed every time you change the subtitle
e 24.
rom the disc menu. Refer to the
or details
io Languag
anguage (if multiple languages are avail
able on disc) during DVD playbac
AUDIO
Each time you press
AUDIO
anguage changes as example below.
NG
English audio)
PA
Spanish audio)
French audio
Hin
• Some discs will only allow you to change
the audio settin
to the manual accompan
i
• When “OFF” appears on the TV screen, it
means au
• If your language is not shown after pressing
AUDIO] several times, the disc may not have
that lan
audio lan
Operation varies depending on the disc, so
refer to the manual alon
amera Angle
Some DVD discs ma
ntain
been shot simultaneously
from various angles.Y can
change the camera angle if the icon
appears on the screen. If the “AN
ICON” setting is “OFF” in the OTHERS
menu, the icon will not appear. (Refer
to pages 20-22.
ack Level Settin
Adjust the Black Level Setting to make the
dark areas of the TV picture brighter
ON: Makes the dark areas brighter
OFF: Shows the original picture as recorded
from the disc menu. Refer
io language is not available
e. However, some disc allow
e setting on the disc menu.
with the disc.
which have
e audio
ing the discs for
LE
reo
This unit allows you to select a sound
mode during CD playbac
AUDIO
ach time you press
AUDIO
sound
ode changes as example below.
TEREO
right and left channels
re active
-ch
-ch
left channel is active
right channel is active
Virtual Surroun
You can enjoy stereophonic virtual world on
our existing 2 channel stereo system.
r
once for CD
ress
ENTER] for the desired effect
: Natural effec
: Emphasized effec
FF: No effects (original sound
Hin
For CD play back on
• Vir
sound mode is set to something other than
TEREO. Refer to “
• When playing back 96kHz with Virtual
Surround
samp
audio
will not be eff
unction, the sound will be down
ing at 48kHz and output as digita
if th
on
DVD Funct
19
Page 20

20
D
u
io
2
l
.
p
p
DVD
ENTER
ENTER
ENTER
t
with some discs.
f
f
d.
]
g
4
the desired item.
To exit the menu
5
guag
*2
(
)
.
SU
)
.
(
)
u.
P
(
)
y.
ENTER
ENTER
ENTER
SETUP
2
the desired item.
ess
.
SETUP
QUICK
CUSTOM
INITIALIZE
SETUP
STOP
SETUP QUICK
PLAYER MENU
TV ASPECT
DOLBY DIGITAL
ENGLISH
4:3 LETTER BOX
BITSTREAM
u
y.
ENTER
ENTER
ENTER
AUDIO
ORIGINAL
ENGLISH
FRENCH
SUBTITLE
OFF
ENGLISH
FRENCH
DISC MENU
ENGLISH
FRENCH
SPANISH
PLAYER MENU
ENGLISH
FRANÇAIS
ESPAÑOL
u
A
S
SETUP LANGUAGE
AUDIO
SUBTITLE
DISC MENU
PLAYER MENU
ORIGINAL
OFF
ENGLISH
ENGLISH
ENTER
ENTER
ENTER
3
ect the desired item.
.
SETUP CUSTOM
LANGUAGE
DISPLAY
AUDIO
PARENTAL
OTHERS
ENTER
ENTER
ENTER
u
SETUP
STOP
SETUP OTHERS
ANGLE ICON
AUTO POWER OFFONON
SETUP AUDIO
DRC
DOWN SAMPLING
DOLBY DIGITAL
ON
ON
BITSTREAM
SETUP DISPLAY
TV ASPECT
STILL MODE
4:3 LETTER BOX
AUTO
.
.
U>
u
u
SETUP LANGUAGE
AUDIO
SUBTITLE
DISC MENU
PLAYER MENU
ORIGINAL
OFF
ENGLISH
ENGLISH
u
0
A
1pag
2
SETUP PARENTAL
PASSWORD
Please enter a 4-digit password.
u
2
SETUP
QUICK
CUSTOM
INITIALIZE
SETUP
QUICK
CUSTOM
INITIALIZE
oro
ENTER
ENTER
ENTER
oror
or
>
.
DVD Setu
UICK SETUP Men
You can select the “PLAYER MENU”, “TV ASPECT” or “DOLBY DIGITAL” from the QUICK SETUP menu quickl
r
SETUP] in the stop mode
VD F
ETUP MENU
onfirm that “QUICK” is selected
• Refer to the sections “PLAYER MENU”, “TV ASPECT”
r “DOLBY DIGITAL” section on page 20 or 21.
TOM Men
You can change the settings of the unit
QUICK
on pages 20-21 indicates DVD Setup menus also accessible from the QUICK SETUP menu
Se
ress
SETUP]in the stop mode
<SETUP MEN
LANGUAGE men
DISPLAY menu
ect “CUSTOM”
AUDIO men
r
ARENTAL men
20
tep 5
21Step 5
21Step 5
l
THERS men
nct
ns
age 2
ANGUAGE Settin
LANGUAGE men
page 21
Select the desired lan
AUDIO: *1
Default: ORIGINAL
Sets the audio language
BTITLE:
(Default: OFF
Sets the subtitle language
DISC MENU:
Default: ENGLISH
Sets the language for DVD
n
LAYER MENU:
Default: ENGLISH
Sets the language for the
n-screen displa
QUICK
page 2
age 2
e.
e 2
Hin
Language options are not available
If OTHER is selected on the AUDIO,
UBTITLE or DISC MENU screen, press
our-digit number to enter the code
or the desired language. (Refer to the
anguage code list on page 24.)
Only the languages supported by the
isc can be selecte
anguage Setting for Audio and Subtitle
re not available with some discs. Then
AUDIO]and
etails are on page 19.
SUBTITLE/T-SET
Page 21

21
i
s
ISPLAY Settin
g
.
g
.
4
ect the desired item
SETUP AUDIO
DRC
DOWN SAMPLING
DOLBY DIGITAL
ON
ON
BITSTREAM
5
t
T
:
h
d
.
f
d
d.
ect
ected to this unit.
:
l
acteristics of the
)
h
ll
d.
y
.
f
f
f
ode due to the
date
acteristics.
the desired item.
u
:
)
.
TV ASPECT
4:3
LETTER BOX
4:3
PAN & SCAN
16:9
WIDE
TV ASPECT
4:3 LETTER BOX
STILL MODE
AUTO
:
)
.
TV ASPECT
4:3 LETTER BOX
STILL MODE
AUTO
STILL MODE
AUTO
FIELD
FRAME
5
:
)
)
.
.
.
DRC ON
DOWN SAMPLING
ON
DOLBY DIGITAL BITSTREAM
OFF
ON
BITSTREAM
ENTER
ENTER
ENTER
:
)
.
.
DRC ON
DOWN SAMPLING
ON
DOLBY DIGITAL BITSTREAM
ON
ON
PCM
DRC ON
DOWN SAMPLING
ON
DOLBY DIGITAL BITSTREAM
ON
OFF
BITSTREAM
t
C:
format.
:
wh
t
ll
-
”.
ecorded
.
SETUP DISPLAY
TV ASPECT
STILL MODE
4:3 LETTER BOX
AUTO
ENTER
ENTER
ENTER
ENTER
ENTER
ENTER
ENTERENTERENTER
or
or
u
SETUP
ENTER
ENTER
ENTER
ENTER
ENTER
ENTER
ENTER
ENTER
ENTER
the
desired
.
or
ect the
desired
g.
o
o exit the menu
SETUP
You can change the display functions. Follow steps 1 to 3 in the “CUSTOM Menu” section on page 20
TV ASPECT
(Default: 4:3 LETTER BOX
See Hint on the right
QUICK
setting
T
Hin
V ASPECT
DISPLAY men
TILL MODE
(Default: AUTO
See Hint on the right
l
settin
r
Select “4:3 LETTER BOX”, so
at black bars may
t
ppear on the top an
m of the screen
Select “4:3 PAN & SCAN” for a
ull height picture with both
es adjuste
si
l
“16:9 WIDE” if a wide-screen TV
conn
TILL MODE
Select “AUTO” usually.
If you select “AUTO”,
utomatically select the best
ution setting (FRAME
reso
r FIELD) based on the
char
pictures. (default
If you select “FIELD”, the
picture in t
e stabilize
e still mode wi
If you select “FRAME”, the
icture in the still mode will
defined
be highl
An individual picture on TV
screen is called a “
which consists o
rate images called as “
rame”,
two sepa-
ield”.
Some pictures may be blurred
f you select “AUTO” in the
ill m
ir
har
AUDIO Settin
hoose the appropriate audio settings for your equipment. It only affects during the playback of DVD discs. Follow steps 1 to 3 in the
CUSTOM Menu” section on page 20
l
DRC (Dynamic Range Control)
(Default: ON
Set to “ON” to compress the range between soft and loud sounds.
To exit the men
Hin
AUDIO menu
DOWN SAMPLING
Default: ON
Set to “ON” when outputting in 48kHz
Set to “OFF” when outputting the original sound
DOLBY DIGITAL:
QUICK
Default: BITSTREAM
et to “BITSTREAM” when the unit is connected to a Dolby Digital
ecoder
• BITSTREAM: outputs a Dolby Digital Signals
• PCM: converts the Dolby Digital into PCM (2 channel)
R
This function is available
nly on the discs which are
ecorded in the Dolby Digital
WN SAMPLING
When playing back a 96kHz
isc with the
opyright protection, or
en Virtual Surround is set
o “1” or “2”, the sound wi
e down sampled at 48kHz
nd output as digital audio
ven if the “DOWN SAM
LING” is set to “OFF
This function is available only
n digital outputting of a
isc r
in 96kHz
on
DVD Funct
Page 22

22
D
u
io
S
d.
.
.
.
TIPS FO
S
.
d
e
n
y
f
.
4
d.
4
.
t
y
.
]
,7],
]
,
y
p
w
d
to
.
SETUP PARENTAL
PASSWORD
Enter current password.
SETUP PARENTAL
PASSWORD
Please enter a 4-digit password.
5
l
”.
PARENTAL Settin
g
.
tal Levels
s
Y
ENTER
ENTER
ENTER
ENTER
ENTER
ENTER
u
PASSWORD CHANGE
PARENTAL LEVEL ALL
u
SETUP
ect the desired level.
PARENTAL LEVEL
ALL
8 [ADULT]
7 [NC-17]
6 [R]
5
ect
.
PASSWORD CHANGE
PARENTAL LEVEL ALL
To exit the menu
SETUP PARENTAL
PASSWORD
Enter current password.
SETUP PARENTAL
PASSWORD
Please enter a 4-digit password.
u
5
g
.
4
ect the desired item.
u
To exit the menu
:
)
l
k.
:
)
.
ANGLE ICON ON
AUTO POWER OFF
ON
ON
OFF
ANGLE ICON ON
AUTO POWER OFF
ON
OFF
ON
SETUP OTHERS
ANGLE ICON
AUTO POWER OFF
ON
ON
.
ENTER
ENTER
ENTER
123
456
789
0
ENTER
ENTER
ENTER
ENTER
ENTER
ENTER
SETUP
SETUP
ENTER
ENTER
ENTER
ENTERENTERENTER
123
456
789
0
123
456
789
0
t
h
.
ororor
o
arental Control limits the disc viewing that exceed your settings. (An incorrect password will not be acceptable.)
This feature prevents your children from viewing inappropriate materials
Paren
arental Level allows you to set the rating levels of your DVD discs. Playback will stop if the ratings exceed the levels you set. Follow
steps 1 to 3 in the “CUSTOM Menu” section on page 20.
Se
Enter your desired four-digit
asswor
ect “PARENTAL
EVEL
l
To exit the men
ARENTAL men
If you have set a password
already, enter the current
four-digit password
NTROL LEVEL
ALL: All parental locks are cancelle
Level 8: DVD softwares of any grades (adult/general/children) can be played back
Levels 7 to 2:
Level 1: Only DVD softwares intended for children can be played back, with those
R LEVEL
8 [ADULT]: DVD softwares of any grades (adult/general/children) can be played back
7 [NC-17]: No one under 17 admitted
6 [R]: Restricted; under 17 requires accompanying parent or adult guardian
5 [PGR]: Parental Guidance Recommended
4 [PG13]: Unsuitable for children under 13
3 [PG]: Parental Guidance suggeste
2 [G]: General Audienc
1 [KID SAFE]: Suitable for childre
Only DVD softwares intended for general use and children can be played back
intended for adult and general use prohibited
n
• DVD-Video discs may not respond to the parental lock settings. Make sure this function works
your DVD-Video discs
wit
To Change the Password for Parental Control
ou can change your password for parental controls. Follow steps 1 to 3 in the “CUSTOM Menu” section on page 20.
Enter
Enter current four-digit
assword
HANGE”
l
“PASSWORD
our new
our-digit password
(except for 4737)
VD F
nct
ARENTAL men
ns
Hin
Record the password
ou forget it
in case
you forget the password,
ress [4
[3
7]at
step 4, then enter
new
ill be cleared an
parental levels will be set
“ALL”
our
assword. Password
You can change the other functions. Follow steps 1 to 3 in the “CUSTOM Menu” section on page 20
THERS Settin
l
THERS men
ANGLE ICON
(Default: ON
Set to “ON” to show the angle icon when multiple camera
ang
r
es are available during DVD playbac
AUTO POWER OFF
(Default: ON
Set to “ON” to turn this unit off automatically after 30 minutes of no use
Page 23

f
n
T
de
g
.
.
.
on
t
.
2
.
3
.
ess
.
Reset to the Default Setting (Except for PARENTAL Settin
g)
SETUP
QUICK
CUSTOM
INITIALIZE
SETUP INITIALIZE
Initialize?
NO
YES
>
SETUP
the
ess
twice.
SETUP
QUICK
CUSTOM
INITIALIZE
SETUP
STOP
ENTER
ENTER
ENTER
ENTER
ENTER
ENTER
D
/
C
M
.
.
.
T
h
l.
.
l.
.
.
]
, which
l.
f
.
.
.
VC
T
.
.
]
.
C
.
.
s
[
.
L/K
G
/
K
,
H
/
L
ote control.
aud
.
.
.
.
.
.
lly.
.
]
]
f
pe.
.
.
.
D
D
.
y
.
ess
.
d.
sc.
sc.
.
.
d.
y.
.
.
.
t
.
.
.
.
.
.
A
.
.
.
h
d.
.
.
A
b
d.
.
.
th
p
.
.
.
or
or
r
SETUP]in the stop
mode
<SETUP MENU
“INITIALIZE”
“YES”
r
To exit
n
When you cancel to
nitialize at step 3,
“NO”
nformati
roubleshooting Gui
If this unit does not perform properly when operated as instructed in this Owner's Manual, check this unit consulting the following checklist
PROBLE
No power
VD
his unit does not respond to
e remote contro
t
V
R
oor picture or noise
imer recording is impossible
annot go into record mode
layback picture is partially
oisy.
Cannot view a tape but the
io is OK
R
o or poor, playback picture
TV programs cannot be seen
norma
Video or color fades in and
out when making a copy o
video ta
Cannot remove the tape
o picture
isc cannot be playe
o soun
o DTS audio is outpu
V
istorted picture
udio or subtitle language
oes not match the setup
The camera angle cannot be
c
ange
udio or subtitle language
e change
cannot
“Prohibited icon” appears on
e screen, prohibiting an
o
eration
• Make sure the power plug is connected to an AC outlet
• Make sure the power is turned on
• Check if the power plug is connected to an AC outlet
• Check the batteries in the remote contro
• Aim the remote control directly at the remote sensor. If necessary, remove all the obstacles between the sensor and the remote control
• You have to be within 23 feet (7m) of this unit
• Check if the right mode is selected. If it’s not in the right mode, press
• Check if a cassette tape is in this unit.
• Tune your radio to an empty AM station so that you hear a lot o
esponse to your pressing buttons on the remote control, the remote control is working
• Interference signal may be received. Change the position and orientation of the unit
• Make sure the Timer Recording is set correctly
• Make sure TIMER REC indicator on the front panel lights up. If not, press
• Make sure the VCR clock is set correctly
• Make sure the tape has a record tab. If needed, cover the hole with adhesive tape
• Activate this unit in VCR mode. Pres
• Adjust tracking control for a better picture by pressing
• Head cleaning may be necessary. Refer to “AUTO HEAD CLEANING”
• Make sure the VCR is not in the Menu mode
• Change the RF output channel to CH4. Then select the same channel on the TV
• Fine tune your TV
• Re-check the ANT-IN and ANT-OUT connections. See the front page and page 6
• Press
VCR
• Press
VCR] on the remote control to activate it in the VCR mode. Check if the VCR OUTPUT light is lit, then set it to the TV position by pressing
• You cannot copy a copyrighted video tape. You are experiencing copy guard protection
a
• Check if this unit is in the VCR mode. If not, press
• Connect the video cable rmly.
• Insert a correct video disc that pla
• Pr
DVD] on the remote control. Check if the DVD OUTPUT light is lit. Then try other DVD features
• Insert the di
• Clean the di
• Place the disc correctly with the label side up
• Cancel the parental lock or change the control levels
• Handle a disc with special care so that it does not have ngerprints, scratches, or dusts on its surface.
• Connect the audio cable rml
• Turn the power of the audio component on
• Correct the audio output settings
• Correct the input settings on the audio component
• This unit does not support DTS audio
-This is not a malfunction
• Connect this unit directly to the TV
• There are some cases where pictures may be slightly distorted, and those are not a sign of a malfunction
• Although pictures may stop for a moment, this is not a malfunction
• The selected language is not available for audio or subtitles on the DVD
-This is not a malfunction
• The DVD does not contain sequences recorded from di erent camera angles
-This is not a malfunction
• The DVD does not contain audio source or subtitles in the selected language
-This is not a malfunction
• That operation is prohibited by this unit or the disc
-This is not a malfunction
VCR] on the remote control so that the VCR OUTPUT light is lit
VCR] on the remote control to switch the mode
s on this unit
RRECTIVE ACTION
DVD] orVCR
noises. Turn the volume up, then if you hear some signal sound from the radio in
SUBTITLE/T-SET
CHANNEL
on the unit or
ever you need, on the remote contro
SKIP/CH.
n the rem
VCR
ormatio
In
• Some functions are not available in specific modes, but this is not a malfunction. Read the description in this Owner’s Manual for details on correct
operations
• Playback from a desired track and random playback are not available during program playback
• Some functions are prohibited on some discs.
23
Page 24

I
fo
a
o
Specification
s
p
deo Heads :
eads
:
color
source :
%
:
:
)
:
(
)
(
)
(
)
W
:
h
.
.
Y
t
:
:
y.
.
S:
t
w
.
t
.
-
w
.
f
-
f
S.
O
OCCASIO
Y
.
.
:
.
:
S
.
S:
:
ON
0
w
t
5
gg
gg
gg
gg
gg
A-B
8
7
52
6563
59
64
5471
ssamese
65
1
2
7
7
0
uta
5072
854
855
eto
864
3
ese
5971
1
Embodia
5759
7
4
61
oatia
5464
5
7
8
0
1
stonia
5166
H
oese
5261
6
5
4
5271
5358
7
1
8
5758
5360
7
ausa
5447
5569
5455
7
K
5
5560
7
1
7
7
6
7
Javanese
5669
ada
5760
5765
5757
9
1
6460
1
5767
N
aothia
5861
5847
8
0
5866
acedonia
5957
3
5
8
tese
5966
5955
5964
5961
0
6047
1
1
6149
4
9
7
5
5247
8
6
7
aeto-Romance
6459
1
7
6559
3
6547
5350
6564
oatia
6554
6566
6660
6560
6550
5
6565
7
6558
656
5
ese
6567
656
T
Tag
Taj
Ta
6647
Tata
6666
T
Tha
665
Tibeta
T
5
Tong
T
5
T
Tu
6657
T
666
Zkra
6757
676
6772
Vietnamese
6855
V
Wels
Wolo
696
Xhosa
05
Yiddis
5655
Yoruba
67
y
f y
)
Vi
Four H
Output signal format
NTSC
wer
120 V AC +/- 10%, 60 Hz +/- 0.5
ower consumption
18 W (standby: 2.8W)
Language Code List
perating temperature
41°F (5°C) to 104°F (40°C
imensions
W : 17 3/16”
H : 3 3/4”
D : 9 3/16”
435mm
94mm
233mm
eight
Approx 6.0lbs (2.7kg)
• Designs and specifications are subject to
ange without notice
c
• If there is a discrepancy between
languages, the default language will be
English
n
rm
ti
n
Abkhazian 474
Afar 474
Afrikaans 47
Albanian
Amharic 47
Arabic 47
Armenian
A
47
Aymara 477
Azerbaijani 477
Bashkir 484
Basque 516
Bengali;Bangla 486
Bh
ni
Bihari 4
Bislama 4
Br
n 4
Bulgarian [BUL] 485
Burm
Byelorussian 485
lan 494
Chinese [CHI] 725
rsican 49
r
Czech [CZE] 496
Danish [DAN] 504
Dutch [DUT] 605
English [ENG] 516
Esperanto 516
E
Far
Fiji 525
Finnish [FIN] 525
If you choose a Language that has a 3 letter language code, the code will be displa
any other languages, ‘---’ will be displayed instead. (3 letter language code is written in bracket.
-
n
n
n
-
French [FRE] 526
Frisian
Galician
Georgian 574
German [GER] 505
Greek [GRE] 515
Greenlandic
Guarani
Gujarati 536
H
Hebrew
Hindi
Hungarian [HUN] 546
Icelandic [ICE] 556
Indonesian
Interlingua 554
Interlingue 555
Inupiak 555
Irish [IRI] 534
Italian [ITA] 556
Japanese [JPN] 564
Kann
Kashmiri
Kazakh
Kinyarwanda 646
Kirghiz 577
Kirundi
Korean [KOR] 576
Kurdish
L
Latin
Latvian;Lettish 586
Lingala 586
Lithuanian
-
-
n
ed every time you change the Audio or Subtitle language setting on page 19. I
IMITED WARRANT
FUNAI CORP. will repair this product, free of charge in the CANADA in
he event of defect in materials or workmanship as follows
DURATION
PARTS: FUNAI CORP. will provide parts to replace defective parts
LABOR: FUNAI CORP. will provide the labor without charge for a
LIMITS AND EXCLUSION
This warranty is extended only to the original retail purchaser. A purchase receipt or other proof of original retail purchase will be required
This warranty shall not be extended to any other person or
This warranty is void and of no effect if any serial numbers on the prod
uct are altered, replaced, defaced, missing or if service was attempted
by an unauthorized service center. This limited
This product is produced for home use and this warranty only covers
by FUNAI CORP., or damage which results from accident, misuse, abuse,
mishandling, misapplication,
alteration, faulty installation, improper maintenance, commercial use
such as hotel, rental or office use of this product or damage which
results from fire, flood, lightning or other acts of God.
THIS WARRANTY DOES NOT COVER PACKING MATERIALS, ANY
ACCESSORIES (EXCEPT REMOTE CONTROL), ANY COSMETIC PARTS,
FUNAI CORP. AND ITS REPRESENTATIVES OR AGENTS SHALL IN N
EVENT BE LIABLE FOR ANY GENERAL, INDIRECT OR CONSEQUENTIAL
without charge for one (1) year from the date of original retail
purchase. Certain parts are excluded from this warrant
period of ninety (90) days from the date of original retail purchase
ogether with the product to obtain service under this
arranty
ransferee
arranty does not apply to any product not purchased and used in
ANADA
ailures due to defects in material or workmanship which occurs dur
ng normal use. It does not cover damage which occurs in shipment, or
ailures which are caused by repairs, alterations or product not supplied
MPLETE ASSEMBLY PARTS, DEMO OR FLOOR MODEL
24
M
Malagasy 595
Malay 596
Malayalam 595
Mal
Maori
Marathi
Moldavian
Mongolian 596
Nauru
Nepali 605
Norwegian [NOR] 606
Oriya 616
Oromo(Afan) 615
Panjabi 624
Pashto;Pushto 626
Persian
Polish [POL] 625
Portuguese [POR] 626
Rh
Romanian [RUM] 646
Russian [RUS] 646
Sangho 655
Singhalese 655
n
itan
uechua 636
moan
nskrit
Gaelic
rbian
rbo-Cr
ho
wana
hona
indhi
-R
n
iswat
lovak [SLO] 655
lovenian
mali
anish [SPA] 516
ndan
wahili
wedish [SWE] 6568
alog 6658
ik 6653
mil
r
elugu 6651
i
n 4861
igrinya 665
a 6661
songa 666
urkish [TUR] 6664
rkmen
wi
inian
rdu
zbek
olapuk 6861
h 4971
f
7
h
lu 72
-
7161
ou choose
DAMAGES ARISING OUT OF OR
INABILIT
TO USE THIS PRODUCT. THIS WARRANTY IS MADE IN LIEU OF ALL
OTHER WARRANTIES, EXPRESS OR IMPLIED, AND OF ALL OTHER
LIABILITIES ON THE PART OF FUNAI, ALL OTHER WARRANTIES
INCLUDING THE WARRANTY OF MERCHANTABILITY, AND FITNESS FOR
A PARTICULAR PURPOSE, ARE HEREBY DISCLAIMED BY FUNAI AND ITS
REPRESENTATIVES IN CANADA. ALL WARRANTY INSPECTIONS AND
REPAIRS MUST BE PERFORMED BY AN AUTHORIZED SERVICE CENTER
THIS WARRANTY IS VALID WHEN THE UNIT IS CARRIED-IN TO AN
AUTHORIZED SERVICE CENTER
NED BY THE USE OF OR THE
IMPORTANT
THIS LIMITED WARRANTY GIVES YOU SPECIFIC LEGAL RIGHTS. YOU MAY
HAVE OTHER RIGHTS THAT VARY FROM STATE TO STATE. IF, AT ANY
TIME DURING THE WARRANTY PERIOD, YOU ARE UNABLE TO OBTAIN
SATISFACTION WITH THE REPAIR OF THIS PRODUCT, PLEASE CONTACT
FUNAI CORP
ATTENTION
FUNAI CORP. RESERVES THE RIGHT TO MODIFY ANY DESIGN OF THI
PRODUCT WITHOUT PRIOR NOTICE
WARRANTY STATEMENT REGARDING NON AUTHORIZED REPAIR
To obtain warranty service, you must take the product, or deliver the
product freight prepaid, in either its original
packaging or packaging affording an equal degree of protection, to any
AUTHORIZED SERVICE CENTER. FUNAI CORP. will not reimburse you for
any service done by unauthorized service
providers without prior written approval.
To locate your nearest AUTHORIZED SERVICE CENTER
service inquiries, please contact us at
FUNAI SERVICE CORPORATI
Tel :1-800-605-861
r for general
ww.magnavox.com/suppor
2200 Spiegel Drive, Groveport, OH 4312
1
9
4
9
4
1
4
Page 25

he
e
Tu
set it to channel 3.
g
.
2
Th
.
or
STANDBY-ON
uick Use Gui
de
y
.
l
p
,
.
.
e.
.
4.
k.
ections
p
e
g
ol
DVDVCR
SOURCE
STANDBY-ON
DISPLAY VCR DVD PAUSE
SLOW
VCR/TV
SKIP/CH.
PLAY
STOP
RECORD
MENU
SETUP TOP MENU
MODE ZOOM
SUBTITLE
T-SET
ANGLE
ENTER
RETURN
SEARCH
MODE
REPEAT A-B
OPEN/CLOSE
/EJECT
SPEED AUDIO
C
/
C
T
123
456
789
0
+10
PLAYDISC IN
DVDVCR
OPEN/CLOSE
CHANNEL SOURCE PREV STOP PLAY NEXT
DVD PLAYER / VCR CMWD 2206
SOURCE button
DVD SOURCE light
VCR SOURCE light
DVD button
VCR button
VC
ess
)
)
.
G
/
K
,
H
/
L
K/L
)
h
.
es
ess
]
to exit.
k?
t
f
l.
Th
B
t
2
ect the current month.
T
3
y.
Th
B
t
4
.
Th
B
t
5
ect the current hour.
T
ect the current
ute.
T
.
8
To exit the CLOCK S
een
.
o
MENU
orororororor
-
]
C
B
T
CLOCK S
R
–
M
–
CLOCK S
R
–
M
–
CLOCK SET MO
R
9
M
–
CLOCK SET MO
R
9
M
–
CLOCK S
R
9
M
–
CLOCK SET MO
R
9
M
M
B
CT
B
]
S
3
ess
B
1
AUTO S
UP
O
YES
VCR
VCR
2
2
3
1
Please refer to “Basic TV Connection” on the front page before
RF Output Channe
If channel 3 has been already occupied for broadcasting
1) Set your TV to channel 4.
3) Press
4) Press
5) After a few seconds, press and hold
6) Press
2
3
r
nn
ou use this unit
) Insert a pre-recorded tape into this unit
SOURCE] on the unit so that the VCR SOURCE light is
it
If noise appears on the TV screen, press
VCR/TV]on the
remote control.
PLAY B
c
PLAY Bn the unit for
3 seconds
The RF output channel will change to channel 4 from channel
3 and you will see a playback picture.
When a picture does not appear on the TV screen, repeat
step
STOP C to stop playbac
Installing the Batteries for the Remote
ntr
VCR/DVD Switchin
r
to start Auto Set Up.
ET
o you connect the cable from the cable box or the satellite box to the
nit’s ANT-IN jac
N
Y
Pr
MENU
o
lease wait for a few minutes
After scanning...
The tuner stops on the lowest memorized channel.
You can select only the channels memorized in this unit by using
SKIP/CH.
If “AUTO SET UP” appears on the TV screen again, check the cable con-
nections. T
5
en, pressB once again
Clock Setu
ress
MENU]and select “CLOCK SET“.
en press
If the clock is not set, the CLOCK SET screen appears when you
MENU]. In this case, go to step 2
l
hen pressBto go to next step.
(or
CHANNEL
o go to next step.
.
- M E N U
MONTH DAY YEA
1 0 / – – – – –
HOUR MINUTE AM/P
– – : – – –
TIMER PROGRAMMING
AUTO REPEAT [OFF
HANNEL SET UP
CLOCK SE
LANGUAGE SELECT
ET
CH 0
r
VCR]n the remote control. (Verify that the VCR SOURCE
R MODE
ight is lit.
ress
DVD] on the remote control. (Verify that the DVD SOURCE
VD MODE
ight is lit.
Hin
• Pressing only [SOURCE] on the front panel DOES NOT switch the mode
the remote control. You MUST select the correct mode on the remote
o
contro
Turn on the Unit for the First Tim
4
rn on the TV and
If channel 3 has been already occupied for
broadcastin
Select your language when turning this unit on for the first time.
en pressB to go to next step
, see “RF Output Channel” section
LEAR
. RESE
ANGUAGE SELE
ENGLISH [ON
FRANCAI
ESPAÑOL
25
elect the current da
en press
o go to next step.
elect the current year
en press
o go to next step.
l
hen pressBto go to next step.
l
min
hen pressBto go to next step.
elect “AM” or “PM”
r
ET scr
ET
MONTH DAY YEA
1 0 / 0 5 – – –
HOUR MINUTE AM/P
– – : – – –
NTH DAY YEA
1 0 / 0 5 2 0 0
HOUR MINUTE AM/P
– – : – – –
NTH DAY YEA
1 0 / 0 5 MON 2 0 0
HOUR MINUTE AM/P
0 5 : – – –
ET
MONTH DAY YEA
1 0 / 0 5 MON 2 0 0
HOUR MINUTE AM/P
0 5 : 4 0 –
NTH DAY YEA
1 0 / 0 5 MON 2 0 0
HOUR MINUTE AM/P
0 5 : 4 0 P M A
Page 26

k
efore:
set it
to channel 3.
g
.
2
4
PLAY
STOP
OPEN/CLOSE
/EJECT
de
l
STANDBY-ON
DISPLAY VCR DVD PAUSE
SLOW
VCR/TV
SKIP/CH.
PLAY
STOP
RECORD
MENU
SETUP TOP MENU
MODE ZOOM
SUBTITLE
T-SET
ANGLE
ENTER
RETURN
SEARCH
MODE
REPEAT A-B
OPEN/CLOSE
/EJECT
SPEED AUDIO
C
/
C.
T
123
456
789
0
+10
To start
k
T
layback
T
he
tte
3
VCR
deo
t.
k
y
to this unit. Make sure the
audio
to the correct channel.
3
PLAY
4
STOP
STANDBY-ON
OPEN/CLOSE
/EJECT
th
.
start
k
T
k
DVD
e
ly.
y.
ect channel.
butto
effect
C
ode.
h
.
layback
.
th
-
.
.
sc.
C
/
C.
i
.
ly.
.
l
d
T
de.
d ch
l.
activate the remote
ode.
T
.
activate the remote
ode.
the cursor and dete
i
.
the cursor and deter-
select a
the VC
u.
the
u.
a
g.
.
lay
ly.
ff.
ff.
T
ff.
.
f
.
.
ame at a time.
.
g.
ame at a time.
k.
k.
h
.
dly.
-
i
h
ime.
h
h
.
.
h
.
enu.
p
u.
.
lly d
k.
ion.
y
h
d.)
t
th
A
y
h
d.)
.
.
g.
ect subtitles on a disc.
g.
.
.
l
.
.
.
)
utton
)
e
cut e e
cut
he
e
a
8C6BCD
uick Use Gui
VCR Playbac
6
B
Turn on the TV and
• If channel 3 has been already occupied for broadcastin
Output Channel” section
Insert a vi
into this uni
o stop
p
DVD/CD Playbac
7
Before: Turn on the TV, amplifier and an
other components which are connected
receiver (commercially available) are set
label facing up
To
playbac
Remote Contro
8
, see “RF
laybac
o eject t
asse
TV and
nsert disc wi
o stop
aybac
LEAR
RESE
B
(Alphabetical order
123
456
789
0
A-B
ANGLE
AUDIO
LEAR
RESET
DISPLAY
DVD
ENTER
MENU
MODE
OPEN/CLOSE
/EJECT
PAUSE
PLAY
RECORD
REPEAT
RETURN
SEARCH
MODE
SETUP
SKIP/CH.
SKIP/CH.
SLOW
SPEED
STANDBY-ON
STOP
SUBTITLE
T-SET
TOP MENU
VCR
VCR/TV
ZOOM
isc/Tap
To select chapter or title
irect
+10
To search forward/backward
rough a disc
t
To begin slow forward
in the pause mode
p
To repeat between your cho
sen point of A and B
To select camera angles on a
isc
To select audio languages on
di
To remove status number in
program
To clear the numbers entered
incorrect
To cancel the point for A-B repeat
To display the current disc
mo
To select the DVD output mode.
To
ntrol in DVD m
To move
ne its position
m
nput
• To select track directl
• To search forward/backward
rough a disc.
To repeat between your
hosen point of A and B.
• To select STEREO, L-ch or R-ch.
• To remove status number in
rogram input.
ear the numbers entere
• To c
ncorrectly.
o cancel the point for A-B repeat.
• To display the current disc
ode.
o select the DVD output mode
• To
ntrol in DVD m
r-
• To move
ne its position.
To call up the Menu on a disc
VD mode VCR mod
To arrange the playing order
random
or p
To set black level on/o
To set virtual surround on/o
• To arrange the playing order
r play randomly.
o set virtual surround on/o
To open or close the disc tray.• To open or close the disc tray
To pause disc playback
To advance playback one
fr
To begin disc playbac
To play a chapter or title
repeate
To return to the previous
on in menu.
operat
To search chapter, title or
t
To set or search the markers.
To call up the DVD setup
m
• To pause disc playback
• To begin disc playbac
• To play a track or disc repeat
y.
• To return to t
peration in menu.
• To searc
• To searc
• To set or search the markers
• To call up the DVD setu
n
To skip chapters or titles.• To skip tracks
To turn the unit on or to turn
the unit into the standb
mode. (To completely turn off
e unit, you must unplug the
t
AC power cor
To stop playback
• To turn the unit on or to turn
he unit into the standby
ode. (To completely turn off
e unit, you must unplug the
C power cord.)
• To stop playback
To sel
To call up the Top Menu on a
isc
To select DVD position or TV
osition
To magnify part of a picture.
x2 / x4
• To select CD position or TV
osition.
track.
time
e previous
To sel
The +10
in V
R m
n has no
To forward/backward a tape.
To exit the VCR Menu.
To reset the tape counter.
To display the current time,
tape counter, an
anne
To
n item
n
R Men
To advance to
xt VCR Men
To go back one
tep during clock
nd timer settin
To call up the VCR Menu.
To eject the video
rom the VCR
cassette
To pause tape playback or
recordin
To advance playback one
fr
To begin tape playback.
To start a recording or One
Recording
Touc
To call up the index or time
menu
searc
To change channels.
To adjust the tracking manu-
uring playbac
a
To view the tape in slow
mot
To select the recording speed.
To turn the unit on or to turn
the unit into the standb
mode. (To completely turn off
e unit, you must unplug the
t
AC power cor
To stop playback or
recordin
To put the VCR into standby
mode for a Timer Recordin
To select the VCR output mode
To activate the remote
in VCR mode
contro
To select VCR position or TV
osition
r
E
Printed in Chin
 Loading...