

Page 1
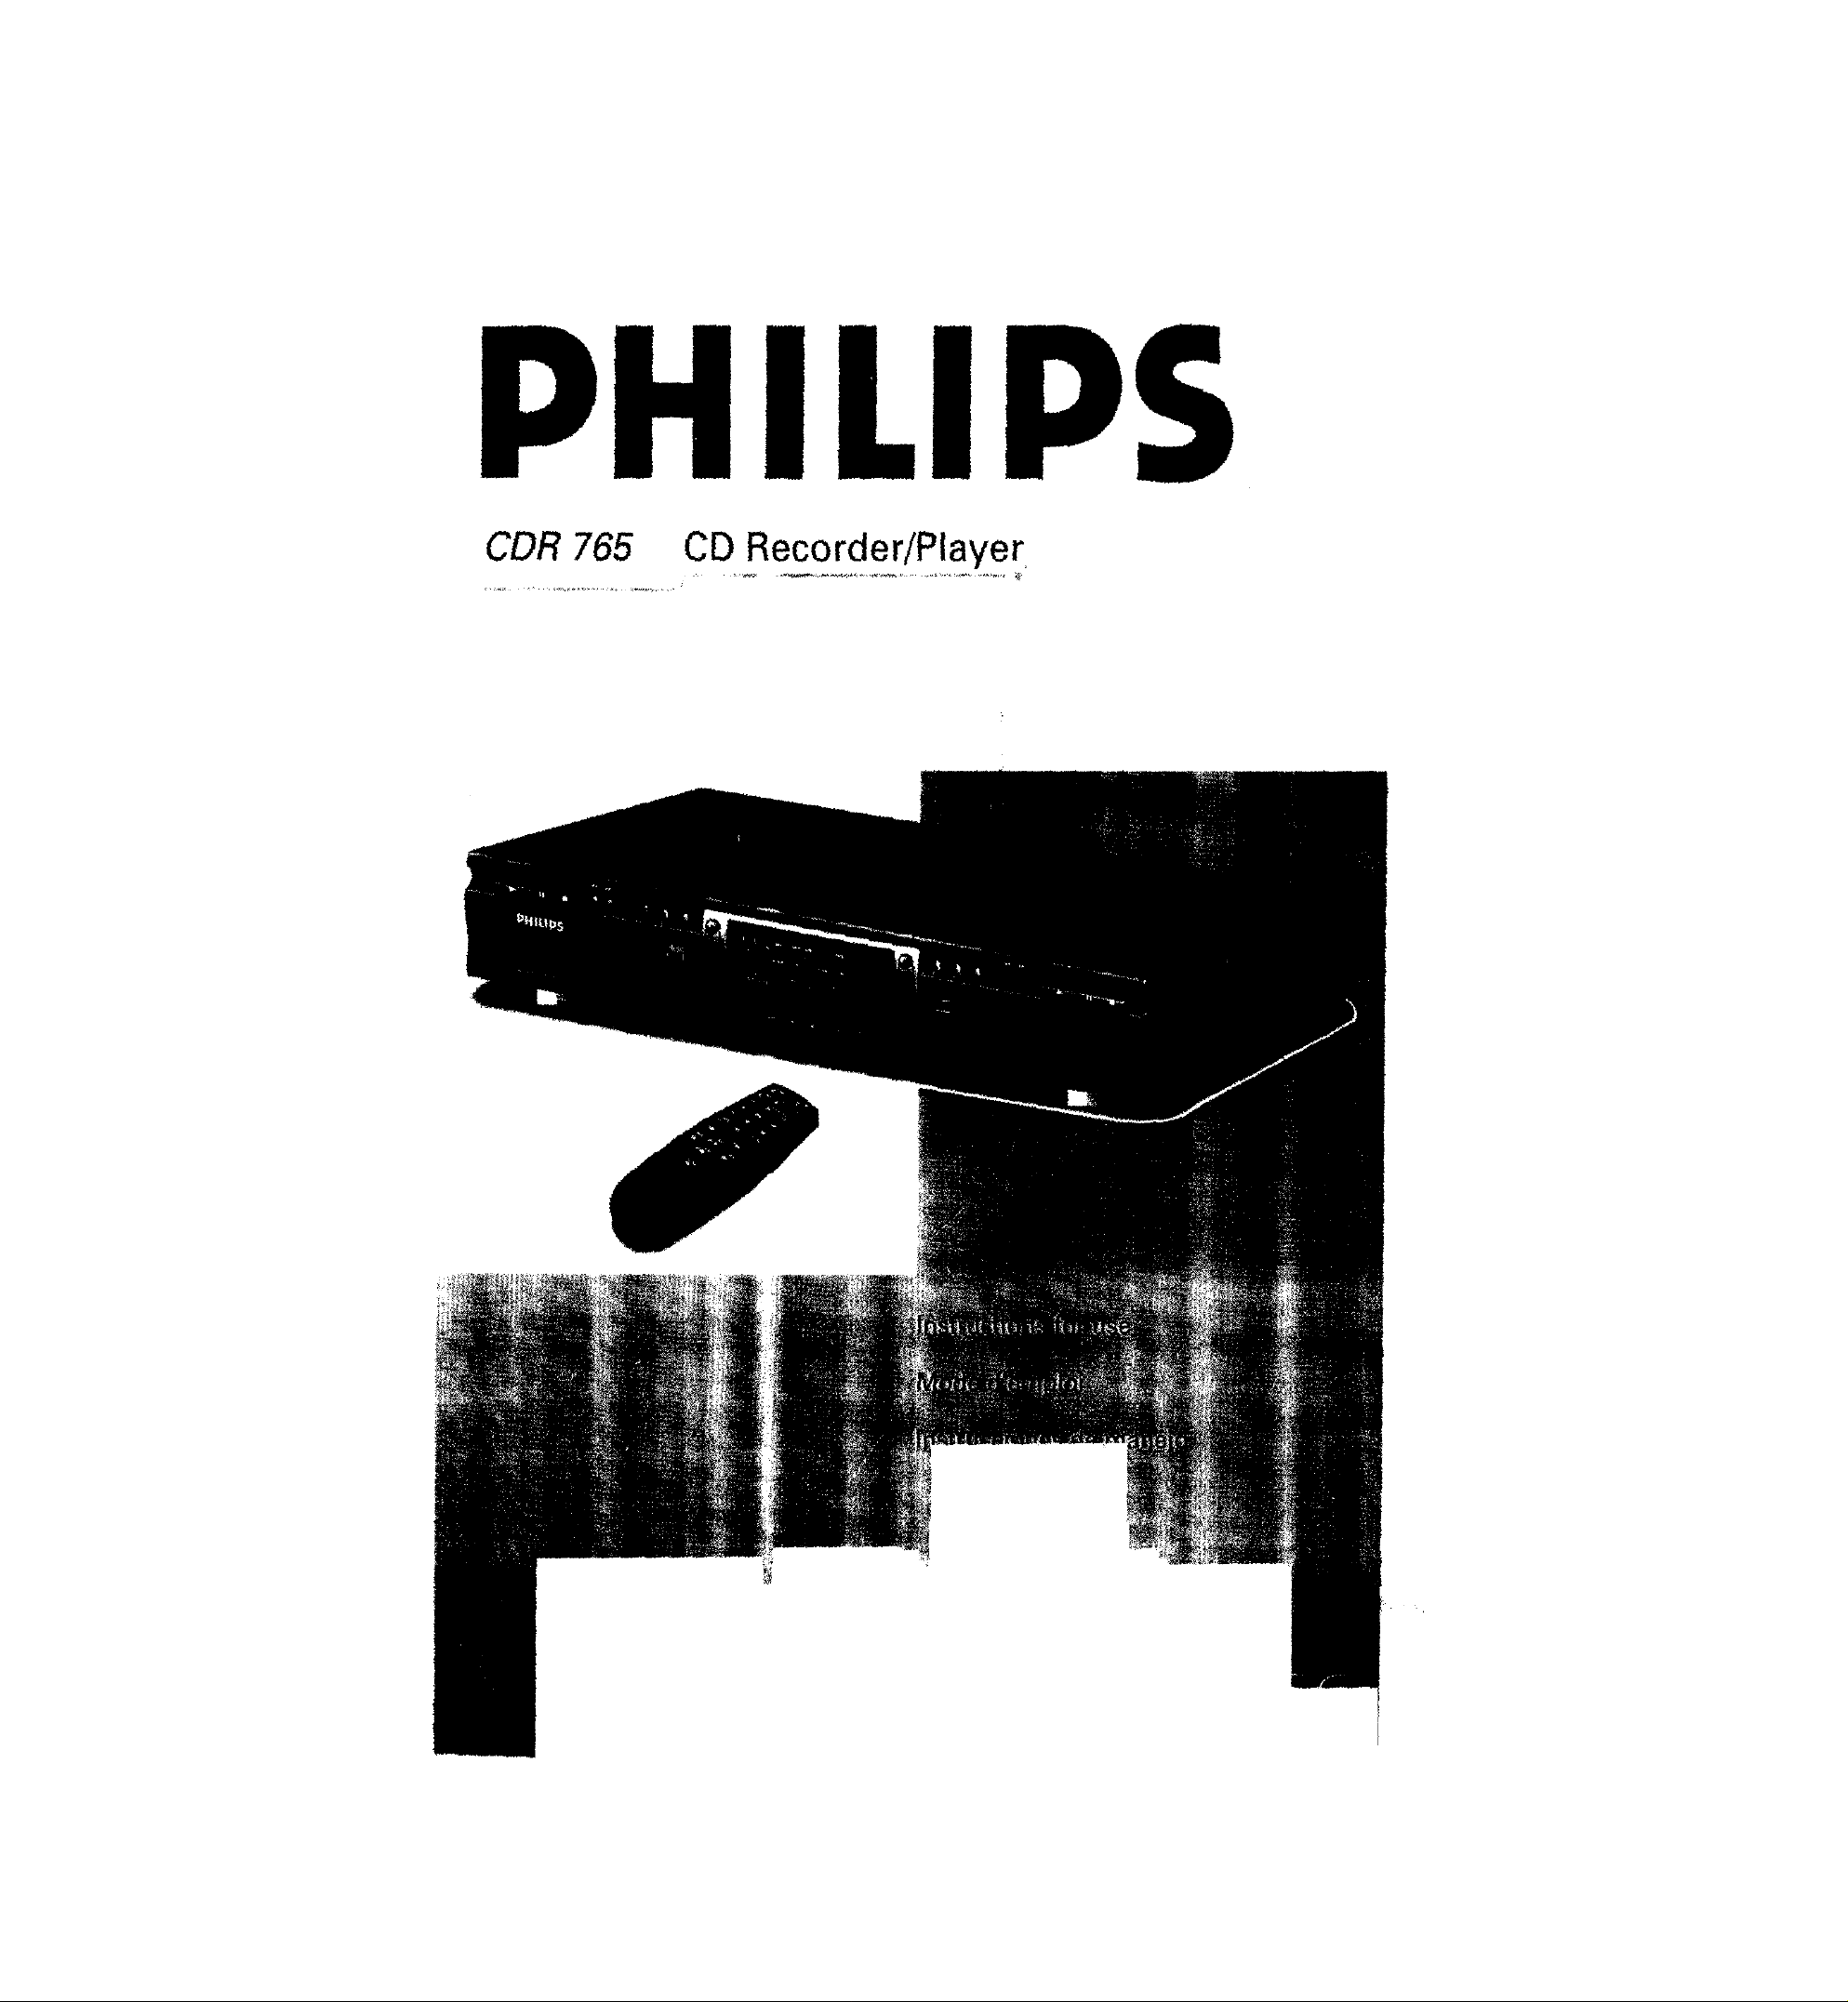
PHILIPS
CDR 765 CD Recorder/Player
Page 2
IMPORTANT SAFETYINSTRUCTIONS
1. Read Instructions - All the safety and operating instrucUons
should be read before the appliance is operated.
2. Retain Instructions - The safety and operating instructions should
be retained for future reference.
3. Heed Warnings - All warnings on the appliance and in the
operating instructions should be adhered to.
4. Follow Instructions - All operating and use instructions should be
followed.
5. Water and Moisture - The appliance should not be used near
water - for example, near a bathtub, washbowl, kitchen sink,
laundry, tub, in a wet basement, or near a swimming pool, and the
like.
6. Carts and Stands - The appliance should be used only with a cart
or stand that is recommended by the manufacturer.
6A.
with care. Quick stops, excessive force, and uneven
An appliance and cart combination should be moved
surfaces may cause the appliance and cart
combinatioia to overturn.
7. Wall or Ceiling Mounting - The appltcance should be mounted to
a wall or ceiling only as recommended by the manufacuten
8. Ventilation - The appliance should be situated so that its location
or position does not interfere with its proper ventilation. For
example, the appliance should not be situated on a bed, sofa, rug, or
simular surface that may block the ventilation openings; or, placed
iI_ a built-in instala fion, such as a bookcase or cabinet that may
impede the flow of air trough the ventilation openings.
9. Heat - The applicance should be situated away from heat sources
such as radiators, heat registers, stoves, or other appliances
(including amplifiers) that produce heat.
I0. Power Sources - The appliance should be connected to a power
supply only of the type described in the operation instructions or as
marked on the appliance
11. Grounding or Polarization - The p_ecautions that should be
taken so that the grounding or polarization
means of an appliance is not defeated.
12. Power-Cord Protection - Power-Supply cords should be routed
so that they are not likely to be walked on or pinched by items
placed upon or against them, paying particular attention to cords at
plugs, convenience receptacles, and the point where they exit from
the appliance.
13. Cleaning - The appliance should be cleaned only as
recommended by the manufacturen
14 Nonuse Periods - The power cord of the appliance should be
unplugged from the outlet when left unused for a long period of
time
15. Object and Liquid Entry - Care should be taken so that objects
do not fail and liquids are not spilled into the enclosure through
openings.
16. Damage Requiring Service - The apliance should be seviced by
qualified service personnel when :
a. The power-supply cord or plug has been damaged; or
b Objects have fallen, or liquid has been spilled into the
appliance; or
¢. The appliance has been exposed to rain ; or
d. The appliance does not appear to operate normally or exhibits a
marked change in performance; or
e. The appliance has been dropped, or the enclosure damaged.
17 Servicing - The user should not attempt to service the appliance
beyolad that described in the operating instructions. All other
servicing should be referred to qualified service persone].
TO REDUCE THE RISK OF FIRE OR ELECTRI_ SHOCK,
DO NOT EXPOSE THIS APPLIANCE TO RAIN OR MOISTURE.
I
R[SK OFDOELEoCTRI[_SNHOCK
CAUTION:TOREDUEE THERISKOFELECTRICSHOCK,DONOI
REMOVECOVER(ORBACK)NOUSER-SERVICEABLEPART_
INSIDE REFERSERVICINGTOQUALIEIEDSERVICEPERSONNEL
WARNING
The lightning flash with arrowhead symbol, within
an equilateral triangle, is intended to alert the
user to the presence of uninsulated "dangerous
voltage" within the product's enclosure that may
be of sufficient magnitude to constitute a risk of
electric shock to persons,
The exclamation point within an ec_uilateral
triangle is intended to alert the user to the
presence of important operating and
maintenance (servicing) instructions in the
literature accompanying the appliance.
Page 3
GENERALINFORMATION
CAUTION
USE OF CONTROLS OR ADJUSTMENTS OR
PERFORMANCE OF PROCEDURES OTHER
THAN THOSE SPECIFIED HEREIN MAY
RESULT IN HAZARDOUS RADIATION
EXPOSURE.
The set complies with the FCC-Rules, Part 15
and with 21 CFR 1040.1
(:_) Canada
This digital apparatus does not exceed the Class B
limits for radio noise emissions from digital apparatus
as set out in the Radio Interference Regulations of the
Canadian Department of Communications.
Cet appareil numedque n'_met pas de bruits
radioelectriques depassant les limites applicables dans
la rC,glement sur le brouillage radio61ectriques6dict6
par le ministere des communications du Canada.
This warning label is located on the rearside and inside this laser product.
CAUTION
TO PREVENT ELECTRIC SHOCK, MATCH
WIDE BLADE OF PLUG TO WIDE SLOT,
FULLY INSERTED.
ATTENTION
POUR EVITER LES CHOCS ELECTRIQUES,
INTRODUIRE LA LAME LA PLUS LARGE DE
LA FICHE DANS LA BORNE CORRESPON-
DANTE DE LA PRISE ET POUSSER
JUSQU'AU FOND.
LASER
Type SemiconductorlaserGaAIAs
Wave lenght 775-795 nm(at 25°C)
Output Power 2,5 mW (Read)
35 mW (Write)
Beam divergence 60 degree
or
VARO! AVarrAESSAJAsucaAta_a_s ommrrAv_,shotgr
V_! OCHSpAv.Va__ URKOPPL_B_r_crA FJs'r_aa_ j
THIS DEVICE COMPLIES WITH PART 15 OF THE FCC (U.S.A.) RULES.
OPERATION IS SUBJECT TO THE FOLLOWING TWO CONDITIONS : (1) THIS DEVICE MAY NOT CAUSE HARMFUL
INTERFERENCE, AND (2) THIS DEVICE MUST ACCEIgr ANY INTERFERENCE RECEIVED, INCLUDING INTERFERENCE THAT MAY
CAUSE UNDESIRED OPERATION.
i NOTE
This equipment has been tested and found to comply with
i the limits for a Class B digital device, pursuant to part 15
of the FCC Rules. These limits are designed to provide
reasonable protection against harmful interference in a
residential installation. This equipment generates, uses and
can be used in accordance with the instructions, may
cause harmful interference to radio communications.
However, there is no guarantee that interference will not
occur in a particular installation.
THIS PRODUCT WAS FCC VERIFIED UNDER TEST CONDITIONS THAT INCLUDED USE OF SHIELDED CABLES AND
CONNECTORS BEWTEEN SYSTEM COMPONENTS. IT IS IMPORTANT THAT YOU USE SHIELDED CABLES TO REDUCE THE
POSSIBILITYOF CAUSING INTERFERENCE TO RADIOS, TELEVISION SETS AND OTHER ELECTRONIC DEVICES.
IF YOU HAVE ANY PROBLEMS CONTACT YOUR DEALER.
_L__ L,_BRSAI_L'dJ.EALA
IMPORTANT
DANGER - Invisible laser radiation when open.
AVOID DIRECT EXPOSURE TO BEAM
If this equipment does cause harmful interference to radio
or television reception, which can be determined by
turning this equipment off and on, the user is encouraged
to try to correct the interference by one or more of the
following measures :
- reorient or relocate the receiving antenna.
- increase the separation between the equipment and
receiver.
- connect the equipment into an outlet on a circuit
different from that to which the receiver is connected.
- consult the dealer or an experienced radio/TV technician
for help.
ANY CHANGE OR MODIFICATIONS TO THE EQUIPMENT BY THE USER NOT EXPRESSLY APPROVED BY THE
GRANTEE OR MANUFACTURER COULD VOID THE USER'S AUTHORITY TO OPERATE SUCH EQUIPMENT.
Page 4
CD-R RECORDER/PLAYER
90 Days Free Labor
One Year ExchangeWarranty on Parts
This product must be carried in for repair.
LIMITEDWARRANTY
WHO IS COVERED?
You must have proof of purchase to receive warranty service. A sales
receipt or other document showing that you purchased the product
is considered proof of purchase.
WHAT IS COVERED?
Warrant'/coverage begins the day you buy your product. For 90 days
thereafter, all parts will be repaired or replaced, and labor isfree. From
90 days to one year from the day of purchase, all parts will be repaired
or replaced, but you pay for all labor charges• After one year from the
day of purchase, you pay for the replacement or repair of all parts,
and for all labor charges.
All parts, including repaired and replaced parts, are covered only for
the original warranty period. When the warranty on the product
expires, the warranty on all replaced and repaired parts also expires.
WHAT IS EXCLUDED?
Your w_rranty does not cover:
labor charges for installation or setup of the product, adjustment
of customer controls on the product, and installation or repair of
antenna systems outside of the product.
• product repair and/or part replacement because of misuse,
accident, unauthorized repair or other cause not within the
control of Philips Consumer Electronics Company.
• reception problems caused by signalconditions or cable or
antenna systems outside the unit.
• aproduct that requires modification or adaptation to enable it to
operate in any country other than the country for which it was
designed, manufactured, approved and/or authorized, or repair of
products damaged by these modifications,
• incidental or consequential damages resulting from the product•
(Some states do not allow the exclusion of incidental or
consequential damages, so the above exclusion may not apply to
you. This includes, but is not limited to, prerecorded material,
whether copyrighted or not copyrighted.)
• a product that is used for commercial or institutional purposes
{including but not limited to rental purposes).
WHERE IS SERVICE AVAILABLE?
Warranty service is available in all countries where the product is
officially distributed by Philips Consumer Electronics Company In
countries where PhifipsConsumer Electronics Company does not
distribute the product, the local Philips service organization will
attempt to provide service (although there may be a delay if the
appropriate spare parts and technical manual(s) are not readily
available).
MAKE SUREYOU KEEP ...
Please keep your sales receipt or other document showing proof of MODEL #
purchase• Attach it to this owner's manual and keep both nearby.
Also keep the original box and packing material in case you need to SERIAL #
return your product.
BEFORE REQUESTING SERVICE...
Rease check your owner's manual before requesting service.
Adjustments of the controls discussed there may save you a service
call.
TO GETWARRANTY SERVICE IN U.S.A.,
PUERTO RICO OR U.S.VIRGIN
ISLANDS...
Take the product to a Philipsfactory service center (see enclosed
list) or authorized service center for repai_When the product has
been repaired, you must pick up the unit at the center. Centers may
keep defective parts.
(In U.S.A., Puerr_ Rico and U.S.Virgin Islands,all implied warranties,
including implied waarranties of merchantability and fitness for a
particular purpose, are limited in duration to the duration of this
express warranty. Because some states do not allow limitations on
how long an implied warranty may last. this limitation may not apply
to you.)
TO GETWARRANTY SERVICE IN
CANADA...
Take the product to a Philips consumer service center (listed below),
self=servicingdealer ar autorized service depot.
(In Canada, this warranty isgiven in lieu of ag other warranties. No
other warranUes are expressed or implied, including any implied
warranties of merchantability or fitness for a particular purpose.
Philips is not liable under any circumstances for any direct, indirect.
special, incidental or consequential damages, howsoever incurred,
even if noUfied of the possibility of such damages•)
REMEMBER..•
Please record the model and serial numbers found on the product
below. Also. please fill out and mail your warranty registration card
prompdy. It wilF be easier for us to notify you if necessary.
Philips Electronics Ltd.
601 Milner Avenue, Scarborough, Ontario, M I B I M8
(416) 292-5161
4977 Levy Street, St. Laurent Quebec. H4R 2N9
{S_'_) 9S6-0_20
1741 Boundary Road,Vancouver, B.CVSM 3Y7
(604) 294-3441
Philips Service Company, RO. Box 555Jefferson City, Tennessee 37760, (423) 475-8869
EL6J91E001/ MAC 605B/ 10-96
tB7922E001
Page 5
CONTENTS
l English....................................................4
Fran_ais ................................................ 22
I Espa_ol.................................................40
I,M
m
m
I,IJ
Page 6
GENERALINFORMATION
rrl
Table of contents
GENERALINFORMATION
Technicalinformation...................................................4
Discforrecording.........................................................5
Discsforplayback........................................................5
Maintenance................................................................5
Accessories.................................................................5
OPERATINGBu'rroNs AND CONNECTIONS
Operatingbuttonsonthefront ....................................6
Connectionsonthe back..............................................6
DISPLAY
DISPLAYexplanation....................................................7
DISPLAYmessages......................................................8
INSI'AU.A'rloN
Connectionsgeneral....................................................9
Welcome !
Thankyou for purchasingthis Phi/ipsCompactDisc
Recorder/PlayerDoubleDeck,
Inthe 1980sPhdipsinventeda new audiosystem- the CD.
TheCD(compactdisc)revealedthe newdimensionsofdigital
soundsand enhancedthe pleasuresof audio
Compactdisc technologypermitsahighcontrast in bothloud
andquiet passages,with perfectchannelseparation.Philips
has continuedto developcompactdisctechnologyandthe
result is the CDrecorder.
With yourPhilipsCDRecorder/Playeryoucan makeyourown,
high-quality audioCDs,subjectonlyto the legal restrictions
on copying.Youcan either dubat high or normal speedfrom
the Playerto the Recorderorrecordfrom anexternalsource.
Naturallyall pre-recordedaudioCDscancombinedCDs- e.g.
CD-Extra- canbeplayedusingoneor bothof the decks
individually ortogether as a double-deckchanger.
AnalogueconnectionsCDRecorder&CDPlayer......9
AnalogueconnectionsCDPlayerdeck......................10
DigitalcoaxialconnectionsCDRecorder..................10
DigitalopticalconnectionsCDRecorder...................11
Powersupply..............................................................11
Recordingsmayonly bemade farpersonaluse.It is forbidden
tocopymaterialprotectedby copyright,includingcomputer
programs,films, televisionandaudio recordings.This
appliancemaynot be usedfor suchapplications.
Set-uprecommendations...........................................11
Insertingbatteriesintheremotecontrol..................11
_l'echnical information _,
REMOTECONTROL& INSERTINGDISCS
Remotecontrolcommands........................................12
Subjectto modification without notice.
Insertingdiscs............................................................12
Digital frequencyresponse.....................................0-22,05gHz
RECORDING
Remarksaboutrecording...........................................13
Normalandhigh-speeddubbing..............................13
DigitalrecordingfromexternalCDplayer................14
Synchronizeddigitalrecordingfromexternal
COplayer:CD-SYNC..................................................15
Analoguerecordingfromanexternalsource............16
PlaybackS/N....................................................................1OOd8
Playbackdynamicrange.....................................................95dB
Playbacktotal harmonicdistortion..................0.0056%,-85dB
RecordingS/NtAnalogue)..................................................9OdB
RecordingS/N (Digital).....................................Equalto source
Recordingdynamicrange...................................................92dB
Recordingtotal harmonicdistortion................0.0056%,-85dB
FinalizingCD-R& CD-RWdiscs.................................17
UnfinalizingCD-RWdiscs..........................................17
ERASING& PLAYING
ErasingCD-RWdiscs.................................................18
PlayingCDsondeck 1 and/or deck 2 ........................18
Playingasa2-discchanger ......................................18
Digital coaxia!input(IEC958)...................44 1 kHz+/-lOOppm
Digital optical input (IE0958)....................441 kHz+/- lOOppm
Analogueinput(4 steps-3,O,3 and6 dB)
.........................................................500 mVrms/50k£2=0dB
Audio output........................................................2VRMS±2dB
Digital coaxialoutput............................................0.5 Vpp/75Q
Headphones...............................................0-5VRMS/8-20OO_
PLAYING
Selectingatrackor searching...................................19
Shuffle (random-order)play ......................................19
RepeatCD,track or program.....................................19
Programming..............................................................20
FIXINGPROBLEMS
Troubleshooting..........................................................21
Diagnosticprogram....................................................21
Dimensions...................................171/8 x 12x 35 5/8 inches
Weight................................................................................4kg
Powerconsumption...........................................................20W
Operatingtemperature.............................................. 5 35%
PowerSupply........................................................AC220-240V
Page 7
GENERALINFORMATION
[Disc for recording
Forrecordinguse,specialaudio discsmustbeused(for music
only),TheseDiscsbeartheloges asshown below.Thetext
'DIGITALAUDIO'is present! Copyrightfees havebeenpaidon
these discsinsome countries.
With your recorderyou canuse two types of discsfor
recordingpurposes:
Fullyrecordedandfinalized, these discs
- CD-Audio Recordable (CD-R)discs: [_ _]o_p_
play onall CDplayersandrecorders, ole_TALAUOIO
- CD-Audio ReWritable (CD-RW}discs: _nc_op_p_
Canbe recorded,erasedandre-recorded
hunderdsof times. When finalized, they omwAL_om
playon CD-RWcompatible COplayers IReWdtable]
andrecorders.
Inthe courseof 1999most Philips CDplayersandrecorders
will beCD-RWcompatible.
IOiscsfor playback
YourCDRecorder/Playercanplay:
- AllprerecordedaudioCDs,andcombinedCOssuchasCO
Extra.
- AgAudioCO-RandAudioCD-BW.
Note. CD-Rdiscsrecorded with a computercan only beused
when theyare correctlytreated accordingthe audio
standard(IEC958:Consumerpart), Singlesessiononly!
[Maintenance
It is extremely important that the discs usedforrecordingare
free of dust and scratches.
Tocleana CO,wipe it in a straight
linefrom the center towards the
outer edgeusinga soft, lint-free
cloth. Cleaningagentsmaydamage
the disc! Write onlyon the printed
side of a CD-BorCD-RW,andonly
with a soft felt-tipped pen.
Cleanthe CORecorder/Playerusing
asoft, lint-free cloth that hasbeen
slightlydampened.Do not usea
cleaningagent;this might havea
corrosiveeffect.
DonotexposetheCORecorder/Player
thebatteriesorCOsto extreme
humidity,rain,sandorexcessiveheat
fromheatingequipmentordirect
sunlight.
Ifthe CDRecorder/Playerdoesnot readthe COscorrectly,use
acleaningCD(commonlyavailable)to cleanthelens before
takingthe CORecorder/Playerinfer repairs.Othercleaning
methodsmaydamagethe lens.Keepthe tray closedat all
times to avoidgettingdust onthe lens.
Thelensmay becomecloudedwhen the CORecorder/Player
ismovedfromcoldto warm surroundings;it will not be
possibleto play a CDwhen this happens.Leavethe CD
Recorder/Playerin the warm surroundingsto allow the
moistureto evaporate.
J/j
Accessories
2Analogueaudiocables(with red and white plugs)
1Digital coaxial cable(with black plugs)
Powercord
2 Batteries
Remotecontrol
Guarantee
Page 8
OPERATINGBUT]'ONSAND CONNECTIONS
m
zI-
IOperating buttons on the front 1
CD recorder
ON/OFF ........... turntheCDrecorder/playerONandOFF
[]
Disctray
[]
PLAY • ......... start play or record
%
PAUSEII ........ interrupt play
[]
STOP• ......... stops
_,_ ............. previoustrack/searchback'
[]
J,_ ............. nexttrack/searchleoNard/newtrack
[]
RECORD......... record
[]
[]
FINALIZE...... finalizerecording
ERASE......... eraserecording
[]
OPEN/CLOSE..... open/closedisctray
DISPLAY)informationscreen)
[]
DISPLAY ........ selectdisplayinformation
SOURCE......... selectdigital or analogueinput
[]
RECLEVEL ...... adjuststhe recordinglevel(analogue)
[]
CD-SYNC..... synchronizedrecording;recording
DUDB.......... digital dubbing(normalor high
[]
AUTO/MANUAL.. selecttracknumberingmethod
8 e ro 11 121 i13J 14 !15 1i6 17 _18 19[ ;20 eli 122 23
/ / /
/
/
2 a !4 15 6 7 8)
[_ PAUSEII ........ interruptplay
[] STOP• ......... stops
Disctray
[_ OPEN/CLOSE..... open/closedisc tray
[] PHONES ........ plug for headphones
[_ DISPLAY........ selectdisplay information
[_ DUAL ........... playsCDRecorderandCDPlayer
IConnections on the back
[_ Connectionto power supply
[_] ANALOG IN ...... connectsto the line output of an
[_ ANALOGOUTCDR& CD
............... connectionfor input line on
[] DIGITALIN ...... connectionfor digital coaxial input
startsautomatically
speed)from CDPlayerto
CDRecorder
DIGITALOUTCDR& CD
................ connectsto the digital coaxial input
_] OPTICALIN ...... connectionfor digital optical input
Foruseonly in the DUALmode)simultaneousplay-back):
separately
amplifier.(left andright)
amplifier (left and right)
from externalsource,eg amplifier
or recordingdevice
of e.g. amplifier or recordingdevice
from external CDplayer
CD player
_ ............. previoustrack/searchback
[] _ ............. next track/searchforward
2_ PLAY • ....... start play
[_ DIGITALOUTCD.. connectionfor digital coaxialoutput
from CDdeckto externaldevice,
e.g.amplifier or recordingdevice
[_ ANALOGOUT CD. connectionfor analogueoutput from
CDdeckto input line on an amplifier
(left and right)
Page 9

[DISPLAY explanation
DISPLAY
Thedisplayhasa sectionfor the CORecorderand a section
forthe CDPlayer.
[_AUTQTRACK TOTAL flEM TRACK TIM[
_ t','_USE Ifi ANALOG pT P_OG REPEAT1
Un. DC
CD recorder section
[] RECORD......... lights upduringrecordingand
flashesinrecordstandby
[] FINALIZE........ lights upduring finalizingandflashes
in finalize standby
[] ERASE.......... lights upduring eraserecordingand
flashesin erasestandby
[] CD-SYNC........ synchronizedrecordingis active.
[A_SHUFFLE........ playstracksin randomorder
[] t_€o ........... remotecontrolactive
[Z] SCAN.......... scansfor COPYPROHIBITor data
trackin dubbingmode.
[] TRACK.......... tracknumber
[] TOTALREMTRACKTIME lights upaccordingto
selectedtime mode
[] REPEAT(1) ...... repeatfunction activatedduring play
[] PROG........... programmedplay
1[_ RECORDABLE .. UnfinalizedCD-Rdiscinserted
[] OPT ............ digital optical input is selected
1_] REWRITABLE.... CD-RWdiscinserted
CD ............. COinserted(a pre-recordedCDor
finalizedCD-Ror CD-RWdisc)
1_ ANALOG ....... analogueinput is selected
1_ DIG............ lights when digital input is selected
andflasheswhen digital input is
incorrect.
[] PAUSE ......... pausefunctionisactive
[] AUTOTRACK .... automaticallyincreasetrack
numbers
[] DUBB(1) .... _ .dubbingfromCDplayertoCOrecorder
[] Record/playlevel bar(analogue)
LJ "q.i _ -V/
,us, ,, _E,F_TI_///
Z
;2-°
CD player section
[] DUAL ........... play CDRecorderandCDPlayer
separately
[] SHUFFLE........ playstracksin randomorder
[] TRACK.......... tracknumber
[] TOTAL REM TRACKTIME lights up accordingto
selectedtime mode
[] REPEAT1........ repeat track
[] COPYPROHIBIT.. lights upwhen attemptingto record
a protecteddigital audiorecording
[] PROO.......... programmedplay
[] PAUSE ......... pausefunction is active
I.LI
Page 10
DISPLAY
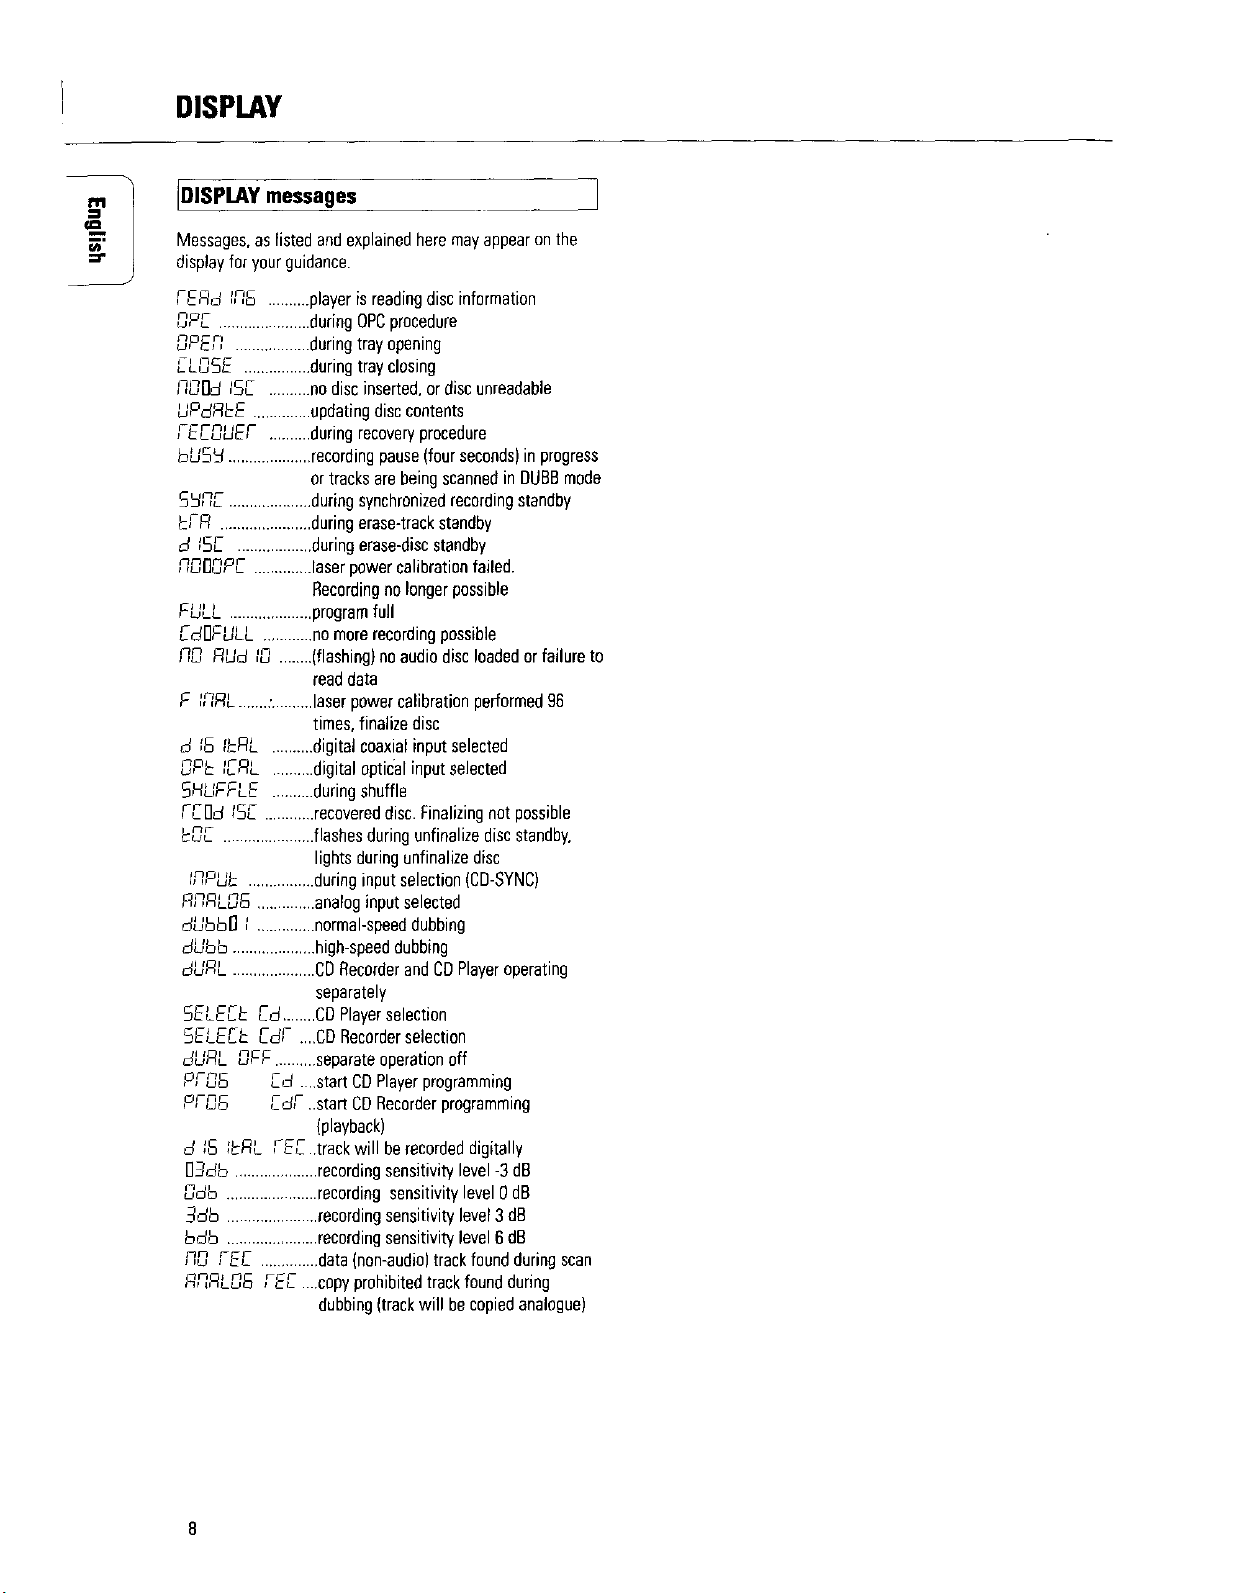
IDISPLAY messages
Messages,as listed and explainedheremayappearonthe
displayfor yourguidance.
FERd ins ..........player is readingdiscinformation
OPE ......................duringOPCprocedure
SPEn ..................duringtrayopening
ELunSE ................duringtrayclosing
l]S[]d 15C ..........nodiscinserted,or disc unreadable
UPdRkE ..............updatingdisccontents
FEC_OUEF ..........during recoveryprocedure
bUSkt ....................recordingpause(fourseconds)inprogress
or tracks arebeing scannedinDUBBmode
5NNE ....................duringsynchronizedrecordingstandby
kFR ......................during erase-trackstandby
d tS[ ..................duringerase-discstandby
NDOunPC..............laserpower calibrationfailed.
Recordingnolongerpossible
FULL ....................programfull
EdlqFULL ............no morerecordingpassible
,q,g RU,d _ ........(flashing)noaudiodisc leadedorfailureto
readdata
F INRL .......:..........laser powercalibration performed96
times,finalize disc
d _6 _kRL ..........digitalcoaxialinputselected
,gP5 ;[RL ..........digital optical input selected
SHUFFLE ..........during shuffle
FC[]d tS[ ............recovereddisc. Finalizingnotpossible
kS_ ......................flashes during unfinalize disc standby,
lights duringunfinalizedisc
l,n,PU_ ................during input selection(CB-SYNC)
RNRL_g_ ..............analoginput selected
dUbbg I ..............normal-speeddubbing
dUbb ....................high-speeddubbing
dURL ....................CDRecorderand CDPlayeroperating
separately
5ELE_k Ed........CO Playerselection
5ELEEt- EdF _..CDRecorderselection
dURL 2,FF..........separateoperationoff
PFu_[_ __d..start COPlayerprogramming
PF_6 CdF ..startCDRecorderprogramming
(playback)
d t6 _bqL FEC..track will berecordeddigitally
D__db....................recordingsensitivity level -3 dB
_db ......................recording sensitivity level 0 dB
_db ......................recordingsensitivity level3 dB
bdb ......................recordingsensitivity level 6 dB
Rn FEE ..............data (non-audio)trackfound duringscan
,qnRLDS FEE ....cOpyprohibitedtrack foundduring
dubbing(trackwill be copiedanalogue)
Page 11

INSTALLATION
Connections general 1
Forplayingbackonthe CDRecorderand/or the CD Player
deck,the following output connectionsareavailable:
- Digital coaxialoutput(CO& CO-R)
Analogueoutput (CO& CD-R)
We recommendthat these beconnectedto the TAPEor CD-R
inputon youramplifier.
Forexternalrecording,the following input connectionsare
available:
- Digital optical input
- Digital coaxialinput
-Analogueinput
Forplayingbackonthe CDRecorderandCOPlayerdecks
separately(DUALmode),the following output connectionsare
available:
- Digital coaxialoutput (CD)
- Analogueoutput(CD)
We recommendthat these beconnectedto the CDinput on
youramplifier.
Theconnectionsto be madedependupon the possibilities
youraudioequipmentoffers• Pleaserefer to the user manuals
foryour otheraudioequipmentfirst.
Digital recordings,eitheroptical or coaxial,will givethebest
performancein terms of audioandversatility (e.g.auto-track).
(Thedigital optical connectionis less sensitiveto external
disturbances)•
Ifyourequipmentdoesnot allow for digital connections,the
high quality Analogue/Digital Converteron the CD
Recorder/Playerwill ensureexcellent audioperformance
when recordingsaremadefroman analoguesource.
JAnalogueconnections CD Recorder & CD PlayerI
Thisconnectionmustbeestablishedfor the play-backCD
Recorderdeckandfor the CDPlayerdeck)cable(_)
Cable(_ is used onlyif youwant to makerecordingsfrom an
externalanaloguesource•
Usetheaudiocablessupplied•Connectthe red plugstothe
Rsockets,andthe white plugsto the L sockets,
1 Forrecordingfrom anexternalsource,connectCable(_) to
the ANALOGUEIN plugon the CDRecorder/Playerand the
LINE-OUTorTAPE-OUTplug on an amplifier.
Note: Forrecordingdirectlyfroma CDplayer the analogue
input of the CDRecorder/Playershouldbeconnectedto
theanalogueoutput of theCDplaye_
Playbackviathe digital coaxialoutputof the CD
Recorder/Playergivesthe best audio performance.
Ifyourequipmentdoesnot offer digital connectionsthe high
quality Digital-Analog-Convertorofthe CDRecorder/Player
ensuresa highsoundqualityvia the analogueoutput•
We recommendthat bothdigital and analogueconnectionsbe
made,sothat analogue recordingscan bemadewhendigital
recordingis not possible•
Themostcommonwaysof connectingthe CDRecorder/Player
areexplainedbelow•Ifyou still havedifficulties with the
connections,feel free to contactthe PhilipsConsumerService
deskinyourcountry.
2 Forplayingback,connectCable0 to the ANALOGUEOUT
plugsonthe CDRecorder/Playerandthe INPUTplugson an
amplifier,e.g. TAPEIN,CD-RorAUX.
Note: Never usethe PHONOinput
9
Page 12
INSTALLATION
;/
___J
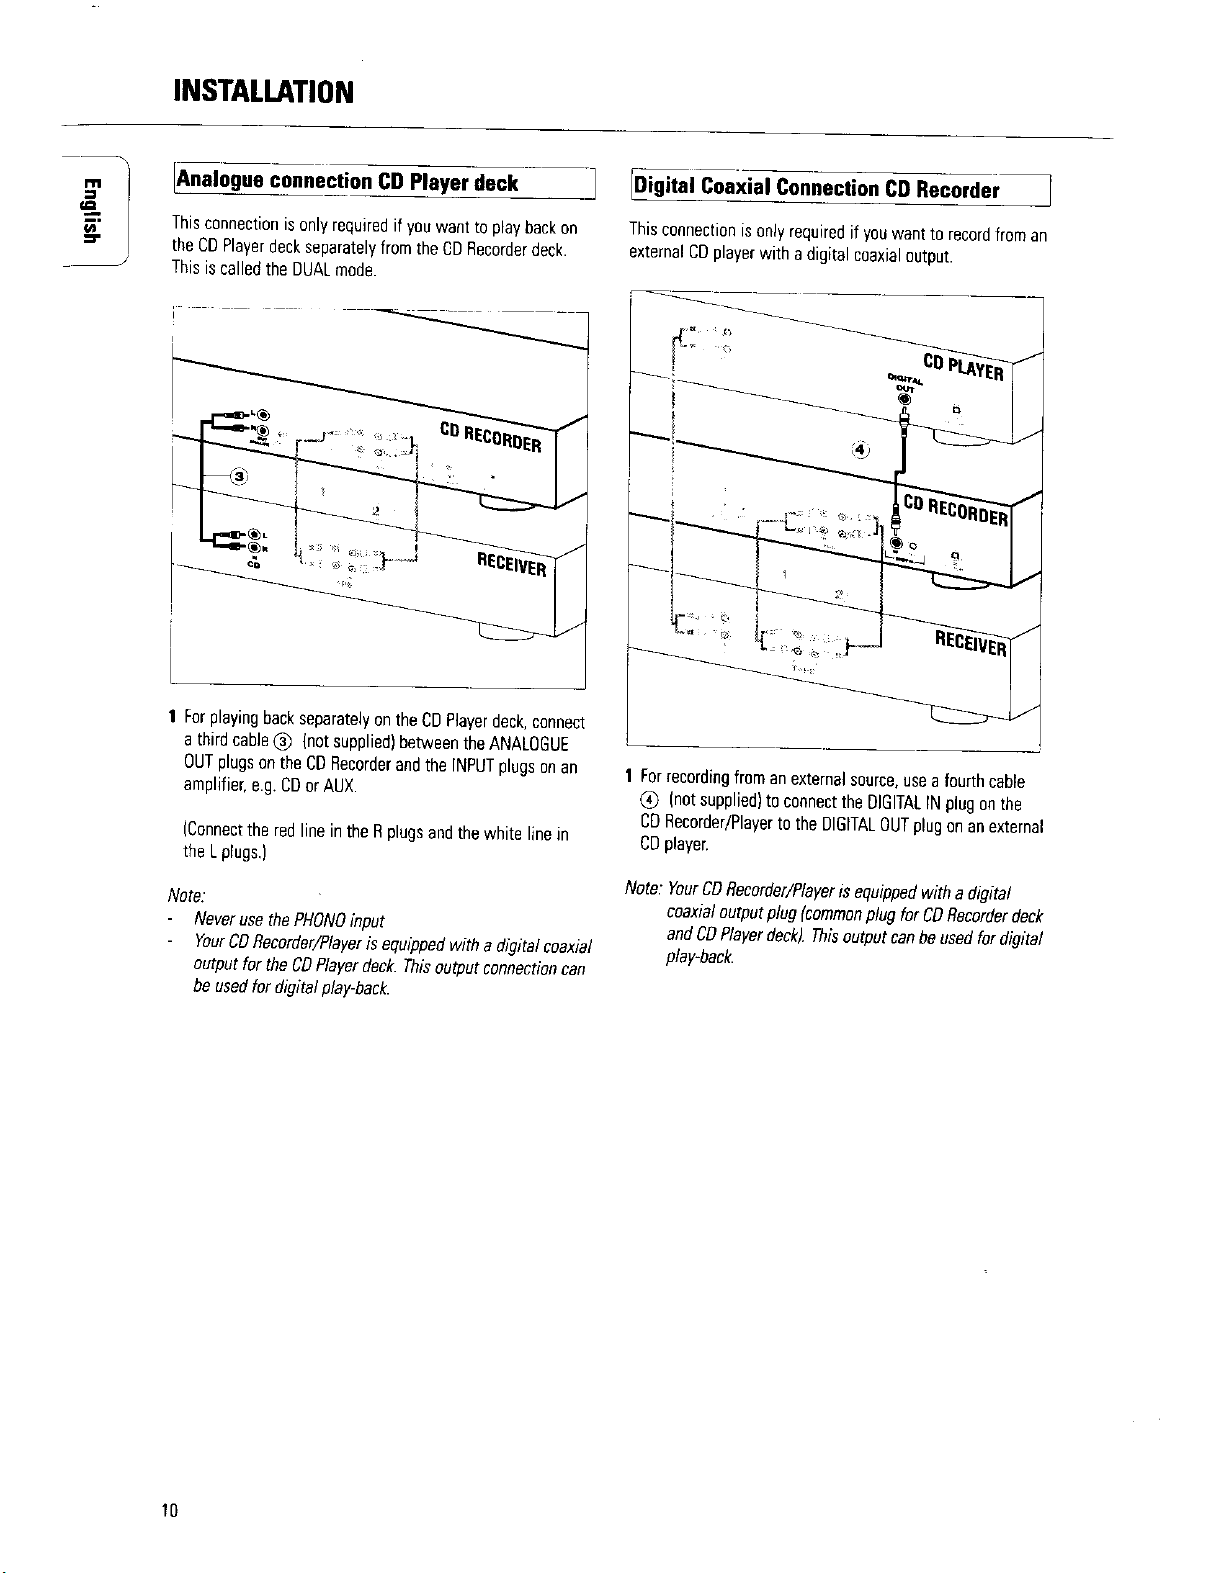
_nalogue connection CD Player deck
Thisconnectionis only required if you want to play backon
the COPlayerdeckseparately from the DDRecorderdeck.
i
Thisis celled the DUALmode.
t" ....
1 Forplaying backseparatelyon the CDPlayerdeck,connect
a third cable(_ {notauppliedlbetweenthe ANALOGUE
OUTplugs on the CDRecorderandthe INPUTplugson an
amplifier,e.g. CDorAUX.
(Connectthe red line in the Rplugs andthe white line in
the L plugs,)
Note:
Neveruse thePHONOinput
YourCDRecorder/Playeris equipped with a digital coaxial
output for the COPlayerdeck. Thisoutput connectioncan
be used for digital play-back.
[Digital Coaxial Connection CD Recorder
Thisconnectionis onlyrequiredif youwanttorecordfroman
externalCOplayerwith adigitalcoaxialoutput.
1
1 Forrecordingfroman externalsource,useafourth cable
(_ Inot supplied)to connecttheOIGITALIN piagonthe
CDRecorder/Playerto the DIGITALOUTplugon anexternal
CDplayer.
Note: YourCDRecorder/Playeris equippedwitha digital
coaxialoutputplug Icommonplug for CDRecorderdeck
and CDPlayerdeck). Thisoutputcanbe used for digital
play-bank.
10
Page 13
INSTALLATION
_ital Optical Connection CD R.ecorder I
Thisconnectionisonlyrequiredif youwanttorecordfroman
externalCDplayerwithadigitalopticaloutput
1 Removethe dustcapsfrom the digital optical connections.
(Werecommendthatyou savethe caps).
!Setup recommendations
Placethe CD Recorder/Playerona solid,vibrationfree
surface
Donot placethe CDRecorder/Playerneara sourceof
heator in directsunlight
Do not usethe CDRecorder/Playerunder extremelydamp
conditions.
If the CDRecorder/Playerisplacedinacabinet, make
surethat aone-inchspaceremainsfree on all sidesof the
recorderfor properventilation
i
!lnse8ing batte[ies in the remote control
IAJ
\ ......
i
_J
2 Forrecordingfrom an externalsource,usea fiber-optic
cable(_ to connectthe digital optical input on the CO
Recorder/Playerand the digital optical output onan
externalCDplayer.
Note Forplaying back,the digital coaxialoutputsor analogue
outputs on the CDPlayerandthe CORecordermust be
connectedtoan amplifie_
lPower supply
1 Plugthepower cord supplied intothe MAINS connectoron
the CD Recorder/Player,then into a wall socket.
2 PressON/OFFto turn the CORecorder/Playeron.
Note
TheCORecorder/Playerwill automaticallyadjust to the
localmains voltage
When the CORecorder/Playeris in the "OFF'position,it
is stiff consumingsomepowe_If youwish to disconnect
yourCDRecorder/Playercompletelyfrom the mains,
withdraw theplug from theAC Outlet.
1 Openthe battery compartmentcover.
2 Insert2batteries(AAA,R03orUM-4;assupplied)as
shown.
3 Replacethe cover.
Note. Werecommendusing2 batteriesof the same typeand
condition.
Batteries contain chemical substances; dispose of
themproperly.
11
Page 14

REMOTE & INSERTINGDISCS
IRemote €o_l commands 1
PROGRAM.......... programstracknumbers
DISPLAY........... selectsdisplayinformation
Numberkeys0- 9... Seletsatrackbynumber
SHUFFLE........... playsCD(RW)orprograminrandom
order
............... Searchesbackward
PREVIOUS_1 ....... selectsthebeginningofa previous
track
STOP• ............ stopsCD(RW)andclearsa program
PAUSE II........... interruptsCD(RW)play
NEXTI_1 ........... selectsthebeginningofsubsequent
PLAY• ............ startsCD(RW)play
............... Searchesforward
REPEAT............ repeatplay
CD ................ selectCOPlayer
CD-R............... selectCORecorder
OPEN/CLOSE........ Opensorclosesthedisctray
[InserUng discs ]
1 PressOPEN/CLOSE(11)toopenthedisctray.
2 InsertaCD.CD-Ror,CD-RWintheappropriaterecessin
thetray.labelsideup.
IMPORTANT:
Forrecordingit is importantthatthe blankdisc be
completelyfreeof dustparticlesor scratches.(see
Disc Maintenance,p.5).
Unfinalizeddiscscannotbeplayed in the CDPlayer
deck!
3 Gentlypushthefrontof thetrayorpressOPEN/CLOSEto
closethetray(seealsoPlayinga CD).
CD-Recorderonly
_The displaywill indicatethe typeofdiscyouhaveinserted.
AUTOTRA(;r( 9[AI _EM TRACK TME TrTAL REM TRA/3( H_._
PAUSE 1G ANAIQ(_ OFT PROG RFp_A_-I _AJS_ P_OG _ p_TI
Whenyoupressabuttonontheremotecontrol,theindicator
on thedisplaywill lightup.
_ I{€O TRACK OVER
_USB_ SHUFFLE SCAN 1 0 O
CDSYNC t 0 0
II II
Note.Unlessindicatedotherwise,allbuttonsarelocatedon
thefrontof theCORecorder/PlayerIf alsoprovidedon
theremotecontrol,the correspondingbuttonson the
remotecontrolcanbe usedafter theCORecorderor
theCOPlayerhasbeenselectedbypressingCD-Ror
CO.
• If a CD-Risfinalizedthedisplaywillindicateco.
• If a CO-RWis finalizedit is still a CO-ReWritableandthe
displaywill indicateCDnEMrrael.E
Ifyouinserta blankorpartly-recordedCO-RorCD-RW,the
CDrecorderwill calibratethediscfor optimumrecording.
Duringthisprocessthedisplaywill firstshowDPL- andthen
thenumberofaudiotrackspreviouslyrecorded.Calibration
cantakeup to25seconds.
AUTO TBA_:I( TOTAL RM T_g_ TM_
I-I 0 I-"
UI L
PAt_SE [Jl/_ ANALOG OPT P_OG RBFEA_i
Note."OnlyAudioCOswill be accepted.If a non-audiodiscis
inserted,thedisplaywill indicate,,u RLId lun.
I1 TOTALREM T_A{:_ TIME
_ PA_SE PRU6 _EpEA_I
II
El COPYPROHIBIT
17F7
Page 15

_emarks about recording
j [Normal and high-speed dubbing
Youwill soondiscoverhow easyit is to make yourown COs
Nevertheless,we recommendthatyou usea CD-RWdisc for
yourfirst try. Thetwo ways to makerecordingsaredescribed
below:
- Digital dubbing)normalor high-speeddubbing)
- Recordingfrom an external source:
- Digital
- Digital with synchronizedstart usingexternal CDplayer
- Analogue
• The recordingprocedureisthe samefor CD-RsorCD-RWs
• If the disc is a CD-RWandis alreadyfinalizedyoumust
unfinalizeit first (page17).
• Ifthe disc already containsrecordings,theCDrecorderwill
automaticallysearchfor the end of the last track, so that
you canstart recordingfromthere.
• There mustbe at least 7 secondsof recordingtime left on
the disc, or you will not be ableto activatethe record
standbymode.
• If the display indicatescoPYPROHIBIT,no digital recording
can bemadeof the sourcematerial. Recordingwill not
start or will stop after 4 seconds.
• TheSerial CopyManagement System (SCMS)only
alLowsdigital recordingunderspecificconditions:
- It is not possibleto make a digital copyfrom a digital
copy.
- Analoguerecord!ngisalways possible!
- Thenumberof recordingsfrom the original is unlimited.
• A maximumof 99trackscanberecordedona disc.The
minimumallowabletracklengthis4seconds.
• Digital recordingscanbe madefrom CDs(orother sources
with an output SampleFrequencyof 44,1 kHz+/- 100 ppm)
via the digital input.
• RecordingsfromDATor DCCplayerswill not stop
automaticagy.
{lmportant:
If you want to play back the recorded CD-R disc on the
CDPlayer deck or on any etherregular CDplayer, it
must be finalized first.See the instructions for
finalizing discs (page 17).
Finalized CD-RWdiscs play only on CD-RW _
CDplayers.
Usethedubbingfeaturefor high-speedrecordingfromthe CD
Playerdeckto the CDRecorderdeck.Thequality of the
original recordingwill be retained.
Somecommentsaboutdubbing:
Acomplete disc or programcanbe copiedat high speed
(euaa).
- Single tracksor programscanbe copiedat normalspeed
(OUeB-I).
- Tracknumberswill be increasedautomatically,
- Tracknumberscannotbe increasedmanually.
Preparing for normal and high-speed dubbing
1 Makesurethat the recordingdisciscompletelyfree of
scratchesanddust particles.
2 If necessary,pressthe DUALbuttonto switch off the DUAL
modeonthe display.
")' DUALshouldbeoff.
f_Lji; i _ilLiF_i 7¸ $GA_ i! II SHiJFF_E
Starthigh-speeddubbing(Disccopy)
1 Torecorda completediscor program,press DUBB
repeatedlyuntil:
•-) dUbb appearsand OUBBflasheson the display.After
sometime, bUSEr andthe track numberwill appearon
the display.TheCDPlayerwill scanthe tracksonthe
CDand thenstop.
L_l_ !i L F_LE 'S(:,', ! ! _,[,(,L
0 LII_I _ - I_ II II
r'_tusf OG J',_lO, OT pIInG _EpEt i II II FAj7 PRf)_I EI>EATi
• Tosee thetracksthatwill be recorded,press DISPLAY.
Thetracknumberswill beshown in sequence.
- If nu_nFE[ appears,the track cannotbe dubbed.
- If F]nF_Lun_UE FEE appears,the trackedwill be
dubbedanalogueat normalspeed.
-All other tracks will becopiedin the normal fashion at
double speed.
- Tracksfor whichd f_ It:RL F_E appearswill be
digitallyrecordedat doublespeed.
E '3
Ii II
ii II
II II
13
Page 16

RECORDING
2 To start dubbing,pressPLAYon the COPlayerdeck.
•_. High-speeddubbingwill start. DuDewill stop flashing
andremain lighted. Thetrack numberand the recording
time will be displayed.
• Tocheckthe(remaining)recordingtime,pressDisplay(this
canbe done during recording).
• Dubbingwill stop automatically.
3 Tomanuallystop recording,pressSTOP
DDBewill goout anddubbingwill stop.Theminimal
track length must be fourseconds,otherwise a pause
will beaddedto the track
After dubbing,thedisplaywill show for severalseconds.The
Total"limeindicationsmaydifferslightty, butnoaudio ! " _ _'_._°_ii_ T__
After dubbing,UPdRbcu will appearon the displayfor
severalseconds.TheTotal"timeindicationsmaydiffer
slightly,but no audio informationwill berust.
Note.Pausecannotbeoperated duringoue#-l.
[Digital recording from an external CD Player !
,o,o,mo,,oo,s,o,,
Note." L_ _
Pausecannotbeoperatedduringouea.
Dubbingwill be doneonetrackat a time, meaningthat Preparing for digital recording
shortpauseswill beaddedbetween the tracks.If you
programafl tracksin their original sequenceanddubat ! Make sure the disc is absolutelyfree of scratchesanddust
normalspeed (Dime-l),pauseswill not beadded, particles.
Start dubbingat normalspeed(copya track or program)
Copyingonetrack at a time (DuDe-l)is doneat normalspeed.
1 Forrecording,pressDUBBrepeatedly until:
_' dUbb[] f appearsonthe display andDUDe-1flashes,
After sometime,RECORDwig flash.
2 PressSOURCErepeatedlyuntil (dependingonthedigital
connectionused):
-_ DZDd fG ILRL or Om_P_ fERL appearsonthe
display.
i!_ _ _, _,,
L.... ........ i __
2 Toselectatrackfordubbing,brieflypress[_,_or_,_)onthe
CDPlayeroneormoretimes.
• Ifyou went to copya program,you mustentertheprogram
first before selectinguuee-1IcedProgramming,page20).
• If youselect a track usingthe digital key pad onthe remote
control, dubbingwill start automatically
3 Tostart dubbing,press PLAYon the CDPlayer.
DUDe-1will stop flashing andremain lighted and the
selectedtrackor programwill be copiedat normal
speed.Thetracknumberandthe recordingtime used
will be shown onthe display.
• Tocheckthe (remaining)recordingtime, pressDisplay.This
canbe doneduringrecording.
Note. Copyprohibitedtracks will be copiedanalogue.
4 Tostop dubbing,pressSTOP
-_ Dueu-I will goout and the dubbingwill stop.The
minimaltrack lengthmustbe fourseconds,otherwise a
pausewill be addedto the track.
• Ifnecessary,pressDUALto switch off the DUALmode;
DUALwill no longerappearonthe display.
3 PressAUT0/MANUALto switch be'b,veenautomaticand
manualtracknumbering.
IfAUTOis selected(thepreferredmethod),AUTOTRACK
will appearon the display.
• AUTO: Thetrackir',crementsare automaticallycopiedfrom
the digital sourcematerial.
• MANUAL:Tracknumberscanbe incrementedmanually
bypressing_._.(minimumtrack_engthis
4 seconds).
(Thiscan alsobedonein AUTOmode).
• Tracknumberscannotbechangedafterrecording.
Note: Auto track worksonly with ConsumerSourceswith a
digital output signalaccordingto theIEC958(consumer
part)audio standard.
14
Page 17
RECORDING
Start digital recording
1 With the recorderstopped,pressRECORDto enter the
Recordstandbymode.
-_ RECORDflashes.
I
i
I
,
• If aid also flashes, the digital connectionis incorrect.
2 Tostart recording,press PLAYon the CORecorder/Player
andimmediatelystart the source(fromthe stop mode)
4 RECORDlightscontinuouslyThetracknumberand
recordingtime usedwill be indicatedon the display.
• Torecorda three-secondpause(silence)at the beginning of
a track, pressPAUSEon the CDRecorder/Player.
, Tocheckthe (remaining)recordingtime, pressDISPLAY
(Thiscanalsobe daneduringthe recording.)
I Tostoprecording,pressSTOPontheCDRecorder/Player.
-) RECORDwill goout.
Tointerruptrecording,pressPAUSE.
-I)"RECORDstarts to flash. Resumeat step 2.
After recordingthe displaywill show UPdREE for several
seconds.
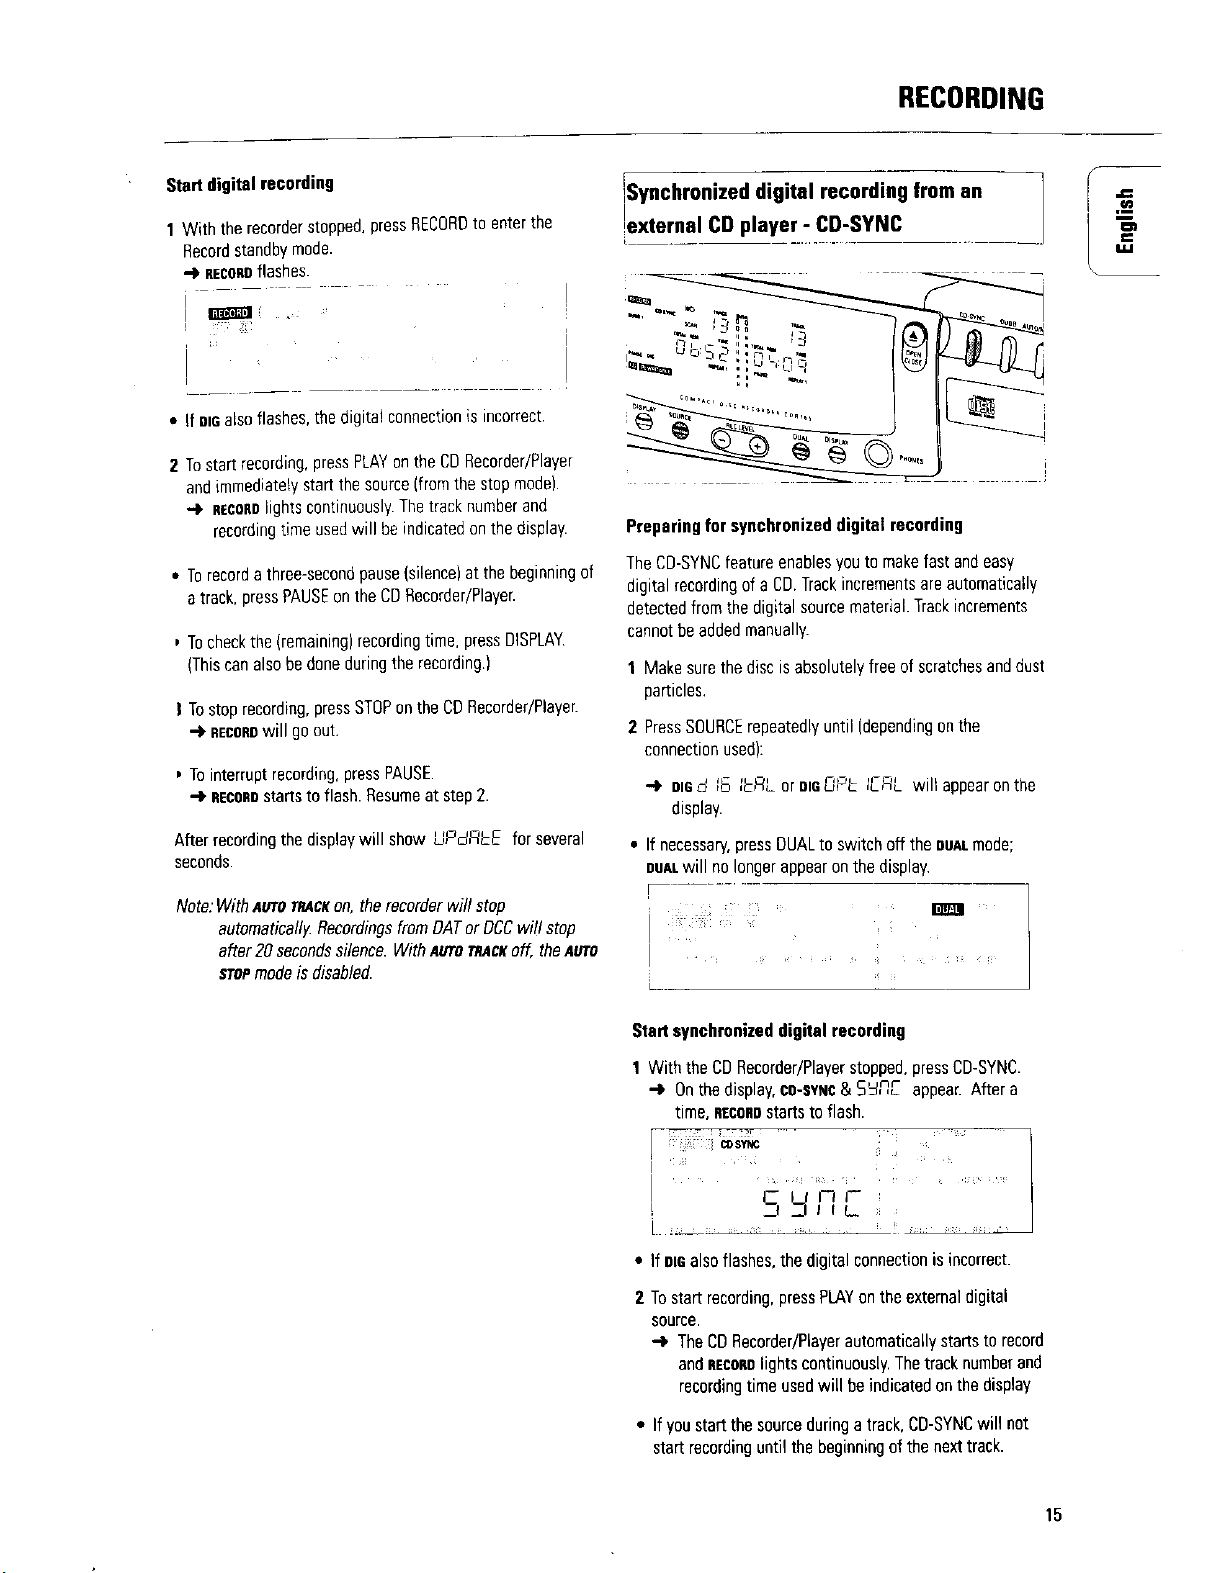
_Synchronized digital recording from an
external CD player - CD-SYNC
Preparing for synchronizeddigital recording
TheCO-SYNCfeature enablesyou te makefast andeasy
digital recordingof a CO.Trackincrementsareautomatically
detectedfrom the digital sourcematerial.Trackincrements
cannotbe addedmanually.
I Makesurethe disc is absolutelyfree of scratchesanddust
particles,
2 PressSOURCErepeatedlyuntil )dependingonthe
connectionused):
-_ ale d 16 ILFIL or amOP[: IERL wilt appearonthe
display.
• If necessary,pressDUALto switch off the DUALmode;
DUALwill nolonger appearon the display,
Note:WithAUTO7_AClton,therecorderwillstop
automatically.RecordingsfromOATorDCCwill stop
after20secondssilence.WithAUTOmACttoff, theAUTO
STOPmodeis disabled.
Start synchronized digital recording
1 With the CORecorder/Playerstopped,pressCD-SYNC.
-_ On the display,CD-RYNC& 5Et,n,E appear. After a
time, RECORDstartsto flash.
[
• If DIDalso flashes,the digital connection is incorrect.
2 Tostart recording,pressPLAYontheexternaldigital
source.
-_ The CD Recorder/Playerautomaticallystartsto record
andDECODDlights continuously.Thetrack numberand
recordingtime usedwill be indicatedon the display
• If youstart the sourceduringa track,CD-SYNCwill not
start recordinguntil the beginning of the next track.
15
Page 18

RECORDING
fa,)
• TochecktheIremaining}recordingtime,pressOISPLA¥.
(Thiscanalsobedoneduringrecording)
3 To stop recording, press STOP on the CD Recorder/Player
-1' CD-SYNCand RECOROgo out
• Tointerrupt recording,press PAUSE
4 RECORDstartsto flash. To resume,pressPLAYon the
CORecorder/Player
After recording the display will show LlPd,qkE for several
Seconds.
Note:
TheCDRecorder/Playerwill not start until it recognizesa
digital signal.Although thereaction time is less than200
mi!liseconds`the verybeginningof the musicmay
sometimesnot be recorded.If this happens,you can start
the recordingmanually(seedigital recording-
unsynchronized).
RecordingsfromDATor BCCwill only stopafter 20
secondssilence
Analogue recording from_an external source I
Onlymake analogrecordingsifdigital recordingis not
possible
Preparing for analogue recording
1 Make surethediscisabsolutelyfree ef scratchesand dust
particles
2 PressSOURCErepeatedlyuntil:
ANALOGappearsonthe display.
t _qno, S'S
! ANALOG
i
* {f necessaH,pressOUALte switch off the OUALmode;
OUALwill no longer appearon the display.
r
I(f(t_
ii
3 PressAUTO/MANUALto switch between auto andmanual
tracknumbering.
-) If Auto isselected)preferred),AUTOTRACKappearson
the display.
• AUTO: Thetrack numberisautomatically incremented
after a silenceon the original of at least 3
seconds.
• MANUAL: Tracknumberscanbe incrementedmanuallyby
pressing_. )minimumtracklength is4
seconds).(Thiscanalso be donein AUTO
mode)
• Tracknumberscannotbechangedafter recording.
#,With the recorderstopped,press RECORDto enter Record
standbymode.
-Ik REGOROwill flash
, q
i _ ' L;, l
i t;_'q ' .... , ,:
16
Page 19
RECORDING
5 Playthe sourcefirst to setthe optimalrecordinglevel on
the CDRecorder/Player.
6 PressRECLEVEL(+or -) repeatedlyuntil all the blue
segmentson the Record/Playlevelbarlight up continuously
but the red segmentsdo notduring the loudest passages
-I'The displaywill show O_db or_db or 3rib orbdb
7 Stopthe source.
Start analogue recording
1 To start recording,pressPLAYontheCDRecorder/Player
andimmediatelystart the source
4 RECORDlights continuouslyThetracknumberand
recordingtime usedappearonthe display•
• Torecorda 3-secondsilenceat the start of atrack, press
PAUSE•
• Tocheckthe (remaining)recordingtime, pressDISPLAY•
(Thiscanalso be doneduringtherecording)
2 Tostoprecording,pressSTOPon the CDRecorder/Player.
-) nEcneawill go out.
• Tointerrupt recording,press PAUSE•
-.I.BECOeDwill startto flash. Resumeat step 1.
After recordingthe displaywill show UPdREE for several
seconds•
IFinalizing CD-R& CD-RWdiscs
Finalizingis a simple procedurethat is necessaryin orderto
playbackthediscs onthe CDRecorder/Playeroronan
externalCOplayer.
Note Finalizingpreventsanyfurtherrecordingon a CD-R.
A hnalizedCD-RWmustbe unfinalizedtoallow
further recordingor erasureof tracks•
1 Makesurethe disc (inthe CDRecorder/Player)is
absolutely free of scratchesand dustparticles•
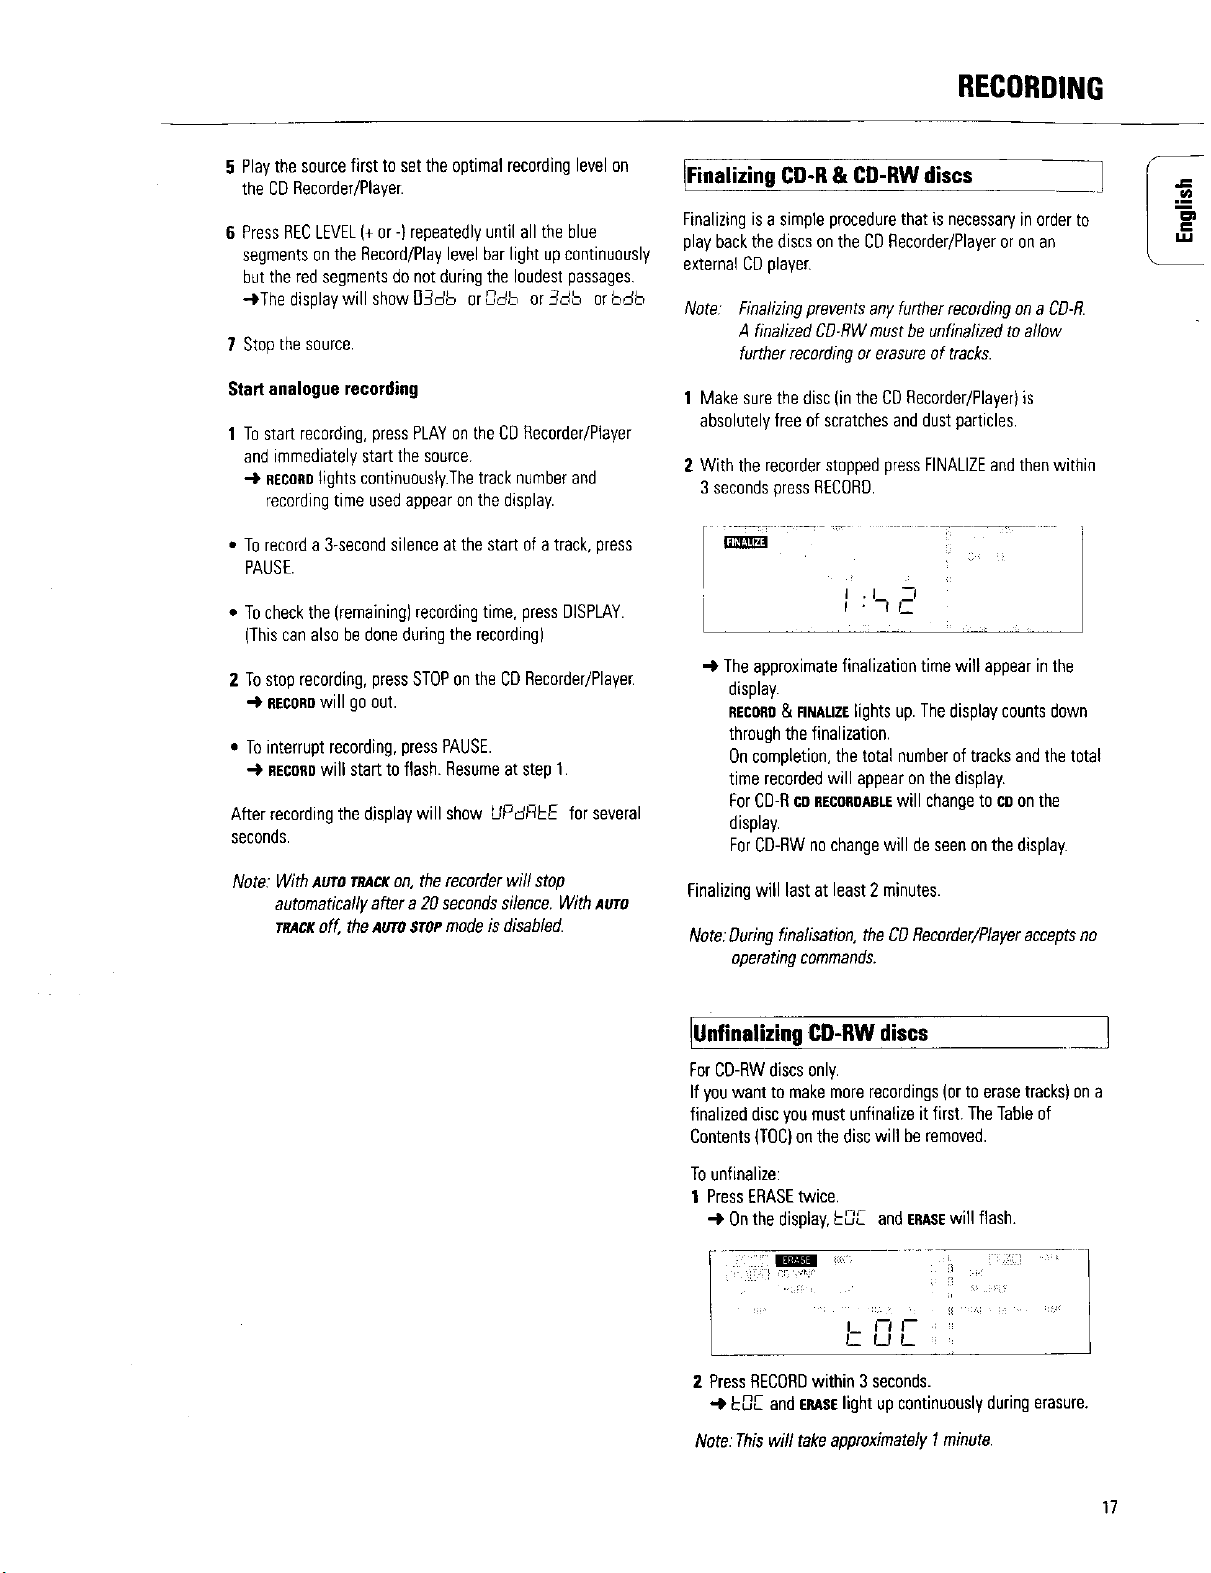
2 With the recorderstopped pressFINALIZEandthenwithin
3secondspress RECORD•
I .J
f .-_C
_" Theapproximatefinalization time will appearinthe
display•
ReCOeD&nNAUZElights up. Thedisplay counts down
throughthefinalization.
Oncompletion,the total numberoftracksandthetotal
time recordedwill appearon the display.
ForCD-RcoRECOROABLEwill changeto coonthe
display.
ForCD-RWnochangewill deseen onthe display.
Note, WithAUTOmACKon, the recorderwill stop
automaticallyafter a 20 secondssilence.With AUTO
TRACKoff, theAUTOSTOPmodeis disabled•
Finalizingwill lastatleast2 minutes•
Note.•Outing finalisation, the CORecorder/Playeracceptsno
operatingcommands.
IUnfinalizing CD-RWdiscs 1
ForCO-RWdiscsonly.
Ifyouwant to makemorerecordings(orto erasetracks)on a
finalizeddisc youmustunfinaliznit first. TheTableof
Contents(TOC)on the disc will beremoved.
Tounfinalize:
i PressERASEtwice,
-) Onthedisplay,__ andERASEwigflash.
L I'-I I--
L WL
2 PressRECORDwithin3seconds.
EnE ande_z lightupcontinuouslyduringerasure.
Note••This will take approximatelyI minute.
17
Page 20

ERASING& PLAYING
[Erasing CD-RW discs ] _ - 1
ForCD-RWdiscsonly
Youcanerase:
- track by track from the end
- the entire disc
Toerase the lasttrack :
1 Makesure the disc is not finalized (Showing n-r on
displayduringstart up). Otherwiseunfinalizefirst (p17)
2 PressERASE
-I. Onthe dlspla;, c, ,_ andERASEwill flash
3 PressRECORDwithin 3 seconds•
-.) _FR andERASElight continuouslyduringerasure•
Toerase the entire disc:
...... iPlaymg CDs on Deck 1 and/or Deck 2 I
With your CD DoubleDeck,youcan play the CDRecorder
deckand/or the COPlayerdeckeither simultaneouslyor
separately(DUAL)Forseparateplaying,theextraCDoutput
mustalsobe connectedto anamplifier(seepage9).
i b J I_
FID
i i i
1 Press DUAL to switch DUALon
-IP DUALwill light up continuously
2 Onthe deckyouwant to use,pressPLAYto start CDplay•
_' Thetrack numberand the tracktime forthe deckin play
will appearon the display,togetherwith the
record/playlevelindicator.
1 PressERASEonce(for finalized CD-RW)and twice (for
unfinalizedCD-RW)
•-I. Onthe display,d _5Cand ERASEwill flash.
I'.5'-
2 PressRECORDwithin 3 seconds,
i r-
-) d ,£L and ERASElight continuouslyduringerasure.
Erasureof a complete disc maytake upto 1.5minutes•
3 PressDISPLAYonce,twice or threetimes te see:
-_ Remainingtracktime, total remainingtime, or total
tracktime )without level indicator(,
4 To interrupt playtemporarily,pressPAUSE.
-IPPAUSEwill light up anthe display
5 Tocontinueplay,pressPAUSEagainor pressPLAY.
6 To stopplay,pressST0£
-_ Thenumberof tracks andthe total playingtime will
appearonthedisplay.
[Playing as a 2-disc changer i
YourCDRecorder/Playercanplay COsin both deckseither
successivelyor in randomorder(SHUFFLEplay)
1 PressDUALto switch DUALoff
-]PCOALshouldbeoff.
2 Onthe deckyou want to use,pressPLAYte start CDplay.
-_ Thetrack numberand tracktime of the deckin play
appearonthe display,together with the record/play
levelindicator,
After the first disc hasplayed,the seconddisc will beplayed,
18
TIP:
UseSHUFFLEto playthe tracks onthe two discsin random
order(seeSHUFFLE,page19).
Page 21

PLAYING
3 PressDISPLAYonce,twice or three times te see:
-1, Remainingtracktime, total remainingtime,or total
tracktime with level indicatoroff.
4 Totemporarily interruptplay,pressPAUSE
•-I*PAUSEwill light upon the display.
5 Tocontinueplay,pressPAUSEagainor pressPLAY.
6 Tostopplay,pressSTOP.
-_ The numberof tracks andthe total playingtime on the
CDwill appearon the display.
iSelecting a trac-k or searching " i_
PHIl
Selecting atrack during play
1 Briefly press [_ or_] one or moretimes.
Theplayerwill skipto the beginningof the current,
previousornext tracks,includingtracksonthe other
disc when both decksarein useasa 2-disc changer
or
• SelectCD Ror CDonthe remotecontrol,then pressthe
desiredtracknumberusingthe numerickey pad onthe
remotecontrol Fortwo-digit tracknumbers,pressthe
numerickeysinrapid succession.Fortracks on the other
disc,selectthe desireddeckfirst by pressingCDor CD-R.
-_ Playwill skip to the beginningof the selectedtrack
Selecting a track when CD is not playing
1 Briefly press[_,_or k,_]oneor more times.
or
Select CD-RorCDon the remotecontrol, then pressthe
desiredtrack numberusingthe numerickeypadon the
remotecontrol.Fortwe-digit track numbers,pressthe
numerickeysin rapidsuccession,
2 PressPLAY.
-1 Playwill startwiththetrackselected
2 Releasethe button when the desired passagehasbeen
found.
-_ Playwill start with the desiredpassage
Note: During Shuffle, RepeatorProgrammedplay,searchis
restricted to within the track beingplayed at the time.
[Shuffle (rand0m- order) play _ 1
1 Press DUALto switch aff the DeALmode and te switch an
the Ewe-disc changer mode.
-I_ DUALshould not be lighted on the display.
2 Press SHUFFLEon the remote contrel before starting or
during play to activate shuffle play.
-_ Thetracks on the CD(erin programif programmed)wilt
playin randomorder.5HUFFL_ will appearonthe
display betweentracks
3 PressSHUFFLEagainto returnto normat CDplay.
Note: Shuffle is also clearedwhen youopenthe disc tray`
JRepeatCD, track or program
1 PressREPEATon the remetecontrol oneormore times
duringCDplay.
•'_ WhenREPEATI appearson the display,the current track
playsrepeatedly.WhenRZPF.ATappearsonthe display,
the discsorprogrammesplayrepeatedly.
2 Toreturnto normal play,pressREPEATone or moretimes
until:
The repeatmessagedisappearsfromthe display.
Note:
Youcan useshuffle in combinationwith repeatCOor
programmedplay using the two-disc change_
Repeatwill also be clearedif youopenthe disc tra_
Searching during CD play
1 Holddown[_,_orz*_)onthe front of the deckor_ orz_
ontheremotecontrol.
4 Theplayerwill searcheither forward or backwardat ten
times the normalspeedwith the soundonlow level,
andwig then searchat fifty times the normalspeed
with the soundmuted.The searchwill extendoverboth
discs if the changermode(DUALoff) is activated
19
Page 22

PLAYING
m
:3
=_
IProgramming
Youcanprogramupto thirty tracks to play in a desired
sequenceusingeither the CDPlayerdeckorthe 00
Recorder/Player.Individualtracks canbe includedinthe
programmorethan once,but will countasa trackeachtime
they are included.
1 PressCD-RorCDon the remotecontrolto selecta deck
Themessage£FLE,_'_,'_-Calf or S_LCF_ Ld will
brieflyappearonthe display.
2 PressPROGRAMon the remotecontrol to start
programming.
PROGwill flash andPF_06 _dF or
PEru5 Ed will brieflyappearonthe display.
3 Pressa track numberwith the numberkeys.For2-digit
numbers,pressthekeys in rapidsuccession.
•_' Onthe display,the track numberappearsbriefly,
followed by the total programmedtracksandtotal
programtime.
4 Repeatstep 2for all tracksto he programmed.
5 PressSTOPorPROGRAMtoendprogramming.
Peeelightscontinuously.
Note:
- Toreviewtheprogram,press[_ or_,_]withthedeckinthe
stopmode.
- Toaddmoretrackstotheprogram,repeatstepsI through6.
- Ifyoutrytostoremorethan30tracks,FULLappearson
thedisplay
6 PressPLAYto start programmedplay.
Clearing a program
1 PressSTOPif necessarytostep programmedplay.
2 PressSTOPagaintoclearthe program.
Imoodisappearsfromthe display
Note:Theprogramisalsoclearedwhenyouopenthedisc
traF
2O
Page 23
FIXING PROBLEMS
Troubleshooting
If you think your CORecorder/Playeris defective, it iswise to
checkthis list first, and runthediagnostic program Maybe
you haveforgotten a simplestep
Warning!
Under no circumstances should you attempt to repair
the CD Recorder/Player yourself as this will invalidate
the guarantee.
SYMPTOM: • SOLUTION:
No power • checkto ensurethat the ON/0FFbuttonis on
• checkto ensurethat the powercable is
pluggedin correctly
• switchthe recorderOFFandthen immediately
backON
Auto track does not work
• checkto ensurethat autotrack isselected.
• checkto ensurethat there are 3 seconds
silenceinbetween the tracks (analogue
recordingonly)
• checkto ensurethat the sourceis a consumer
sourcewith the digital outputaccordingthe
lEOaudiostandard.
No sound • checkthe audio connections
• if usinganamplifier,try usingadifferent
source
20 second pause between recordings
• seeSynchronizeddigital recording(CD-SYNC)
p.15
Player does not react
• switchthe ON/OFFbutton onthe front ofthe
playeroff andbackon
; _-C_UFF on display
• a powerfailure hasoccuredduringrecording,
the CORecorder/Playerisattempting to repair
the disc.
• if FCR,4 tS£ then appearson the display,the
disc cannotbe recerdedfurther and cannotbe
finalized It can, hewever,still beplayed on
the CDRecorder/Playeror on anotherCO
recorder
• on a CO-RWdisc, the track being recordedis
lost, but further recordingandfinalization can
still be done.
• Ifl-,'L;'_PC appearsen the display,the disc
cannotbeusedfor recording.However,it can
still beusedas a COonthis recorder.
NOr]FEE ondisplay
• While scanninga CObefore recording,anon-
audiotrack was detected,Thistrackcannotbe
copiedandwill be skipped.
Amplifier sound is distorted
• checktoensurethat the CDRecorder/Player
analogueoutputis not connectedto the
amplifier Phenoinput
Play will not start
• checkto ensurethat the labelofthe CDis
facingup
• cleanthe disc
• checkto ensurethatthe disc is not defective
bytrying anotherdisc
• makesure that the disc has beenfinalized for
playin a COplayer.
Remote control does notwork
• pointthe remotecontrol directly at the
CDRecorder/Player
• checkthebatteriesand replace if necessary
Will not record
• cleanthedisc
• checkto ensurethat CD-RWis not finalized
• checkto ensurethat the disc is recordableand
replaceif necessary
• makesurethe disc isan AUDIOdisc
(,n,FJ F:fUd _un maynot appear)
• wronginputsourceselected.
Analog recording is distorted
• makesure the recording level is correct
[Diagnostic program 1
Ifthe malfunction persists,perform the DiagnosticProgram:
1 Switchthe CORecorder/Playeroff usingON/OPE
2 SimultaneouslypressPLAYandSTOPandswitchtheCD
Recorder/PlayerbackonusingON/OFE
Thedisplaywill nowindicatebUSEt andafterafew
minutes,themessagewill changetoBRI]FIor
P_SSEd
Ifthe rlBrlR messageappears,yourrecorderis
defectiveandneedste berepaired,Consultyour
supplier or callthe PhilipsConsumerLineto find the
nearestservicecentre.Thenumberof the Consumer
Linecanbe found in the guaranteebooklet.
If the PRSSEd messageappears,youmaybe
misinterpretingthe userinstructionsor usingan
inappropriatedisc,or there maybe a mechanicaldefect
or an incorrect connection.Carefullyreadthe user
instructionsonce again;and if necessarycontactyour
supplier.
• If youcannotsolvetheproblem,contactto the nearest
servicecentre.
3 Switch off the CORecorder/PlayerusingON/OFFto exit
from the DiagnosticProgram.
21
Page 24

 Loading...