

Page 1
Owner’s manual
Manuel du propriétaire
Manual del propietario
32MF330B
26MF330B
LCD TV
English
1-866-341-3738
1-866-341-3738
Quick Use Guide Inside!
Guide d’usage Rapide Incluse!
Guía de Uso Rápido Incluida!
1-866-341-3738
Français
Español
MODEL NUMBER SERIAL NUMBER
Page 2

If you have any questions, please visit our website at
www.
magnavox .com/support
Quick
Start
EN
Installation
FR
Installation
ES
Instalación
Need help connecting this LCD TV? Call us at 1-866-3
Vous avez besoin d’aide pour connecter ce téléviseur LCD?
Appelez-nous au 1-866-3
¿Necesita ayuda para conectar esta TV LCD ? Llame al número 1-866-3
Model / Modèle / Modelo :
Serial / Série / Serie:
41-3738
41-3738
41-3738
Page 3

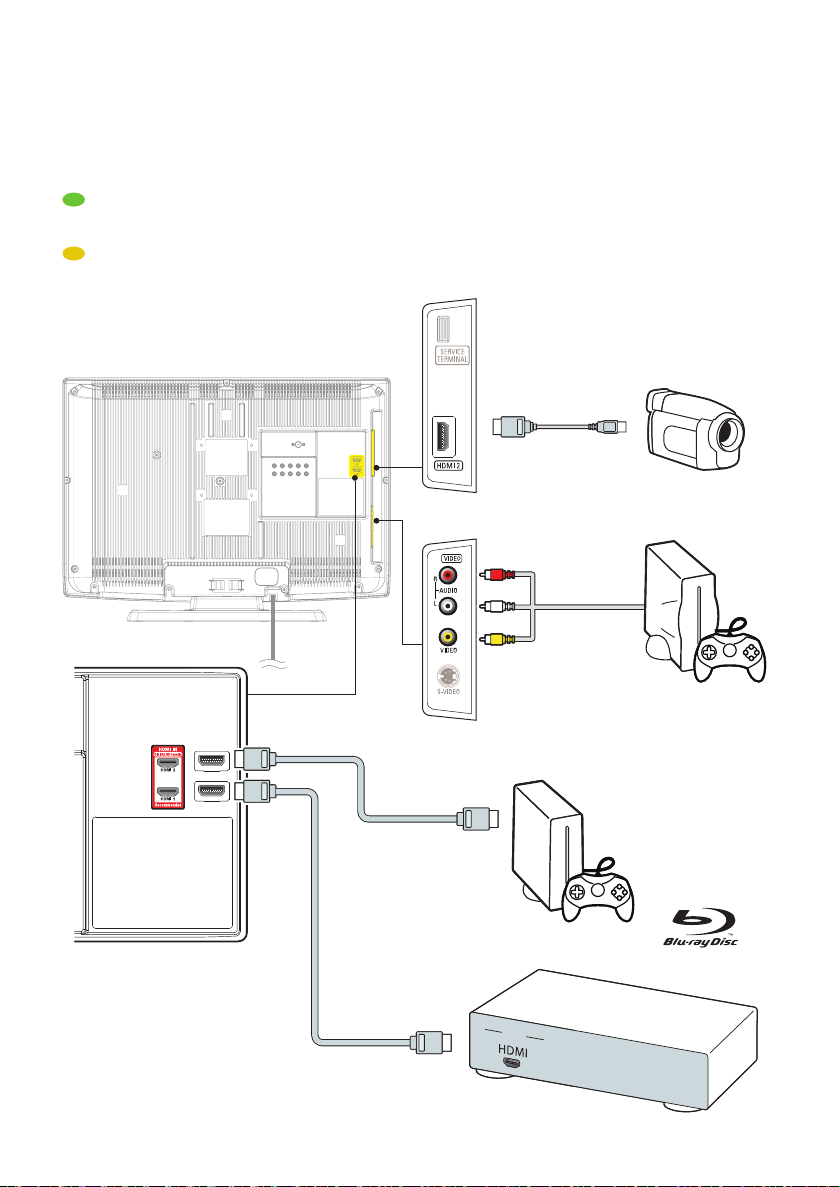
HD camcorder, game console,
Blu-ray Disc player, HD game console
FR
caméscope haute défi nition, console de jeu,
lecteur de disque Blu-ray, console de jeu HD
ES
cámara de video HD, consola de juegos,
reproductor de discos Blu-ray, consola de juegos HD
TV
Game
console
HD camcorder
VIDEO
S-VIDEO
VIDEO
L
AUDIO
R
HDMI 2
OUT
Blu-ray Disc player
HD game
console
Page 4

DVD recorder, cable receiver, satellite box
FR
Enregistreur DVD, décodeur câble, décodeur satellite
ES
Grabador DVD, receptor de cable, receptor de satélite
DVD recorder
TV
OUT
IN
ANTENNA
IN
OUT
OUT
Cable receiver/
Satellite box
A
N
TENNA
IN
OUT
Page 5
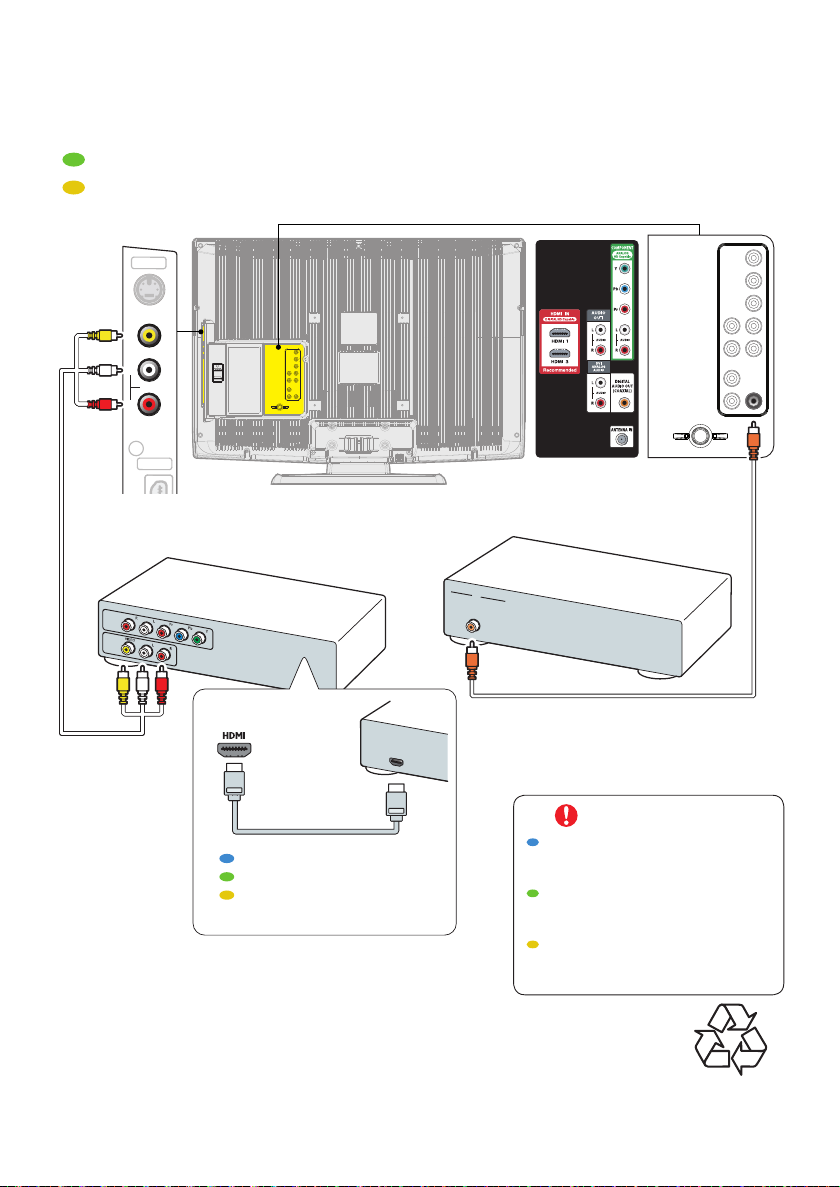
DVD player, home theater system
FR
Lecteur DVD, Système de cinéma maison
ES
Reproductor de DVD, sistema Home Theatre
TV
VIDEO
S-VIDEO
VIDEO
L
AUDIO
R
HDMI 2
DVD player
OUT
OUT
Or use an HDMI connection
Ou utilisez une connexion HDMI
O use una conexión HDMI
Specifi cations are subject to change without notice
© 2010 Funai Electric Co., Ltd.
www.magnavox .com/support
HDM
OUT
Home theater system
IN
DIGITAL
AUDIO
IN
I
Caution
Disconnect the AC power cord before
connecting devices.
Attention
Déconnectez le cordon d’alimentation
avant de raccorder les appareils.
Precaución
Desconecte el cable de suministro eléctrico
antes de conectar dispositivos.
Printed in China
1EMN25 840 ★★★★★
Page 6

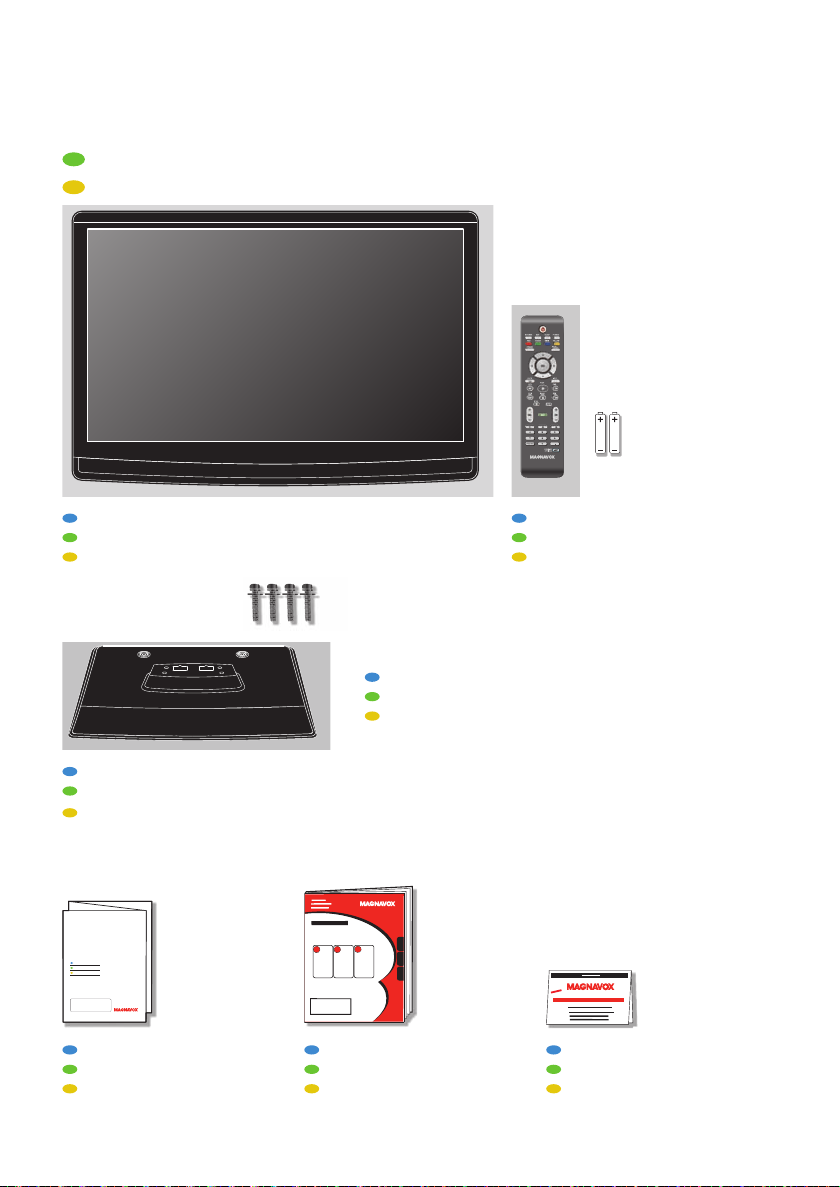
What’s in the box
FR
Contenu de la boîte
ES
Qué hay en la caja
AAA
AAA
Television
Téléviseur
Televisor
TV base and 4 bolts (M 4 x 20)
Socle du téléviseur et 4 boulons (M 4 x 20)
Base de TV y 4 pernos (M 4 x 20)
If you have any questions, please visit our website at
www.
magnavox .com/support
Quick
Start
EN
Installation
FR
Installation
ES
Instalación
Quick Start
Démarrage Rapide
Inicio Rápido
Base may differ according to TV model.
Le socle peut être différent d’un modèle de téléviseur à l’autre.
La base puede variar según el modelo de TV.
Owner’s manual
Manuel du propriétaire
Manual del propietario
Remote control and 2 AAA, 1.5V batteries
Télécommande et 2 piles AAA, 1,5V
Mando a distancia y 2 baterías AAA, 1,5V
Registration card
Carte d’enregistrement
Tarjeta de registro
Page 7

Mount base onto TV
FR
Montage du socle sur le téléviseur
ES
Acople la base al TV
1
2
x 4
Page 8

Connect the power
and antenna or cable
FR
Connexion de la prise secteur et de l’antenne ou du câble
ES
Conecte los cables a la red eléctrica y la antena o el cable
TV
a
b
Cable
Page 9

Use the remote control
AAAAAAAAA
AAA
AAAAAA
FR
Utilisez la télécommande
ES
Uso del mando a distancia
1
CURSOR AND OK KEYS
Press ▲,▼ or ◄,► to navigate
the TV menu. Press OK to
2
3
confi rm selection.
TOUCHES CURSEUR ET OK
Appuyez sur ▲,▼ ou ◄,► pour
naviguer dans le menu du
téléviseur. Appuyer sur OKpour
confi rmer la sélection.
TECLAS DE CURSOR Y OK
Pulse ▲,▼ o ◄,► para navegar al
menú del TV. Pulse OK para
confi rmar la selección.
First time setup
FR
Première confi guration
ES
Confi guración inicial
Initial Setup
Select your menu language.
Seleccione el idioma para el menú.
Sélectionnez la langue du menu.
Select
OK
OK
English
Español
Skip
MENU
Skip
Initial Setup
Select “Retail” or “Home” for your location.
Retail
Select
Home
OK
OK
Follow the on-screen instructions to complete your TV setup.
Suivez les instructions apparaissant à l’écran pour terminer la confi guration de votre téléviseur.
Siga las instrucciones en pantalla para realizar la confi guración de la TV.
Select source
FR
Sélection de la source
ES
Seleccione una fuente
Source
TV
Video
1
Component
HDMI1
HDMI2
HDMI3
2
Page 10

If you have any questions, please visit our website at
www.
magnavox .com/support
Quick
Start
EN
Installation
FR
Installation
ES
Instalación
Need help connecting this LCD TV? Call us at 1-866-3
Vous avez besoin d’aide pour connecter ce téléviseur LCD?
Appelez-nous au 1-866-3
¿Necesita ayuda para conectar esta TV LCD ? Llame al número 1-866-3
Model / Modèle / Modelo :
Serial / Série / Serie:
41-3738
41-3738
41-3738
Page 11
HD camcorder, game console,
Blu-ray Disc player, HD game console
FR
caméscope haute défi nition, console de jeu,
lecteur de disque Blu-ray, console de jeu HD
ES
cámara de video HD, consola de juegos,
reproductor de discos Blu-ray, consola de juegos HD
TV
Game console
HD camcorder
HD game
console
Blu-ray Disc player
O
UT
Page 12

DVD recorder, cable receiver, satellite box
FR
Enregistreur DVD, décodeur câble, décodeur satellite
ES
Grabador DVD, receptor de cable, receptor de satélite
TV
OUT
IN
OUT
Cable receiver/
Satellite box
DVD recorder
ANTENNA
IN
O
UT
ANT
ENNA
I
N
O
UT
Page 13

DVD player, home theater system
FR
Lecteur DVD, Système de cinéma maison
ES
Reproductor de DVD, sistema Home Theatre
OUT
OUT
TV
IN
DIGITAL AUDIO
IN
DVD player
HDMI
OUT
Or use an HDMI connection
Ou utilisez une connexion HDMI
O use una conexión HDMI
Home theater system
Specifi cations are subject to change without notice
© 2010 Funai Electric Co., Ltd.
www.magnavox .com/support
Caution
Disconnect the AC power cord before
connecting devices.
Attention
Déconnectez le cordon d’alimentation
avant de raccorder les appareils.
Precaución
Desconecte el cable de suministro eléctrico
antes de conectar dispositivos.
Printed in China
1EMN26281 ★★★★★
Page 14
What’s in the box
FR
Contenu de la boîte
ES
Qué hay en la caja
AAA
AAA
Television
Téléviseur
Televisor
TV base and 4 bolts (M 4 x 20)
Socle du téléviseur et 4 boulons (M 4 x 20)
Base de TV y 4 pernos (M 4 x 20)
If you have any questions, please visit our website at
www.
magnavox .com/support
Quick
Start
EN
Installation
FR
Installation
ES
Instalación
Quick Start
Démarrage Rapide
Inicio Rápido
Base may differ according to TV model.
Le socle peut être différent d’un modèle de téléviseur à l’autre.
La base puede variar según el modelo de TV.
Owner’s manual
Manuel du propriétaire
Manual del propietario
Remote control and 2 AAA, 1.5V batteries
Télécommande et 2 piles AAA, 1,5V
Mando a distancia y 2 baterías AAA, 1,5V
Registration card
Carte d’enregistrement
Tarjeta de registro
Page 15
Mount base onto TV
FR
Montage du socle sur le téléviseur
ES
Acople la base al TV
1
2
x 4
Page 16
Connect the power
and antenna or cable
FR
Connexion de la prise secteur et de l’antenne ou du câble
ES
Conecte los cables a la red eléctrica y la antena o el cable
TV
a
b
Cable
Page 17

Use the remote control
AAAAAAAAA
AAA
AAAAAA
FR
Utilisez la télécommande
ES
Uso del mando a distancia
1
CURSOR AND OK KEYS
Press ▲,▼ or ◄,► to navigate
the TV menu. Press OK to
2
3
confi rm selection.
TOUCHES CURSEUR ET OK
Appuyez sur ▲,▼ ou ◄,► pour
naviguer dans le menu du
téléviseur. Appuyer sur OKpour
confi rmer la sélection.
TECLAS DE CURSOR Y OK
Pulse ▲,▼ o ◄,► para navegar al
menú del TV. Pulse OK para
confi rmar la selección.
First time setup
FR
Première confi guration
ES
Confi guración inicial
Initial Setup
Select your menu language.
Seleccione el idioma para el menú.
Sélectionnez la langue du menu.
Select
OK
OK
English
Español
Skip
MENU
Skip
Initial Setup
Select “Retail” or “Home” for your location.
Retail
Select
Home
OK
OK
Follow the on-screen instructions to complete your TV setup.
Suivez les instructions apparaissant à l’écran pour terminer la confi guration de votre téléviseur.
Siga las instrucciones en pantalla para realizar la confi guración de la TV.
Select source
FR
Sélection de la source
ES
Seleccione una fuente
Source
TV
Video
1
Component
HDMI1
HDMI2
HDMI3
2
Page 18

EN
www.magnavox.com/support today to get the very most from your purchase.
Registering your model with MAGNAVOX makes you eligible for all of the valuable benefits listed below, so don’t miss out.
or register online at www.magnavox.com/support
:
*
e
*
y
*
w
t
.
t
.
l
.
,
:
T
y.
ppy
.
A
r
,
k.
r
l
.
A
d
t
.
:
w
t
h
y
ls
T
s
y
g.
T
g
.
r
d
liquid
.
h
.
A
s
jusq
.
e
d
s
.
.
.
Return your Product Registration Card or register online at
Complete and return your Product Registration Card at once,
Proof of Purchas
Product Safet
Notification
eturning the enclosed card
guarantees that your date of purchase
ill be on file, so no additional
paperwork will be required from you
o obtain warranty service
Congratulations on your purchase
and welcome to the “family!”
Dear MAGNAVOX product owner
hank you for your confi dence in
MAGNAVOX. You’ve selected one of the
est-built, best-backed products available toda
We’ll do everything in our power to keep you ha
with your purchase for many years to come
s a member of the MAGNAVOX “family,” you’re
entitled to protection by one of the most
omprehensive warranties and outstanding service
networks in the industry. What’s more, you
purchase guarantees you’ll receive all the
nformation and special offers for which you qualify
plus easy access to accessories from our convenient
ome shopping networ
ost importantly, you can count on ou
uncompromising commitment to your tota
satisfaction
ll of this is our way of saying welcome - an
hanks for investing in a MAGNAVOX product
By registering your product, you’ll
receive notifi cation directly from
he manufacturer - in the rare
case of a product recall or safety
efect
to ensure
Additional Benefits
egistering your product
guarantees that you’ll receive all
f the privileges to which you’re
ntitled, including specia
money-saving offers
now t
ese safet
his “bolt of lightning” indicate
uninsulated material within your unit
may cause an electrical shock. For the safet
of everyone in your household, please do not
remove product coverin
he “exclamation point” calls attention to
features for which you should read the
enclosed literature closely to prevent operatin
and maintenance problems
WARNING : To reduce the risk of fi re o
electric shock, this apparatus should not be
exposed to rain or moisture and objects fi lle
with
aced on this apparatus
AUTION : To prevent electric shock, matc
wide blade of plug to wide slot, fully insert
TTENTION : Pour éviter les choc électriques,
ntroduire la lame la plus large de la fi che dan
a borne correspondante de la prise et pousser
s, such as vases, should not be
u’au fond
symbo
.S. To get the most from your MAGNAVOX
purchase, be sure to complete and return your
roduct Registration Card at once or register
online at
ww.magnavox.com/suppor
Visit our World Wide Web Site at www.magnavox.com/support
or Customer Us
Enter below the Serial No. which is locate
on the rear of the cabinet. Retain thi
nformation for future reference
odel No
erial No
2
Page 19

h
IMPORTANT SAFETY INSTRUCTIONS
t
.
.
.
.
.
.
.
th
.
r
d
d
r
.
d
w
.
t
.
s
,
s
t
d.
:
;
;
;
d.
.
which
.
d
.
ili
.
is
.
A
r
f
,
r
.
.
dily inj
,
:
s
.
d
.
time.
e
A
)
A
E
S
ead before operating equipmen
. Read these instructions
2. Keep these instructions
. Heed all warnings
4. Follow all instructions
. Do not use this apparatus near water.
6. Clean only with a dry cloth
. Do not block any of the ventilation openings
Install in accordance with the manufacturer’s instructions
8. Do not install near any heat sources such as radiators, heat
registers, stoves, or other apparatus (including amplifiers)
at produce heat
9. Do not defeat the safety purpose of the polarized o
grounding-type plug. A polarized plug has two blades with
ne wider than the other. A grounding type plug has two
ades and third grounding prong. The wide blade or thir
prong are provided for your safety. When the provide
plug does not fit into your outlet, consult an electrician fo
replacement of the obsolete outlet
0. Protect the power cord from being walked on or pinche
particularly at plugs, convenience receptacles, and the point
here they exit from the apparatus
1. Only use attachments/accessories specified by the
manufacturer.
se only with a cart, stand, tripod, bracket, or table
specified by the manufacturer, or sold with the appara-
us. When a cart is used, use caution when moving the
art/apparatus combination to avoid injury from tip-over.
3. Unplug this apparatus during lightning storms or when unused for long periods of time
4. Refer all servicing to qualified service personnel. Servicing i
required when the apparatus has been damaged in any way
such as power-supply cord or plug is damaged, liquid ha
been spilled or objects have fallen into apparatus, the appara-
us has been exposed to rain or moisture, does not operate
normally, or has been droppe
5. Damage Requiring Service - The appliance should be
serviced by qualified service personnel when
A. The power supply cord or the plug has been damaged
B. Objects have fallen, or liquid has been spilled into the
appliance
C. The appliance has been exposed to rain
D. The appliance does not appear to operate normally or
exhibits a marked change in performance
E. The appliance has been dropped, or the enclosure damage
6. Tilt/Stability - All televisions must comply with recommended
nternational global safety standards for tilt
and stability properties of its cabinet design
• Do not compromise these design standards by applying
xcessive pull force to the front, or top, of the cabinet
could ultimately overturn the product
• Also, do not endanger yourself, or children, by placing
electronic equipment/toys on the top of the cabinet. Such
tems could unsuspectingly fall from the top of the set an
cause product damage and/or personal injury
7. Wall or Ceiling Mounting - The appliance should be
mounted to a wall or ce
ng only as recommended by the
manufacturer.
8.
ower Lines - An outdoor antenna should be located
away from power lines
9.
utdoor Antenna Grounding - If an outside antenna
s connected to the receiver, be sure the antenna system
grounded so as to provide some protection against voltage
surges and built up static charges
ection 810 of the National Electric Code, ANSI/NFP
o. 70-1984, provides information with respect to prope
grounding of the mast and supporting structure, ground-
ng of the lead-in wire to an antenna discharge unit, size o
grounding connectors, location of antenna-discharge unit
onnection to grounding electrodes, and requirements fo
the grounding electrode. See Figure below
20.
bject and Liquid Entry- Care should be taken so
that objects do not fall and liquids are not spilled into the
enclosure through openings
21. Battery Usage CAUTION- To prevent battery
eakage that may result in bo
r damage to the unit
• Install all batteries correctly, with + and - aligned a
marked on the unit
• Do not mix batteries (old and new or carbon an
alkaline, etc.)
• Remove batteries when the unit is not used for a long
nglis
ury, property damage
Note to the CATV system installer : This reminder is provided to call the CATV system installer’s attention to Article
820-40 of the NEC that provides guidelines for proper grounding and, in particular, specifies that the cable ground shall
be connected to the grounding system of the building, as close to the point of cable entry as practical.
Example of Antenna Grounding as
per NEC - National Electric Cod
ELECTRIC SERVICE EQUIPMENT
ROUND CLAMP
OWER SERVICE GROUNDING ELECTRODE SYSTEM (NEC ART 250, PART H)
NTENNA LEAD IN WIR
NTENNA DISCHARGE UNIT (NEC SECTION 810-20)
ROUNDING CONDUCTORS (NEC SECTION 810-21
ROUND CLAMP
Page 20

4
CC WARNIN
G
E
Y
:
.
Add
.
7
W
W
Like all LCD products, this set contains a lamp with Mercury, please dispose of according to all Local, State and
G
’
.
B
.
W
.
.
E
.
A
g.
.
G
.
A
.
I
y
.
.
.
.
.
.
T
.
the original ENERGY STAR
.
T
.
This apparatus may generate or use radio frequency energy. Changes or modifications to this apparatus may cause harmful interference
unless the modifications are expressly approved in the manual. The user could lose the authority to operate this apparatus if an
unauthorized change or modification is made.
ADIO-TV INTERFERENC
This apparatus has been tested and found to comply with the limits for a Class B digital device, pursuant to Part 15 of the FCC Rules.
These limits are designed to provide reasonable protection against harmful interference in a residential installation. This apparatus
generates, uses, and can radiate radio frequency energy and, if not installed and used in accordance with the instructions, may cause
harmful interference to radio communications. However, there is no guarantee that interference will not occur in a particular installation.
If this apparatus does cause harmful interference to radio or television reception, which can be determined by turning the apparatus off
nd on, the user is encouraged to try to correct the interference by one or more of the following measures:
Reorient or relocate the receiving antenna.
2) Increase the separation between the apparatus and receiver.
3) Connect the apparatus into an outlet on a circuit different from that to which the receiver is connected.
4) Consult the dealer or an experienced radio/TV technician for help.
DECLARATION OF CONFORMIT
rade Name
odel:2MF330B / 26MF330B
esponsible Party:UNAI CORPORATION, Inc
ress:9900 Van Ness Avenue, Torrance, CA 90501 U.S.A
elephone Number:1-866-341-3738
his Class B digital apparatus complies with Canadian ICES-003. Standard Television Receiving Apparatus, Canada BETS-7 / NTMR-
AUTION :
ARNING :
Danger of explosion if battery is incorrectly replaced. Replace only with the same or equivalent type.
Batteries (battery pack or battery installed) shall not be exposed to excessive heat such as sunshine, fire or the like.
Disconnect the mains plug to shut off when find trouble or not in use. The mains plug shall remain readily operable.
is apparatus should not be placed in a built-in installation such as a bookcase or rack unless proper ventilation is provided.
Make sure to leave a space of
ARNING:
o prevent injury, this apparatus must be securely attached to the wall in accordance with the instructions.
.2 inches ( 8cm) or more around this apparatus.
Federal laws. For the disposal or recycling information, contact:
www.mygreenelectronics.com or www.eiae.org
Do not place the unit on the furniture that is capable of being tilted by a child and an adult leaning, pulling, standing or
climbing on it. A falling unit can cause serious injury or even death.
NOTE ABOUT RECYCLIN
This unit
HEN CARRYING THIS UNIT
O AVOID THE HAZARDS OF
ELECTRICAL SHOCK AND FIR
Do not put your fi ngers or objects into the unit
OCATION AND HANDLIN
Depending on the environment, the temperature of this unit may
Be sure to unplug the AC power cord from the AC outlet before
s packaging materials are recyclable and
can be reused. Please dispose of any materials in
accordance with your local recycling regulations
atteries should never be thrown away or
ncinerated but disposed of in accordance with your
ocal regulations concerning chemical wastes
At least 2 people are required when
carrying this unit
ake sure to hold the upper and bottom
frames of the unit fi rmly as illustrated
Do not handle the AC power cord with wet hands
Do not pull on the AC power cord when disconnecting it from an
C outlet. Grasp it by the plu
o not install the unit in direct sunlight, near strong magnetic
fi elds, or in a place subject to dust or strong vibration
void a place with drastic temperature changes
nstall the unit in a horizontal and stable position. Do not place
anything directly on top or bottom of the unit. Depending on
our external devices, noise or disturbance of the picture and / or
sound may be generated if the unit is placed too close to them.
n this case, please ensure enough space between the external
evices and the unit
ncrease slightly. This is not a malfunction
carrying the unit
Trademark Information
HDMI, the HDMI Logo, and High-Defi nition Multimedia Interface
are trademarks or registered trademarks of HDMI Licensing LLC
n the United States and other countries
Manufactured under license from Dolby Laboratories. Dolby and
the double-D symbol are trademarks of Dolby Laboratories
rotection Agency and the U.S. Department of Energy helping
us all save money and protect the environment through energy
effi cient products and practices
onsumer Notice:
his TV has been set to maximize energy effi ciency while
elivering the best possible picture using the factory installed
ome mode settings
hanging or enabling other features in this TV (e.g. brightened
backlighting) will possibly increase energy consumption beyond
he American Academy of Pediatrics discourages television
viewing for children younger than two years of age
is a joint program of the U.S. Environmental
qualifi ed limits
Page 21
h
INTRODUCTION
T
4
A
T
lling the B
A
4
4
1
1
T
7
7
T
9
A
9
A
A
1
1
2
2
4
7
9
1
T
4
4
7
Y
.
Y
th
DTV prog
.
Thi
.
T
.
p
.
A
.
,
t
.
r
T
.
:
.
.
d
y
.
HDMI Link
)
t
.
A
t
t
t
.
A
t
hibited.
igh
bligati
pli
igh
hibited. F
Contents
Important Safety Instructions
rademark Information
INTRODUCTION
eatures
upplied Accessories
mbols Used in this Manual
ttaching the Base
xing the Unit on Your Furniture
ontrol Panel
erminals 8
Remote Control Function
nsta
PREPARATION
ntenna Connection
onnection to Cable Receiver or Satellite Box
External Device Connection
able Management 1
lug In the AC Power Cord 1
Initial Setup 15
WATCHING TV
leep Timer 16
Switching Each Input Mode
reeze Mode
hannel Selection 16
V Screen Display Mode 1
ound Functions 1
V Screen Information 18
Reducing the Brightness 18
un-Link Options 18
OPTIONAL SETTING
Main Menu 1
utoprogram 1
hannel List 20
dd Channels 20
ntenna Confi rmation 2
Language Selection 2
icture Adjustment 2
ound Adjustment 2
losed Caption 2
hild Lock 2
Fun-Link 2
Energy Saving Mode 30
ocation
urrent Software Info
TROUBLESHOOTING
AQ 3
roubleshooting Guide 3
INFORMATION
lossary 3
Maintenance 3
eneral Specifi cations 3
Electrical Specifi cation 3 5
ther Specifi cations 35
Limited Warranty 3
atteries
Features
• DTV / TV / CATV
ou can use your remote control to select channels which
are broadcast in digital format and conventional analog
format. Also, cable subscribers can access their cable TV
annels
• Information Display (ATSC only)
ou can display the title, contents and other information of
e current
•Autoprogram
s unit automatically scans and memorizes channels
available in your area, eliminating difficult setup procedures
•
hild Lock
his feature allows you to block children’s access to
nappropriate programs
•
losed Caption Decoder
Built-in closed ca
aption supported programs
• MTS / SAP Tuner
udio can be selected from the remote control
•Auto Shut Off Function
If there is no input signal and no operation for 15 minutes
0
0
0
0
he unit will turn off automatically
• Sleep Time
his feature will automatically turn off the power of the unit at
a specific time
•
hoices for On-screen Language
elect your on-screen language
English, Spanish or French
• Stereo Sound Function
•
LL Frequency Synthesized Tuning
rovides free and easy channel selection and lets you tune
rectly to any channel using the number and decimal point
buttons on the remote control
• Various Adjustment for Picture and Soun
ustomizes image quality suitable for your room and sets
our sound preference
•
un-Link via
HDMI Cable not Included
un-Link allows your other HDMI link devices (such as
Magnavox DVD) to be controlled by the HDMI cable
onnected to your TV.
•
Inpu
When using HDMI1 Input, you can enjoy this unit as a PC
onitor if your PC has a DVI output terminal
•
omponent Video Input
• S-Video Input
V Inpu
•
• Digital Audio Outpu
•Analog Audio Outpu
2010 Funai Electric Co., Ltd
ll rights reserved. No part of this manual may be reproduced, copied,
ransmitted, disseminated, transcribed, downloaded or stored in any storage
medium, in any form or for any purpose without the express prior written
consent of Funai. Furthermore, any unauthorized commercial distribution of this
manual or any revision hereto is strictly pro
Information in this document is subject to change without notice. Funai
reserves the r
td. and may not be used in any way without the express written consent
of Funai. All other trademarks used herein remain the exclusive property
of their respective owner s. Nothing contained in this manual should be
construed as granting, by im
se any of the trademarks displayed herein. Misuse of any trademarks or
any other content in this manual is strictly pro
enforce its intellectual property rights to the fullest ex tent of the law.
t to change the content herein without the o
with the design is a registered tr ademark of Funai Electric Co.,
tion decoder displays text for closed
ram on the TV screen
cation or otherwise, any license or r
unai shall aggressively
nglis
on to
t to
INTRODUCTION
PREPARATION
WATCHING TV
OPTIONAL SETTING
TROUBLESHOOTING
INFORMATION
Page 22

Y
.
h
.
A
.
)
h
d th
d b
Dri
Philli
.
Philli
A
r
of the
.
W
.
.
.
W
p
.
.
t
y
.
Supplied Accessories
N
9
)
t
1EMN
1EMN
1
)
l
)
d
N
9
)
s
AAA
AAA
f
A
1
A
)
t
ill
pp
l.
Phillips head
.
T
t
:
ATSC
NTSC
h.
wner’s manual
2583
(1EM
emote contro
804 UD
atterie
(AAA, 1.5V x 2)
uick Star
2MF330B:
26MF330B:
egistration car
2469
1EM
Screw kit
or attaching the base
2MF330B: 1ES
26MF330B: 1ES
25840
2628
988
23705
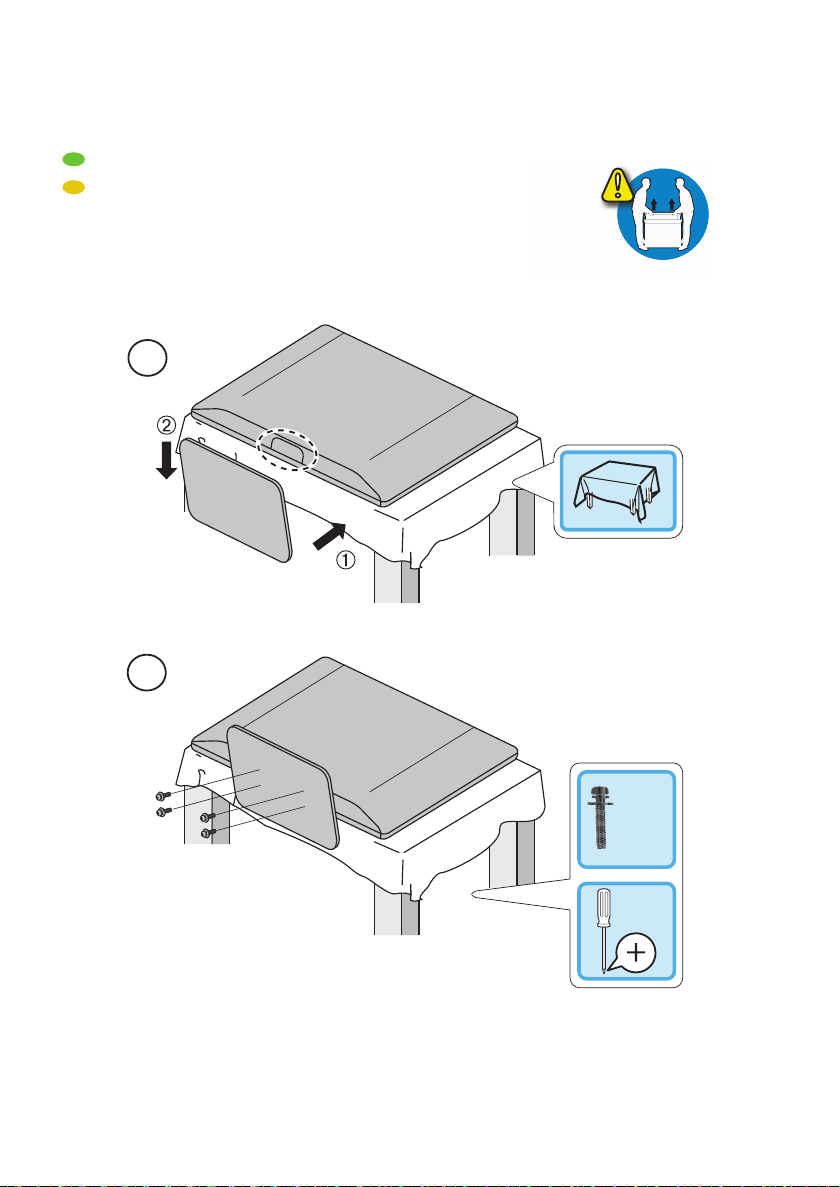
Attaching the Base
ou must attach the base to the unit to have it as a table top
nit. Be sure the front and rear of the base match the proper
rection
Spread a thick and soft
oth over a table as
s
own
lace the main unit face
own onto it. Make sure
ot to damage the screen.
t least 2 people are
required for this step
2 Insert 2 hooks under the
ottom of the main unit
nto base holes. (shown by
arrow
s
stops an
sure not to put the AC
power cor
nto the
at the bottom of the base
, then move the
ase in the direction as
own by arrow
e
until it
mounting
oles are aligned. Make
etween the
ase and the unit.
ve
ps pan screws
threaded holes
ntil they are tight
If you need to replace these accessories, please refer
o the part No. with the
free customer su
ustrations and call our toll
ort line found on the cover of this
manua
Note
If you lose the screws, please purchase M420
ocal store
Symbols Used in this Manual
he following is the description for the symbols used in
his manual. Description refers to
: Digital TV operation
: Analog / Cable TV operation
If neither symbol appears, the operation is applicable to
ot
screws at your
To remove the base from this unit
nscrew the
fter the screws are removed, move the base in the opposite direction as
own by arrow
nit. Be careful not to drop the base when you remove it
Note
hen attaching the base, ensure that all screws are tightly fastened. If the
base is not properly attached, it could cause the unit to fall, resulting in
njuries as well as damage to the unit
Make sure to use a table which can support the weight of this unit and is
arger than this unit
ake sure the table is in a stable location
hen attaching the base, ensure that FRONT
ward. If it's not upward, the 2 hooks don't fi t in the base
u
ps pan screws on step
on step 2, then pull the base up toward the rea
written on the base is
Fixing the Unit on Your Furniture
crew this unit on your furniture tightly using wood screws
not supplied) in the 2 holes at the back of the base as shown
Recommended screw dimension : 5.1 x 20 mm
ear of this uni
Note
When you remove this unit make sure to unscrew the wood screws from
our Wood Stand, Furniture and other wood item
Page 23

h
Control Panel
5
(
)
(
)
th
.
7
(
)
(
)
th
.
w
l.
r
Ligh
.
r
.
2MF330B
nglis
INTRODUCTION
-
VOLUME
+
42 13
26MF330B
MENU
-
CHANNEL
POWER
HANNEL +/
Press to select channels or move up
p. 1
p. 16
/ down
PREPARATION
rough the main menu items
5
Infrared sensor windo
6
7
+
POWER
STAND BY indicato
VOLUME +/
Press to adjust the volume or move right
p. 19
p. 1
/ left
rough the main menu items
Receives infrared rays transmitted from the remote
ontro
OWER ON indicato
ts up green when power is on
WATCHING TV
OPTIONAL SETTING
Lights up red when power is off
TROUBLESHOOTING
INFORMATION
7
6
5
STAND BY
-
VOLUME
+
MENU
-
CHANNEL
+
POWER ON
24
POWER
13
Page 24

Terminals
B
B
1
l
4
4
s
A
1
4
A
.
W
ll.
0
4
t
1
.
.
T
d
.
2MF330
8
9
*
17
18
26MF330
9
10
11
12
13
14
15
16
*
8 S-Video / Composite Video / Audio (L/R)
Input jacks for VIDEO
9 HDMI 2 Input jack
p. 12, 13
p. 10, 1
ear Pane
0 AC power cord
able management
2
omponent Video and Audio (L/R) Input jack
3 Audio (L/R) Output jacks
p. 1
p. 1
p. 10, 11, 12
p. 13
udio (L/R) Input jacks for HDMI
p. 12, 1
udio cable connection from a DVI device
hen you connect your PC that has a DVI terminal, use
a stereo mini plug conversion cable as we
(For HDMI 1Input jack only)
5 Digital Audio Output jack
6 Antenna Input jack
7 HDMI 1 Input jack
HDMI connection for HDMI or DVI device. When you
onnect your PC that has a DVI terminal, you can enjoy
his unit as a PC monitor.
8 HDMI 3 Input jack
p. 13
p. 1
p. 10, 11, 12, 1
p. 10, 1
8
11
10
16
18
17
12
15
13
14
Note for service terminal
service terminal (service use only)
se this terminal only when a software update is necessary
ser should not connect any devices to the service terminal such as digital
camera, keyboard, mouse, etc. (because these will not work)
he software update is, in most cases, handled by an authorized service
person or in some circumstances the user may be asked to do the software
ate themselves
up
8
Page 25

h
Remote Control Function
t
d
.
ls.
p
.
pli
.
p
.
.
p
.
.
5
7
.
5
5
.
7
l.
7
.
p
y
.
REV
D
c
B
k.
G
.
F
k.
C
ppy
k
7
.
.
p
HDMI
.
.
AAAAAAAAA
AAA
AAAAAA
1
2
3
4
5
6
7
8
9
When using a universal remote control to operate this unit.
ake sure the component code on your universal remote control is set
o our brand. Refer to the manual accompanying your remote control for
etails
more
We do not guarantee 100% interoperability with all universal remote
contro
Note
Buttons in gray background ( ) are not available unless you are
connected to devices that are com
We do not guarantee 100% interoperability with other brands of HDMI link
ant devices
com
atible with Fun-Link function
10
11
12
13
14
15
16
17
18
19
20
(power)
p. 1
AP ➠p. 1
OURCE
➠
➠
p. 16
p. 16
ress to freeze screen image
K
▲/▼/
/►
cursor)
B ACK
➠
p. 1
p. 1
p. 18
ress to return to the previous menu operation
8 VOL +/−
9 PREV CH
p. 1
p. 16
ress to return to previously viewed channe
0 SLEEP
FORMAT
p. 16
p. 1
Press to select aspect ratio available for the TV screen
RED / GREEN / BLUE / YELLOW
➠
p. 29
unctionally usefulfor Fun-Link
3
4 INFO
5
E / FWD
➠
p. 19
. 1 8
p. 29
ress to search backward or forward through the dis
p. 29
ress to begin the disc playbac
SKIPH / SKIP
p. 29
ress to skip backward or forward chapters, titles or
tracks of the disc
AUSE
➠
p. 29
ress to pause the disc playbac
STOP
p. 29
ress to stop the disc playbac
6
7
8 ECO
H +/−
p. 1
p. 16
p. 18
ress to reduce the brightness
9 Number buttons
➠
p. 16
(dot)
Press to shift the subchannel from the main channel
20 FUN-LINK OPTIONS
Press to call u
various menu from your Fun-link device
onnected through an
cable
p. 18, 29
Installing the Batteries
Install the batteries (AAA, 1.5V x 2) matching the polarity
ndicated inside battery compartment of the remote control
nglis
INTRODUCTION
PREPARATION
WATCHING TV
OPTIONAL SETTING
TROUBLESHOOTING
INFORMATION
Battery Precautions:
Be sure to follow the correct polarity as indicated in the battery
com
artment. Reversed batteries may cause damage to the device
Do not mix different types of batteries together (e.g. Alkaline and
arbon-Zinc, or rechargeable batteries like ni-cad, ni-mh, etc) or old
batteries with fresh ones
If the device is not to be used for a long period of time, remove the
batteries to
o not try to recharge batteries; they can overheat and rupture
revent damage or injury from possible battery leakage
9
Page 26

PREPARATION
:
.
.
a
l
t
t
ilabl
5
.
.
(
.
p
.
p
p
.
ily b
l
HDMI
p
t
.
t
h
x
l
PPV
mponent video
)))
No supplied cables are used with these connections:
Please purchase the necessary cables at your local store.
High Speed HDMI cable (also known as HDMI category 2
cable) is recommended for the better compatibility.
Before you connect
e sure your antenna or other device is connected properly
before plugging in the AC power cord
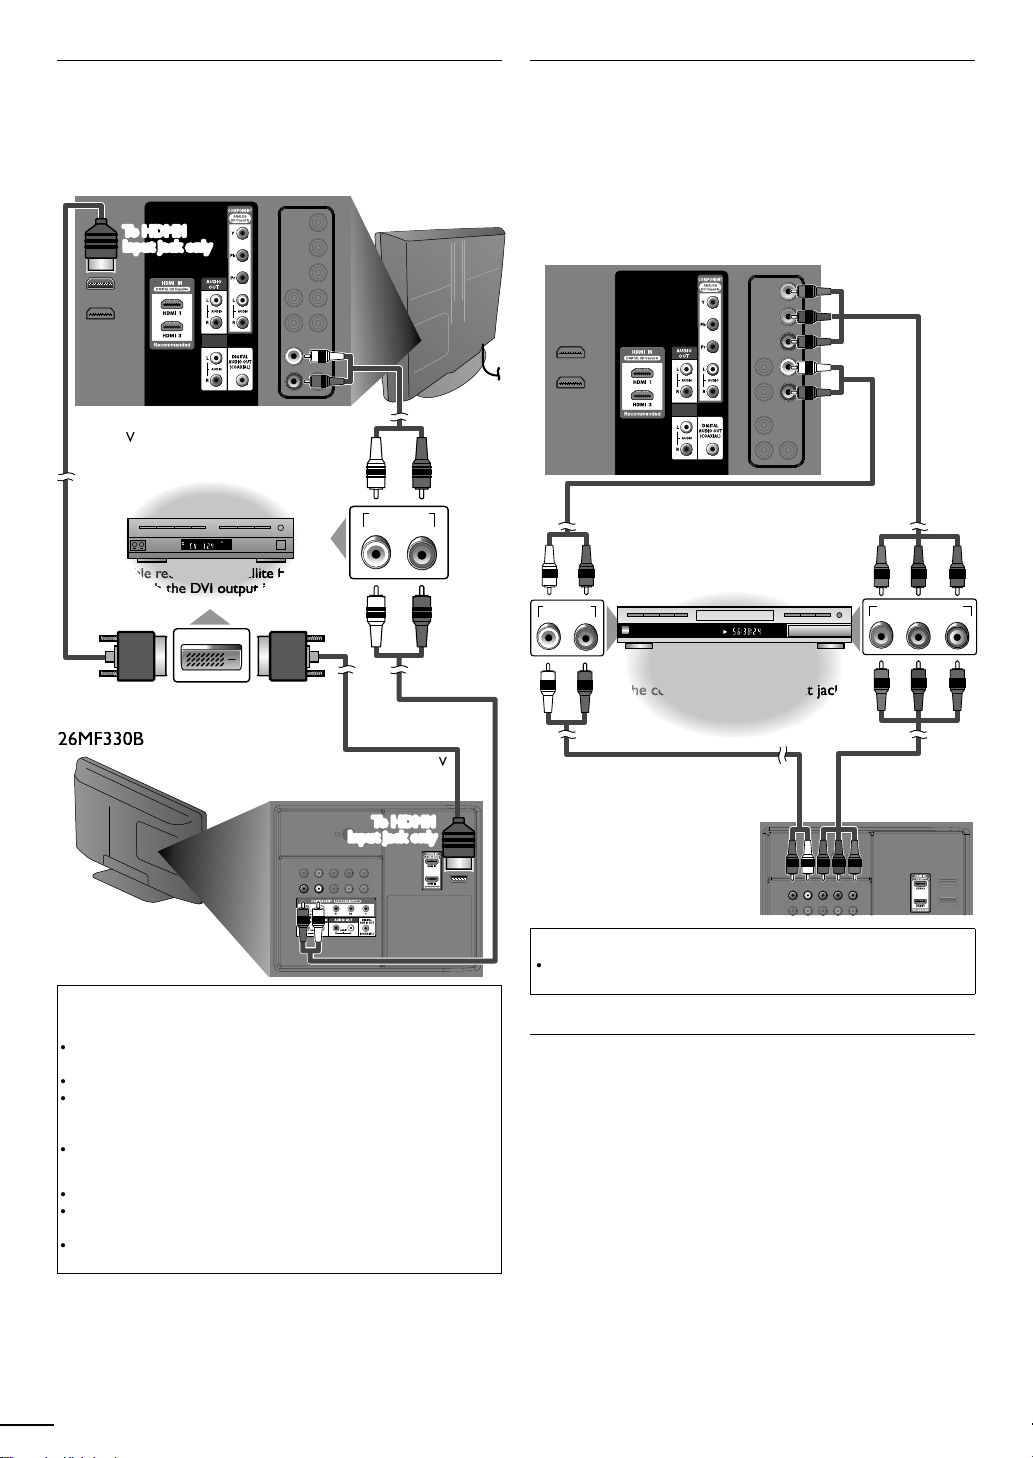
Connection to Cable Receiver or
Satellite Box
se an
HDMI or the Com
he HDMI or the component video output jacks of the cable
receiver / satellite box
If you connect to the unit’s Component Video Input jacks,
onnect audio cables to the Audio L/R Input jacks right beside
he Component Video connector.
e.g.)
2MF330B
or component video cables to connect the
onent Video Input jacks of the unit to
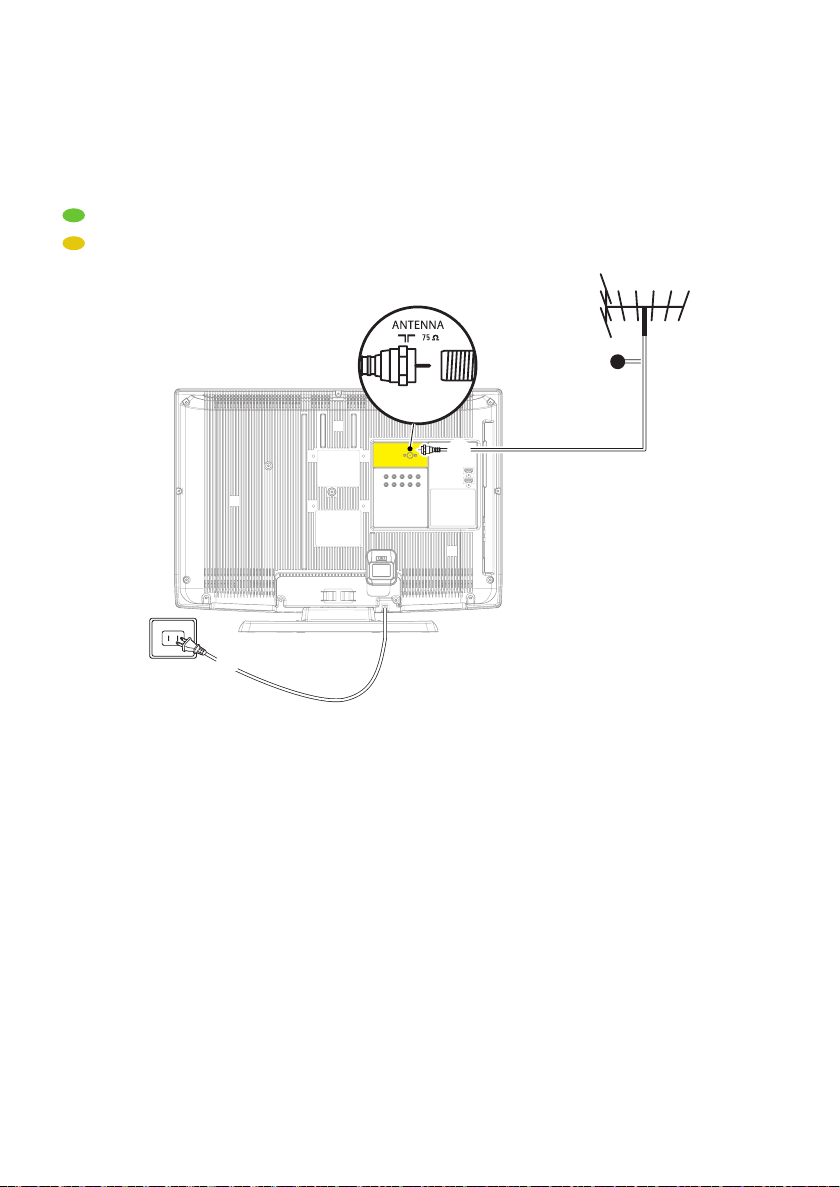
Antenna Connection
onnect the RF coaxial cable on your home outlet to the
antenna input jack of this unit
2MF330B
VHF / UHF
nalog
or
ntenn
or
cable TV signa
26MF330B
ear of this uni
coaxial cable
coaxial cable
atellite dis
cable TV signa
including
or
or
cable
HDMI OUT
coaxial cable
ANT IN
or
AUDIO OUT
cable receiver /
satellite bo
STEREO
PCM
COMPONENT VIDEO OUT
RL
Pr/CrPb/CbY
ear of this uni
nce connections are completed, turn on the unit and begin initial
setup. Channel scanning is necessary for the unit to memorize all
ava
e channels in your area.
Initial Setup]p. 1
Note
If you have any question about the DTV’s antenna, visit www.antennaweb
org for further information
Depending on your antenna system, you may need different types of
combiners
store for these items
For your safety and to avoid damage to this unit, please unplug the RF
coaxial cable from the antenna in
If you use an antenna to receive analog TV, it should also work for DTV
rece
or inside antenna
To switch your reception source eas
antenna se
If you are not receiving a signal from your cable service, contact the Cable
mixers) or separators (splitters). Contact your local electronics
ut jack before moving the unit
tion. Outdoor or attic antennas will be more effective than a set to
etween antenna and cable, install an
rovider.
ector.
or
side or rear of this unit
Page 27

h
1
h
ble TV
l
PPV
26MF330B
and audio ca
and audio cables
Y
lli
HDMI
t
.
.
vid
with the HDMI output jack
with the HDMI output jack
with the HDMI output jack
with the HDMI output jack
with the HDMI output jack
with the HDMI output jack
with the HDMI output jack
with the HDMI output jack
with the HDMI output jack
with the HDMI output jack
with the HDMI output jack
with the HDMI output jack
with the HDMI output jack
with the HDMI output jack
with the HDMI output jack
with the HDMI output jack
with the HDMI output jack
with the HDMI output jack
with the HDMI output jack
with the HDMI output jack
with the HDMI output jack
with the HDMI output jack
with the HDMI output jack
with the HDMI output jack
with the HDMI output jack
with the HDMI output jack
with the HDMI output jack
with the HDMI output jack
with the HDMI output jack
with the HDMI output jack
with the HDMI output jack
with the HDMI output jack
with the HDMI output jack
with the HDMI output jack
with the HDMI output jack
with the HDMI output jack
with the HDMI output jack
with the HDMI output jack
with the HDMI output jack
with the HDMI output jack
with the HDMI output jack
ith the HDMI output ja
th the HDMI output ja
th the HDMI output ja
th the HDMI output ja
th the HDMI output ja
h the HDMI output j
satellite dis
nglis
INTRODUCTION
External Device Connection
coaxial cable
ANT IN
cable receiver /
atellite box
or
COMPONENT VIDEO OUT
Pr/CrPb/CbY
STEREO
PCM
AUDIO OUT
ca
including
or
signa
HDMI OUT
cable
or
ide or rear of
this unit
ou can also connect this unit to the cable receiver or sate
ther than the
or the component video output jacks because
or
te box
hey might have different output jacks
Required cables and connecting methods of the cable receiver /
satellite box, or the availability channel for the clear QAM may differ
epending on the cable / satellite provider. For more information,
please contact your cable / satellite provider.
HDMI Connection
HDMI connection offers the highest picture quality
(High-Defi nition Multimedia Interface) transports high defi nition
eo and multi-channel digital audio through a single cable.
RL
2MF330B
or
or
cable
TITLE 5
CHAPTER 15
REPEAT A-B
BD/DVD recorder
26MF330B
or
ide or rear of this unit
HDMI OUT
cable
or
PREPARATION
WATCHING TV
OPTIONAL SETTING
TROUBLESHOOTING
INFORMATION
side or rear of this unit
1
Page 28
HDMI-DVI Connection
HDMI-DVI
l vid
DVI
B
le receiver or satellite b
le receiver or satellite b
le receiver or satellite b
le receiver or satellite b
e receiver or satellite
e receiver or satellite
e receiver or satellite
e receiver or satellite
e receiver or satellite
e receiver or satellite
receiver or satellite
receiver or satellite
receiver or satellite
receiver or satellite
receiver or satellite
receiver or satellite
receiver or satellite
receiver or satellite
receiver or satellite
receiver or satellite
receiver or satellite
receiver or satellite
receiver or satellite
receiver or satellite
receiver or satellite
receiver or satellite
receiver or satellite
receiver or satellite
receiver or satellit
receiver or satellit
receiver or satellit
receiver or satellit
receiver or satellit
receiver or satellit
with the DVI output jack
h the DVI output ja
the DVI output
the DVI output
the DVI output
the DVI output
the DVI output
the DVI output
the DVI output
the DVI output
the DVI output
the DVI output
the DVI output
the DVI output
s
s
t
t
HDMI
T
.
T
).
g
"
.
T
.
HDMI-DVI
T
.
DVI
g
g.
/
.
vid
.
t
CHAPTER 15
REPEAT A-B
TITLE 5
4.2T 2D
;
DVI
ANALOG
AUDIO
AUDIO OUT
RL
COMPONENT VIDEO OUT
Pr/CrPb/CbY
the component video output jack
he component video output jack
e component video output jac
e component video output jac
e component video output jac
e component video output jac
e component video output jac
e component video output jac
component video output ja
component video output ja
component video output ja
component video output ja
component video output ja
component video output ja
component video output j
component video output j
component video output j
component video output j
component video output j
component video output j
component video output j
component video output j
component video output j
component video output j
component video output j
component video output j
component video output j
component video output j
component video output j
component video output j
component video output j
component video output j
t
s
s
T
.
r
se an
externa
e.g.)
2MF330
conversion cable to connect the unit to
eo devices equipped with
DVI
ANALOG
AUDIO
udio cable
output jack.
ear of this uni
Component Video Connection
omponent Video connection offers better picture quality for
eo devices connected to the unit
If you connect to the unit’s Component Video Input jacks,
onnect audio cables to the Audio L/R Input jacks right beside
he Component Video connector.
e.g.)
2MF330B
ear of this uni
AUDIO OUT
RL
DVI OUT
STEREO
PCM
udio cable
ear of this uni
Note
or
or
connection
he unit accepts 480i, 480p, 720p and 1080i of video signals, and 32kHz,
44.1kHz and 48kHz of audio signals
his unit accepts only 2 channel audio signal (LPCM
You need to select "PCM" for the digital audio of the device you connected
or check the HDMI audio settin
Bitstream", etc
select
his unit accepts only signals in compliance with EIA861
he unit accepts 480i, 480p, 720pand 1080i video signals
audio si
DVI does not display 480i image which is not in compliance with EIA
EA-861/861B
connection
-
connection requires separate audio connections as well and the
nals are converted from digital to analo
. There may be no audio output if you
udio cable
BD/DVD recorder with
udio cable
26MF330B
ear of this unit
Note
he unit accepts 480i / 480p / 720p and 1080i of video signals for this
onnection
S-Video Connection
-Video connection offers good picture quality for video
evices connected to the unit. If you connect to the unit’s
-Video Input jack, connect audio cables to the Audio L/R
Input jacks right beside the Composite Video connecto
.
2
Page 29

h
e.g.)
CHAPTER 15
REPEAT A-B
TITLE 5
AUDIO OUT
RL
S-VIDEO
OUT
r r r erererer
nd VCR with the S-Video output
nd VCR with the S-Video output
d VCR with the S-Video output
d VCR with the S-Video output
d VCR with the S-Video output
d VCR with the S-Video output
d VCR with the S-Video output
VCR with the S-Video outpu
VCR with the S-Video outpu
VCR with the S-Video outpu
VCR with the S-Video outpu
VCR with the S-Video outp
VCR with the S-Video outp
VCR with the S-Video outp
VCR with the S-Video outp
VCR with the S-Video outp
VCR with the S-Video outp
s
t
t
s
y
t
t
V
.
STEREO
STAND-BY
AUDIO OUT
RL
VIDEO
OUT
s
vid
aaaamcorder
video game
V
t
j
y.
,
y
d.
.
A
,
y
.
dio devi
.
R -HDMI- L
R - LINE OUT- L
COAXIAL
R L Pr Pb Y
-HDMI- L
L
r
Y
DVI
ANALOG
AUDIO
DIGITAL AUDIO
COAXIAL IN
AUDIO IN
RL
al
tal
tal
tal
tal
ital
gita
gita
gita
igita
igita
Digi
Digi
Digi
Digi
Digi
Digi
Dig
Dig
Dig
Dig
Dig
ererer
der
der
oder
code
ecode
g
t
t
o sy
o sy
o sy
sys
sys
syst
syst
syst
syst
syst
syst
syst
syst
syst
syst
syst
syst
syst
syste
syste
ystem
ystem
ystem
stem
tem
tem
tem
B
B
s
2MF330B
side of this uni
S-Video cable
udio cable
Audio Output Connection
igital(for digital broadcasting only)
If you connect this unit to an external digital audio device
ou can enjoy multi-channel audio like 5.1ch digital
roadcasting soun
se a digital audio coaxial cable to connect the unit to
xternal digital audio devices
nalog (for both analog and digital broadcasting)
If you connect this unit to an external analog audio device
ou can enjoy stereo (2-channel) audio
se audio cables to connect the unit to external analog
au
.g.)
32MF330
ces
udio cable
ear of this uni
nglis
INTRODUCTION
PREPARATION
WATCHING TV
udio cable
side of this uni
S-Video cable
Composite Video Connection
omposite Video connection offers standard picture quality
for video devices connected to the unit. If
he unit’s Composite Video Input jack, connect audio cables
o the Audio L/R Input jacks right beside the Composite
ideo connector. When the audio jack of the video device is
monaural, connect an audio cable to the Audio L Input jack
e.g.)
2MF330B
udio cable
side of this unit
ou connect to
eo cable
ear of this uni
OPTIONAL SETTING
TROUBLESHOOTING
INFORMATION
CR
26MF330B
Note
If you connect to the S-Video Input jack and the Composite Video Input
ack at the same time, the S-Video connection will have priorit
side of this uni
26MF330
13
Page 30

PC Connection
T
.
i
ll.
s
s
DVI
DVI
.
r
DVI
t
T
:
t
n
VGA
A
A
4
x
A
.
DVI
.
.
.
.
.
t
t
A
d.
t
t
B
A
d
A
t
t
).
.
Each ti
.
his unit can be connected to your PC that has a DVI terminal
se an HDMI-DVI conversion cable for this connection and it
requ
res stereo mini plug conversion cables as we
If you connect this unit to your PC, you can use this unit as a
C monitor.
e.g.)
2MF330B
Cable Management
eep the cables through this holder to avoid tangling them
ear of this uni
DVI
ANALOG
AUDIO
-
cable
DVI OUT
conversion
stereo mini plug
conversion cable
-
should be with ferrite core
conversion cable
-
conversion cable
26MF330B
stereo mini plug
ear of this uni
he following video signals can be displayed
orma
esolutio
640x480
VG
XG
WXG
800x600
02
280x68
360x68
ther formats or non-standard signals will not be displayed
orrectly
Note
ease purchase the cable
ore
The following operations may reduce noise
- Attach a ferrite core to the AC power cord of your PC
- Unplug the AC power cord and use the built-in battery of your PC
conversion cable
Refresh rate
68
-
conversion cable that has a ferrite
60Hz
26MF330B
ear of this uni
Plug In the AC Power Cord
Make sure that the AC power cord must be plugged to an
C outlet after all the necessary connections are completed.
omplete
2MF330
AC outle
26MF330B
ear of this uni
C power cor
Caution:
Do not connect the AC power cord to a power supply outside the
ndicated voltage of this unit (AC 120V
onnecting the AC power cord to a power supply outside of this range may
result in fi re or electrical shocks
Note
me you plug in the AC power cord, no operations will be performed
for a few seconds. This is not a malfunction
ear of this uni
C outle
Page 31

h
5
These operations are accessible by remote control.
T
d
i
.
:
.
A
,
.
.
it i
.
(Eng
TV
.
ill begin.
U
ill b
ibly
.
t
to y
.
f
the l
ill be displ
.
duri
ill b
d.
T
the i
.
Y
it.
A
.
]
.
]
0
.
1
g.
]
Some may also be accessible by controls on the main unit.
Initial Setup
his section will guide you through the unit’s initial setting
which includes selecting a language for your on-screen menu
an
autoprogram, which automatically scans and memorizes
v
ewable channels
Before you begin
ake sure the unit is connected to antenna or cable
1
fter making all the necessary connections
press to turn on the unit
It may take a few moments to turn on the unit for the
first time
Initial Setup]menu appears automatically after the
s turned on
un
2
se ▲/▼ to select the on-screen language from the
choices
screen
3
se ▲/▼ to select Antenna]for TV channels or
for CATV channels, then press
Initial Setup
Make sure the antenna is connected to ''ANT. IN'' jack.
Select your signal source.
Initial Setup
lish / Español / Français) on the right side of the
Select
Antenna
Cable
Or
OK
OK
ANT.IN
BACK
Back
MENU
utoprogram]w
Please wait while the system is scanning for channels. Auto programming
may take more than 20 minutes to complete.
0%
Digital channels
Analog channels
0 ch
0 ch
MENU
able
Antenna
Cable
Skip
Skip
Skip
se
/► to select the desired location setting, then
press
Initial Setup
Select “Retail” or “Home” for your location.
Home
OK
OK
e set up with
elect
etail] store, the unit w
Retail
Select
redefined setting for retail displays. In this setting, the
ower consumption may poss
exceed the limited
qualification
elect
ome], the unit is set to maximize the energy
efficiency for home setting and it can be adjusted
hrough a choice of picture and sound quality according
our preference
When the initial setup is completed, the lowest
memorized channel with the confirmation message o
ocation setting w
ayed on the TV screen
Note
If you are not receiving a signal from your cable service, contact the Cable
rovider.
If you pressr
he initial autoprogram function can be executed for either
Cable]only once. When you change the connection (Antenna / Cable),
etAutoprogram]again.
If there is no signal input from the antenna terminal and no operation for
everal seconds after you turn on the unit,
nstructions listed on the TV screen
Initial Setup
No channel is registered.
Try Autoprogram again?
Verify that you have a cable connected to the "ANT. IN" jack on the back
of the TV, the channel installation process searches this connection. If
you are using a cable or satellite box, please confirm the input which
you have connected the box and press "SOURCE" key on the remote
control to select the appropriate source input.
ou must set
ound quality you adjusted will not be memorized after you turn off the
un
ome] in step 4. Otherwise, the settings of picture and
ng autoprogram, this setting w
p. 19
Select
OK
OK
e cancele
Antenna]or
Helpful Hints] appears. Follow
Retry
Later
MENU
Skip
fter an initial setup is completed...
If you want to scan the channels automatically again
utoprogram
You can add the desired cable and analog channels
nmemorized by autoprogram
Add Channels
If you want to change to another language
Language Selection]
If you want to change the location settin
ocation
.
9
. 2
. 2
.
nglis
INTRODUCTION
PREPARATION
WATCHING TV
OPTIONAL SETTING
TROUBLESHOOTING
INFORMATION
1
Page 32

WATCHING TV
p
t
s
)
once to call up the display for checking the remaining time.
T
dly
il
d.
il
.
.
.
el
.
.
Th
ill
d.
T
s
T
,
s
T
,
s
T
s
ATSC
1
g
th
.
NTSC
1
l.
ill app
l.
Sleep Timer
ress SLEEP repeatedly to change the amount of time (ncreases
he time by 30 minutes up to 120 minute
an be set to automatically turn off the unit after an incremental
until shut off.
Sleep 120min.
ress
o cancel sleep timer, press SLEEP repeate
unt
Sleep Off] is displaye
Switching Each Input Mode can eas
y switch with the remote control
between TV (ATSC or NTSC) and external devices when they are connected to the unit
ress SOURCE or H repeatedly to cycle through the input modes
Source
TV
Video
Component
HDMI1
HDMI2
HDMI3
ressing
Freeze Mode
ress
e sound output w
e.g.)
11.1 Video
DTV/TV chann
HDMI3
HDMI2 HDMI1
Component
or PC input)
H − reverses the direction of the input modes
can freeze the image shown on the TV screen for 5 minutes
to freeze the image
Freeze
not be pause
o cancel freeze mode, press any buttons except
Channel Selection
elect channels by usingH +/− or the Number button
o select the memorized channels
use
H +/− or the
o select the non-memorized channels
usethe Number button
o use the Number button
When selecting digital channel 11.
e sure to press
When selecting cable or analog channel 1
ress
REV CH to return to the previously viewed channe
Note
[No Signal]will appear on the TV screen after the subchannel broadcast is over.
only sound signa
umber button
before enterin
udioonly program] message w
e subchannel number
11.1
ear on the TV screen, when you receive
6
Page 33

h
TV Screen Display Mode
py
.
.
l
l
Wid
d
Z
l
.
.
d
.
Z
.
Wid
Thi
.
l
l
Wid
d
Z
l
.
.
d
t
t
.
Z
t
.
Wid
iginal si
lly
.
de
l
t
ll
l
.
ll
.
t
iginal size.
.
.
.
.
w
.
.
ATSC
AP
repeatedly to cycle through the available
.
Av
.
]
is displ
.
NTSC
to display the currently selected audio mode.
l.
m
modes can be selected for PC input signal
ress FORMAT repeatedly to switch the TV aspect ratio
or 16:9 video signa
orma
e
or 4:3 video signa
orma
e
or PC input signal through
orma
4:3
6:9
HDMI1
u
Input mo
ovie Expan
oom
ovie Expan
oom
ot By Do
orma
isplays a 16:9 picture at its original size
4:3
isplays a 16:9 picture at a 4:3 size; the picture
s shortened horizontally. Sidebars appear on both
edges of the screen
ovie Expan
vertically stretched to fi ll the screen. This only crops
ut the top of the picture
oom
without changing its horizontal and vertical ratio
e
rops out the left and right sides of the picture
orma
idebars appear on both edges of the screen
6:9
isplays a 4:3 picture at a 16:9 size; the picture is
tretched horizontally to fi ll the screen
ovie Expan
he picture is stretched more vertically at the top of
he screen. This crops out the top of the picture
oom
maximum size that is more vertically stretched to fi ll
he screen. This crops out the top and bottom of the
picture
e
r
fi ll the screen
orma
idebars appear on both edges of the screen
u
isplays a picture that is stretched out of
proportion horizontally to fi ll the screen
ot By Do
isplays a 16:9 picture that is
isplays a 16:9 picture at its maximum size
splays a horizontally stretched picture.
isplays a 4:3 picture at its original size.
isplays a 4:3 picture at a 16:9 size;
isplays a 4:3 picture at a 16:9 size; at its
splays the picture with its center at the
ze and the edges stretched horizonta
splays a proportionately stretched picture.
splays a picture in its or
to
nglis
INTRODUCTION
PREPARATION
s
WATCHING TV
OPTIONAL SETTING
TROUBLESHOOTING
INFORMATION
Sound Functions
escribe how to change the audio or the audio language as well as the volume
ress
original volume
ress S
audio languages
cannot be acquired, or the acquired languages are
other than English, Spanish or French
to turn off the sound temporarily
Mute
ress
ill be displayed for a few seconds
again or VOL +/− to recover the
Switching Audio Mode
ailable languages differ depending on the
roadcast
Other
English 1/3
ayed when the audio language
11.1
Silence Mode
Volume Adjustment
se VOL +/− to adjust the volume
Volume 30
seconds when adjusting the volume
ress
While receiving an MTS broadcast, press repeatedly to cycle through the
available audio channe
11
SAP / STEREO
e.g.)When all audio are available
SAP / STEREO SAP / MONO SAP / STEREO
STEREO: Outputs stereo-audio
SAP : Outputs second audio progra
MONO: Outputs mono-audio
will be displayed for a few
hi!
hola!
salut!
Page 34

TV Screen Information
O
ATSC
11.1
TV: TV-14
1080i
1080i
16:9
16:9HDHD
CC
CC
KABC
KABC
1 23 4
5
6, 7, 8
9
10
NTSC
1
2
g
)
4
r
)
]
1
]
)
hild lock
g
.
Y
K
ll.
]
is displayed wh
d.
d.
;
Vid
k.
T
.
0
.
y.
Y
]
in
0
.
Y
]
in
d
y
.
;
X
F
7
A
X
1
T
t
T
top
.
e
T
.
p
.
.
li
.
You can display the currently selected channel or other
information such as the audio mode on the TV screen.
In the digital mode, the detailed broadcasting information for
the current channel such as program title, program guides are
displayed.
ress INF
A Day of Memories
A Day of Memories
A quarter-century ago,which may now qualify as the
good old days of newspapering,run-of-paper sales
accounted for 80 percent of the industry's advertising
revenues.Department stores and supermarket were
4
11
SAP / STEREO
480i
480i
TV-PG DLSV
5
4:3SDSD
4:3
6, 7, 8
CC
CC
9
10
rogram title
program guide
The program guide added to broadcastin
nformation is displayed to a maximum of 4 lines.
3 broadcast station
channel numbe
5 audio language (ATSC) / audio mode (NTSC
Switching Audio Mode
6 effective scanning lines and scan mode
7 TV format
8 program aspect ratio
9 CC (not available if closed caption is set to
0 c
ratin
To clear the display, press INFOagain
ou can also press BAC
Note
When the program guide consists of more than 4 lines, use
o description provided.
rovide
While the program guide is displayed, the closed caption function is
nterrupte
In external input mode, the following screen is displayed
e.g.) When an external device is connected to
English 1/2
Rating
p.
Off
/▼to scro
en the program guide is not
eo Input jac
Reducing the Brightness
Backlight brightness can be reduced which may save on power
consumption more than you just set [On] in [Energy Saving
Mode].
p. 3
ress ECO once to reduce the brightness
ress ECO again to increase the brightness.
Note
Even if this function is in effect, the brightness will be increased when you
ange
Energy Saving Mode]on or off due to the energy saving mode has
riorit
ou must set
therwise, the settings you adjusted will not be memorized after you turn
ff the unit
ome
ocation]p. 3
Fun-Link Options
If you have our brand products such as BD player or DVD
recorder that are compatible with Fun-Link functions, connect
them to this unit via an HDMI cable so you can simply operate
various items from this unit's remote control.
Before you begin:
ou must set
Fun-Link Control]p. 29
therwise, FUN-LINK OPTIONS
ou connected our brand devices to this unit
To enjoy Fun-Link, verified and recommended devices
re as follows
MAGNAVO
B530MGX
B500MG1
MBP1100 / F
Press FUN-LINK OPTIONS to display
Device-menu
Device-contents
Device-favorit
On
Device Control] an
unLink Options] menu
Fun-Link Options
Device-menu
Device-contents
Device-favorite
his function allows you to control
he menu of your connected Fun-Link
evice.
his function allows you to control the
his function allows you to control the
op-up menu of your Blu-ray discs
oes not work even if
SYLVANI
B530SL
B500SL
menu of your DVD or Blu-ray discs
Video
SD
480i
SD
480i
TV-PG DLSV
he information display will automatically disappear in 1 minute
8
CC
CC
Use ▲/▼/◄/► /
o
erate the desired functions for your devices
n this unit's remote control to
Note
ome of Fun-Link functions may not be available depending on your Fun-
nk devices or discs
We do not guarantee 100% interoperability with other brands of HDMI link
ant devices
comp
Page 35

h
OPTIONAL SETTING
T
t
.
s
g
uage
d
Y
.
[
]
0
T
t
to access them.
[
]
0 Y
th
.
]
4
Y
w
.
[
7 Y
.
[F
.
]
0
[L
]
0
.
[
]
0
]
1
.
f
y
DTV ch
t
.
:
.
U
d
s
,
]
]
ill begin.
Wh
ill be displayed.
A
ilabl
.
ider
ill b
d.
A
The PIN
ill b
PIN
7
Main Menu
his section describes the overview of the main menu
splayed when you press
he function setting items below
. The main menu consists of
nglis
Autoprogram
If you switch wires (e.g. between antenna and CATV) or if you
move the unit to a different area after the initial setting, or i
ou restore the
annels you deleted, it is recommended
o use Autoprogram to perform a new channel search
Before you begin
ake sure the unit is connected to antenna or cable
Press MENU to display the main menu.
INTRODUCTION
PREPARATION
ress
PicturePicture Adjustment]
Soun
Setup
eatures [Closed Caption
anguageLanguage Selection
[Sound Adjustment]
utoprogram]
ou can automatically scan the viewable channels
Channel List
he Channels that were autoprogrammed are in
his Channel list, use
Add Channels
ou can add TV channels that were not found by
e autoprogram scan
ou can change the display closed caption format
hich displays the dialogue of a TV program or
ther text information across the TV screen
Child Lock]
ou can set viewing limitations
un-Link]
You can set Fun-Link options
[Energy Saving Mode
ocation
witch setting from
esired
icture] andSound]mode to be kept in
memory
Current Software Info
hange the Main Menu language
H
etail] to
Picture
ound
Setup
eature
an
ome] to allow the
p. 22
p. 22
p. 19
p. 2
p. 2
p. 2
p. 2
p. 29
p. 3
p. 3
p. 3
p. 2
2
se ▲/▼to select
se ▲/▼to select Autoprogram
Setup], then press
, then press
se ▲/▼to select an appropriate option, then press
Back
Antenna
Cable
ANT.IN
Picture
oun
Setup
eature
anguage
Autoprogram will rescan all channels.
Auto programming may take more than 20
minutes to complete.
Select your signal source.
Antenna
Cable
Or
When connected to VHF / UHF antenna
select
When connected to CATV, select
ntenna
Cable
utoprogram]w
Please wait while the system is scanning for channels. Auto programming
may take more than 20 minutes to complete.
75%
Digital channels
Analog channels
MENU
10 ch
6 ch
Exit
en the scanning and memorizing are completed, the
owest memorized channel w
Note
fter setting
unava
If you are not receiving a signal from your cable service, contact the Cable
prov
If you press or
Even if
C power cord is unplugged before turning off the unit by pressing
p. 2
If you want to change your PIN code, follow the instruction of
Change PIN]
utoprogram], using
e programs automatically
.
utoprogram] is completed, the channel setting will be lost if the
code w
during autoprogram, the setting w
e required once you set a
28
H +/
on the remote control skips
code in the
e cancele
Child Lock]
WATCHING TV
OPTIONAL SETTING
TROUBLESHOOTING
INFORMATION
9
Page 36

0
Channel List
Th
kipped wh
–
Th
ill b
s
.
d
s
T
Y
ill
–
highlighted.
d
ll.
.
Th
.
.
T
l
.
P
.
d
s
.
]
is displ
d.
ill be displ
.
.
e channels selected here can be s
annels using
ose channels can st
H+ /
e selected with the Number button
en selecting the
Add Channels
his function lets you add the channels that were not added
y the autoprogram due to reception conditions at the initia
setting
Press
2
se ▲/▼ to select
3
se ▲/▼ to select
4
se ▲/▼ to select the channel you want to remove, then
to display the main menu
Setup], then press
hannel List
, then press
press
DTV 11.1
DTV 11.2
DTV 11.3
Pict
oun
Setup
eature
anguage
Highlight channels for Ch Up / Down key selection.
Ch Select
OK
Watch/Skip
he channel display for the removed channel darkens.
ou w
not be able to select the channel again using
H+ /
To reactivate a removed channel, use ▲/▼ and press
. The registered channels are
When you remove a main channel, its subchannels are
as we
to exit
5
remove
ress
Note
e channel with the
therwise the channel is NTSC
indicated on the display is ATSC
ress
2
se ▲/▼to select
3
se ▲/▼to select Add Channels, then press
4
se the Number buttons to enter the number of the
to display the main menu
Setup], then press
annel you want to add, then press
11
BACK
Add channels
Back
aye
Picture
For analog channels, select a channel to be
Setup
eature
5
anguage
ress
BACK
Back
added using number keys.
For digital channels, you must perform
Autoprogram function.
Ch Change
to exit
Note
If setup completes successfully,
If external input is used, it is not possible to register the channel and
navailable] w
y using
H + /
, you can select the memorized channels only
dded to the channel list
ayed on the TV screen
2
Page 37

h
1
Antenna Confi rmation
ATSC
T
l.
.
–
t
h.
d
s
f
dition.
d
s
.
d
s
.
K
K
.
his function lets you check the digital signal strength of each
anne
Press
2
se ▲/▼ to select
3
se ▲/▼to select Antenna, then press
to display the main menu
Setup], then press
nglis
Language Selection
You can choose English, Spanish, or French as your on-screen
language.
1 Press MENU to display the main menu.
2
se ▲/▼to select
3
se ▲/▼to select
press
nguage
nglish
, then press
spañolor
rançais then
INTRODUCTION
PREPARATION
4
se the Number buttons or
H+ /
o select the
channel for which you want to check the digital signal
strengt
Pict
oun
Setup
eature
anguage
Current 50 Max 50
CH
Ch Change
If the channel is set to analog (cable) channel or
external input, you cannot con
irm the antenna
con
Pict
Setup
eature
anguage
Indicator is available for digital
broadcasting only.
11.1
Back
Video
Back
English
Español
Français
4
Picture
oun
etup
eature
Language
ress
Select your menu language.
Seleccione el idioma para el menú.
Sélectionnez la langue du menu.
to exit
Note
If you need the English menus instead of the Spanish or French menus, press
. Use ▲/▼to select
se ▲/▼ to select
ress
to exit the main menu
ioma]or
nglish], then press O
angue], then press O
WATCHING TV
OPTIONAL SETTING
TROUBLESHOOTING
INFORMATION
CH
Ch Change
5
ress
to exit
2
Page 38

Picture Adjustment
Y
]
i
0
.
.
d
ures
Adj
.
]
)
d
ures
e
Y
t
l]
in
.
s
s
t
t
t
y
y
t
d
e
s
l
s
s
t
.
Y
.
Y
]
in
0
.
.
s
g
uage
Adj
.
You can adjust picture mode, or customize the picture quality
as your preference.
Before you begin:
ou must set
therwise, the settings you adjusted will not be memorized
after you turn off the unit
1
ress
2
se ▲/▼ to select
3
se ▲/▼ to select the item you want to adjust, then press
Picture
Setup
4
Smart Picture
se ▲/▼to select the desired setting, then press
ersonal]
ome
n
ocation]
to display the main menu
icture], then press
Smart Picture
oun
eat
anguage
Brightness
Contrast 60
Color 36
Tint 0
Sharpness 0
Color Temperature Normal
ust the following items
Standard]
Sports]
p. 3
ovie] and
Personal
30
Game
rightness, Contrast, Color, Tint,
Sharpness
ou can only adjust the following options when you set
o
ersona
esired setting, then use
rightness
Brightness 30
Adjust Move OK
ontras
Contrast 60
Adjust Move OK
olor
Color 36
Adjust Move OK
in
Tint 0
Adjust Move OK
Sharpness
Sharpness 0
Adjust Move OK
olor Temperatur
Color Temp. Normal
Adjust Move OK
5
res
Color Temperatur
Smart
icture ]. Use ▲/▼ to select the
/► to adjust
OK
OK
OK
OK
OK
OK
o exit
to decrease
rightnes
ress
to decrease
contras
ress
to decrease
color intensit
to add re
ress
to soften
to add warm
color
ress
to increase
rightnes
ress
to increase
contras
ress
to increase
color intensit
ress
to add green
ress
to sharpen
ress
to add coo
color
Picture
oun
etup
eat
anguage
Smart Picture
Brightness
Contrast Sports
Color Movie
Tint Game
Sharpness
Color Temperature
Personal
Standard
Sound Adjustment
ou can adjust the sound mode, equalizer and some other
sound functions
Before you begin:
ou must set
therwise, the settings you adjusted will not be memorized
after you turn off the unit
1
ress
2
se ▲/▼to select
3
se ▲/▼to select the item you want to adjust, then press
Picture
Sound
Setup
4
ome
ocation]p. 3
to display the main menu
ound], then press
Smart Sound
Equalizer
Virtual Surround Sound On
eature
an
Auto Volume Leveling Off
TV Speakers Ext. Amp
Primary MTS Stereo
ust the following items
Standard
22
Page 39

h
Smart Sound
]
)
ures
A
▼
ures
g
uage
d
Vi
l
▼
ures
.
f
.
A
T
.
ures
TV
.
f
.
HDMI
t
]
s
g
uage
T
.
f
T
.
HDMI link devi
.
.
Y
.
Thi
s
g
uage
o
.
o
.
.
.
se ▲/▼ to select the desired setting, then press
ersonal]
Standard]
ovie]
usic] and
ews
nglis
INTRODUCTION
Reduces volume differences between the
commercials and the programs
f
emoves the auto volume leveling
Picture
Sound
etup
eat
anguage
Smart Sound Personal
Equalizer
Virtual Surround Sound Movie
Auto Volume Leveling Music
TV Speakers News
Primary MTS
Standard
Equalizer
djust tonal quality for each frequencies. Use
select the specifi c frequency and use ▲/
evel, then press
Picture
Sound
etup
eat
an
0
120Hz0500Hz01.5kHz05kHz010kHz
/►to
to adjust the
Virtual Surround Soun
rtual surround sound gives you the stereo phonic virtua
space through your existing 2-channel stereo system. Use
▲/
to select the desired option, then press
Picture
Sound
etup
eat
anguage
This selects the modes for more spatial or
surround sound reproduction.
n Emphasized effect
f
atural effect
On
Off
uto Volume Leveling
his function keeps a constant loudness differential
etween the TV commercials and the programs
se ▲/▼ to select the desired option, then press
TV Speakers
elect the audio output from the unit’s speakers, or not.
If your amplifi er is HDMI link function compatible and
onnected by an
cable to this unit, some sound
perations such as volume up can be changed by using
his unit’s remote control. Make sure
s set to
On] ➠p. 29
Fun-Link Control
se ▲/▼to select the desired option, then press
Picture
Sound
etup
eature
an
f
xt. Amp
"
On":
Sound will be output from the TV
speakers.
"Off":
Sound will not be output from the TV
speakers.
"Ext. Amp":
Operation is possible by connecting to the
HDMI-CEC compatible amp with a
HDMI cable.
For details look in the user manual.
he sound will be output from the unit’s
speakers
he sound will not be output from the
unit’s speakers
You can control audio output from your
onnected
unit's remote control
On
Off
Ext. Amp
ces by using this
Note
We do not guarantee 100% interoperability with other brands of HDMI
nk compliant devices
rimary MTS
ou can set the output mode as a default for the sound
mode (NTSC only)
s setting is not interlocked when you change the
utput mode by pressing SAP Sound Functions]p. 17
se ▲/▼to select the desired option, then press
Picture
Sound
Setup
eature
an
Smart Sound
Equalizer
Virtual Surround Sound
Auto Volume Leveling
TV Speakers
Primary MTS
Stereo
Mono
SAP
PREPARATION
WATCHING TV
OPTIONAL SETTING
TROUBLESHOOTING
INFORMATION
Picture
Sound
Setup
eat
anguage
Auto Volume Leveling reduces volume
differences between channels and
programs, providing a consistent audio
level.
On
Off
Stere
on
SAP
ress
utputs stereo-audio
utputs mono-audio
utputs second audio program
to exit
23
Page 40

4
Closed Caption
.
.
p
g
A
U
d
Th
.
.
T
.
,
.
e
ly.
de
th
.
de
).
P
.
You can view closed captioning (CC) for TV programs,
movies and news. Closed caption refers to text of dialogue or
descriptions displayed on-screen.
A. Caption ServiceA. Caption Service
Press
2
se ▲/▼ to select
Use ▲/▼ to select
to display the main menu
eatures], then press
losed Caption
ee the following description for setting each item
Picture
ound
etu
Features
an
Caption Service
Digital Caption Service
Caption Style
, then press
Off
Off
se ▲/▼to select
4
ption Service], then press
se ▲/▼to select the desired closed caption, then press
Picture
etup
Features
anguage
C-1 and T-1
C-3 and T-3
C-2, CC-4
-2 and T-4
Caption Service
Digital Caption Service
Caption Style CC-2
e primary caption and text services. The
aptioning or text is displayed in the same
anguage as the program’s dialogue (up to
4 lines of script on the TV screen, where
t does not obstruct relevant parts of the
picture)
erve as the preferred data channels
he captioning or text is often a secondary
anguage
arely available and broadcasters use them
nly in special conditions, such as when
CC-1]and
CC-3] or
T- 1] andT- 3] are
ot available
Off
CC-1
CC-3
CC-4
T-1
T-2
T-3
T-4
• There are 3 display modes according to programs:
Paint-on mod
op-on mo
oll-up mo
ress
splays input characters on the TV screen
mmediate
nce characters are stored in memory,
ey are displayed all at once
splays the characters continuously by
scrolling (max. 4 lines
to exit
2
Page 41

h
B. Digital Caption ServiceB. Digital Caption Service
ATSC
dditi
DTV h
pti
digital
t
.
digital
p
g
f
.
6
]
.
.
.
ATSC
Y
tc.
U
e
d
▼
So, y ou m us t be P hi li p. Hi!
I’m p le as ed t o me et you.
p
y
T
.
.
n a
on to the basic closed caption,
ca
on called
he settings for digital caption service
se ▲/▼to select
5
se ▲/▼to select the desired
ress
Picture
ound
etu
Features
an
f
S-1 to CS-
6
ress
caption service. Use this menu to change
Digital Caption Service
Caption Service
Digital Caption Service
Caption Style CS-2
elect if you do not want digital caption
ervice
Select one of these before changing
any other item in
menu. Choose
circumstances
to exit
as its own closed
, then press
caption service, then
Off
CS-1
CS-3
CS-4
CS-5
CS-6
Closed Caption
CS-1] under normal
C. Caption StyleC. Caption Style
ou can change the caption style such as font, color or size,
e
se ▲/▼to select
se ▲/▼to select
Pictur
oun
etup
Features
anguage
6
se ▲/▼to select n, then press
se ▲/▼to select an item, then press
▲/
to select the desired setting and press
Picture dis
So, you must be Philip. Hi!
So, you must be Philip. Hi!
I’m pleased to meet you.
I’m pleased to meet you.
Caption Style], then press
User Setting
User Setting
Font Style
Font Size Middle
Font Color
Font Opacity Solid
Background Color
Background Opacity Solid
Edge Color
Edge Type
, then press
Off
Font0
White
Black
Black
None
. Then use
lay
nglis
INTRODUCTION
PREPARATION
WATCHING TV
OPTIONAL SETTING
TROUBLESHOOTING
Note
Digital Caption Service] that you can switch differs depending on the
roadcast description
ge
(Edge Color and Edge Type)
ont
Font Style, Font Size, Font Color and Font Opacit
or Transparency)
ackground
( Background Color and Background Opacity or
Transparency)
he setting description for each item is shown on the
ext page
eview your setting choice made on the next page
y looking in the upper right corner of the displayed
etting box (not all selections show the differences
elected)
INFORMATION
25
Page 42

Font Style
ill
d.
d.
r
d.
y
d.
r
itched
ill
d.
itched
ill
d.
r
i
d.
pti
d.
.
ion.
T
i
.
p
.
.
.
A
ds.
A
p p
.
Th
ill
hil
.
]
g
:
El
Weak si
p
)
T
.
.
losed Captioning font style
an be changed as
ustrate
Font Size
ont size of the displayed
aption can be switched as
ustrate
Font Colo
ont color of the displayed
aption can be switched as
ustrate
Font Opacit
ont opacity of the displayed
aption can be switched as
ustrate
Background Colo
Background color of the
splayed caption can be
sw
as
ustrate
Closed Caption
Closed Caption
Large
Middle
Small
Closed Caption
White
Black
Red
Green
Blue
Yellow
Magenta
Cyan
Closed Caption
Solid
Flash
Translucent
Transparent
Closed Caption
White
Black
Red
Green
Blue
Yellow
Magenta
Cyan
Background Opacity
Closed Caption
Background opacity of the
splayed caption can be
sw
as
ustrate
Edge Colo
Solid
Flash
Translucent
Transparent
Closed Caption
Edge color of the displayed
capt
on can be switched as
ustrate
ge Type
White
Black
Red
Green
Blue
Yellow
Magenta
Cyan
Closed Caption
Edge type of the displayed
ca
on can be switched as
ustrate
None
Raised
Depressed
Uniform
L. Shadow
R.Shadow
8
ress
to exit
Note
losed caption will not be displayed when you are using an HDMI
connect
o show the closed caption on your TV screen, broadcast signal must
n the closed caption data
conta
ot all TV programs and commercials have the closed caption or all types
of the closed ca
aptions and texts may not exactly match the TV voice
hanging channels may delay the closed caption for a few seconds
djusting or muting the volume may delay the closed caption for a few
secon
bbreviations, symbols and other grammatical shortcuts may be used in
order to kee
e caption or text characters w
or functions display is shown
If a black box appears on the TV screen, this means that the closed caption
s set to the text mode. To clear the box, select
CC-4] or
If the unit receives poor quality television signals, the captions may contain
errors, or there mi
uality signals are
-Automobile ignition noise
ectric motor noise
-
-
- Multi
Data dropout and Pixelation (for DTV only)
he unit retains the closed caption setting if the power fails
When the unit receives special effects playback signal (e.g. Search, Slow
and Still) from a VCR’s video output channel (ch3 or ch4), the unit may not
splay the correct caption or text
tion
ace with the on-screen action. This is not a malfunction
not be displayed w
CC-1]
Off
ht be no captions at all. Some possible causes of poor
gnal reception
lex signal reception (ghosts or screen fl utter
e the main menu
CC-2]
CC-3]
26
Page 43

h
7
Child Lock
t
h
t
ible.
.
p
g
y
PIN
.
PIN
ter
Wh
PIN
d.
.
p
g
A
Wh
high
ill b
y
g.
Wh
high
]
lly.
To block
k]
T
.
ill
ill b
.
.
T
y.
ible i
t
.
dly
d
e
d
.
.
dly
d
e
d
y
X
7
d
3
d
.
hild lock reads the ratings for programs, then denies access
o the programs which exceed the rating level you set. Wit
his function, you can block certain programs inappropriate
for children and any channels or external input modes can be
nvis
1
ress
2
se ▲/▼ to select
3
se ▲/▼ to select
Picture
ound
etu
Features
an
4
se the Number buttonsto enter the 4-digit numbers for
our
to display the main menu
eatures], then press
Closed Caption
Child Lock
Fun-Link
Energy Saving Mode
Location
Current Software Info
code
, then press
On
Home
A. Channel LockA. Channel Lock
articular channels or external input modes can be invis
his function
5
se ▲/▼to select
6
se ▲/▼to select the desired rating, then press
7
repeate
ress
to switch between View an
Pictur
oun
etup
Features
anguage
to exit
Channel L
Video
Component
HDMI1
HDMI2
HDMI3
40.1 DTV
Select
OK
View / Block
, then press
BACK
Back
nglis
INTRODUCTION
n
PREPARATION
WATCHING TV
OPTIONAL SETTING
Features
anguage
When you have not set up your
en
en the
Enter PIN .
code is correct,
_
code,
Child Lock] menu is
splaye
ee the following description for setting each item
Picture
ound
etu
Features
an
Channel Lock
US Movie Ratings Lock
US TV Ratings Lock
Canadian English Rating
Canadian French Rating
Region Ratings Lock
Change PIN
Note
en you select a rating and set it to
blocked automaticall
en you set the
automatica
any inappropriate programs, set your limits in
ock]
US TV Ratings Lock]andegion Ratings Loc
he child lock setting will be retained after a power failure (except the PIN
code reverts to 0000)
If the rating is blocked, w
egion Ratings Lock]w
roadcast using the new rating system
or the United States, the unit may download the Region Ratings Lock Table,
f required
he Canadian rating systems on this unit are based on CEA-766-A and
RTC polic
. The lower ratings will be available for viewin
est rating to
appear.
e available when the unit receives a digital
ock], the
iew], all ratings turn to
er ratings w
US Movie Ratings
iew
B. Setting US Movie ratingsB. Setting US Movie ratings
TROUBLESHOOTING
S Movie ratings lock is the rating system created by MPAA
5
se ▲/▼to select
6
se ▲/▼to select the desired rating, then press
repeate
e
NC-1
to switch between View an
Pictur
etu
Features
anguage
ating
G-13
US Movie Ratings Lock], then press
X
NC-17
R
PG-13
PG
G
NR
OK
Select
View / Block
ategor
ature audience only
o one under 17 admitte
Restricted; under 17 requires accompanying
parent or adult guardian
nsuitable for children under 1
arental guidance suggeste
eneral audience
o rating
BACK
Back
INFORMATION
7
ress
to exit
2
Page 44

C. Setting TV ratingsC. Setting TV ratings
repeatedly to switch between
View
d
p
g
y
MA
4
G
d
G
Y7
Approp
r-Y
A
r
.
s
A
t
T
.
dly
k]
ure
d
p
g
g
y
g
TV-Y7VViol
T
A
T
4
T
G
T
G
ill
.
]
g
]
).
A
y
PIN
.
.
PIN
.
uage
.
.
f
.
,
.
T
.
D. Change PIND. Change PIN
se ▲/▼to select
5
6
se ▲/▼ / ◄/► to select the desired rating, then press
, then press
and
7
Picture
Features
V-14
V- P
V-
-
ress
oun
etu
an
ating
TV-MA
TV-14
TV-PG
TV-G
TV-Y7
TV-Y
Select
ature audience only
nsuitable for children under 1
arental guidance suggeste
eneral audience
riate for all children 7 and
e
ppropriate for all children
to exit
FV V S L D
OK
View / Block
BACK
Back
ategor
o set the sub rating
s for TV-MA, TV-14, TV-PG, or TV-Y7, you can further set
he sub ratings to block specifi c elements of programming.
o set the sub ratings, follow the step below
igher
owe
lthough the default PIN code (0000) is supplied with the unit,
ou can set your own
5
se ▲/▼to select
6
ress the Number buttons to enter the new 4-digit PIN
code
hange PIN
, then press
ode
7
nter
Picture
ound
Setup
Features
ress
code again in
Enter PIN.
Confirm PIN.
to exit
Confirm PIN.] entry field
_
PIN Code
BACK
Back
Note
Make sure new PIN code and confi rm PIN code must be exactly the same.
If they are different, the space is cleared for reentering
Your PIN code will be erased and return to the default (0000) when a
ailure occurs
power
If you forget the PIN code, unplug the AC power cord while turning the unit
wait for
on
he unit will restore the PIN code to 0000 as the factory default
0 seconds to plug the AC power cord again
se ▲/▼ / ◄/► to select the desired rating, then press
repeate
Pict
oun
etu
Features
an
Sub Ratin
S
to switch between
TV-MA
TV-14
TV-PG
TV-G
TV-Y7
TV-Y
Select
ategor
antasy Violence
ence
exual Situation
oarse Language
uggestive Dialogue
iew] and
FV V S L D
OK
View / Block
BACK
V- M
V- 1
V- P
V-14, TV-P
Note
ocked sub rating w
US TV Ratings Lock]menu
You cannot block a sub rating (D, L, S or V) if the main rating is set to
iew
hanging the category to
s to the same (ock] or
ratin
appear beside the main rating category in
ock] or
iew]automatically changes all its sub
iew
oc
Back
atin
28
Page 45

h
Fun-Link
T
i
HDMI
.
.
d
A
.
]
T
]
d
p
t
.
fsabl
k.
A
f
Y
t
d
g
uage
.
f
y
.
A
Thi
ill
l
.
Thi
y
.
f
T
.
Y
p
’
.
d
p
g
uage
/▼/
/► /
t
l
fsabl
l.
t
T
.
HDMI devi
the TV
p
uage
.
his function allows you to operate the linked functions
between our brand devices with a Fun-Link feature and this
un
t connecting through an
1
ress
2
se ▲/▼to select
3
se ▲/▼to select
to display the main menu
cable
eatures], then press
un-Link], then press
uto TV On
s unit w
s sent from your connected Fun-Link device
se ▲/▼to select the desired setting, then press
Picture
ound
etup
Features
anguage
turn on detected when the power on signa
On
When set to "On", TV and connected device
are turned on automatically.
Off
nglis
INTRODUCTION
PREPARATION
Pict
oun
etup
Features
anguage
Fun-Link Control
Auto Device Off On
Auto TV On On
Device Control On
Device List
On
4
se ▲/▼to select the desired setting, then press
5
djust the following items
un-Link Control
et the Fun-Link
he following additional settings will be in gray when you
et to
Off
se ▲/▼ to select the desired setting, then press
Picture
oun
etu
Features
anguage
n
f
On]or
When set to "On", Fun-Link functions are
enabled.
Off
On
Off
elects if you have connected an external device
hat is compatible with the Fun-Link function
es all Fun-Lin
uto Device Of
ou can set your device to turn off by interlocking from
his unit’s power.
se ▲/▼ to select the desired setting, then press
n
f
s unit turns on automatically when you turn on
our connected Fun-Link device
his unit stays off even if you turn on your
onnected Fun-Link device
Device Control
ou can operate some functions such as disc playback or
call u
the menu of the connected devices, by using this
unit
s remote control
se ▲/▼to select the desired setting, then press
Picture
Features
n
f
etu
an
When set to "On", the connected device is
controlled using the remote control.
LAY B / STOP C/ FWD D /
KIP H/ PAUSE F/ FUN-LINK OPTIONS /
▲
uttons /
/ BACK / the Number
/
REEN /
sed to control your connected Fun-Link devices
his unit's remote contro
es the device contro
On
Off
E / SKIP G /
/ YELLOW can be
y
Device Lis
his function lets you see the product model number or
name of connected devices
se ▲/▼to select the desired
screen, then press
K.
ce listed on
WATCHING TV
OPTIONAL SETTING
TROUBLESHOOTING
INFORMATION
Picture
ound
etu
Features
HDMI1
NB530MGX
HDMI2 MBP1100 / F7
Select
OK
Input Change
BACK
Back
ure
oun
Setup
Features
an
When set to "On" and TV is turned off,
connected devices are turned off
automatically.
On
Off
n
f
Your connected Fun-Link device turns off
automatically when you turn off the unit
Your connected Fun-Link device stays on even if
ou turn off the unit
6
ress
to exit
29
Page 46

Energy Saving Mode
Y
.
.
d
.
f
Th
ibl
.
.
Wh
q
.
.
d
.
T
d.
.
U
d
.
ou can set whether the power consumption is saved or not
1
ress
2
se ▲/▼ to select
Use ▲/▼ to select
Use ▲/▼ to select the desired mode, then press
Pict
oun
etup
Features
anguage
to display the main menu
eatures], then press
Energy Saving Mode
When set to “On”, power consumption is reduced
by decreasing backlight brightness.
, then press
On
Off
Current Software Info
his function shows what version of the software currently
se
1
ress
2
se ▲/▼to select
se ▲/▼to select
Confi rm the version of the software currently used.
oun
etup
Features
anguage
to display the main menu
eatures], then press
urrent Software Info, then press
Release Version:
XXXXXXX_XXX_X_XXXX
Back
n
f
ress
educes the power consumption
e power consumption may poss
exceed the limited requirement of the
qualification
to exit
Location
en you select
ossibly exceed the limited requirement of the
1
ress
2
se ▲/▼ to select
Use ▲/▼ to select
Use ▲/▼ to select the desired location, then press
etup
Features
anguage
etail] store, the power consumption may
ualifi cation
to display the main menu
eatures], then press
ocation
, then press
Retail
Location Home is recommended for
normal home use.
In the Retail Store mode, all settings are
fixed.
Home
y
ress
to exit
ress
to exit
Page 47

h
TROUBLESHOOTING
?
.
.
l.
T
.
Aim the remote control directly at the infrared sensor window on the front of the unit.
.
.
t
.
.
?
.
.
Why I
]
h
Autoprogram must be completed when you set up the unit for the fi rst time or move it
p
t
.
.
Wh
]
is i
ill
ived. Mak
The selected channel cannot be viewed by the
]
setting.
7
The unit requires some kind of antenna input. An indoor antenna
y
g
.
f
?
–
]
.
Wh
.
T
i
T
.
Wh
?
.
?
T
.
nglis
INTRODUCTION
FAQ
Question Answer
y remote control does not
work.
What should I do
ow come the Initial setup
ppears every time I turn on
this unit
The selected channel may not be broadcasting
cannot watch some RF
signal TV programs.
ow come there is no image
rom the connected external
evices
enever I entered channel
number,it changes automatically.
y are captions not displayed
entirely
r, captions are delayed behind
the dialogue.
How can I set the clock
heck the antenna or cable connection to the main unit
heck the batteries of the remote control
heck if there is an obstacle between the infrared sensor window and the remote
ontro
est the signal output. If OK, then possible infrared sensor trouble
IR Signal Check]
educe the distance to the unit
Re-insert the batteries with their polarities (+/– signs) as indicated
When there is an infrared-equipped device such as PC near this unit, it may interrupt
he remote control signal of this unit
Move the infrared-equipped device away from this unit, change the angle of the infrared
sensor or turn off the infrared communication function
onnect the RF coaxial cable to the unit directly and run the initial setup
Make sure to complete the channel scan before turning off the unit
ake sure
o a location where previously unavailable channels are broadcast
en
rece
(VHF /UHF), an external antenna (VHF /UHF) or an RF coaxial cable from your wall
able/satellite box needs to be plugged into the unit
heck if the right input mode is selected by pressing
Switching Each Input Mode
When using the Component Video Connection check that the Green (Y), Blue (Pb/Cb)
and Red (Pr/Cr) connectors are connected to their corresponding colored jacks on the
unit
any digital channels have alternate channel numbers
he unit changes the numbers automatically to the ones signifying the broadcasting
on channel number.
stat
hese basic numbers used for previous analog broadcasts
(e.g., input ch#30 auto change to ch#6.1)
aptions that are delayed a few seconds behind the actual dialogue are common for live
roadcasts. Most captioning production companies can display a dialogue to maximum
f 220 words per minute. If a dialogue exceeds that rate, selective editing is used to
nsure that the captions remain up-to date with the current TV screen dialogue
here is no clock function on this unit
utoprogram
utoprogram
e sure to complete.
. 34
as been completed.
nterrupted and not completed, some channels w
p.19
. 1 6
.19
Child Lock
OURCE or usingH +/
not be
p. 2
PREPARATION
WATCHING TV
OPTIONAL SETTING
OPTIONAL SETTING
TROUBLESHOOTING
TROUBLESHOOTING
INFORMATION
Page 48

Troubleshooting Guide
gg
r
.
pp
y.
.
.
.
.
.
d
ly.
y
k.
d
d
.
.
y
Vi
k si
h.
.
d
.
k.
d
l
ill
.
to adjust the
.
r
.
.
A
]
ti
.
0
r
.
A
]
i
.
Vi
k signal
h.
.
.
r
Vi
ight be limited
k signal
h.
y.
Y
d.
.
T
.
.
Vi
.
If the unit does not perform properly when operated as instructed in this manual,
Symptom Remedy
• Make sure the AC power cord is plugged in
o powe
ontrol button does not work
ower is ON but no screen
mage
o picture or soun
o colo
djusted
settings are not effective every
me the unit is turned on
ound OK, picture poo
icture OK, sound poo
ou see a distorted picture or
ear an unusual soun
icture] or
Sound
• Make sure that the AC outlet supplies the proper voltage, plug another electrical
liance into the AC outlet to ensure that AC outlet operates normall
a
• If a power failure occurs, unplug the AC power cord for 1 minute to allow the unit to
reset itself
•
ress only one button at a time. Do NOT press more than one button at the same time
• Ensure that no buttons on the remote are depressed and move freely
•
heck whether the connection of the antenna, cable receiver or satellite box is
connecte
•
heck whether all the cables to the unit are connected to the correct output jack of
our device like BD / DVD recorder.
ake sure that the selected input mode is connected to the working input jac
•
•
heck if your computer is NOT in sleep mode when the input mode of this unit is in PC
mo
•
heck if the power is on
•
heck if the right input mode is selected
•
heck whether all the cables to the unit are connected to the correct output jack of
our device like BD / DVD recorder.
ew other TV channels. The problem might be limited to the broadcasting station or
•
wea
•Turn off the unit and wait for about 1 minute, then turn on the unit again
•
heck whether the connection of the antenna, cable receiver or satellite box is
connecte
•
ake sure that the selected input mode is connected to the working input jac
•
heck if your computer is NOT in sleep mode when the input mode of this unit is in PC
mo
•
ake sure that the sound is not muted. Press
vo
• Make sure that the volume is NOT set to
esired volume
•View other TV channels. The problem might be limited to the broadcasting station
•Adjust
• You must set [Home] in [Location].
Otherwise, the settings you adjusted will not be memorized after you turn off the unit.
Electrical interference from nearby appliances may affect picture quality
djust
ew other TV channels. The problem might be limited to the broadcasting station or
wea
or the best picture quality, watchHigh Definition" wide screen programs
If the HD content is not available, watch "Standard Definition
ew other TV channels. The problem m
wea
heck if the audio cable is connected in correctl
You may be getting interference from electrical appliances, automobiles, motorcycles or
fl uorescent lights
ry moving the unit to another location to see if this is the cause of the problem
correct
e. Tap any key on the keyboard to wake up your computer.
gnal strengt
correctly
e. Tap any key on the keyboard to wake up your computer.
ume level w
appear on the TV screen
Color] in the main menu
Contrast] andrightness
strengt
strengt
or
p. 3
n the main menu
so that the volume bar and current
ute]. If so, use VOL +/
programs instead
to the broadcasting station or
hosts, lines or streaks in picture
2
Electrical interference from nearby appliances may affect picture quality
ew other TV channels. The problem might be limited to the broadcasting station
Page 49

h
Symptom Remedy
Y
.
i
h.
Vi
ight be limited
issing d
d th
.
T
.
h
.
d th
.
T
.
The displ
th
.
repeatedly to switch various screen modes.
.
.
.
.
T
.
TV
.
T
]
T
.
T
.
.
ou see
noise" or
trash" on the
screen
Different color marks on the TV
screen
You switch to a different input
e volume changes
an
You switch to a different input
e screen size changes
an
ay image does not cover
e entire screen
When the capabilities of the unit exceed the capabilities of the digital broadcasting, the
signal will be increased to match the capabilities of the display of the unit. This may cause
no
ew other TV channels. The problem m
m
his unit will memorize the volume level from the last time you adjusted it
If the volume of the sound from another device is higher or lower, then the loudness will
ange
c
his unit will memorize the viewing mode from the last time you used the particular
nput modes
If you are watching TV or using the Composite Video, S-Video, Component Video or
HDMI with 480i Input, press
aptions are displayed as a white
ox
o caption is displayed in the
losed Caption-supported
Interference from buildings or weather conditions may cause captioning to be incomplete
roadcasting station may shorten the program to insert advertisement
he closed caption decoder cannot read the information of the shortened program
program
ack box is displayed on the
screen
he text mode is selected for caption. Select
se or tras
ata or pixelation.
to the broadcasting station,
CC-1]
CC-2]
CC-3]
CC-4]or
Off
nglis
INTRODUCTION
PREPARATION
WATCHING TV
OPTIONAL SETTING
TROUBLESHOOTING
Note
he LCD panel is manufactured to provide many years of useful life. Occasionally a few non active pixels may appear as a fi xed point of blue, green or red
his is not to be considered a defect in the LCD screen
ome functions are not available in specifi c modes, but this is not a malfunction. Read the description in this manual for more details on correct operations
INFORMATION
3
Page 50

INFORMATION
ATSC
A
t
.
A
o
T
.
o
T
th
l
Th
lby Lab
digital
.
.
(High Definition TV)
.
C
A
t
.
.
A
.
Thi
bili
.
.
o
(y)
.
dry.
.
W
t
.
t
l
)
t
.
With
a
l. P
l
th
di
Maintenance
Glossary
cronym that stands for Advanced Television Systems Committee and
he name of the digital broadcasting standards
spect Rati
he width of a TV screen relative to its height. Conventional TVs
are 4:3 (in other words, the TV screen is almost square); widescreen
models are 16:9 (the TV screen is almost twice as wide as its height)
omponent Vide
his is a video signal format that conveys each of 3 principal colors
of light (red, blue and green) through different signal lines. This allows
e viewers to experience picture colors as original as it is. There are
several signal formats, including Y / Pb / Pr and Y / Cb / Cr.
olby Digita
e system developed by Do
sound. It offers stereo sound (2ch) or multi-channel audio
(High-Definition Multimedia Interface)
Interface that supports all uncompressed, digital audio / video formats
ncluding set-top box, BD / DVD recorder or digital television, over a
single cable
ltimate digital format that produces high resolution and high picture
quality
NTS
cronym that stands for National Television Systems Committee and
he name of analog broadcasting standards
ff the air NTSC signals are no longer being sent by major
broadcasting stations in the USA
code
stored 4-digit number that allows access to parental control features
SAP
Secondary Audio Program)
econd-audio channel delivered separately from main-audio channel.
s audio channel is used as an alternate in
SDTV
Standard Definition TV)
tandard digital format that is similar to the NTSC picture quality
S-Vide
ffers higher quality images by delivering each signal, color (c) and
uminance
independently of each other through a single cable
oratories to compress
ngual broadcasting
Cabinet Cleaning
Wipe the front panel and other exterior surfaces of the
unit with a soft cloth immersed in lukewarm water and
wrung
ever use a solvent or alcohol. Do not spray insecticide
iquid near the unit. Such chemicals may cause damage and
iscoloration to the exposed surfaces
Panel Cleaning
ipe the panel of the unit with a soft cloth. Before cleaning
he panel, disconnect the AC power cord
Servicing
hould your unit become inoperative, do not try to correct
he problem yourself. There are no user serviceable parts
nside. Turn off the unit, unplug the AC power cord and call
ur toll free customer support line found on the cover of this
manua
to locate an authorized service center.
IR Signal Check
If the remote control is not working properly, you can use a
igital camera (including a cellular phone with built-in camera
o see if it is sending out an infrared signal
a digital camer
including built-in cell phone cameras):
oint the Digital Camera towards the remote
control infrared diode at the front of the
remote contro
remote contro
isplay. If the infrared pulsating light appears
rough the camera, the remote control is
sen
ng out an IR signal.
ress any button on the
and look through the camera
Page 51

h
A
V
A
s
Y
3
Y
3
j
1
)
2
s
y)
s
thout base
Width
)
)
inches
)
)
W
ht
g)
7
lbs.
g)
s
s
thout base
Width
9
inches
9
inches
)
7
inches
2
inches
)
)
W
ht
9
lbs.
General Specifi cations
d
VHF
3
)
.
VHF
3
9
2~13, A~W,
,
A
Di
A
2
i
bli
.
ill be English.
nglis
INTRODUCTION
Other Specifi cations
TV format ATSC / NTSC-M TV standar
losed caption system
§15.122 / FCC (digital CC)
15.119 / FCC (analog CC)
hannel coverage (ATSC / NTSC)
Terrestrial DTV (ATSC)
2~1
14~51 each channel has e.g.
2.1~2.9, 3.1~3.9, etc
Terrestrial Analog (NTSC)
2~1
14~6
W+1~W+94 (analog W+1~W+84)
A-5~A-1, 5
uning system Channel frequency synthesized tuning
system
hannel access
rect access keyboard,
Programmable scan, and up / down
Electrical Specifi cation
udio Output
0 W, 8 Ω x
erminals
ntenna Input VHF / UHF / CAT
udio Input RCA jack (L/R) x 6 500mV rm
ompositeVideo Input
S-Video Input Mini DIN 4pin jack x
omponentVideo Input
Input HDMI 19pin x
oaxial Digital Adio Output
Audio Output RCA jack (L/R) x
RCA jack x
RCA jack x
RCA
ack x
5 Ω unbalanced (F-type)
V p-p (75 Ω)
1 V p-p (75 Ω)
286 mV p-p (75 Ω)
1V p-p (75 Ω)
b/Cb 700 mV p-p (75Ω)
r/Cr 700 mV p-p (75Ω)
500 mV p-p (75 Ω
500 mV rm
emote control
Digital encoded infrared light system
perating temperature
41 °F (5 °C) to 104 °F (40 °C)
ower requirements
20V~ AC +/- 10 %, 60Hz +/- 0.5
LCD
2MF330B
2
nches
31.5 inches measured diagonall
ower consumption (maximum)
45 W
imension
eig
LCD
wi
0.0inches760.0 mm)0.0inches760.0 mm
eight20.5inches519.3 mm
epth 4.3 inches107.0 mm) 9.4 inches238.0 mm
8.96lbs.8.60 k
nche
26
6MF330B
>
with base>
20.0
ower consumption (maximum)
10 W
imension
eig
wi
25.
eight7.
epth 4.5 inches112.0 mm) 9.3 inches234.0 mm
4.8
>
656.0 mm)25.
448.0 mm)9.
(6.75 kg)
with base>
5.88lbs.(7.20 kg)
563.0 mm
9.10 k
656.0 mm
487.0 mm
PREPARATION
WATCHING TV
OPTIONAL SETTING
TROUBLESHOOTING
INFORMATION
Designs and specifi cations are subject to change without
not
ce and without our legal o
gation
If there is a discrepancy between languages, the default
anguage w
5
Page 52

6
Page 53

h
LIMITED WARRANTY
NINETY (90) DAY LABOR / ONE(1)YEAR PARTS
nglis
INTRODUCTION
WARRANTY COVERAGE:
This warranty obligation is limited to the terms as set forth
below.
WHO IS COVERED:
This product warranty is issued to the original purchaser or the
person receiving the product as a gift against defects in materials
and workmanship as based on the date of original purchase
(“Warranty Period”) from an Authorized Dealer. The original
sales receipt showing the product name and the purchase date
from an authorized retailer is considered such proof.
WHAT IS COVERED:
This warranty covers new products if a defect in material or
workmanship occurs and a valid claim is received within the
Warranty Period. At its option, the company will either (1)
repair the product at no charge, using new or refurbished
replacement parts, or (2) exchange the product with a product
that is new or which has been manufactured from new, or s erviceable used parts and is at least functionally equivalent or most
comparable to the original product in current inventory, or (3)
refund the original purchase price of the product.
Replacement products or parts provided under this warranty are
covered against defects in materials and workmanship from the
date of the replacement or repair for ninety (90) days or for the
remaining portion of the original product’s warranty, whichever
provides longer coverage for you. When a product or part is
exchanged, any replacement item becomes your property and the
replaced item becomes company property. When a refund is
given, your product becomes company property.
Note: Any product sold and identified as refurbished or
renewed
Replacement product can only be sent if all warranty
requirements are met. Failure to follow all requirements
can result in delay.
WHAT IS NOT COVERED - EXCLUSIONS AND LIMITATIONS:
This Limited Warranty applies only to new company manufac-
to any hardware product or any software, even if packaged or
sold with the product, as manufacturers, suppliers, or publishers
may provide a separate warranty for their own products packaged with the bundled product.
carries a ninety (90) day limited warranty.
mission, or (d) if any serial number has been removed or defaced,
or (e) product, accessories or consumables sold “AS IS” without
warranty of any kind by including refurbished product sold “AS
IS” by some retailers.
This Limited Warranty does not cover:
• Shipping charges to return defective product.
• Labor charges for installation or setup of the product, adjustment of customer controls on the product, and installation or
repair of antenna/signal source systems outside of the product.
• Product repair and/or part replacement because of improper
installation or maintenance, connections to improper voltage
supply, power line surge, lightning damage, retained images or
tent for extended periods, product cosmetic appearance items
due to normal wear and tear, unauthorized repair or other
cause not within the control of the company.
• Damage or claims for products not being available for use, or
for lost data or lost software.
• Damage from mishandled shipments or transit accidents when
returning product.
it to operate in any country other than the country for which
it was designed, manufactured, approved and/or authorized, or
• A product used for commercial or institutional purposes
(including but not limited to rental purposes).
can be provided.
• Failure to operate per Owner’s Manual.
TO OBTAIN ASSISTANCE…
Contact the Customer Care Center at:
REPAIR OR REPLACEMENT AS PROVIDED UNDER THIS
WARRANTY IS THE EXCLUSIVE REMEDY FOR THE CONSUMER, WITH THE ISSUING COMPANY NOT LIABLE FOR
ANY INCIDENTAL OR CONSEQUENTIAL DAMAGES FOR
BREACH OF ANY EXPRESS OR IMPLIED WARRANTY ON
THIS PRODUCT. EXCEPT TO THE EXTENT PROHIBITED BY
APPLICABLE LAW, ANY IMPLIED WARRANTY OF MERCHANTABILITY OR FITNESS FOR A PARTICULAR PURPOSE
ON THIS PRODUCT IS LIMITED IN DURATION TO THE
DURATION OF THIS WARRANTY.
1-866-
341-3738
PREPARATION
WATCHING TV
OPTIONAL SETTING
TROUBLESHOOTING
INFORMATION
The company is not liable for any damage to or loss of any programs, data, or other information stored on any media contained
within the product, or other additional product or part not covered by this warranty. Recovery or reinstallation of programs,
data or other information is not covered under this Limited
Warranty.
This warranty does not apply (a) to damage caused by accident,
abuse, misuse, neglect, misapplication, or non-supplied product,
(b) to damage caused by service performed by anyone other than
company approved Authorized Service Location, (c) to a product
FUNAI CORPORATION, Inc. 19900 Van Ness Avenue, Torrance, CA 90501
rinted in China
Some states do not allow the exclusions or limitation of incidental or consequential damages, or allow limitations on how long an
implied warranty lasts, so the above limitations or exclusions may
not apply to you.
Page 54

Owner’s manual
Manuel du propriétaire
Manual del propietario
32MF330B
26MF330B
LCD TV
English
1-866-341-3738
1-866-341-3738
Quick Use Guide Inside!
Guide d’usage Rapide Incluse!
Guía de Uso Rápido Incluida!
1-866-341-3738
Français
Español
MODEL NUMBER SERIAL NUMBER
Page 55

Renvoyez votre carte d’enregistrement de produit ou enregistrez-vous en ligne aujourd’hui
g
pp
p
:
t
t
.
t.
!
:
.
.
.
t
.
.
.
:
w
t
iliari
d
é
ill
.
.
A
s
liquid
il.
A
jusq
.
À
t
i
.
sur le site www.magnavox.com/support pour profiter au mieux de votre achat.
our assurer
Preuve d’acha
Avis de sécurité du
rodui
Retournez la carte d’enregistrement
ci-incluse afi n de garantir que la date
achat de votre produit sera classée
ans nos dossiers et éviter ainsi le
esoin de remplir d’autres formulaires
afi n d’obtenir votre service de garantie
élicitations pour votre achat et bienvenue
dans la « famille »
her propriétaire d’un produit MAGNAVOX
Merci de faire confi ance à MAGNAVOX. Vous
avez choisi l’un des produits les mieux fabriqués et
arantis offerts sur le marché actuel
ous ferons tout en notre pouvoir pour que vous
soyez satisfait de votre achat pendant plusieurs
années
En tant que membre de la « famille »
MAGNAVOX, vous pouvez profi ter de l’une des
garanties les plus complètes et de l’un des réseaux
e service les plus exceptionnels de l’industrie
e plus, votre achat vous garantit que vous recevrez
ous les renseignements et les offres spéciales
auxquels vous avez droit tout en ayant accès à des
accessoires par le biais de notre réseau d’achats à
omicile des plus pratiques
Le plus important, c’est que vous pouvez vous
fi er à notre engagement profond à vous satisfaire
einement
’est notre façon de vous souhaiter la bienvenue
et de vous remercier d’investir dans un produit
MAGNAVOX
n inscrivant votre produit, votre
serez directement avisé par notre
fabricant en cas de retrait de
produit ou de défaut compromettant
a sécurité, ce qui arrive très peu
souven
des bénéfi ces
supplémentaires
n inscrivant votre produit, vous
tes assuré de bénéfi cier de tous
es privilèges auxquels vous avez
roit, y compris les offres vous
permettant d’économiser.
am
sez-vous avez ces symboles
et « éclair » est associé à des composantes
non isolées à même votre produit qui pourraient
causer un choc électrique. Pour assurer la sécurité
e tous les membres de votre domicile, veu
as retirer le boîtier du produit
Le « point d’exclamation » attire l’attention
sur les fonctions pour lesquelles vous devriez
ire la documentation ci-jointe afi n de prévenir les
roblèmes en matière d’utilisation et d’entretien
VERTISSEMENT : Pour réduire les risque
e feu ou de choc électrique, cet appareil ne
evrait pas être exposé à la pluie ou à l’humidité
et les objets contenant des
es vases, ne devraient pas être placés sur cet
appare
TTENTION : Pour éviter le choc électrique,
ntroduire la lame la plus large de la fiche dans
a borne correspondante de la prise et pousser
u’au fond
e sécurit
ez ne
es, tels que
P.S. Pour profiter au mieux de votre achat
AGNAVOX, veillez à remplir la carte
d’enregistrement de votre produit et
l’envoyer aussitôt ou à vous enregistrer en
ligne sur le site
ww.magnavox.com/suppor
Consultez notre site Web à www.magnavox.com/support
2
l’attention du clien
nscrire ci-dessous le numéro de série qu
se trouve à l’arrière du coffre. Conserver ce
renseignement pour consultation future
uméro de modèle
uméro de série
Page 56

rança
is
É
À
.
.
.
.
.
.
.
.
.
.
.
ili
.
ili
.
.
v
:
l
.
.
’
bili
.
.
.
.
.
.
.
.
:
.
.
.
)
)
E
E
E
E
INSTRUCTIONS IMPORTANTES EN MATIÈRE DE SÉCURIT
lire avant utilisation
. Lire ces instructions
2. Garder ces instructions
. Tenir compte de tous les avertissements
4. Suivre toutes les instructions
5. Ne pas utiliser cet appareil à proximité d’eau
6. Nettoyer seulement avec un linge sec
. Ne pas bloquer les orifi ces de ventilation
Installer conformément aux instructions du fabricant
8. Ne pas installer près de sources de chaleur telles que les
radiateurs, les bouches d’air chaud, les cuisinières ou tout autre
appareil (y compris les amplifi cateurs) produisant de la chaleur.
9. Ne pas contourner le dispositif de sécurité que représente
a fi che polarisée ou la fi che avec mise à la terre. Une fi che
polarisée possède deux lames dont l’une d’elles est plus large
que l’autre. Une fi che avec mise à la terre comporte deux
ames et une broche de mise à terre. La lame large et la broche
e mise à la terre sont prévues pour votre sécurité. Si la fi che
fournie ne convient pas à votre prise, consulter un électricien
pour qu’il remplace la prise désuète
0. Protéger le cordon d’alimentation de façon à ce qu’il ne soit
pas ni écrasé, ni coincé, surtout près des fi ches, des blocs
multiprises et du point de sortie de l’appareil
1. N’utiliser que des accessoires spécifi és par le fabricant
t
ser le téléviseur uniquement avec le chariot, le meuble,
e trépied, le support ou la table recommandés par le
fabricant ou vendus avec l’appareil. En cas d’utilisation d’un
ariot, être prudent lors du déplacement du chariot et de
appareil pour éviter des blessures dues au renversement
3. Débrancher cet appareil pendant les orages ou lorsqu’il n’est
pas ut
sé pendant de longues périodes
4. Consulter un membre du personnel compétent pour toute
emande de service. Il faut faire réparer l’appareil s’il est
endommagé, par exemple, si le cordon d’alimentation ou la
prise a été endommagé(e), si un liquide ou un objet a pénétré
à l’intérieur de l’appareil, ou si l’appareil a été exposé à la pluie
u à l’humidité, s’il fonctionne anormalement ou s’il est tombé
5. Dommage nécessitant du service - L’appareil devrait être
érifi é par un membre du personnel compétent quand
A. Le cordon d’alimentation ou la prise a été endommagé(e)
B. Des objets ou des liquides ont pénétré à l’intérieur de
apparei
C. Si l’appareil a été exposé à la pluie
D. Si l‘appareil ne semble pas fonctionner normalement ou
’il démontre des changements fl agrants en matière de
rendement
E. Si l’appareil est tombé ou si l’enceinte est endommagée
Remarque pour l’installateur de systèmes de câblodistribution : Cet avis rappelle à l’installateur de systèmes de
câblodistribution que l’article 820-40 du NEC fournit des conseils pour une mise à la terre correcte et préconise notamment
que la mise à la terre du câble doit être reliée au système de mise à la terre de l’immeuble, aussi près que possible du point où
le câble entre dans l’immeuble.
Remarque pour l’installateur de
systèmes de câblodistribution
OLLIER DE MISE À LA TERR
6. Basculement et (ou) stabilité - Tous les téléviseurs doivent se
soumettre aux normes de sécurité d
recommandées en matière de basculement et de sta
ensemble internationales
té au
sujet de la conception de son coffre
• Ne pas compromettre ces normes de conception en
appliquant une force excessive à l’avant ou sur le dessus du
offre, car à la limite, il pourrait entraîner le renversement du
produit
• De plus, ne pas vous mettre en danger, vous et vos enfants,
n plaçant de l’équipement électronique et (ou) des jouets
ur le dessus du coffre. De tels articles pourraient tomber
ans avertissement du dessus du téléviseur et endommager le
produit et (ou) causer des blessures corporelles
7. Installation au mur ou au plafond- L’appareil ne devrait
pas être fi xé à un mur ou au plafond à moins de suivre les
recommandations du fabricant
8. Lignes électriques- Une antenne extérieure ne devrait pas
être située à proximité des lignes électriques
9. Mise à la terre d’une antenne extérieure - Si une antenne
extérieure est branchée au récepteur, s’assurer que le circuit
antenne est mis à la terre pour permettre une protection
adéquate contre les surtensions et l’accumulation de charges
électrostatiques
La section 810 du Code électrique national (numéro 70-
984 de l’ANSI / NFPA ) fournit des renseignements au sujet
e la mise à la terre adéquate d’un mât, d’une structure de
support ou des câbles de descente au dispositif de décharge
antenne, de la taille des conducteurs de mise à la terre,
e l’emplacement du dispositif de décharge d’antenne, du
raccordement des électrodes de mise à la terre et des
exigences pour mettre les électrodes à la terre. Voir le schéma
-dessous
20.
énétration d’objets ou de liquides- Des précautions doivent
être prises pour éviter que des objets ou des liquides ne
pénètrent à l’intérieur de l’enceinte par le biais des ouvertures
21. Utilisation de piles ATTENTION - Pour prévenir les fuites de
piles qui pourraient entraîner des blessures corporelles ou des
ommages matériels ou à l’unité
• Installer toutes les piles de façon appropriée en alignant le +
t le - tel qu’indiqué sur l’unité
• Ne pas mélanger les piles (anciennes ou récentes ou au
arbone et alcalines, etc.)
• Enlever les piles quand l’unité n’est pas utilisée pendant de
ongues périodes
BLE DE DESCENTE D’ANTENN
DISPOSITIF DE DÉCHARGE D’ANTENNE (SECTION 810-20 DU NEC
ONDUCTEURS DE MISE À LA TERRE (SECTION 810-21 DU NEC
OLLIERS DE MISE À LA TERR
MATÉRIEL D’ALIMENTATION ÉLECTRIQU
LECTRODE DE MISE À LA TERRE DE L’ALIMENTATION ÉLECTRIQUE (ART. 250, PARTIE H DU NEC)
Page 57

4
A
VERTISSEMENT DE LA FCC
à
)
)
É
:
.
Ad
.
7
A
A
.
A
Comme tout produit LCD, cet équipement comporte une lampe contenant du mercure.
pqppp
g
E
’
ili
ill
.
V
.
pp
il.
A
V
p
.
.
.
A
et appareil peut générer ou utiliser de l’énergie de radiofréquence. Des changements ou modifications apportés à cet appareil peuvent causer un
brouillage nuisible,
effectue un changement ou une modification sans autorisation.
l’exception des modifications explicitement approuvées dans ce manuel. L’utilisateur peut perdre le droit d’utiliser cet appareil s’il
ROUILLAGE RADIO-TV
et appareil a été testé et jugé conforme aux limites pour appareil numérique de Classe B, conformément à la Partie 15 des Règlements de la
FCC. Ces limites sont conçues pour assurer une protection raisonnable contre le brouillage nuisible dans une installation résidentielle. Cet appareil
génère, utilise et peut émettre de l’énergie de radiofréquence ; s’il n’est pas installé et utilisé conformément aux instructions, il peut brouiller les
communications radio. Par ailleurs, il n’est pas garanti qu’il ne causera pas de brouillage dans une installation donnée. Si cet appareil brouille la
éception de la radio ou du téléviseur, ce qui peut être vérifié en éteignant et rallumant l’appareil, l’utilisateur est invité à essayer d’annuler le brouillage
en prenant l’une ou plusieurs des mesures suivantes :
1) Réorientez ou repositionnez l’antenne.
Augmentez la distance entre l’appareil et le récepteur.
2
3) Branchez l’appareil sur une prise de courant qui se trouve sur un circuit différent de celui auquel le récepteur est branché.
Informez-vous auprès du détaillant ou d’un technicien spécialisé en radios / téléviseurs pour obtenir de l’aide.
4
DÉCLARATION DE CONFORMIT
Nom Commercial
odèle :2MF330B / 26MF330B
ersonne Responsable :UNAI CORPORATION, Inc
resse :9900 Van Ness Avenue, Torrance, CA 90501 U.S.A
uméro de Téléphone :1-866-341-3738
et appareil numérique de la classe B est conforme à la norme NMB-003 du Canada.Appareil de réception télévision ordinaire, Canada BETS-7 / NTMR-
TTENTION :Il y a danger d’explosion si les piles ne sont pas remplacées correctement. Remplacez-les uniquement avec despiles du même modèle ou d’un modèle équivalent.
VERTISSEMENT :Les piles (emballées ou installées) ne doivent jamais être exposées à une chaleur excessive telle que celle du soleil, des flammes ou autre source similaire
Débranchez la fiche d’alimentation pour éteindre l’appareil en cas de problème ou lorsque vous ne l’utilisez pas. La fiche d’alimentation doit être facilement accessible.
et appareil ne doit pas être placé dans un meuble fermé, par exemple une bibliothèque ou une étagère, sans assurer une ventilation
ppropriée. Laissez un espace de
VERTISSEMENT :our éviter les risques de blessure, cet appareil doit être fermement fixé au mur conformément aux instructions.
2 pouces, ou 8 cm, minimum autour de cet appareil.
e recyclage, contactez :www.mygreenelectronics.com ou www.eiae.or
Ne placez pas cet appareil sur un meuble qui pourrait être renversé par un enfant ou un adulte qui pourrait s’y appuyer, le
tirer ou monter dessus. La chute de l’appareil peut causer des blessures graves ou même la mort.
EMARQUE SUR LE RECYCLAG
Le matériel d
et peut être réut
ce matériel conformément aux réglementations locales
e recyclage
ous ne devez jamais jeter les piles ni les incinérer mais les déposer
ans les endroits recommandés par les réglementations concernant les
échets chimiques
ORSQUE VOUS DÉPLACEZ
E APPAREIL
Il faut au moins 2 personnes pour porter
ce a
ssurez-vous de tenir fermement les cadres
nférieur et supérieur du téléviseur comme
indiqué sur l’illustration.
POUR ÉVITER LES RISQUES DE CHOC
ÉLECTRIQUE ET D’INCENDIE
•
Ne manipulez jamais le cordon d’alimentation secteur avec les mains
mouillées.
• Ne tirez pas sur le cordon d’alimentation pour le débrancher de la
prise murale.
• N’introduisez ni vos doigts ni aucun objet dans le téléviseur.
EMPLACEMENT ET MANIPULATION
•
N’exposez pas le téléviseur à la lumière directe du soleil ; ne le placez
pas à proximité de champs magnétiques importants, ni à un endroit
soumis à de fortes vibrations.
• Évitez les emplacements soumis à des changements de température
extrêmes.
• Installez le téléviseur en position horizontale et stable. Ne placez rien
directement sous ou sur le téléviseur. Si le téléviseur est placé trop
près de vos équipements externes, il est possible que ceux-ci (selon
leur type) provoquent du bruit ou des perturbations de l’image et / ou
du son. Dans ce cas, assurez-vous de laisser suffi samment d’espace
entre les équipements externes et le téléviseur.
• En fonction de l’environnement, la température du téléviseur peut
augmenter légèrement. Il ne s‘agit pas d’un dysfonctionnement.
eillez à débrancher le cordon d’alimentation secteur de la prise
murale avant de trans
emballage de ce téléviseur est recyclable
sé. Veu
ez procéder à la sélection de
are
Information sur les Marques Commerciales
HDMI, le logo HDMI et High-Defi nition Multimedia Interface
sont des marques de commerce ou des marques déposées de la
société HDMI Licensing LLC aux États-Unis et dans d’autres pays
abriqué sous licence de Dolby Laboratories. Le terme Dolby
et le sigle double D sont des marques commerciales de Dolby
aboratories
• ENERGY STAR
Protection de l’Environnement des États-Unis et au Ministère
Américain de l’Energie, visant à réduire nos dépenses et à
protéger l’environnement au moyen de produits et de pratiques
écoénergétiques.
Avis à l’Utilisateur :
e téléviseur a été paramétré de manière à développer un
rendement énergétique optimal dans le cadre d’une utilisation
omestique, tout en affi chant une image de la meilleure qualité
possible. La modifi cation des paramètres d’origine ou l’activation
e nouvelles fonctions sur ce téléviseur (ex. augmentation de
’intensité du rétro-éclairage) risque d’augmenter ses besoins en
énergie, et donc, de le faire dépasser la consommation d’énergie
L’
orter l’appareil
cadémie Américaine de Pédiatrie déconseille la télévision pour
les enfants de moins de deux ans.
®
est un programme commun à l’Agence de
Page 58

is
INTRODUCTION
4
A
9
Pil
4
4
7
7
9
9
Aj
V
1
1
2
22
4
V
7
9
g
4
A
7
V
ili
.
V
télévi
o
ibl
.
.
s
.
’
.
.
.
p
:
A
.
o
.
n
.
HDMI
HDMI
.
o
.
T
.
p
t
.
Contenu
Instructions Importantes en Matière de Sécurité
Information sur les Marques Commerciales
INTRODUCTION
aractéristiques
ccessoires Fournis
mboles Utilisés dans ce Manuel
xation de la Base
ixation du Téléviseur sur le Support Mural
anneau de Commande
Bornes 8
Boutons de la Télécommande
nsérer les
PRÉPARATION
onnexion de l’Antenne 10
onnexion à un Décodeur de Diffusion par Câble / Satellite 10
onnexion d’un Appareil Externe
estion des Câbles 1
Branchez le Cordon d’Alimentation Secteur 1
Installation Initiale 15
REGARDER LA TÉLÉVISION
Minuterie de Sommeil 16
arcours des Modes d’Entrée 16
ode Freeze
élection de Chaîne 16
onctions Sonores 1
Mode d’Affi chage sur Écran de Télévision 1
Informations sur Écran 18
Réduction de la Luminosité 18
ptions Fun-Link 18
CONFIGURATION OPTIONNELLE
Menu Principal 1
rogrammation Auto 1
Liste Chaînes 20
outer Chaînes 20
érifi cation de l’Antenne 2
élection de la Langue 2
Réglage de l’Image 2
Réglage du Son
ous-titres 2
errouillage 2
un-Link 2
Mode Économie d’Énergie 30
Ré
Info Logiciel Actuel 30
es
ion 30
Caractéristiques
• DTV / TV / CATV
ous pouvez ut
es chaînes diffusées en format numérique ou analogique
assique. Les abonnés du câble peuvent également accéder
aux chaînes de câblodiffusion
• Affichage d’Informations (uniquement ATSC)
ous pouvez afficher le titre, le contenu et d’autres
nformations relatives à l’émission DTV sur l’écran du
seur.
rogrammation Aut
•
et appareil balaye automatiquement les chaînes et
mémorise celles qui sont dispon
argnant ainsi les difficiles procédures de configuration
• Verrouillage
ette fonction permet de bloquer l’accès des enfants à des
missions inappropriées
• Décodeur Sous-titre
Le décodeur de sous-titres intégré affiche le texte des
missions sous-titrées
• Syntoniseur MTS / SAP
audio peut être sélectionnée à l ‘aide de la télécommande
L
• Fonction de Mise Hors Tension Automatique
i aucun signal n’est reçu par la borne d’antenne et
qu’aucune commande n’est exécutée pendant 15 minutes,
appareil se met automatiquement hors tension
• Minuterie de Sommeil
ette fonction permet d’éteindre l’appareil automatiquement
à l’heure spécifiée
•
électionnez la langue du menu sur écran
nglais, Espagnol ou Français
• Fonction de Son Stéré
• Syntonisation par Synthétiseur de Fréquences PLL
6
ermet de sélectionner librement et facilement les chaînes
t vous permet de régler directement la fréquence d’une
haîne à l’aide des touches numérotées et de la touche « »
(point décimal) de la télécommande
• Divers Réglages pour l’Image et le So
ermettent d’adapter la qualité de l’image aux conditions
e votre pièce et de régler le son en fonction de vos
préférences
•
un-Link via Liaison
(Câble HDMI Vendu Séparément)
un-Link permet à vos autres appareils connectés via une
iaison HDMI (lecteur DVD Magnavox, par exemple) d’être
ontrôlés par le câble
• Entrée HDMI
râce à l’entrée HDMI1, vous pouvez utiliser ce appareil
omme moniteur pour votre PC (pour cela, ce dernier doit
tre équipé d’une sortie DVI)
• Entrée Vidéo à Composantes
• Entrée S-Vidé
• Entrée AV
• Sortie Audio Numérique
• Sortie Audio Analogique
ser la télécommande pour sélectionner
rança
es dans votre région, vous
relié à votre téléviseur.
INTRODUCTION
PRÉPARATION
REGARDER LA
TÉLÉVISION
CONFIGURATION
OPTIONNELLE
DÉPANNAGE
INFORMATION
DÉPANNAGE
INFORMATION
oire aux Questions (FAQ) 31
uide de Dépannage 32
lossaire
ntretien
écifi cations Générales
pécifi cations Électriques
utres Spécifi cations
arantie Limitée 3
2010 Funai Electric Co., Ltd
ous droits réservés. Aucune partie du présent manuel ne peut être
reproduite, copiée, transmise, diffusée, transcrite, téléchargée ou stockée sur
n support de stockage quelconque, sous aucune forme ou dans n’impor te
quel but sans consentement écrit exprès préalable de Funai. En outre, toute
iffusion commerciale non autorisée du présent manuel ou de l’une de ses
révisions est strictement interdite
Les informations contenues dans ce document sont susceptibles d’être
modifi ées sans
unai Electric Co., Ltd. et ne peuvent être utilisés en aucune façon sans
onsentement écrit exprès de Funai. Toutes les autres marques mentionnées
ci sont la propr iété exclusive de leurs détenteur s respectifs. Aucune
nformation contenue dans le présent ne doit être interprétée comme un
ctroi, implicite ou autre, d’une licence ou d’un droit quelconque à utiliser
’une de marques commerciales présentées ci-dessus. L’usage abusif de
oute marque commerciale ou de tout autre contenu du présent manuel est
strictement interdit. Funai fera appliquer avec déter mination ses droit s de
propriété intellectuelle dans toute l’étendue des lois
réavis. Funai se réserve le droit de modifi er son contenu sans
et le dessin forment une marque commerciale déposée de
Page 59

.
ill
.
A
.
),
4
trous de montage sont alors
ill
4
trous fi letés situés sous la
.
A
.
t
.
ili
d
i.
A
.
h
.
V
.
T
ill
.
Accessoires Fournis
N
9
)
1EMN
1EMN
1
)
)
t
N
9
)
s
AAA
AAA
A
1
A
)
’
l.
Philli
d
ill
l.
ili
:
ATSC
NTSC
ppliq
télévi
Manuel du propriétaire
2583
(1EM
Télécommande
804 UD
Démarrage Rapide
2MF330B:
26MF330B:
arte d’enregistremen
2469
1EM
25840
2628
ixation de la Base
our pouvoir poser le téléviseur sur une surface plane, vous
evez le fi xer sur sa base. Assurez-vous que la base est bien
rientée dans la bonne direction
tendez un linge épais et doux
sur une table tel qu’indiqué sur
illustration. Posez le téléviseur
à plat sur ce linge en ve
e que l’écran soit dirigé vers
e bas. Assurez-vous de ne pas
endommager l’écran
2 personnes sont requises pour
ette étape
ant à
u moins
2 Insérez les 2 crochets situés
sous le fond du téléviseur dans
es deux trous situés sur la base
(indiqués par la fl èche
puis déplacez la base dans le
sens indiqué par la fl èche
jusqu’à ce qu’elle se bloque : les
ile
(AAA, 1,5V x 2)
Ensemble de vis pour fixer
e socle
2MF330B: 1ES
26MF330B: 1ES
i vous devez remplacer ces accessoires, veuillez
rendre comme référence le numéro indiqué sur les
ustrations et contacter le numéro gratuit de notre
service d
aide à la clientèle, indiqué sur la couverture de
ce manue
Remarque
i vous perdez les vis, rachetez des vis cruciforme M 4 20
éta
votre
ant loca
Symboles Utilisés dans ce Manuel
es symboles ut
essous. La description concerne
i aucun symbole n’apparaît sous l’indication de la
fonction, son utilisation s’a
seur.
sés dans ce manuel sont décrits ci-
: L’utilisation d’un téléviseur Numérique
: Télévision Câble / Analogique
ue aux deux types de
988
23705
ps chez
alignés. Ve
e pied et
nsérez puis vissez les vis
base jusqu’à ce qu’elles soient
ez à ne pas placer le
ordond’alimentation CA entre
a base
ruciformes Phillips dans les
en serrées
Pour Enlever le Support du Appareil
Dévissez les vis cruciformes mises en place lors de l’étape
ne fois les vis retirées, déplacez la base dans le sens opposé à celui indiqué
par la fl èche
ttention de ne pas faire tomber le socle en le retirant
lors de l’étape 2, puis tirez la base vers l’arrière du téléviseur.
Remarque
Lorsque vous montez le support, vérifi ez que toutes les vis sont serrées
correctement. Si le support n’est pas fi xé correctement, l’appareil risque de
omber, ce qui peut provoquer des blessures et endommager l’arriére
t
sez une table qui puisse supporter le poids du appareil et qui soit plus
e que celui-c
gran
ssurez-vous que la table se trouve sur un emplacement stable
Lors de la fi xation de la base, assurez-vous que la mention FRONT
nscrite sur la base soit bien dirigée vers le haut. Si ce n’est pas le cas, les 2
ets ne pourront pas être insérés dans la base
croc
Fixation du Téléviseur sur le Support Mural
issez bien cet appareil sur votre meuble à l’aide de vis à
ois (non fournies), sur les 2 trous situés à l’arrière de la base,
omme indiqué
aille de vis recommandée : 5,1 x 20 mm
rrière de l’appareil
Remarque
orsque vous retirez votre téléviseur du support mural, ve
évisser les vis à bois
ez à bien
Page 60

is
Panneau de Commande
5
A
(
)
(
)
l.
4
7
A
(
)
(
)
l.
tél
.
.
.
2MF330B
rança
INTRODUCTION
-
VOLUME
+
42 13
26MF330B
MENU
-
CHANNEL
POWER
HANNEL +/
p. 1
p. 16
PRÉPARATION
ppuyez pour sélectionner les chaînes ou pour vous
éplacer vers le haut
/ bas
dans les options du
menu principa
5
6
Fenêtre de capteur infrarouge
7
+
POWER
Indicateur POWER ON
VOLUME +/
p. 19
p. 1
ppuyez pour régler le volume ou vous déplacer à
roite
/ gauche
en utilisant les options du menu
principa
Capte les signaux de commande infrarouges émis par la
écommande
S’allume en vert lorsque l’appareil est sous tension
REGARDER LA
TÉLÉVISION
CONFIGURATION
OPTIONNELLE
Indicateur STAND BY
S’allume en rouge lorsque l’appareil est éteint
DÉPANNAGE
INFORMATION
7
6
5
STAND BY
-
VOLUME
+
MENU
-
CHANNEL
+
POWER ON
24
POWER
13
Page 61

Bornes
B
B
0
,
e
4
4
1
4
.
MI 1
)
0
4
.
.
.
p
.
technici
ili
j
.
2MF330
8
9
*
17
18
26MF330
10
11
12
13
14
15
16
9
8 Prises S-Vidéo / Vidéo Composite / Audio (G/D)
pour VIDEO
9
rise d’Entrée HDMI 2
anneau Arrièr
0
ordon d’alimentation
estion des câbles
2 Prises d’Entrée Vidéo Composantes et Audio (G/D)
3
rise de Sortie Audio (G/D)
rises d’Entrée Audio (G/D) pour HDMI
Raccordement d’un périphérique DVI à l’aide d’un câble
audio. En connectant un PC doté d’un port DVI, utilisez
n câble de conversion à mini fiche stéréo
our prise d’Entrée
5
rise de Sortie Audio Numérique
6
rise d’Antenne
7
rise d’Entrée HDMI 1
*
Connexion HDMI pour appareil HDMI ou DVI
En connectant un PC doté d’un port DVI, vous pouvez
tiliser cet appareil comme moniteur pour votre PC
8
rise d’Entrée HDMI 3
D
uniquement
p. 12, 13
1
p. 1
p. 1
p. 10, 11, 12
p. 13
p. 12, 1
p. 13
p. 1
. 10 1
12, 1
. 10 1
8
11
10
16
18
17
12
15
Remarque le prise de maintenance
13
14
prise de maintenance (usage du service seulement)
utilisez ce port que si une mise à jour du logiciel est nécessaire
L’utilisateur ne doit raccorder aucun autre périphérique le prise de
maintenance (appareil photo numérique, clavier, souris, etc.) : ces derniers
ne fonctionneront
La mise à jour du logiciel est, dans la plupart des cas, effectuée par un
en agréé. Dans certains cas, les ut
effectuer la mise à
lus
sateurs peuvent être amenés à
our eux-mêmes
8
Page 62

is
Boutons de la Télécommande
A
d bi
.
.
tél
.
.
’
.
V
pil
g
.
il
.
i
.
5
7
Appuy
.
5
5
A
.
7
A
.
7
pp
p
k.
D
.
AY
B
.
G
.
F
.
C
q
.
7
.
Appuy
.
l
.
tél
.
AAAAAAAAA
AAA
AAAAAA
1
2
3
4
5
6
7
8
9
Utilisation d’une télécommande universelle pour commander cet appareil.
ssurez-vous que le code composant de votre télécommande universelle
correspon
onsultez le manuel accompagnant votre télécommande pour toute
nformation complémentaire
ous ne garantissons pas une interopérabilité à 100 % avec toutes les
écommandes universelles
Remarque
Les boutons à fond gris ( ) ne sont pas disponibles si vous n’êtes pas
connecté à des appareils compatibles avec la fonction Fun-Link
ous ne garantissons pas une interopérabilité à 100 % avec d’autres
marques d
Précautions Concernant les Piles :
ous devez insérer les
u’indiqué dans le logement à piles. L’inversion des pôles des piles peut
causer des domma
’utilisez pas simultanément des piles de types différents (ex., alcalines et
carbone / zinc ou piles rechargeables de type Ni-Cd, Ni-Mh, etc.) ou des
es usagées avec des piles neuves
p
i vous prévoyez de laisser l’appareil inutilisé pour une période prolongée,
ret
par une fuite d’électrolyte
’essayez pas de recharger les piles ; elles risqueraient de surchauffer et
éclater.
en à celui de notre marque
appareils compatibles HDMI
es en plaçant les pôles dans le bon sens, tel
es à l’appareil
rez les piles pour éviter les risques de dommages ou de blessure causés
rança
INTRODUCTION
10
11
12
13
(power)
2 SAP
SOURCE
4
ez sur cette touche pour geler l’image
affichée sur l’écran
K
▲/▼/
/►
cursor)
B ACK
ppuyez pour revenir au menu précédent
8 VOL +/−
9
REV CH
➠
➠
➠
➠
p. 1
p. 1
p. 16
p. 16
p. 1
p. 1
p. 18
p. 1
p. 16
PRÉPARATION
REGARDER LA
TÉLÉVISION
ppuyez pour revenir à la chaîne précédente
14
0 SLEEP
1 FORMAT
p. 16
p. 1
ermet de sélectionner l’une des tailles d’image
15
isponibles pour l’écran du téléviseur.
2 RED / GREEN / BLUE / YELLOW
p. 29
CONFIGURATION
OPTIONNELLE
onction utile pour Fun-Lin
16
17
18
19
3
5
INFO
E / FWD
p. 19
. 1 8
p. 29
ermettent d’avancer ou de reculer rapidement
ans le disque
L
p. 29
ermet de commencer la lecture du disque
KIP H / SKIP
p. 29
ermet d’ignorer le chapitre, le titre ou la piste
DÉPANNAGE
précédente ou suivante
20
AUSE
ermet de mettre la lecture du disque en pause
TOP
ermet d’arrêter la lecture d’un disque
6
7
H +/−
8 ECO
➠
➠
p. 29
p. 1
p. 16
p. 18
p. 29
INFORMATION
ette touche permet de réduire la luminosité
9
umber buttons
(point)
➠
p. 16
ez pour accéder à la sous-chaîne à partir de la
aîne principale
20 FUN-LINK OPTIONS
ermet d’accéder à divers menus de votre apparei
➠
p. 18, 29
un-Link connecté à l’aide d’un câble HDMI
Insérer les Piles
Insérez les piles (AAA, 1,5V x 2) en faisant correspondre
eurs pôles avec ceux indiqués dans le logement à piles de la
écommande
9
Page 63

PRÉPARATION
A
on
A
.
.
F
F
Le balayage des chaînes est
ibl
Visi
.
.
icles.
.
l
’
.
r
ili
HDMI
i
HDMI
.
p
.
F
video á compos
v
g
Aucun des câbles fournis n’est utilisé avec ces connexions :
Procurez-vous les câbles nécessaires chez votre détaillant local.
Le câble High Speed HDMI (connu également comme câble HDMI
catégorie 2) est recommandé pour une meilleure compatibilité.
vant toute connexi
vant de brancher le cordon d’alimentation, assurez-vous que
antenne ou l’autre appareil est bien connecté
Connexion à un Décodeur de
Diffusion par Câble / Satellite
t
sez un câble
es prises d’Entrée HDMI ou Vidéo Composante de l’appareil
aux pr
ses de sortie
âble / satellite
i vous connectez les prises d’Entrée Vidéo Composantes,
onnectez les câbles audio aux prises d’entrée Audio G/D
situées à côté du Connecteur vidéo Com
x.)
ou vidéo composante pour raccorder
ou vidéo composante du décodeur
osantes
Connexion de l’Antenne
onnectez le câble coaxial RF de la sortie murale à la prise
entrée d’antenne de l’appareil
ex.)
2MF330B
VHF / UHF
nalogique ou
ntenne
signal TV par câble
26MF330B
ou
câble coaxial R
câble coaxial R
rrière de l’appareil
2MF330B
ntenne
parabolique
signal TV par
câble avec PPV
câble HDMI
ou
ou
câble coaxial R
HDMI OUT
ANT IN
ou
écodeur de diffusion
par câble / satellite
AUDIO OUT
RL
STEREO
PCM
COMPONENT VIDEO OUT
Pr/CrPb/CbY
rrière de l’appareil
ne fois les connexions terminées, allumez l’appareil et
nécessaire pour que l’appareil mémorise toutes les chaînes
spon
es dans votre région. [Installation Initiale] p. 15
Remarque
tez le site www.antennaweb.org pour toute question concernant
’antenne de télévision numérique (DTV)
uivant le type d’antenne, vous aurez peut-être besoin de types différents
e combinateurs (mélangeurs) ou séparateurs (diviseurs)
ontactez votre magasin local de produits électroniques pour vous
procurer ces art
ar mesure de sécurité et pour éviter d’endommager l’appareil,
éconnectez le câble coaxial RF de la prise d’entrée d’antenne avant de
éplacer l’appareil
i vous utilisez une antenne pour capter la télévision analogique, cette
antenne devrait également fonctionner pour capter la télévision numérique
(DTV). Les antennes installées à l’extérieur ou au grenier sont plus effi caces
es antennes posées sur le téléviseur.
que
our permuter facilement la source entre l’antenne et le câble, installez un
sélecteur d
contactez votre opérateu
antenne
i vous ne recevez aucun signal de votre service de télévision par câble,
.
ou
côté ou arrière de l’appareil
Page 64

is
1
l TV
26MF330B
g
V
HDMI
.
llite.
lité.
HDMI
t
.
nregistreur BD / DVD avec prise d
nregistreur BD / DVD avec prise d
nregistreur BD / DVD avec prise d
registreur BD / DVD avec prise
registreur BD / DVD avec prise
registreur BD / DVD avec prise
registreur BD / DVD avec prise
registreur BD / DVD avec prise
gistreur BD / DVD avec pris
gistreur BD / DVD avec pris
gistreur BD / DVD avec pris
gistreur BD / DVD avec pris
I
ntenne
parabolique
rança
INTRODUCTION
Connexion d’un Appareil Externe
écodeur de diffusion
par câble / satellite
COMPONENT VIDEO OUT
Pr/CrPb/CbY
STEREO
PCM
AUDIO OUT
signa
par
câble avec PPV
HDMI OUT
ou
câble HDMI
ANT IN
ou
ou
côté ou arrière
e l’appareil
ou
ous pouvez également connecter cet appareil à une prise de sortie
autre que
ou vidéo par composantes si le décodeur de
iffusion par câble / satellite possède des prises de sor tie différentes
es câbles requis et les méthodes de connexion au décodeur, ainsi
ue le canal de réception des signaux MAQ en clair varient suivant
e fournisseur de diffusion par câble / satellite. Pour de plus amples
nformations, contactez votre fournisseur de service de télévision par
âble ou par sate
Connexion HDMI
La connexion HDMI permet d’obtenir une image de meilleure
qua
a connexion
e transfert de signaux vidéo haute-défi nition et de signaux
umériques audio multicanal à l’aide d’un seul câble
RL
x.)
2MF330B
26MF330B
(High-Defi nition Multimedia Interface) perme
ou
ou
câble HDMI
TITLE 5
CHAPTER 15
REPEAT A-B
ou
côté ou arrière de
câble HDMI
HDMI OUT
’appareil
PRÉPARATION
REGARDER LA
TÉLÉVISION
CONFIGURATION
OPTIONNELLE
DÉPANNAGE
INFORMATION
ou
côté ou arrière de l’appareil
1
Page 65

Connexion HDMI-DVI
ili
HDMI-DVI
ie DVI.
B
vers
vers la prise
MI1 uniq
vers la prise
vers la pr
vers la prise
écodeur de diffusion pa
écodeur de diffusion pa
écodeur de diffusion pa
écodeur de diffusion pa
écodeur de diffusion pa
codeur de diffusion p
codeur de diffusion p
codeur de diffusion p
odeur de diffusion
odeur de diffusion
odeur de diffusion
odeur de diffusion
llite avec prise de s
llite avec prise de
llite avec prise de
lite avec prise de
lite avec prise de
lite avec prise de
lite avec prise de
lite avec prise de
ite avec prise de
ite avec prise de
ite avec prise de
ite avec prise de
ite avec prise de
o
o
HDMI
,
.
).
V
glag
.
.
HDMI-DVI
.
HDMI-DVI
’
ion.
.
.
.
CHAPTER 15
REPEAT A-B
TITLE 5
4.2T 2D
;
DVI
ANALOG
AUDIO
AUDIO OUT
RL
COMPONENT VIDEO OUT
Pr/CrPb/CbY
nregistreur BD/DVD avec prise de
nregistreur BD/DVD avec prise de
nregistreur BD/DVD avec prise de
nregistreur BD/DVD avec prise d
registreur BD/DVD avec prise d
registreur BD/DVD avec prise d
registreur BD/DVD avec prise d
registreur BD/DVD avec prise d
registreur BD/DVD avec prise d
t
o
o
.
.
A
.
t
sez un câble de conversion
appareil aux appareils vidéo externes équipés d’une prise de
sort
ex.)
2MF330
DVI
ANALOG
AUDIO
pour raccorder
rrière de l’appareil
Connexion Vidéo à Composantes
La connexion par Vidéo Composante offre une meilleure qualité
image avec des périphériques vidéo connectés à cet appareil
i vous connectez les prises d’Entrée Vidéo Composantes,
onnectez les câbles audio aux prises d’Entrée Audio G/D
situées à côté du connecteur Vidéo Composantes
x.)
2MF330B
rrière de l’appareil
rrière de l’appareil
DVI OUT
câble audi
AUDIO OUT
STEREO
PCM
RL
câble audi
sortie vidéo composan
câble audi
câble audi
26MF330B
rrière de l’appareil
Remarque
L’appareil accepte les signaux vidéo 480i / 480p / 720p et 1080i
Remarque
our la connexion
L’appareil accepte les signaux vidéo 480i, 480p, 720p et 1080i et les signaux
audio de 32kHz
e appareil ne prend en charge que le signal audio à 2 chaînes (LPCM
ous devez sélectionner « PCM » pour l’audio numérique de l’appareil
connecté ou vérifi er le ré
as être restitué si vous sélectionnez « Bitstream », etc
e appareil ne prend en charge que les signaux conformes EIA861
44,1kHz et 48kHz
our la connexion
L’appareil accepte les signaux vidéo 480i, 480p, 720p et 1080i
a connexion
séparés et les signaux audio sont convertis d
cette connex
Le DVI n’affi che pas d’image 480i non conforme à la norme EIA / CEA-
861 / 861B
2
e audio HDMI. Le signal audio risque de ne
nécessite également des branchements audio
analogique en numérique pour
Connexion S-Vidéo
La connexion S-Vidéo offre une bonne qualité d’image pour
es appareils vidéo raccordés á l’appareil
i vous branchez un périphérique sur la prise d’Entrée S-Vidéo
e l’appareil, branchez des câbles audio sur les prises d’Entrée
udio G/D situées sous le connecteur Vidéo Composite
Page 66

is
ex.)
CHAPTER 15
REPEAT A-B
TITLE 5
AUDIO OUT
RL
S-VIDEO
OUT
eteeeeeeeeeeeeee
nregistreur BD/DVD, caméscope
nregistreur BD/DVD, caméscope
nregistreur BD/DVD, caméscope
nregistreur BD/DVD, caméscope
gnétoscope avec prise de sortie S-V
gnétoscope avec prise de sortie S-V
nétoscope avec prise de sortie S
nétoscope avec prise de sortie S
étoscope avec prise de sortie
étoscope avec prise de sortie
étoscope avec prise de sortie
étoscope avec prise de sortie
étoscope avec prise de sortie
toscope avec prise de sortie
toscope avec prise de sortie
toscope avec prise de sortie
o
B
o
’
.
.
.
STEREO
STAND-BY
AUDIO OUT
RL
VIDEO
OUT
o
o
aaaaméscope
o
V
.
.
ili
.
giq
.
il
.
R L Pr Pb Y
L
r
Y
DVI
ANALOG
AUDIO
DIGITAL AUDIO
COAXIAL IN
AUDIO IN
RL
r r r r ur
ur
ur
eur
eur
eu
Digita
Digit
Digit
Digit
Digit
Digit
Digit
Digit
Digit
y Digi
by Dig
by Dig
lby Dig
olby Dig
me
e sté
e sté
e sté
e sté
stéré
stéré
stéré
stéré
stéré
stéré
stéréo
stéréo
stéréo
stéréo
stéréo
stéréo
stéréo
stéréo
stéréo
stéréo
stéréo
téréo
téréo
téréo
éréo
o
B
B
o
2MF330
côté de l’appareil
câble S
câble audio
Vidé
rança
Connexion de Sortie Audio
Numérique (pour le contenu diffusé en numérique uniquement)
i vous connectez l’appareil à un appareil audio numérique
externe, vous pourrez profi ter d’un rendu audio multicanal
similaire au son diffusé en mode numérique 5.1 canaux
t
sez un câble coaxial audio numérique pour raccorder
appareil aux appareils audio numériques externes
Analogique (diffusion analogique et numérique)
n connectant cet appareil à un appareil audio analo
externe, vous pourrez profi ter d’un son stéréo (2 canaux)
Utilisez un câble audio pour connecter l’appareil à des
appare
s audio analogiques externes
x.)
32MF330
câble audi
rrière de l’appareil
ue
INTRODUCTION
PRÉPARATION
REGARDER LA
TÉLÉVISION
câble audio
côté de l’appareil
câble S-Vidé
Connexion Vidéo Composite
La connexion Vidéo Composite offre une qualité d’image
standard aux périphériques vidéo connectés à l
i vous connectez un périphérique que la prise d’Entrée Vidéo
omposite de l’appareil, connectez des câbles audio aux
prises d’Entrée Audio G/D situées à côté du connecteur Vidéo
omposite
orsque la prise audio du périphérique vidéo est monaurale,
onnectez un câble audio à la prise d’Entrée Audio de gauche
ex.)
2MF330B
câble vidé
câble audi
côté de l’appareil
appareil
câble audi
câble coaxial
udio
numérique
rrière de l’appareil
CONFIGURATION
OPTIONNELLE
DÉPANNAGE
INFORMATION
magnétoscope
26MF330B
Remarque
i vous connectez à la fois la prise d’Entrée S-Vidéo et la prise d’Entrée
idéo Composite, la connexion S-Vidéo aura la priorité
côté de l’appareil
jeu vidé
26MF330
13
Page 67

Connexion PC
.
ili
HDMI-DVI
blir
.
o
o
vers la p
rise d’entr
vers la prise d’entrée
vers la pr
vers la prise d’entrée
:
t
n
l
VGA
A
A
4
x
A
.
V
.
.
.
.
.
.
B
l
li
.
p
.
et appareil peut être connecté à un PC doté d’un port DVI
t
sez un câble de conversion
ette connexion. Vous aurez également besoin d’un câble de
onversion à mini-fi che stéréo
i vous connectez l’appareil à votre PC, vous pouvez l’utiliser
omme moniteur.
ex.)
2MF330B
DVI
ANALOG
AUDIO
pour éta
rrière de l’appareil
Gestion des Câbles
assez ensuite les câbles dans ce serre-câbles pour éviter qu’ils
e s’emmêlent
rrière de l’appareil
26MF330B
câble de conversion à
mini-fiche stéré
DVI OUT
Le câble de conversion HDMI-DVI
oit être doté d'une
me en ferrite.
26MF330B
câble de conversion à
rrière de l’appareil
mini-fiche stéré
Les signaux suivants peuvent être affi chés
orma
Résolutio
Fréquence du
alayage vertica
640x480
VG
XG
WXG
800
02
00
68
280x68
360x68
Les autres formats ou les signaux non-standard ne sont pas
affi chés correctement
Remarque
euillez acheter un câble de conversion HDMI-DVI avec un noyau en ferrite
es opérations suivantes peuvent réduire le bruit
- Placez un tore magnétique sur le cordon d’alimentation de votre PC
- Débranchez le cordon d’alimentation de votre PC et utilisez la batterie
ntégrée
Branchez le Cordon d’Alimentation
Secteur
e branchez le cordon d’alimentation sur une prise murale
u’après avoir effectué tous les branchements nécessaires
2MF330
’alimentation secteur
26MF330B
rrière de l’appareil
60Hz
Attention :
e branchez pas le cordon d’alimentation secteur sur une prise murale
mentée par une tension supérieure à celle préconisée pour cet appareil
a
(120 V CA)
n ne respectant pas cette mise en garde, vous risquez de provoquer un
ncendie ou de vous électrocuter.
Remarque
À chaque fois que vous branchez le cordon d’alimentation, aucune
ération ne peut être réalisée pendant quelques secondes. Il ne s’agit pas
o
’un dysfonctionnement
cordon
’alimentation secteur
rrière de l’appareil
prise mura
e
Page 68

is
5
Ces opérations sont accessibles par la télécommande. Certaines peuvent
l
’
de l
.
A
:
A
.
r
.
.
.
▼
(Eng
▼
]
p
h
ppuy
.
l’appareil est
p
’
ili
.
’
p
h
.
q
(
’
e
V
.
’
.
i
.
]
V
h
.
0
]
1
.
]
aussi être accessibles par les commandes de l’appareil principal lui-même.
Installation Initiale
ette section vous guide à travers les étapes de la
onfi guration initiale de l’appareil, qui comprennent la
sé
ection de la langue pour le menu sur écran, et le balayage
automatique des chaînes, c
et
a mémorisation des chaînes captées
vant de commencer
ssurez-vous que l’appareil est relié à une antenne ou au
âble
est-à-dire du balayage automatique
rança
électionnez le paramètre région de votre choix à l’aide
u
/►
et appuyez sur
Configuration initiale
Sélectionnez “Magasin” ou “Maison” comme emplacement.
Magasin
Sélectionner
électionnez le magasin
onfiguré avec des paramètres d’affichage prédéfinis
et sa consommation
Maison
OK
OK
agasin],
eut parfois dépasser les valeurs
INTRODUCTION
PRÉPARATION
REGARDER LA
TÉLÉVISION
1 Une fois les connexions nécessaires effectuées,
2 Utilisez ▲/
3 Utilisez ▲/
appuyez su
La première mise sous tension de l’appareil peut
e menu
orsque l’appareil est mis sous tension
écran dans la liste
roite de l’écran du téléviseur.
c
aînes de télévision ou
câblodiffusion, et a
Configuration initiale
Vérifier que l’antenne est connectée à “ANT. IN”.
Sélectionner la source de votre signal.
a
Configuration initiale
pour allumer l’appareil
emander quelques instants
Initial Setup] apparaît automatiquement
pour sélectionner la langue du menus sur
lish / Español / Français) située à
pour sélectionner Antenne
âble
ez sur
Antenne
Câble
SélectionnerOKOK
Ou
BACK
rogrammation auto]commence
Attendez pendant que le système balaye les canaux. L’programmation auto
peut s’effectuer en plus de 20 minutes.
0%
Chaînes numériques
Chaînes analogiques
pour les chaînes de
ANT.IN
MENU
Saut
0 ch
0 ch
MENU
Saut
Retour
our les
Antenne
Câble
Saut
i vous sélectionnez
énergétique de l
t
sation à domicile et vous pouvez régler la qualité de
aison] le rendement
appareil est optimisé pour une
’image et du son en fonction de vos préférences
ne fois les réglages initiaux effectués, la chaîne
mémorisée dotée du plus petit numéro ainsi qu
message vous demandant de confirmer le réglage du
ieu d’utilisation s’affichent sur l’écran du téléviseur.
Remarque
i vous ne recevez aucun signal de votre service de télévision par câble,
contactez votre o
i vous appuyez sur
aînes, le paramètre sera annulé
c
La fonction de balayage automatique initiale des chaînes ne peut être
exécutée
modifi ez la connexion
rogrammation auto]p. 19
i aucun signal n’est reçu par la borne d’antenne et qu’aucune commande
est exécutée pendant plusieurs secondes après la mise sous tension de
n
appareil,
ur l’écran du téléviseur.
Configuration initiale
onfiguration initial
Pas de chaîne enregistrée.
Essayer programmation auto à nouveau?
Vérifiez si un câble est bien connecté à la prise "ANT. IN" à l’arrière du
téléviseur, le procédé d’installation des chaînes recherche cette
connexion. Si vous utilisez un décodeur de diffusion par câble ou
satellite, confirmez l’entrée que vous avez connectée au décodeur et
appuyez sur la touche "SOURCE" de la télécommande pour sélectionner
l’entrée source appropriée.
ous devez régler
Dans le cas contraire, les modifi cations que vous aurez apportées aux
réglages ne seront pas mémorisées lorsque vous éteindrez l
érateur.
u
pendant le balayage automatique des
u’une seule fois, pour
Conseils Utiles]apparaît. Suivez les instructions qui apparaissent
Sélectionner
aison]dans l’étape 4
Antenne] ou
Antenne / Câble), réglez de nouveau le paramètre
OK
OK
Câble]. Lorsque vous
Recommencer
Plus tard
MENU
Saut
appareil
Une fois la confi guration initiale terminée...
i vous souhaitez effectuer une nouvelle recherche
automat
rec
que des chaînes
Programmation Auto
➠ . 9
ous pouvez ajouter les chaînes analogiques et câblées
e votre choix non mémorisées par la fonction de
erche auto des chaînes
Ajouter Chaînes]
. 2
i vous souhaitez changer la langue utilisateur.
Sélection de la Langue
➠
. 2
i vous souhaitez modifi er les paramètres
Région
.
un
CONFIGURATION
OPTIONNELLE
DÉPANNAGE
INFORMATION
1
Page 69

REGARDER LA TÉLÉVISION
l
.
A
pour modifi er le temps qui doit s’écouler avant
.
Appuy
pour affi cher la durée restante sur l’écran.
.
.
A
.
Appuy
.
TV
.
Appuy
.
.
r
ili
s
ili
s
iliser
s
ATSC
1
.
NTSC
1
A
.
.
v
.
Minuterie de Sommeil peut être rég
ée de manière à éteindre
automatiquement l’appareil après un laps de temps donné
ppuyez plusieurs fois sur
que le téléviseur ne s’éteigne (augmente la durée de 30 minutes jusqu’à 120 minutes)
Sommeil 120min.
ez une fois sur
our annuler la minuterie, appuyez plusieurs fois sur SLEEP
jusqu’à ce que
Parcours des Modes d’Entrée
Sommeil Hf] apparaisse
permet de basculer facilement du téléviseur (ATSC ou
TSC) aux autres périphériques externes à l’aide de la télécommande lorsque ces périphériques sont connectés à l’appareil
ppuyez plusieurs fois sur SOURCEou
Source
TV
Video
Component
HDMI1
HDMI2
HDMI3
er sur
H − inverse le sens du cycle des modes d’entrée
Mode Freeze
ez sur
Image fi xe
11.1 Video
haîne DTV /
HDMI3
permet de geler l’image affi chée sur l’écran du téléviseur pendant 5 minutes
pour geler l’image
H
pour parcourir les modes d’entrée
Component
HDMI2 HDMI1
ou entrée PC)
La sortie audio n’est pas mise en pause
our annuler le mode Freeze, appuyez sur n’importe quelle touche à l’exception de
Sélection de Chaîne
électionnez les chaînes en utilisant sur
es
our sélectionner les chaînes mémorisées, ut
H +/− ou
our sélectionner les chaînes non mémorisées, ut
es Touches numérique
es Touches numérique
our ut
ppuyez sur
Remarque
es Touches numérique
Lorsque vous sélectionnez le canal numérique 11.
oubliez pas d’appuyer sur
Lorsque vous sélectionnez la chaîne câblée ou analogique 1
REV CH pour revenir à la chaîne que vous regardiez
[Pas de Signal]apparaît sur l’écran du téléviseur une fois la diffusion de la
sous-canal terminée
e message
ous recevez uniquement un signal audio
rog. audio seulement]apparaît sur l’écran du téléviseur lorsque
H +/− ou su
avant d’appuyer sur le numéro du sous-canal
sez
sez
11.1
6
Page 70

is
Mode d’Affi chage sur Écran de Télévision
g
.
A
.
9
l
Z
l
.
.
.
Z
.
.
l
Z
l
.
g
.
g
.
Z
4
.
g
taill
iginal
.
p
p
l
t
l
.
n
.
t
.
.
ili
.
.
A
.
.
A
ili
blir l
l.
ATSC
A
AP
pour parcourir les
ibles.
.
ibl
ibl
.
NTSC
Appuy
AP
pour affi cher le mode audio actuellement sélectionnée.
ibles.
s
: Émet le deuxième programme audio
e modes d’affi chage peuvent être sélectionnés pour un signal d’entrée PC
ppuyez plusieurs fois sur FORMAT pour changer le rapport de format du téléviseur
our un signal vidéo 16:
4:3 affi che une image 16
est raccourcie horizontalement. Des barres latérales
apparaissent de chaque côté de l’écran
orma
arge
our un signal vidéo 4:3
orma
arge
our un signal d’entrée PC via le mode d’Entrée
orma
4:3
6:9
ein
oom
oom
HDMI1
t par p
xt. image
xt. image
rogné
modifi er ses proportions horizontales et verticales
écran
étirée horizontalement pour remplir l’écran
image est étirée verticalement au niveau du haut de
écran. Le haut de l’image est rogné
étirée verticalement afi n de remplir l’écran. Le haut et le
bas de l’image sont rognés
remplir l’écran
respect des proportions afi n de remplir l’écran
rança
9 ou 4. Et 3 types
orma
affi che une image 16:9 à sa taille originale
9 au format 4 ; l’image
xt. image
e manière à remplir l’écran. Seul le haut de l’image est
oom
arge
’affi chage rogne les côtés gauche et droit de l’image
orma
es bandes latérales apparaissent des deux côtés de
6:9 affi che une ima
xt. image affi che une ima
oom affi che une image
arge affi che l’ima
orma
roportionnelle. Des bandes latérales apparaissent des
eux côtés de l’écran
ei
t par p
affi che une image 16
affi che une image 16:9 à sa taille maximum sans
affi che une image étirée horizontalement. Ce mode
affi che une image 4:3 à sa taille originale.
e 4:3 au format 16:9 ; l’image est
e or
affi che une image étirée de façon
affi che une image étirée horizontalement sans
e avec le centre de celle-ci à la
e et les côtés étirés horizontalement pour
affi che une image à sa taille originale
9 étirée verticalement
e 4:3 au format 16:9 ;
au format 16
9 ; l’image est
INTRODUCTION
PRÉPARATION
REGARDER LA
TÉLÉVISION
CONFIGURATION
OPTIONNELLE
DÉPANNAGE
Fonctions Sonores
écrit comment modifi er l’audio, la langue audio ainsi que le volume
Réglage du Volume
t
sez VOL +/−pour régler le volume
Mode Silence
ppuyez sur
Sourdine
ppuyez de nouveau sur
VOL +/− pour réta
pour couper temporairement le son
’affi che pendant quelques secondes
ou ut
e niveau de volume initia
sez
Changement du Mode Audio
ppuyez plusieurs fois sur S
angues audio dispon
Les langues disponibles varient d’une diffusion à l’autre
utre]s’affi che lorsque la langue audio n’est pas
spon
e ou lorsque les langues dispon
autres que l’anglais, l’espagnol ou le français
11.1
Anglais 1 / 3
es sont
Volume 30
secondes lors du réglage du volume
endant la réception d’une diffusion des MTS, appuyez plusieurs fois pour
parcourir les canaux audio dispon
ex.) Quand tous les modes sont disponible
SAP / STÉRÉO SAP / MONO SAP / STÉRÉO
STÉRÉO: Émet l’audio stéréo
SAP
MONO: Émet l’audio mono
ez sur S
SAP / STÉRÉO
11
s’affiche pendant quelques
hi!
hola!
salut!
INFORMATION
Page 71

Informations sur Écran
A
O
ATSC
11.1
TV: TV-14
1080i
1080i
16:9
16:9HDHD
CC
CC
KABC
KABC
1 23 4
5
6, 7, 8
9
10
NTSC
t
s
)
)
]
lig
V
]
)
V
K
▼
.
di
ible.
.
;
.
.
0
A
.
A
.
v
.
V
0
glag
.
g
pp
il.
A
:
V
]
p
iphériq
il.
;
X
X
F
7
A
X
1
]
.
y.
p
l
.
ili
.
iphériq
k.
q
iphériq
ibl
HDMI.
Vous pouvez afficher sur l’écran du téléviseur la chaîne
actuellement sélectionnée ou d’autres informations, telles
que le mode audio. En mode numérique, les informations
d’émission détaillées pour le canal actuel telles que titre du
programme ou guide des programmes sont affichées.
ppuyez sur INF
Un jour de souvenirs
n jour de souvenirs
Il y a un quart de siècle, à une époque que l’on peut
qualifier de bon vieux temps de la presse écrite, les ventes
d’espace publicitaire en emplacement indéterminé
représentaient 80 pour cent des revenus de publicité de cette
4
11
SAP / STÉRÉO
480i
480i
TV-PG DLSV
5
4:3SDSD
4:3
6, 7, 8
CC
CC
9
10
itre d’émission
guide des émission
Le guide des émissions s’affiche en plus des
nformations de diffusion. Affichage de 4 lignes
maximum.
3 station émettrice
numéro de chaîne
langue audio (ATSC) / mode audio (NTSC
Changement du Mode Audio
nombre réel de
nes de balayage et mode de
alayage
format T
8 format d’image du programme
CC (non disponible si le paramètre Sous-titres
codés est réglé sur
Hf
10 catégorie de contenu bloquée
our effacer l’affichage, appuyez de nouveau sur INFO
ous pouvez aussi appuyer sur BAC
Remarque
Lorsque le guide des émissions comporte plus de 4 lignes, utilisez ▲/
pour faire défi ler le texte
Aucune description fournie.] s’affi che lorsque le guide des émissions n’est
spon
pas
Lorsque le guide des programmes est affi ché, la fonction de sous-titres est
nterrompue
En mode d’entrée externe, l’écran suivant s’affi che
ex.) Lorsqu’un appareil externe est connecté à la prise d’Entrée Vidéo
Video
SD
480i
SD
480i
TV-PG DLSV
L’affi chage des informations disparaît automatiquement au bout d’1 minute
8
CC
CC
Anglais 1 / 2
Cote
.
Réduction de la Luminosité
Il est possible de réduire la luminosité du rétroéclairage afin
d’économiser davantage d’énergie que si le paramètre [Mode
Économie d’Énergie] est réglé sur [Ef].
ppuyez une fois sur ECO
ppuyez de nouveau sur ECO
pour diminuer la luminosité
pour augmenter la luminosité
p. 3
Remarque
Même si cette fonction est activée, la luminosité augmente lorsque
ous activez ou désactiver le
économie d’énergie est prioritaire
ous devez sélectionner le paramètre
Dans le cas contraire, les modifications que vous aurez apportées aux
es ne seront pas mémorisées lorsque vous éteindrez l’appareil
ré
Mode économie d’énergie] car le mode
aison] dans
Région]p. 3
ptions Fun-Link
i vous possédez des périphériques de notre marque (lecteur
BD ou
raveur DVD) compatibles avec les fonctions Fun-
Link, connectez-les à cet a
e manière à pouvoir contrôler les différents périphériques à
artir de la télécommande de cet appare
vant de commencer
ous devez régler les paramètres
et
Commande de Fun-Link] sur
ans le cas contraire, FUN-LINK OPTIONS ne
fonctionne
ér
Appuyez sur FUN-LINK OPTIONS pour affi cher le
Remarque
Il se peut que certaines fonctions Fun-Link ne soient pas disponibles avec
ertains disques ou pér
mar
as, et ce, même si vous avez branchés des
ues de notre marque à cet appare
Les périphériques approuvés et recommandés
permettant de profiter de Fun-Link sont les suivants
MAGNAVO
B530MG
B500MG1
MBP1100 / F
menu
Options Fun-Link
enu des dispos
ont des dispos
avori des dis
t
sez ▲/▼/◄/► /
es fonctions souhaitées de vos périphériques
ous ne garantissons pas une interopérabilité à 100 % avec d’autres
ues de pér
areil à l’aide d’un câble HDMI
Commande des dispositifs
Ef]p. 29
YLVANI
B530SL
B500SL
Options Fun-link
Menu des dispos
Cont des dispos
Favori des disp
ette fonction vous permet
e contrôler le menu de votre
périphérique Fun-Link connecté
ette fonction vous permet de
contrôler le menu principal de vos
ou de vos disques Blu-ra
ette fonction vous permet de
contrô
er le menu pop-up de vos
sques Blu-ray
e la télécommande pour actionner
ues Fun-Lin
ues compat
es
Page 72

is
CONFIGURATION
.
Appuy
n
s
g
ue
e
.
]
0
t
]
0
V
’
i
.
]
4
V
p
t
]
7
V
visi
.
[F
k]
V
k.
]
]
]
]
1
.
q
.
A
:
A
.
▼
r
t
Utili
t
n
s
V
]
l
]
.
.
A
iliser
d
ibles.
.
’
t
7
i
OPTIONNELLE
Menu Principal
ette section présente un aperçu du menu principal qui s’affi che
ors de la pression sur
options de confi guration des fonctions ci-dessous
ez sur
. Le menu principal comprend les
Image
onfiguratio
ption
an
rança
Programmation Auto
i vous changez de mode de connexion au réseau (ex. vous
remplacez le câble d’antenne par la télévision par câble), ou si
nstallez l’appareil dans une autre région après avoir procédé à
a configuration initiale, ou bien si vous restaurez les chaînes du
réseau numéri
’utiliser la fonction Recherche automatique afin d’effectuer
ne nouvelle recherche des chaînes
vant de commencer
ssurez-vous que l’appareil est relié à une antenne ou au
âble
Appuyez sur MENU pour affi cher le menu principal.
2 Utilisez ▲/
appuyez su
Utilisez ▲/▼ pour sélectionner
e
appuyez sur
ue que vous avez effacées, il est recommandé
pour sélectionner
onfiguration
et
rogrammation auto
INTRODUCTION
PRÉPARATION
REGARDER LA
TÉLÉVISION
mag
Réglage de l’Image]
Son [Réglage du Son]
onfiguration
Programmation Auto]
Liste Chaînes
Ajouter Chaînes
tions [Sous-titres
Mode Économie d’Énergie
Région]
Info Logiciel Actuel
angueSélection de la Langue
p.22
.
p.19
Vous pouvez lancer un balayage automatique des
aînes captées et retirer les chaînes indésirables
p.2
Les Chaînes programmées automatiquement
figurent dans cette liste des Chaînes : utilisez les
ouches
H +/− pour y accéder.
p.2
ous pouvez ajouter des chaînes de télévision
qui n
ont pas été détectées lors de la recherche
automat
que
p.2
ous pouvez modifier le format d’affichage des
sous-titres utilisé
our afficher les dialogues
’un programme TV ou les autres informations
extuelles qui s’affichent sur l’écran du téléviseur.
errouillage
p.2
ous pouvez spécifier des restrictions d’accès au
onnement
un-Lin
.29
ous pouvez régler les options Fun-Lin
p.3
p.3
emplacez le réglage
agasin] par
aison
our permettre la mémorisation des modes
mage]et
Son]sélectionnés.
p.3
p.2
hanger la Langue du Menu Principal
sez ▲/▼ pour sélectionner une option appropriée,
e
appuyez sur
e
o
Configuration
ption
angue
Programmation auto balaye à nouveau toutes les
chaînes.
L’programmation auto peut s’effectuer en plus de
20 minutes.
Sélectionner la source de votre signal.
Antenne
Ou
Câble
Retour
Antenne
Câble
ANT.IN
Lorsque l’appareil est connecté à une antenne
HF / UHF, sélectionnez
i un décodeur de câblodiffusion est connecté,
ectionnez
sé
Câble
Antenne
a rogrammation auto] commence
Attendez pendant que le système balaye les canaux. L’programmation auto
peut s’effectuer en plus de 20 minutes.
75%
Chaînes numériques
Chaînes analogiques
MENU
Quitter
10 ch
6 ch
ne fois le balayage et la mémorisation terminés, la chaîne
mémorisée dont le numéro est le plus bas s’affichera
Remarque
près avoir effectué
e sauter automatiquement les programmes indispon
permet
i vous ne recevez aucun signal de votre service de télévision par câble,
ontactez votre opérateur.
i vous appuyez sur ou
aînes, le paramètre sera annulé
ême après un
si vous débranchez le cordon d
sur
appuyan
Le Code NIP sera nécessaire une fois que vous aurez défi ni un Code NIP
e
errouillage]
our modifi er votre Code NIP, suivez les instructions fournies dans la
on
Changez Code]
sect
rogrammation auto] ut
pendant le balayage automatique des
rogrammation auto] le réglage des chaînes est perdu
alimentation avant d’éteindre l’appareil en
p.2
p.28
H+/−
sur la télécommande
CONFIGURATION
OPTIONNELLE
DÉPANNAGE
INFORMATION
9
Page 73

0
Liste Chaînes
l
s
l.
▼
r
▼
t
▼
n
s
b
ili
ili
▼
li
.
l
i.
.
A
.
l.
l.
▼
t
▼
r
l
n
s
.
]
.
ili
.
es chaînes sélectionnées ici peuvent être ignorées lors de la
sé
ection de la chaîne via la touche
es chaînes restent accessibles à l’aide
H +/−
es Touches numérique
Ajouter Chaînes
ette fonction vous permet d’ajouter les chaînes qui n’ont pas
té ajoutées par le balayage automatique des chaînes en raison
es conditions de réception lors du réglage initia
Appuyez sur
2 Utilisez ▲/
appuyez su
3 Utilisez ▲/
pour quitter le menu principa
pour sélectionner
pour sélectionner
onfiguration
Liste chaînes e
appuyez sur
4 Utilisez ▲/
pour sélectionnez la chaîne que vous
ésirer ignorer, et appuyez sur
Image
o
Configuration
ption
angue
Allume chaînes pour sélection avec touches Ch
Up / Down
Sélection Ch
OK
Visionner / Saut
L’affichage de la chaîne qui a été supprimée devient
re. Vous ne pouvez plus sélectionner cette chaîne
som
en ut
sant
H+/−
our réactiver une chaîne supprimée, ut
et appuyez sur
gnées
sur
orsque vous supprimez une canal principale, ses sous-
sont supprimées auss
cana
5 Appuyez sur
. Les chaînes enregistrées sont
pour quitter
Remarque
Les chaînes sont en mode ATSC si elles portent l’indication
utrement elles sont en mode NTSC
et
DTV 11.1
DTV 11.2
DTV 11.3
BACK
Retour
sez ▲/
Appuyez sur
2 Utilisez ▲/
pour quitter le menu principa
pour sélectionner
onfiguration
appuyez sur
3 Utilisez ▲/
appuyez su
4 Utilisez les Touches numériques pour entrer
pour sélectionner Ajouter chaînes et
e numéro
e la chaîne que vous voulez ajouter, et appuyez sur
Image
o
Configuration
ption
angue
5 Appuyez sur
Pour les chaînes analogiques, sélectionner une
chaîne à ajouter à l’aide des touches
numériques.
Chaînes numériques, exécuter la fonction
Programmation auto.
Changement CH
pour quitter
Ajouter chaînes
BACK
Retour
Remarque
i le réglage a été correctement effectué, le message
apparaît
chaînes.
i l’entrée externe est utilisée, il n’est pas possible d’enregistrer la chaîne et
on disponible] s’affi che sur l’écran du téléviseur.
n ut
sant
eulement
H +/−, vous pouvez sélectionner les chaînes mémorisées
Ajoutée à la liste des
e
11
2
Page 74

is
1
Vérifi cation de l’Antenne
ATSC
.
p
l.
▼
r
▼
r
’
.
n
s
r
.
n
s
p
.
▼
▼
n
n
s
.
pagnol
a
]
s
]
A
l.
numérique de chaque chaîne
Appuyez sur
2 Utilisez ▲/
appuyez su
3 Utilisez ▲/
su
pour sélectionner
our quitter le menu principa
pour sélectionner Antenne
onfiguration
, et appuyez
et
rança
Sélection de la Langue
Vous avez le choix entre l’anglais, l’espagnol et le français
comme langue de menu sur écran.
1 Appuyez sur MENU pour quitter le menu principal.
2 Utilisez ▲/
3 Utilisez ▲/
rançais, et appuyez sur
pour sélectionner
pour sélectionner
angue
, et appuyez sur
nglish
spañolou
INTRODUCTION
PRÉPARATION
4 Utilisez
es
ou
H
/− pour
sélectionnez la chaîne pour laquelle vous désirez vérifi er la
puissance du signal numérique capté par l
antenne
11.1
Image
o
Configuration
ption
angue
i la chaîne est réglée sur un canal analogique (câble)
Actuel 50 Max 50
CH
Changement CH
ou sur une entrée externe, vous ne pouvez pas vérifie
état de l’antenne
Retour
Video
Image
o
Configuration
ption
ue
Indicateur disponible uniquement
pour la transmission numérique.
Retour
4 Appuyez sur
Remarque
i vous souhaitez affi cher les menus en français, et non en anglais ou en
es
u
électionnez
ppuyez sur
Image
o
Configuratio
ption
Langue
, appuyez sur
/▼et appuyez sur
rançai
Select your menu language.
Seleccione el idioma para el menú.
Sélectionnez la langue du menu.
pour quitter
. Sélectionnez
à l’aide du
pour quitter le menu principa
anguage]ou
/▼, et appuyez sur
English
Español
Français
iom
REGARDER LA
TÉLÉVISION
CONFIGURATION
OPTIONNELLE
à l’aide
DÉPANNAGE
INFORMATION
5 Appuyez sur
CH
our quitter
Changement CH
2
Page 75

Réglage de l’Image
V
.
A
:
V
’
.
l.
▼
▼
l
n
s
ili
r
]
)
n
n
s
r
V
ili
▼
ili
.
t
A
A
e
Appuy
Appuy
A
r
r
A
e
Appuy
r
Appuy
t
A
ir
A
r
s
A
s
A
.
V
.
A
:
V
’
.
l.
▼
l
n
ons
g
ue
ili
]
)
n
ons
g
ue
ous pouvez régler le mode d’image ou personnaliser la
qualité de l’image selon vos préférences
vant de commencer
aison] dans
modifi cations que vous aurez apportées aux réglages ne
seront pas mémorisées lorsque vous éteindrez l
Région]p.3 Dans le cas contraire, les
1 Appuyez sur
2 Utilisez ▲/
pour sélectionner
3 Utilisez ▲/
rég
er, et appuyez sur
Image
onfiguratio
ption
angue
ous devez sélectionner le paramètre
appareil
our quitter le menu principa
mage
, et appuyez sur
pour sélectionner l’option que vous désirez
Smart image
Luminosité
Contraste 60
Couleur 36
Teinte 0
Netteté 0
Température couleur Normal
Préférentiel
ette
Netteté 0
Ajuster Déplacer OK
emp
ratura couleu
Temp. couleur Normal
Ajuster Déplacer OK
ppuyez sur
ppuyez sur
OK
OK
pour adouc
pour ajouter des
couleurs chaude
pour quitter
ppuyez sur
pour rendre
plus net
ppuyez sur
pour ajouter des
ouleurs froide
Réglage de Son
ous pouvez régler le mode sonore, l’égaliseur et d’autres
tions sonores
30
vant de commencer
aison] dans
Région]
modifi cations que vous aurez apportées aux réglages ne
seront pas mémorisées lorsque vous éteindrez l
1 Appuyez sur
2
Utilisez ▲/▼ pour sélectionner on, et appuyez sur
ous devez sélectionner le paramètre
p.30 Dans le cas contraire, les
appareil
pour quitter le menu principa
4 Réglez les paramètres suivants.
t
sez ▲/▼ pour sélectionner le réglage souhaité, et
appuyez su
Préférentiel]
Image
o
onfiguratio
ption
angue
Luminosité, Contraste, Couleur, Teinte,
etteté, Température couleu
ous ne pouvez régler que les options lorsque
Préférentiel]est réglé sur
pour sélectionner le réglage de votre choix, puis ut
/► pour procéder au réglage
uminosi
Luminosité 30
Ajuster Déplacer OK
ontrast
Contraste 60
Ajuster Déplacer OK
ouleur
Couleur 36
Ajuster Déplacer OK
eint
Teinte 0
Ajuster Déplacer OK
Standard]
Smart image
Luminosité
Contraste Sport
Couleur Film
Teinte Jeu
Netteté
Température couleur
Sport]
Smart image ]. Ut
ppuyez sur
OK
OK
OK
OK
pour réduire la
uminosité
pour réduire le
contraste
ppuyez sur
pour atténue
a couleu
our accentue
e rouge
ilm] et
ez sur
ez sur
eu
Préférentiel
Standard
sez ▲/
sez
ppuyez sur
pour augmenter
a luminosité
ez sur
pour augmenter
e contraste
ppuyez sur
pour accentuer
a couleur
ez sur
our accentuer
e vert
3 Utilisez ▲/
rég
er, et appuyez sur
Image
Son
onfiguratio
pti
an
pour sélectionner l’option que vous désirez
Smart son
Egaliseur
Son d’ambiance virtuelle Ef
Nivelage auto du volume Hf
Haut-parleurs du téléviseur Amp. ext.
MTS primaire Stéréo
4 Réglez les paramètres suivants.
t
sez ▲/▼ pour sél ectionner le réglage de votre
oix, et appuyez sur
Préférentiel]
ouvelle
Image
Son
onfiguratio
pti
an
Standard]
Smart son Préférentiel
Egaliseur
Son d’ambiance virtuelle Film
Nivelage auto du volume Musique
Haut-parleurs du téléviseur Nouvelle
MTS primaire
ilm]
Standard
usique] et
Standard
22
Page 76

is
galiseur
.
ili
n
s
e
i
ili
n
s
.
.
e
p
l
blici
ili
’op
n
s
f
blici
.
.
t
]
ili
ge
n
ons
g
ue
.
.
Amp
.
V
il.
iphériq
ibl
HDMI
e
V
.
’
]
7
ili
r
ge
n
ons
g
ue
o
.
o
.
.
A
r
.
ermet de régler la qualité du son pour chaque fréquence
t
sez
/►
pour sélectionner la fréquence spécifi que et utilisez
▲/▼ pour régler le volume sonore, et appuyez sur
Image
Son
onfiguratio
on
angue
0
rança
Haut-parleurs du téléviseur
électionnez la sortie audio des enceintes de l’appareil
u non. Si votre amplifi cateur est compatible HDMI et
onnecté à cet appareil au moyen d’un câble HDMI,
ertains réglages sonores (augmentation du volume,
par exemple) peuvent être effectués à l’aide de la
élécommande de cet appareil. Assurez-vous que
Commande de Fun-Link]est réglé sur
t
sez ▲/▼ pour sélectionner l’option de votre choix,
appuyez sur
Ef
. 29
INTRODUCTION
PRÉPARATION
120Hz0500Hz01.5kHz05kHz010kHz
Son d’ambiance virtuell
Le son d’ambiance virtuelle vous offre l’espace
stéréophonique virtuel via votre système stéréo à 2
canaux ex
stant. Ut
sez▲/▼pour sélectionner l’option
e votre choix, et appuyez sur
Image
Son
onfiguratio
ption
angue
Sélectionne les modes de reproduction
SPATIAL ou SURROUND.
Effet accentué
Effet naturel
Ef
Hf
Nivelage auto du volum
La fonction maintient un volume sonore constant en
com
ensant les différences de volume sonore constatées
entre
es pu
sélectionner l
Image
Son
onfiguratio
ption
angue
E
tés et les programmes. Ut
sez ▲/▼ pour
tion de votre choix, et appuyez sur
Ef
Le nivelage auto du volume réduit les
différences de volume entre les chaînes et
les programmes, et offre un niveau audio
régulier.
Réduit les différences de volume entre les
pu
tés et les programmes de télévision
ésactive la mise à niveau automatique du
volume
H f
Ima
Son
onfiguratio
pti
an
"Ef" :
Son restitué par les haut-parleurs du téléviseur.
"Hf" :
Son non restitué par les haut-parleurs.
"Amp. ext." :
Utilisation possible de l’amplificateur
compatible HDMI-CEC connecté avec un câble
HDMI. Pour plus d’information, voir le manuel
d’utilisation.
Ef
Hf
Amp. ext.
e son sera émis par les haut-parleurs de
appareil
e son ne sera pas émis par les haut-
parleurs de l’appareil
ous pouvez contrôler la sortie audio des
. ext
ériphériques connectés au moyen d’un
câble HDMI à l’aide de la télécommande de
cet appare
Remarque
ous ne garantissons pas une interopérabilité à 100 % avec d’autres
marques de pér
ues compat
es
.
TS primair
ous pouvez régler le mode de sortie comme une valeur
par défaut pour le mode sonore (NTSC uniquement)
e réglage n’est pas verrouillé lorsque vous modifi er le
mode de sortie à l
Fonctions Sonores
t
sez▲/▼pour sélectionner l’option de votre choix, et
appuyez su
Ima
Son
Configuratio
pti
an
aide de la touche SAP.
Smart son
Egaliseur
Son d’ambiance virtuelle
Nivelage auto du volume
Haut-parleurs du téléviseur
MTS primaire
.1
Stéréo
Mono
SAP
REGARDER LA
TÉLÉVISION
CONFIGURATION
OPTIONNELLE
DÉPANNAGE
INFORMATION
Stéré
on
SAP
ppuyez su
met l’audio stéréo
met l’audio mono
met le deuxième programme audio
pour quitter
23
Page 77

4
Sous-titres
l.
▼
ili
r
.
eonfig
n
g
A
t
Utili
▼
p
ppuy
n
n
t
.
.
.
.
t
ibl
.
A
A
p
.
p
A
.
Appuy
r
.
Vous pouvez afficher les sous-titres des émissions de télévision,
des films et des nouvelles. Les sous-titres désignent le texte
des dialogues ou les descriptions qui s’affichent à l’écran pour
les personnes malentendantes.
Appuyez sur
our quitter le menu principa
A. Service Sous-titrageA. Service Sous-titrage
4
Utilisez ▲/▼pour sélectionner
appuyez sur
a
sez ▲/
ez sur
our sélectionner le sous-titre souhaité, et
Service sous-titrage] e
2 Utilisez ▲/
Ut
sez ▲/▼pour sélectionner
su
pour sélectionner
ptions, et appuyez sur
Sous-titre], et appuyez
uivez les instructions ci-dessous pour confi gurer chacune
es options
Options
an
uratio
Service sous-titrage
Service sous-titrage num
Style des sous-titres
H f
H f
Image
o
onfiguratio
Options
angue
C-1 et T-1
C-3 et T-3
C-2, CC-4, T-2
et T-4
Service sous-titrage
Service sous-titrage num
Style des sous-titres CC-2
es sous-titres principaux et les services
extuels
Les sous-titres ou le texte s’affi chent
ans la même langue que le dialogue de
’émission (jusqu’à 4 lignes de texte sur
écran du téléviseur, là où le texte ne cache
pas les parties impor tantes de l’image)
servent de chaînes de données préférées
e sous-titrage ou le texte est souvent une
angue secondaire
Rarement disponible. Les diffuseurs ne
utilisent que dans des cas spéciaux, lorsque
CC-1]et
pas dispon
CC-3] ou
es, par exemple
H f
CC-1
CC-3
CC-4
T-1
T-2
T-3
T-4
T- 1] etT- 3] ne son
•
modes d’affichage sont disponibles, suivant le type
’émission :
ode Paint-on
ode Pop-on
ode Roll-u
ez su
ffi che immédiatement les caractères saisis
sur l’écran du téléviseur.
ffi che tous les caractères en même temps
a
rès leur mise en mémoire
ffi che les caractères de manière continue,
par défi lement (max. 4 lignes)
pour quitter
2
Page 78

is
B. Service Sous-titrage NumB. Service Sous-titrage Num
ATSC
t
.
ili
Utili
n
g
À
6
]
Appuy
r
.
.
ATSC
V
ple la poli
ill
.
Utili
t
r
n
▼
r
ili
hai
So, y ou m us t be P hi li p. Hi!
I’m p le as ed t o me et you.
A
A
d
e
.
.
rança
INTRODUCTION
C. Style des Sous-titresC. Style des Sous-titres
utre les sous-titres codés de base, le téléviseur numérique
ossède ses propres sous-titres codés appelés service de sous-
itres numériques. Utilisez ce menu pour modifi er les réglages
u service de sous-titres numériques
t
sez ▲/▼ pour sélectionner
num
, et appuyez sur
ervice sous-titrage
sez ▲/▼ pour sélectionner le service de sous-titres
umériques de votre choix, et appuyez sur
Image
onfiguratio
Options
an
S-1 à CS-
Service sous-titrage
Service sous-titrage num
Style des sous-titres CS-2
sélectionner si vous ne souhaitez pas de
service sous-titrage num.
Sélectionnez un de ces services avant de
anger toute autre option dans le menu
Sous-titre]. En temps normal, choisissez
CS-1
H f
CS-1
CS-3
CS-4
CS-5
CS-6
ous pouvez changer le style des sous-titres, comme par
exem
ce de caractères, la couleur, la ta
sez ▲/▼ pour sélectionner
e, etc
Style des sous-titres] e
appuyez sur
Utilisez ▲/▼ pour sélectionner
appuyez su
onfiguratio
Options
angue
6 Utilisez ▲/
e
pour sélectionner
Param. utilis
Style police
Taille police Moyenne
Couleur police
Opacité police Plein
Couleur l’arrière-plan
Opacité l’arrière-plan Plein
Couleur bord
Type bord
aram. utilis et
H f
Police0
Blanc
Noir
Noir
Aucun
, et appuyez sur
Utilisez ▲/▼our sélectionner une option, et appuyez
su
. Puis ut
sou
té, et appuyez sur
ffichage de l’image
sez ▲/▼ pour sélectionner le réglage
PRÉPARATION
REGARDER LA
TÉLÉVISION
CONFIGURATION
OPTIONNELLE
DÉPANNAGE
6
ez su
pour quitter
Remarque
es
Service sous-titrage num] disponibles varient suivant les spécifi cations
e diffusion
So, you must be Philip. Hi!
So, you must be Philip. Hi!
I’m pleased to meet you.
I’m pleased to meet you.
or
Couleur bord et Type bord)
olic
Style police, Taille police, Couleur police, Opacité
ou Transparence police)
rrière-plan
( Couleur de l’arrière-plan, Opacité ou Transparence de
’arrière-plan)
Les différents réglages sont décrits sur la page suivante
onsultez les réglages que vous avez effectués dans
a page suivante en vous reportant au coin supérieur
roit de la fenêtre des paramètres affichée (toutes les
élections n’indiquent pas les différences sélectionnées)
INFORMATION
25
Page 79

Style police
p
q
.
ille d
.
p
.
p
.
.
n
p
q
.
d
.
d
p
.
.
g
.
i
.
l
d
.
i
.
’
.
.
i
]
t
ibl
:
g
)
i
.
le b
.
e style des caractères des
sous-titres affi chés
modifi é tel
eut être
u’indiqué dans
illustration
aille police
a ta
es caractères des
sous-titres affi chés peut être
modifi ée tel qu’indiqué dans
illustration
ouleur police
a couleur des caractères des
sous-titres affi chés
eut être
modifi ée tel qu’indiqué dans
illustration
pacité police
L’opacité des caractères des
sous-titres affi chés
modifi ée tel qu’indiqué dans
illustration
La couleur du fond des
sous-titres affi chés peut être
modifi ée tel qu’indiqué dans
illustration
eut être
Sous-titre
Sous-titre
Grande
Moyenne
Petite
Sous-titre
Blanc
Noir
Rouge
Vert
Bleu
Jaune
Magenta
Cyan
Sous-titre
Plein
Clignotement
Translucide
Transparent
Sous-titre
Blanc
Noir
Rouge
Vert
Bleu
Jaune
Magenta
Cyan
pacité l’arrière-pla
Sous-titre
L’opacité du fond des soustitres affi chés
modifi ée tel
eut être
u’indiqué dans
illustration
Plein
Clignotement
Translucide
Transparent
ouleur bor
Sous-titre
a couleur des bords des
sous-titres affi chés peut être
modifi ée tel qu’indiqué dans
illustration
ype bor
Blanc
Noir
Rouge
Vert
Bleu
Jaune
Magenta
Cyan
Sous-titre
e type de bord des soustitres affi chés
eut être
modifi é tel qu’indiqué dans
illustration
8 Appuyez sur
pour quitter.
Aucun
Accru
Réduit
Uniforme
Ombre G.
Ombre Dr .
Remarque
Le sous-titrage codé ne s’affi chera pas si vous utilisez une connexion HDMI
our que les sous-titres s’affi chent sur l’écran du téléviseur, il faut que le
nal diffusé contienne des données de sous-titres
si
es émissions de télévision et les annonces télévisées ne sont pas toutes
trées ou ne possèdent pas tous les types de sous-titres
sous-t
se peut que les sous-titres et les textes ne correspondent pas exactement
a voix émise par le téléviseur.
à
es changements de chaîne peuvent causer le retard des sous-titres
ant quelques secondes
pen
e réglage du volume ou la coupure du son peuvent causer le retard des
tres pendant quelques secondes
sous-t
Il se peut que des abréviations, des symboles ou d’autres formes
rammaticales abrégées soient utilisées pour que le texte n’accuse pas de
retard par rapport à l
sfonctionnement
Les caractères des sous-titres ou du texte ne s’affi chent pas pendant
’affi chage du menu principal ou des fonctions
i une case noire apparaît sur l’écran du appareil, cela signifi e que les
tres sont réglés sur le mode texte. Pour enlever la case, sélectionnez
sous-t
CC-1]
CC-2]
i l’appareil reçoit des signaux de mauvaise qualité, il se peut que les sous-
itres contiennent des erreurs ou qu’aucun sous-titre ne soit disponible. Les
causes poss
- Le brouillage causé par le démarrage d’un véhicule automobile
Le brouillage d’un moteur électrique
- La faiblesse du si
La réception d’un signal multiplex (image fantôme ou scintillement de l’écran
- Perte de données et Pixellisation (DTV uniquement)
En cas de coupure de courant, l’appareil garde en mémoire les réglages de
tres que vous avez choisis
sous-t
Lorsque l’appareil reçoit un signal de lecture d’effets spéciaux (ex. :
Recherche, Ralenti et Arrêt sur l’Image) depuis la chaîne de sortie vidéo du
magnétoscope (ch3 ou ch4), il se peut qu’il n’affi che pas les bons sous-titres
on texte
ou
action qui se déroule sur l’écran. Il ne s’agit pas d’un
CC-3]
CC-4]ou
es de mauvaise qualité des signaux sont
nal capté
Hf
26
Page 80

is
7
Verrouillage
’
.
l.
Utili
Utili
ppuy
n
g
.
isi
.
.
n
g
A
l
ibl
.
iq
]
A
.
.
q
.
A
i
.
.
p
ive.
▼
t
▼
r
pour basculer entre
V
n
n
.
AA.
▼
t
▼
ppuy
pour permuter entre
V
n
n
e
e
X
bli
7
A
s
G
T
blic
.
e contrôle parental lit les cotes de protection parentale des
émissions et refuse l’accès aux émissions dont la cote est supérieure
au niveau que vous avez spécifi é. Grâce à cette fonction, vous pouvez
bloquer l’accès à certains programmes ne convenant pas aux enfants
et rendre invisibles certaines chaînes ou modes d
Appuyez sur
sez ▲/▼pour sélectionner
ur
sez ▲/▼pour sélectionner
a
ez sur
Image
Configuratio
Options
an
4 Utilisez
IP à quatre chiffres
Options
angue
i vous n’avez pas encore défini votre Code NIP,
ssez
sa
Lorsque le Code NIP est correct, le menu
errouillage]s’affiche
uivez les instructions ci-dessous pour confi gurer chacune
es options
Image
onfiguratio
Options
an
Remarque
orsque vous sélectionnez une cote et la réglez sur
é
evées sont automatiquement bloquées. Les émissions à cote plus basse
eront dispon
i vous réglez la cote la plus élevée sur
automat
uement réglées sur
fi n de verrouiller l’accès à tout programme inapproprié, défi nissez vos
références dans les paramètres
Verrou qualif. US TV]et
Le réglage de verrouillage est mémorisé en cas de panne de courant (sauf
e code PIN qui revient sur 0000)
i la cote est bloquée, s’affi che
Taux régional]est disponible lorsque l’appareil reçoit un signal de diffusion
numéri
ue utilisant le nouveau système d’évaluation
ux États-Unis, l’appareil peut télécharger la table des verrous de codes de
on, si nécessaire
rég
Les systèmes d’évaluation canadiens de cet appareil sont basés sur la norme
EA-766-A et sur la politique du CRTC
es
es pour le visionnement
pour quitter le menu principa
Sous-titre
Verrouillage
Fun-Link
Mode economie d’energie
Région
Info logiciel actuel
pour saisir votre Code
Veuillez introduire votre code
.
Verrouillage de chaîne
Verrou qualif. US Ciné
Verrou qualif. US TV
Classement EN-CA
Classement FR-CA
Taux régional
Changez code
ision] toutes les cotes sont
ision
Verrou qualif. US Ciné]
Taux régional]
ptions, et appuyez
errouillage] et
_
Barré], les cotes plus
entrée externe
Ef
Maison
rança
A. Verrouillage de ChaîneA. Verrouillage de Chaîne
ertaines chaînes ou certains modes d’entrée externes
s
écifiques peuvent être invisibles lorsque cette fonction est
act
5 Utilisez ▲/
e
appuyez sur
6 Utilisez ▲/
puis appuyez plusieurs fois su
ision
Image
o
onfiguratio
Options
angue
7 Appuyez sur
pour sélectionner Verrouillage de chaîne
pour sélectionner le rating de votre choix,
et
Barré
Video
Component
HDMI1
HDMI2
HDMI3
40.1 DTV
Sélectionner
OK
Vision / Barré
BACK
Retour
pour quitter
B. Verrou qualif. US CinéB. Verrou qualif. US Ciné
Le système américain de classement des fi lms est celui créé
par la MP
5 Utilisez ▲/
6 Utilisez ▲/
NC-1
PG-13
P
7 Appuyez sur
e
appuyez sur
a
ez plusieurs fois sur
ision
et
Image
o
onfiguratio
Options
angue
aractéristiqu
pour sélectionner
Verrou qualif. US Ciné]
pour sélectionner la cote désirée, puis
Barré
X
NC-17
R
PG-13
PG
G
Sélectionner
NR
OK
Vision / Barré
BACK
Retour
atégori
u
c adulte seulement
ucune personne de moins de 17 ans admise
Restreint ; les moins de 17 ans doivent être
accompagnés d’un parent ou d’un tuteur adulte
e convient pas aux enfants de moins de 13 an
upervision parentale recommandée
out pu
as de classement
pour quitter
INTRODUCTION
PRÉPARATION
REGARDER LA
TÉLÉVISION
CONFIGURATION
OPTIONNELLE
DÉPANNAGE
INFORMATION
2
Page 81

C. Verrou qualif. US TVC. Verrou qualif. US TV
r
p
V
n
e
e
MAubli
e
s
G
G
T
blic
Y7
s
Y
s
e
.
s
r
.
ili
t
n
n
q
e
e
TV-Y7
V
Viol
T
A
T
4
T
G
l
s
T
G
incipal
]
(
]
]
).
.
▼
t
.
]
n
n
.
A
q
V
.
.
Utilisez ▲/▼ to select
5
su
6 Utilisez ▲/▼/◄/►
uis appuyez plusieurs fois sur OK pour permuter entre
ision
et
Barré
Verrou qualif. US TV
our sélectionner la cote désirée,
, et appuyez
Remarque
es cotes secondaires barrées apparaissent à côté de la catégorie de cote
rincipale dans le menu
Il n’est pas possible de barrer une cote secondaire (D, L, S ou V) si la cote
e est réglée sur
pr
Le changement d’une catégorie sur
automatiquement toutes ses cotes secondaires sur la même valeur
ou
ision
Verrou qualif. US TV]
ision
Barré]ou
ision] règle
Barré
Image
onfiguratio
Options
angue
aractéristiqu
-
V-14
V- P
V-
-
-
7 Appuyez sur
TV-MA
TV-14
TV-PG
TV-G
TV-Y7
TV-Y
Sélectionner
c adulte seulement
e convient pas aux enfants de
moins de 14 an
upervision parentale
recommandée
out pu
onvient à tous les enfants de 7
ans et plu
onvient à tous les enfant
pour quitter
FV V S L D
OK
Vision / Barré
atégori
BACK
Retour
our spécifi er les cotes secondaire
Dans le cas de TV-MA, TV-14, TV-PG, ou TV-Y7, vous
pouvez aussi spécifi er des cotes secondaires pour bloque
’accès à des éléments spécifi ques des émissions. Pour
spécifi er les cotes secondaires, suivez les étapes ci-dessous
t
sez ▲/▼/◄/► pour sélectionner la cote
ésirée, puis appuyez plusieurs fois sur
permu
er entreVision
et
Barré
pour
plus
élevé
plus
ass
D. Changez CodeD. Changez Code
Le code PIN par défaut de l’appareil est 0000, mais vous
pouvez défi nir votre propre PIN
5 Utilisez ▲/
appuyez sur
6 Appuyez sur
7 Appuyez sur
Remarque
ssurez-vous que le nouveau Code NIP et le Code NIP de confi rmation
sont identi
ermettre de saisir à nouveau le Code NIP.
otre Code NIP sera effacé et remis à la valeur par défaut (0000) si une
anne de courant survient
i vous oubliez le Code NIP, débranchez le cordon d’alimentation pendant
0 secondes pour remettre le Code NIP à 0000
ouveau Code NIP à 4 chiffres
aisissez de nouveau le Code NIP dans l’espace
onfirmer le code.
Image
o
Configuratio
Options
angue
pour sélectionner
es
Veuillez introduire votre code.
Confirmer le code.
Code NIP
hangez code
pour saisir le
_
BACK
Retour
pour quitter
ues. S’ils sont différents, l’espace de saisie devient vide pour
e
28
Image
Options
o
onfiguratio
angue
Sous
TV-MA
TV-14
TV-PG
TV-G
TV-Y7
TV-Y
Sélectionner
FV V S L D
OK
Vision / Barré
atégori
BACK
Retour
aractéristiqu
antaisie Violence
ence
S
cène à Caractère Sexue
angage Vulgaire
Dialogues Suggestif
V- M
V- 1
V- P
V-14, TV-P
Page 82

is
Fun-Link
’
.
l.
Utili
▼
n
ili
t
ili
l
n
.
f
.
A
f
V
’
ili
t
n
.
.
t
v
r
’
.
ili
v
ge
n
n
.
f
.
ili
l
ge
n
B
/
s
ili
.
.
iphéri
ili
’
geonfig
n
.
ette fonction vous permet de faire fonctionner des périphériques
e notre marque dotés de la fonction Fun-Link lorsqu’ils sont
connectés à cet appareil au moyen d
1 Appuyez sur
2
sez ▲/▼ pour sélectionner
pour quitter le menu principa
un câble HDMI
ptions, et appuyez
ur
3 Utilisez ▲/
pour sélectionner
un-Link], et appuyez
ur
4
Image
onfiguratio
Options
angue
Commande de Fun-Link
Arrêt auto. du dispositif Ef
Marche automatique téléviseur Ef
Commande des dispositifs Ef
Liste des dispositifs
t
sez ▲/▼pour sélectionner le réglage de votre choix,
e
appuyez sur
Ef
5 Réglez les paramètres suivants.
ommande de Fun-Link
églez Fun-Link sur
upplémentaires suivants seront grisés si vous avez
électionné
rég
age de votre choix,
Image
Configuratio
Options
angue
électionnez ce réglage si vous avez connecté un
ériphérique externe compatible avec la fonction Fun-Link
H
Désactive toutes les fonctions Fun-Link
rr
t auto. du dispositi
ous pouvez régler votre périphérique de manière à ce
qu
il s’éteigne lorsque cet appareil est mis hors tension.
t
sez ▲/▼pour sélectionner le réglage de votre choix,
e
appuyez sur
Ef] ou sur
Hf]
t
sez ▲/▼ pour sélectionner le
Hf]. Les réglages
appuyez sur
Lorsque réglé sur “Ef”, les fonctions de
Fun-link sont validées.
Ef
Hf
rança
Le périphérique Fun-Link connecté s’éteint
automatiquement lorsque vous éteignez l’appareil
e périphérique Fun-Link connecté reste allumé
même si vous éteignez l’appareil
arche automatique
et appareil s’allume lorsqu’il détecte un signal de mise
sous tension envoyé par l
connectés
t
sez ▲/▼pour sélectionner le réglage de
un des périphériques Fun-Link
otre choix, et appuyez sur
Ima
o
Configuratio
Options
angue
H
Lorsque réglé sur “Ef”, le téléviseur et les
dispositifs connectés sont mis en marche
automatiquement.
et appareil s’allume automatiquement lorsque
vous mettez l’un des périphériques Fun-Link
connectés sous tension
et appareil reste éteint même si vous mettez l’un
es périphériques Fun-Link connectés sous tension
ommande des dispositifs
ertaines fonctions telles que la lecture d’un disque ou l’entrée
ans un menu d’un périphérique connecté peuvent être
ontrôlées à partir de la télécommande.
sé
ectionner le réglage de votre choix, et appuyez sur
Ima
onfiguratio
Options
angue
H
Lorsque réglé sur “Ef”, le dispositif connecté
est commandé au moyen de la
télécommande.
/ STOP C / FWDD/
SKIP H / PAUSE F / FUN-LINK OPTIONS /
▼/◄/ /
numérique
peuvent être ut
/ BACK /
/
/
sées po ur contrôler les périphériques
un-Link connectés à partir de la télécommande
ésactive les commandes du périphérique
iste Des dispositifs
ette fonction vous permet de voir le nom des
pér
e périphérique HDMI de votre choix dans la liste affi chée
sur l
ques connectés. Ut
écran du téléviseur, et appuyez sur
iseu
Ef
Hf
t
sez ▲/▼ pour
Ef
Hf
E/ SKIP G /
es Touches
REEN /
sez ▲/▼ pour sélectionner
/ YELLOW
K.
INTRODUCTION
PRÉPARATION
REGARDER LA
TÉLÉVISION
CONFIGURATION
OPTIONNELLE
DÉPANNAGE
INFORMATION
Image
Configuratio
Options
angue
Lorsque réglé sur “Ef” et que le téléviseur est
arrêté, les dispositifs connectés sont
utomatiquement arrêtés.
Ef
Hf
Ima
uratio
Options
angue
6 Appuyez sur
HDMI1
NB530MGX
HDMI2 MBP1100 / F7
Sélectionner
OK
pour quitter
Chgt entrée
BACK
Retour
29
Page 83

Mode Économie d’Énergie
V
l
.
l.
Utili
r
▼
ili
r
n
n
.
Appuy
r
.
l.
ili
r
▼
ili
t
n
n
r
.
ili
.
l.
Utili
r
▼
r
P
ll
ili
n
n
A
r
.
ous pouvez choisir de réduire ou non la consommation
é
ectrique
1 Appuyez sur
2
sez ▲/▼ pour sélectionner
su
3 Utilisez ▲/
ode économie d’énergie], et appuyez sur
Ut
sez ▲/▼ pour sélectionner le mode désiré, et
appuyez su
pour quitter le menu principa
ptions, et appuyez
pour sélectionner
Info Logiciel Actuel
ette fonction indique la version du logiciel actuellement
t
sée
1 Appuyez sur
2
sez ▲/▼ pour sélectionner
su
3 Utilisez ▲/
appuyez su
ermet de connaître le numéro de la version du logiciel
actue
ement ut
pour quitter le menu principa
pour sélectionner
sée.
ptions, et appuyez
Info logiciel actuel] et
Image
o
onfiguratio
Options
angue
ez su
Quand paramétré sur “Ef”, la conso. est réduite en
diminuant la luminosité du rétro-éclairage.
Réduit la consommation d’électricité
se peut que la consommation de cet
appareil soit supérieure aux valeurs limites
pour quitter
Ef
Hf
Région
orsque vous sélectionnez le magasin
a consommation dépasse les valeurs limites prévues par la
1 Appuyez sur
Ut
sez ▲/▼ pour sélectionner
su
pour quitter le menu principa
agasin], il se peut que
ptions, et appuyez
o
onfiguratio
Options
angue
ppuyez su
Release Version:
XXXXXXX_XXX_X_XXX
pour quitter
Retour
3 Utilisez ▲/
Ut
sez ▲/▼ pour sélectionner le région de votre choix,
e
appuyez sur
o
onfiguratio
Options
angue
Appuyez su
pour sélectionner
L’emplacement Maison est recommandé
pour une utilisation domestique normale.
En mode Magasin de détail, tous les
réglages sont fixes.
Région], et appuyez sur
pour quitter
Magasin
Maison
Page 84

is
DÉPANNAGE
f
?
V
.
V
.
A
tél
.
V
.
4
.
.
.
pp
.
-
?
.
V
.
?
A
.
.
.
7
r
.
?
V
ili
V
.
.
pp
)
?
.
?
.
rança
INTRODUCTION
Foire aux Questions (FAQ)
Question Réponse
Ma télécommande ne
onctionne pas.
ue dois-je faire
ourquoi le menu de
configuration initiale apparaît
il à chaque fois que j’allume
’appareil
ourquoi ne puis-je pas
egardes certaines émissions
e télévision basées sur des
ignaux RF
ourquoi les images provenant
es appareils externes
connectés n’apparaissent-elles
pas
A chaque fois que je saisi un
numéro de chaîne, il change
utomatiquement.
ourquoi les sous-titres
n’apparaissent-ils pas
ntièrement ou sont-ils en
etard par rapport au dialogue
omment puis-je régler
’horloge
ointez la télécommande directement vers la fenêtre du capteur infrarouge à l’avant de
appareil
Rapprochez-vous de l’appareil
Réinsérez les piles en plaçant les pôles (signes +/− ) dans le sens indiqué
Lorsqu’un appareil équipé d’un système infrarouge (par exemple un PC) se trouve à
apteur infrarouge ou éteignez la fonction de communication infrarouge
nitiale
Le balayage automatique des chaînes doit être effectué lors de la première confi guration
se peut que la chaîne sélectionnée ne soit pas en ondes
orsque
reçues. Veillez à laisser la recherche auto des chaînes se dérouler jusqu’à la fi n
a chaîne sélectionnée est bloquée par le paramètre.
L’appareil nécessite l’utilisation d’une antenne. Une antenne interne (VHF / UHF), une
antenne externe (VHF / UHF) ou un câble coaxial RF raccordé à votre décodeu
âble / satellite doit être branché(e) sur l’appareil
Parcours des Modes d’Entrée]p.16
Lors de l’utilisation d’un câble de Branchement Vidéo Composite, assurezvous que
es connecteurs Vert (Y), Bleu (Pb/Cb) et Rouge (Pr/Cr) sont branchés sur les prises
olorées correspondantes de l’appareil
L’a
anal d’entrée n° 30 est automatiquement remplacé par le canal n° 6.1
Il arrive fréquemment que les sous-titres accusent du retard de quelques secondes
par rapport au dialogue lors des diffusions en direct. La plupart des compagnies de
production de sous-titres peuvent affi cher les sous-titres des dialogues à une vitesse
maximale de 220 mots par minute. Si le débit du dialogue est plus rapide, le texte est
édité pour assurer que les sous-titres suivent le débit du dialogue sur l’écran du appareil
Il n’y a pas de fonction horloge sur ce appareil
érifi ez la connexion entre l’appareil principal et l’antenne ou le câble
érifi ez les piles de la télécommande
ssurez-vous que rien ne fait obstacle entre la fenêtre du capteur infrarouge et la
écommande
érifi ez que le signal est bien émis. Si c’est le cas, il est possible que le problème vienne
u capteur infrarouge
é
ification du Signal IR]p.3
roximité de ce appareil, il se peut qu’il interrompe le signal de la télécommande du
onnectez le câble coaxial RF directement à l’appareil et effectuez la confi guration
érifi ez que le balayage des chaînes est terminé avant d’éteindre l’appareil
ssurez-vous que
e l’appareil ou s’il est déplacé en un endroit où certaines chaînes auparavant non
isponibles sont diffusées
rogrammation auto]est interrompue avant la fi n, certaines chaînes ne sont pas
érifi ez si le mode d’entrée sélectionné est bien le bon en appuyant sur SOURCE sur
u sur en ut
érifi ez la connexion entre l’appareil principal et l’antenne ou le câble
e nombreuses chaînes numériques possèdent des numéros de chaînes optionnels.
areil remplace automatiquement les chiffres par ceux de la chaîne de télévision.
es chiffres de base étaient utilisés pour les précédentes diffusions analogiques. (ex. : le
Programmation Auto]a été effectuée.
sant
H +/−
p.19
p.19
errouillage]p.2
PRÉPARATION
REGARDER LA
TÉLÉVISION
CONFIGURATION
OPTIONNELLE
DÉPANNAGE
INFORMATION
Page 85

Guide de Dépannage
,
vérifiez le tableau suivant et toutes les connexions avant d’appeler pour une demande de réparation.
pp p p
A
.
t
t.
’
pas.
Appuy
t
.
q
.
.
.
.
.
i
A
.
.
.
.
.
r
V
.
’
r
i
l.
]
d
l.
.
0
’
.
g
.
]
d
l.
l.
p
di
.
l.
.
i l’appareil ne fonctionne pas correctement même si vous l’utilisez en suivant les instructions de ce manuel
Symptôme Solution
•
ssurez-vous que le cordon d’alimentation CA est branché
•Vérifi ez que la prise murale CA délivre la tension correcte ; branchez un autre appareil
as d’alimentation
a touche de commande ne
fonctionne
L’appareil est allumé mais aucune
mage n’est visible à l’écran
électrique dans la prise murale afi n de vous assurer que cette dernière fonctionne
correc
• En cas de panne de courant, débranchez le cordon d’alimentation pendant 1 minute
•
•Assurez-vous qu’aucun des boutons de la télécommande n’est coincé en position
•Vérifi ez la connexion de l’antenne ou du décodeur de diffusion par câble / satellite
•Vérifi ez que tous les câbles de l’appareil sont connectés aux prises de sortie correctes
•Vérifi ez que le mode d’entrée choisi correspond bien à la prise d’entrée utilisée
•Assurez-vous que votre ordinateur N’EST PAS en mode veille lorsque le mode d’entrée
•
•Assurez-vous que le bon mode d’entrée est sélectionné
•Vérifi ez que tous les câbles de l’appareil sont connectés aux prises de sortie correctes
• Regardez d’autres chaînes. Le problème peut être limité à la chaîne ou dû à la faible
emen
pour permettre á l
ez sur une seule touche à la fois. N’appuyez pas simultanément sur plusieurs
ouches. NE PAS appuyer sur plusieurs touches à la fois
enfoncée et
u dispositif externe tel qu’enregistreur BD / DVD
u appareil est défi ni sur PC. Appuyez sur n’importe quelle touche du clavier pour
réact
ver votre ordinateur.
ssurez-vous que l’appareil est allumé
u dispositif externe tel qu’enregistreur BD / DVD
appareil de se réinitialiser.
ue tous les boutons peuvent bouger librement
as d’image ou de son
as de couleu
es réglages des paramètres
mage] ou
appliqués à chaque fois que
appareil est allumé
on correct mais image médiocre
mage correcte mais son
mé
Son]ne sont pas
ocre
•
•Vérifi ez la connexion de l’antenne ou du décodeur de diffusion par câble / satellite
•Vérifi ez que le mode d’entrée choisi correspond bien à la prise d’entrée utilisée
•Assurez-vous que votre ordinateur N’EST PAS en mode veille lorsque le mode d’entrée
u appareil est défi ni sur PC. Appuyez sur n’importe quelle touche du clavier pou
réactiver votre ordinateur.
érifi ez que le son n’est pas réglé sur la sourdine. Appuyez sur
•
’écran la barre de volume et vérifi er le réglage
•Vérifi ez que le volume n’est pas réglé sur
volume au niveau désiré à l
• Regardez d’autres chaînes. Le problème peut être limité à la chaîne ou dû à la faible
ssance du signa
pu
•
églez
Couleur
• Vous devez sélectionner le paramètre [Maison] dans [Région].
Dans le cas contraire, les modifications que vous aurez apportées aux réglages ne seront
pas mémorisées lorsque vous éteindrez l
• Le brouilla
ualité de l’image
•
églez
•Regardez d’autres chaînes. Le problème peut être limité à la chaîne ou dû à la faible
uissance du signa
•
our une qualité d’image optimale, regardez les programmes
conçus
rogrammes de
•Regardez d’autres chaînes. Le problème peut être limité à la chaîne ou dû à la faible
uissance du signa
•Assurez-vous que le câble audio est branché correctement
e électrique causé par d’autres appareils près du téléviseur peut affecter la
Contraste] etLuminosité
our écrans larges. Si vous n’avez pas accès à des programmes HD, regardez des
défi nition standard »
aide des touches VOL +/−
ans le menu principa
0]ou
Sourdine]. Si c’est le cas, réglez le
appareil
ans le menu principa
pour affi cher à
p.3
haute définition »
2
Page 86

is
Symptôme Solution
d
l.
.
.
’
’
.
.
g
.
’
r
ixelli
.
V
l
.
.
.
V
’
.
ili
.
t
.
V
.
.
’
i
.
d
.
ies.
]
p
).
.
L’image est déformée ou vous
ez un son inhabitue
enten
Image fantôme, lignes ou bande
image
sur l
L’écran affi che du
ou des
parasites
rouillage
Marques de couleurs différentes
écran du téléviseu
sur l
ous changez de source d’entrée
e volume sonore change
et
ous changez de source d’entrée
et la taille de l
écran change
L’image affi chée ne couvre pas la
otalité de l’écran
Les sous-titres s’affi chent sous
forme de case blanche
Les sous-titres ne s’affi chent pas
il s’agit d’une émission
même s
trée
sous-t
ne case noire s’affi che sur
écran du téléviseur.
L’appareil reçoit peut-être des interférences causées par des appareils électriques, des
automobiles, des motocyclettes ou des éclairages fl uorescents
Déplacez l’appareil pour vérifi er si des interférences sont bien la cause du problème
Le brouillage électrique causé par d’autres appareils près du téléviseur peut affecter la
qualité de l
Regardez d’autres chaînes. Le problème peut être limité à la chaîne
Lorsque les capacités de l’appareil dépassent celles du signal numérique diffusé, le signal
est au
Regardez d’autres chaînes. Le problème peut être limité à la chaîne ou dû à une
p
L’appareil garde en mémoire le dernier réglage de volume
i le volume sonore de l’autre dispositif est réglé plus bas ou plus haut, le volume sonore
et appareil garde en mémoire le dernier mode d’affi chage utilisé lors de la dernière
ut
Si vous regardez la télévision ou si vous utilisez l’Entrée Vidéo Composite, S-Vidéo,
idéo Composantes ou HDMI avec une résolution de 480i, appuyez plusieurs fois sur
FORMAT pour faire défi ler les différents modes d’affi chage
Il se peut que le brouillage généré dans l’édifi ce ou que les conditions météorologiques
ren
Il se peut que le télédiffuseur réduise la longueur de l’émission pour insérer de la
ublicité. Le décodeur de sous-titres ne peut pas lire les informations des émissions ainsi
raccourc
Le mode texte est sélectionné pour les sous-titres. Sélectionnez
CC-4]ou
rança
image
menté pour s’adapter aux capacités de l’appareil, ce qui peut causer le brouillage
sation
sation de la source considérée
ent les sous-titres incomplets
Hf
CC-1]
CC-2]
CC-3]
INTRODUCTION
PRÉPARATION
REGARDER LA
TÉLÉVISION
CONFIGURATION
OPTIONNELLE
DÉPANNAGE
INFORMATION
Remarque
Le panneau à cristaux liquides (LCD) est fabriqué pour durer de longues années. Il peut arriver que quelques pixels non actifs s’affi chent en permanence sous
forme de
oints bleus, verts ou rouges. Cela ne doit pas être considéré comme un vice de fabrication de l’écran à cristaux liquides (LCD
ertaines fonctions ne sont pas disponibles dans certains modes, mais cela n’est pas un dysfonctionnement. Lisez les explications de ce manuel pour plus de
étails sur les opérations correctes
3
Page 87

INFORMATION
C
.
P
.
l
.
q
.
(télévision haute définition)
.
C
.
t
t
.
g
.
.
o
’
.
s
.
’
.
.
p
É
.
pp
.
s
A
t
t
l
Glossaire
ATS
Il s’agit d’un acronyme pour
évolués
, et du nom donné aux normes de diffusion numérique
ode NI
Il s’agit d’un numéro à 4 chiffres qui donne accès aux fonctions de
supervision parentale
olby Digita
Il s’agit du système développé par Dolby Laboratories pour la
compression du son numérique. Il permet d’obtenir un son stéréo (2
canaux) ou l’audio multicanal
High-definition Multimedia Interface)
Interface
audio / vidéo numériques non com-primés, y compris ceux d’un
Il s’agit du format numérique ultime, qui produit une image à haute
résolution et une qualité d’image supérieure
ui prend en charge, sur un seul câble, tous les formats
écodeur , d’un lecteur BD / DVD et d’un téléviseur numérique
NTS
Il s’agit d’un acronyme pour
national et du nom donné aux normes actuelles de diffusion
analogique. Les signaux NTSC hertziens ne sont plus utilisés par la
plupart des grandes chaînes aux USA
apport de Forma
La largeur de l’écran du téléviseur par rapport à sa hauteur. Les
éléviseurs classiques ont un rappor t de format 4:3 (autrement dit,
’écran du téléviseur est presque carré), contre un rapport de format
6:9 pour les modèles à écran large (l’écran du téléviseur est presque
eux fois plus large que haut)
SAP
canal audio secondaire)
it du canal audio secondaire diffusé séparément du canal audio
Il s’a
rincipal. Ce canal audio sert de canal optionnel dans les diffusions
ngues
SDTV
télévision à définition standard)
Il s’agit d’un format numérique standard dont la qualité équivaut à celle
’une image NTSC
S-Vidé
ffre une qualité d’image supérieure en transmettant chaque signal, la
couleur (c) et la luminance (y) indépendamment l’une de l’autre par le
un câble unique
biais d
Vidéo à Composante
Il s’agit d’un format de signal vidéo où chacune des 3 couleurs
primaires (le rouge, le bleu et le vert) est transportée sur une ligne
e signaux différente. Cela permet aux téléspectateurs d’obtenir une
mage aux couleurs très fidèles à l’original. Il existe plusieurs formats de
signaux, dont Y / Pb / Pr et Y / Cb / Cr.
omité de systèmes de télévision
Comité du système de télévision
Entretien
Nettoyage du Boîtier
Essuyez le panneau avant et les autres surfaces extérieures
e l’appareil avec un chiffon doux trempé dans l’eau tiède
et essoré
utilisez jamais un solvant ou de l’alcool. Ne pulvérisez
pas d
insecticide près de l’appareil. De tels produits
chimiques peuvent endommager et décolorer les surfaces
exposées
Nettoyage du Panneau
Essuyez le panneau de l’unité avec un chiffon doux. Avant de
ettoyer le panneau, débranchez le cordon d’alimentation CA
Réparation
i votre appareil ne fonctionne plus, n’essayez pas de le
ré
arer vous-même. Aucune pièce intérieure n’est réparable
par l’utilisateur.
’alimentation CA et appelez le numéro gratuit d’assistance à
a clientèle que vous trouverez sur la couverture de ce manuel
our localiser un centre de service autorisé
Vérification du Signal IR
i la télécommande ne fonctionne pas correctement, vous
ouvez utiliser un appareil photo numérique (ou un téléphone
mobile doté d’une fonction a
ignal infrarouge qu’il envoie est bien reçu par l’appareil
teignez l’appareil, débranchez le cordon
areil photo) pour voir si le
Avec un appareil photo numérique
y compris les appareils photos intégrés dan
un téléphone portable) :
Dirigez l’
ppareil Photo Numérique vers
a diode infrarouge située à l’avant de la
élécommande. Appuyez sur n’importe quelle
ouche de la télécommande et regardez
’écran de l’appareil photo. Si la lumière
clignotante infrarouge apparaît, ceci signifi e
que
a télécommande envoie bien un signal
nfrarouge.
Page 88

is
Spécifi cations Générales
d
VHF
3
.
VHF
3
9
2~13, A~W,
,
A
,
Bal
s
o
2
’
.
iorité.
s
VHF
V
o
G
/
s
s
3
Y
)
)
700 mV p-p (75Ω)
1
x
s
t
A
)
s
)
)
4,3
)
ds
lb
lb
p
s
s
4,5
ds
lb
lb
rança
INTRODUCTION
Autres Spécifi cations
Format de télévision ATSC / NTSC-M TV standar
Sous-titres système §15.122 / FCC
15.119 / FCC
(sous-titres numériques)
(sous-titres analogiques)
ouverture des chaînes (ATSC / NTSC)
Télévision Numérique Terrestre (ATSC)
2~1
14~51 chaque chaîne comporte ex.)
2.1~2.9, 3.1~3.9, etc
Télévision Analogique Terrestre (NTSC)
2~1
14~6
W+1~W+94 (analogiqueW+1~W+84)
A-5~A-1, 5
Système de syntonisation
Syntonisation par synthétiseur de
fréquence de chaîne
Accès aux chaînes Clavier d’accès direct
ayage programmable,
et touches de haut / ba
Spécifi cations Électriques
Sortie audi
10W, 8 Ω x
orne
Entrée d’Antenne
Entrée Audi
Entrée Vidéo Composite
Entrée S-VidéoMiniprise DIN à 4 broches x Y 1 V p-p (75 Ω)
Entrée Vidéo àomposante
Entrée HDMI
Sortie Audio
Sortie Audiorise RCA(G/D)
/
/
rise RCA (
rise RCA x
rise RCA x
rise HDMI à 19 broches x
umérique Coaxiale
rise RCA x
AT
D) x
5 Ω asymétrique (type F)
500mV rm
V p-p (75 Ω)
286 mV p-p (75 Ω)
1V p-p (75 Ω
b/Cb 700 mV p-p (75Ω
/
500 mV p-p (75 Ω)
500 mV rm
Télécommande
ystème de lumière infrarouge codée numériquement
Température de fonctionnemen
41 °F (5 °C) à 104 °F (40 °C)
limentation
LCD
20V~ CA/− 10%, 60
ur
2MF330B
2 pouces31,5 puces en diagonale
/− 0,5
onsommation (maximale)
45 W
imension
oi
argeur
0,0
auteur20,5
8,96
ans base>
ouces760,0 mm)0,0
ouces519,3 mm)22,0
ouces107,0 mm) 9,4
(8,60 kg) 20,07
avec base>
ouces760,0 mm
ouces563,0 mm
ouces238,0mm
(9,10 kg)
PRÉPARATION
REGARDER LA
TÉLÉVISION
CONFIGURATION
OPTIONNELLE
DÉPANNAGE
Le design et les spécifi cations sont sujets à modifi cation sans
préavis et n
En cas de différence entre les langues, la langue anglaise a
pr
impliquent aucune obligation légale de notre part
ur
LCD
26
6MF330B
ouce
INFORMATION
onsommation (maximale)
imension
oi
10 W
ans base>
argeur 25,9 pouces(656,0 mm) 25,9 pouces(656,0 mm)
auteur7,7 pouces(448,0 mm)
pouces(112,0 mm) 9,3 pouces(234,0mm)
14,89
(6,75 kg) 15,88
avec base>
9,2 pouces(487,0 mm)
(7,20 kg)
5
Page 89

6
Page 90

rança
is
GARANTIE LIMITÉE
QUATRE-VINGT-DIX (90) JOURS LA MAIN D’ŒUVRE / UN (1) AN SUR LES PIÉCES
COUVERTURE DE GARANTIE:
La provision pour la garantie se limite aux termes énumérés cidessous.
QUI EST COUVERT?
La compagnie garantit le produit au premier acheteur ou à la personne recevant le produit en cadeau contre tout défaut de matière
ou de main d’œuvre conformément à la date d’achat originale («
Période de garantie ») d’un distributeur agréé. Le reçu de vente
original indiquant le nom du produit ainsi que la date d’achat d’un
détaillant agréé est considéré comme une preuve d'achat.
QU'EST-CE QUI EST COUVERT?
La garantie couvre les nouveaux produits contre tout défaut de
matière ou de main d’œuvre et suivant la réception d’une réclamation valide dans les limites de la garantie. La compagnie s’engage, à
son choix, à (1) réparer le produit gratuitement avec des pièces de
rechange neuves ou remises à neuf, ou à (2) échanger le produit
pour un produit neuf ou ayant été fabriqué à partir de pièces
neuves ou usagées en bon état et au moins fonctionnellement
équivalent ou comparable au produit d’origine dans l’inventaire
actuel de Philips, ou à (3) rembourser le prix d’achat initial du produit.
La compagnie garantit les produits ou pièces de remplacement
prévus sous cette garantie contre tout
main d’œuvre à partir de la date de remplacement ou de réparation pour une période de quatre-vingt-dix (90) jours ou pour la
portion restante de la garantie du produit d’origine, la plus longue
de ces couvertures étant à retenir. Lorsqu’un produit ou une pièce
est échangée, tout article de rechange devient votre propriété et
l’article remplacé devient la propriété de la compagnie. Lorsqu’un
remboursement est effectué, votre produit devient la propriété de
la compagnie.
Remarque : tout produit vendu et idenifié comme étant
remis à neuf ou rénové porte une garantie limitée de qua-
tre-vingt-dix (90) jours.
Un produit de remplacement ne pourra être envoyé que si
toutes les exigences de la garantie ont été respectées.
Tout manquement de répondre à toutes les exigences
pourra entraîner un délai.
CE QUI N’EST PAS COUVERT - EXCLUSIONS ET LIMITATIONS:
Cette garantie limitée ne s’applique qu’aux nouveaux produits fab-
que de commerce, le nom commercial ou le logo qui y sont
apposés. Cette garantie limitée ne s’applique à aucun produit
matériel ou logiciel, même si celui-ci est incorporé au produit ou
vendu avec celui-ci. Les fabricants, fournisseurs ou éditeurs peuvent
fournir une garantie séparée pour leurs propres produits intégrés
au produit fourni.
La compagnie ne saurait être tenu responsable de tout dommage
ou perte de programmes, données ou autres informations mis en
mémoire dans tous médias contenus dans le produit, ou autre
additionnel produit ou pièce non couvert par cette garantie. La
récupération ou réinstallation des programmes, données ou autres
informations n’est pas couverte par cette garantie limitée.
Cette garantie ne s’applique pas (a) aux dommages causés par un
défaut de matière ou de
accident, un abus, un mauvais usage, une négligence, une mauvaise
application ou à un produit non fournis, (b) aux dommages causés
par un service réalisé par quiconque autre que la compagnie ou
qu’un centre de service agréé de la compagnie, (c) à un produit ou
un produit, accessoire ou produit non durable vendu « TEL QUEL
» sans garantie de quelque description que ce soit par l’inclusion de
produits remis vendu « TEL QUEL » par certains détaillants.
Cette garantie limitée ne couvre pas:
les frais d'expédition pour le renvoi du produit défectueux.
produit, le réglage des commandes sur le produit du client ainsi
que l'installation ou la réparation du système d'antenne/source
sonore externe au produit.
la réparation du produit et/ou le remplacement des pièces à
cause d'une mauvaise installation ou entretien, d'un raccordement à
une alimentation électrique incorrecte, d’une surtension temporaire, de dommages occasionnés par la foudre, d’une rémanence de
l’aspect esthétique du produit causé par une usure normale, d'une
réparation non autorisée ou de toute autre cause non contrôlable
par la compagnie.
tout dommage ou réclamation pour des produits non disponibles
à l’utilisation ou pour des données perdues ou logiciel perdu.
tout dommage causé par un mauvais acheminement du produit
ou par un accident encouru lors du renvoi du produit.
permettre l'utilisation dans tout pays autre que celui pour lequel il
était désigné, fabriqué, approuvé et/ou autorisé ou toute réparation
un produit perdu lors de l’expédition sans preuve signée de la
réception.
tout manquement d’exploiter le produit selon le manuel de l’util-
isateur.
POUR OBTENIR DE L’AIDE…
Communiquez avec le centre de service à la clientèle:
1-866-
LA RÉPARATION OU LE REMPLACEMENT CONFORMÉMENT
À CETTE GARANTIE CONSTITUE LE SEUL REMÈDE POUR LE
CONSOMMATEUR, AVEC LA COMPAGNIE ÉMETTRICE NON
RESPONSABLE N’EST AUCUNEMENT RESPONSABLE DE TOUT
DOMMAGE ACCESSOIRE OU INDIRECT RÉSULTANT DE LA
VIOLATION DE TOUTE GARANTIE EXPRESSE OU IMPLICITE
SUR CE PRODUIT. SAUF DANS LA MESURE INTERDITE PAR
LES LOIS APPLICABLES, TOUTE GARANTIE IMPLICITE DE
QUALITÉ LOYALE ET MARCHANDE OU D’UTILITÉ PARTICULIÈRE DU PRODUIT EST LIMITÉE DANS LE TEMPS À LA
DURÉE DE CETTE GARANTIE.
Certains états ne reconnaissent pas l'exclusion ou la limitation de la
responsabilité pour dommages indirects ou accessoires, ou
autorisent des limitations sur la durée d’une garantie implicite, il est
donc possible que les limitations ou exclusions mentionnées cidessus soient sans effet dans votre cas.
341-3738
INTRODUCTION
PRÉPARATION
REGARDER LA
TÉLÉVISION
CONFIGURATION
OPTIONNELLE
DÉPANNAGE
INFORMATION
mprimé en Chine
FUNAI CORPORATION, Inc. 19900 Van Ness Avenue, Torrance, CA 90501
Page 91

Owner’s manual
Manuel du propriétaire
Manual del propietario
32MF330B
26MF330B
LCD TV
English
1-866-341-3738
1-866-341-3738
Quick Use Guide Inside!
Guide d’usage Rapide Incluse!
Guía de Uso Rápido Incluida!
1-866-341-3738
Français
Español
MODEL NUMBER SERIAL NUMBER
Page 92

S
Devuelva su Tarjeta de registro de producto o regístrese en línea en
Al registrar su modelo con MAGNAVOX usted cumplirá con los requisitos para obtener todos los valiosos benefi cios que se
¡p
:
a
.
A
s
d.
ibi
.
a
!
:
ible h
todo lo q
.
ti
gid
y
t
l.
Tod
.
a
w
t
d
.
.
A
.
:
P
.
A
jusq
.
e
.
.
.
.
www.magnavox.com/support hoy mismo para aprovechar al máximo su compra.
para asegurarse de
Comprobante de Compr
Seguridad del producto
Notificación
a devolución de la tarjeta incluida
garantiza que se archive la fecha de
compra, de modo que no necesitará
más papeleo para obtener el servicio
e garantía
Felicitaciones por su compra y bienvenido
la “familia”
Estimado propietario de un producto
AGNAVOX
racias por su confi anza en MAGNAVOX. Usted ha
escogido uno de los productos mejor construidos y
on mejor respaldo dispon
ue esté a nuestro alcance por mantenerle
satisfecho con su compra durante muchos años
omo miembro de la “familia” MAGNAVOX, usted
ene derecho a estar prote
arantías más completas y redes de servicio más
sobresalientes de la industria. Lo que es más: su
ompra le garantiza que recibirá toda la información
ofertas especiales a las que tiene derecho, además
e un fácil acceso a los accesorios desde nuestra
ómoda red de compra desde el hogar.
Y lo que es más importante: usted puede confi ar en
nuestro irrestricto compromiso con su satisfacción
ota
o esto es nuestra manera de decirle bienvenido y
gracias por invertir en un producto MAGNAVOX
oy en día. Haremos
o con una de las
l registrar su producto, recibirá
a notifi cación (directamente del
fabricante) en el raro caso de un
retiro de productos o de defecto
en la segurida
Beneficios adicionales
egistrar su producto garantiza
que rec
a los cuales tiene derecho,
ncluyendo las ofertas especiales
para ahorrar dinero
onozca estos símbolos de segurida
Este “relámpago” indica material no aislado
entro de la unidad que puede causar una
escarga eléctrica. Para la seguridad de todos en
su hogar, por favor no retire la cubierta del
producto
El “signo de exclamación” llama la atención
hacia funciones sobre las que debería leer con
atención en la literatura adjunta para evitar
roblemas operativos y de mantenimiento
DVERTENCIA: Para reducir el riesgo de
ncendios o de descarga eléctrica, este aparato
no se debe exponer a la lluvia ni a la humedad, y
no se le deben colocar encima objetos llenos de
íquido como jarrones
PRECAUCIÓN
haga que la paleta ancha del enchufe coincida con la
ranura ancha e introdúzcala hasta el fondo
TTENTION: Pour éviter les choc électriques,
ntroduire la lame la plus large de la fi che dans
a borne correspondante de la prise et pousser
u’au fond
rá todos los privilegios
ara evitar descargas eléctricas,
Sólo para uso del client
.S.: Para aprovechar al máximo su compr
AGNAVOX, asegúrese de llenar y de
devolver inmediatamente su Tarjeta de
egistro del producto oregístrese en línea en
ww.magnavox.com/suppor
Visite nuestro sitio en el World Web www.magnavox.com/support
Escriba a continuación el Nº de serie, el cual se
ubica en la parte posterior del gabinete
uarde esta información para futura referencia
º de modelo
º de serie
2
E
Page 93

S
spaño
l
o
.
.
.
.
ili
.
.
.
.
t
.
.
.
ili
.
ili
.
l
:
;
;
;
.
y
bilidad del di
.
y
.
.
.
.
- Si conecta una
bid
.
.
.
d:
tal
d.
.
ili
.
)
)
O
)
A
É
O
A
A
INSTRUCCIONES SEGURIDAD IMPORTANTES
ea estas instrucciones antes de utilizar el equip
. Lea estas instrucciones
2. Guarde estas instrucciones
. Tenga en cuenta todas las advertencias
4. Siga todas las instrucciones
. No ut
ce este aparato cerca de lugares que contengan agua
6. Limpie la pantalla únicamente con un paño seco
. No obstruya las aberturas de ventilación
Realice la instalación según las instrucciones del fabricante
8. No coloque el aparato cerca de fuentes de calor, como por
ejemplo radiadores, hornillos u otros aparatos (incluidos
amplifi cadores) que produzcan calor.
9. No ignore el objetivo de seguridad del enchufe con toma de
ierra o polarizado. Un enchufe polarizado tiene dos clavijas, una
más ancha que la otra. Un enchufe con toma de tierra tiene
os clavijas y una tercera clavija de toma de tierra. La clavija
ancha o la tercera clavija se proporcionan por su seguridad.
i el enchufe suministrado no encaja en la toma de corriente,
onsulte con un electricista para cambiar la toma de corriente
soleta
0. Proteja el cable de corriente para que no se pise ni se pellizque,
especialmente en los enchufes, las tomas de corriente y el
punto donde salen del aparato
1. Utilice únicamente accesorios especifi cados por el fabricante
t
ce el aparato solamente con un carro, base, trípode,
soporte o mesa especifi cado por el fabricante o vendido
junto con el aparato. Si utiliza un carro, preste atención
uando lo desplace para evitar daños por caída
3. Desconecte el aparato durante las tormentas eléctricas o
uando no se ut
ce durante un período prolongado de tiempo
4. Remita todas las reparaciones al personal de servicio técnico
ualifi cado. Será necesario acudir al servicio técnico siempre
que se dañe de forma alguna el aparato, por ejemplo cuando
a fuente de alimentación o el enchufe estén dañados, cuando
se haya derramado líquido o se hayan caído objetos dentro de
aparato, cuando éste se haya expuesto a la lluvia o la humedad,
no funcione normalmente o se haya dejado caer.
5. Daños que requieren asistencia técnica- La unidad debe
ser reparada por personal técnico cualifi cado cuando
A. El cable de alimentación o el enchufe se haya dañado
B. Se hayan caído objetos o derramado líquidos dentro del
aparato
C. El aparato se haya expuesto a la lluvia;
D. El aparato no funcione con normalidad o muestre un claro
cambio en su rendimiento
E. El aparato se haya dejado caer o la carcasa haya sufrido algún
año
Nota para el instalador del sistema CATV : este recordatorio pretende llamar la atención del instalador del sistema CATV en relación
al Artículo 820-40 del Código Eléctrico Nacional (NEC) en el que se proporcionan instrucciones para realizar una conexión a tierra adecuada
y, en particular , especifi ca que el cable de tierra se debe conectar al sistema de tierra del edifi cio tan cerca del punto de entrada del cable
como sea posible.
Ejemplo de la conexión a tierra
según NEC (National Electric Code,
BRAZADERA DE TOMA DE TIERR
es decir, Código eléctrico nacional)
EQUIPO DE SERVICIO EL
CTRIC
6. Inclinación y estabilidad- Todos los televisores deben
umplir las normas de seguridad globales internacionales
recomendadas relacionadas con las propiedades de inclinación
esta
seño de su carcasa
• No ponga en peligro estas normas de diseño ejerciendo una
fuerza excesiva sobre la parte frontal o superior de la carcasa,
a que el producto podría volcarse
• Asimismo, no ponga en peligro su integridad física ni las de
os niños colocando juguetes o equipos electrónicos en la
parte superior de la carcasa. Tales elementos podrían caerse
e forma desprevenida de la parte superior de la unidad y
provocar daños personales y materiales al producto
7. Instalación en la pared o en el techo- El aparato
sólo se debe instalar en la pared o en el techo siguiendo las
recomendaciones el fabricante
8. Líneas de alta tensión - Las antenas exteriores se deben
olocar alejadas de las líneas de alta tensión
9.
antena exterior al receptor, asegúrese de que el sistema de la
misma tiene conexión a tierra para proporcionar protección
ontra su
as de tensión y cargas estáticas
La Sección 810 del Código Eléctrico Nacional (NEC), ANSI /
FPA Nº. 70-1984, proporciona información sobre las
siguientes cuestiones: conexión adecuada a toma de tierra de
postes y estructuras de soporte, conexión de toma de tierra
el cable de entrada a una unidad de descarga de antena,
tamaño de los conectores de toma de tierra, ubicación de la
unidad de descarga de antena, conexión a electrodos de toma
e tierra y requisitos para el electrodo de toma de tierra.
onsulte la fi gura siguiente
20. Inserción de objetos y líquidos - Extreme las precauciones
para que ningún objeto o líquido entre en la carcasa a través de
as aberturas
21. ATENCIÓN con el uso de las pilas - Evite fugas en las
pilas que puedan provocar daños físicos, materiales y a la
unida
• Instale las pilas correctamente, con la polaridad + y - alineada
y como se indica en la unida
• No mezcle las pilas (usadas y nuevas o de carbono y alcalinas,
tc.)
• Extraiga las pilas si no va a ut
zar la unidad durante un
prolongado período de tiempo
ABLE DE ENTRADA A LA ANTEN
NIDAD DE DESCARGA DE ANTENA (NEC, SECCIÓN 810-20
NIDAD DE DESCARGA DE LA ANTENA (NEC, SECCIÓN 810-20
ONEXIÓN A TIERRA DE CONDUCTORES (NEC, SECCIÓN 810-21)
ISTEMA DE ELECTRODOS DE CONEXIÓN A TIERRA DEL SERVICI
DE ALIMENTACIÓN (NEC, ARTÍCULO 250, SECCIÓN H
E
Page 94

4
S
A
DVERTENCIA DE LA FCC
igui
)
)
:
.
.
7
A
.
A
v
A
O
iclabl
ili
ll
.
pil
gl
.
.
É
O
d.
.
.
.
Este aparato puede generar o utilizar energía radioeléctrica. Los cambios o las modificaciones que se hagan en este aparato podrán causar
interferencias a menos que éstos sean aprobados expresamente en este manual. El usuario podrá perder la autorización que tiene para utilizar este
parato si hace algún cambio o modificación que no haya sido autorizado.
INTERFERENCIA DE RADIO Y TV
Este aparato ha sido probado y ha demostrado cumplir con los límites existentes para los dispositivos digitales de la Clase B, de conformidad con el
Apartado 15 de las Normas de la FCC. Este aparato genera, utiliza y puede radiar energía radioeléctrica, y, si no se instala y utiliza de acuerdo con las
instrucciones, puede causar interferencias perjudiciales en las comunicaciones por radio. Sin embargo, no existen garantías de que no se produzcan
interferencias en una instalación particular. Si este aparato causa interferencias perjudiciales en la recepción de la radio o la televisión, lo que se puede
eterminar apagando y luego encendiendo el aparato, al usuario se le recomienda intentar eliminar la interferencia tomando una, o más, de las medidas
entes:
s
1) Cambie la orientación y la ubicación de la antena de recepción.
Aumente la separación entre el aparato y el receptor.
2
3) Conecte el aparato en una toma de corriente o circuito que sean diferentes de aquellos a los que está conectado el receptor.
Consulte a su concesionario o técnico en radio / TV con experiencia para solicitar su ayuda.
4
DECLARACIÓN DE CONFORMIDAD
Nombre Comercial
arte Responsable:UNAI CORPORATION, Inc
odelo:2MF330B / 26MF330B Dirección:9900 Van Ness Avenue, Torrance, CA 90501 U.S.A
Número Telefónico:1-866-341-3738
Este aparato digital de clase B cumple con la norma canadiense ICES-003. Aparato receptor de televisión estándar, Canadá BETS-7 / NTMR-
VISO:
DVERTENCIA:
Desconecte la clavija de alimentación de la toma de corriente cuando busque un problema o no utilice el aparato. La clavija de la alimentación deberá estar siempre lista para ser conectada.
Este aparato no deberá colocarse en una instalación empotrada como, por ejemplo, una librería o estantería, a menos que disponga de una
entilación apropiada. Asegúrese de dejar un espacio libre de unos
DVERTENCIA:ara impedir lesiones, este aparato deberá fijarse firmemente al pared siguiendo las instrucciones.
i la pila se sustituye incorrectamente existe el riesgo de que se produzca una explosión. Sustitúyala siempre por otra de tipo equivalente
Las baterías y las pilas (la batería o la pila que está instalada) no deberán exponerse a un calor excesivo como, por ejemplo, el del sol, el de un incendio u otro similar.
2 pulgadas (8 cm) alrededor de este aparato.
Al igual que el resto de productos LCD, este equipo contiene una lámpara con mercurio; sírvase deshacerse de ella
cumplimiento todas las normas locales, autonómicas y estatales. Si desea información relativa a la eliminación o el reciclaje,
póngase en contacto con: www.mygreenelectronics.com o www.eiae.org
No coloque la unidad sobre un mueble que pueda volcar si algún niño o adulto lo inclina, empuja, se coloca encima o trepa
por él. La caída de la unidad puede provocar lesiones graves e incluso la muerte.
NOTA ACERCA DEL RECICLAD
os materiales de embalaje de esta unidad son
rec
es y pueden volver a ut
e
os según los reglamentos de reciclado locales
Las baterías y las
asura ni incinerarse, sino que se deberá disponer de ellas según los
re
amentos locales relacionados con la basura química
as nunca deberán tirarse a la
RANSPORTE DE ESTA UNIDAD
sta unidad deberá ser llevada por un
mínimo de 2 personas
zarse. Disponga de
Información sobre Marcas Registradas
HDMI, el logotipo HDMI y High-Defi nition Multimedia Interface
son marcas comerciales o marcas comerciales registradas de
HDMI Licensing LLC en los Estados Unidos y en otros países
• Asegúrese de sujetar fi rmemente los
bastidores superior e inferior de la unidad
como se muestra en la ilustración.
ARA EVITAR PELIGROS DE
DESCARGA EL
CTRICA O INCENDI
abricado bajo licencia de Dolby Laboratories. Dolby y el símbolo
e la doble D son marcas comerciales de Dolby Laboratories
• No maneje el cable de alimentación de CA con las manos mojadas.
• No tire del cable de alimentación CA cuando lo desconecte de una
toma de CA. Sujete la clavija y tire de ella.
• No meta sus dedos ni otros objetos en la unidad.
COLOCACIÓN Y MANEJO
•
No instale la unidad expuesta a la luz solar directa, cerca de campos
magnéticos o en lugares expuestos al polvo o a vibraciones fuertes.
• Evite colocar la unidad donde se produzcan cambios extremos de
temperatura.
• Instale la unidad en una posición horizontal y estable. No ponga
nada directamente encima o debajo de la unidad. Dependiendo
de los dispositivos externos, es posible que se produzcan ruidos y
alteraciones en la imagen y / o sonido si la unidad se coloca demasiado
cerca de ellos. En este caso, deje un buen espacio entre los dispositivos
externos y la unidad.
• Dependiendo del medio ambiente, la temperatura de esta unidad
puede aumentar un poco, pero esto no indica ningún fallo de
funcionamiento.
Desenchufe el cable de alimentación de CA de la toma de CA antes
e transportar la unida
• ENERGY STAR
Protección Ambiental de los Estados Unidos y del Departamento
de Energía de los Estados Unidos que nos ayuda a ahorrar dinero
y proteger el medioambiente mediante el uso de productos y
prácticas energéticamente efi cientes.
Nota al Consumidor:
Este televisor ha sido ajustado para maximizar la efi ciencia
energética y ofrecer la mejor imagen posible con los ajustes del
modo hogar confi gurado de fábrica
i modifi ca o activa otras funciones de este televisor (p.ej.,
retroiluminación más luminosa), es posible que aumente el
consumo energético por encima de los límites originales
• La Academia Americana de Pediatría desaconseja que niños
menores de dos años vean la televisión.
®
es un programa conjunto de la Agencia de
E
Page 95

l
S
INTRODUCCIÓN
4
A
A
T
Pil
4
4
T
7
7
9
9
Agreg
1
1
Aj
2
Aj
4
7
9
1
2
4
ili
.
DTV
s
ibl
plicad
.
i
.
s
.
P
.
o
.
o
.
a
:
.
o
a
.
do
A
.
)
HDMI
TV.
HDMI
lida DVI.
o
a
.
Tod
g
A
isi
hibida.
.
i
ilizad
did
bido d
hibid
y.
Contenido
Instrucciones de Seguridad Impor tantes
Información sobre Marcas Registradas
INTRODUCCIÓN
aracterísticas
ccesorios Suministrados
ímbolos Utilizados en este Manual
coplamiento de la Base
ijación de la Unidad al Soporte de TV 6
anel de Control
erminales 8
unción de Mando a Distancia
nstalación de las
PREPARACIÓN
onexión de Antena 10
onexión al Receptor de Cable o Caja de Satélite
onexión de Dispositivo Externo
olocación de los Cables 1
Enchufe el Cable Alimentador de CA 1
onfi guración Inicial 15
PARA VER LA TELEVISIÓN
emporizador de Apagado 16
ara Cambiar Entre Cada Modo de Entrada 16
Mode Congelado
elección de Canal 16
Modo de Visualización de Pantalla del Televisor 1
Funciones de Sonido 1
Información de Pantalla 18
Reducción del Brillo 18
pciones de Fun-Link
AJUSTE OPCIONAL
Menú Principal 1
intonización Automática 1
Lista de Canales 20
ar Canales 20
onfi rmación de la Antena 2
elección de Idioma 2
uste de Imagen 2
uste de Sonido
ubtítulo Cerrado 2
Bloqueo Infantil 2
Fun-Link 2
Modo de Ahorro de Energía 30
bicación 30
Información Actual del Software 30
SOLUCIÓN DE PROBLEMAS
reguntas Frecuentes 3
uía de Solución de Problemas 3
INFORMACIÓN
losario
antenimiento
Especifi caciones Generales
Especifi cación Eléctrica
tras Especifi caciones
arantía Limitada tapa trasera
as
spaño
Características
• DTV / TV / CATV
uede ut
anales emitidos en formato digital y en formato analógico
onvencional. Además, los suscriptores de cable pueden
acceder a sus canales de televisión por cable
• Visualización de Información (solamente ATSC)
actual programa
• Exploración Automática de Canale
anales dispon
• Bloqueo infantil
Esta función le permite bloquear el acceso de los niños a
programas
• Decodificador de Subtítulo
El decodificador de subtítulos incorporado muestra el texto
• Sintonizador MTS / SA
• Función de Apagado Automátic
0
• Temporizador de Apagad
Esta función apagará la corriente de la unidad
automáticamente en un momento concreto
•
pciones para Idioma de Pantall
Inglés, español o francés
• Función de Sonido Estére
• Sintonización de Frecuencia PLL Sintonizad
que le permite sintonizar directamente cualquier canal
mando a distancia
•
iversos ajustes de la imagen y el soni
onido que usted prefiera
• Fun-Link a través de Vínculo HDMI
Cable HDMI no Incluido
8
HDMI (como Magnavox DVD) se puedan controlar
mediante el cable
• Entrada
• Entrada de Vídeo en Componentes
• Entrada de S-Vide
• Entrada AV
• Salida de Audio Digital
• Salida de Audio Analógic
2010 Funai Electric Co., Ltd
os los derechos reservados. No se permite la reproducción total o parcial
e este manual, ni su copia, transmisión, difusión, transcripción, descarga o
almacenamiento en nin
con fi n alguno sin la autorización expresa y previa por escr ito de Funai.
demás, toda distribución comercial no autorizada de este manual o toda
rev
ón del mismo queda estrictamente pro
La información contenida en este documento puede ser objeto de cambios
n previo aviso. Funai se reserva el derecho de cambiar el contenido de este
ocumento sin la obligación de notifi car dichos cambios a ninguna persona
u organización
4
con el diseño es una marca comercial registrada de Funai Electric
o., Ltd. y no se puede utilizar en modo alguno sin la autorización expresa
por escr
to de Funai. Todas las restantes marcas comerciales ut
este documento siguen siendo propiedad exclusiva de sus respectivos
propietarios. Nada de lo contenido en este manual debe ser enten
omo concesión, implícita o de otro tipo, de cualquier licencia o derecho
e uso de cualquiera de las marcas comerciales en él visualizadas. El uso
nde
e cualquier marca comercial o de cualquier otro contenido de este
manual queda estrictamente pro
us derechos de propiedad intelectual dentro de los límites máximos
establecidos por la le
zar su mando a distancia para seleccionar
uede visualizar el título, el contenido y otra información del
en la pantalla del televisor.
sta unidad explora y memoriza automáticamente los
es en su zona, eliminando com
rocedimientos de configuración
napropiados
e la programas que contiene subtítulos
uede seleccionarse el audio desde el mando a distancia
i no hay señal de entrada y no se realiza ninguna operación
urante 15 minutos, la unidad se apagará automáticamente
eleccione el idioma que aparecerá en la pantalla
roporciona una selección de canales libre y fácil, al tiempo
tilizando los botones numéricos y de punto decimal " del
decua la calidad de la imagen a su entorno y selecciona el
un-Link permite que sus otros dispositivos con vínculo
conectado a su
uando utilice una Entrada HDMI1, puede utilizar esta
nidad a modo de monitor de PC siempre que su PC
sponga de un terminal de sa
ún soporte de almacenamiento, en forma alguna
o. Funai hará cumplir enérgicamente
os
as en
INTRODUCCIÓN
PREPARACIÓN
PARA VER LA TELEVISIÓN
AJUSTE OPCIONAL
SOLUCIÓN DE PROBLEMAS
INFORMACIÓN
o
E
Page 96

S
A
ili
.
y
.
), y, a continuación, desplace
hasta que se detenga
y
.
A
ill
Phillip
s
4
.
ill
Philli
illos,
i
.
A
idad
d.
A
d
d.
A
.
A
g
.
A
t
p
.
Accesorios Suministrado
s
o
N
9
)
o
1EMN
1EMN
1
)
a
)
o
N
9
)pilas
AAA
AAA
J
h
A
1
A
)
q
l
l.
l.
:
ATSC
Digital
NTSC
,
plicabl
.
anual del propietari
2583
(1EM
ando a distanci
804 UD
(AAA, 1,5V x 2)
i necesita cambiar estos accesorios, consulte el número
e pieza que aparece junto a las ilustraciones y llame a
nuestro teléfono de atención al cliente,
en
a portada de este manua
Nota
i pierde los tornillos, compre tornillos cabeza Phillips M4 20 en su tienda
abitua
Inicio Rápid
2MF330B:
26MF330B:
arjeta de registr
2469
1EM
uego de tornillos para
enganc
ar el soporte
2MF330B: 1ES
26MF330B: 1ES
ue encontrará
25840
2628
988
23705
coplamiento de la Base
ebe acoplar la base a la unidad para ut
e sobremesa. Asegúrese de que la parte delantera y trasera
e la base están colocadas en la dirección correcta
xtienda un paño grueso
suave encima de la mesa
omo se indica en la imagen.
oloque la unidad principal
oca abajo sobre el paño.
ompruebe que no daña
a pantalla. Para realizar este
paso se necesita al menos 2
personas
zarla como unidad
2 Inserte 2 ganchos en los
rifi cios de la base por debajo
e la parte inferior de la unidad
principal (cómo indica la fl echa
a unidad en la dirección de la
fl echa
los 4 orifi cios de montaje
queden alineados
segúrese de que el cable de
alimentación de CA no queda
atrapado entre la unidad y
ase
ntroduzca los torn
en lo
Para retire es sporte de esta unidad
esenrosque los torn
isplace la base en dirección opuesta tal como indica la fl echa
2 y, a cont
nidad. Tenga cuidado de no dejar caer el soporte cuando lo retire
Nota
l poner el soporte, compruebe que todos los tornillos están bien
apretados. Si el montaje no está bien puesto, podría hacer que se caiga la
un
segúrese de utilizar una mesa que pueda soportar el peso de la unidad y
que sea más gran
segúrese de que la mesa se encuentra en posición estable
l acoplar la base, asegúrese de que la palabra FRONT
está hacia arriba. Si no está hacia arriba, los 2
rifi cios roscados
e la parte inferior de la base
asta que queden apretados
nuación, tire de la base hacia arriba y hacia la parte trasera de la
con el resultado de heridas así como daños a la unida
e que la unida
os
os
a
s
ps del paso
. Una vez extraídos los torn
en el paso
marcada en la base
anchos no encajan en la base
Símbolos Utilizados en este Manual
sta es la descripción de los símbolos utilizados en este
manual. La descripción se refi ere a
: Funcionamiento de TV
: Funcionamiento del TV Analógico / por Cable
i no aparece ninguno de los símbolos bajo el
encabezamiento de función
a
e a ambos
E
el funcionamiento es
Fijación de la Unidad al Soporte de TV
tornille esta unidad fuertemente al mueble utilizando tornillos
para madera (no suministrados) en los 2 orifi cios de la parte
rasera de la base como se indica en la imagen.
Dimensiones recomendadas de los tornillos : 5,1 x 20 mm
Nota
uando vaya a retirar esta unidad, no olvide desenroscar los tornillos para
madera del So
orte de Madera, Mueble u otro elemento de madera
Page 97

l
S
Panel de Control
5
P
)
(
)
.
4
7
P
(
)
(
)
l.
s
.
.
.
spaño
INTRODUCCIÓN
2MF330B
-
VOLUME
+
42 13
26MF330B
MENU
-
CHANNEL
OWER
2
HANNEL +/
resione para seleccionar canales o desplazarse arriba
/ abajo
por los elementos del menú principal
VOLUME +/
p. 1
p. 16
p. 19
p. 1
PREPARACIÓN
resione para ajustar el volumen o para moverse a
erecha
principa
/ izquierda
por los elementos del menú
PARA VER LA TELEVISIÓN
Ventana del sensor de infrarrojo
5
6
7
+
POWER
Recibe los rayos infrarrojos transmitidos desde el mando
a distancia
Indicador de POWER ON
Se ilumina de color verde cuando está encendido
Indicador de STAND BY
Se ilumina de color rojo cuando está apagado
AJUSTE OPCIONAL
SOLUCIÓN DE PROBLEMAS
INFORMACIÓN
7
6
5
STAND BY
-
VOLUME
+
MENU
-
CHANNEL
POWER ON
+
24
POWER
13
E
Page 98

S
Terminales
B
B
1
o
4
4
A
1
4
.
1
)
0
4
.
.
1
ili
.
.
del
i
.
2MF330
8
9
*
17
18
26MF330
8 Toma de Entrada de S-Video / Vídeo
ompuesto / Audio (I/D) para VIDEO
p. 12, 13
➠
9 Toma de Entrada HDMI 2
p. 10, 1
anel Traser
10
11
12
0
able de alimentación de CA
olocación de Los cables
➠
Toma de Entrada de Vídeo en Componentes y
udio (I/D)
➠
3 Toma de Salida de Audio (I/D)
p. 1
p. 1
p. 10, 11, 12
p. 13
4 Toma de Entrada de Audio (I/D) para HDMI
13
14
15
16
Conexión para cable audio de dispositivo DVI
uando conecte un PC con terminal DVI, utilice un cable
e conversión miniplug estéreo. (Solamente para la toma
e entrada HDMI
5 Toma de Salida de Audio Digital
6 Toma de Entrada de Antena
7 Toma de Entrada HDMI 1
*
9
onexión HDMI para dispositivos HDMI o DVI
uando conecte un PC con terminal DVI, podrá utilizar
esta unidad como monitor del PC
8 Toma de Entrada HDMI 3
p. 12, 1
p. 13
➠
p. 1
➠
p. 10, 11, 12, 1
p. 10, 1
8
11
10
16
18
17
12
15
13
14
Nota para servicio terminal
servicio del terminal (uso de servicio slo)
t
ce esta terminal sólo cuando sea necesaria una actualización de
softwate
usuario no debe conectar ningún dispositivo al servicio del terminal, tales
como: cámara digital, teclado, mouse, etc. (porque éstos no funcionarán)
La actualización de software es gestionada en la mayoría de los casos por
una persona
ocasiones se pedirá al usuario que realice la actualización de software por
smo
sí m
servicio técnico autorizado, si bien en en determinadas
8
E
Page 99

l
S
Función de Mando a Distancia
V
p
l
.
.
(
) no están disponibles, salvo que esté
.
ibl
HDMI.
A
imi
.
.
.
pil
.
5
7
.
5
5
V
7
.
7
ibl
ppp
p
lidad
k.
D
.
B
.
G
.
F
.
C
pp
.
7
illo.
l.
HDMI.
laridad indicad
il
.
AAAAAAAAA
AAA
AAAAAA
1
2
3
4
5
6
7
8
9
A la hora de utilizar un mando a distancia universal para esta
unidad.
erifi que que está seleccionada nuestra marca en el código del
onente del mando a distancia universal. Consulte más detalles en el
com
suministrado con el mando a distancia
manua
o garantizamos la interoperabilidad al 100% con todos los mandos a
stancia universales
10
11
12
13
14
15
16
17
18
19
20
spaño
(power)
SAP ➠p. 1
SOURCE
resione para congelar la imagen en pantalla
K
▲/▼/
/►
cursor)
B ACK
resione para volver a la operación de menú anterior.
8
OL +/−
9 PREV CH
resione para volver al canal que se estaba viendo antes
0 SLEEP
FORMAT
resione para seleccionar las relaciones de aspecto
spon
es para la pantalla del televisor.
RED / GREEN / BLUE / YELLOW
unciona
3
útil para Fun-Lin
INFO
5
E / FWD
resione para buscar hacia atrás o hacia adelante en el
sco
resione para comenzar la reproducción del disco
KIP H / SKIP
resione para saltar adelante o atrás en capítulos, títulos
pistas
AUSE
resione para interrumpir la reproducción de un disco
TOP
resione para detener la reproducción del disco
6
7
H +/−
8 ECO
resione para reducir el br
9
umber buttons
(punto)
resione para cambiar el subcanal del canal principa
20 FUN-LINK OPTIONS
resione para invocar varios menús del dispositivo Fun-
nk conectado a través del cable
➠
➠
➠
➠
➠
➠
p. 1
p. 16
p. 16
p. 1
p. 1
p. 18
p. 1
p. 16
p. 16
p. 1
p. 29
p. 19
. 1 8
p. 29
p. 29
p. 29
p. 29
p. 29
p. 1
p. 16
p. 18
p. 16
p. 18, 29
INTRODUCCIÓN
PREPARACIÓN
PARA VER LA TELEVISIÓN
AJUSTE OPCIONAL
SOLUCIÓN DE PROBLEMAS
INFORMACIÓN
Nota
Los botones con fondo gris
conectado a dispositivos compatibles con la función Fun-Link
o garantizamos la interoperabilidad al 100 % con otras marcas de
spositivos compat
Precauciones sobre las Pilas:
segúrese de seguir la polaridad correcta según lo indicado en el
compart
pilas recargables como de ni-cad, y ni-mh, etc) o pilas viejas con pilas nuevas
ento de las pilas. Unas pilas en posición invertida pueden causar
años en el dispositivo
o mezclar diferentes tipos de pilas (p.ej. pilas alcalinas y carbono-zinc, o
i el dispositivo no se va a usar durante un período prolongado de tiempo,
uite las pilas para evitar daños o lesiones por posibles fugas de las pilas
o intente recargar las
es con vínculo
as; ya que podrían sobrecalentarse y romperse
Instalación de las Pilas
Instale las pilas (AAA, 1,5V x 2) de manera que coincida la
po
p
as del mando a distancia
a en el interior del compartimiento de las
9
E
Page 100

S
PREPARACIÓN
A
n
A
.
d.
d
RF
RF
i
ibl
5
.
.
tienda d
.
ial RF de l
d.
tambi
DTV. L
.
.
ili
HDMI
HDMI de l
lida d
.
j
o
RF
HDMI
o
d
(ro (rojo / azul / verde)
y cable de audio
y cable de audio
En estas conexiones no se utiliza ninguno de los cables suministrados:
Deberá adquirir los cables necesarios en su establecimiento local. El
cable de alta velocidad HDMI cable (también conocido como HDMI
cable de categoría 2) se recomienda para una mejor compatibilidad.
ntes de proceder a la conexió
segúrese de que la antena u otros dispositivos están bien
onectados antes de enchufar el cable de alimentación de CA
Conexión de Antena
onecte el cable coaxial RF de su toma de corriente a la toma
e entrada de antena de esta unida
p. ej.)
2MF330B
Conexión al Receptor de Cable o
Caja de Satélite
t
ce un cable
onectar las tomas de Entrada de Vídeo por Componentes
de
omponentes o de HDMI del receptor de cable / satélite
i conecta a las tomas de Entrada de Vídeo Compuesto
e la unidad, conecte los cables de audio a las tomas de
Entrada de Audio I/D situadas
omponentes.
p. ej.)
2MF330B
plato de
atélite
o
o de vídeo por componentes para
a unidad a las tomas de sa
unto al conector de Vídeo por
cable coaxial
ANT IN
e vídeo por
eceptor de cable /
caja de satélite
STEREO
PCM
VHF / UHF
nalógico o
ntena
señal de televisión
por cable
26MF330B
parte trasera de la unida
o
cable coaxial
cable coaxial
na vez completadas las conexiones, encienda la unidad e
nicie la confi guración inicial. La exploración de canales es
necesar
a para que la unidad memorice todos los canales
spon
es en su zona.[Configuración Inicial] p. 1
Nota
i tiene alguna duda acerca de la antena del DTV, visite la página www
antennaweb.org para obtener más información
Dependiendo de su sistema de antena, podrá necesitar diferentes tipos
e combinadores (mezcladoras) o separadores (divisores). Contacte a su
e electrónica local para estas piezas
ara su seguridad y para evitar daños en esta unidad, desenchufe el cable
coax
i utiliza una antena para recibir televisión analógica, ésta debería funcionar
efi caces que las de versiones de sobremesa
ara cambiar fácilmente su fuente de recepción entre antena y cable, instale
n selector de antena
i no recibe señal de su servicio de cable, póngase en contacto con el
proveedor de Cable.
a toma de entrada de antena antes de mover la unida
én para recepción de
as antenas de exterior tejado serán más
señal de televisión
por cable incluyendo la
televisión de pag
cable
o
o
HDMI OUT
trasera de la unida
o
parte lateral
AUDIO OUT
COMPONENT VIDEO OUT
RL
Pr/CrPb/CbY
E
 Loading...