

Page 1

Directions for Use
3121 235 21132
Page 2

Once your PHILIPS purchase is registered, you're eligible to receive all the privileges
of owning a PHILIPS product. So complete and return the Warranty Registration
Card enclosed with your purchase at once. And take advantage of these important benefits.
Congratulations on your purchase,
and welcome to the "family!"
Dear PHILIPS product owner:
Thank you for your cm_dence in PHILIPS.You've selected one of the best-built, best-backed products available
today. And we'll do everything in our power to keep you I_ppy with your purchase for many years to come.
As a member of the PHILIPS"family," you're entitled to protection by one of the most comprehensive war-
ranties and outstanding service networks in the industry.
What's more, your purchase guarantees you'll receive allthe information and special offers for which you quali=
fy, plus easyaccessto accessories from our convenient home shopping network.
And most importantly you can count on our uncompromising commitment to your total satisfaction.
All of this is our way of sayingwelcome-and thanks for investing in a PHILIPSproduct.
Sincerely,
Lawrence J. Blanford
President and Chief Executive Officer
PHILIPS
P.S. Remember, to get the most from your
PHILIPS product, you must return your
Warranty Registration Card within I0
days.So please mail it to us right now!
Know these
safetysymbols
_k ,This "bole of lightning" indicates uninsulated material within your uniCmay cause an elec-
Criealshock. For the safetY/of everyone in your household, please do noCremove product cov-
e"The "to_clarnadon point' calls attention co features for which you should read the
enclosed I(teraturo closely co prevent operating and ma(ntenance problems.
WARNING: "TO PREVENT FIREOR SHOCK HAZARD, DO NOT EXPOSE,THIS EQUIP-
MENT TO PAIN OR MOISTURE.
CAU7ON: "Toprevent electric shock,match wide blade of plug cow_deslot_and fully insert=
A'--EN'-ION: Pour 6viter leachocs _lectriques, introduire la lame la pluslargede lafiche dans
la borne correspondante de la prrsec_ pousser jusqu'aufond.
2
Page 3

IMPORTANT SAFETY INSTRUCTIONS
Read before operating equipment
1. Read these insmtctiuns.
2. Kanp these instructions.
3. Hc_xl all warnings.
4. Follow all instructions.
5. Do not use this apparatus near watur.
6. Clean only with a dry cleft1.
7. Do not block any of"the vantilation openings. Install in accordance
with the ManUfanturc*s instructions.
8. Do not ingall near any heat souraas sunh as radiators, heat regis-
tc_, stoves, or other apparatus (including amplificra) that produc_
heat.
9. IX_ not defeat the safety purpose, of the polarized or grounding-
type plug. A pal arir_d plug has two blades with one wider than
the othur. A grounding type plug has two blades and third ground-
ing prong. The wide blade or third prong am grovided for your
s_fety. When the providexl plug deas not fit into your outlet, tun-
suit an electrician for replaceMant of the obsolete outlet.
10, Protnct the power cord fraM being walkcxl on or pinchad particu-
larly at plugs, cunveniance rc_:_p_clas, and the point whom the)"
exit froM tim apparatus.
11. On.so arcachMantsiaccassuries specificxl by file manufacturer.
12, _ Use only with a cart, stand, tripod, bracket, or table
_ specified by the ManUfanturar, or sold with file app-
,_._ aratus. When a.cart......is uscxl, use caution when MOVing
the cartgapparatus combmatlon to avoid mjury froM tip-over.
13, Unplug*his apparatus during lightning storms or when unu_xl for
long pariods of"time,
14, Refer all servicingtoqualificxlscevicepe_unnel. Sca_,icingis
rcquirad when the apparatus has been damagcxl in any way, such
as pewar-supply cord or plug is damagcxl, liquid has been Sl_illcxl
or objects have fallen into apparatus, the apparatus has been
expe_xl to rain or Moisture, does not operate normally, or has
been dropped.
15, q-his groduct May contain lead and mercury. Disposal of"these
matarials May be ret,ntlatcxl due to anvironmental c*_nsideratiuns.
For disposal or racycling informatiun, please contant your local
authuritias or the Elec_unic Industrias Alliance: www.eian.org
lg, IIlmmge Requlri_g Servlee - The applianc_ should be serviocxl
by qualificxl _r_fic_ parsotmc] when:
A, "[he pewar supply cord or the pfag has be_ damagcxl; or
B. Objects have fallen, or liquid has beta spilled into tim appli-
atlce; or
C, The appliance has be_n expo_xl to rain; or
II, The appliance deas not appear to operate normally or
c_libits a marked change in pcrforrnanc_; or
I_. The appliance has be,an dropped, or tim cnclosura damagcxl.
1% "Hit"Stability - All telcMsions must comply wifll rc_:xmunended
international global s_fety standards for the and stability propartias
of its cabinet design.
• Do not C*_MgrOMiSethese design standards by applying exces-
sive pull forc_ to the front, or top, of"the cabinet which could ulti-
mately overturn the groduct.
• Also, do not endanger yourselL or childran, by placing olc_:,t'ran-
ic cquipMantiloys on the top of the cabinet. Such itnMs could
unsuspectingly fall from the top of the set and cause groduct dam-
age and/or personal injury.
18, Wall or Ce'lling Motmling - The appliance shouid be mounted to
a wall or ceiling only as rc_:xmunended by the Manufacturcx.
19, Power Linas - An outdour antutma should be locatcxl away from
power lines.
20, Outtloor Amenna Groundlng - If an outside antenna is connect-
CAtO the reCC/lVar,be sure the antetma system is grounded so as to
grovide some Irrotuction againg voltage surges and built up static
charges.
Sc*:,tiun810 of the National Electric Code, ANSIiNFPA No. 70-
1984, grovides infunmatiun with respe_:,tto proper grounding of
the Mast and supporting stractam, grounding of the lead-in wira to
an antutma discharge lmit, sirz of grounding connc*:,tors, location
of antenna-discharge unit, cx_nnection to grounding elec_odes, and
raquirements for the grounding elec_ode. San Figttra below.
21, Ollject arid Liquid Enlry - Care shouid be taken so that objects
do not fall and liquids ara not S!glllcxlinto the enclosure through
openings.
22, BatEery Usage CAU FtON - To prcxent battery leakage that may
result in bodily injury, property damage, or damage to the unit:
• lilgall all batt_as correctly, with -_and - aligned as Marked on
the lmit.
• Do not mix battcNas (old and new or carbon and alkaline, etc.).
• ReMove battarias when the unit is not or_d for a long time.
Note to the CATV system insr.aJle_ This reminder is provided to call the CATV s)_tem installer'sattention to Article 820-40 o_ the NEC
that provides guidelines _or proper grounding and, in particular, specifies that the cable ground shall be connected to the grounding system oi the
bui ding, as c ose to the point o_ cabe entry as pracCica.
Example of Antenna Grounding
as per NEC - National Electric Code
GRUUDDULANP ANTEDNALEADIN WIRE
3
Page 4

SAFETYINSTRUCTIONS- Readbeforeoperatingequipment
Safety Precautions
Warning: To preve_lt tim or shty& h_zmJ, do not ex'tx_ tilis e_leSp-
Tt_e__ rain or rnoistttTe.
Federal Communications Commission (FCC) Wat_'mg: Any
unauthc_lzed changes or modifications to ttfis equipment wild the
user's autilority m operate it.
Laser Safety
T_fis urfit emp]oys a laser. Orfly a qu_flified service person should
remove the cover or attempt k_ service, ti6s device, due tx_lx)sdlble
eye htjary.
CAUTION: USE OF CONTROLS OR ADJUSTMENTS OR
PERFORMANCE OF
PROCEDURES OTHER THAN THOSE SPECIFIED HEREIN
MAY RESULT 1N
HAZARDOUS RADIATION EXPOSURE.
CAUTION: _TSIBLE AND IN_TSIBLE LASER RADIATION
WHEN OPEN AND INTERLOCK DEFEATED. DO NOT
STARE INTO BEAM. THE BEAM IS LOCATED INSIDE,
NEAR THE DECK MECHANISM.
Special Information for Canadian Users
This digital apparatus does not exceed fire Class B ]irtfits for
radio noise errfissiona fram digital apparatus as set out in fire
Radio Interference Regulations of the Canadian Dept_tment of
Cornmunicatkms.
Radlo?l%' Interference
This eqaipnlent [_ been t_s_ed *rodfimnd _x_ccm_ply with the limits
for a Class B digital device, per_aJant to P*_ 15 of tire FCC Rttle&
These lit nits are designed m Irrovide reasonable im_tec'tion against
htuanfttl intertimence in a m_idential installation. This ezluipment gezter-
t_.s, u_s, attd can r*_vle radio fiXXleenW er_a'gy and. if m_t inst*dled
and met in ,axx_rdance with the instructions, may c*_tse ht_nfal inter-
f_ rK_, _) r[atio O.glCt[nllili **_lI_iolls, However, tlr_ is no glJ/_',iitt_ that
tnteffexer_cewi]l not oc,cxtrin a particaflariltstal]tOon,ff tiffsexluipment
dees c*_se ht_nfal inteaff'exer_cem _tio or television reeeption, which
can be deternlk_d by tLmTingthe e_gtipnle_tt offand on, the user is
erra_tteagedto try to cxmec¢tile in_ztce by one or mcrreof tile fol-
lowing llleasureN:
1) RerMent or rek_te the receiving anteaanL
2) Increase the separation between the exluipment and the
receiver.
3) C*mneet fire equitm_ent into tat outlet on a circuit different
fi_ml that m wldch the r_deiv_r is Collnec_.!.
4) Ctmsult the dealer or *to experieeced radioilW teehnician for
help.
W.MINING
To reduce the rink of tire or electric shock, de not exp<xse tifia appli-
tlnce R) _di_tor _tK)ia_re.
CAUTION
Use of conmfls or adjustments or peffonnanee of pmcedores other
titan berein may resttit ht ht_ardous radiation exposure.
The set complies with tire FCC-Rules, Part 15 and with 21 CFR
l1_-0.10.
Copyright Protection
Urmuth(nized copying, br_.mdeasting,public tx_'(mltance and lending
of Di_ *u'eprahibited.
T_fisproduct incorporates copyright wotection technology fltat is
protected by methc,d claims of cerm'm U.S. patents and otlrer httel-
lec_N property fights owned by Maca_wision Corporation and
other rights owners.
Use,of this _x_pyfightprotection technok_gy must be ,_tit(aizM by
Mac_wision Corpt_ion and is inteztded for home atd ofi_erlimited
viewing _ orflyun]ess otlwerwiseauth(rrized by Mac_viakm
Coqxmation. Reverse. eitgilteering or di_bly ia prohibited.
DecOration of Conformi;y
Trade, Name: Pldlips
ReslX_'lble Party: Phflips Cortautwer Electronics N(_h Arwerica
P.O. Box 14810
Knoxvtile, TN 37914-1810
(865) 521--4316
LASER PRODUCT
CLASS _
LASER SAFETY
Tiffsrefit e_ploys a ]a_. Dae to pessible
eye kljtn3r, only a qtlalified sen'vice person
should re,trove rite cover or atte_r_pfto serv-
ice this de:vice.
USE OF CONTROLS OR ADJUST-
MENTS OR PERFORMANCE OF
PROCEDURES OTHER THAN
THOSE SPECIFIED HEREIN MAY"
RESULT IN HAZARDOUS RADIA-
TION EXPOSURE,
LASER
Type InGalpiA]GaAs
Wave lezlg_l 650 r_l (DVD)
790 m_ (VCDfl2D)
Output Power 7 roW (DVD)
7 mW (VCD/CD)
Be_ar_divergenco 28-o(DVD)
32-"(VCD/CD)
__ The region code fur
this set is ALl, or 1,
DVDs *trustbe labeled
for ALL regions or for Region 1 in order
to plW on fltis TV/DVD PIwer. You call
not p]ay Discs flint are ]abe]ed for other
regions. Look for file sNnbe]s abeve on
your DVDs. It"fllese region sNnbe]s do
not appear on your DVDs, you ctm not
p]ay the DVD in rids TViDVD Player.
NOTE: PICTURES SHOWN MAYBE
DIFFERENT BETWEEN COUNTRIES.
NEVER MAKE OR CHANGE CON-
NECTIONS WITH THE POWER
SWITCHED ON.
CAUTION
VISIBLE AND INVISIBLE LASER
RADIATION WHEN OPEN AVOID
EXPOSURE TO BEAM (WARNING
LOCATION: INSIDE ON LASER COV-
ERSHIELD OR THE BACKPLATE OF
SET)
This woduct incorlx_rates copyright Womc-
tion technology that is Fmtected by me,thod
chfims of oe:rtain U.S. patents _md oflte¢
intel]ectttal prape:rty fights owned by
Macrovision C_r-lxmfflon and other fights
owners. Use of this copyright protection
teclmolog2# rottst be autherized by
Macrovision C*wpomfion, _ald is intended
for ho*rm altd other ]i,tilted viewing uses
only tmless ofllerwise autheri_zd by
Macmvision C_rporafion. Rmrerse engi-
neering or dis_sserobly is p_lfibited.
4
Page 5
Introduction
• . .., , - . r
Welcome!Registration of Yottr _ ...................... 2
S_ety 51structions ................................ 3-4
Table of Contents ................................... 5
Features .......................................... 6
Disc Types trod Disc Cletming ........................ 6
_ Install Menu
How to use the La_lg,_tageCk_ntrol............... 7
How to use the Tlmer Mode (kmm_l ................... 8
How to Automatically Program ('htuntels ................ 9
How to Add or Delete C_annels ...................... 10
_ Picture Menu
_icture Adjustn,ent O.,nm, ls ...... 11
_ Sound Menu
How to Use the Sound Adjustment Controls ...... 12
_Features Menu ,
How to Use the Rotafum Control ..................... ]4
Using file Format Ckmtrol ........................... ]5
Uederstanding file AumlmckT_Z Controls ............... 16
How to Block Chmnlels ............................. 18
How to Clear All Blocked Channels at file Sane Time .... 19
How to Block All Channels at file Same Time .........
Blocking Programming Based on Movie Ratings .......
Blocking Progralmning Based on TV Ratings .........
Oilier Autolmck TM Blocking Options ................
How to Use the Active (kmtrol .....................
_ Remote Control Use
How to use the Closed Captioning Conrail .............. 26
Using file QuadraSurf TM Butt_ns (Alternate Channel)...29-30
How use s................. 13
Setting up the AutoLock TM Access 12k_de................ 17
..20
• .21
•.22
.23
.24
Setting file Sleeptimer ConSul ................ 25
Setting the Sma_Picture TM Conm_] .................... 27
Setting the SmartSound TM (kmm_] .................... 28
_ Ooerating the DVD Player
Operating fire DVD Player - Basic Operation ...... 31
DVD Remote Conrail Button Descriptions .............. 32
Menu Bar Operation ................................ 33
Setup Menu
La_lgttage (Default AtMio, Default Sub4itle) ............ 34
TV (TVSystem) .................................. 35
Audio Menu (Digital Output) ....................... 36
Features (PBC -Play Back Control) ................... 37
Access (Parental Level, Change PIN, Disc Lock) ........ 38
Preference Menu
Sound (Night Mode) .............................. 39
Features (Help Line, Stat_s Window) ................. 40
Tt×flbar
Play Option (Disc Navigation, Audio, Sub4itle) ......... 41
Slide Show (Pic Time, Tram" Time, Trans Effect) ........ 42
View (Angle, Zoom, Chapter Review, Rotate) ........... 43
Search (Time, Fast, Slow, Frame by Fr_e) ............ 44
Progn_n (Program, Tracks, Play List, Clear All) ........ 45
Remo_ (kmm_l Feattves
Audio Button .................................... 46
Sub-title Bu_m .................................. 47
Repeat Button .................................... 48
Repeat A-B Button ................................ 48
Bookmark DVD ................................... 49
Audio 12'2)Playbtv& ................................ 50
General Information
Troubleshooting Tips ......................... 5l
Cleaning and Care ................................. 51
Glossary of Terms ................................. 52
Index ............................................ 53
Factory Service Location ......................... 54-55
Wammty ......................................... 56
5
Page 6

Adive ControV Mcontinuously measures arul corrects all
klconlklg signals to help provide the best picture quality, This
t'eature menitors _id correets both the shiffpness control arul
noise rextuctien contrail,
Audio/Vide*) Jack Pand aJlows direx'_ connex'_ons with acees-
so_' devices, providing quali D, TV picatre arid seulld playback.
Audio Volume Leveler (AVL) Control keeps the TV setmd at
ari even level. Peaks arid valleys in volmne tbet occar during
prograra chariges or connne_i_ breaks are reduced, making tbr
a more censistent, c(_lq_(_table seu_d,
AutoL_.rkTM allows you to bkxJk tim viewing of eertaki chari-
nels or programs with eertaki ratings ff you do not warityeur
children to view inapIm_pdate matedMs.
Auto Pr_grarmning _aris (when *_vated) tbr all awfilable
c_amels _ma regular argenna or cable si,g'atls arid st_*resonly
active bmadeast stzaJonsin the TV's merrlo_',
AutoPieture TM allews you to charige the picatre _ttings (coloL
tint, contrast, etc.) tbr vadeus types of lmWar*mahig, such as
sp_nts, movies, nmltkrledia (garrles),or weak sigglMswith tim
push of one button.
AutoSotmd TM allows you to sel_t them three fhc_tny-_t con-
trols arid a personal control flra you _t according to your oval
preferences thmuNithe en-_rean Sound menu. The three thc-
to_,-set cenmfls 0ioiee, Music, arid Theatre) enable you to t_-
lot the TV _und so as to enhara'e tim particular pmgnmamkig
you are watching.
Channel Fxlit allews you to add or delete charmels _ma the
fist st_*redk1the TV's memory. Oamnel Edit makes it easy to
limit or exparid the ntnnber of charmels flintare awdlable to you
when you press the Charmel (+) or (-) burros on your remote
contml,
Closed Captioning allows the viewer to rea_! TV grograra dia-
logce or voice cenversafiens as on-scxeen text,
Contrast + helps you sharpen the picatre quality by maldng
derk porfiens of the picatre &trker arid light porfiens brighter.
Infrared Remote Control controls yeur TV mid the built in
DVD pktyer.
On-screan Menu shows helpfal messages arid kistntctkms tbr
settthg TV fea_tre controls (cmi be viewed in English, French,
or Sparfi_0.
Sleep Timer automatically turns tim TV OFF aRer a set amount
of time ttwt you ciua)_,
Standard Broadcast (VIiD_HF) or Cable TV (CATV)
enamel capabili_, allews Nr viewing _, aritemar or cable.
Stereo capability, including a built-k1 audie arnpfifier arid twin-
speaker system, allews tbr tim receNkm of TV gmgrarns bmM-
east in stereo sotmd.
Surf Button 'allows you to eesily switch arnong only the chan-
nels tha rye of interest to yeu (the enes _ag[ you have pro-
grar*mred into the TV's Sun" ceatrol thmuNi the ea-_men
rrle*iu),
Timer tfllows you to set your TV to turn itself ON arid OFF
once or &tily like ari alarm clock,
IIVD Player pktys D¥ D di_s, ¥_deo CDs, Audio CDs, Photo
CDs, etc. Creatte Favorite Track Prograras arid store them in file
TViD_TI Players memory.
r . n N "
Playable Disc Types
This DVD Player will play Digital Video Discs (DVDs), Audio
CDs, CD-Rs and CD-RW discs. In order to play a DVD or Audio
CD on this DVD Player, make sam the Disc meets rite require-
ments for fire Regkm Code its described on page 4.
Tbe Discs should contain the loges shown below and meet rite
stmtdards listed for each.
DI*¢ DI*¢
T_e Logo Concent* Segment*
Digit_ I gaued
VTdeo and
CD n_r_m
¢°
Disc
[_is_ Size Playback TI me
12cm (_iv#e_id_:)
12¢m
_aued
SO011d Viceo CDs
Patv_
Pi_r_ 8 cm
8 ¢1_
_jld di_'iced rL_ T_;I_
ned
(_ing[_ I 20 mil_
and 12cn_ 74 I_ie_tl_
Some problems oocttr because the disc inside the player is dirty. To
avoid fltese problems clean your discs regularly, in the following
way:
• When a disc becomes dirt),, clean it with a C2) cleaning cloth.
Wipe the disc from the center out.
Caution: Do not use solvents such as benzine, thinner, eommer-
claily available cleaners, or anti-statle spray intended for analog
discs,
Your new television and its packing con'rainmaterials that can be
recycled arid reused. Specialized comparfies can recycle your pr_x!-
uct to increase fire amount of reusable matefitfls and minimize the
amounts that *teed to be gmperly disposed.
Your product 'also uses batteries that should *totbe thrown away
when depleted, but should be handed in and disposed of as smtdl
chemical wttste.
Wben you replace your existing equipment, please find out abeut the
local regulations regarding disposal of your old television, batteries,
and packing materials.
Auto Loc_, Auto l_clm'_._,Auto Sound, Actlv¢ Conll'ot, QuadraSu_f
all registered l_ema_k_ of P_ps Consttmer F_ecttt_c_ CompaW.
Ha_rnurn
DVD_ are
App"J_. _ _our_
(dr. bl_sid_d_
(do. blt_idefl_
74 miens
20 rain _'$
Copyright © 9J&Y2 All fights _serv_d.
divilt_d into Ttl_,
whirl" a"_ d vi_d
_d into r. ml_
6
Page 7

F_Ir our Spanish speaking TV owners an on-
creen LANGUAGE option ispresent,,, With
the LANGUAGE control you can set the TI_s
on-screen menu to be stu_wn in either English,
Spanish or French,
Press the MENU buttott on the
I
reirlo_ to show the on-screen ltleltu.
Press the CURSOR UP or DOWN
2
buttons to scroll fltmugh the olt-screee
menu tutti] the word INSTALL is
hJg[flighted.
[
Press the CURSOR RIGHT button
to display the INSTALL meeu features.
LANGUAGE wi]l be, hig[flighted.
%0 0 ®
0000
Press the CURSOR RIGHT butloit
repeatedly to select ENGLISH,
ESPAli_OL (Spanish), or FRANCIAS
(Frerlch).
Wheit fiitished, press rite SYSTEMMENU (OSD) button to remove the
lilerlu from the 'I_r's scre,eit.
O@
iiiiiiiiiiiiiiiiiiiiiiiiiiiiiiiiiii@i iiiiiiiiiiiiiiiiiiiiiiiiiiiiiiiiiii
The Lmtguage colttml oldy makes the TNr's
on-screen MENU items appear in Eltgfish
or SpaltJsh _xL
It does not change the other on-screen text
features such as Closed Captiolt (CC) TV
shows.
o Siritor_ia
o AJJtePrograma
o FJ:ilarC,aml
v
OR
7
Page 8

Tche TUNER MODE control allows you to
hange the 77,,s signal input to either
ANTENNA, CABLE or AUTO mode. It's
important fbr the 77I to know what type Of
signal to look fbr. (From a Cable TV signal or
a narmal Antenna signal,) In the AUTO
nu_de, when the Affl'O PROGRAM feature is"
activated, the TV will automatically choose
the correct mode.
':8;;;;;;;;;;;;;;;;_g-_ _ _*m
T_r_
MOI_...
Press the MENU buttott on the
I
remo_ to show the on-screen ltleltu.
Press the CURSOR UP or DOWN
2
buttons to sc_)ll fltraugh the olt-screelt
menu until the word INSTALL is
hJgtflighted.
Press the CURSOR RIGHT button
3
to display the INSTALL melm t?a-
_wes.
Press CURSOR UP or DO$_'q but-
4
tons to sc_)ll file Install features tmdl
the words TUNER MODE is high-
lighted.
Press the CURSOR RIGHT buttoit
to select either ANTENNA, CABLE,
or AUTO mode.
Whett fittished, press fl)e SYSTEM
MENU (OSD) button to remove the
on-screeit menu froTtl file TV's screen.
oo°,o_ \
0000
®@®®
®@@
®@@
@®®
@@6
N
!
- ]
[ Ir_'Iall • ]
o Lart_age English
o AI;!O Program
o Gl_anr_lErJt
OR
o L,_l_lage Enqlish
ot_1oFr_gr_r_
o C_r_@l EeJl
[
OR
iiiiiiiiiiiiiiiiiiiiiiiiiiiiiiiiiii@i iiiiiiiiiiiiiiiiiiiiiiiiiiiiiiiiiii
When CABLE is selec_d, channels 1-125
areavailable.
When ANTENNA is selected, channels 2-
69 are available.
When AUTO ls selected, the T%z will auto-
maticaUy set itself to fire correct mode
based oil tile type of signal it detects when
the AUTO PROGRAM feature is activated.
8
o Lai_g_k_le Enqlish
[ ,7 I-unor"_':_e _ N
o ,_Io Pr_ram
o C_i_nel EeJl
[ •
Page 9
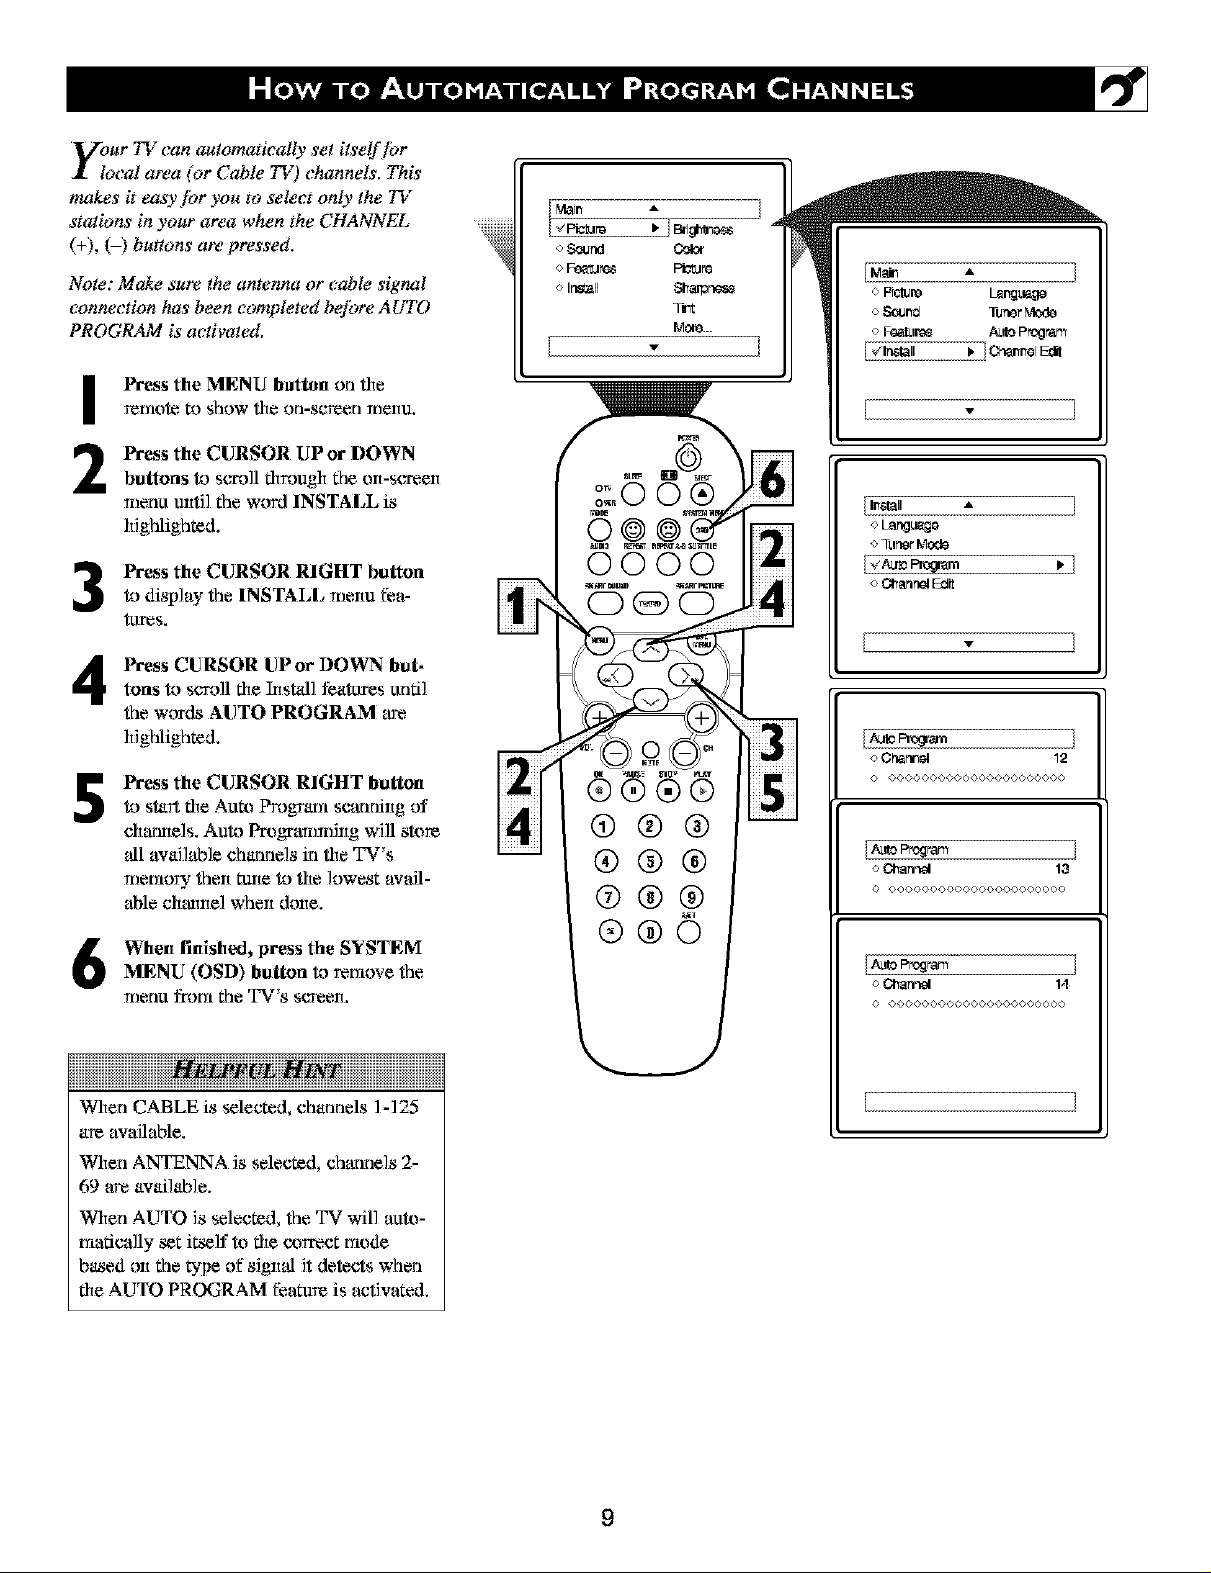
Four TV can automaticall), set itself lbr
J[ local area (or Cable I-1,) channels. This
makes it eas3' lbr you to select only the TV
stations in your area when the CHANNEL
(+), (-) buttons are pressed.
Note: Make sure the antenna or cable signal
connection has been completed bejbre AUTO
PROGRAM is activated.
Press the MENU button on the
remote, to show the on-screen ltleltu.
I
Press the CURSOR UP or DOWN
2
buttons to scax_]lfllmugh the orl-sc_eerl
menu until the word INSTALL is
ldgtflighted.
Press the CURSOR RIGHT button
3
to display the INSTALL menu t?a-
_ures.
Press CURSOR UP or DOWN but-
4
tons to scroll file Install features trod]
the words AUTO PROGRAM are
hJg_mghted.
Press the CURSOR RIGHT button
5
to start fire Aut_ Pragram scanning of
chamtels. Auto Progxammhtg will store
tdl available channels in fire T_;'s
lIlelnOl_i thell _lile to file lowest avail-
able chmnte] when done.
_ra _as_
]
S
o F_r&lre_ Plo_re
o Irls_ll Shallsrtes_
Tin1:
MOIS...
0
o ISr_l_ L_flt_
o _r_d il_r
o F_a_ara_ &_) Pregram
o La_kege
o _r_r Mode
o Cl_aaaelEdR
o Great.el 12
© 0000000000000@00000000
A
v
v
@@@
®®®
@®@
[A_to Program
o Ohanr_ 13
0 o000<,00000000000000000
®®©
When finished, press rite SYSTEMMENU (OSD) button to remove the
lilenu from the T_;'S _creeit.
iiiiiiiiiiiiiiiiiiiiiiiiiiiiiiiiiiiiiiiiiiiiiiiiiiiiiiiiiiiiiiiiiiiiii
When CABLE is selected, channels l- 125
areavailable.
When ANTENNA is selected, channels 2-
69 are available.
When AUTO is selected, the T_; will auto-
maticaUy set itself to file correct mode
based on the type of signtd it detects when
fire AUTO PROGRAM t?ature is activated.
9
o _an_el 14
0 0©000000©0000000000000
[
Page 10

Channel Edit makes it easyfi_r you to ADD
or DELETE channels fiz_m the list of
channels stored in the TV's menu_ty.
Press the MENU button on the
I
relno_ to s_rlow the on-screen TtleltU.
Press the CURSOR UP or DOWN
2
buttons to sc_fll fltrough the on-screen
menu until the word INSTALI, is
higtflighted.
Press the CURSOR RIGHT button
to display the INSTALL menu fea-
t_wes.
Ilrl
Press the CURSOR UP or DOWNbuttons to sca_fllfile Install features
until ritewords CHANNEL EDIT are
higkflighted.
Press the CURSOR RIGHT button
to display the CHANNEL EDIT
optkms.
With the CHANNEL EDIT options
6
displayed, and CHANNEL NO. high-
llgh_d; enter file channel number (wiflt
the NUMBERED or the CH + or -
buttons) you wish to add (Skipped
OFF), or delete (Skipped ON) fram the
_V'_S li:leli:lory.
Using the CURSOR DOWN button,scroll rite menu to high]ight rite word
SKIPPED.
Now use the CURSOR RIGHT but-
8
ton to toggle between ON or OFF,
If ON is selected rite chmnte] ls
skipped when scrolling channels with
the CY-I+ or - buttons. If OFF is
selected the channel ls not skipped
when scrolling channels with file CH +
or - buttons,
_nor _ S_
o AutoPregram
E •
_ Chan_l N_. _2 •
ICl_an_l ErJ_
[_s_moa oe •
When finished, press file SYSTEM
MENU (OSD) button to _emove rite
Ttlen_sfraln the T%r'S s*._reelt.
10
Page 11

To adjust your T_"p_ctum controls, select a
I channel and/bllow the steps shown below:
Press the MENU button on fire remote
I
k_ display the on-scaeen menu.
Press the CURSOR UP or DOWN
buttons tutfil rite word PICTURE is
2
highlighted.
Press the CURSOR RIGHT button t_)
display the PICTURE menu fe,amres.
Press CURSOR UP or DOWN but-
tons _.__l] the Pic_tre features and
high]ight fire conrail yott wish to ad'yast
(Bright_tess, O._]€._r,Pic_ttre, Sharpness,
Tint, Color Temp., DNR, or Contrast +).
Press the CURSOR RIGHT or theCURSOR LEFT buttons m adjust fire
_lecte, d ¢xmtrol or to make _le_ions
tbr the choselt conO'o].
Press the CURSOR UP or DOWNbuttons m select and adjust other
Pic'tttm _,_ntt ¢xmtrols.
$_len finished, press file SYSTEMMENU (OSD) button m remove rite
ltleltU frr.)ltl the TV's sc'reelt.
o _Dr_ N¢TJre
[
Di iLnos
Pi lure
Di 9 iLncss
Colo_
4 ,===,_e==== ,_0 •
Pic .u
Bli 9 ihlcss
CI
PcLHI
BRIGHTNESS: Press the Cursor Right or
Left buttons tut_il darkest parts of fire pic'ttt_
are, as bright as you paperer.
_: Press the Cursor Right or Left
buttons _) add or eliminate e_flor,
P_: Pr¢_ the Cursor Right or I,eR
buttons mtfil ]igh_st parts of file pickle
show g_gx!detail.
SHARPNESS: Press the Cursor Right or
Left buttons _) improve detail in fire pic_mre.
TINT: Press the Cursor Right or Lea _.t-
tons R_obtain natttml skin tones.
COLOR TFA|P: Press the Cursor Right
or Left buttons m sele_ NOR3,LA_L,COOL,
or WARM pic_tre pre_erenoes. (NORMAL
will keep the whites, white,; COOL will make
firewhites, bluish; mtd WARM wi]l make the
whites, reddish.)
DNR: Press the Cursor Right or Left but-
tons m 0ant DNR ON or OFF. D3atamic
Noise Reduction helps k_eliminate '!noise"
ti_rn the picture,.
CONTRAST +: Press the Cursor Right or
LeR bl_ttons m rant C_)nm_st+ ON or OFF.
When ON, fltisc_mtm] will optirniT_ the pic-
ture contrast for improved picture clarity.
Pic .u
Bli 9 ihlcss
CI
PcLHI
Pic0 I
B igl Inss
Coot
Pictu o
_1 tl pllpSs
Ti it
Pictu o
BrighLr css
(_]Ol
Pic .u
%h_lp iss
Tin
i _DNR Or_
Pith c
Briqhb s
(_lol
Pic die
Till
11
Page 12

Besides the noratal vohane level control,
your TV also has Treble, Bass, Balance,
AVL (automatic volume leveler), Incr.
Surround, Ultra Bass, SAP, and Sound
(Stemo/Mono) controls.
Press the MENU button on file remote
to display fl_e on-screen melm,
I
Press the CURSOR UP or CURSOR
DOWN button tmtil the word SOUND
2
is _figldighted.
Press the CURSOR RIGHT button
to display the SOUND menu features.
3
Press the CURSOR UP or CURSOR
DOWN butLon to sc_fl] the Somtd
4
menu featares until fire control you ,Msh
k_chmtge is hJg_flighted (Treble_ Baas_
Balance_ AVL_Incr. SurT_und_ Ultra
Bass, SAP, or Sound ).
S Press the CURSOR RIGHT orLEFT button to tam the adjust or mm
the control On or Off'.
MENU (OSD) button to remove fire
When finished, press rite SYSTEM
Ttlenu from the T_r's s_r_,elt.
iiiiiiiiiiiiiiiiiiiiiiiiiiiiiiiiiii i_iiiiiiiiiiiiiiiiiiiiiiiiiiiiiiiiii
TRF_LE: Press the Cut,jr Right or l.dt
buttons to az_justthe control. The control will
eI_umcethe hi#i t?equen%w_t_ds.
_: Press the Cursor Right or 1.eftbut-
tons to _ljust the control. The control will
e_umce the low t_quenc3r _tmds,
_: Press the Cursor Right or Left
buttons to 'adjustthe level or"_tmd coming
ti_nnthe left _d ri_It speakers.
AVL: (Auk_VoltmaeLeveler) Press the
Cursor Right or l.dt buttons to tufa the con-
trol On t_rOff._rhen Ori, AWLwill level out the
seinedbe'rag hea_ when gaddea changes in vol-
_rle oc¢_trduring c_mmercdal bre_Nsor ch_mnel
ch_mges.
INCR. SURROUND: Press the Cursor Right
or Left buttons to _lexrt between lncx,
Sure,mid or Stereo ,settings{IfS_), or _l_t
SI_aialor Mone (It Meno),
I;LTRA BASS: Press the Cursor Right or
1.eft buttons ta turn Ultra BassOn _*rOff. Ultra
Bass will enhance the lew tiequent3r semid.
SAP: Pre_ the Cursor Right of 1.eft buttons
to turnSAP (Secen&_y Audio Program)Oa or
Off_If the charmel ttmed is aot broedcasth_ga
SAP si_ral, '5get Available" will appear as the
option when OrI is _le4_cl.
_: Press the Cursor Right or 1.eftbut-
tons to sel_ between Stereo _r Mono _ttings.
Note: _" S_ is not [Jre_llt OIIa selecteAshow
and the TV is placed kIthe Stereo m_e, the
seinedc_m_kIgthn_ _ie 'IW will remain in the
Meno mode,
+
oAVL
o U'0a_
o_
12
Page 13

_TIe Timer controls allow you to use your
as an alarm clock if set to turn itself
on and off at a specific time. It also can be set
to tune to a specific channel at a specific
time.
Press the MENU button on theremote to display file on-screen menu.
o S¢_nd Color
O F_Jd ri_ P_L¢0.1_
o IrkSl_cJl
Press the CURSOR DOWN buttonuntil fire word FEATURES is high-
lighted.
Press the CURSOR RIGHT button R_display fire FEAT(IRES menu options.
TIMER will be highlighted.
to shift the menu to fire left and enter
Press the CURSOR RIGHT button
the TD,IER control options.
Press the CURSOR UP or DOWNbutton to select *aidhighlight one of
the TD,IER Controls. Choose from
TIME, START TIME, STOP TIME,
CHANNEL, ACTIVATE, or DISPLAY.
RIGHT button to start the control
Press the CURSOR LEFT or
adjustnlents. Use the buttons described
in the defildtions below m finish the
adjustment.
"l?IMl{: Enter the c,urrcnt tirnc with the
nlunbere_l buttons. Use the Cursor Right
blttton to move to the AMiPM area and ltsc
Nc Cursor Le_ or Right buttons to toggle
__¢I ur PM,
StARt rIME: Use the nurnbc-rc_l buttons
to cater a start-ltp time for the TV to turn
on or to ttmc a spcg-tfic channel.
StOP "I3MI{: Use the nmnbcrcd buttons to
cater a time for the TV to shut ik,_',_ off.
CHANNEL: Use the Cursor Lctl or Right
buttons to select a specific channel AV
Input, or DVD for the TV to ttmc to at thc
spe£ific Start Time. If a DVD is playing,
the control can be, set to Bookmark DVD,
If"Bookmark DVD is scaantcd the playback
of the DVD in the spot it was Ix_okmarkc_l
will resume when the TV powers Jk,_,_on.
Please rofur to the Bookmark DVD section
of this manual fur morc derailed kistrac-
tions (please refer to page 49).
AC'I?IVA rE: Set thc Timc'r to groform i*'s
func_on ONCE or DAILY.
I)[SPLAY: Set to ON or 01313,When ON,
the time will be, displaycxl ALL the time the
TV i_ ON. When OFF, the fimc will only
appear whan the SYSTEM MENU (OSD)
button is grcsscd.
When finished, press the SYSTEM
7
MENU (OSD) button to remove fire
Ttlenu from the T_r's screeli.
[ - 1
oTr_e
o Agt-.,_l_
Z
o_x_qqme
9 Channel N¢
oD_
13
A
O_T_
Channelr_
[ - 1
-- o $_riTin3e
[¢CYa_I NO , 10
o Oi_pia_
[
r
[lirr_r
o_rn_
o $_riTin3e
o $_ Tr_e
o Ch_nnenqo
o _m_,_die
o_
w
Page 14
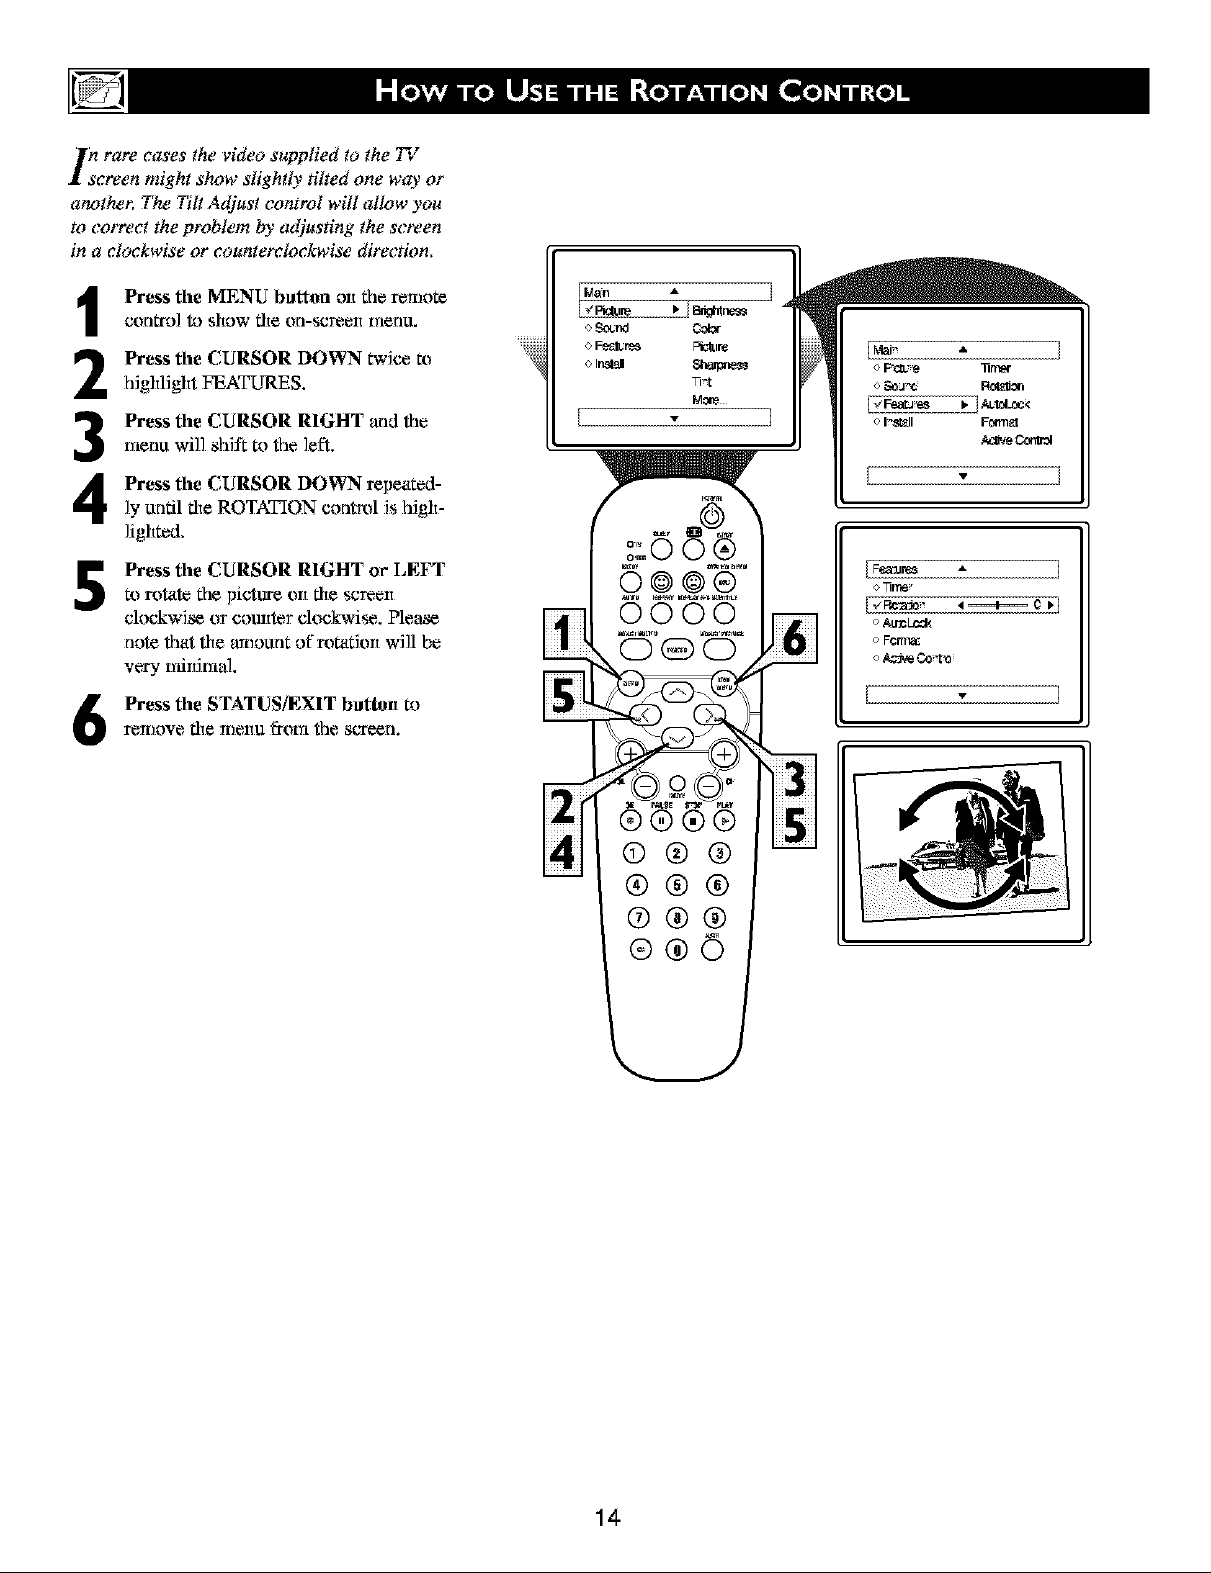
in rare cases the video supplied to the TV
screen might show slightly tilted one way or
atu_thet; The Tilt Adjust control will allow you
to correct the problem by adjusting the screen
in a clockwise or counterclockwise direction,
Press file MENU button olt the remote
i
contm] to show fire on-screelt menu.
Press file CURSOR DOWN twice m
2
highlight FEATURES.
Press file CURSOR RIGHT and the
menu wi]] shift to the ]eft.
3
Press file CURSOR DO$_rN repeated-
4
]y aodl fire ROTATION control is high-
]igh_d.
Press the CURSOR RIGHT or LEFT
5
m rota_ the picture olt fire screelt
clockwise or comt_r clockwise. Pletrve
note that file aItlollrlt of rotafiolt will be
very rrfildrnN.
Press file STATUS/EXIT buttott toVe,TtlOVefile TlleIlU tToIn the SCTeAgn.
o $¢_nd Co1¢€
o Fs_fJ.:r_ Fr_lm
o In._l 8lerOne_
14
Page 15

M;nY times while watching movies from a
_'D player the intage is shown in
"letter box" ]brmat. This"is the ]brmat that is
shown in movie theaters', When shown on a TV
screen, the image will have areas of black on
top and bottom of the screen. The FORMAT
Cbntrol can help to display the image as close
as possible to its"original aspect ratio,
Press the MENU button on rite
I
remote to display the on-scween menu.
Press the CURSOR DOWN button
2
until fire word FEATURES is high-
lighted.
Press the CURSOR RIGHT button mdisp]ay rite FEATURES menu options
(Timer, Aut_Lc_ck, F(_naL or Active
Ccmmfl).
Press the CURSOR DOWN button
4
tutti]rite word FORMAT is tfigtflighted.
Press the CURSOR RIGHT or CUR-
SOR LEFT buttons m select one of
5
the fltree options 4:3, Zx_om 14:9,
Zoom 16:9, Subtitle Zoom, Super
Zoom, or Wide,sc_re,en. (There is alsc_an
AUTO setting that wil] use the format
the is encoded on DVD discs.)
When finished, press file SYSTEMMENU (OSD) button to remove rite
menu from the T_;'S S_._,elt.
The Expand 4:3 fcmnatcmt *dsc_be, *_c_l-
vatex!using the FORMAT [t_ button
7
when the onsca_e,en menu ]s not beJng
displayed. Pressing ttfis but_m wi]l rag.
g]e the standard 4:3 fc_nat, file Expand
4:3 fc_nat, or Comwess 16:9 fc_nat.
0000
0
©®@
®®®
@@@
®®6
I_ FORMAT
4:_, I I¢FORMAT zoomt4:9, I [_F0_MAT zoom i,:9,]
I_ FORMAT SUBTITLEZOOM.I
1_ FORMAT SUPE_OOM_1
15
Iv FORMAT WIRESCREEH,I
Page 16

Tehe AutoLock _r_lleature is an integrat-
d circuit that receives and processes
data sent by broadcasters, or other pro-
gram providers, that contain program con-
tent advisories. When programmed _v the
viewer, a TV with AutoLock _r'lcan respond
to the content aAvisories and block pro-
gram content that may befimnd objection-
able (such as"offensive language, violence,
sexual situations, eto.), This is a great lea-
ture to censor the type of viewing children
may watch.
Over the next few pages" you'll learn how
to block channels and certain rated pro-
drumming. Below is a brief explanation of
some terms and ratings you will jitM in the
AuloLoek fealure,
AutoI,ock TM offers various BLOCKING
controls from which to choose:
Access Code: Azl Access (k_de must be set
to g_event children fi_nn tmblocking ques-
tionable pmgramrning.
Channel Block: Individual chmtne]s
including the AA: inputs can be blocked.
Clear All: Allows you clear al] channels
being blocked from your viewing set with
file Channel Block Control.
Block All: Allows you to block ALL chan-
nels and A/Winputs at one time.
Movie Ratings: Block programming
b_rsedon ratings patterned by the Motion
Picture,s Asscx:iation of America.
TV Ratings: Block programming based
on standard TV ratings set by TV broad-
casters,
To learn more about the Motion Picture
Ratings and fire TV Ratings, _efer to fire
definitions listed on the coltmms to fl_e
right.
Press the SYSTEM MIEN[1 (OSD) but-
ton twice to display the AotoLock
reGew screen. This scTeen shows what is
actiwffed within the Autolmck settings.
Um_
NO Rang
o Pa
o P_ 18
OFf
oX
v
G: General Audience - All ages admit-
ted. Most parents would find this Wo-
gram suitable for 'all ages. This type of
programming con'tains little or no vio-
lenoe, no strong ]ang_aage,and little or
no sexual di',dogue or situations.
PG: Parental Guidance Suggested -
This progr_mmaingcontains muterkd th_a
parents may find masuitablefor yomager
children.) It may coot_finooe or more of
the tbllowing: Moderate violence, s_mae
sexual situations, hffrequent coarse l_m-
garage,or scmle suggestive dialogue.
PG-13 : Pt_,nO_ Strongly Catai.oned-
This progrtmmfing contains muterkd thtff
parents may find masuitable for diildren
reader the age of 13, It c_ontai!as one or
more of the following: violence, sexu_ sit-
uatiens, coarse larigqtuge, or suggestive
dialogue.
R: Resttleted -This is prograngning is
specifically desi_ied fbr adults, Anyone
readerttie age of 17 should only view dais
progr_,mmaingwith an ecc_ptmyk_g par-
ent or _Iult guarditm. It contains one or
more of the following: kitense violence,
intense sexual situations, stroog coarse
l_mguage,or intensely suggestive diNogue.
NC-17: No one, under the age of 17 will
be admitted. - This type of progr_maing
should be viewed by adults only. It c_n-
tains graphic violence, explicit sex, or
crude indecent language.
X: Adults Only - This type of pmgnun-
mhag contahas one or more of the follow-
ing: ve_ gruphic violence, very gr_aphic
arm explicit or indecent sexuN acts, very
coarse _mdintensely suggestive l_mguage.
16
iTVR_Jng A
i,_wv On
oIvY'Z
oIva
oIvPG
OIV14
o IVMA
v
TV-Y - (All children -- This pro-
gram is designed to be appropriate
for all children.) Designed for a
very young audience, including children
ages 2-6. This type of progr_,mmaingis not
expected to frighten younger children.
TV-Y7 - (Directed to Older
Children -- Thisprogram is
designed for children age 7 and
above,) It may be more appropriatefbr
children who have acquired the develop-
merit skills needed to distingtti_ between
make-believe _mdreality. This program-
ming may include mild tkntasy and c_maic
violence (FV).
TV-G - (General Audience -- Most
parents would find this program
suitable for all ages,)'"This type of
progranmaing COll_drls lit[le Or no vie-
lence, no stroog larigqtage,tad little or no
sexuM dialogue or sittuNens.
TV-PG - (Parental Guidance
Suggested -- This ptvgram con-
tains material that parent_ _,
find unsuitable for younger children.) This
type of progrtmmaing contains one or more
of the tbllowing: Moderate violence (V),
scmaesexual situatiens (S), kifYequent
coarse hmguage (L), or s_e suggestive
diNogue (D).
TV-I4 - (Parents Strongly
Cautioned -- This ptvgram con-
tains some material that many par-
ent_ would,find unsuitable for children
under t4 years _*fage,) This type of pro-
gr*,mm_]ngcontains one or more of the fbl-
lowing: intense violence (V), intense sexu-
al situufioos (S), strong coarse ltmguage
(L), or intensely suggestive di_flegue tD).
TV-MA - (mature Audience Only
-- This program i_specifically
designed to be viewed by adults
and therefore r,m'ybe unsuitable for chil-
dren under 170 This type of pmgraumaing
contains one or more of the following:
gr_aphicviolence (V), explicit sexual situa-
fioos (S), or crude indecent larigqtage(L),
Page 17
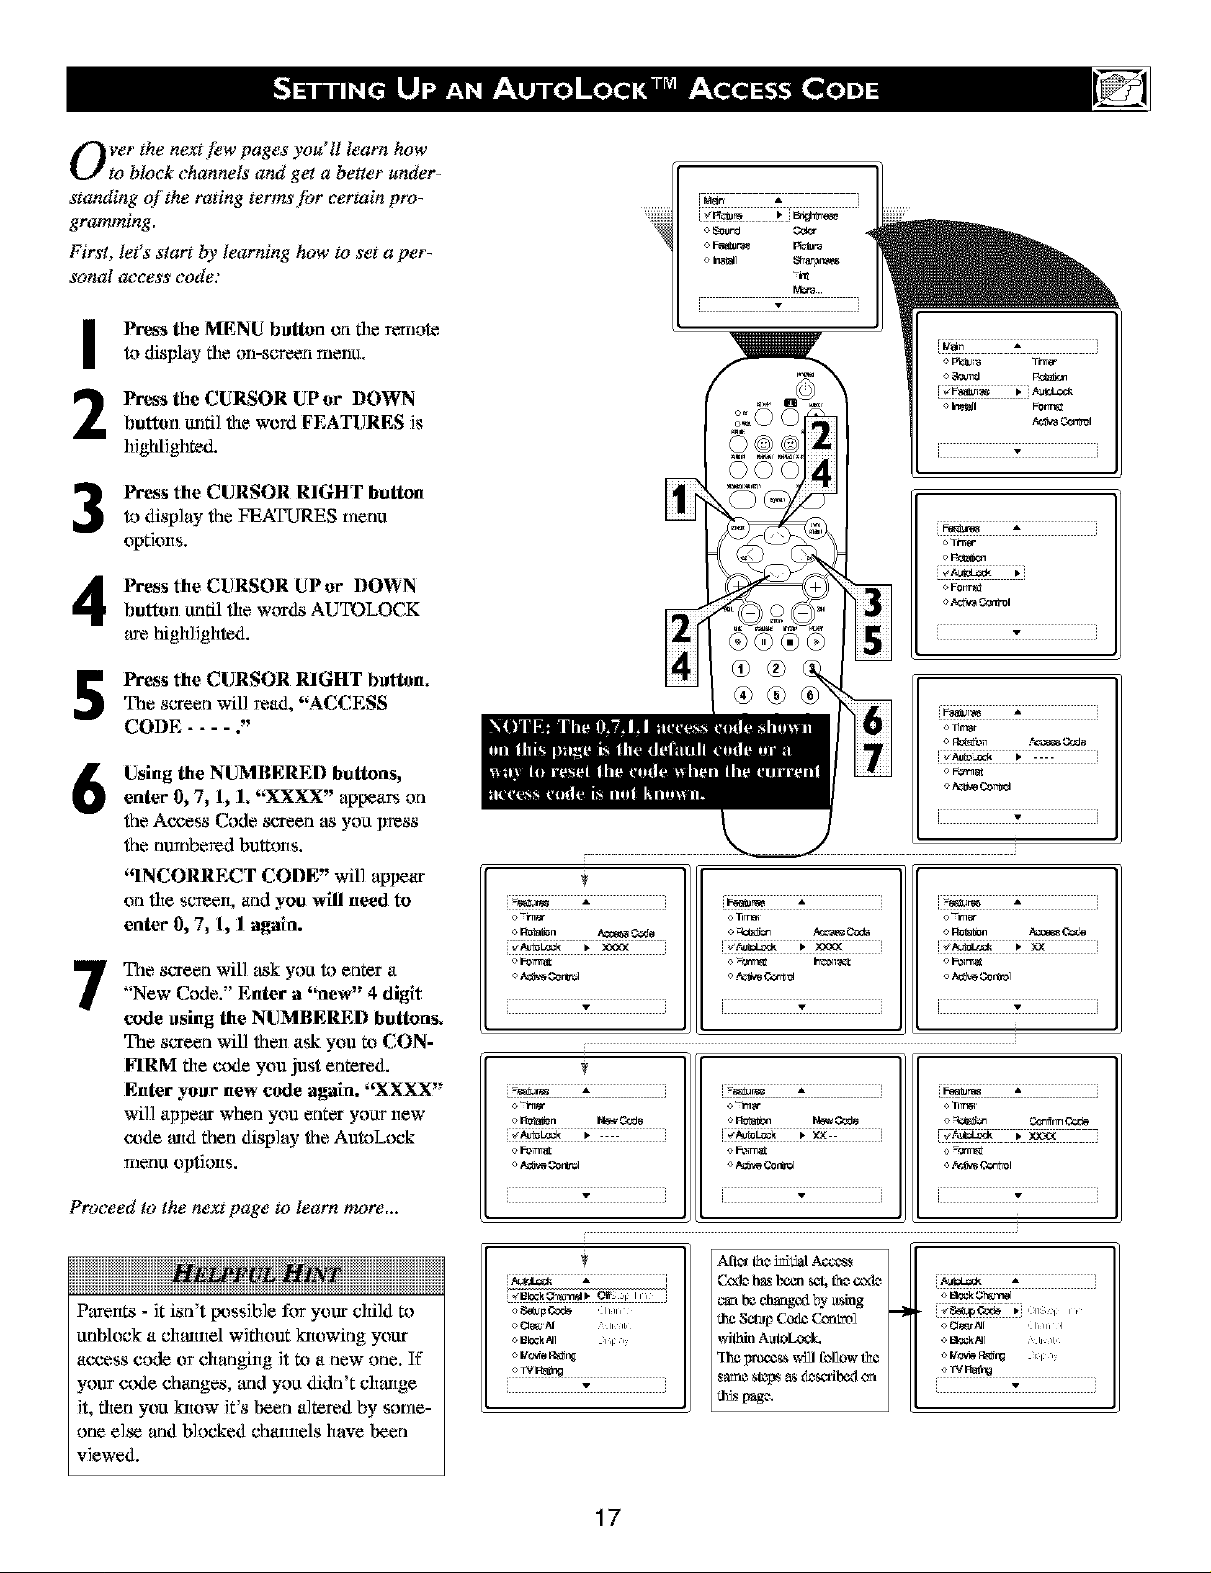
Over the next lew pages you'll lea_ff how
to block channels and get a bet¢er under-
standing O# the rating terms lbr certain pro-
gra_ing,
First, le(s start by learning how to set a per-
sonal access code:
Press the MENU bl_tton on die remote
I
to display fire on-screen melm,
Press the CURSOR UPor DOWN
2
button tutti] the word FEATURES is
hig_dighted,
Press the CURSOR RIGHT button
to display the FEATURES menu
optkms.
button ttufil fire words AUTOLOCK
Press the CURSOR UP or DOWN
are[figh]ighted.
Press the CURSOR RIGHT button.The screen will read, "ACCESS
CODE .... 2'
o _oun_
_a..
i - i
Using the NUMBERED buttons,
6
enter 0, 7, 1, 1. "XXXX" appears on
the Access Code screen as you press
the numbered buttons.
"INCORRECT CODE': will appear
on rite screen, and you will need to
enter 0, 7, 1, 1 again.
The screen will *_skyou to enter a
7
"New Code." Enter a "new" 4 digit
o 7ru6r
o P,z'b'_ _ nlr_l
v
code using the NUMBERED buttons,
The screen will then ask you m CON-
FIRM the ctxle you just entered.
Enter yotlr new code again. "XXXX"
will appear when you enter yottr new
c_tde and then display the AutoLock
menu options.
Proceed to the next page to learn nu_re...
iiiiiiiiiiiiiiiiiiiiiiiiiiiiiiiiiii@i iiiiiiiiiiiiiiiiiiiiiiiiiiiiiiiiiii
Parents - it isn't txtsslble for your child to
ttublock a chmmel wiflmut klmwing yottr
access code or changing it m a new one. If
your ctxle changes, and you didn't chmtge
o_n t_ _'4zl_s
e g_rr_
o P,z'b_ _nlr_l
v
i,_,t,x_ - i
o _._OJp OIxJo /INN,
o _i AI tl it,
I/t, Me Fl_n_
v
it, flten you kltow it's been altered by some-
one else and blocked chamtels have been
viewed.
o $1_r o7r1_1
o 71_l_t
i " i
AlLotthe i_i_kalAc_'_,s
C¢_e has _ set, the c¢_e
c_a be changed by u_mg
_e Setup Cede Cmlrol
within A_loLock,
"[beI_mCe_ v¢111follow _e
_ame steps a__scribed ca
tl_s page.
i_ A [
e Rotat_n _'rs_e _'o_ro
0 _rr_
i v i
o _tarrl_
] '_" •
v
17
Page 18
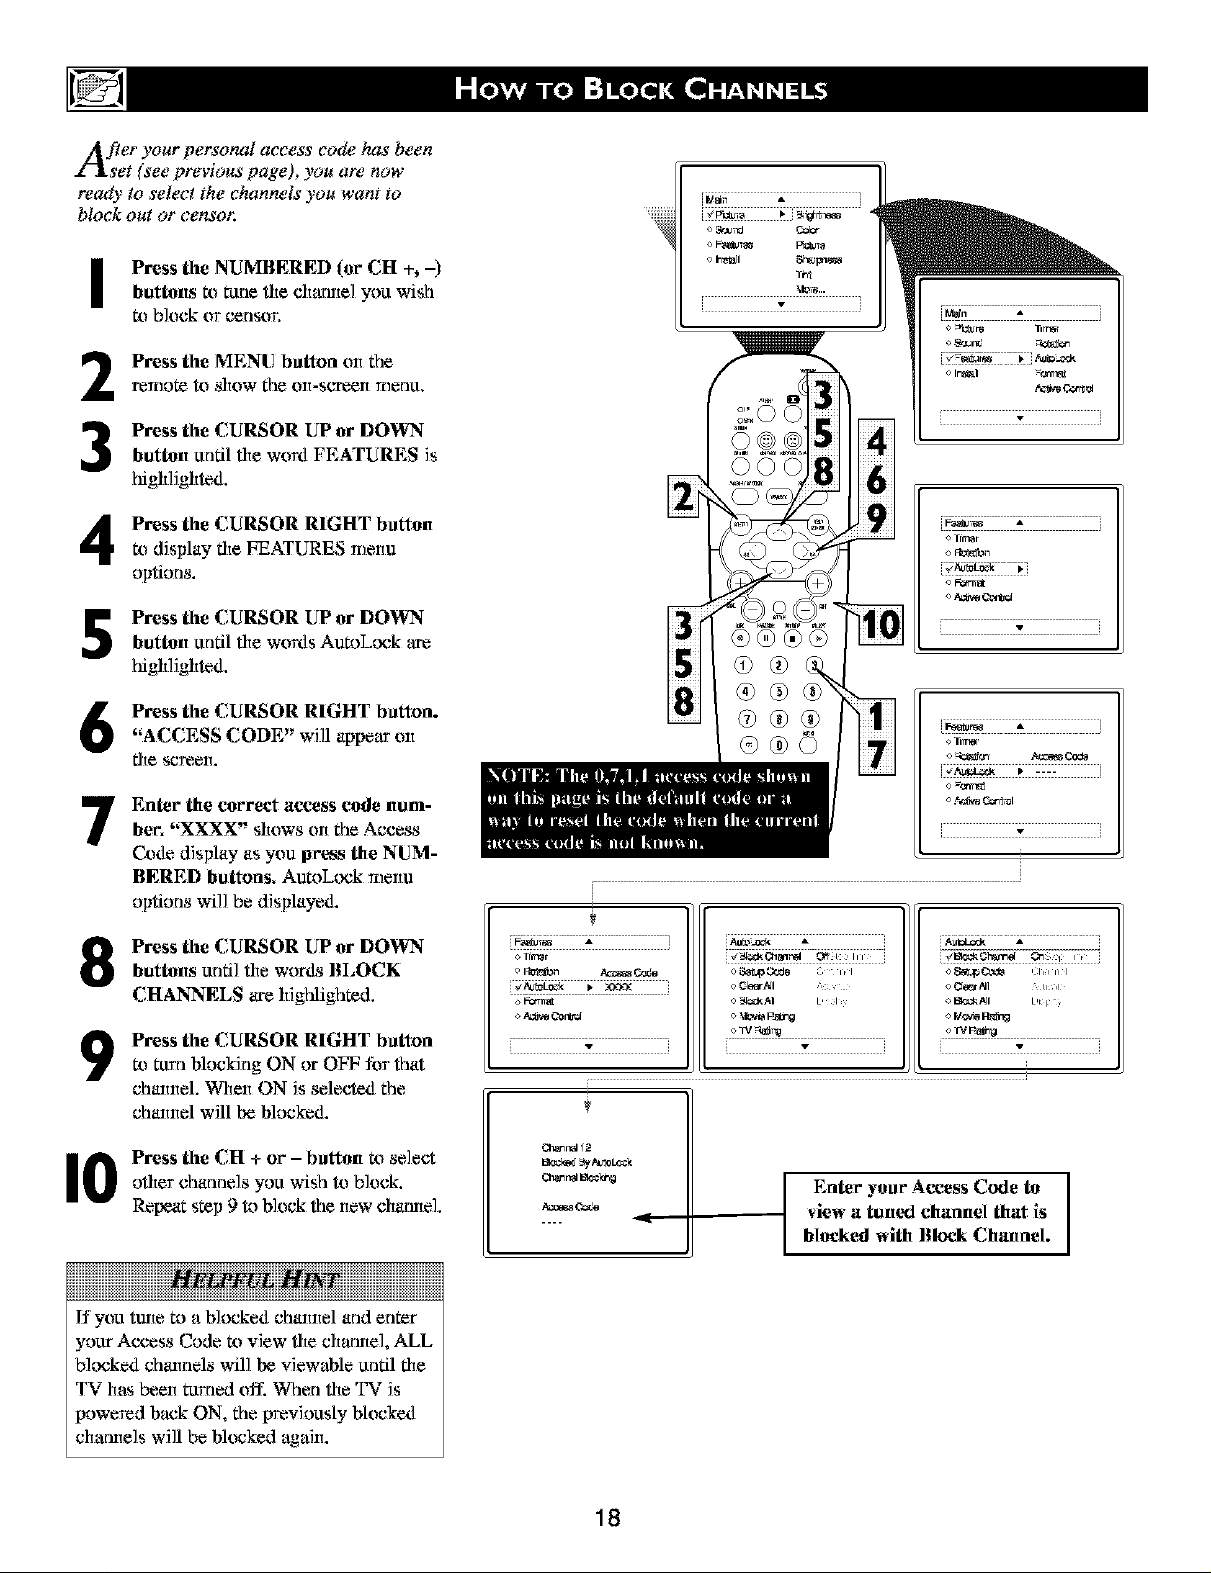
After your personal access code has been
set (see previous page), you am now
ready to select the channels you want to
block out or censor.
I Press the NUMBERED (or CH % -)
buttons m txmethe chamte] you wish
to b]ock or censor.
Press the MENU button on the
2
l_eTllOt_ tO show _he Oll=S_'l*eell Tllenl_[.
Press flze CURSOR UP or DOWN
button until rite word FEATURES is
3
_figh]ighted.
Press the CURSOR RIGHT button
to display fire FEATURES menu
options.
button tmdl rite words AutoLock are
Press flze CURSOR UP or DOWN
_figh]ighted.
Press flze CURSOR RIGHT button.
"ACCESS CODE'" wi]l appear on
fire screelt.
i •
Enter the correct access code ttum-
bet. "XXXX" shows on the Access
7
Ck_de display as you press the NUM-
BERED buttons. AutoLock menu
options wi]] be d_splayed.
Press flze CURSOR UP or DOWN
B
buttons tmfi] rite words BLOCK
CHANNELS _re hig[flighted.
Press the CURSOR RIGHT button
9
to mrn blocking ON or OFF for that
channel. When ON _sselected the
channel will be blocked.
l0 ress flze CH + or - button to se]ect
otter channe]s you wish to b]ock.
Repeat step 9 to b]ock the new chamte].
i F_a_o_ A i
o TiCOOI
,w w
iiiiiiiiiiiiiiiiiiiiiiiiiiiiiiiiiiiii iiiiiiiiiiiiiiiiiiiiiiiiiiiiiiiiii
If you tmte m a Nocked channel and enter
your Access Code m view file chamte], ALL
b]ocked channels wil] be vJewable tmdl file
TV has been turned off. When rite T%r _s
powered back ON, the trmevk_usly blocked
chamte]s will be blocked again.
2
o C_r _] tl ,t ¸
,w
view a tuned channel that is
I Enter your Access Code to
blocked with Block Chatmel.
18
Page 19

After blocking speci/ic channels there may
come a time when you want to clear all
the channels so they can be viewed. The fi_l-
lowing steps explain how to CLEAR ALL
blocked channels.
Press the MENU button on file
relno_ to _how the on-screen TtleltU.
I
Press the CURSOR UP or DOWN
2
button until the word FEATURES is
higtflighted.
Press the CURSOR RIGHT button
3
to display the FEATURES menu
options.
Press the CURSOR UP or DOWN
4
button until the words AutoImck are
higtflighted.
Press the CURSOR RIGHT button,
5
Enter the correct access code nmn-
|_r. "XXXX" shows on file Access
6
Ctnle display as you press the NUM-
BERED buttons. AutoLock menu
options will be displayed.
Press the CURSOR UP or DOWN
button until the words CLEAR ALL
7
are high]igh_d.
Press the CURSOR RIGHT button
to clear MI blocked chmntels. The
8
Clear All option will read, "Cleared."
When finished, press file SYSTEM
9
MENU (OSD) button to remove file
Ttlen_sfrom the T_r'S sG_,elt.
oTrl_
[ v [
i
o _d C_b_
_nt
v
oI_/Pa_N
i •
o _IT_
o For_
o F.r.'N'_ _01
i - i
o FIt_'_n #_ _6
Na*rnot
o A_vo Con_
• v •
i
i_oKtx¢_
o_ p_rg
v
@
ff you tane m a blocked channel and enter
your Access Ctxle to view the chamtel, ALL
blocked channels will be viewable until the
TV is powered OFF and flten turned back
ON. "*_qtenthe TV is powered back ON, the
previously blocked channels will be blocked
again.
CLEAR ALL will not work wiflt the Movie
and TV Rati_tgs. These options must be
reset individually.
o _.F_I ill1
The Oear All option when activated
will unblock ALL Mocked channels. It
will not affect programming blocked
by the Movie or TV Rating options.
19
.... i
Code to view a tuned
chaunel that is blocked
Or, enter your Access
with Block Channel,
Page 20

ThBere may come a time when you want to
lock All the television's channels. Maybe
you don2 want your children to watch TV lbr
a given time. With the BlockAll control, ALL
available channels (including the AiV Inputs)
can be set to block at the same time.
Press the MENU button on the
I
T_$IYIO_, tO ShOW tile orl-sCT_$eil [Ylerlu.
[*tess the CURSOR UPor DO_rN
2
button until the word FEATURES is
highlighted.
[*tess the CURSOR RIGHT button
3
to display the FEATURES menu
options.
[*tess the CURSOR UPor DO_rN
4
button mttil the words AutoLx_ck a_e
highlighted.
[*tess the CURSOR RIGHT button,
5
Enter the correet a_ess code hum=
ber. "XXXX" shows on fire Access
6
Code display as you press the NUM-
BERED buttons. AuR_Leck rnenu
opdons will be displayed.
[M_n A [
[*tess the CURSOR UPor DO_rN
button until the words BLOCK ALL
7
*_e,highlighted.
[*tess the CURSOR RIGHT button
8
to tunt Block All ON or OFF. When
ON is selected, ALL awtilable chamtels
will be,blocked.
When finished, press the SYSTEM
MENU (OSD) button to remove rite
TIlelIu_erYt the s_'redsrl.
o_o_n _ c._re
! - !
iiiiiiiiiiiiiiiiiiiiiiiiiiiiiiiiiiii iiiiiiiiiiiiiiiiiiiiiiiiiiiiiiiiii
ff you ttme m a blocked channel and enter
yottr Access Ctxle to view the channel, ALL
blocked channels will be viewable until the
TV has been mined of_: When the TV is
powered back ON, the previously blocked
channels will be blocked again.
o G_AI
o W p_i_
view a tuned channel that is
I Enter your Access Code to I
blocked with Block Channel.
w
€
2O
Page 21

Twhem are two types of program ratings
ithin the AutoLock _r'lfeature. One is
based on the Movie Industry ratings while the
other is"based on the TV Industry ratings. Both
can be used to block or eensor progr_ng
that has been rated in either manner,
Le(s first look at the Movie Bating options of
AutoLock r:a :
Press file MENU button on the r_rmte
I
to display fl_e on-so'teen _rlenu.
Press file CURSOR UP mrDOWN
2
button tmtil fl_eword FEATURES is
highlighted,
_lrt
: w i
Press file CURSOR RIGHT button to
3
display rite FEATURES menu options.
Press file CURSOR UP or DOWN
4
button until AumLtxck is high]ighted.
Press file CURSOR RIGHT button.
5
The scxeen will prompt you for your
Acoess Ck_de.
Using file NUMBERED buttons on
the _emote, enter yottr 4-digit Aeoess
Ctxle. The AutoL_x:k menu options will
be,displayed.
Press file CURSOR UP or DOWN
7
button to [figldight fire words MOVIE
RATING.
Press file CURSOR RIGHT button to
8
display fire MOVIE RATING options
(G, PG, PG-13, R, NCI% or X).
Press the CURSOR UP or DOWN
9
button m hJgtflight any of fire Movie
Rating options. When _figh]ighted, all
these options can be turned ON (which
will allow blocking) or OFF (which will
allow viewing).
o g0mlt_
kk_ r[Fz_'to_ A
i_A_oLo_k _i
i " i
4i
i _L0ck
®®
oR
o NO_-/7
oX
w
i v i
7i
[ •
?
l0 Use file CURSOR RIGHT button on
the remote m runt rite rating option ON
or OFF.
oR
ot_I7
iiiiiiiiiiiiiiiiiiiiiiiiiiiiiiiiiii@i iiiiiiiiiiiiiiiiiiiiiiiiiiiiiiiiiii
When a rating is set m bkxsk, aU hlgber rat-
lngs will be automatically blocked as well.
(Example: If the the PG-13 rating is set m
block, the R, NC-17, and X ratings will also
be blocked.
21
/,_C_ _ L ¸l,I-h'
t
the Mo_4_ Radrtg oNi_m_, t,_ntez
yo_s _-dSgkaccc_ssc,:.-d_.
wffl disable all bloe.&_xlMo_e
Ratings until theT3/Js po__cd_,,,_
I To view a prod-am brooked by
off' and.on agabx Themthe block
ing opdtm_,_dll bem_,tom,L
Page 22

Zhis portion of the AutoLock r:afeatures
rover program ratings based on the 77,
Industry rating system. This"is known as TV
Rating within AutoLoefi r:a.
After selecting the Autolock _r'lleature and
entering your personal access code, the
AutoLock _r'_options screen appears;
I Scroll the menu using the CURSORUP or DOWN buttons tmtil the words
TV RATING _ce highlighted.
Press the CURSOR RIGHT button to
2
display file TV Ratings (TV-¥; TV-Y7,
TV-G, TV-PG, TV-14, or TV-MA).
When highlighted, the TNr-Yand TX._G
can be tttmed ON (which will allow
blocking) or OFF (which will allow
viewing), of these rated programs.
The ratings of T%'-Y7, T%'-t_, T%'-I4,
TNr-MA can be cxtsmrnized m block V
(violence), FV (Nntasy viNence), S
(sexual situations), L (cotwse lan-
guage), or D (suggestive dialogue).
Press the CURSOR UP or DOWN
3
button to [figh]ight the desired rating.
Press the CURSOR RIGHT button
on file remote m tttm file T%r-Yor T%r-
4
G rating ON or OFF. Or_press the
CURSOR RIGHT bl_ttolt to enter the
sub-menus tot the T%'-Y7, TV-PG, T%'-
14 or TV-MA ratings.
K the TNr-Y7, TX.cPG, T%r- 14 or TX.c
5
MA sub-menu is accessed, press the
CURSOR UP or CURSOR DOWN
button to select one of the options
(Bkx:k All, V, S, L, D, or FV).
To view a program
blocked by file TV
Rating options, enter
your 4 digit access
code. This will dis-
Ratings until file TV
is powered off and
on agaim Then the
blocking options will
be restored.
[_vp_r 0 A
o W-Y _ AI
o W.y_ V
oW_ 8
_-m ;? L
o 1V4_1_
L " J
@®@
@@@
®@@
[_v_r 0 A
o W-Y _ AI
o W-'¢_ V
oW_ 8
o W4'KI L
o W4,11_
• j
o _qz_ L
o _qz14.
• j
Press the CURSOR RIGHT buttonon rite remote m turn rite option ON or
OFF.
I TV Ratings and
TV-Y - (All childi_*l-- Thisprogram is designed to be appr_pHate¢br all child_n,) Dnsign_l for a very young audience, iucluding cliildrml ages 2-6. This type
of pmgrunmmlg is not expected to fi-ightenyounger cliildw_&
TV-¥7 - (Diruc_d to Otdca"Children -- This program is designndtbr chiMmn age 7 and above,) It nlay be,more apprfflwiate5_3rchildren wilo have acquired file
dexdopment _itls ne_xl to d]stillgdish botwo_nmakc-bolicve aud ruality. Thi_ progamming may blclude mild fantasy mid comic viotence tFV).
TV-G - (C_alc'mlAttdieuce -- Most parems wouldfind this program suitabletbr all ages,) Thi_ type of Frogunnming contains little or no vidence, no stroug
lungu_e and little or nosexual dialogue or _itaafiO_lS.
TV-PG - (Paruntal Guidancz Suggested - This pr_gtam contains material that parents mayfind unsuilablefor younger chi/dren,)This t_T,eof No_g
contains one or more of the following: some suggestive Nalogue (I3), i;il_lunnt c&arselangunge (-L),some sexual siatatio_ts (S), or nlCd_ato violcalCC(V).
T¥-14 - tParcntsStro.gly Camiotled-- Thisprogram contains some material thatmany"parents would find _.itable for children _er 14 years ofage, ) Thi_
type of programming contains oue or mere of file foilowhlg: intensely suggestive dialogtte (D), stroug ooarse language (L), bltealSesensualsituations (S), or
intense violmlcc (V').
TV-MA - _tature Audience Only - This program is speci&ally designed to be vie_,ed by a&ats and therefore may &, unsuilable for children under lZ) This
type of programming contaiTlsotle ormere of"file foilowhlg: crude,illd_nt laTlguage (L), explicit sexual situations (S), or grapltic viN eTlce(V).
Rating Sub-Menus
When aTV Rating is s_ected lo block,
ALL higher _alings _5]11_¢bDcked also.
22
Page 23

A utoLock r:a,offers the viewer other block-
ing features as well, With these Blocking
Options, the censoring can be turned ON or
OFF.
Press file MENU button on the
I
_eTglote to show the olt-_L_een TglaltLt.
Press file CURSOR UP or DOWN
2
button until fireword FEATURES is
highlighted.
Press file CURSOR RIGHT button
to display fire FEATURES maim
options.
Press file CURSOR UP or DOWNbutton until fire words AutoLock are
highlighted.
Press file CURSOR RIGHT button.
[ _h A
o mwJ _hoq_ _
• i
Enter the correct access code num-
ber, "XXXX" shows on the Access
6
(k_de display as you press the NUM-
BERED buttons, AutoLock menu
options will be displayed.
buttons tmdl rite words BLOCKING
Press file CURSOR UP or DOWN
OPTIONS are highlighted.
Press file CURSOR RIGHT button
m display fire Blocking Options
(BLOCKING, UNRATED, or NO
RATING) menu.
Press file CURSOR UP or DOWN
buttons to _figh]ight the desired fea-
ture.
l0 hen highlightcd, each feature, can be
turned ON or OFF using the CUR-
SOR RIGHT or LEFT buttons on the
l_eTt_ote.
[ v [
v
@ ®
®®
<>O_r _d tl it,
o _/t._e P,t_ ng
o IV V_ti_
o Unra_l
v
v
<_8a'_ Oede Un'n_l
o O]e_t/_11 N¢ FI_O_
o N_. All BII3_}_
BLOCKING OPTIONS:
BLOCKING: Tiffs is what might be c*flled the "master switch" for Aut_Lock TM. When lit fire ON position, ALL blocVing!_it_lng
will take place. When in fire OFF tx_sidon, ALL blocking is disabled.
UNRATED: ALL tutratex! programs b_d on the Movie Ratings or Parental (T%r) Guidelines calt be blocked if this feature is set m
ON and the BLOCKING feature is set a_ OFF.
NO RATING: ALL prognwnming with NO content advisory data can be blocked if this feature ls set a_ ON air0 fire BLOCKING fea-
ttwe is set to OFF.
23
Page 24

T_n e Active Control monitors and adjusts
coming video signals to help provide the
best picture qualib',
When you choose to turn the Active Control
ON, the Brightness, Picture, Sharpness,
Contrast + and DNR (dynamic: noise reduc-
tion) Ieatures am controlled automatically.
Active Control adjusts these picture settings
continuously and automatically,
Press the MENU buttott on the
I
relno_ to show the on-screen Ttlenu.
Press the CURSOR UP or DOWN
2
button until the word FEATURES is
higtflighted.
Press the CURSOR RIGHT buttott
to display the FEATURES menu
optiolts.
I Main A
o_,o_ Cd.cr
o F_ree Pierre
o In_ll Sharpr_3
"nrt
More...
v
[ ,, ]
o "-Irn_r
o _or_
o r-orrr_
o Ad_'eOcrJ_Ol
Press the CURSOR UPor DOWNbutton mttil the words Active Control
are high]ighted.
Press the CURSOR RIGHT buttott
5
to set fire Active Control m Oft', On, or
Display ON.
Display Ott- When selected, an Active
Control monitoring screen will be,
shown for a few seconds whertever a
chamte] change is made. Within tiffs
menu, you cat actu*flly see rite controls
changirlg to give the best possible plc-
tmre quality.
Oil - When selected, the Active
Corltml will work to give Ne viewer
the best possible picture, but will m>t
display the monlmfiltg screen whee
chamtels are changed.
Off- fire Active control will not be
activated.
Wheit fiitished, press file SYSTEMMENU (OSD) button to _emove fire
Ttlenu from ttie T_r'S S_._,elt.
(b®®
®®®
@®@
®®0
Active Cmttrol Momti*rm_ Sereett
Will appear whelt fireActive Contral
is set to "Display On.".
A¢€¢_C_nca
Pi_re .......... -[].....
S_rt,_ ........n........
C.om'r_l + Or_
OblR O_
[ - ]
Off
v
071
o _r_L_k
o F_ra_l
[]_",%'1_ Cord_[ On
[
07t
rt_lre¢ A
o "1_ff_-
o_
otk_Loek
o Formal
E v
2,4.
Page 25

Have you ever fallen asleep in fizmt of the
TF only to have it wake you up at two in
the morning with a test pattern screeching in
your ears? Well, your TV can save you all
that trouble by automatically turning itself o[f.
Press the SLEEP battott on theremote colttrol and the SLEEP timer
display will appear oil the soreen.
Press the SLEEP button repeatedly to
pick fire amount of time (15, 30, 45,
60, 90, 120, 180 or 240 minutes)
before the TV will tttrn itself off.
An on-screen count down will appear
during rite last minute before rite TV
shuts itself off:
The on-soreen menu will time out and dis-
appear from the screen whee you fi_tish, or
you can press the SYSTEM MENU (OSD)
button to clear the menu from the screee.
@®
_10 O
Duriitg fire last ufinute of a
Sleeptimer setting, at on-
scveee count dower will be dis-
played. Pressing any button
during rite last mhtute will
cancel fire Sleeptimer.
®®®®
®@@
®@@
®®®
®®©
T
Dariitg the last 10 seeoltds of
a Sleeptimer settiltg, an olt-
screelt display will read
GOOD BYE.
25
Page 26

Closed Captioning (CC) allows you to
read the voice content of television pro-
grams on the TV screen. Designed to help the
hearing impaired, this'feature uses on-screen
"text boxes" to stu_wdialogue and conversa-
tions while the TV program is"in progress.
Press the CC button on fl_er_no_ to
I
display the cttrrent C]osed Caption
setting.
Press the CC button repeatedly to
2
cht_se frc_l the fcttr Closed Caption
options (CC Off, 12'£'.1, CC 2, CC
Mute). Di_llognle (_ld desc_pfions) far
the action on the captioned TV progvea_
wi]] appear on-._reen if"the ttmed pm-
gq'amis broadcasting CC Jnforl_1ath:_lL
When Finished, press the SYSTEM
3
MENU (OSO) button to _love the
menu frt_l the TV's screen ar let the
option thne out _mddisappear frarn the
TV S_re_L
Not aU TV programs anti product com-
merelals are made with Closed Caption
(CC) information included. Nfflther are all
Closed Caption modes (CC1, ar CC2) nec-
essarily being used during the transrrfissknt
of a closed caption tin, gram. Refer to your
area's TV progrt_n ]_stings far the stations
and times of Closed Caption shows.
t
NOTE: The CC MU_ option
cmt be used to set the T%rto
mm the Closed Caption mode
"ON" whenever fire MUTE but-
mn on the remote _spressed.
Ttfis activates fire CCI option.
26
Page 27

IA/hether you're watehing a movie or a
It ¥ sporting event, your TI, has automatic
video control settings matched for your cur-
rent program source or content. The
SmartPieture _r_lfeature quickly resets your
TV's video controls for a number of different
types of programs and viewing conditions you
may have in your home. Each SmartPietnre _r_i
setting is"preset at the/acto_' to automatical
ly adjust the TV's Brightness', Color, Picture,
Sharpness', Tint, Color Temperature, DNR and
Contrast+ levels'.
T
I Press file SMART PICTURE buttonon file _x_o_ corttTo]. The cu.rrent Au_
Picture setting wi]l appear in fire xrfiddle
of the ._reen.
Press file SMART PICTURE button
repea_dlov to select either PERSONAL,
MOVIES, SPORTS, WE,AK SIGNAL,
or MULTIMEDIA pictttre settings.
Note: The PERSONAL setting is the setting
that you setup using fire PICYI'UREoptions
wit_fin fire on-so'teen menu. T_fis is fire only
Smart Picture setfmg that can be changed. A]]
other settings are setup at firefactory during
the time of prtxlucNon.
MOVIES - Preset picture options tot watch-
ing Video Tapes, or DVDs.
SPORTS - Preset picture options for watch-
ing sporting events.
_,_¢T.AKSIGNAL - Preset picture options for
watching programs where rite reception is not
at its besL
MULTIMEDIA - Preset picture options for
use wiflt video gaming.
:.00 ®
0000
®®®®
@@®
®@@
®®@
®®©
27
Page 28

Tthe SmartSound r:'_feat utw allows the lis-
ener to select between four d!ffetwnt /dc-
tory set sound options. Personal (which can
be set _v the user), Theatre (for movie view-
ing), Music: ([dr musical type programming)
and Voice (when the program & mainly dia-
logue). These setting affect the Sound menu's
Bass, Treble, AVL, and Incredible Surround
controls
To select any of the options /dllow the direc-
lions below.
l Press the SMART SOUND button onthe re,note control. The cttvrentS*_art
Sotmd setting wil] al_pear in tl_e _iddle
ot the screen.
Press the SMART SOUND button
r_peatedly to k_gg]e between tlte R_ur
settings.
Note: Ordy the PERSONAL _n_] can be
eh_mged by the viewer. This dmrlges the _ttings
i_l the main on-s_reen menu's m_d ctmtrols.
THEATRE - Preset sound opfitms ft_r watching
lrlovies.
MUSIC - Preset sotmd optior_s for musical
tn_gT_nr1*rlirtgwhere tl_ere is little di_llogme,
VOICE - Preset sotmd optior_s for t_gTam-
,uing where heavy dial%me is prese*_t.
w######
28
Page 29

A "list" or series of previously viewed
channels can be selected with the
QuadraSutf r:a (colored) buttons on your
mnu_te control With this feature you can easL
ly switch between different 77/ progran_" that
currently interest you. The QuadraSurf _r'lcon-
trol allows you set up four different personal
Surf lists using the colored buttons (on the
mnu_te control), each homing up to ten chan-
nels in its quick viewing "list,"
Press file CHANNEl, (+) or (-) but-tons (or the NI_ER buttons) to
select a cbaxmel to _mldto one at the
SURF fists.
Press the SMIL_Y O button on theremote control to ADD the cbaxmel to
one of the SURF lists.
Press the corresponding COLORF_D
3
(Red, Greeo, Yellow or Blue) button
to _mldfl_ecl_trmel to that btt_m's Sttff
fist. (Up to ten charmels pe_"button c_m
be stored.)
Repeat steps 1 fltrough 3 to add additiorttd
charmels (up to 10) to each of the rite SURF
lists.
To remove a chmmel from oite of file SURF
lists;
Press the COLORED QuadraSurf TM
button until the desired channel
4
appe*_rs.The scTeen will display the
chamlel rlmnber with a co]o_ed
"Strfiley" face to indicate file Co]ored
butt_m _trelates to.
:_iiiiiiiiiiiiiiiiiiiii
GO
®®@
®®®
®®®
®®©
O®
I @12 A_!]
While the "Smiley" face channel
5
indicator is displayed, press the
FROWNIE _[_ face button. The
screerl w_llread, "Remove item? -
Press _ ."
Press the FROWNIE _ face button
again to contim_ your decision to
remove the channel from the Surf list.
Repeat steps 4-6 _ remove oflter channels
from Surf lists.
Your mmo_ a]_l has an A!CZ-I(Alternate
Chamtel) butt_m. Pressirlg flus buttolt will rag.
gle betweelt fire curreltt and one previously
selected chanltel.
II
29
Page 30

_e e QuadraSu_'ff :a buttons on your t_nutte
ontrol allow you to store up to 10 chan-
nels per button (40 total). This"is a gtwat fea-
tare if you want to store all your favorite
Sports channels, Movie channels, or News
channels in one surf list, Family members can
have thetw ownfavorite list of channels, You
can even progr_ the external AiV Input
jacks (Front channeO fi_r one of the buttons
making it a "soume" button lbr your external
accessory devices.
Assuming channels have now been added to
the fimr QuadraSurf lr_llists (the lbur colotwd
buttons on the remote, see the previous page),
let's"review how the leature works.
Press one of the pre-pro_ammed
I
COLORED buttons on _e re_o_
(Red, Green, Ye31ow er Blue). The
._reen will display a sm]ley face w]fl_ the
first ping.camped chtume] for that sttrf
fist.
While the colored "srailey" face still
2
appe_ll_ On the _Fl_lnl_ pr/_s tfie SaIl]_
COLORF.D buiton on the remote to
tune the second clu_atel ping.camped for
flint specific sttff"fist.
/
/
Repeatedly pressing the same COL-
3
ORED button while fire "stuffer' face
appears will ttme all the wogr_n_ed
cfiarmeJs for that specJtic stwf list..After
the l_st clumnel is ttmed, pressing fl_e
COLORED button again _fill remm you
to fire _t charme] b_fl_e list.
It fire "srniley" face disappe_a's ti_l the
screen and fire s_le COLORED btt_m
is pres_d, the stkff'clmrme3s ,,,,,illbe dis-
phlyed starting with the FIRST prtr-
gq'ar_ed cfia_me] again.
Repeat steps 1-3 for the other three
COLORED butto_s (Sttrf fists)if
desired.
Paty time rite "snfiley" face appears
5
with the cha_mel number, pressing the
"frownie" face button will allew you
to remeve it from the list (see the pre-
vkms page tot more details).
/
f
Z
/
z
/
/
_J
3O
Page 31

This section of the Directions for Use manual begins to explain the operating procedures
of the DVD Player portion of this television.
Let's learn _he simple operation of the TWs
builtJn D_'D Player,
Unless otherwise stated, all operations can be
performed by using the mnu_te control
I Press the POSVF.R button on the
remote control (or fire TV) t_ turn fire
_]evision ON.
Press file EJECT button on the
remote control t_ place the T%riDX,O in
fire DVD mcxle and to opec the disc
tray.
Place your chosen disc in file tray, Besure, flint the disc label is facing up and
die disc is centered in die tray.
Press file EJECT button on the
remote control (or file EJECT btttton on
file TV) t_ close file disc t_y.
The on-screee display wi]l indicate that
fire DVD Player is reading fire disc.
Then playbtmk of the disc wi]l begin
aatomafictdly.
Note: It"the "Child Lock" option is set m ON
within the User Preference Settings section,
file 4-digit access code must be entered or the
disc must be aufllofizgd. (See the "Access
(k_ntro]" section w]fllin rids manual.)
A defattlt screen (DVD Video "b]ue" back-
_)ttnd) is displayed when the DVD Player is
in the STOP mode. It may contain a "Status
Window" mid a "Temporary Feedback F]e]d."
Ttfis screen gives infomlation concerning pro-
tfibited actions, p]ayback, modes, avai]ab]e
ang]es, etc.
31
Page 32

T_e remote control supplied with your
/D $'D product has speci[ic buttot_'for
the operation of the DVD Player, This page is
a brief overview of those buttons.
POWER button - Press R_power the --
TV!DVD on or off.
REPEAT button - l_ess once to repeat the
playback of the current chapter. Pveas a see-
ond time to repeat file cttrrent rifle. Press a
flfird time to repeat file entire disc. PYess a
fourth time to tunl the rrepeat option off.
AUDIO button - Press m display the --
onscreee DVD Audio options.
fi'om factory set sound vMues R_ match fire
type of programming your watsthhtg. Choose
fi'om: Personal, Voice, Music, or Theatre.
See fire Smart Sound section of fire TV in
fltis manual.
CURSOR buttons - Press to navigate the
onscreee menus. Press die _ to fast for-
ward the playback of a disc. Press die
m fast backwards the playback a disc. Press
flte& R_s]ow forward flte p]ayback of a
disc. Press the Y slow revere the p]ayback
of a disc.
OK button - Press t_ confirm
wifltin fire onsereen Ttleltu options.
PAUSE button - Press m pause
back of a disc. Press the Play button to
resmne playback.
MUTE button - Press to mute, the sounfl
coining t_om the T%r spe'_e_. Press again m
restore the sounfl at its previous voltune
]eve].
_-EJECT button - Wiflt flte TV on, press to
p]ace the _tnit in flte DVD operafionM mode
and open the disc tray. Press again to c]ose
the disc tray.
MENU (OSD) button -Pressto
display flte onscreen DVD meeu options.
_,bqtenthe menu is displayed, press m remove
the meeu _om fire T%r screen.
IB-TITLE button - Press m display the
Sub-rifle option control
button - Press once at yo_
chosen starting peint of the playback. Press
again at our chosen enclirlg point. The ]engflt
of playback chosen will now repeat itself.
Press again to tttm fire Repeat A-B option off.
CTURE button - Press to select
from factca_yset pictttre v_ttes t_ match file
type of progTt_muhtg your watching. Choose
from: Person'd, Movies, Sports, Weak Signal,
or Multimedia. See fire SmaWcPicture secdon
of fire TV in this manual.
J button - Press to access the
built-in menu options stored on the DVD disc
you are viewing.
TV/DVD button - Press to toggle between
the TV mtd DVD operarional modes.
- Press to begin the playback
of a disc.
of a disc. Use m gain access to a locked disc
if you have forgotten you PIN (press four
times, flten eeter new PIN).
32
Page 33

_opiS manual gives the basic: instructions fi_r
erating this D_'D Player. Some D_'D
(discs) require speei[ic operation or allow
only limited operation during playback. In
these cases, the player may not respond to all
operating commands, When this"occurs,
please refer to the instructions contained with
the DVD (disc',).When the symbol
appears on the TV screen, the operation is not
permitted by the player or the disc.
Unless otherwise stated, all operations t_at
be performed by _sing the remote control.
......$11l
_qlen the "X" icon appears on file TV
screen, it means the fanction carmot be
preformed or is not an available option
for that disc.
ff the HELP LINE feature is set m ON,
information shoat fits statas window can
be displayed m help mtdersttmd fits best
action to take. WiN the HELP LINE fea-
ture set to OFF, Ne text lx_x at Ne bof
mm of the screen will not be displayed.
Please refer to Ne Preferenc,e Options
section of Ne manual for more details.
Press the SYSTEM MEN U (OSD)
I
button to display fire DVD Player's
on-screen menu.
Press the CURSOR RIGHT button
2
to highlight and select TOOL BAR
options: Play Option, Slide Show,
View, Search, or Program.
OR, press file the CURSOR DO$_
to highlight and select either
Preference or Setup options.
Once you have chosen a specific
3
TOOL BAR option, press the CUR-
SOR DO_rN button to highlight or
select it's sub-option control. (See the
Onscreen Menu Options outline at the
betmm of this page.)
MENU (OSD) button while fits on-
Repeatedly pressing file SYSTEM
screen menu is displayed will remove
the menu from fl_eTV screen.
/
/
/
Tool Bar:_ PlayOption -_ Slide Show _ View
Preferences: -_=,_Sound )= Features
Setup: _- Language
I I I
Discnavigation PicIirne Angle
I I I
Audio Transtime Zoom
I I I
S_Jb-titlo Traneeffect Cha_ter _mview
I I
Night mode Help line
I
Defaultaudio
I
Delau[ISSbl_[_[e
I
Stat_eWindow
> TV -_>_Audio Menu -_Features -_Access
I I I I
TV eyeIem DigiIal osIplJt PBC EntercurrenIpin
I
Rotate
B
/
/
ll[] _ ........ ] ....
> Search
I
Tithe
I
Fast
I
Slow
I
Frame by frame
> Program
Proglram
I
Tracks
I
Playliet
I
Clearall
I
Parental level
I
Change pin
I
Disk lock
33
Page 34

yOpU can select different languages so the DVD
layer,,,will automatically display its
Onscreen Menu and DVD Disc: Menus in the
language you of your choice. The De/ault Audio
and Subqitle can also be changed to a desired
language. To change the De/ault Audio
Language or Default Sub-title Language,/bllow
the steps below.
Stop playback if a disc is playing in file
player. Press file SYSTEM MENU
(OSD) button on the remote control to
display the ort-_*reen mertu.
Press the CURSOR DOWN button until
2
the word Setup is hig[flighted.
Press the CURSOR RIGHT button to
3
move fire puck to the _ight highlighting
the work Language.
Press the CURSOR DOWN button to
hig_flight either the Default Audio, or
Default Sub-Title cortm_].
Press the CURSOR RIGHT button to
gairt access to fire highlighted _x_rttrol's
optiorts.
mtmtmmmmmmm_
B
/
,riu,ml
MUb ..........
/@ o , -
.eemlmmeh
imm,me,leR
Press the CURSOR UP or DOWN but-
tons to sc_)]l file Ust of available lan-
6
guages. Choose fixml: English, Espafiol,
I%ant;ais,Portugu6s, ltaliano, Russian,
Deutseh, Greek, Japanese, Korean,
Chinese, Quechua, Guarani, Aylnanl,
or Inuplaq.
Press the OK button to select or activate
the chosen option.
7
Press the SYSTEM MENU (OSD) but-
ton to c]ear the on-sc,T_n Tgleltu_OTII the
8
T_r sc_reelt.
• ub ..............
34
Page 35

_c.oe DVD Player included in this television is
mpatible with NTSC and PAL, For the
DVD Player to playback a disc correctly, the
color Lvstem of the CD, the TV and the DVD
Player should match,
I Stop playback if a disc is playing in
the player. Press the SYSTEM
MENU (OSD) button on the remote
conrail to display the on-screen menu.
Press file CURSOR DOWN button
2
until fire word Setup is highlighted.
Press file CURSOR RIGHT button to
3
move the puck to fire fight highlighting
the word TV.
B
/
Press file CURSOR DOWN button to
4
highlight rite TV System control
Press file CURSOR RIGHT button to
5
gain access to the highlighted conm_l's
options.
Press the CURSOR UP or DOWN
buttons m scroll file list of available
6
langttages. Choose fram: PAL, NTSC
or .AUTO,
PAL: Select fltis option if fire connect-
ed t_ a PAL sys_m. It will change the
video signal of a NTSC disc and output
in PAL format.
_: Select this option if comtected
to aNTSC system. It will chmtge the
video signal of a PAL disc (VCD only)
and output in NTSC format.
_: Select this if compatible with
both NTSC and PAL (mtdti-system).
The output will determined by the
video signN of the disc.
Press file OK button to select or acti-
vate fire chosen option.
7
lil
lil
lllmmlln @ <. <, <,
lllllllllllll
Press file SYSTEM MENU (OSD)
8
button to c]eltr the Olt-scTeen itleltu
from rite TV screen.
Note: It is possible that slight picture distof
tion may occur due to file video conversions.
This is normal and does not require a service
c_dl.
35
Page 36

Ifyan external atMio system is being used with
our D_'D Player, the Digital Output control
nu_ need to be set to match the output of the
system.
I Stop playback if a disc is playing in
file player. Press the SYSTEM
MENU (OSD) button on the remote
COlltro]to disp]ay file on-screell menu.
Press the CURSOR DOWN button
2
until rite word Setup is [figh]ighted.
Press the CURSOR RIGHT button to
3
move rite puck to the _ight high]ighting
the words Audio Menu.
Press the CURSOR DOWN button to
hig_flight the Digital Output control.
Press the CURSOR RIGHT button to
gain access to rite highlighted contro]'s
options.
/
.,,_.
Press the CURSOR UP or DOWN
buttons to scax_]lfile list of avaiJable
6
languages. Choose t'rom: PCM Only_
All, or Off.
_: SeJect th_soption ff your
receiver is not capable of decoding
Mu]fi-chamte] audio.
All: Select th_s option if connected to a
mu]ti-chmtne] decoder or receiver.
Off: Select fltis option to deactivam rite
Dig_ttd Output control
Press the OK button to select or acti-
7
vate the chosen option.
Press the SYSTEM MEN U (OSD)
button to c]ear the on-s_Tcen TtlelIU
8
fr_ml file TV screen.
iIInl_ @ * o
B
mu
36
,dmv .............
Page 37

Some Video CDs contain in/ibrmation that
allow you to control the playback of the
disc: through a special playback menu. the
PBC (Play Back Control) can be set to On or
off,
I Press file SYSTEM MENU (OSD)
bl_tton on the remote, contrt_] to display
fire on-screen menu.
Press the CURSOR DOWN button
2
tutti] the word Setup is hig[flighted.
Press the CURSOR RIGHT button to
3
move the puck to riteright highlighting
fireword Features.
Press the CURSOR DOWN button to
4
highlight rite PBC control.
Press the CURSOR RIGHT bl_tton
m se]ect On or Off.
5
Press file OK button m select or acti-
6
V_t_ rite chosell option,
!
/
nwl
s Illllilnlmlllm
_l?lP ........ ,lnlv
Press file SYSTEM MENU (OSD)
bBttolI _0 cle/;!l file Oll=scTeell [nenL[
7
_o[n the m r screelt.
!
37
Page 38

When using and making changes within the
Access C_mtrol options an access PIN will have
to entered before any new settings ca_ be ma_e.
Other controls incltMe Parental Levd, Change
Ph¥, and Disc Lock,
I Press file SYSTEM MENU (OSD)button on fire remote control to display
the Oll-sGTeell menu.
Press file CURSOR DOWN button
2
until rite word Setup is high]igh_d.
Press file CURSOR RIGHT button to
3
move the puck to fire fight highlighting
the word Access.
Press file CURSOR DOWN button tohighlight the Enter Current PIN con-
/
I
I@
littlillltlalilD
5
6
7
8
9
I0
Press file CURSOR RIGHT button to
gain access to the PIN enWy scxeen.
If first time use, enter a 4-digit PIN
using the NUMBERED buttons. If
you have forgotten yottr PIN, press the
STOP button 4 times, then enter a
four digit PIN using the NUM-
BERED buttons. (You will be,asked a_
confiml rite new number.)
Press the CURSOR DOWN button to
s_col] the available access controls.
Choose from: Parental Level, Change
PIN, or Disc Lock,
Once an option is selected, press the
CURSOR RIGHT button to gain
access to fire highlighted control's
options.
Parental Leveh Press file CURSOR
RIGHT or LEFT to select a level of
security fram 0-8 (see infomlation
below).
_: Select fltis option to cre-
ate, a new 4 dig_t PIN access number.
Follow onscreen htstructions.
_: Press fire CURSOR RIGHT
to toggle the conm_] On or Oft" to block
v_ew of certain discs.
Press file OK button to select or acti-
vate rite chosen option.
Press file SYSTEM MENU (OSD)
button to clear the Oli-_Teen TIlelIU
fK)TI1file TV screen.
®®
@@
®®©
I *
_ ossamalae
lllllD
10uitallllllo
m
8
mllllssillD
IOJMmlID
_tal I,vel: ¢Ralings I to 8): If yo_ _et a _ting rc_ thepLay_', all sc_e_ wffh the _,ar_¢ralhagc_ lower will
be play_L Hig]x_ zakxl scenes will _oLbe pMyexltiaras an _dtemalive gsavaCL_bleon the d_c. "[i_e_l_Tmfive
m_st i_vo _e _ rating or a lower o_¢. If no _ditabloal_-_a_vo is fouml, pla)_ack will stop a_d the _-digff
c<_le_ to be enlczed.
_tal I,vel _r: _fhis l_Vl_ pLayecfeatures the Pa_nk_l L¢_-_ sys_n which LSN_._iXlef[ to ac_vate
wbe_ play_g DVD dg'_sfvzdi_l with _xiain softw_ _. Tais is a:cordJng to tt_lmSral sta_d_ls I_1o_1
by _e set maker a_d d_se co,tern im_ustrics. Please note that the ParentalLevd syslem _511_ot operate a DVD
disc wNch is not fur_sbed vddi the approgc_alesofl_ codhN. AL_onot_ _hatat the _ of zele_se of this
"PCIDVI) Player, c_lain _specl_ of _ t_mhnicalstan_rds had not _._n selfl_ botwccmthe set maker _r_ die
disc ircl_s_rie#.On this bosi_ PhiliI_ Ceas_r Elec_odics cannot g_tce ;_oning ot the Partmtal LC_'_-_
_ys_'ra _md&_a"_os a_y liabi3iLywith unimemleA watching di disc contcnL If in _oubh pl_ n_ko _e the d_
plays acco_lJ_g Io yot_ Panmk_l LC_'_-tsedin_ befor_ you allow -t-t-t-t-t-t-t-t-t_ldamacc_*_.
38
I *
lummatlltm
R
Page 39

_Vt e Sound option within the Preference
enu contains a control called Night
Mode, the Night Mode control .,'hen On will
optimize the d);v_amicsof the Players so_r,d
output. High Volume sound are softened,
enabling you to watch your ldvorite action
tr_vies without disturbing others at night.
When the Night Mode control is set to Off', the
sound output will be hearst in its thll dynamic
range.
Press the SYSTEM MENU (OS)
buttoit on the remo_ con_rt_]to display
_1_ on-scn_ell C(lerlU.
Press file CURSOR DOWN buttoituntil the word Preferences is highlight-
ed.
Press file CURSOR RIGHT burton V:
move file :puck to fireright highlighting
fire word Somtd.
Press file CURSOR DOWN buttott to
highlight fire Night Mode con0vol.
9
mmmmm
I
| ,,,d •
=,, ..............
Press the CURSOR RIGHT button to
t_ggle flt_ Night Mode control On or
Off.
_.._: This setting will soften fire dynam-
ics of rite sound outpuL
_._q.:when the Night Mode control is
set to Oft; the disc will be heard _n its
fa]l d3qtarnic sottnd output.
Press file OK buttott m select or acti-
vate rite chosen option.
6
Press file SYSTEM MENU (OSD)
7
bBttoll _0 cle[ff file OII=SCTe_',II [nenL[
r , . l_otn the 'I_ _ sc31ye,el.
39
Page 40

_th e DVD Pla_,er has two special controls"
at can be turned on to help navigate the
menu with helpful suggestions (Help Line) and
the show the current play state and time infor-
mation (Status Window) on the screen during a
disc:playback.
Imlmlllllllllllml
mmmmmm
m
Press file SYSTEM MENU (OSD)
button on rite remote contral to display
fire on-screen memt.
Press the CURSOR DOWN button
arttil the word Preferences is highlight-
ed.
Press the CURSOR RIGHT button to
move tile puck to the right highlighting
fire word Features.
Press the CURSOR DOWN button to
highlight eiflter fire Help Line or
Status Window conrail.
Press the CURSOR RIGHT button to
5
toggle fire selected control On or Off.
ON: Will display a srnaU window at
fire lmtVam of the screen with sugges-
tions to help navigate fire ouscreen
inenu,
OFF: The Help Line will not appear
when fire onsereen menu is displayed
on scTeen.
Status Window:
ON: Will display current disc status
and time.
OFF: The Status Window will not
appear on screen.
imlHi
1
m@
illelm,l,ll!!,lmllm
lil
lil
I
1
Press file OK button to select or acti-
vate tile chosen option.
Press file SYSTEM MENU (OSD)
button to clear fire on=scTeen D'lenl_l
tTotn the T_r sere,ell.
li
HNp Line win give sugg-_sdons regarding
lhe navig0fitrn of the ons_n menu.
4O
Page 41

T_e Play Option area of the DVD Player
t_'creen menu contains three control that
allow you to navigate the disc: _v titles and
chapters, set the at_io language, and set the
st_-title language.
I
I
I
I Press the SYSTEM MEN U (OSD)
button or, the remote _rttrol to display
the on-screen metro, fl,e Tt×dbar optiort
will be highlighted.
Press the CURSOR RIGHT button
until tie words Play Option are high-
ligh_ti.
Press the CURSOR DOWN button to
big[flight the Disc Navigation, Audio,
or Sub-rifle corttro].
Press the CURSOR RIGHT button to
4
gain access to file highlighted corltrol's
options.
_: Search fire dlse by
tire tuld chap_r.
_: Use to set the audio language
from a list of awtilable choices.
_: Use a_set fire sub-title lan-
guage from a list of available choices.
Press the CURSOR UPor DOWN
buttons to scroll trod highlight fire
available menu optiorm.
Illlmt
000
/
/
/
/
I
Press the OK button to select or ttcti-
6
va_ the chosen optiort.
Press the SYSTEM MEN U (OSD)
button to c]ettr the on-s_een T_leltu
7
from file TV screen.
lI91flliill
I
I
41
Page 42

T_e DVD Player has the capability to view
hoto CDs that contain digital photos
(JPEG only) on the TV semen, The Slide Show
controls" of the Tool Bar menu allows you to
control the time between pictures.
_tiz the TViDVD in the DVD mode
I
press the EJECT button to open the
disc troy.
Place a Photo CD (JEPG only) into fire
2
disc troy and press the EJECT button
to close the disc tray.
If available on fire disc you will see
Thmnbeail Images filed across fire
screert.
Press the CURSOR RIGHT_ LEFT,
UP or DOWN buttons to scroll
3
through the available pictures.
Press the OK button after highlighting
4
a Thumbnail to view the picture fifll
screell.
Other Slide Show option (Pic Time):
Press the SYSTEM MEN U OSD but-
ton to display rite onscreen menu.
Toolbar will be highligh_d.
Press the CURSOR RIGHT button
until the words Shde Show are high-
lighted.
Press the CURSOR DOWN button tohig[flight Pic Time corttral.
_: Will control file length of
time the picture is displayed. With INc
Time highlighted, press the Cursor
Right button to enter rite sub-menu
categories. C"ht×_se from Slow, Medium
or Fast,
Press the PLAY II_ button to sturt the
Slide Show.
8
Press the STOP • button to end rite
Slide Show
9
No[€: Wi_h th_ _humbr_ail_ C_m a photo CD displayed[
button _dll allow you to view the picture 5ull scrz._.
12viewing a Slkle Show, gressthg the Stop buttcgl will
slop the show. P_,ss _e Pl_n,,._but_ ag_ to continue
[t_e Slk_ shc_,,
42
Page 43

I
Some Discs contain additional information
that will allow the viewer to change the
camera angles, zoom the picture, rotate the pic-
ture, and scan chapters with chapter preview.
I Press the SYSTEM MEN[) (OSD)
button on the remote control to display
tie on-screert menu. the Too]bar option
will be highlighted.
Press the CURSOR RIGHT button
until the word View is highlighted.
Press the CURSOR DOWN button to
highlight eiflter fire Angle, Zoom,
Chapter Preview, or Rotate colttrol.
Press the CURSOR RIGHT button to
4
gailt access to fire highligh_d conrad's
options.
_: ff addifiolt',d camera angle exist
on the disc, Wess fire O.t_r Right to
access the sub-memt, flten the ('_rsor
Up or Down to select desired angle.
new camera angle will appear on the
s_Teen,
Zoom: Press the C_lrsor Right to acti-
w_te, fltelt use rite ('_trsor butmlts m
select an area to zoom. Press the OK
button repeatedly to zoom 2x, 4x, 8x,
or to return to lx pictmre size.
Chanter Preview: Use rant Chapter
Preview On or Off. Wherl On disc will
preview all awtilable chapters.
_: It"available on fire disc, select
rotate to turn the picture 90 degrees
clockwise from the original. G_eat fea-
ture when viewing a photo CD.
/
mR
/
B
/
IImll_ IIMIllllB
1
1
Ilillllll _ _
B
/
I mmammmm
m
/
Press the CURSOR UP or DOWN
5
buttons m scroll and highlight the
available melm options.
Press file OK button m select or acti-
6
vate file choselt option.
Press the SYSTEM MENU (OSD)
tIBt_on to cle[!l _le oil-scTeeil inenL[
7
from the T%r sc_eee.
I
/
imaail
1
l
_ mlaaaaaam
,*3
Page 44

_e Search control allows you to start the
layback at any ctu_sen time on the disc or
to seamh /br certain areas. The seamh options"
can be set fa_, slow, or can be searched fr_e
bv_ame,
I Press file SYSTEM MENU (OSD)
button on fire remote conrail to display
file Oli-s_eli menu. the Toolbar option
will be highlighted.
Press file CURSOR RIGHT button
2
tmti] rite word Search is highlighted.
Press file CURSOR DOWN button to
3
highlight rite Time, Fast, Slow, or
Frame by Frame control.
Press the CURSOR RIGHT button to
4
gain access to the highlighted control's
options.
_: Se_ch the disc by entering a
desired time (based on playback time).
Use fire Numbared bttttons to enter the
time.
useO,e*l*l o, bat ,ns
scan fire disc at +4, +8, or +32 times
speed forward or -4, -8, or -32 times
speed backward.
_: Use fire _ or _ buttons m
scan fire disc at +1/8, +1/4, +1/2 or +1
times speed forward or -1/8, -1/4, -1/2
or -1 times speed backward.
Frame by Frame: Use fire _ or
_l_l_ buttons to se_ch the dlse one
fi'ame at a time fca-_vard or backward.
ilmmnllllnllm
1
m
B
II1_1
B
m
B
m.
iaaanim,_ _
m
B
B
OR
Imltdttmiil _ _
Press file OK button once you are
done with fire search Wocess to retttrn
R_the menu options.
button to clear the Olt-_*reen TtleltU
Press file SYSTEM MENU (OSD)
fi'o_ll rite T%z 8¢.,*reen.
I
alllmemim_.
B
B m
B
4,*
n
B
unlulim_ _
m
B
Page 45

y;u can program lavorite tracks to be
layed in the order you want using the
Program options within the Toolbar, Up to 20
tracks can be programmed at one time.
I Press file SYSTEM MENU (OSD)
buttott on fire remote control to display
fire on-so'teen menu. the Too]bar option
will be highligh_d.
Press file CURSOR RIGHT buttott
until the word ProgTam is highlighted.
Press file CURSOR DOWN butto_t to
highlight eiflter fire Program, Tracks,
Play llst, or Clear all control.
Press the CURSOR RIGHT button to
4
gain *recessm the highlighted control's
options.
P_: Once a Track or C_apter has
been selected and added to file Play
list, press the • button to t_ggle the
Progn_n function On or Off.
_: Use fire • button to display a
list of avNlable Tracks, wess the •
button agNn to display a list of avail-
able Chaptem. With a track or chapter
highlighted, press the OK bu_m to add
fire selection m the Play lisL
P_: Press the • button m display
file current Play lisL Use the Ik or V
buttons to scroll file play list and press
OK to start the playback at that pr_int.
_: With Clear till selected, press
fire• button to select Cleared, erasing
al] progTt_rmlJng.
n
u
mnn,m,
IImfWlliliS ** _
B
m
m
OR
Iglffllfftllllk ** _
B
m
B
wl..............
OR
illmismes., _
mmetamm_
B
Press file OK buttott once you are
done with the programming process m
return m the menu options.
buttolt to clear the on-screen men_a
Press file SYSTEM MENU (OSD)
t_om the T%r screen.
wl..............
OR
mmmmmB
B
B
45
Page 46

Spelecting an Audio Language is a_"ea_), as
twss one button,
To Select the desired Audio Language:
I Press the red AUDIO bz_tton on fl_e
re_o_ contrail to display the on-s_en
Audio _entt,
Pcess file A or V button to sc_]l file
2
avai]able ltulguage optiorls.
Pcess file OK button m corlflrm file
3
_]ectJoll aJld ve,Tt_ove, file Tt_e,ilu bar
from the, T_ r s_Te,erl.
Audlols heard in
the_lect_dlag',u_uag$.
46
Page 47

The Sub4itle button frill allow you to select
I the desired Sub-lille language quickly or
to turn the Sub-title option off,
To Select lhe desired Sub-title Language:
I Press the blue Sub-title button on the
remote control to display the on-_reen
Sub-title _enu,
Press the A or V button to scroll the
awtilable sub-title language options or
the option "none".
selectiorl ttrld l"emove the mellU bar
Press the OK button to corn_irln the
from the TV screen.
"_qlell "none" is tile selection, no sub-
title wi]l appear on file screen during
the playback of a disc.
Sub.tie will appear at the Ix_C_om
oft_e screen in the selected language.
47
Page 48

_a e Repeat button on the t_mote control will
Ilow you to program the playback of
Chapters, Tracks, Titles, or the entire Disc: to be
repeated.
[hess the green REPEAT button on the
I
remote control repeatedly to ch_×_ one
of the avai]able repeat m_xle,s:
_: Press the REPEAT button onoe,
REPEAT will appear on the screen. Tiffs
tkulction will repeat the current CHAP-
TER being v_ewed. Press OK t_ c_ntfirtn
rite selection.
Title.- Press the REPEAT bu_m twice,
TITLE wi]l appear on the screen. Tiffs
tkmctkm will allow you to repeat carrent
TITLE being vie_v!.!. Press OK to oan-
finn the selection.
l)i_: Press rite REPEAT bu_m three
times, DISC wfl] appear on rite scn'ee.n.
ThJs tkmctknl will repeat playback of file
entire DISC _xmte,nt. Press OK to _.m-
tlr_n the selection.
Off: Press the REPEAT bu_m a fi._ttrt.h
time, OFF will appear oll file screen.
Pa-e,ss OK to confirm the selection trod
turn the Repeat Sexluenee off.
...,_,_0 O®
(DQ(D
/
®®®®
@®®
®®@
®@@
We Repeat A_B button on the twmote control
ill allow you to program the" 'playback of
certain lengths of Titles or Tracks on the disc,
Daring the playback of a disc, press the
I
yellow REPEAT A-B bulton on the
relnote COlIN_]R)select a starting N_irit
for the repeat playback to begil. Repeat
Awill briefly appearon the screen.
When the disc reaches the ending point
2
of the desired playback you wtutt to
repeat, press the REPEAT A-B button
again. Repeat B will briefly appear on
t/le scree_. The seqt_errceof playback
between fl_e"A'" part a_d fl_e"B" part
will repeat _tselt:
remote control a fffird time to turn the
Press the REPEAT A-B button on t/le
Repeat A-B sequence off. Repeat A-B
OFF will appear briefly on the screen.
IsO O ®
©@ @®.....
®®®®
@@@
®@@
@®@
®®©
iml=l
'\\
I
I
I
I
I
I
!
/
/
48
Page 49

ZhBe /Ollowing steps describe how to
ookmark your D_'Ds when using the
Timer Controls within the TVs onscmen menu,
,Note: With an "on tinter" sequence set (and
active), the Timer Controls can tune the TV to
the DVD mode when the TV powers itself on.
lf a DVD is playing and an "on timer"
sequence is set (and active), the DVD can be
Bookmarked so the Timer Controls" will
resume playback of the DVD when the TV
powers itself on. For more information about
specific Timer Control lunctions, please refer
to page 13 of this manual.
Press the MENU button on tie remote
to display tile TVs on-screelt menu.
I
Press the CURSOR DOWN button
2
until the word FEATURES is high-
lighted.
Press the CURSOR RIGHT button to
display tbe FEATURES menu options.
3
TINIER will be high]ightex!.
Press the CURSOR RIGHT button to
shift rite menu to the left and enter the
4
TIMER control options.
Press the CURSOR DOSVN button
to select and highlight the word
5
CHANNEL.
W?????????
0000
0@)0
®®®
®®O
T_
O®
A
_ A_t;vs_ C_zrrd \c
Ae_s
0Sla't _e
m
4/
B ,
a.) If not nlavin_ a DVD press the
CURSOR LEFT or RIGHT button m
6
scroll fire awdlable channels tmtil fire
word DVD appe_ws,
b.) If olavltt_ a DVD press the CUR-
SOR LEFT or RIGHT button t_
scroll fire available channels tmtil fire
words BOOKMARK DND? appears.
tion.
Press the OK button m store rite selec-
If DVD is selected and a Timer
Sexluence active (refer m page 13),
when the T%r powers itself on, it will
automatically ttme m the DVD mode.
If BOOKMARK DVD? is selected,
when the OK button is pressed the
words will change m BOOKMARKED.
With BOOKMARK DVD? selected and
a Timer Sexluence active (refer m page
13), the playback of the DVD (hi the
position it was Iron.harked) will
vasume when the T%r powers itself on.
Refer to page 13 of thls manual to setrite specific TIME, START TINIE,
STOP TIME, mtd to ACTINATE rite
"on timer" sequence Onoe, or Daily.
o _rne
j_ _l-_and No I0 I
r
+
o '1_n_
o_Tms
oAeJv_s
D_ay
[
To ttnn a BOOKMARKED DVD OFF, enter file menu as desc'ribed to file lefL
Once Chamtel is highlighted, and "Bookmarked" appetws, press the OK burthen
t_ tam the Boo.hark off. The text will change from "BOOKMARKED" to
"BOOKMARK DVD?".
0T_
o -A_'_
4g
Page 50

_the fOllowing steps describe how to set up
e playback of an At_io CD.
I Press file EJECT button on the
remote con0xfl to open fire disc _y and
place the TV!DVD in fire DX,O mode.
Insert an Audio CD into the disc tray
and press file EJECT button on rite
remote to c]ose rite disc troy.
ff automatic playback of file disc does
3
not start, press the PI, AY button on
file remote control when the Audio CD
menu appears to beg_n p]ayback on
Track 1.
Press file Aikor V buttons to sc_xfll
fltmugh fire other available tracks on
fire disc m begin playback of that
selected track,
When firfished, press the STOP button
on the remote control t_ st_p file play-
back of fire disc.
mmo_ control R'_remove the disc from
Press file EJECT button on the
dte disc tray.
Note: some Audio CDs contain CD Text fltat
will appear when tracks are playing. Tiffs _xt
could _nc]ude fire track titles or special added
text _nformatkm.
5O
Page 51

No Power
• Cheek tile TV pewer cord. Unplug the TV, wait 10 seconds,
fllen reinsert the plug into file outlet mid push the POWER
bu_m again.
• Cheek tllat the outlet is not on a wall switch.
• Be sure the fuse is not blown on tile AC power strip, if one is
being used.
No Picture
• Cheek ant_mta comtections. Are they properly seeured m the
TV's ANT 75Q plug?
• Cheek tile TUNER MODE control for tile correct tuner set-
ring.
• Try ranning file Aut_ Prog_un featx_e t_ find aU available
channels.
No Sound
• Cheek tlte VOLUME buttons.
• Cheek tlte MU_ button on the remotc control.
• Cheek tlte SPEAKER on=screen control. It"it is in tlte OFF
position, somtd at fire set will be elimlnatcd.
• ff you're attempting to ht×_k up au×iliary equipment, check
fire audiojack connections.
• (It" applicable) Check fire audio meeiver for fire correct operat-
ing mode.
Remote Does Not Work
- Cheek tlte bathes. If necessary, replace them with AA
Heavy Duty (Zinc Chloride) or Alkaline batteries.
• Clean the ve_l_otc con_Kfl altd fire remote con_)] sensor win-
dow on file TV.
• Cheek the T%r power cord. Unplug the T%r, wait 10 seconds,
flten reinsert the plug into tlte outlet and push fire POWER
button again.
• Be sure the fuse is not blowll on the AC pewer strip, if one is
beirlg used.
• Cheek to be sure the 2"%'outlet is not on a w*dl switch.
"IV Displays Wrong Channel or No
Channels Above 13
• Repeat channel selection.
• Add the desired channel numbe_ (using the CHANNEL
EDIT control) ink) tlte TNr's rnemory.
• Cheek to be sure the TUNER MODES are set to fire CABLE
option and run fire Auto Pragram feature to find all avtfilable
channels.
Cleaning and Care
• To avoid pessible shock hazard, be sure the 2W is unplugged
t_om the electrical outlet before clemdng.
• When you are cleaning the T%r,take care not to scratch or
damage fire screen surface (avoid wearing jewelry or using
anyflling abrasive). Wipe file front screen with a clean c]ofll
dampened with watcr. Use even, easy, vertical strokes when
c]emdng.
• Ccently wipe tlte cabinet st_'aces with a clean cloflt or sponge
dampened in a solution of cool, clear water. Use a clemt, dry
c]oflt to dry fire wiped surfaces.
• Never use fltinne_, klsectiaide sprays, or otlter cbemicals on
or near the cabinet, as they might cause permanent marring of
fire cabinet finish.
WARNING Concerning Stationary Images on the "IV
Screen:
Do not leave stationary or lett_rbox images on screen
for extended periods oftlme. This can cause uneven
plcture-tube aging.
Normal use of fire TV should involve fire showing of pictures
firm contain constmttly moving and changing images that fill fire
screen. Be careful not t_ leave nomarwing images on screen for
extcnded periods of time, or to display fire same images on
screen too frequently, because subtle ghost images can be left
on the picture tubes. Sources of stationary images may be DVD
disks, laser disks, video gtunes, CD-i disks, videotapes, digittfl
television lmxes, braedcast cltannels, cable cltannels, satellite,
channels, and othe_. Here are some examples of stationary
ilnages (.this is not an alMnclusive list; you lnay encounter
others in your viewing):
• DVD menus--listings of DVD disk content
• Lett_rbox black barx_--shown at the t_p and Ix_ttom of fire
TV screen when a wide screen (16:9) movie is viewed on a
TV wiflt standard (4:3) aspect ratio.
• Video-game images and scoreboards
• Television station Iogos_present a problem if they are
bright and stationary; movhtg or low-contrast gxaphics are
less likely to cause uneven aging of tlte picttwe tube
• Stock-market tlcker_---presentcd at the bo_)m of tbe TV
screen
• Shopping channel Iogos and pricing dlsolays--bright
and showlt constantly or repeatedly in fire same location on
file TV screen.
PLACEMENT OF THE TV
• To avoid cabinet warping, cabinet color changes, and
increased chance of set failure, do not place the T%r where
tcmperatures can become excessively hot; for example, in
direct sunlight or near a heating appliance.
• Be sure to allow a tree flow of air m mtd from fireperforated
back cover of the seL
CLEANING
,, To avoid possible shock hazard, be sure the T%r is unplugged
from tlte eleetric',d outlet before cleaning.
• Reg_flarly dust the T%r with a dry, nonsoratcldng duster to
keep the TV clean.
• V_qtee cleaning fire TV, take care not t_ scTatch or damage the
screen surface. Avoid wearing jewelry or using anyflfing
abrasive. Do not use household cleane_. Wipe the front
screen with a clean c]ofll dampened witll water. Use even,
easy, vertictfl sm)kes whee cleaning.
• Ccently wipe the cabinet st_'aces wifll a clemt cloth or sponge
dampcoed in a solution of cool, clear water mtd a mild soap
or detcrgenL Use a clemt, dry c]oflt m dry fire wiped surfaces.
• OccasionNly vacumn the vcotilation holes or slots hi the back
cover of the seL
• Never use thinners, insecticide sprays, or oflter chemicMs on
or near the cabinet, as they might cause permanent maWmg
of fire cabinet finish.
51
Page 52

Auto Programming • Hie proeed_ of adding or deleting
charnel numbers inte the Television's memory circuits, hi flds
way file Television "remembers" only file ]oc',dly awtilable or
desired channel numbe_ and skips over any unwanted chamtel
nu_tlbers.
Closed Caption • Broadcast stmtdard which Mlows you to
_ead the voice, content of television progrt_ns on the T%r screen.
Designed to help the heating impaired this feature uses on-
screen "text boxes" te show diMogme and colwersations while
fire TV program is in progxess.
Coaxial Cable • A single solid antenna wire nonmdly matched
wifll a metal plug iF-type) end connector flit screws (or pushes)
directly onto a 75 Ohm input found on file Television or VCR.
Menu • An on-screen listing of featt_e conm)ls shown on fire
Television _,'reen that are made available for user adjustments.
On Screen Displays (OSD) • Refers te the wording or mes-
sages generated by file television (or VCR) to help the user with
specific feature controls (color adjustment, programming, etc.).
Quadra Surf • The feature fllat allows the progrannhing of
roar separate Sttr[" lists holding up to ] 0 channels each.
Side Audio/Video Inputs • Located on fire side of fire Tar
these cormecto_ (phono t3q_e plug) are used for the input of
audio and video signMs. Designed for easy use with VCRs or
c[_neras.
Surf • The action of scanning specific chmmel in a limited
chamtel list.
System Menu (OSD) • Mlows the user to quickly confirm
what channel number is cttrrently being viewed. Stares can *dso
be, used to clear the Television of on screen displays or informa-
tion (mflter fltmt waiting tbr the displays to "time out" or auto-
maritally disappear from fire screen).
Tuner Mode • Feature control settings made by the Tar
Designed for first thile set up and use. Settings for signal con-
nections (antenna or cable Ta;), plus chmntel program rnertua3_
are held in file TaPs memory (even if the set is mtplugged mid
moved to a Mew location.)
Twin Lead Wire• The more commonly used name for rite
two strmtd 300 Ohm antemta wire used wlflt many indoor and
outdoor mttelma systems. In many cases this type of antenna
wire requires mt additiontd adaptcr (or balun) hi order to con-
nect m the 75 Ohm Input termintds designed into the more
recent Televisions and VCRs.
Rernot;e Sensor Window • A window or opening found on
fire Television conm)l panel through which infrared remote con-
m)] command signals are reoeived.
52
Page 53

DVD Player Operation
Audio CD Playback ................................ 50
Basic DVD Operation .............................. 31
Bookmark DVD ................................... 49
Menu Bar Operation ................................ 33
Preference Menu
Features
Help Line ..................................... 40
Status Window .................................. 40
Sound
Night Mode .................................... 39
Remote Control DVD Button Descriptions .............. 32
Remote Control Features
Audio Button ................................... 46
Repeat Button ................................... 48
Repeat A-B Button ............................... 48
Sub-title Button ................................. 47
Set-up Menu
Access
Parental Level ................................. 38
Change PIN ................................... 38
Disc Lock ..................................... 38
Audio Menu
Digital Output ................................. 36
Features
PBC- Playback Control ......................... 37
Language
Defbalt Audio ................................. 34
Defbalt Sub-title ............................... 34
TV
TV System .................................... 35
Toolbar
PrayOption
Disc Navagation ............................... 41
Audio ........................................ 41
Sub-title ...................................... 41
Program
Program ..................................... 45
Tracks ....................................... 45
Play List ..................................... 45
Clear All ..................................... 45
Search
lime ........................................ 44
Fast ......................................... 44
Slow ........................................ 44
Frame by Frame ............................... 44
Slide Show
Pic Time ..................................... 42
Trans(ition) Time .............................. 42
Trans(ition) Effect .............................. 42
View
Angle ........................................ 43
Zoom ........................................ 43
Chapter Preview ............................... 43
Rotate ....................................... 43
Television Operation
Active Control ..................................... 24
Alternate Channel ................................... 29
AutoLock TM
Access Code ..................................... 17
Block All Control .................................. 20
Block Channels Control ............................ 18
Blocking Options .................................. 23
Clear All Control .................................. 19
Explanation of Auto Lock ........................... 16
Movie Rating Control .............................. 21
TV Rating Control ................................. 22
AutoPicture TM Control ............................... 27
AutoProgram TM Control ............................... 9
AutoSound rMControl ................................ 28
AVL Control ....................................... 12
Balance Control .................................... 12
Bass Boost Control .................................. 12
Brightness Control .................................. 11
Care and Cleaning .................................. 51
Channel Edit Control (Add and Delete Channels) .......... 10
Closed Caption Control .............................. 26
Color Control ...................................... 11
Color Temperature Control ............................ 11
Contents ........................................... 5
Contrast + Control .................................. 11
Dynamic Noise Reduction (DNR) Control ............... 11
Factory Service Information ........................ 54-55
Format Control ..................................... 15
Glossary of Terms ................................... 52
Index ............................................. 53
Language Control .................................... 7
Picture Controls .................................... 11
Remote Control Buttons ............................... 6
Rotation Control .................................... 14
Safety Instructions ................................... 3
Sharpness Control ................................... 11
Sleeptimer Control .................................. 25
Surf/Quadra Surf Controls ......................... 29-30
Timer Controls ..................................... 13
Tint Control ....................................... 11
Treble Boost Control ................................ 12
Troubleshooting Tips ................................ 51
Tuner Mode Control .................................. 8
Warranty .......................................... 56
Welcome/Regislrafion Information ...................... 2
53
Page 54

• . Charlotte
.\/
Atlanta/N Georgia
* Indicates In-Home Service Only _/_
Milwaukee:call Chicago _ _\
Cincinnatiand Columbus:callCleveland
Nashwlleand Chattar_x_ga:call Knoxville
Washington/Ba_imore:call Philadelphia
Charlotte:callAtlanta
All Floridalocations;call Tampa
• Indicatu In-Home/Carry-In Service
Toll-frsenumbersprovidedon the nextpage
NOTE:If youresideinoneof our PhifipsFactoryServiceBranchareas(seedirectoryonback),youcancontactthenearestServiceBranchtoobtain
efficientandexpedientrepairforyourproduct.Ifyourproductis In-Warranty,you shouldhaveproof-of-purchasetoensureNoChargeService.For
Out-of-Warrantyservice,callthelocationnearestyou.
NOTA:Sivousrdsidezdartsunedesrdgionsdesserviesparunesuccursaledeserviceapr_sventedufabricantPhiflps(voirlisteci-dessous),vous
pourrezcontacterlabranchedeserviceapr_sventela plusprosdechezvouspourobtenirunserviceapr_sventerapideetefficace. Si]eproduitest
sousgarantie,il suffiradepresenterunepreuved'achatpourb_ndficierd'unservicesansfrais. Pourlesproduitsnoncouvertsparlagarantie,con-
tactezlecentre]eplusprosde chezvous.
NOTA:SiUd.resideenunadenuestraszonasparasucursalesPhilipsdeservicioaldef_brica(verdirectoriom_sabajo),Ud.puedecomunicarsecon
lasucursa]deserviciom_scercanaparaobtenerunareparaci6noportunay eficazdesuproducto.Si su productoest_todaviabajogarantia,Ud.
debepresentarcomprobantedecompraparanoocasionarningunoscargosporservicio.Paraserviciodespudsdelvencimientodelagarantfa,Ilame
al]ugarm_scercanode losabajoindicados.
TampatW Rorlda
_lFt M.Myers/SW Florida
laml/SE Florida
InCanada
Howyoucanobtain_ficient andexpedientcarry-in,mail-in,orin-homeserviceforyour product
PleasecontactPhilips_ 1-800-661-6162(Frenchspeaking)
1-800-531-0039(Englishor Spanishspeaking)
_anada
Commentobtenirleserviceapr_s-ventepourlesproduitsapport_souenvoydsparla poste_ notrecentredeserviceouleservice_ domicile
Veuillezcontacterphilips_: 1-800-661-6162(Francophone)
1-800-531-0039(Anglaisou Espagnol)
Enel Canad_
C6mo recibir servicio efficiente para su producto, en persona, por correo o a domicillo
Favorde comunicarse con Philips al: 1-800-661-6162 (Francds)
1-800-531-0039 (Ingldso Espafiol)
54
Page 55

OUALITYSERVICEIS ASCLOSEASYOURTELEPHONE!SIMPLYLOOKOVERTHELISTBELOWFORTHENUMBEROFA FACTORYSERVICECENTER
NEARYOU. YOURPRODUCTWILLRECEIVEEFFICIENTANDEXPEDIENTCARRY-IN,MAIL-IN,ORIN-HOMESERVICE,ANDYOUWILLRECEIVEPEACEOF
KNOWINGYOURPRODUCTIS BEINGGIVENTHEEXPERTATTENTIONOFPHILIPS'FACTORYSERVICE.
COMMEHTOBTENIRNOTRESERVICEAPRESVENTERAPIDEETEFFICACESOIT PAR COURRIER,_ DOMICILE,OUENSEPRESERTART_ UN CENTREDE SERVICEPHILIPS. PLUSDE600 CENTRES
DERECEPTIONDEPROOUiTS._ REPARER_ TRAVERSLEPAYS:CONTACTERLECENTREDESERVICEAUX CONSOMMATEURSLE PLUSPROCHEPOUR SAVOIRL'EMPLACEMENTDECESOI_PI_TS
DARSUN RAYONDE50 _ 75 MtLES (80 KM _ 120KM) DU CENTREDESERVICELOCAL.
C6MO ORTENERUNSERViCIOOPORTUNOY ERCiENTEPORCORREO,ENCASA0 ENPERSONAPARASU PRODUCTOA TRAV_SDE UN CENTROPHILIPSDESERVtCIO MASDE600 smos POR
TODOELPAlS PARALARECEPCIONDEPRODUCTOSNECESITADOSDEREPARACIONES:COMUNICARSECONELCENTRODESERVICIODEFABR]CAMASCERCAROPARAESTOSLUGARESDENTRO
DEUN RADIODE80 A t20 NM (50 A75 MILLAS) DELCENTRODESERVICIOLOCAL
MIND,
ATLANTA
Philips FactoryService
550 FranklinRoad., SuiteF
Marietta,GA30067
800-273-1501
TAMPA
Philips FactoryService
1911 USHighway301North, Suite100
Tampa,FL33619
800-442-2027
SANFRANCISCO
Philips FactoryService
681 EastBrokaw Rd.
SanJose,CA95112
800-300-9013
HOUSTON
Philips FactoryService
1110 N. Post OakRd., Suite 100
Houston,TX77055
800-952-3254
CLEVELAND
Philips FactoryService
950 KeynoteCircle
Brooklyn Heights,OH44131
800-331-7037
DETROIT
Philips FactoryService
25173 Dequindre
Madison Heights,MI 48071
800-438-1398
DALLAS
Philips FactoryService
415 N. MainSt_,#107
Euless,TX 76040
800-952-3254
LOSANGELES
Philips FactoryService
20930 Boni_, Ste. V
Carson,CA 90746
800-300-9013
CHICAGO
Philips FactoryService
1279 W. Hamilton Pkwy.
Itasca,IL 60143
800-531-2922
KNOXVILLE
Philips FactoryService
OnePhilips Drive
Knoxville,TN37914
800-821-1767
PHILADELPHIA
Philips FactoryService
352 Dunks FerryRd.
Bensalem,PA19020
800-847-9320
55
Page 56

COLOR TELEVISION
90 Days Free Labor
One Year Free Replacement of Parts (Two Years Free Replacement on Color Picture Tube)
This product can be repaired in home,
WHO IS COVERED?
You must haveproof of purchase to receive warranty service. A sales
receipt or other document showing that you purchased the product is
considered proof of purchase.
WHAT IS COVERED?
Warranty coverage beginsthe day you buy your product. For 90 days
thereafter,all parts will be repaired or replaced free, and labor isfree.
From 90 days to one year from the day of purchase, all parts will be
repaired or replaced free, but you payfor all labor charges. From one
to two years from the day of purchase,you payfor the replacement
or repair of all parts except the picture tube, and for all labor charges.
After two years from the day of purchase,you payfor the replacement
or repair of all parts, and for all labor charges.
All parts, including repaired and replaced parts, are covered only for
the original warranty period. When the warranty on the product
expires, the warranty on allreplaced and repaired parts also expires.
WHAT IS EXCLUDED?
Your warranty does not cover:
labor chargesfor installation or setup of the product, adjustment of
customer controls on the product, and installation or repair of
antenna systems outside of the product.
product repair and/or part replacement becauseof misuse, acci-
dent, unauthorized repair or other cause not within the control of
Philips Consumer Electronics Company.
reception problems caused by signalconditions or cable or antenna
systemsoutside the unit.
aproduct that requires modification or adaptation to enable it to
operate in any country other than the country for which it was
designed,manufactured, approved and/or authorized, or repair of
products damagedby these modifications.
incidental or consequential damagesresulting from the product.
(Some states do not allow the exclusion of incidental or consequen-
tial damages,so the above exclusion may not apply to you. This
includes, but is not limited to, prerecorded material, whether copy-
righted or not copyrighted.)
• a product used for commercial or institutional purposes.
WHERE IS SERVICE AVAILABLE?
Warranty service is available in all countries where the product is offi-
cially distributed by Philips Consumer Electronics Company. In coun-
tries where Philips Consumer Electronics Company does not distribute
the product, the local Philipsservice organization will attempt to pro- MODEL#
vide service (although there may be a delay if the appropriate spare
parts and technical manual(s) are not readily available). SERIAL#
MAKE SURE YOU KEEP...
Pleasekeepyour salesreceipt or other document showing proof of
purchase. Attach it to this owner's manualand keep both nearby.
Also keepthe original box and packing material in caseyou need to
return your product.
BEFORE REQUESTING SERVICE...
Pleasecheck your owner's manual before requesting service.
Adjustments of the controls discussed there may save you aservice
call.
TO GET WARRANTY SERVICE IN U.S.A.,
PUERTO RICO OR U.S. VIRGIN ISLANDS...
Contact a Philips factory service center (seeenclosedlist) or author-
ized service center to arrange repair.
(In U.S.A., Puerto Rico and U.S.Virgin Islands,all implied warranties,
including implied warranties of merchantability and fitness for a partic-
ular purpose, are limited in duration to the duration of this express
warranty. But, becausesome states do not allow limitations on how
long an implied warranty may last, this limitation may not apply to
you.)
TO GET WARRANTY SERVICE IN CANADA...
Pleasecontact Philips at:
(In Canada, this warranty isgiven in lieu of all other warranties. No
other warranties are expressed or implied,including any implied war-
ranties of merchantability or fitnessfor a particular purpose. Philips is
not liable under any circumstances for any direct, indirect, special,inci-
dental or consequential damages,howsoever incurred, even if notified
of the possibility of such damages.)
REMEMBER...
Pleaserecord the model and serial numbers found on the product
below. Also, pleasefill out and mail your warranty registration card
promptly. It will be easier for usto notify you if necessary.
1-800-66 I-6162 if calling from Canada (French speaking)
1-800-531-0039 (English or Spanishspeaking)
Printed in U.S.A.
Philips, P.O. Box 520890, Miami, FL 33152, (402) 536-4171
56
Page 57

30" Widescreen TV with built-in DVD
Highlights
• Plays DVD, audio CD, CD-R, CD-RW and MP3
• Active Control T_ optimizes picture
_0
• 30" Widescreen Real Flat TM picture invar tube
• QuadraSurf r" TV-DVD remote controller
• 5-disc resume play
Features
• Side stereo AV inputs and headphone jack
• Rear stereo AV inputs/outputs, S-Video and CVI
• Digital comb filter for fine picture detail
• 20 watt audio with Incredible Surround T"
• Optional TC3OPV2 matching stand
AutoFeaturePak
• AutoPicture TM
• AutoSound T"
• AutoMute TM
• AutoLock T.
_O
Show_ _bove w_aho_,_nal nl_tchirk_T C_Oi_J'2stand.
Page 58

30" Widescreen Designer
TV with DVD
Technical specifications
Picture Quality
• Active Control TM
Noise and sharpnessimprovement settings are optimized with .....
everychanneland sourceselection.
• 30" Real Flat Tu high contrast invar tube _y_
The flatter tube provides a wider viewing anglewhile minimizing _;
reflections for the best picture possib{e. Widescreen enables
movies to beviewed as the director intended.
• Digital comb filter
Separateschrominance(color) from luminance (brightness) '_ _' '_ :_
information for independent processing to improve picture _: :. :o;
resolution and minimize distortion.
• Dynamic Noise Reduction
Reducespicture graininess causedby weak signalsto produce a
clearer picture and enhance the viewing experience. "_
• 3-Position Color Temperature
Customize picture to your personal flesh-tone preference with
cool, normal and warm settings.
Ease of Use
• QuadraSurf _MTV. DVD Remote control
Controls all TV and DVD features with easyto use onscreen
menu. To personalize and customize TV viewing simply use each
of the four colored surf buttons to view up to ten of your favorite
programs by category (that's 40 total movie, spor_, news, music,
children's, etc.) or by family member. The AV inputs can also be
programmed for use as a "source" selector.
• AutoPicture TM
Instantly optimizes brightness, contrast, color, tint and sharpness
settings with picture presets for Movies, Sports, Video games and
weak signal reception.
• AutoSoundTM
Audio volume levels are automatically adjusted and optimized with
the choiceof three presets: Movies, Voice, Music plus an
adiustable Personal setting.
• AutoMute TM
Automatically activates the closed-captioningwhen the MUTE
button is pressed.
• AutoLock TM
Protects young children from objectionable programming with
V-chip technology.
Any-Button-On Top Controls
Channel Auto-Programming
English/Spanish menu
Event On/Off + 240-minute Sleep Timer
Closed Caption viewing
This televislon receiver provides display of television closed captioning inaccordance with
15_9 of the FCC roles
Optional TC30PV2 television stand
Provides the ideal solution to TV and accessoryplacement with an
emphasis on high design and safety.
Sound Quality
• 20 watt Stereo Sound system
Receivesstereo broadcasts for highpower performance through
dual speakers with exciting and lifelike sound.
• Incredible SurroundTMsound
Widens and deepens thesoundstage for more immersing home
entertainment experience.
Connectivity
• Component Video inputs
The best possible input for highresolution sources such as DVD,
STBsand game consoles for superb color purity, detail and
reduced color noise, surpassingeven S-Video.
• S-Video input
The ideal way to connect high resolution picture sources like
DVD, Digital Satellite & Cable TV and video games consoles for
even better detail than standard Video inputs.
• Rear stereo AV inputsloutputs with digital audio
Connect a VCR, DVD. Satellite and video game through SVideoor
stereo AV connection. Digital audio out plus Audio/video output
jacks make adding a home theatre surround sound even easier!
• Side stereo AV in + headphone jack
Connecting digital cameras andvideo games is quick andeasy.You
can enjoy your favorite program or gamein great stereo sound
without disturbing others by connectingyour headphones (optional)
to the handyside jack.
Side AV + Headphone
Inputs/Outputs
UPC:
Product Dimensions:
Product Weight:
Carton Dimensions:
Carton Weigh_
Carton containS:
Active Control TM, AutoSound TM, AutoPicture rM,
AutoMute TM,AutoLockr% QuadraSurf rM,Real Flat_
are trademarks of Philips Consumer ElectronicsCompany.
Printed in the U.S.A.
©2003 PhiJipsConsumer Electronics Company
www.philipsusa.com or AOL keyword: Philips
Specifications subject to changewithout notice.
0 37849 93564 4
35"W x 23.5"H x 21.5"D
125 Ibs.
39.5"W x 28.5"H x 28"D
142 Ibs.
QuadraSurf _ Remote Control
w/batteries, operating instructions.
warranty information
Rear AV
Page 59

Quick Use and Hookup Guide
Important Notice/Warning ..................... 1
Basic TV Operation .......................... 1
Remote Battery Installation ................... 1
Remote Control Button Descriptions ............ 1
Hooking Up the TV
Basic Cable TV Connections .................. 2
Basic Cable Box Connections ................. 2
yThur television has a set of controls located on the font (_f
e cabinet for use when the remote control is not needed.
Press the POWER button to turn the TV ON,
Basic Antenna TV Connections ................ 2
Using the AVI Inputs ........................ 3
Using the AV2 Inputs ........................ 3
Using the Component Video Inputs ............. 3
Using the S-Video Inputs ..................... 4
Using the Monitor (Audio/Video) Outputs ....... 4
Using the Side Audio/Video Inputs ............. 4
IMPORTANT
NOTE: This owner's manual is used with several different television
models. Not allfeatures (and drawings) discussed in this manual will
necessarily match those found with your televfflon set. This is normal
and does not require that you contact your dealer or request service.
L_[@] The region code for this set is ALL or L
Player. You can not play Discs that are labeled for other regions. Look
for the symbols above on your DVDs. If these region symbols do not
appear on your DVDs, you can not play the DVD in this TV_VD
Player•
DVDs must be labeled for ALL regions or for
Region [ in order to play on this TV/DVD
Press the VOL (+) button to increase the sound level or
the VOL (-) button to lower the sound level.
Pressing both buttons at the same time will display the
onscreen menu. After you are in the menu, use these buttons
to make adjustments or selections.
Press the CH - (down) or + (up) button to select TV chan-
3
nels. Use these buttons to make adjustments or selections in
the onscreen menu.
There is also a set of Audio and Video Input jacks located on the
side of the television cabinet, This jack panel also contains a head-
phone jack that when used will mute the TV speakers. These jacks
are great for connecting a video camcorder or any accessory device
that will only be hooked up temporarily,
To load the supplied batteries into the remote;
Remove the battery compartment door on the back ofthe remote.
Place the batteries (2-AA) in the remote. Be sure the (+)
and (-) ends of the batteries line up correctly (the inside of
the case is marked).
Reattaeh the battery compartment door,
\
Side A/V Inputs
DVD _lYay
Remote Sensor - Sensor for activating
POWEI
Power Light Indicator - Light will
show while TV is powered on.
remote control commands when the
remote is used to control the TV.
Installing the Remote
Control Batteries _ \_ -- -- Battery Companment Door
(shown from the bottom)
Besure to point the I (h _1 'IIA
+ I
,emoteattheRemoteI k U -Ih I +hi
Sensor windowonthe _k M__I I I / I-[J
front of the television
w en,.the omote ".,,
control to operate the I/
television. 2 "AA" Batteries _ Battel2¢ Compartment
SLEEP Button - Press the Sleep button to set the TV to automatically turn itself
off after a set period of time..
MODE (TV or VCR) Button - Press to place the remote in the TV or VCR
mode. When the desired mode is selected the green LED will light for a second
to indicate the present mode, TV or VCR.
SMILEY Button - Press to add channels in the "Quadra Surf" lists• Works with
all four colored buttons•
AUDIO Button (DVD) - Press to display the Audio menu when the DVD
player is active•
REPEAT Button (DVD) - When using the DVD player, press to repeat the
playback of a chapter, title, track or the disc•
SMART SOUND Button - Press repeatedly to choose from different factor
pre-defined sound settings• Choose from Personal (how you set the Sound Menu
options), Voice (for programming with speaking), Music (for musical program-
ming), or Theatre (for watching movies)•
MENU Button ('rv) - Press to display the onscreen menu. Also can be used
back out of the onscreen menu until it disappears from the TV s scree 1,
CURSOR Right, Left, Up or Down Buttons - Press to navigate,
adjust controls within the onscreen menu after the Menu button is pressed. These
buttons also can be used with a VCR, DVD or similar device and when in that
mode. Press the _ Left or _ Right to use as fast forward or fast reverse in
the VCR or DVD mode.
VOL(ume) + or - Buttons - Press he VOL + butto _ to ncrease the TV s
sound level. Press the VOL- button to decrease the TV s sou ld level.
MUTE Button - Press 1o eliminate the sound being heard from the TV. Press
again 1o restore the TV's vdume 1o it's previous level.
OK • Button - Press the OK button to confirm selections and ar
in the on-screen menus. Also used with the Play button to stall a VCR recording
when in the VCR mode,
Pause Button (DVD) - Press m pause the playback of a DVD disc or audio
CD. Pressing repeatedly will show frame-by-frame playback of a DVD disc.
CC Button - Press m activate the Closed Captioning options. Repeatedly press
the CC button with scroll the options available on the TV screen.
®
3121 233 44471
POWER Button - Press the Power button to turn the "IV on or off.
FORMAT Button -Allows you to choose between the 4:3 04 EXPAND 4:3
screen modes.
ECT Button (DVD) - Opens/Closes the DVD disc tray and places the TV in
the DVD mode.
nels within the "Quadra Surf" lists for the four colored buttons.
Surf' lists for the colored buttols.
SUBTITLE Button (DVD - Press to select the subtitle language•
REPEAT A-B Button (DVD) - When using the DVD player, press to repeat
_the sequence in a title•
SMART PICTURE Button - Press repeatedly to choose from 4 different factory
pre-defined picture settings• Choose from Personal (how you set the Picture Menu
event), or Weak Signal (used when the signal being received is not the best).
disc being played.
CH(annel) + or - Buttons - Press to select channels in ascending or descending
order.
_DVD disc or VCR tape.
STOP Button - When in VCR or DVD mode, press to stop the play back of a
_DVD disc or VCR tape.
NUMBERED (0-9) Buttons - Press the numbered buttons to select TV channels
or to enter certain values within the onscreen menu. For single channel entries,
press the numbered button for the channel you desire, the TV will pause for a sec-
\ ond or two before changing to the chosen channel.
\
A/CH Button - (Alternate Clmmlel) Press to toggle between the last view chan-
nel and the channel presently being viewed.
Button -Allows you to delete stored channels within the "Quadra
), Movies (when watching movies), Sports (for any sporting
Button - When in the DVD Mode, press to toggle between DVD
• When in the TV mode, this button will have no func-
- Press to display the onscreen menu that is on the DVD
Button - When in VCR or DVD mode, press to start the play back of a
Page 60

Direct Cable Connection:
yore" Cable TV input into your home may be a single (75 ohm)
•able or use a cable box decoder. In either case the connec-
tion is very simple.
Follow the steps below to connect your cable signal to your new
television.
Cable signal
coming fi'om
Cable Company
(Round 75f_
coaxial cable)
Direct Cable Connections:
This connection will supply Stereo sound to the TV.
Connect the open end of the round Cable Company sup-
plied cable to the 75f_ input on the TV. Screw it clown finger
tight.
Cable Box (w/RF In/Outputs):
This connection will NOT supply Stereo sound to the TV. The sound Cable Signal
from the cable box will be mono. IN from the
Connect the open end of the round Cable Company sup-
plied cable to the cable signal IN(put) plug on the back of
the Cable Box.
Using a separate round coaxial cable, connect one end to the
3
OUT(put) (TO TV) plug on the back of the Cable Box.
Cable Box with RF Inputs and Outputs Connection:
Cable
Company
Jack Panel Back of TV
Output Channel Switch
CABLE TOTV
\\\
OUTPUT
N=]
3 4
Jack Panel Back
of Cable Box
CH
Connect the other end of the round coaxial cable to the
4
75f_ input on the back of the television. Screw it clown finger
tight.
NOTE: Be sure to set the OUTPUT CHANNEL SWITCH on the
back of the cable box to CH 3 or 4, then tune the TV to the corre-
sponding channel. Once tuned, change channels at the cable box, not
the television.
Cable Box (w/Audio/Video Outputs):
This connection will supply Stereo sound to the TV.
Connect the open end of the round Cable Company sup-
plied cable to the cable signal IN(put) plug on the back of
the Cable Box.
Using a RCA type Video Cable, connect one end of the
cable to the Video (or ANT, your cable box may be labeled
differently) Out jack on the cable box and the other end to the
AVI Video Input on the TV.
Round 75ff2
Coaxial Cable
Jack Panel Back of TV
Cable Box with Audio/Video Outputs Connection:
Cable Signal IN
from the Cable
Company
Jack Panel Back
1
N:
] A/V Outputs
Using a RCA type Audio Left and Right Cable, connect one
end to the left and right Audio Out L & R jacks on the
cable box. Connect the other end to the AVI Audio L & R
Input jacks on the TV.
NOTE: Use the Channel +, or - buttons on the TV remote control to
tune to the AVI channel for the cable box signal. Once tuned, change
channels at the cable box, not the television.
Acombination antenna receives normal broadcast chan-
nels (VHF 2-13 and UHF 14_9). Your connection is
easy because there is only one 75_2 (ohm) antenna plug on
the back of yore TV} and that s where the antenna goes.
If your antenna has a round cable (75 ohm) on the end,
!
then you're ready to connect it to the TV.
If your antenna has fiat, twin-lead wire (300 ohm), you
first need to attach the antenna wires to the screws on a
300- to 75-ohm adapter.
Video Cable (Yellow)
(_) VIDEO O
Antenna Connection:
Outdoor or Indoor Antenna
_ n 1/////_// (Combin at, on "v'HF/U HF)
_ / The combination antenna receives normal
broadcast channels 2-13 (VHF) and 14-69 (UHF).
3(X)to 75-ohm
1
Jack Panel Back of TV
Adapter
Push the round end of the adapter (or antenna) onto the
75£2 (ohm) plug on the back of the TV. If the round end of
the antenna wire is threaded, screw it down finger tight.
Twin
Lead Wire
Round 75ff_ Coaxial
Cable fi'om Antenna
Jack Panel Back of TV
Page 61

_o e TV s audio/video input jacks are ]'or direct picture and
und connections between the TV and a VCR (or similar
device) that has audio/video output .jacks. Both the AV1 and AV2
Input Jack connections are shown on this page, but either one can
be connected alone. Follow the easy steps below to connect your
accessory device to the AV1 and AV2 in ,lacks h)cated on the back of
the TV
Connect the VIDEO (yellow) cable to the VIDEO AV1 in
(or AV2 in) jack on the back of the TV,
BACK
OF TV
S VIDEO
Connect the AUDIO (red and white) cables to the
AUDIO (left and right) AV1 in (or AV2 in) jacks on the
rear of the TV,
Connect the VIDEO (yellow) cable to the VIDEO OUT
jack on the back of the VCR (either one or two) or acces-
sory device being used.
Connect the AUDIO (red and white) cables to the
AUDIO (left and right) OUT jacks on the rear of the VCR
(either one or two) or accessory device being used.
Turn the VCR (either one or two) or accessory device
and the TV ON.
Press the CH + or - buttons on the remote control to
select the AV 1 channel for accessory device number one, or
the AV2 channel for accessory device number two, AVI or
AV2 will appear in the upper left comer on the TV screen
depending on the channel chosen.
With either of the VCRs (or accessory devices) ON and a
prerecorded tape (CD, DVD, etc.) inserted, press the
PLAY button to view the tape on the television.
S:oO0 ®
0000
OGO
@®®
®@®
@®®
®®O
AVI
Connection
VCR ONE (or accessoI_2 device)
(EQUIPPED WITH VIDEO AND
AUDIO OUTPUT JACKS)
AV2
Connection (RED/WHrl
AUDIO IN
VIDEO IN
(YELLOW)
Note: The Audio/Video cables needed for this connection are
not supplied with your TV. Please contact your dealer or Philips
at 800-531-0039 for information about purchasing the needed
cables.
Component Video inputs provide for the highest possible color
and picture resolution in the playback of digital signal source
material, such as with DVD players. The color difference signals
(Pb, Pr) and the luminance (Y) signal are connected and received
separately, which allows fi)r improved color bandwidth #¢brma-
tion (not possible when using composite video or S-Video connec-
tions).
CVI
@
ANT/CABLE R L
VCR TWO toraccessor
(EQUIPPED WITH VIDE
AUDIO OUTPUT JACKS)
AUDIO OUT
VIDEO
OUT
BACK OFTV
Connect the Component (Y, Pb, Pr) Video OUT jacks
from the DVD player (or similar device) to the (Y, Pb, Pr)
in(put) jacks on the TV. When using the Component Video
Inputs, it is best not to connect a signal to the AVI in Video
Jack.
Connect the red and white AUDIO CABLES to the
Audio (left and right) output jacks on the rear of the acces-
sory device to the Audio (L and R) AVI in Input Jacks on
the TV.
Turn the TV and the DVD (or digital accessory device)
ON.
Press the CH +, - buttons to scroll the available channels
until CVI appears in the upper left comer of the TV screen.
Insert a DVD disc into the DVD player and press the
PLAY _- button on the DVD Player.
w
The description for the component video connectors may differ
depending on the DVD player or accessory digital source equip-
ment used (for example, Y, Pb, Pr; Y, B-Y, R-Y; Y, Cr, Cb).
Although abbreviations and terms may vary, the letters b and r
stand for the blue and red color component signal connectors,
and Y indicates the luminance signal. Refer to your DVD or
digital accessory owner's manual for definitions and connection
details.
S_EP
0 0 ®
0000
0@0
The CVI colmeclion will be dominate over the AVI in Video Input.
When a Componenl Video Device is connected as described, it is best
nol to have a video signal connected Io the AV I in Video Input jack.
ACCESSORY DEVICE
EQUIPPED WITH COMPONENT
VIDEO OUTPUTS.
S.VIDEO
Page 62

_ye S(uper)4qdeo connection on the rear of the 77/can provide
ou with better picture detail and clarity fi_r the playback of
accessory sources than the normal antenna picture connections.
,VOTE: The accessory device must have an S4"TDEO OUT(put)
jack in onter fi_r you to complete the connection on this page.
i Connect one end of the S-VIDEO CABLE to the S-
VqDEO jack on die back of the TV. Then connect one end
the ALrDIO (red and white,) CABLES to die AV2 in
AUDIO L and R(left and right) jacks on the rear of die T%L
Connect other end of the S-VIDEO CABLE to the S-
2
VqDEO OUT jack on the back of the VCR. Then comlect
the oflter ends of rite AUDIO (red and white) CABLES R_
the AUDIO (left and righ0 OUT jacks on fire rear of fire
VCR.
Turn the VCR and the TV ON.
3
Press the CH + or - buttons on rite remote, m scroll rite
4
channels until SVHS appears in the upper left corner of the
T_ r sc_feen.
Now your ready m place a prerecorded video tape in the
VCR and press the PLAY lib button,
I
I li
! 1'
o ®
0000
0@)0
®®®@
@®@
_)®®
iiiiiiiiiiiiiiiiiiiiiii iiiiiiiiiiiiiiiiiiiiii
The S-VDEO and V']DEO AV2
in(puts) are in parallel. The S-
_UDEO input is dominant when in
use. It"separate video sigmds are
connected to the S-VqDEO mid
_UDEO AV2 in(puts), the signal
fram the VqDEO AV2 in(put) will
not be usable.
Note: The S-_qde,o and Audio
cables needed for flds _x_mtection
are not supplied with your T%'.
Please contact your deMer or Phil_ps
at 80(t-531-0(t39 for informatkm
almut purchasing the needed cables.
_e Monitor (Audioi'_qdeo) out jacks are great Jbr recording
ith a _'CR or used to connect an external audio s3,stem for
better sound reproduction.
For Audio System Connection:
i Connect one end of the R(ight) and L(eft) AUDIO
(Monitor Out) jacks on fire TV to the R and L audio input
jacks on your atnplifier or sound system. Set the audio sys-
tem's volume m a m_ntd listcning level.
Turn the TV and audio system ON. You can )tow adjust
fire sound level coming from rite audio sys_m with the
VOLUME (+) or (-) button on fire TV or remote, control.
For Second VCR Connection/Recorder:
NOTE: Refer m page 9 for rite proper hookxtp of the first VCR.
Follow the instructions on how m ttme to fire AV 1 chmnte] to
view a pre-recorded tape,
The following steps allow you to connect a second VCR to
record the program while your watching it
Connect one end of the yellow Video Cable m fireMonitor out VIDEO plug, Connect rite other end to fire
VIDEO IN plug on rite second VCR.
Second VCR ConnectionlRecorder
. • r, . r .
Connect one end of the red attd white Audio cable fix_)n
fireMomtor out AUDIO L and R plugs on fire T__to the
AUDIO IN plugs on file VCR.
Turn the Second VCR ON, insert a bhtek VHS tape and
it's ready m record what's being viewed on the TV screen.
Audio and _)deo Side Inputs" are available fi_r a quick connec-
tion of a _'CR to playback video from a camera or attach a
gaming device. Use the CH + or - buttons on the remote control
to tune these inputs.
i Connect the video (yellow) cable from fire Video output
on fire Camera (or _tecess_a T device) to rite Video (yellow)
htput located on file Side of the T%r.
For Stereo Devices: (kmnect fire audio cable (red and
white,) fTOTDrite Audio Left and Right Outputs on rite
Camera to a Sterex_ to Mono adapter. Then plug the single
end of fire adapter m the Audio N (wldte) jack on the Si0e
of the television.
For Mono Devices: C_mnect one end of rite audio cable
from the Audio Out jack on fire device k) rite Audio In
(white) jack on file Side,of file television.
Turn the TV mid the acoessory device ON.
Aodio Cabtos
(red & white)
_@@_
oo00
o@o
Press the CH + or - buttons on fire remote control to mite
the T%r to fire side input jacks. Front' will appear on rite
T_ r sC_eli,
Press the PLAY I_ button on the accessory device m
5
view playback, or to access the accessory devine (camera,
gaming unit, etc.).
®0®®
@®®
®®®
®@©
 Loading...