

Magnavox 34PW8402, 26PW8402 Owner’s Manual

User Manual
26PW8402137
30PW8402137
34PW8402137
30PW8502137
34PW8502137
Model No,:
Serial No,:
Thank you for choosing Philips.
Need help fast?
Read your User Manual first for quick tips that make
using your Philips product more enjoyable. If you have
read your instructions and still need assistance you may
access our online help at
www.p4c.philips.com
or
call 1-800-531-0039
while with your product.
PHILIP$
3121 235 21791

Registering your model with PHfLfPSmakes you eligible for all of the valuable benefits listed below, so don't miss out.
Complete and return your Product Registration Card at once to ensure:
Know these
PHILIPS
Congratulations on your purchase,
and welcome to the "famifyl. "
Dear PHtLIPS product owner:
Thank you for your cant dence in PHILiP&You've selected one of the
best-built, best-backed products avalable today.We'll do everything in
our power to keep you happy wth your purchase for many years to
cattle.
As a member of the PHILIPS"famty,"you're ent Ued to protect on by
one of the most comprehensive warranties and outstand ng service
networks n the ndustry.What's more, your purchase guarantees
you'll receive all the informal on and special offers for whch you
qualify, plus easy access to accessor es from our conven ent home
shopping network.
Most importantly, you can count on our uncompromising commit-
ment to your total sat sfact on.
All of ths is our way of saying welcome - and thanks for nvesting in
a PHELPSproduct.
P.S. To get the most from your PHILIPS purchase, be
sure to complete and return your Product Registration
Card at once.
sa fetysy bofs
_IL This _'bolt of li_hulin_" indicates
uninsulated material "wi_Jlin your" unit
may cause an electrical shock, For" the safe-
ty of everyone in your household, please
do not remove product covering,
The _'exclamation point" calls atten-
tion to features for which you
should read the ellclosed literature closely
to prevent operating a_d mainte_ance
problems,
CAUTION: To prevent electric shock,
match wide blade of plug to wide slot. fully
i_ser't,
ATTENTION: Pour _viter" les choc alec-
triques, il_tr'oduire la lame la plus lar'ge de
la fiche dens la bor'_e correspo_dante de la
prise eL pousser" jusqu'au fond,
For Customer Use
[_llter" below the Serial No, which is
located o_ the rear of the cabinet, Retain
this infor'l:qatioll for" future refer'elite,
Model No,
Serial No,
2

IMPORTANT SAFETY INSTRUCTIONS
Read before operating equipment
B. Objects havc I'allen, or liquid has bcen .spilled inlo flae ag91i-
C. The a_Iianc_ _as b_ exposed to rain; or
D. Tile a_Iian¢_ do_ n_tl appear l_t Opo_a]_ t_o_l_y or
exh_i_ a ma_ed chmage in per folvna_ce; or
E. The a_pIimace has be_ _pped, or _e enclos_rc dama_d.
17. TilffStabi_ _ All lel_visi_s rm_.st c_mp_ wilh _eomrn_nd_d
in_n_aI gIobaI sal'ety _and_ds I'or till a_d stability pro_erties
ofi_ cabinet d_,_ign.
• Do _ot compromis_ th_,_e d_,_i_ sla_dard_ by applying exce_
s_ve pull I_rce 1o fl_e fixmt, or top, of 1]_ cabh_et which co_dd _1_
• A]_o, do _ot e_dan_r y_eIt_ or chiklrc_, by pIaeing ele¢_un_
ic _q_iprn_tiloys o_ th_ top o1!_e cabi_et. Such items could
ur_s_,_pectingly _hlI fi'om fl_e top ofth_ _el a_d caus_ producl _rn-
18. Wall or Ceilillg Mo_illg _ Thc applia_ce sh_ld be rn_n_ed 1_
a wa]| or ¢_iling onIy as _c_n_m_dcd _y ll_ man_P_¢h_re_
19. Power Lilies _ An outdoor matenna should be ]oca_d aw_ l?om
20. O_t_or A_te_a Grou_fllng - If an o_side a_te_ma i_ c_n_cd m
rcc_ _% be _e _he _te_ma _tem i.s_x_a_ded _ a_ _ _mvide
_n_c prote_'ti_ agai_st _ ollage _ and _i]t up static ¢ha_ge,s.
Seelion 810 oflhe Na_aI Elcc_c C_|e, ANSFNFPA No. 70_
1984, pmvid_,_ inlbrma_ion _lh _z_ect m pro_er _'_ding oP
flac rna_ a_ s_pporting slructm_z, grooa_ing oflh_ l_ad_in wi_
aa_at_lll& discharge ililit_ size of gro_ndiilg ¢on]_¢_o1"6_ location
of matenna-_cha_e unit, co_cc_ _ gm_nding el_¢trud_,_, a_
req_irements Ibr _e gm_nding el_¢trud_. See Figm_z beIow.
21. Object and Li_l_ifl E_tr_ _ Care sh_ld be lakc_ ,_o fl_t o_eel_
not _h]] a_ ]iq_id,_ are not _illed in_ lhe enclosurc through
o?,ening_.
a) W'a_ing: To vcd_ce lhe n,_k of l]re or e]cclric shriek, lhis appa_
ram_ should _ot be exposed to rain or moi_tm_z mad o_eel_ filled
_ Iiquid,_, ,_ueh a,_ v_ses, _ho_dd not be pIae_d o_ thi_ apparatu_s.
22. Battery Usage CAUTION - To prevcn_ battery leakage lhat m_
resell in bo_Iy i_j_vy, property damage, o_"damage to _e u_i_:
• ]r_stall all ba_t_e_ corrc¢l]_ with _ and - ali_ed a.s ma_cd o_
flac _nit.
• Do _ot rni_ ba_er_e_ (old a_d ncw o_" ea_on a_d alkaline, etc.).
• Remove bakeries w_ lhe ul_it i_ not as_d I_r a long tim_.
INote to the CATV system installer: This reminder is provided to calI the CATV system instalter's attention to Article 820-40 of the NEC
that providesguidelinesfor proper 9roundir_j and, in particular, specifies that the cable ground shalI be connected to the groundir_J s_tem of the
LbuiIdir_J as cio_ to the point of cable entry aspractical.
Example of Antenna Grounding
as per NEC - National Electric Code
GI_0UND CLt_Mp __ ANTEHNA LEAD IN WIR£

[lllmIi! l
Features
Active Cont_fl TM continuously measures aarl corrects all incoraing
signals m help provide the best picture quality. _IIlis feature renal-
tars aarl corrects both the sharpness control aarl noise reduction con-
trot.
AudioNidea Jack Panel allows direct conneclinas with VCRs,
DVDs, or adler devices, providing quativy TV picture mad sound
playback,
Audio _flume Leveler (AVL) Control keeps tbe TV sound at an
even level. Peaks _nd valleys that occur during progrmn changes or
commercial breaks are reduced, making for a more conalstent, cora-
fortable sound.
AutoLaek TM allows you to block the viewing of certain channels or
programs with certain ratings if you do not wmlt your children m
view inappropriate m_erials,
AuloPieture TM allows you to chmlge the picttlre settings (edior, tint,
con_st, etc,t for v_oas types of programming, such _s sports,
movies, multimedia (Dunes), or weak signals with the push of one
button,
AutoSoRnd TM allows you to select from fbt_ factory-set controls
and a personal contrdi _hN you set according to your own prefer-
ences _hrough the onscreen Smmd menu. The four factory-set con-
trdis (Speech, Movie, Music, and Multimedia) enable you m tailor
the TV sound so as R) enNmce the particular progrmnming you are
watching.
Channd Edit allows you m add or delete charmels from (he list
stored in the TV's memory. Charmel Edit makes it easy to limit or
exp_nd (he munber of channels _hat are available tu you when you
press the Chmmal (+) or (-} buttons on your remote central.
Clos_I Captioning allows _he viewer to read TV progrzan dialogue
or vdice cnaversations as onsarcen text,
hffrared Remote Contral works your TV and o(ber remote-con-
trolled devices sach as VCtLs, DX,_Dplayers, cable comerters, and
satellite recei_ ors.
Onsereen Menu shows helpful messages aarl instructions for set-
ting TV feature centrals (ca_ be viewed in English, French, or
SpanishL
Sleep Timer automatically turns the TV OFF after a set mnount of
time that you choose.
Timer allows you to set your TV to turn itself ON and OFF once or
dally like ma Mann clock,
_ As ma Energy Star,. Pretzel-, Ph_hps (onsumer
/ _._ Electronics has determined this product meets fl_e
/_/_ Energy Star_ guidelines for energy efficiency.
products with the Energy Stal*_ label can save eneNy. Saving
energy reduces air pollution mad lowers utility bills.
Active Control, AutoPicture, AutoSom_d, AutoChmn, and
[ncrediMe SulTound are trademarks of Philips Consumer
Electronics Company. Copyright 2001 Philips Consumer
Electronics.
*Manufactured under license from Dolby Laboratories. "Dolby"
and the double-D symt,_l are trademarks of Dolby Laboratories.
Energy Star@ is a U.S. registered mark. Using
Refer to the simple Quick Use andSetup
Guide (supplied with your TV) for details on
making Connections and Remote Control
Operation.
RII"IMIILI_,
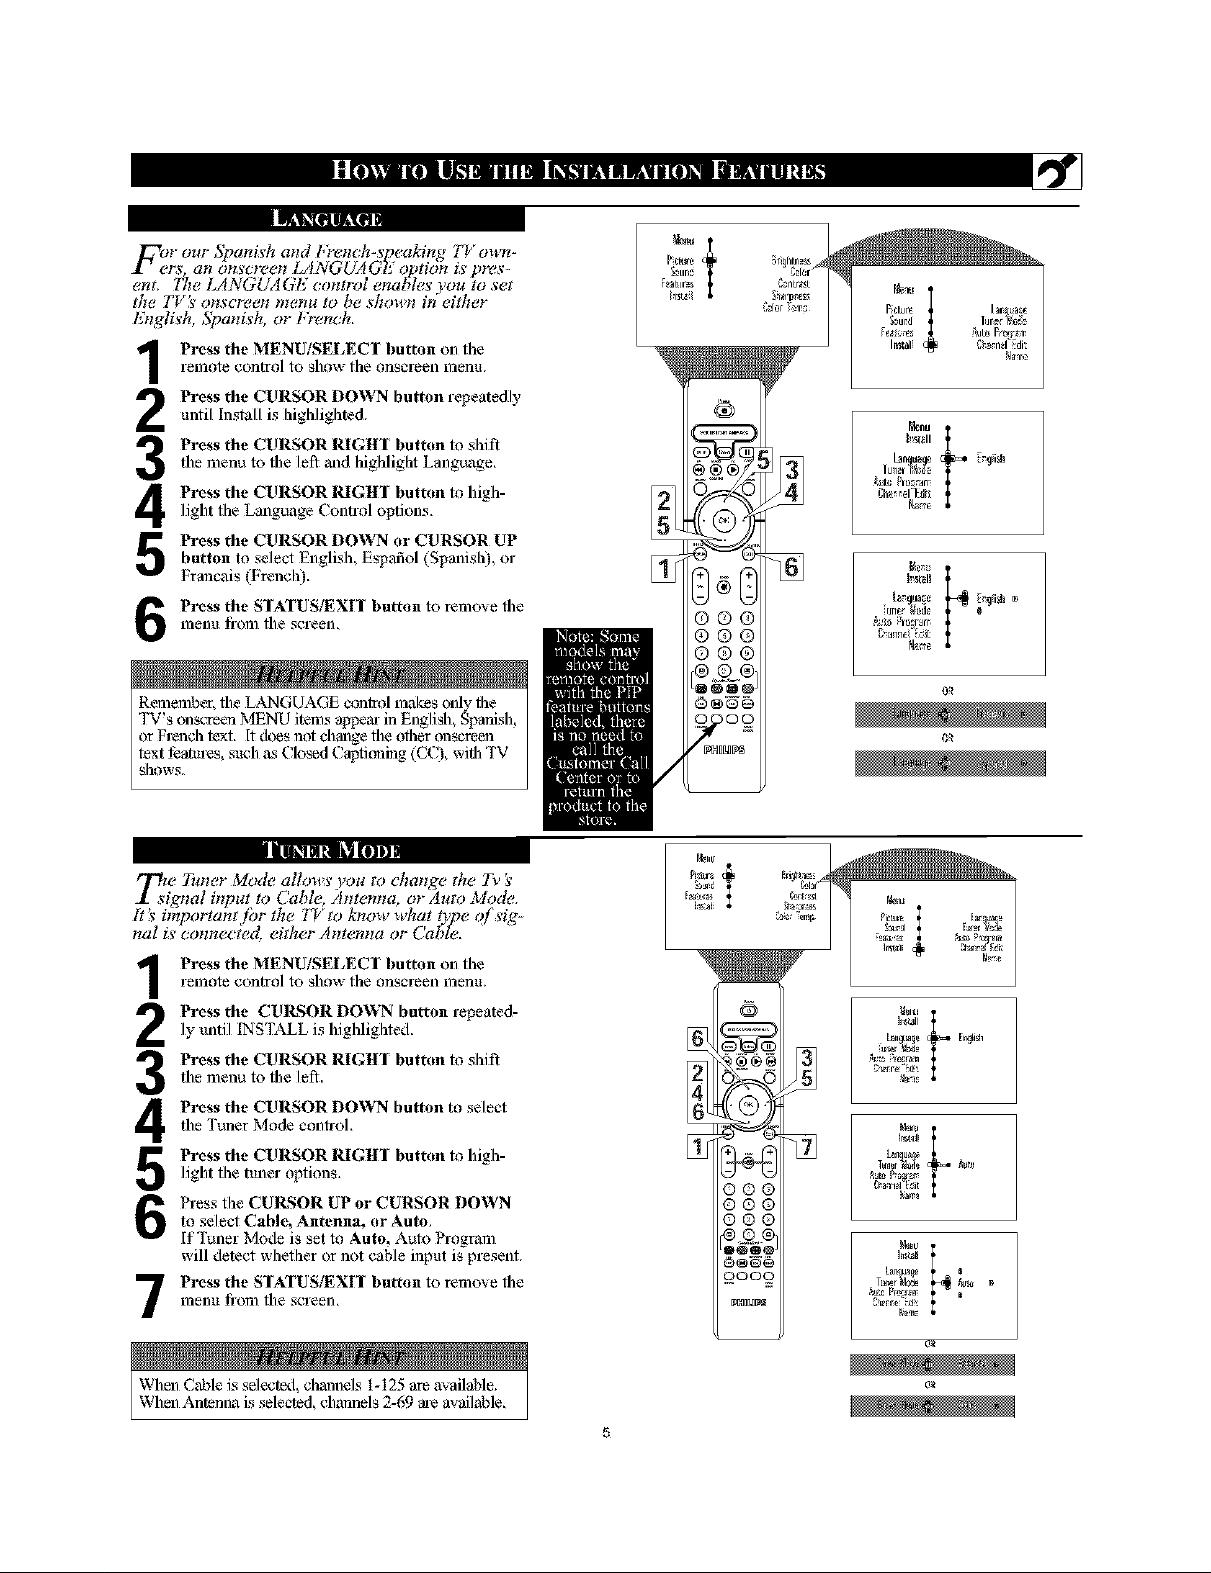
Foer our 5)_anis'h a_td [+em:h-s'peaking ZT own-
rs, an ons'cree_ LANGUA GI( ot_tion is' pres-
ent, l[!e LANGUAGE comrol ena_les'you to set
the T_/ s' ollscFeell IlleHa to be sho]lll iH either
E_tglis'h, 5_a_tis'h, or l;)_ench,
1-efllote control to show file onscl-een fllen_L
Press the MENU/SELEC$ button on flae
Press the CURSOR DOWN button repeatedlyuntil Install is higlaliglated.
the menu to fl_e let_ _d higldiglat Language,
Press the CURSOR RIGtII Imtton to shift
Press the CURSOR RIGHI Imtton to high-light flae Language (ontrol options,
Press the CURSOR DOWN or CURSOR EPbutton to select English, Espafiol (Spanisla), or
Francois (French).
Press the SIATUS/EXH I)utton to remove file
fflenl_ li-om the screen.
_eur
"t
°°'{.
gh_ri_el_Edi_
RememI_r, file LANGUAGE conlrol makes only the
'|'V's onscreen MENU items a_em- in English, Spanish,
or French text. [t does not change the other ¢mscreen
text i_aatul-es, such ,_._Closed Capti¢ming (CC),with TV
show&
_zi e 7i_zer Mode allows' you to cha_z,ge the 7_' 's'
,gnal bzpat to Cable, Amemta, or Auto Mode.
It _ important/br the ZT to know what t)pe of s'ig-
ha! is' _:o_mecied, either Amemm or Cable.
remote control to show the onscreen menu.
Press the MENU/SELECI Imtton on the
Press the CUlLS;OR DOWN button repeated-ly until INSTALL is highlighted,
the menu to tbe let%
Press the CURSOR RIGItl Imtton to shift
the Tuner Mode conh-ol.
Press the CURSOR DOWN button to select
light flae tuner options,
Press the CURSOR RIGltl Imtton to high-
Press flae CUI_;OR UP or CURSOR DOWN
to select Cable, Antenna, or Auto,
If Tuner Mode is set to Auto, Auto Program
will detect whether or not cable input is present.
0_
53er "e_ Pietu_ [a_ _
°"C
NN re_mn
uN_ IN_ I
t*n_u_
fflenu li-om fl_e screen.
Press the SIATUStEXH butt< n to remove fl_e
When C,nMe is selected, chmnlels t-125 are available.
When Antenna is selected, chmmels 2-69 are available.
N_n
5

LtL iBl ilur IOI!N][1B
IM E|il U NIl]iN _lll
_mr TV can automatically set i_se!/for local
21 area (or cable T_) channels. 77ffs makes it
easy for you to select only the TV stations in your
area l_v pressing the CtlANNEL (_) or ( ) button,
Press the MENUiSEI,ECT button on fileremote control to show tile onscreen menu,
Press the CURSOR DOWN I)utton repeatedly
until Install is highlighted,
Press the CURSOR RIGHT button to enter fileInstall menu. Language will }._ higldighted.
Press the CURSOR DOWN button repeatedlyuntil Auto Program is selected. "Search ?" will
appear.
Press the CURSOR RIGHT button to stalt riseAuto Programming process,
Press the STATUS!_XIT button to remove the
menu from the screen when tile Auto program-
ruing process has finislsed.
Ariel- you've run Auto Program, check out the
results. Press tbe CItANN_EL (+) or button and
see which chanllels you can select.
Remember, ma matemaa or cable TV signal must first
be connected to your TV. see Quick-Use Guide for
making conllections.
_mnnel Edit mak_<_ it easy for you to add or &dew
k._ cham_ds fmm th_ list o/ channcls storcd in th_
T_ k memor3_
Press the MENU/SELECT I)utton oil the remote
control to show the onscreen menu,
Press the CURSOR DOWN button repeatedly
until Install is higlalighted,
Press the CURSOR RIGHI button to enter file
[nstall menu, Lmlguoge will },_ higlalighted,
Press the CURSOR DOWN button repeatedly
until Chmmel Edit is selected,
Press the CURSOR RIGHI button to enter file
Chmnlel E,_fit mode,
Press the CURSOR UP or CURSOR DOWN
buttons to scroll though the list of available chan-
nels, you can also press tile CH+ or CH- to scroll
through the list ofchmmels. Or. press the numbered
buttons to select a _eciflc numbered channel.
CUlLs;OR RIGHI button to activate file "skip-
With the channel y_u wmat to edit selected, pre_s the
ping" of the channel. The skipped channel _,_illnot
appem- when thronging chmmels,
onscreen menu from tile sereen.
Prcss the STATUStE_r button to remove the
Note: When yoit want to add a chmmel that has been
skipped, repeat steps t-4. By pressing the CURSOR
RIGHT button skipped is deactivated.
umn mmmm I"I
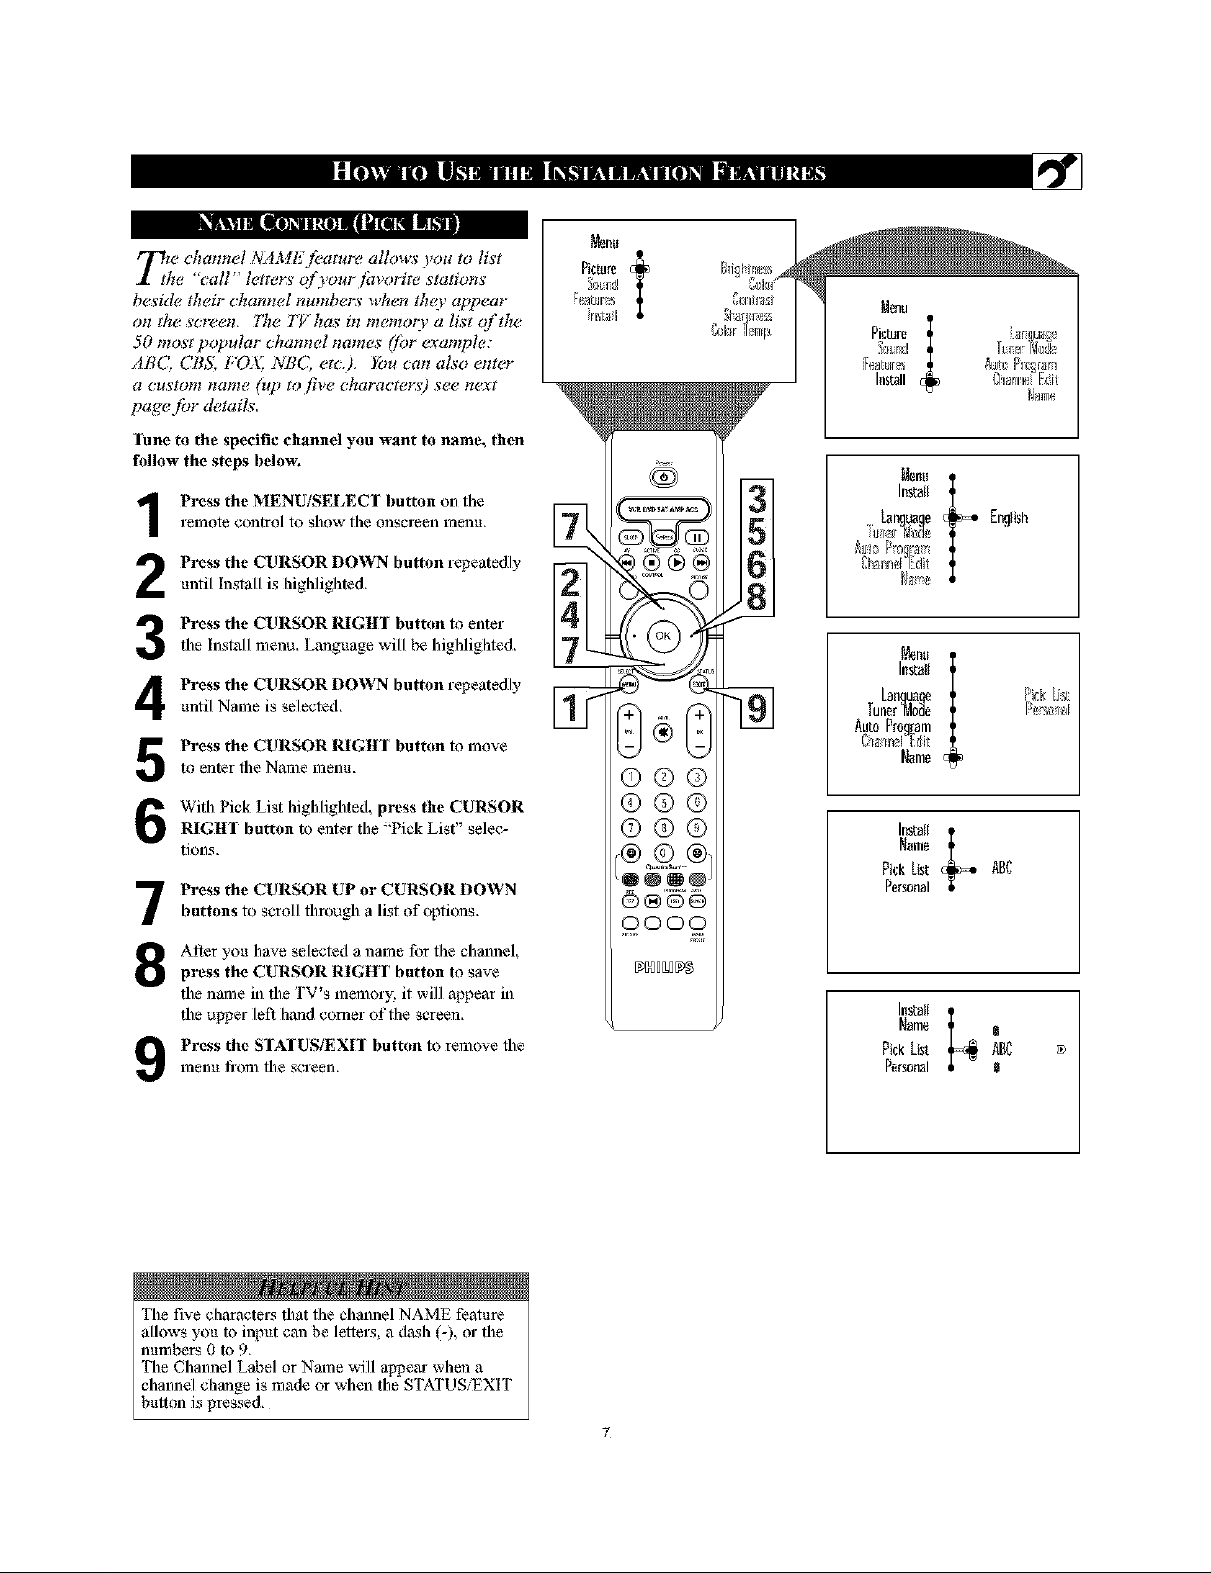
77ze channel NAME feature allows you to li_'t
I the "call" letferw ofyourfavorife _'tation_'
be_'ide their channel numbers when tho_ appear
on #w _'creen+ 77w T_ has in memoo_ a li,w of the
50 mo_¢ popular channel names ([br ¢<_;ample:
ABC, CBS, /,*OX, NBQ era,), _bu can also enter
a ct_'loIll halite (t_p fo five. chaFacfe_:s') S¢.¢.n¢<_g
page for details.
lune to the specific channel you want to name, then
follow the steps I)elo,_
relTlote control to show file onscreen ITlenu,
Press the MENU/SELECI Imtton on floe
Press the CURSOR DOWN button repeatedly
until Install is highlighted,
Press the CURSOR RIGHI Imtton to enter
3
the Install menu, Language will _,_ highliglated,
Press the CURSOR DOWN button repeatedly
4
until Name is selected,
Press the CURSOR RIGHI Imtton to moveto enter the Name menu,
++u++j
Pi+mm t
_,+++J+,m
+I+N++H
Imtstl
tz_mtmqe [r_{ish
%_nn_Zdi_
Install
Lanquam Pick[.[+t
Tuner'Mo_e P+r_m'+_
Auto Program
Nm+
12rmnnelE;/it
[@me
With Pick List highlighted, press the CURSOR
RIGtlI button to enter the "Pick List" selec-
tions.
Press the CURSOR UP or CURSOR DOWN
7
buttons to scroll fllrough a list of options.
Alter you have selected a name for the channel,
8
press the CURSOR RIGHT button to save
the name in the TV's memory, it will appear in
the upper left hand comer of the screen.
Prcss the SIAIUSiEXIT Imtton to remo_e the
menu li-om the screen,
The fi'_e characters that the channel NAME feature
allows you to input can be letlers, a tkn._h(-), or the
numbers 0 to 9.
The Channel Label or Name will aI_ear when a
channel change is made or when the STATUS/EXIT
button is pressed,
Name
P+_kList _BC
hr,tstt e_=.
Personal
N_me
PickLim ABC ++
Install
Personal
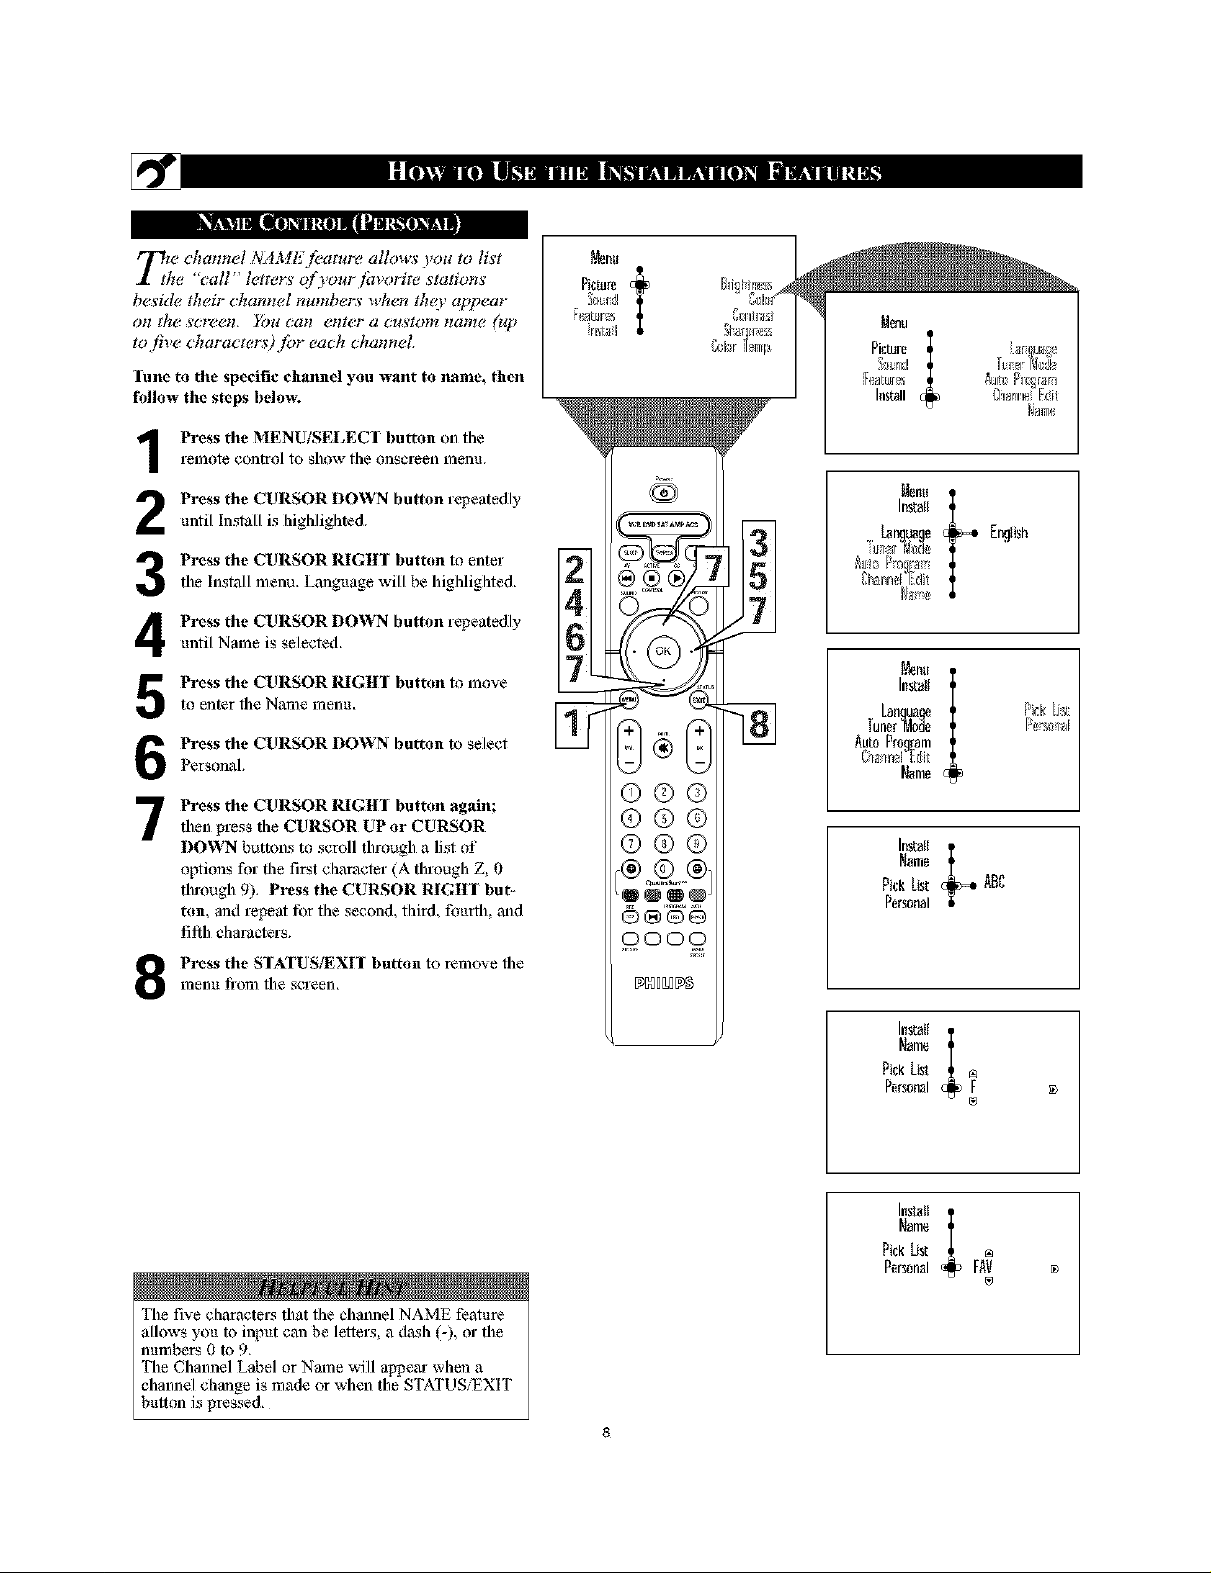
rl_ze channel NAME feature allows you to lis't
I the "call" letterw ofyourl'avorite s'tations'
bes'ide their channel numbers when thc(v appear"
0II the" S'CF_IL _'OH C(llt _llte!r a Ct_s'lo_t llem_e (t_p
to five characters)for each channel,
Tune to the specific channel you want to name, then
follow the steps below.
Press the MENU/SELECT Imtton on thereDlote control to show the onscreen Dlenu,
++u+J
Pi+mm t
+#m+
+I+++i++H
Press the CURSOR DOWN button repeatedly
until Install is highlighted+
Press the CURSOR RIGHI Imtton to enter
3
the Install menu. Lmlguage will _,_ highlighted,
Press the CURSOR DOWN button repeatedly
4
until Name is selected,
to enter fl_eName menu,
Press the CURSOR RIGH] Imtton to move
Press the CURSOR DOWN button to select
Personah
Press the CURSOR RIGHT Imtton again;
7
then press the CURSOR UP or CURSOR
DOWN buttons to scroll through a list of
options for the first character (A through Z, 0
through 9)+ Press the CURSOR RIGItT but+
ton, mad repeat for the second, third, fourth, mid
fifth characters,
Press the SIATUS/EX[I button to remove file
fflenu from file screen,
8
_NOBO_5
Imtstl
LB_UB{le [r_!lish
%ann_ Edil
l_+tsl+
Lan_uam Pi@[.ist:
Tuner"_Ao_e r++_+_
Auto Program
NNne
@annul DU_
Name
Name
Pi+kList AB_
Personal
Name
Pick List m
Personal F +
®
The fi'_e characters that the channel NAME feature
allows you to input can be letlel-s, a d.x_h (-), or the
numbers 0 to 9.
The Channel Label or Name will al_em when a
channel change is made or when the STATUS!EXIT
button is pressed,
Name
Pickbst
Personal FAV +

Tjva_(fust ycmr TV pictum conttg[_, select a channel and
l[ow these steps.
contrnl tu 5how the on_reen ITlellU. b__
Press the CURSOR UP or CURSOR DOWN but- Irr_all
Press the MENU/SELECT button on the remot_ P'_tur_ai_
ton to lfigh]ight PICI'URE.
Press the CURSOR RIGHT button to e_ter the
Pietare metal
3
Press the CURSOR UP or CURSOR DOWN
4
button to select the picture adjustment you w,mt to
change: Brighmess, Color, Contrast, gharl_less,
Color Temp., Tint, Dyn. Contrast, or CNOr Enh.
NOTE: 'IIle menu will show only five items at a dine, so
_xm will need to continue sernllJng with the CURSOR
DOWN button to adjust ihe Tint, Dyn. Contrast, or Color
Enh,
Press the CURSOR LEFF or CURSOR RIGHTbutton to a@lst the selected eontroh OR_ if Color
Temp. or Dwl. Conlr_t is chosen, press Ihe CUR,
SOR UP or CURSOR DOWqN tu select the pre-
ferred mode, If Color Enh, is _le¢ied press file
CURSOR RIGIfF button repeatedly m toggle the
various modes.
Press the STATUS/EXIT button when finished to
remo_e the mei}u from the screell.
NOTE: The Tint Controls will not be available for
adjuslments when tuned to the AVt iAV2!AV3
Inputs,
Brightness adds or subtracts light from the darkest
pmt of the picture,
Color adds or eliminates color,
Contrast improves the detail of the lightest parts of
the picture,
Sharpness improves the detuil in the picture.
Color Iemp. ofi&-s NORMAL, COOL, or WARM
picture preferences, (Normal will keep the whites,
white; Cool will make the whites, bluish; mid Warn1
will make the whites, reddish,)
Tint adjusts the picture to obtuin natural skin tones.
Dyn(amic) Contrast helps m "sharpen, the picture
quality by making the dark ix_rtions of the picture
&arker mid the light i'4_rtions more noticeable. You can
select from the various modes: OFF, Min, Med, mid
Max.
Color Enh(ancement) increases file intensity of file
color when "On" is selected.
®&,N1
OOO_ j
_NHLH_
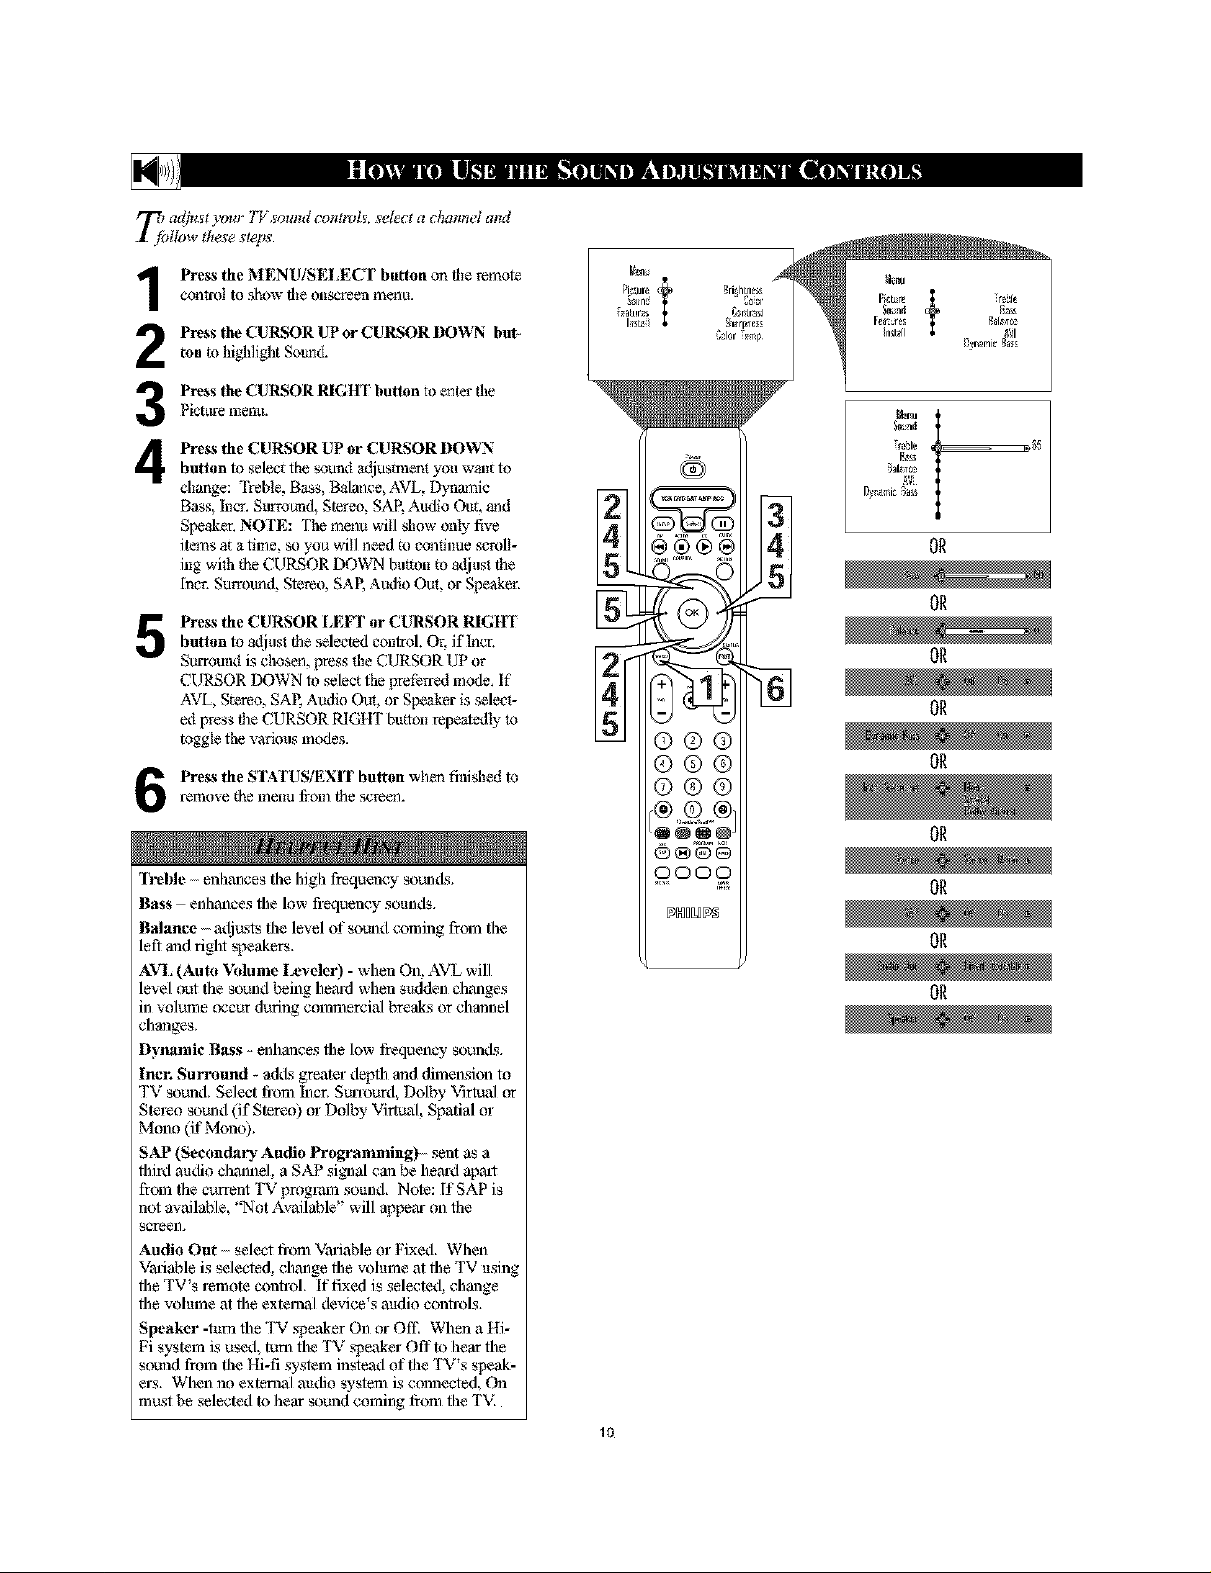
7_/ a_(h_sty(mr TV so*md cot*troLL select a chatmet and
follow these steps.
conlrot to show the al}_reen ixiellu.
Press the CURSOR UP or CURSOR DOWN buy
Press the MENU/SELECT bution on the remote
ton to highlight Sound.
Press the CURSOR RIGHT bution to enter fl_e
Pictare meun.
3
Press the CURSOR UP or CURSOR DOWN
4
button to select the sound adjusmaent you wailt to
akange: Trehie Bass, Bslance, AVL Dynmnic
Bass, Incr. Sl_ound, Stereo, SAP, Audio Ou_, mad
Speaker, NOTE: Tile melm will sllow allty five
items at a time, so you will need m continue semlt-
hlg with _he CURSOR DO_LN button m adjust the
Incr. Surround, Stereo, SAE Audio Out, or Speaker.
Press the CURSOR LEI:T or CURSOR RIGHTbutton to alliust the selected eontroh Or, if lner,
S_ound is chosen, press die CURSOR UP or
CURSOR DOWN to select the preferred mode, If
AVL, Stereo, SAE Audio Out, or Speaker is select-
ed press the CURSOR RIGHT burion repeatedly 1o
toggle the various modes.
Press the STATUS/EXIT bufron when finished to
remo_e the mei}u from the sereell.
Trelfle enhal/ces the high frequency sounds.
Bass - enhallces file low fi-equency sounds.
Balance - adj _rs the level _ sound cxmlJng from the
left and right speakers.
Alvq, (Aura Volume Leveler} - when On, AVL will
level out the sound t,ming head when sudden clmnges
in volume eccur during commercial breaks or channel
changes.
Dynamic Bass - enhances the low frequency sound.s.
Incr. Surraund - adds greater depth and dimension to
TV sound. Select from h/un Su_tourd, Dolby \;irlual or
Stereo sound (if Stereo) or Dolby Virtual, Spatial or
Mono (if M_Io).
SAP (Secondary Audio l_'ogramming) sent as a
third audio ehalmel, a SAP signal can be he_d apat
from the current TV prog_mn sound. Note: If SAP is
not available, *'Not Avvailable" will appeal- on the
screen.
Audio Out select from ValSable or Fixed. When
Vaiable is selected, chal/ge the volume ,atthe TV using
the TV's remote controh If fixed is selecte& change
the volume at the external device's audio controls.
Speaker -turn the TV s_eaker On or Off. When a Hi-
Fi system is used, turn the TV s_eaker Off to hear the
sound from the Hi-fi system instead of the TV's speak-
el-s. When no external audio system is calmected, On
mu_t be selected to hear sound coming from the TM
[saktlr.% G_r Ir_,
hI_
®®®
©@®
@®®
®®N@
OOOO
t
10
s_i
OR
OR
OR
OR
OR
OR
OR
OR
OR

"_ur television comes with ate onsct_,et¢ clock. 777e
I TVean aL_o be set to turn on or off]at a sFeeifie
time and tt¢ne _ a ,_pe_?ifi_?ehamtel _¢4ten it powem
itseljon.
Press the CLOCK button on the remote con-trol to display the Timer onscreen menu,
Press the CURSOR UP or CUlLs;OR DOWNbutton to highlight one of the Timer controls,
These controls are 'l'ime, Start Time, Stop Time,
Program No,, Activate, Display, mad Auto( hron,
Press the CUlLs;OR RIGHT button to display
tile menu _br tile selected item,
3
Make adjustments to ttie selected items by fol-
4
lowing ttie steps below,
Time: Enter the CUlxent time using the
Numbered buttons, Use the CURSOR UP and
CURSOR DOWN buttons to toggle the AM and
PM setting,
Start Time: Use ttie numbered buttons to enter
the time you want the TV to tuna itself On, Use
the CURSOR UP and CURSOR DOWN but-
tons to toggle the AM and PM setting,
Stop Time: Use the numbered buttons to enter
the time you want the TV to tuna itself Off, Use
the CURSOR UP and CURSOR DOWN but-
tons to toggle the AM and PM setting,
Program No.: Use the NUMBERED buttons or
the CH + or CH- buttons to enter ttie desired
start-up clmnnel, You can also press the CUR-
SOR RIGHT or CURSOR LEFT buttons m
enter the desired start-up channel,
Activate: Set ttie timer to tuna itself On (Once
or Daily) or O111 Press the CURSOR UP or
CURSOR DOWN buttons to select Once, Daily,
or Off,
Display: Press the CURSOR RIGHT or CUR-
SOR LEFT m toggle between On or Off- If On
is selected, the time will be displayed all the
time when the TV is on, When Offis selected,
the time will only appear when the
STATUS/EXIT button is pressed,
AutoChron: For use of the AutoChmn teatul-e,
le_er to the section on "How to Use ttie
AutoChron Contror' see next page,
OR
OR
OR
OR
OR
OR
0000
Refer to tile next page for
details about how to use
the AutoChron control,
menu from file screen,
Press the STATUS/EXIT button to remove file
11
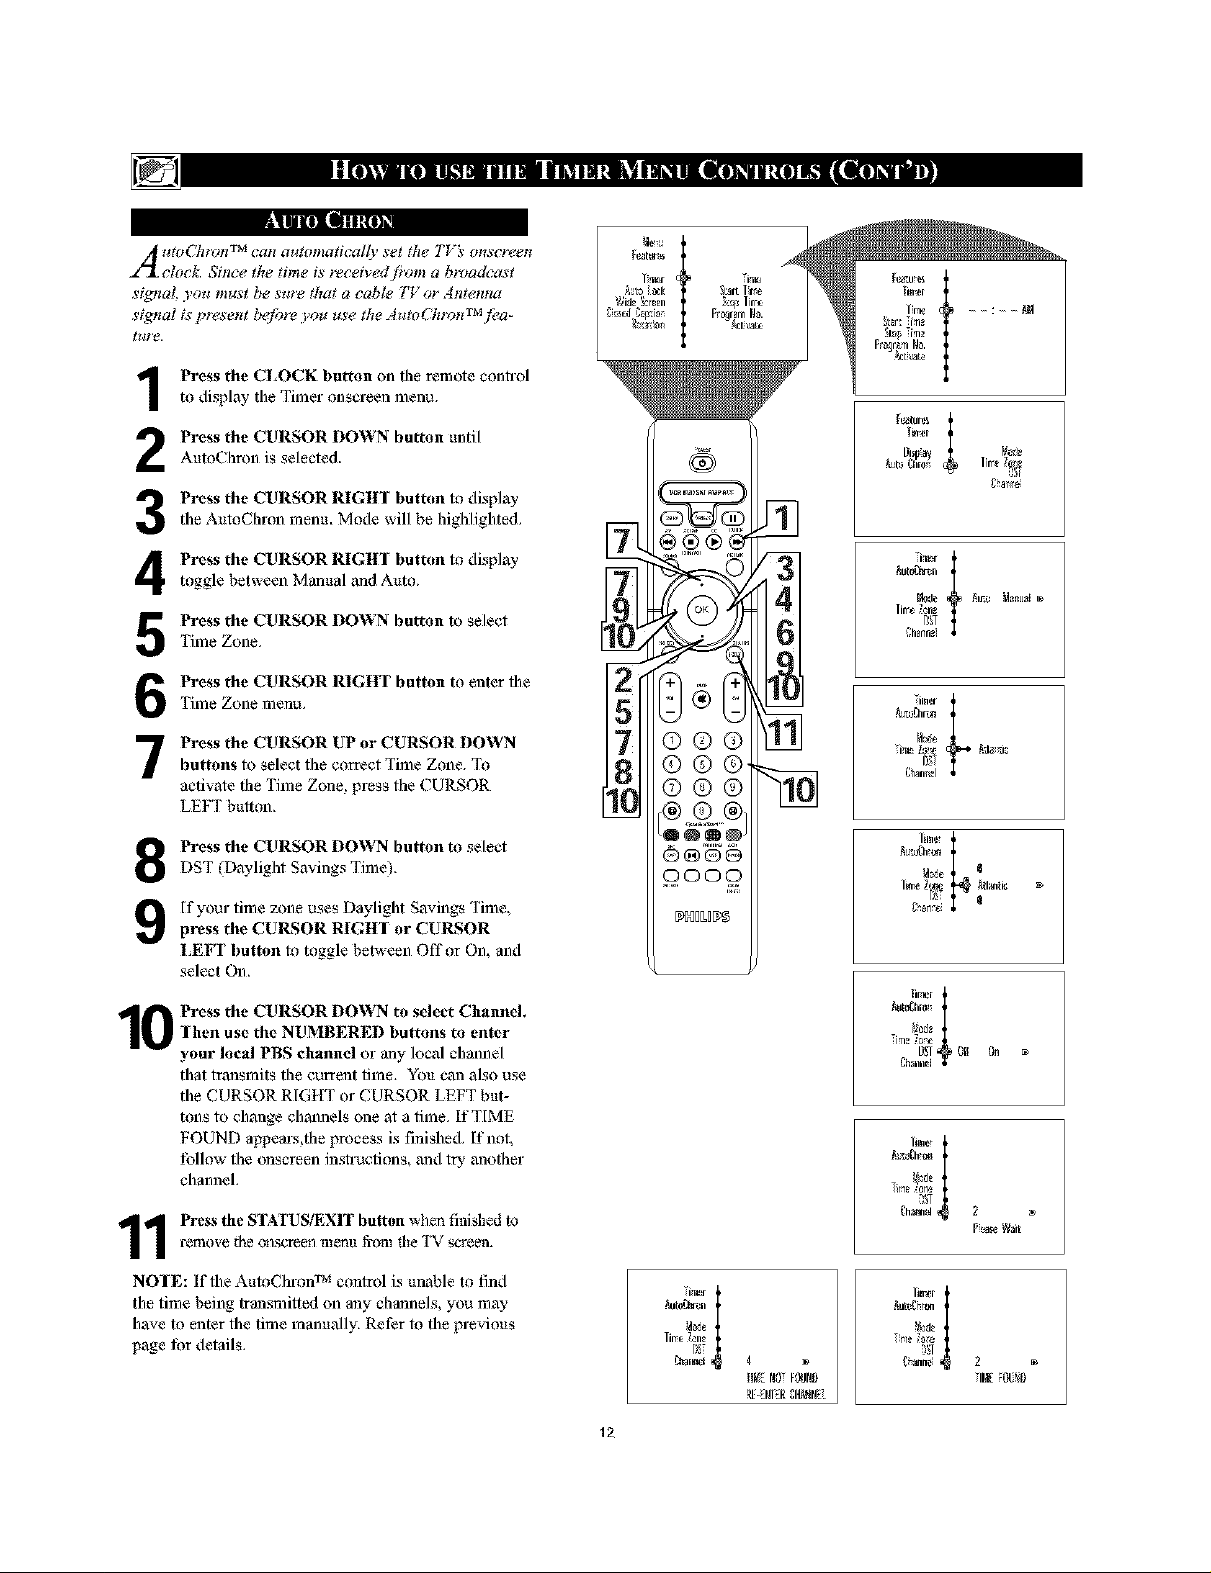
|ll [|Ill IN|]_
A 4tO('-_lt_h'l TM (?all aI4_ot_la_icaffy se_ the* T_'_ OHSCF(_eH
clock. Since the time is received fivm_ a broadcast
signal you must be sure that a cable TV or Antenna
signal is F_,sent b_jbre you use the AutoCht_mTM fl'a-
_t#'e.
Press the CLOCK button on the remote conh-ol
to display the Timer onscreen menu,
Press the CURSOR DOWN button untilAuto( hron is selected,
Press the CURSOR RIGH] button to displaythe AutoChron menu, Mode will be highlighted,
])!1_
L_I[ life
_ql lre
Fralqm la.
Press the CURSOR RIGItl button to display
toggle between Manual mad Auto,
'Firae Zone,
Press the CURSOR DOWN button to select
Press the CURSOR RIGHT button to enter fl3e
Time Zone menu,
Press the CURSOR UP or CURSOR DOWNbuttons to select flae correct Time Zone, To
activate the Time Zone. l}l-eSsthe ( URSOR
LEFT bulton,
Press the CURSOR DOWN button to select
DST (Daylight Savings Time),
[f your time zone uses Daylight Savings Time,
press the CUlLs;OR RIGH¥ or CUlLs;OR
LEFT button to toggle between Offor On, and
select On,
Press the CURSOR DOWN to select Channel.
-[hen use the NUMBERED buttons to enter
your local PBS channel or any local channel
that transmits ttie current time, You can also use
the CURSOR R[GtfT or CURSOR LEFT but-
tons to change ch_3nels one at a time. If TIME
FOUND al_eals,ttie process is fnished. [f not,
_bllow the onscrecn instructions, and try anottier
channeh
remo_e _heons_.rrecn mentt _o1_ the TV _ree_.
1 Press the STATUS/EXIT button when finished to
5TM
7
8
[LC
Nto_a-_n
_Je _m_ Na_uat
i;ha_n.'l
7im_
I_:e I
[Jrler i
Ig Ol In
lm_rI
g
_h_ 2
Pt_c Nait
NO-[E: If the AutoChmn TM control is unaMe to find
the time being transmilted on any channels, you may
have to enter the time manually, Refer to the previous
page tbr details,
_ut_ r_
li_e _¢ne
11_NOf_ND
12
/_ra I
_h_an_ 2
IN
 Loading...