

Page 1

20MT4405
3139
125
35882-Englis
h
Page 2

CONTENTS
Welcome/Registration of Your TV
. . . . . . . . . . . . . . . . . . . . . .
. . . . . . . . . . . . . . . . . . . . . . . . . . .
4
GUIDE
. . . . . . . . . . . . . . . . . . .
. . . . . . . . . . . . . . . .
. . . . . . . . . . . . . . . . . . . . . . . . . . . . . . .
AV(Audio/Video) Input Connection
. . . . . . . . . . . . . . . . . . . . .
Connections
. . . . . . . . . . . . . . . . . . . . . . . . . . . . . . . . .
. . . . . . . . . . . . . . . . . . . .
) Input
. . . . . . . . . . . . .
AV
. . . . . . . . . . . . . . . . . . . . . . . . . . . . . . . . . . . .
. . . . . . . . . . . . . . . . . .
. . . . . . . . . . . . . . . . . . . . .
to
. . . . . . . . . . . . . . . . . .
Auto Program
. . . . . . . . . . . . . . . . . . . . . . . . . . . . . . . . . . . . .
. . . . . . . . . . . . . . . . . . . . . . . . . . . . . . . . . . . . . . .
. . . . . . . . . . . . . . . . . . . . . . . . . . . . . .
. . . . . . . . . . . . . . . . . . . . . . . . . . . . . . .
The
4:3 Expand F
. . . . . . . . . . . . . . . . . . . . . . .
MENU
. . . . . . . . . . . . . . . . . . . . .
Access Code
. . . . . . . . . . . . . . . . . . . . . . . . . .
. . . . . . . . . . . . . . . . . . . . . . . . . . . . . . . . . . . .
t The Same Time
. . . . . . . . . . . .
. . . . . . . . . . . . . . . . . . . . . . . . . . . . . . . . . . . . . .
TV Ratings
. . . . . . . . . . . . . . . . . . . . . . . . . . . . . . . . . . . . . . . . .
. . . . . . . . . . . . . . . . . . . . . . . . . . . . . . . . . . . . .
. . . . . . . . . . . . . . . . . . . . . . . . . . . . . . . . . . .
. . . . . . . . . . . . . . . . . . . . . . . . . . . . . . . . . . . . . . . . .
Alternating Channels with A/CH button
. . . . . . . . . . . . . . .
. . . . . . . . . . . . . . . . . . . . . . . . . . . . . . . . . . . . . .
. . . . . . . . . . . . . . . . . . . . . . . . . . . . . . . . . . . . . . .
. . . . . . . . . . . . . . . . . . . . . . . . . . . . . . . . . . . . . . . . . .
Troubleshooting Tips
. . . . . . . . . . . . . . . . . . . . . . . . . . . . . . . .
. . . . . . . . . . . . . . . . . . . . . . . . . . . . . . . . . .
. . . . . . . . . . . . . . . . . . . . . . . . . . . . . . . . . . . . . .
. . . . . . . . . . . . . . . . . . . . . . . . . . . . . . . . . . .
. . . . . . . . . . . . . . . . . . . . . . . . . . . . . . . . . . . . . . . . . . .
to your own preference. The four pre-set controls (Personal, Voice,
the sound of the program you are watching (Pg. 19).
the TV memory. Channel Edit makes it easy to limit or expand the
the viewer to set a timer to automatically turn
the TV off
As an Energy Star® Partner, Magnavox has
with the Energy Star® label can save energy.
Page 3
Return your Product Registration Card today
to ge
t the very most from your purchase.
Registering your model with MAGNAVOX makes you eligible for all of the valuable benefits listed below, so don't miss
out. Complete and return your Product Registration Card at once to ensure:
*Proof of
Purchase
Returning the enclosed card guarantees
that your date of purchase will be on file,
so no additional paperwork will be
required from you to obtain warranty
service.
*Product Safety
Notification
By registering your product, you'll receive
notification
turer - in the rare case of a product
recall or safety defect.
- directly from the manufac-
*Additional Benefits
of Product Ownership
Registering your product guarantees that
you'll receive all of the privileges to
which you're entitled, including special
mone
y-saving offers.
Know these
safety
Congratulations on your purchase,
and welcome to the “family!”
symbols
Dear MAGNAVOX product owner:
Thank you for your confidence in MAGNAVOX.You’ve selected one
of the best-built, best-backed products available today. We’ll do
erything in our power to keep you happy with your purchase for
ev
many years to come.
As a member of the MAGNAVOX “family,” you’re entitled to protection by one of the most comprehensive warranties and outstanding service networks in the industry.What’s more, your purchase guarantees you’ll receive all the information and special offers
for which you qualify, plus easy access to accessories from our convenient home shopping network.
Most importantly, you can count on our uncompromising commitment to your total satisfaction.
All of this is our way of saying welcome - and thanks for investing in
a MAGNAVOX product.
P.S. To get the most from your MAGNAVOX purchase,
be sure
to complete and return your Product
Registration Card at once.
This “bolt of lightning” indicates uninsulated material within your unit may
cause an electrical shock. For the safety of
eryone in your household, please do not
ev
remove product covering.
The “exclamation point” calls atten-
tion to features for which you should
read the enclosed literature closely to prevent operating and maintenance problems.
WA
RNING: To reduce the risk of fire or
electric shock, this apparatus should not be
exposed to rain or moisture and objects
filled with liquids, such as vases, should not
be placed on this apparatus.
CAUTION: To prevent electric shock,
match wide blade of plug to wide slot, fully
insert.
AT
TENTION: Pour éviter les choc élec-
triques, introduire la lame la plus large de la
fiche dans la borne correspondante de la
prise et pousser jusqu’au fond.
Visit our World Wide Web Site at http://www.usasupport.magnavox.com
Page 4
Keep these instructions.
Follow all instructions.
Do not use this TV near water.
Clean only with a dry cloth.
with the manufacturers instructions.
Do not install near any heat sources such as radiators, heat
Do not defeat the safety purpose of the polarized or grounding-
type plug. A polarized plug has two blades with one wider than the
When the provided plug does not fit into your outlet, consult an
they exit from the apparatus.
specified by the manufacturer, or sold with the TV
When a cart is used, use caution when moving
the cart/TV combination to avoid injury from tip-over.
Refer all servicing to qualified service personnel. Servicing is
Damage Requiring Service - The TV should be serviced by qualified
Objects have fallen, or liquid has been spilled into the TV; or
The TV has been exposed to rain; or
The TV does not appear to operate normally or exhibits a
The TV has been dropped, or the enclosure damaged.
- All televisions must comply with recommended
• Do not compromise these design standards by applying excessive
• Also, do not endanger yourself, or children, by placing electronic
g - The TV should be mounted to a
wall or ceiling only as recommended by the manufacturer.
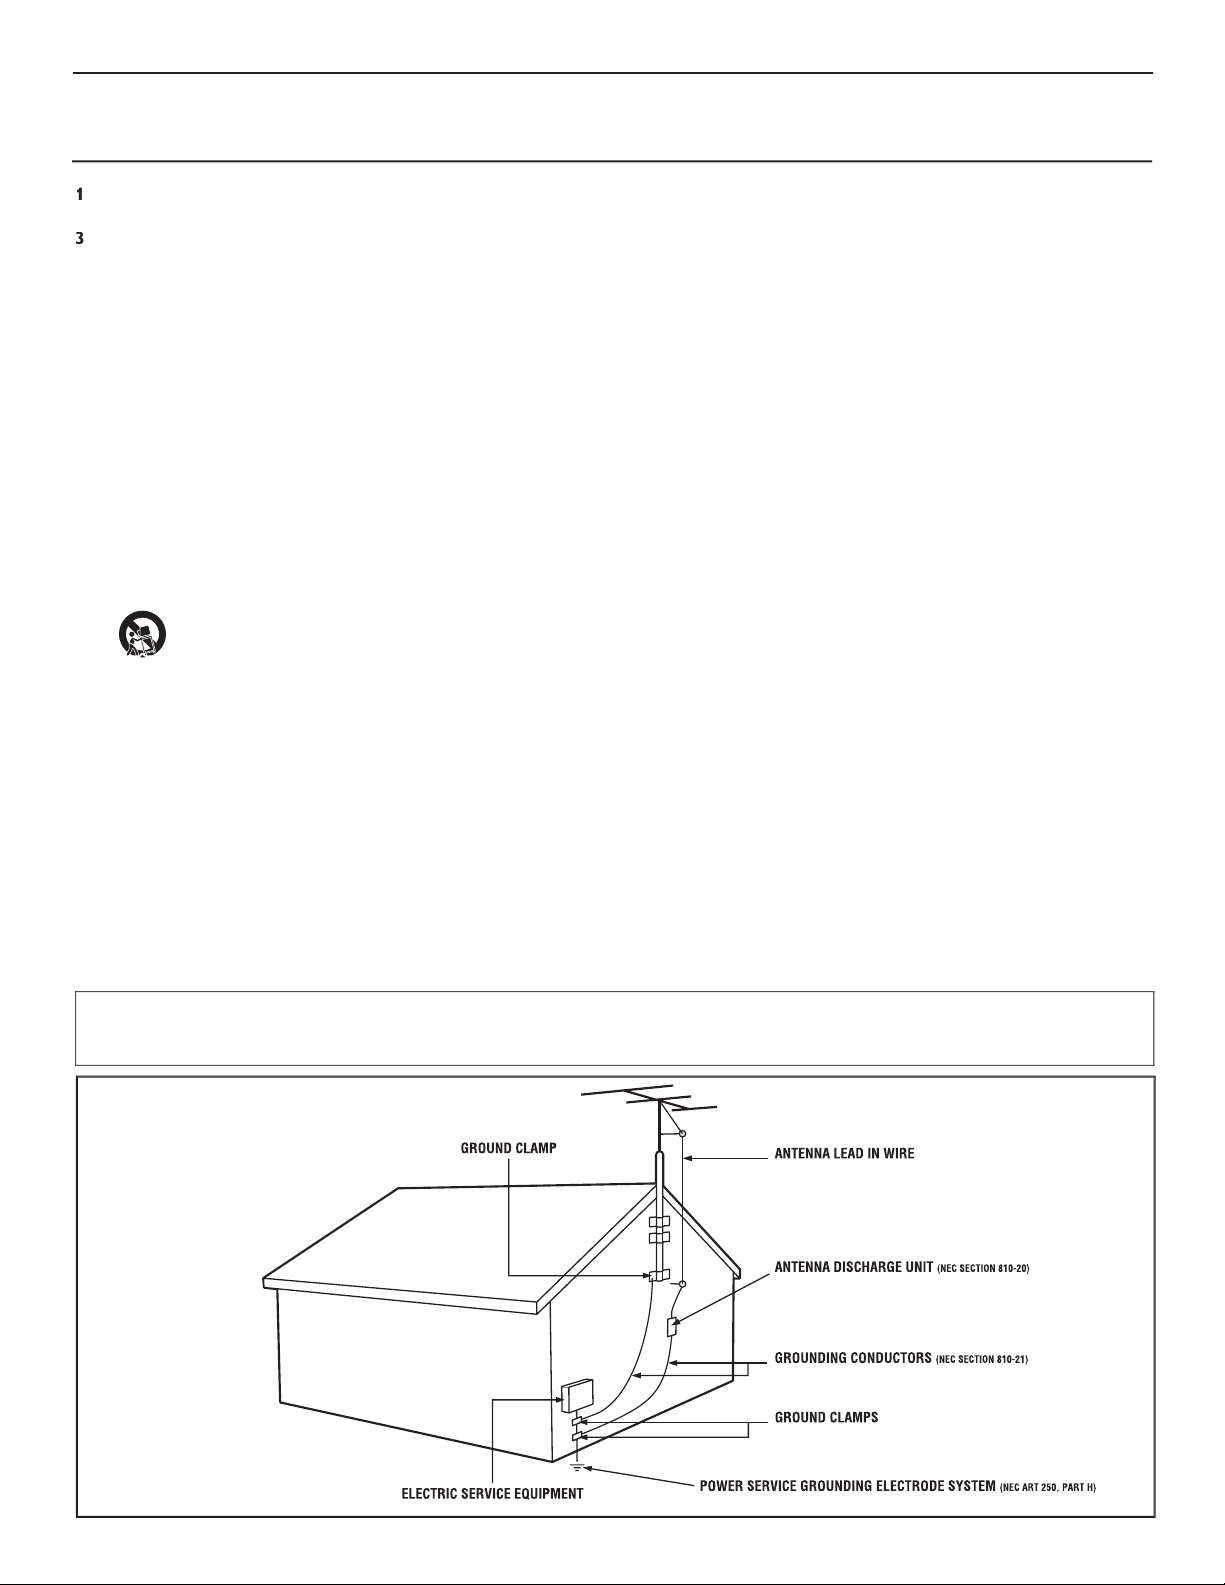
- If an outside antenna is
Section 810 of the National Electric Code, ANSI/NFPA No. 70-
the mast and supporting structure, grounding of the lead-in wire to
Object and Liquid Entry
- Care should be taken so that
through openings.
a)
Warning: To reduce the risk of fire or electric shock, this
filled with liquids, such as vases, should not be placed on this
To prevent battery leakage that
• Install all batteries correctly, with + and - aligned as marked on
the unit.
• Do not mix batteries (old and new or carbon and alkaline, etc.).
• Remove batteries when the unit is not used for a long time.
This reminder is provided to call the CATV system installer's attention to Article 820-40 of the NEC
that provides guidelines for proper grounding and, in particular, specifies that the cable ground shall be connected to the grounding system of the
Page 5
75
75‰
L
R
S-VIDE
O
VIDE
O
AUDI
O
CV
IAV out
Y
Pb
Pr
AV in
1
Back of TV
Cable signal
coming from
Cable Company
Jack Panel Back of TV
75
1
2
75‰
L
R
S-VIDE
O
VIDE
O
AUDI
O
CV
IAV out
Y
Pb
Pr
AV in
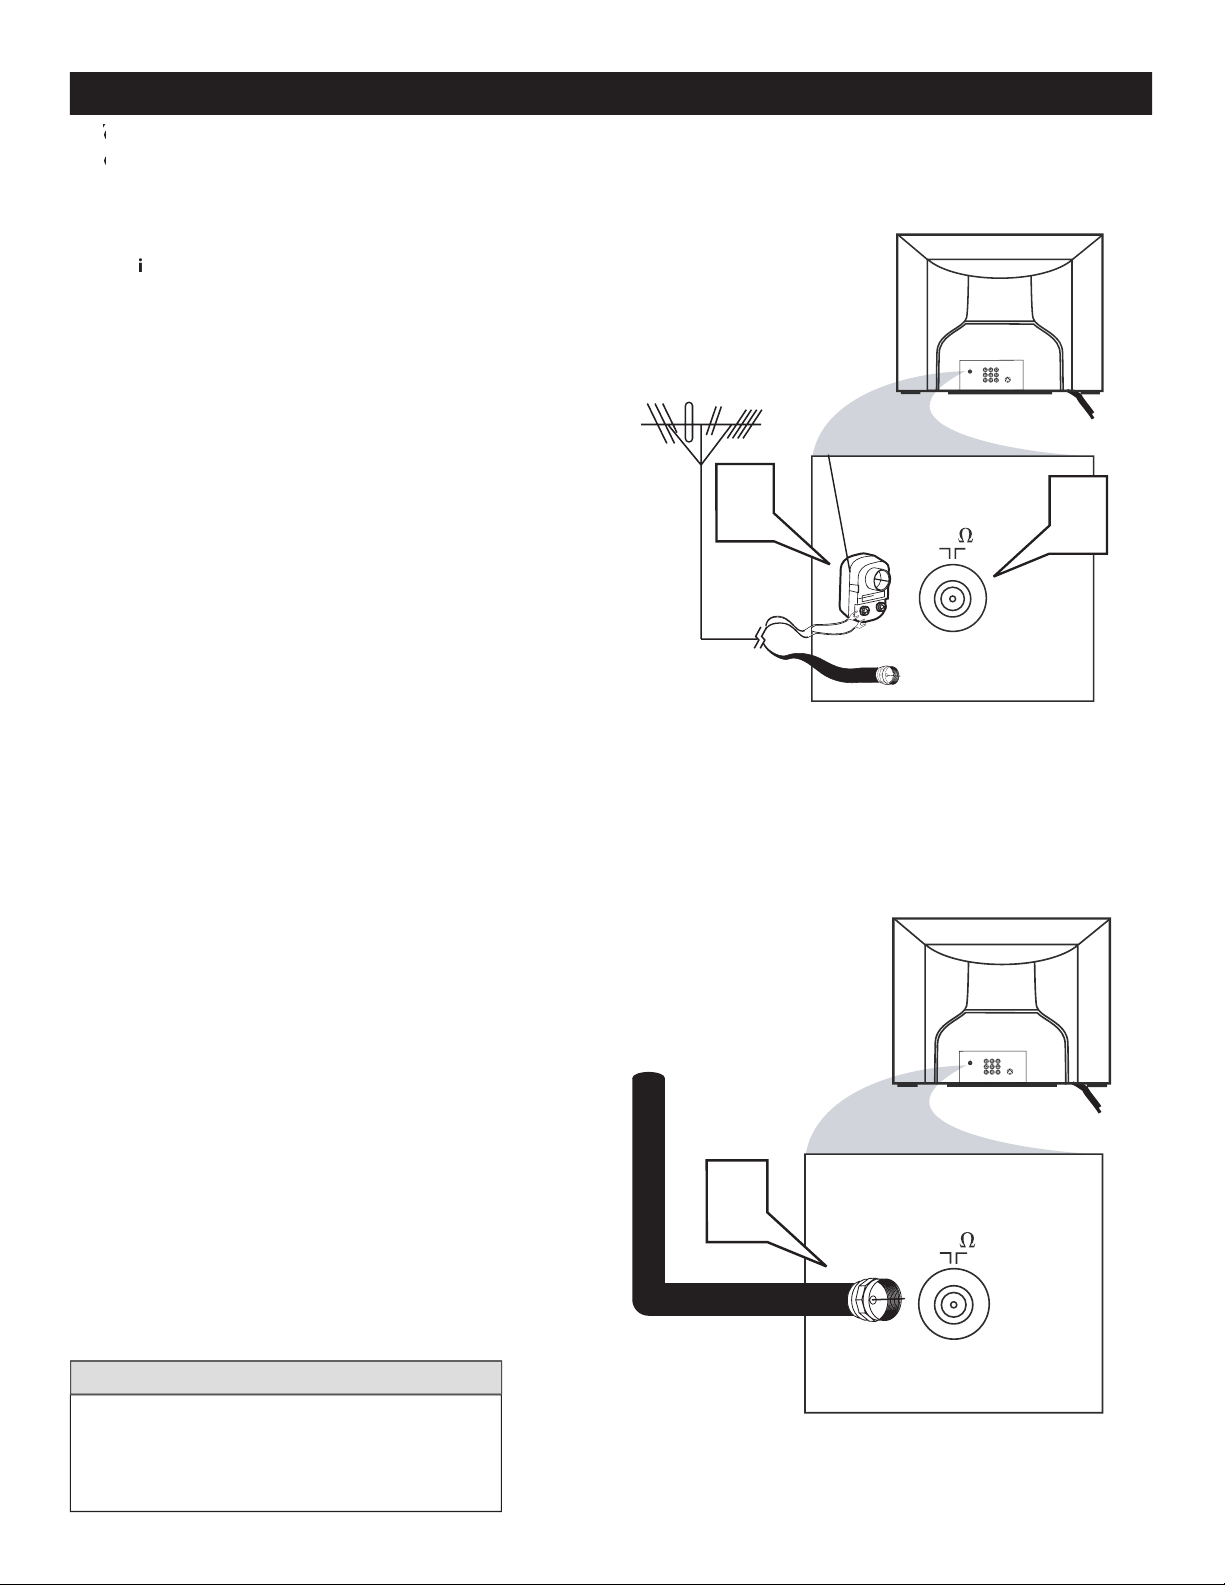
Antenna Connection
300 to 75Ω
Adapte
r
Combination
VHF/UHF Antenna
(Outdoor or Indoor)
Twin Lead
Wire
Round Cable
75Ω
Back of TV
Direct Cable Connection
75Ω Round
Coaxial Cable
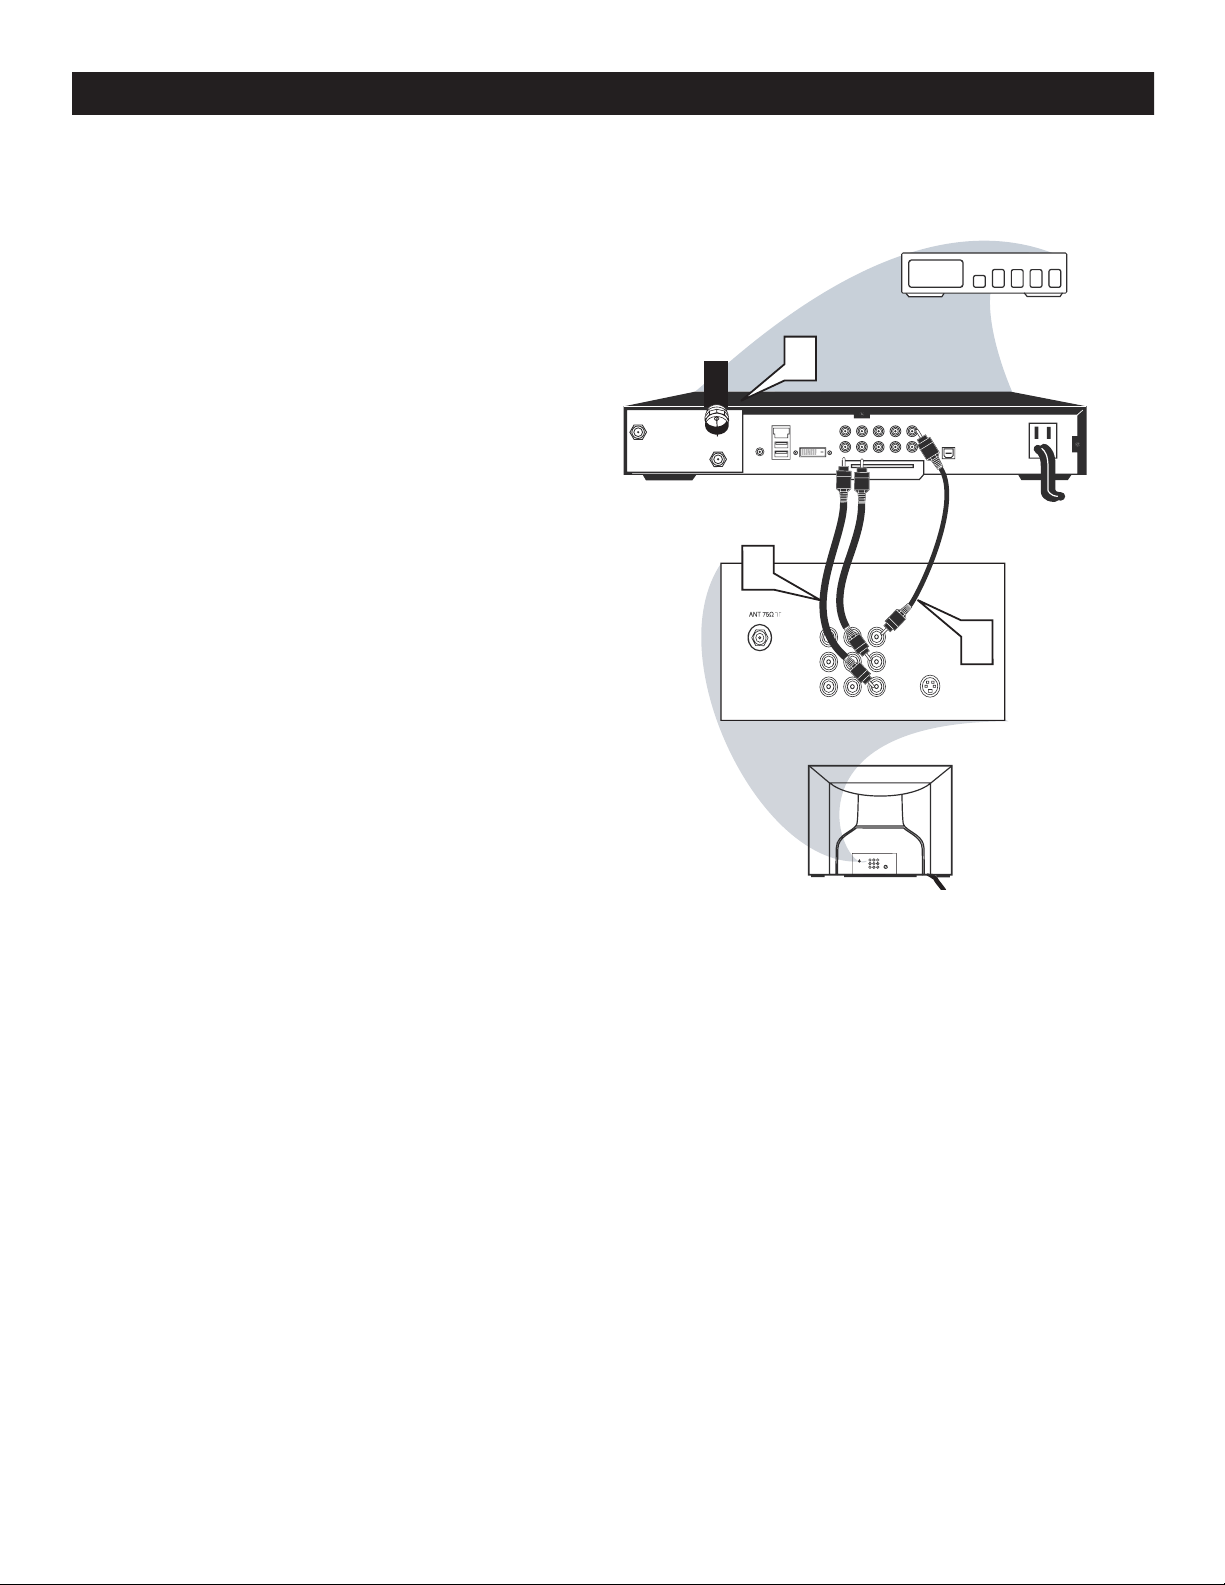
BASIC ANTENNA AND CABLE CONNECTIONS
After using the Auto Program Control, press the
and
buttons to scroll through all the
(75 ohm) then you are ready
to connect to the TV.
win
wires to the screws of a 75 ohm adapter.
gnal IN(put) plug on the C
) to the 75 plug
on
the TV
If you have a Cable Converter Box : Connect
the OUT (
) plug from the Converter to the
1
2
Ω
Ω
Page 6
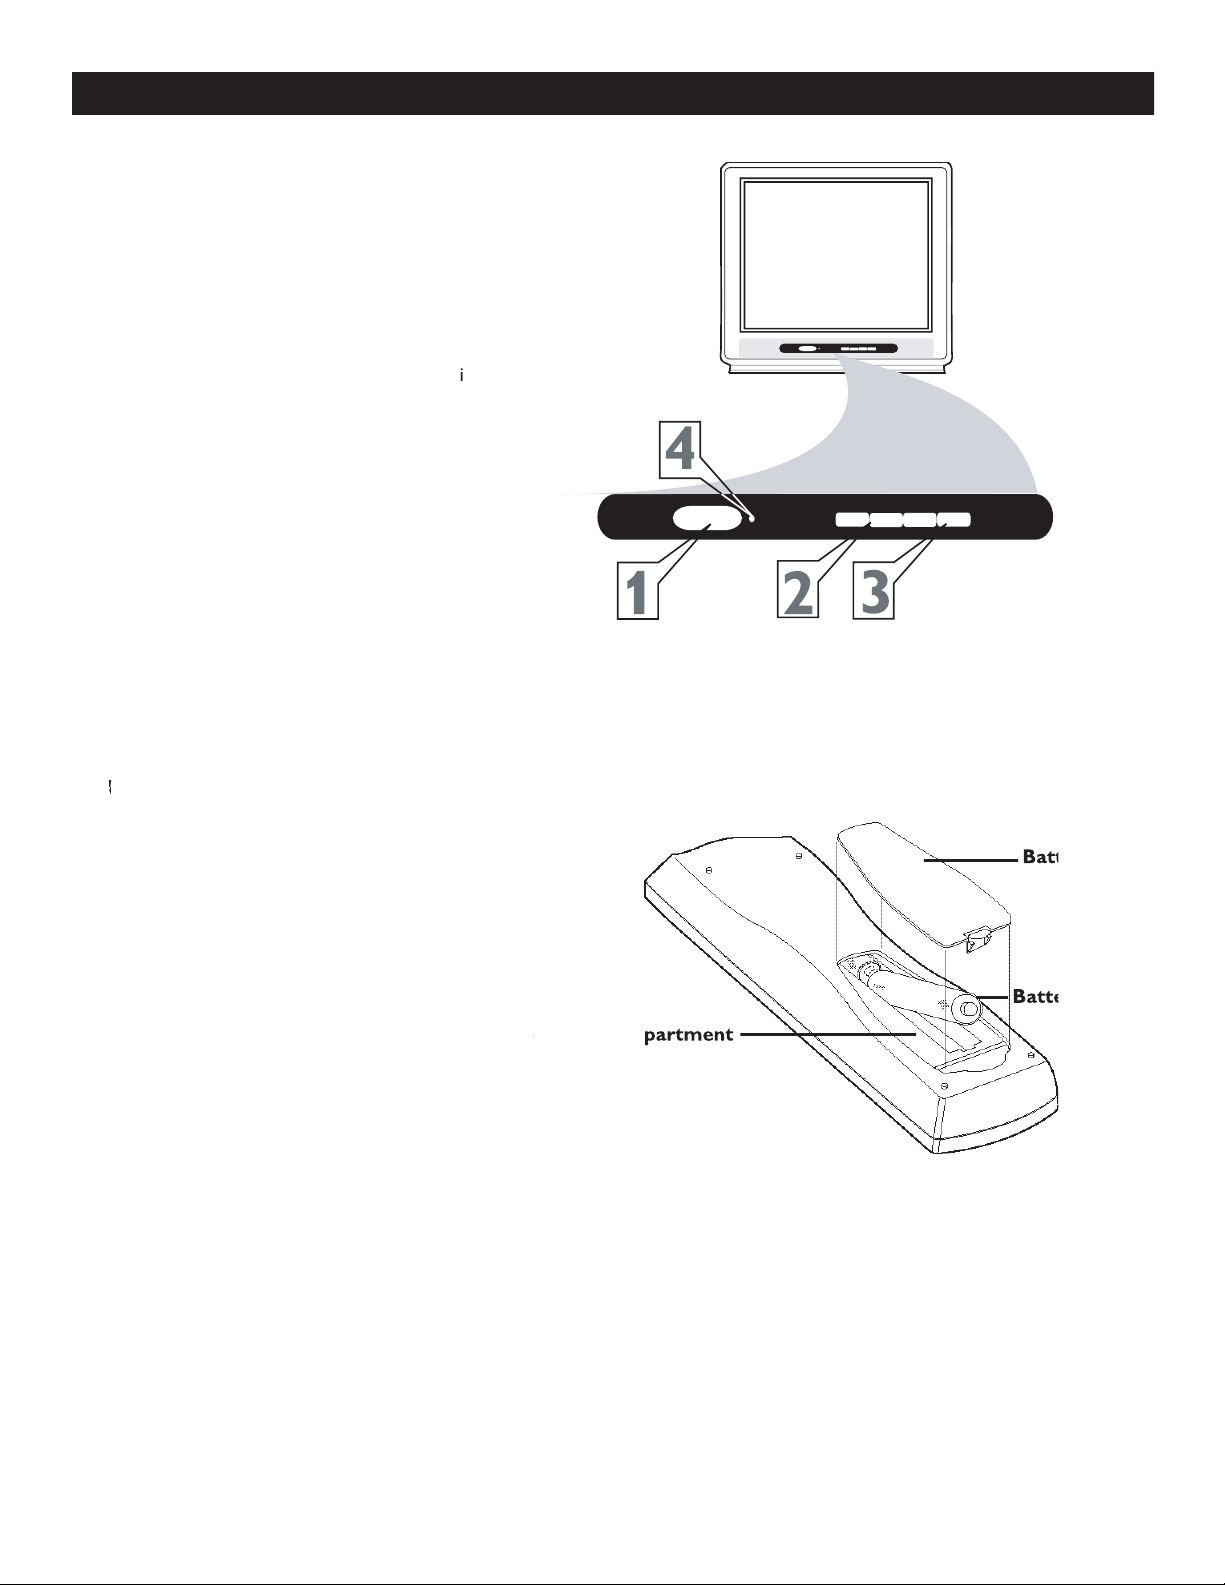
1
WER button
to tu
to increase
the sound level
VOLUME - button
to
will display the on-screen menu
toward the
TV with the remote.
ve the battery compartment lid
the back of the remote.
POWER
VOLUME
-
+
>
<
CHANNEL
POWER
VOLUME
-
+
>
<
CHANNEL
2
3
4
BASIC TV AND REMOTE CONTROL OPERATION
1
2
3
Page 7
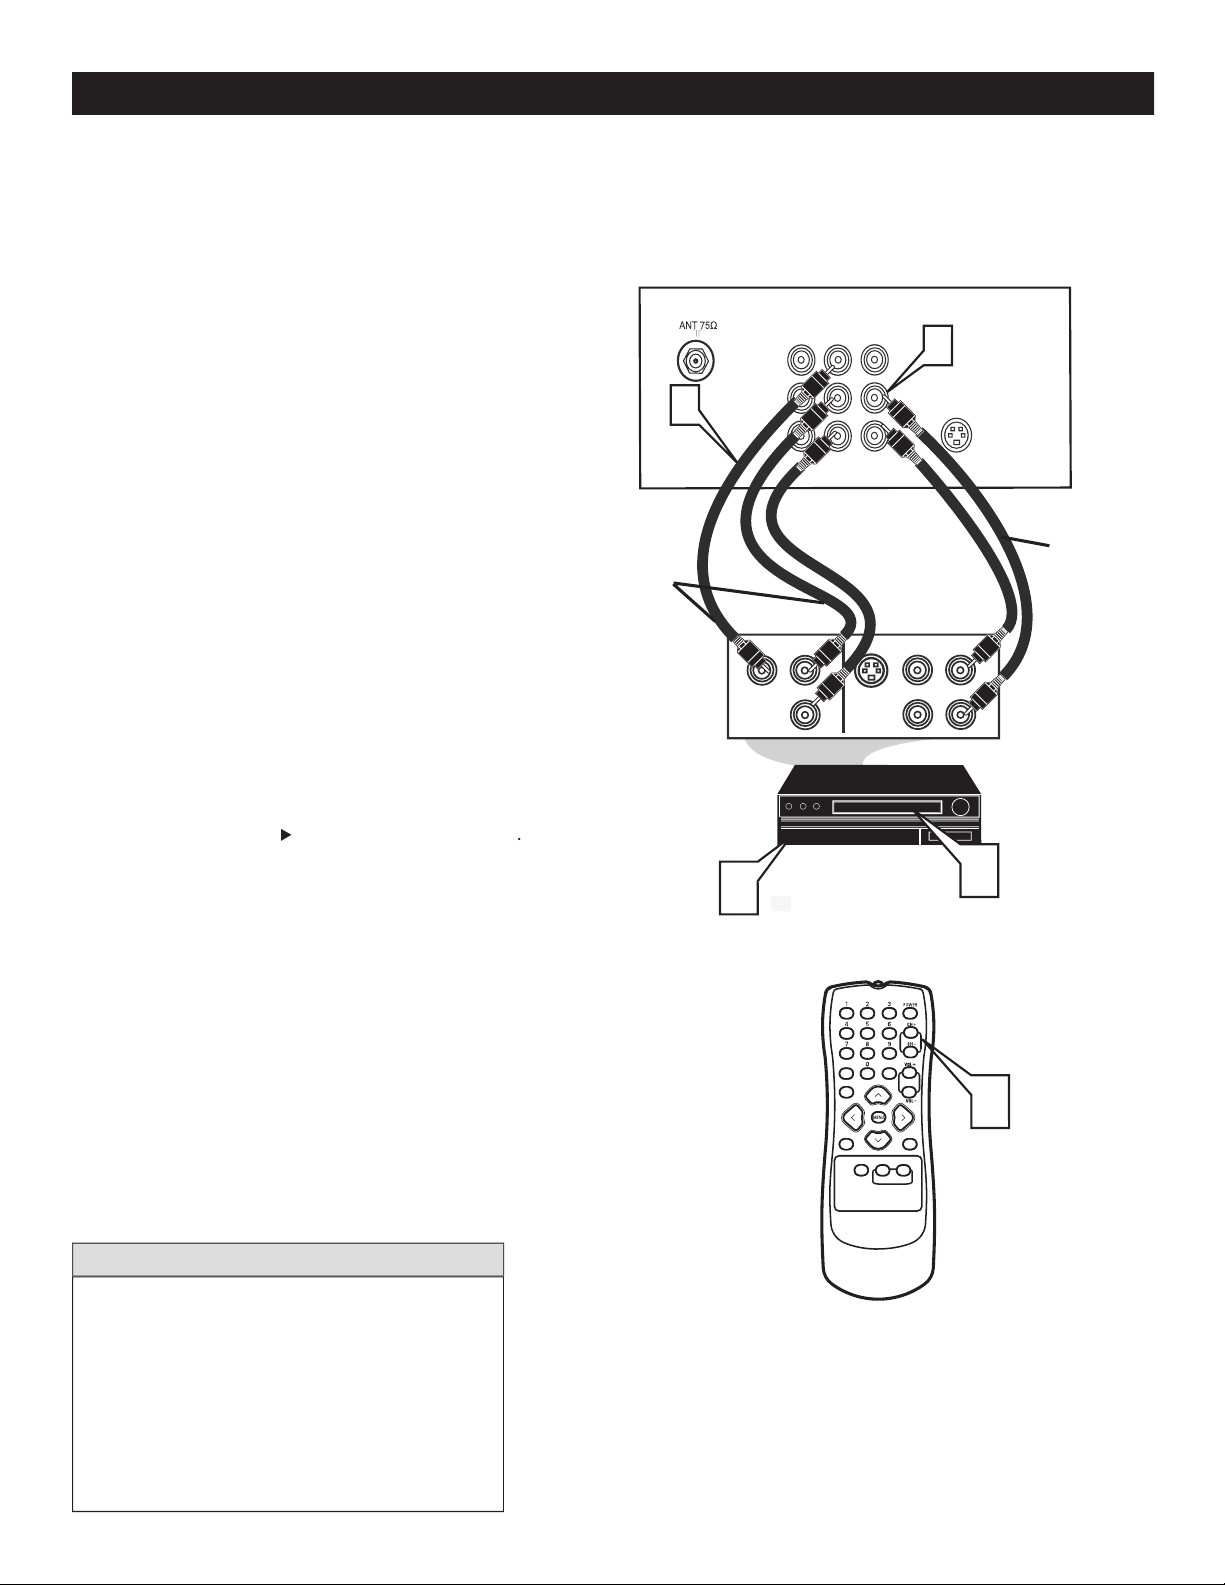
f your cable signal uses a cable
1
to the signal IN(pu
t) plug at the back of
the Cable Box.
(or ANT,
your cable box may be labeled differently)
jack
AVI Video Input on the TV.
to the
Connect the
Audio L & R Input jacks
to tune to the AV channel or the cable box
L
VIDEO
S-VIDEO
CV
I
Y
Pb
Pr
AUDI
O
TO
TV/VCR
CABLE
IN
IR
USB
DVD-D OUT
AUDIO IN
SPDIF
VIDE
O
IN OUT
S-VIDEO
R L
AUDIO OUT
TV
PASSCARD
Y Pb Pr
OPTICAL
SPDIF
4
6
24
5
75‰
L
R
S-VIDEO
VIDE
O
AUDI
O
CV
IAV out
Y
Pb
Pr
AV in
AV In
AV
Out
R
Cable Signal IN
from the Cable
Company
Cable Box with A/V Outputs
Jack Panel Back of TV
Audio Cables
L (White) & R (Red)
Video Cable
(Yellow)
Cable Box (w/Audio/Video Outputs):
2
6
CABLE BOX CONNECTIONS
Ω
Page 8
Jacks located at the back of the TV.
Jacks located at the back of the TV.
1
V
to the AUDIO (left and right) AV
jacks on the re
to the
VIDEO OUT jack
to the AUDIO (left and right) O
j
will
With the VCR (or accessory de
vice) ON and
VD, etc
to view the tape
222
75
S-VIDEO
ANTENNA
OU
T
ANTENNA
IN
VIDE
O
AUDIO
IN
IN
OU
TOUT
LR
5
3
7
Y
Pb
2
1
Video Cable
(Yellow)
Audio Cables
Back of TV
Back of Typical VCR
VCR
with
Audio/Video Outputs
VIDEO
CVI
AUDI
O
AV
In
AV ou
t
R
Pr
L/Mono
4
STATUS
EXIT
A/CH
SLEEP
MUTE
SMART
SOUNDPICTURE
SURF
CC
2
3
4
AV (AUDIO/VIDEO) INPUT CONNECTION
5
6
7
Page 9
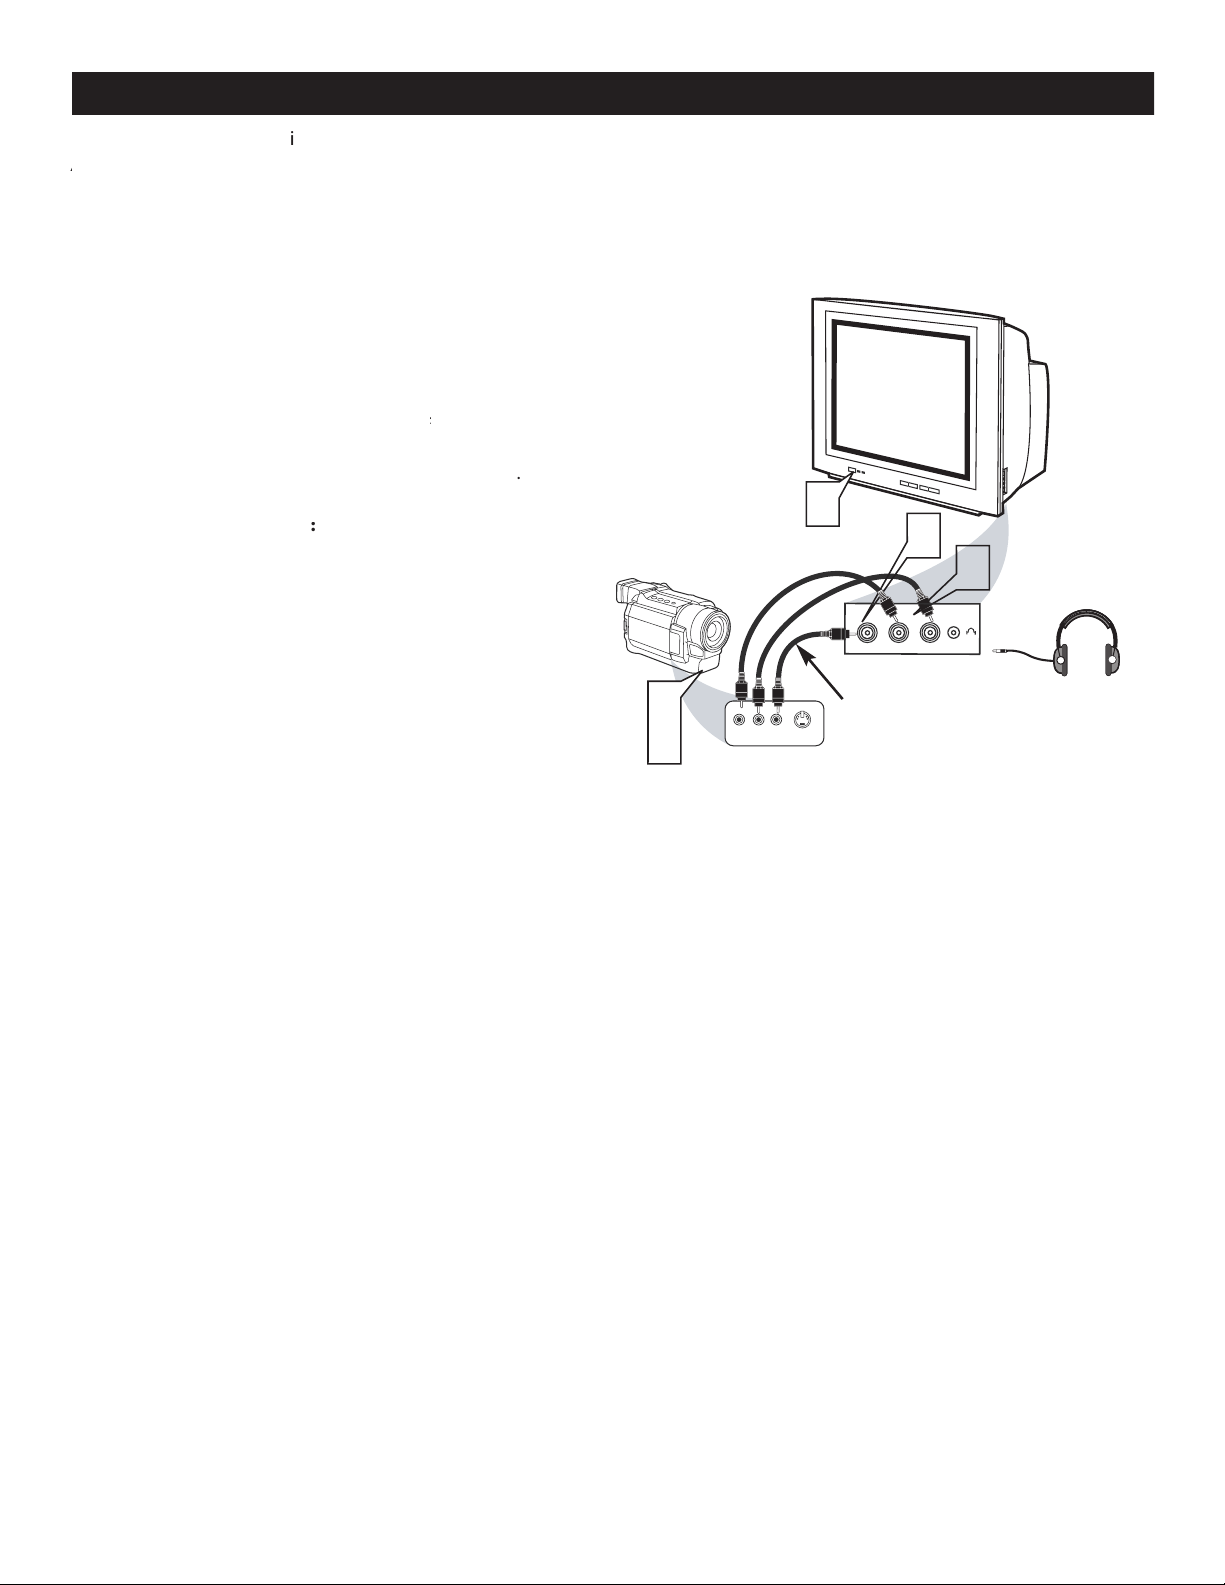
A
A
gaming device
butt
1
from
the Vi
vice) to the Video (yellow)
the SIDE (or FRONT) of the TV.
t and Right
jack on the SIDE (or FRONT)of the tel
Connect one end of the
television.
Turn
the TV and the
.
AV
t
n
o
r
F
S-VIDEO
VIDEOAUDIO
LEFT RIGHT
3
1
2
3
5
Side AV Inputs:
Side Jack
panel of TV
Vide
o
Cable
Audio
Cables
Jack Panel of Accessory Device
Optional
Headphones
VIDE
O
AUD
IO
L
R
2
SIDE AV CONNECTIONS
3
4
5
Page 10
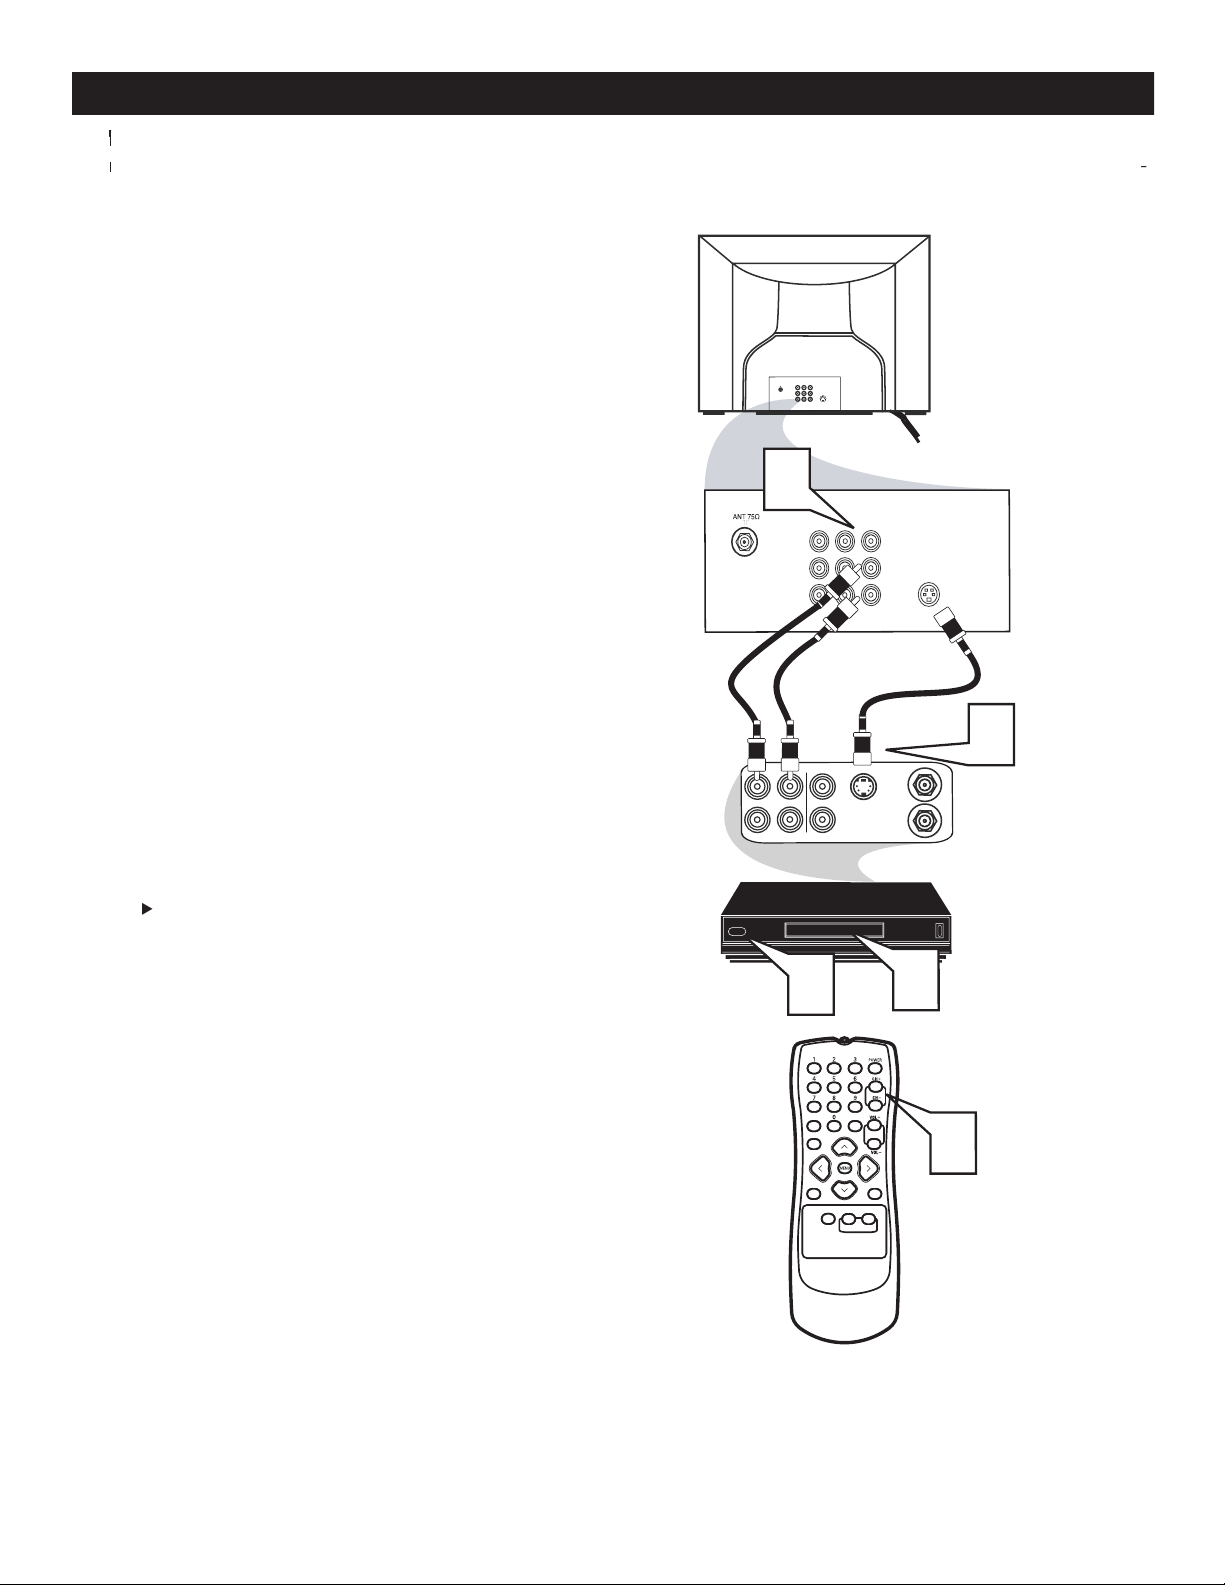
(Digital
B
VHS VCR (video cassette
recorder) tapes than the norma
The accessory device mus
t have an - VIDEO
1
one end of the S-VIDEO CABLE
to the S-VIDEO jack to the back of the TV.
th
to the S-VHS (S-Video
) OUT jack
the other
to the AUDIO (re
to the
AUDIO (left and right) OUT jacks on the rear
Turn
the
VCR and
TV
TV screen.
video tape in
the
VCR and
press the PLAY
button
75‰
L
R
S-VIDE
O
VIDE
O
AUDI
O
CV
IAV out
Y
Pb
Pr
AV in
L
VIDEO
S-VIDE
O
CV
I
Y
Pb
Pr
AUDI
O
AV
In
R
ANTENNA
OUT
ANTENNA
IN
VIDEO
AUDIO
IN
IN
OUTOUT
LR
S-VHS OUT
3
2
5
4
1
STATUS
EXIT
A/CH
SLEEP
MUT
E
SMART
SOUNDPICTURE
SURF
CC
Audio
& White)
VCR or External
Accessory Device
2
S-VIDEO (S-VHS) INPUT CONNECTIONS
3
4
5
Page 11
1
the Component (Y, P
Vid
jacks from the DVD player (or
) in
When using the Component Video
AV in Video Ja
th
to the Audio (
jacks on the rear of the accessory de
vice to the
Audio (L and R) AV
the
button on the DVD Player
The description for the component video
the letters b and r stand for blue and red color
L
VIDEO
S-VIDEO
CVI
Y
Pb
Pr
AUDIO
AV In
R
S-VIDEO
OUT
OUT
OUT
L
R
AUDIO
VIDEO
COMP VIDEO
Y
Pb
Pr
3
5
4
1
2
Component
Video Cables
(Green, Blue,
Red)
Audio
Cables
(Red &
White)
Accessory Devic
e
Equipped with
Component Vide
o
Output
s
Back of TV
STATUS
EXIT
A/CH
SLEEP
MUT
E
SMART
SOUNDPICTURE
SURF
CC
2
3
4
COMPONENT VIDEO (CVI) INPUT CONNECTIONS
5
Page 12

AUDIO SYSTEM CONNECTION :
1
AUDIO
jacks on the TV to the R and L audio
ystem
To
will need to change the volume at the external
the television
CONNECTION :
first VCR
the AV1 channel to view a pre-rec
The following steps allow
you to connect a s
to
the other end to the V
the second VCR.
Audio cable
from the
AV Out A
AUDIO IN
tape and its ready to record what’s being
vi
the TV
A
U
X
/
T
V
I
N
P
U
T
P
H
O
N
O
IN
P
U
T
R
L
2
L
AV Ou
t
VIDE
O
S-VIDE
O
CV
I
Y
Pb
Pr
AV In
AUDI
O
1
1
R
Back of TV
Audio Cables
(Red and White)
AUDIO SYSTEM CONNECTION:
AUDIO SYSTEM CONNECTION :
Y
Pb
Pr
ANTENNA
OU
T
ANTENNA
IN
VIDE
O
AUDI
O
IN
IN
OU
TOUT
LR
ANTENNA
OU
T
ANTENNA
IN
VIDE
O
AUDI
O
IN
IN
OUT OUT
RL
1
2
3
L
AV Ou
t
VIDE
O
S-VIDE
O
CVI
AV
In
AUDIO
R
Back of TV
Audio Cables
1st VCR
(refer to panel 4 for
proper connection)
Vide
o
Cable
2nd VCR with Audio and
Video Input Jacks
AUDIO SYSTEM CONNECTION:
CONNECTION :
2
AV OUTPUT CONNECTIONS
1
2
3
Page 13

STATUS
EXI
T
A/CH
SLEEP
MUTE
SMART
SOUNDPICTURE
SURF
CC
REMOTE CONTROL BUTTON DESCRIPTIONS
Button - To turn off the
Button - Press to turn
the TV
or put on
PICTURE
Button - To
Weak Signal, or Multimedia).
Button - To display
Buttons - To select
TV channels or enter values in the on-
for a second or two before changing to
the chosen channel.
SOUND
Button - To
Buttons (
) -
To highlight and select items on the
TV onscreen menu.
VOL(ume) + / -
Buttons - To
A/CH
(Alternate Channel) Button -
Toggle between last viewed and current
Button - To display the
Button - Set the TV to
tedly to select 15,
Button -
Page 14

Language
Tuner Mode
Auto Progra
m
Channel Edit
Language
Tuner Mode
Auto Instal
l
Channel Edit
Install
Main
Idioma
Sintonia
Auto Program
a
Editor Canal
Instalar
MUTE
SLEEP
STATUS
EXI
T
A/CH
you can set the TV’s on-screen menu to be show in English, French or Spanish.
1
>
to scro
through the on-sc
is highlighted.
to display the
menu features.
to scroll
through the Install features unti
to select
W
/ EXIT
HOW TO USE THE LANGUAGE CONTROL
2
3
4
5
6
Page 15

the AUTO PROGRAM feature is activated, the TV will automatically choose the correct mode.
1
>
to scro
through the on-sc
wor
is highlighted.
to display the
menu features.
to scroll
through the Install features unti
to select
ANTENNA, CABLE or
AUTO
W
/ EXIT
When CABLE is selected, channels 1 - 125 are
When ANTENNA is selected, channels 2 - 69 are
When AUTO is selected, the TV will
Language
Tuner Mode
Auto Program
Channel Edit
Language
Tuner Mode
Auto Program
Channel Edit
Install
Language
Tuner Mode
Auto Program
Channel Edit
Install
OR
Language
Tuner Mode
Auto Program
Channel Edit
Install
OR
Cable
Auto
MUTE
SLEEP
STATUS
EXI
T
A/CH
CC
2
3
4
5
HOW TO USE THE TUNER MODE CONTROL
6
Page 16

is activated.
1
control to show the on-screen menu.
>
to scro
through the on-sc
wor
is highlighted.
to display the
menu features.
to scroll
through the Install features unti
Auto Program
CURSOR >
to s
tart the Auto
W
/
This makes it easy for you to select only the TV stations in your area
when the
or
buttons are pressed.
58
59
MUTE
SLEEP
STATUS
EXI
T
A/CH
CC
Channel Edit
Channel Edit
When CABLE is selected, channels 1 - 125 are
When ANTENNA is selected, channels 2 - 69 are
When AUTO is selected, the TV will
2
3
4
AUTO PROGRAM
5
6
Page 17

1
control to show the on-screen menu.
>
to scro
the on-sc
to display the
>
to scroll through
the Install features unti
to select
With the CHANNEL EDIT options
you can use the
to scroll
th
that you wish
to
ADD
(skipped OFF
) or
(skipped
to go
directly
to a specific channel that you want to add or
or
to
is selected the channel
is s
when scrolling channels with
or
is selected the channel is not skipped
when scrolling with
or
When finished
or
channels from the list of channels st
An “X” appearing in front
that channel has skipped
Install
Language
Tuner Mode
Auto Program
Channel Edit
Channel
Skipped
Channel Edit
Channel No. 3
Skipped
Off
Language
Tuner Mode
Auto Install
Channel Edit
Channel Edit
Channel No. 3
Skipped
On
Channel Edit
Channel No. 3
Skipped
On
MUTE
SLEEP
STATUS
EXIT
A/CH
CC
2
3
CHANNEL EDIT
4
5
6
7
8
9
Page 18

button on the remote control
to display the onscreen menu.
feature is highlighted.
to adjust
picture are as bright as you want.
to add or remove color.
adjust until the lightest parts of the
picture show good detail.
Sharpness
Sharpness
to improve sharpness in the
picture.
picture quality.
to select Normal, Cool,
or Warm picture preferences. For Normal, whites
will mainain their whiteness;
Cool will make the whites bluish; and Warm will
make the whites reddish.
-
w
PICTURE
The current Smart Picture
PIC
repeatedly to
Weak Signal
picture
settings.
:
The way you choose to set the Picture Menu
W
your current program source or content.
MUTE
SLEEP
STATUS
EXI
T
A/CH
CC
Tint
0
SMART
SOUNDPICTURE
SURF
1
2
3
PICTURE MENU CONTROLS
1
2
SMART PICTURE
Page 19

button on the remote control
to display the onscreen menu.
feature is highlighted.
to adjust
Th
will
high frequency sounds.
The control will enhance the low
frequency sounds.
and righ
t speakers.
AVL
(Auto Volume Leveler)
(Auto Volume Leveler)
When On, AVL
will level out the sound being heard when sudden
changes in volume occur
during commercial breaks
during commercial breaks changes in volume occur
or channel
changes.
or
settings if you're in
or
if you're in Mono mode.
-
Toggles Ultra Bass
When
On,
y sound will be enhanced.
Sound
or
settings.
SOUND
Sound
SOUND
toggle between the four settings. (
Theatre, Music, or Voice
).
:
The way you choose to set the Sound Menu
SMART
SOUNDPICTURE
SURF
Spatial
or Mono
Incr. Surround
or Stereo
or
Ultra Bass
MUTE
SLEEP
STATUS
EXI
T
A/CH
CC
1
2
3
SOUND MENU CONTROLS
1
2
SMART SOUND
Page 20

button on the remote control to
display the onscreen menu.
is highlighted.
to display the
opt
to highlight
to select one of the t
wo
options
4:3 or Expand 4:3.
4:3 -
Expand 4:3 -
entire screen area, elimating the “letterbox” effect.
When finished
button on
the remote control to remove the menu from the
V’s
T
the
or
when the onscreen menu is not
tandard
and
M
M
4:3
Expand 4:
3
Format
4:3 Expand
Features
SmartLoc
k
Format 4:
3
MUTE
SLEEP
STATUS
EXIT
A/CH
CC
1
2
3
4
5
THE 4:3 EXPAND FORMAT CONTROL
6
Page 21

UNDERSTANDING SMARTLOCK CONTROLS
MOVIE RATINGS
- All ages admitted. Suitable for all ages.
- Contains material
- Contains material
No one under the age of 17 will be admitted.
X: Adults Only
- Contains one or more of the following: very
graphic violence, very graphic and explicit or indecent sexual acts,
very coarse and intensely suggestive language.
is a feature that lets the TV receive and process data sent by broadcasters or other program providers with program content
that may be found objectionable (such as offensive language, violence, sexual situations, etc.). This feature is useful for adults to prevent
offers various BLOCKING controls to choose from:
Access Code
- An Access Code must be set to prevent children from unblocking questionable or censored programming set by their
- After an access code has been programmed, you can block individual channels including the A/V inputs.
- Lets you block ALL channels including A/V inputs.
- Certain blocking options exist which will block programming based on ratings patterned by the Motion Pictures
Association of America (MPAA).
- Like the Movie Ratings, programs can be blocked from viewing using standard TV ratings set by TV broadcasters.
Designed for a very young audience, including children
Appropriate for children age 7 and above who have
Suitable for most audiences. Contains little or no violence,
Contains material unsuitable for younger children.
violence (V), intense sexual situations (S), strong coarse language
Viewed by adults and therefore may be unsuitable for
violence (V), explicit sexual situations (S), or crude indecent
Page 22

button on the remote control to
display the onscreen menu.
is
highlighted.
to display the
opt
til the word
and the screen will read
ACCESS CODE - - - - .“
enter
“
XXXX
you press the
“
will appear
and you
will need to enter 0
The
scree
You will be as
the code
the new code again
“XXXX” will appear when you
enter your new code and then display the SmartLock
menu options.
ver the next few pages you’ll
Main
Pictur
e
Sound
Features
Instal
l
SmartLock
Format
Features
SmartLoc
k
Format
Timer
Start
Time
Stop Time
Channe
l
Activate
Displa
y
Features
SmartLock
Format
Access Code
- - -
-
SmartLock
Block Channel
Setup Code
Clear Al
l
Block Al
l
Movie Rating
TV Rating
OffStop Time
Channe
l
Activate
Displa
y
Features
SmartLock
Format
Access Code
XXXX
Features
SmartLock
Format
Access Code
XXXX
Incorrect
Features
SmartLock
Format
New Code
- - -
-
Features
SmartLock
Format
Confirm Code
XXXX
MUTE
SLEEP
STATUS
EXIT
A/CH
CC
1
2
3
SETTING UP AN ACCESS CODE
4
5
6
7
Page 23

the CURSOR
B
are highlighted
to turn blocking
or
for
that channel. When
is selected the channel
will be blocked.
to select other channels
you wish to bl
Repeat step 2 to b
new channel.
To Unblock a channel,
CH+ or CH-
to scroll
to the chann
will show a message
telling you
that
the channel has
been blocked by SmartLock a
your Access Code to
your Access Code.
The Blocked channel will be UnBlocked.
When finished
button
on the remote c
the screen.
factory def
A
A
fter you
A
/V inputs you wan
t to block out or censor
SmartLock
Block Channe
l
Setup Code
Clear Al
l
Block Al
l
Movie Rating
TV Ratin
g
OffStop Time
Channe
l
Activate
Displa
y
Channel 12
Blocked By SmartLoc
k
Channel Blocking
Access Code
- - - -
Block Channel
On
Enter your
Access Code to
view a
tuned
channel that is
blocked wit
h
Block C
hannel.
MUTE
SLEEP
STATUS
EXIT
A/CH
CC
1
2
3
4
BLOCK CHANNELS
5
6
Page 24

the CURSOR
to select eit
or
is selected, press
to
clear all blocked channels. All channels will be
viewable. Now all blocked channels can be viewed.
is selected, press
to
turn the control
or
is
selected, ALL available channels will be blocked
from viewing.
When finished
/EXIT
button
on the remote control to remove the menu from
the screen.
factory def
fter
SmartLock
Block Channe
l
Setup Code
Clear Al
l
Block Al
l
Movie Rating
TV Ratin
g
Clear ?Stop Time
Channe
l
Activat
e
Displa
y
Clear All
Cleare
d
SmartLock
Block Channe
l
Setup Code
Clear Al
l
Block Al
l
Movie Rating
TV Ratin
g
Off
Block All
On
MUTE
SLEEP
STATUS
EXIT
A/CH
CC
CC
1
2
3
BLOCK / CLEAR ALL CHANNELS AT THE SAME TIME
Page 25

to
words
> button to display the
VIE
opt
17, or X)
to high
M
these options can be turned
(
blocking
) or
) or blocking
(
).
).viewing
or
factory def
the Move
SmartLock
Block Channe
l
Setup Code
Clear Al
l
Block Al
l
Movie Ratin
g
TV Ratin
g
G
PG
PG-1
3
R
NC-17
X
Movie Rating
G
PG
PG-1
3
R
NC-17
X
Off
G
On
MUTE
SLEEP
STATUS
EXIT
A/CH
CC
1
2
3
4
MOVIE RATINGS
Page 26

to
words
RATING
> button to display the
opt
TV-Y, TV-
Y7
PG, TV-14 or TV
)
to high
TV
Rating options. When highlighted
these options can be turned
(
blocking
) or
) or blocking
(
).
).viewing
to block V (violence), FV (fantasy violence), S (sex scenes), L
the TV-
Y or TV-G rating
or
CURSOR >
to enter the
sub
ratings.
A sub-
is accessed, press
to select one
o
f the options (Block All, V, S, L
t
the option
or
factory def
the TV
TV Rating
TV-Y
TV-Y
7
TV-G
TV-P
G
TV-14
TV-MA
Off
TV-Y
On
TV-Y7
Block
All, FV
TV-G
Of
f
TV-14
Block
All, V, S, L, D
TV-MA
Block
All, V, S, L
TV-PG
Block
All, V, S, L, D
CC
MUTE
SLEEP
STATUS
EXIT
A/CH
CC
1
2
3
4
TV RATINGS
5
6
Page 27

> button to display the
or NO RATING) menu.
:
:
All unrated programs based on the Movie
feature is set to ON and the BLOCKING feature is set to
:
All programs with NO content advisory
feature is set to ON.
or
to
feature.
When highlighted
or
> or <
factory def
tions as
well. With these
SmartLock
Setup Code
Clear All
Block All
Movie Rating
TV Ratin
g
Block Option
s
Blocking
On
Unrated
On
No Rating
On
MUTE
SLEEP
STATUS
EXIT
A/CH
CC
1
2
BLOCKING OPTIONS
3
4
Page 28

to display the
Closed Caption settings.
button repeatedly
to choose
from the four Closed Caption options (CC
Off, CC1, CC Mute).
When finished
the remote control to remove the menu from the
TV screen.
vision programs on the TV screen. Designed to
on the remote control to
display the sleeptimer menu.
to select the amount of time (15, 30, 45, 60,
An onscreen countdown will appear during
the last minute before the TV switches
turn the TV off after a period of ti
CC Off
CC1
CC2
CC Off
MUTE
SLEEP
STATUS
EXIT
A/CH
CC
Sleep 15
Sleep 30
Sleep 45
Sleep 60
Sleep 90
Sleep 120
Sleep 180
Sleep 240
Sleep 15
Sleep off
MUTE
SLEEP
STATUS
EXIT
A/CH
CC
You will not be able to
1
2
3
CLOSE CAPTIONING
1
2
SLEEPTIMER
Page 29

STATUS
EXIT
A/CH
SLEEP
MUTE
SMART
SOUNDPICTURE
SURF
CC
5
12
A/CH
1
A/CH
toggle
4:3
4:3 is an aspect ratio of traditional squarish National Television Systems Committe (NTSC) TV screens; it stands for four
Audio Video (A/V)
A term often used when discussing a channel on a TV receiver or on video equipment, which has been
within the TV set to prevent picture distortion and skewing. It is also used for audio-video processors, which
A device that allows your television to receive the expanded number of channels provided by broadcasters. Some of these
An analog encoded video signal that includes vertical and horizontal synchronizing information. Since both luminance
video jack is usually a single RCA-type.
The color difference signals (Pb, Pr) and the luminance(Y) signals are connected separately which allows for improved
The brightness or black-and-white component of a color video signal. Determines the level of picture detail.
video.
An encoded video s
the picture when conne
(ALTERNATING CHANNELS)
GLOSSARY
Page 30

TROUBLESHOOTING TIPS
Symptoms
and
Suggested Steps To Take
before requesting Service. You may be able to solve the problem yourself.
SYMPTOMS
SUGGESTED STEPS TO TAKE
button on the remote control repeatedly to select the desired AV channels.
TV Displays
Wrong
in the television menu and select the correct signal source, then perform the
automatic installation again. (Refer to page 15).
in the television menu and select the correct signal source, then perform the
automatic installation again. (Refer to page 15).
S
from a distance less than 2 meters (6 feet) with the television sound muted.
S
This could be due to any of the following reasons:
with several major network stations to be sure that the station you selected is in
4. When using an AV input, the television will not display STEREO even though it is producing
TV
the plug into your wall outlet. Power On the TV again.
the fuse on the AC power strip is not blown.
TV is not
TV Displays white
when viewing a
type of disc with extra video information can produce a number of small white lines in the
and does not require a service call.
Page 31

Concerning Stationary Images on the TV Screen:
that contain constantly moving and changing images that fill the
for extended periods of time, or to display the same images
TV screen when a wide screen (16:9) movie is viewed on a
TV with standard (4:3) aspect ratio.
TV screen.
temperatures can become excessively hot; for example, in
from the electrical outlet before cleaning.
the screen surface. Avoid wearing jewelry or using anything
wiped surfaces.
CLEANING AND CARE
Page 32

SPECIFICATIONS
Aspect ratio :
SOUND
Weight (incl. Packaging) :
Weight (excl. Packaging) :
Visible diagonal / screen size :
Auto Program
AV1:
AV2
S-Video
AV3: Monitor Out
4:3
kg / 58.57 lbs
inch / 50.8 cm
Page 33

Magnavox, P.O. Box 671539, Marietta, GA. 30006-0026
Ninety (90) Days Labor & One (1) Year Parts & One (1) Year Display
MAGNAVOX LIMITED WARRANTY
MAGNAVOX warrants this product against defect in material
or workmanship, subject to any conditions set forth as follows:
PROOF OF PURCHASE:
You must have proof of the date of purchase to receive warranted repair on the product. A sales receipt or other document showing the product and the date that you purchased the
product as well as the authorized retailer included, is considered such proof.
COVERAGE:
(If this product is determined to be defective)
LABOR: For a period of ninety (90) days from the date of pur-
chase, Magnavox will repair or replace the product, at its
option, at no charge, or pay the labor charges to any Magnavox
authorized service center. After the period of ninety (90) days,
Magnavox will no longer be responsible for charges
incurred.
PARTS: For a period of one (1) year, Magnavox will supply, at
no charge, new or rebuilt replacement parts in exchange for
defective parts. Magnavox authorized service centers
will pro-
vide removal and installation of the parts under
the specified
labor warranty.
DISPLAY: For a period of one (1) year from the date of pur-
chase, Magnavox will supply, at no charge, a new or rebuilt
active display device in exchange for the defective display.
Magnavox authorized service centers will provide removal and
installation of the parts under the specified labor warranty.
(PTV screens carry a thirty (30) day replacement warranty.)
EXCLUDED FROM WARRANTY COVERAGE
Your warranty does not cover:
• L
abor charges for installation or setup of the product, adjustment of customer controls on the product, and installation
or repair of antenna systems outside of the product.
• P
roduct repair and/or part replacement because of improper
installation, connections to improper voltage supply, abuse,
neglect, misuse, accident, unauthorized repair or other cause
not within the control of Magnavox.
• A
product that requires modification or adaptation to enable
it to operate in any country other than the country for
which it was designed, manufactured, approved and/or
authorized, or repair of products damaged by these modifications.
• Damage occurring to product during shipping when improperly packaged or cost of associated packaging.
• P
roduct lost in shipment and no signature verification of
receipt can be provided.
• A
product used for commercial or institutional purposes
(including but not limited to rental purposes).
• P
roducts
sold AS IS or RENEWED.
TO OBTAIN WARRANTY SERVICE IN THE U.S.A.,
PUERTO RICO, OR U.S. VIRGIN ISLANDS…
Contact Magnavox Customer Care Center at:
1-800-705-2000
TO OBTAIN WARRANTY SERVICE IN CANADA…
1-800-661-6162 (French Speaking)
1-800-705-2000 (English or Spanish Speaking)
REPAIR OR REPLACEMENT AS PROVIDED UNDER THIS
WARRANTY IS THE EXCLUSIVE REMEDY FOR THE CONSUMER. MAGNAVOX SHALL NOT BE LIABLE FOR ANY
INCIDENTAL OR CONSEQUENTIAL DAMAGES FOR
BREACH OF ANY EXPRESS OR IMPLIED WARRANTY ON
THIS PRODUCT. EXCEPT TO THE EXTENT PROHIBITED
BY APPLICABLE LAW, ANY IMPLIED WARRANTY OF MERCHANTABILITY OR FITNESS FOR A PARTICULAR PURPOSE
ON THIS PRODUCT IS LIMITED IN DURATION TO THE
DURATION OF THIS WARRANTY.
Some states do not allow the exclusions or limitation of incidental or consequential damages, or allow limitations on how
long an implied warranty lasts, so the above limitations or
exclusions may not apply to you. In addition, if you enter into a
service contract agreement with the MAGNAVOX partnership
within ninety (90) days of the date of sale, the limitation on
how long an implied warranty lasts does not apply.
This warranty gives you specific legal rights. You may have other rights which vary from state/province to state/province.
(Warranty: 4835 710 28125)
Page 34

Alternating Channels
. . . . . . . . . . . . . . . . . . . . . . . . . . . . . . . .
A
. . . . . . . . . . . . . . . . . . . . . . . . . . . . . . . . . . . . .
AV (Audio/Video
) Input Connection
. . . . . . . . . . . . . . . . . . . .
AV (Audio/Video
) Output Connection
. . . . . . . . . . . . . . . . . .
. . . . . . . . . . . . . . . .
. . . . . . . . . . . . . . . . . . . . . . . . . . . . . .
Channel
. . . . . . . . . . . . . . . . . . .
. . . . . . . . . . . . . . . . . . . . . . . . . . . . . . . . . .
. . . . . . . . . . . . . . . . . . . . . . . . . . . . . . . . . . .
. . . . . . . . . . . . . . . . . . . . . . . . . . . . . . . . . . . . . . . . . . .
. . . . . . . . . . . . .
. . . . . . . . . . . . . . . . . . . . . . . . . . . . . . . . . . . . . . . . . . . .
. . . . . . . . . . . . . . . . . . . . . . . . . . . . . . . . . . . .
. . . . . . . . . . . . . . . . . . . . . . . . . . . . . . . . . . . . . . . . . .
. . . . . . . . . . . . . . . . . . . . . . . . . . . . . . . . . . . . . . . . . . . . .
. . . . . . . . . . . . . . . . . . . . . . . . . . . . . . . . . . .
. . . . . . . . . . . . . . . . . . . . . . . . . . . . . . .
Brightness
. . . . . . . . . . . . . . . . . . . . . . . . . . . . . . . . . . . . . .
18
. . . . . . . . . . . . . . . . . . . . . . . . . . . . . . . . . . . . . . . .
18
C
. . . . . . . . . . . . . . . . .
18
Constrast
. . . . . . . . . . . . . . . . . . . . . . . . . . . . . . . . . . . . . . . .
Color Temperature (Color Temp) Control
. . . . . . . . . . . .
Picture
. . . . . . . . . . . . . . . . . . . . . . . . . . . . . . . . . . . . . . . . .
Sharpness
. . . . . . . . . . . . . . . . . . . . . . . . . . . . . . . . . . . . . . . .
. . . . . . . . . . . . . . . . . . . . . . . . .
. . . . . . . . . . . . . . . . .
. . . . . . . . . . . . . . . . . . . . . . . . . . . . . . . . . .
. . . . . . . . . . . . . . . . . . . .
. . . . . . . . . . . . . . . . . . . . . . . . . . . . . . . . .
. . . . . . . . . . . . . . . . . . . . . . . . . . . . . . . . . . . . . . . .
Access Code
. . . . . . . . . . . . . . . . . . . . . . . . . . . . . . . . . . . . .
. . . . . . . . . . . . . . . . . . . . . . . . . . . . . . . . . . .
. . . . . . . . . . . . . . . . . . . . . . . . . . .
4
Movie Ratings
. . . . . . . . . . . . . . . . . . . . . . . . . . . . . . . . . . . .
TV Ratings
. . . . . . . . . . . . . . . . . . . . . . . . . . . . . . . . . . . . . . .
Blocking Options
. . . . . . . . . . . . . . . . . . . . . . . . . . . . . . . . . .
. . . . . . . . . . . . . . . . . . . . . . . . . . . . . . . . . . . . . .
. . . . . . . . . . . . . . . . . . . . . . . . . . . . . . . . . . . . . . .
. . . . . . . . . . . . . . . . . . . . . . . . . . . . . . . . . . . . . . .
Menu Control
. . . . . . . . . . . . . . . . . . . . . . . . . . . . . . . .
AVL (Automatic Volume Leveler)
. . . . . . . . . . . . . . . . . . .
19
. . . . . . . . . . . . . . . . . . . . . . . . . . . . . . . . . . . . . . .
19
. . . . . . . . . . . . . . . . . . . . . . . . . . . . . . . . . . . . . . . . . .
19
Incr. Surround
. . . . . . . . . . . . . . . . . . . . . . . . . . . . . . . . . . . .
Sound
. . . . . . . . . . . . . . . . . . . . . . . . . . . . . . . . . . . . . . . . . . .
Ultra Bass
. . . . . . . . . . . . . . . . . . . . . . . . . . . . . . . . . . . . . . .
Troubleshooting Tips
. . . . . . . . . . . . . . . . . . . . . . . . . . . . . . . .
Tuner Mode
. . . . . . . . . . . . . . . . . . . . . . . . . . . . . . . .
. . . . . . . . . . . . . . . . . . . .
Warraty (L
. . . . . . . . . . . . . . . . . . . . . . . . . . . . . . . . . . .
INDEX
 Loading...