

Page 1
Page 2

Last changes: Friday, August 11, 2017
This docu mentation is protected by copyright law.
All rights, especially the right of duplication, circulation, and translation are reserved.
No part of this publication may be reproduced in form of copies, microfilms or other processes, or transmitted into a language used for
machines, especially data processing machines, without the express written consent of the publisher.
All rights of reproduction are reserved. Errors in and changes to the contents as well as program modifications reserved.
Copyright © MAGIX Software GmbH, 1994 – 2017. All rights reserved.
MAGIX, Vegas and all mentioned MAGIX product names are registered trademarks of MAGIX Software GmbH
PlayStation is a registered trademark and PSP is a trademark of Sony Corporation Entertainment Inc.
HDV and HDV logo are trademarks of Sony Corporation and Victor Company of Japan, Limited (JVC).
"ATRAC," "ATRAC3," "ATRAC3plus," "ATRAC Advanced Lossless," and the ATRAC logo are trademarks of Sony Corporation.
http://www.sony.net/Prod ucts/ATRAC3/
More license information can be foun d online at the Vegas web sites.
MAGIX licensing conditions are included in the installation and also at www.magix.com under EULA.
www.vegascreativesoftware.com
Page 3

Table of Contents
Table of Contents
Table of Contents 3
Introduction 13
Technical Support 14
About Vegas Pro 14
Interactive Tutorials 14
The Vegas Pro Window 15
Main toolbar 16
Editing Tool 17
Time Display 20
Track List 21
Scrubbing 22
3
Timeline 23
Marker Bar 25
The Transport and Editing Toolbar 26
Viewing the status bar 28
Window Docking Area and Floating Window Docks 29
The Explorer Window 29
The Trimmer Window 32
The Master Bus Window 32
The Video Preview Window 33
The Project Media Window 33
The Edit Details Window 34
The Transitions Window 34
The Video FX Window 35
The Media Generators Window 36
The Compositors Window 37
The Plug-In Manager Window 38
The Video Scopes Window 39
The Surround Panner Window 39
The XDCAM Explorer Window 40
The Mixing Console Window 40
The Device Explorer Window 41
Page 4

4
Loudness meters 41
Working with projects 45
Creating a new project 45
Setting project properties 45
Opening a project or media file 54
Creating rotated projects 57
Nesting projects 59
Opening a recent project 60
Saving a project 60
Automatic project saving 60
Saving and renaming a project (Save As) 60
Project references in rendered files 61
Sharing a project online 63
Uploading your movie to YouTube 63
Uploading your movie to Facebook 64
Uploading your movie to Vimeo 65
Uploading your movie to YouTube 65
Importing and exporting projects 66
Importing and exporting AAF files 67
Archiving projects 70
Working with P2 Video 70
Edit Decision Lists 71
Closing a Project 72
Exiting the Vegas Pro Application 72
Adding, managing, and arranging media 74
Using the Project Media window 74
Previewing media files 80
Adding media files to your project 81
Working with high-frame-rate (HFR) clips 86
Adding layered PSD files to the timeline 87
Creating a picture slideshow 87
Importing media from a project file 89
Importing Broadcast Wave Format files 89
www.vegascreativesoftware.com
Page 5

Table of Contents
Importing video from a DVD camcorder 90
Editing video from an XDCAM Station with StreamChase 91
Using the Device Explorer 94
Creating proxy files for high-definition editing 96
Using HitFilm effects 96
Sorting your media with bins 97
Viewing or changing media file properties 99
Inserting audio tracks 104
Inserting video tracks 104
Recording audio 105
Metronome 110
Capturing video 111
Capturing from an SDI card 112
5
Capture preferences 115
Capturing HDV clips 119
Converting video to 24p 120
Extracting audio from CDs 120
Editing events on the timeline 122
Adding media files to your project 123
Inserting an empty event 127
Inserting time 127
Creating selections and positioning the cursor 128
Moving events 131
Automatic crossfades 132
Enable snapping 132
Quantize to frames 135
Cutting, copying, and pasting events 136
Deleting events 139
Trimming events 141
Post-edit ripple 141
Splitting events 143
Shuffling events 143
Using the Trimmer 144
Adjusting an event's length 152
Page 6

6
Expanded edit mode 155
Slipping and sliding events 157
Repairing audio/video synchronization offsets 159
Event envelopes 160
Panning and cropping video events 164
Stabilizing video clips 174
Reversing an event 175
Using takes as alternate versions of events 175
Grouping events 177
Using sync links 178
Applying switches to events 179
Audio streams 181
Audio channels 181
Opening events in an audio editor 182
Opening a copy of an event in an audio editor 183
Editing event properties 183
Copying and pasting or selectively pasting event attributes 188
Using the Edit Details Window 188
Removing red eye from still images 189
Undoing and redoing edit operations 190
Rebuild audio peaks 191
Zooming and magnification 191
Multicamera editing 193
Shooting multicamera video 193
Capturing multicamera video 193
Synchronizing video in multicamera projects 194
Creating multicamera events 195
Editing multicamera video 196
Stereoscopic 3D editing 201
Setting up your stereoscopic 3D project 201
Setting up stereoscopic 3D previews 205
Synchronizing stereoscopic 3D events 205
Aligning left- and right-eye views and adjusting depth 208
www.vegascreativesoftware.com
Page 7

Table of Contents
Rendering a stereoscopic 3D project 210
Using markers, regions, and commands 215
Inserting markers 215
Inserting regions 216
Using media markers and regions 217
Inserting command markers 218
Inserting CD track regions 222
Inserting CD index markers 223
The Marker Tool 223
Track editing 224
Inserting audio tracks 224
Inserting video tracks 224
Selecting tracks 224
7
Arranging tracks 225
Grouping tracks 226
Duplicating tracks 227
Audio track controls 228
Video track controls 236
Audio bus tracks 241
Video bus track 244
Setting default track properties 248
Render to New Track 249
Using automation 250
Audio track automation 250
Video track automation 254
Automating audio effect parameters 257
Adjusting envelopes 260
Recording track envelope and keyframe automation 264
Animating video events and tracks 268
Panning and cropping video events 268
Editing track motion 278
Keyframe animation 285
Applying effects 290
Adding audio track effects 290
Page 8

8
Adding audio event effects 292
Using bus effects 293
Applying non-real-time event effects 295
Using assignable effects 295
Adding an assignable effects chain 295
Routing tracks to an assignable effects chain 297
Using assignable effects envelopes 298
Removing an assignable effects chain 298
Creating and using effects packages 298
Bypassing all audio effects 299
Editing audio effects 299
Adding video effects 303
Adding transitions 308
Adding generated media to your project 312
Creating text and titles 314
Using the Titles & Text Plug-In 315
Mixing audio 319
Using the Master Bus Window 319
Busses - overview 321
Adding audio busses 322
Assigning tracks to busses 322
Using bus envelopes 324
Routing busses 324
Signal flow diagram 326
Using input busses 326
Adding or deleting input busses 327
Recording using an input bus 327
Using input busses with hardware-based effects 330
Real-time rendering 332
The Mixing Console 335
The Mixing Console Toolbar 335
The Channel List Pane 337
The View Controls Pane 338
www.vegascreativesoftware.com
Page 9

Table of Contents
Channel Strips 339
Using the Mixing Console 341
Adding Track, Assignable FX, and Bus Channels 341
Audio Track Channel Strips 341
Bus Channel Strips 349
Input bus channel strips 354
FX send (assignable effects) channel strips 360
Creating a cue (headphone) mix with the Mixing Console 366
Compositing video 369
Compositing and masks 369
3D compositing 374
Video signal flow diagram 383
Proxy-first workflow 385
9
Working with HDV 387
Capturing HDV clips 387
Editing HDV video on the timeline 388
Working with XDCAM video 389
XDCAM EX workflow 389
XDCAM and XDCAM HD workflow 390
Setting up an XDCAM Device 390
Using the XDCAM Explorer Window 391
Importing XDCAM Discs 394
Editing XDCAM Clips on the Timeline 395
Exporting Video to XDCAM Discs 396
Working with RED camera clips 399
Working with AVCHD video 401
S-Log and ACES workflow in Vegas Pro14.0 403
Enabling color management in your Vegas Pro project 409
Specifying the color space for individual shots 410
Specifying the color space in a custom rendering template 411
VEGAS Pro 15 ACES 1.0.3 updates 413
5.1 surround projects 415
Setting up your 5.1 surround project 415
5.1 surround panning and mixing 417
Page 10

10
Audio panning modes 425
Rendering your 5.1 surround project 429
Exporting a Vegas Pro project to DVD Architect 430
Closed Captioning 431
Adding closed captioning to video files 431
Captioning Windows Media files 441
Previewing your project 445
Loop Playback 445
Mute All Audio 445
Mute All Video 445
Using the Video Preview window 445
Split-screen previews 451
Using dynamic RAM previews 453
Using an External Video Monitor 454
External monitor via DVI (Windows Graphics Card) 454
External monitor via IEEE-1394 (FireWire) 455
External monitor via SDI 457
Selectively prerender video 458
Cleaning up prerendered video files 459
Loudness metering and logging 459
Loudness meters 459
Generating a loudness log 462
Monitoring video with scopes 465
The Vectorscope Monitor 465
The Video Waveform Monitor 466
The Histogram Monitor 467
The RGB Parade Monitor 470
Video Scope Settings 470
Timecode synchronization 473
Generate MIDI Timecode 473
Generate MIDI Clock 473
Trigger from MIDI Timecode 474
Burning discs 477
www.vegascreativesoftware.com
Page 11

Table of Contents
Track-at-once (TAO) CD burning 477
Disc-at-once (DAO or Red Book) CD Burning 478
Burning a Blu-ray Disc from the timeline 483
Burning a DVD from the timeline 485
Printing video to tape 487
Printing video to tape from the timeline 487
Printing video to HDV tape 494
Rendering projects (Render As) 497
Rendering Multichannel Audio Files 501
Rendering MPEG Files 503
Rendering Projects for Use in DVD Architect 504
Media File Settings for Blu-ray Disc Projects 506
Custom rendering templates 508
11
Using Vegas Pro Connect 511
Setting up Vegas Pro Connect 511
Using Vegas Pro Connect to control playback 512
Using Vegas Pro Connect to review projects on your mobile device 518
Adjusting Vegas Pro Connect settings 521
Troubleshooting Vegas Pro Connect Connections 522
Using hardware controllers 523
Using a control surface 523
Using a Mackie Control 524
Using a Frontier TranzPort 540
Using a PreSonus FaderPort 542
Using a Generic Control Surface 544
Configuring a Generic Control Surface 545
Using a joystick for panning, adjusting controls, and color correction 547
Using a multimedia controller 549
Using Scripting 553
Customizing the Vegas Pro interface 557
Customizing the toolbar 557
Customizing keyboard shortcuts 557
Customizing ASIO port naming 558
Time ruler 561
Page 12

12
Grid spacing 563
Saving and recalling window layouts 563
Vegas Pro preferences 567
Preferences - General Tab 567
Preferences - Video Tab 572
Preferences - Preview Device Tab 574
Preferences - Audio Tab 581
Preferences - Audio Device Tab 585
Advanced Audio Configuration 587
Preferences - MIDI Device Tab 589
Preferences - VST Effects 589
Preferences - Editing Tab 589
Preferences - Display Tab 593
Preferences - CD Settings Tab 594
Preferences - Sync Tab 595
Preferences - External Control & Automation Tab 597
Keyboard shortcuts 601
Glossary 615
Index 633
www.vegascreativesoftware.com
Page 13

13
Introduction
MAGIX proudly introduces Vegas Pro , a full-featured nonlinear editor (NLE) for video and multitrack digital audio
designed for video postproduction and multichannel audio recording and mixing.
What's new in this version
n A new MAGIX AVC/AAC codec significantly accelerates encoding on machines that utilize Intel® Quick
Sync Video (QSV) technology
n A new MAGIX AVC/AAC codec significantly accelerates encoding on machines equipped with modern
NVIDIA graphics card GPU technology
n The user can now select from the list of attributes of a copied timeline clip event to specify which attributes
will be pasted into a target event
n ACES 1.0 support enable users to work with the expanded color spaces and dynamic range of modern cam
eras.
n More efficient handling of AVC files on the timeline through Intel QSV technology
n Picture-in-picture OFX plug-in enables the user to perform size and position adjustments of video at any of
the four effects levels (including track and event) through parameter adjustment controls and direct inter
action with the Video Preview window
n Crop OFX plug-in enables the user to quickly crop out portions of a video at any of the four effects levels
(including track and event) through parameter adjustment controls and direct interaction with the Video Pre
view window
n The user can specify which track header buttons and controls appear on tracks and set these (separate for
audio and video tracks) as project defaults for all new tracks in the current and new projects. Controls that
have been hidden can be accessed through a new "hamburger button" menu
n LUT Filter OFX plug-in enables the user to apply LUTs to their project at any of the four supported FX levels
(event, track, media, and video bus)
n Redesigned timeline clip events now contain headers to hold important information and buttons and can be
customized through the hamburger button/menu system.
n The user can specify which controls appear in the transport area of both the Trimmer Window and the Video
Preview window as project defaults for the current and new projects. Controls that have been hidden can be
accessed through a new "hamburger button" menu
n A simple "one-click" option creates a freeze frame on all selected events touched by the timeline cursor
n Users can specify one of four options for the shading of the VEGAS Pro interface ranging from very bright to
a dark interface
n Users can define the amount (strength) of color they want shown in their buttons
n Modern controls enable logical docking and undocking of windows and maximizing windows within a dock
n A user-friendly and intuitive Render As dialog box makes it easy to understand and specify render options
n The Share Online option now provides direct render-and-upload operations for YouTube, FaceBook, and
Vimeo
n Optimized default user layout to reduce visual clutter
n Non-selected timeline clip events are now the same color as the corresponding track header while selected
events are white. This (while directly opposite previous behavior) reduces visual "clutter" and the harsh
appearance of events, particularly in large projects
n New layout option enables user to switch back to the VEGAS Pro 14 default layout, including revealing all but
tons in the hamburger menu system
n Updated button glyph for the Record and Arm for Record buttons clarifies the function of these buttons
n The default Pan type has been changed to Constant Power which is the most logical and expected type
n Audio notification alerts you when your render is complete for all format types
www.vegascreativesoftware.com
Page 14
Introduction
Technical Support
If you experience problems or have questions while using Vegas Pro, our technical support department is always
ready to help you. Additional support and information can be found at http://www.vegascreativesoftware.com.
For a detailed list of Technical Support options, please visit our web site.
About Vegas Pro
From the Help menu, choose About Vegas Pro to display information about the application, such as the software
license owner, copyright and system information, program version and serial number, and the Vegas Pro logo.
Before contacting Technical Support, click the Computer tab to display information about your computer.
Interactive Tutorials
Use the Interactive Tutorials Button from the Main Toolbar or , choose Interactive Tutorials from the Help menu
to start an interactive guide that will show you each part of the Vegas Pro interface and teach you how to create
projects.
14
Choose a topic from the Interactive Tutorials overview to start a tutorial—you'll be up and running in no time!
Page 15
15
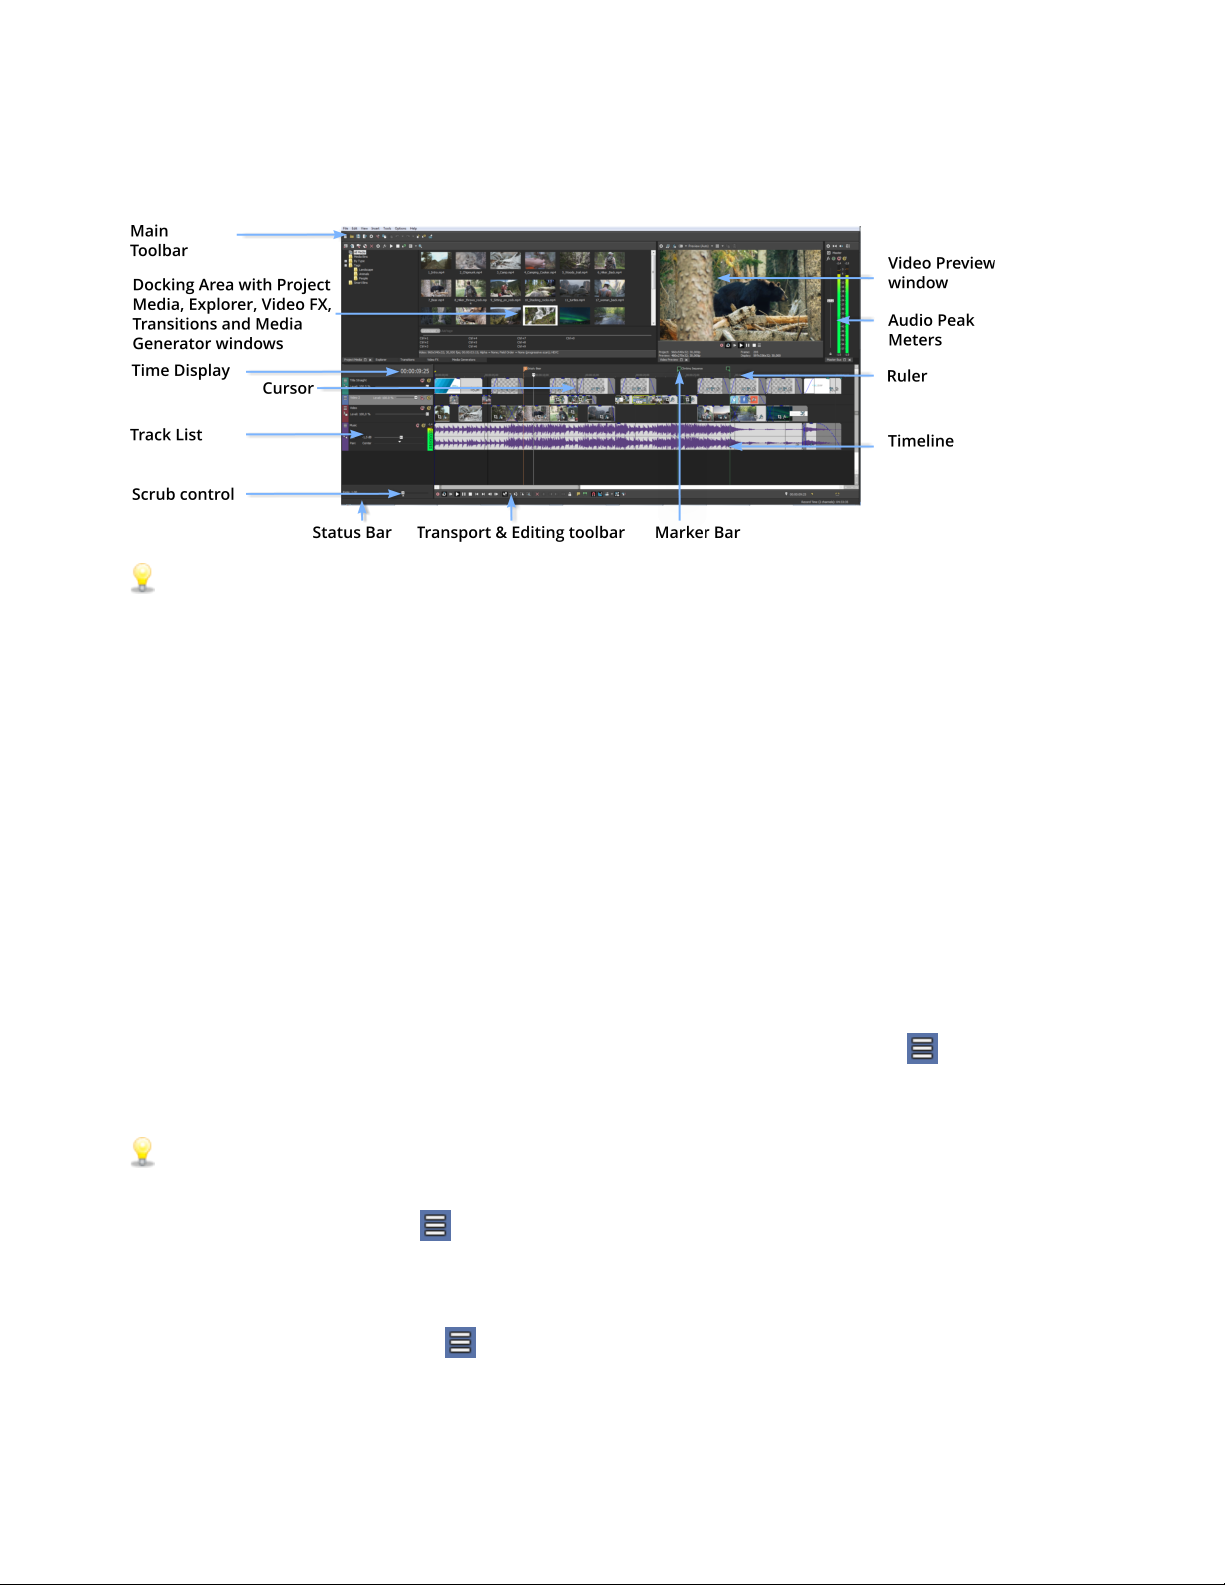
The Vegas Pro Window
The Vegas® Pro window is where you edit your project, and the screen is divided into several areas.
Tips:
n If you prefer to work with the timeline at the bottom of the window and the docking area at the top of
the window, select the Display timeline at bottom of main window check box on the Display tab of the
Preferences dialog. For more information, see "Preferences - Display Tab" on page 593.
n The track list, timeline, and window docking area sections can be sized to your preferences by dragging
the dividers between them or by using F11:
oF11 minimizes and restores the window docking area.
oShift+F11 minimizes and restores the track list.
oCtrl+F11 maximizes and restores the timeline vertically and horizontally (window docking area
and track list will be hidden).
There are times when you don’t need quick access to the all various buttons in the UI. Some buttons you will use all
the time while others only occasionally. Several areas of the UI have been designed so that you can customize which
buttons are displayed by default. Examples of this are the tool bars found in the Video Preview window, the Trimmer
window, and the audio and video Track Headers.
Access to the buttons that are not currently displayed can be achieved via the Hamburger button . The
Hamburger button also gives you access to the Edit Visible Button Set command which enables you to control
which buttons are displayed by default.
Hint: Throughout the manual and help system, feature descriptions are based on visible buttons. To access a
button not currently displayed:
n
Click the Hamburger button
n Click the command in the pop-up menu to perform the action of that button.
To choose which buttons are displayed by default:
n
Click on the Hamburger button and choose Edit Visible Button Set
n Click the check box for any button you want to be displayed by default.
www.vegascreativesoftware.com
Page 16
The Vegas Pro Window
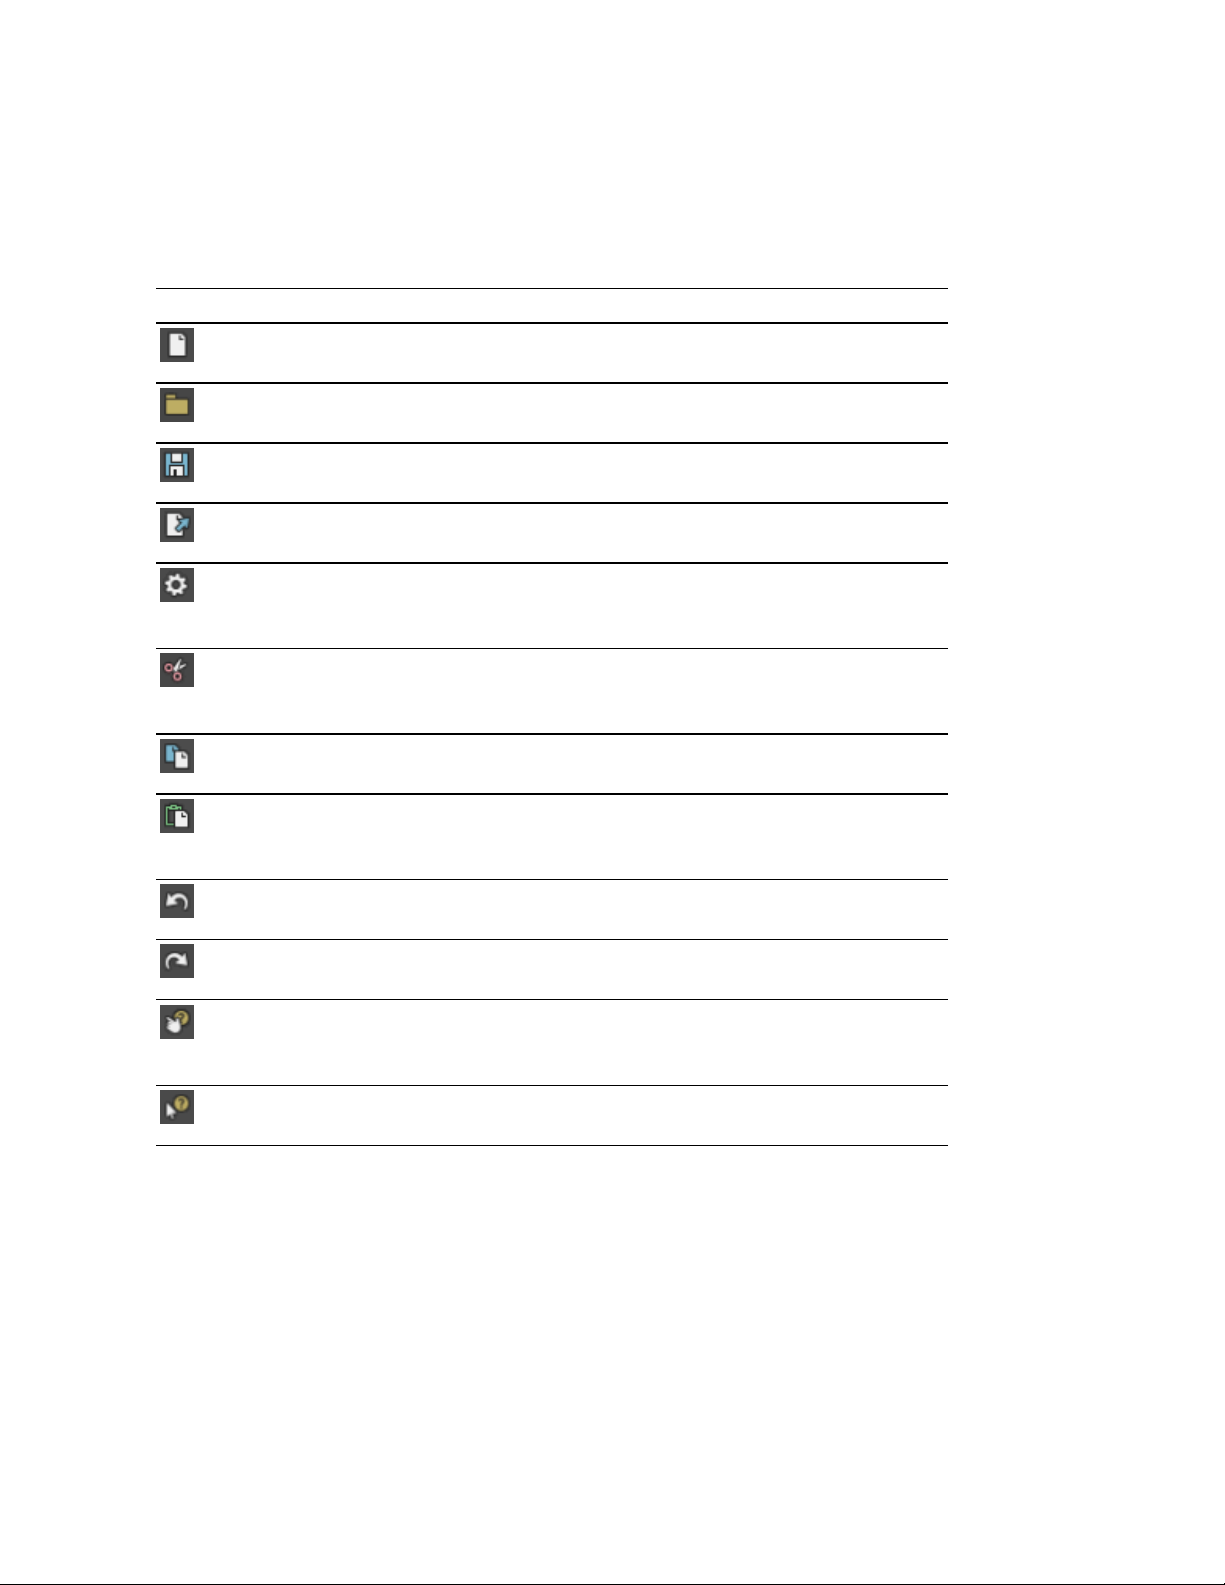
Main toolbar
From the View menu, choose Toolbar to toggle the display of the main toolbar.
The toolbar contains buttons that enable you to select frequently used commands quickly. You can customize it by
adding, removing, or reordering buttons.For more information, see "Customizing the toolbar" on page 557.
Button Name Description
16
New Empty
Project
Open Opens an existing project or media file. For more information, see
Save Saves the current project. For more information, see "Saving a
Render As Saves your project in a new format as a single file. For more
Properties Opens the Project Properties dialog box allowing you to make
Cut Deletes and copies the current event selection to the clipboard. For
Copy Copies the current event selection to the clipboard. For more
Paste Pastes the contents of the clipboard at the current cursor position.
Undo Reverses the last action performed. For more information, see
Creates a new blank project using the default settings. For more
information, see "Creating a new project" on page 45.
"Opening a project or media file" on page 54.
project" on page 60.
information, see "Rendering projects (Render As)" on page 497.
changes to the current project. For more information, see "Setting
project properties" on page 45.
more information, see "Cutting, copying, and pasting events" on
page 136.
information, see "Cutting, copying, and pasting events" on page 136.
For more information, see "Cutting, copying, and pasting events" on
page 136.
"Undoing and redoing edit operations" on page 190.
Redo Reverses the action of the Undo command. For more information,
see "Undoing and redoing edit operations" on page 190.
Interactive
Tutorials
What's This
Help
Starts an interactive guide that will show you each part of the Vegas
Pro interface and teach you how to create projects. For more
information, see "Interactive Tutorials" on page 14.
Displays context-sensitive help.
Page 17
17
Editing Tool
Choose Edit > Editing Tool and select a tool from the submenu to change the active tool.
Normal
To use the Normal tool , choose Editing Tool from the Edit menu, and choose Normal from the submenu.
This tool gives you the most flexibility while editing; selection, project navigation, most envelope editing, etc. The
only functions you cannot perform while in normal editing mode are box selection, box magnification, and multiple
envelope point selection.For more information, see "Adjusting envelopes" on page 260.
Selecting events
Click an event to select it. Hold Ctrl while clicking to select multiple events, or hold Shift to select all events between
the first and last event you click.
Moving events
Select events and drag them along the timeline.
Changing an event's length
Drag either edge of an event to change its length. The event edge will snap to grid lines if snapping is on. Hold the
Shift key while dragging to temporarily suspend snapping.For more information, see "Enable snapping" on page 132.
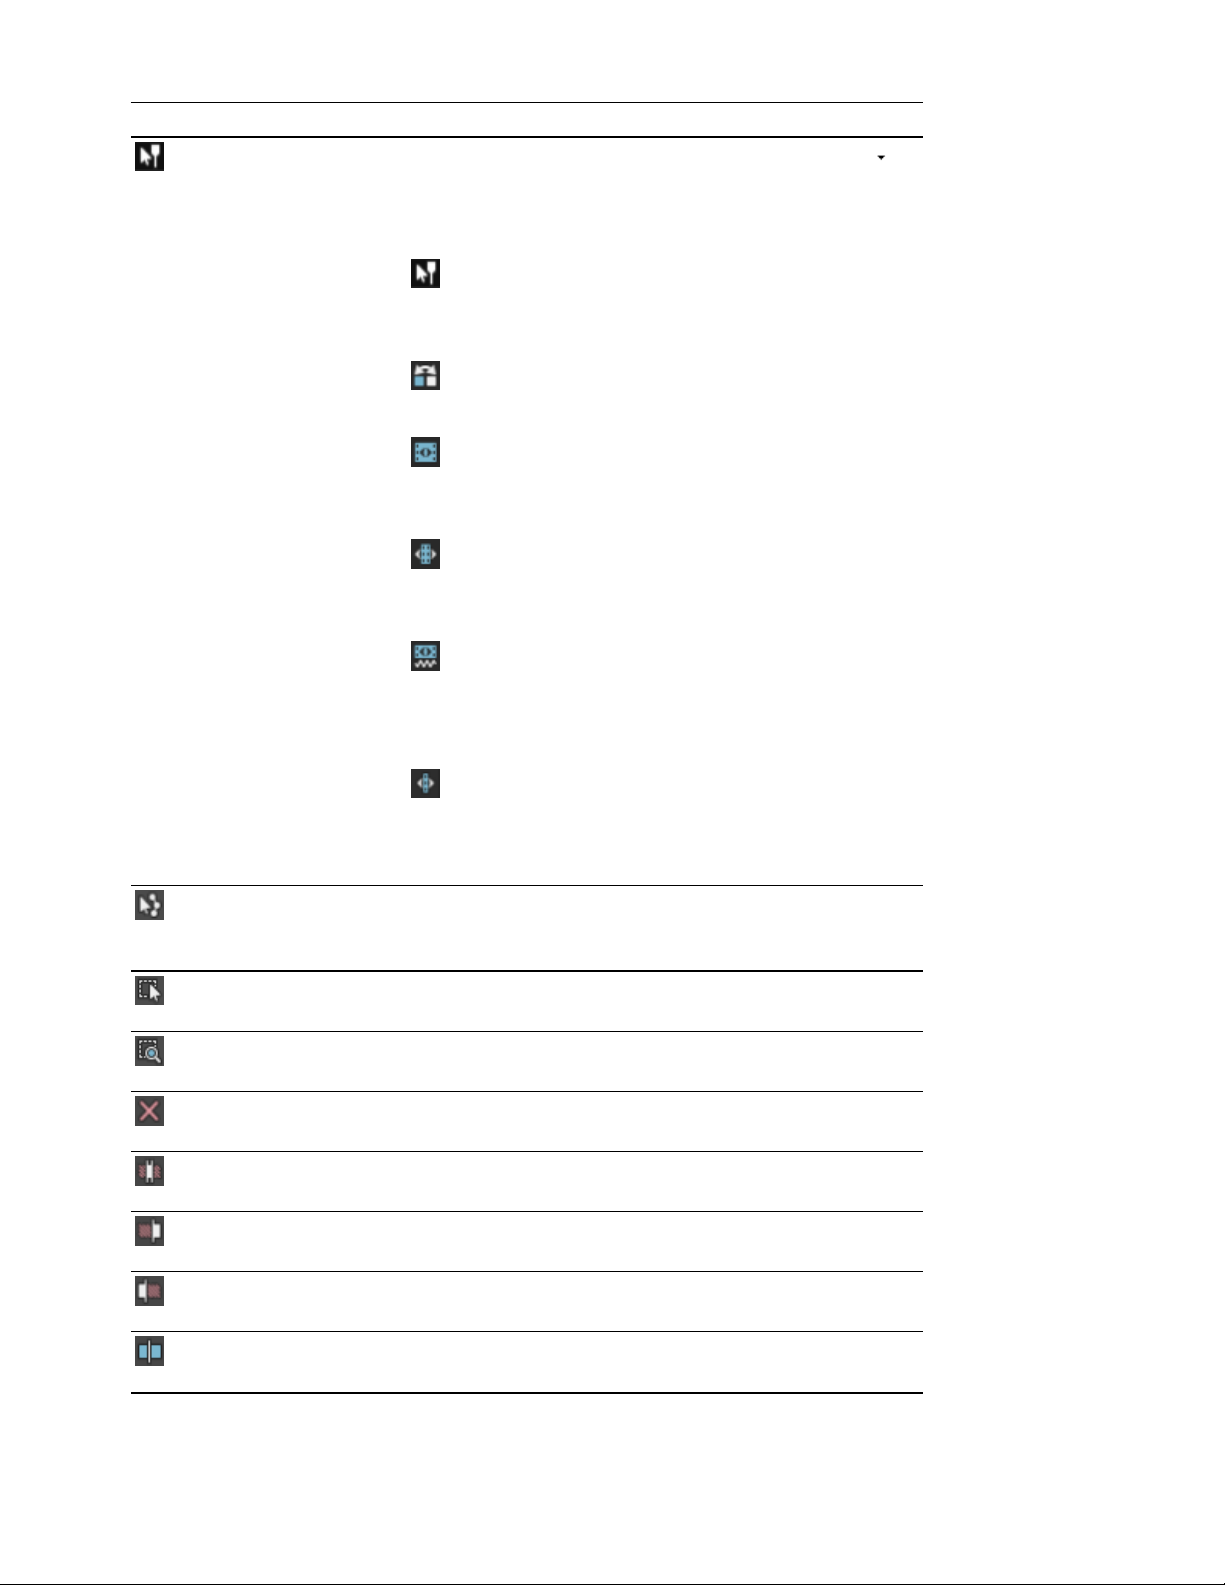
Click the down arrow next to the Normal tool and choose a tool from the menu to select the mode that will be
used for editing events. For more information, see "The Transport and Editing Toolbar" on page 26.
Tool Description
Normal Edit Tool
Use to select, move, and trim the ends of events.
Click an event to select it. Hold Ctrl while clicking to select multiple
events, or hold Shift to select all events between the first and last
event you click.
Select events and drag them along the timeline to move them.
Drag either edge of an event to change its length. The event edge will
snap to grid lines if snapping is on. Hold the Shift key while dragging
to temporarily suspend snapping.For more information, see "Enable
snapping" on page 132.
For more information, see "Creating selections and positioning the
cursor" on page 128,"Moving events" on page 131,"Moving events"
on page 131, or "Adjusting an event's length" on page 152.
www.vegascreativesoftware.com
Page 18
Tool Description
18
Shuffle Tool
Slip Tool
Slide Tool
Time
Stretch/Compress Tool
Use to rearrange events on the timeline. For more information, see
"Shuffling events" on page 143.
Right-click and drag an event to a new location on the timeline
and choose Shuffle Events from the shortcut menu to shuffle
events when the Shuffle Tool is not active.
Use to slip an event's media without moving the event on the
timeline. For more information, see "Slipping and sliding events" on
page 157.
Hold Alt while dragging an event to slip events when the Slip
Tool is not active.
Use to move an event on the timeline without moving the underlying
media. For more information, see "Slipping and sliding events" on
page 157.
Hold Ctrl+Alt while dragging an event to slide events when the
Slide Tool is not active.
Use to make events longer or shorter while changing the velocity of
the media to create fast- or slow-motion effects. For more
information, see "Adjusting an event's length" on page 152.
Hold Ctrl while dragging the edge of an event to time
stretch/compress events when the Time Stretch/Compress
Tool is not active.
Split Trim Tool
Use to split an event at the point you click and trim the event in the
direction you drag (eraser mode). For more information, see "Slipping
and sliding events" on page 157.
Hold Ctrl+Alt+Shift and drag to split trim events when the Split
Trim Tool is not active.
Envelope
To use the Envelope tool , choose Edit >Editing Tool > Envelope.
The Envelope tool is designed to manipulate envelopes in events. With the Envelope tool selected, you can add,
delete, select, and move envelope points, but events cannot be moved or edited.For more information, see
"Adjusting envelopes" on page 260.
Selection
To use the Selection tool , choose Edit > Editing Tool > Selection.
The Selection tool is designed to select multiple events across tracks by drawing selection boxes around the events
you want to include. The Selection tool can draw three types of selection boxes:
Page 19
19
Type Description
Free Selection The default behavior of the tool:
n Click to select individual events (hold Shift or Ctrl to select
multiple events).
n Drag to draw a rectangular region that begins where you start
drawing and ends where you release the mouse button. All of
the events that are inside the region will be selected. This
method is good for selecting a group of events that are close
together.
Vertical Can be used to easily select all events that occur within a time range.
The vertical selection box automatically selects all of the tracks
between your first mouse click and where you draw the selection
box; even tracks that are not visible at the current magnification are
selected.
Horizontal Can be used to easily select all events on a single or multiple adjacent
tracks. The horizontal selection box automatically selects all events
on a track that is touched by the selection box; even events that are
not visible at the current magnification are selected.
To change the type of selection box you are using, right-click the mouse while holding down the left mouse button.
Clicking the right mouse button will toggle through the three types of selection boxes.
Zoom
To use the Zoom tool , choose Edit > Editing Tool > Zoom. You can use the zoom tool to change the
magnification of the Vegas Pro project.
Click the Zoom button in the corner of the timeline to temporarily change the cursor into the Zoom tool. Select
an area of the timeline that you want to magnify, and the cursor will revert to the previously active tool.
Before zooming, you can maximize the timeline by using the following shortcuts:
n Press F11 to maximize the timeline vertically (Window Docking area will be hidden).
n Press Ctrl+F11 to maximize the timeline vertically and horizontally (Window Docking area and Track List will
be hidden).
n Press Shift+F11 to maximize the timeline horizontally (Track List will be hidden).
Drag the mouse over the area you want to magnify. A dotted rectangle is drawn around the area, and the area is
magnified when the mouse button is released.
While holding the left mouse button, click the right mouse button to toggle through the three magnification modes:
www.vegascreativesoftware.com
Page 20
Item Description
Free Zoom The default behavior of the Zoom tool. Use this mode to zoom into a
section of your Vegas Pro project horizontally and vertically at the
same time.
Time Zoom Use this mode to zoom horizontally without changing the vertical
magnification.
Track Height Zoom Use this mode to zoom vertically without changing the horizontal
magnification.
Clicking anywhere in the project with the Zoom tool will zoom out so that the entire project fits in the timeline,
and as many tracks as possible will be displayed.
Next Tool
Choose Next Tool (or press D) to switch to the next tool in the list. For example, if you're using the Normal tool, Next
Tool selects the Envelope tool.
Previous Tool
20
Choose Previous Tool (or press Shift+D) to switch to the next tool in the list. For example, if you're using the
Envelope tool, Previous Tool selects the Normal tool.
Time Display
The Time Display window shows the current cursor position, MTC input, MTC output, or MIDI clock output time.
Right-click the window and choose a command from the submenu to change the display format.
Item Description
Time at Cursor Displays the current cursor position using the current time format.
MIDI Timecode In Displays incoming MIDI timecode. For more information, see
"Trigger from MIDI Timecode" on page 474.
MIDI Timecode Out Displays outgoing MIDI timecode. For more information, see
"Generate MIDI Timecode" on page 473.
MIDI Clock Out Displays outgoing MIDI clock. For more information, see "Generate
MIDI Clock" on page 473.
Time Format Choose Time Format and choose a setting from the submenu to set
the time units used in the Time Display and Time Ruler. For more
information, see "Time ruler" on page 561.
Text Color Choose Custom to specify the color that will be used to display the
text in the window.
Page 21
21
Item Description
Background Color Choose Custom to specify the color that will be used to display the
background of the window.
Changing the Time Display window colors affects only the
current color scheme. You can change the color scheme on the
Display tab of the Preferences dialog.
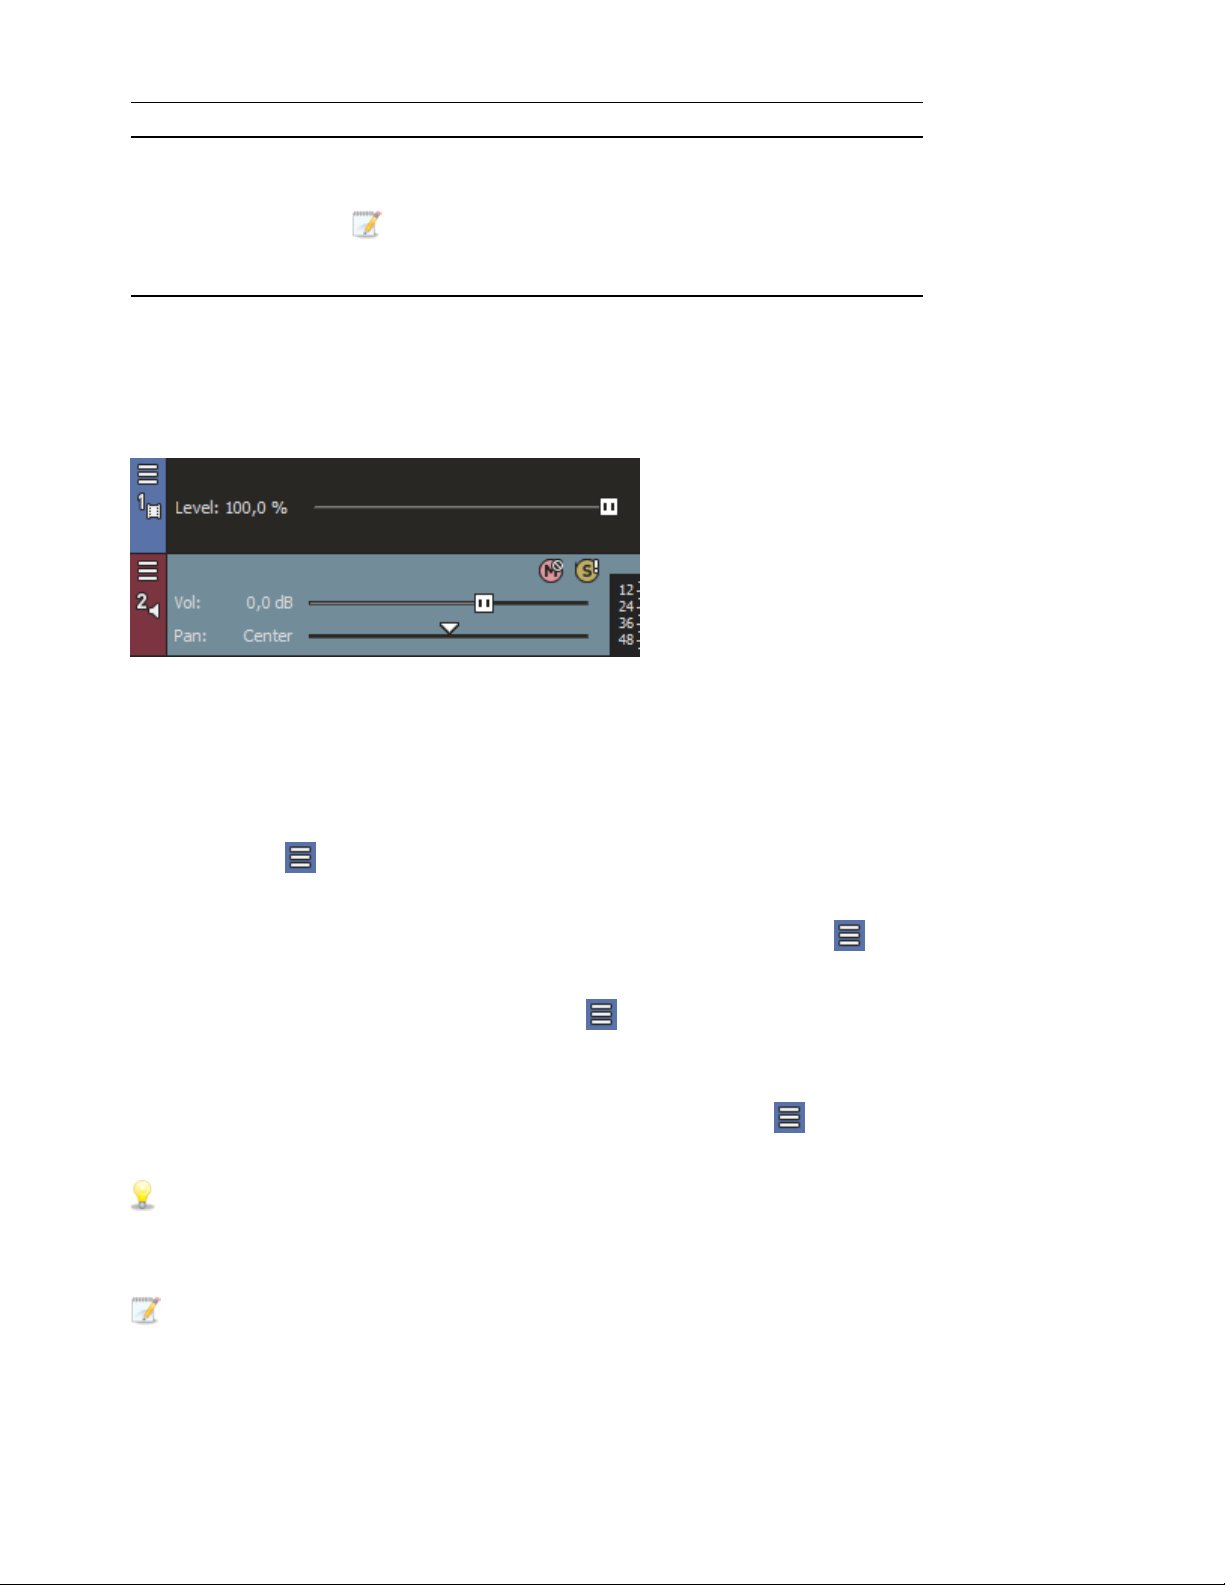
Track List
The track list displays all of the audio and video tracks in your project and contains the master controls for each track.
A scrub control and playback rate slider is also available below the track list.
For more information, see "Audio track controls" on page 228, "Video track controls" on page 236, and "Scrubbing"
on page 22,
Track Headers
The Track Headers have been designed to be less cluttered and take up less screen realestate. You can use the
Hamburger button , located just above the track number in the track header, to quickly assess buttons that are
not displayed or to select which buttons are displayed by default each time you open the program.
To access a button not currently shown in the track header, click the Hamburger button to open the menu. Select
the command according to the button from the drop down list.
To add a button to the track header, click the Hamburger button to open the button selection menu. Choose Edit
Visible Button Set from the drop down list. Click the check box of the button(s) you want to be shown in the track
header and click OK.
If you want all of the buttons to show on the Track Header, click the Hamburger button to open the button
selection menu, choose Edit Visible Button Set from the drop down list, click the Show All button, and click OK.
Tip:
You can quickly reset the buttons displayed on the Track Header to the factory default by choosing View |
Window Layouts | Default Layout (Alt+D, D).
Note:
This resets the application back to all of the factory default settings, not just the Track Header defaults.
www.vegascreativesoftware.com
Page 22
There are times when you need to free up as much screen/track real-estate as possible. The video and audio Track
Headers have been designed to accommodate that. You can go from full to minimal to very minimal and back again
quickly and easily.
1.
Click the Hamburger button and choose Edit Visible Button Set
2. Click the Hide All button and click OK
3. Do the same for both audio and video tracks. You now see only the faders and pan controls
4. Place the cursor on the vertical border between the track headers and the tracks. The mouse will change its
shape to a line with a double-headed arrow . Click and drag to the left until all you see are the track numbers
and Hamburger button. To return to the default Track Header size drag the border back to the right, or double
click the border.
Note:
You don’t need to hide all the buttons for this to work. As you drag the Track Header border to the left it will
automatically hide the buttons. You can always get to hidden buttons via the Hamburger menu. Doubleclicking the border will take you to and from full Track Header width and just the track color bars.
Scrubbing
22
You can use scrubbing to scroll playback of your project at varying speeds.
Choose a setting from the JKL / shuttle speed drop-down list on the Editing tab of the Preferences dialog to control
the scrub speed and range when you scrub with the JKL keys or with a multimedia controller. For more information,
see "Using a multimedia controller" on page 549.
Scrubbing with the playhead
Drag the playhead above the timeline to shuttle forward or backward from the cursor position to find an edit
point.
Tips:
n Hold Alt, click the ruler, and drag to move the cursor to the position you clicked and scrub in the
direction you drag.
n Hold Ctrl while dragging (or drag while holding the right mouse button) to find audio when you're
zoomed out. The cursor moves in larger steps than with a regular drag.
n Hold Ctrl+Alt while dragging to scrub video only.
n Zoom in or out to adjust the scrub sensitivity. For more information, see "Zooming and magnification"
on page 191.
Using the scrub control in the track list
Drag the scrub control to shuttle forward or backward from the cursor position to find an edit point.
Page 23
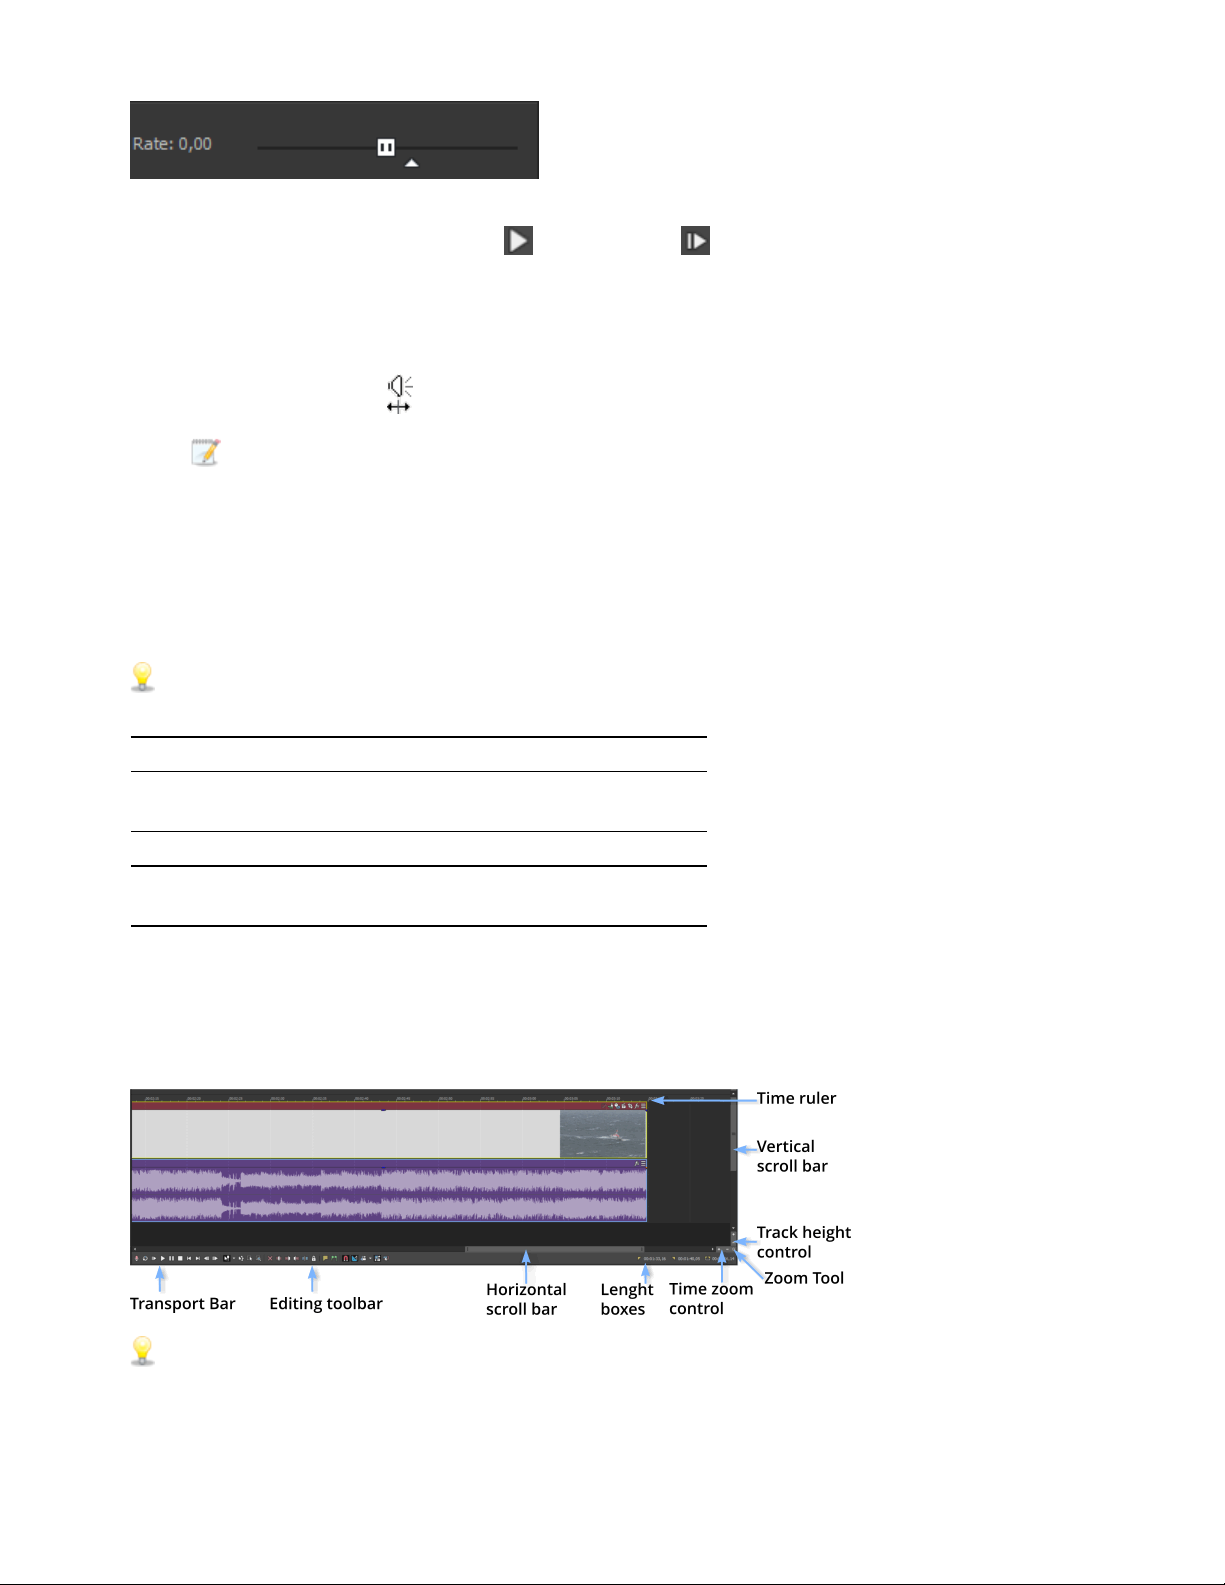
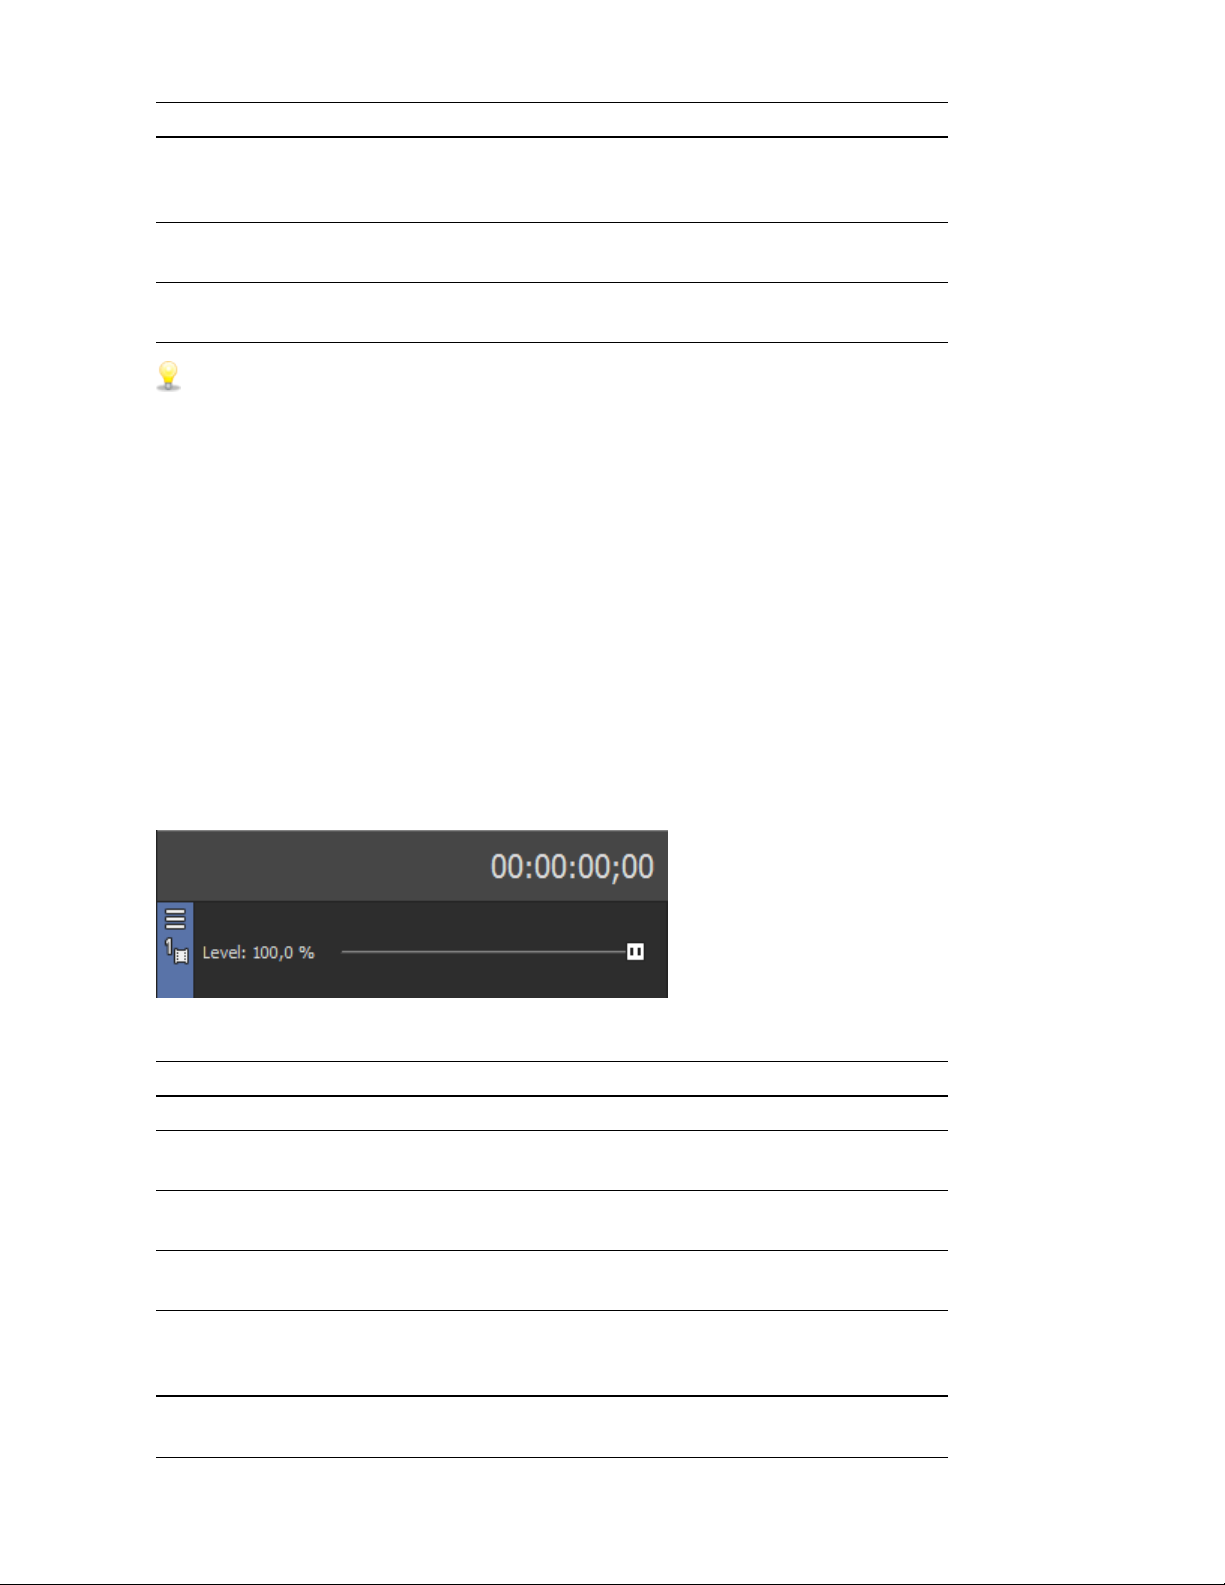
23
You can drag the Normal Rate indicator below the scrub control (or double-click the label to type a playback rate) to
adjust playback speed when you click the Play or Play from Start button.
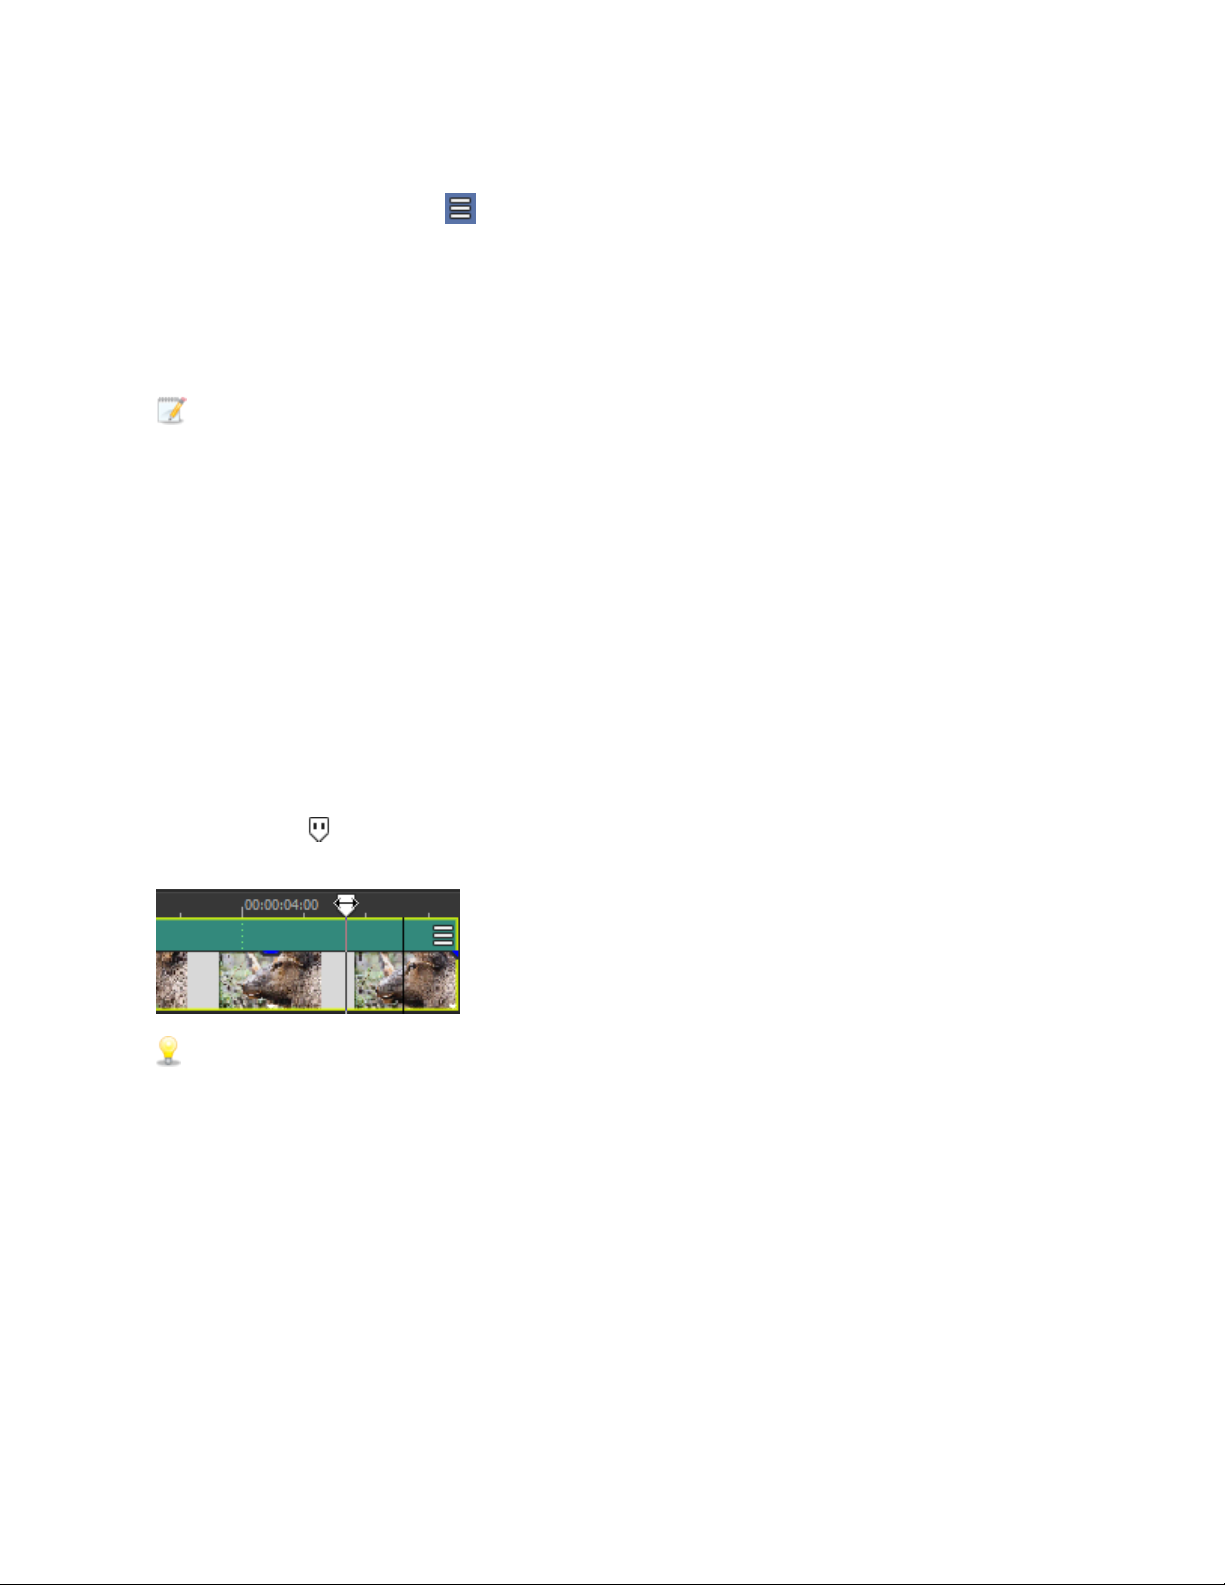
Scrubbing with the cursor
1. Hover over the cursor in an area of the timeline that does not contain an event and press Ctrl. The mouse
pointer is displayed as a .
When the Allow Ctrl+drag cursor style scrub over events check box on the General tab of the
Preferences dialog is selected, you can scrub with the mouse even when the cursor is over an event.
2. Drag left or right to scrub playback.
Scrubbing with the keyboard
Press the J, K, or L keys to use the keyboard as a scrub control.
Press and hold K while pressing J or L to emulate a shuttle knob mode. Press K+J to turn the knob to the left or
K+L to turn the knob to the right.
Item Description
J Scrub reverse mode. Press again to accelerate the
playback rate.
K Pause.
L Scrub forward mode. Press again to accelerate the
playback rate.
Timeline
The timeline is the main part of the Vegas Pro window where you will be doing most of your work. The majority of
the window consists of actual track space. This area contains the drawn events on each track.
You can choose Edit > Navigate and choose a command from the submenu to navigate the timeline quickly.
www.vegascreativesoftware.com
Page 24

Time ruler
Displays the time in the format you select. For more information, see "Time ruler" on page 561.
Vertical scroll bar
Drag the scroll box to pan the view of the project up or down.
Double-clicking the vertical scroll bar will zoom the project out so that as many tracks as possible will be
displayed.
Track height control
Click + to increase the height of the tracks, or click - to decrease track height.
You can also click in the space between the + and - buttons and drag vertically for adjusting track height.
Time zoom control
24
Click + to zoom in horizontally, or click - to zoom out.
You can also click in the space between the + and - buttons and drag horizontally for adjusting zoom.
Horizontal scroll bar
Drag the scroll box to pan the view of the project left or right. The ends of the scroll bar also function as zoom
controls. You can zoom the project in and out by dragging the edges of the scroll box.
Double-clicking the horizontal scroll bar will zoom the project out so that the entire length of the project will be
displayed.
Zoom tool
Click the Zoom Tool button in the corner of the timeline to temporarily change the cursor into the Zoom tool.
Select an area of the timeline that you want to magnify, and the cursor will revert to the previously active tool.
Editing toolbar
The editing toolbar is displayed below the timeline and provides access to tools you'll use while editing events on the
timeline. For more information, see "The Transport and Editing Toolbar" on page 26.
Length boxes
The length boxes display the start time, end time and length of a selected time range. If there’s no time selection, the
first box shows the current cursor position.
Page 25
25
You can double-click the boxes and type a value to change the start, end or length of the current selection. For more
information, see "Creating selections and positioning the cursor" on page 128.
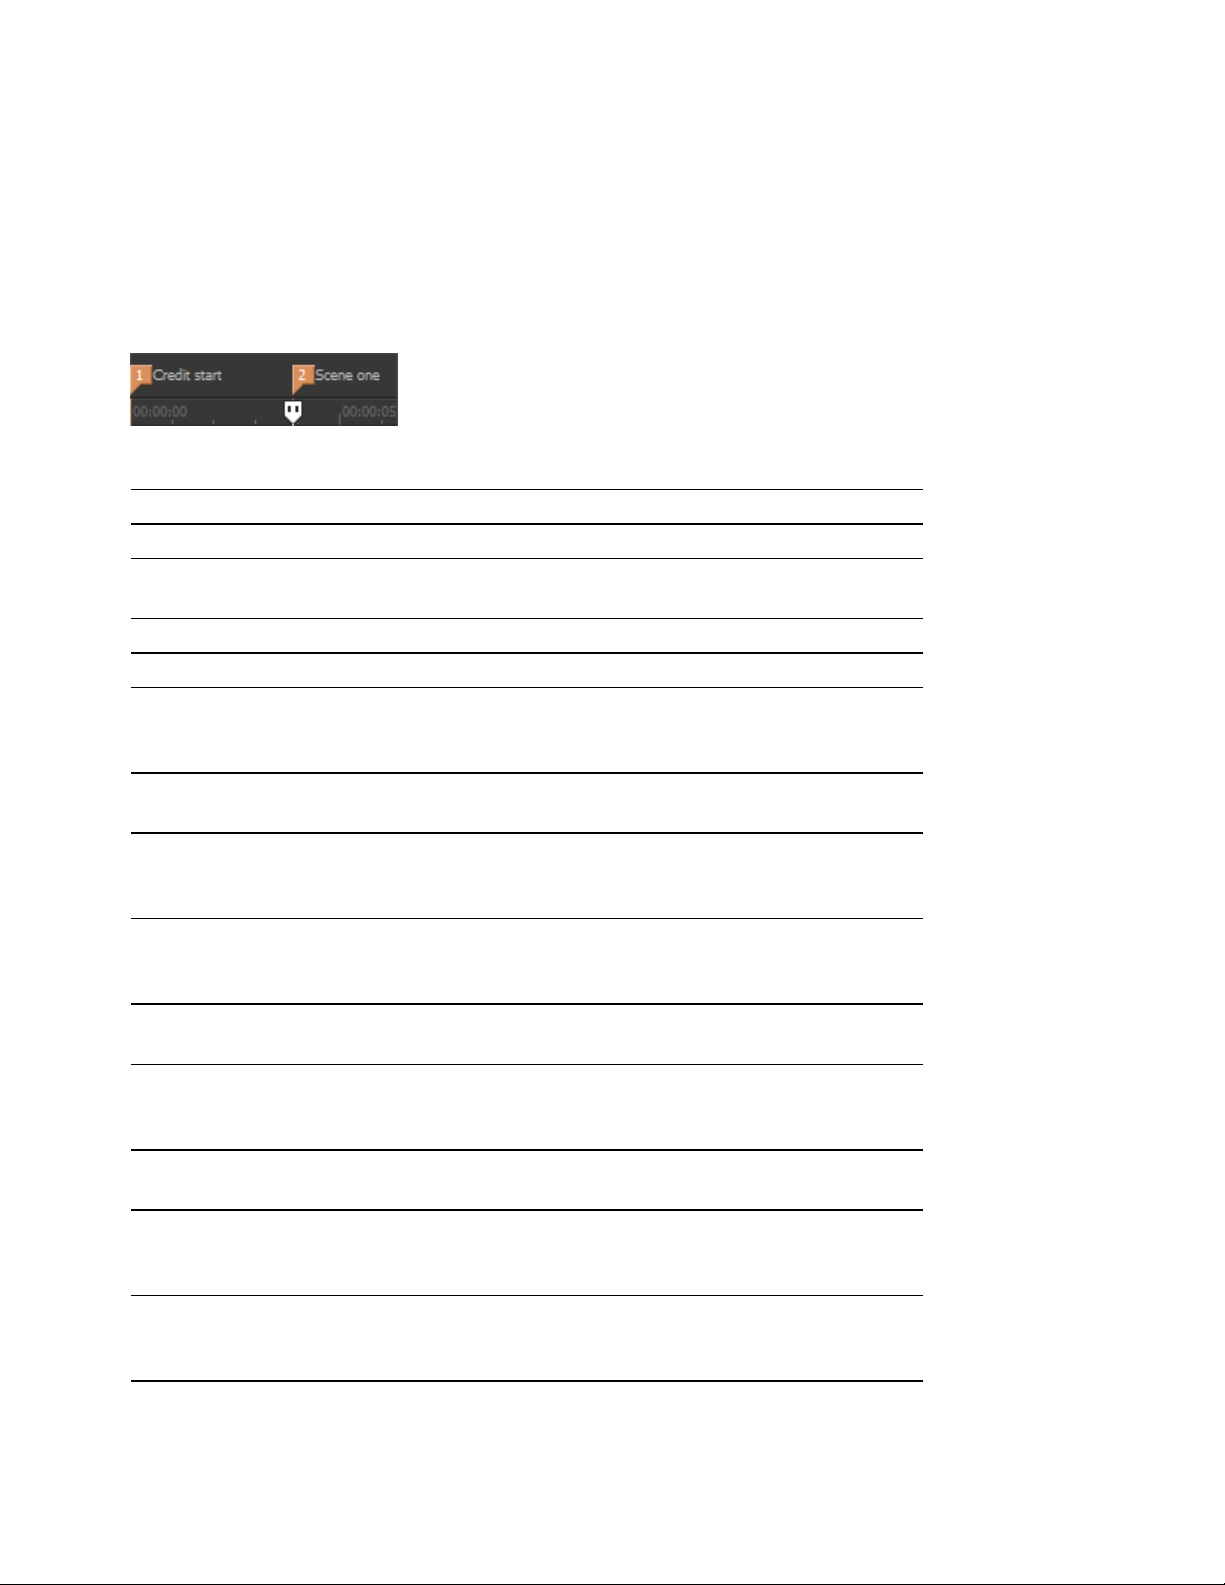
Marker Bar
The marker bar displays markers that you add to your project. Markers are a handy way to ease navigation in the
timeline. They can be used to indicate sections of projects, or you can use markers as snap points for editing.
For information about inserting markers, see "Inserting markers" on page 215.
A shortcut menu is displayed when you right-click the marker bar:
Item Description
Loop Playback Sets the time selection range to repeat the music when played.
Set Selection to View Sets the loop region to the visible edges of the timeline. If the entire
project is displayed, the loop region is set to the ends of the project.
Set Selection to Project Sets the loop region to the ends of the project.
Select Loop Region Creates a time selection based on the current loop region.
Markers/Regions Choose a command from the submenu to add or delete markers or
regions. For more information, see "Inserting markers" on page 215
and "Inserting regions" on page 216.
Quantize to Frames Forces edits to occur on frame boundaries. For more information, see
"Quantize to frames" on page 135.
Enable Snapping When snapping is enabled, the Snap to Grid and Snap to Markers
commands become available. For more information, see "Enable
snapping" on page 132.
Snap to Grid Select this command to force elements in the timeline to snap to the
grid. The grid is defined in units of time. For more information, see
"Enable snapping" on page 132.
Snap to Markers Select this command to force elements in the timeline to snap to
markers. For more information, see "Enable snapping" on page 132.
Snap to All Events Select this command to force elements in the timeline to snap to the
ends of events on other tracks. For more information, see "Enable
snapping" on page 132.
Grid Spacing Choose a command from the submenu to set the spacing of vertical
grid lines along the timeline.
Selectively Prerender
Video
Clean Up Prerendered
Video
Opens the Prerender Video dialog, where you can create a full-quality
preview of your project as it will appear in its final form. For more
information, see "Selectively prerender video" on page 458.
Removes the temporary files created as a result of using the
Selectively Prerender Video command. For more information, see
"Cleaning up prerendered video files" on page 459.
www.vegascreativesoftware.com
Page 26

The Transport and Editing Toolbar
The Transport and Editing toolbar provides controls for playback, recording, and cursor-positioning buttons and
timeline editing.
During project playback, audio tracks will be mixed to the Master bus unless you are using a custom bus
assignment. Video tracks will be mixed to the Video Preview window.
For more information, see "Assigning tracks to busses" on page 322 and "Using the Video Preview window" on
page 445.
You can choose Edit >Navigate and choose a command from the submenu to navigate the timeline quickly.
Button Name Description
Record Starts recording on all armed tracks. If no tracks are armed, a new
track will be created automatically. For more information, see
"Recording audio" on page 105.
Loop Playback Plays only the events in the loop region in a continuous mode.
Play from Start Starts playback from the beginning of the project regardless of the
current cursor position. When you stop playback, the cursor returns
to its original position.
26
Play Starts playback from the cursor position.
Select the Make spacebar and F12 Play/Pause instead of
Play/Stop check box in the General Preferences tab if you want
the F12 and spacebar keyboard shortcuts to toggle between Play
and Pause mode. In this mode, the cursor will maintain its
position.
Pause Pauses playback and leaves the cursor at its current position.
Stop Stops playback or recording and returns the cursor to its starting
position.
Go to Start Moves the cursor to the beginning of the project.
Go to End Moves the cursor to the end of the project.
Previous Frame Moves the cursor to the previous frame.
Click and hold the Previous Frame and Next Frame buttons to
move the cursor multiple frames.
Next Frame Moves the cursor to the next frame.
Page 27
27
Button Name Description
Normal Edit
Tool
Select this button to perform event editing. Click the down arrow
and choose a tool from the menu to select the mode that will be used
for editing events. For more information, see "Editing Tool" on page
17.
n
Normal Edit Tool: Use to trim the ends of events. For
more information, see "Adjusting an event's length" on page
152.
n
Shuffle Tool: Use to rearrange events on the timeline. For
more information, see "Shuffling events" on page 143.
n
Slip Tool: Use to slip an event's media without moving
the event on the timeline. For more information, see "Slipping
and sliding events" on page 157.
n
Slide Tool: Use to move an event on the timeline without
moving the underlying media. For more information, see
"Slipping and sliding events" on page 157.
n
Time Stretch/Compress Tool: Use to make events longer
or shorter while changing the velocity of the media to create
fast- or slow-motion effects. For more information, see
"Adjusting an event's length" on page 152.
n
Split Trim Tool:Use to split an event at the point you click
and trim the event in the direction you drag (eraser mode). For
more information, see "Slipping and sliding events" on page
157.
Envelope Edit
Tool
Selection Edit
Tool
Zoom Edit Tool Magnifies the current project. For more information, see "Editing
Delete Deletes the selected events or tracks. For more information, see
Trim Trims a time selection. For more information, see "Trimming events"
Trim Start Trims the start of the selected event to the cursor. For more
Trim End Trims the end of the selected event to the cursor. For more
Split Click to split an event. For more information, see "Splitting events" on
Select this button when you want to edit multiple envelopes without
moving the events. For more information, see "Editing Tool" on page
17.
Select this button when you want to select multiple events. For more
information, see "Editing Tool" on page 17.
Tool" on page 17.
"Deleting events" on page 139.
on page 141.
information, see "Trimming events" on page 141.
information, see "Trimming events" on page 141.
page 143.
www.vegascreativesoftware.com
Page 28
Button Name Description
Lock Locks an event so that it cannot be moved or edited. For more
information, see "Applying switches to events" on page 179.
Insert Marker Adds a marker at the cursor position. For more information, see
"Inserting markers" on page 215.
Insert Region Adds region tags at each end of the selection. For more information,
see "Inserting regions" on page 216.
28
Enable
Snapping
Automatic
Crossfades
Auto Ripple Select this button and choose a mode from the drop-down list to
Lock Envelopes
to Events
Ignore Event
Grouping
Turns on snapping and enables the Snap to Grid and Snap to Markers
commands. For more information, see "Enable snapping" on page
132.
Select this button to automatically create a crossfade when two or
more events overlap. For more information, see "Automatic
crossfades" on page 132.
automatically ripple the contents of the timeline following an edit
after adjusting an event's length, cutting, copying, pasting, or
deleting events. For more information, see "Post-edit ripple" on page
141.
Select this button if you want envelope points to follow an event
when it is moved along the timeline. For more information, see
"Video track automation" on page 254.
Select this button to override event groups without removing the
groups. For more information, see "Grouping events" on page 177.
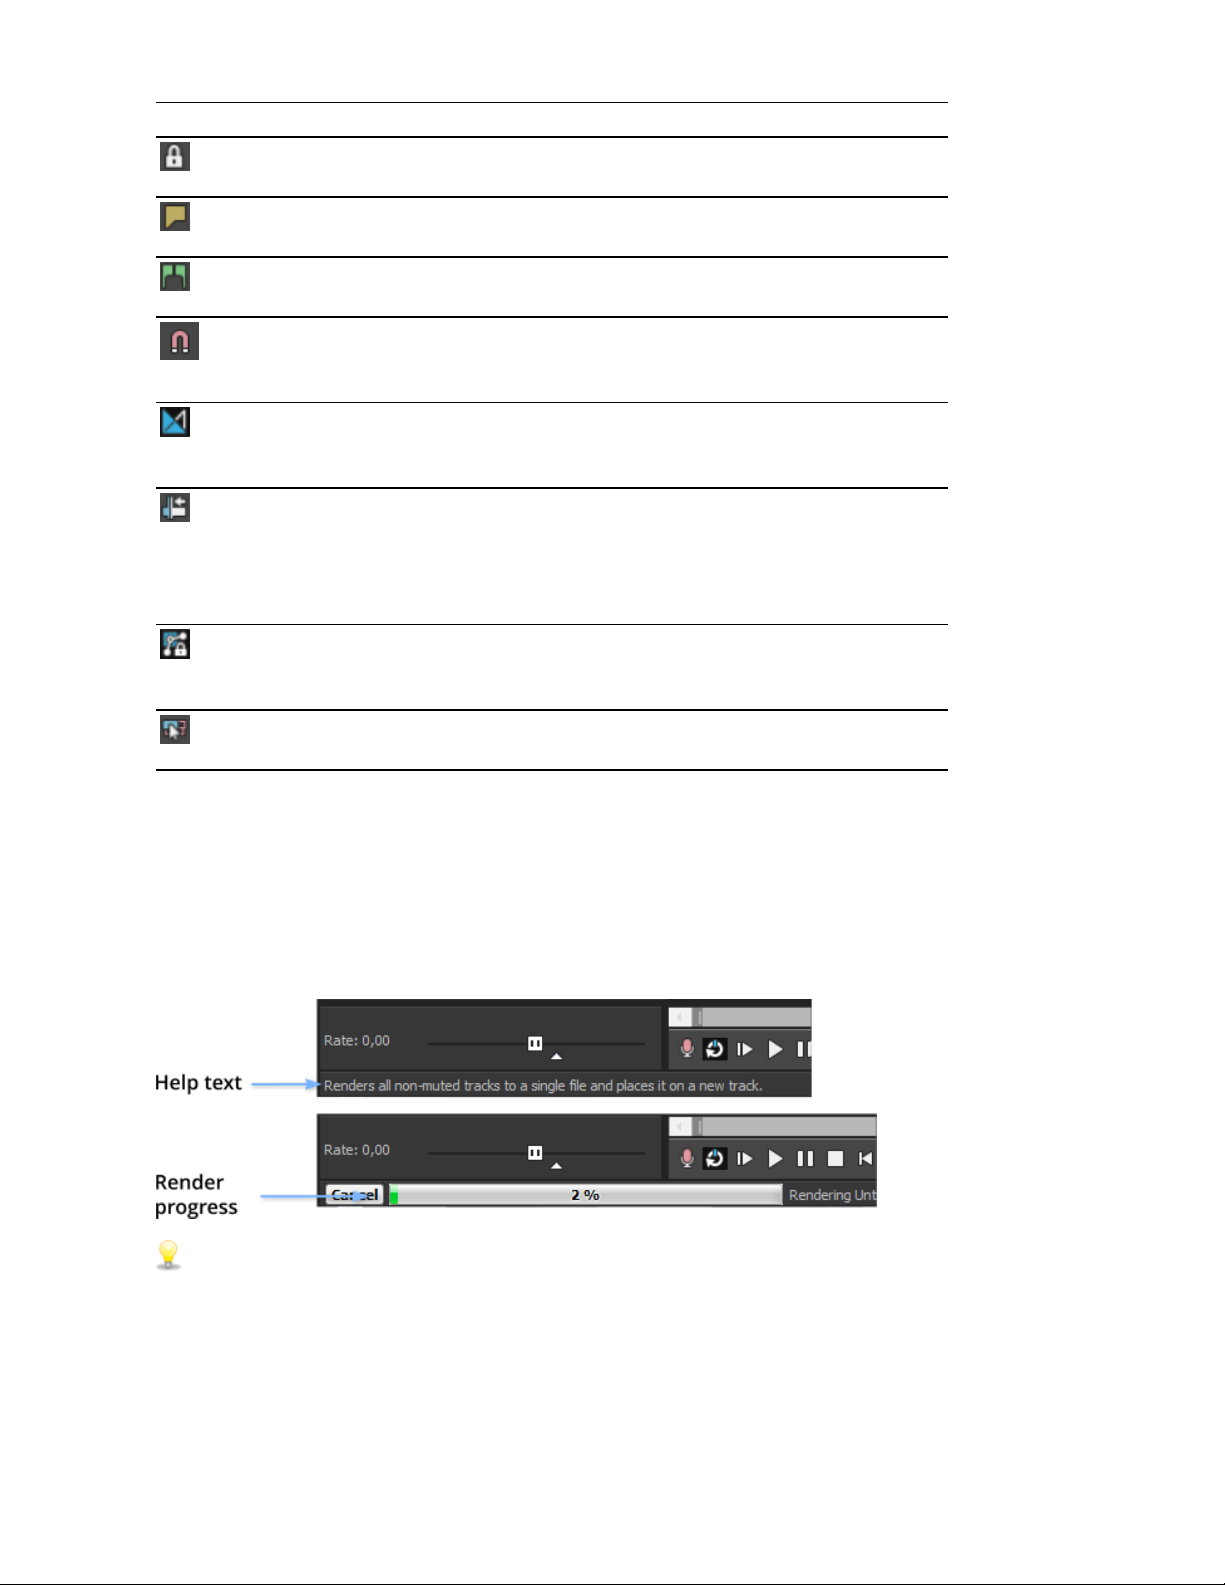
Viewing the status bar
From the View menu, choose Status Bar to toggle the display of the status bar at the bottom of the Vegas Pro
window.
The status bar displays help text when your mouse is over menu items, shows the available record time in the
selected folder, and will also show progress meters for any actions that take time to complete.
To change the recorded files folder, choose Properties from the File menu and click the Audio tab.For more
information, see "Setting project properties" on page 45.
Page 29
29
Window Docking Area and Floating Window Docks
You can use the window docking area to keep frequently used windows available, but out of the way, while you are
working with a project.
Tips:
n If you want to display the window docking area at the top of the Vegas® Pro window, select the Display
timeline at bottom of main window check box on the Display tab of the Preferences dialog. Clear the
check box to display the docking area at the bottom of the Vegas Pro window.
n If you want to display tabs at the top of docking windows, select the Position tabs at top of docked
windows check box on the Display tab of the Preferences dialog.
You can also create multiple floating docks to organize your Vegas Pro windows. These docks can float over the
Vegas Pro window or — if you have a dual-monitor video card — on a secondary monitor.
n To dock a window, ctrl + drag it by the title bar to the docking area or a floating dock. Drop near the top of the
window to create a tabbed window or a new docking area. Drop at the top of the window to dock the
window at the top. Drop at the bottom of the window to dock the window at the bottom.
n To undock a window, click the and drag the window tab out of the docking area or floating dock.
n To prevent a window from docking when you drag it, do not hold the Ctrl key.
When the Allow floating windows to dock check box on the Display tab of the Preferences dialog is
cleared, windows will not dock unless you hold the Ctrl key. When the check box is selected, you can
prevent a window from docking by holding the Ctrl key.
n To expand a docked window so it fills the docking area, click the Maximize button . Click the restore button
to restore the window to its previous size.
n To remove a window from the docking area or a floating dock, click the Close button .
You can dock several windows in the same area of the screen, and the windows will be layered. Click a window’s tab
to bring it to the top.
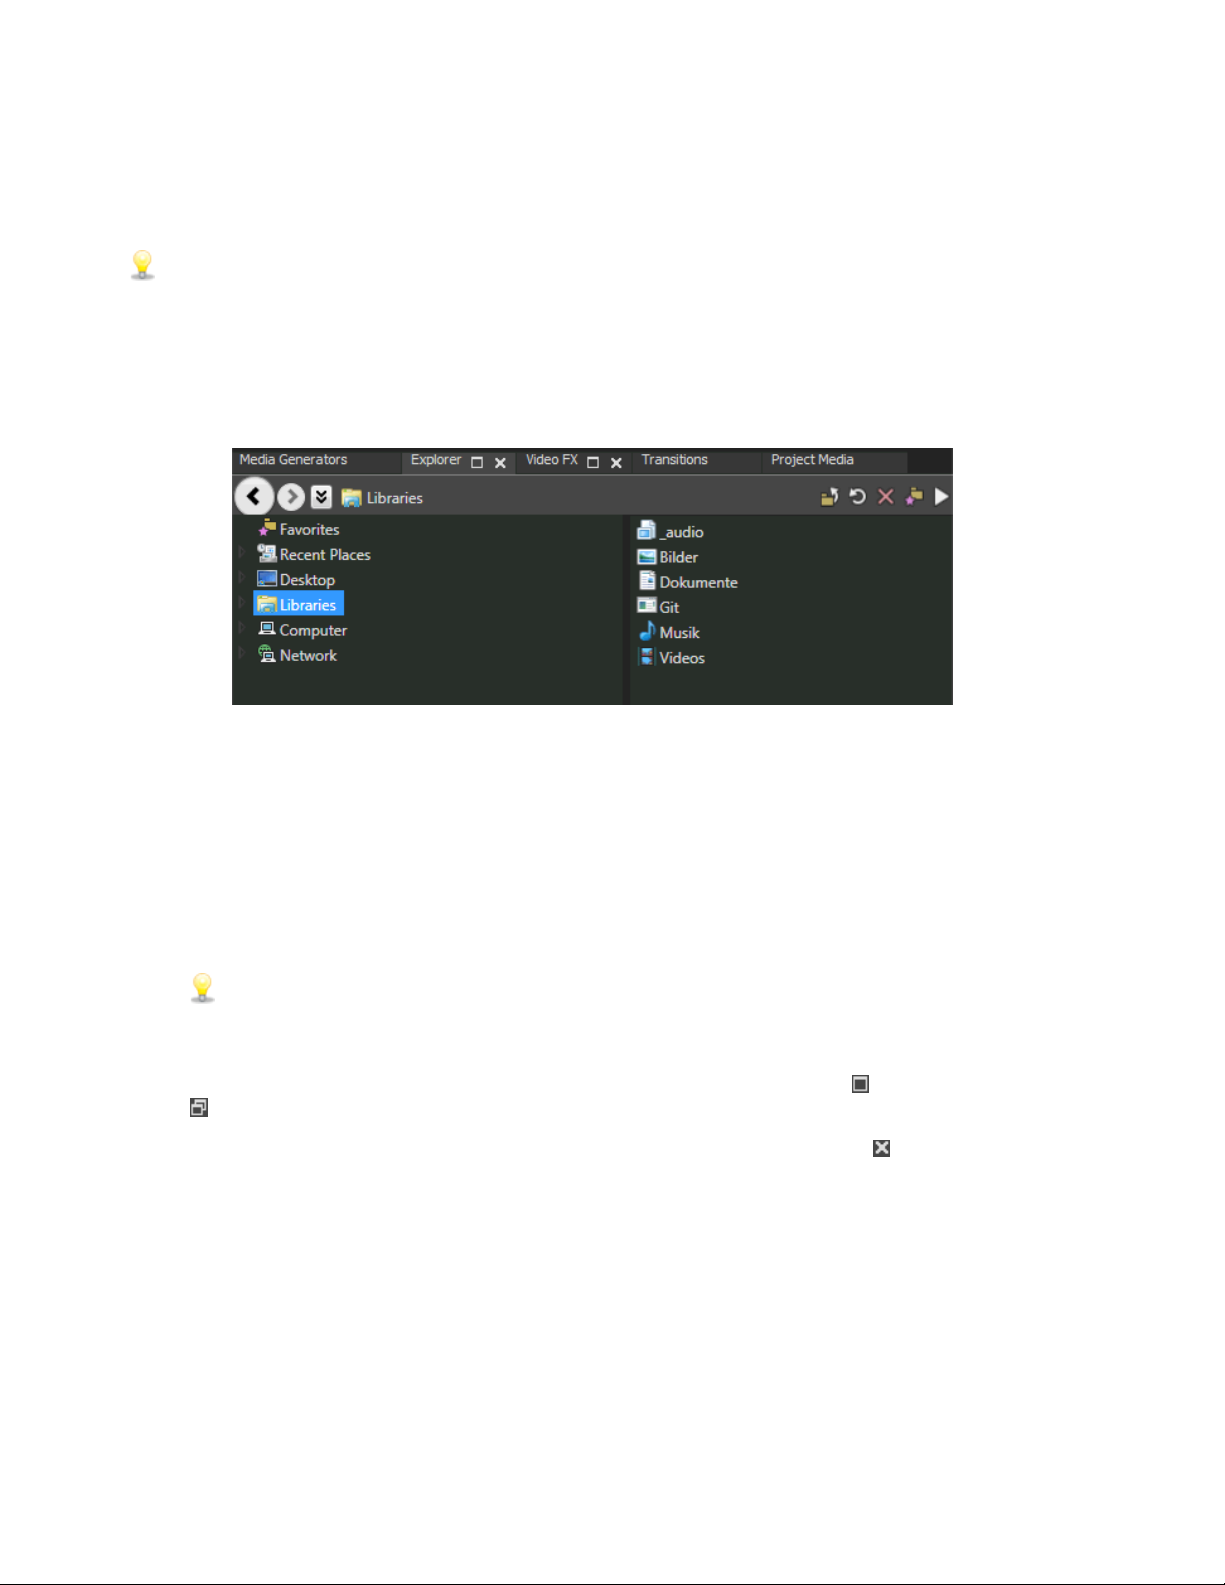
The Explorer Window
Choose View >Window >Explorer to toggle the display of the Explorer window.
Like the Project Media window, you can use the Explorer window to view, preview, and add media files to your
project.
www.vegascreativesoftware.com
Page 30
Window Docking Area and Floating Window Docks
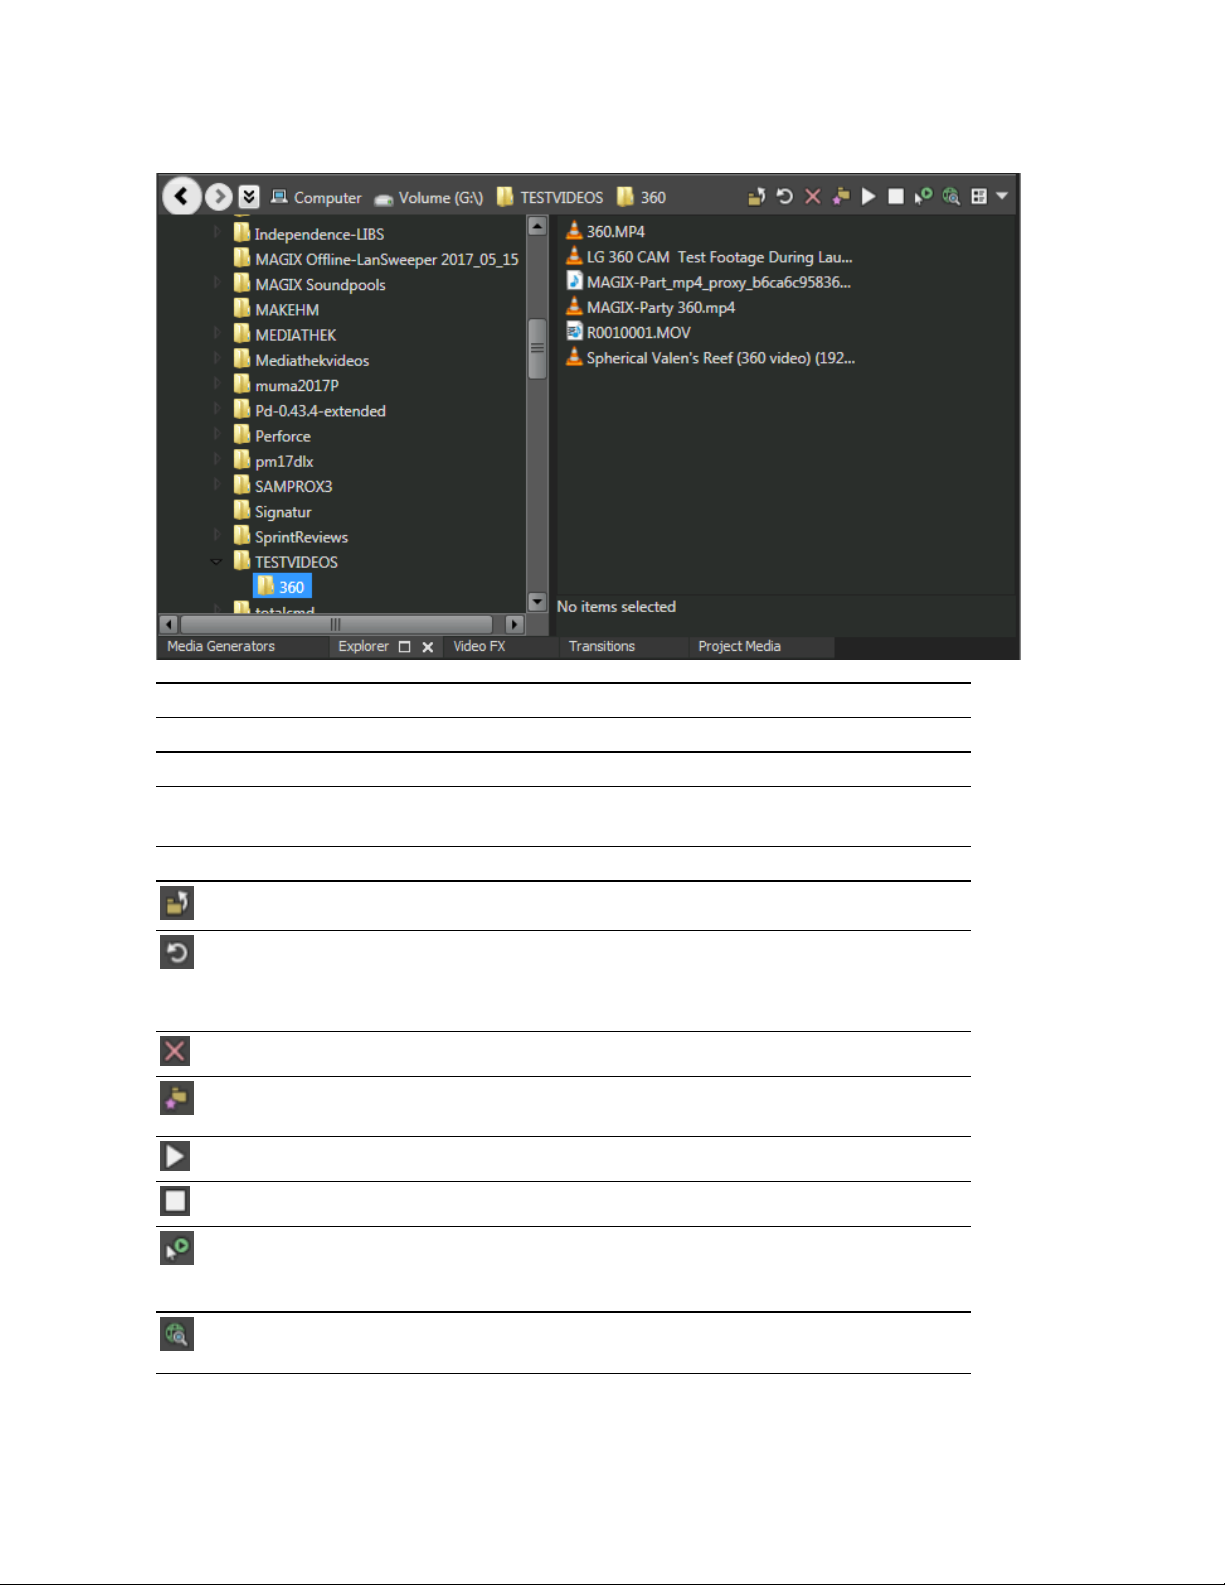
Learning more about the Explorer window
30
Item Name Description
Back/Forward Use the Back and Forward buttons to navigate the folder history.
Address Bar Displays the path to the current folder.
Tree View Displays all of the available files and folders where you can find
media files.
Contents Pane Displays the folders and media files contained in the active folder.
Up Opens the folder one level above the active folder.
Refresh Refreshes the contents of the active folder.
If you insert a new CD (or other removable media), click to refresh
the Explorer.
Delete Deletes the selected folder or file.
Add to Favorites Adds the selected folder to the Favorites folder in the tree view. The
Favorites folder contains links to folders that you use most often.
Start Preview Plays the selected media file.
Stop Preview Stops the playback of the selected media file.
Auto Preview Automatically preview media files when you click them in the
Explorer window. For more information, see "Previewing media files"
on page 80.
Get Media from the
Web
Opens the Get Media from the Web dialog, where you can download
files to use in your project.
Page 31

31
Item Name Description
Views Allows you to change the way the files are viewed in the list view.
n Details – Displays the file size, date and when the file was last
created or last modified.
n List – Displays a simple list of the file name of each file in the
Explorer window.
n Thumbnail – Displays the first frame of a video file.
n Regions – Displays any regions that have been defined in the
selected media file.
n Summary – Displays a short description of the selected media
file at the bottom of the Explorer window.
n Tree – Displays all of the available drives and folders that you
may choose from to find files.
n All Files – Displays all file types in the active folder.
Adding regions from a file to the timeline
When Regions is selected in the Explorer window, any regions saved in the selected file are displayed in the bottom
of the Explorer window.
You can drag a region to the timeline to create an event using a portion of a file.
You can save regions and markers in a media file using the Trimmer window. For more information, see "Using
the Trimmer" on page 144.
Click the down arrow next to the Views button and choose Regions to toggle the display of regions in the
Explorer window.
Using the Favorites folder
Select the Favorites folder in the tree view to view the contents of the Favorites folder. This folder contains
shortcuts to folders that you use often.
Favorites are saved in the following file:C:\Users\user name\AppData\Local\Vegas\Vegas
Pro\14.0\NewExplorerFavorites.txt.
The file is saved whenever you close the Explorer window or exit the application. You can copy the file to
different computers or user accounts to migrate Favorites settings.
To see this file, you must have the Show hidden files and folders radio button selected on the View tab of the
Folder Options Control Panel.
www.vegascreativesoftware.com
Page 32

Window Docking Area and Floating Window Docks
Adding a folder to the Favorites folder
1. Browse to the folder you want to add.
2. Right-click the folder and choose Add Folder to Favorites from the shortcut menu. A shortcut to the folder is
added to the Favorites folder.
Removing a folder from the Favorites folder
1. Select the Favorites folder.
2. Right-click the folder you want to delete and choose Delete from the shortcut menu.
Deleting a folder from Favorites deletes only the shortcut to the folder; the target folder is unaffected.
The Trimmer Window
The Trimmer window is a good place to edit any media file. When a media file is placed in the Trimmer window, you
can place portions of the file on separate tracks by dragging and dropping.
32
For more information, see "Using the Trimmer" on page 144.
The Master Bus Window
The Master Bus window provides you with a streamlined view of your project's master output.
For more information, see "Using the Master Bus Window" on page 319.
Page 33

33
The Video Preview Window
Choose View >Window > Video Preview to toggle the display of the Video Preview window.
The Video Preview window displays a project's video output at the current cursor position during editing and play
back. The playback includes any effects that you have applied to it. This window is also useful when editing frame by
frame for synchronizing audio. Right-click anywhere in the window to display a shortcut menu with Video Preview
window options.
For more information, see "Using the Video Preview window" on page 445.
The Project Media Window
Choose View >Window > Project Media to toggle the display of the Project Media window.
You can use the Project Media window to collect and arrange all the media you will use in your project. You can add
media, preview it, view and change file properties, and add effects to a file.
For more information, see "Using the Project Media window" on page 74.
www.vegascreativesoftware.com
Page 34

Window Docking Area and Floating Window Docks
34
The Edit Details Window
Choose View >Window > Edit Details to toggle the display of the Edit Details window.
The Edit Details window displays a database for all of the media in your project. It shows information about how
files in the project are being used and allows you to modify many of those properties. You may sort, add or change
information, rearrange columns, and edit items in the project.
This window provides an alternate method for working with events, audio CD track lists, commands, markers, and
regions.
For more information, see "Using the Edit Details Window" on page 188.
The Transitions Window
Choose View >Window > Transitions to display or hide the Transitions window. Use this window to choose and
preview transition effects that you can use to control how a video event begins or ends, or to change the way one
event flows into another.
The left pane lists each of the available transitions organized in folders. Click the Expand and Collapse buttons
to open and close the folders, and select a plug-in name. The thumbnail images in the right pane represent each of
the existing presets for the selected transition. Hover your cursor over a preset to see an animated example.
You can type in the Search plug-ins box to find plug-ins. For example, if you wanted to find a specific colorcorrection plug-in, you could type "color" in the box to display only plug-ins that include the term "color" in the plugin name, description, or group name.
For more information, see "Adding transitions" on page 308.
Page 35

35
The Video FX Window
Choose View >Window > Video FX to toggle the display of the Video FX window.
The left pane lists each of the available video effects organized in folders. Click the Expand and Collapse buttons
to open and close the folders, and select a plug-in name. The thumbnail images in the right pane represent each of
the existing presets for the selected effect. Hover your cursor over a preset to see an animated example.
You can type in the Search plug-ins box to find plug-ins. For example, if you wanted to find a specific colorcorrection plug-in, you could type "color" in the box to display only plug-ins that include the term "color" in the
plug-in name, description, or group name.
You can drag a preset thumbnail to a track, event, or to the Video Preview window to apply the effect.
For more information, see "Adding video effects" on page 303.
www.vegascreativesoftware.com
Page 36

Window Docking Area and Floating Window Docks
36
The Media Generators Window
Choose View >Window > Media Generators to toggle the display of the Media Generators window. You can use
this window to add text, titles, backgrounds, and other generated media.
The left pane lists each of the available media generators organized in folders. Click the Expand and Collapse
buttons to open and close the folders, and select a plug-in name. The thumbnail images in the right pane represent
each of the existing presets for the selected generator. Hover your cursor over a preset to see an animated example.
You can type in the Search plug-ins box to find plug-ins. For example, if you wanted to find a specific colorcorrection plug-in, you could type "color" in the box to display only plug-ins that include the term "color" in the
plug-in name, description, or group name.
You can drag a preset thumbnail to a track to add media.
For more information about using generated media, see "Adding generated media to your project" on page 312.
Page 37

37
The Compositors Window
Choose View >Window > Compositors to toggle the display of the Compositors window. You can use this
window to add compositing effects.
The left pane lists each of the available compositors organized in folders. Click the Expand and Collapse buttons
to open and close the folders, and select a plug-in name. The thumbnail images in the right pane represent each of
the existing presets for the selected compositor. Hover your cursor over a preset to see an animated example.
You can type in the Search plug-ins box to find plug-ins. For example, if you wanted to find a specific colorcorrection plug-in, you could type "color" in the box to display only plug-ins that include the term "color" in the
plug-in name, description, or group name.
You can drag a preset thumbnail to a track to add media.
For more information, see "Compositing and masks" on page 369.
www.vegascreativesoftware.com
Page 38

Window Docking Area and Floating Window Docks
38
The Plug-In Manager Window
Choose View >Window > Plug-In Manager to toggle the display of the Plug-In Manager window.
You can use this window to access effects and effects packages that can be applied to events, tracks, and busses.
This window also allows you to rename and reorganize plug-ins. For more information, see "Applying effects" on
page 290.
To add effects quickly, you can drag plug-ins and plug-in packages from the Plug-In Manager window to
events, tracks, busses, and the Audio Plug-In, Video FX, or Video Preview windows.
Page 39

39
The Video Scopes Window
Choose View >Window > Video Scopes to toggle the display of the Video Scopes window in Vegas® Pro.
Broadcast video uses a narrower range of color than the RGB you see on your computer. When you broadcast a
project that contains out-of-gamut (out-of-range) colors, you can introduce image problems or even noise into the
audio stream.
Use the scopes to analyze your video and adjust accordingly with the Brightness and Contrast, Broadcast Colors,
Color Corrector, Color Corrector (Secondary), and Levels plug-ins before rendering.
Choose a setting from the drop-down list to choose which scope you want to display.
For more information, see "Monitoring video with scopes" on page 465.
The Surround Panner Window
Choose View >Window > Surround Panner to toggle the display of the Surround Panner window. Use the Surround
Panner window to pan tracks, busses, and assignable effects chains.
For more information, see "5.1 surround projects" on page 415.
www.vegascreativesoftware.com
Page 40

Window Docking Area and Floating Window Docks
40
The XDCAM Explorer Window
Choose View >Window > XDCAM Explorer to toggle the display of the XDCAM Explorer window.
You can use this window to import, manage, and export XDCAM clips.
For more information, see "Using the XDCAM Explorer Window" on page 391.
The Mixing Console Window
Choose View >Window > Mixing Console to display the Mixing Console window.
The Mixing Console window provides an integrated view of all tracks and busses in your project using the
appearance of a traditional hardware-based mixer.
For more information, see "The Mixing Console" on page 335.
Page 41

41
The Device Explorer Window
The Device Explorer allows you to browse and import clips from AVCHD, XDCAM EX, NXCAM, XAVC, XAVC S,
Panasonic P2, and RED ONE/EPIC/SCARLET/WEAPON devices; CompactFlash-based memory recording units
such as the HVR-MRC1; and hard-disk-based recording units such as the HVR-DR60.
For more information, see "Using the Device Explorer" on page 94.
Loudness meters
Choose View >Window > Loudness Meters to display the Loudness Meters window.
The Loudness Meters provide data about an audio file's momentary loudness, short-term loudness, integrated
(overall) loudness, and loudness range. You can use these values when mastering for broadcast to ensure
compliance with loudness standards (such as the CALM Act).
www.vegascreativesoftware.com
Page 42

Window Docking Area and Floating Window Docks
The meters display real-time values for each of the following measurements:
42
n The M meter represents the momentary loudness — in loudness units (LU) — across all audio channels
based on 400-millisecond integration windows. The Momentary box displays a numeric representation of
the momentary loudness.
n The S meter represents the short-term loudness — in loudness units — across all audio channels based on 3-
second integration windows. The Short box displays a numeric representation of the short-term loudness.
n The I meter represents the integrated loudness — in loudness units — across all audio channels over the
duration of the program. The Integrated box displays a numeric representation of the integrated loudness and
includes an over-target indicator.
n The LRA meter represents the loudness range — in loudness units — of the momentary and short-term
levels. The Loudness Range measurement provides a standardized method of determining the dynamic range
of the signal.
n The True peaks meter represents the peak levels in dB FS. True peaks are calculated using a higher sample rate
than peaks in the Master Bus window for increased accuracy.
The True Peaks indicator shows you whether the target loudness has been exceeded. The indicator is reset
when you restart playback, or you can right-click the Loudness Meters window and choose Reset Clip from
the shortcut menu.
The statistics on the left side of the window display the last-calculated values and are reset when you restart
playback. You can reset the values by right-clicking the Loudness Meters window and choosing Reset Metering
Engine from the shortcut menu.
Loudness is recalculated whenever you start, stop, seek, or change playback direction. If you want to force a
recalculation, right-click the window and choose Reset Metering Engine from the shortcut menu.
When the Master bus mode drop-down list on the Audio tab of the Project Properties dialog is set to 5.1
Surround, surround processing is applied when measuring loudness (a gain of ~1.5 dB is applied to the left and
right surround channels). When the Master bus mode drop-down list is set to Stereo, all channels contribute
equally to the loudness measurement.
Choosing a metering mode
To change the mode of the meters, choose Options > Loudness Meters, and then choose EBU R 128 Mode or ATSC
Page 43

43
A 85 Mode from the submenu (you can also right-click the meter to set its options).
n When using EBU R 128, the target value of the Integrated meter is -23 LUFS, and the maximum True peak
value is -1.0 dB FS. Use this mode when you're mastering to European Broadcasting Union (EBU) standards.
n When using ATSC A 85, the target value of the Integrated meter is -24 LUFS, and the maximum True peak
value is -2.0 dB FS. Use this mode when you're mastering to North American Advanced Television Systems
Committee (ATSC) standards.
The over-target indicators will be triggered if the target values for Integrated and True Peaks meters are exceeded.
Choosing a loudness scale
To change the scale of the meter, choose Options > Loudness Meters >Loudness Scale, and then choose EBU +9 or
EBU +18 from the submenu (you can also right-click the meter to set its options).
n When using EBU +9, the meters are displayed with a range of -18 to +9 LU.
n When using EBU +18, the meters are displayed with a range of -36 to +18 LU.
Choosing a wide range allows you to see low-level signals at the expense of precision display at high
levels.
Select Absolute (-23 LUFS) if you want to display loudness values as Loudness Units Full Scale (LUFS). When
Absolute (-23 LUFS) is not selected, all values are expressed as Loudness Units (LU) relative to the selected mode
(EBU R 128 Mode or ATSC A 85 Mode).
www.vegascreativesoftware.com
Page 44

Window Docking Area and Floating Window Docks
Configuring peak meters
To toggle the True Peaks meters in the Loudness Meters window, choose Options > Loudness Meters >Show True
Peak Meter (you can also right-click the meter to set its options).
Please note that true peaks are calculated using a higher sample rate than peaks in the Master Bus window for
increased accuracy.
Peak levels may be miscalculated if audio signals are asymmetrical or if a DC offset is present. To enable filtering,
choose Options > Loudness Meters > True Peak Blocking Filter. When True Peak Blocking Filter is selected, peaks are
calculated as the maximum of the filtered and unfiltered signals.
Choosing a wide range allows you to see low-level signals at the expense of precision display at high levels.
44
Page 45

45
Working with projects
A project (.veg) file saves the relevant information about your source media: file locations, edits, insertion points,
transitions, and effects.
A project file is not a multimedia file. It contains pointers to the original source files, so you can edit your project
nondestructively — you can be creative without worrying about corrupting your source files.
Creating a new project
The first step in creating your masterpiece is to create a Vegas® Pro project file.
You can quickly create a project by clicking the New button on the toolbar. The project will use the default
settings, but you can use the Project Properties dialog to edit the settings later. For more information, see
"Setting project properties" on page 45.
1. From the File menu, choose New. The New Project dialog is displayed.
2. Use the New Project dialog to set your project properties.
3. Click OK to create the project.
Setting project properties
Use the Project Properties dialog to control the default settings and store information about the current project.
From the File menu, choose Properties to display the dialog.
Select the Start all new projects with these settings check box to use the current settings whenever a new
project is created.
www.vegascreativesoftware.com
Page 46

Working with projects
Video
Use the Video tab to adjust the video format of your project. You can also click the Project Video Properties button
on the Video Preview window to display this tab.
Item Description
Template Allows you to select a preset template to automatically configure the
controls in the dialog.
You may also manually change the settings and save them as a
custom template for future use. To create a new template, enter a
name in the text box and click the Save Template button . The
new custom template name is added to the drop-down list.
To set your project properties to match the properties of an existing
media file, click the Match Media Settings button and browse to
the file you want to use.
Width and Height Determines the frame size of your final movie when rendered. The
maximum frame size for AVI, MPEG, QuickTime, Windows Media,
and still-image output is 2048x2048.
46
The maximum frame size is 4096x4096.
Field order Determines field order of the frames when drawn on the screen.
Consult your capture/video output card's documentation for the
proper field order for your specific device.
n None (progressive scan): Select this option when viewing the
video on a computer. This option ignores interlacing.
n Upper field first: Select this option (also called odd or field A)
for video that will be viewed on a television.
n Lower field first: Select this option (also called even or field B)
for DV output or if Upper field first produces jittery or shaky
output.
Pixel aspect ratio Choose a setting from the drop-down list to change the pixel aspect
ratio of your project. This setting will depend on your capture/video
output card.
Computers display pixels as squares, or a ratio of 1.0. Televisions
display pixels as rectangles (ratios other than 1.0).
Using the incorrect setting can result in distortion or stretching.
Consult your capture/video output card's manual for the proper
settings.
Page 47

47
Item Description
Output rotation Choose a setting from the drop-down list to rotate your project's
output. Use output rotation to edit projects for display in portrait
(rather than landscape) or inverted orientation:
In this example, the video was shot with the camera tripod rotated
90 degrees. However, with the project output unrotated, the video is
pillarboxed within the standard landscape frame.
After choosing 90 clockwise° from the Output rotation drop-down
list, the Video Preview window is rotated, and the video fills the
frame.
If you want to rotate a media file's orientation, you can use the
Rotation drop-down list on the Media Properties dialog.
For more information, see "Creating rotated projects" on page 57.
Frame rate Choose a setting from the drop-down list to change the frame rate of
your project.
The television frame rate in the US, North and Central America, parts
of South America, and Japan (NTSC) is 29.97 frames per second
(fps). In many parts of the world, including Europe and much of
Asia, the television standard is PAL at 25 fps. France, Russia, and
most of Eastern Europe use SECAM, which is a variation on PAL and
also uses 25 fps.
Stereoscopic 3D mode Choose a setting from the drop-down list to create a stereoscopic 3D
project, or choose Off to create a 2D project.
By default, the project's Stereoscopic 3D mode, Swap Left/Right, and
crosstalk cancellation settings will also be used when previewing and
rendering your project, but you can override the project settings if
necessary.
For more information, see "Setting up your stereoscopic 3D project"
on page 201.
www.vegascreativesoftware.com
Page 48

Working with projects
Item Description
Pixel format Choose a setting from the drop-down list to indicate whether you
want to perform video processing (compositing, scaling, previewing,
rendering, and most video plug-ins) using 8-bit or 32-bit, floatingpoint arithmetic.
n 8-bit: Performs video processing using 8-bit arithmetic and in
the video (studio RGB, or 16-235) color space.
n 32-bit floating point (video levels): Performs video processing
using 32-bit arithmetic and in the video color space.
n 32-bit floating point (full range): Performs video processing
using 32-bit arithmetic and in the full-range color space.
The 32-bit floating point settings allow greater precision for
processing video, but require significantly more processing
power than working with 8-bit video.
Tips:
n 32-bit floating point (video levels) is recommended when
working with 10-bit YUV input/output or when using
xvYCC/x.v.Color media.
48
n When using 8-bit input/output, the 32-bit floating point
(video levels) setting can prevent banding from compositing
that contains fades, feathered edges, or gradients.
n Video plug-ins and media generators that support floating-
point processing are included in the 32-bit floating point
folder in the Transitions, Video FX, Media Generators,
Compositors, and Plug-In Manager windows.
n If you're creating a 32-bit project, you can increase
performance during editing and playback by using the 8-bit
setting during editing and switching to 32-bit floating point
(video levels) before rendering.
Compositing gamma When you choose 32-bit floating point (full range) from the Pixel
format drop-down list, you can choose a compositing gamma value.
n 1.000 (Linear): The default setting when you choose 32-bit
floating point (full range) from the Pixel format drop-down
list.
n 2.222 (Video): Processing in 8-bit video is always performed
using a setting of 2.222.
View transform Choose the reference view transform to use for the project. For more
information, see "Enabling color management in your Vegas Pro
project" on page 409.
Page 49

49
Item Description
Full-resolution rendering
quality
Choose a setting from the drop-down list to set the quality of the
rendered video.
Unless you have specific performance problems, choose Good.
Choosing Best can dramatically increase rendering times.
Good uses bilinear scaling without integration, while Best uses
bicubic scaling with integration. If you're using high-resolution stills
(or video) that will be scaled down to the final output size, choosing
Best can prevent artifacts.
Some file formats allow you to associate a video rendering
quality setting with a custom rendering template. Final
rendering template settings override the Full-resolution
rendering quality setting in the Project Properties dialog. For
more information, see "Custom rendering templates" on page
508.
Motion blur type Choose a setting from the drop-down list to choose the curve that is
used to blur frames when you add a motion blur envelope to the
video bus track. For more information, see "Video bus track" on page
244.
Motion blurring creates the illusion of motion on individual frames
(much like using a long exposure time) and can make computergenerated animation appear more smooth and natural.
n Gaussian: Gives more weight to the central frame in the blur
and less weight to the outer frames. A bell-shaped curve is
used between the central and outer frames. Gaussian blur is
the best choice in most situations where blurring is required.
n Pyramid: Gives more weight to the central frame in the blur
and the least weight to the outer frames. A linear slope is
used between the central and outer frames.
n Box: Uses an equal weighting for all frames, essentially
averaging the frames in the blur.
The Gaussian (asymmetric), Pyramid (asymmetric), and Box
(asymmetric) settings use only the left half of each curve, from the
central frame back. Asymmetric settings create a hard leading edge
with a trailing blur behind the moving object.
www.vegascreativesoftware.com
Page 50

Working with projects
Item Description
Deinterlace method Choose a setting from this drop-down list to determine the method
used to render effects and deinterlace the two fields that make up a
frame.
n None: Performs no deinterlacing.
n Blend fields: Uses contents from both fields and works well
for high-detail, low-motion video.
n Interpolate: Uses a single field at a time and works well for
high-motion, low-detail video.
n Smart adaptive (GPU only): An advanced deinterlacing
method that you can use when upscaling video for 4K/Ultra
HD output.
This setting is for use with interlaced clips up to 2048x1080.
No deinterlacing occurs in the Draft and Preview video preview
modes. The Good and Best modes apply the selected
deinterlacing method.
50
Resample mode Choose a setting from the drop-down list to determine how video
frames will be resampled when the frame rate of a media file is lower
than the project’s frame rate. This can occur either when the event
has a velocity envelope or when the frame rate of the original media is
different than the Frame rate setting on the Video tab of the Project
Properties dialog.
With resampling, the intervening frames are interpolated from the
source frames, much like a crossfade effect between the original
frames. This may solve some interlacing problems and other jittery
output problems.
n Smart resample
Resampling occurs only when an event's calculated frame
rate does not match the project frame rate and the project
frame rate is 24 fps or greater.
The calculated frame rate takes into account any changes
made to event speed with velocity envelope, playback rate,
and undersample rate.
n Force resample
Events are always resampled, regardless of frame rate or the
output frame rate.
n Disable resample
No resampling will occur
You can override the project Resample mode setting for each
event using the event switches. For more information, see
"Applying switches to events" on page 179.
Page 51

51
Item Description
Adjust source media to
better match project or
render settings
Select this check box if you want Vegas Pro to scale images or adjust
interlacing to allow media files to work better with your project.
This setting will correct for the following types of inconsistencies:
n DV media will be cropped for 320x240 Internet renders to
prevent letterboxing.
n DV widescreen media will be cropped in HD projects.
n HD media will be cropped in DV widescreen projects.
n 486-line media will be cropped in 480-line projects.
n 480-line media will be padded in 486-line projects.
When the check box is cleared, source media files are processed with
their native settings.
Prerendered files folder Prerendered video files are saved to this folder so that you don't need
to rerender the project every time you view it. For more information,
see "Selectively prerender video" on page 458.
If you want to change the location of the folder, click the Browse
button and choose a location. Ideally, this location should be on a
different hard drive than the one where your operating system is
installed.
Free storage space in
selected folder
Prerendered files can consume significant drive space. Select a
folder on an a/v-capable drive with ample free space: DV
requires approximately 228 MB per minute.
Displays the total amount of available space on the selected drive.
www.vegascreativesoftware.com
Page 52

Audio
Use the Audio tab to change the data format of the current project.
Item Description
Master bus mode Choose Stereo from the drop-down list to create a two-channel
stereo project.
Choose 5.1 Surround if you want to perform advanced 5.1-channel
mixing. For more information, see "5.1 surround projects" on page
415.
Working with projects
52
Number of stereo
busses
Sample rate Choose a sample rate from the drop-down list or enter a value in the
Bit depth Select a setting from the drop-down list to specify the number of bits
Resample and stretch
quality
Enable low-pass filter
on LFE
Enter the number of stereo busses for the project. For more
information, see "Adding audio busses" on page 322.
edit box.
used to store each sample. Higher values will increase the quality of
playback and any recordings that you make.
Choose a setting from the drop-down list to determine the accuracy
with which audio files will be resampled to match your project
settings.
The Resample and stretch quality setting also determines the quality
of processing when time-stretching audio events. For more
information, see "Editing event properties" on page 183.
Select this check box if you want to apply a low-pass filter to each
track in a 5.1 surround project that is assigned to the LFE channel. For
more information, see "5.1 surround panning and mixing" on page
417.
Applying a low-pass filter approximates the bass-management
system in a 5.1 decoder and ensures that you're sending only lowfrequency audio to the LFE channel.
Before rendering your surround project, check your surround
authoring application's documentation to determine its required
audio format. Some encoders require a specific cutoff frequency
and rolloff, and your encoder may require that no filter be
applied before encoding.
Cutoff frequency for
low-pass filter
Low-pass filter quality Choose a setting from the drop-down list to determine the sharpness
Choose a frequency from the drop-down list or type a frequency in
the box to set the frequency above which audio will be ignored by the
LFE channel.
of filter's rolloff curve. Best produces the sharpest curve.
Page 53

53
Item Description
Recorded files folder When you record audio tracks, your recorded files are saved in a
single folder.
If you want to change the location of the folder, click the Browse
button and choose a location. Ideally, this location should be on a
different hard drive than the one where your operating system is
installed.
If you have not specified a location, you will be prompted for the
location where you want to save your recorded audio when you
click the Arm for Record button in the track header:
Free storage space in
selected folder
Displays the total amount of available space on the selected drive.
Ruler
Use the Ruler tab to change the format used to display the timeline ruler. Vegas Pro also sends tempo information to
tempo-aware audio plug-ins.
Item Description
Ruler time format Choose a setting from the drop-down list to choose how you want
the Time Ruler to be displayed. You can change the format at any
time after project creation.
For more information about each time format, see "Time ruler" on
page 561.
Ruler start time Enter the desired starting time for the project.
For example, the ruler can be offset to start at 1 hour for timecode
synchronization purposes.
Beats per minute Enter your project tempo in Beats Per Minute.
This tempo is used to determine the scale of the ruler (if you choose
Measures & Beats from the Ruler time format drop-down list) and to
specify the tempo used by the metronome.
Select the Import at project tempo check box on the Audio tab of the
Preferences dialog if you want ACID loops to be stretched to match
the project tempo when you add them to the timeline or preview
from the Explorer window. Clear the Import at project tempo check
box if you want to ignore tempo information.
www.vegascreativesoftware.com
Page 54

Working with projects
Item Description
Beats per measure Specify the number of beats in each measure.
This tempo is used to determine the scale of the ruler (if you choose
Measures & Beats from the Ruler time format drop-down list) and to
specify the tempo used by the metronome.
Note that gets one beat Specify the note that receives one beat. For example, if this value is
four, then a quarter note gets one beat.
This tempo is used to determine the scale of the ruler (if you choose
Measures & Beats from the Ruler time format drop-down list) and to
specify the tempo used by the metronome.
Summary
Item Description
Title Enter a title for the project.
Artist Enter the name of the artist.
54
Engineer Enter the name of the person who mixed or edited the project.
Copyright Enter copyright information for the project.
Comments Enter any comments you want to associate with the project.
Audio CD
Use the Audio CD tab to configure options for burning disc-at-once CDs. For more information, see "Disc-at-once
(DAO or Red Book) CD Burning" on page 478.
Item Description
Universal Product
Code/
Media Catalog Number
First track number on
disc
Universal Product Codes (UPC) or Media Catalog Numbers (MCN)
can be written to a CD as a means of identification. However, not all
CD-R drives support this feature. Check your CD-R drive
documentation to determine if your drive will write these codes.
Enter the code in this box, and the codes will be written to the CD
along with the rest of the project.
Universal product codes are administered by GS1 US:
http://www.gs1us.org/.
Enter a number in the box or to specify the track number of the first
track.
Specifying a value other than one will produce a valid Red Book
CD, but some audio CD players may be unable to play the disc.
Opening a project or media file
From the File menu, choose Open to open a media file or Vegas Pro project.
Page 55

55
You can open multiple Vegas Pro projects by launching another instance of the application (if your computer
has enough resources).
n Opening a project closes the current project and displays the opened project in the Vegas Pro window.
n Opening a media file will place the event that contains the media onto a new track in the current project.
Opening a Vegas Pro project
1. From the File menu, choose Open. The Open dialog box is displayed.
2. Choose the folder where the project you want to open is stored:
n Choose a drive and folder from the Look in drop-down list.
n Choose a folder from the Recent drop-down list to quickly select a folder from which you have
previously opened files.
3. Select a file in the browse window or type a name in the File name box. Detailed information about the
selected file appears at the bottom of the dialog box.
Tips:
n To limit the files displayed in the dialog, choose a file type from the Files of Type drop-down list
or enter *. and an extension in the File name box. For example, enter *.wav to display all wave
files in the current folder, or enter *guitar*.wav to display all wave files that have the word guitar
in the file name.
n To open a project quickly, double-click a .veg file in the Explorer window.
4. Click Open. If you have not saved the current project, you will be prompted to save your changes.
Adding a Vegas Pro project to the current project (nesting)
Nesting allows you to add a Vegas Pro project to the timeline of another project. Nesting can help you organize a
timeline or create other effects. For more information, see "Nesting projects" on page 59.
Use nested projects to organize a project that uses extensive compositing.
Perform either of the following actions to nest a Vegas Pro project within the current project:
n Drag a Vegas Pro project from the Explorer window (or Windows Explorer) to the timeline.
n From the File menu, choose Import, then choose Media from the submenu, and then browse to the project
you want to use.
The file is added to the Project Media window and an event is created where you drop the project in the timeline or at
the cursor position before you opened the Import Media dialog.
Opening a media file
1. From the File menu, choose Open. The Open dialog box is displayed.
2. Choose the folder where the file you want to open is stored:
www.vegascreativesoftware.com
Page 56

Working with projects
n Choose a drive and folder from the Look in drop-down list.
n Choose a folder from the Recent drop-down list to quickly select a folder from which you have
previously opened files.
3. Select a file in the browse window or type a name in the File name box. Detailed information about the
selected file appears at the bottom of the dialog box.
To limit the files displayed in the dialog, choose a file type from the Files of Type drop-down list or enter
*. and an extension in the File name box. For example, enter *.wav to display all wave files in the current
folder, or enter *guitar*.wav to display all wave files that have the word guitar in the file name.
If you want to use RAW camera files in your project, the Microsoft Camera Codec Pack will allow you
to view RAW camera files and add them to the timeline. For more information, see
http://www.microsoft.com/download/en/details.aspx?id=26829.
4. Click Open.
5. The file is added to the Project Media window and an event is created. The event is created at the cursor
position in the selected track, or a new track will be created if no tracks of the appropriate type exist. For
example, if your current project contains three audio tracks when you open an AVI file, a video track will be
created for the AVI.
56
Opening a still-image sequence
If you've exported a video clip as a still-image sequence using another application (a 3D-rendering application, for
example), you can add the sequence to the Vegas Pro timeline as a single event.
1. From the File menu, choose Open. The Open dialog box is displayed.
2. Choose the folder where the sequence you want to open is stored:
n Choose a drive and folder from the Look in drop-down list.
n Choose a folder from the Recent drop-down list to quickly select a folder from which you have
previously opened files.
3. Select the first image in the sequence (or the image you want to use to start the event). Detailed information
about the selected file appears at the bottom of the dialog box.
4. Select the Open sequence check box.
5. In the Last image box, type the number of the last image you want to open. For example, if you'd selected
AnimationOne_00001.tga in step 3, you could type 120 in this box to create a new event using AnimationOne_
00001.tga to AnimationOne_00120.tga.
6. Click Open to display the Media Properties dialog, where you can view or edit information about the
sequence. For more information, see "Viewing or changing media file properties" on page 99.
7. Click OK. A new event is created at the cursor position in the selected track (a new track will be added if no
track is selected). Each image in the sequence will be displayed for one frame.
Page 57

57
Opening a CD Architect version 4 project
If you have existing CD Architect version 4 projects, you can use Vegas Pro to open your project files and create Red
Book CDs.
1. From the File menu, choose Open. The Open dialog box is displayed.
2. Choose the folder where your CD Architect project file (.cdp) is stored:
n Choose a drive and folder from the Look in drop-down list.
n Choose a folder from the Recent drop-down list to quickly select a folder from which you have
previously opened files.
3. Select a project file in the browse window or type a name in the File name box.
4. Click Open. If you have not saved the current project, you will be prompted to save your changes.
For more information about creating Red Book CDs, see "Disc-at-once (DAO or Red Book) CD Burning" on
page 478.
Creating rotated projects
The use of rotated displays — monitors that display vertical media — has become increasingly popular: you can see
them in kiosks, presentations, and even on the nightly news. If you have a project that you'd like to display in a
rotated format, Vegas Pro makes it easy.
1. Create a new project.
2. Set your project properties as needed, and then choose a setting from the Output rotation drop-down list to
indicate the orientation of your destination display device. If you want to display your project in portrait (tall)
mode, choose 90° clockwise or 90° counterclockwise. For more information, see "Setting project properties"
on page 45.
In this example, the video was shot with the camera tripod rotated 90 degrees. However, because neither the
project or the media has been rotated, the video is displayed sideways within the standard landscape frame.
After choosing 90° clockwise from the Output rotation drop-down list, the Video Preview window is
rotated. Because the media hasn't been rotated yet, it doesn't match the project orientation and is letterboxed
within the frame.
www.vegascreativesoftware.com
Page 58

Working with projects
3. Add your media files to your project. For more information, see "Adding media files to your project" on page
123.
4. Edit the properties for each of your media files to set its rotation as needed:
a. Right-click a media file in the Project Media window and choose Properties from the shortcut menu.
The Media Properties dialog is displayed.
b. Choose a setting from the Rotation drop-down list to indicate the direction you want to rotate your
media.
After choosing 90° clockwise from the Rotation drop-down list, the media is rotated, and the video
fills the frame.
c. Click OK to close the Media Properties dialog and save your changes.
58
To rotate multiple files quickly, select them in the Project Media window, right-click a selected
file, and then choose Rotate 90° Clockwise or Rotate 90° Counterclockwise from the shortcut
menu.
5. Drag your clips from the Project Media window to the timeline to create events.
6. Edit your project as needed. For more information, see "Editing events on the timeline" on page 122.
7. Render your project to any supported rendering format. For more information, see "Rendering projects
(Render As)" on page 497.
In the Render As dialog, click the Render Options button and select the Use project output rotation setting
check box if you want to use the Output rotation setting from the Project Properties dialog for your rendered
file. When the check box is cleared, the media is rotated according to its Media Properties setting, but the
project itself is unrotated—you can use this setting to proof your project on an unrotated display.
To render a portrait-oriented file for viewing on a computer without a rotated display, you can create a
rendering template that matches the proportions of your project. For more information, see "Custom
rendering templates" on page 508.
a. Right-click the Video Preview window and ensure Simulate Device Aspect Ratio is selected.
b. Next, adjust the size of the Video Preview window to match the frame size you'd like to render and
note the Display dimensions in the lower-right corner of the Video Preview window.
c. From the File menu, choose Render As, choose the desired rendering format from the Formats box
list, and then choose a rendering template that's close to the frame size you noted in step b.
Windows Media Video is a good choice.
d. Click the Custom button, and then use the Video tab in the Custom Template dialog to adjust the
frame size to match the dimensions you noted in step 7b.
e. Save your template for later use.
f. Clear the Use project output rotation setting check box and render your file.
Page 59

59
Nesting projects
Nesting allows you to add a Vegas Pro project to the timeline of another project. Nesting can help you organize a
timeline or create other effects:
n Create a single element — such as a lower-third graphic or watermark — that you can use in multiple timeline
locations or projects.
n Create a complex composited element that you can use as a single media object in the timeline. For more
information, see "Compositing video" on page 369.
n Create a transition across multiple events by placing the events in a nested project and applying a transition
to the nested project event.
n Create a musical composition with its own tempo and FX bus structure that you can use in another project.
n Create a separate project for each scene in a video and nest those projects in a master video project. You can
apply color correction to each shot within the scene and then apply color correction to the entire scene in the
master project.
n Use master projects to deliver a single project in multiple formats without time- and disk-consuming
intermediate renders: for example, you could add your 24p, 16:9 HD (high-definition) project to a master
project to reformat the project as widescreen SD (standard definition) for DVD, letterboxed SD for VHS, 4:3
pan-and-scan SD, or 25p.
Perform either of the following actions to nest a Vegas Pro project within the current project:
n Drag a Vegas Pro project from the Explorer window (or Windows Explorer) to the timeline.
n From the File menu, choose Import, then choose Media from the submenu, and then browse to the project
you want to use.
The file is added to the Project Media window and an event is created where you drop the project in the timeline (or
at the cursor position if import or use the Explorer to open a project file).
You can edit the nested project's events just like any other event on the timeline: trim, shuffle, stretch, crop, or apply
event switches.
For more information, see "Editing events on the timeline" on page 122.
Notes:
n The output from the nested project's master bus is used to create the audio event. If you nest a 5.1 surround
project, the audio event will be a stereo downmix of the surround master bus. For more information, see "5.1
surround projects" on page 415.
n Audio events from nested projects cannot be edited in a sound editor. For more information, see "Opening
events in an audio editor" on page 182.
n The audio from a nested project will require that a proxy file be built. To avoid building proxy files, delete
audio from nested projects and use the master project to create your audio.
From the Tools menu, choose Rebuild Offline Nested Audio to rerender any offline audio proxy files in your
project. Audio proxy files can be offline if you cancel rendering when adding a nested project.
n Markers and regions in the nested project are displayed in the timeline as media markers in the event. For
more information, see "Using media markers and regions" on page 217.
n Prerendered video from a project will be used when that project is nested in another project's timeline.
www.vegascreativesoftware.com
Page 60

Working with projects
n You can edit a nested project by right-clicking the event in the timeline and choosing Edit Source Project from
the shortcut menu. A new Vegas Pro window will open to allow you to edit the project. For more
information, see "Project references in rendered files" on page 61.
Opening a recent project
A list of recently used project files is maintained at the bottom of the File menu. Choosing a project from this list
allows you to quickly return to work on that project.
You can use the General tab in the Preferences dialog to turn the recently used file list on or off and to specify how
many files should be displayed. For more information, see "Preferences - General Tab" on page 567
Saving a project
From the File menu, choose Save to save changes to the current Vegas Pro project (.veg). When a Vegas Pro project
is saved, all of the layout of tracks, envelope adjustments, effects parameters, etc. are saved in this project file.
The first time you save a project, the Save As dialog is displayed.
If you want to keep the previous version of your project before you made changes, use the Save As command
to save the new version of the project with a new name. For more information, see "Saving and renaming a
project (Save As)" on page 60.
60
Automatic project saving
A backup copy of your project is automatically saved every five minutes. If your system crashes, you will be
prompted to open the backup file the next time you start the application.
Backup files are saved in the location specified in the Temporary files folder box on the General tab of the Preferences
dialog. Files are saved with the .autosave.veg extension and are deleted when you exit the application. For more
information, see "Preferences - General Tab" on page 567.
If you prefer not to autosave your project, you can clear the Enable autosave check box on box on the General tab of
the Preferences dialog.
When you save a project, .veg.bak files are created in your project folder to allow you to return to the project's
last-saved state. Creation of backup files is independent of automatic project saving.
Saving and renaming a project (Save As)
From the File menu, choose Save As to save the current project to a different location or with a new name.
1. From the File menu, choose Save As.
2. Select the drive and folder where you want to store the project.
3. Type a name in the File Name box.
Page 61

61
4. From the Save as Type drop-down list, choose the format in which you want to save the project.
Extension Format Name Description
.veg Vegas Pro
project
.txt EDL text file This option creates a text version of event placements in the
.aaf Edit Protocol
Compliant AAF
File
.aaf Avid Legacy
AAF File
5. Select the Copy media with project check box if you want to create copies of each of the project's media files
in the same location as the project file. This allows you to collect all of a project's assets in a single location.
6. Click the Save button.
7. If you selected the Copy media with project check box, a dialog is displayed to allow you to specify how you
want to copy media files:
This option saves the references to media files used in the
project. Also saved is project information, track effects,
envelopes, bus assignments, and output properties. The
.veg file does not combine events into a single file.
track view. This text description can then be imported into a
database or text application for modification or other
purposes.
These options create AAF (Advanced Authoring Format)
files that you can use to exchange projects between
applications. For example, if your postproduction facility
uses a tool other than Vegas Pro software, you could
provide your project as an AAF file.
For more information, see "Importing and exporting AAF
files" on page 67.
n Select the Copy source media radio button to copy the entire source media files to your project folder.
Any project media files from folders outside the project folder are copied to the project folder. Media
files that are saved in folders below the project folder are not copied.
n Select the Create trimmed copies of source media radio button and enter a value in the Extra head and
tail box to reduce the number and size of media files necessary to represent your project.
Your project will be scanned to determine how much of each media file is being used and those
regions will be rendered to new media files. The amount of time specified in the Extra head and tail
setting will be added before and after the media file to allow subsequent edits. All events are then
updated to point to the new files. Finally, inactive takes are removed from the project, and the project
is saved.
The newly rendered files will match the source files' properties as closely as possible:
n Audio/video events are saved in a new AVI file. You can trim DV AVI, uncompressed AVI, and
YUV AVI files. Because of the lossy nature of other video formats, those video files will not be
trimmed, but will simply be copied to the project folder.
n Audio-only events will be rendered to the Wave format if under 2 GB (or Wave64 if over 2 GB),
and DV files will be rendered as DV AVI files.
Project references in rendered files
When your Vegas Pro project uses media that was rendered with an embedded project path reference, you can easily
open the source project in the associated application if you need to edit the media later. ACID 5.0, Sound Forge 8.0,
www.vegascreativesoftware.com
Page 62

Working with projects
and Vegas Pro 6.0 and later allow you to save the project path reference when you render files.
For example, imagine that you have an audio file on the Vegas Pro timeline that was rendered from an ACID project.
In previewing your Vegas Pro project, you discover that you'd accidentally rendered your ACID project with a critical
track muted. You could simply right-click the event on the Vegas Pro timeline and choose Edit Source Project from
the shortcut menu to reopen your ACID project, unmute the track, and then rerender it.
The project information in the rendered file is a reference to a project file only. If you modify the project file after
rendering, the project data will no longer match the rendered file. To edit a project using a path reference, the
project file and all media must be available on your computer.
Saving the project path in the rendered file
1. Save your Vegas Pro project. The project must be saved before you can embed the project reference in the
rendered file.
2. Perform the procedure described in the Rendering Projects topic to choose the file type and location for
rendering your files, and select the Save project as path reference in rendered media check box.
For more information, see "Rendering projects (Render As)" on page 497.
The check box will be unavailable if you haven't saved your project or if you're rendering using a thirdparty file-format plug-in.
62
Editing a referenced project
1. Perform one of the following actions:
n Right-click a media file in the Explorer window.
n Right-click a media file in the Project Media window.
n Right-click an event on the timeline.
2. From the shortcut menu, choose Edit Source Project. An ACID, Vegas Pro, or Sound Forge window will open
with the source project.
To edit a source project using a computer other than the computer where the project was created, the
editing computer must meet the following requirements:
n The software that was used to create the project must be installed and the project file extension (.acd,
.acd-zip, .veg, .vf, or .frg) must be registered on the editing computer.
n The editing computer must have the same version (or later) of the software that was used to create
the project.
n The project file must exist on the editing computer using the same file path as on the computer where
the project was created.
n The project's source media must exist on the editing computer. If the media files do not use the same
file path as on the computer where the project was created, you will be prompted to choose a new
folder or replacement files.
3. Edit the project as necessary.
Page 63

63
4. Render the edited project using the same name as the original media file and close the editing application.
If you're editing an existing track, your project will automatically be updated to use the latest rendered media
file.
Sharing a project online
From the File menu, choose Share Online and then follow the on-screen instructions to choose a publishing provider
and save your current project to the Web so you can share it with others.
Uploading your movie to YouTube
When you're done with your movie, you're probably going to want to share it with your friends and family as soon
as possible.
This feature requires that you have a YouTube account. If you don't already have an account, you can go to
http://www.youtube.com/signup to sign up.
1. From the File menu , choose Share Online > Upload to YouTube. The Upload to YouTube dialog is displayed.
2. Type a title to identify your video in the Title box.
The information from the Title box of on the Summary tab of the Project Properties dialog is used by
default.For more information, see "Setting project properties" on page 45.
3. Type a description of your movie in the Description box.
The information from the Comments box on the Summary tab of the Project Properties dialog is used by
default.
4. Type keywords you want to associate with your movie in the Tags box. Use words that relate to your movie
and describe its content. These tags will be used when searching YouTube. Use commas to separate multiple
keywords.
If you are uploading a stereoscopic 3D project, Vegas Pro automatically adds the tags needed to enable
3D viewing on YouTube. For more information, see "Stereoscopic 3D editing" on page 201.
5. Select the Public or Private radio button to set broadcast options for your movie. Public videos can be seen by
any YouTube user; private videos can be seen only by members you specify.
6. Select the Normal or Higher radio button to set the video quality for your movie. The Higher setting creates
better-looking video for broadband connections but will take longer to render.
The estimated file size is displayed at the bottom of the dialog.
7. Select the Render and upload loop region only check box if you want to save only the portion of the project
that is contained within the loop region. Loop Playback does not need to be selected for this option to work.
www.vegascreativesoftware.com
Page 64

Working with projects
8. Click the Upload button to start uploading your movie to YouTube. If you do this the first time, the Log In to
Google dialog is displayed. Log in to your Google account with your Google Email and Password. Now select
the Youtube account that is connected to your Google account and authorize MAGIX AG to manage your
Youtube account.
Note that you authorize not only your Vegas Pro program to access your Youtube account but any
MAGIX Video Editing Software. That means, once authorized you can use the Youtube upload with any
recent MAGIX video program without entering any password again. To revoke the access, go to your
Google connected Apps settings, click on MAGIX AG and click Remove.
9. After the upload has finished your web browser will open on the site to let you edit further settings of the just
uploaded video.
Uploading your movie to Facebook
When you're done with your movie, you can upload it to Facebook to share it with your friends, family, and
followers.
This feature requires that you have a Facebook account. If you don't already have an account, you can go to
http://www.facebook.com/ to sign up.
64
1. From the File menu , choose Share Online > Upload to Facebook. The Upload to Facebook dialog is displayed.
2. Type a title to identify your video in the Title box.
The information from the Title box of on the Summary tab of the Project Properties dialog is used by
default.For more information, see "Setting project properties" on page 45.
3. Type a description of your movie in the Description box. This description will be included when your video is
posted.
The information from the Comments box on the Summary tab of the Project Properties dialog is used by
default.
4. Add tags in the Tags field to make it easier to find your videos on the site.
5. Select the Normal or Higher radio button to set the video quality for your movie. The Higher setting creates
better-looking video for broadband connections but will take longer to render.
The estimated file size is displayed at the bottom of the dialog.
6. Select the Render and upload loop region only check box if you want to save only the portion of the project
that is contained within the loop region. Loop Playback does not need to be selected for this option to work.
7. Click the Upload button to start uploading your movie to Facebook. If you do this the first time, the Log In to
Facebook dialog is displayed. Log in to your Facebook account with your Email and Password . Now click on
Allow to authorize Vegas Pro to access your Facebook account.
Note that you authorize not only your Vegas Pro program to access your Facebook account but any
MAGIX Video Editing Software. That means, once authorized you can use the Facebook upload with
any recent MAGIX video program without entering any password again.
8. After the upload has finished your web browser will open on the site to let you edit further settings of the just
uploaded video.
Page 65

65
Uploading your movie to Vimeo
When you're done with your movie, you can upload it to Vimeo to share it with your friends, family, and followers.
This feature requires that you have a Vimeo account. If you don't already have an account, you can go to
https://vimeo.com to sign up.
1. From the File menu , choose Share Online > Upload to Vimeo. The Upload to Vimeo dialog is displayed.
2. Type a title to identify your video in the Title box.
The information from the Title box of on the Summary tab of the Project Properties dialog is used by
default.For more information, see "Setting project properties" on page 45.
3. Type a description of your movie in the Description box. This description will be included when your video is
posted.
The information from the Comments box on the Summary tab of the Project Properties dialog is used by
default.
4. Add tags in the Tags field to make it easier to find your videos on the site.
5. Select the Normal or Higher radio button to set the video quality for your movie. The Higher setting creates
better-looking video for broadband connections but will take longer to render.
The estimated file size is displayed at the bottom of the dialog.
6. Select the Render and upload loop region only check box if you want to save only the portion of the project
that is contained within the loop region. Loop Playback does not need to be selected for this option to work.
7. Click the Upload button to start uploading your movie to Vimeo. If you do this the first time, the Log In to
Vimeo dialog is displayed. Log in to your Vimeo account with your Vimeo Email and Password or use your
Facebook credentials. Now click on Allow to authorize Vegas Pro to access your Vimeo account.
Note that you authorize not only your Vegas Pro program to access your Vimeo account but any
MAGIX Video Editing Software. That means, once authorized you can use the Vimeo upload with any
recent MAGIX video program without entering any password again. To revoke the access, go to your
Vimeo profile settings and remove the MAGIX Video Editing App under Connected Apps.
8. After the upload has finished your web browser will open on the site to let you edit further settings of the just
uploaded video.
Uploading your movie to YouTube
When you're done with your movie, you're probably going to want to share it with your friends and family as soon
as possible.
This feature requires that you have a YouTube account. If you don't already have an account, you can go to
http://www.youtube.com/signup to sign up.
1. From the File menu , choose Share Online > Upload to YouTube. The Upload to YouTube dialog is displayed.
2. Type a title to identify your video in the Title box.
The information from the Title box of on the Summary tab of the Project Properties dialog is used by
default.For more information, see "Setting project properties" on page 45.
www.vegascreativesoftware.com
Page 66

3. Type a description of your movie in the Description box.
The information from the Comments box on the Summary tab of the Project Properties dialog is used by
default.
4. Type keywords you want to associate with your movie in the Tags box. Use words that relate to your movie
and describe its content. These tags will be used when searching YouTube. Use commas to separate multiple
keywords.
If you are uploading a stereoscopic 3D project, Vegas Pro automatically adds the tags needed to enable
3D viewing on YouTube. For more information, see "Stereoscopic 3D editing" on page 201.
5. Select the Public or Private radio button to set broadcast options for your movie. Public videos can be seen by
any YouTube user; private videos can be seen only by members you specify.
6. Select the Normal or Higher radio button to set the video quality for your movie. The Higher setting creates
better-looking video for broadband connections but will take longer to render.
The estimated file size is displayed at the bottom of the dialog.
7. Select the Render and upload loop region only check box if you want to save only the portion of the project
that is contained within the loop region. Loop Playback does not need to be selected for this option to work.
66
8. Click the Upload button to start uploading your movie to YouTube. If you do this the first time, the Log In to
Google dialog is displayed. Log in to your Google account with your Google Email and Password. Now select
the Youtube account that is connected to your Google account and authorize MAGIX AG to manage your
Youtube account.
Note that you authorize not only your Vegas Pro program to access your Youtube account but any
MAGIX Video Editing Software. That means, once authorized you can use the Youtube upload with any
recent MAGIX video program without entering any password again. To revoke the access, go to your
Google connected Apps settings, click on MAGIX AG and click Remove.
9. After the upload has finished your web browser will open on the site to let you edit further settings of the just
uploaded video.
Importing and exporting projects
Project-interchange tools add flexibility to your workflow, allowing you to exchange projects with other popular
editing platforms.
Importing a project
1. From the File menu, choose Import, and then choose a project type from the submenu:
n AAF: imports an AAF file from an edit protocol compliant AAF, Avid ProTools, or Avid Media
Composer. For more information, see "Importing and exporting AAF files" on page 67.
n Premiere/After Effects (*.pproj): imports an Adobe Premiere or After Effects project.
n Final Cut Pro 7/DaVinci Resolve (*.xml): imports an XMLfile from Apple Final Cut Pro 7 or DaVinci
Resolve.
n Final Cut Pro X (*.fcpxml): imports an XMLfile from Apple Final Cut Pro X.
Page 67

67
n EDLText File (*.txt): imports an EDLtext file. For more information, see "Edit Decision Lists" on page
71.
The Import dialog is displayed.
2. Choose the folder where the project you want to open is stored:
n Choose a drive and folder from the Look in drop-down list.
n Choose a folder from the Recent drop-down list to quickly select a folder from which you have
previously opened files.
3. Select a file in the browse window or type a name in the File name box.
4. Click Open.
If elements in the project could not be imported, a report is displayed.
Exporting a project
1. From the File menu, choose Export, and then choose a project type from the submenu:
n Pro Tools AAF File (*.aaf): exports your project to an AAF file for use in Avid Pro Tools. For more
information, see "Importing and exporting AAF files" on page 67.
n Media Composer AAF (*.aaf): exports your project to an AAF file for use in Avid Media Composer.
For more information, see "Importing and exporting AAF files" on page 67.
n Premiere/After Effects (*.pproj): exports your project for use in Adobe Premiere or After Effects
project.
n Final Cut Pro 7/DaVinci Resolve (*.xml): exports your project to an XMLfile for use in Apple Final Cut
Pro 7 or DaVinci Resolve.
n Final Cut Pro X (*.fcpxml): exports your project to an XMLfile for use in Apple Final Cut Pro X.
n EDLText File (*.txt): exports your project to an EDLtext file. For more information, see "Edit Decision
Lists" on page 71.
The export dialog is displayed.
2. Choose the folder where you want to export the project:
n Choose a drive and folder from the Look in drop-down list.
n Choose a folder from the Recent drop-down list to quickly select a folder from which you have
previously opened files.
3. Type a name in the File name box.
4. Click Save.
If elements in the project could not be exported, a report is displayed.
Importing and exporting AAF files
You can use AAF (Advanced Authoring Format) files to exchange projects between applications. For example, if
your postproduction facility uses a tool other than Vegas Pro, you could provide your project as an AAF file.
www.vegascreativesoftware.com
Page 68

Creating an AAF file
If you intend to export your project as an AAF file, please note the following usage guidelines and plan your project
accordingly:
n Audio and video cuts are preserved.
n Track-based audio gain and panning are preserved when saving or importing AAF files.
Select the AAF Export - Use clip-based audio envelope check box on the General tab of the Preferences dialog
if you want to combine track and event gain envelopes and save them as clip-based gain envelopes in the
AAF file. When the check box is cleared, track envelopes are saved as track envelopes, and event envelopes
are saved as clip envelopes. For more information, see "Preferences - General Tab" on page 567.
When exchanging AAF with another application, refer to its documentation to determine whether audio gain
and panning changes are supported.
n Muted audio tracks are not included in the AAF file.
n When you import an AAF file, the track- and clip-based gain envelopes are combined and imported as track
envelopes.
68
n Audio and video effects are ignored.
n All video transitions are exported as AAF Video Dissolve transitions.
n All audio crossfades are exported as AAF Mono Audio Dissolve transitions.
n Time-stretched video is exported using the AAF "Video Speed Control" effect.
n Time-stretched audio is not supported: audio events that are time stretched will play at their original speed,
and time is added to the track to represent the stretched duration; audio events that are time compressed will
play at the original speed, but the event is trimmed to match the compressed event length.
n Any track that has mono and stereo audio will be ignored; the AAF format does not allow mono and stereo
audio on a single track.
n Still images will be exported as 1,080,000 frames (the AAF specification does not allow media with a length
and frame rate of 0).
n Track order in your exported AAF will not match your Vegas Pro project: in the Vegas Pro track model, the
first track represents the foreground; in the AAF specification, the first track represents the background.
n Audio is exported using frame units when the AAF Export - Use frame unit for audio check box is selected on
the General tab of the Preferences dialog. Clear the check box if you want to use sample units for exported
audio (use this setting only if your project contains audio only or if you know the application that will import
your AAF supports frame units for video and sample units for audio). For more information, see "Preferences
- General Tab" on page 567.
1. From the File menu, choose Export, and then choose Pro Tools AAF File or Media Composer AAF File from
the submenu. The export dialog is displayed.
2. Select the drive and folder where you want to store the project.
3. Type a name in the File name box.
4. Click Save.
Page 69

69
Importing an AAF file into the current project
If you intend to import an AAF file into a Vegas Pro project, please note the following usage guidelines and plan your
project accordingly:
n Audio and video cuts are preserved.
n Track-based audio gain and panning are preserved when saving or importing AAF files.
When you import an AAF file, the track- and clip-based gain envelopes are combined and imported as track
envelopes.
When exchanging AAF with another application, refer to its documentation to determine whether audio gain
and panning changes are supported.
n All video transitions are imported as crossfades.
n Audio and video effects are ignored.
n The AAF Video Speed Control effect is preserved and mapped to the Playback rate setting in the imported
event's properties. For more information, see "Editing event properties" on page 183.
n If you import an AAF file that has embedded wave or AIFC audio, the files will be extracted to the same folder
as the AAF file when you import the project.
1. From the File menu, choose Import, and then choose AAF from the submenu. The Import dialog is displayed.
2. Choose the folder where the project you want to open is stored:
n Choose a drive and folder from the Look in drop-down list.
n Choose a folder from the Recent drop-down list to quickly select a folder from which you have
previously opened files.
3. Select a file in the browse window or type a name in the File name box.
4. Click Open. The AAF is imported into the current project.
Importing an AAF file into a new Vegas Pro project
If you intend to import an AAF file into a Vegas Pro project, please note the following usage guidelines and plan your
project accordingly:
n Audio and video cuts are preserved.
n Track-based audio gain and panning are preserved when saving or importing AAF files.
When you import an AAF file, the track- and clip-based gain envelopes are combined and imported as track
envelopes.
When exchanging AAF with another application, refer to its documentation to determine whether audio gain
and panning changes are supported.
n All video transitions are imported as crossfades.
n Audio and video effects are ignored.
www.vegascreativesoftware.com
Page 70

n The AAF Video Speed Control effect is preserved and mapped to the Playback rate setting in the imported
event's properties. For more information, see "Editing event properties" on page 183.
n If you import an AAF file that has embedded wave or AIFC audio, the files will be extracted to the same folder
as the AAF file when you import the project.
1. From the File menu, choose Open. The Open dialog is displayed.
2. Choose the folder where the project you want to open is stored:
n Choose a drive and folder from the Look in drop-down list.
n Choose a folder from the Recent drop-down list to quickly select a folder from which you have
previously opened files.
3. Select a file in the browse window or type a name in the File name box.
4. Click Open. If you have not saved the current project, you will be prompted to save your changes.
Archiving projects
70
Choose File >Export >Vegas Project Archive to export your project and its associated media.
1. Choose File >Export >Vegas Project Archive. The Vegas Project Archive dialog is displayed.
2. Use the Vegas Project Archive dialog to choose options for saving your archive:
a. In the Project file box, choose the folder and file name you want to use to save your archive.
b. Select the Include nested projects check box if you want to include nested projects in the archive.
c. Select the Include media if you want to copy media files with the archive.
d. Select the Include video proxy/audio peak files check box if you want to include audio peaks and
audio/video proxy files with the archive. For more information, see "Rebuild audio peaks" on page 191
or "Creating proxy files for high-definition editing" on page 96.
e. Select the Exclude unused media if you want to skip archiving unused media files. If you clear the
check box, all project media will be archived.
3. Click the Finish button to create your project archive.
Working with P2 Video
The following steps will guide you through the process of using P2 video in your Vegas Pro project.
1. Shoot your video with a P2 camera.
2. Start a new Vegas Pro project, and set your project properties to the format that most closely matches your
desired output format (or use the Match Media Video Settings button in the Project Properties dialog to
match an existing media file).
For more information, see "Setting project properties" on page 45.
3. Use the Device Explorer window to import your P2 files.
For more information, see "Using the Device Explorer" on page 94.
4. Drag your clips from the Project Media window to the timeline to create events.
Page 71

71
5. Edit your project as needed.
If you're working on a system with limited processing power, converting to a lower-resolution format
will streamline the editing process and allow you to preview your project with higher frame rates. This
process is called proxy editing.
For more information, see "Creating proxy files for high-definition editing" on page 96.
6. Render your project to any supported rendering format.
If you want to render to P2 format and export the rendered file to a P2 camera, please use the following steps:
1. Verify that your Vegas Pro project is set match your P2 file settings.
2. From the File menu, choose Render As.
3. In the Render As dialog, choose Panasonic P2 MXF in the Output Format box.
4. Use one of the following templates, or select a template and click the Customize Template button to edit its
settings.
If you use the Custom Template dialog to customize your rendering template, leave all settings at their
default values except for the Frame size control.
5. Use the Output File controls to choose where the files will be rendered. The P2 file format has strict file-
naming requirements, so when you render P2 files, you choose an output folder rather than rendered file
names.
Click the Browse button to choose where you want to render:
n To render to a P2 camera that's connected to your computer, choose the CONTENTS folder on the camera's
memory card.
n To render to a folder on your computer, choose a folder. If a P2-format CONTENTSfolder exists in the
selected folder, Vegas Pro will use the existing folder structure. If no P2-format CONTENTSfolder exists,
Vegas Pro will create all necessary files and folders
File names are automatically incremented when you render. For example, if the highest-numbered clip in the
selected render folder is ..\CONTENTS\VIDEO\00036R.mxf, the next file you render to that folder will be
created as ..\CONTENTS\VIDEO\0004xx.mxf.
File naming is an important part of the P2 file specification. Do not change the file names in a P2
CONTENTSfolder.
Edit Decision Lists
An Edit Decision List (EDL) is a text summary of a project. An EDL lists of all of the media files used, where they are
placed on the timeline, and how they are trimmed.
Vegas Pro EDLs are not the same as those used in traditional linear editing suites and are not intended as a project
interchange for other editing applications.
Because of the significant differences between editing applications, projects that are converted from EDLs (or
exported to EDLs) are necessarily simplified. Events are inserted into the timeline on a single track, and transition
effects from the other application are replaced with crossfades. Projects that are imported from another application's
EDL are initially limited to four audio tracks. If you add more tracks, save the project as a .veg file.
www.vegascreativesoftware.com
Page 72

Creating an EDL
1. From the File menu, choose Export >EDLText File (*.txt). The export dialog is displayed.
2. Select the drive and folder where you want to store the project.
EDL files do not contain information about the location of source media. Save the .txt file in the same
folder as the source media.
3. Type a name in the File name box.
4. Click OK.
Opening an EDL
1. From the File menu, choose Import >EDLText File (*.txt). The import dialog is displayed.
2. Choose the folder where the project you want to open is stored:
n Choose a drive and folder from the Look in drop-down list.
—or—
72
n Choose a folder from the Recent drop-down list to quickly select a folder from which you have
previously opened files.
3. Select a file in the browse window or type a name in the File name box.
4. Click Open. If you have not saved the current project, you will be prompted to save your changes.
Events are placed in the Vegas Pro timeline. All transitions are replaced with crossfades. You can change the
crossfades to other transition types if desired. For more information, see "Automatic crossfades" on page
132.
Closing a Project
From the File menu, choose Close to close the current project. If you have not saved the project since changes were
last made, a dialog appears asking if you want to save your changes.
n Click No if you want to close the project without saving it.
n Click Yes to save your changes.
n Click Cancel to return to your current project.
Use the Save As command to save your project under a different name or file type. For more information, see
"Saving and renaming a project (Save As)" on page 60.
Exiting the Vegas Pro Application
From the File menu, choose Exit to close the application and return to your desktop.
If you have not saved the current project since changes were last made, a dialog appears asking if you want to save
your changes.
n Click No if you want to exit without saving your project.
n Click Yes to save your changes.
Page 73

73
n Click Cancel to return to the Vegas Pro window and your current project.
Use the Save As command to save your project under a different name or file type. For more information, see
"Saving and renaming a project (Save As)" on page 60.
www.vegascreativesoftware.com
Page 74

74
Adding, managing, and arranging media
After you've created a project, you're going to need to add media to it.
The objects you work with in Vegas® Pro projects are referred to as media files and events:
n Media files are the source audio and video files that are stored on your hard disk. Vegas Pro projects do not
operate on or modify these files. Files can be accessed from the Explorer window.
n An event is an occurrence of a media file on the Vegas Pro timeline. An event can represent an entire media
file or a portion of it. A single media file can be used repeatedly to create any number of different events, since
each event can be trimmed independently. An event's position on the timeline determines when it will be
played back in your project.
Using the Project Media window
Choose View >Window > Project Media to toggle the display of the Project Media window.
You can use the Project Media window to collect and arrange all the media you will use in your project. You can add
media, preview it, view and change file properties, and add effects to a file.
Adding media files to the Project Media window
Files are added to the Project Media window when you open media files, import media, or add media files to the
timeline using the Explorer.
You can also drag the files to the Project Media window from the Vegas Pro Explorer or Windows Explorer.
To add media files from external sources, use the buttons in the Project Media toolbar:
Item Description
Import Media: click to add a media file to your project without adding it to the
timeline.
Capture Video: click to start the video capture application specified on the
Video tab of the Preferences dialog.
For more information, see "Capturing video" on page 111.
Extract Audio from CD: click to extract a track from an audio CD.
For more information, see "Extracting audio from CDs" on page 120.
Vegas Pro is not intended, and should not be used for, illegal or
infringing purposes, such as the illegal copying or sharing of copyrighted
materials. Using Vegas Pro for such purposes is, among other things,
against United States and international copyright laws and contrary to
the terms and conditions of the End User License Agreement. Such
activity may be punishable by law and may also subject you to the breach
remedies set forth in the End User License Agreement.
Get Media from the Web: click to open the Get Media from the Web dialog,
where you can download files to use in your project.
www.vegascreativesoftware.com
Page 75

Adding, managing, and arranging media
Cleaning the Project Media list
Click the Remove All Unused Media from Project button to remove any files that have not been used on the
timeline.
Removing a media file from the project
Click the Remove Selected Media from Project button to remove all selected media files from the Project Media
window and project.
If a file is in use by an event on the timeline, you will be prompted to delete the event.
Viewing or editing file properties
Click the Properties button to display the Properties dialog for the selected media file. For more information, see
"Viewing or changing media file properties" on page 99.
In most cases, you will not need to edit file properties. However, adjusting the Field Order setting for video files can
help correct jitter when you output your project to a television monitor.
75
Tagging media files
Use the Media Tags panel in the Project Media window to add tags to your media files. To show or hide the Media
Tags panel, click the down arrow next to the Views button and choose Media Tags.
When you add tags to media files, media bins are created for each tag under the "Tags" folder. For more information,
see "Sorting your media with bins" on page 97.
Adding tags
1. Select one or more media files in the Project Media window.
2. Type the tag text in the Add tags box.
3. Press Enter to add the tag to the media files.
You can also add tags using keyboard shortcuts. For more information, see "Creating Quick Tags" on page 76.
Page 76

76
Removing tags
1. Select one or more media files in the Project Media window.
2. Press Backspace in the Add tags box to remove tags from the media files.
You can also click the "x" in the tag icon to remove a tag from a media file:
Creating Quick Tags
Quick Tags allow you to assign tags to keyboard shortcuts that you can use to quickly add tags to media files.
1. Select one or more media files in the Project Media window.
2. Type the tag text in the Add tags box.
3. Press Ctrl+Shift and the number you want to assign for the shortcut. For example, press Ctrl+Shift+1 to
assign the tag text to the Ctrl+1 shortcut.
4. Press Enter to add the tag to the media files.
Editing Quick Tags
Right-click the Quick Tags area and choose Edit Quick Tags to display the Edit Quick Tags dialog. You can use this
dialog to edit the text of existing Quick Tags or create new Quick Tags.
Configuring 24p pulldown removal
Right-click a DV AVI file in the Project Media window and choose File Format Properties from the shortcut menu to
edit file settings from the file format plug-in associated with the media file type.
For 24p NTSC DV AVI files with 2-3 pulldown, you can use this dialog to configure removal of pulldown fields.
In most cases, you will not need to edit pulldown removal settings. However, if the settings were not properly set in
the DV header when your video was captured, you can fine-tune pulldown removal without recapturing your video.
1. Right-click an AVI file in the Project Media window and choose File Format Properties from the shortcut
menu. The AVI/DV Media Properties dialog is displayed.
This command is not available for clips that are not AVI or DV or those that use 2-3-3-2 pulldown.
2. Select the Enable 2-3 pulldown removal check box.
You can clear this check box if you want to override pulldown removal for individual files when the
Allow pulldown removal when opening 24p DV check box is selected on the General tab of the
Preferences dialog.
www.vegascreativesoftware.com
Page 77

Adding, managing, and arranging media
3. Choose a setting from the Starting frame timecode offset drop-down list to indicate what timecode numbers
represent which frame in the video sequence.
For example, if you have an NTSC DV file with 2-3 pulldown created on a Sony JH3 HDCAM deck, the
default settings for timecode offset use 0 for the Starting frame timecode offset.
If you have changed the timecode offsets on the deck (or if you have material with pulldown from another
source) you will have to experiment with the settings to determine the correct offset.
4. Check for interlacing:
a. In the Project Properties dialog, choose a NTSC DV 24p template from the Template drop-down list.
For more information, see "Setting project properties" on page 45.
b. Choose the Best (Full) setting in the Video Preview window to show full frames.
c. Step though the clip and look for interlace lines in moving objects or backgrounds.
d. If you see interlace lines, repeat from step 3 and choose a different offset value.
e. When no interlace lines appear, the offset is set correctly.
Adding effects to a media file
77
Click the Media FX button to add an effect to every occurrence of the selected media file in your project (the
source media file is not affected).
Media FX are used for video files only. For more information about adding video effects, see "Adding video effects"
on page 303.
Previewing a media file
Select the media file you want to preview.
n
Click the Start Preview button to begin previewing the media file.
n
Click the Stop Preview button to stop previewing the media file.
n
Select the Auto Preview button to automatically preview a media file when you click it.
Select the Auto Preview button to automatically preview a media file when you click it.
Pairing two media files as a stereoscopic 3D subclip
If you have two files that have synchronized timecode — such as video shot on a 3D camera that creates separate
left- and right-eye clips — you don't need to align the audio and video. Just select the clips in the Project Media
window and choose Pair as Stereoscopic 3D Subclip from the shortcut menu.
If you view the clip properties for the new subclip, you'll see that the Stereoscopic 3D Mode is set to Pair with next
stream.
For more information, see "Stereoscopic 3D editing" on page 201.
Changing the appearance of the Project Media window
Click the Views button
Page 78

78
and choose a setting from the menu to change the display of the Project Media window:
Item Description
List Displays a simple list of the file name of each file in the Project Media
window.
Details Displays a list of each file in the Project Media window and a
spreadsheet that displays information about the media file:
You can control the information that is displayed by right-clicking the
Project Media window and choosing View from the shortcut menu.
A list of the available fields is displayed in the shortcut menu.
Specific fields can be hidden by dragging them off of the Project
Media window.
The data fields are listed along the top of the Project Media window
and can be reordered by dragging them. Click on the tabs along the
top to sort the data in ascending or descending order.
The Comments field can be used to add notes about a file in the
Project Media window. Double-click the field to enter text. This
information is saved with the project and is not saved with the media
file itself.
Depending on your current time ruler format, you may see
inconsistencies in the timecode values for clips that you
captured. Video Capture uses SMPTE drop time (29.97 fps). If
you switch the time format to SMPTE drop time in the Vegas
Pro window, the same timecode information will be displayed in
the Video Capture and Vegas Pro windows.
Thumbnail Displays the first frame of a video file.
Media Tags Shows or hides the Media Tags panel. For more information, see
"Tagging media files" on page 75.
Recapturing video
If you've captured video files from a DV device using Video Capture, you can recapture your clips from the Vegas
Pro window if the media files are deleted.
If a media file cannot be found, any events that refer to the file will display Media Offline, and the clip will be
displayed with a generic icon in the Project Media window (if you're using the Thumbnail view).
Select the clips that you want to recapture. Right-click a clip and choose Recapture from the shortcut menu. Video
Capture starts in batch capture mode to recapture the clips.
Depending on your current time ruler format, you may see inconsistencies in the timecode values for clips that
you captured. Video Capture uses SMPTE drop time (29.97 fps). If you switch the time to SMPTE drop time in
the Vegas Pro window, the same timecode information will be displayed in the Video Capture and Vegas Pro
windows.
www.vegascreativesoftware.com
Page 79

Adding, managing, and arranging media
Replacing a media file
You can replace a file in the Project Media window with a different file. Replacing a media file updates every
occurrence of the event to use the new media file contents.
1. Right-click a file in the Project Media window, and choose Replace from the shortcut menu. The Replace
Media File dialog is displayed.
2. In the Replace Media File dialog, select the file that you want to use in place of the current file.
3. Click the Open button. The file is replaced in the Project Media window, and every occurrence of the event is
updated to use the new media file contents.
Creating video proxy files
Right-click a video file and choose Create Video Proxy to create a proxy file (.sfvp0) alongside the original video file.
Proxy files are smaller and faster to work with on the timeline. For more information, see "Creating proxy files for
high-definition editing" on page 96.
Using bins to sort your media
79
Media bins are folders within projects that you can use to organize your media files. For more information, see
"Sorting your media with bins" on page 97.
Selecting all events that refer to a specific media file
Right-click a file in the Project Media window and choose Select Timeline Events from the shortcut menu. The cursor
moves to the first event that uses the media, the timeline scrolls to the cursor, and all events that use the selected
media file in the active take are selected. For more information, see "Using takes as alternate versions of events" on
page 175.
Hold Ctrl or Shift while choosing Select Timeline Events from the shortcut menu to add the events to the current
selection.
Tips:
n When multiple events are selected, press Ctrl+[ or Ctrl+] to move the edge of the previous or next selected
event.
n When multiple events are selected, press Ctrl+Shift+[ or Ctrl+Shift+] to create a time selection from the
previous or next selected event.
Add a high-frame-rate clip to the timeline and adjust its playback rate
Right-click a clip in the Project Media window and choose Add At Project Frame Rate to create an event is created at
the cursor position and set the event's Playback rate value to allow the event to play back using the project frame
rate.
For more information, see "Working with high-frame-rate (HFR) clips" on page 86.
Page 80

80
Matching project video settings to a media file
Right-click a file in the Project Media window and choose Match Project Video Settings to update your project video
settings to match the selected file.
If you choose a Vegas Pro project (.veg) file, Vegas Pro will match the settings of the project, not the media
within the project.
For more information, see "Setting project properties" on page 45.
Previewing media files
You can preview media files from the Explorer window or Project Media window before placing them in your project.
When you preview a file, the signal is sent to the Preview bus in the Master Bus window.
Previewing a media file
1. Select a media file in the Vegas Pro Explorer or Project Media window.
2.
Click the Start Preview button to preview the file.
3.
Click the Stop Preview button , select a different file, or place the file in the project to stop previewing the
file.
Tips:
n To automatically preview selections when you click a media file in the Explorer or Project Media
window, select the Auto Preview button . To turn off Auto Preview, click the Auto Preview
button again.
n Video is previewed in the Trimmer window. If you want to preview in the Video Preview
window, right-click the Trimmer window and deselect the Show Video Monitor command. For
more information, see "Using the Trimmer" on page 144.
For more information, see "Using the Video Preview window" on page 445.
www.vegascreativesoftware.com
Page 81

Adding, managing, and arranging media
Adjusting audio preview volume
The Preview control in the Master Bus window allows you to view and adjust the playback volume level. If the
control is not visible, choose Mixer Preview Fader from the View menu.
81
Item Description
Fader Drag the fader to adjust the playback volume while previewing the
audio file.
Meter Displays the playback level.
Right-click and choose a command from the shortcut menu to adjust
the range of the meter, reset clip indicators, or hold peaks/valleys.
Adding media files to your project
After you've previewed files to determine which media files you want to use in your project, there are several ways
you can add them to your project.
The volume for new audio tracks is determined by your default track properties. For more information, see
"Setting default track properties" on page 248.
Page 82

82
Notes:
n Select the Allow pulldown removal when opening 24p DV check box on the General tab of the
Preferences dialog if you want to remove pulldown when you open 24 fps progressive-scan DV video
files. When the check box is cleared, 24p video will be read and edited as 29.97 fps interlaced video
(60i). For more information, see "Preferences - General Tab" on page 567.
n Select the Import audio at project tempo check box on the Audio tab of the Preferences dialog if you
want ACID loops to be stretched to match the project tempo (specified on the Ruler tab of the Project
Properties dialog) when you add them to the timeline or preview from the Explorer window. Clear the
Import at project tempo check box if you want to ignore tempo information. For more information, see
"Preferences - Audio Tab" on page 581 and "Setting project properties" on page 45.
n When you add a multichannel audio file (.wav/.wav64, .avi, .mxf, ATRAC, and BWF) to your project,
the audio is added across tracks. For example, if you import a four-channel WAV file, the audio will be
added to four adjacent tracks. For control over which channels are used by each event, right-click a
multichannel audio event, choose Channels from the shortcut menu, and choose a command from the
submenu. For more information, see "Audio channels" on page 181.
n When you add a multistream audio file to your project, you can choose which stream you want to use
by right-clicking the event, choosing Stream from the shortcut menu, and then choosing a stream from
the submenu.
n 5.1-channel audio from DVD camcorders will be downmixed to stereo when importing into a stereo
project. When importing into a 5.1 surround project, audio will be added to separate tracks for the
center, front, rear, and LFE channels.
n If Vegas Pro cannot read frames in a video event, they will be displayed in red in the timeline (those
frames will be black in the Video Preview window and the rendered output):
n If you want to use RAW camera files in your project, the Microsoft Camera Codec Pack will allow you
to view RAW camera files and add them to the timeline.
n The first time you add video media to the timeline, Vegas Pro will ask you whether you want to match
your project video settings to match the first video media you add to the timeline.
If you choose a Vegas Pro project (.veg) file, Vegas Pro will match the settings of the project, not
the media within the project.
Using the Windows Explorer to add media and create events
If you're using the Windows Explorer to browse your computer for media, you can add a media file quickly by
dragging it to the Vegas Pro window.
The media file is added to the Project Media window, and an event is created where you drop the file. If you drop the
file on an area of the timeline that does not contain a track, a new track will be created.
www.vegascreativesoftware.com
Page 83

Adding, managing, and arranging media
Using the Vegas Pro Explorer to add media and create events
If you're using the Vegas Pro Explorer to preview files, you can add media by performing either of the following
actions:
n Double-click a media file or Vegas Pro project to add it to your project. The file is added to the Project Media
window, and an event is created at the cursor position.
n Drag a media or project file from the Vegas Pro Explorer to the timeline. The file is added to the Project Media
window, and an event is created where you drop the file.
Tips:
n To add multiple files to the timeline, Ctrl+click (or Shift+click) to select the files and drag them to the
timeline or track list.
n Drag a .veg file to the timeline to add it to the current project as a nested project. For more information,
see "Nesting projects" on page 59.
n Double-click a .veg file in the Explorer window to open a project.
n To add a track from an audio CD, browse to your CD drive and double-click a .cda file (or drag it to the
timeline). You will be prompted to type a name for the file, and then the track will be extracted. After the
track is extracted, it will be added as an event on an audio track in your project.
83
n If you're adding video files to the timeline, you can choose to add only the audio or video stream to your
project. Right-click and drag the files to the timeline. When you drop the files, a shortcut menu is
displayed. Choose Audio Only or Video Only from the shortcut menu and choose a command from the
submenu to arrange the event on the timeline.
Vegas Pro is not intended, and should not be used for, illegal or infringing purposes, such as the illegal copying
or sharing of copyrighted materials. Using Vegas Pro for such purposes is, among other things, against United
States and international copyright laws and contrary to the terms and conditions of the End User License
Agreement. Such activity may be punishable by law and may also subject you to the breach remedies set forth
in the End User License Agreement.
Page 84

84
Adding multiple files and creating events
If you're using the Explorer or Project Media window, you can add several media files to your project at once.
1. Select the media files or Vegas Pro projects you want to use.
2. Right-click the selected files and drag them to the timeline. A shortcut menu is displayed.
3. Choose a command from the shortcut menu to indicate how you want to arrange the events on the timeline.
Command Description
Add Across Time Adds the selected media files end-to-end on the track where you
drop them.
Select the Automatically overlap multiple selected media when
added check box on the Editing tab of the Preferences dialog if
you want to overlap events when you add them to the same
track. Automatic Crossfades must be turned on to use this
feature. For more information, see "Preferences - Editing Tab"
on page 589 and "Automatic crossfades" on page 132.
To change the amount of overlap between events, adjust the Amount
setting in the Cut-to-overlap conversion section of the dialog.
Add Across Tracks Adds the selected media files as events on adjacent tracks.
Add As Takes Adds the selected media files as multiple takes of the same event. For
more information about choosing takes, see "Using takes as alternate
versions of events" on page 175.
Video Only If you're dragging video files to the timeline, you can choose to add
only the video stream to your project. Choose Video Only from the
shortcut menu and choose a command from the submenu to
indicate how you want to arrange the events on the timeline.
Audio Only If you're dragging video files to the timeline, you can choose to add
only the audio stream to your project. Choose Audio Only from the
shortcut menu and choose a command from the submenu to
indicate how you want to arrange the events on the timeline.
4. Events are created where you drop the files (and the media files are added to the Project Media window if
you're using the Explorer).
The order of the events is determined by file that you click before dragging and the order of the files in the
Explorer or Project Media window: for example, select the files A.wav, B.wav, and C.wav. Right-click B.wav
and drag the files to the timeline. When the shortcut menu is displayed, choose Add Across Time. When you
drop the files, B.wav will be added as the first event, followed by A.wav and C.wav.
www.vegascreativesoftware.com
Page 85

Adding, managing, and arranging media
Adding media over other events (punching-in vs. inserting)
When you drop a file on a blank spot on the timeline, an event is created at that location. What happens if you drop a
file on an existing event? You can either punch-in or insert an event.
Punch-in
If you add a media file in the middle of another event, a punch-in is created: an event is created where you drop the
file, and the new event simply lies on top of any existing events on the track.
1. Drag a media file from the Vegas Pro Explorer or Project Media window to the middle of an existing event (or
position the cursor and double-click a file in the Vegas Pro Explorer or Project Media window).
85
2. The original event maintains its position on the timeline, but cuts to the new event where you added the new
file:
Inserting media
By using auto ripple, you can drop a media file in timeline and automatically move downstream events to make space
for the new event. For more information, see "Post-edit ripple" on page 141.
1.
Select the Auto Ripple button .
2. Drag a media file from the Vegas Pro Explorer or Project Media window to a position on the timeline between
two events (or position the cursor and double-click a file in the Vegas Pro Explorer or Project Media
window).
If you want to insert an event in the middle of an existing event, you can split the existing event before adding
the media file. For more information, see "Splitting events" on page 143.
Page 86

86
3. When you add the file, the events to the right move to make space for the new event:
Using the Project Media window to add media without creating events
You can use the Project Media window to collect and arrange all the media you will use in your project before
creating events on the timeline.
From the File menu, choose Import, and then choose Media from the submenu (or click the Import Media button
in the Project Media window) to add a media file to your project without adding it to the timeline.
When you're ready to start adding events, you can drag media files from the Project Media window to the timeline.
For more information, see "Using the Project Media window" on page 74.
Working with high-frame-rate (HFR) clips
If you want to use high-frame-rate clips to create slow-motion effects, you need to adjust the clip's playback rate to
conform to the project's frame rate.
You can use the Project Media window to set the clip's playback rate when creating events, or you can use the Event
Properties dialog to edit events already on the timeline.
Adding HFR clips from the Project Media window
1. Add your clips to the Project Media window. For more information, see "Using the Project Media window"
on page 74.
2. Click to position the cursor in the timeline where you want to create an event.
3. Right-click the clip in the Project Media window and choose Add at Project Frame Rate.
An event is created at the cursor position, and the event's Playback rate value is calculated to allow the event
to play back using the project frame rate. For example, if you add a 120 fps clip to a project with a frame rate
of 30 fps, the event's playback rate will be set to .25.
Event playback is limited to a range of .25 to 4.0x playback. If the event needs to be modified beyond
that range, a velocity envelope is applied. For example, when using a 240 fps clip in a 24 fps project, the
event's playback rate is set to .25, and a velocity envelope is applied to achieve the required playback rate
of .1. In these cases, the event's audio will not play in sync with the video.
If you need to check or adjust your project's frame rate, you can use the Project Properties dialog. For
more information, see "Setting project properties" on page 45.
Setting the playback rate of an existing event
1. Right-click the clip on the timeline and choose Properties from the shortcut menu.
www.vegascreativesoftware.com
Page 87

Adding, managing, and arranging media
2. On the Video Event tab of the Project Properties dialog, click the Conform to Project Frame Rate button.
The event's Playback rate value is calculated to allow the event to play back using the project frame rate. For
example, if you add a 120 fps clip to a project with a frame rate of 30 fps, the event's playback rate will be set
to .25.
Event playback is limited to a range of .25 to 4.0x playback. If the event needs to be modified beyond
that range, a velocity envelope is applied. For example, when using a 240 fps clip in a 24 fps project, the
event's playback rate is set to .25, and a velocity envelope is applied to achieve the required playback rate
of .1. In these cases, the event's audio will not play in sync with the video.
If you need to check or adjust your project's frame rate, you can use the Project Properties dialog. For
more information, see "Setting project properties" on page 45.
3. Trim the event end to adjust the event so all frames are visible. For more information, see "Adjusting an
event's length" on page 152.
Adding layered PSD files to the timeline
You can add layered PSD files to the Vegas Pro timeline, with each layer of the file being an event on its own track.
87
These events are just like other events in Vegas Pro software. For example, you could use track motion to move
layers individually, use parent tracks to group and move layers together, apply track effects to animate just one layer
of the graphic, or you could replace a layer with a video.
1. Select a layered PSD file in the Explorer or Project Media window.
2. Right-click and drag the file to the timeline.
3. When you release the mouse button, a shortcut menu is displayed. Choose Add Across Tracks to import the
PSD layers across tracks in the timeline.
The PSD layers, including the composite layer, are now available as streams. You can change an event’s
stream by right-clicking an event, choosing Stream from the shortcut menu, and then choosing the stream
you want to use for the event.
Creating a picture slideshow
If you want to create a slideshow using your photos or other still images, Vegas Pro makes it a breeze.
1. Set the duration you want each photo to be displayed on screen.
a. From the Options menu, choose Preferences.
b. Click the Editing tab.
c. In the New still image length box, type the number of seconds you'd like each photo to be displayed
in your movie.
For example, if you wanted each photo to be displayed for three seconds with a one-second crossfade
between photos, choose 5 seconds.
If you have 40 images that you want to display during a three-and-a-half-minute song, choose 5.25
(210 seconds divided by 40 images).
d. Click OK to close the Preferences dialog.
Page 88

88
2. If you want to automatically add crossfades between events when you add them to the timeline, you can
configure cut-to-overlap conversion:
a. From the Options menu, choose Preferences.
b. Click the Editing tab.
c. Select the Automatically overlap multiple selected media when added check box.
d. In the Cut-to-overlap section of the tab, type the desired fade length in the Amount (seconds) box.
For example, if you'd set the New still image length setting to 5 in the previous step and set the
Amount (seconds) setting to 1, dragging three still images to the timeline would create three fivesecond events with one second of overlap between them.
3. Click OK to close the Preferences dialog.
4. Select the files you want to use in the Project Media or Explorer window. For more information, see "Adding
media files to your project" on page 123.
5. Drag the files to a video track.
6. If you want to use transitions between events, drag a preset from the Transitions window to the overlapping
area between two events. For more information, see "Adding transitions" on page 308.
7. For added interest, you can use event panning and cropping and keyframes add motion to your images. For
example, you could pan across an image or zoom in to simulate camera motion.
a.
Click the Pan/Crop button on an event. The Event Pan/Crop dialog is displayed.
b.
Verify the Lock Aspect Ratio button is selected on the left side of the dialog, and then right-click
the image on the right side of the dialog and choose Match Output Aspect from the shortcut menu.
This sets the crop area to match your output frame proportions.
c.
Click the First Keyframe button to move the cursor in the keyframe controller (at the bottom of the
dialog) to the beginning of the event.
d. Adjust the selection rectangle to change the viewable portion of the event. A keyframe is created to
store your crop settings at that point.
e.
Click the Last Keyframe button to move the cursor in the keyframe controller (at the bottom of the
dialog) to the end of the event.
f. Adjust the selection rectangle to change the viewable portion of the event. A keyframe is created at
the end of the event.
When you play back your project, the viewable portion of the image will be animated between the
first and last keyframe settings. For example, if the crop rectangle in the first keyframe matches the
image size (no cropping) and the crop rectangle in the last keyframe is small, you'll create an
animated zoom effect.
For more information, see "Panning and cropping video events" on page 268 and "Keyframe
animation" on page 285.
8. Add an audio file to an audio track to set your slideshow to music.
www.vegascreativesoftware.com
Page 89

Adding, managing, and arranging media
Importing media from a project file
From the File menu, choose Import, and then choose Media from Project from the submenu to add media from
another Vegas Pro project file to your project.
Using this feature, you can create small, template projects to streamline frequent editing tasks.
Generated media and offline media files are not imported.
1. From the File menu, choose Import, and then choose Media from Project from the submenu. The Import
Media dialog box is displayed.
2. Choose the folder where the file you want to open is stored:
n Choose a drive and folder from the Look in drop-down list.
n Choose a folder from the Recent drop-down list to quickly select a folder from which you have
previously opened files.
3. Select a file in the browse window or type a name in the File name box.
4. If you want to import the project's media bins, select the Import bins check box. For more information, see
"Sorting your media with bins" on page 97.
89
Select the Merge with existing bins check box if you want to merge the imported project's bins with the
current project. When the check box is cleared, a bin is created using the imported project's name, and the
project's bins are imported inside that bin.
5. Click Open.
6. The project's media is added to the Project Media window. For more information, see "Using the Project
Media window" on page 74.
Importing Broadcast Wave Format files
You can use Broadcast Wave Format (BWF) files to exchange audio between audio editors or broadcasting
platforms.
Broadcast Wave Format files are similar to standard .wav files, but they contain additional metadata including
timestamps that tell the software where to add audio on the Vegas Pro timeline.
You can also add Broadcast Wave Format files to your project by dragging them from the Explorer window to
the timeline. However, if you drag a BWF file to the timeline, events are created where you drop the file. Using
the Import Broadcast Wave dialog ensures that events are arranged according to the timestamps in the file.
1. From the File menu, choose Import, and then choose Broadcast Wave Format from the submenu. The Import
Broadcast Wave Format dialog is displayed.
2. Choose the folder where the project you want to open is stored:
n Choose a drive and folder from the Look in drop-down list.
n Choose a folder from the Recent drop-down list to quickly select a folder from which you have
previously opened files.
3. Select the files you want to open in the browse window.
Information about the selected files is displayed at the bottom of the Import Broadcast Wave dialog.
Page 90

90
4. From the Arrange drop-down list, choose a setting to indicate how you want to arrange audio events on the
timeline:
Setting Description
Add across tracks A separate track is created for each BWF file you import.
Add across time All selected BWF files are added to a single track.
Audio from multichannel BWF files is always added across tracks, regardless of the Arrange setting. For
example, if you import a four-channel BWF file, the audio will be added to four adjacent tracks. For
control over which channels are used by each event, right-click a multichannel audio event, choose
Channels from the shortcut menu, and choose a command from the submenu. For more information,
see "Audio channels" on page 181.
5. If you chose Add across tracks in step 4, choose a setting from the Order tracks drop-down list to indicate
how you want to arrange the tracks in the track list:
Setting Description
By timestamp Sorts tracks chronologically using the timestamp in each file.
Select a file in the Import Broadcast Wave dialog to display its
timestamp at the bottom of the dialog.
Alphabetically by
filename
6. Choose a setting from the Positioning drop-down list to indicate where imported audio will be added to the
timeline.
Setting Description
Use ruler time Adds each imported file to the Vegas Pro timeline at the exact
Relative to cursor Adds each imported file to the Vegas Pro timeline and offsets the
7. Click Open. The selected files are imported and added to the timeline of the current project.
Sorts tracks alphabetically using the names of the files you import.
position indicated by its timestamp. For example, if you import a
BWF file with a timestamp of 00:00:30;00, the media would be
added to the timeline at the thirty-second mark on the ruler.
timestamp value by the cursor position. For example, if you position
the cursor at 00:00:10;00 before importing a BWF file with a
timestamp of 00:00:30;00, the media would be added to the
timeline at the forty-second mark on the ruler.
Importing video from a DVD camcorder
From the File menu, choose Import, and then choose DVD Camcorder Disc from the submenu to import video from
a finalized Sony DVD Handycam® camcorder disc.
www.vegascreativesoftware.com
Page 91

Adding, managing, and arranging media
Notes:
n Before importing video, you'll need to finalize the disc. For information about finalizing a disc, please
refer to your camcorder's documentation.
n 5.1-channel audio will be downmixed to stereo when importing into a stereo project. When importing
into a 5.1 surround project, audio will be added to separate tracks for the center, front, rear, and LFE
channels.
1. Place the DVD you want to import in your computer's DVD drive or connect your camcorder to your
computer via USB.
The Sony Handycam USB driver that is included with DVD-based camcorders can prevent Vegas Pro
from recognizing a USB-connected camera. If you use the Add/Remove Programs Control Panel to
uninstall the "Sony DVD Handycam USB driver" component, Vegas Pro will be able connect to the
camera and import video.
2. From the File menu, choose Import, and then choose DVD Camcorder Disc from the submenu. The Import
DVD Camcorder Disc dialog is displayed.
3. From the Source drop-down list, choose the disc that contains the video you want to import.
4. The Destination box displays the folder where the video will be imported. The folder name is based on the
disc's volume label.
91
Click the Browse button if you want to choose a different folder.
5. Click the OK button to start importing video.
After importing is complete, the video from the disc is added to the Project Media window. Each chapter is
imported as a separate file.
You can then add the imported video to your project just like any other media file. For more information, see
"Adding media files to your project" on page 123.
Editing video from an XDCAM Station with StreamChase
XDCAM Station StreamChase allows you to edit XDCAM clips while they are still being ingested into the XDCAM
Station device from an XDCAM optical disc or live-feed sources such as SDI. XDCAM clips from the XDCAM
Station can also be imported after they have been ingested to the XDCAM Station.
When an MXF file is imported during ingest to the XDCAM Station device, only the material that has already been
ingested will be imported. The clip’s length can be updated during ingest by right-clicking the clip in the Project
Media window and choosing Refresh. Refreshing the clip length allows you to work with the most recent material
available.
The following formats are supported for StreamChase on the Sony XDS-PD2000 device:
n 1080i 35, 50Mb
n 720p 50Mb
n IMX 50Mb
Page 92

92
1. Begin ingesting a clip on the XDCAM Station device.
2. Import the clip into your Vegas Pro project:
n From the File menu, choose Import > Media, and then browse to the clip you want to import.
n Using Windows Explorer or the Vegas Pro Explorer window, drag a clip from the XDCAM Station to
the Vegas Protimeline.
An event is created on the timeline and the clip is added to the Project Media window.
In the Project Media window, clips that are currently being ingested are displayed with an orange indicator:
After the clip is imported into the project and added to the timeline, it can be played, edited, and exported just
like any other video clip.
www.vegascreativesoftware.com
Page 93

Adding, managing, and arranging media
3. While the clip is ingesting, refresh the file to work with the most recent material available. To update the
clip's length, right-click it in the Project Media window and choose Refresh from the shortcut menu. For
more information, see "Using the Project Media window" on page 74.
Notice that the clip's Length value (displayed at the bottom of the Project Media window) increases each
time the clip is refreshed during ingest if new media is available.
New, usable media is made available periodically by the XDCAM Station device. This is dependent on
the media format being ingested, but most media formats can be refreshed at ten-second intervals.
Refreshes performed between these intervals will result in no visible update to the media in Vegas Pro.
The new clip length will be reflected in the Trimmer window if the clip is loaded. For more information, see
"Using the Trimmer" on page 144.
Additionally, if one or more events from the clip have been added to the timeline, the event length in the
timeline can be extended to use the available material:
a. Drag the right edge of the event to the right past the clip length. A notch is displayed in the event to
represent the end of the clip:
93
If you want to create a placeholder event, drag past the end of the clip length. When the clip is
refreshed, the notch will move to show the new end of the clip, and the event will be filled with
updated video.
Notes:
oThe image displayed after the notch will be either a loop of the existing media or a still
frame of the last frame of video depending on the Enable looping on events by default
setting on the Editing tab of the Preferences dialog. For more information, see
"Preferences - Editing Tab" on page 589.
oThe in point for placeholder event segments must always start at or before the last frame
of the existing media. Placeholder events cannot be created for media that has not been
ingested. For example, you cannot create a placeholder with an in point 30 seconds after
the current end of the available media.
oIf a you split a placeholder event, the in point of the placeholder segment on the right
side of the split will begin at the end frame of the currently available media.
b. If you want to resize the event to the current media length, drag the right edge of the event back to the
notch to set the event length. If Enable Snapping is selected, the event edge will snap to the notch. For
more information, see "Enable snapping" on page 132.
For more information about adjusting events, see "Adjusting an event's length" on page 152.
Page 94

94
4. Continue to edit your project, refreshing StreamChase clips as needed. For more information, see "Editing
events on the timeline" on page 122.
Clips that are refreshed after they have been ingested by the XDCAM Station are displayed with a green
indicator, and the Length value at the bottom of the Project Media window represents the final clip length:
5. Render your project to your required output format. For more information, see "Rendering projects (Render
As)" on page 497.
Using the Device Explorer
The Device Explorer allows you to browse and import clips from AVCHD, XDCAM EX, NXCAM, XAVC, XAVC S,
Panasonic P2, and RED ONE/EPIC/SCARLET/WEAPON devices; CompactFlash-based memory recording units
such as the HVR-MRC1; and hard-disk-based recording units such as the HVR-DR60.
For more information, see "Working with AVCHD video" on page 401,"XDCAM EX workflow" on page 389, and
"Working with RED camera clips" on page 399.
1. Choose View >Window > Device Explorer. The Device Explorer window is displayed.
2. Connect your camera to a USB port on your computer. The camera is displayed on the left side of the Device
Explorer window.
3. Select your camera on the left side of the Device Explorer window. The camera's clips are displayed on the
right side of the window, and clips that have not yet been imported are indicated with a yellow icon .
Tips:
n If you want to use clips from a folder on your computer, right-click the left pane of the Device Explorer
window and choose Browse from the shortcut menu.
n In order for some devices to appear in the Device Explorer window, you may need to change the
device's USB Connect setting from Automatic or MTP to Mass Storage.
Previewing clips
Select your camera on the left side of the Device Explorer window. The camera's clips are displayed on the right side
of the window, and clips that have not yet been imported are indicated with a yellow icon .
www.vegascreativesoftware.com
Page 95

Adding, managing, and arranging media
If the Auto Preview button is selected, you can click a clip in the Device Explorer to audition it. You can stop the
preview by clicking the Stop Preview button , or you can turn off the preview feature by deselecting the Auto
Preview button.
Video is previewed in the Trimmer window. If you want to preview in the Video Preview window, right-click the
Trimmer window and deselect the Show Video Monitor command.For more information, see "Using the
Trimmer" on page 144.
When the Auto Preview button is not selected, click the Start Preview button to start preview.
Choosing the folder where you want to import clips
1.
Select your camera on the left side of the Device Explorer window and click the Device Properties button .
The Device Properties dialog is displayed, and the Capture Folder box displays the path to the folder where
imported clips will be saved.
2. Click the Browse button to display the Capture Folders dialog. This dialog lists the available folders for saving
your imported video:
95
n Select a folder's check box to save your imported video in that folder.
n
Click the Add Folder button and browse to a folder to add a new folder.
n
Select a folder in the list and click the Remove Folder button to remove it from the list.
Importing clips
1. Select your camera on the left side of the Device Explorer window. The camera's clips are displayed on the
right side of the window, and clips that have not yet been imported are indicated with a yellow icon .
2.
Click the Import All New Clips button to import clips to the Project Media window:
n If clips are selected in the Device Explorer window, only the selected clips are imported (you can hold
Ctrl while clicking to select multiple clips).
n If no clips are selected in the Device Explorer window, all new clips are imported.
Right-click a clip in the Device Explorer window and choose Open in Trimmer or Import and
Add to Project to choose how you want to import clips.
3. You can then use the Project Media window to organize your clips and add the imported video to your
project just like any other media file.For more information, see "Adding media files to your project" on page
123.
For more information, see "Working with AVCHD video" on page 401,"XDCAM EX workflow" on page 389,
and "Working with RED camera clips" on page 399.
5.1-channel audio will be downmixed to stereo when importing into a stereo project. When importing into a 5.1
surround project, audio will be added to separate tracks for the center, front, rear, and LFE channels.
You can also drag a clip from the Device Explorer directly to the Project Media window, Trimmer, or timeline.
Vegas Pro begins importing the clip when you release the mouse, and an event is created on the timeline when
importing is finished.
Page 96

96
Creating proxy files for high-definition editing
If you're working on a system with limited processing power, creating a proxy file will streamline the editing process
and allow you to preview your project.
Video proxy files are not used for rendering your project.
1. Capture or import your high-definition clips.
2. Start a new project.
3. Add your high-definition clips to the Project Media window.
4. Right-click the clips in the Project Media window and choose Create Video Proxy from the shortcut menu.
Vegas Pro creates video proxy files (.sfvp0) alongside the original files in Windows Explorer. You will not see
these files in the Project Media window or Vegas Pro Explorer.
Proxy files are created automatically when working with 4Kvideo.
5. Add your high-definition clips to the timeline and edit your project as usual.
The Preview Quality setting in the Video Preview window determines whether the proxy files or original files
are used for editing and preview:
n When the preview quality is set to Draft or Preview, the proxy file is used.
n When the preview quality is set to Good or Best, the original file is used.
For more information, see "Adjusting the preview quality and resolution" on page 447.
Using HitFilm effects
If you have HitFilm 4 Pro installed, you can use HitFilm projects in your Vegas Pro timeline.
Adding a HitFilm project to the timeline
You can add HitFilm projects to your Vegas Pro project in the same way you add other media files: simply add the
HitFilm project (.hfp) file to your project.
For more information, see "Adding media files to your project" on page 123.
Adding HitFilm effects to an event
1. Right-click the video event where you want to add the effects and choose Add HitFilm Effect from the
shortcut menu.
A HitFilm project (.hfp) file is created in the folder where your media file is saved using the same base name
as your media file, and the event's active take is updated to use the HitFilm project file. For more information,
see "Using takes as alternate versions of events" on page 175.
If you have multiple events selected, the event under the mouse pointer is used.
www.vegascreativesoftware.com
Page 97

Adding, managing, and arranging media
2. HitFilm 4 Pro starts so you can edit your HitFilm effects as necessary.
For more information about using HitFilm 4 Pro, please refer to its documentation.
3. When you're finished editing, save your HitFilm project and close HitFilm 4 Pro. The event's active take is
updated with the edited version of your HitFilm project.
Editing HitFilm effects on an event
1. Right-click a video event that is using a HitFilm project (.hfp) as its active take and choose Edit in HitFilm
from the shortcut menu.
2. HitFilm 4 Pro starts so you can edit your HitFilm effects as necessary.
For more information about using HitFilm 4 Pro, please refer to its documentation.
3. When you're finished editing, save your HitFilm project and close HitFilm 4 Pro. The event's active take is
updated with the edited version of your HitFilm project.
Sorting your media with bins
97
When you're creating your masterpiece, your project is likely to get a little unwieldy—you can't express creative
genius with a handful of media files, after all.
The detailed view of the Project Media window helps you sort your media files using their attributes, but for more
control, you can create bins. Bins are folders within projects that you can use to organize your media files.
Media bins are virtual folders that are saved with your project. They do not affect the way media is saved on your
computer.
Tips:
n Bins are automatically created for each media tag. For more information, see "Tagging media files" on
page 75.
n Bins are automatically created for each type of media in your project: audio, video, and still images.
Creating a bin
Right-click the parent bin where you want to create a new bin and choose Create New Bin from the shortcut menu.
The new bin is created inside the bin you clicked.
Adding media to a bin
1. Browse your existing bins to find the media file you want to move. The All Media folder contains all media
files in your project.
Page 98

98
2. Drag a file from the right pane to a bin.
Searching media bins
1. Right-click a media bin and choose Search Media Bins from the shortcut menu.
2. The Search Media Bins dialog is displayed.
3. Use the drop-down lists in the Search Media Bins dialog to set your search conditions, and then click the
Search button to search the selected bin and all subbins.
4. Your search is added to the folder list. Click the Search Results icon to view the matching files.
Right-click the Search Results icon and choose Save as Bin from the shortcut menu to save the results
of your search as a new media bin.
Using smart bins
Smart bins are saved search results that are automatically updated when new media items match the search results.
You can also edit the search criteria of an existing smart bin.
Creating a smart bin
Right-click the Search Results icon and choose Save as Smart Bin from the shortcut menu to save the results of your
search as a new smart bin.
Editing a smart bin
Right-click the smart bin and choose Edit Search from the shortcut menu to display the Search Media Bins dialog
and edit your search conditions. Click the Search button when you are done.
Automatically adding recorded or captured files to a media bin
Select a media bin if you want to automatically add your recorded audio to a media bin.
If the Add captured clips to Media Pool check box is selected in the Video Capture post-capture dialog, your
captured clips will be added to the selected media bin.
www.vegascreativesoftware.com
Page 99

Adding, managing, and arranging media
Deleting media from a bin
1. Select a media file.
2. Press Delete on your keyboard.
n If the All Media folder is selected, the file will be removed from your project.
n If a media bin is selected, the file is removed from the bin, but remains part of your project. The file is
still available in the All Media folder.
Viewing or changing media file properties
In the Project Media window, click the Media Properties button to display the Properties dialog for the selected
media file.
The application will try to detect the properties of your media files automatically. In most cases, you will not need to
edit file properties.
99
Editing properties for an audio file
Select an audio file in the Project Media window and click the Media Properties button to display the Properties
dialog.
You can also view the properties for the media file associated with an event. Right-click the event, choose
Properties from the shortcut menu, and click the Media tab.
The following settings are available for audio files.
Item Description
File name Displays the current media file name and location.
Tape name This can be used to display the name of the tape from which you
recorded the audio. The name can be edited here or in the
corresponding field in the Edit Details window. For more information,
see "Using the Edit Details Window" on page 188.
Stream If a file contains multiple streams, you can use this control to select
the stream for which you want view properties.
Attributes Displays the file's sample rate, bit depth, number of channels, and
length.
Format Displays the compression format of the file.
Editing properties for a video file
Select a video file in the Project Media window and click the Media Properties button to display the Properties
dialog.
You can also view the properties for the media file associated with an event. Right-click the event, choose
Properties from the shortcut menu, and click the Media tab.
The following settings are available for video files.
Page 100

100
Item Description
File name Displays the current media file name and location.
Tape name This can be used to display the name of the tape from which you
captured the video. The name can be edited here or in the
corresponding field in the Edit Details window. For more information,
see "Using the Edit Details Window" on page 188.
Use timecode in file Select this radio button to accept the default timecode settings.
Use custom timecode Select this radio button to specify a beginning value for the timecode.
Stream If a file contains multiple streams, you can use this control to select
the stream for which you want view properties.
Format Displays the compression format of the file.
Attributes Displays the frame size, in pixels (x,y). color depth, and length of the
file.
Field order Choose a setting from the drop-down list to change the field order of
the file. Consult your capture/video output card's manual for the
proper field order.
n None (progressive scan) – Select this option when viewing
the video on a computer. This option ignores interlacing.
n Upper field first – Select this option (also called odd or field A)
for video that will be viewed on a television.
n Lower field first – Select this option (also called even or field
B) for DV output or if Upper field first produces jittery or
shaky output or if your hardware manual specifies lower field
first.
Pixel aspect ratio Choose a setting from the drop-down list to change the pixel aspect
of the file. This setting will depend on your capture/video output
card. Consult your capture/video output card manual for the proper
settings.
www.vegascreativesoftware.com
 Loading...