

Page 1

Page 2

2
www.magix.com
Copyright
This documentation is protected by law. All rights, especially the right to duplicate,
circulate, and translate, are reserved.
No part of this publication may be reproduced in the form of copies, microfilms or
other processes, or transmitted into a language used for machines, especially data
processing machines, without the express written consent of the publisher.
All copyrights reserved.
All other product names are trademarks of the corresponding manufacturers. Errors in
and changes to the contents as well as program modifications reserved.
MAGIX is a registered trademark of MAGIX AG.
Other mentioned product names may be registered trademarks of their respective
owners. MAGIX licensing conditions are made clear in the installation process and
can also be found at www.magix.com, under "EULA". This product uses MAGIX
patent technology.
Copyright © MAGIX Software GmbH, 2014. All rights reserved.
Page 3

Preface 3
Preface
Welcome to MAGIX Fastcut
MAGIX Fastcut is the perfect tool for all action cam owners. It requires very little time
to learn how to use and gets straight to the point. Just like the motto says: "Straight to
the action!"
The start wizard helps you create perfectly edited videos (even directly from the
camera) and offers fitting templates for all uses - with cuts and music for every taste.
MAGIX Fastcut's premade effects settings save you tons of time and work.
Of course, you can always create your videos manually without the wizard. Thanks to
tons of transition templates and detailed effects settings you can also easily create
videos with customized editing and dubbing.
There are also many export options available, ranging from saving files locally on your
PC to uploading to internet platforms.
We don't want to take up any more of your time, so we'll let you get started using the
program. And get "straight to the action".
Enjoy!
Your MAGIX Team
Page 4

4
www.magix.com
Table of Contents
Copyright 2
Preface 3
Support 6
Serial number 8
Key features 9
Tips for Program Help 10
Personal tips from Tilman Herberger 11
GoPro action cam settings 11
Connecting your GoPro to your PC 13
From GoPro to PC 13
Effects 16
Publish 17
Program start 18
Select video clips 19
Select template 20
Program interface 22
Video monitor 24
Template mode 26
Edit Video 26
Insert Title 28
Sound and music 29
Manual editing mode 30
Manual cut 30
Insert Transitions 31
Sound and music 32
Finish movie 34
Save on computer 34
Upload to Internet 35
Export to a mobile device 36
Dialog and Interface Reference 37
Edit objects 37
Page 5

Table of Contents 5
Display duration... 41
Clean-up Wizard 42
Object properties 42
Project settings 43
Program settings 43
Menu Reference 45
File Menu 45
Edit Menu 48
Effects Menu 50
Share Menu 52
Help Menu 52
MAGIX Online World 54
MAGIX Online Album 54
MAGIX Website Maker 54
Catooh – the Online Content Library 54
MAGIX News Center 54
Glossary 55
Index 70
Page 6

6
www.magix.com
Support
Dear MAGIX customer,
Our aim is to provide fast, convenient, solution-focused support at all times. To this
end, we offer a wide range of services:
• Unlimited web support:
As a registered MAGIX customer, you have unlimited access to web support
offered via the convenient MAGIX service portal on http://support.magix.net,
including an intelligent help assistant, high-quality FAQs, patches and user
reports that are constantly updated.
The only requirement for use is product registration at www.magix.com
• The online community, on-the-spot support and a platform for exchange:
MAGIX customers have free and unlimited access to the online community at
www.magix.info, which includes approx. 150,000 members and offers the
opportunity to ask members questions concerning MAGIX products as well as
use the search function to search for specific topics or answers. In addition to
questions & answers, the knowledge pool includes a glossary, video tutorials and
a discussion forum. The multiple experts, found round-the-clock at
www.magix.info guarantee quick answers, which sometimes come within
minutes of a question being posted.
• Email support for MAGIX products:
For each new MAGIX product you will automatically receive 12 months free
customer support by email.
• Premium Email Support:
For priority support, or if you want the support team to help with non-MAGIX
related hardware problems you can purchase a premium email support ticket.
Proceed as follows:
1. Go to the MAGIX customer support page at http://support.magix.net
http://support.magix.net.
2. Si
gn in using your login details.
3. Click on "Purchase access code" in the navigation bar.
Each ticket corresponds to a specific problem, it will remain valid until the
problem has been solved. A ticket is not limited to a single email.
Please note: To be able to use the Premium email support and free product email
support via the Internet, you have to register your MAGIX product using the serial
number provided. The serial number can be found on the sleeve of the installation
disc or on an insert card included in the package.
• Additional telephone service:
Besides the large number of free customer service offers, we also offer a feebased telephone customer service.
Page 7

Support 7
Here you can find a summary of our technical support telephone numbers:
http://support.magix.net/
Mail (Europe): MAGIX Development Support, P.O. Box 20 09 14, 01194 Dresden,
Germany
Mail (North America): MAGIX Customer Service, 1105 Terminal Way #302, Reno,
NV 89502, USA
Please make sure you have the following information at hand:
• Program version
• Configuration details (operating system, processor, memory, hard drive, etc.),
sound card configuration (type, driver)
• Information regarding other audio software installed
MAGIX Sales Department
You can reach the MAGIX Sales Department workdays for help with the following
questions and problems:
• Orders
• Product consulting (pre-purchase)
• Upgrade requests
• Returns
Europe
Monday - Friday, 09:00-16:00 GMT
U.K.: 0203 3189218
Denmark: 45 699 18763
Sweden: 46 852 500713
Finland: 35 89 42419023
Norway: 47 210 35843
North America
9 am to 4 pm EST Mon-Fri
Phone: 1-305-722-5810
Page 8

8
www.magix.com
Serial number
A serial number is included with each product. This serial number is required for
software activation. Please store this number in a safe place.
What does a serial number do?
With a serial number your program license is clearly assigned to you and only you.
This allows you take advantage of the free email customer service.
Serial numbers also help to protect against software piracy. This makes it possible for
us to offer our customers the best value for their money.
Where can the serial number be found?
The serial number can be found on the reverse side of your CD/DVD case. If your
product is packed in a DVD box, you'll find the serial number on the inside.
If you have purchased the download version, you will receive a confirmation email
with the serial number that you can use to activate the program. This will be sent
immediately after purchase to the email address used for the order process.
When will you need the serial number?
The serial number is required when you start the program the first time and for
program registration.
Using the serial number on another computer
If you want to use the serial number on another computer or after reinstalling your
operating system, you must deactivate (view page 53) the program on your current
PC.
This "rel
eases" the serial number from the current computer so that it can be used on
another.
Note: You can also deactivate the program in the MAGIX Service Center, but it is
much more convenient to do this with the integrated feature in MAGIX Fastcut.
Page 9

Key features 9
Key features
Supports all standard action cams
MAGIX Fastcut lets you import and edit (view page 19) videos from all standard
action cams models.
Movie Wizard for automatic video editing
Let MAGIX Fastcut do the work. Just provide the clips you want to use in your
finished video. The template mode (view page 25) contains action templates for tons
of differe
nt applications, such as bike trips and surf videos.
Transitions and effects
In MAGIX Fastcut's manual mode, you can apply exciting transitions (view page 31)
to make your movie stand out. There are also tons of effects templates available.
Music and audio editing
In the templates you will find fitting music tracks which perfectly match the cut of the
video. Of course, you can also accentuate your video's original sound and mix it with
the music. In the manual editing mode you can load your own music tracks and adjust
them to fit your video clips (view page 32).
You can opt
imize your video's original sound with audio filters and even remove wind
noise (view page 29).
Proxy video editing optimized for GoPro
HD and 4K recordings in particular put high performance demands on your computer.
For this reason, MAGIX Fastcut can create LVR files (view page 19) during import.
These fil
es have a significantly lower resolution and are used in place of the original
videos during editing. Of course, the high resolution original videos are used during
export to unsure high-quality results.
Automatic enhancements
MAGIX Fastcut offers many useful Wizards to make things easier. Image stabilization
automatically corrects shaky footage and removes distortions caused by your GoPro's
wide-angle lens. The automatic color and brightness setting wizard helps you find the
perfect settings.
Unlimited further uses
Your finished videos can be exported for all typical uses (view page 33) thanks to the
useful output wizard. This allows you to present your videos on your TV or
smartphone as well as upload them to social platforms such as YouTube and showfy.
Page 10

10
www.magix.com
Tips for Program Help
When the program is open, you can access the Help feature by pressing F1 on your
keyboard. The program Help contains tips on how to use the program and lots of
additional information. Many important terms are indicated in the text in italics.
Simply click on these terms for a more detailed explanation of what they mean.
Context Help: Press the "F1" key on your keyboard at any point in the open program
and Help will open with the matching help topic.
Search function: This feature can be used to look for specific words in the Help
section. Enter either the individual word or use logical operators (e. g. OR, AND,
NEAR) to refine your search if you have several search words.
• OR (between two words): all topics which contain both words or one of the
words will be listed.
• AND (between two words): only those topics will be listed which contain both
words.
• NEAR (between two words): only those topics will be listed which contain both
words. A maximum of 6 additional words are allowed between two search
words.
• NOT (before a word): topics which contain this word will not be listed.
Print: The print function can be used to print out specific Help topics or entire topic
sections. The print button is located at the very top of the toolbar in the Help window.
Page 11
Personal tips from Tilman Herberger 11
Personal tips from Tilman Herberger
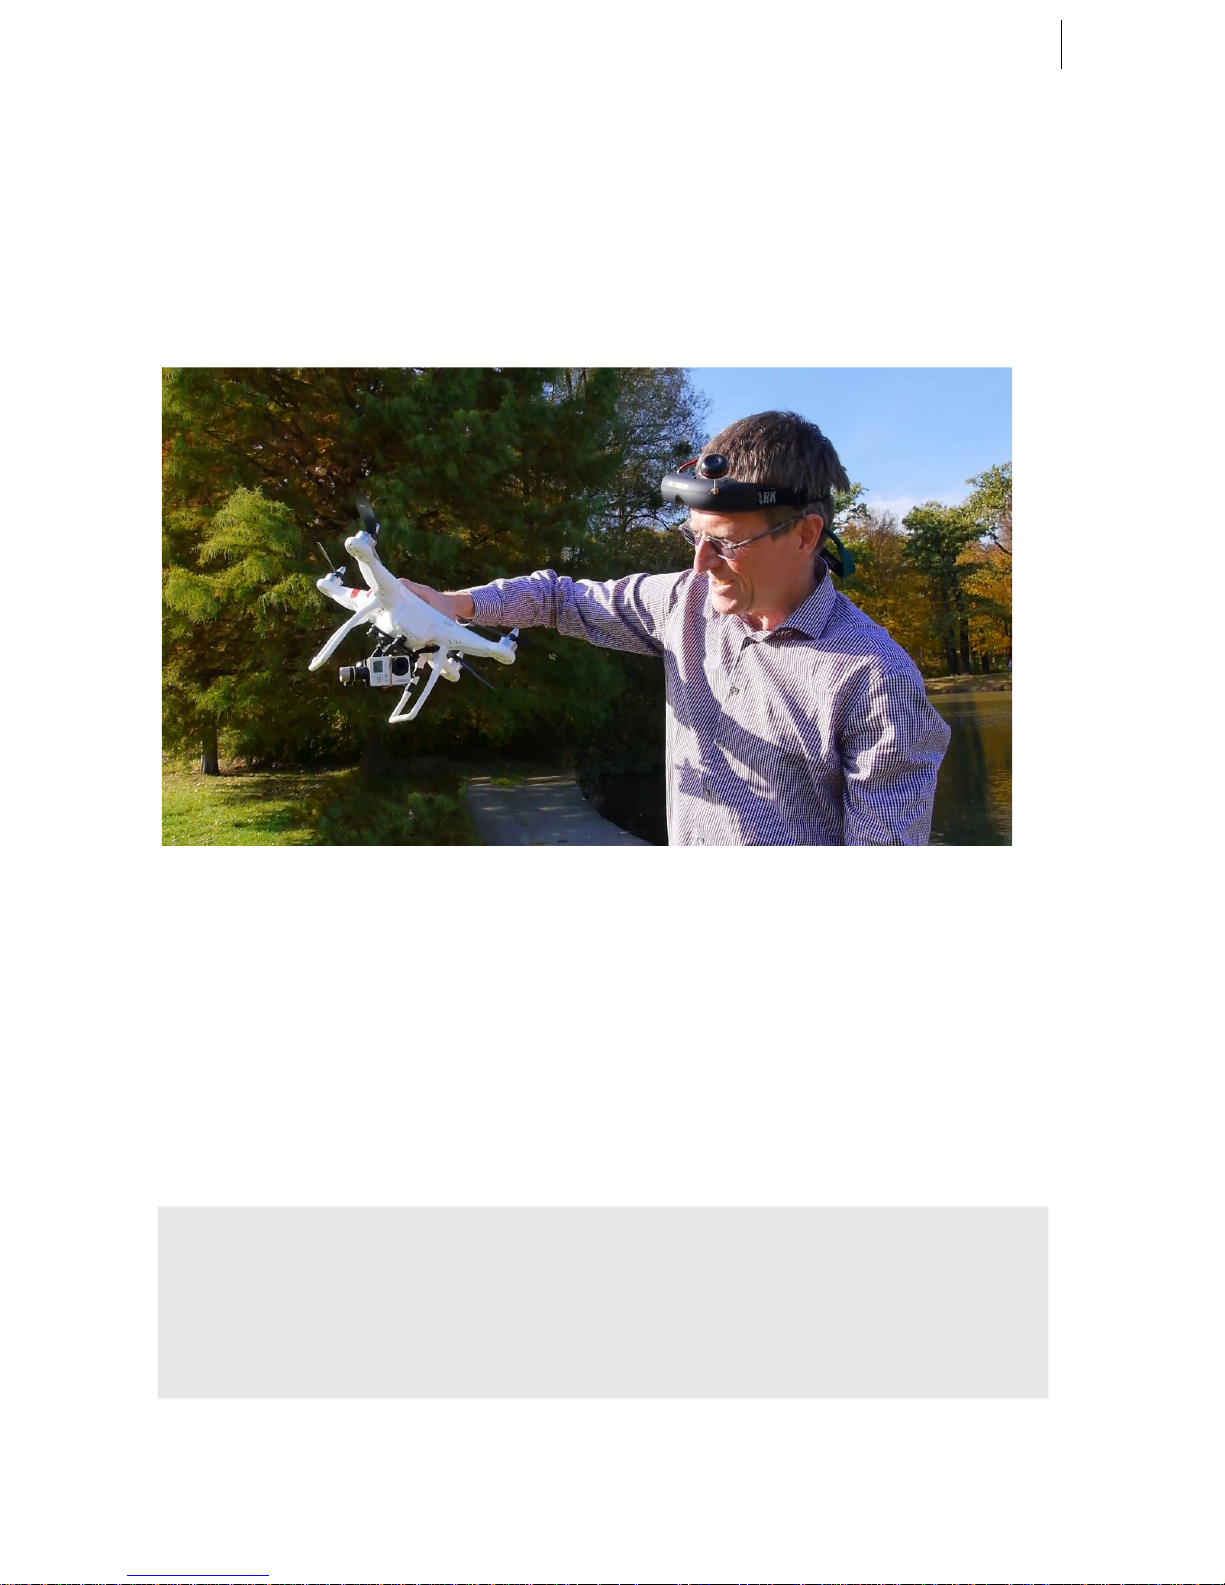
Hi, I´m Tilman Herberger, chief developer at MAGIX Software GmbH.
For many years i´ve been using GoPro action cams for my hobbies such as skiing,
biking and aerial photography using my quadrocopter. That's why I´m very proud to
introduce MAGIX Fastcut for super high speed editing and improving GoPro clips.
I´d like to give you – especially the action cam beginner – some tips based on
my experience in this area. This will help you to achieve good results in a very short
time using the right GoPro settings and the best tools in MAGIX Fastcut.
GoPro action cam settings
Video format
State-of-the-art action cams support many different video formats. If you have lots of
time, try them all and find out which meet your needs best.
My tip: Use the full HD format. That means 1080 lines. For really fast movement in
your videos, use 50 or 60 frames, but in most cases also 25 or 30 frames per
second are enough.
Advantage over higher resolutions: These settings keep editing slick and fluid and
the resulting file sizes are moderate. A typical HD TV shows the same format –
1080 lines.
Page 12
12
www.magix.com
Angle settings
When using a 1080 video format the GoPro 3 and 4 support three different view
angles: Wide (W), Medium (M) and Narrow (N).
In my experience, the medium angle (M) works best for most situations:
• All objects in front of the camera are in the picture.
• The wide angle distortion is moderate and can be easily compensated in
MAGIX Fastcut.
When using the W setting you have to deal with massive distortions and some
objects appear really small. When using N, some important objects might not be in
the picture.
PAL or NTSC?
Hidden in the GoPro settings, you can find the switch between the American video
system (NTSC) and the European setting (PAL).
If you live in Europe, I recommend that you switch to PAL. Only in PAL mode can you
use common European frame rates like 25 or 50 frames per second.
Using NTSC you get 30 or 60 fps, which is OK for Internet media, but not perfect for
European televisions.
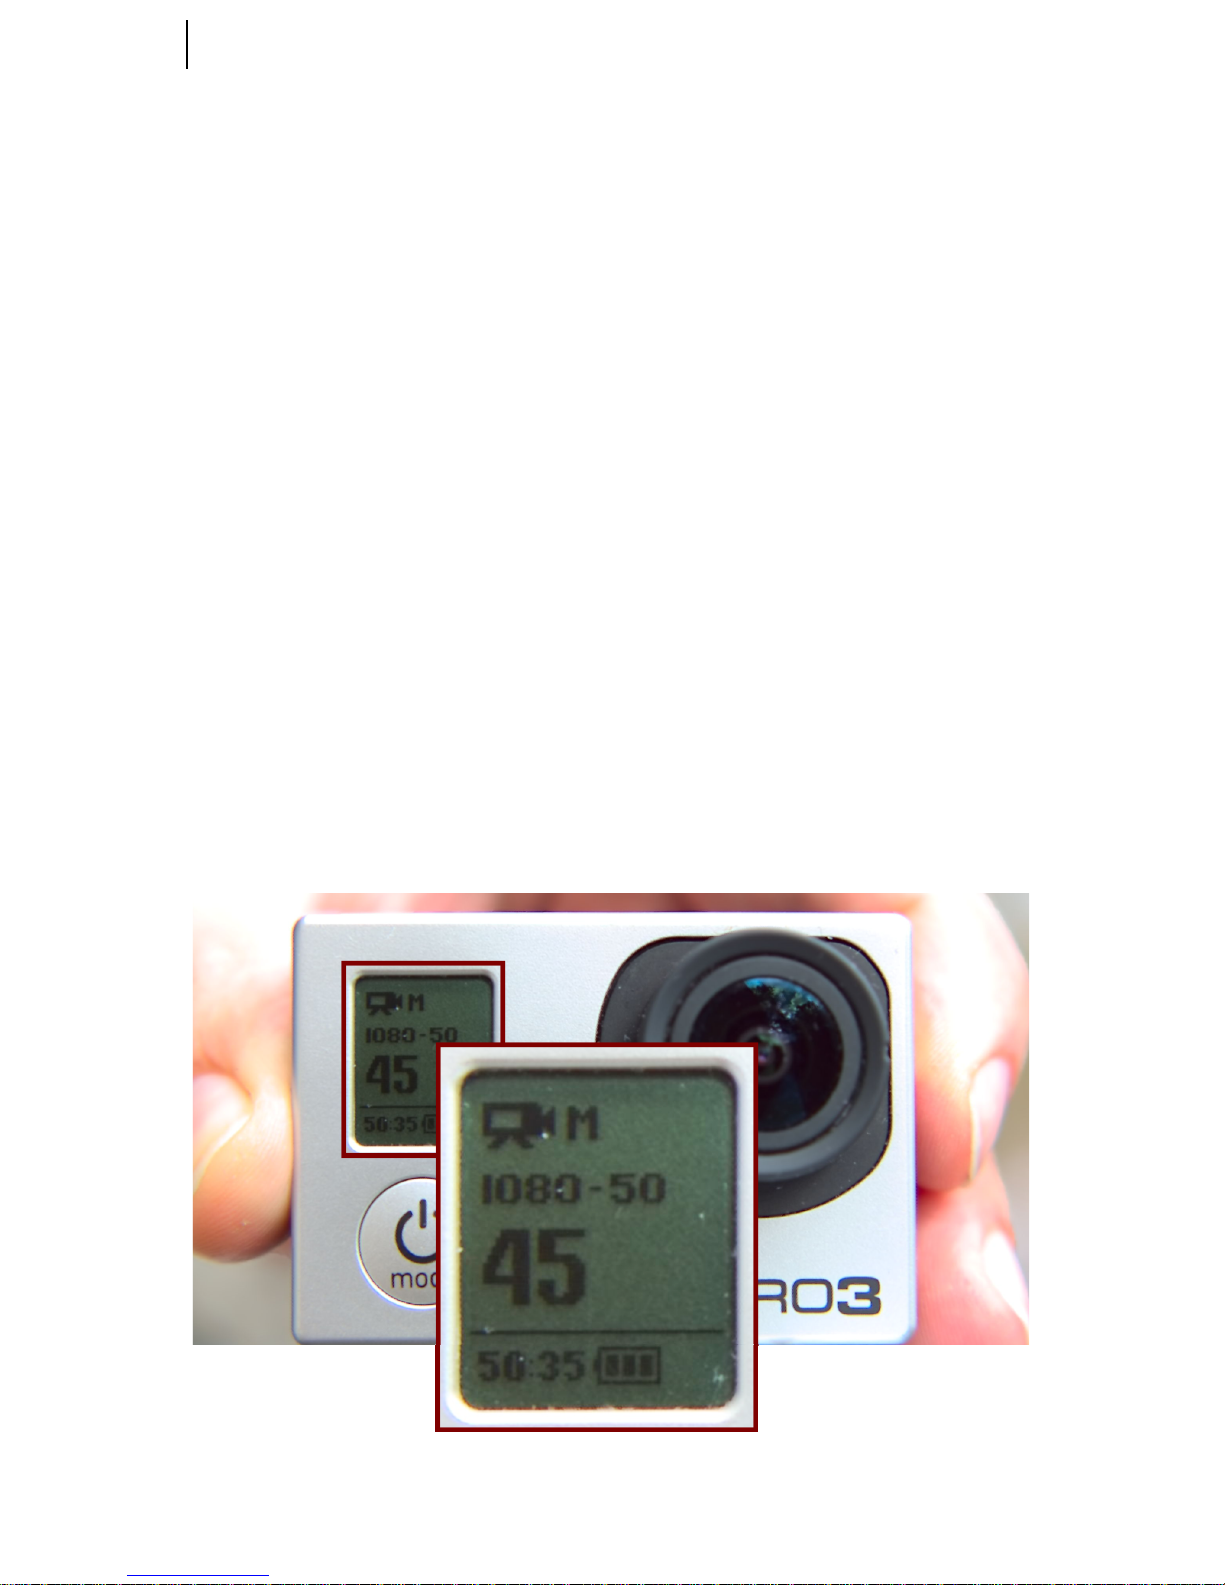
Here you can see the GoPro settings I use for most recordings - with 1080, 50 fps and
a medium angle setting:
Page 13
Personal tips from Tilman Herberger 13
Connecting your GoPro to your PC
You can connect your GoPro to your PC using a USB cable, then switch it on and
access the clips.
But my tip is: If your PC or notebook has an SD- or micro-SD card slot: Take the small
micro SD card out of your GoPro and attach it to this slot.
Advantage: Much faster data access compared to a USB cable.
This lets you edit your clips more fluidly! This way you can create small editing
projects with MAGIX Fastcut directly from your SD card without the need of copying
large files to your PC, which can easily take 15 minutes or more. A unique MAGIX
Fastcut advantage!
From GoPro to PC
Should I use Direct Import or Copy to hard drive?
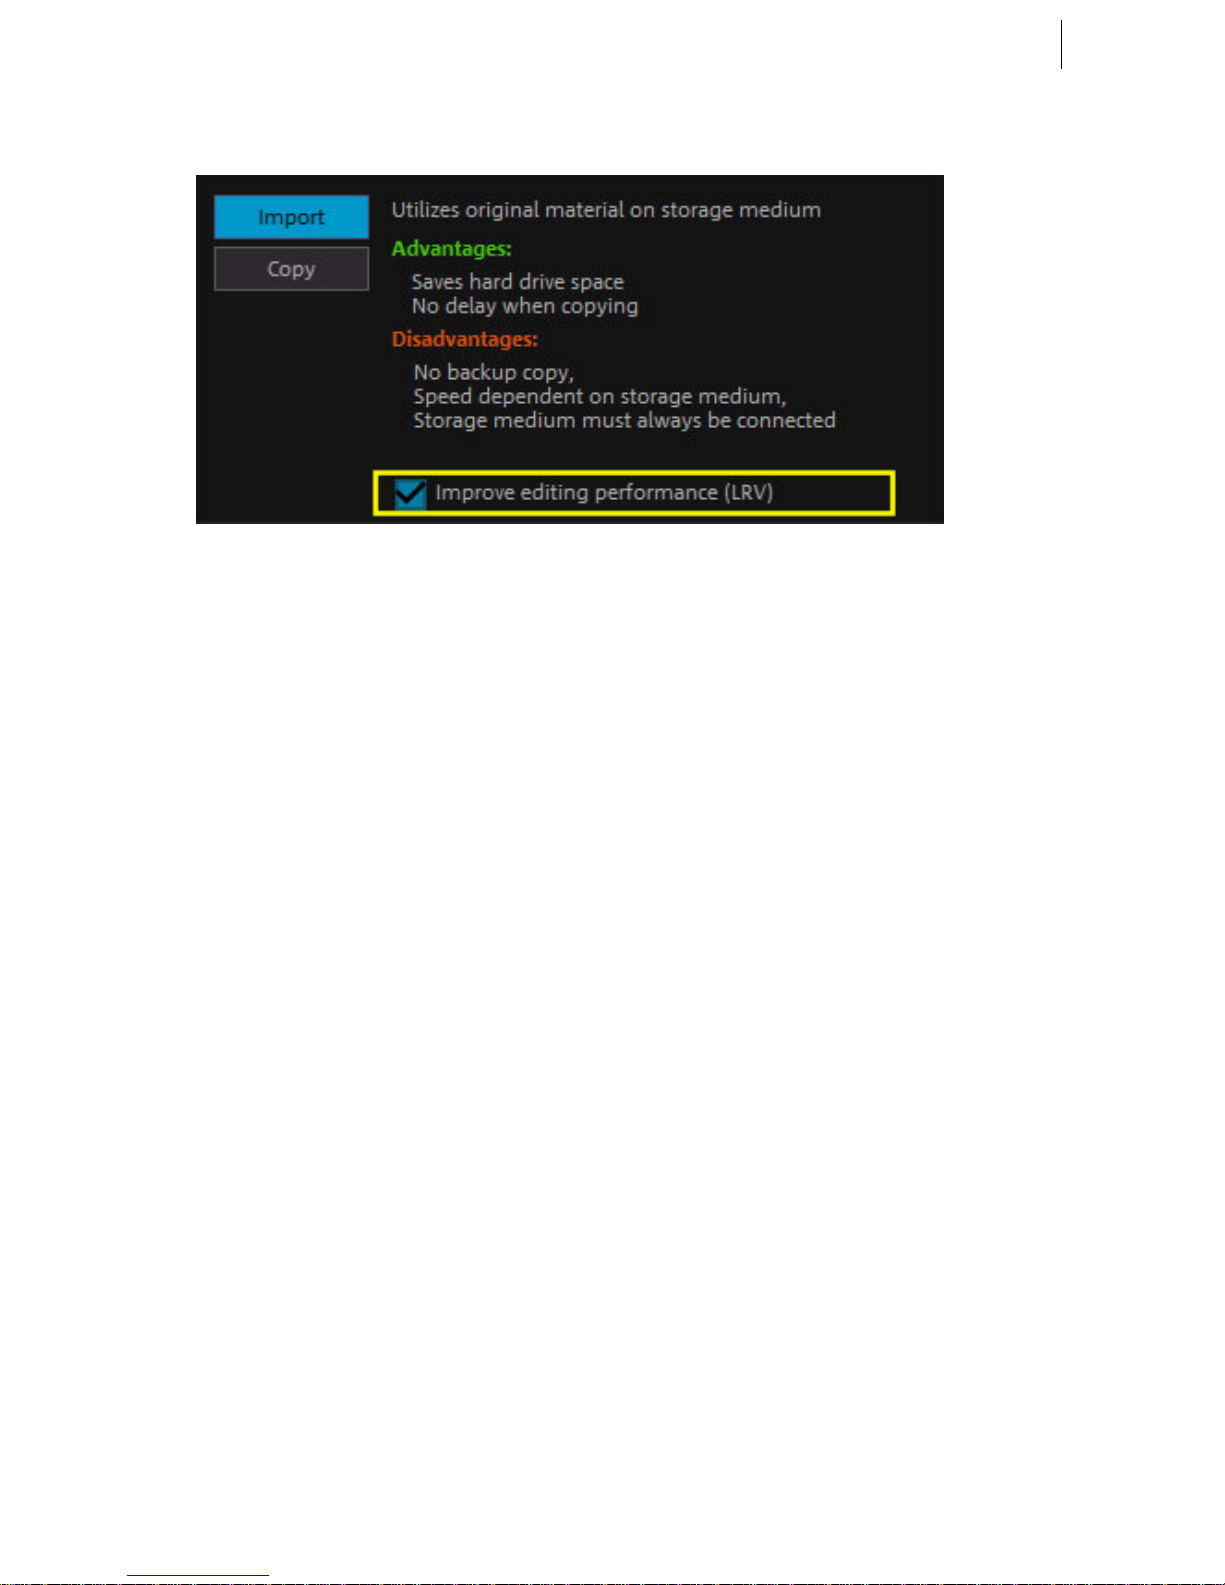
MAGIX Fastcut offers two ways to access your GoPro clips:
• Import: The large clips stay on your SD card, they are accessed directly via USB,
or better, via an SD card reader.
Advantage: No time is lost to time consuming copy processes, and editing can
start immediately. This way you can show template-based results in less than
three minutes, while users of other tools still have to wait to finish the Import
procedure.
• Copy: Using the Copy mode all video data is copied from your GoPro to the PCs
hard drive. This takes time and space.
Page 14

14
www.magix.com
But the advantage is: Normally the hard drive is faster than the SD card. This
makes later editing more fluid. Besides that, you get a backup copy of your clips.
My personal tip is:
Use copy mode if, for example, you are going to start a big editing session of an
unrecoverable recording.
For all other projects – where speed matters – I use the direct import mode,
for example if it's only the ski clip of the day.
Should I use templates or manual editing?
MAGIX Fastcut offers the fascinating option to automatically apply professionally
created project templates to your clips. The program makes dozens of perfectly
aligned cuts – you will be surprised how impressive this looks with your own video
material!
If one of the clips doesn´t fit right, you can easily trim it afterwards using the trim
tools below the video monitor.
My tip: Give some of the templates a chance before starting with time-consuming
manual editing! Often you will get near-perfect results using a template and need to
make only a few small manual corrections - and all this can be done in a fraction of
the time of a complete manual edit.
Help! My video doesn´t play smoothly!
No need to panic – sometimes it is possible that the video preview in MAGIX Fastcut
jumps if your PC is overloaded. But this is only the preview! Your final video will be
exported fluidly – you can count on this!
Page 15
Personal tips from Tilman Herberger 15
Here some tips for a slick preview:
• Activate the LRV option in the import dialog.
GoPro cameras create Low Resolution Videos (LRV) together with most high
resolution videos. MAGIX Fastcut can use these LRVs for a quicker preview.
Even if the video quality is quite poor, the final export quality will be in the finest
HD, of course!
• Use a fast SD card reader instead of accessing the clips via USB cable. Or copy
the clips to your hard drive using the "Copy" import option.
• Use only the video quality you really need, for example 1080 or 720 lines. This
reduces the load on your PC compared to 2.7K or 4K videos.
Page 16

16
www.magix.com
Effects
MAGIX Fastcut offers a wide range of video effects.
For action clips the following effects are very useful:
"Optimize" (1) effects page
• Lens Correction (2): With this tool it
is easy to correct a bent horizon or
other crooked lines in your clips. Just
select the right GoPro setting
("Narrow", "Medium" or "Wide")
and use the slider to fine tune.
• Image stabilization (3): Often action
clips are a little bit shaky, e.g. after a
rough ski ride. Shaky clips can
usually be stabilized, making them
look smoother and softer.
"Color" (4) effects page
• Auto Brightness (5): Sometimes the colors in GoPro clips look a bit soft and dull.
In this case it helps to activate the Auto Brightness option to generate brilliant
colors!
• Back light correction (6): This effect is very helpful for creating nicer colors in
shadows and dark areas in your clips. It is perfect for optimizing a sunset
atmosphere.
"Speed" effects page
• Slow motion/Fast motion: Sometimes your action clip does not look as fast as it
felt while filming it. It may help to increase the video speed by a certain factor.
Try out 1.2 to 1.3 to create the look of rapid action rides. But don't overdo it!
Page 17

Personal tips from Tilman Herberger 17
Publish
Of course, you'll want to share the videos you've made with MAGIX Fastcut.
MAGIX Fastcut has built-in export modules for MP4 files, as well as YouTube and
Facebook upload.
But sometimes you don't want to show your clips to everybody, e. g. if people who
you do not know personally or do not wish to be filmed appear in them. MAGIX
developed showfy for precisely those cases when you only want to share your photos
and videos with a few friends and family.
For example, I use a showfy stream for my quadrocopter clips. Only some friends with
the same hobby are invited to watch them.
However, I upload clips from my latest bike tour to the "biking friends" stream, and
only the participants of the trip can access these videos.
And best of all: My invited stream guests can also upload their own videos into the
stream, so it grows and shows the best of all participants.
So far that's all for now – I'm happy to receive your personal feedback on MAGIX
Fastcut. You can be sure that we will improve the program consistently – and I will
make sure of this out of personal interest!
Tilman Herberger
Page 18
18
www.magix.com
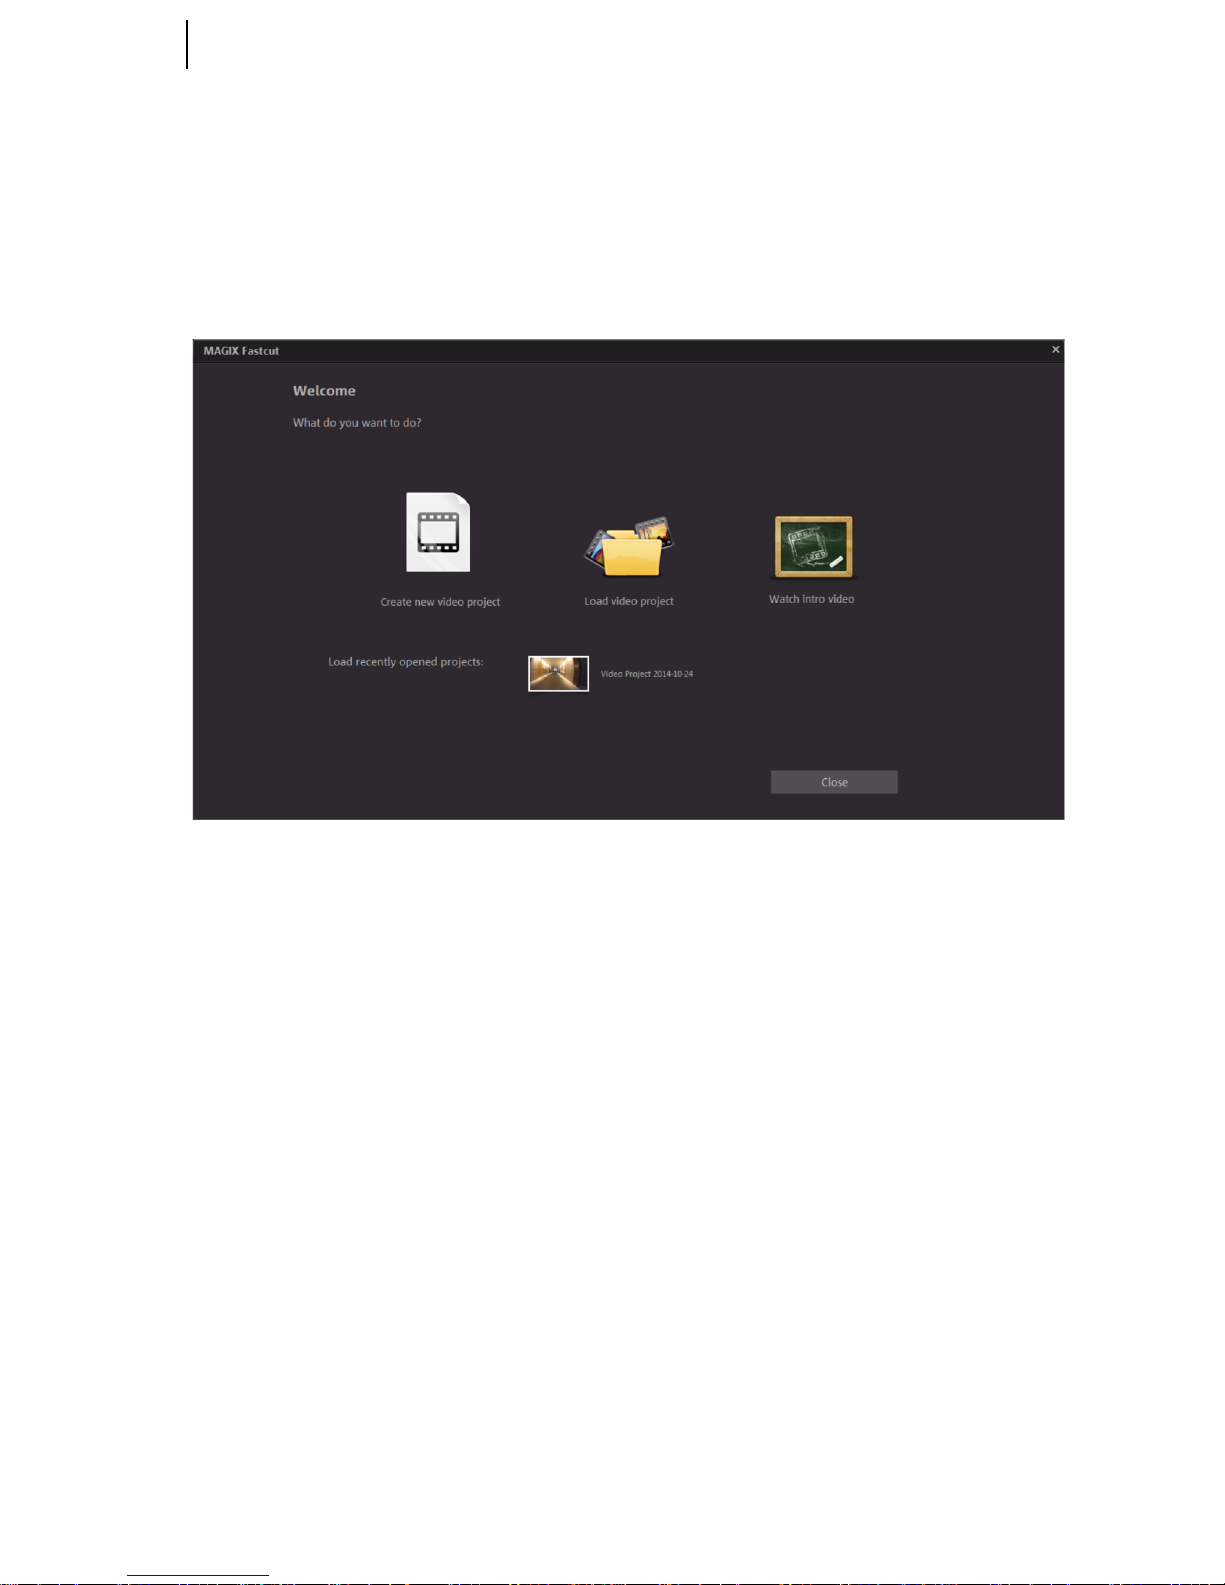
Program start
• Start MAGIX Fastcut by double-clicking the program icon on the desktop or by
accessing MAGIX Fastcut via the Windows Start menu.
The first time the program is started, you will have to enter the serial number. More
information about this can be found in the chapter "Serial number" (view page 7).
New video project:This is where you create a new project. MAGIX Fastcut
automatically creates a subfolder for the newly created video project bearing the
same name as the project itself. In the dialog that follows, you can load the video clips
you want to work with.
Load video project: Previously saved video projects can be loaded again and further
edited (view page 26).
View introduc
tion video: This video describes the basics in MAGIX Fastcut. It's
especially interesting for beginners who have little or no experience with digital video
editing.
Load recently opened projects: Here you can open projects that you have recently
worked on.
Page 19
Program start 19
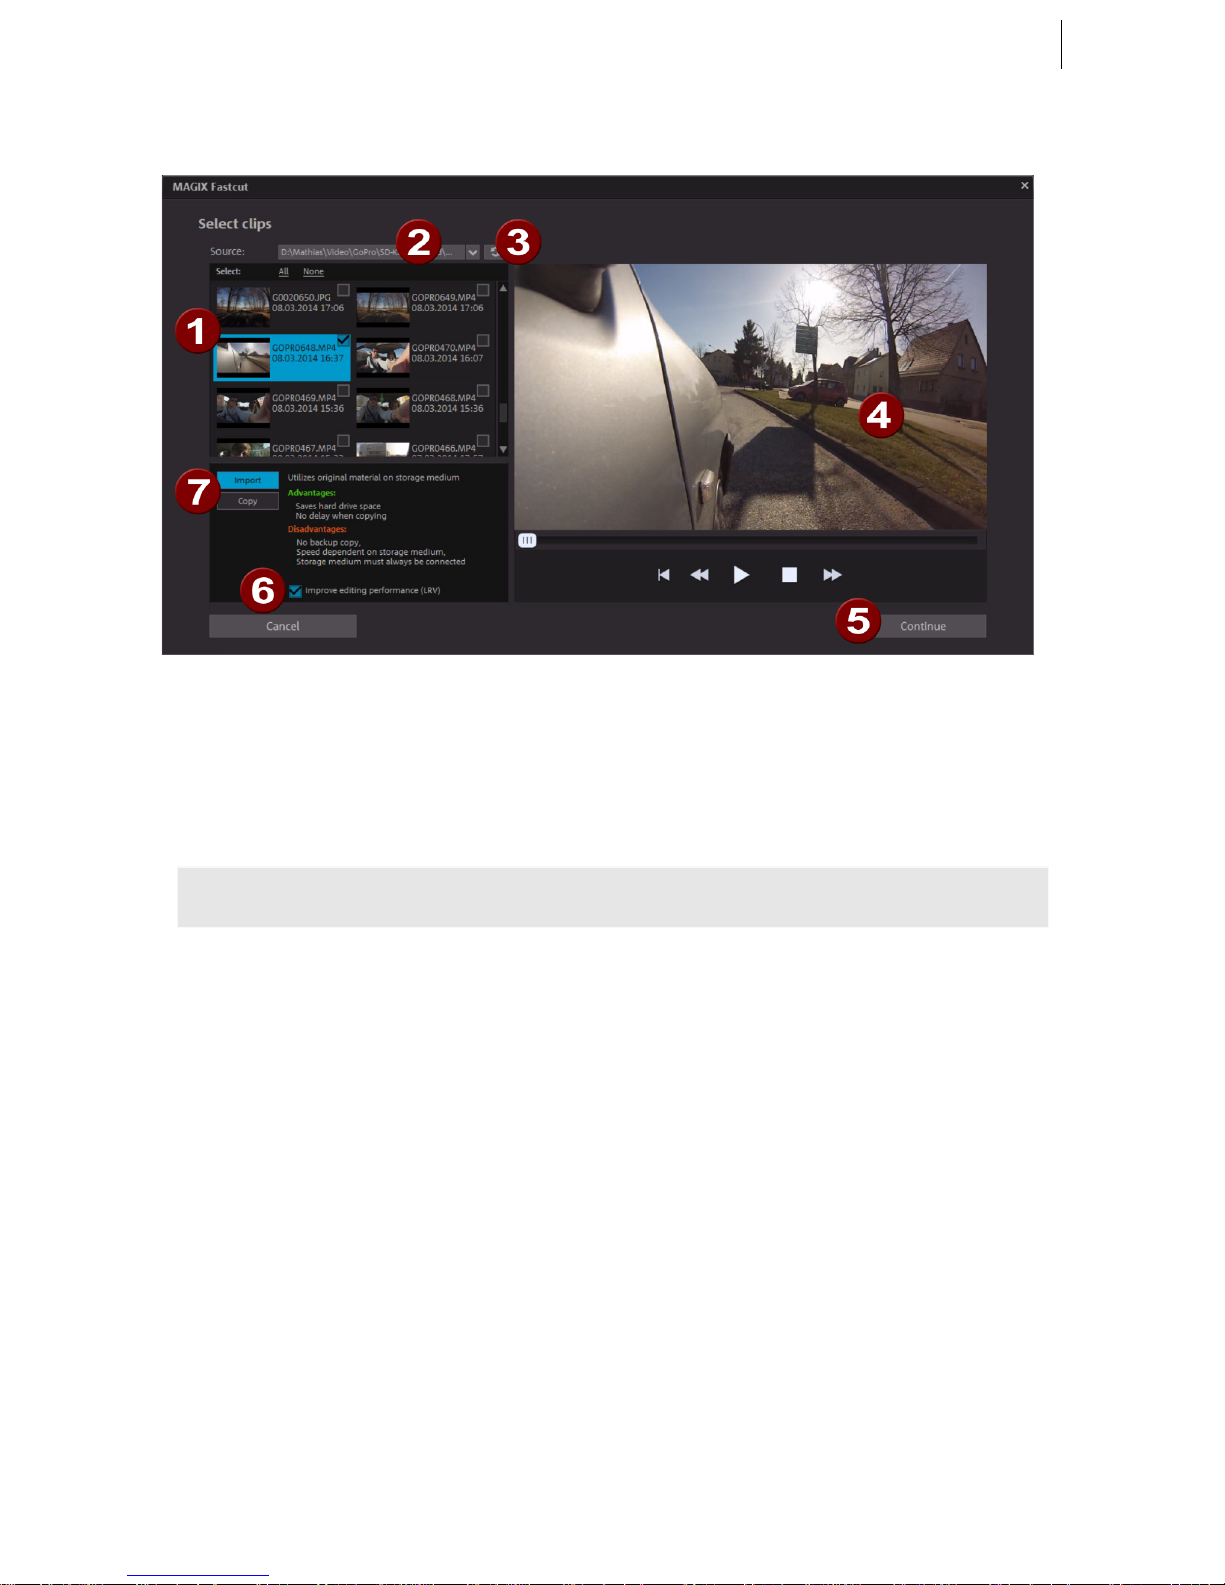
Select video clips
1. Remove the storage card from your action cam and insert it into the
corresponding card reader slot.
or
1. connect your camera to your computer and turn it on.
2. Switch your camera to playback mode. The computer will normally recognize
the camera automatically.
Tip: Check the battery level and if necessary plug the camera into the wall socket.
2. If your camera or storage card are not automatically recognized, click on the
Update list (3) button in MAGIX Fastcut.
If automatic recognition opens the wrong path, you can
- select the connected device or drive letter from the list (2).
- You can enter a completely different storage location in the "Select own
folder" entry.
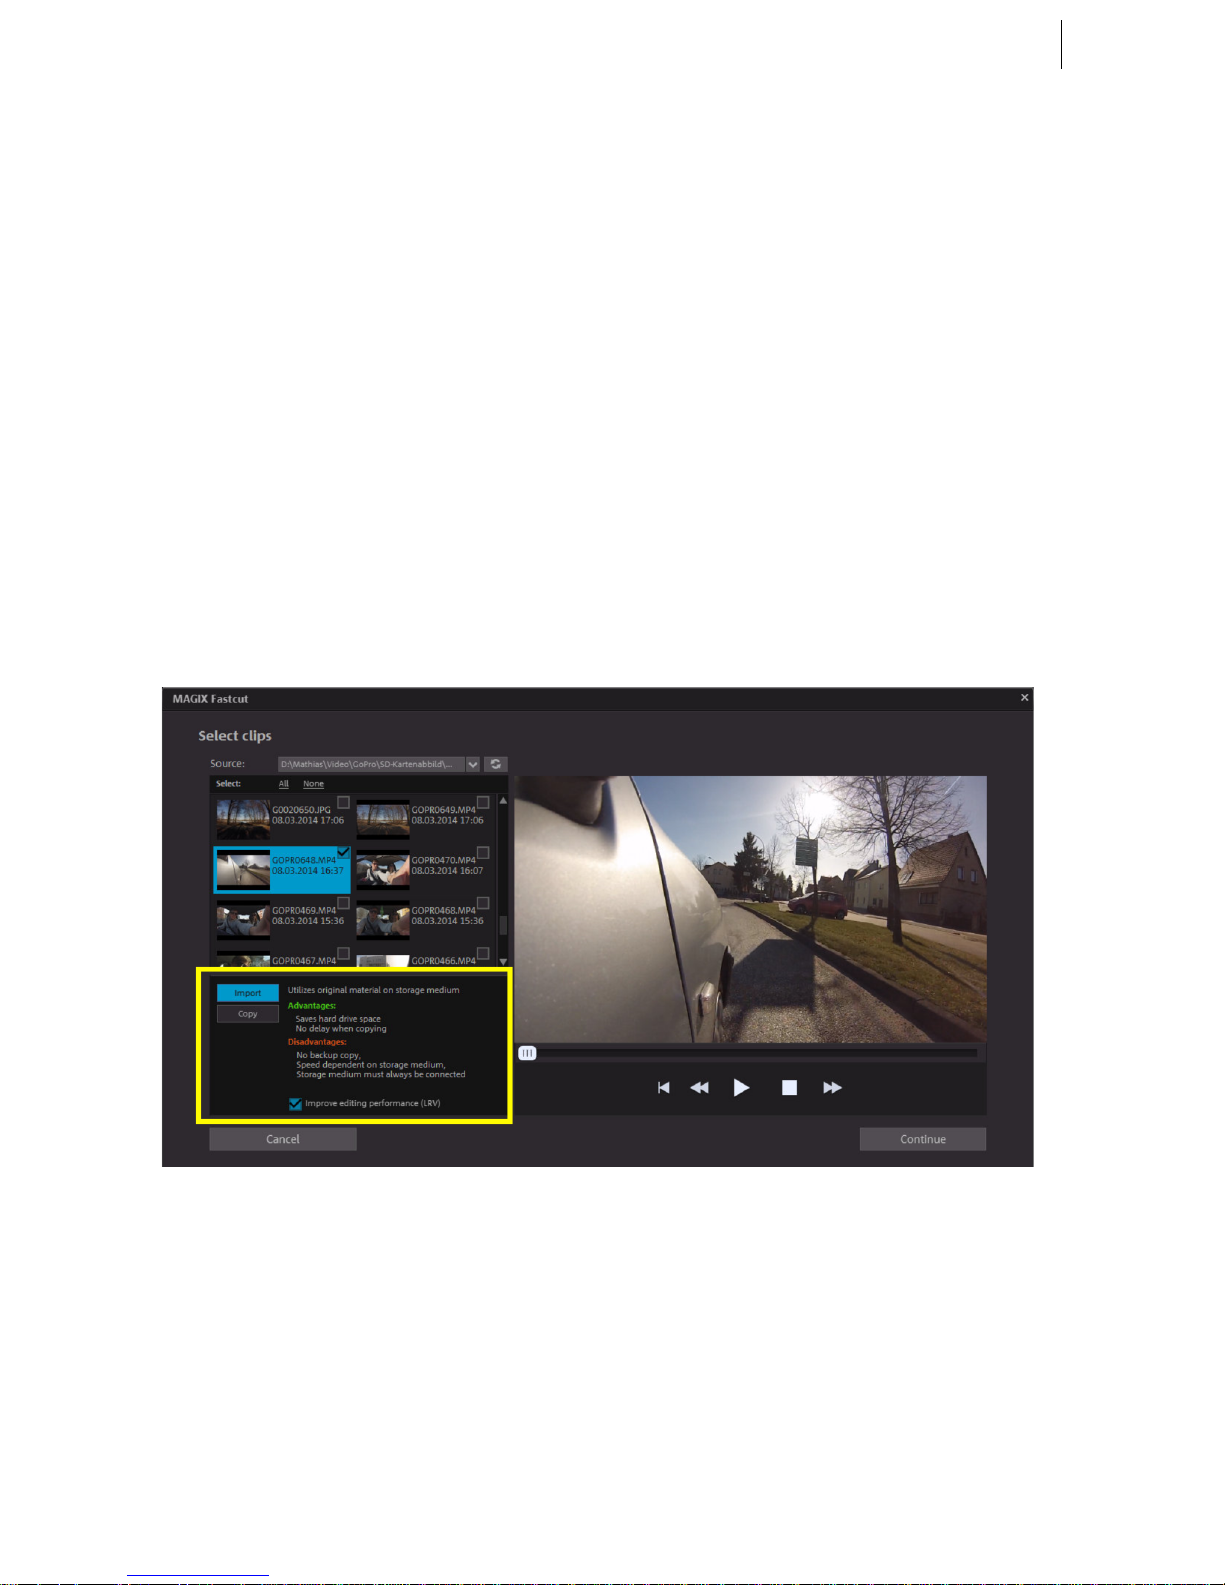
3. Now select the clips you want to use for the movie from the clip list (1). This
procedure is identical to using Windows® Explorer™.
You can play back the last selected clip in the preview monitor (4).
Additional selection aids:
- In the clip list (1) you can select all clips with "All" or deselect with "None".
- Each clip has a check box next to it which can be used to individually select
and deselect clips.
4. Specify if you want the clips to be directly "imported" or "copied" first (7).
5. Many action cams also generate a so-called LVR stream (Low Video Resolution)
in the video file. If the clips contain an LVR stream, activate the "Improve
performance for editing (LVR)" (6) option.
Page 20
20
www.magix.com
proves
.
6.
If the vide
o clips do not contain an LVR stream, MAGIX Fastcut will generate this
file when the option is activated. This can be very time-consuming, but it im
editing speed in MAGIX Fastcut considerably
Click on the "
Continue" (5) button.
The selection page for movie templates (view page 20) will appear.
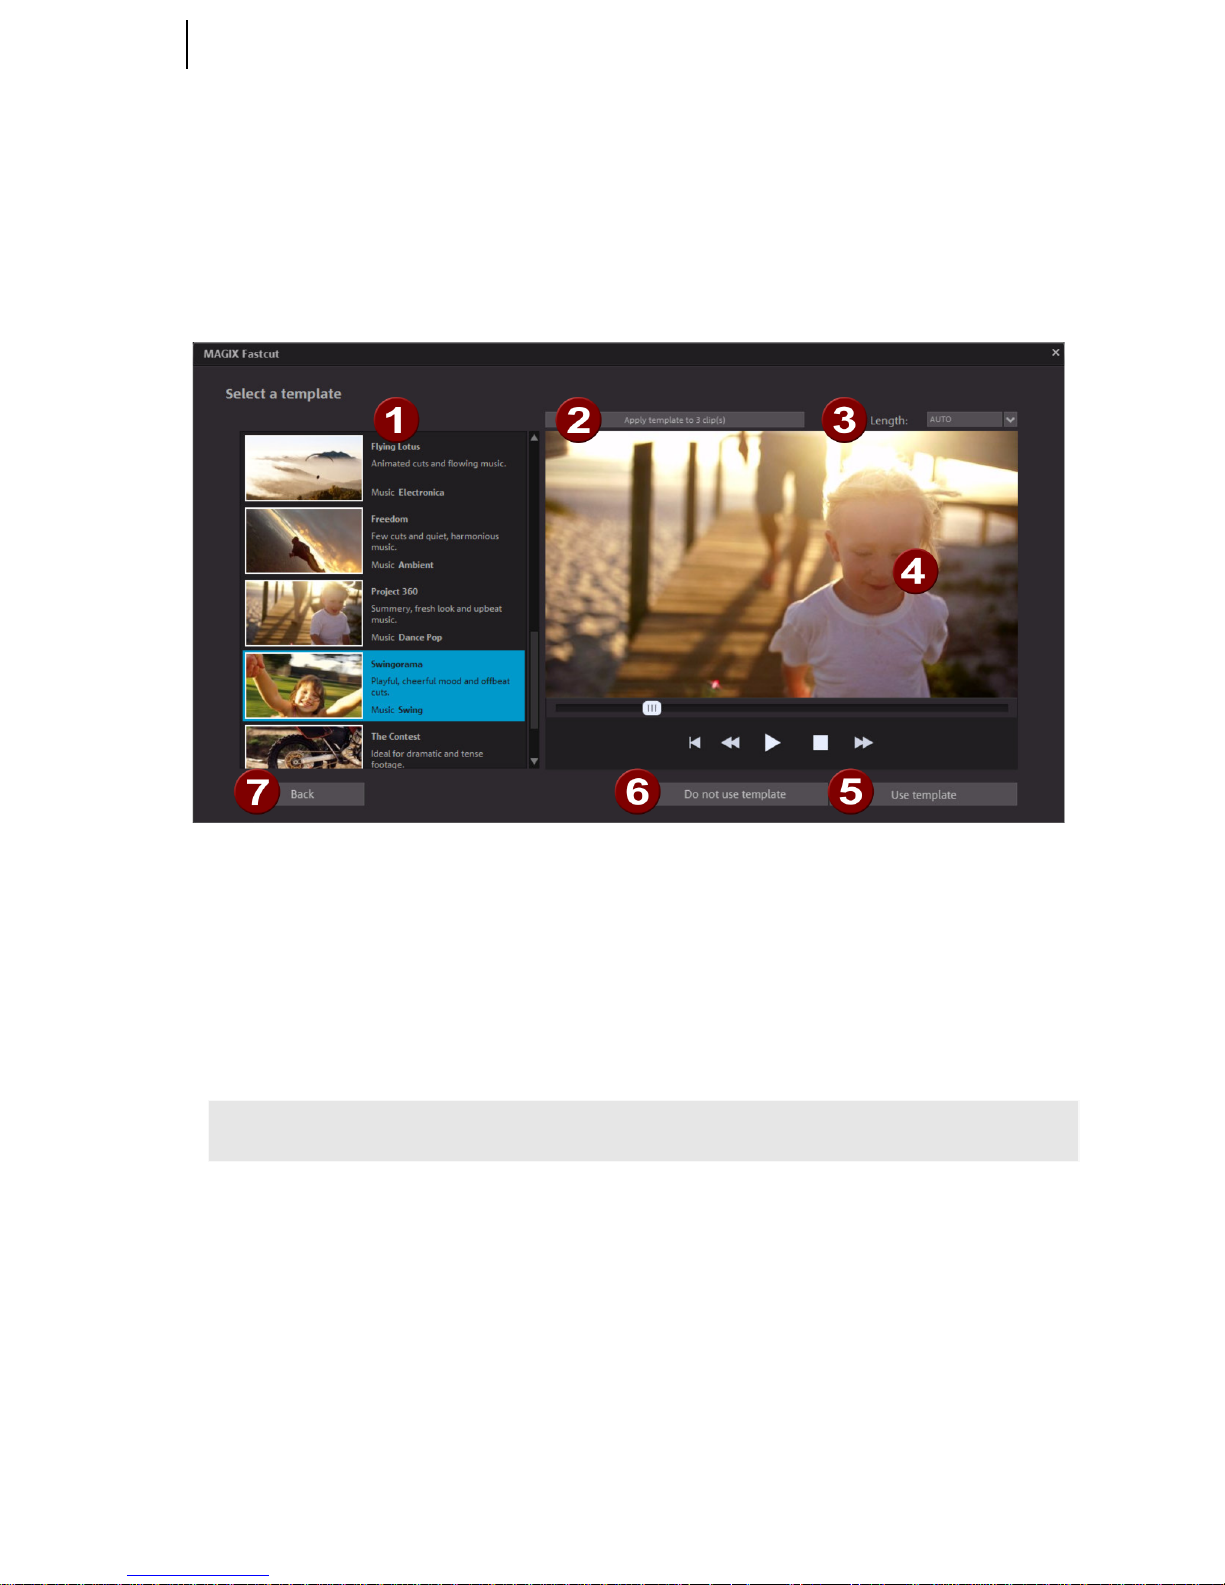
Select template
On this page you can select the movie template you want to use for your video clips.
To do this, proceed as follows:
MAGIX Fastcut will immed
iately play back a preview of the selected template in
mplate, press the "
Apply template to n
1. Select one of the templates (1).
the preview monitor (4).
2. Once you have found the right te
clip(s)" (2) button.
Note: n = The number of video clips selected on the previous page
MAGIX Fastcut generates a new movie out of the previously selected video clips
3. e transport controls in the preview monitor( 4) to play back the generated
4. s, press the "Use template" (5) button.
).
IX Fastcut then "shuff
les" the video clips again.
using th
e template selected here.
Use th
movie.
If you are satisfied with the result
MAGIX Fastcut then makes the ge
nerated film available for further editing (view
page 25
5. If you want to make changes, you have the following options:
- Press the "Apply template to n clip (s) again"(2) button.
MAG
Page 21

Program start 21
-
plate to n clip(s)" (2)
provided length.
"Use template" (5) button and ad
just the movie as you want.
-
the
-
To add more video clips, press the "Back" 7 button.
This opens the previous video clip selection dialog.
Manually set the Length (3) and press the "Apply tem
butt
on.
MAGIX Fastcut will generate a new movie with the
- Repeat the previous steps with another template (1).
- Press the
Press the "Do not use template" (6) button to start editing the mov
ie
without a template.
MAGIX Fastcut loads the selected video clips into the movie and enters
manual editing mode (view page 29).
Page 22
22
www.magix.com
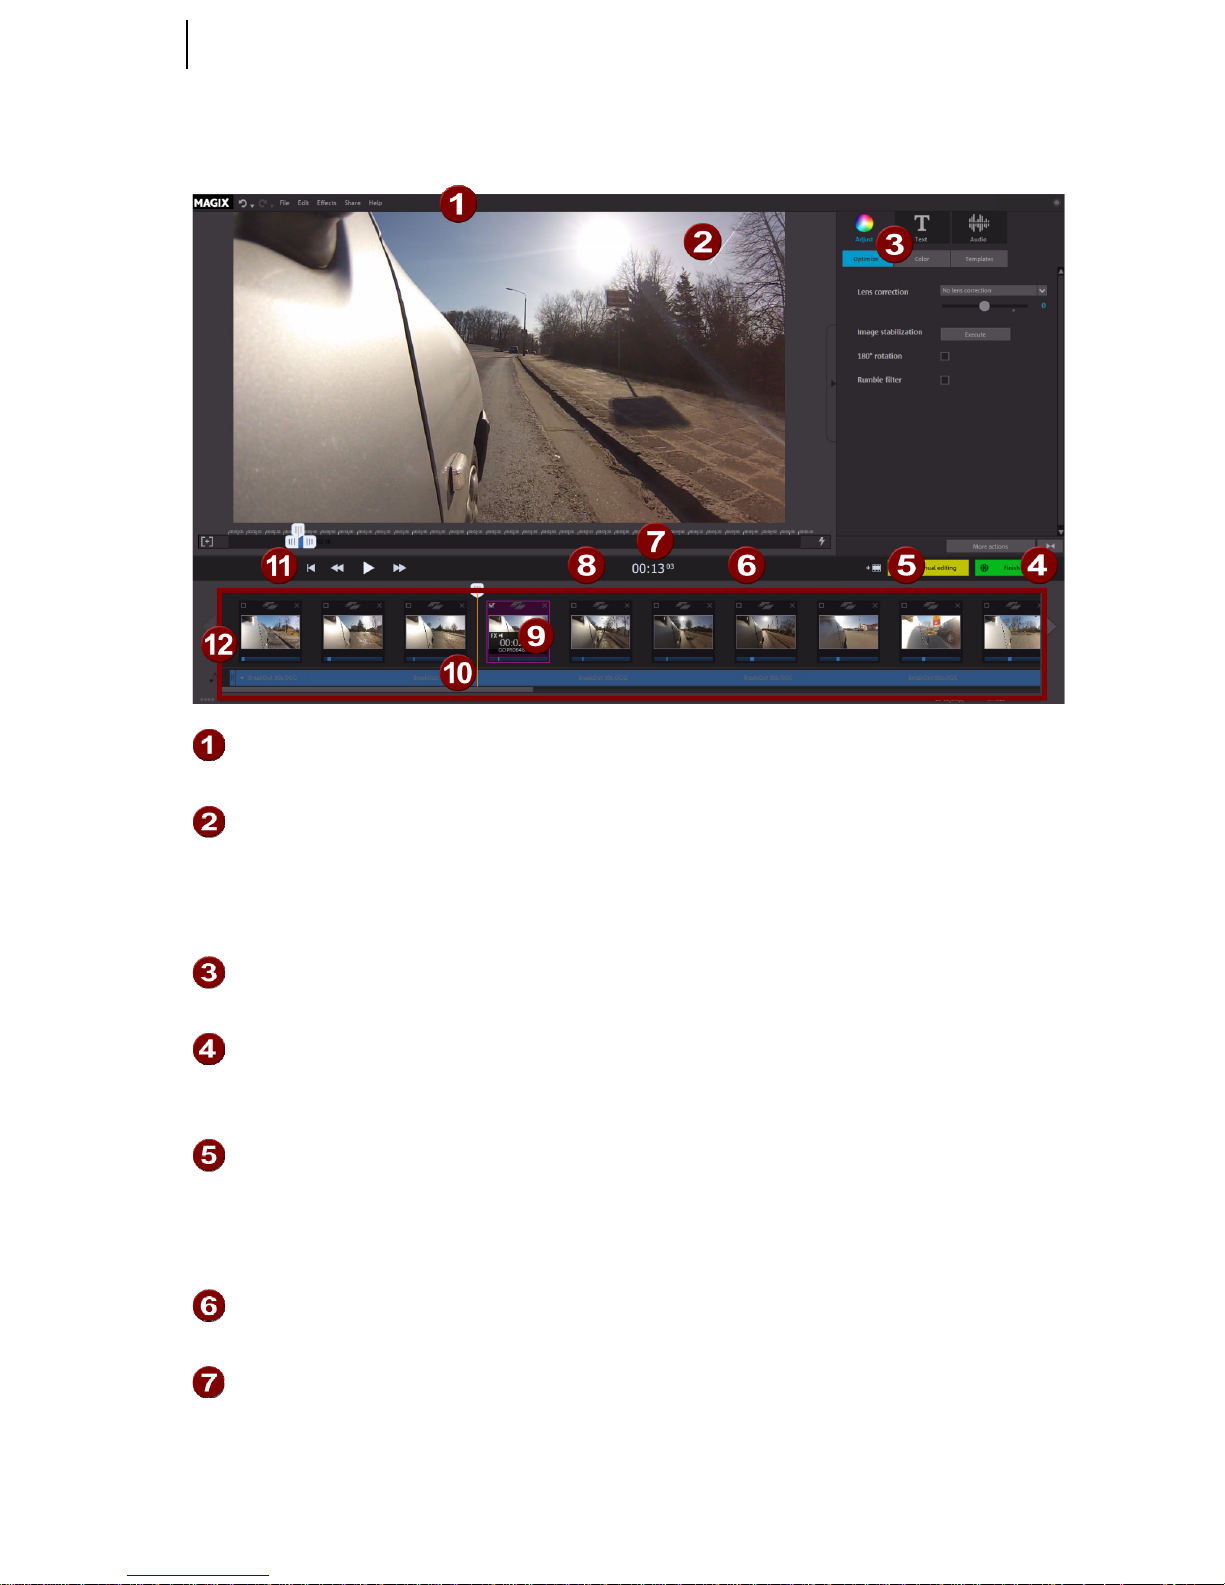
Program interface
Menu bar: (view page 45) This contains most of the important MAGIX Fastcut
functions.
Video monitor: (view page 23) Disp
lays a preview of the movie when playback is
started. When you select an object (9), it is displayed here along with any set
effects (3).
Double-clicking on the preview monitor switches to full screen view.
Editing area for objects: There are various effects areas available for optimizing
slideshow objects, displaying text, editing sound, etc.
Finish: (view page 33) Whe
n you are finished arranging and editing your movie,
you can save it locally to your computer, export it to a mobile device or make it
available online.
Add media: (view page 26) A
dd videos and background music to your movies to
make them more varied.
Manual editing (view page 29): Allows you to make manual cuts and cha
nge the
background music. Activating manual editing cannot be undone.
Time display (view page 23): The current ti
me position of the playback marker is
displayed here.
Contents bar (view page 23): When an obj
ect is selected, the time section of the
video clip in the object is moved with this bar.
Page 23

Program interface 23
Cut buttons: These buttons allow you to quickly split and remove object parts.
Note: These buttons are only available if "Manual editing" (5) (view page 29) is
activated.
Selected object: When an object is selected, it is highlighted, and additional
information is displayed on top of it. The playback marker will be moved to the
start of the object and the preview can be seen in the video monitor (2).
Settings in the editing area (3) always effect the selected object.
Background music: When background music is added manually or as part of a
template, it appears here as a bar. In manual editing mode (5) (view page 29)
you can adjust
the length and start time of the background music by using the
handles.
Transport console (view page 23): Use the transport butt
ons to start and stop
playback, move forward and backward within the project and jump back to the
very beginning.
Arranger with 2 tracks: Images and objects are displayer in the 1. track. The
background music (10) appears in the second track.
Page 24

24
www.magix.com
Video monitor
The video monitor displays a preview of the movie that you are working on at the
moment.
You can close the effects area to create more room for the video monitor.
Activating this button improves playback performance with the following
measures:
• Resolution reduction (both vertical and horizontal image resolution are cut in
half)
• Framerate (image repetitions per second) reduction
• Using Low Resolution Video files for playback (only if the "Improve playback
performance (LRV)" option is activated when importing (view page 19))
Position display: The current position of the play cursor is displayed here in
[minutes]:[seconds]:[frames].
Timeline: This is where the current position of the playback marker is displayed.
When you select a video object, the length of the video clip being used is
displayed.
Transport console: Use the transport buttons to control movie playback in
MAGIX Fastcut:
To the beginning: The playback marker jumps to the beginning of the movie.
Page 25

Program interface 25
Back: The playback marker moves toward the beginning.
Playback/pause: Starts playback. Another click stops playback, and the play
cursor remains at the current position.
Forwards: The playback marker moves toward the end.
Contents bar: When an object has been selected, the following editing steps are
available:
• In template mode (view page 25): T
he object's contents can be moved.
• In manual editing mode (view page 29): Use
the left and right handles to
move the start and end points. This causes the length of the object to
change, and the time position of the cut will move.
The start and end points are hidden during playback. Only the playback position is
displayed.
This button makes the timeline (5) bigger so that the contents bar (7) can be
positioned more precisely.
Displays playback position Change the playback position by moving the mouse.
If a video or a photo object is selected, the position within this object will be
displayed.
Cut (not displayed): The following features are only available in the manual editing
mode (view page 29):
Removes the part of the object in front of the playback marker (left).
The clip is split at the position of the playback marker. This turns a single clip
into two segments.
Page 26

26
www.magix.com
Template mode
After applying a template, the template mode ensures that
• the time position of transitions between objects stays the same,
• that the transition type remains the same, since it is set according to the
background music,
• that the order of objects remains the same,
• and that the background music remains the same so that cuts stay in rhythm.
However, there are still many ways to edit objects:
• Swapping video clips (view page 27) assigned to objects with
other video clips,
• adding additional video clips (view page 26),
• e
diting objects with effects (view page 28),
• ad
ding texts (view page 28),
• an
d editing the original sound of video objects (view page 29).
Note: MAGIX Fastcut remains in template mode until "manual editing" is activated.
Edit Video
Start video editing
The buttons for video editing are located on the right side of the screen.
1. First, select the object on the film strip that you want to edit.
2. Next, click the "Set object" button to access the effects settings for the selected
object.
Adding additional video clips
1. Click on the following button:
This opens the selection dialog for loading video clips.
2. Select the video clips you want to load. This approach corresponds to selecting
video clips in the start wizard (view page 19).
MAGIX Fastcut loads the selected video clips, but they do not automatic
ally get
used in movie.
3. Now you can replace the video clips in the movie with your own.
Page 27

Template mode 27
Exchange video clips
All the video clips that have already been loaded into the movie in MAGIX Fastcut
can be easily exchanged:
1. Press the following button in the desired video object:
The video clip selection dialog will open.
Note: If you want to use a video clip which has not yet been loaded, you must first
add it to the movie (view page 26).
2. Select the video clip you want to replace the old clip with.
3. Click on "Exchange".
MAGIX Fastcut will replace the old video clip in the object with the one you
selected.
4. You can now move the time section of the video clip in the object (view page
27).
Move the time section of the video clip in the object
As long as MAGIX Fastcut is in template mode, you cannot move the object start and
end on the timeline. This is how MAGIX Fastcut ensures that transitions remain in the
same position so that they are always synchronized with the music.
However, you can move the time section of the video clip that is located "behind the
video object" and displayed during playback:
1. Select the video object you want to edit.
The playback marker is located behind the start transition of the selected video
object.
A bar will be displayed at the bottom edge of the preview monitor which
represents the time section of the assigned video clip which is to be played.
2. Select the bar and move it to the desired position.
- Press the following button to position the bar exactly where you want:
The time section of the video clip in the object has been moved. The image in the
preview monitor will be updated accordingly.
Note: The playback marker will remain at the same position in the movie strip
since the contents of the video object have been moved, not the object itself.
Page 28

28
www.magix.com
Apply effects
Use the slider to set the various effects parameters for the object:
• To do this, click on the slider and drag it to the left to decrease the value or to
the right to increase it.
• Alternatively, you can click on the percentage field next to the slider and
manually enter a value between 0 and 100 %.
Use the color wheel to increase or reduce the selected color. This allows you to
remove a blue tint from the footage, for example:
• Click the color wheel and drag the point at the center to the range you want to
highlight.
Insert Title
Switch to the text module by clicking the "Title and Text" button.
3.
1. Select the object you want to apply the text to.
Note: The display always starts at the beginning of the selected object. If you
would the title to be displayed somewhere other than the start, cut it at the
desired start point and select the back part.
2. Double-click to select the desired template.
3. Now open "Title and text"
This opens the text editor.
4. Type the desired text in the input field.
The following options are also available in the text editor:
• Font type and font appearance: Use this option to format the text.
The three buttons to the right can be used to align the text to the left, center or
right. You can also outline the letters in your text or give them shadows.
• Position: Use the arrow key to position the text exactly how you want in the
image.
• Animation: Creates moving titles. To create cinematic closing credits, you can
select the animation "From bottom to top".
• Fade in/Duration/Fade out: Here you can set the lengths of the individual
phases of the title (fade in/display/fade out) during playback.
Page 29

Template mode 29
Sound and music
In MAGIX Fastcut background music and audio commentary can be easily added and
edited.
Adjusting the volume
The volume of the audio track can be adjusted with the volume slider in the "Audio"
section:
• Object: This slider sets the volume of the original sound. The slider is
deactivated for photos because they do not contain an audio track.
• Background: Use this slider to set the background music volume.
Slider settings always refer to the original sound of the selected object and the
background music at the current playback position. This allows you to accentuate the
original sound and lower the background music at important spots.
Optimize video sound
You can optimize a video's original sound quickly and easily using templates.
Once you've selected a video with sound you can choose a template from the drop
down menu and being the optimization process. Use the slider to adjust the intensity
of the effect.
Page 30

30
www.magix.com
Manual editing mode
The manual editing mode is useful for the following use cases:
• if you have unsorted video material you want to quickly cut and sort.
• If you want to use your own background music and prefer to cut your video
matieral yourself.
Tip: Try the templates first - you will be surprised what they can do with your
video material! Plus they will save you tons of time.
• If you have used a template, but want to manually set the transitions between
video objects.
All the editing features in the template mode are also available when using manual
editing.
Activate
Note: If you close the start wizard, MAGIX Fastcut will automatically switch to
manual editing mode.
This button activates the manual editing mode.
Activating manual editing cannot be undone.
This setting is made for each movie separately.
Manual cut
If you want to cut your videos manually and select your own background music, then
the following procedure is recommended for you:
Create movie and load media
1. Start MAGIX Fastcut.
2. Import your video clips without using a template.
MAGIX Fastcut will import the video clips and close the start wizard without using
a template. The manual editing mode is activated.
3. Add the desired background music:
Cut objects to match the beat and remove unwanted material
1. Start playback.
2. Stop playback at the point where you want to cut.
The playback marker will stop at the current position.
Page 31

Manual editing mode 31
Tip: If you want to cut the video material to match the beat of the background
music, tap your foot along to the beat and stop playback on the desired spot.
Start/stop keyboard shortcut: Spacebar
3. Cut/remove object:
- If you want to remove the part of the object played back up to this point,
press the "Remove object start" button":
Keyboard shortcut: Z
- If you want to keep the part of the object played back up to this point, press
the "Split object" button:
Keyboard shortcut: T
4. Repeat these steps until you reach the end of the movie.
You have now cut the entire movie to the beat and removed all unwanted material
at the same time.
Insert Transitions
Transitions control how your movie plays from one object to another. Normally, a socalled "hard cut" is made between objects: The first image of the following object
appears directly at the end of the previous object, i.e. without any special fade effect.
However, you are free to select and add a transition:
1. Click on the transition icon between two objects.
The transition dialog will open.
2. Select an option and click "Preview" to get an idea of the effect.
- If "No Fade" is selected, a hard cut will be made.
- If "Transition" is selected, the objects will be faded softly from one into the
other.
- "Fade Through Black" fades the last image of the first object to black, and the
first image of the following object begins shortly after.
- "More..." opens the transition menu next to the preview monitor, providing
you with a large selection of transition types.
3. Click "OK" if you are satisfied with the settings you have selected.
Page 32

32
www.magix.com
Sound and music
In MAGIX Fastcut background music and audio commentary can be easily added and
edited.
Remove background music
Individual music tracks can be easily removed:
1. Right click on the music track. Alternatively, you can click on the small arrow
(see illustration)
The context menu for the music track will open.
2. Select one of the following entries in the context menu:
- "Remove music track",
(removes only the selected music track)
- "Remove background music completely"
(removes all music tracks used in the project)
The following features are also available:
Note: You cannot remove a video's original sound; however, it is possible to reduce
the volume to 0 in the "Audio" section.
Add background music
• Click on the "Music" button to choose background music for your video.
• Then select the desired music files. "Open" inserts the file into the audio track.
The length of the music will be adjusted to match the length of the video. The
background music will be adjusted automatically if you insert other images or
videos into the video project.
• You can insert additional music tracks before or after the selected music track
via its context menu or the arrow symbol (see illustration).
The music volume can be changed in the "Audio" dialog with the help of a separate
volume controller.
Hint: The music track will be cut off if it is longer than the video.
Shortcut: M
Page 33

Manual editing mode 33
Move background music
If necessary, music tracks can be repositioned. Click in the center and move it with
the mouse key held down to the desired position.
Hint: If there are several music tracks in the video project, they cannot be exchange
with each other and may be moved around only in the free ranges.
Shorten background music
1. Click and hold down the mouse button on the edge of the music track.
2. Move the edge to the desired position with the mouse button held down
3. Release the mouse button.
Page 34

34
www.magix.com
Finish movie
If you are satisfied with your movie, you can burn it to disc, export it as a video file, or
upload it to the Internet, e.g. YouTube or to your MAGIX Online Album.
• Click "Finish movie" to open the export dialog.
.
The dialog that follows offers a wide range of options of what you can do with your
finished movie.
Keyboard shortcut: B
Save on computer
If you save your movie as a video file, you can open it at any time on your computer
and play it back with Windows Media Player.
• Click "Save on computer" in the selection dialog to save your movie as a video
file.
If you want to use a different quality or format instead of the default WMV make sure
to do so before exporting the file.
The following formats are available: MPEG-4 and Windows Media Video
• Quality: Select the desired quality. The higher the quality, the more space
required on the hard drive.
• Click "Save video" to select a save folder and start the export process.
Page 35

Finish movie 35
Upload to Internet
You can present your movie on YouTube or share it with family and friends on
Facebook.
• Click "Upload to Internet" in the export dialog.
In the dialog that follows, you may setup your video for presentation on YouTube®
and Facebook
®
.
• Under "Title" enter a descriptive title for the video as it will appear on YouTube
®
or Facebook
®
.
• An informative "description" tells your viewers what the video is about.
• You may enter terms in "Keywords" to help users find your video in YouTube.
• Just for YouTube
®
: You can select the "Category" in which the video should be
published.
In "Send" you choose which user groups are able to see your videos.
"Export settings" allows you to choose different quality settings for your video.
Page 36

36
www.magix.com
Export to a mobile device
You can export your project to mobile devices made by Apple, the Samsung Galaxy
Tab, or mobile phones with Android operating systems.
• Click on "Export to mobile device" in the export dialog
Then select the mobile device from the list.
Tip (only for Android phones and the Samsung Galaxy Tab): Normally your device
will be correctly recognized as "Mass storage device) by your computer. If this is not
the case then change the connection detection settings of the device before
connecting to your computer, so you can select the correct connection type (e.g.
"Mass storage drive") For more details on these consult your device manual.
Page 37

Dialog and Interface Reference 37
Dialog and Interface Reference
Edit objects
In the effects area you can edit image, video and audio objects, insert text, choose
transitions and much more.
Settings: (view page 38) Use these
settings to adjust the display options.
Click an object
to display its settings.
This lets you make further changes.
Text: (view page 39) Select this tab to
add titles or text to the object.
Audio: (view page 40) Adjust the
volume of the original sound, the audio
dubbing and the background music.
You can also optimize the video sound
using presets and record commentary.
Transitions: If you want to transition
between image/video objects browse
the selection for a suitable style.
This can be used to add additional video clips and music files.
For adding video clips, the wizard for loading video clips (view page 19)
will o
pen. Depending on which mode is active, MAGIX Fastcut will
behave differently. For more info, read the chapters on template mode
(view page 25) and manual editing mode (view page 29).
For adding music, a dialog will open allowing you to select the files you
want to import. You can only add music when using the manual editing
mode (view page 29).
New music files are always added to the end of the arrangement and can be manually
moved to the desired position.
Finish Movie: (view page 33) The wizard for finishing projects opens to help you
export the video in the desired format or to burn it to disc.
Page 38

38
www.magix.com
Adjusting
Optimize
Lens correction: With the lens correction you can remove image distortions caused
by certain lenses. Even so called "converging lines" can be easily straightened. There
are useful presets for action cams which can be selected from the drop down menu.
Image stabilization: Image stabilization balances undesired picture movements. The
motion stabilizer counteracts unwanted movements by moving the image in the
opposite direction. This produces overlapping edges in the footage that are trimmed
automatically and replaced by black borders which are in turn removed using a zoom
shot. This results in a clearly more stable, almost imperceptibly larger picture.
180° rotation: If the image is upside down because of the way the camera was
mounted, activate this feature to rotate the picture 180°.
Ruble filter: Effectively filters out rumbling noises. This could be wind noise which
typically arises during recordings of ski runs.
Color
Brightness: The brightness is not changed linearly so that it is adjusted to normal
human perception. This means that changes in the median brightness range are
stronger than in dark and bright ranges.
Contrast: In photo editing, the level of the difference in brightness is referred to as
contrast. If the contrast is increased bright areas become brighter and dark areas
darker. Contrast is also often referred to as "brilliance".
Saturation: Refers to the color intensity of an image. If the saturation is turned up too
high the image will look artificial. Reducing the saturation completely produces a
black and white image (grayscale).
Backlight correction: Brightens shadows and darkens areas which are too bright.
Hue: The color wheel allows you to color the image. The further out you place the
point, the stronger the image will be colored.
Automatic correction for color and exposure: The optimum color setting/exposure is
calculated automatically.
Page 39

Dialog and Interface Reference 39
Templates
Clicking on "Templates" opens a selection of effect presets. Here you can find the
"Old movie" effect which gives your clip a 1920s style look. There are also various
movement effects which simulate camera tracking shots, e.g. "Zoom in" or "Move left
to right".
Try out the different effects to get an idea of what you can do with them.
• First select an effect and click "Preview"
to preview it.
• If you want to use the effect, either drag it onto an object using the mouse or
click on it.
.
• Since the effects do not change the original material, you can easily undo any
effect. Click on
to undo.
Speed
When you've specified the object's playback speed, slow and fast motion are also
possible. The video can also be played in reverse.
Title and text
Enter the text as you would like to
see it displayed.
Specify the font type, size, color, and
position of the text. You can also add
outlines and shadows to the text.
The text can be animated.
The display duration and fade in/out
duration can also be changed.
If you click the "New Title" button, your title will be displayed in front of the actual
object. This will then become an independent object. By clicking on "Templates" you
can access a selection of pre-made titles, all you have to do is add your own text.
Page 40

40
www.magix.com
Audio
Object: This controls the volume of the original sound.
Background: This controller influences the volume of the background music for the
duration of the selected clip.
Optimize Video Sound: You can optimize a video's original sound quickly and easily
using certain templates. Once you've selected a video with sound you can choose a
template from the drop down menu and begin the optimization process. Use the
slider to adjust the intensity of the optimization.
Page 41

Dialog and Interface Reference 41
Transitions
Note: Transitions are only available in manual editing mode since they are assigned
by the selected template in template mode.
Transitions control how your movie plays
from one object to another. Normally, a
"hard cut" is made between objects: The
first image of the following object appears
directly at the end of the previous object,
i.e. without any special fade effect.
Here you can find all fades from MAGIX
Fastcut, sorted into various categories.
Click on a category to see all the fades in a
list.
• First select a transition and click "Preview"
to preview it.
• If you want to use the transition, either drag it into the gap between two objects
or click
, if the first object is selected.
• Since the effects do not change the original material, you can easily undo any
transition. Select the object that uses the transition and click
to undo.
Display duration...
Enter the display duration for the current photo here in
[Minutes]:[Seconds]:[Frames].
Apply to all: The settings are applied to every photo in the current movie. The settings
will not be applied to photos in additional movies in the project.
Keyboard shortcut: Ctrl + L
Page 42

42
www.magix.com
Clean-up Wizard
The Clean-up Wizard helps you delete disc projects from your hard drive, including all
movies and the audio, video, and picture files used in them. Use this function to free
up disk space for future projects.
Caution: If the files you used in the movie have also been used in other movies (like
trailers, opening music, etc.), then you should make backup copies of these files
beforehand.
Delete certain files
Choose this option if you would like to select certain files for deletion. In the file
selection dialog, you can select the desired files. In the next step the Clean-up Wizard
automatically look for other files which belong to your selection. Using this method
you can delete an entire movie with all of its accompanying media, help, project, and
backup files. Before they are deleted, you receive relevant information in a dialog and
a confirmation request.
Search and delete unnecessary files
Choose this option if you would like to find unnecessary files or free up some space
on your hard drive. The Clean-Up Wizard then automatically looks for extraneous files
created during use of MAGIX Fastcut. Before they are deleted, you receive relevant
information in a dialog and a confirmation request.
Object properties
This function displays all the information about the currently selected objects such as
file name, and its location on the hard-drive etc. Depending on the type of object, the
elements displayed will vary.
General information
Here you can change the name of the selected object. Additional information is also
displayed about which file the selected object points to.
Interlace/Deinterlace (only for video objects)
The tab "Interlace/Deinterlace" lets you specify the interlace editing of the video
material.
Interlace properties: Normally, MAGIX Fastcut automatically makes suitable settings
for this. Adjustments still need to be made to faulty video footage. If playback of the
Page 43

Dialog and Interface Reference 43
exported movie is very jittery, if flickering occurs, or if some effects do not look how
they should, you can reverse the source material frames.
Deinterlace options: Normally, the setting "Automatic interlace processing" does not
have to be changed. The frames are processed separately and passed to the encoder
when exported. If necessary, MAGIX Fastcut will perform high-quality interlacing. If
"No interlace processing" is set, then it is assumed that the source material contains
full frames.
For more information on interlacing, please see "Interlace".
Keyboard shortcut: Ctrl + E
Project settings
Description: Enter your project's name here. This name will be used as a preset title
for the disc you have to burn.
Video settings: Specify the format and ratio for the entire project. The format
specified will be set as the default size during export.
Keyboard shortcut: E
Program settings
Project folder: This is the folder where MAGIX Fastcut will normally save all projects
and imported videos. When a project is created, a correspondingly named subfolder is
added to help keep things clearly laid out.
Video standard: PAL is used in Europe, the US and Japan use NTSC. This setting
should not be changed.
AVCHD Export: If your motherboard/graphics card is new enough MAGIX Fastcut
will automatically use the graphics card's processors to calculate compression when
exporting HD videos. If this causes problems you can deactivate it here.
Shortcut: Y
Page 44

44
www.magix.com
Video Mode
Compatibility Mode (Video for Windows)
This mode works on all systems. Activate this mode if there are problems with
playback.
Hardware Acceleration (Direct 3D)
This mode offers extreme increase in speed by calculating mixing, effects, and various
transitions the the graphics card directly. Depending on the graphics card,
performance can increase by 300%. The graphics card will not be used during export.
Note! To use this mode the graphics card must possess at least 128 MB memory.
You will need to install Direct 3D 9, or higher, and the graphics card driver must
support "High Level Pixel Shader Language 2.0". MAGIX Fastcut checks the
corresponding properties when this mode is selected and switches it off if
necessary.
Alternative Mode 1 (Mixer Overlay)
This mode performs hardware-based deinterlacing for output onto a PC screen or a
projector, whereby the playback quality is significantly better than with interlaced
analog video recordings.
Alternative Mode 2 (Video Mixing Renderer 9)
This mode uses the hardware de-interlacing function of modern graphics cards
together with DirectX 9. Make sure that you are using the most recent version of your
graphics card driver, which must be compatible with DirectX 9 to function properly.
This mode is only superior to "Overlay Mixer" mode with a limited number of
graphics card models.
Fade in/out time for background: You can set the length of the fade in/out time for
the background audio. The values are given in milliseconds (ms).
Reactivate hint dialogs
Once installed, MAGIX Fastcut displays a number of safety queries and instructions
at various points in the program. These may be switched off by clicking the small box
at the bottom that says "Don't show this message again". To display these warning
messages again, select the "Reactivate hint dialogs" option.
Page 45

Menu Reference 45
Menu Reference
In this chapter you'll find the full menu list of your copy of MAGIX Fastcut and the
corresponding functions.
File Menu
New
This menu item creates a new MAGIX Fastcut project. You can also open this feature
via the "New Project" button above the video monitor.
Keyboard shortcut: Shift + N
Open
This menu item loads a previously saved MAGIX Fastcut project. Please note that the
related files must be accessible.
MAGIX Fastcut searches for the used sounds, pictures and videos under the path to
where you last saved the disc project.
Keyboard shortcut: Ctrl + O
Load recently opened projects
Load the last projects you opened using this menu item.
Clean-up Wizard
This menu item opens the Clean-up Wizard (view page 41). This helps remove
unnecessary names to save memory on the hard drive.
Save
The current disc project is saved with the name displayed in the project window. If
you have not yet specified a name for your project, a dialog will open wherein MAGIX
Fastcut asks you to do so.
Keyboard shortcut: Shift + S
Page 46

46
www.magix.com
Save as...
A dialog opens where you can specify the path and name of the video, under which it
is to be saved.
Keyboard shortcut: Shift + S
Import
These 3 menu entries enable video, photo, and music files to be imported into the
current project.
You can use the buttons in the filmstrip view to do this.
Keyboard shortcuts:
F (Photo)
M (Music)
V (Video)
Online
This is a list of menu entries regarding all of the services that are available directly
from within MAGIX Fastcut.
MAGIX Online Album
With MAGIX Online Album you can publish your photos and videos directly to the
Internet. You can also play your music as MP3s in the Online Album. Create your
personal album website in no time with your own Internet address and showcase
everything that's fun about multimedia to the world.
Catooh – the Online Content Library
Catooh provides you with high-quality photos, videos, and music for every theme,
expanded by intelligent iContent with professional Soundpools, DVD menu
templates, and brilliant MAGIX ShowMaker styles to help you make your photo,
video, and music projects reality. All of this is available directly from your MAGIX
software.
Just choose "Share" from the menu "Catooh" to set up an Internet connection.
Browse through the thematically sorted categories or view the results directly by
entering a keyword. After downloading, you can drag the objects from the Media Pool
directly into your arrangement.
Page 47

Menu Reference 47
Tip: Read the introduction online http://rdir.magix.net/?page=JRF6LASAR2Z3!
Export single frames as BMP files
Exports the image located at the playback marker and displayed in the video monitor
as a bitmap (*.BMP) file.
With the still picture export function you can export individual pictures from a movie,
for example, as a background picture.
A suitable resolution will be used automatically, this can be changed though.
Finish Project
This menu point opens the Project Finishing Wizard (view page 33).
Settings
Project...
This menu entry opens up the Settings for the opened project (view page 43).
Keyboard shortcut: E
Program...
This menu item opens the program settings (view page 43).
Keyboard shortcut: Y
Language
Here you can change the language used in MAGIX Fastcut. Normally the language
that is used for installation is set as the program language.
Reset Program Settings to Default...
Use this function to reset all program settings (view page 43) you made in MAGIX
Fastcut to their original settings.
Exit
Closes MAGIX Fastcut.
Keyboard shortcut: Alt + F4
Page 48

48
www.magix.com
Edit Menu
Undo
During movie editing you can undo the last changes you made. This way, it's
no problem if you want to try out critical operations. If you don't like the
result, you can always revert to the previous state using "Undo".
Using the arrow buttons you can select individual changes which you would
like to undo.
Keyboard shortcut: Ctrl + Z
Restore
This function undoes the previous "Undo" function.
Using the arrow buttons you can select individual changes which you would
like to undo.
Keyboard shortcut: Ctrl + Y
Cut
This command deletes the selected object and saves it to the clipboard. You can then
use the "Paste" command to copy it into any movie.
Keyboard shortcut: Ctrl + X
Copy
This command copies the selected object to the clipboard. Then you can use the
"Paste" command to use it again.
Keyboard shortcut: Shift + C
Insert
This command inserts the clipboard material at the current position of the start
marker.
Keyboard shortcut: Ctrl + V
Page 49

Menu Reference 49
Delete
This command deletes the selected object.
Keyboard shortcut: Del
Splitting objects
This command cuts a selected scene at the point where the playback marker is
positioned. This way, two free-standing objects are created.
This way you can isolate a part of an object in order to delete it or move it:
1. Set the playback marker at the desired starting position in the object and click on
the button.
2. Place the play cursor at the end of the part you wish to remove and click on the
button again.
3. Select the middle object that was created and press "Del".
4. Pull the object at the back to the front, it should automatically snap into place.
All subsequent objects will be moved along in unison so that no gaps appear.
You can also use this function to apply effects to a certain part of an object only.
Keyboard shortcut: T
Remove object start
The object will be split at the current position of the playback marker, and the
first part of the object will be removed.
Shortcut: Z
Removing an object end
The object will be cut at location of the play cursor and the latter part of the object
will be removed.
Shortcut: U
Remove entire background music
Music previously inserted may be removed with this function.
Shortcut: Ctrl + H
Page 50

50
www.magix.com
Select All
All objects found in the project are selected.
Keyboard shortcut: Ctrl + A
Effects Menu
Rotate 90°
Turns an object 90° to the left or to the right.
View duration
Opens a dialog to set the Display duration for photo and title objects (view page 41).
Keyboard shortcut: Ctrl + L
Scene recognition
Calls up the automatic scene recognition, which "cuts up" longer videos into scenes
for storage in the "Takes" directory.
Keyboard shortcut: Shift + Z
Effects Settings
The entries for this submenu are directly available in the effects under "Additional
Actions" in the video object context menus.
Apply to all
The current effects settings will be applied to all objects.
Keyboard shortcut: Shift + A
Page 51

Menu Reference 51
Apply to all subsequent objects
The current effects settings will be applied to all objects in your movie which lie
behind the selected object.
Keyboard shortcut: Shift + O
Copy
The current settings will be saved to the clipboard so that they can be applied to other
objects.
Keyboard shortcut: Alt + C
Insert
Applies the effects settings from the clipboard to the selected bject. The settings
must be copied beforehand.
Keyboard shortcut: Alt + P
Reset
This "effect" is not an effect. as such. It disables all applied effects.
Keyboard shortcut: Shift + C
Object properties
This function displays all the information about the currently selected objects such as
file name, position on the hard-drive, tempo, etc.
You can also set a background color for the object to make it stand out and easier to
find.
Keyboard shortcut: Ctrl + E
Page 52

52
www.magix.com
Share Menu
Here you will find many options for for quickly and easily publishing your data from
the program on the web. Additionally, data transfer into other programs for
specialized editing, if you have such programs installed, is enabled.
Help Menu
Help
This command is available for almost every feature of the program, and it opens the
"Help" file for the corresponding topic. Use this command to get help on any of
MAGIX Fastcut's functions.
Keyboard shortcut: F1
Show video tips online...
This menu entry displays a video which contains general tips about filming with action
cams. This function requires an Internet connection.
Note: You can find additional tips in the personal tips from Tilman Herberger (CTO
at MAGIX Software GmbH) (view page 11).
Context help
The mouse cursor will turn into an arrow with a question mark. Click on any button in
the main screen to open program help.
PDF manual
Opens the manual in PDF format. Similar to the Help feature that can be accessed by
pressing F1, this manual contains all of the important information about the program.
Open magix.info
Directly from within the program you'll be able to access magix.info, the Multimedia
Community from MAGIX. You'll find answers to all the most frequently asked
questions about MAGIX products and multimedia in general. Were you unable to find
a solution to your particular problem? No problem, just ask the question yourself.
Show introduction video online...
The online introduction video is a great way to quickly familiarize yourself with
MAGIX Fastcut.
Page 53

Menu Reference 53
Display tooltips
Tooltips are small information windows that open up automatically if the mouse
pointer stops briefly on a button or some other area. They provide information about
the function of the button. These information boxes can be switched on or off with
this option.
Register online
This option opens the MAGIX homepage for online registration where you can
register as a MAGIX user.
Registration grants you access to the MAGIX support website where various program
updates and help programs can be downloaded.
Online Update
Connects directly to the online update page where you can get the latest version of
your program.
Deactivate Program
This menu item deactivates MAGIX Fastcut with immediate effect. After
deactivation, it is possible to immediately install and activate MAGIX Fastcut on
another computer
About MAGIX Fastcut
Displays copyright info and version number of MAGIX Fastcut.
Page 54

54
www.magix.com
MAGIX Online World
MAGIX Online World from MAGIX offers you a range of new services for your
photos, videos, and music that are accessible directly from the "Share" menu in
MAGIX Fastcut.
MAGIX Online Album
MAGIX Online Album is your personal multimedia album on the Internet. If you want
to present slideshows or videos online, then MAGIX Online Album is the perfect
service.
MAGIX Website Maker
MAGIX Website Maker helps you create a personal Internet showcase with a
professional design in just a few mouse clicks – without prior knowledge, including
your own chosen domain and email address. Publish slideshows and videos and
accessorize your site with music and various effects – anything from a simple
business card to a fireworks display of effects, professional or private – show your
best side!
More about this topic can be found under MAGIX Website Maker.
Catooh – the Online Content Library
If your project is missing pictures, videos, DVD menus, sounds, or samples, then you
should have a look at the huge selection available at Catooh. There you'll be able to
buy media in excellent quality for low prices: DVD menus, MAGIX Movieshow Maker
styles, decorative elements, 3D power effects, 3D transition series, MAGIX
Soundpools, songs, ringtones... Perfectly suited to all MAGIX photo, video, and music
projects.
MAGIX News Center
The MAGIX News Center features links to current online tutorials and tips & tricks on
the software application examples. The "News" is indicated by color according to
content:
• Green indicates practical tips & tricks for the software
• Yellow reports the availability of new patches and updates
• Red for special offers, contests and questionnaires
If no new messages are present, the button will appear gray. When the MAGIX News
Center is clicked, all of the available information will be displayed. Click the messages
to reach the corresponding website.
Page 55

Glossary 55
Glossary
A
Aliasing
Aliasing, or alias effects, are mistakes that appear during digital scanning of sounds,
videos or images when the sample frequency (in audio editing) or resolution (in video
editing) used are too low.
ATN:
This abbreviation stands for "Absolute Track Number". Which is the actual time code
of DV and HDV recordings recorded using the helical scan method.
Audio
This is then referred to as "audio" when the sound signal is saved directly as such on
the PC. The actual sound is recorded or played back here.
audioid
audioid is a process used to determine the title and artist name base on musical
properties. An Internet connection is required to access the audioid database.
AVCHD
Stands for "Advanced Video Codec Definition". It is an HD format for video cameras,
which has been developed by Panasonic and Sony. In comparison to the "HDV"
format, a clear improvement in quality can be seen here.
MPEG-4 AVC/H.264 is used for video encoding and AAC or AC3 for audio encoding.
The maximum bitrate is 25 Megabits/sec.
AVI
The AVI format (Audio Video Interleaved) isn't actually a proper video format!
Rather, it is a so-called "container" for which the conventions for transferring audio
and video files to the program are only loosely defined. More in this topic can be
found in General notes on AVI videos.
B
Backup disc
Copying of files to a different file storage medium to secure these files is called
backing up, or creating a backup.
Page 56

56
www.magix.com
Browser
A browser (also known as web browser, or Internet browser) is a computer program
that displays websites. The best-known browsers are Internet Explorer, Firefox, Safari,
and Opera.
Button
Refers to an element of the graphic user interface of a program. The button initiates
an action in the program via left mouse click.
Button
Refers to an element of the graphic user interface of a program. The button initiates
an action in the program via left mouse click.
C
Cache
Simply stated, this is a temporary folder where frequently accessed files are saved so
that they can be quickly launched while you are working.
CC
CC stands for "Connectivity Co-ordination" and describes how the change of a
domain name from one provider to another occurs (domain transfer).
Clip level
Signifies the volume level at which the recorded signal is overmodulated, or "clipped".
Clipboard
The clipboard is used to temporarily store objects during execution of commands like
"copy" and "cut".
Clipboard
The clipboard is used to temporarily store objects during execution of commands like
"copy" and "cut".
Compatible
Different devices are compatible with each other if they operate together without any
errors occurring.
Page 57

Glossary 57
Context menu
Context menu can be reached by right clicking on a selected object. It offers functions
which are available and can be expected in the given context.
Copyright
Protection of intellectual and creative property against unauthorized copying.
Copyright
Protection of intellectual and creative property against unauthorized copying.
CPU
Central processing unit: The name for the main processor of the computer (CPU).
Modern computers have even two or more processors, or one processor with several
cores.
D
Dialog
A dialog opens in a new window and lets the user interact with the program. This
means that the dialog can present information to the user and/or expects to receive
input from the user.
A dialog can contain various user elements which can be manipulated by a simple
mouse click. Keyboard entries are also possible.
Disc project
A "Disc project" includes everything that you want to put on your CD and DVD.
This normally contains one or more movies and includes a menu structure/menu
design which allows you to choose a movie later on the CD or DVD.
Disc types
The disc types determines the format and medium (CD, DVD, Blu-ray disc, etc.) to
which the current project will be burned.
Dissolve
Transitions, Dissolve. Can be used to fade between objects.
Page 58

58
www.magix.com
DNS
The abbreviation DNS stands for Domain Name Service and refers to a provider of
Internet services that registers domain names for customers.
Domain
A domain is the website's Internet address. It consists of the name of the Internet
protocol (usually http://), the computer or network name (such as www), the
second-level domain (such as magix), and the top level domain (like .com, .net).
Altogether we have: protocol://networkname.second-level-domain.top-level-domain
(such as "http://www.magix.com").
Domains are allocated by a country's so-called NIC (Network Information Center). In
Germany the DENIC is responsible for the release of domains.
Domain transfer
See CC. If you already have a domain, you can move it from your previous provider to
another provider.
Downmix
A method developed for audio technology to turn a Surround Sound recording into a
version with fewer channels. Most often (as is the case with MAGIX Fastcut) this will
be a stereo version.
Drag & drop
Enables files and objects to be moved freely between various applications (or within
an application) by dragging the object and letting it drop using the mouse cursor.
F
Fader
Used for visual input of values. Similar to volume control on a mixing board, you can
control various parameters by sliding the fader. A very common example for this is
the zoom slider that lets you see a picture in more detail.
Field
A half-image, two of which combine to produce a frame (see interlace).
Page 59

Glossary 59
Flip menu
Drop down menus create menus consisting of lists of selectable choices. They look
very similar to text input fields, but have a button with a downward-pointing symbol
on the right-hand side.
Frame
A frame is a single image from a video sequence which also called a full image.
A PAL video contains 25 frames per second; NTSC contains 29.97 frames.
H
Handles
Handles are the five little rectangles at the edges of selected objects. All curve points
can be moved by holding down the left mouse button.
Length handles: Bottom right and bottom left. You can use them to change the length
of an object.
Transition/Fade handles: Top right and top left. These can be used to softly fade an
object in or out.
Volume/Brightness handle: Above-center. You can use it to adjust the volume or the
brightness.
Hard disk
Storage medium with the largest storage capacity where the operating system(s),
programs, and files are saved. A hard disk can be built into the computer, but there
are also external hard disks which can be used with different computers via a USB
connection (portable drives or external hard disk).
Hard disk drive
Storage medium with the largest storage capacity where the operating system(s),
programs, and files are saved. A hard disk can be built into the computer, but there
are also external hard disks which can be used with different computers via a USB
connection (portable drives or external hard disk).
Hardware
The all-encompassing name for all internal components of a computer. For example
hard disk, graphics card, mainboard, etc. External peripheral devices are also
considered hardware, i.e. printer, scanner, monitor, etc. The synchronization of single
hardware components is coordinated by the software.
Page 60

60
www.magix.com
HDD
Storage medium with the largest storage capacity where the operating system(s),
programs, and files are saved. A hard disk can be built into the computer, but there
are also external hard disks which can be used with different computers via a USB
connection (portable drives or external hard disk).
HDTV
This acronym stands for "High Definition Television.
HTTP
Stands for Hyper Text Transfer Protocol and is used for transferring websites onto the
Internet (from web server to the browser). For this reason, the abbreviation http://
always comes before the Internet address. This is automatically inserted and does not
have to be entered when entering the Internet address.
Hyperlink
Hyperlinks (or in short "links") are references to other websites/online documents (or
other computer networks). They build the base of the World Wide Web (WWW) as
it is only via these hyperlinks that networking or interlinking between the billions of
website out there is actually possible.
I
ID3 tags
ID3 tags contain title information that can be added to a music title. This includes the
title, artist, album, as well as the genre, year of release, and other criteria that can help
searching through a database. The database is created using this information.
Info: Title information will only be saved for MP3s in the so-called ID3 tags (Identify
an MP3), but other formats offer similar possibilities, like "Vorbis comment" for the
OGG Vorbis format, for example.
Image
An image is a representation of a CD, DVD, hard drive, or another storage medium
that is saved as a file.
The difference from a copy or backup is that an image contains information about the
structure of the original storage medium, and not just individual files. This enables
01:01 copies of complete storage media to be created.
Page 61

Glossary 61
Caution! Copyright laws forbid copying of commercial CDs/DVDs, and for this
reason, this process can be prohibited by copy protection.
IMAP
Stands for Internet Message Access Protocol and is an advanced process of receiving
emails.
Interlace
Describes the creation of a full image from 2 half-images (fields).
In this process, even and odd lines are alternately assigned to one of the two fields.
The human eye perceives both of the projected half-images as a single full image, so
that despite the slow image repetition rate (25 Hz for PAL, 29.97 for NTSC) a
subjectively fluid image is seen.
Intro
"Intro" means the introduction or opening credits of a movie.
J
jpx
A format developed by MAGIX which is used for photo editing. It enables free
experimentation with effects without altering the original file. The effects settings are
also displayed when the photos are opened using a different MAGIX program.
M
Menu
Menus contain practically all the program functions. They can be opened using a
simple mouse click on the corresponding menu. Keyboard shortcuts, if available, are
also found at the end of menu entries.
The graphical surface of a CD/DVD will also be represented as a menu.
Menu bar
Almost every program has a menu bar. It can normally be found underneath the title
line of the program. A simple mouse click opens a corresponding menu.
Page 62

62
www.magix.com
MIDI
MIDI files do not contain the actual sounds like audio files, but only the note control
information which can be interpreted during playback by the synthesizer chip on the
sound card or an external synthesizer.
Motherboard
This is the centerpiece of hardware components of a computer. All other hardware
components like CPU, RAM, hard disk, additional drives, graphics cards, as well as
other cards for specialized uses are connected to the motherboard.
Motherboard
This is the centerpiece of hardware components of a computer. All other hardware
components like CPU, RAM, hard disk, additional drives, graphics cards, as well as
other cards for specialized uses are connected to the motherboard.
Motherboard
This is the centerpiece of hardware components of a computer. All other hardware
components like CPU, RAM, hard disk, additional drives, graphics cards, as well as
other cards for specialized uses are connected to the motherboard.
MP3
MP3 (actually MPEG-1 layer 3) is currently the most important standard for
compressing audio files.
MPEG
MPEG is short for "Moving Picture Experts Group" and refers to a committee
concerned with the standardization of video and audio data compression as well as
container formats.
MS audio
A process developed by Microsoft for compressing audio files with properties similar
to those of MP3.
MTC
MTC stands for MIDI Time Code and it transmits the exact playback position via
MIDI. In this way, programs and devices can be synchronized with each other.
Page 63

Glossary 63
N
Noise Sample
Sample of a noise that is to be removed
NTSC (USA, Japan)
NTSC stands for "National Television Systems Committee". This is a US institution
that defined the first color carrier system for TV which is now used in most of
America and some East Asian countries.
The image repetition rate for NTSC is 29.97 Hz.
Numeric keypad
Also known as the numpad, or the number block.
O
Offset
With an offset of 60:00:00 (1 hour) you can, for example synchronize a tape whose
time code that starts at 1 hour, MAGIX Fastcut however, still starts the tape beginning
at 0.
OGG VORBIS
This is a new, royalty-free format with similar properties to MP3.
P
PAL (Europe)
Phase Alternating Line, or PAL, is a process for color transmission for analog TV that
is primarily used in Europe, but also in Australia, South America, and many African
and Asian countries.
The image repetition rate for PAL is 25 Hz.
Play marker
The play marker is a red vertical line which moves from left to right during playback. It
indicates the current play position.
Playlist
Arrange your songs in playlists from various sources in different formats and in
whatever way you like, sometimes updated daily.
Page 64

64
www.magix.com
Important: Playlists are only links to songs on your hard drive or in your CD drive.
When you add a song to your playlist whose real source is a CD in your computer's
drive, the song will no longer be playable when the CD is removed from the drive.
Similarly, when you move a folder on your hard drive, the playlist will no longer be
able to play the song, since the link is no longer valid.
For the latter, however, there is a simple solution: If you know where the song has
been saved, then you can redefine the path. A corresponding dialog window is
provided for this purpose. You can reset the path by navigating through the Explorer
folders. The playlist is now correct once again.
Plug-in
Plug-ins are additional programs that expand the functionality of the main program.
They are inserted into the main program.
POP3
Stands for Post Office Protocol (version 3) and is used in standard email programs for
receiving email (for example, Outlook Express). POP3 enables email to be collected
by the provider's email server and loaded into your email program.
Provider
A provider or ISP (Internet Service Provider) offers Internet services like webhosting
or domains (DNS). In relation to the MAGIX Website Service, MAGIX is the provider.
R
RAM (Random Access Memory)
This is a hardware component of a computer. RAM is needed to temporarily save
files. This type of storage is erased when the computer is shut down or reset. The
larger this storage is, the faster you can work with programs to change and save files.
Ratio
The aspect ratio is the ratio between the height and width of a rectangle. In practice
these are photos, screens or projection screens. This method can also be used to
describe the aspect ratio of pixels.
Here are some examples of typical aspect ratios: at home 4:3, 16:9 (typical for TV
sets), or 16:10 (widescreen flat screens, widescreen notebooks), 3:2 for 35 mm films
and photos. In cinemas you mostly find 1.85:1
Page 65

Glossary 65
Red Book
Specific standards have been established for the different CD types in order to unify
their data structure and to make them compatible with the different CD drives. Their
names refer to the color of the books where these standards were written.
The term "Red Book" is common language for the Compact Disc Audio Standard. The
requirements listed here have to be observed for industrial CP production. Audio CD
players only read CDs created according to the Red Book format. It is therefore
necessary to first convert PC files into this format before writing them onto an audio
disc compatible with any audio CD player.
Restore
Restoration of files originating from a backup is called "Restoring".
S
Scene
Freely definable section of a video in MAGIX Fastcut.
In general, a scene is a segment of a film that is a product of various settings and
conveys a certain action.
Screenshot
A screenshot is an image composed of all visible screen elements (messages, open
dialogs, etc.) at a certain time. By pressing the "Print screen" key on the keyboard, this
image is saved into the clipboard. Next, open a program which can edit images and
select "Insert" (shortcut "Ctrl+V") in a new document to add the screenshot for
editing and saving.
Note: Press "Alt + Print screen" on the keyboard to capture the active window only.
Slider
Used for visual input of values. Similar to volume control on a mixing board, you can
control various parameters by sliding the fader. A very common example for this is
the zoom slider that lets you see a picture in more detail.
SMTP
Stands for Simple Mail Transfer Protocol and enables the exchange of emails across
computer networks.
Page 66

66
www.magix.com
Software
The name for all non-physical functional components of a computer. This primarily
includes computer programs and files that are meant to be used by computer
programs.
Storyboard mode
The Storyboard mode is the default edit screen view. This view offers an easy,
streamlined interface to simplify the editing process. The alternative Timeline mode
offers a more detailed interface for more extensive editing and scene arrangements,
the scene overview mode offers a complete overview of all scenes on a small scale.
You can toggle between the three view modes using the Tab key.
Submenu
Along with normal entries, a menu can contain submenus that offer additional
functions. These provide a better overview of the menus.
Super Video CD (SVCD)
The Super Video CD (SVCD) is a technological advancement of the video CD. SVCDs
are also like VCD-specified CD-ROMs which can be played using either a Super
Video CD player (connected to the television), or directly with the CD-ROM drive of a
computer. Many DVD players can also play SVCDs. MPEG-2 and the increase of the
data transfer rate makes it hard to tell videos from videos in DVD quality apart.
Resolution: SVCDs use the better MPEG-2 encoder in a standardized resolution of
480 x 576 (PAL). The MPEG-2 format offers a maximum resolution of up to 720 x
576 points and improved compression methods characterized by excellent image
definition and homogeneity.
Hard disk capacity: An average 90-minute movie must be spread across 3 CDs. On
one SVCD you can get about 30 minutes of good-quality movie.
Encoder setting: Compared to the VCD with 1.3, the data transfer rate is doubled to
2.6 Mbit/s.
MPEG-2 format introduces the so-called variable bit rate (VBR). In contrast to the
constant bit rate (CBR) of the MPEG-1 encoders, this encoder has the option of using
more bits for movement-intensive sections, as well as saving bits if picture content
remains the same.
Page 67

Glossary 67
T
Toolbar
All basic functions of the corresponding program can be found here. The
corresponding functions can be called up via mouse click.
Toolbar
Here you will find small buttons that provide a function when clicked. For example,
you can cut out a selected object by clicking on the scissors.
Top-level domain
Top-level domains (TLD) are always those separated by a dot at the end of an
Internet address (for example, "http://www.magix.com" < here, .com is the top-level
domain). Among these are also country top-level domains, such as .co.uk, .us, .de as
well as so-called generic top-level domains like .net, .org, .biz, and so on.
Traffic
Traffic (data transmission) occurs within your MAGIX Website Service as soon as
data is transferred across the Internet: for example, when uploading or downloading
files to your website or when someone else opens your website.
U
Universal Plug & Play; UPnP
Universal Plug ‘n’ Play (UPnP) is a network protocol which enables data exchange
between different devices (PCs, hi-fi systems, video cameras, PDAs, and webservers).
UPnP allows various devices to participate in network-wide communication, i.e. the
initialization of functions and other device functions. Long-winded configuring or
installing of drivers is not required as the devices can handle their own functions and
data sources by themselves. Find out more at www.upnp.org.
Hint: To work with UPnP you have to activate it first. This can be found under
"Options" ("Y" -> UPnP).
URL
URL stands for Uniform Resource Locator and describes where a source can be found
online (for example, a website). The address or the path to the storage location of a
file on your computer is known as a URL. Often the term URL is used as a term for the
domain. The URL for the MAGIX website is: http://www.magix.co.uk
Page 68

68
www.magix.com
V
VirtualDub plug-in
Plug-ins are additional programs that expand the functionality of the main program.
They are inserted into the main program.
VirtualDub plug-ins are also referred to "VirtualDub filters" and have the "VDF" file
extension. You can use them to apply additional video effects to video objects.
VST and DirectX plug-ins
Plug-ins are additional programs that expand the functionality of the main program.
They are inserted into the main program.
Two standards exist for audio editing: VST (Steinberg) and DirectX (Microsoft). VST
has asserted itself stronger in the current market.
W
WAV
Wave (*.WAV) is a standard uncompressed audio format.
Wave
Wave (*.WAV) is a standard uncompressed audio format.
Wave file
Wave (*.WAV) is a standard uncompressed audio format.
Webhosting
This means that an Internet Service Provider makes domains and webspace available
to its customers. With the MAGIX Website Service, MAGIX provides webhosting to
its customers.
Webmail
Webmail enables the customer to view and receive the contents of their email inbox
without having to install email software on their computer. Customers of the MAGIX
Website Service can use MAGIX Webmail for this.
Webmaster
A webmaster is responsible for the administration and maintenance of a website.
Often, the webmaster is also the owner of the website as well as the domain that
belongs to it. Once you have registered a domain in the MAGIX Website Service, an
Page 69

Glossary 69
email account will automatically be set up, for example:
"mailto:webmaster@domainname.co.uk".
Webserver
Webserver refers to the computer on which your host saves your website's pages and
which makes your pages accessible on the Internet 24-hours a day.
WMA
A process developed by Microsoft for compressing audio files with properties similar
to those of MP3.
World Wide Web (WWW)
WWW stands for "World Wide Web" and is the most used service of the Internet.
On the WWW, web browsers (for example, Internet Explorer) are used to display
information via websites. The process is colloquially called "Surfing the Internet".
Page 70

70
www.magix.com
Index
A
About MAGIX Fastcut............................................................................................................ 53
Add background music........................................................................................................... 32
Adding additional video clips.................................................................................. 22, 26, 27
Adjusting ............................................................................................................................. 37, 38
Adjusting the volume.............................................................................................................. 29
Aliasing ....................................................................................................................................... 55
Alternative Mode 1 (Mixer Overlay)...................................................................................44
Alternative Mode 2 (Video Mixing Renderer 9)..............................................................44
Apply effects ......................................................................................................................26, 28
Apply to all.................................................................................................................................50
Apply to all subsequent objects............................................................................................ 51
ATN: ............................................................................................................................................ 55
Audio.............................................................................................................................37, 40, 55
audioid......................................................................................................................................... 55
AVCHD....................................................................................................................................... 55
AVI............................................................................................................................................... 55
B
Backup disc................................................................................................................................ 55
Browser....................................................................................................................................... 56
Button..........................................................................................................................................56
C
Cache........................................................................................................................................... 56
Catooh – the Online Content Library...........................................................................46, 54
CC................................................................................................................................................. 56
Clean-up Wizard...............................................................................................................42, 45
Clip level ..................................................................................................................................... 56
Clipboard.................................................................................................................................... 56
Color ............................................................................................................................................ 38
Compatibility Mode (Video for Windows).......................................................................44
Compatible.................................................................................................................................56
Connecting your GoPro to your PC ...................................................................................... 13
Context help .............................................................................................................................. 52
Context menu............................................................................................................................ 57
Copy.......................................................................................................................................48, 51
Copyright................................................................................................................................2, 57
CPU.............................................................................................................................................. 57
Cut................................................................................................................................................48
D
Deactivate Program.............................................................................................................8, 53
Page 71

Index 71
Delete.......................................................................................................................................... 49
Dialog...........................................................................................................................................57
Dialog and Interface Reference.............................................................................................37
Disc project ................................................................................................................................57
Disc types ...................................................................................................................................57
Display duration.................................................................................................................41, 50
Display tooltips..........................................................................................................................53
Dissolve.......................................................................................................................................57
DNS ............................................................................................................................................. 58
Domain....................................................................................................................................... 58
Domain transfer ....................................................................................................................... 58
Downmix.................................................................................................................................... 58
Drag & drop............................................................................................................................... 58
E
Edit Menu................................................................................................................................... 48
Edit objects.................................................................................................................................37
Edit Video ............................................................................................................................18, 26
Effects .......................................................................................................................................... 16
Effects Menu............................................................................................................................. 50
Effects Settings......................................................................................................................... 50
Exchange video clips.........................................................................................................26, 27
Exit............................................................................................................................................... 47
Export single frames as BMP files ....................................................................................... 47
Export to a mobile device .......................................................................................................36
F
Fader ........................................................................................................................................... 58
Field ............................................................................................................................................. 58
File Menu ................................................................................................................................... 45
Finish movie .................................................................................................... 9, 22, 34, 37, 47
Finish Project............................................................................................................................. 47
Flip menu.................................................................................................................................... 59
Frame .......................................................................................................................................... 59
From GoPro to PC......................................................................................................................13
G
GoPro action cam settings ...................................................................................................... 11
H
Handles....................................................................................................................................... 59
Hard disk.................................................................................................................................... 59
Hard disk drive.......................................................................................................................... 59
Hardware ................................................................................................................................... 59
Hardware Acceleration (Direct 3D)................................................................................... 44
HDD ............................................................................................................................................60
HDTV.......................................................................................................................................... 60
Page 72

72
www.magix.com
Help.............................................................................................................................................. 52
Help Menu ................................................................................................................................. 52
HTTP............................................................................................................................................60
Hyperlink ....................................................................................................................................60
I
ID3 tags ......................................................................................................................................60
Image...........................................................................................................................................60
IMAP ............................................................................................................................................61
Import..........................................................................................................................................46
Insert......................................................................................................................................48, 51
Insert Title...........................................................................................................................26, 28
Insert Transitions ................................................................................................................. 9, 31
Interlace.......................................................................................................................................61
Intro ..............................................................................................................................................61
J
jpx..................................................................................................................................................61
K
Key features..................................................................................................................................9
L
Language .................................................................................................................................... 47
Load recently opened projects .............................................................................................45
M
MAGIX News Center.............................................................................................................. 54
MAGIX Online Album .....................................................................................................46, 54
MAGIX Online World............................................................................................................. 54
MAGIX Website Maker .........................................................................................................54
Manual cut.................................................................................................................................30
Manual editing mode ............................................................................21, 22, 23, 25, 30, 37
Menu ............................................................................................................................................61
Menu bar.....................................................................................................................................61
Menu Reference ................................................................................................................22, 45
MIDI............................................................................................................................................. 62
Motherboard ............................................................................................................................. 62
Move background music........................................................................................................ 33
Move the time section of the video clip in the object .................................................... 27
MP3 .............................................................................................................................................62
MPEG ..........................................................................................................................................62
MS audio ....................................................................................................................................62
MTC............................................................................................................................................. 62
Page 73

Index 73
N
New ............................................................................................................................................. 45
Noise Sample.............................................................................................................................63
NTSC (USA, Japan)..................................................................................................................63
Numeric keypad ........................................................................................................................63
O
Object properties...............................................................................................................42, 51
Offset ...........................................................................................................................................63
OGG VORBIS .............................................................................................................................63
Online.......................................................................................................................................... 46
Online Update............................................................................................................................53
Open............................................................................................................................................ 45
Open magix.info........................................................................................................................52
Optimize......................................................................................................................................38
Optimize video sound.........................................................................................................9, 29
P
PAL (Europe) .............................................................................................................................63
PDF manual ................................................................................................................................52
Personal tips from Tilman Herberger ............................................................................ 11, 52
Play marker.................................................................................................................................63
Playlist..........................................................................................................................................63
Plug-in......................................................................................................................................... 64
POP3 ...........................................................................................................................................64
Preface........................................................................................................................................... 3
Program interface .....................................................................................................................22
Program settings............................................................................................................... 43, 47
Program start............................................................................................................................. 18
Program...................................................................................................................................... 47
Project settings.................................................................................................................. 43, 47
Project......................................................................................................................................... 47
Provider ...................................................................................................................................... 64
Publish ..........................................................................................................................................17
R
RAM (Random Access Memory)........................................................................................ 64
Ratio ............................................................................................................................................ 64
Reactivate hint dialogs ........................................................................................................... 44
Red Book .................................................................................................................................... 65
Register online...........................................................................................................................53
Remove background music............................................................................................... 9, 32
Remove entire background music....................................................................................... 49
Remove object start................................................................................................................ 49
Removing an object end......................................................................................................... 49
Reset............................................................................................................................................. 51
Page 74

74
www.magix.com
Reset Program Settings to Default... ................................................................................... 47
Restore.................................................................................................................................48, 65
Rotate 90°..................................................................................................................................50
S
Save..............................................................................................................................................45
Save as... .....................................................................................................................................46
Save on computer .................................................................................................................... 34
Scene ........................................................................................................................................... 65
Scene recognition.....................................................................................................................50
Screenshot ................................................................................................................................. 65
Select All.....................................................................................................................................50
Select template......................................................................................................................... 20
Select video clips.............................................................................................9, 19, 24, 26, 37
Serial number ........................................................................................................................ 8, 18
Settings ....................................................................................................................................... 47
Share Menu................................................................................................................................ 52
Shorten background music.................................................................................................... 33
Show introduction video online............................................................................................ 52
Show video tips online............................................................................................................ 52
Slider............................................................................................................................................ 65
SMTP........................................................................................................................................... 65
Software......................................................................................................................................66
Sound and music........................................................................................................ 26, 29, 32
Speed........................................................................................................................................... 39
Splitting objects........................................................................................................................49
Start video editing.................................................................................................................... 26
Storyboard mode......................................................................................................................66
Submenu.....................................................................................................................................66
Super Video CD (SVCD)........................................................................................................ 66
Support ..........................................................................................................................................6
T
Template mode............................................................................................... 9, 20, 25, 26, 37
Templates ..................................................................................................................................39
Timeline ...................................................................................................................................... 26
Tips for Program Help..............................................................................................................10
Title and text ......................................................................................................................37, 39
Toolbar........................................................................................................................................ 67
Top-level domain .....................................................................................................................67
Traffic .......................................................................................................................................... 67
Transitions ..................................................................................................................................41
U
Undo ............................................................................................................................................48
Upload to Internet.................................................................................................................... 35
Universal Plug & Play .............................................................................................................. 67
URL............................................................................................................................................... 67
Page 75

Index 75
V
Video Mode............................................................................................................................... 44
Video monitor............................................................................................................. 22, 23, 24
View duration ........................................................................................................................... 50
VirtualDub plug-in................................................................................................................... 68
VST and DirectX plug-ins...................................................................................................... 68
W
WAV........................................................................................................................................... 68
Wave........................................................................................................................................... 68
Wave file.................................................................................................................................... 68
Webhosting............................................................................................................................... 68
Webmail..................................................................................................................................... 68
Webmaster................................................................................................................................ 68
Webserver................................................................................................................................. 69
WMA.......................................................................................................................................... 69
World Wide Web (WWW) ................................................................................................. 69
 Loading...