

Page 1
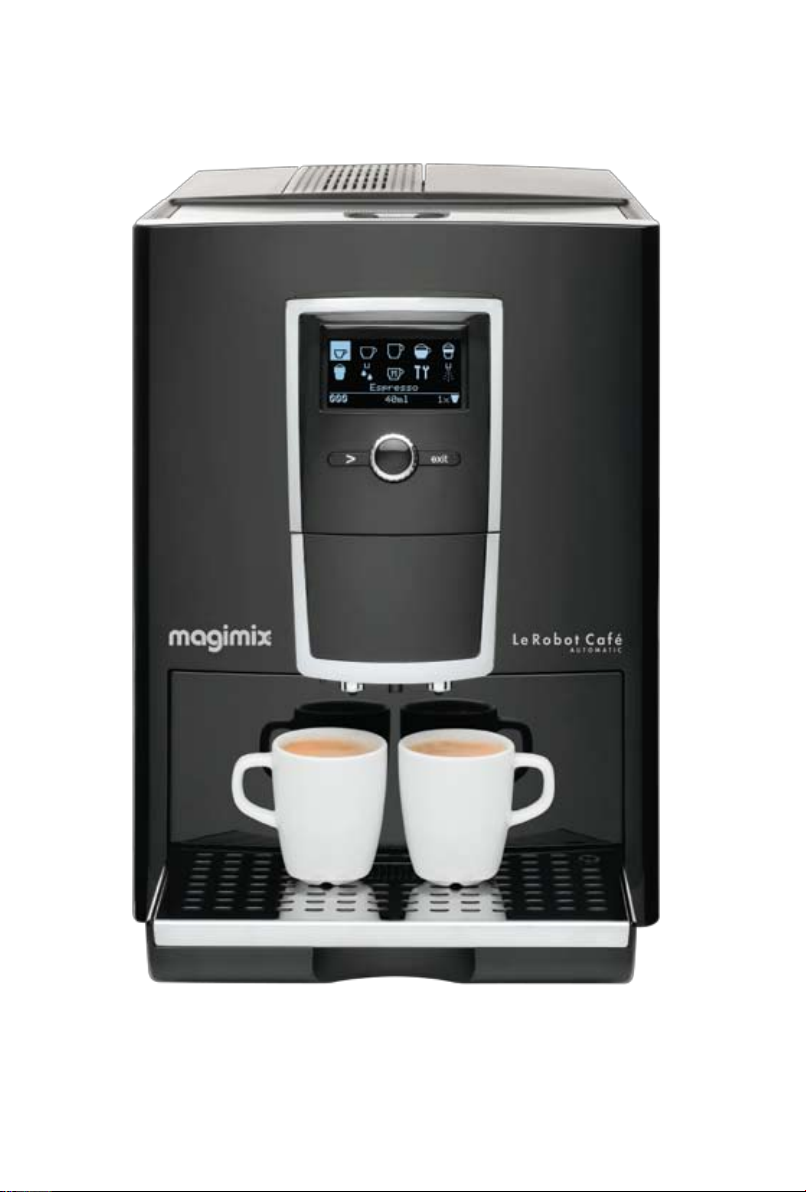
Le Robot Café Automatic
Fr
Mode d’emploi
Nl
Gebruiksaanwijzing
Uk
Instructions of use
www.magimix.com
Page 2
Page 3
1
SOMMAIRE
Descriptif 2
Avant la première utilisation
Rinçage 4
Réglage langue 4
Réglage horloge 5
Installation du filtre 6
Niveau de dureté d’eau 7
Réglage de la température 7
Préparation d’un café
Préparation de l’appareil 8
Expresso / Café Crème / Café Lungo 8
Réglage de la finesse de la mouture 9
Café moulu 9
Préparation d’un cappuccino / latte machiatto 10
Lait chaud / eau chaude 11
Entretien
Entretien régulier 12
Rinçage buse 13
Nettoyage buse 13
Changement filtre à eau 14
Programme de nettoyage automatique 14
Programme de détartrage automatique 15
Recettes 16
Messages écran 17
Que faire si 18
Consignes de sécurité 19
Page 4
2
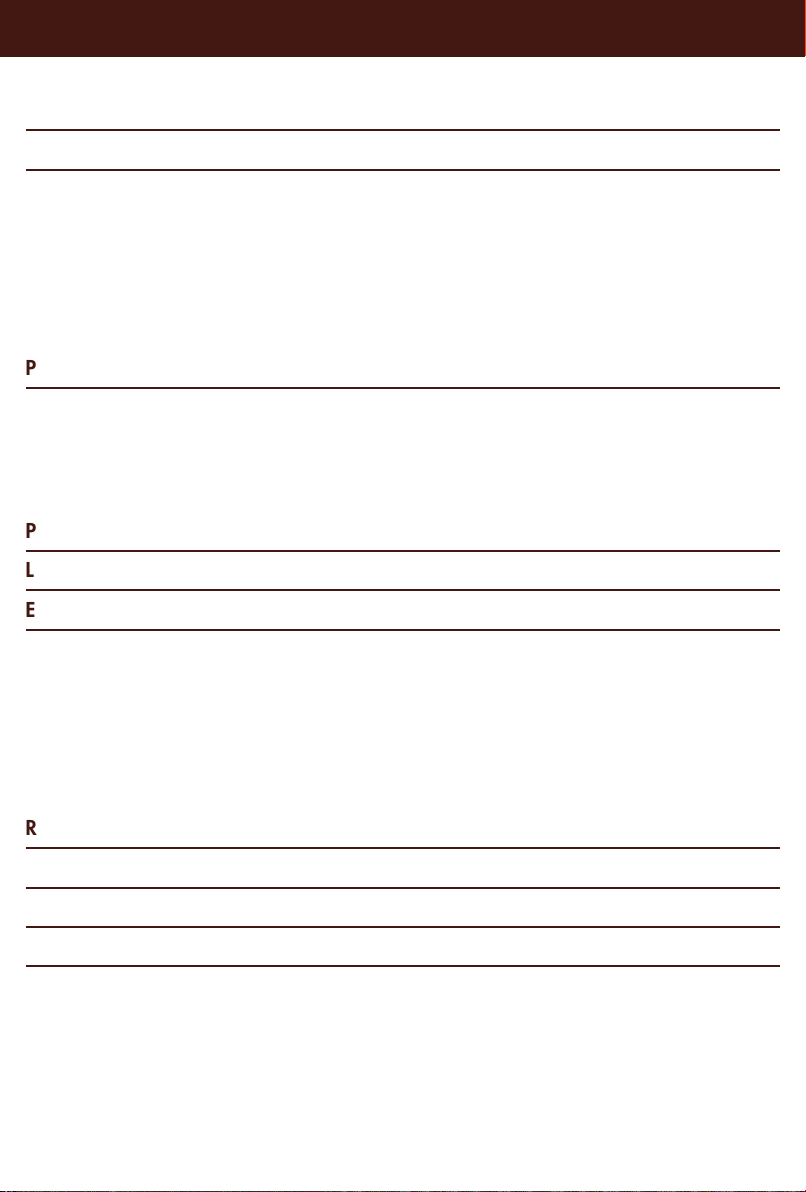
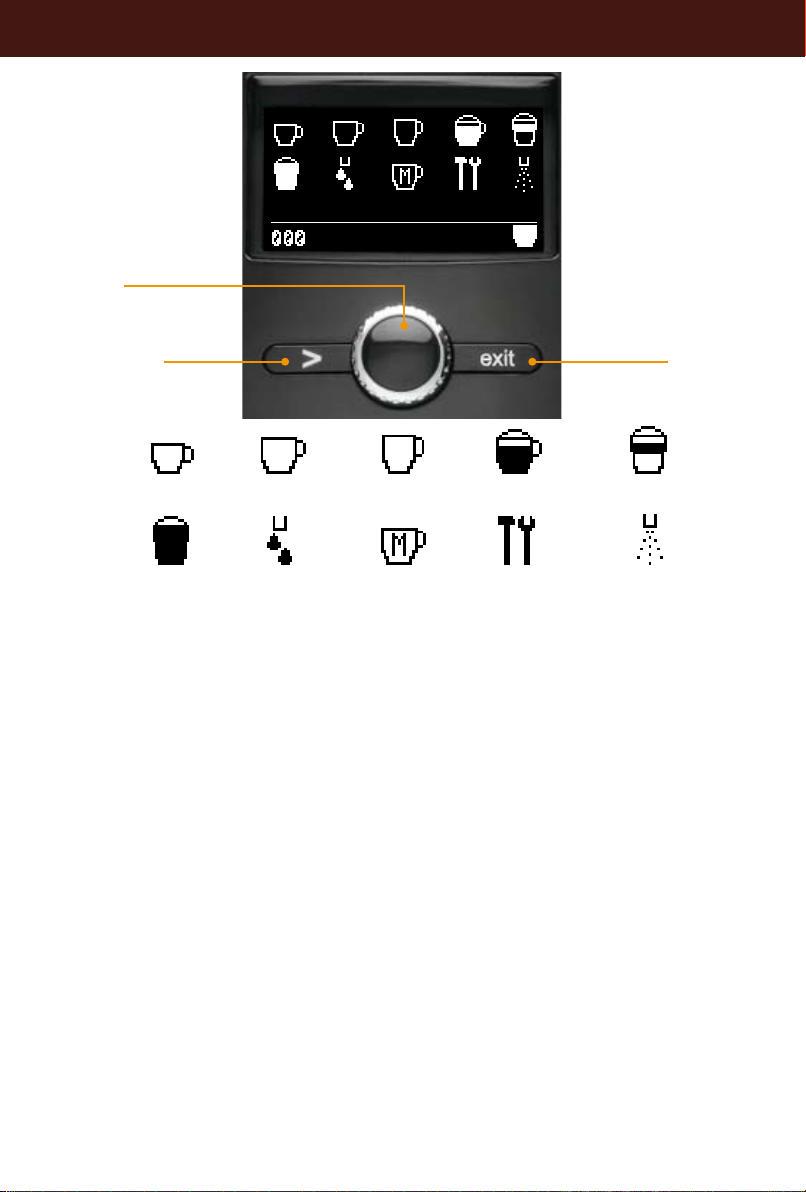
DESCRIPTIF
Lisez attentivement les consignes de sécurité avant d’utiliser votre appareil.
Compartiment à café en grains avec
réglage de la finesse de la mouture
Compartiment café moulu
1 dose max.
Bouton marche /
mise en veille
Réservoir d’eau
amovible (1,8 l.)
Ecran digital
Touches de sélection
Têtes d’écoulement
Interrupteur
marche/arrêt
Bac à marc
Touche activation
chauffe tasse
(uniquement sur le
modèle chrome)
Accessoire lait
Carafe à lait*
Tiroir à marc
* uniquement sur le modèle Chrome
Cuillère-doseur : 1 cuillère rase = 1 dose (1 café)
Page 5
3
Bouton rotatif
Espresso
40ml 1x
de sélection/validation
DESCRIPTIF
Touche de sélection
pour adapter chaque
préparation
Espresso Café Crème* Café Lungo Cappuccino Latte Macchiato
Lait chaud Eau chaude Mon café Paramètres Entretien
Recettes au café
Filtre
Dureté de l’eau
Température
Temps
Langue
Touche de sortie
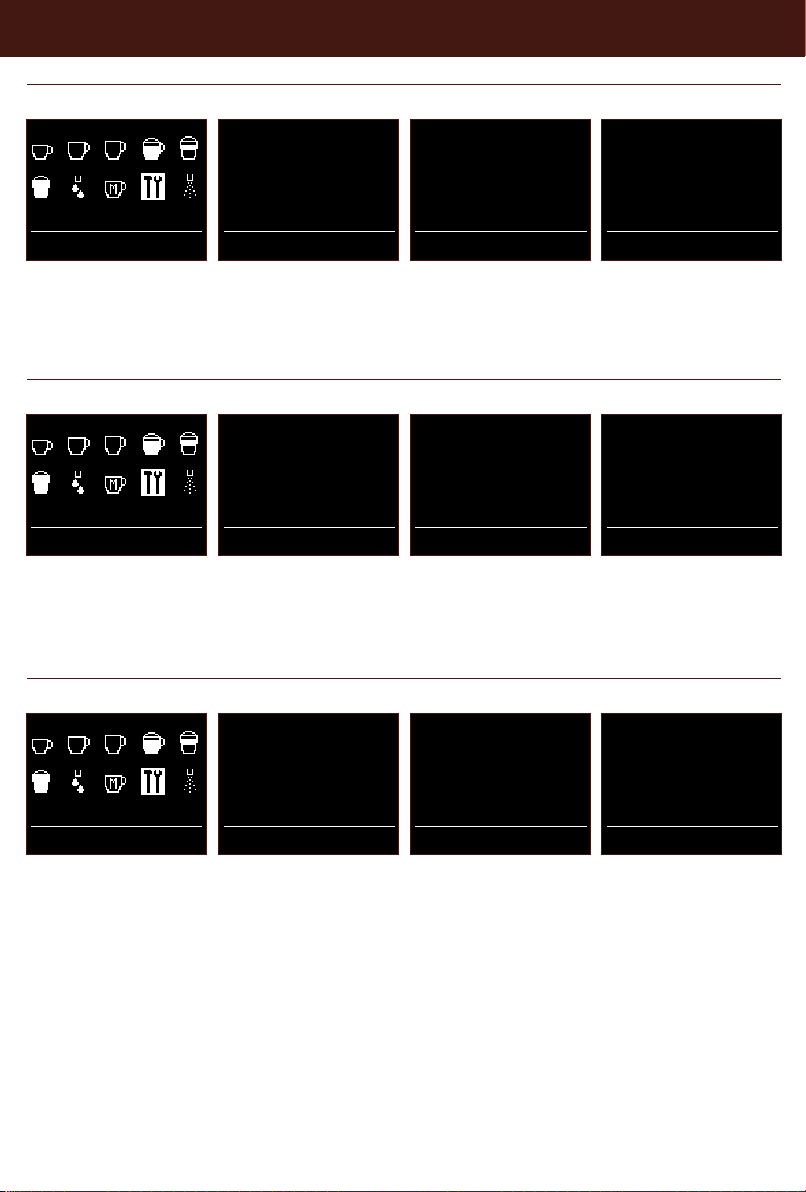
LISTE DES PARAMETRES
>
Vous pouvez modifier la présélection de chaque préparation.
Vous pouvez régler l’option filtre (p.6).
>
Vous pouvez régler votre dureté d’eau entre 1 et 4. (p.7).
>
Vous pouvez régler la température de votre café en fonction de 3 niveaux.
>
L’option Individuelle, vous permet de régler pour chaque café la température.
Vous pouvez régler l’heure de mise sous/hors tension.
>
Vous pouvez sélectionner la langue de votre choix (p.4).
>
Rinçage final
Mode ECO
Statistique
La touche exit vous permet de revenir au menu précédent à tout moment.
* café medium
Vous pouvez rincer votre système.
>
Vous pouvez régler la mise en veille différée.
>
Vous pouvez consulter le nombre d’utilisations de chaque fonction.
>
Page 6

4
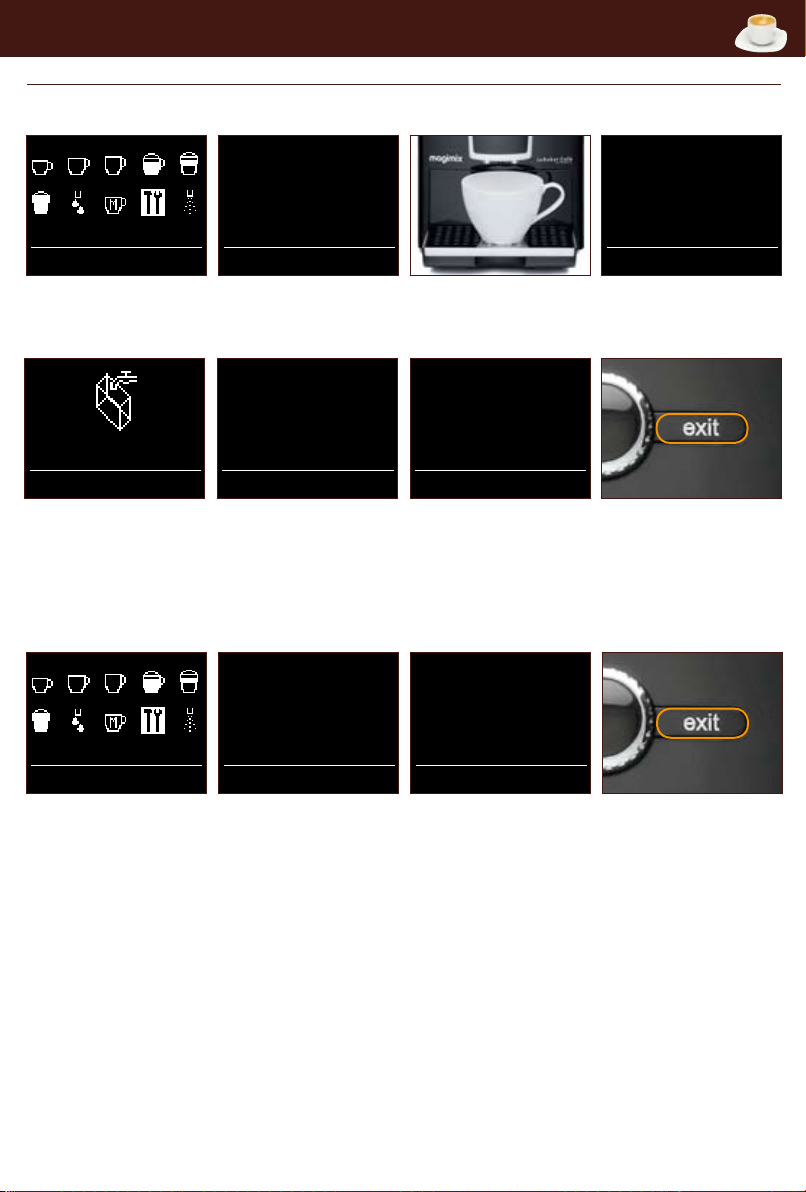
AVANT LA PREMIERE UTILISATION
Rinçage
Lors de la première mise en service, vous devez procéder au rinçage du circuit d’eau pour éliminer l’eau
résiduelle du système.
Ajouter eau
Branchez la prise.
Appuyez.
Placez un récipient.
Appuyez sur l’interrupteur.
Remplir système
Appuyez sur le bouton
Chauffage en cours
Remplissage système
Placez un récipient.
rotatif.
Réglages : le déplacement dans le menu se fait en tournant le bouton rotatif
Réglage langue
Langues : français
Sélectionnez la langue
désirée.
Appuyez sur le bouton
Paramètres
Tournez le bouton
jusqu’à Paramètres.
Appuyez pour valider.
Langues
Sélectionnez Langues.
Appuyez sur le bouton
rotatif.
rotatif.
Remplissez d’eau fraîche.
Rincer svp
Appuyez sur le bouton
rotatif.
Appuyez pour revenir au
menu.
Page 7
5
AVANT LA PREMIERE UTILISATION
Réglage horloge
Vous pouvez appuyer sur la touche exit à tout moment pour revenir au menu précédent.
Paramètres
Tournez le bouton
jusqu’à Paramètres.
Appuyez pour valider.
Temps
Sélectionnez Temps.
Appuyez sur le bouton
rotatif.
Sélectionnez Horloge.
Appuyez sur le bouton
rotatif.
Horloge
Réglage heure de mise en marche automatique
Vous pouvez appuyer sur la touche exit à tout moment pour revenir au menu précédent.
Paramètres
Tournez le bouton
jusqu’à Paramètres.
Appuyez pour valider.
Temps
Sélectionnez Temps.
Appuyez sur le bouton
rotatif.
Allumage auto à
Sélectionnez Allumage
auto à.
Appuyez sur le bouton
rotatif.
Réglage heure d’arrêt automatique
Vous pouvez appuyer sur la touche exit à tout moment pour revenir au menu précédent.
Paramètres
Tournez le bouton
jusqu’à Paramètres.
Appuyez pour valider.
Temps
Sélectionnez Temps.
Appuyez sur le bouton
rotatif.
Arrêt auto après
Sélectionnez Arrêt auto
après.
Appuyez sur le bouton
rotatif.
Réglage de l’heure
Sélectionnez Réglage.
Réglez l’heure. Appuyez.
Réglez les minutes.
Appuyez.
Allumage automatisé
Sélectionnez Allumage
automatisé.
Réglez l’heure désirée.
Arrêt automatique
0.5
1h
2h
3h
4h
Sélectionnez.
Appuyez sur le bouton rotatif.
Page 8
6
AVANT LA PREMIERE UTILISATION
Installation filtre à eau
• Option 1
Vous pouvez choisir d’activer l’option filtre. Dans ce cas, le programme dureté de l’eau ne s’affiche plus.
Insérer filtre ?
OUI
Sélectionnez OUI.
Appuyez sur le bouton
rotatif.
Appuyez pour revenir au
menu.
Paramètres
Tournez le bouton
jusqu’à Paramètres.
Appuyez pour valider.
Ajouter eau
Remplissez d’eau fraîche.
Filtre
Sélectionnez Filtre.
Appuyez sur le bouton
rotatif.
Videz le réservoir. Insérer la
cartouche dans le réservoir.
Placez un récipient.
Rinçage filtreInsérer filtre
Appuyez.
• Option 2
Vous pouvez choisir de ne pas activer l’option filtre. Dans ce cas vous devez régler le niveau de dureté d’eau
(voir p.7)
Filtre
Insérer filtre ?
NON
Paramètres
Tournez le bouton
jusqu’à Paramètres.
Appuyez pour valider.
Sélectionnez Filtre.
Appuyez sur le bouton
rotatif.
Sélectionnez NON.
(rotation anti horaire)
Appuyez sur le bouton
rotatif.
Appuyez pour revenir au
menu.
Page 9
7
AVANT LA PREMIERE UTILISATION
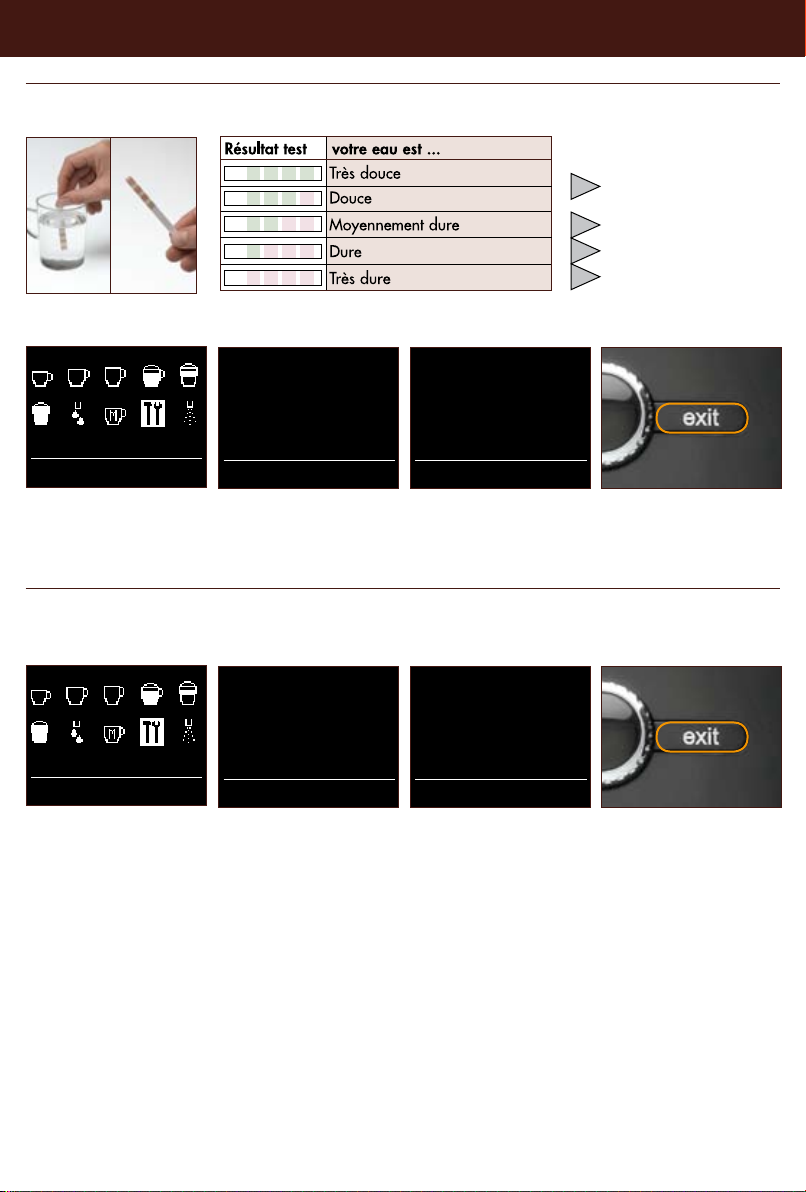
Niveau de dureté d’eau
Uniquement si vous n’avez pas installé votre filtre, vous devez régler le niveau de dureté d’eau afin que le
système vous indique à quel moment un détartrage sera nécessaire.
Réglage
machine
1-7°
1
8-14°
2
15-21°
3
> 21°
1 s 1 min
Plongez la bandelette test
dans l’eau froide.
Comparez.
Dureté d’eau
--------------
-------------
Dureté d’eau
4
Paramètres
Tournez le bouton
jusqu’à Paramètres.
Appuyez pour valider.
Réglage de la température
La température du café peut être réglée sur 3 niveaux en fonction de votre préférence.
NORMALE – ELEVEE – MAXIMALE – INDIVIDUELLE
L’option individuelle vous permet de sélectionner la température souhaitée pour chaque type de café.
Paramètres
Tournez le bouton
jusqu’à Paramètres.
Appuyez pour valider.
Sélectionnez Dureté d’eau.
Appuyez sur le bouton
rotatif.
Température
Sélectionnez Température.
Appuyez sur le bouton
rotatif.
Niveau 2 : 8-14°
Sélectionnez le niveau.
Appuyez sur le bouton
rotatif.
Normale
Elevée
Maximale
Individuelle
Sélectionnez le niveau.
Appuyez sur le bouton
rotatif.
Appuyez pour revenir au
menu Paramètres.
Appuyez pour revenir au
menu.
Page 10
8
PREPARATION D’UN CAFE
Préparation de l’appareil
Remplissez d’eau. Remplissez le compartiment
à grains.
Expresso / Café Crème / Café Lungo
A tout moment vous pouvez lancer votre préparation en appuyant sur le bouton rotatif.
Espresso
40 ml 1x
Sélectionnez le café désiré.
Appuyez sur le bouton
rotatif si les réglages vous
conviennent.
Espresso
40 ml 1x
Sélectionnez le volume désiré
à l’aide du bouton rotatif.
Appuyez si vous souhaitez
modifier les réglages.
Appuyez.
Espresso
40 ml 1x
Sélectionnez la force désirée
à l’aide du bouton rotatif.
Placez 1 ou 2 tasses.
Appuyez.
Espresso
40 ml 1x
Sélectionnez le nombre de
tasses à l’aide du bouton
rotatif. Appuyez sur le bouton
rotatif pour obtenir votre
préparation.
Page 11

9
PREPARATION D’UN CAFE
Réglage de la finesse de la mouture
Plus les grains sont clairs (légèrement torréfiés) plus le café doit être moulu finement.
Le réglage de la finesse de la mouture doit se faire uniquement en cours de fonctionnement du broyeur sous
peine d’endommager l’appareil.
Réglez vers la droite : plus gros
Réglez vers la gauche : plus fin
Ouvrez. Réglez. Refermez la porte.
Café moulu
Café moulu prêt
Versez le café moulu dans
le compartiment. Fermez le
couvercle.
Ne dépassez jamais 1 cuillère-doseur de café moulu.
Ne jamais introduire autre chose que du café moulu (à l’exception des pastilles de nettoyage).
Si vous ouvrez le compartiment à poudre par erreur ou si vous n’appuyez sur aucune touche après avoir versé
du café moulu, le message Café moulu prêt apparaît. La machine est rincée automatiquement via les têtes
d’écoulement. Refermez le couvercle et attendez 1 minute.
Placez 1 tasse.
Appuyez sur le bouton
rotatif.
Page 12
10
PREPARATION CAPPUCCINO / LATTE MACCHIATO
Cappuccino / Latte Macchiato
Les réglages de chaque préparation sont présélectionnés. Toutefois vous pouvez régler pour chaque préparation
la force, le volume et la quantité de mousse. Il n’est pas possible de préparer 2 tasses de lait chaud simultanément.
Il n’est possible de préparer 2 tasses cappuccino simultanément que sur le modèle chrome.
Remplissez d’eau.
Cappuccino
200 ml 20%
Sélectionnez la préparation
désirée. Appuyez sur le
Remplissez le compartiment
à grains.
1x
Appuyez si vous souhaitez
modifier les réglages.
Fixez l’accessoire mousse
de lait.
Cappuccino
200 ml 20%
1x
Sélectionnez la force désirée
à l’aide du bouton rotatif.
bouton rotatif si les réglages
vous conviennent.
Cappuccino
200 ml 20%
1x
Sélectionnez le volume désiré
à l’aide du bouton rotatif.
Appuyez.
Cappuccino
200 ml 20 %
1x
Sélectionnez le volume de
mousse désiré.
Appuyez sur le bouton rotatif.
Rincez votre buse ainsi que votre carafe* immédiatement après utilisation. (voir p.13)
* uniquement sur le modèle Chrome
Placez le tuyau dans un
récipient ou la carafe à
lait* rempli d’1/3 de lait.
Appuyez.
Quelques secondes
s’écoulent avant
la préparation.
Page 13

11
PREPARATION LAIT CHAUD / EAU CHAUDE
Lait chaud
Les réglages de chaque préparation sont présélectionnés. Toutefois vous pouvez régler pour chaque préparation le
volume.
Il n’est possible de préparer 2 tasses de lait chaud simultanément que sur le modèle Chrome.
Lait chaud
150 ml
Fixez l’accessoire mousse
de lait.
Lait chaud
150 ml
Sélectionnez le volume désiré.
Appuyez sur le bouton rotatif.
Placez le tuyau dans un
récipient ou la carafe à
lait* rempli d’1/3 de lait.
Sélectionnez Lait chaud.
Appuyez sur le bouton rotatif
si le réglage vous convient.
Appuyez si vous souhaitez
modifier les réglages.
Rincez votre buse ainsi que votre carafe* immédiatement après utilisation. (voir p.13)
* uniquement sur le modèle chrome
Eau chaude
Eau chaudeEau chaude
Sélectionnez Eau chaude.
Appuyez sur le bouton rotatif
Appuyez si vous souhaitez
modifier les réglages.
150 ml
Sélectionnez le volume désiré.
Appuyez sur le bouton rotatif.
1x
si le réglage vous convient.
Page 14
12
ENTRETIEN
Avant entretien : l’appareil doit être débranché et froid. Ne nettoyez pas les éléments au lave-vaisselle.
N’utilisez pas d’éponge abrasive ou de détergent agressif.
Entretien régulier
• Réservoir à eau
• Bac + grille
• Contacts au fond du bac
Videz le bac collecteur
et le bac à marc
Nettoyez avec un chiffon
sec.
Retirez la porte.
Nettoyez et essuyez bien.
(eau + détergent doux).
Retirez le cache.
Déverrouillez à l’aide de la
poignée tout en appuyant
sur le bouton rouge.
Essuyez le corps de
l’appareil avec un chiffon
humide.
Démontez l’accessoire.
Nettoyez le sous l’eau.
Démontez l’accessoire.
Nettoyez avec un chiffon
humide et séchez le
compartiment et le couvercle.
Remontez l’accessoire
et le cache.
Nettoyez avec un chiffon
humide l’entonnoir + le
filtre.
Replacez l’unité centrale
au fond de la machine.
Verrouillez à l’aide de la
poignée en appuyant sur le
bouton rouge.
Page 15
13
Rinçage buse
ENTRETIEN
Rincer buse vapeur
Sélectionnez Entretien.
Appuyez sur le bouton
rotatif.
Monter tuyau sur buse
et placer le sur
le bac collecteur.
Appuyez sur le bouton
rotatif.
Nettoyage buse
Sélectionnez Entretien.
Appuyez sur le bouton
rotatif.
Monter tuyau sur buse et
placer le dans le produit de
nettoyage.
Placez un récipient.
Rinçage buse vapeur
Ne pas enlever le tuyau
Placez un récipient.
Nettoyage buse vapeur
Ne pas enlever le tuyau
Sélectionnez Rincer buse
vapeur. Appuyez sur le
bouton rotatif.
Nettoyer buse vapeur
Sélectionnez Nettoyez
buse vapeur. Appuyez sur
le bouton rotatif.
Montez le tuyau sur la
buse. Appuyez sur le
bouton rotatif.
Montez le tuyau sur la
buse et placez l’autre
extremité dans le produit
de nettoyage.
Appuyez sur le bouton
rotatif.
Page 16
14
ENTRETIEN
Changement filtre à eau
Filtre
Sélectionnez Paramètres..
Appuyez.
Sélectionnez Filtre.
Appuyez sur le bouton
Placez un récipient.
rotatif.
Changer filtre
Sélectionnez Changer filtre.
Appuyez sur le bouton
rotatif.
Videz le réservoir.
Changer la cartouche dans
le réservoir.
Appuyez à nouveau sur le
bouton rotatif.
Programme de nettoyage automatique
Un message sur l’écran vous indique quand un nettoyage est nécessaire.
Le programme de nettoyage en cours d’exécution ne doit pas être interrompu.
Nettoyer système
Insérer filtre?
OUI
Sélectionnez OUI Appuyez
sur le bouton rotatif.
Rinçage filtreChanger filtre
Pastille de nettoyage dans
compartiment/poudre
Sélectionnez Entretien.
Appuyez.
Démarrer nettoyage
Appuyez sur le bouton
rotatif.
Placez un récipient.
Nettoyage en cours
15 min.
Sélectionnez Nettoyer
système. Appuyez sur le
bouton rotatif.
Vider bacs
Videz les bacs.
Placez une pastille de
nettoyage dans le
compartiment café moulu.
Page 17
15
Programme de détartrage automatique
Un message sur l’écran vous indique quand un détartrage est nécessaire.
Le programme de détartrage en cours d’exécution ne doit pas être interrompu.
Ne jamais utiliser de vinaigre ou un produit à base de vinaigre pour détartrer.
Retirez le filtre du réservoir avant le détartrage.
ENTRETIEN
Sélectionnez Entretien.
Appuyez sur le bouton
rotatif.
Vider réservoir
Videz le réservoir d’eau.
Vider bacs
Videz les bacs.
Placez un récipient.
Remplissez 0.5 L d’eau
+ détartrant.
Remplir le réservoir.
Détartrer système
Sélectionnez. Appuyez sur
le bouton rotatif.
Démarrer détartrageAjouter eau
Appuyez sur le bouton
rotatif.
Démarrer rinçageAjouter eau
Appuyez sur le bouton
rotatif.
Vider bacs
Videz les bacs.
Détartrage en cours
20 min.
Page 18
16
RECETTES
L’Expresso
L’expresso se caractérise par sa couleur, entre roux et noisette, sa crème onctueuse et
ses arômes puissants. Un expresso représente à peu près 40 à 50 ml de café noir servi
dans une tasse de 60 ml.
Le Cappuccino
Remplissez au 1/3 une grande tasse de mousse de lait (voir chapitre Cappuccino p.10).
Faites mousser le lait à l’aide de l’accessoire cappuccino. Faites couler un expresso sur
votre mousse et saupoudrez de cacao.
Le Ristretto
C’est un concentré d’expresso : il est fait avec la même quantité de café tout en étant
2 fois moins dilué. Son volume ne dépasse pas 30 ml.
Le Macchiato
« Macchiato » signifie « tacheté » en italien. Proche du cappuccino, il est plus fort et
plus aromatisé : préparez une tasse d’expresso et déposez une cuillère à café de lait
mousseux.
Page 19

17
Messages écran Actions
MESSAGES ECRAN
Remplir système
Ajouter eau
Ajouter grains de café
Vider bacs
Bacs absents
SVP nettoyer Nettoyez la machine (voir p.14).
SVP détartrer Détartrez la machine (voir p.15).
Changer filtre Remplacez le filtre (voir p.14).
Fermer la porte
Rincer SVP
Appuyez sur le bouton central.
Retirez ou changez le filtre à eau.
Remplissez d’eau fraîche.
Positionnez correctement le réservoir d’eau.
Versez du café en grains dans le compartiment.
Le message ne s’éteint que lorsque vous broyez du café à nouveau.
Videz les bacs.
Nettoyez et essuyez bien les contacts au fond du bac.
Positionnez correctement les bacs.
Nettoyez et essuyez bien les contacts au fond du bac.
Assurez-vous que l’unité centrale est bien positionnée (voir p.12).
Refermez la porte.
Placez un récipient sous les têtes d’écoulement.
Appuyez sur le bouton central.
Page 20

18
QUE FAIRE SI
Question Réponse
Le café ne coule pas. Contrôlez la position du réservoir.
Remplissez le réservoir d’eau.
Contrôlez la position des bacs.
Appareil entartré
Nettoyez le filtre de l’unité centrale.
Le café coule trop lentement. Mouture trop fine
gros.
Le café est trop clair ou pas assez corsé. Remplissez le réservoir à grains.
Diminuez le volume de café en ml.
Sélectionnez un café plus corsé dans le programme force du
café.
Réduisez la finesse de la mouture.
Mauvais goût.
Café pas assez chaud. Changez le réglage de la température du café.
Une partie seulement du café s’écoule. Remplissez le compartiment à grains.
Bruit anormal du broyeur. Remplissez le compartiment à grains.
Lait pas assez mousseux. Rincez votre buse.
L’accessoire Cappuccino n’aspire plus. Nettoyez le tube (voir p.13).
Impossible de retirer de l’eau chaude. Nettoyez le système.
Eau autour de l’appareil. Videz le bac collecteur.
L’appareil ne fonctionne plus. Vérifiez les branchements.
Café: éventé ? acide ?
Eau: chlorée ?
bouteille (faiblement minéralisée).
Après un détartrage: procédez à un rinçage complémentaire,
faites couler un réservoir d’eau claire.
Portez votre appareil à un service après-vente agréé Magimix.
Utilisez du lait entier froid.
Vérifiez le bon emboîtement des éléments de l’accessoire.
Refermez le compartiment à poudre et attendez 1 minute.
Rincez.
Appelez un service après-vente agréé Magimix ou notre service
consommateurs au 01.43.98.36.36.
> détartrez.
---
> réglez la finesse de la mouture sur plus
---
> changez de grains de café.
---
> utilisez la cartouche filtrante ou de l’eau en
---
Ce symbole indique que ce produit ne doit pas être traité avec les déchets ménagers. Il doit être
apporté dans un point de collecte adapté au recyclage des équipements électriques et électroniques.
Pour connaître l’emplacement des points de collecte, vous pouvez contacter votre municipalité ou votre
déchetterie.
Nous nous réservons le droit de modifier à tout moment et sans préavis les caractéristiques techniques de cet
appareil. Les informations figurant dans ce document ne sont pas contractuelles.
Tous droits réservés pour tous pays par Magimix.
Page 21

19
CONSIGNES DE SECURITE
• S’assurer que le voltage de votre installation correspond bien à celui indiqué sur
la plaque signalétique.
• Ne pas laisser les enfants sans surveillance lorsqu’ils sont à proximité de
l’appareil. L’appareil n’a pas été conçu pour être utilisé par des enfants.
• Cet appareil n’est pas conçu pour être utilisé par des personnes (y compris
des enfants) à aptitudes physiques, sensorielles ou mentales réduites, manque
d’expérience et de connaissances à moins qu’elles n’aient fait l’objet d’une
première supervision ou n’aient reçu des instructions concernant l’emploi de
l’appareil par une personne responsable de leur sécurité.
• L’appareil doit toujours être branché sur une prise de terre.
• Ne pas laisser pendre le cordon du plan de travail.
• Ne jamais mettre l’appareil ou son cordon en contact avec une surface chaude
ou mouillée.
• Débrancher toujours l’appareil pour remplir le réservoir, le déplacer, le nettoyer
et après chaque utilisation. Ne jamais tirer sur le cordon pour le débrancher.
• Ne pas laisser votre appareil et/ou son câble à proximité d’une source de
chaleur.
• Pendant l’utilisation, éviter le contact avec certaines parties de l’appareil qui
peuvent devenir brûlantes (tête d’écoulement, buse…).
• Ne jamais chauffer de liquides inammables avec la vapeur.
• Verser uniquement de l’eau froide dans le réservoir d’eau et pas d’autres
liquides.
• Les pannes dues à une absence de détartrage ou à un détartrage non conforme
au mode d’emploi ne sont pas couvertes par la garantie.
• Ne jamais utiliser l’appareil après une chute ou s’il est en panne. Si le câble
d’alimentation est endommagé, il doit être remplacé par le fabricant, son
service après-vente ou des personnes de qualification similaire afin d’éviter tout
danger.
• Ne pas utiliser l’appareil à l’extérieur.
• Cet appareil est destiné uniquement à un usage domestique.
Les utilisations dans les cas suivants ne sont pas couvertes par la garantie : dans
des coins de cuisines réservés au personnel dans des magasins, bureaux et autres
environnement professionnels, dans des fermes, par les clients d’hôtels, motels
et autres environnements à caractère résidentiel et dans des environnements de
types chambres d’hôtes.
Page 22

20
INHOUDSOPGAVE
Beschrijving 21
Voor de eerste ingebruikname
Doorspoelen 23
Taal instellen 23
De klok instellen 24
Het waterfilter inzetten 25
Hardheid van het water 26
De temperatuur instellen 26
Een koffie bereiden
Voorbereiding van het apparaat 27
Espresso / Koffie met crèmelaag / Espresso lungo 27
De fijnheid van het maalsel instellen 28
Gemalen koffie 28
Cappuccino / latte macchiato bereiden 29
Warme melk / Warm water 30
Onderhoud
Wekelijks onderhoud 31
De Melkschuimer spoelen 32
De Melkschuimer reinigen 32
Filter verwisselen 33
Reinigingsprogramma 33
Ontkalkingsprogramma 34
Recepten 35
Schermberichten 36
Problemen oplossen 37
Veiligheidsvoorschriften 38
Page 23

21
Lees de veiligheidsvoorschriften aandachtig door, voordat u het apparaat gaat
gebruiken.a
Compartiment voor koffiebonen met
instelling van de fijnheid van het
maalsel
BESCHRIJVING
Compartiment voor
gemalen koffie
max. 1 dosis
Aan/
uit schakelaar
Uitneembaar
waterreservoir (1,8 l.)
Digital display
Selectietoetsen
Uitstroomopeningen
AAN / UIT
-schakelaar
Bak voor koffiedik
aanschakelen warme
Knop voor
plaat (alleen op het
chroom model)
Cappuccinoaccessoire
Melk Karaf*
Koffiediklade
*Alleen op het chroom model
Maatlepel: 1 afgestreken lepel = 1 dosis (1 koffie)
Page 24

22
Espresso
40ml 1x
BESCHRIJVING
Draaiend knop
voorselectie en validatie
Selectie toetsen
voor elk voorbereiding
Espresso Café Crème* Café Lungo Cappuccino Latte Macchiato
Warme melk Heet water Mijn koffie Instellingen Onderhoud
Koffie recepten
Filter
Water hardh
Temperatuur
Tijden
Taal
Lijst van instellingen
>
U kunt de voorselectie van elke bereiding wijzigen.
U moet de filteroptie instellen (p. 25).
>
U moet de hardheid van uw leidingwater instellen tussen 1 en 4 (p. 26).
>
U kunt de temperatuur van uw koffie instellen op 3 niveaus.
>
Met de individuele optie kunt u voor elke koffie de temperatuur instellen.
U kunt de tijd instellen voor het in-/uitschakelen van de stroom.
>
U kunt de gewenste taal selecteren (p. 23).
>
Uitgang toetsen
Spoelt bij uitschak
ECO - Modus
Statistiek
Met de exit toets kunt u te allen tijde terugkeren naar het vorige menu.
* Koffie medium
U kunt uw systeem doorspoelen.
>
U kunt de tijd instellen voor de overschakeling op stand-by.
>
U kunt het aantal keren zien dat elke functie is gebruikt.
>
Page 25

23
VOOR DE EERSTE INGEBRUIKNAME
Doorspoelen
Voordat u het apparaat voor het eerst in werking stelt, moet u het watercircuit doorspoelen om in het systeem
achtergebleven water te verwijderen.
Water vullen
Steek de stekker in het
stopcontact. Druk op de
Drukken.
Zet een kom onder de
uitstroomopeningen.
schakelaar.
Drukken.
Systeem vullen
Systeem verwarmt
Systeem wordt gevuld
Zet een kom onder de
uitstroomopeningen.
Instellingen: verplaatsing door het menu gebeurt met de draaiende knop
Taal instellen
Taal: Nederlands
Instellingen
Selecteer Instellingen.
Taal
Selecteer Taal. Drukken. Selecteer de taal. Drukken.
Drukken.
Met koud water vullen.
Spoelen a.u.b.
Drukken.
Druk hier om terug te
keren naar het menu.
Page 26

24
VOOR DE EERSTE INGEBRUIKNAME
De klok instellen
U kunt te allen tijde op de exit toets drukken om terug te keren naar het vorige menu.
Instellingen
Selecteer Instellingen.
Tijden
Selecteer Tijden. Drukken.
Selecteer Klok. Drukken.
Klok
Drukken.
De tijd instellen voor de automatische inwerkingtreding
U kunt te allen tijde op de exit toets drukken om terug te keren naar het vorige menu.
Instellingen
Selecteer Instellingen.
Drukken.
Tijden
Selecteer Tijden. Drukken.
App.Auto.In
Selecteer App.Auto. In.
Drukken.
De tijd instellen voor het automatisch uitschakelen
U kunt te allen tijde op de exit toets drukken om terug te keren naar het vorige menu.
Instellingen
Selecteer Instellingen.
Drukken.
Tijden
Selecteer Tijden. Drukken.
Automatisch uitschak
Selecteer Automatisch
uitschak. Drukken.
Klok instellen
Drukken. Selecteer de uren
en de minuten.
Auto.aan instell.
Drukken.Selecteer de
gewenste tijd.
Automatisch uitschak
0.5 Uren
1h Uren
2h Uren
3h Uren
4h Uren
Selecteer. Drukken.
Page 27

25
VOOR DE EERSTE INGEBRUIKNAME
Het waterfilter inzetten
• Optie 1
U kunt besluiten om de filteroptie te activeren. In dit geval wordt het programma voor de hardheid van het water
niet langer weergegeven.
Filter plaatsen?
JA
Selecteer JA.
Drukken.
Druk hier om terug te
keren naar het menu.
Instellingen
Selecteer Instellingen.
Drukken.
Water vullen
Met koud water vullen.
Filter
Selecteer Filter. Drukken.
Leeg het reservoir. Plaats de
filterpatroon in het reservoir.
Zet een kom onder de uitstroomopeningen.
Filter spoeltFilter plaatsen
• Optie 2
U kunt besluiten de filteroptie niet te activeren. In dit geval moet u de hardheidsgraad van het water instellen.
Filter plaatsen?
NEE
Selecteer NEE. Drukken.
Druk hier om terug te
keren naar het menu.
Instellingen
Selecteer Instellingen.
Drukken.
Filter
Selecteer Filter. Drukken.
Page 28

26
VOOR DE EERSTE INGEBRUIKNAME
Hardheidsgraad van het water
Alleen wanneer u geen filter hebt ingezet, moet u de hardheidsgraad van het water instellen opdat het systeem u
waarschuwt op welk moment een ontkalking nodig is.
Instelling van het
apparaat
1-7°
1
8-14°
2
15-21°
3
> 21°
4
1 s 1 min
Dompel het teststrookje in
het koude water.
Testresultaat
Vergelijk.
Waterhardheid
uw water is...
Heel zacht
Zacht
Matig hard
Hard
Zeer hard
--------------
-------------
Waterhardheid
Instellingen
Selecteer Instellingen.
Drukken.
De temperatuur instellen
De temperatuur van de koffie kan naargelang uw voorkeur ook op 3 niveaus worden ingesteld.
NORMAAL – HOOG– MAXIMAAL– INDIVIDUEEL
Met de individuele optie kunt u voor elke soort koffie de gewenste temperatuur instellen.
Instellingen
Selecteer Instellingen.
Drukken.
Selecteer Waterhardheid.
Drukken.
Temperatuur
Selecteer Temperatuur.
Drukken.
Niveau 2 : 8-14°
Selecteer.
Drukken.
Normaal
Hoog
Maximum
Individueel
Selecteer.
Drukken.
Druk hier om terug te
keren naar het hoofdmenu.
Druk hier om terug te
keren naar het hoofdmenu.
Page 29

27
Voorbereiding van het apparaat
Met water vullen. Het compartiment met
koffiebonen vullen.
Espresso / koffie met crèmelaag / Espresso lungo
Man kan op elke moment zijn keuze starten indien man op de draaiende knop drukt.
EEN KOFFIE BEREIDEN
Espresso
40 ml 1x
Selecteer het gewenste
type koffie. Druk op de
draaiknop als de instellingen naar wens zijn
Espresso
40 ml 1x
Selecteer de gewenste
hoeveelheid.
Druk hier als u de instellingen
wilt wijzigen.
Drukken.
Espresso
40 ml 1x
Selecteer de gewenste sterkte.
Plaats 1 of 2 kopjes onder
de uitstroomopeningen.
Drukken.
Espresso
40 ml 1x
Selecteer het gewenste aantal
kopjes. Drukken.
Page 30

28
EEN KOFFIE BEREIDEN
De fijnheid van het maalsel instellen
Des te lichter van kleur de koffiebonen zijn (licht gebrand) des te fijner de bonen gemalen moeten worden.
De fijnheid van het maalsel moet uitsluitend worden ingesteld tijdens het malen van de koffie.
Op het maximum instellen (naar rechts): grover
Op het minimum instellen (naar links): fijner
Openen. Instellen. De deur weer sluiten.
Gemalen koffie
Poederkoffie invoeren
Doe de gemalen koffie in
het hiertoe bestemde
compartiment. Suit het
deksel.
Doe nooit meer dan 1 maatlepel gemalen koffie in het compartiment.
Doe nooit iets anders dan gemalen koffie in het compartiment (met uitzondering van reinigingstabletten).
Als u het compartiment voor gemalen koffie per ongeluk opent of als u, na de gemalen koffie in het
compartiment te hebben gedaan, op geen enkele toets drukt, wordt het apparaat automatisch doorgespoeld via de
uitstroomopeningen.
Sluit de deksel en wacht 1 minuut.
Plaats 1 kopje onder de
uitstroomopeningen.
Selecteer Gemalen koffie.
Druk op de draaiknop.
Page 31

29
CAPPUCCINO / LATTE MACCHIATO BEREIDEN
Cappuccino / Latte Macchiato
De instellingen voor elke bereiding zijn vooraf geselecteerd. U kunt echter voor elke bereiding de sterkte, de
hoeveelheid en de hoeveelheid schuim van instellen. Het is niet mogelijk twee kopjes warme melk tegelijk te
bereiden.
De functie 2 kopjes cappuccino tegelijk is uitsluitend beschikbaar bij het model Chrome.
Met water vullen.
Het compartiment met
koffiebonen vullen.
Bevestig de Melkschuimer. Het cappuccino pijpje in
een 1/3 melk ingevuld
karaf plaatsten
Cappuccino
200 ml 20%
Selecteer de gewenste
bereiding. Druk op de
1x
Druk hier als u de instellingen wilt wijzigen.
Cappuccino
200 ml 20%
1x
Selecteer de gewenste sterkte.
Drukken.
draaiknop als de instellingen naar wens zijn.
Het duurt enkele seconden
vooraf de voorbereiding
start
Cappuccino
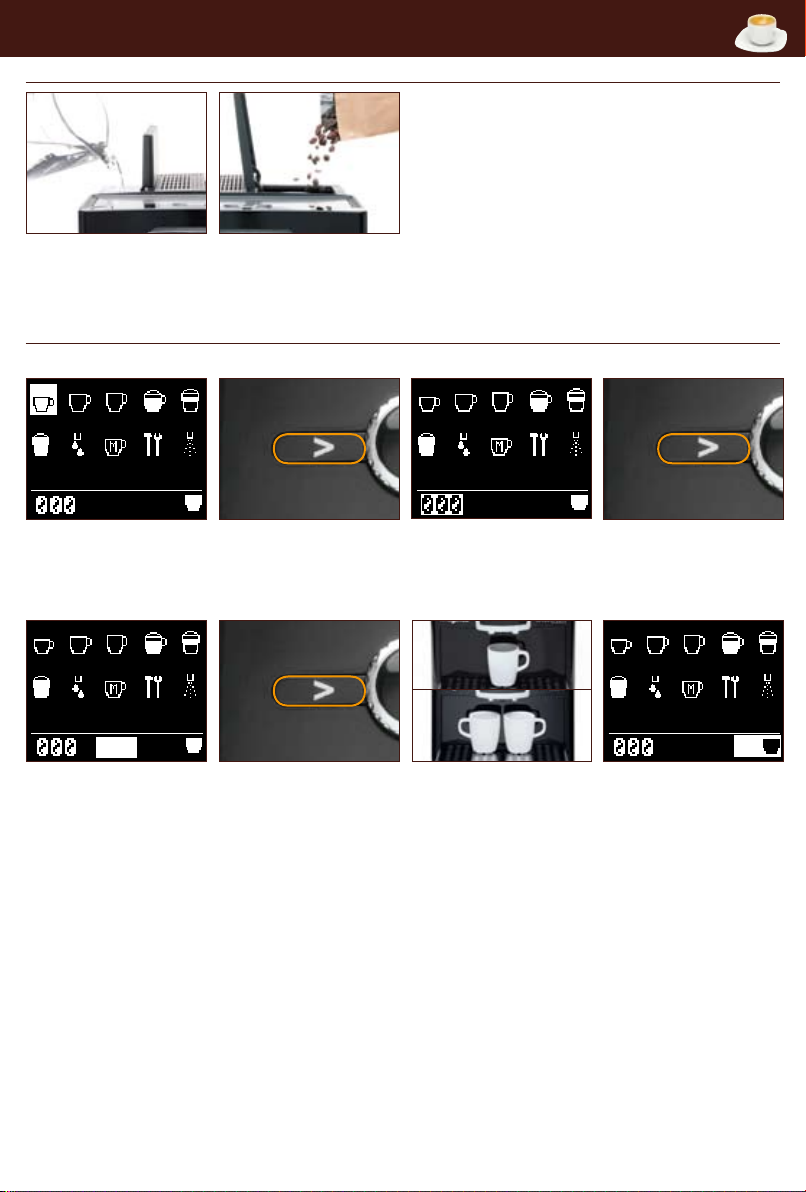
200 ml 20%
Selecteer de gewenste
hoeveelheid.
1x
Drukken.
Cappuccino
200 ml 20 %
1x
Selecteer de gewenste hoeveelheid schuim.
Druk op de draaiknop.
De karaf en het pijpje schoon maken onmiddellijk naar het gebruik (zie p.13). le numéro de page n’est pas bon
* Alleen op het chroom model.
Page 32

30
WARM WATER / WARME MELK BEREIDEN
Warme melk
De instellingen voor elke bereiding zijn vooraf geselecteerd. U kunt echter voor elke bereiding de hoeveelheid en de
hoeveelheid schuim instellen. Het is niet mogelijk 2 kopjes warme melk tegelijk te bereiden.
De functie 2 kopjes cappuccino tegelijk is uitsluitend beschikbaar bij het model Chrome.
Warme melk
150 ml
Bevestig de Melkschuimer. Het cappuccino pijpje in
een 1/3 melk ingevuld
karaf plaatsten.
Warme melk
150 ml
Selecteer de gewenste hoeveelheid.
Druk op de draaiknop.
Selecteer Warme melk. Druk
op de draaiknop als de
instelling naar wens is.
Druk hier als u de instellingen
wilt wijzigen.
De karaf en het pijpje schoon maken onmiddellijk naar het gebruik (zie p.13). idem
* Alleen op het chroom model
Warm water
Warm waterWarm water
Selecteer Warm water.
Druk op de draaiknop als de
Druk hier als u de instellingen
wilt wijzigen.
150 ml
Selecteer de gewenste hoeveelheid.
Druk op de Draaiknop.
1x
instelling naar wens is.
Page 33

31
Voordat u onderhoudswerkzaamheden gaat uitvoeren, moet het apparaat van de stroom zijn losgekoppeld en
moet het koud zijn. Was de onderdelen niet af in de vaatwasmachine. Gebruik geen schuurspons of bijtende
reinigingsmiddelen.
Wekelijks onderhoud
• Waterreservoir
• Bak + rooster
• Contacten
ONDERHOUD
Leeg de lekbak en de bak
voor koffiedik.
Schoonvegen met een
droge doek.
Verwijder de deur.
Afwassen en goed afdrogen (water + mild reinigingsmiddel).
Verwijder de bescherming
en maak de Melkschuimer
schoon.
Ontgrendelen met behulp
van de handgreep, terwijl
u de rode knop indrukt.
Veeg de buitenkant van
het apparaat af met een
vochtige does.
Demonteer de Melkschuimer
en was hem af onder
water.
De centrale eenheid uit het
apparaat nemen.
Met een vochtige doek
schoonvegen en het compartiment droogmaken.
Breng de Melkschuimer
weer op zijn plaats.
De trechter + de filter
schoonmaken met een
vochtige doek..
De centrale eenheid weer
achterin het apparaat
plaatsen.
Vergrendelen met de
handgreep, terwijl u de
rode knop indrukt. De
deur weer vastschroeven.
Page 34

32
ONDERHOUD
De Melkschuimer spoelen
Melkschuimer spoelen
Selecteer Onderhood.
Drukken.
Slang aan uitloop Aansluiten en
In lekbak hangen
Drukken.
De Melkschuimer reinigen
Selecteer Onderhoud.
Drukken.
Slang aan uitloop
Aansluiten en
In reinigingm. hangen
Zet een kom onder de
uitstroomopeningen.
Mel kopschuim spoelt
Slang niet verwijder
Zet een kom onder de uitstroomopeningen.
Melkopschuim. reinigt
Slang niet verwijder
Selecteer Melkschuimer
spoelen. Drukken.
Melkschuimer reinigen
Selecteer Melkschuimer
reinigen. Drukken.
Monteer het slangetje op
de uitloop.
Monteer het slangetje op
de uitloop.
Drukken.
Page 35

33
Filter verwisselen
ONDERHOUD
Filter
Selecteer Instellingen.
Drukken.
Filter verwisselen
Selecteer Filter verwisselen.
Drukken.
Selecteer Filter. Drukken.
Leeg het waterreservoir.
Vervang de filter.
Zet een kom onder de
uitstroomopeningen.
Druk opnieuw op de
draaiknop.
Reinigingsprogramma
Een bericht op het scherm waarschuwt u wanneer een reiniging nodig is.
Wanneer het reinigingsprogramma bezig is mag het niet onderbroken worden.
Systeem reinigen
Filter plaatsen
JA
Selecteer JA. Drukken.
Filter spoelingFilter verwisselen
Reinigingstabletten
poederkoffie in open.
Selecteer Onderhoud.
Drukken.
Reinigen starten
Drukken.
Zet een kom onder de uitstroomopeningen.
Systeem reinigt
15 min.
Selecteer systeem reinigen.
Drukken.
Lekbak legen
Leeg de bakken en breng
ze weer op hun plaats.
Plaats een reinigingstablet
in het compartiment voor
gemalen koffie. Sluit het
dekseltje.
Page 36

34
ONDERHOUD
Ontkalkingsprogramma
Een bericht op het scherm waarschuwt u wanneer een reiniging nodig is.
Tijdens de uitvoering van het ontkalkingsprogramma mag dit niet worden onderbroken.
Gebruik nooit azijn of een product op basis van azijn om te ontkalken.
Verwijder de filter uit het reservoir, voordat u het apparaat gaat ontkalken.
Selecteer Onderhoud.
Drukken.
Watertank verwijd.
Leeg het waterreservoir.
Lekbak legen
Leeg de bakken en breng
ze weer op hun plaats.
Zet een kom onder de
uitstroomopeningen.
0.5 L
Systeem ontkalken
Selecteer Systeem
ontkalken. Drukken.
Ontkalken startenWater vullen
Drukken.Vers water + ontkalker tot
Begin spoelenWater vullen
Drukken.Vul de tank.
Lekbak legen
Leeg de bakken en breng
ze weer op hun plaats.
Systeem ontkalkt
20 min.
Page 37

35
RECEPTEN
Espresso
Een espresso wordt gekenmerkt door de kleur, tussen roodbruin en hazelnootbruin, het
romige schuim en de krachtige aroma’s… Een espresso bestaat uit ongeveer 40 à 50 ml
zwarte koffie, geserveerd in een kopje van 60 ml.
Cappuccino
Vul een grote kop tot 1/3 met melk (Zie hoofdstuk Cappuccino p.30).
Laat de melk schuimen met behulp van het cappuccino-accessoire. Giet het melkschuim
op uw espresso en bestrooi met cacao of laat de espresso op uw melkschuim uitstromen.
Ristretto
Dit is een geconcentreerde espresso: hij wordt gemaakt met dezelfde hoeveelheid koffie,
maar is twee keer minder verdund. De hoeveelheid is niet meer dan 30 ml.
Macchiato
«Macchiato» betekent «gevlekt» in het Italiaans. Deze koffie komt dichtbij de
cappuccino, maar is sterker en aromatischer: bereid een kopje espresso en doe er een
theelepel melkschuim op.
Page 38

36
SCHERMBERICHTEN
Schermberichten Acties
Systeem vullen
Water vullen
Bonen vullen
Schalen legen
Schalen ont br
Schoonmaken AUB Maak het apparaat schoon (zie p. 33).
Ontkalken AUB Ontkalk het apparaat (zie p. 34).
Filter vervangen Vervang de filter (zie p. 33).
Deur Sluiten
Spoelen AUB
Druk op de knop in het midden.
Verwijder of verwissel de waterfilter.
Met koud water bijvullen.
Breng het waterreservoir goed op zijn plaats.
Doe koffiebonen in het hiertoe bestemde compartiment.
Het bericht verdwijnt pas wanneer u opnieuw koffie maalt.
Leeg de bakken.
Maak de contacten op de bodem van de bak schoon en droog ze goed af.
Breng de bakken goed op hun plaats.
Maak de contacten op de bodem van de bak schoon en droog ze goed af.
Controleer of de centrale eenheid goed op zijn plaats is gebracht (zie p.31).
Sluit de deur.
Plaats een houder onder de uitstroomopeningen
Druk op de knop in het midden.
Page 39

37
PROBLEMEN OPLOSSEN
Probleem Oplossing
De koffie stroomt niet. Controleer of het reservoir goed geplaatst is.
Vul het reservoir met water.
Controleer of de bakken goed geplaatst zijn.
Kalkaanslag in het apparaat ---> ontkalken.
Reinig de filter van de centrale eenheid.
De koffie stroomt te langzaam uit. Koffie te fijn gemalen ---> stel de fijnheid van het maalsel
grover in.
De koffie is te licht van kleur of niet sterk
genoeg.
Vieze smaak.
Koffie niet warm genoeg. Verander de instelling van de koffietemperatuur.
De koffie stroomt slechts gedeeltelijk uit. Vul het koffiebonencompartiment met koffiebonen.
De koffiemolen maakt een abnormaal
geluid.
De melk schuimt niet genoeg.
Het Cappuccino-accessoire zuigt niet
meer aan.
Onmogelijk warm water of stoom af te
tappen
Water rondom het apparaat. Leeg de lekbak.
Het apparaat werkt niet meer. Controleer de aansluitingen.
Vul het hiertoe bestemde compartiment met koffiebonen.
Verminder het aantal ml van de hoeveelheid koffie.
Selecteer een sterkere koffie in het programma voor de sterkte
van de koffie.
Maal de koffie fijner.
Koffie: verschaald? zuur? ---> vul met nieuwe koffiebonen.
Water: gechloreerd? ---> gebruik de filterpatroon of (licht
gemineraliseerd) essenwater.
Na een ontkalking: spoel het apparaat nog een keer extra
door, laat een reservoir vol schoon water doorstromen, de
ene helft aan de kant van het pijpje en de andere helft aan
de kant van de uitstroomopeningen.
Vul het koffiebonencompartiment.
Breng uw apparaat naar een erkende Magimix klantenservice.
Pijpje, leiding: verstopt, kalkaanslag? ---> zie «Onderhoud».
Gebruik koude melk.
Maak het pijpje schoon (zie p. 32).
Controleer of de elementen van het accessoire goed in elkaar
geschoven zijn.
Maak het pijpje schoon.
Sluit het compartiment voor gemalen koffie en wacht 1 minuut.
Breng uw apparaat naar een erkende Magimix klantenservice.
Dit symbool duidt aan dat dit product niet met het huisvuil mag worden verwerkt. Het moet naar een
inzamelpunt voor recycling van elektrische en elektronische apparaten worden gebracht.
Neem contact op met uw gemeente of uw inzamelcentrum voor chemisch afval om te weten waar deze
inzamelpunten zich bevinden.
Wij behouden ons het recht voor de technische kenmerken van dit apparaat op elk moment en zonder
voorafgaande kennisgeving te wijzigen. De in dit document vermelde informatie is niet contractueel bindend.
Alle rechten voorbehouden voor alle landen door Magimix.
Page 40

38
VEILIGHEIDSVOORSCHRIFTEN
• Controleer of de netspanning van uw installatie overeenkomt met de op het
typeplaatje vermelde spanning.
• Laat kinderen niet zonder toezicht in de nabijheid van het apparaat komen. Het
apparaat is niet bestemd om door kinderen te worden gebruikt.
• Dit apparaat is niet bestemd om te worden gebruikt door lichamelijk, zintuiglijk
of geestelijk gehandicapte personen (inclusief kinderen), evenmin als door
personen met gebrek aan kennis of ervaring, tenzij zij dit een eerste keer onder
toezicht hebben gedaan of onderricht hebben gekregen in het gebruik van het
apparaat door een persoon die verantwoordelijk is voor hun veiligheid.
• Het apparaat moet altijd worden aangesloten op een geaard stopcontact.
• Laat het snoer niet van het werkvlak neerhangen.
• Laat het apparaat of het snoer nooit in aanraking komen met een warm of nat
oppervlak.
• Trek altijd de stekker van het apparaat uit het stopcontact voordat u het reservoir
vult, het apparaat verplaatst of schoonmaakt en telkens na het gebruik. Trek
nooit aan het snoer om de stekker uit het stopcontact te trekken.
• Houd uw apparaat en/of het snoer uit de buurt van warmtebronnen.
• Vermijd tijdens het gebruik iedere aanraking met bepaalde delen van het
apparaat die gloeiend heet kunnen worden (uitstroomopeningen, pijpje enz.).
• Gebruik de stoom nooit om brandbare vloeistoffen te verwarmen.
• Giet uitsluitend koud water in het waterreservoir en geen andere vloeistoffen.
• Storingen veroorzaakt door het niet ontkalken of door het niet volgens de
gebruiksaanwijzing ontkalken worden niet door de garantie gedekt.
• Gebruik het apparaat nooit nadat het is gevallen of wanneer het defect is. Als
het snoer beschadigd is, moet dit worden vervangen door de fabrikant, een
door hem erkende klantenservice of gelijksoortig bevoegde personen om ieder
gevaar te voorkomen.
• Gebruik het apparaat niet buitenshuis.
• Dit apparaat is uitsluitend bedoeld voor huishoudelijk gebruik en is niet bestemd
voor professioneel / commercieel gebruik.
• Dieses Gerät ist nur für den Hausgebrauch bestimmt.
Die Garantie gilt nicht, wenn das Gerät in folgenden Fällen verwendet wird:
in Küchenecken, die in Geschäften dem Personal vorbehalten sind, in Büros
und anderen gewerblichen Umgebungen, auf Bauernhöfen, durch Kunden von
Hotels, Motels und anderen Beherbergungseinrichtungen sowie in allen Arten
von Gästezimmern.
Page 41

39
CONTENTS
Description 40
Set up
Rinsing 42
Language selection 42
Setting the clock 43
Installing the filter 44
Setting the water hardness level 45
Selecting the temperature 45
Brewing a coffee
Preparing the machine 46
Espresso/double espresso/coffee lungo 46
Grinding settings 47
Ground coffee 47
Brewing a cappuccino/latte machiatto 48
Hot milk/hot water 49
Aftercare
Weekly aftercare 50
Rinsing the nozzle 51
Cleaning the nozzle 51
Changing the water filter 52
Cleaning programme 52
Descaling programme 53
Recipes 54
Screen messages 55
Troubleshooting 56
Safety instructions 57
Page 42

40
DESCRIPTION
Read these safety instructions carefully before using your machine.
Coffee bean compartment
with grinding setting
Ground coffee compartment
Max: 1 level teaspoon
Power on/
Standby
Removable water tank
(1.8 litres)
Digital screen
Menu Dial
Coffee spout
On/Off switch
Grounds container
Cup warmer
on/off*
Milk tube
Milk jug*
Grounds drawer
* only available on Chrome model
Measuring spoon: 1 level spoon = 1 cup (1 coffee)
Page 43

41
Menu dial
Espresso
40ml 1x
and Select
DESCRIPTION
Use to change
the settings of the coffee
Espresso Double espresso* Caffé Lungo Cappuccino Latte Macchiato
Warm milk Hot water My coffee Settings Care
Coffee recipes
Filter
Water hardness
Temperature
Times
Language
SETTINGS
>
You can change the pre-selection for each preparation
Indicates whether or not you have chosen to install the water filter. (p. 44)
>
Choose your water hardness setting (p. 45)
>
Choose between three temperature settings for your coffee.
>
The individual option allows you to set the temperature for each coffee
Setting the on/off time.
>
Select your language (p. 42)
>
Exit button
OFF-Rinse
ECO mode
Statistics
The exit button enables you to return to the previous menu at any time.
* medium coffee
Rinsing the system
>
You can set the machine to go into standby later
>
You can find out how many times each function has been used.
>
Page 44

42
SET UP
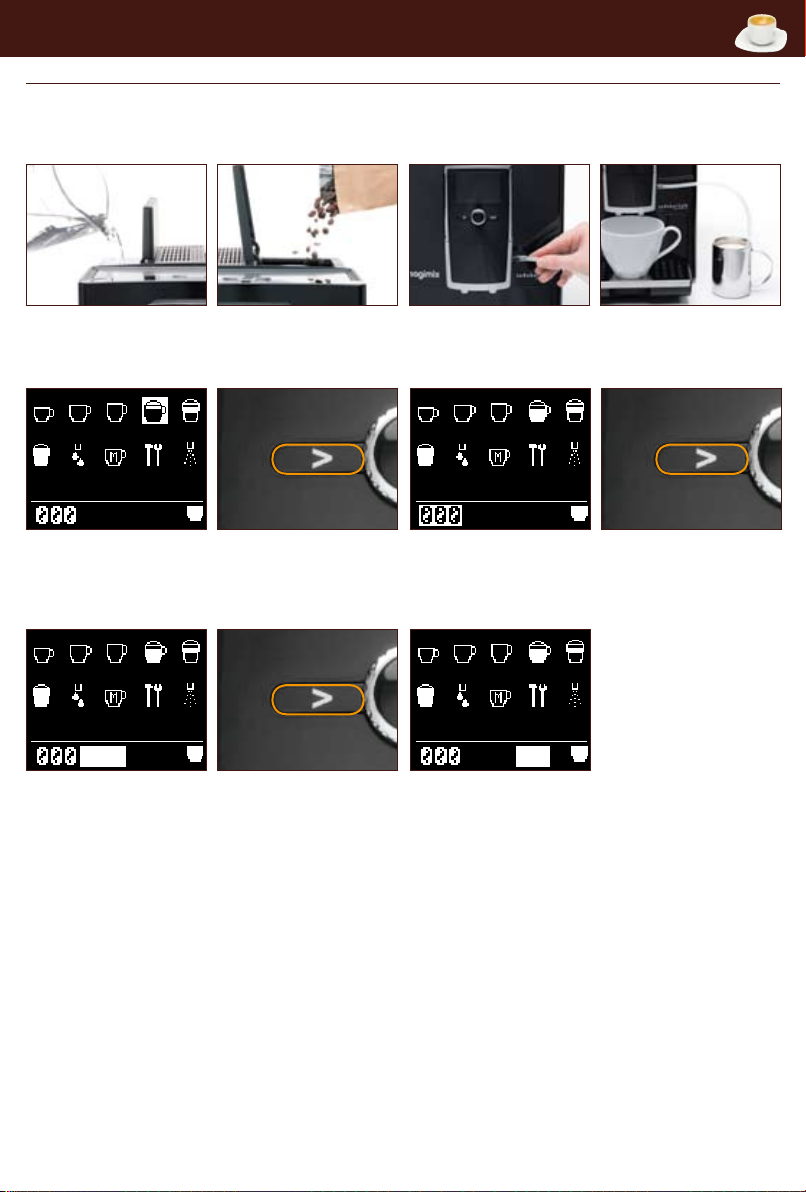
Rinsing
Before you use your machine for the first time, you must rinse the water circuit to remove any residual water in
the system.
Fill with water
Plug into earthed socket.
Switch the machine on.
Turn the coffee machine
on by pressing the button
located on the top of the
machine.
Fill up system
Heating
Press the menu dial.
Note: Scroll through the menu by turning the menu dial.
Language selection
Language
Settings
Select ‘Settings’ using the
Select ’Languages’. Select the desired language.
menu dial.
Place a cup underneath the
spout.
System filling up
Place a cup underneath the
ow head.
Language: English
Fill the water tank with
water.
Rinse
Press the menu dial.
Press the exit button until
you return to the main
menu.
Page 45

43
Setting the clock
You can press the exist button at anytime to go back a step.
SET UP
Times
Settings
Select ‘Settings’.
Select ‘Times’.
Select ‘Clock’.
Setting the timer for the automatic switch-on
You can press the exist button at anytime to go back a step.
Times
Settings
Select ‘Settings’
Select ‘Times’ using the
menu dial.
Select ‘unit auto on at’ using
the menu dial.
Setting the timer for automatic switch-off
You can press the exist button at anytime to go back a step.
Times
Settings
Select ‘Settings’ using the
menu dial.
Select ‘Times’ using the
menu dial.
Select ‘Unit auto OFF after’.
Clock
Unit auto ON at
Unit auto OFF after
Set clock
Select the hour and minutes
using the menu dial.
Set auto on
Select the hour and minutes
using the menu dial.
Unit auto OFF after
0.5
1h
2h
3h
4h
Select preferred time for the
machine to switch off after
last use.
Page 46

44
SET UP
Installing the water filter
• Option 1
If you use the filter option, the water hardness will no longer be displayed.
Filter
Settings
Select ‘Settings’ using the
menu dial
Fill with water
Fill with fresh water.
Select ‘Filter’ using the menu
dial.
Empty the water tank. Place
Place a cup underneath the
spout.
Rinsing filterInsert filter
the cartridge in the water
tank. Press the menu dial.
• Option 2
If you decide not to use the filter option, you will need to set the water hardness (p.)
Filter inserted?
NO
Select ‘NO’ using the menu
dial.
Settings
Select ‘Settings’ using the
menu dial.
Filter
Select ‘Filter’ using the menu
dial.
Filter inserted?
YES
Select YES.
Press exit to go back.
Press exit to go back.
Page 47

45
Setting the water hardness
If, and only if, you have not installed your filter, you must select the water hardness.
SET UP
The test shows
1 s 1 min
Dip the test strip in cold
water.
Settings
Select ‘Settings’ using the
menu dial.
Selecting the temperature
You can choose between four temperature settings for your coffee.
NORMAL – HIGH – MAXIMUM – INDIVIDUAL
The individual option allows you to choose the desired temperature for each type of coffee.
Settings
Select ‘Settings’ using the
menu dial.
Compare using the chart above.
Water hardness
Select ‘Water hardness’
using the menu dial.
Select ‘Temperature’.
That your water is...
Very soft
Soft
Average hardness
Hard
Very hard
Temperature
--------------
-------------
Water hardness
Level 2 : 8-14°
Select your water hardness
level using the menu dial.
Normal
High
Maximum
Individually
Select the desired
temperature using the
menu dial.
Machine
level
1
2
3
4
Press the exit button until
you return to the main
menu.
Press the exit button until
you return to the main
menu.
1-7°
8-14°
15-21°
> 21°
Page 48

46
BREWING A COFFEE
Preparing the machine
Fill the water tank with
fresh water.
Fill the coffee bean
compartment.
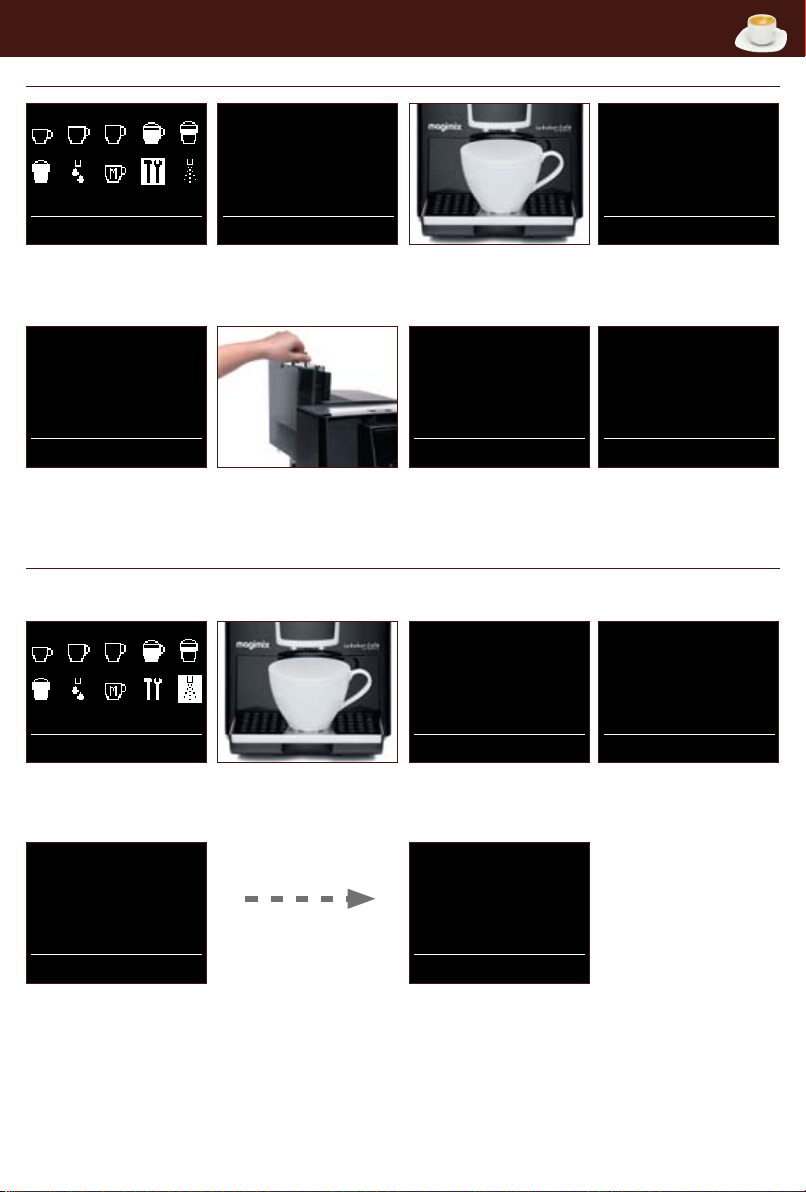
Espresso / Coffee cream / Coffee Lungo
You can make your coffee at anytime by pressing the menu dial.
Espresso
40 ml 1x
Select your chosen coffee
type.
Espresso
40 ml 1x
Select the desired level.
Press if you want to
change the settings.
Press.
Select the desired intensity of
coffee.
Place one or two cups
under the spout.
Espresso
40 ml 1x
Press.
Espresso
40 ml 1x
Select one or two cups. Press.
Note: The coffee settings you set ate remembered until you switch your coffee machine off standby mode.
Page 49

47
Grinding settings
The paler the beans (lightly roasted) the finer they must be ground.
Only adjust the grind setting while the grinder is running.
To set to a coarse grind, slide to the right.
To set a finer grind, slide to the left.
Open. Select your desired level.
Close.
Ground coffee
Powder is ready
BREWING A COFFEE
Pour the ground coffee into
the compartment. Close the
lid.
Never use more than one measuring spoon of ground coffee.
Never insert anything other than ground coffee or cleaning tablets into the ground coffee compartment.
If the ground coffee compartment is opened by mistake or a button has not been pressed within a minute of putting
the ground coffee in, the machine will automatically be rinsed through via the spout.
If this happens, close the lid and wait 1 minute.
Place 1 cup under the spout.
Press the menu dial.
Page 50

48
BREWING CAPPUCCINO/LATTE MACCHIATO
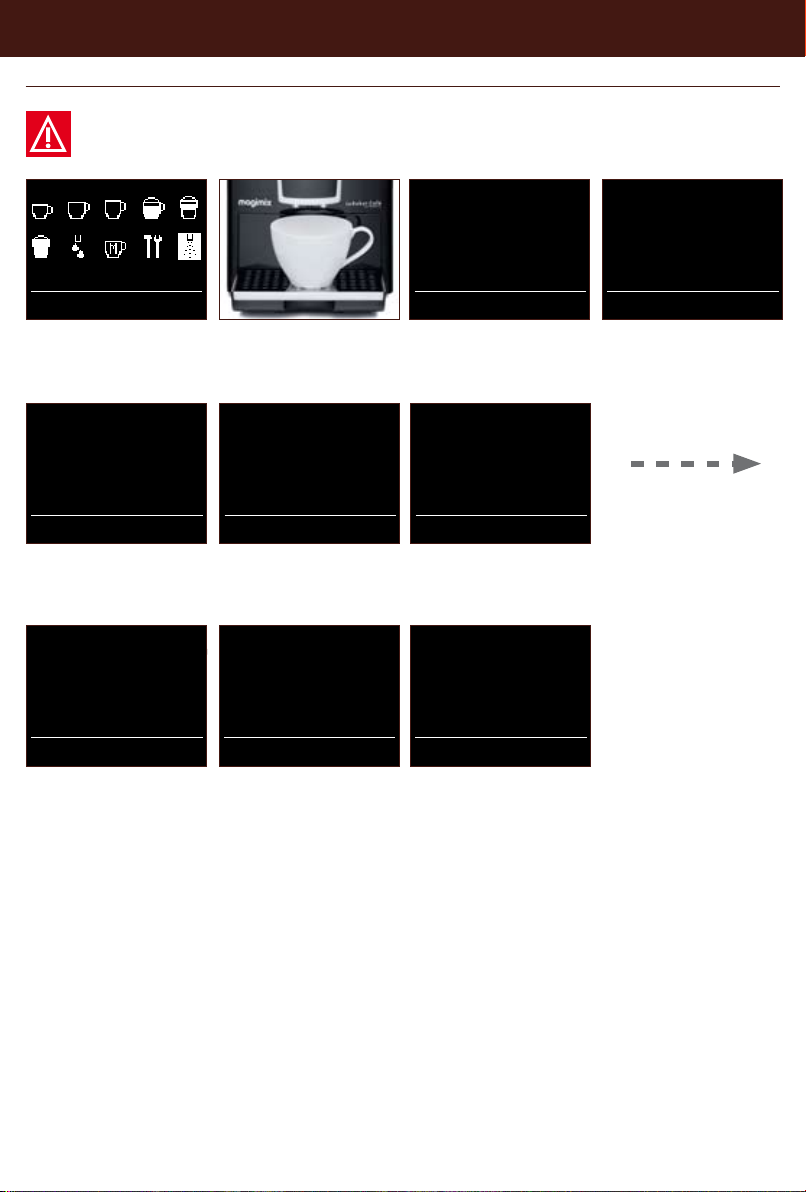
Cappuccino/Latte Macchiato
The settings for each coffee are pre-programmed. However, for each coffee type you can set the strength and
volume of your coffee.
It is not possible to prepare simultaneously 2 milk preparations (except on the chrome model).
Fill the water tank.
Fill the coffee bean
Attach the milk tube. Place 1 cup under the
compartment.
Cappuccino
200 ml 20%
1x
Select your chosen coffee
type.
Cappuccino
200 ml 20%
1x
Select the desired volume.
Press if you want to
change the settings.
Press.
Cappuccino
Select the desired intensity.
Cappuccino
200 ml 20 %
Select the desired amount of
froth. Press.
Rinse the nozzle and your milk jug*immediately after use (see p. 51)
* only available on Chrome model
200 ml 20%
spout. Fill the jug 1/3 full
of milk and place the milk
tube in the jug.
1x
Press.
It may take a few seconds
for the process to begin.
1x
Page 51

49
WARM MILK / HOT WATER
Warm milk
The settings for each preparation are pre-programmed. However, for each option you can set the strength and
volume of your coffee.
It is not possible to prepare milk for 2 coffees simultaneously (except on the chrome model).
Warm milk
150 ml
Attach the milk tube. Place 1 cup under the
spout. Fill the jug 1/3 full
of milk and place the milk
tube in the jug.
Warm milk
150 ml
Select the desired level. Press.
Select Warm milk. Press if you want to
change the settings.
Rinse the nozzle and your milk jug*immediately after use (see p.)
* only available on Chrome model
Hot water
Hot waterHot water
150 ml
Select Hot water. Select the desired level. Press
Press if you want to
change the settings.
the menu dial.
1x
Page 52

50
AFTERCARE
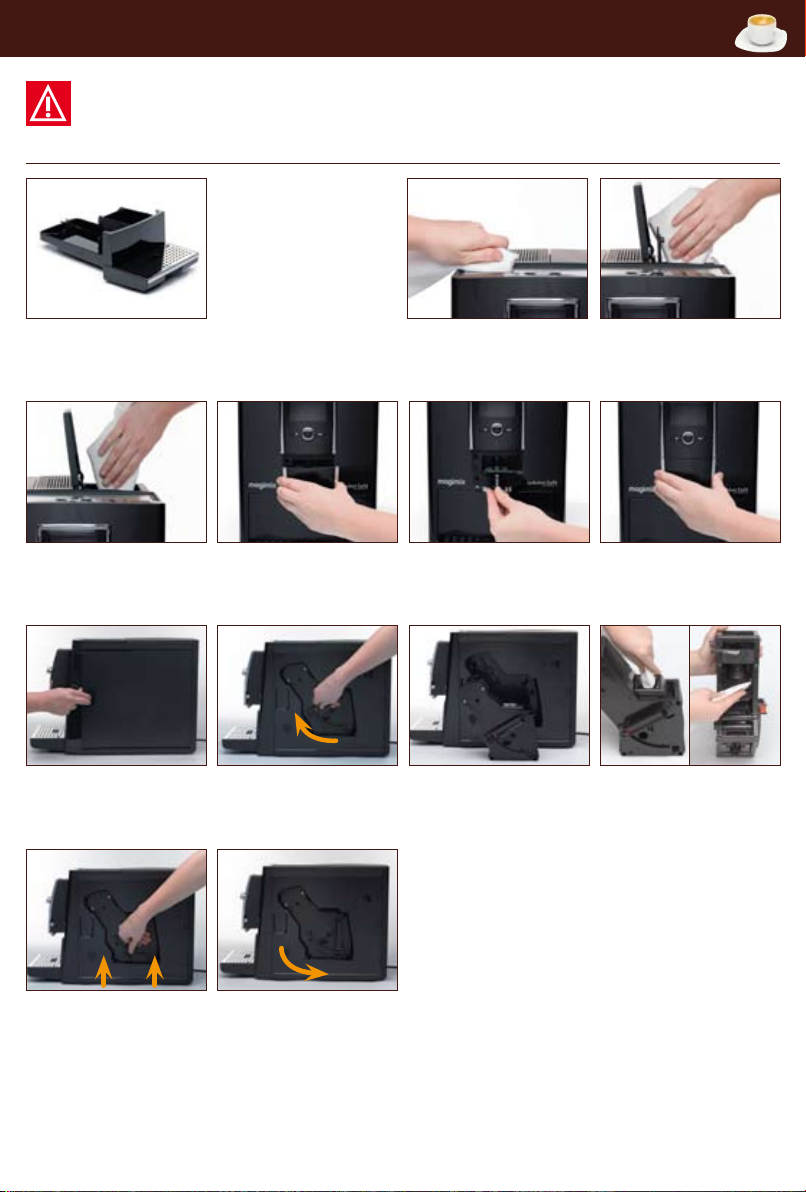
Always unplug the machine and wait for it to cool down before cleaning. Do not put any of the parts in the
dishwasher. Do not use an abrasive sponge or aggressive detergent.
Weekly aftercare
• Water tank
• Tray + grid
• Contacts
Empty the drip tray and
the grinds container.
Remove the cover.
Open the door.
Clean and dry well using
water + mild detergent.
Disassemble and clean
under running water.
Raise the release handle,
pressing the red button at
the same time.
Wipe the exterior of the
machine housing with a
damp cloth.
Reassemble and replace.
Remove the machine’s
central unit.
Clean the inside a damp
cloth and dry the compartment and the lid.
Clean the funnel + filter
with a damp cloth.
Place the central unit back
in the machine.
Lock into place by pushing
the handle down, pressing
the red button at the same
time. Screw the door shut.
Page 53

51
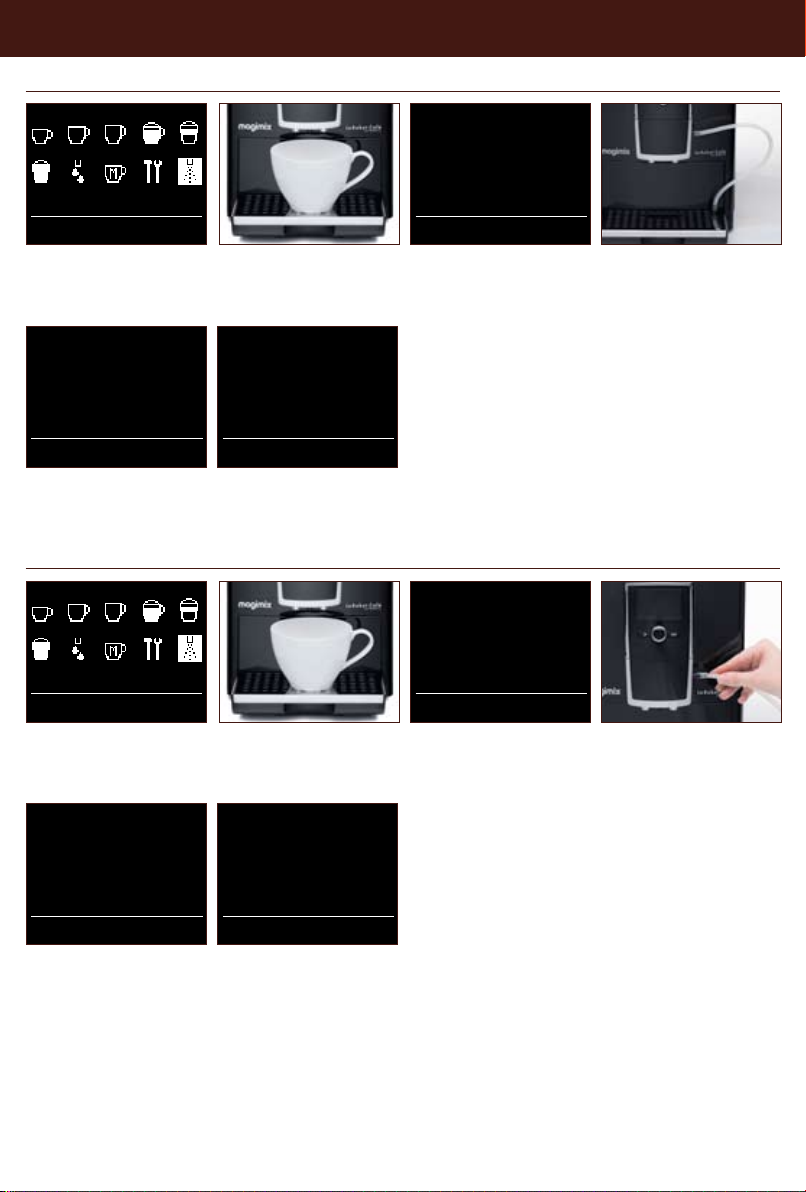
Rinsing of the nozzle
AFTERCARE
Rinse frother
Select Care.
Press the menu dial.
Unclear when
using machine
for the first time.
Once the milk tube has
been connected press the
menu dial.
Cleaning of the nozzle
Select Care. Press the menu
dial.
Connect hose pipe
with spout
and put in cleaner
Place a cup underneath the
spout.
Rinsing frother
Do not remove milk tub
Place a cup underneath the
spout.
Cleaning frother
Do not remove h.p
Select Rinse frother. Press.
Clean frother
Select Clean frother. Press
menu dial.
Attach the milk tube on
the ow head and the drip
tray.
Attach the milk tube to the
side of the spout and put
the other end in cleaner.
Press menu dial.
Page 54

52
AFTERCARE
Changing the filter
Filter
Select Settings. Press menu
dial.
Replace filter
Select ‘Replace filter’. Press
the menu dial.
Select Filter. Press menu
dial.
Empty the water tank.
Change the filter.
Place a cup underneath the
spout.
Press menu dial again.
Cleaning programme
A message on the screen informs you when the machine needs cleaning.
Never interrupt the cleaning programme once it has started.
Clean system
Filter inserted?
YES
Select ‘YES’. Press the
menu dial.
Rinse filterReplace filter
Cleaning tablet
in powdershaft
Select Care. Press the menu
dial.
Start cleaning
Place a cup underneath the
spout.
Select ‘Clean system’.
System cleans
15 min.
Press menu dial.
Empty the trays and put
them back.
* Cleaning tablets are available from Magimix Customer care.
Put a cleaning tablet*
in the ground coffee
compartment. Close the
lid.
Empty trays
Page 55

53
Descaling programme
A message will appear on the screen when you need to descale your coffee machine.
Never interrupt the descaling programme once it has started.
Never use vinegar or a vinegar-based product for descaling.
Always remove the water filter before descaling.
AFTERCARE
Select Care. Press the menu
dial.
Empty tanks
Empty the water tank.
Empty trays
Empty the trays.
Place a cup underneath the
spout.
water + descaling product
up to 0.5 l mark.
fresh water.
Descale system
Press the menu dial.
Start descalingFill up water
Press the menu dial.Fill the tank with fresh
Start rinsingFill with water
Select using the menu dial.Fill the water tank with
Empty trays
Empty the trays.
Descaling takes about
20 minutes.
Page 56

54
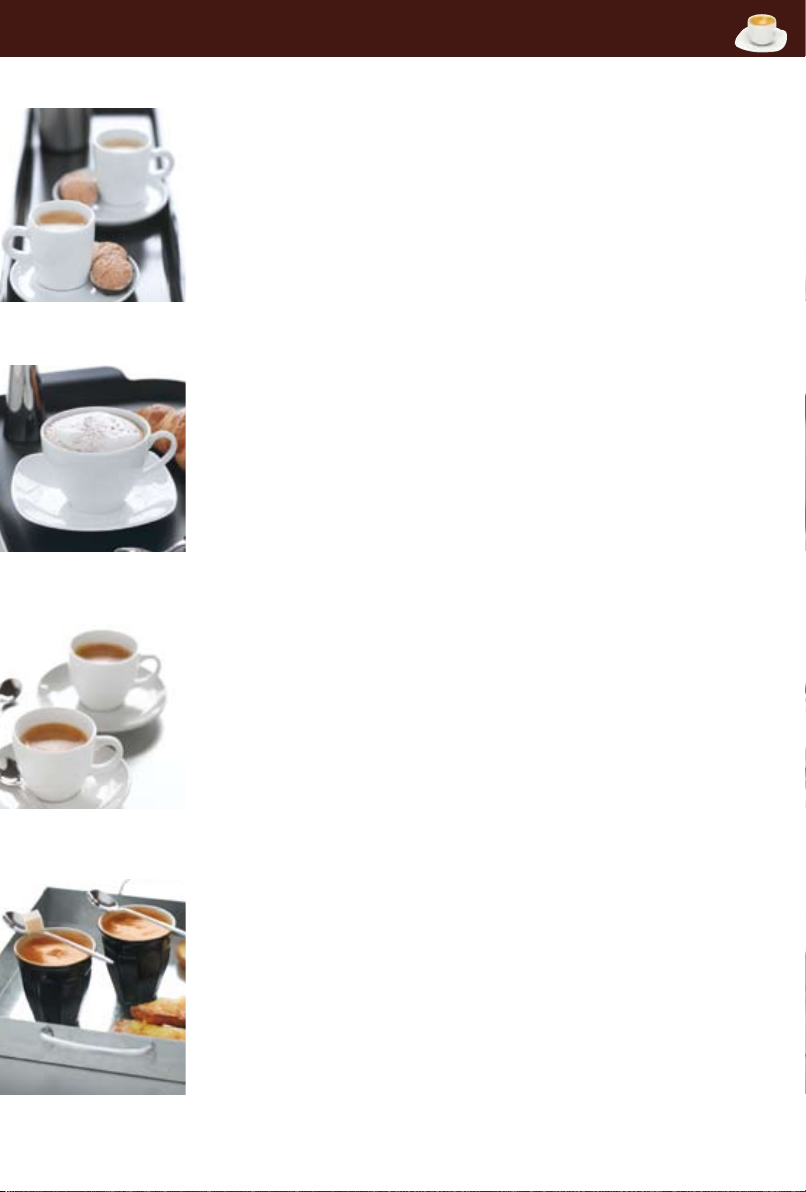
RECIPES
Espresso
Espresso coffee is characterised by the colour of its creamy golden top, midway between
russet and hazel, and by its extremely rich aroma…Espresso coffee represents roughly
40 or 50 ml of black coffee served in a 60 ml cup.
Cappuccino
Fill a large cup
1
/3 full with frothed milk (see “Cappuccino” chapter, p. 49). Froth the
milk using the cappuccino attachment. You can either spoon the froth onto your espresso
coffee and sprinkle it with cocoa powder or pour the coffee on top of your frothed milk.
Ristretto
This is concentrated espresso coffee, made from the same quantity of ground coffee, but
only half the water. It never exceeds 30 ml.
Macchiato
“Macchiato” means “spotted” in Italian. It closely resembles cappuccino coffee, but is
stronger and has a more powerful aroma. Make a cup of espresso coffee and top it with
a spoonful of milk froth.
Page 57

55
Screen messages Actions
SCREEN MESSAGES
Fill up pipe-sys
Fill water
Fill beans
Empty trays
Trays missing
Please clean Clean the machine (see p. 52).
System Calcif Descale the machine (see p. 53).
Filter change Replace the filter (see p. 52).
Close the door
Please rinse
Press the central switch.
Remove or change the water filter.
Fill the water tank with fresh water.
Ensure the water tank is fitted correctly.
Pour coffee beans into the coffee bean compartment. This message will remain on
the screen until you grind some more coffee.
Empty the trays.
Clean the contacts at the bottom of the drip tray and dry thoroughly.
Ensure the drip tray is correctly positioned.
Clean the silver contacts at the back of the drip tray and dry thoroughly.
Check that the central unit is properly positionned (see p. 50).
Check the door is closed properly.
Place a cup under the spout.
Press the central switch.
Page 58

56
TROUBLESHOOTING
Question Answer
No coffee ow. Check the water tank is fitted properly.
Fill the water tank with fresh water.
Ensure trays are correctly fitted.
Descale your machine (see p. 53)
Clean the central unit filter (see p. 52)
Coffee ow reduced to a dribble. Coffee ground too finely: adjust the setting to a coarser grind.
Coffee too watery, not strong enough. Refill the coffee bean compartment.
Reduce the volume of coffee in ml.
Select a stronger coffee.
Reduce the fineness of the grind.
Unpleasant taste. Coffee: stale? Acidic?: replace the coffee beans..
Chlorinated water?: use the filter cartridge or bottled water (low
mineral content).
After descaling, fill the water tank and rinse the machine
through, ½ via the nozzle, ½ via the ow head.
Coffee not hot enough. Adjust the coffee temperature setting (see p. 45).
Insufcient coffee ow. Refill the coffee bean compartment.
Grinder making unusual noise. Refill the coffee bean compartment.
Call Magimix Customer Care 0844 5738655.
Milk not frothy enough. Rinse your pipe and the cappucino device.
We recommend using cold, full fat milk.
Milk tube not working. Clean the tube (see p. 51).
Ensure it is correctly assembled.
No water supply. Ensure the water tank is full.
Rinse the machine (see p. 52).
Water around the base of the machine. Empty the drip tray.
If problem continues contact Magimix Customer Care on
0844 5738655.
Machine not working at all. Check all the connections.
Close the ground coffee compartment and wait for one minute.
Rinse (see p.).
Call Magimix Customer Care 0844 5738655.
Where can I buy cleaning tablets? Call Magimix Customer Care on 0844 5738655.
This symbol means that this product must not be treated as household waste. It must be taken to a
suitable collection point for the recycling of electrical or electronic equipment.
To find out where your nearest collection points are, contact your local council or the local waste
reception centre.
We reserve the right to modify the characteristics of this machine at any time and without prior notice.
The information contained in this document is not legally binding.
All rights reserved for all countries by Magimix.
Page 59

57
SAFETY INSTRUCTIONS
• Check that the voltage of your power supply corresponds to that shown on the
identification plate of your machine.
• Never leave children near the machine unattended. The machine has not been
designed for use by children.
• This machine has not been designed for use by persons (including children)
with physical, sensory or mental impairments or who are lacking in knowledge
or experience, unless they have the necessary supervision or have received
instructions as to how to use the machine by a person responsible for their
safety.
• The machine must always be connected to an earthed socket.
• Never allow the power cord to dangle over the work surface.
• Never allow the machine or its power cord to come into contact with a hot or
wet surface.
• Always unplug the machine after using it, before you ll the water tank and move
or clean the machine. Never tug on the power cord to unplug it.
• Never leave the machine and/or its power cord near heat.
• While using the machine, avoid touching certain parts which can become
extremely hot (spout, nozzle, etc.).
• Never heat ammable liquids with the steam.
• Always ll the tank with cold water and never add other types of liquid.
• Malfunctions due to failure to descale the machine or the use of a descaling
method other than that described in the Instructions for Use are not covered by
the guarantee.
• Never use your machine if it has fallen, been dropped or if it is not working
properly. If the power cord has been damaged, it must be repaired by an agent
approved by Magimix. For further information please contact Magimix Customer
Care on 0844 5738655, in order to avoid all possible danger.
• Never use your machine outside.
• This machine is intended solely for domestic use.
The following usages are not covered by the guarantee: in kitchen areas reserved
for personnel in shops, offices and other workplace environments, on farms, by
the patrons of hotels, motels and other commercial environments of a residential
nature, and in bed and breakfast-type environments.
Page 60

www.magimix.com
Réf : 460599 - 01/2010
 Loading...