

Page 1

Refrlgerator/Freezer
nolrost
REFRIGERATOR
LIGHT SHIELD CONTROL WINE DAIRY
ICECUBETRAYS FREEZER CANTILEVER CHILLER COMPARTMENT
&STORAGEBUCKET CONTROL SHELVES EGGSTORAGE
L I
REFRIGERATOR
FREEZER DOORSHELVES
DOORSHELVES SLIDE-OUT STATIONARY
FREEZER SHELVES CRISPER REMOVABLE
DRAWER LOWER MEAT COVER BASEGRILLE
LIGHT KEEPER
Please read the enclosed instructions to become better acquainted with your new
model. In order to prevent unnecessary service calls, refer to the self-service check
list. If you do need service, be sure to report the model and serial numbers to the
service man. They are found on the serial plate, located behind the front grille at
the bottom of the cabinet. Here is a convenient place to record these numbers.
MODEL NO ............... SERIAL NO.
Page 2
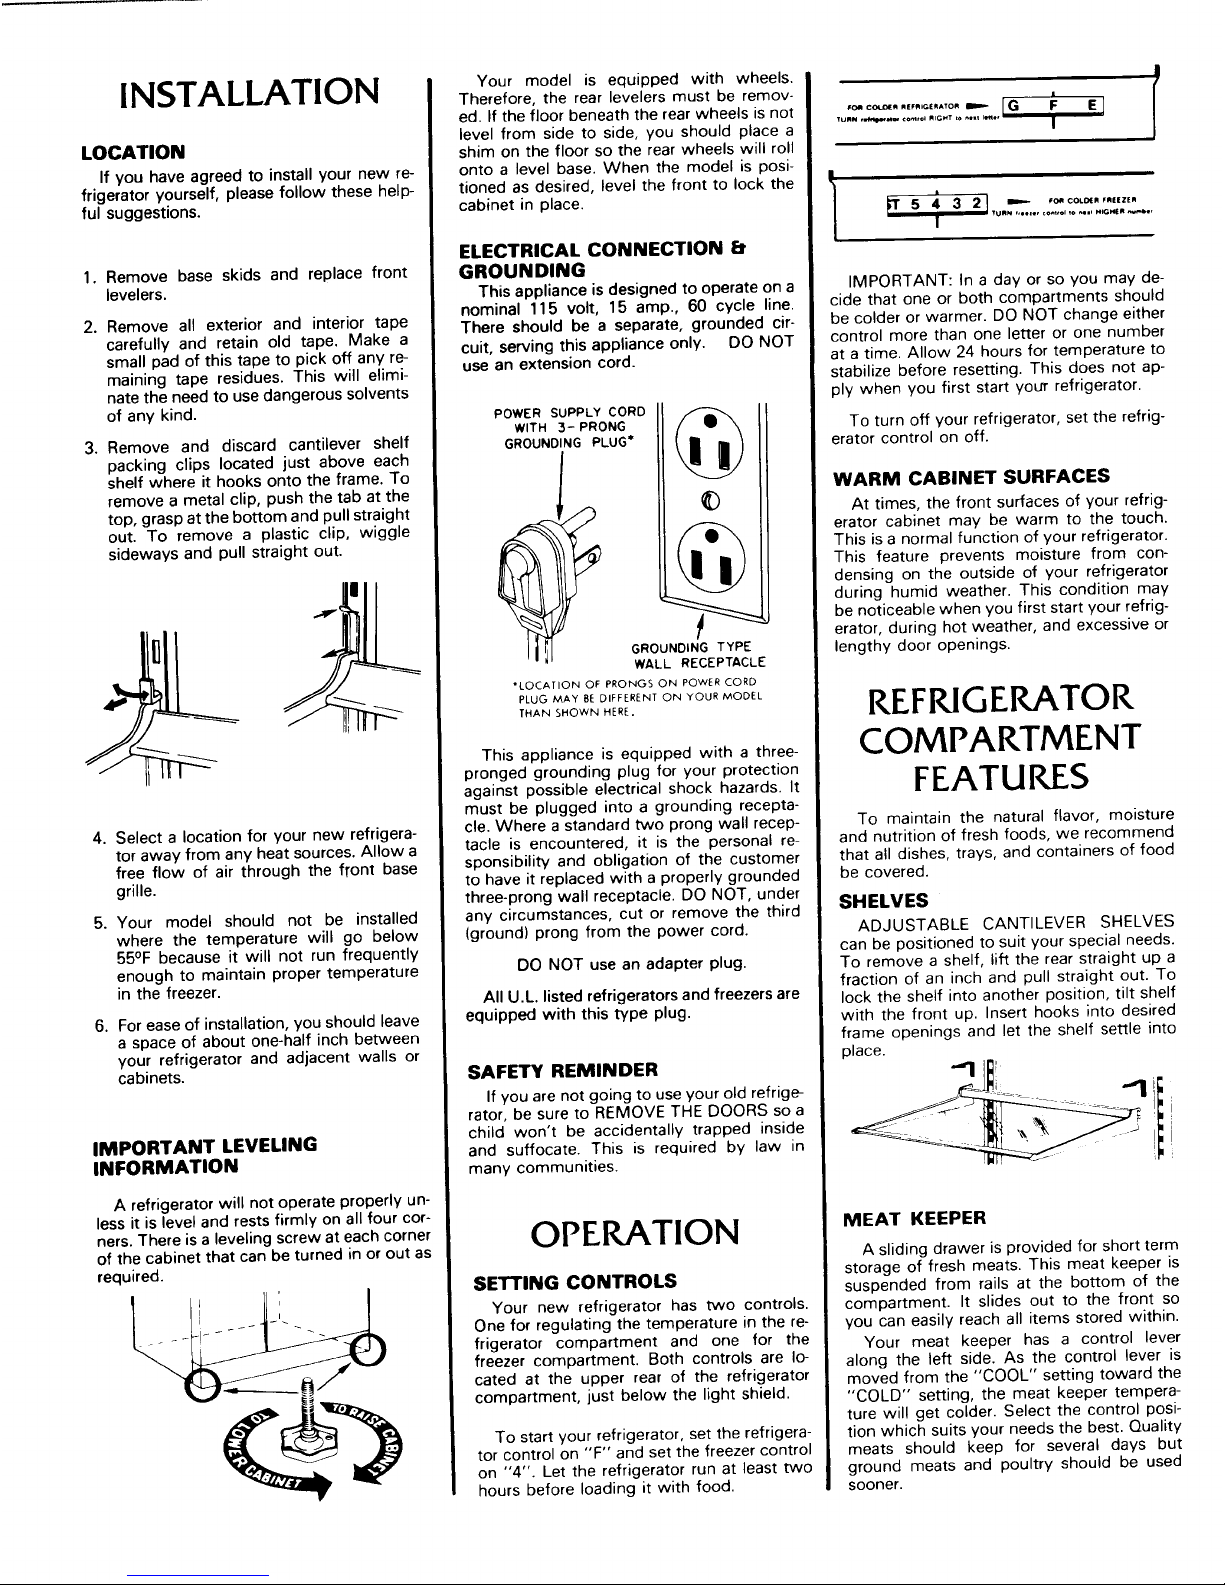
INSTALLATION Your model is equipped with wheels. |
Therefore, the rear levelers must be remov- ,............... _ G _: E ]
i
ed. If the floor beneath the rear wheels is not
level from side to side, you should place a !
LOCATION shim on the floor so the rear wheels will roll
If you have agreed to install your new re- onto a level base. When the model is posi-
frigerator yourself, please follow these help- tioned as desired, level the front to lock the L
ful suggestions, cabinet in place. '5 4 3 2J ...............
| , TURN...,., _o*,.ol,o _,, NIG_m,_,_.,
I
ELECTRICAL CONNECTION _r
1. Remove base skids and replace front GROUNDING
levelers. This appliance is designed to operate on a IMPORTANT: In a day or so you may de-
nominal 115 volt, 15 amp., 60 cycle line. cide that one or both compartments should
2. Remove all exterior and interior tape There should be a separate, grounded cir- be colder or warmer. DO NOT change either
carefully and retain old tape. Make a cult, serving this appliance only. DO NOT control more than one letter or one number
small pad of this tape to pick off any re- use an extension cord. at a time. Allow 24 hours for temperature to
maining tape residues. This will elimi- stabilize before resetting, This does not ap-
nate the need to use dangerous solvents ply when you first start your refrigerator.
of any kind. POWER SUPPLY CORD
WITH 3- PRONG _ To turn off your refrigerator, set the refrig-
3. Remove and discard cantilever shelf GROUNDINGPLUG* erator control on off.
packing clips located just above each
shelf where it hooks onto the frame. To WARM CABINET SURFACES
remove a metal clip, push the tab at the _)
top, grasp at the bottom and pull straight At times, the front surfaces of your refrig-
out. To remove a plastic clip, wiggle _ erator cabinet may be warm to the touch.
sideways and pull straight out. This is a normal function of your refrigerator.
This feature prevents moisture from con-
L _ densing on the outside of your refrigerator
during humid weather. This condition may
-_" be noticeable when you first start your refrig-
_ erator, during hot weather, and excessive or
._ GROUNDING TYPE lengthy door openings.
WALL RECEPTACLE
"LOCATION OF PRONGS ON POWER CORD REFRIGERATOR
PLUG MAY BE DIFFERENT ON YOUR MODEL
S.OWNHERE COMPARTMENT
This appliance is equipped with a three-
pronged grounding plug for your protection FEATURES
against possible electrical shock hazards. It
must be plugged into a grounding recepta-
4, Select a location for your new refrigera- cle. Where a standard two prong wall recep- To maintain the natural flavor, moisture
tor away from any heat sources. Allow a tacle is encountered, it is the personal re- and nutrition of fresh foods, we recommend
free flow of air through the front base sponsibility and obligation of the customer that all dishes, trays, and containers of food
grille, to have it replaced with a properly grounded be covered.
three-prong wall receptacle. DO NOT, under
5. Your model should not be installed any circumstances, cut or remove the third SHELVES
where the temperature will go below (ground) prong from the power cord. ADJUSTABLE CANTILEVER SHELVES
55°F because it will not run frequently can be positioned to suit your special needs.
enough to maintain proper temperature DO NOT use an adapter plug. To remove a shelf, lift the rear straight up a
fraction of an inch and pull straight out. To
in the freezer. All U.L. listed refrigerators and freezers are lock the shelf into another position, tilt shelf
6. For ease of installation, you should leave equipped with this type plug. with the front up. Insert hooks into desired
a space of about one-half inch between frame openings and let the shelf settle into
your refrigerator and adjacent walls or place.
cabinets. SAFETY REMINDER "3 IJ_
If you are not going to use your old refrige- j__ -"
rator, be sure to REMOVE THE DOORS so a - ]
child won't be accidentally trapped inside
IMPORTANT LEVELING and suffocate. This is required by law in
INFORMATION many communities.
A refrigerator will not operate properly un-
less it is level and rests firmly on all four cur- MEAT KEEPER
ners. There is a leveling screw at each corner OPERATION
of the cabinet that can be turned in or out as A sliding drawer is provided for short term
storage of fresh meats. This meat keeper is
required. SETTING CONTROLS suspended from rails at the bottom of the
i Your new refrigerator has two controls, compartment. It slides out to the front so
• i .... - " - One for regulating the temperature in the re- you can easily reach all items stored within.
frigerator compartment and one for the Your meat keeper has a control lever
i freezer compartment. Both controls are Io- As control lever is
along
the left side, the
cated at the upper rear of the refrigerator moved from the "COOL" setting toward the
compartment, just below the light shield. "COLD" setting, the meat keeper tempera-
ture will get colder. Select the control posi-
To start your refrigerator, set the refrigera- tion which suits your needs the best. Quality
tor control on "F" and set the freezer control meats should keep for several days but
on "4". Let the refrigerator run at least two ground meats and poultry should be used
hours before loading it with food. sooner.
Page 3

KEEP YOUR MEAT KEEPER TIGHTLY FREEZER STORAOE DRAWER CLEANING
CLOSED AT ALLTIMES The slide-out freezer drawer can be
To remove the meat pan, pull it out until it removed by pulling it out as far as it will go, IT IS RECOMMENDED THAT YOU
stops. Then lift the front edge slightly and then lift the front edge and pull straight out. DISCONNECT THE POWER CORD
pull completely out. If you notice that the drawer is not sliding BEFORE CLEANING.
All meats or poultry should be stored in smoothly or easily, lubricate the slide rails Your refrigerator can be easily rolled out
their original store wrappings or in plastic ,I I_
bags to reduce the evaporation of moisture _1 I for cleaning. Simply turn the leveler feet
COUNTERCLOCKWISE until they turn free.
from them. Then pull the cabinet straight out. If you
FRUIT _ VEGETABLE CRISPER have installed an automatic ice maker, we
The fruit and vegetable crisper drawer recommend that you turn the water supply
slides out for easy access to foods stored _ _ off before moving the cabinet.
within. It is completely r_movable for clean- After cleaning behind your refrigerator,
ing or for use elsewhere in your kitchen. The push it back and turn the levelers
FREEZERCOMPARTMENT CLOCKWISE until they touch the floor and
crisper cover also serves as a refrigerator 90T"rOM
storage shelf. To remove the cover for clean- lock the cabinet in place.
ing, lift the front edge and pull straight out. with petroleum jelly. Apply lubrication to OUTSIDE
Keep your crisper tightly closed to insure points as shown. Also, make sure the bot-
crispness and freshness. Storing leafy vege- tom of the freezer is clean where the slide Use mild soap and water. DO NOT use
tables, such as celery and lettuce in plastic rails make contact, scouring powders. Rinse with clear water.
Use glass wax or a similar product for pro-
bags reduces the evaporation of moisture ICE CUBE SERVICE tection of the finish.
from them.
Twist ends or depress center of flexible Door gaskets may be cleaned with soap
ice cube trays for easy removal of ice and water, a soda solution, or mild scouring
WINE CHILLER cubes, powder.
To use your wine chiller racks, pivot each INSIDE
it locks into place. Then slide DOOR
rack out until
the bottles in as shown. Use baking soda and warm water only on
FEATURES interior compartments and interior door
_ liners. DO NOT use liquid detergents,
L_ abrasive or solvent cleaners on interior parts.
_ AUTOMATIC DOOR CLOSERS Rinse with clear water. Do not wash interior
I\\ _'l All doors contain built in mechanisms that parts in your dishwasher.
automatically pull them completely shut Glass cantilever shelves can be removed
once they are ciosed to within 6 inches of and completely submerged in warm water.
the cabinet. All doors also have magnetic ALLOW GLASS TO WARM TO ROOM
door gaskets that cling to the cabinet front. TEMPERATURE BEFORE IMMERSING
These features combine to insure com-
plete door closures and air tight seals all
around. Once the door is within 6 inches of
the cabinet, the door closer will pull it the DEFROST WATER PAN
rest of the way. It's always important that Defrost water drains into a shallow pan
FREEZER your refrigerator is reasonably level for the beneath the cabinet and evaporates. During
door closers to function properly, periods of high humidity, water could remain
COMPARTMENT in the pan. This pan should be cleaned once
a month with a solution of strong soap and
FEATURES EASYCLEAN
water.
DOOR SHELFFRONTS /I ///_'-..___--
To maintain the natural flavor, moisture Door shelf fronts can be removed for easy /
and nutrition of frozen foods, we recom- cleaning of the door liner and shelf fronts. IIII
mend that all foods be wrapped or sealed Lift the shelf front straight up until it clears
properly, the retainers on the door liner and pull
SHELVES straight out. Reverse this procedure when
To remove a freezer shelf, lift the shelf replacing the door shelf front.
straight up, tilt sideways and pull straight __'_ "_'" I
out. When replacing a freezer shelf, reverse
the removal procedure. To remove defrost pan, grasp base grille
_ at both ends and pull it straight out. Lift front
of defrost pan and pull straight out. To
replace, reverse procedure as shown.
i
5LID_ R_LS
OPTIONAL AUTOMATIC Your model has an egg tray that fits _t __----',-_'_,_-_,
ICE MAKER securely on a door shelf. This tray can be
This model refrigerator is designed so an removed and carried to your working area. _
Automatic Ice Maker can be easily installed
whenever you want it. Order the ice maker
kit number shown on the label on the MAGNETIC DOOR GASKETS
cabinet back. The kit contains installation Door gaskets are magnetized to insure
instructions, water connection instructions an air tight seal all around. These gaskets ,A,_
and other information concerning the ice cling to the cabinet front, once the doors are spo,
maker operation, closed to within their magnetic range. TAS
Page 4

To replace base grille, line up the spring
clipson the base grillewith the squareopen-
ingsin the cabinet and tap each end in until
grille locks in place.
CONDENSER
The condenser shouldbe cleaned at least
twice a year or more often if conditions re-
quireit. If you move your refrigeratorout for
cleaning, the condenser can be cleaned
through the rearaccessopening. Thoroughly
vacuum dirt and lint from the open end of
the condenser.
REAR ACCESS
If you do not pull the cabinet out, the con-
denser can be cleaned through the left front
base opening. Grasp the basegrille at both
ends and pull straight out. Reach through
the base opening with your vacuum cleaner
attachment to clean the front and open end
of the condenser. After cleaning, replace
base grille.
REPLACING
LIGHT BULBS
IT IS RECOMMENDED THAT YOU
DISCONNECT THE POWER CORD
BEFORE REPLACING LIGHT BULBS
To replace a light bulb at the upper rear,
grasp the light shield near the ends and pull
either the top or bottom out until the shield
pulls free of the retainer lugs.
USE A 60 WA'I-F, STANDARD BASE, AP-
PLIANCE TYPE BULB WHEN REPLACING
THE UPPER REFRIGERATOR COMPART-
MENT LIGHT. THE UPPER FREEZERCOM-
PARTMENT LIGHT REQUIRES A 40 WAI-I-,
STANDARD BASE, APPLIANCE TYPE
BULB.
After replacing the light bulb, hook the
shield over the upper retainer lugs and press
in at the bottom until the shield snaps in
place.
The light behind the freezer divider bar is
easily accessible for replacement. Open the
lower freezer door and reach up behind the
divider bar to locate the bulb.
ALWAYS USE A 25 WATT, STANDARD
BASE, APPLIANCE TYPE BULB WHEN RE-
PLACING A LIGHT AT THIS LOCATION.
Page 5

ENERGY TIPS
FOR EFFICIENT ENERGY USE:
1. Be sure refrigerator is level and ventila-
tion around front grilleis not blocked.
2. Check door seals occsionally for leak-
age. Check at various places, top, bot-
tom, sides.
3. Check the temperature, avoid unneces-
sary cold settings.
4. Keep freezer full to nearcapacity, less
cold air is lost during door openings.
5. Let hot dishes cool before putting into
refrigeratoror freezer.
6. Cover liquids, if uncovered, the unit
must work longer.
7. Clean refrigerator condenser coils at
least twice a year.
SAFETY TIPS
1. In case of power failure, minimize door
openings. If power failure is of long
duration, protect frozen food by placing
blocks of dry ice on top of the packages,
or check with a local frozen foods locker
plant about temporary storage.
2. Use the three-pronged plug only with a
grounding receptacle to provide protec-
tion from electrical shock.
3. Unplug refrigerator before cleaning con-
denser or replacing light bulb.
4. Remove the doors from out-of-use re-
frigerator. Prevent a child from becom-
ing accidentally trapped and suf-
focating.
GOING ON
VACATION
If you will be gone for a month or less,
leave the control knob at its usual setting.
During longer absences, (a) remove all
food, (b) disconnect from electrical outlet, (c)
clean the refrigerator thoroughly, including
defrost pan, (d) leave doors open to prevent
odor formation.
AVOID
UNNECESSARY
SERVICE CALLS
BEFORE CALLING A TECHNICIAN,
CHECKTHE FOLLOWING LIST FORPOSSI-
BLE TROUBLES THAT YOU CAN REMEDY
WITHOUT DIFFICULTY.
NOISY OPERATION
• Fan noise--normal air flow
• Defrost pan not positioned correctly
• Cabinet not level
• Weak floor
• Dishes rattling against each other
Page 6

Additional motors and controls are used to FOODS DRY OUT REFRIGERATOR RUNS TOO
provide the improved performance of this (FRESH OR FROZEN) FREQUENTLY
larger capacity refrigerator. Therefore, nor- • Packages not wrapped or sealed properly • Frequent running provides more stable
mal operating sounds may be more noticea-
ble than on the model it replaced. • Crisper not tightly closed temperatures
• Too many door openings
WATER ON FLOOR • Prolonged door openings
SIZZLING SOUND IN FREEZER UNDER CABINET FRESH FOOD COMPARTMENT
• Defrost pan missing or not positioned cor- TOO WARM
• Normal sound caused by defrost water rectly
dripping on defrost mechanism • Refrigerator control set too warm
RED GLOW VISIBLE IN FREEZER MOISTURE COLLECTS ON • Freezer control set at coldest position
• Reflection of defrost mechanism during OUTSIDE SURFACE • Prolonged door openings
normal defrost cycle. • Hot humid weather increases condensa- FRESH FOOD COMPARTMENT
tion. As humidity decreases, moisture will
ICE CUBES EVAPORATE disappear TOO COLD
• Cold air moving over ice cubes causes • Refrigerator control set too cold
cubes to shrink when not used regularly CABINET LIGHT NOT WORKING FREEZER COMPARTMENT
ICE CUBES STICKING IN TRAY • Bulb burned out TOO WARM
• Trays may be coated with residue film • No power at outlet • Freezer control set too warm
from minerals in the water. Wipe trays • Prolonged door openings
with vinegar-soaked cloth until clean. If REFRIGERATOR WON'T RUN
residue is heavy, clean trays each time re-
frigerator is cleaned. • Temperature control turned to OFF.
ODOR IN CABINET • Power cord not plugged in.
• No poweratelectricaloutlet. IF YOU NEED
• Odor producing foods should be covered
• Interior needs cleaning • .ouse fuse b.own SERVICE
CABINET VIBRATES REFRIGERATOR RUNS TOO LONG
Under normal conditions, due to larger The model number, serial number, and bill
• Cabinet not level • size and colder temperatures, modern re- of material (BM) number of your model are
• Weak floor frigerators run a greater percentage of the listed on a serial plate. The serial plate is ]o-
time. cared at the lower left side of the liner wall
WARM AIR FROM • Prolonged or frequent door openings, next to the crisper drawer or the upper left
front corner of the liner. Refer to all of these
CABINET BOTTOM • Condenser needs cleaning, numbers in any correspondence with your
• Normal air flow for condenser • Poor air circulation around condenser, dealer or distributor concerning your model.
102645-1
 Loading...