

Page 1
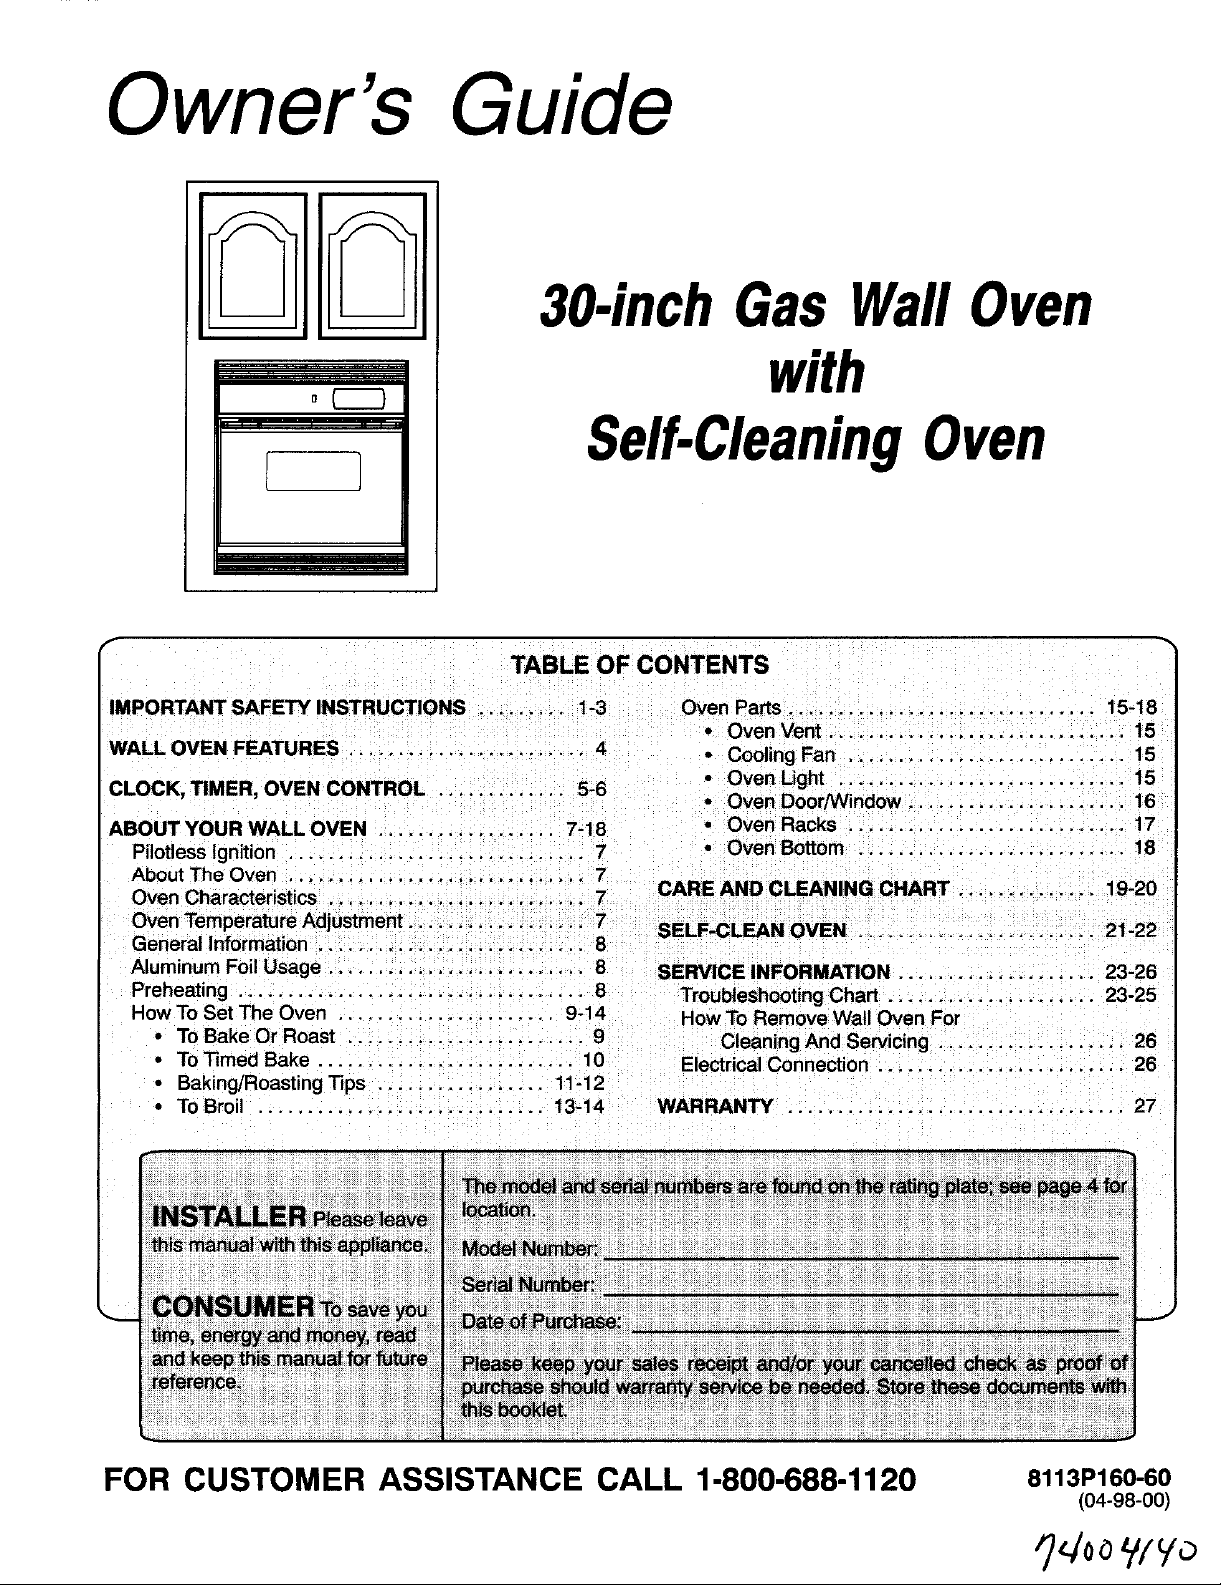
Owner's Guide
_ _ 30-inchGasWallOven
_ with
t I Self-CleaningOven
f
TABLEOFCONTENTS
IMPORTANTSAFETY INSTRUCTIONS ......... 1-3 OvenParts............................... 15-18
• OvenVent .............................. 15
WALLOVENFEATURES........................ 4 - CoolingFan ............................ 15
CLOCK,TIMER,OVENCONTROL .. 5-6 • OvenLight ............................ 15
ABOUTYOUR WALLOVEN .................. 7-18
PilotlessIgnition .............................. 7
AboutTheOven .............................. 7
OvenCharacteristics.......................... 7 CAREAND CLEANINGCHART .............. 19-20
OvenTemperatureAdjustment.................. 7
GeneralInformation............................ 8 SELF-CLEANOVEN ........................ 21-22
AluminumFoil Usage .......................... 8 SERVICEINFORMATION.................... 23-26
Preheating ................................... 8 TroubleshootingChart ..................... 23-25
HowToSet The Oven ...................... 9-14 HowTo RemoveWallOven For
• ToBake Or Roast ........................ 9 CleaningAnd Servicing ................... 26
• ToTimed Bake .......................... 10 ElectricalConnection ......................... 26
• Baking/RoastingTips ................. 11-12
• ToBroil ............................. 13-14 WARRANTY .................................. 27
........... - OvenDoor/Window..................... 16
• OvenRacks ........................... 17
• OvenBottom ........................... 18
FOR CUSTOMER ASSISTANCE CALL 1-800-688-1120 8113P160-60
(04-98-00)
q,./ooWyo
Page 2

O IMPORTANTSAFETYINSTRUCTIONS
Readall instructions before using this appliance.
Thank You for purchasingourcooking I
appliance.Tohelpyouobtainthemaximumincooking WARNING: If the information in this
satisfaction,we offerthesesuggestions: manual is not followed exactly, a fire or
explosion may result causing property
[]ETReadthismanualbeforeusingthe appliance, damage,personalinjuryor death.
Reviewallsafetyandcautioninstructions.
- Do not store or use gasoline or other
[]ETReviewtheTroubleshootingCharton flammable vapors and liquids in the
pages23 to25 ifservicebecomesnecessary, vicinity of this or any other appliance.
[_ Includethe modelandserialnumbersof your - WHAT TO DO IF YOU SMELL GAS:
appliancewhenrequestingservice.
• Proofof purchasesuchas sales receipt • Do not try to lightany appliance.
will be neededforwarrantyservice. • Do nottouch any electrical switch.
[ET'Youcancontactusat: • Do not useany phoneinyour building.
I
MaytagAppliances Sales Company • Immediately call your gas supplier
Attn:CAIns_Center
P.O. Box2370 from a neighbor's phone. Follow the
Cleveland,TN 37320-2370 gas supplier's instructions.
1-800-688-1120
• If you cannot reachyour gas supplier,
In our continuingeffortto improvethe qualityand callthe fire department.
performanceofour cookingappliances,it may be
necessaryto make changesto the appliancewithout
revisingthis manual. - Installation and service must be
performedbya qualifiedinstaller,service
agency or the gas supplier.
Page 3

MP()RTANTSAFETYINSTRUCTIONS
Thefollowinginstructionsarebasedonsafety NEVERleavechildrenalone or unsupervisednear the
considerationsandmustbe strictlyfollowedtoeliminate appliancewhenitisinuseor isstillhot.NEVER allow
thepotentialrisksoffire,electricshock,orpersonalinjury, childrento sitor standonany partoftheappliance.
Haveyourapplianceinstalledandproperlygroundedbya Childrenmustbetaughtthatthe
qualifiedinstalleraccordingtotheinstallationinstructions, applianceandutensilsinit canbe hot.
Havetheinstallershowyouthelocationofthegasshutoff Lethotutensilscoolina safeplace,
valveand howtoshutJtoffin an emergency, outof reachofsmallchildren.
Alwaysdisconnectpowerto appliancebeforeservicing, applianceisnota toy. Childrenshould
Toensureproperoperationandavoid possibleinjuryor otherpartsof the unit.
damageto unit do not attemptto adjust,repair,service,or
replaceanypartof yourapplianceunlessitis specifically CAUTION: NEVERstoreitems of
recommendedinthis book.Allotherservicingshouldbe interestto childrenin cabinetsabove
referredto a qualifiedinstalleror servicer, an appliance.Childrenclimbingon
Besure all packingmaterialsareremovedfromthe
appliancebeforeoperatingit. NEVERuse applianceas a _ /'E;TC_/
Keepareaaround applianceclearandfree from a room to prevent potential "
combustiblematerials, gasoline,andotherflammable hazardto the user and
Childrenshouldbe taughtthatan
notbeallowedto playwith controls or
theapplianceto reach items could be seriouslyinjured.
space heaterto heatorwarm
Z
vaporsand materials, damageto the appliance. !"_]_ _
Manyplasticsarevulnerable to heat.Keepplasticsaway a storageareafor foodor __
from partsofthe appliancethat may becomewarm or hot. cookingutensils.
Manyaerosol-typespraycansare EXPLOSIVEwhen Do not obstructtheflowof
exposedto heatand may behighlyflammable.Avoidtheir combustionandventilation
useorstorage nearan appliance, airby blockingthe oven vent or air intakes.Restrictionof
1. Turnoffappliance. Avoidtouching ovenvent areawhile oven is onandfor
2. Use dry chemicalorfoam-typeextinguisheror baking ventand surroundingareabecome hot enough tocause
sodato smotherfire or flame. Neveruse water ona burns.Afterovenisturned off, donottouchthe ovenvent
greasefire. orsurroundingareas untiltheyhave hadsufficienttime to
3. If fire is in the oven or broilerpan, smotherby closing cool.
ovendoor.
Also,do notusetheoven as _1_/. _ _:_:_..._.
airflowtothe burner preventsproperperformanceand
increasescarbonmonoxide emissionto unsafelevels.
severalminutesafter oven is turned off. Someparts ofthe
appliancedoor,as a stepstool /
orseatas this mayresult in
possibletipping ofthe
appliance,damage tothe
appliance,and serious
injury.
Do nottouch a hot oven light
.vuse
bulbwith a dampclothas the
bulbcould break. Shouldthe bulb break,disconnect
powerto the appliance beforeremovingbulb to avoid
electricalshock.
/
Page 4

O IMPORTANTSAFETYINSTRUCTIONS
NEVERheat an unopenedcontainerintheoven. Turnoffallcontrolsandwaitfor appliancepartsto cool
Pressurebuild-upmaycausecontainertoburstresulting beforetouchingorcleaningthem.
inseriouspersonalinjuryordamagetotheappliance.
Usedry,sturdypotholders.Damppotholdersmay cause burnsif a wetspongeorclothisusedtowipespillsona
burnsfromsteam.Dishtowelsor othersubstitutesshould hotsurface.Somecleanerscanproducenoxiousfumesif
neverbe usedas potholdersbecausetheycantrail appliedtoa hotsurface.
acrosshotburnersandigniteorget caughton appliance
parts.
NEVERweargarmentsmadeof flammablematerialor
loosefittingorlonghanging-sleevedapparelwhile Cleanonlypartslistedinthismanual.Donotcleandoor
cooking.Clothingmayigniteor catchutensilhandles, gasket.Thedoorgasketisessentialfora goodseal.Care
Alwaysplace oven racksinthe desired positionswhile Donotuseovencleanersof any kindin or aroundany
oven iscool.Slideovenrack outto addor removefood, partoftheself-cleanoven.
usingdry sturdypot holders.Always avoid reachinginto
theovento add or removefood. Ifa rack must bemoved Beforeself-cleaningthe oven, removebroiler pan,oven
while hot, use a dry pot holder.Alwaysturnthe oven off at racks,andother utensils,and wipe off excessive
theend ofcooking, spilloversto preventexcessivesmokeor flare ups.
Use carewhenopeningtheovendoor. Let hot airor theoven duringtheself-clean cycle.
steamescapebefore removingor replacingfood.
PREPAREDFOODWARNING:Followfood
manufacturer'sinstructions,Ifa plasticfrozenfood
containerand/orits coverdistorts,warps,or isotherwise
damagedduring cooking, immediatelydiscardthefood The CaliforniaSafe DrinkingWaterand ToxicEnforcement
and its container.The food couldbecontaminated. Act of 1986 (Proposition65) requiresthe Governorof
Followthe manufacturer'sdirectionswhen usingoven exposuresto suchsubstances.
cookingbags. Users ofthis applianceare herebywarnedthat the
Onlycertaintypesof glass,glassceramic,ceramic,or burningof gascanresult inlow-levelexposureto someof
glazed utensilsare suitableforcooktopor oven usage
without breakingdue tothe suddenchange in and soot,due primarilyto the incompletecombustionof
temperature, naturalgas or liquid petroleum(LP)fuels.Properly
Thisappliancehas beentestedforsafe performance Exposuretothese substancescanalso be minimizedby
usingconventionalcookware.Do not use any devicesor properlyventingthe burnersto the outdoors.
accessoriesthatare not specificallyrecommendedin this
manual.Do not useadd-onoven convectionsystems.The
useof devices or accessoriesthat are not expressly
recommendedinthis manualcan createserious safety
hazards,result in performanceproblems,and reducethe
life ofthe componentsofthe appliance.
Cleanappliancewithcaution.Usecaretoavoidsteam
shouldbe takennotto rub,damage,ormovethegasket.
CAUTION: Do not leavefood or cooking utensils,etc. m
Californiatopublish a list of substancesknownto the
Stateof Californiato cause canceror reproductiveharm,
and requiresbusinessesto warn customersof potential
the listedsubstances,includingbenzene,formaldehyde
adjustedburnerswill minimizeincompletecombustion.
SAVETHESEINSTRUCTIONS
Page 5
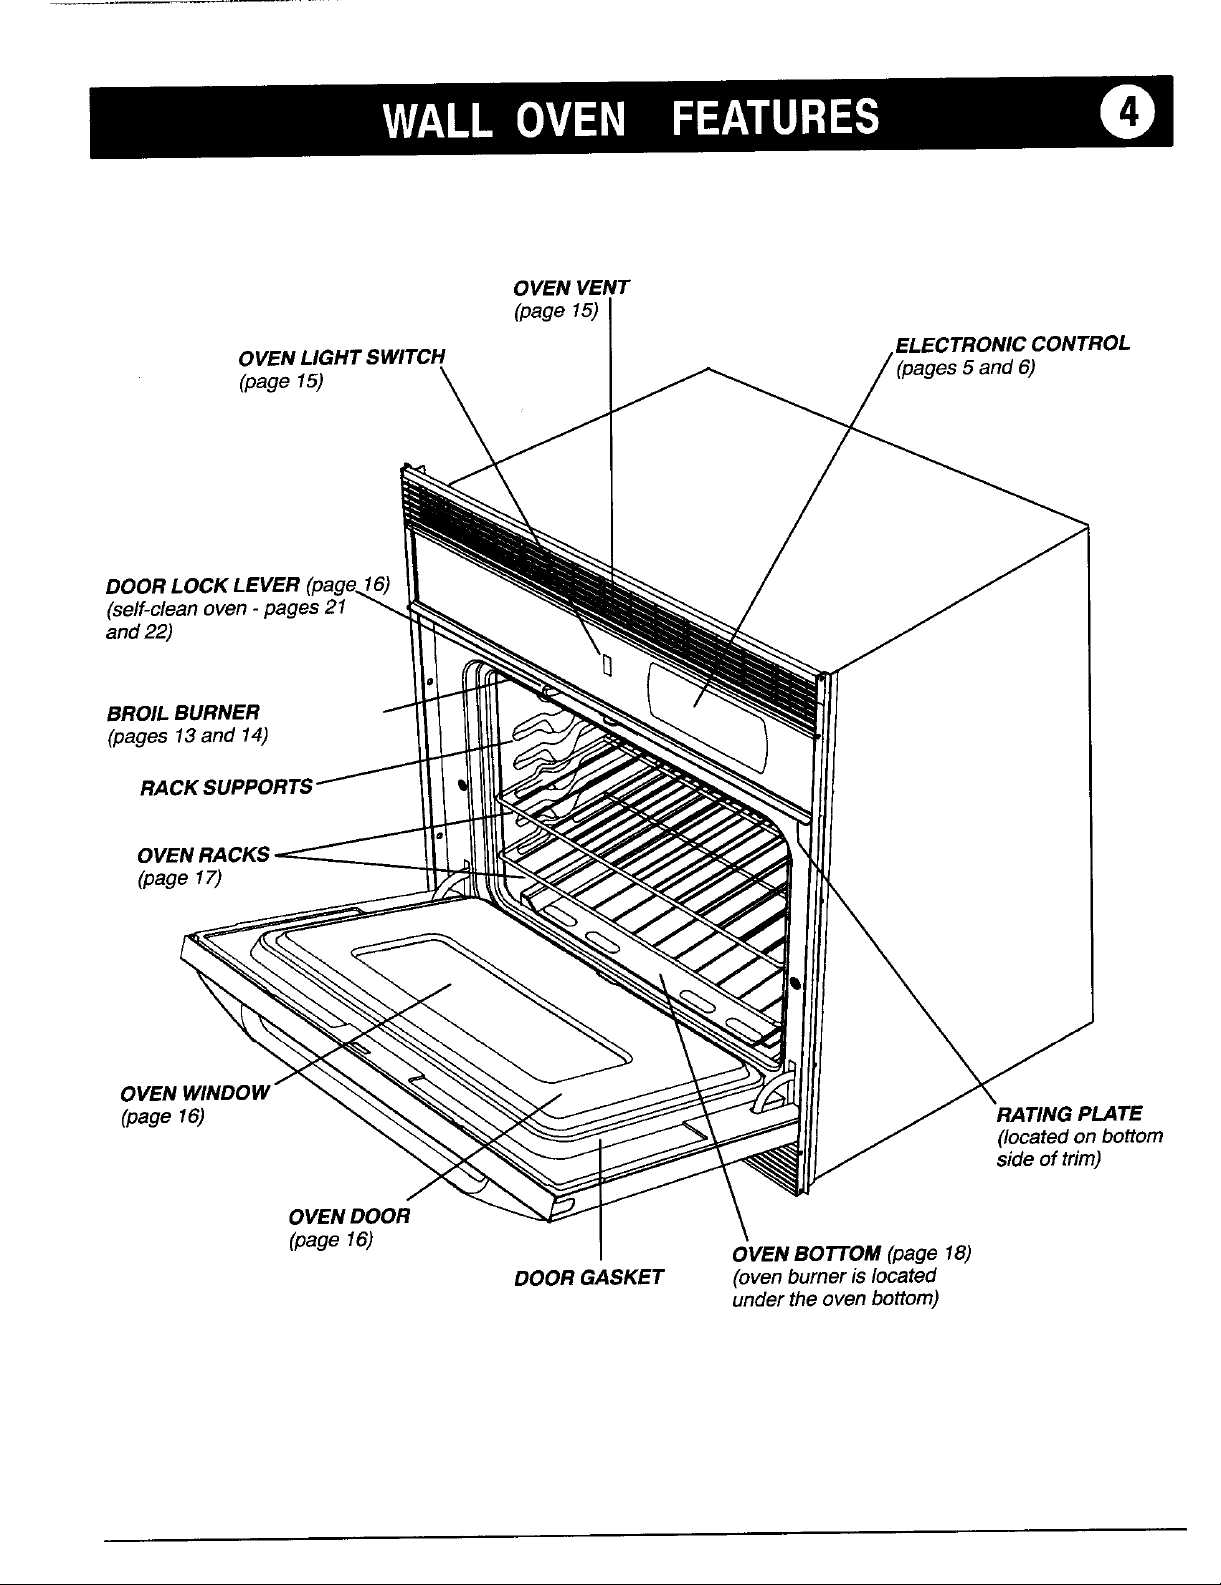
OVENVENT
OVENLIGHT SWITCH 5 and 6)
(page 15)
DOORLOCK LEVER
(self-cleanoven-pages 21
and22)
BROIL BURNER
(pages 13and 14)
RACKSUPPOR_
OVENRACKS
(page 17)
(page 15) I
CONTROL
C
(page 16) RATINGPLATE
(locatedon bottom
sideof trim)
OVENDOOR
(page 16) OVENBOTTOM(page 18)
DOORGASKET (ovenburnerislocated
under the ovenbottom)
Page 6
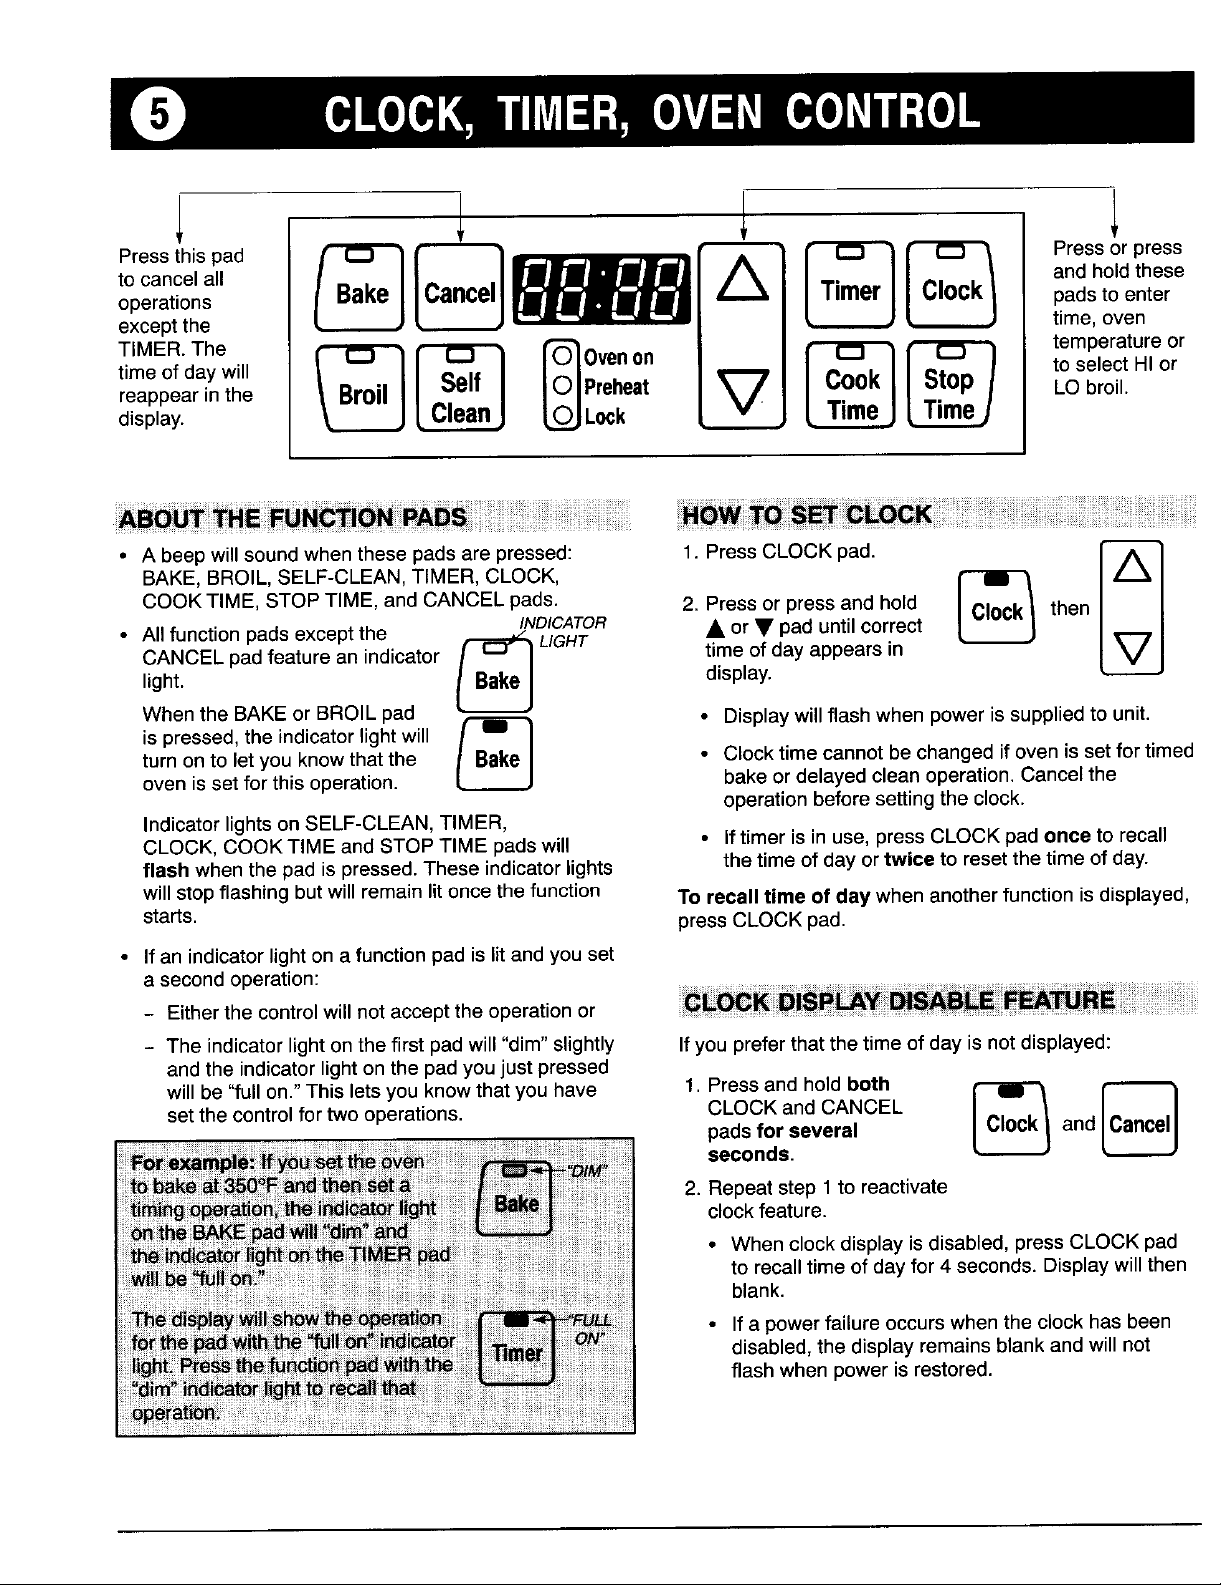
to cancel all _ _ and holdthese
operations padsto enter
exceptthe time, oven
TIMER.The temperatureor
timeofdaywill to select HI or
reappearin the LO broil.
display.
PressthspaPresspress
• A beepwillsoundwhen these pads are pressed: 1. PressCLOCKpad.
BAKE,BROIL,SELF-CLEAN,TIMER, CLOCK, I_
COOKTIME, STOPTIME, and CANCELpads. 2. Pressorpress andhold l CloCkI then
• Allfunctionpads exceptthe _ LIGHT
CANCELpadfeature an indicator timeof day appearsin
light, l BakeJ display.
Whenthe BAKEor BROIL pad _ • Displaywill flash when powerissupplied to unit.
ispressed,the indicatorlightwill I n_"_'._I
turn onto letyou knowthatthe • Clocktimecannotbechangedif ovenis setfor timed
ovenis setfor this operation. _ bake or delayed clean operation.Cancelthe
Indicatorlights on SELF-CLEAN,TIMER,
CLOCK,COOKTIME and STOPTIMEpadswill • Iftimer isin use, pressCLOCKpadonce to recall
flash when the pad ispressed.These indicatorlights thetimeof dayortwice to resetthe time of day.
will stopflashing butwill remainlitonce the function Torecall time of day when another function is displayed,
starts, pressCLOCK pad.
• If an indicatorlight on a functionpad islit andyou set
a second operation:
- Eitherthe controlwill not acceptthe operationor
- The indicatorlightonthefirst padwill "dim" slightly Ifyou preferthat thetime of day isnotdisplayed:
and the indicatorlight on the padyoujust pressed
will be "fullon."This lets youknowthatyouhave 1. Pressand hold both _
setthe controlfor two operations. CLOCKand CANCEL
INDICATOR • or • pad until correct
operationbeforesettingthe clock.
padsfor several and
seconds.
2. Repeatstep1toreactivate
clockfeature.
io,oo,
Lc,o.,j
• Whenclockdisplayisdisabled,pressCLOCKpad
torecalltimeofdayfor4 seconds.Displaywillthen
blank.
• Ifa powerfailureoccurswhentheclockhasbeen
disabled,thedisplayremainsblankandwillnot
flashwhenpowerisrestored.
Page 7

CLOCK,TIMER,OVENCONTR(IL
1. PressTIMERpad. _ Youhavea choiceof three"endof timed cook"reminder
time appearsin display, then
• or • pad untilcorrect I TinierJ • Option 1: Fourbeepsthen onebeep every 30seconds
2. Pressor pressand hold _ l_71 beeps for theAutomaticOvenTimerfeature.
• Thetimerfeature does notoperate the oven.
• The timercanbe set from 1 minute[0:01]upto 9 the next 12hours oruntilCANCELpad is pressed.
hoursand 50 minutes[9:50].
• The timerwillstartautomatically. Howto select the desiredoption:
• The TIMER indicatorontheTIMERpad willlight 1. Pressand holdboth
wheneverthe timeris inuse. COOKTIME and CLOCK J P"_L,I I_W_I
• Onelong beepand "End"will bebrieflydisplayedto padsfor 3 seconds. [ _/n_; 1 andt,oo.j
signaltheend of thetimer operation. • A single beepwill sound.
To cancel timer: Press and hold TIMERpad for 3 • Displaywill showcurrent
seconds. Time of daywill reappear in the display, option.
The 12Hour EnergySaver feature automaticallyturnsoff • The currenttime of day
theoven if itwas accidentlyleft on after 12 hours, will reappearin the display
Todeactivatethis featuresothe ovenwill NOT turn off
automaticallyat the end of 12hours:
1. Pressand hold CLOCKpad
for the next 5 minutes or until CANCELpad is
pressed. (Defaultoption.)
• Option 2: Four beeps.There areno otherbeeps.
• Option 3: Fourbeepsthen one beep every minutefor
2. Press• or•padto
selecttheoptionnumber
youwish.
after4 seconds.
2. Press• or• paduntil8:88 l Clockl then beingturnedon.Thisisespeciallyhelpfulwhencleaning
appearsinthedisplay, thecontrolpanel.
• Currenttimeofdaywill To activate:
for 3 seconds. _ 17l The ControlLock-Outfeaturepreventsthe ovenfrom
reappearinthedisplayafter4 seconds. 1. Pressandholdboth _
3. Repeatsteps 1 and 2to reactivatethe 12 Hour STOPTIMEand [ _'_PeJ and
EnergySaverfeature. CANCELpadsfor 3
• 12:00willappearin displayto indicatethe Energy 2. "OFF"willappearin displaywhenthisfeature is
Saverfeatureis restored, activated.
seconds.
• Onlythe clockand timer functionswill operate
whenControlLock-Outfeatureis activated.
3. Repeatstep 1to deactivatethis feature.
Lcao-,J
Page 8
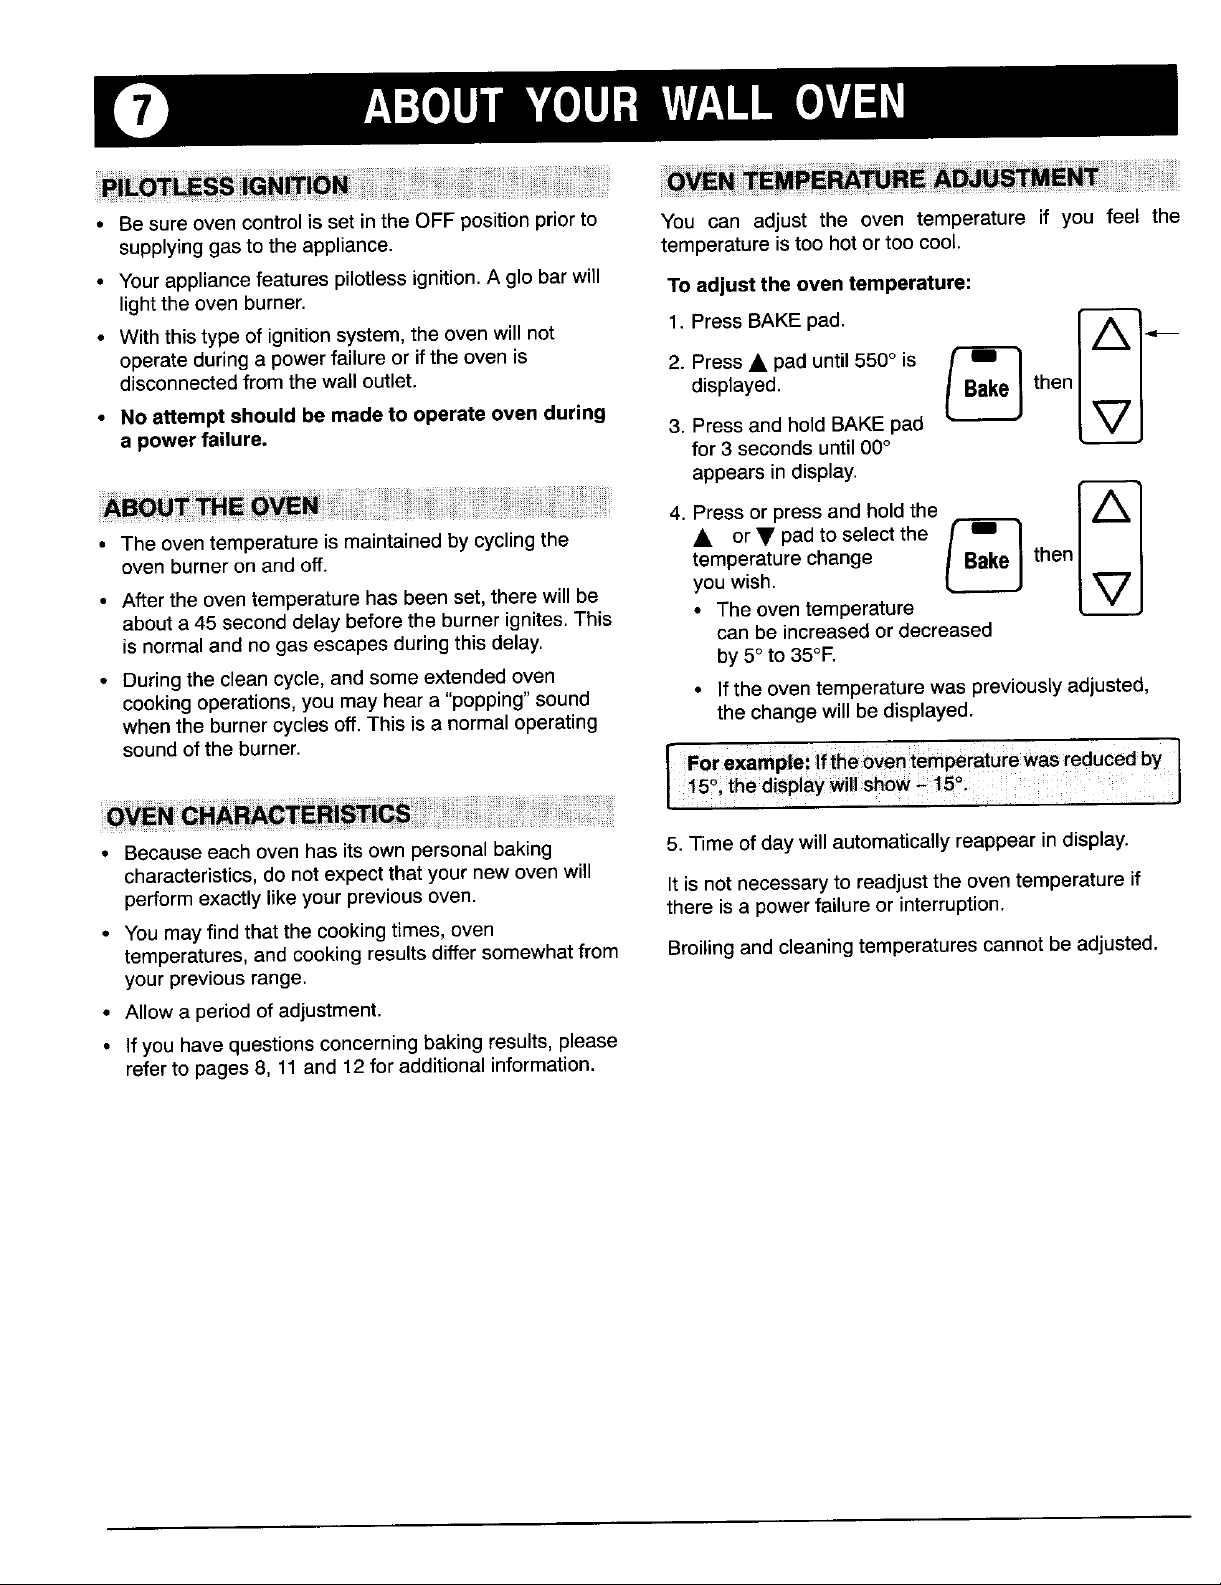
ABOUTY)UR WALLOVEN
• Besureovencontrolisset inthe OFF positionpriorto You can adjust the oven temperature if you feel the
supplyinggastothe appliance, temperatureistoo hotortoo cool.
• Yourappliancefeaturespilotlessignition.A globarwill Toadjust the oven temperature:
lightthe ovenburner.
• Withthistype of ignitionsystem,the ovenwill not 1. PressBAKEpad. _-_-_,,_
operateduringa powerfailureor ifthe oven is 2. Press• pad until550°is
• No attemptshould be madeto operateovenduring
disconnectedfromthe wall outlet, displayed, l Bake] then
a powerfailure. 3. PressandholdBAKEpad
• The oventemperature ismaintainedby cyclingthe • orV padto select the
oven burneron and off. temperaturechange _ then
• Aftertheoventemperaturehas beenset,there will be you wish.
abouta 45 seconddelay beforethe burner ignites.This • Theoven temperature
is normaland no gasescapesduring this delay, can be increasedor decreased
• Duringthe clean cycle,and someextendedoven
cookingoperations,you may hear a "popping"sound • Ifthe oventemperaturewas previouslyadjusted,
whenthe burnercyclesoff.Thisis a normaloperating thechangewill be displayed.
for3 secondsuntil00°
appearsindisplay.
4. Pressor pressand holdthe I AI
by 5°to35°F.
soundof the burner. I Forexampleilftheoventem_ratuiewasreducedby I
• Becauseeachovenhasitsown personalbaking 5.Timeofdaywillautomaticallyreappearindisplay.
characteristics,do not expectthat yournewovenwill
performexactly like your previousoven.
• Youmay find that the cooking times,oven
temperatures,and cookingresultsdiffersomewhatfrom Broilingand cleaningtemperaturescannotbe adjusted.
your previousrange.
• Allowa periodof adjustment.
• If you havequestionsconcerningbakingresults,please
referto pages8, 11and12for additionalinformation.
lo: ;
I !the d!spayw show
It is not necessaryto readjustthe oventemperature if
there is a power failure or interruption.
Page 9
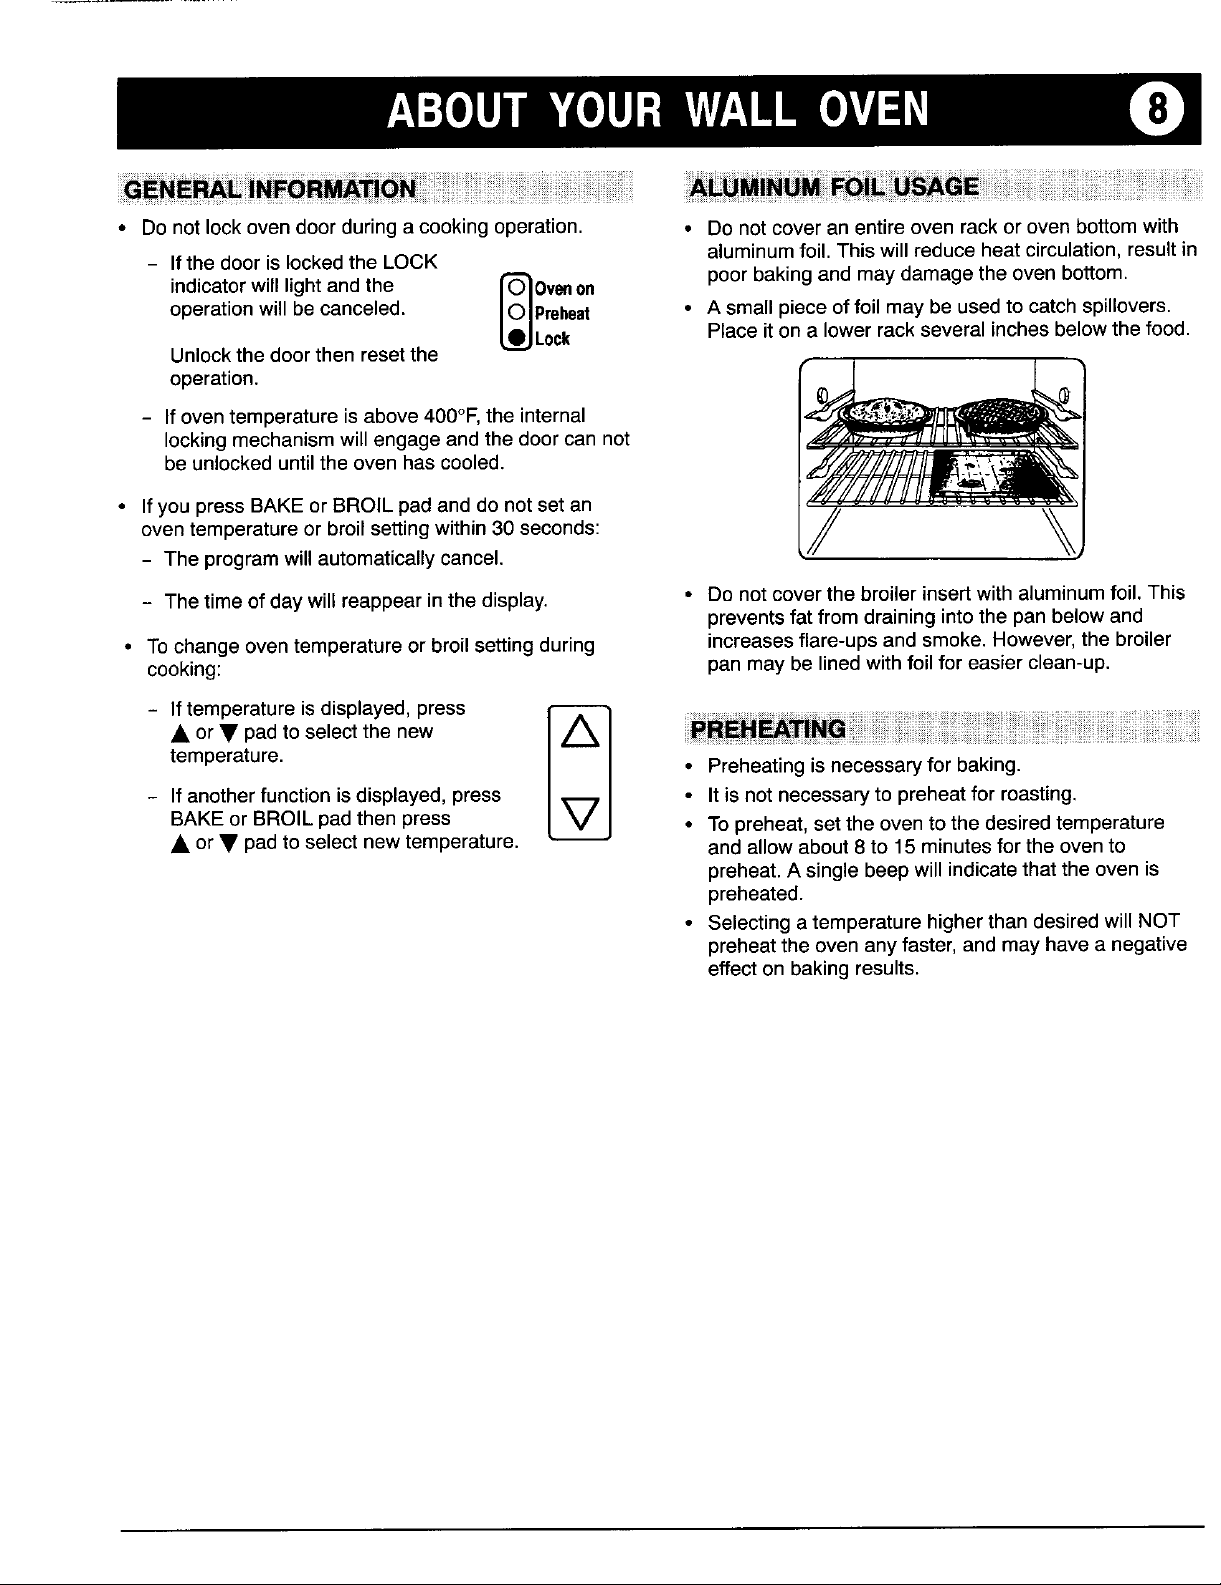
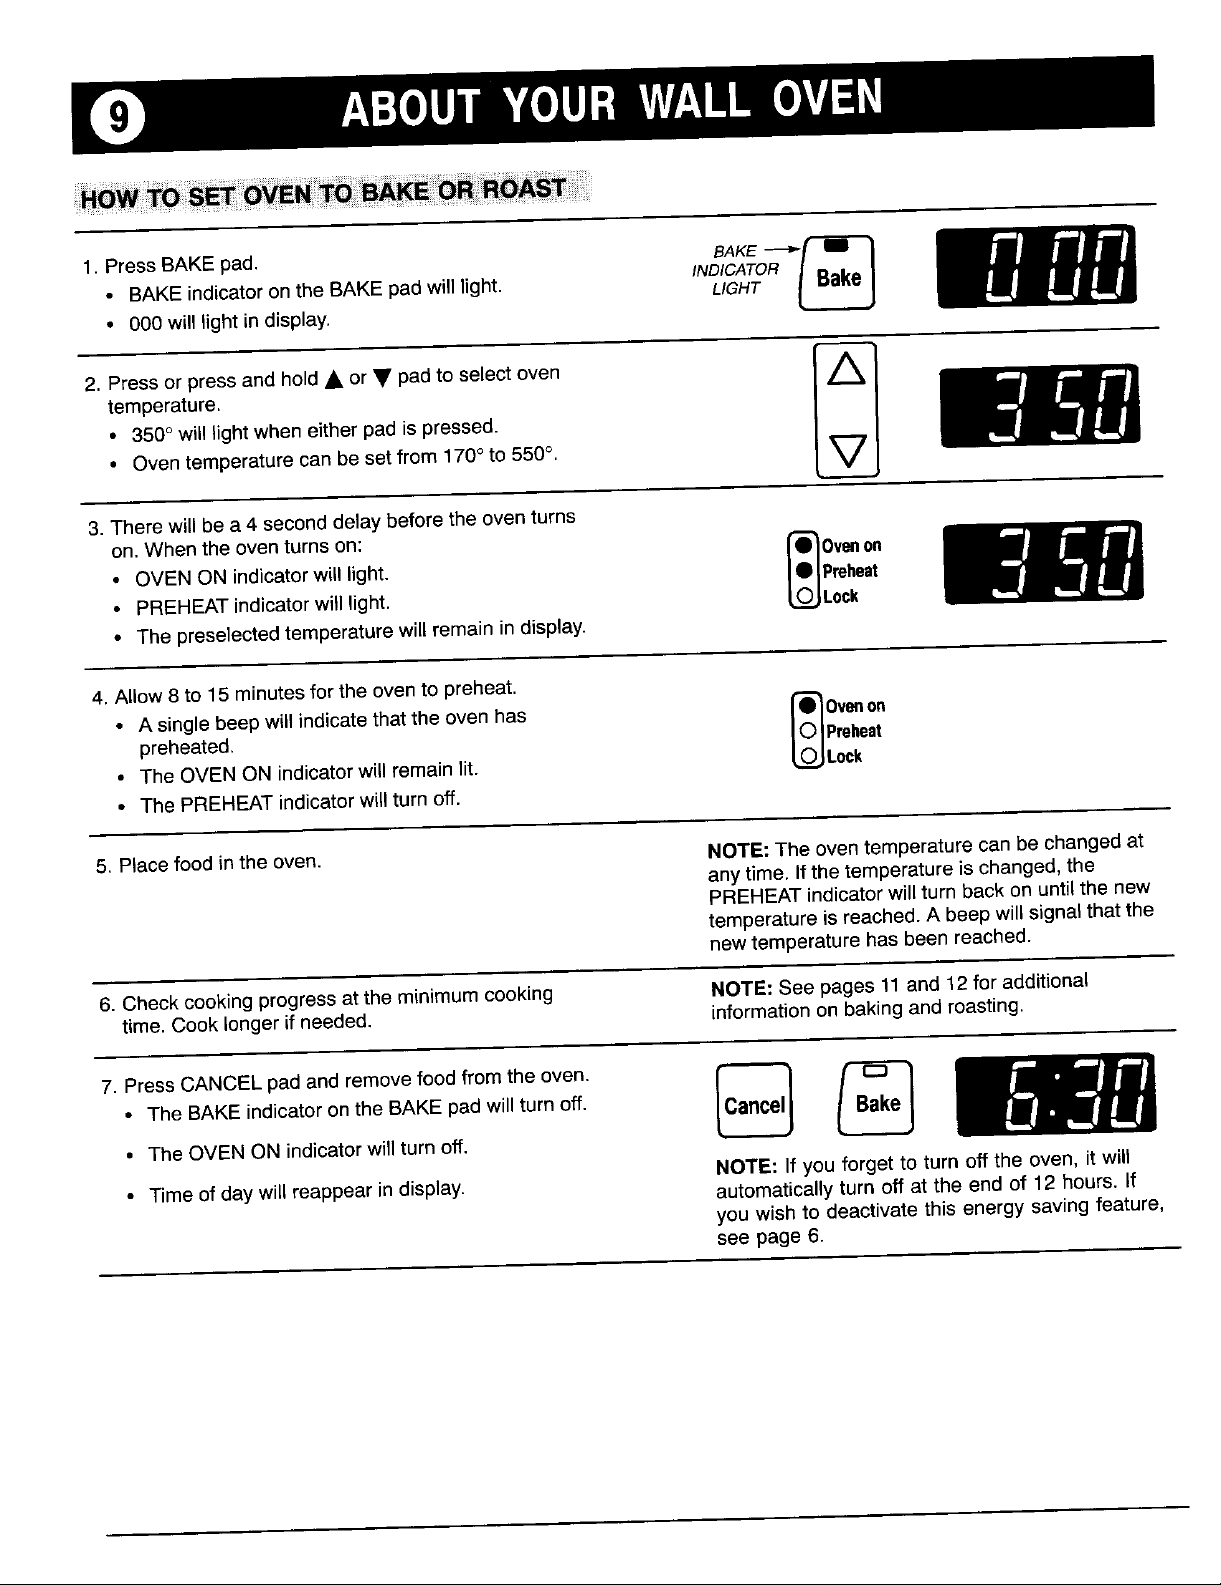
• Do not lock ovendoorduringacooking operation. • Do notcoveran entire oven rackor oven bottomwith
- Ifthe door is lockedthe LOCK aluminumfoil. This will reduceheat circulation,resultin
indicatorwill lightand the _'_Ovenon poorbakingand maydamagethe oven bottom.
operationwillbe canceled, i_lPrebeat • A smallpieceoffoilmaybe usedtocatchspillovers.
Unlockthe doorthen resetthe •
__JLock Placeit on a lower rack severalinchesbelowthefood.
- If oventemperatureis above400°F,the internal ,_
lockingmechanismwill engageandthe doorcan not ___
operation.
beunlockeduntilthe oven hascooled. _ _'__._
• Ifyou pressBAKE or BROIL padanddo notset an
kk
oventemperatureor broil setting within30seconds: /_ \\
- The programwillautomaticallycancel. ,// \\
- Thetimeof daywillreappearinthe display. • Do notcoverthe broiler insertwithaluminumfoil. This
preventsfat from draininginto the panbelowand
• Tochange oventemperatureorbroilsettingduring increasesflare-upsand smoke.However,the broiler
cooking: pan may be lined withfoil for easier clean-up.
- If temperatureisdisplayed, press
• or • pad to selectthe new
temperature. • Preheatingis necessaryfor baking.
- If anotherfunctionisdisplayed, press • It is not necessaryto preheatfor roasting.
BAKEor BROILpadthen press • To preheat,setthe oven tothe desiredtemperature
• or • pad to selectnewtemperature, andallowabout 8 to 15 minutesfor the ovento
preheat.A singlebeepwillindicatethat theoven is
preheated.
• Selectinga temperaturehigherthan desiredwill NOT
preheatthe oven any faster,and may have a negative
effecton baking results.
Page 10
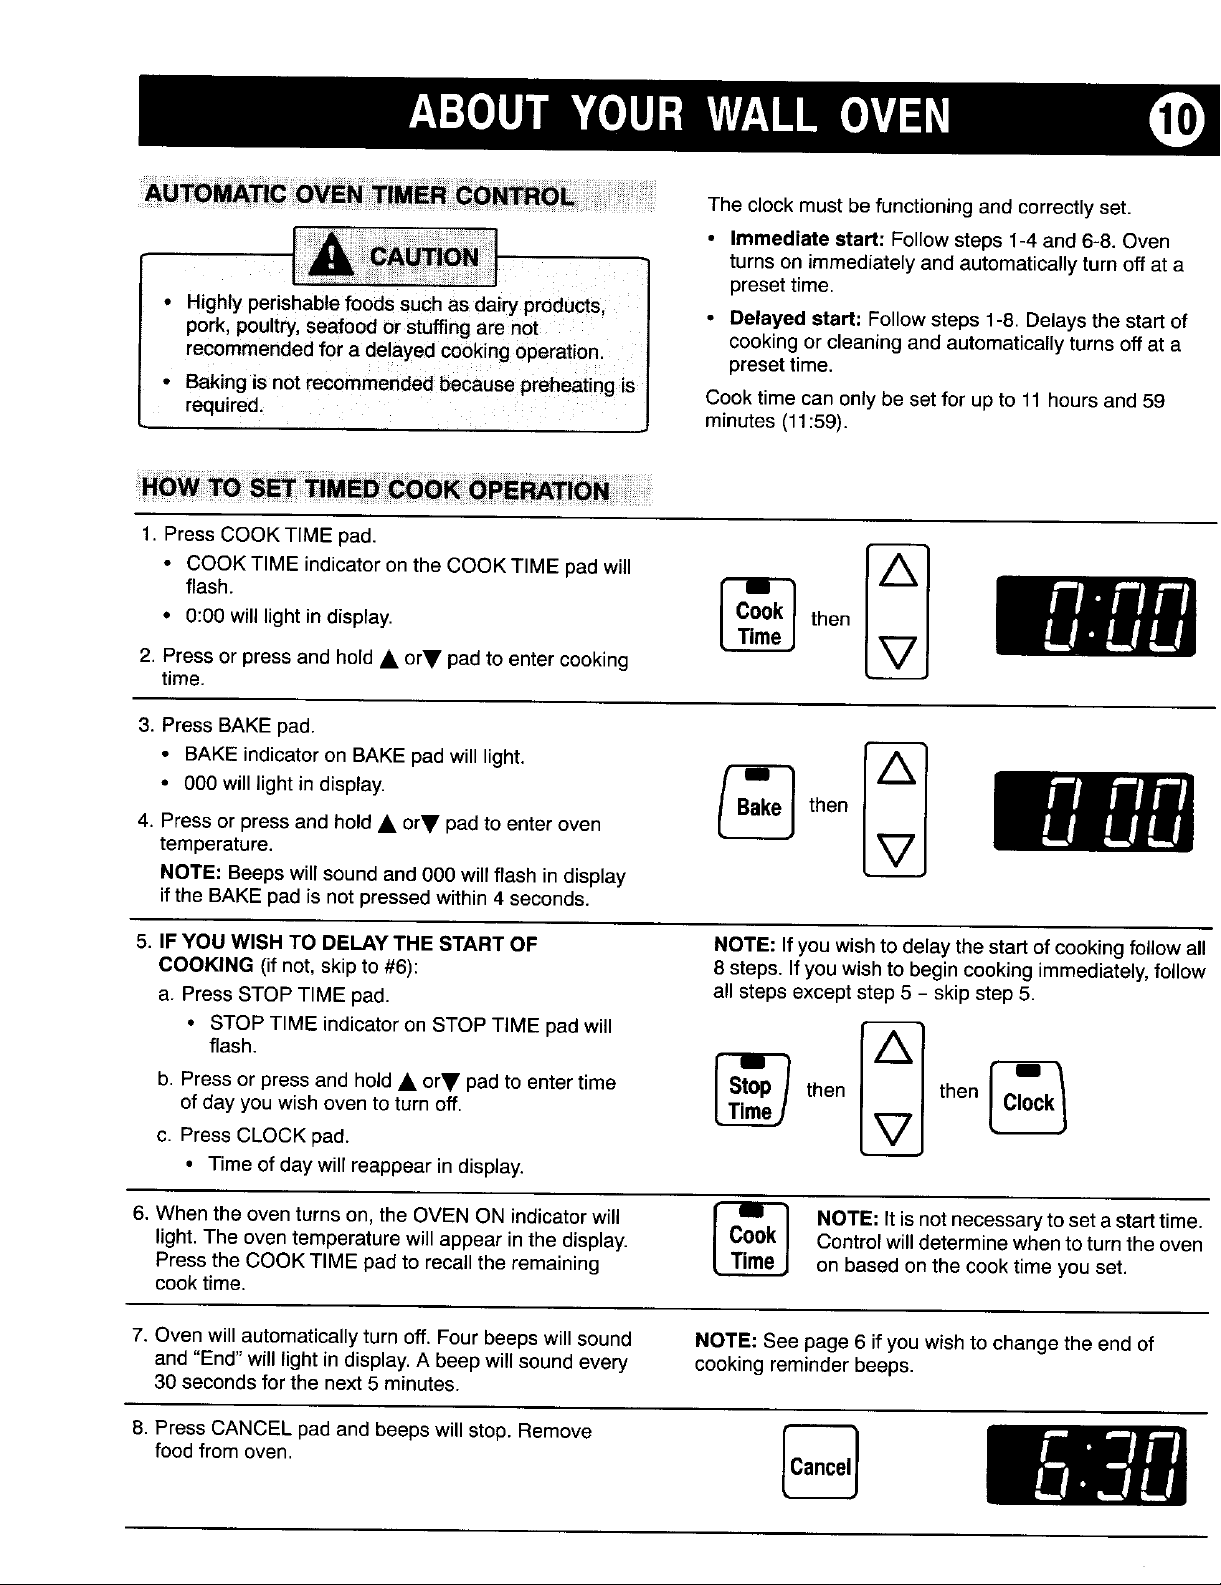
0 ABOUTYOURWALLOVEN
• BAKE indicatoron the BAKEpad willlight. LIGHT
1.PressBAKEpad. INDICAToRBAKE_"_
• 000will light in display.
2. Pressor pressand hold• or • padto select oven i-_
temperature.
• 350° will lightwheneitherpadis pressed.
• Oventemperaturecan be setfrom 170° to 550°.
3.Therewill bea 4 seconddelaybeforethe oventurns
on.Whenthe oventurns on: i,_0_ on
• PREHEATindicatorwilllight. Lock
• OVENONindicatorwilllight. _Preheat
• Thepreselectedtemperaturewill remain in display.
4.Allow8 to 15 minutesfor the ovento preheat.
• A single beepwill indicatethat theovenhas IO)0v_on
preheated. IUIPreheat
• TheOVENON indicatorwill remainlit. L.U_JLock
• ThePREHEATindicatorwillturn off.
5. Placefood inthe oven. NOTE:The oventemperaturecan be changed at
anytime. Ifthe temperatureischanged,the
PREHEATindicatorwillturn backon untilthe new
temperatureisreached.A beep will signalthat the
newtemperaturehas been reached.
6. Check cookingprogressat the minimumcooking NOTE:Seepages 11and 12for additional
time. Cooklongerif needed, informationon baking and roasting.
• The BAKEindicatoronthe BAKEpadwillturnoff.
7. PressCANCELpad and removefood from the oven. [_
• TheOVENON indicatorwillturnoff.
NOTE: If you forget to turn off the oven, it will
• Timeof day will reappearin display, automaticallyturn off at the end of 12 hours. If
you wishto deactivatethis energy saving feature,
see page6.
Page 11
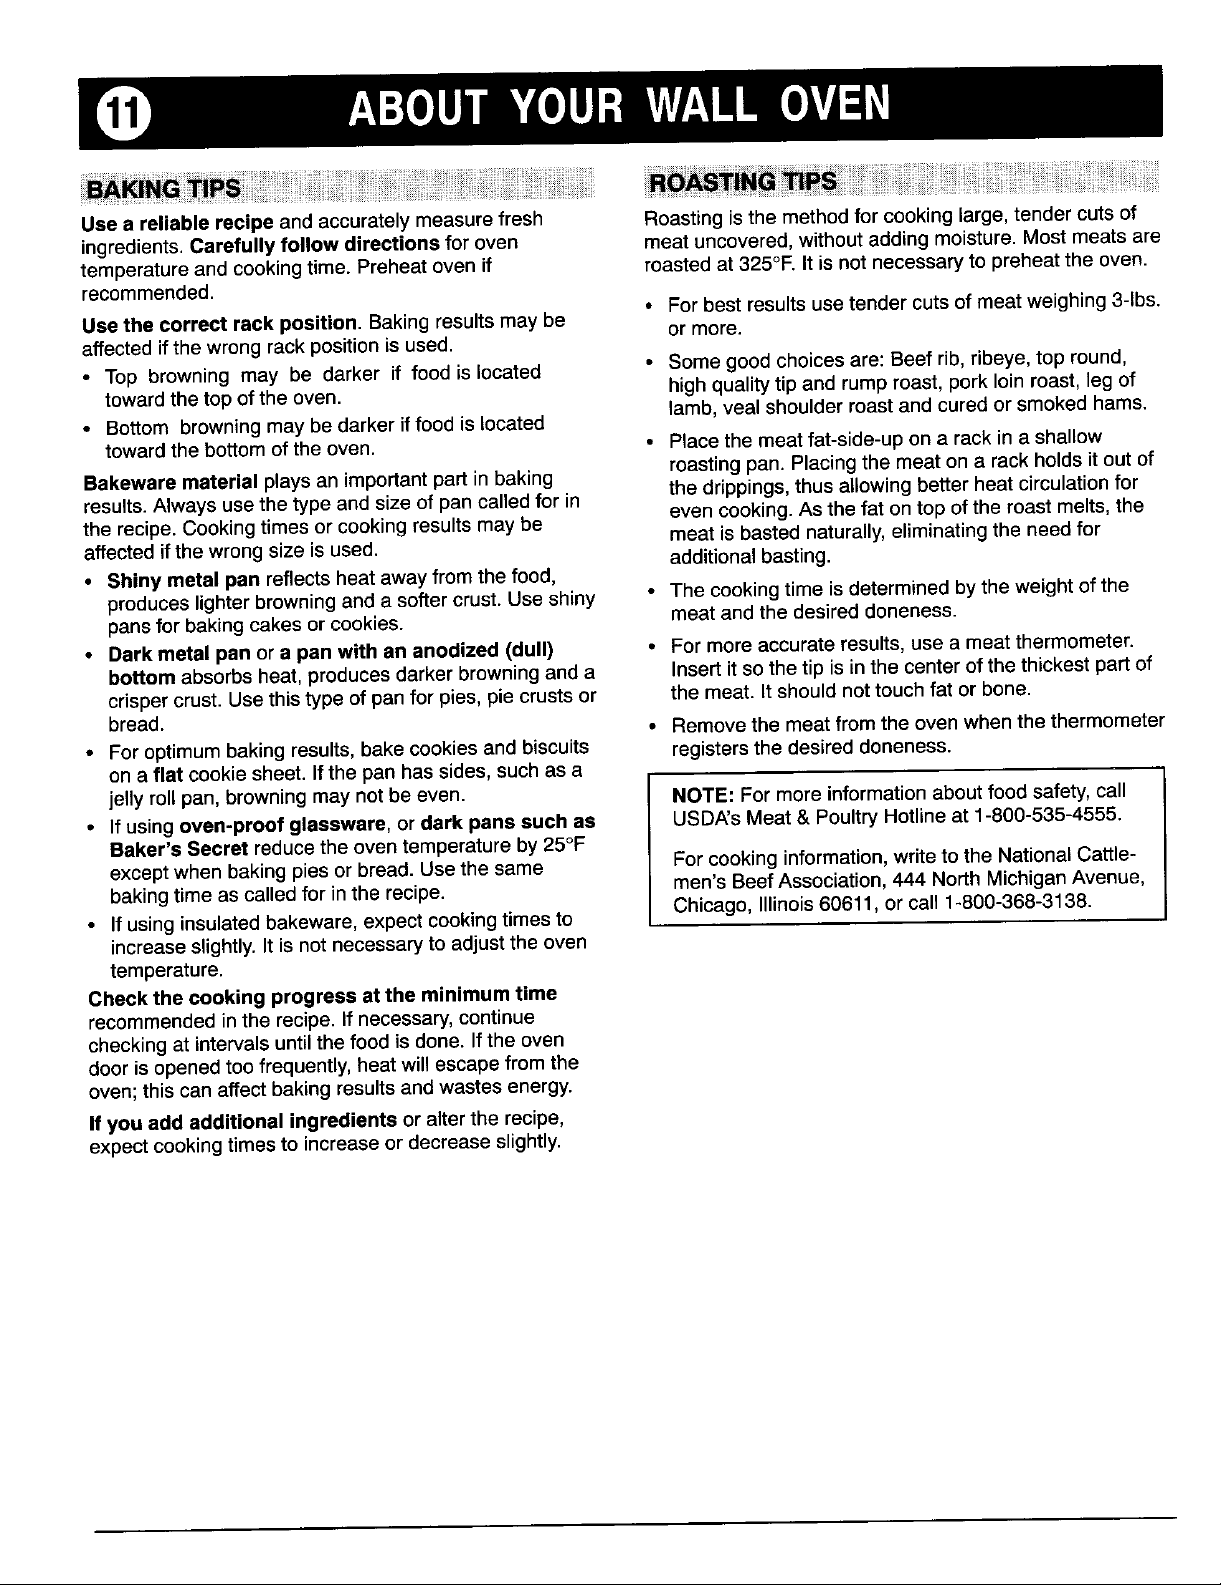
ABOUTYOURWALLOVEN
The clockmustbe functioningand correctlyset.
• Immediate start: Followsteps 1-4 and 6-8. Oven
turnson immediatelyand automaticallyturnoff ata
presettime.
• Highlyperishablefoodssuchas dairy products,
pork,poultry,seafoodorstuffingare not • Delayedstart: Followsteps1-8. Delaysthe startof
recommendedfora delayedcookingoperation, cookingorcleaningandautomaticallyturnsoffat a
• Bakingis notrecommendedbecausepreheatng s
required. Cooktimecanonlybe setforupto 11hoursand59
1. PressCOOKTIME pad.
• COOKTIME indicatoronthe COOKTIME padwill I _, I __
• 0:00 willlightindisplay, then
flash.
2. Pressor pressand hold• orV pad to entercooking
time.
3. PressBAKEpad.
presettime.
minutes(11:59).
4. Pressor pressandhold• orv pad to enteroven
• 000 willlight indisplay, i, j
temperature.
• BAKEindicatoron BAKEpadwill light. /_ then [_
NOTE: Beepswill soundand 000 willflash in display
iftheBAKE padis not pressedwithin4 seconds.
5. IFYOU WISH TO DELAYTHESTARTOF NOTE:If you wishto delay the startof cookingfollow all
COOKING(ifnot,skipto#6): 8 steps.Ifyouwishtobegincookingimmediately,follow
a. PressSTOP TIME pad. allstepsexceptstep5 - skipstep5.
b. Pressor pressand hold•or V pad to entertime IS_oo I
ofdayyouwishoventoturnoff.
c. PressCLOCKpad.
• flash.STOPTIME indicatoron STOPTIME padwill _"rinte] then I_1_ then [_
• Timeofclaywillreappearindisplay.
6. Whenthe oventurnson,the OVEN ON indicatorwill _ NOTE:Itisnotnecessarytosetastarttime.
light.The oventemperaturewillappearinthedisplay. _OmO;J Controlwilldeterminewhentoturntheoven
PresstheCOOKTIME padtorecalltheremaining onbasedonthe cooktimeyouset.
cooktime.
7. Oven willautomaticallyturn off, Four beepswill sound NOTE:Seepage6 if you wishto changethe end of
and "End"will light indisplay.A beepwill sound every cooking reminderbeeps.
30secondsforthe next 5 minutes.
8. Press CANCELpadandbeeps will stop. Remove
foodfrom oven.
Lcan-,I
Page 12
(D ABOUTYOURWALLOVEN
Usea reliablerecipeandaccuratelymeasurefresh Roastingisthemethodforcookinglarge,tendercutsof
ingredients.Carefullyfollow directionsforoven meatuncovered,withoutaddingmoisture.Mostmeatsare
temperatureandcookingtime.Preheatovenif roastedat325°F.Itisnotnecessarytopreheattheoven.
recommended.
Usethe correct rackposition. Bakingresultsmay be ormore.
affectedifthe wrongrackpositionis used.
• Top browning may be darker if food is located • Somegoodchoicesare: Beef rib,ribeye, top round,
towardthetop of the oven. highqualitytip and rump roast, pork loinroast, leg of
• Bottom browningmay be darker if food is located lamb,veal shoulderroast and cured or smoked hams.
towardthebottomof the oven. • Placethe meat fat-side-upon a rack in a shallow
Bakewarematerialplaysan importantpartin baking
results.Alwaysusethetypeandsizeof pancalledfor in the drippings,thusallowingbetter heatcirculationfor
therecipe.Cookingtimesor cookingresultsmay be evencooking.As thefatontopofthe roastmelts,the
affectedifthewrongsizeisused. additionalbasting.
• Shinymetal pan reflectsheataway from the food,
produceslighterbrowningand a softercrust.Use shiny • The cookingtime isdeterminedbythe weight of the
pansfor baking cakesor cookies, meatandthe desireddoneness.
• Darkmetalpan ora pan with an anodized (dull) • Formoreaccurateresults,usea meatthermometer.
bottomabsorbsheat,producesdarkerbrowninganda Insertitsothe tipis inthe centerofthethickestpartof
crispercrust.Usethistypeofpanfor pies,piecrustsor the meat.Itshould nottouchfat orbone.
bread. • Removethe meatfromtheovenwhenthethermometer
• Foroptimumbakingresults,bakecookiesandbiscuits registersthedesiredaloneness.
onaflat cookiesheet. Ifthepanhassides,suchasa
jellyrollpan,browningmaynotbe even. NOTE:Formoreinformationaboutfoodsafety,call
• Ifusingoven-proofglassware,ordarkpanssuch as USDA'sMeat& PoultryHotlineat 1-800-535-4555.
Baker's Secretreducetheoventemperatureby25°F
exceptwhenbakingpiesor bread.Usethesame Forcookinginformation,writetothe NationalCattle-
bakingtime as calledfor inthe recipe, men'sBeefAssociation,444 North MichiganAvenue,
• If using insulatedbakeware,expectcookingtimesto Chicago, Illinois60611,or call 1-800-368-3138.
increaseslightly.Itis not necessaryto adjustthe oven
temperature.
Checkthe cookingprogressatthe minimumtime
recommendedin the recipe.If necessary,continue
checkingatintervals untilthe food isdone. Ifthe oven
dooris openedtoo frequently,heatwill escapefromthe
oven;this canaffectbaking resultsandwastesenergy.
If you add additionalingredientsoraltertherecipe,
expectcookingtimesto increaseor decreaseslightly.
• Forbestresultsusetendercutsofmeatweighing3-1bs.
roastingpan.Placingthe meat on a rackholds it out of
meatis bastednaturally,eliminatingtheneedfor
Page 13

ABOUTYOURWALLOVEN (D
COMMONBAKINGPROBLEMSAND WHYTHEY HAPPEN
PROBLEM POSSiBLeCAUSES
Cakesare uneven. • Panstoocloseortouchingeachotherorovenwalls.• Batteruneveninpans.
• Temperaturesettooloworbakingtimetooshort.• Ovennotlevel., Undermixing.
• Toomuchliquid.
Cake high in middle,, Temper=areset toohgh • Bakingt me t:o ong, Overmixing, Too muchflour
• ;Panstouchingeachotherorovenwails, incorrect rackposition.
Cake falls. • Toomuchshorteningorsugar.• Toomuchortoolittleliquid.• Temperaturesettoo
low.• Oldor toolittlebakingpowder.• Pantoosmall.• Ovendooropenedfrequently.
• Addedincorrecttypeof oiltocakemix.=Addedadditionalingredientstocake mixor
recipe.
!i i i ¸ i : i ¸
FO_optimumresui_ibake°n one rack:If bakingcakeson_o racks,placepanstoward
the_ont oftheoVen;Onthe upperrackandtowardthe backoftheovenonthe !ower
Cakes, cookies, biscuits • Ovennotpreheated.• Panstouchingeachotheror ovenwalls.• Incorrectrack
too brown on bottom, position.• Incorrectuseofaluminumfoil.• Placed2 cookiesheetsononerack.• Used
glass,dark,stained,warpedordullfinishmetalpans.(Usea shinycookiesheet.)
Followcookwaremanufacturer'sinstructionsfor oventemperature.Glasswareanddark
cookwaresuchasEcko'sBaker'sSecretmayrequireloweringthe oventemperatureby
25°R
Excessive shrinkage. • Toolittleleavening.• Overmixing.• Pantoo large.• Temperaturesettoohigh.
Uneven texture. *Toomuchliquid, Undermixing, Temperatureset tooIowi,Baking timetooshorti
Cakeshave tunnels. • Notenoughshortening.• Toomuchbakingpowder.• Overmixingorat toohigha
Pie crust edges too • Temperaturesettoohigh.• Panstouchingeachotherorovenwalls. • Edgesofcrust
brown, toothin;shieldwithfoil.
• Bakingtimetoolong.° Panstooclosetoeachotheror ovenwalls.
speed.• Temperaturesettoohigh.
Pies have soaked crusL • Temperaturetoo low atstart of baking.• Fillingtoojuicy.• Usedshinymetalpans.
Page 14

AB(IUTYOURWALLOVEN
• BROILindicatoron the BROILpad will light. INLIGHT _l;_,u. |
• 000 will light in display.
2. Pressthe• padto select HI (high)broilor the • pad _ ,.,- Hi
to select LO (low)broil.
• Select HI broil for normalbroiling.
• Select LObroilfor low temperaturebroiling of
longer cookingfoods suchas poultry. _,- Lo
3. There willbean 8second delay beforetheoven turns _-'_Oven
on.Whenthe oventurns on: _-_1_lpreheat
• TheOVENON indicatorwill light. L_JLock
4. Placefood in the oven.The ovendoor isclosedfor NOTE:See page 14for broilinginstructionsand
broiling, broilingchart.
5.Turnmeatonceabout halfway through cooking.
6. PressCANCELpad. Removefood and broiler pan
• TheOVENON indicatorwill turn off.
fromthe oven. _ _
• TheBROILindicatorontheBROILpadwill turn off.
• Timeof daywill reappearin display.
on
Page 15

o ABOUTYOURWALLOVEN (D
Broiling is used for tender cuts of meat or marinated • Use a broiler pan with an insert designed to drain
meats, poultry,fish and some fruits and vegetables. The excess liquid and fat away from the cooking surface.
food is placed directly underthe broil burner. This is to prevent spatters and smoke.
Cooking time is determined by the desired degree of • Fora brown exterior and rare interior,meat should be
doneness and the distance between the food and the close to the broil burner. For well-done meat, place the
element, broilerpan farther from the burner.
• For best results, steaks and chops should be at least • Increasing the distance between the meat and the broil
3/4-inch thick. Thinner cuts should be pan broiled, burner will help reduce spattering and smoking.
• Before broiling, trim excess fat to prevent excessive • Select Lo Broil for longer cooking foods such as
spattering or smoking. Cut slashes in the outer edges chicken pieces.
of the fat to prevent curling during cooking. • Foods that require turning should be turned only once
• Season meat after cooking. Salt tends to draw juices during broiling. Turn after half the recommended
out of the meat and delay browning, cooking time.
BROILINGCHART
TOTALTIME
TYPEOF MEAT RACK POSITION* DONENESS (MINUTES)**
BACON #4 Well Done 6to 10
BEEFSTEAKS
1-inchthick #4 Medium 15 to 20
CHICKEN LOBROIL
Pieces #3 or#4 Well Done 30 to 45
FISH
Fillets #4 Flaky 8 to12
Steaks,1-inchthick #4 Flaky 12 to15
GROUNDBEEF PATTIES
3/4-inchthick #4 Well Done 15to 20
HAMSLICE, precooked
1/2-inchthick #4 Warm 8to 12
PORK CHOPS
1-inchthick #4 Well Done 20to 25
* The top rack positionis position#5.
** Broilingtimesare approximateand may vary dependingon themeat.
, ,, , , ,
#4 WellDone 20 to 25
,, , , ,
Page 16

(D ABOUTYOUR WALL OVEN
iiii iii!i!iUiQiH iiiiil ¸ !!iii i! i i i iiii ii iii!iii i i ii! i !i iiii i i!iii i!i!iiiiii! iii! !!i!!i ! iii iiii ii!i!ii] ii iiiii!ii ii¸¸
Whenovenisin use,the areaneartheovenvent
openingmayfeel warm or hottothetouch. J • Disconnectpowerto wall ovenbytrippingcircuit
The ovenvent is locatedabovethecontrolpanel.
v • Usea drypothotdertopreventpossibleharmto
Control = 0 _ handswhenreplacingbulb.
Panel
Whentheoven is in use,this area mayfeel warmor hotto
thetouch. Toreplaceovenlight bulb:
Topreventbakingproblems,do not block the vent
opening. 2. Holdbulb cover in placethen slidewire retaineroff
...... • Donottouchhotbulbwitha dampclothasthis
breakeror removingfuse before replacinglight
bulb.
• Besurebulb is cootbeforetouchingor replacing
bulb.
maycausethebulbtobreak.
Toturn on the oven light: Pushin _]_1
rockerswitchlocatedonthe control
panel.
1. Disconnectpowertowalloven.
cover.NOTE:Bulb cover will fall if notheld in place
while removingwire retainer.
3. Removebulbcover.
A coolingfan willautomaticallyturnon, ifneeded,to help 4. Removelightbulb and replacewith a 40 wattappliance
keepthe interiorcomponentpartscoolduring some bulb.
cookingandallcleaningoperations. 5. Replacebulbcover andsecurewithwire retainer.
Thefan will automaticallyturnoff when the oven has 6. Reconnectpowerto walloven. Resetclock.
cooled.
BULB COVER
WIRE
RETAINER
Page 17

AB()UTY()URWALLOVEN
• WARNING:NEVER placeexcessiveweightonor
standonanopenoven door.Thiscouldcausethe
rangetotipover,breakthedoor,or injuretheuser.
• NEVER placefingersbetweenhingeandfrontoven
frame.Hingearmsarespringmounted.If
accidentlyhit,the hingewillslamshutagainstoven
frameand couldinjureyourfingers.
Whenbaking,be sureovendooris completelyclosed. To protect theoven door window:
Bakingresultswillbe affectedifdooris notclosed. 1. Do not use abrasive cleaningagents such as steel wool
NOTE:Whenovenisnew,the ovendoor may feel scouringpadsor powderedcleansersas they may
"spongy"whenyou closethe door.This is normalandwill scratchthe glass.
becomeless"spongy"withuse. 2. Do not hit the glasswith pots,pans,furniture,toys, or
Toremovelift-offovendoor:
1. Whencool,openovendoortothe stopposition 3. Donotclosetheovendooruntiltheovenracksare in
(openedabout4-inches). place.
2. Grasp door ateach side. Scratching, hitting,jarring or stressingthe glass may
3. Liftupevenlyuntildoor clearshingearms. Do notuse
doorhandleto lift door. breakageat a later date.
other objects.
weaken its structurecausing an increasedrisk of
OVENFRAME The doorlockleverisused to lockthe ovendoor duringa
self-cleanoperation.Tolockdoor,movethe leverto the
right.Thisisthe locked positionfor the clean cycle.
Do not movethe lock levertothe right or locked position
whenbaking.Ifthe door is accidentlylocked:
DOORHINGE • The cookingoperationwill becanceled.
• Ifoventemperatureis above400°F,the door will not
unlockuntilthe ovenhas cooled.
Toplaceovendoorback onwalloven:
1,Graspdoorat eachside. fan infrontofovento speedcooling.)
2. Alignslotsindoorwithhingearmson range.
3. Slidedoordownontohingearmsuntildooris
completelyseatedonhinges.Thenpushdownontop
cornersofdoorto completelyseatdooronhinges.
Doorisnotcompletelyseatedifone sideishigheror if
doorappearstobecrooked.
Donotattemptto openorclosedoororoperateovenuntil
doorisproperlyreplaced.
• Allowoven to coolthenunlockandopendoor.(Placea
Page 18

ABOUTY(IURWALLOVEN
• Foroptimumresults,airmustcirculatefreelywithinthe
ovenand around the food. Tohelpensurethis, place
food in the centerofthe oven.Allowtwo inches
betweenthe edge ofthe pan(s)and the ovenwalls.
• Useone rackfor optimum bakingresultsof cakes,
cookiesor biscuits.
The ovenrack is designedwith a safety lock-stopposition. Positionthe rackso the food is inthecenter ofthe oven.
Thispreventsthe rackfrom accidentlycomingcompletely Useeitherrack position2 or 3.
outof theovenwhen pullingthe rack out to addor remove
food. • Ifcookingon two racks,
Toremove: properairflow.
1. Whenrackiscool,pullrackstraightoutuntilitstopsat • Ifcookingontworacks,
thelock-stopposition, userackpositions2 and4
NOTE:Ifitis necessarytochangerackpositionwhen positions1 and4 or2 and5
rackis hot,usepotholderstoprotecthands, whenusingcookiesheets.
2. Tiltthefrontendoftherackup. Neverplacetwocookiesheets ononerack.
3. Continuepullingrackoutofoven. • If roastinga largeturkey,placetheturkeyonrack1and
staggerthe foodto ensure
forcakesandrack
thesidedishesonrack5.
/ SUPPORT 0
l_II "_'_'V / I I I # WI I | _'l _ _"\_ !;11_ . 1_ 23
Toreplace: RACK5 (highestposition): Used fortoastingbread,or for
1 Placerackonthe racksupportsinoven. two-rackbaking.
2. Tiltthefrontendoftherackupslightly. RACK4: Usedformostbroilingandtwo-rackbaking.
3. Sliderackbackuntilitclearsthe lock-stopposition. RACK3: Usedformostbakedgoodsona cookiesheetor
4. Lowerfrontofrackandsliderackstraightbackinto jellyrollpan,or forfrozenconveniencefoods.
oven,
RACK2: Usedfor roastingsmallcutsof meat, large
5. IMPORTANT:Pull rackout to thelock-stoppositionto casseroles,bakingloaves of bread, cakes(ineithertube,
besure rackis correctlyreplaced, bundt,or layerpans) or two-rack baking.
6. If properlyinstalled,rackwill not comeout of oven
unlessthe front edgeis liftedup. RACK1: Usedfor roastinglargecutsof meatand large
7. Pushrack back into oven andclose ovendoor. baking.
poultry,pies,souffles,orangelfood cake, or for two-rack
Page 19

AB()UTYOURWALLOVEN
ProtectovenbottomagainstexcessivespJlloversespecially To remove:
acidorsugaryspilloversastheymaydiscolortheporcelain. 1.Whencool,removetheovenracks.Slidethe two
To protectovenbottom: catches,locatedateachrearcornerof theoven
• Usethecorrectsize cookingutensiltoavoidboilovers.
• Placeapieceof aluminumfoilthatis slightlylargerthan
thepanonthe ovenrackdirectlybelowthepanif 3. Then,slideitbackuntilthefrontedgeoftheoven
boiloversareexpected, bottomclearstheovenfrontframe.Removeoven
• Neverplacecookwareoraluminumfoildirectlyonthe
ovenbottom. Toreplace:
bottom,towardthefrontoftheoven.
2. Liftthe rearedgeof theovenbottomslightly.
bottomfromoven.
1. Fitthefrontedgeof theovenbottomintothe ovenfront
2. Lowertherearofthe ovenbottom.
place.
_; 2 3. Slidethetwo catchesbackto lockthe ovenbottominto
frame.
Page 20

CAREANDCLEANINGCHART
• Besureapplianceisoffand all partsare coo_beforehandlingor
cleaning.Thisisto avoiddamageandpossibleburns.
• If a partis removed,besureJtiscorrectlyreplaced.
• To preventstainingor discoloration,cleanapplianceafter each use.
CLEANING CHART
Broiler pan • Soapandwater Never cover insertwith aluminumfoil as this preventsthe fat from
and insert • Plasticorsoap drainingto pan below.
filledscouringpad 1. Removefromovenafteruse.Coolthenpouroffgrease.
• Dishwasher 2. Placesoapyclothoverinsertand pan;letsoaktoloosensoil.
3. Wash in warmsoapywater. Use soapfilledscouringpad to remove
stubbornsoil.
4. Broiler pan andinsertcanbecleanedinthe dishwasher.
Enamel,painted - Soapandwater NOTE:Usedrytowelorclothto wipeupspills,especiallyacid(milk,lemon
• Mildliquidcleaner juice,fruit,mustard,tomatosauce)orsugaryspills.Surfacemaydiscoloror
• Glasscleaner dullifsoilisnotimmediatelyremoved.Thisisespeciallyimportantforwhite
Glass • Soapandwater To preventstainingof the ovenwindow,avoidusingexcessive
• Ovendoor • Glasscleaner amountsofwaterwhichmayseep underor behindglass,
• Ovenwindow • Pasteof baking 1. Washwith soapand water.Removestubbornsoilwithpasteof baking
sodaand water soda andwater.Rinsewithclearwaterand dry.
• Cooktopcleaner- 2. Do not use abrasive materials such as scouring pads, steel wool or
conditioner powderedcleaning agents.They will damage glass.
Metalfinishes • Soapandwater 1. Washwithsoapand wateror a glasscleaneranda soft cloth.
such as brushed • Glasscleaner 2. Topreventscratchingordullingof the finish, do notuse mildlyabrasive,
aluminum,or • Plasticornon- abrasive,orharshcleaners,or causticcleanerssuchas ovencleaners.
chrome abrasivepad or 3. Tocleanbrushedaluminum: Useonlysoapandwaterorasoft clothand
• Ovendoor sponge g/asscleanerto preventscratchingordullingofthefinish.
• Trim parts 4. Toclean brushed chrome cooktopor door:
surfaces.
1.When cool, wash with warm soapy water,rinseand dry. Neverwipe a
warm or hot surfacewith a damp cloth asthis may damagethe surface
and may causea steamburn.
2. For stubborn soil, use mildlyabrasive cleaningagentssuch as baking
soda pasteorBon Ami.
3. Do notuseabrasive,causticor harshcleaningagentssuchassteelwool
pads or oven cleaners. These products will scratch or permanently
damagethe surface.
• Use a paste of bakingsoda andwater and a softcloth.
• Rubwiththegrainto preventscratching,dullingorstreakingof the
finish.
• Use a soft cloth and mineraloil to restoreluster or to remove
fingerprintsor smudges.
• Cleanwithanautomotivechromecleanerorpolisher.
(continuednextpage)
Page 21

CAREANDCLEANINGCHART
Ovenbottom • Soapand water Protectovenbottomagainstacidspills(milk, cheese,tomato, lemonjuice,
• Pasteof baking etc.)orsugaryspills (piefilling) asthey maypit ordiscolorthe oven bottom.
soda andwater Tomakecleaningeasier,protectthe ovenbottomby (1) usinglarge enough
• Non-abrasive cookwareto prevent boilovers; (2) place a pieceof aluminum foil, that is
plasticpad slightlylargerthanthe cookware,onthelowerrack.NEVERplacefoildirectly
Oven racks • Soapandwater 1. Cleanwith soapywater.
• Plasticscouring 2. Removestubbornsoilwithcleansingpowderorsoap-filledscouringpad.
pad Rinseanddry.
• Cleansingpowders Rackswillpermanentlydiscolorandmaynot slidesmoothlyifleftintheoven
• Soap-filled supportswitha smallamountofvegetableoilto restoreease of movement,
scouringpad thenwipe off excess oil.
Plasticfinishes • Soapandwater NOTE: To prevent staining or discoloration,wipe up fat, grease or acid
• Doorhandles • Non-abrasive (tomato,lemon,vinegar,milk,fruitjuice,marinade)immediatelywitha dry
• Trim plasticpador papertowelorcloth.
sponge 1. Whencool,cleanwithsoapandwater,rinse,anddry.
• Glasscleaner 2. Use aglass cleaneranda softcloth.
Porcelainenamel • Soapand water Porcelainenamelisglassfusedonmetalandmaycrackorchipwithmisuse.
• Ovencavity • Pasteofbaking It is acidresistant,notacidproof.All spillovers,especiallyacid or sugar
• Ovenbottom sodaandwater spiUovers,shouldbewipedupimmediatelywitha dry cloth.See page21for
• Non-abrasive
plasticpad or
sponge 1. Protectovenbottomagainstacidspills(milk,cheese,tomato,lemonjuice,
onthe ovenbottom.
Foreasiercleaning,ovenbottomcan beremovedandcleanedatthesink. Do
notsoakorimmerseovenbottominwaterorplace underrunningwater.See
Porcelainenamelbelow for additionalinformation.
duringaself-cleanoperation.Ifthisoccurs,wipetherackandembossedrack
NOTE: Neveruse ovencleaners,abrasiveor causticliquidor powdered
cleansersonplasticfinishes.Thesecleaningagentswillscratchormarfinish.
instructionson the self-clean oven.
About the oven bottom:
etc.)orsugaryspills(piefilling)asthey maypitordiscolorthe ovenbottom.
2. To make cleaning easier, protect the oven bottom by (1) using large
enoughcookwareto preventboilovers;(2)placea pieceofaluminumfoil,
that isslightlylargerthan the ceokware,on the lowerrack. NEVER place
foil directlyonthe oven bottom.
3. Foreasiercleaning,oven bottomcanbe removedand cleanedatthesink.
Do not soak or immerse oven bottom in water or place under running
water.
Non-AbrasiveCleaners- Pasteof bakingsoda andwater.
• Readthe manufacturer's instructionstobesurethe MildlyAbrasivePowderor LiquidAll Purpose
cleanercanbe safely usedonthisappliance. Cleansers- Ajax, BarkeepersFriend,BonAmi, Cameo,
• Carefullyfollow manufacturer'sdirections. Comet,Soft Scrub,Elco Cleaner-conditioner.
• Testa smallinconspicuousareato see ifcleaning Non-Abrasiveor ScratchlessPlasticor Nylon
productissafe. Thisisimportantforporcelainenamel, Scouring Padsor Sponges- ChoreBoy Plastic
highlypolishedor shiny metalor plasticsurfaces,and CleaningPuff,ScrungeScrubSponges,orScotch-Brite
paintedsurfaces. No Scratch,Cookwareor KitchenSponge.
GlassCleaners - Cinch,GlassPlus, Windex. Abrasive Scouring Pads - S.O.S.,BrilloSteelWool
DishwashlngLiquid Detergents- Dawn,Dove, Ivory. Soap,Scotch-BritePads.
(Brandnamesfortheabovecleaningproductsareregistered
MildLiquidSpray Cleaners- Fantastik,Formula409. trademarksoftherespectivemanufacturers.)
Page 22

SELF-(;LEANOVEN
• It is normalfor partsof therangeto becomehotduring
a cleancycle.
• AvoidtouchingCooktop,door,window,orovenvent
areaduringa cleancycle.
• Topreventdamagetoovendoor,donotattemptto
dnlockthedoorwhenthe LOCKindicatorisdisplayed.
• It isnormalforexcessiveflare-upsandsmokingto
occurduringcleaningif theovenisheavilysoiled.
BEFORECLEANCYCLE DURINGCLEANCYCLE AFTER CLEANCYCLE
• Turnoffovenlightbeforecleaning • Asovenheats,theLOCKindicator • The LOCKindicatorwillturnoff
asthe lightmayburnoutduringa willlightinthedisplay.Atthispoint, aboutonehouraftercleancycle
cleancycle, thedoorcannotbeunlockedand ends.The doorcanbe unlockedand
• Removepans,broilerpan,andoven opened, opened.Usecareasovenmaystill
racks. • Topreventdamageto dooror lock be hot.
NOTE:Racksmaydiscolorandnot lever,do notforcedooropenwhen • A graypowderyashmayremainon
slideeasilyaftercleaning, theLOCK indicatorisdisplayed, the ovenbottomorwalls.Thisis
• Cleanovenframe and doorframe. • Somesmokeandodor maybe normal.Use adampclothto remove
These areasare notexposedto iscleaned.Thisis normalandwill • If soilremains,the clean cycle may
cleaningtemperatures;soilmay
bake on duringclean cycle, lessen intime. nothave been long enough.
• Topreventdamage,donotclean • Smoke may occurif oven is heavily • Wipe ovenrackswith a small
gasketlocated on oven door. soiled or if broilerpan was left in amountof vegetableoil if racksdo
Gasketseals in heat duringthe oven. notslideeasily after cleancycle.
cleancycle. • As ovenheats, youmayhear • Cleanaroundovenvent openingif
• Topreventexcessivesmoke,
flare-upsor flaming,wipe upexcess
greaseor spilloversfromoven will not damageoven. • Finelinesmayappearin the
bottom, porcelain.This is normaland results
• Porcelainisacidresistant,not acid fromtheheatingand coolingof the
proofand may discolor duringthe finish.Thiswillnot affectoven
cleancycle.To preventor reduce performance.
discoloration,wipe up sugar or acid • A white discolorationmay appear
spills(lemon,milk,barbecuesauce, after cleaning if acid soils (milk,
cheese), tomato,lemon,etc.) orsugarysoils
detectedthe firstfew times the oven ash.
soundsof metalparts expanding there is a depositfromthe fumes
and contracting.This isnormaland ventedduringcleaning.
were not wiped up beforethe clean
cycle.This discoloration is normal
and willnot affectthe performance
of the cleancycle.
ofthe rangeas theywilldamagethefinishor parts.
Page 23
SELF-CLEANOVEN
r
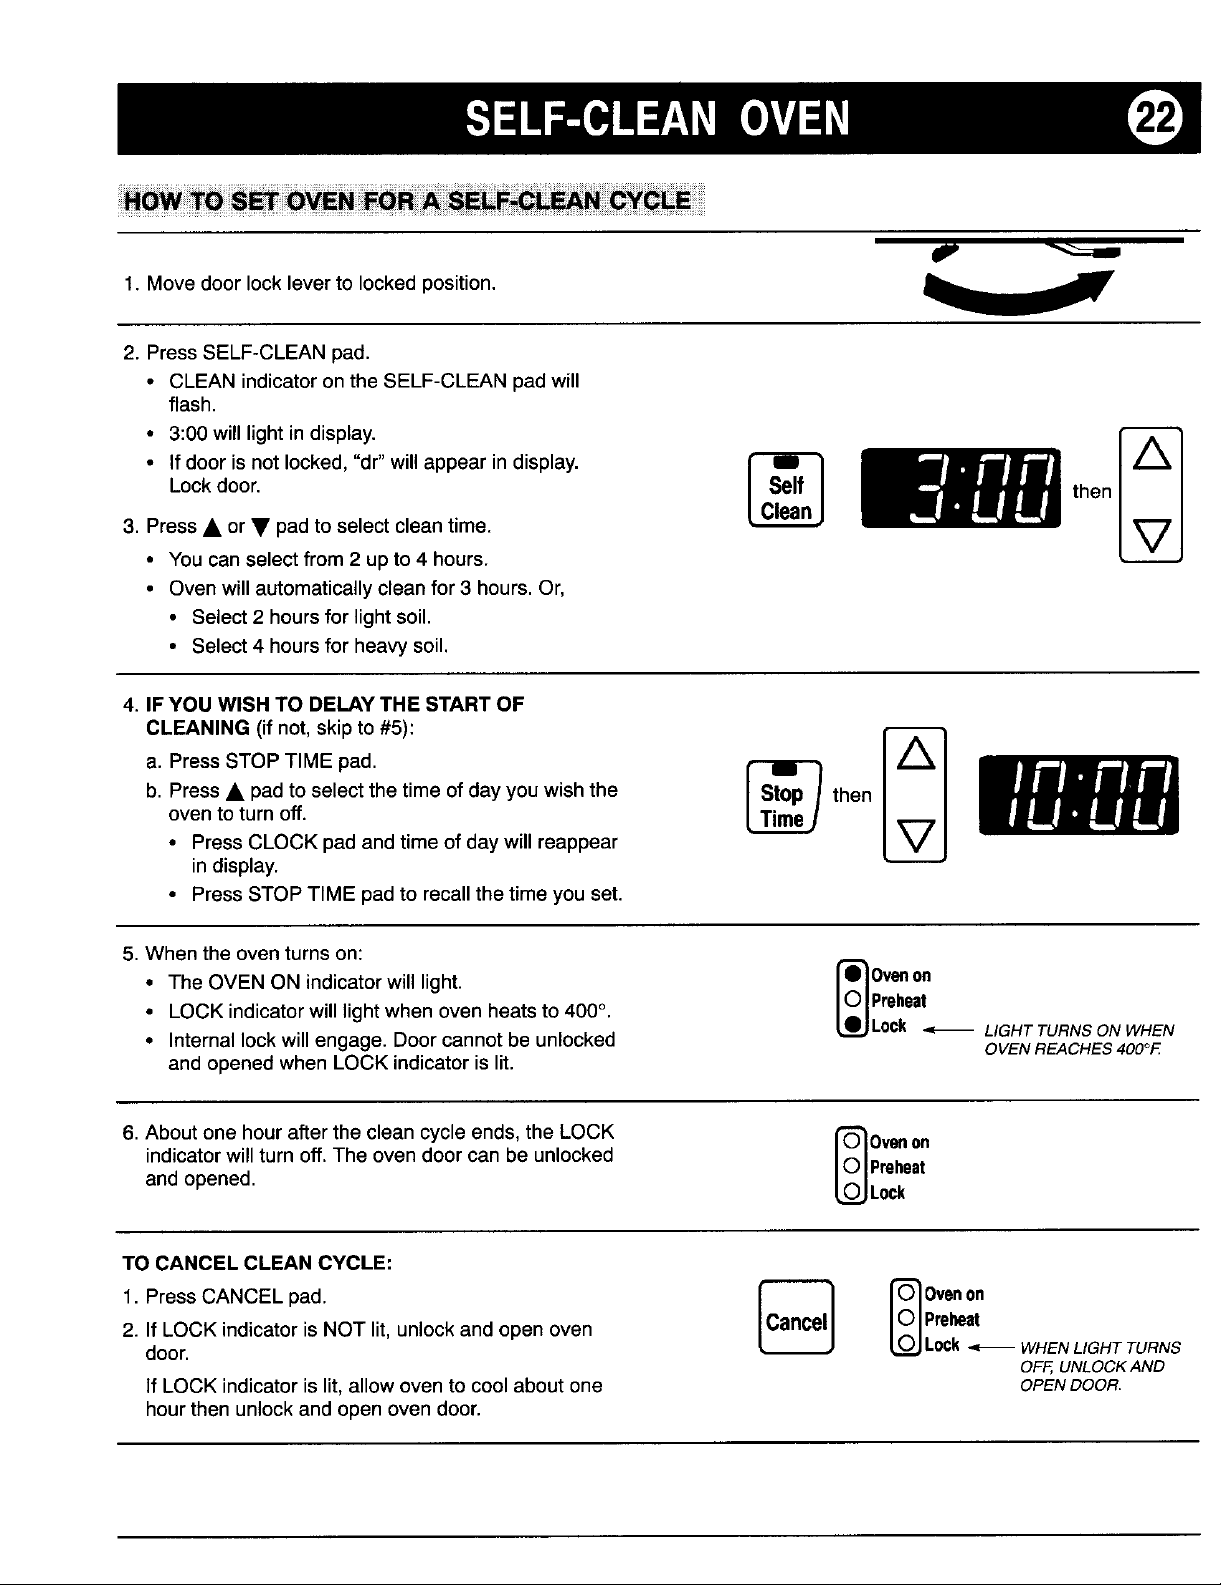
1. Movedoor lockleverto lockedposition.
2. PressSELF-CLEANpad.
• CLEANindicatorontheSELF-CLEANpadwill
flash.
• 3:00will lightin display.
• If door is not locked,"dr"willappearindisplay.
Lockdoor. [ cSlee_fJ then
3. Press• or • padto select cleantime.
• Youcanselectfrom2 upto 4 hours.
• Ovenwill automaticallycleanfor 3 hours.Or,
• Select2 hoursfor light soil.
• Select4 hoursfor heavysoil.
4. IF YOUWISH TO DELAYTHE STARTOF
a. PressSTOPTIMEpad.
b. Press• pad to selectthe time ofdayyou wish the then
ovento turnoff.
• PressCLOCKpad andtime of day will reappear
CLEANING(if not,skip to #5): [ TS_°PeJ _
in display.
• PressSTOPTIME padto recallthe time you set.
5.Whenthe oventurns on:
• TheOVENON indicatorwilllight, lUlo-,non
• LOCKindicatorwilllightwhenoven heatsto400o. __JPreheatLock ,= LIGHTTURNS ON WHEN
• Internallockwillengage.Doorcannotbe unlocked OVENREACHES4OOOF.
andopenedwhenLOCKindicatoris lit.
6.Aboutone hourafter thecleancycleends, theLOCK f6"]0venon
indicatorwillturn off. Theovendoorcanbe unlocked IlPreheat
andopened. _ Lock
TO CANCELCLEAN CYCLE:
1. PressCANCELpad. _ r_ Ovenon
2. If LOCKindicatoris NOT lit,unlockandopenoven
door. L_ Lock., WHENLIGHTTURNS
If LOCK indicatoris lit, allowoven to coolabout one OPENDOOR.
hourthen unlockandopen oven door.
Lc...,j
IUI Preheat
OFF,UNLOCKAND
Page 24

SERVI(;EINF()RMATION
• Donotattempttoservicethisapplianceyourself youknowwhatcausedthe problem.Alwaysreplacea
unlessdirectedto do so inthismanual or thechart blownfusewith one of the correctamperage,donot
below.Referall otherservicingto a qualifiedservicer use a substitute.
orcall us at 1-800-688-1120. • Alwaysdisconnectpowerto unitbefore anyservicing
• Locateand markcircuitbreakerorfuse. Never bytrippingcircuitbreakertotheOFFpositionorby
replacea blownfuseorreseta circuitbreakeruntil removingthefuse.
TROUBLESHOOTING CHART
PROBLEM POSSIBLECAUSES SUGGESTEDCORRECTIONS
Oven burnerfails to 1. Powersupplynotconnected. 1. Connectpower,checkcircuitbreakerorfusebox.
lightorovendoes 2. Powerfailure. 2. Ovenwillnotoperateduringapowerfailureor if
notoperate. 3. Ovencontrollock-outfeatureis disconnectedfrompower.See page7.
activated. 3. See page 6 to deactivatethisfeature.
Poppingsound heard Thisis a normalsoundthatoccurswithsometypesofgaswhena hotburneristurnedoff.
whenburnergoesout. Thepoppingsoundisnota safetyhazardandwillnotdamagetheappliance.
Clockand/oroven 1. Powersupplynotconnected. 1.Connectpowersupply,checkcircuitbreakeror
lightdoes not work. fusebox.
2. Bulbmaybe looseor burnedout. 2. Tightenorreplacelight bulb.
3. Malfunctioningswitch. 3. Callservicemantocheck.
4. Malfunctioningclockorloosewiring. 4. Callservicemantocheck.
Moisturecondensa- 1.It is normalforthewindowtofog 1. Leavedoorajarforoneor twominutestoallow
ition on ovenwindow, duringthefirstfew minutesthe oven moistureto escape.
ifequipped is on. 2. Use a dampclothto cleanwindowto prevent
2. Clothsaturatedwithwateris usedto excesswaterfromseepingbetweenthepanelsof
cleanthewindow, glass.
Oven temperature 1. Ovennot preheated. 1. Preheatoven10to 15 minutes.
inaccurate. 2. Incorrectrackposition. 2. See page17.
• foodtakestoolong 3. Incorrectuseof aluminumfoil. 3. See page8.
orcookstoofast 4. Ovenbottomincorrectlyreplaced. 4. Replaceovenbottomcorrectly.
• palebrowning 5. Oventhermostatsensingdeviceout 5. Sensingdeviceislocatedat thetoprearof the
• foodover-doneon ofholdingclip(s), ovencavity.Reinstallsensingdevicesecurelyinto
outsideandunder- clip(s).
doneincenter See ProblemCharton page12.
• overbrowning SeeBakingTipsonpage11.
Bakingresultsdiffer 1. Ovenseemshotterorcoolerthan 1. See page7forinstructionsonadjustingtheoven
from previousoven. yourpreviousoven. temperature.NOTE:Donotadjusttemperatureif
onlyoneor two recipesare inquestion.The
problemmay bethe reciperatherthantheoven.
NOTE:Oventemperaturesmay varybetweenthe newandthe old oven. As ovensage,the
oven temperatureoften "drifts"and maybecomehotterorcooler.Also, newerovensmay
operatedifferentlyfrom olderovens.Youshouldexpectsome differencesinbakingresults.
(Continuednextpage)
Page 25

SERVII:E INF(IRMATION
Baking results are 1. Oven istoo hotortoo cool. 1. Selectcorrect oventemperature.When baking,
not whatyou alwayspreheatovenbeforeaddingfood,See
Iexpected, page7 forinstructionsonadjustingthe oven
• Uneven browning temperature.
(too dark ontop or 2. SelectedBROILratherthanBAKE. 2. Selectthe BAKEpad,notBROIL,for baking.
bottom). 3. Foodnotpositionedcorrectlyin 3. See rackplacementonpage 17.
• Underdoneor oven.
overdone. 4. Usedincorrectpan. 4. Darkpansproducedarkbrowning.Selectshiny
• Browningistoo aluminumpans or reducetheoventemperature
darkorlight, by25°F.See page 11.
• Cake is not level. 5. Used aluminumfoilincorrectly. 5. Neverusefoiltocoveran ovenrack.Placea
smallpieceof foilontherackbelowtherack
holdingthepan.Seepage8.
6. Ovenrackwascrowdedwithpans. 6. Staggerpansonrack.Allow1 to2-inches
betweenpansand ovenwalls.
7. Used unreliablerecipeordidnot 7. Selectrecipesfromreliablesources.Readand
followrecipe, carefullyfollowinstructionsanddonotsubstitute
ingredients,
8. Oven ventwasblocked. 8. Seepage15for informationonovenvent.
9. Dooris notcorrectlyinstalled. 9. See page 16for instructionson replacingdoor.
Foodnot broiling 1. Ovenincorrectlyset. 1.See page 13foroperatinginstructions.
properly, 2. Used incorrectrackposition. 2. See page13forinformationon broiling.
3. Usedaluminumfoil incorrectly. 3. The broilerpancanbe linedwithfoil;neverline
thebroilerinsertwithfoil.
Oven smokes 1. Foodplacedtooclosetobroil t. Movebroilerpandownonerackposition.
excessivelyduring element.
broiling. 2. Broilerinsertcoveredwithaluminum 2. Nevercoverinsertwithfoilasthis preventsfat
foil, fromdrainingto panbelow.
3. Meatistoofatty. 3. Trimexcessfat beforebroiling.
4. Marinadenotcompletelydrained 4. Completelydrainmarinadefrommeat.
beforebroiling.
5. Bastedmeattooearlyduring 5. Bastemeatduringthelastfew minutesof
broiling, cooking.
6. Useda soiledbroilerpan. 6. Alwayscleanbroilerpanandinsertafteruse.
Oven willnot 1. Self-cleanfeaturewas notproperly t. Followinstructionsonpage22.
self-clean, set.
2. Ovensetfora delayedclean. 2. Cancelprogramandresetcleancycle.
3. Ovendoornotclosedand/orlocked. 3. Closeand lockovendoor.
Oven doorwillnot 1. Self-cleanwasnotproperlyset. 1. Followinstructionsonpage22.
lock for self-clean. 2. Ovendooris notclosed. 2. Besuredoorisproperlyclosed.
Oven doorwill not 1. Cleancycleendedlessthanone 1.Allowabout1hourforovento cool.Doorcanbe
unlockafterclean hourago. unlockedwhenLOCKindicatoris nolonger
cycleor if accidenUy displayed.See page16,
lockedduring baking. 2. Ovenhotenoughto engageinternal 2. AllowoventocooluntilLOCKindicatornolonger
lock,ifaccidentlylockedduring isdisplayed.Tospeedcooling,allowa fan to blow
baking, on ovendoor.
Moisturecondense- 1.Windowmay fog when cookingfood 1.This condition is normal.
tionon oven window, highinmoisture.
2, Useda clothsaturatedwithwaterto 2, Wringexcesswaterfromclothbeforecleaning.
cleanwindow.
(Continuednextpage)
Page 26

SERVll;E INFORMATION
Oven light does not 1,Ovenlightbulbis looseor burned 1.Check or replacebulb.
turn on. out.
2. Lightswitchinthe OFFposition, 2. Seepage 15for instructions.
Strongodoror light 1."Burningoff"of manufacturingoils 1.Thisisnormalfora newovenandwilldisappear
smokewhen ovenis orinsulation, aftera fewuses.A cleancyclewillspeed upthe
turnedon. process.Turningon aventilationfanwillhelp
2. Foodsoil. 2. Useself-cleanfeature,
"F" plus a number Thisiscalleda FAULTCODE. Ifa faultcodeappearsinthe displayand beepssound,press
appears in display, any padexcept the CANCELand• or • pads.
Ifthe faultcode and beepscontinue,disconnectpowerto the appliance.Waita few minutes
then reconnectpower tothe appliance.Ifthe fault code and beepsstill continuethen calla
factoryauthorizedserviceror 1-800-688-1120.
NOTE: Iftheoven is heavilysoiled, excessiveflare-upsmayresultin a fault code duringa
cleancycle. Pressany pad except the CANCELpadandthe • or • pads and allowovento
coolforone hour then resetthecleancycle.
removethesmokeand/orodor.
Page 27

SERVI(:E INFq)RMATI()N
Appliances which require electrical power are
Followtheseproceduresto removeappliancefor cleaning equippedwitha three-pronggroundingplug which
orservicing: three-hole120voltelectricaloutlet.
1.Shut-offgas supplytoappliance.
2. Disconnectelectricalsupplyto appliance.
3. Disconnectgas supplytubingtoappliance. (_
4. Removethescrewsthatsecure thewalloven tothe
cabinet.Removeovenfrom cabinet.
5. Reverse procedureto reinstall.If gasline has been
disconnected,checkforgasleaksafter reconnection. _
See InstallationInstructionsfor gasleaktest method. Always disconnectpower toappliance beforeservicing.
NOTE:A qualifiedservicershould disconnectand
reconnectthe gas supply. Thethree-pronggroundingplug offersprotectionagainst
WARNING: Possiblerisksmayresultfromabnormal GROUNDINGPRONGFROMTHEPOWERCORD
usage,includingexcessiveloadingofthe ovendoorand PLUG.
the riskoftipover,shouldthe appliancenotbereinstalled
accordingtotheinstallationinstructions. Ifan ungrounded,two-holeorothertypeelectricaloutletis
mustbe pluggeddirectlyintoa properlygrounded
shockhazards.DONOTCUT OR REMOVETHETHIRD
encountered,It isthe personalresponsibility ofthe
applianceowner to havetheoutlet replacedwitha
properlygroundedthree-hole electrical outlet.
Page 28

WALLOVENWARRAN
FULL WARRANTY - PartsandLabor
Forone (1) yearfromthedateof orignalpurchasedate, anypartwhichfailsinnormalhomeusewillbe
repairedorreplacedfreeofcharge.
Canadian Residents:Theabovewarrantyonlycoversanapplianceinstalledin Canadathathasbeencertified
or listedbyappropriatetestagenciesforcomplianceto a NationalStandardofCanada unlessthe appliancewas
broughtintoCanadadueto transferofresidencefromtheUnitedStatesto Canada.
Thespecificwarrantyexpressedaboveistheonlywarrantyprovidedbythemanufacturer.Thiswarrantygivesyouspecificlegalrights,and
youmayalsohaveotherrightswhichvaryfromstatetostate.
WHAT ISNOT COVERED BYTHESEWARRANTIES: HOWTORECEIVEWARRANTYSERVICE:
1. Conditionsanddamagesresultingfromanyofthe 1. Forauthorizedservice,contactthedealerfromwhom
following: youpurchasedthe appliance,orcall Maytag
a. improperinstallation,delivery,or maintenance. AppliancesSalesCompanyat: 1-800-688-1120.
b. Any repair,modification,alterationor adjustment 2. Ifyou arenot ableto satisfactorilyresolvethe
notauthorizedby the manufactureror an complaintwith local response,call orwriteto:
authorizedservicer. MaytagAppliancesSales Company
c. Misuse,abuse, accidentsor unreasonableuse. Attn: CAIR_ Center
d. Incorrectelectricalcurrent,voltageorsupply. Cleveland,TN 37320-2370
e. Impropersetting ofanycontrol. 1-800-688-1120
P.O. Box 2370
2. Warrantiesarevoidif theoriginalserialnumbershave 3. Whenrequestingservice,thefollowinginformation
beenremoved,altered,or cannotbereadily willbe needed:
determined, a. Yourname,addressandtelephonenumber.
3. Lightbulbs, b. Modelandserialnumbers(foundonthedataplate).
4. Productspurchasedfor commercialorindustrialuse. c. Nameandaddressofdealer orservicer.
5. The costofserviceorservicecallto:
a. Correctinstallationerrors, history.
b. Instructtheuserontheproperuseofthe product.
c. Transporttheapplianceto a servicer.
6. Consequentialor incidentaldamagessustainedby
any personasa resultof any breachofthese
warranties.
Somestatesdo not allowthe exclusionor limitation of
consequentialor incidentaldamages,so theabove
exclusionmay not applyto you.
d. Proofof purchasedate(salesreceipt).
e. A cleardescriptionofthe problemand service
WarrantyPartNo.:8109P092-60
(09-97-00}
Page 29

BAKING
UTENSILS
1. Usethe size utensil recommendedin the 3.Choosethecorrectutensilfor whatyouare
recipe-DONOToverorunderfill theutensil, baking.
Always allow for expansionof foods or a.Shinyutensils- reflectheatthebestand
liquids, will producealight evencrustoncakes
andpies.
HOW TO MEASURE PANS b. Rough,dark or dull utensils- absorb
Besure your pans are the kind and size heatandwill producea heavier,darker
specifiedin the recipe.Thesize of some crust.
cookwareis expressedin liquid measure- c.Glassutensils-absorbheat-youshould
mentatits levelfullcapacity, turnyourovendown25° lowerthanthe
glass- theyproducea heaviercrust.
suggestedtemperaturewhen using
Mlaur| ta_ il_id, of Mlkl- .,z.,e....,....,.... METHODS
wareforlength,widthor and grlddla arestatedas the
dlame_remoraporpndl- topo_,ad,dl,,m_,a- Bake-Tocookbydryindirectheatuntilfood
cullrinsidefro"depth, elusiveofImndlz*. beginsto brownor drythe exteriorsurface
2.Whenusingmorethanoneutensilinoven, andinteriorhasreacheddesiredtemperature.
staggerthemonthesamerackorontwo
rackssothatoneisnotdirectlybelowthe Defrostor Thaw- To melticecrystalsfrom
other-makesurethatthepansdon0ttoUch frozenfoodsbyplacingin a warmoven.
andareat leastl_hto2 inchesawayfrom a. Placein deeppantocatchrun-off.
theovenwallsandotherpans. b; Placein 150°Foven(mostfoodsdefrost
approximatelyfourtimesfasterthanat
_''_F_;:-_"_"-, _I.I I IIII I] II II I I I roomtemperature).
IIII©_O©©© I]1 d. NEVERrefreeze.
I_0000QO_
® 0©© Rout - To bake slowly, (at approximately
325°F)tendercutsof meats,inanuncovered
pan.
. a.Calculatecookingtimeperpound.
NUMBER RACK c. Placeonlowestshelf.
OFPANS POSITION PLACEMENT d. Insert meat thermometerto measure
1 2 or3 center internaltemperature.
2 2 or3 oppositecornersandat carving.Theinternaltemperaturewillrise
3- 4 2 or3 oppositecornerontwo
IIIIrD©©©_ III c. Cookfoodsimmediatelyafter defrosting.
b.Setmeatfat sideupsoitwillbasteitself.
e.Allowmeattostand15-20minutes,before
leastl_hto 2 inches 5°Fduringstandingtime.
apart.
rackssothatnopanis
aboveorbelowtheother.
29
Page 30

I BAKING [
RACK POSITIONS HIGHEST 4thposition
It is importantto cookfoodsonthe proper MED.HI 3rdposition
rack. MED.LOW 2ridposition
* Checkrackpositionbeforeanybaking. LOWEST 1stposition
* Alwayschangerackswhileoveniscold.
, 1 II
TYPEOFBAKING RACKPOSITION REASON
Angelfood #1 Heatmust beableto deflectto
browntop.
Biscuits,cookies : 2 or3 Middlepositionallowsforthe
mostcirculationandoven
heating.
Cakes- casseroles 2 or 3
Frozenpies oncookiesheet#1 Heatmustbeableto deflectto
browntopcrust.
Muffinsandbreads 2 or3 Middlepositionallowsmost
circulationandevenheating.
Roasting 2 or3
Turkeyor
largeroast 1 Allowseasyaccessfor basting.
30
Page 31

I ROASTINGCHART I
(OVENTEMPERATURE325°)
APPROX.MIN. INTERNAL
CUT APPROX.WEIGHT PERLB. MEATTEMP.
Rib 6to 8 pounds 23- 25 140Rare
27- 30 160Med.
32- 35 170Well
BonelessRib 4 toOpounds 26- 32 140
34- 38 160
40,42 170
RolledRump 4 to 6 pounds 25- 30 150- 170
(highquality)
SirloinTip 31/4to 4 pounds 35- 40 140- 170
Pork(fresh)Loin 3 to 5 pounds 30- 35 170
5-7 35-40 170
BonelssHam 2 - 5 30- 45 170
Cookbeforeeatingham Under10pounds 26- 30 155- 160
10- 15 17- 20 155- 160
Precookedham 14- 18 130
Shoulderpicnicham 25- 35 170
LambLeg 5to 8 pounds 30- 35 170- 180
Shoulder(whole) 3 to 5 pounds 30- 35 170- 180
Shoulder(boned) 3 to 5 pounds 40- 45 170- 180
Veal
Leg.lambshoulder 3 to 5 pounds 30- 40 170- 180
6 to 8 pounds 25- 35 170- 180
Poultry
Chicken 3 to 5 pounds 30- 40 185- 190
Over5pounds 35- 40 185- 190
Turkey Oto 16pounds 20- 25 180- 185(inthigh)
16to20 pounds 18- 20 180- 185
Over20 pounds 15- 18 180- 185
31
Page 32

J BROILING I
UTENSILS- Broilingpanandgrid(includedin an excessiveamountofsmoke,therack
oven)anddeepmetalpanwithrack. hasbeenplacedtoocloseto thebroiler.
BROILINGMETHOD- Broilingisa methodof c.Turnselectordialto broil,turnthermostat
cookingtenderfoodsbydirectheatunderthe dialto broil- preheatis not necessary
burner.Generally,thedistancebetweenthe exceptfor charcoalexteriorwith rare
meat and the burner and broiling time interior(steaks)preheat5-10 minutes.
regulatesdegreeofdoneness.
d.Broilingshouldbedonewiththeovendoor
Anysteakfor broilingshouldbeat least3/, openonelectricovensanddoorshutongas
inchthick.Thinnercutswill bedonebefore ovens.
theyare brownandshouldbe panbroiled
instead, e. Followsuggestedtimeson broilchart-
meatshouldbe turnedonceabouthalf
Veal and Pork shouldnot be broiled;veal waythroughbroilingtime.
becauseit is too lean;andporkbecauseit
requireslong, slow cookingto be eaten f. Checkthedonenessbycuttingslit inmeat
safely, nearcenterfordesiredcolor.
Fishneedstobebrushedinoilbeforebroiling g. Removebroilerpan immediatelyafter
andplacedskinsidedowningreasedbroiler broilingsothatdrippingwill notbakeon
pan. andcausemessycleanup.
Chickenneedsto be lessthan 3 Ibs. and EASY CLEANING
occassionallybastedwith fat (will needa
lowerracksetting). Allowtocoolslightlythen:
a. Preparemeat- removeexcessfat from
meat and slash remainingfat being broiling.
carefulnottocutintomeat-thiswillhelp
excessfat to drainandkeepsmeatfrom 2. Draindrippings.
curling.
b.Positionracksothatmeatwill beapproxi- wetpapertowel-thiswillsoftenbakedon
mately1inchfromthebroiler.Ifyounotice foodsandmakecleanupeasy.
1. Removebroiler pan immediatelyafter
3. Sprinklewithsoapandcoverbottomwith
32
Page 33

] BROILINGCHART I
Thetimesgiveninthechartshouldbeusedonlyasaguide.Increaseordecreasebroilingtimesto
suitindividualtastefordoneness.
THICKNESS& MIN.COOKTIME
FOOD QUANTITY DONENESS SIDEI SIDE2 TOTAL
Bacon 8 slices crisp 3 2 5
morecrisp 5 3 8
BeefSteaks 3/4" rare 5-6 3-4 8-10
medium 7-8 3-5 10-13
3/4" well 10-11 6-8 16-19
BeefSteaks 1_ rare 6-7 4-5 10-12
Frozen medium 8-9 6-7 14-16
well 16-17 10-12 26-29
BeefSteaks 1_/2" rare 8-9 6-8 14-17
Fresh medium 11-12 10-12 21-29
well 18-20 15-18 33-38
ChickenBroiler 180° 20skin 15skin
Split&Quartered internal down up 35
FishFillets
Fresh 1" 6-7 4-5 10-12
Frozen 1" 8-9 5-7 13-16
Hamburger 1/2" rare 5-6 4-5 9-11
Fresh medium 6-7 4-5 10-12
well 9-10 5-6 14-16
Hamburger 1/2"
Frozen medium 9-10 5-6 14-16
Hamslice 314" 150-160 9-10 7-8 16-18
precooked internal
LambChops 3/4" medium 6-8 3-5 9-13
Fresh well 8-9 6-7 14-16
Frozen medium 8-9 6-7 14-16
Liver-Fresh 1/2" - 3/4" 4 3-4 7-8
LobsterFresh 7 oz. shellup shelldown
7-8 6-7 13-15
Frozen 14-16 11-12 25-28
33
Page 34

I COOKINGTERMS J
BAKINGPOWDER- A leaveningagent which. BRUSHWITH-Touseapastrybrushto spread
makesfoodsrisewhentheyarebaked.Itis a food lightly with liquid such as salad oil,
combination of baking soda, a dry acid or meltedfat, milk, heavycreamor beatenegg.
acid salt and starch or flour. The acid
ingredient reacts with the baking soda to CHOP- To cut food into small pieceswith a
producegas bubblesinthe mixture.Double- knife, blenderor food processor.
acting bakingpowderproducesgasbubbles
twice:firstduringmixingandsecondduring
baking, flour,sauce,etc.,untilcovered.
nAKINGSODA- An essentialingredientof 1.Tocutfoodintosmallcubes(about_hinch).
bakingpowder,may be usedalone as a 2.Tocutsurfaceofmeatincheckeredpattern
leaveningagentin mixturescontainingan
acid ingredientsuch as buttermilkor in meatfibers.
combinationwith bakingpowder.Mixtures
containingbakingsodashouldbebakedas CUTIN- Todistributesolidfatinflourorflour
soonasmixed,sincethesodastartstoreact mixturebyusingpastryblenderortwoknives
assoonasitcomesincontactwiththeliquid, scissor-fashion until flour-coated fat
COAT- To sprinklefoodwith, or dipit into,
CUBE-
toincreasetendernessbybreakingtough
BARBECUE-Toroastorbroilfoodona rackor particlesare ofdesiredsize.
spitovercoals,orundera heatunit.Thefood DICE- To cut food into very small pieces
is usuallybrushedwith a highlyseasoned (about1/4inch).
sauceduringthe lastof thecookingtime.
BATTER- Amixtureoffairlythinconsistency, %'%
madeofflour,liquidandotheringredients. -"_._
BEAT- Tomakea mixturesmoothwithrapid,
regularmotionusinga wirewhisk,spoon,
handbeateror mixer.Whenusinga spoon,
themixtureshouldbeliftedupandoverwith DICINGANONION-Cutonioninhalflengthwise,
eachstroke, withcutsidedown,cutonioncrosswisein1/4
BLEND- To mix thoroughlytwo or more inchthickslices.
ingredients;ortopreparefoodinblenderuntil Holdonionfirmlyandoivequarterturn;cutin
pureed,chopped,etc.,asdesired. 114inchpieces.Repeatwithotheronionhalf.
BREAD- Tocoatwithbreadcrumbs,cracker
floured,then dipped in beateneggor other
liquidto helpcrumbsto adhere.
BROIL-Tocookfoodbydirectheatona rack
cusocorn_gomrs,e
orspit.
34
Page 35

i TERMS J
DRAW.Toremoveentrails from, and clean, theninto a choiceofsauces.Dessertfondues
poultry or game.Drawnfisharewholefish includechocolateorothersaucesfordipping
thathavebeencleaned(eviscerated)butnot chunksof poundcakeorfruit.Thetermalso
boned, denotesabakedmaindishmadewithcheese,
milkandbread.
DOT- To scatter bits, as of butter or
margarine,oversurfaceof food. GELATIN- Availableasunflavoredandfruit-
flavored.Theyarenotinterchangeable.
DREDGE-Tocoveror coatfood,aswithflour,
cornmeal,etc. OLACE-1.Glazed,aswithafrosting.2.Frozen.
DRESS- To mix salad or otherfood with Glue.1.Tocoatwithaglossymixture.2.Con-
dressingorsauce, centratedstockusedto addflavor.
DRIPPINGS-Fatandjuicegivenoffbymeator GRATE- To I:ubfoodona grater(orchopin
poultryas it cooks, blenderor foodprocessor)toproducefine,
mediumorcoarseparticles.
FLAME-Toignitewarmedalcoholicbeverage
pouredoverfood.Alsoknownas flambe. 6RATIN-AFrenchtermdefiningabrowncrust
formedby bakingor broilingbreadcrumbs,
FLOUR-1.AII-purpose.Madefromavarietyof cheese,butter or a mixtureon top of a
wheats,it producesgoodresultsfora wide casseroleor otherdish.
varietyofbakedgoods.Whole-wheatflouris
milledfromtheentirewheatkernelwhilerye OREASE-Torubsurfaceofdishorpanwithfat,
flour ismilledfromtheryekernel.Cakeflour to keepfoodfromsticking.
is milledespeciallyforcakesandotherlight
bakedproducts.Forbestresultsalwaysuse 6ARNISH.Toadda decorativetouchtofood,
theflour calledfor in the recipe.In recipes as with parsley, croutons or prepared
callingforall-purposeand wholewheator vegetables.
rye,a certainproportionofall-purposetothe GRILL-Tocookfoodonarackbydirectheat;
otherflourisneededforbestresults;sodon't
alsotheapplianceorutensilusedforthistype
substituteflour.2. Tocoatlightlywithflour, of cooking.
FLUTE- Tomakedecorativeindentations. GRIND-Toreducetoparticlesinfoodgrinder,
FOLDIN-Tocombinedelicateingredientssuch blenderor foodprocessor.
aswhippedcreamorbeateneggwhiteswith KNEAD- To work a food mixture(usually
otherfoodsbyusingagentle,circularmotion
tocutdownintothemixture,slideacrossthe dough)witha press-foldmotion.
bottomof the bowl to bringsomeof the LUKEWARM-Atatemperatureofabout95°F.
mixtureupandoverthesurface. Lukewarmfoodfeelsneitherwarmnorcold
FONDUE- Mostoftena dish of hot melted
cheeseandwine,intowhichbreadisdipped MARBLED- Termusedto describemeatwith
andtheneaten.Formeatfondues,atthetable, visiblefat runningthroughthelean.
cubesof meataredippedinhotfat to cook,
whenincontactwithinsideof thewrist.
35
Page 36

i TERMS ]
MARGARINE-Comesinseveralforms.Regular PIT- Toremoveseedfromwholefruit.
margarinewith80percentfatisinterchange-
ablewithbutterin recipes. SCORE- 1.Tocut shallowslitsinsurfaceof
foodto increasetendernessor topreventfat
MARINADE-Aseasonedliquid,inwhichfoodis coveringfromcurling.2.To decorate.
soakedto enhanceflavor.
SHRED- To cutfood intosliversor slender
MARINATE-Tosoakin a marinade, pieces,usinga knifeorshredder.
MEATTENDERIZER- Papain from natural SHUCK- Toremovemeatof oysters,clams,
tenderizerssuchaspapayaisusedtosoften etc.fromtheirshellsorto removethehusk
meattissue.It is usuallysprinkledon the fromcorn.
meatbeforemeatiscooked.
SKIM- Toremovefatorscumfromsurfaceof
MERINGUE- Mixtureof stiffly beatenegg food.
whites and sugar. Also the cookedsoft
mixtureon dessertsor the cooked"hard" TOSS- To mix foodslightlywith a lifting
mixtureas a dessertshell, motion,usingtwoforksorspoons.
MINCE- Tocutintoverysmallpieces,using TRUSS- To securepoultrywith stringor
knife, food grinder or blender,or food skewers,to holditsshapewhilecooking.
processor. VINEGAR-Anacidliquidusedforflavoringand
PEEL-Toremoveoutercoveringoffoodsby preserving.Amongthetypes:Cidervinegar,
trimmingawaywithknifeorvegetablepeeler, madefrom applejuice, has a mellowfruit
or by pullingoff. flavor;distilledwhitevinegar,usuallymade
fromgrain alcohol;herbvinegarsflavored
POT-ROAST-Tocooklargepiecesofmeator with herbs;andredor whitewinevinegars
poultrybybraising;alsocertainmeatcuts. whichalsomay beflavoredwithgarlic.
PREHEAT To heat oven to desired WHIP-Tobeatrapidlywithmixer,wirewhisk
temperaturebeforeputtingfoodintobake. or hand beater, to incorporateair and
increasevolume.
PUNCffDOWN- Todeflatea risenyeastdough
bypushingit downwiththefist. YEAST-Micro-organismsthatproducecarbon
dioxideandalcoholfrom carbohydratestO
PUREE-l.Athickmixturemadefromapureed causebakedgoodsto rise,fruitstoferment,
vegetablebase.2. To pressfoodthrougha etc.
finesieveorfoodmill,ortoblendinblenderor
foodprocesserto a smooth,thickmixture.
36
Page 37

EQUIVALENTMEASURES
Dash 2 to 3 drops or less than 1/8 teaspoon
1 tablespoon 3 teaspoons
1/4 cup 4 tablespoons
1/3 cup 5 tablespoonsplus1 teaspoon
1/2 cup 8 tablespoons
1 cup 16 tablespoons
1 pint 2 cups
1 quart 4 cups
1 gallon 4 quarts
1 peck 8 quarts
1 bushel 4 pecks
1 pound 16 ounces
BAKINGPANEQUIVALENTS
4 - CUPBAKINGDISH:
9 inch pie plate
9 x 1%inch layer cakepan
7% x 3% x 21/4inchloaf pan
6 - CUPBAKINGDISH:
8 or 9 x tlh inchlayer cake pan
10 inch pie plate
81hx 31/$x 2 2/8 inchloaf pan
8 - CUPBAKINGDISH:
8 x 8 x 2 inchsquarepan
11 x 7 x 11hinch bakingpan
9 x 5 x 3 inchloaf pan
I0- CUPRAKINGDISH:
9 x 9 x 2 inch squarepan
113hx 71hx 13/4inch bakingpan /
15 x 10 x 1 inchjelly roll pan
12 - CUPRAKINGDISHANDOVER:
131hx 81hx 2 inchglass bakingpan - 12 cups
13 x 8 x 2 inchmetalbaking pan - 15 cups
14 x lO_hx 2_hinch roastingpan - 19 cups
37
Page 38

I CAUSE& CORRECTIONi
PROBLEM CAUSE CORRECTION
BROWNING: 1. Dentedor warped pan. 1. Use even bottomedpan.
Unevenbottombrowning2. Ovennot preheated. 2. Preheatto desiredtemp.
beforeaddingfood.
3. Rangenot level. 3. Adjustleg levelers(see
Useand Care).
Too brownon bottom 1. Improperrack placement. 1. Checkfor correctrack posi-
tion beforestartingwhile
oven is cold.
2. Ovendoorhas beenopened2. Opendooronlyafterfoodhas
too often, beenbakedfor shortestre-
commendedbakingtime.
3. Ovennot preheated. 3. Preheatto desiredtemp.be-
fore addingfoods.
4. Panstouchingwallsor other4. Pansshouldnot be closer
pans. than 11hto 2 inchesfrom
each otheror oven walls.
5. Warped,darkor dullfinished5. Use even bottomed,shiney
pan (includeglass), pans for light browning.
Too brownon top. 1. Ovendoorsopentoo often. 1.Opendooronlyafterfoodhas
beenbakedfor shortestre-
commendedbakingtime.
2. Overmeasuring. 2. Usestandardmeasuring
(fats-sugars-liquids). cups.
3. Oventemp.too low. 3. Doublecheckrecipefor cur-
rect oventemperature.
4. Pansize too large. 4. Usepansizerecommendedin
recipe.
Crackon top. 1. Oventemperaturetoo high. 1. Doublecheckrecipefor cor-
rect oventemperature.
2. Overmeasuring. 2. Use standardmeasuring
cups.
Crumblyor dry. 1. Oventemp.too high. 1. Doublecheckrecipefor cor-
rect oven temp.- excess
2. Overbaking. 2. Checkfoodsafter shortest
bakingtime.
3. Overmeasuring. 3. Use standardmeasuring
heat driesfood.
cups.
38
Page 39

PROBLEM CAUSE CORRECTION
Fallen 1. Ovendooropenedtoo soon.1. Checkfood only after the
shortestrecommended
bakingtime.
2. Oven temperaturetoo low. 2. Checkrecipefor correct
oventemperature.
>
3. Oldor too little baking 3. Usestandardmeasuring
powder, utensils.
4. Too muchbatteror too little 4. Usecorrectpan size.
pan.
5. Toomuchor too littleliquid.5. Use standardmeasuring
utensils.
6. Underbaked. 6. Checkfood after shortest
recommendedbakingtime.
Flat 1. Improperrack placement. 1. Checkrack position,before
startingand while oven is
2. Oldor too little baking 2. Usestandardmeasuring
powder, utensil.
, 3. Oventemperaturetoo high 3. Checkrecipefor correctoven
still cold.
or too low. temp.and correcttype of
utensil(glassutensils)re-
quire lowertemperature.
4. Pantoo largefor amounto 4. Use recommendedbaking
batter, utensil.
5. Too muchortoo little liquid 5. Use standardmeasuring
utensil.
Moundor peakedcenter 1. Bakingtime too long. 1. Checkfoodaftershortestre-
commendedbakingtime.
oven temperature.
3. Pantoo largeor too small 3. Use recommendedbaking
2. Oventemperaturetoo high. 2. Checkrecipefor correct
utensil.
4. Panstouchingwalls or 4. Pansshouldnot be closer
otherpans. than 11/2to 2 inches.
5. Too little liquid. 5. Usestandardmeasuring
utensils.
Shrinkage(morethan 1. Bakingtime too long. 1. Checkfood after shortest
recommendedbakingtime.
2. Oventemperaturetoo high 2. Checkrecipefor correct
oven temperature.
3. Panstouchingwallsor othet3. Pansshouldnot be closer
pans. than 11/2to 2 inches.
39
Page 40

PROBLEM CAUSE CORRECTION
Uneventop 1. Panstouchingwallsor other1. Pansshouldnot be closer
pans. than 11hto 2 inches.
oventemperature
3. Rangenot level. 3. Adjustleg levelers(consult
2. Oventemperaturetoo low. 2. Checkrecipefor correct
4. Too muchliquid. 4. Use standardmeasuring
5. Underbaking. 5. Checkfood after shortest
6. Undermixing. 6. Checkrecipe.
Uneventextureholes 1. Bakingtime too short. 1. Checkfoodsafter shortest
and tunnels, recommendedbakingtime.
2. Improperrack placement. 2. Checkrack positionbefore
-_ cold.
after mixing.
3. Not bakingimmediately Always
4. Oventemperaturetoo high. 4. Checkrecipefor correct
5. Too muchbakingpowder. 5. Use standardmeasuring
Use and CareManual).
utensils.
recommendedbakingtime.
startingand while oven is
3.
oventemperature.
utensils.
bake
immediately.
6. Undermixing. 6. Usestandardmeasuring
utensils.
40
Page 41

I , SERVICINGI
BEFOREYOUCALLASERVICETECHNICIANCHECKTHEFOLLOWING
SOMEORNONEOFYOURRANGEOPERATES:
Is your rangeplugdisconnectedfrom the electricaloutlet?
Areyour housefusesblown?
Is your circuit breakertripped?
is therangepluglooseor improperlyplugged?
ELEMENTWON'THEAT:ISURFACEUNITSONLY)
Are yourelementsproperlyin place?
Areelementprongsbentor dirty?
BAKEDGOODSNOTTURNINGOUT:
Are yourracks properlyin placeandin correctpositionfor what youarebaking?
Isyourrangelevel?(Checkleglevelers).
Areyouusingtheproperpan?Isit bright,notsoiledordarkcolored?
Haveyouusedfoilduringcookingorto lineyouroven?
Areyouusingstandardmeasuringutensils?
OVENWILLNOTOPERATE:
Didyouturntheselectorandthermostatswitchesto correctpositions?
Clocks- areknobsin,correctpositions?Seesectiononclocksandtimers.
OVENUGHTWILLNOTWORK:
Isyourbulbburnedout?
Isyourbulbloose?
NEEDSERVICE?WHENYOURRANGEREQUIRESSERVICEORREPLACEMENTPARTS,CONTACTYOUR
DEALERORAUTHORIZEDSERVICEAGENCY.CONSULTTHEYELLOWPAGESIN YOURTELEPHONE
DIRECTORYUNDER"RANGES"FORTHESERVICENEARESTYOU.
DESURETOINCLUDE:NAME,ADDRESS,PHONE.MODELNUMBER,SERIALNUMBER,ANDCOMPLAINT.SEE
WARRANTYSHEETINCLUOEDWITHTHISMANUALFORMANUFACTURERSADDRESS.
41
 Loading...