

Page 1
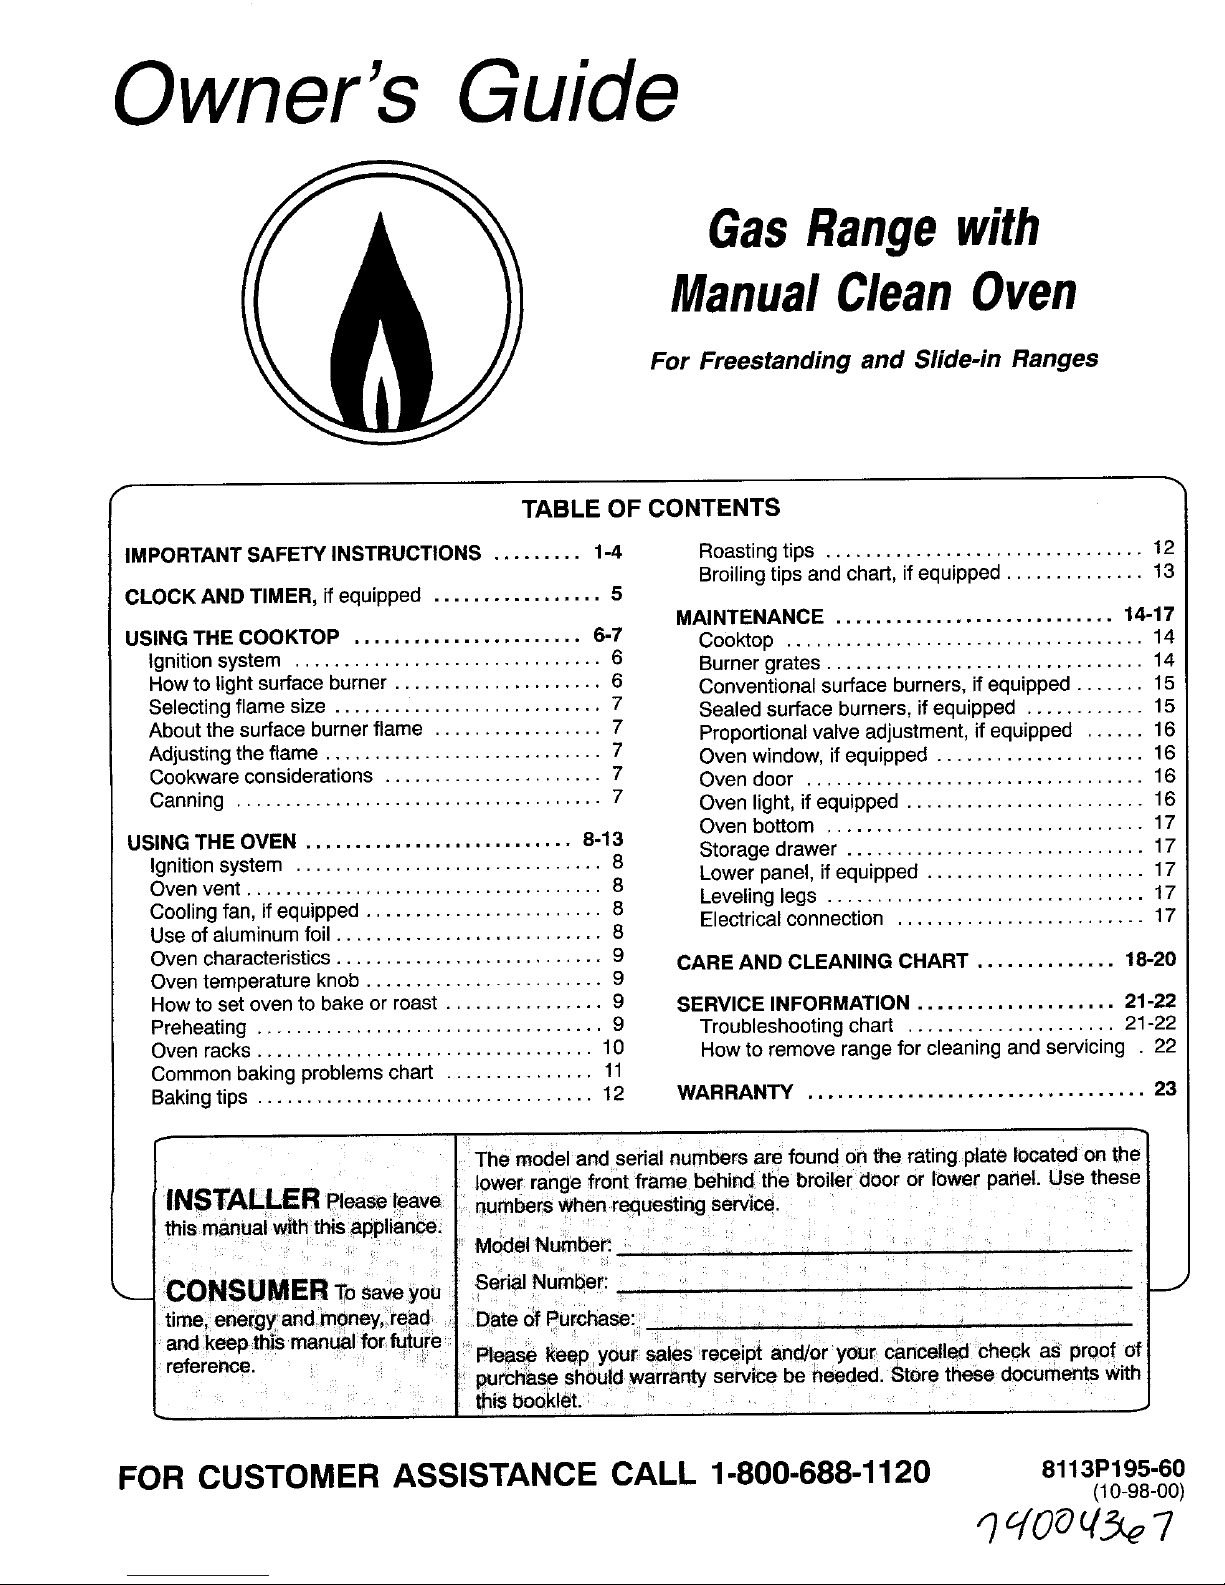
Owner's Guide
GasRangewith
ManualCleanOven
For Freestanding and Slide-in Ranges
r
TABLE OF CONTENTS
IMPORTANTSAFETYINSTRUCTIONS ......... 1-4 Roastingtips ................................ 12
Broilingtipsandchart,ifequipped.............. 13
CLOCKAND TIMER, ifequipped................. 5
MAINTENANCE ............................ 14-17
USINGTHE COOKTOP ....................... 6-7 Cooktop .................................... 14
Ignitionsystem ............................... 6 Burnergrates................................ 14
Howto lightsurfaceburner ..................... 6 Conventionalsurface burners,ifequipped ....... 15
Selectingflamesize ........................... 7 Sealedsurfaceburners,ifequipped ............ 15
Aboutthesurfaceburnerflame ................. 7 Proportionalvalveadjustment,if equipped ...... 16
Adjustingtheflame ............................ 7 Ovenwindow, ifequipped ..................... 16
Cookwareconsiderations ...................... 7 Ovendoor .................................. 16
Canning ..................................... 7 Ovenlight,if equipped ........................ 16
Ovenbottom ................................ 17
USINGTHE OVEN ........................... 8-13 Storagedrawer .............................. 17
Ignitionsystem ............................... 8 Lowerpanel,if equipped ...................... 17
Ovenvent .................................... 8
Levelinglegs ................................ 17
Coolingfan, if equipped........................ 8 Electricalconnection ......................... 17
Useof aluminumfoil ........................... 8
Ovencharacteristics........................... 9 CAREANDCLEANINGCHART .............. 18-20
Oventemperatureknob ........................ 9
Howto setovento bake or roast ................ 9 SERVICEINFORMATION.................... 21-22
Preheating ................................... 9 Troubleshootingchart ..................... 21-22
Ovenracks.................................. 10 How to removerangefor cleaningandservicing . 22
Commonbakingproblemschart ............... 11
Bakingtips .................................. 12 WARRANTY .................................. 23
The modelandserialnumbersarefoundonthe ratingplate locatedon the
lowerrange front frame behindthe broilerdoor or lower panel. Use these
INSTALLERF_easeleave Jestingservice.
thismanualwiththisappliance.
CONSU SerialNumber: _,
DateofPurchase:
and/0r your cancelled check as proof of
reference. ,servicebe needed.Storethese documentswith
this booklet.
FOR CUSTOMER ASSISTANCE CALL 1-800-688-1120 8113P195-6o
(10-98-00)
qqOO 7
Page 2

Readall instructionsbeforeusingthis appliance.
Thank You., for purchasingour cooking
appliance.Tohelpyou obtainthe maximumincooking WARNING: If the information in this
satisfaction,we offerthese suggestions: manual is not followed exactly, a fire or
explosion may result causing property
[]E_Readthismanualbeforeusingthe appliance, damage, personal injuryor death.
[_ Reviewallsafetyandcautioninstructions. - Do not store or use gasoline or other
flammable vapors and liquids in the
I_ Reviewthe TroubleshootingCharton
pages21and22 ifservicebecomesnecessary, vicinityof this or any other appliance.
0_=Includethemodelandserialnumbersofyour - WHAT TO DO IF YOU SMELL GAS:
appliancewhenrequestingservice.
• Proofofpurchasesuchassalesreceipt • Do not try to light any appliance.
willbeneededforwarrantyservice. • Do not touch anyelectricalswitch; do
Youcan contactusat: not use any phone in your building.
MaytagAppliances SalesCompany • Immediately call your gas supplier
Attn: CAIRsMCenter from a neighbor's phone. Follow the
P.o. Box 2370 gas supplier's instructions.
Cleveland,TN 37320-2370
1-800-688-1120 • If yOU cannot reach your gas supplier,
In our continuingeffortto improvethe quality and call the fire department.
performanceofour cookingappliances,itmay be
necessaryto makechangesto theappliancewithout - Installation and service must be
revisingthis manual, performed by a qualified installer, service
agency or the gas supplier,
A, WARNI WARNING: To reducethe riskoftipping ofthe
__. ) NG appliancefromabnormalusageor byexcessiveloading
of the oven door,the appliancemust besecuredby a
i properly anti-tip
installed device.
* ALL RANGESCANTIP AND
CAUSEINJURIESTOPERSONS, Iftherangeismovedfromthewall,be suretheanti-tip
deviceisengagedwhentherangeisreplaced.Look
_i • INSTALLANTI-TIPDEVICES underneathrangeto verifythat oneof the rear leveling
PACKEDWITHRANGE. legsis properlyengagedinthe bracketslot.
q
• FOLLOWALLINSTALLATION The anti-tipdevicesecurestherearlevelinglegto the
INSTRUCTIONS. floorwhen properlyengaged.Also,be suretherangeis
properlyre-installed.
Page 3

I_ORTANT SAFETY]N_hUC_NS INCA_ OF RRE
The followinginstructionsare based onsafety Turnoffapplianceand ventilatinghoodto avoidspreading
considerationsand must be strictlyfollowedto eliminate the flame.Extinguishflamethenturn on hoodto remove
the potentialrisksof fire, electricshock,or personalinjury, smokeandodor.
Haveyour applianceinstalledand properlygroundedbya Usedry chemicalor foam-typeextinguisherorbaking
qualifiedinstaller accordingtothe installationinstructions, sodato smotherfire or flame. Neveruse water on a
Havethe installershowyou the location ofthe gas shut off greasefire.
valveand howto shut it off in an emergency.
If fire is in the oven or broiler pan,smother by closing
Alwaysdisconnectpowerto appliancebeforeservicing, ovendoor.
Iffire is in a pan onthe surface burner,cover pan.Never
Toensureproperoperationand avoid possibleinjuryor
damageto unit do not attemptto adjust,repair,service,or attemptto pick up or movea flamingpan.
replaceanypartof yourapplianceunlessitis specifically
recommendedinthis book.All other servicingshould be
referredto a qualifiedinstalleror servicer. C_LD _ .
NEVERleave childrenalone or unsupervisednearthe
appliancewhen it isinuseor isstill hot. NEVERallow
childrento sit or standonany part of theappliance.
Besure allpackingmaterialsare removedfrom the Childrenmustbetaughtthat the L----JL L_
appliancebeforeoperatingit. applianceand utensils in it can be
hot.Let hot utensilscoolin a safe
Keeparea aroundapplianceclear andfree from place,out of reachof smallchildren.._-_,, _ ,
combustiblematerials,gasoline,and otherflammable Childrenshouldbe taughtthat an ' ,
vaporsand materials, applianceis not atoy. Children _,_i
shouldnot be allowedto playwith
If applianceis installednear awindow, properprecautions controlsor other parts ofthe unit.
shouldbetaken to preventcurtainsfrom blowingover
burners. CAUTION: NEVERstore itemsof
interestto childrenin cabinets above
NEVERleave any itemson the cooktop.The hot air from an applianceor on the backguardof
theventmayigniteflammableitemsand may increase a range.Childrenclimbingon the _._-
pressureinclosedcontainerswhich may causethemto applianceor on the appliancedoor
burst, to reach itemscould be seriouslyinjured.
Manyplasticsare vulnerableto heat. Keepplasticsaway
from partsoftheappliancethat maybecomewarm or hot. AB_ YOURAPP_..E' '
Do notleaveplasticitemsonthe cooktopas they may ....
meltor softeniflefttoo closeto the vent or a lighted NEVERuse applianceas \
surface burner, a spaceheater to heat or
warm a roomto prevent
Many aerosol-typespraycansare EXPLOSIVEwhen potentialhazardto the
exposedto heat and may behighlyflammable.Avoid their userand damageto the
useorstoragenear anappliance, appliance. Also, do not
usethe cooktopor oven
Toeliminatethe hazard ofreachingover hotsurface as a storage area for food
burners,cabinetstorageshouldnotbe provideddirectly orcooking utensils.
abovea unit.Ifsuchstorageis provided,itshouldbe /
limitedto items whichare used infrequentlyandwhich are Donotobstructthe flow of combustionand ventilationair
safelystoredinan areasubjectedto heatfrom an by blockingthe ovenvent or airintakes. Restrictionofair
appliance.Temperaturesmay beunsafefor someitems, flowto the burnerprevents proper performanceand
suchasvolatileliquids,cleanersor aerosol sprays, increasescarbonmonoxideemissionto unsafe levels.
Page 4
Avoidtouchingovenvent areawhileoven isonand for NEVERheat an unopenedcontaineron the surface
severalminutesafter oven is turnedoff.Someparts of the burner or in the oven. Pressurebuild-upmaycause
ventandsurroundingarea becomehot enoughto cause containerto burst resultingin seriouspersonal injuryor
burns.Afteroven isturnedoff, do not touchthe oven vent damageto the appliance.
orsurroundingareasuntilthey havehadsufficienttime to
cool. Usedry,sturdypotholders. Damppot holdersmaycause
burnsfrom steam.Dishtowelsorothersubstitutesshould
WARNING:NEVERuse r--_u___.l_ ._r--_u_ j never be usedas pot holdersbecausetheycan trail
acrosshot surface burnersand igniteor getcaught on
appliancedoorordrawer,if applianceparts.
equipped,as a step stoolor
seatas this may result in Alwayslet quantitiesof hotfat usedfor deepfat frying
possibletippingof the coolbefore attemptingto moveor handle.
appliance,damageto the
appliance,and serious Do not letcookinggrease or other flammablematerials
injury, accumulateinorneartheappliance,hoodor vent fan.
Cleanhoodfrequently to preventgreasefrom
accumulatingon hoodorfilter. Whenflamingfoods under
Do nottouch a hot ovenlight bulbwith a damp cloth as the hoodturn thefanon.
the bulbcould break.Shouldthe bulb break,disconnect
powertothe appliancebefore removingbulbto avoid NEVERweargarments _ _
electricalshock, madeofflammable material
orloosefittingorlong
hanging-sleevedapparel
while cooking.Clothingmay
Alwaysplace a panon a surfaceburner beforeturningit igniteor catch utensil
on.Besure you knowwhich knobcontrolswhich surface handles.
burner.Makesure thecorrect burneristurnedon andthat
the burnerhas ignited.Whencookingis completed,turn Alwaysplace oven racks inthe desiredpositionswhile
burneroffbeforeremovingpanto preventexposureto oven iscool.Slide oven rack outto addor removefood,
burnerflame, usingdrysturdypot holders.Alwaysavoidreachinginto
the ovento add or remove food. Ifa rackmustbe moved
Alwaysadjust surfaceburnerflameso that it does not whilehot, usea dry pot holder.Always turntheoven offat
extendbeyondthebottomedgeofthe pan. An excessive theend ofcooking.
flame is hazardous,wastes energyandmaydamagethe
appliance,pan or cabinetsabovetheappliance. Use carewhenopeningthe oven door.Let hot air or
NEVERleavea surface _ steam escapebeforeremovingor replacingfood.
cookingoperationunattended _ I PREPAREDFOODWARNING: Followfood
especiallywhen using a high _ manufacturer'sinstructions.Ifa plasticfrozenfood
heatsettingorwhendeepfat containerand/orits cover distorts,warps, or isotherwise
frying. Boiloverscause damagedduringcooking,immediatelydiscardthe food
smokingandgreasyspillovers and its container.The food could be contaminated.
mayignite.Cleanupgreasy
spillsassoon as possible.Do
notusehighheatfor extended
cookingoperations.
Page 5
I IMPORTANT:SAFEWINSTRUCTIONS i
UTENSIL SAFETY CLEANING SAFETY
Use panswith flat bottomsand handlesthat areeasily Turnoff all controlsand wait for appliancepartsto cool
graspedandstaycool. Avoid using unstable,warped, beforetouchingor cleaningthem. Donot touch the burner
easilytippedorloosehandledpans.Also avoid using grates or surroundingareas untilthey havehadsufficient
smallpans,especiallysmallpans with heavyhandles,as time to cool.
theycanbeunstableand easilytip. Pansthat are heavy
to movewhenfilled withfood may alsobe hazardous. Cleanappliancewithcaution.Usecareto avoid steam
burnsifa wet spongeor cloth is used towipespillson a
Besure utensilis largeenoughto properly containfood
hotsurface.Some cleanerscanproducenoxiousfumes if
andavoid boilovers.Pansize is particularlyimportantin appliedto a hot surface.
deepfat frying. Besure panwill accommodatethe volume
offoodthat is to beaddedas wellas the bubbleaction of
fat. IMPORTANT SAFETYNOTICEAND
Tominimizeburns,ignitionof flammablematerialsand WARNING ....
spillagedue to unintentionalcontactwith the utensil,do
TheCalifornia Safe DrinkingWaterandToxic Enforcement
notextendhandles
over adjacentsurface _ R Actof1986(Proposition65) requirestheGovernorof
Californiato publisha listof substancesknownto the
burners.Alwaysturn _ Stateof Californiato causecanceror reproductiveharm,
panhandlestoward
thesideor backofthe and requiresbusinessesto warn customersof potential
appliance,not out into exposuresto such substances.
theroomwherethey Usersofthis applianceare herebywarned thatthe
are easilyhitor burningof gas canresult Jnlow-levelexposureto someof
reachedby small thelistedsubstances,includingbenzene,formaldehyde
children, and soot,due primarilyto the incompletecombustionof
Neverlet a pan boildry as this could damagethe utensil naturalgas or liquid petroleum(LP)fuels.Properly
andthe appliance, adjustedburnerswill minimizeincompletecombustion.
Exposuretothese substancescanalso be minimizedby
Followthe manufacturer'sdirectionswhen using oven properlyventingtheburnersto the outdoors.
cookingbags.
Only certaintypes of glass,glass/ceramic,ceramic,or
glazedutensilsare suitablefor cooktop or oven usage
withoutbreakingduetothe suddenchangein
temperature.
Thisappliancehasbeentested for safe performance
usingconventionalcookware.Donot useanydevicesor
accessoriesthat arenotspecificallyrecommendedinthis
manual.Donot use eyelidcoversfor the surface units,
stovetopgrills,or add-on ovenconvectionsystems.The
useof devicesor accessoriesthatare notexpressly
recommendedinthis manualcan create serioussafety
hazards,resultin performanceproblems,andreducethe
life of the componentsofthe appliance.
SAVETHESEINSTRUCTIONS
Page 6
i
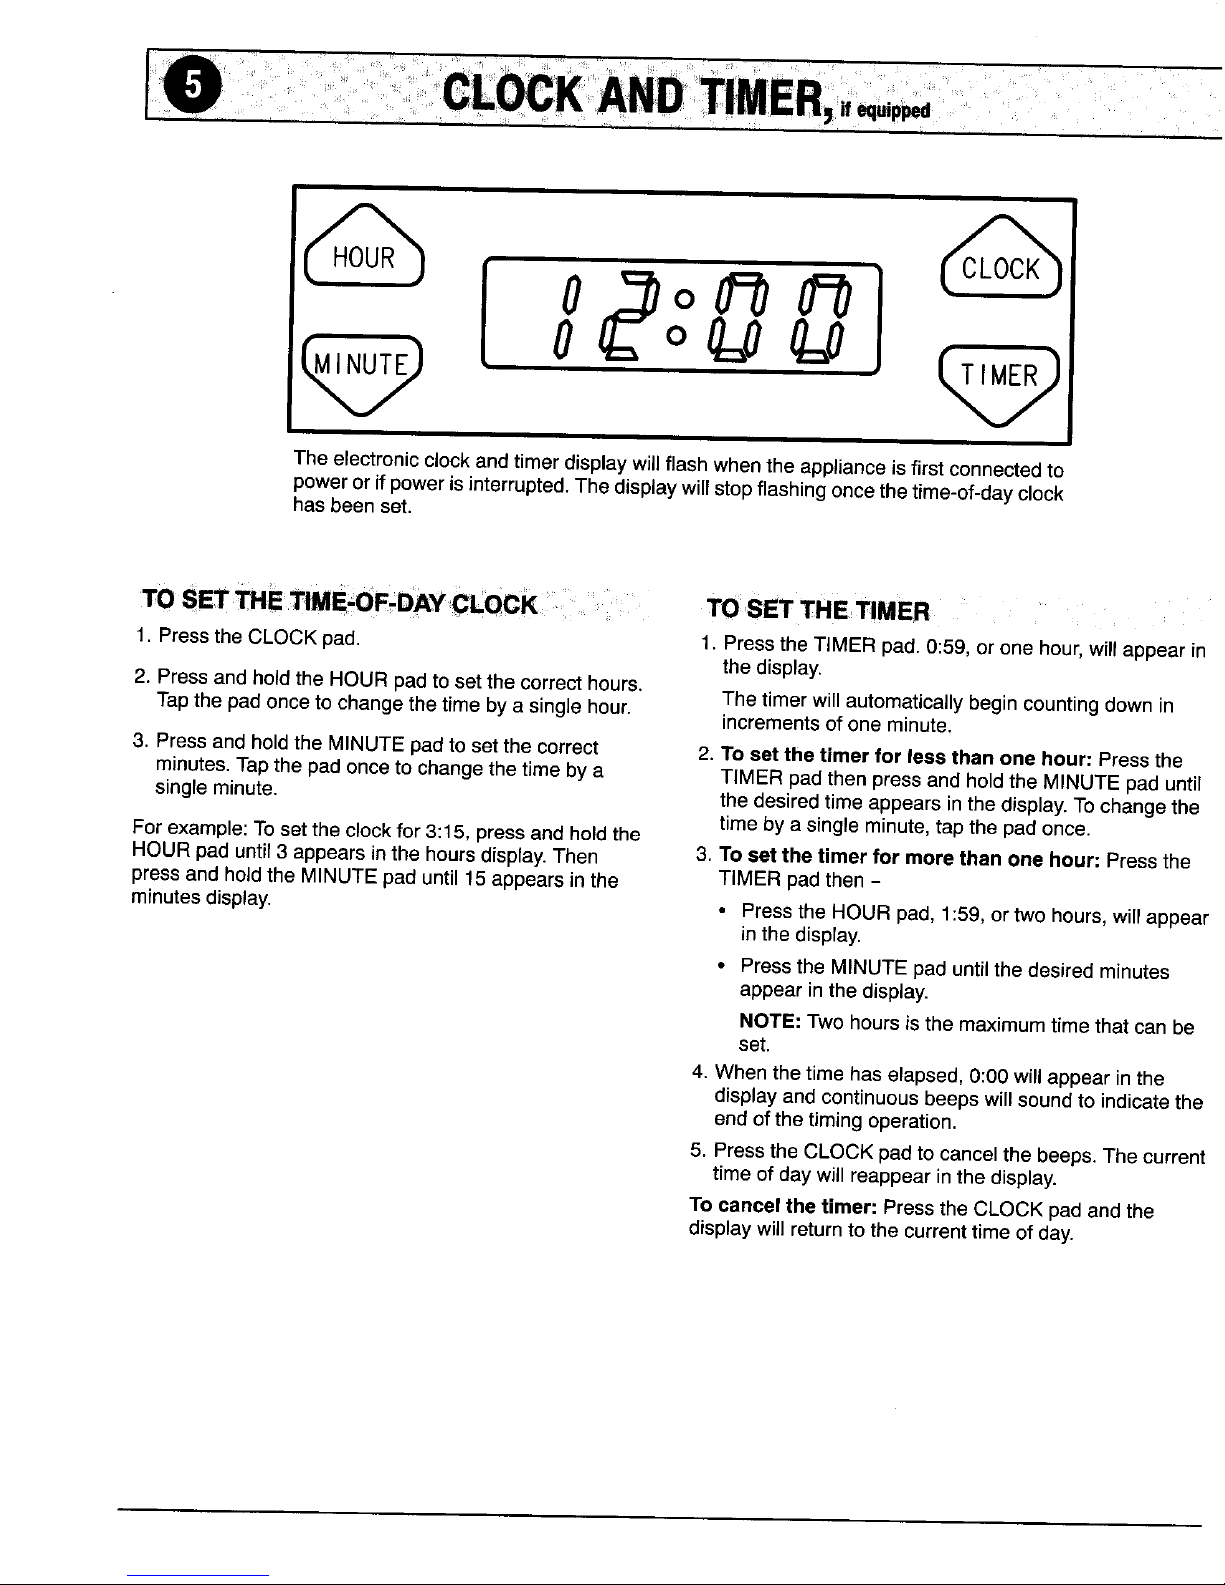
The electronic clock and timer display will flash when the appliance is first connected to
power or if power is interrupted. The display will stop flashing once the time-of-day clock
has been set.
TOSET THE TIMER
1. Press the CLOCK pad. 1. Press the TIMER pad. 0:59, or one hour, will appear in
the display.
2. Press and hold the HOUR pad to set the correct hours.
The timer will automatically begin counting down in
Tap the pad once to change the time by a single hour.
increments of one minute.
3. Press and hold the MINUTE pad to set the correct 2. To set the timer for less than one hour: Press the
minutes. Tap the pad once to change the time by a TIMER pad then press and hold the MINUTE pad until
single minute, the desired time appears in the display. To change the
time by a single minute, tap the pad once.
For example: To set the clock for 3:15, press and hold the
HOUR pad until 3 appears in the hours display. Then 3. To set the timer for more than one hour: Press the
press and hold the MINUTE pad until 15 appears inthe TIMER pad then -
minutes display. ° Press the HOUR pad, 1:59, or two hours, will appear
in the display.
• Press the MINUTE pad until the desired minutes
appear in the display.
NOTE: Two hours is the maximum time that can be
set.
4. When the time has elapsed, 0:00 will appear in the
display and continuousbeeps will sound to indicatethe
end ofthe timing operation,
5. Press the CLOCK pad to cancel the beeps. The current
time of day will reappear inthe display.
To cancel the timer: Press the CLOCK pad and the
display will return to the current time of day.
Page 7
i !;ii iii _[, •
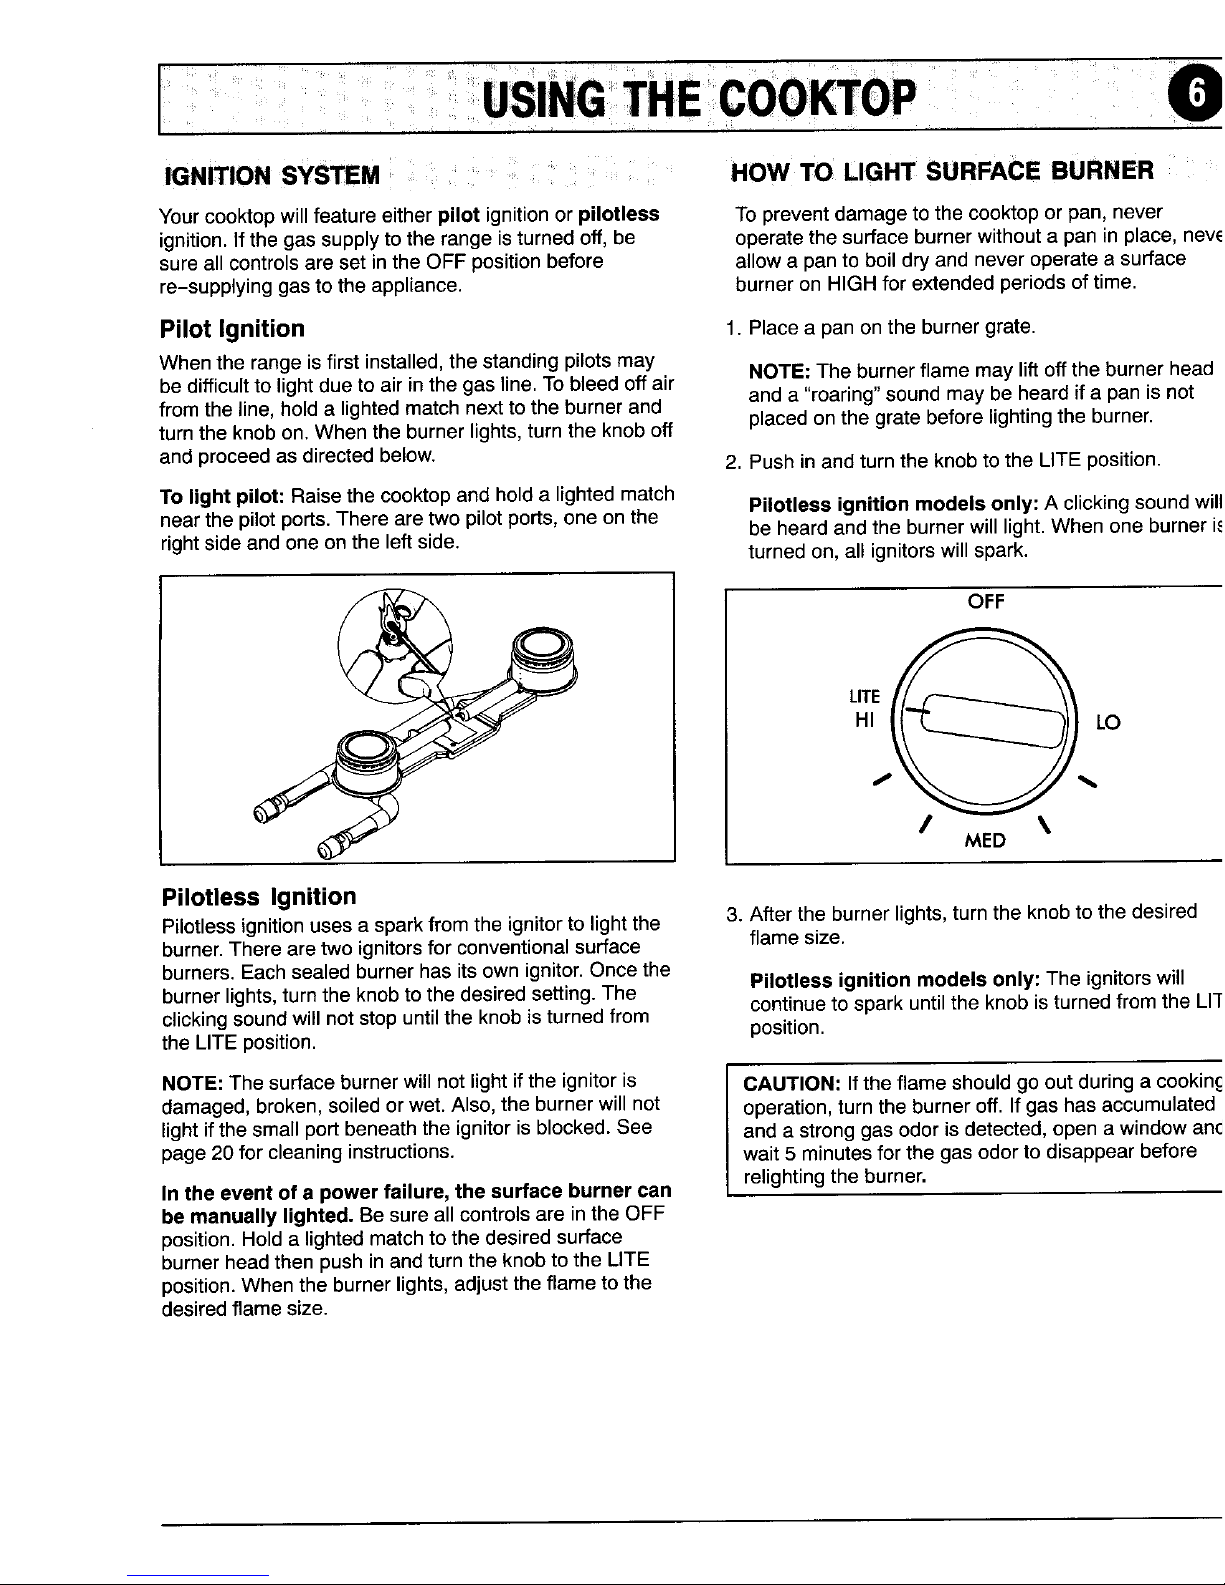
IGNmON SYS_M HOW TO LIGHT SURFACE BURNER
Yourcooktopwillfeatureeitherpilotignitionorpilotless Topreventdamagetothecooktoporpan,never
ignition.Ifthegassupplytotherangeisturnedoff,be operatethe surfaceburnerwithoutapaninplace,neve
sure all controlsare set inthe OFFpositionbefore allowa panto boildry and never operatea surface
re-supplying gasto the appliance, burneronHIGHfor extendedperiodsoftime.
Pilot Ignition 1. Placea pan on the burnergrate.
Whenthe rangeis first installed,thestanding pilots may NOTE:Theburner flamemaylift offtheburnerhead
bedifficultto light due to airin the gas line.Tobleed off air
and a "roaring"sound may beheardif a pan is not
fromthe line,holda lightedmatch nextto the burnerand placedon the grate beforelightingthe burner.
turnthe knobon.Whenthe burnerlights, turn the knoboff
and proceedasdirected below. 2. Pushinandturnthe knobto the LITE position.
To light pilot: Raisethe cooktopandhold a lightedmatch
Pilotlessignitionmodelsonly:A clickingsoundwill
nearthe pilotports.There aretwopilotports,one onthe beheardandtheburnerwilllight.Whenone burneri_
rightsideandone onthe leftside. turnedon,allignitorswillspark.
OFF
LITE_
"t,t:-----q)
/ MED Ii
Pilotless Ignition
Pilotlessignitionusesa sparkfromtheignitorto lightthe 3. Aftertheburnerlights,turntheknobtothe desired
burner.Therearetwoignitorsforconventionalsurface flamesize.
burners.Eachsealedburnerhasitsownignitor.Oncethe
Pilotlessignitionmodelsonly:The ignitorswill
burnerlights,turnthe knobto the desired setting.The
continueto spark untilthe knob is turnedfrom the LIT
clickingsoundwill notstopuntilthe knob isturned from
position.
theLITEposition.
NOTE:Thesurfaceburnerwillnotlight ifthe ignitoris CAUTION:Ifthe flame shouldgo out during a cooking
damaged,broken, soiledorwet. Also, the burnerwill not operation,turn the burner off. If gashasaccumulated
lightif the small portbeneaththe ignitor isblocked.See anda stronggas odor isdetected,open a window and
page20 for cleaning instructions, wait 5 minutesfor the gas odor to disappearbefore
relightingthe burner.
Inthe event ofa powerfailure, the surface burnercan
bemanuallylighted.Besure all controlsare inthe OFF
position.Holda lightedmatchto the desired surface
burnerheadthen push inand turnthe knobto the LITE
position.Whenthe burner lights, adjustthe flameto the
desiredflame size.
Page 8
_i_ ii_ IL i_ !!:i _ _i; "'iI ,_ 'i! ili' _!_ i_"
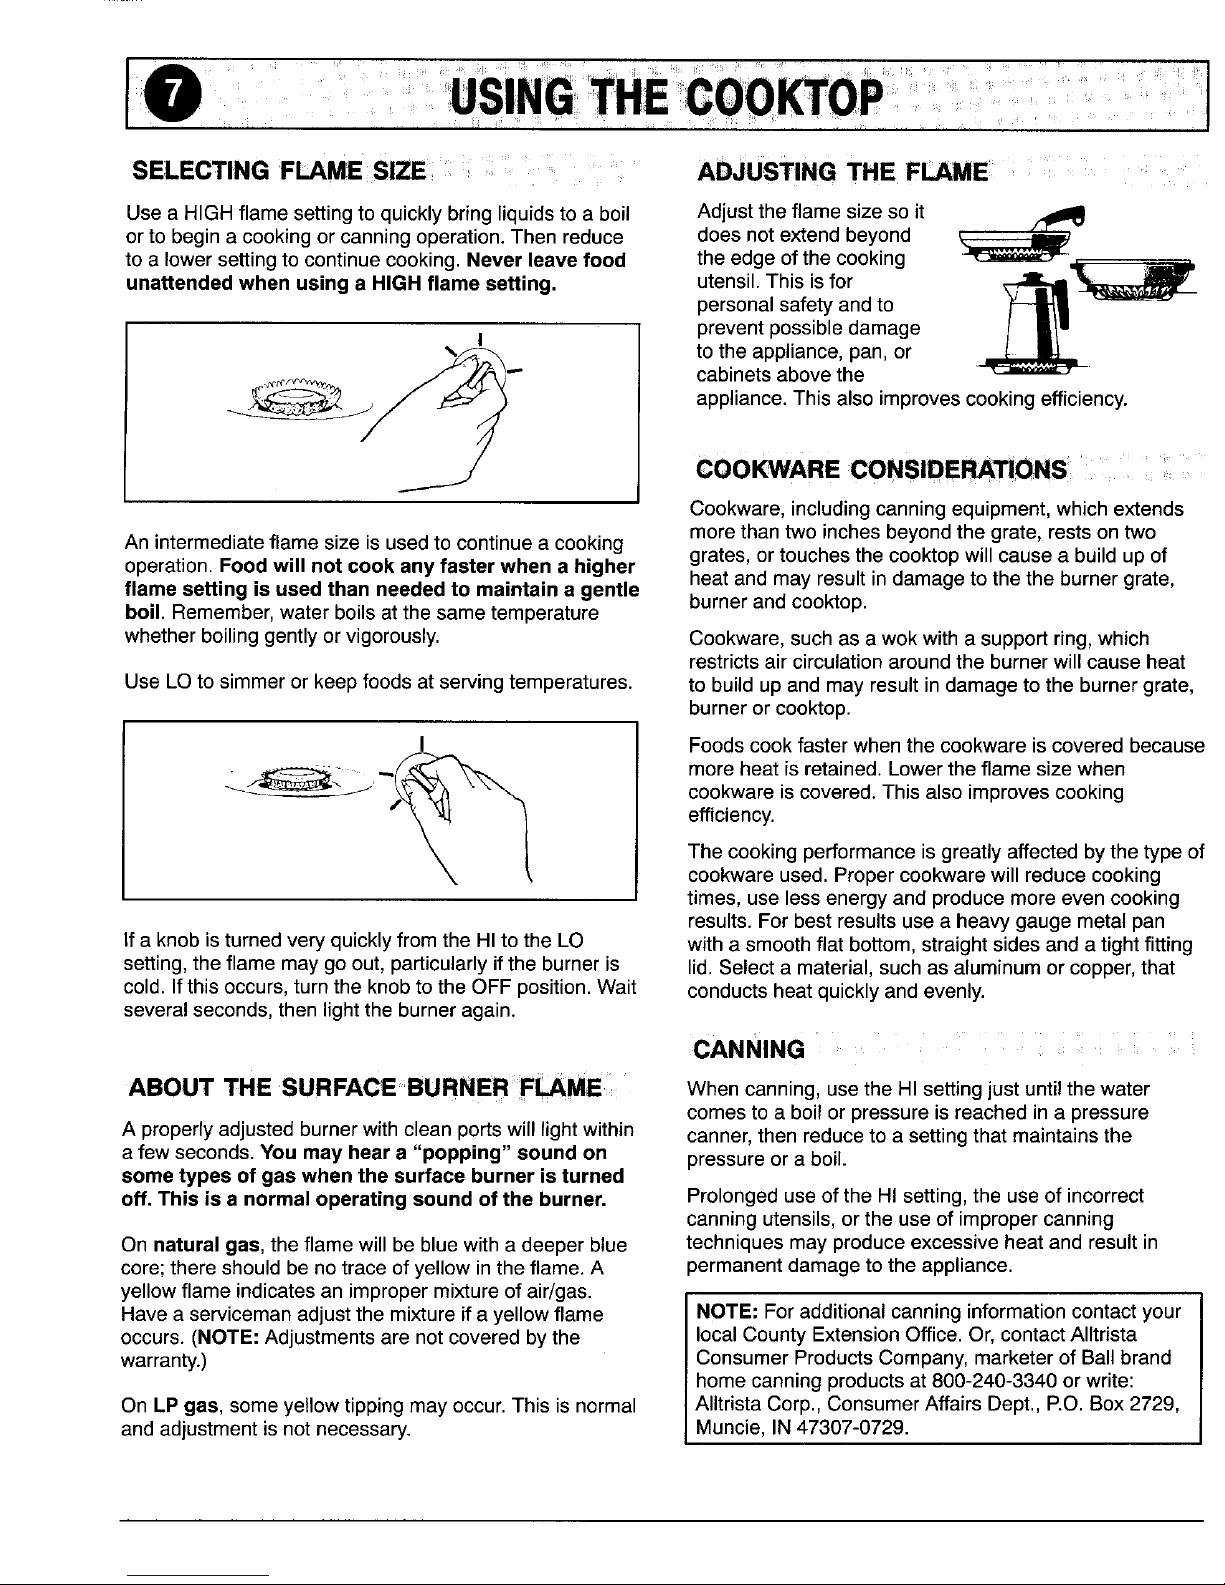
SELECTINGF_ME Sl_ ADJUSTING THE FLAME
Usea HIGH flamesettingto quicklybring liquidsto a boil Adjustthe flamesize so it /_
orto begin acooking or canningoperation.Then reduce doesnotextend beyond
to a lower settingto continuecooking. Neverleavefood the edge ofthe cooking
unattendedwhenusing a HIGHflame setting, utensil.This isfor _--,_-,i __
personalsafetyandto
preventpossibledamage
to the appliance,pan,or
_,_._ "- cabinetsabovethe
__ appliance.This alsoimprovescookingefficiency.
COOKWARECONSIDERATIONS
Cookware,includingcanningequipment,whichextends
Anintermediateflame size is usedto continuea cooking morethan two inchesbeyondthe grate, restson two
grates,or touches the cooktopwill causea build upof
operation.Foodwill notcook anyfaster when a higher heatandmayresult in damageto the the burner grate,
flame setting is usedthan neededto maintaina gentle burnerand cook-top.
boil. Remember,waterboilsatthesametemperature
whetherboilinggentlyorvigorously. Cookware,suchas a wokwitha supportring,which
restrictsaircirculationaroundtheburnerwillcauseheat
Use LOto simmerorkeepfoodsatservingtemperatures, to buildupandmayresultindamagetothe burnergrate,
burnerorcooktop.
I Foodscookfasterwhenthe cookwareiscovered because
__, more heat is retained. Lowerthe flame size when
_- cookware iscovered.Thisalso improvescooking
efficiency.
Thecooking performanceisgreatlyaffectedbythe type of
cookwareused. Propercookwarewill reduce cooking
times, uselessenergy and producemore even cooking
results.For best resultsusea heavy gauge metalpan
If a knob isturnedveryquicklyfromtheHIto the LO witha smoothflat bottom, straightsidesand a tightfitting
setting,the flame may goout, particularlyifthe burneris lid.Selecta material,suchas aluminumorcopper,that
cold. Ifthis occurs,turnthe knobto the OFF position.Wait conductsheat quicklyand evenly.
severalseconds,thenlightthe burneragain.
CANNING
ABOUT THE SURFACEBURNERFME Whencanning,usethe HI settingjustuntilthe water
comesto a boilor pressureis reachedina pressure
A properlyadjustedburnerwithcleanportswilllightwithin canner,then reducetoa settingthatmaintainsthe
a fewseconds.You may heara "popping" soundon pressureora boil.
sometypesof gaswhenthe surface burneristurned
off. Thisis a normaloperating soundof the burner. Prolongeduseofthe HI setting,theuseof incorrect
canningutensils,orthe useofimpropercanning
On naturalgas, theflamewillbebluewitha deeperblue techniquesmayproduceexcessiveheatandresultin
core;thereshouldbenotraceofyellowintheflame.A permanentdamagetothe appliance.
yellowflame indicatesanimpropermixtureofair/gas.
Havea servicemanadjustthemixtureifa yellowflame NOTE:Foradditionalcanninginformationcontactyour
occurs.(NOTE:Adjustmentsarenotcoveredbythe localCountyExtensionOffice.Or,contactAIItrista
warranty.) ConsumerProductsCompany,marketerofBallbrand
homecanningproductsat800-240-3340or write:
On LPgas, someyellowtippingmayoccur.This isnormal AIItristaCorp.,ConsumerAffairsDept.,P.O.Box2729,
and adjustmentisnotnecessary. Muncie,IN47307-0729.
Page 9
' I '111('[1'11"
, ........ I . :,. '
....... ' I) 1 .
I , , , , ,,i , , ,, , , ,, , ,,, _,' i,, _ ,,, ;,
IGNmON SYSTEM OVEN VE_
Yourovenwillfeatureeitherpilot ignitionorpilotless Theovenventislocatedatthebase ofthe backguardon
ignition, ifthe gas supplytotherangeisturnedoff,be freestandingrangesandacrossthebackof theoooktop
sureallcontrolsare set intheOFF positionbefore onslide-inranges.Whentheovenisinuse,thisarea ma_
re-supplyinggasto theappliance, feelwarmor hottothetouch.
Topreventbakingproblems,do not blockthe vent
Pilot Ignition openingin any way.Also,do not placeplasticsnear the
ventopeningas heatfromthe ventcould distortor melt
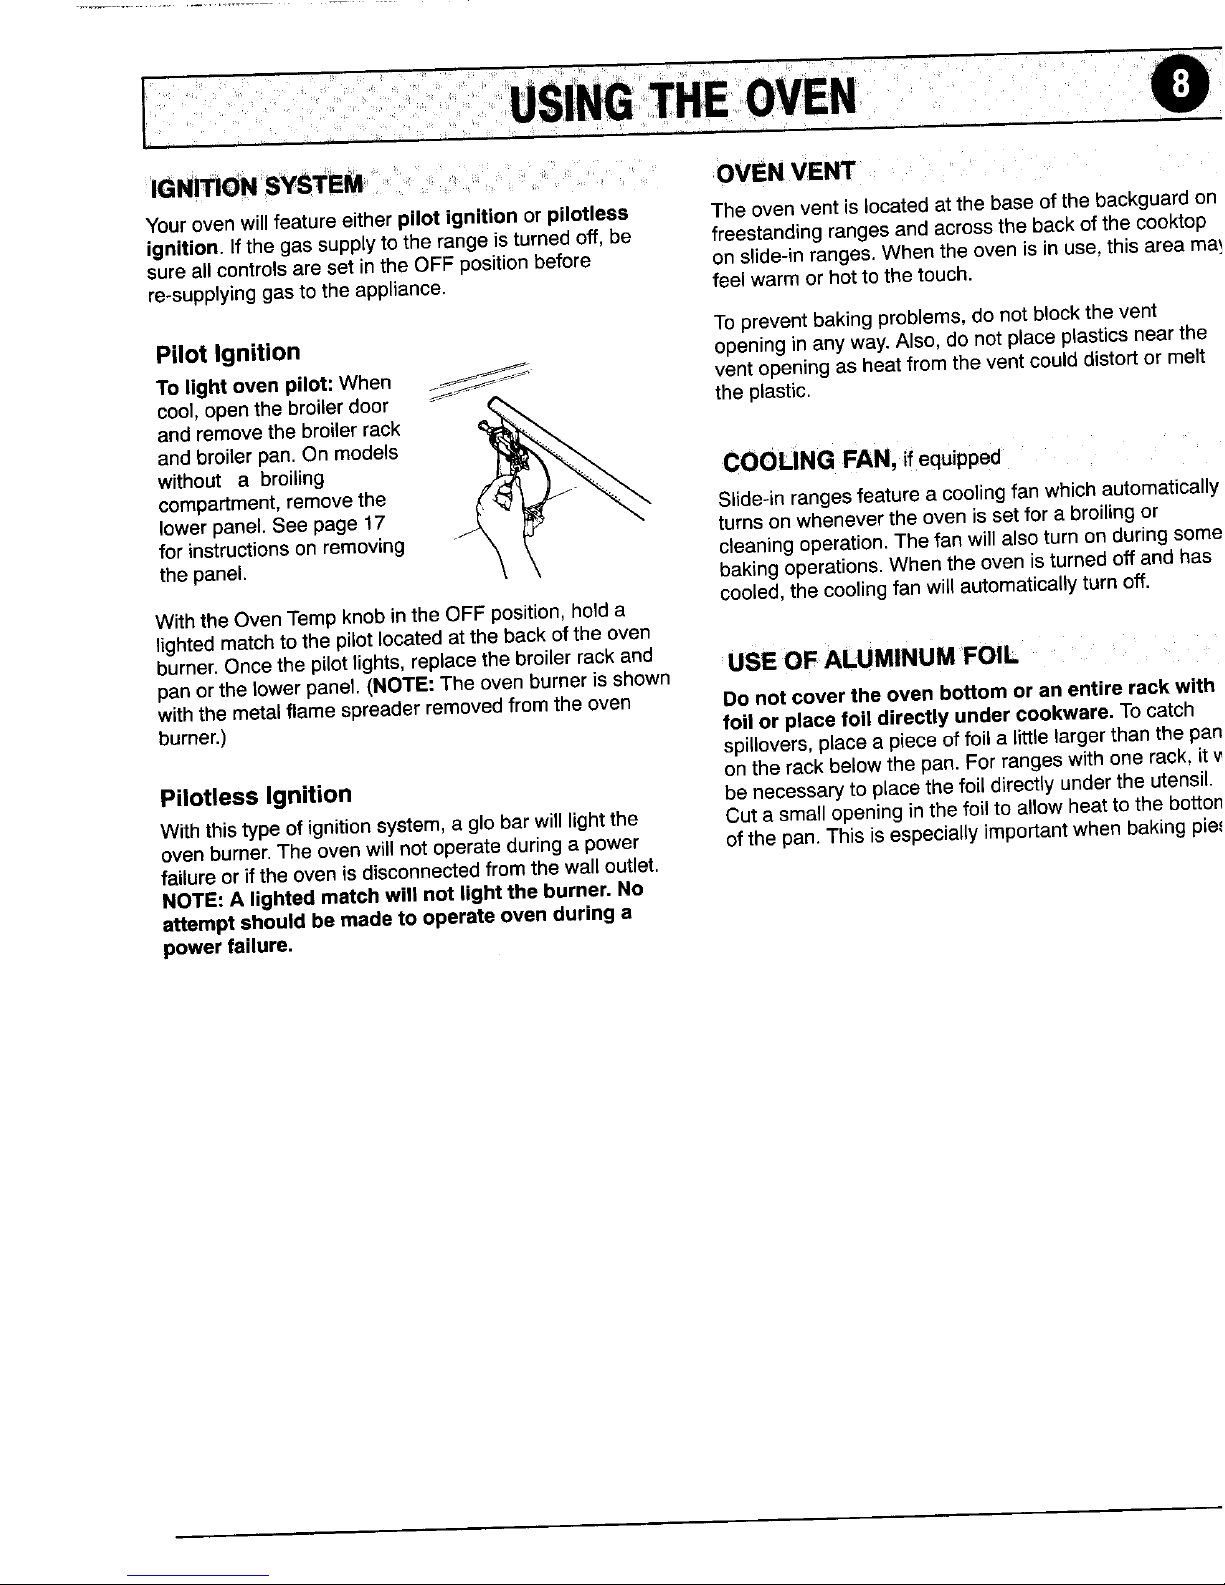
To
light
oven
pilot:
When
cool,openthebroilerdoor ....." _ theplastic,
and removethe broilerrack
and broilerpan.On models
without a broiling COOLING FAN, if equipped =
compartment,removethe Slide-inrangesfeaturea coolingfanwhichautomatically
lowerpanel.Seepage 17 turnsonwhenevertheovenis setforabroilingor
forinstructionsonremoving " cleaningoperation.Thefan willalsoturnonduringsome
thepanel, bakingoperations.Whenthe ovenisturnedoffand has
cooled,thecoolingfanwillautomaticallyturnoff.
WiththeOvenTampknobintheOFF position,holda
lightedmatchtothe pilotlocatedatthe backoftheoven
burner.Oncethepilotlights,replacethe broilerrackand =USE OF ALUMINUM FOIL ....
panorthe lowerpanel.(NOTE:Theovenburnerisshown
withthemetalflamespreaderremovedfromthe oven Do notcoverthe ovenbottomor an entirerackwith
burner.) foil or placefoil directlyunder cookware.To catch
spillovers,placea piece offoil a littlelargerthan thepan
ontherackbelowthe pan. For rangeswith one rack, it
Pilotless Ignition benecessaryto placethe foil directly underthe utensil.
Withthistypeofignitionsystem,a globarwilllightthe Cuta small openinginthe foiltoallowheattothebotton
ovenburner.Theovenwillnot operateduringa power ofthepan.Thisis especiallyimportantwhenbakingpie,,
failureoriftheovenisdisconnectedfromthewalloutlet.
NOTE:A lightedmatch willnot lightthe burner.No
attemptshouldbe madeto operateovenduringa
powerfailure.
Page 10
IO¸¸¸...............= ...."r,,.....•' ='i.....i, ii.... ::1
OVENC_ RISKS OWTO S OVENTO BAKEOR ROAST
HARACTE
H ET
Becauseeachovenhasitsownpersonalbaking 1. Whencool,positiontherackintheoven.
characteristics,do notexpectthatyournewovenwill
performexactlylikeyourpreviousoven,Youmayfindthat 2. PushinandturntheOvenTemperatureknobtothe
thecookingtimes,oven temperatures,and cooking desiredtemperature.
resultsdiffer somewhatfrom your previousrange.Allowa Selecting a temperature higher than desired will NOT
period ofadjustment,ifyou havequestionsconcerning preheat the oven any faster and may have a negative
bakingresults, pleasereferto pages 11,12 and21 for
additionalinformation, effecton bakingresults.
3. Placethe food inthe centerof the oven, allowinga
minimumof 1to 2-inches betweenthe utensilandthe
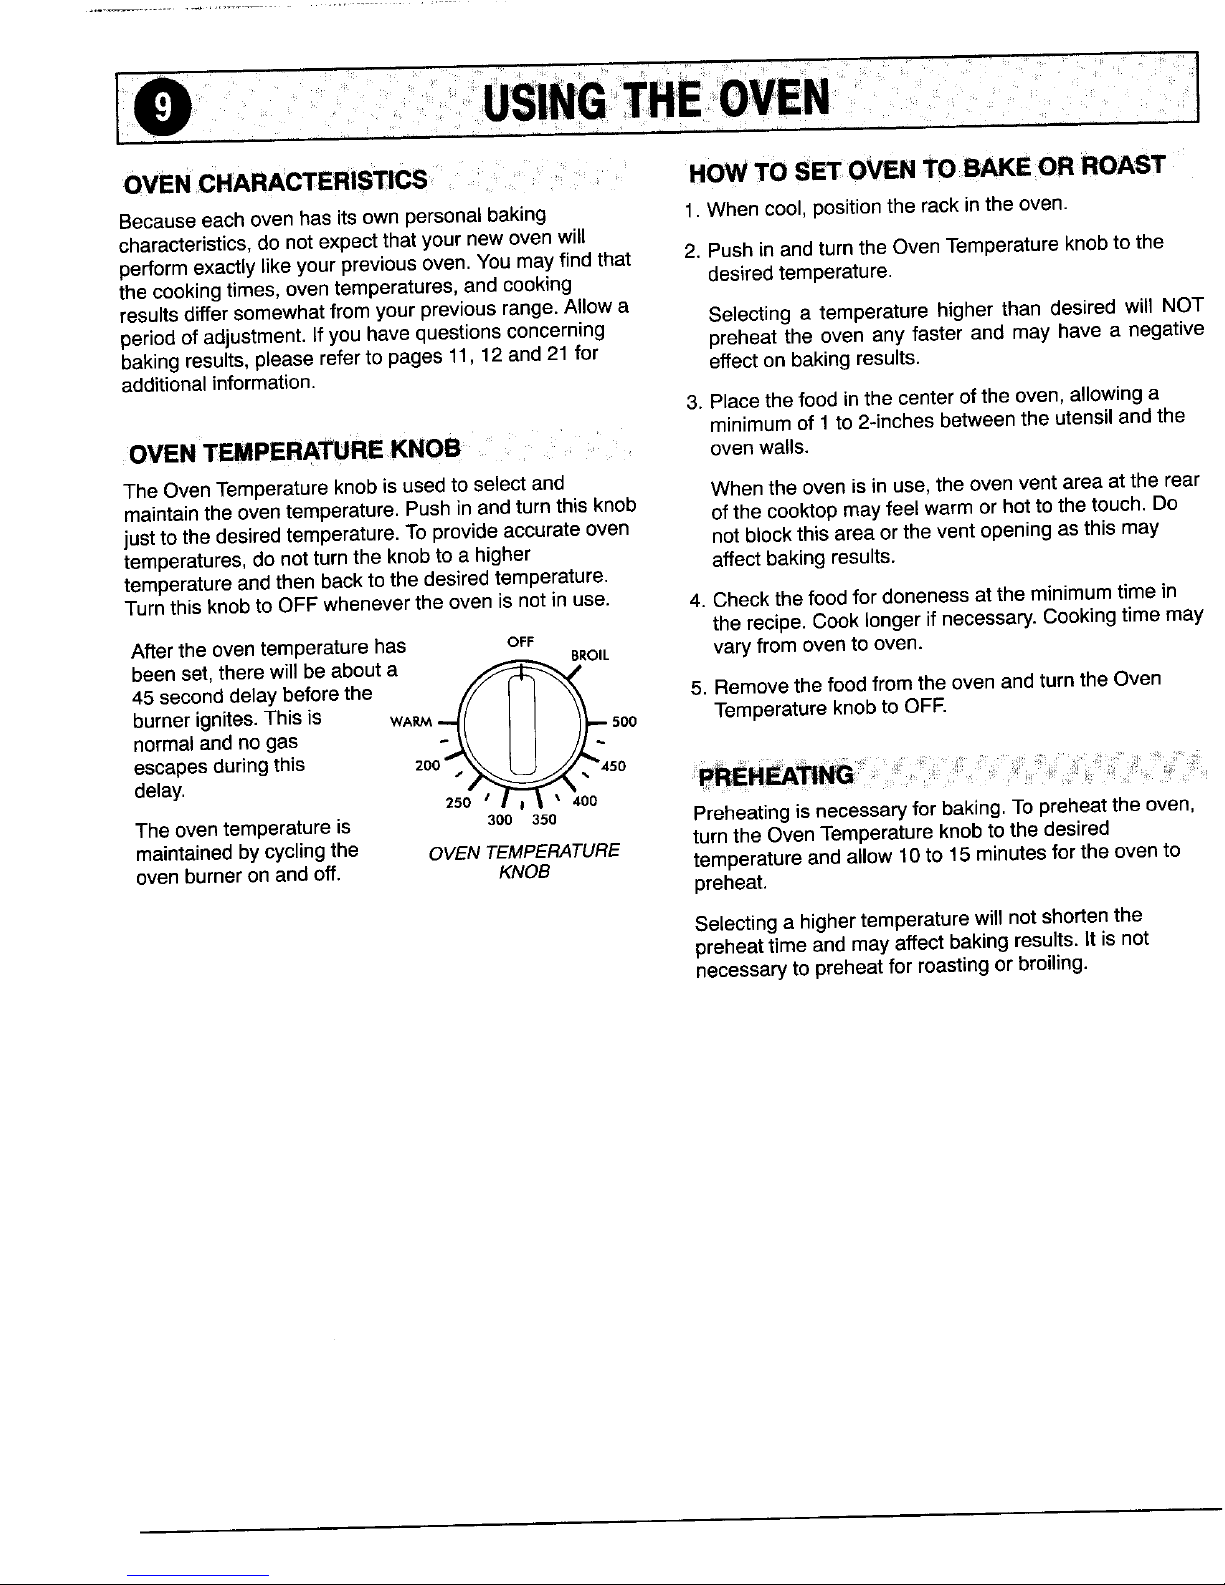
OVEN TEMPERATUREKNOB , ovenwalls.
TheOven Temperatureknobis usedto select and Whenthe oven is in use,the ovenventarea at the rear
maintainthe oventemperature.Pushin andturnthis knob ofthe cooktopmay feel warm or hot to the touch. Do
justto the desiredtemperature.To provideaccurateoven not blockthis areaortheventopeningas this may
temperatures,do not turntheknobto a higher affectbakingresults.
temperatureandthen back tothe desiredtemperature.
Turnthis knob toOFF wheneverthe oven is not in use. 4. Checkthefood for doneness atthe minimumtime in
the recipe.Cook longerifnecessary.Cookingtime may
Aftertheoventemperaturehas OFF
B_O_L varyfrom ovento oven.
beenset, there will be about a _
45seconddelay beforethe _._/ ' I "_,.._" 5. Removethe foodfromthe ovenand turn the Oven
burnerignites.This is WARM S00 Temperatureknob to OFF.
normaland no gas
escapesduringthis 200,\\ _ 4so
delay.
250 I | _ 400
Theoventemperatureis 30o 35o Preheatingisnecessaryforbaking,Topreheattheoven,
turntheOvenTemperatureknobtothe desired
maintainedbycyclingthe OVENTEMPERATURE
oven burneronand off. KNOB temperatureandallow 10to 15 minutesfor the oven to
preheat.
Selectinga highertemperaturewill not shortenthe
preheattimeand may affectbakingresults. Itis not
necessaryto preheatfor roastingor broiling.
Page 11
!i¸ i ili!! ......ii ' ..............................
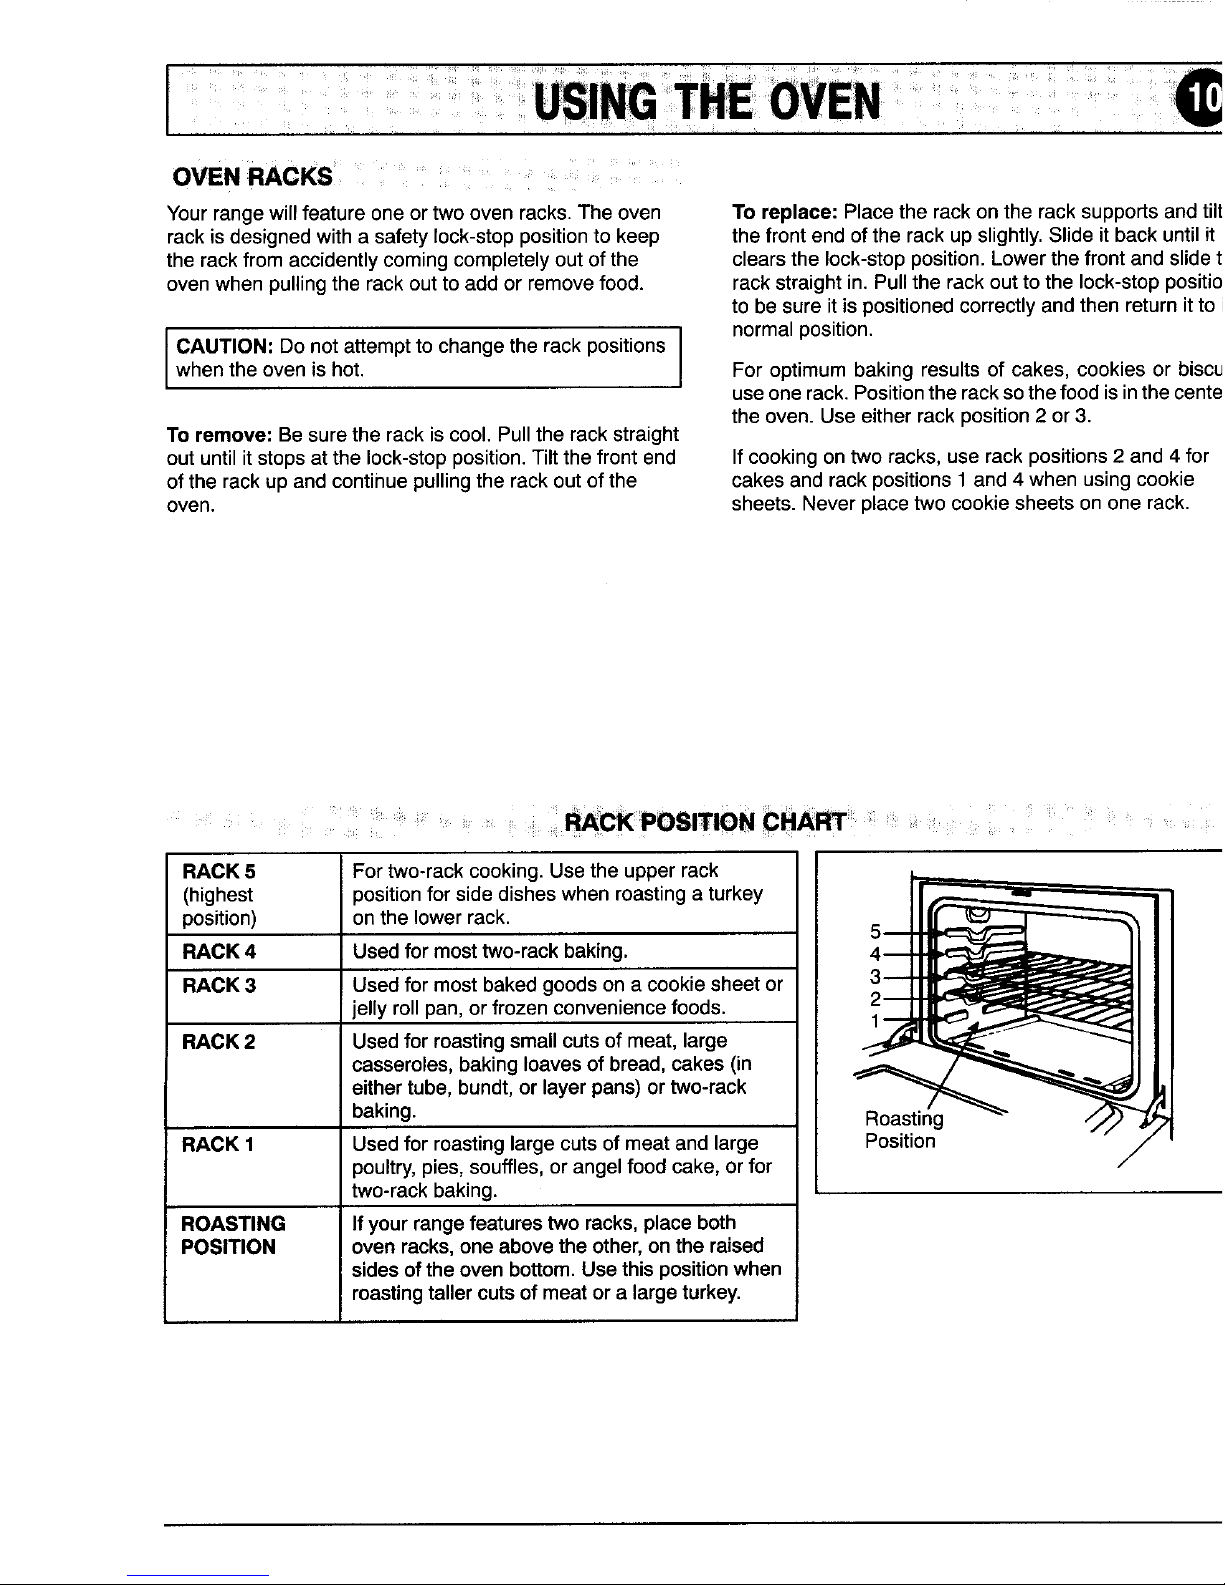
OVENRACKS
Yourrangewill featureoneortwoovenracks.Theoven To replace:Placetherackonthe racksupportsandtilt
rackisdesignedwitha safetylock-stoppositionto keep thefrontendoftherackupslightly.Slideitbackuntilit
therackfromaccidentlycomingcompletelyoutofthe clearsthelock-stopposition.Lowerthefrontandslidet
ovenwhenpullingtherackouttoaddor removefood. rackstraightin.Pulltherackouttothelock-stoppositio
tobesureit ispositionedcorrectlyandthenreturnittoi
CAUTION:DonotattempttochangetherackpositionsI normalposition.
whentheovenis hot. I Foroptimumbakingresultsof cakes,cookiesorbiscu
useonerack.Positiontheracksothefoodisinthecente
theoven.Useeitherrackposition2 or3.
Toremove:Besurethe rackiscool.Pulltherackstraight
outuntilitstopsat thelock-stopposition.Tiltthefrontend Ifcookingontworacks,userackpositions2 and4 for
oftherackupandcontinuepullingthe rackoutof the cakesandrackpositions1 and4whenusingcookie
oven. sheets.Neverplacetwo cookiesheetsononerack.
POSmONeXAm
RACK5 Fortwo-rackcooking.Usethe upperrack
(highest positionfor side disheswhen roastingaturkey
position) on the lower rack. 5
RACK4 Usedfor mosttwo-rackbaking.
RACK3 Usedformostbakedgoodsonacookiesheetor
jellyrollpan,orfrozenconveniencefoods.
RACK2 Usedforroastingsmallcutsofmeat,large
casseroles,bakingloavesof bread,cakes(in
eithertube,bundt,orlayerpans)ortwo-rack
baking. Roasting -'- //,P7) _'_
RACK 1 Usedfor roastinglargecutsof meatand large Position - j i
poultry,pies,souffles,or angelfood cake, or for
/
two-rack baking.
ROASTING Ifyourrangefeaturestwo racks,placeboth
POSITION ovenracks,oneabovetheother,onthe raised
sidesoftheovenbottom.Usethispositionwhen
roastingtallercutsofmeatora largeturkey.
Page 12
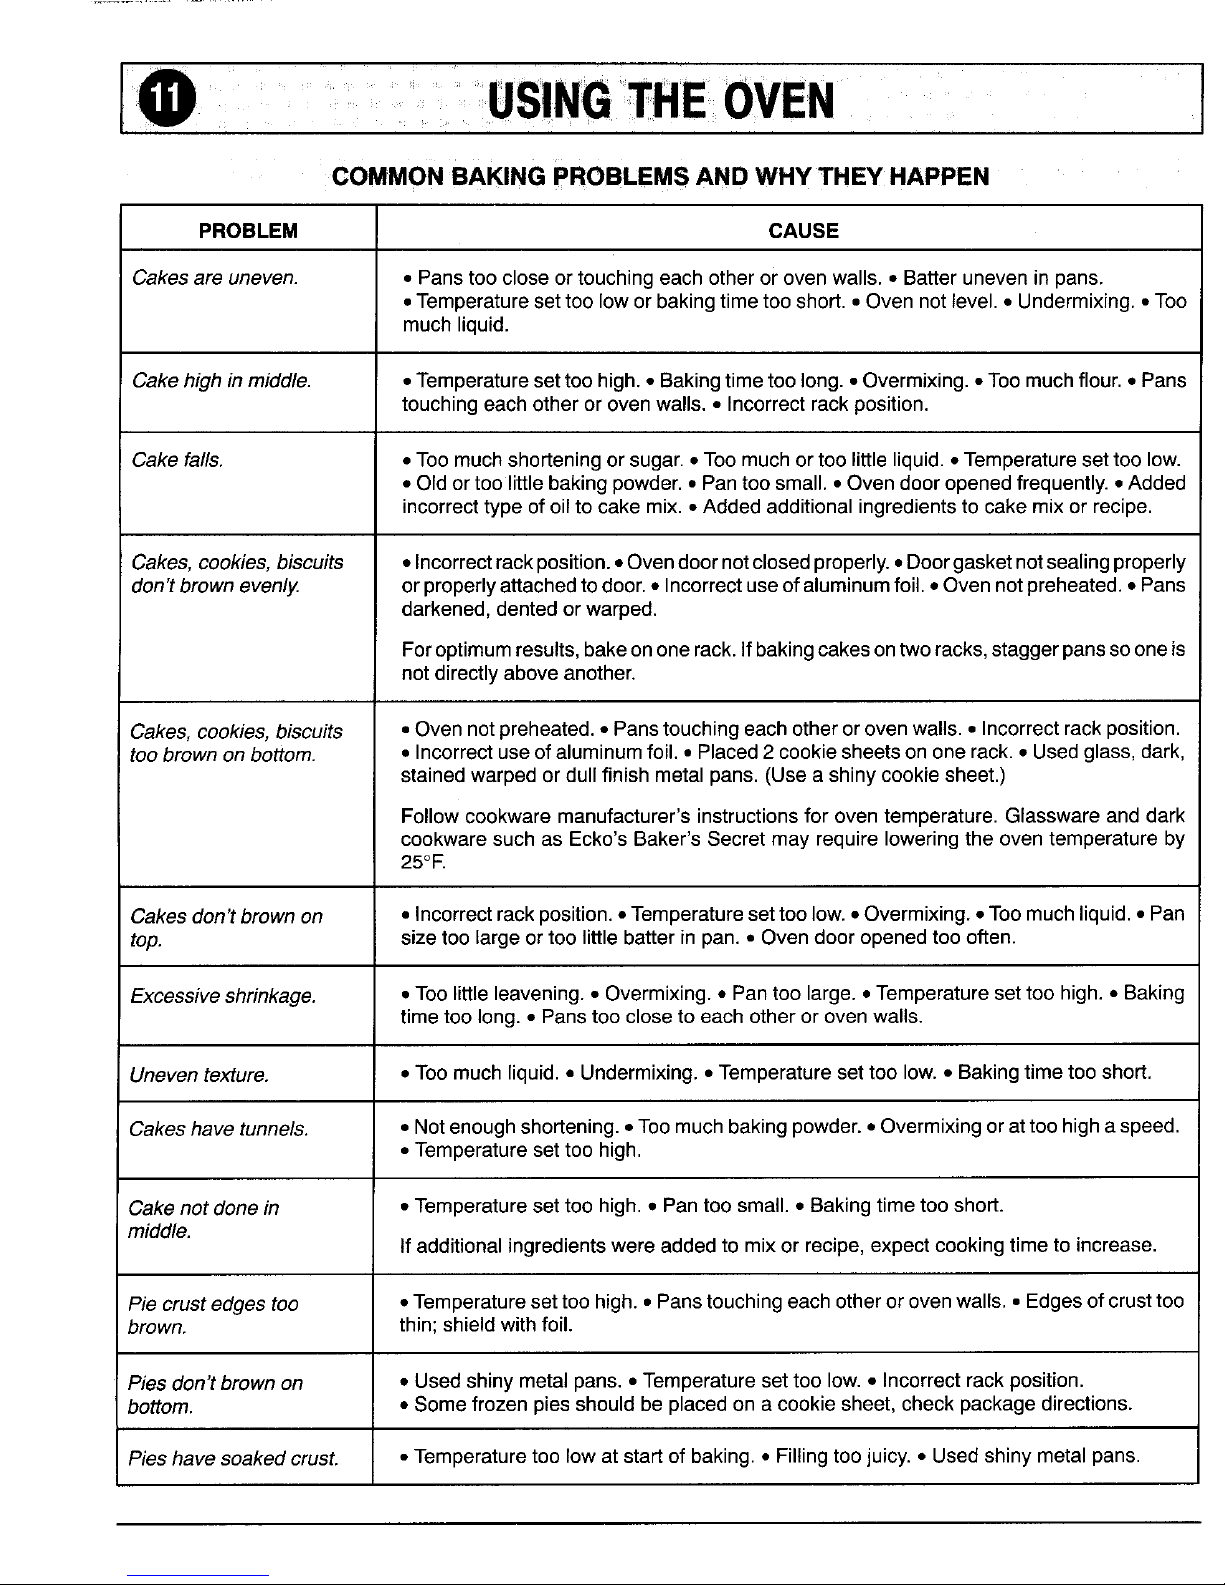
COMMONBAKING PROBLEMSAND WHYTHEY HAPPEN
PROBLEM CAUSE
Cakesare uneven. • Panstoo closeor touchingeach other or ovenwalls.• Batteruneveninpans.
• Temperaturesettoo low or bakingtimetooshort.• Ovennot level.• Undermixing.• Too
muchliquid.
Cakehigh in middle. • Temperaturesettoo high.• Bakingtimetoolong. • Overmixing.• Too muchflour.* Pans
touching eachother or oven walls. • Incorrectrackposition.
Cakefalls. • Toomuchshorteningor sugar.• Too muchortoolittleliquid.• Temperaturesettoo low.
• Oldortoo little bakingpowder.• Pantoo small. • Ovendooropenedfrequently.• Added
incorrecttype of oil to cakemix.• Addedadditionalingredientsto cake mixor recipe.
Cakes,cookies,biscuits =Incorrectrackposition.=Ovendoornotclosed properly.=Doorgasketnotsealingproperly
don'tbrown evenly, or properlyattachedtodoor.• Incorrectuseof aluminumfoil. • Ovennotpreheated.• Pans
darkened,dentedor warped.
Foroptimumresults,bakeon onerack.Ifbakingcakesontworacks,staggerpanssooneis
notdirectlyaboveanother.
Cakes,cookies,biscuits • Oven notpreheated.• Panstouchingeachotherorovenwalls.• Incorrectrackposition.
toobrownon bottom. • Incorrectuseofaluminumfoil. • Placed2 cookiesheetsononerack.• Used glass,dark,
stainedwarpedordullfinishmetal pans.(Usea shinycookiesheet.)
Followcookwaremanufacturer's instructionsfor oventemperature. Glasswareand dark
cookwaresuchas Ecko's Baker's Secret may require loweringthe oven temperature by
25OF.
Cakesdon't brown on • Incorrectrackposition.•Temperaturesettoolow.• Overmixing.• Toomuchliquid.• Pan
top. sizetoo large or too little batter in pan.• Ovendooropenedtoo often.
Excessiveshrinkage. • Too little leavening.• Overmixing.• Pantoo large. • Temperaturesettoo high.• Baking
timetoo long.° Panstoocloseto each otheror ovenwalls.
Uneventexture. • Toomuchliquid.• Undermixing.• Temperaturesettoo low.• Bakingtime too short.
Cakeshave tunnels. • Notenoughshortening.• Toomuchbakingpowder.• Overmixingorat too high aspeed.
• Temperatureset too high.
Cakenot donein • Temperaturesettoo high. • Pantoo small.• Bakingtimetooshort.
middle.
tfadditionalingredientswere addedto mix or recipe,expectcooking time to increase.
Pie crustedges too • Temperaturesettoohigh. • Panstouchingeachotherorovenwalls.° Edgesof crusttoo
brown, thin; shield withfoil.
Piesdon't brownon • Used shiny metalpans.• Temperatureset too low. • Incorrectrackposition.
bottom. • Somefrozen piesshouldbe placedon a cookie sheet,check packagedirections.
Pieshave soaked crust. ° Temperaturetoo low at start of baking.• Fillingtoo juicy. • Usedshinymetal pans.
Page 13
BAKINGTIPS ROASTINGTIPS
Use a reliable recipe andaccuratelymeasurefresh Roastingisthemethodforcookinglarge,tendercutsof
ingredients.Carefullyfollowdirectionsforoven meatuncovered,withoutaddingmoisture.Mostmeatsar
temperatureand cookingtime.Preheatovenif roastedat325°F.It isnot necessaryto preheatthe oven.
recommended. Placethe roastingpan on either ofthetwo lowest rack
positionsor on the specialroastingposition (see page8).
Usethe correct rack position. Bakingresultsmay be
affectedif the wrong rack positionis used. Usetender cuts of meatweighingthree poundsor more.
Top browning may be darker if food is located Somegood choicesare: Beefrib, ribeye, top round,high
qualitytip and rump roast, porkloin roast, legof lamb,
towardthetopofthe oven. veal shoulderroastand curedor smoked hams.
Bottom browningmay be darker if food is located
towardthebottomof the oven. Seasonmeat,ifdesired, eitherbeforeor afterroasting.
When usingtwo racksfor baking, allow enough Rub intothesurfaceofthe roastifaddedbeforecooking.
space betweenthe racksfor properair circulation. Placethe meatfat-side-upon a rack in a shallowroastin(
Browningand cookingresultswill be affected if air pan.Placingthe meatona rack holds it out ofthe
flow is blocked, drippings,thusallowing betterheat circulationfor even
Cookwarematerialplays animportantpart in baking cooking.As thefat ontopof the roast melts,themeatis
results.Alwaysusethetypeandsize of pancalledfor in bastednaturally,eliminatingthe needfor additional
the recipe.Cookingtimes or cookingresultsmay be basting.
affectedif the wrongsizeis used.
Shiny metal panreflectsheatawayfrom the food, The cookingtime isdeterminedbytheweightof the mea
produceslighterbrowninganda softer crust. Use andthe desired doneness.Formoreaccurateresults, us,
shinypansforbakingcakes or cookies. For optimum a meatthermometer.Insert it sothe tipis inthe center of
bakingresults,bake cookiesand biscuitsona flat the thickest part ofthe meat.Itshould nottouch fat or
cookiesheet.If the pan has sides,suchas ajelly roll bone.
pan,browningmaynotbe even. Removethe roastfrom the ovenwhen the thermometer
Darkmetal panor a panwith ananodized(dull) registersthedesired doneness.
bottomabsorbsheat,producesdarkerbrowningand
a crispercrust.Usethistype ofpanfor pies,pie NOTE:Formoreinformationaboutfoodsafety,call
crustsor bread. USDA'sMeat& PoultryHotlineat1-800-535-4555.For
Ifusingoven-proofglassware,ordark panssuch cookinginformationwritetothe NationalLiveStockand
asBaker's Secretreducetheoventemperatureby MeatBoard,444 NorthMichiganAvenue,Chicago,
25°Fexceptwhenbakingpiesorbread.Usethe Illinois60611.
samebakingtimeas calledfor inthe recipe.
Allow hotair to flow freely throughthe ovenfor
optimumbakingresults.Improperplacementof pans in
theovenwill blockairflowand may result in uneven
browning.For optimum browningandeven cooking
results:
Do not crowda rackwithpans. Neverplace more
thanone cookiesheet, one 13x9x2-inchcakepan or
two9-inch roundcakepans onone rack.
Staggerpanswhen bakingon two racks so onepan
is notdirectly overanother pan.
Allowoneto two inchesbetweenthe panandthe
ovenwalls.
Checkthecookingprogressat the minimumtime
recommendedin the recipe. If necessary,continue
checkingat intervals untilthe food isdone. Ifthe oven
doorisopened too frequently,heatwill escapefrom the
oven;this canaffectbakingresults and wastes energy.
If you addadditional ingredientsor altertherecipe,
expectcookingtimesto increaseordecreaseslightly.
Page 14

How To Set Oven To Broil:
1. Place the broiler rack with
Broilingis a method of cooking tender meats bydirect the broiler pan inthe
radiant heat. The cooking time is determined by the recommended position
distance between the meat and the oven burner, the shown in the broiling chart
desired degree of doneness and the thickness of the below.
meat. _ _._-_-- J__
Lower Broiler Compartment:
Broilingrequiresthe use ofthe broilerpan and insert.The Ifthe bottom positionis
broilerinsert must be in place to allow fat and liquidto selected, use mittsand
drain to the pan below to prevent spatters, smoke and carefully remove the _ _v//
flare-ups. Improper use may cause grease fires, broiler pan.
For easier clean up, line the broiler pan with foil and spray 2. Push in and turn the Oven Temperature knob to
the insert with a non-stick vegetable spray. Do not cover BROIL.
the broiler insert with aluminum foil as this prevents fat
from draining into pan below. It is possible to broil longer cooking foods such as
chicken at a lower temperature to prevent
Trim excess fat and slash remaining fat to help keep meat overbrowning and reduce splattering. Turn the knob
from curling and to reduce smoking and spattering, to 400° or 450°F, rather than BROIL, for low
Season meat after cooking, temperature broiling.
3. Follow the suggested times in the broiling chart. Meat
Place the broiler rack in the correct rack position when the
should be turned once about halfway through
broiling compartment is cool. For darker browning, place
meat closer to the oven burner. Place meat further down if cooking.
you wish meat to bewell done or if excessive smoking or 4. Check the doneness by cutting a slit in the meat near
flaring occurs, the center to check the color.
See Care and Cleaning Chart on page 18 for instructions 5. After broiling, turn the oven off and remove the broiler
on cleaning the broiler pan and insert, pan.
BROIL CHART
TYPE OF FOOD DONENESS LOWERBROILERCOMPARTMENT WAISTLEVELBROILING
RACK TOTALTIME RACK TOTALTIME
BACON Well Done Bottom LOBROIL #4 BROIL
7 to10 minutes 6 to10 minutes
BEEFSTEAKS
1-inchthick Medium Middle BROIL #4 BROIL
14to20 minutes 15to 20 minutes
WellDone Middle BROIL #4 BROIL
16to25minutes 20 to25 minutes
CHICKEN
Pieces Well Done Bottom LOBROIL #3 or#4 LO BROIL
30 to45 minutes 30 to45 minutes
FISH
Fillets Flaky Middle BROIL #4 BROIL
8 to 12 minutes 8 to 12 minutes
Steaks, 1-inchthick Flaky Middle BROIL #4 BROIL
10to 15 minutes 12to 15 minutes
GROUNDBEEFPATTIES
3/4-inchthick Well Done Middle BROIL #4 BROIL
14to 18 minutes 15to 20 minutes
PORKCHOPS
1-inchthick Well Done Middle BROIL #4 BROIL
18to 25 minutes 20to 30 minutes
Page 15

W
....... _ _ .... _ ...... _'", .... !__ _.......... _'_i__i_,i'ii? _!_ :i .......__.... i_ i, _ i • i
_KTOP .... BURNER_ATES
i J
Topreventstainingordiscoloration,cleancooktopafter Burnergratesmustbe properly
eachuse.Wipeacid orsugarstainsas soonasthe positionedbeforecooking.Burnergrates
cooktophascooledasthesestainsmaydiscoloror etch aredurablebutmaygraduallylosetheir
theporcelain, shineduetousageandhigh
Freestandingrangeswithconventionalgasburnerswill temperatures.
featurea lift-upcooktop. When installingsquare grates,place
Thecooktopdoes NOT lift-upon these models: indentedsides together sostraight sides
• Freestandingrangewith sealedburner, are atthefront and rear.Improper
installationof the grates may resultin
• Slide-in rangewith eitherconventionalorsealed damage or chippingofthe cooktop,
burners.
Toraisethe "lift-up" cooktop:Whencool,grasp the CAUTION:Donot operatea surfaceburnerwithouta
frontedgeofthecooktopandgentlyliftupuntilthetwo panonthegrate.Theporcelainfinishonthe gratemay
supportrods,if equipped,atthefrontofthe cooktopsnap chipwithouta pantoabsorbtheintenseheatfromthe
intoplace, burnerflame.
Tolowerthe top: Holdthe frontedge ofthe cooktopand
carefullypushbackoneachsupportrod,ifequipped,to
releasethenotchedsupport.Thengentlylowerthetop
intoplace.Thesupportrodswillslideintothecooktop
frame.
Page 16

if equipped The porcelainon the burner isdurable but may gradually
Underno circumstancesare the surface burner lose its shine dueto usageand high temperatures.
assembliesto be taken apartforcleaning.The surface
burnerassemblycan be removedto clean the burner box The sealed surfaceburners aresecuredto the cooktop
area. and are NOTdesignedto beremovedby the consumer.
FreestandingRangeOnly: SelectmodelsfeaturetwospecialSUPER HIGHSPEED
Thetwosurfaceburnerassembliesaresecuredinplace sealedburnerslocatedat the right-frontandleft-rear.Use
duringtransportationwithscrews.Oncetherangeis theseburnerstoquicklybringwatertoa boilandwhen
installed,thesescrewsmaybe removedto allowquick usinglargerpans.Seeinformationonratingplate,located
andeasyremovalofthe burnerassemblies, onthelowerrangefrontframebehindthebroilerdooror
lowerpanel,todetermineifyourappliancefeaturesthese
__ burners.-_C_
Cleanburnercap after eachuseespeciallyif a spillover
s_ -_ occurs.A soiledburnermayresultinimproperignitionor
• an unevenflame.Whencleaningthe sealedsurface
burner,use careto preventdamageto the ignitor.If a
__ cleaningclothshouldcatchtheignitor,itcouldbe
I__ damagedor broken.
Lip
Toremove:Allowthe burnerassemblytocool. Liftup __ Ignitor
cooktop.Grasptheburner assemblyandrotateit slightly
towardthe leftto releasethe two tabson the assembly.... Portdirectlybelowignitor
Then lifttheassemblyandpulltowardthe backof the
cooktopuntilthe airshutterends on the assembly release
fromthevalves.
Thesurface burnerwill not lightifthe ignitorisdamaged,
Toreplaoe: Inserttheair shutterendsonthe burner broken,soiledorwet.The burnerwill alsonot light ifthe
assemblyoverthe valvesand lowertheassemblyinto ports,especiallythesmallportlocateddirectlybelowthe
place.Be suretosecurethetwotabsontheburner ignitor,areblocked.See page20for cleaninginstructions
assemblyintothe twoslotsonthe burnersupportbracket
whichismountedtotheburnerboxbottom.(NOTE:If the NOTE:Whenonesurfaceburneristurnedto theLITE
tabsarenotproperlyinsertedintothe slots,theassembly position,allfourignitorswillspark.Oncetheburnerlights
mayrockandtheburnersmaynotlightproperly.) turntheknobtothe desiredflamesize.
Page 17

__!i___'_¸'! :i¸'i_i ii ii_: __
OVEN_R : : :
Proportionalvalveshave anadjustingscrewlocated Do not place excessiveweightonan open oven dooror
insidethevalvestem.Valvesthat do not havethis screw standon an open oven door as, in somecases, it could
can not beadjusted, causethe rangeto tipover,break the door or cause
seriousinjuryto the user.
The LO settingshould producea stableflamewhen
turningthe knobfrom HI to LO. On conventional surface When openingtheovendoor,allowsteamandhot air to
burners,the flameshould be 1/8-inchtall orlower and escape beforereachinginto the ovento check,add or
must bestableon all portson LO setting.Forsealed removefood.
surfaceburners,the flameshould extendto the outer Do not attemptto open or closethe door untilthedoori.,
edgeof the lip on the burnercap onthe LOsetting, completelyseatedonthe hingearms.Neverturn on the
oven unlessthe door is properlyinplace. Whenbaking,
To adjust:Operate burneron HIfor about 5 minutesto
becertainthe door iscompletelyclosed. Bakingresults
preheattheburnercap.Turnthe knobback to LO; remove
will be affectedif the door is not securelyclosed.
knob,and insert a smallscrewdriverintothe center of the
valvestem.Adjusttheflame size byturningthe CAUTION:Hinge armsare spring mountedand will
adjustmentscrewineitherdirection, slamshut against the range if accidentlyhit. Never
place handor fingers betweenthe hinges andthe
front oven frame. Youcould be injured ifhinge snap_
back.
Toremove lift-offdoor:Whenthe door is cool,openth
doortothe"stop"position(openedabout6 inches)and
graspthedoorateachside.Donotusethe doorhandle
toliftthedoor.Liftupevenlyuntilthedoorclearsthe
hingearms.
Theflame must be of sufficientsize to be stable on all I__
burnerports.If the flameadjustmentis needed,adjust
ONLYonthe LO setting.Neveradjustflamesize on a
highersetting.
O_ _INDOW, if_i ....
Toprotectthe oven doorwindow:
To replacedoor: Graspthe doorateachside,alignthe
1. Do not use abrasivecleaningagentssuch assteel slotsin the doorwith the hingearmsand slidethe door
wool scouringpadsor powderedcleansersas they down ontothe hingearms until it iscompletelyseatedor
mayscratchthe glass, the hinges.
2. Do not hit the glasswith pots,pans,furniture,toys, or
otherobjects. O_N LIGHT,if_Ui_ ed
Beforereplacingthelightbulb,DISCONNECTPOWER
3. Donotclosetheovendooruntiltheovenracksare in TO THE RANGE.Besurethebulbis cool.Donottouch
place, hotbulbwitha dampclothas the bulbmay break.
Scratching,hitting,jarringorstressingthe glassmay Toturn on oven light: Push_ f_
weakenits structurecausingan increasedrisk of in the rocker switch located / ,"
breakageata later date. onthebackguardor on the _ IIFi'LJ....
manifoldpanel.
To replace oven light: Besurethe bulb is cool. Usea
drypotholder,to preventpossibleharmto hands,and
verycarefullyunscrew bulb.
Replacewitha 40 watt appliance bulband reconnect
powerto the range. Resetthe clock.
Page 18

• !
LOWER _NEL, if_uOVEN BOTTOM i
! i i _ , i
Protectthe ovenbottomagainstexcessivespillovers, Rangesthat do notfeaturea lowerbroilingcompartment
especiallyacid or sugaryspillovers,as they may discolor will have a panel in placeof the broiler door.This panel
the porcelain.Usethecorrectsize cookingutensilto avoid must be removedto accessthe ratingplate locatedonthe
boilovers.Neverplace utensilsor aluminumfoil directlyon lowerrangefrontframe.The rating plate containsthe
theoven bottom, model and serial numbersfor your appliance.
Toremove panel:Grasp the bottomcorners ofthe panel.
'1'_ Then liftthe panelupand awayfrom the range.
To replace panel: Align the four slots on the panelwith
. the four screwsonthe rangefront frame.Then lowerthe
_ 2 panel and pushdownuntilthe panelsnaps intoplace.
....... ....
_.. Somefloors are not level. For _
properbaking,your range
mustbe level.Levelinglegs
To remove: Whencool,removethe oven racks.Slidethe are locatedon eachcornerat
two catches,locatedat each rearcornerof the oven the baseof the range. Levelby
bottom,towardthe frontoftheoven. Liftthe rearedgeof turning the legs. )_)
the ovenbottomslightly.Then slide it backuntilthe front
edgeof the oven bottomclearsthe ovenfront frame.
Removetheoven bottomfrom the oven. To prevent rangefrom accidentlytipping, rangeshould be
securedto the floor by slidinga rearleveling leg intothe
Toreplace: Fitthe front edge of the oven bottominto the anti-tipbracketsuppliedwiththe range.
frontframe. Lowerthe rearof the oven bottomandslide
thetwo catchesbackto lockthe ovenbottomintoplace. ELECTR_ CONNECTION :
, Applianceswhich requireelectrical powerare
STORAGEDRAWER equipped with athree-prong groundingplugwhich
Thestorage drawerat the bottomof the rangeis safe and must bepluggeddirectly into a properly grounded
convenientfor storing metalandglass cookware.DO three-hole120volt electricaloutlet.
NOTstoreplastic, paperware,food or flammable material
inthis drawer.Removedrawerto clean under range. I_
Always disconnectpowerto appliancebefore servicing.
Toremove: Pull drawerout tothe firststopposition.Lift The three-pronggrounding plug offersprotectionagainst
upfrontof drawerandpull tothe secondstop position, shockhazards.DO NOT CUTOR REMOVETHE THIRD
Graspsides and lift up and out. GROUNDINGPRONGFROMTHE POWERCORD
PLUG.
Toreplace: Fittherollerslocatedat theendsofthe
drawerglides intothe railsontherange.Liftupdrawer Ifan ungrounded,two-holeorothertypeelectricaloutletis
frontand gently pushin to first stop position.Liftup encountered,it is the personalresponsibility of the
draweragainandcontinueto slide drawerto the closed appliance owner to have the outlet replaced with a
position, properly groundedthree-hole electricaloutlet.
Page 19

iii•iii iiii!i i__i_i!_z'_' '__,_.....
, , _" _ " _'_ ,_, _ ,, i" _! !!il i:_ _!_, _, , _ i! _i, _ "il :i'! ;i ,'_ _ _,,
ABO_ CLEAN_G PRODUCTS ....
Readandcarefullyfollowthemanufacturer'sinstructions. Abrasive ScouringPads- S.O.S., BrilloSteelWool
Testasmallinconspicuousareausingavery light Soap,Scotch-BritePads.
pressureto see if the surface may scratchor discolor. (Brandnamesfortheabovecleaningproductsareregistered
Thisis particularlyimportantfor porcelainenamel,highly trademarksoftherespectivemanufacturers.)
polishedorshiny metalorplasticsurfaces,andpainted
surfaces.
Glass Cleaners - BonAmi,Cinch,GlassPlus,Windex.
DishwashingLiquidDetergents- Dawn,Dove,Ivory,
Joy.
MildLiquidSprayCleaners- Fantastik,Formula409. • Besureapplianceisoffandallpartsarecool
Non-AbrasiveCleaners- DonAmi,pasteof baking beforehandlingorcleaning.This isto avoid
sodaandwater, damageandpossibleburns.
MildlyAbrasive Powder or LiquidAll Purpose • Ifa part is removed,be sureitiscorrectly
Cleansers- Ajax,BarkeepersFriend,Cameo,Comet, replaced.
SoftScrub, ElcoCleaner Conditioner. • Toprevent stainingor discoloration,clean
Non-Abrasiveor ScratchlessPlasticor Nylon applianceafter each use.
ScouringPadsor Sponges - ChoreBeyPlastic
CleaningPuff,ScrungeScrubSponges,or Scotch-Brite
NoScratch,CookwareorKitchenSponge.
CAREANb CLEA_NG CHART
PARTS CLEANINGAGENTS DIRECTIONS
Bakedenamel • Soapandwater Use a drytowelorclothtowipeup spills,especiallyacid(milk,
or painted • Mildliquidcleaner lemonjuice,fruit,mustard,tomatosauce)orsugaryspills.Surface
• Backguard • Glasscleaner maydiscolorordullifsoilis notimmediatelyremoved.Thisis
panels especiallyimportantforwhitesurfaces.
• Broilerdoor Whensurfaceiscool,washwithwarmsoapywater,rinseanddry.
• Ovendoor Forstubbornsoil,usenon-abrasivecleaningagentssuchasbakin(
• Rangefront sodapasteorBonAmi. Ifdesired,athincoatof mildappliancewa>
framebehind can beusedto protectthe sidepanels.Aglasscleanercan be
broilerdoor usedtoadd"shine"tothe surface.
• Sidepanels NOTE:Donotuseabrasive,causticorharshcleaningagentssuch
assteelwoolpadsorovencleaners.Theseproductswillscratchor
permanentlydamagethesurface.
NOTE:Neverwipea warmorhotsurfacewitha dampclothasthis
maydamagethesurfaceandmaycausea steamburn.
Broilerpanand • Soapandwater Removefrombroilingcompartmentafteruse.Coolthenpouroff
insert • Plasticscouringpad grease.Placesoapyclothoverinsertandpan;letsoaktoloosen
• Soap-filledscouringpad soil.Washinwarmsoapywater.Usesoap-filledscouringpadto
• Dishwasher removestubbornsoil.Cleanindishwasherifdesired.
NOTE:Foreasiercleanup,sprayinsertwitha non-stickvegetable
coatingandlinebroilerpanwithaluminumfoil.
Burnerbox • Soapandwater Burnerbox,forfreestandingrangeswithconventionalburners,is
• Pasteofbakingsoda locatedunderlift-upcooktop.Cleanfrequentlyto removespillovers
andwater Ifsoilisnotremovedandisallowedtoaccumulate,it maydamage
• Non-abrasiveplasticpad the finish.To cleanremovegratesandsurfaceburnersandclean
orsponge withsoapandwater,rinseanddry.NOTE: Cooktopdoesnotliftup
• Liquidcleaner onthesemodels:freestandingrangewithsealedburnercooktop
• Glasscleaner andslide-inranges.
Page 20

I
ICLEANINGINSTRUCTIONSI
TOCLEANCOOKTOP TOCLEANUNIBURNER
1.Cleancooktopwithcaution-ifawetsponge Whenburneriscool,remove,cleanwith soap
or cloth is used to wipe spills on a hot & water or place in dishwasherbefore
cookingarea, becarefulto avoidsteam returningtotherange,besureall holesand
burn.Somecleanerscanproducenoxious portsareopenandclearofbakedonfood.To
fumesif appliedto a hotsurface, openholesscrubwithsoap&waterandnylon
2. Tocleanareabelowcooktoplift cooktop brush. Dry thoroughly before returning
andwipecleanwithsoap&warmwater, uniburnerto yourrange.
TOCLEANWINDOWS
Whenoveniscool,usea mild,non-abrasive
glasscleaningagentondampcloth.
PORCELAINORSTANDARDOVEN
PORCELAIN DAILYMAINTENANCE
Canbechippedif misused-useammoniaora Warmsoapy water in a slightly warm oven
commercialcleaner.It issuggestedthat fruit (nothot)-willremovespillsimmediatelyafter
juices,vinegarand otheracidmixturesbe spillover(a finesteelwoolcanbeusedon
wipedupimmediately, stubbornareas).
SOILEDOVEN HEAVYBUILDUPORLARGESPILLOVERS
1.Place8oz.glassorenamelcontainerfullof 1. Followdirectionson can of commercial
householdammoniain ovenovernightor cleaner.
severalhourspriorto washing(this"will 2.Rinsethoroughlywithonetbsp.vinegarin
loosensoil), onecupofwater.
2.Washwithwarmsoapywater.
3.Scourstubbornareas. NOTE:Protectmetaltrimwithmaskingtape.
4. Rinsethroughlywithcleanwater. DONOTMIXCLEANINGAGENTS.
20
Page 21

I CLEANINGINSTRUCTIONSJ
CONTINUOUSCLEANOVEN
CONTINUOUSCLEAN SPECIALCLEANINGINSTRUCTIONS
A continuouscleanovenhasa veryspecial DONOTUSECOMMERCIALOVENCLEANERS
finish.Itwillbeslightlyroughtothetouchand ORABRASIVES.
if it were magnified,you wouldsee many
peaks and valleys. This polycrystalline FORLAR6ESPILLOVERS
surfaceallowsgrease,oil, andothersoilto 1.Startwhenoveniscool.
spreadoveritsmanyasurfacessothatmore 2. Removeall racksandcookingutensils.
ofthesoilwillbeexposedtotheair.Whileyou 3. Removespilloverbygentlypryingup- O0
cook,theheatofyourovenwillthenoxidize NOTSCRAPE- (lightly rub with plastic
or burnthesoiledareasawayslowly.The mesh).
soiledareaswill notdisappealimmediately. 4. Washwithdetergent.
This cleaningis a gradualor continuous 4. Rinsethoroughlywith smallamountsof
cleanwater.
process. 6.Blotdrywithspongeortowel.O0NOTWIPE.
IFSOILISHEAVY,youmayfinditnecessaryto
operatethe oven emptyat approximately
400°Fapproximately1hoursothespotswill
lighten(somesmokingmayappear).
21
Page 22

_"__.............•• __,__.....__0__.......___'_........._9__•................._............._"__'__....•_....."iiii!¸!!!_iii•I ...._'
i_¸ i_ _ _ _ • _ • _ •
PROBLEM CAUSE CORRECTION
Surfaceburnerfailsto light, a. powersupplynotconnected, a. connectpower,checkcircuit
breakerorfusebox.
b.cloggedburnerport(s), b. cleanportswithstraightpinor
smallpaperclip.See page20for
cleaninginstructions.
c. surfacecontrolnotcompletely c. turncontroltotheLITEposition
turnedto untiltheburnerignites,thenturn
the LITEpositionorturnedtoo controlto desiredflamesize.
quickly
fromthe LITEposition.
d. powerfailure(pilotlessignition), d. see page6to lightburnerduringa
powerfailure.
e. onsealedburnermodels:Burner e. cleananddryburnerhead.If
willnotlightiftheignitoris brokenordamaged,calla
damaged,soiled,wetorifthe port serviceman.
directlybelowtheignitoris
blocked.
f. burnerassemblyincorrectly f. seepage15.
installed.
Burnerflameis uneven, a. cloggedburnerport(s), a. cleanportswithstraightpin.
Surface burnerflame lifts off a. air/gasmixturenotproper, a. callservicemantoadjustburner.
port or is yellow in color, b. nopaninplace, b. alwaysplacepanongratebefore
lightingburner.
NOTE: Liftingof flame is normalfor NOTE:Besureinstallerproperly
sealedburners.Someyellowtipping adjustedrangeattimeofinstallation.
withLPgasisnormalandacceptable.
Surface burnerIgnitor a. controlknobisinthe LITEposition, a. besureALLsurfaceburnercontrol
producingclicking sound. NOTE:Thelifeofthe ignitionsys- knobsareintheOFFpositionor
ternmaybe shortenedifthe knob areadjustedto the desiredflame
isleftintheLITEposition, setting.
b. surfacecontrolswitchis moistasa b. allowswitchtodrythenrelight
resultofcleaningthe range, burner.
c. malfunctioningswitch, c. callservicemanto check.
Oven burnerfails to light, a. powersupplynotconnected, a. connectpower,checkcircuit
breakerorfusebox.
b. powerfailure, b. ovenwillnotoperateduringa pow-
erfailure.
c. ovenincorrectlyset. c. See page9.
Poppingsound heard when This isa normalsoundthatoccurswithsometypesof gaswhena hotburneris
burnerextinguishes, turnedoff.The poppingsoundisnota safetyhazardandwillnotdamagethe
appliance.
Clockand/or ovenlight does not a. powersupplynotconnected, a. connectpowersupply,check
work. circuitbreakerorfusebox.
b. bulbmaybelooseorburnedout. b. tightenorreplacelightbulb.
c. malfunctioningswitch,starteror c. callservicemanto check.
ballast, d. callservicemanto check.
d. malfunctioningclockorloose
wiring.
(Continuednextpage
Page 23

t_ _i_¸_¸tii_ _
PROBLEM CAUSE CORRECTION
Moisturecondensationonoven a. itis normalforthewindowtofog a. leavedoorajarforoneortwo
window,if equipped,when oven duringthefirstfewminutesthe minutestoallowmoistureto
is in use. ovenis on. escape.
b.clothsaturatedwithwaterisused b.useadampclothtocleanwindow
tocleanthe window, topreventexcesswaterfrom
seepingbetweenthe panelsof
glass.
Bakingresults are not a. ovennotpreheatedor setat a. preheatoven10to15 minutes.
satisfactory, correcttemperature.
• browningistoopale,toodark b. usedincorrectrackposition, b. see page10.
or isuneven, c. incorrectuseofaluminumfoil. c. see page8.
• foodcooksunevenly, d. ovenbottomincorrectlyreplaced, d. replaceovenbottomcorrectly.
• foodisunderdoneor e. oventhermostatsensingdeviceis e. reinstallthermostatsensing
overdone, outoftheholdingclip(s), device.
See ProblemChartonpage 11for
additionalinformation.
Ovensmokesexcessively a.foodtoocloseto burner, a. movebroilerpandownonerack
duringa broiloperation, position.
b. meathastoomuchfat. b.trimfat.
c. sauceappliedtooearlyor c. applysauceduringlastfew
marinadenotcompletelydrained, minutesof cooking.If meathas
beenmarinated,drainthoroughly
beforecooking.
d. soiledbroilerpan. d. alwayscleanbroilerpanandinser
after eachuse.
e. broiler insert coveredwith e. nevercover insertwith foil as this
aluminumfoil. preventsfat from drainingto pan
below.
f. broilingcompartmentbottom is f. clean broilingcompartment.
soiled.
Strongodoror lightsmoke Thisisnormalfora newrangeandwilldisappearafterafew uses.Openinga
when oven isturned onthe windoworturningona fanwillhelpremovethesmokeandodor.
first fewtimes.
Followtheseproceduresto removeapplianceforcleaning qualifiedservicershoulddisconnectandreconnectth
orservicing: gas supply.See the InstallationInstructionsfor gas le
test method.
1. Shut-offgas supplyto the appliance.
2. Disconnectelectricalsupplyto the appliance,if Topreventrangefromaccidentlytipping,range mustbe
equipped, securedto the floor bysliding rear levelingleg into an
3. Disconnectgassupplytubingto the appliance, anti-tipbracketsuppliedwiththe range.
4. Slide rangeforward to disengagerangefrom the
anti-tipbracket.See the InstallationInstructionsfor WARNING" Possiblerisksmay resultfrom abnormal
locationofthebracket, usage,includingexcessiveloading oftheoven door
and ofthe riskof tip over,shouldthe appliancenotbe
5. Reverseprocedureto reinstall.If gasline has been reinstalledaccordingto the installationinstructions.
disconnected,checkfor gasleaksafterreconnection.A
Page 24

COOKINGAPPLIANCEWARRANTY
FULL WARRANTY - PartsandLabor
Forone (1) year fromthe date oforiginalpurchasedate,anypartwhichfailsinnormalhomeusewillbe
repairedor replacedfreeof charge.
LIMITEDWARRANTY - Partsonly
Foranadditionalfour (4) years beyondthefirstyearofthefullwarrantyperiod- Partslistedbelowwillbe
repairedorreplacedfreeofchargeforthe partitself,withtheownerpayingall othercosts,includinglabor,
mileage,andtransportation.
Gas sealedsurfaceburnerwhichfailsinnormalhomeuse
CanadianResidents:Theabovewarrantiesonlycoveranapplianceinstalledin Canadathathasbeencertifiedor
listedbyappropriatetestagenciesforcompliancetoa NationalStandardofCanadaunlesstheappliancewas
broughtintoCanadaduetotransferofresidencefromthe UnitedStatestoCanada.
Thespecificwarrantiesexpressedabovearetheonlywarrantiesprovidedbythemanufacturer.Thesewarrantiesgiveyouspecificlegalrights,and
youmayalsohaveotherrightswhichvaryfromstatetostate.
WHATIS NOTCOVEREDBYTHESE WARRANTIES: HOWTO RECEIVEWARRANTYSERVICE:
1. Conditionsanddamagesresultingfromanyofthe 1. Forauthorizedservice,contactthedealerfromwhom
following: youpurchasedtheappliance,or callMaytag
a. Improperinstallation,delivery,ormaintenance. AppliancesSalesCompanyat:1-800-688-1120.
b. Anyrepair,modification,alterationoradjustment 2. Ifyouare notabletosatisfactorilyresolvethe
notauthorizedbythemanufactureroran complaintwithlocalresponse,callorwriteto:
authorizedservicer. MaytagAppliancesSalesCompany
c. Misuse,abuse,accidentsor unreasonableuse. Attn: CAIRs" Center
d. Incorrectelectricalcurrent,voltageorsupply. P.O. Box2370
Cleveland,TN 37320-2370
e. Impropersettingofanycontrol. 1-800-688-1120
2. Warrantiesarevoidiftheoriginalserialnumbershave 3. Whenrequestingservice,thefollowinginformation
beenremoved,altered,orcannotbe readily willbeneeded:
determined,
a. Yourname,addressandtelephonenumber.
3. Lightbulbs, b. Modelandserialnumbers(foundonthe dataplate).
4. Productspurchasedforcommercialorindustrialuse. c. Nameandaddressofdealerorservicer.
5. Thecostof serviceorservicecallto: d. Proofof purchasedate (salesreceipt).
a. Correctinstallationerrors, e. Acleardescriptionoftheproblemandservice
history.
b. Instructtheuserontheproperuseofthe product.
c. Transportthe applianceto a servicer.
6. Consequentialorincidentaldamagessustainedby
anypersonas a resultofanybreachofthese
warranties.
Somestatesdonotallowtheexclusionorlimitationof
consequentialorincidentaldamages,sothe above
exclusionmaynotapplytoyou.
WarrantyPartNo.:8109P087-60
(09-97-00)
Page 25

A QUICKREFERENCETOQUICKCLEANING
PART CLEANINGAGENT INSTRUCTIONS
BroilerPan& Rack soap&water removethebroilpanimmediatelyafterbroiling,
scourpad letcoolslightly,sprinklepanwithsoapandlay
wetpapertowelinit- letstanda few minutes-
wash- scourif necessary- dry.
ControlKnobs mildsoap&water pullknobsoff- washgentlyand returnto range
donotsoak.
Grate soap&water washwithsoap- scourwithcleanserorsteel
steelwool wool- drythoroughly.
Exterior(Porcelain soap&water wipeupspillsimmediatelywithpapertowelwhen
enamel) drytowel surfacesarecool,washwithsoapandpolishwith
drycloth.DONOTuseabrasivecleaners.
Glass soap&water washwithsoap,polishwithdryclothorwash
orglasscleaner withglasscleanerandpapertowel.
Metals soap& water wash,rinse,then'polishwith drycloth- DONOT
chromecleaner useabrasivesorothercleaners.
Interior soap& water usea smallglassofhouseholdammonia- let
(standardclean) commercialoven standovernightinsideyouroven- thencleanwith
cleanerorscouringsoapandwaterorusea cleanerfollowinginstru-
powder ctionsoncan- usethescouringpadonstubborn
soil- rubgently- rinseandwipethoroughlywith
onetbsp.vinegartoonecupofwater- DONOT
MIXCLEANERS.
ContinuousClean detergentex.409, donotscrape- ovenisalwaysburningoffsoil-
Fantastic if areasare heavilysoiled,runoverto lighten
Janitorin a Drum spotsor washwithdetergentandplasticscour-
ingpad- DONOTUSEABRASIVErinseandblot
dry.
SelfClean -_h heat lockinplaceaccordingtodirectioninthismanual
setselectorandthermostat- ovenwill cleanit-
self- wipeoutasheswithdampclothsponge.
SiliconeRubberDoor soap& water washwithsoap- rinsethoroughly.
Gaskets(standard& DONOTREMOVE.
continuousclean).
BraidedGaskets DONOTCLEAN.
(self-clean)
OvenVent soap& water notremovable- washinplace_
Racks soap&water washandrinse- commercialcleanerscandis-
commercialcleaner coloryourracks- testbeforeusing.
BroilDrawer _ & water removedrawer-washinsoapand
(notonselfclean) ; USEABRASIVE.
Uniburner sot-_-a--ap& water removeuniburner- washinsoapandwateror
dishwasher.Usesmallwireto reopenholesfor
25
Page 26

CONSERVINGENERGY
1.Choosemediumweightmetalcookwarewith flat bottoms,straight sidesandfittedcovers.
2.Thesizeofthepanshouldcompletelycovertheheatedportionofyoursurfaceelement.Ongas
ranges,adjustyourflameto pansize.
3.Preheatpansonlywhenrecommendedandthensaveenergybyusingthepanimmediately.
4. Usetheleastamountofliquidsorfatstoshortencookingtimeandretainthemostvitamins
andminerals.
5.Startfoodsonhigherheatthenturnthemdownoroffduringtheremainderofthecookingtime.
6.Properlyusedcooktopelementsorburnersaremoreefficientthanyouroven- usethemwhen
applicable.
7.Heatthepan- nottheairTAlwaysplacetheutensilonsurfaceelementorburnergratebefore
turningit onandturnit off.Useresidualheatfromthepantofinishcookingbeforeremoving
pan.
8. Useonlyrefrigeratedor roomtemperaturefoodswhencooking.Thawfrozenfoodsbefore
cooking.
9.Duringcookingorbaking,avoidfrequentdooropeningsorlidlifting,asitresultsinlossofheat
andunsatisfactoryresults.
10.Cookmorethanoneitemtogether- potatoes,vegetables,etc.canbecookedwiththemain
dish.
11.Doyourbakingdirectlyafteranovenmealto avoidreheatingtheoven.
12.Wheneverpossibleusecoverswhilecookingto retainheat.
SAVES
YOU
MONEY
Page 27

i IMPROVECOOKINGPERFORMANCEI
SURFACECOOKING
should be heavy gauge and lined with
COOKINGUTENSILS anothermetal.
1.Flatbottomutensilsarethebestandmost G/ass ceramic's chief advantageis its
efficientinusingtheheatfromthecooktop multiuses;it cango fromfreezerto topof
(checkfor flatnessby rotatinga straight rangeorovento table.
edge ruler on the bottomof the pan,
checkingfor dips or unevenessas you 3.Thecorrectheatsettingfor eachutensilis
rotate).Unevenutensilscauseslowuneven very importantfor goodresults- check
cooking, your cookware directions for
recommendedheatsettingforeachpan.
4. Utensils should have tightly secured
,_ handlesmadeofaheatresistantmaterial-
theyshouldbefreeof roughedges,cracks,
wells, etc.that would makethem hardto
clean.
i.Mediumweightutensilsarebestsuitedfor
5. Teapots may havea ledgeor rim around
cooking becausethey heat evenly and
the bottom.If this ledgeextendsoverthe
quickly.Theyarealsolightweightandeasy heatingelement,or grate it can overheat
to handleevenwhenfull. Saucepan and and damage the porcelain top and heat
broiler information listed below, elementor grate.
Aluminum is moderately priced, light-
weight,anda goodconductorof heat.The METHODS
heavierthe gauge(thickness),the more
durable.Aluminummaystainfrommineral Baste- Tomoistenfoodwhileitcooks,sothat
inwaterandinfoods, the surfacedoesn'tdry out and flavor is
added.Meltedfat, drippings,sauceandfruit
Stain/ess stee/ is exceptionallydurable, juiceare theliquidsgenerallyused.
easytoclean,anddoesn'treactwithfoods
or detergents.Becausestainless steel _ ._
alQneisa relativelypoorconductorofheat,
it isusuallycombinedwithothermetalsto
providemoreevenheatdistribution.
Castiron is heavyto handle,butdurable
and inexpensive.Cast ironheatsslowly
andretainsheatwell.It tendsto rustand
alsotodiscoloreggsandfoodscontaining Blanch-Tocookafewminutesinboilingwater
acidsuchaswineorvinegar, either to help loosenthe skin from some
Copperis good looking,veryexpensive, foods,orasastopinpreparingvegetablesfor
and an excellentconductorof heat. It freezing.
27
Page 28

SURFACECOOKING
Bell- Tocookfoodoverhighheatinliquidin Peach- To cook food over low heat in
whichbubblesriseconstantlytothesurface simmeringliquid.
andbreak.
Prusure-cook- Tocookin steamunderhigh
Braise-Tocookfoodoverlowheatinasmall pressure,usinga specialsaucepan.
amountofliquidina coveredpan.(Foodmay
ormaynotbebrownedfirstinasmallamount Saute-Tobrownquicklyinasmallamountof
offat). fat, with frequentturning.Usedas a verb
meaningto fry ina smallamountof fat.
Caramelize-Tostirinskilletoverlowheatuntil
it meltsanddevelopscharacteristicflavor Sear- To brownthesurfaceof meatby the
andgolden-browncolor, short applicationof intenseheat.Meat is
searedfor thepurposeofdevelopingflavor
Deep-fry- Tocookfoodinhotfatdeepenough andimprovingappearance.
forfoodto floatonit.
Scald-Toheatliquidjusttobelowtheboiling
Fry- Tocookfoodoverhighheatina small point.
amountof fat. Seealsodeep-fry,pan-fry,
saute. Simmer-Tocookfoodoverlowheatinaliquid
justbelowtheboilingpointinwhichbubbles
Pan-Tocook,covered,inverysmallamount form slowly and collapsejust belowthe
of liquid, surface.
Pzn-brell-Tocookfood,uncovered,overhigh Steam-Tocookfoodonarackorinacolander
heat on ungreasedor lightly greasedhot ina coveredpanoversteaminghotwater.
surface, pouring off accumulatingfat.
Stew- To cook food over low heat in a
Panfry- Tocookfoodoverhighheatinasmall simmeringliquid.
amountoffat. Stir-fry- TocookslicedfoodquicklyChinese-
Parbeil-Toboiluntilpartiallycooked,usually styleina skilletor wok.
before completing cooking by another
method.
28
Page 29

BAKING
UTENSILS
1. Usethe size utensil recommendedin the 3.Choosethecorrectutensilfor whatyouare
recipe-DONOToverorunderfill theutensil, baking.
Always allow for expansionof foods or a.Shinyutensils- reflectheatthebestand
liquids, will producealight evencrustoncakes
andpies.
HOW TO MEASURE PANS b. Rough,dark or dull utensils- absorb
Besure your pans are the kind and size heatand will produceaheavier,darker
specifiedin the recipe.Thesize of some crust.
cookwareis expressedin liquid measure- c.Glassutensils-absorbheat-youshould
mentatits levelfullcapacity, turnyourovendown25° lowerthanthe
suggestedtemperaturewhen using
glass- theyproducea heaviercrust.
Mlaur| ta_ il_id, of Mlkl- .,z.,e....,.... ,.... METHODS
wareforlength,widthor and grlddla arestatedas the
dlame_remoraporpndl- topo_,ad,dl,,m_,a- Bake-Tocookbydryindirectheatuntilfood
cullrinsidefro"depth, elusiveofImndlz*. beginsto brownordrytheexteriorsurface
2.Whenusingmorethanoneutensilinoven, andinteriorhasreacheddesiredtemperature.
staggerthemonthesamerackorontwo
rackssothatoneisnotdirectlybelowthe Defrostor Thaw- To melt icecrystalsfrom
other-makesurethatthepansdon0ttoUch frozenfoodsbyplacingin a warmoven.
andareat leastl_hto2 inchesawayfrom a. Placein deeppanto catchrun-off.
theovenwallsandotherpans. b; Placein 150°Foven(mostfoodsdefrost
approximatelyfourtimesfasterthanat
_''_F_;:-_"_"-, _I.I I IIII I] II II II I roomtemperature).
IIIIrD©©©_ III c. Cookfoodsimmediatelyafter defrosting.
IIII©_O©©© I]1 d. NEVERrefreeze.
I_0000QO_
® 0©© Rout - To bake slowly, (at approximately
325°F)tendercutsof meats,inanuncovered
pan.
. a.Calculatecookingtimeperpound.
b.Setmeatfat sideupsoitwillbasteitself.
NUMBER RACK c. Placeonlowestshelf.
OFPANS POSITION PLACEMENT d. Insert meat thermometerto measure
1 2 or 3 center internaltemperature.
e.Allowmeattostand15-20minutes,before
2 2 or3 oppositecornersandat carving.Theinternaltemperaturewillrise
leastl_hto 2 inches 5°Fduringstandingtime.
apart.
3- 4 2or3 oppositecornerontwo
rackssothatnopanis
aboveorbelowtheother.
29
Page 30

I BAKING [
RACK POSITIONS HIGHEST 4thposition
It is importantto cookfoodsonthe proper MED.HI 3rdposition
rack. MED.LOW 2ridposition
* Checkrackpositionbeforeanybaking. LOWEST 1stposition
* Alwayschangerackswhileoveniscold.
, 1 II
TYPEOFBAKING RACKPOSITION REASON
Angelfood #1 Heatmust be ableto deflectto
browntop.
Biscuits,cookies : 2 or3 Middlepositionallowsforthe
mostcirculationandoven
heating.
Cakes- casseroles 2 or3
Frozenpies on cookiesheet#1 Heatmustbeableto deflectto
browntopcrust.
Muffinsandbreads 2 or 3 Middlepositionallowsmost
circulationandevenheating.
Roasting 2or3
Turkeyor
largeroast 1 Allowseasyaccessfor basting.
30
Page 31

I ROASTINGCHART I
(OVENTEMPERATURE325°)
APPROX.MIN. INTERNAL
CUT APPROX.WEIGHT PERLB. MEATTEMP.
Rib 6 to 8 pounds 23- 25 140Rare
27- 30 160Med.
32- 35 170Well
BonelessRib 4 toOpounds 26- 32 140
34- 38 160
40,42 170
RolledRump 4 to 6 pounds 25- 30 150- 170
(highquality)
SirloinTip 31/4to 4 pounds 35- 40 140- 170
Pork(fresh)Loin 3 to 5 pounds 30- 35 170
5-7 35-40 170
BonelssHam 2 - 5 30- 45 170
Cookbeforeeatingham Under10pounds 26- 30 155- 160
10- 15 17- 20 155- 160
Precookedham 14- 18 130
Shoulderpicnicham 25- 35 170
LambLeg 5to 8 pounds 30- 35 170- 180
Shoulder(whole) 3to 5 pounds 30- 35 170- 180
Shoulder(boned) 3to 5 pounds 40- 45 170- 180
Veal
Leg.lambshoulder 3 to 5 pounds 30- 40 170- 180
6 to 8 pounds 25- 35 170- 180
Poultry
Chicken 3 to 5 pounds 30- 40 185- 190
Over5pounds 35- 40 185- 190
Turkey Oto 16pounds 20- 25 180- 185(inthigh)
16to20 pounds 18- 20 180- 185
Over20 pounds 15- 18 180- 185
31
Page 32

J BROILING I
UTENSILS- Broilingpanandgrid(includedin an excessiveamountofsmoke,therack
oven)anddeepmetalpanwithrack. hasbeenplacedtoocloseto thebroiler.
BROILINGMETHOD- Broilingis a methodof c.Turnselectordialtobroil,turnthermostat
cookingtenderfoodsbydirectheatunderthe dial to broil- preheatis not necessary
burner.Generally,thedistancebetweenthe exceptfor charcoalexteriorwith rare
meat and the burner and broilingtime interior(steaks)preheat5-10 minutes.
regulatesdegreeofdoneness.
d.Broilingshouldbedonewiththeovendoor
Anysteakfor broilingshouldbeat least3/, openonelectricovensanddoorshutongas
inchthick.Thinnercutswill bedonebefore ovens.
theyare brownandshouldbe panbroiled
instead, e. Followsuggestedtimeson broilchart-
meatshouldbeturnedonceabouthalf
Veal and Pork shouldnot be broiled;veal way throughbroilingtime.
becauseit is too lean;andporkbecauseit
requireslong, slow cookingto be eaten f. Checkthedonenessbycuttingslitinmeat
safely, nearcenterfordesiredcolor.
Fishneedstobebrushedinoilbeforebroiling g. Removebroilerpan immediatelyafter
andplacedskinsidedowningreasedbroiler broilingsothatdrippingwill notbakeon
pan. andcausemessycleanup.
Chickenneedsto be lessthan 3 Ibs.and EASY CLEANING
occassionallybastedwith fat (will needa
lowerracksetting). Allowto coolslightlythen:
a. Preparemeat- removeexcessfat from
1. Removebroiler pan immediatelyafter
meat and slash remainingfat being broiling.
carefulnottocutintomeat-thiswillhelp
excessfat to drainandkeepsmeatfrom 2. Draindrippings.
curling.
3. Sprinklewithsoapandcoverbottomwith
b.Positionracksothatmeatwillbeapproxi- wetpapertowel- thiswillsoftenbakedon
mately1inchfromthebroiler.Ifyounotice foodsandmakecleanupeasy.
32
Page 33

] BROILINGCHART I
Thetimesgiveninthechartshouldbeusedonlyasaguide.Increaseordecreasebroilingtimesto
suitindividualtastefordoneness.
THICKNESS& MIN.COOKTIME
FOOD QUANTITY DONENESS SIDEI SIDE2 TOTAL
Bacon 8 slices crisp 3 2 5
morecrisp 5 3 8
BeefSteaks 3/4" rare 5-6 3-4 8-10
medium 7-8 3-5 10-13
3/4" well 10-11 6-8 16-19
BeefSteaks 1_ rare 6-7 4-5 10-12
Frozen medium 8-9 6-7 14-16
well 16-17 10-12 26-29
BeefSteaks 1_/2" rare 8-9 6-8 14-17
Fresh medium 11-12 10-12 21-29
well 18-20 15-18 33-38
ChickenBroiler 180° 20skin 15skin
Split&Quartered internal down up 35
FishFillets
Fresh 1" 6-7 4-5 10-12
Frozen 1" 8-9 5-7 13-16
Hamburger 1/2" rare 5-6 4-5 9-11
Fresh medium 6-7 4-5 10-12
well 9-10 5-6 14-16
Hamburger 1/2"
Frozen medium 9-10 5-6 14-16
Hamslice 314" 150-160 9-10 7-8 16-18
precooked internal
LambChops 3/4" medium 6-8 3-5 9-13
Fresh well 8-9 6-7 14-16
Frozen medium 8-9 6-7 14-16
Liver-Fresh 1/2" - 3/4" 4 3-4 7-8
LobsterFresh 7 oz. shellup shelldown
7-8 6-7 13-15
Frozen 14-16 11-12 25-28
33
Page 34

I COOKINGTERMS J
BAKINGPOWDER- A leaveningagentwhich. BRUSHWITH-Touseapastrybrushto spread
makesfoodsrisewhentheyarebaked.It isa food lightly with liquid such as salad oil,
combination of baking soda, a dry acid or meltedfat, milk,heavycreamor beatenegg.
acid salt and starch or flour. The acid
ingredient reacts with the baking soda to CHOP- To cut food into small pieceswith a
producegas bubblesinthe mixture.Double- knife, blenderor food processor.
acting bakingpowderproducesgasbubbles
COAT- To sprinklefoodwith, or dipit into,
twice:firstduringmixingandsecondduring
baking, flour,sauce,etc.,untilcovered.
CUBE-
nAKINGSODA- An essentialingredientof 1.Tocutfoodintosmallcubes(about_hinch).
bakingpowder,may be usedalone as a 2.Tocutsurfaceofmeatincheckeredpattern
leaveningagentin mixturescontainingan
toincreasetendernessbybreakingtough
acid ingredientsuchas buttermilkor in meatfibers.
combinationwith bakingpowder.Mixtures
containingbakingsodashouldbebakedas CUTIN-Todistributesolidfatinflourorflour
soonasmixed,sincethesodastartstoreact mixturebyusingpastryblenderortwoknives
assoonasitcomesincontactwiththeliquid, scissor-fashion until flour-coated fat
BARBECUE-Toroastorbroilfoodona rackor particlesare ofdesiredsize.
spitovercoals,orunderaheatunit.Thefood DICE- To cut food into very small pieces
is usuallybrushedwith a highlyseasoned (about1/4 inch).
sauceduringthe lastof thecookingtime.
BATTER- Amixtureoffairlythinconsistency, %'%
madeofflour,liquidandotheringredients. -"_._
BEAT- Tomakea mixturesmoothwithrapid,
regularmotionusinga wirewhisk,spoon,
handbeateror mixer.Whenusinga spoon,
themixtureshouldbeliftedupandoverwith DICINGANONION-Cutonioninhalflengthwise,
eachstroke, withcutsidedown,cutonioncrosswisein1/4
BLEND- To mix thoroughlytwo or more inchthickslices.
ingredients;ortopreparefoodinblenderuntil Holdonionfirmlyandoivequarterturn;cutin
pureed,chopped,etc.,asdesired. 114inchpieces.Repeatwithotheronionhalf.
BREAD- Tocoatwithbreadcrumbs,cracker
cusocorn_gomrs,e
floured,then dipped in beateneggor other
liquidto helpcrumbsto adhere.
BROIL-Tocookfoodbydirectheatonarack
orspit.
34
Page 35

i TERMS J
DRAW.Toremoveentrails from, and clean, theninto a choiceof sauces.Dessertfondues
poultry or game.Drawnfishare wholefish includechocolateorothersaucesfordipping
thathavebeencleaned(eviscerated)butnot chunksof poundcakeorfruit.Thetermalso
boned, denotesabakedmaindishmadewithcheese,
milkandbread.
DOT- To scatter bits, as of butter or
margarine,oversurfaceof food. GELATIN- Availableasunflavoredandfruit-
flavored.Theyarenotinterchangeable.
DREDGE-Tocoveror coatfood,aswithflour,
cornmeal,etc. OLACE-1.Glazed,aswithafrosting.2.Frozen.
DRESS- To mix salador otherfood with Glue.1.Tocoatwithaglossymixture.2.Con-
dressingorsauce, centratedstockusedto addflavor.
DRIPPINGS-Fatandjuicegivenoffbymeator GRATE- To I:ubfoodona grater(orchopin
poultryas it cooks, blenderor foodprocessor)to producefine,
mediumorcoarseparticles.
FLAME-Toignitewarmedalcoholicbeverage
pouredoverfood.Alsoknownasflambe. 6RATIN-AFrenchtermdefiningabrowncrust
formedby bakingor broilingbreadcrumbs,
FLOUR-1.AII-purpose.Madefromavarietyof cheese,butter or a mixtureon top of a
wheats,it producesgoodresultsfora wide casseroleor otherdish.
varietyofbakedgoods.Whole-wheatflouris
milledfromtheentirewheatkernelwhilerye OREASE-Torubsurfaceofdishorpanwithfat,
flour ismilledfromtheryekernel.Cakeflour to keepfoodfromsticking.
is milledespeciallyforcakesandotherlight
bakedproducts.Forbestresultsalwaysuse 6ARNISH.Toadda decorativetouchtofood,
theflourcalledfor inthe recipe.In recipes as with parsley, croutons or prepared
callingforall-purposeand wholewheator vegetables.
rye,a certainproportionofall-purposetothe GRILL- Tocookfoodonarackbydirectheat;
otherflourisneededforbestresults;sodon't
alsotheapplianceorutensilusedforthistype
substituteflour.2. Tocoatlightlywithflour, of cooking.
FLUTE- Tomakedecorativeindentations. GRIND-Toreducetoparticlesinfoodgrinder,
FOLDIN-Tocombinedelicateingredientssuch blenderorfoodprocessor.
aswhippedcreamorbeateneggwhiteswith KNEAD- To work a food mixture(usually
otherfoodsbyusingagentle,circularmotion
tocutdownintothemixture,slideacrossthe dough)witha press-foldmotion.
bottomof the bowlto bringsomeof the LUKEWARM-Ata temperatureofabout95°F.
mixtureupandoverthesurface. Lukewarmfoodfeelsneitherwarmnorcold
whenincontactwithinsideof thewrist.
FONDUE- Mostoftena dishof hot melted
cheeseandwine,intowhichbreadisdipped MARBLED- Termusedto describemeatwith
andtheneaten.Formeatfondues,atthetable, visiblefat runningthroughthelean.
cubesof meataredippedinhotfat to cook,
35
Page 36

i TERMS ]
MARGARINE-Comesinseveralforms.Regular PIT- Toremoveseedfromwholefruit.
margarinewith80percentfatisinterchange-
ablewithbutterinrecipes. SCORE- 1.Tocutshallowslitsinsurfaceof
foodto increasetendernessor to preventfat
MARINADE- Aseasonedliquid,inwhichfoodis coveringfromcurling.2.To decorate.
soakedto enhanceflavor.
SHRED- Tocut food into sliversor slender
MARINATE-Tosoakin a marinade, pieces,usinga knifeorshredder.
MEATTENDERIZER- Papainfrom natural SHUCK- Toremovemeatofoysters,clams,
tenderizerssuchaspapayaisusedtosoften etc.fromtheirshellsorto removethehusk
meattissue.It is usuallysprinkledonthe fromcorn.
meatbeforemeatiscooked.
SKIM- Toremovefatorscumfromsurfaceof
MERINGUE- Mixture of stiffly beatenegg food.
whites and sugar. Also the cookedsoft
mixtureon dessertsor the cooked"hard" TOSS- To mix foodslightlywith a lifting
mixtureasa dessertshell, motion,usingtwoforksor spoons.
MINCE- Tocutintoverysmallpieces,using TRUSS- To securepoultrywith stringor
knife, food grinder or blender,or food skewers,toholditsshapewhilecooking.
processor. VINEGAR-Anacidliquidusedforflavoringand
PEEL-Toremoveoutercoveringoffoodsby preserving.Amongthetypes:Cidervinegar,
trimmingawaywithknifeorvegetablepeeler, madefrom applejuice, has a mellowfruit
or by pullingoff. flavor;distilledwhitevinegar,usuallymade
fromgrain alcohol;herbvinegarsflavored
POT-ROAST-Tocooklargepiecesofmeator with herbs;andredor whitewinevinegars
poultrybybraising;alsocertainmeatcuts. whichalsomay beflavoredwithgarlic.
PREHEAT To heat oven to desired WHIP-Tobeatrapidlywithmixer,wirewhisk
temperaturebeforeputtingfoodintobake. or hand beater, to incorporateair and
increasevolume.
PUNCffDOWN- Todeflatea risenyeastdough
bypushingit downwiththefist. YEAST-Micro-organismsthatproducecarbon
dioxideandalcoholfromcarbohydratestO
PUREE-l.Athickmixturemadefromapureed causebakedgoodsto rise,fruitstoferment,
vegetablebase.2. To pressfoodthrougha etc.
finesieveorfoodmill,ortoblendinblenderor
foodprocesserto a smooth,thickmixture.
36
Page 37

EQUIVALENTMEASURES
Dash 2 to 3 drops or less than 1/8 teaspoon
1 tablespoon 3 teaspoons
1/4 cup 4 tablespoons
1/3 cup 5 tablespoonsplus1 teaspoon
1/2 cup 8 tablespoons
1 cup 16 tablespoons
1 pint 2 cups
1 quart 4 cups
1 gallon 4 quarts
1 peck 8 quarts
1 bushel 4 pecks
1 pound 16 ounces
BAKINGPANEQUIVALENTS
4 - CUPBAKINGDISH:
9 inch pie plate
9 x 1%inch layer cakepan
7% x 3% x 21/4inch loaf pan
6 - CUPBAKINGDISH:
8 or 9 x tlh inch layer cake pan
10 inch pie plate
81hx 31/$x 2 2/8 inch loaf pan
8 - CUPBAKINGDISH:
8 x 8 x 2 inch squarepan
11 x 7 x 11hinch bakingpan
9 x 5 x 3 inch loaf pan
I0- CUPRAKINGDISH:
9 x 9 x 2 inchsquarepan
113hx 71hx 13/4inchbakingpan /
15 x 10 x 1 inchjelly roll pan
12 - CUPRAKINGDISHANDOVER:
131hx 81hx 2 inchglass bakingpan - 12 cups
13 x 8 x 2 inch metalbakingpan - 15 cups
14 x lO_hx 2_hinchroastingpan - 19 cups
37
Page 38

I CAUSE& CORRECTIONi
PROBLEM CAUSE CORRECTION
BROWNING: 1. Dentedor warped pan. 1. Useeven bottomedpan.
Unevenbottombrowning2. Ovennot preheated. 2. Preheatto desiredtemp.
beforeaddingfood.
3. Rangenot level. 3. Adjustleg levelers(see
Useand Care).
Too brownon bottom 1. Improperrack placement. 1. Checkfor correctrack posi-
tion beforestartingwhile
oven is cold.
2. Ovendoorhas beenopened2. Opendooronlyafterfoodhas
too often, beenbakedfor shortestre-
commendedbakingtime.
3. Ovennot preheated. 3. Preheatto desiredtemp. be-
fore addingfoods.
4. Panstouchingwallsor other4. Pansshouldnot be closer
pans. than 11hto 2 inchesfrom
each otheror ovenwalls.
5. Warped,darkor dullfinished5. Use even bottomed,shiney
pan (includeglass), pans for light browning.
Too brownon top. 1. Ovendoorsopentoo often. 1.Opendooronlyafter foodhas
beenbakedfor shortestre-
commendedbakingtime.
2. Overmeasuring. 2. Usestandardmeasuring
(fats-sugars-liquids). cups.
3. Oventemp.too low. 3. Doublecheckrecipefor cur-
rect oventemperature.
4. Pansize too large. 4. Usepansizerecommendedin
recipe.
Crackon top. 1. Oventemperaturetoo high. 1. Doublecheckrecipefor cor-
rect oventemperature.
2. Overmeasuring. 2. Usestandardmeasuring
cups.
Crumblyor dry. 1. Oventemp. too high. 1. Doublecheckrecipefor cor-
rect oven temp.- excess
heat driesfood.
2. Overbaking. 2. Checkfoodsafter shortest
bakingtime.
3. Overmeasuring. 3. Use standardmeasuring
cups.
38
Page 39

PROBLEM CAUSE CORRECTION
Fallen 1. Ovendooropenedtoo soon.1. Checkfood only afterthe
shortestrecommended
bakingtime.
2. Oventemperaturetoo low. 2. Checkrecipefor correct
oventemperature.
3. Oldor too little baking 3. Usestandardmeasuring
>
powder, utensils.
4. Too muchbatteror too little4. Usecorrectpan size.
pan.
5. Toomuchor too littleliquid.5. Use standardmeasuring
utensils.
6. Underbaked. 6. Checkfood after shortest
recommendedbakingtime.
Flat 1. Improperrack placement. 1. Checkrack position,before
startingand while ovenis
still cold.
2. Oldor too little baking 2. Usestandardmeasuring
powder, utensil.
, 3. Oventemperaturetoo high 3. Checkrecipefor correctoven
or too low. temp. and correcttype of
utensil(glassutensils)re-
quire lowertemperature.
4. Pantoo largefor amounto 4. Use recommendedbaking
batter, utensil.
5. Toomuchortoo littleliquid 5. Use standardmeasuring
utensil.
Moundor peakedcenter 1. Bakingtime too long. 1. Checkfoodafter shortestre-
commendedbakingtime.
2. Oventemperaturetoo high. 2. Checkrecipefor correct
oven temperature.
3. Pantoo largeor too small 3. Use recommendedbaking
utensil.
4. Panstouchingwalls or 4. Pansshouldnot be closer
otherpans. than 11/2to 2 inches.
5. Too little liquid. 5. Use standardmeasuring
utensils.
Shrinkage(morethan 1. Bakingtime too long. 1. Checkfood after shortest
recommendedbakingtime.
2. Oventemperaturetoo high 2. Checkrecipefor correct
oven temperature.
3. Panstouchingwallsor othet3. Pansshouldnot be closer
pans. than 11/2to 2 inches.
39
Page 40

PROBLEM CAUSE CORRECTION
Uneventop 1. Panstouchingwallsor other 1. Pansshouldnot be closer
pans. than 11hto 2 inches.
2. Oventemperaturetoo low. 2. Checkrecipefor correct
oventemperature
3. Rangenot level. 3. Adjustleg levelers(consult
Use and CareManual).
4. Too muchliquid. 4. Use standardmeasuring
utensils.
5. Underbaking. 5. Checkfood after shortest
recommendedbakingtime.
6. Undermixing. 6. Checkrecipe.
Uneventextureholes 1. Bakingtime too short. 1. Checkfoodsafter shortest
and tunnels, recommendedbakingtime.
2. Improperrack placement. 2. Checkrack positionbefore
startingand while oven is
-_ cold.
3. Not bakingimmediately Always
3.
bake
immediately.
after mixing.
4. Oventemperaturetoo high. 4. Checkrecipefor correct
oventemperature.
5. Too muchbakingpowder. 5. Usestandardmeasuring
utensils.
6. Undermixing. 6. Usestandardmeasuring
utensils.
40
Page 41

I , SERVICINGI
BEFOREYOUCALLASERVICETECHNICIANCHECKTHEFOLLOWING
SOMEORNONEOFYOURRANGEOPERATES:
Is your rangeplug disconnectedfrom the electricaloutlet?
Areyour housefusesblown?
Is your circuit breakertripped?
is therangepluglooseor improperlyplugged?
ELEMENTWON'THEAT:ISURFACEUNITSONLY)
Are your elementsproperlyin place?
Areelementprongsbentor dirty?
BAKEDGOODSNOTTURNINGOUT:
Are your racks properlyin placeandin correctpositionfor whatyouarebaking?
Isyourrangelevel?(Checkleglevelers).
Areyouusingtheproperpan?Isit bright,notsoiledor darkcolored?
Haveyouusedfoilduringcookingorto lineyouroven?
Areyouusingstandardmeasuringutensils?
OVENWILLNOTOPERATE:
Didyouturntheselectorandthermostatswitchesto correctpositions?
Clocks- areknobsin,correctpositions?Seesectionon clocksandtimers.
OVENUGHTWILLNOTWORK:
Isyourbulbburnedout?
Isyourbulbloose?
NEEDSERVICE?WHENYOURRANGEREQUIRESSERVICEORREPLACEMENTPARTS,CONTACTYOUR
DEALERORAUTHORIZEDSERVICEAGENCY.CONSULTTHEYELLOWPAGESIN YOURTELEPHONE
DIRECTORYUNDER"RANGES"FORTHESERVICENEARESTYOU.
DESURETOINCLUDE:NAME,ADDRESS,PHONE.MODELNUMBER,SERIALNUMBER,ANDCOMPLAINT.SEE
WARRANTYSHEETINCLUOEDWITHTHISMANUALFORMANUFACTURERSADDRESS.
41
 Loading...