

Page 1
I Refrigerator/Freezer_
.ofro. J
I1,,,
I
w'-
Please read the enclosed instructions to become better acquainted with your new model. In order to
prevent unnecessary service calls, refer to the self-service check list. If you do need service, be sure
to report the model and serial numbers to the service man. They are found on the serial plate, located
lit the upper front left corner of the lower liner. Here is a convenient place to record these numbers.
MODEL NO. SERIAL NO.
Page 2
INSTALLATION A., U.L. listedrefrigeratorsandfreezersare ENERGY SAVER CONTROL
equipped with thistype plug. During extremely humid weather, mois-
LOCATION SAFETY REMINDER ture has atendency to collect onobjects that
If possible, place your model out of direct If you are not going to use your old refrige- are cooler than the surrounding air, just as
sunlightandaway from heat sourcessuchas rator,be sureto REMOVE THE DOORS so a dropletsofwater accumulate on a glass con-
a radiator, oven, or range, child won't be accidentally trapped inside raining an iced drink during a hot summer
and suffocate. This is required by law in day. This refrigerator is built to exacting
Your modelshould not be installed where many communities, standards a'nd, therefore, contains conden-
the temperature will go below 55°F. because satedriersthat are designed to minimize any
it will not run frequently enough to maintain collectionof moistureonthe cabinet external
proper temperatures in the freezer. OPERATION surface during periods of high humidity.
Forease of installation,youshouldleave a - ENERGY SAVER
space of about one-halfinch between your SAVES ,_=UCESE_T_,O=
refrigeratorand adjacent walls or cabinets. If 81: I IING CONTIROLS .,,,;v 4 awl_cH _ MO ......
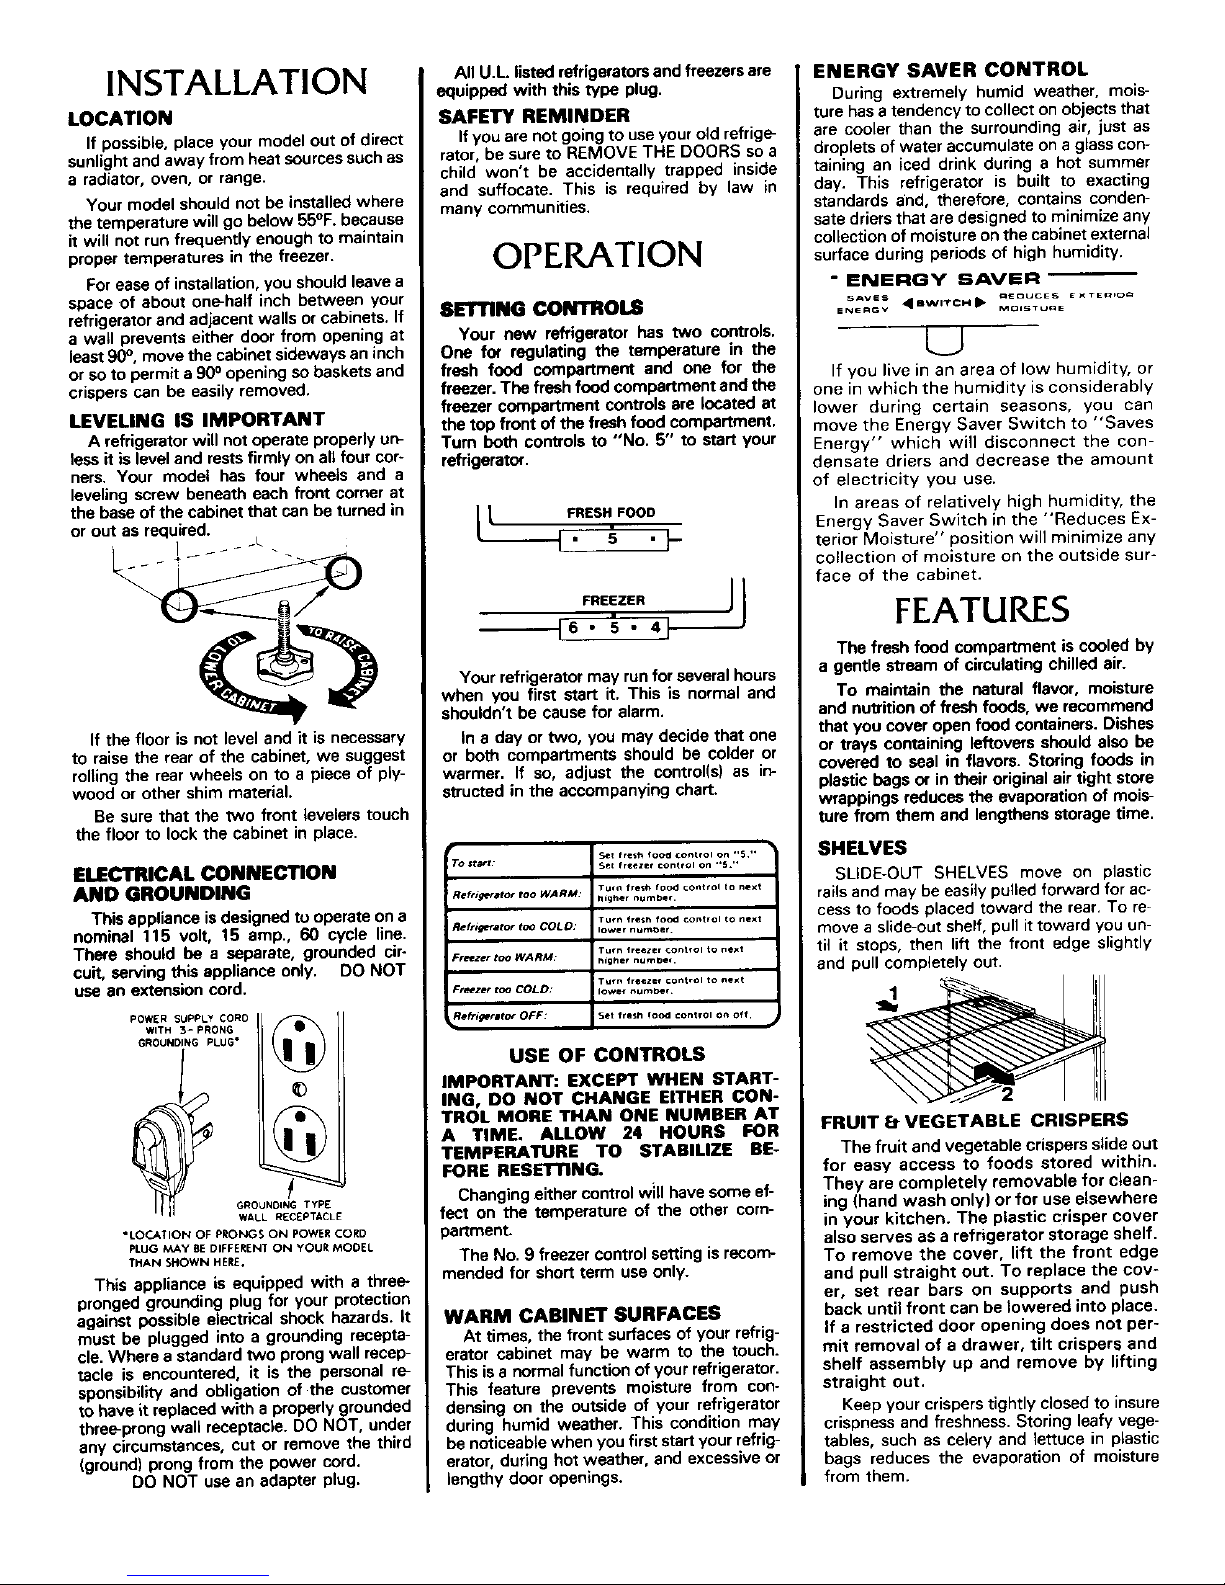
a wall prevents either door from opening at Your new refrigerator has two controls.
least90°, movethe cabinetsideways an inch One for regulating the temperature in the
or so to permita 90Oopening so baskets and fresh food compartment and one for the If you live in an areaoflow humidity, or
crisperscan be easily removed, freezer.The fresh food compartment and the one in which the humidity is considerably
freezer compartment controlsare located at lower during certain seasons, you can
LEVELING IS IMPORTANT the top front of the fresh food compartment, move the Energy Saver Switch to "Saves
A refrigerator will notoperate properly on- Turn both controlsto "No. 5" to start your Energy" which will disconnect the con
less it is level and rests firmly on alt four cor- refrigerator, densate driers and decrease the amount
ners. Your model has four wheets and a of electricity you use.
leveling screw beneath each front cornerat In areas of relatively high humidity, the
the base of the cabinet that can be turned in [ [ FRESHFOOD Energy Saver Switch in the "'Reduces Ex-
or out as required. _L L I " 5 • J-- terior Moisture" position will minimize any
1_ - - - collection of moisture on the outside sur-
face of the cabinet.
,.EEZE. lJ FEATURES
16• _.4J
The fresh food compartment is cooled by
Your refrigeratormay runfor several hours a gentle stream of circulating chilled air.
when you first start it. This is normal and To maintain the natural flavor, moisture
shouldn't be causefor alarm, and nutrition of fresh foods, we recommend
If the floor is not level and it is necessary In a day or two, you may decide that one that you cover open food containers. Dishes
or trays containing leftovers should also be
to raise the rear of the cabinet, we suggest or both compartments should be colderor covered to seal in flavors. Storing foods in
rolling the rear wheels on to a piece of ply- warmer. If so, adjust the control(s) as in- plastic bags or in their original air tight store
wood or other shim material, structed in the accompanying chart, wrappings reduces the evaporation of mois-
Be sure that the two front levelers touch ture from them and lengthens storage time.
the floor to lock the cabinet in place.
H
Se ................... ,,5,* SHELVES
I_1I=c'rR|CAL CONNECTION To,t,_t. i s,._......... _,o,o,"s." 1 SLIDE-OUT SHELVES move on plastic
AND GROUNDING A,f,_,,,o, ,ooWA,M .... ,.,. ,ooo...... ,to,..t rails and may be easily pulled forward for ac-
Iligh_r number.
This appliance is designed to operate on a _,,, ,.,, ,oDd,o,t,o,_o..., cessto foods placed toward the rear.To re-
nominal 115 volt, 15 amp., 60 cycle line. Ao_,_._.to_t_ colo. ,....... _,,. move a slide-outshelf, pull it toward you un-
Turnfr4.iszf.r_ont,Oltonext til it stops, then lift the front edge slightly
There should be a separate, grounded cir- Ft_zert_WARM highe'numc=e'.
cult, serving this appliance only. DO NOT and pull completely out.
usa an extension cord. F,_,r tooCOLD lowernumber
POW_R SUPPLY CORD - Refri_tato_ O,¢:F: Set fr(tsh loc.d control O_ off. __L I]l
WITH 3- PRONG •
o,oo.o,.oPL00"\1I) USEOFCONTRO'S
IMPORTANT: EXCEPT WHEN START-
ING, DO NOT CHANGE EITHER CON-
_ _ _•|_ TROL MORE THAN ONE NUMBER AT
A TIME. ALLOW 24 HOURS FOR FRUIT EtVEGETABLE CRISPERS
TEMPERATURE TO STABILIZE BE- The fruit and vegetable crispers slide out
FORE RESt:= I'ING. for easy access to foods stored within.
Changingeither control will have some ef- They are completely removable for clean-
GROUNDINGType ing (hand wash only) or for use elsewhere
WALLRECEPTACLE feet on the temperature of the other corn- in your kitchen. The plastic crisper cover
•LOCATIONOFPRONGSONPOWERCORD partment, also serves as a refrigerator storage shelf.
PLUGMAy8EDIFFERENTONYOURMODEL The No. 9 freezer control setting is recom- To remove the cover, lift the front edge
THAN SHOWN HERE.
This appliance is equipped with a three- mended for short term use only. and pull straight out. To replace the coy-
pronged grounding plug for your protection er, set rear bars on supports and push
against possible electrical shock hazards. It WARM CABINET SURFACES back until front can be lowered into place.
must be plugged into a grounding recepta- At times, the front surfaces of yourrefrig- If a restricted door opening does not per-
cle. Where a standard two prongwall recep- erator cabinet may be warm to the touch, mit removal of a drawer, tilt crispers and
tacle is encountered, it is the personal re- This isa normal function of your refrigerator, shelf assembly up and remove by lifting
sponsibility and obligation of the customer This feature prevents moisture from con- straight out.
to have it replacedwith a properlygrounded densing on the outside of your refrigerator Keep yourcrisperstightly closed to insure
three-prong wall receptacle.DO NOT, under during humid weather. This condition may crispnessand freshness.Storing leafy vege-
any circumstances,cut or remove the third be noticeablewhen you firststart your refrig- tables, such as celery and lettuce in plastic
(ground) prong from the power cord. erator, during hotweather, and excessiveor bags reduces the evaporation of moisture
DO NOT use an adapter plug. lengthy door openings, from them.
Page 3

Leveling Crisper Shelf 2. Refrigerator is not to be used for a CONNECTING ICE MAKER
If the crispershelf is not level, adjust the considerable time, such as vacations. TO WATER SUPPLY
support leg as shown. Also, turn off the water supply to the
icemaker in this instance, if practical All installations must be in accordance
__ with local plumbing code requirements.
3. Water supply is to be shut-off for Do not use plastic tubing or plastic fit-
__111 _L_ / several hours.
_1 s_,_ tings because the connection between the
How the Icemaker Works water supply and the refrigerator water
:_- valve inlet is under constant pressure.
Water fills the empy cube mold when Also, certain types of plastic tubing may
the freezer compartment has cooled to become brittle with age and crack, result-
freezing temperature. Cold air is forced Jng in water leakage.
directly over mold. When frozen, the cubes Tubing (V4" O.D.) and saddle valve can
MAGNETIC DOOR GASKETS _ be purchased from local hardware stores.
Door gasketsare magnetized to insure an _ _ Sweat or flare connection can be used in-
air tight seal all around. These gasketscling [__ _i_lUTu stead of the compression union, if desired.
to the cabinet front, once the doors are be
closed to within their magnetic range. Note: When using unfiltered well water, it
is advisable to use a filter in the water sup-
AUTOMATIC ICE MAKER ply line. This eliminates all possibility of
The automatic ieemaker is designed to small particles from entering the water
furnish a continual supply of ice cubes, are rotated up and out of the mold. The valve.
With this useful feature, you no longer sweeper arm ejects them into the ice stor- 1. Working at the right rear of the cabi-
have the inconvenience of filling ice cube age bin below. The sensor arm senses
trays, or the frustration of running out of net, remove the screws from the right
ice. ________'_ and left end of the black fiber panel
The amount of ice produced depends on __q._ that covers the machine compart-
the temperature in the freezer section of Ice ment with an adjustable wrench, and
your refrigerator. The colder the freezer remove the panel. Save the screws
section,
the more ice is
produced.
We
sug-
t ] for later reinstallation as this panel is
I I "_--'-- Ice Pan required for proper and safe operation
gest you start with your refrigerator and
freezer controls at their mid settings. In _ J of the refrigerator.
most cases, this is satisfactory. If the door . _j
to the refrigerator or freezer is opened fre- --I_
quently or temperatures in the kitchen are when the bin is full and signals the icemak-
abnormally high, a colder setting may be er to stop ejecting more cubes. Meanwhile, _
necessary, the mold has been refilled and cubes fro- 0
After your model has been installed and zen so the new supply is ready when need-
the water supply connected to the icemak- ed. As soon as ice is removed from the bin, (_, _"RemoveScrews
er, it may be 8 to 12 hours before the the sensor arm signals that more is need- l_:_-.,
icemaker furnishes any usable ice cubes, ed. The icemaker resumes operation by _ "_'AccessPanel
The first one or two harvests will, proba- ejecting ready-and-waiting frozen cubes.
bly contain undersized and irregular cubes _"11_
because of air in the supply line. _ 2. Find a 3/8" to 1" vertical COLD wa-
The initial harvest may also contain im- tar pipe near the refrigerator. Water
purities from the new water supply piping, pressure must be between 20 and
Therefore, all cubes from the first two or 120 p.s.i. Vertical pipe is preferable,
three harvests should be discarded. Once but a horizontal pipe will work. If a
this initial starting period is past, your horizontal pipe is used, install the sad-
icemaker will perform steadily and dle valve on the top or the side of the
dependably, pipe, not on the bottom.
lee cubes that have been in the ice stor-
age bin for a considerable length of time 3. Turn OFFthe main water supply and
may pick up off-flavor taste, stick togeth- drain the selected pipe.
er, and gradually become smaller. We sug- 4. Follow the installation instructions
gest that these cubes be thrown away. We
also suggest using an open box of baking For Your Safety that are supplied with the saddle
valve for proper and safe installation.
soda in the refrigerator for food odor Do not place fingers or hands on the au t.,___i_lll=_j/_ pipe
absorption, tomatic icemaking mechanism while the PiPeClamps
Certain sounds may accompany the var- refrigerator is plugged in. This will help
ious cycles of the icemaker. The motor protect you from possible injury. It will also
may have a slight hum--the cubes will rat prevent interference with moving parts of
tie as they fall into an empty storage the ejector mechanism and the heating BtassSleeve
pan--the water valve may click or "buzz" element that releases the cubes.
occasionally. All of these sounds are nor- Under certain rare circumstances, ice BT,.Nut
mal and should be ignored, cubes may be discolored, usually appear- Manual
The icemaker has a wire sensor arm that ing with a green-bluish hue. The cause of shu_off
is connected to ashut-off switch. This arm this unusual discoloration is apparently a valve
stops the mechanism when the ice cube combination of factors such as certain Co_dwater
storage pan is full, and restarts it after characteristics of local waters, household u.e
several ice cubes have been used. You can plumbing and the accumulation of copper Copp*r
Tubing
use the stop arm to stop all productions salts in an inactive water supply line which
of ice at any time. All you need to do is feeds the icemaker.
raise the arm into the OFF position. Continued consumption of such dis- 5. Route the copper tubing through the
The icemaker should be turned off (arm colored ice cubes may be injurious to floor, wall or sink cabinet to the sad-
health. If such discoloration is observed, die valve location. Form the excess
up) when: discard the ice cubes and contact the deal- tubing into a large loop. This allows
1. Ice storage bin is to be removed for er from whom the refrigerator was movement of the refrigerator without
extended period of time. purchased, disconnecting the tubing.
Page 4

, TYPICAL WAYSTO CONNECT OUTSIDE
TO WATERSUPPLY Wash regularlywith mild soap and water.
rinse with clear water. Never use abrasive
scouring powders, automobile polish or fur-
niture polish.Appliance Wax or a similarpro-
duct will clean and protect the finish satis-
factorily.
Your door gaskets are vinyl. They may
be cleaned with a baking soda solution,
_1_ I soap and water or with a mild scouring
powder.
,= ThroughThe FlCOtTOBasementColdWater Pipe
_ DEFROST PAN
6. Locate the brass nut and sleeve , IJ Defrost water drains into a shallow pan
which comes with the saddle valve. _/ beneath the cabinet and evaporates. Dur-
Slide them onto the ¼" copper tub- ing periods of high humidity, water could
ing. Insert the end of the tubing into remain in the pan. This pan should be
the saddle valve as far as it will go cleaned once a month with a solution of
and tighten the nut with an adjusts- strong soap and water.
ble wrench. Turnoff the saddle valve.
7. Turn ON the main water supply and . f//_J_--,
flush out the pipe until the water runs
clear. At the same time, check for ,.t,_C,.w,S_.Und_,You,.om_
leaks at the saddle valve. Next pre-
pare to flush out the ¼" tubing. Po-
sition a bucket or other container at To remove the defrost pan, grasp the base
the open end of the ¼'" tubing so it _'_ grille at both ends and pull it straight out.
will catch the water. Turn on the sad- _ Slide the pan out from underneath the
die valve and allow water to flow un- I___1 cabinet.
til it has cleared. Turn off saddle valve. ,.i S_FORT_A,LS
8. Connect the water line from the sad- _ ILl /_EF_o_rm.
die valve to the water valve as shown .... _L 1 __
Insert the water line into the com- UctderTheSinkToTheColdWater_pe
pression union as far as it will go.
Tighten each brass nut with one
wrench on the nut and the other _ To replace the defrost pan, position the
wrench on the compression union. _ side flanges to fit over slide railsand push it
Return water line to vertical. Secure in until it stops.
water supply line clamp. Tighten hose _ To replace base grille, align spring clips
nut with pliers, with square opening in cabinetand tap each
and until grille locks in place.
r Thewaterintet tubing assemblyrequired
to complete the water connectionto the CONDENSER
watervalveislocatedinthecrisperdrawerin = Your refrigerator will operate more er-
a bag, ThrOugh The WalPToThe Utility RoomColdWater Flpe
ficiently when the condenser is clean. It
C'>) CAUTION: ic e Melter tubing _ld itot bo inltlllled should be cleaned at least twice a year or
T,_tenReturnwale,su_p=vh_etove.,Ca=ho_enut onwe=weSecure Wae_ou_nupp_mv where temper=ture may fell below frmwJ.g, more often if conditions require it. It can
w_ter linewith clamp "_
_ I ,,_ be adequately cleaned through the right
front of the base opening. Grasp the base
grille at both ends and pull straight out.
_=_'_1 \/ :l I ,_S ............ ELF_PLACING Then reach through the base opening with
HOSe Nut _/_ I ] , I _' _ ....... line your vacuum cleaner attachment to clean
.......... LIGHT BULB thefrontandopenendofthecondenser.water Supply I r _ wate[lines
\ _ ))_V/t_jr_xf_ _ i_['??........ °C'°° DISCONNECT THE POWER .-_1
.......... CO.DBE,=O.E.EPLAC,NG
................ LIGHT BULBS
Lmeassh_n
ALWAYS USE A 40 WA'l-r, STANDARD
9 .Turn on saddle valve. Tighten any BASE, APPLIANCE TYPE BULB WHEN RE-
connections that leak. PLACING A LIGHT.
To replace base grille, align spring clips
10. Re-install the fiber panel and secure CLEANING with square opening in cabinet and tap each
with the screws removed and saved end until grille locks in place.
in Step 1. DISCONNECT THE POWER
11. Plug in the power cord and push the CORD BEFORE CLEANING GOING ON
refrigerator into place, arranging the INSIDE
copper tubing so that is does not vi-
brate against the back of the refriger- Clean both compartments and inner door VACATION
panelswith mild soap and water. Do not use
ator or against the wall. an abrasive powder, solvent, polishcleaner If you will be gone for a month or less,
or undiluted detergent, leave the control knob at its usualsetting.
IMPORTAN3_ Because the refrigerator You may notice a slight discolorationap- During longer absences, (a) remove all
and icemaker are warm, it may take up peering at the top and nearthe center of the food, (b) disconnectfrom electricaloutlet, (c)
to 12 hours before the icemaker back wall of the fresh food compartment, clean the refrigerator thoroughly, including
produces the first supply of ice cubes. This is no cause for alarm, but it should be defrost pan, (d) leave doors open to prevent
cleaned off periodically, odor formation.
Page 5

ENERGY TIPS 3 Using e socket screwdriver or end 17. While holding the door in a closed
wrench, removethe screwsfrom the up- position, take the center hinge pin that
FOR EFFICIENT ENERGY USE. per hinge. Carefully lift the door (includ- was removed in step 8, and insert it
ing upper hinge) off the center hinge through the left hole of the center
1. Be sure refrigerator is level and ventila- and place it on a padded surface to pre- hinge and into the bottom door bush-
tionaround front grille is not blocked, vent scratching.Avoid losingthe spacer ing. Make sure the long pin goes into
2. Check door seals occasionally for leak- that was between the hingeand thecab- the bottom door and the short pin
age. Check at various places, top, but- inst top. goesinto the top door.
tom, sides. 4. Using a putty knife,pry the plug button 18. Set the upper door on the center
coverfrom the plasticbushingat the top hinge, making sure the hinge pin
3. Check the temperature; avoid unneces- ofthedoor. Savethecoverforfutureusa. enters the door bushing. When you
sarilycold settings, close this door, the gasket should ho(d
6. Lift the upper hinge and the spacer it in place.
4. Keep freezer full to near capacity, less washers from the door and install
cold air is lost during door openings, them at the opposite corner. 19. Making sure to use the same number
of spacers that were originally used
5. Let hot dishescool before putting intore- 5. Position the plug button cover, saved beneath the upper hinge, install the
ftigerator or freezer, from step 4, over the old hinge bush- hinge mounting screws. Before tight-
6. Cover liquids;if uncovered,the unitmust ing and pressit into p_ace, ening these screws, make sure the topof the door is leve_ with the cabinet
work longer. 7. Pry out the 3 plastic plug buttons top, and the space between the door
7. Cleanrefrigeratorcondensercoilsat least from the cabinet top and press them is equidistant across the entire front.
twice a year. into the oppositecorner. Avoid over-tightening these screws.
Tighten both until they are just snug,
8. Lift the center hinge pin out of the then turn them in another one-half
SAFETY TIPS bottom door and center hinge. Care- turn.
fully lift the lower door off the lower 20. Examine the door gasket all around
1. In case of power failure, minimize door hinge and place it on a padded sur- each door, making sure no gaps are
openings.(f power failureis of longdura- face. If the metal hinge pin pulls out visible between the gasket and cabi-
tion, protect frozen food by placing of the lower hinge when the door is net. If a gap shows, try stretching the
blocks of dry ice on top of the packages, removed, pull it out of the door but- gasket away from the door so the
or check with a localfrozen foods locker tom and pressit back intothe hinge, magnet will contact the cabinet sur-
plant about temporary storage. 9. Remove the center hinge and spacer face.
2. Use the three-pronged plug only with a from the cabinet. Transfer the two 21. Usinga phillips screwdriver, remove the
propedygroundedthree-prongedreceptacle screws from the left end of the divider screws thatattach the nameplate and in-
to provideprotectionfromelectrical shock, bar to the right end. Install the center sert to the handles and installthem on
Do not use an adapter plug or extension hinge and spacer on the left end of the opposite handles as shown.
cord. the divider bar the same way it was 22. Invert the handles and install on oppc-
installed on the right end. Tighten site sides of the doors as shown.
3. Unplugrefrigeratorbeforecleaningtheinteri-
or, the condenseror replacinglight bulb. both screws until they are just snug,
then turn them one-half turn more.
4. Remove the doors from out-of-use re-
frigerator. Prevent a child from becom- 10. Pry the plug cover from the plastic
ing accidentally trapped and suf- bushing at the top of the lower door
focating, and press into the plastic bushing on .,..A.EM.AT=.......
the opposite side of the door.
CHANGING 11 Remove the base grille by grasping at
both endsand pulling itstraight out.
REVERSIBLE 12 Remove the lower hinge and spacer.
DOORS 13. Rotate the lower hinge counterclock-
wise 90° and install it (including 23. To replacethe base grille, line up itsspr-
This refrigerator has been built with the spacer) to the left leg of the cabinet, ing clipswith the squareopenings inthe
doors hinged on the right. If you wish to cabinet and tap each end in until the
hinge the doors on the left, follow these in- NOTE: It will take extra effort to install the grille locks in place.
structions. If it becomes necessary to return screws. The screws are self tapping and
the hinges to the right side, merely trans wil_havetocutthreadsinthescrewholes. 24. Replace all food and return the fresh
poseallreferencesto"right'and"left'" ____,__ food control to its usual operating poem-
when following these instructions, tion.
TOO,SREOUIREB AVOID
Phillips screwdriver UNNECESSARY
End wrench (5/16")
Hex-head socket screwdriver (5/16")
Putty knife SERVICE CALLS
14. Pull the metal hinge pin from the side BEFORECALLINGA TECHNICIAN, CHECK
CHANGING BOORS of the lower hinge and place it, in- THE FOLLOWING LIST FOR POSSIBLE
1. Turnthe fresh food control to OFF,unplug cluding the spacer washer, into the top TROUBLES THAT YOU CAN REMEDY
the refrigeratorandremoveallfoodfromthe hole. WITHOUT DIFFICULTY.
interior. 15. Pry out the two screw hole plug buttons
on the bottom left side of the top door NOISY OPERATION
2. Remove the handles from the doors and lower door. Press in the plug but- • Fan noise--normal air flow.
and set aside. On the side of the doors tons in the holes on the right side of Defrost pan not positioned correctly
that you are going to install the hun- both doors. •
dies, remove the small round screw • Cabinet not level.
hole plugs with a table knife and press 16. Set the lower door on the bottom
them into the holes on the opposite hinge, making sure the hinge pin • Weak floor.
sideof the doors, entersthe bushingin the door bottom. • Dishes rattling against each other
Page 6

Additional motorsand controlsare usedto WATER ON FLOOR REFRIGERATOR RUNS TOO LONG
provide the improved performance of this UNDER CABINET • Modern refrigerators are larger and run
larger capacity refrigerator.Therefore, nor-
mal operating sounds may be more noticea- • Defrost pan missing or not positionedcor- colder, which requires more runningtime
hiethan on the model it replaced, rectly • Prolonged door openings
• Water connection loose on water valve • Control set too cold
SIZZLING SOUND IN FREEZER • Condenser needs cleaning
• Normal sound caused by defrost water FOODS DRY OUT • Poor air circulation around condenser
dripping on defrost mechanism
(FRESH OR FROZEN)
• Packages not wrapped or sealed properly REFRIGERATOR WON'T RUN
ICE CUBES EVAPORATE • Crisper not tightly closed • Temperature control turned to OFF.
• Cold air moving over ice cubes causes • Line cord not plugged in.
cubes to shrink when not used regularly MoIErURE COLLECTS ON • No power at electrical outlet.
OUTSIDE SURFACE * Housefuseblownorcircuitbreakertripped.
WARM AIR FROM • Hot humid weather increases condensa-
CABINET BoI-rOM tion. As humidity decreases, moisture will AUTOMATIC ICE MAKER
• Normal air flow for condenser disappear. NOT OPERATING
• Check EnergySaverControl position • Stop arm in OFF position
• Water supply turned off
CABINET VIBRATES ODOR IN CABINET • Water pressuretoo low
• Cabinet not level • Odor producing foods should be covered • Freezer too warm
• Weak floor • Interior needs cleaning
FRESH FOOD COMPARTMENT • Defrost pan needs cleaning CABINET LIGHT NOT WORKING
• Bulb burned out
TOO COLD • No power at outlet
• Refrigeratorcontrolset too cold
WATER IN FRESH FOOD
FRESH FOOD COMPARTMENT COMPARTMENT BO'rFOM
TOO WARM • Cabinetnot,eve, IF YOU
NEED
• Refrigerator control set too warm • Drain tube plugged SERVICE
• Freezer control set at coldest position
• Prolonged door openings REFRIGERATOR RUNS TOO The model number, serialnumber, and bill
FREQUENTLY of material (BM) number of your model are
listedon a serial plate. The serial plate is Io-
FREEZER COMPARTMENT • Frequent running provides more stable cated at the upper left front corner of the
TOO WARM temperatures lower liner, Refer to all of these numbers in
• Freezer control set too warm • Too many door openings any correspondencewith your dealer or dis-
• Prolonged door openings • Prolonged door openings tributor concerning your model
The manufacturer,whose policy isone of continuous product development, reservesthe right to change specifications without notice.
Printed ;n U. S.A. 106455-1
 Loading...