

Page 1

Care
Instructions for your Electric Range with "T" Clock
(ELECTRONICCONTROLLER)
CONTENTS
SAFETY INSTRUCTIONS ................... 1-3 Commonbakingproblemchart ................ 8
ELECTRONIC CONTROLLER .................. 4
USINGYOUR COOKTOP ................... 5-6
Surfaceelements .......................... 5 SELF CLEANING OVEN ..................... 11
Dripbowls ................................ 5
Controlknobs ............................. 5 MAINTENANCE ............................ 12
Signallights............................... 5 Lightreplacement ......................... 12
Cookingtips .............................. 5 Storagedrawer ........................... 12
Utensils .................................. 5 Oven door ............................... 12
Heatsettings .............................. 6 Leveling legs ............................. 12
USING YOUR OVEN ....................... 7-9 CARE AND CLEANING CHART ............... 13
Oven characteristics ........................ 7
Fan ..................................... 7 SERVICE .................................. 14
Oven racks ............................... 7 Troubleshooting ........................... 14
Preheating ................................ 7
How to bake or roast ........................ 8 WARRANTY ............................... 15
Howto broil ............................... 9
AUTOMATIC OVEN COOKING ................ 10
Fuses(Canada only) ....................... 14
8112P092-60
(7/91)
Page 2

GUsc
Care
Instructions for your Electric Range with "C" Clock
CONTENTS
SAFETY INSTRUCTIONS ................... 1-3 Howto bake or roast ........................ 8
FEATURES ................................. 4 Howto broil ............................... g
Clockand timer ............................ 4
Automaticovencooking ..................... 4 CONTINUOUS CLEANING OVEN .............. 10
Eye leveloven ............................. 4
USING YOUR COOKTOP ................... 5-6
Surface elements .......................... 5 MAINTENANCE ............................ 12
Dripbowls ................................ 5 Oven light ............................... 12
Controlknobs ............................. 5 Storagedrawer ........................... 12
Signal lights............................... 5 Ovendoor ............................... 12
Cookingtips .............................. 5 Levelinglegs ............................. 12
Utensils .................................. 5
Heat settings.............................. 6
Commonbaking problemchart ................ 8
SELF CLEANING OVEN ..................... 11
CARE AND CLEANING CHART ............... 13
USING YOUR OVEN ....................... 7-9 SERVICE .................................. 14
Ovencharacteristics ........................ 7 Troubleshooting........................... 14
Oven indicatorlight ......................... 7 Fuses(Canada only) ....................... 14
Ovenracks ............................... 7 WARRANTY ............................... 15
Preheating................................ 7
8112P090-60
(7/91)
Page 3

SAFETY INSTRUCTIONS
Informationin the Safety Instruction section covers all STORAGE IN, ON OR NEAR APPLIANCE - Do not
electriccooking appliances. You may find some infor- storeor use gasolineor other flammable materials, va-
marion that does not pertain to your particular appli- porsandliquidsintheoven, nearsurfaceunitsorinthe
ance. Please review this section before using your vicinity of this or any other appliance. The fumes can
cooking appliance, create a fire hazard or explosion. Do not use cooktop
or ovenas astorage areafor foodorcookingutensils.
The following instructionsare basedon safety consid-
erations and must be strictly followed to eliminate the
potentialrisks offire, electric shock, or personalinjury. DO NOT USE WATER // ( (f r-""""'_
PROPERINSTALLATION- Besureyour appliance is use dry chemical or
properly installed and grounded by a qualified techni- foam-type extinguisher, _'_-r_
clan. if available or sprinkle
NEVER USE YOUR potholders on hot surfaces may result in burns from
APPLIANCE FOR steam. Do not let potholder touch hot heating ele-
WARMING OR HEAT- merits. Do not use a towel or other bulky cloths.
ING THE ROOM.
ON GREASE FIRES -
Smother fire or flame or
heavily with baking soda.
USE ONLY DRY POTHOLDERS - Moist or damp
SURFACE COOKING UNITS:
USE PROPER PAN SIZE - This appliance is
equipped with one or moresurface elements of differ-
STORAGEABOVERANGE-To eliminatethe hazard ent sizes. Select utensils having flat bottoms large
ofreachingover hotsurface elements,cabinet storage enough to cover the surface element. The use of un-
should not be provided directly above a unit. If pro- dersized utensils will expose a portion of the heating
vided, storage should be limited to infrequently used elementto direct contact and may result in ignition of
itemsthat can besafely stored in an area subjected to clothing. Proper relationship of utensil to element will
heat. Temperatures may be unsafe for some items also improve efficiency.
such as volatile liquids,cleaners, or aerosol sprays. If
cabinet storage is provided, installation of a range ,,_ ,/
hood that projects at least 5-inches beyond the bot- NEVER LEAVE SURFACE
tom of the cabinet will reduce the hazardsassociated UNITS UNATTENDED AT ] _ I J!l\
with such storage. HIGH HEAT SETTINGS - [ _ _ jJ.J
Boilover causes smoking F_'_-_,_
APPAREL - may ignite. /
Loose-fitting or
hanging garments
should never be MAKE SURE DRIP BOWLS ARE IN PLACE - Ab-
worn while using sence of these bowls during cooking may subject wir-
_WEAR PROPER and greasy spillovers that l _ I_
the appliance, ing or components underneath to damage.
I .Z!
USERSERVICING - Donot repairorreplaceany part PROTECTIVE LINERS - Do not use aluminum foil to
of the appliance unless specifically recommended in linesurface unit drip bowlsoroven bottoms,except as
the Use and Care Book. All other servicing should be suggestedin the Use andCare Book. Improper instal-
referred to a qualified technician. Always disconnect lation of these liners may result in a risk of electric
unitor cut-off powerto unitbefore any servicing, shock, or fire.
--'1--
Page 4

SAFETY INSTRUCTIONS
GLAZED COOKING UTENSILS - Only certaintypes VENTILATING HOODS:
of glass, glass/ceramic, ceramic, earthenware, or CLEAN VENTILATING HOODS FREQUENTLY -
otherglazed utensilsaresuitablefor range-top serv- Grease should notbe allowedto accumulateon hood
icewithoutbreakingduetothesuddenchangeintern- or filter.When flamingfoods underthe hood,turnthe
perature, fan off. The fan, ifoperating,mayspreadthe flame.
IMPORTANT SAFETY NOTICE AND WARNING
UTENSIL HANDLES TheCaliforniaSafeDrinkingWaterandToxicEnforce-
TURNED INWARD norof California to publish a list of substances known
AND NOT EXTEND to the State of California to cause cancer or reproduc-
OVER ADJACENT tive harm, and requiresbusinesses to warncustomers
SURFACE UNITS - of potential exposures to such substances.
To reduce the risk of
burns, ignition of flam- Users of this appliance are hereby warned that when
_ _ SHOULD BE mentAct of1986 (Proposition65) reqairesthe GOVer-
tentienal contact with the utensil, the handle of a uten- substances, including carbon monoxide. Exposure to
sil should be positionedso that it is turned inward, and these substances can be minimized by properly vent-
does not extend over adjacent surface elements, ingthe applianceto the outdoors duringthe self-clean
DO NOT SOAK REMOVABLE HEATING ELE-
MENTS - Heating elements should never be im- DEEP FAT FRYERS:
mersedin water. Immersingelement in water would Useextremecautionwhenmovingthegreasekettleor
damage insulatingmaterialinsideelement, disposingofhot grease.
mable materials, and the appliance is engaged in the self-clean cyclethere
spillage due to unin- may besome low-level exposure to some ofthe listed
cycle.
DO NOT TOUCH SURFACE ELEMENTS OR OVEN
OVENS: ELEMENTS, AREAS NEAR ELEMENTS OR INTE-
USE CARE WHEN OPENING DOOR - Let hotair or RIOR SURFACES OF OVEN - Elementsmay be hot
steamescape before removingor replacingfood. eventhoughthey are darkincolor. Areasnearsurface
elements and interior surfaces of oven may become
DO NOT HEATUNOPENED FOOD CONTAINERS - hot enough to cause burns. During and after use, do
Build-up ofpressure may causecontainerto burstand not touch or let clothing or other flammable materials
result in injury, terior surfaces of oven until they have had sufficient
KEEP OVEN VENT DUCTS (located under rear ele- faces facing the cooktop, ovenvent opening and sur-
ment; rear corner of cooktop;between oven door and faces nearthis opening, oven door, andovenwindow.
control panel of wall oven or on backguard) UNOB- Also, do not allow aluminum foil, meat probes or any
STRUCTED. Blockage of vent prevents proper oven other metal object, other than a utensil on a surface
aircirculation and will affect oven performance. Avoid element, to contact heating elements.
touching oven vent area while oven is on and for sev-
eral minutesafteroven isturned off.Some parts of the ANTI-TIP BRACKET:
vent and surrounding area become hot enough to WARNING: To reduce the risk of tipping of the appli-
cause burns, ance from unusual usage or by excessive loading of
PLACEMENTOFOVEN RACKS-Always placeoven properly installed anti-tip device. To check if device is
racks in desired location while oven is cool. If rack installed properly: Use a flashlight and look under-
mustbe moved while hot, use care to avoid contact of neath range to seethat one of the rear levelinglegs is
potholder with oven element, for cleaning, be sure anti-tip device is engaged when
contact heating elements, areas near elements or in-
timeto cool. Among theseareas are the cooktop, sur-
the oven door, the appliance must be secured by a
engaged inthebracketslot.When removingappliance
rangeisreplaced.The anti-tip devicesecures the rear
leveling leg to the floor, when properly engaged.
-2-
Page 5

SAFETY INSTRUCTIONS
ADDITIONAL INFORMATION:
After appliance is installed, be certain all packing ma- ATTENTION: NE LAISSER AUCUN ALIMENT, US-
terials are removed from the appliance before operat- TENSILE DE CUISINE, ETC., DANS LE FOUR
ing the unit. If appliance is installed near a window, DURANT LE CYCLE D'AUTONETTOYAGE.
take steps to prevent curtains from blowing over sur-
face elements creating a fire hazard. On some models, a fan should be heard during the self
clean cycle. Ifnot, cancel clean cycle and call a serv-
Care should be given to location of appliance. Be sure iceman before self cleaning again. (Refer to CON-
floor covering under appliance, walls adjacent toappli- TENTS on front cover for location of self clean instruc-
ance, cabinetry adjacent toappliance, and other mate- tions and fan information.)
rials adjacent to appliance can withstand prolonged
heat. This is a heavy appliance and can settle intosoft SMOOTHTOP COOKTOP:
floor coverings such as cushioned vinyl. Use care Do not cook on broken cooktop. If cooktop should
when moving range on this type of floor covering, break, cleaning solutions and spillovers may pene-
trate the broken cooktop and create a risk of electric
shock. Contact a qualified technician immediately.
Do not place excessive used to wipe spills on a hot cooking area, be careful to
weight on an open oven avoid steam burn. Some cleaners can produce nox-
_' _ door or stand on an open ious fumes if applied to a hot surface.
I
oven door as, in some
cases, it could cause the DO NOT LEAVE CHILDREN ALONE - Children
range to tip over, break- should not be left alone or unattended in area where
age of the door or serious appliance is in use. They should never be allowed to sit
injury, or stand on any part of the appliance. CAUTION: Do
_ _,_ OVEN DOOR Clean cOoktep with cautiOn" If a wet sponge or clOth is
CIRCUIT BREAKER OR FUSE - Locate and mark an appliance or on the backguard of a range.
breaker or fuse. Never replace a blown fuse or reset a
not store items of interest to children in cabinets above
Always replace a blown fuse with one of the correct ance to reach items could be seri- "/
amperage, do not use a substitute, ously injured. Children must be
taught that the appliance and
CONTROL KNOBS - Turn off control at the comple- utensils in or on it can be hot. Chil-
tion of a cooking operation, dren should be taught that an ap-
pliance is not a toy. They should
not be allowed to play with con-
SELF CLEANING OVEN: trois or other parts of the unit.
breaker until you know what has caused the problem. Children climbing on the appli- __ (
Do not clean door gasket. The door gasket is essential
for a good seal. Care should be taken not to rub, dam-
age, or move the gasket. Do not use oven cleaners or
oven liner protective coating of any kind in or around
any part of the self clean oven. Clean only parts listed
in this booklet. Before self cleaning the oven, remove
broiler pan, oven racks, and other utensils.
CAUTION: DO NOT LEAVE FOOD OR COOKING
UTENSILS, ETC., IN OVEN DURING THE SELF
CLEANING MODE OF OPERATION. -- SAVE THESE INSTRUCTIONS -
-3-
Page 6
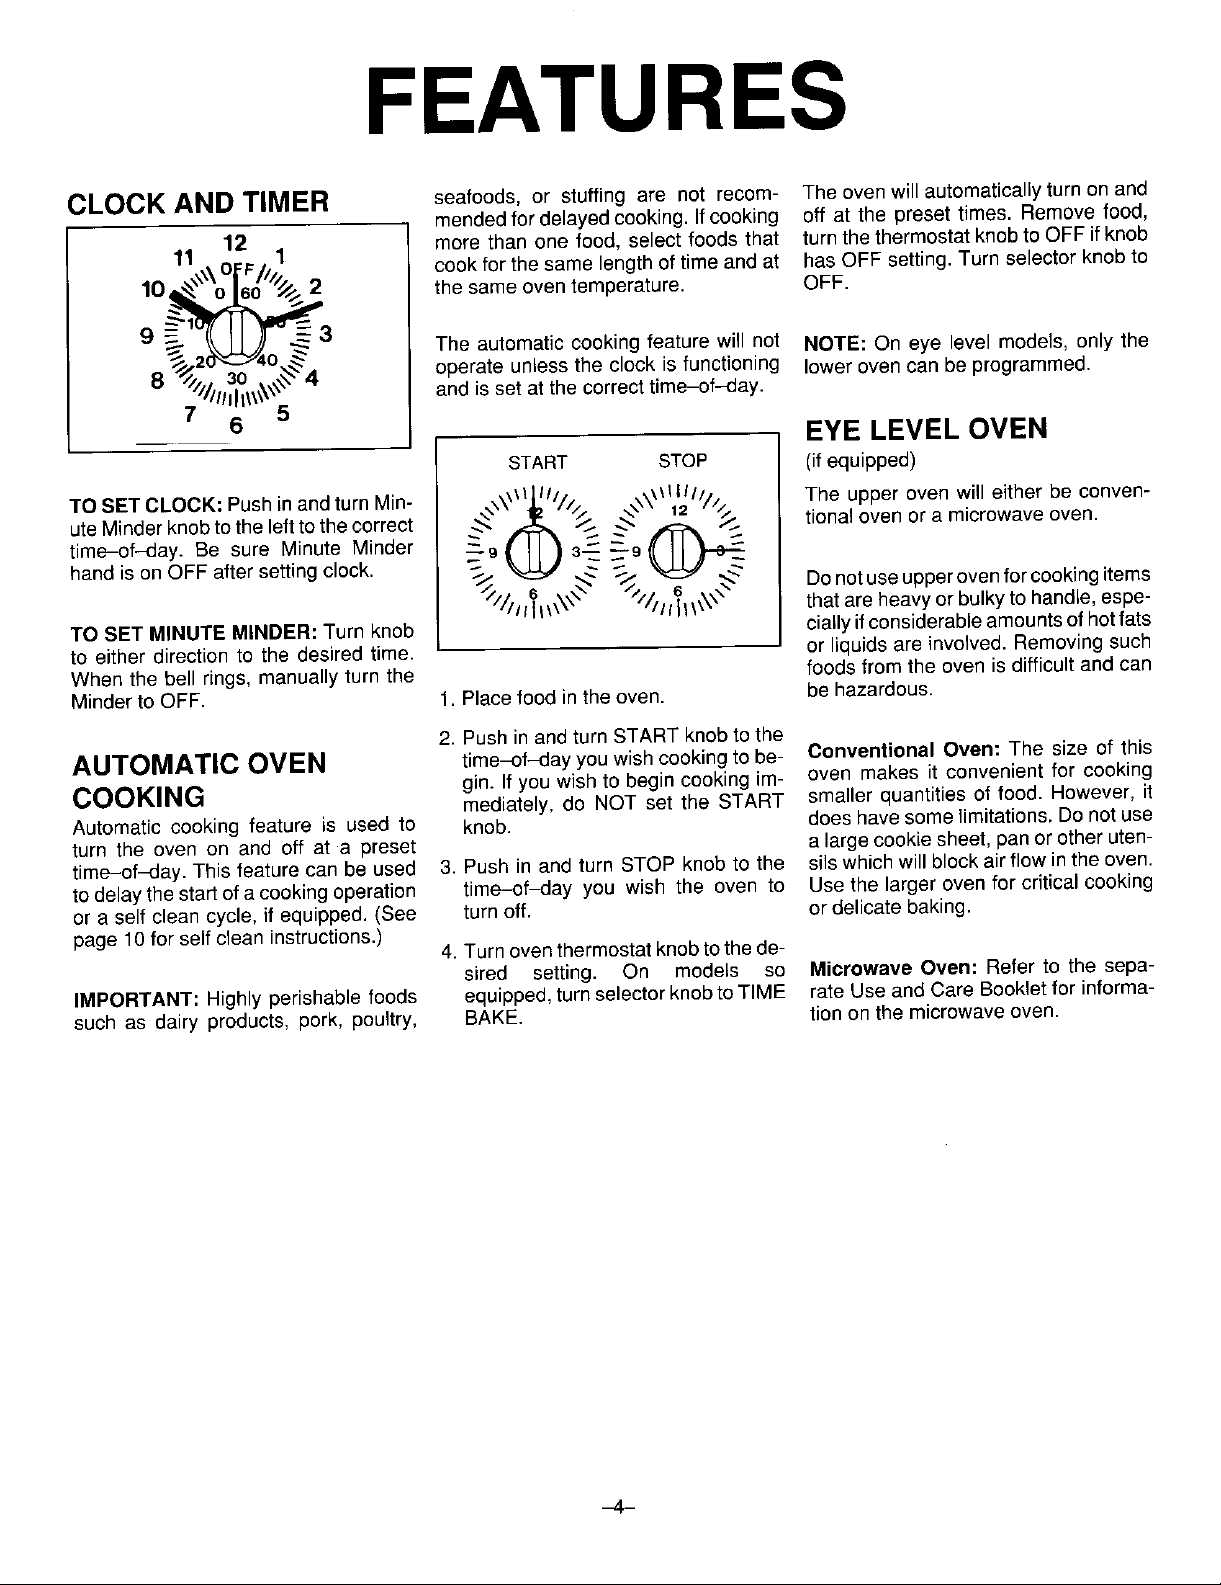
FEATURES
CLOCK AND TIMER seafoods, or stuffing are not recom- The oven will automatically turn on and
mendedfor delayedcooking. Ifcooking off at the preset times. Remove food,
12 more than one food, select foods that turn the thermostat knob to OFF ifknob
11 o 1 cook for the same length of time and at hasOFF setting. Turn selector knob to
10_//_'_,_ the same oven temperature. OFF.
9 =_'1 =
_1_ The automatic cooking feature will not NOTE: On eye level models, only the
8 //////. 30 &\_,',:4 and is set at the correcttime-of--day.
/1111t_\_
7 6 5
TO SET CLOCK: Push in andturn Via- ,._\\',_J_ll//,=,/ -,.-,='\\"_11_////// The upper oven will either be oonven-
time-of-day. Be sure Minute Minder
uteMinderknobto theleftto the correct _",;9_/,_ 3_.__'_9_ tionaloven or a microwave oven.
hand is on OFF aftersettingclock. ,. _ .. _. _ <.,
TOSET MINUTE MINDER: Turn knob ciaily ifconsiderableamounts of hotfats
to either direction to the desired time. or liquids are involved. Removing such
When the bell rings, manually turn the foods from the oven is difficult and can
Minder to OFF. 1. Placefood in the oven. be hazardous.
3
,_ operate unless the clock is functioning loweroven can be programmed.
EYE LEVEL OVEN
START STOP (ifequipped)
-'< _ -"-. Do notuseupperovenforcooking items
"_//I II_,,s, "//I hI\x, that are heavyor bulkyto handle,espe-
2. Push in and turn START knob to the
AUTOMATIC OVEN time-of-day youwish cooking to be- Conventional Oven: The size of this
gin. If you wish to begin cooking im- oven makes it convenient for cooking
COOKING mediately, do NOT set the START smaller quantities of food. However, it
Automatic cooking feature is used to knob. does have some limitations, Do not use
turn the oven on and off at a preset a large cookie sheet, pan orother uten-
time-of_lay. This feature can be used 3. Push in and turn STOP knob to the sils which will block airflow in the oven.
to delaythe start of a cooking operation time-of_lay you wish the oven to Usethe larger oven for critical cooking
ora self clean cycle, if equipped. {See turn off. or delicate baking.
page 10 for self clean instructions.)
IMPORTANT: Highly perishable foods equipped,turn selectorknob to TIME rate Use and Care Booklet for informa-
such as dairy products, pork, poultry, BAKE. tion on the microwave oven.
4. Turn oven thermostat knobto the de-
sired setting. On models so Microwave Oven: Refer to the sepa-
_4-
Page 7

USING YOUR COOKTOP
SURFACE ELEMENTS Drip bowls will turn blue or gold over Never let a pan boil dry as this could
................................................... timeor ifoverheated.Thistypeofdiscol- damage the utensil and the appliance.
_ _para_ _ e_!( yo_ ra_g_
_atu_ ei_ _i_ _!_ __ _ orationis permanentand will not affect
cookingusing highperformance,settingsforTolongprevent,periodsavoidof UTENSILS
time. Reduce to a lower setting once Cookingperformanceisgreatlyaffected
Surfaceelementsare self cleaning.Do food begins cooking.Also, do not use by the type of utensils used. Utensils
not immerseelements in water. When oversized utensils.Utensil should not SHOULD HAVEA FLAT BOTTOM.The
an elementis turnedon, it willcycleon extendmorethan2 inchesfromtheele- flat bottomallowsgoodconductivitybe-
andoff to maintainthe heatsetting, ment. tween the utensil and the element to
To remove: Raise element WHEN CONTROL KNOBS ergy.
COOL and carefully pull out and away Your cooktop is equipped with control
fromthe receptacle, knobs that provide an infinite choice of
settings from LOW to HIGH. The knob n
provideuniformcookingresults,faster
heating and moreefficient use of en-
tingsorbetweenthe numberedsettings.
To operate push in and turn knob to the
desired setting.
can be set onany of the numbered set-
To replace: Insert the terminals on the
element into the receptacle. Gently lift Ranges are equipped with one to four utensil with a badly curved bottom will
up on outer edge of element (opposite signal lights to indicate when a surface notmakegoodcontactwiththeelement
terminal-side of element) while insert- element is on. The light will remain on and may not get enough heat to bring
ing terminals into receptacle. Gently until the element is turned off. After a water to a boil.
press down on outer edge of element cooking operation, besureelement and
until element sits level on drip bowl. signal light are off.
SIGNAL LIGHTS result in slower, less even heating. A
Utensils with uneven, warped, or
grooved bottoms do not make good
contact, reduce heat conductivity and
M
P----J
DRIP BOWLS, ifequipped TIPS FOR I
The dripbowls,locatedundereachsur- SUCCESSFUL COOKING
faceelement,aredesignedtocatchany Food will not cook any faster when a
spillsor boilovers, higherheatsetting isusedthan needed
tomaintaina gentleboil.Water boilsat
Be sure drip bowls are in place. Ab- the same temperature whetherboiling
sence of these bowls duringcooking gentlyor vigorously.If a highsettingis
maysubject wiringor component parts used, excessive spattering will occur
underneath the cooktop to damage, andfood may stickor burn onto the bot- Fitthe size of the utensil to the size of
Clean after each use with soap and across two elements may trap enough
water. Remove stubborn stains with Use a higher heat setting to bring liquid heat tocause damage to the cooktopor
baking soda paste and plastic scouring to a boil or to begin cooking, then re- elements.
pad.To prevent scratchingthefinish,do duce to a lower setting. Never leave
not use abrasive cleaning agents, food unattended during a cooking Do not use woks equipped with round
Rinse, dry and replace, operation, metal rings.The ring,which isdesigned
To prevent risk of electric shock or fire, Always place utensil onthe surface ele- will trap heat and may damage the ele-
donotlinedripbowlswithaluminumfoil. ment before turning element on. ment and the cooktop.
tom of the utensil, the element. This conserves energy.
Oversized utensils or utensils that rest
to support the wok above the element,
-5-
Page 8

USING YOUR COOKTOP
CANNING When canning, use the HIGH setting Stainless Steel is a poor heat conduc-
Acceptable water-bath or pressure just until water comes to a boil or pres- tor and develops hot spots. Ifcombined
canners should not be oversized and sure is reached in the pressure canner, with other metalssuchasaluminum and
must have a flat bottom. The following Then, reduce to the lowestheat setting copper, however, they will evenly dis-
are not recommended: Canners with that maintains the boil or pressure, tribute heat. Use for cooking functions
ridged bottoms, oversized canners similar toaluminum.
(2-inches larger than the surface ele-
ment) or a very large canner that rests Prolonged use of the HIGH setting, or Cast Iron utensils are slow to heat but,
ontwo surface elements, the use of incorrect canning utensils cook more evenly once temperature is
produce excessive heat. Excessive reached. Use for long term, low heat
heat can cause permanent damage to cookingor for browning and frying.
_ _ _ theporcelain cooktop,surface element
J
-_. and the drip bowl. Glass ceramic, earthenware,
Characteristics of Utensil Materials: facturer for range top cooking. Best
evenly.Best suitedforsimmering, brais-
ing,boiling andfrying. Do not usewhen
,_ _ Aluminum utensils heat quickly and used on low to medium heat settings.
cooking acid based foods such as spa- Follow manufacturersdirectionsfor use
ghetti sauce, on surface elements.
heatproofglassor glazedutensilscan
be used if recommendedbythe manu-
SUGGESTED HEAT SETTINGS
Usethefollowingchartas aGUIDELINEuntilyoubecomemorefamiliarwithyourcooktop.Keepinmindthatdifferenttypesof
utensilmaterialsrequiredifferentheatsettingsforthe samecookingoperation.Wesuggestthatyouexperimenttofindthe heat
settingthat best suits your particular cooking needs. Information in the chart is basedon heavy gauge aluminum cookware.
Lowerthe heat setting if using stainless steel, cast iron utensils or glassware designed for surface cooking.
HI To bring liquidto a boil, blanch, preheat skillet, or bring pressure up in pressure cooker. (Note:
Alwaysfollow instructionsinpressure cooker use/carebook.)Always reducetoa lower heat set-
ting when liquids just begin to boil or food begins to cook.
LO To keep foods warm before serving.
NOTE: Referto utensil manufacturer's recommendations for suggested heatsettings. Some manufacturers do not recom-
mend the useof HIGH or the use of HIGH for extended cooking operations.
-6-
Page 9

USING YOUR OVEN
OVEN OVEN INDICATOR LIGHT
CHARACTERISTICS TheOVENindicatorlight,locatedonthe
Eve_ ove_ _ !_ _ _act_ris whenever the oven is turned on. When
_ YO_ _ay _i_d_ _ _l'J_g the oven reaches the preset tempera-
__ _ _m_at_e_ _ we_ ac ture, the indicatorlight turns off andthen
_st_ to_!_h_ _ev _ _g_ cycles on and off as the oven elements
_ay _d t_ b_ _lt_e_ _l_tly _i_h cycle on and off.
OVEN CONTROLS and off, the oven indicator light will turn
_ Ifcooking on tworacks, staggerpans so
THERMOSTAT SELECTOR the oven.
backguard or control panel turns on
On some models, the indicator light is __
controlled by the thermostat knob. ,/
When the thermostat knob isturned on /
on and off.
OVEN RACKS 4, depending on results, when cooking
The two oven racks aredesigned with a ontwo racks.
"lock-stop" position to keep racksfrom
accidentally coming completely out of
HINTS:
one is not directly over the other. Use
rackpositions 1and3, 2and4, or 1 and
_ies o_biscuits us_ _ne rack P_
TOremove: Be sure rack is cool. Pull _d _ _ve_ _d_ _ adj_e_ _@_
TheTHERMOSTATknob is used tose- rack out to the "lock-stop" position. Tilt
lectand maintaintheoventemperature, up and continue pulling until rack re-
Always turn this knob just TO the de- leases. NEVERplace pans directly on the oven
sired temperature not to a higher tem- bottom.
peratureand then back, Turn this knob
to OFF, if knob has an OFF setting,
wheneverthe oven is not in use. To replace: Place rack on rack sup- Do not cover entire rack with aluminum
ports, tilt up and push toward rear of foil or place foildirectly under utensil.To
oven. Pull rack out to "lock-stop" posi- catchspillovers, cut a piece offoil a little
The SELECTOR knob determines the tiontobesurerackis correctly replaced, larger than the pan and place it on the
typeof oven operation. This knob is la- sil.
beledOFF,BAKEand BROIL.Turnthis
knob to desired setting. Each setting is RACK POSITIONS:
identified by an indent (stop) and a PREHEATING
"click"sound. RACK 1 (top of oven) used for broiling
thinfoods. Preheating is necessary for baking. Al-
RACK 2 used for one-rack baking or fore adding food. Preheat broil element
To turnthe oven on, both the Thermo- broiling thicker cuts of meat. for5 to 10minutes if darker browning is
stat and Selector knobs must be set. RACK 3 usedformostone-rack baking desired or if broiling thin (3/4-inch)
The ovenwill notoperate ifthe Selector and for roasting some meats, meats. It is not necessary to preheat
knob is left in the OFF position.To turn oven for roasting.
theoven off, turnboth knobsto the OFF RACK 4 used for roasting large meats,
position. NOTE: Some thermostat cooking larger foods and for baking an-
knobsdo not have an OFF setting, gel food cake or pie shells. Selecting temperature higher than de-
rackbelowthe rackcontaining the uten-
lowovento heat for 10to 15minutesbe-
sired will NOT preheat the oven any
faster. Preheating at a higher tempera-
ture may have a negative effect onbak-
ing results.
-7-
Page 10

USING YOUR OVEN
HOW TO BAKE OR knob to BAKE. sary. Remove food from the oven and
3. Place food incenter of oven, allowing turn oven thermostat and selector to
ROAST a minimum of 2 inches between uten- OFF.
1. When cool, position rack in oven de- sil and oven walls. If you have carefully followed the basic
pending on what you are baking. 4. Check food for doneness at minimum instructions and still experience poor re-
2.To set oven: Turn thermostat knob to time in recipe. Cook longer if neces- suits, these suggestions may be helpfuh
desired temperature and the selector
COMMON BAKING PROBLEMS AND WHY THEY HAPPEN
Cakesare uneven. Pans touching each other or Cakes don't brown on top. Incorrect rack position.
Cake high in middle. Temperature set too high. Excessiveshrinkage. Too little leavening.Overmixing.
Cake falls. Too much shortening or sugar.
Cakes, cookies, biscuits Incorrect rack position.
don't brown evenly. Oven door notclosed properly. Cakes crack on top. Batter overmixed.
_ t_ _,_a_eono_i_ck I_bakngcakeson I Pan too small.
_]a_eP_s _w_rd free'of _ve__ U_P_ rack I Bakingtime too short.
Cakes, cookies, biscuits too Oven notpreheated.
brown on bottom. Pans touching each other or
T ......... .... " ...... .... n.... ] Temperature too low at startof
rFo ow utensI manufacturers instructions for ove tem_ Pies have soaked crust.
oven walls. Temperature set too low.
Batter uneven in pans. Overmixing.
Temperature set too low or Too much liquid.
baking time too short. Pansizetoo large or too little
Oven not level, batter in pan.
Undermixing. Oven door opened too often.
Too much liquid.
Baking time too long. Pan too large.
Overmixing. Temperature set too high.
Too much flour. Bakingtime too long.
Panstouching each other or Panstoo close to each other
oven walls, or oven walls.
Incorrect rack position.
Uneven texture. Too much liquid,
Too much or too little liquid. Undermixing.
Temperature set too low. Temperature set too low.
Old or too little baking powder. Baking time too short.
Pan too small.
Oven door opened frequently. Cakes have tunnels. Not enough shortening.
Added incorrect type of oil to Too much bakingpowder.
cake mix. Overmixing or at too high a
Added additional ingredients speed.
to cake mix or recipe. Temperature set too high.
Door gasket not sealing Temperature set too high.
properly. Too much leavening.
Incorrect use of aluminum foil. Incorrect rack position.
Oven not preheated.
Pans darkened, dented or
warped. Cake not done in middle. Temperature set too high.
_a_ditiooatingredientswere addedt0 mixor [eCipe,ex- ]
I pe_tCbe_ingtime iOincrease.
oven walls. Pie crust edges too brown. Temperature set too high.
Incorrect rack position. Pans touching each other or
Incorrect use of aluminum foil. ovenwalls.
Placed2 cookie sheets on one Edges of crust too thin.
rack.
Used glass, darkened, stained,
warped or dull finish metal Pies don't brown on bot- Used shiny metal pans.
pans. (Use a shiny cookie tom. Temperature set too low.
sheet.)
| Baker'_s_!et requ re fb_eriCgt_e Oven!empe_at_reby UsedFillingshinyt°°juicy.
peraturb; Giassware and da.rk_ten_iis such Ecko'_ t baking.
[ 25'_F, metal pans.
-8-
Page 11

USING YOUR OVEN
HOW TO BROIL Preheat broilelement 5 to 10minutes if
meats bydirect heatunderthe element.
The cooking time is determined by the TO BROIL:
distance betweenthe meatand the ele- 1. Preparemeatbyremoving excess fat
ment, the desired degree of doneness and slashing remaining fat, being
Br°iling is a method of co°king tender darker br°wning is desired" _ _
and the thickness of the meat. careful notto cut into meat. This will
help keep meatfrom curling. THERMOSTAT SELECTOR
Broilingrequiresthe use of the broiler 2. Place broiler pan on the recom-
pan and insert. The correctpositionof mendedrackposition.Forbrownex-
the insert inthe pan is very important, terior and rare interior, the meat
The broilerinsert shouldbe placed in shouldbeclosetotheelement.Place
the pan sogrease willdrain freely. Im- further down if you wish meat well 5. Follow suggested times on broiling
properuse may causegrease fires, done. chart. Meat should be turned once
3. Tosetoven:Turnboththethermostat about halfwaythrough cooking.
The broilerinsertCANNOT be covered and selectorknobstoBROIL. 6. Check alonenessbycutting a slit in
withaluminumfoil as this preventsfat If the range is equippedwith broiler meat nearcenter fordesiredcolor.
fromdrainingintopan below.However, shield,abovethebroilerelement,pull 7. Turn both the oven thermostat and
for easier cleaning,the broilerpan can the shieldoutas far as itwillextend, selectortoOFF, ifknobhasOFF set-
belined with foil. Do not usedisposable 4. Broiling should be done with oven ting, after cooking. Broil times may
broiler pans. They do not provide a dooropenedtothebroil"STOP"posi- need to be increased if range is in-
separatetray. tion (opened about 4 inches.), stalled on a 208-volt circuit.
BROILING CHART
STEAKS 2 rare 12 to 14 min.
1-inch medium 16to 18 rain.
well 19to 21 min.
HAMBURGER 2 rare 10to 12min.
3/4to l-INCH medium 12to 15 min.
well 15 to 18 min.
FISH FILLETS
Fresh 2 flaky 10 to 15 min.
Frozen 2 flaky 15 to 20 min.
BACON 1 well done 6 to 8 min.
we i
--9--
Page 12

CONTINUOUS CLEANING OVEN (if equipped)
WHAT IS THE CONTINUOUS MANUALLY CLEANING HINTS
CLEANING OVEN? HEAVY SPILLOVERS Brittlecrusts or stainscan be loosened
The finish of the Continuous Cleaning The special finish will clean most spat- by GENTLY tapping stain with a
Ovenis identified by its dark gray color, ters during normal oven use unless wooden or plastic utensil. Brush away
whitestippleand rough,porous texture, there is a heavy buildup of soil. Heavy any loose soil that flakes off. Varnish
The rough texture prevents grease spillovers such as pie or casserole type stains usually need to be softened
spatters from forming beads which run boilovers will not clean effectively with- with a small amount of water or damp
down the walls leaving unsightly out some manual help. The crusty or cloth. Remaining soil wilr gradually re-
streaks. Rather, the rough texture ab- varnish-like stains that form fromthese duce with continued oven use at normal
sorbs spatters and allows them to spillovers clog the pores and prevent baking temperatures.
spread, thus exposing a larger area to the special finish from being exposed to
the hot oven air. The catalyst, when ex- the hot oven air. This greatly reduces
posedto heat, speeds the oxidation of the cleaning effectiveness of thefinish.
soil. DO NOT USE ANY TYPE OF OVEN
CLEANER, POWDERED CLEANS-
Cleaning action automatically begins Thesecrustyorvarnish-likestainsmust ERS, SOAP, DETERGENTOR PASTE
whenevertheoven is turned on for bak- either be removed or broken up before ON ANY CONTINUOUS CLEANING
ing or roasting.The oven MUST be on cleaning can effectively take place. SURFACE, ALSO, DO NOT USE ANY
for cleaning to take place. No cleaning ABRASIVE MATERIALS, STEEL
will occurwhenthe oven isoff.Thespe- WOOL, SHARP INSTRUMENTS OR
cial catalytic finish must be exposed to TO MANUALLY CLEAN SCRAPERS FOR THEY WILL DAM-
hot oven air before soil will begin to HEAVY SPILLOVERS AGE THE FINISH.
gradually reduce in size. Brush off heavy soil with a nylon brush
orplastic pad.DONOT USEpapertow-
FACTORSAFFECTING LENGTH OF els, cloths or sponges forthe oven walls
CLEANING TIME are porous and particlesof thesemate- Avoid spillovers by using utensils that
The higher the oven temperature, the with clear water only. sheet or pieceof aluminum foil,just a lit*
fasterthe cleaning action. The length of
cleaning time will depend on these fac- tie largerthan thepan,canbeplacedon
tors: Type ofsoil,amountor size ofsoil, the rack directly below the rackholding
oven temperature and length of time the utensil to catch spills.
oven is inuse.Time mayvaryfromafew
minutestoseveralhours.Soil deposited
at theend of a cycle maystill be visible.
This will usually fade with continued Over a period of time, wear marks may
oven use until the soil gradually disap- appearonthe embossed racksupports.
pearsor can be wipedup manually.The This is normal and results from sliding
oven will appear presentably clean, the racks in and out of the oven. Wear
eventhough some spattersmaybepre- marks will not affect the cleaning action
sent. of theoven.
rials will rub offonthe walls. Rinsearea are large enoughto hold food. A cookie
-10-
Page 13

SELF CLEAN OVEN equipped)
The self clean oven uses temperatures 3. Set cleaning time for up to 3 hours. As the oven heats and cools, you may
above normal cooking temperatures to Pushinand turn STOP knobahead 3 hear sounds of metal parts expanding
automaticallyclean the entire oven. hours. Besure START knob is in the and contracting. This is normal and will
OUT position, notdamage your appliance.
NOTE: On eye level models, only the
loweroven canbeselfcleaned. Referto
the cleaning charton page 13 for clean- START STOP AFTER SELF CLEANING
ing instructionsfor the upper oven. \\,,_Jll//, .,\_1111/;
' _",'_ _',\\ 12 ///i About one hour after the clean cycle is
BEFORE SELF CLEANING .... O _ gage, LOCK light will turn off and the
Rem_e ail_an_ f_m_ee_e_ B_ks I_ -_ "_ _ (unlocked)position. Do not attempt to
n_tsiid_aSilya_er_iea_n_ ////rh_\ \\: /mh_\k\ unlock door until lock light has
............ turned off. Door and latch will be
Clean oven frame, door frame and
aroundthe oven vent witha non-abra-
sivecleaning agent such as Bon Ami. Somesoilmay leavea lightgray,pow-
These areas are not exposed to clean- dery ash which can be removed with a
ing temperatures and should be damp cloth. If soil remains, it indicates
cleanedto prevent soil from baking on that the clean cycle was not long
during the clean cycle, enough.Thesoilwillbe removedduring
Wipe up excess grease or spillovers
from the oven bottomto prevent exces-
sive smoking during the clean cycle. If the oven racks do not slide smoothly
DO NOT USE OVEN CLEANERS OR DURING SELF CLEANING bossed rack supports with a small
OVEN LINER PROTECTIVE COAT- Itis normalfor the cooktop of the range of movement.
INGS OF ANY KIND ON THE SELF to become hot during a clean cycle.
CLEAN OVEN FINISH OR AROUND Therefore, touching the cooktop during
ANY PART OF THE OVEN. a self clean cycle should be avoided.
To preventdamage, do not clean or rub The oven automatically begins to heat realconditionresultingfrom heatingand
thegasket aroundthe front oven frame, upwhen thedoor is locked.As the oven cooling of the porcelain finish. These
The gasket is designed to seal in heat reaches cleaning temperatures, the lines do not affect the performance of
during the clean cycle. LOCK light will turnon. Atthis point, the the oven.
TO OPERATE SELF CLEAN Do not force latch to the left once the
1. Close door and movedoor lock lever lock light turns on.
to therightuntil itrests in the lock po-
sition. NOTE: On ranges equipped with a ce-
_s 3_ _-9 _ doorlatchcan be returnedto itsoriginal
oven door can not be manually opened.
ramicsmoothtoporaglasscooktopwith k_bS to QEE Ifthe EO_K g_t has
solid elements: a blower sound can be not td_ned_ _h_ _i_ve_ _
/-- _ ,#d:_ ;/ completed, the internal lock will disen-
damaged if the latch is forced to the
left before the lock light turns off.
the next clean cycle.
after a clean cycle, wipe racks and era-
amount of vegetable oilto restore ease
Fine, hair-like lines may appear in the
oven interiororoven door.This is a nor-
J I_ -_ heardduring the clean cycle.
2. Turn thermostat and selector knobs soiled, or if the broiler pan is left in the
to CLEAN. oven, smoke and odor may occur.
The first few times the oven iscleaned,
somesmokeandodor maybe detected.
This is normal and will reduce or disap-
pear with use. If the oven is heavily
-11-
Page 14

MAINTENANC
LIGHT REPLACEMENT OVEN DOOR DESIGN2
Before replacing light bulb, DISCON- Do not place excessive weight on an On some models, the oven door is
NECT POWER TO RANGE. Be sure open oven door or stand on an open equippedwith aspecial hingethat locks
bulbiscool.Do nottouch a hotbulbwith oven door as, in some cases, it could into place as the door is removed.
a damp cloth as the bulb may break, cause the range to tip over.
NON SELF CLEAN OVEN MODEL 1. Open door to the broil stop position
To replace oven light: Remove oven When opening oven door, allow steam (open about4-inches.)
racks. Oven bulb is protected with a and hot airto escape before reaching in 2. Grasp the sides of the door at the
metalperforatedscreen. Usea Phillips- ovento check, add or remove food. middle of the door. Slowly lift door
headscrewdrivertoremovetwoscrews straight up.
securing screen to back of oven. Use 3. As you lift the door up, very slightly
care not to damage capillary tube near opendoorbypullingdoortowardyou.
screen. Checkto be surelatches swing down
_'u- - intothe notcheson the hinge arms.
SELF CLEAN OVEN MODEL
To replace oven light: Remove 4
screwsand platesas illustratedbelow.
Use carewhen removinggasket, itmay
tear.
To remove door:
, DESIGN 1 1.Grasp sidesof doorand align slots in
To remove lift-off door: Open door to door with hinge arms.
the "stop" position (opened about 4 2. Very slightly pull door to a more
_, inches)and grasp door with both hands open position as you slide the door
_'_' _ To replace door:
Very carefully remove bulb with a dry 3. Gently push thedoor downward until
potholder to prevent possible harm to b. r___ --_--_F'C-/r __-- the door rests evenly on the hinges.
hands.Replacewitha40wattappliance _ _ Closedoor.
bulb.Reconnect powerto rangeand re-
setclock, if equipped. LEVELING LEGS
at each side. Do not use door handle to down onto the hinge arms. The slid-
liftdoor. Lift up evenly until door clears ing action of the door will disengage
the hinge arms.
the latches on the hinge arms.
some floors are not level. For proper
STORAGE DRAWER baking,your range mustbelevel. Level-
Thestorage drawer atthe bottomof the ing legs are located on each corner of
rangeis safe andconvenient for storing the base of the range. Level by turning
metal and glass cookware. DO NOT the legs.
store plastic, paperware, food or flam-
mable material in this drawer. Remove To replace door: Grasp door at each ]--rr j
drawer to clean under range, side, align slots in the door with the
_-_ l_.._ lI' onthe hingearms until completely seatedhinges.
hinge arms and slide door down onto
_._.__ k_.__ To prevent range from accidently tip-
_-""----J anti-tip bracket.
-12-
ping, range should be secured to the
floor by sliding rear leveling leg into an
Page 15

CARE AND CLEANING
iiiiiiiii_iiiiiiiiiiiiiiiiiiiiiiiiiiiiiiiiiiii!iiii!iiiiiiii_iiiiii_i!iiiiiii
PARTS
Broiler pan & in- Soap & water. Plastic Removefrom oven after use. Cool then pour off grease. Place soapy
sert scouring pad. Soap cloth over insert and pan; let soak to loosen soil. Wash in warm soapy
filled scouring pad. water. Use soap filled scouring pad to remove stubborn soil. Clean in
Control knobs Mild detergent&water. To removeknobs,gently pullforward.Wash in milddetergentandwater.
dishwasher if desired.
Donotuseabrasivecleaningagents.Theywill scratch finishand remove
markings.Rinse,dry and replace.Turn each elementONto see if knobs
have been replaced correctly.
Metal finishes: Soap & water. Pasteof Wash with soap and water. Remove stubborn soil with paste of baking
Aluminum- back- baking soda & water, soda and water. Do not use oven cleaner, abrasive or caustic agents.
guard base. They will damage the finish.
Chrome & stainless
steel- trim parts
Plastic finishes: Soap & water. Never useovencleaner, abrasiveor causticcleaning agents on vinyl fin-
Door handle ishes.
Backguardtrim
Silicone rubber Soap & water. Wash with soap. Rinse thoroughly. DO NOT REMOVE.
door gaskets (Non self clean models only.)
-13-
Page 16

SERVICE
PART ORALL OF YOUR Istherange plugdisconnected from the electricaloutlet? ,,Are house fuses blown
RANGE DOES NOT OPERATE or circuit breakers tripped? • Is the range plug loose or improperly plugged in?
Has power supplyto your home been interrupted? • Was oven properly set?
SURFACE ELEMENTS FAIL Is range plug disconnectedfrom the electrical outlet? • Check circuit breaker or
TO TURN ON OR HEAT FOOD fuse box fortripped circuit breakersorblownfuses. • Iselementproperly plugged
PROPERLY into receptacle? =Was incorrect utensil used? * For optimum results, utensil
SHOULD HAVE A FLAT bottom. See pages 5 and 6 for additional information.
(NOTE:Expectcookingtimes toincreaseifrangeisconnectedto 208volts). • Have
serviceman check element.
FOOD NOT BAKING SATIS- Are racks properly in place and in correct position for what you are baking? = Is
FACTORILY range level? =Are you using the proper pan? = Isit bright, not soiled or dark col-
ored? =Haveyou used foil incorrectly? =Are you using standard measuring uten-
sils? =Did you preheat if recommended? • Oven temperature is incorrectly set-
too low or too high. = See common baking problems chart on page 8.
OVEN DOES NOTOPERATE Is the range disconnected from the electrical power? =Was the Selector knob
turned to bake or broil? ° Was oven properly set?
OVEN LIGHT DOES NOT Is bulb loose or burned out?
WORK
SERVICE If you are not satisfied with the local re- as acourt ofappeals on consumer com-
Do not attempt to service the appli- sponse to your service requirements, plaints which have not been resolved
ance yourself unless directed to do call or write MAYCOR Appliance Parts satisfactorilywithin a reasonable period
so in this book. Contact the dealer and Service Company, 240 Edwards of time.
who sold you the appliance for serv- Street, S.E., Cleveland, TN 37311,
ice. (615) 472-3500. Include or have avail-
able the complete model and serial CANADIAN RANGES
numbersofthe appliance,thenameand ONLY
HOWTO OBTAIN address of the dealer from whom you
purchased the appliance, the date of Your range is equipped with seven (7)
SERVICE purchase and details concerning your type "P" fuses. The fuses are located
When your appliance requires service problem, acrossthe front storage drawer frame.
or replacement parts, contact your Open the storage drawer for access to
Dealeror Authorized Servicer. Useonly the fuses.
genuine factory or Maycor parts if re- If you did not receive satisfactory serv-
placementpartsare necessary. Consult ice through yourservicer or Maycor you If part of your range does not operate,
the Yellow Pages in your telephone di- may contact the Major Appliance Con- check to see if a fuse has blown. A gap
rectory under appliance for the service sumer Action Panel by letter including in the fuse strip or a darkened window
center nearest you. Be sure to include your name, address, and telephone indicatesablownfuse. Replacewiththe
your name, address, and phone num- number, aswell as the modeland serial same type and amperage type"P" fuse.
ber, along with the model and serial numbers ofthe appliance.
numbers of the appliance. (See front I /'1_ __"-
coverfor locationof your modelandse- MajorApplianceConsumerActionPanel ' LOCATIONOF
rialnumbers.) 20NorthWackerDrive ,_ 7FUSES
Chicago,
Ifyou are unable to obtainservice,write __
to us.Our address isfound onthe rating MACAP (Major Appliance Consumer
plate. Seefront coverfor location of rat- Action Panel) isanindependent agency
ingplate, sponsored by three trade associations
IL
606O6
-14-
Page 17

FULL ONE-YEAR WAR-R-TY
J DOMESTIC GAS OR ELECTRIC RANGE
JMaycor Appliance Parts& ServiceCompany will repairorreplace,withoutcharge,any part ofyour productwhichhasa"""
defectinmaterialorworkmanshipduring the first yearafterthe date ofthe original installation.Thiswarranty extends
to anyowner during the one-year warranty period.
LIMITED 5 YEAR WARRANTY
Onelectricrangesequippedwith soliddiscor smoothtop heatingelements, andongasrangeswith sealedburners,for
anadditional 4yearperiodbeyondthefirstyear ofthe generalcoverageofthiswarranty, Maycorwill replaceany ofthe
soliddisc or smoothtop heatingelements, or sealed burnerswhich failto heat asa resultof defective workmanship or
material. Additionally, Maycor will replace any smoothtop cooking surface which cracks or breaks during normal
householdcooking. These parts must beinstalledby aqualified person.Anylaborcharge requiredfor replacement is
notcovered by this warranty.
HOW TO OBTAIN SERVICE
To obtain the repair or replacement of a defective part under these warranties,you should contact the dealer from
whom you purchased the appliance or a servicer he designates.
WHAT IS NOT COVERED BY THESE WARRANTIES
1. Conditions and damage resulting from improper in- 5. Any product used for other than normal household
stallation, delivery, unauthorized repair, modifica- use. It does not extend to products purchased for
tion,or damagenotattributable to adefect in mate- commercial or industrial use.
rial or workmanship.
6. Anyexpense incurred for service calls to correct in-
2. Conditions resulting from damage, such as: (1) im- stallation errors or to instructyou onhow to usethe
proper maintenance, (b) misuse, abuse, accident, products.
or (c) incorrectelectrical current or voltage.
7. CONSEQUENTIAL OR INCIDENTAL DAMAGES
3. Warranties arevoid ifthe originalserial number has SUSTAINED BYANY PERSONAS A RESULT OF
been removed, altered, or cannot be readilydeter- ANY BREACHOFTHESEWARRANTIES ORANY
mined. IMPLIEDWARRANTY. Some states do not allow
the exclusion or limitation of consequential or inci-
dental damages, so the above exclusion may not
4. Lightbulbs, apply to you.
ADDITIONAL HELP :
Ifyou are not satisfied with the local responseto your service requirements and wish to contact Maycor, please ad-
dressyourletter tothe CustomerRelations Department,MaycorParts&ServiceCompany,240EdwardsStreet,S.E., .....
Cleveland,TN 37311or call (615)472 3500. To savetime, your letter should include the complete modeland serial .......
date of purchase and details concerning your problem.
These warranties are the only written or expressed warranties given by Maycor. No one is authorized to increase,
alter, or enlarge Maycor's responsibilities or obligations under these warranties. These warranties give you specific
numbersofthewarranted appliance,thenameandaddressofthe dealerfromwhomyou purchasedtheappliance,the
legal rights, and you may also have other rights which vary from state to state.
(6/91)
!
8109P059-60
-15-
 Loading...