

Page 1

Magellan® RoadMate
Reference Manual
™
Instructions for Operating the
Magellan RoadMate 760
Page 2

IMPORTANT SAFETY WARNINGS
The Magellan RoadMate 760 is a vehicle-navigation aid designed to assist you in arriving at your
selected destinations. When using the Magellan RoadMate, these safety rules must be followed to
prevent accidents that can result in injury or death to yourself or others:
• When driving, the need to view the display is minimal. Voice prompts will guide you to your
destination. The driver should enter data or program the unit only when the vehicle is stopped.
Only a vehicle passenger should enter data or program the unit while the vehicle is moving.
• It is your responsibility to comply with all traffic laws.
• Every attempt is made to ensure that the database is accurate. However, roadways, points of
interest (POIs), and business and service locations may change over time. The database does not
include, analyze, process, consider, or reflect any of the following: legal restrictions (such as
vehicular type, weight, height, width, load and speed restrictions); road slope or grade; bridge
height, width, weight, or other limits; population density; neighborhood quality or safety;
availability or proximity of law enforcement, emergency rescue, medical, or other assistance;
construction work zones or hazards; road or lane closures; road, traffic, or traffic facilities’ safety
or condition; weather conditions; pavement characteristics or conditions; special events; traffic
congestion. It is your responsibility to disregard any unsafe, hazardous, or illegal route
suggestions.
• Keep the Magellan RoadMate safe from extreme temperature conditions. For example, do not
leave it exposed to direct sunlight for an extended period of time.
• Take care when mounting the unit in your vehicle, whether using the windshield mount or other
mount or accessories, that it does not obstruct the driver's view of the road, interfere with the
operation of the vehicle's safety devices such as air bags, or present a hazard to occupants of the
vehicle should the unit be dislodged while driving. You assume the risks associated with damage
to your vehicle or vehicle occupants as the result of your choices in mounting the unit.
• Please refer to the Read Me First document supplied with your Magellan RoadMate for
installation instructions.
© 2005 Thales S.A. All rights reserved. The Magellan Logo, Magellan, Magellan RoadMate, Turn it on
and go, TrueView, QuickSpell, SmartDetour, TrueFix, and SayWhere are trademarks of Thales. No part of
this user manual may be reproduced or transmitted in any form or by any means, electronic or
mechanical, including photocopying and recording, for any purpose other than the purchaser’s personal
use, without the prior written permission of Thales.
631242-18A
Page 3

Table of Contents
Information ............................................................................................................................... 1
About Satellite Navigation ........................................................................................................ 1
How Satellite Navigation Works ................................................................................................ 1
Line of Sight ........................................................................................................................ 1
Precision .............................................................................................................................. 1
A Word on the Safe Usage of GPS Maps .................................................................................... 2
From Source to Destination .................................................................................................... 2
GPS Maps and Your Safety .................................................................................................... 3
Magellan RoadMate ................................................................................................................... 4
Front View .............................................................................................................................. 4
Rear View ............................................................................................................................... 5
Cradle Front View .................................................................................................................... 6
Cradle Side View ..................................................................................................................... 6
Installation ................................................................................................................................ 7
Installation with the Windshield Mount ...................................................................................... 7
POI Manager ............................................................................................................................. 9
Overview ................................................................................................................................. 9
Latitude ............................................................................................................................... 9
Longitude ........................................................................................................................... 10
Altitude ............................................................................................................................. 11
Installation ........................................................................................................................... 12
Connecting Your Magellan RoadMate ...................................................................................... 14
Application ........................................................................................................................... 14
Adding A Single POI ............................................................................................................14
Adding Multiple POIs .......................................................................................................... 16
Basic Operation ....................................................................................................................... 19
Turning the Magellan RoadMate On ........................................................................................19
Adjusting the Volume ............................................................................................................. 20
Repeating the Last Command ................................................................................................. 20
Inputting Text Characters ....................................................................................................... 20
Additional Characters ............................................................................................................. 20
Numerical Characters ............................................................................................................ 21
What Is QuickSpell? .............................................................................................................. 21
FlexAddress .......................................................................................................................... 22
Traveling .................................................................................................................................23
Guidance Information Screens ................................................................................................ 23
Map Screen .......................................................................................................................... 24
Changing the Map Zoom Levels ..............................................................................................24
Maneuver List Screen ............................................................................................................ 25
TrueView 3D Screen ............................................................................................................
Detouring from the Planned Route .......................................................................................... 26
Excluding a Maneuver in the Planned Route ............................................................................26
Displaying Information About Your Present Location ................................................................. 27
Saving Your Current Location to Your Address Book .................................................................. 28
Finding POIs Along Your Route ............................................................................................... 28
Finding a Detour Along Your Route .......................................................................................... 29
.. 25
i
Page 4

Table of Contents
Selecting Destinations .............................................................................................................. 31
Choosing the Routing Method ................................................................................................. 32
Changing the Routing Method ................................................................................................ 33
Cancelling a Planned Route .................................................................................................... 34
Selecting a Destination Using Select Address ........................................................................... 35
Search by Town .................................................................................................................. 35
Search by Postcode .............................................................................................................37
Search by County ................................................................................................................ 39
Previous Towns ................................................................................................................... 41
Selecting a Destination Using the Address Book ....................................................................... 43
Previous Destinations ..........................................................................................................43
Saving a Previous Destination to the Address Book ................................................................. 44
Deleting A Previous Destination ............................................................................................ 46
Favourites .......................................................................................................................... 47
Editing a Favourite .............................................................................................................. 48
Deleting A Favourite ............................................................................................................ 49
List Addresses .................................................................................................................... 50
Editing an Address .............................................................................................................. 51
Deleting an Address ............................................................................................................53
Create New Entry – Search by Town ...................................................................................... 54
Create New Entry – Search by Postcode ................................................................................ 55
Create New Entry – Search by County ...................................................................................57
Create New Entry – Previous Town ........................................................................................ 59
Trip Planner – New Trip ....................................................................................................... 60
Trip Planner – Optimizing a Trip ........................................................................................... 61
Trip Planner – Guide Me ...................................................................................................... 62
Trip Planner – Edit .............................................................................................................. 63
Trip Planner – Delete and Rename ....................................................................................... 64
Selecting a Point of Interest as a Destination ........................................................................... 66
Spell Name ........................................................................................................................ 66
Select Category ................................................................................................................... 69
Custom POIs ...................................................................................................................... 72
Selecting an Junction as a Destination .................................................................................... 74
Search by Town .................................................................................................................. 74
Search by Postcode .............................................................................................................75
Search by County ................................................................................................................ 77
Previous Towns ................................................................................................................... 79
Options ................................................................................................................................... 81
Trip Computer ....................................................................................................................... 82
Current Trip ........................................................................................................................ 82
Stopping or Starting the Trip Computer ................................................................................. 82
Saving the Current Trip Report ............................................................................................. 83
Resetting the Trip Computer ................................................................................................ 83
Viewing a Saved Trip Report ................................................................................................ 84
Deleting a Trip Report ........................................................................................................
Configuration ........................................................................................................................ 85
POI Selection ..................................................................................................................... 85
Custom POIs ...................................................................................................................... 86
.84
ii
Page 5

Table of Contents
Map Options ....................................................................................................................... 91
Select Map Colour ............................................................................................................... 92
Route Preferences ............................................................................................................... 93
Detour Options ................................................................................................................... 94
Voice Options ..................................................................................................................... 96
Menu Colors ....................................................................................................................... 96
Contrast ............................................................................................................................. 97
Brightness .......................................................................................................................... 97
Display Options .................................................................................................................. 98
Tone Options ...................................................................................................................... 99
Language ...........................................................................................................................99
Diagnostics ......................................................................................................................100
Product Information ................................................................................................................................... 100
Video Test ................................................................................................................................................. 100
Touch Screen Test ..................................................................................................................................... 100
Keypad Test .............................................................................................................................................. 100
Audio Test ................................................................................................................................................. 101
GPS Status ................................................................................................................................................ 101
Initialize GPS ............................................................................................................................................ 101
Set GPS Position ....................................................................................................................................... 101
TMC Status ............................................................................................................................................... 102
Simulator Mode ......................................................................................................................................... 103
Edit User Name ................................................................................................................ 104
Map Regions .................................................................................................................... 104
Safety Lockout .................................................................................................................. 106
Password ......................................................................................................................... 106
Automatic Volume ............................................................................................................. 107
TMC Options .................................................................................................................... 108
Backup and Restore .......................................................................................................... 110
Restoring Information and Preferences ................................................................................ 110
Tutorial .............................................................................................................................. 112
Moving Around the Tutorial ................................................................................................ 112
Help .................................................................................................................................. 113
Contact Information ............................................................................................................... 114
Technical Support .............................................................................................................. 114
Appendix A ...........................................................................................................................115
Adding Addresses from an IrDA-Equipped Device ................................................................... 115
Appendix B ........................................................................................................................... 116
GPS Status Screen .............................................................................................................. 116
GPS STATUS Screen Structure-first page ............................................................................ 116
Bad fix code ..................................................................................................................... 116
GPS STATUS Screen Structure - second page ...................................................................... 117
Typical GPS STATUS Screen Display .................................................................................. 118
Appendix C ...........................................................................................................................119
POI Categories .................................................................................................................... 119
Appendix D ........................................................................................................................... 120
Specifications ..................................................................................................................... 120
THALES CONSUMER PRODUCTS GPS RECEIVER END USER SOFTWARE LICENSE ......................1
THALES NAVIGATION MAGELLAN PRODUCTS LIMITED WARRANTY ............................................ 1
iii
Page 6

Information
Information
About Satellite Navigation
Global satellite navigation is an exciting technology, providing enhanced productivity and accuracy in a vast number of
industries. It adds a new level of enjoyment and safety to a wide range of navigation, sports, and recreational activities.
A Global Navigation Satellite System (GNSS) is a network of satellites that transmit high-frequency radio signals containing
time and distance data that can be picked up by a receiver, allowing users to pinpoint their precise locations anywhere
around the globe.
There are two Global Navigation Satellite Systems in operation: the U.S. Global Positioning System (GPS) and the Russian
GLObal NAvigation Satellite System (GLONASS). These systems are constantly being upgraded to meet higher standards of
reliability. A third GNSS named GALILEO, after the Italian astronomer of the early 1600s, is being developed in Europe
specifically to provide a higher standard of integrity and reliability, required to ensure the safety of lives during transport by
air, land and sea, without the use of additional augmentation systems.
While the GPS and GLONASS satellite networks are being developed to achieve maximum performance, Satellite-Based
Augmentation Systems (SBAS) have been established to provide improved accuracy. SBAS provides differential signal
corrections for GPS and GLONASS transmissions with the use of ground stations and geostationary satellites in specific
regions. This is GNSS-1, the first phase in establishing the required integrity for high-precision satellite navigation.
GNSS-2 requires the launching of new satellites into orbit and a complete upgrade of the existing satellite systems. This
second phase is already well underway. GALILEO, scheduled to begin service in 2008, is being developed to meet the
standards of GNSS-2 for rapid and reliable, certified precision positioning.
How Satellite Navigation Works
Global navigation satellites continuously transmit time and distance information as they orbit Earth in a precise formation.
Navigation satellite receivers use this information to calculate an exact location through triangulation. Every point on Earth is
identified by two sets of numbers called coordinates. These coordinates represent the exact point where a horizontal line,
known as latitude, crosses a vertical line, known as longitude. The receiver locks on to at least three satellites and uses the
information received to determine the coordinates of the receiving device.
By comparing the time the signals were transmitted from the satellites and the time they were recorded, the receiver
calculates how far away each satellite is. The distance of the receiver from three or more satellites reveals its position on the
surface of the planet. With these distance measurements, the receiver might also calculate speed, bearing, trip time,
distance to destination, altitude, and more.
The satellite-navigation device may display its position as longitude/latitude, Universal Transverse Mercator (UTM), Military
Grid (MG), or simply as a point on an electronic map. Many Thales Navigation receivers provide comprehensive mapping
data, making satellite navigation an easy tool to enhance your recreational and industrial activities.
Line of Sight
Satellite-navigation receivers operate by line of sight with global-positioning satellites. This means that at least three
satellites must be in “view” of a receiver in order to calculate longitude and latitude. A fourth satellite must also be within
line of sight to calculate altitude. On average, eight satellites are continuously within line of sight of every position on Earth;
the more satellites in view, the more accurate the positioning.
Though the radio signals of navigation satellites will pass through clouds, glass, plastic, and other lightweight materials,
satellite-navigation receivers will not work underground or in other enclosed spaces.
Precision
On average, a satellite-navigation receiver is accurate to within 15 meters. Thales Navigation employs several technologies to
increase the accuracy of their professional and Magellan®-branded receivers. An accuracy of 3 meters or better is achieved
using correction signals from satellite navigation-augmentation systems. In the U.S., an accuracy of 3 meters is achieved
1
Page 7

Information
using signal corrections from a network of ground stations and fixed-position satellites known as WAAS (Wide-Area
Augmentation System). Throughout Europe a similar system, EGNOS (European Geostationary Navigation Overlay System),
provides the same accuracy. In Asia, satellite navigation-signal correction is provided by MSAS (Multi-functional Transport
Satellite-Based Augmentation System). Other ways to increase the accuracy of satellite navigation include the use of DGPS
(Differential Global-Positioning System); ground relay stations, set at known positions, transmit corrected satellite-navigation
signals. Various methods and applications of DGPS can increase satellite-navigation accuracy from a few meters to within a
few millimetres. Using DGPS requires a differential-beacon receiver and antennae in addition to a satellite-navigation
device. Accuracy can also be increased using an RTK (Real-Time Kinematic) satellite-navigation system. This is a receiver
capable of transmitting a phase-corrected signal from a known position to one or more rover receivers.
A number of positioning errors can occur, limiting accuracy to within 15 to 25 meters. These errors are monitored and
compensated for in a number of ways:
Orbiting errors -- Occasionally, a satellite's reported position does not match its actual trajectory. In the U.S., the
Department of Defense continuously monitors each satellite, making orbital corrections with on-board booster rockets.
Poor geometry -- If all of the satellites within line of sight of a receiver are clustered closely together, or lined up relative to
the position of the receiver, the geometric calculations necessary for triangulating a position become difficult and less
reliable. The use of differential-correction signals from satellite-based augmentation systems or DGPS can compensate for
both orbital errors and poor geometry.
Multipath signals -- Signals may be reflected off tall buildings or other obstructions before reaching the receiver, increasing
the distance a signal travels and reducing accuracy.
Thales Navigation receivers make a number of complex mathematical calculations to effectively compensate for other
potential errors in positioning:
Atmospheric delay -- Satellite-navigation signals slow as they pass through Earth's atmosphere. Thales Navigation receivers
calculate the average delay in nanoseconds to compensate.
Clock errors -- The clock built into a receiver is not as accurate as the atomic clock on a navigation satellite, which is
accurate to one second every million years. Each Thales Navigation receiver compensates for time differentials by comparing
the time signals of several satellites and adjusting its calculations and its clock to match.
A Word on the Safe Usage of GPS Maps
Just like paper maps, maps on GPS devices vary greatly in terms of information included and visual presentation. Whether
topographical maps, roadmaps or marine charts, each map and the data it presents is designed for a specific purpose. For
example, marine charts will often present only a minimal representation of roadways and are not a substitute for street maps.
Topographic maps usually provide minimal detail about bodies of water and do not contain marine navigational markers.
Maps also vary widely in scale: the smaller the scale, the more detailed the map. Therefore, when using GPS maps (just as
with paper maps) it is important to consider what type of map you are using in your explorations and to use common sense.
From Source to Destination
Thales Navigation, maker of Magellan GPS products, is not a cartography company. We do not create the maps that are used
on our GPS devices. We seek to acquire map data from the best public and private sources available at the time of
publication. Thales Navigation licenses* topographical maps, roadmaps, marine charts and points of interest (POI) data
from commercial and governmental cartographic sources that provide raw map data. Thales Navigation processes and
compresses the raw data into a format that makes it presentable and manageable to work on our GPS devices. And to ensure
that our map data is as robust as possible, data from multiple sources are often combined to provide a better user experience
for our customers. This processing does not alter the landforms, coordinates or other spatial data that comes in the raw data.
The accuracy of the maps is fundamentally dependent on the source data used to create them. Map data changes frequently
due to both natural and man-made causes. As a result, governmental and commercial cartography companies must
2
Page 8

Information
continuously review, correct, and improve upon their map data. We release new versions of our maps on a regular basis to
reflect these changes.
After processing the data, we test the compatibility of the map with our GPS devices to ensure that the products we release
work properly on our GPS devices. We also beta-test our products to get customer feedback prior to release.
GPS Maps and Your Safety
Remember, your GPS device is an aid to navigation. It must be used with common sense, and it is important that users
interpret GPS map data with a critical eye. Landscapes and roads change or may be impassable, trees and tall buildings can
obscure GPS signals, and your GPS device may not always reflect the complete picture. When using GPS, you must combine
the information provided by your GPS map with your relevant local knowledge, road signage, buoys, depth soundings and
changing local conditions to generate a complete understanding of your situation.
It is your responsibility to ensure compliance to all traffic laws, including pedestrian observance of crosswalks, and to use
good judgment while operating the Magellan GPS receiver. Safety must be your primary concern. The Magellan GPS receiver
must not be used while engaged in any activity requiring the user's full attention to the environment. For instance, the
Magellan GPS receiver should be operated only by vehicle passengers or by the driver when the vehicle has come to a
complete stop. The driver must not attempt to view the display while driving. A climber must not attempt to view the display
while negotiating treacherous terrain. Disregard any unsafe, hazardous or illegal route suggestions.
Magellan maps do not include, analyze, process, consider or reflect any of the following: legal restrictions (such as weight,
height, width, load and speed restrictions); road slope or grade; bridge height, width, weight or other limits; population
density; neighborhood quality or safety; availability or proximity of law enforcement, emergency rescue, medical or other
assistance; construction work zones or hazards; road, sidewalk, or waterway closures or conditions; weather conditions;
pavement characteristics or conditions; special events; traffic congestion; time of day.
*Thales Navigation licenses map data from governmental sources such as, but not limited to, U.S. Geological Survey
(USGS), the National Oceanic and Atmospheric Administration (NOAA-NOS) and the Canadian Hydrographic Service (CHS).
Thales Navigation also licenses map data from commercial cartography companies such as Navigation Technologies,
Navionics, DMTI and C-Map.
3
Page 9

Magellan RoadMate
Magellan RoadMate
Front View
2
1
13
3
4
1112
10
5
9
1 Power Button Press to turn the Magellan RoadMate on or off.
2 Volume Control Adjust to set the volume of the speaker.
3 Repeat Button Press to repeat the last spoken prompt.
6
7
8
4 Zoom In Button While viewing the map, press to zoom in on the center of the display.
5 Option Button Press to access the User Options menu.
6 Enter Button Press to confirm highlighted selections.
7 Cancel Button Press to stop the current function.
8 Navigation Button Press to move the cursor or to highlight other options.
9 Locate Button Press to display current location details.
10 Light Sensor
Automatically changes the contrast and brightness of the display to
adjust for changes in lighting.
11 View Button Press to view map display, maneuver list or TrueView 3D display.
12 Zoom Out Button While viewing the map, press to zoom out from the center of the display.
13 Infrared (IR) Port Enables wireless IR transfer from a PDA or SmartPhone device.
4
Page 10

Magellan RoadMate
Rear View
23 4
1
6
1 Speaker Used for audible maneuvering instructions.
2 Repeat Button Press to repeat the last spoken prompt.
3 Volume Control Adjust to set the volume of the speaker.
4 Detachable Antenna Rotate up when in use to receive signals from the GPS satellite network.
5 Compact Flash Compartment to store the compact flash memory card.
6 Power/Data Connector Connection for power and data for the Magellan RoadMate.
5
5
Page 11

Magellan RoadMate
Cradle Front View
1
2
1 Power/Data Connector Connection for power and data for the Magellan RoadMate.
2 Release Press to remove the Magellan RoadMate from the cradle.
Cradle Side View
1
2
1 USB Connection Connect to your PC to upload Custom POIs or software updates.
2 Power Connection Plug into your vehicle or at home.
6
Page 12

Installation
Installation
Take care when mounting the Magellan RoadMate in your vehicle, whether using the windshield mount, vent mount or other
mount, that it does not obstruct the driver’s view of the road. Make sure that the placement of the Magellan RoadMate and
cable does not interfere with the operation of vehicle safety devices, such as air bags. You assume the risks associated with
damage to your vehicle or vehicle’s occupants as a result of how you choose to mount the Magellan RoadMate.
Installation with the Windshield Mount
Slide the cradle and plate assembly onto the windshield mount.
Attach the Magellan RoadMate to the cradle.
Clean the area of the windshield with the supplied alcohol swab.
Press the windshield mount to the glass and rotate the locking dial until it clicks into place.
7
Page 13
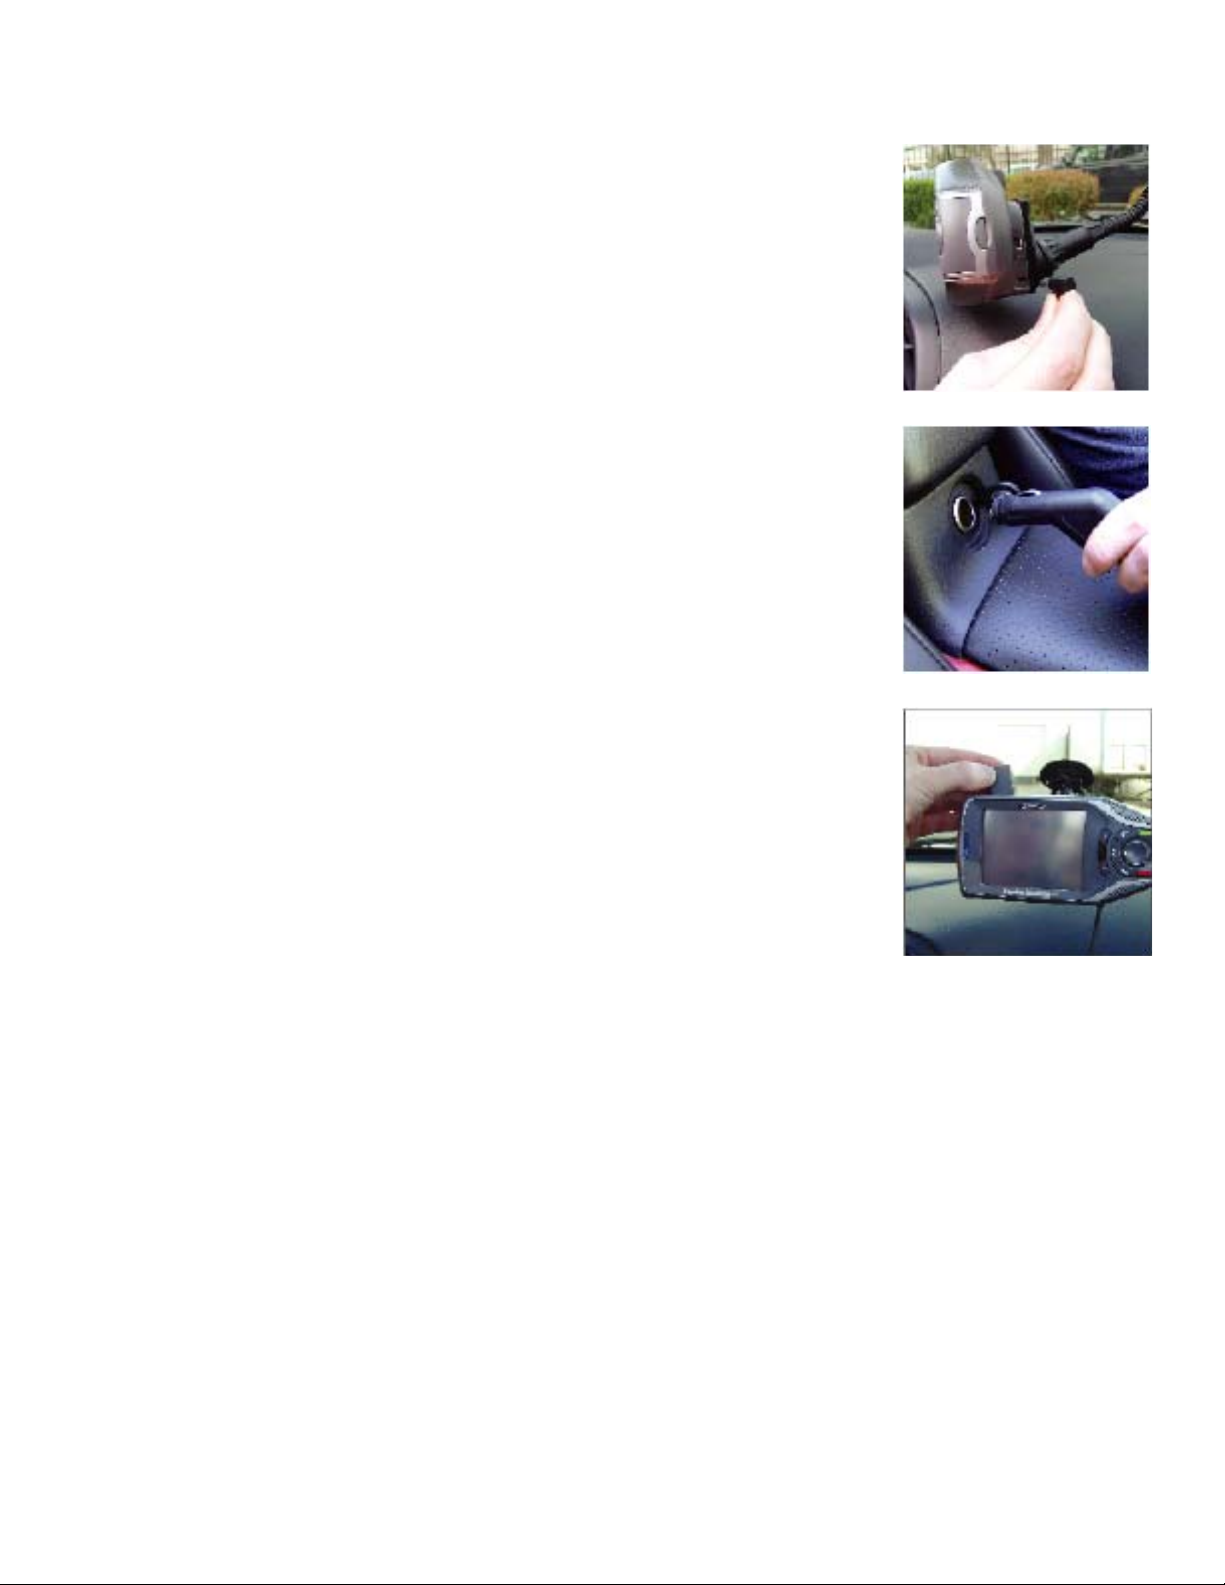
Installation
Plug the power cable into the cradle.
Plug the cigarette lighter connector into an appropriate 12V receptacle in your car.
Rotate the antenna upward.
Installation is complete, and you are ready to turn the Magellan RoadMate on and go.
8
Page 14

POI Manager
POI Manager
Overview
The Magellan RoadMate 760 comes with Magellan RoadMate POI Manager Software. This allows you to add custom POIs to
your Magellan RoadMate. You can add things such as friends’ houses and other favorite places that are not in the installed
database. POIs are easier to search for than street addresses and show up on the Map screen. The POI Manager adds POIs
based on Latitude, Longitude, and a name. Other information such as altitude and a description are optional.
Latitude
Latitude can be expressed by dividing Earth into horizontal segments totalling 180 degrees. Starting at the Equator, or zero
degrees Latitude, lines (or Parallels) are drawn in 10-degree increments 90 degrees to the north and 90 degrees to the
south. If your location is below the Equator, you are at a South Latitude.
90° (North Pole)
80°
70°
60°
50°
40°
30°
20°
10°
0°
0°
10°
20°
30°
40°
50°
60°
North Latitude
Equator
South Latitude
70°
80°
90° (South Pole)
9
Page 15

POI Manager
Longitude
Conversely, longitude lines can be expressed by dividing Earth into vertical segments totalling 360 degrees. Starting at the
Prime Meridian (which is The Royal Observatory in Greenwich, England), or zero degrees Longitude, lines are drawn in 10degree increments 180 degrees to the West and 180 degrees to the East. If your location is on the western hemisphere, you
are at a West Longitude.
West Longitude
70° 50° 30° 10° 10° 30° 50° 70° 90°
90°
80° 60° 40° 20° 0° 20° 40° 60° 80°
East Longitude
Additionally, to narrow down your location further, each 10-degree segment is divided into 60 smaller segments called
minutes and, still further, each minute is divided into 60 segments called seconds.
To express this in coordinates, the city of Los Angeles is located at 34° (degrees) 03’ (minutes) and 08 (seconds) North of
the Equator, and 118° (degrees) 14’ (minutes) and 42 (seconds) West of the Prime Meridian.
10
Page 16

POI Manager
Altitude
Each location also must have an Altitude. Altitude is expressed by how far the point is above or below the level of the ocean,
or Sea Level. For example, Los Angeles, California is about 92 meters above sea level. Death Valley, California is about 82
meters below sea level.
100m Above
80m Above
60m Above
40m Above
20m Above
Sea Level 0m
20m Below
40m Below
60m Below
80m Below
100m Below
11
Page 17

POI Manager
Installation
Insert the POI Manager CD into your PC’s CD drive.
The setup application will begin automatically. If it does not, browse your computer’s CD drive and double-click on the
setup.exe file.
Select a default language for the Application.
The Welcome screen will appear to begin the installation process.
Choose a destination for the application. Select Next to use the
default location, or select Browse to choose a custom
destination.
12
Page 18

POI Manager
Next, choose a Program Folder to place the application icons.
THe Magellan RoadMate POI Manager software will be installed.
When it has finished, to can have the installer launch the
application automatically, or deselect to exit without launching
the application.
13
Page 19
POI Manager
Connecting Your Magellan RoadMate
The standard cradle is equipped with ports for connecting the Magellan RoadMate to a personal computer and external
power.
When connecting to a personal computer, leave the Magellan RoadMate attached to the cradle, disconnect the vehicle power
cable and remove the assembly (Magellan RoadMate and cradle) from the vehicle.
Connect the small end of the USB cable to the USB port on the cradle and the large end to an available USB port on your
personal computer. See “Cradle Side View” on page 6.
Connect the small end of the External Power cable to the power port on the cradle and plug the other end of the cable into a
standard, 110 VAC wall outlet. See “Cradle Side View” on page 6.
Depending on the location and surrounding obstructions, the Magellan RoadMate may or may not be able to receive GPS
satellite information.
Application
The POI Manager has a single interface for loading, adding, and deleting custom POIs from your Magellan RoadMate.
Adding A Single POI
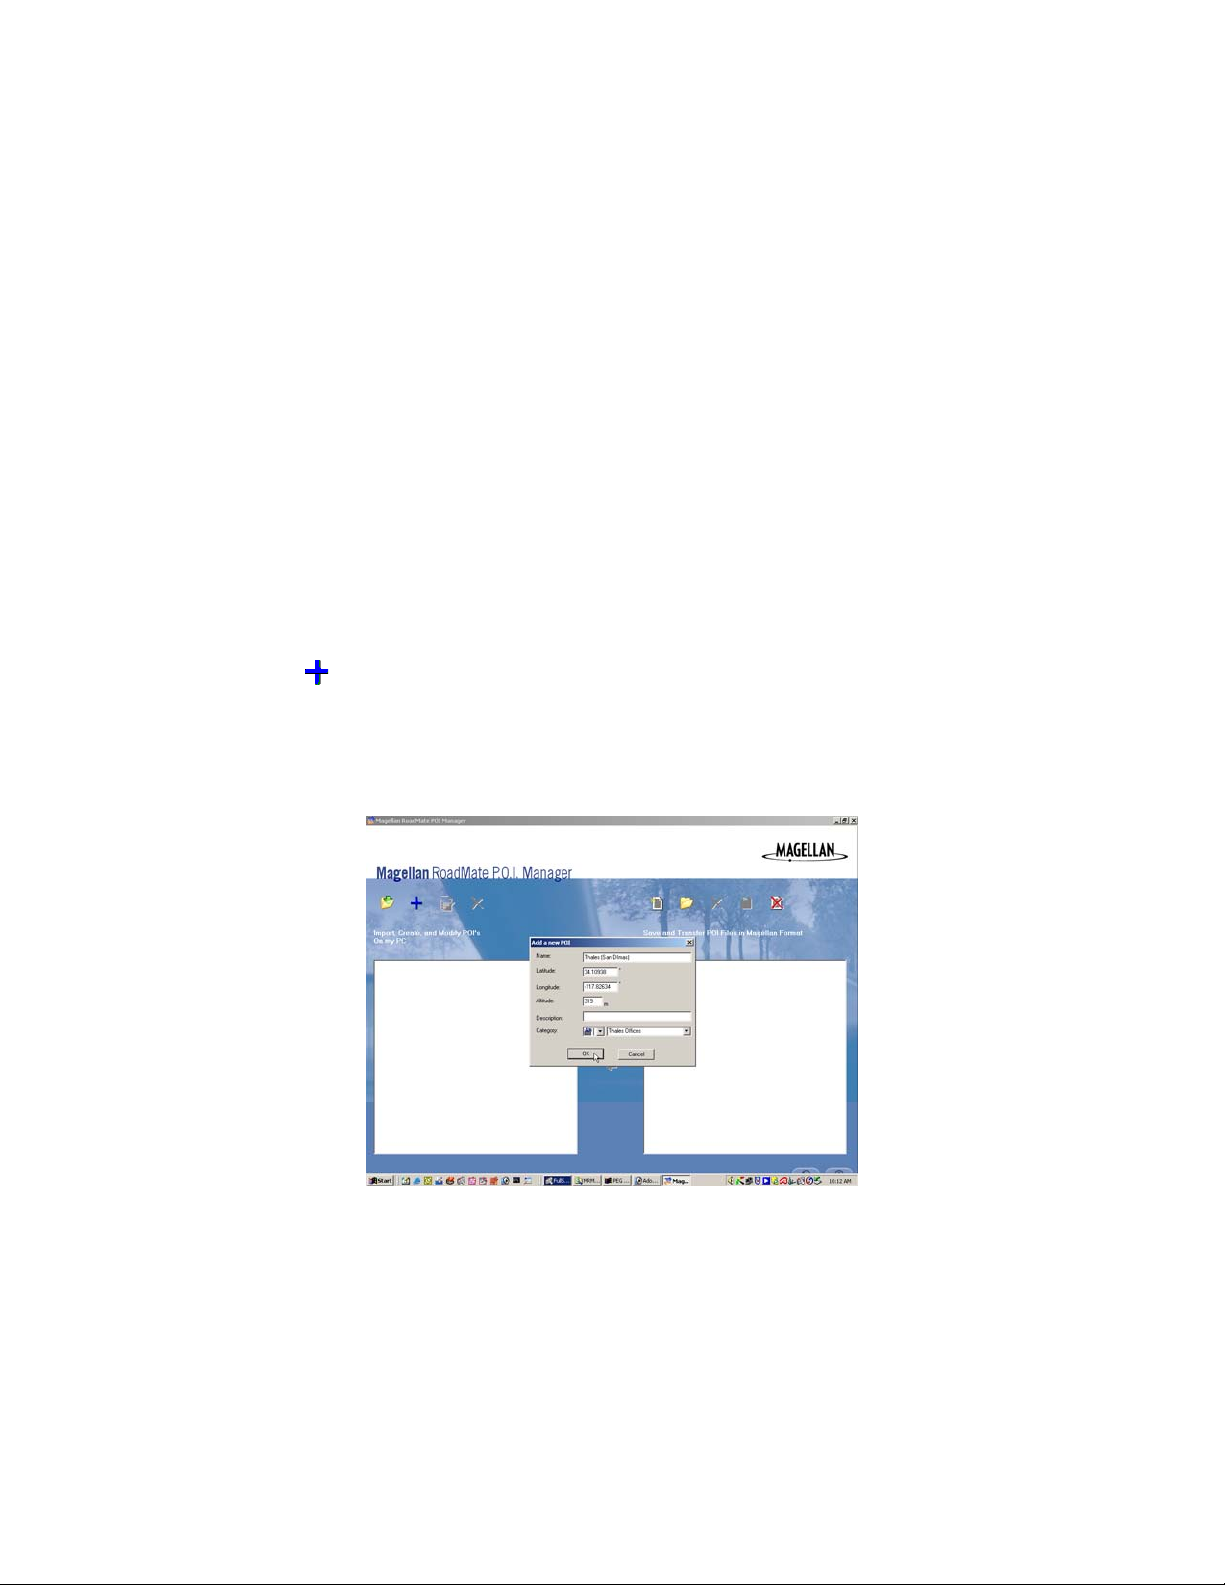
Click on the Add New POI button. A dialog box will appear. Enter the Name, the Latitude, the Longitude, the Altitude
(optional), and Description (optional). To find the latitude, longitude, and altitude of a POI, press the Locate button on the
Magellan RoadMate while you are at the location. See “Displaying Information About Your Present Location” on page 27.
Next, select an icon for the POI by clicking on the drop-down menu.
Finally, create a category for your POI. For example, “Friends’ Houses”, or “Coffee Shops”. Click on OK.
The POI you created is now in the Import, Create, and Modify window. You can continue adding POIs to the new category by
repeating the previous instructions. Each POI file can contain up to 10 categories with 1,000 POIs for a total of 10,000
total POIs.
14
Page 20

POI Manager
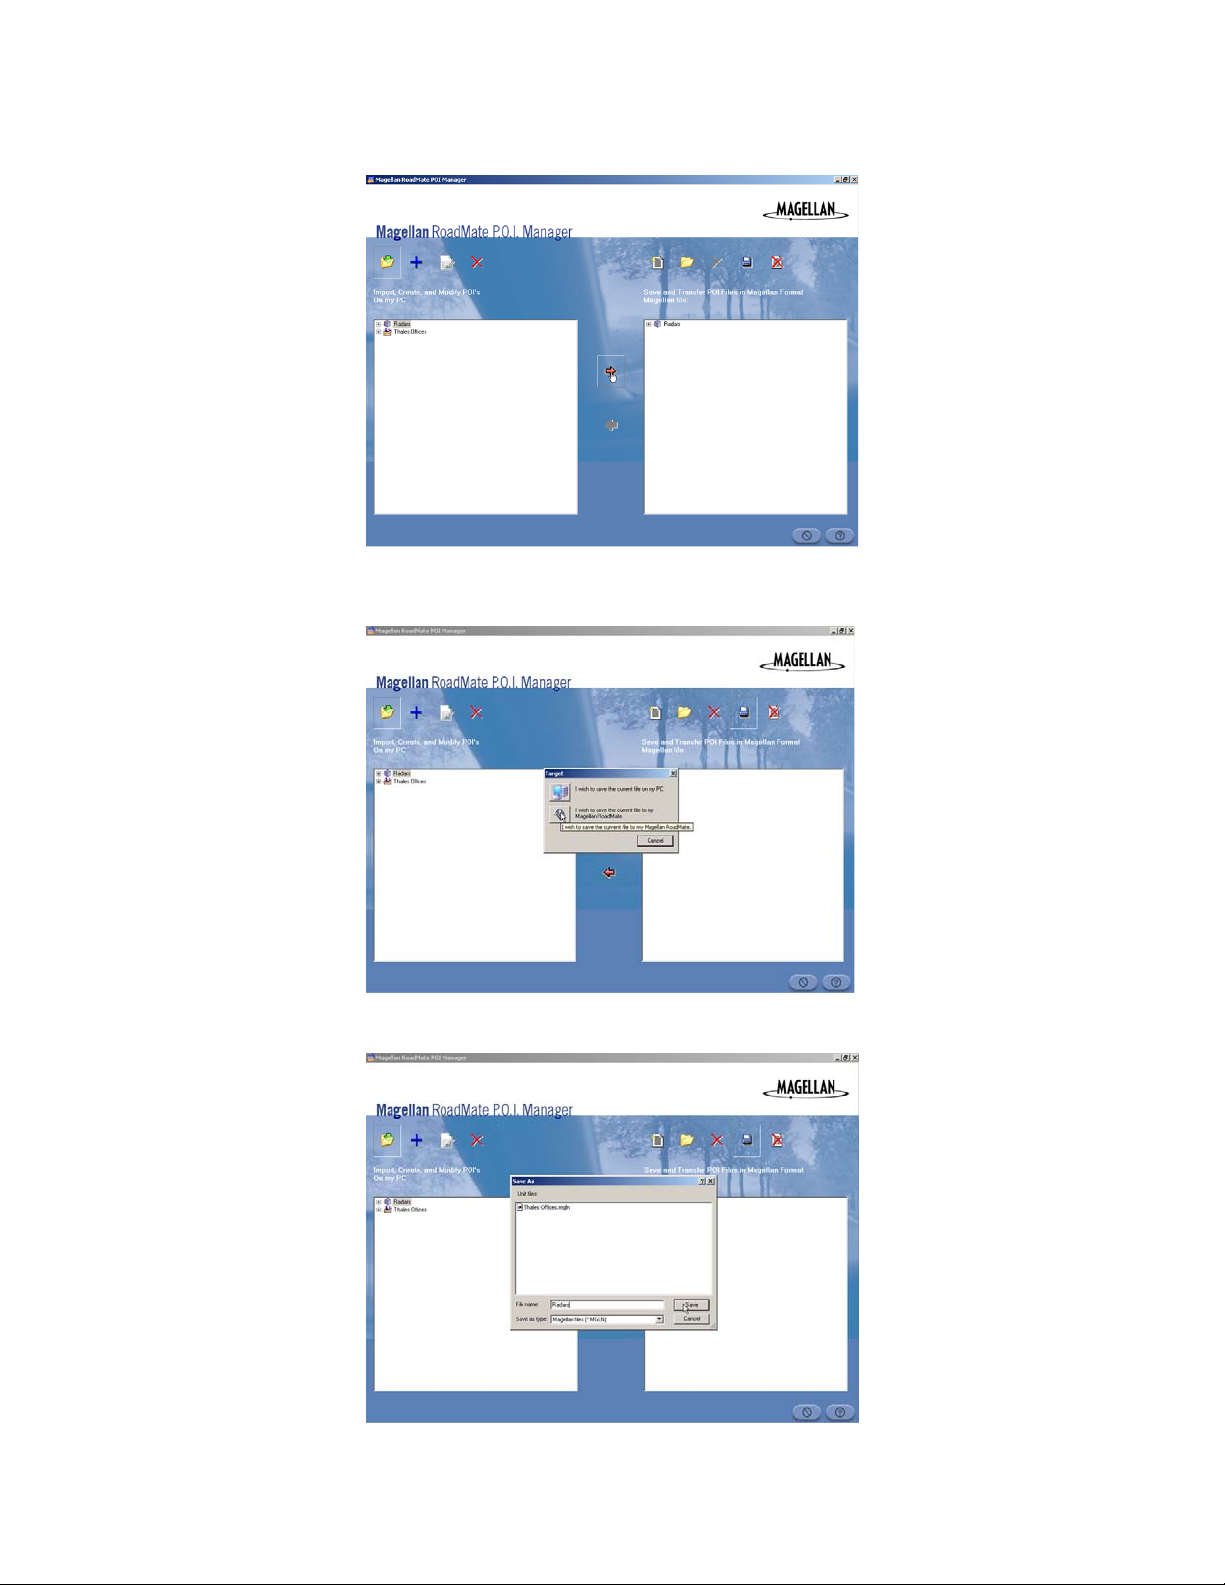
Once you have finished creating POI’s, select the category or categories you wish to upload and click on the right arrow to
add them to the Save and Transfer window.
Click on the Save button. You are given the option of saving the POIs either to your computer (for later transfer) or directly
to your Magellan RoadMate. Select the Save to My Magellan RoadMate button.
Give your POI file a name and click on Save.
15
Page 21

POI Manager
The POIs are uploaded to your Magellan RoadMate. To access the new POIs on your Magellan RoadMate, refer to page 86.
Adding Multiple POIs
The POI Manager software supports ASCII file format (.ASC,.CSV,.TXT); GPS Exchange file format (.GPS,.XML); Magellan
Waypoint file format (.WPT,.RTE); and Garmin PCX5 Waypoint file format (.WPT,.RTE).
Click on the Import POI File button.
Select a POI file. Assign the POIs an icon and create a category. Click Open.
16
Page 22

POI Manager
Define the data separator. Click Next.
Assign a title to each field. You must have a latitude, a longitude, and a name. Click Finish.
If there are any errors in the data you can view them. Otherwise, click No. The POI file has been imported and is ready to
upload to your Magellan RoadMate.
17
Page 23
POI Manager
Select the POI file and click the right arrow.
Click the Save button. You are given the option of saving the POIs either to your computer (for later transfer) or directly to
your Magellan RoadMate. Select the Save to My Magellan RoadMate button.
Give your POI file a name and click on Save.
The POIs are uploaded to your Magellan RoadMate. To access the new POIs on your Magellan RoadMate, refer to page 86.
18
Page 24

Basic Operation
Basic Operation
Turning the Magellan RoadMate On
Press the Power button.
If power is properly connected, a logo screen is displayed, followed by the Warning screen.
Select the preferred User. The Magellan RoadMate can be personalized for three different
users. It will use the saved profile settings for the user that you select here.
Either the Select Destination screen or the Resume Route screen will be displayed automatically.
Select Destination Resume Guidance
Resume Route is displayed if you were navigating toward a destination when the Magellan RoadMate was turned off.
Press the Power button and the Magellan RoadMate will turn off.
19
Page 25

Basic Operation
Adjusting the Volume
The volume control is located at the top of the Magellan RoadMate. Use the thumbwheel to set the volume of the speaker to
a desired level. See “Rear View” on page 5.
Repeating the Last Command
If you missed the last verbal command, you can repeat it by pressing the Repeat button. The Repeat button is located on the
top of the Magellan RoadMate. See “Rear View” on page 5.
Inputting Text Characters
Whenever you need to input names, street addresses, etc., the Magellan RoadMate will display a keyboard. Touch the letter
you want and, if you make a mistake, use the Backspace key to go back one character at a time. The Spacebar is used to
insert spaces between characters or words.
Cancel
Backspace
Spacebar
Characters
Accept EntryNumerical
Additional
Characters
Additional Characters
When you are entering street or town names, you may need to add special characters. When
available, selecting & ? / - button brings up a keypad with the characters shown here.
20
Page 26

Basic Operation
Numerical Characters
When available, select 123 to access numerical characters and punctuation.
What Is QuickSpell?
The Magellan RoadMate uses QuickSpell technology to provide you with the fastest method possible to enter characters.
QuickSpell eliminates the possibility of a misspelled word or looking for a city or street that is not in the loaded database. As
you begin entering characters, the QuickSpell feature of the Magellan RoadMate dims out those characters that are not
available, thereby speeding up the process of entering data.
Example:
Suppose that you need to input the name of a town--in this case, Bedford.
Select “B”.
Select “E”.
Select “D”.
21
Page 27

Basic Operation
Select “F”.
When the list of passible town names is narrowed down enough, the Magellan RoadMate
will automatically display a list of all the towns with words beginning with the characters
you entered (see FlexAddress below). At this point you can continue, or if the list is too
long, press the Cancel button and continue entering characters to narrow down the list
further.
FlexAddress
FlexAddress (also know as mult-word indexing) allows you to search any word in a street or town name.
For example, you are searching for “Cleveland Trading Estate” but you only know the the
word “Trading” is in the name, enter T-R-A and select OK.
The search will return every town with a word that starts with “Tra”.
22
Page 28

Traveling
Traveling
Guidance Information Screens
The Magellan RoadMate has three screens you can use to assist you in travelling to your destination: the Map screen, the
Maneuver List screen and the TrueView 3D/ Split TrueView screen.
Map: When a new destination is selected and calculated, the Map screen is displayed. This screen displays a map of your
surrounding area, along with the planned route (if calculated) and information about the route. This screen can be accessed
when no route has been calculated by selecting Map (Map button) or by pressing the View button while at the Select
Destination screen. It can also be selected by pressing the View button while viewing the TrueView 3D screen.
Maneuver List: This screen is available only when a route has been calculated. This screen displays a list of maneuvers to
follow in order to arrive at the destination. It can also be used exclude a maneuver and reroute you to your destination. To
access the Maneuver List screen, press the View button while viewing the Guidance screen.
TrueVie w 3 D : This screen displays the next maneuver as a 3D graphic. It will help you to know which lane to be in and
provides you with an easy-to-follow picture of the next maneuver. To access the TrueView 3D screen, press the View button
while viewing the Maneuver List. You can also show the TrueView 3D in split mode (refer to page 91). This view shows the
TrueView screen on the left side and the Map on the right side.
TrueView 3D
Map
Split TrueView
(enabled from Map
Options menu)
23
Maneuver List
View
Page 29

Traveling
Map Screen
The Map screen is the most commonly used screen in the Magellan RoadMate and provides you with detailed information
about where you are and where you are going.
Current Road
POI Icon †
Planned Route (pink)
Position Cursor
(points in the
direction you are
traveling)
Next Maneuver
Direction of Travel
and GPS Signal
Strength ††
Distance to Next
Maneuver
Estimated Tim e to
Destination
Direction of Destination
Next Road
Distance to Destination
† By touching the POI icon on the screen, you can get information and route to it.
†† Blue = EGNOS Signal, Green = Strong Signal, Yellow = Average Signal, Red = Weak Signal,
Black = No Signal
As you travel, the Guidance screen constantly updates your location and provides you with not only a map, but a visual
indication of where you are on the map.
Changing the Map Zoom Levels
You can zoom in by pressing the Plus (+) button or zoom out by pressing
the Minus (-) button.
Zoom In Button
Zoom Out Button
24
Page 30

Traveling
Maneuver List Screen
The Maneuver List screen can be viewed only after a route has been calculated. From the Map screen, press the View button
to bring up a list of all of the maneuvers along the route. When you are done viewing the Maneuver List screen, press the
View button twice to return to the Map screen, or wait a few moments and it will return automatically.
Next Maneuver
Direction of Travel
and GPS Signal
Strength
Distance to Next
Maneuver
Estimated Tim e to
Destination
Distance to Destination
Direction of Destination
TrueView 3D Screen
The Magellan RoadMate uses TrueView 3D technology to display a three-dimensional picture of the next maneuver. The
TrueView 3D screen can be viewed only after a route has been calculated. From the Map screen, press the View button twice
to view the TrueView 3D screen.
Next Maneuver
Direction of Travel
and GPS Signal
Strength
Distance to Next
Maneuver
Estimated Tim e to
Destination
Distance to Destination
Direction of Destination
25
Page 31

Traveling
In split mode, the left half of the screen shows TrueView 3D, while the right half of the screen shows the map.
Map with
Planned Route
Next Maneuver
Direction of Travel
and GPS Signal
Strength
Distance to Next
Maneuver
Estimated Tim e to
Destination
Detouring from the Planned Route
Distance to Destination
Direction of Destination
If you exit the planned route, the Magellan RoadMate will get you back on course in one of two ways.
1. If you exited the planned route before its completion and turned off your vehicle, the Magellan RoadMate would also
turn off, and, upon returning to your vehicle turned your vehicle back on (which turns the Magellan RoadMate back on),
you would be presented with a screen asking if you wanted to resume your route.
Select Resume to have the Magellan RoadMate resume the route to the selected destination.
Select Cancel to clear the route and display the Select Destination screen.
2. If while driving, you exited the planned route, the Magellan RoadMate will automatically recalculate the route based on
your new location.
Excluding a Maneuver in the Planned Route
While travelling or setting up your destination you may find it necessary to exclude one of the maneuvers in the Maneuver
List. This could be due to an accident or street maintenance you want to avoid. The Magellan RoadMate provides you tools
to select a specific maneuver, exclude it from the planned route and reroute the trip.
Press the View button to get to the Maneuver List. Select the maneuver you wish to exclude.
26
Page 32

Traveling
The details for the maneuver are displayed. Select Exclude.
The trip will be recalculated excluding the selected maneuver. This calculation is done using
the same Route Method that was chosen originally. After the route is recalculated, the Map
screen is displayed.
Displaying Information About Your Present Location
Anytime that you want to view information about your present location you can press the
Locate button.
The first screen displays your heading and the street you are on, the state and city you are
currently traveling in, the latitude and longitude of your present location, a compass, and your
speed.
The next screen displays the street you are currently traveling on, the distance to and the next
street on the map, and the distance from and the last street you passed.
27
Page 33

Traveling
Saving Your Current Location to Your Address Book
While you are in the Locate screen, you can save your current location to your Address Book.
Select Save Location.
The information about your location is displayed. Select Edit Name and/or Edit Information; use
the keypad to assign a name to the location and other information about it.
When you have finished, select Save. The location is saved to your Address Book and you are
returned to the Locate screen.
Finding POIs Along Your Route
While driving along a route, if you need to find a gas station, ATM, or other POI, the Magellan RoadMate can find the nearest
POI and route to it. Then, when you have completed the side route, resume guidance to your original destination.
While driving along a route, press the Enter button.
Select Points of Interest.
Select the desired POI category.
28
Page 34

Traveling
A list of the nearest POIs is displayed. Use the Navigation key to scroll the list up or down (if
necessary) and select the desired POI.
The Magellan RoadMate will calculate a new route to the selected POI from your current
position.
When you have arrived at the new destination, you will be prompted to resume guidance to your
original destination. Select Resume. The Magellan RoadMate will calculate the route to your
original destination using the Route Method previously selected.
Finding a Detour Along Your Route
While driving along a route, if you encounter traffic, road construction, or other situation you might need to navigate around,
the Magellan RoadMate can calculate an alternate route to your destination.
While driving along a route, press the Enter button.
Select Detour.
Select the distance of the detour. Select 5 km, 10 km, or 15 km.
29
Page 35

Traveling
Or, you can enter a custom distance. Select Custom and select the custom distance.
Enter the number of kilometers for your detour and then select OK.
Select Route. The Magellan RoadMate will recalculate the alternate route to your destination.
30
Page 36

Select Address
Selecting Destinations
Selecting Destinations
Previous
Destinations
Favorites
List Addressed
Search by Town
Search by
Postcode
Search by Area
Previous Towns
Address Book
Point of Interest
Create New Entry
Trip Planner
Spell Name
Search by Town
Select Category
Search by
Postcode
Custom POIs
Search by Area
Junction
Previous Towns
31
Page 37

Selecting Destinations
Choosing the Routing Method
Every route is calculated based on the Routing Method criteria selected. Every time a new destination is selected, the
Magellan RoadMate prompts you for the method that will be used to calculate the route.
Shortest Time: This selection calculates a route that should take the least amount of time
using speed limits and other information in the database. Other factors, such as traffic
conditions, cannot be used in the calculation of shortest time.
Shortest Distance: This option calculates the route using the most direct route to the
destination. This route may not be the fastest due to lower speed limits, left turns or other
factors.
Least Use of Motorways: This selection calculates the route avoiding freeways whenever
possible.
Most Use of Motorways: This selection calculates the route using freeways as much as
possible.
View Destination on Map: Before you select your Routing Method, you can see where you
are going.
32
Page 38

Selecting Destinations
Changing the Routing Method
When you select a destination for the first time, a Routing Method is chosen (see “Choosing the Routing Method” on
page 32). At any time during the trip you can change the Route Method.
While viewing the Map screen, the Maneuver List screen, or the TrueView
3D screen, press the Cancel button.
Select Route.
Select the new Route Method.
The route will be recalculated using the new Routing Method chosen, and the Map screen will
be displayed.
33
Page 39

Selecting Destinations
Cancelling a Planned Route
While viewing the Map screen, the Maneuver List screen, or the TrueView
3D screen, press the Cancel button.
Select Yes to cancel the route and display the Select Destination screen.
Selecting No returns the display to the last viewed screen.
34
Page 40

Selecting Destinations
Selecting a Destination Using Select Address
A destination can be created by entering the street address that you want to go to. This address is not automatically added
your Address Book but is saved to your Previous Destination list. You have four options, Search By Town enables you to find
an address if you know the town it is located in, Search By Postcode will find all addresses within a postcode area, Search by
County searches a county area for the specified address, or Previous Towns gives you a list of towns that have been routed to.
Search by Town
Select the Globe icon.
Use the Navigation key to scroll the list up or down (if necessary) and select the desired
country to search from.
From the Select Destination screen, select Select Address.
Select Search by Town.
Enter the first few characters in the city name and select OK.
Remember, if the list is too long, press Cancel while viewing the list to return to this screen
and continue to input characters.
35
Page 41

Selecting Destinations
Use the Navigation key to scroll the list up or down (if necessary) and select the desired
town.
Enter the first few characters for the street name and select OK.
Use the Navigation key to scroll the list up or down (if necessary) and select the desired
street.
Enter the street address. The acceptable range of numbers is displayed at the top of the
screen. Select Done.
Select the desired Routing Method.
The Magellan RoadMate will calculate the route. When the calculations are complete, the
Map screen will be displayed.
36
Page 42

Selecting Destinations
Search by Postcode
Select the Globe icon.
Use the Navigation key to scroll the list up or down (if necessary) and select the desired
country to search from.
From the Select Destination screen, select Select Address.
Select Search by Postcode.
Enter the first few characters of the postcode and select OK.
Use the Navigation key to scroll the list up or down (if necessary) and select the desired
town.
37
Page 43

Selecting Destinations
Enter the first few characters for the name of the street and select OK.
Use the Navigation key to scroll the list up or down (if necessary) and select the desired
street.
Use the Navigation key to scroll the list up or down (if necessary) and select the area with
the desired address range.)
Enter the street address. The acceptable range of numbers is displayed at the top of the
screen. Select Done.
Select the desired Routing Method.
The Magellan RoadMate will calculate the route. When the calculations are complete, the
Map screen will be displayed.
38
Page 44

Selecting Destinations
Search by County
Select the Globe icon.
Use the Navigation key to scroll the list up or down (if necessary) and select the desired
country to search from.
From the Select Destination screen, select Select Address.
Select Search by County.
Enter the first few characters for the name of the county and select OK.
Use the Navigation key to scroll the list up or down (if necessary) and select the desired
county.
39
Page 45

Selecting Destinations
Enter the first few characters for the name of the street and select OK.
Use the Navigation key to scroll the list up or down (if necessary) and select the desired
street.
Use the Navigation key to scroll the list up or down and select the town the street is in.
Enter the street address. The acceptable range of numbers is displayed at the top of the
screen. Select Done.
Select the desired Routing Method.
The Magellan RoadMate will calculate the route. When the calculations are complete, the
Map screen will be displayed.
40
Page 46

Selecting Destinations
Previous Towns
Select the Globe icon.
Use the Navigation key to scroll the list up or down (if necessary) and select the desired
country to search from.
From the Select Destination screen, select Select Address.
Select Previous Town.
Use the Navigation key to scroll the list up or down (if necessary) and select the desired
town.
Enter the first few characters for the name of the street and select OK.
41
Page 47

Selecting Destinations
Use the Navigation key to scroll the list up or down (if necessary) and select the desired
street.
Enter the street address. The acceptable range of numbers is displayed at the top of the
screen. Select Done.
Select the desired Routing Method.
The Magellan RoadMate will calculate the route. When the calculations are complete, the
Map screen will be displayed.
42
Page 48

Selecting Destinations
Selecting a Destination Using the Address Book
The Address Book can store up to 200 addresses for each of the three users you have available. When you select Address
Book you are given five options: Previous Destinations lets you select from a list of the last 20 destinations you routed to;
List Addresses displays a list of all the addresses you have stored in your Address Book; Favorites gives you a shortened list
of entries from your Address Book marked as Favorites; Create New Entry lets you add a new address to your Address Book;
and Trip Plan n e r (indicated by the Tip button) lets you create a multi-destination trip from entries in your Address Book or
from other destinations.
Previous Destinations
Select the Globe icon.
Use the Navigation key to scroll the list up or down (if necessary) and select the desired
country to search from.
From the Select Destination screen, select Address Book.
Select Previous Destinations.
Use the Navigation key to scroll the list up or down (if necessary) and select the desired
previous destination.
43
Page 49

Selecting Destinations
Select Route.
Select the desired Routing Method.
The Magellan RoadMate will calculate the route. When the calculations are complete, the
Map screen will be displayed.
Saving a Previous Destination to the Address Book
From the Select Destination screen, select Address Book.
Select Previous Destinations.
Use the Navigation key to scroll the list up or down (if necessary) and select the desired
previous destination.
44
Page 50

Selecting Destinations
Select Edit.
The top line (Name) and the bottom line (Information) can be edited. The address cannot
be changed. Select the line you want to modify. Use the keypad to enter the desired text
and select OK.
When you have finished making changes, select Save.
The address is saved to the Address Book. The Previous Destination screen is displayed to
continue the routing to the previous destination. Select Route.
Select the desired Routing Method.
The Magellan RoadMate will calculate the route. When the calculations are complete, the
Map screen will be displayed.
45
Page 51

Selecting Destinations
Deleting A Previous Destination
From the Select Destination screen, select Address Book.
Select Previous Destinations.
Use the Navigation key to scroll the list up or down (if necessary) and select the desired
previous destination.
Select Delete.
A dialog box will appear to confirm your selection. Select Yes .
The Previous Destination is deleted from the list.
46
Page 52

Selecting Destinations
Favourites
From the Select Destination screen, select Address Book.
Select Favourites.
Use the Navigation key to scroll the list up or down (if necessary) and select the desired
favourite.
Select Route.
Select the desired Routing Method.
The Magellan RoadMate will calculate the route. When the calculations are complete, the
Map screen will be displayed.
47
Page 53

Selecting Destinations
Editing a Favourite
From the Select Destination screen, select Address Book.
Select Favourites.
Use the Navigation key to scroll the list up or down (if necessary) and select the desired
favourite.
Select Edit.
The top line (Name) and the bottom line (Information) can be edited. The address cannot
be changed. Select the line you want to modify. Use the keypad to enter the desired text
and select OK.
When you have finished making changes, select Save.
48
Page 54

Selecting Destinations
The address is saved to the Address Book. The Previous Destination screen is displayed to
continue the routing to the previous destination. Select Route.
Select the desired Routing Method.
The Magellan RoadMate will calculate the route. When the calculations are complete, the
Map screen will be displayed.
Deleting A Favourite
From the Select Destination screen, select Address Book.
Select Favourites.
Use the Navigation key to scroll the list up or down (if necessary) and select the desired
previous destination.
49
Page 55

Selecting Destinations
Select Delete.
A dialog box will appear to confirm your selection. Select Yes .
The Previous Destination is deleted from the list and you are returned to the Address Book
screen.
List Addresses
From the Select Destination screen, select Address Book.
Select List Addresses.
Use the Navigation key to scroll the list up or down (if necessary) and select the destination
from the list of addresses.
50
Page 56

Selecting Destinations
Select Route.
Select the desired Routing Method.
The Magellan RoadMate will calculate the route. When the calculations are complete, the
Map screen will be displayed.
Editing an Address
From the Select Destination screen, select Address Book.
Select List Addresses.
Use the Navigation key to scroll the list up or down (if necessary) and select the desired
previous destination.
51
Page 57

Selecting Destinations
Select Edit.
The top line (Name) and the bottom line (Information) can be edited. The address cannot
be changed. Select the line you want to modify. Use the keypad to enter the desired text
and select OK.
When you have finished making changes, select Save.
The address is saved to the Address Book. The Address screen is displayed to continue the
routing to the Address. Select Route.
Select the desired Routing Method.
The Magellan RoadMate will calculate the route. When the calculations are complete, the
Map screen will be displayed.
52
Page 58

Selecting Destinations
Deleting an Address
From the Select Destination screen, select Address Book.
Select List Addresses.
Use the Navigation key to scroll the list up or down (if necessary) and select the desired
previous destination.
Select Delete.
A dialog box will appear to confirm your selection. Select Yes .
The Previous Destination is deleted from the list and you are returned to the Address Book
screen.
53
Page 59

Selecting Destinations
Create New Entry – Search by Town
From the Select Destination screen, select Address Book.
Select Create New Entry.
Select Search By Town.
Enter the first few characters in the town name and select OK.
Use the Navigation key to scroll the list up or down (if necessary) and select the desired
town.
Enter the first few characters for the street name and select OK.
54
Page 60

Selecting Destinations
Use the Navigation key to scroll the list up or down (if necessary) and select the desired
street.
Enter the street address. The acceptable range of numbers is displayed at the top of the
screen. Select Done.
The top line (Name) and the bottom line (Information) can be edited. The address cannot
be changed. Select the line you want to modify. Use the keypad to enter the desired text
and select OK.
Select the Favourites box if you wish to add the address to your Favourites list. When you
have finished making changes, select Save and you are taken back to the Address Book
screen.
Create New Entry – Search by Postcode
From the Select Destination screen, select Address Book.
Select Create New Entry.
55
Page 61

Selecting Destinations
Select Search By Postcode
Use the keypad to enter the first few characters for the postcode and select OK.
Use the Navigation key to scroll the list up or down (if necessary) and select the Postcode.
Enter the first few characters for the street name and select OK.
Use the Navigation key to scroll the list up or down (if necessary) and select the street.
Use the Navigation key to scroll the list up or down (if necessary) and select the area with
the range of addresses.
56
Page 62

Selecting Destinations
Enter the street address. The acceptable range of numbers is displayed at the top of the
screen. Select Done.
The top line (Name) and the bottom line (Information) can be edited. The address cannot
be changed. Select the line you want to modify. Use the keypad to enter the desired text
and select OK.
Select the Favourites box if you wish to add the address to your Favourites list. When you
have finished making changes, select Save and you are taken back to the Address Book
screen.
Create New Entry – Search by County
From the Select Destination screen, select Address Book.
Select Create New Entry.
Select Search By County
57
Page 63

Selecting Destinations
Use the keypad to enter the first few characters for the county and select OK.
Select the county.
Enter the first few characters for the street name and select OK.
Use the Navigation key to scroll the list up or down (if necessary) and select the desired
street.
The top line (Name) and the bottom line (Information) can be edited. The address cannot
be changed. Select the line you want to modify. Use the keypad to enter the desired text
and select OK.
Select the Favourites box if you wish to add the address to your Favourites list. When you
have finished making changes, select Save and you are taken back to the Address Book
screen.
58
Page 64

Selecting Destinations
Create New Entry – Previous Town
From the Select Destination screen, select Address Book.
Select Create New Entry.
Select Previous Town.
Use the Navigation key to scroll the list up or down (if necessary) and select the desired
town.
Enter the first few characters for the street name and select OK.
Use the Navigation key to scroll the list up or down (if necessary) and select the desired
street.
59
Page 65

Selecting Destinations
The top line (Name) and the bottom line (Information) can be edited. The address cannot
be changed. Select the line you want to modify. Use the keypad to enter the desired text
and select OK.
Select the Favourites box if you wish to add the address to your Favourites list. When you
have finished making changes, select Save and you are taken back to the Address Book
screen.
Trip Planner – New Trip
With the Trip Planner you can choose multiple destinations and be guided to them sequentially.
From the Select Destination screen, select Address Book.
Select Trip .
Select New.
Use the keypad to enter a name for the new trip and select OK.
60
Page 66

Selecting Destinations
From the pop-up menu, select Add.
From the Select Trip Planner Address screen, select the method for adding a destination to
your trip: Map (Map button) will add a destination from a point on the map; Select Address
will add a destination from a new address; Address Book will add a destination from your
Address Book; Point of Interest... will add a destination from the POI database; and
Junction will add a destination of two intersecting streets.
When you have selected your destination, select Save and it is added to your trip. Select
the destination and select Add from the pop-up menu to continue adding destinations.
Continue adding destinations. When you are finished, select Save [Trip Name] and you are
taken back to the Trip screen.
Trip Planner – Optimizing a Trip
With Route Optimization, you can sort the destinations in your trip from closest to farthest.
From the Trip Planner screen, select Edit.
Select the trip to optimize.
61
Page 67

Selecting Destinations
Select Optimize.
The destinations are sorted from closest to farthest from your current location.
Select Save.
Trip Planner – Guide Me
Once you have your destinations set and optimized, you can begin your trip.
From the Trip Planner screen, select Guide Me.
Select the trip you wish to begin.
Select the first destination in the list you wish to route to.
Note: Selecting the second destination in the list will exclude the first destination,
selecting the third destination in the list will exclude the first and second destinations, and
so on.
62
Page 68

Selecting Destinations
Select the desired Routing Method.
The Magellan RoadMate will calculate the route. When the calculations are complete, the
Map screen will be displayed.
Trip Planner – Edit
Destinations within a trip can be moved, deleted, or added to.
From the Trip Planner screen, select Edit.
Select the trip to edit.
Select the destination you wish to change, and select Move Up from the pop-up menu.
Select the destination you wish to delete, and select Delete from the pop-up menu.
63
Page 69

Selecting Destinations
When you have finished, select Save and you are returned to the Trip Planner screen.
Trip Planner – Delete and Rename
From the Trip Planner screen, select Delete, Rename.
Select Delete.
Select the trip you wish to delete.
A dialog box will appear to confirm your selection. Select Yes . The trip is deleted
Select Rename.
64
Page 70

Selecting Destinations
Select the Trip to rename.
Use the backspace key to delete the old name; then, enter the new name for the trip. When
you have finished, select OK.
The trip has been renamed.
65
Page 71

Selecting Destinations
Selecting a Point of Interest as a Destination
Points of Interest (POIs), are commercial or recreational locations, landmarks, or services that are preloaded into the
Magellan RoadMate database. There are over 750,000 POIs in the database, which range from restaurants, parks, petrol
stations, and banks, to schools and police stations, and more. The purpose of the POI database (accessed through the Points
of Interest menu) is to provide you with a list of popular destinations without having to add them to your Address Book
manually.
Spell Name
From the Select Destination screen, select Point of Interest...
Select Spell Name.
Enter the name of the POI.
Selecting Nearest will list the POIs matching the name you entered from closest to farthest.
Select Nearest.
Use the Navigation key to scroll the list up or down (if necessary) and select the desired
POI. This list can be very long because the first 100 POIs beginning with the text entered
are displayed.
66
Page 72

Selecting Destinations
Select the desired Routing Method.
The Magellan RoadMate will calculate the route. When the calculations are complete, the
Map screen will be displayed.
Selecting List by Town will list the POIs matching the name you entered within a selected
city. Select List by Town.
Enter the name of the city you wish to search.
Use the Navigation key to scroll the list up or down (if necessary) and select the desired
town.
Use the Navigation key to scroll the list up or down (if necessary) and select the desired
POI. This list can be very long because the first 100 POIs beginning with the text entered
are displayed.
67
Page 73

Selecting Destinations
Select the desired Routing Method.
The Magellan RoadMate will calculate the route. When the calculations are complete, the
Map screen will be displayed.
Selecting Select Category enables you to list all of the POIs in the selected category. Select
Select Category.
Use the Navigation key to scroll the list up or down and select the desired POI category.
Use the Navigation key to scroll the list up or down (if necessary) and select the desired
POI. This list can be very long because the first 100 POIs beginning with the text entered
are displayed.
Select the desired Routing Method.
68
Page 74

Selecting Destinations
The Magellan RoadMate will calculate the route. When the calculations are complete, the
Map screen will be displayed.
Select Category
From the Select Destination screen, select Point of Interest.
Select Select Category.
Select the POI category.
Selecting Nearest will list the POIs matching the name you entered from closest to farthest.
Select Nearest.
A list of all the POI’s in the selected categories nearest to your current position is displayed.
Select the POI from the list.
69
Page 75

Selecting Destinations
Select the desired Routing Method.
The Magellan RoadMate will calculate the route. When the calculations are complete, the
Map screen will be displayed.
Selecting List by Town will list the POIs matching the name you entered within a selected
city. Select List by Town.
Enter the name of the city you wish to search from. When you are finished, select OK.
Use the Navigation key to scroll the list up or down (if necessary) and select the desired
city.
Use the Navigation key to scroll the list up or down (if necessary) and select the desired
POI.
70
Page 76

Selecting Destinations
Select the desired Routing Method.
The Magellan RoadMate will calculate the route. When the calculations are complete, the
Map screen will be displayed.
Selecting Spell Name will list the POIs matching the name you entered. Select Spell Name.
Enter the name of the POI. When you are finished, select OK.
Use the Navigation key to scroll the list up or down (if necessary) and select the desired
POI.
Select the desired Routing Method.
71
Page 77

Selecting Destinations
The Magellan RoadMate will calculate the route. When the calculations are complete, the
Map screen will be displayed.
Custom POIs
Please refer to page 14 for information on creating and loading Custom POIs.
From the Select Destination screen, select Point of Interest
Select Custom POIs.
Select the Category.
If the POI list has more than 15 returns, you can further narrow the search by selecting
either Nearest, or Spell Name. Select the desired POI from the list.
Select Route to go to the selected Address, or select Cancel to return to the Select Custom
POI menu.
72
Page 78

Selecting Destinations
Select the desired Routing Method.
The Magellan RoadMate will calculate the route. When the calculations are complete, the
Map screen will be displayed.
73
Page 79

Selecting Destinations
Selecting an Junction as a Destination
An junction of two streets can be used as a destination for your trip. The search for the junction can be done whether or not
you know the city. If you know the city, you can start there; if you are unsure of the city, you can start with the state.
Search by Town
From the Select Destination screen, select Junction.
Select Search by Town.
Enter the first few characters for the city and select OK.
Use the Navigation key to scroll the list up or down (if necessary) and select the desired
town.
Enter the first few characters for the first street and select OK.
74
Page 80

Selecting Destinations
Use the Navigation key to scroll the list up or down and select the first street from the list.
Enter the first few characters for the second street and select OK.
Use the Navigation key to scroll the list up or down (if necessary) and select the second
street from the list.
Select the desired Routing Method.
The Magellan RoadMate will calculate the route. When the calculations are complete, the
Map screen will be displayed.
Search by Postcode
From the Select Destination screen, select Junction.
75
Page 81

Selecting Destinations
Select Search by Postcode.
Enter the first few characters for the state and select OK.
Use the Navigation key to scroll the list up or down (if necessary) and select the state from
the list.
Enter the first few characters for the first street and select OK.
Use the Navigation key to scroll the list up or down (if necessary) and select the first street
from the list.
Enter the first few characters for the second street and select OK.
76
Page 82

Selecting Destinations
Use the Navigation key to scroll the list up or down (if necessary) and select the second
street from the list.
Select the desired Routing Method.
The Magellan RoadMate will calculate the route. When the calculations are complete, the
Map screen will be displayed.
Search by County
From the Select Destination screen, select Junction.
Select Search by County.
Enter the first few characters of the county and select OK.
77
Page 83

Selecting Destinations
Use the Navigation key to scroll the list up or down (if necessary) and select the desired
county.
Enter the first few characters for the first street and select OK.
Use the Navigation key to scroll the list up or down (if necessary) and select the first street
from the list.
Enter the first few characters for the second street and select OK.
Use the Navigation key to scroll the list up or down (if necessary) and select the second
street from the list.
Select the desired Routing Method.
78
Page 84

Selecting Destinations
The Magellan RoadMate will calculate the route. When the calculations are complete, the
Map screen will be displayed.
Previous Towns
From the Select Destination screen, select Junction.
Select Previous Towns.
Use the Navigation key to scroll the list up or down (if necessary) and select the desired
city.
Enter the first few characters for the first street and select OK.
Use the Navigation key to scroll the list up or down (if necessary) and select the first street
from the list.
79
Page 85

Selecting Destinations
Enter the first few characters for the second street and select OK.
Use the Navigation key to scroll the list up or down (if necessary) and select the second
street from the list.
Select the desired Routing Method.
The Magellan RoadMate will calculate the route. When the calculations are complete, the
Map screen will be displayed.
80
Page 86

Options
Options
The Options menu of the Magellan RoadMate enables you with enhanced features to customize your Magellan RoadMate.
Additionally, it also provides features to assist you in learning how to operate the most common functions, and assist you in
contacting a Support Representative should you need more detailed assistance.
The Trip Computer displays useful information about your trip that can be saved for future reference. Ideal for the
business traveller who needs to record mileage and time spent on the road. See “Trip Computer” on page 82.
Configuration provides access to customize the look and operation of the Magellan RoadMate. It also contains diagnostic
features to keep your Magellan RoadMate performing at its best. See “Configuration” on page 85.
Tutorial provides instructions and verbal narration on how to use the most common features of the Magellan RoadMate.
See “Tutorial” on page 112.
Help provides you with Customer Support phone numbers. See “Help” on page 113.
These functions are accessed by pressing the Option button on the Magellan RoadMate.
81
Page 87

Options
Trip Computer
The Trip Computer is a valuable tool for recording the mileage and time spent driving while on business or vacation. The
information for the trip can be saved and viewed at any time, providing you easy access to information on your current trip,
as well as previous trips.
Current Trip
When you begin a new trip and you need to record the information, access the Trip Computer. There, you can save the
information displayed for the current trip (if needed) and reset the Trip Computer to zero in preparation for your new trip.
From any screen press the Option button. Select Trip Computer.
Select Current from the list of saved Trip Reports.
The Trip Computer is always in a “Running” state. The information for the current trip is
displayed.
Stopping or Starting the Trip Computer
At any time the Trip Computer can be stopped and started. If the Trip Computer is currently
running, select Stop. The Trip Computer will stop recording until restarted or reset.
82
Page 88

Options
While the Trip Computer is in a “Stopped” state, select Start to continue recording the current
trip or select reset to begin a new trip.
Saving the Current Trip Report
When you have finished with your trip, you can save the information for later viewing. Select
Save at any time.
Use the keypad to enter a name for the Trip Report and select OK when you are finished.
Resetting the Trip Computer
Before starting a new trip that you want to record, you need to reset the Trip Computer first.
Select Reset and the information will be set to zero. The Trip Computer will remain in a
“Running” state.
83
Page 89

Options
Viewing a Saved Trip Report
From the Trip Computer screen, select the Trip Report you wish to view.
The saved Trip Report is displayed. Press the Cancel button when you are finished viewing the
trip and return to the Trip Computer screen.
Deleting a Trip Report
Select the Trip Report to be deleted.
Select Delete.
The trip is deleted and you are returned to the Trip Computer screen.
84
Page 90

Options
Configuration
The configuration options can be set differently for each user.
From any screen, press the Option button and select Configuration.
POI Selection
From the POI Selection menu, you can choose which icons to display on the Map screen
Select POI Selection.
Select Mark All to display all POI icons on the Map screen.
Select Clear All if you wish not to have any POI icons displayed on the Map screen.
You can also select individual icons to display or hide on the Map screen. When you have
finished, press the Cancel button to return to the Configuration menu.
85
Page 91

Options
Custom POIs
The Custom POI menu enables you to select POIs previously loaded into your Magellan RoadMate using the Magellan
RoadMate POI Manager software (see “Application” on page 14). The instructions following instructions are assuming you
have loaded one or more POIs into your Magellan RoadMate.
Select Custom POIs.
Select Select a POI file.
Use the Navigation key to scroll the list up or down (if necessary) and select a POI file. With the
file selected, you are returned to the Custom POIs menu.
Select Display Categories.
The categories you created are displayed in the same way as the built-in POIs.
Select Mark All to display all POI icons on the Map screen. Select Clear All if you wish not to
have any POI icons displayed on the Map screen. You can also select individual icons to display
or hide on the Map screen.
86
Page 92

Options
When you have finished, press the Cancel button to return to the Custom POIs menu.
You can also be alerted when you approach a custom POI. The Set Alarm function works for
Custom POIs only and only if the POI has been selected to show on the Map screen. Select Set
Alarms.
Again, you can select all, none, or individual POIs to have an alert set. Select Mark All to set an
alert for all custom POI icons on the Map screen. Select Clear All if you wish not to have any
alerts set for custom POI icons displayed on the Map screen. You can also select individual
categories to have an alert set.
When you have finished, press the Cancel button to return to the Custom POIs menu.
With the POI alerts set, you can now choose at what point you will be alerted. Select Alert
Parameters.
Select the POI category to customize.
87
Page 93

Options
The Detection Angle is set to alert you when you are within so many degrees of the POI.
Select Detection Angle.
Use the numeric keypad to enter the number of degrees in which to set the alert. When you
have finished, select OK.
88
Page 94

Options
The First Warning is set to alert you when you are within a certain number of feet from the POI.
Select First Warning.
Use the numeric keypad to enter the number of feet in which to alert you. When you have
finished, select OK.
89
Page 95

Options
The Last Warning is set as a final alert when you are within a certain number of feet from the POI.
Select Last Warning.
Use the numeric keypad to enter the number of feet in which to alert you. When you have
finished, select OK.
When you have set the parameters as you like, select Save.
90
Page 96

Options
Map Options
Map Options enable you to determine the behavior of the Map while you are driving.
Select Map Options.
With Map Smart selected, the Map screen will automatically switch to the Maneuver List and/or
the TrueView 3D screen when applicable. That is, when the satellite signal is lost for more than
30 seconds, the Maneuver List will be displayed so that you can still be guided to your
destination. Also, when you are one-half mile from the next maneuver, the TrueView 3D screen
is displayed. Then, at two-tenths of a mile before the maneuver, the Map screen is displayed.
With Map Always selected, only the Map screen is displayed with the highlighted route.
With Map Manual selected, the Maneuver List and TrueView 3D screen can only be shown only
by pressing the View button.
With Scrolling enabled, the vehicle position icon will always remain in the same position with
the Map scrolling, or moving as while the vehicle is in motion. With Scrolling disabled, the
vehicle position icon will move forward slightly; then, the map will scroll down. Having Scrolling
disabled allows for a faster display.
With Split TrueView enabled, when the TrueView 3D screen is displayed, it will show the next
maneuver in TrueView 3D on the left side of the screen, and the map with the highlighted route
on the right side of the screen.
91
Page 97

Options
Heading Up sets the map display so that the direction of travel is always at the top of the
screen. North Up sets the map display so that North is always at the top of the screen.
Select Miles or Kilometers as the unit of measure for distance.
Select Map Colour
Select Select Map Colour.
With Automatic Night Mode enabled, the Magellan RoadMate will switch between a Day screen
and a Night screen based on sunrise and sunset times for your current location.
Select Day Screen to choose a color scheme for the map while you are driving during the
day.
Select Night Screen to select a color scheme for driving at night or when the light levels are
low.
92
Page 98

Select from nine available color schemes:
Options
When you have finished, select Save and you will be returned to the Configuration menu.
Route Preferences
Route preferences enable you to set parameters for the Magellan RoadMate to follow when
calculating a route. Select Route Preferences.
Avoid Toll Roads instructs Magellan RoadMate to avoid known toll roads when calculating a
route.
93
Page 99

Options
Automatic Re-Route will cause the Magellan RoadMate to try up to three times to automatically
re-route to the destination when it has detected that the vehicle has deterred from the
calculated route.
Detour Options
The Magellan RoadMate comes equipped with SmartDetour. If you are driving on the motorway with SmartDetour enabled
and your speed drops below 24 KPH, you may press the detour icon on the Map screen in order to caculate an alternate
route around traffic.
Select Detour Options.
Select the distance of the detour. You can select from a preset distance of three miles, five
miles, or 10 miles.
You can also select a custom distance. Select Custom, and then select the button to the right to
enter a custom distance.
Enter the number of miles and select OK.
94
Page 100

Options
Next, select the amount of time the Magellan RoadMate will wait before alerting you to
recalculate the route. Select the Time button.
Enter the number of minutes and select OK.
To have the Magellan RoadMate re-route you automatically, select Enable automatic detour.
When you have finished, select Save.
When you encounter traffic, and the set time has elapsed, the Detour icon will flash on the Map
screen. Touch the icon on the screen to have the Magellan RoadMate calculate the detour. You
can choose to ignore the Detour alert; after one minute it will stop flashing until the set time
has elapsed again when it will alert you once more.
95
 Loading...