

Page 1

Page 2

Wireless Stereo Headset
Table of Contents
1. Package Contents
2. Headset Controls / Base Station
3. Battery Installation / Power Save
Mode / Wireless Range
4. Xbox 360 Component/Composite
/VGA Setup
5. Xbox 360® HDMI Setup
6. Xbox 360® E Setup
7. PlayStation®3 HDMI/Component
/Composite Setup
8. PlayStation®4 Connect to
Controller Setup
9. PlayStation®4 Back of TV Setup
10. Wii U GamePad
™
/Mobile Devices Setup
/ Sync Headset to Base Station
11. PC / Mac
Page 3

Wireless Stereo Headset
A B
Kunai Headset
C
USB Cable
F G
Xbox LIVE®
Communication Cable
H I
Base Station
D
3.5mm Mobile / Wii U™ / PS4 Cable
E
3.5mm Audio Cable
RCA Connection Cable
Analog Audio Adapter
AA
AA
2x AA Batteries
1
Page 4
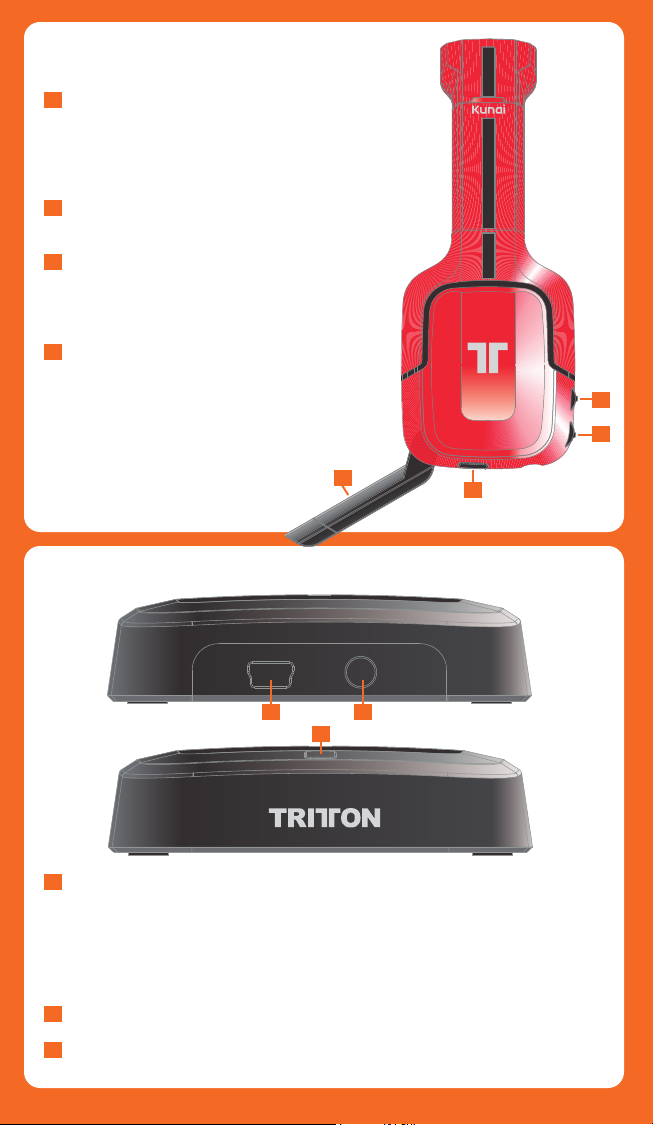
Headset Controls
A
Push to turn Headset ON/OFF. Press
and hold for 3 seconds to Sync
Headset to Base Station. See page
10 for more information on syncing
the Headset to the Base Station.
B
Use to adjust the volume of the
game audio.
C
Use to adjust the volume of
the voices of other players or
music/game volume when using
3.5mm jack on headset
D
Fold the mic up to mute.
C
B
D
A
Base Station
POWER IN
B C
A
A
Flashing: Syncing or searching for Headset.
Solid: Connected to a Headset while Base Station
is powered ON.
OFF: Base Station is powered OFF or in standby mode.
Press and hold for 3 seconds to put Base Station in
Sync mode. See page 10 for more information.
B
USB Port
C
Audio Input
AUDIO IN
2
Page 5
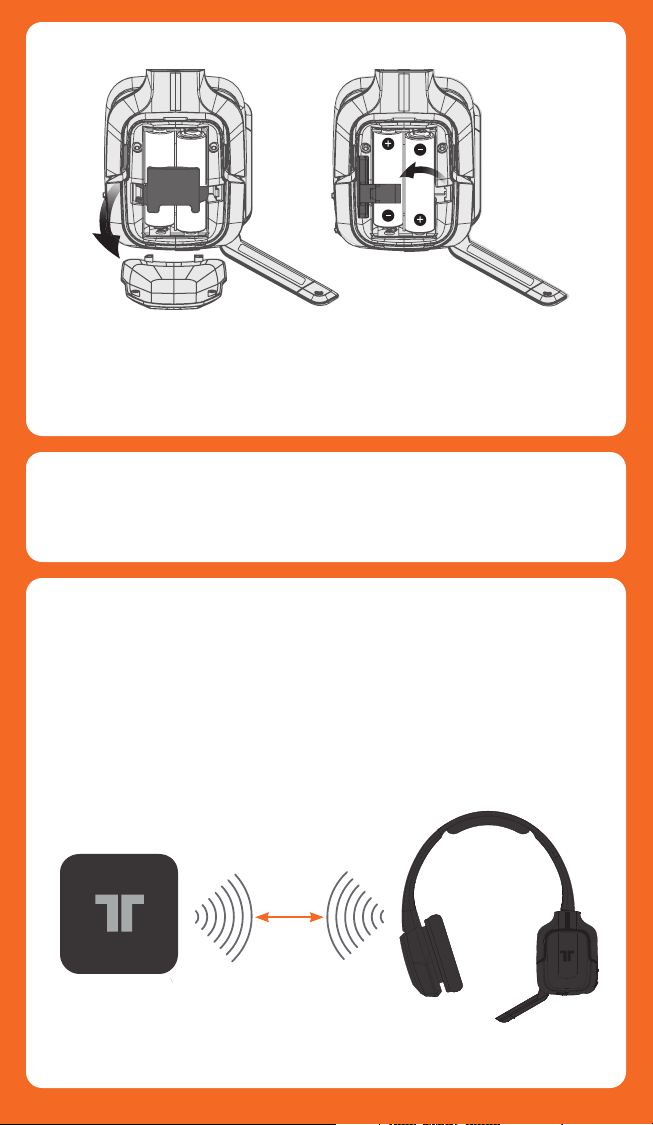
Battery Installation
Insert 2 AA batteries into the Headset matching the
polarity as shown.
When the battery level is low, the power LED will flash.
Battery life = 20 hours (based on constant audio
playback at medium volume.
Power Save Mode
If the Headset receives no audio for 10 minutes, the
Headset will power down to save battery power and
the LED on the Base Station will flash.
Wireless Range
The Kunai Headset transmits audio via digital radio
frequency (RF) and has an operating range of 33 feet/10
meters in any direction. Please remain within this range
for optimal performance. Avoid placing the Base Station
on top of a metal surface or behind other devices that
use RF. If the Headset is not operating properly within the
33-foot/10-meter range, try moving the Base Station to a
different location for improved performance.
33ft/10m
3
Page 6

Xbox 360 Component/Composite/VGA
*
G
C
E
F
2
E
1
1
Plug one end of the USB Cable into a USB port on
the gaming console. Plug the other end of the USB
Cable into the USB Port of the Base Station.
Plug Component/VGA/Composite Cable into Xbox 360.
2
3
Connect RCA connection Cable to red/white
connectors on the Component/VGA/Composite Cable.
Plug 3.5mm Audio Cable into the Audio Input of the
4
Base Station.
Connect the Headset Connector Cable in the
5
proper order:
1- Connect Headset Connector Cable to the Headset
Connector Port on the Headset.
2- Connect puck side of Headset Connector Cable into Xbox
360-compatible controller.
6
Insert the batteries into the Headset. See page 10 for
more information.
7
Power ON the Xbox 360 Console and Headset.
To confirm Xbox LIVE settings, press the “Xbox Guide
8
Button” when a game is loaded,
and go to Personal Settings > Voice. Ensure that
“Headset Only” is selected.
C
E
C
G
E
4
Page 7

Xbox 360® HDMI
G
C
E
2
1
Plug one end of the USB Cable into a USB port on
the gaming console. Plug the other end of the USB
Cable into the USB Port of the Base Station.
2
Plug Analog Audio Adapter into Xbox 360 AV Port.
3
Plug Analog Audio Adapter into RCA connector
Cable.
4
Plug 3.5mm Audio Cable into the Audio Input of the
Base Station.
5
Connect the Headset Connector Cable in the
proper order:
1- Connect Headset Connector Cable to the
Headset Connector Port on the Headset.
2- Connect puck side of Headset Connector Cable
into Xbox 360-compatible controller.
6
Insert the batteries into the Headset. See page 10 for
more information.
7
Power ON the Xbox 360 Console and Headset.
8
To confirm Xbox LIVE settings, press the “Xbox Guide
Button” when a game is loaded, and go to Personal
Settings > Voice. Ensure that “Headset Only” is
selected.
C
G
F
C
H
H
E
F
1
5
Page 8

Xbox 360® E
C
E
1
2
1
Plug one end of the USB Cable into a USB port on
the gaming console. Plug the other end of the USB
Cable into the USB Port of the Base Station.
2
Plug 3.5mm Audio Cable into the Audio Input of the
Base Station. Plug the other end into the 3.5mm A/V
port on the Xbox 360.
3
Connect the Headset Connector Cable in the proper
order:
1- Connect Headset Connector Cable to the
Headset Connector Port on the Headset.
2- Connect puck side of Headset Connector Cable
into Xbox 360-compatible controller.
4
Insert the batteries into the Headset. See page 10 for
more information.
5
Power ON the Xbox 360 Console and Headset.
6
To confirm Xbox LIVE settings, press the “Xbox Guide
Button” when a game is loaded, and go to Personal
Settings > Voice. Ensure that “Headset Only” is
selected.
C
F
C
6
Page 9

PlayStation®3 HDMI/Component/Composite
*
* *
G
C
E
* Not Included / Non inclus
** Included with console /
Inclus avec la console
D
Plug one end of the USB Cable into a USB port on the
1
gaming console. Plug the other end of the USB Cable
into the USB Port of the Base Station.
Plug RCA Connector Cable into the red/white
2
connectors of the PS3 AV Cable
Plug the 3.5mm Audio Cable into the RCA
3
connector cable
Plug 3.5mm Audio Cable into the Audio Input of
4
the Base Station.
Insert the batteries into the Headset. See page 3
5
for more information.
Power ON the PlayStation 3 Console and Headset.
A
G
E
C
G
PlayStation®Network
On the PS3 go to Settings > Sound Settings > Audio
Output Settings and change the audio output to be
“Audio Input Connector/SCART/AV Multi.”
On the PS3 go to Settings > Accessory Settings > Audio
Device Settings, and set both the input and output to
“TRITTON KUNAI Wireless Headset.” You can see a visual
confirmation that the microphone is functioning if the
bar graph moves.
7
C
Page 10

PlayStation®4 Connect to Controller
*
* Not Included / Non inclus
** Included with console /
Inclus avec la console
Plug one end of the 3.5mm Mobile/Wii U/PS4 cable
1
to the PS4 controller.
2
Plug the other end of the 3.5mm Mobile/Wii U/PS4
cable to the port on the left earcup of the
D
headset.
D
D
8
Page 11

PlayStation®4 Back of TV
*
* *
G
C
E
Plug one end of the USB Cable into a USB port on
1
the gaming console. Plug the other end of the USB
Cable into the USB Port of the Base Station.
2
Plug the Red/White connectors of the RCA Connector Cable to the back of the TV.
3
Plug the 3.5mm Audio Cable into the RCA
Connector Cable.
4
Plug the other end of the 3.5mm Audio Cable into
the Base Station.
C
G
C
E
E
9
Page 12

Wii U GamePad™/Mobile Devices
D
Wii U
SELECTSELECT HOMEHOME STARTSTART MICMIC BATTERYBATTERY POWERPOWER
™
XX
AA
YY
BB
Nintendo 3DS
™
PlayStation®Vita Tablets/Phones
Plug one end of the 3.5mm Mobile/Wii U/PS4 cable
to the device.
Plug the other end of the 3.5mm Mobile/Wii U/PS4
cable to the port on the left earcup of the headset.
D
D
Sync Headset to Base Station
Note: Headset is synced to the Base Station at the
factory. This step is only necessary when syncing a new
Headset to the Base Station. Only one Headset can be
paired at a time.
With the Base Station connected via USB and powered
ON, on the Headset, press and hold the Power/Sync
button for 3 seconds. The Headset and Base Station will
sync, and the LEDs on the Base Station and Headset will
illuminate solid when the sync is successful.
10
Page 13

PC / Mac
D
C
Plug one end of the 3.5mm Audio Cable to the
A
D
headphone jack of the PC/Mac.
Plug the other end of the 3.5mm Audio Cable to the
A
D
Base Station.
Plug one end of the USB Cable into a USB port on
A
C
the gaming console.
A
Plug the other end of the USB Cable into the USB
C
Port of the Base Station.
For immediate support, visit HTTP://SUPPORT.MADCATZ.COM to find the latest documentation, Knowledge Base articles, and software for your
device. You can also chat live with a support technician or submit a trouble ticket.
2-Year Limited Warranty
Mad Catz warrants this product to be free from defects in materials and workmanship for the warranty period. This non-transferable, two (2) year
limited warranty is only to you, the first end-user purchaser. If a defect covered by this warranty occurs AND you provide proof of purchase, Mad Catz,
at its option, will repair or replace the product at no charge.
The Mad Catz two (2) year limited warranty is available to North American and European customers. Your sole and exclusive remedy is repair or
replacement of your Mad Catz product. In no event shall Mad Catz liability exceed the original purchase price of the product. This warranty does not
apply to: (a) normal wear and tear or abusive use; (b) industrial, professional or commercial use; (c) if the product has been tampered with or modified.
To receive warranty service, you must:
1. Obtain a Return Authorization Number from Mad Catz Technical Support via ONE of the following methods:
a. Submit a Ticket at http://support.madcatz.com
b. Call the Mad Catz Tech Support Center nearest you:
North America: (USA) or (outside USA)
UK (Toll-Free)
Europe (Outside UK)
Deutschland (gebührenfrei)
France (gratuit)
España (gratis)
Once you have your unique Return Authorization Number, do the following:
1. Ship the product to Mad Catz at your expense for service.
2. Enclose a copy of the original sales receipt showing a purchase date.
3. Enclose a full return address with daytime and evening phone numbers.
WWW.TRITTONAUDIO.COM
©2013 Mad Catz, Inc. 7480 Mission Valley Road, Suite 101, San Diego, CA 92108 U.S.A. Mad Catz, TRITTON, Kunai, and the Mad Catz and TRITTON
logos are trademarks or registered trademarks of Mad Catz Interactive, Inc., its subsidiaries and affiliates. The shape and design of this product are
a trade dress of Mad Catz Interactive, Inc., its subsidiaries and affiliates. All other product names and images are trademarks or registered
trademarks of their respective owners. Made in China. All rights reserved. Product features, appearance and specifications may be subject to
change without notice. Please retain this information for future reference.
Mad Catz is a publicly traded company on the TSX/NYSE MKT, symbol MCZ.
1-800-659-2287 or 1-619-683-2815
08450 508418
+44(0) 1633 883110
089-21094818
01 82 88 01 80
93 181 63 94
Monday - Friday
Monday - Friday
Monday - Friday
Montag - Freitag
Lundi - Vendredi
Lunes - Viernes
11
Page 14

EN
Addendum
Warning: Changes or modifications not expressly approved by the
party responsible for compliance could void the user's authority to
operate the equipment.
NOTE: THE MANUFACTURER IS NOT RESPONSIBLE FOR ANY RADIO OR TV
INTERFERENCE CAUSED BY UNAUTHORIZED MODIFICATIONS TO THIS
EQUIPMENT.SUCH MODIFICATIONS COULD VOID THE USER’S AUTHORITY
TO OPERATE THE EQUIPMENT.
This device complies with Part 15 of the FCC Rules. Operation is subject to the
following two conditions: (1) this device may not cause harmful interference, and (2)
this device must accept any interference received, including interference that may
cause undesired operation.
This device complies with Industry Canada licence-exempt RSS standard(s).
Operation is subject to the following two conditions: (1) this device may not cause
interference, and (2) this device must accept any interference, including interference
that may cause undesired operation of the device.
Warning
To prevent possible hearing damage, do not
listen at high volume levels for long periods.
FR
Le présent appareil est conforme aux CNR d'Industrie Canada applicables aux
appareils radio exempts de licence. L'exploitation est autorisée aux deux conditions
suivantes : (1) l'appareil ne doit pas produire de brouillage, et (2) l'utilisateur de
l'appareil doit accepter tout brouillage radioélectrique subi, même si le brouillage est
susceptible d'en compromettre le fonctionnement.
FCC Addendum-R0
Size: 100 (W) x 100 (H)mm
Material: 128gsm Double Side Art Paper
Color: 1C + 0
Coating: Vernish
Date: 17-Oct-2013
 Loading...