

Page 1

FOR POUR FÜR*
PC
MAC
®
multiplatform :: multi-plateforme
via Bluetooth
®
Smart technology
*Any device supporting mouse input over Bluetooth 4.0 :: *Jedes Gerät unterstützt Mauseingaben über Bluetooth 4.0 ::
* Toutes les entrées de la souris au-dessus de dispositif de support Bluetooth 4.0
:: WIRELESS MOBILE GAMING
:: KABELLOSE MOBILE GAMING-MAUS
:: SOURIS DE JEU MOBILE SANS FIL
Page 2
.2
AA
.C
A
B
C
D
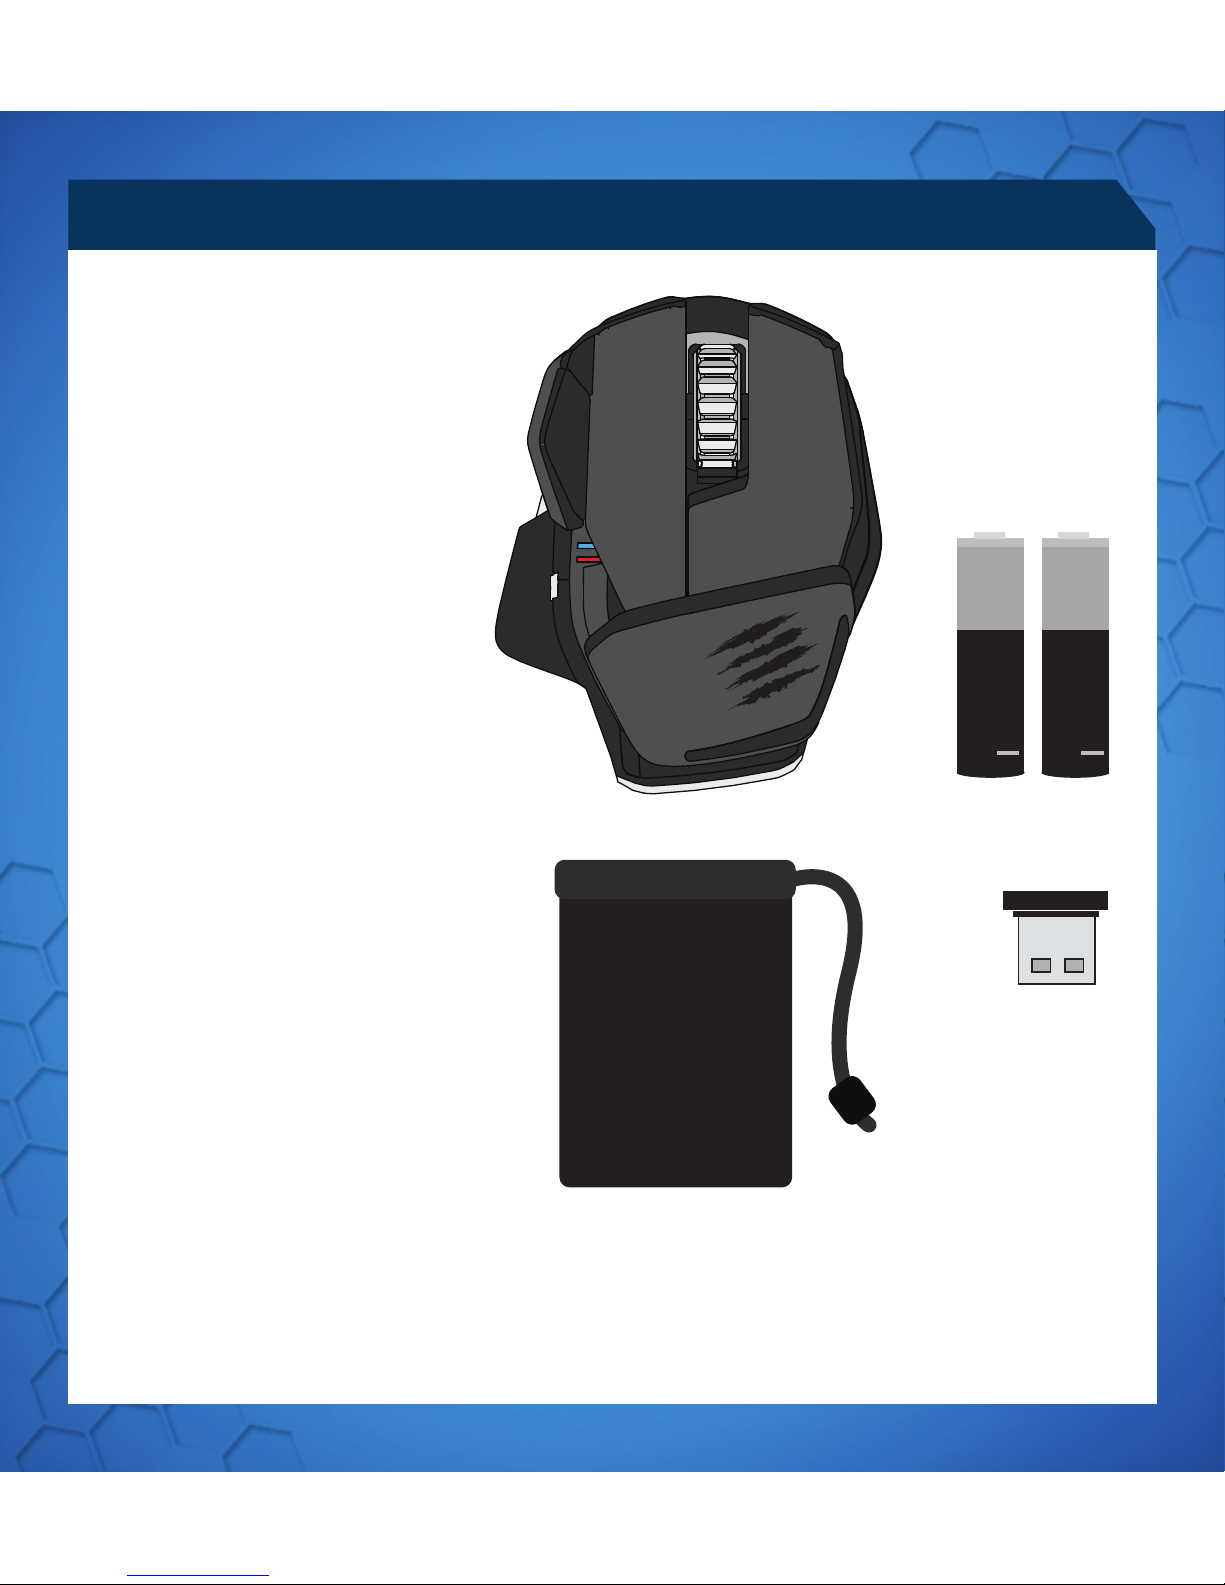
R.A.T.
M
Wireless Mouse
Dongle
Pouch
2 x AAA Battery
R.A.T.
M
Souris Sans Fil
Dongle
Housse
2 piles AAA
A
B
C
D
R.A.T.
M
Funkmaus
Dongle
Hülle
2 Mikrobatterien
A
B
C
D
R.A.T.
M
Mouse wireless
Adattatore
Borsa
2 batterie ministilo
A
B
C
D
R.A.T.
M
Ratón inalámbrico
Llave electrónica
Bolsa
2 x batería AAA
A
B
C
D
R.A.T.
M
Trådlös mus
Dongle
Fodral
2 x AAA-batterier
A
B
C
D
R.A.T.
M
Trådløs mus
Dongle
Lomme
2 x AAA-batterier
A
B
C
D
R.A.T.
M
Rato Sem Fios
Dongle
Bolsa
2x pilhas AAA
A
B
C
D
ENGLISH
DEUTSCH
FRANÇAIS
ITALIANO
ESPAÑOL
SWEDISH DANISH PORTUGUÊS
.D
.B
5 21
PACKAGE INCLUDES
.A
Page 3

.3
ENGLISH
Mouse Overview
Mouse Status LEDs
Setup Instructions
4
6
7
Présentation de la souris
Témoins lumineux (DEL)
Instructions d’installation
14
16
17
Mausübersicht
LED-Anzeigen
Installationsanleitung
9
11
12
Musöversikt
LED-indikatorer
Istallationsanvisningar
29
31
32
Panoramica del mouse
Spie LED di indicazione
Istruzioni di configurazione
19
21
22
Oversigt over mus
Lysdioder
Opsætningsvejledning
34
36
37
Descrição geral do rato
Indicadores LED
Instruções de configuração
24
26
27
Descrição geral do rato
Indicadores LED
Instruções de configuração
39
41
42
DEUTSCH
SWEDISH
FRANÇAIS
ITALIANO
DANISH
ESPAÑOL
PORTUGUÊS
CONTENTS
Page 4
.4
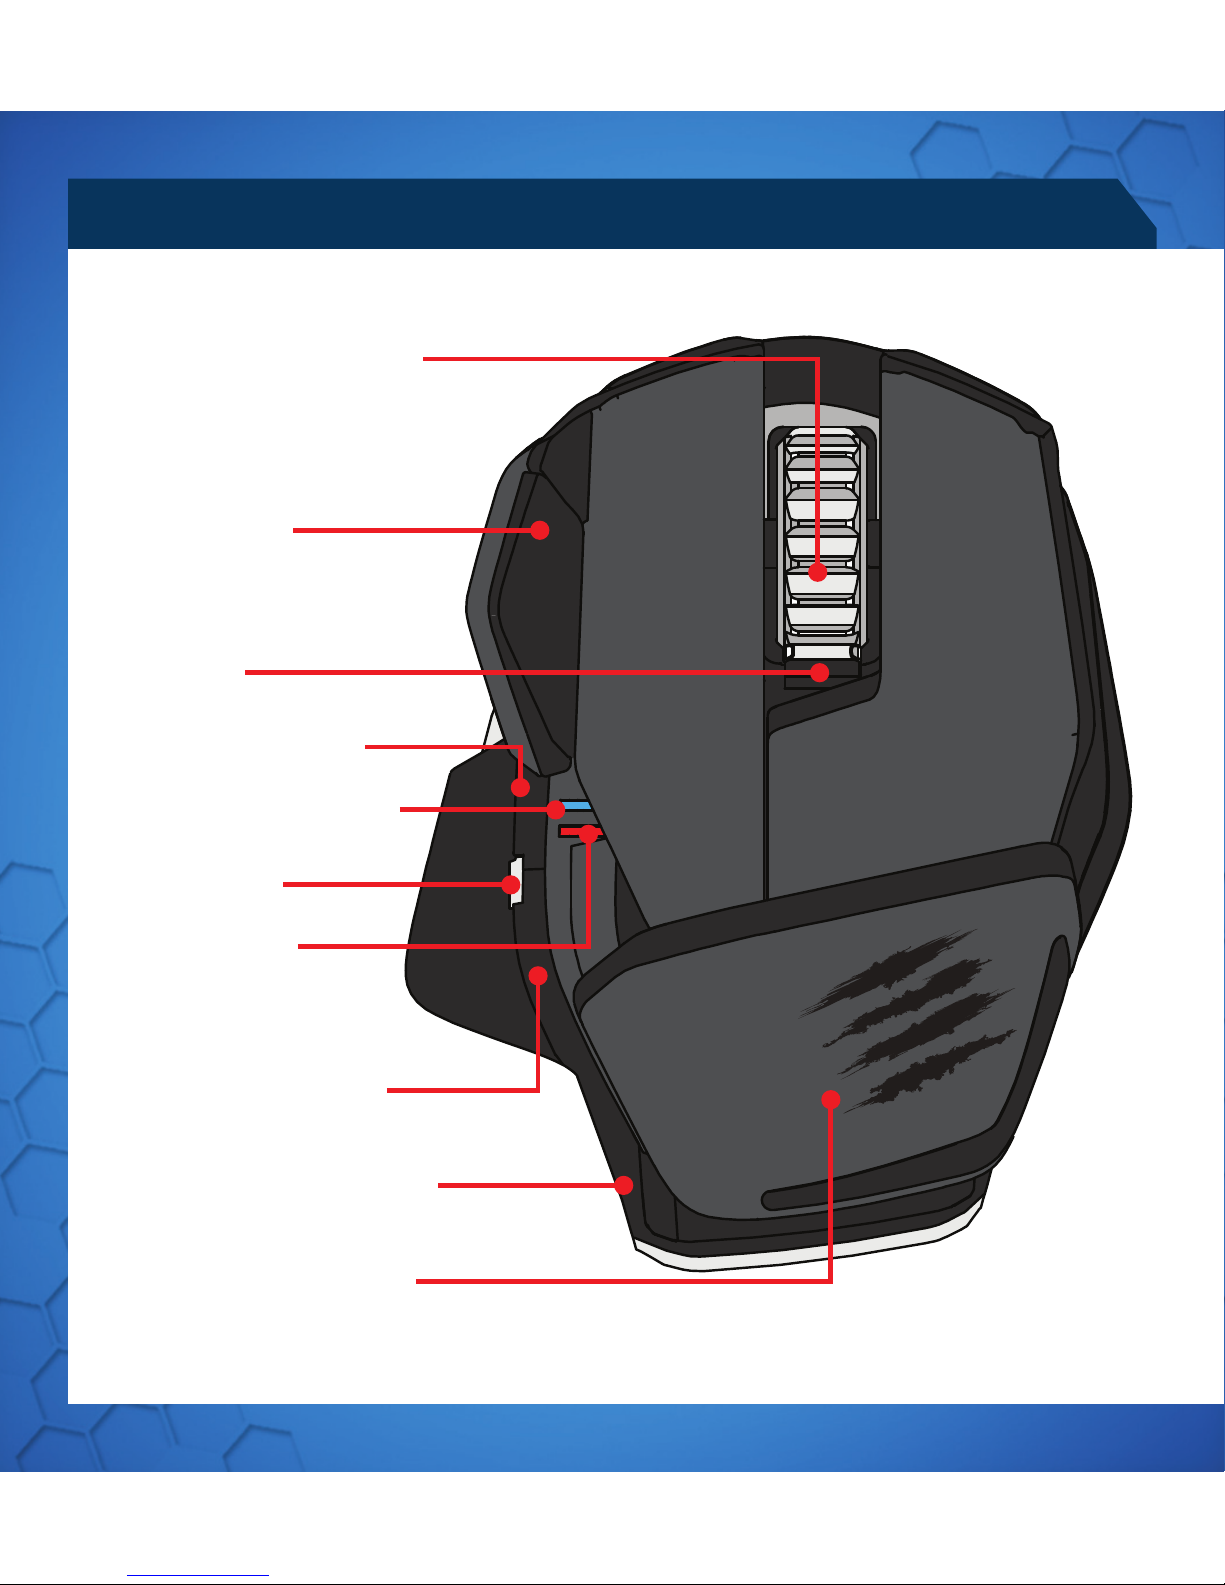
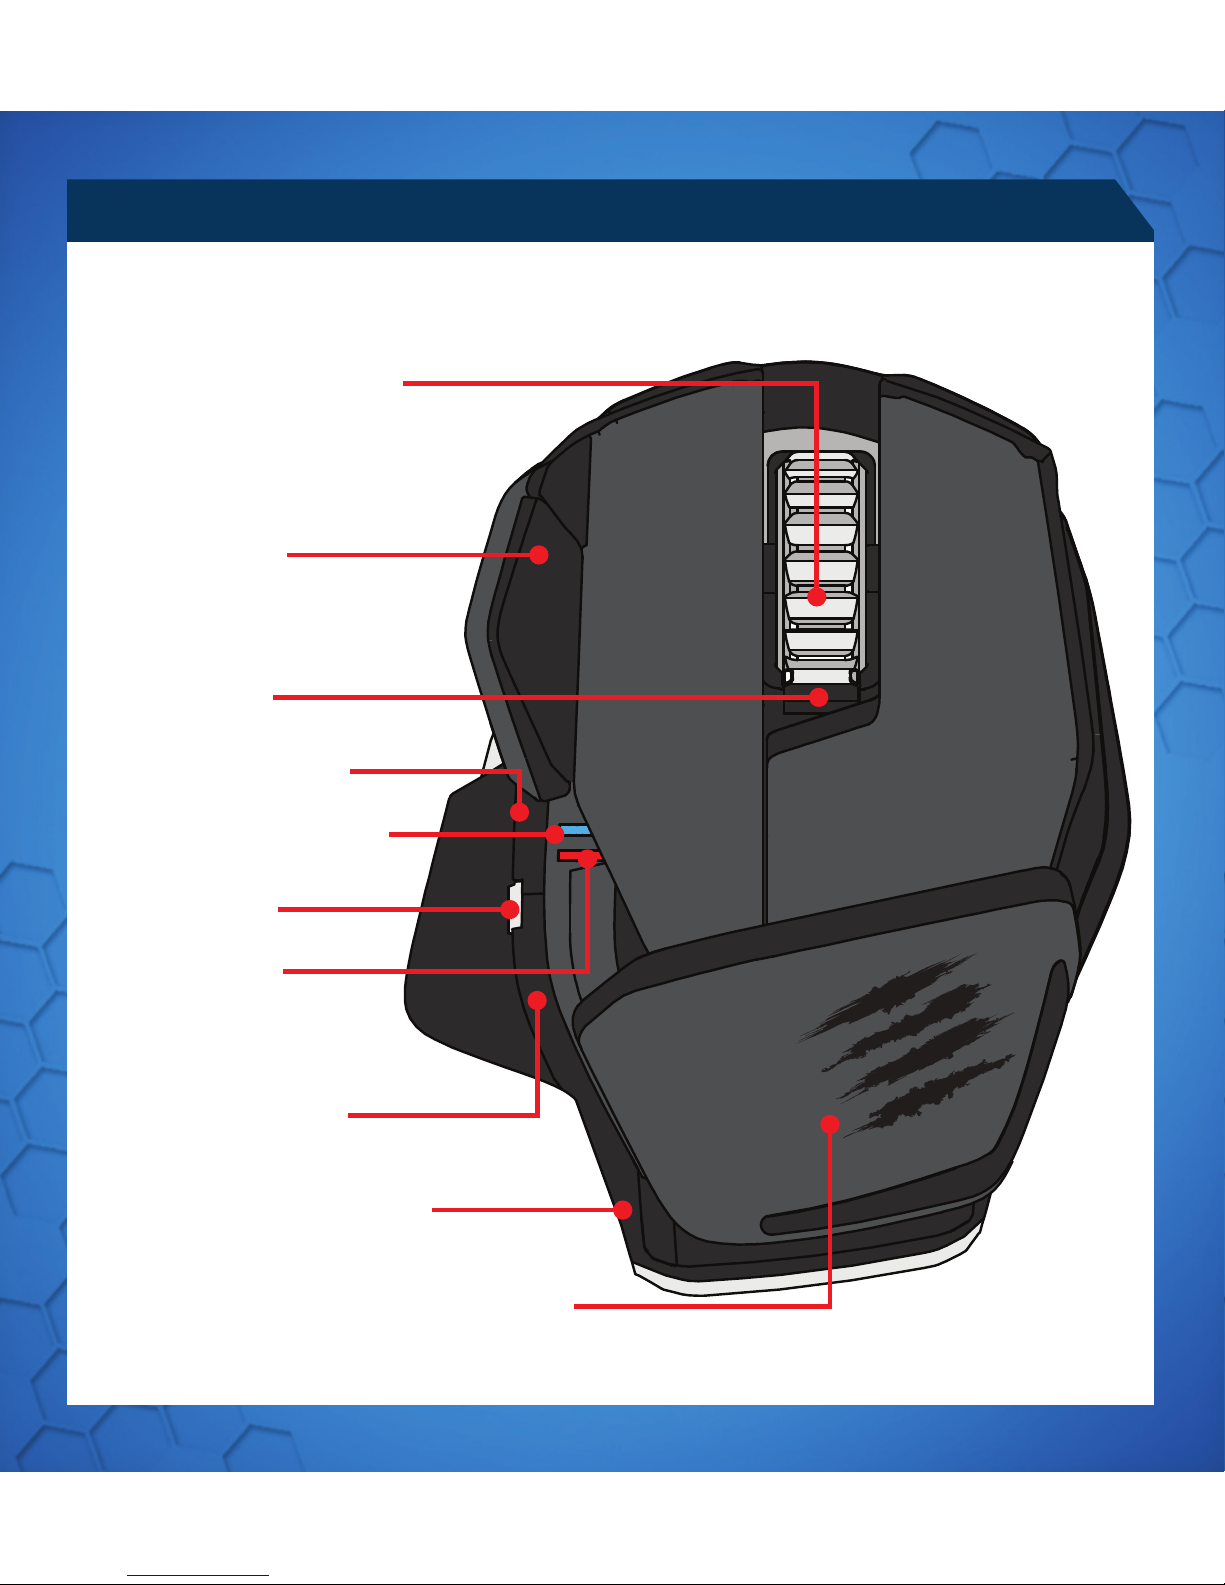
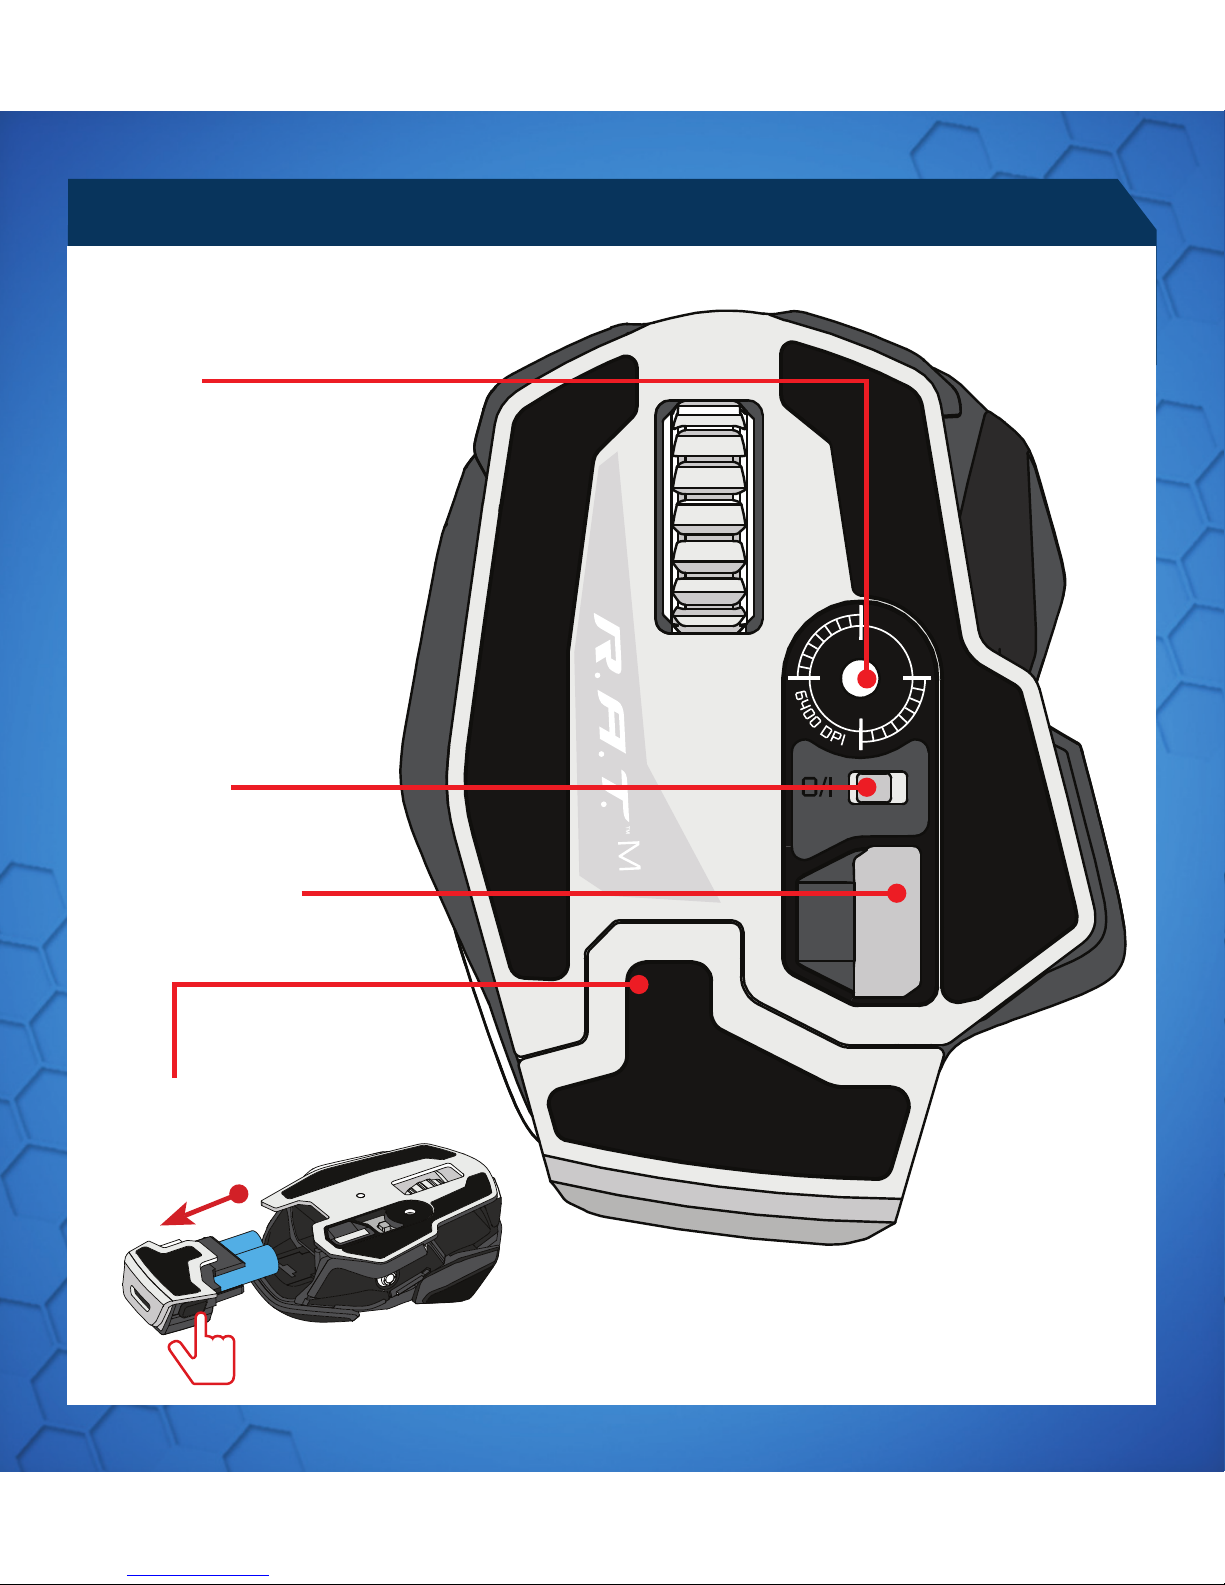
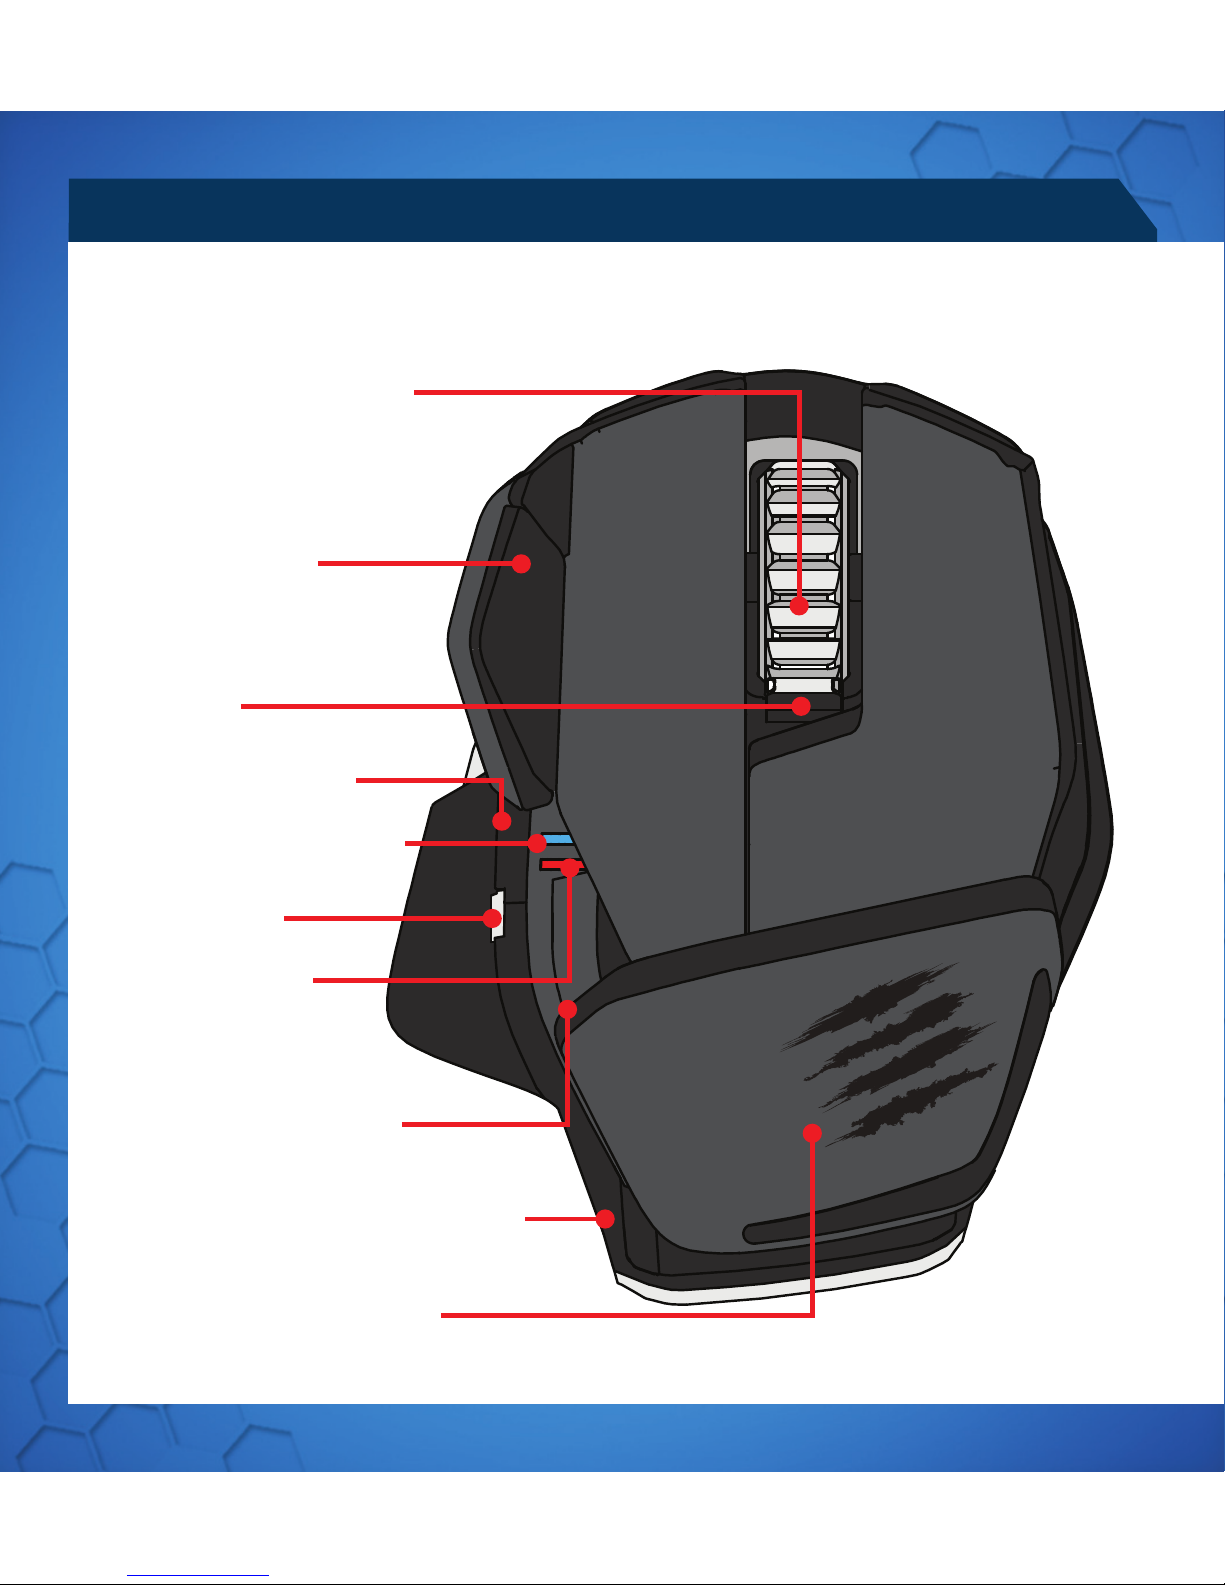
MOUSE OVERVIEW
INTERNET BACKWARD
ADJUSTABLE PALM REST
INTERNET FORWARD
BLUETOOTH INDICATOR
DPI INDICATOR
5D™ BUTTON
BATTERY RELEASE BUTTON
MIDDLE MOUSE BUTTON
VERTICAL SCROLL
WING BUTTON
DPI CYCLE
Page 5
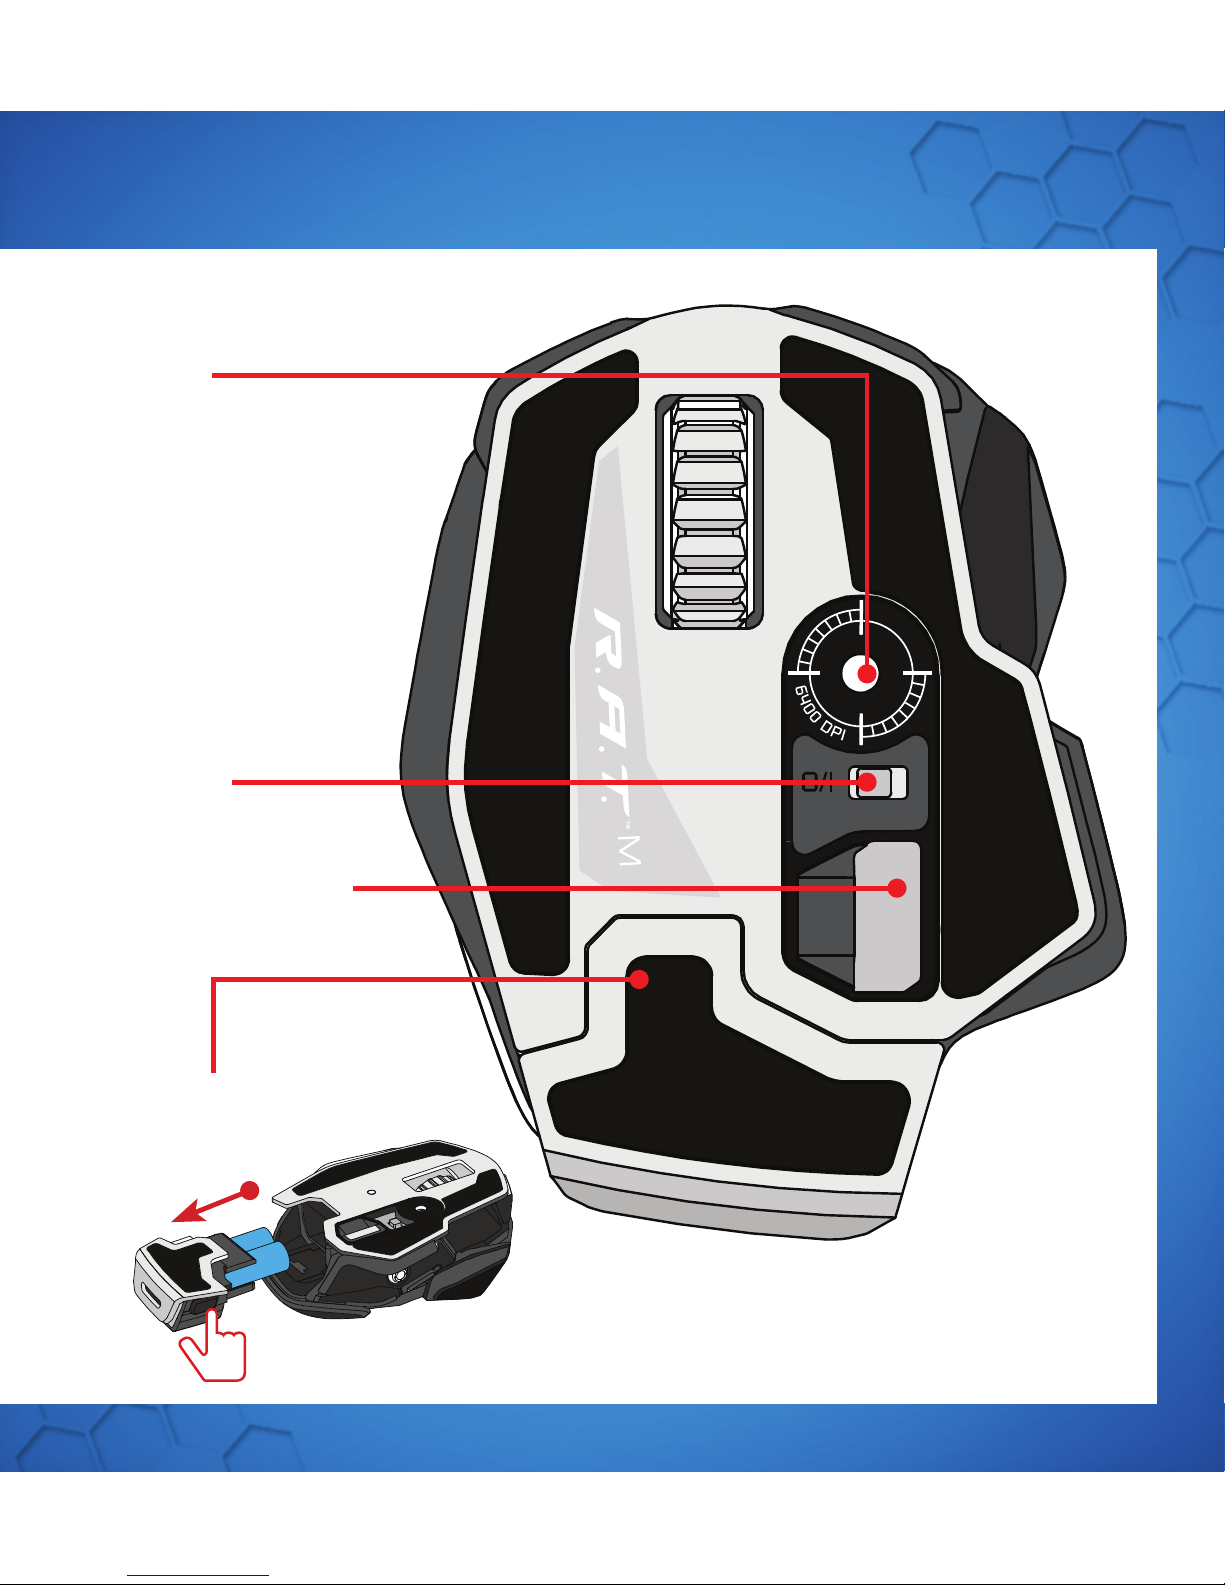
.5
5 21
ON/ OFF
LASER
BATTERY COMPARTMENT
DONGLE STORAGE
Page 6

.6
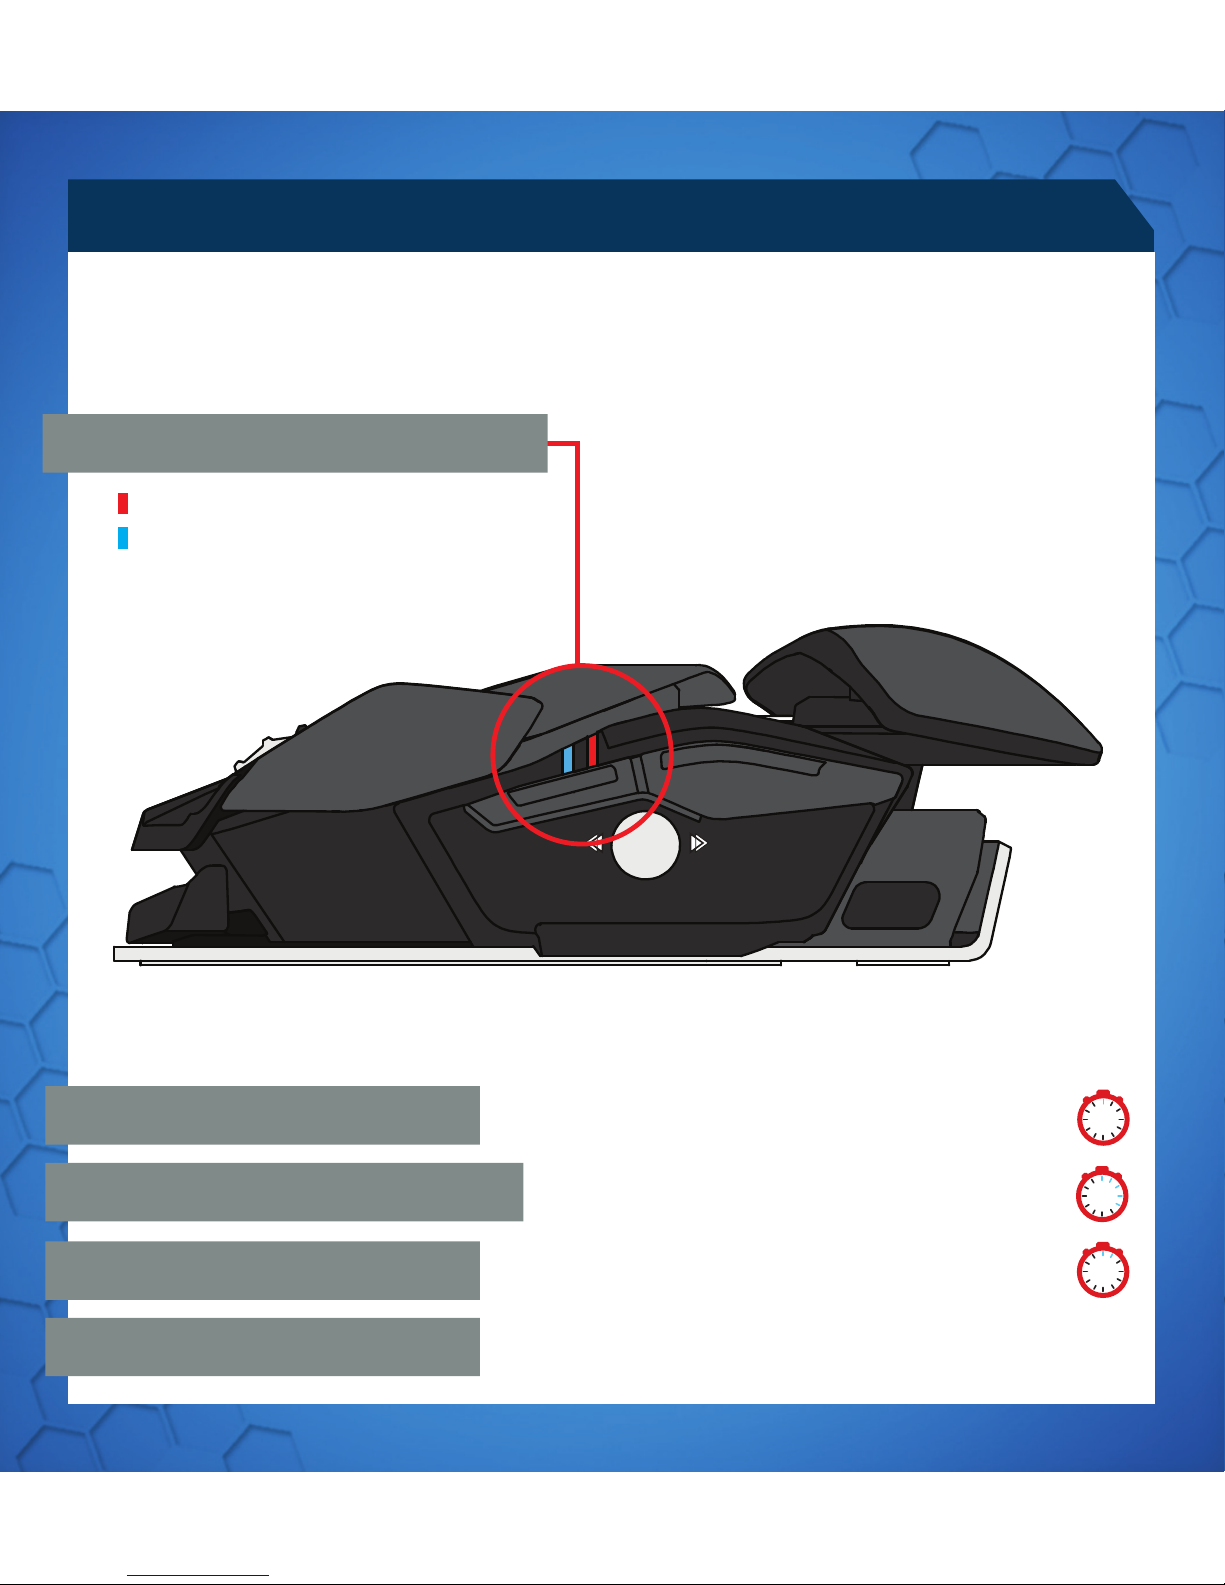
Red LED - DPI indicator
Blue LED - Bluetooth indicator
MOUSE STATUS LEDS
Blue LED flashes once every second
Blue LED pulses every 5 seconds
(5%) - Blue LED pulses every 2 seconds
Red LED Low Brightness = DPI Setting 1
Red LED Full Brightness = DPI Setting 2
LED indication will remain active for one minute upon any change of status, after
which it will extinguish in order to conserve battery.
5 2
1
5
21
2
PAIRING MODE
BATTERY LOW
DPI LED
PAIRED AND OPERATING
LED COLOR INDICATORS
Page 7

.7
SETUP INSTRUCTIONS
BLUETOOTH SMART TECHNOLOGY
CONNECTING TO DEVICES WITH BUILT-IN BLUETOOTH
®
SMART
TECHNOLOGY (DONGLE NOT REQUIRED)
1. Insert 2 x AAA batteries into the mouse
2. Plug the USB dongle into an available port
3. Turn the mouse ON
Bluetooth Smart is a new, power-efficient version of Bluetooth wireless technology
and is already being used in many devices. Check with your manufacturer to see if it is
Bluetooth Smart ready. Check with your device manufacturer for support for Bluetooth
Smart mice and then follow their instructions for pairing.
WINDOWS
®
8
1. Ensure the USB dongle is unplugged and power the R.A.T.
M
on
2. Press and hold the 5D™ and Wing buttons for 5 seconds until the Blue LED starts
flashing
3. Move mouse to bottom right corner of the screen to open the Charms bar
4. Click Settings
5. Click Change PC Settings
6. Click Devices
7. Click Add a device
8. Select R.A.T.
M
CONNECTING THE MOUSE USING THE DONGLE
Page 8

.8
SETUP INSTRUCTIONS
1. Go to www.madcatz.com/downloads to download and install the Mad Catz
software application
2. Use the drag-and-drop interface to customize your mouse
3. Go to the Support section of the software for full programming instructions
SOFTWARE FOR WINDOWS AND MAC
SOFTWARE INSTALLATION
•
If your R.A.T. M does not appear to be working with your device then, with it powered
on, press and hold the Wing and 5D™ buttons for 5 seconds until the Blue LED starts
flashing. If you wish to connect to the USB dongle then ensure that it is connected
to your computer. If you wish to connect to another device then follow the Bluetooth
pairing procedure for that device to rediscover the R.A.T .
M
TROUBLESHOOTING
• Information for Customers in the United States
• FCC & IC Warning
• This device complies with part 15 of the FCC Rules and Industry Canada licence-exempt RSS standard (s).
Operation is subject to the following two conditions: (1) This device may not cause harmful interference, and (2)
this device must accept any interference received, including interference that may cause undesired operation.
• Any Changes or modifications not expressly approved by the party responsible for compliance could void
the user’s authority to operate the equipment.
•
• FCC Radiation Exposure Statement:
• This equipment complies with FCC radiation exposure limits set forth for an uncontrolled environment.
• This transmitter must not be co-located or operating in conjunction with any other antenna or transmitter.
•
• IC RF Exposure Statement:
• The device meets the exemption from the routine evaluation limits in section 2.5 of RSS 102 and compliance
with RSS-102 RF exposure, users can obtain Canadian information on RF exposure and compliance.
•
• Under Industry Canada regulations, this radio transmitter may only operate using an antenna of a type and
maximum (or lesser) gain approved for the transmitter by Industry Canada. To reduce potential radio interference to other users, the antenna type and its gain should be so chosen that, the equivalent isotropically
radiated power (e.i.r.p.) is not more than that necessary for successful communication.
Page 9
.9
MAUSÜBERSICHT
INTERNET ZURÜCK
ANPASSBARE HANDBALLENAUFLAGE
INTERNET WEITER
BLUETOOTH-ANZEIGE
DPI-ANZEIGE
5D™-TASTE
BATTERIEFREIGABETASTE
MITTLERE MAUSTASTE
VERTIKALER BILDLAUF
FLÜGELTASTE
DPI-ZYKLUS
Page 10
.10
EIN/AUS
LASER
BATTERIEFACH
DONGLE-FACH
MAUSÜBERSICHT
5 21
Page 11
.11
“
Rote LED – DPI-Anzeige
Blaue LED – Bluetooth-Anzeige
LED-ANZEIGEN
Blaue LED blinkt einmal pro Sekunde
Blaue LED blinkt alle 5 Sekunden
(5 %) - Blaue LED blinkt alle 2 Sekunden
Rote LED geringe Helligkeit = DPI-Einstellung 1
Volle Helligkeit = DPI-Einstellung 2
Die LED-Anzeige bleibt bei jeder Statusänderung eine Minute lang eingeschaltet.
Anschließend erlischt sie, um Energie zu sparen.
5 2
1
5
21
2
KOPPLUNGSMODUS
GERINGER BATTERIESTAND
DPI-LED
GEKOPPELT UND IN BETRIEB
LED-FARBANZEIGEN
Page 12

.12
INSTALLATIONSANLEITUNG
BLUETOOTH SMART-TECHNOLOGIE
VERBINDUNG MIT GERÄTEN MIT INTEGRIERTER BLUETOOTH
®
SMART-TECHNOLOGIE (KEIN DONGLE ERFORDERLICH)
1. Legen Sie zwei Mikrobatterien in die Maus ein
2. Schließen Sie den USB-Dongle an einen freien Anschluss an
3. Schalten Sie die Maus ein
Bluetooth Smart ist eine neue energiesparende Version der Bluetooth-Funktechnologie,
die bereits in vielen Geräten genutzt wird. Prüfen Sie, ob Ihr Gerätehersteller
Bluetooth Smart unterstützt. Überprüfen Sie beim Hersteller Ihres Geräts Unterstützung
für Bluetooth Smart-Mäusen und dann folgen Sie den Anweisungen für das Pairing.
WINDOWS
®
8
1. Stellen Sie sicher, dass der USB-Dongle getrennt ist, und schalten Sie R.A.T.
M
ein
2. Halten Sie die Flügeltaste- und 5D™-Tasten 5 Sekunden lang gedrückt, bis die blaue
LED blinkt
3. Bewegen Sie die Maus in die untere rechte Ecke des Bildschirms, um die Charms-
Leiste zu öffnen
4. Klicken Sie auf „Einstellungen“
5. Klicken Sie auf „PC-Einstellungen ändern“
6. Klicken Sie auf „Geräte“
7. Klicken Sie auf „Gerät hinzufügen“
8. Wählen Sie R.A.T. M aus
VERBINDUNG DER MAUS MIT DEM DONGLE
Page 13

.13
INSTALLATIONSANLEITUNG
1. Besuchen Sie www.madcatz.com/downloads, um die Mad Catz-Softwareanwendung
herunterzuladen und zu installieren
2. Passen Sie Ihre Maus über die Drag-and-Drop-Oberfläche an
3. Eine vollständige Programmieranleitungen finden Sie im Supportbereich der
Software
SOFTWARE FÜR WINDOWS UND MAC
SOFTWAREDOWNLOAD
•
Wenn R.A.T. M mit Ihrem Gerät anscheinend nicht funktioniert, während es eingeschaltet ist, halten Sie die Flügeltaste- und 5D™ Tasten 5 Sekunden lang gedrückt,
bis die blaue LED blinkt. Wenn Sie eine Verbindung mit dem USB-Dongle herstellen
möchten, stellen Sie sicher, dass er an den Computer angeschlossen ist. Wenn
Sie eine Verbindung mit einem anderen Gerät herstellen möchten, führen Sie das
Bluetooth-Kopplungsverfahren für das jeweilige Gerät aus, damit R.A.T.
M
erneut
gesucht wird.
PROBLEMBEHANDLUNG
Page 14
.14
PRÉSENTATION DE LA SOURIS
INTERNET (PRÉCÉDENT)
REPOSE-PAUME RÉGLABLE
INTERNET (SUIVANT)
INDICATEUR BLUETOOTH
INDICATEUR DPI
BOUTON 5D™
BOUTON DE LIBÉRATION DE PILES
MOLETTE DE LA SOURIS
DÉFILEMENT VERTICAL
BOUTON À AILES
CYCLE DPI
Page 15

.15
MARCHE/ARRÊT
LASER
COMPARTIMENT DES PILES
RANGEMENT DE DONGLE
5 21
Page 16

.16
Témoin rouge - Indicateur DPI
Témoin bleu - Indicateur Bluetooth
TÉMOINS LUMINEUX (DEL)
Le témoin bleu clignote toutes les secondes
Le témoin bleu clignote
toutes les 5 secondes
(5 %) - Le témoin bleu clignote toutes les 2
secondes
Témoin rouge Faible luminosité = Réglage DPI 1
Luminosité totale = Réglage DPI 2
Un témoin lumineux reste allumé pendant 1 minute en cas de changement d’état,
après quoi il s’éteint pour économiser les piles.
5 2
1
5
21
2
MODE DE COUPLAGE
PILES FAIBLES
TÉMOIN DPI
COUPLAGE EFFECTUÉ ET FONCTIONNEMENT
TÉMOINS LUMINEUX COULEUR
Page 17

.17
INSTRUCTIONS D’INSTALLATION
TECHNOLOGIE BLUETOOTH SMART
CONNEXION AUX APPAREILS INTÉGRANT LA TECHNOLOGIE BLUETOOTH
®
SMART (DONGLE NON REQUIS)
1. Installez les 2 piles AAA dans la souris
2. Branchez le dongle USB sur le port disponible
3. Activez la souris
Bluetooth Smart est une nouvelle version économe en énergie de la technologie sans fil
Bluetooth déjà utilisée dans de nombreux appareils. Renseignez-vous auprès du fabricant de votre périphérique pour savoir si celui-ci est compatible avec la technologie
Bluetooth Smart. Renseignez-vous auprès du fabricant de votre périphérique pour
obtenir des souris Bluetooth Smart et puis suivez les instructions pour le jumelage.
WINDOWS
®
8
1. Assurez-vous que le dongle USB est débranché, puis allumez le R.A.T.
M
2. Puis maintenez les boutons Bouton 5D™ et Bouton à ailes enfoncés pendant 5
secondes jusqu’à ce que le voyant bleu se mette à clignoter
3. Déplacez la souris dans l’angle inférieur droit de l’écran pour ouvrir la barre des icônes
4. Cliquez sur Settings (Paramètres)
5. Cliquez sur Change PC Settings (Modifier les par amètres du PC)
6. Cliquez sur Devices (Périphériques)
7. Cliquez sur Add a device (Ajouter un périphérique)
8. Sélectionnez R.A.T.
M
CONNEXION DE LA SOURIS AVEC LE DONGLE
1. Accédez à l’adresse www.madcatz.com/downloads pour télécharger et installer
l’application logicielle de Mad Catz
2. Utilisez l’interface glisser-déposer pour personnaliser votre souris
3. Accédez à la section Support du logiciel pour obtenir les instructions de program
mation complètes
LOGICIEL POUR WINDOWS ET MAC
TÉLÉCHARGEMENT LOGICIEL
Page 18

.18
INSTRUCTIONS D’INSTALLATION
•
Si votre R.A.T.M ne semble pas fonctionner avec votre appareil, allumez-le, puis maintenez les boutons Bouton à ailes et Bouton 5D™ enfoncés pendant 5 secondes jusqu’à
ce que le voyant bleu se mette à clignoter. Si vous souhaitez établir la liaison avec le
dongle USB, assurez-vous qu’il est bien branché sur votre ordinateur. Si vous souhaitez
établir la liaison avec un autre appareil, suivez la procédure d’appariement Bluetooth
pour que cet appareil relance la découverte de R.A.T.
M
RÉSOLUTION DES PROBLÈMES
• Avertissement de la FCC & IC (Industry Canada)
• Cet appareil répond aux exigences de la section 15 de la réglementation FCC et aux normes RSS sans
licence d’Industry Canada. Son fonctionnement est soumis aux deux conditions suivantes : (1) Ce
périphérique ne doit pas provoquer d’interférences nuisibles et (2) il doit accepter toute interférence
reçue, y compris les interférences susceptibles de causer un dysfonctionnement.
• Tout changement ou toute modification n’ayant pas été expressément approuvé(e) par l’entité respon-
sable de la conformité peut annuler le droit de l’utilisateur à se servir de cet équipement.
•
• Déclaration de la FCC relative à l’exposition au rayonnement électromagnétique :
• Ce matériel est conforme aux exigences de la FCC relatives aux limites d’exposition au rayonnement
établies dans le cadre d’un environnement non contrôlé.
• Cet émetteur ne doit pas être combiné à ou fonctionner simultanément avec une autre antenne ou un
autre émetteur.
•
• Déclaration d’IC relativement aux radiofréquences :
• Cet appareil répond aux exigences lui permettant d’être exempté des limites de l’évaluation de routine
exposées à la section 2.5 de la norme RSS 102 et est conforme aux limites d’exposition aux RF établies
par la norme RSS-102. Les utilisateurs peuvent obtenir des informations du gouvernement canadien
relatives à l’exposition aux RF et à la conformité.
•
• Conformément à la réglementation d’Industry Canada, cet émetteur radio doit uniquement fonctionner
• à l’aide d’une antenne dont le type et le gain maximum (ou moindre) ont été jugés aptes au
• fonctionnement avec l’émetteur par Industry Canada. Pour réduire le risque d’interférence radio pour
• les autres utilisateurs, le type d’antenne et son gain doivent être choisis de façon à ce que la puissance
• isotrope rayonnée équivalente (PIRE) ne dépasse pas celle nécessaire pour une bonne communication.
Page 19

.19
PANORAMICA DEL MOUSE
INTERNET INDIETRO
POGGIAPOLSI REGOLABILE
INTERNET AVANTI
INDICATORE BLUETOOTH
INDICATORE DPI
PULSANTE 5D
™
PULSANTE DI SBLOCCO
BATTERIA
PULSANTE CENTRALE DEL MOUSE
SCORRIMENTO VERTICALE
PULSANTE LATERALE
CICLO DPI
Page 20

.20
ON/ OFF
LASER
VANO BATTERIA
COMPARTIMENTO
ADATTATORE
PANORAMICA DEL MOUSE
5 21
Page 21

.21
“
LED rosso – Indicatore DPI
LED blu – Indicatore Bluetooth
INDICADORES LED
Il LED blu lampeggia ogni secondo
Il LED blu lampeggia ogni 5 secondi
(5%) – Il LED blu lampeggia ogni 2 secondi
Scarsa luminosità del LED rosso = Impostazione DPI 1
Luminosità al massimo = Impostazione DPI 2
Gli indicatori LED rimarranno attivi per un minuto dopo qualsiasi cambiamento dello
stato, quindi si spegneranno per risparmiare la batteria.
5 2
1
5
21
2
MODALITÀ DI ABBINAMENTO
BATTERIA IN ESAURIMENTO
LED DP
ABBINATO E FUNZIONANTE
INDICATORI COLORATI LED
Page 22

.22
ISTRUZIONI DI CONFIGURAZIONE
TECNOLOGIA BLUETOOTH SMART
CONNESSIONE A DISPOSITIVI CON TECNOLOGIA BLUETOOTH
®
SMART
INTEGRATA (ADATTATORE NON RICHIESTO)
1. Inserire nel mouse 2 batterie ministilo
2. Collegare l’adattatore USB a una porta disponibile
3. Accendere il mouse
Bluetooth Smart è una nuova versione a risparmio energetico della tecnologia wireless
Bluetooth già usata in molti dispositivi. Chiedere al produttore se il dispositivo supporta
la tecnologia Bluetooth Smart. Verificare con il produttore del dispositivo per il supporto
per i mouse Bluetooth intelligenti e poi seguire le istruzioni per l’accoppiamento.
WINDOWS
®
8
1. Assicurarsi che l’adattatore USB sia scollegato e accendere la R.A.T.
M
2. Premere e tenere premuta la Pulsante 5D™ e i pulsanti laterale per 5 secondi fino a
quando il LED blu non inizia a lampeggiare
3. Spostare il mouse sull’angolo inferiore destro dello schermo per aprire la barra
degli accessi
4. Fare clic su Impostazioni
5. Fare clic su Modifica impostazioni PC
6. Fare clic su Dispositivi
7. Fare clic su Aggiungi un dispositivo
8. Selezionare R.A.T.
M
COLLEGAMENTO DEL MOUSE CON L’ADATTATORE
Page 23

.23
ISTRUZIONI DI CONFIGURAZIONE
•
Se la R.A.T.
M
sembra non funzionare con il proprio dispositivo, tenendola accesa,
premere e tenere premuta la Pulsante laterale e i pulsanti Pulsante 5D™ per 5
secondi fino a quando il LED blu non inizia a lampeggiare. Se si desidera collegare
all’adattatore USB assicurarsi che sia collegato al computer. Se si desidera collegare
a un altro dispositivo, seguire la procedura di abbinamento Bluetooth per il dispositivo
per ritrovare la R.A.T.
M
1. Visitare il sito www.madcatz.com/downloads per scaricare e installare l’applicazione
del software Mad Catz
2. Usare l’interfaccia di trascinamento della selezione per personalizzare il mouse
3. Visitare la sezione Supporto del software per istruzioni di programmazione complete
SOFTWARE PER WINDOWS E MAC
DESCARGA DE SOFTWARE
RISOLUZIONE PROBLEMI
Page 24

.24
DESCRIPCIÓN GENERAL DEL RATÓN
VERSIONES ANTERIORES
DE INTERNET
APOYAMANOS AJUSTABLE
VERSIONES POSTERIORES
DE INTERNET
INDICADOR DE BLUETOOTH
INDICADOR DPI
BOTÓN 5D
™
BOTÓN PARA LIBERAR LA
BATERÍA
BOTÓN MEDIO DEL RATÓN
DESLIZAMIENTO VERTICAL
BOTÓN ALA
CICLO DPI
Page 25

.25
ENCENDIDO
APAGADO
LASER
ALMACENAMIENTO
DE LLAVE ELÉCTRICA
5 21
COMPARTIMIENTO DE
LAS BATERÍAS
Page 26

.26
“
LED roja – indicador DPI
LED azul – indicador de Bluetooth
INDICADORES LED
El LED azul parpadea una vez por segundo
El LED azul parpadea cada 5 segundos
(5%) - El LED azul parpadea cada 2 segundos
Brillo bajo del LED rojo = Configuración DPI 1
Brillo total = Configuración DPI 2
El indicador LED permanecerá activo durante un minuto al momento de un cambio de
estado, luego de lo cual se apagará para preservar la batería.
5 2
1
5
21
2
MODO DE EMPAREJAMIENTO
BATERÍA BAJA
LED DPI
SINCRONIZADO Y FUNCIONANDO
INDICADORES DE COLOR LED
Page 27

.27
INSTRUCCIONES DE CONFIGURACIÓN
TECNOLOGÍA BLUETOOTH SMART
CONECTARSE A DISPOSITIVOS CON TECNOLOGÍA BLUETOOTH
®
SMART
INCORPORADO (NO SE REQUIERE LLAVE ELECTRÓNICA)
1. Insertar las 2 x baterías AAA en el ratón
2. Enchufar la llave electrónica USB en el puerto disponible
3. Encender el ratón
El Bluetooth Smart es una nueva versión que ahorra energía de tecnología inalámbrica
Bluetooth y ya se usa en muchos dispositivos. Consulte con el fabricante para ver si
es Bluetooth Smart ready. Consulte con el fabricante del dispositivo de apoyo para los
ratones Bluetooth inteligentes y siga sus instrucciones para el emparejamiento.
WINDOWS
®
8
1. Asegúrese de que la llave USB esté desconectada y encienda el R.A.T.
M
2. Presione y mantenga apretados los botones 5D™ y Botón ala durante 5 segundos
hasta que el LED azul comience a titilar.
3. Mueva el ratón a la esquina inferior derecha de la pantalla para abrir la barra Charms
4. Haga clic en configuraciones
5. Haga clic en Cambiar configuraciones de PC
6. Haga clic en Dispositivos
7. Haga clic en Agregar un dispositivo
8. Seleccione R.A.T.
M
CONECTAR EL RATÓN USANDO LA LLAVE ELECTRÓNICA
Page 28

.28
INSTRUCCIONES DE CONFIGURACIÓN
•
Si el R.A.T.M no parece funcionar con el dispositivo entonces, encendido, presione y
mantenga apretados los botones Botón ala y Botón 5D™ durante 5 segundos hasta
que el LED azul comience a titilar. Si desea conectar la llave USB asegúrese de
que esté conectada a su computadora. Si desea conectar otro dispositivo, siga el
procedimiento para emparejamiento de Bluetooth para que dicho dispositivo vuelva a
detectar el R.A.T.M.
1. Visite www.madcatz.com/downloads para descargar e instalar la aplicación del
software Mad Catz
2. Use la interfaz de arrastrar y soltar para personalizar su ratón
3. Visite la sección Soporte del software para recibir instrucciones completas
de programación
SOFTWARE PARA WINDOWS Y MAC
DESCARGA DE SOFTWARE
SOLUCIÓN DE PROBLEMAS
Page 29

.29
MUSÖVERSIKT
INTERNET BAKÅT
JUSTERBART HANDSTÖD
INTERNET FRAMÅT
BLUETOOTH-INDIKATOR
DPI-INDIKATOR
5D™-KNAPP
BATTERIFRIGÖRINGSKNAPP
MITTERSTA MUSKNAPPEN
VERTIKAL RULLNING
VINGKNAPP
DPI CYCLE
Page 30

.30
PÅ/AV
LASER
BATTERIFACK
DONGLEFÖRVARING
MUSÖVERSIKT
5 21
Page 31

.31
“
Röd LED - DPI-indikator
Blå LED - Bluetooth-indikator
LED-INDIKATORER
Blå LED blinkar en gång i sekunden
Blå LED pulserar var femte sekund
(5 %) Blå LED pulserar varannan sekund
Röd LED svag ljusstyrka = DPI-inställning 1
Full ljusstyrka = DPI-inställning 2
LED-indikatorn förblir aktiv i en minut efter statusändring, sedan slocknar den för att
spara på batteriet.
5 2
1
5
21
2
KOPPLINGSLÄGE
LÅGT BATTERI
DPI LED
LÄNKAD OCH IGÅNG
LED-FÄRGIN DIKATORER
Page 32

.32
ISTALLATIONSANVISNINGAR
BLUETOOTH SMART TEKNOLOGI
ANSLUTNING TILL APPARATER MED INBYGGD BLUETOOTH
®
SMART-TEKNOLOGI (DONGLE BEHÖVS INTE)
1. Sätt i 2 x AAA-batterier i musen
2. Sätt i USB-dongle i en tillgänglig port
3. Slå på musen
Bluetooth Smart är en ny energisnål version av trådlös Bluetooth-teknologi och används
redan i måna apparater. Kontrollera hos tillverkaren av din apparat om den är redo för
Bluetooth Smart. Kontrollera med din enhet för support för Bluetooth Smart möss och följ
deras anvisningar för att koppla ihop.
WINDOWS
®
8
1. Kontrollera att USB-dongle kopplats ur och slå på R.A.T.
M
2. Tryck sedan in och håll inne 5D™- och Ving-knapparna i 5 sekunder tills den blå
LED-lampan börjar blinka.För markören till nedre högra hörnet på skärmen för att
öppna snabbknappsfältet
3. För markören till nedre högra hörnet på skärmen för att öppna snabbknappsfältet
4. Klicka på Inställningar
5. Klicka på Ändra datorinställningar
6. Klicka på Enheter
7. Klicka på Lägg till en enhet
8. Välj R.A.T.
M
ANSLUT MUSEN MED HJÄLP AV DONGLE
Page 33

.33
ISTALLATIONSANVISNINGAR
•
Om din R.A.T.M inte verkar fungera med din enhet, slå på den och tryck sedan in och håll
inne Vingknapp- och 5D™-knapparna i 5 sekunder tills den blå LED-lampan börjar blinka.
Om du vill ansluta till USB-dongle ska du kontrollera att den är ansluten till din dator.
Om du vill ansluta till en annan enhet ska du följa Bluetooth-pairingproceduren för den
enheten för att återupptäcka R.A.T.
M
1. Gå till www.madcatz.com/downloads för att hämta och installera
Mad Catz programvara
2. Använd gränssnittet med dra och släpp och att anpassa din mus
3. Gå till Support i programvaran för fullständiga programmeringsanvisningar
PROGRAMVARA FÖR WINDOWS OCH MAC
HÄMTNING AV PROGRAMVARA
PROBLEMLÖSNING
Page 34

.34
OVERSIGT OVER MUS
INTERNET BAGUD
JUSTERBAR HÅNDLEDSSTØTTE
INTERNET FREMAD
BLUETOOTH-INDIKATOR
DPI-INDIKATOR
5D
™
-KNAP
BATTERIUDLØSNINGSKNAP
MELLEMSTE MUSEKNAP
LODRET RULLETAST
VINGEKNAP
DPI CYKLUS
Page 35

.35
TÆND/SLUK
LASER
BATTERIBEHOLDER
OPBEVARING AF DONGLE
5 21
Page 36

.36
“
Rød LED - DPI-indikator
Blå LED - Bluetooth-indikator
LYSDIODER
Blå LED blinker en gang i sekunde
Blå LED pulserer hvert 5. sekund
(5 %) - Blå LED pulserer hvert 2. sekund
Rød LED lav lysstyrke = DPI-indstilling 1
Fuld lysstyrke = DPI-indstilling 2
LED-indikationen vil aktiveres i et minut efter hvert statusskifte, og derefter slukkes for at
spare på batteriet.
5 2
1
5
21
2
PARRINGSTILSTAND
LAVT BATTERI
DPI-LED
PARRET OG I DRIFT
LED-FARVEINDIKATORER
Page 37

.37
OPSÆTNINGSVEJLEDNING
BLUETOOTH SMART-TEKNOLOGI
TILSLUTNING TIL ENHEDER MED INDBYGGET BLUETOOTH
®
SMART-
TEKNOLOGI (KRÆVER DONGLE)
1. Sæt 2 x AAA-batterier i musen
2. Sæt USB-donglen i en åben port
3. Tænd for musen
Bluetooth Smart er en ny, strømeffektiv version af den trådløse Bluetooth-teknologi,
som allerede anvendes af mange enheder. Kontrollér hos din producent, om din enhed
kan bruge Bluetooth Smart. Check med producenten af enheden for support til Bluetooth Smart mus og derefter følge deres instrukser til parring.
WINDOWS
®
8
1. Sørg for, at USB-donglen ikke er sat i, og tænd for R.A.T.
M
et
2. Trykke og holde 5D™’et og Vinge-knapperne nede i 5 sekunder, indtil den blå LED
begynder at blinke.
3. Flyt markøren til skærmens nederste højre hjørne for at åbne Amulet-baren
4. Klik på Indstillinger
5. Klik på Redigér PC-indstillinger
6. Klik på Enheder
7. Klik på Tilføj en enhed
8. Vælg R.A.T.
M
TILSLUTNING AF MUSEN VHA. DONGLE
Page 38

.38
OPSÆTNINGSVEJLEDNING
•
Hvis dit R.A.T.M ikke ser ud til at fungere sammen med din enhed, skal du, når enheden
er tændt, trykke og holde Vingeknap’et og 5D™-knapperne nede i 5 sekunder, indtil den
blå LED begynder at blinke. Hvis du ønsker at tilslutte USB-donglen, skal du sørge for,
at den er tilsluttet til din computer. Hvis du ønsker at tilslutte til en anden enhed, skal du
følge parringsproceduren for Bluetooth for denne enhed for at genopdage R.A.T.Met
1. Gå til www.madcatz.com/downloads for at downloade og installere
Mad Catz-softwareapplikationen
2. Brug træk-og-slip-interfacet til at brugertilpasse din mus
3. Se softwarens Support-sektion for komplet programmeringsvejledning
SOFTWARE TIL WINDOWS OG MAC
SOFTWARE INSTALLATION
FEJLFINDING
Page 39

.39
DESCRIÇÃO GERAL DO RATO
INTERNET ANTERIOR
APOIO DA PALMA AJUSTÁVEL
INTERNET SEGUINTE
INDICADOR BLUETOOTH
INDICADOR PPP
BOTÃO 5D
™
BOTÃO DE LIBERTAÇÃO
DAS PILHAS
BOTÃO CENTRAL DO RATO
DESLOCAMENTO VERTICAL
BOTÃO LATERAL
CICLO PPP
Page 40

.40
LIGAR/ DESLIGAR
LASER
ARMAZENAMENTO
DA DONGLE
DESCRIÇÃO GERAL DO RATO
5 21
COMPARTIMENTO
DAS PILHAS
Page 41

.41
LED vermelho - Indicador PPP
LED azul - Indicador Bluetooth
INDICADORES LED
O LED azul pisca uma vez por segundo
O LED azul pulsa de 2x
segundos
(5%) - O LED azul pulsa de 2 x segundos
LED vermelho com intensidade reduzida = Definição PPP 1
Intensidade total = Definição PPP 2
A indicação do LED permanecerá activa durante um minuto depois de qualquer alteração
de estado, após o que se apagará para poupar as pilhas.
5 2
1
5
21
2
MODO DE EMPARELHAMENTO
PILHAS FRACAS
LED PPP
EMPARELHADO E EM FUNCIONAMENTO
INDICADORES LED COLORIDOS
Page 42

.42
INSTRUÇÕES DE CONFIGURAÇÃO
TECNOLOGIA BLUETOOTH SMART
LIGAR A DISPOSITIVOS COM TECNOLOGIA BLUETOOTH
®
SMART
INCORPORADA (NÃO É NECESSÁRIA DONGLE)
1. Insira 2 pilhas AAA no rato
2. Ligue a dongle USB a uma porta disponível
3. Ligue o rato
Bluetooth Smart é uma nova versão da tecnologia sem fios Bluetooth, eficiente em
termos energéticos, que já é utilizada em muitos dispositivos. Verifique junto do
fabricante do seu dispositivo o suporte de Bluetooth Smart. Verifique com o fabricante
do dispositivo de apoio para os ratos Bluetooth inteligentes e siga as instruções para
o emparelhamento.
WINDOWS
®
8
1. Certifique-se de que o dongle USB está desligado e ligue o R.A.T.
M
2. Mantenha premidos os botões Lateral e 5D™ durante 5 segundos, até o LED azul ficar
intermitente.
3. Mova o rato para o canto inferior direito do ecrã para abrir a barra Atalhos
4. Clique em Definições
5. Clique em Alterar definições do PC
6. Clique em Dispositivos
7. Clique em Adicionar um dispositivo
8. Seleccione o R.A.T.
M
LIGAR O RATO UTILIZANDO A DONGLE
Page 43

.43
INSTRUÇÕES DE CONFIGURAÇÃO
•
Se o R.A.T.M não estiver a funcionar com o seu dispositivo, com este ligado, mantenha
premidos os botões Lateral Botão 5D™ durante 5 segundos, até o LED azul ficar
intermitente. Se pretender ligar ao dongle USB, certifique-se de que está ligado ao seu
computador. Se pretender ligar a outro dispositivo, siga o procedimento de
emparelhamento Bluetooth desse dispositivo para detetar novamente o R.A.T.
M
1. Visite www.madcatz.com/downloads para transferir e instalar a aplicação Mad Catz
2. Utilize a interface de arrastar e largar para personalizar o seu rato
3. Consulte a secção Suporte do software para obter instruções completas de
programação
SOFTWARE PARA WINDOWS E MAC
RESOLUÇÃO DE PROBLEMAS
TRANSFERÊNCIA DE SOFTWARE
Page 44

©2013 Mad Catz, Inc. 7480 Mission Valley Road, Suite 101, San Diego, CA 92108 U.S.A. Mad Catz, R.A.T.,
GameSmart, and the Mad Catz logo are trademarks or registered trademarks of Mad Catz Interactive, Inc., its
subsidiaries and affiliates. Covered by U.S. Patent No. 6,157,370. The shape and design of this product are a
trade dress of Mad Catz Interactive, Inc., its subsidiaries and affiliates. The Bluetooth® word mark and logos are
registered trademarks owned by Bluetooth SIG, Inc. and any use of such marks by Mad Catz Interactive Inc. is
under license. All other trademarks or registered trademarks are the property of their respective owners. Made
in China. All rights reserved. Product features, appearance and specifications may be subject to change without
notice. Please retain this information for future reference.
©2013 Mad Catz Europe, Ltd. 1-2 Shenley Pavilions, Chalkdell Drive. Shenley Wood, Milton Keynes,
Buckinghamshire MK5 6LB, Royaume-Uni (UK). Mad Catz, R.A.T., GameSmart, et le logo Mad Catz sont des
marques de commerce ou des marques déposées de Mad Catz Interactive, Inc., de ses filiales et sociétés
affiliées. Couvert par le Brevet Américain No. 6,157,370. La forme et le design de ce produit sont caractéristiques
de la marque Mad Catz Interactive, Inc., de ses filiales et sociétés affiliées. Le mot, la marque et les logos
Bluetooth® sont la propriété de Bluetooth SIG, Inc. et toute utilisation de ces marques par Mad Catz, Inc. est faite
sous licence. Toutes les autres marques ou marques déposées sont la propriété de leurs propriétaires respectifs.
Fabriqué en Chine. Tous droits réservés. L’aspect, les fonctionnalités et les spécifications du produit peuvent
changer sans préavis. Veuillez conserver cette notice pour référence ultérieure.
Mad Catz is a publicly traded company on the TSX/NYSE MKT, symbol MCZ.
Mad Catz ist ein börsennotiertes Unternehmen (TSX, NYSE MKT: MCZ).
Les actions de Mad Catz sont cotées en bourse sur le TSX/NYSE MKT sous le symbole MCZ.
FCC ID: P25R243710A4512C
IC: 4633A-43710AC
FCC ID: VHVBTVD1154
IC: 4633A-43710AR
R 211-121005
MOUSE
DONGLE
KCC-CRM-MAD-43710C
KCC-CRM-MAD-43710R
R 211-121007
R21-MCB43710
 Loading...