


ENGLISH
MC2TM RACING WHEEL
FOR THE XBOX, GAMECUBE, PLAYSTATION2,
PS ONE AND PLAYSTATION VIDEO GAME SYSTEMS
Thank you for purchasing the Mad Catz MC2 Racing Wheel for use with the Xbox,
GameCube, PlayStation 2, PS one and PlayStation video game systems. The Mad
Catz MC2 Racing Wheel will give you precision control and enhance the realism of
all your favorite driving games. This users guide will help you understand how to
use your MC2 Racing Wheel and get the most from the features it has to offer.
The Mad Catz MC2 Racing Wheel is one of the most durable and reliable
accessories you can buy. Be sure to visit www.madcatz.com to register your
product and check out our full line of other quality video game accessories.
TABLE OF CONTENTS
SET-UP 1
STEERING WHEEL ADJUSTMENT 1
PROGRAMMING ACCUDRIVE 2
REPROGRAMMING THE BUTTON LAYOUTS 3
MC2 RACING WHEEL LAYOUT XBOX 4
MC2 RACING WHEEL LAYOUT PLAYSTATION (All types) 5
MC2 RACING WHEEL LAYOUT GAMECUBE 6
CAUTIONS 8
TROUBLESHOOTING 9
TECHNICAL SUPPORT 10
WARRANTY 10
SETUP
IMPORTANT! Before using this product, read the video game system instruction
manual for safety, health, and other information.
1. Make sure the video game system is turned OFF. Connect the MC2 Racing
Wheel to the video game system.
2. Insert game and turn on the power to the video game system. DO NOT MOVE THE
STEERING WHEEL DURING START UP. The controller uses this time to calibrate.
STEERING WHEEL ADJUSTMENT
Many steering wheel compatible and analog controller compatible games will
offer a variety of controller configurations and settings in the game’s options
menu. The different controller configurations will allow the user to select and
assign different functions to different buttons.
The MC2 comes equipped with AccuDrive™ Calibration System (ACS). The ACS
display on the MC2 has two purposes: it provides a visual indication of throttle level
during game play and provides visual feedback when adjusting calibration settings.
The ACS is designed to adjust characteristics of the steering response. There are
two different attributes that can be adjusted in steering performance: maximum
range, and deadband.
The deadband setting indicates how far from center the steering wheel must
be turned before any action occurs. A large deadband setting requires a large
movement from center before any action occurs on-screen; a small deadband
setting results in almost immediate action when the wheel is moved off center.
Maximum range refers to how far the steering wheel must be turned to reach the
maximum turn position. This is mostly a matter of personal preference; some people
like to throw the steering wheel hard from side to side, while others like more
sensitive steering. The sensitivity on the MC2 can be adjusted from full throw to
less than half of that.
Programming Accudrive
To use the Accudrive feature simply press the ‘Calibrate’ button. Two red LED’s
near the center will show the current deadband setting, and two green LED’s
near each end of the display will show the current maximum range setting. To
adjust the settings, use the ‘Up/Down’ buttons on the D-pad to widen/narrow the
deadband, and the ‘Left/Right’ buttons to widen/narrow the amount of distance
needed to move the wheel to achieve maximum turning position. The deadband
and maximum range features offered on this controller are in addition to any
calibration adjustments which may be made by the game software. Many games
offer calibration screens in the game options menu. BE AWARE THAT A LARGE
CONTROLLER DEADBAND AND A LARGE SOFTWARE DEADBAND WILL ADD
TOGETHER AND RESULT IN A VERY LARGE TOTAL DEADBAND, MAKING THE
GAME DIFFICULT TO CONTROL.
1
2
Reprogramming the Button Layouts
The MC2 has been designed to be fully programmable for PLAYSTATION and
GAMECUBE. Only pedals and stick shift can be re-mapped.
To re-map pedals and stick shift,
1. Press the program button. (Note: While in program mode, the controller will
not function in a game)
2. Once the program button has been pressed, the Program LED will light up, you
may begin programming.
3. Press the pedal or stick shift you would like to re-map (LED begins flashing) and
then press the button that has the desired function (LED shuts off).
For example, to make the ‘right pedal’ button function as the ‘B’ button, the
following steps would be followed.
1. Press the Program button. The program button will light when activated.
2. Press the ‘right pedal’ button. The program light will flash.
3. Press the ‘B’ button.
4. The program light will go out. The button has been reprogrammed.
To clear the configuration and reset it back to the default settings, press the
Program button, then press the button twice to reset. All programming must be
done one session at a time. If you wish to change multiple buttons, repeat the
steps above for each button you wish to change.
ENGLISH
ENGLISH
XBOX MC2 RACING WHEEL LAYOUT
Steering Wheel
This is the heart of the controller. It provides all of your steering control. Because it
is true analog, you will get more responsive and accurate control.
Pedals
Provide analog acceleration (right pedal) and braking (left pedal). The pedals
emulate the right and left analog triggers (respectively).
Stick Shift
Emulates buttons ‘X’ and ‘A’. Press forward on the stick to press X, pull backwards
for ‘A’.
Directional Pad
This emulates the D-pad found on most control pads. This is used for navigating
through the menus and making menu changes.
Action Buttons
These buttons are fully analog and correspond to specific game functions detailed
in your software documentation and options menu.
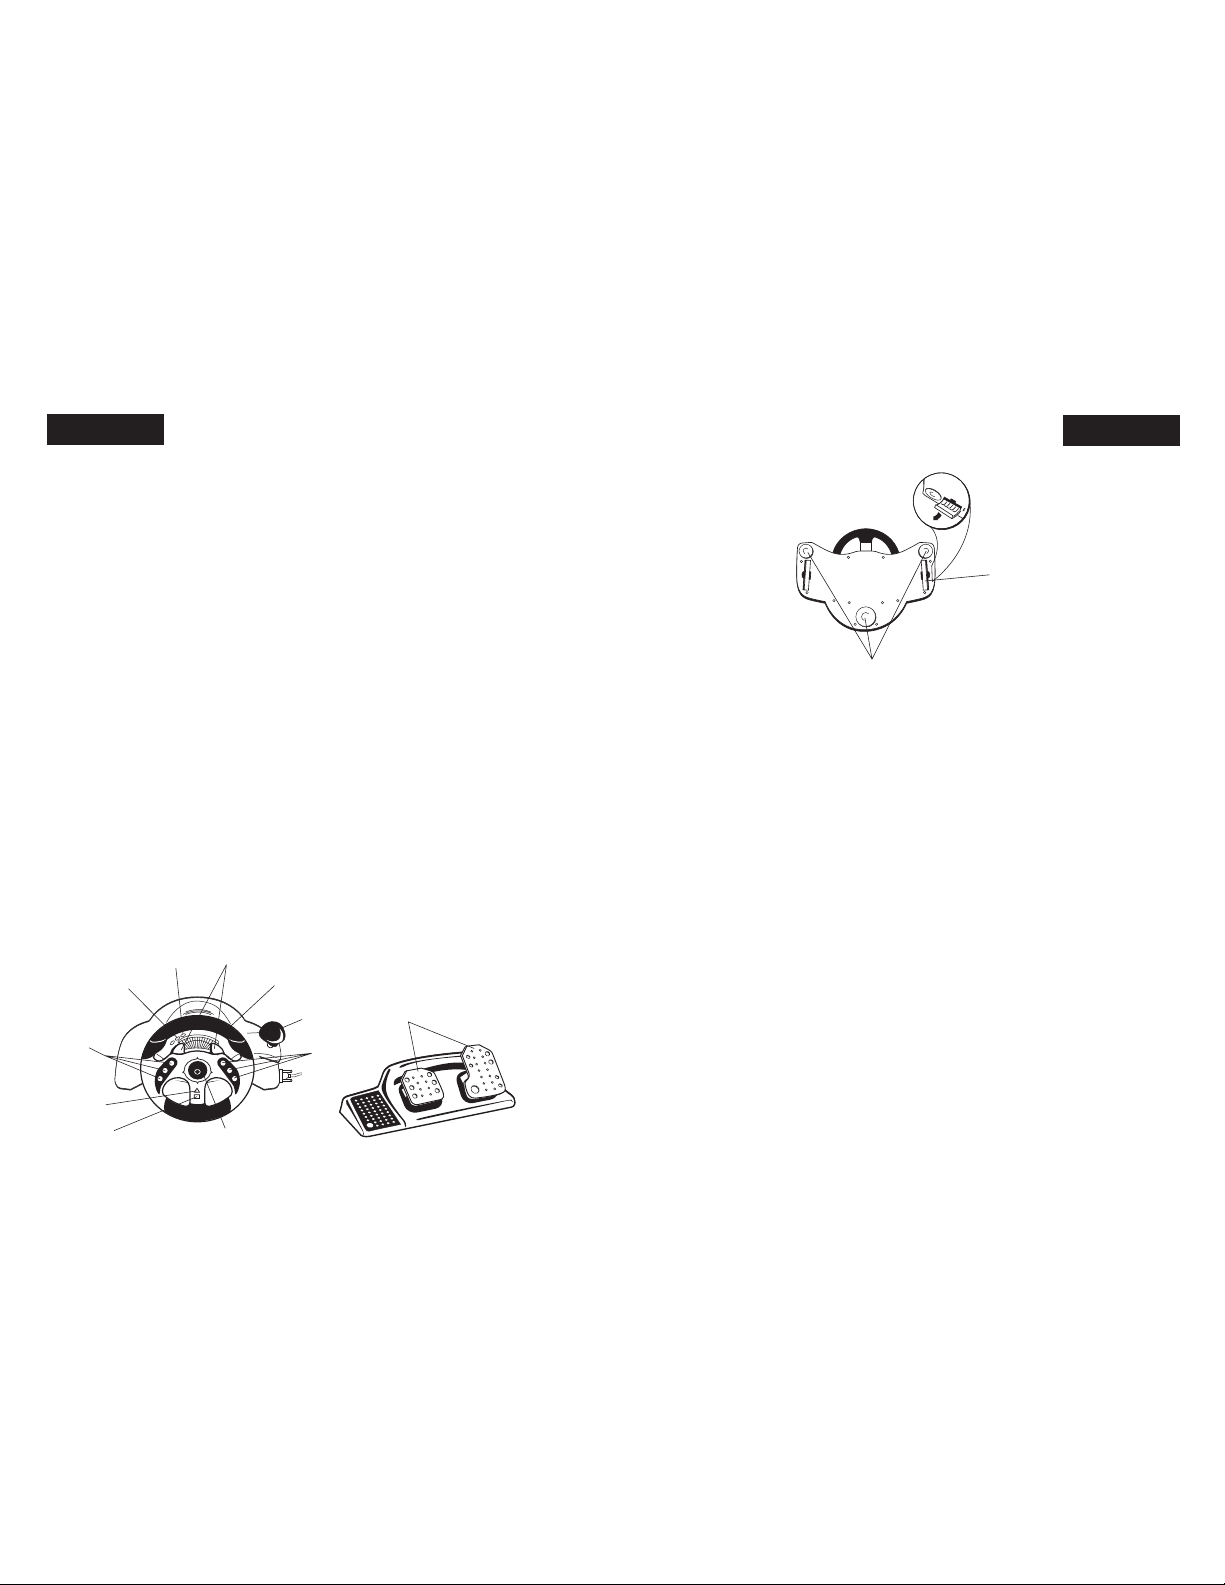
Butterfly Switches
Press the left butterfly IN and button ‘A’ is emulated (full on). Push the left butterfly
3 4
Suction
C
ups
Retractabl
e
L
eg Straps
Action
Buttons
Action
Buttons
Steerin
g
W
heel
Stick
Shift
Select/Back
S
tar
t
D
-Pad
Butterfly
Switches
Calibrate
Program
Pedals
Suction
C
ups
Retractabl
e
L
eg Straps

ENGLISH ENGLISH
OUT and the ‘button under the left analog joystick’ is emulated.
Press the right butterfly IN and button ‘X’ is emulated (full on). Push the right
butterfly OUT and the ‘button under the right analog joystick’ is emulated.
Retractable Leg Straps
There are two retractable leg straps on the base of the MC2 that can extend to
provide stability, comfort and added support when the wheel is on your lap.
Suction Cups
There are three suction cups on the base of the MC2 for mounting to a table or
desktop.
Start Button
Functions the same as in the standard controller.
Back Button
Functions the same as in the standard controller.
Calibrate Button
Engages Accudrive mode (see Steering Wheel Adjustment section below).
PLAYSTATION (ALL TYPES)
MC2 RACING WHEEL LAYOUT
Steering Wheel
This is the heart of the controller. It provides all of your steering control. Because
it is true analog, you will get more responsive and accurate control.
Pedals
Provide analog acceleration (right pedal) and braking (left pedal). The pedals
emulate the ‘right analog stick forward for gas’ and the ‘right analog stick
backwards for braking’ buttons (respectively).
Stick Shift
Emulates buttons ‘R1’ and ‘L1’. Press forward on the stick to press ‘R1’, pull
backwards for ‘L1’.
Directional Pad
This emulates the D-pad found on most control pads. This is used for navigating
through the menus and making menu changes.
Action Buttons
These buttons are fully analog and correspond to specific game functions detailed
in your software documentation and options menu.
Butterfly Switches
Press the left butterfly IN and button ‘L1’ is emulated (full on). Push the left butterfly
OUT and the ‘button under the left analog joystick’ is emulated.
Press the right butterfly IN and ‘R1’ is emulated (full on). Push the right butterfly
OUT and the ‘button under the right analog joystick’ is emulated
Retractable Leg Straps
There are two retractable leg straps on the base of the MC2 that can extend to
provide stability, comfort and added support when the wheel is on your lap.
Suction Cups
There are three suction cups on the base of the MC2 for mounting to a table or
desktop.
Start Button
Functions the same as in the standard controller.
Select Button
Functions the same as in the standard controller.
Calibrate Button
Engages Accudrive mode (see Steering Wheel Adjustment section below).
GAMECUBE MC2 RACING WHEEL LAYOUT
Steering Wheel
This is the heart of the controller. It provides all of your steering control. Because it
is true analog, you will get more responsive and accurate control.
5 6

ENGLISH ENGLISH
Pedals
Provide acceleration (right pedal) and braking (left pedal). The pedals emulate the
‘A’ and ‘B’ buttons (respectively).
Stick Shift
Emulates buttons ‘R’ and ‘L’. Press forward on the stick to press ‘R’, pull
backwards for ‘L’.
Directional Pad
This emulates the D-pad found on most control pads. This is used for navigating
through the menus and making menu changes.
Action Buttons
These buttons are fully analog and correspond to specific game functions detailed
in your software documentation and options menu.
Butterfly Switches
Press the left butterfly IN and button ‘Z’ is emulated (full on). Push the left butterfly
OUT and the ‘Z’ is emulated.
Press the right butterfly IN and button ‘C Stick down’ is emulated (full on). Push
the right butterfly OUT and ‘C Stick up’ is emulated.
.
Retractable Leg Straps
There are two retractable leg straps on the base of the MC2 that can extend to
provide stability, comfort and added support when the wheel is on your lap.
Suction Cups
There are three suction cups on the base of the MC2 for mounting to a table or
desktop.
Start Button
Functions the same as in the standard controller.
Select/Back Button
Has no function on the GameCube.
Calibrate Button
Engages Accudrive mode (see Steering Wheel Adjustment section below).
CAUTIONS
• IMPORTANT! Before using this product read all accompanying information
and your game system’s instruction manual for safety, health and
other information.
• To prevent fire or shock hazard, do not expose this unit to rain or moisture.
Do not use with 30’ of any water such as swimming pools, bathtubs, or sink.
• To avoid electrical shock, do not disassemble. Refer servicing to qualified
personnel only.
• Never push objects of any kind, other than authorized items, into the product
as they may touch dangerous voltage points or short out parts that could result
in fire or electrical shock.
• Stop using this unit immediately if you begin to feel tired or if you experience
discomfort or pain in your hands and/or arms while operating the unit. If the
condition persists, consult a doctor.
• Do not attempt to operate the unit in any way except with your hands. Do
not bring the unit in contact with your head, face, or near the bones of any
other part of your body.
• The vibration function of this unit can aggravate injuries. Switch off or do not
use the vibration function of the unit if you have any ailment of the bones or
joints of your hands or arms.
• Avoid prolonged use of this unit. Take breaks every 30 minutes.
• Route all cords so that they are not likely to be walked on or tripped over.
Make sure that cords are not placed in positions or areas where they may
become pinched or damaged. Do not wrap this cord around any part of
anyone’s body.
• Do not allow children to play with cords.
• Use this unit only as intended.
• Do not plug the MC2 Racing Wheel into the game console while the power
is on.
• Precautions should be taken to prevent electrical shock.
7 8

ENGLISH ENGLISH
9 10
• For indoor use only.
• Do not submerge in water.
• Choking hazard, small parts: not for children under three years.
TROUBLESHOOTING
Below are answers to frequently asked questions.
Problem: The MC2 Racing Wheel will not function.
Solution: If the MC2 Racing Wheel continues to not function, turn the power to
your video game system OFF, disconnect the MC2 Racing
Wheel and reconnect the MC2 Racing Wheel. Turn the power on to
your video game system and retry the game.
Problem: Vehicle control is touchy or sluggish.
Solution: Go to the software options menu and adjust the steering sensitivity and
dead zone if available.
Problem: The vehicle drifts in one direction.
Solution: Unplug the controller and plug back into the console. Restart the
system if necessary.
Problem: The game acts as if one of the pedals is being activated.
Solution: Unplug the controller and plug back into the console. Restart the
system if necessary.
Problem: I’m playing a Vibration Function compatible game and it’s not vibrating.
Solution: Some software titles require you to manually turn the vibration option
on in the option menus.
Problem: User gets no response on screen to any movement of controls.
Solution: Make sure you are not in Accudrive Mode or Program Mode.
Problem: The action buttons are not configured the way I like them.
Solution: Please check the games options menu for additional controller
configurations. Most software titles will allow you to choose or
program a different button layout.
TECHNICAL SUPPORT
Mad Catz provides technical support for all of its products in a variety of ways.
Online - Check the Mad Catz Home Page at www.madcatz.com. There you will
find up-to-the-minute solutions, tips, and information for all of our products. Our
comprehensive Tech Support area offers answers to nearly every question.
E-mail - You can send e-mail to our Support Technicians at
techsupport@madcatz.com. In most cases, you will receive a reply within one
business day.
Telephone - Technical Support is available from 8 A.M. to 4 P.M. pacific standard
time, Monday through Friday (excluding holidays) at 1.800.659.2287 (U.S. only) or
1.619.683.9830 (outside U.S.)
Fax - Technical Support is available via fax at 1.619.683.9839.
WARRANTY
When you purchase from Mad Catz, you purchase quality. We put our products
through comprehensive tests to ensure the highest reliability and compatibility.
You will probably never encounter a problem with our products, but if you should
experience any difficulties, Mad Catz offers a five (5) year replacement warranty
on this product. Mad Catz warrants to the original consumer purchaser that this
product is free from defects in either material or workmanship. If a defect covered
by this warranty occurs, Mad Catz, at its option, will repair or replace the product
at no charge. Mad Catz’ products are tested to withstand normal wear and tear,
but are not indestructible and can be damaged if misused. The Mad Catz warranty
does not cover normal wear and tear or abusive use. This warranty does not
apply to products used for any industrial, professional or commercial purpose. This
warranty does not apply to products that have been damaged by abuse, misuse,
modification or tampering or by any other cause not relating to either materials
or workmanship. If a replacement is necessary and your product is no longer

ENGLISH
11
available, a comparable product may be substituted at Mad Catz’ sole discretion.
The Mad Catz limited lifetime warranty is available to North American customers
only, including Canada, Mexico and the United States
To activate your five (5) year warranty, you must:
• Register your Mad Catz product on the web at www.madcatz.com
To obtain warranty service, you must:
• Call Mad Catz Technical Support at 1.800.659.2287 (USA only) or 1.619.683.9830
(outside USA)
• Obtain a Return Authorization Number from Mad Catz Technical Support
• Return the product to Mad Catz with the postage prepaid and insured. Mad
Catz will not be responsible for any loss or damage during shipment. Mad Catz
will pay the full return shipping (see return address below)
• Enclose a copy of the original sales receipt showing a purchase date
• Enclose a full return address along with daytime and evening phone numbers
Be sure to package the product so that it will not become damaged in
shipping. We recommend placing the original box inside another box packed with
packaging material. Mad Catz, Inc. will not be responsible for any damage or loss
to the product in shipment
All returns should be addressed to:
Mad Catz, Inc.
ATTN: Warranty
7480 Mission Valley Rd
Suite 101
San Diego, CA
92108-4406
Please allow for 4 to 6 weeks for processing. In the event of a problem, we will
contact you at one of the phone numbers provided.
©2002 Mad Catz, Inc. 7480 Mission Valley Road, Suite 101, San Diego, CA 92108 USA. Mad Catz, the Mad Catz logo and MC2
are trademarks or registered trademarks of Mad Catz, Inc., its subsidiariesand affiliates. The shape and design of this product
is a tradedress of Mad Catz. TouchSense(tm) Technology Licensed from Immersion Corporation. All other product names are
trademarks or registered trademarks of their respective owners. Product appearance, featuresand specification maybe subject
to change without notice. International and domestic patents pending. Made in China. Printed in Hong Kong. All rights reserved.
Please retain this information for future reference. Mad Catz stands behind its products 100%.
Questions? Visit our web site at www.madcatz.com or call 1.800.659.2287 (USA only) or 1.619.683.9830.
Product No. 6320 8/02
ENGLISH
 Loading...