

Mad Catz GameSaves Instruction Manual

INSTRUCTION MANUAL FOR
For use with the Xbox®
Game Console
®

XBOX GAMESAVES MANUAL
INTRODUCTION
Congratulations! You have purchased the ultimate game enhancer for the Xbox®
that
will provide you with everything that you need to beat the game and manage your
game saves!! To get the most out of your XBOX GameSaves, please visit us at
www.gameshark.com to register your XBOX GameSaves and receive all of the benefits
of being a member and to get all of the hottest saves for the latest games!!!
XBOX GameSaves allows you to download the coolest game saves available for your
games from the dedicated website, www.gameshark.com, allowing you to unlock levels, have tons of cash, and unlock secret characters.
XBOX GameSaves lets you back-up all the saves you have on your XBOX Memory
Units to your PC, meaning you can free up valuable space on your XBOX Memory
Units! You can also delete any saves you no longer require at the click of a mouse button.
1) GETTING STARTED
a) Requirements
To use XBOX GameSaves you must have a PC running Windows 98SE or above.
It is advisable to have over 300MB of disk space free for storing the saved games you
transfer from your XBOX Memory Unit(s). You will need a CD-ROM drive and one
free USB port.
A PC modem and account with an Internet service provider (ISP) or a dial-up Internet
connection is required to use XBOX GameSaves online features.
b) Setting up XBOX GameSaves for the First Time
1. Insert the XBOX GameSaves disc into the CD drive of your PC and close
the drawer.
2. After a few seconds, the installation launch panel will appear. If the launch
panel does not automatically appear, double-click on the My Computer Icon,
then double-click on the CD-ROM icon, and lastly double-click on the
SETUP.EXE file to bring up the launch panel.
3. Follow the onscreen prompts to install XBOX GameSaves onto your PC.
c) Connecting the Supplied USB PC to XBOX Memory Unit Cable
1. Connect an XBOX Memory Unit to the supplied USB PC to XBOX Memory
Unit Cable.
2. Insert the USB plug end of the supplied USB PC to XBOX Memory Unit Cable
into a spare USB socket usually located at the back of your PC.
3. Windows will now ask you for a path to install the required USB drivers. The
USB drivers can be found on the XBOX GameSaves CD inside the ‘FireLink
Drivers’ folder.
d) Starting-up the XBOX GameSaves Interface
1. Make sure you have the supplied USB PC to XBOX Memory Unit Cable
correctly connected to a spare USB socket on your PC.
2. Also make sure you have an XBOX Memory Unit connected to the supplied
USB PC to XBOX Memory Unit Cable.
3. Double-click the XBOX GameSaves icon on your PC.
2) AN OVERVIEW OF XBOX GAMESAVES INTERFACE
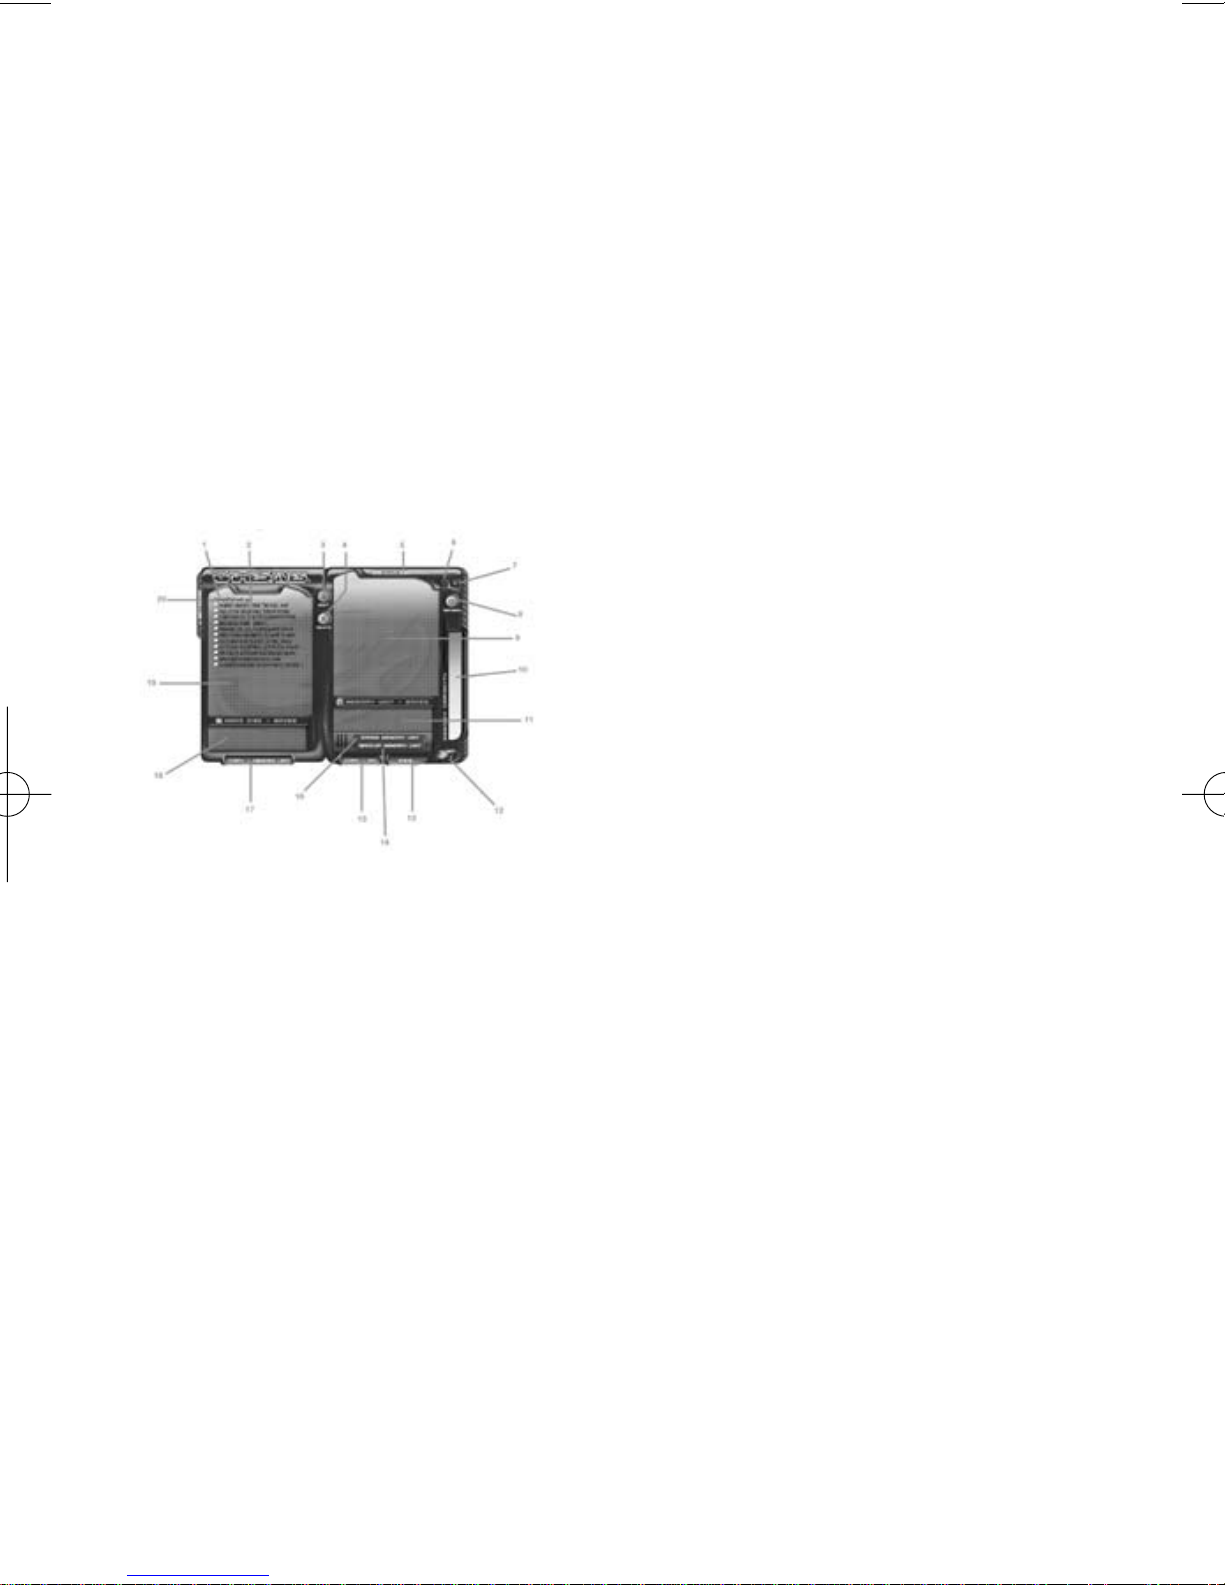
When you first start your XBOX GameSaves software, you will be presented with an
interface consisting of two different panels as shown below. Details of each panel and
its functions are explained in more detail below:
a) PC Panel
This is the left panel that displays all the Saves stored on your PC. The Saves are
stored in Group Folders so the user can manage their own Saves by simply grouping
them together. Saves can also be copied or moved into different Group Folders within
the PC Panel.
b) Memory Unit Panel
This is the Panel on the right and displays saves, which are stored on the XBOX
Memory Unit that is attached to the supplied USB PC to XBOX Memory Unit Cable.
1. Group Folder - These are the folders that contain the saves stored on
the PC.
2. Saves - These are the actual save files that are stored on the PC.
3. Edit - This button allows you to Edit the Game name and Save Descriptions
of the saves stored on the PC or XBOX Memory Unit.
4. Delete - This button will delete any highlighted Game Save.
5. Status - This button shows useful information about the number of saves
stored on the PC and properties of the currently connected XBOX Memory
Unit such as number of blocks free and the number of saves it currently
stores.
6. Minimize - This button minimizes the XBOX GameSaves application into
your Task bar.
7. Off - This button closes the XBOX GameSaves application.
8. Refresh - Refreshes the Memory Unit Panel displaying the contents of the
currently connected XBOX Memory Unit.
9. Memory Unit Panel - This panel displays all the saves that are currently
stored
on the XBOX Memory Unit attached to the supplied USB PC to XBOX
Memory Unit Cable.
10. Memory Unit Capacity Bar - This bar shows how much free space is
available on the connected XBOX Memory Unit.
11. Memory Unit Save Information Panel - This box displays useful save
information for selected save stored on the connected XBOX Memory Unit.

12. GameShark Icon - This brings up Build and version information.
13. WWW - This button will open up the XBOX saves page of
www.gameshark.com.
14. Back up Memory Unit - This button copies the entire contents of the
connected XBOX Memory Unit to the PC.
15. Copy -> PC -This button copies highlighted saves from the Memory Unit
Panel to the PC.
16. Erase Memory Unit - This button erases the entire contents of the
connected XBOX Memory Unit.
17. Copy -> Memory Unit - This button copies highlighted saves from the PC
to the connected XBOX Memory Unit.
18. PC Panel Save Information Panel - Displays Save information for currently
selected save in the PC Panel.
19. PC Panel - This panel displays all the saves you have stored on the PC.
20. Network - Opens the Internet Connection Panel, used to connect to the
XBOX section of GameShark website to find new saves.
3) MANAGING SAVES ON THE PC
XBOX GameSaves allows you to store and manage all your XBOX GameSaves on
your PC. You can quickly and easily copy, delete and backup game saves from your
XBOX Memory Units.
You can then rename and add Save Descriptions to help you compile your own collection of game saves stored on your PC that can be quickly transferred back to your
XBOX Memory Units for use at any time.
The following sections explain XBOX GameSaves numerous functions and capabilities in detail so you can begin to manage your game saves right away.
a) Group Folders
On the PC Panel, all the saves are stored in Group Folders, which are designed to
make it easier for you to manage the GameSaves stored on your PC. E.g. you could
have a Group Folder named ‘Game X’ and only store saves for ‘Game X’ inside.
You can open and close the Group Folders by simply double-clicking on them to show
or hide the saves stored inside them.
b) Creating Group Folders
To create a new Group Folder simply double-click left button while the mouse cursor
is in any blank space within the PC Panel. A dialogue box will appear allowing you to
enter a name for a new Group Folder.
c) Editing Group Folder Names
To edit a Group Folder name, simply use the mouse to highlight a Group Folder then
click on the ‘EDIT’ button. A dialogue box will appear allowing you to edit the Group
Folder name.
d) Editing Game Save Information
When you highlight a game save in the PC Panel, useful information is displayed in
the Information box below such as file size, save name, save description and game name.
 Loading...