

Page 1

ADOBE®MEDIA SERVER
Developer’s Guide
Page 2

Legal notices
Legal notices
For legal notices, see http://help.adobe.com/en_US/legalnotices/index.html.
Last updated 9/4/2014
Page 3

Contents
Chapter 1: Getting started streaming media
Supported clients, encoders, codecs, and file formats . . . . . . . . . . . . . . . . . . . . . . . . . . . . . . . . . . . . . . . . . . . . . . . . . . . . . . . . . . . . . . . . . . . 1
Pre-built media players . . . . . . . . . . . . . . . . . . . . . . . . . . . . . . . . . . . . . . . . . . . . . . . . . . . . . . . . . . . . . . . . . . . . . . . . . . . . . . . . . . . . . . . . . . . . . . . . 3
Stream live media (HTTP) . . . . . . . . . . . . . . . . . . . . . . . . . . . . . . . . . . . . . . . . . . . . . . . . . . . . . . . . . . . . . . . . . . . . . . . . . . . . . . . . . . . . . . . . . . . . . . 5
Stream live media (RTMP) . . . . . . . . . . . . . . . . . . . . . . . . . . . . . . . . . . . . . . . . . . . . . . . . . . . . . . . . . . . . . . . . . . . . . . . . . . . . . . . . . . . . . . . . . . . . . 17
Stream on-demand media (HTTP) . . . . . . . . . . . . . . . . . . . . . . . . . . . . . . . . . . . . . . . . . . . . . . . . . . . . . . . . . . . . . . . . . . . . . . . . . . . . . . . . . . . . . 19
Stream on-demand media (RTMP) . . . . . . . . . . . . . . . . . . . . . . . . . . . . . . . . . . . . . . . . . . . . . . . . . . . . . . . . . . . . . . . . . . . . . . . . . . . . . . . . . . . . 24
Stream on-demand encrypted media (pRTMP) . . . . . . . . . . . . . . . . . . . . . . . . . . . . . . . . . . . . . . . . . . . . . . . . . . . . . . . . . . . . . . . . . . . . . . . . 29
Multicast media (RTMFP) . . . . . . . . . . . . . . . . . . . . . . . . . . . . . . . . . . . . . . . . . . . . . . . . . . . . . . . . . . . . . . . . . . . . . . . . . . . . . . . . . . . . . . . . . . . . . 36
Configure closed captioning . . . . . . . . . . . . . . . . . . . . . . . . . . . . . . . . . . . . . . . . . . . . . . . . . . . . . . . . . . . . . . . . . . . . . . . . . . . . . . . . . . . . . . . . . . 39
Configure alternate audio . . . . . . . . . . . . . . . . . . . . . . . . . . . . . . . . . . . . . . . . . . . . . . . . . . . . . . . . . . . . . . . . . . . . . . . . . . . . . . . . . . . . . . . . . . . . 49
Configure content protection . . . . . . . . . . . . . . . . . . . . . . . . . . . . . . . . . . . . . . . . . . . . . . . . . . . . . . . . . . . . . . . . . . . . . . . . . . . . . . . . . . . . . . . . . 51
Configure HTTP Dynamic Streaming and HTTP Live Streaming . . . . . . . . . . . . . . . . . . . . . . . . . . . . . . . . . . . . . . . . . . . . . . . . . . . . . . . . . 51
HTTP streaming configuration file reference . . . . . . . . . . . . . . . . . . . . . . . . . . . . . . . . . . . . . . . . . . . . . . . . . . . . . . . . . . . . . . . . . . . . . . . . . . . 76
Build custom media players . . . . . . . . . . . . . . . . . . . . . . . . . . . . . . . . . . . . . . . . . . . . . . . . . . . . . . . . . . . . . . . . . . . . . . . . . . . . . . . . . . . . . . . . . . . 91
Offline packaging . . . . . . . . . . . . . . . . . . . . . . . . . . . . . . . . . . . . . . . . . . . . . . . . . . . . . . . . . . . . . . . . . . . . . . . . . . . . . . . . . . . . . . . . . . . . . . . . . . . . 97
Troubleshoot issues with streaming media . . . . . . . . . . . . . . . . . . . . . . . . . . . . . . . . . . . . . . . . . . . . . . . . . . . . . . . . . . . . . . . . . . . . . . . . . . . 111
iii
Chapter 2: Content protection
Configuring content protection for HDS . . . . . . . . . . . . . . . . . . . . . . . . . . . . . . . . . . . . . . . . . . . . . . . . . . . . . . . . . . . . . . . . . . . . . . . . . . . . . . 115
Configuring content protection for HLS . . . . . . . . . . . . . . . . . . . . . . . . . . . . . . . . . . . . . . . . . . . . . . . . . . . . . . . . . . . . . . . . . . . . . . . . . . . . . . 157
Chapter 3: Getting started developing applications
Application architecture . . . . . . . . . . . . . . . . . . . . . . . . . . . . . . . . . . . . . . . . . . . . . . . . . . . . . . . . . . . . . . . . . . . . . . . . . . . . . . . . . . . . . . . . . . . . . 179
Set up a development environment . . . . . . . . . . . . . . . . . . . . . . . . . . . . . . . . . . . . . . . . . . . . . . . . . . . . . . . . . . . . . . . . . . . . . . . . . . . . . . . . . . 179
Example: Hello World application . . . . . . . . . . . . . . . . . . . . . . . . . . . . . . . . . . . . . . . . . . . . . . . . . . . . . . . . . . . . . . . . . . . . . . . . . . . . . . . . . . . . 180
Overview of creating an application . . . . . . . . . . . . . . . . . . . . . . . . . . . . . . . . . . . . . . . . . . . . . . . . . . . . . . . . . . . . . . . . . . . . . . . . . . . . . . . . . . 182
Test an application . . . . . . . . . . . . . . . . . . . . . . . . . . . . . . . . . . . . . . . . . . . . . . . . . . . . . . . . . . . . . . . . . . . . . . . . . . . . . . . . . . . . . . . . . . . . . . . . . . 184
Deploy an application . . . . . . . . . . . . . . . . . . . . . . . . . . . . . . . . . . . . . . . . . . . . . . . . . . . . . . . . . . . . . . . . . . . . . . . . . . . . . . . . . . . . . . . . . . . . . . . 185
Chapter 4: Developing streaming media applications
Connecting to the server . . . . . . . . . . . . . . . . . . . . . . . . . . . . . . . . . . . . . . . . . . . . . . . . . . . . . . . . . . . . . . . . . . . . . . . . . . . . . . . . . . . . . . . . . . . . 188
Managing connections . . . . . . . . . . . . . . . . . . . . . . . . . . . . . . . . . . . . . . . . . . . . . . . . . . . . . . . . . . . . . . . . . . . . . . . . . . . . . . . . . . . . . . . . . . . . . . 193
Streaming media files . . . . . . . . . . . . . . . . . . . . . . . . . . . . . . . . . . . . . . . . . . . . . . . . . . . . . . . . . . . . . . . . . . . . . . . . . . . . . . . . . . . . . . . . . . . . . . . 195
Checking video files . . . . . . . . . . . . . . . . . . . . . . . . . . . . . . . . . . . . . . . . . . . . . . . . . . . . . . . . . . . . . . . . . . . . . . . . . . . . . . . . . . . . . . . . . . . . . . . . . 201
Handling errors . . . . . . . . . . . . . . . . . . . . . . . . . . . . . . . . . . . . . . . . . . . . . . . . . . . . . . . . . . . . . . . . . . . . . . . . . . . . . . . . . . . . . . . . . . . . . . . . . . . . . 205
Working with playlists . . . . . . . . . . . . . . . . . . . . . . . . . . . . . . . . . . . . . . . . . . . . . . . . . . . . . . . . . . . . . . . . . . . . . . . . . . . . . . . . . . . . . . . . . . . . . . . 207
Dynamic streaming . . . . . . . . . . . . . . . . . . . . . . . . . . . . . . . . . . . . . . . . . . . . . . . . . . . . . . . . . . . . . . . . . . . . . . . . . . . . . . . . . . . . . . . . . . . . . . . . . . 210
Reconnecting streams when a connection drops . . . . . . . . . . . . . . . . . . . . . . . . . . . . . . . . . . . . . . . . . . . . . . . . . . . . . . . . . . . . . . . . . . . . . 219
Fast switching between streams . . . . . . . . . . . . . . . . . . . . . . . . . . . . . . . . . . . . . . . . . . . . . . . . . . . . . . . . . . . . . . . . . . . . . . . . . . . . . . . . . . . . . 223
Smart Seeking . . . . . . . . . . . . . . . . . . . . . . . . . . . . . . . . . . . . . . . . . . . . . . . . . . . . . . . . . . . . . . . . . . . . . . . . . . . . . . . . . . . . . . . . . . . . . . . . . . . . . . . 224
Detecting bandwidth . . . . . . . . . . . . . . . . . . . . . . . . . . . . . . . . . . . . . . . . . . . . . . . . . . . . . . . . . . . . . . . . . . . . . . . . . . . . . . . . . . . . . . . . . . . . . . . . 227
Detecting stream length . . . . . . . . . . . . . . . . . . . . . . . . . . . . . . . . . . . . . . . . . . . . . . . . . . . . . . . . . . . . . . . . . . . . . . . . . . . . . . . . . . . . . . . . . . . . . 232
Last updated 9/4/2014
Page 4

ADOBE MEDIA SERVER 5.0.6 DEVELOPER’S GUIDE
Contents
Chapter 5: Working with live video
Capturing live video . . . . . . . . . . . . . . . . . . . . . . . . . . . . . . . . . . . . . . . . . . . . . . . . . . . . . . . . . . . . . . . . . . . . . . . . . . . . . . . . . . . . . . . . . . . . . . . . 235
Adding DVR features to live video . . . . . . . . . . . . . . . . . . . . . . . . . . . . . . . . . . . . . . . . . . . . . . . . . . . . . . . . . . . . . . . . . . . . . . . . . . . . . . . . . . . . 237
Adding metadata to a live stream . . . . . . . . . . . . . . . . . . . . . . . . . . . . . . . . . . . . . . . . . . . . . . . . . . . . . . . . . . . . . . . . . . . . . . . . . . . . . . . . . . . . 244
Capturing timecode sent from Flash Media Live Encoder . . . . . . . . . . . . . . . . . . . . . . . . . . . . . . . . . . . . . . . . . . . . . . . . . . . . . . . . . . . . . 251
Publishing live video in RAW file format . . . . . . . . . . . . . . . . . . . . . . . . . . . . . . . . . . . . . . . . . . . . . . . . . . . . . . . . . . . . . . . . . . . . . . . . . . . . . . 251
Multi-point publishing between servers . . . . . . . . . . . . . . . . . . . . . . . . . . . . . . . . . . . . . . . . . . . . . . . . . . . . . . . . . . . . . . . . . . . . . . . . . . . . . . 254
Chapter 6: Building peer-assisted networking applications
Real-Time Media Flow Protocol (RTMFP) . . . . . . . . . . . . . . . . . . . . . . . . . . . . . . . . . . . . . . . . . . . . . . . . . . . . . . . . . . . . . . . . . . . . . . . . . . . . . . 257
RTMFP groups . . . . . . . . . . . . . . . . . . . . . . . . . . . . . . . . . . . . . . . . . . . . . . . . . . . . . . . . . . . . . . . . . . . . . . . . . . . . . . . . . . . . . . . . . . . . . . . . . . . . . . . 258
Distribute peer introductions across servers . . . . . . . . . . . . . . . . . . . . . . . . . . . . . . . . . . . . . . . . . . . . . . . . . . . . . . . . . . . . . . . . . . . . . . . . . . 270
Chapter 7: Developing social applications
About social applications . . . . . . . . . . . . . . . . . . . . . . . . . . . . . . . . . . . . . . . . . . . . . . . . . . . . . . . . . . . . . . . . . . . . . . . . . . . . . . . . . . . . . . . . . . . . 283
About shared objects . . . . . . . . . . . . . . . . . . . . . . . . . . . . . . . . . . . . . . . . . . . . . . . . . . . . . . . . . . . . . . . . . . . . . . . . . . . . . . . . . . . . . . . . . . . . . . . . 283
Remote shared objects . . . . . . . . . . . . . . . . . . . . . . . . . . . . . . . . . . . . . . . . . . . . . . . . . . . . . . . . . . . . . . . . . . . . . . . . . . . . . . . . . . . . . . . . . . . . . . 284
SharedBall example . . . . . . . . . . . . . . . . . . . . . . . . . . . . . . . . . . . . . . . . . . . . . . . . . . . . . . . . . . . . . . . . . . . . . . . . . . . . . . . . . . . . . . . . . . . . . . . . . 285
Broadcast messages to many users . . . . . . . . . . . . . . . . . . . . . . . . . . . . . . . . . . . . . . . . . . . . . . . . . . . . . . . . . . . . . . . . . . . . . . . . . . . . . . . . . . . 287
iv
Chapter 8: Securing applications
Allow or deny access to assets . . . . . . . . . . . . . . . . . . . . . . . . . . . . . . . . . . . . . . . . . . . . . . . . . . . . . . . . . . . . . . . . . . . . . . . . . . . . . . . . . . . . . . . 288
Authenticate clients . . . . . . . . . . . . . . . . . . . . . . . . . . . . . . . . . . . . . . . . . . . . . . . . . . . . . . . . . . . . . . . . . . . . . . . . . . . . . . . . . . . . . . . . . . . . . . . . . 289
Authenticate users . . . . . . . . . . . . . . . . . . . . . . . . . . . . . . . . . . . . . . . . . . . . . . . . . . . . . . . . . . . . . . . . . . . . . . . . . . . . . . . . . . . . . . . . . . . . . . . . . . 293
Chapter 9: Developing Plug-ins
What’s new with plug-ins in Flash Media Server 4.5.1 . . . . . . . . . . . . . . . . . . . . . . . . . . . . . . . . . . . . . . . . . . . . . . . . . . . . . . . . . . . . . . . . . 295
What’s new with plug-ins in Flash Media Server 4.5 . . . . . . . . . . . . . . . . . . . . . . . . . . . . . . . . . . . . . . . . . . . . . . . . . . . . . . . . . . . . . . . . . . . 295
Versioning, upgrading, and server editions . . . . . . . . . . . . . . . . . . . . . . . . . . . . . . . . . . . . . . . . . . . . . . . . . . . . . . . . . . . . . . . . . . . . . . . . . . . 295
Working with plug-ins . . . . . . . . . . . . . . . . . . . . . . . . . . . . . . . . . . . . . . . . . . . . . . . . . . . . . . . . . . . . . . . . . . . . . . . . . . . . . . . . . . . . . . . . . . . . . . . 297
General development tasks . . . . . . . . . . . . . . . . . . . . . . . . . . . . . . . . . . . . . . . . . . . . . . . . . . . . . . . . . . . . . . . . . . . . . . . . . . . . . . . . . . . . . . . . . . 300
Developing an Access plug-in . . . . . . . . . . . . . . . . . . . . . . . . . . . . . . . . . . . . . . . . . . . . . . . . . . . . . . . . . . . . . . . . . . . . . . . . . . . . . . . . . . . . . . . . 301
Developing an Authorization plug-in . . . . . . . . . . . . . . . . . . . . . . . . . . . . . . . . . . . . . . . . . . . . . . . . . . . . . . . . . . . . . . . . . . . . . . . . . . . . . . . . 303
Developing a File plug-in . . . . . . . . . . . . . . . . . . . . . . . . . . . . . . . . . . . . . . . . . . . . . . . . . . . . . . . . . . . . . . . . . . . . . . . . . . . . . . . . . . . . . . . . . . . . 331
Last updated 9/4/2014
Page 5

Chapter 1: Getting started streaming media
Supported clients, encoders, codecs, and file formats
Supported clients and servers for streaming services
Streaming services are pre-built Adobe Media Server applications. Use streaming services to stream media to Flash,
AIR, and Apple (iOS and QuickTime) clients. The services are installed to rootinstall/applications/servicename.
The following table lists the streaming services and their earliest supported server versions, server editions, and client
runtimes:
1
Streaming type Service
On-demand streaming over
RTMP.
See Stream on-demand media
(RTMP).
On-demand streaming over
HTTP.
See “Stream on-demand media
(HTTP)” on page 19.
Live streaming over RTMP.
See “Stream live media (RTMP)”
on page 17
Live streaming over HTTP.
See “Stream live media (HTTP)”
on page 5.
name
vod 3 All Flash Player 6
None 4.5 All Flash Player 10.1
live 3 All Flash Player 6
livepkgr 4 4—Adobe Media
Server version Server
edition(earliest
supported)
Server Extended,
Adobe Media Server
Professional
4.5—All
Client runtime
(earliest supported)
AIR 1
AIR 2
iOS 3.0
QuickTime X
AIR 1
4—Flash Player 10.1,
AIR 2
4.5—Flash Player
10.1, AIR 2, iOS 3.0,
QuickTime X
Last updated 9/4/2014
Page 6

ADOBE MEDIA SERVER 5.0.6 DEVELOPER’S GUIDE
Getting started streaming media
2
Streaming type Service
Multicast streaming over RTMFP.
See “Multicast media (RTMFP)”
on page 36.
name
multicast 4 Adobe Media Server
Server version Server
edition(earliest
supported)
Professional supports
IP Multicast
Adobe Media Server
Extended supports IP
Multicast,
Application-level
Multicast, and
Multicast Fusion.
Multicast Fusion
technology
combines IP and
Application-level
Multicast.
The server editions
have changed with
server version 5.
Adobe Flash Media
Streaming Server is
Adobe Media Server
5 Standard. Adobe
Flash Media
Interactive Server is
Adobe Media Server
5 Professional. Adobe
Flash Media
Enterprise Server is
Adobe Media Server
5 Extended. Adobe
Flash Media
Development Server
is Adobe Media
Server 5 Starter.
Client runtime
(earliest supported)
Flash Player 10.1
AIR 2
Important: On Adobe Media Server 5 Standard, you cannot modify the server-side code in the streaming services. In all
other editions of the server, you can modify the code.
Supported file formats and codecs
Adobe Flash Platform
For a complete list of supported file formats and codecs, see Supported file formats and codecs.
Live HTTP Dynamic Streaming supports the H.264, VP6, MP3, and AAC codecs.
For on-demand HTTP Dynamic Streaming, the just-in-time packager supports F4V/MP4 files. This document
explains how to use the just-in-time packager. To package FLV files for HTTP Dynamic Streaming, use the offline File
Packager tool. See
In addition, see the following Flash Platform articles:
Smart phone and tablet video encoding recommendations for Flash Player and AIR by Adobe encoding
evangelist, Maxim Levkov, and Adobe Product Manager, Tom Nguyen.
Video encoding and transcoding recommendations for HTTP Dynamic Streaming on the Flash Platform by
Adobe encoding evangelist, Maxim Levkov.
File Packager reference.
Last updated 9/4/2014
Page 7

ADOBE MEDIA SERVER 5.0.6 DEVELOPER’S GUIDE
Getting started streaming media
For a longer list of articles about encoding, see the Video Encoding page on Adobe Developer Connection.
Apple HTTP Live Streaming
Adobe Media Server support for Apple HTTP Live Streaming includes H.264 and AAC/HE-AAC for audio-video
content and AAC/HE-AAC for audio-only content.
For more information, see Apple HTTP Live Streaming Overview - FAQ.
For recommended encoding settings, see Best Practices for Creating and Deploying HTTP Live Streaming Media for
the iPhone and iPad and Recommended Encoding Settings for HTTP Live Streaming Media.
Supported encoders
Use the following encoders to publish a live stream to Adobe Media Server:
• Flash Media Live Encoder
• Server-side scripts running on Adobe Media Server Extended, Adobe Media Server Professional, and Adobe Media
Server Starter. When you call the Server-side ActionScript method
• A custom-built Flash Player or AIR application. See “Working with live video” on page 235.
• Third-party encoding solutions. See Adobe Media Server Solution Partners.
Stream.play(), the stream is considered “live”.
3
Pre-built media players
Flash and AIR media players
Media player Supported protocols Media player location
Flash Media Playback RTMP/x, HTTP
Note: Flash Media Playback
doesn’t support Set-level
Manifest files.
Strobe Media Playback RTMP/x, HTTP osmf.org/developers.html
Adobe Media Server sample video
player
The AMS sample video player is
Strobe Media Playback in a
wrapper. The wrapper includes
sample and generates HTML
embed code.
Adobe Media Server multicast
sample player
Flash FLVPlayback component RTMP/x fl.video.FLVPlayback
Flex components RTMP/x mx.controls.VideoDisplay
RTMP/x, HTTP
To use this player for multicast
playback, use the multicast
configurator to create a
manifest file. Use the manifest
file as the source.
RTMFP rootinstall/tools/multicast/multicastplaye
www.adobe.com/products/flashmediapl
ayback/
rootinstall/samples/videoPlayer
r
FLV playback 2.5 supports DVR
spark.components.VideoPlayer
spark.components.VideoDisplay
Last updated 9/4/2014
Page 8

ADOBE MEDIA SERVER 5.0.6 DEVELOPER’S GUIDE
Getting started streaming media
Note: The previous table is not a complete list of supported media players. Many third parties have developed excellent
media players. When using a third party media player, please check with the third party to verify which features the media
player supports.
Play media in Flash Media Playback
Flash Media Playback is a compiled SWF file hosted on Adobe.com. Flash Media Playback is built on the Open Source
Media Framework (OSMF). Flash Media Playback is not open source, but it is fully configurable and supports
dynamically loaded plug-ins from third-party service providers. It runs in Flash Player 10.1 and AIR 2 and supports
multi-bitrate streaming, Adobe HTTP Dynamic Streaming (streaming over HTTP), and DVR.
Note: Flash Media Playback does not support set-level manifest files; use Strobe Media Playback instead. Or, to use multibitrate HTTP Dynamic Streaming with Flash Media Playback, use a Manifest.xml file.
For more information about Flash Media Playback, see www.adobe.com/products/flashmediaplayback.
1 Load the Flash Media Playback Setup page in a web browser: www.osmf.org/configurator/fmp/.
2 Enter the Video Source.
3 Indicate whether the video uses HTTP Dynamic Streaming or Adobe Access.
4 To use DVR, click the Advanced tab and select Stream Type DVR.
5 Click Preview to update the embed code.
6 Click Play to test the code.
7 To use the player in your own HTML page, copy the embed code and paste it into your page.
4
Play media in Strobe Media Playback
Strobe Media Playback is built with the Open Source Media Framework (OSMF). It supports progressive download,
RTMP streaming, HTTP Dynamic Streaming (including adaptive bitrate manifest files), multicast streaming, and
content protection with Adobe® Flash® Access™. You must host Strobe Media Playback on your own server.
Download the latest Strobe Media Playback and its documentation from osmf.org.
Play media in the Adobe Media Server sample video player
The sample player that installs with Adobe Media Server to rootinstall/samples/videoPlayer is based on Strobe Media
Playback. You can use the sample player to generate HTML embed code to use in your own HTML page.
Important: To play the sample F4M manifest files in the sample video player, enter a localhost address in the Stream URL
box. For example, http://localhost/vod/hds_sample1_manifest.f4m.
Embed the Adobe Media Server sample video player in an HTML file
1 Browse to the sample video player and open it in a browser. The file is located at
rootinstall/samples/videoPlayer/videoplayer.html.
2
Enter the URL of the video to play and click Stream. The sample player adds the URL of the video file to the embed code.
To play an on-demand file from the vod service, copy the file to the rootinstall/applications/vod/media folder. The
URL is something like the following:
rtmp://localhost/vod/mp4:sample1_1500kbps.f4v
For more information, see “URLs for playing on-demand media files over RTMP” on page 26, “URLs for publishing
and playing live streams over RTMP” on page 18, “URLs for publishing and playing live streams over HTTP” on
page 12, and “URLs for playing on-demand streams over HTTP” on page 23.
Last updated 9/4/2014
Page 9

ADOBE MEDIA SERVER 5.0.6 DEVELOPER’S GUIDE
Getting started streaming media
3 Find the section on the page labeled “Embed Code”.
4 Copy the code from the text field at the bottom of the page. The code begins and ends with <object> tags.
5 Create a new HTML page.
6 Paste the code from the sample video player into the HTML file between the <body></body> tags.
7 Save the HTML page to the rootinstall/webroot folder.
Important: Do not name the file “index.html”. The Adobe Media Server Start Screen is the index.html file in the
webroot folder. If you save a file named index.html to the webroot folder, the file will overwrite the Start Screen.
The embed code looks for the SampleMediaPlayback.swf file at swfs/SampleMediaPlayback.swf. The
SampleMediaPlayback.swf is installed to this folder by default. To serve the HTML page from a different web server,
use the same folder structure.
8 Open your HTML file in a browser.
Apple media players
Apple HTTP Live Streaming supports both live content and on-demand content.
Media player Supported streaming type
5
Devices running iOS 3.0 and later include built-in client
software.
On Mac OS 10.6 and later, Safari 4.0 and QuickTime X. On-demand and live (HTTP)
For more information about Apple media players, see Apple HTTP Live Streaming Overview.
On-demand and live (HTTP)
Stream live media (HTTP)
Prerequisites for live streaming over HTTP
To use HTTP Dynamic Streaming (HDS) and HTTP Live Streaming (HLS) to serve live streams to clients over HTTP,
publish the streams to the HTTP Live Packager service on Adobe Media Server (rootinstall/applications/livepkgr). The
livepkgr service ingests the streams, packages them into fragments, and delivers the fragments to Flash and iOS clients
in real-time.
To complete these tutorials, use the following software:
• Adobe Media Server 5. See the video Install Adobe Media Server 5 and verify HTTP streaming to Flash and iOS.
• Flash Media Live Encoder
Note: Flash Media Live Encoder on Windows doesn’t support AAC encoding. To add support for AAC, purchase the
MainConcept AAC Encoder.
• (Adobe HTTP Dynamic Streaming) Adobe Media Server sample video player (which uses Strobe Media Playback)
and Flash Player 10.1.
• (Apple HTTP Live Streaming) iOS 3.0 or later device or Mac OS 10.6 with Safari 4.0 or QuickTime X.
For more information, see “Supported clients, encoders, codecs, and file formats” on page 1 and “Pre-built media
players” on page 3.
Last updated 9/4/2014
Page 10
ADOBE MEDIA SERVER 5.0.6 DEVELOPER’S GUIDE
Getting started streaming media
Publish and play a single live stream over HTTP
1 Install Adobe Media Server 5 and choose to install Apache HTTP Server.
2 Install Flash Media Live Encoder and configure it to use absolute time.
a Close Flash Media Live Encoder.
b Open the Flash Media Live Encoder rootinstall\conf\config.xml file in a text editor.
The default installation location on Windows is C:\Program Files\Adobe\Flash Media Live Encoder 3.2.
The default installation location on Mac OS is Macintosh HD:Applications:Adobe:Flash Media Live Encoder 3.2.
c Set the tag //flashmedialiveencoder_config/mbrconfig/streamsynchronization/enable to true:
<flashmedialiveencoder_config>
<mbrconfig>
<streamsynchronization>
<!-- "true" to enable this feature, "false" to disable.-->
<enable>true</enable>
d Save the file.
3 To publish a live stream to Adobe Media Server, start Flash Media Live Encoder and do the following:
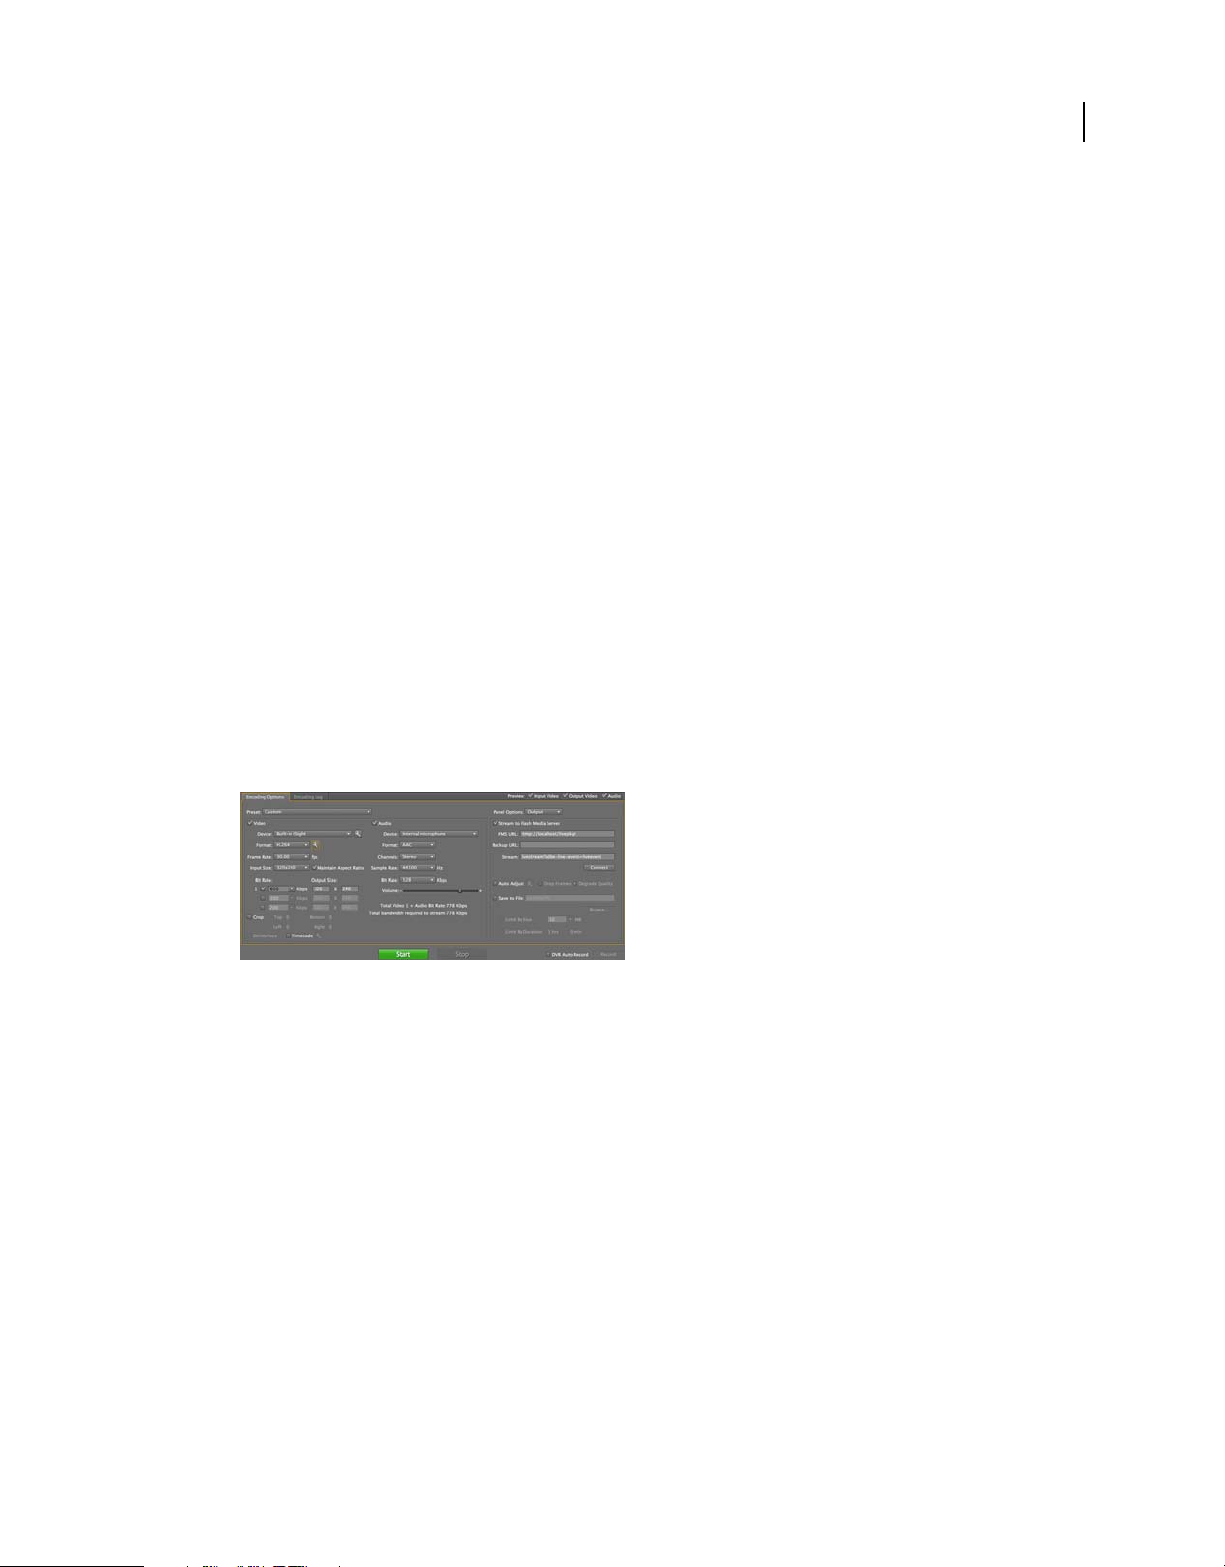
a In the Encoding Options panel, from the Preset pop-up menu, choose High Bandwidth (800 Kbps) — H.264.
For Audio Format, choose AAC.
Note: Flash Media Live Encoder on Windows doesn’t support AAC encoding. To add support for AAC, purchase
MainConcept AAC Encoder.
the
6
Flash Media Live Encoder Encoding Options panel
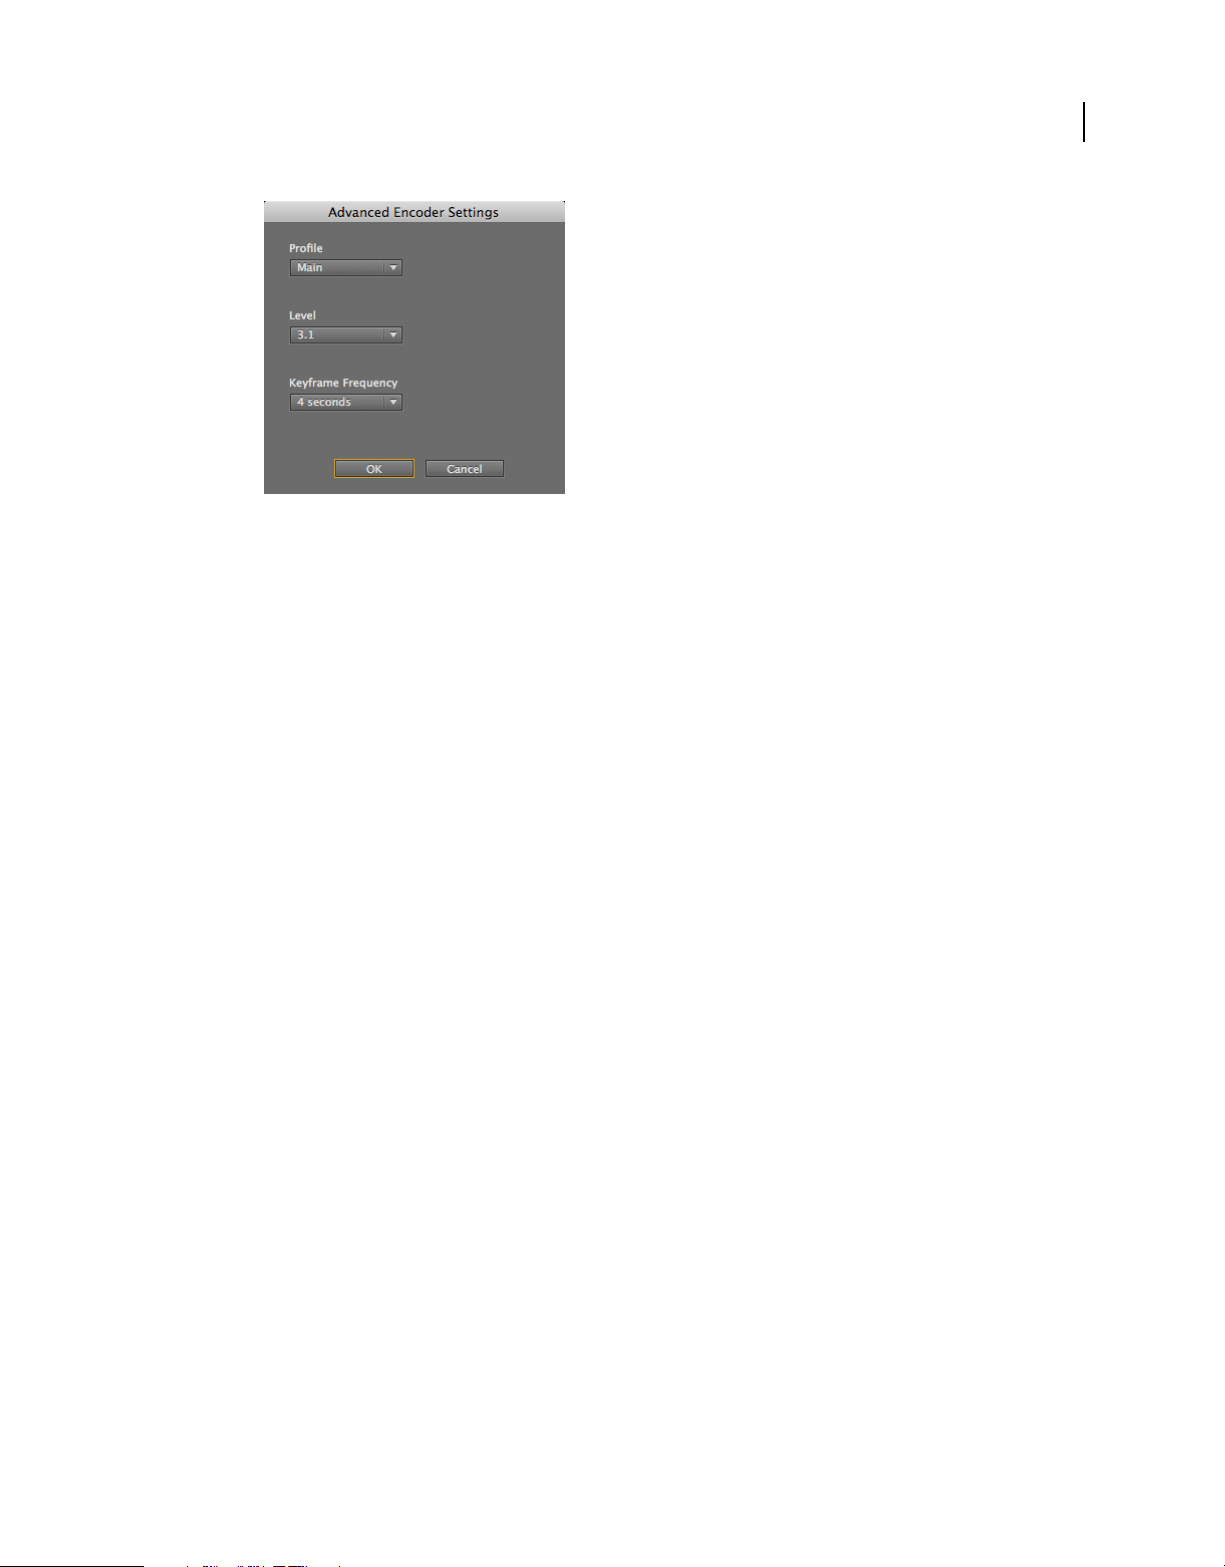
b Click the wrench next to Format to open Advanced Encoder Settings and do the following:
• Profile—Main
• Level—3.1
• Keyframe Frequency—4 or a multiple of <FragmentDuration> in the
applications/livepkgr/events/_definst_/liveevent/Event.xml file. The default value of
<FragmentDuration>
is 4000 milliseconds.
Note: For information about profile and level support, see “Supported file formats and codecs” on page 2.
Last updated 9/4/2014
Page 11
ADOBE MEDIA SERVER 5.0.6 DEVELOPER’S GUIDE
Getting started streaming media
Flash Media Live Encoder Advanced Encoder Settings
c In the AMS URL text box enter the following:
rtmp://localhost/livepkgr
Note: Use the RTMP protocol to stream the content to the livepkgr application on Adobe Media Server. You can
substitute an IP address or a domain name for “localhost”.
7
d In the Stream text box enter the following:
livestream?adbe-live-event=liveevent
Note: The applications/livepkgr/main.asc file expects this value.
e Deselect Save to File.
f Click Start.
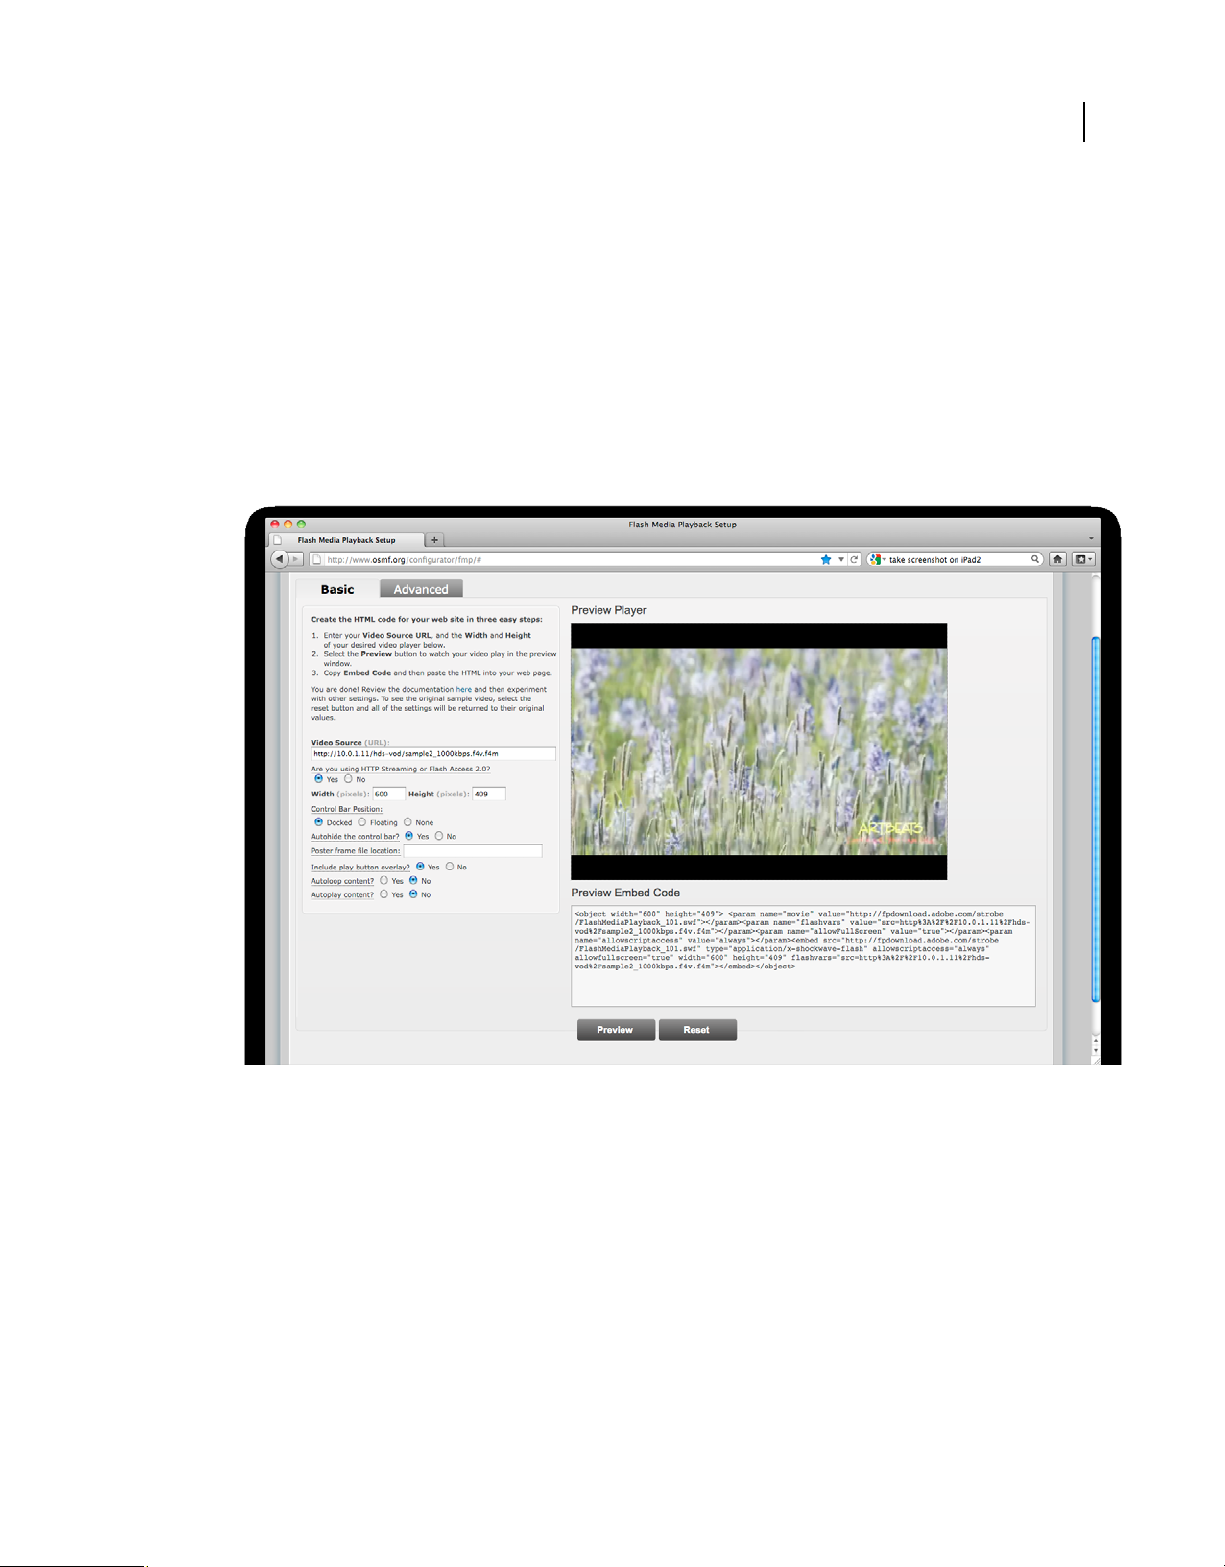
4 (Adobe HTTP Dynamic Streaming) To play the media in Flash Media Playback, do the following:
a Open Flash Media Playback in a web browser:
http://www.osmf.org/configurator/fmp/
Note: Flash Media Playback requires Flash Player 10.1 to support HTTP Dynamic Streaming.
b In Video Source, enter:
http://localhost/hds-live/livepkgr/_definst_/liveevent/livestream.f4m
For information about the request URL, see “URLs for publishing and playing live streams over HTTP” on
page 12.
c Select Yes under the question “Are you using HTTP Streaming or Adobe Access 2.0?”.
d Click Preview. Click Play.
5 (Adobe HTTP Dynamic Streaming) To play the media in Strobe Media Playback, do the following:
a Open the Adobe Media Server sample video player in a web browser. Browse to
rootinstall/samples/videoPlayer/videoplayer.html
b In STREAM URL, enter:
http://localhost/hds-live/livepkgr/_definst_/liveevent/livestream.f4m
For information about the request URL, see “URLs for publishing and playing live streams over HTTP” on
page 12.
Last updated 9/4/2014
Page 12

ADOBE MEDIA SERVER 5.0.6 DEVELOPER’S GUIDE
Getting started streaming media
c Select LIVE and Click PLAY STREAM.
6 (Apple HTTP Live Streaming) Use the following URL:
http://10.0.1.11/hls-live/livepkgr/_definst_/liveevent/livestream.m3u8
For information about where to use the URL to serve various iOS devices, QuickTime, and Safari, see HTTP Live
Streaming Overview in the iOS Reference Library.
For information about the request URL, see “URLs for publishing and playing live streams over HTTP” on page 12.
Note: Replace “localhost” or “10.0.1.11” with the domain name or IP address of the computer hosting Adobe Media
Server. If you’re using a Adobe Media Server hosting provider, they can give you this value.
More Help topics
“Troubleshoot issues with streaming media” on page 111
“Disk management” on page 70
“Content storage (HDS and HLS)” on page 56
“Configure HTTP Dynamic Streaming and HTTP Live Streaming” on page 51
“Stream live media (RTMP)” on page 17
8
Publish and play live multi-bitrate streams over HTTP
1 Install Adobe Media Server 5 and choose to install Apache HTTP Server.
2 Install Flash Media Live Encoder and configure it to use absolute time.
a Close Flash Media Live Encoder.
b Open the Flash Media Live Encoder rootinstall\Conf\config.xml file in a text editor.
c Set the tag //flashmedialiveencoder_config/mbrconfig/streamsynchronization/enable to true:
<flashmedialiveencoder_config>
<mbrconfig>
<streamsynchronization>
<!-- "true" to enable this feature, "false" to disable.-->
<enable>true</enable>
d Save the file.
3 Browse to rootinstall/applications/livepkgr/events/_definst_/liveevent and do the following:
• Edit the Event.xml file to look like the following:
<Event>
<EventID>liveevent</EventID>
<Recording>
<FragmentDuration>4000</FragmentDuration>
<SegmentDuration>16000</SegmentDuration>
<DiskManagementDuration>3</DiskManagementDuration>
</Recording>
</Event>
• Remove the Manifest.xml file from the liveevent folder or rename it.
Last updated 9/4/2014
Page 13

ADOBE MEDIA SERVER 5.0.6 DEVELOPER’S GUIDE
Getting started streaming media
4 (Adobe HTTP Dynamic Streaming) For multi-bitrate streaming, Flash and AIR media players request an F4M
manifest file that contains the location and bitrate of each live stream. This type of F4M file is called a set-level
manifest. To create an set-level manifest, do the following:
a Open rootinstall/tools/f4mconfig/configurator/f4mconfig.html in a browser.
b Select the f4m file type.
c Stream URIs can be absolute or relative to a Base URI. Enter the following for the Base URI:
http://localhost/hds-live/livepkgr/_definst_/liveevent
d Enter the following for each stream and click Add:
Stream URI Bitrate
livestream1.f4m 150
livestream2.f4m 500
livestream3.f4m 700
e To preview the file, click View Manifest. The manifest file looks like this:
<manifest xmlns="http://ns.adobe.com/f4m/2.0">
<baseURL>http://localhost/hds-live/livepkgr/_definst_/liveevent/</baseURL>
<media href="livestream1.f4m" bitrate="150"/>
<media href="livestream2.f4m" bitrate="500"/>
<media href="livestream3.f4m" bitrate="700"/>
</manifest>
9
f Click Save Manifest and save the file as liveevent.f4m to rootinstall/webroot.
The media player requests this file from a web server. This tutorial saves the file to rootinstall/webroot, but the
file can be served from any location on any webserver. This file does not need to live on Adobe Media Server.
This file can also have any name.
5 (Apple HTTP Live Streaming) iOS devices request an M3U8 variant playlist file that contains the location, bitrate,
and optionally the codec of each stream. To create an M3U8 file, do the following:
a If the Set-level F4M/M3U8 File Generator tool isn’t open, double-click
rootinstall/tools/f4mconfig/configurator/f4mconfig.html to open it in a browser.
b Select m3u8.
c Enter the Stream URI and bitrate for each stream. Stream URIs can be absolute or relative. If they are relative,
they are relative to the m3u8 file.
Note: You can’t use a Base URI when generating an M3U8 file.
This tutorial uses the following Stream URI settings:
Stream URI Bitrate
http://localhost/hls-live/livepkgr/_definst_/liveevent/livestream1.m3u8 150
http://localhost/hls-live/livepkgr/_definst_/liveevent/livestream2.m3u8 500
http://localhost/hls-live/livepkgr/_definst_/liveevent/livestream3.m3u8 700
d For m3u8 files, you can optionally add a codec for each stream.
If one stream is audio-only, specify an audio codec. Specify audio and video codecs for the other streams in the
manifest. See
“Publish an audio-only stream (HLS)” on page 11.
Last updated 9/4/2014
Page 14

ADOBE MEDIA SERVER 5.0.6 DEVELOPER’S GUIDE
Getting started streaming media
e To view the file, click View Manifest. The m3u8 file looks like this:
#EXTM3U
#EXT-X-STREAM-INF:PROGRAM-ID=1,BANDWIDTH=150000
http://localhost/hls-live/livepkgr/_definst_/liveevent/livestream1.m3u8
#EXT-X-STREAM-INF:PROGRAM-ID=1,BANDWIDTH=500000
http://localhost/hls-live/livepkgr/_definst_/liveevent/livestream2.m3u8
#EXT-X-STREAM-INF:PROGRAM-ID=1,BANDWIDTH=700000
http://localhost/hls-live/livepkgr/_definst_/liveevent/livestream3.m3u8
f Save the file as liveevent.m3u8 to the folder rootinstall/webroot.
The media player requests this file from a web server. This tutorial saves the file to rootinstall/webroot, but the
file can be served from any location on any webserver. This file does not need to live on Adobe Media Server.
6 To publish a live stream to Adobe Media Server, start Flash Media Live Encoder and do the following:
a In the Encoding Options panel, from the Preset pop-up menu, choose Multi Bitrate - 3 Streams (1500 Kbps) -
H.264. Choose Audio Format AAC.
Note: Flash Media Live Encoder on Windows doesn’t support AAC encoding. To add support for AAC, purchase
MainConcept AAC Encoder.
the
b Click the wrench next to Format to open Advanced Encoder Settings. For Keyframe frequency, select 4 seconds.
Note: This value matches the <FragmentDuration> value in the
applications/livepkgr/events/_definst_/liveevent/Event.xml file. The
<FragmentDuration> value is in
milliseconds.
10
c For Bit Rate, choose 150, 500, and 700.
d In the AMS URL text box, enter the following:
rtmp://localhost/livepkgr
Note: This application is installed with Adobe Media Server and contains a main.asc file and configuration files
for live HTTP Dynamic Streaming.
e In the Stream text box, enter the following:
livestream%i?adbe-live-event=liveevent
Note: The applications/livepkgr/main.asc file expects this value. Flash Media Live Encoder uses the variable %i to
create multiple stream names: livestream1, livestream2, livestream3, and so on. To use another encoder, provide
your own unique stream names, for example, livestream1?adbe-live-event=liveevent, livestream2?adbe-live-
event=liveevent.
f Deselect Save to File.
g Click Start.
7 (Adobe HTTP Dynamic Streaming) Flash Media Playback does not support set-level manifest files. To play the
media, use Strobe Media Playback. Strobe Media Playback is used in the sample video player that installs with
Adobe Media Server.
a Copy the videoPlayer directory from rootinstall/samples/videoPlayer to rootinstall/webroot.
b Browse to the sample player in a web browser:
http://localhost/videoPlayer/videoplayer.html
c In Video Source, enter the following:
http://localhost/liveevent.f4m
Last updated 9/4/2014
Page 15

ADOBE MEDIA SERVER 5.0.6 DEVELOPER’S GUIDE
Getting started streaming media
8 (Apple HTTP Live Streaming) In iOS, enter the following URL in Safari:
http://localhost/liveevent.m3u8
For information about where to use the URL to serve various iOS devices, QuickTime, and Safari, see HTTP Live
Streaming Overview in the iOS Reference Library.
Note: You can replace localhost with the domain name or IP address of the computer hosting Adobe Media Server. If
you’re using a Adobe Media Server hosting provider, they can give you this value.
Setting the record option while publishing to livepkgr
You can define the record option by adding a query parameter string adbe-record-mode. The value of this string can
be “record” or “append”. If the parameter is not specified, “append” will be used. In case of “record”, livepkgr
overwrites the previous recording for the same stream and event name. In case of “append”, livepkgr application
appends to the previous recording for the same stream and event name.
For example, to publish a stream in record mode, use:
livestream%i?adbe-live-event=liveevent&adbe-record-mode=record
To publish a stream in append mode (default case), use:
livestream%i?adbe-live-event=liveevent&adbe-record-mode=append
11
Packaging an audio-only stream (HLS)
To serve streams over a cellular network, one of the streams must be audio-only. For more information, see HTTP Live
Streaming Overview.
AAC-encoded audio files (MP4/F4V) are packaged as .aac file. Also, the M3U8 file will list the file names as .aac instead
of .ts. An audio-only stream functionality will be available only if the M3U8 URL has the following embedded tags:
Tag Description
audio-only Specifies whether the stream/file is audio-only. If the tag is not present, the
audio-only-mp3/audio-only-aac Specifies the audio codec of the requested stream file. If this tag is not present,
Here is an example of a valid M3U8 URL:
http://myserver/hls-vod/audio-only-aac/sample1_1500kbps.f4v.m3u8
Here is an example M3U8 file snippet:#EXTM3U_#EXT-X-STREAM-INF:PROGRAMID=1,BANDWIDTH=1500000,CODECS="avc1.42001e, mp4a.40.2"http://10.40.23.222/hlsvod/sample1_1500kbps.f4v.m3u8#EXT-X-STREAM-INF:PROGRAMID=1,BANDWIDTH=150000,CODECS="avc1.42001e, mp4a.40.2"_http://10.40.23.222/hlsvod/sample1_150kbps.f4v.m3u8#EXT-X-STREAM-INF:PROGRAMID=1,BANDWIDTH=1000000,CODECS="avc1.42001e, mp4a.40.2"_http://10.40.23.222/hlsvod/sample1_1000kbps.f4v.m3u8#EXT-X-STREAM-INF:PROGRAMID=1,BANDWIDTH=64000,CODECS="mp4a.40.2"http://10.40.23.222/hls-vod/audio-onlyaac/sample1_1000kbps.f4v.m3u8
audio-only stream will be extracted from the A/V stream.
the file/segment will be segmented as TS.
Publish an audio-only stream (HLS)
To publish an audio-only stream, enter the following in the Adobe Media Encoder Stream field:
Last updated 9/4/2014
Page 16

ADOBE MEDIA SERVER 5.0.6 DEVELOPER’S GUIDE
Getting started streaming media
livestream%i?adbe-live-event=liveevent&adbe-audio-stream-name=livestream1_audio_only&adbe-audiostream-src=livestream1
If the encoder specifies individual query strings for each stream, use individual stream names instead of the variable %i:
livestream1?adbe-live-event=liveevent&adbe-audio-stream-name=livestream1_audio_only
livestream2?adbe-live-event=liveevent&adbe-audio-stream-name=livestream2_audio_only
Note: You can use the values in italics or replace them with your own values. The default live event is called “liveevent”.
Parameter Description
adbe-audio-stream-name The name of the audio-only stream.
12
adbe-audio-stream-src The name of the stream from which to extract the audio for the audio-only
stream. If this parameter is not specified, the server uses the stream on which
adbe-audio-stream-name parameter was specified.
the
To generate a set-level variant playlist when using an audio-only stream, specify the audio codec of the audio-only
stream. Specify the audio and the video codec of the streams that contain audio and video. For more information about
using the Set-level F4M/M3U8 File Generator, see
“Publish and play live multi-bitrate streams over HTTP” on page 8.
Note: It is highly recommended to use the "Audio-only packaging" as mentioned in previous section rather than
publishing audio-only streams.
URLs for publishing and playing live streams over HTTP
Important: The format for HDS request URLs has changed in Adobe Media Server 5. The Apache httpd.conf file redirects
requests in the 4.0 format to the 4.5 format. The path /live/events/livepkgr/events redirects to the path /hds-live/livepkgr.
Use the following URL to publish a single live stream to Adobe Media Server for streaming over HTTP:
rtmp://ams-ip-or-dns/livepkgr/livestream?adbe-live-event=liveevent
Use the following URL to publish multiple live streams to Adobe Media Server for adaptive bitrate streaming:
rtmp://ams-ip-or-dns/livepkgr/livestream%i?adbe-live-event=liveevent
Note: Publish the stream over RTMP. Clients play the stream over HTTP.
Use the following URLs to play live streams over HTTP:
Client Single stream or
Adaptive Bitrate
Adobe HDS Single stream http://<ams-dns-or-ip>/hds-
Apple HLS Single stream http://<ams-dns-or-ip>/hls-
Adobe HDS Adaptive bitrate The media player requests a set-level manifest file:
Request URL
live/livepkgr/<instname>/<eventname>/<streamname>.f4m
live/livepkgr/<instname>/<eventname>/<streamname>.m3u8
http://<webserver-dns-or-ip>/<set-level-manifest>.f4m
The set-level manifest file contains URLs for each live stream in the
following format:
http://<ams-dns-or-ip>/hds-
live/livepkgr/<instname>/<eventname>/<streamname>.f4m
Last updated 9/4/2014
Page 17

ADOBE MEDIA SERVER 5.0.6 DEVELOPER’S GUIDE
Getting started streaming media
13
Client Single stream or
Adaptive Bitrate
Apple HLS Adaptive bitrate The media player requests a set-level variant playlist file:
Request URL
http://<webserver-dns-or-ip>/<set-level-variant-playlist>.m3u8
The set-level variant playlist contains URLs for each live stream in the
following format:
http://<ams-dns-or-ip>/hls-
live/livepkgr/<instname>/<eventname>/<streamname>.m3u8
Important: To play streaming media over HTTP, a media player requests a manifest file (F4M or M3U8). The server
generates manifest files in real-time. The files are not written to disk; you cannot see them on the server.
The path /hds-live is a <Location> directive in the Apache httpd.conf file that tells the server to package the content
for Adobe HTTP Dynamic Streaming (HDS).
The path /hls-live is a <Location> directive in the Apache httpd.conf file that tells the server to package the content
for Apple HTTP Live Streaming (HLS).
For adaptive streaming, the client requests a set-level manifest. For HDS, this file is a .f4m file. For HLS, this file is a
.m3u8 file. The set-level manifest can live on any web server. You can create multiple set-level manifest files for a single
set of live streams.
The set-level manifest contains the paths to the F4M manifest files (HDS) and M3U8 variant playlists (HLS) of each
live stream. The paths must begin with /hds-live or /hls-live to tell the server to package the streams for HTTP.
Note: Do not include /hds-live or /hls-live in the URL that requests the set-level manifest.
You can configure the <Location> directive settings and the content location in the Apache httpd.conf file. For more
information, see
Content storage (HDS and HLS).
Differences in HTTP live URLs from Flash Media Server 4.0 to Adobe Media Server 5
The default URL to play a live stream over HTTP has changed in Adobe Media Server 5. In Flash Media Server 4.0, the
URL to play a live stream was http://<servername>/live/events/livepkgr/events/<eventname>. The Adobe Media
Server 5 Apache httpd.conf file uses a 301 redirect to redirect requests that use a 4.0 URL to the 4.5 URL.
For more differences, see “Differences in HTTP Dynamic Streaming between Flash Media Server 4.0 and 4.5” on
page 54.
Configure DVR (HDS)
Configure DVR on the server
1 Open the Set-level F4M/M3U8 File Generator in a browser:
rootinstall/tools/f4mconfig/configurator/f4mconfig.html.
2 In addition to entering values for Stream URI and Bitrate, enter a value for DVR Window Duration. This value sets
the amount of viewable content, in minutes, before the live point.
Use the following guidelines to set a Window Duration:
• Set Window Duration to a value greater than 0.
Setting the Window Duration to 0 can cause a bad user experience.
Last updated 9/4/2014
Page 18

ADOBE MEDIA SERVER 5.0.6 DEVELOPER’S GUIDE
Getting started streaming media
• A value of -1 indicates that the available recorded content behind the live point is unlimited.
3 In the Event.xml file, configure the DiskManagementDuration element to specify the amount of content the server
caches. By default, the server caches 3 hours of content. Use the following formula to determine the value of the
Window Duration in relation to the value of
HDSWindowDuration <= (DiskManagementDuration - SegmentDuration)
DiskManagementDuration:
For more information about disk managment, see “Disk management” on page 70.
Publish a DVR stream
To publish a DVR stream from Flash Media Live Encoder, do not click Record or check DVR Auto Record. Publish
the stream just as you publish any live stream.
Play DVR streams
Strobe Media Playback supports DVR streams by default.
Note: Flash Media Playback does not support set-level manifest files. To use Flash Media Playback, configure a
Manifest.xml file. See
“Manifest.xml” on page 86.
Configure a sliding window (HLS)
Configure a sliding window on the server
14
A sliding window is the seekable portion of the stream for Apple HTTP Live Streaming. Clients cannot seek beyond
the sliding window length. HTTP Live Streaming clients use the sliding window to configure the seek bar.
Configure a sliding window at the following levels:
Level Configuration file
Server rootinstall/Apache2.2/conf/httpd.conf
Application rootinstall/applications/livepkgr/Application.xml
The livepkgr application is the default application for HTTP streaming. You can
duplicate and rename this application.
Event rootinstall/applications/livepkgr/events/_definst_/liveevent/Event.xml
The liveevent folder is the default live event. You can create multiple live events within
an application.
Use the following parameters:
Parameter Configuration file Description
HLSSlidingWindowLength httpd.conf The number of TS files available for seeking
SlidingWindowLength Application.xml and Event.xml The number of TS files available for seeking
HLSMediaFileDuration httpd.conf The length of a TS file, in milliseconds.
in a sliding window.
in a sliding window.
MediaFileDuration Application.xml and Event.xml The length of a TS file, in milliseconds.
The time within the sliding window is:
HLSSlidingWindowLength * HLSMediaFileDuration
SlidingWindowLength * MediaFileDuration
Last updated 9/4/2014
Page 19

ADOBE MEDIA SERVER 5.0.6 DEVELOPER’S GUIDE
Getting started streaming media
By default, HLSSlidingWindowLength is set to 6 and HLSMediaFileDuration is set to 8000 milliseconds. Therefore,
by default, all HLS live events are seekable within a window that is 48 seconds wide.
The sliding window is relative to the current position of the live stream. For example, if sliding window is configured to
have 15 minutes of data and the event starts at time 0, when the live stream is at 30, the last seek position possible is 15.
To make an entire live event seekable, set SlidingWindowLength or HLSSlidingWindowLength to 0. However, doing
so may impact performance.
Configure the sliding window to be smaller than the duration of content cached on disk. In the Event.xml file, the
DiskManagementDuration element specifies the amount of content the server caches. By default, the server caches 3
hours of content. The size of the HLS sliding window must be as follows:
HLSSlidingWindow <= (DiskManagementDuration - SegmentDuration)
For more information about disk managment, see “Disk management” on page 70.
Configure a sliding window at the event level
The following Event.xml file creates a 1 hour sliding window for a single HLS live event:
<Event>
<EventID>liveevent</EventID>
<Recording>
<FragmentDuration>4000</FragmentDuration>
<SegmentDuration>400000</SegmentDuration>
<DiskManagementDuration>3</DiskManagementDuration>
</Recording>
<HLS>
<MediaFileDuration>8000</MediaFileDuration>
<SlidingWindowLength>450</SlidingWindowLength>
</HLS>
</Event>
15
Configure a sliding window at the application level
The following Application.xml file creates a 1 hour sliding window for all HLS live events within the livepkgr
application:
<Application>
<StreamManager>
<Live>
<AssumeAbsoluteTime>true</AssumeAbsoluteTime>
</Live>
</StreamManager>
<HLS>
<MediaFileDuration>8000</MediaFileDuration>
<SlidingWindowLength>450</SlidingWindowLength>
</HLS>
</Application>
Reload the livepkgr application.
Configure a sliding window at the server level
The following Apache configuration sets HLSSlidingWindowLength to 450. This configuraiton creates a 1 hour
sliding window for all HLS live events on the server:
Last updated 9/4/2014
Page 20

ADOBE MEDIA SERVER 5.0.6 DEVELOPER’S GUIDE
Getting started streaming media
...
<IfModule hlshttp_module>
<Location /hls-live>
HLSHttpStreamingEnabled true
HttpStreamingLiveEventPath "../applications"
HttpStreamingContentPath "../applications"
HLSMediaFileDuration 8000
HLSSlidingWindowLength 450
HLSFmsDirPath ".."
HLSM3U8MaxAge 2
HLSTSSegmentMaxAge -1
Options -Indexes FollowSymLinks
</Location>
Restart Apache HTTP Server.
Publish streams with a sliding window
You don’t need to configure any encoder settings to publish a stream with a sliding window.
Play streams with a sliding window
Devices that support HTTP Live Streaming support the sliding window feature by default.
16
Duplicate the livepkgr service
The server supports an unlimited number of instances of the livepkgr service.
❖ Duplicate the rootinstall/applications/livepkgr folder in the applications folder and give it a new name, for example,
livepkgr2. In this case, the new livepkgr service is located at rootinstall/applications/livepkgr2.
You can create as many instances of the livepkgr service as you need.
Modify server-side code in the livepkgr service
Note: You cannot modify server-side code on Adobe Media Server Standard.
❖ Remove the rootinstall/applications/livepkgr/main.far file and replace it with the
rootinstall/samples/applications/livepkgr/main.asc file.
Removing all HDS segments
To remove all the existing HDS segments when the application unloads, you can use the clearOnAppStop tag as
shown below:
<ScriptEngine>
<ApplicationObject>
<config>
<clearOnAppStop>true</clearOnAppStop>
</config>
</ApplicationObject>
</ScriptEngine>
Last updated 9/4/2014
Page 21

ADOBE MEDIA SERVER 5.0.6 DEVELOPER’S GUIDE
Getting started streaming media
Stream live media (RTMP)
Tutorial: stream live media (RTMP)
To complete this tutorial, install the following software:
• Flash Media Live Encoder
Flash Media Live Encoder captures live audio and video, encodes it, and streams it to Adobe Media Server. Flash
Media Live Encoder is free so it’s a good idea to download the latest version.
• Adobe Media Server
You can use any edition of Adobe Media Server to stream live media, including the free developer edition. For
information about installing the server, see
• Flash Player
This tutorial uses a video player that requires Flash Player 10.
For more information, see “Supported clients, encoders, codecs, and file formats” on page 1 and “Pre-built media
players” on page 3.
Installing the server.
17
Publish a live stream to Adobe Media Server
1 Connect a camera to the computer.
2 Open Flash Media Live Encoder and do the following in the Encoding Options panel:
a From the Preset menu, choose High Bandwidth (300 Kbps) - H.264.
You can choose any of the single stream options (not Multi Bitrate) from the Preset menu. The information on
the left side of the panel is filled in when you choose a preset.
b Select Stream to Adobe Media Server.
c For AMS URL, enter rtmp://localhost/live.
Use localhost for testing when Flash Media Live Encoder and Adobe Media Server are on the same computer. In
a production environment, use the domain name or IP address of the computer hosting Adobe Media Server,
for example, rtmp://ams.mycompany.com/live.
If you’re using a Adobe Media Server hosting provider, they can give you the domain name or IP address of the
server.
You must use the name live in the AMS URL unless you duplicate and rename the live service. The live service
is a pre-built application on Adobe Media Server installed to rootinstall/applications/live. For more information,
“Duplicate the live service” on page 18.
see
d For Stream, enter livestream.
e To save a recording of the stream on your hard drive, select Save to File, click Browse, and choose a location. If
you chose an H.264 preset, use an .f4v filename extension. If you chose a VP6 preset, use an .flv filename
extension.
Note that the server is not recording the file; Flash Media Live Encoder is recording the file. To serve the file ondemand when the live event is over, copy the file to the local disk of the server. For more information, see
“Stream on-demand media (RTMP)” on page 24.
To play an F4V file recorded by Flash Media Live Encoder without streaming it from the server, use the F4V
Flattener tool to flatten the file. You can play FLV files without flattening them.
Last updated 9/4/2014
Page 22

ADOBE MEDIA SERVER 5.0.6 DEVELOPER’S GUIDE
Getting started streaming media
f Click Start to connect to the server and start streaming.
Use the Adobe Media Server sample player to play a live stream
1 Double-click the rootinstall/samples/videoPlayer/videoplayer.html file to open the sample video player in a
browser.
Note: Substitute the Adobe Media Server installation directory for rootinstall.
2 In the sample video player, do one of the following:
• In the list of videos, click “livestream”.
• Enter rtmp://localhost/live/livestream, check the LIVE checkbox, and click PLAY STREAM.
If the media player isn’t on the same computer as Adobe Media Server, replace localhost with the domain name
or IP address of the computer hosting Adobe Media Server.
Use this URL to play this stream from any compatible video player, including Flash Media Playback and Strobe
Media Playback. For more information about the sample video player and other video players, see
“Pre-built
media players” on page 3.
Use Flash Media Playback to play a live stream
1 Load the Flash Media Playback Setup page in a web browser: www.osmf.org/configurator/fmp/.
2 Enter the Video Source:
rtmp://localhost/live/livestream
18
You can replace localhost with the domain name or IP address of the server.
3 Click Preview to update the embed code.
4 Click Play to test the code.
5 To use the player in your own HTML page, copy the embed code and paste it into your page. Flash Media Playback
is a compiled SWF file hosted by Adobe.
More Help topics
“Troubleshoot issues with streaming media” on page 111
“Stream live media (HTTP)” on page 5
URLs for publishing and playing live streams over RTMP
Use the following values to publish a single live stream to Adobe Media Server for streaming over RTMP:
AMS URL: rtmp://ams-ip-or-dns/live
Stream: streamname
Use the following URL to play a live stream:
rtmp://ams-ip-or-dns/live/streamname
Duplicate the live service
You can create as many instances of the live service as you need.
1 Create a folder in the rootinstall/applications folder, for example, rootinstall/applications/live2
Last updated 9/4/2014
Page 23

ADOBE MEDIA SERVER 5.0.6 DEVELOPER’S GUIDE
Getting started streaming media
2 Copy the main.far, Application.xml, allowedHTMLdomains.txt, and allowedSWFdomains.txt files from the
rootinstall/applications/live folder to the live2 folder.
3 Open the ams.ini file (located in rootinstall/conf) and add a parameter to set the content path for the new service,
for example:
LIVE2_DIR = C:\Program Files\Adobe\Adobe Media Server 5\applications\live2
4 Open the Application.xml file in the rootinstall/applications/live2 folder and edit the virtual directory to the
following:
<Streams>/;${LIVE2_DIR}</Streams>
5 Restart the server.
6 Clients can connect to the new publishing point at the URL:
rtmp://ams-ip-or-dns/live2
Modify server-side code in the live service
Note: You cannot modify server-side code in the live service on Adobe Media Server Standard.
❖ Remove the rootinstall/applications/live/main.far file and replace it with the
rootinstall/samples/applications/live/main.asc file.
19
Disable live services
❖ Move any live services folders out of the applications folder.
Stream on-demand media (HTTP)
Prerequisites for streaming on-demand media (HTTP)
To complete these tutorials, use the following software:
• Adobe Media Server 5. See the video Install Adobe Media Server 5 and verify HTTP streaming to Flash and iOS.
• (Adobe HTTP Dynamic Streaming) Adobe Media Server sample video player (which uses Strobe Media Playback)
and Flash Player 10.1
• (Apple HTTP Live Streaming) iOS 3.0 or later device or Mac OS 10.6 with Safari 4.0 or QuickTime X
For more information, see “Supported clients, encoders, codecs, and file formats” on page 1 and “Pre-built media
players” on page 3.
Play a single on-demand media file over HTTP
A community member has created a screencast that walks you through similar steps: Stream on-demand video to
Flash and iOS over HTTP.
1 Install Adobe Media Server 5 and choose to install Apache HTTP Server.
2 Copy an F4V/MP4 file to the following location:
rootinstall/webroot/vod
Note: Replace rootinstall with the Adobe Media Server installation folder.
Last updated 9/4/2014
Page 24
ADOBE MEDIA SERVER 5.0.6 DEVELOPER’S GUIDE
Getting started streaming media
This tutorial uses the file sample2_1000kbps.f4v which installs with Adobe Media Server to the
rootinstall/webroot/vod folder.
3 (Adobe HTTP Dynamic Streaming) To play the media in Flash Media Playback, do the following:
a Open Flash Media Playback in a web browser:
http://www.osmf.org/configurator/fmp/
Note: Flash Media Playback requires Flash Player 10.1 to support HTTP Dynamic Streaming. To see which version
of Flash Player is installed on your computer, go to
b In Video Source, enter:
Adobe Flash Player.
http://localhost/hds-vod/sample2_1000kbps.f4v.f4m
20
HDS on-demand streaming in Flash Media Playback
Although the media file lives in the /webroot/vod directory, the URL request is /hds-vod. The path /hds-vod is
<Location> directive in the Apache httpd.conf file. When a request URL begins with /hds-vod, the server
a
looks for media in the /webroot/vod folder and packages it for HTTP Dynamic Streaming. For information
about the request URL syntax, see
c Select Yes under the question “Are you using HTTP Streaming or Adobe Access 2.0?”.
d Clear the text from the Poster frame file location text box.
e Click Preview to update the embed code.
f Click the Play button to test the code.
g To use the player in your own HTML page, copy the embed code and paste it into the body of the page. Flash
Media Playback is a compiled SWF file hosted by Adobe. For more information, see
“URLs for playing on-demand streams over HTTP” on page 23.
Flash Media Playback.
Last updated 9/4/2014
Page 25

ADOBE MEDIA SERVER 5.0.6 DEVELOPER’S GUIDE
Getting started streaming media
4 (Adobe HTTP Dynamic Streaming) To play the media in Strobe Media Playback, do the following:
a Open the Adobe Media Server sample video player in a web browser. Double-click
rootinstall/samples/videoPlayer/videoplayer.html.
b In STREAM URL, enter:
http://localhost/hds-vod/sample2_1000kbps.f4v.f4m
c Select VOD and click PLAY STREAM.
d To use the player in your own HTML page, copy the embed code and paste it into the body of the page.
5 (Apple HTTP Live Streaming) On iOS, enter the following URL in the Safari address bar:
http://10.0.1.11/hls-vod/sample2_1000kbps.f4v.m3u8
21
HLS on-demand streaming in Safari on an iPad
To test in Safari on Mac OS 10.6, use the following HTML code:
<video src="http://10.0.1.11/hls-vod/sample2_1000kbps.f4v.m3u8"
controls="controls"></video>
Note: You can replace “localhost” and “10.0.1.11” with the domain name or IP address of the computer hosting Adobe
Media Server. If you’re using a Adobe Media Server hosting provider, they can give you this value.
More Help topics
“Troubleshoot issues with streaming media” on page 111
“Supported file formats and codecs” on page 2
Last updated 9/4/2014
Page 26

ADOBE MEDIA SERVER 5.0.6 DEVELOPER’S GUIDE
Getting started streaming media
“Content storage (HDS and HLS)” on page 56
“Configure HTTP Dynamic Streaming and HTTP Live Streaming” on page 51
“Stream on-demand media (RTMP)” on page 24
Play on-demand multi-bitrate media files over HTTP
A community member, Jody Bleyle has created a screencast that walks you through similar steps: HTTP adaptive
bitrate streaming to Flash and iOS.
1 Install Adobe Media Server 5 and choose to install Apache HTTP Server.
2 Do one of the following:
• Encode an F4V/MP4 file at 3 different bitrates.
• Use the multi-bitrate sample files that install with Adobe Media Server to the rootinstall/webroot/vod folder.
This tutorial uses the following files installed to the webroot/vod folder:
rootinstall/webroot/vod/sample1_150kbps.f4v
rootinstall/webroot/vod/sample1_700kbps.f4v
rootinstall/webroot/vod/sample1_1500kbps.f4v
22
3 (Adobe HTTP Dyanmic Streaming) To stream multi-bitrate content, Flash and AIR media players request a set-
level manifest file. This is a .f4m file that contains the location and bitrate of each stream. To create a set-level F4M
file, do the following:
a Open rootinstall/Adobe Media Server/tools/f4mconfig/configurator/f4mconfig.html in a browser.
b Select the f4m file type.
c Stream URIs can be absolute or relative to a Base URI. Enter the following for the Base URI:
http://localhost/hds-vod/
d Enter the following for each stream and click Add:
Stream URI Bitrate
sample1_150kbps.f4v.f4m 150
sample1_700kbps.f4v.f4m 700
sample1_1500kbps.f4v.f4m 1500
e To view the file, click View Manifest. The manifest file looks like this:
<manifest xmlns="http://ns.adobe.com/f4m/2.0">
<media href="http://localhost/hds-vod/sample1_150kbps.f4v.f4m" bitrate="150"/>
<media href="http://localhost/hds-vod/sample1_700kbps.f4v.f4m" bitrate="700"/>
<media href="http://localhost/hds-vod/sample1_1500kbps.f4v.f4m" bitrate="1500"/>
</manifest>
f Click Save Manifest to save the file as sample1.f4m to rootinstall/webroot.
The media player requests this file from a web server. This tutorial saves the file to rootinstall/webroot, but
the file can be served from any location on any webserver. This file does not need to live on Adobe Media
Server. This file can have any name.
Last updated 9/4/2014
Page 27

ADOBE MEDIA SERVER 5.0.6 DEVELOPER’S GUIDE
Getting started streaming media
4 (Apple HTTP Live Streaming)For multi-bitrate streaming, iOS devices request a set-level M3U8 variant playlist
file that contains the location, bitrate, and optionally the codec of each stream. To create a set-level M3U8 file, do
the following:
a If the File Generator tool isn’t open, double-click rootinstall/Adobe Media
Server/tools/f4mconfig/configurator/f4mconfig.html to open it in a browser.
b Select the m3u8 file type.
c Enter the Stream URI, bitrate, program-ID, and optionally a resolution and codec for each stream. Stream URIs
can be absolute or relative. If they are relative, they are relative to the m3u8 file. The program-ID must be the
same for each stream.
Note: For information about supported codecs, see Apple HTTP Live Streaming Overview.
This tutorial uses the following Stream URI settings:
Stream URI Bitrate
http://10.0.1.11/hls-vod/sample1_150kbps.f4v 150
http://10.0.1.11/hls-vod/sample1_700kbps.f4v 700
http://10.0.1.11/hls-vod/sample1_1500kbps.f4v 1500
23
d To view the file, click View Manifest. The m3u8 file looks like this:
#EXTM3U
#EXT-X-STREAM-INF:PROGRAM-ID=1,BANDWIDTH=150000
http://10.0.1.11/hls-vod/sample1_150kbps.f4v.m3u8
#EXT-X-STREAM-INF:PROGRAM-ID=1,BANDWIDTH=700000
http://10.0.1.11/hls-vod/sample1_700kbps.f4v.m3u8
#EXT-X-STREAM-INF:PROGRAM-ID=1,BANDWIDTH=1500000
http://10.0.1.11/hls-vod/sample1_1500kbps.f4v.m3u8
e Click Save Manifest and save the file as sample1.m3u8 to the folder rootinstall/webroot.
The media player requests this file from a web server. This tutorial saves the file to rootinstall/webroot, but the
file can be served from any location on any webserver. This file does not need to live on Adobe Media Server.
5 (Adobe HTTP Dynamic Streaming) Flash Media Playback does not support set-level manifest files. To play the
media, use Strobe Media Playback. Strobe Media Playback is used in the sample video player that installs with
Adobe Media Server.
a Double-click rootinstall/samples/videoPlayer/videoplayer.html to open it in a browser.
b In Video Source, enter the following:
http://localhost/sample1.f4m
6 (Apple HTTP Live Streaming) On iOS, enter the following URL in the Safari address bar:
http://10.0.1.11/sample1.m3u8
To test in Safari on Mac OS 10.6, use the following HTML code:
<video src="http://10.0.1.11/sample1.m3u8" controls="controls"></video>
For more information, see HTTP Live Streaming Overview in the iOS Reference Library.
URLs for playing on-demand streams over HTTP
Use the following URLs to play on-demand streams over HTTP:
Last updated 9/4/2014
Page 28

ADOBE MEDIA SERVER 5.0.6 DEVELOPER’S GUIDE
Getting started streaming media
24
Client Live or
Adobe HTTP
Dynamic
Streaming
Apple HTTP Live
Streaming
Adobe HTTP
Dynamic
Streaming
Apple HTTP Live
Streaming
VOD
VOD Single stream http://<ams-dns-or-ip>/hds-
VOD Single stream http://<ams-dns-or-ip>/hls-
VOD Adaptive bitrate The media player requests a set-level manifest file:
VOD Adaptive bitrate The media player requests a set-level variant playlist file:
Single stream or
Adaptive Bitrate
Request URL
vod/<streamname>.<fileextension>.f4m
vod/<streamname>.<fileextension>.m3u8
http://<webserver-dns-or-ip>/<set-level-manifest>.f4m
The URLs in the set-level manifest point to the individual
streams and use the following URL:
http://<ams-dns-or-ip>/hds-
vod/<streamname>.<fileextension>.f4m
http://<webserver-dns-or-ip>/<set-level-variantplaylist>.m3u8
The URLs in the set-level variant playlist point to the
individual streams and use the following URL:
http://<ams-dns-or-ip>/hls-
vod/<streamname>.<fileextension>.m3u8
The path /hds-vod is a <Location> directive in the Apache httpd.conf file. The directive tells the server to look for the
content in the rootinstall/webroot/vod folder. It also tells the server to package the content for delivery to Flash and
AIR over HTTP (called HTTP Dynamic Streaming or HDS).
The path /hls-vod is a <Location> directive in the Apache httpd.conf file. The directive tells the server to look for the
content in the rootinstall/webroot/vod folder. It also tells the server to package the content for delivery to Apple HTTP
Live Streaming.
Note: Apple HTTP Live Streaming supports live and on-demand streaming.
For adaptive bitrate streaming, the client requests a set-level manifest file. For HDS, this file is an .f4m file. For HLS,
this file is a .m3u8 file. Set-level manifest files contain the paths to the physical locations of the media files. The paths
to the media files must begin with /hds-vod or /hls-vod to tell the server to package them for HTTP.
More information
“Content storage (HDS and HLS)” on page 56
Stream on-demand media (RTMP)
Tutorial: Stream on-demand media (RTMP)
Prerequisites
To complete this tutorial, install the following software:
• Adobe Media Server
You can use any edition of Adobe Media Server to stream on-demand media, including the free developer edition.
For information about installing the server, see
Installing the server.
Last updated 9/4/2014
Page 29

ADOBE MEDIA SERVER 5.0.6 DEVELOPER’S GUIDE
Getting started streaming media
• Flash Player
This tutorial uses a video player that requires Flash Player 10.
To see which version of Flash Player is installed in a browser, go to www.adobe.com/software/flash/about/.
Copy on-demand files to Adobe Media Server
Use the vod (video on demand) service on Adobe Media Server to stream recorded media to clients. Simply copy
recorded media files to the server and clients can stream them. The vod service streams files to media players from the
following two folders:
rootinstall/applications/vod/media
rootinstall/webroot/vod
You can also create subfolders of these folders to hold media files. This tutorial creates a subfolder and copies a file to
the subfolder to stream.
1 Browse to the following folder:
rootinstall/applications/vod/media
Note: Replace rootinstall with the Adobe Media Server installation folder. For example, on Windows the default
installation folder is C:\Program Files\Adobe\Adobe Media Server 5.
25
2 Create the folder “tests” in the “media” folder, as follows:
rootinstall/applications/vod/media/tests
3 Copy an F4V/MP4 or FLV file to the /tests folder.
This tutorial uses the following file:
rootinstall/applications/vod/media/tests/polymorphics.f4v
If you don’t have a video file, you can download a file from the Moving Images Archive at
www.archive.org/details/movies. You can also use a sample file included with the server. For learning purposes,
copy a sample file from rootinstall/applications/vod/media to rootinstall/applications/vod/media/tests.
For information about supported file formats and codecs, see Supported file formats.
Use the Adobe Media Server sample player to play an on-demand file
1 To open the sample video player in a browser, double-click the rootinstall/samples/videoPlayer/videoplayer.html
file.
2 Enter the address of the video in the STREAM URL textbox, check VOD, and click PLAY STREAM. This tutorial
plays the following file:
rtmp://localhost/vod/mp4:tests/polymorphics.f4v
If you’re using a Adobe Media Server hosting provider, replace localhost with the domain name or IP address of the
server that they provided.
Important: Although you copy the media file to the vod/media folder, you do not need to specify /media in the path
when you play the file. The server is configured by default to look for media files in the vod/media folder. If you specify
/media in the path, the server looks in the /vod/media/media folder.
Begin paths to F4V/MP4 files with the prefix mp4:. Use the filename extension of the file, whether it’s F4V, MP4,
MOV, and so on.
Last updated 9/4/2014
Page 30

ADOBE MEDIA SERVER 5.0.6 DEVELOPER’S GUIDE
Getting started streaming media
Use Flash Media Playback to play an on-demand stream
1 Load the Flash Media Playback Setup page in a web browser: www.osmf.org/configurator/fmp/.
2 Enter the Video Source:
rtmp://localhost/vod/mp4:tests/polymorphics.f4v
You can replace localhost with the domain name or IP address of the server.
3 Click Preview to update the embed code.
4 Click the Play button to test the code.
5 To use the player in your own HTML page, copy the embed code and paste it into the body of the page. Flash Media
Playback is a compiled SWF file hosted by Adobe. For more information, see
“Play media in Flash Media Playback”
on page 4.
More Help topics
“Supported file formats and codecs” on page 2
“Troubleshoot issues with streaming media” on page 111
“Stream on-demand media (HTTP)” on page 19
26
URLs for playing on-demand media files over RTMP
After completing the tutorial once, learn more about how to build a URL that requests a file from the server. Run
through the tutorial again using different files and different paths.
The syntax for requesting a file from Adobe Media Server is as follows:
protocol://server-domain-or-IP/ams-app-name/[ams-app-instance-name/][codec-prefix:]filepath[filename-extension]
Element Required Description
protocol Yes The protocol for media delivery. For information about the
server-domain-or-IP Yes The domain name or IP address of the computer hosting Adobe
ams-app-name Yes The Adobe Media Server application that the client connects to.
ams-app-instance-name No Applications can have an unlimited number of instances. For
codec-prefix Required for
F4V/MP4 and
MP3 files
protocols Adobe Media Server supports, see
HTTP in the Technical Overview.
Media Server. If the client is on the same computer as Adobe
Media Server, you can use localhost for testing purposes.
The default folder that holds Adobe Media Server applications is
rootinstall/applications. This tutorial uses the application
rootinstall/applications/vod.
example, you could have clients connect to
rtmp://localhost/vod/instance1, rtmp://localhost/vod/instance2,
and so on.
The F4V/MP4 and MP3 file formats require a codec prefix in the
request URL. For F4V/MP4 files, use the prefix
use the prefix
mp3:. FLV files do not require a codec prefix.
RTMP, RTMFP, and
mp4:. For MP3 files,
Last updated 9/4/2014
Page 31

ADOBE MEDIA SERVER 5.0.6 DEVELOPER’S GUIDE
Getting started streaming media
Element Required Description
27
file-path Yes The path from the folder configured to hold media files to the
filename-extension Required for
F4V/MP4 and
MP3 files.
media file. For the vod application, the following folders are
configured to hold media files:
rootinstall/applications/vod/media
rootinstall/webroot/vod
In the tutorial, the request URL is:
rtmp://localhost/vod/mp4:tests/polymorphics.f4v. The file-path is
tests/polymorphics.
If the file polymorphics.f4v were in the /vod/media folder instead
of in the /vod/media/tests folder, the full request URL would be
rtmp://localhost/vod/mp4:polymorphics.f4v. The file-path would
be polymorphics.
Configure the folders to hold media files in the
rootinstall/conf/ams.ini file.
Use the filename extension of the file you want to play. For
example, if the file is an F4V file, use .f4v. If the file is an MOV file,
use .mov.
Use the following addresses to stream on-demand media files over RTMP:
File format Address
F4V rtmp://server-domain-or-IP/vod/mp4:filename
rtmp://server-domain-or-IP/vod/mp4:filename.f4v
rtmp://server-domain-or-IP/vod/mp4:subfolder/fileName.f4v
FLV rtmp://server-domain-or-IP/vod/filename
rtmp://server-domain-or-IP/vod/filename.flv
To download a file progressively over HTTP from the Apache web server installed with Adobe Media Server, use a
standard HTTP address. The following file is in the rootinstall/webroot/vod folder:
http://server-domain-or-IP/vod/filename.xxx
Note: To use localhost over HTTP, append the port number 8134, for example, http://localhost:8134/vod/video.f4v. The
server uses port 8134 internally for HTTP.
Configure the location of media files
Two parameters in the rootinstall/conf/ams.ini file determine the locations of the folders in which the vod application
looks for media files:
VOD_COMMON_DIR = C:\Program Files\Adobe\Adobe Media Server 5\webroot\vod
VOD_DIR = C:\Program Files\Adobe\Adobe Media Server 5\applications\vod\media
When a client connects to the vod application and plays a file, the server looks for the file in these two folders.
Files in the folder specified in the VOD_DIR parameter can stream over RTMP only.
Files in the folder specified in the VOD_COMMON_DIR parameter can stream over RTMP and can download progressively
over HTTP. Write code in the client that checks for a successful NetConnection to the server over RTMP. If the client
doesn’t connect successfully, write code that requests the file over HTTP. The server does not automatically fall back
to HTTP.
Last updated 9/4/2014
Page 32

ADOBE MEDIA SERVER 5.0.6 DEVELOPER’S GUIDE
Getting started streaming media
Important: Although you copy media to the vod/media folder, do not specify /media in the path when you play the file.
The server is configured by default to look for media in the vod/media folder. If you specify /media in the path, the server
looks in the /vod/media/media folder.
Change the storage location of media files
1 Open the rootinstall/conf/ams.ini file in a text editor.
2 Edit the VOD_DIR and VOD_COMMON_DIR parameters.
3 Restart Adobe Media Server.
Add new media storage locations
1 Open the rootinstall/conf/ams.ini file in a text editor.
2 Add a new parameter and point it to the desired location, for example:
VOD_DIR_2 = C:\hrvideos
3 Open the rootinstall/applications/vod/Application.xml file in a text editor.
The parameters in the ams.ini file are used in the Application.xml configuration file.
<Application>
<StreamManager>
<VirtualDirectory>
<Streams>/;${VOD_COMMON_DIR}</Streams>
<Streams>/;${VOD_DIR}</Streams>
</VirtualDirectory>
</StreamManager>
28
4 Add a <Streams> tag with the new parameter, for example:
<Streams>/hr;${VOD_DIR_2}</Streams>
To play streams stored in this folder, use the following address:
rtmp://localhost/vod/hr/mp4:somefilename.f4v
The <Streams> tag tells the server to look for media in the location specified in the VOD_DIR_2 parameter if the
media path starts with /hr.
5 Restart Adobe Media Server.
Duplicate the vod service
The server supports an unlimited number of instances of the vod service.
1 Duplicate the rootinstall/applications/vod folder in the applications folder and give it a new name, for example,
vod2. In this case, the new vod service is located at rootinstall/applications/vod2.
You can create as many instances of the vod service as you need.
2 Clients can connect to the vod service at the URL rtmp://adobemediaserver/vod2.
3 Open the ams.ini file (located in rootinstall/conf) and do the following:
• Add a parameter to set the content path for the new service, for example: VOD2_DIR = C:\Program
Files\Adobe\Adobe Media Server 5\applications\vod2\media.
• If you installed Apache and want the media files to be available over HTTP, add a new VOD2_COMMON_DIR
parameter:
VOD2_COMMON_DIR = C:\Program Files\Adobe\Adobe Media Server 5\webroot\vod2.
Last updated 9/4/2014
Page 33

ADOBE MEDIA SERVER 5.0.6 DEVELOPER’S GUIDE
Getting started streaming media
4 Open the Application.xml file in the rootinstall/applications/vod2 folder and do the following:
• Edit the virtual directory to the following: <Streams>/;${VOD2_DIR}</Streams>.
• Edit the virtual directory to the following: <Streams>/;${VOD2_COMMON_DIR}</Streams>.
5 Place recorded media files into the following locations:
• Place files that stream only over RTMP in the C:\Program Files\Adobe\Adobe Media Server
5\applications\vod\media folder.
• Place files that stream over RTMP or HTTP in the C:\Program Files\Adobe\Adobe Media Server
5\webroot\vod2.
Note: You do not have to specify the media folder in the URL; the media folder is specified in the path you set in the
ams.ini file.
Modify server-side code in the vod service
Note: You cannot modify server-side code in the live service on Adobe Media Server Standard.
❖ Remove the rootinstall/applications/vod/main.far file and replace it with the
rootinstall/samples/applications/vod/main.asc file.
29
Disable the vod service
❖ Move any vod service folders out of the rootinstall/applications folder.
Stream on-demand encrypted media (pRTMP)
Use protected RTMP (pRTMP) to encrypt and deliver on-demand content to Flash Player and AIR.
Note: Protected RTMP isn’t a protocol. It delivers encrypted content over the RTMP protocol.
System requirements
Protected RTMP is supported in origin-only configurations. Unlike RTMPE, pRTMP does not work in an edge-origin
configuration.
Applications that share media files must use the same protected RTMP configuration settings for the shared files.
Flash Player 11.0 and AIR 3.0 are required to play protected RTMP content. Protected RTMP supports all the ondemand
Note: In Adobe Media Server 5, protected RTMP is supported for VOD streaming, it is not supported for live streaming.
About protected RTMP
Adobe Media Server encrypts on-demand media files and embeds a Adobe Access 3.0 license in the DRM metadata of
the content. Flash Player and AIR clients communicate with Adobe Media Server to play the media. Protected RTMP
does not require a license server; the license is embedded in the content metadata and a client receives it along with the
media.
file formats and codecs that RTMP supports except F4M, RAW, and F4F.
Protected RTMP is more secure than RTMPE because it uses Adobe Access 3.0 DRM content protection. Protected
RTMP encrypts the content whereas RTMPE protects the communication channel.
Last updated 9/4/2014
Page 34

ADOBE MEDIA SERVER 5.0.6 DEVELOPER’S GUIDE
Getting started streaming media
Because the content is encrypted, unauthorized replay is impossible. Protected RTMP content can be decrypted only
by Flash Player and AIR clients that have the Protected Streaming private key.
There is no way to use an RTMPE connection between servers and decrypt the content on Adobe Media Server.
Different applications that access common media files must have consistent setup with respect to Protected RTMP.
That is, you should not access the same media file over both protected and unprotected RTMP.
Separate applications that include common media files must have consistent settings with respect to Protected RTMP.
When AMS receives requests for media file playback (VOD) it applies the application-specified protection to the
media and then caches it in memory. Each time the server receives a new request for an already cached media file it
compares the protection settings of the cached media with the settings of the application in the new request. If those
settings are inconsistent AMS replaces the cached media with content processed according to the settings of the
application of the current request and then sends the media to the client. AMS generates an error log entry every time
it identifies inconsistency between cached media settings and requested media settings.
Protected RTMP simplifies deployment and increases security because:
• Adobe Media Server is the only server required.
• No license server is required.
• No domain server is required.
• All media can be packaged with the same common key.
• Content is encrypted with Adobe Access 3.0 DRM protection.
• Protected RTMP uses 128-bit AES encryption. RTMPE uses 128-bit RC4.
Configure protected RTMP at the vhost, application, or application instance level. Use the Application.xml file, ServerSide ActionScript, and the Authorization Plug-in to configure protected RTMP.
30
Note: The DRM used for Protected RTMP is the same DRM used for Protected HTTP streaming..
Quick start: Use protected RTMP to play on-demand media
To complete this tutorial, install the following software:
• Adobe Media Server 5
For information about installing the server, see Installing the server.
• Flash Player 11
This tutorial requires Flash Player 11.
Configure protected RTMP on Adobe Media Server
1 Configure protected RTMP for the VOD application.
2 Open amsrootinstall/applications/vod/Application.xml in a text editor.
3
Add the
<Application>
</Application>
4 Save and close the file.
<ProtectedRTMP enabled="true"></ProtectedRTMP>
<ProtectedRTMP enabled="true"></ProtectedRTMP>
...
element. The Application.xml file looks like this:
Last updated 9/4/2014
Page 35

ADOBE MEDIA SERVER 5.0.6 DEVELOPER’S GUIDE
Getting started streaming media
5 If the VOD application is running, close it to reload the Application.xml file. If the Adobe Media Server Start Screen
is open, the VOD application is running. Closing the Start Screen closes the VOD application (unless another client
is also connected to the VOD application).
Play on-demand media
1 Double-click the Adobe Media Server Sample Video Player to open it in a browser:
amsrootinstall/samples/videoPlayer/videoplayer.html.
2
Click any link in the /applications/vod/media list. Every file that the VOD application streams uses protected RTMP.
Configure protected RTMP
You can configure protected RTMP in the following locations:
• Application.xml file:
• Configure the Application.xml file in an application folder to configure pRTMP for a single application.
• Configure the Application.xml file in a vhost folder to configure pRTMP for all applications in a virtual host.
• Server-Side ActionScript:
• Set properties on the application object.
• Authorization plug-in:
• Set fields in the in the E_APPSTART event of the Authorization plug-in.
31
Use the Application.xml file to configure protected RTMP
To configure protected RTMP, add a <ProtectedRTMP> section to the Application.xml file at the application level or
at the vhost level and set the enabled attribute to
use the default values or set the parameters to new values. The following is a sample
<Application>
<ProtectedRTMP enabled="true">
<CommonKeyFile>creds/common-key.bin</CommonKeyFile>
<UpdateInterval>60</UpdateInterval>
<SWFVerification enabled="true">
<WhiteListFolder>whitelists</WhiteListFolder>
</SWFVerification>
</ProtectedRTMP>
</Application>
Use the following parameters in an Application.xml file to configure protected RTMP:
"true". The other pRTMP parameters have default values. You can
<ProtectedRTMP> section:
Last updated 9/4/2014
Page 36

ADOBE MEDIA SERVER 5.0.6 DEVELOPER’S GUIDE
Getting started streaming media
Parameter Description Default
32
CommonKeyFile A relative path to a file containing a base
UpdateInterval Optional configuration that specifies how
SWFVerification Container for SWFVerification. To enable
WhiteListFolder The folder that contains the SWF whitelist
key. The path is relative to the folder that
contains the Application.xml file.
The server generates the base key file
during installation. The server uses the base
key (along with the content ID) to generate
the final content encryption key. The key
data is scrambled and Base64 encoded
using the scramble tool. The server
generates the content ID automatically.
often (in minutes) the server updates the
DRM metadata.
SWF verification, set the
"true".
to
for SWF verification. The folder can contain
more than one whitelist file. Relative paths
are relative to the application folder.
enabled attribute
rootinstall/creds/common-key.bin
60
"false"
The folder containing the application folder.
Use the Authorization plug-in to configure protected RTMP
To configure protected RTMP at the plug-in level, write code in the E_APPSTART event to set the F_APP_PRTMP field
to true. The other pRTMP fields have default values. You can use the default values or set the fields to new values.
Protected RTMP settings in the Application.xml file are overridden in the Authorization plug-in.
The E_APPSTART event is an application-level event that supports reading all application-level fields, including the
following:
Field Description Read/Write
F_APP_URI The URI of the application to which the client connected.
The value does not include the server name or port
information.
F_APP_NAME The application name. Read-only
F_APP_NAME The application instance name. Read-only
Read-only
The E_APPSTART event supports the following new fields for protected RTMP:
Field Description Read/Write
F_APP_PRTMP A Boolean value indicating whether RTMP
streaming is protected.
F_APP_PRTMP_COMMON_KEY_FILE A string to specify the path to the common key
file. The path can be absolute or relative.
Relative paths are relative to the location of the
application folder.
F_APP_PRTMP_UPDATE_INTERVAL A number to specify how often (in minutes) the
DRM metadata will be updated.
F_APP_PRTMP_SWF_VERIFICATION A Boolean value indicating whether SWF
Verification is enabled.
Read/Write
Read/Write
Read/Write
Read/Write
Last updated 9/4/2014
Page 37

ADOBE MEDIA SERVER 5.0.6 DEVELOPER’S GUIDE
Getting started streaming media
Field Description Read/Write
33
F_APP_PRTMP_SWF_WHITELIST_FOLDER A string to specify the path to the whitelist
folder for SWF verification.
The path can be absolute or relative. Relative
paths are relative to the location of the
application folder.
F_APP_PRTMP_SWF_WHITELIST A string containing one or more SWF digests,
separated by '\n'. SWF digests are sha256
hashes of the SWF, base64 encoded. You
generate a whitelist using the whitelist tool that
ships with AMS. This string can also contain the
comments and empty lines that are in the
whitelist generated by the tool, which are
ignored.
F_APP_PRTMP_AIR_WHITELIST A string containing one or more AIR identifiers,
separated by '\n'. AIR identifiers are derived
from the signature.xml file that is used to sign
an AIR app. You generate a whitelist using the
whitelist tool that ships with AMS. This string
can also contain the comments and empty lines
that are in the whitelist generated by the tool,
which are ignored.
Read/Write
Read/Write
Read/Write
The E_PRTMP_WHITELIST event is an application-level event that AMS calls every n minutes (according to the update
interval), enabling you to update the SWF/AIR whitelists through the
F_APP_PRTMP_AIR_WHITELIST fields.
F_APP_PRTMP_SWF_WHITELIST and
Use Server-side ActionScript to configure protected RTMP
Use the following Server-side ActionScript properties to configure protected RTMP:
Property Data type
application.prtmpEnabled Boolean
application.prtmpCommonKeyFile String
application.prtmpUpdateInterval Int
application.prtmpSWFVEnabled Boolean
application.prtmpSwfWhitelistFolder String
Note: The prtmpCommonKeyFile and prtmpSwfWhitelistFolder properties specify a path to a file or folder. The
server resolves relative paths to an application directory.
These properties are filled in by values retrieved from configuration files during the application.onAppStart()
event. You can also set values in this event, as follows:
Last updated 9/4/2014
Page 38

ADOBE MEDIA SERVER 5.0.6 DEVELOPER’S GUIDE
Getting started streaming media
application.onAppStart = function()
{
trace ("----------prtmp on start----------");
trac e("prtmp " + application.prtmpEnabled);
trace("prtmpCommonKeyFile " + application.prtmpCommonKeyFile);
trace("prtmpUpdateInterval " + application.prtmpUpdateInterval);
trace("prtmpSwfVerification " + application.prtmpSWFVEnabled);
trace("prtmpSwfWhitelist " + application.prtmpSwfWhitelistFolder);
trace ("------------prtmp on start------- -");
application.prtmpEnabled = false;
application.prtmpCommonKeyFile = "TEST ";
application.prtmpUpdateInterval = 12000 ;
application.prtmpSWFVEnabled = true;
application.prtmpSwfWhitelistFolder = "";
}
Trace the new values in the application.onConnect() event:
{
trace("----------prtmp on connect----------");
trace("prtmp " + application.prtmpEnabled);
trace("prtmpCommonKeyFile " + application.prtmpCommonKeyFile);
trace("prtmpUpdateInterval " + application.prtmpUpdateInterval);
trace("prtmpSwfVerification " + application.prtmpSWFVEnabled);
trace("prtmpSwfWhitelist " + application.prtmpSwfWhitelistFolder);
trace("------------prtmp on connect--------");
}
34
The previous code prints an application.log file similar to the following:
#Version: 1.0
#Start-Date: 2011-10-19 12:20:41
#Software: Adobe Media Server 5 d430 x64
#Date: 2011-10-19
#Fields: date time x-pid x-status x-ctx x-comment
2011-10-19 12:20:41 7832 (s)2641173 ----------prtmp on start---------- -
2011-10-19 12:20:41 7832 (s)2641173 prtmp true -
2011-10-19 12:20:41 7832 (s)2641173 prtmpCommonKeyFile c:\Program Files\Adobe\Adobe Media
Server 5\conf\_defaultRoot_\_defaultVHost_\streamtest\creds\common-key.bin -
2011-10-19 12:20:41 7832 (s)2641173 prtmpUpdateInterval 3600000 -
2011-10-19 12:20:41 7832 (s)2641173 prtmpSwfVerification false -
2011-10-19 12:20:41 7832 (s)2641173 prtmpSwfWhitelist c:\Program Files\Adobe\Adobe Media
Server 5\conf\_defaultRoot_\_defaultVHost_\streamtest -
2011-10-19 12:20:41 7832 (s)2641173 ------------prtmp on start-------- -
2011-10-19 12:20:41 7832 (s)2641173 ----------prtmp on connect---------- -
2011-10-19 12:20:41 7832 (s)2641173 prtmp false -
2011-10-19 12:20:42 7832 (s)2641173 prtmpCommonKeyFile c: \Program Files\Adobe\Adobe Media
Server 5\conf\_defaultRoot_\_defaultVHost_\streamtest\TEST -
2011-10-19 12:20:42 7832 (s)2641173 prtmpUpdateInterval 12000 -
2011-10-19 12:20:42 7832 (s)2641173 prtmpSwfVerification true -
2011-10-19 12:20:42 7832 (s)2641173 prtmpSwfWhitelist c:\Program Files\Adobe\Adobe Media
Server 5\WhiteListFolder -
2011-10-19 12:20:42 7832 (s)2641173 ------------prtmp on connect-------- -
Last updated 9/4/2014
Page 39

ADOBE MEDIA SERVER 5.0.6 DEVELOPER’S GUIDE
Getting started streaming media
Tune server performance
The pRTMP operations that use the most CPU power are generating the DRM metadata and generating a license.
Adobe Media Server generates DRM metadata the first time a client requests a media file. The server caches the
metadata and reuses it for subsequent request for the same media file.
The media license in the DRM metadata imposes a 24-hour time limit on media playback from the point at which the
license was generated. Therefore, the server refreshes the license periodically and generates new DRM metadata with
a new time-stamp. Configure the
<UpdateInterval> parameter to control how often the server generates DRM
metadata. The default value is 60 minutes. To use less CPU power, generate the license less frequently.
Certificates and policy files
All certificates and the policy file for protected RTMP are installed to the Adobe Media Server rootinstall/creds folder.
Add Protected Streaming certificates
Adobe Media Server uses Protected Streaming certificates (.cer files) for protected RTMP. The server installs with
three Protected Streaming certificates. It uses different certificates for desktop, mobile, and set-top.
In the event of a security breach, Adobe will release a security alert telling you to download new Protected Streaming
certificates.
35
To add a Protected Streaming certificate, copy it to the rootinstall/creds/sd folder.
Understand static security files
The following files are installed with Adobe Media Server to the rootinstall/creds/static folder. Do not replace
or modify these files.
Policy file
Adobe Media Server installs with the policy file rootinstall/creds/static/creds_24hr_policy.pol. The policy is set as:
anonymous; not use license chaining; 24 hours limited license caching; and Protected Streaming
is permitted.
This policy file lets clients start playing content within 24 hours from when the server generated the DRM metadata.
Users can continue watching the content until the end, even if that time is beyond the 24 hour window. The 24 hour
window starts when the server generates the DRM metadata and stores it in a cache. The
parameter in the Application.xml file determines the frequency at which the server generates DRM metadata. The
default value is 60 minutes.
License server certificate
An Adobe-issued DER-encoded license server certificate. The license server certificate specifies the private key used to
sign the license.
Transport certificate
An Adobe-issued DER-encoded X.509 transport certificate file. The transport certificate file is used when the client
communicates with a server (for example, an authentication server). This feature is not supported in Adobe Media
Server 5 but the certificate is still required.
<UpdateInterval>
Packager credential
An Adobe-issued packager server credential (a certificate and its associated key) PFX file. The server uses this file to
apply a signature to the metadata while encrypting content files.
Last updated 9/4/2014
Page 40

ADOBE MEDIA SERVER 5.0.6 DEVELOPER’S GUIDE
Getting started streaming media
Multicast media (RTMFP)
About the multicast service
Flash Media Server 4.0, Flash Player 10.1
Important: The Multicast service (rootinstall/applications/multicast) does not run on Adobe Media Server Standard.
The multicast service is part of the Adobe Media Server multicast solution. The multicast solution is an end-to-end
solution for live, corporate, multicast events. The multicast solution delivers a single, live stream to Flash Player clients
over IP multicast, P2P multicast, and the combination of both (called fusion multicast).
The multicast solution consists of the following components:
• The multicast config tool (rootinstall/tools/multicast/configurator)
Collects information to describe and configure a multicast event. Generates a live stream name to copy and paste
into Flash Media Live Encoder that embeds required multicast event settings as parameters within the stream
name's query string. Generates a manifest.f4m file that you copy to the same folder as the multicast player.
• Flash Media Live Encoder
Captures, encodes, and publishes the live video to the multicast service on the Adobe Media Server.
36
• The multicast service (rootinstall/applications/multicast)
A server-side Adobe Media Server application that republishes the live stream as a multicast stream into a target
RTMFP Group.
• The multicast player (rootinstall/tools/multicast/multicastplayer)
A client-side Flash Player application that connects to the multicast service, joins the group, and plays the live
stream.
Configure the multicast event
Do the following to configure the multicast event:
1 Open rootinstall/tools/multicast/configurator/configurator.html in a browser.
2 Select one of the following multicast types:
• Fusion (simultaneous, cooperative IP and P2P multicast)
• IP Multicast
• Peer to Peer
• Peer to Peer with Peer Discovery
Note: The tool contains descriptions of each type.
3 For Fusion and Peer to Peer, enter the server name (or IP address) and the full path to the multicast application, for
example, rtmfp://ams.example.com/multicast. If the server is configured to use a port other than 1935, specify the
port, for example, rtmfp://ams.example.com:1940/multicast.
Note: IP Multicast events do not require a connection URI. IP Multicast events use the URI rtmfp: which puts the
NetConnection object in “connectionless” mode.
4 Enter the name of the live stream, for example, CorpAllHandsQ2_2010, or livestream.
5 Enter a publish password.
Last updated 9/4/2014
Page 41

ADOBE MEDIA SERVER 5.0.6 DEVELOPER’S GUIDE
Getting started streaming media
The password ensures that only the multicast server can publish a multicast stream into the group. Other peers do
not have the publish password and can only play the stream, not publish a stream.
6 Enter a name for the group. To make the group name unique, select Make Unique.
Use unique group names for streaming events occuring at the same time.
7 For IP Multicast and Fusion, enter an IP multicast address and port to use for the live event. This is the address and
port to which the live stream is broadcast.
Note: Get the IP multicast address from your IT department. The IT department sets up the multicast router and
multicast address. The multicast address delivers data to all members of the group on the network.
8 (Optional) If the server hosting Adobe Media Server has more than one network interface card (NIC), enter the IP
address for one NIC in the Interface Address text box. Adobe Media Server uses this IP address to determine the
appropriate interface to use when publishing.
9 (Optional) To use source-specific multicast, enter an IP address and port in the Source-specific Multicast Address
text box. For more information, see “Source-specific IP multicast” on page 266.
10 Click Generate. The multicast config tool generates the following:
• A name for the live stream. To publish a stream, you’ll click Copy and paste this value into the Flash Media Live
Encoder Stream field.
• An F4M file to use with the client multicast player. To view the F4M file, click View Manifest File.
This tutorial uses the following settings:
37
11 To use the Multicast Sample Player, do the following:
a Click Save Manifest File.
b Save the manifest.f4m file to the same location as the multicastplayer.html and multicastplayer.swf files. By
default, this location is rootinstall/tools/multicast/multicastplayer.
12 To use Strobe Media Playback, leave the Configurator open. After you set up Strobe Media Playback, you will return
to the Configurator and save the manifest.f4m file to the same folder as Strobe Media Playback.
Publish a stream from Flash Media Live Encoder
1 Launch Flash Media Live Encoder 3.1 or later and do the following:
2 From the Preset menu, select a single stream preset. The multicast solution does not support multi-bitrate
streaming.
3 For AMS URL, enter the URL of the multicast service. If you’re testing on the same computer that Adobe Media
Server is running on, enter rtmp://localhost/multicast.
Note: Flash Media Live Encoder connects to Adobe Media Server over the RTMP protocol, not over the RTMFP
protocol.
4 Paste the Publisher Stream Name you copied from the Multicast Config Tool to the Stream field.
Last updated 9/4/2014
Page 42

ADOBE MEDIA SERVER 5.0.6 DEVELOPER’S GUIDE
Getting started streaming media
38
Flash Media Live Encoder configured to stream to the multicast application
5 Click Start to connect to the multicast service and start streaming.
6 Launch the Adobe Media Server Administration Console and click on View Applications > Clients. The RTMP
client is the connection from FMLE to the server. The RTMFP client is a server-side peer established by the
multicast service to republish the live stream into the target RTMFP Group.
Play a multicast stream
Play a stream in the multicast sample player:
1 Open rootinstall/tools/multicast/multicastplayer/multicastplayer.html in a browser.
2 To run Flash Player from the local file system, right-click on the screen, choose Global Settings, and do one of the
following:
• On the Flash Player Help page, from the list in the top left, choose Global Security Settings panel. Click Edit
locations > Add location > Browse for folder. Select folder containing the multicastplayer.swf file
(rootinstall/tools/multicast/multicastplayer).
• In the Flash Player Settings Manager, choose Advanced and click Trusted Location Settings. Click Add, browse
to the folder containing the multicastplayer.swf file (rootinstall/tools/multicast/multicastplayer). Click Confirm.
3 Reload the multicastplayer.html file in the browser. The Adobe Flash Player Settings manager displays a Peer
Assisted Networking dialog. Click Allow to allow the peer-to-peer connection.
Last updated 9/4/2014
Page 43

ADOBE MEDIA SERVER 5.0.6 DEVELOPER’S GUIDE
Getting started streaming media
The multicastplayer plays the stream that Flash Media Live Encoder is publishing.
4 Open the Adobe Media Administration Console to see the new client connection.
Play a stream in the Adobe Media Server sample video player
1 Double-click rootinstall/samples/videoPlayer/videoplayer.html to open the sample video player in a browser.
The Adobe Media Server sample video player is built on OSMF Strobe Media Player 1.6.
2 Copy the manifest.f4m file you generated using the Multicast Config Tool from the
rootinstall/tools/multicast/configurator folder to the rootinstall/samples/videoPlayer folder. Both the multicast
sample player and the Adobe Media Server sample player must use the same manifest file.
3 In the sample video player, in the Stream URL text box, enter manifest.f4m. Click Play.
4 Open the Adobe Media Administration Console to see the new client connection. There are now 4 connections: 1
from Flash Media Live Encoder (RTMP), 1 from the multicast application publishing into the group (RTMFP), 1
from the multicast sample player, (RMTFP), and 1 from the Adobe Media Server sample video player (RTMFP).
More Help topics
“Building peer-assisted networking applications” on page 257
“Troubleshoot issues with streaming media” on page 111
39
Configure closed captioning
Closed captioning (CC) allows the content provider to display text overlayed on the video content thus providing
additional information about the video content to the consumers. Closed captioning is primarily used as an
accessibilty tool to show a transcription of the audio portion of the video content as it occurs. The term “closed” in
closed captioning indicates that the captions are not made part of the video by default. Hence, the captions have to be
decoded/extracted by an external tool. Adobe Media Server (AMS) 5.0.1 supports injecting closed caption data into
the video stream supporting the following streaming techniques:
• HDS (Live and VOD)
• HLS (Live and VOD)
• RTMP
Closed captioning in AMS is implemented by injecting/embedding caption data within the H264 SEI NALU as
specified in ANSI/SCTE 128 2010 Section 8. Adobe Media Server supports industry standard 608/708 closed
captioning for video streaming to the following output channels/devices:
• Adobe Flash Player/AIR (through the OSMF framework)
• iOS devices (through HLS)
This document defines the input and output workflows, use cases, and configurations for supporting the 608/708
closed caption data in AMS. The closed caption data will be embedded inside the VOD stream and can be viewed
through HDS, HLS, or RTMP based subscribers.
Last updated 9/4/2014
Page 44

ADOBE MEDIA SERVER 5.0.6 DEVELOPER’S GUIDE
Getting started streaming media
Closed captioning workflows
There are many techniques for implementing the caption data within the video stream. Few of these techniques are:
• Embedding the caption data in the video content. For instance, media stream or storage format can hold 608/708
caption data embedded inside the H264 SEI NALU as part of ATSC picture data.
• MP4 video content can contain a timed track, which can hold the caption data.
The following closed captioning workflows are supported in AMS:
• Type 1 – Streaming captioning data stored in ATSC Picture User Data.
• Type 2 – Extracting the caption data from a timed track and embed the data in a ATSC Picture User Data inside
H264 SEI NALU (Network Abstraction layer Units).
• Type 3 – Embedding captioning data inside an AMS-defined onCaptionInfo AMS message.
Type 1 – CC in ATSC Picture User Data
In this type, the CC input is natively supported for HLS. The Type 1 input can be just-in-time converted to an
OnCaptionInfo message to support caption display on HDS and RTMP. The content providers can embed closed
captioning data as part of the ATSC Picture User Data inside an H264 SEI NALU. However, this method is only
suitable for video streams supporting H264 codec types.
40
Closed caption in ATSC picture user data
Note: This type is widely used for MPEG2 TS streams.
HLS players can natively support such modified stream. AMS can be used to just-in-time package this embedded
format into AMS defined
ideal way of embedding the caption data. To prepare/package video content in this form, you can:
onCaptionInfo messages to display captions over HDS and RTMP. Note that this is the
• Use AMS for packaging the caption data.
• Convert a natively available MPEG2 TS stream to this type.
Type 2 – Extracting CC in Timed Track
The closed caption data can also reside inside a separate timed track. Apple has defined a timed track format for
QuickTime movie files.You can use the tool provided by AMS to convert this type of timed tracks containing caption
data into an ATSC Picture User Data of Type I.
Last updated 9/4/2014
Page 45

ADOBE MEDIA SERVER 5.0.6 DEVELOPER’S GUIDE
Getting started streaming media
41
Closed captions in timed track
Type 3 – CC in AMF Message
The closed caption data can be just-in-time extracted from Type 1 data and stored inside the AMS-defined
onCaptionInfo AMF message. The following file types are supported:
• MP4
• F4V
You can use AMS to package such files capitalizing on the onCaptionInfo message as a way of sending caption data
as part of the live/VOD stream.
Closed captions in AMF messages
Note: If content is recorded in this format, it can be played through RTMP and HDS without any additional
packaging/streaming support from AMS.
Note that HLS is not supported for this type.
Last updated 9/4/2014
Page 46

ADOBE MEDIA SERVER 5.0.6 DEVELOPER’S GUIDE
Getting started streaming media
The following table shows the summary of supported types for HLS, HDS, and RTMP:
Closed caption types
Packaging captions
The HLS protocol demands packaging the caption data as user_data_registered_itu_t_t35, embedded as H264
SEI NALU in video access unit within the MPEG2 TS stream. Therefore, input video frames will be exactly translated
into the MPEG2 transport stream. No repackaging in terms of caption data will be required. In case of HDS and
RTMP, H264 SEI NALU will be converted to the onCaptionInfo data messages. In the incoming video stream, a NALU
of type 6 with a payload of type 4 (user_data_registered_itu_t_t35) will be parsed for caption data. If there are multiple
NALU in one access unit of the video frame, they will be packaged into a single data message. In this case, original
caption data and corresponding NALU inside H264 access unit will remain intact. This will be done at the time of
content packaging.
42
Configurations
AMS provides easy configurations to turn on and off the processing of the caption data on the server side. However,
these configurations will not extract out the caption data encapsulated in any of the types defined in the previous
section.
VOD use case
Configuring httpd.conf at the Server level (Only for HDS-VOD)
You can configure closed captioning at the server level by modifying the JitGenerateCaptionInfo element in
Apache Server’s
<Location /hds-vod>
JitGenerateCaptionInfo true
...
</Location>
Configuring jit.conf at the content level (Only for HDS-VOD)
You can configure closed captioning at the content level by modifying the cc-info-enabled element in jit.conf
file as follows:
httpd.conf file as follows:
Last updated 9/4/2014
Page 47

ADOBE MEDIA SERVER 5.0.6 DEVELOPER’S GUIDE
Getting started streaming media
<hds>
<cc-info-enabled>
true
</cc-info-enabled>
</hds>
Configuring server.xml (only for RTMP)
For RTMP, you can configure closed captioning by adding the following code snippet in the server.xml file:
<Mp4>
<Playback>
<GenerateCCInfo>true</GenerateCCInfo >
</Playback>
</Mp4>
Note: In case of VOD, closed captioning data is supported only for H264-encoded MP4/F4V content.
Live use case
Application level (HDS and RTMP)
You can configure closed captioning at the application level by modifying the GenerateCCInfo element in
Application.xml file as follows:
43
<StreamManager>
<Live>
<GenerateCCInfo>true</GenerateCCInfo >
</Live>
</StreamManager >
Note: If any of the tags is not present, it will be considered as “false” by AMS. Closed captioning will also be turned off in
the Application.xml file.
Stream level (HDS and RTMP)
You can also override the application level configuration by modifying the application’s main.asc file by setting the
Stream function
Stream.generateCCInfo = true;
generateCCInfo:
Note: For both the VOD and live use cases, you must ensure that if the captions are already being supplied from the
encoder or the VOD file in the Type 3 format, then these configuration must be turned off to avoid duplicates of the
onCaptionInfo messages.
Note: For the live use case, the onCaptionInfo message generation can be turned on and off through configuration only
on the stream ingest server. If the stream is being relayed from another server, then these configuration won't be effective
and by default will be off.
Support for OSMF
Closed captioning can be enabled for OSMF players through the OSMFCCDecoder class. The OSMFCCDecoder class uses
displayObject, updates the video size, and resets the decoder. You can perform the following actions using the
the
OSMFCCDecoder:
• Enable or disable the display of captions.
• Select caption channels.
Last updated 9/4/2014
Page 48

ADOBE MEDIA SERVER 5.0.6 DEVELOPER’S GUIDE
Getting started streaming media
• Modify various caption display attributes like font, text, and background colors.
The following sections describe the steps needed to get started with closed captioning in OSMF:
Step 1 - Preparing the assets
Before you begin, you need to prepare your assets to hold the closed captionining data.
Enable GenerateCCInfo in Server.xml for VOD playback as follows:
<Root>
<Server>
<Streams>
<Mp4>
<Playback>
<GenerateCCInfo>true</GenerateCCInfo>
</Playback>
</Mp4>
</Streams>
</Server>
</Root>
When the GenerateCCInfo option is enabled, AMS will process the video packets for closed captions and will
generate the onCaptionInfo message, which will be sent to the client.
44
Enable GenerateCCInfo in Application.xml for live playback as follows:
<Application>
<StreamManager>
<Live>
<GenerateCCInfo>true</GenerateCCInfo>
</Live>
</StreamManager>
</Application>
Step 2 - Writing the ActionScript code
You need to initialize the OSMFCCDecoder and expose any customisable attributes as follows:
Last updated 9/4/2014
Page 49

ADOBE MEDIA SERVER 5.0.6 DEVELOPER’S GUIDE
Getting started streaming media
var player:MediaPlayer = ...;
// Initialize the player.
// Listen for MediaPlayerStateChangeEvent on player and
// when the state is MediaPlayerState.READY, then initialize the
// decoder as shown below:
var ccDecoder:OSMFCCDeco d er;
// Create a new instance
ccDecoder = new OSMFCCDecoder();
// Bind the instance to your media player
ccDecoder.mediaPlayer = player;
// Bind the instance to the media player view area
// that can be used to render.
ccDecoder.mediaContainer = mediaContainer;
// Enable the instance
ccDecoder.enabled = true;
// Optionally, select a type and service
// At present, only one type is supported; CEA-708 wrapped over 608,
// which is identified by the value CCType.CEA708.
ccDecoder.type = CCType.CEA708;
ccDecoder.service = CEA708Service.CC1;
45
Note: You must have atleast one instance of OSMFCCDecoder for a video player.
The OSMFCCDecoder contains a number of properties that can be exposed through the UI controls. Most of these
properties enable overriding the font and color attributes and are required under the FCC guidelines. You are
responsible for adding the UI controls to expose these properties. Also, you should add the necessary code to save and
restore the settings between sessions. UI controls must be provided in the video player to enable/disable closed
captioning display and to select the desired caption service/channel. UI controls may be provided to allow the end user
to select values for the displayed font size, background color, and opacity.
The following code snippet describes the steps involved in exposing custom attributes through ActionScript:
/**
* The type of closed captioning data to decode and render.
* A value of null indicates no selected type.
* Valid values are values of the CC Type enumeration class.
* The default value is null .
*
* @throws ArgumentError if the specified type is not supported.
* /
public function gettype():String;
public function settype(value:String):void;
/ **
* The MediaPlayer this OSMFCCDecoder is associated with.
* Assig ning any value disassociates the OSMFCCDecoder from a
* currently assigned MediaPlayer (if any).
* If the assigned value is non-null, the OSMFCCDecoder will
* automatically register itself as an event listener on
* the provided MediaPlayer and access its view property
* to use as the video surface to render captions over.
*/
public function get mediaPlayer():MediaPlayer
public function set mediaPlayer(value:MediaPlayer):void
/**
Last updated 9/4/2014
Page 50

ADOBE MEDIA SERVER 5.0.6 DEVELOPER’S GUIDE
Getting started streaming media
* Whether caption data decoding and rendering is enabled or disabled.
* The default value is true.
* When this property transitions from true to false a side-effect
* is a reset of internal decoder state and
* any currently rendered captions are cleared.
*/
public function get enabled():Boolean
public function set enabled(value:Boolean):void
/**
* The caption "service" to decode and render.
* For CEA-708 wrapped over 608 closed captioning, supported values
* are values of the CEA708Service enumeration class.
* CEA708Service.CC1, CEA708Service.CC2, CEA708Service.CC3, CEA708Service.CC4
* @throws ArgumentError if the assigned service value is not supported
* or available for the closed captioning
* type specified at construction time.
*/
public function get service():String
public function set service(value:String):void
/**
* Font override to apply to rendered text.
* Default value is null, indicating no override, and text will
* assume its intrinsic font according to caption
* authoring.
* To override the font assign an embedded or system font
* name and to disable an override assign null.
*/
public function get font():String
public function set font(value:String):void
/**
* Text color override to apply to rendered text.
* Default value is -1, indicating no override, and text
* will assume its intrisic color which may vary according
* to caption authoring.
* To override the text color assign a RGB hex value (e.g. 0xFF00FF)
* and to disable an override assign -1.
* @throws ArgumentError if the value is not -1 and not within the RGB hex range.
*/
public function get textColor():int
public function set textColor(value:int):void
/**
* Background color override to apply to the background of text character cells.
* Default value is -1, indicating no override, and cell backgrounds
* will assume their intrinsic color which
* may vary according to caption authoring.
* To override the background color assign a RGB hex value (e.g. 0xFF00FF)
* and to disable an override assign -1.
* @throws ArgumentError if the value is not -1 and not within the RGB hex range.
*/
public function get backgroundColor():int
public function set backgroundColor(value:int):void
/**
* Text opacity override to apply to rendered text.
* Default value is -1, indicating no override, and text
* will assume its intrinsic opacity which may vary
* according to caption authoring.
* To override text opacity assign a value between 0 (fully transparent)
46
Last updated 9/4/2014
Page 51

ADOBE MEDIA SERVER 5.0.6 DEVELOPER’S GUIDE
Getting started streaming media
* to 1 (fully opaque) and to disable
* an override assign -1.
* @throws ArgumentError if the value is not -1 and not within the range of [0, 1].
*/
public function get textOpacity():Number
public function set textOpacity(value:Number):void
/**
* Background opacity override to apply to the background of text character cells.
* Default value is -1, indicating no override, and backgrounds will
* assume their intrinsic opacity which may
* vary according to caption authoring.
* To override background opacity assign a value between 0 (fully transparent)
* to 1 (fully opaque) and to
* disable an override assign -1.
* @throws ArgumentError if the value is not -1 and not within the range of [0, 1].
*/
public function get backgroundOpacity():Number
public function set backgroundOpacity(value:Number):void
/**
* Resets the OSMFCCDecoder's internal state, clearing any
* currently rendered captions.
* The currently selected caption service and display overrides are not changed.
*/
public function reset():void
/**
* The default font to use when no custom font is specified.
* This is set to a reasonable default for the device. When using custom devices,
* you may alter this property to change the default font.
*/
public function get defaultFont():String
public function set defaultFont(value:String):void
/**
* Edge type override to apply to rendered text.
*
* Valid values are indicated by the EdgeType enumeration, or null to
* indicate no override. Valid Values:
* EdgeType.NONE: Indicates that no edge decoration should be used.
* EdgeType.DEPRESSED: Indicates that the edge will appear as depressed.
* EdgeType.UNIFORM: Indicates that the edge will with a uniform border.
* EdgeType.LEFT_DROP_SHADOW: Indicates that the edge will with a
* shadow falling to the left.
* EdgeType.RIGHT_DROP_SHADOW: Indicates that the edge will with a
* shadow falling to the right.
*
47
Last updated 9/4/2014
Page 52

ADOBE MEDIA SERVER 5.0.6 DEVELOPER’S GUIDE
Getting started streaming media
* @default null
*
* @throws ArgumentError if the value is not null and not a memory of
* the EdgeType enumeration.
**/
public function get edgeType():String
public function set edgeType(value:String):void
/**
* Edge color override to apply to rendered text.
* The value should be an RGB hex value (e.g. 0xFF00FF).
*
* A value of -1 indicates no override. A reasonable
* default edge color will be selected.
*
* @default -1
*
* @throws ArgumentError if the value is not -1 and not within the RGB hex range.
**/
public function get edgeColor():int
public function set edgeColor(value:int):void
Note: The server side closed captioning support is only available for H.264 videos. The DXP and TTML specifications are
supported in the side-car files to playback closed captions (for VOD) in OSMF, HDS, or RTMP.
48
Using the ccConvertor tool
The ccConvertor tool is a command line utility (bundled with Adobe Media Server) that can be used to convert any
MOV files with Closed Caption content (clcp tracks) into an MP4 file with embedded caption NALUs in 708 format
(having 608 wrapped in it).
Usage
The usage of the ccConvertor tool on Windows is as follows:
ccConvertor.exe --input-file=<file> --[setting]=[arg]...
Parameters
The following table describes the supported input parameters:
Parameter Description
--input-file arg Signifies the path to the source container file. The path can be an absolute path
--output-file arg The path to the destination file. Note that this path should not be the same as
--conf-file arg The configuration file that contains the settings for the packaging process.
Note that if a relative path is passed through the configuration file, the path is relative to the directory containing the
configuration file.
or a relative path.
the input file. The path can be an absolute path or a relative path.
To understand the configuration file format, see the sample configuration file available at
<AMS_INSTALL_DIR>\tools\ccConvertor\sample_cfg.xml.
Last updated 9/4/2014
Page 53

ADOBE MEDIA SERVER 5.0.6 DEVELOPER’S GUIDE
Getting started streaming media
Configure alternate audio
Adobe Media Server has support for including multiple language tracks for HTTP video streams, without requiring
duplication and repackaging of the video for each audio track. This feature, called as “late” binding of audio tracks
allow content providers to easily provide multiple language tracks for a given video asset, at any time before or after
the asset’s initial packaging. The initial packaging of the video asset can include an audio track, and the publisher can
still choose to provide one or more additional audio tracks for the video. Video players can provide support for
allowing the viewers to switch between audio tracks either before or during playback.
Clients can pick the appropriate audio
The primary use case of this feature is that content providers can publish video content in multiple languages. Viewers
can subscribe to such videos using the OSMF player, which allows audio track switching before or during playback.
49
Playback workflow for HDS-VOD
The following steps provide an overview of the content publishing workflow in case of HDS-VOD:
1 The content providers will load videos in the ‘vod’ directory along with its set level manifest F4M file. This set level
manifest file must contain information on which video to play by default and which audio track to be used as an
alternate audio. For instance, if you want to publish a video stream, video1.mp4 along with the language tracks
video1_french.mp4 and video1_spanish.mp4, providing the users a choice to switch audio, you can create a set level
manifest F4M video1_master.f4m and place it in the vod sub directory. The set level manaifest file can have the
following content:
<?xml version="1.0" encoding="utf-8"?>
<manifest xmlns="http://ns.adobe.com/f4m/2.0">
<media href="../hds-vod/video1.mp4.f4m" bitrate="1000" />
<media href="../hds-vod/audio-only/video1_french.mp4.f4m"
bitrate="200" type="audio" label="french" lang="fr" alternate="true" />
<media href="../hds-vod/audio-only/video1_spanish.mp4.f4m" bitrate="200"
type="audio" label="spanish" lang="es" alternate="true" />
</manifest>
2 When a viewer plays the stream, the player will load this set level manifest file and will play video1.mp4 by default
with its embedded audio data. The player will request the manifest file video1.mp4.f4m from the server. The
Apache module for on demand HDS will create the manifest file and will send it to the player. The player will then
request for fragments of the video1.mp4 file and will play the fragments.
3 When the viewer switches to another audio label (in this case, french or spanish), the player will request for the
manifest file for the selected option. For instance, if the viewer has opted for the french track, the player requests
for the manifest video1_french.mp4.f4m file to get the audio-only stream.
4 The Adobe Media Server will know that the request for F4M is coming with the ‘audio-only’ element, hence will
create the manifest file just in time almost similar to step 2.
Last updated 9/4/2014
Page 54

ADOBE MEDIA SERVER 5.0.6 DEVELOPER’S GUIDE
Getting started streaming media
5 Now, the player will request for fragments from both the media files (video1.mp4 and video1_french.mp4) using
their respective manifest F4M files. For the first media file, the player will continue fetching fragments. But for the
second media file, video1_french.mp4, the player will try to get fragments for the media URL with ‘audio-only’
value in the URL as supplied in its manifest F4M file. The request for fragment for this media file will be of this
format '/hds-vod/audio-only/video1_french.mp4Seg1-Frag1'
6 While serving the fragment request, Adobe Media Server understands the 'audio-only' request and sends only the
audio data for the requested fragment of file 'video1_french.mp4'. These fragments are made just in time and
served. If the 'audio-only' element is not present, video data for the fragment is served.
Streaming alternate audio on demand
50
Playback workflow for HLS-VOD
The following steps provide an overview of the content publishing workflow in case of HLS-VOD:
1 The content providers will load videos in the ‘vod’ directory along with its variant playlist M3U8 file. This variant
playlist file must contain information on which video to play by default and which audio track to be used as an
alternate audio. For instance, if you want to publish a video stream, video1.mp4 along with the language tracks
video1_french.mp4 and video1_spanish.mp4, providing the users a choice to switch audio, you can create a variant
playlist M3U8 video1_master.m3u8 and place it in the vod sub directory. The variant playlist file can have the
following content:
#EXTM3U
#EXT-X-MEDIA:TYPE=AUDIO,GROUP-ID="aac",NAME="English",
DEFAULT=YES,AUTOSELECT=YES,LANGUAGE="en", URI="../hls-vod/audio-only/video1.mp4.m3u8"
#EXT-X-MEDIA:TYPE=AUDIO,GROUP-ID="aac",NAME="French",
DEFAULT=NO,AUTOSELECT=NO,LANGUAGE="fr", URI="../hls-vod/audio-only/video1_french.mp4.m3u8"
#EXT-X-MEDIA:TYPE=AUDIO,GROUP-ID="aac",NAME="Spanish",
DEFAULT=NO,AUTOSELECT=NO,LANGUAGE="es", URI="../hls-vod/audioonly/video1_spanish.mp4.m3u8"
#EXT-X-STREAM-INF:BANDWIDTH=1280000,CODECS="mp4a.40.5",AUDIO="aac"
../hls-vod/video1.mp4.m3u8
2 When a viewer plays the stream, the player will load this variant playlist file and will play video1.mp4 by default
with its embedded audio data. The player will request the playlist file video1.mp4.m3u8 from the server. The
Apache module for on demand HLS will create the playlist file and will send it to the player. The player will then
request for fragments of the video1.mp4 file and will play the fragments.
3 When the viewer switches to another audio label (in this case, french or spanish), the player will request for the
playlist file for the selected option. For instance, if the viewer has opted for the french track, the player requests for
the playlist video1_french.mp4.m3u8 file to get the audio-only stream.
4 The Adobe Media Server will know that the request for M3U8 is coming with the ‘audio-only’ element, hence will
create the playlist file just in time almost similar to step 2.
Last updated 9/4/2014
Page 55

ADOBE MEDIA SERVER 5.0.6 DEVELOPER’S GUIDE
Getting started streaming media
5 Now, the player will request for fragments from both the media files (video1.mp4 and video1_french.mp4) using
their respective playlist M3U8 files. For the first media file, the player will continue fetching fragments. But for the
second media file, video1_french.mp4, the player will try to get fragments for the media URL with ‘audio-only’
value in the URL as supplied in its playlist M3U8 file. The request for fragment for this media file will be of this
format '/hds-vod/audio-only/video1_french.mp4Seg1-Frag1'
6 While serving the fragment request, Adobe Media Server understands the 'audio-only' request and sends only the
audio data for the requested fragment of file 'video1_french.mp4'. These fragments are made just in time and
served. If the 'audio-only' element is not present, video data for the fragment is served.
Note: To package an audio-only stream for HLS, see “Packaging an audio-only stream (HLS)” on page 11. To publish an
audio-only stream for HLS, see “Publish an audio-only stream (HLS)” on page 11
Configure content protection
See “Content protection” on page 115.
Configure HTTP Dynamic Streaming and HTTP Live
51
Streaming
Overview of HTTP Dynamic Streaming and HTTP Live Streaming
Streaming media over HTTP
Delivering content over HTTP is usually called “progressive download”. The content must transfer from the server to
the client in a progression from the beginning to the end of a file. A client cannot seek to a forward location until that
location and all the data before it has downloaded.
Delivering content over RTMP is called “streaming”. The client creates a socket connection to the server (such as
Adobe Media Server) over which the content is sent in a continuous stream. The client can seek to any point in the
content instantly, regardless of how much data has been transferred.
Adobe HTTP Dynamic Streaming combines these approaches to introduce HTTP streaming to the Flash Platform.
HTTP Dynamic Streaming packages media files into fragments that Flash Player clients can access instantly without
downloading the entire file. Adobe HTTP Dynamic Streaming contains several components that work together to
package media and stream it over HTTP to Flash Player and AIR. HTTP Dynamic Streaming supports multi-bitrate
streaming, DVR, and Adobe® Flash® Access™ protection.
In Adobe Media Server 5, Adobe HTTP Dynamic Streaming supports Apple HTTP Live Streaming. Use the same
HTTP Dynamic Streaming workflow to package and stream live and on-demand content to all devices that support
Apple HTTP Live Streaming.
Note: Adobe Media Server does not support adding Timed Metadata for HTTP Live Streaming.
Last updated 9/4/2014
Page 56

ADOBE MEDIA SERVER 5.0.6 DEVELOPER’S GUIDE
Getting started streaming media
HTTP Dynamic Streaming components
The Adobe HTTP Streaming solution contains the following components:
Live Packager Live Packager is a Adobe Media Server application installed to rootinstall/applications/livepkgr. The
server ingests a live stream over RTMP and the Live Packager translates it into F4F files and MPEG-2 TS files in realtime.
F4F HTTP Module An Apache HTTP Server module that serves files to Flash Player and AIR. The F4F module (also
known as the HTTP Origin Module), serves live content. It also serves on-demand content that was packaged offline
with the File Packager tool.
The F4F HTTP Module installs with Flash Media Server 4 and later to rootinstall/Apache2.2/modules/mod_f4fhttp.so.
The module is also available from
HLS HTTP Module An Apache HTTP Server module that serves files to iOS devices and Mac OS.
The HTTP HLS Module installs with Adobe Media Server 5 and later to
rootinstall/Apache2.2/modules/mod_hlshttp.so. It is not available as a stand-alone Apache module.
JIT HTTP Module An Apache HTTP Server module that packages on-demand files just-in-time and serves them to
Flash Player and AIR. “Just-in-time” means that media files are packaged in real-time when clients request them.
The JIT HTTP Module installs with Adobe Media Server 5 and later to rootinstall/Apache2.2/modules/mod_jithttp.so.
It is not available as a stand-alone Apache module.
adobe.com as a stand-alone Apache module.
52
File Packager A command-line, offline tool that translates on-demand media into F4F fragments. The File Packager
is located in the rootinstall/tools/f4fpackager folder and is available from
OSMF media players There are several media players built on the Open Source Media Framework (OSMF) that
support HTTP Dynamic Streaming to Flash Player and AIR. See
F4F File Format Specification The F4F file format describes how to divide media content into segments and fragments.
“Pre-built media players” on page 3.
adobe.com.
The Live Packager, the File Packager, and the JIT HTTP module output content based on this specification. Each
fragment has its own bootstrap information that provides cache management and fast seeking. For more information,
F4F File Format Specification.
see
F4M File Format Specification The Adobe Media Manifest file format contains information about a package of files
that the HTTP Origin Module can serve. Manifest information includes codecs, resolutions, and the availability of files
encoded at multiple bit rates. Manifest information also includes DRM data. The media player uses the F4M file to play
a piece of media. For more information, see
Adobe Access Adobe Access delivers protected media to Flash Player. To use HTTP Dynamic Streaming with Adobe
F4M File Format Specification.
Access, use the File Packager and Adobe Media Server to both package and encrypt content. For more information,
Protecting content with Adobe Access.
see
Adobe Media Server 5 adds support for Adobe Access level protection without using a Adobe Access server.
Workflow for streaming live media over HTTP
The best way to experience the workflow for live HTTP streaming is to complete a tutorial. See “Stream live media
(HTTP)” on page 5.
The following is the workflow for all Adobe HTTP Dynamic Streaming and Apple HTTP Live Streaming use cases:
1 Use the default live event or create a live event.
The default live event is rootinstall/applications/livepkgr/events/_definst_/liveevent. Each live event contains
configuration settings for one set of content. For more information, see
“Create and configure live events” on
page 54.
Last updated 9/4/2014
Page 57

ADOBE MEDIA SERVER 5.0.6 DEVELOPER’S GUIDE
Getting started streaming media
2 (Optional) To configure multi-bitrate streaming, use the Set-level F4M/M3U8 File Generator tool to generate an
set-level manifest file. The set-level manifest file contains information about each stream. See
“Publish and play live
multi-bitrate streams over HTTP” on page 8.
3 (Optional) To configure DVR for Adobe HTTP Dynamic Streaming, create a set-level manifest file.
To configure a Sliding Window for Apple HTTP Live Streaming, configure the httpd.conf, Application.xml, or
Event.xml file.
See “Configure DVR (HDS)” on page 13 and “Configure a sliding window (HLS)” on page 14.
4 (Optional—Adobe HTTP Dynamic Streaming) To encrypt content for protected HDS, see “Configuring content
protection for HDS” on page 115.
To encrypt content for use with Adobe Access, edit the Event.xml file. See “Encrypt content for Adobe Access
protection” on page 72.
5 (Optional—Apple HTTP Live Streaming) To encrypt content for Apple HTTP Live Streaming, see Configuring
content protection for HLS.
6 Create a crossdomain.xml file and copy it to the rootinstall\webroot folder.
A crossdomain.xml file allows Flash Player clients hosted on other domains to access data from this domain. For
more information, see
Website controls (policy files) in the ActionScript 3.0 Developer’s Guide.
53
7 Publish a stream to the server.
8 (Adobe HTTP Dynamic Streaming) Use Strobe Media Playback to play media. Strobe Media Playback is installed
with Adobe Media Server.
9 (Apple HTTP Live Streaming) Play the content on iOS or MacOS.
For supported devices, see Apple HTTP Live Streaming documentation.
Workflow for streaming on-demand media over HTTP
The best way to experience the workflow for on-demand HTTP streaming is to complete a tutorial. See “Stream on-
demand media (HTTP)” on page 19.
The following is the workflow for Adobe HTTP Dynamic Streaming and Apple HTTP Live Streaming use cases:
1 Encode media files and copy them to the rootinstall/webroot/vod directory on Adobe Media Server.
To configure this location, see Configure the location of content (HDS and HLS).
2 (Optional) To configure multi-bitrate streaming, use the Set-level F4M/M3U8 File Generator tool to generate a set-
level manifest file. See
3 (Optional—Adobe HTTP Dynamic Streaming) To encrypt content for protected HDS (without Adobe Access), see
“Configuring content protection for HDS” on page 115.
To encrypt content for use with Adobe Access, edit the jit.conf file. See “Encrypt content for Adobe Access
protection” on page 72.
4 (Optional—Apple HTTP Live Streaming) To encrypt content for Apple HTTP Live Streaming, configure the
jit.conf file or the Apache httpd.conf file. See
5 Create a crossdomain.xml file and copy it to the rootinstall\webroot folder.
A crossdomain.xml file allows Flash Player clients hosted on other domains to access data from this domain. For
more information, see
“Play on-demand multi-bitrate media files over HTTP” on page 22.
Protect content for Apple HLS.
Website controls (policy files) in the ActionScript 3.0 Developer’s Guide.
Last updated 9/4/2014
Page 58

ADOBE MEDIA SERVER 5.0.6 DEVELOPER’S GUIDE
Getting started streaming media
6 (Adobe HTTP Dynamic Streaming) Use Strobe Media Playback to play media. Strobe Media Playback is installed
with Adobe Media Server.
7 (Apple HTTP Live Streaming) Play the content on an iOS device or on MacOS.
For supported devices, see Apple HTTP Live Streaming documentation.
Differences in HTTP Dynamic Streaming between Flash Media Server 4.0 and
4.5
The following are differences in HTTP Dynamic Streaming (HDS) between Flash Media Server 4.0 and 4.5:
• Simplified request URLs for live streaming.
See “Differences in HTTP live URLs from Flash Media Server 4.0 to Adobe Media Server 5” on page 13.
• Support for just-in-time on-demand packaging.
When a media player requests an on-demand media files from the rootinstall/webroot/vod folder using HDS,
Apache packages the stream in real-time. You do not need to pre-package the media files for HTTP streaming as
you did with Flash Media Server 4.0. See
• Use a jit.conf file to configure on-demand streaming at the stream-level. Copy the jit.conf file to the same folder as
the media. See
“Configure on-demand HTTP streaming” on page 88.
• Use set-level F4M and M3U8 files to configure a set of streams for adaptive bitrate streaming.
The set-level files describe the bitrates of the media. The live and just-in-time packagers generate stream-level F4M
and M3U8 files to describe the individual pieces of media. The set-level files can live on any webserver. See
and play live multi-bitrate streams over HTTP” on page 8 and “Play on-demand multi-bitrate media files over
HTTP” on page 22.
“Stream on-demand media (HTTP)” on page 19.
“Publish
54
Create and configure live events
You can use the livepkgr application to serve an unlimited number of live streaming events over HTTP (for example,
a debate, a sporting event, and a town hall meeting). Each live streaming event requires its own configuration settings
for multi-bitrate streaming, DVR, and content protection.
A live event is a configuration level within the livepkgr application. Like a Adobe Media Server application, a live event
is a folder on the server. The folder contains two configuration files: Manifest.xml and Event.xml. Use these
configuration files to configure a set of streams.
Also like a Adobe Media Server application, the name of the live event folder is the name of the live event. The Adobe
Media Server application that packages live content for HTTP streaming is called “livepkgr”. The livepkgr application
contains a live event called “liveevent”:
rootinstall/applications/livepkgr/events/_definst_/liveevent
Note: You can configure the location of the “applications” folder. You can also configure virtual directory mappings for
the “streams” folder. However, you cannot configure virtual directory mappings for the “events” folders.
Streams in a live event are packaged as fragments and written to disk. A live event (the stream content and the
metadata) exists until you delete it. A media player can access the content after the source stream has stopped
publishing.
Create a live event
Last updated 9/4/2014
Page 59

ADOBE MEDIA SERVER 5.0.6 DEVELOPER’S GUIDE
Getting started streaming media
For each live streaming event, create a live event folder.
1 Create the following “events” folder structure in the livepkgr application folder:
rootinstall/applications/livepkgr/events/applicationinstancename/liveeventname
The following is a new live event called “liveevent2”:
rootinstall/applications/livepkgr/events/_definst_/liveevent2
You can also create a live event for a different instance of the livepkgr application, as in the following:
rootinstall/applications/livepkgr/events/anotherappinstance/liveevent
2 Copy the Events.xml file from the default liveevent folder to the new folder:
rootinstall/applications/livepkgr/events/_definst_/liveevent2/Events.xml
3 Copy the Manifest.xml file from the default liveevent folder to the new folder:
rootinstall/applications/livepkgr/events/_definst_/liveevent2/Manifest.xml
4 Open the Events.xml file in a text editor and change the event name:
<Event>
<EventID>liveevent2</EventID>
<Recording>
<FragmentDuration>4000</FragmentDuration>
<SegmentDuration>400000</SegmentDuration>
<DiskManagementDuration>3</DiskManagementDuration>
<Recording>
</Event>
55
Configure a live event
For information about the features you can configure in the Event.xml file, see “Configure live HTTP streaming at the
event level (Event.xml)” on page 83.
Write server-side code to assign a stream to a live event
Important: You do not need to write server-side code for HTTP Dynamic Streaming. The livepkgr application has a
Server-Side ActionScript file that assigns streams to a live event. To see the code, open
rootinstall/applications/livepkgr/main.asc in a text editor. Read this section to understand the code.
The Live Packager processes streams that are prefixed with f4f:. Flash Media Live Encoder doesn’t support the f4f:
prefix so you must add it to the stream name in a server-side script or in a Adobe Media Server Authorization Plug-in.
An application can contain more than one live event. For that reason, a stream published to an application is not
associated with a live event by default. Use a server-side script or the Adobe Media Server Authorization Plug-in (not
both) to associate a live stream with a live event. You can associate a live stream with only one live event.
Associate a stream during the publish event. When the stream is published and associated, the server creates a stream
record file (.stream) for the stream in the event directory:
applications/appname/events/appinstancename/liveeventname/livestream.stream
The stream record file contains information about the location of the packaged stream files. The HTTP Origin Module
uses this information to generate an .f4m manifest file. For more information, see
for live HTTP Dynamic Streaming” on page 94.
“Understanding the application flow
Use Server-Side ActionScript
Last updated 9/4/2014
Page 60

ADOBE MEDIA SERVER 5.0.6 DEVELOPER’S GUIDE
Getting started streaming media
To see an example of this code, open rootinstall/applications/livepkgr/main.asc in a text editor.
❖ In the Server-Side ActionScript code, use the application.onPublish event to do the following:
• Use the Stream.liveEvent property to associate a live stream with a live event before the server starts
recording.
• Add the f4f: prefix to the stream name. This tells the server to package the stream.
• Call Stream.record() to record the stream.
Use an Authorization Plug-in
To perform these tasks with an Authorization plug-in, you must write the plug-in code.
❖ In the Authorization Plug-in code, use the E_PUBLISH event to do the following:
• Set the F_STREAM_TYPE field to "f4f".
• Set the F_STREAM_LIVE_EVENT field to "liveeventname". This example uses “liveevent”.
• Set the F_STREAM_PUBLISH_TYPE field to 0 which means "record".
The following is sample C++ code that handles the E_PUBLISH event:
case IFmsAuthEvent::E_PUBLISH:
{
// The name of the FMS app to which the live stream is published.
char* pLiveApp = "livepkgr";
// The stream type used for HTTP Dynamic Streaming.
char* pStreamType = "f4f";
// The name of the live event defined in the livepkgr app.
char* pLiveEvent = "liveevent";
// The Auth Plug-in affects all apps on the server.
// We only want to process streams published to the livehttp app.
char* pAppName = getStringField(m_pAev, IFmsAuthEvent::F_APP_NAME);
if (pAppName && !strncmp(pAppName, pLiveApp, strlen(pLiveApp)))
{
// Set the stream type.
setStringField(m_pAev, IFmsAuthEvent::F_STREAM_TYPE, pStreamType);
// Set the publish type to record.
//0 record, 1 append, -1 live
setI32Field(m_pAev, IFmsAuthEvent::F_STREAM_PUBLISH_TYPE, 0);
// Associate the stream with a live event.
setStringField(m_pAev, IFmsAuthEvent::F_STREAM_LIVE_EVENT, pLiveEvent);
}
}
56
Content storage (HDS and HLS)
Configure the beginning of the request URL
When a media player requests content from the server, it passes the server a request URL. The section of the request
URL following the server name (and optional port number) is defined in the
httpd.conf file. For example, the following is the Location directive for HDS on-demand streaming:
Last updated 9/4/2014
Location directive path in the Apache
Page 61

ADOBE MEDIA SERVER 5.0.6 DEVELOPER’S GUIDE
Getting started streaming media
<IfModule jithttp_module>
<Location /hds-vod>
HttpStreamingJITPEnabled true
HttpStreamingContentPath "../webroot/vod"
JitFmsDirPath ".."
Options -Indexes FollowSymLinks
</Location>
</IfModule>
When Apache receives a request with the path /hds-vod, it uses the jithttp_module (just-in-time) to process the
request. The jithttp_module uses the values of the directives nested within the
Location directive.
To configure HTTP streaming for multiple tenants, or for multiple applications, add Location directives with
different paths. The following table lists the syntax for request URLs, the
Streaming type Request URL syntax
Location directive paths are in bold:
57
Adobe HDS live http://<fms-dns-or-ip>/hds-
Apple HLS live http://<fms-dns-or-ip>/hls-
Adobe HDS on-demand with
just-in-time packaging
Apple HLS on-demand http://<fms-dns-or-ip>/hls-vod/<streamname>.<fileextension>.m3u8
live/livepkgr/<appinstname>/<eventname>/<streamname>.f4m
live/livepkgr/<appinstname>/<eventname>/<streamname>.m3u8
http://<fms-dns-or-ip>/hds-vod/<streamname>.<fileextension>.f4m
Add a Location directive
Note: This task uses HDS on demand, but the steps apply to all types of HTTP streaming.
1 Open rootinstall/Apache2.2/conf/httpd.conf in a text editor.
2 Location the Location directive for the streaming type you want to edit, copy it, and paste it.
3 For example, to create a Location for HDS on-demand streaming, copy the /hds-vod section and paste it
underneath the existing section.
<IfModule jithttp_module>
<Location /hds-vod>
HttpStreamingJITPEnabled true
HttpStreamingContentPath "../webroot/vod"
JitFmsDirPath ".."
Options -Indexes FollowSymLinks
# Uncomment the following directives to enable encryption
# for this location.
# EncryptionScope server
# ProtectionScheme phds
</Location>
</IfModule>
4 In the copied section, change the Location path to /flash-vod. You can also edit the HttpStreamingContentPath
directive to change the location of the on-demand media on disk.
Last updated 9/4/2014
Page 62

ADOBE MEDIA SERVER 5.0.6 DEVELOPER’S GUIDE
Getting started streaming media
<IfModule jithttp_module>
<Location /flash-vod>
HttpStreamingJITPEnabled true
HttpStreamingContentPath "../webroot/vod2"
JitFmsDirPath ".."
Options -Indexes FollowSymLinks
# Uncomment the following directives to enable encryption
# for this location.
# EncryptionScope server
# ProtectionScheme phds
</Location>
</IfModule>
Note: To change the location of content for live streaming, see “Configure the location of live HDS and HLS content”
on page 59.
5 Create the rootinstall/webroot/vod2 folder and copy the sample1_1500kbps.f4v file to it from the /webroot/vod
folder.
6 Restart Apache HTTP Server. The service name is FMSHttpd.
7 Double-click rootinstall/samples/videoPlayer/videoplayer.html to open the Adobe Media Server sample video
player.
8 Enter the following in the Stream URL text box:
http://localhost/flash-vod/sample1_1500kbps.f4v.f4m
58
You can play any file from the /webroot/vod2 folder.
Configure the location of on-demand HDS and HLS content
To configure the location of on-demand content on disk, edit the Apache httpd.conf file. Use the following directives:
Directive Description
HttpStreamingContent
Path
1 Open rootinstall/Apache2.2/conf/httpd.conf
2 To change the location on the server where media is stored for on-demand streaming, edit the
HttpStreamingContentPath directive. For example, the following changes the location to c:\hds_vod_content:
The root location of the streams. This value can be absolute or relative to the Apache
root folder.
By default, the location for on-demand HDS and HLS is "../webroot/vod".
Last updated 9/4/2014
Page 63

ADOBE MEDIA SERVER 5.0.6 DEVELOPER’S GUIDE
Getting started streaming media
<IfModule jithttp_module>
<Location /hds-vod>
HttpStreamingJITPEnabled true
# HttpStreamingContentPath "../webroot/vod"
HttpStreamingContentPath "C:\hds_vod_content"
JitFmsDirPath ".."
Options -Indexes FollowSymLinks
# Uncomment the following directives to enable encryption
# for this location.
# EncryptionScope server
# ProtectionScheme phds
</Location>
</IfModule>
<Location /hls-vod>
HLSHttpStreamingEnabled true
HLSMediaFileDuration 8000
# HttpStreamingContentPath "../webroot/vod"
HttpStreamingContentPath "C:\hds_vod_content"
HLSFmsDirPath ".."
# Uncomment the following directives to enable encryption
# for this location.
# HLSEncryptionScope server
# HLSEncryptCipherKeyFile "../creds/vodkey.bin"
# HLSEncryptKeyURI "https://<ServerName>/hls-key/vodkey.bin"
Options -Indexes FollowSymLinks</Location>
59
3 Restart the Apache HTTP Server. The service name is FMSHttpd.
4 Copy a sample file from /webroot/vod to c:\hds_vod_content. This task uses sample1_1500kbps.f4v.
5 (HDS) Open rootinstall/samples/videoPlayer/videoplayer.html in a browser and in the Stream URL text box, enter:
http://localhost/hds-vod/sample1_1500kbps.f4v.f4m
6 (HLS) On a device running iOS, open Safari and enter the following:
http://localhost/hls-vod/sample1_1500kbps.f4v.m3u8
The request URL is the same as it was before the Apache configuration change, but the content is in a different location
on the disk. When Apache receives a request that start with /hds-vod, it resolves the rest of the path based on the value
HttpStreamingContentPath.
of
To verify that the Apache configuration took effect, try to stream a sample file that isn’t in the c:\hds_vod_content
folder. For example, try to stream http://localhost/hds-vod/sample1_1000kbps.f4v.f4m. The sample video player
displays an error, “We are unable to connect to the content you’ve requested. We apologize for the inconvenience.”
Configure the location of live HDS and HLS content
To configure the location of live HDS and HLS content on disk, edit the Apache httpd.conf file. Use the following
directives:
Last updated 9/4/2014
Page 64

ADOBE MEDIA SERVER 5.0.6 DEVELOPER’S GUIDE
Getting started streaming media
Directive Description
60
HttpStreamingContent
Path
HttpStreamingLiveEve
ntPath
HttpStreamingURLSand
boxLevel
The root location of the streams on disk (livepkgr/streams, by default). By default,
the location is
livepkgr application.
This value can be absolute or relative to the Apache root folder.
The root location of live events on disk (livepkgr/events, by default). The default
value is "../applications". This location must be a subfolder of the livepkgr
application.
This value can be absolute or relative to the Apache root folder.
For HLS, this value is dependant on the value of the
HttpStreamingURLSandboxLevel directive.
Defines the scope at which HttpStreamingLiveEventPath is configured.
Possible values are
"Server".
If HttpStreamingLiveEventPath is configured to a particular application, use
the value
as in the following:
HttpStreamingLiveEventPath "..application/livepkgr"
HttpStreamingURLSandboxLevel "App"
The request URL is:
http://<fms-dns-or-ip>/hls-live/<app-instance>/<eventname>/<stream-name>.m3u8
If HttpStreamingLiveEventPath is configured to an application instance, use
the value
name and the application instance, as in the following:
HttpStreamingLiveEventPath
"..application/livepkgr/events/_definst_"
HttpStreamingURLSandboxLevel "Inst"
The request URL is:
http://<fms-dns-or-ip>/hls-live/<event-name>/<streamname>.m3u8
"../applications". This location must be a subfolder of the
"App", "Inst", and "Server". The default value is
"App". In this case, the client request URL can omit the application name,
"Inst". In this case, the client request URL can omit the application
Configure the location of the live content on disk
1 Open rootinstall/conf/ams.ini in a text editor. Set the VHOST.APPSDIR in parameter to one of the following:
• (Windows) C:/applications
• (Linux) /opt/applications
2 Restart the server.
3 Create a folder at the location in step 1 and copy the livepkgr application to it.
4 Open rootinstall/Apache2.2/conf/httpd.conf in a text editor.
5 To change the location of the HDS live content, edit the directives in bold:
Last updated 9/4/2014
Page 65

ADOBE MEDIA SERVER 5.0.6 DEVELOPER’S GUIDE
Getting started streaming media
<Location /hds-live>
HttpStreamingEnabled true
# HttpStreamingLiveEventPath "../applications"
# HttpStreamingContentPath "../applications"
HttpStreamingLiveEventPath "C:\applications"HttpStreamingContentPath "C:\applications"
HttpStreamingF4MMaxAge 2
HttpStreamingBootstrapMaxAge 2
HttpStreamingFragMaxAge -1
HttpStreamingDrmmetaMaxAge 3600
Options -Indexes FollowSymLinks
</Location>
</IfModule>
Note: On Linux, use "/opt/applications".
6 To change the location of HLS live content, edit the directives in bold:
<IfModule hlshttp_module>
<Location /hls-live>
HLSHttpStreamingEnabled true
# HttpStreamingLiveEventPath "../applications"
# HttpStreamingContentPath "../applications"
HttpStreamingLiveEventPath "C:\applications"HttpStreamingContentPath "C:\applications"
HLSMediaFileDuration 8000
HLSSlidingWindowLength 6
HLSFmsDirPath ".."
HLSM3U8MaxAge 2
HLSTSSegmentMaxAge -1
# Uncomment the following directives to enable encryption
# for this location.
# HLSEncryptionScope server
# HLSEncryptCipherKeyFile "../creds/liveeventkey.bin"
# HLSEncryptKeyURI "https://<ServerName>/hls-key/liveeventkey.bin"
Options -Indexes FollowSymLinks
</Location>
61
7 Restart Apache HTTP Server. The service name is FMSHttpd.
8 Open Flash Media Live Encoder and publish a stream with the following settings:
• Video codec—H.264
• Audio codec—AAC
• Keyframe Frequency—4 seconds
• AMS URL—rtmp://localhost/livepkgr
• Stream—livestream?adbe-live-event=liveevent
9 (HDS) Open rootinstall/samples/videoPlayer/videoplayer.html in a browser and in the Stream URL text box, enter:
http://localhost/hds-live/livepkgr/_definst_/liveevent/livestream.f4m
10 (HLS) On a device running iOS, open Safari and enter:
http://localhost/hls-live/livepkgr/_definst_/liveevent/livestream.m3u8
Note: To play content in Safari 4.0 on Mac OS, create an HTML document that uses the <video> tag.
Last updated 9/4/2014
Page 66

ADOBE MEDIA SERVER 5.0.6 DEVELOPER’S GUIDE
Getting started streaming media
Configure the scope of the request URL
1 Open rootinstall/Apache2.2/conf/httpd.conf in a text editor.
2 To change the scope of the request URL (also called the URL sandbox level) for HDS, edit the directives in bold:
<Location /hds-live>
HttpStreamingEnabled true
# HttpStreamingLiveEventPath "../applications"
# HttpStreamingContentPath "../applications"
HttpStreamingLiveEventPath "c:\applications\livepkgr"
HttpStreamingContentPath "c:\applications"
HttpStreamingURLSandboxLevel "App"
HttpStreamingF4MMaxAge 2
HttpStreamingBootstrapMaxAge 2
HttpStreamingFragMaxAge -1
Options -Indexes FollowSymLinks
</Location></IfModule>
To change the scope of the request URL for HLS, edit the directives in bold:
<IfModule hlshttp_module>
<Location /hls-live>
HLSHttpStreamingEnabled true
# HttpStreamingLiveEventPath "../applications"
# HttpStreamingContentPath "../applications"
HttpStreamingLiveEventPath "C:\applications\livepkgr"
HttpStreamingContentPath "C:\applications"
HttpStreamingURLSandboxLevel "App"
HLSMediaFileDuration 8000
HLSSlidingWindowLength 6
HLSFmsDirPath ".."
HLSM3U8MaxAge 2
HLSTSSegmentMaxAge -1
# Uncomment the following directives to enable encryption
# for this location.
# HLSEncryptionScope server
# HLSEncryptCipherKeyFile "../creds/liveeventkey.bin"
# HLSEncryptKeyURI "https://<ServerName>/hls-key/liveeventkey.bin"
Options -Indexes FollowSymLinks
</Location>
62
3 Restart the Apache HTTP Server. The service name is FMSHttpd.
4 Open Flash Media Live Encoder and publish a stream with the following settings:
• Video codec—H.264
• Audio codec—AAC
• Keyframe Frequency—4 seconds
• AMS URL—rtmp://localhost/livepkgr
• Stream—livestream?adbe-live-event=liveevent
5 (HDS) Double-click rootinstall/samples/videoPlayer/videoplayer.html to open the Adobe Media Server sample
video player. Enter the following for Stream URL and click play:
http://<host>/hds-live/_definst_/liveevent/livestream.f4m
Last updated 9/4/2014
Page 67

ADOBE MEDIA SERVER 5.0.6 DEVELOPER’S GUIDE
Getting started streaming media
6 On a device running iOS, open Safari and enter:
http://<host>/hls-live/_definst_/liveevent/livestream.m3u8
Because the URL sandbox level is configured to “App” instead of the default “Server”, the URL does not include the
application name (livepkgr).
Configure set-level F4M/M3U8 files for multi-bitrate streaming
Adobe Media Server 5
Configuration information about multi-bitrate streams has been divided into multiple levels: set-level F4M and M3U8
files and stream-level F4M and M3U8 files. For HDS, the files are F4M manifest files. For HLS, the files are M3U8
variant playlists. (The documentation sometimes uses the generic term “manifest” to refer to both.)
Set-level F4M and M3U8 files Contain the URL to the stream-level manifest file and the bit rate information for each
stream in a multi-bitrate set. For HDS, the set-level F4M file can also contain information about a DVR rolling
window. For HLS, the set-level M3U8 file can also contain codec information.
Adobe Media Server 5 includes a Set-level F4M/M3U8 File Generator tool. This tool is installed to
rootinstall/tools/f4mconfig/configurator/f4mconfig.html. Use the tool to generate set-level files. Copy the set-level
files to a web server. The media player requests set-level files to play multi-bitrate content.
63
The following is a set-level F4M file:
<manifest xmlns="http://ns.adobe.com/f4m/2.0">
<baseURL>http://localhost/hds-live/livepkgr/_definst_/liveevent/</baseURL>
<media href="livestream1.f4m" bitrate="150"/>
<media href="livestream2.f4m" bitrate="500"/>
<media href="livestream3.f4m" bitrate="700"/>
</manifest>
The following is a set-level M3U8 file:
#EXTM3U
#EXT-X-STREAM-INF:PROGRAM-ID=1,BANDWIDTH=150000
http://10.0.1.11/hls-live/livepkgr/_definst_/liveevent/livestream1.m3u8
#EXT-X-STREAM-INF:PROGRAM-ID=1,BANDWIDTH=500000
http://10.0.1.11/hls-live/livepkgr/_definst_/liveevent/livestream2.m3u8
#EXT-X-STREAM-INF:PROGRAM-ID=1,BANDWIDTH=700000
http://10.0.1.11/hls-live/livepkgr/_definst_/liveevent/livestream3.m3u8
Stream-level F4M and M3U8 files contain bootstrap information and DRM metadata. The live packager and the HTTP
modules generate stream-level F4M and M3U8 files in real time when a media player requests the content.
Flash/AIR media players that support set-level files To play set-level F4M files, use a media player that uses OSMF 1.6
or later. Strobe Media Playback that installs to rootinstall/samples/videoPlayer supports set-level F4M files.
Apple media players that support set-level files To play set-level M3U8 files, use any device that supports Apple
HTTP Live Streaming. See the
F4M specification For detailed information about the F4M file format, see the F4M File Format Specification.
Apple HTTP Live Streaming documentation.
M3U8 specification For detailed information about the M3U8 file format, see HTTP Live Streaming Internet-Draft.
Tutorials that use set-level files The following tutorials use set-level files for multi-bitrate streaming:
• “Publish and play live multi-bitrate streams over HTTP” on page 8
• “Play on-demand multi-bitrate media files over HTTP” on page 22
Last updated 9/4/2014
Page 68

ADOBE MEDIA SERVER 5.0.6 DEVELOPER’S GUIDE
Getting started streaming media
• “Publish an audio-only stream (HLS)” on page 11
• “Configure DVR (HDS)” on page 13
Configure absolute time on the server
Note: The livepkgr application is configured by default to use absolute time. Use this section to understand HTTP
streaming and to duplicate the livepkgr application.
The livepkgr ingest application is configured by default to use absolute time. To see the configuration, open
rootinstall/applications/livepkgr/Application.xml in a text editor.
To publish live, multi-bitrate streams, configure the live encoder to publish the streams using absolute time. See
“Stream live media (HTTP)” on page 5.
1 Copy an Application.xml file to the application folder.
For example, if you’re publishing streams to the application “livepkgr2”, copy an Application.xml file from the
conf\_defaultRoot_\_defaultVHost_ folder to the applications/livepkgr2 folder.
2 Open the Application.xml file in a text editor.
3 Set the tag //Application/StreamManager/Live/AssumeAbsoluteTime to true:
<Application>
...
<StreamManager>
...
<Live>
...
<AssumeAbsoluteTime>true</AssumeAbsoluteTime>
64
4 Save the file.
5 Restart the server. See Starting and stopping the server.
Important: Set <AssumeAbsoluteTime> to true only when all streams published to the application use absolute time. If
this value is set to true and the application ingests a stream that does not use absolute time, you may see warnings in the
server logs about time going backwards when streams are stopped and re-published.
Configure F4F and TS fragment duration
The server records ingested (live) streams into fragments. It records on-demand files into fragments when a client
requests the files.
Adobe HDS fragments are F4F files. Apple HLS fragments are TS files.
Specify the size of content fragments based on frames or based on time. The frame-based configuration overrides the
time-based configuration.
Use frame-based configuration when the source media contains video encoded at a constant frame rate. Use framebased configuration to match the fragment size to the video's keyframe interval. Use time-based configuration for
media that contains audio or data but not video.
The server’s fragment duration must be a multiple of the encoder’s keyframe interval. The value of
KeyframeIntervalsPerFragment defines the multiple.
Configure fragment size for live HDS and HLS
Server-level configurations for live HDS
Last updated 9/4/2014
Page 69

ADOBE MEDIA SERVER 5.0.6 DEVELOPER’S GUIDE
Getting started streaming media
Set the following directive in the Apache httpd.conf to configure fragment size for all live HDS events on the server:
Directive Description Default
65
HttpStreamingFragmentDu
ration
HttpStreamingFrameRate For frame-based fragment duration configuration, this is the frame
HttpStreamingFramesPerK
eyframeInterval
HttpStreamingKeyframeIn
tervalsPerFragment
The default fragment duration, in milliseconds. This is the timebased configuration, and can be overridden by selecting framebased values.
rate of the source content.
For frame-based fragment duration configuration, this is the
number of frames in each keyframe interval (group of pictures).
For frame-based fragment duration configuration, this is the
number of keyframe intervals (GOPs) per fragment.
4000
None
None
1
Server-level configurations for live HLS
Set the following directive in the Apache httpd.conf to configure a time-based fragment size for all live HLS events on
the server:
Directive Description Default
HLSMediaFileDuration The duration of TS files, in milliseconds. Use a value that is a
multiple of the keyframe intervals for the media.
8000
Application-level and event-level configurations for live HDS
To configure fragment size at the application-level, use the Application.xml file in the directory of the Live Packager
application (livepkgr, by default).
To configure fragment size at the event-level, use the Event.xml file in the live event directory
(applications/livepkgr/events/_definst_/liveevent, by default).
Use the elements in the <Recording> container to configure how the server writes files to disk. In the Application.xml
file, the elements are located at
Element Description Default
/Recording The section that configures how the file is written to disk. None
/Recording/FragmentDur
ation
/Recording/FramePrecis
ion
/Recording/FrameRate The frame rate of the original content, in frames per
//Application/HDS. In the Event.xml file, the elements are located at //Event.
The length of each fragment, in milliseconds. Each
segment can contain one or more fragments.
Time-based configuration.
The rounding precision for the fragment run table, in
frame units. Frame units are derived from the specified
frame rate (1/rate).
Frame-based configuration.
second (fps). The value is floating point; for NTSC, use the
value 29.97.
Frame-based configuration
4000
1
None
Last updated 9/4/2014
Page 70

ADOBE MEDIA SERVER 5.0.6 DEVELOPER’S GUIDE
Getting started streaming media
Element Description Default
66
/Recording/FramesPerKe
yframeInterval
/Recording/KeyframeInt
ervalsPerFragment
/Recording/SegmentDura
tion
The number of frames between each keyframe. For
example, 30 fps video with a keyframe every 2 seconds
contains 60 frames per keyframe interval.
Frame-based configuration.
The number of keyframe intervals per fragment. The
default value is 1, which means that the fragment size is
the same as the keyframe interval.
Frame-based configuration.
The length of each segment, in milliseconds. Each .f4f file
contains one segment.
Time-based configuration. Frame-based configurations
override time-based configurations
None
1
400000
Application-level and event-level configurations for live HLS
To configure fragment size at the application-level, use the Application.xml file in the directory of the Live Packager
application (livepkgr, by default).
To configure fragment size at the event-level, use the Event.xml file in the live event directory
(applications/livepkgr/events/_definst_/liveevent, by default).
Use the elements in the <Recording> and <HLS> containers to configure how the server writes files to disk. In the
Application.xml file, the elements are located at
//Event/.
at
//Application/HDS. In the Event.xml file, the elements are located
Element Description Default
/Recording/FrameRate The frame rate of the original content, in frames per
/Recording/FramesPerKe
yframeInterval
/HLS/KeyframeIntervalP
erMediaFile
/HLS/MediaFileDuration The length of each media file (TS), in milliseconds.
second (fps). The value is floating point; for NTSC, use the
value 29.97.
Frame-based configuration.
The number of frames between each keyframe. For
example, 30 fps video with a keyframe every 2 seconds
contains 60 frames per keyframe interval.
Frame-based configuration.
The number of keyframe intervals per media file (TS). The
default value is 1, which means that the fragment size is
the same as the keyframe interval.
Frame-based configuration.
Time-based configuration. Frame-based configurations
override time-based configurations
None
None
1
8000
Specify fragment size for live HDS and HLS based on frames
Use the following elements for HDS: KeyframeIntervalsPerFragment, FrameRate,
FramesPerKeyframeInterval, FramePrecision.
Use the following elements for HLS: FrameRate, FramesPerKeyframeInterval, and
KeyframeIntervalPerMediaFile.
Last updated 9/4/2014
Page 71

ADOBE MEDIA SERVER 5.0.6 DEVELOPER’S GUIDE
Getting started streaming media
<Event>
<EventID>liveevent</EventID>
<Recording>
<FrameRate>29.97</FrameRate>
<FramesPerKeyframeInterval>120</FramesPerKeyframeInterval>
<KeyframeIntervalsPerFragment>1</KeyframeIntervalsPerFragment>
<FramePrecision>1</FramePrecision>
</Recording>
<HLS>
<KeyframeIntervalPerMediaFile>3</KeyframeIntervalPerMediaFile>
</HLS>
</Event>
The server calculates the HLS media file duration according to the following formula:
MediaFileDurationInSeconds = FramesPerKeyframeInterval * KeyframeIntervalPerMediaFile /
FrameRate
Specify fragment size for live HDS and HLS based on time
Use the following elements for HDS: FragmentDuration, SegmentDuration.
Use the following element for HLS: MediaFileDuration.
Use the following elements: FragmentDuration, MediaFileDuration.
67
<Event>
<EventID>liveevent</EventID>
<Recording>
<FragmentDuration>4000</FragmentDuration>
<SegmentDuration>400000</SegmentDuration>
</Recording>
<HLS>
<MediaFileDuration>8000<MediaFileDuration>
</HLS>
</Event>
Configure fragment size for on-demand HDS and HLS
Server-level configurations for on-demand HDS
Set the following directive in the Apache httpd.conf to configure fragment size for all on-demand HDS on the server:
Directive Description Default
HttpStreamingFragmentDu
ration
HttpStreamingFrameRate The frame rate of the source content.
HttpStreamingFramesPerK
eyframeInterval
The default fragment duration, in milliseconds.
This is the time-based configuration. Frame-based configurations
override time-based configurations.
Frame-based configuration.
The number of frames in each keyframe interval (group of pictures.
Frame-based configuration.
4000
None
None
HttpStreamingKeyframeIn
tervalsPerFragment
The number of keyframe intervals (GOPs) per fragment.
Frame-based configuration.
Server-level configurations for on-demand HLS
Last updated 9/4/2014
1
Page 72

ADOBE MEDIA SERVER 5.0.6 DEVELOPER’S GUIDE
Getting started streaming media
Set the following directive in the Apache httpd.conf to configure fragment size for all on-demand HLS on the server:
Directive Description Default
68
HLSMediaFileDuration The duration of TS files, in milliseconds. Use a value that is a
HttpStreamingFrameRate The frame rate of the source content. This is a frame-based
HLSKeyframeIntervalsPerMed
iaFile
HttpStreamingFramesPerKeyf
rameInterval
multiple of the keyframe intervals for the media.
configuration.
The number of keyframe intervals (group of pictures) per
media file. This is a frame-based configuration.
The number of frames in each keyframe interval (group of
pictures). This is a frame-based configuration.
8000
None
1
None
Stream-level configurations for on-demand HDS
To configure a set of on-demand media files (or a single file), copy a jit.conf file to the same directory as the media files.
All media files in a directory use the same jit.conf file.
Use a jit.conf file with the following elements to configure fragment size for HDS at the stream-level:
Element Description Default
//manifest/hds:fragment-duration The fragment duration for the set of content, in
seconds. The value can be fractional (for example,
to specify 2002 milliseconds, use the value 2.002).
Time-based configuration. Frame-based
configurations override time-based configurations
//manifest/hds:frame-rate The frame rate of the set of content. Units are
frames/second, and can be fractional (i.e. 29.97 for
NTSC) .
Frame-based configuration.
None
None
//manifest/hds:frames-perkeyframe-interval
//manifest/hds:keyframeintervals-per-fragment
The number of frames per keyframe interval (GOP).
Units are frames, and should be a whole integer
value.
Frame-based configuration.
The number of keyframe intervals per fragment.
Units are keyframe intervals per fragment, and
should be a whole integer value.
Frame-based configuration.
None
1
Stream-level configurations for on-demand HLS
To configure a set of on-demand media files (or a single file), copy a jit.conf file to the same directory as the media files.
All media files in a directory use the same jit.conf file. Use a jit.conf file with the following elements to configure
fragment size for HLS at the stream-level:
Last updated 9/4/2014
Page 73

ADOBE MEDIA SERVER 5.0.6 DEVELOPER’S GUIDE
Getting started streaming media
Element Description Default
69
//manifest/hds:frame-rate The frame rate of the set of content. Units are
//manifest/hds:frames-perkeyframe-interval
//manifest/hds:hls Container for Apple HTTP Live Streaming
//manifest/hds:hls/hds:keyframeintervals-per-media-file
//manifest/hds:hls/hds:mediafile-duration
frames/second, and can be fractional (i.e. 29.97 for
NTSC) .
Frame-based configuration.
The number of frames per keyframe interval (GOP).
Units are frames, and should be a whole integer
value.
Frame-based configuration.
configurations.
The number of keyframe intervals per TS file
duration. The value must be a whole integer.
Frame-based configuration.
The TS file duration, in milliseconds, for the set of
content associated with this file. Use a value that is
a multiple of the fragment duration.
Time-based configuration. Frame-based
configurations override time-based configurations
None
None
None
None
None
Specify fragment size for on-demand HDS and HLS based on frames
Use the following elements for HDS: hds:frame-rate, hds:frames-per-keyframe-interval, and
hds:keyframe-intervals-per-fragment.
Use the following elements for HLS: hds:frame-rate, hds:frames-per-keyframe-interval, and hds:keyframe-
intervals-per-media-file.
<?xml version="1.0" encoding="utf-8"?>
<manifest xmlns="http://ns.adobe.com/f4m/1.0" xmlns:hds="http://ns.adobe.com/hdspackage/1.0">
<hds:frame-rate>29.97</hds:frame-rate>
<hds:frames-per-keyframe-interval>60</hds:frames-per-keyframe-interval>
<hds:keyframe-intervals-per-fragment>2</hds:keyframe-intervals-per-fragment>
<hds:hls>
<hds:keyframe-intervals-per-media-file>2</hds:keyframe-intervals-per-media-file>
</hds:hls>
</manifest>
Specify fragment size for on-demand HDS and HLS based on time
Use the following element for HDS: hds:fragment-duration.
Use the following element for HLS: hds:media-file-duration.
<?xml version="1.0" encoding="utf-8"?>
<manifest xmlns="http://ns.adobe.com/f4m/1.0" xmlns:hds="http://ns.adobe.com/hdspackage/1.0">
<hds:fragment-duration>8000</hds:fragment-duration>
<hds:hls>
<hds:media-file-duration>8000</hds:media-file-duration>
</hds:hls>
</manifest>
Last updated 9/4/2014
Page 74

ADOBE MEDIA SERVER 5.0.6 DEVELOPER’S GUIDE
Getting started streaming media
Known issue
Note that when the normal recording is on, the HLS module returns an HTTP 503 (Service Unavailable) error
intermittenly for TS requests, if the TS duration is less than the fragment duration.
Configure the size of the IO buffer
Adobe Media Server 5
The IO buffer improves the read and write performance of the Apache f4f module. The IO buffer loads the disk file
into an in-memory buffer. It reads and writes to the in-memory buffer instead of making system calls.
Note: This feature impacts both HTTP Dynamic Streaming and HTTP Live Streaming.
When the buffer is full, or if the read/write head needs to move beyond the buffer boundaries, the server commits the
contents of the buffer to the disk file and pre-loads new content into the buffer from the disk file.
The default value of the IO buffer is 4096 bytes. To increase or decrease the value, edit the Event.xml file. Use a multiple
of 4096 bytes.
1 Open the Event.xml file in a text editor.
For live HTTP streaming, the Event.xml file is located in the live event folder. For example,
rootinstall/applications/livepkgr/events/_definst_/liveevent/Event.xml.
70
2 Set the IOBufferSize to a value that is a multiple of the cluster size of the underlying operating system.
IOBufferSize is the size of the IO buffer in bytes.
<Event>
<EventID>liveevent</EventID>
<Recording>
<FragmentDuration>4000</FragmentDuration>
<IOBufferSize>4096</IOBufferSize>
</Recording>
</Event>
3 Save the file.
Disk management
Adobe Media Server 5
Set the DiskManagementDuration configuration parameter in the Application.xml file or the Event.xml file to specify
how much of the latest live content is on disk. The limit set at the application level cannot be overriden at the event
level. If the limit has been set in the Application.xml file, the Event.xml file can set a duration that is equal to or lower
than that limit.
All live HTTP streaming uses disk management to prevent the disk from filling. Disk management allows you to create
24/7 live streaming events. In addition, when using DVR, configure disk management in relation to the DVR settings.
“Configure DVR (HDS)” on page 13.
See
By default, disk management keeps 3 hours of a live stream. The server constantly checks the content and if the content
duration is above the value of
beyond the limit.
DiskManagmentDuration, the server deletes the .f4f files and the .f4x files for segments
If SegmentDuration or DiskManagmentDuration have values (both do by default), the following formula must be
true for the server to start recording:
Last updated 9/4/2014
Page 75

ADOBE MEDIA SERVER 5.0.6 DEVELOPER’S GUIDE
Getting started streaming media
FragmentDuration < SegmentDuration < DiskManagementDuration
Also, the value of SegmentDuration must be greater than 0. (The value 0 creates 1 segment.) The value of
SegmentDuration specifies how rapidly segments are removed. The smaller the value of SegmentDuration, the faster
segments are deleted.
The server maintains the total duration of all the content available. After a segment is created, the server checks if the
segment does not have any fragments that are in the disk management window. If so, the server removes the segment
from the bootstrap entries, then removes the segment from disk.
Note: This behavior is a change from Flash Media Server 4.0 which allowed FragmentDuration to be greater than
SegmentDuration.
Element Default Description
71
DiskManagementDuration 3 The maximum duration of the content on the server, in hours.
The default value is 3. Use a fractional value to specify
minutes.
The value of DiskManagementDuration in the Application.xml file cannot be overridden by the value in the
Event.xml file. If a value is not set in Application.xml, you can set a value in Event.xml.
The following sets disk management duration to 4 hours in the Application.xml file. This value impacts all live events
running in this application.
<Application>
...
<HDS>
<Recording>
<FragmentDuration>4000</FragmentDuration>
<SegmentDuration>16000</SegmentDuration>
<DiskManagementDuration>4</DiskManagementDuration>
</Recording>
</HDS>
</Application>
The following sets the disk management duration to 1 hour in the Event.xml file. This value limits the content duration
on the server for the event called “liveevent.”
<Event>
<EventID>liveevent</EventID>
<Recording>
...
<DiskManagementDuration>1</DiskManagementDuration>
</Recording>
</Events>
For more information, see “Configure live HTTP streaming” on page 81.
Last updated 9/4/2014
Page 76

ADOBE MEDIA SERVER 5.0.6 DEVELOPER’S GUIDE
Getting started streaming media
Configure content caching (HDS)
To improve the performance of live and on-demand HTTP Dynamic Streaming, enable Apache content caching on
the origin server. When caching is enabled, the server caches content that it packages for HDS. When the server
receives a request, it checks the cache before it serves content. Content caching is disabled by default.
1 Run the htcacheclean tool.
To limit the amount of storage the disk cache uses, run the Apache htcacheclean tool when content caching is
enabled. The tool can run manually or as a daemon. The htcacheclean tool is located at rootinstall/Apache2.2/bin/.
For information about how to run the tool, see the
2 In the Apache httpd.conf file, uncomment the caching configuration section.
# Uncomment this to enable caching
LoadModule cache_module modules/mod_cache.so
<IfModule mod_cache.c>
LoadModule disk_cache_module modules/mod_disk_cache.so
IfModule mod_disk_cache.c>
CacheEnable disk /hds-vod
CacheEnable disk /hls-vod
CacheRoot cacheroot
CacheMaxFileSize 10000000
CacheLock On
</IfModule>
</IfModule>
Apache documentation.
72
Verify that the directory specified by the CacheRoot directive exists. The default cacheroot directory is located at
rootinstall/Apache2.2/cacheroot.
3 Restart Apache.
For more information about content caching, see the Apache documentation.
Encrypt content for Adobe Access protection
Important: Use the HTTP Dynamic Streaming packagers to both encrypt and fragment content. Do not use the Adobe
Access packaging tools to encrypt content. The HTTP Dynamic Streaming packagers cannot fragment content that has
already been encrypted.
To deliver live or on-demand content with HTTP Dynamic Streaming and protect it with Adobe Access, use Adobe
Access Server for Protected Streaming. This server is a Adobe Access license server implementation optimized for use
with HTTP Dynamic Streaming. See
Note: The Adobe Access SDK and the Adobe Access license server reference implementation can also issue licenses for
HTTP Dynamic Streaming.
After you’ve deployed Adobe Access Server for Protected Streaming, configure Adobe Media Server to package and
encrypt the content in real-time.
Configure Adobe Media Server to encrypt live content
You can configure live content encryption with Adobe Access at the application level and at the event level.
To configure Adobe Access at the application level, use the Application.xml file located here:
Adobe Access Protecting Content.
rootinstall/applications/livepkgr/Application.xml
In the Application.xml file, the FlashAccessV2 container element is located here:
//Application/HDS/Recording/ContentProtection/FlashAccessV2
Last updated 9/4/2014
Page 77

ADOBE MEDIA SERVER 5.0.6 DEVELOPER’S GUIDE
Getting started streaming media
To configure Adobe Access at the event level, use the Event.xml file located here:
rootinstall/applications/livepkgr/events/_definst_/liveevent/Event.xml
In the Event.xml file, the FlashAccessV2 container element is located here:
//Event/Recording/ContentProtection/FlashAccessV2
1 Open the file rootinstall/applications/livepkgr/events/_definst_/liveevent/Event.xml in a text editor.
2 Add the XML tags required for encrypting the streams. The following is a sample Event.xml file:
<Event>
<EventID>liveevent</EventID>
<Recording>
<FragmentDuration>4000</FragmentDuration>
<SegmentDuration>10000</SegmentDuration>
<ContentProtection enabled="true">
<ProtectionScheme>FlashAccessV2</ProtectionScheme>
<FlashAccessV2>
<ContentID>foo</ContentID>
<CommonKeyFile>common-key.bin</CommonKeyFile>
<LicenseServerURL>http://dill.corp.adobe.com:8090</LicenseServerURL>
<TransportCertFile>production_transport.der</TransportCertFile>
<LicenseServerCertFile>license_server.der</LicenseServerCertFile>
<PackagerCredentialFile>production_packager.pfx</PackagerCredentialFile>
<PackagerCredentialPassword>hbXX5omIhzI=</PackagerCredentialPassword>
<PolicyFile>policy01.pol</PolicyFile>
</FlashAccessV2>
</ContentProtection>
</Recording>
</Event>
73
Note: The certificates that you use with the Live Packager must match the license server.
Element Description Default value
FlashAccessV2 A container for settings used by Adobe
FlashAccessV2/CommonKeyFile A path to a common key file used to
FlashAccessV2/ContentID The content ID used with the common key
FlashAccessV2/LicenseServer
CertFile
FlashAccessV2/LicenseServer
URL
Access to protect content.
generate a content encryption key. The
path should be absolute or relative to the
configuration file.
The base key used with the content ID to
generate the content encryption key. This
is a binary file containing a 16-byte/128bit binary key.
For adaptive bitrate streaming, use the
same common key and content ID for an
entire set of content. Using the same key
and id allows a single license to decrypt a
set of content.
to generate the content encryption key.
The DER encoded license server certificate
file used for content protection.
The URL of the license server that handles
license acquisition for this content.
None
None
None
None
None
Last updated 9/4/2014
Page 78

ADOBE MEDIA SERVER 5.0.6 DEVELOPER’S GUIDE
Getting started streaming media
Element Description Default value
74
FlashAccessV2/PackagerCrede
ntialFile
FlashAccessV2/PackagerCrede
ntialPassword
FlashAccessV2/PolicyFile The file containing the policy for this
FlashAccessV2/TransportCert
File
The PFX file containing the packager's
protection credentials.
The password string used to secure the
packager credentials.
content. Currently only a single policy can
be applied to content packaged with this
tool.
The DER encoded transport certificate file. None
None
None
None
The Live Packager outputs the fragmented and protected files needed for HTTP Dynamic Streaming. Each fragment
is persistently protected in both the CDN cache and the browser cache.
Configure Adobe Media Server to encrypt on-demand content:
1 Create a file called jit.conf and copy it to the same folder as the on-demand media files. The settings in the jit.conf
file apply to all the files in the folder.
2 Add the XML tags required for encrypting the streams. The following is a sample jit.conf file:
<?xml version="1.0" encoding="utf-8"?>
<manifest xmlns="http://ns.adobe.com/f4m/1.0" xmlns:hds="http://ns.adobe.com/hdspackage/1.0">
<hds:frame-rate>29.97</hds:frame-rate>
<hds:frames-per-keyframe-interval>60</hds:frames-per-keyframe-interval>
<hds:content-protection enabled="true">
<hds:protection-scheme>FlashAccessV2</hds:protection-scheme>
<hds:FlashAccessV2>
<hds:content-id>myfile.manifest</hds:content-id>
<hds:common-key-file>common.bin</hds:common-key-file>
<hds:license-server-url>http://mylicenseserver.myhost.com</hds:license-server-
url>
<hds:transport-cert-file>transport.der</hds:transport-cert-file>
<hds:license-server-cert-file>server.der</hds:license-server-cert-file>
<hds:packager-credential-file>packager.pfx</hds:packager-credential-file>
<hds:packager-credential-password>??????</hds:packager-credential-password>
<hds:policy-file>policy.pol</hds:policy-file>
</hds:FlashAccessV2>
</hds:content-protection>
</manifest>
Last updated 9/4/2014
Page 79

ADOBE MEDIA SERVER 5.0.6 DEVELOPER’S GUIDE
Getting started streaming media
Element Description Default
75
//manifest/hds:contentprotection/hds:flashaccess/hds:common-key-file
//manifest/hds:contentprotection/hds:flashaccess/hds:content-id
//manifest/hds:contentprotection/hds:flashaccess/hds:license-server-url
//manifest/hds:contentprotection/hds:flashaccess/hds:transport-cert-file
//manifest/hds:contentprotection/hds:flashaccess/hds:license-server-certfile
//manifest/hds:contentprotection/hds:flashaccess/hds:packager-credentialfile
//manifest/hds:contentprotection/hds:flashaccess/hds:packager-credentialpassword
The path to common key file. File contains 16byte/128-bit random key.
The path must be absolute or relative to the jit.conf
file.
The Content ID to be used for content protection.
If not specified, the salt is the filename. If specified,
the salt is shared with all content in the directory.
The License Server URL. None
The path to transport cert file. The file is in DER
format.
The path should be absolute or relative to the
jit.conf file.
The path to transport cert file. File is in DER format.
The path should be absolute or relative to the
jit.conf file.
The path to packager credential cert file. File is in
PFX format.
The path should be absolute or relative to the
jit.conf file.
The packager credential password. None
None
None
None
None
None
//manifest/hds:contentprotection/hds:flashaccess/hds:policy-file
The path to a policy file. File is in FAXS policy
format.
The path should be absolute or relative to the
jit.conf file.
None
Publish live streams
❖ Publish a live stream or multi-bitrate streams from a supported encoder to the livepkgr service. Adobe Access
doesn’t require any special settings.
Play encrypted streams
❖ OSMF media players do the following:
a Request the file fragments and play them back seamlessly.
b Obtain a content license from Adobe Access Server for Protected Streaming. The content license contains the
key required to play the content to legitimate clients.
c Decrypt the content in real-time.
Last updated 9/4/2014
Page 80

ADOBE MEDIA SERVER 5.0.6 DEVELOPER’S GUIDE
Getting started streaming media
HTTP streaming configuration file reference
Configure live and on-demand HTTP Streaming at the server level (httpd.conf)
Apache HTTP Server that installs with Adobe Media Server is configured by default for Adobe HTTP Dynamic
Streaming (to Flash Player and AIR) and Apple HTTP Live Streaming (to iOS and Mac OS). The Adobe Media Server
Apache installation includes four custom modules that handle HTTP streaming.
The following table describes the types of streaming that each modules handles, and where the module is configured
in the httpd.conf file:
76
Streaming type Module Location directive in
Live Adobe HTTP Dynamic Streaming f4fhttp_module <Location /hds-live>
On-demand Adobe HTTP Dynamic Streaming packaged
offline by the File Packager tool
On-demand Adobe HTTP Dynamic Streaming packaged
in real-time
Live Apple HTTP Live Streaming hlshttp_module <Location /hls-live>
On-demand Apple HTTP Live Streaming hlshttp_module <Location /hls-vod>
HTTP Streaming failover ctrlplane_module <Location /ctrlplane
f4fhttp_module <Location /vod>
jithttp_module <Location /hds-vod>
httpd.conf
Note: Despite the name, Apple HTTP Live Streaming supports live and on-demand content.
The configuration of the modules determines the format of the URL that the player requests from the server, the
location of the content, the content fragmentation settings, and additional settings. Configure the settings at the
server-level in the Apache httpd.conf file:
rootinstall/Apache2.2/conf/httpd.conf
To see the default configurations, open the httpd.conf file.
Directives for all the HTTP streaming modules
Use the following directives to configure all the HTTP streaming modules (jithttp_module, f4fhttp_module, and
hlshttp_module):
Directive Required Description
HttpStreamingContentPath Yes The physical location of the content path. For live streaming,
HttpStreamingLiveEventPath Yes
For live
streaming
only.
the location of livepkgr/streams.
This value can be absolute or relative to the Apache root
folder. See
The location of the live event directory (by default
livepkgr/events). The default value is "../applications".
This value can be absolute or relative to the Apache root
folder. See
HTTP streaming file operations are routed through the File
plug-in. You can optionally use a File plug-in to manage
content. For more information, see
manage content for live HTTP streaming” on page 333.
“Content storage (HDS and HLS)” on page 56.
“Content storage (HDS and HLS)” on page 56.
“Use the File plug-in to
Last updated 9/4/2014
Page 81

ADOBE MEDIA SERVER 5.0.6 DEVELOPER’S GUIDE
Getting started streaming media
Directive Required Description
77
HttpStreamingURLSandboxLev
el
Location Yes The section of the request URL after the server name (and
No
For live
streaming
only
Defines the scope at which
HttpStreamingLiveEventPath is configured. Possible
values are
is
optional port number). This path tells Apache which module
to use to process the request.
"App", "Inst", and "Server". The default value
"Server".
For more information, see Configure HTTP Streaming failover.
Directives for Adobe HTTP Dynamic Streaming
Use the following directives to configure the Adobe HTTP Dynamic Streaming modules (jithttp_module for ondemand and f4fhttp_module for live):
Parameter Module Required Description
EncryptionScope jithttp_module,
f4fhttp_module
No The scope at which protected HTTP
Dynamic Streaming (PHDS) is configured.
Possible values are:
server—The server uses configuration
settings in the httpd.conf file.
content—The server uses configuration
settings in the Event.xml or
Application.xml file (live), or in the jit.conf
file (on-demand).
See Protected HTTP Dynamic Streaming
(PHDS).
HttpStreamingBootstrapMaxAge f4fhttp_module No The time to live for bootstrap files, in
HttpStreamingEnabled f4fhttp_module Yes Setting HttpStreamingEnabled to true
HttpStreamingFragMaxAge f4fhttp_module
jithttp_module
HttpStreamingDrmmetaMaxAge f4fhttp_module No The time to live for DRM MetaData, in
HttpStreamingFragmentDuration jithttp_module No The length of an F4F file, in milliseconds.
HttpStreamingFrameRate jithttp_module
hlshttp_module
No The time to live for fragment files, in
No For frame-based fragment duration
seconds. The default value is 2.
enables the Origin module to process
requests matching the Location directive.
Possible values are
seconds. The default value is -1 which is
unlimited.
seconds. The default value is 3600 (1 hour).
The default value is 4000. See
F4M and TS duration.
configuration, this is the frame rate of the
source content. This value is overridden if a
jit.conf file is provided. See
and TS duration.
true and false.
Configure
Configure F4M
Last updated 9/4/2014
Page 82

ADOBE MEDIA SERVER 5.0.6 DEVELOPER’S GUIDE
Getting started streaming media
Parameter Module Required Description
78
HttpStreamingFramesPerKeyframeI
nterval
jithttp_module
hlshttp_module
No For frame-based fragment duration
configuration, this is the number of frames
in each keyframe interval (group of
pictures). This value is overridden if a
jit.conf file is provided. See
Configure F4M
and TS duration.
HttpStreamingF4MMaxAge f4fhttp_module No The time to live for F4M files, in seconds.
The default value is 2.
HttpStreamingJITConfAllowed jithttp_module No Indicates whether jit.conf processing is
allowed. The default is
false means that jit.conf will not be
to
true. Setting this
processed, even if present, and the server
will not even attempt to load a jit.conf file.
HttpStreamingJITPEnabled jithttp_module Yes Indicates whether just-in-time packaging
is enabled (
HttpStreamingKeyframeIntervalsP
erFragment
jithttp_module No For frame-based fragment duration
configuration, this is the number of
true) or not (false).
keyframe intervals (GOPs) per fragment.
The default value is 1.
This value is overridden if a jit.conf file is
provided. See
Configure F4M and TS
duration.
HttpStreamingMaxFragmentDuratio
n
jithttp_module,
f4fhttp_module
No This is the maximum allowed size of a
fragment (in milliseconds). Set this
directive to a value that prevents usersupplied overrides from creating large
fragments that can clog the network.
HttpStreamingMinFragmentDuratio
n
jithttp_module,
f4fhttp_module
No This is the minimum allowed size of a
fragment (in milliseconds).Set this
directive to a value that prevents usersupplied overrides from creating many
small fragments. When media is packaged
into too many fragments, the client has to
make too many requests.
JitFmsDirPath jithttp_module Yes The location of the Adobe Media Server
installation.
JitGenerateCaptionInfo jithttp_module No You can configure closed captioning at the
server level by providing
true as a value
for this element.
cc-info-enabled jithttp_module No You can configure closed captioning at the
server level by providing
true as a value
for this element.
PHDSSWFVerification jithttp_module,
f4fhttp_module
No Enables SWF verification for PHDS (true)
false).
or not (
If EncryptionScope is set to content,
this value can be set in the jit.conf file.
Last updated 9/4/2014
Page 83

ADOBE MEDIA SERVER 5.0.6 DEVELOPER’S GUIDE
Getting started streaming media
Parameter Module Required Description
79
PHDSSWFWhiteListFolder jithttp_module,
f4fhttp_module
PHDSSWFMaxTimeToVerify jithttp_module,
f4fhttp_module
ProtectionScheme jithttp_module,
f4fhttp_module
No A path to the folder containing the
No Specifies the maximum time for SWF
No The type of protection to apply to content.
whitelist for on-demand SWF verification.
The folder can contain more than one
whitelist file.
The default value is the content folder
(which contains both media and the
jit.conf file ).
If EncryptionScope is set to content,
this value can be set in the jit.conf file..
verification for PHDS. The default value is
100s.
Possible values are
FlashAccessV2.
phds and
For more HDS directives that can be used for content protection, see “Configuring content protection for HDS” on
page 115
Directives for Apple HTTP Live Streaming
Use the following directives to configure the Apple HTTP Live Streaming module for live and on-demand streaming
(hlshttp_module):
Directive Required Description
HLSEncryptCipherKeyFile No The path of the default cipher key used to encrypt the content for
HLSEncryptionScope No The scope at which protected HTTP Live Streaming (PHLS) is
HLSEncryptKeyURI No The URI that the client uses to fetch the encryption key for PHLS.
HLSFmsDirPath Yes The location of the Adobe Media Server installation. The default
HLSHttpStreamingEnabled Yes Indicates whether or not HLS is enabled (true) or not (false).
HLSJITConfAllowed No Indicates whether jit.conf processing is allowed. The default is
PHLS.
configured. Possible values are:
server—The server uses configuration settings in the
httpd.conf file.
content—The server uses configuration settings in the
Event.xml or Application.xml file (live), or in the jit.conf file (ondemand).
See Protected HTTP Live Streaming (PHLS).
"..".
value is
This value can be absolute or relative to the Apache root folder.
“Content storage (HDS and HLS)” on page 56.
See
The default value is
true. Setting this to false means that jit.conf will not be
processed, even if present, and the server will not even attempt
to load a jit.conf file.
false.
Last updated 9/4/2014
Page 84

ADOBE MEDIA SERVER 5.0.6 DEVELOPER’S GUIDE
Getting started streaming media
Directive Required Description
80
HLSMediaFileDuration No The duration of the TS file to be served, in milliseconds. This
number must be a multiple of the fragment duration specified in
Flash Media Live Encoder. The default value is 8000. See
Configure F4M and TS duration.
In the case of HLS-VOD, HLSMediaFileDuration can be in
between 500 ms to 30000ms. These bound values can be
modified using the following directives:
• HLSMaxMediaFileDuration
• HLSMinMediaFileDuration
HLSM3U8MaxAge No Specifies the max-age to set in the cache-control header for
HLSSlidingWindowLength No The number of TS files in a playlist and available for seeking
HLSTSSegmentMaxAge No Specifes the max-age to set in the cache-control header for TS
HttpStreamingUnavailableR
esponseCode
No The HTTP response code that FMS returns for unavailable
M3U8 responses, in seconds. The default value for HLS Live is 2.
The default value for HLS on-demand is 86400 (1 day). The value
-1 does not set a cache-control header.
within a sliding window. The time within the window is the value
HLSSlidingWindowLength * HLSMediaFileDuration.
of
HTTP Live Streaming clients use the sliding window to configure
the seek bar. The default value is 6.
See Configure a sliding window (HLS).
segment responses, in seconds. The default value for HLS Live is
-1 which doesn’t set a cache-control header. The default value for
HLS on-demand is 86400 (1 day).
fragments (end-of-program, gaps, etc.)
The default is 503.
HLSMaxEventAge No The maximum number of seconds FMS allows the bootstrap to
age before marking it as stale. If the bootstrap age is greater than
this value, the stream is considered to be down.
The default is 300.
HLSAddPadPacketsForCont No Specifies whether or not to allow adding padding TS packets to
maintain continuity across media files.
HLSAllowExtractAudioOnly No Specifies whether or not to allow audio-only extraction from
audio-video sources.
HLSEncryptKeyURIPrefix No A text string prefixed to the event ID to generate the encryption
key.
HLSEncryptKeyURISuffix No A string suffixed to the event ID to generate the encryption key.
HLSFAXSUseUniqueContentID No Set the value to true to use a unique content ID.
HLSKeyframeIntervalsPerMe
diaFile
HLSHttpUnavailableMaxAge No Specifies the maximum duration (in seconds) to set the Cache-
No Specifies the total number of keyframes per HLS media file in the
VOD content.
Control header for unavailable fragment responses.
HttpStreamingFrameRate No Specifies the frame rate in the VOD content.
HttpStreamingFramesPerKey
frameInterval
No Specifies the number of frames per KFI in the VOD content.
Last updated 9/4/2014
Page 85

ADOBE MEDIA SERVER 5.0.6 DEVELOPER’S GUIDE
Getting started streaming media
For more HLS directives that can be used for content protection, see “Configuring content protection for HLS” on
page 157.
Directives for HTTP Streaming failover
Use the following directives to configure HTTP Streaming failover (ctrlplane_module):
Directive Required Description
81
HdsHttpStreamingLiveEvent
Path
HlsHttpStreamingLiveEvent
Path
MaxBootstrapAge No The maximum number of seconds the Control Plane module lets
HttpStreamingURLSandboxLe
vel
Yes The physical location of the root of the event path for HDS. This
Yes The physical location of the root of the event path for HLS. This
No The Level at which HttpStreamingLiveEventPath
can be relative to the Apache installation root.
For example, “C:\Program Files\Adobe\Adobe Media Server
5\applications"or "..\applications.”
can be relative to the Apache installation root.
For example, “C:\Program Files\Adobe\Adobe Media Server
5\applications"or "..\applications.”
the bootstrap age before marking it as stale. If the bootstrap age
is greater than this value, the stream is considered to be down
and the Control Plane module sets the
The default is 300.
sandboxes the access. You should set this to match
corresponding settings in HDS and HLS configurations. Valid
values include App, Application, Inst, Instance, and Server. The
default is Server.
For example, if HdsHttpStreamingLiveEventPath is set to
../applications/livepkgr/events/_definst_, set
HttpStreamingURLSandboxLevel to Inst. if
HdsHttpStreamingLiveEventPath is set to
../applications/livepkgr/, set
HttpStreamingURLSandboxLevel to App.
For information on similar HDS and HLS settings, see “Configure
live and on-demand HTTP Streaming at the server level
(httpd.conf)” on page 76
up status to false.
Configure live HTTP streaming
You can configure live HTTP Dynamic Streaming and live HTTP Live Streaming at the following levels:
Level Configuration file
Server rootinstall/Apache2.2/conf/httpd.conf
Application rootinstall/applications/livepkgr/Application.xml
Event rootinstall/applications/livepkgr/events/_definst_/liveevent/Event.xml
Configure live HTTP streaming at the application level (Application.xml)
To configure HTTP streaming for all live events in an application, use the Application.xml file. The Application.xml
file overrides settings in the httpd.conf file for a single application.
Place the Application.xml file in the application folder. For example,
rootinstall/applications/livepkgr/Application.xml.
Last updated 9/4/2014
Page 86

ADOBE MEDIA SERVER 5.0.6 DEVELOPER’S GUIDE
Getting started streaming media
Note: Configuring HTTP streaming in the Application.xml file at the vhost level is not supported.
The following is an Application.xml file with all possible configuration elements for HTTP streaming:
<Application>
<StreamManager>
<Live>
<AssumeAbsoluteTime></AssumeAbsoluteTime>
</Live>
</StreamManager>
<HDS>
<HLS>
<KeyframeIntervalPerMediaFile></KeyframeIntervalPerMediaFile>
<MediaFileDuration></MediaFileDuration>
<SlidingWindowLength></SlidingWindowLength>
<Encryption enabled="true">
<KeyFile></KeyFile>
<KeyURI></KeyURI>
</Encryption>
</HLS>
<Recording>
<FragmentDuration></FragmentDuration>
<SegmentDuration></SegmentDuration>
<FrameRate></FrameRate>
<FramesPerKeyframeInterval></FramesPerKeyframeInterval>
<KeyframeIntervalsPerFragment></KeyframeIntervalPerFragment>
<FramePrecision></FramePrecision>
<DiskManagementDuration></DiskManagementDuration>
<ContentProtection enabled="true">
<ProtectionScheme></ProtectionScheme>
<PHDS>
<CommonKeyFile></CommonKeyFile>
<VideoEncryptionLevel></VideoEncryptionLevel>
<UpdateInterval></UpdateInterval>
<SWFVerification enabled="true">
<WhiteListFolder></WhiteListFolder>
<UpdateInterval></UpdateInterval>
</SWFVerfication>
</PHDS>
<FlashAccessV2>
<ContentID></ContentID>
<CommonKeyFile></CommonKeyFile>
<LicenseServerURL></LicenseServerURL>
<TransportCertFile></TransportCertFile>
<LicenseServerCertFile></LicenseServerCertFile>
<PackagerCredentialFile></PackagerCredentialFile>
<PackagerCredentialPassword></PackagerCredentialPassword>
<PolicyFile></PolicyFile>
</FlashAccessV2>
</ContentProtection>
</Recording>
</HDS>
</Application>
82
For information about each element, see “Application.xml and Event.xml” on page 84.
Last updated 9/4/2014
Page 87

ADOBE MEDIA SERVER 5.0.6 DEVELOPER’S GUIDE
Getting started streaming media
Configure live HTTP streaming at the event level (Event.xml)
To configure a single event, use an Event.xml file. Copy the Event.xml file to a live event folder. The default live event
is rootinstall/applications/livepkgr/events/_definst_/liveevent. The Event.xml file overrides the Application.xml file
and the Apache httpd.conf file for a single live event. Every live event folder must have a single Event.xml file.
Note: There are a few exceptions in which the Event.xml configuration does not override the Application.xml
configuration. These exceptions are noted with the configuration parameter.
The following is an Event.xml file with all possible configuration elements for HTTP streaming:
<Event>
<EventID></EventID>
<HLS>
<KeyframeIntervalPerMediaFile></KeyframeIntervalPerMediaFile>
<MediaFileDuration></MediaFileDuration>
<SlidingWindowLength></SlidingWindowLength>
<Encryption enabled="true">
<KeyFile></KeyFile>
<KeyURI></KeyURI>
</Encryption>
</HLS>
<Recording>
<FragmentDuration></FragmentDuration>
<SegmentDuration></SegmentDuration>
<FrameRate></FrameRate>
<FramesPerKeyframeInterval></FramesPerKeyframeInterval>
<KeyframeIntervalsPerFragment></KeyframeIntervalPerFragment>
<FramePrecision></FramePrecision>
<DiskManagementDuration></DiskManagementDuration>
<ContentProtection enabled="true">
<ProtectionScheme></ProtectionScheme>
<PHDS>
<CommonKeyFile></CommonKeyFile>
<VideoEncryptionLevel></VideoEncryptionLevel>
<PlaybackExpiration></PlaybackExpiration>
<UpdateInterval></UpdateInterval>
<SWFVerification enabled="true">
<WhiteListFolder></WhiteListFolder>
<UpdateInterval></UpdateInterval>
</SWFVerfication>
</PHDS>
<FlashAccessV2>
<ContentID></ContentID>
<CommonKeyFile></CommonKeyFile>
<LicenseServerURL></LicenseServerURL>
<TransportCertFile></TransportCertFile>
<LicenseServerCertFile></LicenseServerCertFile>
<PackagerCredentialFile></PackagerCredentialFile>
<PackagerCredentialPassword></PackagerCredentialPassword>
<PolicyFile></PolicyFile>
</FlashAccessV2>
</ContentProtection>
</Recording>
</Event>
83
Last updated 9/4/2014
Page 88

ADOBE MEDIA SERVER 5.0.6 DEVELOPER’S GUIDE
Getting started streaming media
Application.xml and Event.xml
Root elements
Element Description Default
//Application The root element for an Application.xml configuration file. N/A
//Event The root element for an Event.xml configuration file. N/A
84
//Event/EventID The name of a live event. This name is the same as the
name of the event folder and the value of the Server-Side
ActionScript
Stream.liveEvent property.
liveevent
Configurations for HTTP Live Streaming
Use the elements in the <HLS> container to configure HTTP Live Streaming. In the Application.xml file, the elements
are located at
Element Description Default
/HLS/KeyframeIntervalPerMedi
aFile
/HLS/MediaFileDuration The duration of the TS file to be served, in
/HLS/SlidingWindowLength The seekable portion of the stream for Apple HTTP
//Application/HDS/HLS. In the Event.xml file, the elements are located at //Event/HLS.
Sets frame-based file duration.
See “Configure F4F and TS fragment duration” on
page 64.
milliseconds. This number must be a multiple of the
FragmentDuration.
See “Configure F4F and TS fragment duration” on
page 64.
Live Streaming. The time within the window is the
SlidingWindowLength *
value of
MediaFileDuration
use the sliding window to configure the seek bar.
The sliding window is relative to the current position
of the live stream.
See “Configure a sliding window (HLS)” on page 14.
. HTTP Live Streaming clients
None
None
6
/HLS/Encryption Set the enabled attribute to "allow" to allow
PHLS configurations in the Event.xml file to override
settings in the Application.xml file.
Set the enabled attribute to "true" to configure
PHLS in the Application.xml file. These
configurations apply to all live events in the
application.
/HLS/Encryption/KeyFile The path of the default cipher key used to encrypt
the content.
/HLS/Encryption/KeyURI The URI that the client uses to fetch the decryption
key.
None
None
None
Configurations for recording
Use the elements in the <Recording> container to configure how the server writes files to disk. In the Application.xml
file, the elements are located at
//Event/Recording.
//Application/HDS/Recording. In the Event.xml file, the elements are located at
Last updated 9/4/2014
Page 89

ADOBE MEDIA SERVER 5.0.6 DEVELOPER’S GUIDE
Getting started streaming media
Element Description Default
/Recording The section that configures how the file is written to disk. None
85
/Recording/DiskManagem
entDuration
/Recording/FragmentDur
ation
/Recording/FramePrecis
ion
/Recording/FrameRate The frame rate of the original content, in frames per
/Recording/FramesPerKe
yframeInterval
/Recording/IOBufferSiz
e
The maximum duration of live content on disk, in hours.
Use a fractional value to specify minutes. When this value
is set in Application.xml, it cannot be overridden in
Event.xml.
See “Disk management” on page 70.
The length of each fragment, in milliseconds. Each
segment can contain one or more fragments. See
“Configure F4F and TS fragment duration” on page 64.
The rounding precision for the fragment run table, in
frame units. Frame units are derived from the specified
frame rate (1/rate). See
duration” on page 64.
second (fps). The value is floating point; for NTSC, use the
value 29.97. See
duration” on page 64.
The number of frames between each keyframe. For
example, 30 fps video with a keyframe every 2 seconds
contains 60 frames per keyframe interval. See
F4F and TS fragment duration” on page 64.
The size of the IO buffer for the recording, in bytes. The IO
buffer loads the disk file into a buffer in memory. It reads
and writes to the buffer in the memory instead of making
system calls. See
page 70.
“Configure F4F and TS fragment
“Configure F4F and TS fragment
“Configure
“Configure the size of the IO buffer” on
3
4000
1
None
None
4096
/Recording/KeyframeInt
ervalsPerFragment
/Recording/SegmentDura
tion
The number of keyframe intervals per fragment. The
default value is 1, which means that the fragment size is
the same as the keyframe interval. See
TS fragment duration” on page 64.
The length of each segment, in milliseconds. Each .f4f file
contains one segment.
See “Configure F4F and TS fragment duration” on
page 64.
“Configure F4F and
1
400000
Configurations for content protection
Use the ContentProtection and ProtectionScheme elements to enable content protection with Protected HTTP
Dynamic Streaming or Adobe Access.
Element Description Default
/ContentProtection Whether to enable content for protection with Protected
/ContentProtection/Pro
tectionScheme
HTTP Dynamic Streaming or Adobe Access. To enable
content protection, set the
The type of protection. Possible values are phds and
FlashAccessV2.
enabled attribute to true.
None
None
Configurations for Protected HTTP Dynamic Streaming (PHDS)
Last updated 9/4/2014
Page 90

ADOBE MEDIA SERVER 5.0.6 DEVELOPER’S GUIDE
Getting started streaming media
Use the elements in the PHDS container to configure Protected HTTP Dynamic Streaming. In the Application.xml file,
the elements are located at
elements are located at
//Application/HDS/Recording/ContentProtection/PHDS. In the Event.xml file, the
//Event/Recording/ContentProtection/PHDS.
Configurations for Adobe Access
Use the elements in the FlashAccessV2 container to configure content protection with Adobe Access. In the
Application.xml file, the elements are located at
//Application/HDS/Recording/ContentProtection/FlashAccessV2. In the Event.xml file, the elements are
located at
//Event/Recording/ContentProtection/FlashAccessV2.
For information about the elements in the FlashAccessV2 container, see “Encrypt content for Adobe Access
protection” on page 72.
Manifest.xml
Adobe Media Server 5 introduces set-level manifest files that replace Manifest.xml files. However, Adobe Media Server
5 supports Manifest.xml files and, in some cases, you may want to use them.
For example, Flash Media Playback does not support set-level manifest files. To use Flash Media Playback for DVR or
multi-bitrate streaming, configure a Manifest.xml file.
The following is the default Manifest.xml file with an added <dvrInfo> element:
86
<manifest xmlns="http://ns.adobe.com/f4m/1.0">
<dvrInfo beginOffset="0"></dvrInfo>
<media streamId="livestream1" bitrate="100">
</media>
<media streamId="livestream2" bitrate="200">
</media>
<media streamId="livestream3" bitrate="350">
</media>
</manifest>
Element Attribute Description
dvrInfo
beginOffset An offset, in seconds, from the beginning
endOffset An offset, in seconds, before the current
media Represents one stream.
of the recorded stream. Clients can begin
viewing the stream at this location. The
default value is 0.
duration of the recorded stream. Clients
cannot view the stream before this
location. The default value is 0.
Negative values are treated as 0. If neither
endOffset nor beginOffset is set, the
start time is the beginning of the content.
streamID The name of the publishing stream.
bitrate The bitrate at which the stream was
encoded.
Last updated 9/4/2014
Page 91

ADOBE MEDIA SERVER 5.0.6 DEVELOPER’S GUIDE
Getting started streaming media
Element Attribute Description
87
bestEffortF
etchInfo
Parent element for best effort
fetchconfiguration. If thiselement is
present, AMS enables best effort fetch.
The bestEffortFetchInfo element is
expected to be a part of F4M 2.0. To
specify your Manifest.xml as F4M 2.0, you
must change the
"http://ns.adobe.com/f4m/2.0". AMS
currently honors this syntax. However,
since the official F4M specification 2.0 is
not yet complete, this element may
change in future releases.
maxForwardFetches Maximum total number of forward
fetches that the OSMF player performs
when it encounters a liveness or dropout
error that is encountered. If the forward
fetches fail, the OSMF player reverts to
non-best-effort behavior.
The default is 2.
maxBackwardFetches Maximum number of consecutive failed
backward fetches that OSMF player
performs before reverting to non-besteffort behavior. A value of 0 indicates that
no backward fetches will be performed.
The default is 2.
fragmentDuration Corresponds to the fragment interval (in
seconds) that is currently in use on the
packaging server. You can specify up to 3
decimal points.
Ensure that this value matches the
configured
Event.xml file. Differences of as little as a
millisecond can result in incorrect best
effort fetch behavior.
This attribute is required.
xmlns attribute to
FragmentInterval in your
segmentDuration Corresponds to the segment interval (in
seconds) that is currently in use on the
packaging server. You can specify up to 3
decimal points.
Ensure that this value matches the
configured
Event.xml file. Differences of as little as a
millisecond can result in incorrect best
effort fetch behavior.
This attribute is required.
For more on fragmentDuration and
segmentDuration, see “Configure live
HTTP streaming” on page 81.
SegmentInterval in your
Note: Manifest.xml files support F4M v1.0 only (if not using best-effort fetch).
Last updated 9/4/2014
Page 92

ADOBE MEDIA SERVER 5.0.6 DEVELOPER’S GUIDE
Getting started streaming media
Note: The bestEffortFetchInfo element is expected to be a part of F4M 2.0. To use best-effort fetch, specify your
Manifest.xml as F4M 2.0 by changing the xmlns attribute to "http://ns.adobe.com/f4m/2.0". AMS currently honors this
syntax. However, since the official F4M specification 2.0 is not yet complete, this element may change in future releases.
Specify the bestEffortFetchInfo element in the set-level manifest. AMS ignores bestEffortFetchInfo elements
specified in the stream-level manifest.
Configure on-demand HTTP streaming
You can configure on-demand HTTP Dynamic Streaming and HTTP Live Streaming at the following levels:
Level Configuration file
Server rootinstall/Apache2.2/conf/httpd.conf
Stream jit.conf
Configure on-demand HTTP streaming at the stream level (jit.conf)
Configure stream-level configuration live in a jit.conf file. Create a jit.conf file and copy it to the same directory as the
on-demand stream or streams. A directory can contain only 1 jit.conf file. The settings in the file apply to all content
in the directory.
88
The following is a jit.conf file with all possible configurations:
Last updated 9/4/2014
Page 93

ADOBE MEDIA SERVER 5.0.6 DEVELOPER’S GUIDE
Getting started streaming media
<?xml version="1.0" encoding="utf-8"?>
<manifest xmlns="http://ns.adobe.com/f4m/1.0" xmlns:hds="http://ns.adobe.com/hdspackage/1.0">
<hds:frame-rate></hds:frame-rate>
<hds:frames-per-keyframe-interval></hds:frames-per-keyframe-interval>
<hds:fragment-duration></hds:fragment-duration>
<hds:keyframe-intervals-per-fragment><hds:keyframe-intervals-per-fragment>
<hds:hls>
<hds:keyframe-intervals-per-media-file></hds:keyframe-intervals-per-media-file>
<hds:media-file-duration></hds:media-file-duration>
<hds:encryption enabled="true">
<hds:keyfile></hds:keyfile>
<hds:keyuri></hds:keyuri>
</hds:encryption>
</hds:hls>
<hds:content-protection enabled="true">
<hds:protection-scheme>phds</hds:protection-scheme>
<hds:phds>
<hds:common-key-file></hds:common-key-file>
<hds:video-encryption-level></hds:video-encryption-level>
<hds:playback-expiration></hds:playback-expiration>
</hds:phds>
<hds:FlashAccessV2>
<hds:content-id></hds:content-id>
<hds:common-key-file></hds:common-key-file>
<hds:license-server-url></hds:license-server-url>
<hds:transport-cert-file></hds:transport-cert-file>
<hds:license-server-cert-file></hds:license-server-cert-file>
<hds:packager-credential-file></hds:packager-credential-file>
<hds:packager-credential-password></hds:packager-credential-password>
<hds:policy-file></hds:policy-file>
</hds:FlashAccessV2>
</hds:content-protection>
</manifest>
89
Configurations for recording to disk
For more information about elements in this table, see “Configure F4F and TS fragment duration” on page 64.
Last updated 9/4/2014
Page 94

ADOBE MEDIA SERVER 5.0.6 DEVELOPER’S GUIDE
Getting started streaming media
Element Description Default
90
//manifest/hds:fragment-duration Use this element to configure fragment duration
//manifest/hds:frame-rate Use this element to configure fragment duration
//manifest/hds:frames-perkeyframe-interval
by time.
The fragment duration for the set of content, in
seconds. The value can be fractional (for example,
to specify 2002 milliseconds, use the value 2.002).
If this value is not specified, the value is taken from
the module configurations in httpd.conf.
See “Configure F4F and TS fragment duration” on
page 64.
by frame rate.
The frame rate that determines the fragment
duration for the set of content. Units are
frames/second, and can be fractional (i.e. 29.97 for
NTSC) .
See “Configure F4F and TS fragment duration” on
page 64.
Use this element to configure fragment duration
by frame rate.
The number of frames per keyframe interval (GOP).
Units are frames, and should be a whole integer
value.
See “Configure F4F and TS fragment duration” on
page 64.
None
None
None
//manifest/hds:keyframeintervals-per-fragment
//manifest/hds:hls Container for Apple HTTP Live Streaming
//manifest/hds:hls/hds:keyframeintervals-per-media-file
//manifest/hds:hls/hds:mediafile-duration
Use this element to configure fragment duration
by frame rate.
The number of keyframe intervals per fragment.
Units are keyframe intervals per fragment, and
should be a whole integer value.
See “Configure F4F and TS fragment duration” on
page 64.
configurations.
Use this element to configure a frame-based file
duration.
The number of keyframe intervals per TS file
duration. The value must be a whole integer.
See “Configure F4F and TS fragment duration” on
page 64.
Use this element to configure a time-based file
duration.
The TS file duration, in milliseconds, for the set of
content associated with this file. Use a value that is
a multiple of the fragment duration.
See “Configure F4F and TS fragment duration” on
page 64.
Configurations for content protection
1
N/A
None
None
Last updated 9/4/2014
Page 95

ADOBE MEDIA SERVER 5.0.6 DEVELOPER’S GUIDE
Getting started streaming media
Use the ContentProtection and ProtectionScheme elements to enable content protection with Protected HTTP
Dynamic Streaming or Adobe Access.
Element Description Default
91
//manifest/hds:content
-protection
//manifest/hds:content
protection/hds:protect
ion-scheme
Whether to enable content for protection with Protected
HTTP Dynamic Streaming or Adobe Access. To enable
content protection, set the
The type of protection. Possible values are phds and
FlashAccessV2.
enabled attribute to "true".
None
None
Configurations for protected HTTP Dynamic Streaming (PHDS)
Use the elements in the <hds:phds> container to configure content protection with PHLS.
Configurations for protected HTTP Live Streaming (PHLS)
Use the elements in the <hds:hls> container to configure content protection with PHLS.
Configurations for Adobe Access
Use the elements in the <hds:FlashAccessV2> container to configure content protection with Adobe Access.
For more information, see “Encrypt content for Adobe Access protection” on page 72.
Build custom media players
Build media players for the live and vod services
Adobe has developed the Open Source Media Framework (OSMF) to make it easier to build media players. OSMF is
an open software framework for building robust, feature rich video players and applications based on the Flash
Platform. For information about building a media player with the OSMF library, see
in Flash with the Adobe Open Source Media Framework.
Building streaming video players
You can also use ActionScript to build a media player from scratch. For more information, see the following:
• “Developing streaming media applications” on page 188
• “Build an HTTP Dynamic Streaming media player” on page 94
Connect to a streaming service
Like all Adobe Media Server applications, streaming services expect a NetConnection.connect() URI in the
following format:
rtmp://ams-ip-or-dna/serviceName/[formatType:][instanceName/]fileOrStreamName
hostName The Adobe Media Server domain name.
serviceName Either live or vod.
instanceName If the client is connecting to the default instance, you can either omit the instance name or use
_definst_. If the client is connecting to an instance you have created, such as room1, use that name.
formatType For mp3 files, mp3:. For MP4/F4V files, mp4:. Not required for FLV files.
Last updated 9/4/2014
Page 96

ADOBE MEDIA SERVER 5.0.6 DEVELOPER’S GUIDE
Getting started streaming media
fileOrStreamName Either a filename (for example, my_video.mp4) or a path (for example,
subdir/subdir2/my_video.mp4), for example,
rtmp://www.examplemediaserver.com/vod/mp4:ClassicFilms/AnOldMovie.mp4. For MPEG-4-based files, if
the file on the server uses a filename extension (.mp4, .f4v, and so on), specify it. If the stream is live and the publisher
specified a filename extension, specify it. For instance,
rtmp://www.examplemediaserver.com/live/livestream.
Unsupported ActionScript APIs
Clients for the vod and live services can use any ActionScript APIs except remote shared objects
SharedObject.getRemote()).
(
You cannot edit the server-side code for streaming services. However, the services do have a custom API that lets you
access information from the server. Call the NetConnection.call() method from client-side code and pass it the
name of the API you want to call.
More Help topics
“Streaming services API” on page 93
Allow connections from specific domains
By default, clients can connect to the live and vod services from any domain. You can limit the domains from which
clients can connect.
92
❖ Navigate to the rootinstall/applications/live or rootinstall/applications/vod folder and do one of the following:
• To add a domain for SWF clients, edit the allowedSWFdomains.txt file.
• To add a domain for HTML clients, edit the allowedHTMLdomains.txt file.
The TXT files contain detailed information about adding domains.
Access raw audio and video data
Note: Adobe Media Server Standard supports this feature through the Access plug-in only.
Beginning with Flash Media Server 3 and Flash Player 9.0.115, you can access raw audio and video data in streams. Use
this data to create snapshots in your applications. To access the data, call the ActionScript 3.0
SoundMixer.computeSpectrum() methods. For more information, see ActionScript 3.0 Reference for Flash
and
Platform.
By default, Adobe Media Server prevents you from accessing streams. To allow stream access, do the following:
1 Move the main.far file from rootinstall/applications/live or rootinstall/applications/vod to
rootinstall/samples/applications/live or rootinstall/samples/applications/vod.
You cannot edit FAR files, so you must replace main.far with main.asc.
2 Copy the main.asc file from rootinstall/samples/applications/live or rootinstall/samples/applications/vod to
rootinstall/applications/live or rootinstall/applications/vod.
3 Open the main.asc file in a text editor.
4 Uncomment the following code to allow all clients to access all streams:
//p_client.audioSampleAccess = "/";
//p_client.videoSampleAccess = "/";
BitmapData.draw()
5 Save the main.asc file.
Note: The application instance requires restarting in order for the changes in the main.asc to take affect.
Last updated 9/4/2014
Page 97

ADOBE MEDIA SERVER 5.0.6 DEVELOPER’S GUIDE
Getting started streaming media
Streaming services API
getStreamLength()
getStreamLength(streamObj)
Returns the length of a stream, in seconds. Call this method from a client-side script and specify a response object to
receive the returned value.
Availability
Flash Media Server 3, vod streaming service
Parameters
streamObj A Stream object.
Returns
A number.
Example
The following client-side code gets the length of the sample_video stream and returns the value to returnObj:
93
nc.call("getStreamLength", returnObj, "sample_video");
getPageUrl()
getPageUrl()
Returns the URL of the web page in which the client SWF file is embedded. If the SWF file isn’t embedded in a web
page, the value is the location of the SWF file. The following code shows the two examples:
// trace.swf file is embedded in trace.html.
getPageUrl returns: http://www.example.com/trace.html
// trace.swf is not embedded in an HTML file.
getPageUrl returns: http://www.example.com/trace.swf
The value must be an HTTP address. For security reasons, local file address (for example, file:///C:/Adobe Media
Server applications/example.html) are not displayed.
Availability
Flash Media Server 3, vod streaming service, live streaming service
Example
The following example calls the getPageUrl() method on the server:
nc.call("getPageUrl", returnObj);
getReferrer()
getReferrer()
Returns the URL of the SWF file or the server where the connection originated.
Availability
Flash Media Server 3, vod streaming service, live streaming service
Last updated 9/4/2014
Page 98

ADOBE MEDIA SERVER 5.0.6 DEVELOPER’S GUIDE
Getting started streaming media
Example
The following code calls the getReferrer() method on the server:
myNetConnection.call("getReferrer", returnObj);
Build an HTTP Dynamic Streaming media player
Use Open Source Media Framework (OSMF)
You don’t need to build an HTTP Dynamic Streaming media player—Strobe Media Playback and Flash Media
Playback support HDS by default.
If you do decide to build a custom player, Adobe strongly recommends using OSMF. OSMF is a robust framework
designed to deliver high-quality video. Use the
implementation. The OSMF Sample Player uses the ActionScript 3.0 NetStream.appendBytes() API to deliver bytes
to Flash Player and AIR.
Understanding the application flow for live HTTP Dynamic Streaming
To play a stream, a media player requests a .f4m file. The player contains logic that requests additional files when a user
seeks, pauses, and plays media. The Adobe Media Server Live Packager (livepkgr application) creates these files when
the server ingests a live stream or when a client requests an on-demand media file.
OSMF Sample Player for HTTP Dynamic Streaming as a reference
94
The HTTP Origin Module generates the .f4m file when it is requested. The file is not physically present on the disk.
However, you can request the file even when a live stream has stopped publishing.
Streaming media using Adobe HDS requires Adobe Media Manifest files (.f4m).
The manifest file contains information about a media asset or information about each stream in a multiple stream
event. This information can include the location of the media, DRM additional header data, media bootstrap
information, adaptive streaming bitrates, and so on.
The Apache HTTP modules create the F4M and M3U8 files as the streams are packaged and written to disk. To create
these files, the HTTP modules use metadata from the Event.xml file (if it exists) and data from the .f4f, .f4x, .meta,
.bootstrap, .stream, and .drmmeta files.
Important: Do not move the files from their original locations.
To generate the file, the HTTP modules follow these steps:
1 Combine the request URL and the HttpStreamingLiveEventPath directive to locate the live event.
2 Retrieve metadata about the event from the Event.xml file and the multi-level manifest file.
3 Scan the event directory for stream record files (.stream).
4 Retrieve the path to the corresponding content from each .stream file. Each .stream file becomes a <media> element
in the manifest file.
5 Retrieve metadata from the .meta file.
6 Create links to the bootstrap information and DRM additional header data (if the content is protected).
7 Return the generated manifest document (.f4m or .m3u8).
For more information, see the F4M File Format Specification at adobe.com.
For more information, sabout the M3U8 file, see the the HTTP Live Streaming Internet-Draft.
Last updated 9/4/2014
Page 99

ADOBE MEDIA SERVER 5.0.6 DEVELOPER’S GUIDE
Getting started streaming media
In the rootinstall\applications\livepkgr\streams\_definst_ folder, the Live Packager creates a folder with the name of
each stream: livestream1, livestream2, and livestream3. The Live Packager creates the following files in each folder:
• livestream#.bootstrap
• livestream#.control
• livestream#.meta
• livestream#Seg#.f4f
• livestream#Seg#.f4x
These are the files that an HTTP Dynamic Streaming media player requests to handle pausing, fast forwarding,
rewinding, and so on. The following table describes each file type:
File Description
95
livestream#Seg#.f4f A segment. The Live Packager outputs one or more F4F files. Each file contains a segment
livestream#Seg#.f4x An index file listing the fragment offsets in each .f4f file. The Live Packager outputs one or
livestream#.meta Contains the stream metadata (bitrate, screen size, and so on).
livestream#.bootstrap Contains the bootstrap information for the stream.
livestream#.control Contains internal metadata that the Live Packager uses to manage stream state.
livestream#.drmmeta Contains additional header information when a stream is encrypted for use with Adobe
of the source file. Each segment contains the fragmented (and optionally protected)
content.
more F4X files. The HTTP Origin Module uses this file to deliver fragments.
Access.
The following are the URL request formats for these files when Apache is configured for HTTP Dynamic Streaming:
Request type URL Form
Fragment http://<host>/<location-tag-alias>/streams/<app-
Bootstrap (.bootstrap) http://<host>/<location-tag-alias>/streams/<app-
name>/streams/<app-instance>/<stream name>Seg<segment #>Frag<fragment #>
Note:You cannot request an F4F file directly. Request a Fragment.
name>/streams/<app-instance>/<stream name>.bootstrap
For more information about configuring Apache for HTTP Dynamic Streaming, see Apache configurations for HTTP
Dynamic Streaming.
Stream record files
A stream record file (.stream) is an XML document that contains the physical location of the stream. The server creates
the stream record file when an incoming stream is associated with a live event. The server creates the file with an
encoded name in the following location:
applications/appname/events/appinstancename/eventname/MTg1ODAyNjgwNg=.stream
The HTTP Origin Module reads the stream record file to locate the content for the stream. The following is the format
of the .stream file:
Last updated 9/4/2014
Page 100

ADOBE MEDIA SERVER 5.0.6 DEVELOPER’S GUIDE
Getting started streaming media
<?xml version="1.0" encoding="UTF-8"?>
<stream xmlns="http://www.adobe.com/liveevent/1.0">
<type>
f4f
</type>
<name>
livestream
</name>
<path>
C:\Program Files\Adobe\Adobe Media Server
5\applications\myapp\streams\_definst_\livestream
</path>
</stream>
Sample .f4m manifest file
The player uses the manifest file to request a content fragment. In the following example, there are two streams
associated with the live event, “livestream” and “livestream1”. The
<media> elements provide the absolute URL path
to the content location with the prefix “/live/streams”.
If .bootstrap and .drmmeta are found in the same location as the .f4f file, <bootstrap> and <drmAdditionalHeader>
elements are included in the manifest file. The .drmmeta file can be shared across multiple streams, therefore there is
only one
same .drmmeta file through the
<drmAdditionalHeader> element in the sample manifest file. Both myStream and myStream1 refer to the
drmAdditionalHeaderId attribute.
96
The metadata element contains the metadata for one piece of media in Base64 encoding. The metadata is the same
information dispatched in the ActionScript
<?xml version="1.0" encoding="UTF-8" ?>
<manifest xmlns="http://ns.adobe.com/f4m/1.0">
<id>live_mbr_event</id>
<streamType>live</streamType>
<duration>0</duration>
<bootstrapInfo
profile="named"
url="/live/streams/myStream.bootstrap"
id="bootstrap2267" />
<drmAdditionalHeader
url="/live/streams/myStream.drmmeta"
drmContentId="live_mbr_event"
id="drmMetadata9996" />
<media>
url="/live/streams/myStream"
bitrate="408"
bootstrapInfoId="bootstrap2267"
drmAdditionalHeaderId="drmMetadata9996">
<metadata>
AgAKb25NZXRhRGF0YQgAAAAAAAhkdXJhdGlvbgBARo9cKPXCjwAFd2lkdGgAQJQAAAAAAAAABmhlaWdodABAho
AAAAAAAAAMdmlkZW9jb2RlY2lkAgAEYXZjMQAMYXVkaW9jb2RlY2lkAgAEbXA0YQAKYXZjcHJvZmlsZQBAWQAA
AAAAAAAIYXZjbGV2ZWwAQEAAAAAAAAAABmFhY2FvdAAAAAAAAAAAAAAOdmlkZW9mcmFtZXJhdGUAQD34U+JVay
gAD2F1ZGlvc2FtcGxlcmF0ZQBA53AAAAAAAAANYXVkaW9jaGFubmVscwBAAAAAAAAAAAAJdHJhY2tpbmZvCgAA
AAIDAAZsZW5ndGgAQTSinwAAAAAACXRpbWVzY2FsZQBA3UwAAAAAAAAIbGFuZ3VhZ2UCAANlbmcAAAkDAAZsZW
5ndGgAQUCGAAAAAAAACXRpbWVzY2FsZQBA53AAAAAAAAAIbGFuZ3VhZ2UCAANlbmcAAAkAAAk=
</metadata>
NetStream.onMetaData() event.
Last updated 9/4/2014
 Loading...