

Page 1

Using
Updated 03 September 2009
®®
ADOBE® PHOTOSHOP LIGHTROOM 2
Page 2

Copyright
Updated 03 September 2009
© 2009 Adobe Systems Incorporated. All rights reserved.
Using Adobe
If this guide is distributed with software that includes an end user agreement, this guide, as well as the software described in it, is furnished under license and
may be used or copied only in accordance with the terms of such license. Except as permitted by any such license, no part of this guide may be reproduced, stored
in a retrieval system, or transmitted, in any form or by any means, electronic, mechanical, recording, or otherwise, without the prior written permission of Adobe
Systems Incorporated. Please note that the content in this guide is protected under copyright law even if it is not distributed with software that includes an end
user license agreement.
The content of this guide is furnished for informational use only, is subject to change without notice, and should not be construed as a commitment by Adobe
Systems Incorporated. Adobe Systems Incorporated assumes no responsibility or liability for any errors or inaccuracies that may appear in the informational
content contained in this guide.
Please remember that existing artwork or images that you may want to include in your project may be protected under copyright law. The unauthorized
incorporation of such material into your new work could be a violation of the rights of the copyright owner. Please be sure to obtain any permission required
from the copyright owner.
Any references to company names in sample templates are for demonstration purposes only and are not intended to refer to any actual organization.
This work is licensed under the Creative Commons Attribution Non-Commercial 3.0 License. To view a copy of this license, visit
http://creativecommons.org/licenses/by-nc/3.0/us/
Adobe, the Adobe logo, Acrobat, Flash, Illustrator, Lightroom, Photoshop, and Reader are either registered trademarks or trademarks of Adobe Systems
Incorporated in the United States and/or other countries.
Windows and Windows Vista are either registered trademarks or trademarks of Microsoft Corporation in the United States and/or other countries. Apple,
Macintosh and Mac OS are trademarks of Apple Inc. registered in the U.S. and other countries. All other trademarks are the property of their respective owners.
Portions of this product contain code licensed from Nellymoser. (
This product includes software developed by the Apache Software Foundation. (
This product includes software developed by the OpenSymphony Group. (
Sorenson Spark™ video compression and decompression technology licensed from Sorenson Media, Inc.
Flash 9 video is powered by On2 TrueMotion video technology. © 1992-2005 On2 Technologies, Inc. All rights reserved. (www.on2.com)
Notice to U.S. Government End Users: The Software and Documentation are “Commercial Items,” as that term is defined at 48 C.F.R. §2.101, consisting of
“Commercial Computer Software” and “Commercial Computer Software Documentation,” as such terms are used in 48 C.F.R. §12.212 or 48 C.F.R. §227.7202,
as applicable. Consistent with 48 C.F.R. §12.212 or 48 C.F.R. §§227.7202-1 through 227.7202-4, as applicable, the Commercial Computer Software and
Commercial Computer Software Documentation are being licensed to U.S. Government end users (a) only as Commercial Items and (b) with only those rights
as are granted to all other end users pursuant to the terms and conditions herein. Unpublished-rights reserved under the copyright laws of the United States.
Adobe agrees to comply with all applicable equal opportunity laws including, if appropriate, the provisions of Executive Order 11246, as amended, Section 402
of the Vietnam Era Veterans Readjustment Assistance Act of 1974 (38 USC 4212), and Section 503 of the Rehabilitation Act of 1973, as amended, and the
regulations at 41 CFR Parts 60-1 through 60-60, 60-250, and 60-741. The affirmative action clause and regulations contained in the preceding sentence shall be
incorporated by reference.
Adobe Systems Incorporated, 345 Park Avenue, San Jose, California 95110, USA.
® Photoshop® Lightroom® for Windows® and Mac OS
www.nellymoser.com)
http://www.apache.org/)
http://www.opensymphony.com/)
Page 3

Contents
Updated 03 September 2009
Chapter 1: Resources
Installation and registration
Help and support
Services, downloads, and extras
Lightroom video tutorials
What’s new
Chapter 2: The Lightroom workflow
Workspace overview
Importing photos into Lightroom: Basic workflow
The Library module
Applying adjustments in the Develop module: Basic workflow
Exporting photos: Basic workflow
Editing in Photoshop or Photoshop Elements: Basic workflow
Creating slide shows: Basic workflow
Printing photos: Basic workflow
Creating web galleries: Basic workflow
. . . . . . . . . . . . . . . . . . . . . . . . . . . . . . . . . . . . . . . . . . . . . . . . . . . . . . . . . . . . . . . . . . . . . . . . . . . . . . . . . . . . . . . . . . . . . . . . . . . . . . 1
. . . . . . . . . . . . . . . . . . . . . . . . . . . . . . . . . . . . . . . . . . . . . . . . . . . . . . . . . . . . . . . . . . . . . . . . . . . . . . . . . . . . . . . . . . . . . . . . . . . . . . . . . . . 5
. . . . . . . . . . . . . . . . . . . . . . . . . . . . . . . . . . . . . . . . . . . . . . . . . . . . . . . . . . . . . . . . . . . . . . . . . . . . . . . . . . . . . . . . . . . . 1
. . . . . . . . . . . . . . . . . . . . . . . . . . . . . . . . . . . . . . . . . . . . . . . . . . . . . . . . . . . . . . . . . . . . . . . . . . . . . . . . . . . . . . . . 3
. . . . . . . . . . . . . . . . . . . . . . . . . . . . . . . . . . . . . . . . . . . . . . . . . . . . . . . . . . . . . . . . . . . . . . . . . . . . . . . . . . . . . . . . . . . . . . 3
. . . . . . . . . . . . . . . . . . . . . . . . . . . . . . . . . . . . . . . . . . . . . . . . . . . . . . . . . . . . . . . . . . . . . . . . . . . . . . . . . . . . . . . . . . . . . . . . . . 7
. . . . . . . . . . . . . . . . . . . . . . . . . . . . . . . . . . . . . . . . . . . . . . . . . . . . . . . . . . . . . . . . . . . . . . 8
. . . . . . . . . . . . . . . . . . . . . . . . . . . . . . . . . . . . . . . . . . . . . . . . . . . . . . . . . . . . . . . . . . . . . . . . . . . . . . . . . . . . . . . . . . . . . . . . . . . . 9
. . . . . . . . . . . . . . . . . . . . . . . . . . . . . . . . . . . . . . . . . . . . . . . . . . . . . . . . . . . . . . . . . . . . . . . . . . . . . . . . . . . . . 13
. . . . . . . . . . . . . . . . . . . . . . . . . . . . . . . . . . . . . . . . . . . . . . . . . . . . . . . . . . . . . . . . . . . . . . . . . . . . . . . . . . 15
. . . . . . . . . . . . . . . . . . . . . . . . . . . . . . . . . . . . . . . . . . . . . . . . . . . . . . . . . . . . . . . . . . . . . . . . . . . . . . . . . . . . . . . 18
. . . . . . . . . . . . . . . . . . . . . . . . . . . . . . . . . . . . . . . . . . . . . . . . . . . . . . . . . . . . . . . . . . . . . . . . . . . . . . . . 20
iii
. . . . . . . . . . . . . . . . . . . . . . . . . . . . . . . . . . . . . . . . . . . . . . . . . . . . . . . . . 11
. . . . . . . . . . . . . . . . . . . . . . . . . . . . . . . . . . . . . . . . . . . . . . . . . . . . . . . . . 15
Chapter 3: Workspace and setup
Managing panels and the screen view
The toolbar
Displaying the Library on a second monitor
Setting preferences for working in Lightroom
Personalizing identity plates and module buttons
Monitoring processes
Color management
Chapter 4: Importing photos
Importing photos into your library
Importing photos automatically
Chapter 5: Viewing photos in the catalog
Viewing photos in the Filmstrip
Viewing photos in Loupe view
Browsing the Grid view
Selecting photos in the Grid view and the Filmstrip
Switching between Grid, Loupe, Compare, and Survey views
Comparing photos in the Library module
Setting Library view options
Chapter 6: Managing catalogs and files
Creating and managing catalogs
Backing up the catalog
The Volume Browser
. . . . . . . . . . . . . . . . . . . . . . . . . . . . . . . . . . . . . . . . . . . . . . . . . . . . . . . . . . . . . . . . . . . . . . . . . . . . . . . . . . . . . . . . . . . . . . . . . . . . . . . . . . 24
. . . . . . . . . . . . . . . . . . . . . . . . . . . . . . . . . . . . . . . . . . . . . . . . . . . . . . . . . . . . . . . . . . . . . . . . . . . . . . . . . . . . . . . . . . . . . . . . 29
. . . . . . . . . . . . . . . . . . . . . . . . . . . . . . . . . . . . . . . . . . . . . . . . . . . . . . . . . . . . . . . . . . . . . . . . . . . . . . . . . . . . . . . . . . . . . . . . . . . 29
. . . . . . . . . . . . . . . . . . . . . . . . . . . . . . . . . . . . . . . . . . . . . . . . . . . . . . . . . . . . . . . . . . . . . . . . . . . . . . . . . . . . . . . . . . . . . . . 44
. . . . . . . . . . . . . . . . . . . . . . . . . . . . . . . . . . . . . . . . . . . . . . . . . . . . . . . . . . . . . . . . . . . . . . . . . . . . . . . . . . . . . . . . . . 49
. . . . . . . . . . . . . . . . . . . . . . . . . . . . . . . . . . . . . . . . . . . . . . . . . . . . . . . . . . . . . . . . . . . . . . . . . . . . . . . . . . . . . . . . . . . . . . . 54
. . . . . . . . . . . . . . . . . . . . . . . . . . . . . . . . . . . . . . . . . . . . . . . . . . . . . . . . . . . . . . . . . . . . . . . . . . . . . . . . . . . . . . . . . . . . . . . . . 56
. . . . . . . . . . . . . . . . . . . . . . . . . . . . . . . . . . . . . . . . . . . . . . . . . . . . . . . . . . . . . . . . . . . . . . . . . . . . . . . . 23
. . . . . . . . . . . . . . . . . . . . . . . . . . . . . . . . . . . . . . . . . . . . . . . . . . . . . . . . . . . . . . . . . . . . . . . . . . . 25
. . . . . . . . . . . . . . . . . . . . . . . . . . . . . . . . . . . . . . . . . . . . . . . . . . . . . . . . . . . . . . . . . . . . . . . . . 27
. . . . . . . . . . . . . . . . . . . . . . . . . . . . . . . . . . . . . . . . . . . . . . . . . . . . . . . . . . . . . . . . . . . . . 28
. . . . . . . . . . . . . . . . . . . . . . . . . . . . . . . . . . . . . . . . . . . . . . . . . . . . . . . . . . . . . . . . . . . . . . . . . . . . . . . . . . . . 31
. . . . . . . . . . . . . . . . . . . . . . . . . . . . . . . . . . . . . . . . . . . . . . . . . . . . . . . . . . . . . . . . . . . . . . . . . . . . . . . . . . . . . . 39
. . . . . . . . . . . . . . . . . . . . . . . . . . . . . . . . . . . . . . . . . . . . . . . . . . . . . . . . . . . . . . . . . . . . . . . . . . . . . . . . . . . . . . . 41
. . . . . . . . . . . . . . . . . . . . . . . . . . . . . . . . . . . . . . . . . . . . . . . . . . . . . . . . . . . . . . . . . . . . . . . . . . . . . . . . . . . . . . . . 43
. . . . . . . . . . . . . . . . . . . . . . . . . . . . . . . . . . . . . . . . . . . . . . . . . . . . . . . . . . . . . . . . . . . . 45
. . . . . . . . . . . . . . . . . . . . . . . . . . . . . . . . . . . . . . . . . . . . . . . . . . . . . . . . . . . . . . . . . . . . . . . . . . . . . 48
. . . . . . . . . . . . . . . . . . . . . . . . . . . . . . . . . . . . . . . . . . . . . . . . . . . . . . . . . . . . . . . . . . . . . . . . . . . . . . . . . . . . . . 52
. . . . . . . . . . . . . . . . . . . . . . . . . . . . . . . . . . . . . . . . . . . . . . . . . . . . . . . . . . 47
Page 4

USING PHOTOSHOP LIGHTROOM 2
Updated 03 September 2009
Contents
Creating and managing folders . . . . . . . . . . . . . . . . . . . . . . . . . . . . . . . . . . . . . . . . . . . . . . . . . . . . . . . . . . . . . . . . . . . . . . . . . . . . . . . . . . . . . . . 57
Synchronizing folders . . . . . . . . . . . . . . . . . . . . . . . . . . . . . . . . . . . . . . . . . . . . . . . . . . . . . . . . . . . . . . . . . . . . . . . . . . . . . . . . . . . . . . . . . . . . . . . . 59
Managing photos
. . . . . . . . . . . . . . . . . . . . . . . . . . . . . . . . . . . . . . . . . . . . . . . . . . . . . . . . . . . . . . . . . . . . . . . . . . . . . . . . . . . . . . . . . . . . . . . . . . . . 60
Chapter 7: Organizing photos in the catalog
Photo collections
Grouping photos into stacks
Filtering and rating photos
Viewing and editing metadata
Keywords
Finding photos in the catalog
Using the Quick Develop panel
. . . . . . . . . . . . . . . . . . . . . . . . . . . . . . . . . . . . . . . . . . . . . . . . . . . . . . . . . . . . . . . . . . . . . . . . . . . . . . . . . . . . . . . . . . . . . . . . . . . . . 66
. . . . . . . . . . . . . . . . . . . . . . . . . . . . . . . . . . . . . . . . . . . . . . . . . . . . . . . . . . . . . . . . . . . . . . . . . . . . . . . . . . . . . . . . . . 71
. . . . . . . . . . . . . . . . . . . . . . . . . . . . . . . . . . . . . . . . . . . . . . . . . . . . . . . . . . . . . . . . . . . . . . . . . . . . . . . . . . . . . . . . . . . 75
. . . . . . . . . . . . . . . . . . . . . . . . . . . . . . . . . . . . . . . . . . . . . . . . . . . . . . . . . . . . . . . . . . . . . . . . . . . . . . . . . . . . . . . . 79
. . . . . . . . . . . . . . . . . . . . . . . . . . . . . . . . . . . . . . . . . . . . . . . . . . . . . . . . . . . . . . . . . . . . . . . . . . . . . . . . . . . . . . . . . . . . . . . . . . . . . . . . . . . . 86
. . . . . . . . . . . . . . . . . . . . . . . . . . . . . . . . . . . . . . . . . . . . . . . . . . . . . . . . . . . . . . . . . . . . . . . . . . . . . . . . . . . . . . . . . 92
. . . . . . . . . . . . . . . . . . . . . . . . . . . . . . . . . . . . . . . . . . . . . . . . . . . . . . . . . . . . . . . . . . . . . . . . . . . . . . . . . . . . . . . 96
Chapter 8: Developing photos
Develop module overview
Adjusting image color and tone
Working in grayscale
Adjusting crop and rotation
Retouching and correcting photos
Correcting lens distortion and noise
Applying Develop adjustments to other photos
Managing image history and snapshots
. . . . . . . . . . . . . . . . . . . . . . . . . . . . . . . . . . . . . . . . . . . . . . . . . . . . . . . . . . . . . . . . . . . . . . . . . . . . . . . . . . . . . . . . . . . . 98
. . . . . . . . . . . . . . . . . . . . . . . . . . . . . . . . . . . . . . . . . . . . . . . . . . . . . . . . . . . . . . . . . . . . . . . . . . . . . . . . . . . . . . 104
. . . . . . . . . . . . . . . . . . . . . . . . . . . . . . . . . . . . . . . . . . . . . . . . . . . . . . . . . . . . . . . . . . . . . . . . . . . . . . . . . . . . . . . . . . . . . . . . 111
. . . . . . . . . . . . . . . . . . . . . . . . . . . . . . . . . . . . . . . . . . . . . . . . . . . . . . . . . . . . . . . . . . . . . . . . . . . . . . . . . . . . . . . . . 112
. . . . . . . . . . . . . . . . . . . . . . . . . . . . . . . . . . . . . . . . . . . . . . . . . . . . . . . . . . . . . . . . . . . . . . . . . . . . . . . . . . . 113
. . . . . . . . . . . . . . . . . . . . . . . . . . . . . . . . . . . . . . . . . . . . . . . . . . . . . . . . . . . . . . . . . . . . . . . . . . . . . . . . . 118
. . . . . . . . . . . . . . . . . . . . . . . . . . . . . . . . . . . . . . . . . . . . . . . . . . . . . . . . . . . . . . . . . . . . . . 121
. . . . . . . . . . . . . . . . . . . . . . . . . . . . . . . . . . . . . . . . . . . . . . . . . . . . . . . . . . . . . . . . . . . . . . . . . . . . . . 122
iv
Chapter 9: Exporting photos
Exporting photos to disk
Exporting photos using presets
Export plug-ins
. . . . . . . . . . . . . . . . . . . . . . . . . . . . . . . . . . . . . . . . . . . . . . . . . . . . . . . . . . . . . . . . . . . . . . . . . . . . . . . . . . . . . . . . . . . . . . . . . . . . . . 128
. . . . . . . . . . . . . . . . . . . . . . . . . . . . . . . . . . . . . . . . . . . . . . . . . . . . . . . . . . . . . . . . . . . . . . . . . . . . . . . . . . . . . . . . . . . . . 124
. . . . . . . . . . . . . . . . . . . . . . . . . . . . . . . . . . . . . . . . . . . . . . . . . . . . . . . . . . . . . . . . . . . . . . . . . . . . . . . . . . . . . . 128
Chapter 10: Editing in other applications
Editing in other applications overview
Edit photos in Photoshop
. . . . . . . . . . . . . . . . . . . . . . . . . . . . . . . . . . . . . . . . . . . . . . . . . . . . . . . . . . . . . . . . . . . . . . . . . . . . . . . . . . . . . . . . . . . . 133
. . . . . . . . . . . . . . . . . . . . . . . . . . . . . . . . . . . . . . . . . . . . . . . . . . . . . . . . . . . . . . . . . . . . . . . . . . . . . . . 130
Chapter 11: Creating and viewing slide shows
Slideshow module panels and tools
Specifying the slide layout
Adding overlays to slides
. . . . . . . . . . . . . . . . . . . . . . . . . . . . . . . . . . . . . . . . . . . . . . . . . . . . . . . . . . . . . . . . . . . . . . . . . . . . . . . . . . . . . . . . . . . 136
. . . . . . . . . . . . . . . . . . . . . . . . . . . . . . . . . . . . . . . . . . . . . . . . . . . . . . . . . . . . . . . . . . . . . . . . . . . . . . . . . . . . . . . . . . . . 141
Playing and exporting slide shows
. . . . . . . . . . . . . . . . . . . . . . . . . . . . . . . . . . . . . . . . . . . . . . . . . . . . . . . . . . . . . . . . . . . . . . . . . . . . . . . . . . 135
. . . . . . . . . . . . . . . . . . . . . . . . . . . . . . . . . . . . . . . . . . . . . . . . . . . . . . . . . . . . . . . . . . . . . . . . . . . . . . . . . . . 144
Chapter 12: Printing photos
Print module overview
Laying out photos using a Grid template
Laying out photos in a picture package
Printing overlay text and graphics
Setting print resolution and color management
. . . . . . . . . . . . . . . . . . . . . . . . . . . . . . . . . . . . . . . . . . . . . . . . . . . . . . . . . . . . . . . . . . . . . . . . . . . . . . . . . . . . . . . . . . . . . . 148
. . . . . . . . . . . . . . . . . . . . . . . . . . . . . . . . . . . . . . . . . . . . . . . . . . . . . . . . . . . . . . . . . . . . . . . . . . . . . 151
. . . . . . . . . . . . . . . . . . . . . . . . . . . . . . . . . . . . . . . . . . . . . . . . . . . . . . . . . . . . . . . . . . . . . . . . . . . . . . 155
. . . . . . . . . . . . . . . . . . . . . . . . . . . . . . . . . . . . . . . . . . . . . . . . . . . . . . . . . . . . . . . . . . . . . . . . . . . . . . . . . . . 156
. . . . . . . . . . . . . . . . . . . . . . . . . . . . . . . . . . . . . . . . . . . . . . . . . . . . . . . . . . . . . . . . . . . . . . 158
Chapter 13: Creating web photo galleries
Web module panels and tools
Specifying web gallery layouts
. . . . . . . . . . . . . . . . . . . . . . . . . . . . . . . . . . . . . . . . . . . . . . . . . . . . . . . . . . . . . . . . . . . . . . . . . . . . . . . . . . . . . . . 162
. . . . . . . . . . . . . . . . . . . . . . . . . . . . . . . . . . . . . . . . . . . . . . . . . . . . . . . . . . . . . . . . . . . . . . . . . . . . . . . . . . . . . . . 163
Previewing, exporting, and uploading a web photo gallery
. . . . . . . . . . . . . . . . . . . . . . . . . . . . . . . . . . . . . . . . . . . . . . . . . . . . . . . . . . . 168
Page 5

USING PHOTOSHOP LIGHTROOM 2
Updated 03 September 2009
Contents
Chapter 14: Keyboard shortcuts
Keyboard shortcuts . . . . . . . . . . . . . . . . . . . . . . . . . . . . . . . . . . . . . . . . . . . . . . . . . . . . . . . . . . . . . . . . . . . . . . . . . . . . . . . . . . . . . . . . . . . . . . . . . . 170
v
Page 6

Chapter 1: Resources
Updated 03 September 2009
Adobe® Photoshop® Lightroom® software is designed for your digital photography workflow. Lightroom helps you
organize, manage, process, print, and show digital photographs.
Installation and registration
Install the software
1 Close any other Adobe application open on your computer.
2 Insert the installation disc into your CD or DVD drive, and follow the on-screen instructions.
Note: For more information, see the ReadMe file on your installation disc.
Register
Register your product to receive complimentary installation support, notification of updates, and other services.
1
❖ To register, follow the on-screen instructions in the Registration dialog box, which appears after you install the
software.
If you postpone registration, you can register at any time by choosing Help > Lightroom Registration.
ReadMe
The ReadMe file for your software is available online and on the installation disc. Open the file to read important
information about topics such as the following:
• System requirements
• Installation (including removing the software)
• Registration
• Troubleshooting
• Customer support
• Legal notices
Download the Lightroom ReadMe.
Help and support
Community Help
Community Help is an integrated environment on Adobe.com that gives you access to community-generated content
moderated by Adobe and industry experts. Comments from users help guide you to an answer.
Page 7

USING PHOTOSHOP LIGHTROOM 2
Updated 03 September 2009
Resources
Community Help draws on a number of resources, including:
• Videos, tutorials, tips and techniques, blogs, articles, and examples for designers and developers.
• Complete on-line product Help, which is updated regularly by the Adobe documentation team.
• All other content on Adobe.com, including knowledgebase articles, downloads and updates, Developer
Connection, and more.
Choose Help > product name Help in the application to access the Help and Support page, the portal to all of the
Community Help content for your product. You can also use the Help search field in some Creative Suite 4
applications, or press F1 (Windows), to access Community Help for your product.
The sites searched by the default Community Help search engine are hand-selected and reviewed for quality by Adobe
and Adobe Community Experts. Adobe experts also work to ensure that the top search results include a mixture of
different kinds of content, including results from on-line product Help.
For more information on using Community Help, see http://help.adobe.com/en_US/CommunityHelp/.
For a video overview of Community Help, see www.adobe.com/go/lrvid4117_xp.
For frequently asked questions about Community Help, see http://community.adobe.com/help/profile/faq.html
Product Help
Adobe provides a comprehensive user guide for each product in several formats, including on-line product Help, PDF,
and printed book. Results from on-line product Help are included in your results whenever you search Community Help.
2
If you’re connected to the Internet, the Help menu within the product opens the product Help and Support page by
default. This page is a portal to all of the Community Help content for the product. If you want to consult or search
on-line product Help only, you can access it by clicking the product Help link in the upper-right corner of the Help
and Support page. Be sure to select the This Help System Only option before you do your search.
If you’re not connected to the Internet, the Help menu within the product opens local Help, a subset of the content
available in on-line product Help. Because local Help is not as complete or up-to-date as on-line product Help, Adobe
recommends that you use the PDF version of product Help if you want to stay offline. A downloadable PDF of
complete product Help is available from two places:
• The product’s Help and Support page (upper-right corner of the page)
• Local and web Help (top of the Help interface)
For more information on accessing product help, see http://help.adobe.com/en_US/CommunityHelp/.
If you are working in Adobe InDesign, Photoshop, Illustrator, Flash, Fireworks, or Dreamweaver, and you want to turn
off Community Help so that local Help opens by default, do the following:
1 Open the Connections panel (Window > Extensions > Connections).
2 From the Connections panel menu , select Offline Options.
3 Select Keep Me Offline and click OK.
Note: When you disable web services from the Connections panel, all other web services (such as Adobe Kuler and Adobe
ConnectNow) are also disabled.
Printed resources
Printed versions of the complete on-line product Help are available for the cost of shipping and handling at
www.adobe.com/go/store.
Page 8

USING PHOTOSHOP LIGHTROOM 2
Updated 03 September 2009
Resources
Support resources
Visit the Adobe Support website at www.adobe.com/support to learn about free and paid technical support options.
Services, downloads, and extras
Adobe Exchange
Visit the Adobe Exchange at www.adobe.com/go/exchange to download samples as well as thousands of plug-ins and
extensions from Adobe and third-party developers. The plug-ins and extensions can help you automate tasks,
customize workflows, create specialized professional effects, and more.
Adobe downloads
Choose Help > Check For Updates in Lightroom to download free updates to the software.
Visit www.adobe.com/go/downloads to find free updates, tryouts, and other useful software.
Adobe Labs
Adobe Labs at www.adobe.com/go/labs gives you the opportunity to experience and evaluate new and emerging
technologies and products from Adobe. At Adobe Labs, you have access to resources such as these:
3
• Prerelease software and technologies
• Code samples and best practices to accelerate your learning
• Early versions of product and technical documentation
• Forums, wiki-based content, and other collaborative resources to help you interact with like-minded users.
Adobe Labs fosters a collaborative software development process. In this environment, customers quickly become
productive with new products and technologies. Adobe Labs is also a forum for early feedback. The Adobe
development teams use this feedback to create software that meets the needs and expectations of the community.
Adobe TV
Visit Adobe TV at http://tv.adobe.com to view instructional and inspirational videos.
Lightroom video tutorials
Click any of these links to watch a video tutorial that teaches you how to use Lightroom.
Workspace and setup
The Lightroom catalog, or “Where are my photos?” (23:21)
Understanding catalogs in Lightroom 2 (5:51)
Working with multiple catalogs (17:46)
Branding Lightroom with the identity plate
Using two monitors with Lightroom 2 (7:42)
Page 9

Getting more out of Lightroom (4:32)
Updated 03 September 2009
Importing photos
Overview of importing (9:26)
Organizing photos
What’s new in the Library module (26:23)
Overview of the Library module (6:24)
Using the Volume Browser (4:01)
Rate and review your photos (7:08)
Collections vs. keywords (8:03)
Filter and find photos (4:31)
Developing photos
What’s new in the Develop module (22:38)
Overview of the Develop module (4:16)
USING PHOTOSHOP LIGHTROOM 2
Resources
4
Tonal and color corrections (9:10)
Exposure and brightness adjustments
Applying the Clarity setting (2:48)
Controlling vibrance and saturation in Lightroom
Adjusting hue and saturation (2:41)
The Blacks slider and black clipping
Working in grayscale (3:12)
Creating a cross-processing film effect using the Split Toning panel (1:49)
Using the Adjustment Brush tool (5:39)
Applying corrections using the Adjustment Brush tool (11:21)
Retouching portraits with the Adjustment Brush tool
Applying a Graduated Filter adjustment (3:40)
Combining local adjustments and the Graduated Filter (3:27)
Grayscale and split-toning effects, and the Post Crop vignette tool (5:55)
Cropping photos in Lightroom 2
Removing spots
Removing red eye
Working efficiently with presets (4:01)
Exporting photos
Overview of exporting (4:24)
Page 10

Editing in Photoshop
Updated 03 September 2009
Working with Lightroom 2 and Photoshop CS3 (7:36)
Editing in Lightroom 2 and Photoshop CS4 (7:42)
Using Lightroom 2 and Photoshop CS4 together (9:48)
Open as layers from Lightroom 2 into Photoshop CS4 (6:37)
Create a composite with Lightroom 2 and Photoshop CS4 (39:19)
The output modules
What’s new in the output modules (22:07)
Overview of the output modules (4:03)
Creating slide shows
Slideshow module basics (7:41)
Watermarking slide show PDFs (Lightroom 1.1)
Printing photos
Print module basics (9:21)
USING PHOTOSHOP LIGHTROOM 2
Resources
5
Using print templates (2:06)
Customizing a print template (3:22)
Print module Guides and Overlays panels (2:42)
Printing with Picture Package layouts (5:16)
Understanding the Print Job panel (4:48)
Creating web galleries
Web module basics (8:40)
Creating Flash galleries with Lightroom 2 (8:09)
Other community learning resources
For links to many more videos, blogs, and other Lightroom learning content from around the web, go to Lightroom
Help and Support.
What’s new
New features in Lightroom 2
Multi-monitor support Open a view of the Library in a second window that can be displayed on a second monitor.
Keep this window open while you’re working in any module, making it easier to view and select photos to edit or
present. See “Displaying the Library on a second monitor” on page 25.
Streamlined Library browsing A reorganized layout in the Library module makes it easier to manage your photos. A
Volume Browser lets you check the status of local and networked volumes at a glance. The new Library Filter bar in
the Grid view lets you find photos by metadata criteria; attributes such as ratings, labels, and flag status; or a text search
Page 11

USING PHOTOSHOP LIGHTROOM 2
Updated 03 September 2009
Resources
of indexed metadata fields. See “The Volume Browser” on page 56 and “Find photos using the Library Filter bar” on
page 93.
Simplified keywording The Keywording panel and new Keyword List panel are both on the right side of the Library
module, making it easier to add, apply, and manage keywords. A new keyword set suggests similar keywords for photos
whose capture times are in proximity. See “Keywords” on page 86.
Support for larger file sizes Work with files up to 65,000 pixels long or wide, up to 512 megapixels. See “File formats”
on page 31.
Local color adjustments Make exposure, brightness, clarity, and other adjustments on specific areas of a photo by
using the Adjustment Brush tool or the Graduated Filter tool. See “Apply local adjustments” on page 115.
Output creations Save settings from the Slideshow, Print, and Web modules with a collection so that you can easily
return to those settings for a group of photos. See “Save slide show settings as an output creation” on page 140, “Save
print settings as an output creation” on page 160, and “Save web settings as an output creation” on page 167.
Smart collections Create smart collections based on metadata rules that you specify. Smart collections automatically
stay up-to-date with the photos that meet the criteria you specify. See “Create a smart collection” on page 69.
Postcrop vignette Apply a vignette effect to a cropped photo. See “Apply a postcrop vignette” on page 120.
Tighter integration with Adobe Photoshop Open photos from Lightroom in Photoshop more quickly and as a Smart
Object. Merge multiple photos to panorama, merge multiple high dynamic range (HDR) photos, or open multiple
photos as one layered file in Photoshop. When you return to Lightroom, edited images are automatically added to the
catalog. See “Edit photos in Photoshop” on page 133.
6
New print options Create print layouts, called picture packages, that contain one photo in a variety of sizes on a page.
Enjoy improved output sharpening, and print to a JPEG file for your print service provider. See “Laying out photos in
a picture package” on page 155, “Sharpen a photo for print” on page 159, and “Print to JPEG” on page 150.
Improved performance Lightroom makes better use of multiple processors for faster display of thumbnails and
photos, and supports 64-bit systems running Windows® Vista® and Mac OS®.
Output SDK A Software Development Kit allows third parties to create plug-ins that enhance Lightroom functionality
for exporting photos, creating web photos galleries, and adding custom metadata. See “Export plug-ins” on page 128.
For more information on additional changes, see the Lightroom ReadMe.
For a video about the new features in the Library module, see www.adobe.com/go/lrvid2216_lrm.
For a video about the new features in the Develop module, see www.adobe.com/go/lrvid2217_lrm.
For a video about the new features in the Slideshow, Print, and Web modules, see www.adobe.com/go/lrvid2218_lrm.
Page 12
Chapter 2: The Lightroom workflow
Updated 03 September 2009
The five modules in Adobe® Photoshop® Lightroom® are designed to correspond to a photographer’s workflow. To
process photos efficiently in Lightroom, it helps to know how the workspace is organized and how to accomplish basic
tasks in each module.
Workspace overview
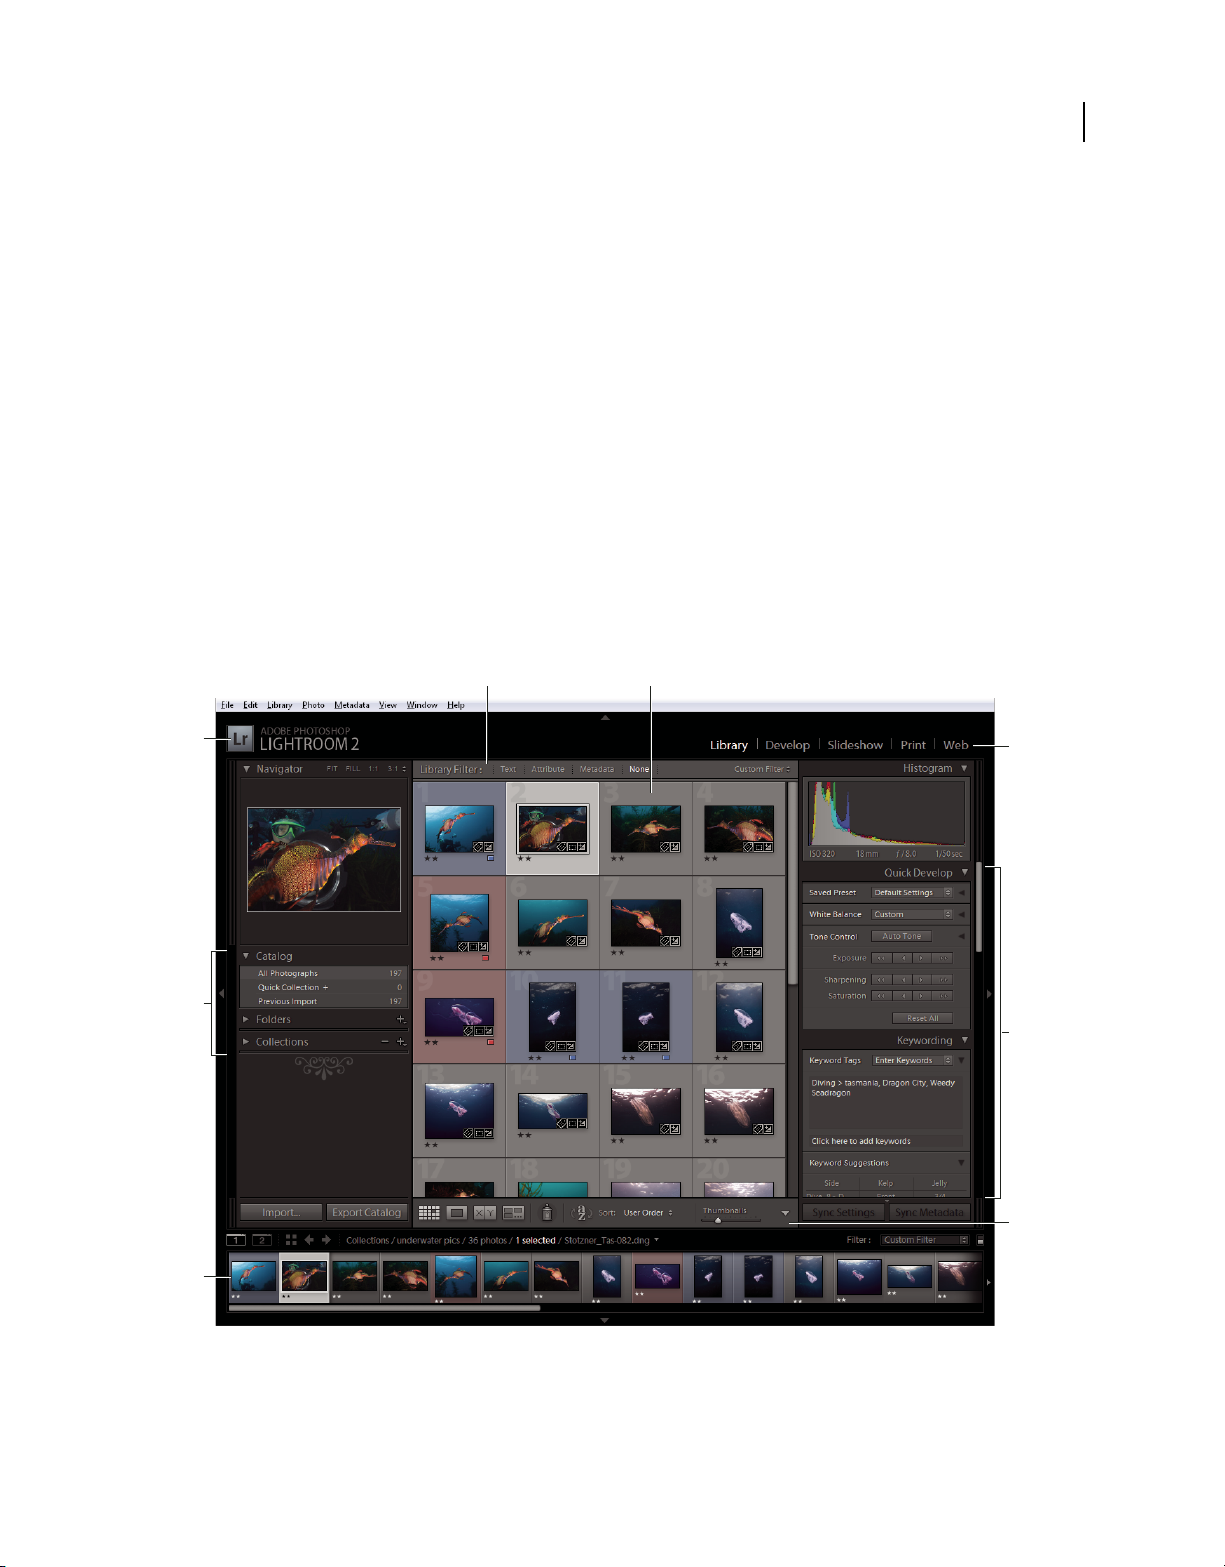
Lightroom is a complete toolbox for professional photographers, organized into five modules. Each module focuses
on a specific portion of the photographic workflow: the Library module is for importing, organizing, comparing, and
selecting photos; the Develop module is for adjusting color and tone, or creatively processing photos; and the
Slideshow, Print, and Web modules are for presenting your photos.
Each of the five modules in the Lightroom workspace include several panels that contain options and controls for
working on your photos.
A B
7
C
D
E
F
G
H
The Lightroom workspace in the Grid view
A. Library Filter bar B. Image display area C. Identity plate D. Panels for working with source photos E. Filmstrip F. Module Picker
G. Panels for working with metadata, keywords, and adjusting images H. Toolbar
Page 13

USING PHOTOSHOP LIGHTROOM 2
Updated 03 September 2009
The Lightroom workflow
The Filmstrip, located at the bottom of the workspace in every module, displays thumbnails of the contents of the
folder, collection, keyword set, or metadata criteria that is currently selected in the Library module. Each module uses
the contents of the Filmstrip as the source for the tasks performed in it. To change the selection in the Filmstrip, go to
the Library module and select different photos. See “Viewing photos in the Filmstrip” on page 41.
To work in Lightroom, first select the images you want to work with in the Library module. Then click a module name
in the Module Picker (upper-right in the Lightroom window) to begin editing, printing, or preparing your photos for
presentation in an on-screen slide show or web gallery.
Hold down Ctrl+Alt/Command+Option and press a number from 1 through 5 to switch to any of the five modules.
Importing photos into Lightroom: Basic workflow
You must import photos into the Lightroom library to begin working with them. Importing tells Lightroom what
photos are in the library, and whether they are imported directly from a camera, hard drive, memory card reader, or
other storage device. During import, you can choose either to move or copy the photo files into a specific folder, or
reference the photo files in their current location. As photos are imported, you can rename them, apply Develop
module adjustments to them, embed metadata and keywords, and even back up the original photos to a different
folder.
8
Note: Lightroom supports photos up to 65,000 pixels long or wide, up to 512 megapixels. Lightroom does not support
CMYK images. For a complete list of supported file formats, see “File formats” on page 31.
After they are imported, Lightroom adds the photos to the library and starts building previews and cataloging
metadata. Unless manually removed, the previews and metadata stay in the library, even if you move the
corresponding photos off of your computer to archive them at a different storage location. Thumbnail previews appear
in the Grid view and Filmstrip, and folders containing the imported photos appear in the Folders panel of the Library
module. You can’t import the same photo into Lightroom multiple times unless you first delete the photo from the
library. See “Browsing the Grid view” on page 44 and “Create virtual copies” on page 62.
Note: Lightroom also offers an auto-import feature for automatically importing photos into the library from a specified
folder. See “Importing photos automatically” on page 39.
The Import Photos dialog box allows you to preview, select, name, and add information about the photos you want to
import. To import photos into Lightroom, follow these basic steps:
1. Connect the camera or memory card reader to your computer.
In addition to cameras and memory card readers, Lightroom imports photos from any folder on the hard drive, CDs
or DVDs, and other storage devices. You can also import photos from another Lightroom catalog or from
Photoshop Elements (Windows).
2. Select the photos to import.
To bring photos into the library, do any of the following:
• Click the Import button in the Library module.
• Choose File > Import Photos From Disk.
• Choose File > Import Photos From Device.
• Drag a folder that contains photos or drag a group of photos into the Grid view of the Library module.
If necessary, navigate to the folder that contains the photos and click Choose.
Page 14

USING PHOTOSHOP LIGHTROOM 2
Updated 03 September 2009
The Lightroom workflow
3. Choose how to import the photos into your library.
In the Import Photos dialog box, choose whether to import photos by referencing them, by copying or moving them
to a specified directory, or by copying photos as Digital Negative (DNG) files. If you copy or move the photos, specify
the destination folder and how to name the imported files. See “Import photos from disk into Lightroom” on page 33.
Select Show Preview to view and select specific photos if you don’t want to import all of the photos in a folder. See
“Preview and select the photos to import” on page 34.
4. (Optional) Back up your photos as they’re importing.
If you’re copying or moving photos into the library, specify whether to make a one-time backup of the original photos
as they’re imported.
5. (Optional) Give your files a custom name.
When copying or moving photos into the library, Lightroom by default imports photos using their current filenames.
You can customize the name by choosing an option from the File Naming Template menu. For example, you can add
a sequence number. See “Name photos when importing” on page 34.
6. (Optional) Set options for importing your photos.
In the Information To Apply area of the Import Photos dialog box, you can set options to apply Develop settings,
metadata, or keywords to the photos as they’re imported. See “Apply Develop settings to photos when importing” on
page 37, “Create and apply Develop presets” on page 101, and “Apply metadata to photos when importing” on page 37.
9
7. Select the type of previews to display.
The Standard-Size Previews option provides higher quality photos in the Grid view. Selecting Minimal uses the
embedded previews in photos and initially displays photos faster. See “Specify initial previews when importing” on
page 37.
8. Click Import.
Lightroom displays a progress bar in the upper-left corner of the window as it imports the photos. Then it renders
thumbnails in the central area of the Library module.
For a video about importing photos into Lightroom, see www.adobe.com/go/lrvid2201_lrm.
More Help topics
“Managing photos” on page 60
The Library module
After the photos are imported, Lightroom stores them in a database called a catalog. You view and organize the photos
in your catalog in the Library module.
More Help topics
“Creating and managing catalogs” on page 52
“Importing photos into your library” on page 31
Page 15

USING PHOTOSHOP LIGHTROOM 2
Updated 03 September 2009
The Lightroom workflow
About Lightroom catalogs
Lightroom uses a catalog to track the location of files and remember information about them. A catalog is like a
database that contains a record of your photos. This record is stored in the catalog and contains data such as preview
information, links that indicate where the photos are located on your computer, metadata that describes the photos,
and editing instructions applied in the Develop module. When you rate photos, add metadata and keyword tags,
organize photos into collections, or remove photos from the catalog—even when the original photo files are offline—
the settings are stored in the catalog.
All of this information enables Lightroom to give you flexibility in managing, identifying, and organizing photos. If
you’re photographing on location, for example, you can import photos into Lightroom on your laptop, and then move
the original photos onto writable media or storage devices, and continue organizing and managing your photos
without worrying about filling up the laptop hard drive. You can then transfer the catalog to your desktop computer,
preserving the changes you make and keeping track of where the photos are stored. The catalog that you import with
photos from the on-location shoot would be a separate catalog from any other catalog that may be stored on the
desktop computer.
Note: Although you can view photos in both Lightroom and Adobe Bridge, the two applications behave differently. To
view photos in Adobe Bridge, your computer hard drive must contain the photos, or your computer must be connected to
a storage media that contains the photos. This is because Adobe Bridge is a file browser that only displays readily
accessible photos. The Lightroom catalog is a database that keeps track of the photos you import, so you can preview
photos whether your hard drive contains the actual photos or not. To edit photos in Lightroom, however, the software
does need to be able to access the stored photos.
10
By default, Lightroom loads the most recent catalog. You can open a different catalog by choosing File > Open Catalog,
or you can determine which catalog is opened in the General preferences.
Viewing and organizing photos
Photos in the catalog and their accompanying data are viewed in the Library module. You can view all photos in the
catalog as thumbnails in a grid, or the catalog can be filtered in different ways to show only specific photos. The Library
module has controls that let you search for and display specific photos and data. You can also group photos into
collections, into a temporary collection called the Quick Collection, or into a smart collection based on a criteria that
you specify. You can also use keyword tags and metadata to find your photos.
The Library module is where you view, sort, manage, organize, compare, and rate your photos. It’s your home base for
working with photos after importing them into Lightroom.
Photos are displayed in the central area of the Library module in any of four views:
Grid view Displays photos as thumbnails in cells, which can be viewed in compact and expanded sizes. The Grid view
gives you an overview of your entire catalog or specific groups of photos for rotating, sorting, organizing, and
managing. Options are available for viewing information about photos, including their ratings, color labels, and Pick
or Rejected flags in the cells. If you photographed a series of similar photos, they can be neatly grouped in a stack with
the thumbnail of the best showing. See “Finding photos in the catalog” on page 92 and “Grouping photos into stacks”
on page 71.
Loupe view
to 11:1 are available. When you’re in the Grid or Survey view, double-clicking a photo displays the image in Loupe view.
Compare view Displays photos side by side so that you can evaluate them.
Displays a single photo. Controls let you view the entire photo or zoom in to see part of it. Zoom levels up
Survey view Displays the active photo with selected photos so that you can evaluate them. The active photo has a white
border. Change the active photo by clicking a different thumbnail, and deselect a photo in Survey view by clicking the
X in the lower-right corner of the thumbnail.
Page 16

USING PHOTOSHOP LIGHTROOM 2
Updated 03 September 2009
The Lightroom workflow
The Library module contains buttons and commands for switching between views. See “Switching between Grid,
Loupe, Compare, and Survey views” on page 47. You can also display these views of the Library module in a second
window, which you can view on a second monitor, if you have one. See “Displaying the Library on a second monitor”
on page 25.
The panels on the left side of the Library module are primarily for displaying specific photos. Use them to navigate and
manage the folders that contain your photos, to view your collections of photos, and to adjust the zoom level of your
photos in Loupe view. See “View the contents of a folder” on page 61 and “Photo collections” on page 66.
The Library Filter bar at the top of the Grid view allows you to find photos by selecting categories of metadata; filtering
by flags, ratings, and color labels; and performing a text search. Being able to search for and find photos is important
when you want to locate specific images, assemble a group of photos into a slide show or web photo gallery, or print
your photos on a contact sheet. See “Find photos using the Library Filter bar” on page 93.
The panels on the right side of the Library module let you view a histogram of the active photo, and view and add
metadata and keyword tags to photos. The Quick Develop panel lets you quickly apply tone adjustments to photos.
The tone adjustments in the Quick Develop panel in the Library module are the same as their counterparts in the
Develop module. However, the Develop module has more precise controls for making adjustments and corrections to
the image. See “Reading image histograms” on page 101, “Viewing and editing metadata” on page 79, and “Using the
Quick Develop panel” on page 96.
Depending on the view, the toolbar below the preview area contains controls for sorting, applying ratings, rotating
photos, playing an impromptu slide show, or viewing information about the photo. See “Show controls in the Library
module toolbar” on page 25.
11
Like all modules in Lightroom, the Library module displays the Filmstrip along the bottom. Applying filters to show
only certain photos in the Filmstrip determines which photos appear in the Grid view. See “Filtering and rating
photos” on page 75 and “Filter the photos displayed in the Filmstrip and Grid view” on page 42.
For a video about the Library module, see www.adobe.com/go/lrvid2202_lrm.
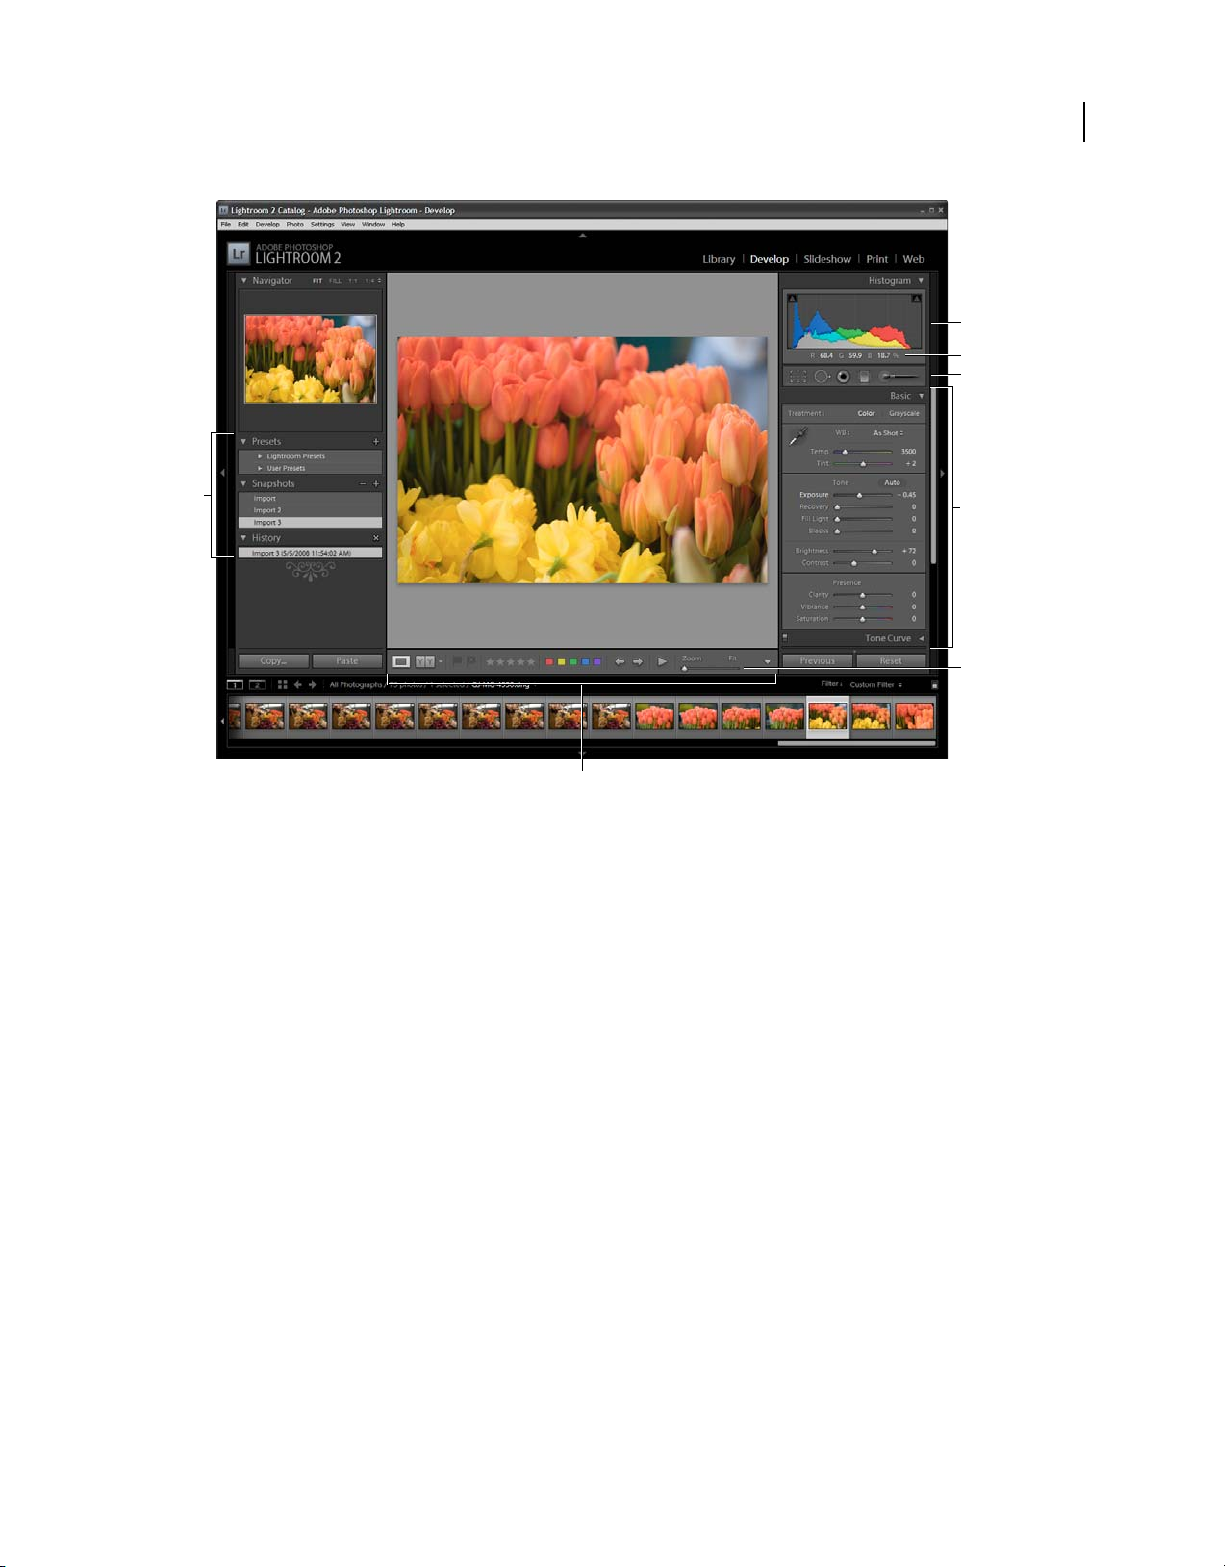
Applying adjustments in the Develop module: Basic workflow
The Develop module in Lightroom includes controls for globally adjusting the color and tonal scale of your photos, as
well as for making local adjustments. All the adjustments you make in Lightroom are nondestructive. With
nondestructive editing, your original file is not altered, whether it’s a camera raw file or a rendered file such as a JPEG
or TIFF. Your edits are stored in Lightroom as a set of instructions that are applied to your photo in memory.
Nondestructive editing means you can explore and create different versions of your photo without degrading your
original image data.
Page 17
USING PHOTOSHOP LIGHTROOM 2
Updated 03 September 2009
The Lightroom workflow
B
C
D
12
A
G
The Develop module
A. Presets, Snapshots, and History panels B. Histogram C. RGB values D. Tool strip E. Adjustment panels F. Navigator zoom controls
G. Toolbar
E
F
Photos in the following formats can be edited in Lightroom: camera raw (including DNG), JPEG, TIFF, and PSD.
Applying adjustments to photos is a subjective and individual process. Use the following steps as a guide for editing
photos in the Develop module.
1. Select a photo to edit.
Select a photo in the Library module and press D to switch to the Develop module. To switch to a different photo in
the Develop module, choose it from the Filmstrip.
2. Evaluate the photo.
Use the zoom controls in the Navigator panel to inspect your photo and the Hand tool to reposition the photo in the
viewing area. When you move the pointer over the photo, the RGB values under its position appear in the toolbar. Use
the Histogram panel as a visual guide for measuring color tones, as well as to preview shadow and highlight clipping.
You can even drag in the histogram interface to make tonal adjustments to the photo. See “Reading image histograms”
on page 101.
3. Make global color adjustments.
By default, the Develop module displays panels for making global adjustments to photos on the right side of the
window. You can make Develop module adjustments in any order, but a common approach to using these panels is to
start at the top and work down. Starting with the Basic panel, you can adjust the white balance, tonal scale, and color
saturation of a photo, including Clarity and Vibrance. You can refine global color and tonal adjustments in the Tone
Curve and HSL/Color/Grayscale panels, and you create special effects or colorize monochrome photos in the Split
Toning panel. See “Adjusting image color and tone” on page 104.
Page 18

USING PHOTOSHOP LIGHTROOM 2
Updated 03 September 2009
The Lightroom workflow
4. Reduce noise and apply sharpening.
Use the Detail panel to reduce noise and adjust the sharpness in a photo. Use the Vignettes panel to correct chromatic
aberrations or lens vignetting caused by the camera lens. See “Reduce image noise” on page 120, “Sharpen a photo” on
page 114, “Compensate for chromatic lens aberration” on page 118, and “Compensate for lens vignetting” on
page 119.
Use the Before/After button in the toolbar to see the results of your edits, or simply press \ to cycle between before and
after views. Use the History panel to return to any previous edit. Click the plus sign (+) in the Snapshots panel to
capture any editing state that you can return to at a later time.
5. Retouch and correct flaws.
At any time, use the Crop Overlay, Red Eye Removal, and Spot Removal tools to crop and straighten your photo and
to remove red eye, dust, and spots. To apply a postcrop vignette, use the options in the Vignettes panel. See “Adjusting
crop and rotation” on page 112, “Remove red-eye” on page 114, “Heal spots and blemishes” on page 113, and “Apply
a postcrop vignette” on page 120.
6. Apply local color adjustments.
Color correct specific areas of a photo by using the Adjustment Brush tool or the Graduated Filter tool. See “Apply
local adjustments” on page 115.
13
7. Apply adjustments to other photos.
You can apply edits from one photo to many others. For example, apply a set of edits to all of the photos from a specific
shoot that require the same global adjustments. You can copy and paste them, or synchronize them. When you copy
or synchronize corrections, Lightroom allows you to select the specific edits that you want to apply to the other photos.
You can also use the Painter tool in the Grid view of the Library to apply Develop settings from one photo to another.
See “Applying Develop adjustments to other photos” on page 121.
For a video about the Develop module, see www.adobe.com/go/lrvid2206_lrm.
For a video about making tonal and color corrections in the Develop module, see www.adobe.com/go/lrvid2207_lrm.
For a video about creating special effects such as grayscale photos, split-toned photos, and postcrop vignettes, see
www.adobe.com/go/lrvid2208_lrm.
For a video about applying local adjustments in the Develop module, see www.adobe.com/go/lrvid2209_lrm.
Exporting photos: Basic workflow
Lightroom lets you export photos in file formats suitable for a wide range of uses. For example, you can export photos
as JPEGs to use in multimedia presentations or send in e-mail, or as TIFFs for publication. You can export single or
multiple photos from the Library or Develop modules to the location you specify. Lightroom can rename photos
during export. When exporting photos in JPEG, TIFF, or PSD format, options are available for specifying their color
space, pixel dimensions, and resolution. Export settings can be saved as presets for reuse. Lightroom also lets you
export photos using the settings of the previous export session.
In the Slideshow module, photos can be exported to an Adobe PDF file or to JPEG. In the Print module, photos can
also be exported JPEG. And in the Web module, photos can be exported to a web photo gallery. See “Export a slide
show” on page 146, “Print to JPEG” on page 150, and “Save and upload a web photo gallery” on page 168.
To export photos from Lightroom, follow these basic steps:
Page 19

USING PHOTOSHOP LIGHTROOM 2
Updated 03 September 2009
The Lightroom workflow
1. Select the photos to export.
Select photos from the Grid view or the Filmstrip. See “Selecting photos in the Grid view and the Filmstrip” on page 45.
2. Export photos and specify a destination folder.
Choose File > Export or click the Export button in the Library module. Then specify a destination folder for the
exported files in the Export dialog box. You can also choose to add the exported photos to the current catalog. See
“Choose an export destination folder” on page 124.
The number of photos being exported is displayed at the top of the Export dialog box.
3. (Optional) Choose an export preset.
Lightroom has several premade presets to make it easier to export photos in specific file formats. For example, the For
E-mail preset generates a small, low-resolution JPEG image suitable for sending to a client as an e-mail attachment.
You can select any of these presets, or save your own settings as a custom export preset by clicking the Add button at
the bottom of the Preset list in the Export dialog box. See “Export photos using presets” on page 128.
4. Specify file naming for the exported photos.
Choose an option from the File Naming Template menu, or choose Edit from the menu to create a custom naming
convention using the Filename Template Editor. See “The Filename Template Editor and Text Template Editor” on
page 35 and “Name photos when exporting” on page 125.
14
5. Choose a file format and specify export file and size settings.
Choose whether to export the original photos, or export your photos as JPEG, PSD, TIFF, or DNG files. After selecting
a format, specify the appropriate settings for your exported files. For example, if you chose JPEG, specify the
compression quality, color space, pixel dimensions, and resolution. You can also apply output sharpening. See “Specify
export file settings” on page 125 and “Specify output sharpening” on page 126.
6. Choose a postprocessing action.
Specify whether to show the files in the Explorer (Windows) or the Finder (Mac OS), open the photos in Photoshop,
launch a specific application, or do nothing after exporting. See “Choose postprocessing actions” on page 127.
7. (Optional) Save your export settings.
To save your export settings for reuse, click Add to create an export preset. See “Save export settings as presets” on
page 128.
8. Click Export.
For a video about exporting photos from Lightroom, see www.adobe.com/go/lrvid2210_lrm.
Page 20

USING PHOTOSHOP LIGHTROOM 2
Updated 03 September 2009
The Lightroom workflow
Editing in Photoshop or Photoshop Elements: Basic workflow
You can edit photos using Adobe Photoshop, Adobe Photoshop Elements, or another application from within the
Library or Develop module in Lightroom. Lightroom automatically uses Photoshop or Photoshop Elements as an
external editor if you have either application installed on your computer. You can designate other applications to
function as external editors, as well as set file format and other options, in the External Editing preferences. See
“Specify external editing preferences” on page 130.
Lightroom provides several ways to edit photos in Photoshop CS4. You can simply edit them in their current format,
or open them as a Smart Object. You can also merge a series of shots into a panorama, merge to HDR, or open two or
more photos as one layered image in Photoshop. When you save edits to a photo in Photoshop, Lightroom
automatically imports the new photo into the catalog. See “Open photos in Photoshop or Photoshop Elements” on
page 131 and “Edit photos in Photoshop” on page 133.
To edit your photo using Photoshop or Photoshop Elements from within Lightroom, you must have one of those
applications installed on your computer. Then, follow these steps:
1. Select a photo to edit.
In the Lightroom Library or Develop module, select the photo you want to edit. Then, choose Photo > Edit In > Edit
In Adobe Photoshop or Edit In Adobe Photoshop Elements. If you’re opening a camera raw file in Photoshop CS4,
Photoshop opens the photo directly. If you’re opening a TIFF, JPEG, or PSD file, choose to open a copy of the photo
with Lightroom adjustments applied, or open a copy of the original photo.
15
2. Edit in Photoshop or Photoshop Elements.
Perform your desired edits in Photoshop or Photoshop Elements, and when you’re ready to commit to them, choose
File > Save.
3. Return to Lightroom.
Switch back to Lightroom. In the Library Grid view, a new version of your photo appears next to the original. The new
photo contains the edits you made in Photoshop or Photoshop Elements. The original photo is untouched.
Important: When saving from Photoshop or Photoshop Elements, be sure to turn on the Maximize Compatibility option
so that Lightroom can read the images. Photoshop CS3 and later automatically save PSD files from Lightroom with
maximum compatibility.
For a video about editing photos in Lightroom and Photoshop CS3, see www.adobe.com/go/lrvid2211_lrm.
For a video about editing photos in Lightroom and Photoshop CS4, see www.adobe.com/go/lrvid4121_ps.
Creating slide shows: Basic workflow
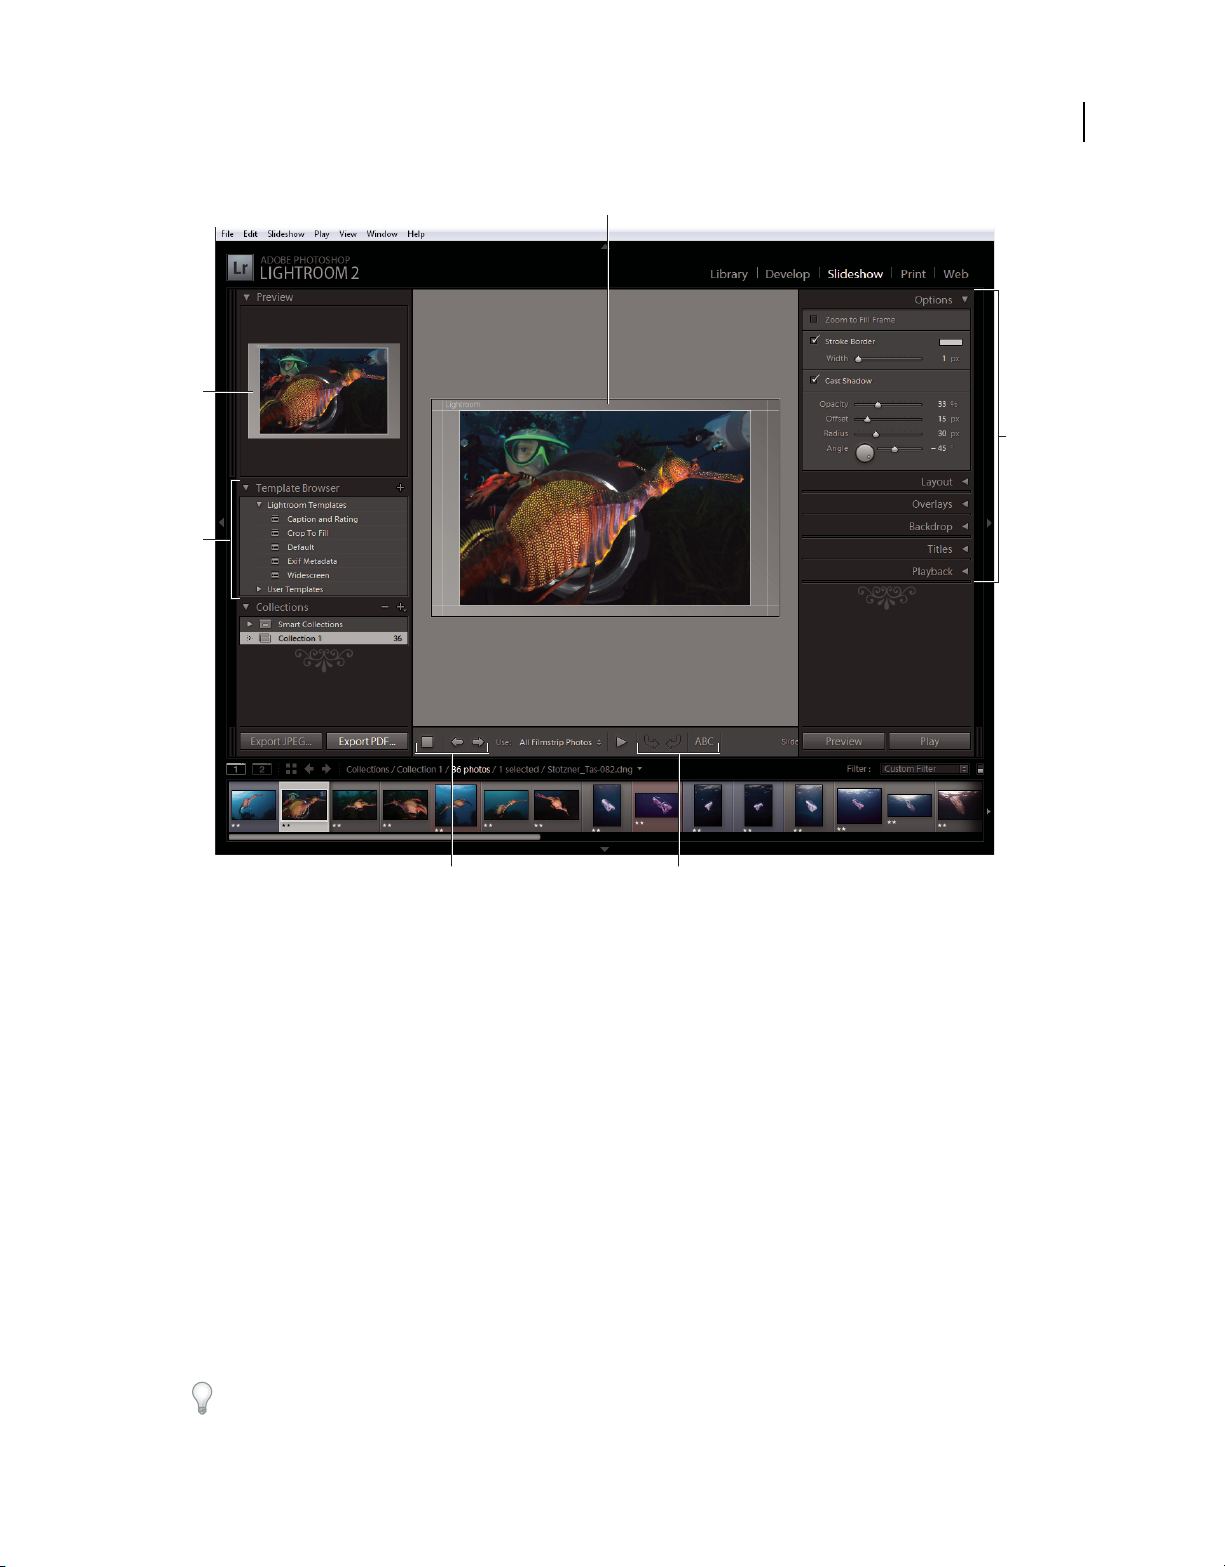
In the Slideshow module, you can create slide shows to present photos on screen with music and transitions. The left
panels contain a list of slide show templates and a preview of their layouts. The Slide Editor view in the center of the
workspace displays the photos in a slide template. The toolbar below the Slide Editor contains controls for playing a
preview of the slide show, refining the selection, and adding text to the slides. The right panels contain controls for
specifying how the photos appear in the template layout, modifying the template, adding text to the slide layout, and
selecting playback settings.
Page 21
USING PHOTOSHOP LIGHTROOM 2
Updated 03 September 2009
The Lightroom workflow
A
B
D
C
16
E F
The Slideshow module
A. Slide Editor view B. Template preview C. Slide show templates D. Panels for setting layout and playback options E. Playback controls
F. Rotate and Add Text tools
If you want to share a slide show with others, or play it on another computer, you can export the slide show as an
Adobe PDF file. Exported slide shows play without music.
You can also play an impromptu slide show from the Library or Develop module. An impromptu slide show plays
using the current template and settings in the Slideshow module. This is a convenient way to view images at full screen
and rate, rotate, or delete images in a folder using keyboard shortcuts.
To create a slide show, follow these basic steps:
1. Select images from the Library.
In the Library module, select photos in the Grid view or Filmstrip. Or select a folder, collection, or keyword to display
photos you want to include in the slide show. See “Selecting photos in the Grid view and the Filmstrip” on page 45.
Use the Quick Collection to assemble photos from multiple folders or with different keywords, or make a collection
from selected photos. Assembling the photos into a collection gives you more control over arranging the slide order
or modifying the slide show later. See “Assemble photos into the Quick Collection” on page 68 and “Create or delete
collections and collection sets” on page 67.
You can filter the photos in the Filmstrip of the Slideshow module by clicking the Use pop-up menu in the toolbar and
choosing All Photos, Selected Photos, or Flagged Photos.
Page 22

USING PHOTOSHOP LIGHTROOM 2
Updated 03 September 2009
The Lightroom workflow
2. Arrange the slide order.
If you assembled your photos into a collection or if you’ve selected a folder that does not contain other folders, drag
the photos in the Filmstrip to arrange them in the desired order. See “Rearrange slide order” on page 139 and
“Randomize the slide order” on page 145.
3. Choose a template in the Slideshow module.
Move the pointer over a template name in the Template Browser on the left side of the workspace to see a preview of
the template. Click a template name to select it for your slide show. See “Choose a slide show template” on page 136.
4. (Optional) Customize the template.
Customize your slide show by modifying the Options, Layout, Overlays, and Backdrop settings. For example, add a
drop shadow; specify whether to show your identity plate or a caption on the slides; and specify a color or image for
the slide show background. See “Adding overlays to slides” on page 141 and “Set the slide background” on page 138.
Note: Save your modifications as a custom template if you might want to use them again later. See “Choose a slide show
template” on page 136.
5. Set playback options.
Set slide duration and transition options for playing a slide show from within Lightroom. You can also specify
introductory and ending slides, and select a music playlist on your computer to play during the slide show. See “Set
slide and transition duration” on page 144.
17
6. Preview or play the slide show.
Click the Preview Slideshow button in the toolbar to display the slide show in the Slideshow Editor view. Click the Play
button to play the slide show as a full-screen presentation on your computer. See “Preview a slide show” on page 145
and “Play a slide show” on page 145.
7. Export the slide show if you plan to share it.
You can save your slide show as an Adobe PDF document so that others can view it. Click the Export button, name
the slide show, and specify your desired size and quality settings. You can also export slides as a series of JPEG files.
See “Export a slide show” on page 146.
Important: Music cannot be included in exported slide shows.
8. (Optional) Save the layout as a custom template or save settings with an output creation.
Save your slide show layout as a custom template so you can reuse it easily. Or save the slide show settings as an output
creation. An output creation lets you easily return to a specific set of output options for a collection of photos. You can
also easily swap photos in the output creation while preserving specific Slideshow, Print, or Web module settings. See
“Create custom slide show templates” on page 139 and “Save slide show settings as an output creation” on page 140.
For a video about of all the output modules, see www.adobe.com/go/lrvid2212_lrm.
For a video about the Slideshow module, see www.adobe.com/go/lrvid2213_lrm.
Page 23
USING PHOTOSHOP LIGHTROOM 2
Updated 03 September 2009
The Lightroom workflow
Printing photos: Basic workflow
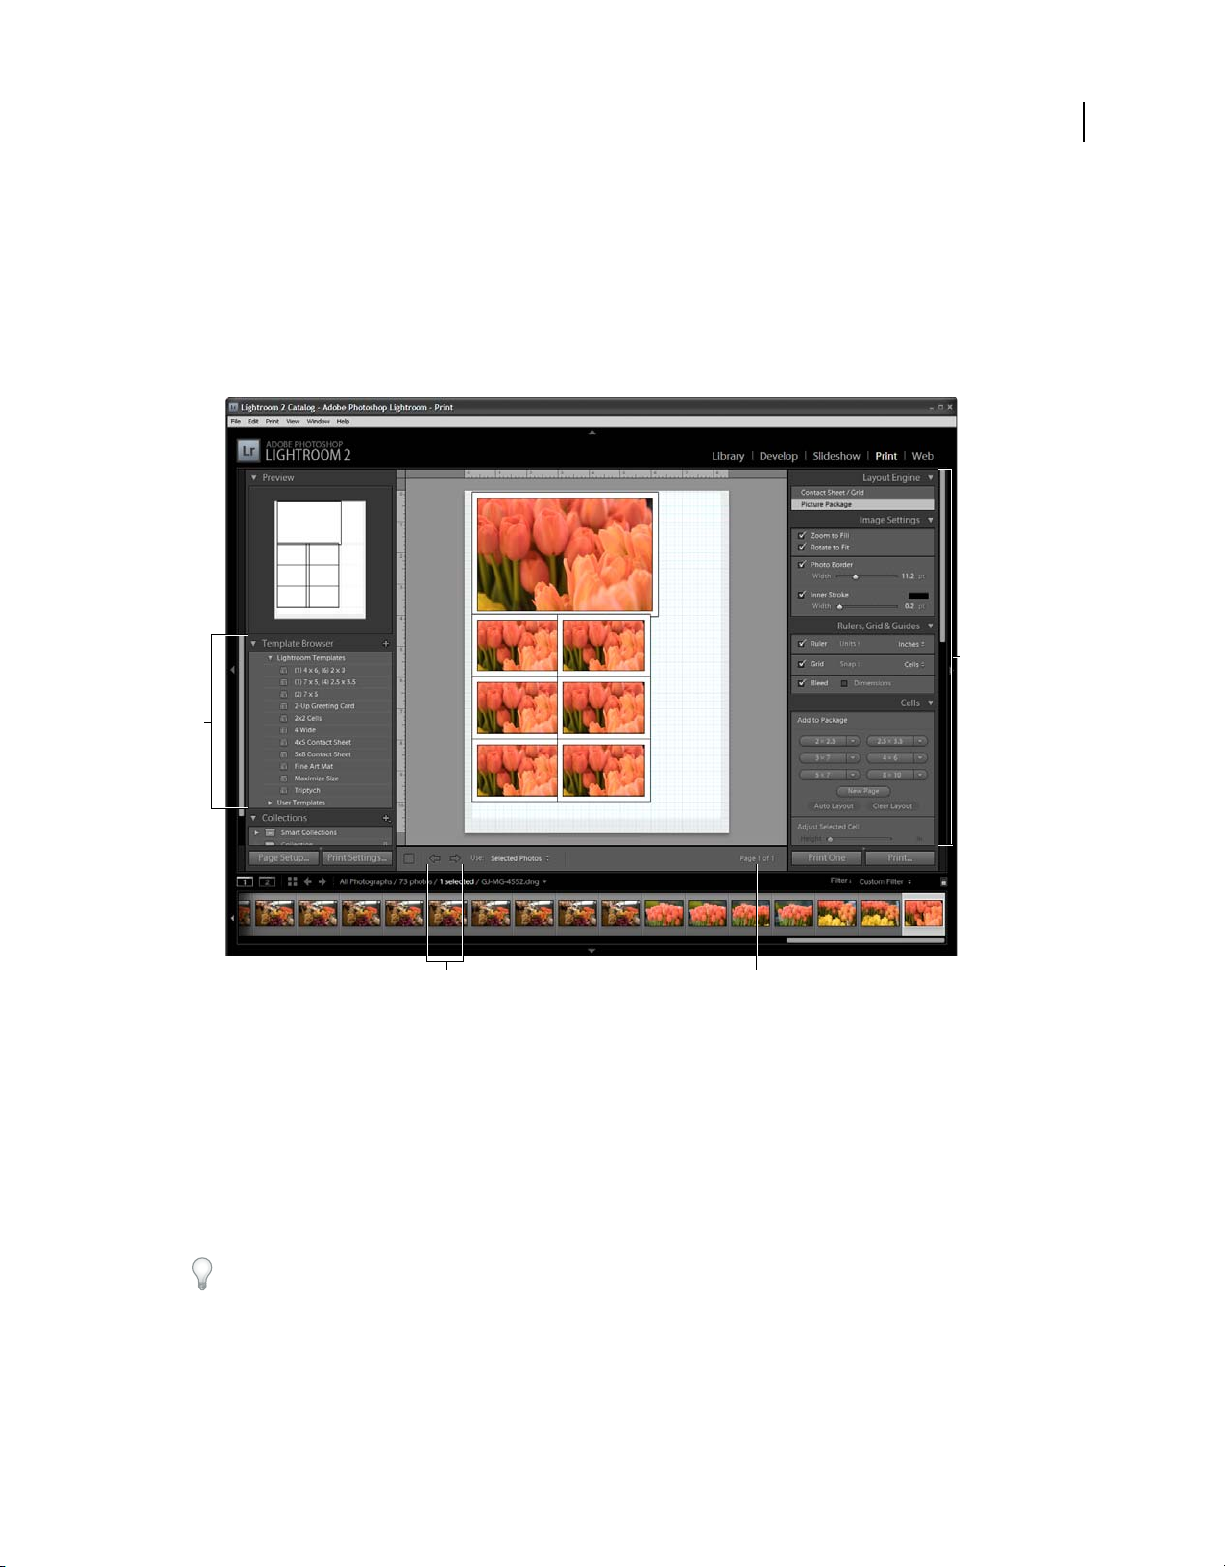
The Print module lets you specify the page layout and print options for printing photos and contact sheets on your
printer. The left panels contain a list of templates and a preview of their page layouts. The area in the center of the Print
module displays the photos in a template. The right panels contain controls for specifying how the photos appear in
the template layout; modifying the template; adding text and other items to the printed page; and selecting printing
settings for color management, resolution, and sharpening.
B
18
A
C D
The Print module
A. Template Browser B. Panels for specifying layout and output options C. Show Previous Page and Show Next page buttons D. Page number
To print photos from Lightroom, follow these basic steps:
1. Select the photos you want to print.
In the Library module, select a folder, collection, or keyword to display photos you want to print. Use the Quick
Collection to assemble photos from multiple folders from the Grid view, or with different keywords in the Filmstrip.
In the Print module, you can also select photos from the Filmstrip. See “Selecting photos in the Grid view and the
Filmstrip” on page 45.
You can filter the photos in the Filmstrip of the Print module by clicking the Use pop-up menu in the toolbar and
choosing All Photos, Selected Photos, or Flagged Photos.
2. Choose the page size.
In the Print module, click the Page Setup button and choose a page size:
• (Windows) In the Paper area of the Print Setup dialog box, choose a page size from the Size menu.
Page 24

USING PHOTOSHOP LIGHTROOM 2
Updated 03 September 2009
The Lightroom workflow
• (Mac OS) In the Page Setup dialog box, choose a printer from the Format For menu, and then choose a page size
from the Paper Size menu.
Leave the Scale set to 100% and do all your image size adjustments in Lightroom.
Note: If necessary, specify the page orientation before clicking OK.
3. Choose a template.
The templates included with Lightroom scale the photos to accommodate the paper size you choose. Three Picture
Package templates allow you to place one photo on a page in multiple sizes, automatically optimizing the space on the
page. Picture Package templates are ideal for such uses as school or wedding photo prints. See “Choose a Grid
template” on page 151 and “Choose a Picture Package template” on page 155.
4. (Optional) Customize the template.
For a grid layout, such as a 4-x-5 contact sheet, modify the template using the controls in the Image Settings and Layout
panels. For example, zoom to fill the photos in the cell, add a stroke border, and adjust margins and cell size. You can
also drag the guides in the work area to resize cells. See “Specify how photos fill an image cell” on page 152 and “Modify
page margins and cell size” on page 152.
For picture package templates, customize the layout by dragging cells freely in the work area and by specifying options
in the Image Settings panel. Use the Rulers, Grid & Guides panel to adjust the display of the work area, and use the
Cells panel to add new cells or pages to the layout. See “Laying out photos in a picture package” on page 155.
19
5. (Optional) Add text and other extras.
In the Overlays panel, specify whether to print your identity plate, photo information, or page numbers. See “Printing
overlay text and graphics” on page 156.
6. Specify the print settings.
In the Print Job panel, do any of the following:
• Specify a print resolution or leave the setting at its default (240 ppi). See “Set printing resolution” on page 158.
• Specify how color management is handled for your photos. Choose from the Profile and Rendering Intent pop-up
menus. See “Set print color management” on page 159.
• Select whether to use Draft Mode Printing. See “Print in draft mode” on page 150.
• Select whether to sharpen the photos for printing. If you select Print Sharpening, use the pop-up menu to choose
how much sharpening to apply. See “Sharpen a photo for print” on page 159.
7. (Optional) Save the print layout and options as a template or with an output creation.
If you plan to reuse your print settings, including layout and overlay options, save the settings as a custom print
template. Or save the settings as an output creation to preserve a set of specific Print module options with a collection
of photos. See “Create custom print templates” on page 153 and “Save print settings as an output creation” on
page 160.
8. Click the Print button and specify printer driver options.
Choose the printer and set the printer options before clicking OK (Windows) or Print (Mac OS). If Lightroom is
managing the color, turn off any color management in the printer settings.
For a video about all the output modules, see www.adobe.com/go/lrvid2212_lrm.
For a video about the Print module, see www.adobe.com/go/lrvid2214_lrm.
Page 25
USING PHOTOSHOP LIGHTROOM 2
Updated 03 September 2009
The Lightroom workflow
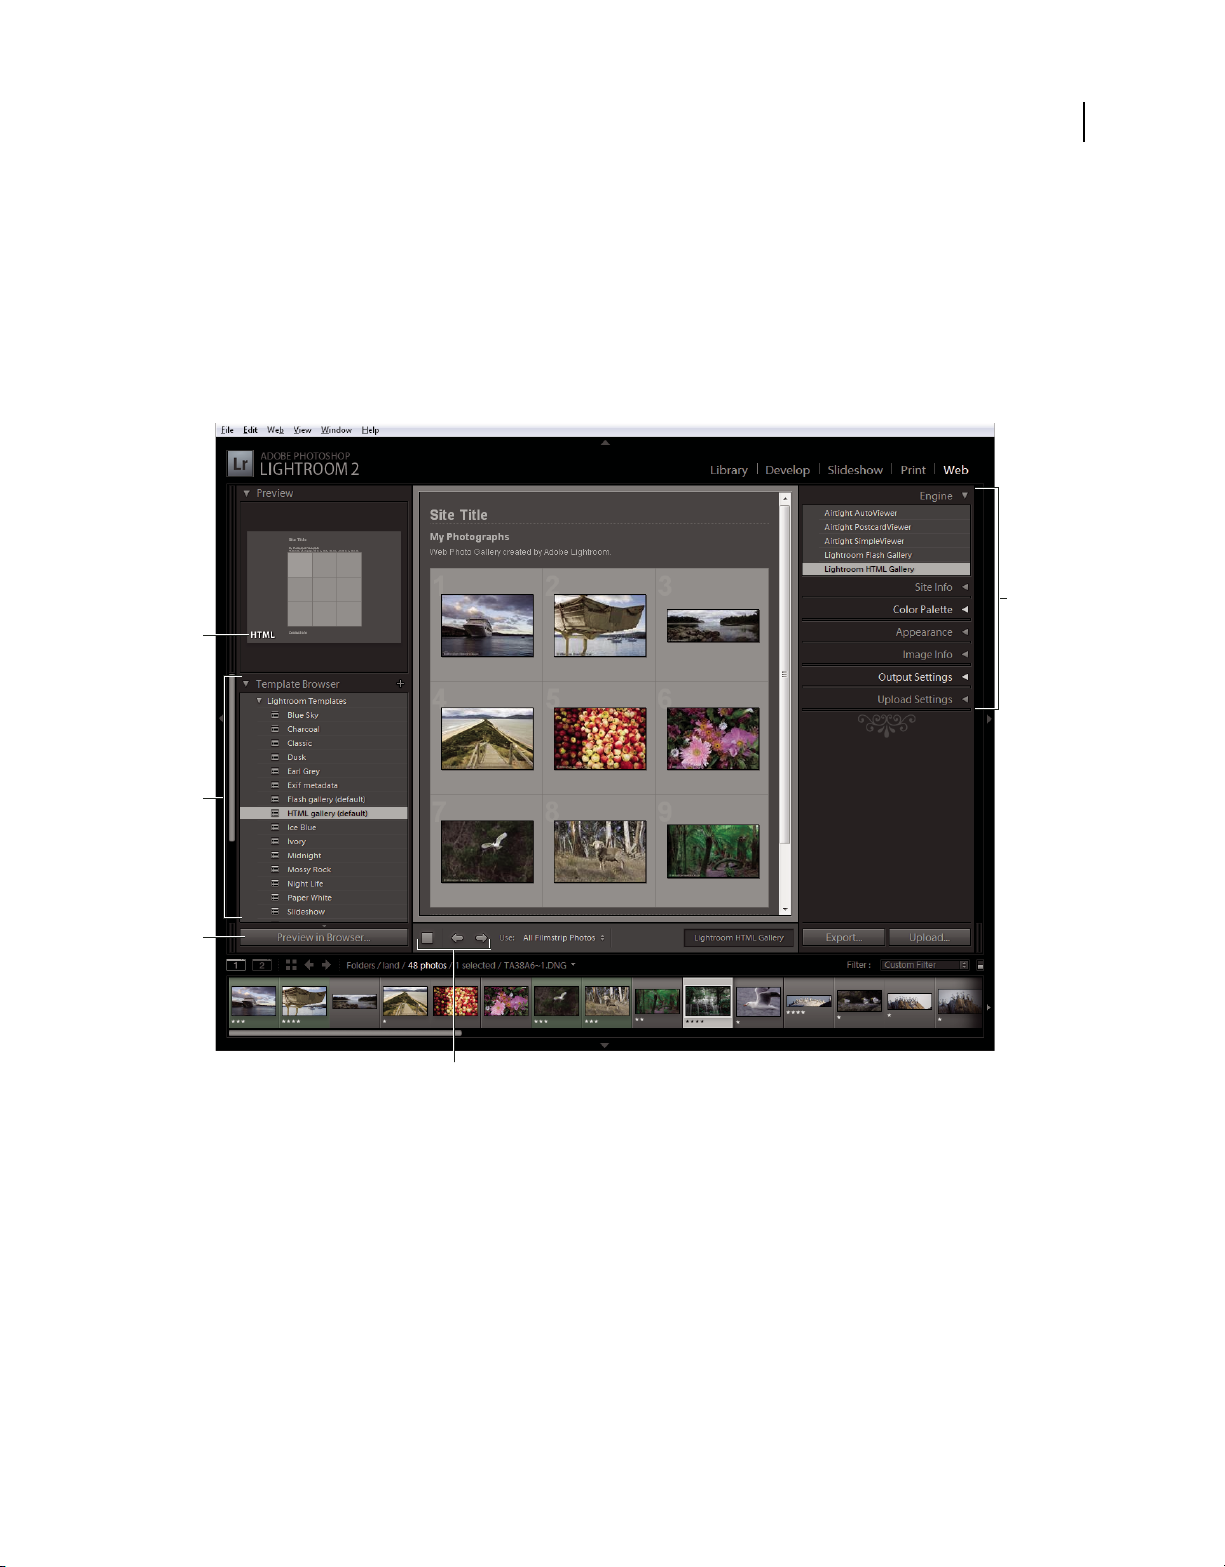
Creating web galleries: Basic workflow
The Web module lets you create web photo galleries, which are websites that feature thumbnail images that link to
larger versions of the photos. The panels on the left side of the Web module in Lightroom contain a list of templates
and a preview of their page layouts. The center pane is the image display area, which automatically updates as you make
changes, and also lets you navigate between the index and other pages in your web photo gallery. Panels on the right
have controls for specifying how the photos appear in the template layout, modifying the template, adding text to the
web page, previewing the web gallery in a browser, and specifying settings for uploading the gallery to a web server.
D
A
20
B
C
E
The Web module
A. Type of web gallery B. Template Browser C. Preview button D. Panels for customizing layout and specifying output options E. Navigation
buttons
Lightroom can create two types of web galleries:
Lightroom HTML gallery Produces a web page of thumbnail images that link to pages with larger versions of the
photos.
Lightroom Flash gallery Produces a website with different views: a row of thumbnail images that display a larger
version of the photos, and a navigable slide show. View this gallery in a browser using Adobe Flash® Player.
To create a web gallery in Lightroom, follow these basic steps:
Page 26

USING PHOTOSHOP LIGHTROOM 2
Updated 03 September 2009
The Lightroom workflow
1. Select images from the Library.
In the Library module, select images in the Grid view or Filmstrip. Or select a folder, collection, or keyword to display
the photos to include in the web photo gallery. You can refine your selection and then add the photos to the Quick
Collection or a collection. You can also use the Quick Collection to assemble photos from multiple folders or photos
that have different keywords. See “Selecting photos in the Grid view and the Filmstrip” on page 45 and “Photo
collections” on page 66.
If you plan to modify your web gallery later, it is a good idea to assemble all of your photos into a collection, which
preserves the photo order and any custom settings you specify.
You can filter the photos in the Filmstrip of the Web module by clicking the Use pop-up menu in the toolbar and
choosing All Photos, Selected Photos, or Flagged Photos.
2. Go to the Web module.
The photos that you selected appear in both the Filmstrip and the work area in the center of the Web module.
3. Rearrange the photo order.
If you assembled your photos into a collection or if you’ve selected a folder that does not contain other folders, drag
photos in the Filmstrip to rearrange them in the order that you want them to appear in the gallery. See “Rearrange web
gallery photo order” on page 164.
21
4. Choose a template.
Move your pointer over a template name in the Template Browser to see a small preview. Click a template name to
select it for your web gallery.
5. Enter website information.
In the Site Info panel, type a title for your website, a title for your gallery, and a description. You can also enter your email address so that visitors to your gallery can click your name to send you an e-mail. See “Add titles, description, and
contact information to web photo galleries” on page 165.
6. (Optional) Specify the web gallery appearance.
In the Color Palette panel, click the color box next to the element that you want to modify and choose a new color for
it. See “Choose colors for web photo gallery elements” on page 164.
7. (Optional) Specify the gallery layout.
In the Appearance panel, modify the gallery layout by setting the Grid options (for HTML galleries) or choosing from
the Layout menu (for Flash galleries). For Flash galleries, you can also specify the size of the thumbnail images and the
enlarged photo in the Appearance panel. See “Specify the appearance of Lightroom HTML galleries” on page 164 and
“Specify the appearance of Lightroom Flash galleries” on page 164.
8. (Optional) Add your identity plate.
Display your identity plate on the web page by checking that option in the Site Info panel (for HTML galleries) or in
the Appearance panel (for Flash galleries). See “Add your identity plate to web photo galleries” on page 165.
9. (Optional) Specify the text that appears with the photos.
In the Image Info panel, type or choose the metadata to display as the title and caption for each photo. Leave the Title
or Caption boxes unchecked if you don’t want text to appear under the photos. See “Display photo titles and captions
in web photo galleries” on page 165.
Page 27

USING PHOTOSHOP LIGHTROOM 2
Updated 03 September 2009
The Lightroom workflow
10. Specify the output settings.
In the Output Settings panel, specify the quality of the enlarged view of a photo. You can also add copyright
information.
11. Preview your web gallery in a browser.
At the bottom of the work area, click Preview In Browser. Lightroom opens a preview of your web gallery in your
default browser. See “Preview a web photo gallery” on page 168.
12. Export or upload your web photo gallery.
After you finish your gallery, you can either export the files to a specific location or upload the gallery to a web server.
In the Upload Settings panel, choose Web Server from the FTP Server menu, or choose Edit Settings to specify settings
in the Configure FTP File Transfer dialog box. If necessary, consult your ISP for help with FTP settings. See
“Previewing, exporting, and uploading a web photo gallery” on page 168.
13. (Optional) Save the web layout and options as a template or with an output creation.
If you plan to reuse your web gallery settings, including layout and upload options, save the settings as a custom web
template. Or save the settings as an output creation to preserve a set of specific Web module options with a collection
of photos. See “Create custom web gallery templates” on page 166 and “Save web settings as an output creation” on
page 167.
22
For a video about all the output modules, see www.adobe.com/go/lrvid2212_lrm.
For a video about the Web module, see www.adobe.com/go/lrvid2215_lrm.
Page 28

Chapter 3: Workspace and setup
Updated 03 September 2009
Adobe® Photoshop® Lightroom® includes five modules that provide a complete digital photography workflow. As you
work on a photograph, you move from one module to another to import, organize, develop, print, and show the photo.
More Help topics
“Workspace overview” on page 7
Managing panels and the screen view
You can customize the Lightroom workspace by displaying only the panels you want or by hiding some or all of the
panels to maximize the display of your photos.
Open or close a panel
❖ Click the panel header. To open or close all panels in a group, Ctrl-click (Windows) or Command-click (Mac OS)
a panel name.
23
Open or close one panel at a time
❖ Right-click (Windows) or Control-click (Mac OS) on a panel header and choose Solo mode, or Alt-click
(Windows) or Option-click (Mac OS) on a panel header.
Solo mode applies independently to a set of panels. The triangle in the panel header is solid when not in Solo mode.
Scroll through a group of panels
❖ Drag the scroll bar or use the scroll wheel on your mouse.
Show or hide panel groups
• To show or hide a single panel group, click the Show/Hide Panel Group icon . A solid icon indicates the panel
group is showing.
• To show or hide both side panel groups, choose Window > Panels > Toggle Side Panels, or press the Tab key.
• To hide all panels, including side panels, the Filmstrip, and Module Picker, choose Window > Panels > Toggle All
Panels, or press Shift-Tab.
Set how panel groups show or hide automatically
❖ Right-click (Windows) or Control-click (Mac OS) the outside edge of the panel group (beyond the scroll bar) and
then choose an option:
Auto Hide & Show Displays the panel as you move the pointer to the outside edge of the application window. Hides
the panel as you move the pointer away from the panel.
Auto Hide Hides the panel as you move the pointer away from the panel. You must open the panel manually.
Manual Turns off automatic show/hide behavior.
Page 29

USING PHOTOSHOP LIGHTROOM 2
Updated 03 September 2009
Sync With Opposite Panel Applies the same hide/show panel behavior to the left and right panels or to the top and
bottom panels.
Workspace and setup
Resize the width of a panel group
❖ Move the pointer over the inside edge of a panel group, and when the pointer becomes a double-arrow, drag the
panel.
Remove or restore a panel from a group
If you don’t use a panel often, you can hide it from view.
❖
Right-click (Windows) or Control-click (Mac OS) on any panel header in the group, and then choose the panel name.
Change the Lightroom screen mode
You can change the screen display to hide the title bar; the title bar and the menus; or the title bar, menus, and panels.
• Choose Window > Screen Mode, and then choose an option.
• When in Normal, Full Screen With Menubar, or Full Screen mode, press the F key to cycle through those three
modes.
• Press Ctrl+Alt+F (Windows) or Command+Option+F (Mac OS) to switch to Normal screen mode from Full
Screen With Menubar or Full Screen mode.
• Press Shift+Ctrl+F (Windows) or Shift+Command+F (Mac OS) to enter Full Screen And Hide Panels mode, which
hides the title bar, menus, and panels.
• When in Full Screen And Hide Panels screen mode, press Shift-Tab and then the F key to display the panels and
menu bar.
Note: Full Screen mode and Full Screen And Hide Panels mode in Mac OS hide the Dock. If you start Lightroom and do
not see the Minimize, Maximize, or Close buttons for the application, press the F key once or twice until they appear.
24
Turn off all settings in a panel
You can temporarily turn off all the settings in a panel of the Develop module or the filtering in the Filmstrip.
❖ Click the Panel On/Off icon .
Dim or hide the Lightroom interface
Use Lights Out to dim or black out the Lightroom interface so that your photo stands out on screen.
❖ Choose Window > Lights Out and then choose an option. You can press the L key to cycle through the three
options.
Customize Lights Out in the Interface Preferences by specifying the dim level and screen color.
The toolbar
You can hide the toolbar or customize it in the Library and Develop modules to include the items you need.
Page 30

USING PHOTOSHOP LIGHTROOM 2
Updated 03 September 2009
Workspace and setup
Show controls in the Library module toolbar
Depending on which view is active in the Library module, the toolbar contains controls for browsing photos, applying
metadata, starting an impromptu slide show, rotating photos, and applying ratings, flags, or labels. The toolbar Info
box displays the filename of the selected photo.
1 To show controls in the toolbar, choose any of the following from the toolbar pop-up menu:
View Modes Lets you select Grid View, Loupe View, Compare View, or Survey View.
Painter (Grid view only) Lets you apply keywords and other attributes quickly by dragging the Painter tool across
photos.
Sorting (not available in Compare view) Specifies the sort direction or sorting criteria for displaying the photo
thumbnails.
Flagging Assigns, removes, and displays a Pick or Rejected flag for selected photos.
Rating Assigns, removes, and displays rating stars for selected photos.
Color Label Assigns, removes, and displays color labels for selected photos.
Rotate Rotates selected photos clockwise or counterclockwise.
Navigate Selects the previous or next image.
25
Slideshow Plays an impromptu slide show of the photos.
Thumbnail Size (Grid view only) Sets the size of the photo thumbnails.
Zoom (Loupe view only) Zooms the view in or out.
Info Displays the filename of the selected photo.
Compare (Compare view only) Displays options for zooming, swapping, and selecting compared photos.
Label (Survey view only) Displays Survey view label.
2 (Optional) Choose a selected item in the toolbar pop-up menu to remove the control from the toolbar.
Show or hide the toolbar
❖ Choose View > Show/Hide Toolbar or press the T key to toggle the toolbar on or off.
Change toolbar icons
❖ On the right side of the toolbar, click the menu and select or deselect items to display in the toolbar.
Displaying the Library on a second monitor
You can open a window that displays a second view of the Library. This second window displays the photos that are
selected in the Library module, and uses the Library module view options that are specified in the primary Lightroom
window for Grid and Loupe view. The second window can stay open regardless of which module you’re working in,
so it’s easy to view and select different photos at any time. If you have a second monitor connected to the computer
that runs Lightroom, you can display the second window on that screen.
Page 31

USING PHOTOSHOP LIGHTROOM 2
Updated 03 September 2009
Workspace and setup
When working with multiple windows, Lightroom applies commands and edits to the photo or photos that are
selected in the main application window regardless of what is selected in the second window. To apply a command to
one or more selected photos in the second window, right-click (Windows) or Control-click (Mac OS) the selected
photos in Grid, Compare, or Survey view in the second window and choose a command.
1 Click the Second Window button in the Filmstrip to open the second window.
26
The Library module in the main window, and the Loupe view in the secondary window (inset)
By default, the second window opens the selected photo in Loupe view. If you have a second monitor connected to the
computer, the second window automatically opens on that monitor in full-screen display. Otherwise, Lightroom
opens a floating Secondary Display window.
2 To change the view mode of the Lightroom Library second window, right-click the Second Window button and
choose an option from the menu. Or, click Grid, Loupe, Compare, or Survey in the second window. If you have a
second monitor, you can also select the Slideshow option.
3 Specify view options.
Grid Resize thumbnails by dragging the Thumbnails slider and filter photos using the Library Filter bar. See “Find
photos using the Library Filter bar” on page 93.
Loupe Choose Normal, Live, or Locked. Normal displays the most-selected photo from the primary window. Live
displays the photo that is under the pointer in the Filmstrip or Grid view in the primary window. Locked displays the
selected photo even if you choose a different photo in the primary window. In all Loupe modes in the second window,
you can adjust the zoom level.
Page 32

USING PHOTOSHOP LIGHTROOM 2
Updated 03 September 2009
Workspace and setup
You can lock any photo by right-clicking (Windows) or Control-clicking (Mac OS) it in the main window and
choosing Lock To Second Monitor. Or select the photo and press Ctrl+Shift+Enter (Windows) or
Command+Shift+Return (Mac OS). The photo that is currently locked to the second monitor displays a secondwindow badge in the Filmstrip and in the thumbnail in Grid view of the main window.
Compare Offers the same functionality as the Compare view in the primary window. See “Comparing photos in the
Library module” on page 48.
Survey Offers the same functionality as the Survey view in the primary window. See “Comparing photos in the Library
module” on page 48.
Slideshow (Available with a second monitor) Allows you to play a full-screen slide show of the currently selected
folder or collection on a second monitor. Click Play to play the slide show; click the slide or press Esc to end it. To
override the current options in the Slideshow module for Intro Screen, Pause On Intro, Ending Screen, and Repeat,
select Override and then select the option.
4 (Available with a second monitor) Display the second window as a floating window by clicking the Second Monitor
button in the main window and deselecting Full Screen.
5 (Available in Full Screen mode on a second monitor) Click the Second Monitor button in the main window and
choose Show Second Monitor Preview to open a small floating window that lets you remotely control the second
monitor display. Use the Second Monitor preview window to toggle between Grid, Loupe, Compare, Survey, and
Slideshow views on the second monitor. You can also use the Second Monitor preview window to control playback
of the slide show. The Second Monitor preview window is meant to be used when your second monitor is not visible
from your location.
6 To close the second window, click the Second Window button, or click it and deselect Show.
27
Setting preferences for working in Lightroom
You can set preferences to change the Lightroom user interface.
More Help topics
“Set import and file-handling preferences” on page 31
“Change catalog settings” on page 54
“Setting Library view options” on page 49
Open the Preferences dialog box
• On Windows, choose Edit > Preferences.
• On Mac OS, choose Lightroom > Preferences.
Reset presets to their original settings
❖ In the Presets Preferences, click any of the Restore buttons in the Lightroom Defaults area.
Restore prompts you chose not to display
❖ In the General Preferences, click Reset All Warning Dialogs in the Prompts area.
Page 33

USING PHOTOSHOP LIGHTROOM 2
Updated 03 September 2009
Workspace and setup
Change the interface font size or the panel end marker
❖ In the Interface Preferences, choose options from the Panels menus.
Change the language setting
Lightroom can display menus, options, and tool tips in multiple languages.
1 Do one of the following:
• (Windows) In Lightroom, choose Edit > Preferences and click the General tab. Then, choose a language from the
Language pop-up menu and click OK.
• (Mac OS) In System Preferences, click International. In the Language panel, drag the desired language to the top of
the Languages list.
(Mac OS) To see which languages are available for your version of Lightroom, select Adobe Lightroom 2 in the
Applications folder. Then choose File > Get Info, and click the triangle next to Languages.
2 Restart Lightroom.
The new language takes effect the next time you start Lightroom.
28
Personalizing identity plates and module buttons
You can personalize the Lightroom interface, slide shows, and printed output using identity plates that include your
name and logo.
1 Do one of the following to open the Identity Plate Editor:
• Choose Edit > Identity Plate Setup (Windows) or Lightroom > Identity Plate Setup (Mac OS).
• In the Slideshow or Print module, click the Identity Plate preview in the Overlays panel and choose Edit from the
pop-up menu.
2 In the Identity Plate Editor, select one of the following:
Use A Styled Text Identity Plate Uses the text you enter in the box with the font characteristics that you specify in the
menus below the box.
(Mac OS) To create a multiline text identity plate, press Option+Return in the text box. Lightroom displays just the
first line of an identity plate to the left of the Module Picker. However, all lines appear when the identity plate is
selected as an output overlay in the Slideshow, Print, or Web module.
Use A Graphical Identity Plate Uses a graphic that is no more than 57 pixels high that you drag into the box. The
graphic can be a BMP, JPG, GIF, PNG, or TIFF (Windows) or JPG, GIF, PNG, TIFF, PDF, or PSD (Macintosh). The
resolution of graphical identity plates may be too low for printed output.
3 Choose Save As from the Enable Identity Plate menu, and give your identity plate a name.
4 To display your identity plate on the left side of the Module Picker, select Enable Identity Plate and choose one of
your saved identity plates from the menu to the right.
5 In the pop-up menus in the right side of the dialog box, customize the font, size, and color of the Module Picker
buttons. The first color picker box sets the color of the current module, and the second box sets the color for
unselected modules.
Page 34

USING PHOTOSHOP LIGHTROOM 2
Updated 03 September 2009
Workspace and setup
Monitoring processes
The activity monitor displays over the identity plate when Lightroom is busy with a task.
• To cancel a process, click the X beside the progress bar.
• To switch and view another process in progress, click the triangle beside the progress bar.
Color management
More Help topics
“Setting print resolution and color management” on page 158
About color management in Lightroom
Lightroom simplifies color management in your photographic workflow. You don’t need to choose color settings or
color profiles until you are ready to output your photos. To take advantage of Lightroom color management, you need
to calibrate your computer monitor so that you are viewing accurate color. See “Calibrate and profile your monitor”
on page 30.
29
Color spaces, color profiles, and tonal response curves
It’s not necessary for you to understand how Lightroom manages color internally, but the following information may
be useful in your workflow.
A color space describes a range or gamut of colors. Various devices in your photographic workflow have different color
gamuts in which they can record, store, edit, and output photos. A color profile defines a color space so that Lightroom
knows how to manage and convert colors in your photo.
Raw photo files do not have embedded color profiles in Lightroom. For raw files, the Develop module assumes a wide
color space based on the color values of the ProPhoto RGB color space. ProPhoto RGB encompasses most colors that
cameras can record.
A color profile is also defined by a gamma value, or more accurately, its tonal response curve. The tonal response curve
defines how tonal values in the raw image are mapped. To provide useful information in the histogram and RGB value
display, Lightroom assumes a gamma value of approximately 2.2. More accurately, it uses a tonal response curve
similar to the tonal response curve of the sRGB color space.
While Lightroom uses a tonal response curve to provide information for the histogram and RGB values, it manipulates
the raw data before it is tone mapped. Working in this linear gamma avoids many of the artifacts that can result in
working with a tone-mapped image.
The Library module stores Low and Medium quality previews in the Adobe RGB color space, and High quality
previews in ProPhoto RGB. These previews are also used when printing in draft mode.
For rendered files such as TIFF, JPEG, and PSD files, Lightroom uses the image’s embedded color profile to display the
image, histogram, and color values. If the image doesn’t have a profile, Lightroom assumes the sRGB profile, and the
image may not look as expected on your monitor.
Page 35

USING PHOTOSHOP LIGHTROOM 2
Updated 03 September 2009
Workspace and setup
Output color profiles
When you print a photo in Lightroom, you can choose to convert the colors to more closely match the color space of
the printer, paper, and ink you are using. For information on working with printer color profiles, see “Set print color
management” on page 159.
Lightroom automatically exports images in the Slideshow and Web modules using the sRGB profile so that the color
looks good on the majority of computer monitors.
Calibrate and profile your monitor
You can calibrate your monitor and create a profile that specifies its color characteristics using monitor profiling
software and hardware.
When you calibrate your monitor, you are adjusting it so that it conforms to a known specification. Once your monitor
is calibrated, the profiling utility lets you save a color profile.
1 If you are calibrating a CRT monitor, make sure it has been turned on for at least a half hour. This gives it sufficient
time to warm up and produce more consistent output.
2 Set the ambient lighting in your room to be consistent with the brightness and color of the room lighting you’ll be
working under.
3 Make sure your monitor is displaying thousands of colors or more. Ideally, make sure it is displaying millions of
colors or 24-bit or higher.
4 Remove colorful background patterns on your monitor desktop, and set your desktop to display neutral grays. Busy
patterns or bright colors surrounding a document interfere with accurate color perception.
5 Calibrate and profile your monitor using third-party software and measuring devices. In general, using a measuring
device such as a colorimeter along with software can create more accurate profiles because an instrument can
measure the colors displayed on a monitor far more accurately than the human eye.
Note: Monitor performance changes and declines over time; recalibrate and profile your monitor every month or so. If
you find it difficult or impossible to calibrate your monitor to a standard, it may be too old and faded.
30
Most profiling software automatically assigns the new profile as the default monitor profile. For instructions on how
to manually assign the monitor profile, refer to your operating system’s Help.
Install a color profile
Color profiles are often installed when a device is added to your system. The accuracy of these profiles (often called
generic profiles or canned profiles) varies from manufacturer to manufacturer. You can also obtain profiles from a
custom profile service, download profiles from the web, or create custom profiles using professional profiling
equipment.
• In Windows, right-click a profile and select Install Profile. Alternatively, copy the profiles into the
WINDOWS\system32\spool\drivers\color folder (Windows XP).
• In Mac OS, copy profiles into the /Library/ColorSync/Profiles folder or the
/Users/username/Library/ColorSync/Profiles folder.
After installing color profiles, be sure to restart Adobe applications.
Page 36

Chapter 4: Importing photos
Updated 03 September 2009
Importing photos into the Adobe® Photoshop® Lightroom® library is the first step in working with your photos. You
can import photos directly from a camera, memory card reader, or other storage device.
More Help topics
“Importing photos into Lightroom: Basic workflow” on page 8
Importing photos into your library
Set import and file-handling preferences
You set import preferences in the Import and File Handling panels of the Preferences dialog box. You can also change
preference settings in the Auto Import Settings dialog box (see “Importing photos automatically” on page 39) and in
the Catalog Settings dialog box (see “Change catalog settings” on page 54).
31
1 From the Lightroom main menu, choose Edit > Preferences (Windows) or Lightroom > Preferences (Mac OS).
2 In the Import preferences, do any of the following:
• To allow the import dialog box to be opened automatically after connecting a camera or memory card reader to
your computer, select the Show Import Dialog When A Memory Card Is Detected option. If this option is not
selected, Lightroom does nothing when a camera or memory card is connected. (You can still choose File > Import
Photos From Device.)
• To not use the folder names that your camera creates, select Ignore Camera-Generated Folder Names When
Naming Folders.
• To import duplicate JPEG files and raw files separately, select the Treat JPEG Files Next To Raw Files As Separate
Photos option. Deselect this option to import only a single file. Select this option if you want XMP metadata
changes made in Lightroom to be applied to both the raw file and the JPEG file.
• To specify how DNG files are imported, specify options in the Import DNG Creation section. For more
information on DNG files, see “Convert photos to DNG” on page 62.
3 In File Handling preferences, do any of the following:
• To determine how periods and forward slashes are used to separate keywords, select options in the Reading
Metadata area.
• To specify which characters and spaces in the filenames of imported photos are illegal and to determine how they’re
replaced, choose from the menus in the File Name Generation area.
More Help topics
“Specify Auto Import settings” on page 39
File formats
Lightroom supports the following file formats:
Page 37

USING PHOTOSHOP LIGHTROOM 2
Updated 03 September 2009
Importing photos
Camera raw formats
Camera raw file formats contain unprocessed data from a digital camera’s sensor. Most camera manufacturers save
image data in a proprietary camera format. Lightroom reads the data from most cameras and processes it into a fullcolor photo. You use the controls in the Develop module to process and interpret the raw image data for your photo.
For a list of supported cameras and camera raw formats, see www.adobe.com/go/learn_ps_cameraraw.
Digital Negative format (DNG)
The Digital Negative (DNG) is a publicly available archival format for raw files generated by digital cameras. DNG
addresses the lack of an open standard for the raw files created by individual camera models, helping ensure that
photographers will be able to access their files in the future. You can convert proprietary raw files to DNG from within
Lightroom. For more information about the Digital Negative (DNG) file format, visit www.adobe.com/dng. You’ll
find comprehensive information and a link to a user forum.
TIFF format
Tagged-Image File Format (TIFF, TIF) is used to exchange files between applications and computer platforms. TIFF
is a flexible bitmap image format supported by virtually all paint, image-editing, and page-layout applications. Also,
virtually all desktop scanners can produce TIFF images. Lightroom supports large documents saved in TIFF format
(up to 65,000 pixels per side). However, most other applications, including older versions of Photoshop (prePhotoshop CS), do not support documents with file sizes greater than 2 GB.
32
The TIFF format provides greater compression and industry compatibility than Photoshop format (PSD), and is the
recommended format for exchanging files between Lightroom and Photoshop. In Lightroom, you can export TIFF
image files with a bit depth of 8 bits or 16 bits per channel.
JPEG format
Joint Photographic Experts Group (JPEG) format is commonly used to display photographs and other continuoustone images in web photo galleries, slide shows, presentations, and other online services. JPEG retains all color
information in an RGB image but compresses file size by selectively discarding data. A JPEG image is automatically
decompressed when opened. In most cases, the Best Quality setting produces a result indistinguishable from the
original.
Photoshop format (PSD)
Photoshop format (PSD) is the standard Photoshop file format. To import and work with a multi-layered PSD file in
Lightroom, the file must be saved in Photoshop with the Maximize PSD and PSB File Compatibility preference turned
on. You’ll find the option in the Photoshop file handling preferences. Lightroom saves PSD files with a bit depth or
8 bits or 16 bits per channel.
File format exceptions
Lightroom does not support the following types of files: CMYK files; PNG files; Adobe Illustrator® files; Nikon scanner
NEF files; files with dimensions greater than 65,000 pixels per side or larger than 512 megapixels; video files, including
video files acquired by digital still cameras.
Note: To import photos from a scanner, use your scanner’s software to scan to TIFF or DNG format, and then import
those files into Lightroom.
Page 38

USING PHOTOSHOP LIGHTROOM 2
Updated 03 September 2009
Importing photos
Import photos from disk into Lightroom
When you import photos into Lightroom, you can reference the photos in their existing location, move the photos into
a specific folder, or copy the photos into a specific folder.
1 In the Library module, do any of the following:
• Click the Import button.
• From the main menu, choose File > Import Photos From Disk.
• Drag a folder with photos or individual photos into the Grid view. (Skip step 2.)
2 Navigate to and select the folder containing the photos to import, and then click Choose Selected (Windows) or
Choose (Mac OS). You can also select individual photos and choose Open (Windows) or Choose (Mac OS).
3 Select one of the following from the File Handling menu:
Add Photos To Catalog Without Moving Keeps the photo files in their current location by using the current folder
structure. Skip steps 4 and 5.
Copy Photos To A New Location And Add To Catalog Copies the photo files to the folder you choose, including any
sidecar files.
Move Photos To A New Location And Add To Catalog Moves the photo files to the folder you choose, including any
sidecar files. Files are removed from their current location.
33
Copy Photos As Digital Negative (DNG) And Add To Catalog Copies proprietary camera raw files to the folder you
choose and converts them to the Digital Negative (DNG) format.
4 If you are importing photos by moving or copying them, do any of the following to specify where to import the
photo files:
• To choose a folder, click Choose, navigate to and select the folder you want in the Browse For Folder (Windows)
or Choose Folder (Mac OS) dialog box, and then click OK (Windows) or Choose (Mac OS).
• To create a folder, click Choose, navigate to the folder you want in the Browse For Folder (Windows) or Choose
Folder (Mac OS) dialog box. Click Make New Folder (Windows) or New Folder (Mac OS), name the new folder,
and then click OK (Windows) or Choose (Mac OS).
• To choose a previously chosen location, click the triangle next to Choose and then choose from the pop-up menu.
5 If you are importing photos by moving or copying them, choose one of the following from the Organize menu:
Into One Folder Copies or moves the imported photos into a new folder.
By Original Folders Maintains the original hierarchy for the folders that contain the imported photos.
By Date Specifies a date name for the folder that contains the imported photos.
6 Select Don’t Re-Import Suspected Duplicates to not import any photos that might be duplicates of existing photos
in the library.
If you deselect this option and accidentally import duplicate photos, no files are overwritten. Lightroom stores two
copies of the same photo.
7 (Optional) Select Backup To and then choose a destination to create backup copies of the photos while importing.
For a video about importing photos into Lightroom, see www.adobe.com/go/lrvid2201_lrm.
Page 39

USING PHOTOSHOP LIGHTROOM 2
Updated 03 September 2009
Importing photos
Preview and select the photos to import
When you import files from disk or another catalog, you can specify what photos or folder of photos to import. In the
upper-left corner of each of the preview thumbnails in the Import Photos dialog box is a check box. A check mark in
the box means that the photo will be imported.
1 In the Import Photos or Import From Catalog dialog box, make sure Show Preview is selected.
Drag the slider below the previews to adjust the thumbnail size.
2 If you’re importing more than one folder of photos simultaneously, select a folder listed in the window above the
Don’t Re-Import Suspected Duplicates option.
3 Do any of the following:
• To select all photos in a folder, click Check All. All photos are usually selected by default.
• To deselect all photos in a folder, click Uncheck All.
• To select or deselect specific photos in a folder, click the box in the upper-left corner of the previews.
Back up photos during import
If you are importing photos by copying or moving them into the catalog, you can create a one-time backup of the
original photo files in a specified location. This feature is useful, for example, if you want to back up to a different drive
for immediate backup protection on import.
34
1 In the Import Photos dialog box, select Backup To and then click Choose.
2 In the Backup Folder dialog box, navigate to the destination you want, and then click OK (Windows) or Choose
(Mac OS).
More Help topics
“Backing up the catalog” on page 54
Name photos when importing
When copying or moving photos into the library during import, you can specify how the files are named.
1 In the Import Photos dialog box, choose an option from the Template menu in the File Naming area.
2 If you choose a naming option that uses a custom name, type the name in the Custom Text box.
3 If you don’t want a numeric sequence to start with “1,” enter a value in the Start Number box.
More Help topics
“Naming options” on page 34
Naming options
Lightroom uses the same naming options for importing, renaming, and exporting photos.
Custom Name (x of y) Names the auto-imported photos using a custom name, followed by sequential numbers in
relation to the total number of photos being imported. For example, 1 of 10, 2 of 10, 3 of 10, and so forth.
Custom Name - Original File Number Names the auto-imported photos using a custom name, followed by the numeric
portion of the photos’ original filenames.
Page 40

USING PHOTOSHOP LIGHTROOM 2
Updated 03 September 2009
Importing photos
Custom Name - Sequence Names the auto-imported photos using a custom name, followed by sequential numbers
starting with the number you specify.
Custom Name Names the auto-imported photos using a name you specify.
Date - Filename Names the auto-imported photos using the creation (capture) date, followed by the photos’ complete
original filenames.
Filename - Sequence Names the auto-imported photos using the photos’ original filenames, followed by sequential
numbers starting with the number you specify.
Filename Names the auto-imported photos using the photos’ original filenames.
Edit Names the auto-imported photos using the options you set in the Filename Template Editor. See “The Filename
Template Editor and Text Template Editor” on page 35.
The Filename Template Editor and Text Template Editor
The Filename Template Editor and the Text Template Editor let you specify text strings for different uses. Using the
Filename Template Editor, you can use the text strings to name files as they’re being imported or exported. Using the
Text Template Editor, you can use text strings to add captions to photos in a slide show, add text overlays to photos
being printed, and add titles and other text to web gallery pages.
35
A token is a text string that is replaced by the corresponding option you set. In the Filename Template Editor and the
Text Template Editor, tokens specify the content data that replaces the text string. Tokens save you the effort of
manually typing content data and lets you leverage the data already in the photo files.
The Filename Template Editor and the Text Template Editor include the following elements:
Preset Chooses, saves, deletes, or renames presets.
Image Name Specifies a text string option using the filename or folder name.
Numbering Specifies three types of numbering: Import, which is a sequential number for each import operation;
Image, which numbers each photo, in sequence starting from 1, based on how many photos have been imported into
the catalog; and Sequence, which numbers each photo in sequence, letting you choose the Start Number of the series.
(This element is not available in the Filename Template Editor when exporting photos.)
Additional Specifies a text string option using the creation (capture) date and time, or Exchangeable Image Format
(EXIF) data. (This element is only available in the Filename Template Editor when importing or auto-importing
photos.)
Sequence And Date Specifies a text string option using sequential numbers and creation (capture) date and time.
(This element is only available in the Filename Template Editor when exporting photos.)
Metadata Specifies a text string option using IPTC or EXIF metadata. (This element is only available in the Filename
Template Editor when exporting photos.)
EXIF Data Specifies a text string option using EXIF data. (This element is only available in the Text Template Editor,
when creating slide shows, printing photos, or creating web photo galleries.)
IPTC Data Specifies a text string option using IPTC metadata. (This element is only available in the Text Template
Editor, when creating slide shows, printing photos, or creating web photo galleries.)
Custom Uses the options you specify for the text string.
Page 41

USING PHOTOSHOP LIGHTROOM 2
Updated 03 September 2009
Importing photos
Open the Filename Template Editor and choose presets
1 Do any of the following to open the Filename Template Editor:
• In the Import Photos dialog box, choose edit from the File Naming menu when importing photos into the library
by copying or moving files. See “Name photos when importing” on page 34.
• Choose File > Auto Import > Auto Import Settings, and then choose Edit from the File Naming menu in the Auto
Import Settings dialog box. See “Specify Auto Import settings” on page 39.
• Choose File > Export, and then choose Edit from the Template menu in the File Naming area of the Export dialog box.
2 Choose a preset from the Preset menu.
Open the Text Template Editor and choose presets
1 Do any of the following to open the Text Template Editor:
• In the Slideshow module, add text to the slide layout. Make sure the text is selected in the work area, and then
choose Edit from the Custom Text menu in the toolbar. See “Add text and metadata to slides” on page 142.
• In the Overlays panel of the Print module, select Photo Info, then choose Edit from the Custom Settings pop-up
menu. See “Print filename, caption, and other information in Grid layouts” on page 158.
• In the Web module, select Title or Caption in the Image Info panel, then choose Edit from the Title or Caption pop-
up menu. See “Add text to web galleries” on page 165.
2 Choose a preset from the Preset menu.
36
Create and save filename and text template presets
1 In the Filename Template Editor dialog box or the Text Template Editor dialog box, choose an option and then
click Insert for as many categories as you want. This action creates the text string.
For example, chose Filename from the Image Name menu and then click Insert. A token is added to the Example
window just below the Preset menu. Add one or as many tokens as you want.
2 To change a token, move your pointer over the token displayed in the Example window. Click the triangle to see
more options, and then choose an option from the pop-up menu.
3 To delete tokens, select one or more tokens in the window and then press the Delete key.
If you don’t want to save your token settings as a preset and want to use them immediately, skip the next step and click
Done.
4 (Optional) To save your settings for reuse, choose Save Current Settings As New Preset from the Preset menu. In
the New Preset dialog box, type a name in the Preset Name field and click Create.
Rename filename and text template presets
1 In the Filename Template Editor or Text Template Editor, choose a preset from the Preset menu.
2 Choose Rename Preset from the Preset menu.
Delete filename and text template presets
1 In the Filename Template Editor or Text Template Editor, choose a preset from the Preset menu.
2 Choose Delete Preset from the Preset menu.
Page 42

USING PHOTOSHOP LIGHTROOM 2
Updated 03 September 2009
Importing photos
Apply Develop settings to photos when importing
Any Develop settings preset can be applied to photos as they’re imported. This is especially useful for applying Develop
settings to photos from a camera for which you created a Develop preset.
❖ In the Import Photos dialog box, choose a setting from the Develop Settings menu.
More Help topics
“Create and apply Develop presets” on page 101
Apply metadata to photos when importing
❖ In the Import Photos dialog box, choose any of the following options from the Metadata menu:
• To not apply metadata to photos during import, choose None.
• To apply a set of metadata that you saved as a template, choose a metadata preset from the menu.
• To apply a new set of metadata to photos while importing, choose New and enter the information in the New
Metadata Preset dialog box.
• To add keyword metadata to photos while importing, type the keywords in the Keywords text box. Use commas to
separate the keywords.
Note: When adding metadata to photos, Lightroom doesn’t apply the data to proprietary camera raw files but to their
sidecar XMP files.
37
Specify initial previews when importing
As photos are imported, Lightroom can immediately display a photo’s embedded preview, or display higher-quality
previews as the program renders them. Embedded previews are created on-the-fly by cameras and are not color
managed, so embedded previews don’t match how Lightroom interprets the camera raw files. Previews rendered by
Lightroom take longer to generate but are color managed.
❖ In the Import Photos dialog box, do one of the following:
• To immediately display images using the smallest previews embedded in the photos, choose Initial Previews >
Minimal. Lightroom renders standard-size previews when needed.
• To display the largest possible preview available from the camera, choose Initial Previews > Embedded & Sidecar.
This option may take longer than a Minimal preview but is still faster than rendering a standard-size preview.
• To display previews as Lightroom renders them, choose Initial Previews > Standard. Standard-size previews use the
ProPhoto RGB color space and are what you to see in the Fit zoom level of the Loupe view. Specify the Standard
preview size in the Catalog Settings dialog box. See “Set preview cache” on page 37.
• To display previews that are a 100% view of actual pixels, as in the Develop module, choose Initial Previews > 1:1.
Set preview cache
Lightroom renders three types of previews: thumbnails, screen resolution images, and 1:1 previews. 1:1 previews have
the same pixel dimensions as the original photos and display sharpening and noise reduction. All previews are stored
in the folder where your catalog is located.
1 Choose Edit > Catalog Settings (Windows) or Lightroom > Catalog Settings (Mac OS), and then click File
Handling.
Page 43

USING PHOTOSHOP LIGHTROOM 2
Updated 03 September 2009
Importing photos
2 Choose from the following menus:
Standard Preview Size Specifies the maximum pixel dimension for the rendered preview. Choose the size that
accommodates the display size you’re working with.
Preview Quality Specifies the appearance of the previews. Low, Medium, and High are similar to the upper range of
the quality scale for JPEG files.
Automatically Discard 1:1 Previews Specifies when 1:1 previews are discarded based on the most recent access to the
preview. 1:1 previews are rendered as needed and can make the library preview file large.
Import photos from Photoshop Elements (Windows)
Lightroom detects if your computer has a Photoshop Elements catalog, and can import photos and data from the
catalog. This feature is not available on Mac OS.
1 In the Library module, choose one of the following options from the File menu:
Upgrade Photoshop Elements 6 Catalog Imports photos from the current Photoshop Elements catalog. (Skip step 3.)
38
Import From Photoshop Elements 5 And Earlier
Imports photos from Photoshop Elements 3.x through 5.x. (Skip step 2.)
Note: Lightroom does not import directly from Photoshop Elements 7 catalogs.
2 If you choose Upgrade Photoshop Elements 6 Catalog, confirm or change the Lightroom catalog to which you want
to add the Photoshop Elements photos. Then, click Upgrade.
3 If you choose Import From Photoshop Elements 5 And Earlier, click OK when you’re warned that importing a large
catalog may take a long time. In the Choose A Catalog dialog box, select the default Photoshop Elements catalog or
navigate to a Photoshop Elements catalog in a custom location. Then click OK.
For information on importing from an iPhoto® library, see the O’Reilly blog post Moving your images from iPhoto to
Lightroom by Lightroom Community Help moderator Gene McCullagh.
More Help topics
“Importing photos into Lightroom: Basic workflow” on page 8
Import photos from a catalog into Lightroom
When you import photos from a Lightroom catalog, you can specify options to handle new photos and photos that
already appear in the current catalog.
Note: Database files or catalogs from Lightroom 1.x or the Lightroom 2 public beta release must be opened and updated
in Lightroom 2 before they can be imported into Lightroom 2.
1 Choose File > Import From Catalog.
2 Navigate to the catalog you want to import and click Open (Windows) or Choose (Mac OS).
3 Specify the photos to import:
• Under Catalog Contents, make sure the folders containing the photos to import are selected.
• To select or deselect individual photos, click Show Preview, and click the box in the upper-left corner of any preview
image. You can also choose Check All or Uncheck All.
4 In the New Photos area, choose from the File Handling menu whether to import new photos at their current
location or at a new location. If you choose to import at a new location, click Choose and specify a folder. If you
choose not to import new photos, only photos that exist in the current catalog are replaced.
Page 44

USING PHOTOSHOP LIGHTROOM 2
Updated 03 September 2009
Importing photos
5 In the Existing Photos area, do any of the following:
• Replace metadata, Develop settings, and negative files to override all the settings in the current catalog. If you
choose this option, you might want to select the Preserve Old Settings As A Virtual Copy option to keep a backup.
You can also select the Replace Non-Raw Files Only option to avoid replacing raw negatives. If changes to raw
negative files affect only metadata, selecting this option helps save time.
• Replace metadata and Develop settings only to leave the negative files (the source photos) unchanged. If you choose
this option, you might want to select the Preserve Old Settings As A Virtual Copy option to keep a backup.
• Replace nothing to import only new photos.
• If photos in the current catalog are missing and can be found in the imported catalog, indicate whether you want
to update the metadata and Develop settings for this file. Select the Preserve Old Settings As A Virtual Copy option
to keep a backup. If the photos missing in the current catalog appear in the imported catalog, specify whether the
missing files are copied and where they copied to.
6 Click Import.
Importing photos automatically
39
The Auto Import feature automatically imports photos into the Lightroom library by monitoring a watched folder for
photos and then moving the photos into a managed folder in the library. The feature has many uses. For example, if
your camera manufacturer’s software provides a tethered connection feature and can download the photos to a
watched folder, Lightroom can monitor the folder and automatically import the photos as they’re being taken. Auto
Import does not import images from a subfolder of a watched folder.
More Help topics
“Synchronizing folders” on page 59
Enable automatically importing photos
❖ Choose File > Auto Import > Enable Auto Import.
Specify Auto Import settings
1 Choose File > Auto Import > Auto Import Settings.
2 In the Auto Import Settings dialog box, specify any of the following:
Watched Folder Chooses or creates the watched folder where Lightroom detects photos to auto import.
Destination Chooses or creates a managed folder where the auto-imported photos are moved into.
File Naming Names the auto-imported photo. See “Naming options” on page 34.
Information Applies Develop settings, metadata, or keywords to auto-imported photos.
3 Select Standard from the Initial Previews menu to have Lightroom render previews of the imported photos rather
than only using the embedded previews in the photo files. See “Specify initial previews when importing” on page 37.
Set up watched folders
1 In the Auto Import Settings dialog box, click the Choose button next to Watched Folder.
Page 45

USING PHOTOSHOP LIGHTROOM 2
Updated 03 September 2009
Importing photos
2 Navigate to the location you want and do any of the following:
• To create a watched folder, click Make New Folder and then overwrite New Folder to give the folder a name
(Windows), or click New Folder (Mac OS), give the folder a name, and click Create.
• To select an existing watched folder, select the folder.
Note: You cannot choose an existing folder that contains photos as a watched folder.
3 Click OK (Windows) or Choose (Mac OS).
Select managed folders for auto-imported photos
When Lightroom detects photos added to a watched folder, the photos are moved into a managed folder called a
destination folder and automatically imported into the library.
1 In the Destination area of the Auto Import Settings dialog box, click the Choose button beside Move To.
2 In the Browse For Folders (Windows) or Open (Mac OS) dialog box, navigate to the location you want, and do any
of the following:
• To create a destination folder, click Make New Folder and then overwrite New Folder to give the folder a name
(Windows), or click New Folder, give the folder a name, and click Create (Mac OS).
• To select an existing destination folder, select the folder.
3 Click OK (Windows) or Choose (Mac OS).
4 (Optional) Type a name for the destination folder in the Subfolder Name text box.
40
Apply Develop settings and metadata to auto-imported photos
❖ In the Information area of the Auto Import Settings dialog box, do any of the following:
• To apply Develop settings to auto-imported photos, choose a preset from the Develop Settings menu. See “Create
and apply Develop presets” on page 101.
• To apply metadata to auto-imported photos, choose a preset from the Metadata menu. See “Create a metadata
preset” on page 82.
• To apply keywords to auto-imported photos, type in the Keywords text box. Use commas to separate the keywords.
• To have Lightroom render previews of the imported photos rather than only using the embedded previews in the
photo files, choose Initial Previews > Standard.
Page 46

Chapter 5: Viewing photos in the catalog
Updated 03 September 2009
Adobe® Photoshop® Lightroom® provides many ways to view your photos in the Library module. You can view
thumbnails in the Grid view, 1:1 previews in the Loupe view, and you can compare two or more photos side by side in
the Compare and Survey views. The Filmstrip provides a way to navigate and select photos for viewing.
More Help topics
“Viewing and organizing photos” on page 10
Viewing photos in the Filmstrip
Filmstrip overview
The Filmstrip displays the photos you are working on as you move between modules. It contains photos from the
currently selected Library folder, collection, or keyword set. Move between photos in the Filmstrip using the Left and
Right Arrow keys or by choosing a different source from the Filmstrip Source Indicator pop-up menu to the right of
the navigation buttons.
41
A B C D E
F
Lightroom Filmstrip
A. Show/Hide Second Window button B. Go to Grid view C. Go Back and Go Forward buttons (to navigate modules) D. Filmstrip Source
Indicator and menu E. Source filter F. Show/Hide Filmstrip control
More Help topics
“Setting preferences for working in Lightroom” on page 27
“Selecting photos in the Grid view and the Filmstrip” on page 45
Hide or show the Filmstrip
• Click the Show/Hide Filmstrip icon at the bottom of the Filmstrip.
• Choose Window > Panels > Show/Hide Filmstrip.
Change the size of the Filmstrip thumbnails
• Place the pointer over the top edge of the Filmstrip. When the pointer changes to a double arrow , drag the
Filmstrip edge up or down.
• Double-click the top edge of the Filmstrip to switch between the last two sizes of thumbnails.
Page 47

USING PHOTOSHOP LIGHTROOM 2
Updated 03 September 2009
Viewing photos in the catalog
Scroll through photos in the Filmstrip
• Drag the scroll bar at the bottom of the Filmstrip, click the arrows on the sides, or drag the top edge of a thumbnail
frame.
• Press the Left and Right Arrow keys to navigate through thumbnails in the Filmstrip.
Show ratings and picks in Filmstrip thumbnails
❖ In the Interface Preferences, select Show Ratings And Picks In Filmstrip.
Rearrange thumbnail images in the Filmstrip and Grid view
❖ Select a collection or a folder that does not contain any subfolders, and then drag a thumbnail to a new location.
Filter the photos displayed in the Filmstrip and Grid view
You can restrict, or filter, the photos displayed in the Filmstrip and the Grid view to photos with a specific flag status,
star rating, or color label.
❖ To filter the photos displayed in the Filmstrip and Grid view by flag status, star rating, or color label, do one of the
following:
• In the Library Filter bar at the top of the Library module, select Attribute, and then select icons to filter the display.
• In the Filmstrip, click Filter, and then select icons to filter the display.
42
A B C
Set filters for the photos displayed in the Filmstrip and the Grid view.
A. Displays photos flagged as Picks or Rejects, or unflagged B. Displays photos with a specific star rating, or those higher or lower C. Displays
photos with one or more color labels
More Help topics
“Find photos using the Library Filter bar” on page 93
Change the photos displayed in the Filmstrip
• Choose an item in the Folders, Collections, or Keyword List panel in the Library, or select criteria from the Library
Filter bar to choose photos.
• Click the Source Indicator in the Filmstrip, and choose a new source from the pop-up menu. You can choose All
Photographs, Quick Collection, Previous Import, or a previously viewed source. Previously viewed Filmstrip
sources are listed, unless you choose Clear Recent Sources.
After you choose a source or sources, the Grid view also displays the photos that are displayed in the Filmstrip. If you
select multiple folders or collections, Multiple Sources appears in the Source Indicator.
If the Grid view does not display all photos when multiple sources are selected, choose Filters Off from the Library
Filter bar.
More Help topics
“Finding photos in the catalog” on page 92
Page 48

USING PHOTOSHOP LIGHTROOM 2
Updated 03 September 2009
Viewing photos in the catalog
Viewing photos in Loupe view
More Help topics
“Set Library view options for Loupe view” on page 50
Zoom an image
You can use the Navigator panel in the Library module or the Develop module to set the level of magnification for an
image in Loupe view. Lightroom saves the last level you used and lets you switch between that level and the current
level when you click the photo with the pointer. You can also toggle between four levels using the Zoom In and Zoom
Out commands.
The settings remain in effect until you select a different zoom level in the Navigator panel or choose a new command
from the View menu.
Note: When two images are in Compare view in the Library module, setting a zoom level in the Navigator panel or
choosing a zoom command automatically displays the selected image in Loupe view.
More Help topics
“Displaying the Library on a second monitor” on page 25
43
Set the zoom levels for the pointer
1 In the Navigator panel, select either Fit or Fill for the first zoom level.
2 For the second zoom level, select either 1:1 (a 100% view of actual pixels) or choose an option from the pop-up
menu.
Note: Zoom levels for the pointer are also available in the secondary window.
Switch between zoom levels
• To switch between the two zoom levels set in the Navigator panel, click the photo with the pointer or press the
spacebar. The pointer changes to the Zoom tool whenever it is possible to zoom in. You can also click the photo to
switch between zoom levels in the secondary window.
• To switch between four zoom levels, press Ctrl-+ or - (Windows) or Command-+ or - (Mac OS). If you choose a
Zoom command from the View menu, the level switches between the four settings in the Navigator panel (Fit, Fill,
1:1, and the option chosen from the menu).
To zoom the photo to the center of the screen, select Zoom Clicked Point To Center in the Interface Preferences.
Pan the image
When the photo is zoomed and parts are not visible, use the Hand tool on the photo or the pointer on the Navigator
panel to move hidden areas into view. The Navigator panel always displays the entire image with a frame overlay to
represent the edges of the main view.
Note: Panning is synchronized in the Before and After views in the Develop module.
• Drag the Hand tool in the Loupe view to move the image. You can also pan with the Hand tool in the Loupe view
in the secondary window.
• Drag the pointer in the Navigator panel to move the image in Loupe view.
Page 49

USING PHOTOSHOP LIGHTROOM 2
Updated 03 September 2009
Viewing photos in the catalog
• Click the pointer in the Navigator panel to move the image to that location in Loupe view.
Temporarily zoom in to pan the image
• Press and hold the space bar to temporarily zoom in.
• Press and hold the mouse button down to zoom in, and then drag in either the photo or the Navigator to pan the
photo.
Display the Info Overlay on a photo
You can display information about a photo in Loupe view in the Library; in Loupe view or Before and After views in
the Develop module; and in Loupe view in the secondary window. You can display two sets of metadata and customize
which information appears in each set.
More Help topics
“Set Library view options for Loupe view” on page 50
“Change the Loupe view info overlay” on page 51
Show and hide the Info Overlay
❖ Choose View > Loupe Info > Show Info Overlay, or choose the specific info set to display. Or, press the I key to
display, hide, and cycle through the info sets.
44
Change the info displayed in the Info Overlay
1 In the Library or Develop module, choose View > View Options.
2 If working in the Library, make sure the Loupe View is selected.
3 In the Loupe Info fields, choose the options you want to display for each set from the menus.
Browsing the Grid view
Show photos in the Grid view and the Filmstrip
Lightroom provides many ways to show specific photos in the Grid view and the Filmstrip. The method you use
depends on which photos you want to see. The Catalog panel lets you instantly display all photos in the catalog or the
Quick Collection, as well as the most recently imported photos.
Note: You can also show photos in the Grid view and the Filmstrip by selecting folders, collections, or keywords, or by
searching for photos. You can refine a selection by using the options in the Library Filter bar.
❖ In the Catalog panel, select any of the following:
All Photographs Shows all the photos in the catalog.
Quick Collection Shows photos in the Quick Collection. To learn about grouping photos in the Quick Collection, see
“Assemble photos into the Quick Collection” on page 68.
Previous Import Shows photos from the most recent import.
Other categories, such as Previous Export As Catalog, may also appear in the Catalog panel.
Page 50

USING PHOTOSHOP LIGHTROOM 2
Updated 03 September 2009
Viewing photos in the catalog
More Help topics
“Photo collections” on page 66
“Finding photos in the catalog” on page 92
“View the contents of a folder” on page 61
“Filtering and rating photos” on page 75
Navigate between photos
In the Library module, you navigate between images by selecting the previous or next photo.
❖ In any view of the Library module, do one of the following:
• To select the previous photo, press the Left Arrow key, click the Select Previous Photo icon in the toolbar, or
choose Library > Previous Selected Photo.
• To select the next photo, press the Right Arrow key, click the Select Next Photo icon in the toolbar, or choose
Library > Next Selected Photo.
Note: Make sure Navigate is chosen from the toolbar menu for the Select Previous Image and Select Next Image icons to
appear.
45
Rearrange photos in the Grid view
❖ In the Grid view, do any of the following to rearrange photos in the grid:
• Click the Sort Direction icon in the toolbar.
• Choose a sort option from the Sort pop-up menu in the toolbar.
• If you have selected a regular collection or the lowest folder in a folder hierarchy, drag from the center of a
thumbnail to sort in any order.
Note: If you have selected a smart collection or a folder that contains other folders, User Order is not available in the Sort
pop-up menu, and you cannot drag to sort photos in any order.
Change the thumbnail size in the Grid view
1 In the Grid view, choose Thumbnail Size from the toolbar menu.
The Thumbnails control is not available unless this option is selected.
2 Drag the Thumbnails slider.
Selecting photos in the Grid view and the Filmstrip
You select photos in the Grid view that you want to work with in the Library or other modules. The photos you select
are reflected in the Filmstrip. Likewise, the specific photos selected in the Filmstrip are displayed in the Grid view.
When you select a photo, it becomes the active photo. You can select multiple photos, but only one photo at a time is
the active photo. Selected photos are indicated in the grid and the Filmstrip by a thin white border and a cell color that
is lighter than unselected photos. The lightest colored cell indicates the active photo.
Page 51

USING PHOTOSHOP LIGHTROOM 2
Updated 03 September 2009
Viewing photos in the catalog
46
When multiple photos are selected, the lightest colored cell indicates the active photo.
When you have several photos selected, you can click any selected photo to make it active without deselecting the other
photos. If you click a photo outside the selection, it becomes the active photo, and all other photos are deselected.
When you have more than one photo selected in the Grid view and you make changes such as applying ratings, labels,
or adding metadata, those changes are applied to all of the selected photos.
When you have more than one photo selected in the Filmstrip and you’re in Loupe, Compare, or Survey view, changes
such as applying ratings, labels, or adding metadata are applied only to the active photo.
Note: You can also select or deselect flagged photos in the Grid view and the Filmstrip. See “Select flagged photos” on
page 78.
1 (Optional) In the Library module, select items in the Catalog, Folders, or Collections panel to display the photos
you want to use. Or, select a keyword tag in the Keyword List panel. If desired, specify criteria in the Library Filter
bar to narrow the selection.
Note: To select photos using the Keyword List panel, click the white arrow to the right of the image count. Photos that
contain that tag display in the Grid view and the Filmstrip.
2 In the Grid view or the Filmstrip, do any of the following:
• To select a photo, click a photo thumbnail.
Page 52

USING PHOTOSHOP LIGHTROOM 2
Updated 03 September 2009
Viewing photos in the catalog
• To select non-contiguous photos in the Grid view or the Filmstrip, click the first photo and then Ctrl-click
(Windows) or Command-click (Mac OS) additional photos.
• To select a photo and all photos between it and the active photo, Shift-click a photo.
• To select all photos, choose Edit > Select All or press Ctrl+A (Windows) or Command+A (Mac OS).
• To deselect all photos, choose Edit > Select None or press Ctrl+D (Windows) or Command+D (Mac OS).
• To deselect all photos except the active one, choose Edit > Select Only Active Photo or press Shift+Ctrl+D
(Windows) or Shift+Command+D (Mac OS).
• To change the active photo in a group of selected photos, click a different photo thumbnail.
• To select a new active photo and deselect all other photos in a group of selected photos, click a photo’s grid cell
border.
• To deselect the active photo in a group of selected photos, choose Edit > Deselect Active Photo or press /. The next
photo in the multiple-photo selection becomes the active photo.
• To deselect selected photos and select all the photos that were unselected, choose Edit > Invert Selection.
When you select multiple photos, the first photo you select is the primary selection (active photo), indicated by the
brighter highlighted frame.
After selecting photos, add them to the Quick Collection to easily prepare them for printing, presenting in a slide show,
assembling into a web gallery, or exporting.
47
More Help topics
“View the contents of a folder” on page 61
“Finding photos in the catalog” on page 92
Switching between Grid, Loupe, Compare, and Survey views
In the Library module, you can view thumbnails in the Grid view, a single photo in Loupe view, two photos in Compare
view, or two or more photos in Survey view.
❖ In the Library module, do any of the following:
• Click the Grid View , Loupe View , Compare View , or Survey View icon in the toolbar.
• Choose View > Grid, Loupe, Compare, or Survey.
• Choose View and then choose either Toggle Loupe View or Toggle Zoom View to toggle between the chosen view
and the previous view.
• With one or more photos selected in the Grid view, choose Photo > Open In Loupe to switch to the Loupe view. If
more than one photo is selected, the active photo opens in the Loupe view. Use the Right and Left Arrow keys to
cycle between selected photos in the Loupe view.
Page 53

USING PHOTOSHOP LIGHTROOM 2
Updated 03 September 2009
Viewing photos in the catalog
Comparing photos in the Library module
Lightroom lets you view large previews of one or more photos for tasks like picking out the best photo in a series. You
can view side-by-side previews of two photos in the Compare view, or view tiled previews of two or more photos in
the Survey view.
In the Compare view, one photo is the select (active) and the other is the candidate. Using controls in the toolbar, you
can swap the select and candidate photos, zoom in and out of one or both views simultaneously, and specify when
you’re done comparing.
In the Survey view, the selected (active) photo has a white border. You can designate the active photo by clicking it in
the image display area. All photos have a Deselect Photo icon in the lower-right corner for removing the photos
from the Survey view. (On the Mac OS, move the pointer over the photo to see the icon.)
Both views provide access to rating stars, color labels, and Pick or Rejected flags for each photo. Both views also let you
deselect photos to narrow down the images under consideration. See “Filtering and rating photos” on page 75.
You can always switch between the Compare and Survey views while comparing photos. You can also display Compare
and Survey views in a second window on a second monitor. See “Displaying the Library on a second monitor” on
page 25.
48
Compare photos in the Compare view
1 In the Grid view or the Filmstrip, select two photos and then do one of the following:
• Click the Compare View icon in the toolbar.
• Choose View > Compare.
Note: If you only select one photo and then switch to Compare view, Lightroom uses the currently selected photo and
either the last previously selected photo or an adjacent photo in the Grid view or the Filmstrip.
2 Do any of the following to adjust the photo previews:
• To zoom in or out of both photos simultaneously, make sure the Link Focus icon is displayed in the toolbar and
then drag the Zoom slider.
• To zoom in or out of one photo, select the photo, make sure the Unlink Focus icon is displayed in the toolbar
and then drag the Zoom slider.
Note: Clicking the toolbar icon toggles between Link Focus and Unlink Focus.
• To synchronize the scaling of the candidate and the select photos, click Sync in the toolbar.
3 Set the rating stars, color labels, or Pick or Rejected flags for the photos.
4 Do any of the following to specify different selected and candidate photos:
• Click Swap in the toolbar to reverse the selected and candidate photos.
• Click the Select Next Photo icon in the toolbar (or press the Right Arrow key) to compare subsequent photos with
the first selection. Select Previous Photo to compare previous photos with the first selection. Press the Up arrow to
replace the selected photo with the current selection and replace the candidate selection with the next image.
• Click the Deselect Photo icon in the lower-right corner below the photo.
• Select the Candidate photo and then click Make Select in the toolbar.
5 Repeat steps 2 through 4 as needed.
6 Click Done to exit the Compare view and display the select photo in Loupe view.
Page 54

USING PHOTOSHOP LIGHTROOM 2
Updated 03 September 2009
Viewing photos in the catalog
Compare photos in the Survey view
1 In the Grid view or the Filmstrip, select two or more photos and then do one of the following:
• Click the Survey View icon in the toolbar.
• Choose View > Survey.
Note: You can always add more photos to your comparison at any time by selecting them in the Filmstrip. Keep in mind
that the previews in the Survey view are smaller when more photos are selected. See “Selecting photos in the Grid view
and the Filmstrip” on page 45.
2 In the Survey view, do any of the following:
• To specify the select photo, click a photo in the work area or in the Filmstrip, or click the Select Previous Photo or
Select Next Photo icon in the toolbar.
Note: Navigate must be chosen in the Survey view toolbar pop-up menu for the icons to appear.
• To delete photos, click the Deselect Photo icon in the lower-right corner of a photo.
• To rate, label, or flag photos, click the rating stars, color labels, and Pick or Rejected flags beneath the photos.
Setting Library view options
49
More Help topics
“Display the Info Overlay on a photo” on page 44
Set Library view options for the Grid view
The Library View Options determine how photos look in the Grid view. You can specify different combinations of
elements, ranging from showing only thumbnails, to thumbnails accompanied with photo information, filters, and
Rotation buttons.
1 In the Library module, choose View > View Options.
2 In the Grid View tab of the Library View Options dialog box, select Show Grid Extras to view information and icons
in the photo thumbnail cells. (Show Grid Extras is selected by default.)
Deselecting this option shows photo thumbnails with no additional information in the Grid view.
3 In the Options area of the dialog box, select any of the following items:
Show Clickable Items On Mouse Over Only Shows clickable items, such as Rotation buttons and flags, only when the
pointer moves over the cell. Deselecting this option means that clickable items are always displayed.
Tint Grid Cells With Color Labels Displays the label colors in the background of each cell.
Show Image Info Tooltips Displays a description of an item, such as a photo, badge, or pick flag, when you hold the
pointer over the item.
4 In the Cell Icons area of the dialog box, select any of the following items to appear in cells:
Flags Makes Pick or Rejected flags available in the upper-left corner of the thumbnail cell.
Quick Collection Markers Shows the Quick Collection marker in the upper-right corner of the photo thumbnail.
Thumbnail Badges Shows thumbnail badges indicating which photos have keywords, cropping applied, or image
adjustments.
Page 55

USING PHOTOSHOP LIGHTROOM 2
Updated 03 September 2009
Viewing photos in the catalog
Unsaved Metadata When you’ve added metadata or keywords to a photo in Lightroom without saving the metadata
to file, the Metadata File Needs To Be Updated icon appears in the upper-right corner of the cell area. See “View
unsaved metadata” on page 85.
5 In the Compact Cell Extras area, select any of the following to appear in compact cells:
Index Number Shows the order number of the photo in the Grid view.
Rotation Makes Rotation buttons available.
Top Label Shows the top label you choose from the menu.
Bottom Label Shows the bottom label you choose from the menu.
6 In the Expanded Cell Extras area, select any of the following to appear in expanded cells:
Show Header With Labels Shows the header area of the thumbnail cell. The header area can display up to four labels
that you choose from the menus.
Show Rating Footer Shows the footer items you select.
Use Defaults Restores the Grid view options to their factory-set defaults.
7 From the Show Grid Extras menu, choose one of the following to set the size of the thumbnail cells in the Grid view:
Expanded Cells Displays the most photo information available in the Grid view, including a header with up to four
metadata labels.
50
Compact Cells Displays smaller cells with less photo information so that more thumbnails are visible in the Grid view.
Change the Grid view options
You can quickly change the Grid view options by choosing from the Grid View Style menu. The views are based on
the default or custom view options set in the Library View Options.
❖ In the Grid view, choose View > Grid View Style and choose any of the following:
Show Extras Shows or hides cell extras set in the Library View Options.
Show Badges Shows or hides keyword tags, cropping, and image adjustment badges.
Compact Cells Shows compact cells in the Grid view.
Expanded Cells Shows expanded cells in the Grid view.
Cycle View Style Cycles through the different views available in the Grid View Style menu.
Set Library view options for Loupe view
The Library View Options determine what information displays with your photos in the Loupe view. You can specify
two different sets of information.
1 In the Library module, choose View > View Options.
2 In the Loupe View tab of the Library View Options dialog box, select Show Info Overlay to display information with
your photos. (Show Info Overlay is selected by default.)
Deselecting this option displays photos with no information overlay in the Loupe view.
3 In the Loupe Info 1 and Loupe Info 2 areas of the dialog box, use the menus to choose what displays in the two Info
Overlays in the Loupe view. You can select up to three items in each overlay, including the filename, metadata, or
no data.
4
Select Show Briefly When Photo Changes to briefly display the Info Overlays only when photos change in the Loupe view.
Page 56

USING PHOTOSHOP LIGHTROOM 2
Updated 03 September 2009
Viewing photos in the catalog
5 Under General area of the dialog box, select Show Messages When Loading Or Rendering Photos to display
overlays in the Loupe view during a process.
6
From the Show Info Overlay menu, choose Info 1 or Info 2 to select the currently active Info Overlays in Loupe view.
Change the Loupe view info overlay
❖ In the Library module, choose View > Loupe Info and then choose any of the following:
Show Info Overlay Displays the Info Overlay specified in the Library View Options.
Info 1 Displays the Info 1 Overlay.
Info 2 Displays the Info 2 Overlay.
Cycle Info Display Cycles through the two Info Overlay sets.
51
Page 57

Chapter 6: Managing catalogs and files
Updated 03 September 2009
Adobe® Photoshop® Lightroom® stores information about imported photos in a database called a catalog. The catalog
contains such data as preview information for each photo, links to where the files are located on the volume, and
metadata such as ratings, keywords, and adjustments made in the Develop module.
More Help topics
“About Lightroom catalogs” on page 10
“Import photos from a catalog into Lightroom” on page 38
Creating and managing catalogs
When you launch Lightroom and import photos, a catalog file (Lightroom Catalog.lrcat) is automatically created for
you. The catalog tracks the photos and their information, but it doesn’t contain the actual photo files themselves. Most
people want to keep all their photos in one catalog, which can have thousands of photos, but you can create separate
catalogs for different purposes.
52
For more information on Lightroom catalogs, see “About Lightroom catalogs” on page 10.
Create a catalog
When you create a catalog, you create a name for the folder, such as “Wedding Photos,” that includes a catalog file
(such as “Wedding Photos.lrcat”). This catalog file stores catalog settings. When you import photos, a new subfolder
(such as “Wedding Photos Previews.lrdata”) is created to store the JPEG preview images.
1 Choose File > New Catalog.
2 Specify the name and location of the new catalog folder, and then click Save (Windows) or Create (Mac OS).
Lightroom resets and displays an empty Library module, ready for you to import photos.
Open a different catalog
When you open a different catalog, Lightroom closes the current catalog and relaunches.
1 Choose File > Open Catalog.
2 In the Open Catalog dialog box, specify the catalog file, and then click Open.
You can also choose a catalog from the File > Open Recent menu.
3 If prompted, click Relaunch to close the current catalog and relaunch Lightroom.
You can also change General preferences to specify which catalog is opened when Lightroom is started.
Copy or move a catalog
Important: Before copying or moving a catalog and preview files, back them up.
1 Locate the folder that contains the catalog and preview files. In Lightroom, choose Edit > Catalog Settings
(Windows) or Lightroom > Catalog Settings (Mac OS).
Page 58

USING PHOTOSHOP LIGHTROOM 2
Updated 03 September 2009
Managing catalogs and files
2 In the Information area of the General panel, click Show to go to the catalog in the Explorer (Windows) or Finder
(Mac OS).
3 Copy or move the catalog.lrcat and Previews.lrdata files to the new location.
4 (Optional) Copy or move your image files to the new location.
5 Double-click the .lrcat file in the new location to open it in Lightroom.
6 (Optional) If Lightroom cannot find folders or photos in the copied or moved catalog, a question mark appears by
folder names in the Folders panel or in photo thumbnails in the Grid view. To restore folder links, right-click
(Windows) or Control-click (Mac OS) a folder with a question-mark icon and choose Find Missing Folder. To
relink individual photos, see “Locate missing photos” on page 60.
Combine or merge catalogs
You can create a catalog from existing photos in Lightroom by selecting the photos and exporting them as a new
catalog. Then, if desired, you can merge the new catalog with another catalog. This is useful when, for example, you
initially import photos into a catalog on a laptop computer and then you want to add the photos to a master catalog
on a desktop computer.
1 Select the photos you want to add to the new catalog.
2 Choose File > Export As Catalog.
3 Specify the name and location of the catalog.
4 Indicate whether you want to export the negative files and previews, and then click Save (Windows) or Export
Catalog (Mac OS).
“Negative files” refers to the original files that were imported into Lightroom.
53
The new catalog contains the selected photos and their information. You must open the new catalog to view it.
5 (Optional) To combine catalogs, import the new catalog into another. See “Import photos from a catalog into
Lightroom” on page 38.
Delete a catalog folder
When you delete a catalog folder, you erase all the work you’ve done in Lightroom that isn’t saved in the photo files.
While the previews are deleted, the original photos being linked to are not deleted.
❖ Using Windows Explorer or Mac OS Finder, locate the catalog folder you created and drag it to the Recycling Bin
(Windows) or Trash (Mac OS).
Change the default catalog
By default, Lightroom opens the most current catalog at startup. This behavior can be changed to opening a different
catalog or to always prompt you to choose a catalog.
❖ In the General preferences, choose one of the following from the When Starting Up Use This Catalog menu:
The file path of a specific library Opens the catalog found at a specific file path location.
Load Most Recent Catalog Opens the most recent catalog you’ve been working with.
Prompt Me When Starting Lightroom Opens the Select Catalog dialog box at startup.
Note: You can also choose Other, navigate to a specific catalog file (.lrcat) and select it as the default library to open at
startup.
Page 59

USING PHOTOSHOP LIGHTROOM 2
Updated 03 September 2009
Managing catalogs and files
Change catalog settings
1 Choose Edit > Catalog Settings (Windows) or Lightroom > Catalog Settings (Mac OS).
2 In the General tab, do any of the following:
Information Provides information such as the location, filename, and creation date of the catalog. Click Show to view
the file in Explorer (Windows) or Finder (Mac OS).
Backup Specifies the frequency in which the current catalog is backed up. If a catalog file is accidentally deleted or
becomes corrupt, the backup file may help you recover your data. See “Backing up the catalog” on page 54.
Relaunch And Optimize After you have imported and removed a number of files, you may have to wait a significant
amount of time while working in Lightroom. In such instances, you should relaunch and optimize your catalog.
3 In the File Handling tab, do any of the following:
Preview Cache Determines how Lightroom renders preview images. See “Set preview cache” on page 37.
Import Sequence Numbers To monitor the number of photos that have been imported into the current catalog, see the
Photos Imported box in the Import Sequence Numbers area. See “The Filename Template Editor and Text Template
Editor” on page 35.
4 In the Metadata tab, select any of the following, and then click OK:
Offer Suggestions From Recently Entered Values When you start typing a metadata entry that resembles a previous
entry, one or more suggestions appear as you type. Deselect this option to turn it off. Click Clear All Suggestion Lists
to clear previous entries.
54
Include Develop Settings In Metadata Inside JPEG, TIFF, And PSD Files Deselect this option to prevent Lightroom
from including Develop module settings in the XMP metadata of JPEG, TIFF, and PSD files.
Automatically Write Changes Into XMP Select this option to save metadata changes directly to the XMP sidecar files,
making the changes visible in other applications. Deselect this option to save metadata settings only in the catalog.
Write Date Or Time Changes Into Proprietary Raw Files This option controls whether Lightroom writes a new date and
time to proprietary raw files when you use the Metadata > Edit Capture Time command to change a photo’s capture
time metadata. By default, this option is not selected.
Backing up the catalog
Backing up your catalog is an important safety precaution in case of corruption. Lightroom automates the process by
allowing you to schedule regular catalog backups when you start the software.
Performing frequent, regular catalog backups is only part of what should be a more comprehensive backup strategy.
Lightroom allows you to make a one-time backup of your original photos when you import them, but thereafter you
must manually back up your edited photos, previews, and sidecar files in addition to your catalog. When formulating
a backup strategy:
• Remember that the more frequently you back up your catalog and photos, the less data you stand to lose when a
crash or corruption occurs.
• If possible, store the backup copies of your photos and catalog on a separate hard disk from your working files.
• Consider using dedicated backup software to automate the process and synchronize changes between your working
and backup files.
• If you’re worried that your backup files might be accidentally erased, create redundant backups on additional disks,
or on read-only media such as DVDs.
Page 60

USING PHOTOSHOP LIGHTROOM 2
Updated 03 September 2009
Managing catalogs and files
• For greater security, store your backup disk in a separate location from your working disk, preferably off site or in
a fire-proof safe.
Important: The interaction between Mac OS X Time Machine™ and Lightroom catalog files is unknown. Running Time
Machine backup or restore operations while Lightroom is in use is not recommended.
More Help topics
“Back up photos during import” on page 34
Specify catalog backup frequency
1 Choose Edit > Catalog Settings (Windows) or Lightroom > Catalog Settings (Mac OS).
2 In the Backup area of the General panel, choose an option from the Back Up Catalog pop-up menu:
Next Time Lightroom Starts Only Backs up the catalog the next time you start Lightroom, and then the Back Up
Catalog option switches to Never.
Every Time Lightroom Starts Backs up the catalog every time you start Lightroom, so changes from every working
session are always backed up.
Once A Day, Upon Starting Lightroom Backs up the catalog the first time you start Lightroom each day. If you start
Lightroom more than once a day, additional changes are not backed up until the next day.
55
Once A Week, Upon Starting Lightroom Backs up the catalog once a week. If you start Lightroom more frequently,
additional changes are not backed up until the next week.
Once A Month, Upon Starting Lightroom Backs up the catalog once a month. If you start Lightroom more frequently,
additional changes are not backed up until the next month.
Never No backups are performed. (Not recommended.)
Choose the catalog backup location
By default, catalog backup files are stored in the Backups folder in the Lightroom data folder. Backup files are in a
folder named by the date and time the backup was performed:
• Mac OS: /User home/Pictures/Lightroom/Backups/YYYY-MM-DD HRMN/
• Windows: C:\Documents and Settings\username\My Documents\My Pictures\Lightroom\Backups\YYYY-MM-
DD HRMN\
Note: The time is represented by a 24-hour clock without a colon between hours and minutes.
You can change the location of the backup files, however.
1 Start Lightroom when a catalog backup is scheduled.
2 In the Back Up Catalog dialog box, click Choose next to the Backup Directory path, and then navigate to the new
location.
Lightroom writes a new catalog every time it creates a backup. To save space on your hard disk, you may want to
delete or compress old backup files.
Page 61

USING PHOTOSHOP LIGHTROOM 2
Updated 03 September 2009
Managing catalogs and files
Check catalog integrity
Lightroom lets you check for catalog corruption when you open or back up a catalog. Checking catalog integrity
increases the time it takes to open or back up a catalog, but reduces the risk of data loss.
❖ To check for catalog corruption, do one of the following:
• Start Lightroom when a catalog backup is scheduled. In the Back Up Catalog dialog box, select Test Integrity Of
This Catalog, and then click Backup.
• In the General panel of the Preferences dialog box, select When Starting Up Use This Catalog > Prompt Me When
Starting Lightroom. Start Lightroom. In the Select Catalog dialog box, select Test Integrity Of This Catalog, and
then click Continue.
Perform a catalog backup
1 Start Lightroom when a catalog backup is scheduled.
2 In the Back Up Catalog dialog box, choose one of the following:
Backup Back up the current catalog.
Skip Now Postpone the backup until the next time you start Lightroom.
Backup Tomorrow When you’ve opted to back up your catalog once a day, you can choose to postpone the operation
for a day.
56
Backup In One Week When you’ve opted to back up your catalog once a week, you can choose to postpone the
operation for a week.
Backup In One Month When you’ve opted to back up your catalog once a month, you can choose to postpone the
operation for a month.
Restore a backup catalog
1 Choose File > Open Catalog.
2 Navigate to the location of your backed up catalog file.
3 Select the backed up .lrcat file and click Open.
4 (Optional) Copy the backed up catalog to the location of the original catalog to replace it.
The Volume Browser
The Volume Browser in the Folders panel provides information about the storage resources for the photos you’re
working with in Lightroom. The Volume Browser displays the name of each volume that contains photos in the
catalog, as well as information about the volume resource. For example, it lets you see whether a volume is online or
offline, and how much disk space is available. The Volume Browser updates dynamically as you import and work with
photos in Lightroom.
The colored LED to the left of the volume name indicates the availability of the resource:
Green 10 GB or more of space is free.
Yellow Less than 10 GB of space is free.
Orange Less than 5 GB of space is free.
Page 62

USING PHOTOSHOP LIGHTROOM 2
Updated 03 September 2009
Managing catalogs and files
Red Less than 1 GB of space is free and the tooltip warns that the volume is nearly full. When less than 1 MB of space
is free, the tooltip warns that the volume is full.
Gray Volume is offline and photos on that volume are unavailable for editing. When photos are unavailable, only low-
resolution previews display in Lightroom.
• To change the information you see for a volume, right-click (Windows) or Control-click (Mac OS) the volume
name and choose any of the following:
Disk Space Displays used/total disk space on the volume.
Photo Count Displays how many photos in the catalog are on the volume.
Status Indicates whether the volume is online or offline.
None Hides all volume information.
• Right-click (Windows) or Control-click (Mac OS) a volume name and choose Show In Explorer (Windows) or
Show In Finder (Mac OS) to open that volume in an Explorer or Finder window.
• Right-click (Windows) or Control-click (Mac OS) a volume name and choose Properties (Windows) or Get Info
(Mac OS) to view the Properties (Windows) or Info (Mac OS) window for that volume.
• To change the information provided by the colored LED next to the volume name, right-click (Windows) or
Control-click (Mac OS) it and choose one of the following:
Show Status Indicates whether a volume is online (green) or offline (gray).
57
Show Status And Free Space Indicates whether a volume is online or offline, as well as how full the resource is. Green
indicates the volume is online and has plenty of storage availability. Yellow/orange indicates the volume is online but
getting full. Red indicates the volume is online but full. Gray indicates the volume is offline.
Creating and managing folders
The folders that contain your photos are displayed in the Folders panel of the Library module. The folders in the
Folders panel reflect the folder structure on the volume itself and appear in alphanumeric order. Click the disclosure
triangle to the right of a volume name to see the folders on that volume. Click the triangle to the left of a folder to see
any subfolders it contains.
Folders panel displaying folders and many photos they contain
You can add and move folders in the Folders panel, rename folders, and delete them. Changes you make to folders in
Lightroom are applied to the folders themselves on the volume.
Page 63

USING PHOTOSHOP LIGHTROOM 2
Updated 03 September 2009
Managing catalogs and files
More Help topics
“The Volume Browser” on page 56
“Synchronizing folders” on page 59
“View the contents of a folder” on page 61
Add new or existing folders
Whenever you import photos, the folders in which they are located are added automatically to the Folders panel. You
can add folders and import the photos they contain using the Folders panel.
1 In the Folders panel of the Library module, click the Plus icon (+) and choose Add Folder.
2 Do one of the following:
• (Windows) In the Browse For Folders dialog box, navigate to the location you want, select the folders you want,
and then click OK. Or, navigate to the location you want and click Make New Folder. Type a name to replace the
New Folder name.
• (Mac OS) In the Choose Or Create New Folder dialog box, navigate to the location you want, select the folder you
want, and then click Choose. Or, navigate to the location you want and click New Folder. Type a name for the folder
and then click Create. Then click Choose.
3 If necessary, specify options in the Import Photos dialog box, and click Import.
If you have multiple copies of a folder and you want to change the location that Lightroom points to, right-click
(Windows) or Control-click (Mac OS) the folder and choose Update Folder Location.
58
Create new subfolders
1 In the Folders panel of the Library module, select the folder in which you want to create the new folder. Then, click
the Plus icon (+) at the top of the Folders panel and choose Add Subfolder.
2 In the Create Folder dialog box, type the Folder name.
3 If photos are selected, determine whether you want to copy the selected photos to the new folder, and then click
Create.
In the Folders panel, the new folder appears in the hierarchy you specified. The new folder also appears in
Windows Explorer or Mac OS Finder.
Add a parent folder
❖ To add a folder’s parent folder to the Folders panel hierarchy, select a folder and right-click (Windows) or Control-
click (Mac OS) and choose Add Parent Folder.
Move folders
You can move folders into other folders in Lightroom. You can only move one folder at a time. You cannot copy
folders in Lightroom.
❖ In the Folders panel of the Library module, select a folder and drag it into another folder.
Page 64

USING PHOTOSHOP LIGHTROOM 2
Updated 03 September 2009
Managing catalogs and files
Locate missing folders
If a folder is moved in the operating system instead of in Lightroom, the link between the catalog and the folder breaks,
and a question-mark icon appears on the folder in the Folders panel.
1 To restore the link, right-click (Windows) or Control-click (Mac OS) on the folder and choose Find Missing Folder
from the context menu.
2 Navigate to the file path of the moved folder and click Choose.
Rename folders
1 In the Folders panel of the Library module, select a folder.
2 Right-click (Windows) or Control-click (Mac OS) and choose Rename from the menu.
3 Overwrite the folder name.
Delete folders
1 In the Folders panel of the Library module, select one or more folders and click the Minus icon (-). Or, right-click
(Windows) or Control-click (Mac OS) and choose Remove.
2 Click Continue in the dialog box.
The folder and its photos are removed from the catalog and the Folders panel. The original folder and photos are not
deleted from the hard drive.
59
Synchronizing folders
If the contents of a folder in your catalog don’t match the contents of the same folder on the volume, you can
synchronize the two folders. When you synchronize folders, you have the option of adding files that have been added
to the folder but not imported into the catalog, removing files that have been deleted, and scanning for metadata
updates. The photo files in the folder and all subfolders can be synchronized. You can determine which folders,
subfolders, and files are imported.
1 In the Folders panel, select the folder you want to synchronize.
2 Choose Library > Synchronize Folder.
3 In the Synchronize Folder dialog box, do any of the following:
• To import photos that appear in the folders but have not been imported in the catalog, select Import New Photos.
If you select Show Import Dialog Before Importing, you can specify which folders and photos are imported.
• To remove photos that have been deleted from the folder but not from the catalog, select Remove Missing Photos
From Catalog. If this option is dimmed, no files are missing. (You can choose Show Missing Photos to display the
photos in Grid view.)
• To scan for any metadata changes made to the files in another application, choose Scan For Metadata Updates.
4 Click Synchronize.
5 If the Import Photos dialog box opens, specify the folders and files you want to import, and then click Import.
If you have a missing folder that is also empty, use the Synchronize Folder command to remove it from the catalog.
Page 65

USING PHOTOSHOP LIGHTROOM 2
Updated 03 September 2009
Managing catalogs and files
Managing photos
Locate missing photos
Sometimes the link between the catalog and a photo breaks. When that happens, Lightroom displays a question-mark
icon in image cells in the Grid view and the Filmstrip. In the Develop module, Lightroom indicates that the photo
is offline or missing. Links between a catalog and its photos can break for a variety of reasons, including because photos
are moved in the operating system instead of from within Lightroom, or because photos are stored on an external drive
that is offline. If the drive is offline, turn it on. To locate missing files, do the following:
1 In the Grid view, click the question-mark icon in a thumbnail cell.
A dialog box displays the original file path of the photo.
2 Click Locate, navigate to location of the moved photo, and then click Select.
3 (Optional) In the Locate dialog box, select Find Nearby Missing Photos to have Lightroom search for other missing
photos in the folder and reconnect them as well.
More Help topics
“Synchronizing folders” on page 59
60
“Locate missing folders” on page 59
“View the contents of a folder” on page 61
Update photos changed by another application
In the Grid view, Lightroom displays alerts in image cells when the photos in your catalog have been changed by
another application. For example, if a photo has a one-star rating in Lightroom, and the photo has been updated to a
two-star rating in another application, you need to decide which rating to respect. Both cannot co-exist together.
Lightroom lets you resolve conflicting photo metadata by either overwriting its data in the catalog with metadata from
the photo or its sidecar XMP file, or overwriting the metadata in the photo file or sidecar XMP file with its stored data
in the catalog.
1 In the Grid view, click the alert icon in a cell.
2 In the Confirm dialog box, select one of the following:
Import Settings From Disk Imports the metadata from the photo or its sidecar XMP file, which overwrites the photo’s
data in the catalog.
Overwrite Settings Exports metadata from the catalog to the photo file and overwrites the data in the photo or its
sidecar XMP file.
Do Nothing Takes no action. If you select this option, be sure that the photo’s metadata in the catalog doesn’t conflict
with data in the photo or its sidecar XMP file.
More Help topics
“Synchronize Lightroom metadata with Camera Raw and Adobe Bridge” on page 84
“View unsaved metadata” on page 85
Page 66

USING PHOTOSHOP LIGHTROOM 2
Updated 03 September 2009
Managing catalogs and files
Rename photos
1 In the Grid view or the Filmstrip in the Library module, select one or more photos and then choose Library >
Rename Photo(s).
2 In the Rename Photos dialog box, choose an option from the File Naming menu. Choose Edit if you want to specify
a naming option using the Filename Template Editor. See “The Filename Template Editor and Text Template
Editor” on page 35.
If you specify “sequence” for a naming option, Lightroom numbers the photos sequentially. If you don’t want the
numbering to begin with “1,” type a starting number in the Start Number text box.
More Help topics
“Naming options” on page 34
View the contents of a folder
Lightroom displays the number of photos in a folder to the right of the folder name. If you later add photos to a folder
in the Explorer (Windows) or Finder (Mac OS), you’ll need to import the new photos into Lightroom or synchronize
the folder to update the number displayed in the Folders panel.
❖ In the Library module, do any of the following:
• Select one or more items in the Folders panel.
• Select a photo, and in the Metadata panel, click the right-pointing arrow next to the Folder box to display that
photo’s folder.
By default, selecting a folder shows all photos in that folder and all subfolders in the Grid view and the Filmstrip. To
show only the photos in the selected folder, choose Library > Include Photos From Subfolders to deselect it.
61
More Help topics
“Locate missing photos” on page 60
“Synchronizing folders” on page 59
Move photos to a different folder
1 (Optional) If you’re not moving photos to an existing folder, create a new folder.
2 Select a folder in the Folders panel.
3 In the Grid view, select the photos you want to move.
4 Drag the photos to a folder in the Folders panel.
Note: You cannot copy photos in Lightroom.
The actual photos are physically moved to a different folder on the hard drive.
Open a photo in its folder in the Library
❖ Select the photo and choose Photo > Show In Folder In Library.
The photo is selected in the Grid view and its folder is selected the Folders panel.
Page 67

USING PHOTOSHOP LIGHTROOM 2
Updated 03 September 2009
Managing catalogs and files
Convert photos to DNG
Lightroom lets you convert camera raw files to DNG for archiving and taking advantage of DNG features. When
photos are converted to DNG, the DNG files replace the originals in the catalog. You have the option of deleting or
preserving the originals on disk after the conversion.
1 Select one or more photos in the Grid view, or select a single photo in the Filmstrip in Loupe, Compare, or Survey
view. Then, choose Library > Convert Photo(s) To DNG.
Note: If more than one photo is selected in the Filmstrip in Loupe, Compare, or Survey view, only the active photo is
converted to DNG.
2 In the Convert Photo(s) To DNG dialog box, select any of the following conversion options:
Only Convert RAW Files Ignores photos that are not camera raw files. Deselecting this option converts all selected
photos, including JPEGs, TIFFs, and PSDs.
Delete Originals After Successful Conversion Deletes the original photo file after the conversion process ends.
Deselecting this option preserves the original file on disk.
File Extension Makes the file extension .dng or .DNG.
Compatibility Specifies the versions of Camera Raw and Lightroom that can read the file. Use the tool tips to help you
choose.
62
JPEG Preview Determines whether the exported JPEG preview is full sized, medium sized, or not created.
Embed Original Raw File Stores all of the original camera raw data in the DNG file.
More Help topics
“File formats” on page 31
Open a file in Explorer or Finder
❖ Select the photo and choose Photo > Show In Explorer (Windows) or Show In Finder (Mac OS).
The file is selected in an Explorer or Finder window.
Create virtual copies
You can have multiple versions of photos by applying different adjustment settings to virtual copies of the original
(master) photos. Virtual copies don’t exist as actual photos, but are metadata in the catalog that stores the different sets
of adjustments.
You create a virtual copy of a photo and then apply adjustment settings to it. If you want another version of the master
photo, you create another virtual copy and apply the new settings to it. You can create as many virtual copies of a master
photo as you wish. You can even make one of the virtual copies a master, making the previous master a virtual copy.
Once created, virtual copies are automatically stacked with the master photo. In the Grid view or the Filmstrip, the
master photo displays the number of images in the upper-left corner of the thumbnail. The virtual copies display pageturn icons on the left side of their thumbnails.
Page 68

USING PHOTOSHOP LIGHTROOM 2
Updated 03 September 2009
Managing catalogs and files
Left Original (master) photo Middle and Right Virtual copies indicated by page-turn icon
Virtual copies become actual photos when they are exported as a copy of the master photo or edited as a copy in an
external editor.
When you create a virtual copy of a photo, “Copy 1” (or “Copy 2,” “Copy 3,” and so on) is added automatically to the
Copy Name field in the Metadata panel.
• In the Grid view in the Library or in the Filmstrip in any module, right-click (Windows) or Control-click (Mac OS)
a photo and choose Create Virtual Copy from the context menu.
• In the Grid view in the Library or in the Filmstrip in any module, right-click (Windows) or Control-click (Mac OS)
to select multiple photos and choose Create Virtual Copies from the context menu.
If the copy does not appear in the Grid view, the photos may be part of a collapsed stack. Try choosing Photo >
Stacking > Expand All Stacks. If that doesn’t work, the photos may be filtered. Try using a different display method,
such as choosing All Photographs in the Catalog panel.
63
• In the Library module, select a virtual copy of a photo in the Grid view or the Filmstrip and choose Photo > Set
Copy As Master.
More Help topics
“Grouping photos into stacks” on page 71
“Exporting photos to disk” on page 124
“Editing in other applications” on page 130
Rotate or flip photos in the Library module
Lightroom lets you rotate photos clockwise and counterclockwise, or flip them along the horizontal or vertical axis.
More Help topics
“Rotate slides” on page 139
“Specify how photos fill an image cell” on page 152
Page 69

USING PHOTOSHOP LIGHTROOM 2
Updated 03 September 2009
Managing catalogs and files
Rotate photos in the Library module
Photos imported into the catalog are automatically rotated if the Exchangeable Image Format (EXIF) data includes
orientation metadata. Otherwise, you can change a photo’s orientation manually. Photos can also be rotated in the
Develop, Slideshow, and Print modules.
❖ In the Library module, do any of the following:
• In the Grid view, select one or more photos, move the pointer over a thumbnail, and click one of the rotate icons
in the lower corner of any cell.
• In the Loupe or Survey view, or in the Grid view with one or more photos selected, click a rotate icon in the toolbar.
(In Loupe and Survey views, only the active photo is rotated.)
Note: If the toolbar doesn’t show the Rotate icons, choose Rotate from the toolbar pop-up menu.
• In the Loupe, Compare, or Survey view, or in the Grid view with one or more photos selected, choose Photo >
Rotate Left or Rotate Right. (In the Loupe, Compare, and Survey views, only the active photo is rotated.)
Flip photos in the Library module
1 In the Grid view or the Filmstrip, select one or more photos.
2 Choose one of the following from the Photo menu:
Flip Horizontal Flips photos horizontally along the vertical axis.
64
Flip Vertical Flips photos vertically along the horizontal axis.
In Loupe, Compare, and Survey views, only the active photo is flipped.
Choose View > Enable Mirror Image Mode to flip all photos in the catalog horizontally along the vertical axis.
Rotate or flip photos using the Painter tool
1 In the Grid view, select the Painter tool in the toolbar, and then choose Rotation from the Paint menu in the toolbar.
Note: If the Painter tool does not appear in the toolbar, choose Painter from the toolbar menu.
2 Choose the one of the Rotate or Flip options in the toolbar, and then click or drag across photos to apply the setting.
3 To disable the Painter, click the circular well in the toolbar. When disabled, the Painter icon is visible in the toolbar.
Remove photos from catalogs
1 Select one or more photos in the Grid view, or select a single photo in the Filmstrip in Loupe, Compare, or Survey
view in the Library module.
2 Do one of the following:
• Press the Backspace key (Windows) or Delete key (Mac OS).
• Choose Photo > Delete Photo(s).
Note: When viewing a collection, pressing the Backspace key (Windows) or Delete key (Mac OS) removes the selected
photo(s) from the collection, not from the catalog, and no Confirm dialog box appears. To remove a photo from a
collection as well as from the catalog, select the photo and press Ctrl+Alt+Shift+Delete (Windows) or
Command+Option+Shift+Delete (Mac OS).
Page 70

USING PHOTOSHOP LIGHTROOM 2
Updated 03 September 2009
Managing catalogs and files
3 In the Confirm dialog box, click one of the following:
Remove Removes photos from the catalog but doesn’t send them to the Recycle Bin (Windows) or Trash (Mac OS).
Delete Removes photos from the catalog and sends them to the Recycle Bin (Windows) or Trash (Mac OS).
If more than one photo is selected in the Filmstrip in Loupe, Compare, or Survey view, only the active photo is deleted.
Note: Selecting photos and pressing the Delete key (Windows) or Forward Delete key (Mac OS, full-size keyboards only)
also removes photos from the catalog but doesn’t send them to the Recycle Bin (Windows) or Trash (Mac OS).
More Help topics
“Remove photos from a collection” on page 69
“Edit smart collections” on page 70
65
Page 71

Chapter 7: Organizing photos in the
Updated 03 September 2009
catalog
The Library module is where you view, organize, and manage the photos in the Adobe® Photoshop® Lightroom®
catalog. In the Library module, you can select photos that you want to edit, display in a slide show, print, or assemble
into a web photo gallery.
More Help topics
“The Library module” on page 9
Photo collections
About collections
Collections are a way to group photos in one place for easy viewing or for performing a variety of tasks. For example,
photos in a collection can be assembled into a slide show, contact sheet, or a web photo gallery. Once created,
collections are listed in the Collections panel of the Library, Slideshow, Print, and Web modules. They can be selected
anytime you need them. You can create as many collections as you need.
66
To temporarily group photos for certain tasks, they can be placed into the Quick Collection. Unlike collections, there
can be only one Quick Collection at a time in the catalog.
Smart collections are collections based on rules that you define. For example, you can create a smart collection of all
photos that have a five-star rating and a red color label. Photos that meet the criteria are automatically added to the
smart collection.
Here are some things to keep in mind about working with collections:
• Make sure that you understand the difference between catalogs and collections. Collections are groups of photos
within a catalog.
• Photos can belong to more than one collection.
• You cannot stack photos in a collection.
• You can change the sort order of the photos in a regular collection, but you cannot sort by User Order or drag
photos to rearrange them in a smart collection.
• Removing a photo from a collection doesn’t remove the photo from the catalog or send it to the Recycle Bin
(Windows) or Trash (Mac OS).
• You can create collection sets to organize your collections.
• You can explicitly save Slideshow, Print, and Web module settings in a type of collection called an output creation.
For a video about using collections and keywords to organize your photos, watch Lightroom 2 basics: collections and
keywords.
Page 72

USING PHOTOSHOP LIGHTROOM 2
Updated 03 September 2009
Organizing photos in the catalog
More Help topics
“Assemble photos into the Quick Collection” on page 68
“Create a smart collection” on page 69
“Save slide show settings as an output creation” on page 140
“Save print settings as an output creation” on page 160
“Save web settings as an output creation” on page 167
Create or delete collections and collection sets
Create a collection
1 In the Grid view, select photos and do one of the following:
• Choose Library > New Collection.
• Click the Plus icon (+) in the Collections panel and choose Create Collection.
2 In the Create Collection dialog box, type a name in the Collection box.
3 If you want the collection to be part of a collection set, choose it from the Set menu. Otherwise, choose None.
4 Select the Include Selected Photos option.
5 Click Create.
The collection appears in the Collections panel with a photo-print icon .
67
Create a collection set
A collection set is a container that includes one or more collections. Collection sets give you flexibility in organizing
and managing your photos. A collection set does not actually contain photos; it only contains collections, including
regular collections, smart collections, and output creations. A collection set has a filing box icon .
1 In the Library module, do one of the following:
• Choose Library > New Collection Set.
• Click the Plus icon (+) in the Collections panel and choose Create Collection Set.
2 In the Create Collection Set dialog box, type a name for your collection set.
3
If you want the new set to be part of an existing set, choose the existing set from the Set menu. Otherwise, choose None.
4 Click Create.
5 In the Collections panel, drag any collection into a collection set folder to add it to the set.
Delete a collection or collection set
When you delete a collection, no photos are removed from the catalog or deleted from disk.
❖ In the Collections panel, select a collection or collection set and click the Minus icon (-).
Note: You can also right-click (Windows) or Control-click (Mac OS) a collection or collection set in the Collections panel
and choose Delete from the menu.
Page 73

USING PHOTOSHOP LIGHTROOM 2
Updated 03 September 2009
Organizing photos in the catalog
Assemble photos into the Quick Collection
Use the Quick Collection to assemble a temporary group of photos to work with in any module. You can view the
Quick Collection in the Filmstrip or in the Grid view, and you can convert the Quick Collection to a permanent
collection.
More Help topics
“Set a target collection” on page 69
Add photos to the Quick Collection
1 Select one or more photos in the Filmstrip or the Grid view.
2 In the Library or Develop module, choose Photo > Add To Quick Collection. In the Slideshow, Print, or Web
modules, choose Edit > Add To Quick Collection.
From any module, select a photo and press the B key. Or move the pointer over a thumbnail image and click the circle
in its upper-right corner.
View photos in the Quick Collection
• In the Library module, select Quick Collection in the Catalog panel.
• In the Filmstrip Source Indicator menu, choose Quick Collection.
68
Remove photos from or clear the Quick Collection
1 Display the Quick Collection in the Filmstrip or Grid view.
2 Select one or more photos in the collection.
3 In the Library or Develop module, choose Photo > Remove From Quick Collection. In the Slideshow, Print, or Web
modules, choose Edit > Remove From Quick Collection.
From any module, select the photo and press the B key. Or move the pointer over a thumbnail image and click the
circle in its upper-right corner.
Convert the Quick Collection to a collection
A Quick Collection can be saved as a collection. You have the option of clearing the Quick Collection after saving it.
1 In any module, choose File > Save Quick Collection.
2 In the Save Quick Collection dialog box, type a name in the Collection Name box.
3 Specify one of the following actions:
• Select Clear Quick Collection After Saving to clear the Quick Collection after it’s saved as a collection.
• Deselect Clear Quick Collection After Saving to preserve the Quick Collection after it’s saved as a collection.
4 Click Save.
Edit collections
Add photos to a collection
1 Select photos in the Grid view.
2 Drag the photos to a collection in the Collections panel.
Page 74

USING PHOTOSHOP LIGHTROOM 2
Updated 03 September 2009
Organizing photos in the catalog
Note: To see which collections a photo is in, select the photo in the Grid view, right-click (Windows) or Control-click
(Mac OS), and choose Show In Collection. Choose a collection from the submenu to select it and display it in the Grid
view. Smart collections are not listed.
Remove photos from a collection
1 Select a collection in the Collections panel.
2 In the Grid view, select the photos and choose Photo > Remove From Collection.
Note: You can also select photos and press the Delete key to remove photos from a collection.
Copy or move photos between collections
1 In the Library module, select a collection in the Collections panel.
2 In the Grid view, select photos.
3 To copy the selected photos, drag them to the collection in the Collections panel that you want to add them to.
4 To move the selected photos, delete the photos from the original collection after dragging them to the new
collection.
Sort collections
• In the Collections panel, click the Plus icon (+) and choose Sort By Name to sort collections alphabetically.
• In the Collections panel, click the Plus icon (+) and choose Sort By Kind to sort collections by type.
69
Rename a collection or collection set
1 In the Collections panel, right-click (Windows) or Control-click (Mac OS) a collection or collection set, and choose
Rename from the menu.
2 Overwrite the name of the collection.
Set a target collection
A target collection allows you to override the temporary Quick Collection. A target collection lets you make any
permanent collection behave as a Quick Collection for as long as it is targeted. Targeted collections are an easy way to
quickly group photos together for further processing.
1 In the Collections panel, select the collection that you want to target.
2 Right-click (Windows) or Control-click (Mac OS) and choose Set As Target Collection.
A white plus icon next to the collection name indicates that it is targeted.
3 To add a photo to a target collection, select the photo in any module and press the B key.
4 To remove a photo from a target collection, select target collection, and then select the photo in the Grid view, and
press the B key.
5 To turn off the target, select the collection, right-click (Windows) or Control-click (Mac OS), and deselect Set As
Target Collection.
Create a smart collection
A smart collection is a collection based on metadata criteria that you specify. Smart collections automatically include
all photos that meet the criteria. You don’t manually add or remove photos from a smart collection.
Page 75

USING PHOTOSHOP LIGHTROOM 2
Updated 03 September 2009
Organizing photos in the catalog
Lightroom includes a set of five default smart collections: Colored Red, Five Stars, Past Month, Recently Modified, and
Without Keywords.
1 In the Library module, do one of the following:
• Choose Library > New Smart Collection.
• Click the Plus icon (+) in the Collections panel and choose Create Smart Collection.
2 In the Create Smart Collection dialog box, type a name for your smart collection.
3
If you want the smart collection to be part of an existing set, choose the set from the Set menu. Otherwise, choose None.
4 Specify the rules for the smart collection by choosing options from the pop-up menus.
Note: The rules used to define text conditions for smart collections are the same as the rules used to search for text with
the Library Filter bar. For definitions, see “Search for photos using the Text filter” on page 93.
5 (Optional) Click the Plus icon (+) to add additional criteria. Click the Minus icon (-) to remove criteria.
6 (Optional) Alt-click (Windows) or Option-click (Mac OS) the Plus icon (+) to open nested options that let you
refine criteria.
7 Choose to match all or any of the criteria from the Match menu.
8 Click Create.
Lightroom adds the smart collection to the Collections panel and adds all the photos in the catalog that meet the
specified rules. Smart collections have a photo-print icon with a gear in the lower-right corner .
70
Edit smart collections
You can change the criteria and rules for a smart collection at any time.
1 Right-click (Windows) or Control-click (Mac OS) a smart collection in the Collections panel and choose Edit
Smart Collection.
2 Choose new rules and options in the Edit Smart Collection dialog box.
3 Click Save.
Note: You cannot sort by User Order or drag photos to rearrange them in a smart collection.
Export and import smart collections
You can share smart collections by exporting smart collection settings and then importing those settings into a
different catalog. Lightroom applies a .lrsmcol filename extension to smart collection settings files.
Note: Exporting a smart collection exports the rules for the smart collection. It does not export the photos that are in the
smart collection.
Export smart collection settings
1 Select the smart collection that you want to export in the Collections panel.
2 Right-click (Windows) or Control-click (Mac OS) and choose Export Smart Collection Settings.
3 Specify the name and location of the exported smart collection settings file, and then click Save.
Import smart collection settings
1 Right-click (Windows) or Control-click (Mac OS) the Smart Collections set in the Collections panel and choose
Import Smart Collection Settings.
Page 76

USING PHOTOSHOP LIGHTROOM 2
Updated 03 September 2009
Organizing photos in the catalog
2 Navigate to and select a smart collection .lrsmcol settings file, and click Import.
Lightroom adds the smart collection to the Collections panel and adds any photos in the current catalog that meet the
smart collection criteria.
Export a collection as a catalog
You can export a collection of photos as a new catalog. When you create a catalog from a collection of photos, the
settings in the photos are exported to the new catalog.
Note: Exporting a smart collection as a catalog adds the photos in the smart collection to the new catalog. It does not
export the rules or criteria that constitute the smart collection.
1 Select the collection or smart collection that you want to use to create a catalog.
2 Right-click (Windows) or Control-click (Mac OS) the collection name and choose Export This Collection As A
Catalog.
3 Specify the name, location, and other options for the catalog, and then click Save (Windows) or Export Catalog
(Mac OS).
More Help topics
“Combine or merge catalogs” on page 53
71
Grouping photos into stacks
About stacks
You can create stacks to group a set of visually similar photos together, making them easy to manage. Stacks are useful
for keeping multiple photos of the same subject or a photo and its virtual copies in one place, and they reduce clutter
in the Grid view and the Filmstrip.
For example, you may want to create a stack to group multiple photos of a portrait session taken with the same pose,
or for photos taken at an event using your camera’s burst mode or auto-bracket feature. When you take photos this
way, you end up with many similar variations of the same photo, but you usually only want the best one to appear in
the Grid view or the Filmstrip. Stacking the photos lets you easily access them all in one place instead of having them
scattered across rows of thumbnails.
When grouping photos in a stack, the photos are stacked according to their sort order in the Grid view, with the active
photo at the top of the stack.
A stack is collapsed when stacked photos are grouped under the thumbnail of the top photo in the Grid view or the
Filmstrip. A stack is expanded when all photos in a stack are visible in the Grid view or the Filmstrip.
Page 77

USING PHOTOSHOP LIGHTROOM 2
Updated 03 September 2009
Organizing photos in the catalog
Collapsed stack (top) and expanded stack (below)
Here are a few tips for working with stacks:
• Any Develop adjustments, ratings, flags, or color labels applied to a collapsed stack affect only the top photo.
• If you select a photo in a stack and add it to a Quick Collection or collection, only the selected photo is added, not
the entire stack.
• When you search for photos, the top photo in a stack appears with the number of photos in the stack in the upper-
left corner.
72
The top photo in a stack displays the number of photos in a stack
Stack photos
1 In the Grid view or the Filmstrip in the Library module, select the photos you want to stack.
Note: Stacked photos must be located in the same folder.
2 Choose Photo > Stacking > Group Into Stack.
The stacked photos are arranged contiguously and display stacking order numbers in the upper-left corner of their
thumbnails. The top photo in the stack is “1,” the next photo is “2,” and so forth.
Note: If you select two stacks and choose Photo > Stacking > Group Into Stack, only the top photo from the second stack
is moved into the stack you selected first.
Unstack photos
1 In the Grid view or the Filmstrip in the Library module, do one of the following:
• Select the thumbnail of a collapsed stack.
• If the stack is expanded, select any photo in the stack. You don’t have to select all photos in the stack.
2 Choose Photo > Stacking > Unstack.
Page 78

USING PHOTOSHOP LIGHTROOM 2
Updated 03 September 2009
Organizing photos in the catalog
Add photos to an existing stack
1 In the Grid view or the Filmstrip in the Library module, select the stack and one or more photos that you want to
add to the stack.
2 Choose Photo > Stacking > Group Into Stack.
Expand and collapse stacks
Expanding a stack displays all the photos in the stack. When you collapse a stack, all the photos are grouped under the
thumbnail of the top photo. The number of photos in the stack is displayed in the upper-left corner of the thumbnail.
❖ In the Grid view or the Filmstrip in the Library module, do any of the following:
• To expand a stack, right-click (Windows) or Control-click (Mac OS) a collapsed stack and choose Stacking >
Expand Stack, or click the stacking number displayed in the upper-left corner of the photo. You can also select a
collapsed stack and choose Photo > Stacking > Expand Stack.
• To expand all stacks, right-click (Windows) or Control-click (Mac OS) any photo and choose Stacking > Expand
All Stacks, or select any photo and choose Photo > Stacking > Expand All Stacks.
• To collapse a stack, right-click (Windows) or Control-click (Mac OS) a photo in the stack and choose Stacking >
Collapse Stack, or double-click the stacking number in the upper-left corner of the photo. You can also select a
photo in the stack and choose Photo > Stacking > Collapse Stack.
• To collapse all stacks, right-click (Windows) or Control-click (Mac OS) any photo and choose Stacking > Collapse
All Stacks, or select any photo and choose Photo > Stacking > Collapse All Stacks.
73
Manage photos in a stack
More Help topics
“Expand and collapse stacks” on page 73
Remove or delete photos from a stack
Removing photos from a stack keeps them in the Lightroom catalog. Deleting photos from a stack removes them from
both the stack and the catalog. Using the Delete Photos command, you also have the option of removing photos from
the catalog and deleting them from the hard drive.
1 In the Grid view or the Filmstrip in the Library module, expand a stack.
2 Select one or more photos in the stack and do one of the following:
• To remove photos from the stack, choose Photo > Stacking > Remove From Stack.
• To delete photos from the stack, choose Photo > Delete Photos. You can also right-click (Windows) or Control-
click (Mac OS) a thumbnail and choose Delete Photo from the menu.
Removing or deleting a photo from a stack containing only two photos unstacks the photos.
Specify the top photo in a stack
By default, the active photo becomes the top photo at the time a stack is created. You can specify any photo in a stack
as the top photo.
1 In the Grid view or the Filmstrip in the Library module, select a photo in an expanded stack.
2 Choose Photo > Stacking > Move To Top Of Stack.
Page 79

USING PHOTOSHOP LIGHTROOM 2
Updated 03 September 2009
Organizing photos in the catalog
Move photos in a stack
1 In the Grid view or the Filmstrip in the Library module, select a photo in an expanded stack.
2 Do one of the following:
• To move the photo up in the stack, press Shift-Left bracket, or choose Photo > Stacking > Move Up In Stack.
• To move the photo down in the stack, press Shift-Right bracket, or choose Photo > Stacking > Move Down In Stack.
Split a stack into two stacks
Photos within a stack can be grouped into a new separate stack using the Split Stack command. When split, the original
stack contains the remaining photos that were grouped into a new stack.
1 In the Grid view or the Filmstrip in the Library module, expand the stack.
2 Select the photos you want grouped in a different stack.
Note: The Split Stack command is not available if you only select the top photo in a stack.
3 Choose Photo > Stacking > Split Stack.
Automatically stack photos by capture time
Lightroom can automatically stack photos in the Grid view or the Filmstrip based on their capture time. You specify
a duration between capture times to create a new stack. For example, suppose you specify 1 minute for the duration.
All contiguous photos with capture times less than 1minute apart are grouped in one stack. A new stack is created
when the next contiguous photo has a capture time that is 1 minute or more later than the previous photo’s capture
time. In turn, the new stack groups contiguous photos with capture times less than 1 minute apart from each other,
and so forth.
74
You can specify a duration between capture times of 0 seconds to 1 hour. Specifying shorter durations creates more
stacks and specifying longer durations creates fewer stacks.
1 Find or filter photos, or select a collection, folder, or keyword tag to display the photos you want in the Grid view
or the Filmstrip.
Lightroom auto-stacks all photos in the Grid view or the Filmstrip regardless of whether any photos are selected.
2 Choose Photo > Stacking > Auto-Stack By Capture Time.
3 In the Auto-Stack By Capture Time dialog box, drag the Time Between Stacks slider to specify the minimum
duration between capture times that creates a new stack.
Edit photos in a stack
Develop adjustments applied to a collapsed stack affect only the top photo.
❖ In the Grid view or the Filmstrip, do any of the following:
• To apply image adjustments to the top photo only, select a collapsed stack and make Develop module adjustments.
Note: Use the Synchronize Settings command or the Copy Settings/Paste Settings commands to apply image adjustments
from the top photo to other photos in a stack. See “Applying Develop adjustments to other photos” on page 121.
• To apply image adjustments to photos within a stack, select the photos in an expanded stack and make Develop
module adjustments to the individual photos.
Page 80

USING PHOTOSHOP LIGHTROOM 2
Updated 03 September 2009
Organizing photos in the catalog
Filtering and rating photos
Applying ratings, flags, and labels to photos lets you filter them so that you can find and display specific photos.
Although you can find photos using keywords and metadata, filtering photos combined with keyword and metadata
searches helps you quickly view the best photos. Filtering photos becomes even more important as your catalog
accumulates thousands of photos.
More Help topics
“Filter the photos displayed in the Filmstrip and Grid view” on page 42
“Find photos using the Library Filter bar” on page 93
View ratings, flags, and labels
In the Library module, photos can display rating stars, flags, and color labels, depending on the view options you set.
Rating star and label settings are applied globally in all collections, while flag states are local. You can have different
flag states in different collections.
Note: Slide shows can display photos with rating stars. See “Display ratings in a slide show” on page 141.
❖ In the Library module, do any of the following to show ratings, flags, and labels:
• To show flags and labels in the thumbnail cells of the Grid view, choose View > View Options. Then, in the Grid
View tab of the Library View Options dialog box, select Flags and Tint Grid Cells With Label Colors. To display
rating stars, choose Rating from the Top Label or Bottom Label menu.
• To show ratings, flags, and labels in the toolbar in the Grid or Loupe view, choose one or more of the following from
the toolbar menu: Rating, Flagging, or Color Label.
Note: Ratings, flags, and labels are always available beneath photos displayed in the Compare and the Survey views.
75
More Help topics
“Filter the photos displayed in the Filmstrip and Grid view” on page 42
“Find photos using the Attribute filters” on page 94
Set rating stars
When assigning ratings to files, you can award from zero to five stars. Rating stars can be set or displayed in any view
of the Library module. Once photos are rated, you can click a rating filter button in the Filmstrip or in the Library Filter
bar to display and work on photos that you’ve rated with a specific number of stars. See “Filter the photos displayed in
the Filmstrip and Grid view” on page 42 and “Find photos using the Attribute filters” on page 94.
• With one or more photos selected in the Grid view, or with a single photo selected in the Filmstrip in Loupe,
Compare, or Survey view, choose Photo > Set Rating. Then, choose a rating from the submenu.
Note: If more than one photo is selected in the Filmstrip in Loupe, Compare, or Survey view, the rating is applied only to
the active photo.
• Press a number from 1 through 5 to set the rating. Hold down Shift and press the number to set the rating to select
the next slide.
In the Compare and Survey views, you can click one of the five dots under the photos to assign rating stars. Clicking
the first dot assigns one rating star, clicking the second dot assigns two rating stars, clicking the third dot assigns three
rating stars, and so forth.
Page 81

USING PHOTOSHOP LIGHTROOM 2
Updated 03 September 2009
Organizing photos in the catalog
Set rating stars in thumbnail cells of the Grid view
1 In the Grid view, select one or more photos.
2 Click one of the five dots below the thumbnail in a cell.
Clicking the first dot assigns a one-star rating, clicking the second dot assigns two rating stars, clicking the third dot
assigns three rating stars, and so forth.
Note: For rating stars to appear in compact thumbnail cells, choose Bottom Label > Rating in the Library View Options.
For rating stars to appear in Expanded thumbnail cells, select Show Rating Footer in Library View Options. See “Set
Library view options for the Grid view” on page 49.
Set rating stars using the Painter tool
1 In the Grid view, select the Painter tool in the toolbar, and then choose Rating from the Paint menu in the toolbar.
Note: If the Painter tool does not appear in the toolbar, choose Painter from the toolbar menu.
2 Specify the rating in the toolbar, and then click or drag across photos to apply the rating.
3 To disable the Painter, click the circular well in the toolbar. When disabled, the Painter icon is visible in the toolbar.
Set rating stars in the Library toolbar
❖ With one or more photos selected in the Grid view, or with a single photo selected in the Filmstrip in Loupe or
Survey view, click a rating star in the toolbar.
Clicking the first dot assigns a one-star rating, clicking the second dot assigns two rating stars, clicking the third dot
assigns three rating stars, and so forth. If more than one photo is selected in the Filmstrip in Loupe or Survey view, the
rating is applied only to the active photo.
76
Note: For rating stars to appear in the toolbar, choose Rating from the toolbar menu. See “Show controls in the Library
module toolbar” on page 25.
Set rating stars in the Metadata panel
1 With one or more photos selected in the Grid view, or with a single photo selected in the Filmstrip in Loupe,
Compare, or Survey view, choose Default, All, Minimal, or Quick Describe from the pop-up menu at the top of the
Metadata panel.
2 In the Metadata panel, click one of the five dots next to Rating.
Clicking the first dot assigns one rating star, clicking the second dot assigns two rating stars, clicking the third dot
assigns three rating stars, and so forth. If more than one photo is selected in the Filmstrip in Loupe, Compare, or
Survey view, the rating is applied only to the active photo.
Change ratings
❖ In the Library module, do any of the following to change rating stars in either the thumbnail cell, toolbar, or
Metadata panel:
• Click a different rating star to increase or decrease the rating. Clicking a one-star rating removes the rating.
• Choose Photo > Set Rating, and then choose a different rating or whether to decrease or increase the rating.
You can select photos and press ] to increase the rating or press [ to decrease the rating.
Page 82

USING PHOTOSHOP LIGHTROOM 2
Updated 03 September 2009
Organizing photos in the catalog
Remove ratings
❖ With one or more photos selected in the Grid view, or with a single photo selected in the Filmstrip in Loupe,
Compare, or Survey view, choose Photo > Set Rating > None. If more than one photo is selected in the Filmstrip in
Loupe, Compare, or Survey view, the rating is removed only from the active photo.
Note: You can also click the stars in a thumbnail cell, in the Library toolbar, or in the Metadata panel to remove ratings.
If a photo has a five-star rating, for example, click the fifth star to remove the rating. If a photo has a four-star rating,
click the fourth star to remove the rating, and so on.
Flag or reject photos
Flags designate whether a photo is a pick , rejected , or unflagged. Flags are set in the Library module. Once photos
are flagged, you can click a flag filter button in the Filmstrip or in the Library Filter bar to display and work on photos
that you’ve labeled with a particular flag. See “Filter the photos displayed in the Filmstrip and Grid view” on page 42
and “Find photos using the Attribute filters” on page 94.
Flag states are local. The same photo can have different flag states in different collections.
❖ In the Library module, do one of the following:
• Select one or more photos in the Grid view, or select a single photo in the Filmstrip in Loupe, Compare, or Survey
view. Then, choose Photo > Set Flag and choose the flag you want. If more than one photo is selected in the
Filmstrip in Loupe, Compare, or Survey view, the flag is applied only to the active photo.
• Select one photo in the Grid view or the Filmstrip and press the letter P to flag the image a pick or the letter X to
mark it as rejected. Hold down Shift and press P or X to set the flag and select the next photo. Hold down Ctrl
(Windows) or Command (Mac OS) and press the Up Arrow or Down Arrow to increase or decrease the flag status,
respectively.
• (Grid view only) Click the Flag icon in the upper-left corner of the photo thumbnails to apply or remove the Pick
flag. Photos with a Reject flag appear dimmed in the Grid view.
Note: To show or set flags in the thumbnail cells of the Grid view, make sure that Flags is selected in the Grid View tab of
the Library View Options dialog box. (Choose View > View Options.)
77
• (Compare and Survey views only) Click the Pick or Rejected flag below the photos.
For a video about using flags to rate your photos, see www.adobe.com/go/lrvid2203_lrm.
Flag photos in the Library toolbar
❖ With one or more photos selected in the Grid view, or with a single photo selected in the Filmstrip in the Loupe or
Survey view, click the desired flag in the toolbar. If more than one photo is selected in the Filmstrip in Loupe or
Survey view, the flag is applied only to the active photo.
Note: To show or set flags in the toolbar, choose Flagging from the toolbar menu.
Flag photos using the Painter tool
1 In the Grid view, select the Painter tool in the toolbar, and then choose Flag from the Paint menu in the toolbar.
2 Specify the flag status in the toolbar, and then click or drag across photos to apply the flag setting.
Quickly unflag or reject photos
The Refine Photos command causes unflagged photos to be flagged as rejected, and picked photos to be unflagged.
1 In the Grid view, select photos.
Page 83

USING PHOTOSHOP LIGHTROOM 2
Updated 03 September 2009
Organizing photos in the catalog
2 Choose Library > Refine Photos.
3 Click Refine in the Refine Photos dialog box.
Select flagged photos
❖ In the Library module, do any of the following:
• To select flagged photos in the Grid view or the Filmstrip, choose Edit > Select Flagged Photos.
• To deselect unflagged photos in the Grid view or the Filmstrip, choose Edit > Deselect Unflagged Photos.
Set labels and color groups
Labeling photos with a certain color is a flexible way to quickly mark a large number of photos. For example, suppose
you’ve just imported a large number of photos and are viewing them in the Grid view. As you review each new photo,
you can label the ones you want to keep. After this initial pass, you can click the color label filter buttons in the
Filmstrip to display and work on photos that you’ve labeled with a particular color. See “Filter the photos displayed in
the Filmstrip and Grid view” on page 42 and “Find photos using the Attribute filters” on page 94.
❖ In the Library module, do one of the following:
• Select one or more photos in the Grid view, or select a single photo in the Filmstrip in Loupe, Compare, or Survey
view. Then, choose Photo > Set Color Label and choose a label from the submenu. If more than one photo is
selected in the Filmstrip in Loupe, Compare, or Survey view, the label is applied only to the active photo.
• (Grid view only) Move the pointer over the Color Label icon at the bottom of the thumbnail cell and then click a
color label.
Note: To show or set color labels in thumbnail cells, select Include Color Label in the Grid View tab of the Library View
Options dialog box. (Choose View > View Options.)
78
• (Grid, Compare, or Survey view only) Click a color label icon below the photos.
Set color labels in the Library toolbar
❖ With one or more photos selected the Grid view, or with a single photo selected in the Filmstrip in Loupe or Survey
view, click a color label in the toolbar. If more than one photo is selected in the Filmstrip in Loupe or Survey view,
the label is applied only to the active photo.
Note: To show or set color labels in the Library module toolbar, choose Color Label from the toolbar pop-up menu.
Set color labels using the Painter tool
1 In the Grid view, select the Painter tool in the toolbar, and then choose Label from the Paint menu in the toolbar.
Note: If the Painter tool does not appear in the toolbar, choose Painter from the toolbar menu.
2 Select the color label in the toolbar, and then click or drag across photos to apply the label.
3 To disable the Painter, click the circular well in the toolbar. When disabled, the Painter icon is visible in the toolbar.
Edit color label sets
You can assign names to color labels in the Edit Color Label Set dialog box. The name is then added to the photo’s
metadata when you apply the label.
1 In the Library module, choose Metadata > Color Label Set > Edit.
2 In the Edit Color Label Set dialog box, type a name next to a color.
Page 84

USING PHOTOSHOP LIGHTROOM 2
Updated 03 September 2009
Organizing photos in the catalog
3 (Optional) Choose Save Current Setting As New Preset from the Preset menu, type a name in the Preset Name text
box, and then click Create.
4 Click Change.
Delete or rename color label sets
1 In the Library module, choose Metadata > Color Label Set > Edit.
2 In the Edit Color Label Set dialog box, choose a preset from the Preset menu.
3 Do any of the following:
• To delete the preset, choose Delete Preset [name of preset]. Click Delete in the alert dialog that opens.
• To rename the preset, choose Rename Preset [name of preset]. Type a name in the Preset Name text box, and then
click Rename.
Viewing and editing metadata
About metadata and XMP
Metadata is a set of standardized information about a photo, such as the author’s name, resolution, color space,
copyright, and keywords applied to it. For example, most digital cameras attach some basic information about a file,
such as height, width, file format, and the time the image was taken. Lightroom also supports the information standard
developed by the International Press Telecommunications Council (IPTC) to identify transmitted text and images.
This standard includes entries for descriptions, keywords, categories, credits, and origins. You can use metadata to
streamline your workflow and organize your files.
79
File information is stored using the Extensible Metadata Platform (XMP) standard. XMP is built on XML. In the case
of camera raw files that have a proprietary file format, XMP isn’t written into the original files. To avoid file corruption,
XMP metadata is stored in a separate file called a sidecar file. For all other file formats supported by Lightroom (JPEG,
TIFF, PSD, and DNG), XMP metadata is written into the files in the location specified for that data. XMP facilitates
the exchange of metadata between Adobe applications and across publishing workflows. For example, you can save
metadata from one file as a template, and then import the metadata into other files.
Metadata that is stored in other formats, such as EXIF, IPTC (IIM), and TIFF, is synchronized and described with XMP
so that it can be more easily viewed and managed.
More Help topics
“Keywords” on page 86
Specify where to write metadata changes
Lightroom automatically writes adjustments and settings metadata to the catalog. You can also instruct Lightroom to
write the changes to XMP. In order for changes made in Lightroom to be recognized by other applications, metadata
must be written to XMP.
1 Choose Edit > Catalog Settings (Windows) or Lightroom > Catalog Settings (Mac OS).
2 Click the Metadata tab, and then do either of the following:
• To write adjustments and settings metadata to XMP, select Automatically Write Changes Into XMP.
• To write adjustments and settings metadata only to the catalog, deselect Automatically Write Changes Into XMP.
Page 85

USING PHOTOSHOP LIGHTROOM 2
Updated 03 September 2009
Organizing photos in the catalog
If you don’t write adjustments and settings metadata to XMP automatically, you can select a file and choose Metadata >
Save Metadata To File.
Save metadata changes to a file manually
To manually save metadata changes to a photo in Lightroom, do one of the following:
• Select one or more photos in the Grid view of the Library module and choose Metadata > Save Metadata To File(s),
or press Ctrl+S (Windows) or Command+S (Mac OS).
• Click the Metadata File Needs To Be Updated icon in a thumbnail in the Grid view of the Library module, and
then click Save.
• If you’re working with a DNG file, choose Metadata > Update DNG Previews & Metadata to save metadata changes
to the file and also generate a preview based on the current raw processing settings.
View photo metadata
In the Library module, the Metadata panel displays the filename, file path, rating, text label, and EXIF and IPTC
metadata of selected photos. Use the pop-up menu to choose a set of metadata fields. Lightroom has premade sets that
display different combinations of metadata.
❖ With one or more photos selected in the Grid view, or with a single photo selected in the Filmstrip in Loupe,
Compare, or Survey view, choose any of the following from the pop-up menu at the top of the Metadata panel:
Default Shows the filename, copy name, folder, rating, text label, and a subset of IPTC and EXIF metadata.
80
All Shows the filename, copy name, file path, rating, text label, and all EXIF and IPTC metadata.
All Plug-in Metadata Displays custom metadata created by third-party plug-ins. If you don’t have any plug-ins
installed, filename, copy name, and folder are displayed.
EXIF Shows the filename, file path, and EXIF metadata.
IPTC Shows the filename and all IPTC metadata.
Large Caption Shows a large caption edit box and the copyright box.
Location Shows the filename, copy name, folder, title, caption, and location fields.
Minimal Shows the filename, rating, plus Caption and Copyright metadata.
Quick Describe Shows the filename, copy name, file path, rating, and the following EXIF and IPTC metadata:
Dimensions, Date Time, Camera, Title, Caption, Copyright, Creator, and Location.
In the Metadata panel, if an IPTC metadata field displays an arrow, clicking the arrow is a quick way to find and
view all photos containing the specific metadata.
If multiple photos with different metadata settings are selected, the metadata fields display <mixed>. To show the
metadata for the photo that’s targeted (active) within the selection, choose Metadata > Show Metadata For Target
Photo Only. If more than one photo is selected in the Filmstrip in Loupe, Compare, or Survey view, the Metadata panel
displays metadata only for the active photo.
More Help topics
“Find photos using Metadata filters” on page 94
Page 86

USING PHOTOSHOP LIGHTROOM 2
Updated 03 September 2009
Organizing photos in the catalog
Add and edit IPTC metadata
Metadata is added to photos by entering the information in the Metadata panel. Premade metadata sets make it easy
to make all or only a subset of the photo’s metadata available for adding or editing.
Note: Choosing a metadata preset, copying and pasting metadata from another photo, and synchronizing metadata are
quick ways to add metadata to photos that will share the same metadata.
1 With one or more photos selected in the Grid view, or with a single photo selected in the Filmstrip in Loupe,
Compare, or Survey view, choose a metadata set from the pop-up menu at the top of the Metadata panel. See “View
photo metadata” on page 80.
2 Do any of the following:
• To add metadata, type in a metadata text box.
• To add metadata from a preset, choose a metadata preset from the Preset menu.
• To edit metadata, overwrite an entry in a metadata text box.
• To perform a related action, click the action icon to the right of the metadata field. For example, to view all photos
with the specified label, click the icon to the right of the Label field.
Separate fields are available for sending e-mail and for jumping to a website link. By clicking the link to the right of
Website, for example, you can open the browser to the specified website.
81
If more than one photo is selected in the Filmstrip in Loupe, Compare, or Survey view, the metadata is added only to
the active photo.
More Help topics
“Apply a metadata preset” on page 83
“Copy and paste metadata between photos” on page 84
“Synchronize metadata between photos in the catalog” on page 84
Change the photo capture time
Sometimes you need to change the capture time for your photos. For example, you might need to change the capture
times if you traveled to a different time zone and didn’t change your camera’s date/time setting before you started
photographing, or if you imported a scanned photo into Lightroom, the photo would contain the creation date of when
it was scanned, rather than when it was taken.
In order to save an edited capture time to a raw photo, you must enable the option in the Catalog Settings dialog box.
See “Change catalog settings” on page 54.
Changing the capture time changes the Date Time Original EXIF metadata in the Metadata panel. For most cameras,
Date Time Original and Date Time Digitized are the same, so Date Time Digitized changes, too. The Date Time
metadata indicates the last time the photo was updated. This metadata is not affected when you change the photo
capture time.
Note: The Edit Capture Time command cannot be undone by pressing Ctrl+Z (Windows) or Command+Z (Mac OS).
You would need to use the Revert Capture Time To Original command.
1 With one or more photos selected in the Grid view, or with a single photo selected in the Filmstrip in Loupe,
Compare, or Survey view, do one of the following:
• Choose Metadata > Edit Capture Time.
• In the Metadata panel with EXIF information displayed, click the arrow in the Date Time field.
Page 87

USING PHOTOSHOP LIGHTROOM 2
Updated 03 September 2009
Organizing photos in the catalog
2 In the Edit Capture Time dialog box, select the type of adjustment:
Adjust To A Specified Date And Time Changes the capture time to the date and time you specify.
Shift By Set Number Of Hours (Time Zone Adjust) Changes the capture time by the number of hours you add to or
subtract from the original time.
Change To File Creation Date For Each Image Changes the capture time in the camera EXIF data to the file creation
date. If you select this option, skip step 3.
3 In the New Time area of the dialog box, do one of the following:
• If you selected Adjust To A Specified Date And Time, type a new date and time in the Corrected Time text box. You
can also select the date and time values and then use the Up or Down Arrow buttons to increase or decrease the
values.
•
If you selected Shift By Set Number Of Hours, choose a value from the pop-up menu to adjust the time forward or back.
Important: If more than one photo is selected in the Grid view, Lightroom changes the capture time for the active photo
by the specified adjustment. (The active photo is previewed in the Edit Capture Time dialog box.) Other photos in the
selection are adjusted by the same amount of time. If more than one photo is selected in the Filmstrip in Loupe, Compare,
or Survey view, the capture time is changed only on the active photo.
4 (Optional) To revert the capture time back to the original, select the photos in the Grid view or the Filmstrip and
choose Metadata > Revert Capture Time To Original.
82
Create and apply metadata presets
Create a metadata preset
Specific metadata can be saved as a preset for reuse on one or more photos. Using a metadata preset saves you the effort
of manually entering the same information for different photos.
1 From the Preset menu in the Metadata panel, choose Edit Presets.
Note: You can also create a preset based on any IPTC metadata, caption, rating stars, and label entered in the Metadata
panel by choosing Save As New Preset after entering the data.
2 Type information for any of the following groups:
Basic Info Lets you enter metadata for a caption, rating stars, and a text label.
IPTC Content Writes metadata for a brief summary of the photo, a newscode found at the newscodes.org website, and
the name of the person who wrote the photo description.
IPTC Copyright Writes metadata for the name of the copyright holder, usage rights granted for the photo, and web
address of the copyright holder.
IPTC Creator Writes metadata for the name, address, contact information, website, and job title of the author of the
photo.
IPTC Image Writes metadata for a publication description using guidelines listed at newscodes.org, a description of
the photo using guidelines specified by newscodes.org, and information about where the photograph was taken.
IPTC Status Writes metadata for the title of the photo, any job number used for the photo assignment, instructions for
transmission, usage or rights of the photo, the name of the photographer, company or agency, and the owner of the
photo.
Keywords Writes metadata for the listed keywords, appending them to any existing keywords applied to the photo.
Page 88

USING PHOTOSHOP LIGHTROOM 2
Updated 03 September 2009
Organizing photos in the catalog
Note: If you manually typed metadata in the Metadata panel before choosing Save As New Preset, the information you
entered appears in the corresponding box in the New Metadata Preset dialog box.
3 Select the metadata to include in the preset by doing any of the following:
• To include all the metadata, click Check All.
• To include none of the metadata, click Check None. You’ll probably use this button when you want to start over
selecting which metadata to include.
• To include only the metadata for which you entered information, click Check Filled.
• To specify individual metadata, click the boxes next to a metadata box.
• To include an entire metadata group, click the boxes next to the name (for example, IPTC Content, IPTC
Copyright, and so on).
4 Choose Preset > Save Current Settings As New Preset, type a name for the preset, and click Create.
5 In the Edit Metadata Presets dialog box, click Done.
Apply a metadata preset
❖ With photos selected in the Grid view or in the Filmstrip in Loupe, Compare, or Survey view, choose a preset from
the Preset menu in the Metadata panel.
83
Apply a metadata preset using the Painter tool
1 In the Grid view, select the Painter tool in the toolbar, and then choose Metadata from the Paint menu in the
toolbar.
Note: If the Painter tool does not appear in the toolbar, choose Painter from the toolbar menu.
2 Choose the preset in the toolbar, and then click or drag across photos to apply the preset.
3 To disable the Painter, click the circular well in the toolbar. When disabled, the Painter icon is visible in the toolbar.
Edit a metadata preset
1 From the Presets menu in the Metadata panel, choose Edit Presets.
2 Choose the preset you want to edit from the Preset pop-up menu.
3 Edit the metadata fields and change settings.
4 Choose Update Preset [preset name] from the Preset pop-up menu, and then click Done.
Delete a metadata preset
❖ To delete a metadata preset, locate it in the Explorer (Windows) or Finder (Mac OS) and drag it to the Recycle Bin
(Windows) or Trash (Mac OS). Metadata presets are stored in the following folders:
Mac OS /User home/Library/Application Support/Adobe/Lightroom/Metadata Presets
Windows XP \Documents and Settings\Username\Application Data\Adobe\Lightoom\Metadata Presets
Windows Vista \Users\Username\App Data\Roaming\Adobe\Lightoom\Metadata Presets
Page 89

USING PHOTOSHOP LIGHTROOM 2
Updated 03 September 2009
Organizing photos in the catalog
Copy and paste metadata between photos
Copying and pasting metadata from one photo to selected photos provides a fast way to add information and IPTC
metadata to photos. Using the Copy Metadata and Paste Metadata commands saves you the effort of repeatedly typing
the same metadata into photos.
1 In the Grid view, select a photo that you want to copy metadata from and choose Metadata > Copy Metadata.
2
In the Copy Metadata dialog box, select the information and IPTC metadata that you want to copy, and then click Copy.
3 Select photos in the Grid view, and choose Metadata > Paste Metadata.
Synchronize metadata between photos in the catalog
Specific metadata in selected photos can be synchronized with metadata in another photo. This provides a fast way to
add information and IPTC metadata to photos. Synchronizing metadata saves you the effort of repeatedly typing the
same metadata into photos.
1 Select a photo in the Grid view that has metadata that other photos will synchronize to. This becomes the active
photo.
2 Ctrl-click (Windows) or Command-click (Mac OS) to select photos that will synchronize with the active photo.
Shift-click to select contiguous photos.
3 Do one of the following:
• Click the Sync Metadata button below the panels on the right.
• Choose Metadata > Sync Metadata.
4 In the Synchronize Metadata dialog box, select the metadata that you want and then click Synchronize.
Note: The metadata you select to synchronize overwrites existing metadata in the selected photos.
84
Synchronize Lightroom metadata with Camera Raw and Adobe Bridge
By default, Lightroom metadata is saved to the catalog file. For Camera Raw, Photoshop, and Adobe Bridge to view
changes to Lightroom metadata, including Develop module adjustment settings, metadata changes must be saved to
XMP in Lightroom. When you save metadata to a raw file, the changes are saved in an XMP sidecar file. With other
file types, the metadata is saved in the file itself.
Note: Keyword hierarchies created in any of these applications are preserved, and no data is lost, even though they might
not appear in one or more of the applications. Versions earlier than Camera Raw 4.1 may not recognize some of the
Develop module adjustments made in Lightroom.
More Help topics
“About metadata and XMP” on page 79
“Change catalog settings” on page 54
“Save metadata changes to a file manually” on page 80
“Set Library view options for the Grid view” on page 49
Page 90

USING PHOTOSHOP LIGHTROOM 2
Updated 03 September 2009
Organizing photos in the catalog
Automatically save metadata changes to photos in Lightroom
The easiest way to make sure that Adobe Bridge and Camera Raw see metadata changes made in Lightroom is to
automatically save those changes as you work.
1 Choose Edit > Catalog Settings (Windows) or Lightroom > Catalog Settings (Mac OS).
2 In the Metadata tab, select Automatically Write Changes Into XMP.
View unsaved metadata
Lightroom displays three types of icons in the Grid view of the Library module to identify unsaved metadata:
Metadata File Needs To Be Updated Indicates unsaved metadata changes made to the photo in Lightroom.
Metadata Was Changed Externally Indicates metadata changes made to the photo in an external application and
not applied in Lightroom.
Error Saving Metadata Indicates an error saving metadata in Lightroom. This icon appears when the same
metadata for a photo has been changed both in Lightroom and externally.
Display these icons using the Grid view options.
1 In the Library module, choose View > View Options.
2 Click the Grid View tab in the Library View Options dialog box.
3 Select the Unsaved Metadata option in the Cell Icons area.
Note: You can also look in the Metadata Status field in the Metadata panel to see if metadata needs to be updated.
85
Resolve metadata conflicts between Lightroom, Adobe Bridge, and Camera Raw
❖ To synchronize metadata in the Lightroom catalog, do one of the following in the Grid view of the Library module:
• Click the Metadata Was Changed Externally icon or the Error Saving Metadata icon on a thumbnail. To
apply the metadata from Camera Raw or Adobe Bridge, choose Import Settings From Disk. To disregard changes
from Camera Raw or Adobe Bridge and apply catalog metadata to the photo, choose Overwrite Settings.
• Select a thumbnail with a Metadata Was Changed Externally icon or an Error Saving Metadata icon and
choose Metadata > Read Metadata From File. Click Read to overwrite catalog settings and apply the changes made
in Bridge or Camera Raw.
Metadata panel actions
Clicking the buttons to the right of the metadata fields in the Metadata panel lets you perform a variety of actions, such
as opening the folder in which an image appears, saving metadata to the file, resolving metadata conflicts, jumping to
a virtual copy’s master, and more. Hold the mouse pointer over each button to display a tooltip description.
Page 91

USING PHOTOSHOP LIGHTROOM 2
Updated 03 September 2009
Organizing photos in the catalog
Keywords
About keyword tags
Keyword tags are text metadata that describe the important contents of a photo. They help you identify, search for, and
find photos in the catalog. Like other metadata, keyword tags are stored either in the photo file or (in the case of
proprietary camera raw files) stored in XMP sidecar files. Once applied to photos, keywords can be read by Adobe
applications such as Adobe Bridge, Photoshop, or Photoshop Elements, or other applications that support XMP
metadata.
Lightroom provides several ways to apply keyword tags to photos. You can type or select them in the Keywording
panel, or drag photos to specific keyword tags in the Keyword List panel.
In the Grid view, photos with keyword tags display a thumbnail badge . All keyword tags in the catalog are viewed
in the Keyword List panel. You can add, edit, rename, or delete keyword tags at any time. When creating or editing
keywords, you can specify synonyms and export options. Synonyms are related terms for keyword tags. When you
select photos that contain keyword tags with synonyms, the synonyms appear in the Keywording panel when Keyword
Tags > Will Export is selected.
Keyword tags can contain other, nested keyword tags. For example, the keyword tag animals might contain the keyword
tags dogs and cats. The keyword tag dogs, in turn, might contain Australian Shepherd, Border Collie, and so on.
86
Keyword tags can also be organized into groups called keyword sets. By choosing a specific keyword set, relevant
keyword tags are more accessible. This is especially useful as you add more keyword tags to the catalog.
For a video about using collections and keywords to organize your photos, watch Lightroom 2 basics: collections and
keywords.
View keyword tags
All the keyword tags in the catalog are viewed in the Keyword List panel. Each keyword tag displays the number of
photos containing it.
❖ In the Library module, do any of the following:
• To view the keyword tags in the catalog, expand the Keyword List panel.
• To view keyword tags for one photo, select it in the Grid view or in the Filmstrip in Loupe, Compare, or Survey
view and look in the Keyword Tags area of the Keywording panel. Or look at the Keyword List panel: A check mark
to the left of a keyword tag in the Keyword List panel indicates that the selected photo contains that tag.
• To view keyword tags for more than one photo, select the photos in the Grid view and look in the Keyword Tags
area of the Keywording panel. An asterisk appears to next to the keyword tags not shared by all the selected photos.
In the Keyword List panel, a minus sign to the left of a keyword tag indicates the tag is not shared by all selected
photos.
Create keyword tags
1 With one or more photos selected in the Grid view, or with a single photo selected in the Filmstrip in Loupe,
Compare, or Survey view, do any of the following:
• Type in the field labeled Click Here To Add Keywords in the Keyword Tags area of the Keywording panel. Then,
press Enter (Windows) or Return (Mac OS). Skip the rest of the steps in this procedure.
• Click the Plus icon (+) in the Keyword List panel.
Page 92

USING PHOTOSHOP LIGHTROOM 2
Updated 03 September 2009
Organizing photos in the catalog
2 In the Create Keyword Tag dialog box, type a name for the keyword tag.
3 Type synonyms for the keyword tag. Use commas to separate the synonyms.
4 Select any of the following options:
Put Inside “[keyword tag]” (Available if an existing keyword tag is selected when you create a keyword tag) Nests the
new keyword tag under the selected keyword tag so that it is contained by the higher-level tag.
Add To Selected Photos Applies the keyword tag to the selected photos.
Include On Export Includes the keyword tag when exporting photos. When this option is deselected, the keyword tag
is not included.
Export Containing Keywords Includes higher-level keyword tags that contain the keyword tag when exporting photos.
Export Synonyms Includes synonyms associated with the keyword tag when exporting photos.
If more than one photo is selected in Loupe, Compare, or Survey view, keywords are added only to the active photo.
To automatically nest new keywords under a particular higher-level tag, right-click (Windows) or Control-click
(Mac OS) the higher-level tag in the Keyword List panel and choose Put New Keywords Inside This Keyword. A dot
appears next to the parent keyword, and all new tags become children to that keyword until you deselect the option in the
context menu.
87
Edit keyword tags
1 In the Library module, right-click (Windows) or Control-click (Mac OS) a keyword tag in the Keyword List panel,
and choose Edit Keyword Tag from the menu.
2 In the Edit Keyword Tag dialog box, type any changes to the keyword tag name, add synonyms, or set any of the
following keyword tag options:
Include On Export Includes the keyword tag when exporting photos. When this option is deselected, the keyword tag
is not included.
Export Containing Keywords Includes higher-level keyword tags that contain the keyword tag when exporting photos.
Export Synonyms Includes synonyms associated with the keyword tag when exporting photos.
Rename keyword tags
1 In the Library module, right-click (Windows) or Control-click (Mac OS) the keyword tag in the Keyword List
panel, and choose Rename from the menu.
2 Overwrite the keyword in the box and then click outside the box to commit the change.
Add keyword tags to photos
The Keywording panel of the Library module lets you add keyword tags to photos by either typing a new keyword tag
or applying keyword tags from a keyword set. You can also add keyword tags to photos by dragging photos to
keywords in the Keyword List panel. And you can apply keyword tags to photos using the Painter tool. See “Add or
remove keywords using the Painter tool” on page 89.
When you add keyword tags to photos, the changes are stored in Lightroom, but the keywords aren’t saved to the files
unless the Automatically Write Changes Into XMP option is selected in the Catalog Settings dialog box. To save the
keywords to the files manually, choose Metadata > Save Metadata To File.
1 To apply keywords to more than one photo at a time, select them in the Grid view. Or, select a single photo in the
Filmstrip in Loupe, Compare, or Survey view.
Page 93

USING PHOTOSHOP LIGHTROOM 2
Updated 03 September 2009
Organizing photos in the catalog
Note: If more than one photo is selected in the Filmstrip in Loupe, Compare, or Survey view, the keywords will be added
only to the active photo.
2 Do any of the following:
• Type keyword tags in the field labeled Click Here To Add Keywords in the Keyword Tags area of the Keywording
panel. Separate keyword tags using commas.
• Click a keyword tag in the Keyword Suggestions area of the Keywording panel. Keyword suggestions are based on
a variety of criteria, including existing keywords applied to the selected photo and to other photos captured within
a relatively close period of time.
• Click a keyword tag from a keyword set in the Keyword Set area of the Keywording panel.
• Click the target box to the left of a keyword tag in the Keyword List panel. A check mark indicates the selected photo
contains that keyword tag.
• (Grid view only) Drag selected photos to keyword tags in the Keyword List panel. Or, drag a keyword tag from the
Keyword List panel to the selected photos.
Note: Keyword tags can also be added to photos as they are imported into Lightroom.
When keyword tags are added to photos, the Keyword List panel updates to reflect the total number of photos that use
the tag.
88
More Help topics
“About metadata and XMP” on page 79
“Keyword sets” on page 90
“Apply metadata to photos when importing” on page 37
Copy and paste keyword tags
1 In the Grid view, select the photo with the keyword tags you want to copy.
2 In the applied tags area of the Keywording panel, select the keyword tags. Right-click (Windows) or Control-click
(Mac OS) and choose Copy.
3 Select the photos in the Grid view to which you want to add keyword tags.
4 Click in the applied tags area of the Keywording panel and the right-click (Windows) or Control-click (Mac OS)
and choose Paste.
Remove or delete keyword tags from photos or the catalog
❖ With one or more photos selected in the Grid view, or with one photo selected in the Filmstrip in Loupe, Compare,
or Survey view, do any of the following:
• To remove keyword tags from photos, choose Keyword Tags > Enter Keywords in the Keywording panel. Then,
select one or more keyword tags in the text box in the panel and delete them. If more than one photo is selected in
the Filmstrip in Loupe, Compare, or Survey view, the keyword tags are removed only from the active photo.
• To permanently delete a keyword tag from photos and the catalog, right-click (Windows) or Control-click
(Mac OS) the keyword tag in the Keyword List panel and choose Delete from the menu. You can also select keyword
tags and click the Minus icon (-) at the top of the Keyword List panel.
Note: If you accidentally delete keyword tags, immediately press Ctrl+Z (Windows) or Command+Z (Mac OS) to undo
the deletion.
Page 94

USING PHOTOSHOP LIGHTROOM 2
Updated 03 September 2009
Organizing photos in the catalog
• To automatically delete any unused keyword tags from the catalog, choose Metadata > Purge Unused Keywords.
Important: Deleting keywords using the Purge Unused Keywords command cannot be undone.
When keyword tags are removed from photos, the Keyword List panel updates to reflect the total number of photos
that use the tag.
Import and export keywords
Importing and exporting keywords lets you share the keyword tags you created to identify photos. For example,
keywords can be exported from one catalog and imported into another catalog on the same or a different computer.
You can also import keywords from other applications, such as Adobe Bridge 2.1. Lightroom imports keyword lists
saved as plain-text files. If the list contains special characters, the list must be tab-delimited and saved in UTF-8 format.
Exporting keywords writes the keyword tags to a text file. When you create or edit keyword tags, you can specify
whether to include them during the export. When you import keywords from a text file, they become keyword tags in
the catalog and appear in the Keyword List panel.
❖ In the Library module, do any of the following:
• To import keywords into the catalog, choose Metadata > Import Keywords, navigate to and select the text file or
catalog file containing keywords, and then click Open (Windows) or Choose (Mac OS).
• To export all exportable keywords from the catalog, choose Metadata > Export keywords, select a location for the
keywords file, and then click Save.
89
More Help topics
“Create keyword tags” on page 86
Create and apply keyword shortcuts
Keyword shortcuts let you quickly apply one or more keywords to multiple photos. After you define the shortcut, you
apply it using the Add Keyword command in the context menu, or by using the Painter tool. See “Add or remove
keywords using the Painter tool” on page 89.
1 In the Library module, do one of the following:
• Right-click (Windows) or Control-click (Mac OS) one keyword tag in the Keyword List panel and choose Use This
As Keyword Shortcut from the menu. Skip step 2.
• Choose Metadata > Set Keyword Shortcut.
2 In the Set Keyword Shortcut dialog box, type one or more keyword tags, separating them with commas, and then
click Set.
Lightroom provides hints as you type. To choose a keyword hint, click it in the pop-up list.
A Plus sign (+) next to a keyword in the Keyword List panel indicates that it is part of the current keyword shortcut.
3 To apply the keyword shortcut, select one or more photos in the Grid view or the Filmstrip, right-click (Windows)
or Control-click (Mac OS), and choose Add Keyword [Name Of Keyword Tag].
Add or remove keywords using the Painter tool
Once you’ve specified the keywords for the keyword shortcut, you can quickly apply the keyword shortcut to photos
using the Painter tool.
Page 95

USING PHOTOSHOP LIGHTROOM 2
Updated 03 September 2009
Organizing photos in the catalog
Note: If the Painter tool does not appear in the toolbar, choose Painter from the toolbar menu.
1 In the Library module, do one of the following:
• Choose Metadata > Enable Painting.
• In the Grid view, click the Painter tool icon in the toolbar.
When the Painter tool is enabled, the pointer becomes a painter icon and the Painter icon is no longer visible in the
toolbar.
2 If necessary, choose Keywords from the Paint menu in the toolbar.
3 If necessary, type the keyword or keywords you want to add or remove in the toolbar field.
4 Do any of the following:
• To apply a keyword shortcut to a single photo, click the photo using the Painter tool. After the keyword is applied,
the Painter tool changes to an eraser icon. To remove the keyword shortcut, click the photo again with the eraser.
• To apply a keyword shortcut to multiple photos, click and drag across the photos in the Grid view. After the
keyword is applied, the Painter tool changes to an eraser icon. To remove the keyword shortcut from multiple
photos, click and drag eraser over the photos containing the keyword tag in the Grid view. (Filter the photos in Grid
view by clicking the white arrow at the far right of the keyword in the Keyword List panel so that only the photos
containing the keywords you want to remove are displayed.)
5 To disable the Painter, click the circular well in the toolbar. When disabled, the Painter icon is visible in the toolbar.
90
Keyword sets
As you add increasing numbers of keyword tags to the catalog, it’s important to create keyword sets so you can easily
access relevant keyword tags. For example, you can create keyword sets of up to nine keyword tags for certain events,
locations, people, or assignments. Keyword sets do not change how keyword tags are written to the photo’s metadata.
They simply provide different ways to organize keyword tags. Keyword tags can belong to more than one keyword set.
Create keyword sets
❖ In the Library module, do any of the following:
• To convert the Recent Keywords set into a keyword set, click the Keyword Set pop-up menu in the Keywording
panel and choose Save Current Settings As New Preset. Type a name for the keyword set and click Create.
• To include specific keyword tags in a keyword set, make sure that a keyword set is chosen in the Keywording panel.
Then, either choose Keyword Set > Edit Set in the Keywording panel or choose Metadata > Keyword Set > Edit.
Type or overwrite keyword tags in the text boxes, and choose Save Current Settings As New Preset from the Preset
menu. In the New Preset dialog box, type a name for the keyword set and click Create.
Choose keyword sets
❖ In the Keywording panel of the Library module, choose a keyword set from the Keyword Set pop-up menu:
Recent Keywords Displays the most recently used keyword tags.
Outdoor Photography Displays keywords associated with nature photography.
Portrait Photography Displays keywords associated with portrait photography.
Wedding Photography Displays keywords associated with wedding photography.
Edit keyword sets
1 In the Library module, choose Edit Set from the Keyword Set pop-up menu in the Keywording panel.
Page 96

USING PHOTOSHOP LIGHTROOM 2
Updated 03 September 2009
Organizing photos in the catalog
2 In the Edit Keyword Set dialog box, type keyword tags in the text boxes. Overwrite or select and delete keyword tags
that you don’t want to include in the keyword set.
3 (Optional) To create a keyword set, choose Save Current Settings As New Preset from the Preset menu. Then, in
the New Preset dialog box, type a name for the keyword set and click Create.
4 Click Change to update the keyword sets.
Rename or delete keyword sets
1 In the Library module, choose Edit Set from the Keyword Set pop-up menu in the Keywording panel.
Note: The Edit option isn’t visible if Recent Keywords is chosen in the Set pop-up menu.
2 In the Edit Keyword Set dialog box, choose the keyword set from the Preset menu.
3 Do one of the following:
• To rename the keyword set, choose Rename Preset “Name
Of Keyword Set” from the Preset menu.
• To delete the keyword set, choose Delete Preset “Name
Of Keyword Set” from the Preset menu.
91
Check and correct keyword spelling (Mac OS)
When you check the spelling of keyword tags, Lightroom questions any words that aren’t in its dictionary. If a
questioned word is spelled correctly, you can confirm its spelling by adding the word to the dictionary. If a questioned
word is misspelled, you can correct it.
Note: Spell-check commands and options may vary slightly between Mac OS v10.4 and v10.5.
1 In the Library module, click in the Keyword Tags text box of the Keywording panel.
2 Choose Edit > Spelling > Spelling (Mac OS v10.4) or Edit > Spelling > Show Spelling And Grammar (Mac OS
v10.5).
3 If necessary, in the dialog box, choose a language from the Dictionary pop-up menu near the bottom of the dialog
box. This is the dictionary Lightroom uses to check spelling.
4 As Lightroom finds unfamiliar words and other possible errors, click one of the following:
Ignore Continues the spelling check without changing the text.
Guess Suggests spelling options in the Guess text box. If no alternate spellings appear in the Guess text box for a
misspelled word, select the misspelled word in the text box next to the Correct button and type a different possible
spelling. Click Guess to see if spelling options appear in the Guess text box.
Find Next Continues the spelling search.
Correct Corrects a misspelling. Make sure that the correctly spelled word is in the Guess text box and click Correct. If
the suggested word is not the word you want, select a different word in the Guess text box or type the correct word in
the text box to the left of the Correct button.
Forget Removes a word from the dictionary. This is useful, for example, for removing a misspelled a word that you
accidently added to the dictionary by clicking Correct or Learn.
Learn Stores the unrecognized word in the dictionary, so that subsequent occurrences are not flagged as misspellings.
Highlight misspelled words (Mac OS)
1 After entering keyword tags in the Library module, click in the Keyword Tags text box of the Keywording panel.
Page 97

USING PHOTOSHOP LIGHTROOM 2
Updated 03 September 2009
Organizing photos in the catalog
2 Choose Edit > Spelling > Check Spelling.
The first misspelled word in the text box is highlighted.
3 Control-click the highlighted word and choose one of the following:
[Suggested spelling corrections] Lightroom lists suggested spelling corrections at the top of the context menu. Choose
a word to correct the spelling.
Ignore Spelling Continues the spelling check without changing the text.
Learn Spelling Stores the unrecognized word in the dictionary, so that subsequent occurrences are not flagged as
misspellings.
Note: You can also choose Spelling > Spelling (Mac OS v10.4) or Spelling > Show Spelling And Grammar (Mac OS v10.5)
from the context menu to open a dialog box for more options.
Check spelling as you type (Mac OS)
Lightroom can automatically check the spelling as you type keyword tags. When you misspell a word, it’s underlined.
1 In the Library module, click the Keyword Tags text box of the Keywording panel.
2 Choose Edit > Spelling > Check Spelling As You Type.
A check mark in the menu indicates that the Check Spelling As You Type command is enabled. It remains enabled
until you choose the command again to disable it (indicated by the absence of a check mark).
92
Type special characters (Mac OS)
❖ In the Library module, choose Edit > Special Characters.
The Mac OS Character Palette opens for inserting special characters and symbols into your keyword tags and metadata
text. For more information on using the Character Palette, consult the Mac OS Help.
Finding photos in the catalog
Finding photos and viewing them in the Library module is a necessary part of working with your photos. Lightroom
provides many different ways to find photos, whether your catalog includes hundreds or thousands of images. You can
select folders, collections, or keyword tags to display specific photos. You can also search on text criteria and filter by
flag status, ratings, labels, and metadata categories in the Library Filter bar. You can even combine a search with a
metadata filter to further refine the photos that you want to display.
More Help topics
“View the contents of a folder” on page 61
“Filtering and rating photos” on page 75
“Assemble photos into the Quick Collection” on page 68
Page 98

USING PHOTOSHOP LIGHTROOM 2
Updated 03 September 2009
Organizing photos in the catalog
Find photos using the Library Filter bar
The Library Filter bar at the top of the Grid view of the Library module offers three modes for filtering photos: Text,
Attribute, and Metadata. You can select and use any one mode, or combine them to perform more complex filtering.
Text Allows you to search any indexed metadata text field, including filename, caption, keywords, and EXIF and IPTC
metadata.
Attribute Filters by flag status, star ratings, color labels, and copies.
Metadata Provides up to eight columns of metadata criteria that you can select to filter photos.
• Click any mode name to show and hide its options. The mode label is white when those options are open. One, two,
or all three filter modes can be open at once.
• Shift-click a second or third label to open multiple modes at once.
• Click None to hide and turn off all filter modes.
Note: When Metadata filter options are open, you can resize the Library Filter bar by moving the pointer over the lower
edge of the bar. When it becomes a double-arrow, drag the edge up or down.
For a video about using the Library Filter bar, see www.adobe.com/go/lrvid2204_lrm.
More Help topics
“Viewing and editing metadata” on page 79
93
Search for photos using the Text filter
The Text filter lets you search through the catalog or selected photos using a text search field. You can search any
indexed field or choose specific fields, and you can specify how the search criteria is matched.
The found photos that are displayed in the Grid view and the Filmstrip depend on whether you searched the entire
catalog, specific folders or collections, or the Quick Collection. The number of photos that match the search criteria
appears in the Filmstrip Source Indicator.
1 In the Library module, select a source in the Catalog, Folders, or Collections panel.
2 In the Library Filter bar, select Text.
3 Choose the field you want to search from the Any Searchable Field pop-up menu.
4 Choose a search rule from the Contains All pop-up menu.
Contains Searches for the specified alphanumeric sequence(s), including partial words. For example, performing a
Contains search for flo returns results that include the word flower. If multiple sequences are entered, Lightroom finds
photos that contain any of the individual sequences.
Contains All Searches for text that contains all specified alphanumeric sequences. Say, for example, you have a folder
of photos of a family gathering, and each photo is tagged with the names of the individuals in the shot. You could
perform a Contains All search on Joh and Su to find all photos that contain both John and Susan.
Contains Words Searches for text that contains all specified alphanumeric sequences as whole words. To find photos
with the keyword flower using a Contains Word search, for example, type flower.
Doesn’t Contain Searches for text that does not contain any specified sequence.
Starts With Searches for text that begins with the specified alphanumeric sequence.
Ends With Searches for text that ends with the specified alphanumeric sequence.
5 Type the text in the search box.
Page 99

USING PHOTOSHOP LIGHTROOM 2
Updated 03 September 2009
Organizing photos in the catalog
Add an exclamation point (!) before any word to exclude it from the results. Add a plus sign (+) before any word to
apply the Starts With rule to that word. Add a plus sign (+) after any word to apply the Ends With rule to that word.
The photos with the specified text criteria appear in the Grid view and the Filmstrip.
6 (Optional) To refine your search, apply an Attribute or Metadata filter.
Note: When two or more filters are specified, Lightroom returns photos that match all criteria.
Find photos using the Attribute filters
The Attribute options in the Library Filter bar let you filter photos by flag status, star ratings, labels, and copy. The
Attribute options are also available in the Filmstrip. See “Filter the photos displayed in the Filmstrip and Grid view”
on page 42.
1 In the Library module, select a source in the Catalog, Folders, or Collections panel.
2 In the Library Filter bar, select Attribute.
3 Click an option to filter the selected photos by flag status, star rating, color label, or copy.
The photos with the specified filter criteria appear in the Grid view and the Filmstrip.
4 (Optional) To refine your search, apply a Text or Metadata filter.
Note: When two or more filters are specified, Lightroom returns photos that match all criteria.
94
Find photos using Metadata filters
You can find photos by selecting specific metadata criteria using the Metadata options in the Library Filter bar.
Lightroom supports metadata embedded in photos by your digital camera and by other applications such as
Photoshop or Adobe Bridge.
1 In the Library module, select a source in the Catalog, Folders, or Collections panel.
2 In the Library Filter bar, select Metadata.
3 Choose a metadata category from the left column by clicking the header and choosing from the pop-up menu.
Then, choose an entry in that column. For example, choose Date, and then select All Dates. Lightroom displays the
number of selected photos that match that criteria next to the entry.
Shift-click and Ctrl-click (Windows) or Command-click (Mac OS) to select multiple entries in a column.
4 In the next column, choose another metadata category, and choose an entry from that column.
5
Continue to choose as many metadata categories and criteria as you like. Click the pop-up menu at the right side of
any column header to add or remove the column, change the sort order, and switch between hierarchical and flat view.
The photos with the specified metadata are displayed in the Grid view and the Filmstrip.
6 (Optional) To refine your search, apply a Text or Attribute filter.
Note: When two or more filters are specified, Lightroom returns photos that match all criteria.
You can also find photos by clicking the right-pointing arrow that appears next to certain metadata text boxes in the
Metadata panel.
Page 100

USING PHOTOSHOP LIGHTROOM 2
Updated 03 September 2009
Organizing photos in the catalog
Customize the Library Filter bar
Lightroom provides six predefined filters to let you quickly perform common filters and restore default settings.
❖ In the Library Filter bar or the Filmstrip, choose any of the following from the Custom Filter menu:
Default Columns Opens the Metadata options to the default four columns: Date, Camera, Lens, and Label, and all
metadata selected in each category.
Filters Off Turns off all filters and hides all filter options.
Flagged Displays photos with a Pick flag.
Location Columns Filters photos by Country, State/Province, City, and Location metadata categories.
Rated Displays photos with a star rating of one or higher.
Unrated Displays photos that have no star rating.
Save Library Filter bar settings as a preset
To expedite common searches and filter operations, save your filter criteria as a preset.
1 Using the Text, Attribute, and Metadata options in the Library Filter bar, specify criteria to filter your photos.
2 Choose Save Current Settings As New Preset from the Custom Filter menu at the right side of the Library Filter bar
or the Filmstrip.
3 Type a name for the preset in the New Preset dialog box, and click Create.
95
Apply a Library Filter bar preset
❖ To apply a filter preset, select it from the Custom Filter menu.
Delete a Library Filter bar preset
❖ To delete a filter preset, select it from the Custom Filter menu and then choose Delete Preset “Preset Name.”
Rename a Library Filter bar preset
❖ To rename a filter preset, select it from the Custom Filter menu and then choose Rename Preset “Preset Name.”
Find photos using collections
Besides letting you view and organize photos, selecting collections provides a way to find specific photos.
1 In the Collections panel, select one or more items.
The photos in the collections are displayed in the Grid view and the Filmstrip. Selecting a collection set includes all of
the collections in the set.
2 (Optional) To refine your search, apply a Text, Attribute, or Metadata filter using the Library Filter bar.
More Help topics
“Photo collections” on page 66
Find photos using keyword tags
Using the Keyword List panel, you can find photos that contain specific keyword tags.
1 In the Keyword List panel, select a keyword tag and click the right-pointing arrow next to the photo count.
 Loading...