

Page 1
USER GUIDE
Page 2

Copyright
© 2007 Adobe Systems Incorporated. All rights reserved.
Adobe® Photoshop® Lightroom™ User Guide for Windows® and Mac OS
If this guide is distributed with software that includes an end user agreement, this guide, as well as the software described in it, is furnished under license and may be used or
copied only in accordance with the terms of such license. Except as permitted by any such license, no part of this guide may be reproduced, stored in a retrieval system, or transmitted, in any form or by any means, electronic, mechanical, recording, or other wise, without the prior written permission of Adobe Systems Incorporated.Pleasenotethatthe
content in this guide is protected under copyright law even if it is not distributed with software that includes an end user license agreement.
Thecontentofthisguideisfurnishedforinformationaluseonly,issubjecttochangewithoutnotice,andshouldnotbeconstruedasacommitmentbyAdobe Systems Incorporated. Adobe Systems Incorporated assumes no responsibility or liability for any errors or inaccuracies that may appear in the informational content contained in this guide.
Please remember that existing artwork or images that you may want to include in your project may be protected under copyright law. The unauthorized incorporation of such
material into your new work could be a violation of the rights of the copyright owner. Please be sure to obtain any permission required from the copyright owner.
Any references to company names in sample templates are for demonstration purposes only and are not intended to refer to any actual organization.
Adobe, the Adobe logo, Flash, Lightroom, and Photoshop are either registered trademarks or trademarks of Adobe Systems Incorporated in the United States and/or other
countries.
Microsoft and Windows are either registered trademarks or trademarks of Microsoft Corporation in the United States and/or other countries. Apple, Mac, and Macintosh are
trademarks of Apple Inc. registered in the U.S. and other countries. All other trademarks are the property of their respective owners.
Portions of this product contain code licensed from Nellymoser. (
www.nellymoser.com) Sorenson Spark™ video compression and decompression technology licensed from
Sorenson Media, Inc. Flash 9 video is powered by On2 TrueMotion video technology. © 1992-2005 On2 Technologies, Inc. All rights reserved. (www.on2.com)
Adobe Systems Incorporated, 345 Park Avenue, San Jose, California 95110, USA.
Notice to U.S. Government End Users: The Software and Documentation are “Commercial Items,” as that term is defined at 48 C.F.R. §2.101, consisting of “Commercial
Computer Software” and “Commercial Computer Software Documentation,” as such terms are used in 48 C.F.R. §12.212 or 48 C.F.R. §227.7202, as applicable. Consistent with
48 C.F.R. §12.212 or 48 C.F.R. §§227.7202-1 through 227.7202-4, as applicable, the Commercial Computer Software and Commercial Computer Software Documentation are
being licensed to U.S. Government end users (a) onlyas Commercial Itemsand (b)with onlythose rights asare granted toall otherend users pursuant tothe terms andconditions
herein. Unpublished-rights reserved under the copyright laws of the United States. Adobe agrees to comply with all applicable equal opportunity laws including, if appropriate,
the provisions of Executive Order 11246, as amended, Section 402 of the Vietnam Era Veterans Readjustment Assistance Act of 1974 (38 USC 4212), and Section 503 of the
Rehabilitation Act of 1973, as amended, and the regulations at 41 CFR Parts 60-1 through 60-60, 60-250, and 60-741. The affirmative action clause and regulations contained in
the preceding sentence shall be incorporated by reference.
Adobe Systems Incorporated, 345 Park Avenue, San Jose, California 95110, USA.
Page 3

Contents
Chapter 1: Getting started
Installation . . . . . . . . . . . . . . . . . . . . . . . . . . . . . . . . . . . . . . . . . . . . . . . . . . . . . . . . . . . . . . . . . . . . . . . . . . . . . . . 1
Adobe Help . . . . . . . . . . . . . . . . . . . . . . . . . . . . . . . . . . . . . . . . . . . . . . . . . . . . . . . . . . . . . . . . . . . . . . . . . . . . . . . 1
Resources . . . . . . . . . . . . . . . . . . . . . . . . . . . . . . . . . . . . . . . . . . . . . . . . . . . . . . . . . . . . . . . . . . . . . . . . . . . . . . . . 2
What’s new . . . . . . . . . . . . . . . . . . . . . . . . . . . . . . . . . . . . . . . . . . . . . . . . . . . . . . . . . . . . . . . . . . . . . . . . . . . . . . . 4
Chapter 2: Workspace and setup
The Lightroom workspace . . . . . . . . . . . . . . . . . . . . . . . . . . . . . . . . . . . . . . . . . . . . . . . . . . . . . . . . . . . . . . . . . 5
Working with the Filmstrip . . . . . . . . . . . . . . . . . . . . . . . . . . . . . . . . . . . . . . . . . . . . . . . . . . . . . . . . . . . . . . . . 8
Viewing photos in Loupe view . . . . . . . . . . . . . . . . . . . . . . . . . . . . . . . . . . . . . . . . . . . . . . . . . . . . . . . . . . . . 10
Setting preferences and personalizing . . . . . . . . . . . . . . . . . . . . . . . . . . . . . . . . . . . . . . . . . . . . . . . . . . . . 11
Color management . . . . . . . . . . . . . . . . . . . . . . . . . . . . . . . . . . . . . . . . . . . . . . . . . . . . . . . . . . . . . . . . . . . . . . 12
Chapter 3: Importing photos
Getting photos into your library . . . . . . . . . . . . . . . . . . . . . . . . . . . . . . . . . . . . . . . . . . . . . . . . . . . . . . . . . . 15
Importing automatically . . . . . . . . . . . . . . . . . . . . . . . . . . . . . . . . . . . . . . . . . . . . . . . . . . . . . . . . . . . . . . . . . 25
iii
Chapter 4: Organizing photos in the catalog
Library module overview . . . . . . . . . . . . . . . . . . . . . . . . . . . . . . . . . . . . . . . . . . . . . . . . . . . . . . . . . . . . . . . . . 27
Browsing the catalog . . . . . . . . . . . . . . . . . . . . . . . . . . . . . . . . . . . . . . . . . . . . . . . . . . . . . . . . . . . . . . . . . . . . . 34
Managing photos . . . . . . . . . . . . . . . . . . . . . . . . . . . . . . . . . . . . . . . . . . . . . . . . . . . . . . . . . . . . . . . . . . . . . . . . 41
Working with collections . . . . . . . . . . . . . . . . . . . . . . . . . . . . . . . . . . . . . . . . . . . . . . . . . . . . . . . . . . . . . . . . . 45
Grouping photos into stacks . . . . . . . . . . . . . . . . . . . . . . . . . . . . . . . . . . . . . . . . . . . . . . . . . . . . . . . . . . . . . 47
Filtering and rating photos . . . . . . . . . . . . . . . . . . . . . . . . . . . . . . . . . . . . . . . . . . . . . . . . . . . . . . . . . . . . . . . 50
Viewing and editing metadata . . . . . . . . . . . . . . . . . . . . . . . . . . . . . . . . . . . . . . . . . . . . . . . . . . . . . . . . . . . 54
Working with keywords . . . . . . . . . . . . . . . . . . . . . . . . . . . . . . . . . . . . . . . . . . . . . . . . . . . . . . . . . . . . . . . . . . 59
Finding photos in the catalog . . . . . . . . . . . . . . . . . . . . . . . . . . . . . . . . . . . . . . . . . . . . . . . . . . . . . . . . . . . . 65
Chapter 5: Developing photos
Develop module overview . . . . . . . . . . . . . . . . . . . . . . . . . . . . . . . . . . . . . . . . . . . . . . . . . . . . . . . . . . . . . . . 68
Adjusting image color and tone . . . . . . . . . . . . . . . . . . . . . . . . . . . . . . . . . . . . . . . . . . . . . . . . . . . . . . . . . . 73
Working in grayscale . . . . . . . . . . . . . . . . . . . . . . . . . . . . . . . . . . . . . . . . . . . . . . . . . . . . . . . . . . . . . . . . . . . . . 80
Retouching and correcting flaws . . . . . . . . . . . . . . . . . . . . . . . . . . . . . . . . . . . . . . . . . . . . . . . . . . . . . . . . . 81
Apply Develop adjustments to other photos . . . . . . . . . . . . . . . . . . . . . . . . . . . . . . . . . . . . . . . . . . . . . . 86
Managing image history and snapshots . . . . . . . . . . . . . . . . . . . . . . . . . . . . . . . . . . . . . . . . . . . . . . . . . . 87
Quick Develop . . . . . . . . . . . . . . . . . . . . . . . . . . . . . . . . . . . . . . . . . . . . . . . . . . . . . . . . . . . . . . . . . . . . . . . . . . . 88
Chapter 6: Exporting photos
Exporting photos . . . . . . . . . . . . . . . . . . . . . . . . . . . . . . . . . . . . . . . . . . . . . . . . . . . . . . . . . . . . . . . . . . . . . . . . 90
Editing in other applications . . . . . . . . . . . . . . . . . . . . . . . . . . . . . . . . . . . . . . . . . . . . . . . . . . . . . . . . . . . . . 95
Page 4

Chapter 7: Creating and viewing slideshows
Creating slideshows . . . . . . . . . . . . . . . . . . . . . . . . . . . . . . . . . . . . . . . . . . . . . . . . . . . . . . . . . . . . . . . . . . . . . . 97
Specifying the slide layout . . . . . . . . . . . . . . . . . . . . . . . . . . . . . . . . . . . . . . . . . . . . . . . . . . . . . . . . . . . . . . 100
Adding overlays to slides . . . . . . . . . . . . . . . . . . . . . . . . . . . . . . . . . . . . . . . . . . . . . . . . . . . . . . . . . . . . . . . . 103
Playing and exporting slideshows . . . . . . . . . . . . . . . . . . . . . . . . . . . . . . . . . . . . . . . . . . . . . . . . . . . . . . . 107
Chapter 8: Printing photos
Printing photos and contact sheets . . . . . . . . . . . . . . . . . . . . . . . . . . . . . . . . . . . . . . . . . . . . . . . . . . . . . . 109
Laying out photos on a page . . . . . . . . . . . . . . . . . . . . . . . . . . . . . . . . . . . . . . . . . . . . . . . . . . . . . . . . . . . . 112
Printing overlay text and graphics . . . . . . . . . . . . . . . . . . . . . . . . . . . . . . . . . . . . . . . . . . . . . . . . . . . . . . . 115
Setting resolution and color management . . . . . . . . . . . . . . . . . . . . . . . . . . . . . . . . . . . . . . . . . . . . . . . 117
Printing multiple photos . . . . . . . . . . . . . . . . . . . . . . . . . . . . . . . . . . . . . . . . . . . . . . . . . . . . . . . . . . . . . . . . 119
Chapter 9: Web galleries
Creating web photo galleries . . . . . . . . . . . . . . . . . . . . . . . . . . . . . . . . . . . . . . . . . . . . . . . . . . . . . . . . . . . . 120
Specifying web gallery layouts . . . . . . . . . . . . . . . . . . . . . . . . . . . . . . . . . . . . . . . . . . . . . . . . . . . . . . . . . . 123
Adding text to web galleries . . . . . . . . . . . . . . . . . . . . . . . . . . . . . . . . . . . . . . . . . . . . . . . . . . . . . . . . . . . . . 125
Previewing, exporting, and uploading a web photo gallery . . . . . . . . . . . . . . . . . . . . . . . . . . . . . . . 126
Index . . . . . . . . . . . . . . . . . . . . . . . . . . . . . . . . . . . . . . . . . . . . . . . . . . . . . . . . . . . . . . . . . . . . . . . . . . . . . . . . . . 128
iv
Page 5

Chapter 1: Getting started
Adobe® Photoshop® Lightroom™ software is designed for your digital photography workflow. Lightroom helps you
organize, manage, process, print, and show digital photographs.
Installation
View requirements
❖ To review complete system requirements and recommendations for your Adobe product, visit
www.adobe.com/products/photoshoplightroom/productinfo/systemreqs.
Install the software
1 Close any other Adobe application open on your computer.
2 Insert the installation disc into your CD or DVD drive, and follow the on-screen instructions.
1
Note: For more information, see the Readme file on your installation disc.
Register
Register your product to receive complimentary installation support, notifications of updates, and other services.
❖ To register, click the Register Now button that appears after you install and activate the software.
If you postpone registration, you can register at any time by choosing Help > Lightroom Registration.
Where do I start?
After installing andregistering your software, familiarize yourself with the many learning aids and customer services
available to you. These include a printed Getting Started Guide in the Lightroom box, instructional movies and
tutorials, printed books, and customer support. For an overview of these aids, see “Resources” on page 2.
Adobe Help
Adobe Help Resources
You can access complete documentation for your Adobe software in a variety of ways: as a Help system that is
installed on your computer, as Livedocs (an updatable, online version of the help system), and as a PDF file.
In-product and Livedocs Help
In-product Help provides access to all documentation and instructional content available at the time the product
ships, and is available through the Help menu in your Adobe product.
Page 6

PHOTOSHOP LIGHTROOM
User Guide
Livedocs Help includes all content that ships with the product, plus updates and links to additional instructional
content available on the web. For some products, Livedocs includes the ability to comment. Find Livedocs Help for
your product in the Adobe Help Resource Center, at www.adobe.com/go/support/documentation.
Think of Help, both in the product and on the web, as a hub for accessing additional content and communities of
users. The most complete and up-to-date version of Help is always on the web.
PDF documentation
The complete in-product Help documentation is generally available as a PDF that has been optimized for printing.
Other documents, such as installation guides and white papers, may also be provided as PDFs.
All PDF documentation is available through the Adobe Help Resource Center, at
www.adobe.com/go/support/documentation.Inmostcases,PDFdocumentationisalsoavailableontheproductDVD.
Lightroom Help
You can browse Help topics by clicking topics in the table of contents or breadcrumb links, or clicking the Next and
Previous buttons.
To search Help, type a term in the search box and browse the list of returned topics, listed in order of relevance,
containing your search term. You can also select an entry in the index to view the topic it refers to.
2
Keyboard shortcuts for navigation
To navigate Adobe Help Viewer and topics, use the following keyboard combinations:
• To move between the navigation pane and the reading pane, press Control-Tab and Shift-Control-Tab.
• To move through links within a pane, press Tab or Shift-tab.
• To activate a selected link, press Enter.
Resources
Help resources online
Adobe help resources for Lightroom are available at www.adobe.com/go/lr_lrm_helpcenter.
You can reach this page from within Lightroom by choosing Help > Help Resources Online.
Adobe Design Center
Offers articles, tips, and tutorials in various formats, including video, Adobe PDF, and HTML. The content is
authored by industry experts, designers, and Adobe publishing partners, and new content is added monthly. You’ll
also find Adobe Studio Exchange, where users download and share thousands of free actions, plug-ins, and other
content. Adobe Design Center is available in English, French, German, and Japanese. It is also available in productspecific versions.
Visit the Adobe Design Center at www.adobe.com/designcenter.
Page 7

PHOTOSHOP LIGHTROOM
User Guide
Adobe Developer Center
Provides samples, tutorials, articles, and community resources for developers who are building rich Internet applications, websites, mobile content, and other projects using Adobe products. The Developer Center also contains
resources for developers who are developing plug-ins for Adobe products. In addition to sample code and tutorials,
you'll find RSS feeds, online seminars, SDKs, scripting guides, and other technical resources.
Visit the Adobe Developer Center at www.adobe.com/go/developer.
Customer support
Containsinformationaboutfreeandpaidtechnicalsupportoptions.TopissuesarelistedbyproductontheAdobe
U.S. and Adobe Japan websites. Follow the Training link for access to Adobe Press books; online, video, and
instructor-led training resources; Adobe software certification programs; and more.
Visit www.adobe.com/go/support to find support information for your Adobe product.
Downloads
Visit www.adobe.com/go/downloads to find free updates, tryouts, and other useful software.
In addition, the Adobe Store (www.adobe.com/go/store) provides access to thousands of plug-ins from third-party
developers, helping you to automate tasks, customize workflows, create specialized professional effects, and more.
3
Adobe Labs
AdobeLabsprovidesyouwiththeopportunitytoexperienceandevaluatenewandemerginginnovations,technologies, and products from Adobe.
At Adobe Labs, you'll have access to resources such as:
• Prerelease software and technologies
• Code samples and best practices to help accelerate your learning curve
• Early versions of product and technical documentation
• Forums, wiki-based content and other collaborative resources to help you interact with like-minded developers
and Macromedia
Labs fosters a collaborative software development process. This allows customers to become productive with new
productsandtechnologiesfasterandtheAdobedevelopmentteamstorespondandreacttoearlyfeedbackinorder
to shape the software in a way that meets the needs and expectations of the community.
Visit Adobe Labs at www.adobe.com/go/labs.
User communities
Features forums, blogs, and other avenues for users to share technologies, tools, and information; ask questions;and
find out how others are getting the most out of their software. User-to-user forums are available in English, French,
German, and Japanese; blogs are posted in a wide range of languages.
Visit www.adobe.com/go/communities to participate in forums or blogs.
Page 8

PHOTOSHOP LIGHTROOM
User Guide
What’s new
New features in Lightroom 1.1 and later
Create and open catalogs A catalog is how Lightroom tracks the location of files and remembers information about
them.Acatalogiscalledalibrary or library database in Lightroom 1.0. In Lightroom 1.1, the terminology has been
updated and you can easily create and open different catalogs in Lightroom 1.1 and later.
Import and export catalogs Export a group of selected photos as a new catalog or import photos from another
catalog into an existing catalog.
Synchronize folders Synchronizing folders provides the option of adding files that have been subsequently added to
the folder but not imported into the catalog, removing files that have been deleted, and scanning for metadata
updates. The photo files in the folder and all subfolders can be synchronized. You can determine which folders,
subfolders, and files are imported.
Enhanced DNG export settings DNG (digital negative) file creations now support the full set of conversion options.
You can specify the JPEG preview size, select an image conversion method, specify a lossless compression, and
determine whether to embed the original camera raw file. Lightroom lets you update the DNG preview on request.
Additional metadata fields and presets The Metadata panel includes new options for large captions and location.
The panel also includes new options for e-mail, URLs, and more. You can perform many actions, such as resolving
metadata conflicts and opening a folder, by clicking the buttons to the right of the metadata fields.
4
Hierarchical template folders Template panels now let you create additional folders with parent-child relationships.
For photographers with a growing number of develop, print or web presets, this folder structure provides additional
options for organizing photos.
You can also store presets with the catalog file for easy mobility.
Painter tool In Lightroom 1.0, you apply keywords to multiple images in Grid view by using the Keyword Stamper
tool. In Lightroom 1.1, the Painter tool replaces the Keyword Stamper tool. Not only can you use the Painter tool to
apply keywords to photos, you can also apply labels, flags, ratings, develop settings, metadata, and rotation settings.
You can click photos or drag across them as if painting.
Remove Red Eye and Remove Spot tool enhancements In Lightroom 1.1 , the Remove Red Eye tool has been
improved to make it easier to detect and remove red eye. The Remove Spot tool has also been improved to make it
easier to repair blemishes in photos.
New develop settings In the Develop module, noise reduction and sharpening tools have been improved, and the
Basic panel includes a new clarity control for adding extra “punch” to your images.
Additional camera raw formats Lightroom 1.1 and later add support for additional raw files from Canon, Leaf,
Phase One, Sony, and other digital camera manufacturers. For a complete list of supported cameras and camera raw
formats, see www.adobe.com/go/learn_ps_cameraraw.
For information on additional changes, see the product readme file.
Page 9
Chapter 2: Workspace and setup
Adobe® Photoshop® Lightroom™ is made up of several modules that provide a complete digital photography
workflow. As you work on a photograph, you move from one module to another to import, organize, develop, print,
and show the photo.
The Lightroom workspace
Workspace overview
You use each Lightroom module to focus on a specific portion of the photographic workflow: the Library module
for importing, organizing, comparing and selecting photos; the Develop module for adjusting color and tone or
creatively processing photos; and the Print, Slideshow, and Web modules for presenting your photos.
Each module workspace includes several panels that contain options and controls for working on your photos.
5
A
B
C
F
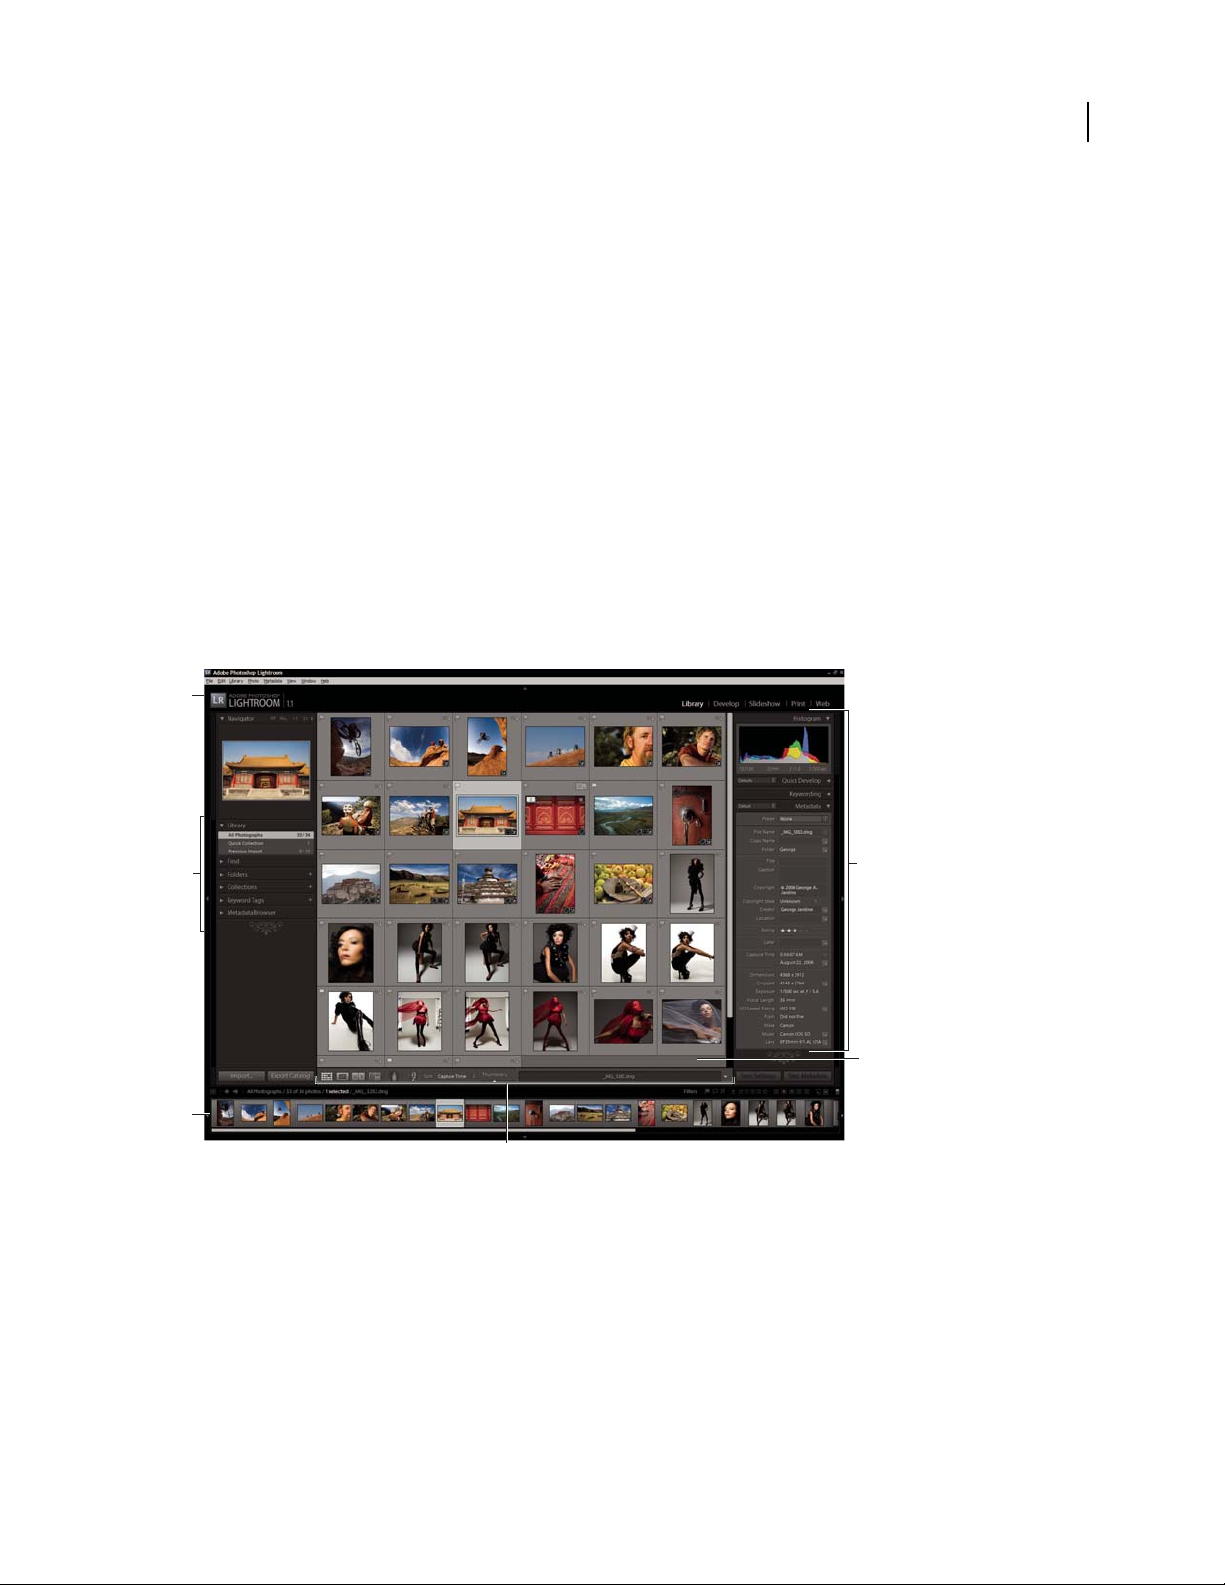
The Lightroom workspace in Grid view
A. Identity plate and Module Picker B. Panels for working with folders and collections, or applying presets C. Filmstrip D. Panels for working
with metadata, adjusting images, customizing layouts E. Grid view or image display F. To o lb a r
D
E
Move between modules and change screen modes using keyboard shortcuts to maximize your efficiency while
working with the software. See shortcuts for each module in the Help menu.
For a video on productivity tips when working in Lightroom, see www.adobe.com/go/learn_lr_video_tips.
Page 10

PHOTOSHOP LIGHTROOM
User Guide
Switch to another module
❖ In the Library module, display the images you want to work with, and then click a module name in the Module
Picker (upper right in the Lightroom window), or use a shortcut key.
Hold down Ctrl+Alt (Windows) or Command+Option (Mac OS) and press a number between 1 and 5 to switch to
any of the five modules.
Manage panels and the screen view
You can customize the Lightroom workspace by displaying only the panels you want or by hiding some or of all the
panels to maximize the display of your photo.
Open or close a panel
❖ Click the panel header. To open or close all panels in a group, Ctrl-click (Windows) or Command-click (Mac OS)
a panel name.
Open or close one panel at a time
❖ Right-click (Windows) or Ctrl-click (Mac OS) on a panel header and choose Solo mode, or Alt-click on a panel
header.
Solo mode applies independently to a set of panels. The triangle in the panel header is solid when not in Solo mode.
6
Scroll through a group of panels
❖ Drag the scrollbar or use the scroll wheel on your mouse.
Show or hide panel groups
• To show or hide a single panel group, click the Show/Hide Panel Group icon . A solid icon indicates the panel
group is showing.
• To show or hide both side panel groups, choose Window > Panels > Toggle Side Panels, or press the Tab key.
• To hide all panels, including side panels, the Filmstrip, and Module Picker, choose Window > Panels > Toggle All
Panels, or press Shift-Tab.
Set how panel groups show or hide automatically
❖ Right-click (Windows) or Ctrl-click (Mac OS) the outside edgeof the panel group (beyondthe scrollbar) and then
choose an option:
Auto Hide & Show Displays the panel as you move the pointer to the outside edge of the application window. Hides
the panel as you move the pointer away from the panel.
Auto Hide Hides the panel as you move the pointer away from the panel. You must open the panel manually.
Manual Turns off automatic show/hide behavior.
Resize the width of a panel group
❖ Move the pointer over the inside edge of a panel group, and when the pointer becomes a double-arrow, drag the
panel.
Remove or restore a panel from a group
If you don’t use a panel often, you can remove it from view.
❖ Right-click (Windows) or Ctrl-click (Mac OS) on any panel header in the group, and then choose the panel name.
Page 11

PHOTOSHOP LIGHTROOM
User Guide
Change the Lightroom screen mode
You can change the screen display to hide the title bar, or the title bar and the menus. In Mac OS, the dock is also
hidden.
❖ Choose Window > Screen Mode, and then choose an option. You can also press the F key to cycle through the
three options.
Maximize the image and hide the panels
❖ Press Shift-Ctrl-F (Windows) or Shift-Command-F (Mac OS).
To restore all panels, press Shift-Tab and then the F key.
Turn off all settings in a panel
You can temporarily turn off all the settings in a panel of the Develop module or the filtering in the Filmstrip.
❖ Click the Panel On/Off icon .
Dim or hide the Lightroom interface
Use Lights Out to dim or black out the Lightroom interface so that your photo stands out on screen.
❖ Choose Window > Lights Out and then choose an option. You can press the L key to cycle through the three
options.
7
Customize Lights Out in the Interface Preferences by specifying the dim level and screen color.
Customize the toolbar
You can hide the toolbar or customize it in the Library and Develop modules to include the items you need.
Show or hide the toolbar
❖ Choose View > Show/Hide Toolbar or press the T key to toggle the toolbar on or off.
Change toolbar icons
❖ On the right side of the toolbar, click the menu and select or deselect items to display in the toolbar.
Monitor processes
The activity monitor displays over the identity plate when Lightroom is busy with a task.
• To cancel a process, click the X beside the progress bar.
• To switch and view another process in progress, click the triangle beside the progress bar.
Page 12
PHOTOSHOP LIGHTROOM
User Guide
Working with the Filmstrip
Filmstrip overview
The Filmstrip displays the photos you are working on as you move between modules. It contains photos from the
currently selected Library folder, collection, keyword set, or contents of the Quick Collection. You move between
previously viewed photos in the Filmstrip using the Forward and Back navigation buttons or by choosing a different
source from the Filmstrip Source Indicator pop-up menu to the right of the navigation buttons.
8
A
B
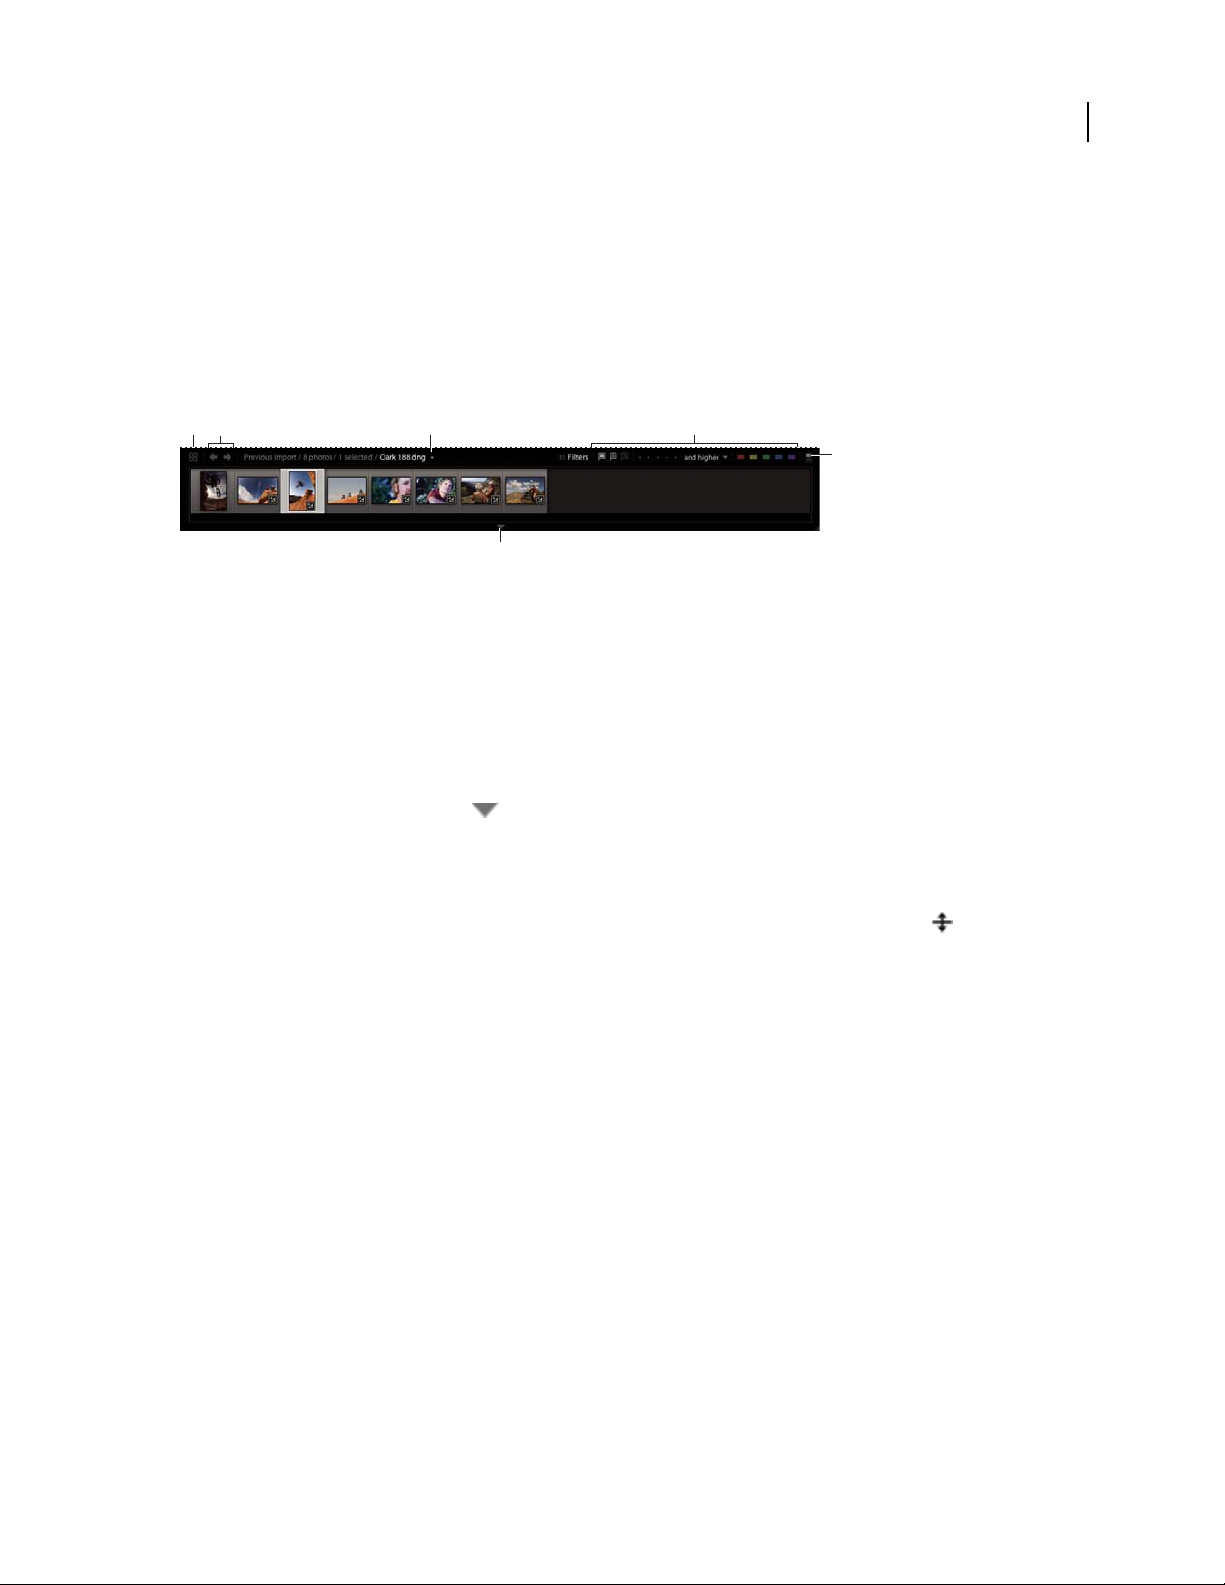
Lightroom Filmstrip
A. Go to Grid view B. Filmstrip source forward and back C. Filmstrip Source Indicator and menu D. Source filters E. Filter On/Off switch
F. Show/Hide Filmstrip control
C
F
D
E
See also
“Set preferences for working in Lightroom” on page 11
“Select photos in the Grid view and the Filmstrip” on page 35
Hide or show the Filmstrip
• Click the Show/Hide Filmstrip icon at the bottom of the Filmstrip.
• Choose Window > Panels > Show/Hide Filmstrip.
Change the size of the Filmstrip thumbnails
• Place the pointer over the top edge of the Filmstrip. When the pointer changes to a double arrow , drag the
Filmstrip edge up or down.
• Double-click the top edge of the Filmstrip to switch between the last two sizes of thumbnails.
Scroll through photos in the Filmstrip
❖ DragthescrollbaratthebottomoftheFilmstrip,clickthearrowsonthesides,presstheleftandrightarrowkeys
on the Filmstrip, or drag the top edge of a thumbnail frame.
Show ratings and picks in Filmstrip thumbnails
❖ In the Interface Preferences, select Show Ratings And Picks In Filmstrip.
Rearrange thumbnail images in the Filmstrip and Grid view
❖ Drag a thumbnail to a new location.
Filter the photos displayed in the Filmstrip and Grid view
You can restrict, or filter, the photos displayed in the Filmstrip and the Grid view to those with a specific flag status,
star rating, or color label.
❖ In the Filters section of the Filmstrip, select icons to filter the display.
Page 13

PHOTOSHOP LIGHTROOM
User Guide
9
A
Set filters for the photos displayed in the Filmstrip and the Grid view.
A. Hides filters B. DisplaysphotosflaggedasPicks,Unflagged,orRejects C. Displays photos with a specific star rating, orthose higher orlower
D. Displays photos with one or more color labels E. Turns off any display filters
B
C D
E
Change the photos displayed in the Filmstrip
• Choose a folder, collection, or keyword tag in the Library.
• Click the Forward and Back buttons in the upper left of the Filmstrip to view a previously viewed source.
• Click the Source Indicator in the Filmstrip, and choose a new source from the pop-up menu. You can choose the
contents of the Quick Collection or a previously viewed source. Previously viewed Filmstrip sources are listed,
unless you choose Clear Recent Sources.
Note: The Grid view displays the photo source you chose in the Filmstrip.
Assemble photos into the Quick Collection
Use Quick Collection to assemble a temporary group of photos to work with in any module. View the Quick
Collection in the Filmstrip or in the Grid view. You can convert the Quick Collection to a permanent collection.
Do not confuse catalogs and collections. A catalog stores photos and their settings in a single place, allowing you to
transfer your photos and settings to a different computer. A collection is a set of grouped photos within a catalog,
such as the twelve photos you want to use for a business calendar.
See also
“Convert Quick Collections to collections” on page 46
“About Lightroom catalogs” on page 27
Add photos to the Quick Collection
1
Select one or more photos in the Filmstrip or the Grid view.
2 In the Library or Develop module, choose Photo > Add to Quick Collection. In the Slideshow, Print or Web
modules, choose Edit > Add to Quick Collection.
From any module, select a photo and press the B key. Or move the pointer over a thumbnail image and click thecircle
in its upper-right corner.
View photos in the Quick Collection
• In the Library module, select Quick Collection in the Library panel.
• In the Filmstrip Source Indicator menu, choose Quick Collection.
Remove photos from or clear the Quick Collection
1
Display the Quick Collection in the Filmstrip or Grid view.
2 Select one or more photos in the collection.
3 In the Library or Develop module, choose Photo > Remove From Quick Collection. In the Slideshow, Print or
Web modules, choose Edit > Remove From Quick Collection.
Page 14

PHOTOSHOP LIGHTROOM
From any module, select the photo and press the B key. Or move the pointer over a thumbnail image and click the
circle in its upper-right corner.
User Guide
Viewing photos in Loupe view
Zoom an image
YoucanusetheNavigatorpanelineithertheLibrarymoduleortheDevelopmoduletosetthelevelofmagnification
for an image in Loupe view. Lightroom saves the last level you used and lets you switch between that and the current
level when you click in the photo with the pointer. You can also toggle between four levels using the Zoom In and
Zoom Out commands.
The settings remainin effect until you select a different zoom level in the Navigator panel or choose a new command
from the View menu.
Note: When two images are in Compare View in the Library module, setting a zoom level in the Navigator or choosing
a zoom command automatically displays the selected image in Loupe View.
Set the zoom levels for the pointer
1
In the Navigator panel, select either FIT or FILL for the first zoom level.
2 For the second zoom level, select either 1:1 (a 100% view of actual pixels) or choose an option from the pop-up
menu.
10
Switch between zoom levels
• To switch between the two zoom levels set in the Navigator panel, click the photo with the pointer or press the
spacebar. The pointer changes to the Zoom tool whenever it is still possible to zoom in.
• To switch between four zoom levels, press Ctrl-+ or - (Windows) or Command + or - (Mac OS). If you choose a
Zoom command from the View menu, the level switches between the four settings in the Navigator panel (FIT,
FILL, 1:1, and the option chosen from the menu).
To zoom the photo to the center of the screen, select Zoom Clicked Point To Center in the Interface Preferences.
Pan the image
Whenthephotoiszoomedandpartsarenotvisible,usetheHandtoolonthephotoorthepointerontheNavigator
panel to move hidden areas into view. The Navigator panel always displays the entire image with a frame overlay to
represent the edges of the main view.
Note: Panning is synchronized in the Before and After view in the Develop module.
• Drag the Hand tool in the Loupe view to move the image.
• Drag the pointer in the Navigator panel to move the image in Loupe view.
• Click the pointer in the Navigator panel to move the image to that location in Loupe view.
Temporarily zoom in to pan the image
❖ Press and hold the mouse button down, and then drag in either the photo or the Navigator to pan the photo.
Page 15

PHOTOSHOP LIGHTROOM
User Guide
Display the Info Overlay on a photo
You can display information about a photo inLoupe view in the Library, and in Loupe view or Before and After view
in the Develop module. You can display two sets of metadata and customize which information appears in each set.
Show and hide the Info Overlay
❖ Choose View > Loupe Info > Show Info Overlay, or choose the specific info set to display. Or, press the I key to
display, hide, and cycle through the info sets.
Change the info displayed in the Info Overlay
1
In the Library or Develop module, choose View > View Options.
2 If working in the Library, make sure the Loupe View is selected.
3 In the Loupe Info fields, choose the options you want to display for each set from the menus.
Setting preferences and personalizing
Set preferences for working in Lightroom
You can set preferences to change the Lightroom user interface.
11
See also
“Set import and file-handling preferences” on page 17
“Change catalog settings” on page 33
“Set Library view options for Loupe view” on page 31
“Set library view options for the Grid view” on page 30
Open the Preferences dialog box
• On Windows, choose Edit > Preferences.
• On Mac OS, choose Lightroom > Preferences.
Reset presets to their original settings
❖ In the Presets Preferences, click any of the Restore buttons in the Presets area.
Restore prompts you chose not to display
❖ In the General Preferences, click Reset All Warning Dialogs in the Prompts area.
Change the interface font size or the panel end marker
❖ In the Interface Preferences, choose options from the Panels menus.
Page 16

PHOTOSHOP LIGHTROOM
User Guide
Personalize identity plates and module buttons
You can personalize the Lightroom interface, slideshows, and printed output using identity plates that include your
name and logo.
1 Do one of the following to open the Identity Plate Editor:
• Choose Edit > Identity Plate Setup (Windows) or Lightroom > Identity Plate Setup (Mac OS).
• IntheSlideshoworPrintmodule,clicktheIdentityPlatepreviewintheOverlayspanelandchooseEditfromthe
pop-up menu.
2 In the Identity Plate Editor, select one of the following:
Use A Styled Text Identity Plate Uses the textyou enter in the box withthe font characteristics that you specify in the
menus below the box.
Use A Graphical Identity Plate Uses a graphic that is no more than 60 pixels high that you drag into the box. The
graphic can be a PDF, JPG, GIF, PNG, TIFF, or PSD (Windows) and JPG, GIF, PNG, TIFF, or PSD (Macintosh). The
resolution of graphical identity plates may be too low for printed output.
3 Choose Save As from the Enable Identity Plate menu, and give your identity plate a name.
4 TodisplayyouridentityplateontheleftsideoftheModulePicker,selectEnableIdentityPlateandchooseoneof
your saved identity plates from the menu to the right.
5 In the pop-up menus in the right side of the dialog box, customize the font, size and color of the Module Picker
buttons. The first color picker box sets the color of the current module, and the second box sets the color for
unselected modules.
12
For a video on personalizing your Lightroom workspace by changing the identity plate, see
www.adobe.com/go/learn_lr_video_idplate.
Color management
About color management in Lightroom
Lightroom simplifies color management in your photographic workflow. You don’t need to choose color settings or
color profiles until you are ready to output your photos. To take advantage of Lightroom color management, you
need to calibrate your computer monitor so that you are viewing accurate color. See “Calibrate and profile your
monitor” on page 13.
Color spaces, color profiles, and tonal response curves
It’s not necessary for you to understandhow Lightroom manages color internally,but the following information may
be useful in your workflow.
A color space describes a range or gamut of colors. Various devices in your photographic workflow have different
color gamuts in which they can record, store, edit, and output photos. A color profile defines a color space so that
Lightroom knows how to manage and convert colors in your photo.
Rawphotofilesgenerallydon’thaveembeddedcolorprofiles.Forrawfiles,theDevelopmoduleassumesawidecolor
space based on the color values of the ProPhoto RGB color space. ProPhoto RGB encompasses most colors that
cameras can record.
Page 17

PHOTOSHOP LIGHTROOM
User Guide
A color profile is also defined by a gamma value, or more accurately, its tonal response curve. The tonal response
curve defines how tonal values in the raw image are mapped. To provide useful information in the histogram and
RGB valuedisplay, Lightroomassumes a gamma value ofapproximately2.2. Moreaccurately,it uses a tonal response
curve similar to the tonal response curve of the sRGB color space.
While Lightroom uses a tonal response curve to provide information for the histogram and RGB values, it manipulates the raw data before it is tone mapped. Working in this linear gamma avoids many of the artifacts that can result
in working with a tone-mapped image.
The Library module stores previews in the Adobe RGB color space. These previews are also used when printing in
draft mode.
For rendered files such as TIFF, JPEG, and PSD files, Lightroom uses the image’s embedded color profile to display
the image, histogram, and color values. If the image doesn’t have aprofile, Lightroom assumes the sRGB profile, and
the image may not look as expected on your monitor.
Output color profiles
When you print a photo in Lightroom, you can choose to convert the colors to more closely match the color space
of the printer, paper, and ink you are using. For information on working with printer color profiles, see “Set print
color management” on page 118.
Lightroom automatically exports images in the Slideshow andWeb modules using the sRGBprofile so that the color
looks good on the majority of computer monitors.
13
Calibrate and profile your monitor
You can calibrate your monitor and create a profile that specifies its color characteristics using monitor profiling
software and hardware.
When you calibrate your monitor, you are adjusting it so that it conforms to a known specification. Once your
monitor is calibrated, the profiling utility lets you save a color profile.
1 If you are calibrating a CRT monitor,make sure it has been turnedon for at least a half hour. This gives it sufficient
time to warm up and produce more consistent output.
2 Set the ambient lighting in your room to be consistent with the brightness and color of the room lighting you’ll
be working under.
3 Make sure your monitor is displaying thousands of colors or more. Ideally, make sure it is displaying millions of
colors or 24-bit or higher.
4 Remove colorful background patterns on your monitor desktop, and set your desktop to display neutral grays.
Busy patterns or bright colors surrounding a document interfere with accurate color perception.
5 Calibrate and profile your monitor using third-party software and measuring devices. In general, using a
measuring device such as a colorimeter along withsoftware can create more accurate profiles because an instrument
can measure the colors displayed on a monitor far more accurately than the human eye.
Note: Monitor performance changes and declines over time; recalibrate and profile your monitor every month or so. If
you find it difficult or impossible to calibrate your monitor to a standard, it may be too old and faded.
Most profiling software automatically assigns the new profile as the default monitor profile. For instructions on how
to manually assign the monitor profile, refer to your operating system’s Help.
Page 18

PHOTOSHOP LIGHTROOM
User Guide
Install a color profile
Colorprofilesareofteninstalledwhenadeviceisaddedtoyoursystem.Theaccuracyoftheseprofiles(oftencalled
generic profiles or canned profiles) varies from manufacturer to manufacturer. You can also obtain profiles from a
custom profile service, download profiles from the web, or create custom profiles using professional profiling
equipment.
• In Windows, right-click a profile and select Install Profile. Alternatively, copy the profiles into the
WINDOWS\system32\spool\drivers\color folder (Windows XP).
• In Mac OS, copy profiles into the /Library/ColorSync/Profiles folder or the
/Users/username/Library/ColorSync/Profiles folder.
After installing color profiles, be sure to restart Adobe applications.
14
Page 19

Chapter 3: Importing photos
Importing photos into the Adobe® Photoshop® Lightroom™ library is the first step in working with your photos. You
can import photos directly from a camera, memory card reader, or other storage device.
Getting photos into your library
Import photos into Lightroom: Basic workflow
You must import photos into the Lightroom library to begin working with them. During import, you can choose
either to move or copy the photo files into a specific folder, or reference the photo files in their current location.
Importing tells Lightroom what photos you want to work with, whether they are imported directly from a camera,
hard drive, memory card reader, or other storage devices. As photos are imported, you can rename them, apply
Develop adjustments to them, embed metadata and keywords, and even simultaneously back up the photos to a
different folder.
Note: Lightroom 1.1 currently supports photos up to 10,000pixels longor wide for a maximum image size of 100 million
pixels.
15
After they are imported, Lightroom adds the photos to the library and starts building previews and cataloging
metadata. Unless manually removed, the previews and metadata stay in the library, even if you move the corresponding photos off of your computer to archive them in a different storage location. Thumbnail previews appear in
theGridviewandFilmstrip,andfolderscontainingtheimportedphotosappearintheFolderspaneloftheLibrary
module. You can’t import the same photo into Lightroom multiple times unless you first delete the photo from the
library. See “Browsing the catalog” on page 34 and “Create virtual copies” on page 43.
Note: Lightroom also offers an auto-import feature for automatically importing photos into the library from a specified
folder. See “Importing automatically” on page 25.
LightroomhasanImportPhotosdialogboxforpreviewing,selecting,andaddinginformationaboutthephotosyou
want to import. The dialog box includes the following options:
File Handling Specifies how to import photos into the library.
Organize Specifies what folder hierarchy to use when copying or moving photos into the library.
File Naming Specifies how to name photos being copied or moved into the library.
Information To Apply Specifies what Develop preset, metadata, and keywords to apply while importing photos.
Show Preview Displays the Preview window for viewing and selecting specific photos to import.
1. Connect the camera or memory card reader to your computer.
In addition to cameras and memory card readers, Lightroomimports photos from any folderon the hard drive, CDs
or DVDs, and other storage devices. You can also import photos from another catalog or from Photoshop Elements
and Photoshop Album 2.0.
Page 20

PHOTOSHOP LIGHTROOM
User Guide
2. Select the photos to import.
To bring photos into thelibrary, either click theImport button inthe Library module or choose File >Import Photos,
then navigate to the folder containing the photosyou wantand click Open or Choose Selected (Windows)or Choose
(Mac OS).
Note: YoucanalsoimportphotosbydraggingafoldercontainingphotosoragroupofphotosintotheGridviewofthe
Library module.
3. Choose the folder of photos.
In the Open dialog box, navigate to the folder containing the photos you want and click Choose.
Important: If the photos you’re importing already exist in the library, an alert dialog box opens explaining why they
cannot be imported.
4. Choose how to import the photos into your library.
Choose whether to import photos by referencing them, or copying or moving them to a specified directory. You can
also copy photos as Digital Negative (DNG) files. See “Import photos from disk into Lightroom” on page 18.
5. (Optional) Back up your photos as they’re importing.
If you’re copying or moving photos into the library, you can also specify whether to back up photos as they’re
imported.
16
6. (Optional) Preview the photos to import.
Select Show Preview to view and select specific photos if you don’t want to import all the photos in a folder. See
“Preview and select the photos to import” on page 19.
7. If copying or moving photos, specify a destination folder and how to name the imported files.
See “Import photos from disk into Lightroom” on page 18.
8. (Optional) Set options for importing your photos.
You can set options to apply specific Develop settings, metadata, or keywords to the photos as they’re being
imported. See “Apply Develop settings to photos when importing” on page 22, “Create and apply Develop presets”
on page 71, and “Apply metadata to photos when importing” on page 22.
9. Select the type of previews to display.
The Standard-Size Previews option provides higher quality, but deselecting the option uses the embedded previews
in photos and initially displays photos faster in the Grid view. See “Specify Standard-Size previews when importing”
on page 22.
For more information on importing photos, see www.adobe.com/go/learn_lr_video_import.
See also
“Managing photos” on page 41
Page 21

PHOTOSHOP LIGHTROOM
User Guide
Set import and file-handling preferences
YousetimportpreferencesintheImportandFileHandlingpanelsofthePreferencesdialogbox.Youcanalsochange
preference settings in the Auto Import Settings dialog box (see “Importing automatically” on page 25) and in the
Catalog Settings dialog box (see “Change catalog settings” on page 33).
1 From the Lightroom main menu, choose Edit > Preferences (Windows) or Lightroom > Preferences (Mac OS).
2 In the Import preferences, do any of the following:
• To allow the import dialog box to be opened automatically after connecting a camera or memory card reader to
your computer, select the Show Import Dialog When A Memory Card Is Detected option. If this option is not
selected, Lightroom does nothing whena cameraor memorycard isconnected. (You can still chooseFile > Import
Photos From Device.)
• To not use the folder names that your camera creates, select Ignore Camera-Generated Folder Names When
Naming Folders.
• To import duplicate JPEG files and raw files separately, select the Treat JPEG Files Next To Raw Files As Separate
Photos option. Deselect this option to import only a single file.
• To specify how DNG files are imported, specify options in the DNG Creation Settings section. For more infor-
mation on DNG files, see “Convert photos to DNG” on page 43.
3 In File Handling preferences, do any of the following:
• To determine how periods and forward slashes are used to separate keywords, select options in the Reading
Metadata area.
• To specify which characters and spaces in the filenames of imported photos are illegal and to determine how
they’re replaced, choose from the menus in the File Name Generation area.
17
See also
“Specify Auto Import settings” on page 25
About file formats
Lightroom support the following file formats.
Camera raw formats
Camera raw file formats contain unprocessed data from a digital camera’s sensor. Most camera manufacturers save
imagedatainaproprietarycameraformat.Lightroomreadsthedatafrommostcamerasandprocessesitintoafull
color photo. You use the controls in the Develop module to process and interpret the raw image data for your photo.
For a list of supported cameras and camera raw formats, see www.adobe.com/go/learn_ps_cameraraw.
Digital Negative format (DNG)
The Digital Negative (DNG) is a publicly available archival format for raw files generated by digital cameras. By
addressing the lack of an open standard for the raw files created by individual camera models, DNG helps ensure
thatphotographerswillbeabletoaccesstheirfilesinthefuture.YoucanconvertproprietaryrawfilestoDNGfrom
within Lightroom. For more information about the Digital Negative (DNG) file format, visit www.adobe.com/dng.
You’ll find comprehensive information and a link to a user forum.
Page 22

PHOTOSHOP LIGHTROOM
User Guide
TIFF format
Tagged-Image File Format (TIFF, TIF) is used to exchange files between applications and computer platforms. TIFF is
a flexible bitmap image format supported by virtually all paint, image-editing, and page-layout applications. Also,
virtually all desktop scanners can produce TIFF images. Lightroom supports large documents saved in TIFF format (up
to 100 million pixels with pixel dimensions of no more than 10,000 on a side). However, most other applications,
including older versions of Photoshop (pre-Photoshop CS), do not support documents with file sizes greater than 2 GB.
The TIFF format provides greater compression and industry compatibility than Photoshop format (PSD), and is the
recommended format for exchanging files between Lightroom and Photoshop. In Lightroom, you can export TIFF
image files with a bit depth of 8 bits or 16 bits per channel.
JPEG format
Joint Photographic Experts Group (JPEG) format is commonly used to display photographs and other continuoustone images in web photo galleries, slideshows, presentations, and other online services. JPEG retains all color information in an RGB image but compresses file size by selectively discarding data. A JPEG image is automatically
decompressed when opened. In most cases, the Best Quality setting produces a result indistinguishable from the
original.
Photoshop format (PSD)
Photoshop format (PSD) is the standard Photoshop file format. To import and work with a multi-layered PSD file in
Lightroom, the file must have been saved in Photoshop with the Maximize PSD and PSB File Compatibility
preference turned on. You’ll find the option in the Photoshop file handling preferences. Lightroom saves PSD files
with a bit depth or 8 bits or 16 bits per channel.
18
Import photos from disk into Lightroom
When you import photos into Lightroom, you can reference the photos in their existing location, move the photos
into a specific folder, or copy the photos into a specific folder.
1 In the Library module, do any of the following:
• Click the Import button.
• From the main menu, choose File > Import Photos From Disk.
• Drag a folder with photos or individual photos into the Grid view. (Skip step 2.)
2 Navigatetoandselectthefoldercontainingthephotostoimport,andthenclickChooseSelected(Windows)or
Choose (Mac OS). You can also select individual photos and choose Open (Windows) or Choose (Mac OS).
3 Select one of the following from the File Handling menu:
Import Photos At Their Current Location Keeps the photo files in their current location by using the current folder
structure. Skip steps 4 and 5.
Copy Photos To A New Location And Import Copies the photo files to the folder you choose, including any sidecar
files.
Move Photos To A New Location And Import Moves the photo files to the folder you choose, including any sidecar
files. Files are removed from their current location.
Copy Photos As Digital Negative (DNG) And Import Copies proprietary camera raw files to the folder you choose
and converts them to the Digital Negative (DNG) format.
Page 23

PHOTOSHOP LIGHTROOM
User Guide
4 If you are importing photos by moving or copying them, do any of the following to specify where to import the
photo files:
• To choose a folder, click Choose, navigate to and select the folder you want in the Browse For Folder (Windows)
or Open (Mac OS) dialog box, and then click OK (Windows) or Choose (Mac OS).
• To create a folder, click Choose, navigate to the folder you want in the Browse For Folder (Windows) or Open
(Mac OS) dialogbox. Click Make New Folder (Windows) orNew Folder(Mac OS), namethe new folder,and then
click OK (Windows) or Choose (Mac OS).
• To choose a previously chosen location, click the triangle next to Choose and then choose from the pop-up menu.
5 If you are importing photos by moving or copying them, choose one of the following from the Organize menu:
Into One Folder Copies or moves the imported photos into a new folder.
By Original Folders Maintains the original hierarchy for the folders that contain the imported photos.
By Date Specifies a date name for the folder that contains the imported photos.
6 Select Ignore Suspected Duplicates to not import any photos that might be duplicates of existing photos in the
library.
If you deselect this option and accidently import duplicate photos, no files are overwritten. There are two copies of
the same photo.
19
7 (Optional)SelectBackupToandthenchooseadestinationtocreatebackupcopiesofthephotoswhileimporting.
Preview and select the photos to import
When you import files from disk or another catalog, you can specify what photos or folder of photos to import. In
theupper-leftcornerofeachofthepreviewthumbnailsintheImportPhotosdialogboxisacheckbox.Acheckmark
in the box means that the photo will be imported.
1 In the Import Photos or Import From Catalog dialog box, make sure Show Preview is selected.
Drag the slider below the previews to adjust the thumbnail size.
2 If you’re importing more than one folder of photos simultaneously, select a folder listed in the window above the
Ignore Suspected Duplicates option.
3 Do any of the following:
• To select all photos in a folder, click Check All. All photos are usually selected by default.
• To deselect all photos in a folder, click Uncheck All.
• To select or deselect specific photos in a folder, click the box in the upper-left corner of the previews.
Back up photos during import
If you are importing photos by copying or moving them into the library, you can create backup photo files in a
specified location. This feature is useful, for example, if you want to back up to a completely different drive for
immediate backup protection on import.
1 In the Import Photos dialog box, select Backup To and then click Choose.
2 IntheImportPhotosdialogbox,navigatetothedestinationyouwant,andthenclickOK(Windows)orChoose
(Mac OS).
Page 24

PHOTOSHOP LIGHTROOM
User Guide
Name photos when importing
When copying or moving photos into the library during import, you can specify how the files are named.
1 In the Import Photos dialog box, choose an option from the Template menu in the File Naming area:
2 If you chose a naming option that uses a custom name, type the name in the Custom Text box.
3 If you don’t want a numeric sequence to start with “1,” enter a value in the Start Number box.
Naming options
Lightroom uses the same naming options for importing, renaming, and exporting photos.
Custom Name (x of y) Names the auto-imported photos using a custom name, followed by sequential numbers in
relation to the total number of photos being imported. For example, 1 of 10, 2 of 10, 3 of 10, and so forth.
Custom Name - Original File Number Names the auto-imported photos using a custom name, followed by the
photos’ original filenames.
Custom Name - Sequence Names the auto-imported photos using a custom name, followed by sequential numbers
starting with the number you specify.
Custom Name Names the auto-imported photos using a name you specify.
Date - Filename Names the auto-imported photos using the creation date, followed by the photos’ original
filenames.
20
Filename - Sequence Names the auto-imported photos using the photos’ original filenames, followed by sequential
numbers starting with the number you specify.
Filename Names the auto-imported photos using the photos’ original filenames.
Edit Names theauto-imported photos usingthe optionsyou set inthe Filename Template Editor. See “The Filename
Template Editor and Text Template Editor” on page 20.
The Filename Template Editor and Text Template Editor
The Filename Template Editor and the Text Template Editor let you specify text strings for different uses. Using the
FilenameTemplateEditor,youcanusethetextstringstonamefilesasthey’rebeingimportedorexported.Usingthe
TextTemplateEditor,youcanusethetextstringstoaddcaptionstophotosinaslideshow,addtextoverlaystophotos
being printed, and add titles and other text to web gallery pages.
A token isatextstringthatisreplacedbythecorrespondingoptionyouset.IntheFilenameTemplateEditorandthe
Text Template Editor, tokens specify the content data that replaces the text string. This saves you the effort of
manually typing content data and lets you leverage the data already in the photo files.
The Filename Template Editor and the Text Template Editor include the following elements:
Preset menu Chooses, saves, deletes, or renames presets.
Image Name Specifies a text string option using the filename, folder name, or a custom name.
Numbering Specifiesatextstringusinganimportnumberbasedonhowmanyphotoshavebeenimportedintothe
library, sequence number, or image sequence number. (This element is only available in the Filename Template
Editor, when importing or auto-importing photos, and in the Text Template Editor, when creating slideshows,
printing photos, or creating web photo galleries.)
Additional Specifies a text string option using the creation date, or Exchangeable Image Format (EXIF) data. (This
element is only available in the Filename Template Editor, when importing or auto-importing photos.)
Page 25

PHOTOSHOP LIGHTROOM
Sequence And Date Specifies a text stringoption usingsequential numbers and creation dates. (This element is only
User Guide
available in the Filename Template Editor, when exporting photos.)
EXIF Data Specifies a text string option using EXIF data. (This element is only available in the Filename Template
Editor, when exportingphotos, orin the TextTemplateEditor,when creatingslideshows, printing photos, or creating
web photo galleries.)
IPTC Data Specifies a text string option using IPTC metadata. (This element is only available in the Text Template
Editor, when creating slideshows, printing photos, or creating web photo galleries.)
Custom Uses the options you specify for the text string.
Open the Filename Template Editor and choose presets
1
Do any of the following to open the Filename Template Editor:
• In the Import Photos dialog box, choose edit from the File Naming menu when importing photos into the library
by copying or moving files. See “Name photos when importing” on page 20.
• Choose File > Auto Import > Auto Import Settings, and then choose Edit from the File Naming menu in the Auto
Import Settings dialog box. See “Specify Auto Import settings” on page 25.
•
Choose File > Export, andthen choose Editfrom the Template menu in theFile Namingarea ofthe Export dialogbox.
2 Choose a preset from the Preset menu.
21
Open the Text Template Editor and choose presets
1
Do any of the following to open the Text Template Editor:
• In the Slideshow module, add text to the slide layout. Make sure the text is selected in the work area, and then
choose Edit from the Custom Settings menu in the toolbar. See “Add text and metadata to slides” on page 104.
• In the Overlays panel of the Print module, select Photo Info, then click the triangle next to Custom settings and
choose Edit from the pop-up menu. See “Print filename, caption, and other information” on page 116.
• IntheWebmodule,selectanyoptionintheImageSettingspanel.Clickthetrianglenexttotheoptionandchoose
Edit from the pop-up menu. See “Adding text to web galleries” on page 125.
2 Choose a preset from the Preset menu.
Create and save filename and text template presets
1
In the Filename Template Editor dialog box or the Text Template Editor dialog box, choose an option and then
click Insert for as many categories as you want. This creates the text string.
For example, chose Filename from the Image Name menu and then click Insert. A token is added to the window just
below the Preset menu. Add one or as many tokens as you want.
2 Move your pointer over the token displayed in the Example window. Click the triangle to see more options, and
then choose an option from the pop-up menu.
3 To delete tokens, select one or more tokens in the window and then press the Delete key.
If you don’t want to save your token settings as a preset and want to use them immediately, skip the remaining steps
and click Done.
4 (Optional) To save your settings for reuse, choose Save As New Preset from the Preset menu., and in the New
Preset dialog box, type a name in the Preset Name text box, and click Create.
5 (Optional) In the New Preset dialog box, type a name in the Preset Name text box, and click Create.
Page 26

Rename filename and text template presets
1
In the Text Template Editor, choose a preset from the Preset menu.
2 Choose Rename Preset from the Preset menu.
Delete filename and text template presets
1
In the Text Template Editor, choose a preset from the Preset menu.
2 Choose Delete Preset from the Preset menu.
PHOTOSHOP LIGHTROOM
User Guide
Apply Develop settings to photos when importing
Any Develop settings preset can be applied to photos as they’re imported. This is especially useful for applying
Develop settings to photos from a camera for which you created a Develop preset.
❖ In the Import Photos dialog box, choose a setting from the Develop Settings menu.
See also
“Create and apply Develop presets” on page 71
Apply metadata to photos when importing
❖ In the Import Photos dialog box, choose any of the following options from the Metadata menu:
• To not apply metadata to photos during import, choose None.
• To apply a set of metadata that you saved as a template, choose a metadata preset from the menu.
• To apply a new set of metadata to photos while importing, choose New and enter the information in the New
Metadata Preset dialog box.
• To add keyword metadata to photos while importing, type the keywords in the Keywords text box. Use commas
to separate the keywords.
22
Note: When adding metadata to photos, Lightroom doesn’t apply the data to proprietary camera raw files but to their
sidecar XMP files.
Specify Standard-Size previews when importing
As photos are imported, Lightroom can immediately display the photo’s embedded previews or display previews as
the program renders them. You can choose the rendered size for previews using the Standard Preview Size menu in
File Management preferences. Please keep in mind that embedded previews are created on-the-fly by cameras and
are not color managed. So, embedded previews don’t match Lightroom’s interpretation of the camera raw files. On
the other hand, previews rendered by Lightroom are color managed.
❖ In the Import Photos dialog box, do one of the following:
• To display previews as Lightroom renders them, select Render Standard-Size Previews.
• To immediately display images using the previews embedded in the photos, deselect Render Standard-Size
Previews. Lightroom renders standard-size previews when needed.
Page 27

PHOTOSHOP LIGHTROOM
User Guide
Set preview cache
Lightroom renders three types of previews: thumbnails, screen resolution images, and 1:1 previews. 1:1 previews
have the same pixel dimensions as the original photos. All previews are stored in the folder where your catalog is
located.
1 Choose File > Catalog Settings.
2 Choose from the following menus:
Standard Preview Size Specifies the maximum pixel dimension for the rendered preview. Choose the size that
accommodates the display size you’re working with.
Preview Quality Specifies the appearance of the previews. Low, Medium, and High are similar to the upper range of
the quality scale for JPEG files.
Automatically Discard 1:1 Previews Specifies when 1:1 previews are discarded. 1:1 previews are rendered as needed
and can make the library preview file large.
Import photos from Photoshop Elements or Photoshop Album 2.0 (Windows)
Lightroom detects if your computer has a Photoshop Elements or Photoshop Album 2.0 catalog, and can import
photos and data from the catalogs. This feature is not available on Mac OS.
23
1 In the Library module, choose File > Import From Elements. If prompted, click OK to continue importing.
2 Choose any of the following from the Select The Catalog To Import menu:
Adobe Photoshop Elements Imports photos from the current Photoshop Elements catalog. (Skip step 3.)
Custom Location Imports photos from a backed-up catalog.
3 If you chose Custom Location, click Choose, navigate to the backed-up catalog you want, and click Open.
4 In the Import Photos dialog box, select the photos and import options, and then click Import.
For more information on importing photos from Photoshop Elements or Photoshop Album, see
www.adobe.com/go/kb400736.
See also
“Import photos into Lightroom: Basic workflow” on page 15
Import photos from a catalog into Lightroom
When you import photos from a different catalog, you can specify optionsto handle new photos and existingphotos
(photos that already appear in the current catalog).
Note: Before you can import photos from a Lightroom 1.0 database (.lrdb), you must open the 1.0 database file as a
catalog in Lightroom 1.1 to convert it.
1 Choose Files > Import From Catalog.
2 Double-click the catalog to import.
3 Specify the photos to import:
• Under Catalog Contents, make sure the folders containing the photos to import are selected.
• To select or deselect individual photos, click Show Preview, and click the box in the upper-left corner of any
preview image. You can also choose Check All or Uncheck All.
Page 28

PHOTOSHOP LIGHTROOM
User Guide
4 In the New Photos area, choose from the File Handling menu whether to import new photos at their current
location or at a new location. If you choose to import at a new location, click Choose and specify a folder. If you
choose not to import new photos, only photos that exist in the current catalog are replaced.
5 In the Existing Photos area, do any of the following:
• Replace metadata, Develop settings, and negative files to override all the settings in the current catalog. If you
choosethisoption,youmightwanttoselectthePreserveOldSettingsAsAVirtualCopyoptiontokeepabackup.
You can also select the Replace Non-Raw Files Only option to avoid replacing raw negatives. If changes to raw
negative files affect only metadata, selecting this option helps save time.
• Replace metadata and Develop settings only to leave the negative files (the source photos) unchanged. If you
choose this option, you might want to select the Preserve Old Settings As A Virtual Copy option to keep a backup.
• Replace nothing to import only new photos.
• If photos in the current catalog are missing and can be found in the imported catalog, indicate whether you want
to update the metadata and Develop settings for this file. Select the Preserve Old Settings As A Virtual Copy
option to keep a backup. If the photos missing in the current catalog appear in the imported catalog, specify
whether the missing files are copied and where they copied to.
6 Click Import.
24
See also
“Import photos from Lightroom 1.0” on page 24
Import photos from Lightroom 1.0
The Lightroom 1.0 catalog (previously called a library or database) you were using previously should be converted
when you first start Lightroom 1.1. In some cases, such as when you created multiple libraries, you need to open the
Lightroom 1.0 library in Lightroom 1.1 before you can import photos from that library.
1 Choose File > Open Catalog, and then double-click the Lightroom 1.0 library database file (Lightroom
Database.lrdb).
By default, the library database stored in the Lightroom folder inside the My Pictures (Windows) or Pictures (Mac
OS) folder.
2 Click Relaunch to close the current catalog and open the selected database file. When prompted, click Continue.
After the Lightroom 1.0 database file is open, youcan import the files into a Lightroom 1.1catalog. For example, you
can choose a different catalog (such as Lightroom Catalog.lrcat) from the File> Open Recent menu, and thenchoose
File > Import From Catalog to import the files from a Lightroom 1.0 database.
See also
“Create and manage catalogs” on page 32
Page 29

PHOTOSHOP LIGHTROOM
User Guide
Importing automatically
About Auto Import
The Auto Import feature automaticallyimports photosinto the Lightroom library by monitoring a watched folder for
photos and then moving the photos into a managed folder in the library. The feature has many uses. For example, if
your camera manufacturer’s software provides a tethered connection feature and can download the photos to a
watched folder, Lightroom can monitor the folder and automatically import the photos as they’re being taken. Auto
Import does not import images from a subfolder of a Watched folder.
See also
“Synchronize folders” on page 41
Enable automatically importing photos
❖ Choose File > Auto Import > Enable Auto Import.
Specify Auto Import settings
1 Choose File > Auto Import > Auto Import Settings.
2 In the Auto Import Settings dialog box, specify any of the following:
Watched Folder Chooses or creates the watched folder where Lightroom detects photos to auto import.
25
Destination Folder Chooses or creates a managed folder where the auto-imported photos are moved into.
File Naming Names the auto-imported photo.
Information Applies Develop settings, metadata, or keywords to auto-imported photos.
3 Select Render Standard-Sized Previews to have Lightroom render previews of the imported photos rather than
only using the embedded previews in the photo files.
See also
“Naming options” on page 20
“Specify Standard-Size previews when importing” on page 22
Set up watched folders
1
In the Auto Import Settings dialog box, click the Choose button next to Watched Folder.
2 Navigate to the location you want and do any of the following:
• To create a watched folder, click Make New Folder and then overwrite New Folder to give the folder a name
(Windows), or click New Folder (Mac OS), give the folder a name, and click Create.
• To select an existing watched folder, select the folder.
Note: You cannot choose an existing folder containing photos as a watched folder.
3 Click OK (Windows) or Choose (Mac OS).
Page 30

PHOTOSHOP LIGHTROOM
User Guide
Select managed folders for auto-imported photos
When Lightroom detects photos added to a watched folder, the photos are moved into a managed folder called a
destination folder and automatically imported into the library.
1 In the Destination area of the Auto Import Settings dialog box, click the Choose button beside Copy To.
2 In the Browse For Folders (Windows) or Open (Mac OS) dialog box, navigate to the location you want, and do
any of the following:
• To create a destination folder, click Make New Folder and then overwrite New Folder to give the folder a name
(Windows), or click New Folder, give the folder a name, and click Create (Mac OS).
• To select an existing destination folder, select the folder.
3 Click OK (Windows) or Choose (Mac OS).
4 (Optional) Type a name for the destination folder in the Subfolder Name text box.
Apply Develop settings and metadata to auto-imported photos
❖ In the Information area of the Auto Import Settings dialog box, do any of the following:
• To apply Develop settings to auto-imported photos, choose a preset from the Develop Settings menu. See “Create
and apply Develop presets” on page 71.
• To apply metadata to auto-imported photos, choose a preset from the Metadata menu. See “Create a metadata
preset” on page 57.
• Toapply keywords toauto-imported photos, typein the Keywords text box.Use commasto separatethe keywords.
• To have Lightroom render previews of the imported photos rather than only using the embedded previews in the
photo files, select Render Standard-Sized Previews.
26
Page 31

Chapter 4: Organizing photos in the catalog
The Library module is where you view, organize, and manage the photos in the Adobe® Photoshop® Lightroom™
catalog. In the Library module, you can select photos to which you want to make develop adjustments, display in a
slideshow, print, or assemble into a web photo gallery.
Library module overview
About Lightroom catalogs
A catalog is how Lightroom tracks the location of files and remembers information about them. It’s like a database
that contains a record of your photos. This record is stored in the catalog and contains data, such as preview information, links that indicate where the photos are located on your computer, metadata that describes the photos, and
editing instructions recorded in the Develop module. When you rate photos, add metadata and keyword tags,
organize photos into collections, or remove photosfrom the catalog—even when theoriginal photofiles are offline—
the settings are stored in the catalog.
27
All ofthis informationenables Lightroom to give you flexibility inmanaging, identifying, and organizing photos and
media files. For example, if you’re photographing on location, youcan import photos into Lightroom on your laptop
computer, and then later move the original photo files onto writable media or storage devices, and continue
organizing and managing your photos without the worry of filling up your laptop’s hard drive with all your original
photos. You can then transfer the catalog to your desktop computer, preserving the changes you make and keeping
track of where the photos are stored. (In Lightroom 1.0, catalogs are called libraries or library databases.)
Note: Though you can view photos in both Lightroom and Adobe Bridge, the two applications behave differently. To
viewphotosinAdobeBridge™,yourcomputerharddrivemustcontainthephotosoryourcomputermustbeconnected
to a storage media containing photos. This is because Adobe Bridge is a file browser that only displays readily accessible
photos. The Lightroom catalog is a database that keeps track of the photos you import, so you can view photo previews
and data whether your hard drive contains the actual photos or not.
By default, Lightroom loads the most recent catalog. You can open a different catalog by choosing File > Open
Catalog, or you can determine which catalog is opened in the General preferences.
See also
“Create and manage catalogs” on page 32
“Getting photos into your library” on page 15
The Library module
Photos in the catalog and their accompanying data are viewed in the Library module. You can view all photos in the
catalog as thumbnails in a grid or the catalog can be filtered in different ways to show only the photos you need to
see. The Library module has controls you use to search for and display specific photos and data. You can also group
photos into collections or a temporary collection called a Quick Collection,or use keyword tags and metadata to find
your photos.
Page 32

PHOTOSHOP LIGHTROOM
User Guide
The Library module is where you view, sort, manage, organize, compare, and rate your photos. It’s your home base
for working with photosafter importing them intoLightroom. Photos are displayed in the central area ofthe Library
module:
Grid view Displays photos as thumbnails in cells, which can be viewed in compact and expanded sizes. The Grid
view gives you an overview of your entire catalog or specific groups of photos in your catalog for rotating, sorting,
organizing, and managing your photos. Options are available for viewing information about photos, including their
ratings, color labels, and Pick or Rejected flags in the cells. If you photographed a series of similar photos, they can
be neatly grouped in a stack with the thumbnail of the best photo showing. See “Grouping photos into stacks” on
page 47.
Loupe view Displaysasinglephoto.Controlsletyouviewtheentirephotoorzoomintoseepartofit.Zoomlevels
up to 11:1 are available.
Compare view Displays photos side-by-side so that you can evaluate them.
Survey view Displays the active photo with selected photos so that you can evaluate them. The active photo has a
Selected Photo icon and the other photos have a Deselect Photo icon.
TherearebuttonsandcommandsforswitchingbetweenviewsintheLibrarymodule.Whenyou’reintheGridview,
double-clicking a photo displays the image in Loupe view. See “Switch between Grid, Loupe, Compare, and Survey
views” on page 30.
28
The panels on the left side are primarily for finding and displaying specific photos. You can find photos by using a
text search, specifying a capture time range, or selecting specific folders, collections, keyword tags, or metadata.
Being able to search for and find photos is important when you want to locate specific images, or assemble a group
of photos into slideshows or web photo galleries, or print your photos in a contact sheet. See “Working with collections” on page 45 and “Finding photos in the catalog” on page 65.
The panels on the left also have features for adding photos to a folder or collection, or assigning keyword tags or
metadata to photos. The Navigator panel lets you adjust the view of your photos in Loupe view. See “Browse photos
by folders” on page 39, “Working with keywords” on page 59, and “Viewing photos in Loupe view” on page 10.
The panels on the right side let you view a histogram of the active photo, as well as view and add metadata and
keyword tags to photos. The Quick Develop panel lets you quickly applying tone adjustments to photos without
leaving the Library module. The tone adjustments in the Quick Develop panel are the same as their counterparts in
the Develop module. However, the Develop module has more precise controls for making adjustments and edits to
the image. See “Reading image histograms” on page 70, “Viewing and editing metadata” on page 54, and “Quick
Develop” on page 88.
Depending on the view, the toolbar contains controls for sorting, applying keywords or ratings, rotating photos,
playing an impromptuslideshow,or viewing information about the photo. See “Show controls in theLibrary module
toolbar” on page 29.
Like all modulesin Lightroom, the Library module displays the Filmstrip along the bottom. Applying filters to show
only certain photos in the Filmstrip determines which photos appear in the Grid view. See “Filtering and rating
photos” on page 50 and “Filter the photos displayed in the Filmstrip and Grid view” on page 8.
Page 33

PHOTOSHOP LIGHTROOM
User Guide
A
29
B
The Library module
A. Selected photo information B. View buttons C. Information box D. To o lb ar me nu
C D
Show controls in the Library module toolbar
Depending on which view is active in the Library module, the toolbar contains controls for browsing the library,
applyingmetadata,startinganimpromptuslideshow,rotatingphotos,andfilteringphotosbyapplyingratings,picks,
or labels. The toolbar’s information box displays the photo’s filename.
1 To show controls in the toolbar, choose any of the following from the toolbar pop-up menu:
Painter (Grid view only) Lets you apply keywords and other attributes quickly by dragging the Painter tool across
photos.
Sorting (Grid view only) Specifies the sort direction or sorting criteria for displaying the photo thumbnails.
Rating Assigns, removes, and displays rating stars for selected photos.
Pick Assigns, removes, and displays a Pick or Rejected flag for selected photos.
Color Label Assigns, removes, and displays color labels for selected photos.
Rotate Rotates selected photos clockwise or counterclockwise.
Navigate Selects the previous or next image.
Slideshow Plays an impromptu slideshow of the photos.
Thumbnail Size (Grid view only) Sets the size of the photo thumbnails.
Zoom (Loupe view only) Zooms the view in or out.
Info Displays the selected photo’s filename in the information well.
2 (Optional) Choose a selected item in the toolbar pop-up menu to remove the control from the toolbar.
See also
“Customize the toolbar” on page 7
Page 34

PHOTOSHOP LIGHTROOM
User Guide
Switch between Grid, Loupe, Compare, and Survey views
In the Library module, you can view thumbnails in the Grid view, a single photo in Loupe view, two photos in
Compare view, or two or more photos in Survey view.
❖ In the Library module, do any of the following:
• Click the Grid View , Loupe View , Compare View , or Survey View icon in the toolbar.
• Choose View > Grid, Loupe, Compare, or Survey.
• Choose View and then choose either ToggleLoupe View or Toggle Zoom Viewto togglebetween thechosen view
and the previous view.
• With one or more photos selected in the Grid view, choose Photo > Open in Loupe to switch to the Loupe view.
Set library view options for the Grid view
The Library View Options determine how photos look in the Grid view. You can specify different combinations of
elements, ranging from showing only thumbnails, to thumbnails accompanied with photo information, filters, and
Rotation buttons.
1 In the Library module, choose View > View Options.
2 In the Grid View tab of the Library View Options dialog box, select Show Grid Extras to view information and
icons in the photo thumbnail cells. (Show Grid Extras is selected by default.)
30
Deselecting this option shows photo thumbnails with no additional information in the Grid view.
3 In the Options area of the dialog box, select any of the following items:
Show Clickable Items On Mouse Over Only Shows clickable items, such as Rotation buttons and flags, only whenthe
pointer moves over the cell. Deselecting this option means clickable items are always displayed.
Tint Grid Cells With Color Labels Displays the label colors in the background of each cell.
Show Tooltips Displays a description of an item, such as a photo, badge, or pick flag, when you hold the mouse
pointer over the item.
4 In the Cell Icons area of the dialog box, select any of the following items to appear in expanded cells:
Pick Flags Makes Pick or Rejected flags available in the upper left corner of the thumbnail cell.
Quick Collection Markers Shows the Quick Collection marker in the upper right corner of the photo thumbnail.
Thumbnail Badges Shows thumbnail badges indicating which photos have keywords, cropping applied, or image
adjustments.
Unsaved Metadata When you’ve added metadata or metadata keywords toa photo in Lightroomwithout savingthe
metadata to file, a down arrow icon appears in the upper right corner of the cell area. If you’ve added metadata
to a file in both Lightroom and a different application, such as Adobe Bridge, an exclamation mark indicates
that metadata has been saved to the file in an external application.
5 In the Compact Cell Extras area, select any of the following to appear in compact cells:
Index Number Shows the order number of the photo in the Grid view.
Rotation Makes Rotation buttons available.
Top Label Shows the top label you choose from the menu.
Bottom Label Shows the bottom label you choose from the menu.
Page 35

PHOTOSHOP LIGHTROOM
User Guide
6 In the Expanded Cell Extras area, select any of the following to appear in expanded cells:
Show Header With Labels Shows the header area of the thumbnail cell. The header area can display up to four labels
that you choose from the menus.
Show Footer Shows the footer items you select.
Use Defaults Restores the Grid view options to their factory-set defaults.
7
From the Show GridExtras menu, choose oneof the following to set the size of the thumbnail cells in the Grid view:
Expanded Cells Displays the most photo information available in the Grid view, including filters, metadata, Quick
Collection marks, index numbers, and Rotation buttons.
Compact Cells DisplaysmallercellswithlessphotoinformationsothatmorethumbnailsarevisibleintheGridview.
Change the Grid view options
YoucanquicklychangetheGridviewoptionsbychoosingfromtheGridViewStylemenu.Theviewsarebasedon
the default or custom view options set in the Library View Options.
❖ In the Grid view, choose View > Grid View Style and choose any of the following:
Show Extras Shows or hides cell extras set in the Library View Options.
Show Badges Shows or hides keyword tags, cropping, and image adjustment badges.
31
Compact Cells Shows compact cells in the Grid view.
Expanded Cells Shows expanded cells in the Grid view.
Cycle View Style Cycles through the different views available in the Grid View Style menu.
Set Library view options for Loupe view
The Library View Options determine whatinformation displayswith your photos inthe Loupe view. You can specify
two different sets of information.
1 In the Library module, choose View > View Options.
2 In the Loupe View tab of the Library View Options dialog, select Show Info Overlay to display information with
your photos. (Show Info Overlay is selected by default.)
Deselecting this option displays photos with no information overlay in the Loupe view.
3 In the Loupe Info 1 and Loupe Info 2 areas of the dialog box, use the menus to choose what displays in the two
Info Overlays in the Loupe view. You can select up to three items in each overlay, including the filename, metadata,
or no data.
4 Select Show Briefly When Photo Changes to briefly display the Info Overlays only when photos change in the
Loupe view.
5 Under General area of the dialog box, select Show Messages When Loading Or Rendering Photos to display
overlays in the Loupe view during a process.
6 From the Show Info Overlay menu, choose Info 1 or Info 2 to select the currently active Info Overlays in Loupe view.
Change the Loupe info view
❖ In the Library module, choose View > Loupe Info and then choose any of the following:
Show Info Overlay Displays the Info Overlay specified in the Library View Options.
Page 36

PHOTOSHOP LIGHTROOM
User Guide
Info 1 Displays the Info 1 Overlay.
Info 2 Displays the Info 2 Overlay.
Cycle Info Display Cycles through the two Info Overlay sets.
Change the thumbnail size in the Grid view
1 In the Grid view, choose Thumbnail Size from the toolbar menu.
The Thumbnails control won’t be available unless this option is selected.
2 Drag the Thumbnails slider.
Create and manage catalogs
When you launch Lightroom andimport photos, a catalog file (Lightroom Catalog.lrcat) is automatically created for
you. You don’t have to create it yourself. The catalog keeps track of the photos and their information, but it doesn't
contain the actual photo files themselves. Most people want to keep all their photos in one catalog, which can have
thousands of photos. You might want to create separate catalogs for different purposes, such as home photos and
business photos. You can import photos into different catalogs.
Keep in mind that you can create collections to organize your photos within a catalog.
32
For a video on using catalogs to manage your photos, see www.adobe.com/go/learn_lr_video_catexport.
See also
“Change catalog settings” on page 33
“Import photos from Lightroom 1.0” on page 24
Create a new catalog
When you create a catalog, you create a name for the folder, such as “Wedding Photos,” that includes a catalog file
(such as “Wedding Photos.lrcat”). This catalog file stores catalog settings. When you import photos, a new subfolder
(such as “Wedding Photos Previews.lrdata”) is created to store the JPEG preview images.
1 Choose File > New Catalog.
2 Specify the name and location of the new catalog folder, and then choose Save.
Lightroom is reset and the Library module is empty, ready for you to import photos.
Create a new catalog from existing photos
When you create a new catalog from selected photos, the settings in the photos are exported to the new catalog.
1 Select the photos you want to add to the new catalog.
2 Choose File > Export As Catalog.
3 Specify the name and location of the catalog.
4 Indicate whether you want to export the negative files and previews, and then click Save.
“Negative files” refers to the original files that were imported into Lightroom.
A new catalog is created that contains the selected photos and their information. You must open the new catalog to
view it.
Page 37

PHOTOSHOP LIGHTROOM
User Guide
Open a different catalog
When you open a different catalog, Lightroom closes the current catalog and relaunches.
1 Choose File > Open Catalog.
2 In the Open Catalog dialog box, specify the catalog file, and then click Open.
You can also choose a catalog from the File > Open Recent menu.
3 If prompted, click OK to close the current catalog and relaunch Lightroom.
You can also change General preferences to specify which catalog is opened when Lightroom is started.
Delete a catalog folder
When you delete a catalog folder, you erase all the work you’ve done in Lightroom that isn’t saved in the photo files.
While the previews are deleted, the original photos being linked to are not deleted.
❖ Using Windows Explorer or Mac OS Finder, locate the catalog folder you created and drag it to the trash.
Change the default catalog
By default, Lightroom opens the most current catalog at startup. This behavior can be changed to opening a different
catalog or to always prompt you to choose a catalog.
33
❖ In the General preferences, choose one of the following from the When Starting Up Use This Catalog menu:
The file path of a specific library Opens the catalog found at a specific file path location.
Load Most Recent Catalog Opens the most recent catalog you’ve been working with.
Prompt Me When Starting Lightroom Opens the Select Catalog dialog box at startup.
Note: You can also click Other, navigate to a specific catalog file (.lrcat) or Lightroom 1.0 database file (.lrdb), and select
it as the default library to open at startup.
Change catalog settings
1 Choose File > Catalog Settings.
2 In the General tab, do any of the following:.
Information Provides information such as the location, file name, and creation date of the catalog. Click Show to
view the file in Exporer (Windows) or Finder (Mac OS).
Backup Specifies the frequency in which the current catalog is backed up. If a catalog file is accidentally deleted or
becomes corrupt, the backupfile may helpyou recover your data. Backupfiles are storedin the Backups folder inside
the Lightroom data folder.
Relaunch And Optimize After you have imported and removed a number of files, you may have a wait a significant
amount of time while working in Lightroom. In such instances, you should relaunch and optimize your catalog.
3 In the File Handling tab, do any of the following:
Preview Cache Determines how Lightroom renders preview images. See “Set preview cache” on page 23.
Import Sequence Numbers Tomonitor thenumber of photos that have been imported into thecurrent catalog, refer
tothePhotosImportedtextboxintheImportSequenceNumbersarea.See“TheFilenameTemplateEditorandText
Template Editor” on page 20.
Page 38

PHOTOSHOP LIGHTROOM
User Guide
4 In the Metadata tab, do any of the following, and then click OK:
Offer Suggestions From Recently Entered Values Whenyoustarttypingametadataentrythatresemblesaprevious
entry, one or more suggestions appear as you type. Deselect this option to turn it off.Click Clear All Suggestion Lists
to clear previous entries.
Write Develop Settings To XMP For JPG, TIFF, And PSD Select this option to save develop settings directly to the
XMP sidecar files, thereby making the changes visible in other applications. Deselect this option to save develop
settings only in the catalog.
Automatically Write Changes Into XMP Select this option tosave metadata changes directly to the XMP sidecar files,
thereby making the changes visible in other applications. Deselect this option to save metadata settings only in the
catalog.
Metadata Browser Categories Select the categories you want to appear in the Metadata Browser panel. See “Find
photos using the Metadata Browser” on page 66.
Browsing the catalog
Show photos in the Grid view and the Filmstrip
Lightroom provides many ways to show specific photos in the Grid view and the Filmstrip. The method you use
depends on which photos you want to see. The options in the Library panel let you instantly display all photos in the
catalog or the Quick Collection, or the most recently imported photos.
34
Note: YoucanalsoshowphotosintheGridviewandtheFilmstripbyviewingspecificcollections,findingphotos,filtering
photos using flags, ratings, and labels, browsing by folders, and searching for specific metadata.
❖ In the Library panel, select any of the following:
All Photographs Shows all the photos in the catalog.
Quick Collection ShowsphotosintheQuickCollection.TolearnaboutgroupingphotosintheQuickCollection,see
“Assemble photos into the Quick Collection” on page 9.
Previous Import Shows photos from the most recent import.
Other categories, such as Missing Files or Previous Export As Catalog, may also appear in the Library panel.
See also
“Working with collections” on page 45
“Finding photos in the catalog” on page 65
“Browse photos by folders” on page 39
“Filtering and rating photos” on page 50
Page 39

PHOTOSHOP LIGHTROOM
User Guide
Navigate between images
In the Library module, you navigate between images by selecting the previous or next photo.
❖ In any view of the Library module, do one of the following:
• To select the previous photo, press the Left Arrow key, click the Select Previous Image icon in the toolbar or
choose Library > Previous Selected Photo.
• Toselectthenextphoto,presstheRightArrowkey,clicktheSelectNextImageicon inthetoolbarorchoose
Library > Next Selected Photo.
Note: MakesureNavigateischosenfromthetoolbarmenufortheSelectPreviousImageandSelectNextImageiconsto
appear.
Rearrange photos in the Grid view
❖ In the Grid view, do any of the following to rearrange photos in the grid:
• Click the Sort Direction icon in the toolbar.
• Choose a sort option from the Sort pop-up menu in the toolbar.
• Drag from the center of a thumbnail to sort in any order.
For a video on sorting photos, see www.adobe.com/go/learn_lr_video_sort.
35
Select photos in the Grid view and the Filmstrip
YouselectphotosintheGridviewthatyouwanttoworkwithintheLibraryorothermodules.Thephotosyouselect
are reflected in the Filmstrip. Likewise, the specific photos selected in the Filmstrip are displayed in the Grid view.
When you select a photo, it becomes the active photo. You can select multiple photos, but only one photo at a time
istheactivephoto.SelectedphotosareindicatedinthegridandtheFilmstripbyathinwhiteborderandacellcolor
that’s lighter than unselected photos. The active photo is indicated by the lightest colored cell.
Page 40

PHOTOSHOP LIGHTROOM
User Guide
36
The active photo is indicated by a lighter colored cell than other selected photos.
When you have several photos selected, you can click any selected photo to make it active without deselecting the
other photos. If you click a photo outside of the selection, it becomes the active photo, and all other photos are
deselected.
Note: You can also select or deselect flagged photos in the Grid view and the Filmstrip. See “Select flagged photos” on
page 53.
1 (Optional) In the Library module, select items in the Folders, Collections, Keyword Tags, or Metadata Browser
panels, or specify the find criteria in the Find panel to display the photos you want to use.
2 In the Grid view or the Filmstrip, do any of the following:
• To select a photo, click a photo thumbnail.
• To select non-contiguous photos in the Filmstrip, click the first photo and then Ctrl-click (Windows) or
Command-click (Mac OS) additional photos.
• To select a photo and all photos between it and the active photo, Shift-click a photo.
• To select all photos, choose Edit > Select All.
• To deselect all photos, choose Edit > Select None.
Page 41

PHOTOSHOP LIGHTROOM
User Guide
• To select a single photo when multiple photos are selected, click the grid cell (not the image itself). Clicking the
image makes that image active without deselecting the other cells.
• To deselect the active photo and select a different active photo in a multiple-photo selection, choose Edit >
Deselect Active Photo. The next photo in the multiple-photo selection becomes the active photo.
• To select only the active photo and deselect all other photos in the multiple selection, choose Edit > Select Only
Active Photo.
• To deselect selected photos and select photos that were unselected, choose Edit > Invert Selection.
When you select multiple photos, the first photo you select is the primary selection (active photo), indicated by the
brighter highlighted frame.
After selecting photos, adding them to a Quick Collection is an easy way to manage the photos you want to display
in a slideshow, print, assemble into a web gallery, or export.
See also
“Browse photos by folders” on page 39
“Finding photos in the catalog” on page 65
37
Rotate photos in the Library module
Photos imported into the catalog are automatically rotated if the Exchangeable Image Format (EXIF) data includes
orientation metadata. If you need to change a photo’s orientation, you can rotate photos either to the left or right.
Photos can also be rotated in the Develop, Slideshow, and Print modules.
❖ In the Library module, do any of the following:
• In the Grid view, move the pointer over a thumbnail and click one of the rotate icons in the lower corner of the cell.
• In the Loupe, Compare, or Survey view, or in the Grid view with one or more photos selected, click a rotate icon
in the toolbar. (In the Compare and Survey views, only the active photo is rotated.)
Note: If the toolbar doesn’t show the Rotate icons, choose Rotate from the toolbar pop-up menu.
• In the Loupe, Compare, or Survey view, or in the Grid view with one or more photos selected, choose Photo >
Rotate Left or Rotate Right. (In the Compare or Survey views, only the active photo is rotated.)
See also
“Rotate slides” on page 102
“Specify how photos fill an image cell” on page 113
Flip photos in the Library module
1 In the Grid view, select one or more photos.
2 In either the Grid, Loupe, Compare, or Survey view, choose one of the following from the Photo menu:
Flip Horizontal Flips photos horizontally along the vertical axis.
Flip Vertical Flips photos vertically along the horizontal axis.
Choose View > Enable Mirror Image Mode to flip all photos in the catalog horizontally along the vertical axis.
Page 42

PHOTOSHOP LIGHTROOM
User Guide
Rotate or flip photos using the Painter tool
1 In Grid view, select the Painter tool in the toolbar, and then choose Rotation from the Paint menu in the toolbar.
Note: If the Painter tool does not appear in the toolbar, choose Painter from the toolbar menu.
2 Choose the rotation or flip option in the toolbar, and then click or drag across photos to apply the setting.
3 To disable the Painter, clickthe circular well inthe toolbar. When disabled,the Painter iconis visible in thetoolbar.
Compare photos in the Library module
Lightroom lets you view large previews of one or more photos for tasks like picking out the best photo in a series.
You can view side-by-side previews of two photos at a time in the Compare view, or view tiled previews of two or
more photos in the Survey view.
In the Compare view, one photo is select (active) and the other is the candidate. Using controls in the toolbar, you
can swap the select and candidate designations, zoom in and out of one or both views simultaneously, and specify
when you’re done comparing.
In the Survey view, the selected (active) photo has a Selected Photo icon in the lower-right corner. All other
photos have a Deselect Photo icon in the lower-right corner for removing the photos from the Survey view. You
can designate the active photo by clicking any photo (not the icon in the lower-right corner).
38
Both views provide access to rating stars, color labels, and Pick or Rejected flags for each photo. Both views also let
you deselect photos to narrow down the images under consideration. See “Filtering and rating photos” on page 50.
You can alwaysswitch between the Compare and Survey views while comparingphotos to focus on only two images
or to get an overview of the photos you’re comparing.
Compare photos in the Compare view
1
In the Grid view or the Filmstrip, select two photos and then do one of the following:
• Click the Compare View icon in the toolbar.
• Choose View > Compare.
Note: If you only select one photo and then switch to Compare view, Lightroom uses the currently-selected photo and
either the last previously-selected photo or an adjacent photo in the Grid view or the Filmstrip.
2 Do any of the following to adjust the photo previews:
• Tozoom in orout of both photos simultaneously, make sure the Link Focus icon isdisplayed in the toolbar and
then drag the Zoom slider.
• To zoom in or out of one photo, select the photo, make sure the Unlink Focus icon is displayed in the toolbar
and then drag the Zoom slider.
Note: Clicking the toolbar icon toggles between Link Focus and Unlink Focus.
• To synchronize the scaling of the candidate and the select photos, click Sync in the toolbar.
3 Set the rating stars, color labels, or Pick or Rejected flags for the photos.
4 Do any of the following to specify different selected and candidate photos:
• Click Swap in the toolbar to reverse the selected and candidate photos.
• Click the Select Next Photo icon in the toolbar (or press the right arrow key) to compare subsequent photos with
the first selection. Select Previous Photo to compare previous photos with the first selection. Press the up arrow
to replace the selected photo with the current selection and replace the candidate selection with the next image.
Page 43

PHOTOSHOP LIGHTROOM
User Guide
• Click the Deselect Photo icon in the lower-right corner below the photo.
• Select the Candidate photo and then click Make Select in the toolbar.
5 Repeat steps 2 through 4 as needed.
6 Click Done to exit the Compare view and display the select photo in Loupe view.
Compare photos in the Survey view
1
In the Grid view or the Filmstrip, select two or more photos and then do one of the following:
• Click the Survey View icon in the toolbar.
• Choose View > Survey.
Note: You can always add more photos to your comparison at any time by selecting them in the Filmstrip. Keep in mind
that the previews in the Survey view are smaller when more photos are selected. See “Select photos in the Grid view and
the Filmstrip” on page 35.
2 In the Survey view, do any of the following:
• To specify the select photo, click a photo inthe work area or in the Filmstrip, or click the Select Previous Photo or
Select Next Photo icon in the toolbar.
Note: Navigate must be chosen in the Survey view toolbar pop-up menu for the icons to appear.
39
• To delete photos, click the Deselect Photo icon in the lower-right corner of a photo.
• To rate, label, or flag photos, click the rating stars, color labels, and Pick or Rejected flags beneath the photos.
Browse photos by folders
When you import photos into Lightroom, the folders containing them are displayed in the Folders panel of the
Library module. The number of imported photos is displayed to the right of the folder name. If you later add photos
to a folder in the Explorer (Windows) or Finder (Mac OS), you’ll need to import the new photos into Lightroom or
synchronize the folder to update the number displayed in the Folders panel.
❖ In the Library module, do any of the following:
• Select one or more items in the Folders panel.
• Select a photo, and in the Metadata panel, click the right-pointing arrow next to the Folder text box.
Photos inthe selected folders and their subfolders display in the Filmstrip and the Grid view. The active photo in the
selected folders appears in the Loupe or Survey view.
By default, selecting afolder shows allphotos inthat folderand all subfolders. To show only the photos in theselected
folder, choose Library > Include Photos From Submenus to deselect it.
Page 44

PHOTOSHOP LIGHTROOM
Folders panel displaying folders and many photos they contain
User Guide
See also
“Finding photos in the catalog” on page 65
“Synchronize folders” on page 41
Create new folders in the Folders panel
1
IntheFolderspaneloftheLibrarymodule,selectthefolderinwhichyouwanttocreatethenewfolder,andclick
the Plus icon (+) at the top of the Folders panel.
2 In the Create Folder dialog box, type the Folder name.
3 If photos are selected, determine whether you want the selected photos to be copied to the new folder, and then
click Create.
40
In the Folders panel, the new folder appears in the hierarchy you specified. The new folder also appears in Windows
Explorer or Mac OS Finder.
Add existing folders to the Folders panel
Whenever you import photos, the folders inwhich they appear are added automatically to the Folders panel. You can
add folders and import photos using the Folders panel.
1 In the Folders panel of the Library module, make sure that no folders are selected, and click the Plus icon (+).
If a folder is selected in the Folders panel, you can only create a folder.
2 Do one of the following:
• (Windows) In the Browse For Folders dialog box, navigate to the location you want, select the folders you want,
and then click OK.
• (Mac OS) In the Choose Or Create New Folder dialog box, navigate to the location you want, select the folders
you want, and then click Choose.
3 If necessary, specify options in the Import Photos dialog box, and click Import.
Move photos to a different folder
1
(Optional) If you’re not moving photos to an existing folder, create a new folder.
2 Select a folder in the Folders panel.
3 In the Grid view, select the photos you want to move.
4 Drag the photos to a folder in the Folders panel.
Page 45

PHOTOSHOP LIGHTROOM
The actual photos are physically moved to a different folder on the hard drive.
Delete folders in the Folders panel
1
In the Folders panel of the Library module, select one or more folders and click the Minus icon (-).
2 Click Continue in the dialog box.
The folder and its photos are removed from the catalog andthe Folders panel. The original folder and photos are not
deleted from the hard drive.
Rename folders
1
In the Folders panel of the Library module, select a folder.
2 Right-click (Windows) or Control-click (Mac OS) and choose Rename from the menu.
3 Overwrite the folder name.
User Guide
Synchronize folders
When you synchronize folders, you have the option of adding files that have been added to the folder but not
imported into the catalog, removing files that have been deleted, and scanning for metadata updates. The photo files
in the folder and all subfolders can be synchronized. You can determine which folders, subfolders, and files are
imported.
41
1 In the Folders panel, select the folder you want to synchronize.
2 Choose Library > Synchronize Folder.
3 In the Synchronize Folder dialog box, do any of the following:
• To import photos that appear in the folders but have not been imported in the catalog, select Import New Photos.
If you select Show Import Dialog Before Importing, you can specify which folders and photos are imported.
• Toremovephotosthathavebeendeletedfromthefolderbutnotfromthecatalog,selectRemoveMissingPhotos
From Catalog. If this option is dimmed, no files are missing. (You can choose Show Missing Photos to display the
photos in Grid view.)
• To scan for any metadata changes made to the files in another application, choose Scan For Metadata Updates.
4 Click Synchronize.
5 If the Import Photos dialog box opens, specify the folders and files you want to import, and then click Import.
Managing photos
About managing files
In addition to viewing, organizing, and sorting your photos in the Library module, you can also perform
managementtaskslikerenamingphotosorconvertingthemtoDNGfileformat.Ifnecessary,youcanremovephotos
from the catalog with the option of sending them to the Recycle Bin (Windows) or Trash (Mac OS).
For a video on organizing and comparing your photos, see www.adobe.com/go/learn_lr_video_sort.
Page 46

PHOTOSHOP LIGHTROOM
User Guide
Locate missing photos
In the Grid view, Lightroom displays alerts in image cells when photos are moved offline. If photos are moved
within avolume, Lightroom usually tries toupdate thefile paths. If you’re deliberatelyorganizing and managing your
catalog with the photos offline, ignore the alerts. However, if you need to locate the photos, for example, to apply
develop settings and have them written to XMP, do the following:
1 In the Grid view, click the Question icon in a thumbnail cell.
An alert dialog box opens with the original file path.
2 Click Locate to navigate to the photo.
To located missing photos in a folder and its subfolders, select a folder in the Folders panel, choose Library >
Synchronize Folder, and click Show Missing Photos.
Note: A red folder name in the Folders panel indicates that the link to the master catalog folder is broken. Right-click
(Windows) or Ctrl-click (Mac OS) on the red folder name and choose Locate Missing Folder to restore the link.
Update photos changed by another application
In the Grid view, Lightroom displays alerts in image cells when the photos in your catalog have been changed by
another application. For example, if a photo has a one star rating in Lightroom, and the photo has been updated to
a two star rating in another application, you need to decide which rating to respect. Both cannot co-exist together.
Lightroom lets you resolve conflicting photo metadata by either overwriting its data in the catalog with metadata
from the photo or its sidecar XMP file, or overwriting the metadata in the photo file or sidecar XMP file with its
stored data in the catalog.
42
1 In the Grid view, double-click the alert icon in a cell.
2 In the Confirm dialog box, click one of the following:
Import Settings From Disk Imports the metadata from the photo or its sidecar XMP file, which overwrites the
photo’s data in the catalog.
Overwrite Settings Exports metadata from the catalog to the photo file and overwrites the data in the photo or its
sidecar XMP file.
Do Nothing Takesno action. If you select this option, be sure that the photo’s metadata in the catalog doesn’t conflict
with data in the photo or its sidecar XMP file.
Rename photos
1 In the Library module with photos selected in the Grid view, or with a selected photo in Loupe, Compare, or
Survey view, choose Library > Rename Photos.
2 In the Rename Photos dialog box, choose an option from the File Naming menu. Choose Edit if you want to
specifyanamingoptionusingtheFilenameTemplateEditor.See“TheFilenameTemplateEditorandTextTemplate
Editor” on page 20.
If you specify “sequence” for a naming option, Lightroom numbers the photos sequentially. If you don’t want the
numbering to begin with “1,” type a starting number in the Start Number text box.
Page 47

PHOTOSHOP LIGHTROOM
User Guide
Convert photos to DNG
Lightroom lets you convert camera raw files to DNG for archiving and taking advantage of DNG features. When
photos are converted to DNG, the DNG files replace the originals in the catalog. You have the option of deleting or
preserving the originals on disk after the conversion.
1 With photos selected in the Grid view, or with a selected photo in Loupe, Compare, or Survey view, choose
Library > Convert Photo(s) To DNG.
2 In the Convert Photo(s) To DNG dialog box, select any of the following conversion option:
Only Convert RAW Files Ignores photos that are not camera raw files. Deselecting this option converts all selected
photos, including JPEGs, TIFFs, and PSDs.
Delete Originals After Successful Conversion Deletes the original photo file after the conversion process ends.
Deselecting this option preserves the original file on disk.
File Extension Choose whether the file extension is .dng or .DNG.
JPEG Preview Choose whether the exported JPEG preview is full sized, medium sized, or not created.
Image Conversion Method The image data is stored in the original “mosaic” format, if possible, which maximizes
the amount of data preserved. Mosaic data can be converted to linear data but the reverse is not possible. Choose
Preserve Raw Image to store the mosaic data. Choose Convert To Linear Image to store the image data in an interpolated (“demosaiced”)format. Theresulting image can beinterpreted by other software even ifthat softwaredoesn’t
have a profile for the digital camera that captured the image.
43
Compressed (lossless) Choose whether to use lossless compression, meaning that no information is lost while
reducing the file size.
Embed Original Raw File Choose whether to store all of the original camera raw data in the DNG file.
See also
“About file formats” on page 17
Open a file in Explorer or Finder
❖ Select the photo and choose Photo > Show In Explorer (Windows) or Show In Finder (Mac OS).
The file is selected in an Explorer or Finder window.
Create virtual copies
You can have multiple versions of photos by applying different adjustment settings to virtual copies of the original
(master) photos. Virtual copies don’t exist as actual photos, but are metadata in the catalog that store the different
sets of adjustments.
You create a virtual copy of a photo and then apply adjustment settings to it. If you want another version of the master
photo, you create another virtual copy and apply the new settings to it. You can create as manyvirtual copies of a master
photo as you wish. You can even make one of the virtual copies a master, making the previous master a virtual copy.
Once created, virtual copies are automatically stacked with the master photo. In the Grid view or the Filmstrip, the
master photo displays the number of images in the upper-left corner of the thumbnail. The virtual copies display
page-turn icons on the left side of their thumbnails.
Page 48

PHOTOSHOP LIGHTROOM
User Guide
Left Original (master) photo Middle and Right Virtual copies indicated by page-turn icon
Virtualcopiesbecomeactualphotoswhentheyareexportedasacopyofthemasterphotooreditedasacopyinan
external editor.
When you create a virtual copy of a photo, “Copy 1” (or “Copy 2,” “Copy 3,” and so on) is added automatically to the
Copy Name field in the Metadata panel.
See also
“Grouping photos into stacks” on page 47
“Exporting photos” on page 90
44
“Editing in other applications” on page 95
Create virtual copies
1
(Optional) Select more than one photo in the Filmstrip or the Grid view if you want to create virtual copies of a
group of photos.
2 In the Filmstrip or in the Library or Develop module, Right-click (Windows) or Control-click (Mac OS) a photo
and do one of the following:
• If you’re creating avirtual copy of one photo, choose Create A Virtual Copy Of This Photo fromthe context menu.
• If you’re creating virtual copies of a group of photos, choose Create Virtual Copies Of These Photos from the
context menu.
If the copy does not appear in grid view, the photos may be part of a collapsed stack. Try choosing Photo > Stacking
> Expand All Stacks. If that doesn’t work, the photos may be filtered. Try using a different display method, such as
choosing All Photographs in the Library panel.
Set copy as master
1
In the Library module, select a virtual copy of another photo.
2 Choose Photo > Set Copy As Master.
Remove photos from libraries
1 With photos selected in the Grid view orthe Filmstrip, or with photos in Loupe Compare, or Survey view, do one
of the following:
• Press the Backspace key (Windows) or Delete key (Mac OS).
• Choose Photo > Delete Photo(s).
Note: When viewing a collection, the Backspace key (Windows) or Delete key (Mac OS) removes the selected photo(s)
from the collection, not from the catalog. No Confirm dialog appears.
Page 49

PHOTOSHOP LIGHTROOM
User Guide
2 In the Confirm dialog box, click one of the following:
Remove Removes photos from the catalog but doesn’t send them to the Recycle Bin (Windows) or Trash (Mac OS).
Delete Removes photos from the catalog and sends them to the Recycle Bin (Windows) or Trash (Mac OS).
Note: Selecting photos and pressing the Delete key (Windows) or forward Delete key (Mac OS, full-size keyboards only)
also removes photos from the catalog but doesn’t send them to the Recycle Bin (Windows) or Trash (Mac OS).
Working with collections
About collections
Collections area way togroup photosin one placefor easy viewing or for performinga variety oftasks. For example,
photos in a collection can be assembled into a slideshow, contact sheet, or a web photo gallery. Once created, collections are listed in the Collections panel of the Library module. They can be selectedanytime you need them. You can
create as many collections as you need.
If you need totemporarily group photos forcertain tasks, they canbe put into a Quick Collection. Unlike collections,
there can be only one Quick Collection at a time in the catalog.
45
Here are some things to keep in mind about working with collections:
• Make sure you understand the difference between catalogs and collections. Collections are groups of photos
within a catalog.
• Photos can belong to more than one collection.
• Collections preserve the sort order of the photos at the time the collection was created.
• Removing a photo from a collection doesn’t remove the photo from the catalog or send it to the Recycle Bin
(Windows) or Trash (Mac OS).
• Output module (Slideshow, Print, and Web) settings are preserved in a collection.
For a video on using collections, see www.adobe.com/go/learn_lr_video_collect.
See also
“Assemble photos into the Quick Collection” on page 9
“About Lightroom catalogs” on page 27
Create a collection
1 In the Grid view, select photos and do one of the following:
• Choose Library > New Collection.
• Click the Plus icon (+) in the Collections panel.
2 In the Create Collection dialog box, type a name in the Collection text box.
3 Select the Include Selected Photos option.
4 Click Create.
Page 50

PHOTOSHOP LIGHTROOM
Create a collection as a child of another collection
User Guide
Just as folders can be nested as subfolders within another folder, a collection can be a child of a parent collection.
This feature gives you more flexibility in organizing and managing your photos.
1 In the Grid view, select the photos.
2 In the Collections panel, Right-click (Windows) or Control-click (Mac OS) the collection that you want to be the
parent of the collection you’re creating, and choose Create Collection As Child Of This Collection.
3 In the Create Collection dialog box, type a name in the Collection text box.
4 Make sure the Create As Child Of “Name Of Collection” option and the Include Selected Photos option are
selected, and click Create.
Rename a collection
1
In the Collectionspanel, Right-click(Windows) or Control-click(Mac OS) a collection, and choose Renamefrom
the menu.
2 Overwrite the name of the collection.
Delete a collection
When you delete a collection, no photos are removed from the catalog or deleted from disk.
46
❖ In the Collections panel, select a collection and click the Minus icon (-).
Note: You can also Right-click (Windows) or Control-click (Mac OS) a collection in the Collections panel and choose
Delete from the menu.
Convert Quick Collections to collections
A Quick Collection can be saved as a collection. You have the option of clearing the Quick Collection after saving it.
1 In any module, choose File > Save Quick Collection.
2 In the Save Quick Collection dialog box, type a name in the Collection Name text box.
3 Specify one of the following actions:
• Select Clear Quick Collection After Saving to clear the Quick Collection after it’s saved as a collection.
• Deselect Clear Quick Collection After Saving to preserve the Quick Collection after it’s saved as a collection.
4 Click Save.
See also
“Assemble photos into the Quick Collection” on page 9
Add photos to a collection
1 Select photos in the Grid view.
2 Drag the photos to a collection in the Collection panel.
Remove photos from a collection
1 Select a collection in the Collections panel.
Page 51

PHOTOSHOP LIGHTROOM
User Guide
2 In the Grid view, select the photos and choose Photo > Remove From Collection.
Note: It’s also possible to select photos and press the Delete key to remove photos from a collection.
Move photos between collections
1 In the Library module, select a collection in the Collections panel.
2 In the Grid view, select photos and then drag them to the collection in the Collections panel that you want to add
them to.
The moved photos are still in the original collection.
Grouping photos into stacks
About stacks
You cancreate stacksto group aset ofvisually similar photos together, making them easy tomanage. Stacks are useful
for keeping multiple photos of the same subject or a photo and its virtual copies in one place, and they reduce clutter
in the Grid view or the Filmstrip.
47
Forexample,youmaywanttocreateastacktogroupmultiplephotosofaportraitsessiontakenwiththesamepose,
or for photos taken at an event using your camera’s burst mode or auto-bracket feature. When you take photos this
way, you end up with many similar variations of the same photo, but you usually only want the best one to appear in
theGridviewortheFilmstrip.Stackingthephotosletsyoueasilyaccessthemallinoneplaceinsteadofhavingthem
scattered across rows of thumbnails.
Whengroupingphotos in a stack, thephotosare stackedaccordingto their sort orderin theGrid view with the active
photo at the top of the stack.
A stack is collapsed when stacked photos are group under the thumbnail of the top photo in the Grid view or the
Filmstrip. A stack is expanded when all photos in a stack are visible in the Grid view or the Filmstrip.
Collapsed stack (top) and expanded stack (below)
Here are a few tips for working with stacks:
• Any develop adjustments, ratings, flags, or color labels applied to a collapsed stack affect only the top photo.
• IfyouselectaphotoinastackandaddittoaQuickCollectionorcollection,onlytheselectedphotoisadded,not
the entire stack.
Page 52

PHOTOSHOP LIGHTROOM
User Guide
• When you search for photos, the top photo in a stack appearswith the number of photos in the stack in the upper
left corner.
The top photo in a stack displays the number of photos in a stack
Stack photos
1 In the Grid view or the Filmstrip, select the photos you want to stack.
2 Choose Photo > Stacking > Group Into Stack.
The stacked photos are arranged contiguously and display stacking order numbers in the upper left corner of their
thumbnails. The top photo in the stack is “1,” the next photo is “2,” and so forth.
Note: If you select two stacks and choose Photo > Stacking > Group Into Stack, only the top photo from the second stack
is moved into the stack you selected first.
48
Unstack photos
1
In the Grid view of the Filmstrip, do one of the following:
• Select the thumbnail of a collapsed stack.
• If the stack is expanded, select any photo in the stack. You don’t have to select all photos in the stack.
2 Choose Photo > Stacking > Unstack.
Add photos to an existing stack
1
In the Grid view or the Filmstrip, select the stack and one or more photos that you want to add to the stack.
2 Choose Photo > Stacking > Group Into Stack.
Expand and collapse stacks
Expanding a stack displays all the photos in the stack. When you collapse a stack, all the photos are grouped under
the thumbnail of the top photo. The number of photos in the stack is displayed in the upper left corner of the
thumbnail.
❖ In the Grid view or the Filmstrip, do any of the following:
• To expand a stack, Right-click (Windows) or Control-click (Mac OS) a collapsed stack and choose Stacking >
Expand Stack, or double-click the stacking number displayed in the upper left corner of the photo. You can also
select a collapsed stack and choose Photo > Stacking > Expand Stack.
• To expand all stacks, Right-click (Windows) or Control-click (Mac OS) a collapsed stack and choose Stacking >
Expand All Stacks, or select any photo and choose Photo > Stacking > Expand All Stacks.
• To collapse a stack, Right-click (Windows) or Control-click (Mac OS) a photo in the stack and choose Stacking >
Collapse Stack, or double-click the stacking number in the upper left corner of the photo. You can also select a
photo in the stack and choose Photo > Stacking > Collapse Stack.
Page 53

PHOTOSHOP LIGHTROOM
User Guide
• To collapse all stacks, Right-click (Windows) or Control-click (Mac OS) a collapsed stack and choose Stacking >
Collapse All Stacks, or select any photo and choose Photo > Stacking > Collapse All Stacks.
Remove or delete photos from a stack
Removing photos from a stack keeps them in the Lightroom catalog. Deleting photos from a stack removes them
from both the stack and the catalog. Using the Delete Photos command, youalso have the option of removing photos
from the catalog and deleting them from the hard drive.
1 In the Grid view or the Filmstrip, expand a stack.
2 Select one or more photos in the stack and do one of the following:
• To remove photos from the stack, choose Photo > Stacking > Remove From Stack.
• To delete photos from the stack, choose Photo > Delete Photos. You can also Right-click (Windows) or Control-
click (Mac OS) a thumbnail and choose Delete Photo from the menu.
Removing or deleting a photo from a stack containing only two photos unstacks the photos.
Specify the top photo in a stack
Bydefault,theactivephotobecomesthetopphotoatthetimeastackiscreated.Youcanspecifyanyphotoinastack
as the top photo.
49
1 In the Grid view or the FIlmstrip, select a photo in an expanded stack.
2 Choose Photo > Stacking > Move To Top Of Stack.
Move photos in a stack
1 In the Grid view or the Filmstrip, select a photo in an expanded stack.
2 Do one of the following:
• To move the photo up in the stack, press Shift-Left bracket, or choose Photo > Stacking > Move Up In Stack.
• To move the photo down in the stack, press Shift-Right bracket, or choose Photo > Stacking > Move Down In
Stack.
Split a stack into two stacks
Photos within a stack can be grouped into a new separate stack using the Split Stack command. When split, the
original stack contains the remaining photos that were grouped into a new stack.
1 In the Grid view or the Filmstrip, expand the stack.
2 Select the photos you want grouped in a different stack.
Note: The Split Stack command is not available if you only select the top photo in a stack.
3 Choose Photo > Stacking > Split Stack.
Page 54

PHOTOSHOP LIGHTROOM
User Guide
Automatically stack photos by capture time
Lightroom can automatically stack photos in the Grid view or the FIlmstrip, based on their capture time. You specify
a duration between capture times to create a new stack. For example, suppose you specify 1 minute for the duration.
All contiguous photos with capture times less than 1minute apart are grouped in one stack. A new stack is created
when the next contiguous photo has a capture time that is 1 minute or more later than the previous photo’s capture
time.Inturn,thenewstackgroupscontiguousphotoswithcapturetimeslessthan1minuteapartfromeachother,
and so forth.
You can specify a duration between capture times of 0 seconds to 1 hour. Specifying shorter durations creates more
stacks and specifying longer durations creates fewer stacks.
1 (Optional) Find photos or select a collection, the Quick Collection, folders, keyword tags, or metadata to display
the photos you want in the Grid view or the Filmstrip.
Lightroom auto-stacks all photos in the Grid view or the Filmstrip regardless of whether some of the photos are
selected or not.
2 Choose Photo > Stacking > Auto-Stack By Capture Time.
3 In the Auto-Stack By Capture Time dialog box, drag the Time Between Stacks slider to specify the minimum
duration between capture times that creates a new stack.
50
Edit photos in a stack
Develop adjustments applied to a collapsed stack affect only the top photo.
❖ In the Grid view or the Filmstrip, do any of the following:
• To apply image adjustments to the top photo only, select a collapsed stack and make develop adjustments.
Note: Use the Synchronize Settings command or the Copy Settings/Paste Settings commands to apply image adjustments
from the top photo to other photos in a stack. See “Apply Develop adjustments to other photos” on page 86.
• To apply image adjustments to photos within a stack, select the photos in an expanded stack, and make develop
adjustments to the individual photos.
Filtering and rating photos
About filtering photos
Applying ratings, flags, and labels to photos lets you filter them so that you can find and display specific photos.
Althoughyoucanfindphotosusingkeywordsandmetadata,filteringphotoscombinedwithkeywordandmetadata
searches helps you quickly view the best photos. Filtering photos becomes even more important as your catalog
accumulates thousands of photos.
For a video on organizing and comparing your photos, see www.adobe.com/go/learn_lr_video_sort.
See also
“Filter the photos displayed in the Filmstrip and Grid view” on page 8
Page 55

PHOTOSHOP LIGHTROOM
User Guide
View ratings, flags, and labels
In the Library module, photos can display rating stars,flags, and color labels, depending on the view options you set.
Rating star and label settings are applied globally in all collections, while flag states are local. You can have different
flag states in different collections.
Note: Slideshows can show photos with rating stars. See “Display ratings in a slideshow” on page 104.
❖ In the Library module, do any of the following to show ratings, flags, and labels:
• To show flags and labels in the thumbnail cells ofthe Grid view, choose View > View Options, and then in the Grid
View tab of the Library View Options dialog box, select Pick Flags and Tint Grid Cells With Label Colors. To
display rating starts, choose Rating from the Top Label or Bottom Label menu.
• To show ratings, flags, and labels in the toolbar in the Grid or Loupe view, choose one or more of the following
from the toolbar menu: Rating, Pick, or Color Label.
Note: Ratings, flags, and labels are always available beneath photos displayed in the Compare and the Survey views.
See also
“Filter the photos displayed in the Filmstrip and Grid view” on page 8
51
Set rating stars
When assigning ratingsto files, you can award from zero to five stars. Ratingstars can be set or displayed in any view
of the Library module. Once photos are rated,you can click a rating filter button inthe Filmstrip to display and work
on photos that you’ve rated with a specific number of stars. See “Filterthe photos displayed in the Filmstrip and Grid
view” on page 8.
• With photos selected in the Grid view or the Filmstrip, orwith photos in Loupe Compare, or Survey view, Choose
Photo > Set Rating and then choose a rating from the submenu.
• Pressanumberbetween1and5tosettherating.HolddownShiftandpressthenumbertosettheratingtoselect
the next slide.
In the Compare and Survey views, you can click one of the five dots under the photos to assign rating stars. Clicking
the first dot assigns one rating star, clicking the second dot assigns two rating stars, clicking the third dot assigns three
rating stars, and so forth.
Set rating stars in thumbnail cells of the Grid view
1
In the Grid view, select one or more photos.
2 Click one of the five dots below the thumbnail in a cell.
Clicking the first dot assigns a one-star rating, clicking the second dot assigns two rating stars, clicking the third dot
assigns three rating stars, and so forth.
Note: For rating stars to be available in the thumbnails cells, the Include Rating Stars option must be selected in the
Library View Options. See “Set library view options for the Grid view” on page 30.
Set rating stars using the Painter tool
1
In Grid view, select the Painter tool in the toolbar, and then choose Rating from the Paint menu in the toolbar.
Note: If the Painter tool does not appear in the toolbar, choose Painter from the toolbar menu.
2 Specify the rating in the toolbar, and then click or drag across photos to apply the rating.
Page 56

PHOTOSHOP LIGHTROOM
3 To disable the Painter, clickthe circular well inthe toolbar. When disabled,the Painter iconis visible in thetoolbar.
Set rating stars in the Library toolbar
❖ With photos selected in the Grid view or the Filmstrip, or with photos in Loupe Compare, or Survey view, click a
User Guide
rating star in the toolbar.
Clicking the first dot assigns a one-star rating, clicking the second dot assigns two rating stars, clicking the third dot
assigns three rating stars, and so forth.
Note: For rating stars to appear in the toolbar, choose Rating from the toolbar menu. See “Show controls in the Library
module toolbar” on page 29.
Set rating stars in the Metadata panel
1
With photos selected in the Grid view or the Filmstrip, or with photos in Loupe Compare, or Survey view, choose
either Default, All, Minimal, or Quick Describe from the pop-up menu at the top of the Metadata panel.
2 In the Metadata panel, click one of the five dots next to Rating.
Clicking the first dot assigns one rating star, clicking the second dot assigns two rating stars, clicking the third dot
assigns three rating stars, and so forth.
Change ratings
❖ In the Library module, do any of the following to change rating stars in either the thumbnail cell, toolbar, or
Metadata panel:
• Click a different rating star to increase or decrease the rating. Clicking a one-star rating removes the rating.
• Choose Photo > Set Rating, and then choose a different rating or whether to decrease or increase the rating.
52
You can select photos and press ] to decrease the rating or press [ to increase the rating.
Remove ratings
❖ In the Library module with photos selected inthe Grid viewor the Filmstrip, or photos in Loupe or Compare view,
choose Photo > Set Rating > None.
Note: If a photo has a one-star rating, clicking the star removes the rating.
Flag or reject photos
Flags designate whether a photo isa pick , rejected , or unflagged . Flagsare set inthe Library module. Once
photos are flagged, you can click a Pick, Rejected, or Unflagged filter button in the Filmstrip to display and work on
photos that you’ve labeled with a particular flag. See “Filter the photos displayed in the Filmstrip and Grid view” on
page 8.
❖ In the Library module with photos selected in the Grid view or the Filmstrip, or with photos in the Loupe,
Compare, or Survey view, do one of the following:
• Choose Photo > Set Flag and then choose the flag you want.
• PresstheletterPtomarktheimageapickortheletterXtomarkitasrejected.HolddownShiftandpressPorX
to set the flag and select the next photo. Hold down Ctrl (Windows) or Command (Mac OS ) and press the up
arrow or down arrow to increase or decrease the flag status, respectively.
• (Grid view only) Click the Flag icon inthe upper leftcorner of the photothumbnails toapply orremove the Pick flag.
Page 57

PHOTOSHOP LIGHTROOM
User Guide
Note: To show or set flags in the thumbnail cells of the Grid view, make sure Include Pick Flags is selected in the Grid
View tab of the Library View Options dialog box (choose View > View Options).
• (Compare and Survey views only) Click the Pick or Rejected flag below the photos.
Flag photos in the Library toolbar
❖ In the Library module with photos selected in the Grid view or the Filmstrip, or with photos in the Loupe view,
click the desired flag in the toolbar.
Note: To show or set flags in the toolbar, choose Pick from the toolbar menu.
Flag photos using the Painter tool
1
In Grid view, select the Painter tool in the toolbar, and then choose Flag from the Paint menu in the toolbar.
2 Specify the flag status in the toolbar, and then click or drag across photos to apply the flag setting.
Quickly unflag or reject photos
The Refine Photos command causes unflagged photos to be flagged as rejected, and picked photos to be unflagged.
1 In the Grid view, select photos.
2 Choose Library > Refine Photos.
3 Click Refine in the alert dialog box.
53
Select flagged photos
❖ In the Library module, do any of the following:
• To select flagged photos in the Grid view or the Filmstrip, choose Edit > Select Flagged Photos.
• Todeselect unflagged photos that are selected inthe Grid view or the Filmstrip, choose, Edit > Deselect Unflagged
Photos.
Set labels and color groups
Labeling photos witha certain coloris a flexible wayto quickly mark a large number ofphotos. For example, suppose
you’vejustimportedalargenumberofphotosandareviewingthemintheGridview.Asyourevieweachnewphoto,
you can label the ones you want to keep. After this initial pass, you can click the color label filter buttons in the
Filmstrip to display and work on photos that you’ve labeled with a particular color. See “Filter the photos displayed
in the Filmstrip and Grid view” on page 8.
❖ In the Library module with photos selected in the Grid view or the Filmstrip, or with photos in Loupe, Compare,
or Survey view, do one of the following:
• Choose Photo > Set Color Label, and then choose a label from the submenu.
• (Grid view only) Move the pointer over the Color Label icon at the bottom of the thumbnail cell and then click a
color label.
Note: To show or set color labels in thumbnail cells, select Include Color Label in the Grid View tab of the Library View
Options dialog box (choose View > View Options).
• (Compare or Survey view only) Click a color label icon below the photos.
Page 58

PHOTOSHOP LIGHTROOM
Set color labels in the Library toolbar
❖ IntheGridviewwithoneormorephotosselectedorinLoupeviewwithaphotodisplayed,clickacolorlabelin
User Guide
the toolbar.
Note: To show or set color labels in the Library module toolbar, choose Color Label from the toolbar pop-up menu.
Set color labels using the Painter tool
1
In Grid view, select the Painter tool in the toolbar, and then choose Label from the Paint menu in the toolbar.
Note: If the Painter tool does not appear in the toolbar, choose Painter from the toolbar menu.
2 Select the color label in the toolbar, and then click or drag across photos to apply the label.
3 To disable the Painter, clickthe circular well inthe toolbar. When disabled,the Painter iconis visible in thetoolbar.
Edit color label sets
You can assign names to color labels in the Edit Color Label Set dialog box. The name is then added to the photo’s
metadata when you apply the label.
1 In the Library module, choose Metadata > Color Label Set > Edit.
2 In the Edit Color Label Set dialog box, type a name next to a color.
3 (Optional) Choose Save As New Preset from the Preset menu, type a name in the Preset Name text box, and then
click Create.
4 Click Change.
54
Delete or rename color label sets
1
In the Library module, choose Metadata > Color Label Set > Edit.
2 In the Edit Color Label Set dialog box, choose a preset from the Preset menu.
3 Do any of the following:
• To delete the preset, choose Delete Preset “name of preset.” Click Delete in the alert dialog that opens.
• To rename the preset, choose Rename Preset “name of preset.” Type a namein the Preset Name text box, and then
click Rename.
Viewing and editing metadata
About metadata and XMP
Metadata is a set of standardized information about a photo, such as the author’s name, resolution, color space,
copyright, and keywords applied to it. For example, most digital cameras attach some basic information about a file,
such as height, width, file format, and the time the image was taken. Lightroom also supports the information
standard developed by the International Press Telecommunications Council (IPTC) to identify transmitted text and
images. This standard includes entries for descriptions, keywords, categories, credits, and origins. You can use
metadata to streamline your workflow and organize your files.
Page 59

PHOTOSHOP LIGHTROOM
User Guide
File information is stored using the Extensible Metadata Platform (XMP) standard. XMP is builton XML. In the case
of camera raw files that have a proprietary file format, XMP isn’t written into the original files. To avoid file
corruption, XMP metadata is stored in a separate file called a sidecar file. For all other file formats supported by
Lightroom (JPEG, TIFF, PSD, and DNG), XMP metadata is written into the files in the location specified for that
data. XMP facilitates the exchange of metadata between Adobe applications and across publishing workflows. For
example, you can save metadata from one file as a template, and then import the metadata into other files.
Metadata that is stored in other formats, such as EXIF, IPTC (IIM), and TIFF, is synchronized and described with
XMP so that it can be more easily viewed and managed.
See also
“Synchronize metadata with Adobe Camera Raw and Bridge” on page 94
“Working with keywords” on page 59
Specify where to write metadata changes
Lightroom lets you specify where to write adjustments and settings metadata. The information can be written to
XMP or to the catalog. Keep in mind that changes made in Lightroom are not automatically recognized by other
applications, when metadata is written to the catalog.
1 Choose File > Catalog Settings.
2 Click the Metadata tab, and then do either of the following:
• To write adjustments and settings metadata to XMP, select Automatically Write Changes Into XMP.
• To write adjustments and settings metadata to the catalog, deselect Automatically Write Changes Into XMP.
55
If you don’t write adjustments andsettings metadatato XMP automatically, you canselect a fileand choose Metadata
> Save Metadata To File.
Save metadata changes to the file manually
• Select one or more photos and choose Metadata > Save Metadata To File.
• In Grid view, click the down arrow icon in a thumbnail image to save (update) the metadata in the file.
Note: The Save Metadata To File command does not update metadata in a DNG file. To update a DNG file, choose
Metadata > Update DNG Preview & Metadata.
View photo metadata
In the Library module, the Metadata panel displays the filename, file path, rating, text label, and EXIF and IPTC
metadata of selected photos. Use the pop-up menu to choose a set of metadata fields. Lightroom has premade sets
that display different combinations of metadata.
❖ With photos selected in the Grid view or the Filmstrip, or with photos in Loupe Compare, or Survey view, choose
any of the following from the pop-up menu at the top of the Metadata panel:
Default Shows the filename, copy name, folder, rating, text label, and a subset of IPTC and EXIF metadata.
All Shows the filename, copy name, file path, rating, text label, and all EXIF and IPTC metadata.
EXIF Shows the filename, file path, and EXIF metadata.
IPTC Shows the filename and all IPTC metadata.
Large Caption Shows a large caption edit box and the copyright box.
Page 60

PHOTOSHOP LIGHTROOM
User Guide
Location Shows the filename, copy name, folder, title, caption, and location fields.
Minimal Shows the filename, rating, plus Caption and Copyright metadata.
Quick Describe Shows the filename, copy name, file path, rating, and the following EXIF and IPTC metadata:
Dimensions, Date Time, Camera, Title, Caption, Copyright, Creator, and Location.
In the Metadata panel, if an IPTC metadata field displays an arrow, clicking the arrow is a quick way to find and
view all photos containing the specific metadata.
If multiple photos with different metadata settings are selected, the metadata fields display <mixed>. To show the
metadata for the photo that’s targeted (active) within the selection, choose Metadata > Show Metadata For Target
Photo Only.
See also
“Find photos using the Metadata Browser” on page 66
Add and edit IPTC metadata
Metadata is added to photos by entering the information in the Metadata panel. Premade metadata sets make it easy
to make all or only a subset of the photo’s metadata available for adding or editing.
56
Note: Choosing a metadata preset, copying and pasting metadata from another photo, and synchronizing metadata are
quick ways to add metadata to photos that will share the same metadata.
1 With photos selected in the Grid view or the Filmstrip, or with photos in Loupe Compare, or Survey view, choose
a metadata set from the pop-up menu at the top of the Metadata panel. See “View photo metadata” on page 55.
2 Do any of the following:
• To add metadata, type in a metadata text box.
• To add metadata from a preset, choose a metadata preset from the Preset menu.
• To edit metadata, overwrite an entry in a metadata text box.
• To perform a related action, click the action icon to the right of the metadata field. For example, to view all photos
with the specified label, click the icon to the right of the Label field.
Separate fields are available for sending e-mail and for jumping to a website link. By clicking the link to the right of
Website, for example, you can open the browser to the specified website.
See also
“Apply a metadata preset” on page 58
“Copy and paste metadata between photos” on page 58
“Synchronize metadata between photos in the catalog” on page 59
Change the photo capture time
Sometimes you need to changethe capture time for your photos. For example, you might need to change the capture
times if you traveled to a different time zone and didn’t change your camera’s date/time setting before you started
photographing, or if you imported a scanned photo into Lightroom, the photo would contain the creation date of
when it was scanned, rather than when it was taken.
Page 61

PHOTOSHOP LIGHTROOM
User Guide
Note: The Edit Capture Time command cannot be undone by pressing Ctrl-z (Windows) or Command-z (Mac OS). You
would need to use the Revert Capture Time To Original command.
1 With photos selected in the Grid view orthe Filmstrip, or with photos in Loupe Compare, or Survey view, do one
of the following:
• Choose Metadata > Edit Capture Time.
• In the Metadata panel with EXIF information displayed, click the arrow in the Date Time field.
2 In the Edit Capture Time dialog box, select the type of adjustment:
Adjust To A Specified Date And Time Changes the capture time to the date and time you specify.
Shift By Set Number of Hours (Time Zone Adjust) Changes the capture time by the number of hours you add or
subtract to the original time.
Change To File’s Creation Date Changes the capture time in the camera EXIF data to the file creation date. If you
select this option, skip step 3.
3 In the New Time area of the dialog box, do one of the following:
• If you selected Adjust To A Specified Date And Time, type a new date and time in the Corrected Time text box.
You can also select the date and time values and then use the up or down arrow buttons to increase or decrease
the values.
• If you selected Shift By Set Number Of Hours, choose a value from the pop-up menu to adjust the time forward
or back.
57
Revert the capture time back to the original
You might need to edit a changed capture time back to its original.
❖ With photos selected in the Grid view or the Filmstrip, or with photos in Loupe Compare, or Survey view, choose
Metadata > Revert Capture Time To Original.
Create a metadata preset
Specific metadata can be saved as a preset for reuse on one or more photos. Using a metadata preset saves you the
effort of manually entering the same information for different photos.
1 From the Preset menu in the Metadata panel, choose Edit Preset.
Note: You can also create a preset based on any IPTC metadata, caption, rating stars, and label entered in the Metadata
panel by choosing Save As New Preset after entering the data.
2 Type information for any of the following groups:
Basic Info Lets you enter metadata for a caption, rating stars, and a text label.
IPTC Content Writes metadata for a brief summary of the photo, a numeric or descriptive newscode found at the
newscodes.org website, and the name of the person who wrote the photo description.
IPTC Copyright Writes metadata for the name of the copyright holder, usage rights granted for the photo, and web
address of the copyright holder.
IPTC Creator Writes metadata for the name, address, contact information, website, and job title of the author of the
photo.
IPTC Image Writes metadata for a publication description using guidelines listed at newscodes.org, a description of
the photo using guidelines specified by newscodes.org, and information about where the photograph was taken.
Page 62

PHOTOSHOP LIGHTROOM
User Guide
IPTC Status Writes metadata for the title of the photo, any job number used for the photo assignment, instructions
for transmission, usage or rights of the photo, the name of the photographer, company or agency, and the owner of
the photo.
Note: If you manually typed metadata in the Metadata panel before choosing Save As New Preset, the information you
entered appears in the corresponding text box in the New Metadata Preset dialog box.
3 Select the metadata to include in the preset by doing any of the following:
• To include all the metadata, click Check All.
• To include none of the metadata, click Check None. You’ll probably use this button when you want to start over
selecting which metadata to include.
• To include only the metadata for which you entered information, click Check Filled.
• To specify individual metadata, click the boxes next to a metadata text box.
• To include an entire metadata group, click the boxes next to the name (for example, IPTC Content, IPTC
Copyright, and so on).
4 In the Edit Metadata Presets dialog box, choose Save Current Settings As New Preset, type a name for the preset,
and click Create. Then click Done.
58
Apply a metadata preset
❖ With photos selected in the Grid view or the Filmstrip, or with photos in Loupe Compare, or Survey view, choose
a preset from the Preset menu in the Metadata panel.
Apply a metadata preset using the Painter tool
1 In Grid view, select the Painter tool in the toolbar, and then choose Metadata from the Paint menu in the toolbar.
Note: If the Painter tool does not appear in the toolbar, choose Painter from the toolbar menu.
2 Choose the preset in the toolbar, and then click or drag across photos to apply the preset.
3 To disable the Painter, clickthe circular well inthe toolbar. When disabled,the Painter iconis visible in thetoolbar.
Edit a metadata preset
1 From the Presets menu in the Metadata panel, choose Edit Presets.
2 Choose the preset you want to edit from the Preset pop-up menu.
3 Edit the metadata fields and change settings.
4 Choose Update Preset [preset name] from the Preset pop-up menu, and then click Done.
Copy and paste metadata between photos
Copying and pasting metadata from one photo to selected photos provides a fast way to add information and IPTC
metadata to photos. Using the Copy Metadata and Paste Metadata commands saves you the effort of repeatedly
typing the same metadata into photos.
1 In the Grid view, select a photo that you want to copy metadata from and choose Metadata > Copy Metadata.
2
In the Copy Metadata dialog box, select the information and IPTC metadata that you want to copy, and then click Copy.
3 Select photos in the Grid view, and choose Metadata > Paste Metadata.
Page 63

PHOTOSHOP LIGHTROOM
User Guide
Synchronize metadata between photos in the catalog
Specific metadata in selected photos can be synchronized with metadata in another photo. This provides a fast way
to add information and IPTC metadata to photos. Synchronizing metadata saves you the effort of repeatedly typing
the same metadata into photos.
1 Select a photo in the Grid view that has metadata that other photos will synchronize to. This becomes the active
photo.
2 Ctrl-click (Windows) or Command-click (Mac OS) to select photos that will synchronize with the active photo.
Shift-click to select contiguous photos.
3 Do one of the following:
• Click the Sync Metadata button below the panels on the right.
• Choose Metadata > Sync Metadata.
4 In the Synchronize Metadata dialog box, select the metadata that you want and then click Synchronize.
Note: The metadata you select to synchronize overwrites existing metadata in the selected photos.
Metadata panel actions
Clicking the buttons to the right of the metadata fields in the Metadata panel lets you perform a variety of actions,
such as opening the folder in which an image appears, saving metadata to the file, resolving metadata conflicts,
jumping to a virtual copy’s master, and more. Hold the mouse pointer over each button to display a tooltip
description.
59
Working with keywords
About keyword tags
Keyword tags are text metadata that describe the important contents of a photo. They help you identify, search for,
and find photos in the catalog. Like other metadata, keyword tags are stored either in the photo file or (in the case
of proprietary camera raw files) stored in XMP sidecar files. Once applied to photos, keywords can be read by Adobe
applications such as Bridge, Photoshop, or Photoshop Elements, or other applications that support XMP metadata.
Lightroom provides several ways to apply keyword tags to photos. You can type or select them in the Keywording
panel, or drag photos to specific keyword tags in the Keyword Tags panel.
In theGrid view,photos with keyword tags displaya thumbnail badge . All keyword tags in the catalog areviewed
intheKeywordTagspanel.Youcanadd,edit,rename,ordeletekeywordtagsatanytime.Whencreatingorediting
keywords, you can specify synonyms and export options. Synonyms are related terms for keyword tags. When you
select photos containing keyword tags with synonyms, the synonyms are displayed in the Implied Keywords text box
of the Keywording panel.
Keywordtagscanbecreatedaschildrenofparentkeywordtags.Whenapplyingaparentkeywordtagtophotos,the
child keyword tags are also applied.
Keyword tags can also be organized into categories called keyword sets.Bychoosingaspecifickeywordset,relevant
keyword tags are more accessible. This is especially useful as you add more keyword tags to the catalog.
For more information on organizing with keywords, see www.adobe.com/go/learn_lr_org.
Page 64

PHOTOSHOP LIGHTROOM
User Guide
View keyword tags
All the keyword tags in the catalog are viewed in the Keyword Tags panel. Each keyword tag displays the number of
photos containing it. Child keyword tags are nested under their parents.
❖ In the Library module, do any of the following:
• To view the keyword tags in the catalog, expand the Keyword Tags panel.
• To view keyword tags for a photo, select a photo in the Grid view or display photos in Loupe, Compare, or Survey
view and look in the Keywording panel.
• To view keyword tags for more than one photo, select the photos in the Grid view and look in the Keywording
panel. An asterisk appears next to the keyword tags not shared by all the selected photos.
Create keyword tags
1 With photos selected in the Grid view or the Filmstrip, or with photos in Loupe Compare, or Survey view, do any
of the following:
• Type keyword tags in the Keyword Tags text box of the Keywording panel, and then press Enter (Windows) or
Return (Mac OS). Skip the rest of the steps in this procedure.
• Click the Plus icon (+) in the Keyword Tags panel.
2 In the Create Keyword Tag dialog box, type a name for the keyword tag in the text box.
3 Type synonyms for the keyword tag. Use commas to separate the synonyms.
60
When a photo containsa keyword tag with synonyms,the synonyms appear in theImplied Keywords text box of the
Keywording panel.
4 Select any of the following options:
Create As Child Of [Name Of Keyword Tag] Makes the current keyword tag the child of a parent keyword tag.
Include Selected Photos applies the keyword tag to the selected photos.
Include On Export Includes the keyword tag when exporting photos. When this option is deselected, the keyword
tag is not included.
Export Parents Includes any parents of the keyword tag when exporting photos.
Export Synonyms Includes synonyms associated with the keyword tag when exporting photos.
Edit keyword tags
1
In the Library module, Right-click (Windows) or Control-click (Mac OS) a keyword tag in the Keyword Tags
panel, and choose Edit Keyword Tag from the menu.
2 IntheEditKeywordTagdialogbox,typeanychangestothekeywordtagname,addsynonyms,orsetanyofthe
following keyword tag options:
Include On Export Includes the keyword tag when exporting photos. When this option is deselected, the keyword
tag is not included.
Export Parents Includes any parents of the keyword tag when exporting photos.
Export Synonyms Includes synonyms associated with the keyword tag when exporting photos.
Page 65

PHOTOSHOP LIGHTROOM
Rename keyword tags
1
In the Library module, Right-click (Windows) or Control-click (Mac OS) the keyword tag in the Keyword Tags
User Guide
panel, and choose Rename from the menu.
2 Overwrite the keyword in the text box and then click outside the text box to commit the change.
Add keyword tags to photos
The Keywording panel of the Library module lets you add keyword tags to photos by either typing a new keyword
tag or applying keyword tags from a keyword set. You can also apply keyword tags to photos using the Painter tool.
See “Add or remove keywords using the Painter tool” on page 62.
Keep in mind that when you add keyword tags to photos, the changes are stored in Lightroom, but the keywords
aren’t saved to the files unless the Automatically Write Changes Into XMP option is selected in the Catalog Settings
dialog box. To save the keywords to the files manually, choose Metadata > Save Metadata To File.
❖ In the Library module, do any of the following:
• IntheGridview,selectoneormorephotosandthendragthemtokeywordtagsintheKeywordTagspanelonthe
leftsideoftheLibrarymodule,oryoucandragakeywordtagfromtheKeywordTagspaneltotheselectedphotos.
• Inanyviewwithselectedphotos,clickakeywordtagfromthekeywordsetintheKeywordingpanel.Youcanalso
choose Metadata > Keyword Set and then choose a keyword tag from the sub-menu.
• In any view with selected photos, type keyword tags in the Keyword Tags text box in the Keywording panel.
Separate keyword tags using commas.
61
Note: Keyword tags can also be added to photos as they are imported into Lightroom.
See also
“About metadata and XMP” on page 54
“About keyword sets” on page 63
“Apply metadata to photos when importing” on page 22
Copy and paste keyword tags
1
In the Grid view, select the photo with the keyword tags you want to copy.
2 In the Keyword Tag text box of the Keywording panel, select the keyword tags and choose Edit > Copy.
3 Select the photos in the Grid view to which you want to add keyword tags.
4 Click in the Keyword Tag text box in the Keywording panel and choose Edit > Paste.
Remove or delete keyword tags from photos or the catalog
❖ With photos selected in the Grid view or the Filmstrip, or with photos in Loupe Compare, or Survey view, do any
of the following:
• To remove keyword tags from photos, select one or more keyword tags in the Keyword Tags text box in the
Keywording panel and delete them.
• To permanently delete a keyword tag from photos and the catalog, Right-click (Windows) or Control-click
(Mac OS) the keyword tag in the Keyword Tags panel on the left side of the Library module, and choose Delete
from the menu. You can also select keyword tags and click the Minus icon (-) at the top of the Keyword Tags panel.
Page 66

PHOTOSHOP LIGHTROOM
User Guide
Note: If you accidently delete keyword tags, immediately press Ctrl-z (Windows) or Command-z (Mac OS) to undo the
deletion.
• To automatically delete any unused keyword tags from the catalog, choose Metadata > Purge Unused Keywords.
Important: Deleting keywords using the Purge Unused Keywords command cannot be undone.
Import and export keywords
Importing and exporting keywords lets you share the keyword tags you created to identify photos. For example,
keywords can be exported from one catalog and imported into another catalog on the same or a different computer.
You can also import keywords from other applications, such as Adobe Bridge 2.1.
Exporting keywords writes the keyword tags to a text file. When you create or edit keyword tags, you can specify
whether to include them during the export. When you import keywords from a text file, they become keyword tags
in the catalog and appear in the Keyword Tags panel.
❖ In the Library module, do any of the following:
• To import keywords into the catalog, choose Metadata > Import Keywords, navigate to and select the text file or
catalog file containing keywords, and then click Open (Windows) or Choose (Mac OS).
• To export all exportable keywords from the catalog, choose Metadata > Export keywords, select a location for the
keywords file, and then click Save.
62
See also
“Create keyword tags” on page 60
Set keyword shortcuts
Keyword shortcuts apply the keywords you specify to photos. Keyword shortcuts are applied using the Add Keyword
commandinthecontextmenuortheKeywordStampertool.See“AddorremovekeywordsusingthePaintertool”
on page 62.
1 In the Library module, do any of the following:
• Right-click (Windows) or Control-click (Mac OS) a keyword tag in the Keyword Tags panel and choose Use This
As Keyword Shortcut from the menu. Skip step 2.
• Click the text box next to the Keyword Stamper tool in the toolbar and type the keyword shortcut. Skip step 2.
• Choose Metadata > Set Keyword Shortcut.
2 In the Set Keyword Shortcut dialog box, type a keyword tag and then click Set.
Add keyword shortcuts to photos
Once you’ve specified the keywords for the keyword shortcut, you can quickly apply the keyword shortcut to one or
more photos.
❖ With photos selected in the Grid view or the Filmstrip, or with photos in Loupe Compare, or Survey view, Right-
click (Windows) or Control-click (Mac OS) and choose Add Keyword [Name Of Keyword Tag].
Add or remove keywords using the Painter tool
Once you’ve specified the keywords for the keyword shortcut, you can quickly apply the keyword shortcut to photos
using the Painter tool.
Page 67

PHOTOSHOP LIGHTROOM
User Guide
Note: If the Painter tool does not appear in the toolbar, choose Painter from the toolbar menu.
1 In the Library module, do one of the following:
• Choose Metadata > Enable Painting.
• In the Grid view, click the Painter tool icon in the toolbar.
When the Painter tool is enabled, the pointer becomes a painter icon and the Painter icon is no longer visible in the
toolbar.
2 In the toolbar, choose Keywords from the Paint menu.
3 Type the keyword or keywords you want to add or remove in the toolbar field.
4 Do any of the following:
• To apply a keyword shortcut, click the photo using the Painter tool.
• To remove the keyword shortcut from a photo, click or drag the Painter tool over the photo containing the
keyword tag, and then click. (You may want to filter the photos in Grid view by clicking the keyword in the
Keyword Tags photo so that only the photos containing the keywords you want to remove are displayed.)
5 To disable the Painter, clickthe circular well inthe toolbar. When disabled,the Painter iconis visible in thetoolbar.
63
About keyword sets
As you add increasing numbers of keyword tags to the catalog, it’s important to create keyword sets so you can easily
access relevantkeyword tags.For example, you cancreate keyword sets withkeyword tagsfor certain events, locations,
people, or assignments. Keyword sets do not change how keyword tags are written to the photo’s metadata. They
simply provide different ways to organize keyword tags. Keyword tags can belong to more than one keyword set.
Create keyword sets
❖ In the Library module, do any of the following:
• To convert the Recent Keywords set into a keyword set, click the Set pop-up menu in the Keywording panel and
choose Save Current Settings As New Preset. Type a name for the keyword set and click Create.
• To include specific keyword tags in a keyword set, make sure a keyword set is chosen in the Keywording panel,
and then either click Edit in the Keywording panel or choose Metadata > Keyword Set > Edit. Type or overwrite
keyword tags in the text boxes, choose Save As New Preset from the Preset menu, and then in the New Preset
dialog box, type a name for the keyword set and click Create.
Choose keyword sets
❖ In the Keywording panel of the Library module, choose a keyword set from the Set pop-up menu.
Edit keyword sets
1
In the Library module, click Edit in the Set section of the Keywording panel.
Note: The Edit option isn’t visible if Recent Keywords is chosen in the Set pop-up menu.
2 In the Edit Keyword Set dialog box, type keyword tags in the text boxes. Overwrite or select and delete keyword
tags that you don’t want to include in the keyword set.
3 (Optional) If you want to create a new keyword set, choose Save As New Preset from the Preset menu, and then
in the New Preset dialog box, type a name for the keyword set and click Create.
4 Click Change to update the keyword sets.
Page 68

Rename or delete keyword sets
1
In the Library module, click Edit in the Set section of the Keywording panel.
PHOTOSHOP LIGHTROOM
User Guide
Note: The Edit option isn’t visible if Recent Keywords is chosen in the Set pop-up menu.
2 In the Edit Keyword Set dialog box, choose the keyword set from the Preset menu.
3 Do one of the following:
• To rename the keyword set, choose Rename Preset “Name Of Keyword Set” from the Preset menu.
• To delete the keyword set, choose Delete Preset “Name Of Keyword Set” from the Preset menu.
Check and correct spelling (Mac OS)
When you check the spelling of keyword tags, Lightroom questions any words that aren’t in its dictionary. If a
questioned word is spelled correctly, you can confirm its spelling by adding the word to the dictionary. If a
questioned word is misspelled, you can correct it.
1 In the Library module, click in the Keyword Tags text box of the Keywording panel.
2 Choose Edit > Spelling > Spelling.
3 If necessary, in the Spelling dialog box, choose a language from the Dictionary pop-up menu near the bottom of
the dialog box. This is the dictionary Lightroom uses to check spelling.
4 As Lightroom finds unfamiliar words and other possible errors, click one of the following:
Ignore Continues the spelling check without changing the text.
64
Guess Suggests spelling options in the Guess text box. If no alternate spellings appear in the Guess text box for a
misspelledword,selectthemisspelledwordinthetextboxnexttotheCorrectbuttonandtypeadifferentpossible
spelling. Click Guess to see if spelling options appear in the Guess text box.
Find Next Continues the spelling search.
Correct Corrects a misspelling. Make sure that the correctly spelled word is in the Guess text box and click Correct.
If the suggested word is not the word you want, select a different word in the Guess text box or type the correct word
in the text box to the left of the Correct button.
Forget Removes a word from the dictionary. This is useful, for example, for removing a misspelled a word that you
accidently added to the dictionary by clicking Correct or Learn.
Learn Stores the unrecognized word in the dictionary, so that subsequent occurrences are not flagged as
misspellings.
Highlight misspelled words (Mac OS)
1
After entering keyword tags in the Library module, click in the Keyword Tags text box of the Keywording panel.
2 Choose Edit > Spelling > Check Spelling.
The first misspelled word in the text box is highlighted.
3 Control-click the highlighted word and choose one of the following:
[Suggested spelling corrections] Lightroom lists suggested spelling corrections at the top of the context menu.
Choose a word to correct the spelling.
Ignore Spelling Continues the spelling check without changing the text.
Learn Spelling Stores the unrecognized word in the dictionary, so that subsequent occurrences are not flagged as
misspellings.
Page 69

PHOTOSHOP LIGHTROOM
User Guide
Note: You can also choose Spelling > Spelling from the context menu to open the Spelling dialog box for more options.
Check spelling as you type (Mac OS)
Lightroom can automatically check the spellingas you type keyword tags. When you misspell a word, it’sunderlined.
1 In the Library module, click the Keyword Tags text box of the Keywording panel.
2 Choose Edit > Spelling > Check Spelling As You Type.
A check mark in the menu indicates that the Check Spelling As You Type command is enabled. It remains enabled
until you choose the command again to disable it (indicated by the absence of a check mark).
Type special characters (Mac OS)
❖ In the Library module, choose Edit > Special Characters.
The Character Palette opens for inserting special characters and symbols into your keyword tags and metadata text.
Lightroom uses the Mac OS Character Palette. For more information on using the palette, consult the Mac OS Help.
Finding photos in the catalog
65
About finding photos in the catalog
Finding photos and viewing them in theLibrary module is a necessary part of working with your photos. Lightroom
provides many different ways to find photos, whether your catalog includes hundreds or thousands of images. You
can specify a text criteria and capture date range inthe Find panel. Selecting folders, collections, keyword tags in the
KeywordTagspanel,metadata,andtheQuickCollectionareanotherwaytodisplayspecificphotos.Yoursearchcan
be refined by selecting one of these criteria and then combining it with the search criteria in the Find panel.
Lightroom also lets you filter the catalog to show photos with specific ratings, flags, and color labels.
See also
“Browse photos by folders” on page 39
“About filtering photos” on page 50
“Assemble photos into the Quick Collection” on page 9
Search for photos using the Find panel
The Find command searchesthrough the catalog or selected photos using the text search anddate range specified in
the Find panel. The number of photos matching the search criteria is shown next to all folders in the Folders panel.
The found photos displayed in the Grid view and the Filmstrip depend on whether you searched through the entire
catalog, specific folders or collections, or the Quick Collection.
Find photos using text
1
(Optional) In the Library module, do any of the following:
• Select All Photographs, Quick Collection, or Previous Import from the Library panel.
• Select specific folders, collections, keyword tags, or metadata.
Page 70

PHOTOSHOP LIGHTROOM
User Guide
2 At the top of the Find panel, select Text and choose the text, filename, or type of metadata you want to search for
from Text pop-up menu.
3 In the Rule pop-up menu, choose a search criterion for the text search, such as Containing, Not Containing, or
Ending With. This setting tells Lightroom how to use the text that you typed in the search text box.
4 Type the text in the search text box.
Add an exclamation mark (!) before any word to exclude it from the results. Add a plus sign (+) before any word to
enable the “Starting With” rule to apply only to that word. Add a plus sign (+) after any word to enable the “Ending
With” rule to apply only to that word.
5 (Optional) Specify a capture date range using the pop-up menu and by moving the date range sliders.
Find photos using capture dates
The Find panel lets you search for photos by specifying a capture date range. Lightroom only displays photos in the
catalog that fall within the range you set. To further refine your search, you can combine the capture date range with
a text search.
1 In the Find panel of the Library module, make sure With Capture Date is selected.
2 Choose an option from the With Capture Date pop-up menu to set the range for finding photos.
3 Drag the timeline end-point markers to view a custom capture date range.
66
Find photos using collections
Besides letting you e and organize photos, selecting collections provides a way to find specific photos.
1 In the Collections panel, select one or more items.
The photos in the collections are displayed in the Grid view and the Filmstrip. Selecting any parent collection
includes its children. However, selecting a child collection does not simultaneously select its parent.
2 (Optional) To refine your search, specify keyword text or a capture date range in the Find panel.
See also
“Working with collections” on page 45
Find photos using the Metadata Browser
You can find photos by selectingspecific metadata displayed in the Metadata Browser.Lightroom supports metadata
embedded in photos by your digital camera and by other applications such as Adobe Photoshop or Adobe Bridge.
1 In the Metadata Browser panel, select one or more items.
The photos with the selected metadata are displayed in the Grid view and the Filmstrip. Selecting any parent
metadata tag also includes its children. However, selecting a child metadata tag does not simultaneously select its
parent.
2 (Optional) To refine your search, specify keyword text or a capture date range in the Find panel.
You can also find photos by clicking the right-pointing arrow that appears next to certain metadata text boxes in the
Metadata panel, or you can do a metadata text search in the Find panel.
Page 71

PHOTOSHOP LIGHTROOM
User Guide
See also
“Viewing and editing metadata” on page 54
Find photos using EXIF data
❖ In the Library module, do any of the following:
• Choose EXIF from theleft pop-up menu at the top of the Find paneland type the EXIFdata in the search textbox.
• Select one or more EXIF items in the Metadata Browser.
• Click the right-pointing arrow next to an EXIF text box in the Metadata panel. The arrow is only available for
certain EXIF items.
Find photos using the Keyword Tags panel
In addition to typing keyword text in the Find panel, you can also find photos by selecting keyword tags displayed
in the Keyword Tags panel.
1 In the Keyword Tags panel, select one or more items.
The photos with the selected keyword tags are displayed in the Grid view and the Filmstrip. Selecting any parent
keyword tag also includes its children. However, selecting a child keyword tag does not simultaneously select its
parent.
67
2 (Optional) To refine your search, specify the keyword text or a capture date range in the Find panel.
See also
“Working with keywords” on page 59
Page 72

Chapter 5: Developing photos
The Develop module in Adobe® Photoshop® Lightroom™ includes controls for adjusting the color and tonal scale of
your photos. All the adjustments you make in Lightroom are nondestructive, which means your original file is not
altered, whether it’s a camera raw file or a rendered file (like a JPEG or TIFF). Your edits are stored in Lightroom as
a set of instructions that are applied to your photo in memory. Nondestructive editing means you can explore and
create different versions of your photo without degrading your original image data.
For a video tutorial about correcting photos in the Develop module, see
www.adobe.com/go/learn_lr_video_develop.
Develop module overview
Panels and tools
The Develop module contains two sets of panels for viewing and developing a photo. On the left are the Navigator,
Presets, Snapshots, and History panels for saving, previewing, and selecting changes you’ve made to a photo. On the
right are the primary panels for adjusting and fine-tuning the photo:
68
• TheHistogrampanelintheDevelopmoduleismorethanjustavisualguideformeasuringcolortones.Youcan
work in the histogram interface to make tonal adjustments to the photo.
• The Basic panel contains the main tools for adjusting the photo’s white balance, color saturation, and tonal scale.
• The Tone Curve and HSL/Color/Grayscale panels contain tools for fine-tuning your color and tonal adjustments.
• The Split Toning panel colors monochrome images or creates special effects with color images.
• The Detail panel lets you adjust the sharpness and reduce noise in the photo.
• The Lens Corrections panel corrects chromatic aberrations or lens vignetting caused by the camera lens.
• The Camera Calibration panel makes adjustments to the default calibration settings for your camera.
Page 73

A
B
DC
The Develop module.
A. Navigator zoom controls B. To o lb a r C. Loupe view D. RGB values
PHOTOSHOP LIGHTROOM
User Guide
69
The photos in thefollowing file formats can be edited inLightroom: cameraraw (includingDNG), JPEG,TIFF,and PSD.
See also
“Customize the toolbar” on page 7
“About file formats” on page 17
Show or hide the Develop toolbar
❖ Choose View > Show Toolbar or Hide Toolbar, or press the T key.
Select tools and options on the toolbar
❖ Click the tool or choose it from the View menu. To deselect a tool, click it or a different tool in the toolbar.
Tools on the Develop toolbar
Crop and straighten Include the Crop Overlay tool, Crop Frame tool, Aspect Ratio Lock button and menu options,
Crop Straighten tool, and slider.
Red Eye Includes Pupil Size and Darken sliders. Click Reset to clear the changes to the photo. Click the Red Eye Tool
button again to revert back to the Hand or Zoom-in tool.
Spot Removal IncludesCloneorHealoptions,andtheSpotSizeslider.ClickResettoclearthechangestothephoto.
Click the Remove Spots button again to revert back to the Hand or Zoom-in tool.
Hand When you hold the pointer (Hand tool) over the photo, R, G, and B color values display in the toolbar. Click
the photo to toggle between two zoom levels if you previously set them in the Navigator panel. The Hand tool is
selected by default, and automatically changes to the Zoom-in tool if it’s possible to zoom in.
White Balance Selector Click this tool in the Basic panel, choose it from the View menu, or press W to select it.
Options appear in the toolbar.
Page 74

PHOTOSHOP LIGHTROOM
User Guide
Targeted Adjustment Lets you adjust certain color and tone sliders by dragging the tool in the photo. Select it in the
Tone Curve or HSL/Color/Grayscale panels, or choose it from the View menu. Once the tool is selected, you can
choose different targets from the Target Group pop-up menu in the toolbar.
Develop buttons below the panels (at either end of the toolbar)
Loupe View Although this single-photo view is available in both the Develop and Library modules, the keyboard
shortcut for Loupe view in the Develop module (the D key) is different than the keyboard shortcut in the Library
module (the E key). The Loupe View button lets you quickly switch to Loupe view in each module.
Copy and Paste These buttons let you copy or paste the current settings to a selected photo.
Previous, Sync or Auto Sync These buttonstoggle according to whether youhave one or more photosselected in the
Filmstrip. If only one photo is selected, thePrevious button letsyou copy andpaste all of the settingsof the previously
selected photo to the currently selected photo on theFilmstrip. If multiple files are selected, the Sync button lets you
choose which of the current settings to paste from the currently selected photo onto the other selected photos. Auto
Sync adjusts other selected photos automatically after eachslider is moved. Ctrl-click (Windows)or Command-click
(Mac OS) the Sync button to turn it into the Auto Sync button.
Before and After Views Toggles through four choices. Youcan arrangetwo photoviews side by side or top tobottom,
display the whole photo in both views, or split the photo in two.
Copy Settings ThesetwobuttonsletyoucopyandpastethecurrentsettingsfromtheAfterviewtotheBeforeview,
andviceversa.TheyappearonthetoolbarwhenyouhaveselectedtheBeforeandAfterviewintheDevelopmodule.
70
Reading image histograms
A histogram is a representation of the number of pixels in a photo at each luminance percentage. A histogram that
stretches from the left side of the panel to the right side indicates a photo that takes full advantage of the tonal scale.
A histogram that doesn’tuse the full tonal range can result in a dull image that lacks contrast. A histogram with spikes
at either end indicates a photo with shadow or highlight clipping. Clipping can result in the loss of image detail.
The left side of the histogram represents pixels with 0% luminance; the right side represents 100% luminance.
AhistogramismadeupofthreelayersofcolorthatrepresenttheRed,Green,andBluecolorchannels.Grayappears
when all three channels overlap; yellow, magenta, and cyan appear when two of the RGB channels overlap (yellow
equals the Red + Green channels, magenta equals the Red + Blue channels, and cyan equals the Green + Blue
channels).
In the Develop module, the Histogram panel is a working tool. You can adjust the photo by adjusting the histogram
itself. The triangle icons in the upper left and right indicate channel clipping.
Page 75

PHOTOSHOP LIGHTROOM
User Guide
See also
“Adjust the tonal scale using the histogram” on page 75
“Adjust image tonal scale” on page 75
“Preview highlight and shadow clipping” on page 76
Viewing RGB color values
The toolbar in the Develop module displays the RGB color values for individual pixels appearing under the Hand or
Zoom tool when you move it over the photo.
You can use this information to determine whether any areas of the photo are clipped, such as whether an R, G, or
B value is 0% black or 100% white. If at least one channel in the clipped area has color, then you might be able to use
it to recover some detail in the photo.
See also
“Adjust image tonal scale” on page 75
Create and apply Develop presets
Presets provide a way to save a group of settings and apply them to other photos. Once you create and add a preset
to the Presets panel in the Develop module, it remains there until you delete it. It also appears in the list of Develop
Settings that you can select it when you import photos.
71
Preview and apply a Develop preset
A set of default presets are listed in the Presets panel of the Develop module. Click the Lightroom Presets folder to
display the default presets.
• To preview the effects of a preset on your photo, move the pointer over it in the Presets panel and view the effects
in the Navigator panel.
• To apply a preset to the photo, click it in the Presets panel.
Create and organize Develop preset folders
1
Right-click (Windows) or Control-click (Mac OS) the area where you want the folder to appear and choose New
Folder.
2 Type the name of the folder and click OK.
3 Drag a template to a folder name to move the template to that folder.
If you drag a Lightroom preset template to a different folder, the template is copied to that folder.
Create a Develop preset
Presets you create are based on the current settings of the selected photo.
1 In the Develop module,click the CreateNew Preset (+) button at the top of the Presets panel orchoose Develop >
New Preset.
2 Click Check All to select everything or click Check None to deselect everything, and then click to select each of
the settings to include in the preset.
3 Type a name in the Preset Name box, specify which folder the preset should appear in, and click Create.
Page 76

PHOTOSHOP LIGHTROOM
User Guide
The preset is added to the list in the Presets panel in the specified folder.
Update a Develop preset
1
Select a preset and modify settings as needed.
2 Right-click (Windows) or Control-click (Mac OS) a preset in the Presets panel and choose Update With Current
Settings.
3 Specify the settings you want to include in the preset and click Update.
Delete a custom preset
You cannot delete the Develop presets. You can delete only custom presets.
❖ In the Develop module, right-click (Windows) or Control-click (Mac OS) a preset in the Presets panel and click
Delete.
Note: Do not press the Delete key on your keyboard; this deletes the currently selected photo.
Determine whether presets are stored with a catalog
❖ In the Presets panel of the Preferences dialog box, select Store Presets With Catalog. If this option is not selected,
presets are stored in the Lightroom folder.
72
Import and export a Develop preset
You can export presets you’ve created to share with colleagues or to use on a different computer. Preset templates are
saved with an .lrtemplate extension.
• To export a preset, right-click (Windows) or Control-click (Mac OS) a preset and choose Export. Type the name
of the preset template file and click Save.
• Toimport a preset, right-click(Windows) or Control-click (Mac OS) thearea where you want the presetto appear
and choose Import. Double-click the preset template file.
Reset a photo
Lightroom provides several ways to reset settings as you’re working in the Develop module.
Save a snapshot, or preset of your settings before resetting the photo so that you don’t completely lose the settings.
To reset a photo in the Develop module, do any of the following:
• Click the Reset button to revert back to the Lightroom default settings.
• Click the Zero’d preset in the Presets panel to remove all settings completely.
• Select an earlier version in the History panel or Snapshots panel that occurred before you applied the settings.
• Double-click individual slider controls to reset the sliders to zero.
• Choose Undo from the Edit menu. Lightroom keeps track of each setting you make. You can undo all of them by
choosing Undo multiple times.
See also
“Managing image history and snapshots” on page 87
Page 77

PHOTOSHOP LIGHTROOM
User Guide
View Before and After photos
YoucancomparetwoversionsofaphotoasyouapplyDevelopsettingstoit.TheBeforeviewfirstdisplaysthephoto
as itwas originally imported, including any presets that were applied. The photo remains unchanged unless you copy
settingstoit.TheAfterviewshowschangesasyoumakethem.Zoomingandpanningaresynchronizedinthetwo
views.
• To switch the Before and After views one at a time in Loupe view, press the backslash (\ ) key or choose View >
Before/After > Before Only. The word “Before” appears in the lower right of the image.
• To display the Before and After photos in two views together, click the Before and After Views button on the
toolbar to toggle through the choices or choose an option from the pop-up menu.
Before/After Left/Right Displays two whole versions of the photo in two views, side-by-side on the screen.
Before/After Left/Right Split Displays two halves of the photo split into two views, side-by-side on the screen.
Before/After Top/Bottom Displays two whole versions of the photo in two views, one on top of the other.
Before/After Top/Bottom Split Displays two halves of the photo split into two views, one on top of the other.
For more information on the Before and After view, see www.adobe.com/go/learn_lr_befaft.
Copy settings to the Before or After version of a photo
When you are working in a Before and After view of your photo, you can apply the settings of one version to the
other, and vice versa.
73
• In the toolbar, click the Copy Settings From The Before Photo To The After Photo button.
• In the toolbar, click the Copy Settings From The After Photo To The Before Photo button.
• Click Swap Before And After Settings.
• Choose Settings > Copy After’s Settings To Before.
• Choose Settings > Copy Before’s Settings To After.
• Choose Settings > Swap Before And After Settings.
Note: Thesemenucommandsarealsoavailablewhenyou’reviewingBeforeandAfterversionsofyourphotoinLoupeview.
All of the current settings for one version are copied to the other version. To copy a single history setting, right-click
(Windows) or Ctrl-click a state in the History panel and choose Copy History Step Settings To Before.
See also
“View Before and After photos” on page 73
Adjusting image color and tone
Set the white balance
You can adjust the white balance of a photo to reflect the lighting conditions under which it was taken—daylight,
tungsten, flash, and so on.
Youcaneitherchooseawhitebalancepresetoptionorclickaphotoareathatyouwanttospecifyasaneutralcolor.
Lightroom adjusts the white balance setting, and then you can fine-tune it using the sliders provided.
Page 78

PHOTOSHOP LIGHTROOM
User Guide
For a video on adjusting white balance in photos using Lightroom, see www.adobe.com/go/learn_lr_video_wb.
Choose a white balance preset option
❖ In the Basic panel of the Develop module, choose an option from the WB pop-up menu. As Shot uses the camera’s
white balance settings, if they are available. Auto calculates the white balance based on the image data.
LightroomappliesthewhitebalancesettingandmovestheTempandTintslidersintheBasicpanelaccordingly.Use
these sliders to fine-tune the color balance. (For more information, see below.)
Note: If the camera’s white balance settings are not available, then the Auto option is the default.
Specify a neutral area in the photo
1
In the Basic panel of the Develop module, click the White Balance Selector tool to select it, or press the W key.
2 Move the White Balance Selector into an area of the photo that should be a neutral light gray. Avoid spectral
highlights or areas that are 100% white.
3 Set options in the toolbar as needed.
Show Loupe Displays a close-up view and RGB values of the pixel under the White Balance Selector.
Scale Slider Zooms the close-up view in the Loupe.
Auto Dismiss Sets the White Balance Selector tool to dismiss automatically after clicking only once in the photo.
74
Done Dismisses the White Balance Selector tool, and the pointer changes to the Hand or Zoom-in tool by default.
The Navigator displays a preview of the color balance as you move the White Balance Selector over different pixels.
4 When you find an appropriate area, click it.
The Temp and Tint sliders in the Basic panel adjust to make the selected color neutral, if possible.
Fine-tune the white balance using the Temp and Tint controls
❖ In the Basic panel of the Develop module, adjust the Temp and Tint sliders.
Temp Fine-tunesthewhitebalanceusingtheKelvincolortemperaturescale.Movetheslidertothelefttomakethe
photo appear cooler, and right to warm the photo colors.
You can also set a specific Kelvin value in the Temp text box to match the color of the ambient light. Double-click
the current value to select the text box and enter a new value. For example, photographic tungsten lights are often
balanced at 3200 Kelvin. If you shoot under photo tungsten lights and set the image temperatureto 3200, your photos
should appear color balanced.
One of the benefits of working with raw files is that you can adjust the color temperature as if you were changing a
setting ina cameraduring capture, allowing a broad rangeof settings. When workingwith JPEG, TIFF,and PSDfiles,
you work in a scale of -100 to 100 rather than the Kelvin scale. Non-raw files such as JPEG or TIFF include the
temperate setting in the file, so the temperate scale is more limited.
Tint Fine-tunes the white balance to compensate for a green or magenta tint. Move the slider to the left (negative
values) to add green to the photo; move it to the right (positive values) to add magenta.
If you see a green or magenta color cast in the shadow areas after adjusting the temperature and tint, try removing
it by adjusting the Shadows Tint slider in the Camera Calibration panel.
Page 79

PHOTOSHOP LIGHTROOM
User Guide
Adjust image tonal scale
You adjust the image tonal scale using the tone controls in the Basic panel. As you set the white and black points,
keep an eye on the end points of the histogram, or use the shadow and highlight clipping previews.
1 (Optional) In the Tone area of the Basic panel, click Auto to set the overall tonal scale. Lightroom sets the sliders
to maximize the tonal scale and minimize highlight and shadow clipping.
2 Adjust the tone controls:
Exposure Sets the overall image brightness, with a greater effect in the high values. Adjust the slider until the photo
looks good and the whites are at the right level. Use Recovery to bring highlight values down.
Exposure values are in increments equivalent to f-stops. An adjustment of +1.00 is similar to increasing the aperture
1 stop. Similarly, an adjustment of –1.00 is similar to reducing the aperture 1 stop.
Recovery Reduces the tones of extreme highlights and attempts to recover highlight detail lost because of camera
overexposure. Lightroom can recover detail in raw image files if one or two channels are clipped.
Fill Light Lightensshadowtorevealmoredetailwhilemaintainingblacks.Takecarenottooverapplythesettingand
reveal image noise.
Blacks Specifies which image values map to black. Moving the slider to the right increases the areas that become
black, sometimes creating the impression of increased image contrast. The greatest effect is in the shadows, with
much less change in the midtones and highlights.
75
Brightness Adjusts image brightness, mainly affecting midtones. Set the overall tonal scale by setting Exposure,
Recovery, and Blacks. Then set the overall image brightness. Large brightness adjustments can affect shadow or
highlight clipping, so you may want to readjust the Exposure, Recovery or Blacks slider after adjusting brightness.
Contrast Increases or decreases image contrast, mainlyaffecting midtones. When you increase contrast, the middle-
to-dark image areas become darker, and the middle-to-light image areas become lighter. The image tones are
inversely affected as you decrease contrast.
You can increment the slider values by selecting the value and using the up and down arrow keys.
Double-clicking the slider control resets the value to zero.
For more information on recovering highlight detail in overexposed photos, see www.adobe.com/go/learn_lr_rec.
For a video on adjusting a photo’s tone curves, see www.adobe.com/go/learn_lr_video_curve.
For a video on basic color correction, see www.adobe.com/go/learn_lr_video_correct.
See also
“Preview highlight and shadow clipping” on page 76
Adjust the tonal scale using the histogram
In the Develop module,specific areas of the Histogram panel(for blacks, fill light, exposure, andhighlight recovery)
are related to the tone sliders in the Basic panel. You can make adjustments by dragging in the histogram. Your
adjustments are reflected in the Basic panel sliders.
Page 80

PHOTOSHOP LIGHTROOM
User Guide
Dragging in the Exposure area of the histogram to adjust the Exposure slider in the Basics panel.
1 Move the pointer into an area of the histogram you want to adjust. The affected area is highlighted, and the
affected tone control is displayed in the lower left of the panel.
2 Press and drag the pointer left or right to adjust the corresponding slider value in the Basic panel.
Preview highlight and shadow clipping
You can preview tonal clipping in a photo as you work on it. Clipping is the shifting of pixel values to the highest
highlight value or the lowest shadow value. Clipped areas are either completely white or completely black, and have
no image detail. You can preview clipped areas as you adjust the tone sliders in the Basic panel.
76
For a video on adjusting shadows and highlights in a photo, see www.adobe.com/go/learn_lr_video_shadow.
Highlight clipped areas
Clipping indicators are located at the top of the Histogram panel in the Develop module. The black (shadow)
clipping indicator is on the left, and the white (highlight) indicator is on the right.
• Move the Blacks slider and watch the black clipping indicator. Move the Exposure or Recovery sliders and watch
the white clipping indicator. An indicator turns white when clipping in all channels occurs. A colored clipping
indicator means one or two channels are clipped.
• To preview clipping in the photo, move the mouse over the clipping indicator. Click the indicator to keep the
preview on.
Clipped black areas in the photo become blue, and clipped white areas become red.
View clipped image areas for each channel
❖ Press Alt (Windows) or Option (Mac OS) while moving the Exposure, Recovery, or Blacks sliders in the Basic
panel of the Develop module.
For the Exposure and Recovery sliders, the image turns black, and clipped areas appear white. For the Blacks slider,
the image turns white and clipped areas appear black. Colored areas indicate clipping in one color channel (red,
green, blue) or two color channels (cyan, magenta, yellow).
Page 81

PHOTOSHOP LIGHTROOM
User Guide
Set overall color saturation
❖ In the Basic panel of the Develop module, change the color saturation (vividness or color purity) of all colors by
adjusting the Clarity, Vibrance, and Saturation controls. (To adjust saturation for a specific range of colors, use the
controls in the HSL/Color/Grayscale panel.)
Clarity Adds depth to an image by increasing local contrast. When using this setting, it is best to zoom in to 100%
or greater. To maximize the effect, increase the setting until yousee halos near the edgedetails of theimage, and then
reduce the setting slightly.
Vibrance Adjusts the saturation so that clipping is minimized as colors approach full saturation, changing the
saturation of all lower-saturated colors with less effect on the higher-saturated colors. Vibrance also prevents
skintones from becoming over saturated.
Saturation Adjusts the saturation of all image colors equally from –100 (monochrome) to +100 (double the
saturation).
For more information on the Vibrance and Saturation controls, see www.adobe.com/go/learn_lr_vib.
For a video on adjusting a photo’s color using the Vibrance slider, see www.adobe.com/go/learn_lr_video_vibrance.
Tone Curve overview
The Lightroomtone curve graph inthe Develop module represents changes made to thetonal scale of aphoto image.
The horizontal axis represents the original tone values of the photo image (input values), with black on the left and
progressively lighter values toward the right. The vertical axis represents the changed tone values (output values),
with black on the bottom and lighter values progressing to white at the top. Use the tone curve to tweak the adjustments you make to a photo in the Basic panel.
77
Lightroom tone curve.
If apoint on the curve moves up, it becomes a lighter tone;if it moves down,it becomes darker. A straight, 45-degree
line indicates no changes to the tonal scale: the original input values exactly match the output values. You may see a
tone curve that isn’t straight when you first view a photo that you haven’t adjusted. This initial curve reflects default
adjustments that Lightroom applied to your photo during import.
Page 82

PHOTOSHOP LIGHTROOM
User Guide
Use the tone curve to adjust the values in specific tonal ranges in the image. For example, if you want to see greater
separation of tones in the midtones, you add contrast by moving the dark tones down the graph and making them
darker, and moving the light tones up to make them lighter. The slope of the tone curve becomes greater, indicating
increased contrast in that tonal range.
For a video on the Tone Curve panel, see www.adobe.com/go/learn_lr_video_curve.
Fine-tune the tonal scale using the Tone Curve panel
You make tone curve adjustmentsdirectly on the curve or using theregion sliders in the Tone Curve panel. Theareas
of the curve affected by the sliders depend on where you set the split controls at the bottom of the graph.
The middle region sliders (Darks and Lights) affect the larger midregion of the curve. The Highlight and Shadows
sliders affect mainly the ends of the tonal range.
For a video on the Tone Curve panel, see www.adobe.com/go/learn_lr_video_curve.
Make adjustments to the tone curve
• In the Tone Curve panel of theDevelop module, dragthe region sliders. Asyou drag, the areaof the curve affected
by the slider is highlighted. You can expand or contract the curve regions that the sliders affect (see below).
• Click a point on the curve and drag it up or down. As you drag the point, the area of the curve affected is
highlighted and the related slider moves. The original and new tonal values are displayed in the upper left of the
tone curve.
• Choose an option from the Point Curve menu. The setting you choose is reflected in the curve but not in the
region sliders. Medium Contrast is the default Point Curve setting. The Point Curve option is blank for photos
imported with metadata and previously edited with the Adobe Camera Raw tone curve. The curve itself will
reflect any custom edits.
• Click the Targeted Adjustment tool in the upper left of the Tone Curve panel, move the pointer over an area
in the photo that you want to adjust, and then click the mouse. Drag the pointer, or press the up and down arrow
keys to lighten or darken the values for all similar tones in the photo.
78
Change curve areas affected by region sliders
❖ Drag the split controls at the bottom of the tone curve graph.
Change the split control between Lights and Darks.
Fine-tune image colors with HSL sliders
Use the HSL and Color panels in the Develop module to adjust individual color ranges in your photo. For example,
if a red object looks too vivid and distracting, you can adjust it using the Saturation slider for Reds. Note that all
similar reds in the photo will be affected.
Page 83

PHOTOSHOP LIGHTROOM
User Guide
The adjustments you make in the HSL and Color panels produce similar results, but the two panels organize the
sliders in different ways. To open a panel, click its name in the HSL/Color/Grayscale panel header.
The slides in these panels work on specific color ranges:
Hue Changes the color. For example, you can change a blue sky (and all other blue objects) from cyan to purple.
Saturation Changes the color vividness or purity of the color. For instance, you can change a blue sky from gray to
highly saturated blue.
Luminance Changes the brightness of the color range.
For a video on adjusting hue and saturation, see www.adobe.com/go/learn_lr_video_huesat.
Make adjustments in the HSL panel
❖ In the HSL panel, select Hue, Saturation, Luminance, or All to display the sliders you want to work with.
• Drag the sliders or enter values in the text boxes to the right of the sliders.
• Click the Targeted Adjustment tool in the upper left of the panel, move the pointer over an area in the photo
that you want to adjust, and then click the mouse. Drag the pointer, or press the up and down arrow keys to make
the adjustment.
Make adjustments in the Color panel
1
In the Color panel, click a color chip to display the range of colors you want to adjust.
2 Drag the sliders or enter values in the text boxes to the right of the sliders.
79
Adjust the color calibration for your camera
Lightroom uses two camera profiles for every camera model it supports to process raw images. The profiles are
produced by photographing a color target under different white-balanced lighting conditions. When you set a white
balance, Lightroom uses the profiles for your camera to extrapolate color information. These color profiles are the
same ones developed for Adobe Camera Raw.
You can adjust how Lightroom interprets the color from your camera by using the controls in the Camera
Calibration panel and saving the changes as a preset. You may find it useful to photograph a standard color target
under the lighting you want to calibrate.
1 Select a photo, and then set options in the Camera Calibration panel.
Profile Sets the version of camera profiles to use for your camera. ACR 3.0 and higher are newer and improved
camera profiles for some cameras. If you don’t see ACR 3.0 or higher, your camera’s profiles didn’t require updating,
and ACR 2.4 represents the latest profiles. If both options are available, you might want to choose ACR 2.4 for
consistent behavior with legacy photos. Embedded indicates that the current file (likely TIFF, JPEG, PSD or DNG
format) has an embedded profile.
Shadows Corrects for any green or magenta tint in the shadow areas of the photo.
Red, Green and Blue Primary The Hue and Saturation sliders adjust the red,green, and blue in the photo. Ingeneral,
adjust the hue first, and then adjust its saturation. Moving the Hue slider to the left (negative value) is similar to a
counterclockwise move on the color wheel; moving it to the right (positive value) is similar to a clockwise move.
Moving the Saturation slider to the left (negative value) desaturates the color; moving it to the right (positive value)
increases saturation.
2 Save the adjustments as a Develop preset.
Page 84

PHOTOSHOP LIGHTROOM
User Guide
You can apply this preset to other photos taken with the same camera, under similar lighting conditions.
Save default settings for cameras
You can save new camera raw defaults for each camera model. Change preference options to determine whether the
camera serial number and ISO settings are included in the defaults.
1 Open Presets preferences, and then select whether you want the camera serial number and the cameraISO setting
to be included in the defaults.
2 In Develop module, select a raw file, change settings, and choose Develop > Set Default Settings.
3 Choose Update To Current Settings.
In Presets preferences, you can choose Reset All Default Develop Settings to revert to the original settings.
Working in grayscale
Convert a photo to gray tones
Grayscale Mix in the Grayscale panel converts color images to monochrome grayscale images, providing control
over how individual colors convert to gray tones.
80
1 Convert the photo to grayscale by selecting Grayscale in the Treatment area of the Basic panel.
2 Adjust the photo’s tonal range using the settings in the Basic and Tone Curve panels.
3 In the HSL/Color/Grayscale panel, darken or lighten the gray tones that represent colors in the original photo.
• Drag the individual color sliders to adjust the gray tone for all similar colors in the original photo.
• Click Auto-Adjust to set a grayscale mix that maximizes the distribution of gray tones. Auto-Adjust often
produces excellent results that can be used as a starting point for tweaking gray tones using the sliders.
• Click the Targeted Adjustment tool in the upper left of the Grayscale panel, move the pointer over an area of
the photo you want to adjust, and click the mouse. Drag the tool, or press the up and down arrow keys, to lighten
or darken the grays for all similarly colored areas of the original photo.
To apply grayscale mix automatically when converting photos to grayscale, select the Apply Auto Grayscale Mix
When Converting To Grayscale option in Presets preferences.
For a video on converting a color photo to black and white, see www.adobe.com/go/learn_lr_video_bw.
Tone a grayscale photo
UsetheslidersintheSplitToningpaneltocoloragrayscalephoto.Youcanaddonecolorthroughoutthetonalrange,
such as a sepia effect, or create a split tone effect in which a different color is applied to the shadows and the
highlights. The extreme shadows and highlights remain black and white.
You can also apply special effects, such as a cross-processed look, to a color photo.
1 Select a grayscale photo.
2 In the Split Toning panel of the Develop module, adjust the Hue and Saturation sliders for the Highlights and
Shadows. Hue sets the color of the tone; Saturation sets the strength of the effect.
3 SettheBalanceslidertobalancetheeffectbetweentheHighlightandShadowsliders.Positivevaluesincreasethe
effect of the Highlight sliders; negative values increase the effect of the Shadow sliders.
Page 85

PHOTOSHOP LIGHTROOM
User Guide
Working with single-channel grayscale images
Grayscale mode images from Photoshop have no color data, but you can make tonal adjustments to them in
LightroomusingthetoneadjustmentsintheBasicpanelorToneCurvepanel.Youcanalsoapplycolortoningeffects
using the options in the Split Toning panel. Lightroom handles the photo as an RGB image and exports it as RGB.
Retouching and correcting flaws
Rotate or flip a photo image in the Develop module
• To rotate a photo image in 90 degree increments, choose Photo > Rotate Left or Rotate Right. To rotate a photo to
less than 90 degrees, see “Crop and straighten a photo” on page 81. The photo rotates in a clockwise or counterclockwise direction around its center point.
• To flip a photo imagehorizontally fromfront toback so thatyou’re lookingat a mirror image, choose Photo >Flip
Horizontal. Objects that appeared on the left side appear on the right side, and vice versa. Text in the image will
show in reversed mirror image.
• To flip a photo image vertically from front to back so that you’re looking at a mirror image upside down, choose
Photo > Flip Vertical.
81
Crop and straighten a photo
The toolbar in the Develop module contains tools and controls for cropping and straightening photos. Lightroom
crop and straighten controls work by first setting a crop boundary, and then moving and rotating the image in
relation to the crop boundary. Or, you can use more traditional crop and straighten tools and drag directly in the
photo.
As you adjust the crop overlay or move the image, Lightroom displays a grid of thirds within the outline to help you
compose your final image. As you rotate an image, a finer grid appears to help you align to the straight lines in the
image.
For a video on straightening photos, see www.adobe.com/go/learn_lr_video_straight.
Crop an image
1
In the toolbar on the Develop module, click the Crop Overlay tool .
An outline with adjustment handles appears around the photo.
2 Drag in the photo with the Crop Frame pointer or Drag a crop handle to set the crop boundary. Corner handles
adjust both image width and height.
Note: After you drag a crop handle, you need to select the Crop Frame tool to use it.
3 Reposition the photo within the crop frame by dragging the photo.
4 Click the Crop tool or press Enter when you’re finished cropping and straightening.
Press the letter “o” to cycle through different grid overlays in the crop area. To display the grid only when cropping,
choose View > Tool Overlay > Auto Show. To turn off the grid, choose View > Tool Overlay > Never Show.
Clear or undo any crop or straighten adjustment
❖ Click Reset in the toolbar.
Page 86

Crop to a specified aspect ratio
1
In the toolbar, click the Crop Overlay icon .
PHOTOSHOP LIGHTROOM
User Guide
The Padlock icon indicates and controls whether the crop controls are constrained.
2 Choose an aspect ratio from the pop-upmenu next to the padlock. Choose Original to specify the photo’s original
aspect ratio. Choose Enter Custom to specify an aspect ratio that is not listed.
3 Drag a crop handle to set the crop outline or use the Crop Frame tool.
Press Shift as you drag a crop handle to temporarily constrain to the current aspect ratio.
Straighten an image
❖ In the Develop toolbar, click the Crop Overlay icon , and do one of the following:
• Rotate the image using the Straighten slider.
• Rotate the image by moving the pointer outside of a corner crop handle to display the rotate icon , and then
drag to rotate the image.
• Select the Straighten tool , and then drag in the photo along a line that you want to be horizontal or vertical.
Holding down Alt (Windows) or Option (Mac OS) with the Straighten tool selected displays a grid that helps you
straighten the image.
82
Reduce image noise
Image noise is extraneous visible artifacts that degrade image quality. Image noise includes luminance (grayscale)
noise, which makes an image look grainy, and chroma (color) noise, which is usually visible as colored artifacts in
the image. Photos taken with high ISO speeds or less-sophisticated digital cameras can have noticeable noise.
Moving the Luminance slider to the right reduces grayscale noise, and moving the Color slider to the right reduces chroma noise.
1 Zoom in on the image to better see image noise and the effects of the sliders.
2 In the Detail panel of the Develop module, adjust one or both of the following sliders.
Luminance Reduces luminance noise.
Color Reduces color noise.
Page 87

PHOTOSHOP LIGHTROOM
User Guide
To turn off noise reduction, set the Amount slider to zero or click the Detail panel On/Off icon .
Sharpen a photo
You sharpen photos at two stages in Lightroom workflow: as you view and work on photos, and when you print
them. Sharpening is part of the camera default that Lightroom automatically applies to your photos.
When Lightroom exports a photo or sends a photo for editing in Photoshop, the sharpen setting for the image is
applied to the rendered file.
1 Zoom in the preview image to at least 100%.
2 In the Detail panel of the Develop module, do any of the following:
Amount Adjusts edge definition. Increase the Amount value to increase sharpening. A value of zero (0) turns off
sharpening. Ingeneral, set Amount to a lower value for cleanerimages. The adjustment locatespixels thatdiffer from
surrounding pixels based on the threshold you specify and increases the pixels’ contrast by the amount you specify.
Radius Adjusts the size of the details that sharpening is applied to. Photos with very fine details may need a lower
radius setting. Photos with larger details may be able to use a larger radius. Using too large a radius generally results
in unnatural-looking results.
Detail Adjusts how much high-frequency information is sharpened in the image and how much the sharpening
process emphasizes edges. Lower settings primarily sharpen edges to remove blurring. Higher values are useful for
making the textures in the image more pronounced.
83
Masking Controls an edge mask. With a setting of zero (0), everything in the image receives the same amount of
sharpening. With a setting of 100, sharpening is mostly restricted to those areas near the strongest edges.
Press Alt (Windows) or Option (Mac OS) while dragging a slider to see the areas to be affected (white) versus the
areas masked out (black)
To turn off sharpening, set the Amount slider to zero (0) or click the Detail panel On/Off icon .
For a video tutorial on sharpening photos in Lightroom, see www.adobe.com/go/learn_lr_video_sharp.
See also
“Sharpen a photo for print” on page 118
Compensate for chromatic lens aberration
Chromatic aberration isacommondefectcausedbythefailureofthelenstofocusdifferentcolorstothesamespot.
In one type of chromatic aberration, the image from each color of light is in focus, but each image is a slightly
different size. This type of aberration is seen as a complementary color fringing in areas away from the center of the
image.Forexample,youmayseearedfringeonthesideofanobjecttowardthecenterofthephoto,andacyanfringe
on the side of the object away from the center of the photo.
Page 88

PHOTOSHOP LIGHTROOM
User Guide
Original photo with blue/yellow fringing (left), and after fixing chromatic aberration (right).
1 Zoom in to an area near the corner of the photo. For the best results, the area should contain very dark or black
detail against a very light or white background. Look for color fringing.
2 In the Lens Corrections panel of the Develop module, adjust one or both of the following sliders:
Red/Cyan Adjusts the size of the red channel relative to the green channel. This compensates for red/cyan color
fringing.
84
Blue/Yellow Adjuststhesizeofthebluechannelrelativetothegreenchannel.Thiscompensatesforblue/yellowcolor
fringing.
To see more clearly the color fringing you are trying to correct, press Alt (Windows) or Option (Mac OS) as you move
a slider to hide any color fringe corrected by the other color slider.
Defringe Choose All Edges to correct color fringing for all edges, including any sharp change in color values. If
choosing All Edges results in thin grey lines or other undesired effects, choose Highlight Edges to correct color
fringing only in the edges of highlighting where fringing is most likely to occur. Choose Off to turn off defringing.
Compensate for lens vignetting
Vignetting is a lens defect that causes the edges, especially the corners, of an image to be darker than the center.
1 In the Lens Corrections panel of the Develop module, move the Lens Vignetting Amount slider to the right
(positive values) to lighten the corners of the image, or move the slider to the left (negative values) to darken the
corners of the image.
2 Move the Lens Vignetting Midpoint slider to the left (lower value) to apply the Vignetting Amount adjustment to
a largerarea away from the corners,or move the slider to the right (higher value) to restrict the adjustment to an area
closer to the corners.
Note: Vignetting adjustments work for the original uncropped image edge only.
Heal spots and blemishes
The Remove Spots tool lets you repair a selected area of a photo with a sample from another area. When removing
spots, you use two connected circles: the spot circle indicates which area will change, and the sample circle determines which area of the photo is being used to clone or heal the spot.
1 In the Develop module, select the Remove Spots tool from the toolbar.
Page 89

PHOTOSHOP LIGHTROOM
User Guide
2 Click one of the following in the toolbar:
Clone Applies the sampled area of the photo to the selected area.
Heal Matches the texture, lighting, and shading of the sampled area to the selected area.
3 (Optional) In the toolbar, drag the Cursor Size slider to specify the size of the area that the Remove Spots tool
affects.
4 Move the Remove Spots tool into the photo and click the part of the photo you want to retouch.
Two circles appear: the spot circle appears over the selected area, and the sample circle designates the area of the
photo used to clone or heal.
5 Do any of the following:
• To select a circle, click it. The selected circle is thicker than the other one.
• To specify the sampled area, drag the sample circle.
• To adjust the size of the circles, move the pointer over the edge of the spot circle until it changes to a double-
pointing arrow, and then drag to make both circles larger or smaller.
• To change the area being cloned or healed, drag inside the spot circle.
• Tohidethecircles,movethemousepointeroutofthecontentarea.YoucanalsopresstheHkeytohideandshow
circles. Hold down H for a few seconds to hide the circles until you release the key.
• To delete a spot, select one of the circles and press Backspace or Delete.
• To cancel the operation, click the Reset button in the toolbar. Clicking Reset also removes all previously created
spot circles.
85
For a video on removing spots from a photo, see www.adobe.com/go/learn_lr_video_spot.
Fix red-eye
1 Zoom in to at least 1:1 (100%) to get a better view.
2 In the Develop module, select the Remove Red Eye tool from the toolbar.
3 Clickthecenteroftheeyetousethecurrentselection,ordragfromthecenteroftheeyetochangetheselection
size. For best results, select the entire eye, not just the pupil.
4 Drag the Pupil Size slider on the toolbar to the right to increase the size of the area corrected.
5 Drag the Darken slider to the right to darken the pupil area within the selection and the iris area outside the
selection.
Press the H key to hide or show the red eye circle. To remove the red eye change, select the red eye circle and press
Enter or Delete.
Click Reset to clear the Remove Red Eye tool changes and to turn off the selection. Click the tool again to make
further corrections.
Move between multiple selected red eye areas by clicking the selection.
Page 90

PHOTOSHOP LIGHTROOM
User Guide
Apply Develop adjustments to other photos
As you make adjustments to a photo in the Develop module or in the Quick Develop panel of the Library module,
Lightroom keeps a record of the settings. You can copy these settings and apply them to different versions of the
photo and to other photos selected in the Filmstrip.
For a video on synchronizing settings across a group of photos, see www.adobe.com/go/learn_lr_video_synch.
Copy the current photo’s Develop settings
You can specify individual settings to copy from the current photo before you paste them to another photo in the
Filmstrip.
• IntheDevelopmodule,clicktheCopybuttontotheleftofthetoolbar,chooseEdit>Copy,orchooseDevelop>
Copy Settings. Select the settings you want and click Copy.
•
In the Library module, choose Photo > Develop Settings > Copy Settings.Select the settings you want and click Copy.
Note: The Edit > Copy command in the Library module (Mac OS only) is designated for copying text and metadata. In
the Develop module, the Edit > Copy command serves a dual purpose for copying selected text in a panel or copying the
Develop settings of a selected photo.
86
Paste Develop settings to another photo
Select the photo in the Filmstrip that you want to apply the settings to and do one of the following:
• In the Develop module, click the Paste button, choose Edit > Paste, or choose Develop > Paste Settings.
• In the Library module, choose Photo > Develop Settings > Paste Settings.
Note: The regular Paste command in the Library module is designated for pasting copies of text and metadata.
Apply Develop settings using the Painter tool
1 In the Grid view of the Library module, select the Painter tool in the toolbar, and then choose Settings from the
Paint menu in the toolbar.
Note: If the Painter tool does not appear in the toolbar, choose Painter from the toolbar menu.
2 Choose the Develop setting in the toolbar, and then click or drag across photos to apply the setting.
3 To disable the Painter, clickthe circular well inthe toolbar. When disabled,the Painter iconis visible in thetoolbar.
Synchronize settings with multiple photos
Whether you are working in the Develop or the Library module, you can copy and paste the Develop settings of the
current photo (which is indicated by a thicker white border around the photo in the Filmstrip) to all other selected
photos in the Filmstrip.
Note: When only one photo is selected in the Filmstrip, the Sync Settings command is not available. In the Develop
module, the Sync button becomes the Previous button; in the Library module, the Sync Settings button is inactive.
Shift-click to select the other photos in the Filmstrip to synchronize with the current photo, and then do one of the
following:
• In the Develop module, click the Sync button, or choose Settings > Sync Settings. Select the settings to copy and
click Synchronize.
Page 91

PHOTOSHOP LIGHTROOM
User Guide
• In the Library module, click the Sync Settings button, or choose Photo > Develop Settings > Sync Settings. Select
the settings to copy and click Synchronize.
AnysettingsthatyoumayhavepreviouslyselectedordeselectedintheCopySettingsdialogboxarealsosetbydefault
in the Synchronize Settings dialog box.
Apply settings of previously selected photo
YoucancopyallthesettingsofthephotoyoulastselectedintheFilmstrip(evenifyoudidn’tmakeanyadjustments
to it) and apply them to the currently selected photo. Do one of the following:
• In the Develop module, click the Previous button to the right of the toolbar, or choose Settings > Paste Settings
From Previous.
• In the Library module, choose Photo > Develop Settings > Paste Settings From Previous.
Note: WhenmultiplephotosareselectedintheFilmstrip,thePreviousbuttonintheDevelopmoduleturnsintotheSync
button.
Managing image history and snapshots
87
Create snapshots
Duringthedevelopingprocess,youcannameandsaveanystateofaphotoasasnapshot.Eachsnapshotyoucreate
is listed alphabetically in the Snapshots panel.
Roll the pointer over the list of snapshots to preview each one in the Navigator.
Add a snapshot
1
In the Develop module, select an earlier state or the current state of your photo in the History panel.
2 Click the Create Snapshot (+) button in the Snapshots panel header (or choose Develop > New Snapshot).
All the settings for the selected history state are recorded in the snapshot.
3 Type a new name, and press Return.
Delete a snapshot
❖ In the Snapshots panel of the Develop module, select the snapshot and click the Delete Selected Snapshot (-)
button in the panel header.
Note: Do not press the Delete key on your keyboard; this will delete the currently selected photo.
View and undo image adjustment history
The History panel keeps a record of the date and time that a photo was imported into Lightroom, including any
preset thatwas applied at thetime. Afterward, whenever you make an adjustment to the photo, Lightroom saves that
adjustment as a state and lists it with all the other states chronologically in the History panel. You can change the
names of the states, but you cannot change the order in which they are listed.
• Preview each state of the photo by rolling the pointer over the list in the History panel and viewing the effects in
the Navigator panel.
Page 92

PHOTOSHOP LIGHTROOM
User Guide
• Select a state in the History panel to reapply it to the photo or to save it as a snapshot.
• Double-click a state to select its name, type a new name, and press Enter or Return.
• Right-click (Windows) or Ctrl-click (Mac OS) a state and choose Copy History Step Settings To Before.
• Click Clear on the History panel header to remove all states from the listing.
When the list of states gets too long in the History panel, create snapshots of the states you want to keep and then
clear the panel.
See also
“Create snapshots” on page 87
“Copy settings to the Before or After version of a photo” on page 73
Quick Develop
Quick Develop panel overview
The Quick Develop panel in the Library module gives you the convenience of quickly applying imagecolor and tone
adjustments to one or more photos withoutleaving the Library module.Any Develop settings you make are recorded
in the History panel of the Develop module, and corresponding slider controls adjust accordingly in the Basic panel.
88
Click the triangle button on the right side of the Quick Develop panel to hide any of the panel sections.
Quick-Develop photos in the Library
1 In the Library module, select one or more photos in Grid view.
2 In the Quick Develop panel, do any of the following:
• Choose a Develop preset from the Preset pop-up menu. Custom is automatically selected whenever you adjust
other settings in the Quick Develop panel. By choosing the Default Settings preset, photos are automatically reset
to Lightroom default import settings.
• Crop photos by choosing a new crop ratio from the pop-up menu. To add more choices to the list, select Enter
Custom, type new crop dimensions for the width and height in the Aspect Ratio boxes, and click OK.
• Change photos to grayscale by selecting the Grayscale treatment.
• Apply a white balance preset by choosing it from the WB pop-up menu.
• Fine-tune the white balance by adjusting the Temp and Tint settings. Click the arrow buttons to incrementally
increase or decrease the Kelvin temperature, green tint, or magenta tint.
• Adjust individual tone settings by clicking their arrow buttons. For example, adjust overall image brightness by
clicking the Exposure buttons. Each click adjusts the exposurein increments of a third of an f-stop or onefull stop.
• Click the Auto Tone button to apply automatic Lightroom settingsfor Exposure, Blacks, Brightness, and Contrast.
To adjust the tone automatically in photos, select the Apply Auto Tone Adjustments option in Presets preferences.
• Adjust the Vibrance setting to change the saturation of all lower-saturated colors with less effect on the higher-
saturated colors.
Page 93

PHOTOSHOP LIGHTROOM
User Guide
The single-arrow buttons adjust the settings in smaller increments than the double-arrow buttons.
For a video tutorial on finding photos using the Compare mode and Quick Develop panel, see
www.adobe.com/go/learn_lr_video_compare.
See also
“Create and apply Develop presets” on page 71
“Apply Develop settings using the Painter tool” on page 86
“Adjusting image color and tone” on page 73
“Working in grayscale” on page 80
“Apply Develop adjustments to other photos” on page 86
Reset Quick Develop adjustments
• As you try out different adjustments in the Quick Develop panel,you can reset them individually by clicking their
names. For example, click Exposure to reset the photo to its original exposure.
• To reset a photo to the Lightroom default import settings, click the Reset All button at the bottom of the Quick
Develop panel or choose Photo > Develop Settings > Reset.
• To remove all settings completely, choose Zero’d from the Preset pop-up menu in the Quick Develop panel.
89
Page 94

Chapter 6: Exporting photos
Photos in Adobe® Photoshop® Lightroom™ can be exported as JPEG, PSD, TIFF, or DNG files for different uses.
Exporting photos
Export photos: Basic workflow
Lightroom lets you export photos in file formats suitable for a wide range of uses. For example, you may want to
export photos as JPEGs to use in multimedia presentations or e-mail, or as TIFFs for publication. You can export
single or multiple photos from the Library or Develop modules to the location you specify. Lightroom can rename
photos during export. When exporting photos in JPEG, TIFF, or PSD formats, options are available for specifying
their color space, pixel dimensions, and resolution. Export settings can be saved as presets for reuse. Lightroom also
lets you export photos using the settings of the previous export session.
In the Slideshow module, photos can be exported to a PDF file, and in the Web module, photos can be exported to
a web photo gallery. See “Export a slideshow” on page 108 and “About saving and uploading web photo galleries” on
page 126.
90
1. Select the photos to export.
SelectphotosfromtheGridviewortheFilmstrip.See“SelectphotosintheGridviewandtheFilmstrip”onpage35.
2. Export photos and specify a destination folder.
Choose File > Export or press the Export button at the bottom of the left panels in the Library module, and then
specify a destination folderfor the exported files in the Export dialog box. See “Choose an export destination folder”
on page 91.
The number of photos being exported is displayed in the lower left corner of the Export dialog box.
3. (Optional) Choose an option from the Preset menu.
Lightroom has several premade Presets for exporting photos in specific file formats. See “Export photos using
presets” on page 93.
4. Specify file naming for the exported photos.
Choose an option from the File Naming Template menu. You can use the Text Template Editor to specify a naming
option. See “The Filename Template Editor and Text Template Editor” on page 20 and “Name photos when
exporting” on page 91.
5. Choose a file format and specify export file settings.
Choose whether to export your photos as JPEG, PSD, TIFF, or DNG files. After selecting aformat, specify the appropriate settings for your exported files. For example, if you chose JPEG, specify the compression setting, color space,
pixel dimensions, and resolution. See “Export file settings” on page 91.
Page 95

PHOTOSHOP LIGHTROOM
User Guide
6. Choose a post-export action.
Specify whether to show the files in the Explorer (Windows) or the Finder (Mac OS), burn the photos to disc, open
the photos in Photoshop, launch a specific application, or do nothing after exporting. See “Choose post-processing
actions” on page 93.
7. (Optional) Save your export settings.
See “Save export presets” on page 93.
8. Click Export.
See also
“About file formats” on page 17
Choose an export destination folder
1 In the Export dialog box, do any of the following:
• Click the Choose button in theExport Location section and then specify adestination folder forthe exportedfiles.
• Click the triangle next to the Choose button and pick a folder from the pop-up menu.
91
Note: As you export and specify a destination folder, it will appear in the pop-up menu the next time you export photos.
2 (Optional) Select Put In Subfolder if you want the photos exported to a subfolder within the destination folder.
You can type a name for the subfolder.
Name photos when exporting
You can specify how the photos are named as they’re exported.
1 In the Export dialog box, choose an option from the File Naming Template menu.
2 If you chose a naming option that uses a custom name, type the name in the Custom Text box.
3 If you don’t want a numeric sequence to start with “1,” enter a different value in the Start Number text box.
See also
“Naming options” on page 20
Export file settings
When you export your photos as JPEG, PSD, or TIFF, specify the settings for saving the files in the Export dialog
box. TheDigital Negative(DNG) formatsaves your camera raw filesin an archival form and requires nofile settings,
because it doesn’t alter the original image data.
JPEG export options
Quality Specifies the amount of compression. JPEG uses lossy compression, discarding data to make a file smaller.
Drag the Quality slider or enter a value between 0 and 100 in the Quality box.
Color Space Converts the photos to sRGB, AdobeRGB, or ProPhoto RGB color space and tags the photos with the
color profile.
Page 96

PHOTOSHOP LIGHTROOM
User Guide
Constrain Maximum Size Sets a maximum size for the width or height of your photos, which determines how many
pixels the photos have and specifies the fineness of detail in the exported images. Select the option and then specify
the size in inches, centimeters, or pixels.
Resolution Sets metadata within the exported photos which describe how large the photos should appear at a given
resolution.
Add Copyright Watermark Adds a copyright watermark if a copyright tag is present in the IPTC metadata.
Minimize Embedded Metadata Includes only copyright metadata fields in the exported photo.
Write Keywords As Lightroom Hierarchy Uses the pipe character ( | ) to indicate parent/child relationships (such as
“Names|Maria”) in the metadata fields.
PSD export options
Color Space Converts the photos to sRGB, AdobeRGB or ProPhoto RGB color space and tags the photos with the
color profile.
Bit Depth Saves the image with a bit depth of 8 or 16 bits per channel.
Constrain Maximum Size Sets a maximum size for the width or height of your photos, which determines how many
pixels the photos have and specifies the fineness of detail in the exported images. Select the option and then specify
the size in inches, centimeters, or pixels.
92
Resolution Sets metadata within theexported photos,which describes howlarge thephotos shouldappear ata given
resolution.
Add Copyright Watermark Adds a copyright watermark if a copyright tag is present in the IPTC metadata.
Minimize Embedded Metadata Includes only copyright metadata fields in the exported photo.
TIFF export options
Compression Specifies ZIP compression or no compression. ZIP is a lossless compression that PDF and TIFF files
support. ZIP compression is most effective for images that contain large areas of single color.
Color Space Converts the photos to sRGB, AdobeRGB, or ProPhoto RGB color space and tags the photos with the
color profile.
Bit Depth Saves the image with a bit depth of 8 or 16 bits per channel.
Constrain Maximum Size Sets a maximum size for the width or height ofphotos, which determines how many pixels
the photos have and specifies the fineness ofdetail in the exported images. Select theoption and then specify the size
in inches, centimeters, or pixels.
Resolution Sets metadata within the exported photo, which describes how large the photos should appear at a given
resolution.
Add Copyright Watermark Adds a copyright watermark if a copyright tag is present in the IPTC metadata.
Minimize Embedded Metadata Includes only copyright metadata fields in the exported photo.
DNG (digital negative) export options
File Extension Choose the .dng or .DNG file extension.
JPEG Preview Choose whether the exported JPEG preview is full sized, medium sized, or not created.
Image Conversion Method Choose Preserve Raw Image to match the default settings of the raw image. Choose
Convert To Linear Image to store the image data in an interpolated (demosaiced) format. The resulting image can
Page 97

PHOTOSHOP LIGHTROOM
User Guide
be interpreted by other software even if that software doesn’t have a profile for the digital camera that captured the
image.
Compressed (lossless) Uses lossless compression, meaning that no information is lost while reducing the file size.
Embed Original Raw File Stores all of the original camera raw data in the DNG file.
Choose post-processing actions
In the Export dialog box, you can specify certain actions be performed as the last step when exporting photos from
Lightroom. The following options are chosen from the After Export menu:
❖ In the Export dialog box, choose any of the following from the After Export menu:
Do Nothing Exports the photos with no further action afterward.
Show In Explorer/Finder Exports the photos and then displays the files in an Explorer (Windows) or Finder
(Mac OS) window.
Burn The Exported Images To A Disc Exports the photos and then prompts you through the process of burning the
files to a writable CD or DVD.
Open In Photoshop / Photoshop Elements Exports the photos and then opens them in Photoshop or Photoshop
Elements.
93
Go To Export Actions Folder Now OpenstheExportActionsfolder,whereyoucanplaceanyexecutable(application)
or a shortcut or alias of an executable (application).
Put items in the Export Actions folder
You can put any item in the Export Actions folder that can be opened with a set of photo files. For example, you can
place an executable file or shortcut (Windows), or application or alias (Mac OS). Items added to the folder are listed
in the After Export menu of the Export dialog box the next time you export photos.
You can also add Photoshop droplets or script files to the Export Actions folder.
1 Do any of the following to open the Export Actions folder:
• In the Export dialog box, choose Go To Export Actions Folder Now from the After Export menu.
• (Windows XP) Navigate to \Documents And Settings\[username]\Application Data\Adobe\Lightroom\Export
Actions\.
• (Windows Vista) Navigate to \Users\[username]\App Data\Roaming\Adobe\Lightroom\Export Actions\.
• (Mac OS) Navigate to /[user home]/Library/Application Support/Adobe/Lightroom/Export Actions/.
2 Add the item to the Export Actions folder.
Save export presets
1 In the Export dialog box, specify the export settings you want to save.
2 Choose Save As New Preset from the Preset menu.
3 In the New Preset dialog box, type a name in the Preset Name text box and click Create.
Export photos using presets
1 Select the photos you want to export.
Page 98

PHOTOSHOP LIGHTROOM
User Guide
2 Do any of the following to choose a preset:
• Choose File > Export or click the Export button, and then in the Export dialog box,choose from the Presetsmenu.
• In any module, choose File > Export Presets and then choose the preset you want.
Lightroom premade export presets
Lightroom includes several premade export presets including:
Burn Full-Sized JPEGs Exports photosas JPEGs converted to and tagged as sRGB withmaximum quality, no scaling,
a resolution of 240 pixels per inch, and (by default) put in a destination subfolder named Lightroom Burned Exports.
A post-processing action of Burn The Exported Images To A Disc is chosen.
Export To DNG ExportsphotosinDNGfileformat.Bydefault,thispresetusesthephoto’soriginalfilenameforthe
DNG file, and specifies no post-processing action.
For E-Mail Exports photos as JPEGs converted to and tagged as sRGB, with a maximum size of 640 pixels (width or
height), medium quality, a resolution of 72 pixels per inch. By default, this preset specifies a post-processing action
of Show In Explorer (Windows) or Show In Finder (Mac OS).
Export photos by using the previous settings
You can export photos using the same settings from the previous export session.
94
1 Select the photos to export.
2 Choose File > Export With Previous.
Synchronize metadata with Adobe Camera Raw and Bridge
Adobe Camera Raw, Adobe Bridge, and Lightroom can read metadata whenever you save metadata changes to the
files. When you save metadata to a raw file, the changes are automatically saved in the Extensible Metadata Platform
(XMP) sidecar files. With other file types, the metadata is saved in the file itself. The keyword hierarchy created in
any of these applications is preserved, and no data is lost, even though it might not appear in one or more of the applications.
If the Automatically Write Changes Into XMP option is selected in the Catalog Settings dialog box (choose File >
Catalog Settings), metadata changes in Lightroom are automatically saved to the files.
Note: Versions earlier than Adobe Camera Raw 4.1 may not recognize some of the Develop adjustments made in
Lightroom.
1 In the Library module, select photos in the Grid view or Filmstrip.
2 Do either of the following:
• To save metadata changes that you’ve made in Lightroom, choose Metadata > Save Metadata To File.
• To include metadata changes made in Adobe Camera Raw or Adobe Bridge, choose Read Metadata From File.
See also
“About metadata and XMP” on page 54
“Create keyword tags” on page 60
Page 99

PHOTOSHOP LIGHTROOM
User Guide
Editing in other applications
About editing in Photoshop or other applications
You can edit photos using Photoshop, Photoshop Elements, or another application from within the Library or
Develop modules in Lightroom. Lightroom automatically uses Photoshop or Photoshop Elements as an external
editor if you have either application installed on your computer. You can designate other applications to function as
external editors in the External Editors preferences.
External editors like Photoshop and Photoshop Elements make edits directly on the pixels in photos, so Lightroom
provides RGB pixels (contained in JPEGs, TIFFs, and PSDs) to these external editors. The mosaic sensor data in
camera raw files cannot be read by external editors that make edits on pixels. Only raw processing applications like
Lightroom and Adobe Camera Rawcan workwith camera raw data. Lightroom must send either TIFFor PSD copies
of camera raw and DNG files for editing in external editors like Photoshop and Photoshop Elements.
The file format and other options for editing camera raw and DNG files in external editors are set in the External
Editors preferences.
For a video on integrating Lightroom with Photoshop, see www.adobe.com/go/learn_lr_video_integrate.
Set preferences for editing camera raw files in an external editor
In the External Editors preferences, you specify the file format, color space, bit depth, and compression for the TIFF
or PSD files that Lightroom sends to Photoshop, Photoshop Elements, and other applications for editing. A combination of 16-bit ProPhoto RGB is recommended for preserving the color details in photos sent from Lightroom.
95
❖ In the External Editors preferences dialog box, choose options from the following menus:
File Format Saves camera raw images in either TIFF or PSD format. See “About file formats” on page 17.
Color Space Converts the photos to sRGB, AdobeRGB or ProPhoto RGB color space and tags the photos with the
color profile. See “About color management in Lightroom” on page 12.
Bit Depth Saves photos with a bit depth of 8 bits or 16 bits per color component (red, green, and blue). Files that are
8 bit are smaller and more compatible with various applications, but do not preserve the fine tonal detail that 16-bit
files can.
Compression Applies either ZIP compression or no compression to photos. ZIP is a lossless compression that PDF
and TIFF files support. ZIP compression is most effective for images that contain large areas of single color (TIFF
only).
Template Uses the template you specify to name the file. Select a template and specify custom text or the start
number of the file names. See “The Filename Template Editor and Text Template Editor” on page 20.
Edit in Photoshop or Photoshop Elements
You can do additional editing to your photo using Photoshop or Photoshop Elements from within Lightroom. You
must have either Photoshop or Photoshop Elements installed on your computer for this feature to be available.
1 IntheLibrarymoduleorDevelopmodule,selectthephotosyouwanttoedit,andchoosePhoto>EditInAdobe
Photoshop or Edit in Adobe Photoshop Elements.
2 In the Edit Photo dialog box, select one of the following:
Edit Original Edits the original file without Lightroom adjustments. (JPEG, TIFF, and PSD only)
Edit A Copy Edits a copy of the original file without Lightroom adjustments. (JPEG, TIFF, and PSD only)
Page 100

PHOTOSHOP LIGHTROOM
User Guide
Edit A Copy With Lightroom Adjustments Edits a copy of the original file with Lightroom adjustments visible.
When sending a copy to the external editor, the newly created file is automatically added to the library.
3 Click Edit.
After making edits in Photoshop orPhotoshop Elements,you will be prompted tosave any changes to the photo sent
from Lightroom. Be sure not to do a Save As and rename the photo because the newly-created photo will not be
automatically added to the library.
Important: When saving from Photoshop or Photoshop Elements, be sure to turn on the Maximize Compatibility option
so that images can be read by Lightroom. Photoshop CS2 automatically saves PSD files from Lightroom with maximum
compatibility.
Choose an external editor
You can designate an application to be used as an external editor in the Preferences dialog box. After you choose an
application, you can always use Preferences to change to a different application.
1 In the External Editing preferences, click Choose in the Additional External Editor area.
2 Navigate to and select the application to use, and then click Open (Windows) or Choose (Mac OS).
Note: You can also select an external editor by choosing Photo > Edit In Other Application from the Library or Develop
module. You’ll be prompted tonavigate to and select theapplication to use. After you choose an external editor, the name
of the application appears as Edit In [Name of Application] in the Photo menu.
96
See also
“About file formats” on page 17
“Color management” on page 12
Edit in other applications
1 In the Library module or Develop module, select the photos you want to edit and then choose Photo > Edit In
[Name of Application].
Note: If you’re editing using another application for the first time, choose Photo > Edit In Other Application. You will be
asked to navigate and choose the application you want to use. Once you choose the application for editing photos, the
name of the application is added to the Edit In command. You can always choose a different editing application in the
External Editors preferences.
2 In the Edit Photo dialog box, specify the editing option you want to use and click Edit.
 Loading...