

Page 1

Chapter 1:
Page 2

Copyright
© 2006 Adobe Systems Incorporated. All rights reserved.
®
Connect™ Enterprise User Guide for Windows® and Macintosh
Adobe
If this guide is distributed with software that includes an end user agreement, this guide, as well as the software described in it, is furnished under license and may be used or
copied only in accordance with the terms of such license. Except as permitted by any such license, no part of this guide may be reproduced, stored in a retrieval system, or transmitted, in any form or by any means, electronic, mechanical, recording, or other wise, without the prior written permission of Adobe Systems Incorporated.Pleasenotethatthe
content in this guide is protected under copyright law even if it is not distributed with software that includes an end user license agreement.
Thecontentofthisguideisfurnishedforinformationaluseonly,issubjecttochangewithoutnotice,andshouldnotbeconstruedasacommitmentbyAdobe Systems Incorporated. Adobe Systems Incorporated assumes no responsibility or liability for any errors or inaccuracies that may appear in the informational content contained in this guide.
Please remember that existing artwork or images that you may want to include in your project may be protected under copyright law. The unauthorized incorporation of such
material into your new work could be a violation of the rights of the copyright owner. Please be sure to obtain any permission required from the copyright owner.
Any references to company names in sample templates are for demonstration purposes only and are not intended to refer to any actual organization.
Adobe, the Adobe logo, Acrobat, Adobe Captivate, Adobe Connect, After Effects, Authorware, Breeze, Contribute, Flash, Flash Player, FlashPaper, Flex, PDF, and Reader are
either registered trademarks or trademarks of Adobe Systems Incorporated in the United States and/or other countries.
Mac OS and Macintosh are trademarks of Apple Computer, Inc., registered inthe United Statesand other countries. Microsoft and Windows are either registered trademarks or
trademarks of Microsoft Corporation in the United States and/or other countries. All other trademarks are the property of their respective owners.
™
RealDuplex
Acoustic Echo Cancellation is Copyright © 1995-2004 SPIRIT.
Notice to U.S. Government End Users: The Software and Documentation are “Commercial Items,” as that term is defined at 48 C.F.R. §2.101, consisting of “Commercial
Computer Software” and “Commercial Computer Software Documentation,” as such terms are used in 48 C.F.R. §12.212 or 48 C.F.R. §227.7202, as applicable. Consistent with
48 C.F.R. §12.212 or 48 C.F.R. §§227.7202-1 through 227.7202-4, as applicable, the Commercial Computer Software and Commercial Computer Software Documentation are
being licensed to U.S. Government end users (a) onlyas Commercial Itemsand (b)with onlythose rights asare granted toall other end users pursuant tothe terms andconditions
herein. Unpublished-rights reserved under the copyright laws of the United States. Adobe agrees to comply with all applicable equal opportunity laws including, if appropriate,
the provisions of Executive Order 11246, as amended, Section 402 of the Vietnam Era Veterans Readjustment Assistance Act of 1974 (38 USC 4212), and Section 503 of the
Rehabilitation Act of 1973, as amended, and the regulations at 41 CFR Parts 60-1 through 60-60, 60-250, and 60-741. The affirmative action clause and regulations contained in
the preceding sentence shall be incorporated by reference.
Adobe Systems Incorporated, 345 Park Avenue, San Jose, California 95110, USA.
Page 3

Contents
Chapter 1: Before you begin
Resources . . . . . . . . . . . . . . . . . . . . . . . . . . . . . . . . . . . . . . . . . . . . . . . . . . . . . . . . . . . . . . . . . . . . . . . . . . . . . . . . 1
What’s new . . . . . . . . . . . . . . . . . . . . . . . . . . . . . . . . . . . . . . . . . . . . . . . . . . . . . . . . . . . . . . . . . . . . . . . . . . . . . . . 2
Using Adobe Help . . . . . . . . . . . . . . . . . . . . . . . . . . . . . . . . . . . . . . . . . . . . . . . . . . . . . . . . . . . . . . . . . . . . . . . . 2
Chapter 2: Connect Enterprise basics
Adobe Connect Enterprise . . . . . . . . . . . . . . . . . . . . . . . . . . . . . . . . . . . . . . . . . . . . . . . . . . . . . . . . . . . . . . . . 5
Enterprise Manager How To Topics . . . . . . . . . . . . . . . . . . . . . . . . . . . . . . . . . . . . . . . . . . . . . . . . . . . . . . . . 6
Adobe Connect Enterprise Manager . . . . . . . . . . . . . . . . . . . . . . . . . . . . . . . . . . . . . . . . . . . . . . . . . . . . . . . 7
Managing permission access for library folders and files . . . . . . . . . . . . . . . . . . . . . . . . . . . . . . . . . . . 13
Managing library folders and files . . . . . . . . . . . . . . . . . . . . . . . . . . . . . . . . . . . . . . . . . . . . . . . . . . . . . . . . 17
Managing content in the Content library . . . . . . . . . . . . . . . . . . . . . . . . . . . . . . . . . . . . . . . . . . . . . . . . . 21
Chapter 3: Adobe Acrobat Connect Professional meetings
Acrobat Connect Professional How To topics . . . . . . . . . . . . . . . . . . . . . . . . . . . . . . . . . . . . . . . . . . . . . . 29
Adobe Acrobat Connect Professional basics . . . . . . . . . . . . . . . . . . . . . . . . . . . . . . . . . . . . . . . . . . . . . . . 29
Acrobat Connect Professional work area . . . . . . . . . . . . . . . . . . . . . . . . . . . . . . . . . . . . . . . . . . . . . . . . . . 33
Working with meeting room templates . . . . . . . . . . . . . . . . . . . . . . . . . . . . . . . . . . . . . . . . . . . . . . . . . . . 39
Creating and attending meetings . . . . . . . . . . . . . . . . . . . . . . . . . . . . . . . . . . . . . . . . . . . . . . . . . . . . . . . . 42
Updating existing meetings . . . . . . . . . . . . . . . . . . . . . . . . . . . . . . . . . . . . . . . . . . . . . . . . . . . . . . . . . . . . . . 46
Viewing data about meetings . . . . . . . . . . . . . . . . . . . . . . . . . . . . . . . . . . . . . . . . . . . . . . . . . . . . . . . . . . . . 52
Sharing content during a meeting . . . . . . . . . . . . . . . . . . . . . . . . . . . . . . . . . . . . . . . . . . . . . . . . . . . . . . . . 53
Managing attendees . . . . . . . . . . . . . . . . . . . . . . . . . . . . . . . . . . . . . . . . . . . . . . . . . . . . . . . . . . . . . . . . . . . . . 63
Using audio conferencing in a meeting . . . . . . . . . . . . . . . . . . . . . . . . . . . . . . . . . . . . . . . . . . . . . . . . . . . 66
Recording and playing back meetings . . . . . . . . . . . . . . . . . . . . . . . . . . . . . . . . . . . . . . . . . . . . . . . . . . . . 69
Taking notes in a meeting . . . . . . . . . . . . . . . . . . . . . . . . . . . . . . . . . . . . . . . . . . . . . . . . . . . . . . . . . . . . . . . . 73
Chat options in a meeting . . . . . . . . . . . . . . . . . . . . . . . . . . . . . . . . . . . . . . . . . . . . . . . . . . . . . . . . . . . . . . . . 75
Broadcasting audio and video . . . . . . . . . . . . . . . . . . . . . . . . . . . . . . . . . . . . . . . . . . . . . . . . . . . . . . . . . . . . 81
Polling attendees . . . . . . . . . . . . . . . . . . . . . . . . . . . . . . . . . . . . . . . . . . . . . . . . . . . . . . . . . . . . . . . . . . . . . . . . 86
iii
Chapter 4: Adobe Connect Training
About Adobe Connect Training 6 . . . . . . . . . . . . . . . . . . . . . . . . . . . . . . . . . . . . . . . . . . . . . . . . . . . . . . . . . 88
Working with Courses . . . . . . . . . . . . . . . . . . . . . . . . . . . . . . . . . . . . . . . . . . . . . . . . . . . . . . . . . . . . . . . . . . . . 91
Working with Curriculums . . . . . . . . . . . . . . . . . . . . . . . . . . . . . . . . . . . . . . . . . . . . . . . . . . . . . . . . . . . . . . . . 99
Chapter 5: Adobe Acrobat Connect Professional Seminars
About Adobe Acrobat Connect Professional Seminars . . . . . . . . . . . . . . . . . . . . . . . . . . . . . . . . . . . . 116
Chapter 6: Adobe Connect Events
About events . . . . . . . . . . . . . . . . . . . . . . . . . . . . . . . . . . . . . . . . . . . . . . . . . . . . . . . . . . . . . . . . . . . . . . . . . . . 126
Creating and editing events . . . . . . . . . . . . . . . . . . . . . . . . . . . . . . . . . . . . . . . . . . . . . . . . . . . . . . . . . . . . . 129
Managing events . . . . . . . . . . . . . . . . . . . . . . . . . . . . . . . . . . . . . . . . . . . . . . . . . . . . . . . . . . . . . . . . . . . . . . . 144
Page 4

Chapter 7: Adobe Presenter
Creating Presentations . . . . . . . . . . . . . . . . . . . . . . . . . . . . . . . . . . . . . . . . . . . . . . . . . . . . . . . . . . . . . . . . . . 147
Editing Presenter Presentations . . . . . . . . . . . . . . . . . . . . . . . . . . . . . . . . . . . . . . . . . . . . . . . . . . . . . . . . . 153
Audio in Presentations . . . . . . . . . . . . . . . . . . . . . . . . . . . . . . . . . . . . . . . . . . . . . . . . . . . . . . . . . . . . . . . . . . 164
Adding quizzes and questions . . . . . . . . . . . . . . . . . . . . . . . . . . . . . . . . . . . . . . . . . . . . . . . . . . . . . . . . . . . 174
Designing presentations . . . . . . . . . . . . . . . . . . . . . . . . . . . . . . . . . . . . . . . . . . . . . . . . . . . . . . . . . . . . . . . . 197
Publishing and viewing in Connect Enterprise Server . . . . . . . . . . . . . . . . . . . . . . . . . . . . . . . . . . . . 205
Troubleshooting presentations . . . . . . . . . . . . . . . . . . . . . . . . . . . . . . . . . . . . . . . . . . . . . . . . . . . . . . . . . . 215
Chapter 8: Managing the Adobe Connect Enterprise Account
The Adobe Connect Enterprise account . . . . . . . . . . . . . . . . . . . . . . . . . . . . . . . . . . . . . . . . . . . . . . . . . . 217
Account reports . . . . . . . . . . . . . . . . . . . . . . . . . . . . . . . . . . . . . . . . . . . . . . . . . . . . . . . . . . . . . . . . . . . . . . . . 225
Connect Enterprise permissions . . . . . . . . . . . . . . . . . . . . . . . . . . . . . . . . . . . . . . . . . . . . . . . . . . . . . . . . . 229
Group permissions . . . . . . . . . . . . . . . . . . . . . . . . . . . . . . . . . . . . . . . . . . . . . . . . . . . . . . . . . . . . . . . . . . . . . . 233
Creating and managing users and groups . . . . . . . . . . . . . . . . . . . . . . . . . . . . . . . . . . . . . . . . . . . . . . . 237
Account modification . . . . . . . . . . . . . . . . . . . . . . . . . . . . . . . . . . . . . . . . . . . . . . . . . . . . . . . . . . . . . . . . . . . 246
Index . . . . . . . . . . . . . . . . . . . . . . . . . . . . . . . . . . . . . . . . . . . . . . . . . . . . . . . . . . . . . . . . . . . . . . . . . . . . . . . . . . 251
iv
Page 5

Chapter 1: Before you begin
Begin here to get information about Help documentation for Adobe® Connect™ Enterprise. You can also find out
about thetools Adobe offers tohelp you get started, find system requirements for your software, andget an overview
of resources available at Adobe.com.
Resources
Help components
Help The documentation is available in Help, browser-based content you access through the Help menu of your
Adobe product. For information about Help and its accessibility features, see Using Adobe Help.
How To topics The How To topics provide a brief overview of the most common tasks. If you need more infor-
mation, just click the links in the How To topic.
PDF version of Help To view allthe Helptopics ina single PDF document, open the PDFfile in the Help folder where
the application is installed (for licensed customers) or on the Documentation Center at
www.adobe.com/go/connect_documentation_en.
1
Adobe Connect Enterprise resources
More information is available from the following sources:
Quick Start Adobe offers Quick Start demos for Connect Enterprise. These short demos show you visually how to
do common tasks. To view Quick Start demos, select Help > Quick Start from a Connect Professional meetingroom.
Resource Center This site, at www.adobe.com/go/resources_connect_en, is updated regularly withtutorials, simula-
tions, best-practices information, and links to procedures.
Support Center This site, at www.adobe.com/go/support_connect_en, contains current support information,
including technical notes, helpful presentations, and support program details.
Developer Center This site, at www.adobe.com/go/devnet_connect_en, is updated regularly with tutorials and
articles about extending Connect Enterprise.
Documentation Center This site, at www.adobe.com/go/connect_documentation_en, contains documentation for
all Acrobat Connect products, answers to frequently asked questions, articles about specialized topics, and presentations.
System requirements
The most complete listing of system requirements for Connect Enterprise can be found at
www.adobe.com/go/connect_sysreqs_en.
Adobe.com
These resources are available on the Adobe website:
Adobe Design Center Offers articles, tips, andtutorials invarious formats,including video, Adobe PDF, and HTML.
The content is authored by industry experts, designers, and Adobe publishing partners, and new content is added
Page 6

ADOBE CONNECT ENTERPRISE
User Guide
monthly. You’ll also find Adobe Studio Exchange, where users download and share thousands of free actions,
plugins, and other content. Adobe Design Center is available in English, French, German, and Japanese.
Adobe Developer Center Provides information for advanced users, including software and plug-in developers.
You’ll find tutorials, SDKs, scripting guides, and sample code, in addition to forums, RSSfeeds, online seminars, and
other technical resources.
Communities Features forums, blogs, and other avenues for users to share technologies, tools, and information; ask
questions; and find out how others are getting the most out of their software. User-to-user forums are available in
English, French, German, and Japanese; blogs are posted in a wide range of languages.
What’s new
New features in Adobe Connect Enterprise
Here are some of the new features in Connect Enterprise:
Enhanced support for integrated audio conferencing Acrobat Connect Professional now offers enhanced support
for accounts with an audio conference bridge installed, to enable synchronized telephonic audio conferences as part
of Acrobat Connect Professionalmeetings. For meetings with international attendees, Acrobat ConnectProfessional
can now display multiple dial-in numbers, so that attendees in each country can see the dial-in number they should
use. Hosts can also block incoming attendees, and can turn on or off notifications when attendees enter or exit an
audio conference.
2
Improved audio conference recording You can now start and stop audio recording when you are recording a
meeting (if your Acrobat Connect Professional account has an audio conference bridge installed). This makes it
possible to test the audio recording, then restart the recording, or to record only selected segments of the audio
during a meeting.
Ability to turn Connect Event guests into users If you invite guests to your Adobe Connect Events, you now have any
easy method for turning those guests into full users. Once guestsarefulluserstheycanhavecustomfieldvaluesin
reports and they can access administration pages.
Adobe Presenter audio quality You now have the option to compress audio in presentations created with Adobe
Presenter. Compressing the audio reduces the size of audio files. To retain settings in high-quality audio, you can
choose to keep the audio uncompressed.
Custom fields in User reports InConnectEnterpriseuserreports,youcannowincludeuptoeightcustomfieldsfor
individual users. This feature enables you to track information about users that is important to your organization.
Using Adobe Help
Browse Help topics
1 In the navigation pane, do one of the following:
• To browse by topic, click Contents.
• To browse alphabetically, click Index, and then click a letter.
2 Expand items in the navigation pane until you reach the desired topic.
Page 7

ADOBE CONNECT ENTERPRISE
User Guide
3 Click items in the navigation pane to view content in the reading pane.
Search Help topics
1 In the navigation pane on the left, click Search.
2 Type one or more words in the text box, and click the Search button.
Topics matching the search terms appear in the navigation pane, listed in order of relevance.
Search tips
These tips can help you improve your search results in Help:
• If you search using a phrase, such as “screen sharing,” put quotation marks around the phrase. The search returns
only those topics containing all words in the phrase.
• Make sure that search terms are spelled correctly.
• If a search term doesn’t yield results, try using a synonym, such as “web” instead of “Internet.”
Navigate Help
❖ Navigate Help by doing any of the following:
• Expand items in the navigation pane until you reach the desired topic. To view a topic, click its title, either in the
navigation pane or the reading pane.
• Click the navigation links that appear above the topic title in the reading pane.
• Click Previous or Next in the reading pane.
• Click Back or Forward on the toolbar.
3
You can also navigate Help using accessible keyboard shortcuts.
Adobe Help and accessibility
Adobe® Help Center is designed so that it is accessible to people with disabilities, such as mobility impairments,
blindness, and low vision. Adobe Help supports standard accessibility features and alternative keyboard shortcuts
for toolbar controls and navigation.
Supported accessibility features
Adobe Help supports the following standard accessibility features:
• Standard HTML tags define content structure.
• Style sheets control formatting (no embedded fonts).
• Each frame has a title to indicate its purpose.
• Graphics without captions include alternate text.
• If link text doesn’t match the title of the destination, the title is referenced in the Title attribute of the Anchor tab.
For example, the Previous and Next links include the titles of the previous and next topics.
• Content supports high-contrast mode.
• Text size can be changed with standard context menu commands or standard menu commands for Mac OS.
Page 8

ADOBE CONNECT ENTERPRISE
Keyboard shortcuts for toolbar controls
Each control in the toolbar for Adobe Help has a keyboard equivalent in Windows:
Back Alt-left arrow
Forward Alt-right arrow
Print Ctrl-p
Keyboard shortcuts for navigation
To navigate Adobe Help, use the following keyboard combinations in Windows:
• To move between the navigation pane and the reading pane, press Control-Tab and Shift-Control-Tab.
• To move through links within a pane, press Tab or Shift-tab.
• To activate a selected link, press Enter.
User Guide
4
Page 9
Chapter 2: Connect Enterprise basics
Adobe® Connect™ Enterprise Server 6 is associated with a suite of applications for hosting and managing online
meetings, seminars, presentations, training, and events. Your organization may have purchased the entire system or
a subset of these applications. If certain functionality is not available to you, your organization may not have
purchased that application, or your administrator may not have granted you the necessary permissions.
Adobe Connect Enterprise
About Connect Enterprise applications
The Adobe Connect Enterprise system is composed of the core Adobe Connect Enterprise Server 6 and four applications.
Adobe Connect Enterprise Server 6 offers scalability, with support for single server or clustered environments, and it
provides reliable redundant deployment that supports thousands of concurrent users. Adobe Connect Enterprise is
designed as an open platform and can be extended and integrated with other systems through a comprehensive set
of APIs.
5
The four associated applications give a full range of functionality:
Adobe Acrobat Connect Professional lets users conduct online meetings, events, and seminars in which hosts can
show multimedia presentations, share their screens, and broadcast live audio and video to attendees in real time.
Adobe Presenter is a plug-in application for Microsoft PowerPoint that lets users create rapid e-learning prototypes,
e-learning content, and on-demand presentations. The finished presentations are AICC and SCORM compliant.
Adobe Connect Events 6 lets users manage the full life cycle of events, from event registration and invitations, to
reminders and generating event reports.
Adobe Connect Enterprise Manager is the web-based application that lets users manage account-related information
and content. It is the primary interface where users create meetings, manage presentations, create curriculums and
events, customize applications, and more.
Training
Presenter
Enterprise Server or Enterprise Hosted
Adobe Connect Enterprise Server 6 works together with other Connect Enterprise applications
Events
Meeting
APIs & SDKs
Page 10

ADOBE CONNECT ENTERPRISE
User Guide
Connect Enterprise terms and concepts
If you are new to Connect Enterprise, you may find the following definitions helpful.
Meetings and seminars
An Acrobat Connect Professional meeting is an online real-time meeting in which a presenter can show slides or
multimedia presentations,share pages, chat, and broadcast live audio and video. Ameeting takes place in an Acrobat
®
Connect Professionalmeeting room,aMacromedia
®
by using Adobe Flash
Player. The meeting room continues to exist even after the meeting is over.
In addition, depending on the pricing model your organization has chosen, you may or may not be able to enter a
meeting if the meeting is not live. In some cases, only the host can enter the meeting room when the meeting is not
live. In other cases, you can enter the meeting room when the meeting is not live if enough meeting room spaces are
available across the system at the moment you enter.
You create the meeting room with Enterprise Manager. In Enterprise Manager, all meeting rooms are contained in
the Meeting library.
A Connect Enterprise seminar is a unique kind of meeting, with its own licensing requirements and attributes. A
seminar room is comparable to a meeting room, that is, it’s a Flash application that runs in a browser window. The
difference is that at least one seminar presenter or host must be in the room in order for others to enter, even if the
seminar is public. A seminar ends if all the presenters and hosts exit the room. Because of their unique requirements
and format, seminars have a dedicated Enterprise Manager tab named Seminar Rooms, as well as their own Seminar
library.
Flash®fromAdobe®application that you run in a browser window
6
Connect Enterprise content
Any file or folder that is stored in the Content library is referred to in Connect Enterprise as content. Content is
synonymous with information and accessed from the Content tab of Enterprise Manager.
TheContentlibraryisassociatedwithConnectEnterpriseauthors,theonlyuserswhocanuploadfilestothislibrary.
Connect Enterprise events
In Connect Enterprise, the term event means a large-scale web meeting, presentation, seminar, or training that
requires registration and has unique reporting requirements. As such, the Connect Enterprise Event Management
functionality contains special features that are exclusive to events.
Connect Enterprise reports
You can create diverse types of reports in Enterprise Manager for information about individual meetings, courses,
curriculums, seminars, and users, among others. You can add report filters to streamline report information, and if
you are a manager, you can view reports for your team members.
Enterprise Manager How To Topics
Content
• “Managing content in the Content library” on page 21
• “Searching the Content library” on page 13
• “Move a library folder or file” on page 17
Page 11

Training
• “Creating a course” on page 91
• “Creating a curriculum” on page 100
• “Accessing the Training library” on page 88
Seminar Rooms
• “Creating a seminar” on page 118
• “Pre-seminar tasks” on page 117
Event Management
• “Creating an event” on page 129
• “Change an existing event” on page 133
Administration
• “Managing content in the Content library” on page 21
• “Searching the Content library” on page 13
• “Move a library folder or file” on page 17
ADOBE CONNECT ENTERPRISE
User Guide
7
Adobe Connect Enterprise Manager
About Enterprise Manager
Enterprise Manager is a web application that acts as an access and control point for all Connect Enterprise applications. Enterprise Manager allows you to set up and manage meetings, seminars, and training courses and curriculums, as well as manage content that can be shared through meetings, presentations, training courses, and events.
In addition, the user management component of Enterprise Manager enables you to set access permissions for both
the users of this content and the content itself.
Note: Not everyone can use all the Enterprise Manager features. The features you can access depend on your Connect
Enterprise configuration and your permissions.
Enterprise Manager users
You use different features of Enterprise Manager depending on your user needs. Users are divided into the following
groups:
Meeting Hosts This group includes administrative assistants, managers, and everyone in an organization who can
create meetings in Connect Enterprise Manager. You do not need Enterprise Manager to attend such a meeting; all
you need is the meeting URL. However, in many cases, you can enter a meeting from Enterprise Manager as well.
Authors An author is anyone who uploads content to the Connect Enterprise Server. Content can include files
®
created in Presenter, Adobe
Training Managers This group includes anyone developing courses and curriculums.
Captivate™, or any other content uploaded to the Content library.
Page 12

ADOBE CONNECT ENTERPRISE
User Guide
Seminar Hosts This group includes individuals who present seminars. A seminar is a special kind of meeting with
its own attributes and licensing structure.
Event Managers This group includes anyone who organizes events. An event can be any meeting, presentation,
course, curriculum, or seminar that requires registration and generates reports with participant tracking information.
Administrators ThisgroupconsistsoftheuserswhomanageConnectEnterpriseapplicationsfortheentireorgani-
zation. As such, administrators are responsible for customizing the appearance of these applications for their organization and managing all aspects of accounts. This includes performing any task pertaining to account and user
management,suchascreatingcustomusergroups,andassigninguserstocustomusergroupsandtobuilt-ingroups.
Start Enterprise Manager
Every Connect Enterprise user receives an organization-specific Enterprise Manager URL, along with a user name
and a modifiable password, in an e-mail sent out by their organization’s Connect Enterprise administrator. You
access Enterprise Manager by typing this URL in a browser window, and then logging in, as described below.
1 In a browser window, enter the URL provided by your administrator or included in the Welcome e-mail.
2 On the Login page, enter your user name and password.
3 Click Submit.
8
See also
“Logging out” on page 13
About starting Enterprise Manager in Internet Explorer
Microsoft has released an update that changes how Internet Explorer manages active content, including content
viewed in certain Adobe products. Active content embedded in HTML may not work properly until the user clicks
to either activate or continue loading the active control.
If you have installed the Microsoft update and do not have the JavaScript option in Internet Explorer selected, you
may need to activate (by clicking) an object so that Enterprise Manager can start. This activation step may be
necessary because Enterprise Manager is launched from an Internet Explorer window.
Determine the version number
Knowing your version number can be useful, especially when contacting the Connect Enterprise support team for
help or when reporting any issues with an application. There are two ways to find your version number.
Determine version number on login page
1
Start Enterprise Manager.
2 On the login page (the page where you enter your login and password) move your cursor over the Help link. The
version number appears.
Determine version number by viewing version.txt file
1
Start Enterprise Manager.
2 In the web browser address field, edit the address so it reads http://<adobe connect url>/version.txt. For example,
if your server is named “server1,” the address would read http://server1.mcompany.com/version.txt.
Page 13
ADOBE CONNECT ENTERPRISE
User Guide
3 Click Enter on your keyboard.
The version.txt file appears listing your Connect Enterprise version number.
Overview of the workspace
Enterprise Manageris the web application that enables users tomanage contentand createmeetings, events,courses,
and much more.
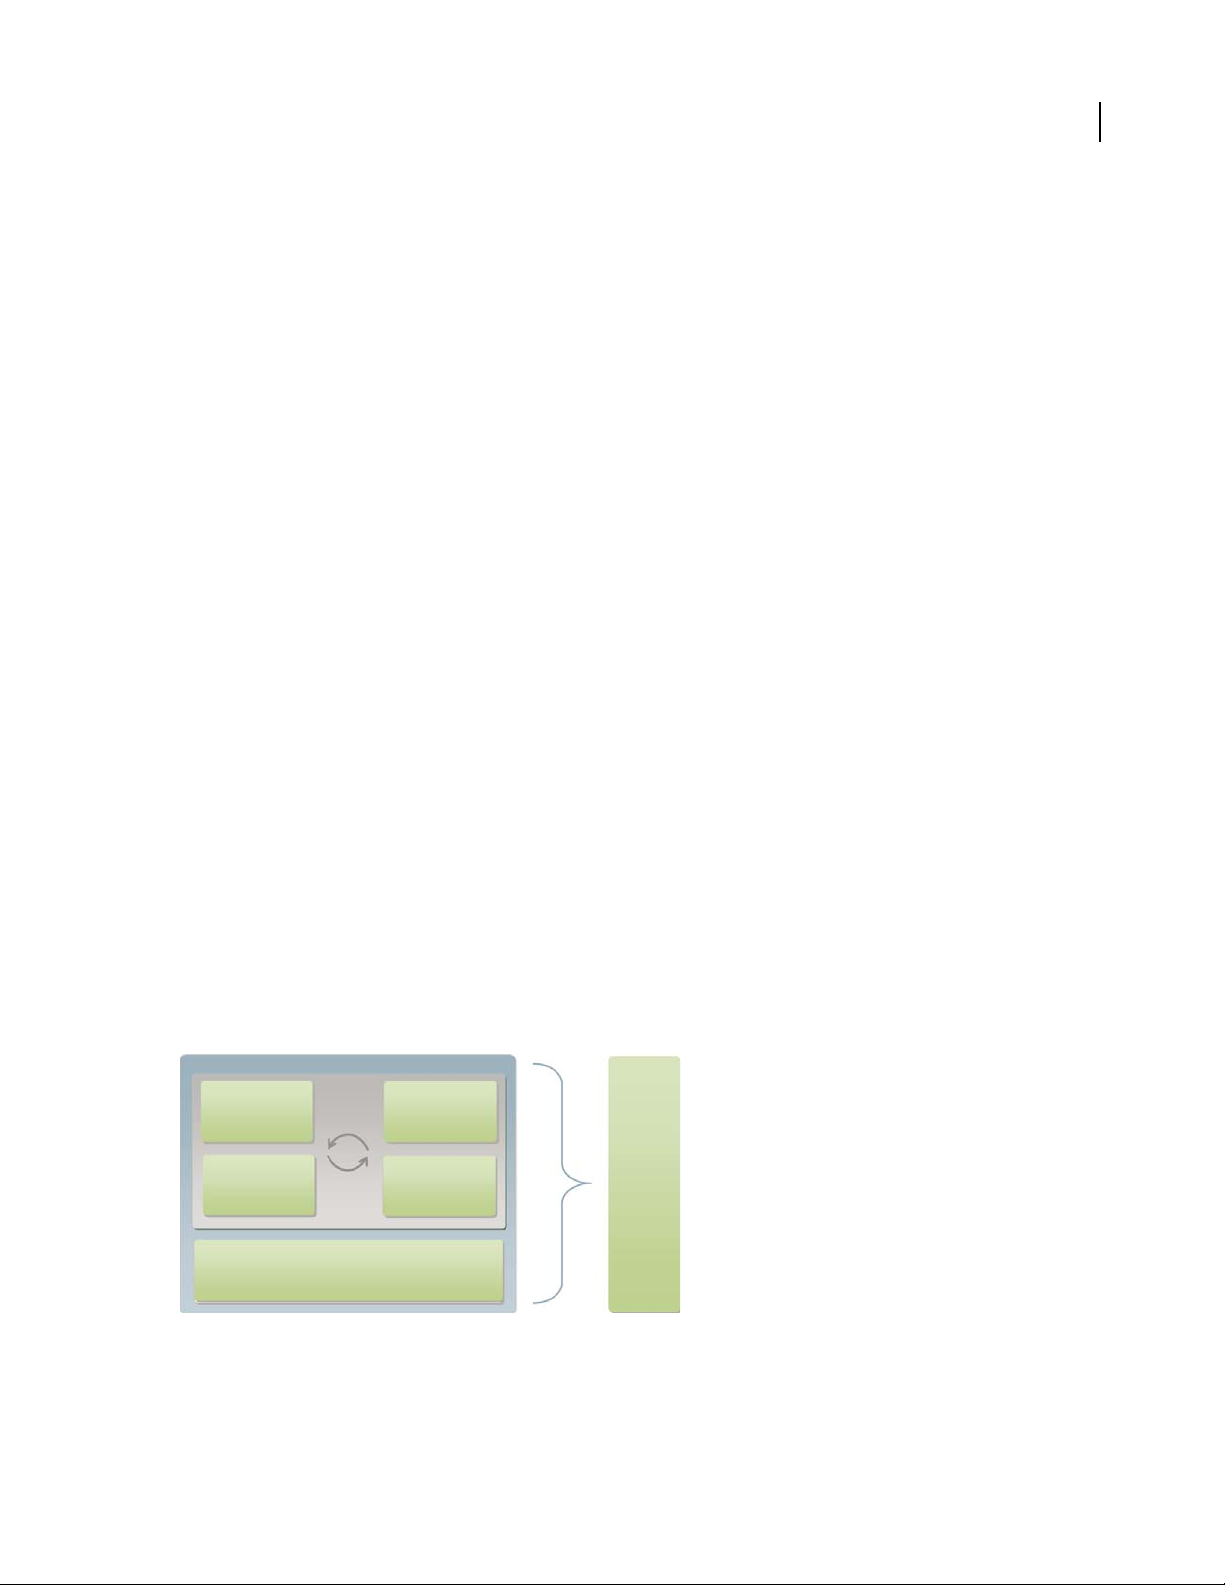
ThefullEnterpriseManagerapplicationuserinterfaceconsistsofseventabs(alsocalledpages), each associated with
a particular function and application, as the following illustration shows.
A
B
C
D
E
F
G
9
H
Navigating the workspace
A. Tabs (pages) B. Links C. Navigation trail D. Navigation bar E. Navigation buttons F. Folder G. Click an item (file) to go to the infor-
mation page for that item H. Information about the item
Connect Enterprise Manager icons
Enterprise Manager uses icons to represent meetings, seminars, presentations, courses, and curriculums.
Content Content includes files such as Adobe PDF files or Microsoft Word documents that are used with
Connect Enterprise meetings, seminars, presentations, or training.
Course A presentation that isassociated with agroup of enrolled learners withtracking for each individual. The
course can be used independently or as part of a curriculum.
Curriculum A group of courses and other learning content that guides students along a learning path.
Curriculum can include Connect Enterprise content, presentations, meetings, seminars and external content such
as classroom sessions and reading lists.
Event A Connect Enterprise event includes registration, invitations, reminders, and reporting. Events usually
involve a large number of participants and are built upon a Connect Enterprise meeting, seminar, presentation, or
training.
Page 14

ADOBE CONNECT ENTERPRISE
User Guide
Meeting An online real-time meeting inwhich a hostor presenter canshow slides or multimedia presentations,
share screens, chat, and broadcast live audio and video.
Seminar A seminar is similar to a Connect Enterprise Professional meeting, but seminars are usually conducted
for one-time or infrequent meetings that have at least 50 participants and involve little audience participation or
interaction.
Archive A recorded Connect Enterprise Professional meeting or seminar, which users can view at their conve-
nience.
Authorware content Files created in Macromedia Authorware from Adobe, a visual authoring tool for creating
e-learning applications that can be delivered on corporate networks, CDs, DVDs, and websites.
Adobe Captivate content Files created in Adobe Captivate,an application that automatically records all onscreen
actions and instantly creates an interactive Flash simulation.
External training In a curriculum, training that occurs outside of Connect Enterprise, such as classroom
training.
Flash Video file (FLV) A video file that users can access just as they access other Connect Enterprise content.
HTML file File defining the structure and layout of a web document using a variety of tags.
Image file (JPEG, GIF, PNG, BMP) Image files can be drawings, photographs, charts, graphs, icons, or any other
type of graphics.
10
MP3 file An audio, sound, or music sequence that is compressed to a small file size.
Presentation A presentation created using the Adobe Presenter Plug-in for Microsoft PowerPoint. These presen-
tations have not been converted into Adobe Presenter presentations.
Presentation A presentation created with Adobe Presenter, a plug-in for Microsoft PowerPoint that lets users
add audio, quizzes, and visual features to a PowerPoint presentation.
Shockwave file (SWF) A multimedia animation file that can be viewed in a web browser.
Enterprise Manager tabs
The tabs at the top of Enterprise Manager represent the Connect Enterprise applications. Your organization may
have purchased some or all of the applications. If you cannot access an application through a tab, your organization
may not have purchased the application or your administrator may not have granted you access to that application.
Home tab Used to perform various tasks related to individual user accounts. This is the only tab accessible to all
Enterprise Manager users.
Content tab Used to manage content for presentations, training, meetings, and seminars. From the Content tab you
access the Content library, a set of content folders and files. Users who create content are called authors. However,
the Content tab is available to all users with appropriate access permissions.
Training tab Used to work with courses and curriculums. If you use this tab to create courses and curriculums, you
are a training manager.
Meetings tab Used to create and manage meetings. If you can create meetings that appear on this tab, you are a
meeting host.
Seminar Rooms tab Used to create and manage seminars, a special type of meeting with its own requirements.
Page 15
ADOBE CONNECT ENTERPRISE
User Guide
Event Management tab Associated with events, which can be any meeting, training, presentation, or seminar that
has registration and special reporting requirements. Event managers use the Event Management tab to create and
manage events.
Administration tab Used by administrators to add new users, assign permissions, customize the interface, and
perform other management functions. Although visible to all users, the Administration tab is accessible only to
administrators.
See also
“Adobe Connect Training” on page 88
“About Acrobat Connect Professional meetings” on page 29
“About Adobe Acrobat Connect Professional Seminars” on page 116
“About events” on page 126
“Managing the Adobe Connect Enterprise Account” on page 217
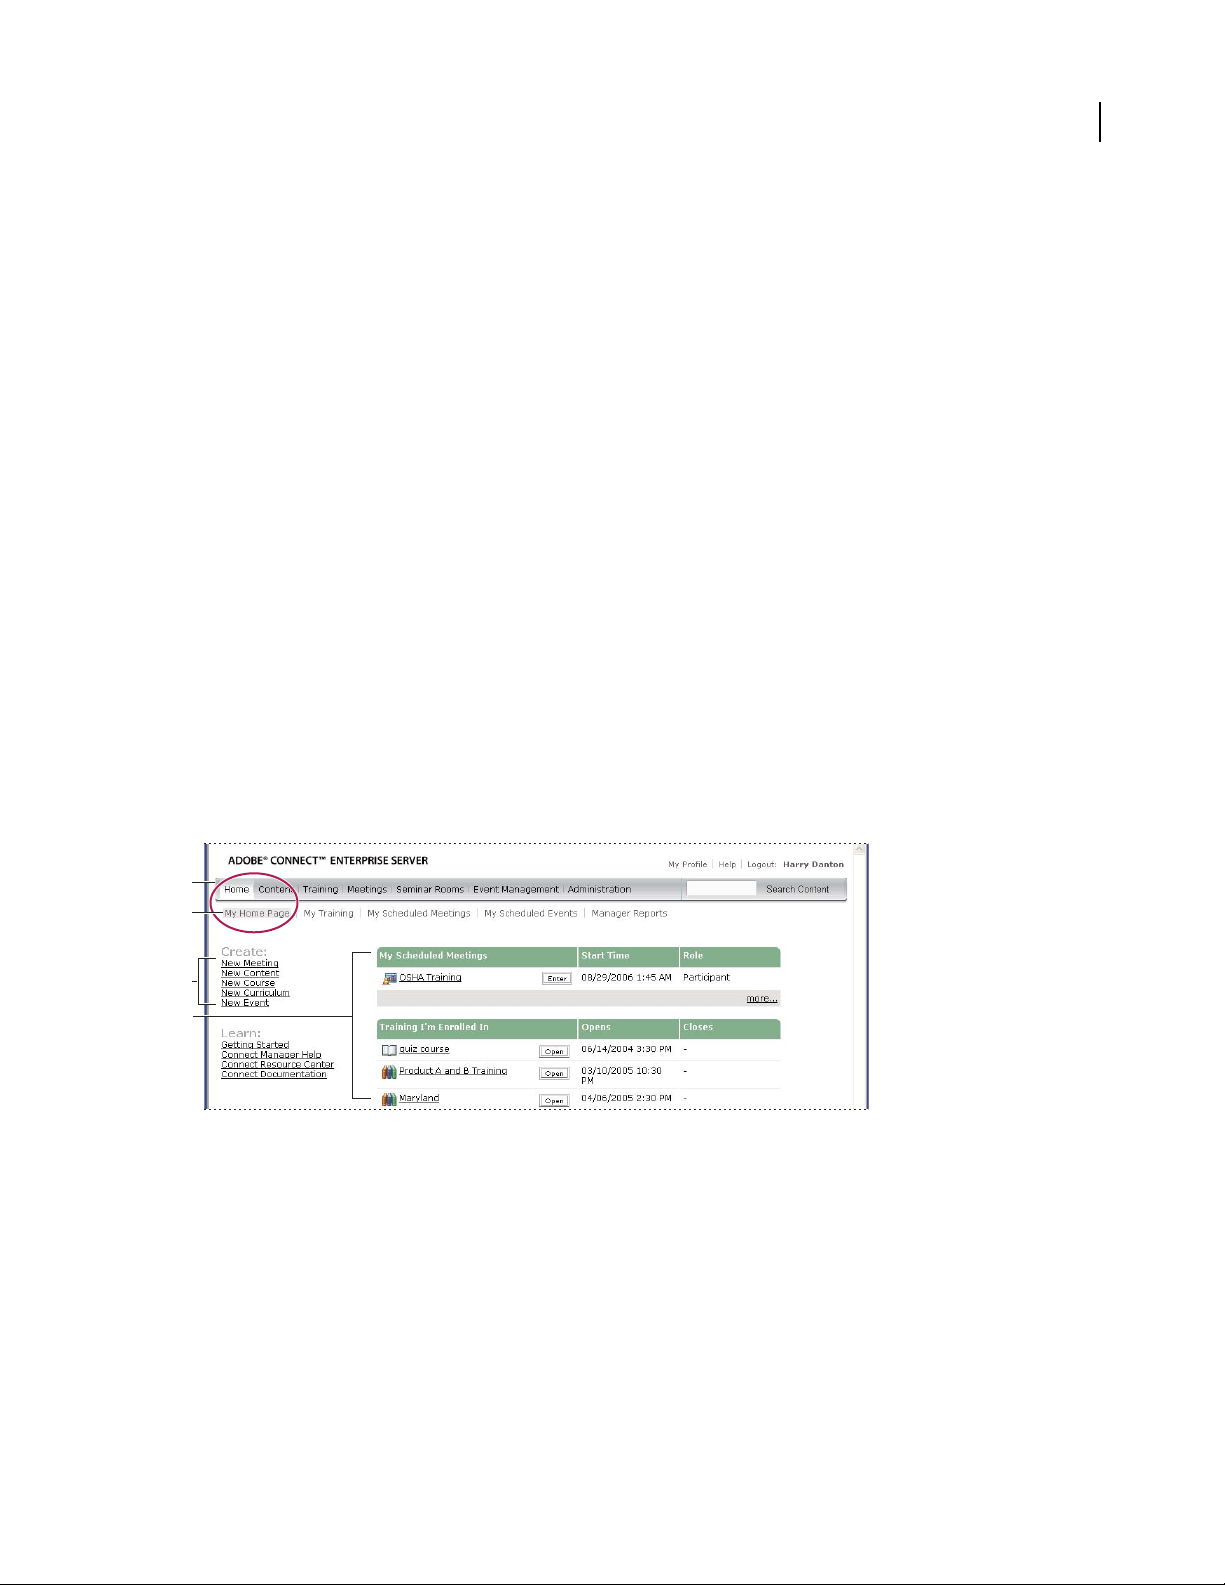
About the Home tab
No matter what functions you use, if you have a Connect Enterprise account, the Home tab (also called the Home
page) is always available to you. Displayed when you log in, this Home page is your base of operations. From here,
you join any meetings or events for which you are scheduled, create any meetings or events for which you have
permission, locate information and resources, and manage your account.
11
Below the Enterprise Managertabs is a row of linksthat take you to lists with information relevant only to you. When
you display one of these lists, you can often perform additional actions.
A
B
C
D
My Home Page
A. Tabs (pages) B. My links C. Shortcut links to creating new items D. Information for My Home Page
My Training
My Training leads toa completelist of training courses or curriculums in which youare enrolled.Toget details about
any item, click its name. To see a list of completed classes, click Training I’ve Completed.
My Scheduled Meetings
My Scheduled Meetings leads to a complete list of your current, future, and expired meetings and your role in those
meetings. Click the Enter link to enter the meeting room, where you can join a live meeting or view a presentation
from a past meeting. Click the meeting name to display the meeting details, and then click Enter Meeting Room to
join the meeting.
Page 16

ADOBE CONNECT ENTERPRISE
User Guide
Note: The same information is displayed inlist form on the Home page, but without expired meetings. Clicking the More
link below the list has the same effect as clicking My Scheduled Meetings.
My Scheduled Events
My Scheduled Events leads to a list of all the events for which you are registered, as well as all your expired events.
Click Enter to view an event.
Manager Reports
The Manager Reports link applies only to users who are managers. (Managers are defined here as people or staff
managers, not training or system managers.) If you are a manager, use this link to display a list of all your direct
reports. You can also select links to the training, meeting, and event reports for each of your reports. From Manager
Reports, you can click the link for a report type to see a list of all reports for this team member for this report type.
You can then click thelink for a given report tosee the report information, and depending on thereport you selected,
you can click another link to see more specific information.
In addition, if any of the users you manage also has subordinates, you can click the direct report’s name to display a
list of that person’s direct reports and the corresponding training, meeting, and event reports for each of them. In
this way, you can view reports for all of the people who report to you either directly or indirectly.
Create menu
On the left side of the Home page is a Create menu for creating new meetings, new content, new events, and so on.
12
Learn menu
On the left side of the Home page is a Learn menu with links leading to useful information.
Viewing and changing your profile
Clicking the My Profile link displays information about your account, as well as links for changing your password,
editing your preferences, and so on. Displayed information includes:
User Information The information displayed may vary, depending on the information your administrator has
defined for user profiles, but usually your first and last names and your e-mail address are listed. In addition, the
following information also appears:
Audio Conference Settings Audio conference settings include telephone access information (your moderator code
and client ID) for dialing into meetings. Your manager’s name (if applicable) and your team members’ names (if
applicable) may also appear.
Note: The client ID is the customer identification number assigned by Premiere Conferencing. If your company uses
another provider, this field has another name.
The following links appear at the top of your profile page:
Change My Password Click here to change your password. When you do, you are prompted once for your current
password, and then twice for your new password.
Edit My Preferences Click here to change your time zone and audio conference settings.
Group Memberships Click here to display a list of all the groups to which you belong, including built-in groups.
Organization Click here to display your manager’s name and the names of all of your team members, if applicable.
Page 17

ADOBE CONNECT ENTERPRISE
User Guide
Logging out
You can log out of Enterprise Manager at any time.
1 Click Logout [your login name] in the upper-right corner of Enterprise Manager.
The Enterprise Manager login page appears.
2 Close the login page to quit Enterprise Manager.
See also
“Start Enterprise Manager” on page 8
Searching the Content library
YoucanenterkeywordsattheSearchContentlinktosearchtheContentlibraryforpresentations,aswellasmeeting
and seminar archives.
Note: The presentations themselves must be searchable for the Search feature to be operable. In addition, you must have
permissions to view the content you are searching for.
To use Search Content, enter a keyword and click Search Content. You can also click Search Content without entering
a keyword to set the search parameters to refine your search.
13
Managing permission access for library folders and files
About libraries
The Content, Training, Meetings, Seminar Rooms, and Event Management tabs in Enterprise Manager each contain
a library with files organized into a directory of folders. Files that you store in the Training, Meetings, Seminar
Rooms, and Event Management libraries are available for activities in those respective tabs only. Files in the Content
library can be accessed from all tabs in Enterprise Manager.
Administrators can set permissions to determine what tasks each user can perform in the libraries. Tasks include
creating, editing, moving, adding, removing, and managing files and folders.
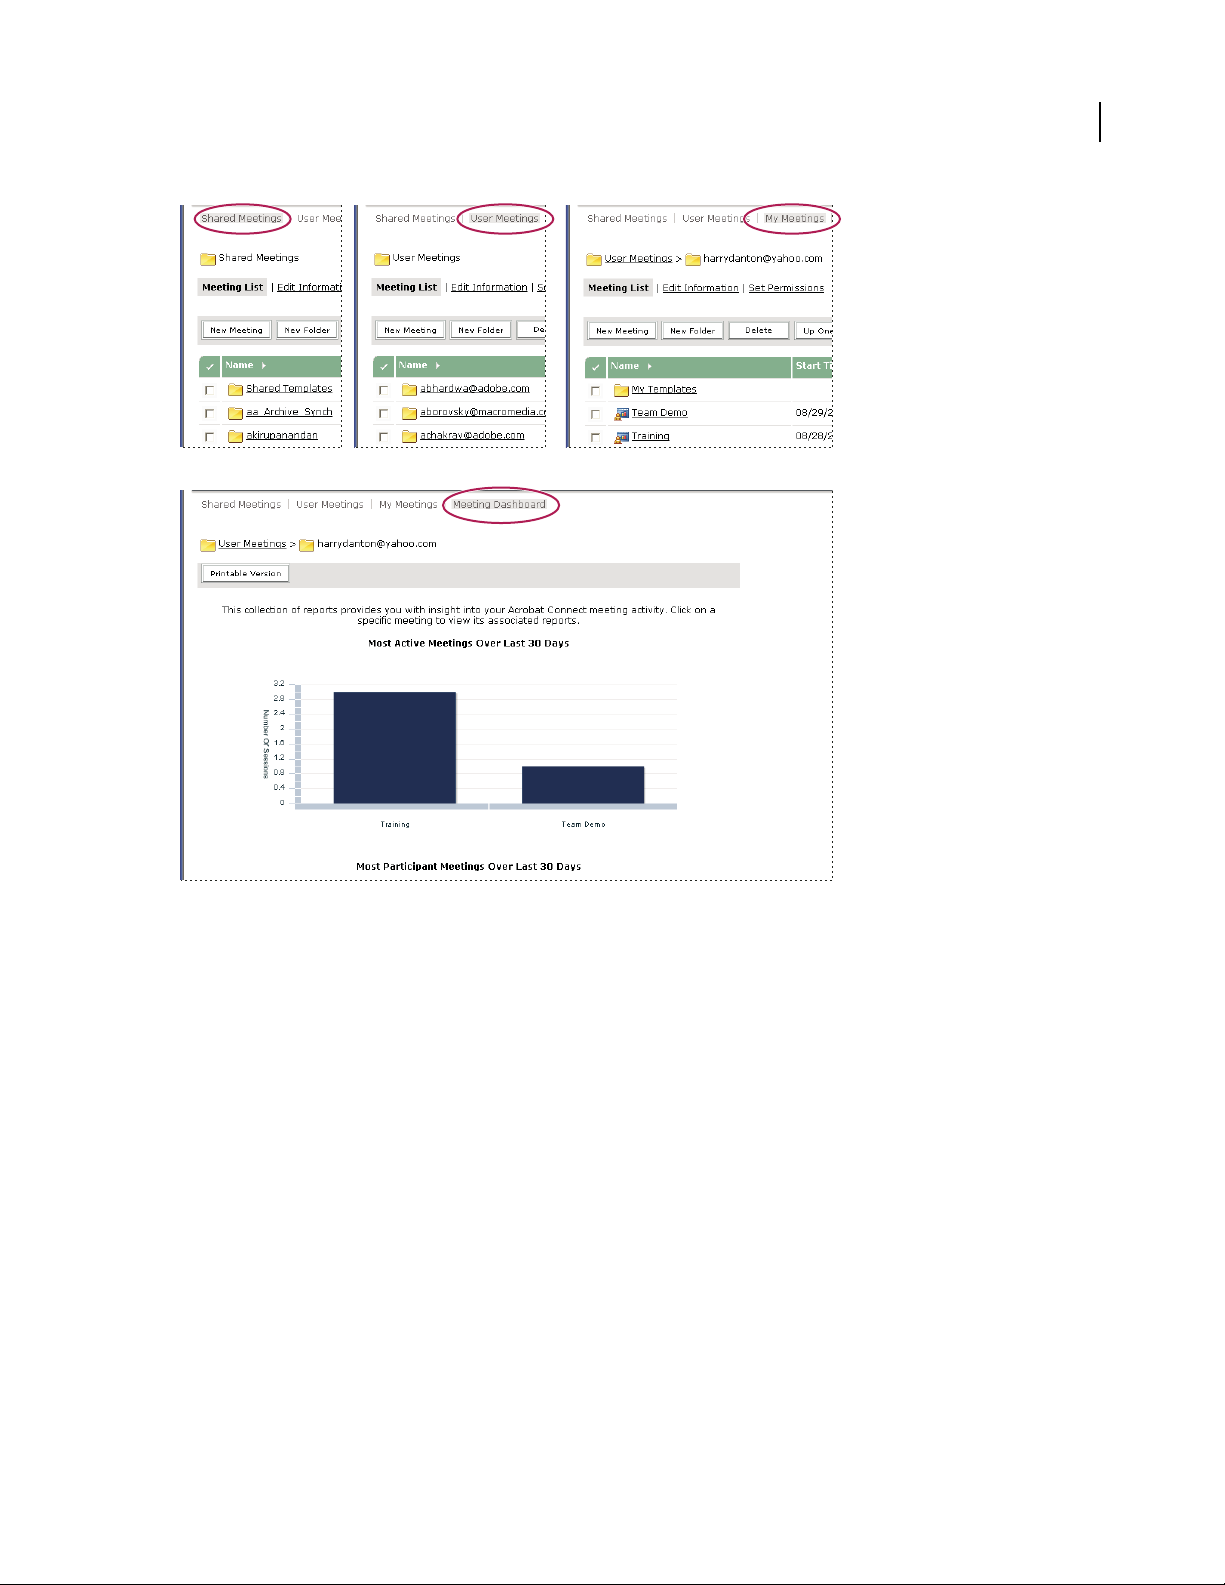
With the exception of the Seminar library, each Connect Enterprise library has two high-level folder directories:
Shared folders and User folders.
• Shared folders: When Connect Enterprise is installed, only the administrator has access privileges to the Shared
folders. Administrators can assign permissions for the Shared folders in any way appropriate. However, although
Manage permissions for a Shared folder can be assigned to any Connect Enterprise user, only members of the
Built-in group associated with that library can create new functions (meetings, events, and so on) in the folder.
For example, in the Meetings library, any user with Manage permissions for a specific Shared Meetings folder can
manage this folder, but only meeting hosts can create new meetings in it.
• User folders: When a user is assigned to a specific Built-in group, Connect Enterprise creates a user folder for that
individual in the associated library. For example, any user assigned to the meeting host group automatically
receives his or her own folder in the User Meetings folder in the Meetings library. It is this folder the user sees
when accessingthe Meetings tab. Users can manage their own user folders, including setting permissions that give
other users access privileges to the folders, but users can do this only for their own folders.
Page 18
ADOBE CONNECT ENTERPRISE
User Guide
14
A
Libraries
A. Shared B. Us er C. My items D. Dashboard
B
D
C
Seminar library folders have a different structure. In the Seminar library, there are no user folders; instead, each
folder represents a different seminar license that your organization purchased. When a user is assigned to the
SeminarHostgroup,thisuserautomaticallyhasManagepermissionsforallSeminarRoomsfolders;suchausercan
add and delete seminars, and assign Manage permissions to other users. Only a seminar host can create new
seminars in this folder.
About library permissions
You can set permissions on library files and folders to determine the level of access that users or groups have to the
items.
These permissions are available for users and groups in the Content, Training, Meetings, Seminar Rooms, and Event
Management libraries:
Manage Users or groups with a Manage permission setting for a folder or file can view, delete, move, and edit the
file or folder, view reports for files in that folder, set permissions for the file or folder, and create new folders.
However, they cannot publish to that folder.
Page 19

ADOBE CONNECT ENTERPRISE
User Guide
Denied Users or groups with a Denied permission setting for a folder or file cannot view, publish, or manage this
folder or file.
These additional permissions are available for users and groups in the Content library only:
Publish Users or groups with a Publish permission setting for a folder or presentation can publish, update, and view
presentations, as well as view reports for files in that folder. However, these users must also be members of the
built-in Author group, as well as have Publish permission, to publish content to this folder.
View Users or groups with a View permission setting for a folder or file can view any content in the folder, or can
view the individual file.
About permissions for Built-in groups
Connect Enterpriserecognizes seven default permission groups, each associatedwith a different Connect Enterprise
library. Each member of a Built-in group has an individual user folder in the corresponding library. You cannot
change the permissions for these groups, but you can extend them by assigning individuals or groups to more than
oneBuilt-ingroup.Inaddition,theadministratorcancreatecustomgroupsandassignthesegroupspermissionsfor
specific library folders. There are seven Built-in groups:
• Administrators
• Meeting Hosts
• Tra i n ing Managers
• Seminar Hosts
• Event Managers
• Authors
• Learners
15
Note: For the Events library, users who belong to the Administrators group can view all events and folders. Users who
belong to the Event Hosts group can view all events and folders in the Shared Events folder and in their My Events folder.
Event permissions apply to all events in a folder. You cannot set permissions for individual events.
See also
“About Built-in groups” on page 233
Viewing options for content files and folders
You can make content files public or private, as follows:
Public Anyone can view a public content file if they have its URL.
Private OnlyConnectEnterpriseuserswithView,Manage,orPublishpermissionscanviewprivatecontent.Todo
so, they must first log in with a Connect Enterprise user name and password.
If you publish or upload a file to a folder that has its permissions set to allow public viewing, the content file is also
available for public viewing by default. Similarly, if the parent folder has a custom permissions profile that allows only
certain groups to view or manage it, the content file by default has the same profile.
You can customize the permission settings of a content file or folder by using the following options:
Allow public viewing Makethecontentfileorfolderavailablepublicly,eveniftheparentfolderpermissionsarenot
set to allow public viewing.
Page 20
ADOBE CONNECT ENTERPRISE
User Guide
Set a custom permission profile for users and groups Add users or groups to the profile and set the access for each
to Denied, View, Publish, or Manage. User and group permissions that you set for the file or folder take precedence
over the permissions that are set for the parent folder.
Reset to parent Set the content file permissions back to the permissions of the parent folder.
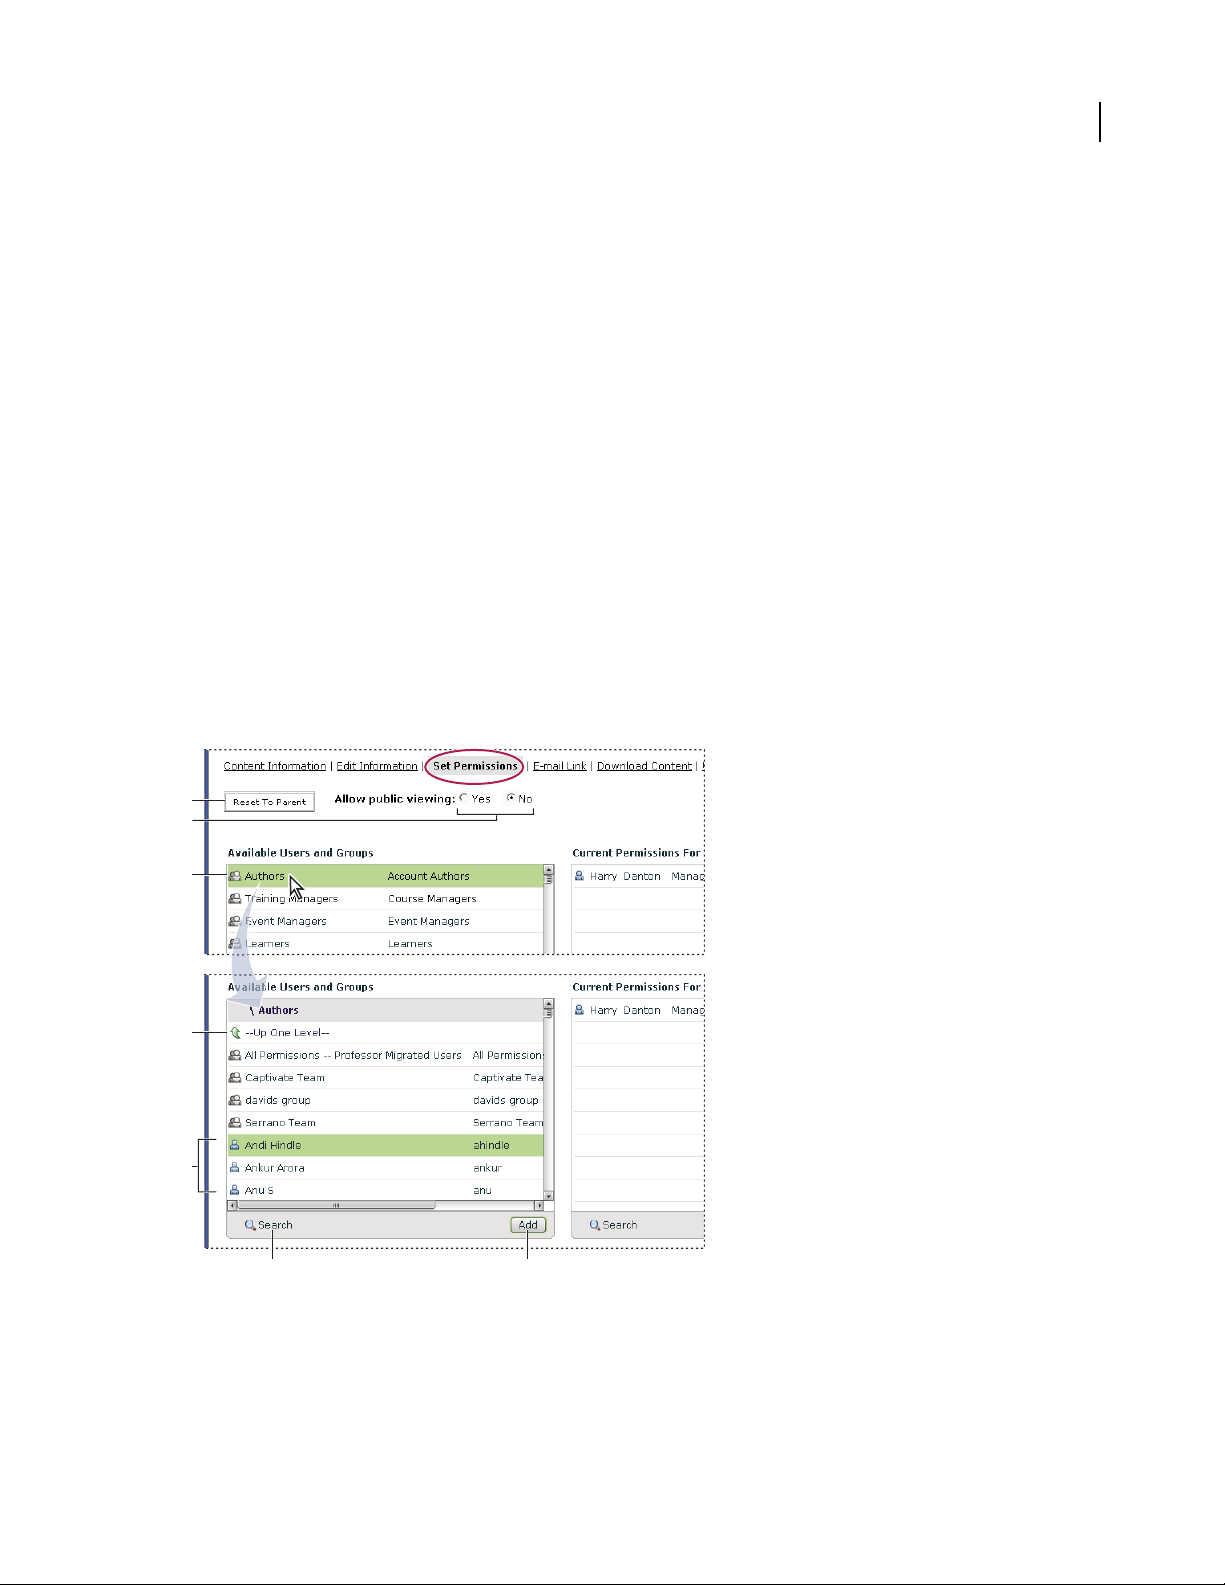
To set permissions for content files or folders
Tocustomizethepermissionslistforafileorfolder,youmustbeanadministratororauserwithManagepermission
for that library folder.
1 Click the Content, Training, Meetings, Seminar Rooms, or Event Management tab.
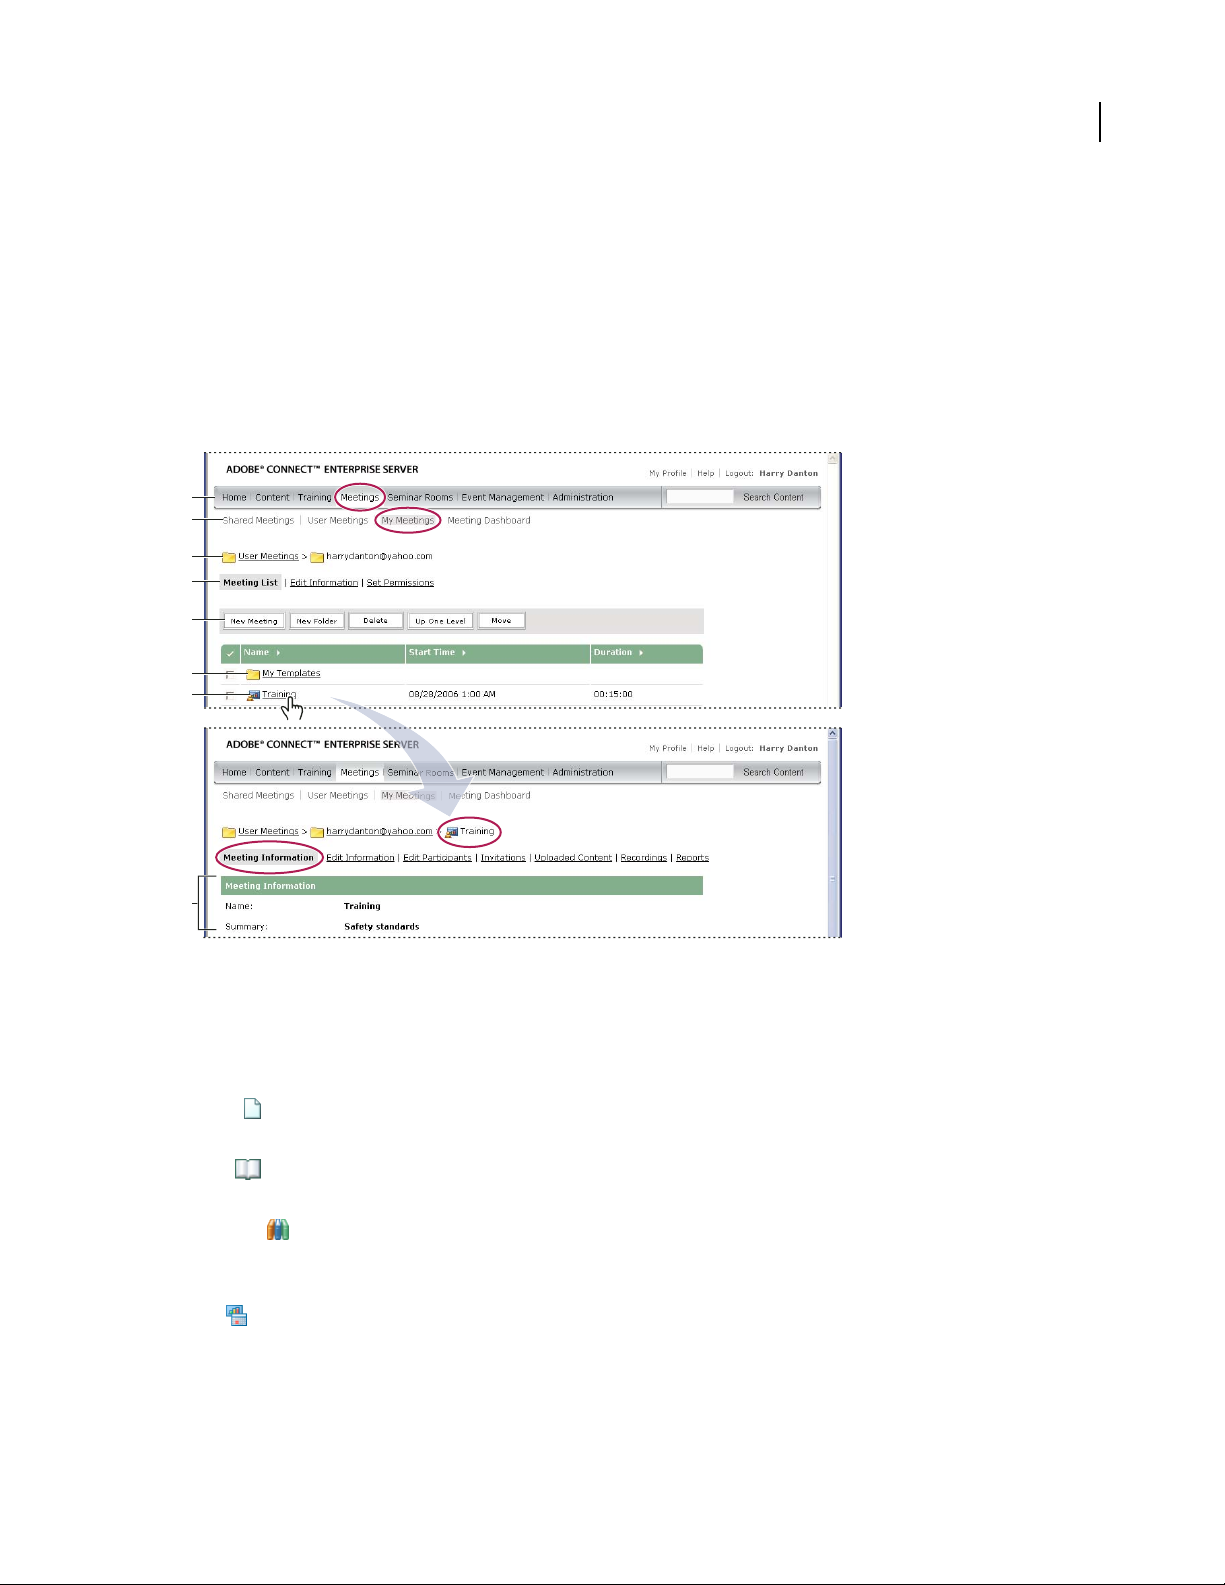
2 Navigate to the folder or file and click its name to open it.
3 Click Set Permissions on the navigation bar.
4 Click Customization. (If the permissions for this item have been modified before, the Customization button does
not appear. Proceed to the next step.)
TheAvailableUsersandGroupspanedisplaysusersandgroupsforwhomyoucandefinepermissionsforthelibrary
item. The Current Permissions pane displays users and groups who already have permissions for the library item.
You can change the existing permissions if desired.
16
5 To add a user or group to the Current Permissions pane, select the name in the Available Users And Groups list
and click Add.
A
B
C
D
E
F G
Setting permissions and navigating Available Users and Groups
A. Click to set folder or file permissions to be the same as the parent folder permissions B. Choose a viewing permission C. Double-click a
groupnametoviewtheusersinthatgroup D. Double-click the Up One Level icon to go up one folderlevel E. Users F. Click theSearch button
to open a text box for searching G. Click Add to move a selected user or group to the Current Permissions list
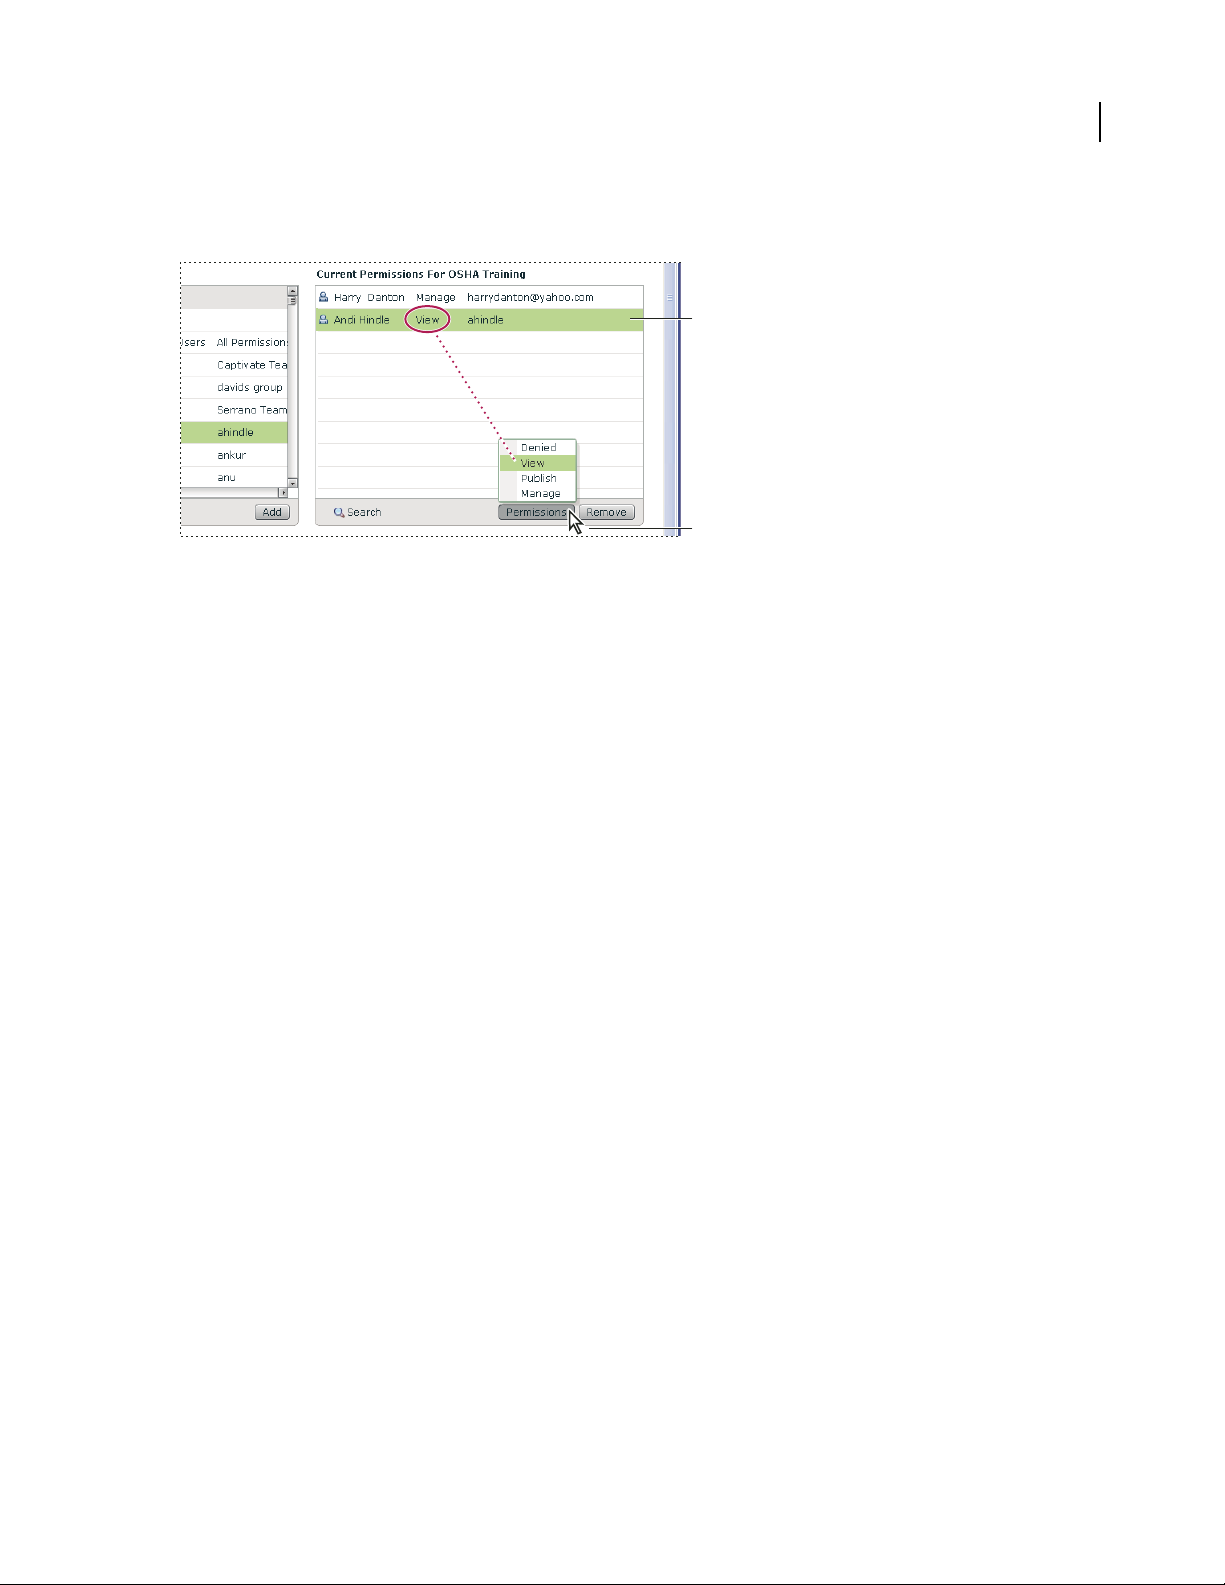
6 To set the permissions for a user or group, select the name in the Current Permissions list and click Permissions.
Page 21
ADOBE CONNECT ENTERPRISE
User Guide
7 Select the appropriate permission setting from the pop-up menu: Manage, Denied, View (for Content library
only), or Publish (for Content library only).
A
B
Current permission settings
A. Selected name B. Click the Permissions button to select a permission setting. The setting is displayed next to the name.
8 To remove a user or group from the Current Permissions list, select the name and click Remove.
9 Toresetpermissionsfortheentirelibraryfolderorfiletobethesameasthoseoftheparentfolder,clickResetto
Parent.
10 For Content library only: Select Yes for Allow Public Viewing to make this folder publicly viewable, even if the
parent folder is not publicly viewable. Select No to make the folder inaccessible to the public.
17
Managing library folders and files
Create a folder
Administrators and users with Manage permission for a specific folder can create folders and subfolders within
it.You cannot create a new folder in the Seminars library.
1 Click the Content, Training, Meetings, or Event Management tab at the top of the Enterprise Manager window.
2 Navigate to the location where you want to add the new folder.
3 Click New Folder on the menu bar above the folder list.
4 Enter the name of the new folder on the new page that appears.
5 Click Save to create the new folder.
Move a library folder or file
You can move a folder or a file in a library. When you move a folder, all of the items within the folder also move to
the new location. You can move folders and files in the Content, Training, Meetings, or Event Management libraries
using the Move button. You can move folders and files in these libraries and in the Seminar Rooms libraries using
the Up One Level button. In Seminar Rooms libraries, you can choose to move uploaded content or recordings that
are saved with a seminar.
1 Click the Content, Training, Meetings, Seminar Room, or Event Management tab at the top of the Enterprise
Manager window.
2 Navigate to the folder or file that you want to move.
Page 22

ADOBE CONNECT ENTERPRISE
User Guide
3 Select the check box to the left of the item that you want to move. For a seminar, choose Uploaded Content or
Recordings if you want to move either of those types of items saved with the seminar.
4 Do either of the following:
• Click Up One Level to move the item up one level in the library folder directory.
• Click Move (this option is not available for the Seminar Rooms tab). Select a folder in the folder directory tree, or
click Up One Level. Click Move and then click OK to apply the change.
Delete a library folder or file
When you delete a library folder or file, it is permanently removed from the library and cannot be retrieved. Be
careful to delete only those items you are sure you will not need again. If you delete items from the Content library
that are linked to meetings, events, seminars, or courses, the deleted content is unavailable from them. When you
delete an item, Enterprise Manager indicates whether the item is linked and allows you to cancel the deletion. In
Seminar Rooms libraries, you can choose to delete uploaded content or recordings that are saved with a seminar.
Note: For the Training library, if you delete a training folder containing a course that was part of a curriculum, the
deleted course is still listed on the Curriculum information page as a course item. However, the course is no longer
available.
1 Click the Content, Training, Meetings, Seminar Room, or Event Management tab at the top of the Enterprise
Manager window.
2 Navigate to the folder or file.
3 Select the check box to the left of the item that you want to delete. For a seminar, choose Uploaded Content or
Recordings if you want to delete either of those types of items saved with the seminar.
4 Click Delete on the menu bar above the content list.
5 Click Delete again to permanently delete the selected items, or click Cancel to cancel the deletion.
18
Edit library folder or file information
You can edit the title or name of a library item and other information, using the Edit Information button.
Note: If you are editing a Seminar library folder, you can view information about the Seminar license for that folder. This
is a quick way to see how many users and meetings are available for a specific Seminar folder. In the navigation bar next
to the Editor Information link, click License Info. Information that appears includes title, summary, start date, end date,
number of concurrent users, and number of concurrent meetings.
1 Click the Content, Training, Meetings, Seminar Room, or Event Management tab at the top of the Enterprise
Manager window.
2 Navigate to the folder or file.
3 Click the Edit Information link in the navigation bar below the navigation trail.
4 Edit the title, name, or other properties that you want to change.
5 Click Save.
Page 23
ADOBE CONNECT ENTERPRISE
User Guide
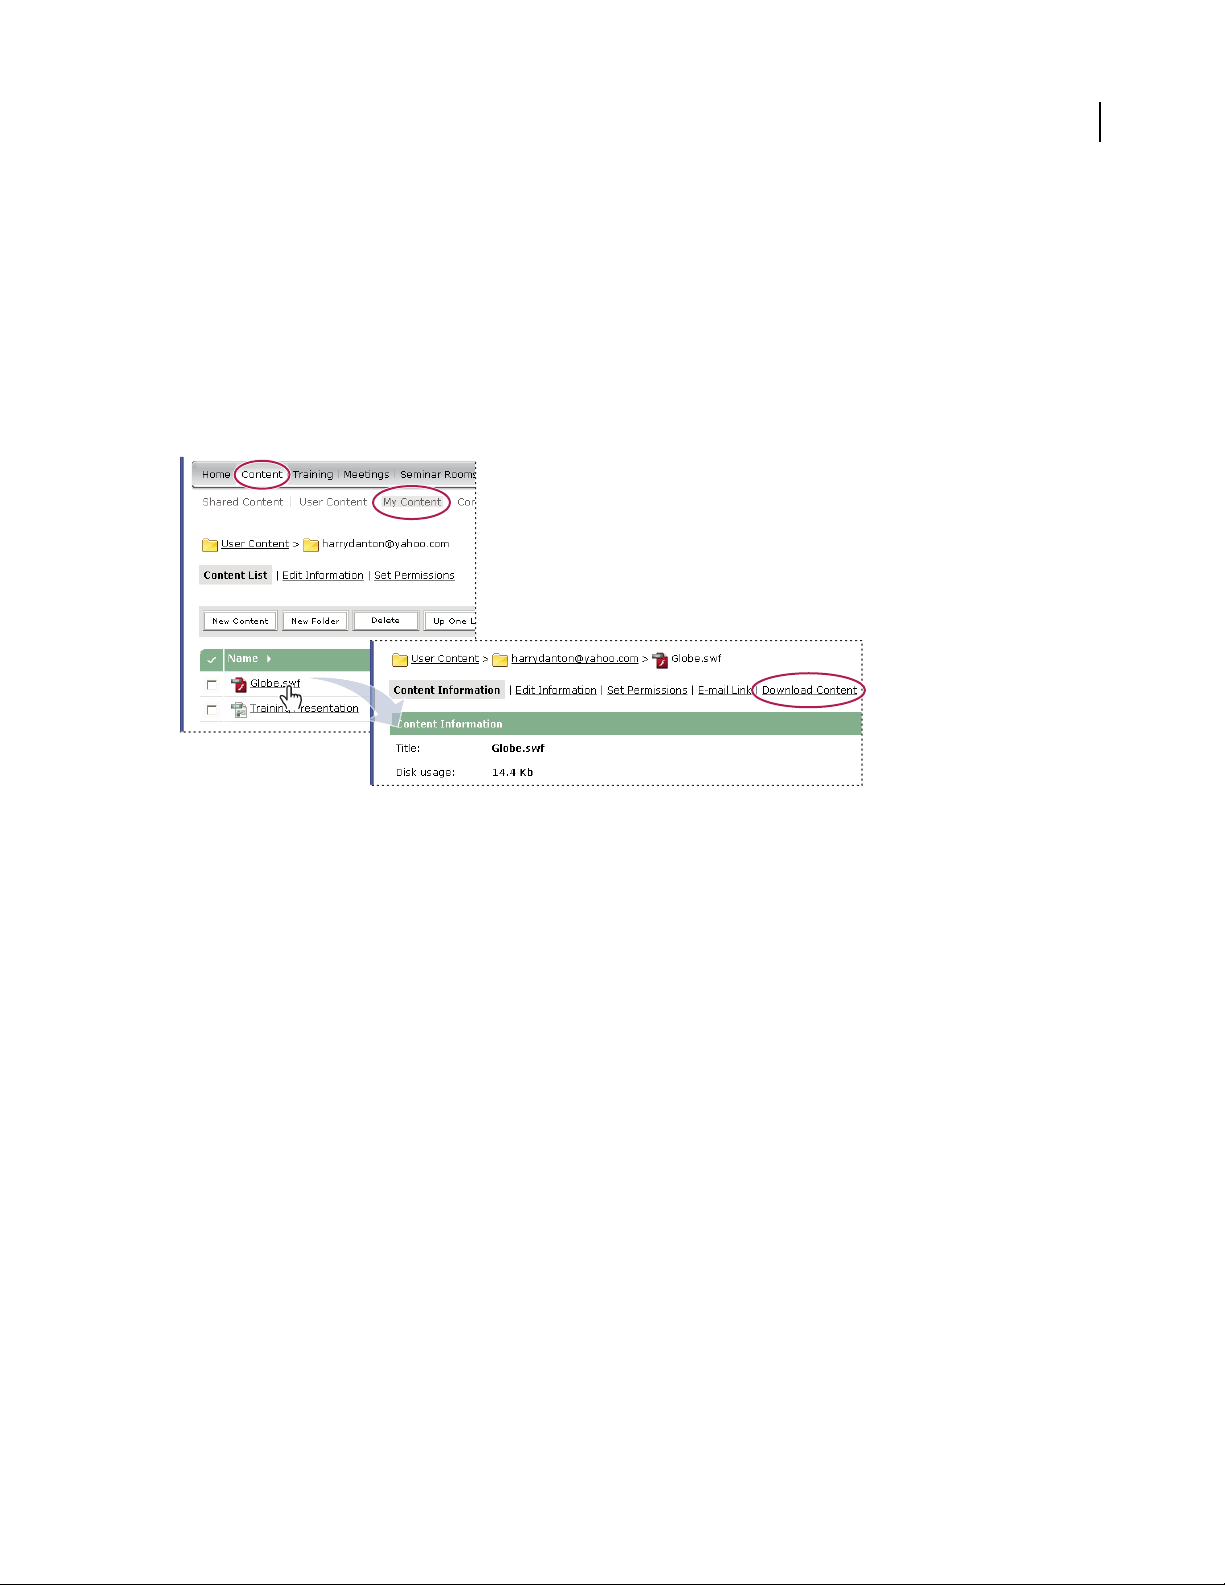
Download Content library files (except presentations)
Users who have access (the correct permission level) to an item can download Content library files to their
computers. You can download any type of content. If the content is composed of more than one file, it is packaged
into a ZIP file.
1 Click the Content tab.
2 Navigate to the content file that you want to download.
3 Click the name of the content file.
4 Click the Download Content link on the navigation bar.
19
The Download Content link is on the information page for the item to be downloaded
5 Under Download output file(s), click the content file name.
6 Click Save.
7 Navigate to where you want to save the file. If necessary, replace the default filename.
8 Click Save.
9 When the download is complete, click Close.
Download presentations from the Content library
Users who have Manage permissions can download a presentation to deploy it intact on an intranet or distribute it
on a CD. It is downloaded as a ZIP file, which the user then extracts.
1 Click the Content tab.
2 Navigate to the presentation and click its name.
3 Click the Download Content link on the navigation bar.
4 Click the Download Output File link.
5 In the Save As dialog box, navigate to where you want to save the file.
6 Click Save in the File Download dialog box.
Page 24

ADOBE CONNECT ENTERPRISE
User Guide
Download presentation source files from the Content library
Youcandownloadthesourcefilesassociatedwithanytypeofcontent.Ifthecontentiscomposedofmorethanone
file, it is packaged into a ZIP file.
Downloading source files can be helpful if you no longer have your source PPT and PPC files for an Adobe Presentation.YoumustsavethePPCfileinthesamefolderinwhichyousavedthePPTfile,andyoumustgiveitthesame
name as the PPT file, but with the .ppc extension, to maintain any audio or timings in the presentation. Thus, you
should have both the PPC and PPT files in your folder, with the same name but with different file extensions. It’s
critical that you do not overwrite the PPT file extension with a PPC extension; if you do, the file may become
unusable
Note: Theonlysourcefilesavailablefordownloadarefilesthathavebeenuploaded.Forexample,AdobePresenterand
Adobe Captivate give users the option to upload or not upload source files. If the option to upload source files is not
selected, those files will not be available for download later.
1 Click the Content tab.
2 Navigate to the presentation and click its name.
3 Click the Download Content link on the navigation bar.
4 In Download source files, click the PPT or PPC file.
5 Click Save in the File Download dialog box.
6 Navigate to where you want to save the file in the Save As dialog box.
7 Click Save.
8 In Download output files, click the zip file.
9 Click Save in the File Download dialog box.
10 Navigate to where you want to save the file in the Save As dialog box.
11 Click Save.
20
Navigate in a library
If you are an administrator, a host, or a user with permissions to manage a specific library folder, you can navigate
in a library.
To open a folder
1
Click the Content, Training, Meetings, Seminar Room, or Event Management tab located at the top of the Enter-
prise Manager window.
2 Click the name of the folder.
The foldersand files within thatfolder appear, and the name of the selected directory appears in the navigation links
at the top of the browser window.
To move up one folder
❖ Click the Up One Level button on the navigation bar above the folder list.
The folders and files within the parent folder appear. The name and location of the parent folder appear in the
navigation links list at the top of the browser window.
Page 25

ADOBE CONNECT ENTERPRISE
User Guide
To return to any folder
Above the functional links is a list of navigation links called the navigation trail, which indicates your current
location in the directory structure. You can move to any parent (higher) folder shown in the navigation trail.
❖ Click the name of a parent folder in the navigation trail.
The folders and files in the higher parent directory appear. The name and location of the parent folder appear in the
navigation links at the top of the browser window.
To edit a seminar folder name or description
To edit a seminar folder name and description you must have Hosted Manager access.
1 Click the Seminar Rooms tab at the top of the Enterprise Manager window.
2 Navigate to the folder and click its name.
3 Click the Edit Information link above the seminar list.
4 Enter the new name for this folder in the Title text input box and, if desired, a description in the Summary text
input box.
5 Click Save.
21
Managing content in the Content library
Content library supported file types
All content in the Content library must be one of the following types
• A single PDF file
• A single PPT file
• A single SWF file
• A single HTML file
• A single Adobe Captivate SWF file
• Captivate content published through the Adobe Captivate application
• Adobe Presenter content published through the Presenter plug-in
• Presenter content packaged as a ZIP file
• An old Macromedia Breeze 4.1 presentation packaged as a ZIP file (downloaded for a 4.1 server) (Breeze is now
Adobe Connect.)
• A ZIP file that contains multiple SWF files and extra files (images, XML files, and so on) and one file called
index.swf that will be loaded first
• A ZIP file that contains simple Authorware content (one HTM file, one AAM file, and extra Authorware files
• A ZIP file that contains multiple HTM or HTML files and extra files (images, SWF, and so on) and one file called
index.htm or index.html
• An Adobe Flash video file (FLV file)
• A single image (JPEG, GIF, or PNG)
• A single audio file (MP3)
Page 26

ADOBE CONNECT ENTERPRISE
User Guide
Each file type is represented by a separate icon in the Content library.
Upload files from Connect Enterprise Manager
Only members of the built-in Authors group with Publish permissions for a specific Content library folder can
upload files to that folder.
1 In Enterprise Manager, do either of the following:
• On the Home tab, select New Content from the Create menu.
• On the Content tab, click the New Content button.
2 Under Select Content File, click Browse to locate the file, click its name, and then click Open.
3 Enter a title for the new content file (required) and a summary (optional) in the Enter Content Information text
boxes.
4 (Optional) Enter a custom URL (if you do not assign a custom URL, the system automatically assigns one).
5 Click Save.
The file is uploaded to the server and appears in the content folder.
Note: If you attempt to upload a file of an unsupported file type, the Enter Content page reappears with the message
“Invalid file format selected.”
22
Note: If you have Adobe Presenter or Adobe Captivate installed, you can also use the Publish option within those applications to upload content to the Content library.
Upload new version of existing file from Connect Enterprise Manager
You can upload new versions of content that already exist in the Connect Library.
1 On the Home tab, click Content.
2 In the Content List, click the content file you want to update.
3 Click Upload Content.
Amessageappearsstating“Pleaseselectthelocationofthecontenttoupload.Thecontentshouldbeinthefollowing
format: *.xxx.”
4 Click Browse to locate a file in the format specified in the message, click the file’s name, and then click Open.
5 Click Save.
The new version of the content is upload to the Content library. To check that the process was successful, find the
file in the Content List and check theDate Modified. You canalso go to theContent Information page, click the URL,
and view the new version of the content.
About AICC content
To upload Aviation Industry CBT Committee (AICC) content into the Content library, you must zip upthe files into
a content package and upload it through the New Content interface in Enterprise Manager.
Note: Content should be AICC compliant if the content contains quizzes or data that can be scored and you want
Connect Enterprise to keep track of the scores.
Page 27
ADOBE CONNECT ENTERPRISE
User Guide
Keep the following in mind when you create AICC content:
• The content must be able to report either "complete" or "passed" to indicate that the user has finished interacting
with the content.
• The content package must have a file named index.htm or index.html that the server relies on to launch the
content.
• Content must report "Incomplete" on all communications until the user has finished interacting with the content.
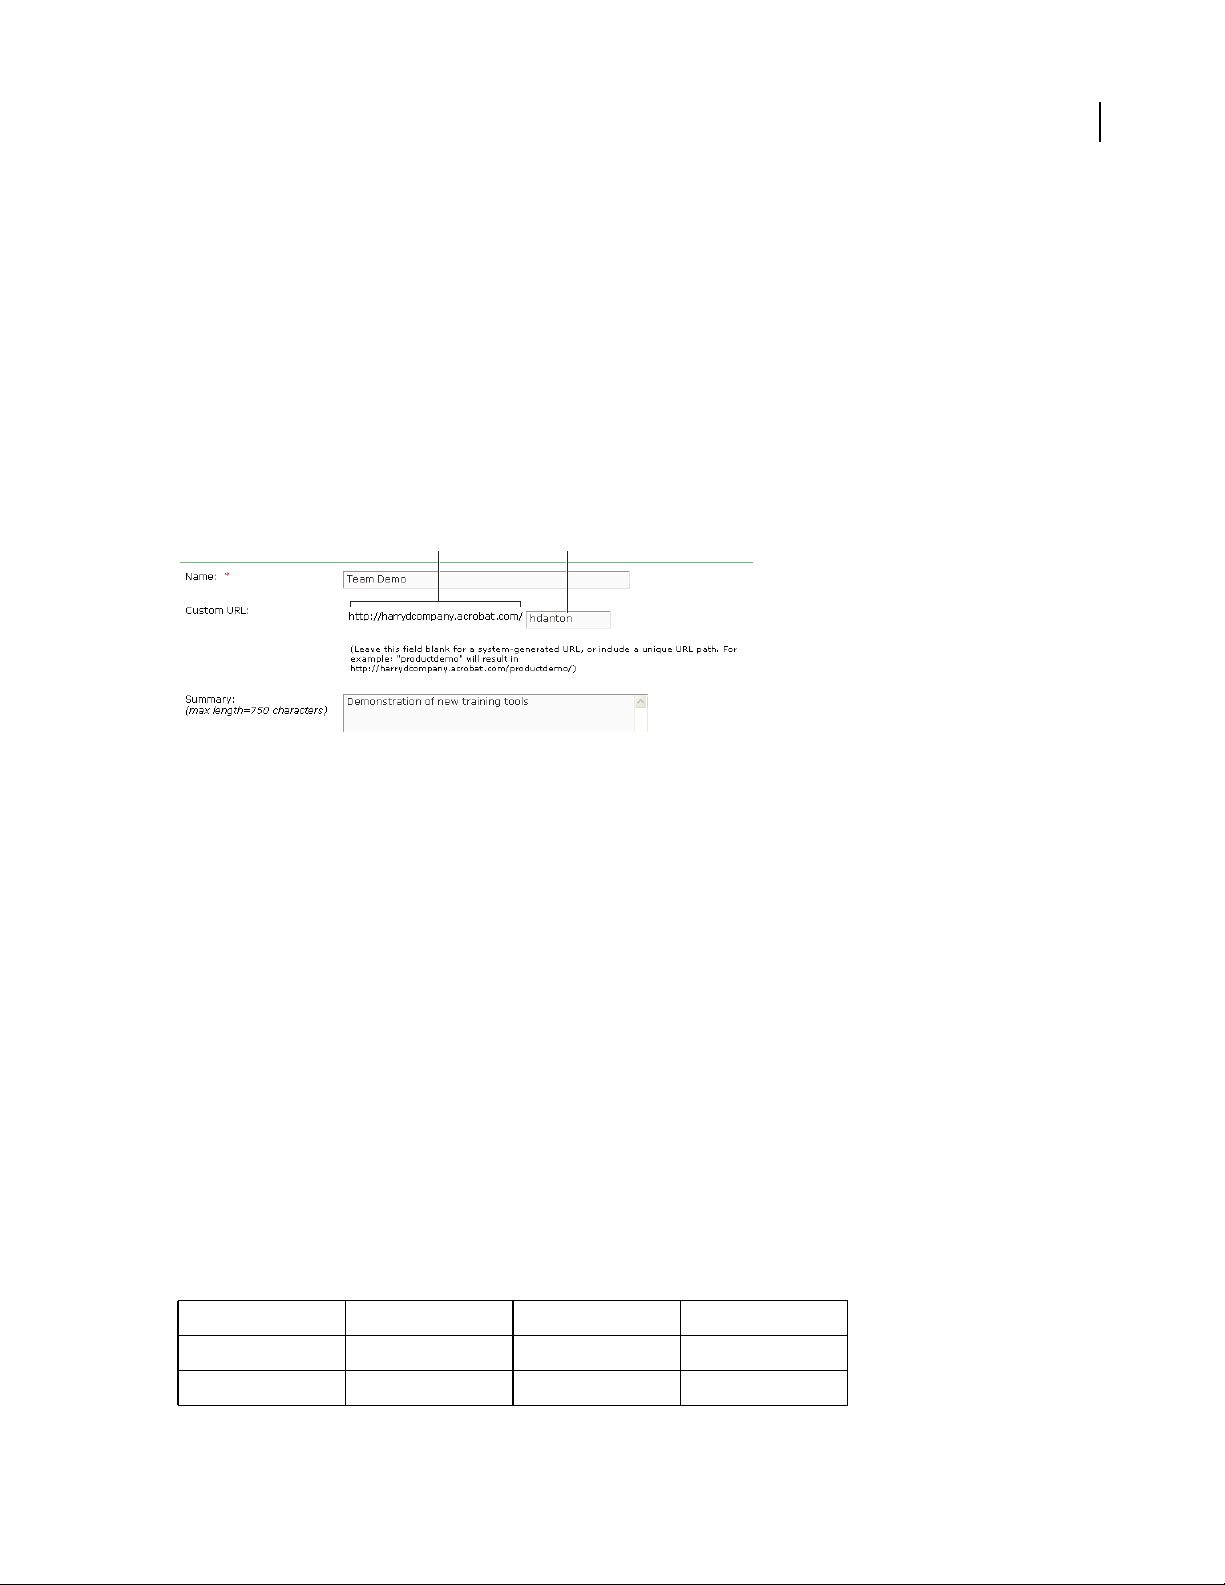
Creating custom URLs
When you add a new piece of content, a new meeting, a new course or curriculum, a new seminar, or a new event,
you can include a custom URL. This URL is unique across the entire Connect Enterprise account and should have a
meaningful name. For example, the custom URL could be your name or the name of your organization.
A B
23
Adding a custom URL
A. Uneditable portion of URL set by your administrator B. Customizable portion of URL
Custom URL use
A custom URL can be associated with only the specific item in which it is included, and you cannot use it for any
other Connect Enterprise function. For example, if you assign the custom URL /yourname to a piece of content, you
cannot assign that URL to another piece of content or to a meeting, nor can any other user who shares your account
assign that URL to anything. If you delete the content that includes the custom URL, however, the custom URL
becomes available for re-use.
If another user is currently using the custom URL, you receive an error message when you enter the URL. In this
case, depending on the circumstances (for example, if another user is using your full name as a custom URL), you
can check with your administrator to see who is using the URL.
Custom URL rules
•
You cannot edit a custom URL after you create it.
• You cannot use digits (0 to 9) at the beginning of a custom URL.
• Custom URLs cannot contain any punctuation, spaces, or control codes.
• If you enter any uppercase letters, they are automatically converted to lowercase letters to conform to URL case-
sensitivity conventions.
• Do not use any of the following reserved keywords in your custom URL.
account content idle report
acrobat course info sco
adobe cs input search
Page 28

ADOBE CONNECT ENTERPRISE
admin cs2 livecycle seminar
administrator curriculum macromedia send
api data meeting service
app default metadata servlet
archives download monitor soap
breeze event open source
builder fcs output src
close flash photoshop stream
com gateway presenter systems
common go producer training
connect home public user
console hosted publish xml
View Connect Enterprise content from the Content library
You can open content for viewing from within Enterprise Manager after you browse to it in the Content library.
User Guide
24
1 Click the Content tab at the top of the Enterprise Manager window.
2 Browse the Content library, and click a filename to view the associated Content Information page.
3 Click the file’s URL For Viewing link.
A new browser window displays the selected file or presentation.
View Connect Enterprise content in a browser window
You do not have to open Connect Enterprise content from within Enterprise Manager. When you have the URL for
viewing the file, you can also browse to it directly from any browser window.
1 Open a browser window.
2 Enter the URL for viewing the content in the browser URL address text box or click a link received in an e-mail.
Send a content URL by e-mail
Every content file in the Content library has a unique URL that lets users view the contents of the file. You can send
this URL to other people by e-mail from within Enterprise Manager.
Enterprise Manager creates a unique version of the URL for each e-mail recipient. Compared to pasting the URL in
an e-mail, using Enterprise Manager has these advantages:
• You can request that a return receipt be sent to you when an e-mail recipient clicks the web link. You can track
who viewed the contents because a unique URL was created for each recipient.
• RecipientscanviewthecontentwithouthavingtologinwithaConnectEnterpriseusernameandpassword,even
if the permissions for the content file in the Content library are not set for public viewing.
1 Click the Content tab at the top of the Enterprise Manager window.
2 Navigate to the content file and click its name.
Page 29

ADOBE CONNECT ENTERPRISE
User Guide
3 Click E-mail Link on the navigation bar.
4 Enter the e-mail addresses for all recipients in the To text box on the E-mail Link page.
If necessary, separate multiple e-mail addresses with commas to create a unique URL for each e-mail recipient.
5 Edit the Subject and Message Body text boxes as needed.
Note: Do not delete the information in the braces (“{tracking-url}”) in the message body. This is a placeholder that is
replaced with the content URL in the generated e-mail message.
6 Select Generate a Return Receipt When Presentation Is Viewed to receive an e-mail notification when a recipient
views the content file; otherwise, clear the check box.
7 Click Send.
About the Content Dashboard
The Content Dashboard provides a graphical representation of statistical data about your content. The data reflects
all of the content in your My Content folder and appears in four bar graphs.
Most Viewed Content Over Last 30 Days The number of views.
Most Effective Presentations Over Last 30 Days Determined by percentage of slides viewed across all viewers.
25
Most Recently Viewed Content Over Last 30 Days In list format, showsthe name,content type, number of views,and
last time this content was viewed. The most recently viewed is listed first.
Aging Content In list format, shows the name,content type, andlast time thiscontent wasviewed. The most recently
viewed is listed last.
Click any item in these displays to view the corresponding Content Information page.
The bar graphs appear in the Enterprise Manager Content tab window. However, you can also export the Dashboard
to a printable browser window. To do so, click Printable Version on the left, above the display.
Viewing content reports
The Reports feature of Enterprise Manger lets you create reports that show you a given piece of content from
different perspectives.
1 Access the information page (for example, the Content, Meeting, Course Information page, and so on) for the file
whose reports you want to set.
2 Click the Reports link above the Content Information title bar. This displays other links that let you define the
kinds of report information you can see for this content. The links are as follows:
Summary The firstreport type that appears when you access theReports feature. TheSummary provides thecontent
name, the date that the content was last modified, and the number of times this content was viewed.
By Slides Applies to presentations only. A bar graph lists each slide in the presentation by slide number and the
numbertimesitwasviewed;belowthegraphisatablewiththesameinformation,whichalsoincludesthelasttime
each slide was viewed.
By Questions A bar chart shows each question, color-coded as correct or incorrect, and the number of respondents
to the question. Click a question in the bar to display a pie chart with a table that provides the answerkey and answer
distribution. The answer key lists all possible answers for the selected question and their corresponding answer
number or letter. The answer distribution lists all of the answer choices selected for this question, flags the correct
answer, and shows the number of users who selected each answer, as well as what percent of the total each number
Page 30

ADOBE CONNECT ENTERPRISE
User Guide
of users represents. Finally, the chart totals the users by number of users and percent of users. Below the graph is a
table that provides an overview of all questions, listing each question by number, name, number of correct answers,
number of incorrect answers, percentage of correct, percentage of incorrect, as well as the score.
By Answers A table provides the maximum possible score, the passing score, the average score, and the high score
for the quiz. For each question, the table also shows the question number, the question itself, and the answer distribution; that is, how each question was answered, if at all. Click the View Answers link to display a pie chart with a
table that provides the answer key and answer distribution. The answer key lists all of the possible answers for the
selected question and their corresponding answer number or letter. The answer distribution lists all of the answer
choices selected for this question, flags the correct answer, and shows the number of users who selected each answer,
as well as what percent of the total each number of users represents. Finally, the chart totals the users by number of
users and percent of users.
Note: Connect Enterprise resets content scores for quizzes and surveys each time the user accesses the content. This
means that if a user closes the quiz or survey without completing it, then returns to it later, all of the previous answers
arelost.Ifyoudonotwantthescoretoreset,andyouhaveaccesstotheTrainingtab,youcancreateanewcourseand
select the content in question as the course content. This way, you have turned the content into a course.
TheHideAnswerDistribution/ShowAnswerDistributionbuttonisatoggleforshowingandhidingthedistribution
of answers for each question.
26
About content report filters
Where appropriate, you can restrict the information you see on a report by specifying report filters. When the filters
are in effect for a given report, the Report Filters link appears above the report display. You can set any or all of the
following criteria to refine your reports:
Time period A date range for the information in that report. For example, if you select a date range for the By Slides
report, it shows only the slides that were viewed within that time frame.
Team members (for managers only) Thedataonthereportappliesonlytothepeoplewhoarethemanager’ssubor-
dinates, either as direct reports or all reports (including both direct and indirect subordinates). This distinction
depends on which option was selected: Show Data From People I Manage Directly or Show Data From People I
Manage Directly And Indirectly.
Groups Thedataonthereportappliesonlytothemembersofaspecificgroupthatparticipated.Youcanselectmore
than one group, and then deselect any group.
Any filters you set apply to all reports that you create, both for the specific report and for any other Connect Enterprise functionality. For example, if you create a training report after you set filters for a content report, the filters you
set apply not only to the content report but also to the trainingreport. This rule applies to any date range youspecify.
If you do not clear a date range filter that you set for one report, all reports are filtered by that date range as well.
Note: Report filters are only saved for the current session. If you set report filters, click Save, then logout of Connect Enterprise, when you log in again the report filters you previously set are not retained.
To clear filters you have set, click Reset on the Set Report Filters page.
Page 31
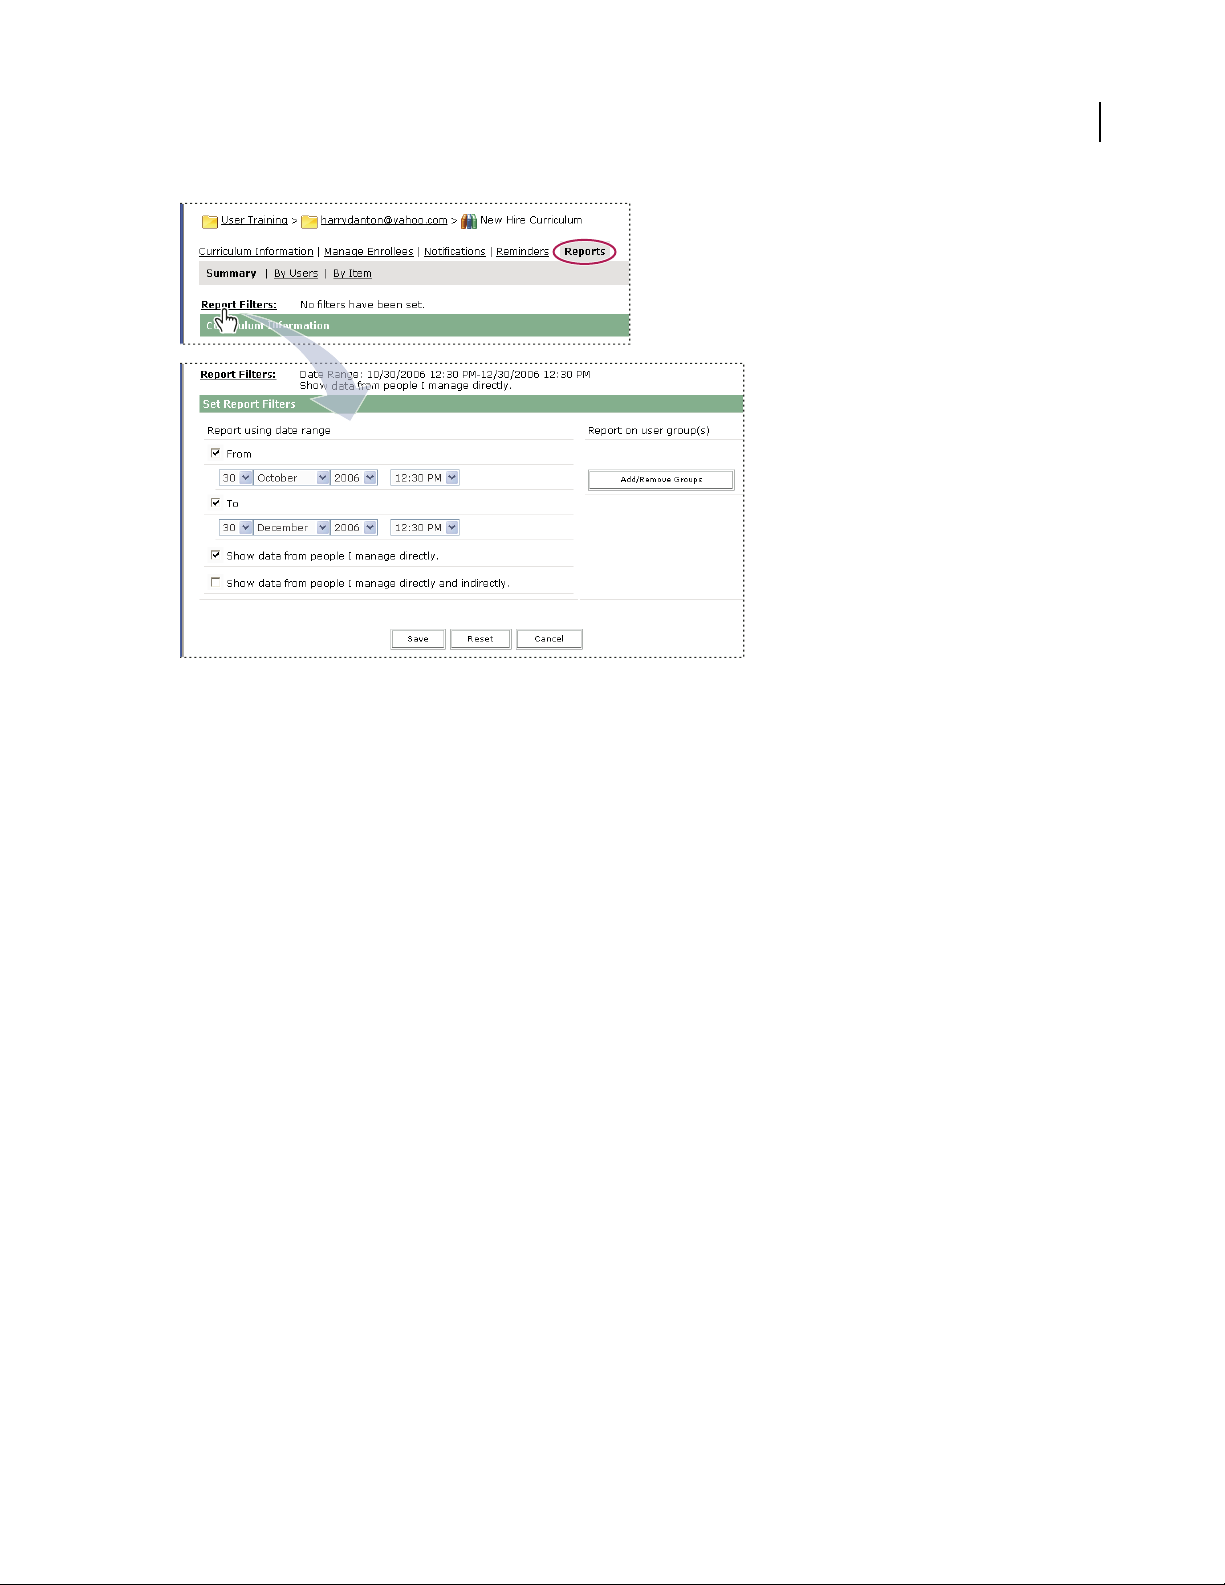
The Set Report Filters options for a curriculum
ADOBE CONNECT ENTERPRISE
User Guide
27
Set content report filters and generate reports
You can set report filters and download reports whenever necessary.
Set report filters
1
Access the information page (for example, the Content, Meeting, Course Information page, and so on) for the file
whose report filters you want to set.
2 On the information page, click the Reports link above the Content Information title bar.
A set of report links appears above the titlebar, with Summary highlighted, andthe Summary report for this meeting
appears below the information heading.
3 Click the report type for which you want to set filters.
The data for the report type you selected appears in the Enterprise Manager window.
4 Click the Report Filters link, to the right of the No Filters Have Been Set label.
5 Set one or more of the following filters:
• To set the date range filters, select the From and/or To check boxes and the start and/or end dates and times.
• To set filters for groups, click the Add/Remove Groups link and select the check box for the groups you want to
track in your report.
• To select team members, click either Show Data From People I Manage Directly or Show Data From People I
Manage Directly And Indirectly.
6 Click Save at the bottom of the Set Report Filters page.
The report page reappears with the filters you set, above the display bar.
Page 32

ADOBE CONNECT ENTERPRISE
Download reports
1
Access the information page (for example, the Content, Meeting, Course Information page, and so on) for the file
User Guide
whose report you want to download.
2 On the information page, click the Reports link above the Content Information title bar.
3 Click a report type, for example, By Slides or By Questions.
4 Click the Download Report Data button.
This exports all the report data to a comma separated values (CSV) file. You can either save or open the report. If
you are running Enterprise Manager in an Internet Explorer browser and choose to open the report, Windows
automatically opens it in Microsoft Excel. In this case, you must double-click each cell to see its information.
Another option is to save the CSV file to your desktop, select Notepad from the Accessories menu (select Start >
Accessories > Notepad), and open the file from Notepad, which makes it easier to read.
In addition, if the Printable Version button appears for a report, you can click the button to export the report to a
browser window and print the report.
Remove report filters
1
Access the information page (for example, the Content, Meeting, Course Information page, and so on) for the file
whose report filter you want to remove.
2 On the information page, click the Reports link above the Content Information title bar
3 Click a report type, either By Slides, By Questions, or By Answers.
4 Click the Report Filters link.
5 In the Set Filters page, do either of the following:
• To clear all filters, click Reset.
• To clear a specific filter, deselect the check box and click Save; if it’s a group, click Add/Remove Groups, deselect
the group check box, and click Save.
28
Page 33

Chapter 3: Adobe Acrobat Connect Professional meetings
Acrobat Connect Professional How To topics
How To topics for Hosts and Presenters
• “Creating meetings” on page 42
• “Meeting room layouts and the layout navigation bar” on page 35
• “Start or stop an audio conference call” on page 66
• “Sharing a computer screen, document, or whiteboard” on page 53
• “View or change an attendee’s role” on page 65
• “Add a note to a Note pod” on page 74
• “About the Chat and Q & A pods” on page 75
• “Record a meeting” on page 70
29
How to topics for Participants
• “Join a meeting” on page 45
• “Join a conference call or mute your phone” on page 69
• “Set up audio broadcasting” on page 81
• “Set up video broadcasting” on page 83
• “Sharing a computer screen, document, or whiteboard” on page 53
• “Send a chat message” on page 76
• “Play back a recorded meeting” on page 71
Adobe Acrobat Connect Professional basics
About Acrobat Connect Professional meetings
An Adobe Acrobat Connect Professional meeting is a live online conference for multiple users. The Acrobat
Connect Professional meeting room is an online application that you use to conduct a meeting. The meeting room
consists of various display panels (pods) and components. You can choose from several prebuilt meeting room
layouts, or customize a layout to suit your needs. The meeting room enables multiple users, or meeting attendees, to
share computer screens or files, chat, broadcast live audio and video, and take part in other interactive online activities.
Page 34

ADOBE CONNECT ENTERPRISE
User Guide
Once you create a meeting room, it exists until you delete it. Its location is a URL, assigned by the system when the
meeting is created. When you click the URL, you start the Adobe Flash application in your browser and enter the
virtual meeting room that Flash constructs for you. A meeting room can be used over and over for the same weekly
meeting. The host can leave the meeting room open or closed between scheduled meetings. If a meeting room is
open between meetings, attendees can enter the room at any time to view content.
To take part in a meeting you must have a browser, a copy of the Adobe Flash Player 7 or higher, and an Internet
connection. Your capabilities in a meeting depend on your assigned role and permissions.
Meeting roles and permissions
Your capabilities for sharing, broadcasting, and other activities in an Acrobat Connect Professional meeting are
determined by your role. There are three roles for meeting room attendees: host, presenter, and participant.
The creator of a meeting is designated as the host by default. The host can specify each attendee’s role, including
selecting other attendees to be hosts for the meeting. Permissions for each role are as follows:
Host Hosts can set up a meeting, invite guests, add content to the library, share content, and add or edit layouts
in a meeting room. They can promote other participants to the role of meeting room host or presenter, or give
enhanced permissions to a participant without promoting the participant. They can also perform all the tasks that a
presenter or participant can.
30
Presenter Presenterscan sharecontent already loaded into the meetingroom fromthe library and sharecontent
from theircomputer, including AcrobatConnect Professionalpresentations, slides (PPT files), Flash applicationfiles
(SWF files), Flash Video files (FLV files), and images (JPEG files). They can share the screen, showing it on the Stage
of all attendees, and they can chat, and broadcast live audio and video.
Participant Participants can view the content that the presenter is sharing, hear and see the presenter’s audio and
video broadcast, and use text chat.
See also
“About attendee names” on page 64
“Managing the Adobe Connect Enterprise Account” on page 217
“Assigning enhanced participant rights” on page 66
Page 35

ADOBE CONNECT ENTERPRISE
User Guide
About audio in meetings
There are two ways to use audio in a meeting: integrate with an audio conference call or broadcast audio using VoIP
(Voice over Internet Protocol.)
• Audio conferencing. A host can integrate a meeting with an audio conference call. This lets you control the audio
conference from the Attendee List pod in the meeting room.
To integrate an audio conference call with a meeting, you must have an Acrobat Connect Professional account with
an audio conference bridge installed. Acrobat Connect Professional has partnerships with third-party companies,
including Premiere and Avaya, to provide conferencing solutions that integrate with Acrobat Connect Professional.
To find out if your account has an audio conference bridge installed, contact your Acrobat Connect Professional
administrator.
To integrate an audio conference call with a meeting, you must specify audio conference information (such as the
telephone number) in the Meeting Information page in Acrobat Connect Enterprise Manager, when you create the
meeting or when you edit the meeting information.
If you have an audio conference bridge installed, you can record an audio conference call when you record a meeting.
If you don’t have an audio conference bridge installed, you can use the microphone on your computer system to
record the audio from your speakerphone.
• VoIP. You can use the Camera And Voice pod to broadcast audio in a meeting using Voice over Internet Protocol
(VoIP) and the microphones on attendees’ computer systems.
31
To use VoIP with a meeting, attendees must have microphones connected to their computer systems. Attendees set
up their microphone using the Audio Setup Wizard. With VoIP, audio is recorded automatically when you record a
meeting.
Enter or leave a meeting room
You entera meeting from its Acrobat Connect Professionallogin page. When you log in,you can enter as a registered
Acrobat Connect Professional user or as a guest.
• If you are a registered user, you can provide the user name and password for your Acrobat Connect Professional
account (created by an administrator) to enter the meeting room. If you are a host or presenter, you must enter as
a registered user.
• Any attendee can log in as a guest. If the meeting’s creator designated themeeting as public, your guest login name
is automatically accepted. If the meeting creator designated the meeting as private, the meeting host receives your
request to enter and can accept or decline it.
Log in to an Acrobat Connect Professional meeting
1
To access the login page, do one of the following:
• From the Home page in Acrobat Connect Enterprise Manager, under My Scheduled Meetings click the Enter
button for the desired meeting.
• From the Meeting Information page in Acrobat Connect Enterprise Manager, click Enter Meeting Room.
• Click the meeting URL in the e-mail invitation that you have received.
• Enter the meeting URL in your browser.
2 Log in to the meeting room as either a guest or an Acrobat Connect Professional user:
• Select Enter As Guest. Type the name to be used as your identifier in the meeting, and click Enter Room.
•
SelectEnterwithYourAcrobatConnectProfessionalPassword.Enteryourloginnameandpassword,clickEnterRoom.
Page 36

ADOBE CONNECT ENTERPRISE
User Guide
If the meeting has started, your browser immediately displays the meeting room. If the meeting has not started, you
receive this message: “The meeting has not yet started. You will be able to access the meeting once the host arrives.
Please wait.”
Leave a meeting room
❖ Click the Close (X) button in the upper-right corner (Windows) or upper-left corner (Mac OS) of the meeting
room window, or choose File > Meeting > Exit Acrobat Connect.
Note: Ifyourmeetingroomviewissettofullscreen,theClosebuttonisnotvisible.ToviewtheClosebutton,resizeyour
meeting room. In Windows, press Esc to enable resizing.
About meeting registration
Depending on the type and purpose of a given meeting, the meeting host may want to have the guests register. If so,
the host must have access to the Event Management capabilities in the Acrobat Connect Enterprise Manager application, since registration for any meeting, training, presentation, or seminar can be done only through the Event
Management tab.
The Event wizard lets the host select and invite users, select and customize registration questions, and send invitations, even to large e-mail lists.
32
See also
“Creating meetings” on page 42
About bandwidth and performance
Many network factors affect the performance of the Acrobat Connect Professional application for attendees,
including the bandwidth setting for the meeting room, the connection speed setting for each individual attendee,
and the type of content being shared and activities being performed in the meeting.
For example, higher bandwidth is required to share a recorded video than to share a text document, and higher
bandwidth is required to broadcast live video than to send chat messages.
Optimize Room Bandwidth The meeting host can specify the bandwidth setting at which the meeting is broadcast.
Options are Modem,DSL/Cable, andLAN. You should match the room bandwidth to the connection speed available
to attendees. For example, only use LAN if all your attendees have access to LAN. If attendees are on a variety of
connection speeds, it is best to choose the slowest speed that attendees are using. If a number of attendees are using
Modem connection, set the room bandwidth to Modem.
Attendee Connection Speed Each attendee can choose My Connection Speed from the Meeting menu and select
Modem, DSL/Cable, or LAN. Attendees should choose the connection speed that matches their Internet connection
type. If attendees experience latency in receiving an audio or video broadcast, they should reduce their connection
speed setting.
The following general guidelines are recommended for room bandwidth settings. Actual speeds may vary according
with each network environment:
• Modem: One presenter can generate around 26 kbits/second of data. Attendees need around 29 kbits/second for
a goodconnection. Having more than one presenter with the Modem setting is not recommended. Screen sharing
with the Modem setting is not recommended.
• DSL/Cable: One presentercan generate around 125 kbits/second of data. Attendees needaround 128 kbits/second
for a good connection. If screen sharing is used, attendees should have 200 kbits/second.
Page 37

ADOBE CONNECT ENTERPRISE
User Guide
• LAN: One presenter can generate around 250 kbits/second of data. Attendees need around 255 kbits/second. If
screen sharing is used, attendees should have 400 kbits/second.
See also
“Creating meetings” on page 42
About the Meetings library
The Meetings tab in Acrobat Connect Enterprise Manager contains three panes for accessing meetings: Shared
Meetings, User Meetings, and My Meetings, which each contain folders and files with meeting content and
recordings. Users can create and manage content in the My Meetings pane that appears when they are logged into
Acrobat Connect Enterprise Manager. Access to content in the other panes is determined by the meeting library
permissions set for each user by the Acrobat Connect Enterprise Manager administrator.
Content that you place in the Meetings library is available only for use in meetings. If you would like the content to
be available for other activities initiated in Acrobat Connect Enterprise Manager (such as events, seminars, or
training), you can upload the content to the Content library, or move content from the Meetings library to the
Content library.
See also
“Managing permission access for library folders and files” on page 13
33
“Managing library folders and files” on page 17
Acrobat Connect Professional work area
Inside an Acrobat Connect Professional meeting room
Content in a meeting room is displayed in pods, panels that contain various types of media, including slides, video,
whiteboards, shared applications, polls, and messages to meeting attendees. The menu bar at the top of the meeting
room window displays meeting information and contains controls for managing the room.
The meeting room Stage is the area of the presenter’s screen that participants see in a meeting. The Stage contains
the pods that display various types of content, such as slides, video, or shared windows or applications.
Page 38

A
B
C
A participant’s view of the Stage
A. Meeting name B. Participant menu bar C. Pods
ADOBE CONNECT ENTERPRISE
User Guide
34
A
C
B
The meeting Host’s view
A. Host menu bar B. Layout navigation bar C. Sharing options D. Show/Hide Presenter Only Area
D
The Acrobat Connect Professional meeting room window has a second display area, the Presenter Only area,which
borderstheStageandisvisibleonlytohostsandpresenters.HostsandpresenterscanusethePresenterOnlyareato
prepare content to be shared with attendees or to view confidential content that is not shared with attendees.
The meeting name appears at the top of the meeting room window.
Meeting room pods
A meeting room usually contains a number of display panels, called pods, each with its own function. When hosts
set up a meeting room, they determine the number, types, size, and position of pods that participants see. The
following pods are available:
Share pod Displays shared content from the presenter’s computer (including windows, applications, or the entire
desktop), documents, or whiteboards.
Attendee List pod Displays the name, role, and status of each attendee, and allows the host to change an attendee’s
role or permissions.
Chat pod Allows attendees to send chat messages to other attendees.
Q & A pod Linked to Chat pod. Redirects questions from the Chat pod to appropriate presenters.
Page 39

ADOBE CONNECT ENTERPRISE
User Guide
Note pod Displays text messages from hosts or presenters to all attendees.
Camera And Voice pod Allows hosts, presenters, and participants with appropriate permissions to broadcast live
audio and video to all attendees.
File Share pod Allows hosts and presenters to post files which can be downloaded by attendees.
Poll pod Allows hosts and presenters to conduct polls or ask questions of attendees.
Web Links pod Lets host post a web link and force all attendees to browse to that link.
Meeting room layouts and the layout navigation bar
The layout navigation bar at the bottom of the meeting room window is visible only to hosts. A host can use the
navigation bar to switch to a new layout. It contains the names of meeting room layouts.
By default, a new meeting room contains three prebuilt layouts: Sharing, Discussion, and Collaboration. The pods
in these layouts are selected and arranged to facilitate sharing of content, discussion of topics, or collaboration with
colleagues.
You can switch from one meeting room layout to another by clicking its name in the layout navigation bar. You can
also create your own meeting room layouts.
When a host clicks a different layout on the layout navigation bar, the new layout is displayed on every attendee’s
screen. In contrast, a host in Preparing mode can navigate between meeting room layouts without affecting the
participants’ view. This makes it possible for a host to edit or prepare meeting room layouts while another attendee
is presenting.
35
AB C D
Layout navigation bar
A. Turn Off Move and Resize Pods B. Turn on Preparing Mode C. Prebuilt layouts D. Add new layout
Presenter Only area
A host can place pods offstage—that is, anywhere that is not taken up by the Stage, menu bar, or layout navigation
bar. Participants don’t see pods placed offstage, in the Presenter Only area. Only other host or presenters can see
those pods. Presenters can use these private pods to exchange notes, text messages, and so on, that they don’t want
participants to see. Any pod in a meeting can be placed in the Presenter Only area.
Page 40

Meeting room with Presenter Only area
A. Presenter Only area (striped) B. Show/Hide Presenter Only area
ADOBE CONNECT ENTERPRISE
User Guide
A
B
36
The Presenter Only area is also useful if a host wants to prepare new content before making it available for viewing.
To show new content, the host can drag it onto the Stage from the Presenter Only area. For more information on
organizing and creating your own meeting room layouts, see “Working with meeting room templates” on page 39.
Meeting room menu bar
The menu bar contains several menus: a host sees the Meeting, Present, Layouts, Pods, and Help menus; a presenter
or participant sees only the Meeting and Help menus. All attendees see the meeting room connectivity indicator.
In the right corner of the menu bar, the colored bar indicates the connection status of the meeting room. Messages
and warnings also appear inthis corner.A red circle in the menu barindicates that the host is recording the meeting.
A C D
The menu bar
A. Click the Acrobat Connect Professional logo to go to the Adobe website B. Meeting menu C. Indicates meeting is being recorded D. Secure
Sockets Lock E. Meeting room status indicator with status shown
Using the menu bar, you can access the following features:
Meeting menu Lets you switch between the original size and a full-screen view of the meeting room and (if you’re
running the Acrobat Connect Add-in) exit a meeting. By selecting the Audio Setup wizard, you can test your
speakers andset the volumelevels for your microphone. A host can use this menu to invite participants to a meeting,
record a meeting, or stop the current meeting, as well as change room background, set room bandwidth and screen
resolution,manage the meeting room using Acrobat ConnectEnterprise Manager, and allow all participants to enter
the room as presenters.
B
E
Page 41

ADOBE CONNECT ENTERPRISE
User Guide
Present menu Lets hosts show and hide the Presenter Only area; change the attendee type to host, presenter, or
participant; enter Preparing mode; and change the display of the host cursor.
Layout menu Lets hosts customize the meeting room’s layout (for example, to view, add, delete, move, or resize
pods).
Pods menu Lets hosts add pods and content to a layout, and organize and lock existing pods.
Help menu Lets you test the type of Internet connectionyou have,and access help and troubleshooting information.
Hosts, presenters, and participants have access to all Help menu commands.
Meeting room status Indicates the connection status of the meeting room. A green bar means that the room
connection is optimal. A gray bar with a twirling icon indicates that you have been disconnected, and Acrobat
Connect Professional is trying to reestablish your meeting connection. Roll over the twirling icon to view a tooltip
with a link to a Troubleshooting page, if reconnection is not successful.
Secure Sockets Lock Indicates that the meeting is connected over a secure socket (verifying the host server’s
identity).
Setting up a meeting room
You create a meeting room using the Acrobat Connect Enterprise Manager web application. You select a meeting
room template and then specify a meeting room name and description, meeting time, access type (open to anyone,
or to registered users only), and attendees to invite. You can also select the language for the interface, and add information on audio conferencing (such as the telephone number.) The application generates a meeting room for you.
You can choose a custom URL for accessing the meeting, or use the automatically generated URL. You can use the
URL to enter the meeting room at any time. The creator of a meeting is designated the host by default.
37
Invite attendees and grant or deny access
While in the meeting room, hosts can invite people to attend a meeting. A host can choose to block access to a
meeting, and can allow or disallow requests to enter a blocked meeting.
Invite attendees while a meeting is in progress
Hosts can invite people to a meeting from the Acrobat Connect Professional meeting room.
1 Do one of the following:
• In the menu bar, select Meeting > Invite Participants.
• IntheAttendeeListpod,clickthePodOptionsbutton inthelower-rightcornerandselectInviteParticipants.
2 In the Invite Participants dialog box, do one of the following:
• Click the Send E-Mail button toopen yourdefault e-mail application and sendinvitees anautomatically generated
e-mail message with the meeting URL.
• Copy the meeting URL from the Invite Participants dialog box into an e-mail or instant message and send the
message to invitees. Return to the meeting room and click Done to close the dialog box.
Block incoming attendees
1
In the menu bar, select Meeting > Block Incoming Attendees.
2 To allow incoming attendees to request entry to the meeting, select Incoming Attendees Can Request Entry.
Deselect this option to disallow requests to enter the meeting.
3 In the text box, enter a message that will be displayed to incoming attendees.
Page 42

ADOBE CONNECT ENTERPRISE
User Guide
4 Select Save Message to save the message for future use.
5 Click OK.
Put a meeting on hold or end a meeting
A host can put participants on hold to block access to the meeting room temporarily. Hosts and presenters can still
enterameetingroomandperformactivitiestherewhileparticipantsareonhold.Audioconferencecallsareplaced
on hold.
A host may put a meeting on hold to allow presenters to enter a meeting room while the meeting is not in session,
so that they canprepare materials for themeeting. A Stop Meeting icon appears at theright of the menubar when
a meeting is on hold.
A host can remove everyone from a meeting and end the meeting to deny everyone access to the meeting room,
including hosts, presenters, and participants. Audio conference calls are disconnected. Hosts may end a meeting if
the Acrobat Connect Professional account is billed by the minute, to prevent charges while the meeting is not in
session. When a host has ended a meeting, a message appears indicating that the meeting has ended.
A button for restarting the meeting appears to hosts. The host can view a notification window to see how many
attendees are waiting to enter the meeting room. Attendees who log into a meeting that is on hold will automatically
enter the meeting when it resumes.
38
Hosts can send On Hold or Meeting Ended messages to inform attendees of the meeting status.
Place participants on hold
1
In the menu bar, select Meeting > Place Participants On Hold.
The Message For Viewers text boxdisplays the message “This meeting has been placed onhold. The host willresume
the meeting shortly. Thank you.”
2 Revise the message if you wish, and click OK to put the meeting on hold and display the message to participants.
To find out how many participants are waiting to enter a meeting you have placed on hold, place the pointer over
the Stop Meeting icon at the right of the meeting room menu bar.
End a meeting
1
In the menu bar, select Meeting > End Meeting.
TheMessageForViewerstextboxdisplaysthemessage“Thehosthasendedthismeeting.Thankyouforattending.”
2 Revise the message if you wish, and click OK to end the meeting and display the message to participants.
Compose an On Hold or End Meeting message without interrupting the meeting
1
In the menu bar, select Meeting > Place Participants On Hold or Meeting > End Meeting.
2 Revise the message in the Message For Viewers text box. Then click Save Message to save the message for future
use and return to the meeting.
Resume a meeting that is on hold or ended
❖ Click the Start Meeting button in the message of the Stop Meeting icon.
Page 43

ADOBE CONNECT ENTERPRISE
User Guide
Working with pods
Hosts can show and hide, add, delete, rearrange, and organize pods. For all pods except the Attendee List pod and
the Camera And Voice pod, you can have more than one instance of a pod displayed in a meeting at one time.
Show or hide a pod
1
In the menu bar, select Pods and select the name of the pod to show. A check mark appears next to the name of
pods that are currently visible in the meeting. To hide a pod, select the pod name again, or click the Hide button (the
minus sign) on the right side of the pod title bar.
2 For pods that can have multiple instances (all pods except the Attendee List and the Camera And Voice pods), to
show or hide a specific instance of the pod, select the instance name from the pod submenu.
Add a pod
1
In the menu bar, select Pods and select the name of a pod.
2 From the pod submenu, select New [pod name].
Move and resize pods
1
In the menu bar, select Pods > Move And Resize. A check mark appears next to the option when it is selected.
2 To move a pod, drag it by its title bar. To resize a pod, drag the lower-right corner.
39
Display a pod at full screen size
1
At the right side of the pod title bar, click the Full Screen button (the screen icon).
2 To restore the pod to its original size, click the button again.
Organize pods
1
In the menu bar, select Pods > Organize Pods.
2 Do one of the following:
• To delete pods, select the pods in the pane on the left and click Delete.
• To rename a pod, select the pod in the pane on the left and click Rename. Enter a new name in the Rename Pod
dialog box and click OK.
• To locate all unused pods, click Select Unused.
3 Click Done when you finish.
Working with meeting room templates
About templates
A template is simply a prepopulated meetingroom. It can contain one or several layouts with different display panels,
or pods, configurations, and content. You can optimize each layout for a specific task, such as presenting slides or
collaborating with peers. You can leverage existing layouts and content, reducing repetitive customization each time
you create a new meeting. You can create your own templates or use the default templates included with Acrobat
Connect Professional.
Page 44

ADOBE CONNECT ENTERPRISE
User Guide
To help you quickly create a meeting room, Acrobat Connect Professional offers three built-in templates: Default
Meeting, Default Training, and Default Events. When you create a meeting by using the New Meeting wizard in
Acrobat Connect Enterprise Manager, you simply select one of these three templates for your meeting room, add
your content, and start your meeting.
When you create a meeting room from a template, the latest version of the content is added to your room. If you edit
thesourcefilefortheembeddedcontent,thechangesdonotaffectthecontentinyourroom.Toupdatethecontent
in your meeting room, you must upload the revised file to the server and then replace the existing content in the
meeting room with the revised content on the server.
Default Meeting template General template for meetings. It contains three layouts: Sharing,Discussion, and Collab-
oration. The Sharing layout is optimized for sharing content (Microsoft PowerPoint presentations, video, Adobe
™
FlashPaper
, and so on). The Discussion layout is optimized for discussing issues interactively and taking notes. The
Collaboration layout is optimized for annotating content and drawing freehand on content.
40
Default Meeting template layouts
Default Training template Used for online collaborative instruction. It contains three layouts: Lobby, Classroom,
and Analysis.The Lobby layout is a place to exhibit a self-running presentation or display other preliminary content.
YoucanleavetheLobbylayoutopensothatattendeescanbrowseitscontentwhilewaitingforthemeetingtobegin.
From the Classroom layout, you can present PowerPoint slides, share your screen, or share a whiteboard. With the
Analysis layout you can collaborate with students, provide files to download and links to browse, and use a whiteboard for instruction.
Default Events template Used for meetings or seminars with a large audience. It contains three layouts: Lobby,
Presentation, and Questions And Answers. The Lobby layout is a place to play music, exhibit a self-running presentation, or display other preliminary content. You can leave the Lobby layout open so that attendees can browse
content while waiting for the meeting to begin. From the Presentation layout you present PowerPoint slides, share
your screen, or show a whiteboard. The Questions And Answerslayout facilitates an open Q & A session with participants.
Information preserved in a template
A meeting room converted to a template is a duplicate of the original room. Layouts, pods, and most contents and
room information are preserved in the template, including the following:
• Layouts with name, order, and starting (selected) status
• Pods with name, size, position, and settings for full-screen toggle
• Pod content
• Page number in FlashPaper and position of the seek bar in Flash Video (FLV file)
• Whiteboard overlay contents
• Poll state (Prepare, Open, Close), questions, answers, and broadcast results
Page 45

ADOBE CONNECT ENTERPRISE
• Questions and answers, Chat pod link, and status (Open, Answered, All)
• Text in Notes pod
• Camera and voice settings
• Room on hold (Yes, No)
• Value for guest entry
• Messages to be displayed to users when a meeting is on hold or ended
• Room background, screen resolution, and bandwidth
• Presenter Only area status
Certain information is not saved to the template. Audio conference settings, Audio Setup wizard settings, and the
content of a Chat pod are not saved to a template.
Apply a template to a new meeting
❖ In the Meeting Information Page in Acrobat Connect Enterprise Manager, select a template from the Select
Template menu. By default, the Default Meeting template is selected.
See also
“Creating and attending meetings” on page 42
User Guide
41
Convert a meeting room to a template
If you are a host, you can create a template in Acrobat Connect Enterprise Manager. From the Meetings tab in
Acrobat Connect Enterprise Manager, move the meeting room to one of two template folders: Shared Templates (in
the Shared Meetings folder) if you want others to be able to access the template, or My Templates (in your user
meeting folder) if you are the only one who will use the template.
1 From the Meetings tab in Acrobat Connect Enterprise Manager, navigate to the meeting room that you want to
convert.
2 Select a meeting room from the list below the navigation bar.
3 Click Move on the navigation bar.
Two columns are displayed in Acrobat Connect Enterprise Manager. The name of the meeting room is displayed in
the left column. In the right column, under the heading Move To This Folder, Shared Meetings > Shared Templates
is selected by default. If this is the folder you want to use, go to step 5.
4 Navigate to and select a template folder.
5 Click Move at the bottom of the column.
Your meeting room now resides in the template folder that you selected. The template is added to the list in the
appropriate folder, either Shared Templates or My Templates.
When you are creating a new meeting with the New Meeting wizard, you can select the new template from the Select
Template pop-up menu. You can customize this room just like any other to meet your needs. Once the meeting is
created, you cannot apply a new template to it. Instead, you must create a new meeting by using the new template.
ToaddameetingroomtotheSharedTemplatesfolder,youmusthaveManagerpermissionsforthefolder.Bydefault,
you have full control over meetings and templates in your user meeting folder.
Page 46

ADOBE CONNECT ENTERPRISE
User Guide
Creating and attending meetings
Creating meetings
You create a meeting in Acrobat Connect Enterprise Manager.
If you want to incorporate registration as part of your meeting, you must have the Event Management tab as part of
your Acrobat Connect Professional installation; see “About meeting registration” on page 32.
You can create a personal meeting room that you return to repeatedly for your own use, and leave persistent content
in the meeting to refer to whenever you need it. When creating a personal meeting room, set the start time of the
meeting far enough in the future that the meeting room will be available whenever you need it (for example, you can
set the start time as late as 2010 to ensure that the meeting room will be available for the forseeable future).
Creating a meeting
You createa meeting using the Meeting wizard, which guidesyou throughthe tasks of creating a name andsummary,
selecting participants, and sending invitations to participants.
1. Start the Meeting wizard
You have two options for starting the Meeting wizard. To create the meeting in your individual My Meetings folder,
click New Meeting under “Create” on the Home tab. To create your meeting in another folder for which you have
Manage permission, navigate to that folder in the Meetings library and click the New Meeting button. In either case,
the Enter Meeting Information page appears.
42
Page 47

ADOBE CONNECT ENTERPRISE
User Guide
2. Enter meeting information
On thefirst page of the Meeting wizardyou enterdetails aboutthe meeting, such as a name, summary,date, duration,
custom URL, language, access restrictions, and audio settings. Only the name and language are required. The other
information is relevant only if you plan to use the application to send e-mail invitations to the meeting.
43
3. Select meeting participants
Usethe Add button inthe Available UsersAnd Groups list to addparticipants. You add participants in order to assign
permissions and tosend e-mail invitations. You can search for them by name andexpand groups toselect individuals
in the group. If you wish, you can assign roles by selecting participant names and clicking Permissions from the
bottomof theparticipants list. You can then proceed to the final step of sending invitations or exit the wizard to send
invitations later.
4. Send invitations
The wizard guides you through two separate processes, depending on whether the meeting is open to registered
usersonlyortoanyone.Iftheformer,youselectSendInvitations,selectagrouptoinvite(forinstance,hostsonly),
and edit the text that will appear in the e-mail. You have the option of including a Microsoft Outlook Calendar
appointment. If the latter, you click Send E-Mail Invitations, which opens your e-mail application, and add invitees
to the distribution list of your e-mail message.
Get information about a meeting
Ifyouwanttoseealistofallthemeetingsyouareinvitedtoor(asahost)allthemeetingsyouhavescheduled,goto
My Scheduled Meetings on the Home tab in your Acrobat Connect Enterprise Manager window. If you have more
scheduled meetings than can appear on the Home tab list, click the More button at the bottom of the list to view
them. Alternatively, you can display your list of scheduled meetings by clicking the My Scheduled Meeting link at
the top of the page.
❖ Click the meeting name under My Scheduled Meetings on the Home tab.
The Meeting Information page appears with the following details:
Meeting name The meeting’s title.
Page 48

ADOBE CONNECT ENTERPRISE
User Guide
Summary A brief description of the meeting.
Start time The date and time that the meeting begins.
Duration The projected length of time of the meeting.
URL The web address where the meeting is to occur (the meeting room’s virtual location).
Status The current state of the meeting; for example, number of participants in the room.
Language The language in which the meeting will be conducted.
Telephony information The telephone number for participants who call in to this meeting and the code that they
must enter (necessary only when the meeting is in progress).
From here, you can click the Enter Meeting Room button to join the meeting.
Set meeting room bandwidth
The host sets meeting room bandwidth to determine the speed (kilobits/second) at which data from the meeting is
sent to attendees. The host should choose a room bandwidth that matches the connection speed used by attendees.
If attendees are using a variety of connection speeds, choose the lowest speed that attendees may be using. For
example, if some attendees are using modems, choose Modem for room bandwidth to ensure that all attendees have
a good connection.
44
❖ Choose Meeting > Optimize Room Bandwidth and choose Modem, DSL/Cable, or LAN.
About starting a meeting
When you are host, starting a meeting is as simple as logging in to your meeting room and then inviting others to
do the same. You can send your meeting room URL to attendees in an e-mail or instant message, and frequent guests
can bookmark the URL for future use. Meetings can be spontaneous, or you may have prearranged groups who log
into your meeting room at the same time every week.
When you have entered the meeting room, you can perform tasks to set the meeting up for attendees, such as the
following:
• Specify phone conference information if attendees will be phoning in to the meeting.
• Resize or rearrange the meeting room pods.
• Type meeting notes or other information for attendees.
• Invite attendees and accept or decline requests to join your meeting.
Start a meeting from any web browser
As the host, you can access the meeting room login screen from a web browser.
1 Type your meeting URL in the address bar of a web browser.
The first time you visit your meeting room, bookmark it for quick access the next time you want to start a meeting.
2 Type your Acrobat Connect login and password, and then click Enter Room.
Page 49

ADOBE CONNECT ENTERPRISE
User Guide
Start a meeting using the Start Meeting button
The Start Meeting button is included in software applications such as Adobe Acrobat®, Adobe Reader®, and some
Microsoft Office programs. As a meeting host, you can use the Start Meeting button to access your meeting room
login screen or to set up a new Acrobat Connect Professional account.
1 Click the Start Meeting button.
2 If the Welcome To Start Meeting dialog box appears, click Create Trial Account to set up a new account or click
Log In if you already have an account.
3 In the Start Meeting Log In dialog box, type your meeting URL, login, and password, and click Log In.
Note: In Acrobat or Reader, your meeting preferences determine how much login information you need to enter, or
whether this dialog box appears at all, before your meeting room opens. To change your Acrobat or Reader meeting
preferences, select Edit > Preferences (Windows) or Acrobat > Preferences or Reader > Preferences (Mac OS), and then
select Meeting on the left.
Join a meeting
You can join a meeting as a guest or as a registered user, depending on the parameters chosen by the meeting host.
You can join a meeting by entering the meeting URL into a browser and then entering information as a registered
user or guest. In addition, if you have Microsoft Outlook and have accepted the invitation, the meeting appears on
your Outlook calendar. If you have been invited to a meeting by someone in your organization (someone using the
same account), the meeting name appears on the list under My Scheduled Meetings on the Home tab in your Acrobat
Connect Enterprise Manager window.
45
When you join a meeting, check the date and time shown to determine whether it is in progress. (If the date is in the
past, the meeting appears on your meeting list under expired meetings.)
If your connection to the server fails, Acrobat Connect Enterprise Manager displays an error message and provides
a link to the Acrobat Connect Enterprise Manager Connection test wizard, which leads you through a series of steps
to test your connection status.
Note: If the administrator for your meeting has activated client-side certificates, the Select Certificate dialog box appears
when you attempt to enter a meeting, prompting you to select a certificate to verify your identity.
1 On the Home tab under My Scheduled Meetings, scroll to the name of the meeting that you want to attend.
Alternatively, you canclick My Scheduled Meetings in the navigation bar to display a longer list, and select the name
from there.
2 Click Enter.
The meeting room is downloaded to a browser window.
Set your connection speed
Each attendee can choose their connection speed for connecting to a meeting. Attendees should choose the
connection speed based on the type of Internet connection they have. For example, attendees who connect to the
Internet via DLS should choose DSL/Cable for their meeting connection speed. This ensures that data from the
meeting will be delivered at a speed appropriate for their system.
• Choose Meeting > My Connection Speed and choose Modem, DSL/Cable, or LAN.
Page 50

ADOBE CONNECT ENTERPRISE
User Guide
Updating existing meetings
View a meeting summary and update meeting information
For hosts, the Meeting Information page in Acrobat Connect Enterprise Manager is your starting point for viewing
and changing any information about a meeting. This page appears when you click the meeting name in the Meeting
List. The Meeting Information page displays a profile of the meeting and provides links to pages with more detailed
information that you can review or manipulate.
1 Click the Meetings tab at the top of the Acrobat Connect Enterprise Manager window.
2 If there is more than one meeting folder, navigate to the folder that contains the meeting.
3 Click the name of the meeting in the meeting list.
4 Click Edit Information.
The Meeting Information page appears. Update the information as needed.
View and modify a participant list
If you have Manage permissions for a meeting, you can view a list of all invited attendees for each meeting room.
However, if this meeting is presented as an event, you must view and manage participants in the Event Management
tab. For more information, see “Adobe Connect Events” on page 126.
46
If you are an administrator or have Manage permissions for this meeting’s folder, you can add or remove attendees
and change an attendee’s permission setting (host, presenter, or participant).
Removed attendees don’t receive any notification,and they can’t enter themeeting unless themeeting’s accesssetting
is changed to allow entry to anyone who has the meeting URL.
See also
“Creating users and groups” on page 237
View a meeting participant list
1
Click the Meetings tab at the top of the Acrobat Connect Enterprise Manager window.
2 If there is more than one meeting folder, navigate to the folder that contains the meeting.
3 Click the meeting name in the list.
The Meeting Information page appears.
4 Click the Edit Participants link on the navigation bar.
The names of invited participants and groups appear.
Add meeting participants
1
Click the Meetings tab at the top of the Acrobat Connect Enterprise Manager window.
2 If there is more than one meeting folder, navigate to the folder that contains the meeting.
3 Click the meeting name in the list.
4 In the Meeting Information page, click the Edit Participants link on the navigation bar.
Page 51

ADOBE CONNECT ENTERPRISE
5 In the Available Users And Groups list, do one of the following to select the users or groups:
• Control-click or Shift-click to select multiple users or groups.
• To expand a group to select any individual members, double-click the group name; when you finish selecting
User Guide
names, double-click Up One Level in the list to restore the original list.
• To search for a name in the list, click Search at the bottom of the window, enter the name to display it in the list,
and then select it.
6 Click Add.
The names you selected appear in the Current Participants list.
7 Foreachnewparticipantuserorgroupthatyouadded,selecttheappropriatepermissiontype(participant,host,
or presenter) from the Set User Role menu at the bottom of the Current Participants list.
The user role you assigned for this user appears next to this user’s name in the list.
8 Click a link in the navigation bar to perform the next task or return to the Edit Information page.
Remove meeting participants
1
Click the Meetings tab at the top of the Acrobat Connect Enterprise Manager window.
2 If there is more than one meeting folder, navigate to the folder that contains the meeting.
3 Click the meeting name in the list.
4 In the Meeting Information page, click the Edit Participants link on the navigation bar.
5 In the Current Participant list, do either of the following to select users or groups:
• Control-click or Shift-click to select multiple users or groups.
• To search for a name in the list, click Search at the bottom of the window, enter the name to display it in the list,
and then select it.
6 Click Remove.
47
The name no longer appears in the Current Participants list.
7 Click a link in the navigation bar to perform the next task or return to the Edit Information page.
Change a participant’s meeting permission
1
Click the Meetings tab at the top of the Acrobat Connect Enterprise Manager window.
2 If there is more than one meeting folder, navigate to the folder that contains the meeting.
3 Click the meeting name in the list.
4 In the Meeting Information page, click the Edit Participants link on the navigation bar.
5 In the Current Participantslist, do either of the following to select the usersor groups whose meeting permissions
you want to change:
• Control-click (Windows) or Command-shift (Macintosh) or Shift-click to select multiple users or groups.
• To search for a name in the list, click Search at the bottom of the window, enter the name to display it in the list,
and then select it.
6 For each name, selectthe new userrole (presenter, participant, or host)from the Set User Role menu at the bottom
of the Current Participants list.
7 Click a link in the navigation bar to perform the next task or return to the Edit Information page.
Page 52

ADOBE CONNECT ENTERPRISE
User Guide
View and manage uploaded content
You can view uploaded content at any time. You can also move uploaded content to the Content library or delete
uploaded content.
View a list of uploaded content
IfyouhaveManagepermissionsforameetingfolder,youcanviewalistofallcontentthathasbeenuploadedtothe
server from a meeting room within that folder.
1 Click the Meetings tab at the top of the Acrobat Connect Enterprise Manager window.
2 If there is more than one meeting folder, navigate to the folder that contains the meeting.
3 Click the meeting name in the list.
4 In the Meeting Information page, click the Uploaded Content link on the navigation bar.
A list of all uploaded content appears. From here, you can do any of the following:
• To see the information about a specific item in the list, click the item’s name.
• Move uploaded content to the Content library.
• Delete uploaded content.
• To determine if the content is still being used in the meeting room, view the Reference column. A Yes indicates
that it is still being used. An empty column indicates that it is not.
5 Do either of the following, as needed:
• To change the title or summary for the piece of uploaded content, click Edit, make your changes on the Edit page,
and click Save.
• To return to the uploaded content list, click Return To Uploaded Content.
48
Move uploaded content to the Content library
To move uploaded content to the Content library, you must be an administrator or a user with permissions to
manage the specific Meetings library folder that contains this meeting.
1 Click the Meetings tab at the top of the Acrobat Connect Enterprise Manager window.
2 If there is more than one meeting folder, navigate to the folder that contains the meeting.
3 Click the meeting name in the list.
4 In the Meeting Information page, click the Uploaded Content link on the navigation bar
5 Click the check box to the left of each file you want to move.
6 Click the Move To Folder button on the navigation bar.
7 Navigate to the folder location in the Content library where you want to move the content file by clicking the
folder titles or the Up One Level button.
8 Click Move.
9 Click OK.
Delete uploaded content
1
Click the Meetings tab at the top of the Acrobat Connect Enterprise Manager window.
2 If there is more than one meeting folder, navigate to the folder that contains the meeting.
Page 53

ADOBE CONNECT ENTERPRISE
User Guide
3 Click the meeting name in the list.
4 In the Meeting Information page, click the Uploaded Content link on the navigation bar.
5 Click the check box to the left of each file that you want to delete.
6 Click the Delete button above the list.
7 Click the Delete button on the confirmation page to permanently delete the selected content.
View a list of recorded meetings
If you are an administrator or have Manage permissions for ameeting folder, you can view a list of all recordings that
have been created from a meeting room.
1 Click the Meetings tab at the top of the Acrobat Connect Enterprise Manager window.
2 If there is more than one meeting folder, navigate to the folder that contains the meeting.
3 Click the meeting name in the list.
4 In the Meeting Information page, click the Recordings link on the navigation bar.
49
Navigating to the Recordings link
A list of all recordings for the meeting room appears. From here, you can do any of the following:
• To see the information about a specific item in the list, click the item’s name.
• To move this content to the Content library, see “Move meeting recordings to the Content library” on page 72.
• To delete this content, see “Delete a meeting recording” on page 72.
5 To change the title or summary of a recording, select the item and click Edit, make your changes on the Edit page,
and click Save.
Edit meeting information
If you are an administrator or a user with Manage permissions for this meeting folder, you can modify the meeting
properties on the Meeting Information page.
1 Click the Meetings tab at the top of the Acrobat Connect Enterprise Manager window.
2 If there is more than one meeting folder, navigate to the folder that contains the meeting.
3 Click the meeting name in the list.
4 In the Meeting Information page, click the Edit Information link on the navigation bar.
5 Edit the meeting information.
6 Click Save.
The Meeting Information page reappears with the new information.
Page 54

ADOBE CONNECT ENTERPRISE
User Guide
Options in the Edit Information page
Name A required field that appears in the meeting list, the meeting login page, and in reports.
Summary A meeting description that appears on the Meeting Information page, and is included in meeting invita-
tions by default. A meeting summary can be 750 characters long.
Start time The month, day, year, and time that the meeting starts.
Note: Some Acrobat Connect Professional pricing models ignore meeting start dates and allow attendees to enter
meetings before the designated start date. Depending on the meeting pricing model your organization uses, if you change
the meeting start date to a future date, participants and presenters might still be able to enter the meeting room any time
after you create the meeting. When you are logged in to a meeting room, you can stop participants from entering the
room between meetings.
Duration The meeting’s length, in hours and minutes.
Meeting Access There are two options:
• Registered users only and accepted guests With this option, the meeting room is accessible only to those who
have been invited as registered users, and to guests who are accepted into the meeting room by the host.
Registered users must enter their user name and password to enter the meeting room. Accepted guests are accepted
into the room by the host. Acrobat Connect Professional can generate an individual attendance report for each registered user in the meeting. Accepted guests are added to the total number of meeting attendees on meeting reports,
but no individual attendance report is available.
50
Note: For some Acrobat Connect Professional accounts, a host must be present in a meeting in order for attendees to
enter.
• Anyone Anyone who receives the meeting URL. Click Send E-mail Invitations to create an e-mail invitation in
your own e-mail application. The new message contains a prepopulated subject (Acrobat Connect Professional
Invitation) and a prepopulated message (containing the meeting date, time, duration, location, and summary) that
you can edit.
Audio Conference Settings Whether audio conference settings are necessary for this meeting, and if so, the
telephone number, moderator code, and participant code for the guests who are calling in.
Note: If you did not add audio conference settings when you initially created the meeting, and you want to add them
while you are in the meeting itself, you can use the preceding procedure to create them in Acrobat Connect Enterprise
Manager. In this case, however, you must first ask all users to log out of the meeting, add the telephony information, and
wait five minutes.
Update information for any items linked to this item Select this check box to update anyitems linked to the meeting
with the revised meeting information.
Send meeting invitations for an existing meeting
You can send invitations for a meeting that has already been created if you are the meeting host, an administrator, or
have Manage permissions for this meeting’s folder.
A meeting invitation is an e-mail invitation informing participants of the date, time, duration, summary, URL, and
audio conference information. You can also choose to attach a Microsoft Outlook calendar event to the e-mail
message. This enables attendees to add the meeting to their Outlook calendar.
Page 55

ADOBE CONNECT ENTERPRISE
User Guide
The way that invitations are sent depends on the type of meeting:
Registered guests If your meeting is for users only, you create a custom e-mail message from within Acrobat
Connect Enterprise Manager. You can send the e-mail invitation to all hosts, participants, and presenters; presenters
only; or participants only. You can customize the subject and message body.
51
Anyone
If your meeting is open to anyone who receives the meeting URL, click Send E-mail Invitations to create an
e-mail invitation in your own e-mail application. The new message contains a prepopulated subject (themeeting name)
and a prepopulated message (containing the meeting date, time, duration, URL, and summary) that you can edit.
Send invitations to registered guests only
1
Click the Meetings tab at the top of the Acrobat Connect Enterprise Manager window.
2 If there is more than one meeting folder, navigate to the folder that contains the meeting for which you want to
get information; for more information, see “Navigate in a library” on page 20.
3 Click the meeting name in the list.
4 In the Meeting Information page, click the Invitations link on the navigation bar.
5
From the To menu, select the group to invite: hosts, participants, and presenters; presenters only; or participants only.
6 Edit the subject and the message body as appropriate.
7 To attach an Outlook calendarevent to thee-mail, select thecheck box next toAttach Microsoft OutlookCalendar
Event (iCal) To E-mail Message; otherwise, clear the check box.
8 Click Finish.
Send invitations to a meeting open to anyone
1
Click the Meetings tab at the top of the Acrobat Connect Enterprise Manager window.
2 If there is more than one meeting folder, navigate to the folder that contains the meeting; for more information,
see “Navigate in a library” on page 20.
3 Click the meeting name in the list.
4 In the MeetingInformation page, click the Invitations link on the navigation bar. You see the Invitations page with
the meeting details.
5 Do either of the following as appropriate:
• Click Send E-Mail Invitations to automatically display a new blank message in your e-mail application.
• Manually create a new e-mail message, then copy and paste the meeting URL (shown in the meeting details) into
the message.
6 Type the e-mail addresses of the invitees or add them from your address book.
7 Edit or type, as appropriate, the e-mail subject and message.
8 Send the e-mail invitation.
Page 56

ADOBE CONNECT ENTERPRISE
User Guide
Viewing data about meetings
About the Meeting Dashboard
The Meeting Dashboard provides a graphical representation of statistical data about your meetings. To see the
Dashboard, click the Meeting Dashboard link under the tab bar, at the top of the Meetings window. The data, which
reflects all the meetings you have created,appears inthree bar graphs; clickingin anyof these brings up the Summary
Report for the meting.
Most Active Meetings Over Last 30 days Determined by the number of sessions.
Most Participant Meetings Over Last 30 Days Determined by the number of participants. This feature counts only
registered attendees; guest attendees are not included in the count. However, guest attendees are included in the data
reported in the Summary Report for each meeting.
Most Viewed Archives Over Last 30 days Determined by the number of views (that is, the number of times each
archived meeting has been viewed).
The bar graphs appear within the Acrobat Connect Enterprise Manager Meetings tab. However, you can also export
the Dashboard to a browser window to print. To do this, click the Printable Version button on the left, above the
display.
52
Meeting reports
The Reports feature of Connect Enterprise Manager lets you create reports that show you a given meeting from
different perspectives. To use this feature, open the Meeting Information page and then click the Reports link above
the Meeting Information title bar. This displays links that let you define the following information that you can see
for this meeting:
Summary The firstreport type that appears when you access the Reports feature. TheSummary showsyou aggregate
meeting information, which includes: name; viewing URL; Unique Sessions (a single instance in which a given user
has joined and exited the meeting); the last time that any invitee entered the meeting room (Most Recent Session);
number of people invited; number of those who attended; and the greatest number of people who entered the room
at any one time (Peak Users).
By Attendees Lists the name and e-mail address of each meeting participant, as well as the time they entered the
meeting and the time they left it.
By Sessions Lists the start and end time of each session, the session number, and the number of attendees. Clicking
on the session number displays the participant list for this session, including participant name and entry and exist
times for each participant.
By Questions Lists each poll by session number, number, and question. You can drill down to two separate views by
clicking the appropriate link under the Report column:
• “View answer distribution” displays a pie chart in which each answer is color-coded with a unique color.
• “View user responses” provides an answer key that lists each answer for this poll and its corresponding answer
number; these numbers map to the pie chart. This option also shows a list of all the participants who responded
in this poll and the number of the answer they selected (if the poll question allowed multiple responses, these are
all shown for the user).
Page 57

ADOBE CONNECT ENTERPRISE
User Guide
Sharing content during a meeting
Sharing a computer screen, document, or whiteboard
Hosts and presenters can share a variety of content with participants in a meeting.
Hosts and presenters use the Share pod to display content to attendees, such as the following:
• Selected items on your computer screen, including one or more open windows, one or more open applications, or
the entire desktop. See “Share your screen or control of your screen” on page 53.
• A document, such as a presentation, an FLV file, a JPEG, or other file format. See “Share a document” on page 57.
• A whiteboard with a variety of writing and drawing tools. You can share a stand-alone whiteboard, or a whiteboard
overlay that appears on top of other shared content. See “Share a whiteboard” on page 58.
Documents shared in the Share pod can be viewed but not downloaded by attendees. In order to enable attendees
to download documents, a host or presenter must upload the documents to the File Share pod.
When you share content in the Share pod, attendees see your pointer move in the Share pod window. All activities
you perform in shared window, application, or document are visible to attendees.
Presenters and hosts must install the Add-in the first time they attempt to upload content or share a screen. The
Add-in is a special version of Flash Player with additional features for hosts and presenters. The Add-in provides
support for uploading files to the server and sharing screens during a meeting. It also provides additional audio
support.
53
Note: Ifyouhaveapop-upblockerenabledinyourbrowser,thedialogboxfordownloadingtheAdd-inwillnotappear.
To correct this problem, temporarily disable the pop-up blocker.
For more information on screen sharing, see
Note: In a meeting, choose Help > Quick Start to view short demos about sharing content.
Screen Sharing Best Practices.
Uploading a document
To enable attendees to download a document, a host or presenter uploads the document to the File Share pod. Hosts
and presenterscan upload files from theircomputer or from the Content library. Meeting participants cannot upload
files; however, the host can change a participant’s role or rights to allow uploading of files. See “Upload and manage
files using the File Share pod” on page 61.
Share your screen or control of your screen
As a host or presenter in a meeting, you can share windows, applications, or your entire desktop with participants in
a meeting.
When you share anything on your computer screen, actions you take in the shared region are visible to all participants in the meeting. Your viewers follow the progress of your pointer as you move it across your screen.
TheregionorregionsthatyousharemustbevisibleonyourdesktopinordertobevisibleintheSharepodtoother
participants. Overlapping windows on the desktop appear as a blue cross-hatched pattern in the Share pod.
You can also display a whiteboard over a shared screen to enable attendees to add annotations.
Note: When you share a screen with participants who use the Macintosh OSX operating system, a system error
sometimes enables those participants to view the Presenter only area, even though they do not have Presenter status.
Page 58

ADOBE CONNECT ENTERPRISE
User Guide
See also
“Share a whiteboard” on page 58
Share your computer screen
1
With a blank Share pod open in a meeting, do one of the following:
• Click the My Computer Screen button in the middle of a blank Share pod.
• Click the Share button on the Share pod control strip, and select My Computer Screen from the pop-up menu.
The Start Screen Sharing window appears.
2 Do one of the following:
• Select Desktop to share your entire desktop. If you have more than one monitor connected to your computer, a
desktop appears for each monitor. Choose the desktop that you want to share.
• SelectWindowstoshareoneormorewindowsthatareopenonyourcomputer.Choosethewindoworwindows
that you want to share.
• Select Applications to share an application and all its related windows that are open on your computer. Choose the
application or applications that you want to share.
3 Click the Share button at the bottom of the Start Sharing window to begin sharing.
54
Share control of your screen with another presenter
Whilescreensharing,youcanpasscontroloftheshareddesktop,window,orapplicationtoanotherpresenter.The
presenter must request control before you can hand over your shared screen to them.
1 Start sharing your computer screen in a meeting.
When another presenter requests control of your screen, you see a request message in the upper-right corner of the
meeting room window.
2 Do one of the following:
• Click Accept to grant control of your screen to the requesting participant.
• Click Decline to deny control of your screen to the participant.
Request control of a shared screen from another presenter
❖ Click the Request Control button on the Share pod control strip.
If the request is accepted, a message informs you that you have been granted control of the screen. The Request
Control button becomes a Release Control button. You can now take control of the shared screen.
Release control of a shared screen
❖ Click the Release Control button on the Share pod control strip to return control of the shared screen to the
original presenter.
Preview your shared screen in the meeting room
When sharing an application, window, or desktop on your computer, you can select the Preview option to show the
same view that participants see in their Share pod.
❖ Click the Pod Options button of the Share pod and select Preview In Pod While Screen Sharing, or click the
Preview button (the eyeglasses icon).
Page 59

ADOBE CONNECT ENTERPRISE
User Guide
Share content in the Share pod
The Sharepod controls lethosts and presenters share content in various ways. You can display the pod at Full Screen
size to make contents larger. You can enable attendees to toggle between Full Screen and Normal display size. You
can choose to display changes in the presenter’s pod to all attendees, so that the presenter can control the pod size
for viewers. You can share content that is already loaded into the meeting room but is not currentlydisplayed. When
content is displayed in the Share pod, you can use a pointer to call attention to particular areas.
Change the content displayed in a Share pod
1
Click the Share button on the Share pod control strip.
2 Select My Computer Screen, Documents, or Whiteboard and select the item you want to share from the submenu.
Display and enable the Full Screen mode
1
To display the Share pod at full screen size, click the Full Screen button in the Share pod control strip. Click the
button again to return to normal display size.
2 To change the attendees’ Share pod display size when you change your own, click the triangle next to the Full
Screen button and select Enable Full Screen Toggle For Participants. (When this option is turned off, attendees
control the size of their own Share pods.)
Note: When you enable full screen mode, use Alt + Tab to go to the window that you want to share.
55
Display changes in the presenter’s pod to all participants
❖ Click the triangle next to the Full Screen button and select Presenter’s Changes Affect Everybody from the
submenu.
Turn off sharing but keep the Share pod open
❖ Click Stop Sharing on the Share pod control strip.
Redisplay Share pod content that has been closed
❖ Do one of the following:
• Select Share > Documentsor Share >Whiteboard from the control strip at the bottom of the Sharepod, andselect
the shared document or whiteboard by name from the submenu.
• Select Pods > Share and select the Share pod by name from the submenu.
Use a pointer in a Share pod
❖ Do one of the following:
• Click the Pointer button on the Share pod control strip.
• Choose Show Pointer from the Share pod options menu.
Share presentations in the Share pod
For hosts or presenters who share a presentation in the Share pod, special controls are available for navigating and
displaying the presentation. A presentation layout has the following areas:
Presentation The main part of the window, which displays the presentation slides.
Page 60

ADOBE CONNECT ENTERPRISE
User Guide
Presentation sidebar Anareaontherightside(defaultlocation)ofthebrowserwindowthatshowsthenameofthe
presentation, the presenter information, and the Outline, Thumb, Notes, and Search tabs (if the tabs were including
when the Presentation was created).
Presentation toolbar A control bar at the bottom of the presentation that gives you control over the presentation
playback, audio, attachments, and screen size. Thisis visible to hostsonly, unless a hostchooses to display it to participants.
Use the presentation Outline tab
Most presentations have an Outline tab on the sidebar. The Outline tab lists the title and duration of each slide. You
can use the Outline tab to display information and to move to a specific slide in the presentation. The current slide
is highlighted with a glow color, which you can change in the theme. You can choose to display the highlight outline
to all attendees or to hosts and presenters only.
1 Click the Outline tab in the sidebar at the right.
2 To move to a slide in the presentation, click its title in the Outline tab.
3 To show the slide title, move the pointer over the title.
Use the Presentation Thumb tab
PresentationscanhaveaThumbtabonthesidebar.TheThumbtabshowsasmallpictureofeachslide,theslidetitle,
and the slide duration. The current slide is highlighted with a glow color, which you can change in the theme. You
can use the Thumb tab to see the contents each slide quickly and to move to a specific slide in the presentation.
56
Note: If you upload your presentations directly from your computer and into a meeting, the Thumb tab is not displayed.
Adobe recommends adding presentations to a meeting from the Content library.
1 Click the Thumb tab in the sidebar at the right.
2 To move to a slide, click its title in the Thumb tab.
3 To show the slide title, move the pointer over the title.
View Presentation slide notes
When creating a presentation in PowerPoint, you can enter notes for individual slides. If any slide notes exist, they
can be displayed in the presentation. Slide notes appear on the right side of the presentation window. You cannot
change the size of the slide Notes tab.
❖ Click the Notes tab in the sidebar on the right side.
The complete notes text is displayed. The text is unformatted and cannot be edited directly on the tab.
Search for text in a presentation
1
Click the Search tab in the sidebar on the right side.
2 Type the text to search for directly into the text box.
3 Click the Search button.
Search results are displayed below the text box. Click any slide title in the results list to display that slide.
Page 61

ADOBE CONNECT ENTERPRISE
User Guide
Presentation toolbar options
You can control the presentation appearance and playback by using the toolbar located at the bottom of the presentation.
Play/Pause button Pauses and resumes play of the current slide.
Back button Moves to the previous slide in the presentation.
Forward button Moves to the next slide in the presentation.
Slide progress bar Showsandcontrolstheplaybacklocationwithinthecurrentslide.Thepositionmarkermovesas
the slide plays. You can drag the marker arrow forward or back in the current slide to change your playback location.
You can also click a specific location on the progress bar to move the slide marker position and slide playback there.
Current slide number Showsthe number of thecurrently displayed slide and the total number ofslides (for example,
slide 2 of 10).
Status Shows the status of the current slide, such as Playing, Stopped, No audio, or Presentation complete.
Time Shows the current slide time and the total slide time as the slide plays (for example, 00.02/00.05).
Audio volume Shows the volume level that is set for the slide.
Attachments Displays a small window showing any attachments (for example, documents, spreadsheets, images,
URLs) that have been added.
57
Show/Hide sidebar Shows or hides the sidebar.
Share a document
A host or presenter can share documents that have been uploaded to the Content library, or share documents directly
from your computer.
If you turn off sharing, change the content in a Share pod, or close the Share pod, the document is still part of the
meeting room andcan be displayed again. If you delete aShare pod, the document is deleted from themeeting room.
(If you uploaded it to the Content library previously, it is still available there.) To edit a shared document, you must
edit the source document and reload it into the meeting.
Share documents from the Content library
A host or presenter can load presentations, SWF files, JPEG files, MP3 files, or FLV files from the Content library on
the server into a Share pod in a meeting. In the Content library, you can select documents from a shared content
folder or from a user folder, either your own or another user’s. The Content library is available in the Acrobat
Connect Enterprise Manager application. (To access a user folder other than your own,the user must grant you View
permission).
If you share a presentation, the Share pod displays controls for navigating the presentation.
Note: You create presentations from PowerPoint presentations, using Adobe Presenter. Acrobat Connect Professional
does not support progressive-scan JPEG files.
1 Do one of the following:
• In the Share pod, click the Documents button.
• Select Pods > Share from the menu bar.
• Select Share > Documents from the control strip at the bottom of the Share pod.
2 Click Select From Content Library on the pop-up menu.
Page 62

ADOBE CONNECT ENTERPRISE
User Guide
The Browse Content window appears.
3 Select one of the following:
• SharedContentdisplaysuploadedcontentthatisavailabletoallaccountholderswiththeappropriatepermissions.
• User Content displays uploaded content in individual user folders. To view the content in another user’s folder,
you must have View permission from that user.
• My Content displays the uploaded content in your user folder.
• Uploaded Content displays the content that has been uploaded for the current meeting.
4 Select the document that you want to share, and click Open.
The selected document appears in the Share pod. The document name appears in the title bar of the pod.
Share documents from your computer
You can load PPT, SWF, JPEG, MP3, or FLV files from your computer into a Share pod. The files are uploaded to the
server. PPT files are converted to presentations.
1 Do one of the following:
• In the Share pod, click the Documents button.
• Select Pods > Share from the menu bar.
• Click Share on the control strip at the bottom of the pod.
2 Click Select From My Computer on the pop-up menu.
58
A Browse Content dialog box appears.
3 Select the document that you want to share and click Open.
The selected document appears in the Share pod. The document name appears in the title bar of the pod.
The document is added to the Uploaded Content folder associated with the meeting room in Acrobat Connect
Enterprise Manager. An Acrobat Connect Enterprise Manager administrator can move the document to the Shared
Content folder in the Content library to make the document available for other meetings. For more information on
using the Content library, see “About library permissions” on page 14.
Turn off display synchronization for multiframe documents
By default, Acrobat Connect Professional synchronizes display of multiframe documents so that attendees see the
framethatthepresentersees.AhostorpresentercanusetheSyncbuttontoturnoffsynchronizationsothatviewers
can move through presentations or Flash Paper documents at their own pace.
Note: The Sync button appears only when you have multiframe content loaded in the Share pod.
❖ In the Share pod window, with content loaded, click the Sync button (Sync is on by default). Controls for presen-
tation playback appear at the right of the Share pod.
Click the Sync button again to turn off synchronization and allow participants to advance through presentations at
their own pace.
Share a whiteboard
A host or presenter can use a whiteboard to create collaborative text, drawings, and other annotations in a meeting.
Page 63

ADOBE CONNECT ENTERPRISE
User Guide
Create and display a whiteboard
A whiteboard allows hosts or presenters to create text, lines, circles, squares, and other free-hand drawings in real
time during a meeting.
You can use a whiteboard in two different ways in a Share pod:
• A stand-alone whiteboard allows presenters to create content on a white background.
• An overlay whiteboard allows presenters to create content over an existing document in a Share pod, adding
annotations to and drawing on the document. You can lay a whiteboard over presentations, JPG, SWF, FLV, and
FlashPaper documents.
If you turn off sharing, change the content in a Share pod, or close the Share pod, the whiteboard is still part of the
meeting room and can be displayed again. If you delete a Share pod, the whiteboard is deleted.
59
CBA D E
Whiteboard overlay
A. Annotation added using the Pencil tool B. Pointer C. Show/Hide whiteboard overlay D. Whiteboard tool options E. Show/Hide white-
board tools
Create a stand-alone whiteboard in a blank Share pod
1
Do one of the following:
• In the Share pod, click the Whiteboard button.
• Select Pods > Share.
• Click Share on the control strip at the bottom of the Share pod.
2 Select New Whiteboard in the pop-up menu.
A blank whiteboard appears in the pod.
Add an overlay whiteboard over a document or a shared screen in a Share pod
❖ With the document displayed in a Share pod, do one of the following:
• Click the Whiteboard button in the Share pod control strip.
• Click the Pod Options button the lower-right corner of the Share pod, and select Whiteboard Overlay.
Page 64

ADOBE CONNECT ENTERPRISE
• In the upper-right corner of the window of the application you are sharing, click the arrow next to the red Stop
User Guide
Sharing button and select Pause and Annotate.
• If you are sharing your entire desktop, click the Acrobat Connect Add-in icon in the system tray (Windows)
or icon bar (Macintosh) and select Pause and Annotate.
Display an existing whiteboard
1
Do one of the following:
• Select Pods > Share from the menu bar at the top of the Stage.
• Select Share > Whiteboards from the control strip.
2 Select the name of the whiteboard that you would like to display on the Stage.
Clear a whiteboard
❖ Press Control+D or press the Clear button .
Navigate between multiple whiteboard pages
A standalone whiteboard is composed of multiple pages. If you need to present multiple whiteboard pages during a
meeting, you can use the forward and back arrow buttons to move between pages.
60
1 Click the Whiteboard Toolbar button.
The page number and next and previous buttons appear in the toolbar.
2 Do one of the following:
• Click the right-pointing arrow to display the next page.
• Click the left-pointing arrow to display the previous page.
Whiteboard drawing tools
The following tools are available to create text and drawings on the whiteboard:
Selection tool Selects a shape or area of the whiteboard. Click a shape to select it. Drag on the whiteboard or
contenttocreateaselectionrectanglethatselectsalltheshapeswithintherectangle.Theselectionrectanglehaseight
control points for resizing theselected shape orshapes. Shift-drag acorner controlpoint to maintain the aspect ratio
when you resize. Select and drag a shape to move it. To add a shape to the selection, Shift-click the shape.
Pencil tool Creates a free-form line. You can customize stroke color and stroke weight by using the color picker
and stroke weight pop-up menu at the lower part of the Whiteboard pod.
Marker tool Creates a free-form thick marker line. You can customize stroke color and stroke weight by using
the color picker and stroke weight pop-up menu at the lower part of the Whiteboard pod.
Line tool Draws a straight line between two points. You can customize stroke color and stroke weight by using
thecolorpickerandlinewidthpop-upmenuatthelowerpartoftheWhiteboardpod.Youcancreatearrowsbyusing
the arrow buttons at the lowerpart of theWhiteboard pod. Holding down the Shift key while drawingmakes the line
snap every 45 degrees.
Rectangle tool Creates square and rectangle shapes. You can customize stroke color, fill color, and stroke weight
by using the color picker and the stroke weight pop-up menu. You can use No Fill as a setting for stroke color and
fillcolor;however,youcannotuseNoFillforbothstrokecolorandfillcolor.Dragtoexpandtheshape.Holddown
the Shift key while drawing to make the rectangle a square.
Page 65

ADOBE CONNECT ENTERPRISE
User Guide
Ellipse tool Creates circle and ellipse shapes. Youcan customizestroke color, fill color, and stroke weightby using
thecolorpickerandstrokeweightpop-upmenu.Dragtoexpandtheshape.HolddowntheShiftkeywhiledrawing
to make the ellipse a circle.
Text tool Creates a floating multiline text field. You can customize fill color, font face, and font size by using the
color picker, font pop-up menu, and font size pop-up menu. Drag to create a text area where you can type.
Stamper tool LeavesaCheckmark,Arrow,Star,orCrossonthescreen.Acheckmarkisthedefaultstamp.You
can change the stamp image by clicking the arrow, star, and carat buttons. You can customize image color and shape
size by using the color picker and size pop-up menu. If your company has a licensed Connect Enterprise account,
youcanuseacustomimageforthestamp.SeeCustomwhiteboardstampsintheAdobeConnectEnterpriseServer
6 Installation and Configuration Guide.
Undo Undoes the previous action. You can undo the following actions: drawing a shape, moving a shape,
resizing a shape, clearing the whiteboard, and changing a shape’s property. There is no limit to the number of times
that you can perform this operation in the pod.
Redo Repeats the previous action.
Clear Deletes everything on the whiteboard.
Print Prints the contents of a whiteboard.
61
Change the Share pod size when viewing content
Content displayed in the Share pod by a host or presenter appears to all meeting attendees. Participants can switch
the Share pod size between full-screen and original size when a host enables this feature.
Change the Share pod size when viewing content
❖ In the Share pod, click the Full Screen button. Click it again to restore the Share pod to the original size.
Upload and manage files using the File Share pod
Hosts and presenters can upload files to share with meeting attendees either from their computers or from the
Content library. Meeting participants cannot upload files; however, the host can change the participants’ status to
allow them to upload files.Participants who wantto upload files shouldrequest the host to change their attendee role
or to grant enhanced rights for the File Share pod.
Upload a file from the Content library
1
Click Upload File.
2 Click Add From Content Library.
3 Navigate to the folder that contains the file.
4 Select the file and click Open.
The filename appears in the File Share pod.
Upload a file from your computer
1
Click Upload File.
2 Click Add From My Computer.
A Browse Content window appears.
3 Navigate to the folder that contains the file.
Page 66

ADOBE CONNECT ENTERPRISE
4 Select the file and click Open.
The filename appears in the File Share pod.
Download a file
Meeting attendees can download files from the File Share pod to their computers.
1 In the File Share pod, select the file to download.
2 Select Save to My Computer.
A browser window opens, with the Save to My Computer dialog box.
3 Click the Click to Download button.
4 Navigate to the desired location.
5 Click Save.
Rename a file
This operation changes only the label that appears in the File Share pod; it doesn’t change the actual filename.
1 In the File Share pod, select the file that you want to rename.
2 In the lower-right corner, click the Pod Options button.
3 From the pop-up menu, select Rename Selected.
4 Type the new name in the Name text box and click OK.
User Guide
62
Remove a file
1
In the File Share pod, select the file that you want to remove.
2 In the lower-right corner, click the Pod Options button.
3 From the pop-up menu, select Remove Selected.
The filename disappears from the list of files.
Display web pages to attendees
During meetings,hosts or presenters maywant participants to viewwebsites. You can usethe Web Links pod to force
attendees’ browsers to open a designated URL.
Add a new web link
1
Click the Pod Options button in the lower-right corner.
2 Select Add Link.
3 Type the URL name and URL path in the text boxes.
4 Click OK.
The URL name appears in the Web Links pod.
Display a web link to all attendees
1
Select a link in the Web Links pod, or enter a URL in the Browse To text box.
2 Click Browse To.
Meeting participants browse to the link.
Page 67
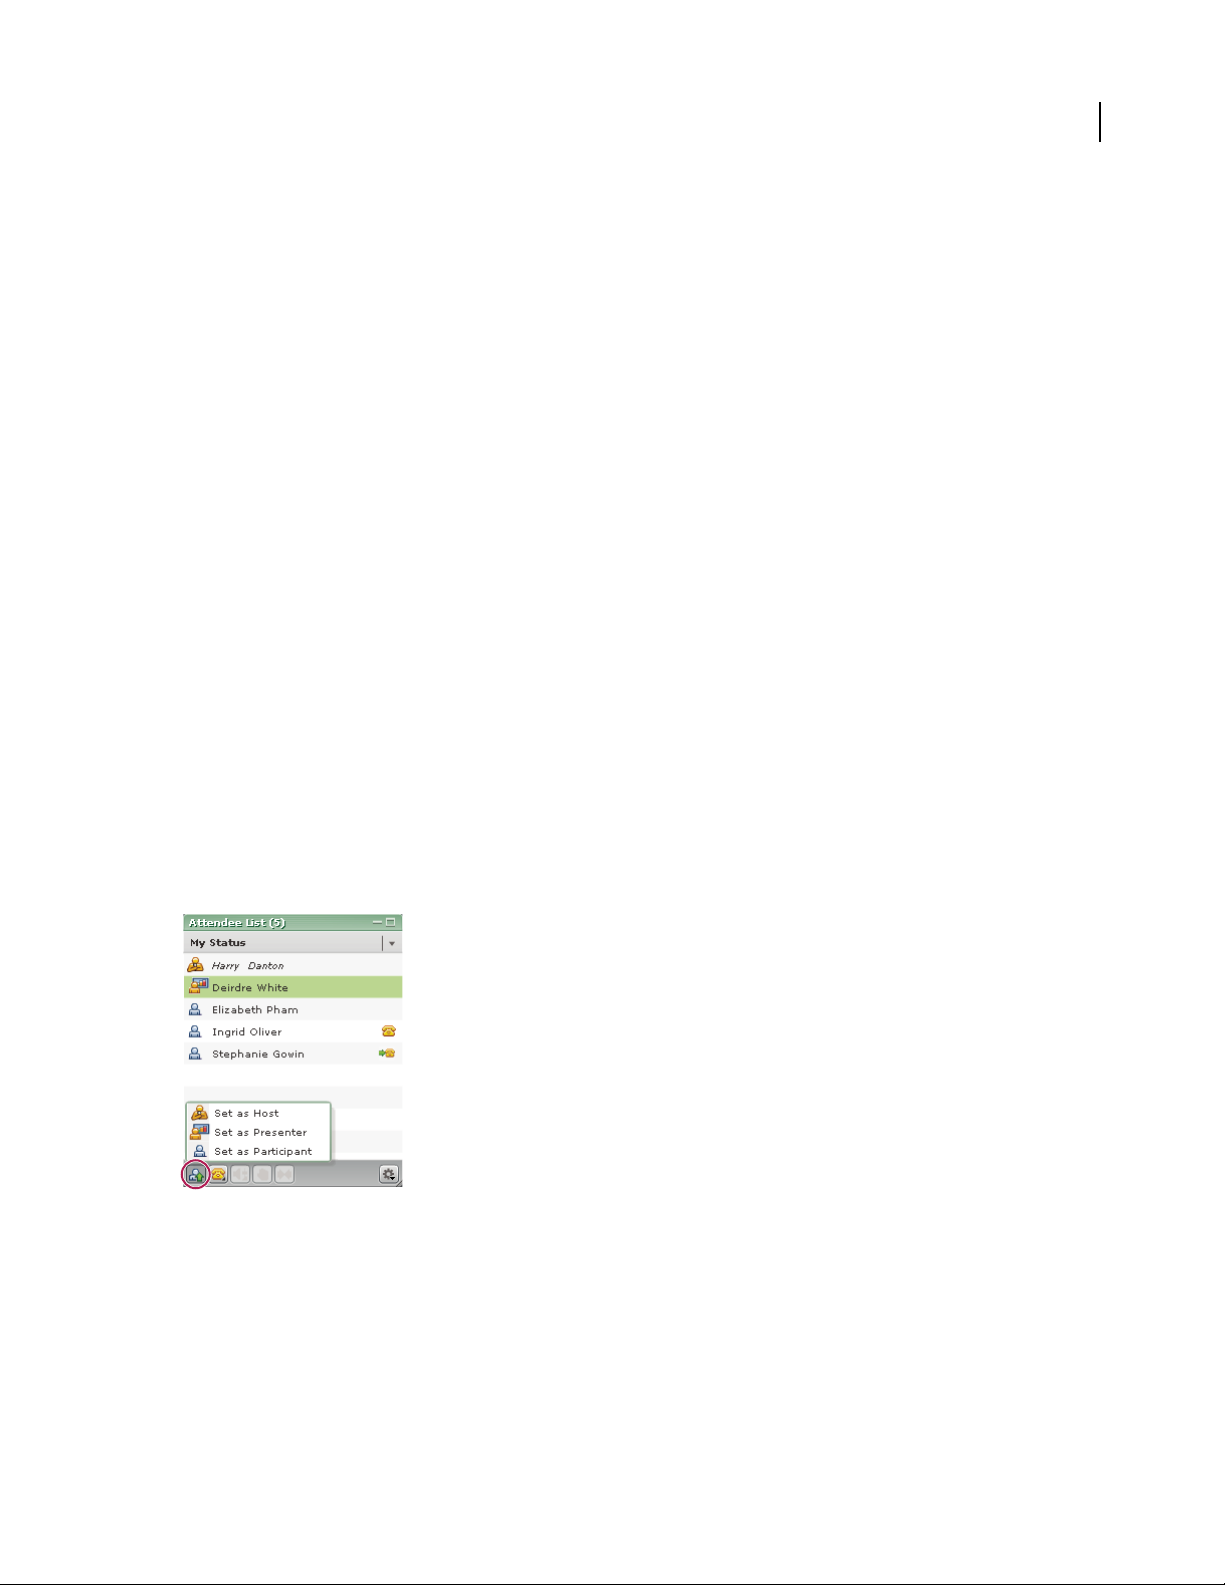
Rename a web link
1
Select a URL name in the Web Links pod.
2 Click the Pod Options button in the lower-right corner.
3 Select Rename Selected Link from the pop-up menu.
4 Type the new name in the URL Name text box.
5 Click OK.
The new URL name appears in the Web Links pod.
Remove a web link
1
Select a link in the Web Links pod.
2 Click the Pod Options button in the lower-right corner.
3 Select Remove Selected from the pop-up menu.
The link disappears from the Web Links pod.
Managing attendees
ADOBE CONNECT ENTERPRISE
User Guide
63
About the Attendee List pod
From the Attendee List pod, attendees can quickly see who is logged in to a meeting and monitor everyone’s name,
role, and status. You can also communicate with the presenter by displaying your participant status next to your
name.
If audio conference calling isenabled, youcan view your conference call status, dial out to yourself to enter the phone
conference, and mute your phone connection. A host can manage meeting attendance and participants’ rights.
Using the Attendee List pod to monitor names, roles, and conference call status
See also
“About audio in meetings” on page 31
“Using audio conferencing in a meeting” on page 66
Page 68

ADOBE CONNECT ENTERPRISE
User Guide
About attendee names
Adobe Acrobat Connect Professional users who logged in with a password are listed by their full name in the
Attendee List pod, as it is registered in Acrobat Connect Enterprise Manager. If an attendee is logged in to a meeting
as a guest, the name in the Attendee List pod is the name that the guest entered at login.
Within a role group, attendee names are organized alphabetically.
Change attendee status
By default,participant status is blank. However, participants can changetheir ownstatus. When a participant selects
a status, an icon appears to the right of the participant’s name. Participants can clear their status at any time during
a meeting. When you have responded to a message and want to clear the participant status, select Clear User Status
from the Attendee List Pod Options menu.
The following table lists the status settings and icons.
Attendee status Icon
I have a question
Go faster
64
Go slower
Speak louder
Speak softer
Thumbs up
Thumbs down
Stepped away
Change your status
1
Click the My Status bar in the Attendee List pod.
A pop-up menu appears with a list of the available status settings.
2 Select the status that you want to show to the presenters.
Clear a participant’s status (host and presenter)
1
Select a participant’s name.
2 Click the Pod Options button in the lower-right corner of the Attendee List pod.
3 Select the Clear User Status option.
View connection status
A group of bars, similar to the bars indicating signal strength on a cell phone, appear next to an attendee’s name in
the Attendee List pod to indicate an attendee’s connection status.
Page 69

ADOBE CONNECT ENTERPRISE
User Guide
When the attendee’s connection falls below the current meeting room bandwidth, the number of bars in the icon
decreases. Ahost can configure the network connection status indicators to be onor off at any time during ameeting.
1 Click the Pod Options button in the lower-right corner of the Attendee List pod.
2 Select Show Connection Status from the pop-up menu.
If you are a host, you can select Show Connection Status in the pod menu. The network connection status is enabled,
and network connection statusis shownfor allattendees in your meeting. If the optionis notselected, the connection
status indicators are hidden for users in your meeting.
View or change an attendee’s role
AhostcanchangetheroleofanyattendeeintheAttendeeListpod,promotinganddemotingattendeesasnecessary.
As a host, you can also change your own role. You can demote yourself to a presenter or participant role, so that you
can see what attendees with other roles are seeing in the meeting room. Although you can demote yourself in the
Attendee List pod, you cannot promote yourself there; instead, you must use the Present menu.
View information about an attendee
❖ Move the pointer over each name to view the attendee’s full name, meeting role, audio conference status,
connection status, and enhanced rights.
65
Change an attendee’s role
1
In the Attendee List pod, select the name of the attendee whose role you want to change.
2 Click Set User Role in the lower-left corner of the Attendee List pod.
3 From the pop-up menu, select the role to give to the selected attendee: Participant, Presenter, or Host.
Theiconoftheattendeechangesonallattendees’screensandattendeenamesarere-sortedinthelistaccordingtorole.
Change your own role
1
If you are a host, in the menu bar at the top of the meeting room window, click Present.
2 Select one of the following:
• Make Me a Participant.
• Make Me a Presenter.
• Make Me a Host.
Your role icon changes on all attendees’ screens.
Remove a participant from a meeting
A host can remove a participant from a meeting.
1 In the Attendee List pod, select the name of the participant to remove.
2 Click the Pod Options button in the lower-right corner of the Attendee List pod.
A pop-up menu appears with a list of the available pod options.
3 Select Remove Selected User from the pop-up menu.
Page 70

ADOBE CONNECT ENTERPRISE
User Guide
See also
“Managing the Adobe Connect Enterprise Account” on page 217
Assigning enhanced participant rights
A host can change the rights of a participant to give the participant control over selected pods. This is a way of
enhancing a participant’s rights without promoting the participant to be a presenter. To change rights for multiple
participants
1 Select the name of a participant from the Attendee List pod. To change the rights for multiple participants, select
multiple names.
2 Click the Pod Options button in the Attendee List pod.
3 Select Change Enhanced Participant Rights.
4 In the dialog box, select the pods that you want the participant to control.
5 Click OK.
The user has full functionality for all instances of the selected pod types.
66
Using audio conferencing in a meeting
Start or stop an audio conference call
In order to use the Acrobat Connect Professional audio conference calling features, the meeting creator must have
an account with an audio conference bridge installed. For more information about audio conference bridge availability with your account, contact your account administrator.
If you have an audio conference bridge installed, you must enter information forthe audio conference, such as call-in
number and participant code, either when you create the meeting, or when you edit the meeting information. If you
have an audio conference bridge and you want the conference call to be integrated with the meeting, you can select
the option on the Meeting Information page labeled Select My (service name) Audio Conference with this Meeting.
You can save your audio conference call information, such as moderator code, client id, and password, in Acrobat
Connect Enterprise Manager under My Profile > Edit My Preferences.
In a meeting, you initialize the conference call connection to the audio bridge by selecting Start Audio Conference
in the Attendee List pod. Once the phone conference is initialized, you can dial out to yourself from the Attendee
List pod or dial in. Stop Audio Conference disconnects everyone in the meeting and ends the call.
Once an audio conference is started, a dialog box appears to all attendees, inviting them to join the teleconference.
Start an audio conference
1
Click the Phone Conference Options button at the bottom of the Attendee List pod.
2 Select Start Audio Conference from the pop-up menu. When the audio conference begins, the dial-in number or
numbers appear at the right side of the meeting window.
Stop an audio conference
1
Click the Phone Conference Options button at the bottom of the Attendee List pod.
2 Select Stop Audio Conference from the pop-up menu.
Page 71

ADOBE CONNECT ENTERPRISE
User Guide
Include attendees in an audio conference call
Acrobat Connect Professional gives hosts several options for dialing out to include participants in an audio
conference call. You can dial out to a registered participant by using the telephone number stored in his or her profile
or by entering a new telephone number. To includean unregistered participant in theaudio conference call only, you
can enter a new name and number to dial. You can create an offline entry to dial later and a list of offline entries to
dial all at once. And you can hang up on selected attendees.
Acrobat Connect Professional provides audio announcements when an attendee enters or departs from a meeting,
when a meeting is ended, and when a meeting is extended.
Call out to a new telephone user
1
Click the Phone Conference Options button at the bottom of the Attendee List pod.
2 Select Call New Telephone User from the pop-up menu.
The Call New Telephone User dialog box appears.
3 Enter the participant’s name and telephone number.
4 Select Call Now to call the participant immediately.
TheattendeeiscalledonthephoneandtheCallinProgressicon isdisplayedtotherightoftheattendee’sname.
67
Create a list of participants to call later
1
Click the Phone Conference Options button at the bottom of the Attendee List pod.
2 Select Call New Telephone User from the pop-up menu.
The Call New Telephone User dialog box appears.
3 Enter the participant’s name and telephone number.
4 Select Call Later.
The participant is added to the Attendee List pod as an offline attendee (gray participant icon with no phone icon).
Call out to a participant who is logged in to Acrobat Connect Professional
1
In the Attendee List pod, select the name of the participant to add to the audio conference.
2 Select Call Selected User from the pop-up menu.
The Call Out dialog box appears. You can either enter a new phone number or select a number from the list of
numbers associated with the participant.
3 Click Call.
The participant is called on the telephone.
Call out to several listings at the same time
1
In the Attendee List pod, select the names of the attendees to add to the audio conference.
2 Select Call Selected User from the pop-up menu.
All the selected participants are called.
About audio conference status
If ahost enables audio conferencing in a meeting and an attendee calls in or is called, an audio conference status icon
appears next to the attendee’s name.
Page 72

ADOBE CONNECT ENTERPRISE
User Guide
When an attendee dials in or a host dials out, a conference call status icon appears to the right of the attendee’s name,
so that you can quickly see the status of the attendee’s conference call.
Attendee status Icon
On the phone
Talking
Dialing in progress
On hold
Muted
Use Mute, Volume, and On Hold controls
FromtheAttendeeListpod,ahostcancontrolanattendee’svolume,mutetheconnection,andplacetheuseronhold.
Control the volume
1
In the Attendee List pod, select the participant’s name.
2 Click the Volume button (Speaker icon).
3 Slide the indicator up or down to increase or decrease the volume.
68
Mute a participant
1
In the Attendee List pod, select the participant’s name.
2 Click the Volume button (Speaker icon).
3 Click the Mute button (No Speaker icon).
The other attendees cannot hear the participant.
Place a participant on hold
1
In the Attendee List pod, select the participant’s name.
2 Click the Hold button (Hand icon).
The participant cannot be heard and cannot hear the audio segment of the meeting.
Merge two listings for the same caller in a conference call
If an attendee logs into a meeting and is then called into an audio conference, the two entries are automatically
merged and only one name appears for the user. But if the attendee’s phone number is not recognized, the attendee
may appear twice on the list, once under Acrobat Connect Professional with a name and once under Unknown Dial
In without a name. If a host knows that an attendee is listed twice, the host can use the Merge Caller ID feature to
combine the listings into one.
1 In the Attendee List pod, select the name of an Acrobat Connect Professional attendee.
2 Control-click the name of an Unknown Dial In attendee.
3 Click the Merge User button in the lower part of the pod.
Page 73

ADOBE CONNECT ENTERPRISE
The two listings merge into one under the Acrobat Connect Professional users group.
Note: For audio conference features to function in your meeting, the conference adapter must be enabled.
User Guide
Join a conference call or mute your phone
Once an audio conference is started in a meeting that you are attending, a dialog box appears inviting you to join.
The dialog box enables you to enter your telephone number so that Acrobat Connect Professional can dial the
number and add you to the conference.
If the meeting you are joining has multiple dial-in numbers (such as a meeting with international attendees which
offers a local dial-in number for each country) you can view a list of the dial-in numbers. This list appears automatically during the first five seconds after you log into the meeting. You can also choose to view the list at any time
while you are logged in.
You can also mute your connection so that you can listen to the conference call but cannot be heard.
Join the audio conference call
1
In the Join Audio Conference dialog box, enter your telephone number. If the Join Audio Conference dialog box
is not visible, choose Show Teleconference Info.
2 Click Call My Phone.
69
You can also select Call My Phone from the My Status menu.
View the list of multiple dial-in numbers during a meeting
❖ Hover over the telephone icon in the upper right corner of the meeting room.
Use the Mute Me button
1
Click the My Status button in the upper-right corner of the pod.
2 Select Mute Me from the pop-up menu.
You cannot be heard, but you can hear the speaker.
Recording and playing back meetings
About meeting recordings
Ahostcanrecordameetingroomsessionincasesomeparticipantsmisseditorwanttoreplayit.Whenplayedback,
the recording shows exactly what the attendees saw and heard during the meeting. A host or presenter can create a
reference archive of meetings and make the recordings available to attendees.
The meeting recording is assigned a URL and added to the Recordings page associated with the meeting room in
AcrobatConnect Enterprise Manager.Toplay arecording, you need anInternet connection, the recording URL, and
permission to view it.
Page 74
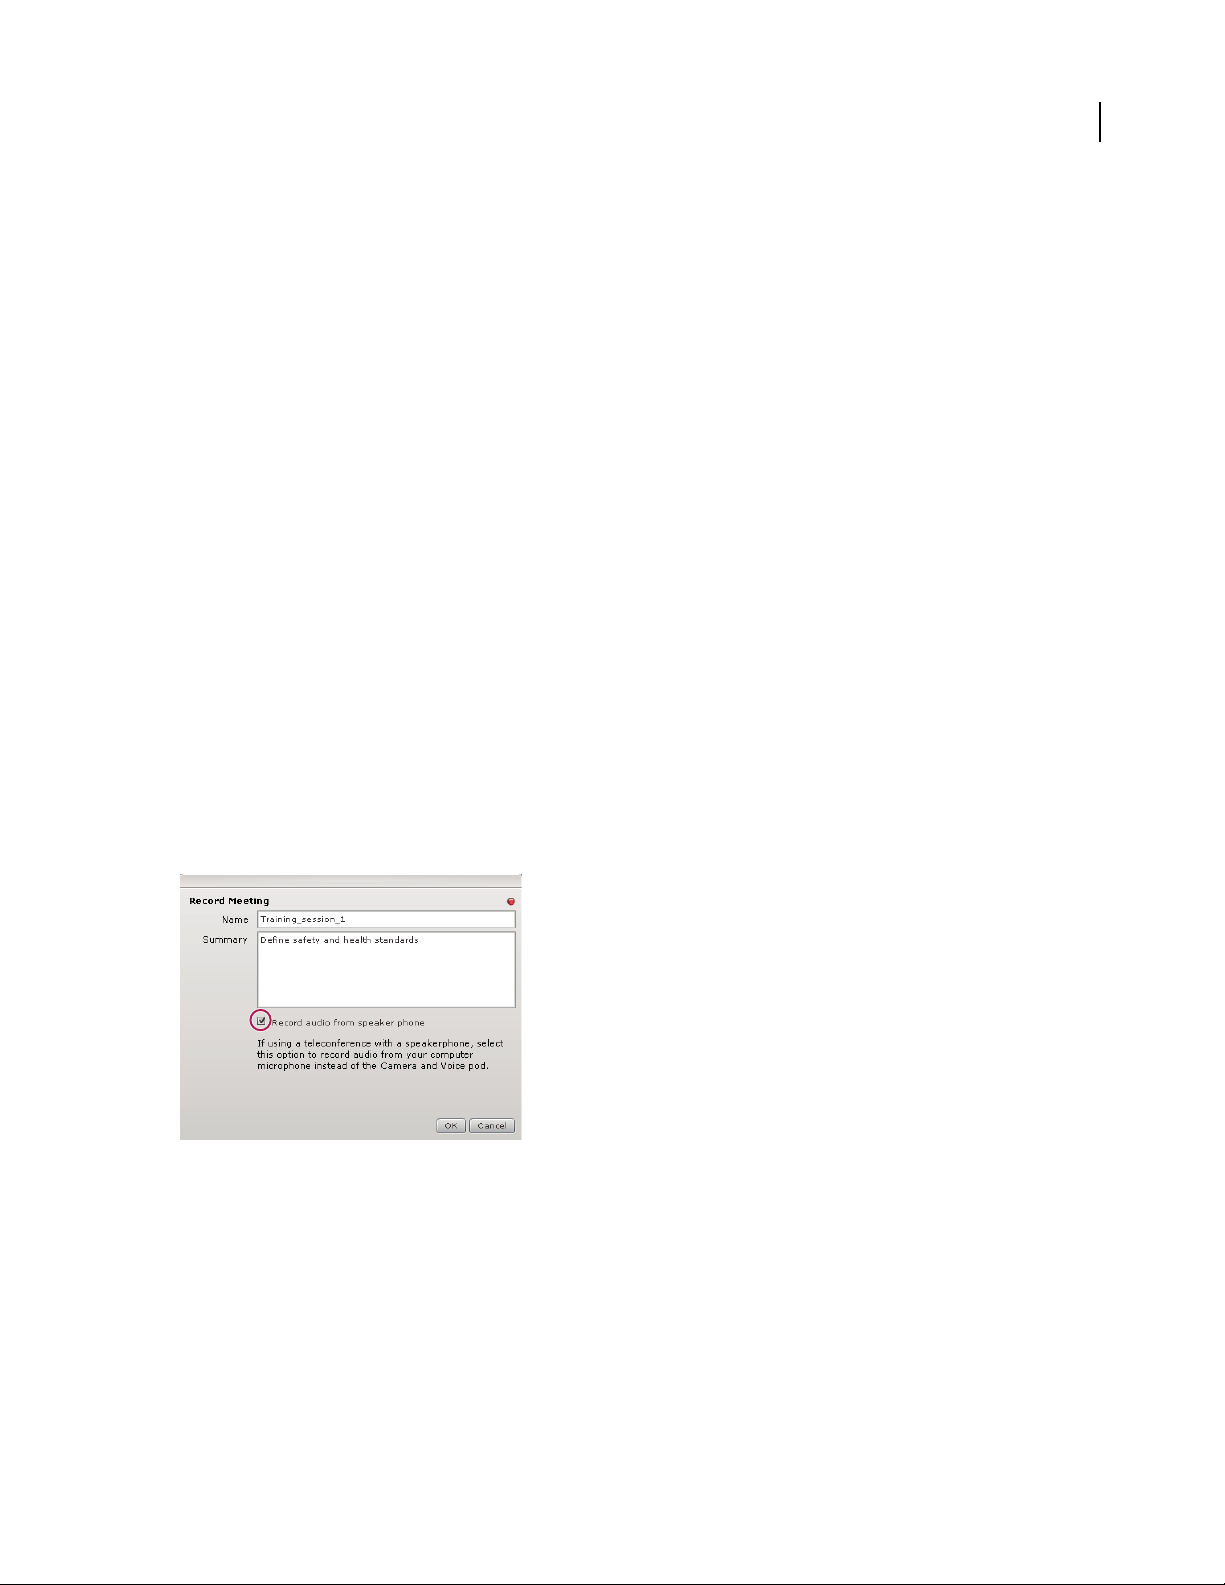
ADOBE CONNECT ENTERPRISE
User Guide
Record a meeting
If you are a host, you can select a recording option. Everything that happens in the meeting room is recorded, with
the exception of the Presenter Only area. At the beginning of the recording, you enter a recording name and
description. You also select the microphone input for the audio recording. You can start and stop recording at any
time during the meeting, so you can decide what meeting content to record.
If you use the Camera And Voice pod to broadcast audio to meeting attendees, all audio is recorded automatically.
The audio broadcast from the Camera And Voice pod is voice over IP (VoIP).
To record an audio conference call, you canuse your speaker phone andyour computer microphoneas the recording
devices. Ifyou select the Record Audio From Speaker Phone option when your first start recording, audio broadcasts
fromtheCameraAndVoicepodaredisabled.Allaudioinputtoyourcomputeriscapturedandrecordedbutisnot
broadcast to participants.
If you have integrated your audio conference using an audio conference bridge, the recording includes audio from
both the Camera And Voice pod and the audio conference. The Record Audio From Speaker Phone option is not
available.
If you are using the Premiere audio conferencing bridge, be sure to begin your recording from within Acrobat
Connect Professional (do not begin your recording by using a Premiere telephone key command).
Note: If you are using Premiere audio conferencing service, and Premiere is unable to create the audio recording when
you begin recording a meeting, you will receive an error message.
70
Start recording a meeting
1
From the menu bar, select Meeting > Record Meeting.
2 In the Record Meeting dialog box, enter a name and summary for the meeting recording.
3 (Optional) Select Record Audio From Speaker Phone.
4 Click OK.
A recording icon (red circle) appears in the menu bar to indicate that the meeting is being recorded.
Stop recording a meeting
To stop recording a meeting, do one of the following:
• Place the pointer over the red circle in the menu bar, and select Stop Recording from the pop-up menu.
• Select Meeting > Record Meeting to remove the check mark from the menu bar.
The meeting recording is saved and is available for playback at any time.
Page 75

ADOBE CONNECT ENTERPRISE
User Guide
Play back a recorded meeting
A host or presenter can make a URL available so that attendees can play the recording of a meeting.
Every recording is automatically assigned a unique URL and is stored on the Recordings tab for the meeting room
in Acrobat Connect Enterprise Manager. Any attendee who has access can view information about the recording,
such as disk use, permissions, recording date, and duration. From this page, the meeting host can edit the recording
title and summary.
When you play a recording, a recording navigation bar appears in a space below the meeting room. For optimal
performance, a high-speed Internet connection is recommended for recording playback.
A B C D E
Recording navigation bar
A. Hide toolbar B. Show/Hide archive transcript C. Pause/Play toggle button D. Status bar E. Elapsed time
Play a recording from a URL
❖ Click the recording URL that the presenter sent to you.
The recording opens in your browser and is ready for playback.
Play a recording from Acrobat Connect Enterprise Manager
1
Click the Meetings tab to go to the Meetings library in Acrobat Connect Enterprise Manager.
2 In the Meetings library, click the meeting link that includes the recording.
3 Click the Recordings option.
71
The Recordings page appears, listing all recordings for the meeting.
4 Select the recording that you want to play.
The Recording Information page appears.
5 Click the meeting URL.
The recording is played in your meeting window.
Navigate recorded meetings
Certain events are indexed for each meeting recording, including layout changes, chat messages, slide changes, and
users joining or leaving the Attendee List or Camera And Voice pod.
Each event is represented by an item in the Recording Index and is followed by a timestamp. By navigating the
Recording Index for a meeting, you can filter and search recorded meetings.
1 Click the View Archive Transcript button on the recording navigation bar.
2 Expand or collapse layout folders to see the recorded events.
About managing recorded meetings
You can view all recordings made for a particular meeting, change permissions, rename, ormove a recording, or view
a content report for a recording. You can use a recordedmeeting as content for another meeting. To view and update
information about recorded meetings, click the meeting title in Acrobat Connect Enterprise Manager and click the
Recordings tab.
Page 76

ADOBE CONNECT ENTERPRISE
User Guide
Move meeting recordings to the Content library
To move meeting recordings (recordings associated with a meeting in a Meetings library folder) to the Content
library, you must be an administrator or a user with permissions to manage that specific Meetings library folder.
1 Click the Meetings tab at the top of the Acrobat Connect Enterprise Manager window.
2 Navigate to the meeting that has recordings you want to move.
3 Click the meeting name in the list.
4 In the Meeting Information page, click the Recordings link on the navigation bar.
5 Select the check box to the left of any recording that you want to move.
6 Click Move on the navigation bar.
7 Navigateto the folder location in the Content library where you want to move the recording by clicking the folder
titles or the Up One Level button. (As you navigate, the new destination appears in the upper right of the Connect
Enterprise Manager window.)
8 Click Move.
The Recordings page appears with an updated recording list.
Delete a meeting recording
To delete a meeting recording associated with a meeting, you must be an administrator or a user with permissions
to manage that specific Meetings library folder. When you do delete a recording, you are deleting it from the
Meetings library. (This process does not delete the recording from the Content library if you moved it there previously. To delete a meeting recording you moved to the Content library, see “Delete a library folder or file” on
page 18.)
72
1 Click the Meetings tab at the top of the Acrobat Connect Enterprise Manager window.
2 Navigate to the meeting that has recordings you want to delete.
3 Click the meeting name in the list.
4 In the Meeting Information page, click the Recordings link on the navigation bar.
5 On the Recordings page, select the check box to the left of any recording you want to delete.
6 Click Delete above the list.
7 Click Delete on the confirmation page.
The Recordings page appears with an updated recording list.
Filter meeting events
To find and view an event, you can use the filtering feature in the Recording Index. You can show all events, a single
event, event types, or any combination of events that can be indexed. Events that can be filtered include layout
changes, chat messages, slide changes, and users joining or leaving the Attendee List or Camera And Voice pod.
1 Click the Select Events button at the top of the Recording Index.
2 Select an option from the pop-up menus.
A filtered list of meeting events appears in the Recording Index.
Page 77

ADOBE CONNECT ENTERPRISE
User Guide
Search for a meeting event
To find a specific meeting event, you can use the search feature in the Recording Index. You enter a search term in
the Find text box in the Recording Index, and all events that contain a match appear highlighted in pink. You can
search the following terms in a an archive:
• Names of meeting participants
• Text in all Note pods
• Text in all Chat pods
• Text on slides shown in the meeting
1 Type a search term in the text box at the top of the Recording Index.
2 Click Find.
A list of items appears in the Recording Index.
Taking notes in a meeting
Using the Note pod
As a host or presenter, you can use a Note pod to take meeting notes that all attendees can see. Unlike a chat message
in a Chat pod, the text note in a Note pod is created and displayed only by presenters. It remains visible in a Note
pod throughout the meeting or until a presenter edits the note or displays a different note. A host can remove the
Note pod from view, or switch to a different room layout that does not contain that Note pod.
73
A new meeting created from the Default Meeting Template contains three layouts. Each layout contains an instance
ofthesameNotepod.Whenyoutypeamessageinonelayout’sNotepod,thesametextappearsinallthreelayouts.
With the New Note Pod option, you can create a single instance of a Note pod that appears in only one layout.
You can use the Note pod in several ways:
• Create a single, persistent note that is visible to attendees during the entire meeting.
• Create multiple notes in a single pod.
• Create multiple Note pods to display different notes.
You can also e-mail the contents of a note pod.
Create a Note pod
A hostcan createand displaymultiple Note pods, eachwith its own text. You can use different Note pods fordifferent
layouts and meetings. When you create a Note pod, it is assigned a default name, such as Note 1, Note 2, and so on.
You can rename the Note pod after it is created.
❖ FromthemenubaratthetopoftheStage,selectPods>Note>NewNotepod,orchooseNewNotefromtheNote
pod options menu.
A new Note pod appears on the Stage. You can move, resize, and rename the pod.
Page 78

ADOBE CONNECT ENTERPRISE
Add a note to a Note pod
A host or presenter can add or change text in any Note pod.
1 Click anywhere inside the Note pod.
2 Type the text that you want to appear in the Note pod.
Meeting attendees immediately see the new text.
Create multiple notes in a Note pod
A host or presenter can create more than one note in a Note pod, and choose which note to display.
Create multiple notes
1
Click the Pod Options button in the lower-right corner.
2 Select New Note from the pop-up menu.
Select which note to display
1
Click the Pod Options button in the lower-right corner of the Note pod.
2 Select the Select Note option.
3 Select the name of the note that you want to display from the pop-up menu.
User Guide
74
Edit a note
AhostorpresentercaneditthetextinaNotepod.Allthetextinapodusesthesameformatting.Alleditingchanges
are immediately visible to attendees.
1 Click anywhere inside the Note pod containing the text that you want to edit.
2 Modify the text.
3 To change the sizeof the text, click thePod Options button inthe lower-rightcorner of the Note pod, andthen
select Text Size. Next, select a text size.
4 Tochangethealignmentofthetext,clickthePodOptionsbuttoninthelower-rightcorneroftheNotepod,select
Text Alignment, and choose an alignment option: left, center, or right.
Rename a note
When a host or presenter creates a note, it is assigned a default name, such as Note 1 or Note 2. If you are a host, you
can rename a note. Simply double-click the name and enter a new one, or follow the procedure below.
1 Click Pods in the menu bar.
2 Select Organize Pods.
The Organize Pods dialog box appears.
3 Select the name of the Note pod that you want to change.
4 Click Rename.
The Rename Pod dialog box appears.
5 Type the new name.
6 Click OK.
Page 79

ADOBE CONNECT ENTERPRISE
User Guide
The new name appears in the Organize Pods dialog box.
7 Click Done.
Delete a note
1 Click Pods in the menu bar.
2 Select Organize Pods.
The Organize Pods dialog box appears.
3 Select the name of the note that you want to delete.
4 Click Delete.
5 Click Done.
E-mail the contents of a note pod
• If you are a host, inthe Notepod select EmailNote fromthe pod options menu (the Acrobat Connect Add-in must
be installed to use this option).
A new message appears in your default email client, with the subject Note and the contents of the Note pod in the
message body. Edit the note if necessary, address the message to recipients, and send.
75
Chat options in a meeting
About the Chat and Q & A pods
Youcancommunicatewithotherattendeeswhileameetingisinprogress,usingaChatpodtosendorreceiveachat
message. If you have a question and do not want to disturb the meeting flow, or if you cannot speak in a meeting
becausesoundisnotenabledonyourcomputer,youcansendachatmessagetothepresentersortoanothermeeting
participant. For example, when you first enter ameeting room, you can introduce yourself by sending achat message
to everyone in the room. Or you can send a chat message to the meeting organizer to ask a question about the
schedule of events.
As a presenter, you can use more than one Chat pod simultaneously. You can specify the Chat podto display content
to everyone, or to presenters (and hosts) only.
In the Chat pod, messages appear as they are submitted, and they are listed sequentially in the pod. Questions and
answers are not linked, and they can appear in different locations on the list in the Chat pod. Presenters can allow
participants to conduct private chats, to clear a chat, and to turn off chat notifications.
Chat pod content is persistent, and will remain in a meeting room until you delete it. If you want to preserve Chat
pod content for future use, you can email it.
You can use a Q & A pod to answer questions posed by attendees. The Q & A pod is linked to the Chat pod. When
an attendee asks a question in the Chat pod, a presenter can answer in the linked Q & A pod. When a presenter
answers a question, the question and answer appear as pairs in the Chat pod.
Page 80

A host or presenter links the Q & A pod to the Chat pod
ADOBE CONNECT ENTERPRISE
User Guide
76
A participant submits a question in the Chat (Q & A) pod
The presenter selects a question and answers from the linked Q & A pod
The question and answer appear as a pair in the Chat pod
Send a chat message
You can use the Chat pod to compose a chat message and address it to a specific participant, to all presenters at the
meeting, or to all attendees (participants, presenters, and hosts).
Page 81

ADOBE CONNECT ENTERPRISE
User Guide
When you receive a chat message from a meeting participant, your Chat pod shows the sender’s name and the
message. If the message was sent to everyone, the sender’s name is followed by the message. If the message was sent
only to you, the sender’s name is followed by “(privately)”. If the message was sent only to the presenters, the sender’s
name is followed by “(presenters).”
1 Select one of the following options from the pop-up menu at the bottom of the Chat pod:
• The name of a participant to whom you want to send a message
• Presenters
• Everyone
2 Click the text box in the Chat pod.
3 Enter your message.
4 Do one of the following:
• Click the Send Message button next to the text box.
• Press Enter or Return.
Your name appears in the Chat pod, followed by the addressee you selected and your message.
Disable private chat between participants
By default, two participants can chat privately. When Enable Private Chat For Participants is selected, participants
can send messages to individual participants as well as to presenters and to all attendees. As a host, you can disable
this option and prevent private chat.
77
1 Click the Pod Options button in the lower-right corner of the Chat pod.
2 Click Enable Private Chat For Participants to disable the option. A check mark indicates when the option is
enabled.
Note: This option is not available if the Chat pod is linked to a Q & A pod.
Clear messages from a Chat pod
When an empty Chat pod is required in a meeting, a host or presenter can clear all messages for all attendees.
1 Click the Pod Options button in the lower-right corner of the Chat pod.
2 Select Clear Chat.
All text is removed from the attendees’ Chat pods.
Use chat notifications
If you are a host or presenter and you are using the Acrobat Connect Add-in, chat notifications let you communicate
with your audience while you are presenting and the meeting window is minimized or maximized to full-screen,
concealing the Chat pod. If an attendee sends you a message while you are presentingin full screen or screen sharing
mode,anotificationappearsinthelower-rightcornerofthescreen.Youcanseethesender’snameandthefirstfew
words of the message in the notification window. By default, Chat Notifications is enabled. If you don’t want notifications to be shown while you are presenting, you can disable them.
1 Click the Pod Options button in the lower-right corner of the Chat pod.
2 Select Disable Chat Notifications.
Page 82

ADOBE CONNECT ENTERPRISE
User Guide
Moderating questions with the Q & A pod
If you are a host orpresenter, theQ & A pod gives you additional controlfor managingquestions andanswers during
a meeting. Using this pod, you can redirect a question to the appropriate presenter and place questions in a queue
until you are ready to answer them.
To manage your queue of questions, you can apply a filter, so that you see certain questions while hiding others. You
can select and edit a question, enter your reply, and send the answer either to all participants or just the sender.
Questions and answers appear as pairs in the Chat (Q & A) pod.
78
A B C
F
G
H
A. Filter options B. Person answering C. Forward D. Presenter list E. Delete question F. Incoming message list G. Answer text box
H. Preview pane I. Answer question to everyone J. Answer question to submitter only K. Pod Options
D E
I J
K
You might use the Q & A pod in situations like these:
• During a product launch with more than a hundred participants, questions are added to a queue on the Q & A
pod while the speaker presents. After completing the presentation, the speaker reviews the messages, applies a
filter, and begins answering the questions.
• A meeting moderator answers logistical questions but forwards technical inquiries to an engineer, who is
presenting.
• A meeting moderator returns certain replies to the sender only. Replies that are relevant to all attendees are sent
to everyone in the meeting.
Add a Q & A pod and link it to a Chat pod
Ifyouareahostorpresenter,youcanaddaQ&ApodtoameetingroomwithanexistingChatpod.Youmustcreate
a linkbetween the two pods. After the twopods are linked, “(Q & A)”is added to the nameof the Chat pod. In Q & A
mode, participants can send messages only to the presenters. There can be only one Q & A pod in a meeting room.
Add a new Q & A pod to a room
❖ From the menu bar at the top of the Stage, select Pods > Q & A.
Link a Chat and a Q & A pod
1
In the Q & A pod, select the name of the Chat pod that you want to link to from the pop-up menu.
2 Click Link.
The Chat pod is linked to the Q & A pod and (Q & A) is displayed in the Chat pod name.
Page 83

ADOBE CONNECT ENTERPRISE
User Guide
Submit a question in the Chat pod
Hosts can submit questions in the Chat pod.
1 From the pop-up menu at the bottom of the Chat pod, select Submit Question (this option is available only if a
Q & A pod is linked to the Chat pod).
2 Enter your message in the text box, and click the Send Message (arrow) button, or press Return.
Answer questions using the Q & A pod
If you are a host or presenter, you can apply a filter to the queue of messages to quickly find the questions that you
want to answer.
1 Select a question from the Incoming Messages list.
The question is highlighted and a duplicate of the question appears in the Preview pane so that you can edit it if
necessary.
2 (Optional) Edit the question in the Preview pane.
3 Type your answer in the text box at the bottom of the pod.
4 Click one of the following buttons in the lower-right corner of the Q & A pod:
Answer question to everyone Sends the answer to all meeting attendees.
79
Answer question to submitter only Sends the answer only to the attendee who sent the question.
When a question is sent, it is deleted from the Incoming Messages list and appears in the Chat pod as a question and
answer pair in the “Answered Questions” list.
Filter and forward questions using the Q & A pod
Ifyouareahostorpresenter,youcanaddafiltertothequeueofquestionsinaQ&Apodsothatyoucanseecertain
questions while hiding others. You can also forward a question to another presenter who might be better able to
answer it.
Manage your questions with filters
1
Click the pop-up menu in the upper left corner of the Q & A pod.
2 Select a filter from the following list:
Show All Questions Displays all questions that you havereceived, starting either with anew podor from the last time
the pod was cleared.
Show My Questions Displays only the questions that have been assigned to you.
Show Open Questions Displays all unanswered questions not assigned to anyone.
Show Answered Questions Displays all questions that have been answered.
Forward a question to another presenter
1
Select the question from the Incoming Messages list.
The question is highlighted, and a duplicate of the question appears in the Preview pane.
2 Click Presenter and select a presenter’s name from the pop-up menu.
The presenter’s name appears on the Presenter button.
Page 84

ADOBE CONNECT ENTERPRISE
3 Click Forward.
User Guide
Manage questions
If you are a host or presenter, you can mark a question as open, delete a selected question, delete all questions, and
select a Chat pod to link to your Q & A pod. Marking a question as open is useful if you want to make it easier for a
presentertotellwhichquestionsstillrequireattention.Youcanalsochoosetodisplaythesubmitter’snameinfront
of questions or the presenter’s name in front of answers.
Mark a question as open
1
From the Incoming Messages list, select an unanswered question.
2 Click the Pod Options button in the lower-right corner.
3 Select Mark as Open.
Delete a message
1
From the Incoming Messages list, select a question.
2 Click the Pod Options button in the lower-right corner.
3 Select Delete Question.
80
The selected question is removed from the list.
Delete all questions
1
From the Incoming Messages list, select a question.
2 Click the Pod Options button in the lower-right corner.
3 Select Delete All Questions.
All questions are removed from the list.
Show the submitter’s name or presenter’s name in front of the question or answer
1
Click the Pod Options button in the lower-right corner.
2 Select one of the following options:
• Show submitter name with answered question.
• Show presenter name with answered question.
Email the contents of a Chat pod
•
IntheChatpod,selectEmailChatHistoryfromthepodmenu(theAcrobatConnectAdd-inmustbeinstalledto
use this option).
A new message appears in your default email client, with the subject Chat History and the contents of the Chat pod
in the message body. Edit the message if necessary, address the message to recipients, and send.
Page 85

ADOBE CONNECT ENTERPRISE
User Guide
Broadcasting audio and video
About audio and video broadcasting
Using the Camera And Voice pod in Acrobat Connect Professional, hosts and presenters canbroadcast and view live
audio, video, or both. To broadcast audio, the broadcaster’s computer must have a microphone connected to it. To
broadcast video, the broadcaster’s computer must have a video or web camera connected to it. For participants to
broadcast audio and video, a host must grant them enhanced rights for the Camera and Voice pod, or promote them
to host or presenter.
Note: If you have an audio conference bridge installed with your Acrobat Connect Professional account, you can use
audio conferencing via telephony.
Attendee roles and audio and video broadcast capabilities
In a meeting,your broadcastcapabilities are determined by your attendee role—host, presenter,or participant.Hosts
control participant access to broadcasting capabilities. The following audio and video capabilities are available for
each attendee role:
The host can do the following:
• Choose settings for broadcasting audio and video
• Broadcast audio and video
• Select the broadcasts that you want to receive
• Control participant access to broadcasting capabilities
• Stop an attendee from broadcasting
81
The presenter can do the following:
• Choose settings for broadcasting audio and video
• Broadcast audio and video
• Select which broadcasts to receive
The participant can do the following:
• If granted enhanced rights to the Camera and Voice pod by a host, can broadcast audio and video
• If promoted by host to be a presenter, can broadcast audio and video
• Select which broadcasts to receive
Set up audio broadcasting
Use the Audio Setup wizard to quickly set up and use your audio devices. You can test sound output, select a microphone, tune the microphone volume, and tune the silence level.
You can also use Advanced Settings to make further adjustments to the ways that Acrobat Connect Professional
handles audio data. Using Advanced Settings is recommended only if you have advanced understanding of audio
technology.
Test audio devices and configure settings
1
Select Meeting > Audio Setup wizard from the menu bar.
Page 86

ADOBE CONNECT ENTERPRISE
User Guide
The Welcome page of the Audio Setup wizard appears.
2 Click Next to begin testing your sound output.
3 On the Sound Output page, click Test.
A sound sample plays from your speakers or headphone. If you did not hear the sound sample, click Help for more
information.
4 Click Next.
5 On the Select Microphone page, select your microphone type from the pop-up menu.
6 Click Next.
7 On the Test Microphone page, click Record to test your microphone.
8 Ifadialogboxappearsrequestingaccesstoyourcameraandmicrophone,clickAllowtoallowAcrobatConnect
Professional to access your camera and microphone.
9 Click Next.
10 On the Tune Silence Level page, click Silence. Remain silent until progress is complete.
Acrobat Connect Professional sets a microphone sound level that compensates for background noise in your
environment.
82
Set Advanced Settings in the Audio Setup wizard (Windows only)
1
From the menu bar, select Meeting > Audio Setup Wizard.
The Welcome page of the Audio Setup wizard appears.
2 Click the Next button to advance to Step 5 of 5 in the Audio Setup Wizard.
3 Click the Advanced Settings button.
The Advanced Audio Settings panel appears.
4 Make sure Use Enhanced Audio (selected by default) is selected.
This option turns on automatic audio control, including echo cancellation, microphone volume control, silence
detection, and noise suppression. You must select this option to use the other Advanced Settings.
5 For Silence Level, drag the slider to adjust the level. A higher setting results in more sensitivity to silence in an
audio broadcast.
6 For Acoustic Echo Cancellation Mode, select an option to adjust echo cancellation (the Acrobat Connect Add-in
must be installed to use this option):
Full Duplex Enablesmultipleuserstospeakatonetime.Ifechofeedbackresults,selectanotheroption(thisoption
is preferred for most systems).
Half Duplex Enables only one user to speak at a time. Use this option if microphones on your system are unusually
sensitive (transmitting unwanted background sound) or if you have poor echo cancellation.
Headphones Optimizes audio settings for use with headphones. This option uses Full Duplex mode, in which
multiple users can speak at one time.
Off Disables echo cancellation.
7 To enable the Acrobat Connect Add-In to automatically select the optimal Acoustic Echo Cancellation Mode,
make sure Auto Sense Acoustic Echo Cancellation Mode (selected by default) is selected.
Page 87

ADOBE CONNECT ENTERPRISE
User Guide
If this option is selected, the Add-In begins with the Mode you selected in step 6 and adjusts the mode based on
informationfromusers’systems.TodisableautomaticadjustmentofAECmodeanduseonlythemodeyouselected
in step 6, you can deselect this option.
8 To enable your microphone volume to adjust automatically in response to changes in voice level, make sure
Automatic Gain Control (selected by default) is selected. Deselect this option if you experience problems with the
audio volume fluctuating unpredictably. Deselecting this option will prevent microphone volume from adjusting
automatically.
9 For Audio Quality, select an option to adjust a combination of all audio settings, including silence level, echo
cancellation, and gain control, to provide optimized performance. A higher quality setting uses more CPU resources,
and therefore slows performance, but provides better audio quality. It is recommended that you use the highest
quality setting that does not cause detectable audio degradation on your system. Select one of four settings:
Fast Provides the fastest performance but the lowest audio quality. (This setting uses the fewest CPU resources. Use
this option for systems with slower CPUs.)
Good Provides somewhat slower performance but better audio quality. (This is the default setting, recommended
for most systems.)
Best Provides the slowest performance but the best audio quality. (Use this option for systems with very fast CPUs.)
Custom Enables you to select options for audio quality settings. Use this option if the standard settings do not
provide adequate results. Proceed to step 10 to select Custom options.
83
10 If you selected Fast, Good, or Best in step 9, proceed to step 11. If you selected Custom in step 9, choose from
the following options:
• For Echo Path, select 128 (the default setting) or 256. The higher setting provides greater suppression of audio
feedback. This setting uses more CPU resources and is recommended for systems that don’t use headphones.
• Select Noise Suppression (selected by default) to reduce the amount of noise that the microphone picks up.
Deselect the option to make the microphone more sensitive.
• For AEC (Acoustic Echo Cancellation), select Fast for the fastest performance and poorest quality, Good for
slower performance and better quality, or Best for slowest performance and best quality.
• Select Non LinearProcessing (selected by default) to use non-linear processing foraudio data. Deselect the option
to use standard processing (and fewer CPU resources).
11 To override your selections and restore the default Advanced Settings, click Reset to Defaults.
12 To apply the Advanced Settings and return to the Audio Setup Wizard, click OK. Step 5 of the Audio Setup
Wizard appears.
13 Click Finish to exit the Audio Setup Wizard.
Set up video broadcasting
You can select a camera for video broadcasting.
Note: To use the Select Camera option, a participant must be promoted by a host.
1 Select Meeting > Select Camera from the Menu bar.
An Adobe Flash Player Settings window opens, with the Camera tab selected.
2 Select the camera that you want to use from the Camera pop-up menu.
Note: If no camera is connected, a No Camera Found message appears instead of the Camera pop-up menu.
Page 88

ADOBE CONNECT ENTERPRISE
User Guide
3 Click Close.
Specify audio broadcast settings for all participants
If you are a host, you can turn audio broadcasting on and off for all attendees, and enable one or multiple attendees
to speak at one time.
1 Click the Pod Options button in the lower-right corner of the Camera And Voice pod.
2 Choose one of the following:
• Voice Off turns off all audio broadcasting.
• Voice On - Multiple Speakers turns on audio broadcasting. Meeting attendees who have the appropriate permis-
sions can broadcast audio. Any attendee can talk when holding down the Talk button.
• Voice On - One Speaker turns on audio broadcasting. Meeting attendees who have the appropriate permissions
can broadcast audio. When a speaker holds down the Talk button, the Talk button is disabled for other users, who
cannot broadcast their voice.
Specify video broadcast settings for all attendees
If you are a host, you can turn video broadcasting on or off for all participants, and specify image quality.
84
Note: If you change a setting while video is being broadcast, buttons may be added to or removed from the Camera And
Voice pod.
1 Click the Pod Options button in the lower-right corner of the Camera And Voice pod.
2 Choose one of the following:
• Camera Off turns off video broadcasting.
• Slow Images samples and transmits the camera image less frequently than other image settings. Images tend to be
low-quality and can shift abruptly. Use this setting if most attendees have low-speed connections or if you are not
concerned about image quality.
• Fast Images (the default setting) provides a clear but not high-quality image. Use this setting if attendees are
connected at a variety of speeds.
• High Quality Images provides high-quality images. Use this setting if all attendees are connected at high speeds.
• High Bandwidth provides the highest-quality images, suitable for use with the highest connection speeds, such as
DSL/Cable or LAN.
Change the aspect ratio of videos
If you are a host, you can choose between Portrait (thedefault setting), Standard, or Landscape aspect ratio for video
display.
1 Click the arrow in the lower-right corner of the Camera And Voice pod.
2 Select the aspect ratio settings you want from the pop-up menu:
• Portrait displays video with a square aspect ratio.
• Standard displays video with a width-to-height aspect ratio of approximately 4/3.
• Landscape displays video with an aspect ratio of approximately 9/5.
Page 89
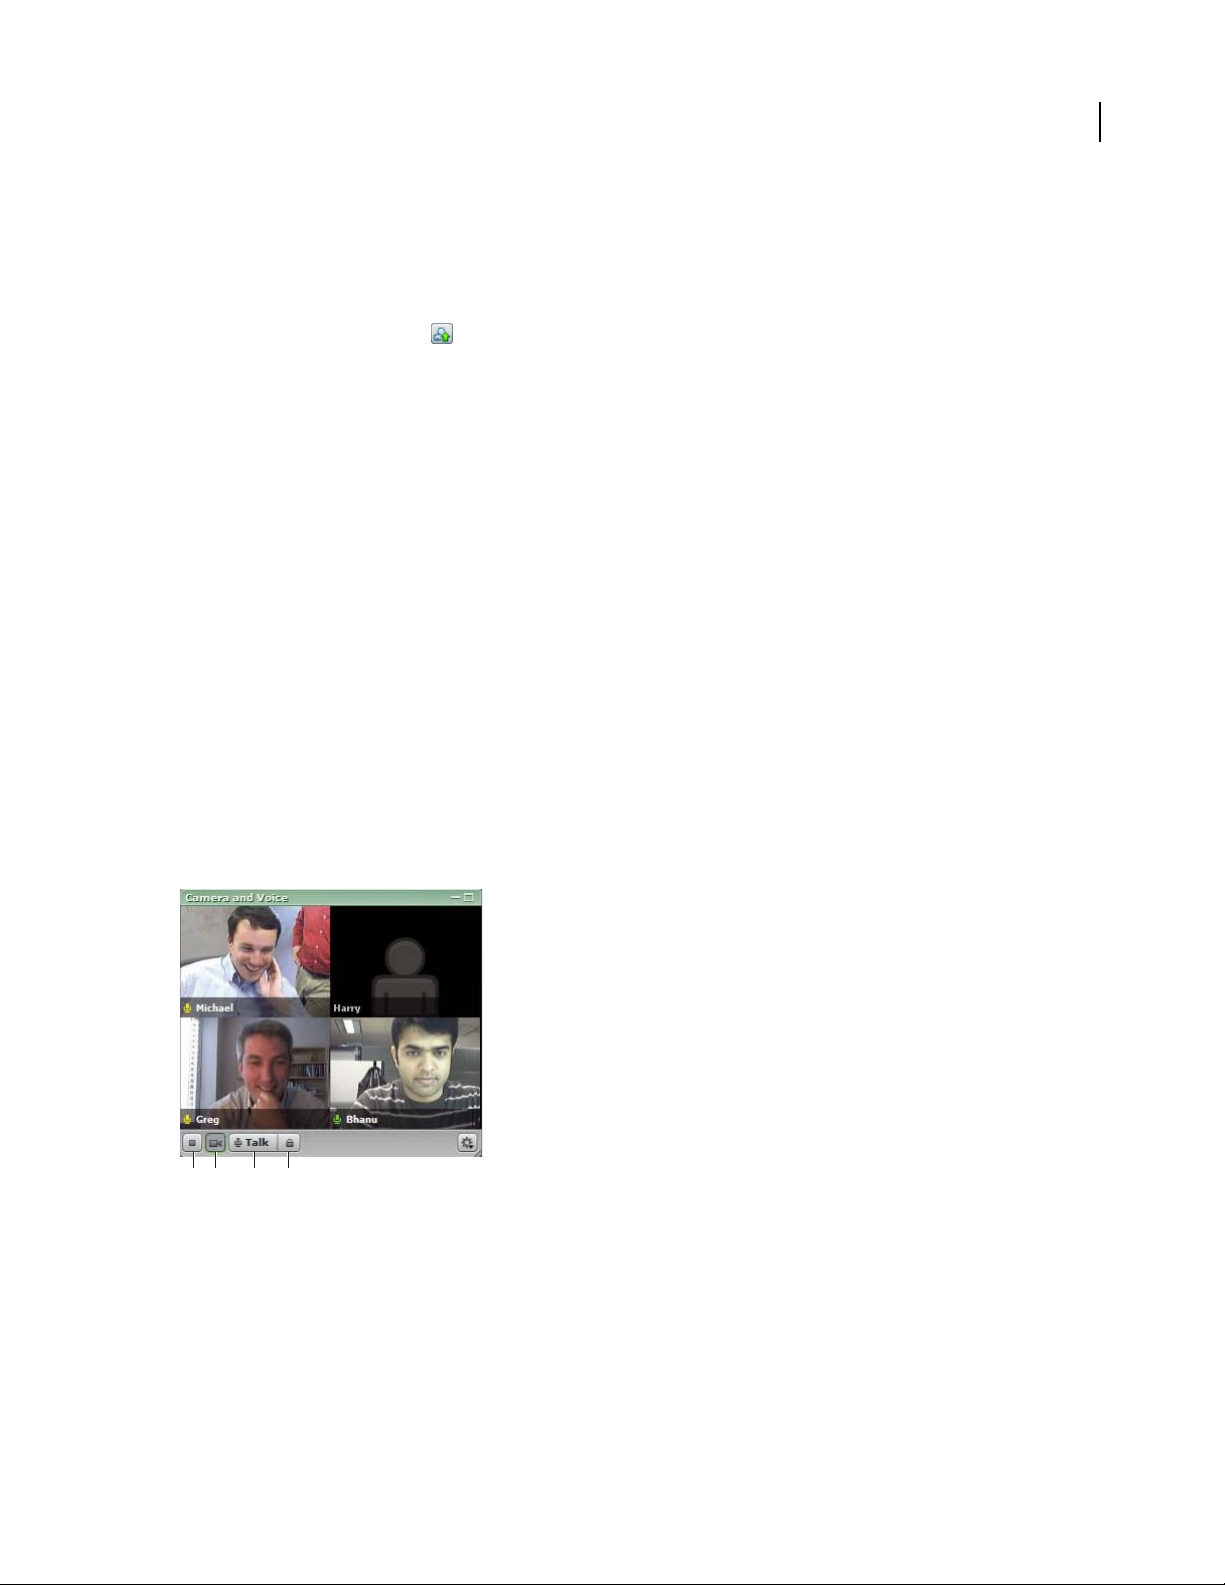
ADOBE CONNECT ENTERPRISE
User Guide
Enable participants to broadcast audio and video
Ameetinghostcanenableaparticipanttobroadcastaudioandvideobychangingtheparticipant’sroletopresenter,
or by changing the participant’s permissions for the Camera And Voice pod.
❖ In the Attendee pod, select the participant’s name and do one of the following:
• Click the Set User Role button in the lower left corner, and select Set as Presenter.
• Click the Pod Options button and select Change Enhanced Participant Rights. In the dialog box, select Camera
And Voice pod and click OK.
Stop an attendee from broadcasting
When necessary, a host can stop a meeting attendee from broadcasting video or voice.
1 Roll over the attendee’s name in the Camera And Voice pod.
2 Click the close icon (X) to the right of the attendee’s name to stop the attendee’s broadcast.
The attendee’s name, image, and media control buttons disappear from all attendees’ Camera And Voice pods.
Control your video and audio broadcast
You click a button in the Camera And Voice pod to turn on your video camera and microphone and start audio and
video broadcasting. Your broadcast appears in the Camera And Voice pod along with other broadcasts in the
meeting (if any are in progress).
85
YoupresstheTalkbuttontoactivateyourmicrophone,ortheHands-Freebuttontokeepyourmicrophoneonallthe
time. When you speak, a green line indicates your audio broadcast level. You can pause broadcast of your microphone or camera, or turn off broadcasting.
Note: In Acrobat Connect Professional, a host must grant permission to a participant to broadcast video and voice.
A B C D
Using the Camera And Voice pod
A. Stop My Camera and Voice B. Camera C. Hold to talk D. Hands-Free
Start audio and video broadcasting
❖ In the Camera And Voice pod, click the Start My Camera And Voice button.
Broadcast your voice
Do one of the following:
• Hold down the Talk button to speak during a meeting.
Page 90

ADOBE CONNECT ENTERPRISE
User Guide
• Click the Hands-Free button (lock icon) in the control strip of the Camera And Voice pod. When the Hands-Free
button is selected, you can speak at any time during the meeting. Click the button again to turn off hands-free
audio broadcasting.
Pause video broadcasting
❖ Click the Camera button in the Camera And Voice pod. Click the button again to resume video broadcasting.
When video broadcasting is paused, the last image broadcast from your camera remains in the Camera And Voice pod.
Stop broadcasting your video and voice
❖ Click the Stop My Camera And Voice button.
Select which broadcasts you receive
If you are a host, you can select to receive or block a video or audio broadcast from a participant. A red line over a
participant’s Microphone or Camera icon indicates that broadcasts from that participant are blocked. If no red line
is visible, broadcasts from that participant are allowed.
Block or unblock audio broadcasts from a participant
❖ Roll over the participant’s name in the Camera And Voice pod and click the Microphone icon next to the name.
86
Block or unblock video broadcasts from a participant
❖ Roll over the participant’s name in the Camera And Voice pod and click the Camera icon next to the name.
Polling attendees
About the Poll pod
HostscanusethePollpodtocreatequestions,orpolls, for participants and to view the results. Onlyhosts can control
poll management and how polls appear to meeting participants. Hosts can also cast votes.
Poll attendees
To poll attendees, a host must create a new Poll pod. Poll results are sent to the server only when the poll is closed.
Ask participants to respond to a poll
❖ Enter a question into the Poll pod and click Open at the bottom of the Poll pod.
Close the answer period for a poll
❖ Click Close at the bottom of the Poll pod.
The results are sent to the application server.
Edit a poll
After you create a poll, you can make changes to the question and responses.
Page 91

Edit a poll
1
Click Prepare in the lower-left corner of the Poll pod.
2 Click the location for the text and edit the text.
3 Click Open at the bottom of the Poll pod.
ADOBE CONNECT ENTERPRISE
User Guide
The updated poll appears in the Poll pod.
View and show poll results
As a host or presenter, you can view poll results in both open and close modes. These results are updated in real time
as participants continue to cast or change their votes.
View poll results
❖ In open or close mode, click Show Individual Votes at the bottom of the Poll pod.
The participant names and responses appear in the Poll pod.
Show poll results to participants
1
Click the pod options menu button in the lower-right corner of the Poll pod.
2 Do one of the following:
• Select Broadcast Results from the pop-up menu.
• Scroll to the bottom of the main area and click Broadcast Results.
87
The poll responses appear to all meeting participants.
Note: This option appears only when the pod is not being edited.
Navigate among polls
You can create multiple polls and navigate among them quickly and easily.
1 Click the pod options menu button in the lower-right corner of the Poll pod.
2 Choose Select Poll.
Clear poll answers
1 Click the pod options menu button in the lower-right corner of the Poll pod.
2 Select Clear all Answers from the pop-up menu.
The results are cleared from the main window.
Page 92

Chapter 4: Adobe Connect Training
About Adobe Connect Training 6
About content, courses, and curriculums
The Adobe Connect Training 6 application consists of two components: courses and curriculums. Courses are
created using content within the Content library. You can only use the Connect Training application if this feature
has been enabled for your Adobe Connect Enterprise Server 6 account.
Content is files stored in the Connect Enterprise Server Content library. Content can be any of the following file
types: PPT, FLV, SWF, PDF, GIF, JPG, PNG, MP3, HTML, or ZIP. With content, no individual user information is
stored. Reports are created for content, but they are aggregate, content-specific reports, and are based on access. If
content is created with Adobe Presenter and the presentation contains quizzes, you cannot set the number of
attempts users have to pass the quizzes. Also, with content there is no resume functionality so, for example, if a user
quits half way through a content item, the next time they launch the item they are taken back to the beginning of the
content.
88
A course containsanyitemfromtheContentlibrary.Acourseisassociatedwithagivensetofenrolledlearnersand
there is usage tracking for each individual learner. The course can be delivered and administered independently or
as part of a curriculum. When you use courses, scores can be captured for AICC-conformant objects and you may
enforce the number of attempts users have to complete the course. Courses also contain resume functionality so that
users can view half a course, close the course, and then open it again later at the spot where they left off.
A curriculum is a group of courses and meetings that moves students along a particular learning path. A curriculum
consists primarily of Connect Training courses, but may include other items such as live training sessions. With
curriculums, youcan assignprerequisites, test-outs, andcompletion requirements toenforce a specific learningpath.
Asisthecasewithcourses,youcangeneratereportstotracktheprogressoftheenrolleesastheymovethroughthe
curriculum to ensure that they meet the learning objectives.
Accessing the Training library
All Connect Training courses and curriculums are contained and organized in a directory of folders called the
Training library. You access the Training library by clicking the Training tab at the top of the Adobe Connect EnterpriseManagerwindow.Asyounavigatethelibrary,thenamesofthefoldersappearasanavigationtrailatthetopof
the browser window.
To create courses and curriculums, you must be a training manager. To manage a Training library folder, you need
not be a training manager, but you must have Manage permissions for this folder in the Training library.
See also
“About libraries” on page 13
Page 93

ADOBE CONNECT ENTERPRISE
User Guide
About Training library permissions
Consider the following aspects of permissions when you work with the Training library:
Enrollee permissions definetheaccessthatlearnershaveforagivencourseorcurriculum.Thetwoenrolleepermis-
sions are Enrolled and Denied. Individuals with an Enrolled permission canview a course or curriculum; individuals
with a Denied permission cannot access the course or curriculum.
Enrolleepermissionsareassignedwhenacourseorcurriculumiscreated.Permissionscanalsobechangedafterthe
course or curriculum is created. To change permissions, the training manager must open the course or curriculum
and edit the participant list to add or remove enrollees. The training manager must also have Manage permissions
for the folder where this course or curriculum is located.
Training library management permissions define who can perform the different tasks associated with the Training
library files and folders, such as adding and deleting files, searching the library archives, and so on. The ability to
create, delete, and editcourses and curriculums in various folders in the Training library is determined by the groups
that a user belongs to and the individual permissions that are assigned to a user for specific files and folders. The
Training library has only two permissions: Manage and Denied.
Members of the Administrator group can manage all files and folders in the Training library. By default, training
managers have Manage permissions only for their individual folder in the User Training folder. This means that
training managers can add, delete, change, or assign permissions only for their own folders. All other Manage
permissions are assigned on an individual or group basis by the administrator.
89
Training library permissions for Built-in groups
Connect Enterprise Server recognizes six default permission groups called Built-in groups. You cannot change the
permissions for these groups, but you can extend them by assigning individuals or groups to more than one Built-in
group.
The Training module applies to the Training Managers group. This group is associated with the Training library.
Each training manager has an individual folder in the User Training folder within the Training library, in which they
can create and administer their courses and curriculums. Each training manager also has a content folder. The
Connect Enterprise Server administrator can also assign Manage permissions for specific Training library folders to
users who are not training managers. Only training managers can create new courses or curriculums, however.
See also
“Multiple permissions precedence” on page 230
Course and curriculum registration
Depending on the type and purpose of a given course or curriculum, the training manager might want to have the
guests register. If so, the manager must have the Event Management tab as part of the Enterprise Manager application, since registration for any training can only be done through the Event Management tab. A training manager
who hasthis tab must first use the Courseor Curriculumwizard tocreate thecourse orcurriculum from the Training
tab, but skip the select participant and send invitations steps. Next, the training manager creates an event by using
the Present an Adobe Connect Training Course or Curriculum option in the Event wizard, and selects the course or
curriculum that was created as the event.
The Event wizard lets the training manager select and invite enrollees, select and customize registration questions,
and send invitations, even to large e-mail lists.
Page 94

ADOBE CONNECT ENTERPRISE
User Guide
If the training is presented as an event, all enrollees, regardless of whether they have a Connect Enterprise Server
account or whether the URL is public, must provide registration information before the training. In this case, the
training manager can review the registration applicationsbefore the trainingand approve or denyadmittanceto each
registrant.
See also
“Events overview” on page 126
AICC content for courses
When you use Aviation Industry CBT Committee (AICC) content in courses, Connect Enterprise Server applies
some specific rules. For more information, see “About AICC content” on page 22.
Viewing the Training Dashboard
The Training Dashboard contains two bar graphs, one for courses and one for curriculums:
Course Summary Over the Last 30 Days Showsthe coursesover thelast 30days withthe greatest number of enrollees
who have passed this course; click any bar to see more detail.
Curriculum Summary Over the Last 30 Days Shows the curriculums over the last 30 days with the greatest number
of enrollees who have completed this curriculum; click any bar to see more detail.
90
The bar graphs appear within Connect Enterprise Manager. However, you can also export the Dashboard to a
browser window that you can print. To do this, click Printable Version on the left, above the display.
Tips for creating training courses and curriculums
Following are some tips for creating training courses and curriculum in Connect Training:
• Use Adobe Presenter and Adobe Captivate to create content for courses. Presenter is suitable for the creation of
linear, simple training materials and Adobe Captivate can be used for creating training materials that need to
contain complex branching and simulations.
• At the course level, set client-side maximum retries to one and server-side maximum retries to any number. (Set
server-side maximum retries to unlimited if you want learners to have as many attempts as they need to pass.)
• Add curriculum items directly into curriculums, not into folders.
• When adding content from the Content library directly into a curriculum, the content is automatically converted
to a course and tracking is enabled. In addition, a curriculum resource folder is automatically created and any
curriculum-specific courses (that is, content automatically converted to a course for this curriculum) are placed
in the folder.
• Communicate with your learners about how to take courses and curriculums, especially any specific settings you
have used. For example, tell them how many times they can attempt to pass a quiz. Also, if you do make any
changes to a curriculum after making the curriculum available, such as adding or removing items, tell your
learners.
• Asklearnerstoopenanitemorcourseinonlyonebrowserwindowandtoclosethatbrowserwindowwhenthey
are done.
• When planning to make a large curriculum available, do a test first. For example, ensure that your Connect Enter-
prise Server system (network, servers, database, etc.) is set up properly and has sufficient resources to manage the
volume of learners scheduled to enroll in the curriculum.
Page 95

ADOBE CONNECT ENTERPRISE
User Guide
• Minimize changes to your courses and curriculums after you have made them available to learners.
Working with Courses
About courses
Note: The material on courses applies only to accounts that include the Adobe Connect Training application.
A course is content for a set of enrolled learners that also includes usage tracking for each learner. A course might
consist of a stand-alone presentation and may be offered as part of a curriculum.
See also
“About curriculums” on page 99
Creating a course
In creating a course, your workflow involves the following tasks:
1. Start the Course wizard
You can create or browse to a folder in the Training library that will contain the course (you must have permission
to access the folder). When you determine a location, open the New Course wizard by clicking the New Course
button.
91
2. Course information
On the first page of the Course wizard you enter background details about the course, such as a name and summary.
(Only the course name is required; all other fields are optional.) You can edit this information after the course is
created.
Note: By default, the “Update information for any items linked to this item” option is selected. Since you are creating a
new course, you probably do not have any items linked to the course yet, but keep this item selected if you think you will
link any items later.
3. Select course content
In this part of the Course wizard, Connect Enterprise Server directs you to the Content library, where you navigate
to the content file you want to use. You can select only one file from the library, and you must have either View or
Manage permissions for this file. After adding content, you can continue in the wizard and enroll learners or save
the curriculum and exit the wizard. (To enroll learners, set up course notifications, or enable e-mail reminders later,
you can edit the course.)
4. Enroll learners
In this part of the Course wizard, you can enroll users or groups of users. Only enrolled users can browse to the
course URL and log in to view the course. To enroll large numbers of users, if you have the Event Management application, present the course as an event.
You can add and delete learners, as required, after the course is created.
Page 96

ADOBE CONNECT ENTERPRISE
User Guide
5. Set up notifications
In this part of the Course wizard, you set up course notifications. A course notification is an e-mail message telling
enrollees how to access the course.
When you format your notification, you can use run time fields in the subject line and in the body of the message.
These fields are course information variables that are automatically filled in for you when the e-mail notification is
sent.
You can change the course notifications after the course is created.
6. Set up reminders
The final part of the Course wizard involves settingup coursereminders. Reminders are optional.A course reminder
is an e-mail message sent to either all or selected course enrollees after you set up the course. You can use reminders,
for example, to remind enrollees that they are scheduled to take the course or to notify specific individuals that they
are required to complete the course.
See also
“Edit courses” on page 95
“Creating a curriculum” on page 100
92
View course information and the enrollee list
After you create a course you can view information about the course and a course enrollee list.
View course information
You can view or change information about a course from the Course Information page of Connect Enterprise
Manager, the page that appears when you click the course name in the Training folder list. From this page, you can
view or edit the information for a specific course, including the course summary, content, enrollees, and settings for
notifications and reminders. Each of these features is accessible as a navigation link.
Every course has a Course Information page, which is a summary that contains the information displayed in the
following illustration.
Page 97

ADOBE CONNECT ENTERPRISE
User Guide
The Course Information page shows key information about individual courses.
Course Information The course name, ID, summary, open date, close date, course URL, number of slides, duration,
maximum attempts (the maximum number of attempts the enrollee has to pass this course), and language.
93
Reminder Policy A field that indicates whether a reminder policy is enabled, to whom reminders are being sent, the
date that the next reminder will be sent, and how often reminders are sent. Click the Training tab at the top of the
ConnectEnterpriseManagerwindow.Navigatetothefolderthatcontainsthecourseforwhichyouwanttogetinformation. In the course list, click the name of the course to select it.
View a course enrollee list
1
Click the Training tab at the top of the Connect Enterprise Manager window.
2 Navigate to the folder that contains the course.
3 In the course list, click the name of the course.
4 Click the Manage Enrollees link in the navigation bar.
A list of enrolled users and groups are shown in the Current Enrollees window on the right.
About notifications and reminders
Notifications are placed in a queue and are sent as follows:
• Notifications set to Send now are sent when you click Send.
• Notifications set up for future dates are processed every night at midnight. On the set date, depending on the
number of notifications in the queue, they are sent within a few minutes or a few hours after midnight PST.
Notifications appear to be sent from whoever creates the course, using the e-mail address specified in their Connect
Enterprise Server account. Any e-mail delivery failure notifications are also sent to that address.
All e-mail notifications are sent individually. Recipients do not see the list of other recipients in the message header.
Reminders are placed in a queue and are sent as follows:
• Reminders to be sent starting on the current date are sent shortly after the course is created.
Page 98

ADOBE CONNECT ENTERPRISE
User Guide
• Connect Enterprise Server sends reminders from the person who creates the course, using the e-mail address
specified in the curriculum creator’s Connect Enterprise Sever account. The e-mail reminders are sent individually; recipients do not see the list of other recipients in the message header. (Also, any e-mail delivery failure
notifications are sent to course creator’s e-mail address.)
• Reminders set up for future dates are processed every night at midnight. On the set date, depending on the
number of e-mail reminders in the queue, they are sent within a few minutes or a few hours after midnight PST.
About changes to course content
There are some important points to remember when making changes to course content.
• When you create a course from content, a copy of the content is made into the course. If you make a change to
course content, the change is not carried over to the course.
• When you add a course to a curriculum, it is a link to the course and not a copy. If you make a change to a course,
the change is carried over to the course inside a curriculum.
• Try to minimize changes to course content if the current course content has a quiz that users have already taken.
Minimizing changes helps lower the number of versions that exist. It also lowers the number of reports for users
who took earlier versions.
94
See also
“Adding and deleting items from a curriculum” on page 103
About review modes
Connect Training contains two review modes: server-side and client-side. It’s important to understand these review
modes, especially if your courses contain quizzes.
Server-side review mode is used only with Connect Training courses. For Connect Training courses, a training
manager can specify the maximum attempts a learner has to complete or pass the course successfully. A learner is
locked into review mode in the following cases:
• The learner has passed or completed the course within the set number of maximum attempts.
• The learner has exceeded the maximum number of attempts allowed to pass or complete the course.
Learners can see whether they are locked into review mode two ways:
• The text “[Review Mode]” appears in the browser title bar when a course is opened.
• Thismessageappearsatthetopofthescreen:“YouhaveexhaustedallyourattemptsandarenowinReviewMode.
Any choices selected will not be tracked.”
If learners are in review mode and they take any quizzes included in the course, their scores and statuses are not
posted to Connect Enterprise Server.This prevents learners from trying to improve their score afterpassing a course.
Important: Learners should always open a course or item in only one browser window at a time and close the window
when they finish. Learners may be locked into review mode incorrectly if they open the same item or course in multiple
windows simultaneously.
The server-side maximum retry setting for a course carries over to all Curriculum items that link to the course.
Because the server-side retry setting for the course is the only one that is enforced, Adobe recommends disregarding
curriculum-level maximum retry settings.
Page 99

ADOBE CONNECT ENTERPRISE
User Guide
Client-side review mode is enforced through the maximum retry setting in presentations created with Adobe
Presenter and Adobe Captivate. Client-side review mode applies only to retries attempted within a single browser
session. However, client-side review mode can persist across multiple browser sessions if the user exits the presentation before finishing, causing resume data to be sent to the server.
In Adobe Presenter the retry setting is defined in the Quiz Manager pass or fail options. For example, if you set the
“If failing grade allow x attempts” option to 1, users have only one chance to take the quiz. Suppose a user begins
taking the quiz, then leaves it to view a slide that is not part of the quiz or begins a second quiz in the presentation.
By exiting the first quiz while the presentation is still open (a single browser session), the user exhausts the single
allowed attempt and can’t re-enter the quiz.Now suppose that a user enters a quiz, answers oneor two questions (but
not enough to pass the quiz), and closes the browser. In this second case, the user exited the presentation but not the
quiz. When this happens, resume data is sent to Connect Enterprise Server and, if the user is permitted another
server-side (course-defined) attempt, the user can open the presentation again and continue working on the first
client-side attempt (although it will be the second server-side attempt).
To prevent possible status and score discrepancies, Adobe recommends setting the client-side maximum retry
attempts to 1. (In both Presenter and Adobe Captivate, the default setting is 1.) A client-side setting of 1 does not
mean that theuser has only one chance to complete orpass the course; the course-level settinggoverns themaximum
number of retries.
95
Edit courses
If you are an administrator or a user with permission to manage a specific Training library folder, you can manage
courses.
See also
“About changes to course content” on page 94
“About notifications and reminders” on page 93
Edit course information
You can edit course information, which includes the course name, ID, summary, start date, and close date.
1 Click the Training tab at the top of the Connect Enterprise Manager window.
2 Navigate to the course.
3 In the course list, click the name of the course.
4 Click the Edit Information link in the navigation list.
5 Edit the course information. You can change the following information:
Course Name (Required) The name of the course; it appears in the course list and in reports.
Course ID The course number or ID: for example, 100, CS100, and so on.
Summary A course description that appears on the Course Information page.
Course Starts On (Required) The date before which users cannot access thecourse. Ifyou change an existing course’s
start date to a later date, no users (not even those who already accessed the course) can access the course until the
new start date. If some enrollees have already accessed the course, their tracking and quiz information is retained in
reports.
Course Closes On The date after which users cannot access the course.
Page 100

ADOBE CONNECT ENTERPRISE
Max Attempts The the maximum number ofattempts the enrollee hasto pass this course;if you leave this blank,you
User Guide
are allowing an unlimited number of retries.
6 Click Save.
Be aware that changing the course title or course summary does not change the information on a presentation
summary slide. This slide uses the information specified at the time the presentation was originally published. To
change this information, you must republish the content and then reselect the content that the course uses.
Change course content
When you create a new course, you select the content to be used in the course from the Content library.
1 Click the Training tab at the top of the Connect Enterprise Manager window.
2
Navigate to the course whose content you want to change. In the course list, clickthe name of the course to select it.
3 Click the Select Content link in the navigation bar.
4 Navigate to the folder that contains the content that you want to use for the course.
5 Select the button next to the content that you want to use for the course.
6 Click Save.
7 A warning message is displayed. To update the content, click Yes, Update My Content. To keep the existing
content, click No, Cancel This Request.
96
Add course enrollees
If you add enrollees toa course, you must notify the new enrollees. You might also want to set up reminders for them.
1 Click the Training tab at the top of the Connect Enterprise Manager window.
2 Navigate to the course.
3 In the list, click the name of the course.
4 Click the Manage Enrollees link in the navigation bar.
5 Do one of the following to select enrollees in the Available Users and Groups list:
• Press Control-click or Shift-click to select multiple users or groups.
• To expand a group to select individual members, double-click the group name. Then select individual users.
• To search for a name in the list, click Search at the bottom of the window; enter the name to display it in the list,
and then select it.
6 Click Add.
The users and groups you added appear in the Current Enrollees list; to remove a name from this list, select it and
click Remove.
Remove course enrollees
If you remove enrollees, they do not receive notification and are no longer able to access the course.
1 Click the Training tab at the top of the Connect Enterprise Manager window.
2 Navigate to the course.
3 In the course list, click the name of the course.
4 Click the Manage Enrollees link in the navigation bar.
 Loading...