

Page 1

Using
ADOBE® CONNECT™ 8
Web Services
Page 2

Copyright
© 2010 Adobe Systems Incorporated. All rights reserved.
Using Adobe® Connect™ 8 Web Services
This user guide is protected under copyright law, furnished for informational use only, is subject to change without notice, and should not be construed as a
commitment by Adobe Systems Incorporated. Adobe Systems Incorporated assumes no responsibility or liability for any errors or inaccuracies that may appear
in the informational content contained in this guide.
This user guide is licensed for use under the terms of the Creative Commons Attribution Non-Commercial 3.0 License. This License allows users to copy,
distribute, and transmit the user guide for noncommercial purposes only so long as (1) proper attribution to Adobe is given as the owner of the user guide; and
(2) any reuse or distribution of the user guide contains a notice that use of the user guide is governed by these terms. The best way to provide notice is to include
the following link. To view a copy of this license, visit
http://creativecommons.org/licenses/by-nc-sa/3.0/
Adobe, the Adobe logo, Acrobat Connect, Adobe Captivate, Adobe Connect, Authorware, Flash, Flash Builder, Flex, and Flex Builder are either registered
trademarks or trademarks of Adobe Systems Incorporated in the United States and/or other countries. All other trademarks are the property of their respective
owners.
Updated Information/Additional Third Party Code Information available at www.adobe.com/go/thirdparty/
Portions include software under the following terms:
This software is based in part on the work of the Independent JPEG Group.
Flash 9 video compression and decompression is powered by On2 TrueMotion video technology. © 1992-2005 On2 Technologies, Inc.
Sorenson Spark(tm) video compression and decompression technology licensed from Sorenson Media, Inc.
MPEG Layer-3 audio coding technology licensed from Fraunhofer IIS and Thomson.
RealDuplex™ Acoustic Echo Cancellation is Copyright © 1995-2004 SPIRIT.
This product contains either BSAFE and/or TIPEM software by RSA Security, Inc.
This product includes software developed by the Apache Software Foundation (www.apache.org/).
Portions © 1995-2005 Jean-loup Gailly and Mark Adler. This software is provided 'as-is', without any express or implied warranty. In no event will the authors
be held liable for any damages arising from the use of this software. Permission is granted to anyone to use this software for any purpose, including commercial
applications, and to alter it and redistribute it freely, subject to the following restrictions: 1. The origin of this software must not be misrepresented; you must
not claim that you wrote the original software. If you use this software in a product, an acknowledgment in the product documentation would be appreciated
but is not required. 2. Altered source versions must be plainly marked as such, and must not be misrepresented as being the original software. 3. This notice may
not be removed or altered from any source distribution. Jean-loup Gailly (jloup@gzip.org) Mark Adler (madler@alumni.caltech.edu)
Adobe Systems Incorporated, 345 Park Avenue, San Jose, California 95110, USA.
Notice to U.S. Government End Users. The Software and Documentation are “Commercial Items,” as that term is defined at 48 C.F.R. §2.101, consisting of
“Commercial Computer Software” and “Commercial Computer Software Documentation,” as such terms are used in 48 C.F.R. §12.212 or 48 C.F.R. §227.7202,
as applicable. Consistent with 48 C.F.R. §12.212 or 48 C.F.R. §§227.7202-1 through 227.7202-4, as applicable, the Commercial Computer Software and
Commercial Computer Software Documentation are being licensed to U.S. Government end users (a) only as Commercial Items and (b) with only those rights
as are granted to all other end users pursuant to the terms and conditions herein. Unpublished-rights reserved under the copyright laws of the United States.
Adobe Systems Incorporated, 345 Park Avenue, San Jose, CA 95110-2704, USA. For U.S. Government End Users, Adobe agrees to comply with all applicable
equal opportunity laws including, if appropriate, the provisions of Executive Order 11246, as amended, Section 402 of the Vietnam Era Veterans Readjustment
Assistance Act of 1974 (38 USC 4212), and Section 503 of the Rehabilitation Act of 1973, as amended, and the regulations at 41 CFR Parts 60-1 through 60-60,
60-250, and 60-741. The affirmative action clause and regulations contained in the preceding sentence shall be incorporated by reference.
Last updated 12/16/2010
Page 3

Contents
Chapter 1: Before you begin
Development environment . . . . . . . . . . . . . . . . . . . . . . . . . . . . . . . . . . . . . . . . . . . . . . . . . . . . . . . . . . . . . . . . . . . . . . . . . . . . . . . . . . . . . . . . . . . . 1
Additional resources . . . . . . . . . . . . . . . . . . . . . . . . . . . . . . . . . . . . . . . . . . . . . . . . . . . . . . . . . . . . . . . . . . . . . . . . . . . . . . . . . . . . . . . . . . . . . . . . . . 1
Conventions . . . . . . . . . . . . . . . . . . . . . . . . . . . . . . . . . . . . . . . . . . . . . . . . . . . . . . . . . . . . . . . . . . . . . . . . . . . . . . . . . . . . . . . . . . . . . . . . . . . . . . . . . . 2
Chapter 2: Architecture
Data flow . . . . . . . . . . . . . . . . . . . . . . . . . . . . . . . . . . . . . . . . . . . . . . . . . . . . . . . . . . . . . . . . . . . . . . . . . . . . . . . . . . . . . . . . . . . . . . . . . . . . . . . . . . . . . 3
Making your first API call . . . . . . . . . . . . . . . . . . . . . . . . . . . . . . . . . . . . . . . . . . . . . . . . . . . . . . . . . . . . . . . . . . . . . . . . . . . . . . . . . . . . . . . . . . . . . . . 6
Chapter 3: Login and requests
Log in from an application . . . . . . . . . . . . . . . . . . . . . . . . . . . . . . . . . . . . . . . . . . . . . . . . . . . . . . . . . . . . . . . . . . . . . . . . . . . . . . . . . . . . . . . . . . . . 10
Send a request in an XML document . . . . . . . . . . . . . . . . . . . . . . . . . . . . . . . . . . . . . . . . . . . . . . . . . . . . . . . . . . . . . . . . . . . . . . . . . . . . . . . . . . 15
Parse a response with XPath . . . . . . . . . . . . . . . . . . . . . . . . . . . . . . . . . . . . . . . . . . . . . . . . . . . . . . . . . . . . . . . . . . . . . . . . . . . . . . . . . . . . . . . . . . 15
Parse an error response . . . . . . . . . . . . . . . . . . . . . . . . . . . . . . . . . . . . . . . . . . . . . . . . . . . . . . . . . . . . . . . . . . . . . . . . . . . . . . . . . . . . . . . . . . . . . . . 16
Log a user out . . . . . . . . . . . . . . . . . . . . . . . . . . . . . . . . . . . . . . . . . . . . . . . . . . . . . . . . . . . . . . . . . . . . . . . . . . . . . . . . . . . . . . . . . . . . . . . . . . . . . . . . 17
iii
Chapter 4: Basics
Find a principal-id . . . . . . . . . . . . . . . . . . . . . . . . . . . . . . . . . . . . . . . . . . . . . . . . . . . . . . . . . . . . . . . . . . . . . . . . . . . . . . . . . . . . . . . . . . . . . . . . . . . . 18
List principals or guests . . . . . . . . . . . . . . . . . . . . . . . . . . . . . . . . . . . . . . . . . . . . . . . . . . . . . . . . . . . . . . . . . . . . . . . . . . . . . . . . . . . . . . . . . . . . . . . 19
Create users . . . . . . . . . . . . . . . . . . . . . . . . . . . . . . . . . . . . . . . . . . . . . . . . . . . . . . . . . . . . . . . . . . . . . . . . . . . . . . . . . . . . . . . . . . . . . . . . . . . . . . . . . . 20
Update users . . . . . . . . . . . . . . . . . . . . . . . . . . . . . . . . . . . . . . . . . . . . . . . . . . . . . . . . . . . . . . . . . . . . . . . . . . . . . . . . . . . . . . . . . . . . . . . . . . . . . . . . . 21
Create custom fields . . . . . . . . . . . . . . . . . . . . . . . . . . . . . . . . . . . . . . . . . . . . . . . . . . . . . . . . . . . . . . . . . . . . . . . . . . . . . . . . . . . . . . . . . . . . . . . . . . 22
Create groups . . . . . . . . . . . . . . . . . . . . . . . . . . . . . . . . . . . . . . . . . . . . . . . . . . . . . . . . . . . . . . . . . . . . . . . . . . . . . . . . . . . . . . . . . . . . . . . . . . . . . . . . 22
Find SCOs . . . . . . . . . . . . . . . . . . . . . . . . . . . . . . . . . . . . . . . . . . . . . . . . . . . . . . . . . . . . . . . . . . . . . . . . . . . . . . . . . . . . . . . . . . . . . . . . . . . . . . . . . . . . 24
Download files . . . . . . . . . . . . . . . . . . . . . . . . . . . . . . . . . . . . . . . . . . . . . . . . . . . . . . . . . . . . . . . . . . . . . . . . . . . . . . . . . . . . . . . . . . . . . . . . . . . . . . . 27
Check permissions . . . . . . . . . . . . . . . . . . . . . . . . . . . . . . . . . . . . . . . . . . . . . . . . . . . . . . . . . . . . . . . . . . . . . . . . . . . . . . . . . . . . . . . . . . . . . . . . . . . 28
Chapter 5: Meetings
Using web services with Adobe Connect meetings . . . . . . . . . . . . . . . . . . . . . . . . . . . . . . . . . . . . . . . . . . . . . . . . . . . . . . . . . . . . . . . . . . . . 30
Find meetings . . . . . . . . . . . . . . . . . . . . . . . . . . . . . . . . . . . . . . . . . . . . . . . . . . . . . . . . . . . . . . . . . . . . . . . . . . . . . . . . . . . . . . . . . . . . . . . . . . . . . . . . 30
Display meetings . . . . . . . . . . . . . . . . . . . . . . . . . . . . . . . . . . . . . . . . . . . . . . . . . . . . . . . . . . . . . . . . . . . . . . . . . . . . . . . . . . . . . . . . . . . . . . . . . . . . . 31
Create meeting room URLs . . . . . . . . . . . . . . . . . . . . . . . . . . . . . . . . . . . . . . . . . . . . . . . . . . . . . . . . . . . . . . . . . . . . . . . . . . . . . . . . . . . . . . . . . . . 32
Create meetings . . . . . . . . . . . . . . . . . . . . . . . . . . . . . . . . . . . . . . . . . . . . . . . . . . . . . . . . . . . . . . . . . . . . . . . . . . . . . . . . . . . . . . . . . . . . . . . . . . . . . . 33
Set or reset a meeting passcode . . . . . . . . . . . . . . . . . . . . . . . . . . . . . . . . . . . . . . . . . . . . . . . . . . . . . . . . . . . . . . . . . . . . . . . . . . . . . . . . . . . . . . 35
Create customized meetings . . . . . . . . . . . . . . . . . . . . . . . . . . . . . . . . . . . . . . . . . . . . . . . . . . . . . . . . . . . . . . . . . . . . . . . . . . . . . . . . . . . . . . . . . . 36
Invite users to meetings . . . . . . . . . . . . . . . . . . . . . . . . . . . . . . . . . . . . . . . . . . . . . . . . . . . . . . . . . . . . . . . . . . . . . . . . . . . . . . . . . . . . . . . . . . . . . . 37
Remove users from meetings . . . . . . . . . . . . . . . . . . . . . . . . . . . . . . . . . . . . . . . . . . . . . . . . . . . . . . . . . . . . . . . . . . . . . . . . . . . . . . . . . . . . . . . . . 39
Calculate meeting usage . . . . . . . . . . . . . . . . . . . . . . . . . . . . . . . . . . . . . . . . . . . . . . . . . . . . . . . . . . . . . . . . . . . . . . . . . . . . . . . . . . . . . . . . . . . . . 40
Check meeting quotas . . . . . . . . . . . . . . . . . . . . . . . . . . . . . . . . . . . . . . . . . . . . . . . . . . . . . . . . . . . . . . . . . . . . . . . . . . . . . . . . . . . . . . . . . . . . . . . . 41
Get meeting archives . . . . . . . . . . . . . . . . . . . . . . . . . . . . . . . . . . . . . . . . . . . . . . . . . . . . . . . . . . . . . . . . . . . . . . . . . . . . . . . . . . . . . . . . . . . . . . . . . 41
Get meeting poll results . . . . . . . . . . . . . . . . . . . . . . . . . . . . . . . . . . . . . . . . . . . . . . . . . . . . . . . . . . . . . . . . . . . . . . . . . . . . . . . . . . . . . . . . . . . . . . 42
Launch meetings with external authentication . . . . . . . . . . . . . . . . . . . . . . . . . . . . . . . . . . . . . . . . . . . . . . . . . . . . . . . . . . . . . . . . . . . . . . . . 43
Configure compliance settings . . . . . . . . . . . . . . . . . . . . . . . . . . . . . . . . . . . . . . . . . . . . . . . . . . . . . . . . . . . . . . . . . . . . . . . . . . . . . . . . . . . . . . . . 44
Last updated 12/16/2010
Page 4

USING ADOBE CONNECT 8 WEB SERVICES
Contents
Chapter 6: Training
Using web services with Adobe Connect Training . . . . . . . . . . . . . . . . . . . . . . . . . . . . . . . . . . . . . . . . . . . . . . . . . . . . . . . . . . . . . . . . . . . . . 47
Training library permissions . . . . . . . . . . . . . . . . . . . . . . . . . . . . . . . . . . . . . . . . . . . . . . . . . . . . . . . . . . . . . . . . . . . . . . . . . . . . . . . . . . . . . . . . . . 47
Find courses and curriculums . . . . . . . . . . . . . . . . . . . . . . . . . . . . . . . . . . . . . . . . . . . . . . . . . . . . . . . . . . . . . . . . . . . . . . . . . . . . . . . . . . . . . . . . . 48
Create a course . . . . . . . . . . . . . . . . . . . . . . . . . . . . . . . . . . . . . . . . . . . . . . . . . . . . . . . . . . . . . . . . . . . . . . . . . . . . . . . . . . . . . . . . . . . . . . . . . . . . . . . 50
View a user’s training . . . . . . . . . . . . . . . . . . . . . . . . . . . . . . . . . . . . . . . . . . . . . . . . . . . . . . . . . . . . . . . . . . . . . . . . . . . . . . . . . . . . . . . . . . . . . . . . . 50
Enroll one user . . . . . . . . . . . . . . . . . . . . . . . . . . . . . . . . . . . . . . . . . . . . . . . . . . . . . . . . . . . . . . . . . . . . . . . . . . . . . . . . . . . . . . . . . . . . . . . . . . . . . . . 51
Enroll a large number of users . . . . . . . . . . . . . . . . . . . . . . . . . . . . . . . . . . . . . . . . . . . . . . . . . . . . . . . . . . . . . . . . . . . . . . . . . . . . . . . . . . . . . . . . 53
View curriculum information . . . . . . . . . . . . . . . . . . . . . . . . . . . . . . . . . . . . . . . . . . . . . . . . . . . . . . . . . . . . . . . . . . . . . . . . . . . . . . . . . . . . . . . . . . 55
Report scores . . . . . . . . . . . . . . . . . . . . . . . . . . . . . . . . . . . . . . . . . . . . . . . . . . . . . . . . . . . . . . . . . . . . . . . . . . . . . . . . . . . . . . . . . . . . . . . . . . . . . . . . 56
Chapter 7: Action reference
What’s new in Adobe Connect 8 Web Services . . . . . . . . . . . . . . . . . . . . . . . . . . . . . . . . . . . . . . . . . . . . . . . . . . . . . . . . . . . . . . . . . . . . . . . . . 58
Sample action . . . . . . . . . . . . . . . . . . . . . . . . . . . . . . . . . . . . . . . . . . . . . . . . . . . . . . . . . . . . . . . . . . . . . . . . . . . . . . . . . . . . . . . . . . . . . . . . . . . . . . . . 58
Actions . . . . . . . . . . . . . . . . . . . . . . . . . . . . . . . . . . . . . . . . . . . . . . . . . . . . . . . . . . . . . . . . . . . . . . . . . . . . . . . . . . . . . . . . . . . . . . . . . . . . . . . . . . . . . . 59
Chapter 8: Filter and sort reference
filter-definition . . . . . . . . . . . . . . . . . . . . . . . . . . . . . . . . . . . . . . . . . . . . . . . . . . . . . . . . . . . . . . . . . . . . . . . . . . . . . . . . . . . . . . . . . . . . . . . . . . . . . . 212
sort-definition . . . . . . . . . . . . . . . . . . . . . . . . . . . . . . . . . . . . . . . . . . . . . . . . . . . . . . . . . . . . . . . . . . . . . . . . . . . . . . . . . . . . . . . . . . . . . . . . . . . . . . . 213
iv
Chapter 9: Using the Telephony XML API
telephony-profile-delete . . . . . . . . . . . . . . . . . . . . . . . . . . . . . . . . . . . . . . . . . . . . . . . . . . . . . . . . . . . . . . . . . . . . . . . . . . . . . . . . . . . . . . . . . . . . . 215
telephony-profile-info . . . . . . . . . . . . . . . . . . . . . . . . . . . . . . . . . . . . . . . . . . . . . . . . . . . . . . . . . . . . . . . . . . . . . . . . . . . . . . . . . . . . . . . . . . . . . . . 216
telephony-profile-list . . . . . . . . . . . . . . . . . . . . . . . . . . . . . . . . . . . . . . . . . . . . . . . . . . . . . . . . . . . . . . . . . . . . . . . . . . . . . . . . . . . . . . . . . . . . . . . 217
telephony-profile-update . . . . . . . . . . . . . . . . . . . . . . . . . . . . . . . . . . . . . . . . . . . . . . . . . . . . . . . . . . . . . . . . . . . . . . . . . . . . . . . . . . . . . . . . . . . . 218
telephony-provider-conf-number-update . . . . . . . . . . . . . . . . . . . . . . . . . . . . . . . . . . . . . . . . . . . . . . . . . . . . . . . . . . . . . . . . . . . . . . . . . . . . 219
telephony-provider-delete . . . . . . . . . . . . . . . . . . . . . . . . . . . . . . . . . . . . . . . . . . . . . . . . . . . . . . . . . . . . . . . . . . . . . . . . . . . . . . . . . . . . . . . . . . . 220
telephony-provider-dial-in-info-update . . . . . . . . . . . . . . . . . . . . . . . . . . . . . . . . . . . . . . . . . . . . . . . . . . . . . . . . . . . . . . . . . . . . . . . . . . . . . . 221
telephony-provider-field-delete . . . . . . . . . . . . . . . . . . . . . . . . . . . . . . . . . . . . . . . . . . . . . . . . . . . . . . . . . . . . . . . . . . . . . . . . . . . . . . . . . . . . . 221
telephony-provider-field-list . . . . . . . . . . . . . . . . . . . . . . . . . . . . . . . . . . . . . . . . . . . . . . . . . . . . . . . . . . . . . . . . . . . . . . . . . . . . . . . . . . . . . . . . . 222
telephony-provider-field-update . . . . . . . . . . . . . . . . . . . . . . . . . . . . . . . . . . . . . . . . . . . . . . . . . . . . . . . . . . . . . . . . . . . . . . . . . . . . . . . . . . . . . 224
telephony-provider-info . . . . . . . . . . . . . . . . . . . . . . . . . . . . . . . . . . . . . . . . . . . . . . . . . . . . . . . . . . . . . . . . . . . . . . . . . . . . . . . . . . . . . . . . . . . . . 226
telephony-provider-list . . . . . . . . . . . . . . . . . . . . . . . . . . . . . . . . . . . . . . . . . . . . . . . . . . . . . . . . . . . . . . . . . . . . . . . . . . . . . . . . . . . . . . . . . . . . . . 229
telephony-provider-update . . . . . . . . . . . . . . . . . . . . . . . . . . . . . . . . . . . . . . . . . . . . . . . . . . . . . . . . . . . . . . . . . . . . . . . . . . . . . . . . . . . . . . . . . . 230
Chapter 10: Common reference
Common XML elements and attributes . . . . . . . . . . . . . . . . . . . . . . . . . . . . . . . . . . . . . . . . . . . . . . . . . . . . . . . . . . . . . . . . . . . . . . . . . . . . . . . 232
Chapter 11: Sample application
Getting started with the sample application . . . . . . . . . . . . . . . . . . . . . . . . . . . . . . . . . . . . . . . . . . . . . . . . . . . . . . . . . . . . . . . . . . . . . . . . . . 246
Build an adapter class . . . . . . . . . . . . . . . . . . . . . . . . . . . . . . . . . . . . . . . . . . . . . . . . . . . . . . . . . . . . . . . . . . . . . . . . . . . . . . . . . . . . . . . . . . . . . . . 246
Log the user in . . . . . . . . . . . . . . . . . . . . . . . . . . . . . . . . . . . . . . . . . . . . . . . . . . . . . . . . . . . . . . . . . . . . . . . . . . . . . . . . . . . . . . . . . . . . . . . . . . . . . . 247
Send XML requests . . . . . . . . . . . . . . . . . . . . . . . . . . . . . . . . . . . . . . . . . . . . . . . . . . . . . . . . . . . . . . . . . . . . . . . . . . . . . . . . . . . . . . . . . . . . . . . . . . 249
Parse XML responses . . . . . . . . . . . . . . . . . . . . . . . . . . . . . . . . . . . . . . . . . . . . . . . . . . . . . . . . . . . . . . . . . . . . . . . . . . . . . . . . . . . . . . . . . . . . . . . . 250
Display user information . . . . . . . . . . . . . . . . . . . . . . . . . . . . . . . . . . . . . . . . . . . . . . . . . . . . . . . . . . . . . . . . . . . . . . . . . . . . . . . . . . . . . . . . . . . . . 251
List a user’s meetings . . . . . . . . . . . . . . . . . . . . . . . . . . . . . . . . . . . . . . . . . . . . . . . . . . . . . . . . . . . . . . . . . . . . . . . . . . . . . . . . . . . . . . . . . . . . . . . . 252
Create and update meetings . . . . . . . . . . . . . . . . . . . . . . . . . . . . . . . . . . . . . . . . . . . . . . . . . . . . . . . . . . . . . . . . . . . . . . . . . . . . . . . . . . . . . . . . . 253
Display meeting detail . . . . . . . . . . . . . . . . . . . . . . . . . . . . . . . . . . . . . . . . . . . . . . . . . . . . . . . . . . . . . . . . . . . . . . . . . . . . . . . . . . . . . . . . . . . . . . . 255
Last updated 12/16/2010
Page 5

Chapter 1: Before you begin
Adobe® Connect® exposes web services that clients can call to exchange data with Adobe Connect accounts. You can
use web services with Adobe Connect hosted accounts and with accounts on Adobe Connect licensed servers.
This guide explains how an application calls Adobe Connect web services and interprets the XML response. It is
intended for developers who want to build custom applications for Adobe Connect or integrate it with another system
such as a learning management system or LDAP directory service.
Before you use this guide, you should understand the basics of XML and of using HTTP to communicate with a server
from a client application. This guide includes some Java™ code samples, but it does not presume that you are using
one specific language or environment.
Development environment
Adobe Connect Web Services allows you to use any language or platform that can send and receive XML over HTTP
to develop custom applications. For example, you can use Java and the J2EE platform, C#.NET, PHP, a portal server,
or any web development platform. Most custom applications are web applications or portals.
1
In general, you may find these types of tools useful:
• An XML parser code library, if your programming language supports XML parsing.
• A cookie management code library, to help you manage the session cookies Adobe Connect returns.
• A tool for viewing HTTP request and response headers in a browser. Many such tools are available on the Internet.
Additional resources
You can find many useful resources on the Internet that provide information about Adobe Connect, web services and
XML, and other technologies that Adobe Connect uses.
Adobe Connect
Adobe Connect User Community The Adobe Connect User Community at connectusers.com is the hub of the
Adobe Connect community. This site has forums, tutorials, events, announcements, a partner showcase and much
more.
Adobe Connect Help Support Center The Adobe Connect Help and Support Center contains the Adobe Connect
documentation and Support contact information.
XML and web services
The Web Services Primer at the Xml.com website (xml.com) is a good introduction to web services.
The XML Tutorial at the W3Schools website (w3schools.com) can help you get started with XML.
The XPath Tutorial also at the W3Schools website (w3schools.com), describes XPath, which parses an XML document
so that you can use it in an application.
Last updated 12/16/2010
Page 6

USING ADOBE CONNECT 8 WEB SERVICES
Before you begin
The XSLT Tutorial, a third tutorial at the W3Schools website (w3schools.com), teaches you XSL Transformations,
which you use to convert XML data to other formats.
The XSL Transformations (XSLT) specification at the W3C website (w3.org) is the official definition of XSLT, from the
standards committee who created it.
Numeric Representation of Dates and Time, at the International Organization for Standardization website (iso.org),
provides information about how to use the ISO 8601 standard date and time format.
Date and Time Formats at the W3C website (w3.org) is the official definition of the ISO 8601 date and time format.
Other technologies
Flash Player Developer Center and Flash Media Server Developer Center, both available from the Adobe Developer
Center, offer articles, samples, and insights to developing applications that use Adobe Flash Player and Adobe Flash
Media Server.
SCORM Concepts, at the Eduworks Corporation website (eduworks.com), is a tutorial about the Shareable Content
Object Reference Model and describes Shareable Content Objects (SCOs) and Learning Management Systems (LMSs).
An LDAP Roadmap at the Kings Mountain Systems website (www.kingsmountain.com), provides a useful overview of
the Lightweight Directory Access Protocol (LDAP). This site might provide good background material or links for
developers integrating an LDAP directory with Adobe Connect.
2
Microsoft SQL Server Adobe Connect uses a Microsoft SQL Server database, which your custom applications
retrieve data from and write data to. You may find useful resources at the Microsoft SQL Server Developer Center
(msdn.microsoft.com) including references, community, support, and other information.
Conventions
This guide uses industry standard conventions for displaying code that you are already familiar with.
However, API reference is a formal definition of the API contract between a calling application and the server. As such,
the syntax definitions of request URLs should be described.
We have placed distinct sections of a request URL on separate lines for readability, like this:
http://server_name/api/xml
?action=custom-fields
&filter-definition=value
&session=BreezeSessionCookieValue
When you enter a request URL in the address bar of a browser or construct it in an application, enter it or construct it
as a single line:
https://example.com/api/xml?action=custom-fields&filter-name=location
Syntax elements in blue code font represent definitions that you construct, with a hyperlink to the syntax of the
definition.
Last updated 12/16/2010
Page 7
Chapter 2: Architecture
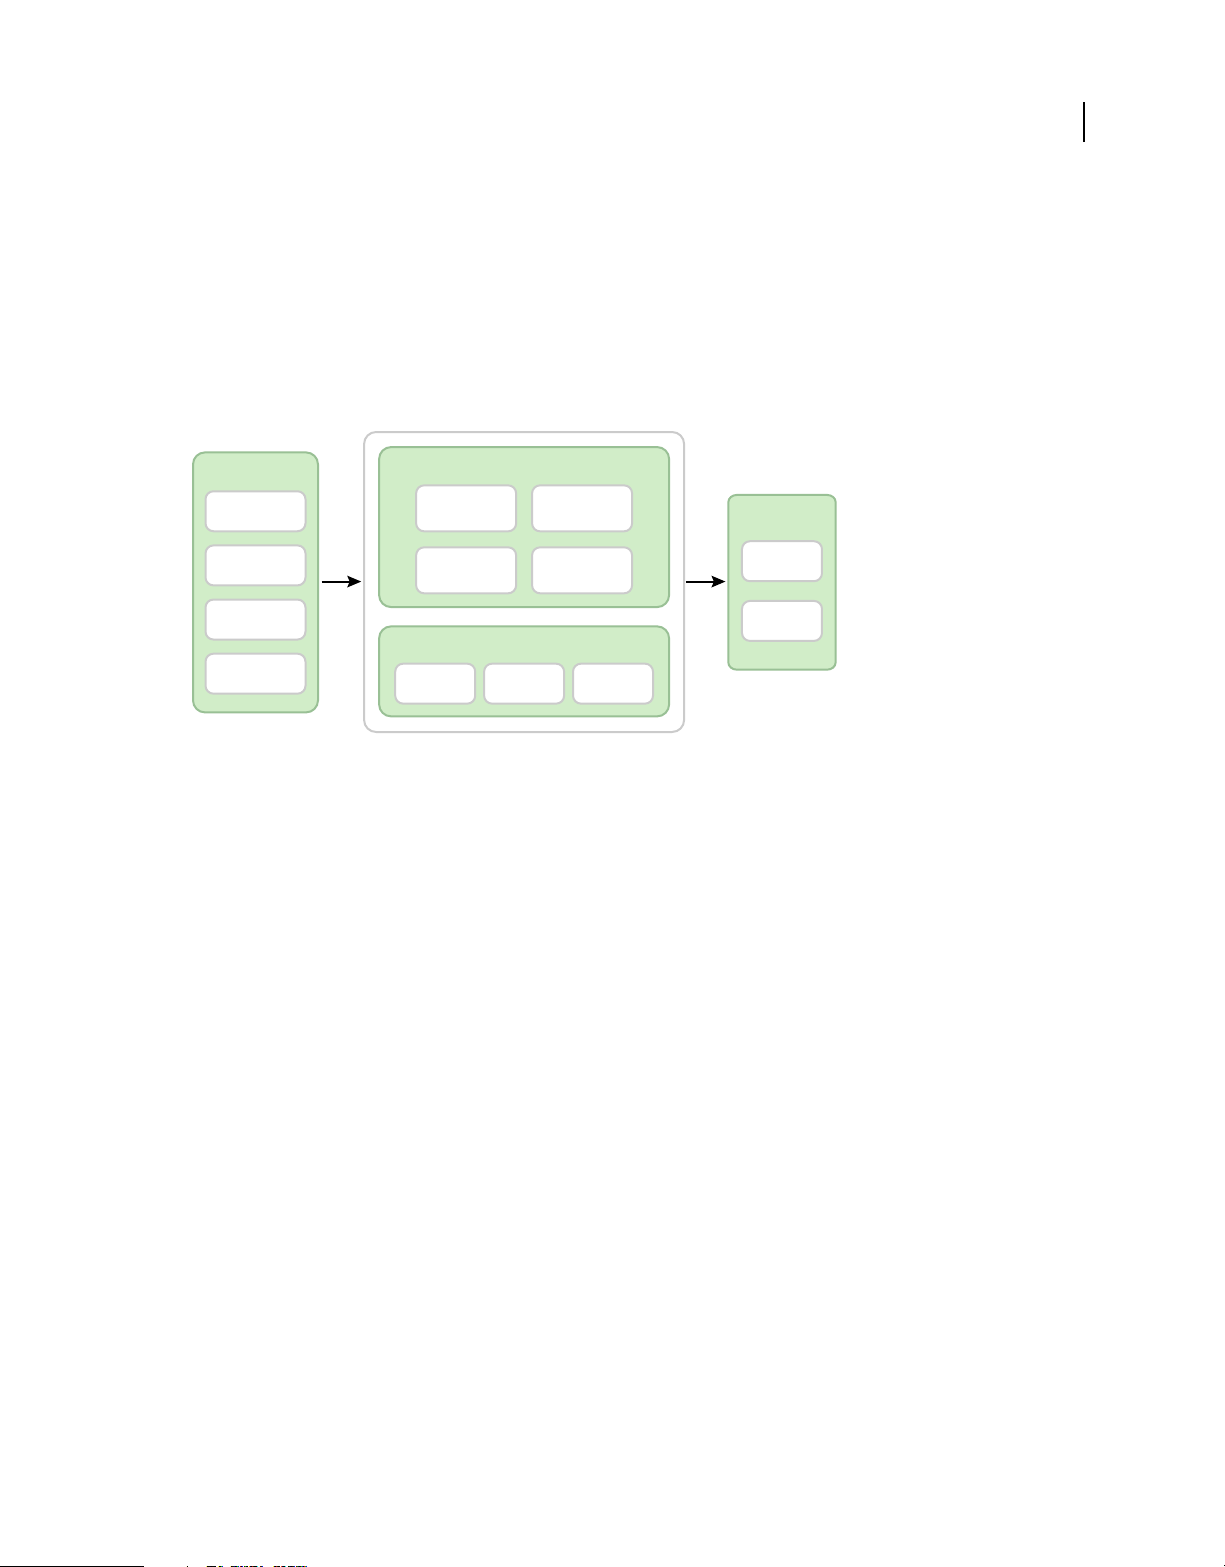
Adobe® Connect™ Web Services is the web service layer over the Adobe Connect Server suite of applications.
Web services allow you to build portals or web applications that integrate Adobe Connect functionality and reporting
information with third-party systems such as portals, customer relationship management systems, and enterprise
resource planning systems.
3
Authoring tools
Adobe Presenter
Adobe Captivate
eLearning Suite
Adobe Acrobat
Adobe Connect Web Services provides meeting, training, and events functionality to your applications through its XML API.
Adobe Connect
Training Events
Training
Deployment Models
Extensibility
Webcast
On PremiseHosted
Managed
Services
XML API
SDK
As an example, you might have a central user management system, such as an LDAP directory, Microsoft Active
Directory, or another third-party system, that is an integral part of your business processes.
Using web services, you can write an application that synchronizes users between your system and Adobe Connect.
The application can use the J2EE platform or another technology of your choice to pull a list of users from the
directory, compare it against a list of Adobe Connect users, and then perform requested updates within the Adobe
Connect user repository, such as adding or deleting users or groups.
Data flow
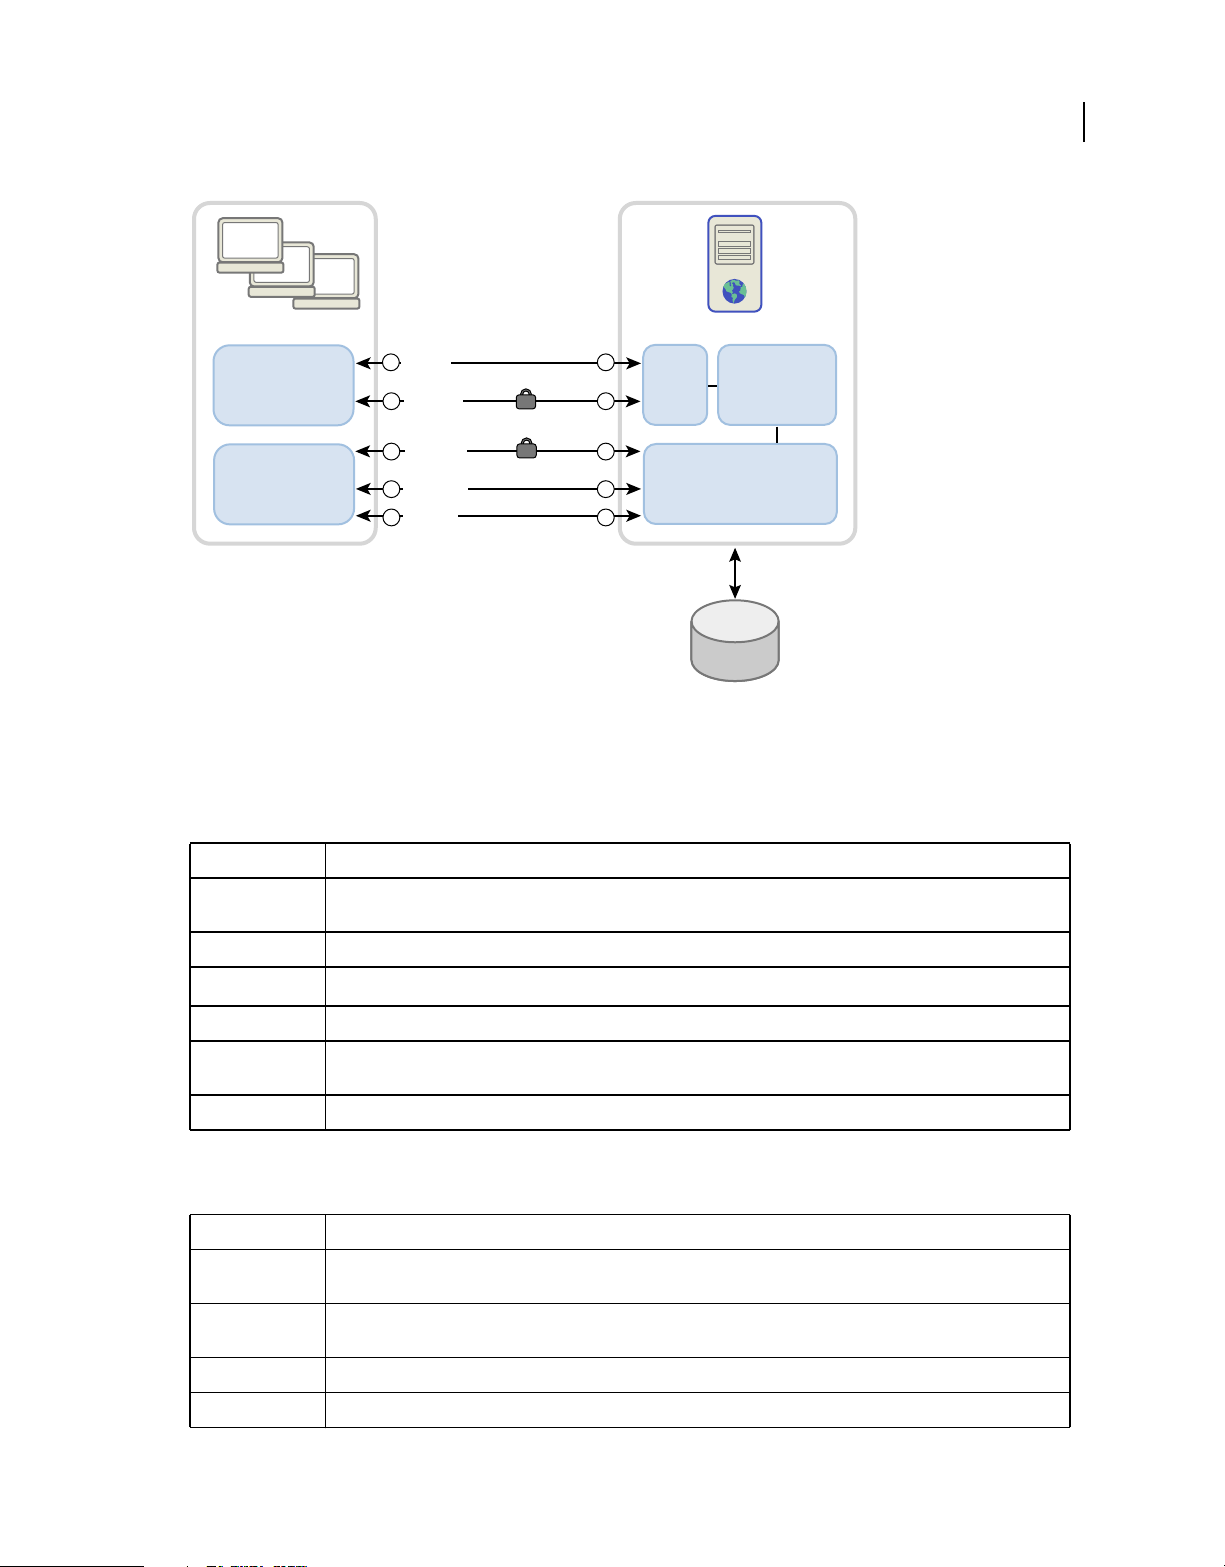
The data flows between client applications and Adobe Connect are shown in the following diagram. Custom
applications that you write use paths 1 to 2 and A to B. Adobe Connect applications (such as Adobe Connect Meeting,
Adobe Connect Training, or Adobe Connect Events) can use any of the data flow paths.
Last updated 12/16/2010
Page 8
USING ADOBE CONNECT 8 WEB SERVICES
Architecture
4
Client application
Web browser
Flash Player
1
HTTP:80
HTTPS:443
A
RTMPS:443
C
RTMP:1935
3
3a 4a
RTMPT:80
2
B
D
4
Adobe Connect
Web
Services
API
Flash Media Server
SQL database
Web/application
server
The data flow between Adobe Connect and client applications
The data flow can be encrypted with SSL or unencrypted.
Unencrypted If the data flow is unencrypted, connections are made over HTTP and Adobe Real Time Messaging
Protocol (RTMP) and follow the paths described in the following table.
Diagram number Description
1 The client web browser requests an Adobe Connect meeting or content URL over port HTTP:80 (connection paths may
vary).
2 The web server responds with content transfer or provides the client browser with information to enter Adobe Connect.
3
Adobe Flash® Player requests a connection to Adobe Flash Media Server over RTMP:1935 and HTTP:80.
4 Flash Media Server responds, and a persistent connection is opened to stream meeting traffic to the browser.
3a (alternate) In some cases, Flash Player requests a connection to the Flash Media Server, but can only obtain a tunneled connection
over RTMPT:80.
4a (alternate) Flash Media Server responds, and a tunneled connection is opened to stream meeting traffic to the browser.
Encrypted If the data flow is encrypted, connections are made securely over HTTPS and RTMPS (Real Time
Messaging Protocol over SSL), as follows.
Diagram number Description
A The client web browser requests a secure meeting or content URL over an encrypted connection on HTTPS:443
(connection paths may vary).
B The web/application server responds with an encrypted content transfer or provides the client with information to
make an encrypted connection to Adobe Connect.
C Flash Player requests an encrypted connection to Flash Media Server over RTMPS:443.
D Flash Media Server responds, and a persistent connection is opened to stream meeting traffic to the browser.
Last updated 12/16/2010
Page 9

USING ADOBE CONNECT 8 WEB SERVICES
Architecture
Custom applications
Adobe Connect Web Services provides an XML API, so your application must be able to communicate with Adobe
Connect using XML over HTTP or XML over HTTPS. Your application calls the API by building a request URL and
passing it one or more parameters, either as name/value pairs or as an XML document. Web Services returns an XML
response, from which you can extract values.
Custom applications retrieve metadata from the Adobe Connect database. Metadata includes meeting or course names
and times, meeting room URLs, content URLs, and report information.
The data flow for a custom application retrieving metadata from the database is from a client web browser, to the client
web application server, to the XML API, the Adobe Connect web application server, and the SQL database—and then
back again.
The data flow between a custom application and Adobe Connect works like this:
1 A user accesses your custom application from a web browser.
2 The application calls the XML API over HTTP:80 or HTTPS:443.
3 The Adobe Connect web application server authorizes the application and its users, retrieves metadata from the
SQL database, and returns the metadata.
4 On the client side, your web or application server, XML parser, and software libraries handle the response and
return it to your application.
5 The user continues to work in your custom application, and clicks a meeting or content URL. At this point, the user
accesses a Adobe Connect application to enter a meeting room, and the typical data flow between a Adobe Connect
application and the server begins.
5
Adobe Connect applications
Adobe Connect applications call the server using the same Web Services XML API that you use from a custom
application.
In general, content is transported over HTTP port 80 or HTTPS port 443. Content includes slides, HTTP pages, SWF
files, and files transferred through the FileShare pod. These are default port numbers that you can configure (see
Migrating, Installing, and Configuring Adobe Connect Server for details).
Streamed, real-time communications from Flash Media Server are transported over RTMP port 1935. Streamed
communications include audio, video (webcam and FLV), file share, and chat. Meeting state is also maintained over
RTMP port 1935.
Components of Adobe Connect
Adobe Connect is architected with two server components, and each server uses a SQL database.
The web application server The web application server is the brains of Adobe Connect. It contains and executes all of
the business logic needed to deliver content to users. It handles access control, security, quotas, and licensing, as well
as management functions such as clustering, failover, and replication.
The web application server also handles Adobe Connect Central, the application through which you view and manage
your organization’s content and users—when you are not using a custom application or integrated third-party system.
The metadata describing content and users can be stored in either single or multiple replicated SQL databases. The
web application server is stateless, which means that scaling is near linear.
Last updated 12/16/2010
Page 10

USING ADOBE CONNECT 8 WEB SERVICES
Architecture
Flash Media Server Flash Media Server is the muscle of Adobe Connect. Flash Media Server streams audio, video, and
rich media content using RTMP. When a meeting is recorded and played back, audio and video are synchronized, or
content is converted and packaged for real-time screen sharing, Flash Media Server does the job.
Flash Media Server also plays a vital role in reducing server load by caching frequently accessed web pages, streams,
and shared data.
The SQL database Adobe Connect uses the Microsoft SQL Server database for persistent storage of transactional and
application metadata, including users, groups, content, and reporting information. The XML API retrieves metadata
stored in the database. The database can be implemented with either the Microsoft SQL Server Desktop Engine
(MSDE) or the full version of Microsoft SQL Server 2005.
Making your first API call
Adobe Connect Web Services uses a servlet framework to handle XML API requests. In the data flow diagram, the
servlet framework is represented by the API component. The API servlet receives XML requests from clients and
returns XML responses from the web application server and the database.
A request to the XML API is formatted as an HTTP request URL that the API servlet handles. A request URL has an
action name and parameters in name/value pairs, like this:
6
https://example.com/api/xml?action=sco-info&sco-id=2006334909
If you have access to a Adobe Connect account in which you can test API calls, you can experiment. In fact, Adobe
recommends testing API calls in the browser while you learn the API and write applications.
Before you begin, it’s useful to install a tool that allows you to view HTTP request and response headers in your
browser.
Call common-info in a browser
1 (Optional) Enable a tool for viewing HTTP headers in your browser.
2 Open a browser and navigate to your Adobe Connect login page.
3 Without logging in, delete the part of the URL after the domain name and add a call to common-info:
https://example.com/api/xml?action=common-info
The response from common-info gives you information about your session with the server, especially the cookie
that identifies your session:
Last updated 12/16/2010
Page 11

USING ADOBE CONNECT 8 WEB SERVICES
Architecture
<?xml version="1.0" encoding="utf-8" ?>
<results>
<status code="ok" />
<common locale="en" time-zone-id="85">
<cookie>breezbryf9ur23mbokzs8</cookie>
<date>2008-03-13T01:21:13.190+00:00</date>
<host>https://example.com</host>
<local-host>abc123def789</local-host>
<url>/api/xml?action=common-info</url>
<version>connect_700_r641</version>
<user-agent>
Mozilla/4.0 (compatible; MSIE 6.0; Windows NT 5.1; SV1;
.NET CLR 1.1.4322)
</user-agent>
</common>
</results>
When you log a user in from an application, you need to send the cookie value back to the server to identify the
user’s session (see
Log in from an application).
Call principal-list in a browser
Once you have the BREEZESESSION cookie value from common-info, the browser adds it to the request header on your
next request.
7
1 In a web browser, log in to Adobe Connect. Change the browser URL to call principal-list:
https://example.com/api/xml?action=principal-list
2 Check the request header. This time it sends the BREEZESESSION cookie value back to the server:
GET /api/xml?action=principal-list HTTP/1.1
Accept: */*
Accept-Language: en-us
Accept-Encoding: gzip, deflate
User-Agent: Mozilla/4.0 (compatible; MSIE 6.0; Windows NT 5.1; SV1; .NET CLR 1.1.4322)
Host: example.com
Connection: Keep-Alive
Cookie: BREEZESESSION=breezbryf9ur23mbokzs8
3 Check the response, which lists all principals on the server, each in its own principal element.
Last updated 12/16/2010
Page 12

USING ADOBE CONNECT 8 WEB SERVICES
Architecture
<?xml version="1.0" encoding="utf-8" ?>
<results>
<status code="ok" />
<principal-list>
<principal principal-id="624526" account-id="624520" type="user"
has-children="false" is-primary="false" is-hidden="false">
<name>joe harrison</name>
<login>jharrison@example.com</login>
<email>jharrison@example.com</email>
</principal>
<principal principal-id="624550" account-id="624520" type="user"
has-children="false" is-primary="false" is-hidden="false">
<name>bob jones</name>
<login>bjones@example.com</login>
<email>bjones@example.com</email>
</principal>
...
</principal-list>
</results>
Add filters and sorts
Many actions in the API allow you to add a filter to return only certain response elements or a sort to display response
elements in a certain order.
8
A filter is a special parameter that starts with the keyword filter, followed by an optional modifier, then a field name
and a value. These are all examples of filters:
• filter-name=jazz doe (which matches results with the exact name jazz doe)
• filter-like-name=jazz (which matches any results that contain jazz in the name)
• filter-out-type=user (which returns any results that do not have a type of user)
These are just a few filter types, and you can find more in filter-definition. Check an action in the reference (at
“Action reference” on page 58) to see whether its response can be filtered. In general, if an action allows filters, you can
use them on any response element or attribute.
A sort is another special parameter that starts with the keyword sort (or sort1 or sort2), followed by a field name
and then one of the keywords
asc or desc, for example:
• sort-name=asc (to sort in ascending order by name)
• sort-group-id=desc (to sort in descending order by group-id)
These are just a few sort examples. You can test sorts in the browser or see sort-definition for more.
Make a call with a filter and sort
1 Call principal-list again, displaying only groups and sorting them alphabetically by name:
https://example.com/api/xml?action=principal-list&filter-type=group
&sort-name=asc
2 To tighten the response, choose a group from the list and filter on its name:
https://example.com/api/xml?action=principal-list&filter-name=developers
This time, only one group is returned:
Last updated 12/16/2010
Page 13

USING ADOBE CONNECT 8 WEB SERVICES
Architecture
<?xml version="1.0" encoding="utf-8" ?>
<results>
<status code="ok" />
<principal-list>
<principal principal-id="2007105030" account-id="624520"
type="group" has-children="true" is-primary="false"
is-hidden="false">
<name>developers</name>
<login>developers</login>
</principal>
</principal-list>
</results>
Where to go from here
At this point, you can continue to test calls in the browser and observe how they work. It’s the best and easiest way to
learn the XML API. When you need more information, turn to any of these sources:
• The API reference in “Action reference” on page 58
• “Login and requests” on page 10 for information on how to log users in from applications
• “Basics” on page 18 to learn the three basic concepts underlying the API
• “Meetings” on page 30 if you want to create and manage meetings from an application
• “Training” on page 47 if you are building a training application
9
Last updated 12/16/2010
Page 14

Chapter 3: Login and requests
This chapter explains how to log a user in from your application, make requests, handle responses, and log the user out.
There are several ways to accomplish most of these tasks, depending on your development environment, server
configuration, and application design.
Log in from an application
Any custom application you write that uses Adobe® Connect™ Web Services functionality or integrates with a thirdparty system needs to log in a user to Adobe Connect. In its simplest form, the process of logging in calls the
action.
However, the technique for logging in varies according to whether you use cookie management, have a licensed server
or a hosted account, and authenticate directly to Adobe Connect or use external authentication. Depending on your
environment and server configuration, you might also use combinations of these options.
Cookie management When a user logs in, Adobe Connect returns a cookie that identifies the user’s session. You need
to pass the cookie back to the server on all calls made to the server during the user’s session. Then, when the user logs
out, the server makes the cookie expire and you should invalidate it.
login
10
In your development environment, you can use a code library that manages cookies for you. The process of logging in
and managing a user’s session varies according to whether you use a cookie management library or manage the user’s
session yourself.
Licensed server or hosted account Your organization might have a licensed Adobe Connect server within your
firewall, or you may have an Adobe Connect hosted account at Adobe. Either way, you send XML requests over HTTP
or HTTPS, but security requirements and the login process vary. If you are a hosted customer, you can use certain
parameters with the
Direct or external authentication Whether you are a hosted or licensed customer, your application might authenticate
directly to Adobe Connect, or you might authenticate users on your own network, set an identifier in an HTTP request
header, and send it to Adobe Connect. The login process varies according to whether you use direct or external
authentication.
login action to avoid sending user IDs and passwords over the Internet.
Log in to Adobe Connect server
The standard technique for logging a user in to Adobe Connect server uses the login action, passing the user’s login
ID and password. This technique works with both HTTP
You also need to manage the BREEZESESSION cookie the server returns for each user session. If you use a client-side
cookie management library, it is much easier to allow it to manage cookies for you than to manage the cookies yourself.
If you do not have such a library, call
HTTP header values.
Note: If you send user passwords to Adobe Connect server, use SSL so passwords are encrypted in transit, even if you have
a licensed Adobe Connect server within your own firewall.
login with the session parameter, as it is easier and more reliable than setting
GET and POST requests.
Log in with cookie management
1 Call the login action, passing it the user’s login ID and password, but no session parameter:
Last updated 12/16/2010
Page 15

USING ADOBE CONNECT 8 WEB SERVICES
Login and requests
http://example.com/api/xml?action=login&login=bobs@acme.com
&password=football
2 Parse the response for a status code of ok.
If the login is successful, the server returns the BREEZESESSION cookie in the response header:
Set-Cookie: BREEZESESSION=breezbryf9ur23mbokzs8;domain=.macromedia.com;path=/
3 Allow your cookie management library to manage the BREEZESESSION cookie.
Your client-side library passes the cookie back to the server in a request header on subsequent calls for the
remainder of the user’s session. You do not need to set the cookie in the request header explicitly. When the user
logs out, the cookie expires.
Log in using the session parameter
1 Before you log the user in, call common-info to get the value of the BREEZESESSION cookie:
http://example.com/api/xml?action=common-info
2 Extract the cookie value from the response:
<cookie>breezxq66rt43poai3if8</cookie>
3 Log the user in, specifying the cookie value:
http://example.com/api/xml?action=login&login=bobs@acme.com
&password=football&session=breezxq66rt43poai3if8
11
4 Parse the response for a status code of ok.
5
Use the
https://example.com/api/xml?action=principal-list
&session=breezxq66rt43poai3if8
session
parameter with the same cookie value on subsequent calls for the user, until the user’s session ends:
6 When the user logs out or the user’s session ends, do not reuse the cookie value.
Log in to a Adobe Connect hosted account
If you want to log in directly to an Adobe Connect hosted account or multiple hosted accounts, you still use the login
action, but you need to specify an account ID or domain name, in addition to the user’s login ID and password. You
can specify a domain name if you want to avoid sending an account ID over the Internet.
With an Adobe Connect hosted account, you cannot use single sign-on or external authentication. You must pass the
user’s authentication credentials on the Adobe Connect hosted account, not the credentials for an external network.
Note: It is important to have SSL enabled on your Adobe Connect hosted account, because you are sending user IDs,
passwords, and account information over the Internet to your Adobe Connect account hosted at Adobe.
Log in to an Adobe Connect hosted account with an account ID
1 Before you log the user in, call common-info with the domain name of your Adobe Connect hosted account in
either the request URL or the
http://acme.adobe.com/api/xml?action=common-info
http://adobe.com/api/xml?action=common-info&domain=acme.adobe.com
domain parameter:
2 Parse the response for the values of cookie and account-id:
<cookie>Sbreezzd2dfr2ua5gscogv</cookie>
...
<account account-id="295153" />
Last updated 12/16/2010
Page 16

USING ADOBE CONNECT 8 WEB SERVICES
Login and requests
3 Collect the user’s login ID and password in your application.
4 Call the login action, adding the user’s credentials and the account-id and session parameters:
https://example.com/api/xml?action=login&login=joy@acme.com
&password=happy&account-id=295153&session=Sbreezzd2dfr2ua5gscogv
5 Parse the response for a status code of ok.
6 (Optional) If you prefer, you can call login before common-info, extract the cookie value from the response
header, and manage it yourself or using a cookie management library.
Log in to an Adobe Connect hosted account with a domain name
1 Before you log the user in, call common-info with the domain name of your Adobe Connect hosted account in
either the request URL or the
http://acme.adobe.com/api/xml?action=common-info
http://adobe.com/api/xml?action=common-info&domain=acme.adobe.com
domain parameter:
2 Parse the response for the values of cookie and host:
<cookie>breezxq66rt43poai3if8</cookie>
...
<host>https://acme.adobe.com</host>
12
3 Extract the domain name from the value of host:
acme.adobe.com
4 In your application, collect the user’s login ID and password.
Be sure the login ID is the user’s Adobe Connect hosted account login ID, not an external one.
5 Call login, adding the user’s credentials and the domain and session parameters:
https://example.com/api/xml?action=login&login=joe
&password=smith99&domain=acme.adobe.com&session=breezxq66rt43poai3if8
The domain is equivalent to the account-id, but by using it you can avoid sending an account ID over the Internet,
especially if you use a non-encrypted connection.
6 Parse the response for a status code of ok.
7 (Optional) If you prefer, you can call login before common-info, extract the cookie value from the response
header, and manage it yourself or using a cookie management code library.
Log in using HTTP header authentication
Note: The instructions in this section apply only to Adobe Connect server.
Your application can use a trusted central server to authenticate users with single sign-on and pass your network’s
(here called external) authentication to Adobe Connect server, without explicitly passing an Adobe Connect server
user ID and password. (For detailed instructions on how to set up and configure HTTP header authentication, see
Adobe Connect Installation and Configuration Guide).
With HTTP header authentication, a user logs in to your authentication server. Once the user is authenticated, you
add an HTTP request header that identifies the user, or configure a proxy server to add the header. The authentication
filter on Adobe Connect (named
HeaderAuthenticationFilter) converts your user identifier to an Adobe Connect
login ID and authenticates the user.
Last updated 12/16/2010
Page 17
USING ADOBE CONNECT 8 WEB SERVICES
Login and requests
13
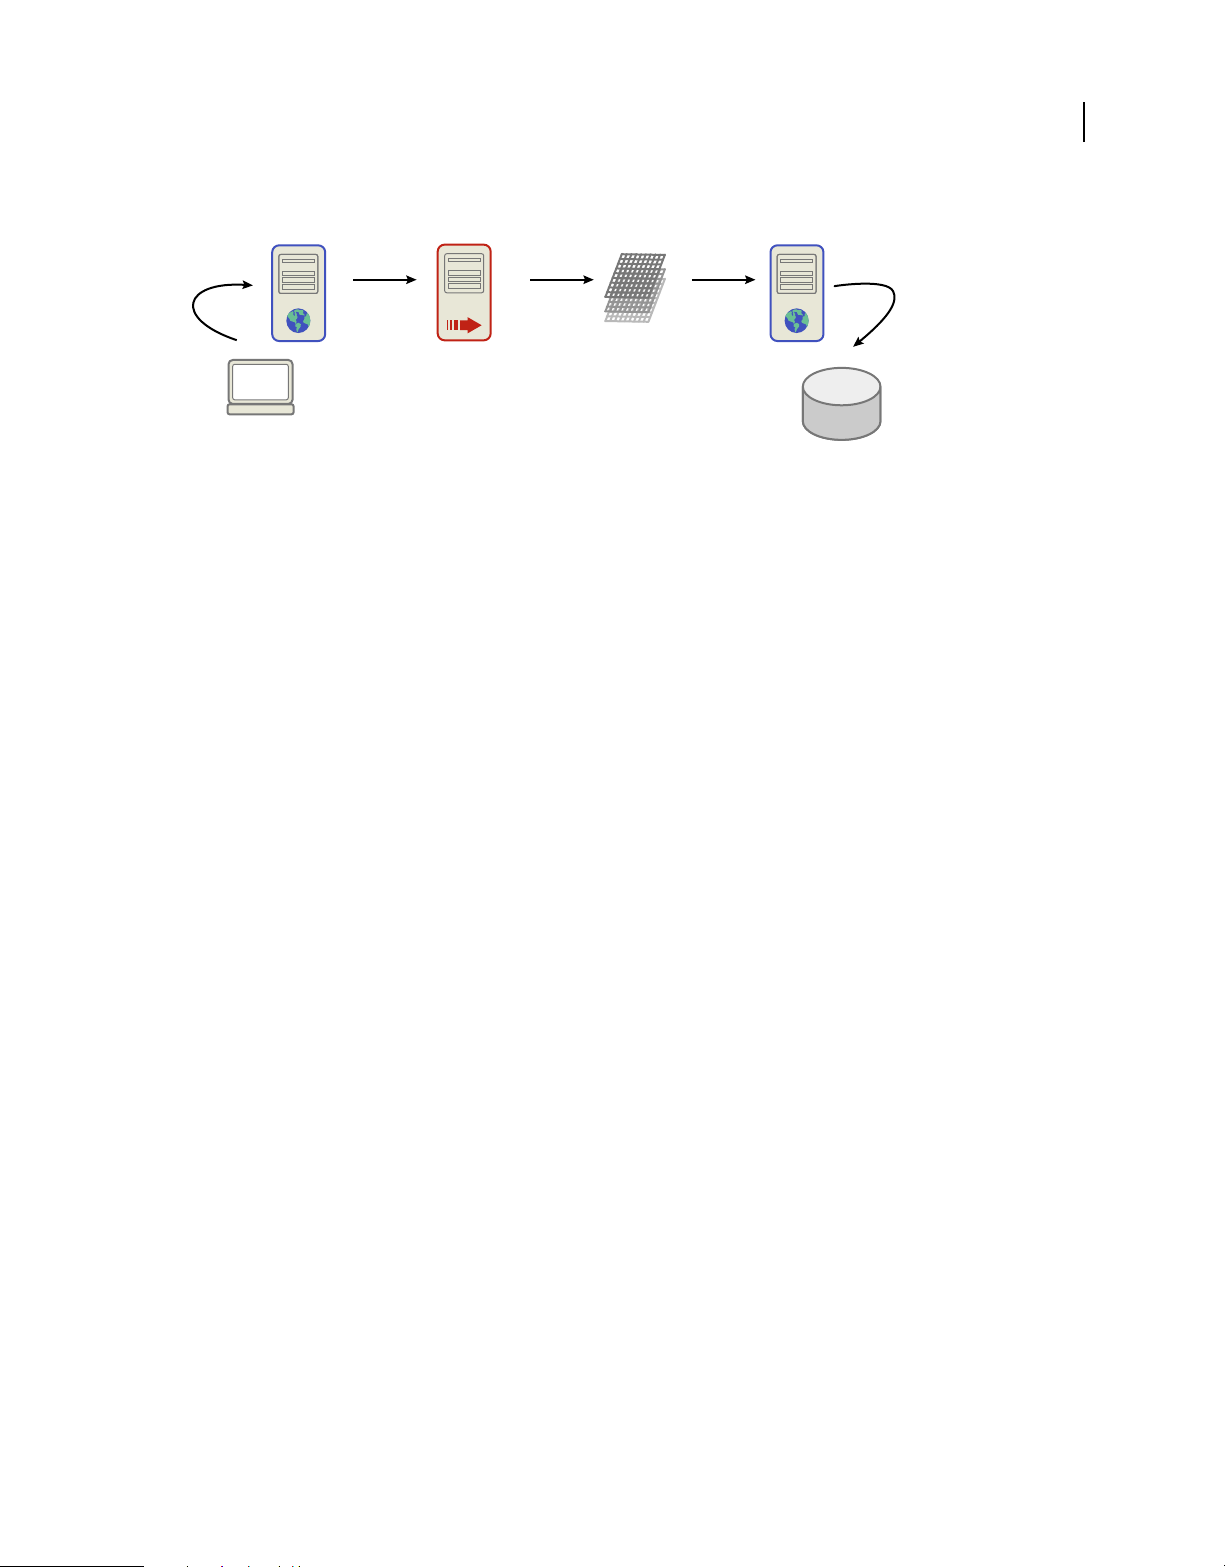
Authentication Server
Authentication filters convert external authentication credentials to Adobe Connect credentials.
Authentication Filter Adobe Connect ServerProxy Server
SQL database
External authentication works in addition to standard Adobe Connect authentication. Each user who needs to access
Adobe Connect server needs a valid Adobe Connect server login and password.
When you send a login request to Adobe Connect server with an external authentication credential:
• The authentication filter intercepts the request and checks for a user on Adobe Connect server with an ext-login
field that matches your external credential.
•
If a match exists, the filter passes your external authentication to Adobe Connect server, and the server logs the user in.
• If no match exists, the filter passes the login request to the server, which displays its login page. The user must then
log in to Adobe Connect server.
• If the user logs in successfully, Adobe Connect server updates the ext-login field in the user’s profile with the
external credential from your request. The next time you send a request with the user’s external credential, Adobe
Connect server finds a match in
ext-login, and the user does not need to log in to Adobe Connect.
• If the user does not log in successfully, the user is not allowed access to Adobe Connect server applications, content,
or meetings.
The steps that follow describe how to call login when you use HTTP header authentication.
Log in to Adobe Connect server using HTTP header authentication
1 Configure your network servers and Adobe Connect server for HTTP header authentication using the instructions
in Adobe Connect Installation and Configuration Guide.
2 In [your server directory]/appserv/conf/WEB-INF/web.xml, remove comment tags around the filter-mapping
element for
<filter-mapping>
<filter-name>HeaderAuthenticationFilter</filter-name>
<url-pattern>/*</url-pattern>
</filter-mapping>
<!--
<filter-mapping>
<filter-name>NtlmAuthenticationFilter</filter-name>
<url-pattern>/*</url-pattern>
</filter-mapping>
-->
HeaderAuthenticationFilter and add comment tags around any other filter-mapping elements:
3 In the filter element for HeaderAuthenticationFilter, enable the /api/ pattern for request URLs. You have
two choices for how to do this:
If your application uses the XML API and any Adobe Connect applications In the filter element for
HeaderAuthenticationFilter, use comment tags to disable the init-param element with a param-value
api/:
of/
Last updated 12/16/2010
Page 18

USING ADOBE CONNECT 8 WEB SERVICES
Login and requests
<!--
<init-param>
<param-name>ignore-pattern-0</param-name>
<param-value>/api/</param-value>
</init-param>
-->
If your application uses only the XML API Change the filter-mapping element for your filter type to use the URL
pattern
<filter-mapping>
<filter-name>HeaderAuthenticationFilter</filter-name>
<url-pattern>/api/*</url-pattern>
</filter-mapping>
/api/* instead of /*:
Then, in the filter element for your filter type, add comment tags around all init-param elements with a param-
name of ignore-pattern-x:
<filter>
<filter-name>HeaderAuthenticationFilter</filter-name>
<filter-class>
com.macromedia.airspeed.servlet.filter.HeaderAuthenticationFilter
</filter-class>
<!--
<init-param>
<param-name>ignore-pattern-0</param-name>
<param-value>/api/</param-value>
</init-param>
...
<init-param>
<param-name>ignore-pattern-4</param-name>
<param-value>/servlet/testbuilder</param-value>
</init-param>
-->
</filter>
14
4 Configure Adobe Connect server so that users are created with the field ext-login set to the external user ID you
send (see Adobe Connect Installation and Configuration Guide for details).
By default, ext-login has the same value as login, the Adobe Connect server login ID.
5 Once your system authenticates the user, create a login request. Add the parameter external-auth=use, but no
login or password parameters:
https://example.com/api/xml?action=login&external-auth=use
6 Add your authenticated user ID to the HTTP request header. By default, use the header name x-user-id:
x-user-id: joesmith
You can specify a different header name by setting a value for HTTP_AUTH_HEADER in the custom.ini file. You can
also configure a proxy server to set the HTTP header value. See Adobe Connect Installation and Configuration
Guide for details of either.
7 Parse the response for a status code of ok.
8 Handle the BREEZESESSION cookie value returned in the response header. You have two choices for how to do this:
If you use a client library that manages cookies Allow your library to extract the cookie value, store it, and pass it
back to the server on subsequent requests for the user.
Last updated 12/16/2010
Page 19

USING ADOBE CONNECT 8 WEB SERVICES
Login and requests
If you manage cookies yourself Extract the value of the BREEZESESSION cookie from the response header. Store it
and pass it back to the server in the
as the user’s session is valid:
https://example.com/api/xml?action=principal=list&session=breezs7zuepmy9wh2tseu
Be sure not to reuse the cookie value when the user’s session ends.
session parameter of all subsequent actions you call for the same user, as long
Send a request in an XML document
At times, you may prefer to send an HTTP POST request to the server to make sure the data is secure and not visible in
transit. In that case, specify the action name and parameters in an XML document.
Make an XML document request
1 Create an XML document with the root element params and param child elements for the action name and each
parameter:
<params>
<param name="action">login</param>
<param name="login">jon@doe.com</param>
<param name="password">foobar</param>
</params>
15
• You can only send one action in the params root element. You cannot batch multiple actions to be executed
sequentially.
• The XML document you send must be valid and well-formed. Try validating the document in an XML editor
before you send it.
2 Write code that sends an HTTP POST request to Adobe Connect and receives an XML response.
The specific code will vary according to your programming language and development environment.
3 In your code, send the XML document to Adobe Connect in the body of the HTTP POST request.
• Read the XML document into the request.
• Be sure to set a content-type header of text/xml or application/xml.
Parse a response with XPath
When you receive an XML response from Adobe Connect, you need to be able to parse it to extract the XML elements
you need.
If you are working in a language such as Java™, with an XML parser (such as Xerces or JDOM) installed, you can parse
through an XML response, select values from nodes, and then use those values.
Use XPath to parse a response
❖ Write a method that calls one or more actions. Create an instance of the XPath class so that you can use the XPath
expressions. Call the actions, read the XML response, and use XPath syntax to select the values you need:
Last updated 12/16/2010
Page 20

USING ADOBE CONNECT 8 WEB SERVICES
Login and requests
public String scoUrl(String scoId) throws XMLApiException {
try {
Element e = request("sco-info", "sco-id=" + scoId);
if(!(codePath.valueOf(e).equalsIgnoreCase("ok")))
return "";
XPath xpath = XPath.newInstance("//url-path/text()");
String path = ((Text) xpath.selectSingleNode(e)).getText();
e = request("sco-shortcuts", null);
xpath = XPath.newInstance("//domain-name/text()");
String url = ((Text) xpath.selectSingleNode(e)).getText();
return url + "/" + path.substring(1) + "?session=" + breezesession;
} catch (JDOMException jde) {
throw new XMLApiException(PARSE_ERROR, jde);
}
}
You can also use string pattern matching to check for a status code of ok. A successful action always returns this
response:
<?xml version="1.0" encoding="utf-8" ?>
<results>
<status code="ok" />
</results>
16
You can check the response for the pattern ok or code="ok" .
Parse an error response
When an API action completes successfully, it returns a status code of ok. If the call is not successful, it can also return
any of the following status codes:
invalid Indicates that the call is invalid in some way, usually invalid syntax.
no-access Shows that the current user does not have permission to call the action, and includes a subcode attribute
with more information.
no-data Indicates that there is no data available for the action to return, when the action would ordinarily return data.
too-much-data Means that the action should have returned a single result but is actually returning multiple results.
When the status code is invalid, the response also has an invalid element that shows which request parameter is
incorrect or missing:
<?xml version="1.0" encoding="utf-8" ?>
<results>
<status code="invalid">
<invalid field="has-children" type="long" subcode="missing" />
</status>
</results>
When the status code is no-access, the subcode explains why:
<?xml version="1.0" encoding="utf-8" ?>
<results>
<status code="no-access" subcode="denied" />
</results>
Last updated 12/16/2010
Page 21

USING ADOBE CONNECT 8 WEB SERVICES
Login and requests
All valid values for code, subcode, and invalid are described in status, in the API reference. Your application needs
to read and handle status codes and subcodes.
Handle status codes
1 Write a method that parses an XML API response for the status code and subcode. This is an example in Java:
private String getStatus(Element el) throws JDOMException {
String code = codePath.valueOf(el);
String subcode = subcodePath.valueOf(el);
StringBuffer status = new StringBuffer();
if(null != code && code.length() > 0)
status.append(code);
if(null != subcode && subcode.length() > 0)
status.append(" - " + subcode);
return status.toString();
}
2 When you call an action, parse the response for the status.
3 If the status is not ok, return a null value, display the error status code for debugging, or throw an application
exception.
The action to take depends on which call you are making and how your application is designed.
17
Log a user out
When a user logs out, the user’s session ends, and Adobe Connect invalidates the BREEZESESSION cookie by setting it
to null and using an expiration date that has passed. For example, if you call
Set-Cookie method in the response header, setting an empty cookie value and an expiration date a year earlier:
Set-Cookie: BREEZESESSION=;domain=.macromedia.com;expires=Mon, 29-Aug-2005
22:26:15 GMT;path=/
If you are managing the BREEZESESSION cookie, invalidate the value so it is not reused after a user logs out.
Log a user out and invalidate the session cookie
1 Call logout to log the user out:
https://example.com/api/xml?action=logout
2 Parse for a status code of ok to make sure the logout was successful.
3 Set the cookie value to null or otherwise invalidate it. For example, in this Java code snippet, the breezesession
variable stores the cookie value and is set to
public void logout() throws XMLApiException {
request("logout", null);
this.breezesession = null;
}
null:
logout on August 29, 2006, you see this
Last updated 12/16/2010
Page 22

Chapter 4: Basics
To get started with Adobe Connect Web Services, you need to understand three key concepts:
• Principals, who are users and groups
• SCOs, which are Shareable Content Objects and represent meetings, courses, and just about any content that can
be created on Adobe Connect. SCOs (pronounced sko, which rhymes with snow) are compatible with the industry
standard Shareable Content Object Reference Model (SCORM) specification and can be used with a Learning
Management System (LMS).
• Permissions, which define how principals can act on objects
This chapter describes basic tasks you can do with Web Services, regardless of which Adobe Connect applications you
have licensed. Many tasks are described as if you are running them in a browser. If you want to make the call from an
application, translate the XML request to the language you are working in (for an example of how to do this in Java™,
“Send XML requests” on page 249).
see
18
Find a principal-id
A principal is a user or group that has a defined permission to interact with a SCO on the server. You can create users
and groups for your organization and modify their permissions.
Adobe Connect also has built-in groups: Administrators, Limited Administrators, Authors, Training Managers, Event
Managers, Learners, Meeting Hosts, and Seminar Hosts. You can add users and groups to built-in groups, but you
can’t modify the permissions of built-in groups.
Note: The built-in groups that are available depend on your account.
Each Adobe Connect user and group has a principal-id. In some API calls, the principal-id is called a group-id
user-id to distinguish it from other values. The value of the ID that identifies a user or group is always the same,
or
regardless of its name. You can check the syntax of any action in
Get the principal-id of a user or group
1 Call principal-list with a filter:
https://example.com/api/xml?action=principal-list&filter-name=jazz doe
It is best to use filter-name, filter-login, or filter-email for an exact match. Be careful with filter-like-
name, as it may affect server performance.
2 Parse the principal elements in the response for the principal-id:
<principal principal-id="2006282569" account-id="624520" type="user"
has-children="false" is-primary="false" is-hidden="false">
<name>jazz doe</name>
<login>jazzdoe@example.com</login>
<email>jazzdoe@newcompany.com</email>
</principal>
“Action reference” on page 58
Get the principal-id of the current user
1 Call common-info after the user is logged in:
Last updated 12/16/2010
Page 23

USING ADOBE CONNECT 8 WEB SERVICES
Basics
https://example.com/api/xml?action=common-info
2 Parse the user elements in the response for the user-id:
<user user-id="2007124930" type="user">
<name>jazz doe</name>
<login>jazz@doe.com</login>
</user>
Here, the principal-id is called user-id, because it always represents a user who is authenticated to Adobe
Connect. A group cannot log in to the server. You can pass the
user-id value as a principal-id in other actions.
List principals or guests
A principal with a type of user is a registered Adobe Connect user, while a user with a type of guest has entered a
meeting room as a guest. The server captures information about the guest and gives the guest a
List all principals on the server
1 Call principal-list with no parameters:
https://example.com/api/xml?action=principal-list
principal-id.
19
This call returns all Adobe Connect users, so be prepared for a large response.
2 Parse the principal elements in the response for the values you want:
<principal principal-id="2006282569" account-id="624520" type="user"
has-children="false" is-primary="false" is-hidden="false">
<name>jazz doe</name>
<login>jazzdoe@example.com</login>
<email>jazzdoe@newcompany.com</email>
</principal>
List all guests on the server
1 Call <<UNRESOLVED XREF>> report-bulk-users, filtering for a type of guest:
https://example.com/api/xml?action=report-bulk-users&filter-type=guest
2 Parse the row elements in the response:
<row principal-id="51157227">
<login>joy@acme.com</login>
<name>joy@acme.com</name>
<email>joy@acme.com</email>
<type>guest</type>
</row>
List all users who report to a specific manager
When you call principal-info with a principal-id, the response shows the principal. If the principal is a user who
has a manager assigned in Adobe Connect, the response also shows data about the principal’s manager in a
manager
element:
Last updated 12/16/2010
Page 24

USING ADOBE CONNECT 8 WEB SERVICES
Basics
<manager account-id="624520" disabled="" has-children="false" is-hidden="false" isprimary="false" principal-id="2006282569"type="user">
<ext-login>jazzdoe@example.com</ext-login>
<login>jazzdoe@example.com</login>
<name>jazz doe</name>
<email>joy@example.com</email>
<first-name>jazz</first-name>
<last-name>doe</last-name>
<x-2006293620>23456</x-2006293620>
<x-2007017651>chicago</x-2007017651>
</manager>
You can use the manager’s principal-id with principal-list to list all users who are assigned to the manager.
1 Call principal-list, filtering on manager-id:
https://example.com/api/xml?action=principal-list&filter-manager-id=2006282569
2 Parse the response for the principal elements:
<principal principal-id="2006258745" account-id="624520" type="user" has-children="false"
is-primary="false" is-hidden="false" manager-id="2006282569">
<name>Pat Lee</name>
<login>plee@mycompany.com</login>
<email>plee@mycompany.com</email>
</principal>
20
Create users
To create a new user, you need Administrator privilege. Adobe recommends that you create a user who belongs to the
admins group for your application to use to make API calls that require Administrator privilege.
Create a new user and send a welcome e-mail
1 In your application, log in as an Administrator user.
See Log in from an application for various ways to log in.
2 Call <<UNRESOLVED XREF>> principal-update with at least these parameters:
https://example.com/api/xml?action=principal-update
&first-name=jazz&last-name=doe&login=jazz99@doe.com&password=hello
&type=user&send-email=true&has-children=0&email=jazz99@doe.com
The type must be user, has-children must be 0 or false, send-email must be true, and email must have a
valid e-mail address.
The server sends a welcome e-mail with login information to the user’s e-mail address.
3 Parse the principal element in the response for the user’s principal-id:
<principal type="user" principal-id="2007184341" has-children="0"
account-id="624520">
<login>jammdoe@example.com</login>
<ext-login>jammdoe@example.com</ext-login>
<name>jamm doe</name>
</principal>
Last updated 12/16/2010
Page 25

USING ADOBE CONNECT 8 WEB SERVICES
Basics
Create a new user without using an e-mail address as a login ID
1 In Connect Central, navigate to Administration > Users and Groups > Edit Login and Password Policies. Make sure
that Use E-mail Address as the Login is set to No.
2 In your application, log in as an Administrator user.
3 Call <<UNRESOLVED XREF>> principal-update to create the new user, passing both login and email
parameters:
https://example.com/api/xml?action=principal-update&first-name=jazz
&last-name=doe&login=jazz&email=jazzdoe@company.com
&password=nothing&type=user&has-children=0
4 Parse the response for the principal-id of the new user:
<principal type="user" principal-id="2007184341" has-children="0"
account-id="624520">
<login>jazzdoe@example.com</login>
<ext-login>jazzdoe@example.com</ext-login>
<name>jazz doe</name>
</principal>
In the response, ext-login has the same value as login by default, until the user logs in successfully using external
authentication (see
Log in using HTTP header authentication).
21
Update users
Once you create users, you often need to update their information. You can update standard fields that Adobe Connect
defines for users by calling
login, first-name, and last-name.
If you have defined custom fields for the principal, use acl-field-update to update them.
You need Administrator privilege to update users, so your application must first log in as a user in the admins group.
You cannot log in as the user and then have the user update his or her own profile.
Update standard user information
1 Log in as an Administrator user.
2 Call principal-list with a filter to get the user’s principal-id (see Find a principal-id).
3 Call <<UNRESOLVED XREF>> principal-update to update the user:
https://example.com/api/xml?action=principal-update
&principal-id=2006282569&email=jazzdoe@newcompany.com
4 Parse the response for a status code of ok.
Update custom field values for a user
1 Log in as an Administrator user.
2 Call custom-fields to get the field-id of the custom field:
https://example.com/api/xml?action=custom-fields
principal-update with the user’s principal-id. The standard fields include email,
3 Get the principal-id, sco-id, or account-id you want to update.
This value is the acl-id you pass to acl-field-update.
Last updated 12/16/2010
Page 26

USING ADOBE CONNECT 8 WEB SERVICES
Basics
4 Call acl-field-update to update the value of the custom field:
https://example.com/api/xml?action=acl-field-update&field-id=x-2007396975&aclid=2006258745&value=44444
Create custom fields
Custom fields are additional data fields that you define. You can define up to eight custom fields on a principal or SCO
custom-field-update.
using
Once you define the custom field, by default you can set its value either by editing the value in Adobe Connect Central
or by calling
To specify that the value can only be updated through the API, call custom-field-update with the parameter
object-type=object-type-read-only.
Define a custom field and set it on a user
1 First, create the field with custom-field-update:
https://example.com/api/xml?action=custom-field-update
&object-type=object-type-principal&permission-id=manage
&account-id=624520&name=Location&comments=adobe%20location
&field-type=text&is-required=true&is-primary=false&display-seq=9
custom-field-update.
22
The name field defines the field name as your application displays it, so use appropriate spelling and capitalization.
The custom field in this example is defined for all Adobe Connect principals.
2 Parse the field element in the response for the field-id:
<field field-id="2007184366" object-type="object-type-principal"
display-seq="9" account-id="624520" is-primary="false"
permission-id="manage" is-required="true" field-type="text">
<comments>test</comments>
<name>Country</name>
</field>
3 Get the principal-id of the user (see Find a principal-id).
4 Call acl-field-update to set the value of the field, passing a field-id, the user’s principal-id as acl-id, and
a value:
https://example.com/api/xml?action=acl-field-update
&acl-id=2006258745&field-id=2007017474&value=San%20Francisco
5 Parse the response for a status code of ok.
Create groups
To add users to groups, you need to call principal-update as your application’s Administrator user.
Add a user to a group
1 Log in as your application’s Administrator user.
2 (Optional) If the user does not yet exist, create the user with <<UNRESOLVED XREF>> principal-update:
Last updated 12/16/2010
Page 27

USING ADOBE CONNECT 8 WEB SERVICES
Basics
https://example.com/api/xml?action=principal-update
&first-name=jazzwayjazz&last-name=doe&login=jazz@doe.com
&password=nothing&type=user&has-children=0
3 (Optional) Parse the response for the new user’s principal-id.
4 If the user already exists, call principal-list to get the user’s principal-id:
https://example.com/api/xml?action=principal-list&filter-type=user
5 Parse the response for the principal-id:
<principal principal-id="5611980" account-id="624520" type="user"
has-children="false" is-primary="false" is-hidden="false">
<name>Joy Black</name>
<login>joy@acme.com</login>
<email>joy@acme.com</email>
</principal>
6 Call principal-list again to get the group’s principal-id:
https://example.com/api/xml?action=principal-list&filter-type=group
7 Call group-membership-update with is-member=true to add the user to the group:
https://example.com/api/xml?action=group-membership-update
&group-id=4930296&principal-id=2006258745&is-member=true
23
• The principal-id is the user’s principal-id.
• The group-id is the group’s principal-id.
• The parameter is-member must be true.
Check whether a specific user is in a group
1 Call principal-list with a group-id, filter-is-member, and a filter that identifies the principal:
https://example.com/api/xml?action=principal-list&group-id=624523
&filter-is-member=true&filter-like-name=bob
2 Parse for a principal element in the response. A successful response looks like this:
<principal-list>
<principal principal-id="624660" account-id="624520" type="user"
has-children="false" is-primary="false" is-hidden="false">
<name>Bill Jones</name>
<login>bjones@acme.com</login>
<email>bjones@acme.com</email>
<is-member>true</is-member>
</principal>
</principal-list>
If the user is not a group member, the principal-list element is empty:
<?xml version="1.0" encoding="utf-8" ?>
<results>
<status code="ok" />
<principal-list />
</results>
Check which users are in a group
1 To get the group’s principal-id, call principal-list with filters:
Last updated 12/16/2010
Page 28

USING ADOBE CONNECT 8 WEB SERVICES
Basics
https://example.com/api/xml?action=principal-list&filter-type=group
&filter-name=developers
With filter-type and filter-name, principal-list should return a unique match.
2 Parse the response for the principal-id:
<principal principal-id="2007105030" account-id="624520"
type="group" has-children="true" is-primary="false"
is-hidden="false">
<name>developers</name>
<login>developers</login>
<is-member>false</is-member>
</principal>
3 Call principal-list again, with the principal-id as a group-id and filter-is-member=true:
https://example.com/api/xml?action=principal-list&group-id=2007105030
&filter-is-member=true
4 Parse the response for the principal elements:
<principal principal-id="5698354" account-id="624520" type="group"
has-children="true" is-primary="false" is-hidden="false">
<name>Bob Jones</name>
<login>bobjones@acme.com</login>
<is-member>true</is-member>
</principal>
24
List all groups a user belongs to
1 Call principal-list with the user’s principal-id and filter-is-member=true:
https://example.com/api/xml?action=principal-list
&principal-id=2006258745&filter-is-member=true
2 Parse the response for the principal elements:
<principal principal-id="5698354" account-id="624520" type="group"
has-children="true" is-primary="false" is-hidden="false">
<name>Bob Jones</name>
<login>bobjones@acme.com</login>
<is-member>true</is-member>
</principal>
Find SCOs
All objects on Adobe Connect are Shareable Content Objects, or SCOs. The word Shareable comes from learning
management systems in which content is combined into courses or curriculums and shared among them.
On the server, a SCO can be any content object that is combined with other content objects into a course or
curriculum. Courses, curriculums, presentations, and other types of content are SCOs. Meetings, events, folders, trees,
links, graphics files, or any other object are also SCOs.
Each SCO has a unique integer identifier called a sco-id. The sco-id is unique across the entire server. On a Adobe
Connect hosted account, the
sco-id is unique across all accounts.
Each SCO also has a type, such as content, course, meeting, and so on. You can see the sco-id and type values in
the response from
sco-info or other actions:
Last updated 12/16/2010
Page 29

USING ADOBE CONNECT 8 WEB SERVICES
Basics
<sco account-id="624520" disabled="" display-seq="0" folder-id="2006258747"
icon="producer" lang="en" max-retries="" sco-id="2006334909"
source-sco-id="" type="content" version="1">
Characteristics of SCOs
When you study the XML responses of various calls, you notice more characteristics of SCOs:
• A SCO’s identifier is called a sco-id in some actions, but can also be called folder-id, acl-id, or another name
in other actions. It’s the same unique ID.
• Each SCO can be accessed by various principals, either users or groups. The specific principals who can access a
SCO are defined in access control lists, or ACLs.
• Each SCO has a unique URL, with two parts: a domain name (like http://example.com) and an URL path (like
/f2006123456/). You can concatenate these to form the full URL that accesses the SCO.
• Each SCO has a navigation path that describes where it resides in the folder hierarchy.
• Each SCO has a permission defined for each principal who can access it.
• Some SCOs have description fields, which are text strings that give you information about the SCO.
Often you need to find the ID of a SCO or some information about it. SCOs are arranged in a specific folder hierarchy
where folders have names that indicate whether they are at the top level, contain shared content or templates, or hold
user content and templates.
25
When you call sco-shortcuts, it returns a list of folders. Notice that folders have different types:
<?xml version="1.0" encoding="utf-8" ?>
<results>
<status code="ok" />
<shortcuts>
<sco tree-id="624530" sco-id="2006258751" type="my-meeting-templates">
<domain-name>http://example.com</domain-name>
</sco>
<sco tree-id="624530" sco-id="2006258750" type="my-meetings">
<domain-name>http://example.com</domain-name>
</sco>
<sco tree-id="624529" sco-id="624529" type="meetings">
<domain-name>http://example.com</domain-name>
</sco>
<sco tree-id="624530" sco-id="624530" type="user-meetings">
<domain-name>http://example.com</domain-name>
</sco>
...
</shortcuts>
</results>
The folders shown in this example happen to be for meetings, but folders for other types of SCOs follow a similar
pattern. Each folder type stores certain types of objects, with certain access privileges, as follows:
content, courses, meetings, events, seminars These are shared folders, such as Shared Meetings, Shared Training, and
so on. The Adobe Connect Administrator has access to this folder. The Administrator can assign Manage permission
to any user, but only members of the built-in group associated with the folder can create new content or meetings
within it.
user-content, user-meetings, user-courses, user-events These folders each contain a folder for each user who can
create content within it (for example, one folder for each meeting host or training developer).
Last updated 12/16/2010
Page 30

USING ADOBE CONNECT 8 WEB SERVICES
Basics
my-courses, my-events, my-meetings, my-meeting-templates, my-content Users create their own content in these
folders and have Manage permission on the content. For example, meeting hosts create meetings in their
meetings folder and have Manage permission on those meetings.
shared-meeting-templates This folder is within the Shared Meetings folder, contains meeting templates, and inherits
my-
permissions from Shared Meetings.
You can list the contents of any folder to get information about a specific SCO. When you need to search for a SCO
but do not have a
sco-search, as it returns only certain types of SCOs.
sco-id, move through folders using sco-shortcuts and sco-expanded-contents. Do not use
Find a SCO when you do not know the sco-id
1 Call <<UNRESOLVED XREF>> sco-shortcuts to get a list of root folders on Adobe Connect:
https://example.com/api/xml?action=sco-shortcuts
2 Parse the response for a type of the root folder that would logically contain the SCO, for example, my-courses for
a course the user has created.
3 Parse the resulting sco element for a sco-id:
<sco tree-id="4930295" sco-id="2006258748" type="my-courses">
<domain-name>http://example.com</domain-name>
</sco>
26
4 Create a call to <<UNRESOLVED XREF>> sco-expanded-contents to list the contents of the folder, adding an
exact match filter, if possible:
https://example.com/api/xml?action=sco-expanded-contents
&sco-id=2006258748&filter-name=All About Web Communities
You have several choices of filters:
• An exact match filter on name or url-path (like filter-name or filter-url-path), if you know the name or
URL of the SCO.
• A greater-than or less-than date filter (filter-gt-date or filter-lt-date) on date-begin, date-created,
date-modified, if you know one of those dates.
or
• A partial name filter (like filter-like-name), if you do not know the exact SCO name. However, using this
filter might affect system performance.
5 Parse the response for the sco-id:
<sco depth="1" sco-id="2006745671" folder-id="2006258748" type="folder"
icon="folder" lang="en" source-sco-id="2006745669" display-seq="0"
source-sco-type="14">
<name>A Day in the Life Resources</name>
<url-path>/f28435879/</url-path>
<date-created>2006-06-12T14:47:59.903-07:00</date-created>
<date-modified>2006-06-12T14:47:59.903-07:00</date-modified>
</sco>
Get information about a SCO
1 Call sco-info with the sco-id:
https://example.com/api/xml?action=sco-info&sco-id=2006745669
2 Parse the response for name, url-path, or any other value:
Last updated 12/16/2010
Page 31

USING ADOBE CONNECT 8 WEB SERVICES
Basics
<sco account-id="624520" disabled="" display-seq="0"
folder-id="2006258748" icon="curriculum" lang="en" max-retries=""
sco-id="2006745669" source-sco-id="" type="curriculum" version="0">
<date-begin>2006-06-12T14:45:00.000-07:00</date-begin>
<date-created>2006-06-12T14:47:59.903-07:00</date-created>
<date-modified>2006-06-12T14:47:59.903-07:00</date-modified>
<name>A Day in the Life</name>
<url-path>/day/</url-path>
</sco>
Construct the URL to a SCO
1 Call sco-shortcuts:
https://example.com/api/xml?action=sco-shortcuts
2 Parse the response for the domain-name value in any sco element:
<sco tree-id="624530" sco-id="2006258750" type="my-meetings">
<domain-name>http://example.com</domain-name>
</sco>
3 Call sco-info with the sco-id:
https://example.com/api/xml?action=sco-info&sco-id=2006334909
27
4 Parse the response for the url-path:
<sco account-id="624520" disabled="" display-seq="0"
folder-id="2006258747" icon="producer" lang="en"
max-retries="" sco-id="2006334909" source-sco-id=""
type="content" version="1">
<date-created>2006-05-11T12:00:02.000-07:00</date-created>
<date-modified>2006-05-16T15:22:25.703-07:00</date-modified>
<name>Test Quiz</name>
<url-path>/quiz/</url-path>
<passing-score>10</passing-score>
<duration>15100.0</duration>
<section-count>6</section-count>
</sco>
The url-path has both leading and trailing slashes. You can take the url-path from report-my-meetings,
report-my-training, or any call that returns it.
5 Concatenate the url-path with the domain-name:
http://example.com/f2006258748/
Download files
You can download zip files from Adobe Connect to a user’s local computer. A zip file is a SCO. To download it, you
need to construct a download URL to the zip file, which looks like this:
http://server-domain/url-path/output/url-path.zip?download=zip
You probably already know the domain name of your server (such as example.com). If you do not, you can get it by
sco-shortcuts.
calling
Last updated 12/16/2010
Page 32

USING ADOBE CONNECT 8 WEB SERVICES
Basics
Download a zip file from the server
1 Call sco-shortcuts:
https://example.com/api/xml?action=sco-shortcuts
2 Extract any domain-name value from the response:
http://example.com
3 Call sco-info with the sco-id of the zip file:
https://example.com/api/xml?action=sco-info&sco-id=2006258747
The SCO is the entire zip file.
4 Parse the response for the url-path element:
<sco account-id="624520" disabled="" display-seq="0" folder-id="624522"
icon="folder" lang="en" max-retries="" sco-id="2006258747"
source-sco-id="" type="folder" version="1">
<date-created>2006-04-18T10:21:47.020-07:00</date-created>
<date-modified>2006-04-18T10:21:47.020-07:00</date-modified>
<name>joy@acme.com</name>
<url-path>/f124567890/</url-path>
</sco>
28
5 Construct the download URL, for example:
https://example.com/quiz/output/quiz.zip?download=zip
Be sure to remove the trailing slash from the url-path value before adding .zip to it (so you have a value like
quiz.zip, not /quiz/.zip).
/
Check permissions
Permissions define the ways in which a principal can interact with a SCO.
A permission mapping, indicating what permissions a principal has for a particular SCO, is called an access control list
or ACL. An ACL consists of three pieces of information:
• The ID of a principal (a principal-id).
• The ID of a SCO, account, or principal being acted on. In permission calls, it’s called an acl-id. In other calls, the
ID might be called a
• A keyword that indicates the permission level the principal has, which is one of the valid values in permission-id.
Check the permission a principal has on a SCO
1 Call permissions-info with both an acl-id and principal-id:
https://example.com/api/xml?action=permissions-info&acl-id=2006334909
&principal-id=2006258745
sco-id, account-id, or principal-id.
To check for permissions on a SCO, the acl-id is a sco-id. The acl-id can also be a principal-id or account-id.
2 Parse the response for a permission-id:
Last updated 12/16/2010
Page 33

USING ADOBE CONNECT 8 WEB SERVICES
Basics
<?xml version="1.0" encoding="utf-8" ?>
<results>
<status code="ok" />
<permission acl-id="2007035246" permission-id="view"
principal-id="2006258745" />
</results>
If a principal does not have an explicit permission to the SCO (in other words, if permission-id=""), the
principal’s permissions on the SCO’s parent object apply.
Check all principals’ permissions on a SCO
1 Call permissions-info with an acl-id, but no principal-id:
https://example.com/api/xml?action=permissions-info&acl-id=2006293572
2 Iterate through the principal elements and parse them for permission-id values:
<principal principal-id="2596608" is-primary="false" type="user"
has-children="false" permission-id="view">
<name>Jay Arnold</name>
<login>jay@example.com</login>
</principal>
The valid permission values are listed in permission-id.
29
Last updated 12/16/2010
Page 34

Chapter 5: Meetings
Custom applications can display, create, and delete Adobe® Connect™ meetings in a web application, portal, or other
environment.
Using web services with Adobe Connect meetings
Custom applications can display, create, and delete Adobe® Connect™ meetings in a web application, portal, or other
environment.
When users click a meeting room URL, they enter Adobe Connect, which hosts the meeting room. Adobe Connect
then streams audio, video, and rich media content to the meeting room users.
Adobe recommends the following actions for meeting applications:
report-my-meetings To display a user’s meetings.
sco-update To create a meeting room or update information about it.
30
permissions-update To add a host, presenter, and participants to a meeting.
report-bulk-consolidated-transactions To calculate meeting usage, especially the amount of time each user has spent
in the meeting.
report-quiz-interactions To get the results of a meeting poll.
Some actions that handle meetings require Administrator privilege, as noted in the task instructions. Create a Adobe
Connect user who is a member of the
admins group for your application to use to make these calls.
Find meetings
You often need to locate the sco-id of a meeting so that you can invite users, get report information about it, or update
it in some other way.
You should understand the structure of folders in which meetings can be stored. By default, meetings are stored in the
host’s My Meetings folder (called
Characteristics of SCOs.
Find the sco-id of a meeting
1 Call sco-shortcuts:
https://example.com/api/xml?action=sco-shortcuts
2 Parse the response for the sco-id of a meetings folder that is likely to contain the meeting:
<sco tree-id="624530" sco-id="624530" type="user-meetings">
<domain-name>http://example.com</domain-name>
</sco>
my-meetings in the API). For more details on the folder structure, see
The folder name should be meetings, user-meetings, or my-meetings. Use a folder as far down the tree as you can.
3 Call sco-contents on the folder, adding a filter or two to reduce the response:
Last updated 12/16/2010
Page 35

USING ADOBE CONNECT 8 WEB SERVICES
Meetings
https://example.com/api/xml?action=sco-contents&sco-id=2006258750
&filter-type=meeting&filter-name=Intro to Film
• The more specific you can make the filters, the better. Good filters to use are filter-name, filter-url-path,
or a date filter. Be careful with using
filter-like-name, as it might affect system performance.
• You can also call sco-expanded-contents to list subfolders and their contents. However, sco-contents is
better for server performance, if you know the
4 Parse the response for the sco-id of the meeting:
<sco sco-id="2006743452" source-sco-id="-1625529" folder-id="2006258750"
type="meeting" icon="meeting" display-seq="0" is-folder="0">
<name>Intro to Film</name>
<url-path>/film/</url-path>
<date-begin>2006-06-09T14:00:00.000-07:00</date-begin>
<date-end>2006-06-09T20:00:00.000-07:00</date-end>
<date-modified>2006-06-09T14:07:13.767-07:00</date-modified>
<duration>06:00:00.000</duration>
</sco>
sco-id of the folder that contains the meeting.
List all meetings on the server
❖ Call report-bulk-objects with type=meeting:
https://example.com/api/xml?action=report-bulk-objects&filter-type=meeting
31
The response has a row element for each meeting, showing the meeting URL, name, and dates:
<row sco-id="2007372149" type="meeting">
<url>/monday/</url>
<name>Monday Staff Meeting</name>
<date-created>2006-12-18T14:15:00.000-08:00</date-created>
<date-end>2006-12-19T02:15:00.000-08:00</date-end>
<date-modified>2006-12-18T17:38:11.660-08:00</date-modified>
</row>
Display meetings
In your application, you might want to lists of Adobe Connect meetings, such as a user’s present or future scheduled
meetings.
An application workflow might log a user in and display the user’s meetings, or it might add the user to a meeting and
then display meetings. Displaying the user’s meetings means listing the contents of the
Display a user’s meetings
1 Log the user in (see Log in from an application).
2 Call report-my-meetings to list the user’s meetings:
https://example.com/api/xml?action=report-my-meetings
You can add a filter to reduce the response. For example, you can exclude meetings that have ended:
my-meetings folder.
https://example.com/api/xml?action=report-my-meetings
&filter-expired=false
3 Parse the response for values from the meeting elements:
Last updated 12/16/2010
Page 36

USING ADOBE CONNECT 8 WEB SERVICES
Meetings
<meeting sco-id="2007063179" type="meeting" icon="meeting" permission-id="host" activeparticipants="0">
<name>September All Hands Meeting</name>
<domain-name>example.com</domain-name>
<url-path>/sept15/</url-path>
<date-begin>2006-09-15T09:00:00.000-07:00</date-begin>
<date-end>2006-09-15T18:00:00.000-07:00</date-end>
<expired>false</expired>
<duration>09:00:00.000</duration>
</meeting>
4 Create the URL to the meeting room by concatenating http:// or https://, domain-name, and url-path.
Add a user to a meeting and display meetings
1 Log in as your application’s Administrator user.
2 Get the user’s principal-id (see Find a principal-id).
3 Get the sco-id of the meeting (see Find meetings).
4 Call permissions-update to add the user to the meeting:
https://example.com/api/xml?action=permissions-update
&acl-id=2006258765&principal-id=2006258745&permission-id=view
32
Use a permission-id of view for a participant, mini-host for presenter, or host for a meeting host.
5 Log out as the Administrator user, and log in as the user you just added to the meeting.
6 Display the user’s current meetings:
https://example.com/api/xml?action=report-my-meetings
&filter-expired=false
Create meeting room URLs
You have several choices of how to construct the URL to a meeting room. The best action to call depends on how your
application is logged in and where you are in your application workflow.
By default, the meeting room is created in the host’s my-meetings folder.
Create the URL to a meeting room for which the user is host
1 If you are logged in as a user, and you want to create a URL to a meeting in the user’s my-meetings folder, call
report-my-meetings:
https://example.com/api/xml?action=report-my-meetings
2 Parse the response for the values of domain-name and url-path:
Last updated 12/16/2010
Page 37

USING ADOBE CONNECT 8 WEB SERVICES
Meetings
<meeting sco-id="2007063179" type="meeting" icon="meeting"
permission-id="host" active-participants="0">
<name>September All Hands Meeting</name>
<domain-name>example.com</domain-name>
<url-path>/sept15/</url-path>
<date-begin>2006-09-15T09:00:00.000-07:00</date-begin>
<date-end>2006-09-15T18:00:00.000-07:00</date-end>
<expired>false</expired>
<duration>09:00:00.000</duration>
</meeting>
3 Concatenate the two values and add http:// or https:// at the beginning:
https://example.com/online/
If you are using HTTPS and you do not explicitly add https://, the URL defaults to http://, and the user might
not be able to access the meeting room.
Create the URL to a meeting room for which the user is not host
1 Get the sco-id of the meeting (see Find meetings).
2 Call sco-info with the sco-id:
https://example.com/api/xml?action=sco-info&sco-id=2006258750
33
3 Parse the response for the url-path:
<sco account-id="624520" disabled="" display-seq="0" folder-id="624530"
icon="folder" lang="en" max-retries="" sco-id="2006258750"
source-sco-id="" type="folder" version="1">
<date-created>2006-04-18T10:21:47.020-07:00</date-created>
<date-modified>2006-04-18T10:21:47.020-07:00</date-modified>
<name>joy@acme.com</name>
<url-path>/f1234567890/</url-path>
</sco>
4 (Optional) If you know the domain name of your Adobe Connect Server account, create the URL using http://
https://, then the domain-name, then the url-path.
or
5 If you do not know the domain name, call common-info:
https://example.com/api/xml?action=common-info
6 Parse the response for the value of the host element.
Create meetings
A user must be an Administrator to create a Adobe Connect meeting, which means the user is a member of the Meeting
Hosts group. In the response from
A meeting can be public, protected, or private, and to create each, you need to set a specific combination of principal-
id and permission-id:
principal-list, this group has type=live-admins.
• Public, equivalent to Anyone who has the URL for the meeting can enter the room
principal-id=public-access&permission-id=view-hidden
• Protected, equivalent to Only registered users and accepted guests can enter the room
principal-id=public-access&permission-id=remove
Last updated 12/16/2010
Page 38

USING ADOBE CONNECT 8 WEB SERVICES
Meetings
If a meeting is protected, registered users invited as meeting participants can enter by clicking the meeting room
URL and logging in. Users who are not invited can log in as guests. The meeting host receives a guest’s request to
enter (known as knocking) and can accept or decline.
• Private, which is equivalent to Only registered users and participants can enter. The login page does not allow guests
to log in.
principal-id=public-access&permission-id=denied
Create a public meeting and add host, presenter, and participants
1 Call principal-list to check that the user creating the Adobe Connect meeting is a member of the live-admins
group:
https://example.com/api/xml?action=principal-list&group-id=624523
&filter-is-member=true&filter-like-name=bob
2 Call sco-shortcuts to obtain the sco-id of the user’s my-meetings folder:
https://example.com/api/xml?action=sco-shortcuts
3 Parse the response for the sco element with type=my-meetings:
<sco tree-id="624530" sco-id="2006258750" type="my-meetings">
<domain-name>http://example.com</domain-name>
</sco>
34
4 Call sco-update to create the meeting room:
https://example.com/api/xml?action=sco-update
&type=meeting&name=October All Hands Meeting
&folder-id=2006258750&date-begin=2006-10-01T09:00
&date-end=2006-10-01T17:00&url-path=october
The folder-id is the sco-id of the user’s my-meetings folder.
5 Parse the response for the sco-id of the new meeting:
<sco folder-id="2006258750" lang="en" account-id="624520"
type="meeting" icon="meeting" sco-id="2007184134" version="0">
<date-begin>2006-10-01T09:00</date-begin>
<date-end>2006-10-01T17:00</date-end>
<url-path>/october/</url-path>
<name>October All Hands Meeting</name>
</sco>
You might want to store the url-path to the meeting, if you plan to create a URL to the meeting room later.
6 Call permissions-update to make the meeting public. Use the sco-id of the meeting as the acl-id:
https://example.com/api/xml?action=permissions-update&acl-id=2007018414
&principal-id=public-access&permission-id=view-hidden
7 Call permissions-update to add a host, a presenter, and participants:
https://example.com/api/xml?action=permissions-update
&principal-id=2006258745&acl-id=2007018414&permission-id=host
• Use a permission-id of host for the meeting host.
• Use mini-host for the presenter.
• Use view for meeting participants.
Last updated 12/16/2010
Page 39

USING ADOBE CONNECT 8 WEB SERVICES
Meetings
• You can specify multiple trios of principal-id, acl-id, and permission-id on one call to permissions-
update.
8 Create the URL to the meeting room (see Create meeting room URLs).
Create a private meeting and add host, presenter, and participants
1 Log in as your application’s Administrator user.
2 Follow the steps for creating a public meeting, but set the meeting permission to private:
https://example.com/api/xml?action=permissions-update&acl-id=2007018414
&principal-id=public-access&permission-id=denied
3 Call permissions-update again to add a host, a presenter, and guests.
4 Create the URL to the meeting room (see Create meeting room URLs).
Set or reset a meeting passcode
By default, when meeting hosts create meetings, they can set a passcode that users must enter to join the meeting. In
Connect Central, Account Administrators can enable and disable the ability to enforce passcodes; the ability to enforce
passcodes is disabled by default.
35
Use the Web Services API to do the following:
• Enable and disable the ability of meeting hosts to enforce passcodes for meetings.
• Set, reset, or remove the passcode for a meeting.
• Check whether a meeting has a passcode
• View a list of meetings that require passcodes
Enable and disable the ability to passcode protect meeting rooms
To enable the passcode protect option for an account, call the following API:
http://<server>/api/xml?action=meeting-feature-update&account-id=<acc_id>&feature-id=fidmeeting-passcode-notallowed&enable=false
To disable the passcode protect option, pass enable=true.
Note: Only administrators can call meeting-feature-update to enable or disable a meeting feature.
Check whether the enforce passcode option is enabled for an account
Call the meeting-feature-info API:
http://<server>/api/xml?action=meeting-feature-info&account-id=<acc_id>
If the result list contains feature-id=fid-meeting-passcode-notallowed, the passcode option is enabled.
Otherwise, the passcode option is not enabled. By default, the passcode options is disabled.
Set, reset, or remove a passcode
Call the acl-field-update API and pass the meeting-passcode parameter:
http://<server>/api/xml?action=acl-field-update&acl-id=<sco-id>&field-id=meetingpasscode&value=<passcode>
To remove a passcode, set the value parameter to empty:
Last updated 12/16/2010
Page 40

USING ADOBE CONNECT 8 WEB SERVICES
Meetings
http://<server>/api/xml?action=acl-field-update&acl-id=<sco-id>&field-id=meetingpasscode&value=
Note: Only administrators and meeting hosts can call acl-field-update with field-id=meeting-passcode.
Check whether a meeting has a passcode
http://<server>/api/xml?action=acl-field-info&filter-field-id=meeting-passcode&acl-id=<sco-id>
If a meeting has a passcode, the result is as follows:
<results>
<status code="ok"/>
<acl-fields>
<field acl-id="22701" field-id="meeting-passcode"><value>connect12</value></field>
</acl-fields>
</results>
If passcode is not set then the result is:
<results>
<status code="ok"/>
<acl-fields/>
</results>
Note: Only administrators can call acl-field-info .
36
View a list of meetings that require passcodes:
http://<server>/api/xml?action=acl-field-list&field-id=meeting-passcode
The result is the list of acl-ids (meeting-ids):
<results>
<status code="ok"/>
<acl-field-list>
<acl acl-id="21907">
<value>breeze</value>
</acl>
<acl acl-id="22701">
<value>connect12</value>
</acl>
<acl acl-id="21401">
<value>raj</value>
</acl>
</acl-field-list>
</results>
Note: Only administrators can call acl-field-list .
Create customized meetings
When you create a Adobe Connect meeting, you can assign it a meeting room template that creates a custom layout
for the meeting room. If you don’t assign a template, the meeting room is created with the default meeting template.
To edit a meeting room template, launch Connect Central and click the template’s URL. You can edit the template
while it is in a meeting templates folder (either My Templates or Shared Templates), if you have edit privileges on the
folder.
Last updated 12/16/2010
Page 41

USING ADOBE CONNECT 8 WEB SERVICES
Meetings
Create a meeting room using a template
1 Log in as your application’s Administrator user.
2 Call sco-shortcuts:
https://example.com/api/xml?action=sco-shortcuts
3 Parse the response for the sco-id of a folder that contains meeting templates:
<sco tree-id="624529" sco-id="-625529" type="shared-meeting-templates">
<domain-name>http://example.com</domain-name>
</sco>
<sco tree-id="624530" sco-id="2006258751" type="my-meeting-templates">
<domain-name>http://example.com</domain-name>
</sco>
4 Call sco-contents, passing it the sco-id of the meeting templates folder:
https://example.com/api/xml?action=sco-contents&sco-id=2006258751
5 Parse the response for the sco-id of the meeting template you want.
6 Create the meeting using sco-update. Pass it the sco-id of the meeting template as a source-sco-id:
https://example.com/api/xml?action=sco-update&type=meeting
&name=August%20All%20Hands%20Meeting&folder-id=2006258750
&date-begin=2006-08-01T09:00&date-end=2006-08-01T17:00
&url-path=august&source-sco-id=2006349744
37
7 Continue to set permissions for the meeting and add participants, host, and presenter (see Create meetings).
8 Create the URL to the meeting room (see Create meeting room URLs).
Invite users to meetings
Once you create a Adobe Connect meeting and add participants and presenters, you may want to send invitations by
e-mail. To send a meeting invitation, you need information about the meeting, including the meeting name, the host’s
name and e-mail address, the meeting room URL, the date and time of the meeting, and the participant’s (or
presenter’s) name and e-mail address.
You can construct an e-mail message using any technique that works with your user interface. Extract specific
information about the meeting using the following steps.
Send an e-mail to meeting participants
1 Call sco-info with the meeting sco-id:
https://example.com/api/xml?action=sco-info&sco-id=2006334033
2 Parse the response for the meeting name, date, or other values:
Last updated 12/16/2010
Page 42

USING ADOBE CONNECT 8 WEB SERVICES
Meetings
<sco account-id="624520" disabled="" display-seq="0"
folder-id="2006258750" icon="meeting" lang="en" max-retries=""
sco-id="2007063163" source-sco-id="-1625529" type="meeting"
version="0">
<date-begin>2006-08-15T09:00:00.000-07:00</date-begin>
<date-created>2006-07-27T15:30:43.220-07:00</date-created>
<date-end>2006-08-15T18:00:00.000-07:00</date-end>
<date-modified>2006-07-27T15:30:43.220-07:00</date-modified>
<name>August All Hands Meeting</name>
<url-path>/august/</url-path>
</sco>
3 Construct the URL to the meeting room (see Create meeting room URLs).
4 Call permissions-info to get the principal-id values of the presenters or participants, filtering on
permission-id:
https://example.com/api/xml?action=permissions-info
&acl-id=2007018414&filter-permission-id=mini-host
• For a list of presenters, use permission-id=mini-host.
• For participants, use permission-id=view.
5 Parse the response for the principal-id values you want:
<principal principal-id="2006282569" is-primary="false" type="user"
has-children="false" permission-id="view">
<name>jazz doe</name>
<login>jazzdoe@example.com</login>
</principal>
38
6 Call principal-info with the principal-id:
https://example.com/api/xml?action=principal-info
&principal-id=2006282569
7 Extract the name and email values from the response:
<principal account-id="624520" disabled="" has-children="false"
is-hidden="false" is-primary="false" principal-id="2006282569"
type="user">
<ext-login>jazzdoe@example.com</ext-login>
<login>jazzdoe@example.com</login>
<name>jazz doe</name>
<email>jazzdoe@newcompany.com</email>
<first-name>jazz</first-name>
<last-name>doe</last-name>
<x-2006293620>E3612</x-2006293620>
<x-2007017651>San Francisco</x-2007017651>
</principal>
8 Call permissions-info again, filtering on a permission-id of host:
https://example.com/api/xml?action=permissions-info&acl-id=2007018414
&filter-permission-id=host
9 Parse the response for the principal-id:
Last updated 12/16/2010
Page 43

USING ADOBE CONNECT 8 WEB SERVICES
Meetings
<principal principal-id="2006282569" is-primary="false" type="user"
has-children="false" permission-id="host">
<name>jazz doe</name>
<login>jazzdoe@example.com</login>
</principal>
10 Call principal-info, using the principal-id:
https://example.com/api/xml?action=principal-info
&principal-id=2006258745
11 Parse the principal element of the response for the name and login (or name and email):
<principal account-id="624520" disabled="" has-children="false"
is-hidden="false" is-primary="false" principal-id="2006282569"
type="user">
<ext-login>jazzdoe@example.com</ext-login>
<login>jazzdoe@example.com</login>
<name>jazz doe</name>
<email>jazzdoe@newcompany.com</email>
<first-name>jazz</first-name>
<last-name>doe</last-name>
<x-2006293620>E3612</x-2006293620>
<x-2007017651>San Francisco</x-2007017651>
</principal>
39
These are for the sender of the e-mail, who is the meeting host.
Remove users from meetings
Occasionally a user is invited to a Adobe Connect meeting as participant or presenter but later needs to be removed
from the participant list. Removing the user has various results, depending on whether the meeting is public or private:
• For a public meeting: The user’s permission (participant, presenter, or host) is removed, but the user can still enter
the meeting as a guest.
• For a private meeting: The user’s permission is removed, and the user can enter only as a guest and with approval
from the meeting host.
To remove a user’s permission to enter, call permissions-update with a special permission value, permission-
id=remove.
If the meeting is in progress and the user has already entered the room, the user is not removed from the meeting.
However, when the user’s session times out, the user cannot reenter.
Remove a user’s permission to access a meeting
1 (Optional) Call permissions-info- to check the principal’s permission to enter the meeting:
https://example.com/api/xml?action=permissions-info&acl-id=2007018414
However, you do not need to know the specific permission the principal has before you remove the permission.
2 Get the meeting’s sco-id (see Find meetings).
3 Get the user’s principal-id (see Find a principal-id).
4 Call permissions-update, using the meeting’s sco-id as the acl-id and permission-id=remove:
Last updated 12/16/2010
Page 44

USING ADOBE CONNECT 8 WEB SERVICES
Meetings
https://example.com/api/xml?action=permissions-update
&acl-id=2007018414&principal-id=2006258745&permission-id=remove
Calculate meeting usage
Once you create users and Adobe Connect meetings, you may need to calculate meeting usage. Meeting usage is often
calculated in one of these ways:
• The time each user spends in a specific meeting, in minutes per user
• The number of concurrent meeting participants
The time a user spends in a meeting is measured by a transaction, which is the interaction between a principal and a
SCO (in this case, between a user and a meeting). The date and time a transaction begins and ends are returned by
report-bulk-consolidated-transactions.
Calculate time spent in meetings per user
1 Call report-bulk-consolidated-transactions, filtering for meetings and another value to identify the
meeting, such as a date:
https://example.com/api/xml?action=report-bulk-consolidated-transactions
&filter-type=meeting&filter-gt-date-created=2006-07-01
40
• The second filter can be for the date the transaction began or ended, the principal-id of the user, the sco-id
of a specific meeting, or another valid filter that meets your needs.
• This call returns all transactions that meet the filter criteria. Be prepared for a large response.
• The call also returns only users who logged in to the meeting as participants, not users who entered as guests.
2 Parse the row elements in the response for date-created and date-closed:
<row transaction-id="2007071217" sco-id="2007071193" type="meeting" principalid="2007003123" score="0">
<name>Thursday Meeting</name>
<url>/thursday/</url>
<login>jazz@doe.com</login>
<user-name>jazzwayjazz doe</user-name>
<status>completed</status>
<date-created>2006-08-03T12:33:48.547-07:00</date-created>
<date-closed>2006-08-03T12:34:04.093-07:00</date-closed>
</row>
3 In your application, calculate the time difference between the two dates.
One way to do this (in Java™) is to write a utility method that converts the ISO 8601 datetime values returned in the
response to a GregorianCalendar object. Then, convert each GregorianCalendar date to milliseconds, calculate
the difference between the creation and closing times, and convert the difference to minutes.
4 Repeat for all the meeting transactions that meet your criteria, and total the meeting usage times.
Last updated 12/16/2010
Page 45

USING ADOBE CONNECT 8 WEB SERVICES
Meetings
Check meeting quotas
The number of concurrent meeting participants you can have is determined by your Adobe Connect license. To check
your quota for the number of concurrent meeting participants, call
concurrent-user-per-meeting-quota in the response:
<quota acl-id="624529" quota-id="concurrent-user-per-meeting-quota" used="0"
limit="unlimited" soft-limit="1000000000">
<date-begin>2004-03-09T09:45:02.297-08:00</date-begin>
<date-end>2999-12-31T16:00:00.000-08:00</date-end>
</quota>
The quota has both a limit and a soft limit. The soft limit is the concurrency limit purchased for the account. It is the
same as the limit, unless you purchase a Burst Pack for meetings, which allows additional participants to join past the
limit, on an overage basis.
Without a Burst Pack, Adobe Connect enforces the concurrency limit and participants who try to enter after the quota
is reached are rejected. If your limit is 20 attendees, attendee 21 receives a notice that the meeting room is full.
All accounts enforce the quotas that are set when the account is created. Accounts do not allow overages, unless you
have a Burst Pack. Furthermore, Burst Packs are only for meetings, not for training or seminars.
report-quotas and look for the quota named
41
Check your meeting concurrency quota and usage
1 Call report-quotas to check your quota for concurrent meeting users:
https://example.com/api/xml?action=report-quotas
2 Parse the response for the quota element with a quota-id value of concurrent-user-per-meeting-quota.
3 Extract the value of soft-limit, the limit defined by your Adobe Connect license.
4 Call report-meeting-concurrent-users to check the peak number of concurrent meeting participants on your
server or in your account:
https://example.com/api/xml?action=report-meeting-concurrent-users
5 Parse the response for the report-meeting-concurrent-users element. Read the value of the max-users
attribute and compare it to the value of
<?xml version="1.0" encoding="utf-8" ?>
<results>
<status code="ok" />
<report-meeting-concurrent-users max-users="18"
max-participants-freq="3" />
</results>
soft-limit:
Get meeting archives
A Adobe Connect meeting can have one or more recorded archives. If the meeting recurs weekly, for example, it might
have an archive for each session.
A meeting archive is identified with type=content and icon=archive. The icon value works as a subcategory of
type, to identify the type of content.
List archives for a meeting room
1 Get the sco-id of the meeting (see Find meetings).
Last updated 12/16/2010
Page 46

USING ADOBE CONNECT 8 WEB SERVICES
Meetings
2 Call sco-expanded-contents with the sco-id and filter-icon=archive to list all archives associated with the
meeting:
https://example.com/api/xml?action=sco-contents&sco-id=2007018414
&filter-icon=archive
3
Parse the response for the
<sco sco-id="2598402" source-sco-id="" folder-id="2598379"
type="content" icon="archive" display-seq="0" is-folder="0">
<name>EN - Monday Night Football_0</name>
<url-path>/p71144063/</url-path>
<date-begin>2004-05-17T15:51:54.670-07:00</date-begin>
<date-end>2004-05-17T15:54:52.920-07:00</date-end>
<date-modified>2004-05-17T15:55:00.733-07:00</date-modified>
<duration>00:02:58.250</duration>
</sco>
sco
element and extract the information you want, such as
name, date-created
, or
url-path
Get meeting poll results
To access the results of a poll used during a meeting, use report-quiz-interactions. This action returns all poll
results, but you can use a filter to reduce the response.
42
:
Each multiple-choice response in the poll has an integer identifier, with the first response in the displayed list
numbered 0, the second 1, and so on.
Get the results of a meeting poll
1 Be sure that the meeting host has closed the poll.
The poll results are cached in the meeting until the poll is closed.
2 Get the sco-id of the meeting (see Find meetings).
3 Call report-quiz-interactions, using the meeting’s sco-id:
https://example.com/api/xml?action=report-quiz-interactions
&sco-id=2007071193
4 (Optional) Add a filter to reduce the response, for example:
• filter-response=1 to check all users who made a specific response
• filter-interaction-id=2007027923 to check all responses to a poll (a meeting might have several polls)
5 Parse the response for response, name, or any other values:
<row display-seq="1" transcript-id="2007071200"
interaction-id="2007027923" sco-id="2007071193" score="0">
<name>jazz doe</name>
<sco-name>Thursday Meeting</sco-name>
<date-created>2006-08-03T12:29:09.687-07:00</date-created>
<description>What is your favorite color?</description>
<response>4</response>
</row>
Last updated 12/16/2010
Page 47

USING ADOBE CONNECT 8 WEB SERVICES
Meetings
Launch meetings with external authentication
Once a user logs in to your network and you authenticate the user to the Adobe Connect Server using an external
authentication credential, you may want to allow the user to enter a meeting as participant or guest without having to
log in a second time to Adobe Connect.
Launch a meeting and let the user enter as participant
1 Once the user is authenticated on your network, log the user in to Adobe Connect (see Log in using HTTP header
authentication for details).
2 Get the value of the BREEZESESSION cookie for the user’s session, in one of two ways:
• Call common-info and retrieve the value of cookie from the response:
<cookie>breezma6zor9rdfps8h6a</cookie>
• Retrieve the value of the BREEZESESSION cookie from the response header:
Set-Cookie: BREEZESESSION=breezqw4vtfarqxvf9pk2;
domain=.macromedia.com;path=/
3 Create a meeting room URL (see Create meeting room URLs for details).
4 Append a session parameter and the BREEZESESSION cookie value to the meeting room URL:
http://example.com/employeeMeeting/?session=breezbityp829r9ozv5rd
43
5 Open the meeting room URL that has session appended. One way to do this is with a JavaScript onClick
command:
<a href="http://example.com/employeeMeeting/"
onClick="javascript:window.open('http://example.com/employeeMeeting/?session=breezbityp82
9r9ozv5rd','Breeze', 'toolbar=no,menubar=no,width=800,height=600,resizable=yes'); return
false">http://example.com/employeeMeeting/</a>
Launch a meeting and let the user enter as guest
1 Once the user is authenticated on your network, log the user in to Adobe Connect (see Log in using HTTP header
authentication for details).
2 Get the value of the BREEZESESSION cookie for the user’s session, in one of two ways:
• Call common-info and retrieve the value of cookie from the response:
<cookie>breezma6zor9rdfps8h6a</cookie>
• Retrieve the value of the BREEZESESSION cookie from the response header after calling login:
Set-Cookie: BREEZESESSION=breezqw4vtfarqxvf9pk2;
domain=.macromedia.com;path=/
3 In your application, create a meeting room URL (see Create meeting room URLs).
4 Append a guestname parameter and the user’s guest display name to the meeting room URL:
http://example.com/employeeMeeting/?guestName=joy
5 Open the meeting room URL that has the guestname parameter. One way to do this is with a JavaScript onClick
command:
<a href="http://example.com/employeeMeeting/"
onClick="javascript:window.open('http://example.com/employeeMeeting/?guestName=joy','Bree
ze', 'toolbar=no,menubar=no,width=800,height=600,resizable=yes'); return
false">http://example.com/employeeMeeting/</a>
Last updated 12/16/2010
Page 48

USING ADOBE CONNECT 8 WEB SERVICES
Meetings
Configure compliance settings
Depending on your organization, you might need to configure your system to ensure compliance with governmental
regulations and industry standards regarding communication. You can use Adobe Connect to monitor
communication data in many ways. For example, you can disable the use of pods, set Adobe Connect to always or
never record meetings, generate transcripts of chat sessions, create a notice that recording is taking place, and more.
You can also control user access in several ways. For example, you can distinguish between authenticated and nonauthenticated users, restrict access to meetings rooms based on roles, and block guest access to rooms. For more
information, see Adobe Adobe Connect User Guide.
When you change the settings for these features, the changes take effect when a new meeting is started or when the
server is refreshed. The typical refresh interval is 10 minutes. The next meeting that starts after the server is refreshed
reflects any new settings.
Changing certain settings through the XML API can affect the use of other features. For example, when the attendee
list is disabled (
confusion, disable the breakout rooms feature at the same time.
Disabling pods
When you disable pods, the layout of a meeting room is affected and may have more empty white space than you want.
Administrators can either resize remaining pods to occupy the empty space (the recommended approach), or create
new meeting room templates. Otherwise, after a meeting starts, the host can manually resize pods as they see fit.
meeting-feature-update), users cannot create breakout rooms. Therefore, to prevent user
44
If a pod with persistent data, such a Chat pod, is disabled and then re-enabled between different sessions of the same
meeting, the contents of the old pod are lost.
Disable the Chat and Note pods
1 Get the account ID for the account under which the meeting exists.
2 Log in using the administrative account.
3 Call meeting-feature-update, passing fid-meeting-chat and fid-meeting-note as arguments to the
feature-id parameter, and setting the enable attribute for both parameters to false.
4 Refresh the server or start a new meeting to see the change.
The following code disables the Chat and Note pods:
http://localhost/api/xml?action=meeting-feature-update&account-id=7&feature-id=fidmeeting-chat&enable=false&feature-id=fid-meeting-note&enable=false
Managing chat transcripts
To configure Adobe Connect to generate chat transcripts, select Generate chat transcripts for all meetings in Adobe
Connect Central or call
To get a chat transcript, you need the sco-id of the chat session. Use a combination of XML APIs to get the sco-id of a
specific transcript. You can then get the transcript from the following Adobe Connect directory:
[RootInstall]/content/account-id/transcript-sco-id/output/.
meeting-feature-update with the feature-idfid-chat-transcripts.
Get chat transcripts
1 Get the sco-id of the chat transcripts tree by calling sco-shortcuts:
[http://example.com/api/xml?action=sco-shortcuts&account-id=7]
Last updated 12/16/2010
Page 49

USING ADOBE CONNECT 8 WEB SERVICES
Meetings
2 Parse the response for the chat transcripts tree-id:
<shortcuts>
<sco tree-id="10026" sco-id="2006258748" type="chat-transcripts">
<domain-name>http://example.com</domain-name>
</sco>
...
</shortcuts>
</results>
3 Get the list of chat transcripts for a particular meeting by calling sco-contents with the chat transcripts tree-id
and the filter
[http://example.com/api/xml?action=sco-contents&sco-id=10026&filter-source-sco-id=10458]
source-sco-id:
In the example above, 10026 is the sco-id of the chat transcripts tree and 10458 is the sco-id of the meeting. (You
can get the sco-id of the meeting from the URL of the meeting information page.)
The list of SCOs that is returned represents the chat transcripts for the meeting.
4 Find the chat transcript in the Adobe Connect directory [RootInstall]/content/account-id/transcript-sco-id/output/.
Forcing meetings to be recorded
You can set up Adobe Connect to record all meetings. Adobe recommends that when meetings are recorded, you show
a disclaimer to notify users that the meeting is being recorded.
45
Force meetings to be recorded
1 Disable the setting that lets hosts control recording (fid-archive) and enable automatic recording (fid-
archive-force) by calling meeting-feature-update. Pass the two feature-id arguments:
https://example.com/api/xml?action=meeting-feature-update&account-id=7&feature-id=fidarchive&enable=false&feature-id=fid-archive-force&enable=true
2 See “Setting up disclaimer notices” on page 45.
3 Refresh the server or start a new meeting to see the change.
Setting up disclaimer notices
You can set up a disclaimer notice to appear when a user enters a meeting. A disclaimer notice typically displays
boilerplate information for your organization. It advises users of the status of the meeting and the terms of use for the
meeting. For example, a disclaimer notice could advise users that the meeting is being recorded, and that users cannot
join the meeting unless they accept the notice. By default, this option is disabled.
Set up a disclaimer notice
1 Call meeting-disclaimer-update and set the text for the disclaimer notice:
https://example.com/api/xml?action=meeting-disclaimer-update&accountid=7&disclaimer=Please note that this meeting is being recorded.
2 Call meeting-feature-update to activate the disclaimer:
https://example.com/api/xml?action=meeting-feature-update&account-id=7&feature-id=fidmeeting-disclaimer&enable=true
3 Refresh the server or start a new meeting to see the change.
Last updated 12/16/2010
Page 50

USING ADOBE CONNECT 8 WEB SERVICES
Meetings
Controlling share settings
You can control settings related to the information that a user can share with other users during a meeting. Call
meeting-feature-update and pass the appropriate feature ID or multiple feature IDs to enable or disable a share
setting. For example, to disable screen sharing, call the following code:
https://example.com/api/xml?action=meeting-feature-update&account-id=7&feature-id=fidmeeting-desktop-sharing&enable=false
The following table lists the feature IDs for share settings. For a full list of feature IDs, see feature-id.
Share setting Feature ID
Share a computer screen or control of the screen; share a document or white board fid-meeting-desktop-sharing
Upload a document to the Share pod fid-meeting-shared-upload
Upload and manage files using the File Share pod fid-meeting-file-share
Share a white board fid-meeting-white-board
Display web pages to attendees fid-meeting-web-links
46
Last updated 12/16/2010
Page 51

Chapter 6: Training
A custom training application or portal can access Adobe® Connect™ Training to display training courses that are
available, enroll users or allow them to self-enroll, list all courses and curriculums the user is enrolled in, and generate
various reports.
Using web services with Adobe Connect Training
A custom training application or portal can access Adobe® Connect™ Training to display training courses that are
available, enroll users or allow them to self-enroll, list all courses and curriculums the user is enrolled in, and generate
various reports. Adobe Connect Training has two types of training modules: courses and curriculums.
A course is content (for example, a presentation) that has a set of enrolled learners with usage tracking for each
individual. The course can be delivered and administered independently or as part of a curriculum.
A curriculum is a group of courses and other learning content that moves students along a learning path. A curriculum
contains primarily Adobe Connect Training courses, but may include other items such as content and meetings. As
with courses, you can generate reports to track the progress of enrolled learners as they move through the curriculum.
This way, you can ensure that enrollees meet the learning objectives.
47
Courses and content can both be modules within a curriculum, and a content object can be used in any number of
courses and curriculums. In Adobe Connect Training, content objects, courses, and curriculums are all SCOs, and
each has a unique
standard.
As you develop training applications, Adobe recommends that you use the following XML API actions:
permissions-update To enroll users in courses and make sure they have the appropriate permissions to access the
course.
group-membership-update To add users to groups if you want to enroll a group.
report-my-training To list all courses and curriculums the current user is enrolled in, including the URL to access the
course or curriculum.
report-curriculum-taker To get details of a user’s progress within a curriculum.
report-user-trainings-taken To view the latest status of all of a user’s courses and curriculums.
report-user-training-transcripts To list all of a user’s transcripts and scores.
These actions work on courses, curriculums, and training folders and use the permissions allowed for objects in the
Training library.
sco-id. Content objects and courses are combinable and reusable, according to the SCORM
Training library permissions
The Shared Training folder that you see in Adobe Connect Central is also called the Training library. Shared Training
is called
courses in the response from sco-shortcuts:
Last updated 12/16/2010
Page 52

USING ADOBE CONNECT 8 WEB SERVICES
Training
<sco tree-id="123456" sco-id="123456" type="courses">
<domain-name>example.com</domain-name>
</sco>
Each folder, course, and curriculum in the library is a SCO. As you navigate the Training library, you see the sco-id
of the current course or curriculum in the browser URL. You can also retrieve the
sco-expanded-contents on a folder in the Training library.
or
sco-id by calling sco-contents
Each course, curriculum, or content object in the Training library has permissions that define which users can access
it. As you design your application, be aware of these permission levels:
Enrollee permissions Courses and curriculums have permissions that define which users are enrolled and can access
them. The two permissions available are Enrolled and Denied.
Training library permissions Courses, curriculums, and folders in the Training library have either Manage or Denied
permission. Manage permission means a user can create, delete, edit, or assign permissions. By default, users have
Manage permission on their own training folders, and Administrators have Manage permission on any folder in the
training library.
An Administrator can assign a user Manage permission on an individual course, curriculum, or folder with
permissions-update or check the permissions a user has with permissions-info.
In XML API calls, you read, use, or set values of permission-id as you work with the Training library. These values
permission-id apply to courses and curriculums:
of
48
view The user has access to the course or curriculum, and permission is Enrolled.
denied The user is not allowed access, and permission is Denied.
You should also be aware of the permission a user has on a folder before executing an API call. Log in as a user with
appropriate permission, or when needed, as your application’s Administrator user. These values of
permission-id
apply to training folders:
manage The user can add, delete, change, or assign permissions to courses, curriculums, and content in a folder. The
user can also list the contents of the folder with
denied The user cannot add, delete, change, or assign permissions to anything in the folder, but can list the contents
sco-contents or sco-expanded-contents.
of the folder.
Find courses and curriculums
Most XML API actions that work with courses and curriculums require the sco-id of the course or curriculum. You
often need to locate the
SCO.
Use these best practices to make searching for training SCOs efficient:
• Create specialized folders within the Shared Training folder for storing courses and curriculums. You can do this
in Adobe Connect Central, or you can use the XML API, in which the Shared Training folder is named
• Use these folders to store various categories of courses and curriculums, such as Marketing Training or Sales
Training.
• Use a flat structure in the specialized folders, storing courses and curriculums one level deep.
This directory structure is also recommended when you want to display a list of all courses and curriculums (or all
those in a subject area) and allow users to enroll themselves.
sco-id dynamically, before you call another action, without knowing the exact name of the
courses.
Last updated 12/16/2010
Page 53

USING ADOBE CONNECT 8 WEB SERVICES
Training
If you are working in Adobe Connect Central, you can find the sco-id of a course or curriculum by navigating to it,
clicking its URL, and taking the value of
sco-id from the browser URL. You can also locate the sco-id from an
application, using the XML API.
Find the sco-id of a course or curriculum
1 Call sco-shortcuts:
https://example.com/api/xml?action=sco-shortcuts
2 Parse the response for the sco-id of the courses folder:
<sco tree-id="624528" sco-id="624528" type="courses">
<domain-name>http://example.com</domain-name>
</sco>
You cannot use a filter with sco-shortcuts, but you can parse the response for the sco element that has
type=courses.
3 Call sco-contents, passing the sco-id of the courses folder and filtering for your specialized training folders:
https://example.com/api/xml?action=sco-contents&sco-id=624528
&filter-name=Sales Training
• You can use filter-name, filter-url-path, another exact match filter, or a date filter. However, be careful
when using
filter-like-name, as it might affect server performance.
• You can also get the sco-id of your specialized training folder from the browser URL in Adobe Connect Central
and pass it to
4 Parse the response for the sco-id of your specialized training folder:
<sco sco-id="2007122244" source-sco-id="" folder-id="624528"
type="folder" icon="folder" display-seq="0" is-folder="1">
sco-contents.
49
5 Call sco-contents, passing it the sco-id of the specialized training folder and adding a filter that identifies the
course or curriculum:
https://example.com/api/xml?action=sco-contents
&sco-id=2007122244&filter-name=Java 201
• You can call sco-contents, rather than sco-expanded-contents, if all courses and curriculums are stored at
the top level of your specialized training folder. This improves performance.
• You can define custom fields for SCOs if it helps you identify them in searches (see “Create custom fields” on
page 22).
6 Parse the sco elements in the response for the sco-id of the course or curriculum:
<sco depth="2" sco-id="2006745673" folder-id="2006745671" type="content"
icon="course" lang="en" source-sco-id="2006744233"
display-seq="1" source-sco-type="0">
<name>All About Web Communities</name>
<url-path>/p33096345/</url-path>
<description>Web 2.0 course</description>
<date-created>2006-06-12T14:48:25.870-07:00</date-created>
<date-modified>2006-06-12T14:48:25.870-07:00</date-modified>
</sco>
Last updated 12/16/2010
Page 54

USING ADOBE CONNECT 8 WEB SERVICES
Training
List all courses or curriculums available
1 Get the sco-id of a specialized training folder you have created.
You can also get the sco-id by navigating to the folder in Adobe Connect Central, clicking its URL, and reading
sco-id in the browser URL.
the
2 Call sco-contents, passing the folder’s sco-id:
https://example.com/api/xml?action=sco-contents&sco-id=2006258748
The best practice is to create the specialized training folders one level deep. By doing so, you can call sco-contents
rather than
3 Parse the response for name, url-path, or any values you want to display:
<sco sco-id="2007035246" source-sco-id="2006334909"
folder-id="2006258748" type="content" icon="course"
display-seq="0" is-folder="0">
<name>Java 101</name>
<url-path>/java101/</url-path>
<date-begin>2006-07-20T17:15:00.000-07:00</date-begin>
<date-modified>2006-07-20T17:21:38.860-07:00</date-modified>
</sco>
sco-expanded-contents. This gives better performance.
50
Create a course
You can use either Adobe Connect Central or Adobe Connect Web Services to create a course. If you use Web Services,
first create an empty SCO and then add content to it.
1 Call sco-update to create a new SCO for the course:
https://example.com/api/xml?action=sco-update&name=salescourse&folderid=12345&icon=course&type=content
2 Parse the response for the sco-id value of the new course.
3 Add content to the new SCO, using the sco-id returned by sco-update:
https://example.com/api/xml?action=sco-update&sco-id=77711&source-sco-id=33444
4 Enroll users in the course (see Enroll one user and Enroll a large number of users).
View a user’s training
Once a user is logged in, you can list all courses the user is enrolled in with report-my-courses, or all of the user’s
courses and curriculums with
is enrolled in, not all courses available.
View a user’s courses and curriculums
1 Log the user in (see Log in from an application).
2 Call report-my-training to list all courses and curriculums the user is enrolled in:
https://example.com/api/xml?action=report-my-training
report-my-training. This lists only the courses (or courses and curriculums) the user
3 Parse the response for name, url, or any other values you want to display:
Last updated 12/16/2010
Page 55

USING ADOBE CONNECT 8 WEB SERVICES
Training
<row sco-id="2007035246" type="content" icon="course"
permission-id="view">
<name>Java 101</name>
<url>example.com/java101/</url>
<date-created>2006-07-20T17:21:11.940-07:00</date-created>
<date-modified>2006-07-20T17:21:38.860-07:00</date-modified>
<date-begin>2006-07-20T17:15:00.000-07:00</date-begin>
<url-path>/java101/</url-path>
<expired>false</expired>
<completed>false</completed>
</row>
View the status of all of the user’s courses and curriculums
1 Get the principal-id of the user (see Find a principal-id).
2 Call report-user-trainings-taken:
https://example.com/api/xml?action=report-user-trainings-taken
&principal-id=2006258745
3 Parse the response for status:
<row transcript-id="2006293632" max-retries="" sco-id="2564016"
type="content" icon="course" status="completed"
certificate="2006293632" score="0" permission-id="" attempts="1">
<name>Programming in Perl</name>
<description>Info about Perl</description>
<url-path>/p57283193/</url-path>
<date-taken>2006-05-01T17:10:56.400-07:00</date-taken>
<from-curriculum>false</from-curriculum>
</row>
51
A course can have many allowed values for status, but a curriculum can only have a status of completed or
incomplete. The allowed values of status are described in status attribute in the reference.
Enroll one user
To give users access to training, Adobe recommends that you enroll them in courses. This gives the users appropriate
permission to launch and complete the course, and it gives you usage tracking and access to various report actions.
Courses differ from content. Courses are resumable and offer server-side review mode (for detailed information, see
Adobe Connect User Guide).
Your application might allow users to self-enroll in courses, which involves calling permissions-update to enroll
one user at a time. You may also want to write a workflow, which is a sequence of API calls, that creates a new user and
enrolls the user in a course.
Enrolling users in training using the XML API (specifically, a call to permissions-update) does not send a
notification. To send enrollment notifications, use Adobe Connect Central to enroll users.
Enroll one user in a course or curriculum
1 Get the sco-id of the course (see Find courses and curriculums).
2 Get the principal-id of the user (see List principals or guests).
Last updated 12/16/2010
Page 56

USING ADOBE CONNECT 8 WEB SERVICES
Training
3 To enroll the user in the course, call permissions-update. Use the course sco-id as the acl-id, with a
permission-id of view:
https://example.com/api/xml?action=permissions-update
&acl-id=2007035246&principal-id=2006258745&permission-id=view
4 Call report-my-training to list all courses and curriculums the user is enrolled in:
https://example.com/api/xml?action=report-my-training
5 Parse the row elements in the response for values you want to display:
<row sco-id="2007035246" type="content" icon="course"
permission-id="view">
<name>Java 101</name>
<url>example.com/java101/</url>
<date-created>2006-07-20T17:21:11.940-07:00</date-created>
<date-modified>2006-07-20T17:21:38.860-07:00</date-modified>
<date-begin>2006-07-20T17:15:00.000-07:00</date-begin>
<url-path>/java101/</url-path>
<expired>false</expired>
<completed>false</completed>
</row>
52
Enroll a new user by workflow
1 Call principal-update to create the new user and send a welcome e-mail:
https://example.com/api/xml?action=principal-update&first-name=jazz
&last-name=doe&login=jazz@doe.com&password=hello&type=user
&send-email=true&has-children=0&email=jazz@doe.com
To send the e-mail, make sure send-email=true.
2 Log the user in to the server:
https://example.com/api/xml?action=login&login=jazz@doe.com
&password=hello&session=breezma6zor9rdfps8h6a
See Log in from an application for other ways to call login.
3 Call group-membership-update with is-member=true to add the user to the group:
https://example.com/api/xml?action=group-membership-update
&group-id=4930296&principal-id=2006258745&is-member=true
4 Call permissions-update to enroll the user in a curriculum:
https://example.com/api/xml?action=permissions-update
&acl-id=2006745669&principal-id=2007124930&permission-id=view
Use a permission-id of view.
5 Call report-my-training to list courses and curriculums the user is enrolled in:
https://example.com/api/xml?action=report-my-training
6 Parse the row elements in the response for values you want to display:
Last updated 12/16/2010
Page 57

USING ADOBE CONNECT 8 WEB SERVICES
Training
<row sco-id="2006745669" type="curriculum" icon="curriculum"
permission-id="view">
<name>A Day in the Life</name>
<url>example.com/day/</url>
<date-created>2006-06-12T14:47:59.903-07:00</date-created>
<date-modified>2006-06-12T14:47:59.903-07:00</date-modified>
<date-begin>2006-06-12T14:45:00.000-07:00</date-begin>
<url-path>/day/</url-path>
<expired>false</expired>
<completed>false</completed>
</row>
Enroll a large number of users
When you enroll a large number of users in a course, first decide whether to enroll the users directly or create a group
and enroll it. Adobe recommends these best practices for enrolling users in courses:
• Enroll users directly in courses using permissions-update, which allows you to enroll 1000, 10,000, or more users
with a single API call.
• Add the users to a group and enroll it only if you plan to reuse the group (for example, to enroll it in multiple
courses). In this case, you can add only 200 users at a time.
53
Enroll a large number of users (1000+) directly in a course
1 Get the sco-id of the course (see Find courses and curriculums).
2 Get the principal-id of each user you want to enroll.
To do this, you can:
• Call principal-list with filters to list the users you want to enroll:
https://example.com/api/xml?action=principal-list&filter-type=user
&filter-type=sales
• Read the values from a file.
3
Write a method that calls permissions-update with multiple trios of acl-id, principal-id, and permission-id:
https://example.com/api/xml?action=permissions-update
&acl-id=2007064258&principal-id=2007105030&permission-id=view&aclid=2007064258&principal-id=2006258745&permission-id=view ...
• The acl-id is the sco-id of the course.
• The permission-id is view to enroll users.
• The principal-id is unique in each trio.
If any trios have incorrect information, permissions-update returns an ok status, executes the correct trios, and
does not execute the invalid ones.
4 Call permissions-info to check that the users have been enrolled:
https://example.com/api/xml?action=permissions-info
&acl-id=2007064258&filter-permission-id=view
Without a principal-id, this call returns a list of all principals enrolled in the course.
Last updated 12/16/2010
Page 58

USING ADOBE CONNECT 8 WEB SERVICES
Training
Unenroll a large number of users (1000+) from a course
1 Get the sco-id of the course (see Find courses and curriculums).
2 Get the principal-id of each user you want to remove. You can:
• Call principal-list with filters to list the users you want to unenroll:
https://example.com/api/xml?action=principal-list&filter-type=user
&filter-account-id=624520
• Read the values from a file.
3
Write a method that calls permissions-update with multiple trios of acl-id, principal-id, and permission-id:
https://example.com/api/xml?action=permissions-update
&acl-id=2007064258&principal-id=2007105030&permission-id=denied&aclid=2007064258&principal-id=2006258745&permission-id=denied ...
The permission-id is denied to unenroll users from the course.
4 Call permissions-info to check that the users have been removed:
https://example.com/api/xml?action=permissions-info
&acl-id=2007064258&filter-permission-id=denied
Enroll a large group (1000+) in a course
1 Create a group.
With the XML API Call principal-update and parse the response for the principal-id:
54
https://example.com/api/xml?action=principal-update&type=group
&has-children=1&name=developersc5
With Adobe Connect Central Create the group at Administration > Users and Groups > New Group. Take the
principal-id of the new group from the browser URL.
2 Add the users you want to enroll to the group. You can use an API call or Adobe Connect Central, but you can add
only 200 users at a time.
With the XML API Call group-membership-update, using multiple trios of group-id, principal-id, and is-
member=true:
https://example.com/api/xml?action=group-membership-update
&group-id=4930296&principal-id=2006258745&is-member=true
&group-id=4930296&principal-id=2007343711&is-member=true
If any trios have incorrect information, group-membership-update returns an ok status, but the user in the
incorrect trio is not added to the group.
With Adobe Connect Central Navigate to Administration > Users and Groups > Import. You can import users
from a CSV (comma-delimited) file with at least a login ID for each user.
3 Get the sco-id of the course (see Find courses and curriculums) using the sco-id of the specialized training folder
that contains the course.
4 Call permissions-update to enroll the group in the course:
https://example.com/api/xml?action=permissions-update
&acl-id=2007064258&principal-id=2007105030&permission-id=view
Unenroll a large group (1000+) from a course
1 Call permissions-info- on the course, filtering for a permission-id of view:
Last updated 12/16/2010
Page 59

USING ADOBE CONNECT 8 WEB SERVICES
Training
https://example.com/api/xml?action=permissions-info
&acl-id=2007064258&filter-permission-id=view&filter-type=group
2 Parse the response for the principal-id of the group:
<principal principal-id="2006258745" is-primary="false" type="group"
has-children="true" permission-id="view">
<name>developers</name>
<login>developers@acme.com</login>
</principal>
3 Call permissions-update with a permission-id of denied to remove the group’s access to the course:
https://example.com/api/xml?action=permissions-update
&acl-id=2007064258&principal-id=2007105030&permission-id=denied
View curriculum information
As training managers create curriculums and users take courses, you need to retrieve information about them to
display in your application. Often you can make just a single call to get the information you need, once you have the
sco-id of the curriculum or course and the user’s principal-id.
55
You may, for example, want to display all users enrolled in a curriculum or all courses a curriculum has. Another
common task is to display the courses in a curriculum the user has completed so far, and then display the remaining
courses.
Display all users enrolled in a course or curriculum
1 Call permissions-info, filtering for a permission-id of view:
https://example.com/api/xml?action=permissions-info
&acl-id=2006298444&filter-permission-id=view
• The acl-id is the sco-id of the course or curriculum.
• The permission-id of view means the user is enrolled.
2 Parse the response for principal-id, name, and any other values you need:
<principal principal-id="2006258745" is-primary="false" type="user"
has-children="false" permission-id="view">
<name>Joy Smith</name>
<login>joy@acme.com</login>
</principal>
Display a list of all training modules in a curriculum
A curriculum is a type of folder, and you can list its contents with sco-contents or sco-expanded-contents.
1 Get the sco-id of the curriculum (see Find courses and curriculums).
2 Call sco-expanded-contents, passing it the sco-id:
https://example.com/api/xml?action=sco-expanded-contents
&sco-id=2006745669
3 Parse the response for the sco-id, folder-id, and depth:
Last updated 12/16/2010
Page 60

USING ADOBE CONNECT 8 WEB SERVICES
Training
<sco depth="1" sco-id="2006745674" folder-id="2006745669" type="link"
icon="course" lang="en" source-sco-id="2006745673"
display-seq="0" source-sco-type="0">
<name>All About Web Communities</name>
<url-path>/l80422078/</url-path>
<description>test</description>
<date-created>2006-06-12T14:48:25.980-07:00</date-created>
<date-modified>2006-06-12T14:48:25.980-07:00</date-modified>
</sco>
The response returns a flat list of sco elements, including the curriculum and each SCO it contains. You can build
a hierarchy using the
sco-id, folder-id, and depth values. The SCO with type=curriculum is the curriculum
that contains the courses.
View a user’s completed and remaining work in a curriculum
1 Get the sco-id of the curriculum (see Find courses and curriculums).
2 Get the principal-id of the user (Find a principal-id).
3 Call report-curriculum-taker, passing the principal-id as a user-id:
https://example.com/api/xml?action=report-curriculum-taker
&user-id=2006258745&sco-id=2006745669
56
4 Parse the response for the status attribute of each sco element and any other values you want to display in your
application:
<sco transcript-id="2006745722" path-type="prereq-none" asset-id=""
sco-id="2006745674" depth="1" folder-id="2006745669" type="15"
icon="course" lang="en" max-retries="" source-sco-id="2006745673"
source-sco-type="0" status="user-passed" score="0" certificate=""
max-score="0" attempts="0">
<access>access-open</access>
<credit-granted>true</credit-granted>
<name>All About Web Communities</name>
<url-path>/l80422078/</url-path>
<description>test</description>
<date-created>2006-06-12T15:06:02.947-07:00</date-created>
<date-modified>2006-06-12T14:48:25.980-07:00</date-modified>
<date-taken>2006-06-12T15:06:02.947-07:00</date-taken>
<override>false</override>
</sco>
• A status of user-passed or completed indicates a module the user has completed.
• A status of not-attempted or incomplete shows the user has not completed the module.
• The curriculum itself can only have a status of completed or incomplete.
Report scores
Many courses offer learners a certain number of retries. If you use server-side review mode, a training manager can
specify the maximum attempts the learner has to complete or pass the course successfully (see Adobe Connect User
Guide for details of how course retry works in both server-side and client-side review mode).
This means that a learner can attempt a course multiple times and have multiple scores. In your application, you may
want to display only the learner’s highest score.
Last updated 12/16/2010
Page 61

USING ADOBE CONNECT 8 WEB SERVICES
Training
Report a user’s highest score on a course or quiz
1 Get the user’s principal-id (see List principals or guests).
2 Get the sco-id of the course or quiz (see Find courses and curriculums).
3 Call report-user-training-transcripts, filtering on the sco-id and sorting on the score:
https://example.com/api/xml?action=report-user-training-transcripts
&principal-id=2006258745&filter-sco-id=2006334909&sort-score=desc
4 Parse the response for the highest score, which should be in the first row element in the list:
<row transcript-id="2006335954" sco-id="2006334909"
principal-id="2006258745" status="user-passed" score="20"
max-score="20" certificate="2006335954" type="content"
icon="producer">
<name>Java Data Type Quiz</name>
<url-path>/quiz/</url-path>
<login>bob@acme.com</login>
<date-taken>2006-05-12T11:55:24.940-07:00</date-taken>
<principal-name>Bob Smith</principal-name>
</row>
57
Last updated 12/16/2010
Page 62

Chapter 7: Action reference
This section provides a reference for each action in the Adobe® Connect™ Web Services XML API.
All action (XML API), parameter, element, and attribute names are case sensitive. In other words, name is not the same
Name, and sco-id is not equivalent to sco-ID. You must enter them exactly as shown in this reference, unless a
as
specific entry indicates an item is not case sensitive.
What’s new in Adobe Connect 8 Web Services
The following parameters are new in Adobe Connect 8 Web Services:
Action Parameter value Description
58
“meeting-feature-update”
on page 95
“acl-field-update” on
page 64
fid-meeting-passcodenotallowed
meeting-passcode To set or reset a meeting passcode, call the action and pass this value for the field-id parameter.
To disable the ability to passcode protect meeting rooms, call the action and pass this value for the
feature-id parameter. For more information, see “Set or reset a meeting passcode” on page 35.
For more information, see
“Set or reset a meeting passcode” on page 35.
Sample action
action name
Availability
The first version of Adobe Connect to support the action. Unless stated, the action is supported in all subsequent
versions of Adobe Connect.
Description
A description of what the action does and when to use it.
Request URL
The syntax of an HTTP request URL.
Parameters
A detailed desription of the parameters in the request.
Filters
Specifies whether or not results can be filtered or sorted. For more information about filtering and sorting, see “Filter
and sort reference” on page 212.
Response structure
The structure of an XML response.
Last updated 12/16/2010
Page 63

USING ADOBE CONNECT 8 WEB SERVICES
Action reference
Response values
A detailed description of the XML elements in a response.
Sample request
A sample HTTP request URL.
Sample response
A sample XML response.
See also
Links to related actions.
Actions
account-expiry-info
Availability
Acrobat Connect Pro Server 7
59
Description
Returns the expiration date of an account.
Request URL
http://server_name/api/xml
?action=account-expiry-info
&account-id=integer
&session=BreezeSessionCookieValue
Parameters
Name Type Required Description
account-id Integer N The ID of the account for which you want expiration information. If you
session String N The value of the BREEZESESSION cookie. Use this parameter if you do
don’t provide an account ID, the expiration date for the current user is
returned.
not use a client-side cookie management library.
Response structure
<?xml version="1.0" encoding="utf-8" ?>
<results>
<status code="ok"/>
<Account account-id=integer>
<name>String</name>
<date-expired>Datetime</date-expired>
</Account>
</results>
Last updated 12/16/2010
Page 64

USING ADOBE CONNECT 8 WEB SERVICES
Action reference
Response values
Element Attribute Type Description
results Container All results the action returns.
60
status Empty, with
attributes
code Allowed
value
Account Container Information about all fields describing the account.
account-id Integer The ID of the account.
name String The name of the account.
date-expired Datetime The date the account expired.
The status of the response.
A code indicating the response status (see status).
Sample request
https://example.com/api/xml?action=acount-expiry-info&account-id=7
Sample response
<?xml version="1.0" encoding="utf-8" ?>
<results>
<status code="ok"/>
<Account account-id="7">
<name>Enterprise Account</name>
<date-expired>2009-09-11T18:15:00.000+05:30</date-expired>
</Account>
</results>
See also
expiry-settings-info, expiry-settings-update
acl-field-info
Availability
Breeze 5
Description
Returns information about a principal, account, or SCO, as defined in an access control list (ACL).
The returned information includes fields and their values. Each field has an ID—a name that describes the field.
To call acl-field-info, you must have view permission for the principal, account, or object. You must also specify
a value for
principal-id. You can call principal-list to determine the account-id or principal-id, or sco-shortcuts
sco-contents to get a sco-id.
or
acl-id, which is the object the principal has access to. The acl-id can be a sco-id, an account-id, or a
Last updated 12/16/2010
Page 65

USING ADOBE CONNECT 8 WEB SERVICES
Action reference
Request URL
http://server_name/api/xml
?action=acl-field-info
&acl-id=integer
&session=BreezeSessionCookieValue
Parameters
Name Type Required Description
61
acl-id
session
Integer Y The ID of the SCO, account, or principal for which you want field
information. Can be a valid
String N The value of the BREEZESESSION cookie. Use this parameter if you do not
use a client-side cookie management library.
Filters
Results cannot be filtered or sorted.
Response structure
<?xml version="1.0" encoding="utf-8" ?>
<results>
<status code=allowedValue />
<acl-fields>
<field acl-id=integer field-id=string>
<value>string</value>
</field>
...
</acl-fields>
</results>
Response values
Element Attribute Type Description
results
Container All results the action returns.
sco-id, account-id, or principal-id.
status
code
acl-fields
field
acl-id
field-id
value
Empty, with attributes The status of the response.
Allowed value A code indicating the response status (see status).
Container Information about all fields describing the principal, account, or
object.
Container One field describing the principal, account, or object.
Integer The acl-id specified in the request, which is a sco-id,
principal-id, or account-id.
String The name of the field.
String The value of the field.
Sample request
https://example.com/api/xml?action=acl-field-info&acl-id=2006258745
Last updated 12/16/2010
Page 66

USING ADOBE CONNECT 8 WEB SERVICES
Action reference
Sample response
<?xml version="1.0" encoding="utf-8" ?>
<results>
<status code="ok" />
<acl-fields>
<field acl-id="2006258745" field-id="email">
<value>joy@acme.com</value>
</field>
<field acl-id="2006258745" field-id="first-name">
<value>Joy</value>
</field>
<field acl-id="2006258745" field-id="last-name">
<value>Smith</value>
</field>
</acl-fields>
</results>
See also
acl-field-list, acl-field-update
acl-field-list
62
Availability
Breeze 5
Description
Returns a list of values for all instances of a field name on your Adobe Connect Server account.
For example, to list the first names of all users in the account, call acl-field-list with field-id=first-name.
You can call acl-field-info first to get a list of field names.
Request URL
http://server_name/api/xml
?action=acl-field-list
&field-id=string
&session=BreezeSessionCookieValue
Parameters
Name Type Required Description
field-id
session
String Y The name of a field in the access control list for which you want values and
IDs. Only one field name is allowed.
String N The value of the BREEZESESSION cookie. Use this parameter if you do not
use a client-side cookie management library.
Filters
Results cannot be filtered or sorted.
Last updated 12/16/2010
Page 67

USING ADOBE CONNECT 8 WEB SERVICES
Action reference
Response structure
<?xml version="1.0" encoding="utf-8" ?>
<results>
<status code=allowedValue />
<acl-field-list>
<acl acl-id=integer>
<value>string</value>
</acl>
...
</acl-field-list>
</results>
Response values
Element Attribute Type Description
63
results
status
code
acl-field-list
acl
acl-id
value
Container All results the action returns.
Empty, with
attributes
Allowed value A code indicating the response status (see status).
Container Information about all of the values in the account for the specified
Container Information about one value for the specified field.
Integer The ID of the principal, SCO, or account the field belongs to.
String The value of the field.
The status of the response.
field.
Sample request
https://example.com/api/xml?action=acl-field-list&field-id=first-name
Sample response
<?xml version="1.0" encoding="utf-8" ?>
<results>
<status code="ok"/>
<acl-field-list>
<acl acl-id="381223">
<value>John</value>
</acl>
<acl acl-id="381302">
<value>Daryl</value>
</acl>
<acl acl-id="381405">
<value>Mary</value>
</acl>
</acl-field-list>
</results>
See also
acl-field-info, acl-field-update
Last updated 12/16/2010
Page 68

USING ADOBE CONNECT 8 WEB SERVICES
Action reference
acl-field-update
Availability
Breeze 5
Description
Updates the value of an ACL field that belongs to a SCO or an account.
Note: To update a standard field for a principal (a user or a group), use the principal-update action. To update a
custom field for a principal, use the
Each SCO or account belongs to at least one access control list (ACL). The ACL lists the principals that have
permission to access the SCO or account.
Call acl-field-info to determine the fields in the ACL for a SCO or account. The response contains the field-id
you need for the request to acl-field-update:
<?xml version="1.0" encoding="utf-8" ?>
<results>
<status code="ok" />
<acl-fields>
<field acl-id="2006258745" field-id="email">
<value>joy@acme.com</value>
</field> ...
</acl-fields>
</results>
acl-field-update action.
64
You can specify multiple trios of acl-id, field-id, and value. If you do, use an HTTP POST method, rather than a
GET, to make the request. The GET method has limitations that might cause the request to be truncated. With a POST,
you can add about 50 trios to the request.
To call acl-field-update, you need modify permission on the SCO or account.
Request URL
http://server_name/api/xml
?action=acl-field-update
&acl-id=integer
&field-id=string
&value=string
&session=BreezeSessionCookieValue
Parameters
Name Type Required Description
acl-id
field-id
value
session
Integer Y The ID of the SCO or account. Can be a valid sco-id or account-id.
String Y The name of the field for which you want to update value. The field can be a
String Y The value to set.
String N The value of the BREEZESESSION cookie. Use this parameter if you do not use
server-defined field or a custom field. A custom field has a
x-, such as x-12056.
with
a client-side cookie management library.
field-id starting
Last updated 12/16/2010
Page 69

USING ADOBE CONNECT 8 WEB SERVICES
Action reference
Filters
Results cannot be filtered or sorted.
Response structure
<?xml version="1.0" encoding="utf-8" ?>
<results>
<status code=allowedValue />
</results>
Response values
Element Attribute Type Description
65
results
status
code
Container All results the action returns.
Empty, with attributes The status of the response.
Allowed value A code indicating the response status (see status).
Sample request
https://example.com/api/xml?action=acl-field-update&acl-id=2007035246
&field-id=name&value=Java 101
Sample response
<?xml version="1.0" encoding="utf-8" ?>
<results>
<status code="ok" />
</results>
See also
acl-field-list
acl-preference-update
Availability
Breeze 4
Description
Updates a user profile with new language and time zone settings.
Request URL
http://server_name/api/xml
?action=acl-preference-update
&acl-id=integer
&lang=allowedValue
&time-zone-id=allowedValue
&session=BreezeSessionCookieValue
Last updated 12/16/2010
Page 70

USING ADOBE CONNECT 8 WEB SERVICES
Action reference
Parameters
Name Type Required Description
66
acl-id
lang
time-zone-id
session
Integer Y The ID of the user whose preferences will be updated. Can be a valid
principal-id.
Allowed value N An abbreviation for the new language (see lang for valid values).
Allowed value N An integer setting for the new time zone (see time-zone-id for
values).
String N The value of the BREEZESESSION cookie. Use this parameter if you
do not use a client-side cookie management library.
Filters
Results cannot be filtered or sorted.
Response structure
<?xml version="1.0" encoding="utf-8" ?>
<results>
<status code=allowedValue />
</results>
Response values
Element Attribute Type Description
results
status
Container All results the action returns.
Empty, with attributes The status of the response.
code
Allowed value A code indicating the response status (see status).
Sample request
https://server.com/api/xml?action=acl-preference-update&acl-id=12345
&lang=fr&time-zone-id=0
Sample response
<?xml version="1.0" encoding="utf-8" ?>
<results>
<status code="ok" />
</results>
common-info
Availability
Breeze 4
Description
Returns basic information about the current user and the Adobe Connect server or Adobe Connect hosted account,
including the value of the
If you call common-info without logging in, the response does not contain user and account elements, because the
server cannot identify a user. However, even without logging in,
BREEZESESSION cookie.
common-info returns a BREEZESESSION cookie value.
Last updated 12/16/2010
Page 71

USING ADOBE CONNECT 8 WEB SERVICES
Action reference
The response also contains host, local-host, and admin-host elements. If Adobe Connect is hosted on a cluster,
host is the cluster name; local-host is the name of the server in the cluster that executes the call to common-info;
admin-host is the name of the secure host on a cluster that supports SSL. Your application can use the value of
and
admin-host to convert HTTP URLs to more secure HTTPS URLs.
Request URL
http://server_name/api/xml
?action=common-info
&domain=string
&session=BreezeSessionCookieValue
Parameters
Name Type Required Description
67
domain
session
String N A domain name identifying a Adobe Connect hosted account. Use
to get information about your hosted account.
String N The value of the BREEZESESSION cookie. Use this parameter if
you do not use a client-side cookie management library.
Filters
Results cannot be filtered or sorted.
Response structure
<?xml version="1.0" encoding="utf-8" ?>
<results>
<status code=allowedValue />
<common locale=allowedValue time-zone-id=integer>
<cookie>string</cookie>
<date>datetime</date>
<host>url</host>
<local-host>hostname</local-host>
<admin-host>hostname</admin-host>
<url>/api/xml?action=common-info</url>
<version>string</version>
<account account-id=integer />
<user user-id=integer type="user">
<name>string</name>
<login>string</login>
</user>
<user-agent>string</user-agent>
</common>
</results>
Response values
Element Attribute Type Description
results
status
code
Container All results the action returns.
Empty, with
attributes
Allowed value A code indicating the response status (see status).
The status of the response.
Last updated 12/16/2010
Page 72

USING ADOBE CONNECT 8 WEB SERVICES
Action reference
Element Attribute Type Description
68
common
cookie
date
host
local-host
admin-host
url
version
account
locale
time-zone-id
account-id
Container Common information about your connection to the server.
Allowed value A setting that defines how Connect Central or your application
displays information to a user (see
lang for values).
Allowed value A code that defines the user’s time zone (see time-zone-id for
values).
String The value of the BREEZESESSION cookie (a string the server
returns identifying this user for this login session).
Datetime The date and time the call to common-info was made, in ISO 8601
format.
String If Adobe Connect runs on a server, the URL of the fully qualified host
name of the server. If a cluster, the name that identifies the cluster.
String The name of the computer that executed the action (on a single
server, the same as
host; on a cluster, the name of the server that
executed the action).
String The name of the secure host on a cluster that supports SSL.
String The part of the URL making this call that identifies the action name.
String The server version name and number.
Empty, with
attribute
Information about the account the user belongs to. Returned if you
are logged in to Adobe Connect or are making the call on a Adobe
Connect hosted account.
Integer The ID of the account the user belongs to.
user
user-id
type
name
login
user-agent
Container Information about the user who established a session with the
Integer The ID of the user who established a session with the server.
Allowed value The type of principal who has a session (usually user; see allowed
String The full name of the user who established a session with the server.
String The login name of the user who is logged in to the server, often the
String The identifier of the web browser or client that established a session
Sample request
https://example.com/api/xml?action=common-info
server. Returned only if the user making the call is logged in.
values for principals at
type).
user’s e-mail address.
with the server.
Last updated 12/16/2010
Page 73

USING ADOBE CONNECT 8 WEB SERVICES
Action reference
Sample response
<?xml version="1.0" encoding="utf-8" ?>
<results>
<status code="ok" />
<common locale="en" time-zone-id="4">
<cookie>breezsi4dundh5srw2fq6</cookie>
<date>2006-09-08T11:17:04.470-07:00</date>
<host>https:example.com</host>
<local-host>localserver17</local-host>
<admin-host>securehost.com</admin-host>
<url>/api/xml?action=common-info</url>
<version>connect_6000</version>
<account account-id="624520" />
<user user-id="2006258745" type="user">
<name>Joy Smith</name>
<login>joy@acme.com</login>
</user>
<user-agent>Mozilla/4.0 (compatible; MSIE 6.0; Windows NT 5.1; SV1;
.NET CLR 1.1.4322)</user-agent>
</common>
</results>
69
curriculum-contents
Availability
Connect Pro 7
Description
Lists all of the SCOs in a curriculum, including the contents of subfolders.
Note: To list the contents of a curriculum, use this action instead of sco-expanded-contents
To find a sco-id to pass in the request URL, call sco-shortcuts. For more information, see “Find SCOs” on page 24.
Request URL
http://server_name/api/xml
?action=curriculum-contents
&sco-id=integer
&session=BreezeSessionCookieValue
Parameters
Name Type Required Description
sco-id Integer Y The unique ID of a curriculum.
session String N The value of the BREEZESESSION cookie. Use this parameter
if you do not use a client-side cookie management library.
Filters
You cannot sort or filter the response to this API call.
Last updated 12/16/2010
Page 74

USING ADOBE CONNECT 8 WEB SERVICES
Action reference
Response structure
<results>
<status code=allowedValue/>
<curriculum-contents>
<sco depth=integer sco-id=integer folder-id=integer type=allowedValue
icon=allowedValue lang=allowedValue source-sco-id=integer display-seq=integer source-scotype=integer source-sco-icon=integer content-source-sco-icon=integer>
<name>string</name>
<url-path>string</url-path>
<description>
string
</description>
<date-created>datetime</date-created>
<date-modified>datetime</date-modified>
</sco>
...more sco elements...
</curriculum-contents>
</results>
Response values
Element Attribute Type Description
70
results Container All results the action returns.
status Empty, with
code Allowed value A code indicating the response status (see status).
curriculumcontents
sco Container Details about one SCO. This SCO can be a folder or any other type of
depth Integer The depth in the content tree at which this object appears, with top-
sco-id Integer The unique ID of the SCO. If the SCO is a folder, same as folder-id.
folder-id Integer The ID of the folder the SCO belongs to.
type Allowed value The type of this content object (see type).
icon Allowed value The name of the icon that visually identifies this object.
lang Allowed value The language in which information about the SCO is displayed (see
source-sco-id Integer The ID of a SCO from which this SCO was created, such as a meeting
display-seq Integer The sequence in which Connect Central (or your application, if you use
attributes
Container The list of all SCOs the curriculum contains.
The status of the response.
object.
level objects at
lang for values).
template or course content.
this value) displays a list of SCOs. Values are not necessarily unique, so
multiple SCOs can have the same
application must define the display sequence. The default is
1.
display-seq value. In that case, the
0.
source-scotype
source-scoicon
Integer An integer indicating the type of SCO from which this SCO was created.
Integer An integer indicating the type of icon from which this icon was created.
Last updated 12/16/2010
Page 75

USING ADOBE CONNECT 8 WEB SERVICES
Action reference
Element Attribute Type Description
71
contentsource-scoicon
name String The name of the contained SCO.
url-path String The URL of the SCO within the curriculum.
description String The summary in the UI. If a SCO has a summary, this field exists,
date-created Datetime The date and time the principal began interacting with the SCO and the
date-modified Datetime The date the SCO was last updated.
Integer An integrer indicating the type of content from which this icon was
created.
otherwise, the field does not exist.
transaction was created.
Sample request
http://example.com/api/xml?action=curriculum-contents&scoid=11697&session=breezq7dyhc7m3de8dksr
Sample response
<results>
<status code="ok"/>
<curriculum-contents>
<sco depth="1" sco-id="31949" folder-id="11697" type="link" icon="course" lang="en"
source-sco-id="41184" display-seq="0" source-sco-type="0" source-sco-icon="1" content-sourcesco-icon="1025">
<name>FlashBelt09</name>
<url-path>/l66176109/</url-path>
<date-created>2009-05-27T03:48:54.277+05:30</date-created>
<date-modified>2009-05-27T03:48:54.277+05:30</date-modified>
</sco>
<sco depth="0" sco-id="11697" folder-id="41177" type="curriculum" icon="curriculum"
lang="en" source-sco-id="" display-seq="0" source-sco-type="" source-sco-icon="" contentsource-sco-icon="">
<name>Backyard Cooking</name>
<url-path>/cooking/</url-path>
<description>
Learn how to cook with things you can find in most urban backyards.
</description>
<date-begin>2009-05-27T03:45:00.000+05:30</date-begin>
<date-created>2009-05-27T03:48:40.383+05:30</date-created>
<date-modified>2009-05-27T03:48:40.383+05:30</date-modified>
</sco>
</curriculum-contents>
</results>
custom-fields
Availability
Breeze 4
Description
Lists all custom fields defined in an account and details about the fields.
Last updated 12/16/2010
Page 76

USING ADOBE CONNECT 8 WEB SERVICES
Action reference
Custom fields provide information about objects (SCOs) or principals that is not already defined in Connect Central.
You can create custom fields, or update their value, using
custom-field-update.
Request URL
http://server_name/api/xml
?action=custom-fields
&filter-definition=value
&session=BreezeSessionCookieValue
Parameters
Name Type Required Description
filter-definition Filter definition N A filter to reduce the volume of the response.
72
session String N The value of the BREEZESESSION cookie. Use this parameter if you do not
use a client-side cookie management library.
Filters
You can filter the response on any element or attribute it contains.
Response structure
<?xml version="1.0" encoding="utf-8" ?>
<results>
<status code=allowedValue />
<custom-fields>
<field permission-id=allowedValue object-type=allowedValue
field-id=string account-id=integer display-seq=integer
field-type=allowedValue is-primary=boolean is-required=boolean>
<name>string</name>
</field>
</custom-fields>
</results>
Response values
Element Attribute Type Description
results
status
Container All results the action returns.
Empty, with
attributes
The status of the response.
custom-fields
field
code Allowed value A code indicating the response status (see status).
Container The list of custom fields that match the query.
Container Details about one custom field.
permission-id Allowed value The permission the current user has to access the custom field (see
object-type Allowed value The type of object the custom field describes (see permission-id
field-id
account-id
String The name of the field, as identified on the server.
Integer The ID of the account in which the custom field is defined.
permission-id for values).
Last updated 12/16/2010
Page 77

USING ADOBE CONNECT 8 WEB SERVICES
Action reference
Element Attribute Type Description
73
display-seq
field-type
is-primary
is-required
name
Integer The sequence in which Connect Central or your application displays
the custom field, relative to other custom fields.
Allowed value The type of data the custom field accepts. Allowed values are text,
textarea, and password.
Boolean Whether the custom field can be deleted (true if no, and false if
yes).
Boolean Whether this custom field is required. true if a value must be
specified for this field in each object that uses it. Otherwise,
String The name of the custom field as Connect Central or your application
displays it.
Sample request
https://example.com/api/xml?action=custom-fields&filter-like-name=name
Sample response
<?xml version="1.0" encoding="utf-8" ?>
<results>
<status code="ok" />
<custom-fields>
<field permission-id="manage" object-type="object-type-principal"
field-id="first-name" account-id="624520" display-seq="1"
field-type="text" is-primary="true" is-required="true">
<name>First Name</name>
</field>
<field permission-id="manage" object-type="object-type-principal"
field-id="last-name" account-id="624520" display-seq="2"
field-type="text" is-primary="true" is-required="true">
<name>Last Name</name>
</field>
</custom-fields>
</results>
false.
See also
custom-field-update
custom-fields-delete
Availability
Breeze 4
Description
Deletes a custom field.
The value of is-primary for a custom field must be false before the field can be deleted. If is-primary is true and
you want to change its value, call
custom-field-update.
Last updated 12/16/2010
Page 78

USING ADOBE CONNECT 8 WEB SERVICES
Action reference
Request URL
http://server_name/api/xml
?action=custom-fields-delete
&field-id=string
&object-type=allowedValue
&session=BreezeSessionCookieValue
Parameters
Name Type Required Description
74
field-id
object-type
session
String Y The ID of the field to be deleted. Call custom-fields-delete to
obtain the ID, which is returned in the
field element.
String Y The type of SCO for which the field is defined (for values, see type).
String N The value of the BREEZESESSION cookie. Use this parameter if you do
not use a client-side cookie management library.
Filters
Results cannot be filtered or sorted.
Response structure
<?xml version="1.0" encoding="utf-8" ?>
<results>
<status code=allowedValue />
</results>
Response values
Element Attribute Type Description
results
status
code
Container All results the action returns.
Empty, with attributes The status of the response.
Allowed value A code indicating the response status (see status).
field-id attribute of the
Sample request
https://example.com/api/xml?action=custom-fields-delete&field-id=2006338719&objecttype=object-type-principal
Sample response
<?xml version="1.0" encoding="utf-8" ?>
<results>
<status code="ok" />
</results>
See also
custom-field-update
Last updated 12/16/2010
Page 79

USING ADOBE CONNECT 8 WEB SERVICES
Action reference
custom-field-update
Availability
Breeze 4
Description
Creates a new custom field or updates the value of an existing one.
You can define up to eight custom fields on a principal or SCO. To create a custom field, call custom-field-update
with at least the following fields:
custom-field-update is successful, it returns a field-id.
If
To update a custom field, specify the field-id, an object-type, and a name for each field that has a value you want
to change.
Be careful when defining custom fields, as retrieving those fields in a report (for example, by calling report-bulk-
users) can affect the performance of the server and the database.
Request URL
http://server_name/api/xml
?action=custom-field-update
&account-id=integer
&object-type=object-type-allowedValue
&permission-id=allowedValue
&name=string
&comments=string
&field-type=allowedValue
&is-required=boolean
&is-primary=boolean
&display-seq=integer
&field-id=integer
&session=BreezeSessionCookieValue
object-type, permission-id, name, field-type, is-required, and is-primary.
75
Last updated 12/16/2010
Page 80

USING ADOBE CONNECT 8 WEB SERVICES
Action reference
Parameters
Name Type Required Description
76
account-id
object-type
permission-id
name
comments
field-type
Integer N The account ID in which the field is created.
String Y The type of SCO this field applies to. Required to create and update fields.
Allowed values:
• object-type-principal
• object-type-meeting
• object-type-sco
• object-type-event
• object-type-read-only
Example:
object-type=object-type-principal
The value object-type-read-only means that Connect Central
displays the value but a user cannot set it using Connect Central. You can
also use this value in custom applications.
String Y The permission a principal needs on the object to set or view the field’s
value. The only allowed value is
String Y The label for the field in the user interface. Required to create a field.
String N Any comments you define for the custom field, displayed as hint text in
your user interface. Can be up to 60 characters long.
String Y The type of field. Allowed values are text, textarea, and password.
Required to create a field.
manage. Required to create a field.
is-required
is-primary
display-seq
field-id
session
Boolean Y Whether this custom field is required. Use true if a value must be
Boolean Y Whether this custom field can be deleted through the user interface
Integer N The sequence in which Connect Central or your application displays the
Integer Y The name of a field that has a value you want to update. Required to
String N The value of the BREEZESESSION cookie. Use this parameter if you do not
Filters
Results cannot be filtered or sorted.
specified for this field in each object that uses it. Otherwise, use
Required to create a field.
true if it cannot be deleted, and false if it can).
(
custom field, relative to other custom fields.
update a field.
use a client-side cookie management library.
false.
Last updated 12/16/2010
Page 81

USING ADOBE CONNECT 8 WEB SERVICES
Action reference
Response structure
<?xml version="1.0" encoding="utf-8" ?>
<results>
<status code=allowedValue />
<field field-id=integer display-seq=integer object-type=allowedValue
account-id=integer is-primary=boolean permission-id=allowedValue
is-required=boolean field-type=string>
<comments>string</comments>
<name>string</name>
</field>
</results>
Response values
Element Attribute Type Description
77
results
status
field
comments
name
code
field-id
display-seq
object-type
account-id
is-primary
permission-id
is-required
field-type
Container All results the action returns.
Empty, with
attributes
Allowed value A code indicating the response status (see status).
Empty, with
attributes
Integer A numeric identifier for the field.
Integer The sequence in which Connect Central or your application displays the
Allowed value The type of object the field describes (see type for allowed values).
Integer For customers on Adobe Connect hosted accounts, the ID of the account
Boolean Whether this custom field can be deleted (true if no, false if yes).
Allowed value The permission needed to access the custom field (see permission-id
Boolean Whether a value for this custom field is required (true if yes and false if
Allowed value The type of data the field accepts. Allowed values are text, textarea,
String The comment entered in comments in the request.
String The name of the field entered in name in the request.
The status of the response.
Information about the custom field.
field.
in which the field is defined.
no).
password.
and
Sample request
https://example.com/api/xml?action=custom-field-update
&object-type=object-type-principal&permission-id=manage
&account-id=624520&name=jobtitle&comments=test&field-type=text
&is-required=true&is-primary=false&display-seq=1
Last updated 12/16/2010
Page 82

USING ADOBE CONNECT 8 WEB SERVICES
Action reference
Sample response
<?xml version="1.0" encoding="utf-8" ?>
<results>
<status code="ok" />
<field field-id="2006472106" object-type="object-type-principal"
display-seq="1" account-id="624520" is-primary="false"
permission-id="manage" is-required="true" field-type="text">
<comments>test</comments>
<name>jobtitle</name>
</field>
</results>
See also
report-bulk-users
expiry-settings-info
Availability
Acrobat Connect Pro Server 7
78
Description
Returns information about the current settings for account-expiration notifications (the warnings given to users
before an account expires). A user is notified x number of days before their account expires. This action simply returns
the value of x.
Request URL
https://example.com/api/xml
?action=expiry-settings-info
&account-id=Integer
&session=String
Parameters
Name Type Required Description
account-id
session
Integer N The ID of the account. If you don’t provide an account ID, the information for
the current account is returned.
String N The value of the BREEZESESSION cookie. Use this parameter if you do not
use a client-side cookie management library.
Response structure
<?xml version="1.0" encoding="utf-8" ?>
<results>
<status code=allowedValue />
<expiry-num-of-days>
<value>30</value>
</expiry-num-of-days>
</results>
Last updated 12/16/2010
Page 83

USING ADOBE CONNECT 8 WEB SERVICES
Action reference
Response values
Element Attribute Type Description
79
results
status
code
expiry-num-of-days
value
Container All results the action returns.
Empty, with
attributes
Allowed value A code indicating the response status (see status).
Container Information about the current settings for account-expiration
Integer The user is notified this many days before their account expires. The
The status of the response.
notifications.
default value is 30. For example, if
December 31, the user is notified on December 1.
Sample request
https://example.com/api/xml?action=expiry-settings-info&account-id=7
Sample response
<?xml version="1.0" encoding="utf-8" ?>
<results>
<status code="ok"/>
<expiry-num-of-days>
<value>30</value>
</expiry-num-of-days>
</results>
See also
expiry-settings-update
a user’s account expires on
expiry-settings-update
Availability
Acrobat Connect Pro Server 7
Description
Updates information about the settings for account-expiration notification (the notification given to users before an
account expires). A user is notified x number of days before their account expires. This action simply updates the value of x.
Request URL
https://example.com/api/xml
?action=expiry-settings-update
&account-id=Integer
&session=String
Last updated 12/16/2010
Page 84

USING ADOBE CONNECT 8 WEB SERVICES
Action reference
Parameters
Name Type Required Description
80
account-id
expiry-num-of-days
session
Integer N The ID of the account. If you don’t provide an account ID, the
information for the current account is updated.
Integer Y A user is notified this many days before their account expires. The
default value is 30; possible values are 30, 60, and 90.
For example, if the value of this parameter is 30, a user is notified 30
days before their account is due to expire.
String N The value of the BREEZESESSION cookie. Use this parameter if you
do not use a client-side cookie management library.
Response structure
<?xml version="1.0" encoding="utf-8" ?>
<results>
<status code=allowedValue />
</results>
Response values
Element Attribute Type Description
results
status
code
Container All results the action returns.
Empty, with attributes The status of the response.
Allowed value A code indicating the response status (see status).
Sample request
https://example.com/api/xml?action=expiry-settings-update&account-id=7&expiry-num-of-days=30
Sample response
<?xml version="1.0" encoding="utf-8" ?>
<results>
<status code="ok"/>
</results>
See also
account-expiry-info, expiry-settings-info
group-membership-update
Availability
Breeze 4
Description
Adds one or more principals to a group, or removes one or more principals from a group.
To update multiple principals and groups, specify multiple trios of group-id, principal-id, and is-member
parameters.
Last updated 12/16/2010
Page 85

USING ADOBE CONNECT 8 WEB SERVICES
Action reference
You can obtain a group-id by calling principal-list and filtering the response with filter-type=group or
another filter value such as filter-type=admins. The built-in groups have distinctive types other than group (see
type for a list of values).
Request URL
http://server_name/api/xml
?action=group-membership-update
&group-id=integer
&principal-id=integer
&is-member=boolean
&session=BreezeSessionCookieValue
Parameters
Name Type Required Description
81
group-id
principal-id
is-member
session
Integer Y The ID of the group in which you want to add or change members.
Integer Y The ID of the principal whose membership status you want to update.
Returned by
Boolean Y Whether the principal is added to (true) or deleted from (false) the
group.
String N The value of the BREEZESESSION cookie. Use this parameter if you do not
use a client-side cookie management library.
principal-info.
Filters
Results cannot be filtered or sorted.
Response structure
<?xml version="1.0" encoding="utf-8" ?>
<results>
<status code=allowedValue />
</results>
Response values
Element Attribute Type Description
results
status
Container Top-level element for the response.
Empty, with attributes The status of the response.
code
Allowed value A code indicating the response status (see status).
Sample request
https://example.com/api/xml?action=group-membership-update&group-id=632398
&principal-id=2006258745&is-member=true
Sample response
<?xml version="1.0" encoding="utf-8" ?>
<results>
<status code="ok" />
</results>
Last updated 12/16/2010
Page 86

USING ADOBE CONNECT 8 WEB SERVICES
Action reference
learning-path-info
Availability
Breeze 5
Description
Returns a list of learning paths for a learning object that belongs to a curriculum.
A learning object is any SCO that has been added to a curriculum. A learning path is determined by rules that establish
whether a learner can proceed to the next learning object.
You can create a learning path by establishing prerequisite requirements, completion requirements, or preassessment
requirements. For example, a learning path might be the rule that the class Welcome to AcmeCo must be completed
before Managing Projects at AcmeCo.
A call to learning-path-info lists modules within a curriculum and their paths to each other. To see the complete
contents of a curriculum, including content, meetings, and so on, call
Request URL
http://server_name/api/xml
?action=learning-path-info
&curriculum-id=integer
&sco-id=integer
&filter-definition=value
&sort-definition=value
&session=BreezeSessionCookieValue
sco-expanded-contents.
82
Parameters
Name Type Required Description
curriculum-id
sco-id
filter-definition
sort-definition
session
Integer Y The ID of the curriculum the learning object belongs to.
Integer Y The ID of the curriculum module (course, presentation, or similar) for
which you want a learning path.
Filter definition N A filter to reduce the volume of the response.
Sort definition N A sort to return results in a certain sequence.
String N The value of the BREEZESESSION cookie. Use this parameter if you do
not use a client-side cookie management library.
Filters
You can filter or sort the response on any element or attribute it contains.
Last updated 12/16/2010
Page 87

USING ADOBE CONNECT 8 WEB SERVICES
Action reference
Response structure
<?xml version="1.0" encoding="utf-8" ?>
<results>
<status code=allowedValue />
<learning-paths>
<learning-path curriculum-id=integer current-sco-id=integer target-sco-id=integer
path-type=allowedValue>
<name>string</name>
</learning-path>
</learning-paths>
</results>
Response values
Element Attribute Type Description
83
results
status
code
learning-paths
curriculum-id
current-scoid
target-sco-id
path-type
name
Container All results the action returns.
Empty, with attributes The status of the response.
Allowed value A code indicating the response status (see status).
Container Information about learning paths in a curriculum.
Integer The numeric ID of the curriculum.
Integer The learning object for which you want a path.
Integer The ID of the learning object that restricts access to the current
Allowed value The type of path between the target and current learning objects
String The name of the target learning object.
learning object (for example, a prerequisite learning object).
(for example, whether completion of the target is required as a
prerequisite). See
path-type for allowed values.
Sample request
https://example.com/api/xml?action=learning-path-info&sco-id=2006334909
&curriculum-id=2006298444
Sample response
<?xml version="1.0" encoding="utf-8" ?>
<results>
<status code="ok" />
<learning-paths>
<learning-path curriculum-id="2006298444" current-sco-id="2006298444"
target-sco-id="2006298445" path-type="completion-required">
<name>Security at AcmeCo</name>
</learning-path>
</learning-paths>
</results>
See also
learning-path-update
Last updated 12/16/2010
Page 88

USING ADOBE CONNECT 8 WEB SERVICES
Action reference
learning-path-update
Availability
Breeze 5
Description
Updates the learning path for a single learning object in a curriculum. A learning object is any SCO that is added to a
curriculum.
Request URL
http://server_name/api/xml
?action=learning-path-update
&curriculum-id=integer
¤t-sco-id=integer
&target-sco-id=integer
&path-type=allowedValue
&session=BreezeSessionCookieValue
Parameters
84
Name Type Required Description
curriculum-id
current-sco-id
target-sco-id
path-type
session
Integer Y The ID of the curriculum to which this learning object belongs.
Integer N The ID of the learning object that has the access you want to update.
Integer N The ID of the learning object that restricts access to the current learning
object (for example, a prerequisite course).
Allowed value Y The type of path between the target learning object and the current
learning object (see
String N The value of the BREEZESESSION cookie. Use this parameter if you do
not use a client-side cookie management library.
Filters
Results cannot be filtered or sorted.
Response structure
<?xml version="1.0" encoding="utf-8" ?>
<results>
<status code="ok" />
</results>
Response values
Element Attribute Type Description
path-type for allowed values).
results
status
code
Container Top-level element for the response.
Empty, with attributes The status of the response.
Allowed value A code indicating the response status (see status).
Last updated 12/16/2010
Page 89

USING ADOBE CONNECT 8 WEB SERVICES
Action reference
Sample request
https://example.com/api/xml?action=learning-path-update
&curriculum-id=2006298444¤t-sco-id=2007064258
&target-sco-id=2007035246&path-type=completion-required
Sample response
<?xml version="1.0" encoding="utf-8" ?>
<results>
<status code="ok"/>
</results>
See also
learning-path-info
limited-administrator-permissions info
Availability
Acrobat Connect Pro 7
85
Description
Returns a list of permissions that can be enabled or disabled for the Limited Administrators group and whether or not
that permission is currently enabled. For more information on Limited Administrators, see
administrator-permissions-update.
limited-
Request URL
http://server_name/api/xml
?action=limited-administrator-permissions-info
&session=BreezeSessionCookieValue
Parameters
Name Type Required Description
session
String N The value of the BREEZESESSION cookie. Use this parameter if you do
not use a client-side cookie management library.
Filters
Results cannot be filtered or sorted.
Response structure
<?xml version="1.0" encoding="utf-8"?>
<results>
<status code="ok"/>
<permissions>
<permission>
<enabled>Boolean</enabled>
<name>string</name>
</permission>
</permissions>
</results>
Last updated 12/16/2010
Page 90

USING ADOBE CONNECT 8 WEB SERVICES
Action reference
Response values
Element Attribute Type Description
86
results
status
code
permissions
permission
enabled
name
Container All results the action returns.
Empty, with attributes The status of the response.
Allowed value A code indicating the response status (see status).
Container A list of permissions.
Container A list of information about the permission.
Boolean A value indicating whether the permission is enabled (true)
String The name of the permission.
or not (
false).
Sample request
https://example.com/api/xml?action=limited-administrator-permissions-info
&session=breeze6qdeheiso93efb5
Sample response
<?xml version="1.0" encoding="utf-8"?>
<results>
<status code="ok"/>
<permissions>
<permission>
<enabled>true</enabled>
<name>edit-account-info</name>
</permission>
<permission>
<enabled>false</enabled>
<name>view-disk-usage-and-reports</name>
</permission>
<permission>
<enabled>true</enabled>
<name>reset-password</name>
</permission>
<permission>
<enabled>true</enabled>
<name>view-user-data</name>
</permission>
<permission>
<enabled>true</enabled>
<name>add-users-groups-webui</name>
</permission>
<permission>
<enabled>false</enabled>
<name>add-users-groups-csv</name>
</permission>
<permission>
<enabled>true</enabled>
<name>set-content-meeting-permissions</name>
</permission>
<permission>
<enabled>true</enabled>
<name>user-profile-fields</name>
Last updated 12/16/2010
Page 91

USING ADOBE CONNECT 8 WEB SERVICES
Action reference
</permission>
<permission>
<enabled>true</enabled>
<name>change-login-pw-policy</name>
</permission>
<permission>
<enabled>false</enabled>
<name>delete-users-groups</name>
</permission>
<permission>
<enabled>true</enabled>
<name>modify-current-users-groups</name>
</permission>
<permission>
<enabled>false</enabled>
<name>customization</name>
</permission>
<permission>
<enabled>false</enabled>
<name>compliance</name>
</permission>
<permission>
<enabled>false</enabled>
<name>chargebacks</name>
</permission>
<permission>
<enabled>false</enabled>
<name>view-system-usage-reports</name>
</permission>
<permission>
<enabled>false</enabled>
<name>quota-threshold-notifications</name>
</permission>
</permissions>
</results>
87
limited-administrator-permissions-update
Availability
Acrobat Connect Pro 7
Description
Updates the permissions that can be enabled for Limited Administrators.
With Limited Administrators, your organization can have finer control over administrators and what types of things
they can access. Your organization can separate system administrators who control all aspects of the system from
Limited Administrators, who can access and control a subset of the system.
Each Adobe Connect installation has one Limited Administrators group. Users in the Administrators group can edit
the permissions of Limited Administrators.
Last updated 12/16/2010
Page 92

USING ADOBE CONNECT 8 WEB SERVICES
Action reference
Request URL
http://server_name/api/xml
?action=limited-administrator-permissions-update
&view-disk-usage-and-reports=boolean
&reset-password=boolean
&view-user-data=boolean
&add-users-groups-webui=boolean
&add-users-groups-csv=boolean
&user-profile-fields=boolean
&change-login-pw-policy=boolean
&delete-users-groups=boolean
&modify-current-users-groups=boolean
&customization=boolean
&edit-account-info=boolean
&set-content-meeting-permissions=boolean
&compliance=boolean
&chargebacks=boolean
&view-training-reports=boolean
&reset-to-default=value
Parameters
When you use this command, pass at least one parameter. The descriptions that follow indicate if the permission is set
true by default.
to
88
Name Type Required Description
view-disk-usage-and-reports Boolean N A value of true allows limited administrators to view disk usage and
reset-password Boolean N A value of true allows limited administrators to reset the password of
view-user-data Boolean N Superset; a value of true allows limited administrators to view user
add-users-groups-webui Boolean N A value of true allows limited administrators to add users and groups
add-users-groups-csv Boolean N A value of true allows limited administrators to add users or groups by
user-profile-fields Boolean N A value of true allows limited administrators to modify user profile
change-login-pw-policy Boolean N A value of true allows limited administrators to change the login and
delete-users-groups Boolean N A value of true allows limited administrators to delete users or groups.
modify-current-users-groups Boolean N A value of true allows limited administrators to modify currents users
customization Boolean N A value of true allows limited administrators to customize the colors of
reports. The default value is
a user. Part of the view-user-data set. The default value is
data. By setting this parameter to enable, you enable all parameters in
this set. (See all parameters that are part of the view-user-data set.) The
default value is
by using the management console. Part of the view-user-data set. The
default value is
importing a CSV file. Part of the view-user-data set
fields.
password policies.
Part of the view-user-data set
and groups. Part of the view-user-data set. The default value is
the account web pages, meetings, and the login page.
true.
true.
true.
true.
true.
edit-account-info Boolean N A value of true allows limited administrators to edit account
information.
Last updated 12/16/2010
Page 93

USING ADOBE CONNECT 8 WEB SERVICES
Action reference
Name Type Required Description
89
set-content-meeting-permissions Boolean N A value of true allows limited administrators to set the permissions for
content or meetings. The default value is
compliance Boolean N A value of true allows limited administrators to change compliance
settings (settings for enabling pods, sharing, and recording, and for
training settings).
chargebacks Boolean N A value of true allows limited administrators to access the cost-center
settings for this account.
view-training-reports Boolean N A value of true allows limited administrators to view training reports.
reset-to-default Boolean N A value of true resets all permissions to the default permissions set by
Adobe.
true.
Filters
Results cannot be filtered or sorted.
Response structure
<?xml version="1.0" encoding="utf-8" ?>
<results>
<status code=allowedValue />
</results>
Response values
Element Attribute Type Description
results
status
Sample request
The example shows
code
Container All results the action returns.
Empty, with attributes The status of the response.
Allowed value A code indicating the response status (see status).
Last updated 12/16/2010
Page 94

USING ADOBE CONNECT 8 WEB SERVICES
Action reference
https://admin.ibreeze.macromedia.com/api/xml?action=limited-administrator-permissions-update
&session=breezghd9nxdhh768vpob
&view-user-data=true
&view-user-data=false
&reset-password=true
&reset-password=false
&modify-current-users-groups=true
&modify-current-users-groups=false
&add-users-groups-webui=true
&add-users-groups-webui=false
&add-users-groups-csv=false
&delete-users-groups=false
&user-profile-fields=true
&user-profile-fields=false
&change-login-pw-policy=true
&change-login-pw-policy=false
&chargebacks=false
&edit-account-info=true
&edit-account-info=false
"a-threshold-notifications=false
&customization=false
&view-disk-usage-and-reports=false
&view-system-usage-reports=false
&compliance=false
&set-content-meeting-permissions=true
&set-content-meeting-permissions=false
90
Sample response
<?xml version="1.0" encoding="utf-8"?>
<results><status code="ok"/>
</results>
login
Availability
Breeze 4
Description
Logs a user in to Adobe Connect Server.
In a client application, after logging in a user, you must read and store the cookie called BREEZESESSION, which can
be found in the HTTP headers of the response from
subsequent request that you make for that user.
If you cannot retrieve cookie values from HTTP response headers, you can call common-info to get the cookie value
before the user logs in. Then, pass the value to
https://example.com/api/xml?action=login&login=loginId&password=password
&session=value
You can also use the session parameter on any API call you make after login. For example, to call principal-list
after logging in, you can enter:
login. You must then include the value of that cookie in every
login using the session request parameter:
https://example.com/api/xml?action=principal-list&session=value
Last updated 12/16/2010
Page 95

USING ADOBE CONNECT 8 WEB SERVICES
Action reference
The BREEZESESSION value is valid for only one login session. Your application must store a new cookie value each time
the user logs in.
When you call the login action, you are sending a login ID and password across a network, unless you use external
authentication. Use SSL or another appropriate security method to protect passwords in transit.
Request URL
http://server_name/api/xml
?action=login
&login=string
&password=string
&account-id=integer
&external-auth=use
&domain=string
Parameters
Name Type Required Description
91
account-id
external-auth
login
password
domain
session
Integer N The ID of your Adobe Connect hosted account. If your organization is
Allowed value N A value indicating whether you send an external network login ID to
String Y/N The user’s login name. Do not use if you use external or HTTP header
String Y/N The user’s password. Do not use if you use external or HTTP header
String N The domain name of your Adobe Connect hosted account. If your
String N The value of the BREEZESESSION cookie. Use this parameter if you
Filters
Results cannot be filtered or sorted.
Response structure
<?xml version="1.0" encoding="utf-8" ?>
<results>
<status code=allowedValue />
</results>
running a licensed Adobe Connect Server, do not use
represent the user to Adobe Connect. If so, use
auth=use
authentication.
authentication.
organization is running a licensed of Adobe Connect Server, do not use
domain.
do not use a client-side cookie management library.
.
account-id.
external-
Response values
Element Attribute Type Description
results
status
code
Container All results the action returns.
Empty, with attributes The status of the response.
Allowed value A code indicating the response status (see status).
Last updated 12/16/2010
Page 96

USING ADOBE CONNECT 8 WEB SERVICES
Action reference
Sample request
http://example.com/api/xml?action=login&login=joy@acme.com&password=happy
&session=breeztg8mz53r93vebwur
Sample response
<?xml version="1.0" encoding="utf-8" ?>
<results>
<status code="ok" />
</results>
See also
logout
logout
Availability
Breeze 4
Description
Ends a user’s login session, invalidating the cookie value associated with the user’s session.
92
After calling logout, set the BREEZESESSION cookie value to null. Do not reuse the cookie value after your user logs out.
Request URL
http://server_name/api/xml
?action=logout
&session=BreezeSessionCookieValue
Parameters
Name Type Required Description
session
String N The value of the BREEZESESSION cookie. Use this parameter if you
do not use a client-side cookie management library.
Filters
Results cannot be filtered or sorted.
Response structure
<?xml version="1.0" encoding="utf-8" ?>
<results>
<status code=allowedValue />
</results>
Last updated 12/16/2010
Page 97

USING ADOBE CONNECT 8 WEB SERVICES
Action reference
Response values
Element Attribute Type Description
93
results
status
code
Container All results the action returns.
Empty, with attributes The status of the response.
Allowed value A code indicating the response status (see status).
Sample request
http://example.com/api/xml?action=logout
Sample response
<?xml version="1.0" encoding="utf-8" ?>
<results>
<status code="ok" />
</results>
See also
login
meeting-disclaimer-info
Availability
Acrobat Connect Pro 7
Description
Provides information about the disclaimer text that is shown when a user enters a meeting. For more information
about the disclaimer, see
meeting-disclaimer-update.
Request URL
https://servername/api/xml
?action=meeting-disclaimer-info
&account-id=integer
&session=string
Parameters
Name Type Required Description
account-id Integer N The ID of the account for which the disclaimer text is retrieved. If not used, the account
session String N A string; the value of the BREEZESESSION cookie.
that you are currently logged in to is updated.
Filters
Filters cannot be used with this action.
Last updated 12/16/2010
Page 98

USING ADOBE CONNECT 8 WEB SERVICES
Action reference
Response structure
<?xml version="1.0" encoding="utf-8" ?>
<results>
<status code=allowedValue />
<disclaimer>
string
</disclaimer>
</results>
Response values
Element Attribute Type Description
94
results
status
code
disclaimer
Container All results the action returns.
Empty, with attributes The status of the response.
Allowed value A code indicating the response status (see status).
String The text of the disclaimer notice.
Sample request
https://example.com/api/xml?action=meeting-disclaimer-info&account-id=7
Sample response
<?xml version="1.0" encoding="utf-8" ?>
<results>
<status code="ok" />
<disclaimer>
This meeting may be recorded for compliance purpose. By clicking OK you agree to
the terms of meeting.
</disclaimer>
</results>
meeting-disclaimer-update
Availability
Acrobat Connect Pro 7
Description
Updates the disclaimer text that is shown when a user enters a meeting.
To comply with communications regulations or standards, you can set up a disclaimer notice to appear when a user
enters a meeting. The disclaimer notice typically displays boilerplate information for your organization. It advises
users of the status of the meeting and the terms of use for the meeting. For example, a disclaimer notice could advise
users that the meeting is being recorded, and that users cannot join the meeting unless they accept the notice.
If the disclaimer is activated, the notice is shown in all meetings. Activate the disclaimer either through the
management console or by using the
meeting-feature-update action with the fid-meeting-disclaimer
parameter set to enabled.
Last updated 12/16/2010
Page 99

USING ADOBE CONNECT 8 WEB SERVICES
Action reference
Request URL
https://servername/api/xml
?action=meeting-disclaimer-update
&account-id=integer
&disclaimer=string
&session=string
Parameters
Value Type Required Description
95
account-id Integer N The ID of the account for which the disclaimer text is updated. If not used, the
disclaimer String Y The disclaimer text that is shown when a user starts a meeting. The disclaimer
session String N The value of the BREEZESESSION cookie.
account that you are currently logged into is updated.
can, for example, notify users that a meeting is being recorded.
The limit is 1500 characters. The disclaimer text can contain XML-compliant HTML
tags. For example: <b>This meeting is being recorded.</b>
Response structure
<?xml version="1.0" encoding="utf-8" ?>
<results>
<status code=code />
</results>
Response values
Element Attribute Type Description
results
status
code
Container All results the action returns.
Empty, with attributes The status of the response.
Allowed value A code indicating the response status (see status).
Sample request
https://example.com/api/xml?action=meeting-disclaimer-update&disclaimer=Please note that this
meeting is being recorded.
Sample response
<?xml version="1.0" encoding="utf-8" ?>
<results>
<status code="ok" />
</results>
meeting-feature-update
Availability
Acrobat Connect Pro 7
Last updated 12/16/2010
Page 100

USING ADOBE CONNECT 8 WEB SERVICES
Action reference
Description
Enables or disables features in a meeting. This action is used to manage features such as recording of meetings and
control of pods. For more information on usage, see
“Configure compliance settings” on page 44. You can append
multiple feature-id and enable pairs to the end of the request URL.
Request URL
http://server name/api/xml
?action=meeting-feature-update
&account-id=integer
&feature-id=value
&enable=value
Parameters
Name Type Required Description
96
account-id
feature-id
enable
Integer Y The ID of your Adobe Connect hosted account. For enterprise
installations, the ID is 7. For licensed installations, use
get the ID.
Integer Y The ID of the feature to enable or disable. For available IDs, see
feature-id.
Boolean Y Whether to enable the specified feature (true) or not (false).
Response structure
<?xml version="1.0" encoding="utf-8" ?>
<results>
<status code=code />
</results>
Response values
Element Attribute Type Description
results
status
code
Container All results the action returns.
Empty, with attributes The status of the response.
Allowed value A code indicating the response status (see status).
Sample request
The following sample disables the Chat pod.
common-info to
https://example.com/api/xml?action=meeting-feature-update&account-id=7&feature-id=fidmeeting-chat&enable=false
Sample response
<?xml version="1.0" encoding="utf-8" ?>
<results>
<status code="ok" />
</results>
Last updated 12/16/2010
 Loading...