

Page 1

Using
ColdFusion Studio
ColdFusion Studio 4.5
for Windows® 95/98/NT4/2000
Allaire Corporation
Page 2

Copyright Notice
© 1999 Allaire Corporation. All rights reserved.
This manual, as well as the software described in it, is furnished under license and may
be used or copied only in accordance with the terms of such license. The content of
this manual is furnished for informational use only, is subject to change without
notice, and should not be construed as a commitment by Allaire Corporation. Allaire
Corporation assumes no responsibility or liability for any errors or inaccuracies that
may appear in this book.
Except as permitted by such license, no part of this publication may be reproduced,
stored in a retrieval system, or transmitted in any form or by any means, electronic,
mechanical, recording, or otherwise, without the prior written permission of Allaire
Corporation.
ColdFusion and HomeSite are federally registered trademarks of Allaire Corporation.
HomeSite, the ColdFusion logo and the Allaire logo are trademarks of Allaire
Corporation in the USA and other countries. All other products or name brands are
the trademarks of their respective holders.
Part number: AA-45STU-RK
Page 3

Contents
Welcome to ColdFusion Studio . . . . . . . . . . . . . . . . . . . . . . . . . . xi
Intended Audience . . . . . . . . . . . . . . . . . . . . . . . . . . . . . . . . . . . . . . . . . . . . . . . . . . . . . xii
Introduction to the ColdFusion 4.5 Web Application Server . . . . . . . . . . . . . . . . . xii
Development Features in ColdFusion Studio 4.5. . . . . . . . . . . . . . . . . . . . . . . . . . xiii
About ColdFusion Documentation. . . . . . . . . . . . . . . . . . . . . . . . . . . . . . . . . . . . . . . xiv
Developer Resources . . . . . . . . . . . . . . . . . . . . . . . . . . . . . . . . . . . . . . . . . . . . . . . . . . . xvi
Documentation updates . . . . . . . . . . . . . . . . . . . . . . . . . . . . . . . . . . . . . . . . . . . xiv
ColdFusion manuals . . . . . . . . . . . . . . . . . . . . . . . . . . . . . . . . . . . . . . . . . . . . . . xiv
ColdFusion Server online documentation . . . . . . . . . . . . . . . . . . . . . . . . . . . xv
ColdFusion Studio online documentation . . . . . . . . . . . . . . . . . . . . . . . . . . . xv
Allaire ColdFusion Developer Center . . . . . . . . . . . . . . . . . . . . . . . . . . . . . . . . xvi
ColdFusion Web Resources . . . . . . . . . . . . . . . . . . . . . . . . . . . . . . . . . . . . . . . . xvi
Making Web sites accessible to visually impaired visitors . . . . . . . . . . . . . . xvi
Contacting Allaire . . . . . . . . . . . . . . . . . . . . . . . . . . . . . . . . . . . . . . . . . . . . . . . . . . . . . xvii
Chapter 1 Exploring the Workspace . . . . . . . . . . . . . . . . . . . . 19
The Workspace Areas . . . . . . . . . . . . . . . . . . . . . . . . . . . . . . . . . . . . . . . . . . . . . . . . . . . 20
Setting workspace options . . . . . . . . . . . . . . . . . . . . . . . . . . . . . . . . . . . . . . . . . 21
Working in the Resource Windows . . . . . . . . . . . . . . . . . . . . . . . . . . . . . . . . . . . . . . . 21
Resource tabs . . . . . . . . . . . . . . . . . . . . . . . . . . . . . . . . . . . . . . . . . . . . . . . . . . . . 21
Creating and Browsing Files in the Document Window. . . . . . . . . . . . . . . . . . . . . 22
Edit tab . . . . . . . . . . . . . . . . . . . . . . . . . . . . . . . . . . . . . . . . . . . . . . . . . . . . . . . . . . 22
Browse tab . . . . . . . . . . . . . . . . . . . . . . . . . . . . . . . . . . . . . . . . . . . . . . . . . . . . . . . 22
Design tab . . . . . . . . . . . . . . . . . . . . . . . . . . . . . . . . . . . . . . . . . . . . . . . . . . . . . . . 22
Tracking Your Work in the Results Window. . . . . . . . . . . . . . . . . . . . . . . . . . . . . . . . 23
Getting the Most from the Help System. . . . . . . . . . . . . . . . . . . . . . . . . . . . . . . . . . . 23
Opening dialog box Help . . . . . . . . . . . . . . . . . . . . . . . . . . . . . . . . . . . . . . . . . . 23
Accessing Help References . . . . . . . . . . . . . . . . . . . . . . . . . . . . . . . . . . . . . . . . . 23
Bookmarking Help topics . . . . . . . . . . . . . . . . . . . . . . . . . . . . . . . . . . . . . . . . . . 24
Searching Help References . . . . . . . . . . . . . . . . . . . . . . . . . . . . . . . . . . . . . . . . . 24
Extending the Help system . . . . . . . . . . . . . . . . . . . . . . . . . . . . . . . . . . . . . . . . . 25
Adding Help References to the booktree structure . . . . . . . . . . . . . . . . . . . . 27
Adding media content . . . . . . . . . . . . . . . . . . . . . . . . . . . . . . . . . . . . . . . . . . . . . 28
Page 4

iv Contents
Chapter 2 Managing Files . . . . . . . . . . . . . . . . . . . . . . . . . . . . . 29
About the Files Tab. . . . . . . . . . . . . . . . . . . . . . . . . . . . . . . . . . . . . . . . . . . . . . . . . . . . . 30
Working with Files . . . . . . . . . . . . . . . . . . . . . . . . . . . . . . . . . . . . . . . . . . . . . . . . . . . . . 31
Setting startup options . . . . . . . . . . . . . . . . . . . . . . . . . . . . . . . . . . . . . . . . . . . . 31
Opening files . . . . . . . . . . . . . . . . . . . . . . . . . . . . . . . . . . . . . . . . . . . . . . . . . . . . . 31
Opening recently used files . . . . . . . . . . . . . . . . . . . . . . . . . . . . . . . . . . . . . . . . 31
Adding a link to an open file . . . . . . . . . . . . . . . . . . . . . . . . . . . . . . . . . . . . . . . 32
Saving files . . . . . . . . . . . . . . . . . . . . . . . . . . . . . . . . . . . . . . . . . . . . . . . . . . . . . . . 32
Changing the File List Display . . . . . . . . . . . . . . . . . . . . . . . . . . . . . . . . . . . . . . . . . . . 33
Dragging Files from Windows Explorer . . . . . . . . . . . . . . . . . . . . . . . . . . . . . . . . . . . 33
Building a Favorite Folders List . . . . . . . . . . . . . . . . . . . . . . . . . . . . . . . . . . . . . . . . . . 34
Working with Files on Remote Servers. . . . . . . . . . . . . . . . . . . . . . . . . . . . . . . . . . . . 35
Downloading Web Pages. . . . . . . . . . . . . . . . . . . . . . . . . . . . . . . . . . . . . . . . . . . . . . . . 36
Chapter 3 Configuring Web Browsers . . . . . . . . . . . . . . . . . . 37
Configuring the Internal Browser . . . . . . . . . . . . . . . . . . . . . . . . . . . . . . . . . . . . . . . . 38
Setting the internal browser options . . . . . . . . . . . . . . . . . . . . . . . . . . . . . . . . 38
Configuring External Browsers . . . . . . . . . . . . . . . . . . . . . . . . . . . . . . . . . . . . . . . . . . 40
Selecting a save option . . . . . . . . . . . . . . . . . . . . . . . . . . . . . . . . . . . . . . . . . . . . 40
Using the external browser . . . . . . . . . . . . . . . . . . . . . . . . . . . . . . . . . . . . . . . . 40
Chapter 4 Connecting to Servers via FTP and HTTP . . . . . . 41
Required Server Information . . . . . . . . . . . . . . . . . . . . . . . . . . . . . . . . . . . . . . . . . . . . 42
Connecting to an FTP Server . . . . . . . . . . . . . . . . . . . . . . . . . . . . . . . . . . . . . . . . . . . . 42
Overview of Remote Development Services. . . . . . . . . . . . . . . . . . . . . . . . . . . . . . . 44
Managing ColdFusion security . . . . . . . . . . . . . . . . . . . . . . . . . . . . . . . . . . . . . 44
Configuring an RDS Server. . . . . . . . . . . . . . . . . . . . . . . . . . . . . . . . . . . . . . . . . . . . . . 45
Managing Servers. . . . . . . . . . . . . . . . . . . . . . . . . . . . . . . . . . . . . . . . . . . . . . . . . . . . . . 46
Chapter 5 Adding Server Mappings . . . . . . . . . . . . . . . . . . . . 47
Understanding Development Mappings. . . . . . . . . . . . . . . . . . . . . . . . . . . . . . . . . . 48
Mapping for page processing . . . . . . . . . . . . . . . . . . . . . . . . . . . . . . . . . . . . . . 48
Mapping for debugging . . . . . . . . . . . . . . . . . . . . . . . . . . . . . . . . . . . . . . . . . . . 48
Understanding RDS Mappings . . . . . . . . . . . . . . . . . . . . . . . . . . . . . . . . . . . . . . . . . . 49
File mapping examples . . . . . . . . . . . . . . . . . . . . . . . . . . . . . . . . . . . . . . . . . . . . 49
Defining a Server Mapping. . . . . . . . . . . . . . . . . . . . . . . . . . . . . . . . . . . . . . . . . . . . . . 52
Page 5

Chapter v
Chapter 6 Writing Code and Web Content . . . . . . . . . . . . . . 53
Inserting Code. . . . . . . . . . . . . . . . . . . . . . . . . . . . . . . . . . . . . . . . . . . . . . . . . . . . . . . . . 54
Inserting tags from the QuickBar . . . . . . . . . . . . . . . . . . . . . . . . . . . . . . . . . . . 54
Selecting tags from the Tag Chooser . . . . . . . . . . . . . . . . . . . . . . . . . . . . . . . . 55
Selecting a Color Coding Scheme . . . . . . . . . . . . . . . . . . . . . . . . . . . . . . . . . . . . . . . . 55
Setting the supported file types for a scheme . . . . . . . . . . . . . . . . . . . . . . . . 56
Setting the tag display . . . . . . . . . . . . . . . . . . . . . . . . . . . . . . . . . . . . . . . . . . . . . 56
Using Inline Tools to Enter Code. . . . . . . . . . . . . . . . . . . . . . . . . . . . . . . . . . . . . . . . . 57
Tag Insight . . . . . . . . . . . . . . . . . . . . . . . . . . . . . . . . . . . . . . . . . . . . . . . . . . . . . . . 57
Function Insight . . . . . . . . . . . . . . . . . . . . . . . . . . . . . . . . . . . . . . . . . . . . . . . . . . 57
Tag Completion . . . . . . . . . . . . . . . . . . . . . . . . . . . . . . . . . . . . . . . . . . . . . . . . . . 58
Auto Completion . . . . . . . . . . . . . . . . . . . . . . . . . . . . . . . . . . . . . . . . . . . . . . . . . 58
Code Templates . . . . . . . . . . . . . . . . . . . . . . . . . . . . . . . . . . . . . . . . . . . . . . . . . . 58
Extended characters . . . . . . . . . . . . . . . . . . . . . . . . . . . . . . . . . . . . . . . . . . . . . . 58
Using Code Generating Tools. . . . . . . . . . . . . . . . . . . . . . . . . . . . . . . . . . . . . . . . . . . . 58
Adding Document Content . . . . . . . . . . . . . . . . . . . . . . . . . . . . . . . . . . . . . . . . . . . . . 59
Using Keyboard Shortcuts . . . . . . . . . . . . . . . . . . . . . . . . . . . . . . . . . . . . . . . . . . . . . . 60
Saving Code Blocks as Snippets. . . . . . . . . . . . . . . . . . . . . . . . . . . . . . . . . . . . . . . . . . 61
Sharing snippets . . . . . . . . . . . . . . . . . . . . . . . . . . . . . . . . . . . . . . . . . . . . . . . . . . 62
Adding snippet shortcut keys . . . . . . . . . . . . . . . . . . . . . . . . . . . . . . . . . . . . . . 62
Chapter 7 Accessing Data Sources . . . . . . . . . . . . . . . . . . . . . . 63
Introduction to Database Tools. . . . . . . . . . . . . . . . . . . . . . . . . . . . . . . . . . . . . . . . . . 64
Registering Data Sources . . . . . . . . . . . . . . . . . . . . . . . . . . . . . . . . . . . . . . . . . . . . . . . 64
Accessing Allaire Spectra data sources . . . . . . . . . . . . . . . . . . . . . . . . . . . . . . 64
Connecting to Data Sources. . . . . . . . . . . . . . . . . . . . . . . . . . . . . . . . . . . . . . . . . . . . . 65
Viewing Data Sources . . . . . . . . . . . . . . . . . . . . . . . . . . . . . . . . . . . . . . . . . . . . . . . . . . 65
Using SQL Builder . . . . . . . . . . . . . . . . . . . . . . . . . . . . . . . . . . . . . . . . . . . . . . . . . . . . . 66
The SQL Builder interface . . . . . . . . . . . . . . . . . . . . . . . . . . . . . . . . . . . . . . . . . 66
Writing SQL statements . . . . . . . . . . . . . . . . . . . . . . . . . . . . . . . . . . . . . . . . . . . 67
Building a SELECT Statement . . . . . . . . . . . . . . . . . . . . . . . . . . . . . . . . . . . . . . . . . . . 68
Testing a Query . . . . . . . . . . . . . . . . . . . . . . . . . . . . . . . . . . . . . . . . . . . . . . . . . . . . . . . . 69
Editing a Query . . . . . . . . . . . . . . . . . . . . . . . . . . . . . . . . . . . . . . . . . . . . . . . . . . . . . . . . 69
Inserting SQL into a Page . . . . . . . . . . . . . . . . . . . . . . . . . . . . . . . . . . . . . . . . . . . . . . . 70
Chapter 8 Exchanging Data via XML . . . . . . . . . . . . . . . . . . . . 71
An Overview of Distributed Data for the Web . . . . . . . . . . . . . . . . . . . . . . . . . . . . . 72
WDDX Components . . . . . . . . . . . . . . . . . . . . . . . . . . . . . . . . . . . . . . . . . . . . . . . . . . . 72
Working with Application-Level Data . . . . . . . . . . . . . . . . . . . . . . . . . . . . . . . . . . . . 73
Page 6

vi Contents
Data Exchange Across Application Servers. . . . . . . . . . . . . . . . . . . . . . . . . . . . . . . . 73
Time Zone Processing . . . . . . . . . . . . . . . . . . . . . . . . . . . . . . . . . . . . . . . . . . . . . . . . . . 73
How WDDX Works . . . . . . . . . . . . . . . . . . . . . . . . . . . . . . . . . . . . . . . . . . . . . . . . . . . . . 74
Converting CFML Data to a JavaScript Object . . . . . . . . . . . . . . . . . . . . . . . . . . . . . 75
Transferring Data from Browser to Server. . . . . . . . . . . . . . . . . . . . . . . . . . . . . . . . . 77
Chapter 9 Editing Pages . . . . . . . . . . . . . . . . . . . . . . . . . . . . . . . 79
Setting Options on the Editor Toolbar . . . . . . . . . . . . . . . . . . . . . . . . . . . . . . . . . . . . 80
Selecting Code and Text Blocks . . . . . . . . . . . . . . . . . . . . . . . . . . . . . . . . . . . . . . . . . . 80
Saving Text to the Multiple-Entry Clipboard . . . . . . . . . . . . . . . . . . . . . . . . . . . . . . 80
Setting the clip entry limit . . . . . . . . . . . . . . . . . . . . . . . . . . . . . . . . . . . . . . . . . 80
Using Collapsing Text . . . . . . . . . . . . . . . . . . . . . . . . . . . . . . . . . . . . . . . . . . . . . . . . . . 81
Setting options . . . . . . . . . . . . . . . . . . . . . . . . . . . . . . . . . . . . . . . . . . . . . . . . . . . 81
Using Tag Editors . . . . . . . . . . . . . . . . . . . . . . . . . . . . . . . . . . . . . . . . . . . . . . . . . . . . . . 82
Using the Tag Tree and Tag Inspector. . . . . . . . . . . . . . . . . . . . . . . . . . . . . . . . . . . . . 82
Navigating a document structure in the Tag Tree . . . . . . . . . . . . . . . . . . . . 82
Editing code in the Tag Inspector . . . . . . . . . . . . . . . . . . . . . . . . . . . . . . . . . . 84
Creating and editing event handler script blocks . . . . . . . . . . . . . . . . . . . . . 85
Preserving Code Formats with CodeSweepers. . . . . . . . . . . . . . . . . . . . . . . . . . . . . 86
Selecting a CodeSweeper . . . . . . . . . . . . . . . . . . . . . . . . . . . . . . . . . . . . . . . . . . 86
Running a CodeSweeper . . . . . . . . . . . . . . . . . . . . . . . . . . . . . . . . . . . . . . . . . . 87
Managing CodeSweepers . . . . . . . . . . . . . . . . . . . . . . . . . . . . . . . . . . . . . . . . . . 88
Allaire CodeSweeper settings . . . . . . . . . . . . . . . . . . . . . . . . . . . . . . . . . . . . . . 88
HTML Tidy settings . . . . . . . . . . . . . . . . . . . . . . . . . . . . . . . . . . . . . . . . . . . . . . . 90
Formatting Pages with Cascading Style Sheets . . . . . . . . . . . . . . . . . . . . . . . . . . . . 91
About the Style Editor . . . . . . . . . . . . . . . . . . . . . . . . . . . . . . . . . . . . . . . . . . . . . 91
Chapter 10 Debugging Application Code
from ColdFusion Studio . . . . . . . . . . . . . . . . . . . . . . . . . . . . . . . . 93
Interactive Debugger Overview. . . . . . . . . . . . . . . . . . . . . . . . . . . . . . . . . . . . . . . . . . 94
Configuring RDS from the Debugger. . . . . . . . . . . . . . . . . . . . . . . . . . . . . . . . . . . . . 94
Specifying Server Mappings. . . . . . . . . . . . . . . . . . . . . . . . . . . . . . . . . . . . . . . . . . . . . 95
Running the Interactive Debugger . . . . . . . . . . . . . . . . . . . . . . . . . . . . . . . . . . . . . . . 96
The Debugger toolbar . . . . . . . . . . . . . . . . . . . . . . . . . . . . . . . . . . . . . . . . . . . . . 96
Debug windows . . . . . . . . . . . . . . . . . . . . . . . . . . . . . . . . . . . . . . . . . . . . . . . . . . 97
Debugging across multiple pages . . . . . . . . . . . . . . . . . . . . . . . . . . . . . . . . . . 98
Stepping through code . . . . . . . . . . . . . . . . . . . . . . . . . . . . . . . . . . . . . . . . . . . . 98
Evaluating expressions and setting watches . . . . . . . . . . . . . . . . . . . . . . . . . 98
Debugger Shortcut Keys . . . . . . . . . . . . . . . . . . . . . . . . . . . . . . . . . . . . . . . . . . . . . . . 100
Page 7

Chapter vii
Chapter 11 Using Projects for Site Management . . . . . . . 101
What is a Project? . . . . . . . . . . . . . . . . . . . . . . . . . . . . . . . . . . . . . . . . . . . . . . . . . . . . . 102
Creating a Project . . . . . . . . . . . . . . . . . . . . . . . . . . . . . . . . . . . . . . . . . . . . . . . . . . . . . 102
Working in the Project Resources Window . . . . . . . . . . . . . . . . . . . . . . . . . . . . . . . 103
Configuring project options . . . . . . . . . . . . . . . . . . . . . . . . . . . . . . . . . . . . . . 103
Accessing project properties . . . . . . . . . . . . . . . . . . . . . . . . . . . . . . . . . . . . . . 103
About Project Folders . . . . . . . . . . . . . . . . . . . . . . . . . . . . . . . . . . . . . . . . . . . . . . . . . 103
Manual-inclusive and auto-inclusive physical folders . . . . . . . . . . . . . . . 104
The project file . . . . . . . . . . . . . . . . . . . . . . . . . . . . . . . . . . . . . . . . . . . . . . . . . . 104
Folder types . . . . . . . . . . . . . . . . . . . . . . . . . . . . . . . . . . . . . . . . . . . . . . . . . . . . . 105
Managing Project Files . . . . . . . . . . . . . . . . . . . . . . . . . . . . . . . . . . . . . . . . . . . . . . . . 105
Working with folders . . . . . . . . . . . . . . . . . . . . . . . . . . . . . . . . . . . . . . . . . . . . . 106
Working with files . . . . . . . . . . . . . . . . . . . . . . . . . . . . . . . . . . . . . . . . . . . . . . . 108
Working with Resources . . . . . . . . . . . . . . . . . . . . . . . . . . . . . . . . . . . . . . . . . . . . . . . 109
Additional Project Features . . . . . . . . . . . . . . . . . . . . . . . . . . . . . . . . . . . . . . . . . . . . 110
Working in a Source Control System . . . . . . . . . . . . . . . . . . . . . . . . . . . . . . . . . . . . 111
Why use source control? . . . . . . . . . . . . . . . . . . . . . . . . . . . . . . . . . . . . . . . . . . 111
Supported source control systems . . . . . . . . . . . . . . . . . . . . . . . . . . . . . . . . . 111
Setting up a project in source control . . . . . . . . . . . . . . . . . . . . . . . . . . . . . . 112
Chapter 12 Deploying Projects . . . . . . . . . . . . . . . . . . . . . . . . 113
Setting Project Level Deployment. . . . . . . . . . . . . . . . . . . . . . . . . . . . . . . . . . . . . . . 114
Setting Folder Level Deployment . . . . . . . . . . . . . . . . . . . . . . . . . . . . . . . . . . . . . . . 114
Relative to the Parent Folder Deployment Location option . . . . . . . . . . . 114
Specific Deployment Location option . . . . . . . . . . . . . . . . . . . . . . . . . . . . . 114
Do Not Upload option . . . . . . . . . . . . . . . . . . . . . . . . . . . . . . . . . . . . . . . . . . . 115
Adding Deployment Servers. . . . . . . . . . . . . . . . . . . . . . . . . . . . . . . . . . . . . . . . . . . . 115
Running the Deployment Wizard . . . . . . . . . . . . . . . . . . . . . . . . . . . . . . . . . . . . . . . 116
Deploying directly . . . . . . . . . . . . . . . . . . . . . . . . . . . . . . . . . . . . . . . . . . . . . . . 116
Using deployment scripts . . . . . . . . . . . . . . . . . . . . . . . . . . . . . . . . . . . . . . . . 117
Managing deployment scripts . . . . . . . . . . . . . . . . . . . . . . . . . . . . . . . . . . . . 118
Saving deployment results . . . . . . . . . . . . . . . . . . . . . . . . . . . . . . . . . . . . . . . . 118
Chapter 13 Customizing the Development Environment 119
The Visual Tools Markup Language (VTML) . . . . . . . . . . . . . . . . . . . . . . . . . . . . . 120
Customizing Tag Chooser and Expression Builder . . . . . . . . . . . . . . . . . . . . . . . . 120
Dialog Definition Files. . . . . . . . . . . . . . . . . . . . . . . . . . . . . . . . . . . . . . . . . . . . . . . . . 122
Creating Tag Definitions . . . . . . . . . . . . . . . . . . . . . . . . . . . . . . . . . . . . . . . . . . . . . . . 123
Creating a tag definition file . . . . . . . . . . . . . . . . . . . . . . . . . . . . . . . . . . . . . . 124
Defining attributes . . . . . . . . . . . . . . . . . . . . . . . . . . . . . . . . . . . . . . . . . . . . . . . 125
Defining attribute categories . . . . . . . . . . . . . . . . . . . . . . . . . . . . . . . . . . . . . . 127
Page 8

viii Contents
Building Tag Editors. . . . . . . . . . . . . . . . . . . . . . . . . . . . . . . . . . . . . . . . . . . . . . . . . . . 128
Defining controls . . . . . . . . . . . . . . . . . . . . . . . . . . . . . . . . . . . . . . . . . . . . . . . . 129
Populating dialog boxes with tag data . . . . . . . . . . . . . . . . . . . . . . . . . . . . . . 131
Generating a tag . . . . . . . . . . . . . . . . . . . . . . . . . . . . . . . . . . . . . . . . . . . . . . . . . 132
Variables passed to the layout template . . . . . . . . . . . . . . . . . . . . . . . . . . . . 132
Special variables . . . . . . . . . . . . . . . . . . . . . . . . . . . . . . . . . . . . . . . . . . . . . . . . . 133
Adding Tag Help . . . . . . . . . . . . . . . . . . . . . . . . . . . . . . . . . . . . . . . . . . . . . . . . . . . . . . 135
Providing Help from an external file . . . . . . . . . . . . . . . . . . . . . . . . . . . . . . . 135
VTML Container/Control Reference . . . . . . . . . . . . . . . . . . . . . . . . . . . . . . . . . . . . 136
Building Custom Wizards . . . . . . . . . . . . . . . . . . . . . . . . . . . . . . . . . . . . . . . . . . . . . . 154
Saving wizard files . . . . . . . . . . . . . . . . . . . . . . . . . . . . . . . . . . . . . . . . . . . . . . . 154
Creating Wizard Definition Pages . . . . . . . . . . . . . . . . . . . . . . . . . . . . . . . . . . . . . . . 155
VTML for Wizards tag summary . . . . . . . . . . . . . . . . . . . . . . . . . . . . . . . . . . . 155
VTML for Wizards tag reference . . . . . . . . . . . . . . . . . . . . . . . . . . . . . . . . . . . 155
Dynamic expressions in tags . . . . . . . . . . . . . . . . . . . . . . . . . . . . . . . . . . . . . . 157
Bound controls . . . . . . . . . . . . . . . . . . . . . . . . . . . . . . . . . . . . . . . . . . . . . . . . . . 158
Creating Wizard Output Templates . . . . . . . . . . . . . . . . . . . . . . . . . . . . . . . . . . . . . 161
Parameters . . . . . . . . . . . . . . . . . . . . . . . . . . . . . . . . . . . . . . . . . . . . . . . . . . . . . 161
Expressions and functions . . . . . . . . . . . . . . . . . . . . . . . . . . . . . . . . . . . . . . . . 161
WIZ Tags . . . . . . . . . . . . . . . . . . . . . . . . . . . . . . . . . . . . . . . . . . . . . . . . . . . . . . . 162
WIZML reference . . . . . . . . . . . . . . . . . . . . . . . . . . . . . . . . . . . . . . . . . . . . . . . . 163
Wizard Definition Page Library . . . . . . . . . . . . . . . . . . . . . . . . . . . . . . . . . . . . . . . . . 165
Chapter 14 Scripting the Visual Tools Object Model . . . . 171
Writing and Executing Scripts in Allaire Visual Tools . . . . . . . . . . . . . . . . . . . . . . 172
Application Object . . . . . . . . . . . . . . . . . . . . . . . . . . . . . . . . . . . . . . . . . . . . . . . . . . . . 174
Table of CommandID Values . . . . . . . . . . . . . . . . . . . . . . . . . . . . . . . . . . . . . . . . . . . 186
Table of SettingID Values . . . . . . . . . . . . . . . . . . . . . . . . . . . . . . . . . . . . . . . . . . . . . . 190
DocumentCache Object . . . . . . . . . . . . . . . . . . . . . . . . . . . . . . . . . . . . . . . . . . . . . . . 197
ActiveDocument Object . . . . . . . . . . . . . . . . . . . . . . . . . . . . . . . . . . . . . . . . . . . . . . . 198
DeploymentManager Object . . . . . . . . . . . . . . . . . . . . . . . . . . . . . . . . . . . . . . . . . . . 203
Special notes about project folder names . . . . . . . . . . . . . . . . . . . . . . . . . . 207
HTTPProvider Object. . . . . . . . . . . . . . . . . . . . . . . . . . . . . . . . . . . . . . . . . . . . . . . . . . 208
ZIPProvider Object. . . . . . . . . . . . . . . . . . . . . . . . . . . . . . . . . . . . . . . . . . . . . . . . . . . . 215
ActiveScripting examples . . . . . . . . . . . . . . . . . . . . . . . . . . . . . . . . . . . . . . . . . . . . . . 220
JScript . . . . . . . . . . . . . . . . . . . . . . . . . . . . . . . . . . . . . . . . . . . . . . . . . . . . . . . . . . 220
VBScript . . . . . . . . . . . . . . . . . . . . . . . . . . . . . . . . . . . . . . . . . . . . . . . . . . . . . . . . 222
Third-Party Add-Ins. . . . . . . . . . . . . . . . . . . . . . . . . . . . . . . . . . . . . . . . . . . . . . . . . . . 224
Page 9

Welcome to ColdFusion Studio
ColdFusion Studio is a powerful and flexible tool for building, testing, and deploying
dynamic Web applications.
It is also an easy to use tool to create and edit Web content, with support for a variety
of scripting languages.
Contents
• Intended Audience...................................................................................................... x
• Introduction to the ColdFusion 4.5 Web Application Server................................... x
• Development Features in ColdFusion Studio 4.5.................................................... xi
• About ColdFusion Documentation ......................................................................... xii
• Developer Resources................................................................................................ xiv
• Contacting Allaire...................................................................................................... xv
Page 10

x Intended Audience
Intended Audience
The principal audience for this user guide is professional Web developers who have a
working knowledge of HTML and Web server environments. The focus is on
introducing you to Studio’s interface and development tools.
Introduction to the ColdFusion 4.5 Web Application Server
The ColdFusion 4.5 release focuses on fundamentals — the fundamentals of delivering
your e-business: faster development, better reliability, enhanced scalability, expanded
integration, and stronger security.
At the center of the ColdFusion 4.5 release is an application server platform that's been
highly optimized with new functionality and native support for UNIX. As a result, your
e-business systems will run better and do more. With this release we're launching a
new edition of ColdFusion Server for Linux so you can take advantage of the reliability
and performance of the hottest new Internet server operating system.
While optimizing the core server, we also enhanced fundamental features including
email integration, server-side FTP and HTTP, advanced security, scheduling, and
database connectivity — again giving you more reliability and new functionality.
The focus on fundamentals extends to new features. As part of a broad new
commitment to Java, ColdFusion 4.5 has a range of new Java integration options from
Java CFXs to Java Servlet support to Java object and EJB connectivity. In ColdFusion
Studio 4.5, we added new tools to make you more productive including a flexible new
project architecture that makes managing and deploying complex Web applications a
snap. On the server, we focused on reliability, performance and security with features
such as service-level fail-over, Cisco Local Director integration, and OS security
integration.
Whether you're revolutionizing your company's HR operations, building the next
generation of your firm's global intranet, or launching the next killer .COM company,
you'll find the speed, scalability, connectivity, and security you need in ColdFusion 4.5.
Page 11

Welcome to ColdFusion Studio xi
Development Features in ColdFusion Studio 4.5
A wide range of features are available in ColdFusion 4.5 for application development
and for creating Web content.
Allaire FTP & RDS — Manage all your files from a single interface that integrates access
to the Windows file system, ColdFusion server via Remote Development Servers (RDS),
and FTP servers.
Advanced Project Management — Manage complex Web application development
projects using physical, virtual, and auto-inclusive folders, resource browsing, and
direct access to version source control applications.
Scriptable Project Deployment — Write in VBScript or JScript to script application
deployment, with granular control over file uploads, to multiple server configurations
with FTP or RDS.
Editing — Easy tag selection, customizable language color coding, collaspe code
blocks, edit code in the Tag Inspector property sheet interface, navigate code hierarchy
in Tag Tree.
Function Insight — Insert function syntax as you type.
Code validation — Configurable for multiple versions of HTML, CFML, SMIL, and
browser-specific tags.
Image Map Editor — Create image maps right in ColdFusion Studio with a new
easy-to-use visual tool.
TopStyle Lite CSS Editor — Create and edit standards-compliant cascading style sheets
to easily control the look and feel of your web applications.
Wireless Support — Build wireless Web applications quickly and easily with the
complete set of Wireless Markup Language (WML) and Handhelp Markup Language
(HDML) visual tools.
CodeSweeper — Enforce code formatting with customizable rules.
Browsers — Preview pages in multiple browsers, with automatic detection of installed
browsers.
Proofing and Testing tools — Maintain site content with search and replace, spell
checking, code validation, and link verification.
Code templates — Quickly insert common text blocks and expand abbreviations.
Snippets — Save code blocks and content for reuse.
Templates and Wizards — Quickly create basic pages, tables, frames, JavaScript and
DHTML elements, and synchronized RealAudio content.
Image preview — View Web images and their properties.
User macros — Automate tasks by scripting the Visual Tools Object Model (VTOM).
Page 12

xii About ColdFusion Documentation
About ColdFusion Documentation
ColdFusion documentation is designed to provide support for all components of the
ColdFusion development system. Both the print and online versions are organized to
allow you to quickly locate the information you need.
In addition to the book set, the documentation is provided in two other formats:
• HTML — Browser-based Help references.
• Adobe Acrobat (PDF) — Available from the root level on the product CD-ROM
and from the Developer area of Allaire’s Web site at http://www.allaire.com/
developer
Documentation updates
Late additions and corrections to ColdFusion printed documentation are listed in the
Documentation Updates page. To reach this page, open the Welcome to ColdFusion
page installed with ColdFusion, where you’ll find links to the update page as well as
links to other pages containing useful information about ColdFusion, Allaire support
options, and Allaire products and services.
.
For ColdFusion Studio users, you can access the Documentation Update page in the
Allaire Support folder in Help References.
ColdFusion manuals
The core ColdFusion documentation set consists of the following titles.
Administering ColdFusion Server
Includes instructions for installing ColdFusion Server. Describes configuration options
for maximizing performance, managing data sources, setting security levels, and a
range of development and site management tasks. If you are administering a
ColdFusion site, you’ll need this book to help plan and implement ColdFusion
security, load balancing, and for details about tuning the ColdFusion application
server.
Developing Web Applications with ColdFusion
Presents the fundamentals of ColdFusion application development and deployment.
Also includes detailed information about ColdFusion data sources, user interfaces,
and Web technologies.
CFML Language Reference
Provides the complete syntax, with example code, of all CFML tags and functions.
Page 13

Welcome to ColdFusion Studio xiii
Using ColdFusion Studio
Documents everything you need to know about using ColdFusion Studio, including
features like projects, source control integration, as well as the Studio workspace and
interface.
Quick Reference to CFML
A valuable quick reference to CFML tags, functions, and variables.
ColdFusion Server online documentation
To view the HTML documentation, open the following URL: http://127.0.0.1/
cfdocs/dochome.htm
Note that because the Verity search libraries are not available on Linux for this release,
the online documentation search facility is not functional on Linux. If you try to open
the search page, a message box opens to explain why the facility is not available.
Acrobat versions of all ColdFusion documentation are available from the root level on
the product CD. If you don’t have a product CD, you can download ColdFusion
documentation from the Allaire web site by visiting
developer
and clicking the Documentation link.
.
http://www.allaire.com/
ColdFusion Studio online documentation
Click the Help resource tab in ColdFusion Studio to view online Help pages. The help
tree contains ColdFusion documentation and a number of additional developer
resources. Studio online documentation is searchable and individual pages can be
bookmarked.
As you code your work, you can use the online HTML Reference to check syntax and
usage. You can open it from the Help References or press place the cursor in an HTML
and press F1. F1 help is available for all the supported languages. Open the Tag
Chooser (Ctrl+E) to view the list.
To learn about creating and modifying editor dialogs for tags, see Customizing the
Development Environment.
Power users and application developers can take advantage of the Visual Tools Object
Model to automate tasks and to call HomeSite functionality from other programs.
Page 14

xiv Developer Resources
Developer Resources
This section is a brief listing of CFML resources.
Allaire ColdFusion Developer Center
The Developer Center at http://www.allaire.com/developer/referenceDesk/index.cfm
contains all the latest information on ColdFusion and offers tutorials, technical
articles, and links to other resources.
ColdFusion Web Resources
Following are just a few of many site dedicated to CFML development.
• CF Advisor Online at http://www.cfadvisor.com/api-shl/engine.cfm.
• Haznet’s Fallout shelter, a CF portal, at http://www.hudziak.com/haznet/
cfml.html.
• ColdFusion Developer’s Journal, online version of the popular print journal, at
http://www.sys-con.com/coldfusion/index2.cfm.
Making Web sites accessible to visually impaired visitors
The W3C Web Accessibility Initiative at http://www.w3.org/WAI/ provides a great deal
of practical information about designing applications and interfaces for the broadest
range of users. Allaire supports user accessibility in its product interfaces and is
striving to fully implement the WAI recommendations.
Simple steps, such as providing a text alternative for images, graphics, and animations,
and using clear descriptive text for page elements and navigation, can make a world of
difference to a visually impaired user’s experience of your site. Validation tools are
available on the site to check compliance with established standards.
Page 15

Welcome to ColdFusion Studio xv
Contacting Allaire
Please contact Allaire for sales and support information.
Corporate headquarters
Allaire Corporation
275 Grove Street
Newton, MA 02446
Telephone: 617.219.2000
Fax: 617.219.2001
http://www.allaire.com
Customer Service
Contact Allaire customer service to inquire about product orders and to obtain
corporate and product information and an Allaire username and password.
Hours: 8:00 AM to 8:00 PM Eastern time.
Toll Free US & Canada: 888.939.2545
Local & International: 617.219.2100
Email: info@allaire.com
Sales
Toll Free: 888.939.2545
Telephone: 617.219.2100
Fax: 617.219.2101
Email: sales@allaire.com
http://www.allaire.com/store
Technical support
Allaire offers a range of telephone and Web-based support options. See the Allaire
Support folder in the online Help References or go to http://www.allaire.com/support/
for a complete description of technical support services.
Page 16

xvi Contacting Allaire
Page 17

C HAPTER 1
Exploring the Workspace
This chapter acquaints you with the main areas of the interface. It will also give you
some pointers on customizing the workspace to make all your development work as
productive as possible.
Contents
• The Workspace Areas ................................................................................................ 18
• Working in the Resource Windows .......................................................................... 19
• Creating and Browsing Files in the Document Window........................................ 20
• Tracking Your Work in the Results Window ............................................................ 21
• Getting the Most from the Help System .................................................................. 21
Page 18

18
The Workspace Areas
The term Workspace describes the user interface that you see when you first load the
program. The workspace has four principal areas:
• Command area — At the top of the workspace is the title bar, which displays
the file path of the current document. Below that is the menu bar, which
contains standard Windows commands plus development menus. Below the
menus are toolbars that provide one-click access to commands and application
tools. To the right is the QuickBar, a tabbed toolbar for inserting JSP, HTML, and
other language elements.
• Resources window — Tabs for file management, data sources, Projects, code
snippets, online Help, and the Tag Inspector.
• Document window — Tabs for writing and browsing pages.
• Results window — Tabs to track search and replace operations, code validation,
link verification, images, project deployment, and compilation. The Console
tab gives you built-in access to the command prompt.
The following illustration shows the main workspace areas.
Page 19

Exploring the Workspace 19
Setting workspace options
Selecting Options > Settings (F8) opens the control center for user preferences. By
navigating the feature tree in the left pane, you can view and change options for file
management, coding, and testing applications and Web content.
Working in the Resource Windows
The Resource window is a multipanel interface that lets you switch easily among
development resources as you build site content. Several of the panels contain their
own toolbars.
Resource tabs
Following is a summary of each of the Resource tabs:
• The Files tab lets you manage files on local and network drives and on remote
servers. The drop-down list at the top allows you to pick a drive or server, the
bottom two panes display directories and files for the selected drive or server.
• The Database tab is the access point for working with ColdFusion data sources.
• The Projects tab helps you manage site content by organizing pages and
supporting files. You have the option of adding projects to your version source
control system. The drop-down list at the top displays recent projects. The
bottom two panes display the folders and files for the selected project.
• The Site View tab gives you a visual rendering of the links in the current
document. Right-click in the pane to select a view type and display options.
Right-click on a link to expand the view.
• The Snippets tab gives you a convenient place to store code blocks and content
for reuse. Snippets can also be shared with other users.
• The Help tab contains product documentation and other online resources.
• The Tag Inspector tab lets you edit in an interactive property sheet interface.
The top pane is the Tag Tree, a customizable view of the document hierarchy.
The bottom pane is the Tag Inspector, where you can edit code without having
to work in the Document window directly.
Page 20

20
Creating and Browsing Files in the Document Window
The Document window is where code and other content are entered and edited.
Edit tab
The Editor has many productivity features for creating and editing code, content, and
navigation structures. You can easily insert tags, generate code, and add content from
text files, Microsoft Office applications, or directly from the Web. You can easily create
templates to insert common content.
The Editor toolbar extends vertically to the left and below the Edit tab in the Document
window.
Browse tab
Click the Browse tab or press F12 to process the current document in the internal
browser.
Design tab
The Browse toolbar displays at the top of the Document window when you select the
Browse tab. You can use it to browse open documents, refresh the display, and access
browser tools. The document URL displays based on the current server mapping. See
“Adding Server Mappings” on page 45 for details.
Press F11 to view the document in the external browser. See “Configuring External
Browsers” on page 38 for details.
This mode allows WYSIWYG creation and editing of HTML page elements. You can set
display and CodeSweeper formatting options in the Options > Settings > Design pane.
Page 21

Exploring the Workspace 21
Tracking Your Work in the Results Window
The Results window presents the results of document operations in individual panels.
It opens automatically when you run Search, Code Validation, Link Verification, Image
Thumbnails, or Project Deployment. You can also open it from the View menu.
Right-click in any of the panels to open a context menu.
Getting the Most from the Help System
The online Help system encompasses a variety of features:
• Pop-up Help for basic tag syntax (F2)
• Comprehensive context-sensitive tag Help (F1)
• Embedded Help in dialog boxes and tag editors
• An extensive collection of searchable references in the Help tab
Opening dialog box Help
Help text in tag editors and in the Tag Chooser provides context-sensitive syntax and
usage information.
To view Help text in a tag editor or in Tag Chooser:
1. Click the Toggle Embedded Help button (Alt+H) to see Help text in a pane at the
bottom of the dialog box.
2. Click the Show help in separate window button (Alt+M) to view the Help text in a
floatable browser window.
Creating Help files for custom tag editors
Using the Allaire Visual Tools Markup Language (VTML), you can edit Help text in
dialog boxes or add your own. See Customizing the Development Environment for
details.
Accessing Help References
The Help system is an extensible resource for learning about product features,
technology extensions, and other development topics. The online Help References
contain the printed product documentation in HTML format and additional online
references.
Click the Help tab at the bottom of the Resources window to view the Help References
tree. The Help toolbar is located at the top of the Help References window.
Page 22

22
Printing Help topics
If you are using Internet Explorer as the internal browser, you can print a Help topic by
right-clicking the document in Browse mode and selecting Print. The default internal
browser does not support printing.
Bookmarking Help topics
You can get quick access to Help documents by bookmarking them. Bookmarks can be
assigned to documents in the Help tree and to HTML documents in the file system or
on the Internet.
To bookmark a document in the Help Tree, right-click the document title and select the
Add bookmark command. If the Help document is open, it displays automatically in
the Bookmarks list. If the document is not open, you need to right-click again and
select the Refresh command.
To open a bookmarked Help document, click the down arrow next to the Bookmarks
icon on the Help tab toolbar and select from the list.
You can maintain bookmarks by selecting Organize Bookmarks from the Help
Bookmarks drop-down list.
To bookmark an external document:
1. Click the Bookmark button in the Help toolbar to open the Help Bookmarks dialog
box.
2. Click the Add button to open the Add Bookmark dialog box.
3. Enter a name for the bookmark.
4. Enter a URL or a filepath for an HTML document.
5. Click OK to add the bookmark to the Help Bookmarks list.
Searching Help References
You can do everything from a simple title search to advanced searches using complex
criteria.
To run a search:
1. Click the Search button on the Help toolbar to open the Search Help References
dialog box.
The first time you open the search dialog box, you will be prompted to index the
Help References. Allaire recommends doing this, as it greatly improves search
engine performance. After the initial indexing, it checks the Help References tree
for changes each time you open the Help panel and automatically indexes the
documents again if needed.
Page 23

Exploring the Workspace 23
2. Enter a word or phrase in the Enter the word(s) to find box.
For information on using search operators, click the Search Tips button.
3. To limit the references searched, select the Search only in selected references
option and select the check box next to one or more references.
4. Click the Search button.
The Help References pane shows the search results.
5. Double-click a document in the results list to open it.
The results list is saved until a new search is run, so you can return to the document list
by clicking the Search results button on the Help toolbar.
Tip To redo a recent search, click the down arrow next to the Enter the
word(s) to find box and select search keywords from the drop-down list.
Using advanced search operators
You can use a variety of advanced search operators to make your searching more
precise. For information on using advanced search operators, click the Search Tips
button in the Search Help References dialog box.
A printable copy of the Search Tips, titled search_tips.pdf, is installed in the Help/
Allaire Support folder of your installation directory. If you have Adobe Acrobat Reader
on your system, you can open this file by double-clicking it in Windows Explorer.
Extending the Help system
One of the Help system’s most useful features is its extensibility. You can add
documents to the Help system by dragging and dropping them into the Help folder,
either from the Files tab or Windows Explorer.
Help document files are generally in HTML, but you can include text files. The Help
browser will use the file name as the title. You can also create hyperlinks from within
an HTML file to files with txt, dtd, and pdf extensions if you use Internet Explorer as the
internal browser. Web graphics files (GIF, JPG, PNG) are viewable in Help files.
This extensibility gives you a number of opportunities:
• You can write and install your own custom Help files.
• You can download documents from the Web and add them to the Help system.
• You can edit existing Help topics.
• You can distribute Help files; this can be particularly helpful for team
development.
Note Documents do not display at the Help References root level, so you must
either place them in an existing folder or create a new folder.
Page 24

24
To create a new folder in the Help tree:
1. Open the Files panel in the Resources window.
2. Navigate to the Help folder of your installation.
3. Right-click in the files pane and select the Create Folder menu item to open a new
folder box in the directory pane.
4. Type a folder name in the box and press Enter to save the new folder.
You might need to press F5 to refresh the Help display.
You have several options for adding documents to the Help system:
To add documents to the Help tree do one of the following:
• Write an HTML Help file and save it to a folder in the Help directory.
• Use standard Windows commands to paste a file into a Help folder.
• Select File > Open from the Web to open an HTML document, then save it to a
folder in the Help tree.
Page 25

Exploring the Workspace 25
Adding Help References to the booktree structure
If you add a folder to the Help directory, the folder appears at the bottom of the Help
References list. For most users, this is all you need.
If, however, you want to control the display order of the Help References, you can edit
the booktree.xml file in the Help root directory. The booktree structure uses a simple
tag set to configure the Help display on the book, chapter, and page level. A quick study
of the file will get you started.
The parser reads the booktree tags from top to bottom, so you can just insert folder
and file tags where you want the references to appear in the Help list. This applies to
rearranging existing Help content and to adding new files. Alternately, you can use the
path attribute in the book and chapter tags to specify the folder location.
To add a folder to the Help structure:
1. Copy the new folder into the Help root directory.
2. Open the Help directory from the Files tab.
3. Make a backup copy of the booktree.xml file.
4. Open the booktree.xml file in the Editor.
5. Enter a book tag for the new folder.
Example: <help_book path="folder name">Custom Help Files.
The new folder now appears in the order you set up, but the files in the folder will be
displayed in alphabetical order. If you want to control the display at the chapter and
page level, you can tag these entries in the booktree file.
Displaying text files in the Help structure
Text files can be added to the Help tree. The Help browser default file type is HTML, so
it looks for a
filename in the Help tree display. You can use the
add title text, if you wish.
TITLE tag in each file. If it doesn’t find one or the tag is empty, it uses the
<help_page title=""> attribute to
Page 26

26
Adding media content
You have considerable flexibility in adding supporting files (such as graphics,
animations, video, and sound) to Help documents. One approach is to create a file
structure in the Help tree that conforms to the media file references in your
documents. Alternately, you can supply a URL or accessible file location for remote
files.
Be aware that if you are using the default internal browser or an older external browser,
proper playback of media files is limited.
Page 27

C HAPTER 2
Managing Files
This chapter shows you how to work with folders and files.
Contents
• About the Files Tab....................................................................................................28
• Working with Files..................................................................................................... 29
• Changing the File List Display.................................................................................. 31
• Dragging Files from Windows Explorer................................................................... 31
• Building a Favorite Folders List................................................................................ 32
• Working with Files on Remote Servers .................................................................... 33
• Downloading Web Pages .......................................................................................... 34
Page 28

28
About the Files Tab
Creating a project is the best way to organize files when developing a Web site or Web
applications (see “Using Projects for Site Management” on page 91), but for general file
management chores, you work in the Files tab on the Resources window. The Files tab
gives you access to servers, drives, directories, and files without having to go to
Windows Explorer.
Page 29

Managing Files 29
Working with Files
You can use the following procedures to work with files, regardless of their location
(local drive, network drive, or remote server).
Setting startup options
Open Options > Settings > Startup to select which files and folders open when load the
program.
Setting the startup file option
You can select one of the these options:
• Open all the documents that were open when you closed the program.
• Open the project that was open.
• Open a blank document.
Setting the startup folder option
• Open the folder that was active in the Files tab.
• Open the folder that was last selected in the File > Open dialog box.
• Select a default folder to open.
Opening files
Use the procedures below to open a file in the file list.
To open a file:
1. On the Files tab, use the Drive List and the Directory List to navigate to the
directory that contains the file you want to open.
2. Double-click the file in the file list or right-click the file and choose Edit from the
menu.
Note Read-only files are marked with a red dot in the file list. You can right-click a file
and choose Properties from the menu to set read and write access. This is not
recommended, however, if you are using a source control application to
manage read and write privileges.
Opening recently used files
You can re-open any of the last 10 closed files from the File > Recent Files list. If you use
this feature regularly, you can maintain the list by clearing it or removing obsolete files
when needed.
Page 30

30
Adding a link to an open file
To create a link to a file:
1. Open the page you want to place the link in the Editor window.
2. Drag the file you want to create a link to from the file list to the page in the Editor
window. Release the mouse button when the cursor is in the location where you
want the link to be added.
Note Alternatively, you can right-click a file and choose Insert As Link
from the shortcut menu. The link is inserted in the current page at
the cursor location.
You can also right-click a file in the file list and use the File options in the shortcut
menu to delete, move, copy, or rename the file.
Saving files
Unsaved changes in a document are indicated by an "X" next to the file name in the
Document tab at the bottom of the Editor window.
Use the Save commands from the File menu or the Standard toolbar icons to save and
close files. Open the Settings dialog box (F8) and use the File Settings pane to specify a
format for saved files. The default is PC, but UNIX and Macintosh formats are
available. You can set a default file extension on this tab, as well.
When you add links or images to a new file, you are prompted to save the file. This
ensures that relative paths to these page elements are resolved correctly.
Page 31

Managing Files 31
Changing the File List Display
You can arrange the file list to display exactly what you want.
To filter the file list:
1. Right-click in the file list and choose Filter from the menu.
2. From the Filter submenu, choose the file type you want displayed:
• Web Documents displays Web documents only.
• Web Images displays Web images only (JPEG, JPG, PNG, and GIF).
• All Web Files displays both Web documents and Web images.
• All Files displays all files in the selected directory.
Note Use the File Settings pane in the Settings dialog box (F8) to view and edit
the list of file extensions that are included for Web documents and Web
images.
To change the file list view:
1. Right-click in the file list and choose View from the menu.
2. From the View submenu, you can toggle the display of the document title,
document size, modified date/time, and document type.
To refresh the file list:
• To refresh the file list if changes to the list are not displayed immediately,
right-click in the file list and choose Refresh from the menu.
Dragging Files from Windows Explorer
You can drag a file from the Windows Explorer into the active document in the editor
window create a link to it.
If you hold down the Ctrl key while dragging the file into the editor, the file will open in
a new document. If the file is not a recognized file type, you are prompted to open it in
the associated program for that file type.
Page 32

32
Building a Favorite Folders List
You can build a list of favorite folders to make accessing their files easier.
To add a folder to the favorites list:
1. Select the folder in the Directory List.
2. In the file list, right-click and choose Favorite Folders > Add Current Folder to
Favorites.
The folder is added to your favorites list for easy selection.
To view a favorite folder:
1. Right-click in the file list and choose Favorite Folders from the menu.
2. From the Favorite Folder submenu, choose the folder you want to see.
The folder is opened in the Directory List and its files are displayed in the file list.
To organize your favorite folders:
1. Right-click in the file list and choose Favorite Folders from the menu.
2. From the Favorite Folders submenu, choose Organize Favorites to see the Favorite
Folders dialog box.
3. Select a folder and use the up and down arrows to move its location in the favorite
folders list.
4. Select a folder and click Remove to remove it from the favorite folders list. When
you are prompted to confirm the deletion, click Yes to delete the folder.
5. Click OK to close the Favorite Folders dialog box and apply your changes.
Page 33
Managing Files 33
Working with Files on Remote Servers
Working with directories and files on remote servers is virtually identical to working
with them on local or network drives. The primary difference is that you need to
establish a connection to a remote server before you can work with its files.
The Allaire FTP & RDS feature lets you work with files on configured remote servers.
See “Connecting to Servers via FTP and HTTP” on page 39 for setup procedures.
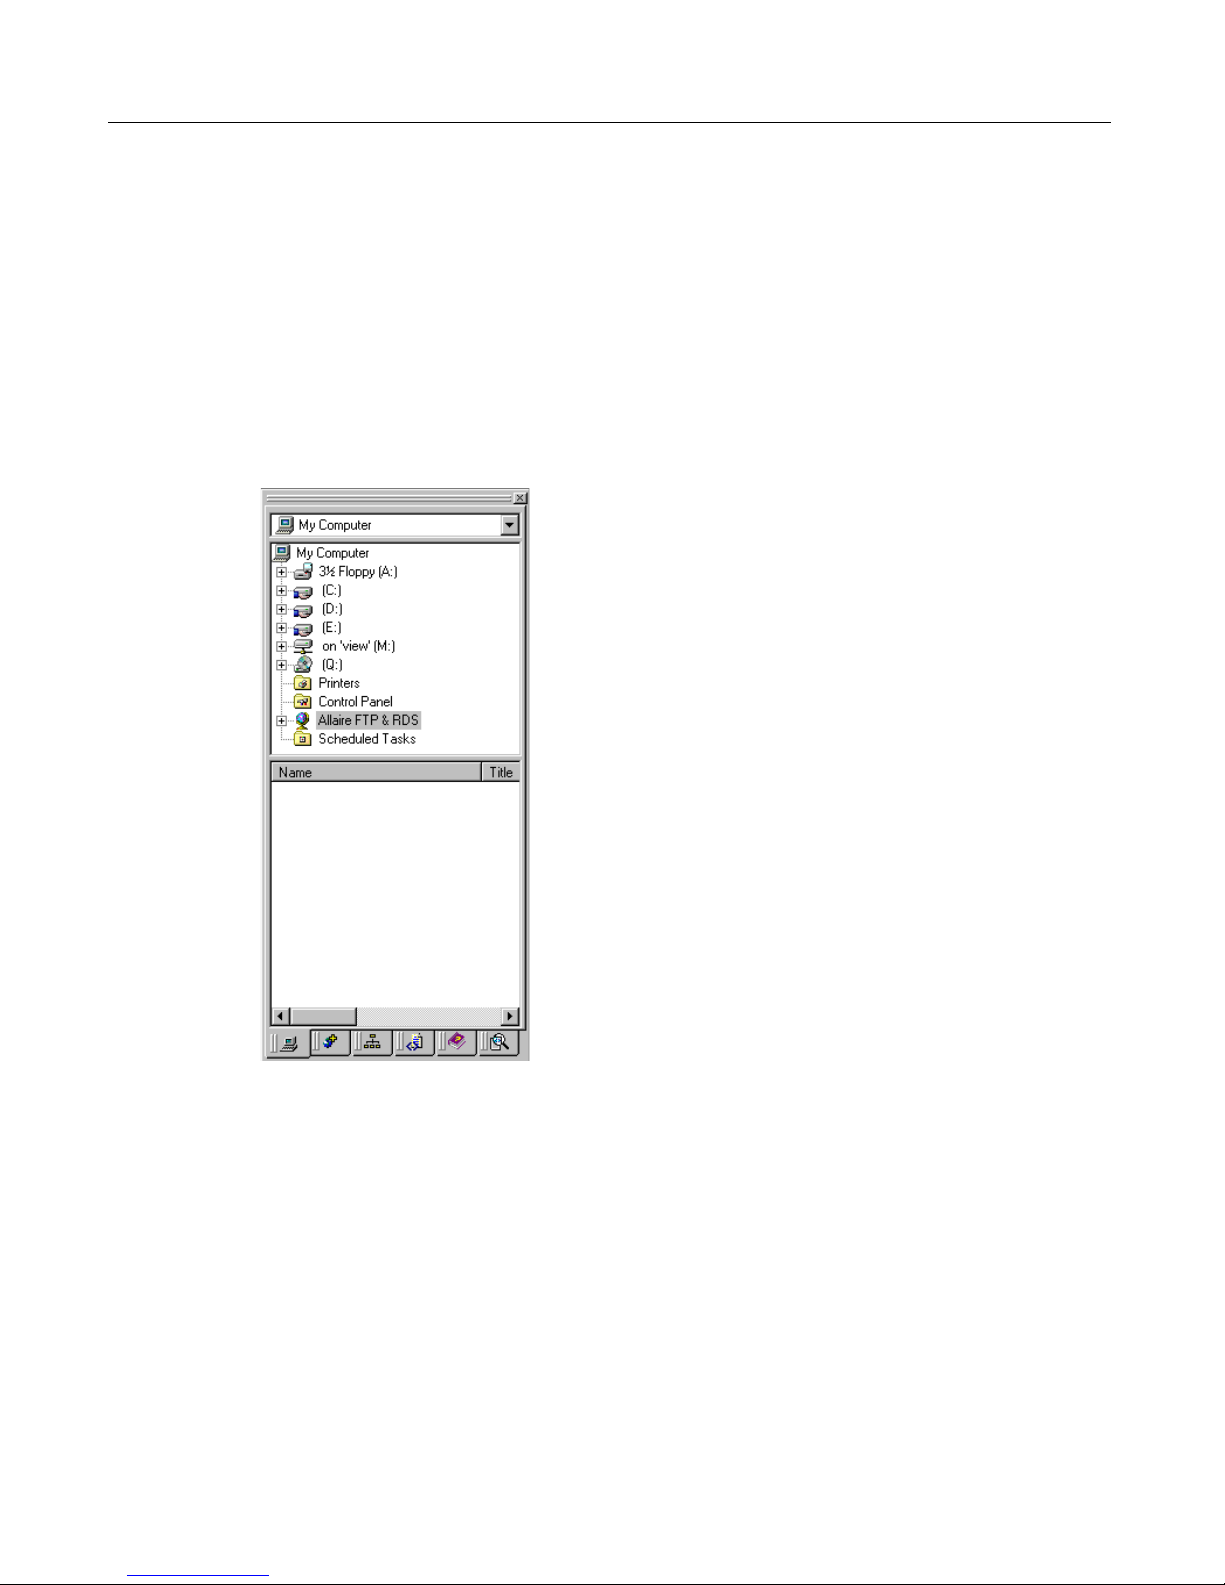
If you set the Drive list to My Computer, you can easily access all your drives, plus
Allaire FTP & RDS servers, in the Directory list as shown in the illustration below.
The procedures for working with remote servers can be performed from either the
Files tab or from Windows Explorer. When you save files, changes are saved to the
remote server.
If you do need server access, you can clear the Options > Settings > File Settings >
Enable Explorer shell integration option.
Page 34

34
Downloading Web Pages
You can download any HTML page and open it in the editor. These files cannot be
saved back to the server.
To open a page from a Web site:
1. Choose File > Open From Web.
2. Enter the URL for the page or select from your Bookmarks or Favorites list.
3. If the site is accessed via a proxy server, click Proxy and enter the server name and
port number.
4. You can optionally set a time-out limit for the connection.
5. Click OK to open the file as an untitled document.
To copy Web page content:
• Use Windows copy and paste commands to select a block of text on a Web page
and insert it into a document. Page formatting is not preserved.
• To copy code and text, use the browser’s command to view the page source
code, then copy and paste the content you want.
Note Please respect an author’s work by observing copyright and other
restrictions on Web document content.
Page 35

C HAPTER 3
Configuring Web Browsers
This chapter contains the procedures for configuring Web browsers for use by
ColdFusion Studio.
Contents
• Configuring the Internal Browser ............................................................................ 36
• Configuring External Browsers ................................................................................ 38
Page 36

36
Configuring the Internal Browser
The following sections describe the choices available for browsing documents and
processing pages from within ColdFusion Studio.
Setting the internal browser options
You can use the internal browser to view documents in a Web browser within the
program. Open the Options > Settings > Browse pane to set options.
You can select from these browser options:
• If Microsoft Internet Explorer is installed on your system, you can use it as the
internal browser.
Go to http://www.microsoft.com/downloads/ to get the latest version.
• If the Mozilla browser NGLayout/Gecko control is installed, you can select the
Use Netscape option.
Go to http://www.mozilla.org/ to download the latest version. See the Installing
Mozilla section for setup instructions.
• A built-in browser is available if you want to use it.
Be aware that the built-in browser is limited in its support of HTML and
browser extensions.
Only one internal browser may be used at a time, but you can change this setting as
needed. Restart the program to effect the change.
Page 37

Configuring Web Browsers 37
Installing Mozilla
1. Downloading the Mozilla binaries.
2. Unzip the Mozilla files into a new directory.
3. Add the Mozilla bin directory to your PATH environment variable and reboot if
necessary. If you are using Win 95/98 you may have to specify the short name
version of the path, such as, c:\mozil~1\bin
If your Mozilla bin directory does not contain a file named component.reg or if that
file is smaller than 5KB, then delete it and run mozilla.exe. This generates a new
component.reg file. This file is the database XPCOM uses to create new objects,
without it the Mozilla control will not be able to create Gecko components and will
not work.
4. Open a DOS prompt, change to the Mozilla bin directory and type regsvr32
mozctl.dll.
If regsvr32.exe is not in you path use the Windows Find Files utility to locate it and
run it using the full path.
5. Run regedit and create a new key HKEY_LOCAL_MACHINE\Software\Mozilla.
6. Create a string value BinDirectoryPath under this key with the value being the path
to the Mozilla bin directory, such as, c:\mozilla\bin.
The control will not function without these settings being correct!
Selecting the Use External Browser Configuration for Internal Browser check box
applies consistent file save behavior when viewing documents in either the internal
browser or an external browser. See “Configuring External Browsers” on page 38 for
details.
Page 38
38
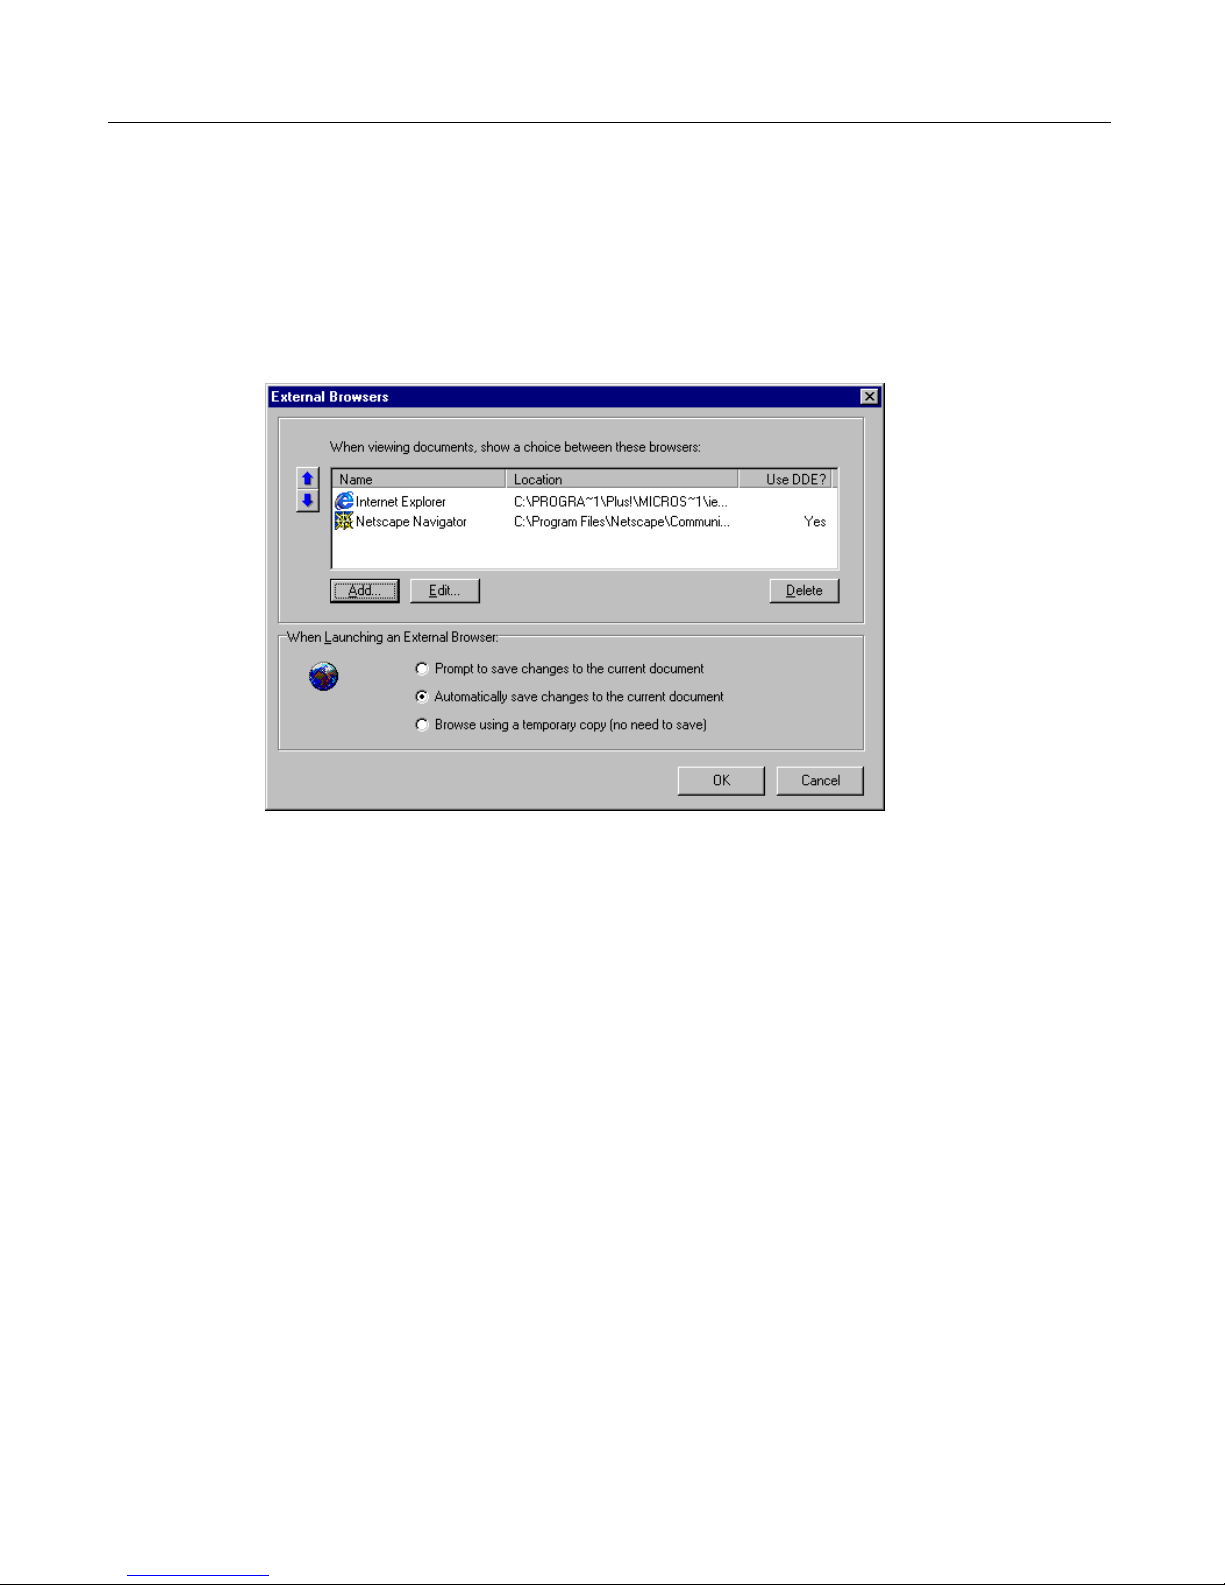
Configuring External Browsers
As part of the installation process, ColdFusion Studio creates a list of Web browsers
that it detects on your system. You can manage the list by selecting the Options >
Configure External Browsers menu command. You can easily Add, Edit, and Delete
browsers using this dialog box.
The browser at the top of the list is the default. Select a browser and click the Up Arrow
button to move it to the top of the list.
Selecting a save option
This setting determines how the current document file is handled when it is loaded in
the external browser. For example, the Browse using a temporary copy option is handy
if you are making many edits to a page and don’t want to use the Undo command.
If you selected the Use External Browser Configuration for Internal Browser box in the
Browse dialog box, the save option you select here also applies to the internal browser.
Using the external browser
You can use either of these methods to view pages in an external browser:
• To load the active document in the default external browser, press F11. You can
then click the browser’s Refresh/Reload button or press F11 again to update the
page after edits.
• To switch to a different browser, click the View External Browser List button on
the View toolbar, and select a browser from the list.
Page 39

C HAPTER 4
Connecting to Servers
via FTP and HTTP
ColdFusion Studio provides FTP server access and secure HTTP access via Remote
Development Services (RDS). You can perform file transfers and other file
management tasks using either FTP or RDS. To access data sources and to run the
debugger, an RDS server connection is required.
Contents
• Required Server Information.................................................................................... 40
• Connecting to an FTP Server.................................................................................... 40
• Overview of Remote Development Services ........................................................... 42
• Configuring an RDS Server....................................................................................... 43
• Managing Servers...................................................................................................... 44
Page 40

40
Required Server Information
You will need specific information about a remote server to connect to it, such as host
name and user access requirements. If you do not have this information, you need to
get it from the owner of that server, whether it is your IT group, an ISP, or another
provider.
Connecting to an FTP Server
The File Transfer Protocol (FTP) is the standard for transferring files between nodes on
the Internet. The Allaire FTP & RDS feature provides an interface for connecting to an
FTP server. When the connection has been established, you can access files on remote
servers and maintain Web sites located anywhere on the Internet.
FTP server connection requirements vary greatly. These instructions work in the
majority of cases, but you might have to try variations on the settings.
To connect to an FTP server:
1. Open the drive list at the top of the Files tab and select Allaire FTP & RDS.
You can also access this feature from Windows Explorer.
2. Right-click Allaire FTP & RDS and select Add FTP Server to open the Configure FTP
Server dialog box.
Page 41

Connecting to Servers via FTP and HTTP 41
3. Enter the following information for the server you want to connect to:
• Description — A descriptive name that will be displayed in the Files tab and in
Windows Explorer.
• Host Name — The server’s domain name, such as allaire.com, or an IP address.
Servers that include ftp as part of the domain name require that you enter the
complete name, such as ftp.somesite.com.
• Initial Directory — This entry is optional for accounts that default to the root
directory of the FTP server, but is required if the account specifies an initial
directory.
• Relative from server-assigned directory — Select the box to specify whether the
initial directory should be set from the server-assigned user directory or from
the server root.
• Username — The login name for the account used to access the remote server
or "anonymous" for anonymous FTP servers. You will be prompted for a
username at login if this field is left blank.
• Password — The password for the account used to access the remote server.
You will be prompted for a password at login if this field is left blank.
• Root URL — Enter the http:// address of the site. This entry allows you to
browse files that were opened from the remote server, edited, and saved.
• Remote Port — The port used by the FTP server. Use the default 21 unless
another is specified by the server administrator or internet service provider.
• Request Timeout — Set a value for the amount of time Studio waits for a server
connection to complete.
• Assume UTC file times — Select this box if you see incorrect date/time
information for files on the FTP server. It adjust for servers that use the
Universal Coordinated Time format.
• Disable passive mode — Select this box if the server does not use passive
connections.
4. Click OK to complete the configuration.
You can now work with files on the server.
To view and edit the configuration for a remote server, right-click the server in the
Allaire FTP & RDS list and select Properties from the menu. Make the necessary
changes, then click OK to save the new server properties.
Page 42

42
Overview of Remote Development Services
Remote Development Services (RDS) lets you communicate via HTTP with ColdFusion
on the local machine and on any configured remote host. RDS features include:
• Secure server access
• Data source browsing and SQL query building
• Remote file access
• CFML debugging
Managing ColdFusion security
The ColdFusion installation configures basic security for the server and by default
requires a password for the ColdFusion Administrator and for ColdFusion Studio.
To change the default security settings:
1. Open ColdFusion Administrator.
2. Select Basic Security from the server link list.
3. Change password security settings as needed.
4. Click the Apply button at the bottom of the page.
Page 43

Connecting to Servers via FTP and HTTP 43
Configuring an RDS Server
Complete the following configuration procedure for each ColdFusion server you want
to access.
To configure an RDS server:
1. In ColdFusion Studio, click the Files tab at the bottom of the Resources window.
2. Open the Drive list at the top of the Files pane and select Allaire FTP & RDS.
3. Right-click Allaire FTP & RDS in the Directory list and select the Add RDS Server
command to open the Configure RDS Server dialog box.
4. In the Configure RDS Server dialog box, make these entries:
• Description: a label for the server connection
• Host name: localhost or an IP address
• Accept the default Port or enter your ColdFusion server port number.
• Select the Use Secure Sockets Layer option if needed.
• Enter RDS Security information based on the settings in the ColdFusion
Administrator. See “Managing ColdFusion security” on page 42 for details.
• Click OK to save the server information.
5. Open the server from Allaire FTP & RDS in the Files pane or in Windows Explorer.
Page 44

44
Managing Servers
You can easily change server configurations as needed.
To view and edit the configuration for a server:
1. Right-click the server name in the Allaire FTP & RDS list and select Properties from
the menu.
2. Make any changes necessary in the Configure Server dialog box and click OK.
To delete a server:
1. Right-click the server name in the Allaire FTP & RDS list and select Delete Server
from the menu.
2. Click Yes when you are asked to confirm that you want to delete the server.
The remote server is removed from the Allaire FTP & RDS list.
Page 45

C HAPTER 5
Adding Server Mappings
Development mappings are essential for working with files via Remote Development
Services (RDS).
Contents
• Understanding Development Mappings................................................................. 46
• Understanding RDS Mappings ................................................................................ 47
• Defining a Server Mapping....................................................................................... 50
Page 46

46
Understanding Development Mappings
Development mappings serve two purposes:
• To enable server-based processing of pages from within ColdFusion Studio
• To enable debugging of application code on a remote server via RDS
Mapping for page processing
By default, when you browse a document in the internal or external browser, it is
opened from the local file system or returned via FTP from a remote server. That’s
adequate for checking page content and formatting, but for developing a Web site you
need to see dynamic pages as visitors to the site will actually experience them.
To do this, you can route the documents through a Web server. The server software can
be on the local machine, a network server, or a remote system. So, instead of just
opening the files, an HTTP request for the page is sent to the server. If any server-side
processing is required, such as for CFML, JSP or other scripting, the Web server will
hand off the page to the appropriate server for further processing, then return it to the
browser. This is valuable for previewing applications and site elements in a test
environment before deploying the site.
You establish this routing by associating the physical directories where your files are
stored with the server that processes the files. This association is called a mapping. A
wide range of Web servers is supported, so you can create multiple mappings and
select a server to use for processing as needed. Consult your server documentation or
provider for the specifics of accessing server directories.
Note that to use server mappings, either Microsoft Internet Explorer or Netscape
Mozilla NGLayout must be configured as the internal browser.
Mapping for debugging
If you have ColdFusion and ColdFusion Studio on the same machine, you can run the
debugger against files opened from the file system, including mapped network drives.
But if you are working with a remote ColdFusion server via RDS, you need to set a
mapping to that server to run the debugger.
Note To debug applications from ColdFusion Studio, you need to complete the
procedures in the Debugging ColdFusion Applications chapter, as well.
Page 47

Adding Server Mappings 47
Understanding RDS Mappings
File mappings ensure that ColdFusion Studio, the server, and your browser can
properly resolve local paths into server paths and URLs.
• Studio Path — How does ColdFusion Studio see the directory?
• ColdFusion Path — How does the Web server/ColdFusion server see the
directory?
• Browser Path — How does the browser see the directory?
The next section presents the most common mapping scenarios.
File mapping examples
The following scenarios show how file mappings work when you have local or remote
files matched with either local or remote servers:
• ColdFusion Studio and ColdFusion on the same machine
• ColdFusion Studio debugging on a remote ColdFusion server using drive
mappings
• ColdFusion Studio debugging on remote server using Network Neighborhood
• ColdFusion Studio debugging on a remote server using RDS file access
Using local paths
Debugging against a local ColdFusion Server is the most common scenario. In most
cases, this arrangement allows both the server and Studio to see the directories in the
same way.
For example, the local path c:\inetpub\wwwroot translates to an identical server path
C:\inetpub\wwwroot, and a URL path of http://215.180.21.1/. The use of mappings in
such a scenario is mainly for URL resolutions. The URL part of the mapping instructs
ColdFusion Studio how a physical file can be viewed in a browser.
In this example, you would create a mapping as follows:
ColdFusion Server and Studio on same machine
Studio path C:\inetpub\localhost\
Server path C:\inetpub\localhost\
Browser/URL path http://215.180.21.1/
Page 48

48
Using drive mappings
Developers often debug against a remote server across an internal network. In many
cases, they use a network drive mapping.
For example, a user may have a remote drive X:\ mapped to a network shared directory
\\MYSERVER\WEBPROJECTS\ where WEBPROJECTS is the name of the shared
directory in the network server MYSERVER.
In such a scenario, a file that appears to Studio as
X:\App1\index.cfm
Might be viewed by the server as
C:\webprojects\App1\index.cfm
The browser might view it using the URL path
http://215.180.21.1/App1/index.cfm
In order to resolve the communication between ColdFusion Studio and the server, you
need to create a mapping for the App1 directory as follows:
Studio access to a remote server using drive mappings
Studio path X:\App1\
Server path C:\webprojects\App1\
Browser/URL path http://215.180.21.1/App1/
Using UNC paths/Network Neighborhood
Developers can debug code against remote ColdFusion servers across an internal
network. They often use the Network Neighborhood to access a file on a remote server.
For example, a developer might access a file on \\myserver\webprojects\ where
webprojects is the name of the shared directory in the network server myserver.
In such a scenario, a file that appears to Studio as
\\myserver\webprojects\App1\index.cfm
Might be viewed by the ColdFusion server as
c:\webprojects\App1\index.cfm
The browser might view it using the URL path
http://215.180.21.1/App1/index.cfm
Page 49

Adding Server Mappings 49
ColdFusion Studio and the server need to understand how a file location appears to
the parties involved. You therefore need to create a mapping for the App1 directory as
follows:
Studio accesses files on remote CF server using UNC paths/Network Neighborhood
Studio path \\MYSERVER\WEBPROJECTS\App1\
Server path C:\webprojects\App1\
Browser/URL path http://215.180.21.1/App1/
Using Remote Development Services
When developing outside local area networks, you access files on a ColdFusion server
across the Internet using Remote Development Services (RDS).
In such a scenario, a file that appears to Studio as
RDS://MY_RDS_SERVER/C:/webprojects/App1/index.cfm
Might be viewed by the ColdFusion server as
C:\webprojects\App1\index.cfm
The browser might view it using the URL path
http://215.180.21.1/App1/index.cfm
Although the server path can be inferred from the local RDS path, you still need to
create a mapping. In special scenarios, ColdFusion server to Studio path resolution
could become ambiguous. You therefore need to create a mapping for the App1
directory as follows:
Studio accesses files on remote CF server using RDS remote file access
Studio path RDS://MY_RDS_SERVER/C:/WEBPROJECTS/App1/
Server path C:\webprojects\App1\
Browser/URL path http://215.180.21.1/App1/
Page 50

50
Defining a Server Mapping
The debugger relies on these mappings to communicate the correct file paths of all
files with breakpoints to the ColdFusion server. You create these mappings in the
Mappings pane of the Remote Development Settings dialog box.
To define a server mapping:
1. Open the Options > Settings > Browse pane.
2. Check either Microsoft Internet Explorer or Netscape’s Mozilla NGLayout as the
internal browser.
3. Click the Development Mappings button to open the Mapping tab on the Remote
Development Settings dialog box.
4. Select a server from the drop-down list of configured servers. If a server is not on
the list, add it using the procedure described above.
5. Enter the Studio, ColdFusion, and Browser path information. For page browsing on
localhost, only the Studio and Browser paths are required.
6. Click the Add button to save the mapping, then click OK.
In the illustration below, ColdFusion and Studio are both installed locally.
You can now browse your documents in the internal (F12) or external (F11) browser. To
edit mapping settings, select a mapping from the list and click the Update button after
making changes in the appropriate fields.
Page 51

C HAPTER 6
Writing Code and Web Content
ColdFusion Studio can handle many different Web development tasks, from writing
simple HTML pages to designing, testing, and deploying complex, dynamic sites.
This chapter describes some basic techniques for creating Web content and
application code.
Contents
• Inserting Code ........................................................................................................... 52
• Selecting a Color Coding Scheme............................................................................ 53
• Using Inline Tools to Enter Code ............................................................................. 55
• Using Code Generating Tools................................................................................... 56
• Adding Document Content...................................................................................... 57
• Using Keyboard Shortcuts ........................................................................................58
• Saving Code Blocks as Snippets ............................................................................... 59
Page 52

52
Inserting Code
The coding tools in ColdFusion Studio support the full range of writing styles, from
typing to point-and-click, and you can set the level of support you want. For repetitive
chores, you can use its productivity to quickly enter common code blocks and required
text. If you’re working with less familiar syntax, you can get pop-up tips and selectable
lists of language elements.
Inserting tags from the QuickBar
The QuickBar is a customizable development toolbar. When you click on a QuickBar
toolbutton, it either inserts the code directly into the document or opens a tag editor
for that specific tag if it supports attributes or other syntax elements.
You can display toolbars for HTML, CFML, JSP, scripting, and ASP code in addition to
toolbars for ColdFusion Studio tools and standard Windows commands.
Customizing toolbars
You can easily change the QuickBar display and organize toolbuttons.
• To change the tab order, right-click the QuickBar, select Organize QuickBar, and
use the arrow buttons to set the tab order.
• To move a toolbar, click and hold on the double lines located at the left end of
the toolbar and drag it to a new location.
• To customize a toolbar, right-click the QuickBar, select Customize, then
double-click on a toolbar name in the Visible Toolbars list to change its
contents.
• To add a toolbar, click Add Toolbar in the Customize dialog box, enter a name
for the new toolbar and click OK to add the toolbar to the Toolbars list. Select
the new toolbar from the list and add toolbuttons as needed.
• To add a custom toolbutton, click Add Custom Button to open the Custom
Toolbutton dialog box, click a radio button to select an action for the
toolbutton, complete the entries for the selected action, and click OK to add the
new toolbutton to the selected toolbar.
You can always return to the original QuickBar configuration by clicking the Reset to
Defaults button in the Customize dialog box.
Page 53

Writing Code and Web Content 53
Selecting tags from the Tag Chooser
The Tag Chooser contains tag sets for languages that are supported by tag editors, the
Tag Inspector, Tag Insight, and Tag Tips.
To use Tag Chooser:
1. Right-click in the editor and select Insert Tag, or press Ctrl+E to open Tag Chooser.
The left pane in Tag Chooser contains a list of supported languages, the right pane
shows the individual tags for the selected language folder.
2. Click a folder in the left pane to display all the language elements, or expand a
folder to see the language organized by functional categories. Click a category to
see a list of those elements in the right pane.
3. Click a tag in the right pane to highlight it.
If you want to view syntax and usage information for the tag, click one of the Help
icons below the right pane. The Help pane opens to display tag-specific help.
4. To insert a tag, press Select for the highlighted tag or double-click it.
Tags that are inserted directly into a document are listed with brackets in the right
pane, such as
when the tag is selected.
5. If an editor opens for the selected tag, complete the entries as needed and click OK
to insert the tag.
You can open the Help pane in an editor for syntax information.
You can resize the Tag Chooser and keep it open while you work.
<HTML></HTML>. All other tags have individual editors that open
Selecting a Color Coding Scheme
Language color coding helps you to identify code blocks in large documents and to
distinguish between language types. Open Options > Settings > Editor > Color Coding
to view the available color coding schemes.
The default is the HTML scheme, but you can select any of the listed schemes and click
the Set as Default button to use that scheme in your documents.
You have a great deal of flexibility in customizing both the supported file types for
schemes and the visual presentation of the code. If you decide to change a scheme
back to its original values, you can easily reset it to the default.
Page 54

54
Setting the supported file types for a scheme
The color schemes for the supported languages are grouped by file extensions in the
Color Coding pane. You can easily change the file types for a scheme.
To modify file types for a scheme:
1. Open Options > Settings > Editor > Color Coding.
2. Select the scheme you want to change.
3. Click the Edit Extensions button to open the edit dialog box.
4. Edit the extensions list as need.
Be sure to separate entries with a semi-colon.
5. Click OK to apply the new list.
You can click the Reset to Defaults button at any time to use the original values.
Setting the tag display
It is easy to implement a custom code scheme by changing the default colors and font
styles.
To change a color scheme:
1. Open Options > Settings > Editor > Color Coding.
2. Select the scheme you want to change.
3. Click the Edit Scheme button to open the edit dialog box.
The preview pane shows the settings for the selected scheme.
4. Select an item from the Elements list.
5. To change either the foreground or background color for the element, first clear the
Use default box below the element color box.
6. Right-click on the color box and select a color from the Color dialog.
7. To change a font style select one of the style boxes.
8. Repeat these steps as needed for other language elements.
9. Click OK when all changes.
You can click the Reset to Defaults button at any time to use the original values.
Page 55

Writing Code and Web Content 55
Using Inline Tools to Enter Code
You have a number of tools to help you easily insert new code and to edit existing code
as you type. Each of these tools supports a distinct language element, such as tags,
objects, and functions.
Tag Insight
This interactive feature can be used to write new code and to edit existing code. Open
the Options > Settings > Editor > Tag Insight pane to configure it.
To insert a tag using Tag Insight:
1. Type a start bracket (<), scroll the drop-down list and press Enter to insert a tag.
2. Press the spacebar to open a drop-down list of attributes and press Enter to insert a
selection.
3. Press the spacebar again to select from a list of known values for the attribute.
4. Repeat steps 2 and 3 until all elements are entered.
5. Press Esc to close a list.
To edit a tag:
1. Place the cursor to the left of a tag end bracket (>) and press the spacebar.
2. Select from the drop-down attribute lists as needed.
3. Press Esc to close a list.
Tip If you just want to see the attributes and values associated with a tag,
Function Insight
Function Insight lets you insert function argument syntax as you type. Open Options >
Settings > Editor > Function Insight to enable this features and to view the function list.
When you type a function name followed by a left parentheses, a drop-down list of
recognized arguments displays. Select an argument from the list and press Enter to
insert it. Separate arguments by commas. Press the spacebar after an argument to add
an argument as needed. Add a closing parenthesis to complete the function call.
place the cursor inside the tag and press F2 to open a Tag Tip. Press Esc to
close the tip.
To customize Function Insight
The entries in the functions list are determined by the Expression Builder function
library. See Customizing the Development Environment in the online Help References
for information on how to modify the Expression Builder definition file to change the
list of functions.
Page 56

56
Tag Completion
When this feature is turned on, the end tag is automatically inserted for the start tag
that you type. Open Options > Settings > Editor > Tag Completion to set the options.
Auto Completion
Auto Completion completes a code block by inserting the appropriate code when the
opening code fragment (the trigger string) is typed.
To enable this feature, open Options > Settings > Editor > Auto Completion. You can
also add your own code blocks and set a cursor position option in this pane.
Code Templates
The Code Templates feature provides a shortcut for entering static text blocks. Open
Options > Settings > Editor > Code Templates to add and change these shortcuts and
provide descriptive text for them. As with Auto Completion, this feature is intended for
user-defined strings.
To use a Code Template, enter the keyword for the shortcut (for example, dt4) and
press Ctrl+J. The abbreviation expands to the full phrase, in this case,
PUBLIC "-//W3C//DTD HTML 4.0 Transitional//EN">
Extended characters
To enter special characters and Latin-1 extended characters, you can either type the
ASCII code or select the character from the list available in View > Extended
Characters.
If you need to change the character to its entity name, select Options > Settings >
Editor > Automatically convert extended characters.
Using Code Generating Tools
• Use templates (File > New) for standard content. The File > Save As Template
command saves the current document as a template file in the Custom tab of
the New Document dialog box.
• Wizards (File > New) generate code for common page elements such as
framesets and tables, plus DHTML, WML and custom scripts. The Servlet
Wizard on the Java tab creates a valid class file containing selected method
syntax.
• If Macromedia Dreamweaver© is detected on your system, you can enable
integration with it in Options > Settings > Dreamweaver. This lets you edit
Dreamweaver code in ColdFusion Studio and preview pages in Dreamweaver.
• Open TopStyle Lite to design, preview, and link Cascading Style Sheets.
<!DOCTYPE HTML
.
Page 57

Writing Code and Web Content 57
• Use Design mode to prototype page layouts and to quickly create HTML tables
and forms and set font and image formatting. Open Options > Settings > Design
to display the Design tab.
• Add hyperlinks to Web images (gif, jpg) with the Image Map Editor. To get
started, open the Tools > New Image Map dialog box.
Adding Document Content
The default template contains just the code required for a valid HTML document. This
default template is stored as \Wizards\HTML\Default Template.htm below your root
directory. You can edit this file and save it to change its content.
To open a new document use one of these commands:
• Press Ctrl+N to open the default document template.
• Select File > New to select a different template or a wizard.
You can easily add a link from an HTML, CFML, JSP or other HTML embedded
document to a URL.
To add a hyperlink use one of these commands:
• Drag files from the Files pane to insert links to HTML documents, images, and
audio and video clips.
• Click the Anchor toolbutton on the Common QuickBar tab to define internal
and external links.
For other supported languages, such as WML and SMIL, use the appropriate link
syntax.
To insert a file into a document:
1. Select File > Insert File.
2. Open the drop-down list of supported file types to filter file list.
3. Locate the file and click OK to insert the file contents in the current document.
To convert a text file:
1. Select File > Convert Text File and locate a local or remote file with a txt extension.
2. Click OK to open the file in the editor surrounded by basic HTML tags.
You can then add formatting or link to a style sheet.
Page 58

58
To copy text from a browser:
1. To strip the HTML formatting code from copied text, select the Treat HTML
dropped from external application as plain text option in Options > Settings >
Editor.
2. Select the text in the browser that you want to copy.
3. Use the Windows copy and paste commands to enter the text block in the editor.
To insert Microsoft Office content:
• To convert Office content, such as lists, tables, and worksheet cells, to plain text,
select the content and copy it to the editor.
• To insert content with the equivalent HTML formatting, enable Design view in
Options > Settings > Design.
You can then edit the content visually in Design mode, for example, by clicking
on a table border and dragging a handle to resize it or you can switch to Edit
mode to work directly in the code.
Using Keyboard Shortcuts
Keyboard shortcuts are active for many file management, editing, and debugging
commands. Select Options > Customize and click the Keyboard Shortcuts tab to see
the current keyboard assignments.
To print the list of shortcut keys:
1. Right-click on the list and select Browse.
2. Use the browser’s print command to print the document.
You can change key combinations and assign keys to the commands in the list.
To assign a key combination:
1. Open the Keyboard Shortcuts tab and select a command from the list.
2. Click in the text box beside the Apply button and press the key combination you
want to use.
If the key combination is already in use, the current assignment appears below the
text box.
3. Click Apply to save the assignment.
This overwrites the existing assignment.
The list automatically refreshes when changes are made.
Page 59

Writing Code and Web Content 59
Saving Code Blocks as Snippets
With Code Snippets, you can easily store code blocks and content for reuse. Comment
your snippets just as you would any code block.
To create a code snippet:
1. Click the Snippets tab in the Resources window.
Before adding a snippet, you need to create a folder.
2. Right-click in the Snippets panel and select Create Folder from the shortcut menu.
3. Enter a name for the folder.
4. Right-click in the Snippets pane and select Add Snippet to open the Snippet dialog
box.
5. Enter a name for the snippet in the Description box. Note that snippet names
cannot contain characters that are illegal in file names, such as slashes, special
characters, or double quotes.
6. In the Start Text window, type or paste an opening code block. You can set a default
spacing between the blocks by pressing the Enter key at the end of the start text and
at the beginning of the end text.
7. In the End Text window, enter a closing code block.
8. Click OK.
Right-click a snippet to edit or delete it.
You can create additional folders as needed. The default location for snippets is the
\UserData\Snippets folder below your root directory.
Tip Because snippets can be created as start and end blocks, you can use
them to surround other tags and content. This is handy for inserting
special formatting, navigation elements, and script blocks. Simply
highlight the content you want to surround, then insert the snippet.
To insert a snippet, double-click an entry in the Snippets panel or right-click and select
Insert into document from the menu.
Use the snippets shortcut menus to manage snippets and snippet folders.
Page 60

60
Sharing snippets
You can share code snippets with other developers by giving them access to a shared
folder on your machine or on another network machine.
To create a shared snippets folder:
1. Open Options > Settings > Locations.
2. Enter a folder path for Shared Snippets and click OK.
The new folder appears in the Snippets list.
Anyone with access to the shared folder can now add, edit, and delete snippets.
Adding snippet shortcut keys
Open the Options > Customize dialog box and select the Snippet Shortcuts tab to
enable a keyboard combination for a snippet. Select a snippet and press keys to enter
the combination in the box at the bottom.
If a combination is in use, the current command appears below the shortcut box. To
overwrite a combination, click Apply.
Page 61

C HAPTER 7
Accessing Data Sources
This chapter describes how to use Studio’s visual tools to significantly accelerate
development of data-driven ColdFusion applications.
Contents
• Introduction to Database Tools ............................................................................... 62
• Registering Data Sources.......................................................................................... 62
• Connecting to Data Sources..................................................................................... 63
• Viewing Data Sources ............................................................................................... 63
• Using SQL Builder ..................................................................................................... 64
• Building a SELECT Statement.................................................................................. 66
• Testing a Query.......................................................................................................... 67
• Editing a Query.......................................................................................................... 67
• Inserting SQL into a Page..........................................................................................68
Page 62

62
Introduction to Database Tools
Studio’s visual database tools support application development using both local,
network, and remote data sources. Access to data sources becomes transparent when a
server is configured in Studio.
Studio's database tools support:
• Remote database development
• Data source schema and data browsing
• Visual SQL statement building
For a full discussion of developing ColdFusion applications using data sources,
including requirements for native drivers, see Developing Web Applications with
ColdFusion.
Registering Data Sources
A set of ODBC drivers and sample data is installed with all versions of ColdFusion.
Native database drivers are installed with the Enterprise version and OLE-DB drivers
are installed with the Professional and Enterprise versions.
To register a data source:
1. Open the ColdFusion Administrator.
2. Select the ODBC or native drivers page under the data sources heading.
3. Name the data source, select the appropriate driver, and click Add.
To test the connection, click Verify. A help message displays if the test connection fails.
For more information on managing data sources, see Administering ColdFusion Server.
Accessing Allaire Spectra data sources
Allaire Spectra data sources registered in the ColdFusion Administrator are viewable in
Studio. Select a data source from the dropdown list in the top pane of the Database tab
to see the database schema.
The SQL Builder, available on the Tools menu, gives you a visual interface for selecting
tables and writing and testing SQL statements for your applications. You can copy
completed SQL code blocks directly into your applications or insert them as part of a
CFQUERY tag.
Page 63

Accessing Data Sources 63
Connecting to Data Sources
Data sources registered in the ColdFusion Administrator are automatically accessible
from Studio’s Database tab. You can also add remote ColdFusion servers (RDS) to
connect to their data sources.
To add a remote server:
1. Open the Database tab and select Add RDS server from the dropdown list in the top
pane.
2. Complete the Configure RDS Server dialog.
See “Connecting to Servers via FTP and HTTP” on page 39 for detailed instructions
on configuring an RDS server.
Viewing Data Sources
Once a data source is registered, you can work with it in Studio.
To open a data source:
1. Open the Database tab and select a server from the dropdown list in the top pane.
Accessing a large database on a remote servers may take a few moments.
2. Click the plus sign (+) next to a data source name to expand the tree.
3. Click the plus sign (+) next to Tables to view the database schema.
4. Click the plus sign (+) next to a table name to view the column definitions.
5. Double-click on a table name to view the records in that table.
You can only browse data in the data browsing window. You cannot modify data or add
new records.
Views are only available in databases that support creating views or tables stored as
queries.
Tip To insert column or table names into a page, just drag and drop the table or column
into the editor. This is useful when you are building database reports.
Page 64

64
Using SQL Builder
Studio provides a powerful visual tool to build, test, and save SQL statements for use in
data queries. Select a query type from the SQL Builder toolbar or right-click in the
Table pane and choose from the Query Type list.
To open SQL Builder choose one of these methods:
• Right-click on a database or a table in the Database tab and choose New Query.
• Click To ols > SQL Bu il der, select a database from the dropdown list, and click
New Query.
• Open the CFQUERY tag editor and click the New Query icon.
The SQL Builder interface
The following illustration shows the SQL Builder interface:
Page 65

Accessing Data Sources 65
The SQL Builder is divided into four sections:
• Toolbar — Contains icons for SQL keywords and commands.
• Ta ble p ane — Provides a view of the tables in your query and allows you to
create joins between tables.
• Properties pane — Allows you to set the properties of the query such as the
columns that are being selected or the columns that are being updated.
• SQL pane — Shows you the SQL statement as it is built.
Writing SQL statements
SQL Builder opens a SELECT statement by default, since this is the most common type
of query. If you have not chosen a table, you will be asked to select one.
SQL Builder supports four types of SQL statements:
• Select
• Insert
• Update
• Delete
The SQL pane does not support reverse editing, so any changes you make in this pane
will not be made to the query in the Properties pane or the Table pane.
Page 66

66
Building a SELECT Statement
SQL SELECT statements let you specify the data from which to build a recordset. This
procedure begins with SQL Builder open.
To optimize performance, tables are only retrieved on an as needed basis.
To create a SELECT statement:
1. Select the first table you want to query.
2. Right-click in the Table pane and choose Add Table or click the Add Table button in
the tool bar to add additional tables to the query.
3. Drag and drop column names between tables to create joins.
4. Right-click on a join to delete the join or change it to an inner or outer join.
5. Drag the columns you want to display onto the Column section of the Properties
pane.
6. Set additional query attributes in the Properties pane.
7. Save or insert the query into your page.
To use a CFML variable in a SQL WHERE clause:
1. In the Properties pane, click in the Criteria column for the column that you want
use in the WHERE clause.
2. Open the select box and choose the appropriate variable syntax.
3. Double-click on the variable placeholder name and enter a value.
To save a query:
1. Click the Save Query button on the Query toolbar.
2. Enter a name for the query in the dialog.
3. Click Save.
Saved queries are stored on the ColdFusion Database Server. They can be edited and
used by to everyone who has access to that server.
If you edit a SQL statement in the SQL pane and then save the query, the changes are
saved. However, if you modify the Table pane or change any values in the Properties
pane, a new SQL statement is generated, overwriting any edits you made in the SQL
pane.
Page 67

Accessing Data Sources 67
Testing a Query
You can test your SQL code in SQL Builder before inserting it in a page.
To run a query in the SQL Builder:
1. Click the Run Query button.
2. You are prompted to enter values for any CFML variables in the query.
Note When you click the Run Query button, the SQL statement is actually
processed. If you run an INSERT, UPDATE, or DELETE statement, the
changes you coded in the SQL statement are made in the data source.
Editing a Query
If you save a query, you can edit it later. Pages that contain the edited query are not
automatically updated, so you will need to re-insert the query for the changes to take
effect.
To edit a query:
1. Open the query folder for the data source you want to use.
2. Double-click on the query you want to edit.
3. Make changes in the Table pane and the Properties pane.
4. Save the new query.
Note The interactions among the SQL Builder panes differ somewhat. If you write a query in
the SQL pane and save it, the code is not reflected in the Properties or Table panes. If
you take an action, such as adding a table, in the Properties or Table panes, the SQL
pane is refreshed with the SQL generated from these panes.
Page 68

68
Inserting SQL into a Page
You can use any of the following methods to insert a query directly into a CFML page
from the SQL Builder:
• If you open the SQL Builder from the CFQUERY tag editor, it prompts you to
insert the query when you close the editor.
• If you open the SQL Builder from a CFML page, it prompts you to insert the
query when you close it.
• To insert just the SQL statement, click the Copy SQL to Clipboard button on the
toolbar. Close the SQL Builder and paste the SQL into your page. You will be
prompted to save the query.
• To insert the SQL statement within a CFQUERY tag, click the Copy CFQUERY
button. Close the SQL Builder and paste the query into your page. You will be
prompted to save the query.
To insert a saved query:
Use either of the methods listed below.
1. Open the data source schema in the Database tab.
2. Open the Queries folder in the data source you want to use.
3. Drag and drop the query onto the page.
OR
1. Click the CFQUERY button on the CFML Basic tag toolbar or select CFQUERY from
the Tag Chooser (Ctrl + E).
2. Enter a name for the query.
3. Click the Insert Query button.
4. Choose a server from the select box.
5. Open the Queries folder in the data source you want to use.
6. Select a query and click Insert.
7. Click Apply in the CFQUERY tag editor.
Page 69

C HAPTER 8
Exchanging Data via XML
You can now move complex data structures across the Web using Web Distributed
Data Exchange (WDDX). This new capability is based on XML 1.0 and can be used to
exchange data between CFML applications and other applications.
Additionally, server-to-browser and browser-to-server JavaScript data exchanges can
be instantiated using WDDX. Server data can be transferred to the browser and
converted to JavaScript objects, while JavaScript data generated on the browser can
be serialized and transferred to the application server.
Contents
This functionality is encapsulated in the CFWDDX tag.
While WDDX is a valuable tool for ColdFusion developers, it’s utility is not limited to
CFML. WDDX serialization of common programming data structures such as arrays,
record sets, and name-value pairs enables data communication, via HTTP, across a
range of languages.
The best source of information about WDDX is http://www.wddx.org/. This site,
sponsored by Allaire Corporation, offers a free download of the WDDX SDK and a
number of resources, including a WDDX FAQ and a developer forum.
• An Overview of Distributed Data for the Web......................................................... 70
• WDDX Components ................................................................................................. 70
• Working with Application-Level Data ..................................................................... 71
• Data Exchange Across Application Servers............................................................. 71
• Time Zone Processing............................................................................................... 71
• How WDDX Works .................................................................................................... 72
• Converting CFML Data to a JavaScript Object........................................................ 73
• Transferring Data from Browser to Server............................................................... 75
Page 70

70
An Overview of Distributed Data for the Web
Web Distributed Data Exchange (WDDX) is an Extensible Markup Language (XML)
vocabulary for describing complex data structures such as arrays, associative arrays,
and recordsets in a generic fashion so they can be moved between different
application server platforms and between application servers and browsers using only
HTTP.
Unlike other approaches to creating XML-based generic distributed object systems for
the Web, WDDX is not designed as an analog of traditional object programming
languages. These approaches use XML as a generic descriptor for initiating remote
procedure calls between different object frameworks. This is a valuable approach to
the problem of using traditional object-based applications to the Internet, but it is
more useful as a bridge between different programming paradigms than it is as a
Web-native methodology for distributing structured data between application
frameworks.
There are several problems with merging the distributed object model of computing
with the Internet. Primarily, this model was designed with a completely different vision
of what general internetworking would look like. Instead of the "dumb and
disconnected" model of HTTP, distributed computing was built on the assumption of
rich network services that would allow resources on remote machines to act like local
components. These services allow an application on one system to find, invoke, and
maintain state with objects on a remote system. Communication between objects on
remote systems uses an efficient, special-purpose wire protocol.
But these services are a barrier to development in the disconnected world. At the most
fundamental level, the wire protocols of DCOM and CORBA are blocked by most Web
firewall software. But the largest barrier is that client-server oriented distributed
computing frameworks impose a development methodology that is radically different
from that of the Web. This methodology excludes the vast majority of developers
building Web applications whose main tools are tag-based markup languages and
scripting. While WDDX will work with systems that support component object
development paradigms, there is a large set of applications that can benefit from the
general characteristics of a distributed data system without the client-server overhead.
WDDX Components
The core of WDDX is the XML vocabulary and a set of components for each of the
target platforms to serialize and de-serialize data into the appropriate data structure
and a document type definition (DTD) that describes the structure of standard data
types. Functionally, this creates a way to move data, its associated data types, and
descriptors that allow the data to be manipulated on a target system between arbitrary
application servers.
WDDX is based on XML 1.0, which is a W3C Recommendation. Other W3C efforts,
such as the XML-Data proposal and metadata formats such as the Resource
Description Framework (RDF), have application to WDDX. The WDDX DTD supports
Page 71

Exchanging Data via XML 71
versioning, allowing these and other enhancements to be folded into the specification
as they become available without disrupting working applications.
Working with Application-Level Data
The real strength of WDDX is clear if the client and server are seen as a unified
platform for applications. This is a subtle, but profound, distinction from the
traditional view of an application where services are partitioned between the client
and server.
In client-server, a client might query a database and get a recordset that can be
browsed, updated and returned to the server without requiring a persistent
connection. In this scenario, data is highly-structured and that structure is baked into
the client side of the application ahead of time.
While this style of databinding relies on the presence of data sources that expose
well-structured data of known types, WDDX is designed to transport application-level
data structures to facilitate seamless computing between the client and the server side
of a web application. Application-level data structures generally differ from data
exposed via traditional data sources, e.g., databases. They are generally more complex
and ad hoc, with dynamic structure. WDDX allows developers to work with this data
without the overhead of setting up a datasource for every type of data needed.
Therefore, it integrates nicely with and complements other approaches that rely on
existing data sources.
Data Exchange Across Application Servers
The other common use of WDDX is expected to be sending complex, structured data
seamlessly between different application server platforms. This will allow an
application based on ColdFusion at one business to send a purchase order, for
instance, to a supplier running a CGI-based system. The supplier could then extract
information from the order and pass it to a shipping company running an application
based on ASP. Unlike traditional client-server approaches (including distributed object
systems) minimal to no prior knowledge of the source or target systems is required by
any of the others.
Time Zone Processing
Because producers and consumers of WDDX packets can be in geographically
dispersed locations, using timezone information during the serialization and
deserialization phases becomes critical for correct date-time processing.
All of Allaire’s WDDX serializers (CFML, COM, and JS) have an attribute/property
useTimezoneInfo that specifies whether time zone information should be used in the
serialization process. The default value is true.
Page 72

72
In the CFML implementation, useTimezoneInfo is a property of the CFWDDX
Action=Cfml2WDDX tag. In the COM implementation,
of the IWDDXSerializer interface provided by the object
implementation
useTimezoneInfo (note the case-sensitivity of JS) is a property of the
useTimezoneInfo is a property
WDDX.Serializer.1. In the JS
WDDXSerializer object.
Date-time values in WDDX are represented using a subset of the ISO8601 format.
Timezone information is represented as an hour/minute offset from UTC, e.g.,
"1998-9-8T12:6:26-4:0".
During WDDX deserialization to CFML and COM time zone information is
automatically taken into account and all date-time values are converted to local time.
In this way, UTC is taken out of the picture entirely and developers do not need to
worry about the details of time zone conversions.
However, during deserialization to JavaScript expressions, time zone information is
not taken into account. Complications arise because of the difficulty of knowing the
timezone of the browser. We will address this issue in an upcoming release.
How WDDX Works
The WDDX vocabulary describes a data object with a high level of abstraction. For
instance, a simple object with two string properties might take the following form after
it is serialized into a WDDX XML representation for delivery via HTTP:
<var name='x'>
The deserialization of this XML by the WDDX Serializer object would create a structure
similar to what would be created directly by this JavaScript object declaration:
x = new Object();
<struct>
<var name='a'>
<string>Property a</string>
</var>
<var name='b'>
<string>Property b</string>
</var>
</struct>
</var>
x.a = "Property a";
x.b = "Property b";
See the CFML Language Reference for more information on JavaScript objects.
Page 73

Exchanging Data via XML 73
Converting CFML Data to a JavaScript Object
The following example demonstrates the transfer of a CFQUERY result set from a
CFML template executing on the server to a JavaScript object that is processed by the
browser.
The application consists of five principal sections:
• Running a data query
• Calling the WDDX JavaScript utility
• Specifying the conversion type and the input and output variables
• Calling the conversion function
• Outputting the object data in HTML
This example uses a registered ColdFusion 4.0 datasource and can be run from
ColdFusion Server.
<!--- Create a simple query --->
<CFQUERY NAME = 'q' DATASOURCE ='snippets'>
SELECT Message_Id, Thread_id,
Username, Posted from messages
</CFQUERY>
<script language=javascript>
<!--- Bring in WDDX JS support objects
A <script src=></script> can be used instead
wddx.js is part of the ColdFusion distribution --->
<CFINCLUDE template='/CFIDE/scripts/wddx.js'>
<!--- Use WDDX to move from CFML data to JS --->
<CFWDDX ACTION='cfml2js' input=#q# topLevelVariable='q'>
<!--- Recordset dumping routine --->
function dumpWddxRecordset(r)
{
// Get row count
nRows = r.getRowCount();
// Determine column names
colNames = new Array();
i = 0;
for (col in r)
{
if (typeof(r[col]) == "object")
{
colNames[i++] = col;
}
}
// Dump the recordset data
o = "Dumping recordset...<p>";
Page 74

74
o += "<table cellpadding=3pt><tr>";
for (i = 0; i < colNames.length; ++i)
{
o += "<td>" + colNames[i] + "</td>";
}
o += "</tr>";
for (row = 0; row < nRows; ++row)
{
o += "<tr>";
for (i = 0; i < colNames.length; ++i)
{
o += "<td>" + r.getField(row, colNames[i]) + "</td>";
}
o += "</tr>";
}
o += "</table>";
// Write the table to the HTML stream
document.write(o);
}
<!--- Dump the recordset --->
dumpWddxRecordset(q);
</script>
Page 75

Exchanging Data via XML 75
Transferring Data from Browser to Server
This example serializes form field data, posts it to the server, deserializes it, and
outputs the data. For simplicity, only a small amount of data is collected. In
applications where complex JavaScript data collections are generated, this basic
approach can be extended very effectively.
<!--- Get WDDX JS utility objects --->
<script language="JavaScript"
src="/CFIDE/scripts/wddx.js"></script>
<!--- Add data binding code --->
<script>
// Generic serialization to a form field
function serializeData(data, formField)
{
wddxSerializer = new WddxSerializer();
wddxPacket = wddxSerializer.serialize(data);
if (wddxPacket != null)
{
formField.value = wddxPacket;
}
else
{
alert("Couldn't serialize data");
}
}
// Person info recordset
var personInfo = new WddxRecordset(new Array("firstName",
"lastName"));
// Add next record
function doNext()
{
nRows = personInfo.getRowCount();
personInfo.firstName[nRows] =
document.personForm.firstName.value;
personInfo.lastName[nRows] =
document.personForm.lastName.value;
document.personForm.firstName.value = "";
document.personForm.lastName.value = "";
}
</script>
<!--- Data collection form --->
<form action="wddx_browser_2_server.cfm" method="post"
name="personForm">
<!--- Input fields --->
Personal information<p>
First name: <input type=text name=firstName><br>
Page 76

76
Last name: <input type=text name=lastName><br>
<p>
<!--- Navigation & submission bar --->
<input type="button" value="Next" onclick="doNext()">
<input type="button" value="Serialize"
onclick="serializeData(personInfo,
document.personForm.wddxPacket)">
<input type="submit" value="Submit">
<p>
<!--- This is where the WDDX packet will be stored --->
WDDX packet display:<p>
<textarea name="wddxPacket" rows="10" cols="80"
wrap="Virtual"><
/textarea>
</form>
<!--- Server-side processing --->
<hr>
<p><b>Server-side processing</b><p>
<CFIF isdefined("form.wddxPacket")>
<CFIF form.wddxPacket neq "">
<!--- Deserialize the WDDX data --->
<CFWDDX action="wddx2cfml" input=#form.wddxPacket#
output="personInfo">
<!--- Display the query --->
The submitted personal information is:<p>
<CFOUTPUT query=personInfo>
Person #CurrentRow#: #firstName# #lastName#<br>
</CFOUTPUT>
<CFELSE>
The client did not send a well-formed WDDX data packet!
</CFIF>
<CFELSE>
No WDDX data to process at this time.
</CFIF>
Page 77

C HAPTER 8
Editing Pages
Editing chores are made easier by a wealth of interface options and tools for
updating code and content.
Contents
• Setting Options on the Editor Toolbar..................................................................... 70
• Selecting Code and Text Blocks................................................................................ 70
• Saving Text to the Multiple-Entry Clipboard .......................................................... 70
• Using Collapsing Text................................................................................................ 71
• Using Tag Editors....................................................................................................... 72
• Using the Tag Tree and Tag Inspector...................................................................... 72
• Preserving Code Formats with CodeSweepers ....................................................... 76
• Formatting Pages with Cascading Style Sheets....................................................... 81
Page 78

70
Setting Options on the Editor Toolbar
The column between the Document window and the Resources window contains a set
of handy toolbuttons for:
• Document handling
• Formatting
• Switching between open documents
• Toggling inline coding tools
• Displaying the document gutter for line numbers and bookmarks
You can set bookmarks in the gutter by selecting the Edit > Toggle Bookmarks
command, but be aware that bookmarks are not retained when the file is closed.
Selecting Code and Text Blocks
You can use the mouse and standard Windows keyboard commands to highlight
sections of a document or use these shortcuts to quickly select and edit tag blocks:
• To select an entire code block, press Shift+Ctrl and double-click in either the
start or end tag.
• To select a range of code and text, click at the start of the selection, then press
Shift and click at the end of the selection.
• Press Ctrl and double-click to select a tag.
Saving Text to the Multiple-Entry Clipboard
This feature allows you to copy multiple text block and store them as separate entries
in the Windows Clipboard. Entries can be pasted in later as needed. You must perform
at least one copy command to activate this feature.
Setting the clip entry limit
By default, the clipboard window stores a maximum of 36 entries. This can be changed
in Options > Settings > Editor. When the maximum number of clipboard entries is
reached, the next copy operation deletes the oldest clipboard entry and adds the new
copied text to the bottom of the clipboard entry window. Three buttons are available
on the Edit toolbar for this feature:
Show Clipboard — Displays a drop-down window of previously copied clip icons. As
you move the mouse over the clip icons, a hint window displays the first few lines of
the clip's text. Click on a an icon to paste the clip into the editor at the current cursor
position.
Paste All — Pastes all of the current clips into the editor at the current position. Clips
are pasted in the order in which they were copied.
Clear Clipboard — Deletes all current clips from memory.
Page 79

Editing Pages 71
Customizing clipboard commands
The clipboard buttons can be added to custom toolbars using the Options > Customize
menu command. The buttons are located in the Edit toolbutton section.
Keyboard shortcuts can be assigned to these features, as well. The shortcut
descriptions are Show clipboard, Paste all, and Clear clipboard.
Using Collapsing Text
When editing long documents or complex applications, you can hide text and code
blocks so that you can focus on just a portion of the content. A customizable marker
displays the first few characters of the collapsed selection.
Setting options
Open Options > Settings > Editor > Collapsed Text to set options for this feature. Using
these settings, you can:
• Customize the appearance of the collapsed text marker, including the font,
foreground and background colors, and amount of text to display inside the
marker (note that the number of characters actually displayed in the marker
may vary if a proportional font is used).
• Enable a popup display of the full text when you move your mouse over the
collapsed text marker. You can set the maximum number of lines to display in
the popup box.
• Enable the automatic selection of text when a collapsed text section is
expanded. This allows you to expand a collapsed region to view its contents,
and then easily collapse it again.
• Set file save/open options for the collapsed text.
Before you can use the Collapsed Text feature
To collapse text in the current document use one of these commands:
• Select some text and click on one of the collapse buttons (-) that appear in the
editor gutter.
• Right-click a selection of text and select Collapse selection from the popup
menu.
• Right-click in a start or end tag and select Collapse Tag. This collapses the entire
tag body.
• Right-click in a start or end tag and select Collapse All Identical Tags. This
collapses all tags which are the same as the current tag, including nested tags.
• Click on the blue plus sign <+> at the top of the Tag Inspector pane. This
collapses the text based on the current Tag Inspector outline.
Page 80

72
To work with collapsed text:
• Double-click a collapsed text marker to expand the text.
• To expand all collapsed text, right-click anywhere in a document and select
Expand All from the popup menu.
• You can drag collapsed text just like regular text blocks.
• Collapsed text blocks can be nested within each other.
• When you run a search operation or check spelling, collapsed text expands if a
match or misspelling is found within the collapsed section.
Using Tag Editors
Editors are tag-specific dialog boxes that contain the attributes and values of the
selected tag. Online Help is available in each editor.
To open the editor for a tag do any of the following:
• Right-click in a tag and select Edit Tag.
• Place the cursor in a tag and press Ctrl+F4.
• Place the cursor in a tag and select Tags > Edit Current Tag.
Click the Toggle Embedded Help button in a tag editor to view syntax and usage Help.
Using the Tag Tree and Tag Inspector
The Tag Inspector panel of the Resources window contains two integrated tools: the
Tag Tree and the Tag Inspector. By using them in combination, you can edit all the code
in a document without having to work directly in the document.
Navigating a document structure in the Tag Tree
The Tag Tree, located in the top pane, is helpful for inspecting and navigating a
document’s structure. It can be easily configured to display just the tags you want.
To use the Tag Tree:
1. Open the drop-down list at the top of the pane to select an Outline Profile.
Profiles let you restrict the outline display to specific tag sets. This can be very
useful when you need to be aware of mixed language elements and language
versions in your documents.
2. Click on a tag in the tree to quickly locate it in the document. Press Shift+Ctrl and
double-click to select the entire tag block.
If the selected tag supports attributes, they are displayed, with their values, in the
Tag Inspector pane.
Page 81

Editing Pages 73
3. Click the Refresh button to update the Tag Tree as you edit the document.
You can click the Collapse button on the Tag Tree toolbar to collapse the selected tag.
Note that the tag body must be collapsed in the Tag Tree to collapse it in the document.
The default set of profiles gives you a lot of options for filtering the outline, but you can
easily customize profiles. Outline Profiles are written in Allaire’s Visual Tools Markup
Language (VTML) and are saved in the \Extensions\Outline Profiles folder. You can
open any of the profiles in this folder to examine the syntax. The VTML markup
identifies the tags that are recognized in the profile.
You can manually edit a profile or create a new one in the editor or use the Outline
Profile Editor dialog box. Before making changes to a profile, it’s a good idea to make a
backup of the original file.
To configure Outline Profiles:
1. Click the Configure Outline Profiles button at the top of the pane to open the
Outline Profiles dialog box.
2. Use the Add and Remove buttons in the Outline Profiles pane to edit the current tag
sets.
3. Use the Add and Remove buttons in the Recognized Tags pane to edit the tag list for
the selected set.
4. To add a caption and tool button to a tag, make selections in the Tag Settings pane.
5. Click Done to update the Tag Tree profiles.
To import an Outline Profile:
1. Click the Import button in the Configure Outline Profiles dialog box.
2. Select either a VTML definition file or a DTD file to import.
3. Click Next.
The Wizard reports the status of the import process. If the process completes
successfully, click Finish. The Import from a DTD file option creates a profile from
the language defined in the DTD.
Page 82

74
Editing code in the Tag Inspector
The Tag Inspector lets you edit code in a property sheet interface that will be familiar
to Visual Basic and Delphi programmers.
Setting the display
Buttons at the top of the Inspector pane control the way attributes and scripting events
are displayed.
• Version-specific — arranges the entries by language and browser version
• Categorized — arranges by type and browser version
• Alphabetically — ascending or descending order by name
Selecting the appropriate display can help when awareness of cross-browser and
language issues is required.
To use the Tag Inspector:
1. Click in a tag, either in the Tag Tree or in the Editor, to see a list of its attributes.
2. Click an attribute name to type a value or to select from a list if the attribute takes
predefined values.
3. Click outside the current field to enter the new value in your code.
Every tag that ColdFusion Studio installs includes a definition file, written in VTML,
that specifies the valid attributes for that tag and the content and formatting of the
tag’s editor.
Working with tag definition files
You can change a tag’s definition from the Tag Inspector by clicking the Edit Tag
Definitions button on the Tag Inspector toolbar and then selecting the tag in the Tag
Definitions Library dialog box. This method has limitations, however, and it might
cause the tag’s editor to not work properly. Be sure to backup the VTM file before
making changes.
Similarly, a new tag definition created from the Tag Inspector will not support a tag
editor.
The preferred method for changing a tag definition is to edit the VTM file directly using
the VTML tag editors.
To edit a tag definition:
1. Open the VTM file from the appropriate language folder in \Extensions\TagDefs.
2. Right-click a tag, and select Edit Tag to change its attributes and values.
This method supports tag editors, Tag Inspector, Tag Insight, and Tag Tips, and also
ensures that Large Fonts display properly on user systems.
Page 83

Editing Pages 75
The best way to create a new tag definition file is modify an existing VTM file and save
it with the tag’s name. You can also open \Extensions\TagDefs\TagDefTemplate.vtm to
work with a skeleton definition file.
Tip To add online help for the tag, create an HTML file containing the help
text and save it with the tag name in the appropriate language folder in
\Extensions\Docs.
Creating and editing event handler script blocks
Adding and modifying script blocks for events such as ONCLICK is easy from the Tag
Inspector. You can edit an event if it is supported as an attribute of the selected tag or
edit the event directly.
To add an event handler script block:
1. Select a tag in the Tag Tree to display a list of supported attributes and events in the
Tag Inspector pane.
2. You can either click the event in the Attributes list or in the Events list.
3. Open the drop-down list in the values column and select a script language for the
event handler.
4. In the Specify Event Handler Name dialog box, you can select the default entry or
type a new name, and then click OK.
The event syntax is added to the tag and a script block is created in the
of the document.
5. Complete the script block for the handler.
To locate an event script block in your document, double-click the name in the Tag
Inspector pane or right-click the tag and select the Navigate to "" function command.
HEAD section
Page 84

76
Preserving Code Formats with CodeSweepers
The CodeSweeper feature automates the task of getting your code properly formatted.
It can be very useful in a number of situations:
• To enforce coding styles for multiple developers.
• To clean up the formatting of existing code.
• To apply formatting rules when using Design mode to visually edit pages.
Selecting a CodeSweeper
Studio includes a number of CodeSweepers, configured for specific types of
development. You can also create your own CodeSweepers or edit the existing ones.
Allaire CodeSweepers
Installed CodeSweepers include:
• HTML\CFML — For ColdFusion applications and HTML
• HTML — Optimized for HTML page code
• JSP (default) — JSP, HTML, and a subset of CFML tags
• My CodeSweeper — A CodeSweeper that you can use for testing and editing
• WDDX Sweeper — WDDX syntax only
• WEB-XML — Java/EJB code used in deployment descriptor files
• Allaire Default HTML Tidy Settings — Code formatting plus additional features
HTML Tidy
HTML Tidy, a tool developed by Dave Ragget under the auspices of the W3C, is
installed as an alternate to the Allaire CodeSweepers. HTML Tidy provides code
formatting options plus settings for tag conversions, language support, and other
features not available in the Allaire CodeSweepers.
Select Options > Settings > CodeSweeper and expand HTML Tidy CodeSweepers to
view and set options.
You can easily update the HTML Tidy engine if new features are added to between
ColdFusion Studio releases.
To install a newer version of HTML Tidy:
1. Click the link at the top of the HTML Tidy settings dialog the HTML Tidy Web site.
2. Download the latest version from the site.
3. Close ColdFusion Studio.
4. Copy the tidy.exe files to your ColdFusion Studio root directory.
5. Restart ColdFusion Studio.
Your HTML Tidy configuration is not affected by the update.
Page 85

Editing Pages 77
Running a CodeSweeper
Open the Tools > CodeSweeper menu to select a CodeSweeper or click the
CodeSweeper button on the Tools toolbar to run the default on the current document.
Click the down arrow button next to the CodeSweeper button to select from the list of
available CodeSweepers.
To set the default CodeSweeper:
1. Open Options > Settings > CodeSweeper.
2. Highlight a CodeSweeper entry in the list and click the Set as Default button.
3. Click OK to save the change.
To run a CodeSweeper automatically after leaving Design mode:
1. In Options > Settings Design, clear the Disable (hide) design tab option.
2. Select whether to display a warning message when leaving Design View.
3. Click the Apply CodeSweeper when return from design view button.
4. Click the CodeSweeper Settings button if you want to edit CodeSweepers.
Page 86

78
Managing CodeSweepers
You can create new CodeSweepers, edit existing ones, and remove them as needed.
To add a new CodeSweeper:
1. Click the New Profile button in the Allaire CodeSweepers panel.
2. Enter a name for the CodeSweeper and select its type: Allaire or HTML Tidy.
3. Click OK to add it to the list.
4. Follow the directions in the next procedure to create a custom profile for the new
CodeSweeper.
To edit a CodeSweeper:
1. Highlight a CodeSweeper in the list and click the Edit Profile button.
2. Make changes to the General and Tag Specific settings and click OK to save the new
profile.
To delete a CodeSweeper, highlight it and click the Remove CodeSweeper button.
Allaire CodeSweeper settings
These settings apply only to Allaire CodeSweepers. HTML Tidy Codesweeper settings
are covered in the next section.
To begin, open the Options > Settings > CodeSweeper pane.
General settings
• Set the case for tag, attribute, and event names. You can select to preserve the
case as it is found in the document or change to all upper or all lower case.
Event names for case-sensitive JavaScript event handler can also be set to
mixed case.
• Set a quoting format for attribute values.
• The Trim white space between tags option deletes extra spacing produced by
some code generation tools. It is enabled by default. Allaire recommends
leaving it on and disabling it for individual tags as needed.
• Select Run in "silent mode" to eliminate the display of alerts the CodeSweeper
generates while it is running. You can use this option to run a CodeSweeper in
an unattended situation.
• Select Write Errors to a Log File to capture any errors found by the
CodeSweeper. You can specify a custom location for the log file.
Allaire CodeSweepers treat the colon character (:) in tag names as a normal character,
allowing processing of XML namespaces in tags, such as <xsl:thistag name="foo"/>.
Page 87

Editing Pages 79
Tag-specific settings
A wide range of options is available for the individual tags contained in an Allaire
CodeSweeper.
These settings cover spacing and indenting and allow you to leave the selected tag
unchanged when invoking the CodeSweeper. If you are encountering problems
parsing server-based script code, then enable the Preserve tag formatting option.
Tip The Strip tag from document option is handy for getting rid of
superfluous and unwanted tags inserted by code generation tools.
To set rules for a tag:
1. Select a CodeSweeper from the list.
2. Edit the General Settings as needed.
3. Switch to the Tag Specific Settings tab and highlight a tag name in the list.
Note that if you select the "All Other Tags" entry in the list, the rules that you select
will apply to every tag not in the list that is found in a document.
4. Edit the settings for the tag.
5. Click Update Tag to save the settings for that tag.
To add a tag and apply formatting rules:
1. Click the Add Tag button in the Tag Specific tab.
2. Enter the tag name and click OK.
3. Set rules for the tag and click Update Tag to save the settings.
To remove a tag, highlight it and click the Remove Tag button.
Page 88

80
HTML Tidy settings
Adding a profile
Creating a custom HTML Tidy profile is much like creating one for an Allaire
CodeSweeper.
To create an HTML Tidy profile:
1. Click the New Profile button in the HTML Tidy CodeSweeper dialog box.
2. Enter a profile name.
3. Select HTML Tidy from the drop-down CodeSweeper type list and click OK.
A default set of options is preselected.
4. Highlight the CodeSweeper in the list and click Edit Profile.
5. Change the settings as you want and click OK to save the new profile.
Editing a profile
The HTML Tidy CodeSweepers pane gives you access to all the supported settings, but
you can also edit a profile directly. This can be useful in a couple of situations:
The HTML Tidy Web site lists new features and the correct syntax for enabling them.
Be sure to backup the original TDY file before making changes.
To edit an HTML Tidy profile:
1. Open the TDY file from \Extensions\Codesweepers.
2. Edit the name:value pairs as needed.
3. Save the file.
To remove an HTML Tidy profile, delete the tdy file.
• If you want to remove an option from the settings pane so that it does not
display, delete it from the TDY file.
• If you download a newer HTML Tidy version and want to enable new settings,
just add the syntax to the TDY file as described in the next procedure.
The changes are reflected in the HTML Tidy CodeSweeper pane.
Page 89

Editing Pages 81
Formatting Pages with Cascading Style Sheets
Cascading Style Sheets (CSS) can be added at any point in a site’s development
process, but ideally the design specification for a site will be implemented via style
sheets, eliminating the need to code and maintain formatting for individual tags. More
significantly, CSS lets developers and content providers focus on organizational and
navigation issues by separating formatting from content. As a site’s structure evolves,
styles can be globally changed, added, and deleted, giving developers greater freedom
(and more time) to achieve design goals.
A site can be retrofitted with CSS, although this requires deleting tag-based formatting
code.
About the Style Editor
TopStyle Lite provides an integrated interface for designing and deploying Cascading
Style Sheets. It is a special version of TopStyle, an application written by Nick Bradbury,
the original developer of HomeSite. To upgrade to the full version, visit
http://www.bradsoft.com/.
TopStyle makes it easy to define, preview, and apply styles to Web content. This
illustration shows the main components of the TopStyle interface.
The TopStyle online Help system includes a tutorial, a CSS reference, and procedures
for using its features. The Help system also includes information about upgrading to
the full version.
Page 90

82
Page 91

C HAPTER 9
Debugging Application Code
from ColdFusion Studio
Debugging information reported from the ColdFusion Application Server is often
adequate for simple templates, but complex development tasks require a more
powerful and immediate debugging interface.
Studio’s Interactive Debugger runs against dynamic pages on the ColdFusion Server.
You can set breakpoints and step through the code to isolate and correct problems.
Contents
A tabbed debug window gives you views of breakpoints, variables, recordsets, tag and
page hierarchies, and page output. From these panes, you can set watches, change,
disable, and delete breakpoints, and evaluate variables and expressions.
For information on setting server-side debugging, see the ColdFusion Administrator
Debugging Options section in Administering ColdFusion Server.
For information on debugging ColdFusion Applications, see Developing Web
Applications with ColdFusion.
• Interactive Debugger Overview................................................................................ 84
• Configuring RDS from the Debugger ...................................................................... 84
• Specifying Server Mappings..................................................................................... 85
• Running the Interactive Debugger .......................................................................... 86
• Debugger Shortcut Keys ........................................................................................... 90
Page 92

84
Interactive Debugger Overview
You can run the debugger against the ColdFusion application pages.
The debugger lets you:
• Set breakpoints and watches
• Evaluate variables and expressions
• Step through lines of code
• Investigate the code stack
• Monitor recordsets
• Observe variables in all scopes
Use the Debug menu or the Debug toolbar to run debugging processes.
Follow these steps to set up the debugging session:
• Select the ColdFusion server against which to run the debugging session.
• Provide mappings to specify the ColdFusion Studio path, the ColdFusion Server
path, and the browser’s path to the files you are debugging.
• Specify the first page in the application to be debugged.
Configuring RDS from the Debugger
To access a remote server from Studio, first configure the server and provide security
login information if the server is protected through ColdFusion security.
To configure a remote development server:
1. Open the first application page you would like to debug and choose Debug >
Debug Settings.
2. Choose Add RDS Server from the drop-down list in the Debug Start pane of the
Remote Development Settings dialog box.
3. Enter the description, host name, user name, password, and port of the remote
server in the Configure RDS Server dialog box. You can optionally enable Secure
Sockets Layer.
4. If the server is protected by ColdFusion RDS Security, enter the user name and
password you use to access this protected resource.
5. Click OK.
Page 93

Debugging Application Code from ColdFusion Studio 85
Specifying Server Mappings
The debugger relies on these mappings to communicate the correct file paths of all
files with breakpoints to the ColdFusion server. See “Adding Server Mappings” on page
45 for a full discussion.
You create these mappings in the Mappings pane of the Remote Development Settings
dialog box.
To specify server and file mappings for debugging:
1. Select Debug > Development Mappings to open the Mappings pane of the Remote
Development Settings dialog box.
2. In the ColdFusion Server list box at the top of the dialog box, choose the
ColdFusion server against which you’ll run the debugging session.
3. In the Studio Path box, enter the file path ColdFusion Studio uses for the page
you’re debugging. Click Add.
If you’re debugging against a local server, the Studio and ColdFusion Server paths
are the same. So if you chose localhost, for example, in the ColdFusion Server list
box above, the CF Server Path is the same as the Studio path you just entered.
4. If you’re debugging against a remote server, enter the CF Server Path.
The CF Server path needs to be the same as the alias or virtual mapping your web
server uses to access the file.
5. Specify the Browser Path, or URL, of the application and click Add.
6. Click OK.
Page 94

86
Running the Interactive Debugger
Running the debugger helps you find problems in code by tracing the way ColdFusion
evaluates the page, step by step. You do this by placing breakpoints in the page to stop
execution of the page, and then step through subsequent lines of code, checking the
values of variables and expressions to make sure the code is behaving as you’d expect.
After you’ve set up remote development settings and file mappings, you can use the
commands on the Debug menu and the Debug toolbar to run the debugger.
The Debugger toolbar
Note You cannot debug encrypted CFML templates.
To run the interactive debugger:
1. Open the first page in the application you want to debug.
The Debug toolbar appears at the bottom of the application window. You can
undock the toolbar by double-clicking on the undock bars on the left-hand side of
the toolbar, drop it into the QuickBar, or keep it docked.
2. In your ColdFusion application page, set breakpoints in your code by clicking in
the gutter on the left side of the editor window.
The breakpoint lines are colored red. Choose Debug > Toggle Breakpoints to turn
breakpoints on and off. Use Debug > Clear Breakpoints to delete all breakpoints in
the current document.
3. In the Debug toolbar, hit the Start/Continue tool.
The Remote Development Settings dialog box appears. It shows the default local
server.
4. Specify the Start URL, which is the URL you use to view the page, and click OK. The
list box shows the pages currently open in ColdFusion Studio.
Enter a fully qualified file path relative to your local ColdFusion server -- for
example, http://127.0.0.1/SomeServerPath/index.cfm.
The Debug Start dialog box displays every time you press the Start button in the
Debugger. Use the check box on the Debug Start pane to disable the display of this
box the next time you hit the Run button.
Whenever possible, the Studio tries to calculate the URLs of open file using the RDS
development mappings, which you can set in the Mappings tab. These mappings
are also required to develop on remote servers.
Based on the RDS Security settings at your site, you’ll see a login prompt to access
protected resources.
Page 95

Debugging Application Code from ColdFusion Studio 87
5. Enter a user name and password if necessary to access remote servers.
The debugger starts, and it forwards your URL to the Browse view. When the
ColdFusion server encounters the breakpoint, a blue bar appears at the breakpoint
in the Edit view. At this point, the ColdFusion server has an open session, and it
waits for your reply from ColdFusion Studio.
6. To continue, hit the Start/Continue button again, and the server moves to the next
breakpoint.
The final time you hit the Start/Continue button, ColdFusion executes the page
and outputs it to the browser.
7. To stop the debugging session, hit the End button.
Note The debugger is active until you hit the End button on the Debug toolbar
or choose Debug > End. This allows you to debug across multiple pages.
Debug windows
Choose View > Debug Window to open the Debug window. There are several panes to
this window:
• Variabl es — Displays all scopes of local variables.
• Watche s — Use this window to set watches and evaluate expressions and
variables.
• Recordsets — Displays the list of recordsets initialized in the current
application page. This pane tracks both CFQUERY-based database recordsets
and dynamic recordsets generated programmatically.
• Output — Shows the output of the page as it is being generated.
• Breakpoints — Shows all the breakpoints that you have set in all files. You can
view, disable, and remove breakpoints from this window, and edit their
conditions.
• Ta g Stac k — Shows a hierarchy of tag and page attributes, and values.
Each of these windows has an associated command button on the Debug toolbar.
You can undock these windows individually, so you can see breakpoints while you're
looking at the Watches, for example.
Page 96

88
Debugging across multiple pages
The debugger is active even after a page is loaded, and until you press the End button
on the Debug toolbar or choose Debug > End.
This enables you to debug applications across multiple HTML and CFML pages. For
example, you can test the submittal of an HTML form and its subsequent processing
by a ColdFusion application page.
Stepping through code
You can use the Step Into, Step Over, Step Out, and Run to Cursor tools on the Debug
toolbar to step through your code.
• Step Into proceeds to the next unit of execution in your code. Use this
command to walk through code line-by-line.
If the next step is inside an included file or CFX, the debugger steps into the
next file.
• Step Over operates in the same way as Step Into, except that it does not step
into included files (CFINCLUDE, CFMODULE, or CFLOCATION) or custom
tags. It executes the included code but does not trace through the included
code step-by-step.
• Step Out is used when you are inside a block of included code and want to step
back to the point in your original page where you entered the included code.
• Use Run to Cursor to execute up to the cursor position, without having to set a
breakpoint. Note that cursor location must be beyond you. If there are
breakpoints between your location and the cursor, Run to Cursor will stop at
these intervening breakpoints.
Evaluating expressions and setting watches
You can use the evaluator box at the top of the Watches pane of the Debug window to
evaluate arbitrary expressions when the debugger is suspended at a breakpoint. Use
the evaluator when you want to know how an expression evaluates as you step through
code, line by line.
Watches allow you to evaluate the same expression or variable every time you stop
execution. When you set a watch, the debugger evaluates the watched expression. A
hand pops up when the expression’s value changes from one line to the next as you
step through code.
To set watches:
1. Select Debug > Watches or click the Watches button on the Debug toolbar. The
Watches pane appears.
2. Cut and paste the expression or variable you want to watch into the list box at the
top of the pane.
Page 97

Debugging Application Code from ColdFusion Studio 89
3. Select Evaluate to find the value of the expression at the next breakpoint or line
where the Debugger stops.
The Evaluator window shows the results of the evaluation at the current point in
processing the page.
4. Select Watch to add the expression in the evaluator list box to the list of watched
expressions.
The Watch area shows the values of watched expressions and any error messages in
resolving these parameters.
5. Press the Start/Continue button to continue debugging.
6. When you are finished debugging, press End.
Note You can use the evaluator to change values of variables, create new
variables, or to insert ColdFusion functions in your expressions.
Page 98

90
Debugger Shortcut Keys
Here is a complete listing of keyboard shortcuts.
Debugger Keyboard Commands
Command Key
Start/Continue Ctrl + F5
End Alt + F5
Step into Ctrl + F8
Step over Ctrl + F9
Step out Ctrl + F10
Run to cursor Ctrl + F11
Variables Alt + Q
Watches Alt + W
Recordsets Alt + R
Stack Alt + K
Breakpoints Alt + B
Toggle breakpoint Alt + X
Clear all breakpoints Alt + F6
Debug start settings Alt + Y
Development mappings Alt + M
Page 99

C HAPTER 10
Using Projects for
Site Management
This chapter describes how to use the project tools in ColdFusion Studio to create
and maintain Web sites.
Contents
• What is a Project? ...................................................................................................... 92
• Creating a Project...................................................................................................... 92
• Working in the Project Resources Window ............................................................. 93
• About Project Folders................................................................................................ 93
• Managing Project Files..............................................................................................95
• Working with Resources ........................................................................................... 99
• Additional Project Features .................................................................................... 100
• Working in a Source Control System .....................................................................101
Page 100

92
What is a Project?
The project features allow you to create your own file system that contains only those
files you need to develop your Web site. The benefits of projects include the following:
• Projects make it possible to have all of the files you need to build your Web site
located in a central, easily accessible location. This means having access to the
files; the physical files themselves can be located anywhere on your local,
network, or remote drives.
• After completing your project, you can copy it to a server and feel confident that
no files are missing. This copying operation, also known as deploying or
uploading, allows you to develop and maintain site content locally.
• You can perform maintenance chores such as search and replace and link
verification on an entire project, eliminating the need to perform the
operations on each individual file.
Creating a Project
When you create a new project, you must specify a folder to hold the project file. This
folder must already exist somewhere on your computer. If the existing folder has files
and subfolders, you can add them to the project.
To create a new project:
1. Click the Projects tab at bottom of the Resources window.
2. Click the New Project icon at the top of the tab.
3. Make the following entries in the New Project dialog.
• Project Name — A descriptive name to display in the Projects list.
• Location of project file — Enter the path to folder in which you want the project
control file (apf) created. This is usually the project root folder.
• Select the Add all subfolders option to include all folders below the project root.
• Files types — You can accept the default All files or, if you want to limit the files
that are included in your project to certain types, open the drop-down list and
select the file types that you want to include. Alternatively, you can enter the file
extensions for the types you want included, separated by a semicolon.
4. Click OK to create the project structure and the project control file.
 Loading...