

Page 1

Installing and
Configuring
ColdFusion Serv er
ColdFusion Server 5
Macromedia, Inc.
Page 2

Copyright Notice
© 2001 Macromedia Inc. All rights reserved.
This manual, as well as the software described in it, is furnished under license an d may
be used or copied only in accordance with the terms of su ch license. The content of
this manual is furnished for informationa l use only, is subject to change without
notice, and should not be constr u ed as a commitment by Macromedia Inc.
Macromedia Inc. assumes no responsibility or liability for any errors or inaccuracies
that may appear in this book.
Except as permitte d by such license, no part of th is pu blication may be repr od u ced,
stored in a retrieval system, or transmitted in any form or by any means, electronic,
mechanical, recording, or otherwise, without the prior written permission of
Macromedia Inc.
ColdFusion and HomeSite are federally registered trademarks of Macromedia Inc,
HomeSite, and the ColdFusion logo are trademarks of Macrom edia Inc. in the USA
and other countries. Microsoft, Windows, Windows NT, Windows 2000 Windows 98,
Windows ME, Microsoft Access, and FoxPro are regi ster e d trad em arks of Micr osoft
Corporation. All other products or name brands are the trademarks of their respec tive
holders. Solaris is a trademark of Sun Microsystems Inc. UNIX is a trademark of The
Open Group. PostScript is a trademark of Adobe Systems Inc.
Part number: ZCF50MINS
Page 3

Contents
Welcome to ColdFusion Server . . . . . . . . . . . . . . . . . . . vii
Intended Audience . . . . . . . . . . . . . . . . . . . . . . . . . . . . . . . . . . . . . . . . . . . . . . . . . . . . viii
New Features . . . . . . . . . . . . . . . . . . . . . . . . . . . . . . . . . . . . . . . . . . . . . . . . . . . . . . . . . viii
Developer Resources . . . . . . . . . . . . . . . . . . . . . . . . . . . . . . . . . . . . . . . . . . . . . . . . . . . . x
About ColdFusion Documentation. . . . . . . . . . . . . . . . . . . . . . . . . . . . . . . . . . . . . . . . xi
Getting Answers. . . . . . . . . . . . . . . . . . . . . . . . . . . . . . . . . . . . . . . . . . . . . . . . . . . . . . . . xii
Contacting Macromedia . . . . . . . . . . . . . . . . . . . . . . . . . . . . . . . . . . . . . . . . . . . . . . . xiii
Printed and online documentation set . . . . . . . . . . . . . . . . . . . . . . . . . . . . . . . xi
Viewing online documentation . . . . . . . . . . . . . . . . . . . . . . . . . . . . . . . . . . . . . . xi
Chapter 1 Installing ColdFusion Server in Windows . . 3
Windows System Requirements. . . . . . . . . . . . . . . . . . . . . . . . . . . . . . . . . . . . . . . . . . . 4
Before You Begin the Installation. . . . . . . . . . . . . . . . . . . . . . . . . . . . . . . . . . . . . . . . . . 5
Required operating system updates . . . . . . . . . . . . . . . . . . . . . . . . . . . . . . . . . . 5
Installing SNMP in Windows NT 4.0 Server and Windows 2000 Server . . . 6
Important Network Considerations . . . . . . . . . . . . . . . . . . . . . . . . . . . . . . . . . . 7
Upgrading from a previous version . . . . . . . . . . . . . . . . . . . . . . . . . . . . . . . . . . 7
Verifying that a Web server is running . . . . . . . . . . . . . . . . . . . . . . . . . . . . . . . . 8
Removing, modifying, repairing, or updating ColdFusion Server 5 . . . . . . 8
Installing ColdFusion Server in Windows . . . . . . . . . . . . . . . . . . . . . . . . . . . . . . . . . 10
ColdFusion Server services . . . . . . . . . . . . . . . . . . . . . . . . . . . . . . . . . . . . . . . . . 11
Configuring Your Installation. . . . . . . . . . . . . . . . . . . . . . . . . . . . . . . . . . . . . . . . . . . . 14
Configuring Web servers manually . . . . . . . . . . . . . . . . . . . . . . . . . . . . . . . . . . 14
Configuring SNMP MIB . . . . . . . . . . . . . . . . . . . . . . . . . . . . . . . . . . . . . . . . . . . . 19
Changing the ColdFusion Server user account . . . . . . . . . . . . . . . . . . . . . . . 20
What to Do Next . . . . . . . . . . . . . . . . . . . . . . . . . . . . . . . . . . . . . . . . . . . . . . . . . . . . . . . 21
Page 4

iv
Chapter 2 Installing ColdFusion Server in Solaris . . . 23
Solaris System Requirements . . . . . . . . . . . . . . . . . . . . . . . . . . . . . . . . . . . . . . . . . . . . 24
Before You Begin the Installation. . . . . . . . . . . . . . . . . . . . . . . . . . . . . . . . . . . . . . . . . 25
Required operating system patches . . . . . . . . . . . . . . . . . . . . . . . . . . . . . . . . . 25
Installing SNMP in Solaris . . . . . . . . . . . . . . . . . . . . . . . . . . . . . . . . . . . . . . . . . 26
Important Network Considerations . . . . . . . . . . . . . . . . . . . . . . . . . . . . . . . . . 27
Upgrading from a previous version . . . . . . . . . . . . . . . . . . . . . . . . . . . . . . . . . 27
Verifying that a Web server is running . . . . . . . . . . . . . . . . . . . . . . . . . . . . . . 28
Uninstalling ColdFusion Server 5 . . . . . . . . . . . . . . . . . . . . . . . . . . . . . . . . . . . 28
Installing ColdFusion Server in Solaris. . . . . . . . . . . . . . . . . . . . . . . . . . . . . . . . . . . . 29
ColdFusion Server Processes . . . . . . . . . . . . . . . . . . . . . . . . . . . . . . . . . . . . . . . 31
Configuring Your Installation. . . . . . . . . . . . . . . . . . . . . . . . . . . . . . . . . . . . . . . . . . . . 33
Configuring Web servers manually . . . . . . . . . . . . . . . . . . . . . . . . . . . . . . . . . . 33
Configuring SNMP MIB . . . . . . . . . . . . . . . . . . . . . . . . . . . . . . . . . . . . . . . . . . . . 36
Configuring databases . . . . . . . . . . . . . . . . . . . . . . . . . . . . . . . . . . . . . . . . . . . . . 37
What to Do Next . . . . . . . . . . . . . . . . . . . . . . . . . . . . . . . . . . . . . . . . . . . . . . . . . . . . . . . 38
Chapter 3 Installing ColdFusion Server in Linux . . . . 39
Linux System Requirements. . . . . . . . . . . . . . . . . . . . . . . . . . . . . . . . . . . . . . . . . . . . . 40
Before You Begin the Installation. . . . . . . . . . . . . . . . . . . . . . . . . . . . . . . . . . . . . . . . . 41
Required operating system patches . . . . . . . . . . . . . . . . . . . . . . . . . . . . . . . . . 41
Installing SNMP in Red Hat . . . . . . . . . . . . . . . . . . . . . . . . . . . . . . . . . . . . . . . . 41
Important Network Considerations . . . . . . . . . . . . . . . . . . . . . . . . . . . . . . . . . 42
Upgrading from a previous version . . . . . . . . . . . . . . . . . . . . . . . . . . . . . . . . . 43
Verifying that a Web server is running . . . . . . . . . . . . . . . . . . . . . . . . . . . . . . . 43
Uninstalling ColdFusion Server 5 . . . . . . . . . . . . . . . . . . . . . . . . . . . . . . . . . . . 43
Installing ColdFusion Server in Linux. . . . . . . . . . . . . . . . . . . . . . . . . . . . . . . . . . . . . 44
ColdFusion Server processes . . . . . . . . . . . . . . . . . . . . . . . . . . . . . . . . . . . . . . . 46
Configuring Your Installation. . . . . . . . . . . . . . . . . . . . . . . . . . . . . . . . . . . . . . . . . . . . 48
Configuring Web servers manually . . . . . . . . . . . . . . . . . . . . . . . . . . . . . . . . . . 48
Configuring SNMP MIB . . . . . . . . . . . . . . . . . . . . . . . . . . . . . . . . . . . . . . . . . . . . 51
Configuring databases . . . . . . . . . . . . . . . . . . . . . . . . . . . . . . . . . . . . . . . . . . . . . 51
What to Do Next . . . . . . . . . . . . . . . . . . . . . . . . . . . . . . . . . . . . . . . . . . . . . . . . . . . . . . . 53
Chapter 4 Installing ColdFusion Server in HP-UX . . . 55
HP-UX System Requirements. . . . . . . . . . . . . . . . . . . . . . . . . . . . . . . . . . . . . . . . . . . . 56
Before You Begin the Installation. . . . . . . . . . . . . . . . . . . . . . . . . . . . . . . . . . . . . . . . . 57
Required operating system settings . . . . . . . . . . . . . . . . . . . . . . . . . . . . . . . . . 57
Upgrading from a previous version . . . . . . . . . . . . . . . . . . . . . . . . . . . . . . . . . 57
Verifying that a Web server is running . . . . . . . . . . . . . . . . . . . . . . . . . . . . . . . 58
Mounting the installation CD-ROM . . . . . . . . . . . . . . . . . . . . . . . . . . . . . . . . . 58
Uninstalling ColdFusion Server 5 . . . . . . . . . . . . . . . . . . . . . . . . . . . . . . . . . . . 59
Installing ColdFusion Server in HP-UX . . . . . . . . . . . . . . . . . . . . . . . . . . . . . . . . . . . 60
Page 5

ColdFusion Server processes . . . . . . . . . . . . . . . . . . . . . . . . . . . . . . . . . . . . . . . 61
Configuring Your Installation. . . . . . . . . . . . . . . . . . . . . . . . . . . . . . . . . . . . . . . . . . . . 62
Configuring Web servers manually . . . . . . . . . . . . . . . . . . . . . . . . . . . . . . . . . . 62
Configuring databases . . . . . . . . . . . . . . . . . . . . . . . . . . . . . . . . . . . . . . . . . . . . . 64
What to Do Next . . . . . . . . . . . . . . . . . . . . . . . . . . . . . . . . . . . . . . . . . . . . . . . . . . . . . . . 66
Chapter 5 Basic ColdFusion Server Administration . 67
Initial Administration Tasks . . . . . . . . . . . . . . . . . . . . . . . . . . . . . . . . . . . . . . . . . . . . . 68
The ColdFusion Administrator. . . . . . . . . . . . . . . . . . . . . . . . . . . . . . . . . . . . . . . . . . . 69
Accessing the Administrator remotely . . . . . . . . . . . . . . . . . . . . . . . . . . . . . . . 69
Server Settings . . . . . . . . . . . . . . . . . . . . . . . . . . . . . . . . . . . . . . . . . . . . . . . . . . . . . . . . . 70
Caching . . . . . . . . . . . . . . . . . . . . . . . . . . . . . . . . . . . . . . . . . . . . . . . . . . . . . . . . . . . . . . . 71
Client Variables . . . . . . . . . . . . . . . . . . . . . . . . . . . . . . . . . . . . . . . . . . . . . . . . . . . . . . . . 72
Migrating Client Variable Data . . . . . . . . . . . . . . . . . . . . . . . . . . . . . . . . . . . . . 74
Memory Variables. . . . . . . . . . . . . . . . . . . . . . . . . . . . . . . . . . . . . . . . . . . . . . . . . . . . . . 76
Locking . . . . . . . . . . . . . . . . . . . . . . . . . . . . . . . . . . . . . . . . . . . . . . . . . . . . . . . . . . . . . . . 77
Single threaded sessions . . . . . . . . . . . . . . . . . . . . . . . . . . . . . . . . . . . . . . . . . . . 77
Variable scope locking settings . . . . . . . . . . . . . . . . . . . . . . . . . . . . . . . . . . . . . 77
Mappings . . . . . . . . . . . . . . . . . . . . . . . . . . . . . . . . . . . . . . . . . . . . . . . . . . . . . . . . . . . . . 79
Mail/Mail Logging. . . . . . . . . . . . . . . . . . . . . . . . . . . . . . . . . . . . . . . . . . . . . . . . . . . . . . 80
Data Sources. . . . . . . . . . . . . . . . . . . . . . . . . . . . . . . . . . . . . . . . . . . . . . . . . . . . . . . . . . . 82
Verity Collections . . . . . . . . . . . . . . . . . . . . . . . . . . . . . . . . . . . . . . . . . . . . . . . . . . . . . . 83
Managing collections . . . . . . . . . . . . . . . . . . . . . . . . . . . . . . . . . . . . . . . . . . . . . . 84
Verity supported file types . . . . . . . . . . . . . . . . . . . . . . . . . . . . . . . . . . . . . . . . . 86
Debug Settings. . . . . . . . . . . . . . . . . . . . . . . . . . . . . . . . . . . . . . . . . . . . . . . . . . . . . . . . . 88
Debug Options . . . . . . . . . . . . . . . . . . . . . . . . . . . . . . . . . . . . . . . . . . . . . . . . . . . 88
Debugging IPs . . . . . . . . . . . . . . . . . . . . . . . . . . . . . . . . . . . . . . . . . . . . . . . . . . . . 89
Automated Tasks. . . . . . . . . . . . . . . . . . . . . . . . . . . . . . . . . . . . . . . . . . . . . . . . . . . . . . . 90
Automation Settings . . . . . . . . . . . . . . . . . . . . . . . . . . . . . . . . . . . . . . . . . . . . . . 90
Schedule Task . . . . . . . . . . . . . . . . . . . . . . . . . . . . . . . . . . . . . . . . . . . . . . . . . . . . 90
Extensions. . . . . . . . . . . . . . . . . . . . . . . . . . . . . . . . . . . . . . . . . . . . . . . . . . . . . . . . . . . . . 93
JVM and Java Settings . . . . . . . . . . . . . . . . . . . . . . . . . . . . . . . . . . . . . . . . . . . . . 93
Java Applets . . . . . . . . . . . . . . . . . . . . . . . . . . . . . . . . . . . . . . . . . . . . . . . . . . . . . . 94
CFX Tags . . . . . . . . . . . . . . . . . . . . . . . . . . . . . . . . . . . . . . . . . . . . . . . . . . . . . . . . . 95
Custom Tag Paths . . . . . . . . . . . . . . . . . . . . . . . . . . . . . . . . . . . . . . . . . . . . . . . . . 97
CORBA Connectors . . . . . . . . . . . . . . . . . . . . . . . . . . . . . . . . . . . . . . . . . . . . . . . 97
Security . . . . . . . . . . . . . . . . . . . . . . . . . . . . . . . . . . . . . . . . . . . . . . . . . . . . . . . . . . . . . . . 99
Basic Security. . . . . . . . . . . . . . . . . . . . . . . . . . . . . . . . . . . . . . . . . . . . . . . . . . . . . . . . . 100
CF Admin Password . . . . . . . . . . . . . . . . . . . . . . . . . . . . . . . . . . . . . . . . . . . . . . 100
Tag Restrictions . . . . . . . . . . . . . . . . . . . . . . . . . . . . . . . . . . . . . . . . . . . . . . . . . . 100
CF Studio Password . . . . . . . . . . . . . . . . . . . . . . . . . . . . . . . . . . . . . . . . . . . . . . 101
v
Page 6

vi
Tools. . . . . . . . . . . . . . . . . . . . . . . . . . . . . . . . . . . . . . . . . . . . . . . . . . . . . . . . . . . . . . . . . 102
Logs and Statistics. . . . . . . . . . . . . . . . . . . . . . . . . . . . . . . . . . . . . . . . . . . . . . . . . . . . . 103
Logging Settings . . . . . . . . . . . . . . . . . . . . . . . . . . . . . . . . . . . . . . . . . . . . . . . . . 103
Log files . . . . . . . . . . . . . . . . . . . . . . . . . . . . . . . . . . . . . . . . . . . . . . . . . . . . . . . . . 104
Server Reports . . . . . . . . . . . . . . . . . . . . . . . . . . . . . . . . . . . . . . . . . . . . . . . . . . . 107
Chapter 6 Managing Data Sources . . . . . . . . . . . . . . . 109
About ColdFusion Data Sources . . . . . . . . . . . . . . . . . . . . . . . . . . . . . . . . . . . . . . . . 1 10
Supported Database Drivers. . . . . . . . . . . . . . . . . . . . . . . . . . . . . . . . . . . . . . . . . . . . 111
What to do next . . . . . . . . . . . . . . . . . . . . . . . . . . . . . . . . . . . . . . . . . . . . . . . . . . 113
Choosing the Correct Drivers. . . . . . . . . . . . . . . . . . . . . . . . . . . . . . . . . . . . . . . . . . . 114
About ODBC drivers . . . . . . . . . . . . . . . . . . . . . . . . . . . . . . . . . . . . . . . . . . . . . . 114
About OLE DB and native drivers . . . . . . . . . . . . . . . . . . . . . . . . . . . . . . . . . . 114
Adding Data Sources for ColdFusion . . . . . . . . . . . . . . . . . . . . . . . . . . . . . . . . . . . . 115
ColdFusion Settings . . . . . . . . . . . . . . . . . . . . . . . . . . . . . . . . . . . . . . . . . . . . . . 118
Verifying ColdFusion Data Sources. . . . . . . . . . . . . . . . . . . . . . . . . . . . . . . . . . . . . . 120
Connecting to Microsoft SQL Server Databases. . . . . . . . . . . . . . . . . . . . . . . . . . . 121
Configuring Microsoft SQL Server Options (Windows) . . . . . . . . . . . . . . . 121
Configuring Microsoft SQL Server Options (UNIX) . . . . . . . . . . . . . . . . . . 122
Connecting to Microsoft Access Databases. . . . . . . . . . . . . . . . . . . . . . . . . . . . . . . 123
Configuring Microsoft Access Options (Windows) . . . . . . . . . . . . . . . . . . . 123
Tips for connecting to Microsoft Access (Windows) . . . . . . . . . . . . . . . . . . 124
Connecting to Remote Access Data Sources . . . . . . . . . . . . . . . . . . . . . . . . 125
Connecting to Oracle Databases . . . . . . . . . . . . . . . . . . . . . . . . . . . . . . . . . . . . . . . . 127
Configuring Oracle 7.3.4/8.0.x options (Windows) . . . . . . . . . . . . . . . . . . . 127
Configuring Oracle 7.3.4/8.0.x options (UNIX) . . . . . . . . . . . . . . . . . . . . . . 127
Connecting to Oracle 7.3.4 and 8.0.x databases (UNIX) . . . . . . . . . . . . . . . 128
Connecting to Oracle 8.0.x through ODBC (UNIX) . . . . . . . . . . . . . . . . . . . 130
Troubleshooting the Oracle 7.3.4 native driver (Windows) . . . . . . . . . . . . 131
Configuring the Oracle 8 Client (Windows, UNIX) . . . . . . . . . . . . . . . . . . . 131
Chapter 7 Preparing Your Server for ClusterCATS . 135
Before You Install ColdFusion Server . . . . . . . . . . . . . . . . . . . . . . . . . . . . . . . . . . . . 136
Configuring DNS servers . . . . . . . . . . . . . . . . . . . . . . . . . . . . . . . . . . . . . . . . . . 136
Configuring Web server IP address fail-over . . . . . . . . . . . . . . . . . . . . . . . . 139
Using ClusterCATS dynamic IP addressing . . . . . . . . . . . . . . . . . . . . . . . . . 140
Enabling the STREAMS protocol (Windows NT only) . . . . . . . . . . . . . . . . 140
Configuring firewalls . . . . . . . . . . . . . . . . . . . . . . . . . . . . . . . . . . . . . . . . . . . . . 142
Analyzing Web server content . . . . . . . . . . . . . . . . . . . . . . . . . . . . . . . . . . . . . 145
Considering domain controllers (Windows NT only) . . . . . . . . . . . . . . . . . 145
After You Install ColdFusion Server. . . . . . . . . . . . . . . . . . . . . . . . . . . . . . . . . . . . . . 146
Page 7

Welcome to ColdFusion Server
Installing and Configuring ColdFusion Server is intended for server administrators
and anyone who is new to ColdFusion Server and needs to install and configure
ColdFusion Server 5.
Contents
• Intended Audience...................................................................................................viii
• New Features............................................................................................................viii
• Developer Resources................................................................................................... x
• About ColdFusion Documentation....................................................................... ...xi
• Getting Answers........................................................................................................xii
• Contacting Macromedia..........................................................................................x iii
Page 8

viii Welcome to ColdFusion Server
Intended Audience
Installing and Configuring ColdFusion Server is intended for anyone who needs to
install, configure, and maintain ColdFusion Server 5. It describes:
• System requirements
• Installation processes for all supported operating systems
• Operating system-specific configuration instructions
• Basic configuration options using the ColdFusion Administrator
New Features
The following table lists the new features in ColdFusion 5:
Benefit Feature Description
Breakthrough
productivity
Powerful
business
intelligence
capabilities
Enhanced
performance
User-defined functions Create reusable functions to accelerate
development.
Query of queries
Easily integrate data from
heterogeneous sources by merging
and querying data in memory using
standard SQL.
Server analysis and
troublshooting
Quickly detect and diagnose server
errors with built-in server reporting
and the new Log File Analyzer.
Charting engine
Create professional-quality charts and
graphs from queried data without
leaving the ColdFusion environment.
Enhanced V eri ty K2
full-text search
Index and search up to 250,000
documents and enjoy greater
performance.
Reporting interface for
Crystal Reports 8.0
Create professional-quality tabular
reports from queried data and
applications.
Core engine tuning
Take advantage of dramatically
improved server performance and
reduced memory usage to deliver
faster, more scalable applications.
Incremental page
delivery
Wire protocol
database drivers
Improve response time by delivering
page output to users as it is built.
Deliver high-performance ODBC
connectivity using new drivers.
Page 9

New Features ix
Benefit Feature Description
Easy
managment
Application deployment
services
Effortlessly and reliably deploy,
archive, or restore entire applications
using ColdFusion archive files.
Enhanced application
monitoring
Keep track of server performance and
availability with customizable alerts
and recovery.
SNMP support
Monitor ColdFusion applications from
enterprise management systems.
Expanded
integration
Expanded Linux support
Deploy on additional Linux
distributions, including SuSE and
Cobalt.
Enhanced hardware load
balancer integration
Apply optimized, agent-based support
for hardwa re load balancers,
including new support for the Cisco
CSS 11000.
Enhanced COM support
Experience easier integrati on with
COM components.
Page 10

x Welcome to ColdFusion Server
Developer Resources
Macromedia Corpo r a tion is comm itte d to set tin g the stan da r d fo r custom e r suppo rt
in developer education, tech nical supp o rt, and pro fes sio nal services . T he Web site is
designed to give you quick access to the entire range of online resources, as the
following table describes.
Resource Description URL
Macromedia W eb
site
Information on
ColdFusion
Technical
Support
ColdFusion
Support Forum
Installation
Support
Professional
Education
Developer
Community
ColdFusion Dev
Center
Macromedia
Alliance
General inf ormation about Macromed ia
products and services
Detailed product information on
ColdFusion and related topics
Professional support programs that
Macromedia offers .
Access to experienced ColdFusion
developers through participation in the
Online Forums, where you can post
messages and read replies on many
subjects relating to ColdFusion.
Support for installation-related issues for
all Macromedia products
Information about cla s ses, on-site
training, and online courses offered by
Macromedia
All the resources th at you need to st ay on
the cutting edge of ColdFus ion
development, inc luding onlin e discussion
groups, Knowledge Base, technical
papers and more
Development tips, articles,
documentation, and white papers
Connection with the growing network of
solution providers, appli ca tio n
developers, resellers, and hosting
services creating solutions with
ColdFusion
Page 11

About ColdFusion Documentation xi
About ColdFusion Documentation
ColdFusion Server documentation is designed to provide support for the complete
spectrum of participant s . T he p rint a nd onl ine v e rsions are organized to allow you to
quickly locate the information that you need. The ColdFusion Server online
documentation is provided in HTML.
Printed and online documentation set
The ColdFusion documentation set consists of the following titles.
Book Description
Installing and
Configuring
ColdFusion Server
Advanced
ColdFusion
Administration
Developing
ColdFusion
Applications
Describes system installation and basic configuration for
Windows, Solaris, Linux, and HP-UX.
Describes how to connect your data sources to the ColdFusion
Server, configure security for your applications, and how to use
ClusterCATS to manage scalability, clustering, and
load-bal ancing for your site.
Describes how to use ColdFusion Server to develop your
dynamic Web applications, including retrieving and updating
your data, using structures, and forms.
CFML Reference The online-only CFML Reference provides descriptions, syntax,
usage, and code examples for all ColdFusion tags, functions,
and variables.
CFML Quick
Reference
A brief guide that shows the syntax of ColdFusion tags,
functions, and variables
Viewing online documentation
ColdFusion documentation in Acrobat format is available on the ColdFusion
product CD-ROM and for download from the ColdFusion Web site: http://
www .coldfusion.com.
Page 12

xii Welcome to ColdFusion Server
Getting Answers
One of the best ways to solve particular programming problems is to tap into the vast
expertise of the ColdFusion developer communities on the ColdFusion Forums at
http://forums.coldfusion.com. Other developers on the forum can help you figure
out how to do just about anything with ColdFusion Server. The search facility can
also help you search messages from the previous 12 months, allowing you to learn
how others have solved a problem that you might be facing. The Forums is a great
resource for learning ColdFusion, but it is also a great place to see the ColdFusion
developer community in action.
Page 13

Contacting Macromedia xiii
Contacting Macromedia
Corporate
headquarters
Technical support Macromedia offers a range of telephone and Web-based
Sales Toll Free: 888.939.2545
Macromedia, Inc.
600 Townsend Street
San Francisco, CA 4103
Tel: 415.252.2000
Fax: 415.626.0554
Web:
support options. Go to http://www.coldfusion.com/support/
for a complete description of technical support services.
You can make postings to the ColdFusion Support Forum
(http://forums.coldfusion.com/DevConf/index.cfm) at any
time.
Tel: 617.219.2100
Fax: 617.219.2101
E-mail: sales@macromedia.com
Web:
Page 14

xiv Welcome to ColdFusion Server
Page 15

Chapter 1
Inst alling ColdFusion Server in Windows
This chapter explains how to install and configure ColdFusion Server in Windows.
Contents
• Windows S yst em Re q uirements................................................... ....... .......................4
• Before You Begin the Installation...............................................................................5
• Installing ColdFusion Server in Windows...............................................................10
• Configuring Your Installation....................................................... ....... .....................14
• What to Do Next........................................................................................................21
Page 16

4 Chapter 1 Installing ColdFusion Server in Windows
Windows System Requirements
The following table compares the system requi rements for the ColdFusi on Server
Professional and Enterprise Ed itions:
ColdFusion
Server
Requirement
Windows V ersi on
Windows 98 x
Windows NT 4.0 (Workstation and Server) x x
Windows 2000 (Professional*, Server, and
Advanced Server)
Hardware
Processor Pentium Pentium
Minimum RAM (MB) 128 256
Recommended RAM (MB) 256 512
Free Hard Disk Space (MB) 200 400
CD-ROM Drive x x
Web Servers
Microsoft Personal Web Server (PWS) x
Microsoft IIS 4.0, 5.0 x x
iPlanet/Netscape Enterprise Server 3.6, 4.1 x x
Apache Server 1.3.x
O’Reilly WebSite Professional
WebSite Server API (WSAPI)
*†
* 2.0, 3.0
*
Professional
xx
xx
xx
xx
ColdFusion
Server
Enterprise
* ClusterCATS and Appl i cati on Man agemen t features are not supported on
these platforms.
† ColdFusion Server provides a precompiled module that is binary compat-
ible with versions 1.3.6 throu gh 1.3.1 9. ColdFusi on Server al so provide s
the files required to build a version of the ColdFusion plug-in module for
a custom version of Apache 1.3.x. For more information, see “Configur-
ing Web servers manually” on page 14.
Page 17

Before You Begin the Installation 5
Before You Begin the Installation
This section contains the following pre-installation instructions:
• Required operating system updates
• Installing SNMP in Windows NT 4.0 Server and Windows 2000 Server
• Important Network Considerations
• Upgrading from a pre viou s version
• Verifying that a Web server is running
• Removing, modifying, repairing, or updating ColdFusion Server 5
Required operating system updates
Categorized by Windows version, the following table lists the updates that must be
installed before installing ColdF usion Server 5:
Operating
System Update Where to find it
Windows 98 Service Pack 1 http://www.microsoft.com/downloads/
MDAC 2.5 SP1 http://www.microsoft.com/data/downloads/
MFC/MSVC 6.0 localdrive\ColdFusion
Image\Redistrib\MSVCRT\setup.exe
NT Option Pack http://www.microsoft.com/msdownload/
ntoptionpack/askwiz.asp
Window NT 4.0 Service Pack 6a http://www.microsoft.com/downloads/
MDAC 2.5 SP1 http://www.microsoft.com/data/
download.htm
MFC/MSVC 6.0 localdrive\ColdFusion
Image\Redistrib\MSVCRT\setup.exe
Simple Network
Management
Protocol
(SNMP)
Windows 2000 Service Pack 1 http://www.microsoft.com/downloads/
MDAC 2.5 SP1 http://www.microsoft.com/data/
MFC/MSVC 6.0 localdrive\ColdFusion
*
Required only for MIB functionality. For
instructions, see “Installing SNMP in Windows
NT 4.0 Server and Windows 2000 Server” on
page 6 and “Configuring SNMP MIB” on page
19.
download.htm
Image\Redistrib\MSVCRT\setup.exe
Page 18

6 Chapter 1 Installing ColdFusion Server in Windows
Operating
System Update Where to find it
SNMP
†
Required only for MIB functionality. For
instructions, see “Installing SNMP in Windows
NT 4.0 Server and Windows 2000 Server” on
page 6 and “Configuring SNMP MIB” on page
36.
* Windows NT 4.0 Server only
† Windows 2000 Server only
Installing SNMP in Windows NT 4.0 Server and Windows 2000 Server
Managed data is accessible in ColdFusion Server 5 Enterprise Edition through the
Simple Network Management Protocol (SNMP) Management Information Base
(MIB) for Advanced ColdFusion Application Management features. You can
integrate this information with your third-party system management tools. These
tools provide a way for you to manage diverse components of your enterprise from a
management station in your network.
If you want to use the ColdFusion Server MIB featur es, you must install SNMP befor e
installing ColdFusion Server. For instructions, see the following procedures.
To install the SNMP service in Windows NT 4.0:
1 From the Start menu, select Settings > Control Panel > Network > Service Tab >
Add > SNMP Service.
2 The installation begins. When prompted, insert your Windows installation
CD-ROM.
3 Start the SNMP trap service.
Note
If you chose to overwrite new files during the SNMP installation, you must re-apply
your most recent operating system Service Pack after the SNMP installation because
the SNMP install includes some older files.
To install the SNMP service in Windows 2000:
1 From the Start menu, select Settings > Control Panel > Add/Remove Progra ms >
Add/Remove Windows Components.
2 Click Management and Monitoring Tools and Details.
3 Select Simple Network Management Protocol, and click OK.
4 To begin the installation, click Next.
Page 19

Before You Begin the Installation 7
After finishing the ColdF usi on Server installa tion, yo u must con figur e yo ur system to
use the MIB features. For more information, see “Configuring SNMP MIB” on page
19.
Important Network Considerations
The following table includes important considerations to keep in mind when
configuring your network before the ColdFusion Server installation:
• ColdFusion Server must be installed using the same administrator account that
was used to install Windows and IIS.
• The server running ColdFusion Server should not be configured as a Primary
Domain Controller (PDC) or Backup Domain Controll er (BDC). Macromedia
follows Microsoft’s network model in which the first level is the PDC/BDC. These
systems only manage the network/domain and are not designed to run
application servers. ColdFusion Server should reside on the second level of
Windows NT and Windows 2000 standalone systems. Standalone servers can
participate in a network/domain.
• In an optimal production environment, each ColdFusion Server application is
hosted on a dedicated server. A database, mail, or other server should not reside
on the same server as ColdFusion Server.
• If you intend to install ClusterCATS, you must first prepare your server. For
instructions, see “Preparing Your Server for ClusterCATS” on page 135.
• Because Windows NT 4.0 Workstation or W indows 2000 Pr ofe ss io nal h andle only
ten TCP/IP connections concurrently, Macromedia does not recommend using
those operating systems in a production environment. Use Window NT 4.0
Server or Windows 2000 Server. In addition, Macromedia does not recommend
using Windows 98 because it is not intended as server platforms.
Upgrading from a previous version
The ColdFusion Server 5 installation upgrades your current version of ColdFusion
Server automatically. However, keep in mind the following important instructions
when upgrading from a previous release of ColdFusion Server:
• If you are upgrading from ColdFusion Server 4.0.1 or an earlier release, you must
uninstall the old version before installing ColdFusion Server 5.
• Using the ClusterCATS Explorer or
servers before upgrading them to ColdFusion Server 5. In addition, some
ClusterCATS management operations using the btcluadm utility require a license
key. The license key is "GoColdFusion".
• To continue to use VisiBroker for CORBA connections in ColdFusion Server 5,
copy the libraries bundled with ColdFusion Server 4.5.1 into the appropriate
directo ry. If you uninstall a previous release of ColdFusion Server before
installing ColdFusion Server 5, these libraries are removed from your system.
Copy the libraries to a safe location before the uninstall.
• If you used Advanced Security policy stores in ColdFusion Server 4.5, you must
import that data into ColdFusion Server 5. The ColdFusion installation
btcluadm, you must remove cluster member
Page 20

8 Chapter 1 Installing ColdFusion Server in Windows
automatically detects and exports po licy store data to an Extensible Markup
Language (XML) file named smpolicy451export.xml. It is stored in the
\cfusion\database\ directory. To complete the migration process, log into the
ColdFusion Administrator and click on the Advanced Security link. Detailed
instructions are provided for importing the policy store data.
Warning
Before proceeding with the upgrade, backup your ColdFusion Server Web
applications.
Verifying that a Web server is running
Before installing ColdFusion Server, check that your Web server is installed and
running.
To check that your local Web server is running:
Enter the URL for a Web page or site from your local Web server in your browser’s
Address field and press Enter.
For example, if the file myindex.htm is in your Web document root directory, load
the page in your browser using the localhost URL:
http://127.0.0.1/myindex.htm
If your Web server is not running, you will receive an error message.
Removing, modifying, repairing, or updating ColdFusion Server 5
To remove ColdFusion Server:
Removing ColdFusion Server deletes all program files and related components from
your system.
1Select Start > Settings > Control Panel > Add/Remove Programs > ColdFusion
Server 5. Click Remove. then Next.
A dialog box displays to confirm the uninstall.
2 To begin the uninstall, click Yes.
When the program completes, restart your system.
To modify ColdFusion Server:
Modifying the ColdFusion server installation installs and uninstalls the components
that you select.
1Select Start > Settings > Control Panel > Add/Remove Programs > ColdFusion
Server 5. Click Modify, then Next.
Page 21

Before You Begin the Installation 9
A dialog box displays a list ColdFusion Server components.
2 Select the components that you want removed or added, and click Next.
When the program completes, restart your system.
To repair/update ColdFusion Server:
Use the Repair/update feature to reinstall a component of ColdFusion Server.
Repairing ColdFusion Server refreshes the Windows registry, reset settings, and
replace missing files.
1Select Start > Settings > Control Panel > Add/Remove Programs > ColdFusion
Server 5. Click Repair, then Next.
When the program completes, restart your system.
Page 22
10 Chapter 1 Installing ColdFusion Server in Windows
Installing ColdFusion Server in Windows
Macromedia recommends that you close all open applications before running the
Setup program. This ensures proper installation of the Merant ODBC 3.7 drivers.
This procedure describes a ColdFusion Server Enterprise Edition installation.
To install ColdFusion Server:
1 Close all open applications.
2 Log into your system using the Local Administrator account.
3 Open the Run dialog and browse to the
CD-ROM or an alternate location. Execute the file.
4 After the Welcome and Licence agreement dialogs, the Customer Information
dialog displays. Enter your information, including the ColdFusion Server license
key. You can find your ColdFusion Server license key on the product box and the
CD-ROM packaging.
The Web Server Selection dialog box displays next.
5 Do one of the following:
If your Web server is already installed, the Install Wizard automatically detects
it. Click the radio button for the Web server that you want ColdFusion Server to
use.
If your Web server is not listed, select Other Server and click Next. For
instructions on manually configuring your Web server to work with ColdFusion
Server, see “Configuring Web servers manually” on page 14.
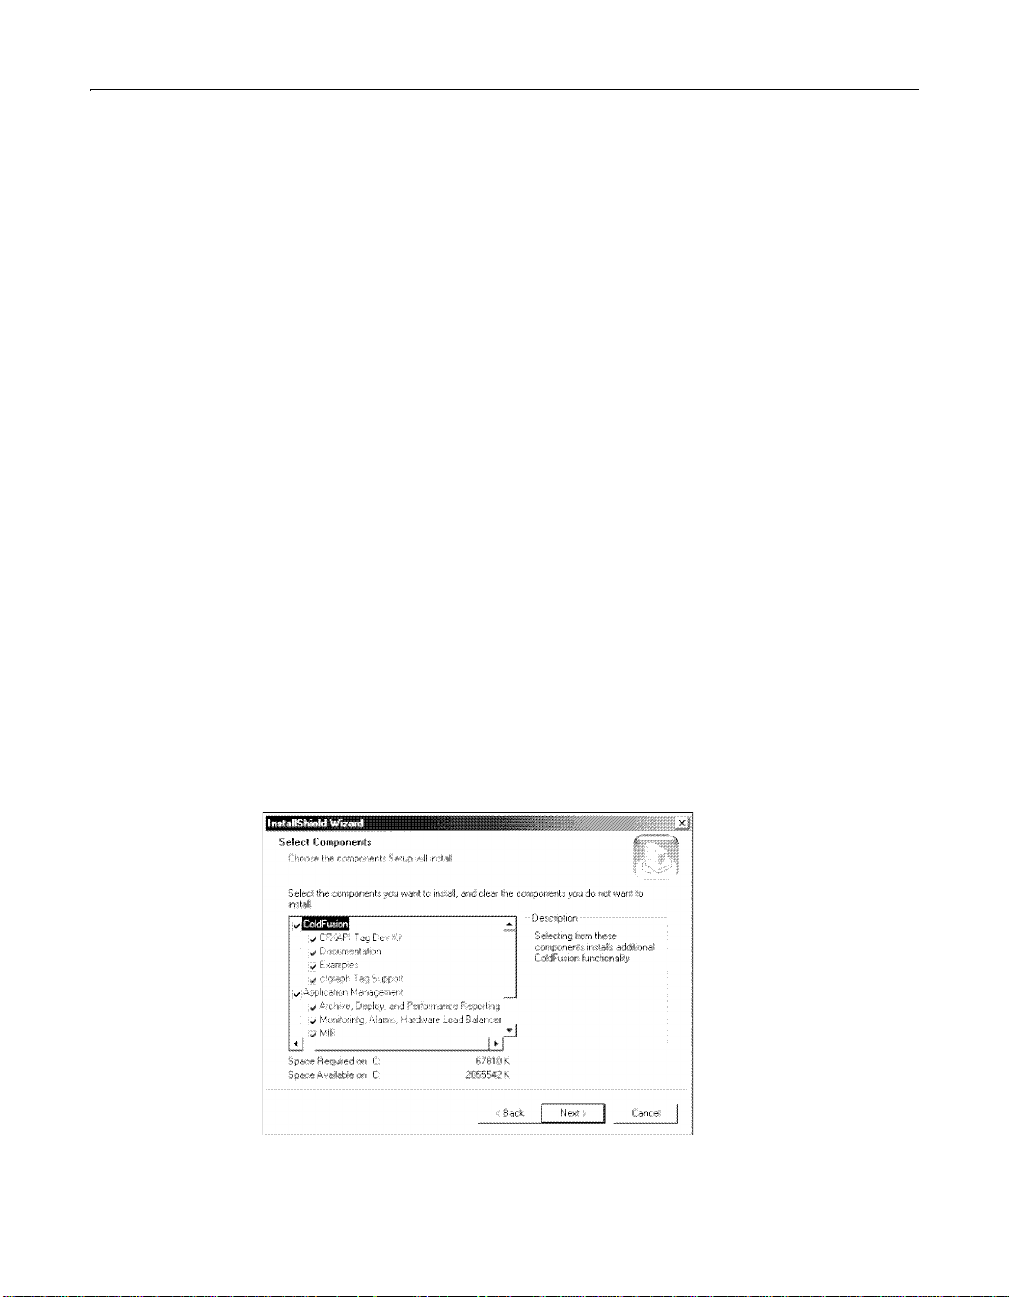
6 After the Choose Destination Path dialog box, the Select Components dialog
displays:
setup.exe file on the ColdFusion Server 5
Select the ColdFusion Server components to install. When you select a
component, a brief description displays in the Description box.
Page 23

Installing ColdFusion Server in Windows 11
The following table lists important installation options and considerations for
ColdFusion Enterprise Edition customers:
If You Select Comment
ClusterCATS If you want the server on which you are installing
ClusterCATS to be able to assume the IP address
and HTTP traffic of a failed server in the cluster,
select Web Server (IP) Failover.
ClusterCA TS and Applicatio n
Management together
MIB support You must install Windows SNMP service before
Warning
Because of potential security concerns, the ColdFusion Server team recommends
that you not install the example applications in production environments.
The monitoring, alarms, and hardware
load-balancing features cannot be accessed using
the ColdFusion Administrator. Instead, use
ClusterCATS Explorer.
installing ColdFusion. The MIB option is available
only if the SNMP service has been installed before
ColdFusion Server. For instructions, see “Installing
SNMP in Windows NT 4.0 Server and Windows
2000 Serve r” on page 6 and “Configuring SNMP
MIB” on page 19.
7 After the Assign Password and Confirm Selections dialogs, the Install Wizard
begins copying the ColdFusion Server files to your system.
8 Restart your system.
ColdFusion Server services
The ColdFusion Server installation cr eates the following services in Windo ws NT and
Windo ws 200 0:
Service Purpose
ColdFusion Application
Server
ColdFusion Executive Polls the ColdFusion Appl ication Server serv ice and, if it is
ColdFusion Remote
Development Service
(RDS)
* Available only in ColdFusion Server Enterprise
The main ColdFusion Server service. ColdFusion pages
cannot be processed if this service is not running.
not running, restarts it.
Provides security, directory and file browsing, and
debugging services for ColdFusion Studio.
Page 24

12 Chapter 1 Installing ColdFusion Server in Windows
Service Purpose
SiteMinder Authenticati on
Service*
SiteMinder Authorization
Service*
ColdFusion Managem ent
Service*
ColdFusion Monitoring
Service*
ColdFusion Graphing
Server*
ColdFusion Managem ent
Repository Server*
Available only if you select the Advanced Security option
during ColdFusion Server setup. Provides use r
authentication services for advanced security.
Available only if you select the Advanced Security option
during ColdFusion Server installation. Provides access
authorization services for advanced security.
Supports ColdFusion Management features, including
Archive/Restore and Server Reporting.
Monitors the performance and avail abi lity of the
ColdFusion Server, the HTTP server, and probes that are
created. This service supports ClusterCATS and
Application Monitoring.
Provides a Java runtime required for Macromedia
Generator (
Provides Repository Management facilities for the
ColdFusion Management Service.
cfgraph) support.
* Available only in ColdFusion Server Enterprise
Starting and stopping ColdFusion Server services
In general, you should stop and restart ColdFusion Server after making changes in
the ColdFusion Administrator that affect a data source or connection parameter,
such as caching, thread count, and so on.
T o start and stop a ColdFusion Service in Windows NT 4.0:
• Select Start > Settings> Control Panel > Services.
If a service is running, its status appears as "Started" in the Status column. If it is
not running, no statu s appears for the service.
− To stop a service, select it and click Stop. You are prompted to verify that you
want to stop the service; click Yes. The Services window refreshes, and the
status of the service is no longer shown as "Started."
− To start a service, select it and click Start. The status of the service appears as
"Started".
To configure ColdFusion Server to startup automatically or manually in
in Windows NT 4.0:
1Select Start > Settings> Control Panel > Services.
2 Double-click the service that you want to configure. The window for that service
opens.
3 In the Startup Type frame, select either the Automatic or Manual option.
4 To save the configuration, click OK.
Page 25

Installing ColdFusion Server in Windows 13
To start and stop a ColdFusion Service in Windows 2000:
• Select Start > Control Panel > Settings > Administrative Tools > Services.
If a service is running, its status appears as "Started" in the Status column. If it is
not running, no statu s appears for the service.
− To stop a service, select it and click Stop. The Services window refreshes, and
the status of the service is no longer shown as "Started".
− To start a service, select it and click Start. The status of the service appears as
"Started".
To configure ColdFusion Server to startup automatically or manually in
Windows 2000:
1 In the MMC, right-click the service that you want to configure and select
Properties.
2 In the Properties dialog, select the General tab. In the Startup Type drop-down
menu, choose either Manual or Automatic.
3Click OK.
Running ColdFusion Server in Windows 98
Since Windows 98 does not have a services architecture, ColdFusion Server runs as
two executables:
Executable Purpose
ColdFusion Application
Server
ColdFusion RDS Provides security, directory and file browsing, and
When ColdFusion Server is running, two icons appear in the task bar. To stop the
ColdFusion Application Server executable, right-click the IDE service icon. To run
ColdFusion Server at startup, place a shortcut for the ColdFusion Server icon in the
Startup program group.
The main ColdFusion Server service. ColdFusion pages
cannot be processed if this service is not running.
debugging services for ColdFusion Studio.
Page 26

14 Chapter 1 Installing ColdFusion Server in Windows
Configuring Your Installation
After installing ColdFusion Server, you may have to perform the following actions:
• Configuring Web servers manually
• Configuring SNMP MIB
• Changing the ColdFusion Server user account
Configuring Web servers manually
If you selected Other Server in the Web Server Selection dialog, or your Web server
was not detected by the Install Wizard, you must manually configure it. This section
explains how to do this in Win dows NT and Windows 2000. The instructions assume
ColdFusion Server is installed in c:\cfusion.
This section explains how to configure these Web servers:
• Internet Information Services (IIS)
• Apache Web server
• Netscape/iPlanet Enterprise Web Server
• O’Reilly WebSite Professional
Internet Information Services (IIS)
The following procedure uses Windows 2000 Profes sional as the example operating
system. The steps for Windows NT 4.0 are similar.
Tip
If you run ColdFusion Server on Windows 2000 with IIS5, you can improve
performan c e a s fo l l ows: open the Int e rn et Services Manager, right-click D ef a u l t Web
Site, and select Properties. On the Home Directory tab, select Low (IIS Process) in the
Application Protection drop-down list, and click Apply. Stop IIS Admin and all Web
services from the Windows NT Control Panel, and then restart IIS.
To configure IIS for ColdFusion Server:
1 Start the Micr o so ft M an agem en t C o ns ole (MMC ) by selecting Start > Pro gra ms >
Administrative Tools > Computer Management.
Page 27
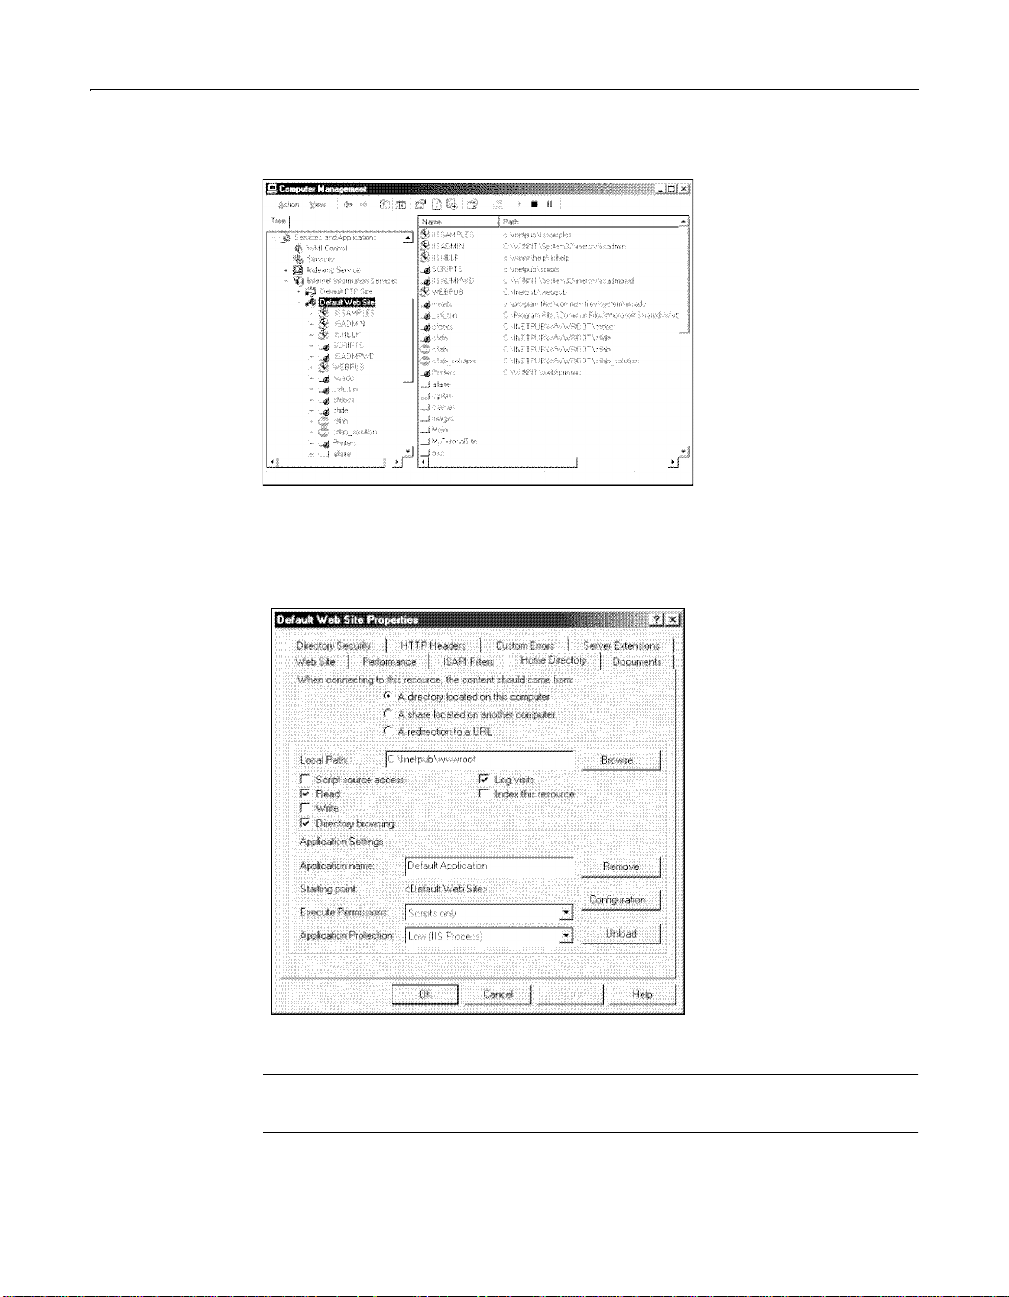
Configuring Your Installation 15
The MMC displays:
2 In the Tree tab, under the Internet Information Services tree, right-click your
Web site and select Properties.
The Properties dialog box displays:
3 Click the Home Directory tab, then Configuration.
Note
If the Configuration button is greyed out, click Create, then click Configuration.
Page 28

16 Chapter 1 Installing ColdFusion Server in Windows
The Application Configuration dialog box displays:
4 In the App Mappings tab, select entries for.cfm and .dbm, and click Remove.
5Click Add.
The Add/Edit Application Extension Mappings dialog box displays:
6 Click Browse and go to c:\cfusion\bin\iscf.dll. Enter .cfm in the Extension text
box, and verify that the Script engine check box is selected. Click OK.
7 Repeat Step 6, substituting .dbm for the extension.
Note
In previous versions, ColdFusion Server used the .dbm file extension for
ColdFusion Server files. Macromedia recommends that you rename templates
that have a .dbm extension to .cfm.
8 Click OK in the Application Configuration dialog box to save your changes.
Page 29

Configuring Your Installation 17
Apache Web server
This procedure assumes that the Apache Web server is installed in c:\Apache.
To configure Apache for ColdFusion Server:
1 If it is not already installed, download the Apache Web server from the Apache
HTTP Server Project Web site at http://www.apache.org/. Read the Windows
documentation at http://www.apache.org/docs/windows.html.
2 If a version of the Apache Web server is running, shut down the Web server.
3 Copy the cfusion\bin\ApacheModuleColdFusion.dll module to your Apache
modules directory.
For example: c:\Apache\modules\ApacheModuleColdFusion.dll.
4 Edit the Apache configuration file (c:\Apache\conf\httpd.conf). Add this line:
LoadModule coldfusion_module modules/ApacheModuleColdFusion.dll
5 Restart the Apache Web server.
Netscape/iPlanet Enterprise Web Server
Manually configuring Netscape/iPlanet Web servers for ColdFusion Server re quires
modifying two files, obj.conf and mime.types, in the Netscape/iPlanet Web server
directory, such as c:\netscape\server4\https-yourserver.com\config.
Warning
Ensure that you do not alter files in the backup or install directories.
To configure Netscape/iPlanet for ColdFusion Server:
1 Make a backup copy of the obj.conf file.
2 Insert the following line at the top of the obj.conf file:
Init fn="load-modules" funcs="DoCFRequest" shlib="C:/CFUSION/Bin/
NS4CF.DLL"
3 Look for the following line in the same obj.conf file:
Service method =(GET|HEAD) type="magnus-internal/imagemap"
fn="imagemap"
After this line, insert the following line:
Service fn="DoCFRequest" method="(GET|POST)" type="magnus-internal/
cold-fusion"
4 Make a backup copy of the mime.types file, which is located in the same
directory as the obj.conf file.
5 Insert the following line to the mime.types file:
type=magnus-internal/cold-fusion exts=dbm,cfm,dbml,cfml
6 Go into the Netscape Administrator, and save the changes.
Page 30
18 Chapter 1 Installing ColdFusion Server in Windows
Note
Netscape is case sensitive, so add the lines exactly as they appear here . Enter
each command one line. If you remove ColdFusion Server, you must undo these
changes. Otherwise, the iPlanet/Netscape Web server will not work.
O’Reilly WebSite Professional
This example uses Windows 2000 Professional as the example operating system and
O’Reilly WebSite Professional 3.0 as the Web server.
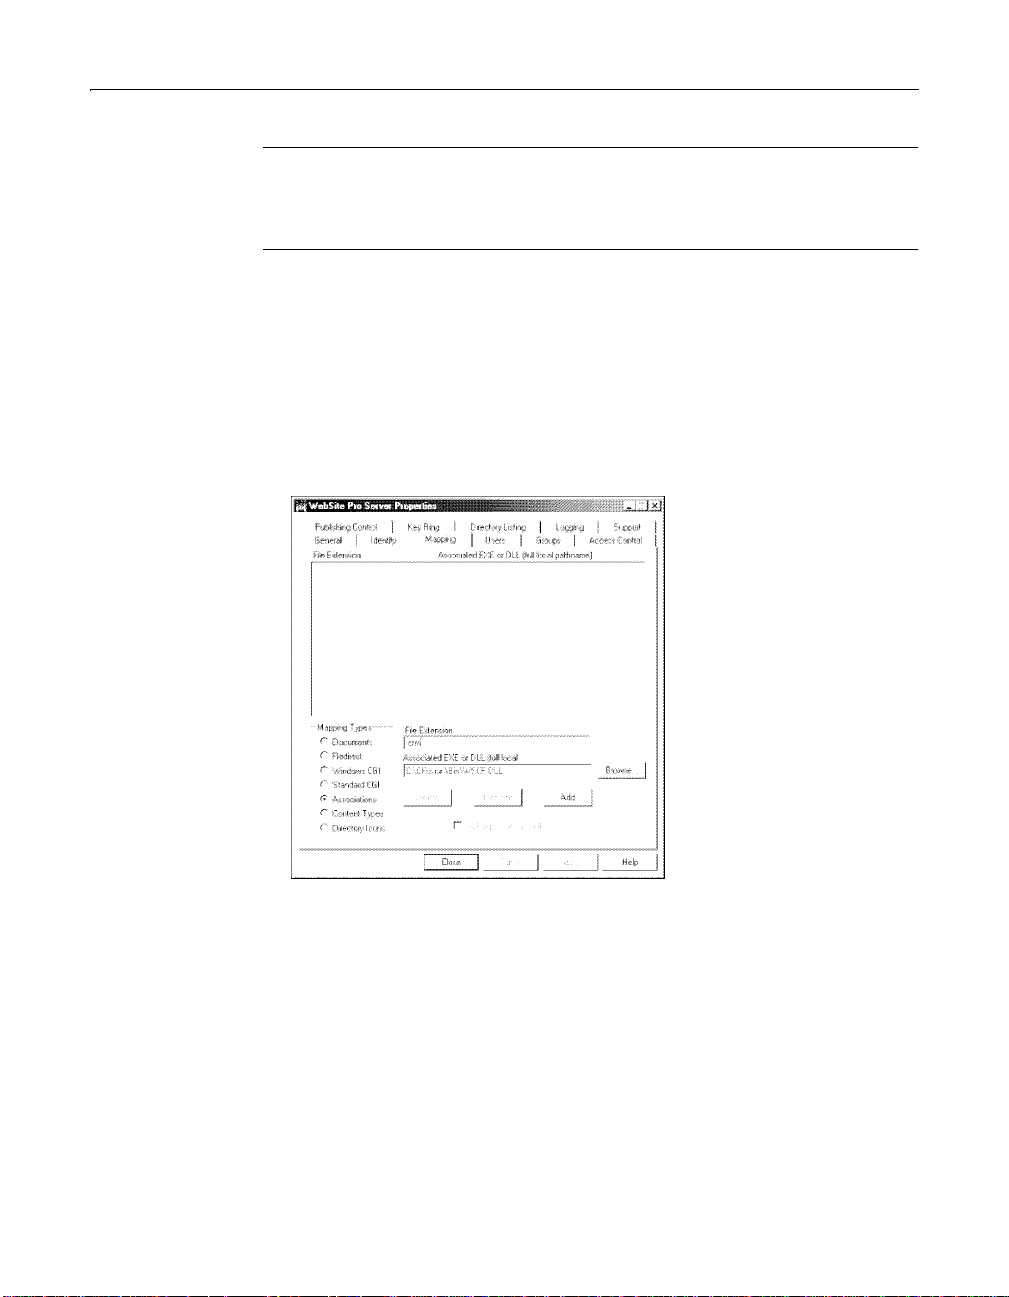
To configure O’Reilly WebSite Professional for ColdFusion Server:
1Select Start > Programs > WebSite Professional > Server Properties.
The WebSite Pro Server Properties dialog box displays:
2 In the Mapping tab, click Associations in the Mapping Types box.
a In the File Extension text box, enter .cfm.
b In the File Extension text box, click Browse; go to c:\cfusion\bin\WSCF.DLL.
Click Add.
c Repeat Step 2, substituting .dbm.
dClick Add.
The .cfm and .dbm mappings display in the File Extension box.
3 In the Mapping tab, in the Mapping Types box, click Content Types.
a In the File Extension text box, enter .cfm and .dbm.
b In the Media or Server-Side Content text field, enter wwwserver/wsapi.
cClick Add.
Page 31

Configuring Your Installation 19
Configuring SNMP MIB
To use the ColdFusion Server MIB features, you must configure these settings:
1 For each system, such as a system with the IP address 192.178.64.88, that is to
receive trap messages from the local host, open the local host’s Registry to:
\\HKEY_LOCAL_MACHINE\SYSTEM\CurrentControlSet\Services\SNMP\Paramete
rs\TrapConfiguration\public
For each system, add a value in the following form:
1: REG_SZ:192.178.64.88
2 Open the Debug Options page of the ColdFusion Administrator, and ensure that
the Enable Performance Monitoring checkbox is selected.
Tip
You can find a copy of the MIB definition in CFusion/cfam/Database/lhmib.mib.
Using HTTPS and non-default ports
To use HTTPS, a different Web server name, or a different port to access the Web
document root for ColdFusion MIB information, modify <installdir>/cfam/
Database/mib.properties
For example, this file usually contains a single entry, such as
maine
is the local host name, and http://maine is the Web document root for the
ColdFusion MIB information. To use HTTPS, a different Web document root
(maine1), and port (459), edit the entry to https://maine1:459.
http://maine where
Page 32

20 Chapter 1 Installing ColdFusion Server in Windows
Changing the ColdFusion Server user account
By default, ColdFusion Server runs under the host’s System account. However,
under this account, ColdFusion application pages may have access rights to interact
with remote data sources, other application pages, and COM objects.
You may have to run ColdFusion Server under a account that provides the necessary
access rights. These instructions use Windows 2000 Professional operating system.
To change the ColdFusion Server user account:
1 Start the MMC by selecting Start > Programs > Administrative Tools > Computer
Management.
a In the Tree tab, expand Services and Applications and select Services.
b Right-click ColdFusion Application Server and sele ct Properties.
The ColdFusion Application Server Properties dialog box displays:
2 Select the Log On tab. Click This account. Enter appropriate account
information.
3 Click OK to apply the changes.
Restart ColdFusion Server services.
Warning
Do not rename your Windows Administrator account. It causes problems with
security policies and profiles.
Page 33

What to Do Next 21
What to Do Next
After installing ColdFusion Server and configuring your installation, you must
perform some initial administration tasks using the ColdFusion Administrator,
ColdFusion Server’s Web-based control console. For more information, see “Initial
Administration Tasks” on page 68.
Page 34

22 Chapter 1 Installing ColdFusion Server in Windows
Page 35

Chapter 2
Inst alling ColdFusion Server in Solaris
This chapter explains how to install and configure ColdFusion Server in Solaris.
Contents
• Solaris System Requirements...................................................................................24
• Before You Begin the Installation.............................................................................25
• Installing ColdFusion Server in Solaris.................................................................... 29
• Configuring Your Installation................................................. ...... ....... ...... ....... ...... ..33
• What to Do Next........................................................................................................38
Page 36

24 Chapter 2 Installing ColdFusion Server in Solaris
Solaris System Requirements
The following table contains the system requirements for the ColdFusion Server
Enterprise Edition:
ColdFusion
Requirement
Solaris Version
Solaris 2.6, 7, 8 x
Hardware
Processor SPARC
Minimum RAM (MB) 256
Recommended RAM (MB) 512
Free Hard Disk Space (MB) 350
CD-ROM Drive x
Web Server
iPlanet/Netscape Enterprise Server 3.6, 4.1 x
Apache Server 1.3.x
*
* ColdFusion Server provides a precompiled module that is binary compat-
ible with versions 1.3.6 throu gh 1.3.1 9. ColdFusi on Server al so provide s
the files required to build a version of the ColdFusion plug-in module for
a custom version of Apache 1.3.x. For more information, see “Configur-
ing Web servers manually” on page 33.
Server Enterprise
x
Page 37

Before You Begin the Installation 25
Before You Begin the Installation
This section contains the following pre-installation instructions:
• Required operating system patches
• Installing SNMP in Solaris
• Important Network Considerations
• Upgrading from a pre viou s version
• Verifying that a Web server is running
• Uninstalling ColdFusion Server 5
Required operating system patches
The following table lists the patches and packages that must be installed before
installing ColdFusion Server 5:
Operating
System Patch Description
Solaris 2.6 105181-17 or higher Kernel patch
105591-09 or higher LibC: Shared library patch for C++
105210-25 or higher LibC: Shared library patch for C/C++
105568-14 or higher libthread: Shared library patch
Solstice Enterprise
Agent (SEA) Runtime
1.0.3
Solaris 7 106541-08 or higher Kernel patch
106327-08 or higher LibC: Shared library patch for C++
106980-07 or higher libthread: Shared library patch
107709-10 or higher Required only for MIB functionality. For
Solaris 8 108869-03 or higher Required only for MIB functionality. For
en_US locale U.S. English language pack
Required only for MIB functionality. For
instructions, see “Installing SNMP in Solaris”
on page 26.
instructions, see “Installing SNMP in Solaris”
on page 26.
instructions, see “Installing SNMP in Solaris”
on page 26.
Note
All versions of Solaris require the SUNWxc u4 - - XCU4 Utili ties pack age . To download
all patches and packages, go to http://sunsolve.sun.com.
Page 38

26 Chapter 2 Installing ColdFusion Server in Solaris
Installing SNMP in Solaris
Managed data is accessible in ColdFusion Server 5 Enterprise Edition through the
Simple Network Management Protocol (SNMP) Management Information Base
(MIB) for Advanced ColdFusion Application Management features. You can
integrate this information with your third-party system management tools. These
tools provide a way for you to manage diverse components of your enterprise from a
management station in your network.
If you want to use the ColdFusion Server MIB featur es, you must install SNMP befor e
installing ColdFusion Server. For instructions, see the following procedures.
T o install SNMP in Solaris 2.6:
1 Download the Solstice Enterprise Agent (SEA) 1.0.3 Runtime from:
http://www.sun.com/software/entagents/download/
1 Uninstall the following components from your system:
pkgrm SUNWsacom
pkgrm SUNWmibii
pkgrm SUNWsadmi
pkgrm SUNWsasnm
2 Install the SEA Runtime by performing the following steps:
a Uncompress the SEA file by entering the following command:
uncompress solaris2.6-sparc-rt.tar.Z
tar -xvf solaris2.6-sparc-rt.tar
b Install the SEA packages, in sequence, as follows:
pkgadd -d . SUNWmibii
pkgadd -d . SUNWsasnm
pkgadd -d . SUNWsadmi
pkgadd -d . SUNWsacom
Note
For more information on installing the SEA packages, see Chapter 2, "Installing
Solstice Enterprise Agent" in the SEA User Guide Releas e 1.0 (docs/UGhtml/
install_solaris.doc.html).
3 Apply Solaris patch 106787-12 or higher.
4 Restart the SNMP process.
To install SNMP in Solaris 7 and 8:
• For Solaris 7. install Solaris patch 107709-10 or higher
• For Solaris 8. install Solaris patch 108869-03 or higher
After installing the ColdFusion Server, you must configure your system to use the
MIB features. For more information, see “Configuring SNMP MIB” on page 36.
Page 39

Before You Begin the Installation 27
Important Network Considerations
The following table includes important considerations to keep in mind when
configuring your network before the ColdFusion Server installation:
• To install and configure Advanced Security for ColdFusion Server, you must have
an installed, running LDAP server available on your n etwork. You mu st have the
Directory Manager DN, password, IP/port, and Root DN for this ser ver.
• If you intend to inst all ClusterCATS, you must first prepare your cluster. For
instructions, see “Preparing Your Server for ClusterCATS” on page 135.
• ClusterCA T S r e quires that the group
during the ColdFusion installation using
ensure that either nsswitch.conf allows for group resolution from the group file,
or the group btcats gets created in NIS/NIS+ before installing ClusterCATS.
• In an optimal production environment, each ColdFusion Server application is
hosted on a dedicated server . A database , mail, or other se rver reside on the same
server as ColdFusion Server.
• Note the location and version number of your installed Web server. The
utility prompts you for this information.
btcats exist. It attempts to cr e a te this group
groupadd. If you are using NIS or NIS+,
pkgadd
Upgrading from a previous version
The ColdFusion Server 5 installation upgrades your current version of ColdFusion
Server automatically. However, keep in mind the following important instructions
when upgrading from a previous release of ColdFusion Server:
• If you are upgrading from ColdFusion Server 4.0 or earlier, you must first run the
registry migration utility
uninstall the old version by running the
README.cfregup file.
• If you are upgrading from ColdFusion 4.5, depending on the installation defaults
of your
before running the
default. Change the v alue o f the in stance fro m
lets the new version of ColdFusion Server overwrite the existing version.
• Using ClusterCATS Explorer or
servers before upgrading them to ColdFusion Server 5. ALso, some ClusterCATS
management operations using the btcluadm utility require a license key. The
license key is "GoColdFusion".
• To continue to use VisiBroker for CORBA connections in ColdFusion Server 5,
copy the libraries bundled with ColdFusion Server 4.5.1 into the appropriate
directo ry. If you uninstall a previous release of ColdFusion Server before
installing ColdFusion Server 5, these libraries are removed from your system.
Copy the libraries to a safe location before the uninstall.
pkgadd utilities, you may have to edit th e package in stallati on def aults file
cfregup.sh to preserve your registry settings. You must
pkgrm utility. For details, see the
pkgadd utility. This file is located at /var/sadm/install/admin/
quit or unique to overwrite. THis
btcluadm, you must remove cluster member
Note
Before proceeding with the upgrade, backup your ColdFusion Server Web
applications.
Page 40

28 Chapter 2 Installing ColdFusion Server in Solaris
Verifying that a Web server is running
Before installing ColdFusion Server, ensure that your Web server is installed and
running.
To check that your local Web server is running:
Enter the URL for a Web page or site from your local Web server in your browser’s
Address field and press Enter.
For example, if the file myindex.htm is in your Web document root directory, load
the page in your browser using the localhost URL:
http://127.0.0.1/myindex.htm
If your Web ser ver is not running, you will receive an error message.
Uninstalling ColdFusion Server 5
Use the pkgrm utility to remove an installed version of ColdFusion Server.
Note
The uninstall script removes your
preserve them, copy them to a new location before uninstalling ColdFusion Server.
odbc.ini file and all Verity collections. To
To uninstall ColdFusion Server:
1 Log in as root.
2 Enter the following command at the prompt:
pkgrm cfusion
3 ColdFusion Server is deleted from your system.
Page 41

Installing ColdFusion Server in Solaris 29
Installing ColdFusion Server in Solaris
The installation procedure assumes that you are installing from a CD-ROM. If you
purchased and downloaded ColdFusion Server, first place the pac kage file
(coldfusion-50-solaris.pkg) into its own directory. To start the installation process,
use the
the install procedure below, substituting the location to which you downloaded
ColdFusion Server for references to the CD -ROM.
This procedure describes a ColdFusion Server Enterprise Edition installation.
By default, the package file i nstalls C o ldFusion Server in the /opt directory. To install
into a different directory, you must create the directory before running
1 Log in as root.
2 If you are installing from a CD-ROM, copy the gziped tar file, using the
3 Untar the resulting tar file by entering the following command:
4Using the cd command, go to the resulting directory:
5 Run the following pkgadd command:
6 At the prompt, enter cfusion and press Enter.
7 Enter the ColdFusion Server registration ID (license key) when prompted.
pkgadd -d coldfusion-50-solaris.pkg shell command and then follow
pkgadd.
coldfusion-50-solaris.tar.gz command, to a directory on your local disk. Using
gunzip, uncompress the ColdFusion Server tar file with the following command:
coldfusion-50-solaris.tar.gz.
tar -xvf coldfusion-50-solaris.tar
cd coldfusion-50-solaris
pkgadd -d coldfusion-50-solaris.pkg
Note
You can find your ColdFusion Server license key on the product box and the
CD-ROM packaging.
8 After entering the install directory for ColdFusion Server, the installation process
prompts you to enter the name of your Web server.
Note
If you entered Other or if you have a custom release of Apache, such as usr/local/
apache, see “Configuring Web servers manually” on page 33.
At the corresponding prompt, press Enter to let the installation script
automatically configure your Web server.
Page 42

30 Chapter 2 Installing ColdFusion Server in Solaris
9 You are prompted to enter y to install the ColdFusion Server options. For each
option that you want to install, enter
y. The following table describes the options:
Option Description
Reporting and
Archive/
Deploy
Monitors,
Alarms, and
Load-Balancer
Integration
Accessed through the ColdFusion Administrator, this option
provides ColdFusio n applicati on reporting st atisti cs and the abili ty
to archive and deploy ColdFusion applications.
Accessed through the ColdFusion Administrator, this option
provides ColdFusion application performance monitoring,
threshold alarms, and hardware load-balancing integration for
Cisco LocalDirector. If you select ClusterCATS, these features is
provided through the ClusterCATS Web Administrator.
ClusterCATS Provides software-based load-balancing and IP failover support
for ColdFusion Server. If you want the server on which you install
ClusterCATS to be able to assume the IP address and HTTP
traffic of a failed server in the cluster, enter y to configure this
server with failover services. For more information, see
“Preparing Your Server for ClusterCATS” on page 135.
SNMP MIB Provides application information to third-party applications. You
must install SNMP on Solaris before installing ColdFusion Server.
For instructions, see “Installing SNMP in Solaris” on page 26 and
“Configuring SNMP MIB” on page 36.
10 After supplying the directory for your Web server documentation, entering and
confirming passwords for the ColdFusion Administrator and ColdFusion Studio,
your are prompted to install Advanced Security. To do this, you must have a
functioning LDAP server for policy storage.
Solaris customers currently using Advanced Security in ColdFusion Server 4.5
encounter a question during installation as to whether SiteMinder is installed.
This is referring to the full, retail version of Netegrity SiteMinder, and it enables
ColdFusion Single Sign-On support in ColdFusion automatically. For details on
this, see your Netegrity SiteMinder document ation.
You are prompted for a target LDAP server instance to migrate the SiteMinder
policy store. ColdFusion Server 5 requires that you do so. This one-time
procedure requires a second, properly-configured LDAP server instance. At the
end of the migration procedure, the install automatically configures Advanced
Security to use this second LDAP instance as the SiteMinder policy store.
11 Select whether to install ColdFusion Server documentation and examples. The
documentation is installed in the /cfdocs directory, under the Web root
directory.
Warning
Because of potential security concerns, the ColdFusion Server team recommends
that you not install the example applications in production environments.
Page 43

Installing ColdFusion Server in Solaris 31
12 Enter the user name under which ColdFusion Server runs, or press Enter to run
under the default user name ("nobody").
13 Press Enter to begin the installation.
When the installation is complete, a shell script restarts th e Web server and starts
ColdFusion Server s ervices. If the ColdFusion Server services are not star ted
automatically, you can start them manually using the ColdFusion Server start-up
script, which is located in the coldfusion/bin directory.
ColdFusion Server Processes
The ColdFusion Server installation creates the following processes in Solaris:
Process Purpose
cfexec
cfserver
cfrdsservice
cfsecurityproxy
smservauth
smservaz
java
ipaliasd
reqmgr
ccmgr
wsprobe
CANamingAdapter
dfp
Starts/stops the other processes and manages page scheduling
The main ColdFusion Server service. ColdFusion pages cannot
be processed if this service is not running.
Provides system support for the Admi nistrator as well as
security and debugging services for ColdFusion Studio
Links ColdFusion Server to the SiteMinder system
Provides SiteMinder authentication service
Provides SiteMinder authorization service
Provides a runtime for the ColdFusion Server graphing and
charting features and application management features
Provides IP failover capability for ClusterCATS
Processes ClusterCATS operations as root
Creates processes to support ClusterCATS
Probes the application server for load and restarts
unresponsive We b servers
Controls the data store for application management features
Provides load-balancing information to LocalDirector
Starting and stopping ColdFusion Server processes
In general, you should stop and restart ColdFusion Server after making changes in
the ColdFusion Administrator that affect a data source or connection parameter,
such as caching or thread count.
ColdFusion Server provides two scripts for starting and stopping ColdFusion Server
processes manually in Solaris:
/opt/coldfusion/bin/start
/opt/coldfusion/bin/stop
Page 44

32 Chapter 2 Installing ColdFusion Server in Solaris
In addition, ColdFusion Application Manager provides two scripts for starting and
stopping ClusterCATS and the Application Manager:
/opt/coldfusion/bin/cfam-start
/opt/coldfusion/bin/cfam-stop
Note
To run scripts, you must be logged in with root privileges.
ColdFusion Server also provides the following scripts to start and stop ColdFusion
Server during system startup and shutdown:
Script Function
/etc/init.d/coldfusion
/etc/rc1.d/K19coldfusion
/etc/rc3.d/S25coldfusion
/etc/init.d/btccmgr start
Starts or stops ColdFusion Server
Stops ColdFusion Server during syst em shutdown
Starts ColdFusion Ser ver during sy stem startup
Starts ClusterCATS and application management
processes.
/etc/init.d/btccmgr
restart
Stops ClusterCATS and application management
processes.
Page 45

Configuring Your Installation 33
Configuring Your Installation
After installing ColdFusion Server, you may have to perform the following actions:
• Configuring Web servers manually
• Configuring SNMP MIB
• Configuring databases
Configuring Web servers manually
If you did not instruct ColdF usion S e rver to configure your Web server automatically
during the ColdFusion Server installation, you must manually configure your Web
server. This section explains how to do this in Solaris. The following Web servers are
described in this section:
• Netscape/iPlanet Web Server
• Apache Web Server
Netscape/iPlanet Web Server
The ColdFusion Server NSAPI plug-in has been tested with Netscape/iPlanet
Enterprise Web Server 3.6 and 4.0 and the Netscape FastTrack Web Server 3.6 and
4.0. The ColdFusion Server installation script configures these servers automatically.
The Netscape/iPlanet plug-in
The Netscape/iPlanet plug-in (coldfusion 35.so) for ColdFusion Server is in the /opt/
coldfusion/webserve r/n sapi directory.
The following procedure assumes that you installed the Netscape/iPlanet server in /
usr/netscape/
server4 on the system named smurf.
To configure the Netscape/iPlanet plug-in:
1 Copy the plug-in to a directory in your server directories. Name it coldfusion.so.
mkdir /usr/netscape/server4/plugins/coldfusion
cp /opt/coldfusion/webserver/nsapi/coldfusion35.so \
usr/netscape/server4/plugins/coldfusion/coldfusion.so
2In the /usr/netscape/server4/https-smurf/config/mime.types file, add a
new ColdFusion Server type. To do this, add the line:
type=magnus-internal/cold-fusion exts=exts=cfm,dbm,cfml,dbml
3 Edit the /usr/netscape/server4/https-surf/config/obj.conf file to add a
service and init directives. Add all of the following syntax on one line:
Init fn="load-modules" shlib="/usr/netscape/server4/
plugins/coldfusion/coldfusion.so" funcs="DoCFRequest"
4 Add the following line in the default Object:
Service fn="DoCFRequest" method="(GET|POST)"
type="magnus-internal/cold-fusion"
Page 46

34 Chapter 2 Installing ColdFusion Server in Solaris
5 Stop and restart the Web server.
Note
If you run the Netscape/iPlanet Server Manager, the browser-based
administrator, you may get a warning about edits to the Netscape configuration
files. This is normal. To reload the new configuration files, follo w the in structions
and click Apply
Apache Web Server
ColdFusion Server has been tested with Apache version 1.3.6. To download Apache,
go to the Apache Web site at http://www.apache.org.
ColdFusion Server includes a precompiled binary module for Apache,
mod_coldfusion_so, that was tested with Apache 1.3.6 through 1.3.19. This module
works with most versions of Apache. To compile another version of Apache, see the
Apache Readme file at /opt/coldfusion/webserver/apache/readme.
Adding the ColdFusion Server module to Apache 1.3.x
You can find the ColdFusion Server module in the installation directory (usually
/opt) under the coldfusion/webserver/apache directory. The prebuilt module
shipped with ColdFusion Server 5 is built with Apache 1.3.6.
This module does not work with earlier Apache 1.3.x versions, and it may not work
with later versions, if Apache Group changes MODULE_MAGIC_NUMBER_MAJOR
(src src/include/ap_mmn.h in the Apache source).
The module provided with ColdFusion Server should work with most versions of
Apache, but if you have a custom distribution of Apache, you must build your own
version of Apache. With a C compiler (gcc or SUN cc) , you can build a version of
mod_coldfusion.so that should work with a version of Apache 1.3.x. For more
information, see the Readme file in /opt/coldfusion/webserver/apache.
T o make the Apache HTTPD load the ColdFusion Server module at startup, you must
configure the mod_so module. This module is not built into Apache by default.
To determine whether the HTTD module is available, run the
the module is present,
mod_so.c displays in the list of compiled-in modules. For
more information, see the Apache documentation (README.DSO).
httpd -1 command. If
To configure and add the ColdFusion Server module for Apache:
1 Configure this module into the Apache build by running this command:
$ ./configure --enable-module=so <other apache options>
$ make
$ make install
2 If you use gcc to compile Apache, include these environment variables for
configure:
$ env LIBS=/usr/lib/libC.so.5 CFLAGS=-fPIC \
./configure --enable-module=so <other apache options>
Page 47

Configuring Your Installation 35
After you configure mod_so in your A pa che bin ary, the simplest way to configur e th e
ColdFusion Server module is to use the apxs program that is included in the Apache
distribution. It installs by default in <apachedir>/apache/bin. This is a Perl script, so
you must have Perl installed on your system. Perl is available at http://
www.perl.com.
To use the apxs program:
1 Ensure that Perl is available in /usr/local/bin/perl.
2 Ensure a C compiler is in your PATH.
3 Add the apache/bin directory to your path:
csh:
set path=($path /usr/ccs/bin /usr/local/apache/bin)
sh/ksh:
PATH=$PATH:/usr/ccs/bin:/usr/local/apache/bin
export PATH
4 Change to the apache/src directory in the ColdFusion Server installation.
cd /opt/coldfusion/webserver/apache/src
5 Run the apxs command to build mod_coldfusion.so by entering this command:
make
6 Run the apxs command to add the module to the Apache configuration by
entering this command:
make install
7 Restart your Apache server by entering this command:
apachectl restart
To configure the Apache module that ColdFusion Server provides for
Solaris:
1 Copy the ColdFusion Server module to the Apache modules directory:
cp /opt/coldfusion/webserver/apache/mod_coldfusion.so /usr/local/
apache/libexec
2 Edit your httpd.conf file to include this directive:
LoadModule coldfusion_module libexec/mod_coldfusion.so
Note
If you have a Clea rModuleList directiv e in httpd.conf, you must add th is di rective
to the AddModule list, as stated by the comments in the httpd.conf file:
AddModule mod_coldfusion.c
3Restart Apache.
Page 48

36 Chapter 2 Installing ColdFusion Server in Solaris
Configuring SNMP MIB
To use the ColdFusion Server MIB features, you must configure the following
settings.
To configure Solaris use the MIB Agent:
1 Stop the SNMP process by entering the following command:
/etc/init.d/init.snmpdx stop
kill -9 <the pid of the allaire_mibd process>
2 In the file /etc/snmp/conf/allaire_mib.acl, find the following section:
trap = {
{
trap-community = public
hosts = localhost
{
enterprise = "allaire"
trap-num = 1, 2, 3, 4
}
}
}
Change localhost to point to the server(s) that are to receive trap messages from
the local host. If two or more servers should receive traps, the line should be in
the format:
hosts = host1, host2
The system names must be valid on your network (you must be able to ping them
from the local host). If the system names are invalid, the MIB does not work
correctly and the MIB log file grows very large . Do not dele te or comment out the
trap section of allaire_mib.acl.
3 Restart the SNMP process by entering the following command:
/etc/init.d/init.snmpdx start
4 Go to the Debug Options page of the ColdFusion Administrator, and ensure that
the Enable Performance Monitoring checkbox is selected.
Configuring the MIB Agent for HTTPS and non-default ports
To use HTTPS, a different Web server name, or a different port to access the Web
document root for ColdFusion MIB information, modify the content of /usr/lib/
btcats/database/mib.properties file.
This file usually contains one entry, such as
host name, and
http://maine is the Web document root directory of the ColdFusion
MIB information. To use HTTPS, a different Web document root (maine1), and port
(459), edit the entry to
https://maine1:459.
Tip
You can find the MIB definition in /usr/lib/btcats/database/lhmib_UNIX.mib.
http://maine , where maine is the local
Page 49

Configuring Your Installation 37
Configuring databases
After the install has completed, but before you can setup data sources in the
ColdFusion Administrator, you must edit the /opt/coldfusion/bin/start script to
include information about your database(s).
Normally this requires two changes per database: setting a database-specific
environment variable, and a dding the path to the client-side database libraries to
LD_LIBRARY_PATH environment variable. Examples are provided in the start
your
script to help you.
After editing the start script, you must stop and restar t ColdFusion Server for the
changes to take effect. Then use ColdFusion Administrator to set up your data
sources.
Note
ColdFusion Server no longer supports OpenIngres database drivers on Solaris.
Note
For more information on configuring data sources for ColdFusion Server, see
“Managing Data Sources” on page 109. Also, see the ODBC 3.7 documentation PDF
file in /opt/coldfusion/odbc/doc/odbcref.pdf.
Page 50

38 Chapter 2 Installing ColdFusion Server in Solaris
What to Do Next
After installing ColdFusion Server and configuring your installation, you must
perform some initial administration tasks using the ColdFusion Administrator,
ColdFusion Server’s Web-based control console. For more information, see “Initial
Administration Tasks” on page 68.
Page 51

Chapter 3
Inst alling ColdFusion Server in Linux
This chapter explains how to install and configure ColdFusion Server in Linux.
Contents
• Linux System Requirements.....................................................................................40
• Before You Begin the Installation.............................................................................41
• Installing ColdFusion Server in Linux.....................................................................44
• Configuring Your Installation................................................. ...... ....... ...... ....... ...... ..48
• What to Do Next........................................................................................................53
Page 52

40 Chapter 3 Installing ColdFusion Server in Linux
Linux System Requirements
The following table compares the system requi rements for the ColdFusi on Server
Professional and Enterprise Ed itions:
ColdFusion
Server
Requirement
Linux Distribution
Red Hat Linux 6.2 and later
SuSE Linux 7.0 and later
Cobalt RAQ3, RAQ4, XTR
Hardware
Processor Pentium Pentium
Minimum RAM 128 MB 256 MB
Recommended RAM 256 MB 512 MB
Free Hard Disk Space 200 MB 350 MB
CD-ROM Drive x x
Web Server
iPlanet/Netscape Enterprise Server 4.1
Apache Server 13.6
*
All Linux distributions must be running glibc-2.1.3-11 or later, gcc/egcs
*
*†
*†
†
‡
Professional
xx
xx
xx
xx
xx
ColdFusion
Server
Enterprise
libstdc++ 2.9, and 2.2 kernel or later . For p erformance r easons, the ColdFusion team recommends performing a Linux Server or Custom install
of Red Hat 6.x rather than KDE or GNOME installation.
†
ClusterCATS and Application Management features are not supported on
this platform.
‡ ColdFusion Server provides a precompiled module that is binary compat-
ible with versions 1.3.6 throu gh 1.3.1 9. ColdFusi on Server al so provide s
the files required to build a version of the ColdFusion plug-in module for
a custom version of Apache 1.3.x. For more information, see “Configur-
ing Web servers manually” on page 48.
Page 53

Before You Begin the Installation 41
Before You Begin the Installation
This section contains the following pre-installation instructions:
• Required operating system patches
• Installing SNMP in Red Hat
• Important Network Considerations
• Upgrading from a pre viou s version
• Verifying that a Web server is running
• Uninstalling ColdFusion Server 5
Required operating system patches
The following table lists the patches and packages that must be installed before to
installing ColdFusion Server 5:
Linux
Distribution Patch Where to find it
Red Hat 6.2, 7.0 compat-libstdc++ RPM ftp://ftp.redhat.com/pub/redhat/current/
UCD-SNMP 4.2.1 Required only for MIB functionality. For
instructions, see “Installing SNMP in
Red Hat” on page 41.
SuSE 7.0 apache.rpm ftp://ftp.s u se.com/pub/suse/i3 86/
update/
Cobalt RAQ 3,
RAQ4, XTR
glibc-2.1.3-22 http://www.cobalt.com/support/
download/index.html
glibc-profile-2.1.3-22 http://www.cobalt.com/support/
download/index.html
glibc-devel-2.1.3-22 http://www.cobalt.com/support/
download/index.html
Red Hat 6.0 glibc patch ftp://ftp.redhat.com/pub/redhat/current/
Installing SNMP in Red Hat
Managed data is accessible in ColdFusion Server 5 Enterprise Edition through the
Simple Network Management Protocol (SNMP) Management Information Base
(MIB) for Application Management features. You can integrate this information with
third-party system management tools. These tools let you manage diverse
components of your enterprise from a management stat ion in your network.
If you want to use ColdFusion Server MIB features, you must install SNMP before
installing ColdFusion Server. For instructions, see the following procedures.
Tip
To find the version of SNMP that you are currently running, enter snmpd -v.
Page 54

42 Chapter 3 Installing ColdFusion Server in Linux
To install SNMP in Red Hat:
The ColdFusion Server MIB Agent uses the Dynamic Module approach of
UCD-SNMP 4.2. To use the MIB Agent, you must ensure that UCD-SNMP 4.2.1 or
higher is installed on your system.
1 Download UCD-SNMP 4.2.1 from http://net-snmp.sourceforge.net(download):
• For Red Hat 6.2, download ucd-snmp-4.2.1-2.rh62.i386.rpm
• For Red Hat 7.0, download ucd-snmp-4.2.1-1.rh7.0.i386.rpm
Note
By default, UCD-SNMP installs into the /usr/sbin directory.
2 Install UCD-SNMP 4.2.1 on your system. If installation of UCD-SNMP 4.2.1 RPM
requires openssl, you can download it at http://rpmfind.net.
When you insta ll the MI B Age nt, th e C oldF usion Se rver inst al latio n asks wheth er y ou
want to replace the current snmpd.conf with a version of snmpd.conf that will make
ColdFusion MIB information accessible.
If you answer Yes, the current copy of snmpd.conf in /etc/snmp is renamed to
snmp.conf_original, and the ColdFusion version of snmpd.conf is inserted into /etc/
snmp. If you answer No, the snmpd.conf_macromedia file is placed into /etc/snmp.
You must then merge the content from snmpd.conf_macromedia into snmpd.conf
to make ColdFusion MIB information accessible.
After finishing the ColdF usi on Server installa tion, yo u must con figur e yo ur system to
use MIB features. For more information, see “Configuring SNMP MIB” on page 51.
Important Network Considerations
Keep the following table important considerations in mind when configuring your
network before a ColdFusion Server installation:
• ClusterCA T S r e quires that the group
during the ColdFusion installation using
ensure that either nsswitch.conf allows for group resolution from the group file,
or the group btcats gets created in NIS/NIS+ before installing ClusterCATS.
• ClusterCATS requires that you enable multicast on all network adapters. To
enable multicast on an adapter, enter the following command:
ifconfig eth0 multicast
• In this example, the adapter is eth0; enter an appropriate adapter name for your
configuration.
• In an optimal production environment, each ColdFusion Server application
should be hosted on a dedicated server. A database, mail, or other server should
not reside on the same server as ColdFusion Server.
• If you intend to install ClusterCATS, you must first prepare your server. For
instructions, see “Preparing Your Server for ClusterCATS” on page 135.
btcats exist. It attempts to cr e a te this group
groupadd. If you are using NIS or NIS+,
Page 55

Before You Begin the Installation 43
Upgrading from a previous version
The ColdFusion Server 5 installation upgrades your current version of ColdFusion
Server automatically. However, keep in mind the following important instructions
when upgrading from a previous release of ColdFusion Server:
• Using the ClusterCATS Explorer or
servers before upgrading them to ColdFusion Server 5. In addition, some
ClusterCATS management operations usin g th e
key. The license key is "GoColdFusion".
• To continue to use VisiBroker for CORBA connections in ColdFusion Server 5,
copy the libraries bundled with ColdFusion Server 4.5.1 into the appropriate
directo ry. If you uninstall a previous release of ColdFusion Server before
installing ColdFusion Server 5, these libraries are removed from your system.
Copy the libraries to a safe location before the uninstall.
Warning
Before proceeding with the upgrade, backup your ColdFusion Server Web
applications.
btcluadm, you must remove cluster member
btcluadm utility require a license
Verifying that a Web server is running
Before installing ColdFusion Server, ensure that your Web server is installed and
running.
To check that your local Web server is running:
Enter the URL for a Web page or site from your local Web server in your browser’s
Address field and press Enter.
For example, if the file myindex.htm is in your Web document root directory, load
the page in your browser using the localhost URL:
http://127.0.0.1/myindex.htm
If your Web ser ver is not running, you will receive an error message.
Uninstalling ColdFusion Server 5
To remove ColdFusion Server, use the remove utility t.
To uninstall ColdFusion Server:
1 Log in as root.
2 Enter the following command at the prompt:
/opt/coldfusion/uninstall/cfremove
ColdFusion Server is deleted from your server.
Page 56

44 Chapter 3 Installing ColdFusion Server in Linux
Installing ColdFusion Server in Linux
This following procedure describes a ColdFusion Server Enterprise Edition
installation. Other editions’ procedure might differ.
By default, ColdFusion Server installs into the /opt directory. To install ColdFusion
Server into a different directory, you must create that directory before running the
installation.
1 Log in as root.
2 If you are installing from a CD-ROM, copy the gziped tar file, using the
coldfusion-50-linux.tar.gz command, to a directory on your local disk. Using
gunzip, uncompress the ColdFusion Server tar file with the following command:
coldfusion-50-linux.tar.gz.
3 Untar the resulting tar file by entering the following command:
tar -xvf coldfusion-50-linux.tar
4Using the cd command, go to the resulting directory:
5 cd coldfusion-50-linux
6 Run the ColdFusion Server installation script by entering the following
command:
./cfinstall
The ColdFusion Server installation script starts.
7 Enter your ColdFusion license key and press Enter.
Note
You can find your ColdFusion Server license key on the product box and the
CD-ROM packaging.
8 After entering the install directory for ColdFusion Server, the installation process
prompts you to enter the name of your Web server.
Note
If you entered Other or if you have a custom release of Apache, such as usr/local/
apache, see “Configuring Web servers manually” on page 48.
At the corresponding prompt, press Enter to let the installation script
automatically configure your Web server. When prompted, enter the location of
your httpd.conf file.
9 When prompted, enter the path of your Web server’s document root directory,
and select whether to install the ColdFusion Server documentation and the
example applications.
Page 57

Installing ColdFusion Server in Linux 45
Warning
Because of potential security concerns, the ColdFusion Server team recommends
that you not install the example applications in production environments.
10 After entering and confirming the passwords for the ColdFusion Administrator
and ColdFusion Studio, enter the login name under which ColdFusion Server
runs.
11 For each option that y ou want to install, you ar e promp ted to enter y to ins tall the
ColdFusion Server options. Enter
y for each option to install.
The following table lists important installation option options and
considerations for ColdFusion Enterprise Edition customers:.
Option Description
Reporting and
Archive/
Deploy
Monitors,
Alarms, and
Load-Balancer
Integration
Accessed through the ColdFusion Administrator, this option
provides ColdFusio n applicati on reporting st atisti cs and the abili ty
to archive and deploy ColdFusion applications.
Accessed through the ColdFusion Administrator, this option
provides ColdFusion application performance monitoring,
threshold alarms, and hardware load-balancing integration for
Cisco LocalDirector. If you select ClusterCATS, these features is
provided through the ClusterCATS Web Administrator.
ClusterCATS Provides software-based load-balancing and IP failover support
for ColdFusion Server. If you want the server on which you are
installing ClusterCATS to be able to assume the IP address and
HTTP traffic of a failed server in the cluster, enter y to configure
this server with failover services. For more information, see
“Preparing Your Server for ClusterCATS” on page 135.
SNMP MIB Provides application information to third-party applications. You
must install SNMP on Linux before installing ColdFusion Server.
For instructions, see “Installing SNMP in Red Hat” on page 41
and “Configuring S NMP MIB” on page 51.
12 Press Enter to begin the installation.
When the installation is complete, a shell script restarts th e Web server and starts
ColdFusion Server services.
Page 58

46 Chapter 3 Installing ColdFusion Server in Linux
ColdFusion Server processes
The ColdFusion Server installation creates the following processes in Linux:
Process Purpose
cfexec
cfserver
cfrdsservice
java
ipaliasd
reqmgr
ccmgr
wsprobe
CANamingAdapter
dfp
* Available in ColdFusion Server Enterprise only
Starts and stops the other processes and manages page
scheduling.
The main ColdFusion Server service. ColdFusion pages cannot
be processed if this service is not running.
Provides system support for the Administrator and security and
debugging services for ColdFusion Studio,
Provides a runtime for the ColdFusion Server graphing and
charting features and application management features.
Provides IP failover capability for ClusterCATS.*
Processes ClusterCATS operations as root.*
Creates processes to support ClusterCATS*
Probes the application server for load and restarts
unresponsive We b servers *
Controls the data store for application management features*
Provides load-balancing information to LocalDirector*
Starting and stopping ColdFusion Server processes
In general, you should stop and restart ColdFusion Server after making changes in
the ColdFusion Administrator that affect a data source or connection parameter,
such as caching, thread count, and so on.
ColdFusion Server provides two scripts for starting and stopping ColdFusion Server
processes manually in Linux:
/opt/coldfusion/bin/start
/opt/coldfusion/bin/stop
In addition, ColdFusion Application Manager provides two scripts for starting and
stopping ClusterCATS and the Application Manager:
/opt/coldfusion/bin/cfam-start
/opt/coldfusion/bin/cfam-stop
Note
To run the scripts, you must be logged in with root privileges.
Page 59

Installing ColdFusion Server in Linux 47
ColdFusion Server also provides the following scripts to start and stop ColdFusion
Server during system startup and shutdown:
Script Function
/etc/rc.d/init.d/coldfusion
/etc/rc1.d/K19coldfusion
Starts and stops ColdFusion Server.
Stops ColdFusion Server during system
shutdown.
/etc/rc3.d/S90coldfusion
/etc/rc4.d/S90coldfusion
/etc/rc5.d/S90coldfusion
/etc/rc.d/init.d/btccmgr start
Starts ColdFusion Server during system
startup.
Starts ClusterCATS and application
management proces se s.
/etc/rc.d/init.d/btccmgr restart
Stops ClusterCATS and application
management proces se s.
Page 60

48 Chapter 3 Installing ColdFusion Server in Linux
Configuring Your Installation
After installation, you may need to configure Linux to work with ColdFusion Server.
This section addresses the following topics:
• Configuring Web servers manually
• Configuring SNMP MIB
• Configuring databases
Configuring Web servers manually
If you did not configure your Web server automatically duringColdFusion Server
installation, you must manually configure the Web server. This section explains how
to do this manually in Linux, for the following Web servers:
• Netscape/iPlanet Web Server
• Apache Web server
Netscape/iPlanet Web Server
The ColdFusion Server NSAPI plug-in has been tested with Netscape/iPlanet
Enterprise Web Server 4.1 and the Netscape FastTrack Web Server 4.1. The
installation script prompts you to configure either of these servers automatically.
The Netscape/iPlanet plug-in
Netscape/iPlanet plug-ins for ColdFusion Server are installed in the <installdir>/
coldfusion/webserve r/n sapi directory.
The following procedure assumes that you installed the Netscape/iPlanet server in
/usr/netscape/server4 on the system named smurf.
To configure the Netscape/iPlanet plug-in:
1 Copy the plug-in to a directory named coldfusion in your server directories.
mkdir /usr/netscape/server4/plugins/coldfusion
cp /opt/coldfusion/webserver/nsapi/coldfusion35.so \
/usr/netscape/server4/plugins/coldfusion/coldfusion.so
2Edit the /usr/netscape/server4/https-smurf/config/mime.types file to add a
new ColdFusion Server type. Add the line:
type=magnus-internal/cold-fusion exts=exts=cfm,dbm,cfml,dbml
3Edit the /usr/netscape/server4/https-surf/config/obj.conf file to add new
service and init directives. Add all of the following on one line:
Init fn="load-modules" shlib="/usr/netscape/server4/
plugins/coldfusion/coldfusion.so" funcs="DoCFRequest"
4 Add the following line in the default Object:
Service fn="DoCFRequest" method="(GET|POST)"
type="magnus-internal/cold-fusion"
5 Stop and restart the Web server.
Page 61

Configuring Your Installation 49
Note
If you run the Netscape/iPlanet Server Manager, the browser-based Web server
administrator, you may receive a warning about edits to Netscape configuration
files. This is normal. To reload the new configuration files, follo w the in structions
and click Apply.
If your server does not restart, check that the pathname for the plug-in you
specified in the obj.conf file is correct for your installation and that it is on a
single line.
Apache Web server
ColdFusion Server has been tested with Apache version 1.3.6. To download Apache,
go to the Apache Web site at http://www.apache.org.
ColdFusion Server includes a precompiled binary module for Apache,
mod_coldfusion_so, that has been tested with Apache 1.3.6 - 1.3.19. Th is module
works with most versions of Apache, but if you must compile your own version of
Apache, see the Apache Readme file at /opt/coldfusion/webserver/apache/readme.
Follo w th e a ppr o pria te p r oc edu r e, according to your Linux distrib ut io n, to c onfigure
Red Hat and Apache and SuSE/Cobalt with Apache:
• To configure Red Hat and Apache:
• To configure SuSE/Cobalt and Apache:
To configure Red Hat and Apache:
1 Shut down Apache with the following command:
/etc/rc.d/init.d/httpd stop
2 To check whether your version of Apache is built with EAPI, run this command:
httpd -V
If the output contains the line -D EAPI, you have an EAPI version of Apache.
3 Open the file /etc/httpd/conf/httpd.conf in a text editor.
a If you are not running an EAPI version of Apache, in the section
add this line:
LoadModule coldfusion_module /opt/coldfusion/webserver/apache/
mod_coldfusion_standard.so
If you are running an EAPI, add this line:
LoadModule coldfusion_module /opt/coldfusion/webserver/apache/
mod_coldfusion_EAPI.so
bIn the section AddModule, add this line:
AddModule mod_coldfusion.c
c Save the file.
4 Restart Apache with this command:
/etc/rc.d/init.d/./httpd start
LoadModule,
Page 62

50 Chapter 3 Installing ColdFusion Server in Linux
To configure SuSE/Cobalt and Apache:
1 To check whether your version of Apache is built with EAPI, run this command:
httpd -V
If the output contains the line -D EAPI, you are running an EAPI server. (SuSE
requires an EAPI version of mod.coldfusion.so.)
2 Shut down Apache with the following command:
/etc/rc.d/apache stop
3 Open the file /etc/httpd/httpd.conf in a text editor.
aIn the section
LoadModule mmap_static_module /usr/lib/apache/mod_mmap_static.so
LoadModule setenvif_module /usr/lib/apache/mod_setenvif.so
LoadModule coldfusion_module /opt/coldfusion/webserver/apache/
mod_coldfusion_EAPI.so
bIn the section AddModule, add the following lines:
ClearModuleList
AddModule mod_mmap_static.c
AddModule mod_vhost_alias.c
AddModule mod_so.c
AddModule mod_setenvif.c
AddModule mod_coldfusion.c
c Save the file.
4 Create a symbolic link from the EAPI version of the ColdFusion Server module to
the /usr/lib/apache directory, to ensure that the EAPI module is ex ecutable:
chmod 755 /opt/coldfusion/webserver/apache/mod_coldfusion_EAPI.so
ln -s /opt/coldfusion/webserver/apache/mod_coldfusion_EAPI.so /
usr/lib/apache/mod_coldfusion.so
5 Open the file /etc/rc.d/apache in a text editor.
a Look for the following lines:
if ! test "$HTTPD_SEC_MOD_SAPCGI" == "no" ; then
test -e /usr/lib/apache/mod_fastcgi_sap.so || \
test $(/usr/sbin/httpd -l | grep "mod_fastcgi_sap.c") =
"mod_fastcgi_sap.c" 2> /dev/null \
&& MODULES="-D SAP_CGI $MODULES" && echo -n " SAP-fastcgi"
fi
b Add these lines directly below the previous lines:
if ! test "$HTTPD_SEC_MOD_COLDFUSION" == "no" ; then
test -e /usr/lib/apache/mod_coldfusion.so && MODULES="-D
COLDFUSION $MODULES" && echo -n " Coldfusion"
fi
6 Restart Apache with this command:
/etc/rc.d/apache start
LoadModule, add the following lines:
Page 63

Configuring Your Installation 51
Configuring SNMP MIB
To use the ColdFusion Server MIB features, you must configure the following
settings.
To configure Red Hat to use the MIB Agent:
1 Stop the SNMP Server by entering the following command as root:
/etc/rc.d/init.d/snmpd stop
2 For each server that is to receive trap messages from the local host, add the
following line to /etc/snmp/snmpd.conf:
trapsink server1.macromedia.com public
where server1.macromedia.com is the name of the des tination server, and
public is the name of the community under which the trap messages are sent.
Ensure that the destination server, such as server1.macromedia.com, is
configured to receive traps from the specified community, such as public.
Warning
Ensure that the following line does not appear in snmpd.conf more than once:
dlmod allaire /usr/lib/btcats/program/allaire_mib.so
3 Go to the Debug Options page of the ColdFusion Administrator, and ensure
Enable Performance Monitoring is selected.
4 Start the SNMP Server, enter the following command as root:
/etc/rc.d/init.d/snmpd start
Tip
You can find a copy of the MIB definition in /usr/lib/btcats/database/
lhmib_UNIX.mib.
Configuring the MIB Agent for HTTPS and non-default ports
To use HTTPS, a different Web server name, or a different port to access the Web
document root for ColdFusion MIB information, modify the content of /usr/lib/
btcats/database/mib.properties file.
This file usually contains a single entry, such as
name of the local host and
ColdFusion MIB information. To use HTTPS, a different Web document root
(maine1), and port (459), edit the entry to
Configuring databases
After the install is complete, but before you can set up data sources in the
ColdFusion Administrator, you must edit the /opt/coldfusion/bin/start script to
include information about whatever database(s) you use.
http://maine where maine is the
http://maine is the Web document root directory for the
https://maine1:459.
Page 64

52 Chapter 3 Installing ColdFusion Server in Linux
Normally this requires two changes per database: setting a database-specific
environment variable, and a dding the path to the client-side database libraries to
your LD_LIBRARY_PATH environment variable. The start script provides examples
to help you.
After editing the start script, you must stop and restar t ColdFusion Server for the
changes to take effect. Then, you can proceed to the ColdFusion Administrator to set
up your data sources.
Note
For more information, see “Managing Data Sources” on page 109.
In Linux, you must us e c ertai n data base clie n ts in Li nu x. The following table lists the
required clients for ColdFusion Server 5 in Linux:
• The Oracle ODBC database driver requires the Oracle Client version 8.1.6.1 or
higher.
• Red Hat requires the following Sybase Open Client 11.9.2-3 components or later
to use the Sybase native database driver:
− sybase-common-11.9.2-3.i386.rpm
− sybase-openclient-11.1.1-3.i386.rpm
Page 65

What to Do Next 53
What to Do Next
After installing ColdFusion Server and configuring your installation, you must
perform some initial administration tasks using the ColdFusion Administrator,
ColdFusion Server’s Web-based control console. For more information, see “Initial
Administration Tasks” on page 68.
Page 66

54 Chapter 3 Installing ColdFusion Server in Linux
Page 67

Chapter 4
Inst alling ColdFusion Server in HP-UX
This chapter explains how to install and configure ColdFusion Server in HP-UX.
Contents
• HP-UX System Requirements...................................................................................56
• Before You Begin the Installation.............................................................................57
• Installing ColdFusion Server in HP-UX...................................................................60
• Configuring Your Installation................................................. ...... ....... ...... ....... ...... ..62
• What to Do Next........................................................................................................66
Page 68

56 Chapter 4 Installing ColdFusion Server in HP-UX
HP-UX System Requirements
The following table contains the system requirements for the ColdFusion Server
Enterprise Edition:
ColdFusion
Requirement
HP-UX Version
HP-UX 11.0 x
Hardware
Processor
Minimum RAM 128 MB
Recommended RAM 128 MB
Free Hard Disk Space 120 MB
CD-ROM Drive x
Web Server
iPlanet/Netscape Enterprise Server 3.51, 4.1 x
Apache Server 1.3.x
*
* ColdFusion Server provides a precompiled module that is binary compat-
ible with versions 1.3.6 throu gh 1.3.1 9. ColdFusi on Server al so provide s
the files required to build a version of the ColdFusion plug-in module for
a custom version of Apache 1.3.x. For more information, see “Configur-
ing Web servers manually” on page 62.
Server Enterprise
PA-RISC 1.1 or 2.0
x
Page 69

Before You Begin the Installation 57
Before You Begin the Installation
This section contains the following pre-installation instructions:
• Required operating system settings
• Upgrading from a pre viou s version
• Verifying that a Web server is running
• Mounting the installation CD-ROM
• Uninstalling ColdFusion Server 5
Required operating system settings
The following list includes patches that must be installed, kernel settings that must
be configured, and general issues to consider before installing ColdFusion Server 5:
• Ensure that you have the latest HP-UX 11.0 patch bundle installed. To download
the latest patch bundle, go to http://www.hp.com.
• Configure your minimum kernel parameter settings as follows:
maxdsize 0x79000000
maxssize 0x8000000
maxtsize 0x8000000
maxfiles 1024
maxusers 64 (to indirectly boost NKTHREAD, used below)
max_thread_proc (NKTHREAD-10)
• Note the Web server, Web root, and configuration file locations. They will be
needed during the installation.
• Note the HP-UX username under which ColdFusion Server will run. It will be
needed during the installation.
• Note where you want to install ColdFusion Server on your system (/opt is the
default directory).
Upgrading from a previous version
The ColdFusion Server installation automatically upgrades previous versions of
ColdFusion Server for HP-UX 11.0.
However, to continue to use VisiBroker for CORBA connections in ColdFusion Server
5, copy the libraries bundled with ColdFusion Server 4.5.1 into the appropriate
directory. If you uninstall a previous release of ColdFusion Server before installing
ColdFusion Server 5, these libraries are removed from your system. Before the
uninstall, copy the libraries to a safe location.
Page 70

58 Chapter 4 Installing ColdFusion Server in HP-UX
Warning
Before upgrading, backup your ColdFusion Server Web applications.
Verifying that a Web server is running
Before installing ColdFusion Server, ensure that the Web server is installed and
running.
To check that your local Web server is running:
Enter the URL for a Web page or site from your local Web server in your browser’s
Address field and press Enter.
For example, if the file myindex.htm is in your Web document root directory, load
the page in your browser using the localhost URL:
http://127.0.0.1/myindex.htm
If your Web ser ver is not running, you will receive an error message.
Mounting the installation CD-ROM
To acco mmodate long filenames, ColdFusion Server 5 is written to the CD-ROM
using the RockRidge format. This format is supported by HP-UX using the Portable
File System (PFS) commands, not the standard HP-UX mount/umount commands.
For more information on the PFS commands, enter man pfs_mount.
To mount the CD-ROM using the HP PFS commands:
1 Create a mount point for the CD. For example:
mkdir /SD_CDROM.
2 Create an entry in the PFS mount file.
a Create or edit the file /etc/pfs_fstab, adding an entry like the following:
/dev/dsk/c1t2d0 /SD_CDROM pfs-rrip xlat=unix 0
The fields in this file have the following meanings:
<device_file> <mount_point> <fs_type> <translation_method>
b In your entry, ensure the path that you set in the device_file field is the device
name of your CD-ROM drive, and that your mount_point is the name that
you selected for the mount point in step 1.
3 Start the PFS processes:
nohup /usr/sbin/pfs_mountd &
nohup /usr/sbin/pfsd &
4Mount the CD:
/usr/sbin/pfs_mount /SD_CDROM
Page 71

Before You Begin the Installation 59
The CD-ROM should be visible under /SD_CDROM. When you finish using the
CD-ROM, you can unmount it using the following command:
/usr/sbin/pfs_umount /SD_CDROM
Uninstalling ColdFusion Server 5
Use the cfremove utility to remove an installed version of ColdFusion Server.
To uninstall ColdFusion Server:
1 Log in as root.
2 Run the following command:
/opt/coldfusion/uninstall/cfremove
ColdFusion Server is deleted from your server.
Page 72

60 Chapter 4 Installing ColdFusion Server in HP-UX
Installing ColdFusion Server in HP-UX
The installation procedure assumes that you are installing from a CD-ROM. If you
purchased and downloaded ColdFusion Server, place the tar.gz file into its own
directory, and follow the install procedure below, substituting the location to which
you downloaded ColdFusion Server for references to the CD-ROM.
The procedure below describes a ColdFusion Server Enterprise Edition installation.
Other editions’ procedures might differ.
By default, ColdFusion Server installs into the
different directory, you must create that directory before running the installation.
1 Log in as root.
2 Mount the CD-ROM using the HP PFS extensions. For instructions, see
“Mounting the installation CD-ROM,” on page 58.
3 Copy the tar.gz file to a temporary location on your hard disk. Run gunzip on the
file, untar the resulting tar file, and change directory to the directory created by
tar.
4 To start the installation process, enter cfinstall.
5 When prompted, enter the ColdFusion Server registration ID (license key).
Note
You can find your ColdFusion Server license key on the product box and the
CD-ROM packaging.
/opt directory. To install into a
6 After entering the install directory for ColdFusion Server, the installation process
prompts you to enter the name of your Web server.
At the corresponding prompt, enter
configure your Web server. If you use Apache, you must configure it manually.
For more information, see “Configuring Web servers manually” on page 62. Enter
the install home directory, the instance root directory, and document root
directory for your Web server at the corresponding prompts.
7 Select whether to install the ColdFusion Server documentation and example
applications.
Warning
Because of potential security concerns, the ColdFusion Server team recommends
that you not install the example applications in production environments.
8 After selecting whether to let ColdFusion Server start automatically at system
startup, enter and verify passwords for the ColdFusion Administrator and the
Rapid Development System (RDS) for ColdFusion Studio.
9 Enter the username under which ColdFusion Server will run.
10 Press Enter to begin the installation.
y to let the installation script automatically
Page 73

Installing ColdFusion Server in HP-UX 61
When the installation is complete, the install program starts the ColdFusion Server
services.
If you are running a version of the Netscape/iPlanet Web server, the install program
also configures the Web server to run ColdFusion Server and restart the Web server
automatically.
If you are running the Apache Web server, you mu st configure and restart the Web
server manually before it will work with ColdFusion Server. Follow the instructions
displayed by the ColdFusion Server installation script for configuring the Apache
Web server, or see “Configuring Web servers manually” on page 62.
ColdFusion Server processes
The ColdFusion Server installation creates the following processes in HP-UX:
Process Purpose
cfexec
cfserver
cfrdsservice
Starts/stops the other processes and manages page scheduling
The main ColdFusion Serv er service. ColdFusion pages cannot be
processed if this service is not running.
Provides system support for the Administrator and security and
debugging services for ColdFusion Studio
Starting and stopping ColdFusion Server processes
ColdFusion Server provides two scripts for starting and stopping ColdFusion Server
processes manually in HP-UX:
/opt/coldfusion/bin/start
/opt/coldfusion/bin/stop
Page 74

62 Chapter 4 Installing ColdFusion Server in HP-UX
Configuring Your Installation
After installation, may have to configure HP-UX to work with ColdFusion Server.
This section addresses the following topics:
• Configuring Web servers manually
• Configuring databases
Configuring Web servers manually
If you did not configure your Web server automatically during ColdFusion Server
installation, you must configure it manually. This section explains how to do this in
HP-UX, for these Web servers:
• Netscape/iPlanet Web Server
• Apache Web Server
Netscape/iPlanet Web Server
The ColdFusion Server NSAPI plug-in was tested with Netscape/i Pl anet Enterprise
Web Server 3.5.1 and 4.1 and Netscape FastTrack Web Server 3.5.1 and 4.1. The
installation script prompts you to configure either of these servers automatically.
The Netscape/iPlanet plug-in
Netscape/iPlanet plug-ins for ColdFusion Server are installed in the opt/coldfusion/
webserver/nsapi directory.
The following procedure assumes that you installed the Netscape/iPlanet server in
/usr/netscape/server4 on the system named smurf.
To configure the Netscape/iPlanet plug-in:
1 Copy the plug-in to a directory named coldfusion in your server directories.
mkdir /usr/netscape/
cp /opt/coldfusion/webserver/nsapi/coldfusion35.so \
/usr/netscape/
2Edit the /usr/netscape/server4/https-smurf/config/mime.types file to add a
new ColdFusion Server type. Add the line:
type=magnus-internal/cold-fusion exts=cfm,dbm,cfml,dbml
3Edit the /usr/netscape/server4/https-surf/config/obj.conf file to add new
service and init directives. Add all of the following on one line:
Init fn="load-modules" shlib="/usr/netscape/server4/
plugins/coldfusion/coldfusion.so" funcs="DoCFRequest"
4 Add the following line in the default Object:
Service fn="DoCFRequest" method="(GET|POST)"
type="magnus-internal/cold-fusion"
5 Stop and restart the Web server.
server4/plugins/coldfusion
server4/plugins/coldfusion/coldfusion.so
Page 75

Configuring Your Installation 63
Note
If you run Netscape/iPlanet Server Manager, the browser-based administrator,
you get a warning about edits to the Netscape configuration files. This is normal.
To reload the new configuration files, follow the instructions and click Apply.
6 Verify that ColdFusion Server wo rks by following the procedure in “Configuring
Your Installation” on page 62.
If your server does not restart, ensure that the path name for the plug-in you
specified in the obj.conf file is correct for your installation and that it is on a
single line.
Apache Web Server
ColdFusion Server attaches to Apache using a dynamically-loaded shared library
(DSO). To use ColdFusion Server with Apache, you must have a version of the
ColdFusion DSO that matches the version of Apache you're running.
T o install and configure Apache:
1 Shut down Apache.
2 To check whether your version of Apache is built with EAPI, run the following
command:
httpd -V
If the output contains the line -D EAPI, you are running an EAPI version of
Apache.
3 ColdFusion Server includes a version of the ColdFusion DSO that was built with
Apache 1.3.6 and that works with Apache 1.3.14. This version is located in /opt/
coldfusion/webserver/apache/mod_coldfusion.sl. If you use a version of Apache
built with the Extended API ( EAPI), you must use the mod_coldfusion-EAPI.sl
module.
Copy the appropriate module into the libexec subdirectory of your Apache
installation.
Note
For more information, see the Readme file located in /opt/coldfusion/
webserver/apache.
4 For Apache to use the ColdFusion DSO, you must enable Apache DSO support.
To check whether DSO support is enabled, enter the following command from
within the Apache bin directory:
httpd -l
If the output does not include a line containing something like mod_so.c, you
must enable DSO support by running the
enable-module option included; for example:
configure --enable-module=rewrite --enable-shared=rewrite
configure script with the
Page 76

64 Chapter 4 Installing ColdFusion Server in HP-UX
5 Open src/Makefile in a text editor.
a Find the following line:
LIBS1= -lcl -lm -lpthread
If it does not contain -lcl , add it.
b Save the file.
6 After performing Steps 4 and 5, you must rebuild Apache and then re-install the
new configuration. For instructi o ns, see the Apache documentation.
7 Open the file /etc/httpd/httpd.conf in a text editor.
a If you are not running an EAPI version of Apache, in the section
LoadModule,
add the following line:
LoadModule coldfusion_module libexec/mod_coldfusion.sl
If you are running an EAPI, add the following line:
LoadModule coldfusion_module libexec/mod_coldfusion-EAPI.sl
bIn the section AddModule, add the following line:
AddModule mod_coldfusion.c
c Save the file.
8Restart Apache.
Configuring databases
After the install is completed, but before you can set up a data source in the
ColdFusion A d m inistrator, you must edit th e
include information about the database(s) you use.
Normally this requires two changes per database: setting a database-specific
environment variable, and a dding the path to the client-side database libraries to
your SHLIB_PATH environment variable. The start script provides examples to help
you.
After editing the start script, you must stop and restar t ColdFusion Server for the
changes to take effect. After that finishes, proceed to the ColdFusion Administrator
to set up your data sources.
Note
For more information, see “Managing Data Sources” on page 109.
/opt/coldfusion/bin/start script to
Page 77

Configuring Your Installation 65
The following table includes important database compatibility information for
ColdFusion Server 5 in HP-UX:
Database ODBC Native
Oracle 8 Yes (Tested using Oracle 8.04
and 8.16 clients)
Oracle 7 No (Oracle client software
unavailable on HP-UX 11.0)
Sybase 11 Yes (Tested using Sybase 11.1.1
client. Clientless driver available.)
Informix 7and 9 Yes (Tested Informix 9 and with
2.40 client. Clientless driver
available for Informix9.)
IBM DB2 No (ODBC driver unavailable in
HP-UX 11.0)
Microsoft SQL
Server
dBase/FoxPro Yes (Simple "flat file" DB. No
OpenIngress No (ODBC driver unavailable in
Text Yes (Comma-separated field text) Not Applicable
Yes (Tested connecting to MS
SQL Server 6.5 and 7.0 DBs.
Wire protocol, no client required.)
client library required.)
HP-UX 11.0)
Yes (Tested using Oracle 8.04
and 8.16 clients)
No (Oracle client software
unavailable on HP-UX 11.0.)
(Tested using Sybase
Yes
1 1.1 .1 cli en t.)
Y es (Tested Informix 9 an d with
2.40 client. Cannot be used
simultaneously with ODBC
connections.)
Yes (Tested using 6.1 client.
Cannot be used sim ultaneously
with ODBC connections.)
No (No native client libraries
available on HP-UX 11.0)
No (ODBC-access only)
Not Applicable
Page 78

66 Chapter 4 Installing ColdFusion Server in HP-UX
What to Do Next
After installing ColdFusion Server and configuring your installation, you must
perform some initial administration tasks using the ColdFusion Administrator,
ColdFusion Server’s Web-based control console. For more information, see “Initial
Administration Tasks” on page 68.
Page 79

Chapter 5
Basic ColdFusion Server Administration
Structured according to ColdFusion Administrator categories, this chapter explains
basic ColdFusion Server administration tasks.
Contents
• Initial Administration Tasks .....................................................................................68
• The ColdFusion Administrator ................................................................................69
• Server Settings...........................................................................................................70
• Caching......................................................................................................................71
• Client Variables..........................................................................................................72
• Memory Variables .....................................................................................................76
• Locking.......................................................................................................................77
• Mappings...................................................................................................................79
• Mail/Mail Logging..................................................... ....... .........................................80
• Data Sources..............................................................................................................82
• Verity Collections ......................................................................................................83
• Debug Settings...........................................................................................................88
• Automated Tasks .......................................................................................................90
• Extensions..................................................................................................................93
• Security ......................................................................................................................99
• Basic Security...........................................................................................................100
• Tools .........................................................................................................................102
• Logs and Statistics...................................................................................................103
Page 80

68 Chapter 5 Basic ColdFusion Server Administration
Initial Administration Tasks
Immediately after installing ColdFusion Server, you may have to perform some or all
of the administrative tasks described in the following table:
Task Description
Establish
database
connections
Specify direct ory
mappings
Configure debug
options
Set up e-mail E-mail lets ColdFusion Server and ColdFusion applications send
Change
passwords
Configure Java
settings
Restrict tag
access
ColdFusion applications require data source connections to query
and write to databases. To create, verify, modify, and delete
database connections, use the Data Sources pages in the
Administrator.
For more information, see “Managing Data Sources ” on page 109.
Directory mappings redirect relative file paths to physical
directories on y ou r s erv er. T o sp ec ify server-wide direc tory aliases,
use the Mappings page in the Administrator.
For more information, see “Mappings” on page 79.
Debug information provides important data about CFML page
processing. To choose what debug information to display and to
designate an IP address(es) to receive debug information, use the
Debug Settings pages of the Admini str ator.
For more information, see “Debug Settings” on page 88.
automated mail messages. To configure an email server and mail
options, use the Mail/M ail Logging page of the Administrator.
For more information, see “Mail/Mail Logging” on page 80.
You may have to change the passwords that you set for the
ColdFusion Administrator and ColdFusion Studio during the
ColdFusion Server installation. To change passwords, use the
Basic Security pages of the Administrator.
For more information, see “CF Admin Password” on page 100 and
“CF Studio Password” on page 101.
Java and Java applets require configuring Java settings, such as
JVM paths. To change Java settings, use the JVM and Java
Settings page of the Administrator.
For more information, see “Extensions” on page 93.
Some CFML tags may present a potential security risk for your
server. To disable certain tags and tag attributes system-wide, use
the Tag Restrictions page of the Administrator.
For more information, see “Tag Re strictions” on page 100.
Page 81

The ColdFusion Administrator 69
The ColdFusion Administrator
You use the Administrator to pe rfo rm adm i nis trative tasks for the ColdFusion S erver,
such as adding and configuring a data source, or scheduling application page
execution, and configuring security settings. During the ColdFusion Server
installation process, you specify an Administrator password that is used to prevent
unauthorized access to the Administrator pages.
To open the ColdFusion Administrator:
• In Windows, select Start > Program Files > ColdFusion Server 5 > ColdFusion
Administrator
or
• In any operating system, open the administrator by entering http://hostname/
CFIDE/administrator/index.cfm in a Web browser where hostname is the name
of the server hosting ColdFusion Server.
Note
The URL path is case-sensitive on Solaris, Linux, and HP-UX.
Accessing the Administrator remotely
To access ColdFusion Administrator pages remotely, enter http://hostname/CFIDE/
administrator/index.cfm in a Web browser, where hostname is the system on which
ColdFusion Server is installed.
If you use C o ldF u sion A dm i nis t r at or s ec u rity, you are prompted to enter a passw ord.
If your Web server provides security, access to the Administrator pages is governed
by the Web server’s permissions.
Page 82

70 Chapter 5 Basic ColdFusion Server Administration
Server Settings
The Server Settings page of the Administrator contains configuration options you
can set or enable to manage ColdFusion Server. They can significantly affect server
performance. Us e the following table to learn more about the option:
Option Description
Limit simultaneo us
requests*
Timeout requests
after [n] seconds
Restart at [n]
unresponsive
requests
Restart when
requests terminate
abnormally
Suppress
whitespace by
default*
Enforce strict
attribute validation
Missing Template
Handler
Site-wide Error
Handler
* Restart ColdFusion Server after making a change to this option.
Enter a number to limit simult aneous re quest s to the Col dFusion
Server. When the server reaches the limit, requests are queued
and handled in the order received. Limiting the number of
simultaneous requests can improve performance.
Enable this option to prevent unusually lengthy requests from
using up server resources. Enter a limit to the time that
ColdFusion Server wai ts b efore terminat ing a re quest. Requ ests
that take longer than the timeout period are terminated.
Enable this option if you want the ColdFusion Server to track
requests that execute code but fail to return in a timely fashion.
Enter the number o f un res pon si ve requests at whi ch the s ervic e
is restarted. The service restarts within the time specified in
Timeout Request above.
Enable this option if you want ColdFusion Server to track
requests that incur "unexpected exception" abnormal
termination condi tions. The service rest art s if abnormal request s
begin to occur on a regular basis.
Enable this option to compress runs of spaces, tabs and
carriage return/line feeds. Compressing whitespace can
significantly compact the output of a CFML template.
Enable this option if you want ColdFusion Server to enforce
strict attribute validation rules. Extraneous attributes are not
allowed for CFML tags. If this option is not enabled, irrelevant
attributes may be passed to CFML tags. Strict attribute
validation improve s te mp late execution time and p r ev ents many
CFML coding errors.
Specify a template to execute when ColdFusion Server cannot
find a requested template.
Specify a template to execute when ColdFusion Server
encounters an error while processing a request.
Page 83

Caching 71
Caching
The Caching Settings pa ge of the Administrator contains configuration options that
you can set or enable to cache templates, queries, and data sources
significantly affect server performance. Use the following table to learn more about
the options:
Option Description
Template cache
size: [n] kilobytes
Trusted cache Enable this option if you want ColdFusio n Server to u se cache d
Limit cached
database
connection inactive
time to [n] minutes
Limit the maximum
number of cached
queries on the
server to [n] queries
Enable this option to limit the memory reserved for template
caching. For best performance, set the value to the total
number of kilobytes of all your active ColdFusion pages.
templates without checking whether they changed. For
templates that are not updated frequently, using this option
minimizes file system ove r he ad.
Enable this option by entering a value to limit the time that
ColdFusion Server allows a cached database connection to
remain inactive before disconnecting. Enter 0 if inactive
connections should be maintained as long as ColdFusion
Server is executing. If the option to maintain database
connections is not enable d in the Edit Data Source page for an
individual data source, the option is ignored. For more
information, see “Adding Data Sources for ColdFusion” on
page 115.
Enable this option by entering a value to limit the maximum
number of cached queries that the server maintains. Cached
queries allow retrieval of result sets from memory rather than
through a database transaction. Because queries reside in
memory, and query res ult set sizes differ, you must provide a
limit for the number of cached queries.
. They can
Page 84

72 Chapter 5 Basic ColdFusion Server Administration
Client Variables
Client variables let you perform tasks like determining the IP address of a site
visitor’s Web browser. Using informatio n from client variables, you can customize
page content for individual users.
You enable client variable default settings in ColdFusion Server on the Client
Variables page of the Administrator. ColdFusion Server lets you store client variables
in these ways:
• The operating system registry
• As cookies in users’ Web browsers
• In a data source.
Note
Y o u can override settings specified in the Client Variables page using the attributes of
the cfapplication tag. For more information, see the Developing ColdFusion
Applications book.
The following table co mpares these storage options:
Storage Type Advantage Disadvantage
System regi stry • Simple implementation
• Good performance
• Regis try can be expo rted
easily to other systems
• Server-side control
Browser cookies • Simple implementation
• Good performance
• Can be set to expire
automatically
• Client-side control
Data source • Can use existing data
source
• Portable: not tied to the
host system or operating
system
• Possible restriction of the
registry’s maximum size limit on
Windows NT and WIndows 2000
in the Control Panel
• Integrated with the host system:
not practical for clustered serve rs
• Solaris, Linux, and HP-UX
registries are text files. Their
registries deliver slow
performance and low scalability.
• Users can configure browsers to
disallow cookies
• ColdFusion Server limits a
cookie’s data to 4 KB
• Netscape Navigator allows only
20 cookies from one host;
ColdFusion Server uses three
cookies to store read-only data,
leaving only 17 cookies available
• Requires database transaction to
read/write variables
• More complex to implement
Page 85

Client Variables 73
Note
If you use the registry to store client variables, ensure that enough memory is
allocated for it.
To enable client variable storage in the registry as the default:
1 In the Client Variables page, select Registry. Click Apply.
2 T o display a page in which to enable the automatic deletion of variables that have
not been used for a specified number of days, click Registry. Click Submit
Changes.
To enable client variable storage in cookies as the default:
In the Client Variables page, select Cookie. Click Submit Changes.
T o enable client variable storage in a data source as the default:
1 In the Client Variable page, select a data source in the drop-down list.
2 Click Add Client Variable Storage. The Add/Edit Client Store page for your data
source display s.
3 On the Add/Edit Client Store page, select options for the data source, as
described in the following table. If you do not want to make changes, return to
the Client Variables screen using one of the arrows on the page.
Option Description
Purge data for
clients that
remain
unvisited for
[n] days
Disable global
client variable
updates
Create Client
database
tables
4Click Submit Changes.
Enable this option to periodically purge client data that has not
been accessed in a specified number of days, and enter a
number.
Enable this option to prevent ColdFusion Server from updating
client variables for every page request. When updates are
disabled, ColdFusion Server only updates global client variables
when they are created and when they are cha nge d. Disabling
updates helps improve the performance of application pages.
Enable this option only when you configure a data source for
client variable storage the first time. ColdFusion Server creates
the tables necessary for client variables. If the data source has
already been configured, disable this option. Otherwise,
ColdFusion Server generates an SQL error because it tries to
create tables that already exist.
Page 86

74 Chapter 5 Basic ColdFusion Server Administration
Note
If a cluster of ColdFusion Servers uses this data source, ensure that only one
server is configured to purge client data.
Migrating Client Variable Data
To migrate your client variable data to another data source, you should know the
structure of the database tables used to store this information. Client variables
stored externally use two small database tables, like those shown in the following
tables:
CGLOBAL Table
Column Data Type
cfid char(64)
data memo
lvisit date
CDATA Table
Column Data Type
cfid char(64)
app char(64)
data memo
Creating client variabl e tables
Use this example ColdFusion page as a model for creating client variable database
tables in your own database. However, keep in mind that not all databases support
the same column data type names. Refer to your database documentation for the
proper data type.
Sample table creation page
<!---- Create the Client variable storage tables in a datasource.
This example applies to Microsoft Access databases --->
<CFQUERY NAME="data1" DATASOURCE="#DSN#">
CREATE TABLE CDATA
(
cfid char(20),
app char(64),
data memo
)
</CFQUERY>
Page 87

Client Variables 75
<CFQUERY NAME="data2" DATASOURCE="#DSN#">
CREATE UNIQUE INDEX id1
ON CDATA (cfid,app)
</CFQUERY>
<CFQUERY NAME="global1" DATASOURCE="#DSN#">
CREATE TABLE CGLOBAL
(
cfid char(20),
data memo,
lvisit date
)
</CFQUERY>
<CFQUERY NAME="global2" DATASOURCE="#DSN#">
CREATE INDEX id2
ON CGLOBAL (cfid)
</CFQUERY>
<CFQUERY NAME="global2" DATASOURCE="#DSN#">
CREATE INDEX id3
ON CGLOBAL (lvisit)
</CFQUERY>
Page 88

76 Chapter 5 Basic ColdFusion Server Administration
Memory Variables
You use the Memory Variables page of the Co ldFusion Administrator to enable
application and session variables server-wide. By default, application and session
variables are enabled when you install ColdFusion Server. If you disable either type
of variable in the Memory Variables page, you cannot use them in a ColdFusion
application.
You can specify maximum and default timeout values for session and application
variables. Unless you define a timeout value in Application.cfm, application
variables expire when you restart ColdFusion Server. Session variables expire when
user sessions end. To change these behaviors, enter default and maximum timeout
values.
Note
Timeout va lue s th a t y o u spe cify f or appli cat io n v a riab les override the timeout values
set in Application.cfm.
Page 89

Locking 77
Locking
You use the Locking page of the ColdFusion Administrator to configure automatic
mechanisms to protect shared data from incorrect access and corruption. In
addition, the
data scope variables, including server, application, and session scopes. For more
information on the
Single threaded sessions
Single threading means that requests from a session occur sequentially. Each
request from the same session waits for previous requests to finish before
proceeding, thereby preventing multiple requests from simultaneously accessing
shared data. This option is disabled at installation.
Because session requests occur sequentially, single threaded sessions are useful if
you do not want to lock session scope variables with the
time, if you use frames in your ColdFusion application, each pane loads
consecutively. When single threaded sessions is enabled in the Administrator, you
do not need to the use the
In addition, single threaded sessions can prove valuable to debugging a ColdFusion
application. If the application error goes away when single threaded sessions is
enabled. you likely have an unlocked session scope variable.
cflock tag provides granular control of simultaneous access to shared
cflock tag, see Developing ColdFusion Applications
cflock tag. At the same
cflock tag for session scope var iables.
Variable scope locking settings
Specify variable scope lock settings by clicking an option. Scope (server, application
and session) settings are described in the following table:
Option Description
No automatic
checking or locking
Full checking ColdFusion Server checks shared variable scope access
Automatic read
locking
No automatic che ck in g o r lo ck in g occurs. The develope r m us t
protect variables with the cflock tag. If variables are not
locked, data corruption may result, and server instability may
occur.
automatically to e nsure that i t is properly locke d. If a dat a read
or write occurs outside the scope of a
displays.
ColdFusion Server checks whether shared variable scope
writes are locked and automatically locks shared variable
scope reads. If Cold Fusion Ser ver encou nters share d variable
scope writes that are not locked, an error displays.
cflock tag, an error
Page 90

78 Chapter 5 Basic ColdFusion Server Administration
Note
Apply full checking and automatic read locking only to applications that use the
scope attribute, not the name attribute, of the
cflock tag to specify locks. If you
specify the name attribute with full checking enabled, ColdFusion Serv er res ponds
with an error on a variable accessed within the scope of a
cflock tag scope. If you
specify the name attribute with automat ic read locking enabled, ColdFusion Server
responds with errors for writes, and possibly a deadlock for reads.
Page 91

Mappings 79
Mappings
You use the Mappings page of the ColdFusion Administrator to add, update, and
delete logical aliases for paths to directories on your server and to change the root
"/" mapping. This alias usually points to the Web root.
ColdFusion mappings apply only to pages processed by the ColdFusion Server with
cfinclude and cfmodule tags. If you save CFML pages outside of the Web root
the
(or whatever directory is mapped to "/"), you must add a mapping to the loc ation of
those files on your server.
For example, le t ’s assume that the "/" mapping on your server points to c:\wwwroot,
but all CFML pages ass ociated w ith you r onli ne stor e r e side i n e:\stor e . For the CFML
pages that sit in the c:\wwwroot, you want to reference the online store pages using /
store in your cfinclude and cfmodule tags. In order for ColdFusion Server to find
those pages, you must add a mapping for /store that points to e:\store.
To add a mapping:
1 In the Logical Path text box, enter an alias to assign to a directory, such as /store.
2 In the Directory Path text box, enter the directory for which to create an alias,
such as e:\store. To locate the directory name, click Browse Server or enter the
directory name.
3Click Add Mapping.
The Active ColdFusion Mappings table shows the new mapping.
To update a mapping:
1 In the Active ColdFusion Mappings table, click a logical or directory path.
2 To update a logical or directory path, edit the information in the appropriate
field, then click Update Mappin g.
The Active ColdFusion Mappings table shows the updated mapping and the original
mapping.
To delete a mapping:
In the Active ColdFusion Mappings table, select a mapping to delete. Click Delete
Mapping. The mapping disappears immediately.
Page 92

80 Chapter 5 Basic ColdFusion Server Administration
Mail/Mail Logging
You use the ColdFusion Administrator Mail page of the ColdFusion Administrator to
specify a mail server to send automated e-mai l messages. ColdFusion Server
supports the Simple Mail Transfer Protocol (SMTP) for sending e-mail and the Post
Office Protocol (POP) for retrieving e-mail from your mail server. To use e-mail
messaging in your C oldFu sion ap plicati ons, y ou must have acc ess to an SM TP server
and/or a POP account.
The ColdFusion implementation of SMTP mail uses a spooled architecture. This
means that when a
generated may not be sent immediately. If ColdFusion is extremely busy or has a
large queue, delivery could occur after some delay.
Note
For more information about the
Applications book.
To configure a mail server:
1 On the ColdFusion Administrator Mail page, enter a mail server for sending
dynamic SMTP mail messages. You can enter an Internet address, such as
mail.company.com, or the IP address of a mail server, such as 127.0.0.1.
2 To cause ColdFusion Server to verify the connection to the mail server, select
Verify Mail Server Connection. If the connection fails, you receive an error
message.
3 In the Server Port text box, enter the mail server port number. The default value
(25) is usually correct. If you are unsure of the appropriate port number, contact
your server administrator.
4 In the Spool Interval text box, enter the interval, in seconds, at which you want
the mail server to process spooled mail.
5 In the Connection Timeout box, enter the number of seconds ColdFusion Server
waits for a response from the mail server.
6Click Submit Changes.
cfmail tag is processed in an application page, the messages
cfmail tag, see the Developing ColdFusion
Tip
Send a test e-mail message to verify that the e-mail server is working, regardless
of whether you enable the Verify Mail Server Connection option.
Page 93

Mail/Mail Logging 81
Mail Logging
Select preferences for handling mail logs, as described in the following table:
Setting Description
Error Log Severity From the drop-down list box, sele ct the ty pe of SMT P-related
error message to write t o a log file. T he opt ions are: Warning,
Information, and Erro r.
Log all e-mail
messages sent by
ColdFusion
ColdFusion Server writes sent mail and mail error logs to the file:
• \cfusion\Log, in Windows
• \opt\coldfusion\log, in Solaris, Linux, and HP-UX
The following table describes the e-mail log files:
Log Description
mailsent.log Records sent e-mail
mail.log Recor ds general e-mail errors
To have the content of all e-mail messages that ColdFusion
Server generates written to a log file, enable this option.
Page 94

82 Chapter 5 Basic ColdFusion Server Administration
Data Sources
The Data Sources section of the Administrator is the interface between you,
ColdFusion Server, databases, and Verity search and indexing features. The
following table describes some common tasks that you can perform in the Data
Sources sectionof the Administrator:
Task Description
Create and manage
ODBC data
sources
Create and manage
native data sources
Create and
maintain Verity
collections
Register a Verity K2
Server with
ColdFusion Server
The ODBC Data Sources page lets you establish, modify, and
delete ODBC data source connections for ColdFusion Server.
For more information, see “Managing Data Sources” on page
109.
The Native Data Sources page lets you establish, modify, and
delete native data source connections for ColdFusion Server.
For more information, see the Ad vanced ColdFusion
Administration book.
The Verity Collections page lets you create and delete Verity
collections and perform maintenance operations on collections
that you create. For more information, see “Verity Collections”
on page 83.
The Verity K2 Server page lets you register a K2 Server to use
with ColdFusion Server. For more information, see the
Advanced ColdFusion Administration book.
Page 95

Verity Collections 83
Verity Collections
The Verity Development Kit (VDK) provides indexing and searching technology to
create, populate, and manage collections of indexed data that are optimized for fast
and efficient site searches. It is available on the Verity Collections page.
A collection is a logic al gr ou p of documents and metadata about the do cume nts . The
metadata includes word indexes, an internal documents table of document field
information, and logical pointers to the document files.
To use Verity searching in ColdFusion applications, you must:
1 Create a Verity collection.
2 Populate a collection with data.
3 Build searching and indexing capability, using the
into your ColdFusion application.
To create a collection:
1 On the Verity Collection page, in the Name Field, enter a name for your
collection. The name can consist of multiple words and spaces.
2 In the Path field, specify a path for the collection files.
3 From the drop-down Language list box, select a language for the collection.
4Click an option:
cfindex and cfsearch tags,
Option Description
Create New
Collection
Map Existing
Collection
5Click Submit Changes.
When you add the first Verity collection, buttons for managing Verity collections
display along the bottom of the ta ble. F or ins tructions ab out using the se buttons , see
“Managing collections” on page 84.
Note
Mapped collections are sometimes confused with external collections. An external
collection is created with a tool other than ColdFusion Server, such as the Verity
command line tool
Server so that it can identify the collection and its directory structure.
Generates a ne w collection
Connects a new m app ing to a col lec ti on tha t was c reated outside
ColdFusion Server or copied from another ColdFusion Server.
After the collection is referenced on this page, ColdFusion
searching and indexing tags can reference it.
mkvdk. External collections are then associated with ColdFusion
Page 96

84 Chapter 5 Basic ColdFusion Server Administration
To populate a collection:
1 On the Verity Collections page, in the Connected Verity Collections table, select a
collection to populate.
2 Click Index. The ColdFusion Administrator page displays with the selected
collection name at the top.
3 Review the extensions in the File Extensions field. If necessary, add, edit, or
remove extensions for files in the collection.
4 In the Directory Path field, enter the path to the directory to index.
5 To include subdirectories of the directory, select Recursively Index Sub
Directories.
6 In the Return URL field, enter a URL to which to return documents found in the
search of this collection, such as http://localhost/cfdocs.
7 From the Language drop-down list, select the langua ge of the documents.
Note
By default, the Verity English Language Pack installs with ColdFusion Server. To
select another language, install the corresponding Verity Language Pack. The
Verity Language Packs are included on the ColdFusion Server CD-ROM.
8Click Submit Changes.
ColdFusion Server populates the collection with data from the specified directory.
Building searching and indexing capabilities
For more information about building search interfaces, see the chapters about the
cfindex, cfsearch, cfcollection tags in the Developing ColdFusion Applications
book.
For faster searching, establish a Verity Server link in the Administrator to take
advantage of the Verity K2 Server. This server caches collection information so that
data is retrieved more quickly when searches are run with the
Server delivers rapid search results in a highly efficient and scalable architecture.
For more information on using the VDK and K2 Server with ColdFusion Server, see
the Advanced ColdFusion Administration book.
Managing collections
You can repair, optimiz e, purge, or delete Verity collections that are connected t o the
ColdFusion Server. To manage collections, use the buttons along the bottom of the
Connected Verity Collections table.
cfsearch tag. The K2
Page 97

Verity Collections 85
Note
Before performing management operations, ensure that the K2 Server is not using
the collections. For more information, see the K2 Server documentation in Advanced
ColdFusion Administration book.
The following table describes the optio ns:
Option Description
Repair Re-indexes a collection to fix broken links and update indexes
Optimize Reclaims space left by deleted and changed files by consolidating
collection indexes for faster searching. Optimize collections regularly
Purge Deletes all documents in a collection , but not the collectio n it self. Leav es
the collect ion directory structure intact
Delete Deletes a collection
To repair a collection:
1 On the Verity Collections page, select a collection from the Connected Verity
Collections table.
2 Click Repair. A message warns you not to work on the collection during the r epair
process, which can occur over several minutes.
3Click OK.
When you repair a collection, a confirmation statement displays above the table.
To optimize a collection:
1 On the Verity Collections page, select a collection from the Connected Verity
Collections table.
2 Click Optimize. A message prompts you to verify the process, which can occur
over several minutes.
3Click OK.
When the optimization is complete, a confirmation statement displays above the
table.
To purge a collection:
1 On the Verity Collections page, select a collection from the Connected Verity
Collections table.
2 Click Purge. A verification message warns you that purging of data cannot be
undone.
3 Click OK.
When the purge is complete, a confirmation statement displa ys above the table.
Page 98

86 Chapter 5 Basic ColdFusion Server Administration
To delete a collection:
1 On the Verity Collections page, select a collection from the Connected Verity
Collections table.
2 Click Delete. A verification message displays warns you that deleting a collection
cannot be undone.
3Click OK.
When the delete is complete, a confirmation statement displays above the table.
Verity supported file types
The ColdFusion VDK implementation supports the document types listed below:
Document Type Format or Program Version
Te xt HTML, CFML, DBM, SGML,
XML, ANSI, ASCII, Plain Text
Word processing Adobe Acrobat (PDF)* All
Applix Words 4.2
Lotus AMI Pro 2.3
Lotus AMI Pro Write Plus All
Lotus Word Pro 96, 97
Microsoft Rich Text Format
(RTF)
Microsoft Word for Windows 2, 6, 95, 97, 2000
Microsoft Word for DOS 4, 5, 6
Microsoft Word for Macintosh 4, 5, 6
Microsoft Works All
Microsoft Write All
WordPerfect 5.x, 6, 7, 8
WordPerfect for Macintosh 2, 3
XYWrite 4.12
Unicode Not Applicable
Spreadsheet Applix Spreadsheets 4.2, 4.4
Corel QuattroPro 7, 8
Lotus 1-2-3 2, 3, 4, 5, 96, 97
Microsoft Excel 3, 4, 5, 96, 97, 2000
Microsoft Works All
* Not Supported in Linux.
Not applicable
1.x, 2.0
Page 99

Verity Collections 87
Document Type Format or Program Version
Presentation Corel Presentations 7.0, 8.0
Lotus Freelance 96, 97
Microsoft PowerPoint 4.0, 95, 97, 2000
* Not Supported in Linux.
Page 100

88 Chapter 5 Basic ColdFusion Server Administration
Debug Settings
You use the Debug Setting and Debugging IPs pages of the Administrator to
configure ColdFusion Server to pro vide debugging informa tion for every applic at io n
page requested by a browser. You specify debugging preferences using these pages:
• On the Debugging Options page, select debugging output options. If debugging
is enabled, the output appears in block format after normal page output.
• On the Debugging IPs page, restrict access to debugging output. If a debugging
option is enabled, debugging output is visible to all users by default.
Debug Options
The Debugging Options page provides these debug options:
Option Description
Enable Performance Monitoring* The standard N T Performanc e Monitor ap plicatio n
displays information about a running ColdFusion
Server. On platforms that do not support the NT
Performance Monitor, a command line utility,
cfstat, displays the same information.
Enable CFML Stack Trace Displays the CFM L tag s that w ere executi ng at the
time of the exception.
Show V ari abl es Displays the nam es and values of CGI, U RL, form
and cookie va riables.
Show Total Processing Time Displays the average time, in milliseconds, that it
takes to process a page request.
Show Detailed Processing Time
Breakdown*
Show SQL and Data Source
Name
Show Query Information Displays the number of records, processing time,
Display the Template Path in
Error Messages
* Restart ColdFusion Server in Windows after selecting this option.
Displays the time, in milliseconds, that it takes to
process each page.
Displays the data source name and the SQL
statement in database query error messages.
and SQL statement for each query executed.
Displays the file name of a template. The name is
useful in debugging. However, use of this option
can pose a security hazard because it displays
information about a server’s file structure.
 Loading...