

Page 1
OL
–3
–6
–9
–20
–3
–6
–9
–20
SIG
OL
SIG
CH
1
33
31
29
23
25
21
2719
17
11
33
31
29
23
25
21
2719
17
11
0
0
1.23v (+4dBu)
SENSITIVITY
GAIN/dB
CH
2
PROTECT
COLD HOT
SHORT
TEMP STATUS
INTERNAL STATUS
CH
1
CH
2
CH
1&2
POWER
3v
2v
1v
0
0
1.23v (+4dBu)
SENSITIVITY
GAIN/dB
3v
2v
1v
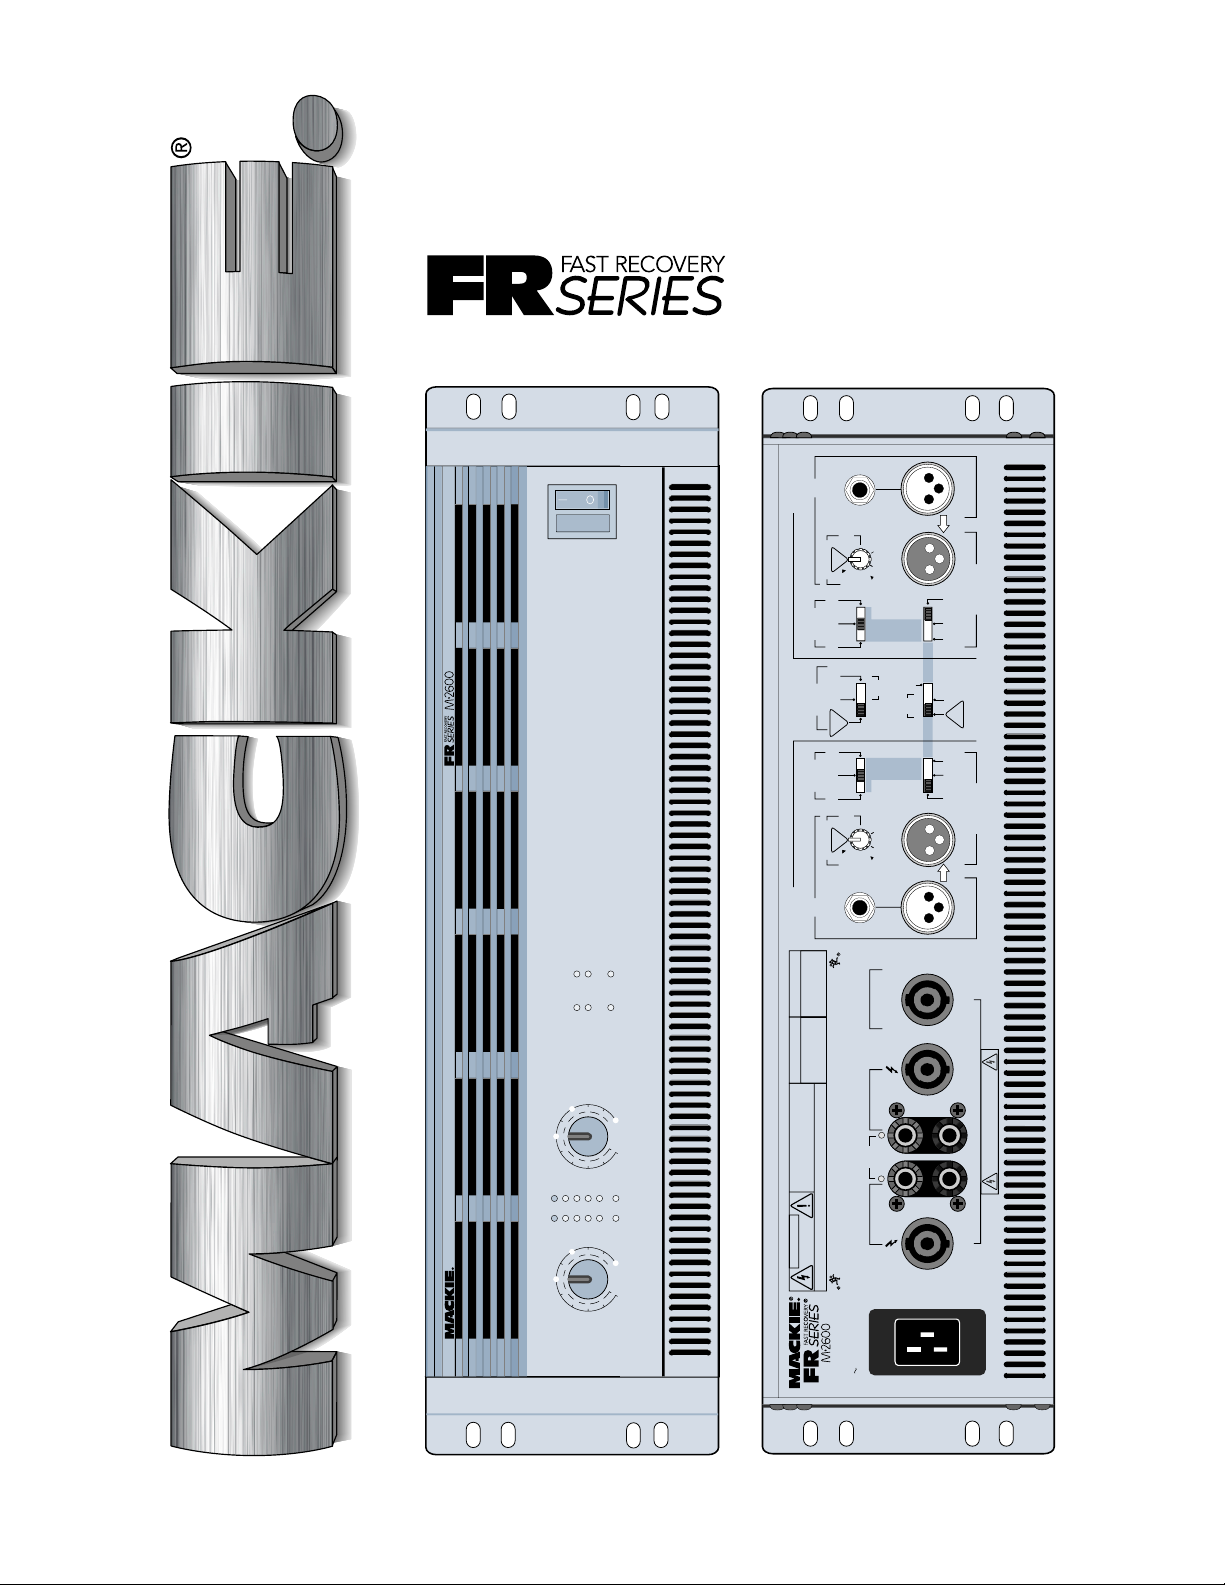
PROFESSIONAL POWER AMPLIFIER
FULL SYMMETRY DUAL DIFFERENT IAL HIGH CURRENT DESIGN
SERIAL NUMBER
MANUFACTURING DATE
RISK OF ELECTRIC SHOCK
DO NOT OPEN
CAUTION
2600 WATTS
4 OHM LOAD MIN.
120 VAC 60 Hz
2000 WATTS
STEREO
TYPICAL
CH
1
CH
2
MONO
BRIDGE
• THE FOLLOWING ARE REGISTERED TRADEMARKS OF MACKIE DESIGN INC.: "MACKIE", "FR SERIES", AND THE "RUNNING MAN" FIGURE •
CONCEIVED AND DESIGNED BY MACKIE DESIGNS INC • WOODINVILLE
WA • 98072 • USA • PATENTS PENDING • COPYRIGHT ©1998
1300 WATTS / CH
2 OHM LOAD MIN.
1
CHANNEL
MONO
BRIDGE
S
U
B
W
O
O
F
E
R
TYPICAL
35 Hz
CHANNEL
2
ON
TYPICAL
CAUTION
LETHAL VOLTAGES MAY APPEAR AT OUTPUT
TERMINALS. CLASS 1 WIRING IS REQUIRED
SPEAKER OUTPUT S
IN
IN
LOW CUT FILTER
INPUT
INPUT
CROSSOVER
SWITCHED OUTPUT
SWITCHED OUTPUT
BALANCED
OR
UNBALANCED
170 Hz
100 Hz
OFF
STAGE
MONITOR
90Hz
LOW
OUT
H
IG
H
O
U
T
THRU
LOW
OUT
H
IG
H
O
U
T
THRU
1
2
0
H
z
60Hz
CROSSOVER
90Hz
1
2
0
H
z
60Hz
AMP MODE
BRIDG
ED
M
O
N
O
OUTPUT APPLICATION
BALANCED
OR
UNBALANCED
LIMITER
(CH1 & CH2)
LOW OUT
(SUB WOOFER)
OFF
CH's
SUMMED
FULL
RANGE
LOW CUT FILTER
170 Hz
100 Hz
OFF
STAGE
MONITOR
S
U
B
W
O
O
F
E
R
TYPICAL
35 Hz
WARNING:
TO REDUCE THE RISK OF FIRE OR ELECTRIC SHOCK, DO NOT
EXPOSE THIS EQUIPMENT TO RAIN OR MOISTURE. DO NOT REMOVE COVER.
NO USER SERVICEABLE PARTS INSIDE. REFER SERVICING TO QUALIFIED PERSONNEL.
AVIS :
RISQUE DE CHOC ELECTRIQUE — NE PAS OUVRIR
PIN 1+ CH1+
PIN 1
–
CH1
–
PIN 2+ & 2
–
NOT USED
PIN 1+ CH2+
PIN 1
–
CH2
–
PIN 2+ & 2
–
NOT USED
PIN 1+ BRIDGE+
PIN 1
–
BRIDGE
–
PIN 2+ & 2
–
NOT USED
THRU
THRU
+
––
+
+
–
M•2600
OWNER’S MANUAL
™
HIGH-CURRENT POWER AMPLIFIER
Page 2
CAUTION AVIS
RISK OF ELECTRIC SHOCK
RISQUE DE CHOC ELECTRIQUE
CAUTION: TO REDUCE THE RISK OF ELECTRIC SHOCK
NO USER-SERVICEABLE PARTS INSIDE
REFER SERVICING TO QUALIFIED PERSONNEL
ATTENTION: POUR EVITER LES RISQUES DE CHOC
ELECTRIQUE, NE PAS ENLEVER LE COUVERCLE. AUCUN
ENTRETIEN DE PIECES INTERIEURES PAR L'USAGER. CONFIER
L'ENTRETIEN AU PERSONNEL QUALIFIE.
AVIS: POUR EVITER LES RISQUES D'INCENDIE OU
D'ELECTROCUTION, N'EXPOSEZ PAS CET ARTICLE
The lightning flash with arrowhead symbol within an equilateral
triangle is intended to alert the user to the presence of uninsulated
"dangerous voltage" within the product's enclosure, that may be
of sufficient magnitude to constitute a risk of electric shock to persons.
Le symbole éclair avec point de flèche à l'intérieur d'un triangle
équilatéral est utilisé pour alerter l'utilisateur de la présence à
l'intérieur du coffret de "voltage dangereux" non isolé d'ampleur
suffisante pour constituer un risque d'éléctrocution.
The exclamation point within an equilateral triangle is intended to
alert the user of the presence of important operating and maintenance
(servicing) instructions in the literature accompanying the appliance.
Le point d'exclamation à l'intérieur d'un triangle équilatéral est
employé pour alerter les utilisateurs de la présence d'instructions
importantes pour le fonctionnement et l'entretien (service) dans le
livret d'instruction accompagnant l'appareil.
DO NOT OPEN
NE PAS OUVRIR
DO NOT REMOVE COVER (OR BACK)
A LA PLUIE OU A L'HUMIDITE
SAFETY INSTRUCTIONS
1. Read Instructions — All the safety and operation instructions should be
read before this Mackie product is operated.
2. Retain Instructions — The safety and operating instructions should be kept
for future reference.
3. Heed Warnings — All warnings on this Mackie product and in these operating
instructions should be followed.
4. Follow Instructions — All operating and other instructions should be
followed.
5. Water and Moisture — This Mackie product should not be used near water
– for example, near a bathtub, washbowl, kitchen sink, laundry tub, in a wet
basement, near a swimming pool, swamp or salivating St. Bernard dog, etc.
6. Cleaning — Clean only with a dry cloth.
7. Ventilation — This Mackie product should be situated so that its
location or position does not interfere with its proper ventilation. For
example, the Component should not be situated on a bed, sofa, rug, or
similar surface that may block any ventilation openings, or placed in a
built-in installation such as a bookcase or cabinet that may impede the
flow of air through ventilation openings.
8. Heat — This Mackie product should be situated away from heat sources
such as radiators, or other devices which produce heat.
9. Power Sources — This Mackie product should be connected to a power
supply only of the type described in these operation instructions or as marked
on this Mackie product.
10 . Power Cord Protection — Power supply cords should be routed so that
they are not likely to be walked upon or pinched by items placed upon or
against them, paying particular attention to cords at plugs, convenience
receptacles, and the point where they exit this Mackie product.
11 . Object and Liquid Entry — Care should be taken so that objects do not
fall on, and liquids are not spilled into, this Mackie product.
12 . Damage Requiring Service — This Mackie product should be serviced
only by qualified service personnel when:
A. The power-supply cord or the plug has been damaged; or
B. Objects have fallen, or liquid has spilled into this Mackie product; or
C. This Mackie product has been exposed to rain; or
D. This Mackie product does not appear to operate normally or exhibits
a marked change in performance; or
E. This Mackie product has been dropped, or its chassis damaged.
13 . Servicing — The user should not attempt to service this Mackie product
beyond those means described in this operating manual. All other servicing
should be referred to the Mackie Service Department.
14 . To prevent electric shock, do not use this polarized plug with an
extension cord, receptacle or other outlet unless the blades can be fully
inserted to prevent blade exposure.
Pour prévenir les chocs électriques ne pas utiliser cette fiche polariseé avec un
prolongateur, un prise de courant ou une autre sortie de courant, sauf si les
lames peuvent être insérées à fond sans laisser aucune pariie à découvert.
15 . Grounding or Polarization — Precautions should be taken so that the
grounding or polarization means of this Mackie product is not defeated.
16 . Power Precaution — Unplug this Mackie product during lightning storms
or when unused for long periods of time.
Note that this Mackie product is
not completely disconnected from the AC mains service when the power
switch is in the OFF position.
17 . This apparatus does not exceed the Class A/Class B (whichever is
applicable) limits for radio noise emissions from digital apparatus as set out in the
radio interference regulations of the Canadian Department of Communications.
ATTENTION —Le présent appareil numérique n’émet pas de bruits
radioélectriques dépassant las limites applicables aux appareils numériques de
class A/de class B (selon le cas) prescrites dans le règlement sur le brouillage
radioélectrique édicté par les ministere des communications du Canada.
PORTABLE CART WARNING
Carts and stands - The
Component should be used
only with a cart or stand
that is recommended by
the manufacturer.
A Component and cart
combination should be
moved with care. Quick
stops, excessive force, and
uneven surfaces may cause
the Component and cart
combination to overturn.
WARNING — To reduce the risk of fire or electric shock,
do not expose this appliance to rain or moisture.
Page 3
Lend Me Your Ears
Exposure to extremely high
noise levels may cause permanent hearing loss.
Individuals vary considerably
in susceptibility to noiseinduced hearing loss, but nearly everyone will
lose some hearing if exposed to sufficiently intense
noise for a period of
time. The U.S.
Government’s Occupational Safety and
Health Administration (OSHA) has
specified the permissible noise level
exposures shown in
this chart.
Duration in Sound level dBA Typical example
hours per day (slow response)
8 90 Duo in small club
692
4 95 Subway Train
397
2 100 Very loud classical music
1.5 102
1 105 Lori screaming at Ron
0.5 110
0.25 or less 115 Loudest parts at a rock concert
INTRODUCTION
Thank you for choosing a Mackie Designs
power amplifier! The M•2600 is designed to
fulfill the amplification needs of almost any type
of application, with solid design features such as:
• 2600 watts into 4 ohms, bridged
• 1700 watts into 8 ohms, bridged
• 1300 watts x 2 into 2 ohms, stereo
• 850 watts x 2 into 4 ohms, stereo
• 500 watts x 2 into 8 ohms, stereo
• Easily handles 2 ohm loads all night long
• Two low-cut filters, 2nd-order Bessel,
12dB/octave, variable from Off to 170Hz
• Two superior design active crossovers,
4th-order Linkwitz-Riley, 24dB/octave,
selectable crossover point at 60, 90 or 120Hz
• Switchable limiter
• Automatic soft turn-on and multiple
protection circuits
• Balanced/unbalanced 1/4" and XLR inputs
• XLR thru outputs, selectable to full-range,
high pass or low pass
• Speakon® or binding post outputs
• Superior T-Design fan cooling
• Ultra low noise and distortion
• Fast Recovery design
• Five year warranty
At Mackie, we know what it takes to be
roadworthy. After all, our mixers have traveled
all over the world under the worst of conditions,
and we’ve applied what we’ve learned to the
mechanical design of our amplifiers.
Reliability is paramount to sound reinforcement. That’s why we use double-sided thru-holeplated fiberglass printed circuit boards. That’s
why our engineers have subjected the amplifier
to the most rigorous and fiendish tests imaginable to fine-tune the design and extend its
limits beyond those of ordinary amplifiers.
Part No. 0003364 Rev. A 05/02
©2002 Mackie Designs Inc. All Rights Reserved.
According to OSHA, any exposure in excess of
these permissible limits could result in some hearing loss. To ensure against potentially dangerous
exposure to high sound pressure levels, it is recommended that all persons exposed to equipment
capable of producing these levels (such as the
M•2600) use hearing protectors while this unit is in
operation. Ear plugs or protectors in the ear canals
or over the ears
must be worn when
operating this amplification system
in order to prevent
a permanent hearing loss if exposure
is in excess of the
limits set forth here.
Our Fast Recovery (FR) amplifiers perform
better than conventional designs when presented
with adverse conditions such as clipping. Conventional designs use lots of negative feedback
to provide stability and lower distortion. When
clipping occurs, this “feedback” causes highfrequency sticking, keeping the amplifier
“latched” in the clipping state longer than
necessary. This results in painfully audible
distortion. The Fast Recovery design eliminates
this high-frequency sticking and allows the
amplifier to remain stable when powering
highly reactive loads at high volume levels.
Carefully read and follow all the safety instructions explained on page 2 and throughout
the manual. The Quick Start guide on page 4
gives an overview of the amplifier, and the rest
of the manual explains the wealth of features
and operating instructions in loving detail.
Please write your serial number here for
future reference (i.e., insurance claims, tech
support, return authorization, etc.):
Purchased at:
Date of purchase:
3
®
Page 4
READ THIS PAGE!
QUICK START
I got ants in my pants and I got to dance!
INSTALLATION
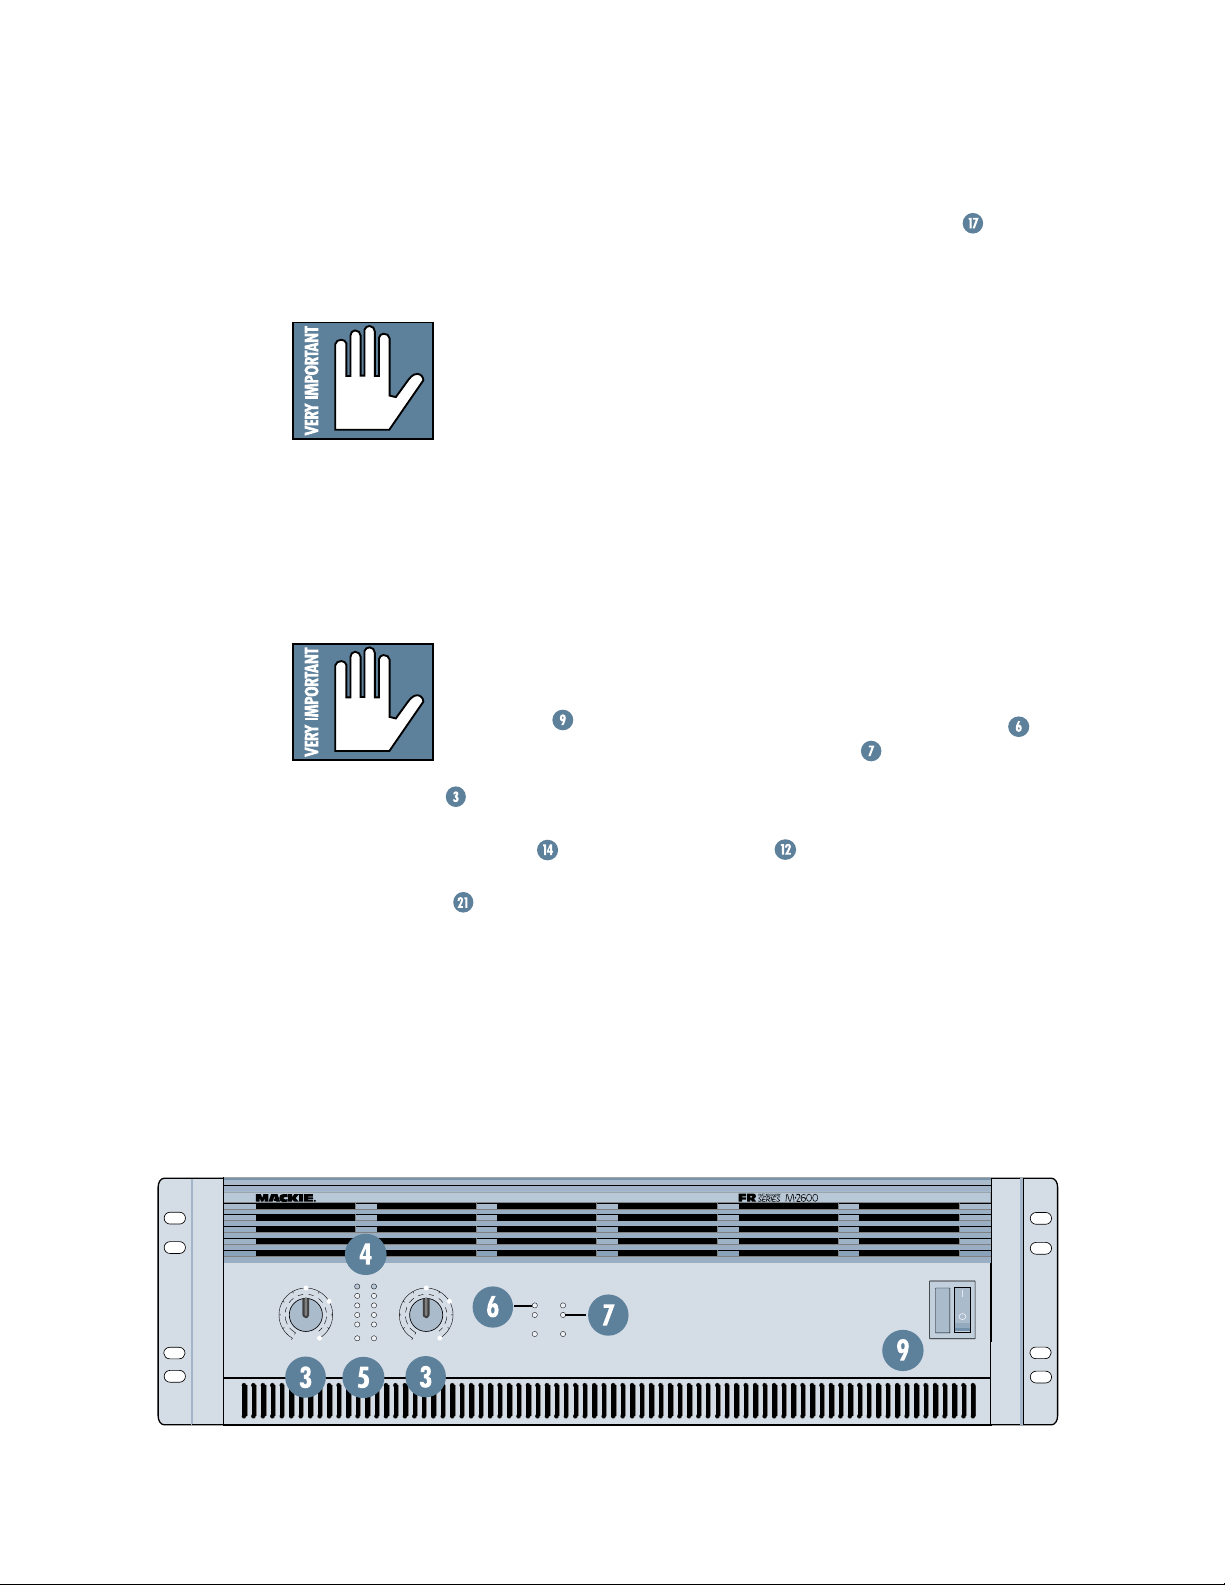
The M•2600 amplifier
must only be installed in a
rack. See page 29 for special details regarding rack
mounting and thermal
considerations.
DO NOT BLOCK THE VENTILATION PORTS
The M•2600 draws its ventilation air in from
the front and out through the side panels. It
needs plenty of fresh air to stay cool.
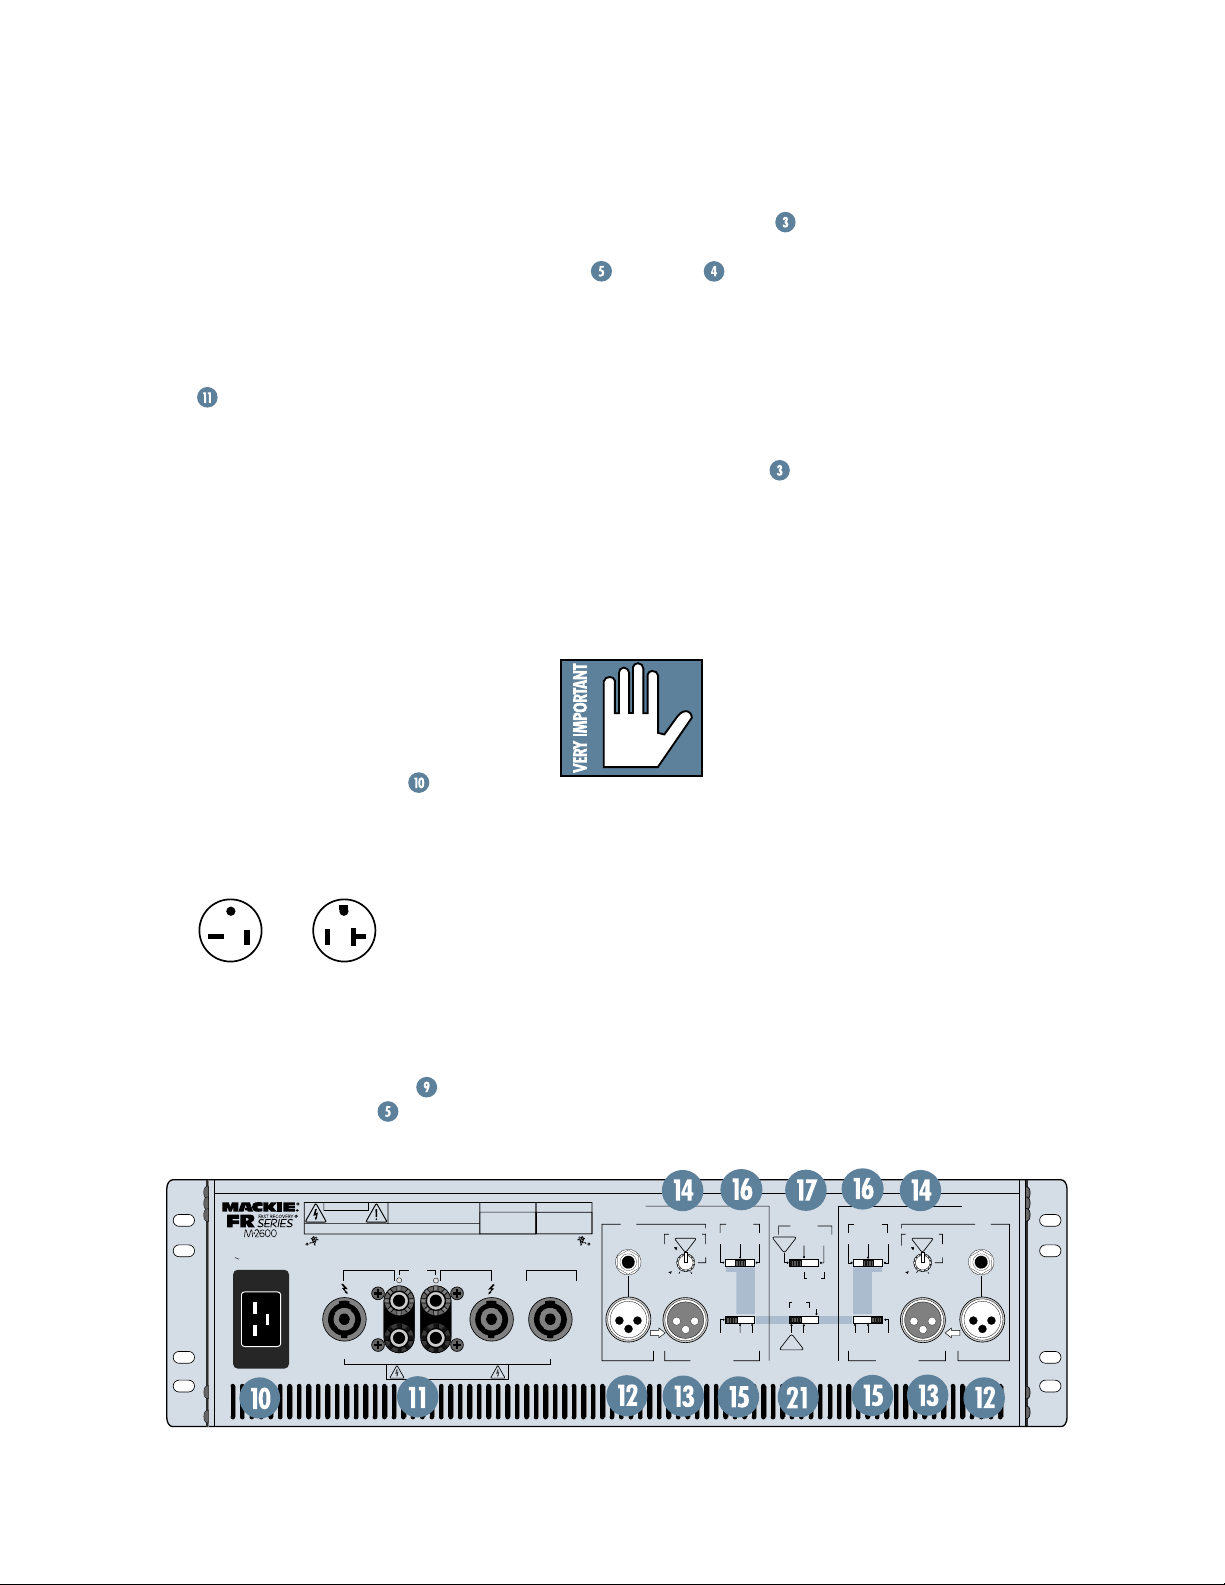
CONNECTIONS AND SETTINGS
1. The output terminals
are capable of high voltage
output, so for your safety,
POWER
the
must be off before making
any connections.
GAIN
2. Turn the
controls fully down
(counterclockwise) for now.
3. Set both
their
4. Set the
LOW CUT FILTER
TYPICAL
marks (35Hz).
LIMITER
switch on.
Note: If you’re using the M•2600 to power a
subwoofer, you probably do not need an external
crossover. Please see page 28 for details.
switch
controls to
5. Determine which
AMP MODE
is best
for your application:
STEREO
•
mode (separate left and right
inputs, separate left and right outputs) is
the typical setup for amplifying stereo
signals.
MONO
•
mode (sometimes called DualMono mode — one or two inputs, two mono
outputs) is for sending a mono signal to
two different speaker sets, with separatelyadjustable level controls.
BRIDGED
•
mode (sometimes called
Bridged-Mono — one or two inputs, one
mono output) uses both sides of the amp to
triple the power going to one speaker. An
M•2600 in
BRIDGED
mode, delivers 2600
watts (into 4 ohms). Garsh!
Note: In
BRIDGED
mode, 4 ohms is the minimum speaker impedance you should connect to
the amplifier. If you connect a lower impedance
load, the amplifier may go into
mode and the
SHORT
LEDs will turn on.
PROTECT
Then the audience will turn on you.
6. In
STEREO
mode, connect line-level cables
from your signal source to the M•2600’s
INPUT
jacks, either XLR or TRS:
• The XLR and TRS inputs for each
channel are wired in parallel.
• The balanced XLR inputs are wired
pin 2 = hot (+), pin 3 = cold (–), and
pin 1 = shield (ground).
• The 1/4" TRS inputs are wired
tip = hot (+), ring = cold (–), and
sleeve = shield (ground), and can accept
either balanced (TRS) or unbalanced (TS)
cables.
FULL S YMMETRY DUAL DIFFERENTI AL HIGH CUR RENT DESIGN
CH
GAIN/dB
CH
1
17
11
SENSITIVITY
OL
3v
23
–3
25
21
2v
2719
–6
–9
29
–20
31
33
0
0
1v
1.23v (+4dBu)
SIGOLSIG
GAIN/dB
CH
3v
23
17
11
SENSITIVITY
2
25
21
2v
2719
29
31
33
0
0
1v
1.23v (+4dBu)
–3
–6
–9
–20
CH
1
INTERNAL STATUS
PROTECT
SHORT
TEMP STATUS
CH
1&2
COLD HOT
2
PROFESSIONAL POWER AMPLIFIER
POWER
4
Page 5
7. In
BRIDGED
to
CHANNEL 1
mode, connect an input cable
’s
INPUT
or
CHANNEL 2
you want to use both inputs, the two input
signals are summed internally to produce a
mono signal.
STEREO
8. In
speaker cables to the
and
MONO
modes, connect
SPEAKER OUTPUTS
, using either the binding post or
Speakon® connectors.
• The binding post connectors are wired
red = hot (+) and black = cold (–).
• See page 35 for Speakon wiring details.
9. In
BRIDGED
mode, connect the speaker
cable like this: the positive (+) wire goes in
CHANNEL 1 SPEAKER OUTPUT’s
the
post and the negative (–) wire goes in
CHANNEL 2’
s red post. Plug nothing into
the black posts. There is also a single
Speakon connector for
BRIDGED
mode
(see page 35).
10. Connect the other ends of the speaker
cables to your loudspeakers.
11. Plug the amp’s power cord
into a
3-prong AC outlet properly configured for
the type of plug supplied with your amplifier,
and capable of delivering at least 20 amps
(for the 120V model). See page 29.
GG
NEMA 5-20P
(Plug supplied with
120 VAC models)
NEMA 5-20R
(120 VAC, 20Amp
Receptacle)
12. Make sure your signal source (feeding the
M•2600’s inputs) is powered up and
delivering signal to the amp.
13. Turn the M•2600’s
and verify that the
POWER
SIG
switch on
LEDs are
showing an input signal is present.
14. Slowly turn both
. If
You should hear the music and see the
GAIN
controls up:
and meter LEDs flashing.
If the topmost LEDs (named
overload) are flashing, turn down either
GAIN
the
controls on the amp or the
source signal’s output level controls (i.e.,
master faders). The point is: The
should not light up.
15. For quieter listening, it is preferable to
adjust the amp’s
GAIN
controls rather
than the source signal’s output level
(unless you have the source’s control all
the way up!).
16. Start dancing, but don’t let the ants out of
red
your pants.
Things You Must Remember:
• Never plug amplifier
outputs into anything
except speakers (unless
you have an outboard box
specifically designed to
handle high-power
speaker-level signals).
• Before making connections to an amp or
reconfiguring an amp’s routing, turn the
GAIN
amp’s level (
) controls down, turn
the power off, make the changes, turn
the power back on, and then turn the
level controls back up.
• If you shut down your equipment, turn
off the amplifiers first. When powering
up, turn on the amplifiers last.
• Save the shipping boxes! You may need
them someday, and you probably don’t
want to have to pay for them again.
OL
, for
OL
SIG
LEDs
120 VAC 60 Hz
2000 WATTS
MANUFACTURING DATE
–
CAUTION
+
––
CH
2
PIN 1+ CH2+
PIN 1
PIN 2+ & 2–NOT USED
SERIAL NUMBER
–
–
CH2
2600 WATTS
4 OHM LOAD MIN.
MONO
BRIDGE
PIN 1+BRIDGE +
–
PIN 1
BRIDGE
PIN 2+ & 2–NOT USED
CAUTION
RISK OF ELECTRIC SHOCK
CONCEIVED AND DESIGNED BY MACKIE DESIGNS INC • WOODINVILLE
• THE FOLLOWING ARE REGISTERED TRADEMARKS OF MACKIE DESIGN INC.: "MACKIE", "FR SERIES", AND THE "RUNNING MAN" FIGURE •
PIN 2+ & 2–NOT USED
WARNING:
TO REDUCE THE RISK OF FIRE OR ELECTRIC SHOCK, DO NOT
EXPOSE THIS EQUIPMENT TO RAIN OR MOISTURE. DO NOT REMOVE COVER.
NO USER SERVICEABLE PARTS INSIDE. REFER SERVICING TO QUALIFIED PERSONNEL.
DO NOT OPEN
AVIS:
WA • 98072 • USA • PATENTS PENDING • COPYRIGHT ©1998
PIN 1+ CH1+
PIN 1
RISQUE DE CHOC ELECTRIQUE — NE PAS OUVRIR
1300 WATTS / CH
2 OHM LOAD MIN.
MONO
BRIDGE
CH
+
1
+
–
–
CH1
SPEAKER OUTPUTS
LETHAL VOLTAGES MAY APPEAR AT OUTPUT
TERMINALS. CLASS 1 WIRING IS REQUIRED
CHANNEL
1
INPUT
BALANCED
OR
UNBALANCED
–
THRU
IN
LOW CUT FILTER
TYPICAL
35 Hz
R
E
F
O
O
W
B
U
S
170 Hz
OFF
60Hz
STAGE
MONITOR
100 Hz
THRU
SWITCHED OUTPUT
CROSSOVER
90Hz
LOW
OUT
AMP MODE
STEREO
120Hz
TYPICAL
OUTPUT APPLICATION
FULL
RANGE
HIGH
OUT
ON
TYPICAL
LIMITER
(CH1 & CH2)
MONO
OFF
CH's
SUMMED
(SUB WOOFER)
BRIDGED
LOW OUT
CROSSOVER
LOW CUT FILTER
120Hz
60Hz
90Hz
O
O
W
B
U
LOW
HIGH
THRU
OUT
OUT
SWITCHED OUTPUT
CHANNEL
2
INPUT
BALANCED
TYPICAL
35 Hz
R
E
F
S
OFF
OR
UNBALANCED
STAGE
MONITOR
100 Hz
170 Hz
THRU
IN
5
Page 6
HOW TO USE THIS MANUAL
APPLICATION DIAGRAMS
Mackie’s chain gang of illustrators have
created easy-to-understand diagrams of popular
studio and live-sound setups. Your setup will
probably be different in some way, but these
diagrams will help you see the big picture so
you can add your own finishing touches.
FEATURE DESCRIPTIONS:
MIND-BOGGLING DETAILS
Each and every knob, switch, and connector
on the M•2600 power amplifier is explained in
depth here. Throughout this section you’ll find
illustrations, with each feature numbered like
. If you’re curious about a feature, sim-
this
ply locate it on the appropriate illustration,
note the number attached to it, and find that
number in the nearby paragraphs.
A PLUG FOR THE CONNECTORS SECTION
Also at the back of this manual is a section on
connectors: XLR, TRS, binding post connectors,
balanced connectors, unbalanced connectors,
and Speakon
ing your own cables, please visit this section
before you start.
®
connectors. If you plan on wir-
ARCANE MYSTERIES ILLUMINATED
Almost last but not least, we’ve included
an appendix entitled Arcane Mysteries Illumi-
nated. This section discusses some of the down
’n’ dirty practical realities of signal transmission,
balancing a sound system, grounding, and balanced versus unbalanced lines. It’s a gold mine
for the neophyte, and even the seasoned pro
might learn a thing or two.
TECHNICAL INFO
This section is for you tech-heads who like
to use a calculator and read specifications.
You’ll find it all here.
This icon marks information that is critically
important or unique to the M•2600. For your
own good, read the information carefully and
remember it. We may call you someday and
quiz you.
This icon leads you to in-depth explanations
of features and practical tips. While not mandatory, these explanations contain some
valuable information.
GENERAL PRECAUTIONS AND
CONSIDERATIONS
This section discusses important things to
keep in mind when installing and using the
M•2600, including rack mounting, AC power,
and wiring.
6
Page 7
CONTENTS
SAFETY INSTRUCTIONS.................................................. 2
INTRODUCTION ............................................................ 3
QUICK START ......................................................... 4
HOW TO USE THIS MANUAL .......................................... 6
APPLICATION DIAGRAMS .............................................. 8
FEATURE DESCRIPTIONS .............................................. 17
GAIN............................................................. 17
METERS ......................................................... 18
SIG ............................................................... 19
PROTECT ........................................................ 19
SHORT........................................................... 19
TEMP STATUS ................................................. 20
POWER ......................................................... 21
POWER CORD ................................................ 21
SPEAKER OUTPUTS ......................................... 22
INPUT ........................................................... 23
THRU and THRU SWITCH ........................... 24
LOW CUT FILTER ............................................. 24
CROSSOVER SWITCH ...................................... 25
AMP MODE SWITCH ....................................... 25
STEREO ......................................................... 26
MONO .......................................................... 26
BRIDGED ....................................................... 26
OUTPUT APPLICATION SWITCH ........................ 27
LIMITER ON, LIMITER OFF ........................... 27
LOW OUT (SUBWOOFER) ................................. 28
GENERAL PRECAUTIONS AND CONSIDERATIONS............. 29
RACK MOUNTING ................................................ 29
THERMAL CONSIDERATIONS .................................. 29
AC POWER CONSIDERATIONS ................................ 29
INPUT WIRING .................................................... 30
OUTPUT WIRING .................................................. 30
70V DISTRIBUTION SYSTEMS ................................ 31
APPENDIX A: Service Info ............................................ 32
WARRANTY SERVICE ............................................ 32
TROUBLESHOOTING ............................................. 32
REPAIR ............................................................... 33
APPENDIX B: Connectors .............................................. 34
“XLR” CONNECTORS ............................................ 34
1⁄4" TRS PHONE PLUGS AND JACKS ....................... 34
1⁄4" TS PHONE PLUGS AND JACKS ......................... 34
UNBALANCING A LINE........................................... 34
BINDING POSTS ................................................... 35
SPEAKONS .......................................................... 35
APPENDIX C: Arcane Mysteries Illuminated ..................... 36
BALANCED LINES .................................................. 36
FIXED INSTALLATIONS ........................................... 36
GROUNDING ....................................................... 37
BI-AMPLIFIED AND TRI-AMPLIFIED SYSTEMS ........... 38
APPENDIX D: Technical Info .......................................... 39
DO THE MATH: OHMS, LOADS, AND SUCH............... 39
SPECIFICATIONS M•2600 ...................................... 40
BLOCK DIAGRAM ................................................. 42
®
7
Page 8
APPLICATION DIAGRAMS
The following pages show some of the more
common uses for the M•2600, including
stereo, mono, and bridged operation.
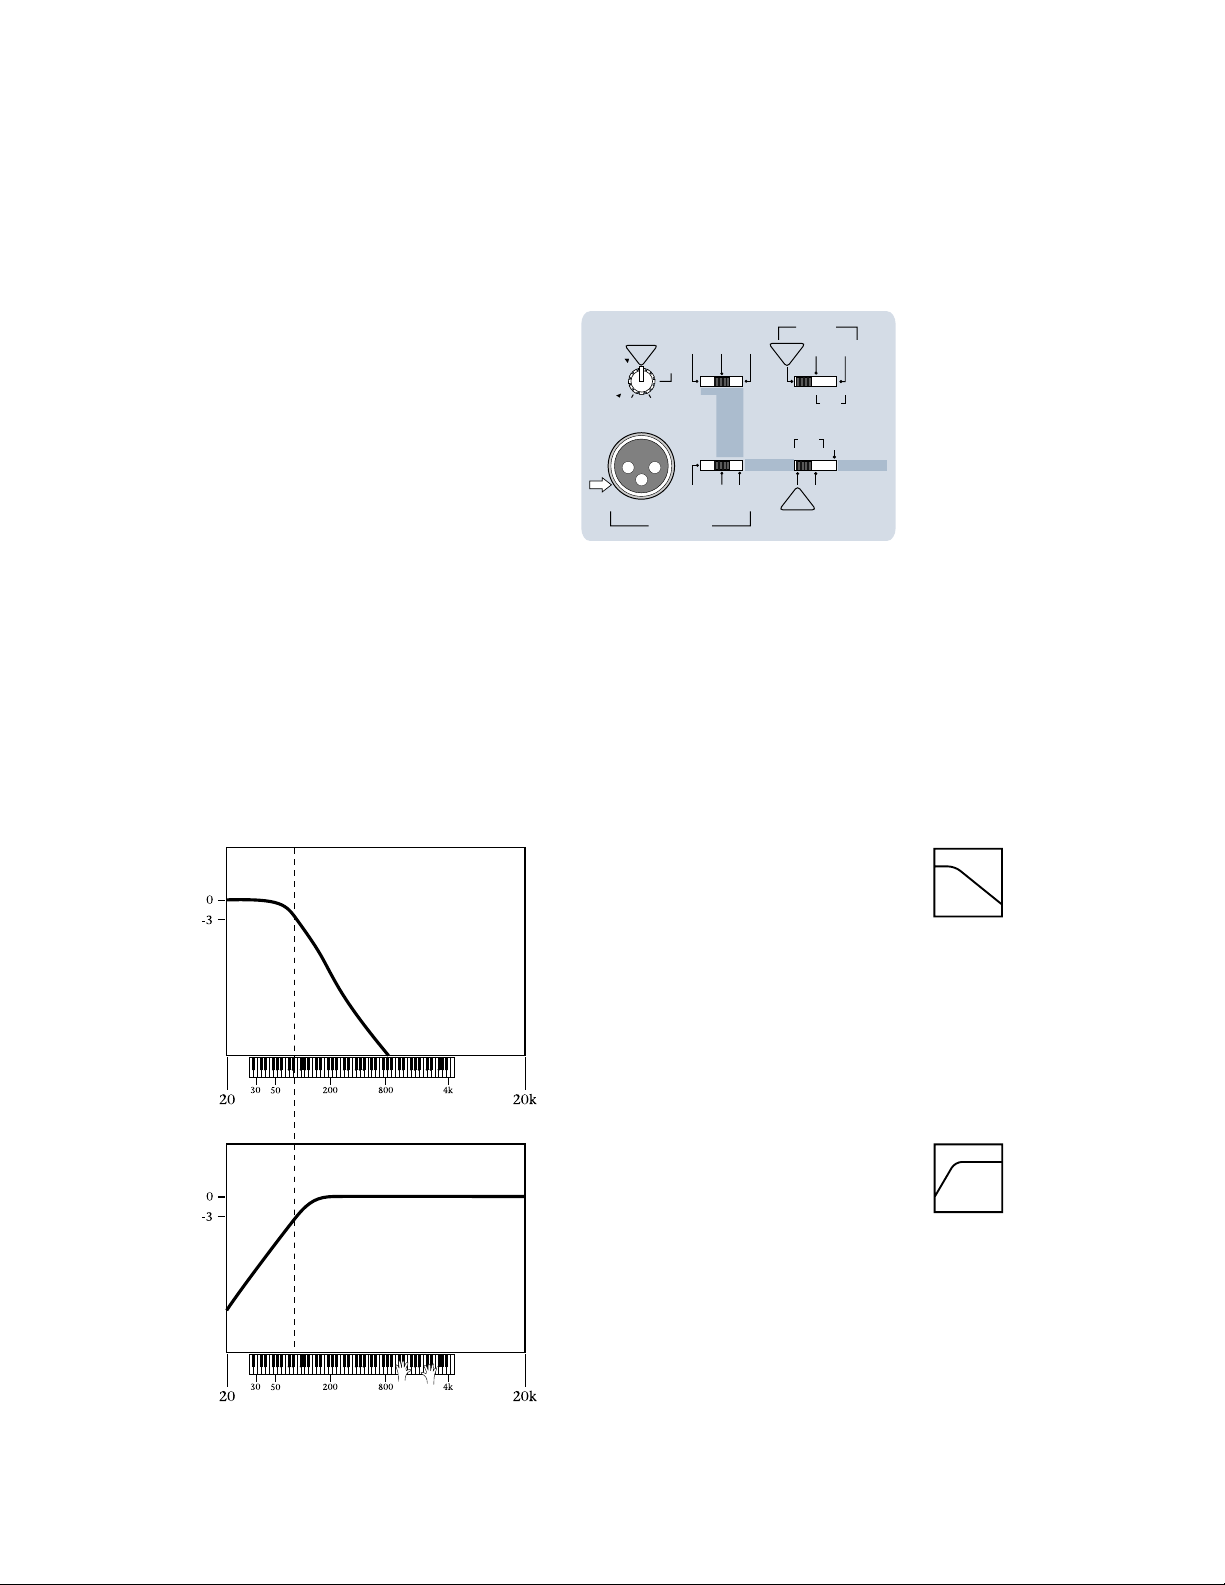
USING THE LOW CUT FILTER
The application diagrams include some
small graphs of the frequency range going into
and coming out of the amplifier. These graphs
show the effect of the
off the lower frequencies going to the speakers.
5
dB
0
dB
–5
dB
Level, dB
–10
dB
–15
dB
1
Hz
Low Cut Filter
10
Hz
LOW CUT FILTER
100
Hz
Frequency, Hz
1k
Hz
to roll
10kHz20k
LOW CUT FILTER
TYPICAL
35 Hz
R
E
F
O
O
W
B
U
S
OFF
THRU
60Hz
STAGE
MONITOR
100 Hz
170 Hz
THRU
SWITCHED OUTPUT
CROSSOVER
90Hz
LOW
H
OUT
O
G
I
U
AMP MODE
STEREO
z
H
0
2
1
TYPICAL
O
N
O
M
SUMMED
OUTPUT APPLICAT ION
FULL
RANGE
ON
TYPICAL
LIMITER
(CH1 & CH2)
OFF
H
T
G
D
I
R
B
CH's
LOW OUT
(SUBWOOFER)
HIGH PASS
The
LOW CUT FILTER
low the frequency setting of the rotary control.
It affects the Speaker output and the
output (if the
Hz
or
LOW OUT
Using the
THRU
).
LOW CUT FILTER
tailor the output to the speakers so they receive only the frequency range they can
handle. For example, if your speakers can
reproduce the frequency range down to
35Hz, set the
LOW CUT FILTER
your main speakers can reproduce the full
range, then set it to
In the hookup diagrams on pages 9–12 and
page 15, this small icon is used to indicate that
the lows have been rolled off by using the
CUT FILTER
.
Note: Page 14 and 16 show the use of the in-
CROSSOVER.
ternal
rolls off the lows be-
switch is set to
allows you to
to 35Hz. If
OFF
.
HIGH OUT
D
E
THRU
LOW
FULL PASS
This icon indicates that the full frequency
range is passed, either to the speakers or to the
THRU
outputs. In the pages that follow, this
also indicates a full-range signal coming from
your mixer or preamp.
LOW PASS
This icon indicates that the highs have been
rolled off. The low-pass range is available if you
use the internal
CROSSOVER
more detail on page 13, with some application
8
diagrams on pages 14, 15, and 16.
, discussed in
Page 9
SERIAL NUMBER
MANUFACTURING DATE
RISK OF ELECTRIC SHOCK
DO NOT OPEN
CAUTION
2600 WATTS
4 OHM LOAD MIN.
120 VAC 60 Hz
2000 WATTS
STEREO
TYPICAL
CH
1
CH
2
+
––
+
MONO
BRIDGE
• THE FOLLOWING ARE REGISTERED TRADEMARKS OF MACKIE DESIGN INC.: "MACKIE", "FR SERIES", AND THE "RUNNING MAN" FIGURE •
CONCEIVED AND DESIGNED BY MACKIE DESIGNS INC • WOODINVILLE
WA • 98072 • USA • PATENTS PENDING • COPYRIGHT ©1998
1300 WATTS / CH
2 OHM LOAD MIN.
1
CHANNEL
MONO
BRIDGE
S
U
B
W
O
O
F
E
R
TYPICAL
35 Hz
CHANNEL
2
ON
TYPICAL
CAUTION
LETHAL VOLTAGES MAY APPEAR AT OUTPUT
TERMINALS. CLASS 1 WIRING IS REQUIRED
SPEAKER OUTPUT S
IN
IN
LOW CUT FILTER
INPUT
INPUT
CROSSOVER
SWITCHED OUTPUT
SWITCHED OUTPUT
BALANCED
OR
UNBALANCED
170 Hz
100 Hz
OFF
STAGE
MONITOR
90Hz
LOW
OUT
H
IG
H
O
U
T
THRU
LOW
OUT
H
IG
H
O
U
T
THRU
1
20
H
z
60Hz
CROSSOVER
90Hz
1
20
H
z
60Hz
AMP MODE
BRIDGED
MONO
OUTPUT APPLICATION
BALANCED
OR
UNBALANCED
LIMITER
(CH1 & CH2)
LOW OUT
(SUB WOOFER)
OFF
CH's
SUMMED
FULL
RANGE
LOW CUT FILTER
170 Hz
100 Hz
OFF
STAGE
MONITOR
S
U
B
W
O
O
F
E
R
TYPICAL
35 Hz
WARNING:
TO REDUCE THE RISK OF FIRE OR ELECTRIC SHOCK, DO NOT
EXPOSE THIS EQUIPMENT TO RAIN OR MOISTURE. DO NOT REMOVE COVER.
NO USER SERVICEABLE PARTS INSIDE. REFER SERVICING TO QUALIFIED PERSONNEL.
AVIS:
RISQUE DE CHOC ELECTRIQUE
— NE P
AS OUVRIR
PIN 1+ CH1+
PIN 1
–
CH1
–
PIN 2+ & 2
–
NOT USED
PIN 1+ CH2+
PIN 1
–
CH2
–
PIN 2+ & 2
–
NOT USED
PIN 1+ BRIDGE+
PIN 1
–
BRIDGE
–
PIN 2+ & 2
–
NOT USED
THRU
THRU
SERIAL NUMBER
MANUFACTURING DATE
RISK OF ELECTRIC SHOCK
DO NOT OPEN
CAUTION
2600 WATTS
4 OHM LOAD MIN.
120 VAC 60 Hz
2000 WATTS
STEREO
TYPICAL
CH
1
CH
2
+
––
+
MONO
BRIDGE
• THE FOLLOWING ARE REGISTERED TRADEMARKS OF MACKIE DESIGN INC.: "MACKIE", "FR SERIES", AND THE "RUNNING MAN" FIGURE •
CONCEIVED AND DESIGNED BY MACKIE DESIGNS INC • WOODINVILLE
WA • 98072 • USA • PATENTS PENDING • COPYRIGHT ©1998
1300 WATTS / CH
2 OHM LOAD MIN.
1
CHANNEL
MONO
BRIDGE
S
U
B
W
O
O
F
E
R
TYPICAL
35 Hz
CHANNEL
2
ON
TYPICAL
CAUTION
LETHAL VOLTAGES MAY APPEAR AT OUTPUT
TERMINALS. CLASS 1 WIRING IS REQUIRED
SPEAKER OUTPUT S
IN
IN
LOW CUT FILTER
INPUT
INPUT
CROSSOVER
SWITCHED OUTPUT
SWITCHED OUTPUT
BALANCED
OR
UNBALANCED
170 Hz
100 Hz
OFF
STAGE
MONITOR
90Hz
LOW
OUT
H
IG
H
O
U
T
THRU
LOW
OUT
H
IG
H
O
U
T
THRU
1
2
0H
z
60Hz
CROSSOVER
90Hz
120
H
z
60Hz
AMP MODE
BRIDGED
MONO
OUTPUT APPLICATION
BALANCED
OR
UNBALANCED
LIMITER
(CH1 & CH2)
LOW OUT
(SUB WOOFER)
OFF
CH's
SUMMED
FULL
RANGE
LOW CUT FILTER
170 Hz
100 Hz
OFF
STAGE
MONITOR
S
U
B
W
O
O
F
E
R
TYPICAL
35 Hz
WARNING:
TO REDUCE THE RISK OF FIRE OR ELECTRIC SHOCK, DO NOT
EXPOSE THIS EQUIPMENT TO RAIN OR MOISTURE. DO NOT REMOVE COVER.
NO USER SERVICEABLE PARTS INSIDE. REFER SERVICING TO QUALIFIED PERSONNEL.
AVIS:
RISQUE DE CHOC ELECTRIQUE
— NE P
AS OUVRIR
PIN 1+ CH1+
PIN 1
–
CH1
–
PIN 2+ & 2
–
NOT USED
PIN 1+ CH2+
PIN 1
–
CH2
–
PIN 2+ & 2
–
NOT USED
PIN 1+ BRIDGE+
PIN 1
–
BRIDGE
–
PIN 2+ & 2
–
NOT USED
THRU
THRU
FROM MIXING CONSOLE
AUX 1 OUT
FROM MIXING CONSOLE
AUX 2 OUT
FROM MIXING CONSOLE
LEFT MAIN OUT
FROM MIXING CONSOLE
RIGHT MAIN OUT
STEREO
35Hz
35Hz
STEREO
100Hz
100Hz
LIMITER ON
LIMITER ON
STAGE MONITORS
(play above 100Hz in
this example).
MAIN SPEAKERS
(play above 35Hz
in this example).
These two examples
show how the LOW CUT
FILTER is used. Set it to
the lowest frequency
your speakers can
handle.
TWO M•260
0S: MAIN SPEAKERS AND STAGE MONITORS
9
Page 10
SERIAL NUMBER
MANUFACTURING DATE
RISK OF ELECTRIC SHOCK
DO NOT OPEN
CAUTION
2600 WATTS
4 OHM LOAD MIN.
120 VAC 60 Hz
2000 WATTS
STEREO
TYPICAL
CH
1
CH
2
+
––
+
MONO
BRIDGE
• THE FOLLOWING ARE REGISTERED TRADEMARKS OF MACKIE DESIGN INC.: "MACKIE", "FR SERIES", AND THE "RUNNING MAN" FIGURE •
CONCEIVED AND DESIGNED BY MACKIE DESIGNS INC • WOODINVILLE
WA • 98072 • USA • PATENTS PENDING • COPYRIGHT ©1998
1300 WATTS / CH
2 OHM LOAD MIN.
1
CHANNEL
MONO
BRIDGE
S
U
B
W
O
O
F
E
R
TYPICAL
35 Hz
CHANNEL
2
ON
TYPICAL
CAUTION
LETHAL VOLTAGES MAY APPEAR AT OUTPUT
TERMINALS. CLASS 1 WIRING IS REQUIRED
SPEAKER OUTPUT S
IN
IN
LOW CUT FILTER
INPUT
INPUT
CROSSOVER
SWITCHED OUTPUT
SWITCHED OUTPUT
BALANCED
OR
UNBALANCED
170 Hz
100 Hz
OFF
STAGE
MONITOR
90Hz
LOW
OUT
H
IG
H
O
U
T
THRU
LOW
OUT
H
IG
H
O
U
T
THRU
1
2
0
Hz
60Hz
CROSSOVER
90Hz
1
2
0
H
z
60Hz
AMP MODE
B
R
ID
G
E
D
M
O
N
O
OUTPUT APPLICATION
BALANCED
OR
UNBALANCED
LIMITER
(CH1 & CH2)
LOW OUT
(SUB WOOFER)
OFF
CH's
SUMMED
FULL
RANGE
LOW CUT FILTER
170 Hz
100 Hz
OFF
STAGE
MONITOR
S
U
B
W
O
O
F
E
R
TYPICAL
35 Hz
WARNING:
TO REDUCE THE RISK OF FIRE OR ELECTRIC SHOCK, DO NOT
EXPOSE THIS EQUIPMENT TO RAIN OR MOISTURE. DO NOT REMOVE COVER.
NO USER SERVICEABLE PARTS INSIDE. REFER SERVICING TO QUALIFIED PERSONNEL.
AVIS :
RISQUE DE CHOC ELECTRIQUE
— NE P
AS OUVRIR
PIN 1+ CH1+
PIN 1
–
CH1
–
PIN 2+ & 2
–
NOT USED
PIN 1+ CH2+
PIN 1
–
CH2
–
PIN 2+ & 2
–
NOT USED
PIN 1+ BRIDGE+
PIN 1
–
BRIDGE
–
PIN 2+ & 2
–
NOT USED
THRU
THRU
STEREO
FROM MIXING CONSOLE
MONITOR OUT
FROM MIXING CONSOLE
MAIN OUT
LIMITER ON
35Hz
100Hz
MAIN SPEAKERS
(play above 35Hz in
this example).
STAGE MONITORS
(play above 100Hz in
this example).
This example shows how each LOW CUT FILTER can
be adjusted so you can play a different type of
speaker on each channel.
M•2600: MAIN SPEAKERS AND STAGE MONITORS WITH ONE AMPLIFIER
10
Page 11
FROM MIXING CONSOLE
MONITOR OUT
SERIAL NUMBER
MANUFACTURING DATE
RISK OF ELECTRIC SHOCK
DO NOT OPEN
CAUTION
2600 WATTS
4 OHM LOAD MIN.
120 VAC 60 Hz
2000 WATTS
STEREO
TYPICAL
CH
1
CH
2
+
––
+
MONO
BRIDGE
• THE FOLLOWING ARE REGISTERED TRADEMARKS OF MACKIE DESIGN INC.: "MACKIE", "FR SERIES", AND THE "RUNNING MAN" FIGURE •
CONCEIVED AND DESIGNED BY MACKIE DESIGNS INC • WOODINVILLE
WA • 98072 • USA • PATENTS PENDING • COPYRIGHT ©1998
1300 WATTS / CH
2 OHM LOAD MIN.
1
CHANNEL
MONO
BRIDGE
S
U
B
W
O
O
F
E
R
TYPICAL
35 Hz
CHANNEL
2
ON
TYPICAL
CAUTION
LETHAL VOLTAGES MAY APPEAR AT OUTPUT
TERMINALS. CLASS 1 WIRING IS REQUIRED
SPEAKER OUTPUT S
IN
IN
LOW CUT FILTER
INPUT
INPUT
CROSSOVER
SWITCHED OUTPUT
SWITCHED OUTPUT
BALANCED
OR
UNBALANCED
170 Hz
100 Hz
OFF
STAGE
MONITOR
90Hz
LOW
OUT
H
IG
H
O
U
T
THRU
LOW
OUT
H
IG
H
O
U
T
THRU
1
2
0
Hz
60Hz
CROSSOVER
90Hz
1
2
0
H
z
60Hz
AMP MODE
B
R
ID
G
E
D
M
O
N
O
OUTPUT APPLICATION
BALANCED
OR
UNBALANCED
LIMITER
(CH1 & CH2)
LOW OUT
(SUB WOOFER)
OFF
CH's
SUMMED
FULL
RANGE
LOW CUT FILTER
170 Hz
100 Hz
OFF
STAGE
MONITOR
S
U
B
W
O
O
F
E
R
TYPICAL
35 Hz
WARNING:
TO REDUCE THE RISK OF FIRE OR ELECTRIC SHOCK, DO NOT
EXPOSE THIS EQUIPMENT TO RAIN OR MOISTURE. DO NOT REMOVE COVER.
NO USER SERVICEABLE PARTS INSIDE. REFER SERVICING TO QUALIFIED PERSONNEL.
AVIS:
RISQUE DE CHOC ELECTRIQUE
— NE P
AS OUVRIR
PIN 1+ CH1+
PIN 1
–
CH1
–
PIN 2+ & 2
–
NOT USED
PIN 1+ CH2+
PIN 1
–
CH2
–
PIN 2+ & 2
–
NOT USED
PIN 1+ BRIDGE+
PIN 1
–
BRIDGE
–
PIN 2+ & 2
–
NOT USED
THRU
THRU
MONO MODE
STUDIO MONITORS
(play above 100Hz in this example).
LIMITER ON
NOTE: In MONO MODE, you can feed
Channel 2 as well, and the speakers will
play the sum of both inputs. Set both LOW
CUT FILTERS to the same frequency.
This example shows how you can use the
MONO MODE to play the same source in
both the left and right Speaker Outputs.
The TOTAL IMPEDANCE must
be greater than 2 ohms per
channel.
In this example, each speaker
must be 8 ohms or greater.
100Hz
M•2600: EIGHT MONITOR SPEAKERS-MONO MODE
11
Page 12
SERIAL NUMBER
MANUFACTURING DATE
RISK OF ELECTRIC SHOCK
DO NOT OPEN
CAUTION
2600 WATTS
4 OHM LOAD MIN.
120 VAC 60 Hz
2000 WATTS
STEREO
TYPICAL
CH
1
CH
2
+
––
+
MONO
BRIDGE
• THE FOLLOWING ARE REGISTERED TRADEMARKS OF MACKIE DESIGN INC.: "MACKIE", "FR SERIES", AND THE "RUNNING MAN" FIGURE •
CONCEIVED AND DESIGNED BY MACKIE DESIGNS INC • WOODINVILLE
WA • 98072 • USA • PATENTS PENDING • COPYRIGHT ©1998
1300 WATTS / CH
2 OHM LOAD MIN.
1
CHANNEL
MONO
BRIDGE
S
U
B
W
O
O
F
E
R
TYPICAL
35 Hz
CHANNEL
2
ON
TYPICAL
CAUTION
LETHAL VOLTAGES MAY APPEAR AT OUTPUT
TERMINALS. CLASS 1 WIRING IS REQUIRED
SPEAKER OUTPUT S
IN
IN
LOW CUT FILTER
INPUT
INPUT
CROSSOVER
SWITCHED OUTPUT
SWITCHED OUTPUT
BALANCED
OR
UNBALANCED
170 Hz
100 Hz
OFF
STAGE
MONITOR
90Hz
LOW
OUT
HIGH
OUT
THRU
LOW
OUT
HIGH
OUT
THRU
120Hz
60Hz
CROSSOVER
90Hz
120Hz
60Hz
AMP MODE
BRIDGED
MONO
OUTPUT APPLICATION
BALANCED
OR
UNBALANCED
LIMITER
(CH1 & CH2)
LOW OUT
(SUB WOOFER)
OFF
CH's
SUMMED
FULL
RANGE
LOW CUT FILTER
170 Hz
100 Hz
OFF
STAGE
MONITOR
S
U
B
W
O
O
F
E
R
TYPICAL
35 Hz
WARNING:
TO REDUCE THE RISK OF FIRE OR ELECTRIC SHOCK, DO NOT
EXPOSE THIS EQUIPMENT TO RAIN OR MOISTURE. DO NOT REMOVE COVER.
NO USER SERVICEABLE PARTS INSIDE. REFER SERVICING TO QUALIFIED PERSONNEL.
AVIS:
RISQUE DE CHOC ELECTRIQUE
— NE P
AS OUVRIR
PIN 1+ CH1+
PIN 1
–
CH1
–
PIN 2+ & 2
–
NOT USED
PIN 1+ CH2+
PIN 1
–
CH2
–
PIN 2+ & 2
–
NOT USED
PIN 1+ BRIDGE+
PIN 1
–
BRIDGE
–
PIN 2+ & 2
–
NOT USED
THRU
THRU
SERIAL NUMBER
MANUFACTURING DATE
RISK OF ELECTRIC SHOCK
DO NOT OPEN
CAUTION
2600 WATTS
4 OHM LOAD MIN.
120 VAC 60 Hz
2000 WATTS
STEREO
TYPICAL
CH
1
CH
2
+
––
+
MONO
BRIDGE
• THE FOLLOWING ARE REGISTERED TRADEMARKS OF MACKIE DESIGN INC.: "MACKIE", "FR SERIES", AND THE "RUNNING MAN" FIGURE •
CONCEIVED AND DESIGNED BY MACKIE DESIGNS INC • WOODINVILLE
WA • 98072 • USA • PATENTS PENDING • COPYRIGHT ©1998
1300 WATTS / CH
2 OHM LOAD MIN.
1
CHANNEL
MONO
BRIDGE
S
U
B
W
O
O
F
E
R
TYPICAL
35 Hz
CHANNEL
2
ON
TYPICAL
CAUTION
LETHAL VOLTAGES MAY APPEAR AT OUTPUT
TERMINALS. CLASS 1 WIRING IS REQUIRED
SPEAKER OUTPUT S
IN
IN
LOW CUT FILTER
INPUT
INPUT
CROSSOVER
SWITCHED OUTPUT
SWITCHED OUTPUT
BALANCED
OR
UNBALANCED
170 Hz
100 Hz
OFF
STAGE
MONITOR
90Hz
LOW
OUT
HIGH
OUT
THRU
LOW
OUT
H
IGH
OUT
THRU
120Hz
60Hz
CROSSOVER
90Hz
120Hz
60Hz
AMP MODE
BRIDGED
MONO
OUTPUT APPLICATION
BALANCED
OR
UNBALANCED
LIMITER
(CH1 & CH2)
LOW OUT
(SUB WOOFER)
OFF
CH's
SUMMED
FULL
RANGE
LOW CUT FILTER
170 Hz
100 Hz
OFF
STAGE
MONITOR
S
U
B
W
O
O
F
E
R
TYPICAL
35 Hz
WARNING:
TO REDUCE THE RISK OF FIRE OR ELECTRIC SHOCK, DO NOT
EXPOSE THIS EQUIPMENT TO RAIN OR MOISTURE. DO NOT REMOVE COVER.
NO USER SERVICEABLE PARTS INSIDE. REFER SERVICING TO QUALIFIED PERSONNEL.
AVIS:
RISQUE DE CHOC ELECTRIQUE
— NE P
AS OUVRIR
PIN 1+ CH1+
PIN 1
–
CH1
–
PIN 2+ & 2
–
NOT USED
PIN 1+ CH2+
PIN 1
–
CH2
–
PIN 2+ & 2
–
NOT USED
PIN 1+ BRIDGE+
PIN 1
–
BRIDGE
–
PIN 2+ & 2
–
NOT USED
THRU
THRU
35Hz
BRIDGED
LIMITER ON
LIMITER ON
FROM MIXING CONSOLE
LEFT MAIN OUT
35Hz
BRIDGED
Use this MONO BRIDGE output instead if
your speaker wire has a SPEAKON connector.
LEFT SPEAKER
(above 35Hz in
this example)
RIGHT SPEAKER
(above 35Hz in
this example)
Each amplifier is set to BRIDGED
MODE by setting the AMP MODE
switch to BRIDGED. Each speaker will
then receive up to 2600 WATTS
(into 4 ohms).
IT IS IMPORTANT THAT
YOUR SPEAKERS ARE
4 OHMS OR GREATER
WHEN USING THE
BRIDGED MODE.
M•2600: STEREO SYSTEM WITH TWO AMPLIFIERS IN BRIDGED MODE
12
Page 13
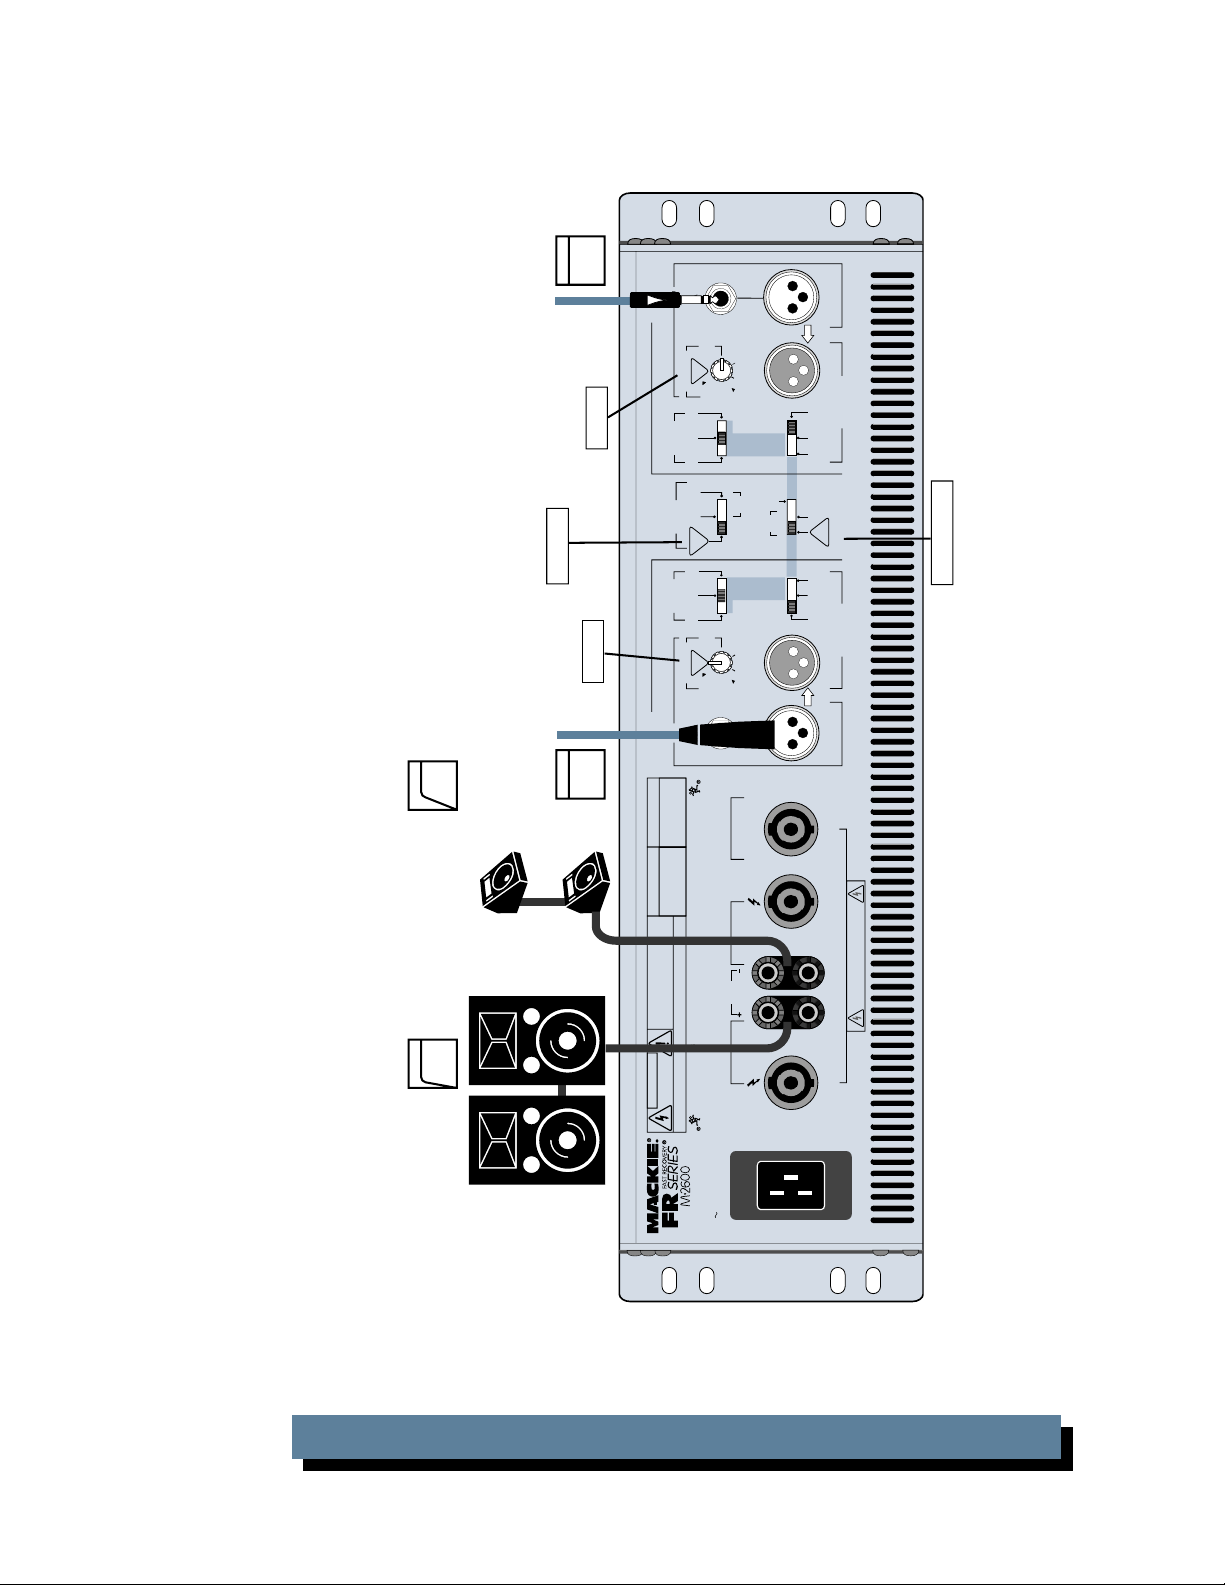
USING THE CROSSOVER
The following three pages show how the
internal crossover can be used to biamp your
system. One amplifer plays the lower frequencies, while another plays the highs.
The electronic crossover inside the M•2600
splits the frequency band into two ranges, one
below the crossover point (
one above (
HIGH OUT
). The
LOW OUT
LOW OUT
) and
is
available to the amplifier section for powering
subwoofers. Both the
are switchable to the
OUT
LOW OUT
THRU
and the
HIGH
outputs, for
sending line-level signals to the inputs of other
amplifiers.
IT’S FREE!
The crossover has been carefully designed to
give high quality, no-compromise performance,
equal to external crossovers (without the extra
cost). It uses a 4th-order Linkwitz-Riley design,
with a slope of 24 dB/octave.
LOW CUT FILTER
TYPICAL
35 Hz
R
E
F
O
O
W
B
U
S
OFF
THRU
STAGE
MONITOR
100 Hz
170 Hz
SWITCHED OUTPUT
CROSSOVER
60Hz
90Hz
LOW
THRU
OUT
AMP MODE
STEREO
z
H
0
2
1
TYPICAL
OUTPUT APPLICAT ION
FULL
RANGE
H
G
I
H
T
U
O
ON
TYPICAL
LIMITER
(CH1 & CH2)
O
M
OFF
O
N
B
CH's
SUMMED
LOW OUT
(SUBWOOFER)
D
E
G
D
I
R
LOUDER
OUTPUT LEVEL dB
QUIETER
LOUDER
OUTPUT LEVEL dB
QUIETER
FREQUENCY IN Hz
crossover point
FREQUENCY IN Hz
LOW OUT
The output level rolls off above the crossover
point. By setting the
switch to
LOW OUT (SUBWOOFER)
OUTPUT APPLICATION
, any
speakers attached to the M•2600 will play only
the lower frequency range.
By setting the
Switch to
LOW OUT
,
THRU
this range can be sent to another amplifier via
THRU
the
output jacks.
HIGH OUT
The output level rolls off below the crossover
point. The high range is not available to the speaker
outputs; it can be sent to another amplifier via
THRU
the
switch to
output jacks if you set the
HIGH OUT
LOW CUT FILTER
The
.
can be used to reduce
the bass level of the speakers attached to the
host amplifer.
THRU
13
Page 14
SERIAL NUMBER
MANUFACTURING DATE
RISK OF ELECTRIC SHOCK
DO NOT OPEN
CAUTION
2600 WATTS
4 OHM LOAD MIN.
120 VAC 60 Hz
2000 WATTS
STEREO
TYPICAL
CH
1
CH
2
+
––
+
MONO
BRIDGE
• THE FOLLOWING ARE REGISTERED TRADEMARKS OF MACKIE DESIGN INC.: "MACKIE", "FR SERIES", AND THE "RUNNING MAN" FIGURE •
CONCEIVED AND DESIGNED BY MACKIE DESIGNS INC • WOODINVILLE
WA • 98072 • USA • PATENTS PENDING • COPYRIGHT ©1998
1300 WATTS / CH
2 OHM LOAD MIN.
1
CHANNEL
MONO
BRIDGE
S
U
B
W
O
O
F
E
R
TYPICAL
35 Hz
CHANNEL
2
ON
TYPICAL
CAUTION
LETHAL VOLTAGES MAY APPEAR AT OUTPUT
TERMINALS. CLASS 1 WIRING IS REQUIRED
SPEAKER OUTPUT S
IN
IN
LOW CUT FILTER
INPUT
INPUT
CROSSOVER
SWITCHED OUTPUT
SWITCHED OUTPUT
BALANCED
OR
UNBALANCED
170 Hz
100 Hz
OFF
STAGE
MONITOR
90Hz
LOW
OUT
HIGH
OUT
THRU
LOW
OUT
HIGH
OUT
THRU
120Hz
60Hz
CROSSOVER
90Hz
120Hz
60Hz
AMP MODE
BRIDGED
MONO
OUTPUT APPLICATION
BALANCED
OR
UNBALANCED
LIMITER
(CH1 & CH2)
LOW OUT
(SUB WOOFER)
OFF
CH's
SUMMED
FULL
RANGE
LOW CUT FILTER
170 Hz
100 Hz
OFF
STAGE
MONITOR
S
U
B
W
O
O
F
E
R
TYPICAL
35 Hz
WARNING:
TO REDUCE THE RISK OF FIRE OR ELECTRIC SHOCK, DO NOT
EXPOSE THIS EQUIPMENT TO RAIN OR MOISTURE. DO NOT REMOVE COVER.
NO USER SERVICEABLE PARTS INSIDE. REFER SERVICING TO QUALIFIED PERSONNEL.
AVIS:
RISQUE DE CHOC ELECTRIQUE
— NE P
AS OUVRIR
PIN 1+ CH1+
PIN 1
–
CH1
–
PIN 2+ & 2
–
NOT USED
PIN 1+ CH2+
PIN 1
–
CH2
–
PIN 2+ & 2
–
NOT USED
PIN 1+ BRIDGE+
PIN 1
–
BRIDGE
–
PIN 2+ & 2
–
NOT USED
THRU
THRU
SERIAL NUMBER
MANUFACTURING DATE
RISK OF ELECTRIC SHOCK
DO NOT OPEN
CAUTION
2600 WATTS
4 OHM LOAD MIN.
120 VAC 60 Hz
2000 WATTS
STEREO
TYPICAL
CH
1
CH
2
+
––
+
MONO
BRIDGE
• THE FOLLOWING ARE REGISTERED TRADEMARKS OF MACKIE DESIGN INC.: "MACKIE", "FR SERIES", AND THE "RUNNING MAN" FIGURE •
CONCEIVED AND DESIGNED BY MACKIE DESIGNS INC • WOODINVILLE
WA • 98072 • USA • PATENTS PENDING • COPYRIGHT ©1998
1300 WATTS / CH
2 OHM LOAD MIN.
1
CHANNEL
MONO
BRIDGE
S
U
B
W
O
O
F
E
R
TYPICAL
35 Hz
CHANNEL
2
ON
TYPICAL
CAUTION
LETHAL VOLTAGES MAY APPEAR AT OUTPUT
TERMINALS. CLASS 1 WIRING IS REQUIRED
SPEAKER OUTPUT S
IN
IN
LOW CUT FILTER
INPUT
INPUT
CROSSOVER
SWITCHED OUTPUT
SWITCHED OUTPUT
BALANCED
OR
UNBALANCED
170 Hz
100 Hz
OFF
STAGE
MONITOR
90Hz
LOW
OUT
HIGH
OU
T
THRU
LOW
OUT
HIGH
OUT
THRU
120Hz
60Hz
CROSSOVER
90Hz
120Hz
60Hz
AMP MODE
BRIDGED
MONO
OUTPUT APPLICATION
BALANCED
OR
UNBALANCED
LIMITER
(CH1 & CH2)
LOW OUT
(SUB WOOFER)
OFF
CH's
SUMMED
FULL
RANGE
LOW CUT FILTER
170 Hz
100 Hz
OFF
STAGE
MONITOR
S
U
B
W
O
O
F
E
R
TYPICAL
35 Hz
WARNING:
TO REDUCE THE RISK OF FIRE OR ELECTRIC SHOCK, DO NOT
EXPOSE THIS EQUIPMENT TO RAIN OR MOISTURE. DO NOT REMOVE COVER.
NO USER SERVICEABLE PARTS INSIDE. REFER SERVICING TO QUALIFIED PERSONNEL.
AVIS:
RISQUE DE CHOC ELECTRIQUE
— NE P
AS OUVRIR
PIN 1+ CH1+
PIN 1
–
CH1
–
PIN 2+ & 2
–
NOT USED
PIN 1+ CH2+
PIN 1
–
CH2
–
PIN 2+ & 2
–
NOT USED
PIN 1+ BRIDGE+
PIN 1
–
BRIDGE
–
PIN 2+ & 2
–
NOT USED
THRU
THRU
STEREO
20Hz
20Hz
MONO
CHOOSE
CHOOSE
CHOOSE
CHOOSE
LIMITER ON
HIGH
OUT
HIGH
OUT
LOW OUT
(SUBWOOFER)
FROM MIXING CONSOLE
MAIN RIGHT OUT
FROM MIXING CONSOLE
MAIN LEFT OUT
This amplifier receives the frequency
range above the first amplifier's
CROSSOVER point.
NOTE: Set its LOW CUT FILTER
below the CROSSOVER point of the
first amplifier or you will miss part of
the bass range.
Because the OUTPUT APPLICATION
switch is set to LOW OUT, this
M•2600 plays the frequency range
below the CROSSOVER point (60, 90,
or 120Hz).
Set the LOW CUT FILTER to the
lowest frequency your subwoofers can
handle (or set it to OFF).
Set the THRU switch to HIGH OUT
so the next amplifier will receive the
frequency range above the
CROSSOVER point.
Use the MONO MODE so the
subwoofers play the same and are
always in-phase. Low-frequency sound
is non-directional, so there is no
benefit in playing the subs in STEREO,
in fact, there may be times when the
speakers get out of phase, causing
some bass reduction.
MAIN SPEAKERS
(play above 90Hz
in this example)
SUBWOOFERS
(play between 20Hz and
90Hz in this example)
M•2600: STEREO SYSTEM BIAMPED WITH SUBWOOFERS, OPTION 1
14
Page 15

SERIAL NUMBER
MANUFACTURING DATE
RISK OF ELECTRIC SHOCK
DO NOT OPEN
CAUTION
2600 WATTS
4 OHM LOAD MIN.
120 VAC 60 Hz
2000 WATTS
STEREO
TYPICAL
CH
1
CH
2
+
––
+
MONO
BRIDGE
• THE FOLLOWING ARE REGISTERED TRADEMARKS OF MACKIE DESIGN INC.: "MACKIE", "FR SERIES", AND THE "RUNNING MAN" FIGURE •
CONCEIVED AND DESIGNED BY MACKIE DESIGNS INC • WOODINVILLE
WA • 98072 • USA • PATENTS PENDING • COPYRIGHT ©1998
1300 WATTS / CH
2 OHM LOAD MIN.
1
CHANNEL
MONO
BRIDGE
S
U
B
W
O
O
F
E
R
TYPICAL
35 Hz
CHANNEL
2
ON
TYPICAL
CAUTION
LETHAL VOLTAGES MAY APPEAR AT OUTPUT
TERMINALS. CLASS 1 WIRING IS REQUIRED
SPEAKER OUTPUT S
IN
IN
LOW CUT FILTER
INPUT
INPUT
CROSSOVER
SWITCHED OUTPUT
SWITCHED OUTPUT
BALANCED
OR
UNBALANCED
170 Hz
100 Hz
OFF
STAGE
MONITOR
90Hz
LOW
OUT
HIGH
OUT
THRU
LOW
OUT
HIGH
OUT
THRU
120Hz
60Hz
CROSSOVER
90Hz
120Hz
60Hz
AMP MODE
BRIDGED
MONO
OUTPUT APPLICATION
BALANCED
OR
UNBALANCED
LIMITER
(CH1 & CH2)
LOW OUT
(SUB WOOFER)
OFF
CH's
SUMMED
FULL
RANGE
LOW CUT FILTER
170 Hz
100 Hz
OFF
STAGE
MONITOR
S
U
B
W
O
O
F
E
R
TYPICAL
35 Hz
WARNING:
TO REDUCE THE RISK OF FIRE OR ELECTRIC SHOCK, DO NOT
EXPOSE THIS EQUIPMENT TO RAIN OR MOISTURE. DO NOT REMOVE COVER.
NO USER SERVICEABLE PARTS INSIDE. REFER SERVICING TO QUALIFIED PERSONNEL.
AVIS:
RISQUE DE CHOC ELECTRIQUE
— NE P
AS OUVRIR
PIN 1+ CH1+
PIN 1
–
CH1
–
PIN 2+ & 2
–
NOT USED
PIN 1+ CH2+
PIN 1
–
CH2
–
PIN 2+ & 2
–
NOT USED
PIN 1+ BRIDGE+
PIN 1
–
BRIDGE
–
PIN 2+ & 2
–
NOT USED
THRU
THRU
SERIAL NUMBER
MANUFACTURING DATE
RISK OF ELECTRIC SHOCK
DO NOT OPEN
CAUTION
2600 WATTS
4 OHM LOAD MIN.
120 VAC 60 Hz
2000 WATTS
STEREO
TYPICAL
CH
1
CH
2
+
––
+
MONO
BRIDGE
• THE FOLLOWING ARE REGISTERED TRADEMARKS OF MACKIE DESIGN INC.: "MACKIE", "FR SERIES", AND THE "RUNNING MAN" FIGURE •
CONCEIVED AND DESIGNED BY MACKIE DESIGNS INC • WOODINVILLE
WA • 98072 • USA • PATENTS PENDING • COPYRIGHT ©1998
1300 WATTS / CH
2 OHM LOAD MIN.
1
CHANNEL
MONO
BRIDGE
S
U
B
W
O
O
F
E
R
TYPICAL
35 Hz
CHANNEL
2
ON
TYPICAL
CAUTION
LETHAL VOLTAGES MAY APPEAR AT OUTPUT
TERMINALS. CLASS 1 WIRING IS REQUIRED
SPEAKER OUTPUT S
IN
IN
LOW CUT FILTER
INPUT
INPUT
CROSSOVER
SWITCHED OUTPUT
SWITCHED OUTPUT
BALANCED
OR
UNBALANCED
170 Hz
100 Hz
OFF
STAGE
MONITOR
90Hz
LOW
OUT
HIGH
OUT
THRU
LOW
OUT
H
IGH
OUT
THRU
120Hz
60Hz
CROSSOVER
90Hz
120Hz
60Hz
AMP MODE
BRIDGED
MONO
OUTPUT APPLICATION
BALANCED
OR
UNBALANCED
LIMITER
(CH1 & CH2)
LOW OUT
(SUB WOOFER)
OFF
CH's
SUMMED
FULL
RANGE
LOW CUT FILTER
170 Hz
100 Hz
OFF
STAGE
MONITOR
S
U
B
W
O
O
F
E
R
TYPICAL
35 Hz
WARNING:
TO REDUCE THE RISK OF FIRE OR ELECTRIC SHOCK, DO NOT
EXPOSE THIS EQUIPMENT TO RAIN OR MOISTURE. DO NOT REMOVE COVER.
NO USER SERVICEABLE PARTS INSIDE. REFER SERVICING TO QUALIFIED PERSONNEL.
AVIS:
RISQUE DE CHOC ELECTRIQUE
— NE P
AS OUVRIR
PIN 1+ CH1+
PIN 1
–
CH1
–
PIN 2+ & 2
–
NOT USED
PIN 1+ CH2+
PIN 1
–
CH2
–
PIN 2+ & 2
–
NOT USED
PIN 1+ BRIDGE+
PIN 1
–
BRIDGE
–
PIN 2+ & 2
–
NOT USED
THRU
THRU
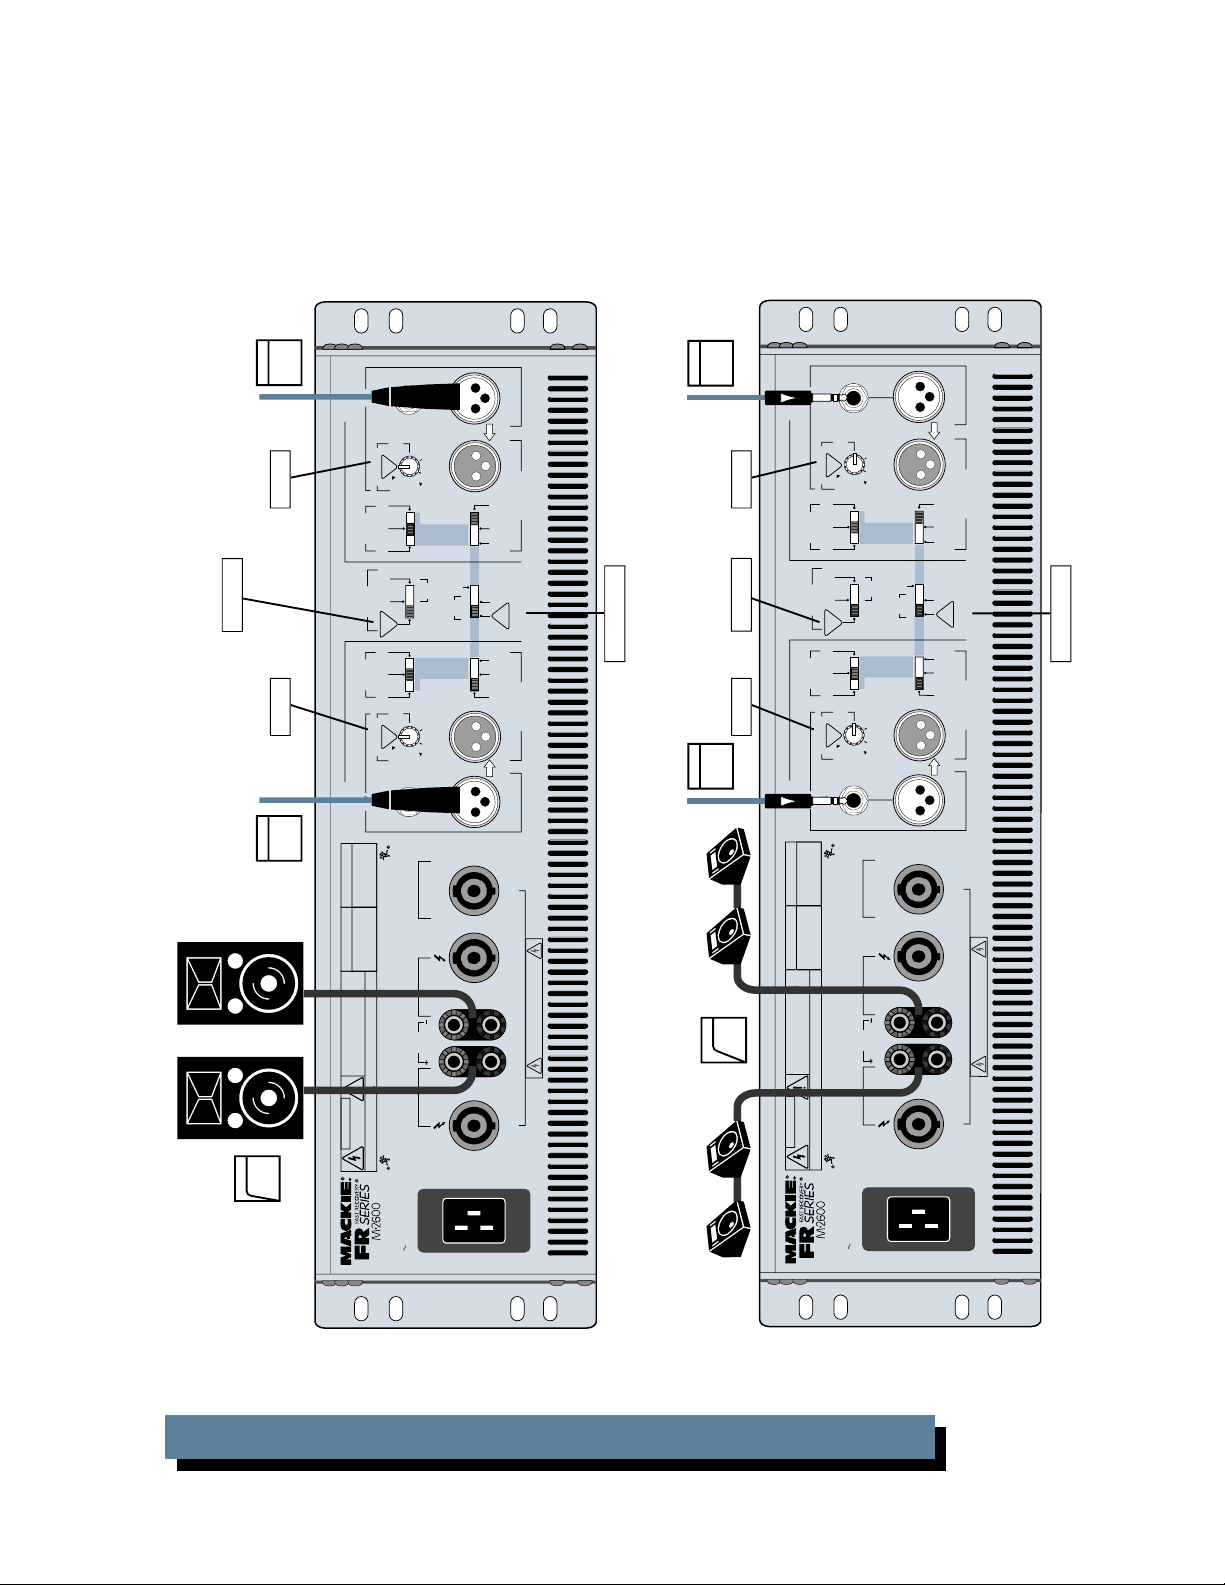
35Hz
35Hz
CHOOSE
CHOOSE
STEREO
LIMITER ON
MONO
LOW OUT (SUBWOOFER)
Because the OUTPUT APPLICATION
switch is set to LOW OUT, this amplifier
plays the frequency range below the
CROSSOVER point (60, 90, or 120Hz).
Set the LOW CUT FILTER of this
M•2600 to the lowest frequency your
subwoofers can handle, or set to the
"OFF" position.
Set the CROSSOVER switch to the
highest frequency the subwoofers can
handle, or to the lower range of your main
speakers.
Use the MONO MODE so that your
subwoofers will play the same program
and will always be in-phase.
Set the THRU switch to "THRU" so the
next M•2600 will receive the full
frequency range, unaffected by the LOW
CUT FILTER or CROSSOVER of this first
amplifier.
NOTE:
If you do not have two
M•2600s as shown here, you should use
your most powerful amplifier to drive the
subwoofers. If your second amplifier is
more powerful than the M
•2600, set the
THRU switch to "LOW OUT" so the
second amp will receive the frequencies
below the crossover point.
If your second amplifier is less
powerful than the M
•2600, set the
THRU switch to "HIGH OUT" so the
second amp receives just the highs.
MAIN SPEAKERS
(play above 35Hz
in this example)
FROM MIXING CONSOLE
MAIN RIGHT OUT
FROM MIXING CONSOLE
MAIN LEFT OUT
SUBWOOFERS
(play between
20Hz and 90Hz
in this example)
20Hz
20Hz
THRU
THRU
M•2600: STEREO SYSTEM BIAMPED WITH SUBWOOFERS, OPTION 2
15
Page 16

+
–
SERIAL NUMBER
MANUFACTURING DATE
RISK OF ELECTRIC SHOCK
DO NOT OPEN
CAUTION
2600 WATTS
4 OHM LOAD MIN.
120 VAC 60 Hz
2000 WATTS
STEREO
TYPICAL
CH
1
CH
2
+
––
+
MONO
BRIDGE
• THE FOLLOWING ARE REGISTERED TRADEMARKS OF MACKIE DESIGN INC.: "MACKIE", "FR SERIES", AND THE "RUNNING MAN" FIGURE •
CONCEIVED AND DESIGNED BY MACKIE DESIGNS INC • WOODINVILLE
WA • 98072 • USA • PATENTS PENDING • COPYRIGHT ©1998
1300 WATTS / CH
2 OHM LOAD MIN.
1
CHANNEL
MONO
BRIDGE
S
U
B
W
O
O
F
E
R
TYPICAL
35 Hz
CHANNEL
2
ON
TYPICAL
CAUTION
LETHAL VOLTAGES MAY APPEAR AT OUTPUT
TERMINALS. CLASS 1 WIRING IS REQUIRED
SPEAKER OUTPUT S
IN
IN
LOW CUT FILTER
INPUT
INPUT
CROSSOVER
SWITCHED OUTPUT
SWITCHED OUTPUT
BALANCED
OR
UNBALANCED
170 Hz
100 Hz
OFF
STAGE
MONITOR
90Hz
LOW
OUT
HIGH
OUT
THRU
LOW
OUT
HIGH
OUT
THRU
120Hz
60Hz
CROSSOVER
90Hz
120Hz
60Hz
AMP MODE
BRIDGED
MONO
OUTPUT APPLICATION
BALANCED
OR
UNBALANCED
LIMITER
(CH1 & CH2)
LOW OUT
(SUB WOOFER)
OFF
CH's
SUMMED
FULL
RANGE
LOW CUT FILTER
170 Hz
100 Hz
OFF
STAGE
MONITOR
S
U
B
W
O
O
F
E
R
TYPICAL
35 Hz
WARNING:
TO REDUCE THE RISK OF FIRE OR ELECTRIC SHOCK, DO NOT
EXPOSE THIS EQUIPMENT TO RAIN OR MOISTURE. DO NOT REMOVE COVER.
NO USER SERVICEABLE PARTS INSIDE. REFER SERVICING TO QUALIFIED PERSONNEL.
AVIS:
RISQUE DE CHOC ELECTRIQUE
— NE P
AS OUVRIR
PIN 1+ CH1+
PIN 1
–
CH1
–
PIN 2+ & 2
–
NOT USED
PIN 1+ CH2+
PIN 1
–
CH2
–
PIN 2+ & 2
–
NOT USED
PIN 1+ BRIDGE+
PIN 1
–
BRIDGE
–
PIN 2+ & 2
–
NOT USED
THRU
THRU
SERIAL NUMBER
MANUFACTURING DATE
RISK OF ELECTRIC SHOCK
DO NOT OPEN
CAUTION
2600 WATTS
4 OHM LOAD MIN.
120 VAC 60 Hz
2000 WATTS
STEREO
TYPICAL
CH
1
CH
2
+
––
+
MONO
BRIDGE
• THE FOLLOWING ARE REGISTERED TRADEMARKS OF MACKIE DESIGN INC.: "MACKIE", "FR SERIES", AND THE "RUNNING MAN" FIGURE •
CONCEIVED AND DESIGNED BY MACKIE DESIGNS INC • WOODINVILLE
WA • 98072 • USA • PATENTS PENDING • COPYRIGHT ©1998
1300 WATTS / CH
2 OHM LOAD MIN.
1
CHANNEL
MONO
BRIDGE
S
U
B
W
O
O
F
E
R
TYPICAL
35 Hz
CHANNEL
2
ON
TYPICAL
CAUTION
LETHAL VOLTAGES MAY APPEAR AT OUTPUT
TERMINALS. CLASS 1 WIRING IS REQUIRED
SPEAKER OUTPUT S
IN
IN
LOW CUT FILTER
INPUT
INPUT
CROSSOVER
SWITCHED OUTPUT
SWITCHED OUTPUT
BALANCED
OR
UNBALANCED
170 Hz
100 Hz
OFF
STAGE
MONITOR
90Hz
LOW
OUT
HIGH
OUT
THRU
LOW
OUT
H
IGH
OUT
THRU
120Hz
60Hz
CROSSOVER
90Hz
120Hz
60Hz
AMP MODE
BRIDGED
MONO
OUTPUT APPLICATION
BALANCED
OR
UNBALANCED
LIMITER
(CH1 & CH2)
LOW OUT
(SUB WOOFER)
OFF
CH's
SUMMED
FULL
RANGE
LOW CUT FILTER
170 Hz
100 Hz
OFF
STAGE
MONITOR
S
U
B
W
O
O
F
E
R
TYPICAL
35 Hz
WARNING:
TO REDUCE THE RISK OF FIRE OR ELECTRIC SHOCK, DO NOT
EXPOSE THIS EQUIPMENT TO RAIN OR MOISTURE. DO NOT REMOVE COVER.
NO USER SERVICEABLE PARTS INSIDE. REFER SERVICING TO QUALIFIED PERSONNEL.
AVIS:
RISQUE DE CHOC ELECTRIQUE
— NE P
AS OUVRIR
PIN 1+ CH1+
PIN 1
–
CH1
–
PIN 2+ & 2
–
NOT USED
PIN 1+ CH2+
PIN 1
–
CH2
–
PIN 2+ & 2
–
NOT USED
PIN 1+ BRIDGE+
PIN 1
–
BRIDGE
–
PIN 2+ & 2
–
NOT USED
THRU
THRU
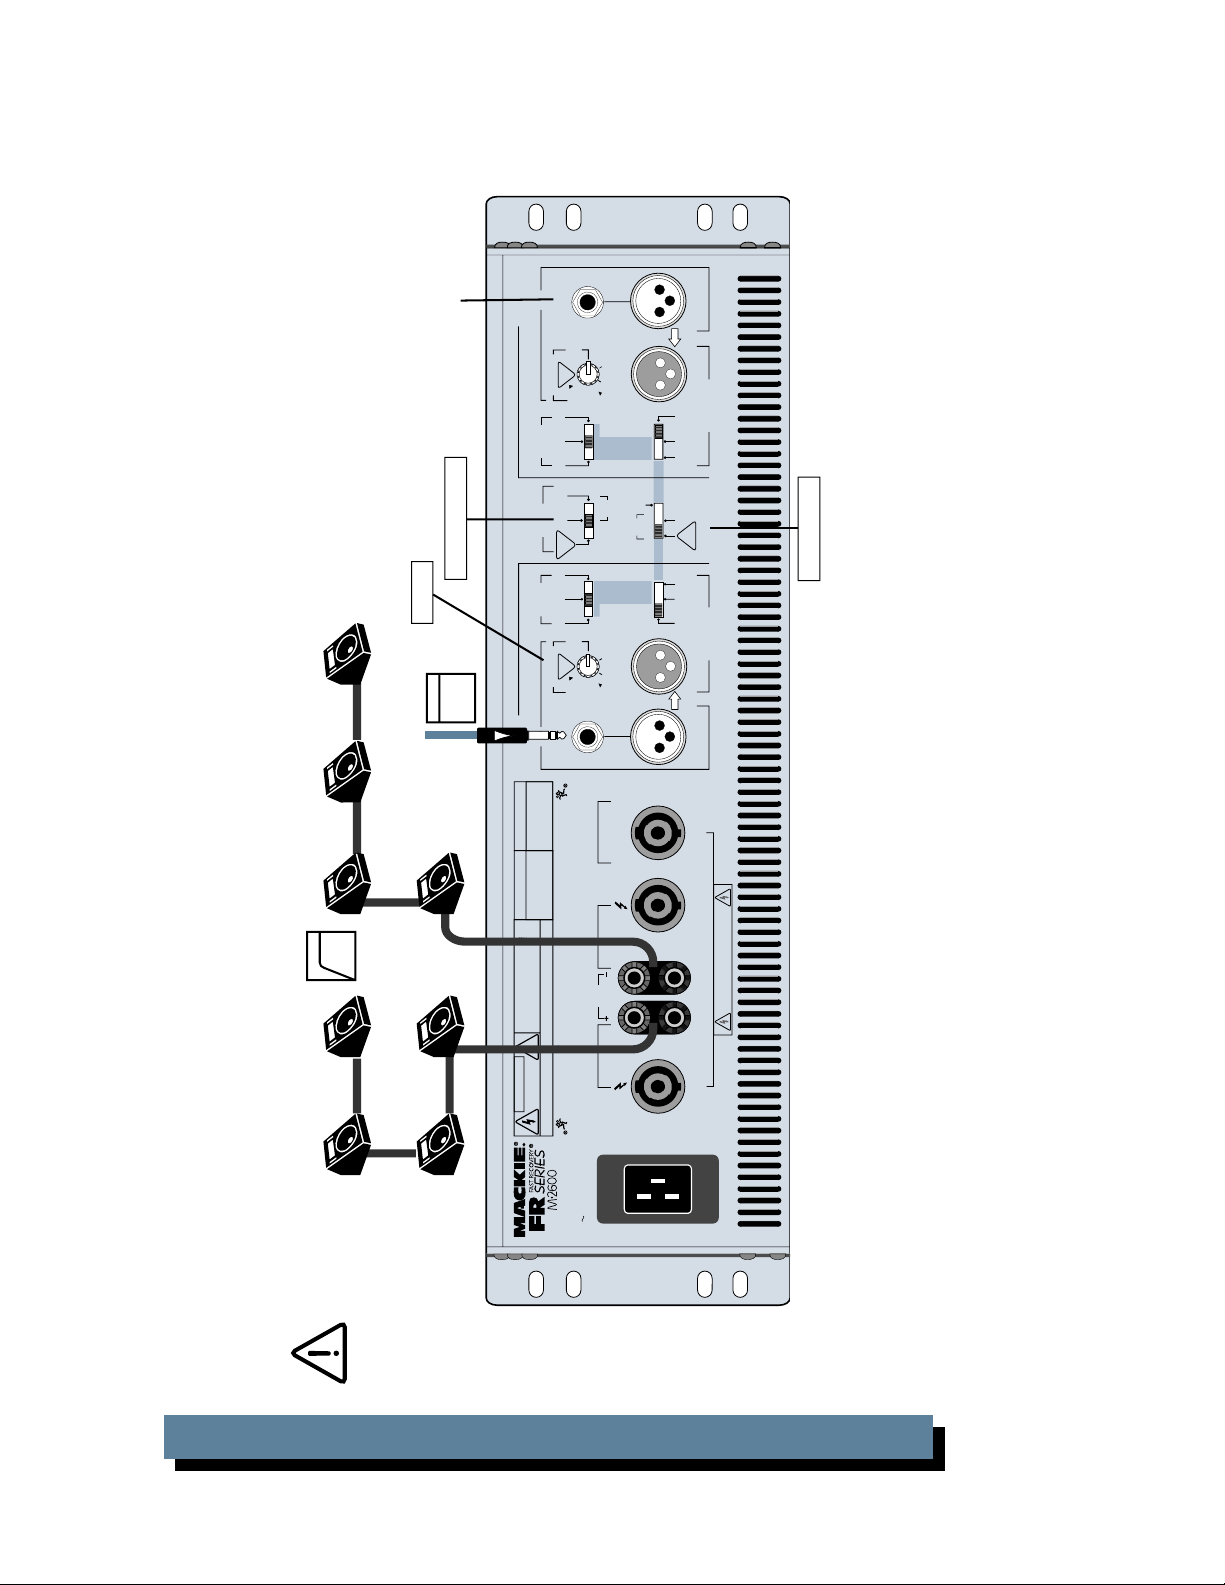
STEREO
20Hz
20Hz
BRIDGED
CHOOSE
CHOOSE
CHOOSE
CHOOSE
LIMITER ON
HIGH
OUT
HIGH
OUT
LOW OUT
(SUBWOOFER)
FROM MIXING CONSOLE
MAIN RIGHT OUT
FROM MIXING CONSOLE
MAIN LEFT OUT
This amplifier receives the frequency
range above the first amplifier's
CROSSOVER point.
NOTE: Set the LOW CUT FILTER to
below the CROSSOVER point of the
first amplifier, or you will miss part of
the bass range.
Because the OUTPUT APPLICATION
switch is set to LOW OUT, this
amplifier plays the frequency range
below the CROSSOVER point (60, 90,
or 120Hz).
Set the LOW CUT FILTER to the
lowest frequency your subwoofers can
handle.
Set the THRU switch to HIGH OUT
so the second amplifier will receive the
frequency range above the
CROSSOVER point.
This example also illustrates the
BRIDGED MODE, playing a single
subwoofer. Both input signals are
summed in this mode, so the
subwoofer plays the combined
channel 1 and channel 2 signal.
The outputs going to the other
amplifier are not summed.
MAIN SPEAKERS
(play above 90Hz
in this example)
SUBWOOFER
(plays between
20Hz and 90Hz
in this example)
M•2600: STEREO SYSTEM BIAMPED WITH BRIDGED SUBWOOFER
16
Page 17

FEATURE DESCRIPTIONS
GAIN/dB
3v
23
25
21
2v
2719
17
GAIN
SENSITIVITY
These front panel knobs allow you to control
the levels going into the output section of the
M•2600 amplifier. Their travel is detented,
meaning there are 20 built-in “resting points” so
you can easily set both controls to the same level.
Usually, these controls are set to maximum.
The gain structure of the amplifier is designed
so that a +4 dBu (1.23V rms) input signal drives
the amplifier to 700 watts into 4 ohms. This is
how the sensitivity of an amplifier is defined.
In this case, it equates to a voltage gain of 32.7
dB. The graphics around the knob depict two
different methods for setting the gain. The inner circle is marked in dB, calibrated from off
(∞) to 33. This represents the amount of voltage
gain from input to output. When using professional equipment with +4 dBu output levels,
GAIN
set the
control all the way up to 33.
The outer circle is labeled in volts, with indications of 1V, 2V, and 3V. These correspond to
the input sensitivity of the amplifier. With the
GAIN
control all the way up (fully clockwise),
the input sensitivity is 1.23V, which works well
with professional equipment operating at a
nominal +4 dBu level.
On the other hand, you may want your listening level to be quieter than the M•2600’s
maximum level. For instance, if you’re using
the M•2600 as a control room amp and your
control room is the size of a telephone booth,
you’ll probably never want to hear the amp at
its maximum level.
reach full power at the amplifier’s output. See
the sidebar “Constant Gain vs. Constant Sensitivity” for a better understanding of how this
works.
Like all amplifier controls, you’ll typically
determine the optimal settings during installation or sound check, then leave them alone,
using your signal source (usually a mixer) to
control listening levels as you work. Or play.
29
31
11
33
0
0
1v
1.23v (+4dBu)
You can set the
GAIN
controls as low as you like.
However, reducing the
GAIN
controls requires an
increased input level to
Constant Gain vs. Constant Sensitivity
There are two viewpoints, or philosophies,
regarding the gain structure of power amplifiers
— constant gain and constant sensitivity.
Constant Gain means that regardless of the
output power of the amplifier, the gain from input
to output remains the same. (By the way, this
refers to the full gain of the amplifier, with the
gain or level controls all the way up.) Within a
product line of constant gain power amplifiers,
as the output power rating of an amplifier
increases, the level of the input voltage must
also increase.
For example, if an amplifier is rated at 100W
into an 8-ohm load, and it has 26 dB of gain, it
requires an input signal of 1.4V rms to drive it to
full power. This is about +5 dBu, a reasonable
operating point for professional gear.
Now take an amplifier rated at 200W into an
8-ohm load. If it also has a gain of 26 dB, it requires an input signal of 2.0V rms to drive it to
full power, or +8 dBu.
This can become problematic as the power
of the amplifier increases. What if you have a
power amp rated at 800W into 8 ohms? This
will require an input signal of 4.0V rms to drive
it to full power. This equates to a whopping
+14.3 dBu! You’ve just robbed your mixer of
10 dB of headroom. You’ll either have to have a
good limiter to keep the transient peaks down,
or turn down the level from the mixer and not
use all the power available from the amplifier.
Constant Sensitivity means that regardless
of the output power of the amplifier, the input
sensitivity of the amplifier (the input voltage
required to attain full output power) remains
the same. As the output power of an amplifier
increases, the gain of the amplifier must also
increase.
Referring back to the previous example, an
amplifier rated at 100W into 8 ohms with a
gain of 26 dB requires an input signal of 1.4V
rms to drive it to full power. It has an input
sensitivity of 1.4V rms. In order for the 200W
amplifier to reach full power into 8 ohms with
a 1.4V rms input signal, it must have a gain of
29 dB. And the 800W amplifier will require a
gain of 35 dB to reach full power with a 1.4V
input signal.
Continued on page 18
17
Page 18

So what are the pros and cons of these two
approaches? The reason some amplifier
manufacturers use the constant gain approach
is because the noise specification looks better.
It’s a fact of physics that as the gain of the
amplifier increases, the circuit noise is amplified
and increases too. By maintaining a constant
gain, the noise spec for an 800W amplifier can
look as good as the noise spec for a 100W amplifier. The downside to this is that you have
to crank up the mixer level feeding the input
of the amplifier, losing headroom and possibly
increasing the noise level from the mixer
(unless you have a Mackie mixer with lownoise VLZ circuitry!).
Conversely, constant sensitivity demands
that as the power increases, so must the gain.
Yes, the output noise of the amplifier will
increase, but you maintain the critical headroom available from your mixer. The noise is
generally not a problem in live sound reinforcement situations. If it is, you can turn down the
GAIN
control a few clicks to find a happy
compromise between noise floor and the
available headroom . As an added benefit, you
can drive multiple amplifiers with the same
signal and get the maximum power available
from all of them.
Mackie subscribes to the philosophy of
constant sensitivity. Our amplifiers can be
driven to full power with an input level of
+4 dBu (1.23V rms).
You may wonder why we
didn’t use just one stereo
control to control both sides.
That’s in case your application requires a left/right
imbalance (due to an irregularly shaped room) or if you’re using the two
sides for completely different purposes (monitor in channel 1 and side-fill in channel 2, for
instance). Besides, they look cool.
METERS
The M•2600’s meters indicate the relative
output level of the amplifier referenced to full
power. The numbers next to the meter’s LEDs
are in dB below full power.
Ideally, the M•2600’s
–20, –9, –6,
LEDs will flicker at normal signal levels, while
OL
LED may flicker occasionally during
the
peak moments.
OL
is short for overload. Overloading, or
clipping, occurs when the output voltage no
longer linearly follows the input voltage and
simply stops. This causes a sine wave to “square
off,” or get “clipped off.” Thus, the term clipping.
Fear not — this scenario is quite unlikely.
GAIN
Even with the
controls fully up, the
M•2600 amplifier easily accepts professional
“+4 dBu” operating levels.
OL
If the
is blinking frequently or
continuously, turn down
the source signal (i.e., the
mixer’s master faders).
and
–3
(Overload) LED
18
FULL SYMMETRY DUAL DIFFERENTIAL HIGH CUR RENT DESIGN
CH
GAIN/dB
CH
1
21
17
11
SENSITIVITY
3v
23
0
0
25
1.23v (+4dBu)
OL
–3
2v
2719
–6
–9
29
–20
31
33
1v
–3
–6
–9
–20
SIGOLSIG
GAIN/dB
21
17
11
SENSITIVITY
3v
23
0
0
25
2719
29
31
33
1v
1.23v (+4dBu)
CH
2
2v
CH
2
1
INTERNAL STATUS
PROTECT
SHORT
TEMP STATUS
CH
1& 2
COLD HOT
Page 19

SIG
SIG
(short for “signal present”) is the lowest
step in the meter
prior to the
GAIN
ladder. It senses the signal
control, so when
SIG
is lit,
you know the M•2600 is receiving signal. If it’s
the only meter LED lit (meaning the other meter
LEDs are not lit), the M•2600 is receiving a
very weak signal (below –20 dB).
PROTECT
If the
PROTECT
output section has shut down. That, of course,
means you won’t hear anything until you rectify
the situation. Three things can cause the
PROTECT
circuit to engage:
• Powering up the M•2600. A built-in delay
circuit saves your speakers (and ears)
from the thumps or pops that can sometimes occur when powering up a system.
During this 4-second delay, the
LEDs light up.
• A short circuit (or near short) in either of
the outputs. Both the
SHORT
LEDs light up.
• The temperature in the M•2600 has risen to
an unsafe level. The
TEMP STATUS HOT
THE VENTILATION PORTS. See
Considerations,”
LEDs are on, the M•2600’s
PROTECT
PROTECT
PROTECT
and the
and the
LEDs light up.
The M•2600 amp draws its
ventilation air in from the
front and out through the
side panels. The amp
needs plenty of fresh air to
stay cool. DO NOT BLOCK
“Thermal
on page 29.
SHORT
If this LED comes on, the M•2600 has detected a short circuit in either of the outputs,
meaning that the positive (+) and negative (–)
speaker wires are touching, or a speaker itself
is shorted out. Such a condition causes the
M•2600 to engage its
PROTECT
(when a signal is present), muting all signals
at the amp’s outputs.
This short-circuit LED is a Mackie exclusive
(until the other guys “borrow” the idea) and
can save precious minutes of your troubleshooting time. Without it, you’d still have
speaker and amp protection (via the
circuit), but you wouldn’t be able to determine
the source of the problem. But with the
LED, the M•2600 comes right out and tells you!
WARNING: The
LEDs indicate an unsafe
condition for the power
amplifier. When the shortcircuit protection is activated, the
lights, then the
PROTECT
about four seconds, the protection circuit turns
off and the amplifier resumes normal operation.
If it senses the shorted condition again, the
cycle repeats until you fix the problem.
Typical causes for a “short” indication would
be either a shorted speaker cable or too many
speakers connected to the amplifier (i.e., the
load impedance is too low). If a “short” is indicated, please check your cables. If the cabling
is OK, then reduce the number of speakers
driven by the amplifier.
mode
PROTECT
SHORT
SHORT
SHORT
LED
LED lights. After
PROFESSIONAL POWER AMPLIFIER
POWER
19
Page 20

Note: When using the amplifier in
BRIDGED
mode, both
SHORT
LEDs will light
under shorted or low impedance conditions.
This is an indication of a problem that requires
further investigation.
TEMP STATUS
TEMP
(short for temperature) is another
feature designed to keep your mind at ease.
COLD
Normally the
the M•2600 is working normally. Under extreme
conditions the amplifier may overheat. You
may ask, “What kind of extreme conditions?”
Overheating problems are usually caused by
one of the following situations: improper ventilation, high ambient temperatures, overdriving
the amplifier into clipping, driving the amplifier
hard into low impedance loads, frayed or partially shorted speaker cables, or defective or
internally shorted speakers.
The heaviest load the M•2600 can tolerate
is 2 ohms per channel (4 ohms in bridged
mode). If you’ve got a set of speakers wired in
parallel, be sure the load isn’t adding up to less
than 2 ohms. Anything below 2 ohms can cause
SHORT
the
PROTECT
LED to light and trigger the
mode.
LED is lit, indicating that
Remember: As the load gets
“heavier,” its value in ohms
goes down. For instance, a
2-ohm speaker load is twice
as “heavy” as a 4-ohm load.
Please see “Do The Math: Ohms, Loads and
Such” in Appendix D to learn about speaker
loads.
As the internal temperature of the amplifier
rises, the fan speed gradually increases. More
air moves through the constant temperature
gradient cooling tunnel to remove additional
heat from the output transistors. However, if
the internal temperature of one of the amplifier channels should exceed 90°C (194°F), the
COLD
LED turns off, the
PROTECT
and its
LED shines. The output of
HOT
LED turns on,
the amplifier is muted — at this point the amplifier is in Standby mode and remains there
until the internal temperature cools off to a
safe level (52°C or 125°F). When this occurs,
HOT
the
the
LED and
COLD
LED turns on and normal operation
PROTECT
LEDs turn off,
resumes.
In the rare event that the transformer gets
too hot, the amplifier will shut down. It will not
come back on until the transformer has cooled
sufficiently, which can take an hour or so.
HOT
Be Aware: If the
LED
comes on frequently or the
transformer ever thermals
out, something is overworking the M•2600 or it’s
not properly ventilated.
Look at each of the “extreme conditions” described on this page and try to determine what
is causing the amplifier to overheat. Refer to
“Thermal Considerations” on page 29 and
“Troubleshooting” on page 32.
20
120 VAC 60 Hz
2000 WATTS
CAUTION
RISK OF ELECTRIC SHOCK
DO NOT OPEN
CONCEIVED AND DESIGNED BY MACKIE DESIGNS INC • WOODINVILLE
WA • 98072 • USA • PATENTS PENDING • COPYRIGHT ©1998
• THE FOLLOWING ARE REGISTERED TRADEMARKS OF MACKIE DESIGN INC.: "MACKIE", "FR SERIES", AND THE "RUNNING MAN" FIGURE •
CH
1
WARNING:
TO REDUCE THE RISK OF FIRE OR ELECTRIC SHOCK, DO NOT
EXPOSE THIS EQUIPMENT TO RAIN OR MOISTURE. DO NOT REMOVE COVER.
NO USER SERVICEABLE PARTS INSIDE. REFER SERVICING TO QUALIFIED PERSONNEL.
AVIS:
RISQUE DE CHOC ELECTRIQUE — NE PAS OUVRIR
1300 WATTS / CH
2 OHM LOAD MIN.
MONO
BRIDGE
+
+
–
+
SERIAL NUMBER
CH
2
MANUFACTURING DATE
2600 WATTS
4 OHM LOAD MIN.
MONO
BRIDGE
––
PIN 1+ CH1+
–
–
PIN 1
CH1
PIN 2+ & 2–NOT USED
SPEAK ER OUTPUTS
CAUTION
LETHAL VOLTAGES MAY APPEAR AT OUTPUT
TERMINALS. CLASS 1 WIRING IS REQUIRED
PIN 1+ CH2+
–
–
CH2
PIN 1
PIN 2+ & 2–NOT USED
PIN 1+ BRIDGE +
–
BRIDGE
PIN 1
PIN 2+ & 2–NOT USED
–
Page 21

What’s that? Why doesn’t the
fan just go fast all the time?
Well, if it did, you might actually hear it whirring during
your quiet moments (there
are quiet moments in your
life, aren’t there?). While this whirring would
be of no concern in most live-sound situations,
it could become annoying in a control room
environment. So, when the M•2600 is not working hard, the fan goes slow; when the music
gets loud and puts the amp to work, the fan
goes faster, and faster still if the heatsink
temperature keeps rising.
POWER
To turn on the amplifier, push the top half of
the
POWER
soothing green light adjacent to it glows. To
turn the amp off, push the lower half. It’ll click
again and the green light will extinguish.
When you power up the M•2600, an in-rush
limiting circuit limits the turn-on current and
prevents you from popping the house circuit
breakers. After about a second, a relay clicks,
defeating this in-rush circuit, meanwhile builtin output muting relays prevent any pops or
thumps from being transmitted to the speakers.
Be sure the signal driving the amplifier is turned
down when you first power up the system.
There are few things as rude as four seconds
of silence followed by full-blast stereo sound,
especially when the baby is sleeping.
switch. It clicks into place and a
When you shut down your
system, turn off your amplifiers first. When powering
up, turn on your amplifiers
last. This way, equipment
feeding the amp won’t
“pop” or “thud” the speakers during power up
or power down.
POWER CORD
We all know what a power cord is. The
M•2600 has a detachable cord. Attach it to the
amplifier first, then plug it into an AC outlet
properly configured for the type of plug on the
power cord and for the voltage rating of your
amplifier.
The M•2600’s voltage
source must be capable of
continuously delivering 20
amps at 120 VAC (9 amps
for 240 VAC models and 14
amps for 100 VAC models).
For safety reasons, the source must be a 3-prong
outlet with hot, neutral, and ground terminals.
We’re dealing with some big-time electricity
here — don’t mess with it. See “AC Power Considerations” on page 29, and carefully read and
follow all the safety instructions at the start of
this manual.
1
CHANNEL
INPUT
BALANCED
OR
UNBALANCED
IN
THRU
LOW CUT FILTER
TYPICAL
35 Hz
R
E
F
O
O
W
B
U
S
170 Hz
OFF
SWITCHED OUTPUT
STAGE
MONITOR
100 Hz
60Hz
THRU
CROSSOVER
90Hz
LOW
OUT
HIGH
OUT
120Hz
AMP MODE
STEREO
TYPICAL
O
N
O
M
B
CH's
SUMMED
OUTPUT APPLICAT ION
(CH1 & CH2)
FULL
RANGE
ON
TYPICAL
LIMITER
OFF
LOW OUT
(SUB WOOFER)
CHANNEL
CROSSOVER
60Hz
HIGH
OUT
90Hz
LOW
OUT
D
E
G
ID
R
LOW CUT FILTER
120Hz
O
O
W
B
U
S
THRU
SWITCHED OUTPUT
TYPICAL
35 Hz
R
E
F
MONITOR
170 Hz
OFF
UNBALANCED
STAGE
100 Hz
THRU
INPUT
BALANCED
OR
IN
2
21
Page 22

SPEAKER OUTPUTS
The binding posts provide a secure and safe
connection for bare speaker wire.
To use the binding post outputs, unscrew
them enough to reveal the holes on their sides,
then insert your stripped wires (stripped about
3/8" back) into the holes and retighten the posts
(finger tight is fine — please don’t reef on them
with a wrench!). Be careful that no runaway
strands touch the chassis or other terminals.
The red posts are labeled “+,” which means
positive. The black posts are labeled “–” for
negative. You probably know the importance of
getting these terms correct — if one side is
hooked up “in phase” and the other side is “out
of phase,” you’ll be “out of work.” (By the way,
although everyone says “phase” in this situation, the correct word is “polarity”... but it’s not
as much fun to say.)
Using high-quality stranded speaker cable
(14 gauge or thicker), connect the positive
outputs of the M•2600 to the positive inputs of
your speakers, and the negative outputs to the
negative inputs. The exception: If you’re using
the M•2600 in
BRIDGED
not apply (see page 26).
mode, this does
If you are using stripped
speaker wire, make sure its
insulation is not stripped
any further back than 3/8”
(9.5mm), to avoid the
chance of a shock hazard.
In addition to binding posts, the M•2600 also
has Speakon®
SPEAKER OUTPUTS
, so you can
use speaker cables with Speakon connectors.
These locking connectors are easy to attach
and are capable of handling high currents and
low impedance loads. Pin 1+ is positive (+)
and pin 1– is negative (–). They’re wired in
parallel with the binding posts and behave
exactly the same (there is a separate Speakon
output if you are using
BRIDGED
mode).
You can use Speakons and
the binding posts simultaneously. Just remember
that doing so creates two
parallel loads. Please see
“Do The Math: Ohms, Loads
and Such” in Appendix D to learn about
speaker loads.
The M•2600 is capable of
high voltage output at the
binding post and Speakon
connectors. Great care
should be taken to avoid
this potential shock hazard:
• Treat the speaker wires with respect, as
you would any live power cord.
• Before you make any connections or
reconfigure any signal routing, turn the
controls down, turn the
make the changes, turn the
and then turn the
GAIN
POWER
POWER
controls back up.
GAIN
off,
back on,
22
120 VAC 60 Hz
2000 WATTS
CAUTION
RISK OF ELECTRIC SHOCK
DO NOT OPEN
CONCEIVED AND DESIGNED BY MACKIE DESIGNS INC • WOODINVILLE
WA • 98072 • USA • PATENTS PENDING • COPYRIGHT ©1998
• THE FOLLOWING ARE REGISTERED TRADEMARKS OF MACKIE DESIGN INC.: "MACKIE", "FR SERIES", AND THE "RUNNING MAN" FIGURE •
CH
1
WARNING:
TO REDUCE THE RISK OF FIRE OR ELECTRIC SHOCK, DO NOT
EXPOSE THIS EQUIPMENT TO RAIN OR MOISTURE. DO NOT REMOVE COVER.
NO USER SERVICEABLE PARTS INSIDE. REFER SERVICING TO QUALIFIED PERSONNEL.
AVIS:
RISQUE DE CHOC ELECTRIQUE — NE PAS OUVRIR
1300 WATTS / CH
2 OHM LOAD MIN.
MONO
BRIDGE
+
+
–
+
SERIAL NUMBER
CH
2
MANUFACTURING DATE
2600 WATTS
4 OHM LOAD MIN.
MONO
BRIDGE
––
PIN 1+ CH1+
–
–
PIN 1
CH1
PIN 2+ & 2–NOT USED
SPEAK ER OUTPUTS
CAUTION
LETHAL VOLTAGES MAY APPEAR AT OUTPUT
TERMINALS. CLASS 1 WIRING IS REQUIRED
PIN 1+ CH2+
–
–
CH2
PIN 1
PIN 2+ & 2–NOT USED
PIN 1+ BRIDGE +
–
BRIDGE
PIN 1
PIN 2+ & 2–NOT USED
–
Page 23

Ordinarily, applying a positive
voltage to a speaker’s positive
input and negative voltage to
the negative input results in
an outward excursion of the
woofer. But some woofers are
built with reverse polarity, meaning that the
above conditions result in an inward excursion.
If you’re not sure which type of speakers you
have, take a look at their literature. If you’re
still not sure, here is a simple test: remove the
speaker wires from the back of the speakers,
then take a 1.5V flashlight battery and connect
the positive terminal of the battery to the positive (+) input of the speaker, and connect the
negative terminal of the battery to the negative
(–) input of the speaker. Observe the motion of
the speaker cone. It should move out when voltage is applied, and return to rest when voltage
is removed. Make sure all the speakers in the
system move in the same direction (there are
a few exceptions — some speakers are deliberately designed with reverse-polarity woofers).
INPUT
The M•2600 amplifier gives you a choice —
it has the traditional XLR inputs, as well as 1/4"
TRS (tip-ring-sleeve) input jacks. Sonically
(and electrically) they’re identical, so choose
either one, but do not use both at the same
time to send signals into the M•2600.
Each can be used with either balanced or
unbalanced signals.
When connecting a balanced signal using the
XLR or 1/4" jacks, they’re wired as shown, per
AES (Audio Engineering Society) standards:
XLR TRS
Hot (+) Pin 2 Tip
Cold (–) Pin 3 Ring
Shield (Ground) Pin 1 Shield
SLEEVERING
TIP
Balanced 1/4" TRS Plug
Unbalanced TS (tip-sleeve) lines can be
accommodated via the TRS jack. Make sure the
cord terminates with a TS plug (like a guitar
plug), or if it’s a TRS plug (like a headphone
plug), make sure the ring is tied to the shield,
preferably at the source.
SLEEVE
TIP
Unbalanced 1/4" TS Plug
TIPSLEEVE
RING
RING (COLD)
TIP (HOT)
SLEEVE (SHIELD)
TIPSLEEVE
RING (COLD)
TIP (HOT)
SLEEVE (SHIELD)
1
CHANNEL
INPUT
BALANCED
OR
UNBALANCED
IN
THRU
LOW CUT FILTER
TYPICAL
35 Hz
R
E
F
O
O
W
B
U
S
170 Hz
OFF
SWITCHED OUTPUT
STAGE
MONITOR
100 Hz
60Hz
THRU
CROSSOVER
90Hz
LOW
OUT
HIGH
OUT
120Hz
AMP MODE
STEREO
TYPICAL
O
N
O
M
B
CH's
SUMMED
OUTPUT APPLICAT ION
(CH1 & CH2)
FULL
RANGE
ON
TYPICAL
LIMITER
OFF
LOW OUT
(SUB WOOFER)
CHANNEL
CROSSOVER
60Hz
HIGH
OUT
90Hz
LOW
OUT
D
E
G
ID
R
LOW CUT FILTER
120Hz
F
O
O
W
B
U
S
THRU
SWITCHED OUTPUT
E
OFF
R
TYPICAL
35 Hz
170 Hz
STAGE
MONITOR
100 Hz
UNBALANCED
THRU
INPUT
BALANCED
OR
IN
2
23
Page 24

You can connect an unbalanced XLR cable
to the M•2600, although this would be unusual
— as unusual as an unbalanced XLR output.
However, if you have an unbalanced XLR
connection to make, refer to the “Connectors”
section (Appendix B) at the back of this
manual for more information.
HOT
2
HOT
1
3
1
3
2
1
2
SHIELD
COLD
HOT
SHIELD
COLD
SHIELD
COLD
3
Balanced XLR Connectors: Apollo/Soyuz Rendezvous
The M•2600 amp expects to see a nominal
signal level anywhere between the –10 dBV
“semipro” and +4 dBu “pro” standards, meaning almost any line-level mixer or other device
INPUT
can be plugged into the amp’s
GAIN
the
controls to adjust the gain of the
s. Use
amplifier to match the signal level you’re using.
THRU and THRU SWITCH
Someday you’ll do a show at NudeStock and
realize that one M•2600 amplifier is just not
going to do the job — you’ll need a six-foothigh rack full of ’em to hide behind. That’s
THRU
what the
of operation, depending on the setting of the
THRU
switch :
THRU
•
the amplifier, nothing added or taken
away from your big finish on spoons.
LOW OUT
•
below the frequency set by the
CROSSOVER
HIGH OUT
•
above the frequency set by the
CROSSOVER
jack is for. It has three modes
, a straight copy of what’s going into
, the lower frequencies only,
switch .
, the higher frequencies only,
switch .
Note that the
and
HIGH OUT
LOW OUT
are also af-
fected by the setting of the
LOW CUT FILTER
.
THRU
To use the
source equipment into the first amp’s
as usual, then patch from that amp’s
jacks to the next amp’s
outputs, connect your
INPUTs
INPUTs
, and so on,
THRU
daisy-chaining as many amps as you want for
your application.
A general rule of thumb is to
maintain a load impedance
10 times or more than the
source impedance to prevent
excessive loading. If your
console has an output impedance of 100 ohms, then you can daisy-chain
up to twenty M•2600 amplifiers, which presents
a load of 1200 ohms to the console (input
impedance of 24 kohms divided by 20 amplifiers
= 1200 ohms).
THRU
The
jacks can also be used to relay
the signal on to other devices such as a DAT or
cassette recorder, enabling you to record exactly
what the audience is hearing. In the
position of switch , the
THRU
wired straight from the XLR and TRS
— so the signal coming out of the
THRU
jacks are
INPUTs
THRU
jacks
is exactly the same as the signal going into the
amplifier.
You can also use the 1/4"
INPUT
TRS
jacks as
THRU
jacks, (not affected by
switch
or by the
CUT FILTER
the 1/4" TRS
on the first amplifier to the TRS 1/4"
LOW
). Connect
INPUT
jacks
INPUT
jacks on the second amplifier using 3-conductor
shielded cables with TRS plugs on both ends.
Warning: If you use a regular guitar cord with
2-conductor TS plugs, you’ll unbalance the signal at the XLR input by grounding the low side
(–) of the signal (pin 3).
LOW CUT FILTER
Every woofer has frequency response specifications. It’s usually expressed in Hertz (or cycles
per second), like “40Hz–300Hz.” The “40Hz”
refers to the low-frequency point (usually, but
not always) where the speaker’s output drops
by 3 dB, and will “roll off” completely as the frequency goes down. There is no point in sending
a woofer any frequencies it can’t reproduce —
you can’t hear it, and worse yet, it’s a waste
of amplifier power that can be better used
reproducing frequencies you can hear.
24
Page 25

k
5
dB
0
dB
–5
dB
Level, dB
–10
dB
–15
dB
1
Hz
10
Hz
100
Hz
1k
Hz
Frequency, Hz
Low Cut Filter Frequency Response
In order to match the output bandwidth
with your particular speaker system, the
M•2600 amplifier has a tunable
. The frequencies are marked along the
FILTER
knob’s travel
:
LOW CUT
• Fully counterclockwise, the frequency is
below 10Hz, effectively bypassing the filter.
• Center detent is
35Hz
and labeled
TYPICAL
since precious few woofers actually go
below that.
• 3/4 of the way up is labeled
TOR, 100Hz
, perfect for stage monitors
STAGE MONI-
(they seldom reproduce below 100Hz;
besides, it prevents low-frequency “leakage”
into the house).
170Hz
• Fully clockwise is labeled
.
So, grab your woofer’s spec sheet and find
the low roll-off spec. Then set the M•2600’s
LOW CUT FILTER
at the same frequency.
If you do this correctly (and make sure the
meters
are happy), you’ll never again see
your woofer moving sporadically without audible signal. Your system will play louder and
cleaner, and you may never blow another
woofer again!
10kHz20
CROSSOVER SWITCH
This three-way switch allows you to set the
120Hz
CROSSOVER
. This affects
crossover point of the internal
to either
60Hz, 90Hz
or
two things:
THRU
• The
output , if the
switch is set to
LOW OUT
THRU
or
HIGH OUT.
• The
SPEAKER OUTPUTS
OUTPUT APPLICATION
set to
LOW OUT
. The amplifier then
, if the
switch is
plays the frequency range below the
crossover point.
both the
,
OUTPUTS
Note: The
LOW CUT FILTER
THRU
outputs and the
in the cases above.
affects
SPEAKER
AMP MODE SWITCH
This three-way switch, along with the
OUTPUT APPLICATION
what kind of amplifier you want the M•2600 to
be (or not to be — what was the question?).
AMP MODE
The
put signal routing within the M•2600 amplifier.
Shipped from the factory, the switch is set to
STEREO
. This is correct for about 90% of the
applications using an amp like this (hence the
TYPICAL
indicator near it). But you may be in
the 10% bracket, requiring special input routing
within the amp.
AMP MODE
should always be configured
before operation, with the amplifier turned off.
switch , determines
switch determines the in-
1
CHANNEL
INPUT
BALANCED
OR
UNBALANCED
IN
THRU
LOW CUT FILTER
TYPICAL
35 Hz
R
E
F
O
O
W
B
U
S
170 Hz
OFF
SWITCHED OUTPUT
STAGE
MONITOR
100 Hz
60Hz
THRU
CROSSOVER
90Hz
LOW
OUT
HIGH
OUT
120Hz
AMP MODE
STEREO
TYPICAL
O
N
O
M
B
CH's
SUMMED
OUTPUT APPLICAT ION
(CH1 & CH2)
FULL
RANGE
ON
TYPICAL
LIMITER
(SUB WOOFER)
OFF
LOW OUT
CHANNEL
CROSSOVER
60Hz
HIGH
OUT
90Hz
LOW
OUT
D
E
G
ID
R
LOW CUT FILTER
120Hz
F
O
O
W
B
U
S
OFF
THRU
SWITCHED OUTPUT
E
R
TYPICAL
35 Hz
170 Hz
STAGE
MONITOR
100 Hz
UNBALANCED
THRU
INPUT
BALANCED
OR
IN
2
25
Page 26

STEREO
mode (separate left and right
inputs, separate left and right outputs) is the
typical setup for amplifying stereo signals.
MONO
mode (sometimes called DualMono — one or two inputs, two mono outputs)
is for sending a mono signal to two different
speaker sets, with separately-adjustable
GAIN
controls.
BRIDGED
mode (sometimes called
Bridged-Mono — one or two inputs, one mono
output) uses both sides of the amp to send
great power to one speaker.
BRIDGED
In
STEREO
Amplifier can deliver 1300 watts per side into
2 ohms. If that’s not enough, you can use two
M•2600’s, each in
2600 watts per amplifier into 4 ohms. Or, you
can use one amp in
monaural system. Finally,
also popular for subwoofer applications — but
please see
28 for a special subwoofer surprise.
To use all the M•2600’s power to drive one
speaker using
1. Turn off the power to the M•2600.
2. Set the
3. The
to be wired as follows :
mode, the M•2600 Power
BRIDGED
BRIDGED
mode, and deliver
mode to power a
BRIDGED
LOW OUT (SUBWOOFER)
BRIDGED
AMP MODE
BRIDGED
mode:
switch to
mode requires the speaker
mode is
on page
BRIDGED.
Connect the positive side of the speaker
cable to the Channel 1 red (+) binding post.
Connect the negative side of the speaker
cable to the Channel 2 red (+) binding post.
4. Instead of the binding posts, you could use
the
MONO BRIDGE
Speakon connector.
Pin 1+ connects to your speaker red post
(positive +).
Pin 1– connects to your speaker black post
(negative –).
MONO or BRIDGED
5. In
mode, you can use
either Channel 1 input, or Channel 2, or
both. If both inputs are used, the inputs are
summed.
Once again: Before making connections to
an amp or reconfiguring an amp’s routing, turn
the power off, make the changes, then turn the
power back on.
BRIDGED
In
mode, both
connections to your
speaker are live; that is,
neither is grounded
through the chassis. Take
great care to read and fol-
low all of the safety instructions. The amplifier
is capable of up to 116 VAC across the speaker
terminals, potentially LETHAL!
26
120 VAC 60 Hz
2000 WATTS
CAUTION
RISK OF ELECTRIC SHOCK
DO NOT OPEN
CONCEIVED AND DESIGNED BY MACKIE DESIGNS INC • WOODINVILLE
WA • 98072 • USA • PATENTS PENDING • COPYRIGHT ©1998
• THE FOLLOWING ARE REGISTERED TRADEMARKS OF MACKIE DESIGN INC.: "MACKIE", "FR SERIES", AND THE "RUNNING MAN" FIGURE •
CH
1
WARNING:
TO REDUCE THE RISK OF FIRE OR ELECTRIC SHOCK, DO NOT
EXPOSE THIS EQUIPMENT TO RAIN OR MOISTURE. DO NOT REMOVE COVER.
NO USER SERVICEABLE PARTS INSIDE. REFER SERVICING TO QUALIFIED PERSONNEL.
AVIS:
RISQUE DE CHOC ELECTRIQUE — NE PAS OUVRIR
1300 WATTS / CH
2 OHM LOAD MIN.
MONO
BRIDGE
+
+
–
+
SERIAL NUMBER
CH
2
MANUFACTURING DATE
2600 WATTS
4 OHM LOAD MIN.
MONO
BRIDGE
––
PIN 1+ CH1+
–
–
PIN 1
CH1
PIN 2+ & 2–NOT USED
SPEAK ER OUTPUTS
CAUTION
LETHAL VOLTAGES MAY APPEAR AT OUTPUT
TERMINALS. CLASS 1 WIRING IS REQUIRED
PIN 1+ CH2+
–
–
CH2
PIN 1
PIN 2+ & 2–NOT USED
PIN 1+ BRIDGE +
–
BRIDGE
PIN 1
PIN 2+ & 2–NOT USED
–
Page 27

OUTPUT APPLICATION SWITCH
The
OUTPUT APPLICATION
switch should
be configured before you turn on the amplifier.
This switch allows you to choose between three
different configurations:
LIMITER ON (TYPICAL)
. This is the
normal configuration: full-bandwidth audio
with protective limiting.
LIMITER OFF
is also full bandwidth
audio, but without protective limiting.
LOW OUT (SUBWOOFER)
mode, with
built-in low-pass filter, but no protective
limiting.
LIMITER ON, LIMITER OFF
The
LIMITER
to alter your sound — it’s
just there to protect your
speakers from the effects of
clipping. Its effect is virtually
transparent, meaning you
probably won’t even notice any audible difference.
We recommend that you leave it engaged, hence
TYPICAL
the
label below the ON setting.
If you’re working at quiet levels all the time,
or you’ve already placed a compressor/limiter
in the signal path, or if you just hate compression,
you can leave the
LIMITER
is not designed
off.
The
LIMITER
works independently on each
channel. It senses when the amplifier channel
is about to be overdriven and attenuates the
overall level just enough to keep the signal
from clipping. Clipping occurs when the output
voltage no longer linearly follows the input
voltage and simply stops. This causes a sine
wave to “square off,” and the average power
going into the speaker is roughly double that
of a sine wave. Square waves sound awful, and
could possibly damage your tweeters and your
reputation.
The
LIMITER
is especially handy when
you’re working with loud output levels. Having
the signal spikes (kick drum, for instance)
attenuated a bit can actually increase the
apparent loudness of the overall mix without
diminishing the “power” behind the spikes.
Be Forewarned: With the
LIMITER
engaged,
you can still overdrive the amplifier into clipping
and cause distortion. It just takes a stronger
signal to do it. So even with the
LIMITER
turned on, you should still pay close attention
to the front panel
OL
LEDs , especially if
you are hearing distortion or your speakers
start smoking (which is bad for their health).
1
CHANNEL
INPUT
BALANCED
OR
UNBALANCED
IN
THRU
LOW CUT FILTER
TYPICAL
35 Hz
R
E
F
O
O
W
B
U
S
170 Hz
OFF
SWITCHED OUTPUT
STAGE
MONITOR
100 Hz
60Hz
THRU
CROSSOVER
90Hz
LOW
OUT
HIGH
OUT
120Hz
AMP MODE
STEREO
TYPICAL
O
N
O
M
B
CH's
SUMMED
OUTPUT APPLICAT ION
(CH1 & CH2)
FULL
RANGE
ON
TYPICAL
LIMITER
(SUB WOOFER)
OFF
LOW OUT
CHANNEL
CROSSOVER
60Hz
HIGH
OUT
90Hz
LOW
OUT
D
E
G
ID
R
LOW CUT FILTER
120Hz
F
O
O
W
B
U
S
OFF
THRU
SWITCHED OUTPUT
E
R
TYPICAL
35 Hz
170 Hz
STAGE
MONITOR
100 Hz
UNBALANCED
THRU
INPUT
BALANCED
OR
IN
2
27
Page 28

LOW OUT (SUBWOOFER)
Here’s a special surprise: If you bought the
M•2600 amplifier to power a subwoofer system,
you just saved yourself the cost of a crossover!
The M•2600 amp has an active crossover built
in. The amplifier can play the frequencies
below the crossover point set with the
switch .
OVER
5
dB
0
dB
–5
dB
–10
dB
–15
dB
20
Hz
100
Hz
1k
Hz
Crossover settings.
Here’s how to configure it:
1. Turn the M•2600’s
2. Set the
to
OUTPUT APPLICATION
LOW OUT (SUBWOOFER).
POWER
3. Select a crossover point, via the
switch : At
OVER
120Hz
low sub-harmonics on up to the audible
90Hz,
bass range. At
subwoofer range. At
you’ll get the standard
60Hz
you’ll get the
lowest frequencies, more to be felt than
heard. You’ll probably want to try this
switch each way.
4. Make sure the
OFF
or nearly
LOW CUT FILTER
OFF
. If it is turned up above
the crossover frequency, the output from the
amplifier will be greatly diminished.
CROSS-
10kHz20k
off.
switch
CROSS-
, you’ll get the
is set to
5. Set the
MONO,
AMP MODE
or
BRIDGED
to either
, depending on your
application. These three modes operate as
usual with
LOW OUT (SUBWOOFER)
activated, except the speakers just get the
lower frequencies.
6. Connect your cords and speaker cables as
required (see the examples on pages 13-16).
7. Turn the M•2600’s
POWER
If you want to use a second M•2600 or an
M•1400i to reproduce the rest of the audio
range, follow this procedure:
THRU
1. Connect the
subwoofer amplifier to the
jacks on the first
INPUT
on the second amplifier.
Hz
2. Set the
subwoofer amplifier to the
THRU
switch on the first
HIGH OUT
position.
3. With
POWER
TION
FULL RANGE (LIMITER
off, set the
OUTPUT APPLICA-
switch on the second amplifier to
either ON or
The first amplifier will play the frequency
range below the crossover point, and the second
amplifier will play the frequency range above it.
See the diagrams and further information on
pages 13–16. As a general rule, use your biggest
amplifier to power the subs.
STEREO,
on. Woof!
jacks
OFF
).
1
CHANNEL
INPUT
BALANCED
OR
UNBALANCED
IN
28
THRU
LOW CUT FILTER
TYPICAL
35 Hz
R
E
F
O
O
W
B
U
S
170 Hz
OFF
SWITCHED OUTPUT
STAGE
MONITOR
100 Hz
60Hz
THRU
CROSSOVER
90Hz
LOW
OUT
HIGH
OUT
120Hz
AMP MODE
STEREO
TYPICAL
O
N
O
M
B
CH's
SUMMED
OUTPUT APPLICAT ION
(CH1 & CH2)
FULL
RANGE
ON
TYPICAL
LIMITER
(SUB WOOFER)
OFF
LOW OUT
CHANNEL
CROSSOVER
60Hz
HIGH
OUT
90Hz
LOW
OUT
D
E
G
ID
R
LOW CUT FILTER
120Hz
F
O
O
W
B
U
S
THRU
SWITCHED OUTPUT
TYPICAL
35 Hz
R
STAGE
E
MONITOR
100 Hz
170 Hz
OFF
THRU
BALANCED
UNBALANCED
2
INPUT
OR
IN
Page 29

GENERAL PRECAUTIONS AND CONSIDERATIONS
RACK MOUNTING and THERMAL
CONSIDERATIONS
The M•2600 is a high-power amplifier, and
special consideration to ventilation cannot be
ignored:
• The amplifier must only be installed in a
rack. It requires three rack space units
(3 U = 5.2"). It also requires 16.7" depth
inside the rack, including the rear
supports.
• There must be a minimum of 1 empty
rack space (1-3/4”, 35mm) above and
below.
• The rear of the rack should be unob-
structed and placed no closer than 10”
(254mm) from walls or other large
obstructions or roadies.
• Air is pulled into the amplifier from the
front, so there should be no obstruction
within 24” (610mm) of the rack’s front.
• Hot air from the main heatsink is
exhausted from the ventilation holes on
each side of the amplifier. A spacing of
2” (51mm) or greater between the sides
of the amplifier and the sides of the rack
is recommended. This spacing is common in most racks designed for permanent installation, and in most shock
mounted road cases.
• We recommend a shock mounted road
case for extensive touring with this
amplifier, for thermal as well as mechanical considerations.
When designing your rack, put the heavier
items at the bottom and the lighter items toward the top.
Secure the front panel of the amplifier to
the front of the rack using eight screws with
soft washers to prevent scratching the panel.
In addition, because of the weight of the amplifier, you must secure the rear support brackets
of the amplifier to the back of the rack. You
could use a support rail or shelf across the
back of the rack, or angle brackets attached
between the rear support brackets and the rear
rails of the rack. This is recommended for all
components mounted in a rack that is going to
be moved frequently.
In the unlikely event of the amplifier overheating, you might consider leaving 2 rack
spaces between amplifiers, or using extra cooling fans in the rack.
AC POWER CONSIDERATIONS
Be sure the M•2600 is plugged into an outlet
that is able to supply the correct voltage specified for your model. If the voltage should drop
below 97% of the line voltage, the M•2600 will
no longer be able to supply rated power. (It will
continue to operate down to 63% of the rated
voltage, but won’t reach full power.)
Under typical conditions, reproducing music
where musical peaks are just below clipping, the
M•2600 draws the following average currents:
Amplifier Loading Average current
2Ω per side or 4Ω bridged 18A
4Ω per side or 8Ω bridged 12A
8Ω per side or 16Ω bridged 7A
(Based on use of amplifier on 120 VAC line)
When heavily loaded, the
M•2600 can pull a considerable amount of current
from the AC power line.
Because of the high cur-
rent demand, the power
cord of the USA model is terminated into a 20A
plug (NEMA 5-20P). A similar 20A rated receptacle is required to power the amplifier
(NEMA 5-20R).
The following table shows how many amplifiers can be plugged into the same 20 or 30
amp service. This is for typical conditions,
reproducing rock music where musical
peaks are just below clipping.
Amplifier Loading Max. # amps Max. # amps
(120 V model) on 20A service on 30A service
2Ω per side or 4Ω bridged 1* 1
4Ω per side or 8Ω bridged 1 2
8Ω per side or 16Ω bridged 2 3
(*May cause nuisance tripping of breakers
under very high output / heavy loading conditions. This table refers to 120V AC line. Other
models are equipped with a power cord and
plug appropriate for the local voltage).
NEVER bypass the plug’s
ground pin. This is
dangerous !
G
NEMA 5-20P
(Plug supplied with
120 VAC models)
G
NEMA 5-20R
(120 VAC, 20Amp
Receptacle)
29
Page 30

It is recommended that a
stiff supply of AC power be
used because the amplifier
places high current demands
on the AC line. The more
power that is available on the line, the louder
the amplifier will play and the more peak output
power will be available for cleaner, punchier
bass. A suspected problem of “poor bass performance” is often caused by a weak AC supply to
the amplifier.
The M•2600 has an in-rush limiting circuit
and relay that will prevent popping the house
circuit breakers during turn-on. You should still
avoid turning on all of your amplifiers at the
same time. Rather, turn them on one at a time.
AC Power Distribution
The majority of AC outlets encountered in
homes and clubs (in the U.S.) are served by a
240VAC center-tapped service entrance transformer. This provides two phases of AC power
on either side of the center tap, at 120V each.
In order to minimize ground loops, the safety
grounds for all the outlets should be connected
to a common (“star”) grounding point, and the
distance between the outlets and the common
grounding point should be as short as possible.
If lighting is used in a show, it is preferable
to power the lights from one leg of the service,
and power the audio equipment from the other
leg. This will help minimize noise from the
lights coupling into the audio (particularly if
SCRs are used).
When setting up for a show, oftentimes you
are plugging into an AC power distribution system you know nothing about. You may even be
faced with 2-wire outlets that are missing the
third safety ground pin. It’s a good idea to have
a three-wire AC outlet tester in your toolbox so
you can check the outlets yourself to make
sure they are wired correctly. These testers will
tell you if the polarity of the hot and neutral
wires is reversed and if the safety ground is
disconnected. Don’t use an outlet if it is wired
improperly! This is to protect yourself as well
as your equipment.
HIGH VOLTAGE POWER LINE
PRIMARY
WINDING
120V
120V
240V
SECONDARY
WINDING
INPUT WIRING
Use a high-quality 3-conductor shielded
cable to connect the signal between the signal
source (mixing console, equalizer, etc.) and
the balanced inputs to the amplifier. If you’re
using the unbalanced inputs, use a high-quality
2-conductor shielded cable. Your Mackie
Dealer can recommend a suitable cable for
your application.
If you want to roll your own, refer to the
“Connectors” section in Appendix B.
OUTPUT WIRING
Use heavy gauge, CLASS 1, stranded wire for
connecting speakers to the M•2600
amplifier’s
SPEAKER OUTPUT
the distance between the amplifier and the
speakers increases, the thickness of the wire
should also increase. Speaker wire has resistance, and when electricity passes through a
resistor, power is lost. The thicker the wire,
the less resistance it offers and the more power
actually gets to the speakers.
The wire thickness is rated in gauges. Use
the chart below to determine the correct gauge
of wire to use according to the distance between
the speakers and the amplifier, and the impedance of the load the amplifier is driving. This
ensures that the power lost across the speaker
wire is less than 0.5 dB.
Load Gauge of
Wire Length Impedance Wire
Up to 25 ft. 2Ω 14 gauge
4Ω 14 gauge
8Ω 14 gauge
Up to 40 ft. 2Ω 12 gauge
4Ω 12 gauge
8Ω 14 gauge
Up to 60 ft. 2Ω 10 gauge
4Ω 12 gauge
8Ω 14 gauge
Up to 100 ft. 2Ω 8 gauge
4Ω 10 gauge
8Ω 14 gauge
Up to 150 ft. 2Ω 6 gauge
4Ω 8 gauge
8Ω 12 gauge
Up to 250 ft. 2Ω 4 gauge
4Ω 6 gauge
8Ω 10 gauge
terminals. As
TRANSFORMER
240V Center-Tapped Secondary
30
EARTH
GROUND
(NEUTRAL)
Page 31

70V DISTRIBUTION SYSTEMS
R
A distributed sound system uses a constantvoltage, high-impedance network that feeds a
number of tapped transformers which, in turn,
deliver power to individual speakers. Each tap
is rated in watts, so you can select the amount
of power delivered to the speaker. Developed
for distributed paging and public address systems,
one benefit of such a system is that it eliminates
complicated impedance calculations when setting up a multi-speaker system. You just add
up the total wattages of all the speakers in the
system and make sure that it doesn’t exceed the
total power rating of the amplifier (allowing at
least 10% for insertion losses). Another benefit
is that by using high voltage and low current,
losses in the speaker distribution wiring are kept
to a minimum. Standard voltage levels include
25V, 70V, and 100V, but 70V systems (actually
70.7V) are most commonly used in commercial
sound distribution systems in the U.S.
Because of the high power capability of the
M•2600 amplifier, it can be used to directly
drive 70V constant-voltage distribution systems
without the use of a step-up transformer.
STEREO
In
, into a nominal 70V system, the
M•2600 output can produce a maximum of 500
watts into 8 ohms (equal to 63V). Since this is
less than 70.7V, you can recalculate the actual
power delivered to each tap by multiplying the
tap’s rated wattage by a correction factor (K).
The correction factor is P
1/P2
, where P1 is the
power delivered by the amplifier into 8 ohms,
2
is the power delivered by 70.7V into 8
and P
ohms (625W).
M•2600: K = 500W/625W = 0.8. Thus, a
2.5W tap becomes 2W, a 5W tap becomes 4W
and a 10 W tap becomes 8W.
CAUTION: A characteristic of many tapped
transformers is that they saturate at very low
frequencies, which causes their impedance to
decrease, approaching the DC resistance of the
copper wire. This can result in overloading the
amplifier if the signal contains lots of low frequencies. When using an M•2600 amplifier in a 70V
distribution system, set the
LOW CUT FILTER
to 100Hz or higher. In addition, install an RC
network at the
SPEAKER OUTPUT
of the am-
plifier, as shown in the figure below.
We recommend that you
do not use the M•2600 in
BRIDGED
mode with a 70V
system, as it can produce
up to 1700 watts into 8
ohms, or 116V. This may
saturate the small 70V transformers. Use the
STEREO
or
MONO
mode instead, and you can
run one or two separate 70V lines.
M•2600
POWER AMPLIFIER
IN STEREO MODE
+
CH 1
RC NETWORK
C1 C2
++
R1
–
RC NETWORK VALUES
C1 = C2 = 680µF @ 250V
R1 = 4Ω @ 100W
Note: You can substitute
a single capacitor for C1/C2.
C3 = 330µF @ 250VDC,
NON-POLARIZED.
70V Constant Voltage
Distribution System
ALTERNATE RC NETWORK
C3
R1
2.5W
70V LINE
CONSTANT
VOLTAGE
TRANSFORME
5W
10W
+
–
2.5W
5W
10W
+
–
5W
10W
2.5W
POWER TAP
SWITCH
+
–
31
Page 32

APPENDIX A: Service Info
WARRANTY SERVICE
If you think your amplifier has a problem,
please do everything you can to confirm it before
calling for service, including reading through
the following Troubleshooting section. Doing so
might save you from being deprived of your
Mackie amplifier.
Of all Mackie products returned for service
(which is hardly any at all), many are coded
“CND” — Could Not Duplicate, which usually
means the problem lay somewhere else in the
system. These may sound obvious to you, but
here are some things you can check:
TROUBLESHOOTING
No power!
• Our favorite question: Is it plugged in?
Make sure the AC outlet is live (check with
a tester or lamp).
• Our next favorite question: Is the
switch on? If not, try turning it on.
• Is the green light next to the power switch
illuminated? If not, make sure the AC outlet
is live. If so, refer to “No sound” below.
• The AC line fuse inside the chassis is
blown. This is not a user-serviceable part.
Refer to “Repair” on the next page to find
out how to proceed.
No sound!
• Are the
down? Slowly turn them up and see if you
hear anything.
• Is the signal source turned up? Make sure
the signal level from the mixing console (or
whatever device immediately precedes the
amplifier) is high enough to produce sound
in the amplifier. The
blinking to indicate that signal is present.
• If the speakers are wired for
mode, make sure the
set to
GAIN
controls turned all the way
BRIDGED
SIG
AMP MODE
.
LEDs should be
POWER
BRIDGED
switch is
• If the
• Is the
• Is the
• Are there fuses in the speaker or in-line
• Make sure the speakers are working properly.
OUTPUT APPLICATION
LOW OUT (SUBWOOFER)
to
LOW CUT FILTER
OFF
or nearly
to
the subwoofer cutoff frequency, the output
from the amplifier will be diminished.
SHORT
check the speaker connections and make
sure that there are no strands of wire
shorting across the speaker terminals.
HOT
cool air available at the front of the
amplifier. Make sure there is room at the
sides of the amplifier for warm air to exit.
Allow the amplifier to cool off.
fuses in the speaker wire? Check ’em to see
if they’re blown.
frequency control is set
OFF
. If it is turned up above
LED lit? Turn the
LED lit? Make sure there is
switch is set
, make sure the
POWER
off,
One side is way louder than the other!
• Do the M•2600’s meters read the same
on both sides? If not, your source may be
delivering an out-of-balance stereo signal.
GAIN
• Are both
position?
• Are the speaker(s) impedances
matched? (See Appendix D— “ do The
Math: Ohms, Loads, and Such.”)
• Try swapping sides: Turn off the amp,
swap the speaker cables at the amp, turn
the amp back on. If the same side is still
louder, the problem is with your speakers
or speaker cabling. If the other side is
louder now, the problem is with the
mixer, the amp, or the line-level cabling.
knobs set to the same
The stereo music sounds kind of sideways,
and the bass frequencies diminish when
standing center, but get louder as you
approach one side!
• Check the polarity of the speaker cable
connections. You may have your positive
and negative connections reversed at
one end of one speaker cable.
32
Page 33

As soon as the music gets loud, the amp
shuts down!
• Check the M•2600’s meters. Be sure that
is not lighting up frequently or continuously.
• Can the amp breathe? The M•2600 amps
draw their ventilation air in from the front
and out through the side panels. They
need plenty of fresh air to stay cool.
Do not block the ventilation ports.
SHORT
• Is the
dead short somewhere in your speaker
setup, or the total impedance of the load is
too low. Turn the amp off and rectify that
right away.
LED lit? If so, you’ve got a
OL
No mid or high frequencies!
• Make sure the
is not set to
OUTPUT APPLICATION
LOW OUT (SUBWOOFER)
switch
.
It hurts when I touch my arm, or my leg, or
even my head!
• You have a broken finger.
Bad sound!
• Is it loud and distorted? Turn down the
signal coming from the mixer or signal source.
• Is the input connector plugged completely
into the jack? Check the speaker connections and verify that all connections are
tight and that there are no stray strands of
wire shorting across the speaker terminals.
• If possible, listen to the signal source with
headphones plugged into the console. If it
sounds bad there, the problem’s not in the
amplifier.
• Keep practicing.
Noise/Hum
• Check the signal cable between the mixer
and the amplifier. Make sure all connections
are good and sound.
• Make sure the signal cable is not routed
near AC cables, power transformers, or
other EMI-inducing device.
• Is there a light dimmer or other SCR-based
device on the same AC circuit as the
monitor? Use an AC line filter or plug the
amplifier into a different AC circuit.
• If possible, listen to the signal source with
headphones plugged into the console. If it
sounds noisy there, the problem’s not in the
amplifier.
• See “Grounding” in Appendix C, page 37.
REPAIR
Service for the M•2600 amplifier is available
only from one of our authorized domestic service
stations or at the factory, located in sunny
Woodinville, Washington. Service for Mackie
amplifiers living outside the United States can
be obtained through local dealers or distributors.
If your amplifier needs service, follow these
instructions:
1. Review the preceding troubleshooting
suggestions. Please.
2. Call Tech Support at 1-800-258-6883, 8am
to 5pm PST, to explain the problem and
request an RA (Return Authorization)
number. Have your amplifier’s serial
number ready. You must have an RA
number before you can obtain service at
the factory or an authorized service center.
3. Keep this owner’s manual. We don’t need it
to repair the amplifier.
4. Pack the amplifier in its original package,
including endcaps and box. This is very
important. When you call for the RA
number, please let Tech Support know if
you need new packaging. Mackie is not
responsible for any damage that occurs
due to non-factory packaging.
5. Include a legible note stating your name,
shipping address (no P.O. boxes), daytime
phone number, RA number, and a detailed
description of the problem, including how
we can duplicate it.
6. Write the RA number in
top of the box.
7. Ship the amplifier to us. We suggest
insurance for all forms of cartage. Ship to
this address:
Mackie Designs
SERVICE DEPARTMENT
16140 Wood-Red Rd. NE, Ste 5
Woodinville, WA 98072
8. We’ll try to fix the amplifier within three
business days. Ask Tech Support for current
turn-around times when you call for your RA
number. We normally send everything back
prepaid using UPS Orange (three-day air).
However, if you rush your amplifier to us by
next-day air, we’ll treat it in kind by shipping
it back the same way in which it was
received . This paragraph does not necessarily apply to non-warranty service.
BIG PRINT on
33
Page 34

APPENDIX B: Connectors
“XLR” CONNECTORS
Mackie amplifiers use 3-pin female “XLR”
connectors on each input, with pin 1 wired to
the grounded (earthed) shield, pin 2 wired to
the “high” (“hot” or positive polarity) side of
the audio signal, and pin 3 wired to the “low”
HOT
2
HOT
1
3
1
3
2
1
2
SHIELD
COLD
HOT
SHIELD
COLD
SHIELD
COLD
3
Figure A: XLR Connectors
(“cold” or negative polarity) side of the signal
(Figure A). All totally above-board and in full
accord with the hallowed standards dictated
by the AES (Audio Engineering Society).
Use a male “XLR”-type connector, usually
found on the nether end of what is called a
“mic cable,” to connect to a female XLR jack.
(output from mixer), ring to signal return
(input back into mixer), and sleeve to ground
(earth).
• Balanced mono circuits. When wired as a
balanced connector, a 1⁄4" TRS jack or plug is
connected tip to signal high (hot), ring to signal low (cold), and sleeve to ground (earth).
This is the application used for the inputs to
Mackie amplifiers.
1⁄4" TS PHONE PLUGS AND JACKS
“TS” stands for Tip-Sleeve, the two connections available on a “mono” 1⁄4" phone jack or
plug (Figure C). TS jacks and plugs are used
in many different applications, always unbalanced. The tip is connected to the audio signal
and the sleeve to ground (earth). Some
examples:
• Unbalanced microphones
• Electric guitars and electronic
instruments
• Unbalanced line-level or speaker-level
connections
SLEEVE
TIPSLEEVE
1⁄4" TRS PHONE PLUGS AND JACKS
“TRS” stands for Tip-Ring-Sleeve, the three
connections available on a “stereo” 1⁄4" or “balanced” phone jack or plug (Figure B). TRS
jacks and plugs are used in several different
applications:
SLEEVERING
TIP
Figure B: 1⁄4" TRS Plugs
• Stereo Headphones, stereo microphones
and stereo line connections. When wired for
stereo, a 1⁄4" TRS jack or plug is connected tip
to left, ring to right and sleeve to ground
(earth).
• Unbalanced Send/Return circuits. When
wired as a send/return “Y” connector, a 1⁄4" TRS
jack or plug is connected tip to signal send
RING
TIPSLEEVE
RING (COLD)
TIP (HOT)
SLEEVE (SHIELD)
TIP
Figure C: TS Plug
UNBALANCING A LINE
In most studio, stage, and sound reinforcement situations, there is a combination of
balanced and unbalanced inputs and outputs
on the various pieces of equipment. This
usually will not be a problem in making
connections.
• When connecting a balanced output to
an unbalanced input, be sure the signal high
(hot) connections are wired to each other, and
that the balanced signal low (cold) goes to the
ground (earth) connection at the unbalanced
input. In most cases, the balanced ground will
also be connected to the ground at the unbalanced input. If there are ground-loop problems,
this connection may be left disconnected at the
balanced end.
TIP (HOT)
SLEEVE (SHIELD)
34
Page 35

• When connecting an unbalanced output
to a balanced input, be sure that the signal
high (hot) connections are wired to each
other. The unbalanced ground (earth) connection should be wired to the low and the ground
connections of the balanced input. If there are
ground-loop problems, try connecting the unbalanced ground connection only to the input
low connection, and leaving the input ground
connection disconnected.
• In some cases, you will have to make up
special adapters to interconnect your equipment. For example, you may need a balanced
XLR female connected to an unbalanced 1⁄4"
TS phone plug. The balanced-to-unbalanced
connection has been anticipated in the wiring
of Mackie jacks. A 1⁄4" TS plug inserted into a
1⁄4" TRS balanced input, for example, automatically unbalances the input and makes all
the right connections. Conversely, a 1⁄4" TRS
plug inserted into a 1⁄4" unbalanced input
automatically ties the ring (low or cold) to
ground (earth).
BINDING POSTS
The binding posts provide a safe and secure
connection for speaker wire.
Prepare your wire by stripping back the insulation to reveal clean, shiny wire. Make sure
it is not stripped back any further than 3/8”
(9.5mm), to avoid the chance of a shock hazard. Carefully twist the wire so that any fine
wire strands are together.
SPEAKONS
Speakon® connectors have become popular
with many loudspeaker manufacturers because they provide a quick, yet safe and secure
method of connecting speaker cables. The connectors have a twist-locking mechanism that
prevents them from being pulled out accidentally. Plus, they are capable of handling high
currents and meet IEC 65 and IEC 348 safety
requirements.
Pin 1+ is speaker positive(+) and Pin 1– is
the speaker negative (–).
The amplifier is fitted with three Speakon
connectors, one for the left, one for the right
and one for the bridged mono operation. The
bridged mono connector must not be used with
any other connection, no speaker wire attached to the binding posts, and no other
Speakons used.
Internally, the bridged mono Speakon is
wired directly to the binding posts. Pin 1+ is
connected to the Channel 1 positive and Pin 1–
is connected to Channel 2 positive. If you find
that your speaker (in bridged mono) sounds
strange, check that the
correctly set to
BRIDGED
AMP MODE
. Otherwise, your
speaker will be playing the difference between
Channel 1 and Channel 2, like an earlier
method of home theater center fill.
switch is
Make sure the amplifier is
turned off before connecting the speaker wire, as
there may be high AC volt-
ages present at the outputs
• Untighten the posts and insert the
bare wire as shown below.
• Check there are no strands of wire
sticking out which may touch the
other terminal.
• Tighten the posts by hand, do not use
a wrench!
Figure D: Binding Posts with Bare Wire
1+
1–
1–
1+
COLD HOT
Figure E: Speakon
Connectors
2–
2+
35
Page 36

APPENDIX C: Arcane Mysteries Illuminated
BALANCED LINES
Balanced lines offer increased immunity
to external noise (specifically, hum and buzz).
Because a balanced system is able to minimize
noise, it is the preferred interconnect method,
especially in cases where very long lengths of
cable are being used. A long unbalanced cable
carries with it more opportunity for noise to get
into a system — having balanced inputs means
very little noise will enter the system via snakes
and other cables that typically must run a long
length.
A balanced line is a threewire system where two wires
carry the signal and the third
is a ground wire that shields
the inner conductors from
EMI. The two inner conductors carry the same signal, but with opposite
polarity. The balanced input amplifies only the
difference between the two conductors. But a
signal that is common to both conductors, and
in phase, is rejected (canceled out) at the balanced input. This includes hum from AC lines
or other EMI induced noise.
An unbalanced line does not have this
noise-rejecting capability because it has only
two conductors. One conductor carries the signal and the other is a ground wire that shields
the inner conductor. Any hum or EMI noise
that gets through the shield is added to the signal and amplified at the unbalanced input.
Often the hum can be louder than the signal itself!
connects to pin 1) to prevent it from
contacting the connector shell.
2. Don’t connect the XLR connector shell to
pin 1 of the XLR connector unless necessary
for RFI shielding. Doing so is an invitation
for a ground loop to come a-courting.
3. Do ensure that your speaker lines and AC
power lines are physically separated from
your microphone lines.
4. If you use floor pockets, use separate
pockets for inputs and speakers, or put the
connectors on opposite sides of the box so
that they may be shielded separately.
5. If your speaker lines run in the open, they
should be twisted pairs, at least 6 twists per
foot. Otherwise, run the speaker lines in
their own conduit. (Of course, conduit is not
too practical for portable systems, heh-heh.)
6. Minimize the distance between the power
amplifiers and the speakers.
7. Use heavy gauge, stranded wire for speaker
lines. Ideally, the wire resistance should be
less than 6% (0.5 dB power loss) of the load
impedance. Remember that the actual run
is twice as long as the physical length of
the run. See below.
Maximum wire run for 0.5dB power loss in feet
wire res. per 2 4 8
gauge 1000 ft. ΩΩΩ
10 1.00 60 120 240
12 1.59 40 75 150
FIXED INSTALLATIONS
If you install sound systems into fixed installations, there are a number of things that you
can do to make your life easier and increase
the likelihood of the sound system operating
in a predictable manner. Even if you don’t do
fixed installations, these are good practices for
any sound system.
1. Do use foil-shielded snake cable for long
cable runs. Carefully terminate each end,
minimizing the amount of shielding
removed. Protect the exposed foil shield
with shrink sleeving or PVC sleeving.
Prevent adjacent shields from contacting
each other (electrically). Use insulating
sleeving on the drain wire (the one that
36
14 2.5 244895
16 4.02 15 30 60
8. Ensure that the electrician uses the starground system for the safety grounds in
your electrical system. All of the audio
system grounds should terminate at the
same physical point. No other grounds may
come in contact with this ground system.
9. Ensure that the AC power feeds are
connected to the same transformer, and
ideally, the same circuit breaker.
Page 37

10. Walk outside — look at the horizon. See
any radio towers? Locate potential sources
of RF interference and plan for them
before you begin construction. Know the
frequency, transmitter power, etc. You can
get this information by calling the station.
Remember that many broadcast stations
change the antenna coverage pattern and
transmitter power at night.
11. Don’t use hardware-store light dimmers.
12. Don’t allow for anything other than microphone inputs at stage/altar locations.
Supplying line inputs at these locations is
an invitation for misuse. Make all sources
look like microphones to the console.
13. Balance (or at least impedance balance)
all connections that are remote from the
console’s immediate location.
GROUNDING
Grounding exists in your audio system for
two reasons: product safety and noise reduction. The third wire on the power cord exists
for product safety. It provides a low-resistance
path back to the electrical service to protect
the users of the product from electrical shock.
Hopefully, the resistance to ground through the
safety ground (third wire) is lower than that
through the user/operator to ground. If you remove this connection (by breaking or cutting
the pin off, or by using a ‘ground cheater’), this
alternate ground path ceases to exist, which is
a safety hazard.
The metal chassis of the product, the
ground connections provided by the various
connectors, and the shields within your connecting cables provide a low-potential point for
noise signals. The goal is to provide a lower impedance path to ground for noise signals than
through the signal wiring. Doing so helps
minimize hum, buzz, and other extraneous
non-audio signals.
Many “authorities” tell you that shields
should be connected only at one end. Sometimes this can be true, but for most (99%)
audio systems, it is unnecessary. If you do everything else correctly, you should be able to
connect every component of your audio system
using standard, off-the-shelf connecting cables
that are available at any music store.
Here are some guidelines:
1. Use balanced lines if at all possible. They
provide better immunity to induced noise
and ground loops. Remember that you can
balance a line by inserting in-line a piece of
equipment that has a balanced output.
2. Avoid using three-phase power lines since
they are usually used for air conditioning
and other heavy power equipment. If using
240VAC single phase with center-ground
power, connect all audio equipment to one
side of the AC power, and all lighting and
other equipment to the other side.
3. Be sure all AC outlet safety grounds are
connected to one common point in a star
ground arrangement. This common ground
point should then tie back to earth ground
at the service entrance by one heavy
stranded wire, #2 gauge or larger.
4. Don’t cut the third pin off the power cord.
Carry some ground-lifter adapters and use
them only if you have to plug into an
ancient two-wire outlet.
5. Cables that are too long are less likely to
pick up hum if you uncoil them in their
entirety, and then find a place to stow the
excess. Leaving the excess coiled only helps
the cable pick up hum more efficiently.
6. If you bundle your cables together, don’t
bundle AC wiring and audio wiring together. Bundle them separately.
7. If your sound system insists on humming,
you may want to teach it the words.
37
Page 38

BI-AMPLIFIED AND TRI-AMPLIFIED
T
T
SYSTEMS
Most speaker systems in use today are of
the two-way or three-way variety. Cone speakers are good at reproducing low and mid-range
frequencies, but not high frequencies. Likewise,
compression drivers are good at reproducing
high frequencies, but definitely not low frequencies. This is why two-way, three-way and even
four-way speaker systems were developed —
to improve the efficiency of each individual
driver by requiring it to reproduce only the
frequencies that it reproduces best.
One method of accomplishing this is
through the use of a passive crossover network
between the amplifier and the speaker(s).
Often the passive crossover is built into the
cabinet along with the various drivers. The
crossover divides the high-level speaker signal
into frequency bands, which are then directed
to the appropriate driver. There are some drawbacks to this method, however. The passive
crossover adds reactance to the load that the
amplifier sees, which can affect the damping.
Power is wasted as heat across the resistors in
the crossover, reducing the amount of amplifier
power available to the drivers themselves.
Biamplified and triamplified systems use
separate power amplifiers to power each individual low-frequency and high-frequency
driver. An electronic crossover (a.k.a. active
crossover) is located between the signal source
and the power amplifier. The advantages of
this method include:
• Increased headroom available from each
amplifier, since they’re amplifying only a
portion of the entire audio spectrum.
• Improved damping factor because the
amplifier output is connected directly to
the driver.
• Improved efficiency because there are no
passive resistors to dissipate heat; and
• Flexibility to choose the optimum cross
over frequency and crossover slope for
the individual drivers in the system.
The M•2600’s internal crossovers are
electronic (active) and allow biamplification
above and below a user-selectable crossover
point of
60Hz, 90Hz,
or
120Hz.
See the
application diagrams on pages 13-16.
TWO-WAY SPEAKER CABINET
FROM SIGNAL SOURCE
(MACKIE MIXING CONSOLE)
FROM SIGNAL SOURCE
(MACKIE MIXING CONSOLE)
FROM SIGNAL SOURCE
(MACKIE MIXING CONSOLE)
Passive Crossover System
LOW-LEVEL
2-WAY ACTIVE
CROSSOVER
TO HIGH-FREQUENCY
AMPLIFIER
TO LOW-FREQUENCY
AMPLIFIER
POWER AMPLIFIER
CH 1
IN
CH 2
IN
FR SERIES
POWER AMPLIFIER
(STEREO MODE)
CH 1
INPUT
CH 2
INPUT
FR SERIES
(STEREO MODE)
+
CH 1
OUT
–
–
CH 2
OUT
+
FROM SIGNAL SOURCE
(MACKIE MIXING CONSOLE)
+
CH 1
OUT
–
–
CH 2
OUT
+
LOW-LEVEL
3-WAY ACTIVE
CROSSOVER
TWEE
WOOF
TWO-WAY SPEAKER CABINET
TO HIGH-FREQUENCY
AMPLIFIER
TO MID-FREQUENCY
AMPLIFIER
TO LOW-FREQUENCY
AMPLIFIER
HIGH-LEVEL
PASSIVE
CROSSOVER
HIGH-LEVEL
PASSIVE
CROSSOVER
HIGH FREQUENCIES
TO TWEETER
LOW FREQUENCIES
TO WOOFER
HIGH FREQUENCIES
TO TWEETER
LOW FREQUENCIES
TO WOOFER
FR SERIES
POWER AMPLIFIER
(STEREO MODE)
CH 1
INPUT
CH 1
OUT
CH 2
INPUT
CH 2
OUT
FR SERIES
POWER AMPLIFIER
(BRIDGE MODE)
CH 1
INPUT
CH 1
OUT
CH 2
OUT
+
–
–
+
+
–
–
+
TWEE
MID
WOOF
38
Triamplified System with External Active CrossoverBiamplified System with External Active Crossover
Page 39

APPENDIX D: Technical Info
DO THE MATH: OHMS, LOADS, AND SUCH
Remember: As the load gets “heavier,” its
value in ohms goes down. For instance, a
2-ohm speaker load is twice as “heavy” as a
4-ohm load. An ohm is a unit of resistance —
the more ohms, the more resistance (impedance). The more the resistance, the less the
power. It can all seem backwards at first. Just
remember that a dead short means no resistance at all, or zero ohms.
Since you’re in the biz (or you are now,
since you just bought an amp), you probably
own a volt/ohm meter (or DVM, for Digital Volt
Meter). It’s an indispensable tool for anyone
working with speakers and such. If you don’t
own a meter, go out and get one right now —
we’ll wait.
If you’re just dealing with one speaker (or
cabinet) per output, the load in ohms will be
printed on it somewhere. That’s your load. You
can confirm this with the volt/ohm meter you
just bought — set it for ohms, set it for the
lowest range (unless it’s an autoranging
meter) and measure across the speaker terminals. It may not agree exactly; a speaker rated
at eight ohms may read between 5 and 7 ohms.
(If it’s a multiple-driver speaker with a built-in
passive crossover, this method won’t work.)
If you’re driving an assortment of speakers
(or cabinets), things can get complicated.
There are two basic ways of linking multiple
loads (speakers in this case): series and parallel.
“Series” means that the positive amp output
connects to the first speaker’s positive terminal, the first speaker’s negative terminal
connects to the second speaker’s positive terminal, the second speaker’s negative terminal
goes to the third, and so on, until the chain
ends at the amp’s negative output. Series connections are not normally used in PA
applications because it ruins the amplifier’s
ability to damp (control) the speakers.
Doing load calculations with series configurations is easy — just add the loads. For
instance, four 8-ohm speakers, connected in
series, will equal 32 ohms (8 + 8 + 8 + 8 = 32).
“Parallel” means that the positive amp output connects to the positive terminals of all the
speakers, and the negative amp output connects to the negative terminals of all the
speakers. If one speaker fails in a parallel configuration, the others will still work, but the
load will change. That lets you breathe a little
easier (the show will go on), except that you
may have a dead speaker and not even know it.
Calculating parallel loads is also easy, as
long as each speaker has the same value —
just divide the value by the number of speakers. For instance, four 8-ohm speakers,
connected in parallel, will equal 2 ohms
(8 / 4 = 2). If the loads aren’t all the same, the
formula gets a little more complicated, but
nothing that you can’t do with a simple calculator.
1
1
+
1
+
+
Z
2
. . .
Z
3
ZT =
1
Z
1
There are other, more complicated configurations, like series-parallel (using a combination
of series and parallel links to arrive at a desired load) and parallel configurations of
unmatched loads (usually not recommended).
But rather than get too deep into this, let’s just
summarize the basics, as they apply to you and
your M•2600 power amplifier:
• As a load gets “heavier,” its impedance in
ohms decreases.
• The lower the impedance (ohms), the
higher the power: The M•2600 has 1300 watts
(per side) with a 2-ohm load, 850 watts with
4 ohms, and 500 watts with 8 ohms.
• Do not connect a load of under 2 ohms
STEREO
(in
BRIDGED
(in
and
mode).
MONO
mode) or 4 ohms
• Never plug amplifier outputs into anything except speakers (unless you have an
outboard box designed to accept speaker levels).
• Never play good music through bad speakers. You may, however, play bad music through
good speakers (but only on odd-numbered
Fridays).
39
Page 40

SPECIFICATIONS M•2600
Maximum Power at 1% THD, midband:
500 watts per channel into 8Ω
850watts per channel into 4Ω
1300 watts per channel into 2Ω
1700 watts into 8Ω bridged
2600 watts into 4Ω bridged
Continuous Sine Wave Average Output Power,
both channels driven:
425 watts per channel into 8Ω from 20Hz to 20kHz,
with no more than 0.025% THD
700 watts per channel into 4Ω from 20Hz to 20kHz,
with no more than 0.05% THD
1000 watts per channel into 2Ω from 20Hz to 20kHz,
with no more than 0.1% THD
Bridged mono operation:
1,400 watts into 8Ω from 20Hz to 20kHz, with no more
than 0.05% THD
2000 watts into 4Ω from 20Hz to 20kHz, with no more
than 0.1% THD
Note: Power ratings are specified at 120VAC line voltages.
The M•2600 power amplifier draws large amounts of
current from the AC line with continuous sine wave testing. Accurate measurement of power requires a steady
and stable AC supply. This means the line impedance
must be very low to insure that the peak AC line voltage
does not sag to less than 97% of its value.
If driving highly reactive loads, we recommend that the
limiter circuit be engaged.
Power Bandwidth:
20Hz to 70kHz (+0, –3 dB) @ 700W into 4Ω
Frequency Response:
20Hz to 40kHz (+0, –1 dB)
10Hz to 70kHz (+0, –3 dB)
Distortion:
THD, SMPTE IMD, TIM < 0.025% @ 8Ω
< 0.050% @ 4Ω
< 0.150% @ 2Ω
Signal-to-Noise Ratio:
> 107 dB below rated power into 4Ω
Channel Separation:
> 80 dB @ 1kHz
Damping Factor:
> 350 @ 400Hz
Input Impedance:
24kΩ balanced
Input Sensitivity:
1.23 volts (+4 dBu) for rated power into 4 ohms
Gain:
32.7 dB (43V/V)
Maximum Input Level:
9.75 volts (+22 dBu)
Rise Time:
< 5µs
Slew Rate:
Voltage Slew Rate > 60V/µs
Current Slew Rate> 30A/µs at 2Ω
CMRR:
> 40 dB, 20Hz to 20kHz
Load Angle:
8(±jx) time independent at 8Ω
4(±jx) time dependent, T > 6 min. at 4Ω
2(1±jx) time dependent, T > 2 min. at 2Ω
Transient Recovery:
< 1µs for 20 dB overdrive @ 1kHz
High Frequency Overload and Latching:
No latch up at any frequency or level.
High Frequency Stability:
Unconditionally stable, driving any reactive or
capacitive load.
Turn On Delay:
3-5 seconds
Variable Low-Cut Filter:
10Hz (Off) to 170Hz, 2nd-Order Bessel
Internal Crossover:
Switched: 60Hz/90Hz/120Hz, 4th-Order Linkwitz-Riley
Lowpass outputs switchable to internal Subwoofer
mode.
Lowpass and Highpass outputs switchable to Thru
output jacks.
Limiter Section:
Complementary Positive and Negative Peak Detecting
Indicators:
6 meter LEDs per channel
SIG (Signal Present), –20, –9, –6, –3, OL (Overload)
CH 1 & 2
PROTECT LEDs
SHORT LEDs
TEMP STATUS
COLD/HOT LEDs
Physical:
(three rack spaces high, standard rack width)
Height 5.20 inches (132mm)
Front panel Width 19.00 inches (483mm)
Chassis Width 17.24 inches (438mm)
Depth 15.65 inches (398mm)
Overall Depth 16.67 inches (423mm)
Weight 55 pounds (25 kg)
(lets get)
AC Drop-out Voltage:
At approximately 63% of rated line voltage
40
Page 41

Power Consumption
Country AC input Line Range
Power Consumption
requirements (1/8 of 2Ω resistive
power/ nominal)
North America 120 V, 60 Hz 76 V - 132 V 1650 W, 18.2 A
240 V, 60 Hz 152 V - 264 V 1650 W, 9.1 A
Europe 240 V, 50/60 Hz 152 V - 264 V 1650 W, 9.1 A
Korea 240 V, 60 Hz 152 V - 264 V 1650 W, 9.1 A
Japan
*
The 100 V version of the Japanese model is not rated into 2Ω. It is only rated at 4Ω stereo or 8Ω bridged.
*
100 V, 50/60 Hz 63 V - 110 V 1000 W, 13.8 A (4Ω)
200 V, 50/60 Hz 126 V - 220 V 1650 W, 10.9 A
Disclaimer:
Since we are always striving to make our products
better by incorporating new and improved materials,
components, and manufacturing methods, we reserve the
right to change these specifications at any time without
notice.
“Mackie,” “The Running Man,” and “FR Series” are trademarks or registered trademarks of Mackie Designs Inc.
All other brand names mentioned are trademarks or
registered trademarks of their respective holders, and are
hereby acknowledged.
©2002 Mackie Designs Inc.
All Rights Reserved.
ventilation slots
(do not cover)
FULL SYMMETRY DUAL DIFFERENT IAL HIGH CURREN T DESIGN
GAIN/dB
CH
1
GAIN/dB
CH
2
17.24" (438mm)
M•2600
WEIGHT
55 lbs.
(25 kg)
CH
CH
2
1
PROFESSIONAL POWER AMPLIFIER
POWER
Depth 15.65" (398mm)
Overall Depth 16.67" (423mm)
NOTE: The Depth is measured from the rear face of the rack ears
ON
OFF
5.2"
(132mm)
3U
19.00" (483mm)
41
Page 42

BLOCK DIAGRAM
+
–
+
–
CH.1 100 VDC
+
–
CH.1 115 VDC
+
–
CH.2 115 VDC
TOROIDAL POWER
TRANSFORMER
LAMP
FUSE
MACKIE DESIGNS
M•2600
BLOCK DIAGRAM
9/21/1998
LOW CUT
FILTER
CROSSOVER
INVERTER
(FOR BRIDGED MONO
OPERATION)
FREQ
CH.1 GAIN
CH.2 GAIN
60-90-120Hz
THRU–LOW–HIGH
LIMIT–OFF-LOW OUT
POWER
SWITCH
IN-RUSH
LIMIT
30 VDC
+15 VDC
-15 VDC
22 VAC
+
–
CH.2 100 VDC
TRANSFORMER
THERMAL
LINE INPUT
(1/4" TRS)
LINE INPUT
(XLR-FEMALE)
THRU OUTPUT
(XLR-MALE)
STEREO-MONO-BRIDGED
STEREO-MONO-BRIDGED
STEREO-MONO-BRIDGED
LIMITER
CONTROL
CH–1
CH–2
LOW
HIGH
LOW CUT
FILTER
CROSSOVER
FREQ
SHORT 2
IN-RUSH CONTROL
THRU–LOW–HIGH
LIMIT–OFF-LOW OUT
LIMIT–OFF-LOW OUT
LINE INPUT
(1/4" TRS)
LINE INPUT
(XLR-FEMALE)
THRU OUTPUT
(XLR-MALE)
60-90-120Hz
LOW
HIGH
SHORT 1
(THE SHORT LEDS ARE
JOINED IN BRIDGED MODE)
LIMITER
CHANNEL 1
POWER
AMPLIFIER
FUSE
OUTPUT
RELAY
–100VDC
–115VDC
22VAC
FUSE
+100VDC
+15VDC
+15VDC
+115VDC
METER
DRIVE
OL
–3
–6
–9
–20
SIG
PROTECT
SHORT
SHORT 1
CH 1
SIG
CH 1
SIG
CH 2
SIG
CH. 1
SPEAKER
OUT
CH. 2
SPEAKER
OUT
CH. 1
SPEAKON
CH. 2
SPEAKON
BRIDGED
MONO
SPEAKON
PROTECTION CIRCUITRY
MUTE
DC OFFSET
PROTECT
SHORT
OUTPUT STAGE CURRENT
OUTPUT STAGE VOLTAGE
TRANSIENT SOA FLT
STEADY STATE SOA FLT
OUTPUT DISSIPATION
LOW VOLTAGE DETECT
IN-RUSH CONTROL
CH.1 DISSIPATION
MUTE
LIMITER
CHANNEL 2
POWER
AMPLIFIER
FUSE
OUTPUT
RELAY
–100VDC
–115VDC
22VAC
FUSE
+100VDC
+15VDC
+15VDC
+115VDC
METER
DRIVE
OL
–3
–6
–9
–20
SIG
PROTECT
SHORT
CH 2
SIG
PROTECTION CIRCUITRY
MUTE
DC OFFSET
PROTECT
SHORT
OUTPUT STAGE CURRENT
OUTPUT STAGE VOLTAGE
TRANSIENT SOA FLT
STEADY STATE SOA FLT
OUTPUT DISSIPATION
LOW VOLTAGE DETECT
IN-RUSH CONTROL
CH.2 DISSIPATION
MUTE
+30VDC
-30VDC
HOT LED
COLD LED
CH.1 MUTE
CH.2 MUTE
80
0
C MUTE
52
0
C UN-MUTE
80
0
C MUTE
52
0
C UN-MUTE
CH 1
TEMP
SENSOR
CH 2
TEMP
SENSOR
OVER TEMPERATURE
DETECTOR
TRANSFORMER
THERMAL SWITCH
VARIABLE SPEED FAN CONTROLLER
45
0
C – 65
0
C SPEED CONTROL CH.1
45
0
C – 65
0
C SPEED CONTROL CH.2
FAN IDLE/VARIABLE CH.1 POWER DETECTOR
FAN IDLE/VARIABLE CH.2 POWER DETECTOR
CH.1 DISSIPATION
CH.2 DISSIPATION
FAN
Σ
1-
1+
1-
1+
-
+
-
+
1-
1+
SHORT 2
(THE CHANNELS ARE
SUMMED IN MONO
OR BRIDGED MODE)
42
Page 43

NOTES
43
Page 44

Some of the
Some of the
people at our
people at our
factory who helped
factory who helped
design, build, sell,
design, build, sell,
and support your
and support your
product.
product.
®
®
™
®
Mackie Designs Inc.
Mackie Designs Inc.
16220 Wood-Red Rd. NE • Woodinville, WA 98072 • USA
Europe, Asia, Central & South America: 425/487-4333
US & Canada: 800/898-3211
Middle East & Africa: 31-20-654-4000
Fax: 425/487-4337 • www.mackie.com
E-mail: sales@mackie.com
 Loading...