

Page 1

Lytro ILLUM User Manual
Documentation Version 2.0 –July 8th, 2015
©
2015 Lytro, Inc. All rights reserved.
1
Page 2

Table of Contents
Introducing the Lytro ILLUM 6
Benets of the Light Field 6
Learning to use Lytro ILLUM 6
Getting Started 18
Charging the battery 18
Inserting the charged battery 18
Inserting the strap rings 18
Inserting an SD card 19
Using the set-up assistant 19
Quick Reference Guide 8
In the box 9
Product Requirements 9
Touchscreen Capture Mode 10
Image View Area 11
Information Bar 12
Menu Bar Page 1 13
Menu Bar Page 2 14
Menu Bar Page 3 15
Playback Mode, Menu Bar Page 1 16
Playback Mode, Menu Bar Page 2 17
Transferring the Pairing data 19
Powering on and off 19
Capture Mode 20
Camera Control Behaviors 21
Touchscreen layout in Capture Mode 22
Capture Mode, Image View Area 24
Capture Mode, Information Bar 26
Capture Mode, Menu Bar Page 1 28
Capture Mode, Menu Bar Page 2 30
Additional touch control icons 32
Tapping the screen to focus 33
Hiding /displaying the Menu / Information Bar 34
Choosing an exposure mode 35
Setting the ISO 38
2
Page 3

Setting the shutter speed 40
Playback Mode 62
Setting the EV compensation 42
Setting the white balance 44
Manually setting the white balance 45
Shooting with continuous shutter 48
Using the self timer 48
Applying a grid overlay 48
Using the live exposure histogram 50
Adjusting the optical offset 51
Adjusting the Settings Menu 51
Opening the Rearrange Menu 52
Rearrange Menu features 53
Using Lights-Out 53
Touchscreen layout in Playback Mode 63
Information Bar 64
Menu Bar 64
Depth Assist Bar 64
Processing a Living Picture for refocusing 65
Refocusing a Living Picture 66
Virtual Aperture in a Living Picture 67
Interactive Perspective Shift in a Living Picture 68
Using grid view 69
Using the review exposure histogram 70
Deleting a picture 70
Deleting one or more pictures in Grid View 70
Using Manual Focus 53
Applying Focus Bracketing 54
Applying Exposure Bracketing 56
Using Focus Lock 58
Using Zoom Lock 58
Using Hyperfocal mode 58
Using a ash 59
Using the Level Gauge 60
Calibrating the Level Gauge 61
Opening the Settings menu 71
3
Page 4

Depth Composition Features 72
Exposure Dials 86
The refocusable range 72
Depth Assist Bar 75
Light eld Hyperfocal position 76
Optical Offset 77
Adjusting Optical Offset 80
Depth Histogram and Depth Overlay 81
Focus bracketing 83
Settings 84
Format SD card 84
Brightness 84
Sounds 84
Exposure Dial Assignments 86
Lens Rings 87
Rearrange Menu 87
Remap Buttons 87
AEL 87
General 87
Date & Time 87
Time Zone 88
Language 88
Distance Measurements 88
About 88
Update Firmware 88
Exposure simulation 84
Clipping warning 85
Instant preview 85
File format 85
iOS Connect 85
Long exposure noise reduction 85
Camera controls 86
Shutter Half-press 86
4
Transfer Pairing Data to SD Card 88
Help 89
Reset 89
Icon Glossary 90
Resources 94
Legal 94
Page 5

5
Page 6

Introducing the Lytro ILLUM
Lytro ILLUM is a light eld camera and software platform designed to redene the way we portray the
world around us. Harnessing the full power of the light eld, the Lytro ILLUM gives photographers a
unique way of capturing visual experiences — not as a static cross-section of reality but an interactive window into their world through Light Field Photography.
Benets of the Light Field
Unlike a conventional digital camera, the Lytro ILLUM captures the light eld, which includes the direction
of light. Most recently, light eld cameras lived only in academic labs – via a roomful of cameras tethered
to a super computer. Lytro’s scientists and engineers have optimized this technology so that the power of
the light eld can t right in your hands.
Capturing this fundamentally new data gives consumers unprecedented capabilities, including the ability
to focus, change the perspective, change the aperture, and view in 3D - all after a picture is taken. Photog-
raphers using the Lytro ILLUM have new creative opportunities to tell stories and capture moments, deliv-
ering Living Pictures to friends, family, and clients.
Learning to use Lytro ILLUM
This User Manual is a technical reference for using the Lytro ILLUM. It explains how to operate the camera,
and the behavior of each of the modes, settings, and buttons.
For many photographers, getting the most out of a light eld camera may require additional education
and thought on how to best compose and capture images with depth.
6
Page 7

Watch education and training videos at training.Lytro.com
Lytro has developed a series of educational and training materials, including videos, online help,
and transformational galleries. Visit training.Lytro.com to get in-depth information in the
following categories:
- Orientation & Setup
- Light Field 101
- Light Field in the Field
- Workow
The educational material covers the Lytro ILLUM ecosystem including camera, desktop software,
publishing to web and mobile devices.
7
Page 8
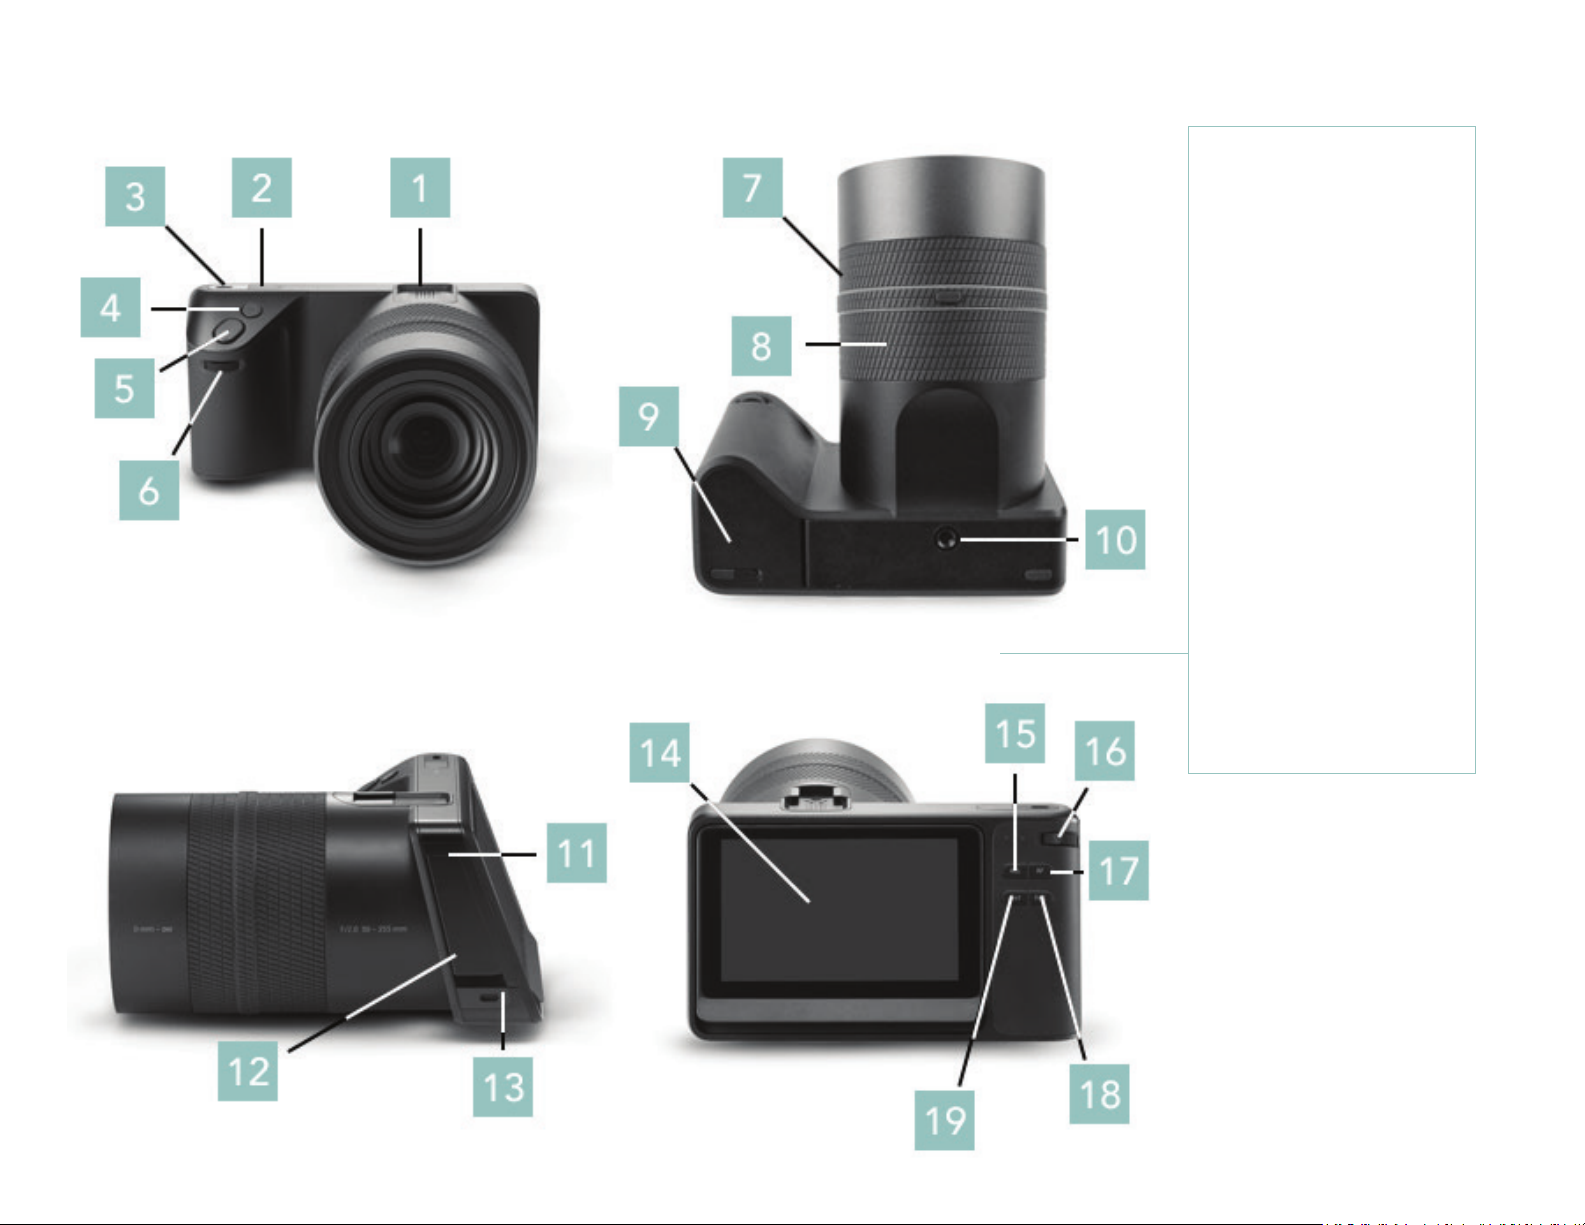
Quick Reference Guide
Camera Exterior
1. Hot shoe
2. Power button
3. Strap point
4. Lytro button*
5. Shutter button
6. Front dial
7. Focus ring
8. Zoom ring
9. Battery door
10. Tripod mount
11. Micro-USB 3.0
12. Port cover
13. Strap point
14. Touchscreen
15. AF button*
16. Rear dial
17. AEL button*
18. Fn button
19. Hyperfocal button
8
Page 9

In the box
• Lytro ILLUM Camera
• Lytro ILLUM Quick Start Guide
• Lytro ILLUM Quick Charger
• Lytro ILLUM Rechargeable Li-ion Battery
• Lytro ILLUM Lens Cap
• Lytro ILLUM Lens Hood
• Shoulder/neck strap
• Strap anchors (2)
• Neutral density lter (ND8) – 72mm
• Micro-USB 3.0 cable
• Lens cloth
Product Requirements
SD card required (not included) Recommended: Class 10, 95 MB/second
Minimum:
Mac OS® X 10.9 or higher (min: 4GB RAM, Intel® Core™ 2 Duo or newer)
- or -
64-bit Windows® 7 or 64-bit Windows 8 (min: 4GB RAM, DirectX® 10.0 and dual-processor CPU)
Recommended:
Mac OS X 10.9 or higher (8GB RAM, Intel i5 or better)
- or -
64-bit Windows 7 or 64-bit Windows 8 (8GB RAM, Intel i5 or equivalent or better) Graphics card:
Intel HD 4600 or better
AMD Radeon™ HD 6750 or better
NVIDIA® GeForce® GTS 450 or better
9
Page 10

Touchscreen layout in Capture Mode
1. Image View Area
2. Depth Assist Bar
3. Menu Bar
4. Information Bar
10
Page 11

Image View Area
1. Sensor crop region
2. Live view area
11
Page 12

Information Bar
1. Exposure mode
2. ISO
3. Shutter speed
4. EV compensation
5. White balance
6. Focal length (35mm
equiv.)
7. Shot buffer
8. Shutter mode
9. Shots remaining
10. Battery remaining
11. Wi (iOS connect)
12. Full screen preview
12
Page 13
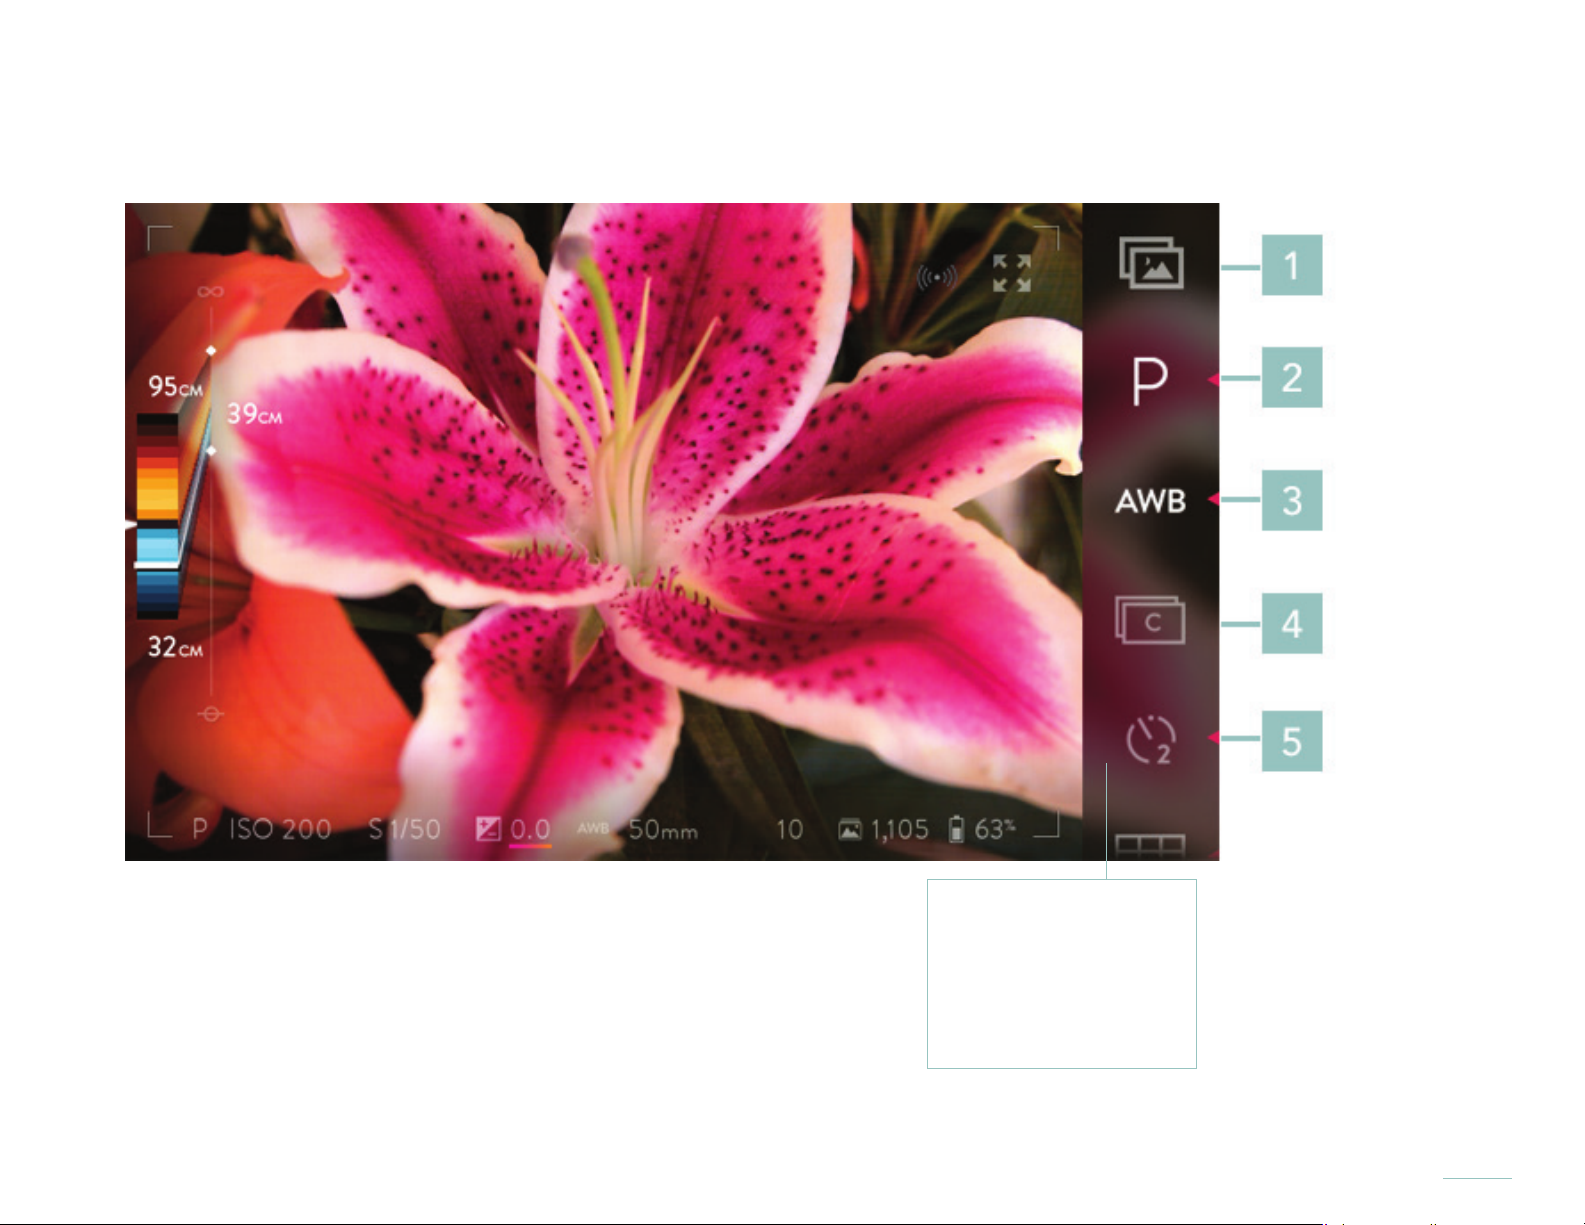
Menu Bar Page 1
1. Playback Mode
2. Exposure mode
3. White balance
4. Continuous shutter
5. Self timer
13
Page 14

Menu Bar Page 2
14
1. Grid overlay
2. Exposure histogram
3. Exposure bracketing
4. Exposure metering
mode
5. Rearrange menu
Page 15

Menu Bar Page 3
1. Settings
15
Page 16

Touchscreen layout in Playback Mode, Menu Bar Page 1
1. ISO
2. Shutter mode
3. Shutter speed
4. White balance
5. Focal length
(35mm eq.)
6. Picture number /
total pictures
7. Battery charge
8. Capture Mode
9. Grid view
10. Exposure histogram
16
11. Delete
12. Rotate image
13. Full screen preview
Page 17

Playback Mode, Menu Bar Page 2
1. Favorites
2. Settings
17
Page 18
Getting Started
Charging the battery
Before using the camera for the rst time, charge the lithium-ion battery. Place the battery into the included quick charger, and plug the charger into a standard 110- or 220-volt, 50-60 Hz electrical outlet. When
taking the battery out of the box, it may be partially charged; a fully discharged battery may take four
hours or more to charge completely.
During charging, the LED on the charger will illuminate. When charging is complete, the LED will turn off.
A blinking LED indicates a power or connection problem, such as the battery not being inserted properly.
Inserting the charged battery
The battery compartment is on the underside of the camera. Hold the camera upside down and slide the
thumb-latch to one side to open the door. Insert the charged battery, hold the door fully closed, and slide
the latch back to the locked position.
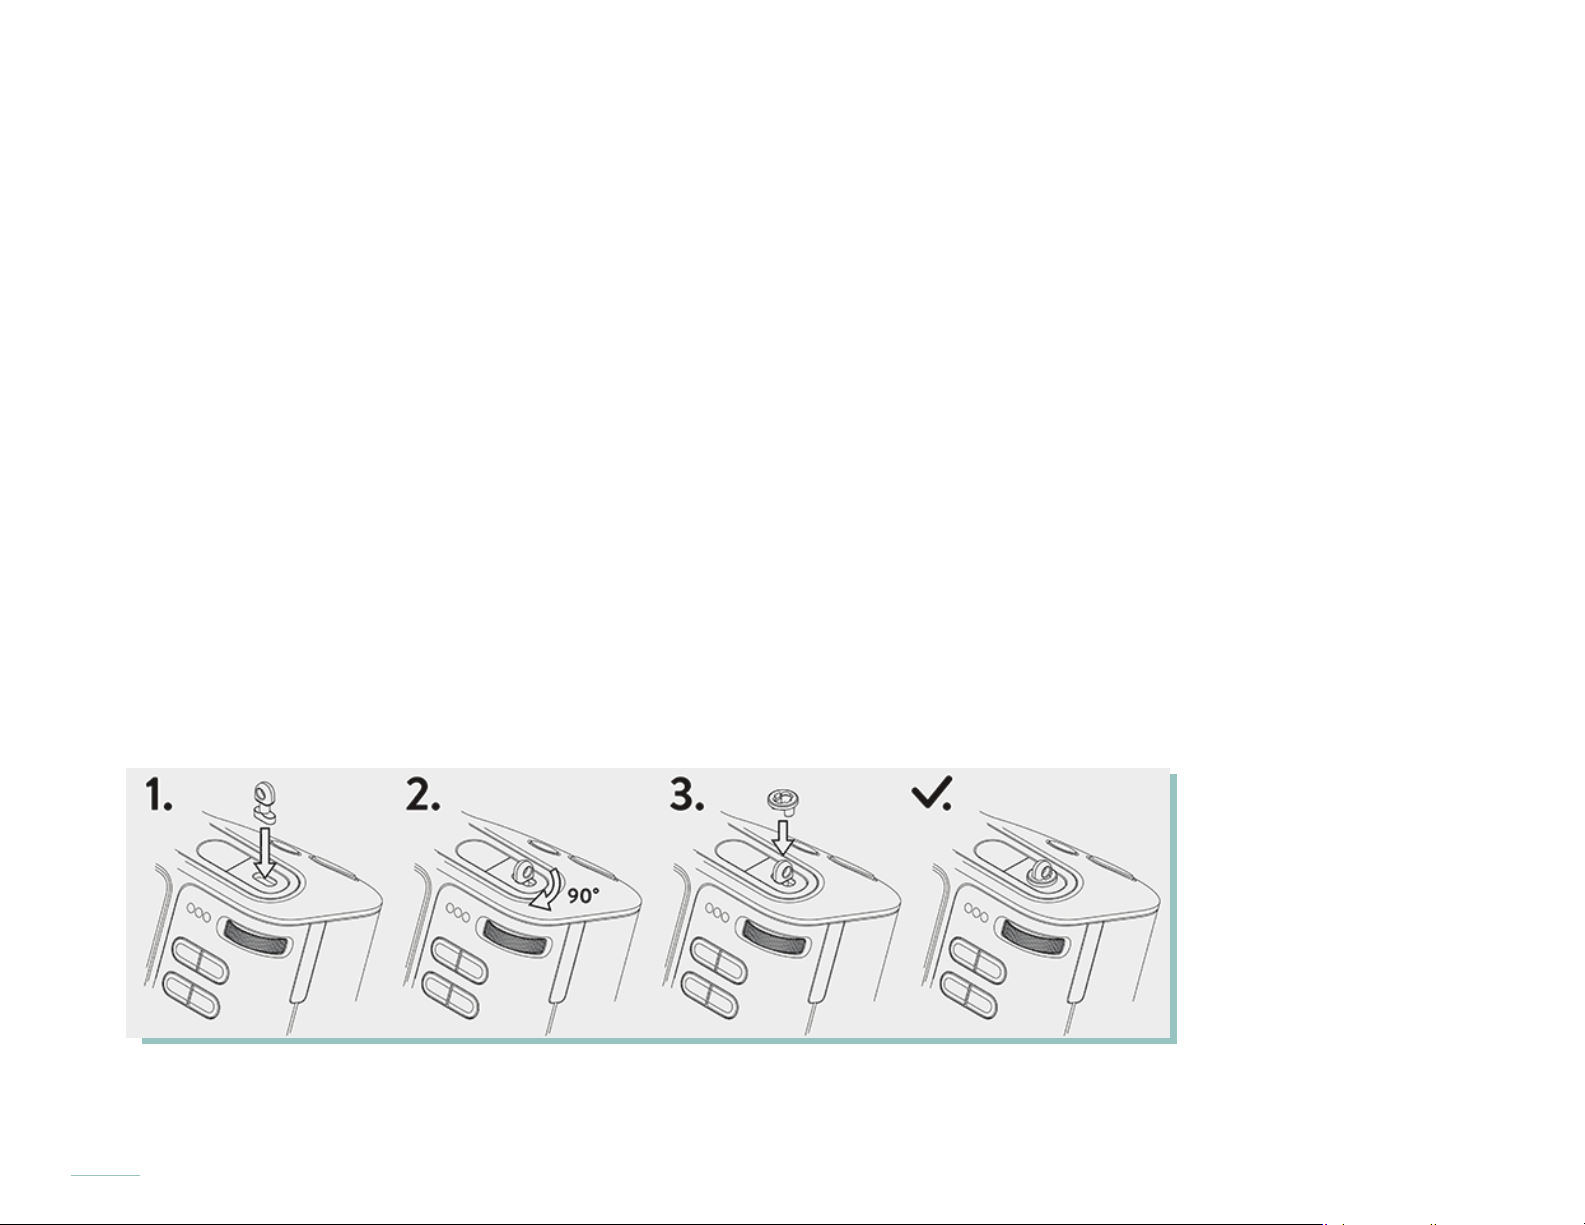
Inserting the strap rings
To prepare camera for use with a strap, install the included strap anchors. Insert an anchor into the strap
point on the top of the camera beside the power button. Turn it 90 degrees to position it. Then place one
of the included collars over the strap anchor and press down until it snaps into place. Repeat these steps
for the strap point on the side of the camera, below the port cover.
Once strap anchors are installed, attach the strap using the split-rings.
18
Page 19

Inserting an SD card
Open the port cover and insert a SD, SDHC, or SDXC card into the SD card slot. For the rst time use of
the camera, 2GB of free space is required on the SD card. This free space is required for the Pairing data
(see Transferring the Pairing data in this section). Close the port cover.
Using the set-up assistant
The rst time the camera is turned on, there is a walk through to set-up the camera, where you select the
language for the camera to use, select time zone, set the date and time, and transfer the Pairing data (see
next section). The camera will then give a very brief overview of its most unique controls and features.
Transferring the Pairing data
As part of the walk-through to set up the camera, Pairing data is transferred to the SD card. The Pairing
data is required by the Lytro Desktop to optimally process pictures, and will be automatically copied off of
the SD card by the Lytro Desktop the rst time pictures are imported from that card.
The Pairing data requires approximately 2GB of free space on the SD card. Do not reformat or delete the
contents of the SD card until the Pairing data has been transferred to the Lytro Desktop.
The Pairing data may be manually transferred at a later time (see Transfer Pairing Data to SD Card).
Powering on and off
Briey press the power button to turn the camera on. To power off, briey press the power button again.
19
Page 20

Capture Mode
When the camera is rst powered on, it will start up in Capture Mode. If there’s a compatible SD card in place, and the
card is not full, the camera is ready to capture a Living Picture. Compose the shot by looking at the live view displayed on
the screen. When ready to capture a picture, press the shutter button all the way down and release.
To operate the camera in Capture Mode, use a combination of physical controls and on-screen controls.
Camera Controls
1. Power button
2. Lytro button
3. Shutter button
4. Front dial
5. Zoom ring
6. Focus ring
7. Touchscreen
8. AF button
9. Rear dial
10. AEL button
11. Fn button
12. Hyperfocal button
Note that these are the default behaviors of the controls. Many can be customized in Settings
(see Camera controls).
20
Page 21

Camera Control Behaviors
1. Power button — when the camera is off, a brief press turns it on; when the camera is on, a brief
press turns it off
2. Lytro button — a half-press displays depth feedback for the object at the center of the frame; a
full-press displays a live depth histogram and depth overlay
3. Shutter button — a half-press engages auto exposure lock (AEL); a full-press releases the shutter
4. Front dial — sets the ISO (in ISO Priority Mode); sets Shutter Speed (in Shutter Speed Priority
Mode and Manual Mode)
5. Zoom ring — adjusts the focal length of the lens
6. Focus ring — adjusts the focus of the lens
7. Touchscreen — Provides view of scene through the lens, plus touch screen menus and informa-
tion
8. Rear dial — sets the EV compensation in Program, ISO Priority, and Shutter Speed Priority
Modes; sets the ISO in Manual Mode
9. AF button — activates autofocus when pressed
10. AEL button — locks the exposure at the current setting while held down
11. Fn — toggles between Capture Mode and Playback Mode
12. Hyperfocal button — sets the focus of the lens to the light eld hyperfocal position (moves the
far end of the refocusable range to innity)
21
Page 22

Touchscreen layout in Capture Mode
1. Image View Area
2. Depth Assist Bar
3. Menu Bar
4. Information Bar
22
Page 23

Touchscreen layout in Capture Mode
1. Image View Area — displays the live view; sensor crop region is indicated by the thin gray frame
2. Depth Assist Bar —
displays the refocusable range (indicated by the colored bands) for a Living Picture captured at the current settings
3. Menu Bar —
displays touch control icons (swipe up to scroll to additional pages)
4. Information Bar —
displays current capture settings, as well as SD card and battery status
23
Page 24

Capture Mode, Image View Area
1. Sensor crop region
2. Live view area
24
Page 25

Capture Mode, Image View Area
1. Sensor crop region – displays where the image is cropped after capture by viewing applications; portions of the picture outside
of the sensor crop region are displayed only when the perspective is changed in a viewing application
2. Live view area –
displays the live view of the camera
25
Page 26

Capture Mode, Information Bar
1. Exposure mode
2. ISO
3. Shutter speed
4. EV compensation
5. White balance
6. Focal length (35mm
equiv.)
7. Shot buffer
8. Picture count
9. Shots remaining
10. Battery remaining
11. Wi-Fi (iOS Connect)
12. Full screen preview
26
Page 27

Capture Mode, Information Bar
1. ISO indicator — displays the current ISO; tap to set ISO in ISO Priority Mode and Manual Mode
2. Shutter speed indicator — displays the current shutter speed; tap to set speed in Shutter Priority Mode and Manual Mode
3. EV compensation indicator — displays the compensation currently selected; tap to set compensation (not available in Manual
Mode)
4. Exposure mode indicator — P for Program, I for ISO Priority, S for Shutter Speed Priority, M for Manual; replaced by a lock sym-
bol when AE is locked
5. White balance indicator — displays the current white balance setting
6. Focal length indicator — displays the current focal length (35mm equivalent)
7. Shot buffer indicator — displays the number of shots remaining in the internal buffer used for burst capture; when the indicator
reaches zero, the maximum continuous frame rate is limited by the write speed of the SD card
8. Shots remaining indicator — displays how many additional Living Pictures the SD card can hold; when no SD card is inserted, the
no SD card indicator will appear here
9. Battery remaining indicator — displays the battery’s remaining charge
10. Wi-Fi (iOS Connect) indicator — visible only when the camera is enabled as an access point in Settings, iOS Connect
11. Full screen mode -- Hides all extraneous data for simple composition.
27
Page 28

Capture Mode, Menu Bar Page 1
1. Playback Mode
2. Exposure mode
3. White balance
4. Continuous shutter
5. Self timer
Note that the order of the icons in the Menu Bar may be customized and additional icons
may be added (see Rearrange Menu). The default order is referenced here.
28
Page 29

Capture Mode, Menu Bar Page 1
1. Playback Mode icon — tap to open Playback Mode, displaying the most recent Living Picture
2. Exposure Mode icon — tap to open the submenu for setting the mode; icon changes to reect the current mode
3. White Balance icon — tap to open the submenu for setting the white balance; icon changes to reect the current setting
4. Continuous Shutter icon — activates continuous shutter when tapped/illuminated
5. Self-Timer icon — tap to activate the self-timer; tap and hold opens the submenu to set the countdown at 2 or 10 seconds; icon
changes to reect the current setting
29
Page 30
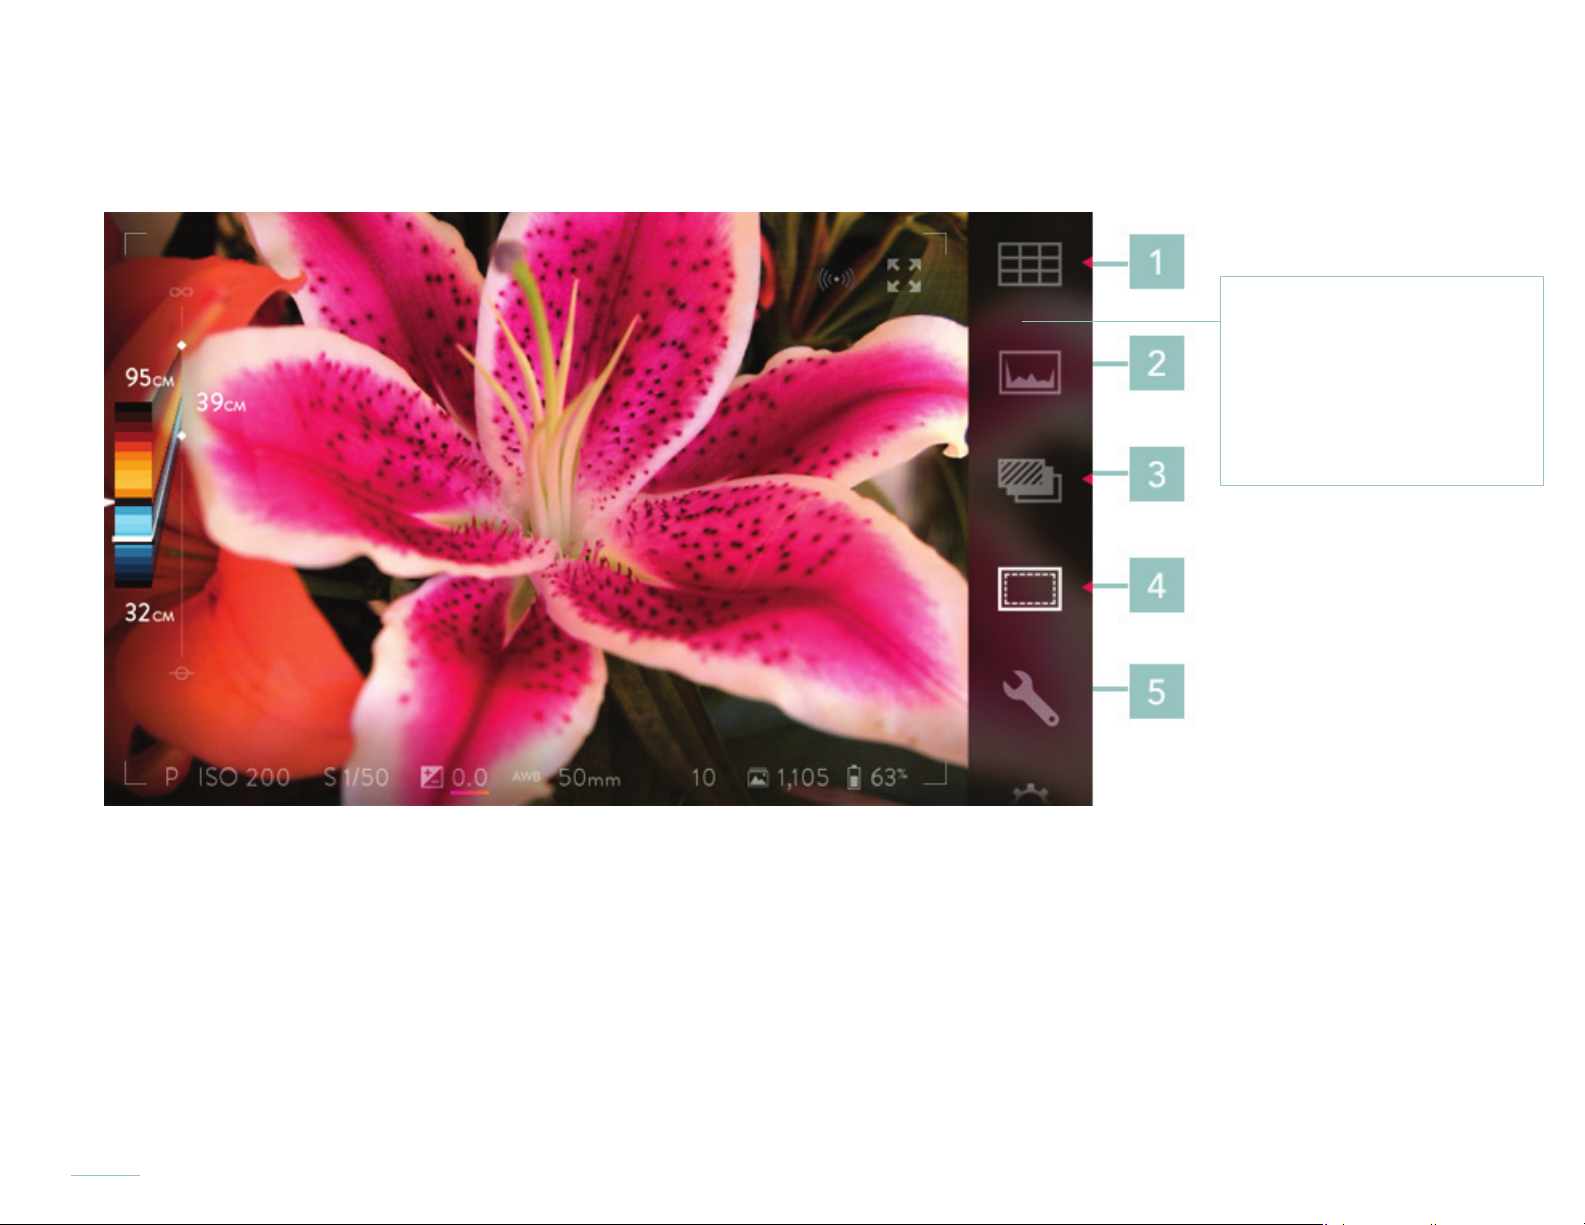
Capture Mode, Menu Bar Page 2
1. Grid overlay
2. Exposure histogram
3. Exposure bracketing
4. Exposure metering
mode
5. Rearrange menu
30
Page 31

Capture Mode, Menu Bar Page 2
1. Grid Overlay icon — tap to activate grid overlay; tap and hold opens the submenu for selecting the style of overlay; icon changes to reect the current selection
2. Exposure Histogram icon — displays the live exposure histogram on screen when tapped/illuminated
3. Exposure Bracketing icon — tap to activate exposure bracketing; tap and hold opens on-screen selection bands, which can be
swiped to set the number of shots and the increment in EV compensation between each shot
4. Exposure metering mode - switches between averaged, evaluative, and spot metering modes
5. Rearrange menu - allows you to customize the camera Menu interface
6. Settings — opens the Settings menu (this will replace the live view; tap CAPTURE or press the shutter button halfway to close the
menu and restore the live view
31
Page 32
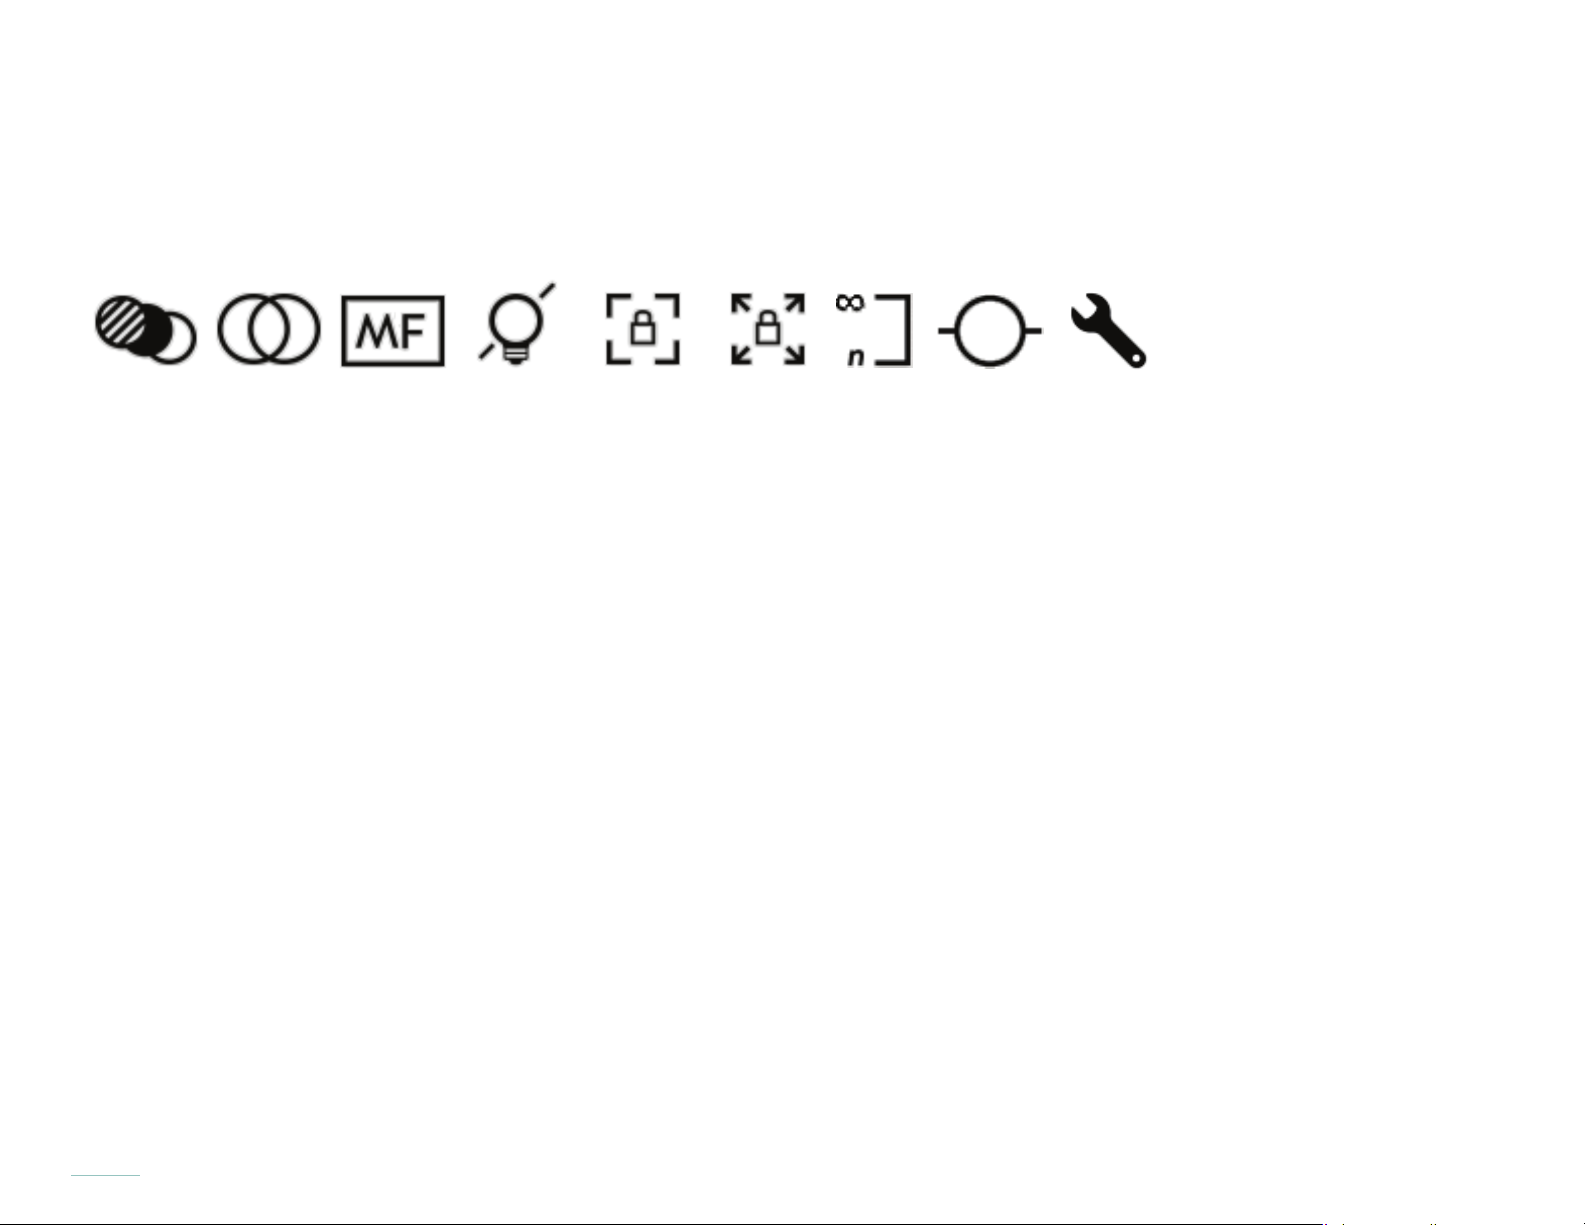
Additional touch control icons (not in the Menu Bar by default)
The additional touch controls below may be added to the Menu Bar. For details on selecting and reordering the controls shown
in the Menu Bar see Rearrange Menu.
The list below describes the basic functionality of the Menu Bar icons pictured above.
• Focus Bracketing icon — tap to activate focus bracketing; tap and hold opens on-screen selection bands, which can be
swiped to set the number of shots and the increment in Depth Steps between each shot
• Optical Offset icon — tap to activate optical offset control (using the front dial) and display (at the right edge of the screen)
• Manual Focus icon— when tapped/illuminated, autofocus is disabled
• Lights-out icon – tap to power-down the touchscreen. Tap and hold anywhere on the screen to restore power
• Focus Lock icon — when tapped/illuminated, the focus ring is disabled
• Zoom Lock icon — when tapped/illuminated, the zoom ring is disabled
• Hyperfocal icon — when tapped, sets the focus of the lens to the light eld hyperfocal position (moves the far end of the
refocusable range to innity)
• Horizon Level icon — when tapped, turns on/off the horizon level gauges to indicate if camera body is level front to back,
and side to side
• Rearrange Menu icon — when tapped the Rearrange Menu is opened to further customize the Capture Mode and Playback
Menu Bars.
Using the Depth Assist Bar
See Depth Assist Bar in Depth composition features.
Using Auto Focus
Press the AF button to focus on the object at the center of the screen. Tap the screen to focus the lens on any area of the live
view (see Tapping the screen to focus, below). This will not work if autofocus is disabled (see Using manual focus).
32
Page 33
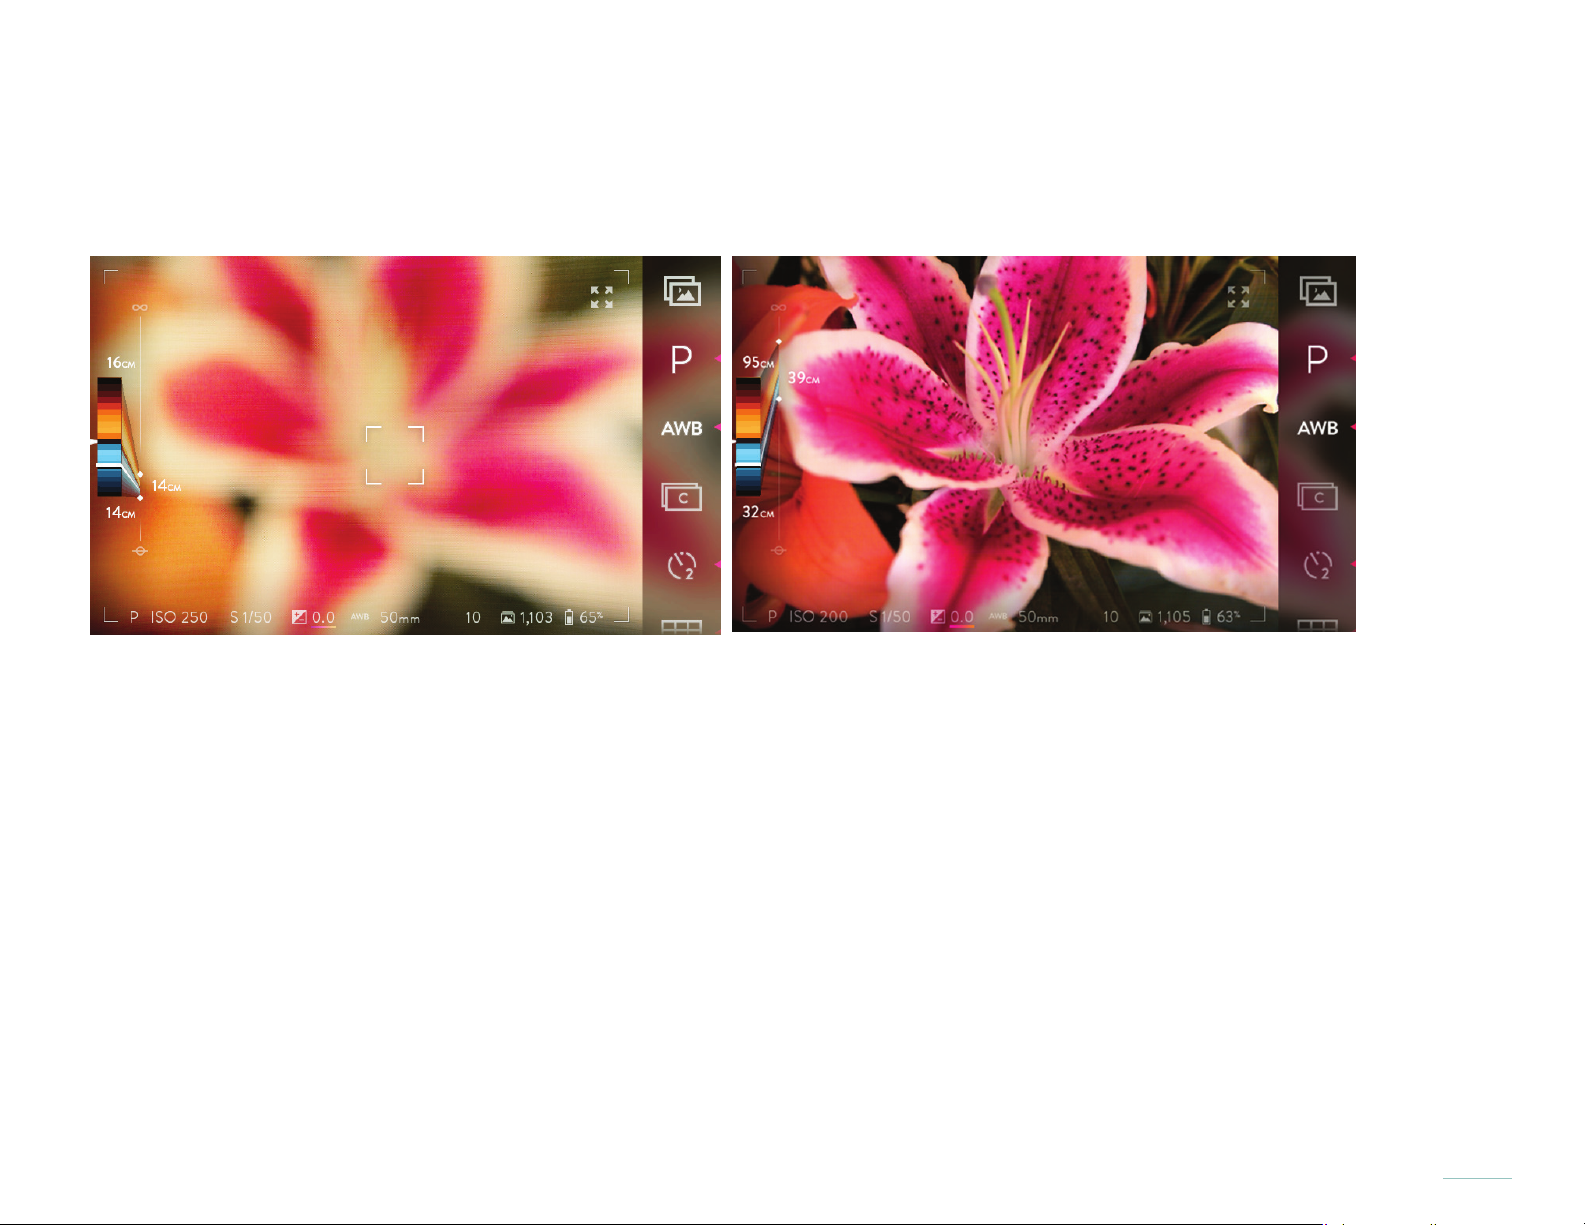
Tapping the screen to focus
Focus by simply tapping the screen in the area to bring into focus. This will not work if autofocus is disabled (see Using manual
focus).
Focus the lens by touching the screen. The lens will focus on any part of your scene based on where you’ve touched.
33
Page 34
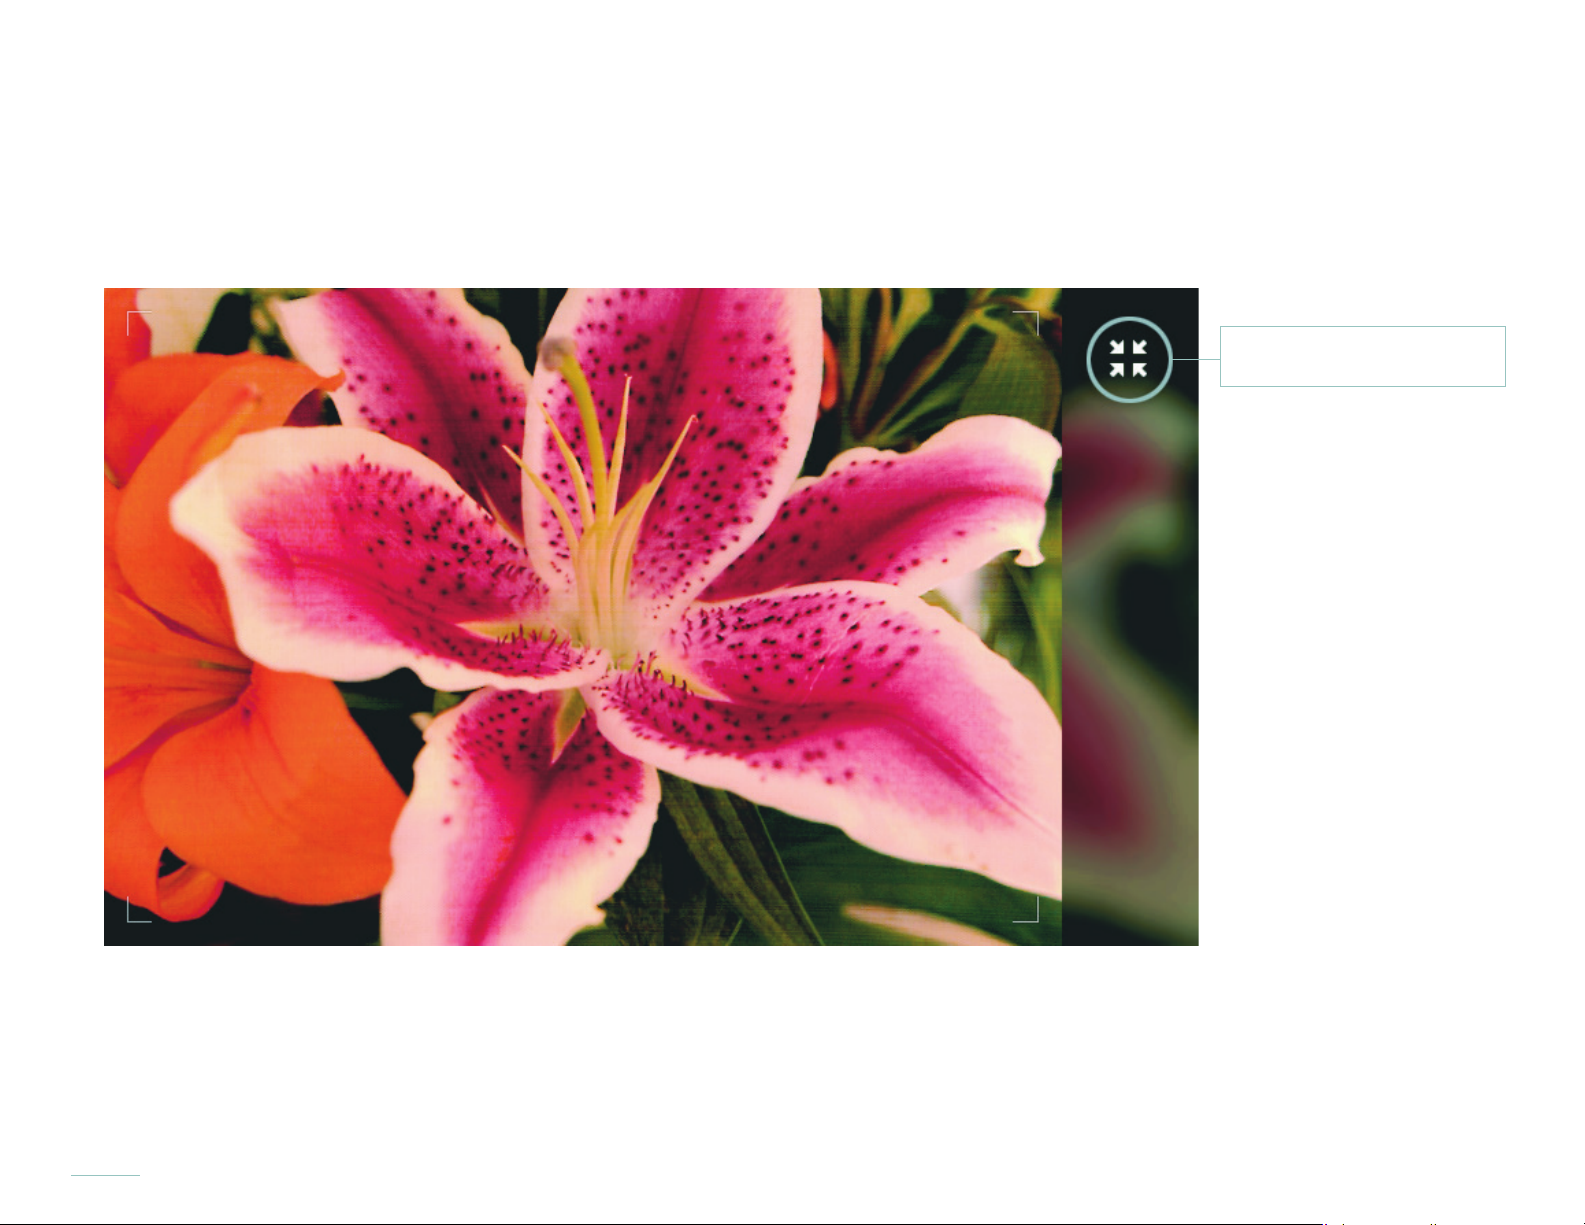
Hiding and displaying the Menu Bar and Information Bar
The Menu Bar and Information Bar can be hidden by touching the Full Screen Preview icon in the upper right corner of the preview
window. To display all menus again, touch the Full Screen Preview icon again. To hide just the Information Bar swipe it down. To display
it again, swipe up from the bottom edge of the screen.
Full Screen Preview icon
The Full Screen Preview icon will hide all menus with a single touch. A second touch returns all menus.
34
Page 35

Choosing an exposure mode
The camera offers four exposure modes. The rst letter of the currently selected mode appears in the exposure mode indicator in
the Information Bar at the bottom of the screen. It is also displayed and illuminated as the exposure mode icon — the rst item in
the Menu Bar. To select a different mode, tap the exposure mode icon. The exposure mode submenu will open to the left, displaying the four mode options.
The list below describes the basic functionality of the Exposure Mode icons pictured above.
• P: Program Mode — the camera sets the ISO and the shutter speed based on metered value and EV compensation value
• I: ISO Priority Mode — manually set the ISO, and the camera sets the shutter speed based on metered value and
EV compensation value
• S: Shutter Priority Mode — manually set the shutter speed, and the camera sets ISO based on metered value and
EV compensation value
• M: Manual Mode — manually set both the shutter speed and the ISO
35
Page 36
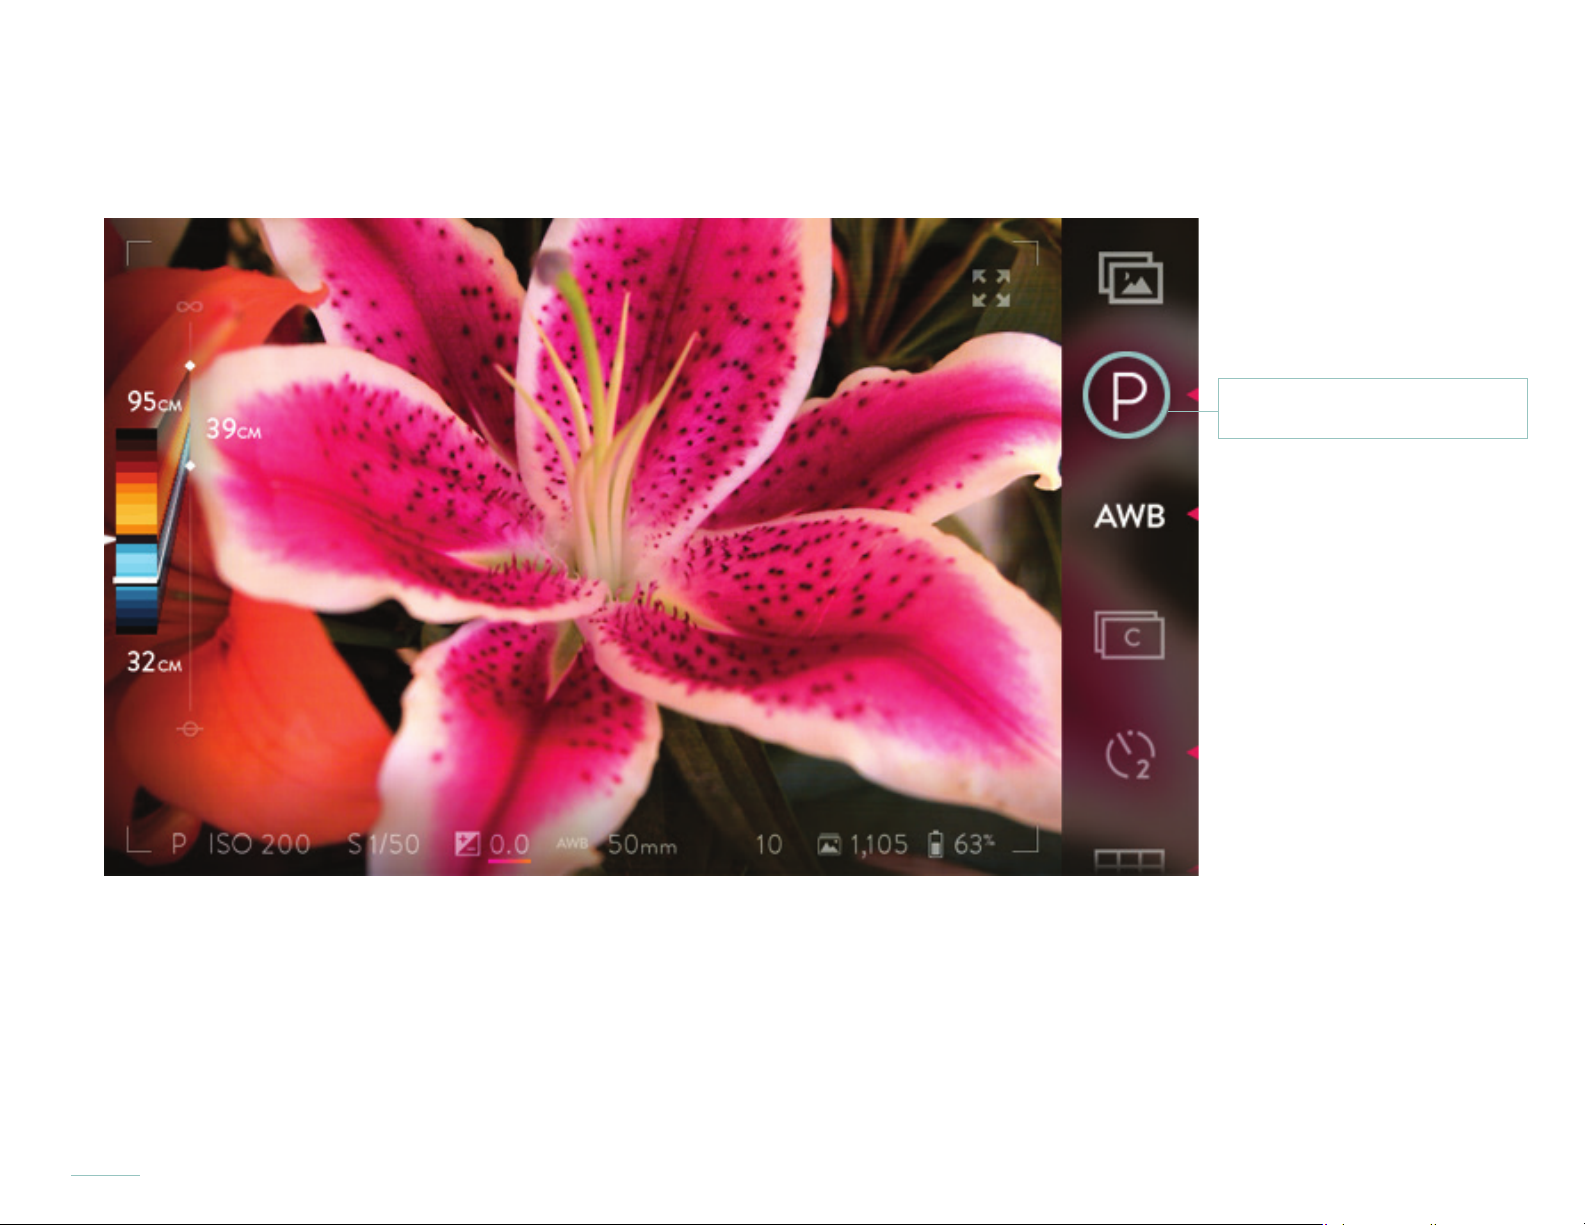
Tap on one of the letter options to set the exposure mode. The submenu will close, and the new selection will now be displayed as the
exposure mode icon as well as in the exposure mode indicator in the Information Bar. If no selection is made, after a few seconds the
submenu will close.
Exposure Mode selection
Tap the current exposure mode icon to open the submenu displaying the four options.
36
Page 37
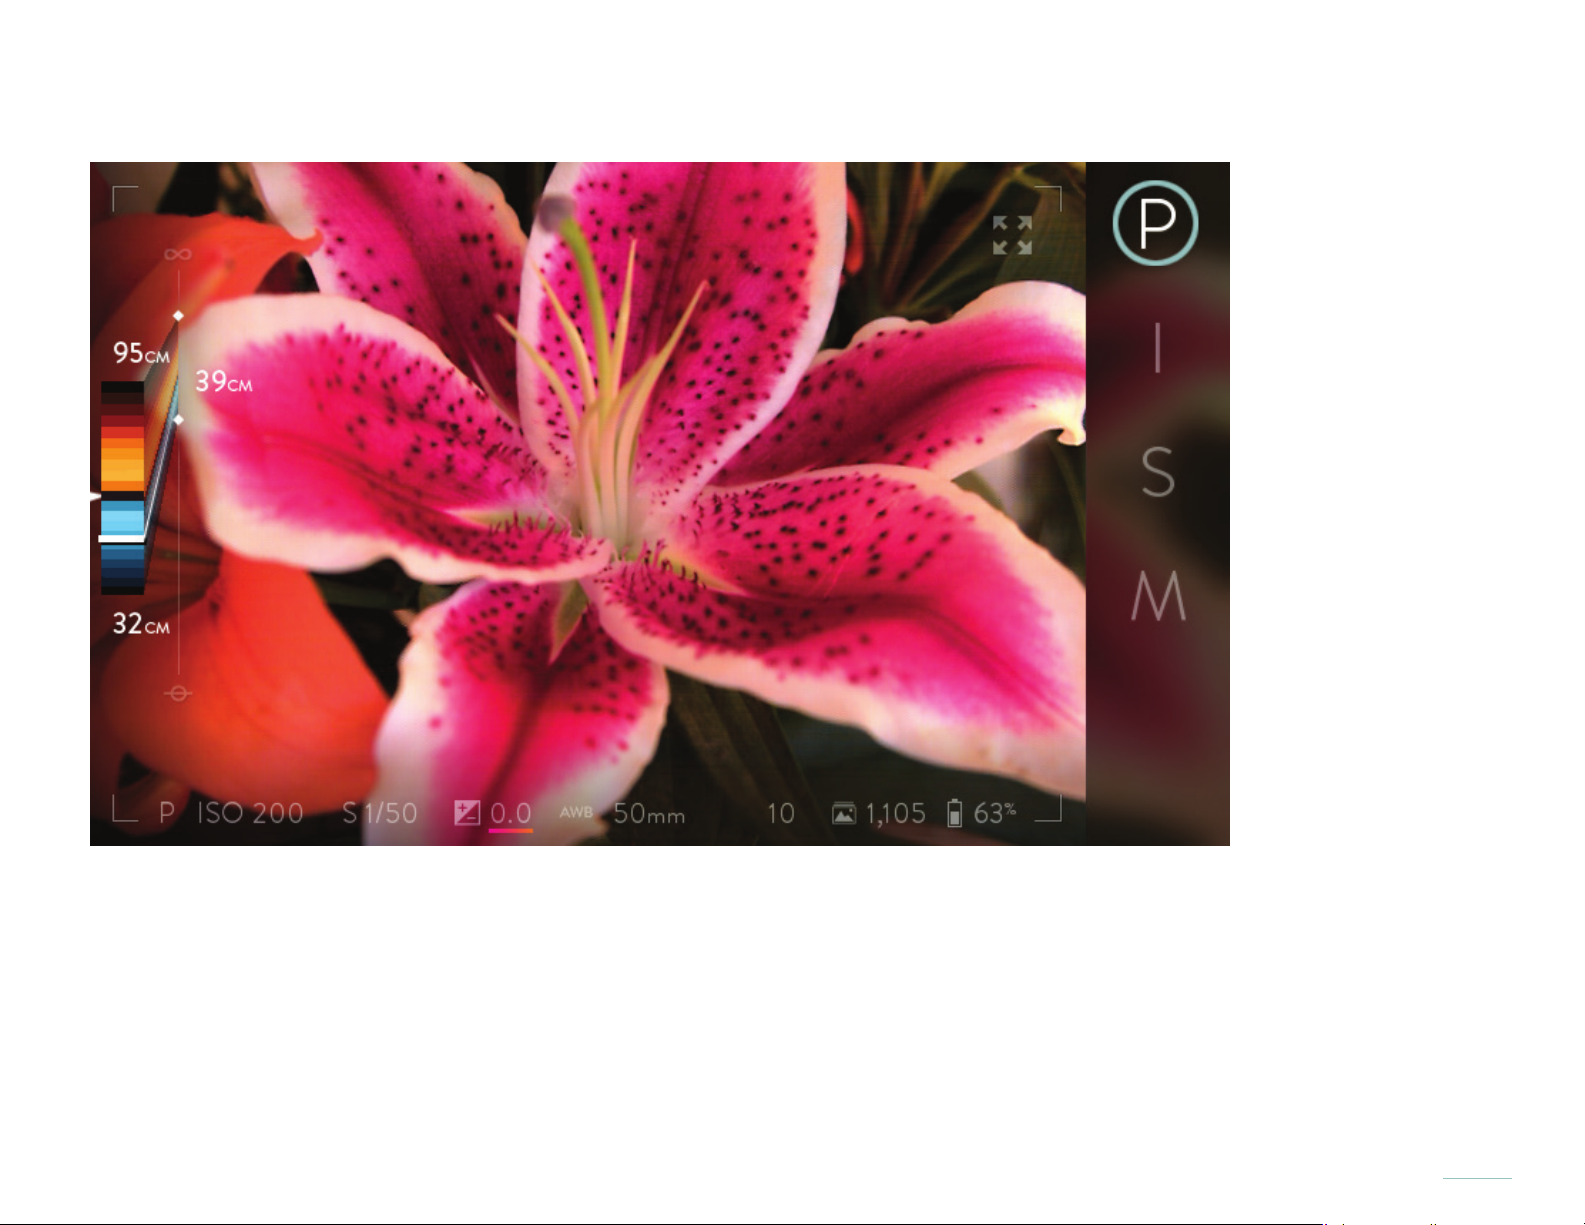
After the rst tap of the exposure mode selection, all four exposure modes will be available to choose from.
Tap on one of the letter options to set the exposure mode from the following four options: Program Mode,
ISO Priority Mode, Shutter Priority Mode, or Manual Mode
37
Page 38
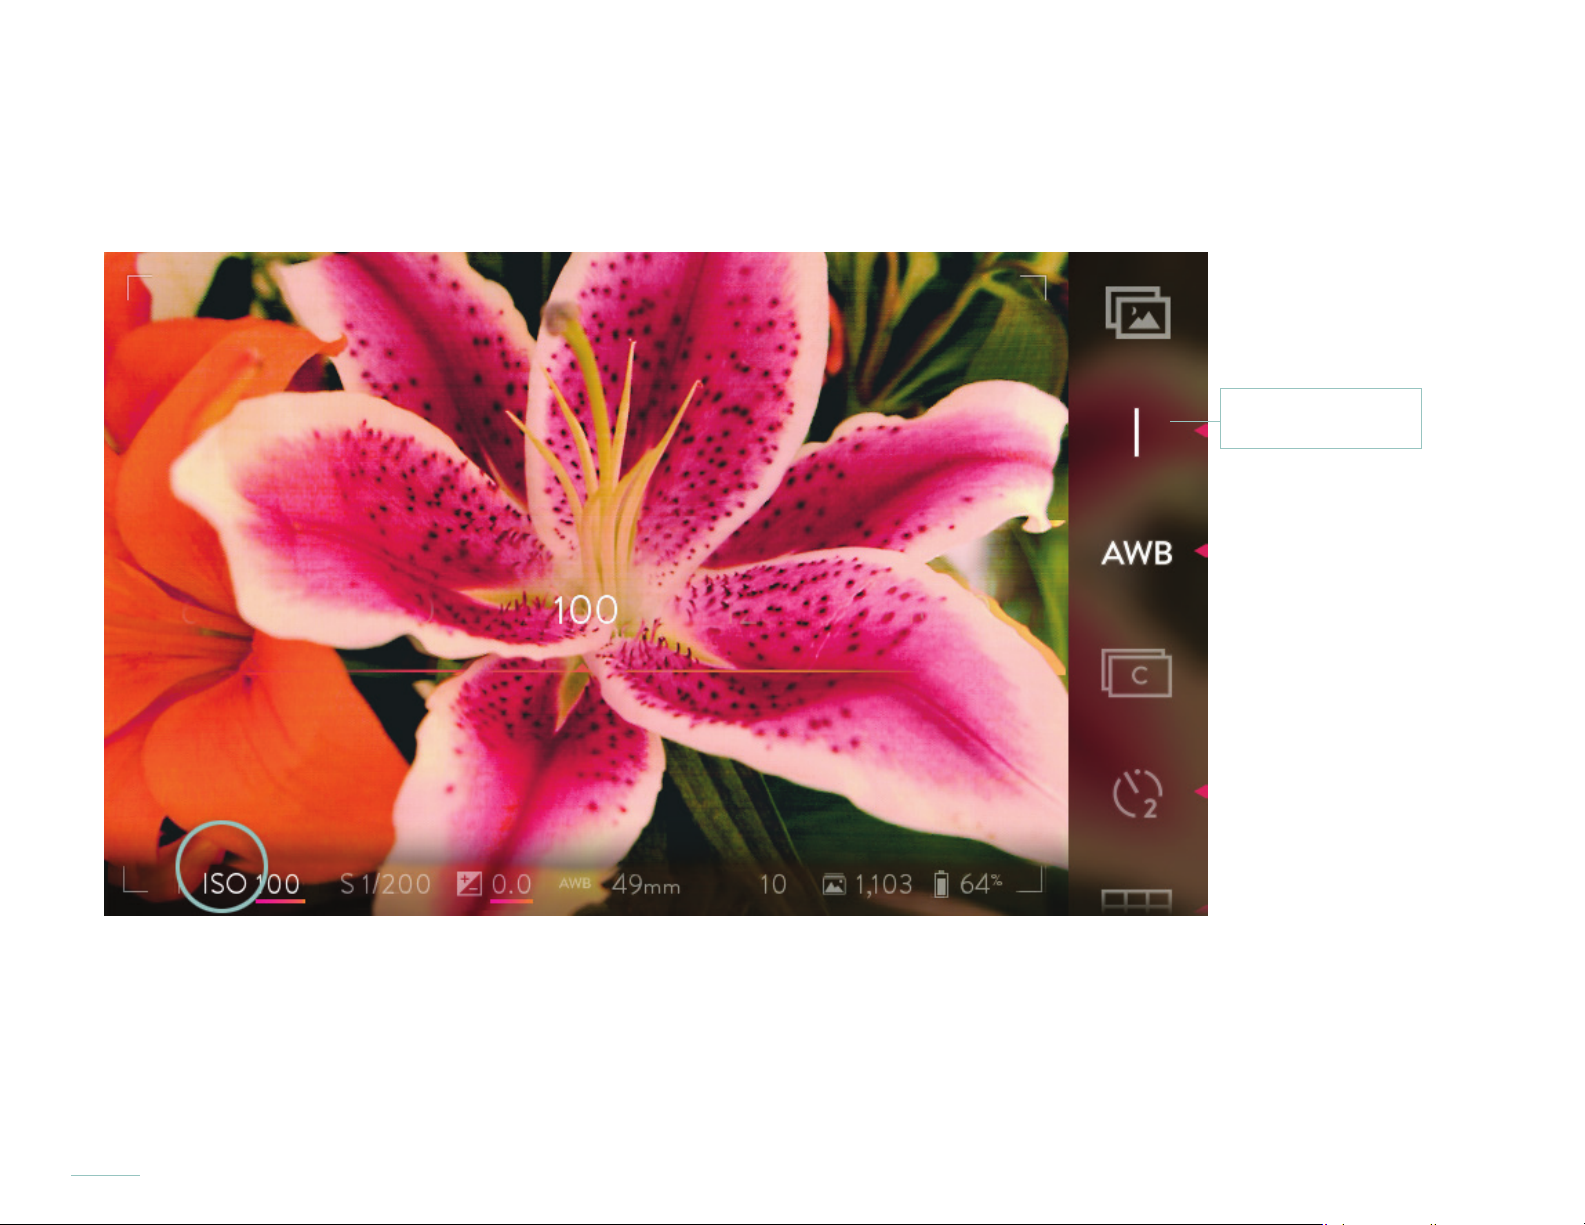
Setting the ISO
In ISO Priority Mode and Manual Mode, set the ISO by tapping the ISO indicator at the left end of the Information Bar. A selection band
will open across the middle of the screen, with the current ISO at the center. Available ISO speeds range from 80 to 3200.
ISO Mode icon
Tap the ISO indicator to open the ISO selection band.
38
Page 39
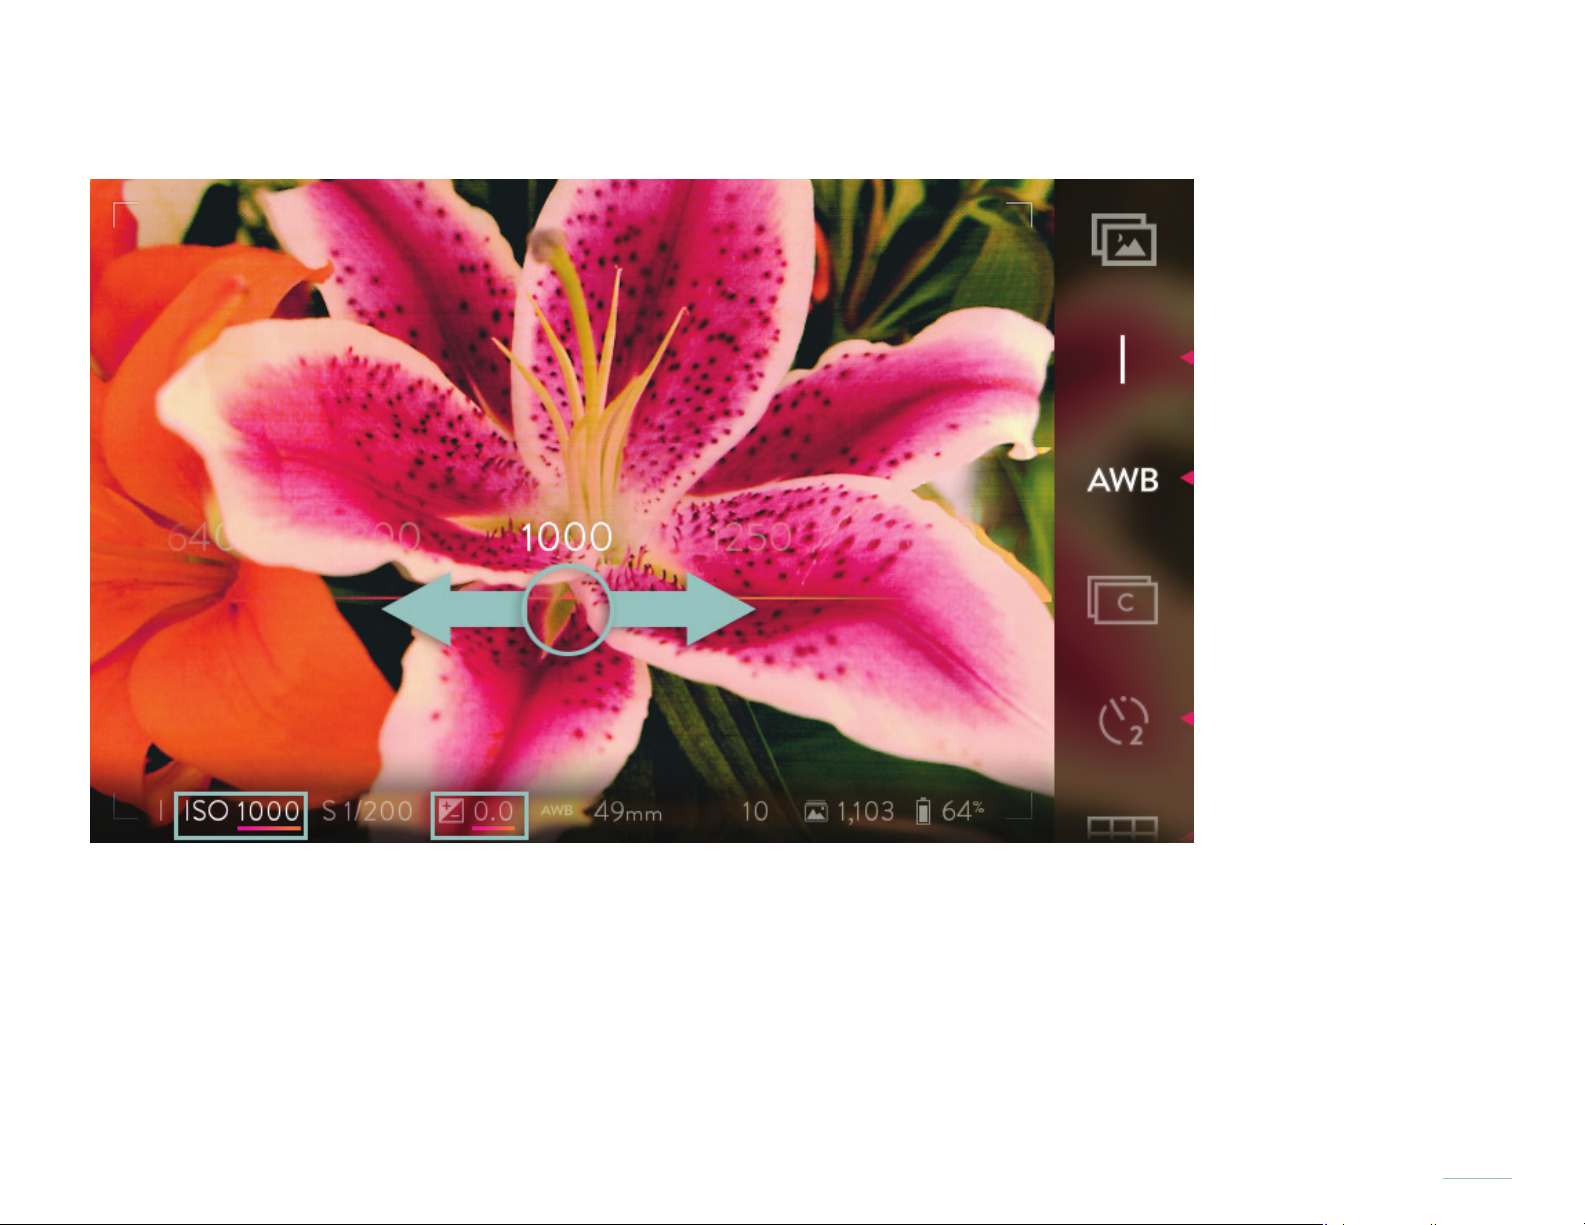
Swipe the band from right to left to increase the ISO, or from left to right to lower it. Tap on any ISO visible in the selection band to
go directly to that setting. Double-tap on the selection band returns to the initial ISO setting.
Swipe the ISO selection band to increase or lower the ISO.
Once the selection has been made, tap the screen anywhere outside of the selection band to close the band. A half press of the
shutter button will also close the selection band. A full press will close it and take a picture.
Set the ISO using the front dial while in ISO Priority Mode or using the rear dial while in Manual Mode*. As the dial is rotated, the
ISO indicator in the Information Bar at the bottom of the screen will change to display the current setting.
*Note that the functions assigned to the front and rear dials in the various exposure modes can be changed (see Camera controls).
The default assignments are referenced here.
39
Page 40
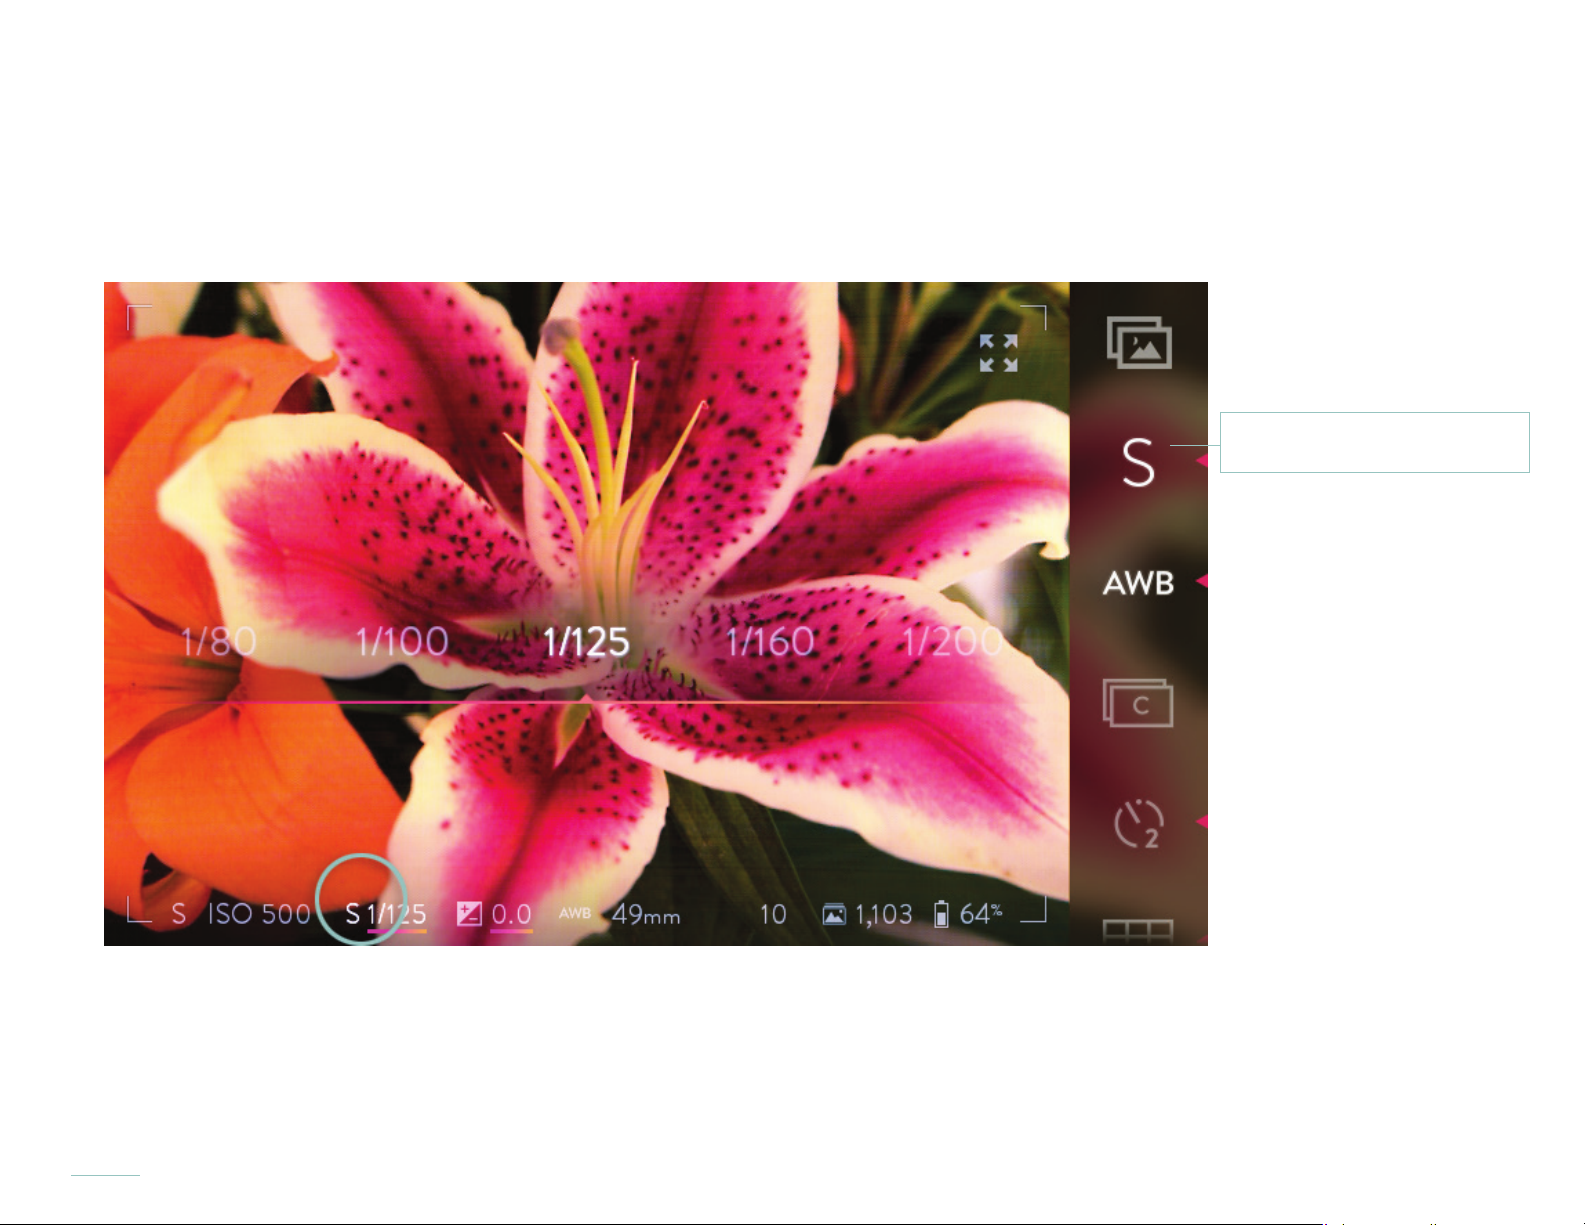
Setting the shutter speed
In Shutter Priority Mode and Manual Mode, set the shutter speed by tapping the shutter speed indicator in the information bar at the
bottom of the screen. A selection band will open across the middle of the screen, with the current speed at the center. Available shutter
speeds range from 1/4000th of a second to 32 seconds.
Shutter Priority Mode icon
Tap the shutter speed indicator to open the shutter speed selection band.
40
Page 41
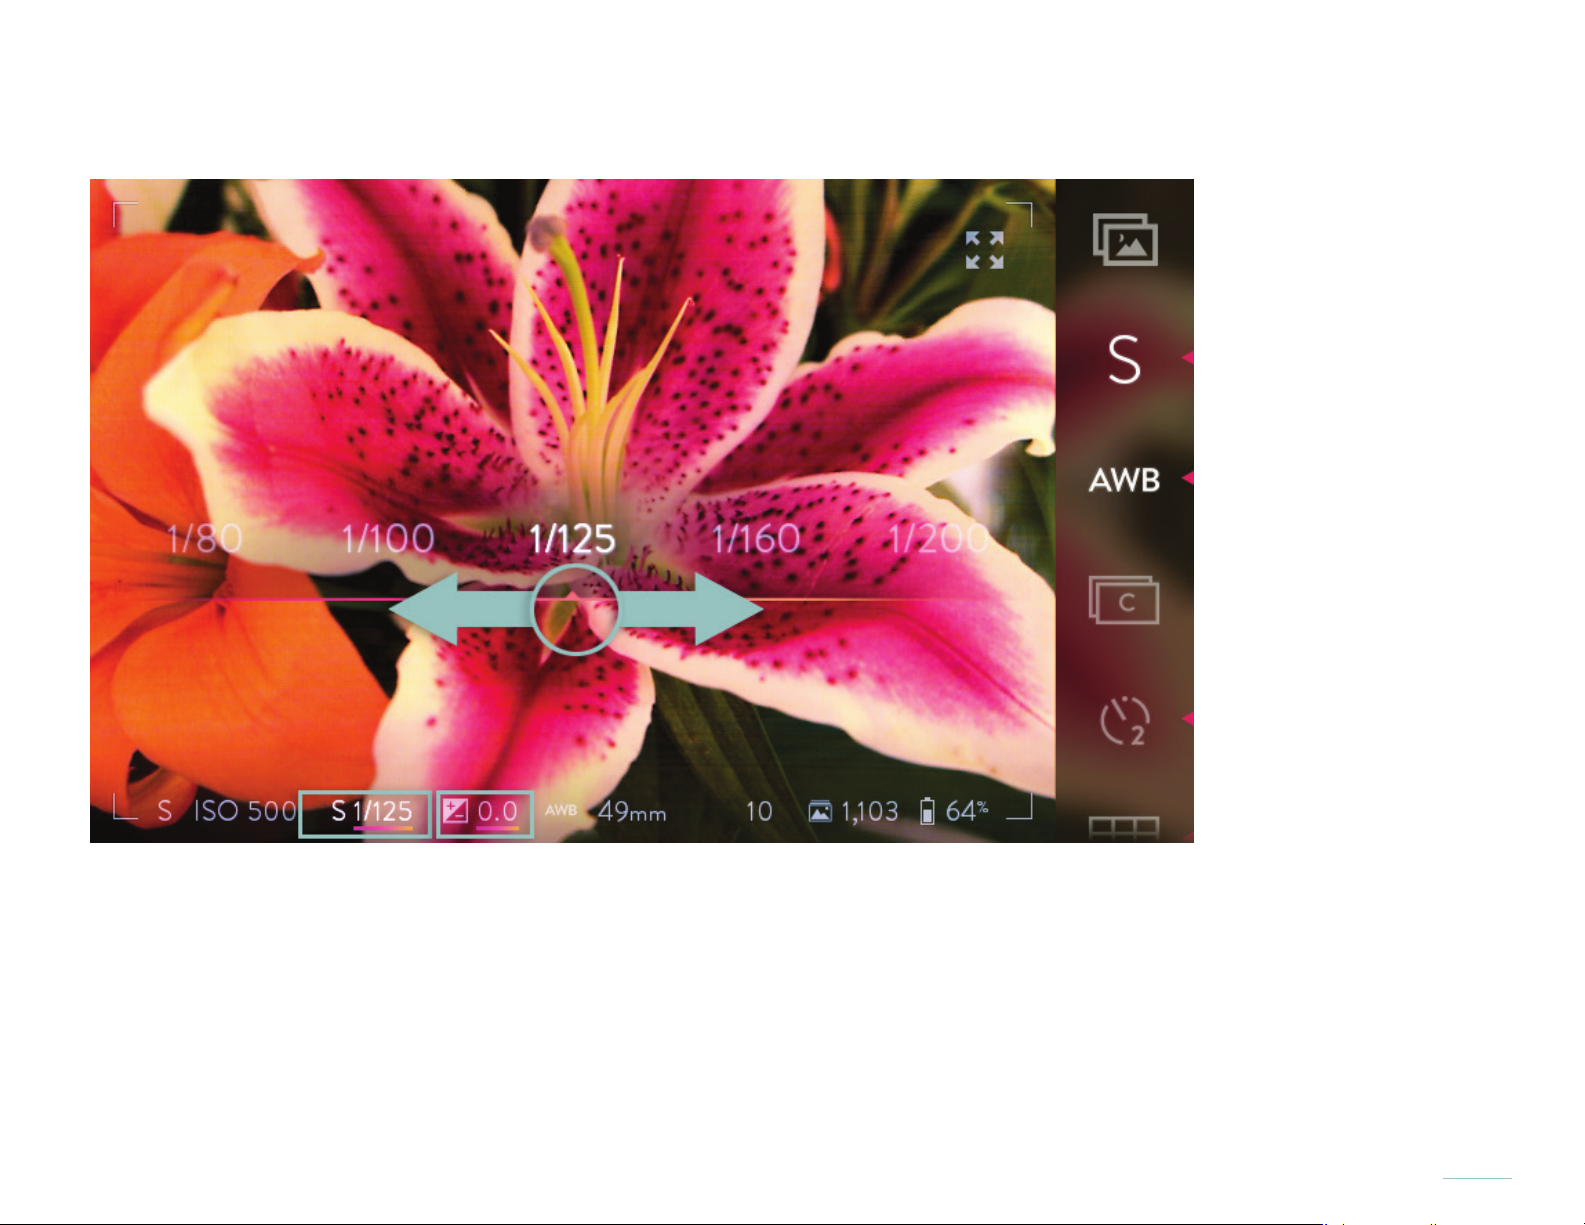
Swipe the band from right to left to increase the shutter speed, or from left to right to lower it. Tap on any speed visible in the selection band to go directly to that speed. Double-tap on the selection band to the initial shutter speed setting.
Swipe the shutter speed selection band to increase or lower the speed.
Once the selection has been made, tap the screen anywhere outside of the selection band to close the band. A half press of the
shutter button will also close the selection band. A full press will close it and take a picture.
Set the shutter speed using the front dial while in Shutter Priority Mode or Manual Mode*. As the dial is rotated, the shutter speedEV compensation indicator in the Information Bar at the bottom of the screen will change to display the current setting.
*Note that the functions assigned to the front and rear dials in the various exposure modes can be changed (see Camera controls).
The default assignments are referenced here.
41
Page 42
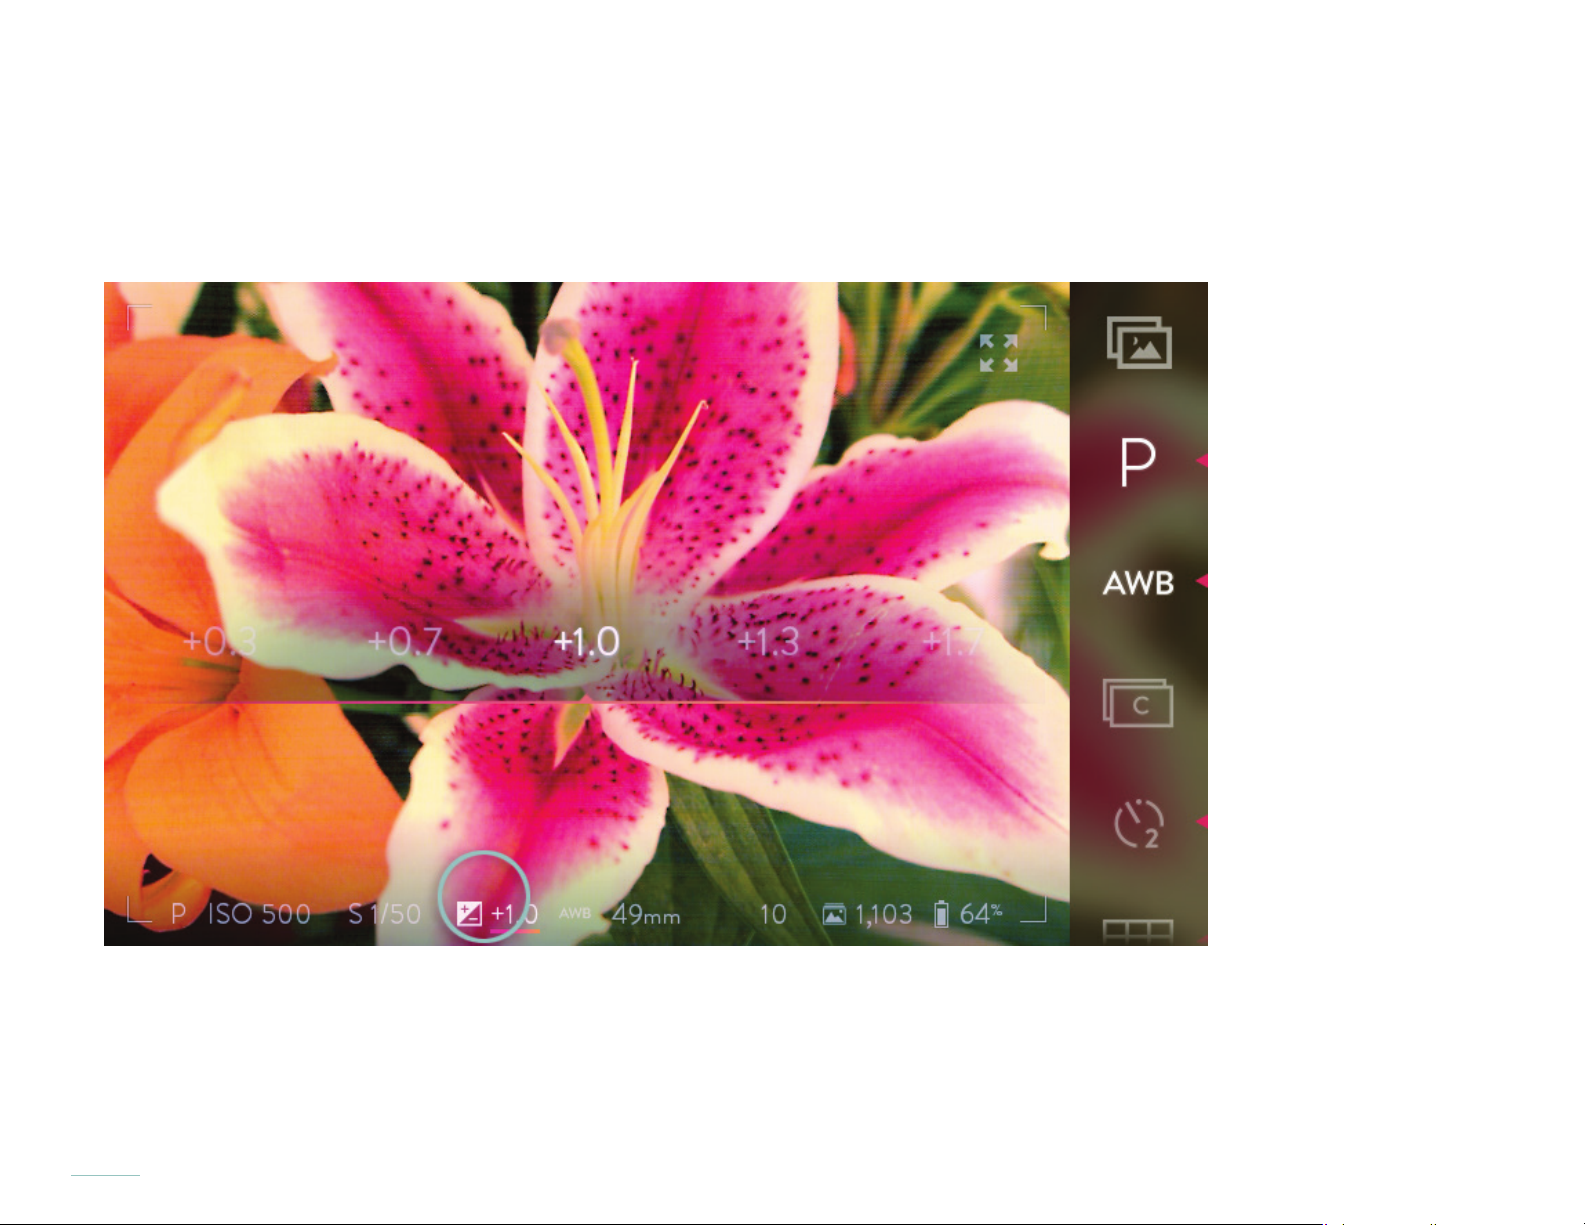
Setting the EV compensation
Exposure value compensation is available in all exposure modes except Manual Mode. Set the EV compensation by tapping the EV
compensation indicator in the information bar at the bottom of the screen. A selection band will open across the middle of the screen,
with the current setting at the center. The available settings range from -2.0 to +2.0.
Tap the EV compensation indicator to open the selection band.
42
Page 43
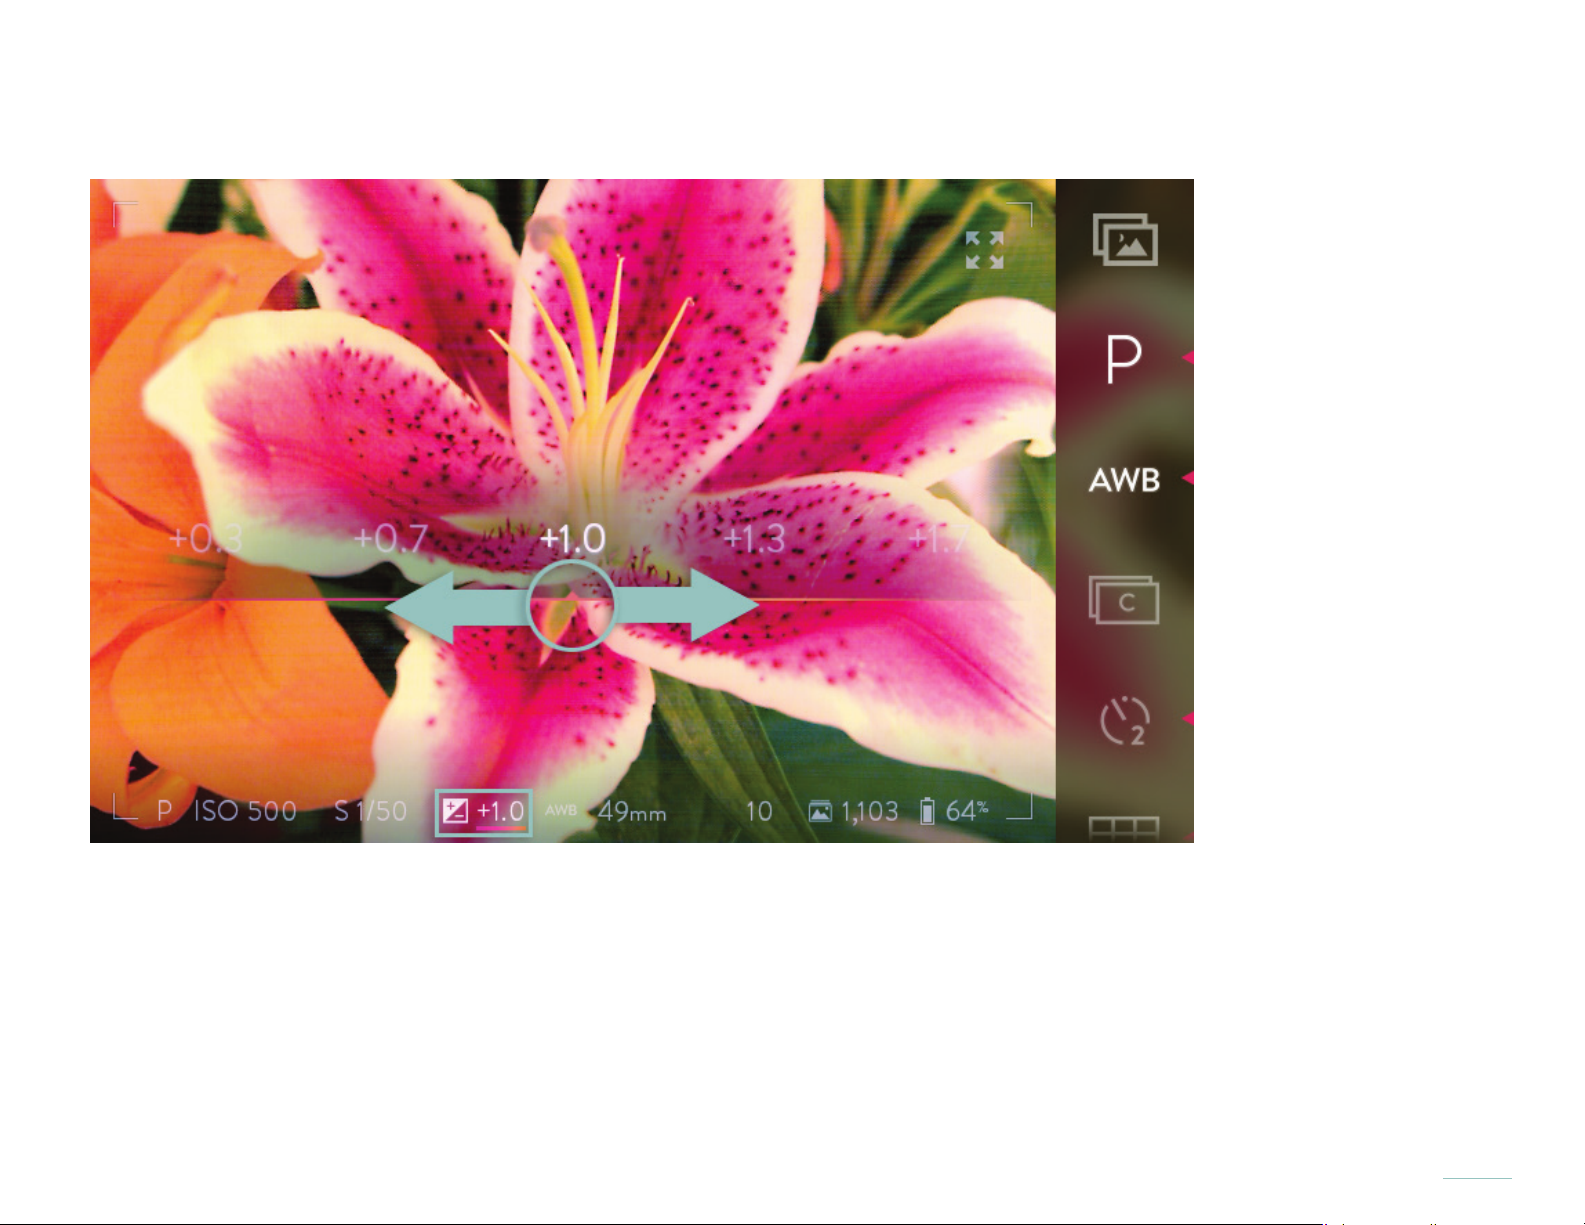
Swipe the band from right to left to increase the compensation, or from left to right to lower it. Tap on any value visible in the selection band to go directly to that setting. Double-tap on the selection band to return to the initial compensation setting.
Swipe the selection band to set the EV compensation.
Once the selection has been made, tap the screen anywhere outside of the selection band to close the band. A half press of the
shutter button will also close the selection band. A full press will close it and take a picture.
Set the EV compensation using the rear dial while in Program, ISO Priority, and Shutter Priority Modes*. As the dial is rotated, the
shutter speed indicator in the Information Bar at the bottom of the screen will change to display the current setting.
*Note that the functions assigned to the front and rear dials in the various exposure modes can be changed (see Camera controls).
The default assignments are referenced here.
43
Page 44
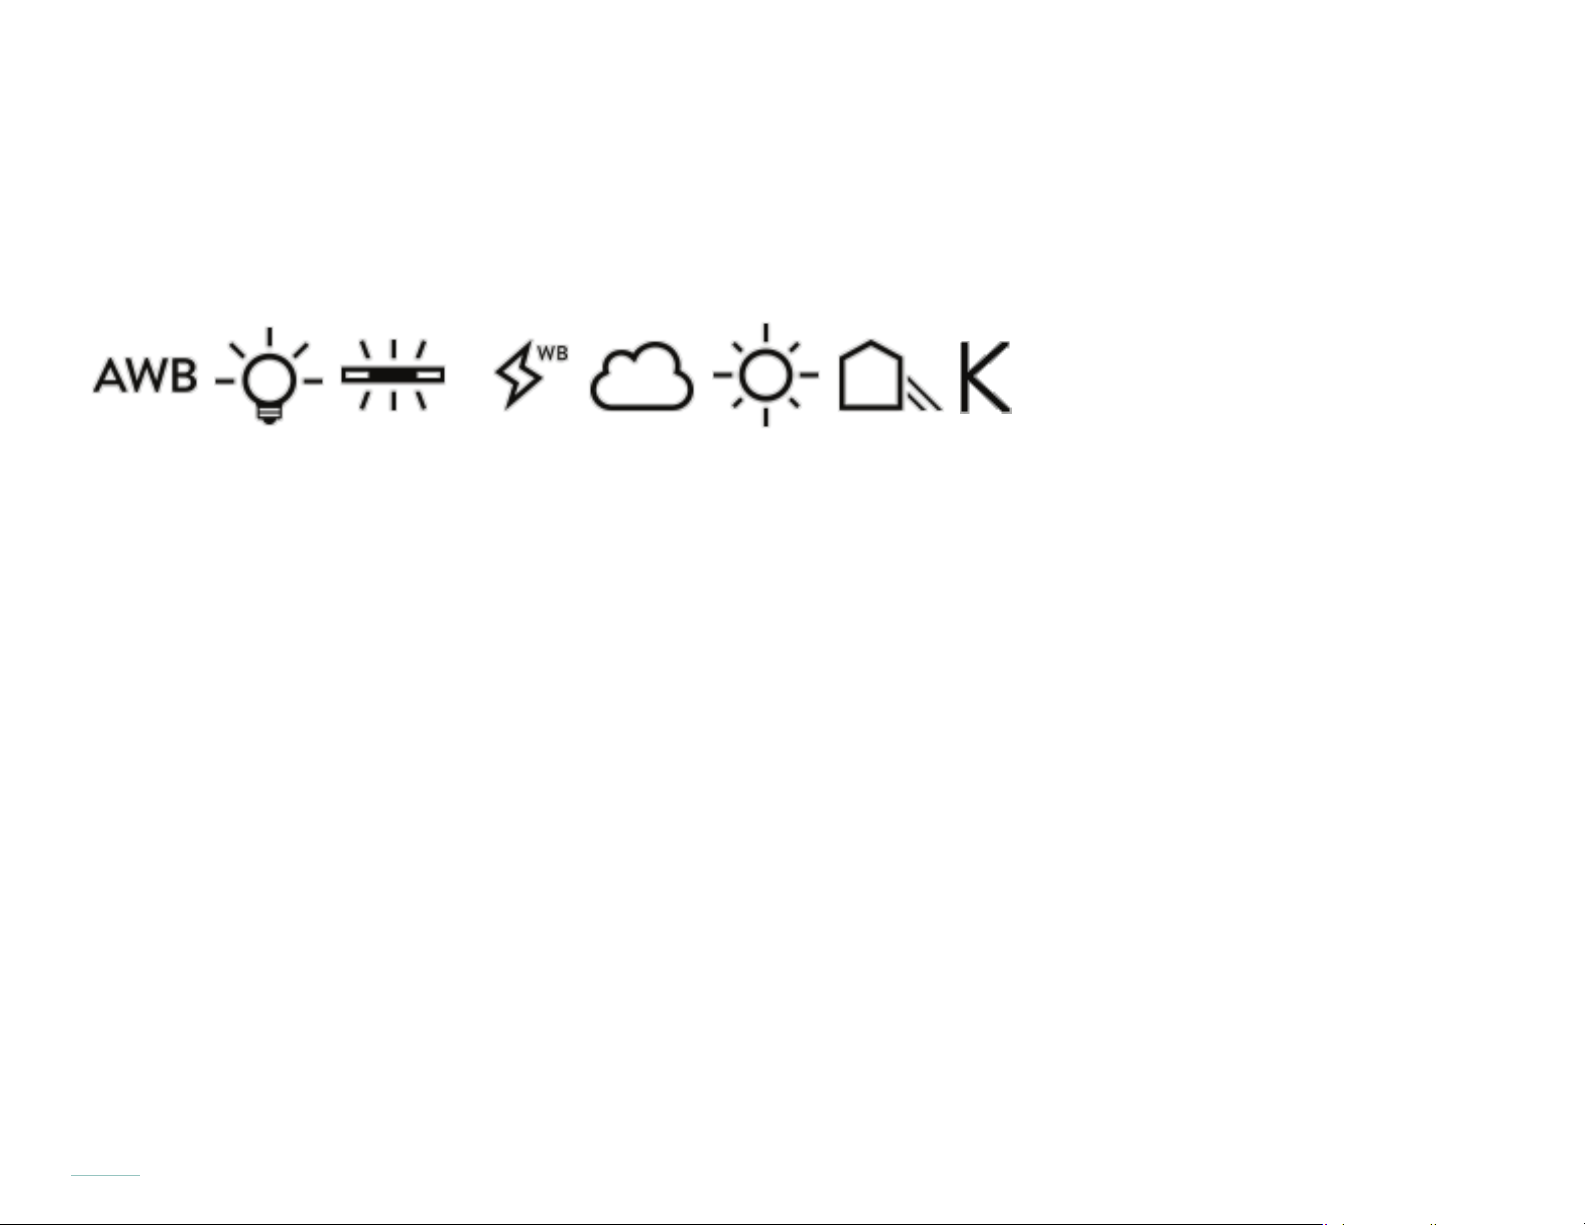
Setting the white balance
To set the white balance, tap the White Balance icon in the Menu Bar. A submenu will open to the left, displaying available options. Swipe up on the submenu to view additional options. Tap any option to change the setting. The submenu will close, and
the new selection will now be displayed as the White Balance icon as well as in the white balance indicator in the Information Bar.
If no selection is made, after a few seconds the submenu will close.
The list below describes the basic functionality of the White Balance icons pictured above.
• Auto White Balance — camera will determine the correct white balance automatically in this mode
• Tungsten —selected when shooting under incandescent tungten lighting conditions
• Flourescent— selected when shooting undeer ourescent tube lighting conditions
• Flash WB – selected when shooting with ash
• Cloudy —selected when shooting in cloudy, overcast conditions
• Shaded —selected when shooting in a shaded location, in otherwise sunny conditions
• Manual WB — selected to choose a custom white balance tint and temperture in Kelvin
44
Page 45
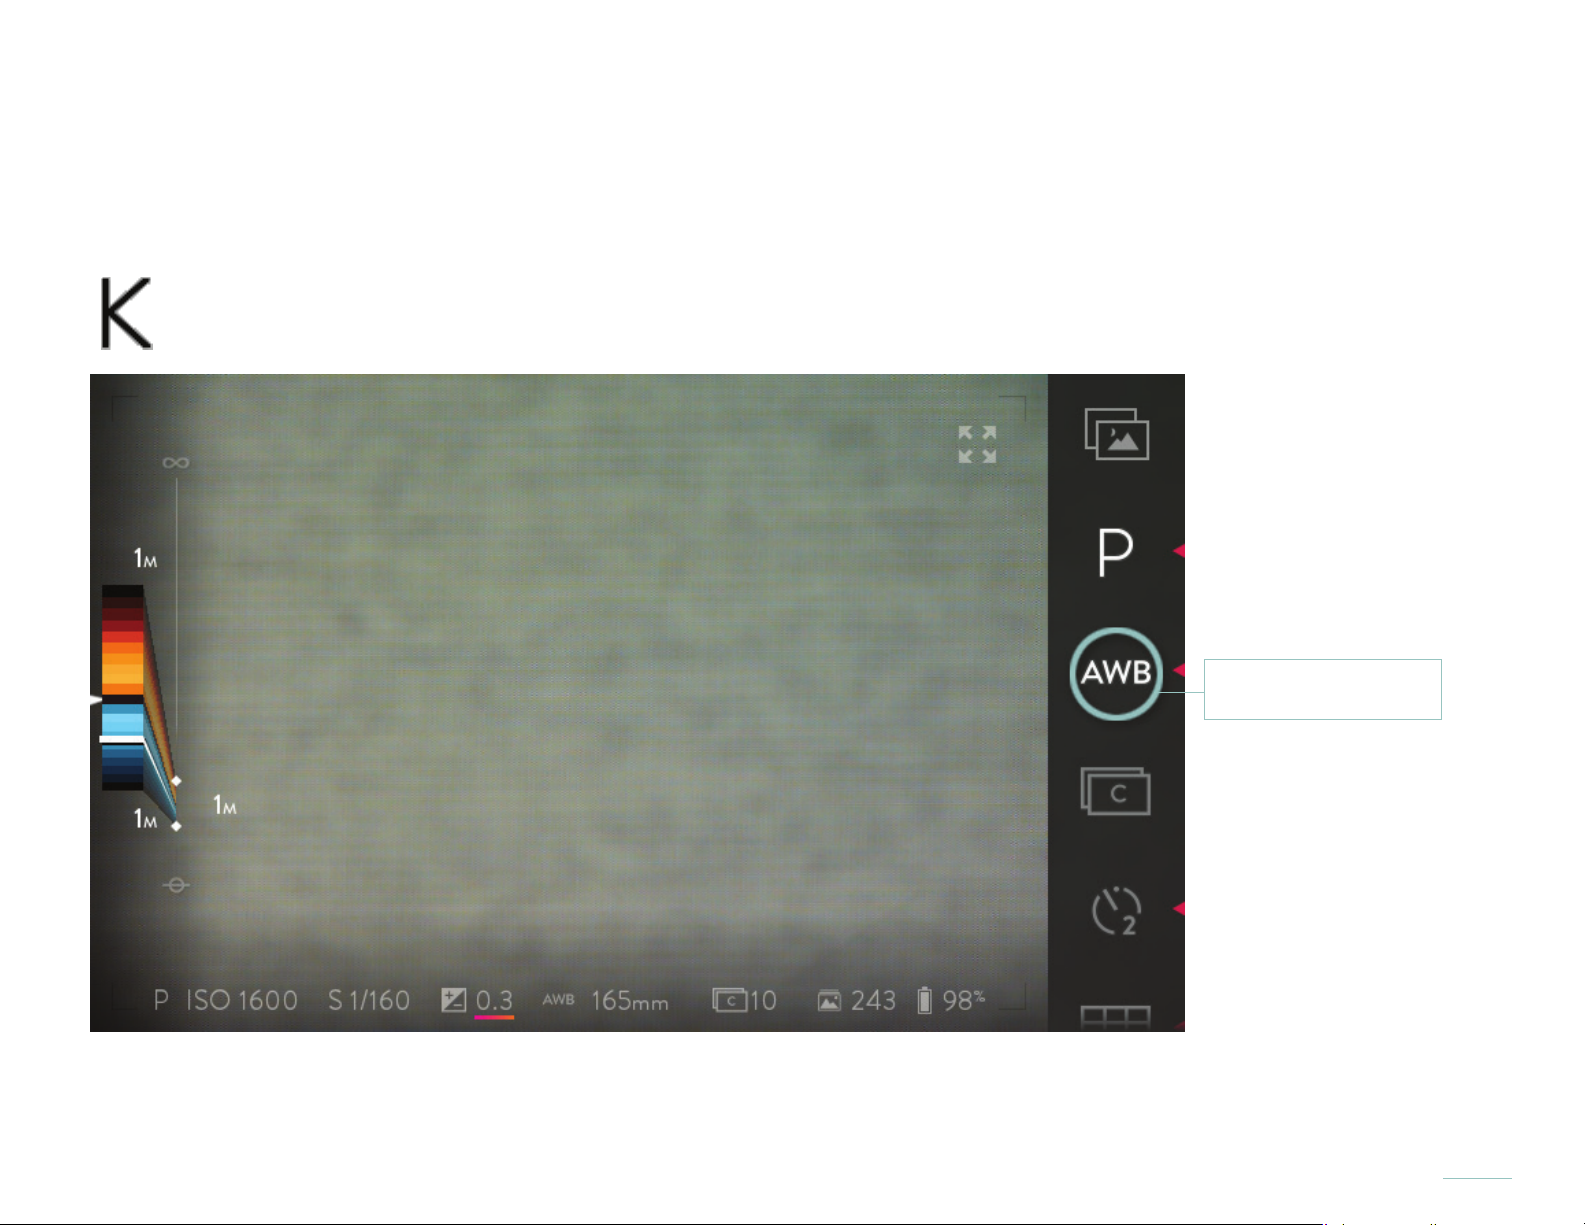
Manually setting the white balance
Manually set the white balance by tapping the White Balance icon in the Menu Bar at the side of the screen. The submenu described on the previous page will appear. Tap the Manual White Balance icon shown below:
White Blalance icon
Tap the White Balance icon to open the white balance submenu of options
45
Page 46
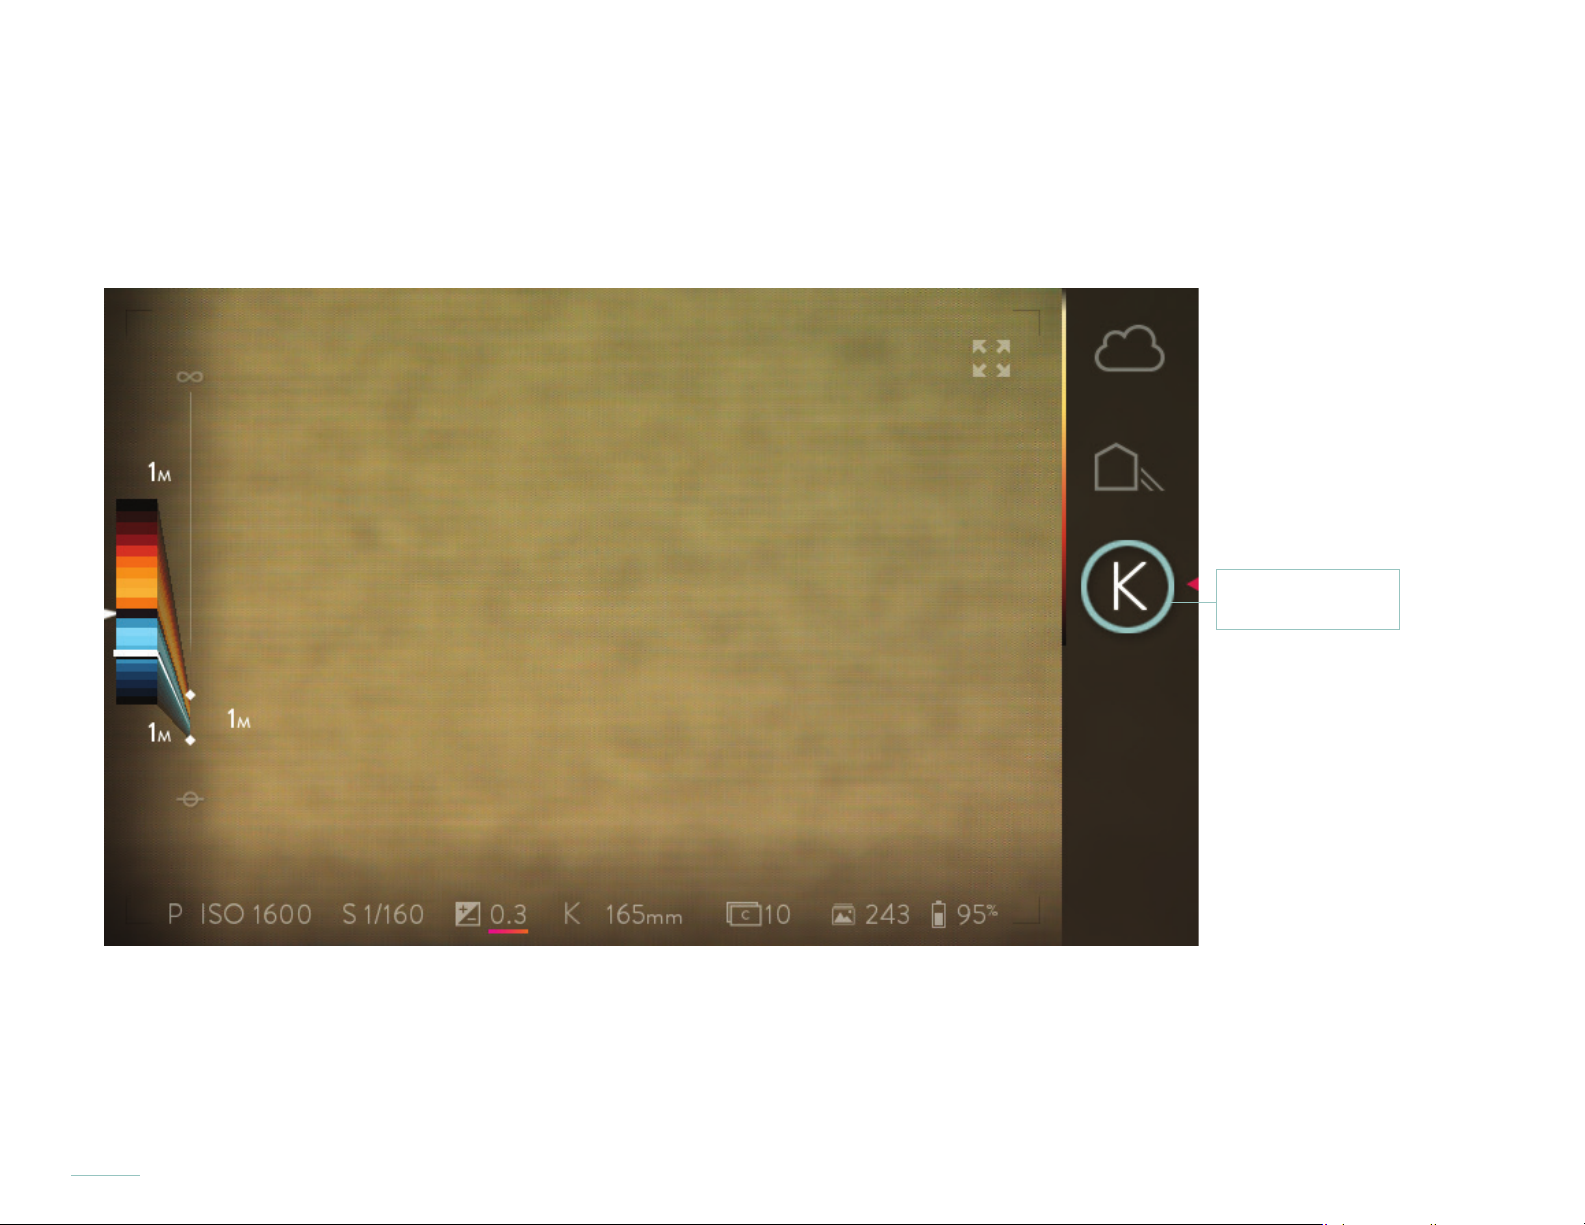
To assist manual setting the white balance, point the lens at a neutral gray card or surface in the same light you are shooting with. Fill
the lens with image of the card’s surface. This will be used as your surface for evaluating the lights’ color and tint. If you have a color meter that displays Kelvin color temperature, this is even more accurate. Press and hold your nger on the Manual white balance icon until
the white balance adjustment sliders are displayed on screen.
Press and hold
46
Page 47
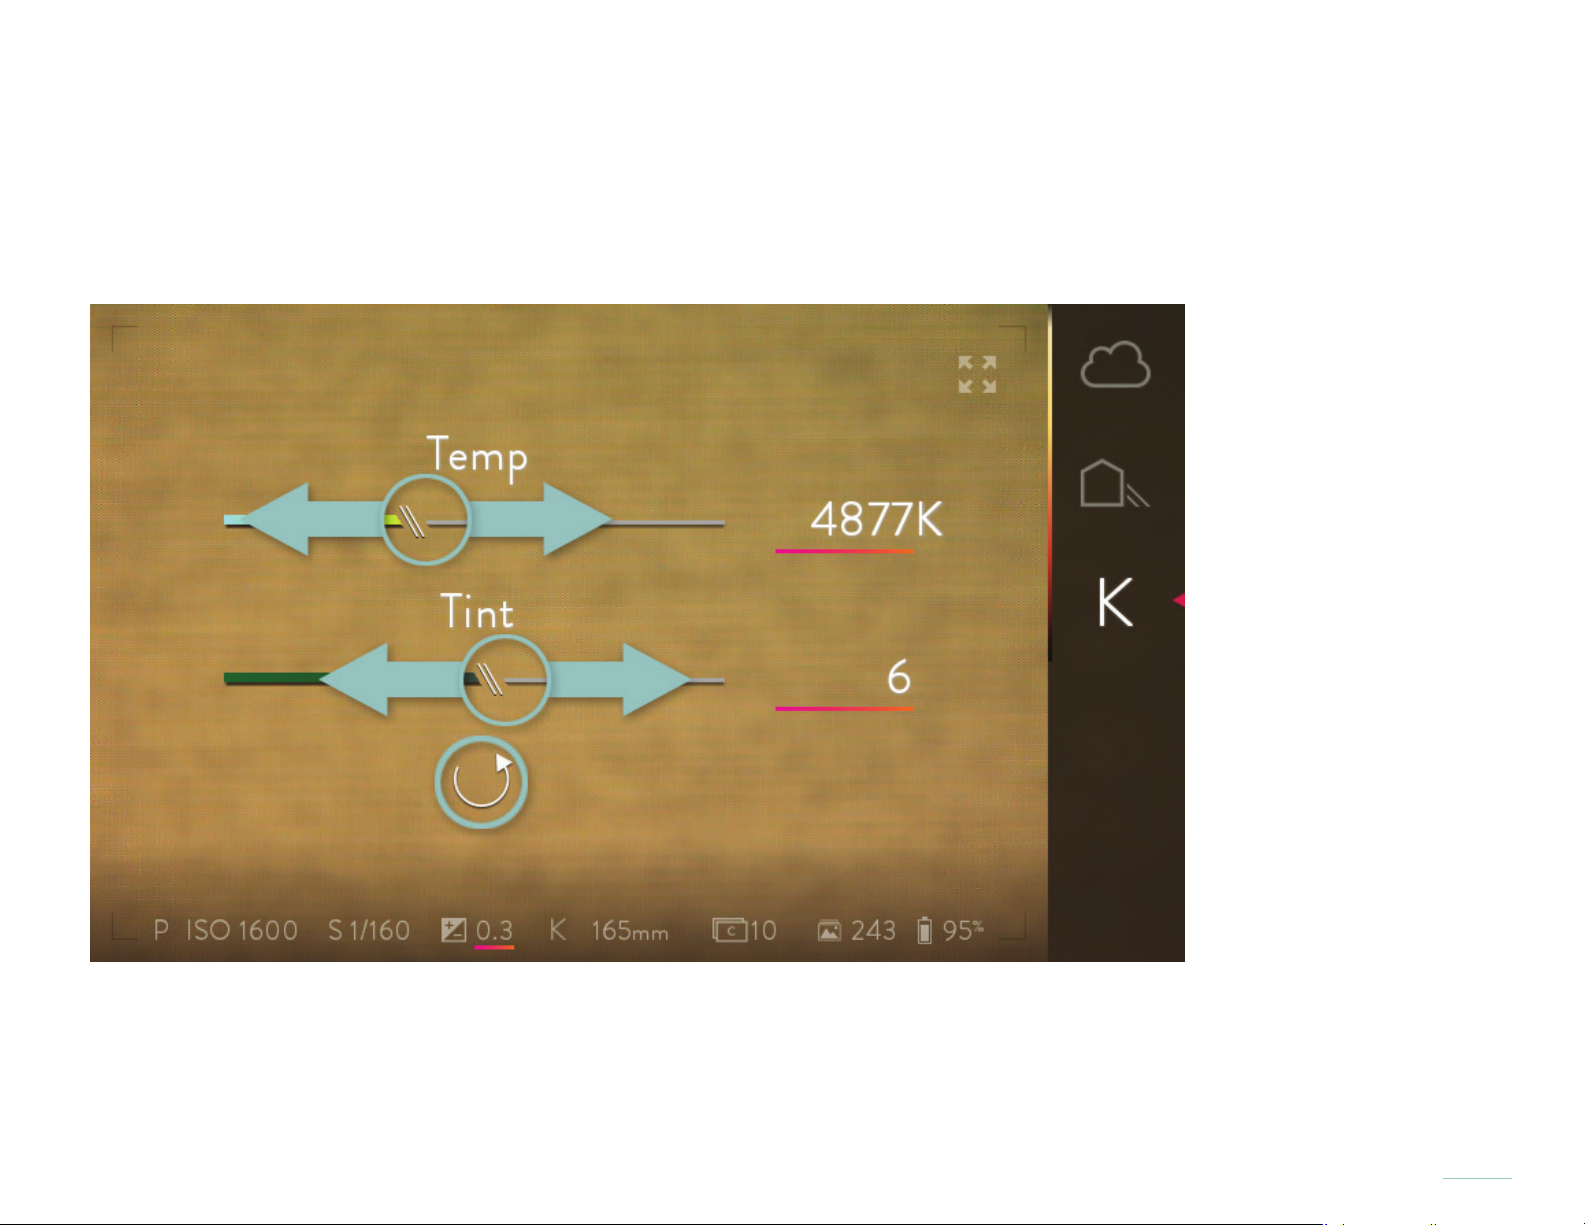
Tap and sweep side to side to adjust the slider values. Adjust the light color temperature K to match the values on your color meter,
or until the gray on screen is a neutral value that matches the gray you see on the card in the scene. The color temperature range is
2000K - 10000K. Adjust Tint to ne tune the white balance, the default setting for Tint is 0. The counterclockwise arrow will reset the
Manual White Balance value to your original starting point. Tap the screen to return to Capture Mode.The Manual White Balance
value you’ve set will be stored in the camera until you edit it again.
Tap the sliders and sweep side to side to adjust their values. Tap the counter clockwise arrow to revert to the original Manual
White Balance.
47
Page 48
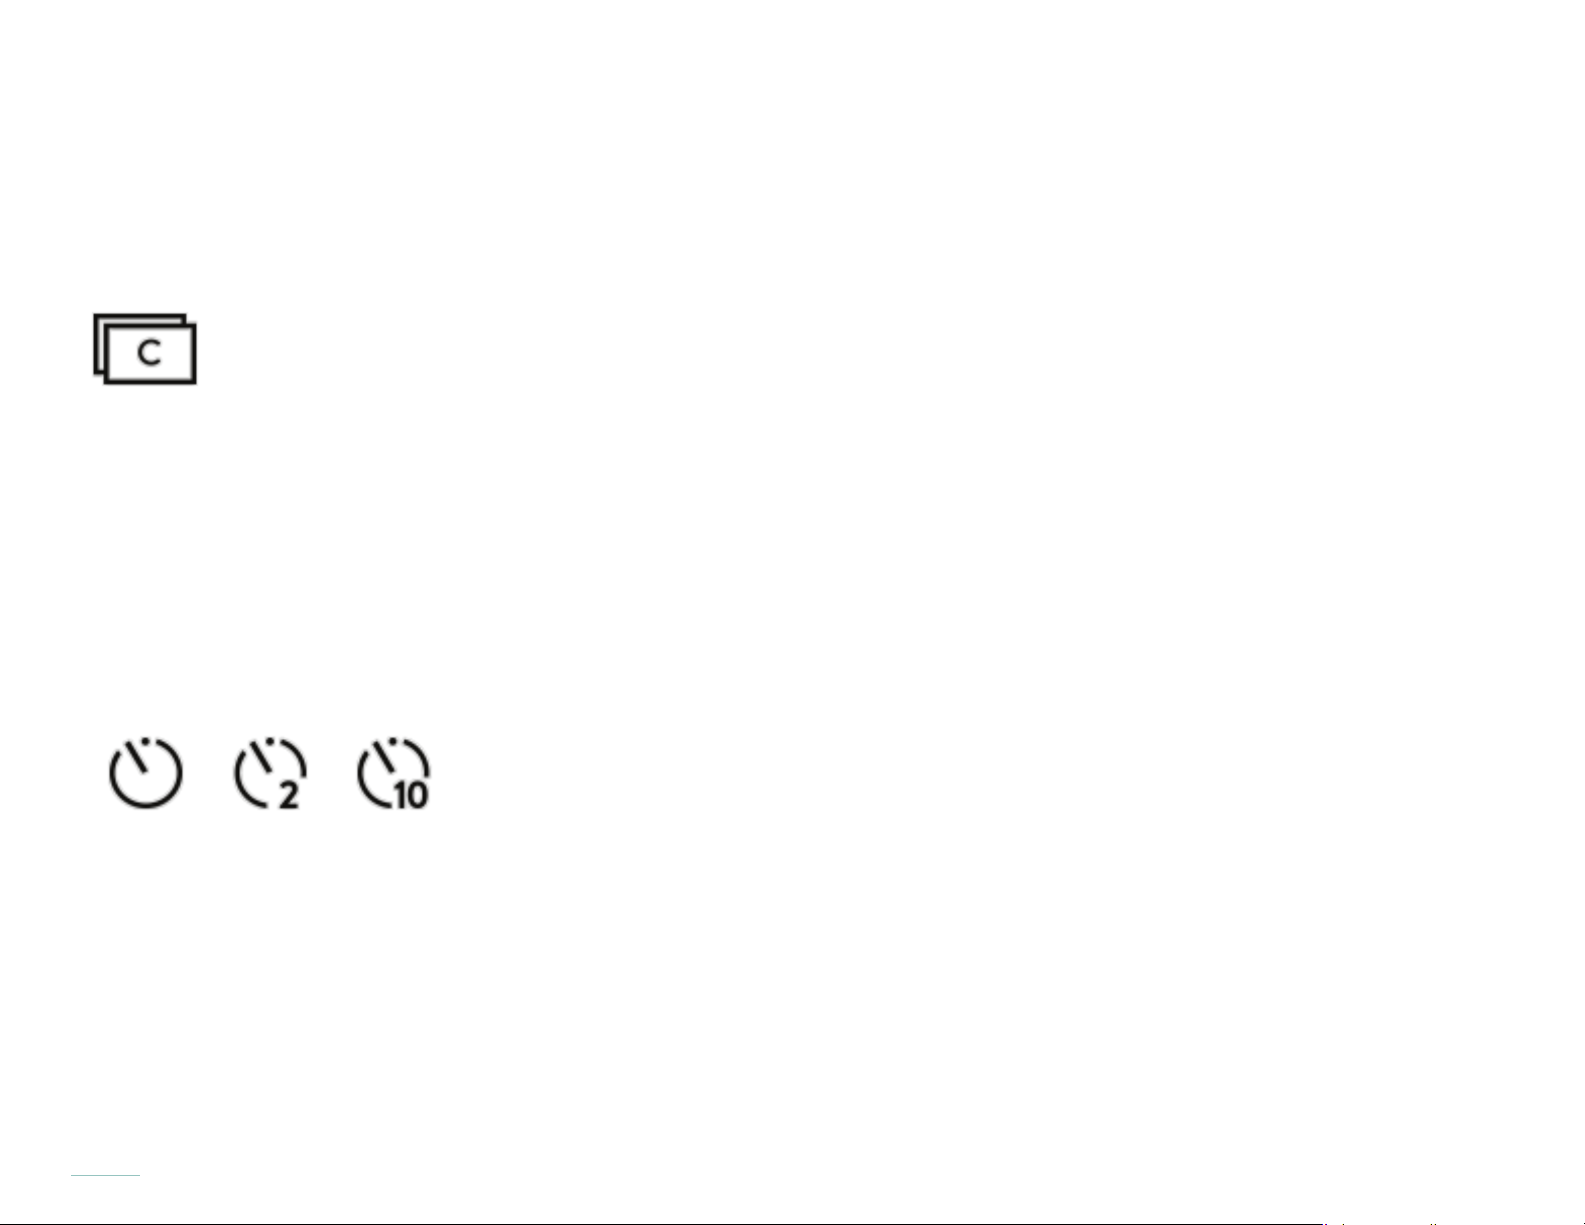
Shooting with continuous shutter
When continuous shutter is active, the camera will trigger the shutter as rapidly as possible for as long as the shutter button is
held down — or until the shot buffer is full. To activate continuous shutter mode, tap the Continuous Shutter icon in the Menu
bar and the icon will illuminate. To return to single shutter mode, tap the icon again.
Using the self timer
To activate the self-timer and set the countdown duration, tap and briey hold the Self-Timer icon. The icon will illuminate and a
submenu will open to the left, with options for 2 and 10 seconds. Tap on the desired selection, the submenu will close, and the
new selection will now be displayed as the Self-Timer icon. The self-timer indicator will also replace the shutter mode indicator in
the Information Bar. If no selection is made after a few seconds, the submenu will close.
To turn off the self-timer, tap the icon again. The camera will remember the selected countdown the next time the self-timer is
activated.
Applying a grid overlay
To select a grid overlay and apply it to the live view, tap and briey hold the Grid Overlay icon. A submenu will open to the left,
displaying available options. Swipe up on the submenu view additional options. Tap any option to select an overlay style. The
submenu will close, and the new selection will now be displayed as the Grid Overlay icon. If no selection is made, after a few
seconds the submenu will close. To turn off the grid overlay, tap the icon again. The camera will remember your selected settings
the next time the overlay is activated.
48
Page 49
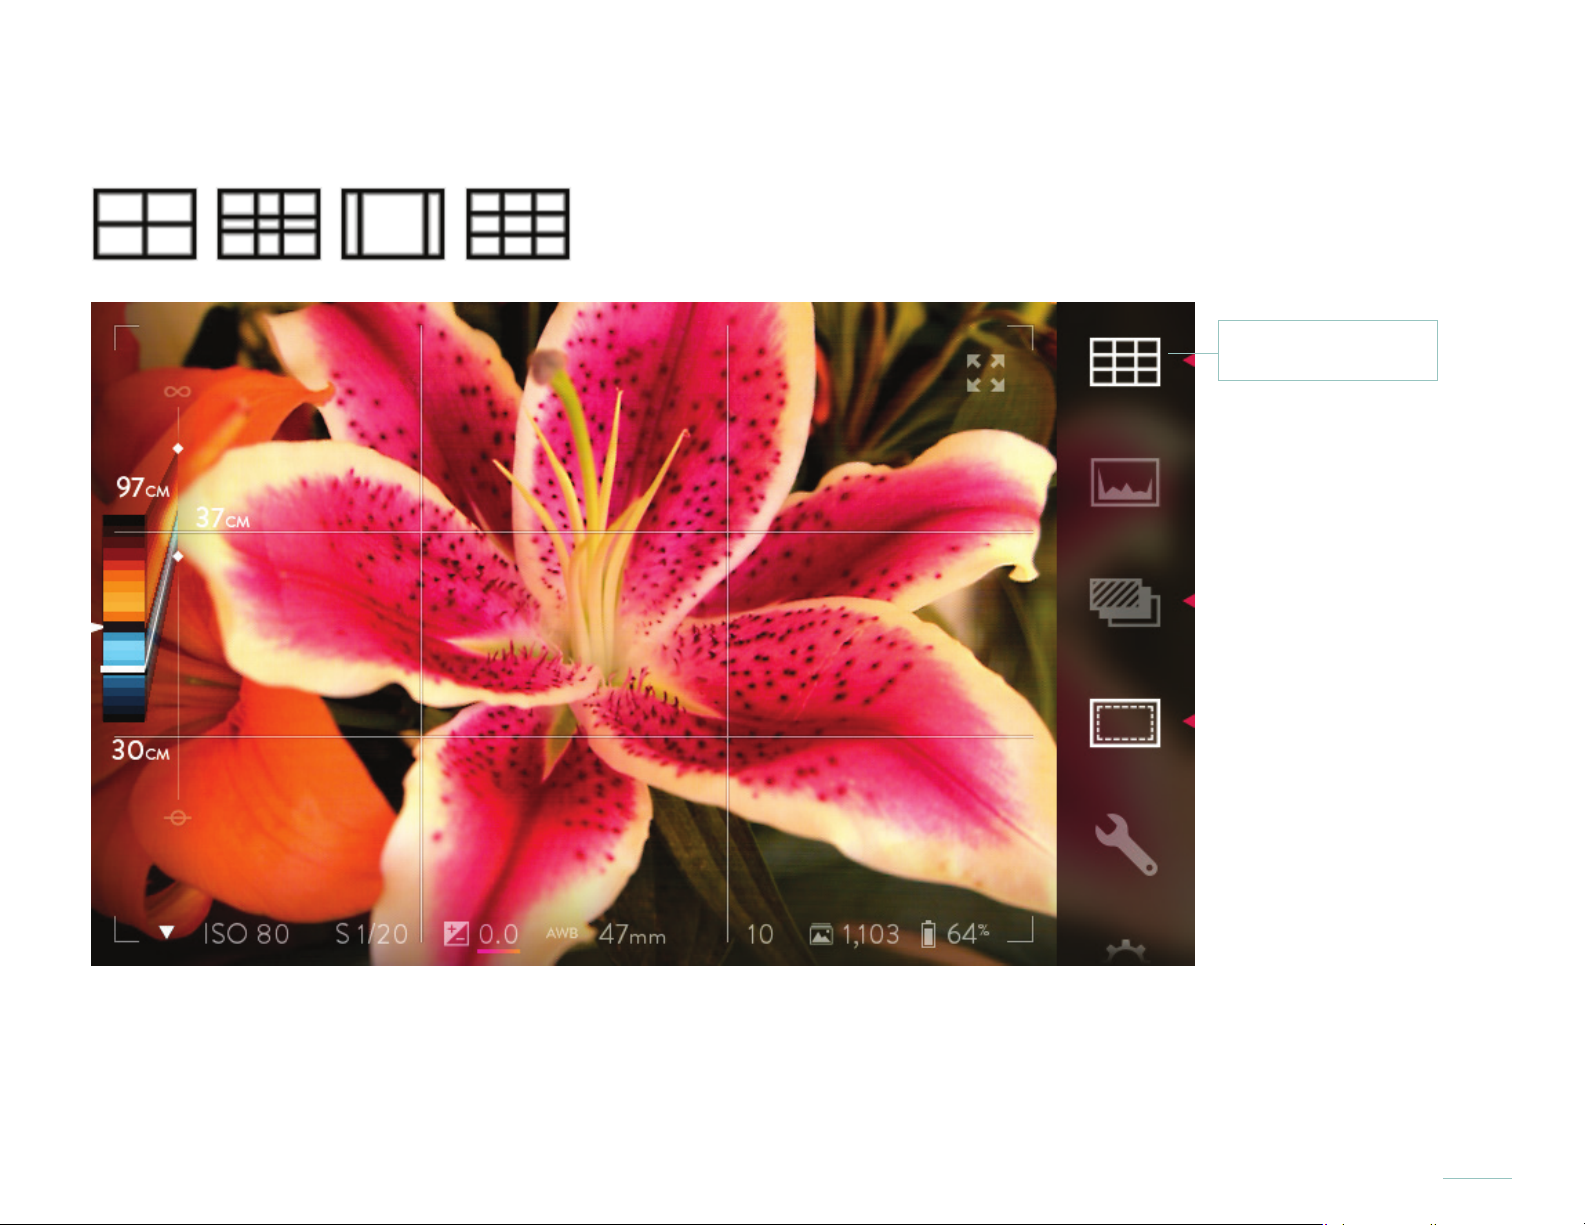
Applying a grid overlay
Grid Overlay icon
Activate the rule-of-thirds grid view.
49
Page 50
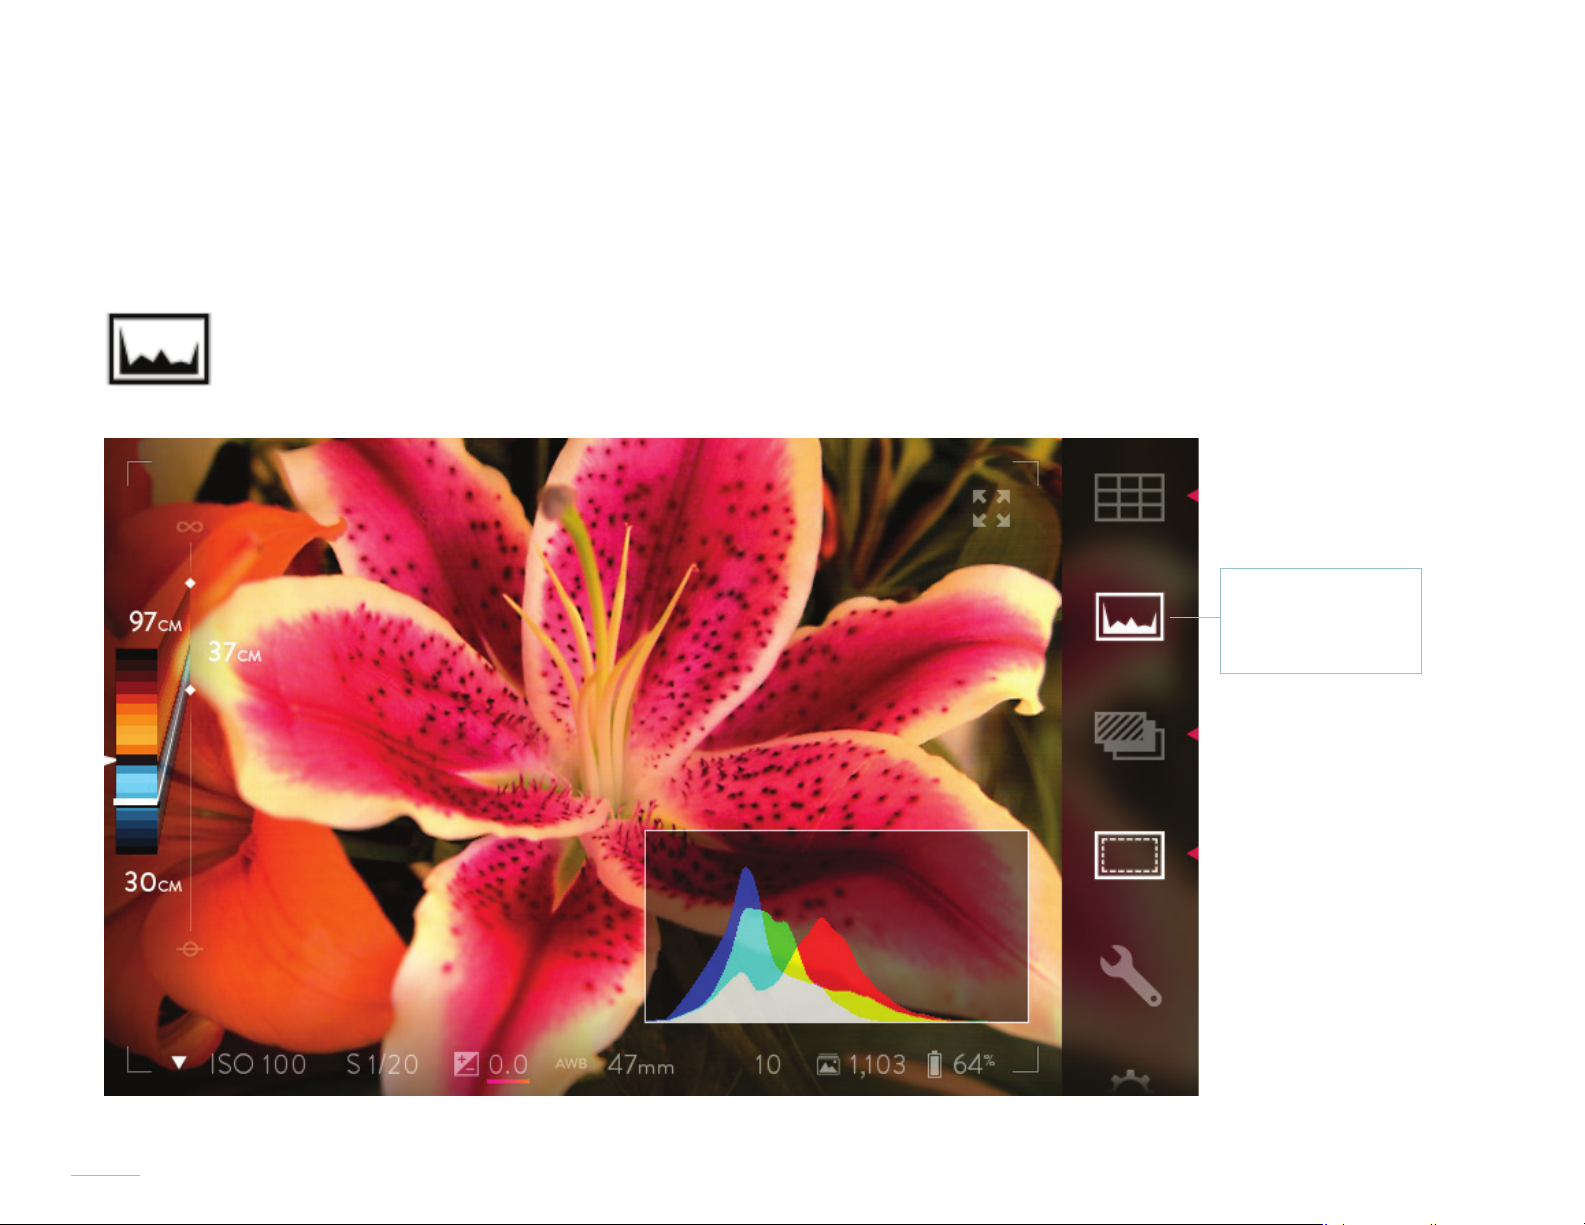
Using the live exposure histogram
To view an exposure histogram for the live view, tap the Exposure Histogram icon in the Menu Bar at the right-hand edge of the screen.
The icon will illuminate, and the histogram will be displayed in the lower left-hand corner of the screen. To close the histogram, tap the
icon again.
Live Exposure
Histogram icon
Activate the live exposure histogram to evaluate a potential shot.
50
Page 51

Adjusting the optical offset
See Optical offset in Depth composition features.
Adjusting the Settings Menu
Open the Settings menu by tapping the Settings icon in the Menu Bar. The menu will replace the live view. For details on each of
the available Settings, see the Settings section. To close the menu and return to Capture Mode and the live view, tap on the word
CAPTURE at the top left of the screen, or press the shutter button halfway.
51
Page 52
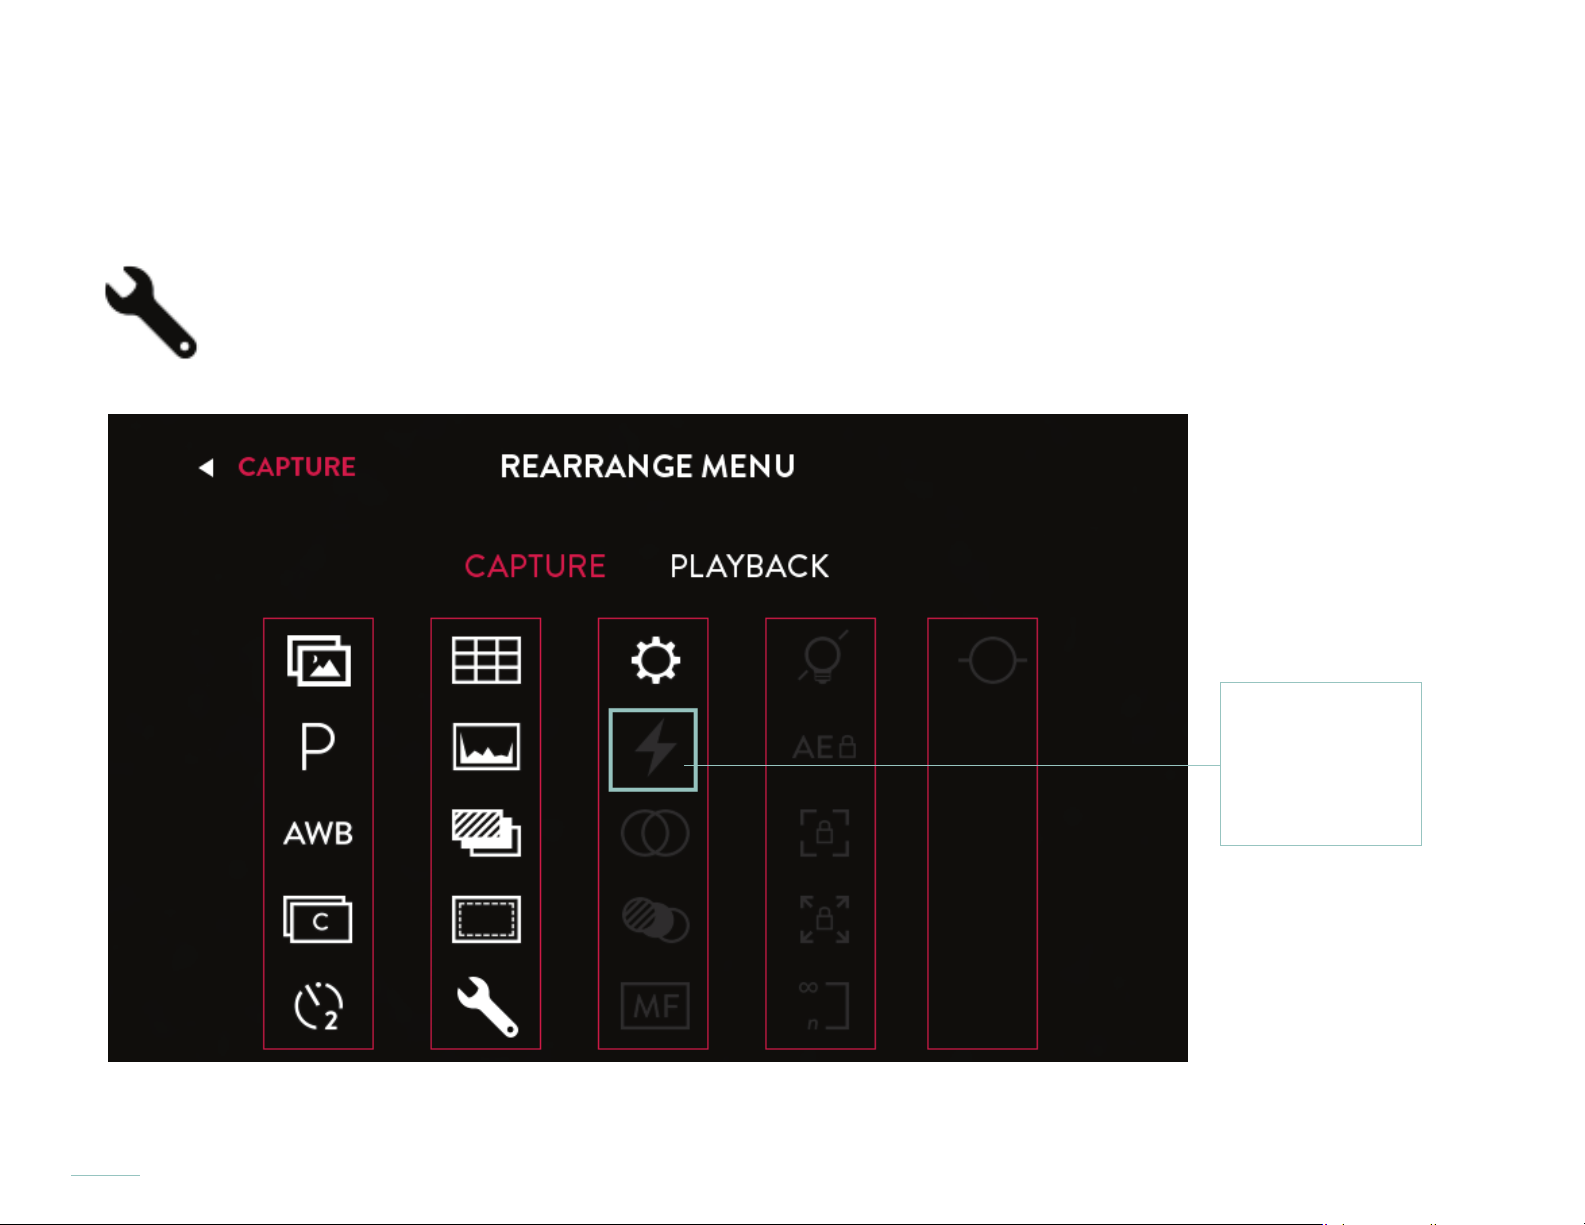
Opening the Rearrange Menu
Open the Rearrange menu by tapping the wrench icon in the Menu Bar. The menu will allow you to select ILLUM features which will
appear in the Menu bar.
Touch items to
add or remove
them from the
Menu Bar
The default Menu Bar features are shown in the illustration above. Features which currently show on the Menu Bar are indicated
in white. Touch grayed out items to add them to the Menu Bar. Touch white items to remove them from the Menu Bar.
52
Page 53

Rearrange Menu features
Use the Rearrange Menu to add the following non-default camera features to the Capture and Playback Menu Bar:
• Flash
• Optical Offset
• Focus Bracketing
• Lights Out
• Auto Exposure Lock
• Focus Lock
• Zoom Lock
• Hyperfocal Mode
• Level Gauge
Using Lights-Out
When manual focus is engaged, the screen is turned off while the camera is fully functional. To exit lights-out, tap and hold the
touch screen.
Using Manual Focus
When manual focus is selected, autofocus is automatically disabled. Set the focus by rotating the focus ring. Manual focus is selected by tapping the Manual Focus icon, which can be added to the Menu Bar (see Rearrange Menu).
53
Page 54

Applying Focus Bracketing
When focus bracketing is active, each time the shutter button is pressed, the camera will take a series of pictures, varying the focus for
each. (For a more detailed explanation, see Focus bracketing) To activate focus bracketing and set the parameters, tap and hold the
Focus Bracketing icon, which can be added to the Menu Bar (see Rearrange Menu).
54
Page 55
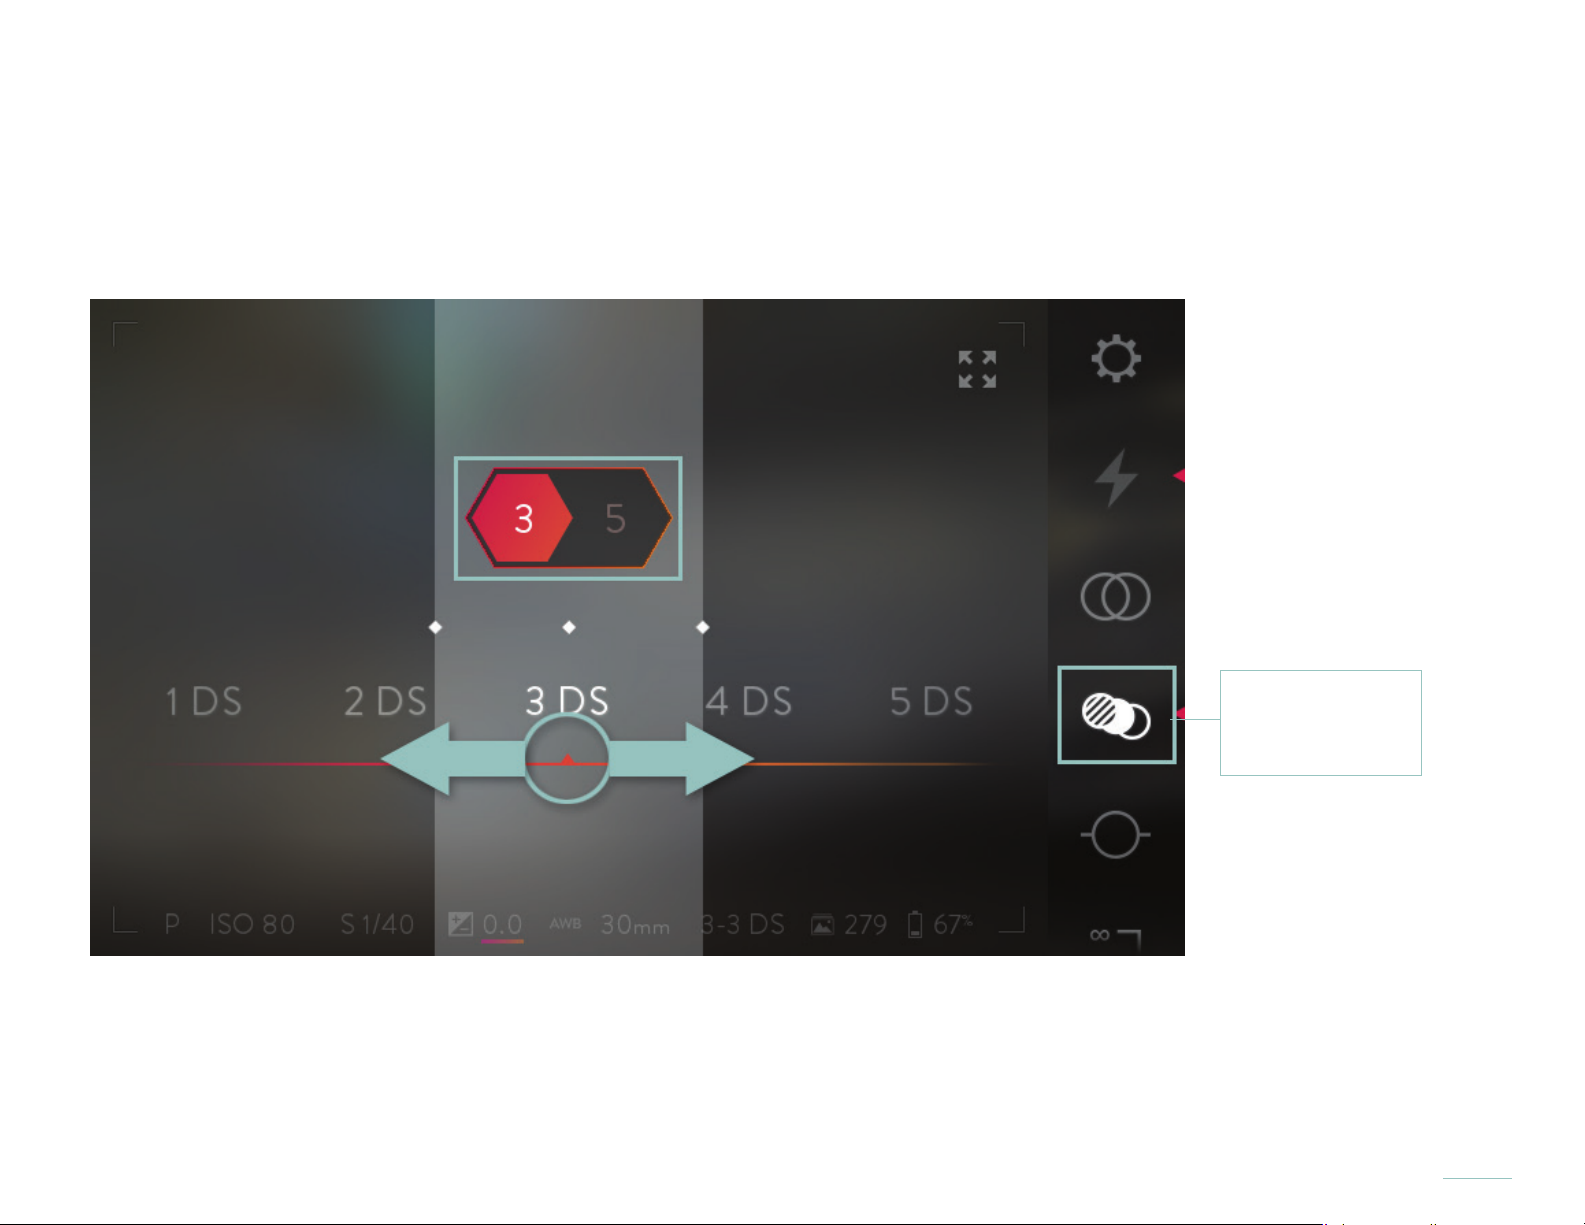
Applying Focus Bracketing
Two selection bands will open across the middle of the screen, with the current settings at the center. The upper band shows the
number of pictures that will be taken, 3 or 5. The lower band shows the increment that will be applied, from 1 to 10, in ‘Depth
Steps’. Swipe the bands to change the settings. Double-tap a selection band to return to the initial setting.
Focus
Bracketing icon
Once selections have been made, tap the screen anywhere outside of the selection bands to close them. A half press of the shutter
button will also close the selection bands. A full press will close them and take a series of pictures using the new settings.
To turn off focus bracketing, tap the icon again. The camera will remember your selected settings the next time focus bracketing is
activated.
55
Page 56

Applying Exposure Bracketing
When exposure bracketing is active, the camera will take pictures at a range of exposure compensation values each time the shutter
button is pressed. To activate exposure bracketing and set the parameters, tap and hold the exposure bracketing icon, which can then
be added to the Menu Bar (see Rearrange Menu).
56
Page 57
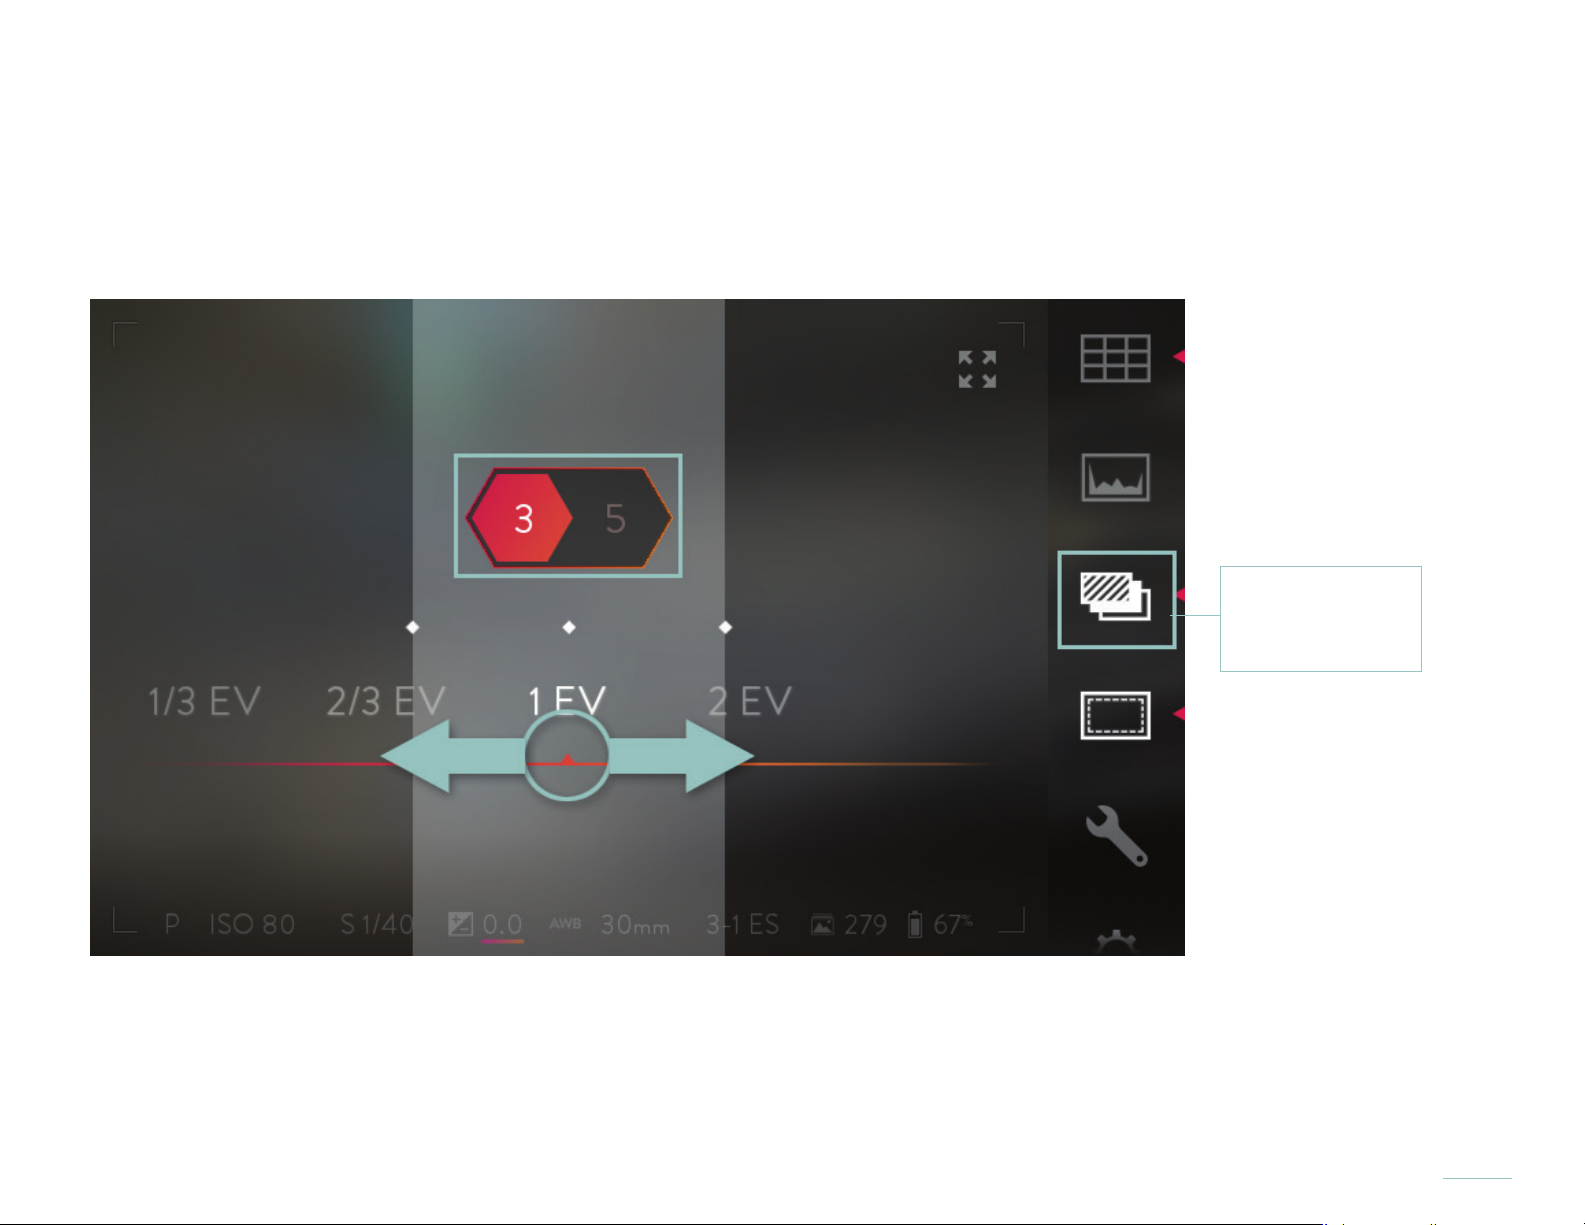
Applying Exposure Bracketing
Two selection bands will open across the middle of the screen, with the current settings at the center. The upper band shows the
number of pictures that will be taken, 3 or 5. The lower band shows the exposure value increment that will be applied, 1/3 EV, 2/3 EV,
1EV, or 2 EV. Swipe the bands to change the settings. Double-tap on a selection band returns it to the initial setting.
Exposure
Bracketing icon
Once selections are made, tap the screen anywhere outside of the selection bands to close them. A half press of the shutter button
will also close the selection bands. A full press will close them and take a series of pictures using the new settings.
To turn off exposure bracketing, tap the icon again. The camera will remember your selected settings the next time exposure brack-
eting is activated.
57
Page 58

Using Focus Lock
When focus lock is selected, input from the focus ring is disabled.
Using Zoom Lock
When zoom lock is selected, input from the zoom ring is disabled.
Using Hyperfocal mode
Touch the Hyperfocal icon to refocus and adjust Optical Offset. This feature replicates the Hyperfocal button functionality. See Optical
Offset for more information.
58
Page 59
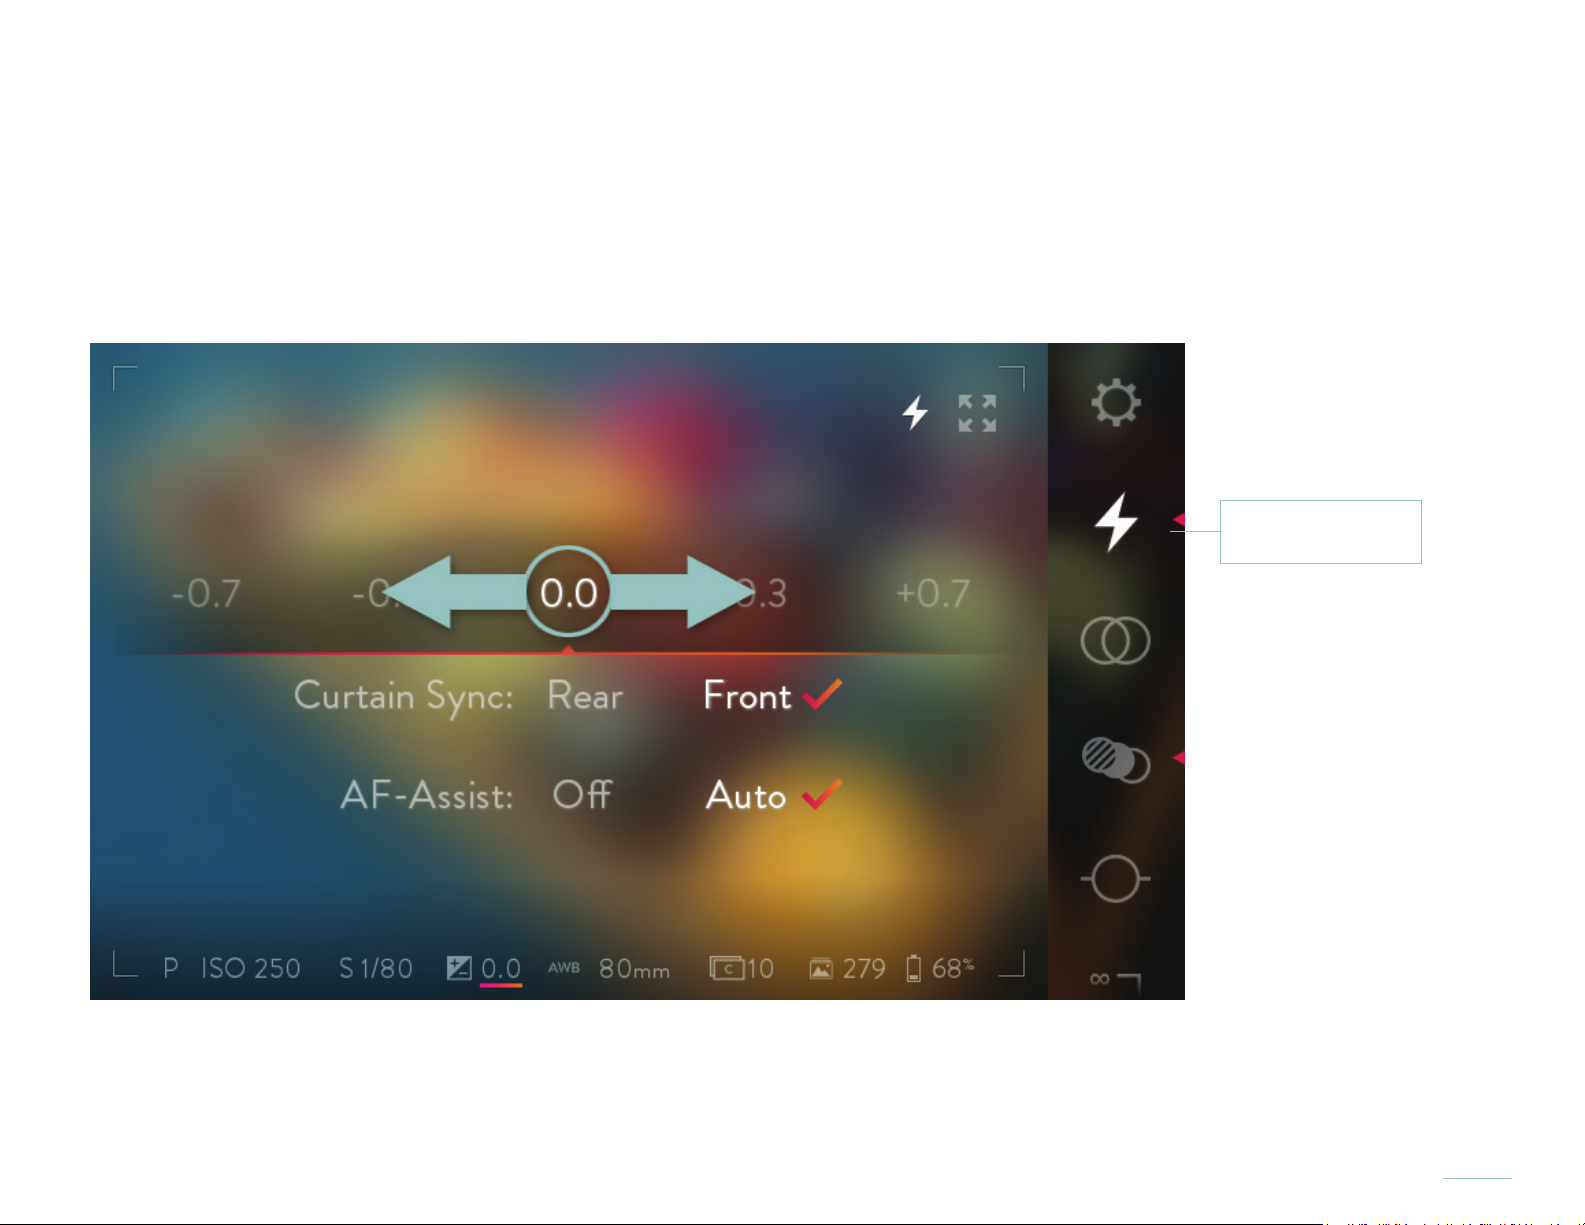
Using a ash
The ILLUM provides full support for the Viltrox JY680L TTL Flash. In the ILLUM Menu, the ash interface controls allow you to select
exposure compensation, choose front or rear curtain sync and enable auto focus assist.
A standard ash can be mounted to the camera’s hot shoe, allowing basic ash synchronization. The ash will be triggered each
time the shutter opens. The sync speed (the fastest shutter speed at which you can use a ash) is 1/250.
Flash settings
With the Viltrox JY680L TTL ash mounted to the ILLUM hot shoe and powered on, touch the Flash icon
to open the ash control interface. Swipe left or right to adjust TTL compensation values. Tap again to
close the control interface.
59
Page 60
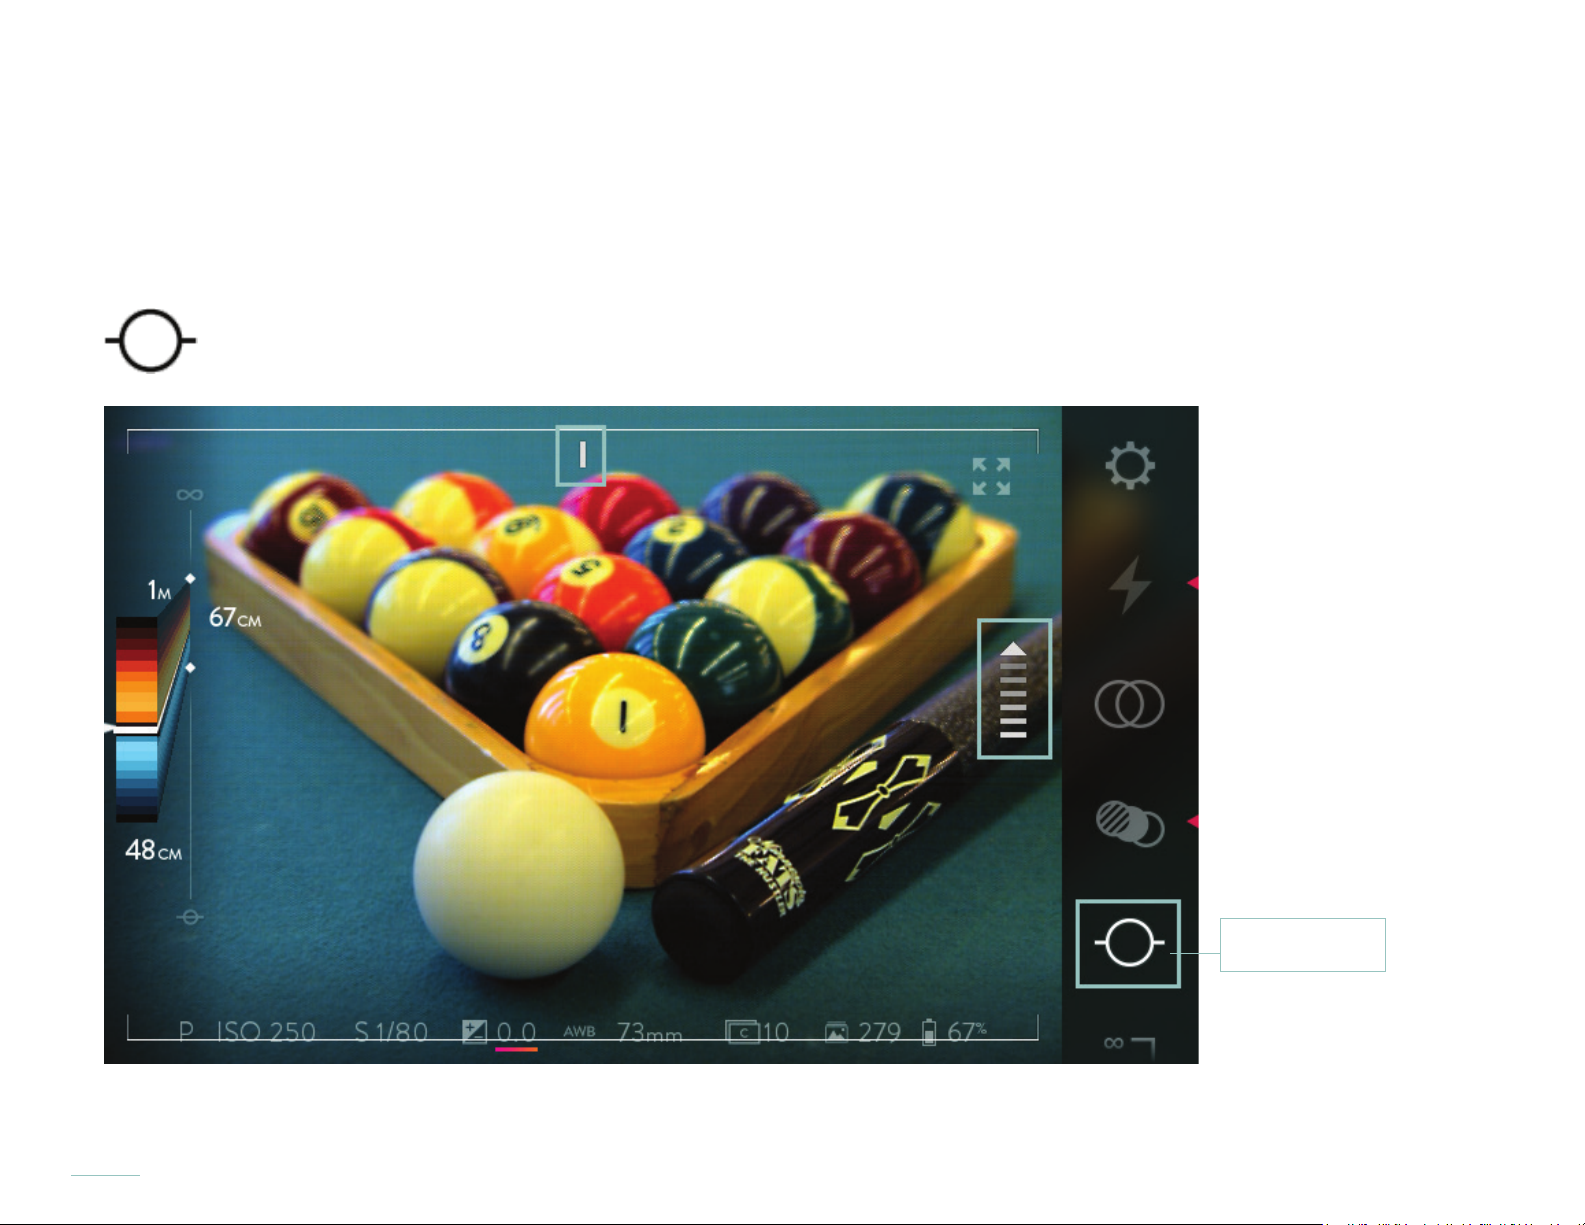
Using the Level Gauge
When the Level Gauge icon is touched, vertical axis and horizontal axis level gauges are shown in the preview. The gauges use a grad-
uated scale to indicate which direction to rotate the camera, side to side or front to back. When the camera is level on either axis the
graduated scale transforms into a solid white bar.
Tap the Level Gauge icon to enable
60
Level Gauge
Page 61
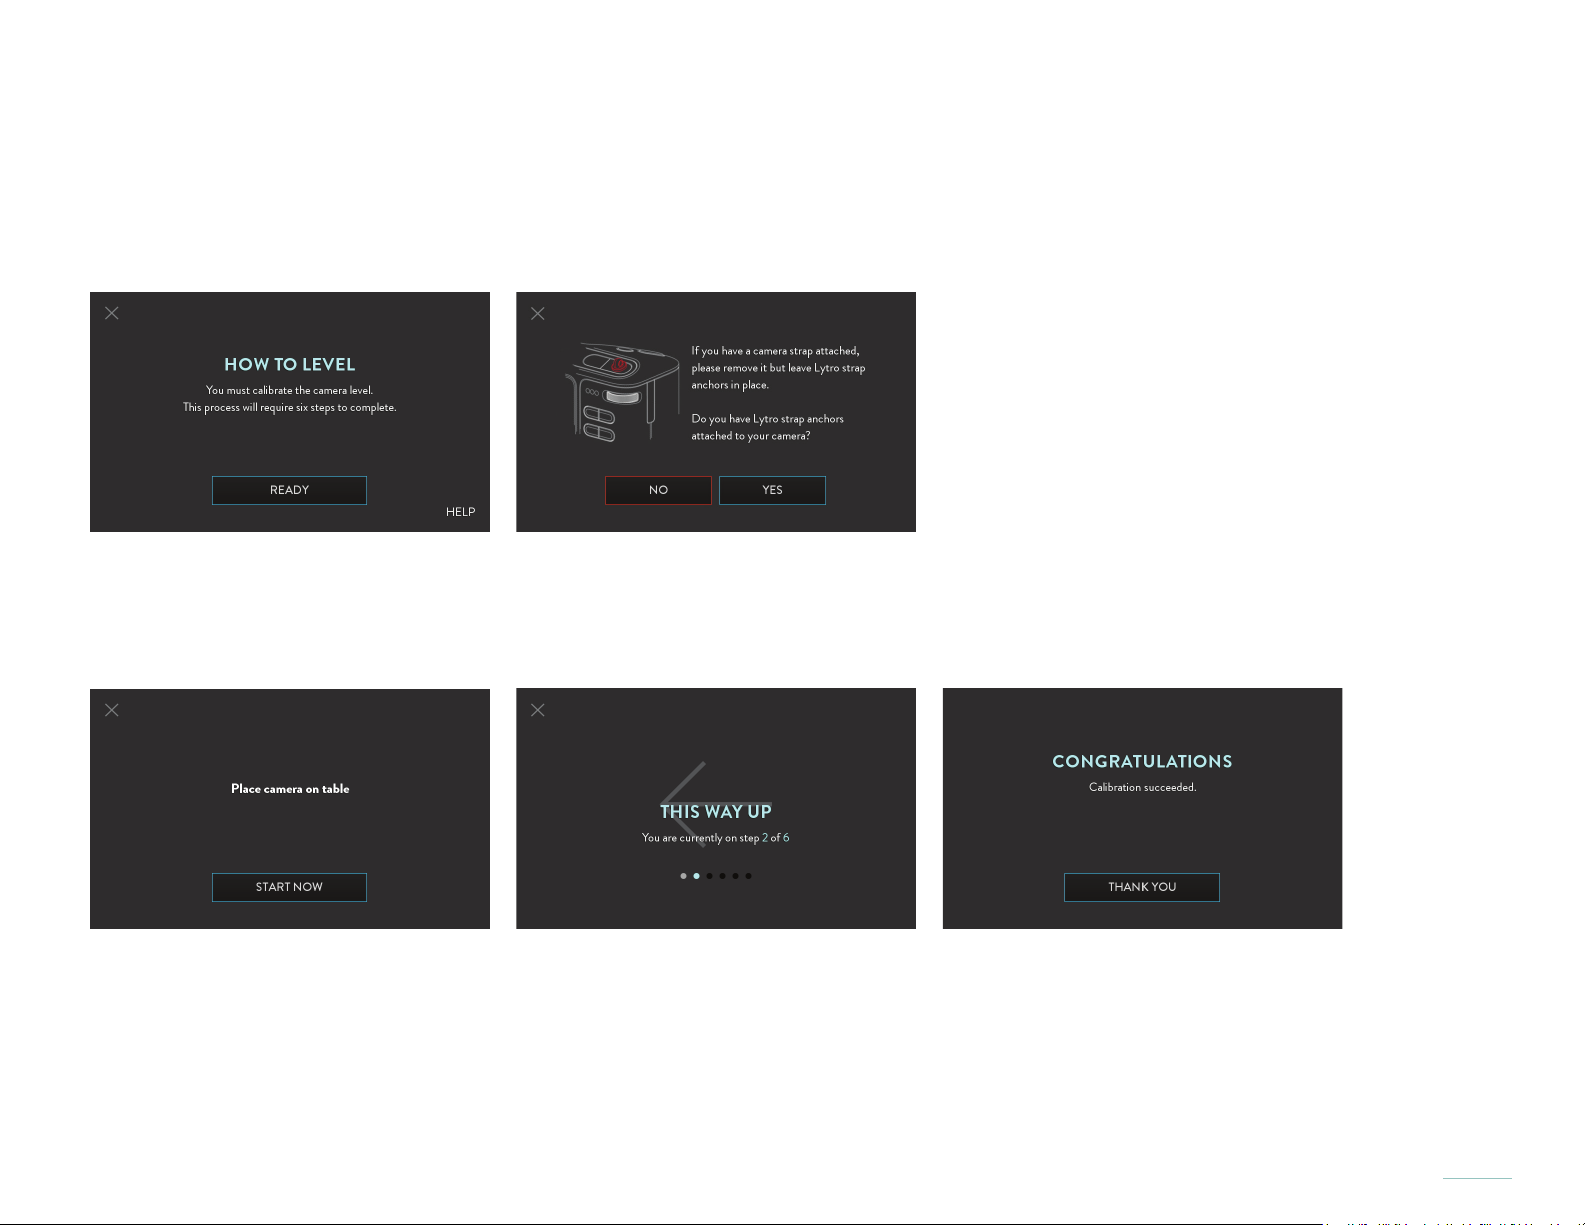
Calibrating the Level Gauge
The rst time you tap the Level icon calibrate the ILLUM’s level feature, your ILLUM may need to be calibrated. Follow the 6
simple on-screen steps to properly calibrate your ILLUM. You can also follow the steps below if you ever need to recalibrate the
level in the camera.
Follow the on-screen guide to calibrate the ILLUM level. You must remove the ILLUM lens hood and Lytro straps before calibrating. If you have attached the Lytro strap anchors to the ILLUM, you will need to remove them to continue. Click yes on
screen to initiate the 6 step calibration process.
Place the ILLUM on a at, level surface like a table. Touch the Start Now button on the screen. As prompted, rotate the ILLUM
in the direction indicated by the arrow and place the ILLUM on that same at table surface. You will be instructed to rotate and
replace the ILLUM in the new orientation six times to complete the process. If you rotate the camera the wrong direction or
skip a step when instructed, the calibration process will not complete.
61
Page 62

Playback Mode
To enter Playback Mode from Capture Mode, tap the Playback Mode icon at the top of the Menu Bar, press the Fn button, or swipe the screen from left to right. The last Living Picture taken will be displayed, a new set of icons will appear in
the Menu Bar at the right edge of the screen, and the contents of the Information Bar will also change. To view an older
picture, simply swipe the screen from left to right. To go back to the rst picture displayed, swipe from right to left.
To return to Capture Mode, tap the Capture Mode icon at the top of the Menu Bar, press the Fn button, or swipe the
screen from right to left when the most recent picture is displayed. Press shutter button halfway to return to Capture
Mode.
62
Page 63
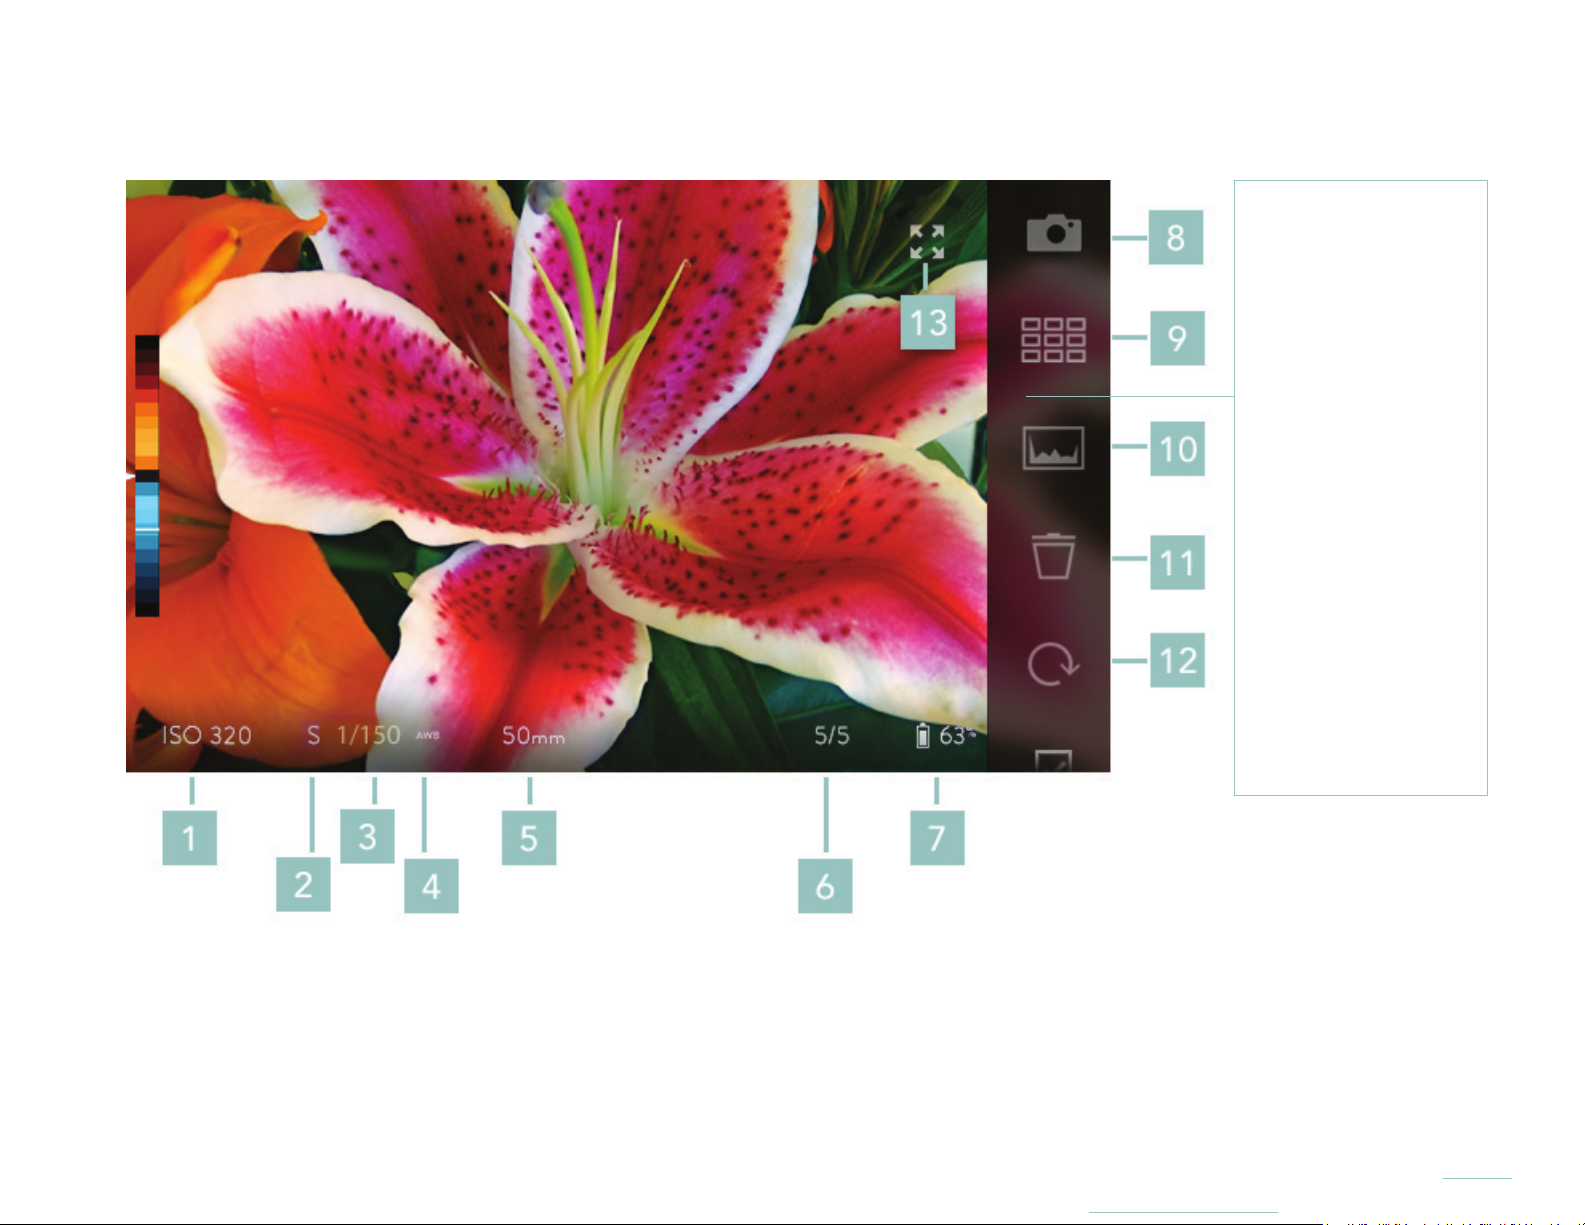
Touchscreen layout in Playback Mode
Playback Mode
Layout
1. ISO
2. Shutter mode
3. Shutter speed
4. White balance
5. Focal length
(35mm eq.)
6. Picture number /
total pictures
7. Battery charge
8. Capture Mode
9. Grid view
10. Exposure
histogram
11. Delete
12. Rotate image
13. Full screen
preview
63
Page 64

Information Bar
• ISO review — shows the ISO at which the currently displayed picture was taken
• Shutter speed review — shows the shutter speed at which the currently displayed picture was taken
• White balance review — shows the white balance setting at which the currently displayed picture was taken
• Focal length review — displays the focal length (35mm equivalent) at which the currently displayed picture was taken
• Picture number / total pictures indicator — shows the number of the picture currently displayed and the total number of
pictures on the SD card
• Wi-Fi (iOS Connect) indicator — visible only when the camera is enabled as an access point in Settings, iOS Connect
• Battery charge indicator — displays the battery’s remaining charge
Menu Bar
• Capture Mode icon — tap to return the camera to Capture Mode
• Grid View icon — tap to display a thumbnail grid of the pictures stored on the SD card
• Exposure Histogram icon — when tapped/illuminated, an exposure histogram for the picture currently displayed is shown
• Delete icon — tap to delete the picture currently displayed
• Settings icon — tap to open the Settings menu (this will close Playback Mode)
Depth Assist Bar
• Depth value indicator – displays the depth value for the for the focus of picture currently being displayed
64
Page 65
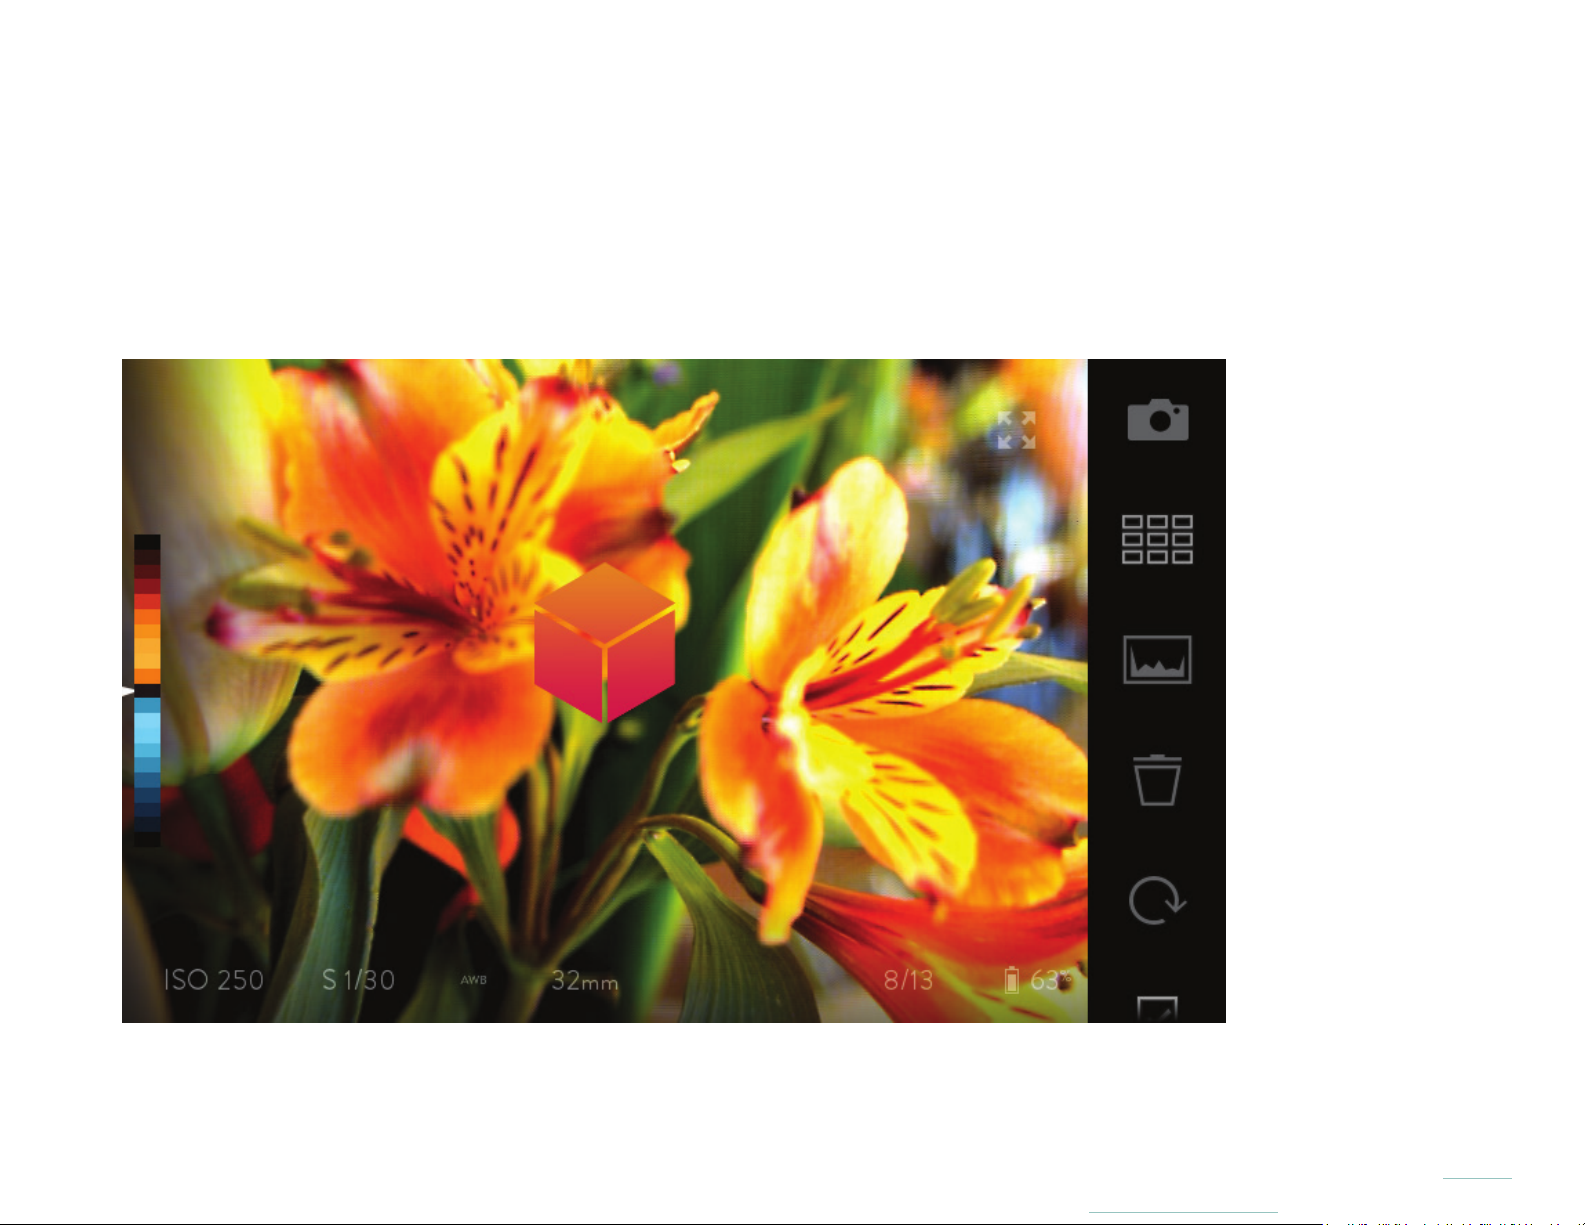
Processing a Living Picture for refocusing
A Living Picture can be refocused by simply tapping the screen, but the camera has to process the picture rst.
The rst time a picture is viewed, it will automatically be processed for refocusing.
A small animated progress icon will appear over the center of the picture during processing. When the progress
icon disappears — usually in just a second or two — the picture is ready to be refocused by tapping the screen.
Indicator of a Living Picture being processed
65
Page 66
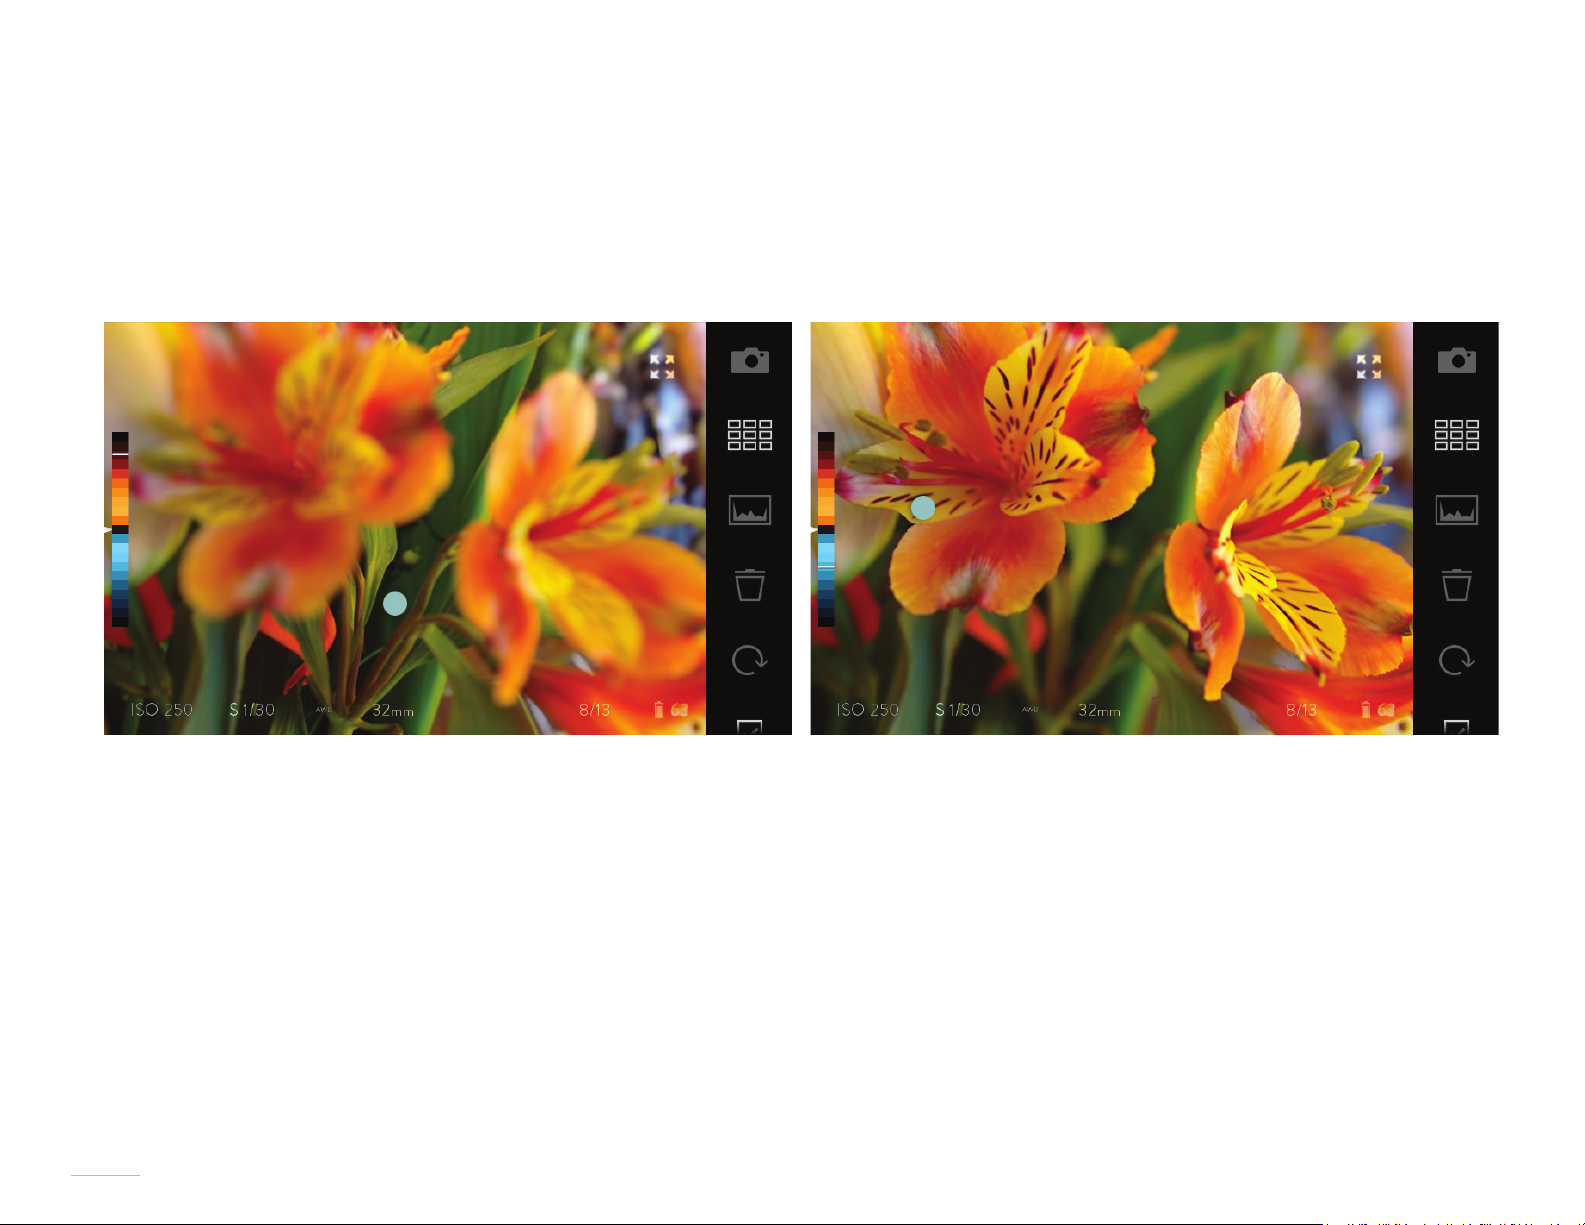
Refocusing a Living Picture
Once a picture has been processed, refocus it by just tapping the screen. The camera will re-center the focus as closely as possible to
the spot tapped. Depending on the composition of the picture, some areas may fall outside the refocusable range — essentially the
maximum range in which the picture can be refocused sharply.
Refocus a Living Picture by tapping the touchscreen.
As the focus of the picture changes, the depth value for that focus is displayed in the Depth Assist Bar as a white line.
66
Page 67
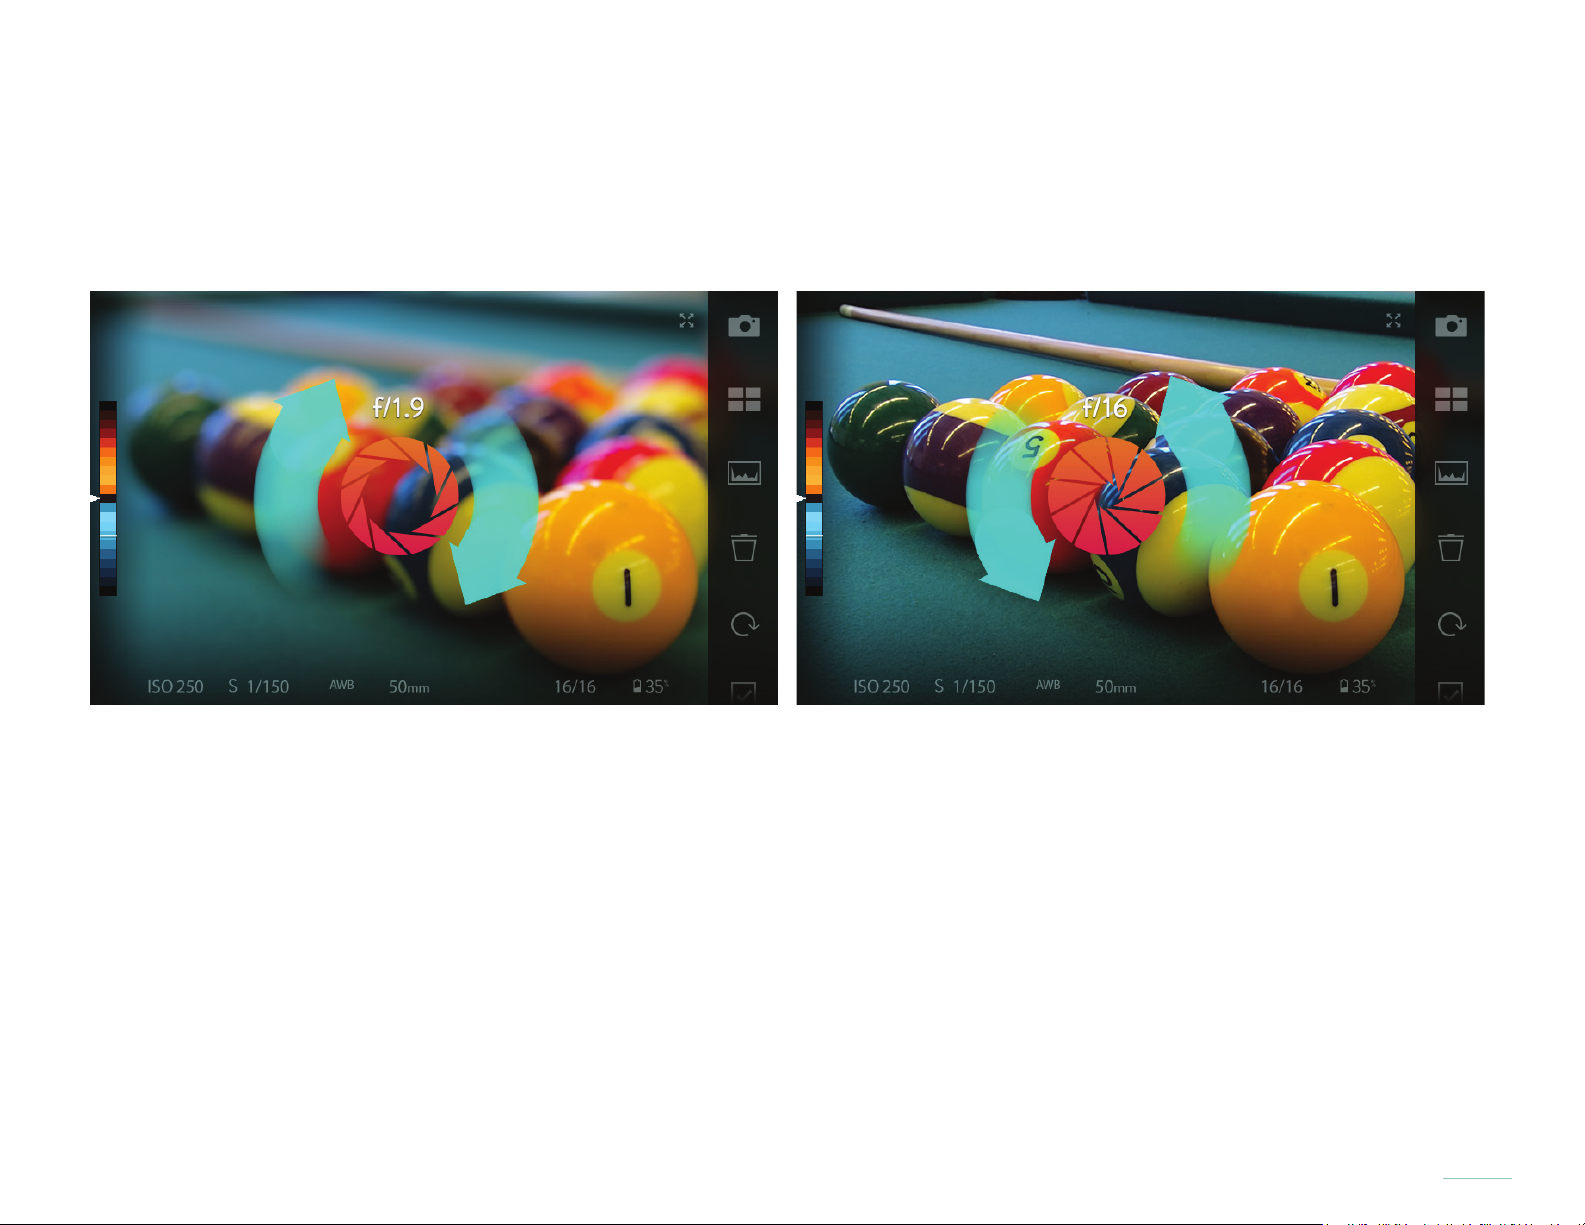
Virtual Aperture in a Living Picture
You can interactively change the Virtual Aperture in Living Pictures. With two ngers touching the screen, twist clockwise or counterclockwise to tighten or open the virtual aperture. The range is from f/1 to f/16.
Use two nger gestures to change the Virtual Aperture
ILLUM 2.0 processes your Light Field captures into Living Pictures that support Lytro’s interactive Virtual Aperture. A clockwise two-nger gesture on the camera’s Playback Screen opens the aperture to a maximum of f1; the opposite counter clockwise gesture tightens
the Virtual Aperture to f16.
67
Page 68
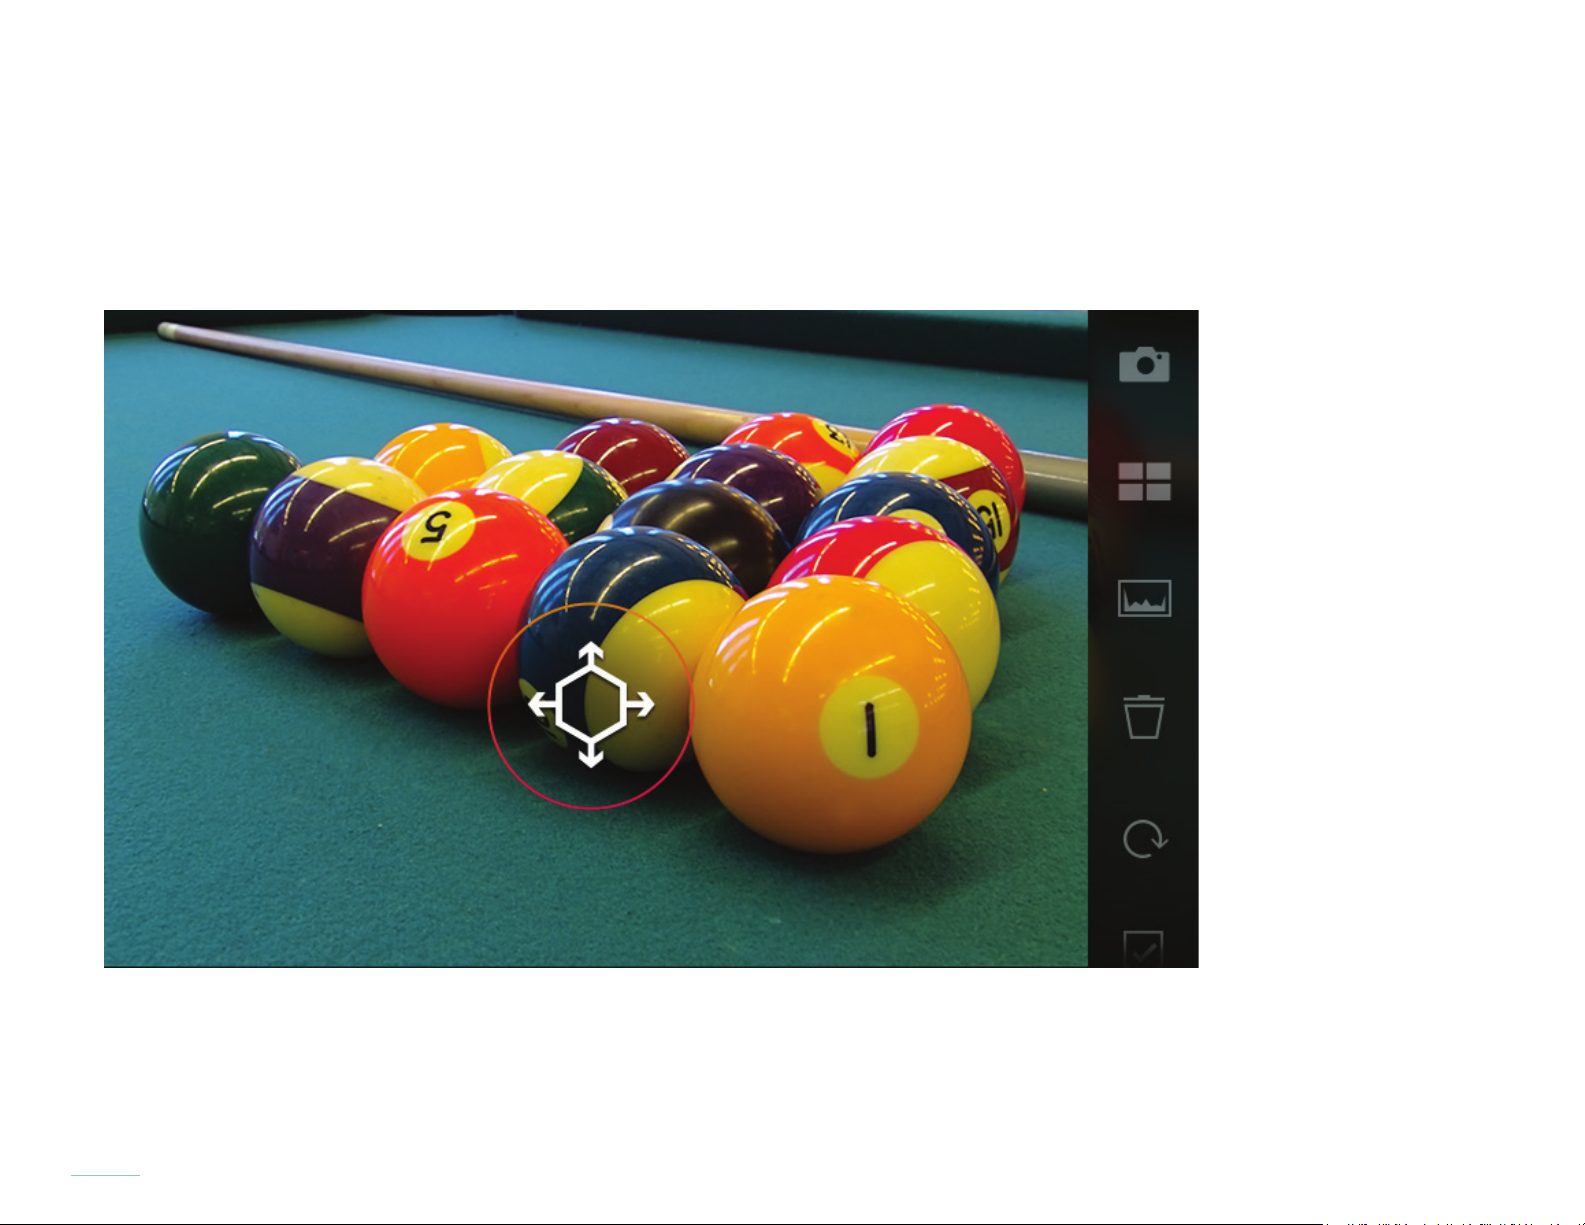
Interactive Perspective Shift in a Living Picture
Living Pictures permit you to shift and preview the perspective in your image. Touch the screen, pause a moment and wait for the
four way arrow to appear, then with your nger still pressing the screen, move the cursor in the image preview to shift perspective
interactively.
Living Pictures in ILLUM 2.0 support Perspective Shift in the Playback Screen. A single nger gesture can be used to select your
refocus area. Pause slightly while touching the screen to start the Perspective Shift mode. By dragging on the Living Picture, the
image’s perspective will interactively shift on screen.
68
Page 69
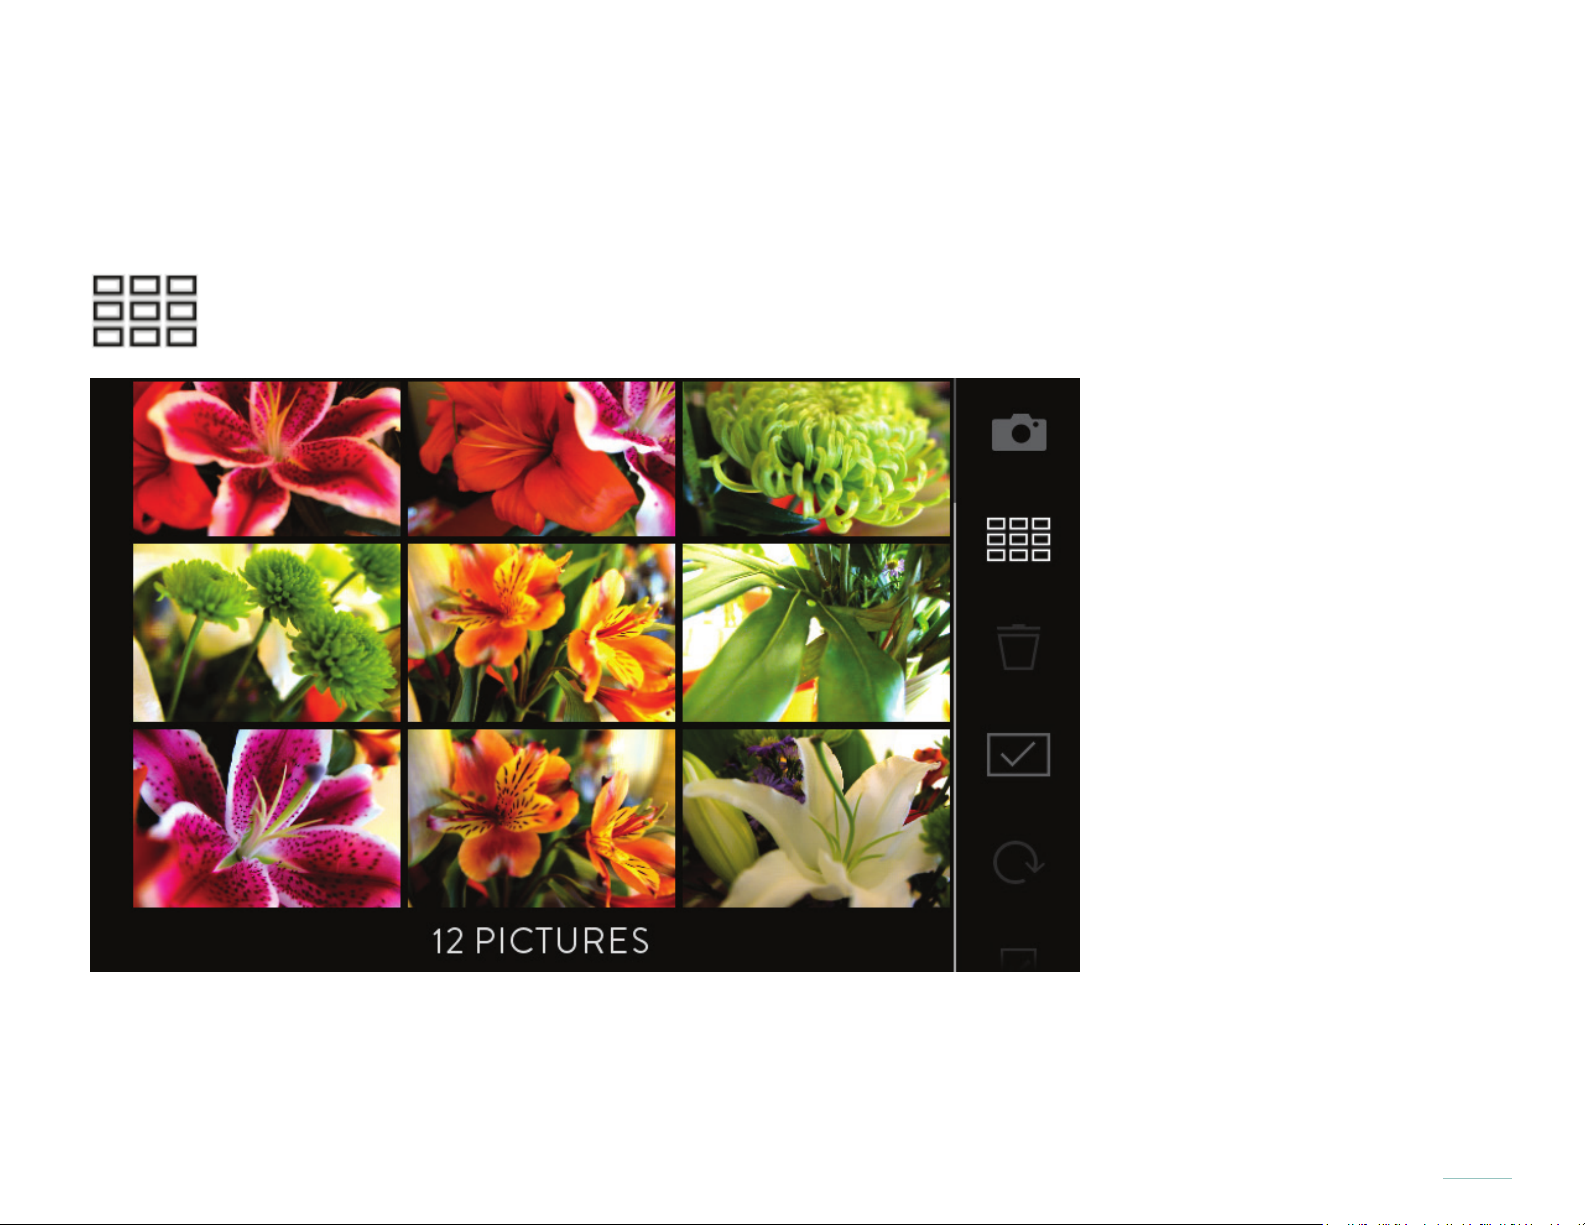
Using grid view
To sort through the Living Pictures on the SD card more quickly, select grid view. Tap the Grid View icon in the Menu Bar at the right-
hand edge of the screen. The icon will illuminate, and a thumbnail grid of 9 pictures will replace the single-picture view.
Tap the Grid View icon to display 9 pictures from the images on your SD card at a time.
Swipe the screen from top to bottom to view older pictures, or from bottom to top to view newer ones. At any time, swiping from
right to left will the return the camera to Capture Mode. Tap the thumbnail to select one or more pictures. If any of the thumbnails
are double-tapped, the picture will expand to ll the screen, closing Grid View.
69
Page 70

Using the review exposure histogram
To view an exposure histogram for each picture as it is displayed, tap the histogram icon in the Menu Bar. The icon will illuminate and
the histogram will appear in the lower left-hand corner of the screen. To close the histogram, tap the icon again.
Deleting a picture
To delete the picture currently displayed, tap the Delete icon in the Menu Bar at the right-hand edge of the screen. A window will open
with two options: OK or CANCEL. Tap OK to delete the picture.
Deleting one or more pictures in Grid View
To delete one or more pictures in grid view, rst tap on the thumbnails to select the pictures. Delete the pictures by tapping the Delete
icon in the Menu Bar at the right-hand edge of the screen. A window will open with two options: OK or CANCEL. Tap OK to delete the
picture.
70
Page 71

Opening the Settings menu
You can open the Settings menu by tapping the Settings icon in the Menu Bar. The Settings menu will display, closing Playback
Mode. For details on each of the available Settings, see the Settings section.
To close the Settings menu, tap CAPTURE at the top left of the screen, or press the shutter button halfway. The camera will always
return to Capture Mode when exiting Settings. To get back to Playback Mode, tap the Playback Mode icon in the Menu Bar again,
press the Fn button, or swipe the screen from left to right.
71
Page 72

Depth Composition Features
The refocusable range
The Living Pictures captured with the Lytro ILLUM can be refocused, just by tapping. This ability to refocus is remarkable, but
it does have limits — what we call the refocusable range — for every picture. The refocusable range comprises all the points
brought into relatively sharp focus after a picture is captured.
The refocusable range is made up of two component ranges: the near refocusable range, which is closer to the camera, and the
far refocusable range, which is further away. Each offers a spectrum of relative sharpness, depending on the depth to which the
image is refocused.
In the illustrations that follow, the brighter the shade of the blue or orange band, the sharper objects at that distance will appear
when refocused. The brightest band in each component range is its peak — where objects will appear sharpest when refocusing.
72
Page 73
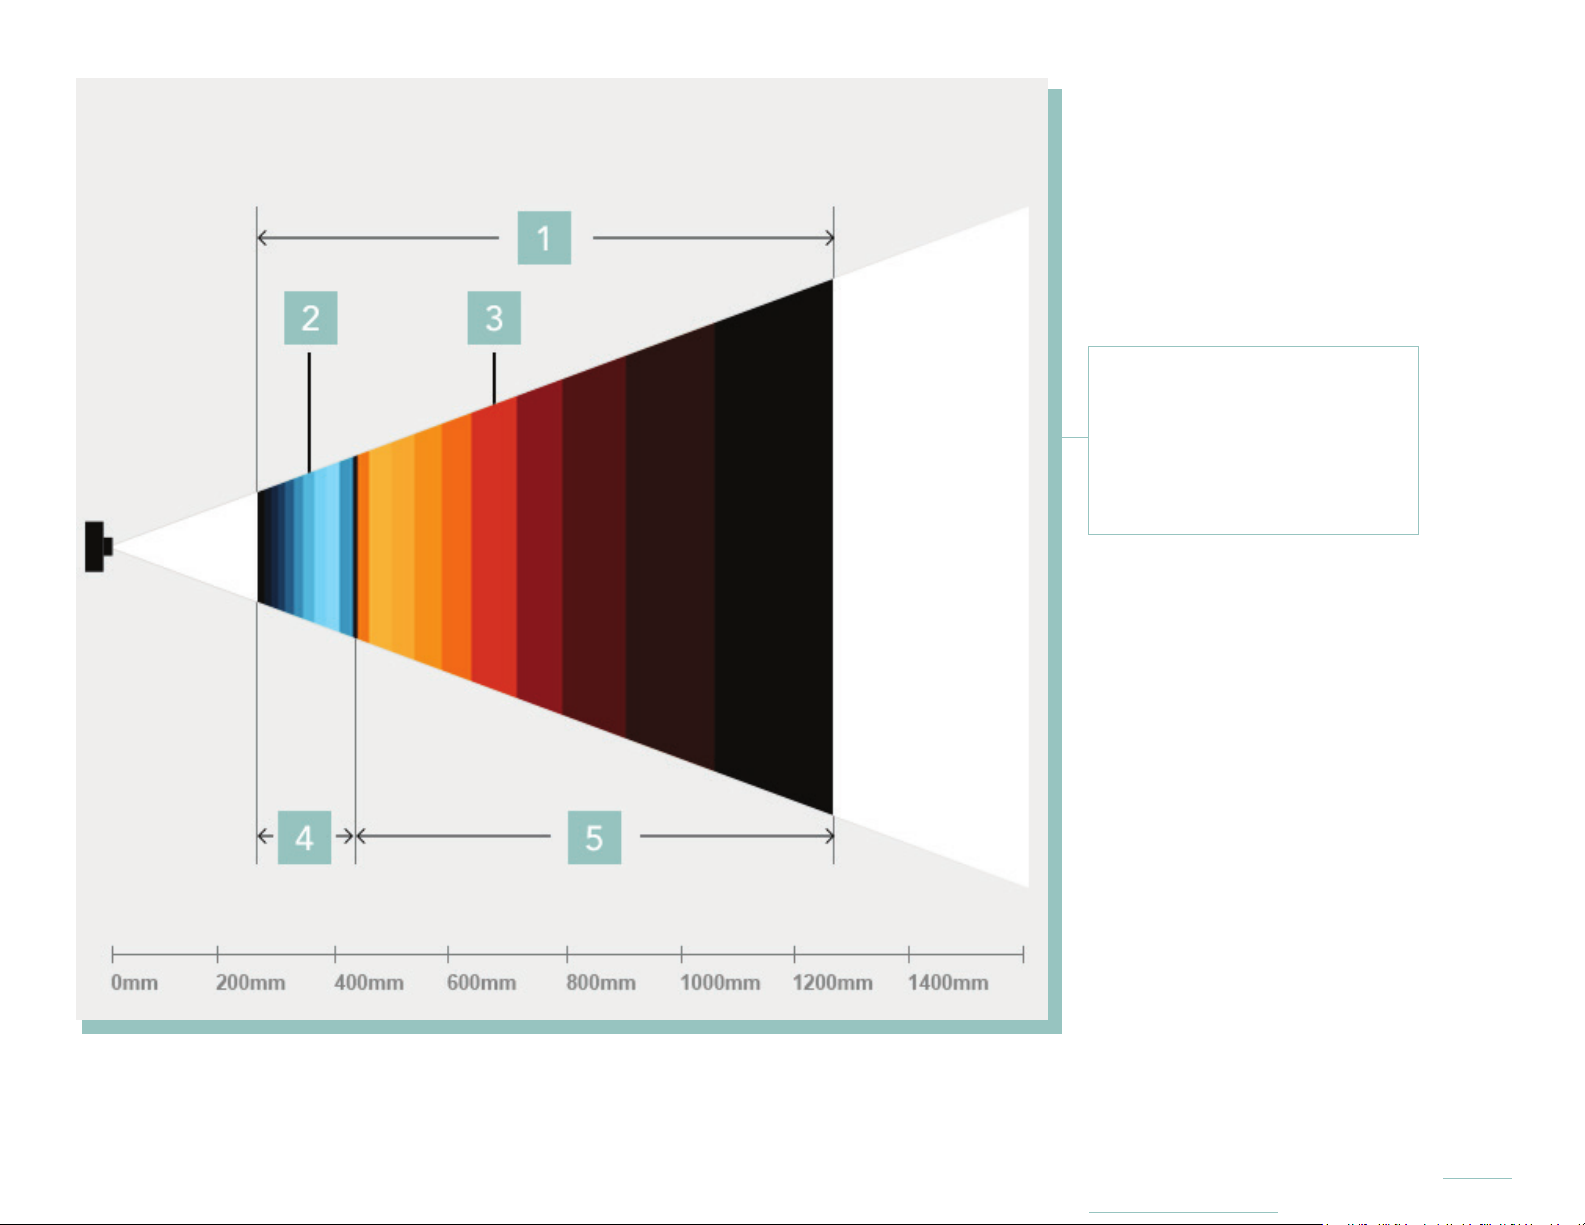
1. Refocusable range
2. Near peak
3. Far peak
4. Near refocusable range
5. Far refocusable range
The refocusable range with the lens zoomed to a 50mm focal length (35mm equivalent) and the
optical focus at approximately 42cm. Physical distances from the camera are shown in gray.
73
Page 74
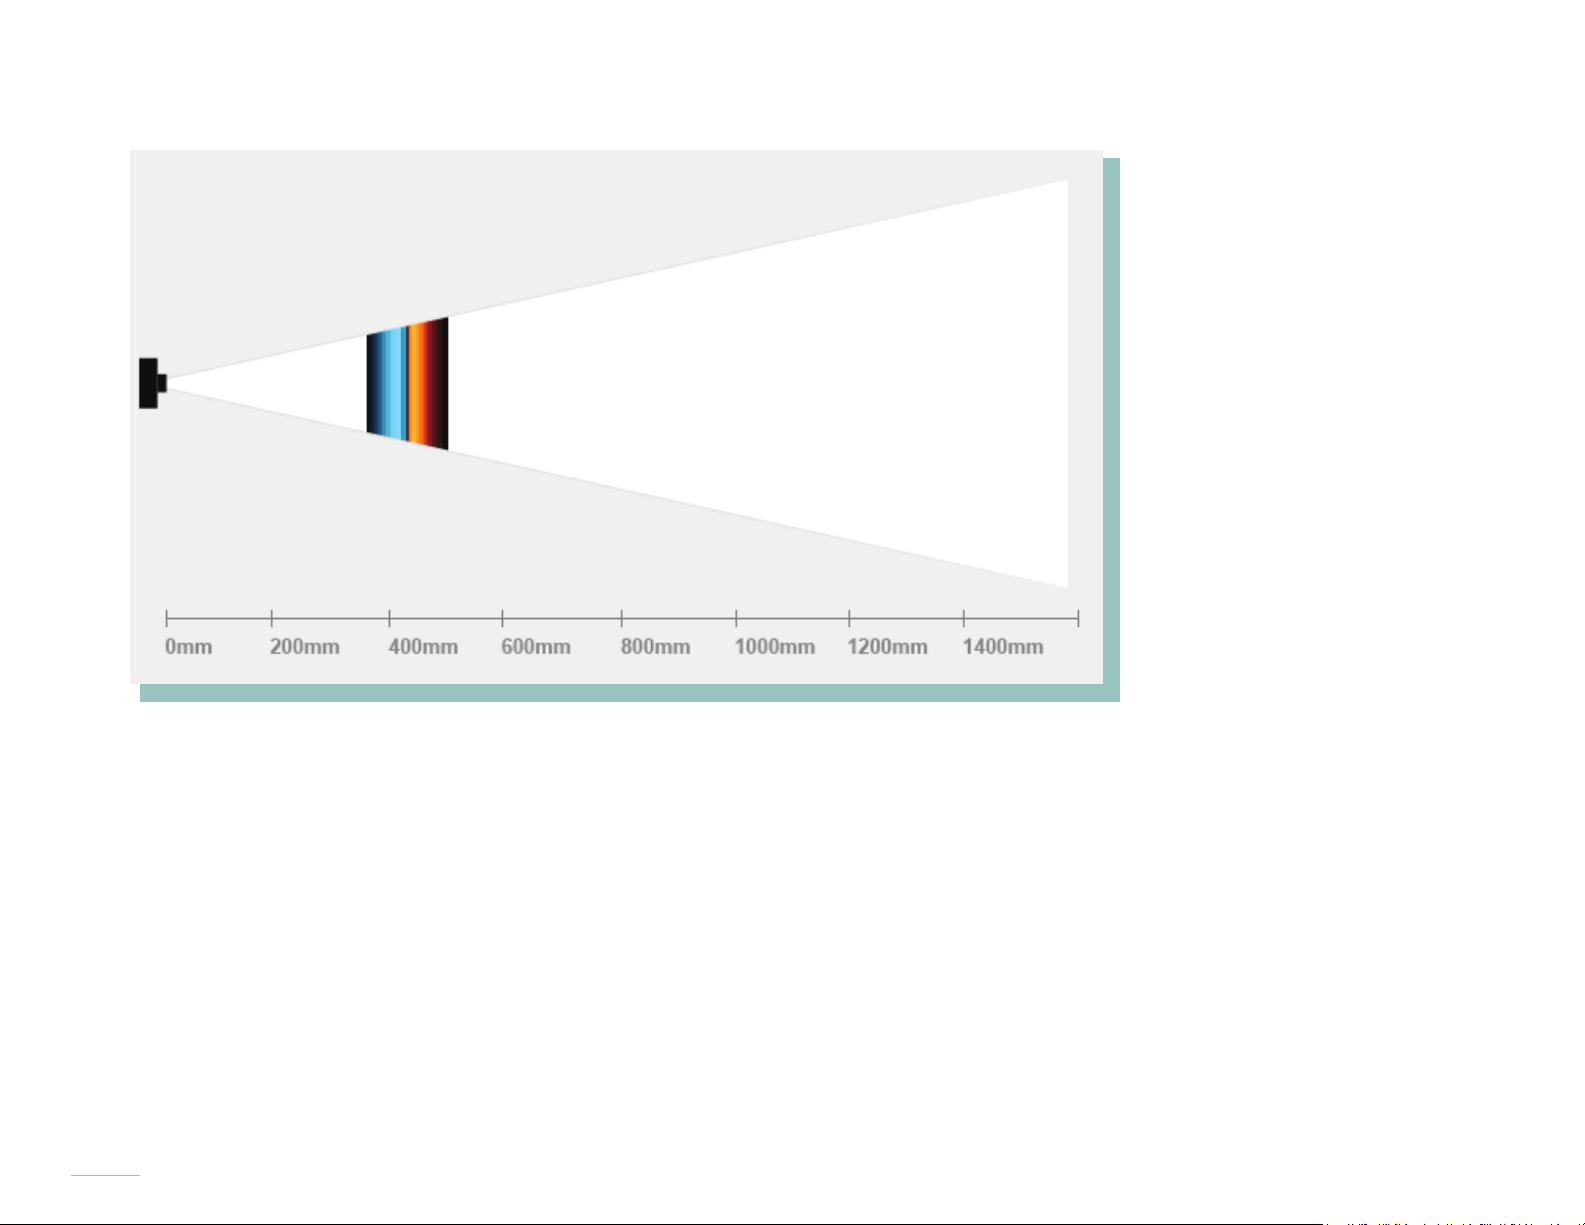
The refocusable range varies widely, depending on the zoom and focus positions of the camera when a picture is captured.
The refocusable range with the lens zoomed to a 100mm focal length (35mm equivalent) and
the optical focus at approximately 42cm. Note the relative size of the refocusable range.
Effective use of the refocusable range and the depth composition features on the Lytro ILLUM is the key to creating
extraordinary Living Pictures. To nd out how to best leverage these tools, visit training.Lytro.com for in depth education
and training.
74
Page 75
Depth Assist Bar
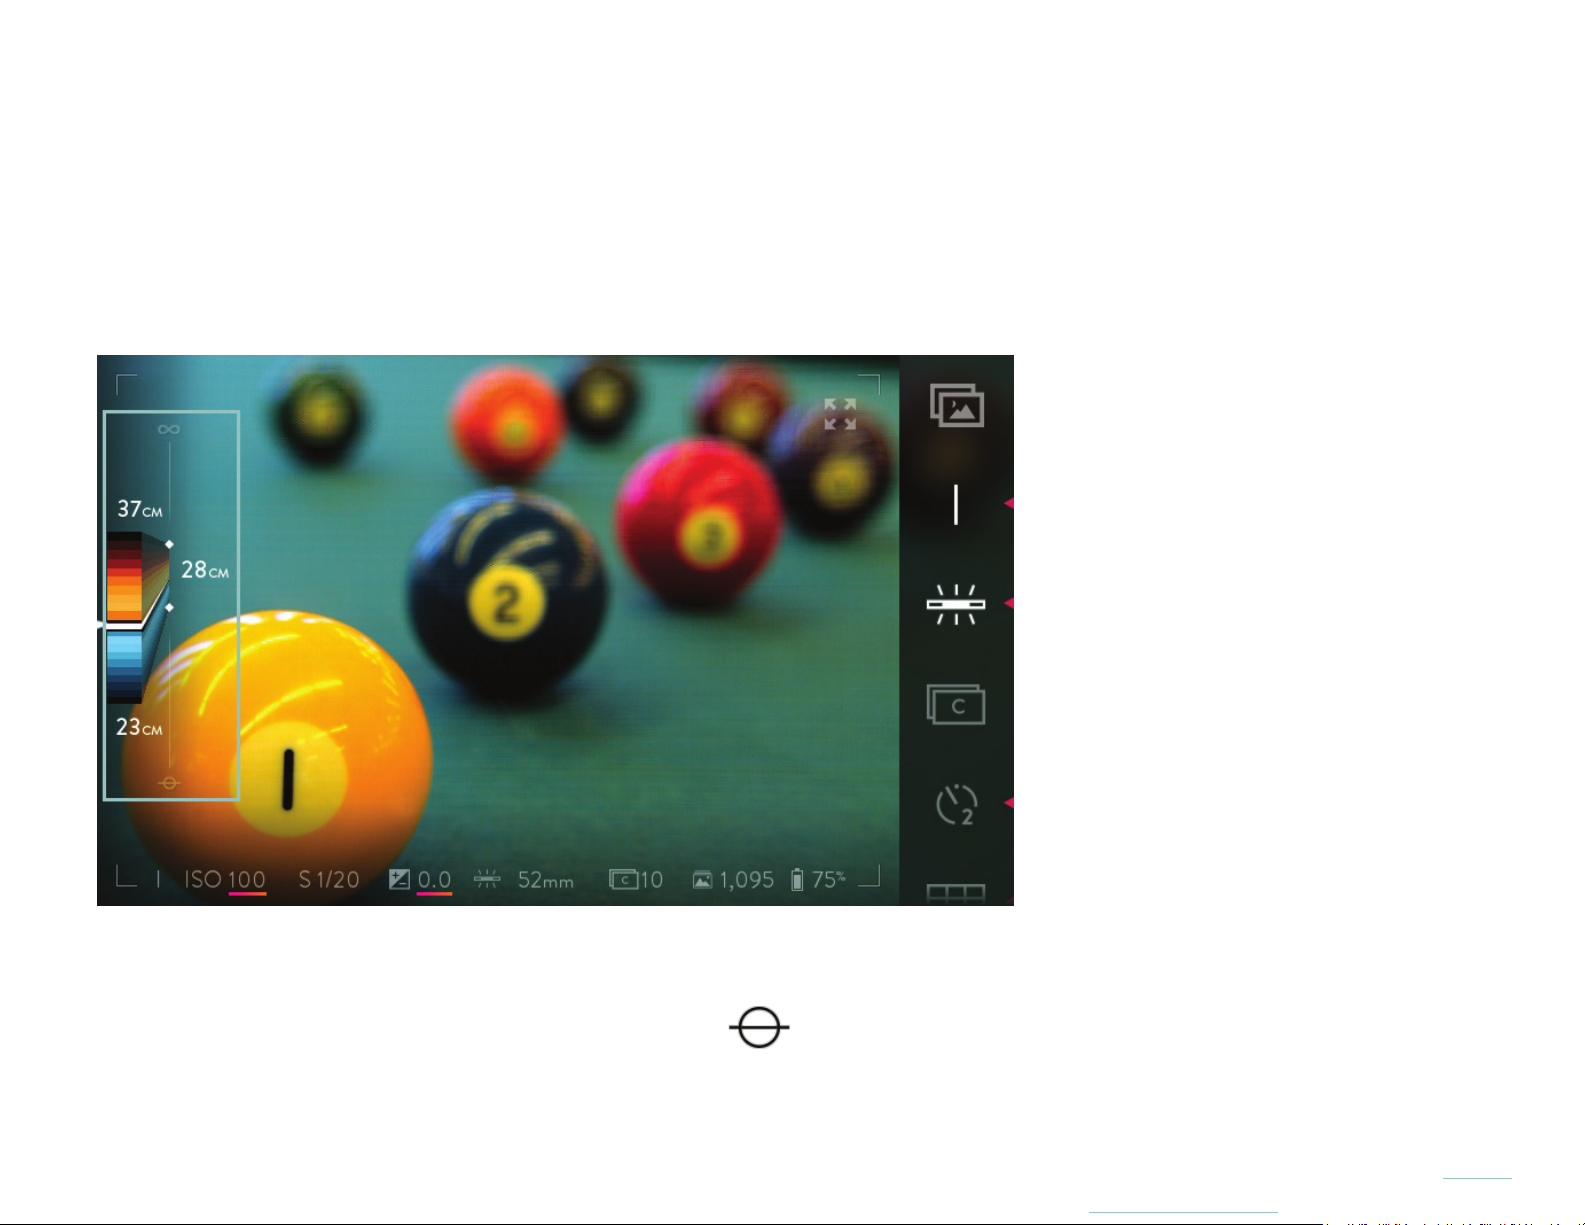
The Depth Assist Bar appears as a column near the right edge of the screen. The orange and blue bands within the bar show
where the current refocusable range falls in terms of distances from the camera. The objects within that range are the ones that can
be refocused on after the Living Picture is captured.
Each of the colored bands represents one slice of the depth within the refocusable range, called Depth Steps. The brighter the
color of a Depth Step, the sharper the objects at that distance will appear when it is refocused.
In the Depth Assist Bar, the orange and blue bands, or Depth Steps, represent the refocusable range. The numbers indicate the
physical distances from the camera.
The distances are measured from the sensor plane symbol,
surements are mostly accurate, they are not perfect. Think them as useful guide, there to give a good sense of where the refocus-
able range is located.
, visible on the right side of the camera’s exterior. While the mea-
75
Page 76
Light eld Hyperfocal position
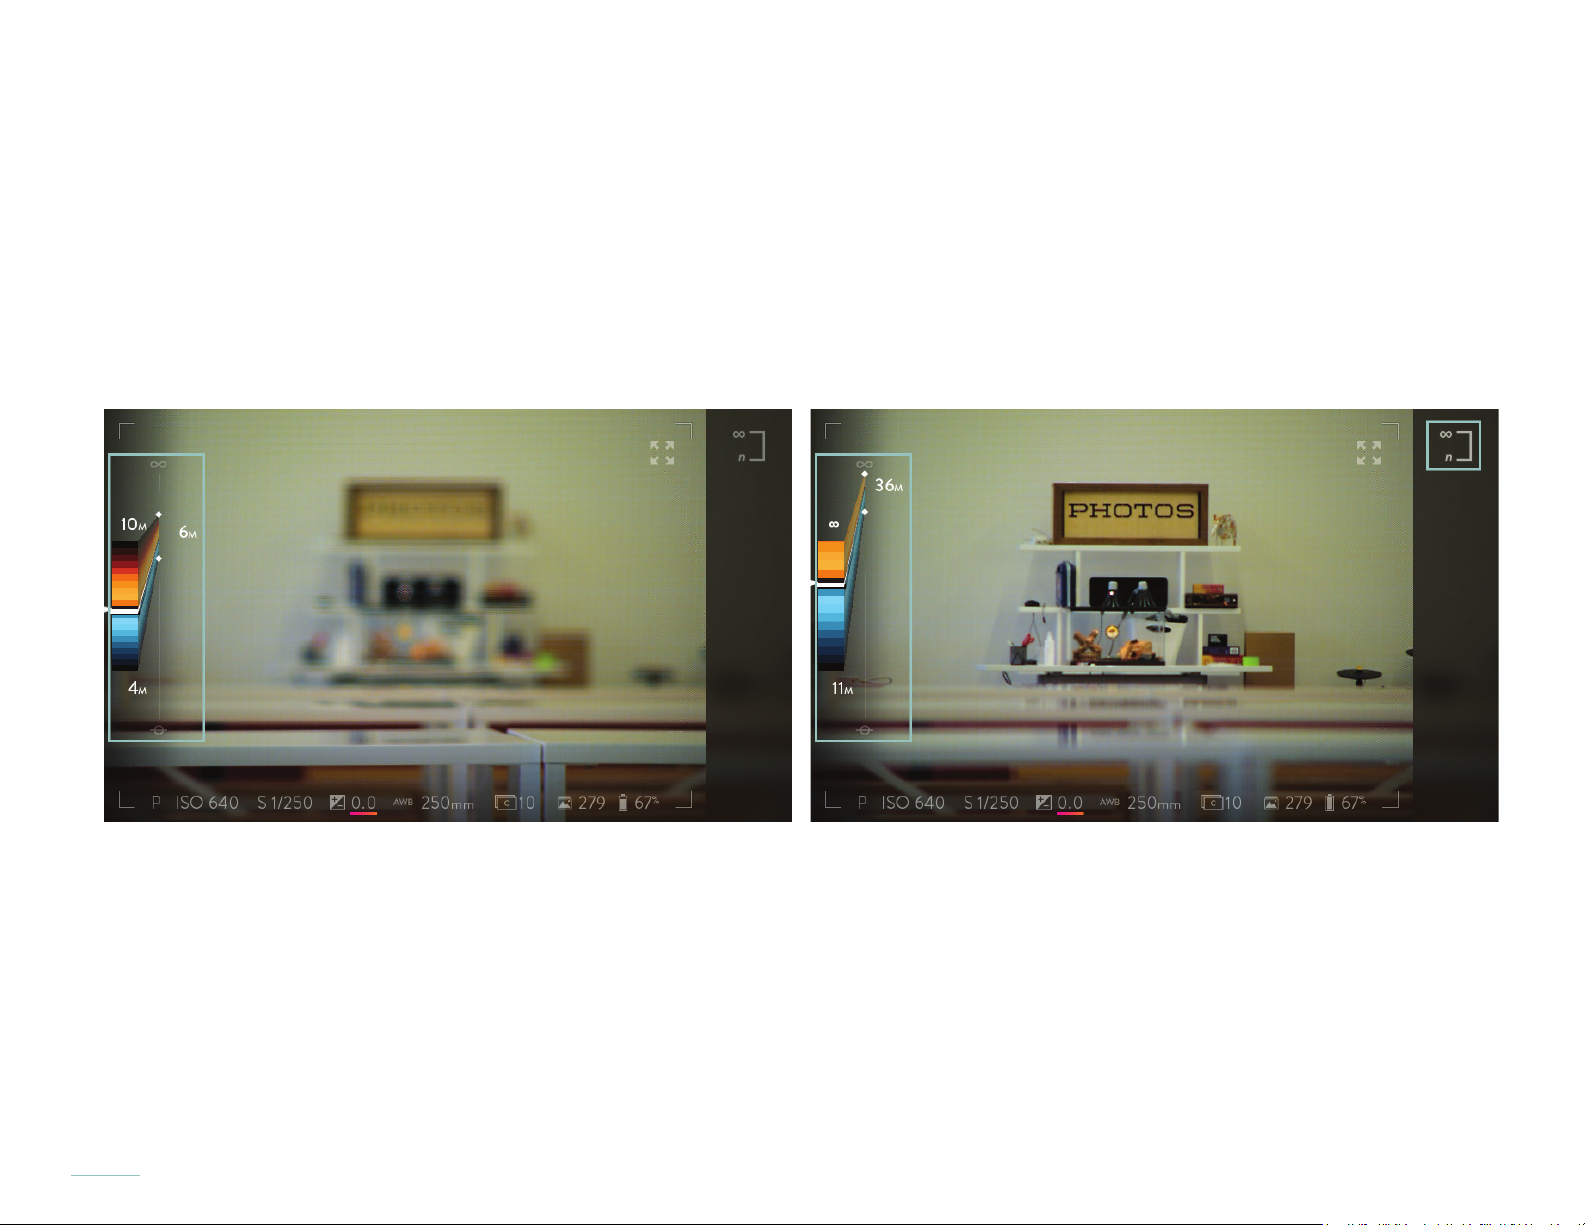
When the lens is set to the light eld hyperfocal position, the refocusable range extends from optical innity (the horizon) to a close
focus distance. More specically, objects at or near optical innity are at a depth near the peak of the far refocusable range, while the
entire near refocusable range extends closer to the camera.
The close focus distance depends on the current focal length of the camera. At wide angle, the close focus distance is approximately
25cm from the sensor plane. At maximum zoom, the close focus distance is approximately 10m.
Click the Hyperfocal icon to enable
76
Page 77

Optical Offset
When looking at the live view, the shallow depth of eld is due to the f /2.0 main lens. There is much more in the refocusable range
than what appears sharp in the live view. The optical offset plots the optical focus position used in the live view (and for autofocus) to
the refocusable range — and can be adjusted to suit the style of Living Picture being captured.
When the optical offset is at the default setting, objects at the peak of the near refocusable range will appear sharply focused in the
live view. This means that a Living Picture can be refocused on whatever looked sharp in the live view when it was taken, as well as on
objects further away, since most of the refocusable range will fall beyond that point.
In the illustrations that follow, the brighter the shade of the blue or orange band, the sharper objects at that distance will appear when
refocused. The brightest band in each component range is its peak — where objects will appear sharpest when refocusing.
77
Page 78
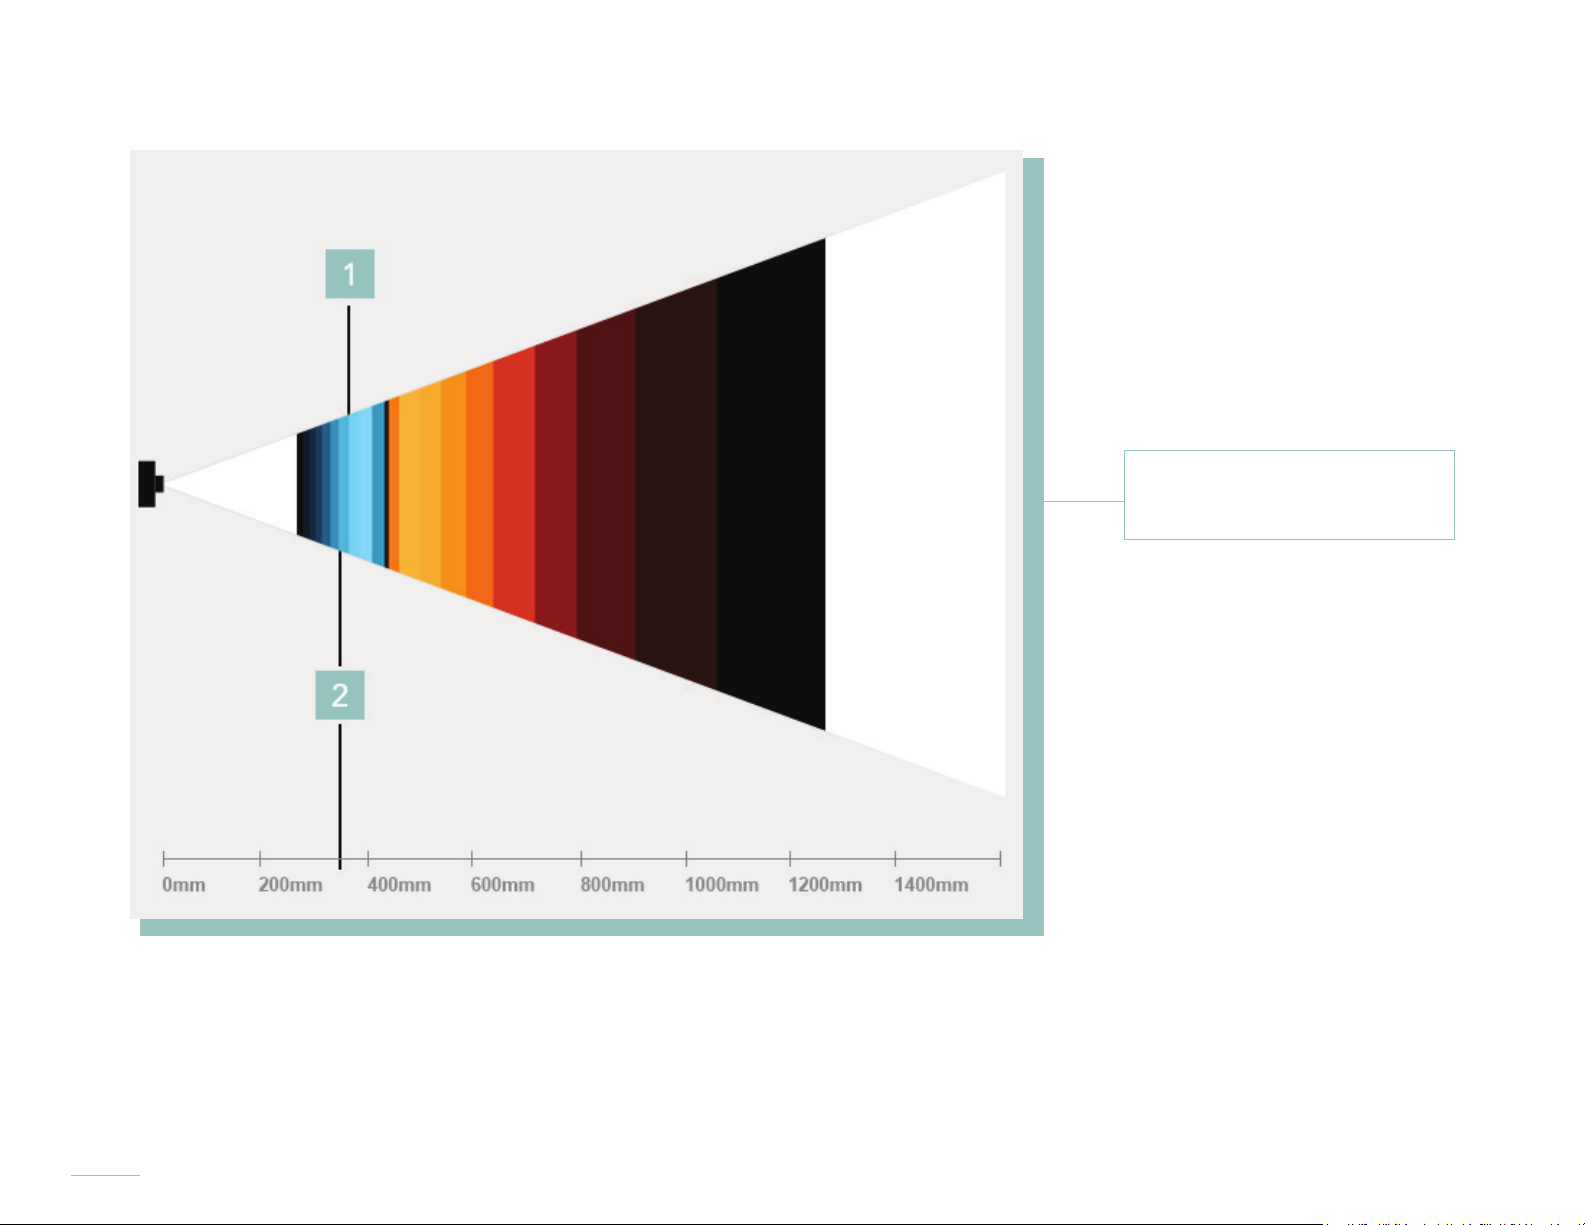
The refocusable range varies widely, depending on the zoom and focus positions of the camera when a picture is captured.
1. Near peak
2. Default optical offset
The default optical offset, with the focus position used for the live view and for
autofocus set at the peak of the near refocusable range
Depending on the style of photography and the subjects being shot, it may be advantageous to relocate the optical offset
position. As an example, when shooting landscapes, set the optical offset to the peak of the far refocusable range. Then,
when composing a shot by focusing on a distant object, most of the refocusable range would be available for closer objects.
78
Page 79
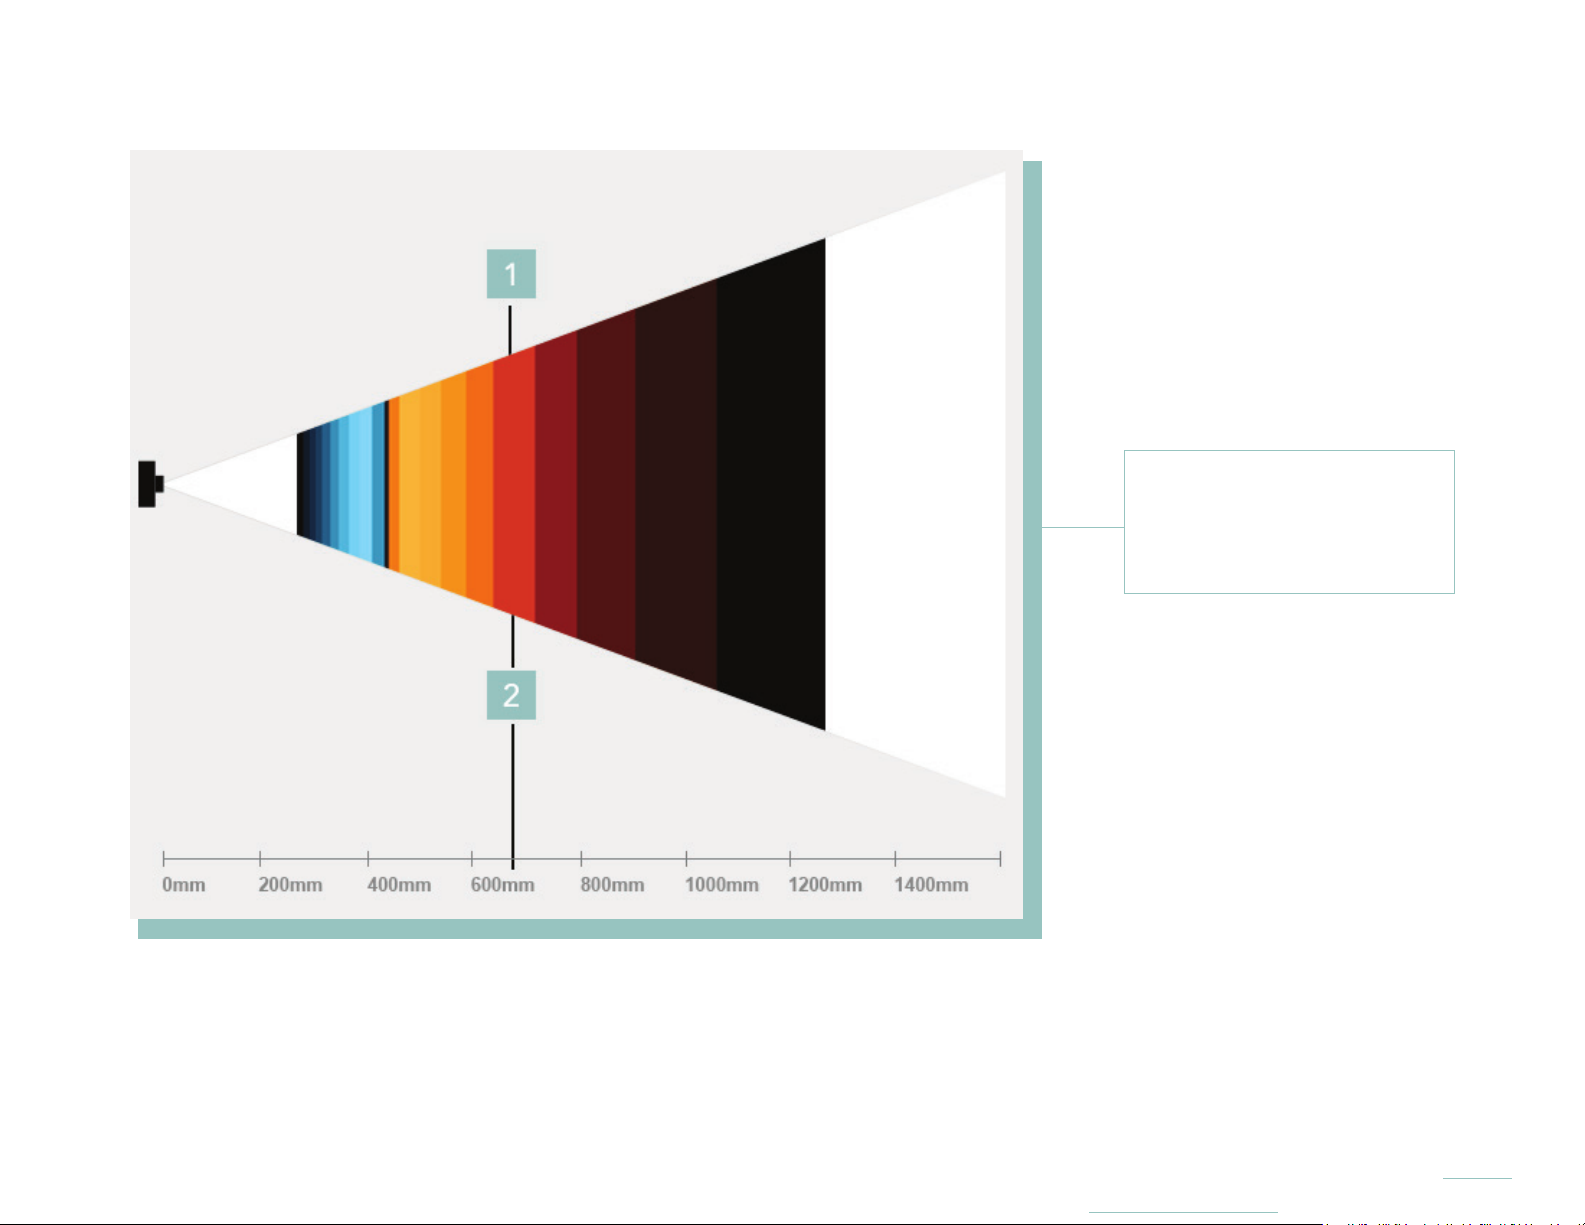
An adjusted optical offset position that might be used for landscape photography
1. Far peak
2. Example optical offset
for landscape
photography
79
Page 80
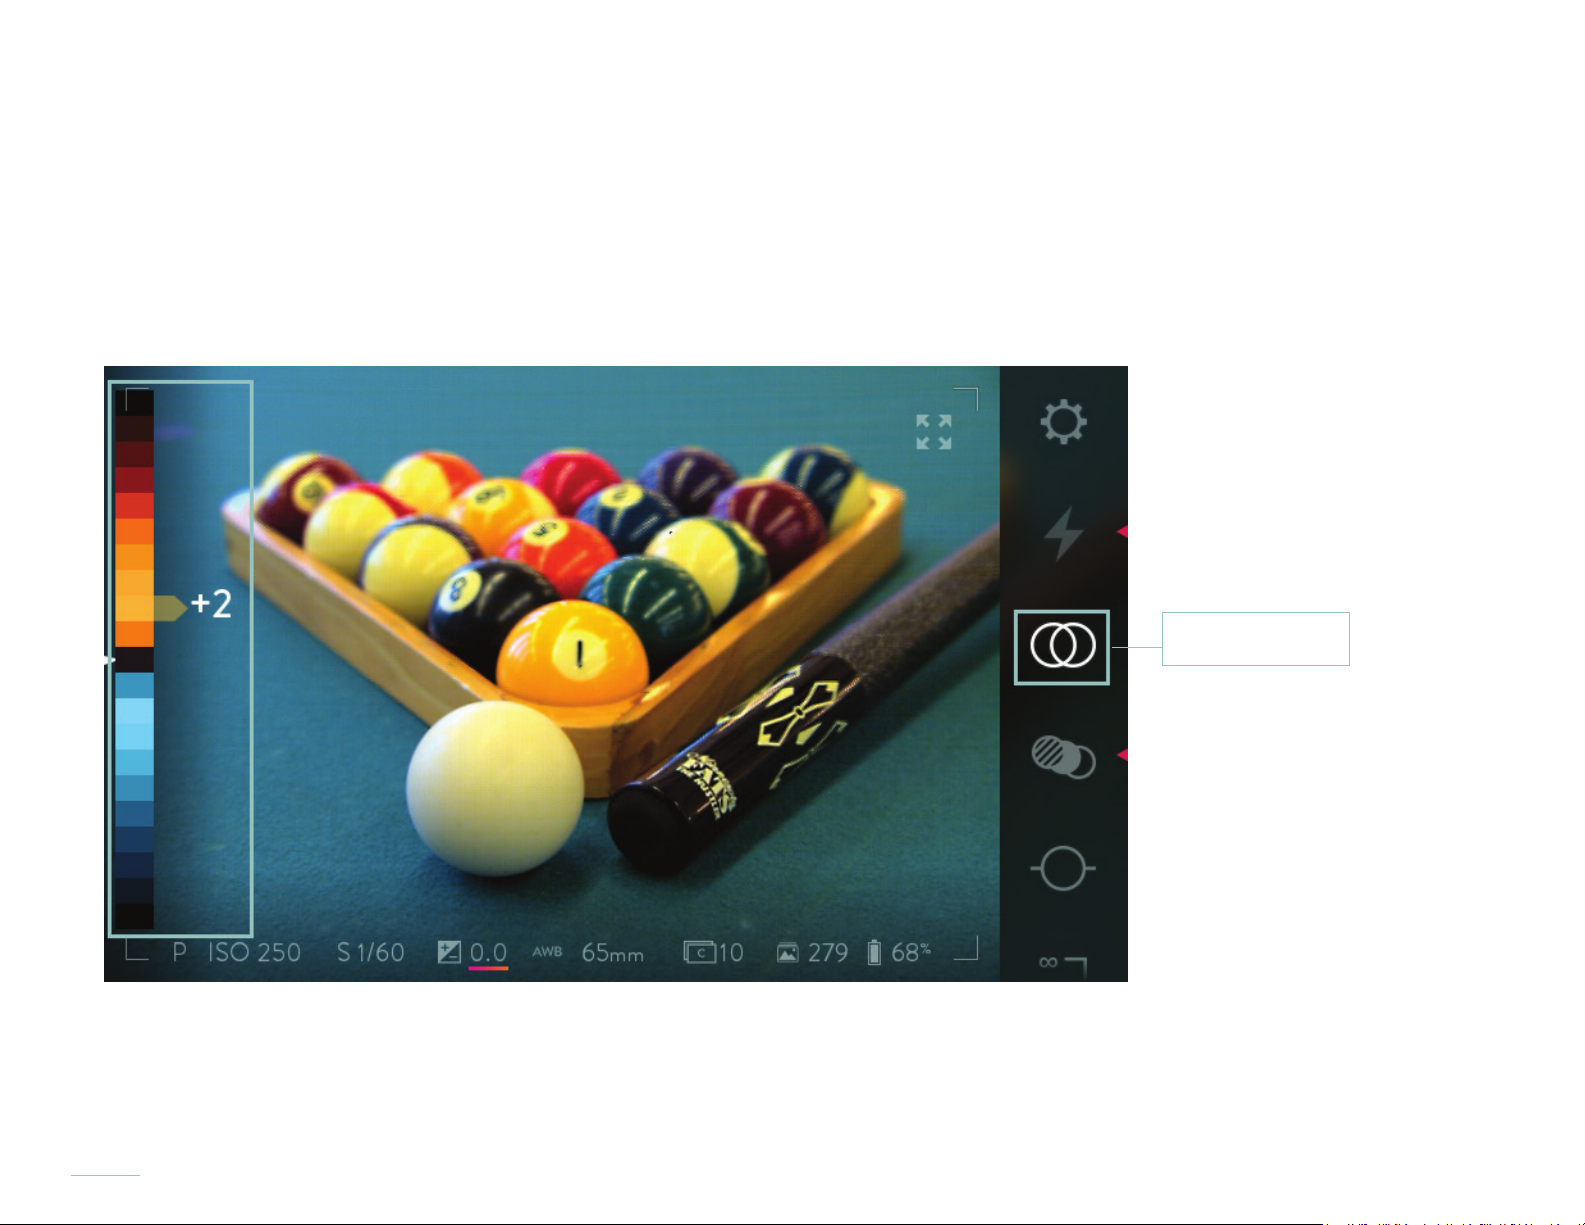
Adjusting Optical Offset
To adjust the optical offset, add the Optical Offset icon to the Menu Bar (see Rearrange Menu), then tap it. The Menu Bar will be
hidden, and a depth scale will be displayed.
Bands in shades of blue represent the near refocusable range, and bands in shades of orange represent the far refocusable range.
The current optical offset position is indicated by a white band (the default position is -4). Rotate the front dial to relocate the optical offset closer or further away in the refocusable range.
Optical Offset
Rotate the front dial to adjust the optical offset.
To close the depth scale, unhide the Menu Bar by swiping left from the right edge of the screen. The optical offset will remain at
the new setting until it is changed using these same steps.
80
Page 81
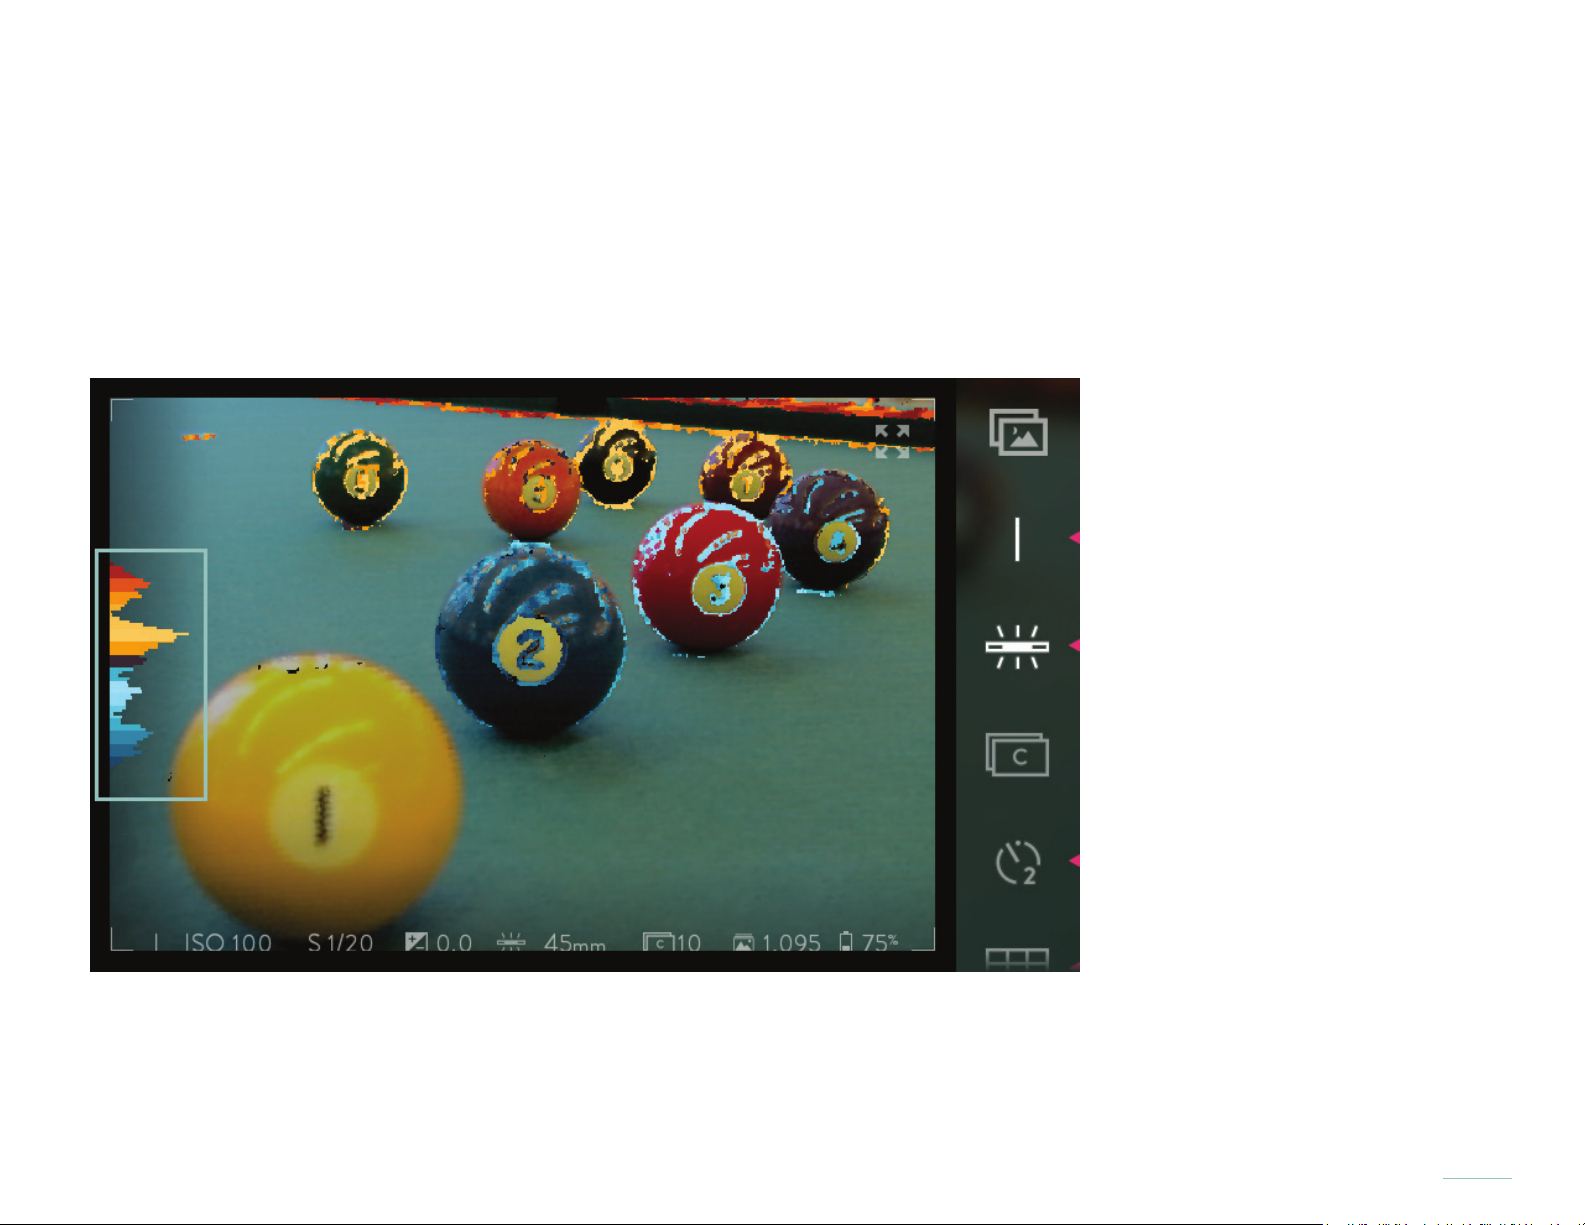
Depth Histogram and Depth Overlay
The Lytro ILLUM offers live, interactive depth analysis in the form of the Depth Histogram and Depth Overlay. Both provide
feedback on where subjects fall relative to the refocusable range. To activate them, fully press the Lytro button.
The Depth Histogram consists of bands extending out to the right of a depth scale. Bands in shades of blue represent the near
refocusable range, and bands in shades of orange represent the far refocusable range. The more there is available to refocus on at
a given depth, the further the band beside it will extend to the right.
Evaluate a potential shot using the Depth Histogram. The large wave in the near refocusable range (blue) corresponds to the
subject in the foreground. The wave in the far refocusable range (orange) corresponds to the subject in the background. A well
structured Living Picture with a full range of interactivity will have a balanced histogram of blue and orange when composed and
captured.
81
Page 82
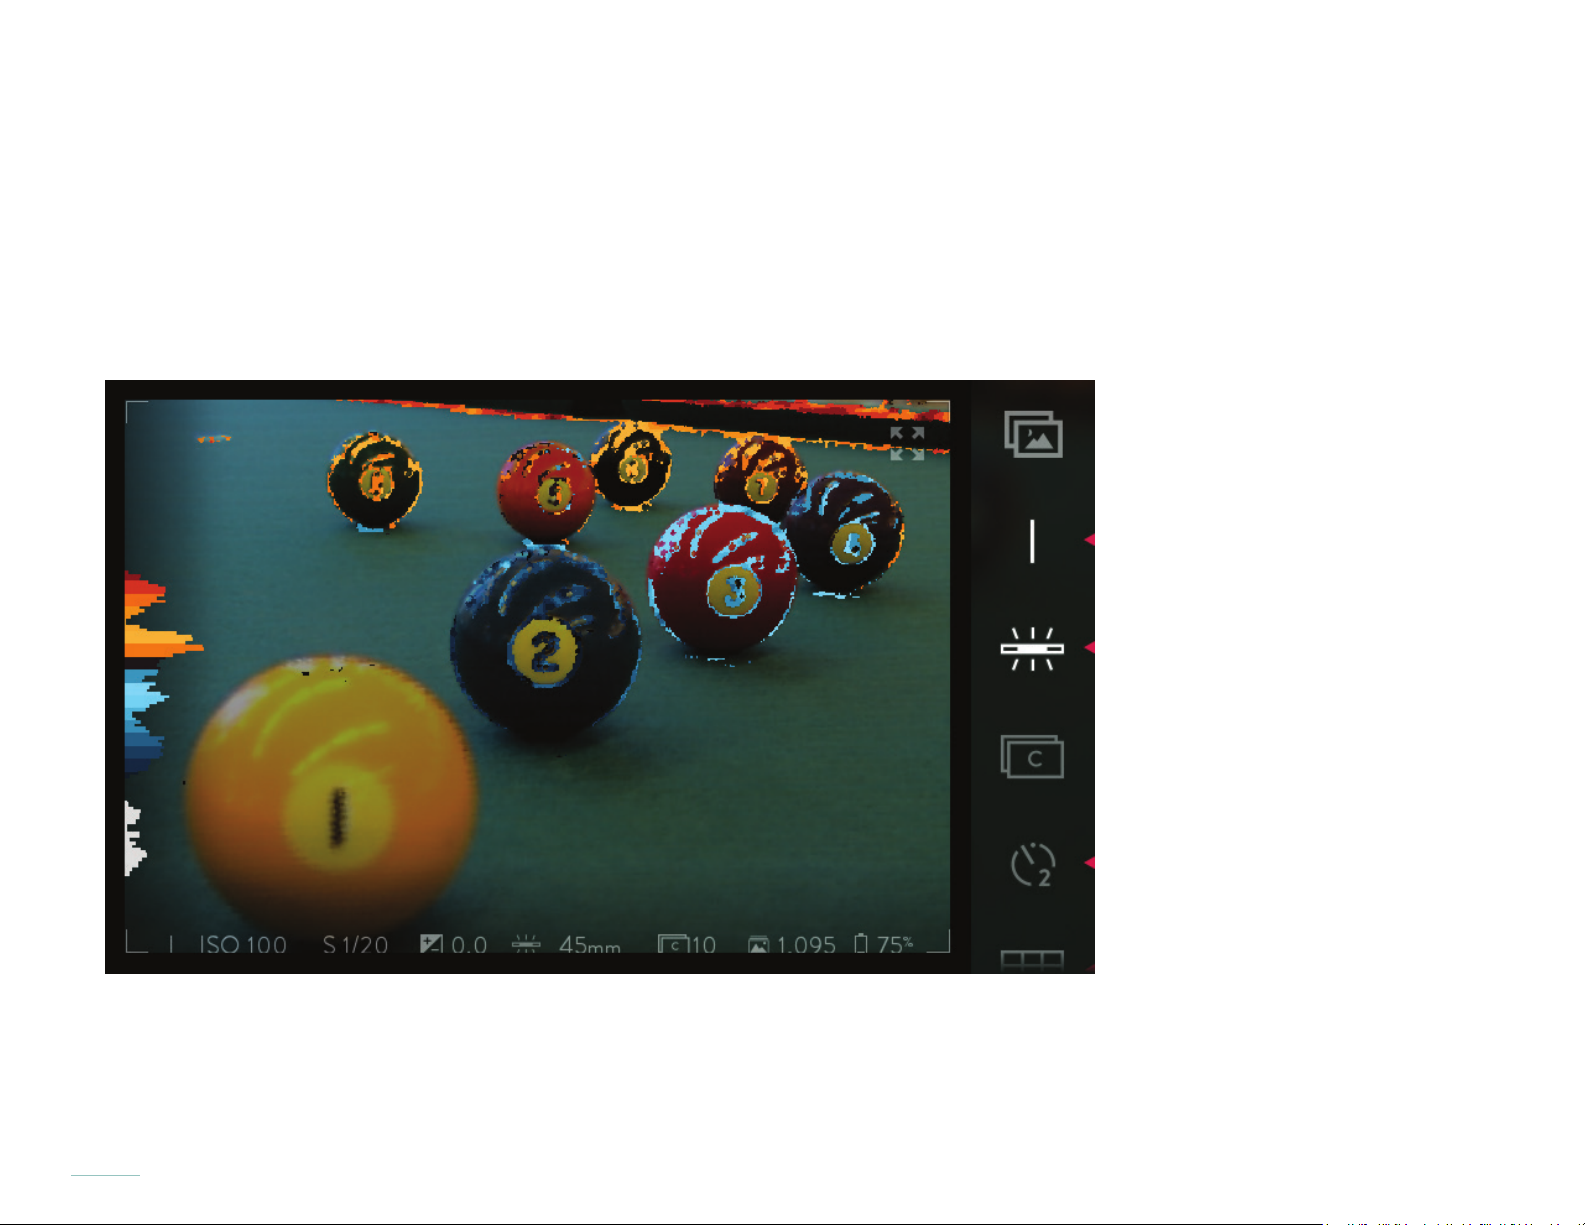
Glancing at the histogram can tell if you have a substantial subject within the refocusable range. To maximize the impact of refocusing, it is ideal to have a signicant histogram wave in both the near refocusable range and the far refocusable range. Waves
outside of the refocusable range correspond to objects in the background or foreground that can not be refocused.
The Depth Overlay provides the same kind of information as the Depth Histogram, but displays it as an overlay on objects in the
live view. Objects that fall within the near refocusable range are edged with blue. Objects that fall within the far refocusable are
edged with orange. Instantly see whether there is enough subject matter in each of the ranges to provide good refocusing possi-
bilities.
Objects in the near refocusable range are edged in blue; those in the far refocusable range are edged in orange. White in the
histogram represents the elements in the scene which will be outside the refocusable range in your Living Picture, and can not be
focused on when interacting with the image..
82
Page 83
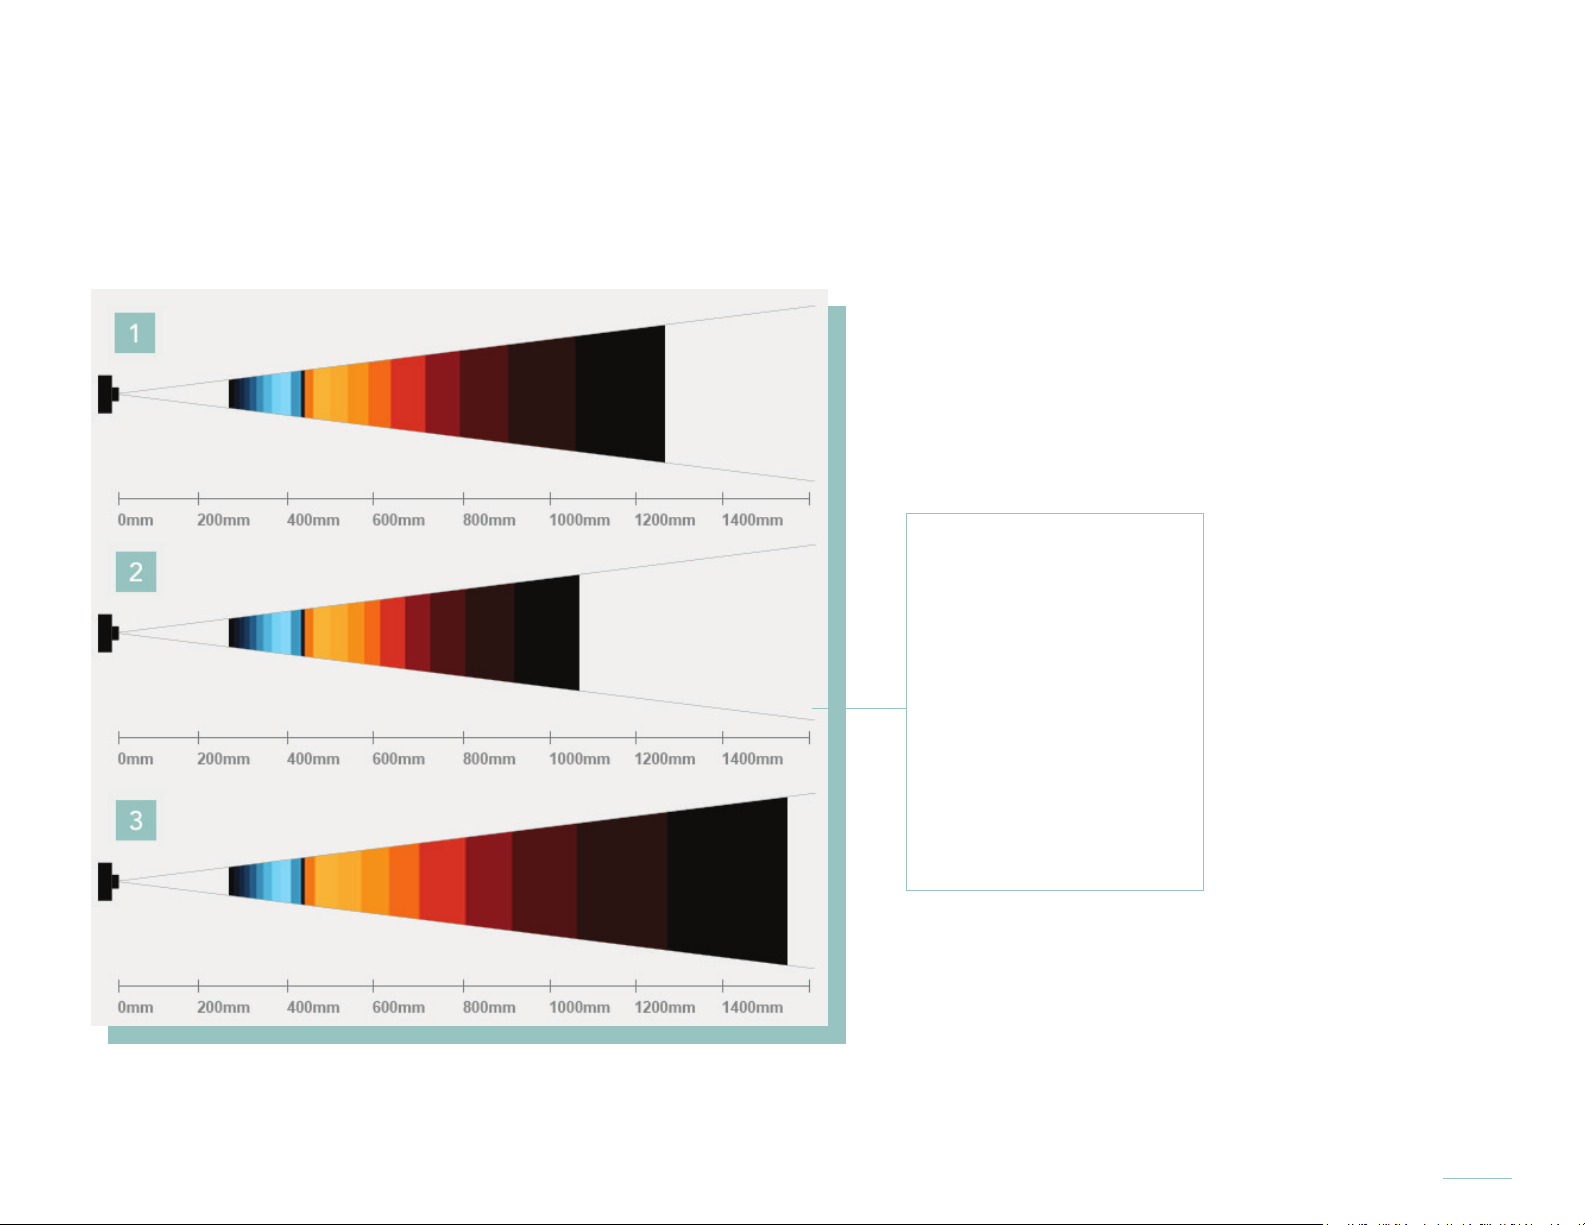
Focus bracketing
Like the more familiar exposure bracketing, focus bracketing causes the camera to take a series of pictures each time the shutter
button is pressed. But instead of varying the exposure between each picture, the camera varies the focus. That means the refocusable range is shifting, too, so there is a better chance of capturing a picture with great possibilities for refocusing.
The change in focus between each picture is expressed in Depth Steps. Choose the number of Depth Steps, from 1 to 10, be-
tween each picture. One can choose 3 or 5 pictures.
The refocusable range
as captured with focus
bracketing set to 3
pictures and 1 Depth
Step (DS).
1. Refocusable range,
original
2. Refocusable range,
-1 DS
3. Refocusable range,
+1 DS
To use focus bracketing, add it to the Menu Bar (see Rearrange Menu). Then activate it and set the number of pictures that will be
taken and the number of Depth Steps between each picture. For help setting those parameters, see Applying focus bracketing.
83
Page 84

Settings
You can open the Settings menu from either Capture or Playback Mode by tapping the Settings icon in the Menu Bar. The Settings menu will ll the screen, replacing whatever was displayed. Swipe the touchscreen to scroll up or down through the menu.
To close the Settings menu, tap CAPTURE at the top left of the screen, or press the shutter button halfway. The camera will always
return to Capture Mode when exiting Settings. To return to Playback Mode, tap the Playback Mode icon in the Menu Bar again,
press the Fn button, or swipe the screen from left to right.
Format SD card
For best performance, format your SD card in the Lytro ILLUM after transferring the Pairing data to the Lytro Desktop, and again
after using it in any other device. Please note that formatting the card will erase any data stored on it. To begin, tap FORMAT SD
CARD in the Settings menu. A window will open with two options: FORMAT or CANCEL. To continue with formatting, tap FORMAT. When formatting is complete, tap DONE to return to the Settings menu.
Brightness
Adjust the brightness of the screen by tapping BRIGHTNESS in the Settings menu and dragging the slider. Or slide the AUTO-BRIGHTNESS selector to the ON position, and the camera will automatically adjust the brightness to the lighting conditions.
Sounds
Tap SOUNDS in the Settings menu, and by dragging the slider, adjust the volume of the sounds produced by the camera. Turn off
either all sounds or just the touch sounds by sliding the appropriate selector to the OFF position.
Exposure simulation
The live view can be set to simulate the exposure that will result if a Living Picture is captured using the current settings. To activate exposure simulation, open the Settings menu, look for EXPOSURE SIMULATION, and slide the selector to the AUTO position.
84
Page 85

Clipping warning
When clipping warning is turned on, pulsing stripes will indicate any areas of the Live View that will be overexposed if a Living Picture is captured using the current settings. To activate clipping warning, open the Settings menu, look for CLIPPING WARNING,
and slide the selector to the ON position.
Instant preview
Set the duration of the instant preview from 1 to 15 seconds or turn instant preview off. Open the Settings menu, and tap INSTANT PREVIEW. Swipe up to see additional duration options. Tap on a selection to set the duration. A half press of the shutter
button dismisses the preview and immediately restores the live view.
File format
You can select which le format the camera records in, Lytro RAW or Lytro XRAW. Tap FILE FORMAT in the Settings menu, then
tap on your selection.
Lytro RAW les contain the raw light eld picture data and can only be viewed on the camera or on a computer running a copy of
Lytro Desktop that has been paired with the camera. Lytro XRAW les contain the raw light eld picture data as well as the pairing
data required to properly process the light eld. Lytro XRAW can viewed using any copy of Lytro Desktop, but is a much larger le.
iOS Connect
To connect your iOS device to the Lytro ILLUM over Wi-Fi, open the Settings menu and tap iOS CONNECT. Set ACCESS POINT
to ON.
On your iOS device, go to Settings, Wi-Fi. Make sure Wi-Fi is activated. Under CHOOSE A NETWORK, tap OTHER. Enter the
network name as displayed on the camera (be sure to use uppercase and lowercase letters exactly as shown). Select WPA security,
and enter the password as displayed on the camera. If the iOS device is within range, it should connect to the camera’s network.
Long exposure noise reduction
Activate this feature to reduce noise in Living Pictures taken with long exposure times. Look for LONG EXPOSURE NOISE REDUCTION in the Settings menu and slide the selector to the ON position. Then, whenever a long exposure time is selected (either
manually or automatically), the camera will take a second picture using the same settings, but with the shutter closed — recording
only noise. Because the noise recorded in the two pictures will be very similar, the camera can use the second picture to identify
the noise and suppress it in the picture.
85
Page 86
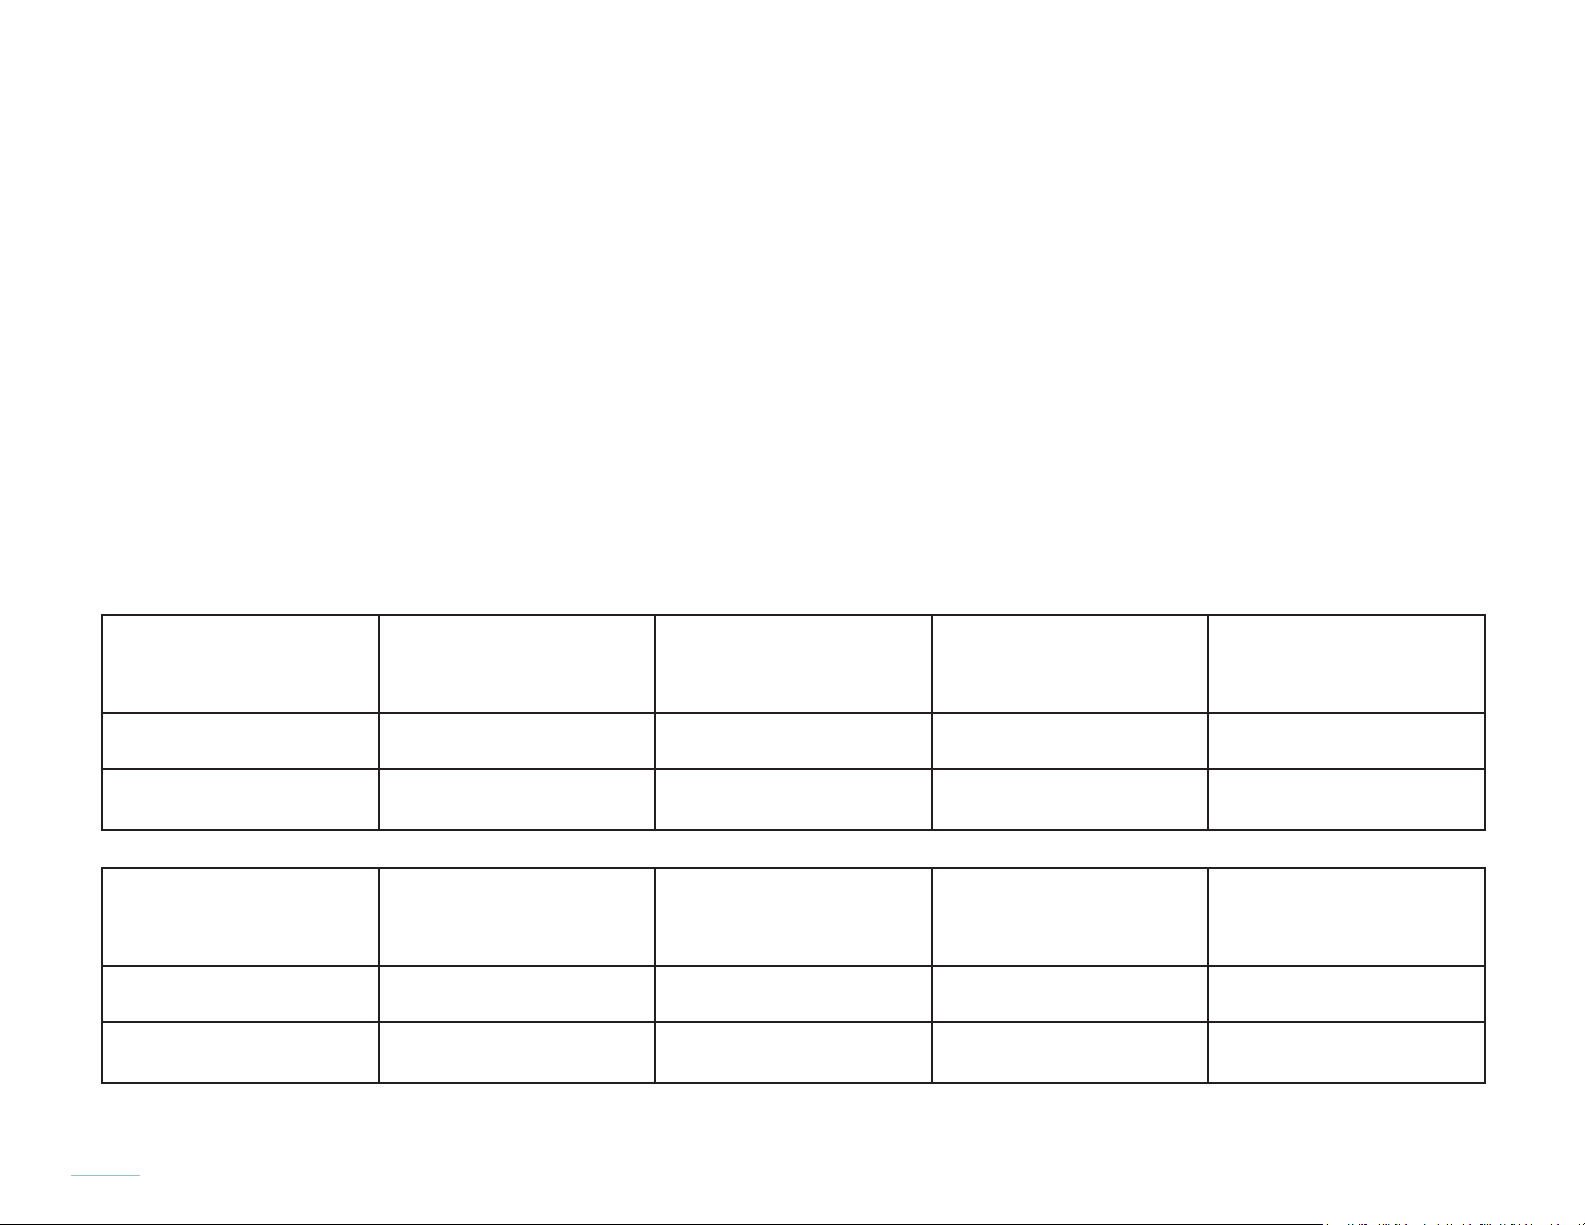
Camera controls
Many of the physical camera controls can be assigned different functions, others can have their functions modied in one way or
another. Tap CAMERA CONTROLS in the Settings menu to open the camera controls submenu containing the options below.
Shutter Half-press
Tap to display the ve functions that may be assigned to the half press of the shutter button: AEL (autoexposure lock), AF (engage
autofocus), AF + AEL (engage autofocus and autoexposure lock), and OFF. Tap an option to select it.
Exposure Dials
Tap to display the two options, DEFAULT and ALTERNATE, for the functions assigned to each dial in the various exposure modes.
Tap an option to select it. The assignments for each dial in each exposure mode are shown below.
Exposure Dial Assignments
DEFAULT P : Program Mode
I : ISO Priority
Mode
Front Dial NA Shutter Speed ISO Shutter Speed
Rear Dial EV Compensation
EV Compensation
I : ISO Priority
ALTERNATE P : Program Mode
Mode
Front Dial EV Compensation EV Compensation ISO ISO
Rear Dial NA
86
Shutter Speed
P : Shutter Priority
P : Manual Mode
Mode
EV Compensation ISO
P : Shutter Priority
P : Manual Mode
Mode
EV Compensation Shutter Speed
Page 87

Lens Rings
Tap to display the two options, DEFAULT and ALTERNATE, for behavior of the lens rings. Tap an option to select it.
Rearrange Menu
Tap to display all of the touch control icons that can be assigned to the Menu Bar. The pages of the Menu Bar are shown as columns from left to right. Icons are shown in their current positions, and those that are currently assigned are illuminated. To relocate
an assigned icon, tap and drag it to a new location.
To assign an icon to the Menu Bar, double-tap it. The icon will illuminate and is now available to tap and drag to relocate it.
Remap Buttons
Tap to assign any of a range of functions to each of the four physical buttons on the back of the camera. There is an illustration of
the four buttons, labeled A, B, C, and D. To the right appears the same four letters, each followed by the function currently assigned to it. Tap one of these to assign a different function.
A list of options will be displayed. Swipe up to scroll to additional options. The current function is indicated by a checkmark, and
options that are currently assigned to one of the other three buttons are indicated by the letter of that button. Tap a function to
assign it, and then the rst screen appears.
AEL
Tap to display the three options for behavior of the AEL button, then tap an option to select it. Select WHILE PRESSED, and auto
exposure will be locked only while the AEL button is pressed. Select CONTINUOUS, and pressing the AEL button will lock auto
exposure until the button is pressed again. Select ONE SHOT, and pressing the AEL button will lock auto exposure until the shutter has been triggered.
General
Tap GENERAL in the Settings menu to open the submenu containing the options below.
Date & Time
Tap to display the selection wheels for the date and time. Swipe up or down to change any selection. Choose the 24-hour clock
option by swiping the selector to the ON position.
87
Page 88

Time Zone
Tap to display a list of locations and their respective time zones. Swipe up to scroll to additional locations/zones. Tap to make a
selection.
Language
Tap to display the options for the language used by the camera. Tap to make a selection.
Distance Measurements
To change the unit of measurement used by the camera, slide this selector from feet to meters or vice versa.
About
Tap to display information about the camera. This information includes the Firmware version currently installed on the camera.
Update Firmware
Tap to update the camera rmware, which takes several minutes. A window will open with two options: CANCEL or UPDATE. To
continue with the update, tap UPDATE.
Transfer Pairing Data to SD Card
Tap to transfer the camera Pairing data to the SD card, which may take a few minutes. A window will appear with two options:
CANCEL or TRANSFER To continue with the transfer, tap TRANSFER.
The Pairing data is required by the Lytro Desktop to optimally process pictures, and will be automatically copied off of the SD
card by the Lytro Desktop the rst time pictures are imported from that card. The Pairing data requires approximately 2GB of free
space on the SD card.
88
Page 89

Help
Replay the walk-through of the camera’s most unique controls and features that played during initial set-up. Tap HELP, then tap
FIRST TIME USER HELP.
Reset
Reset the camera to factory settings. The default functions will be restored for all buttons and controls, and only the default touch
control icons will be assigned to the Menu Bar. Tap RESET. A window will open with two options: RESET or CANCEL. To continue
with the reset, tap RESET.
89
Page 90
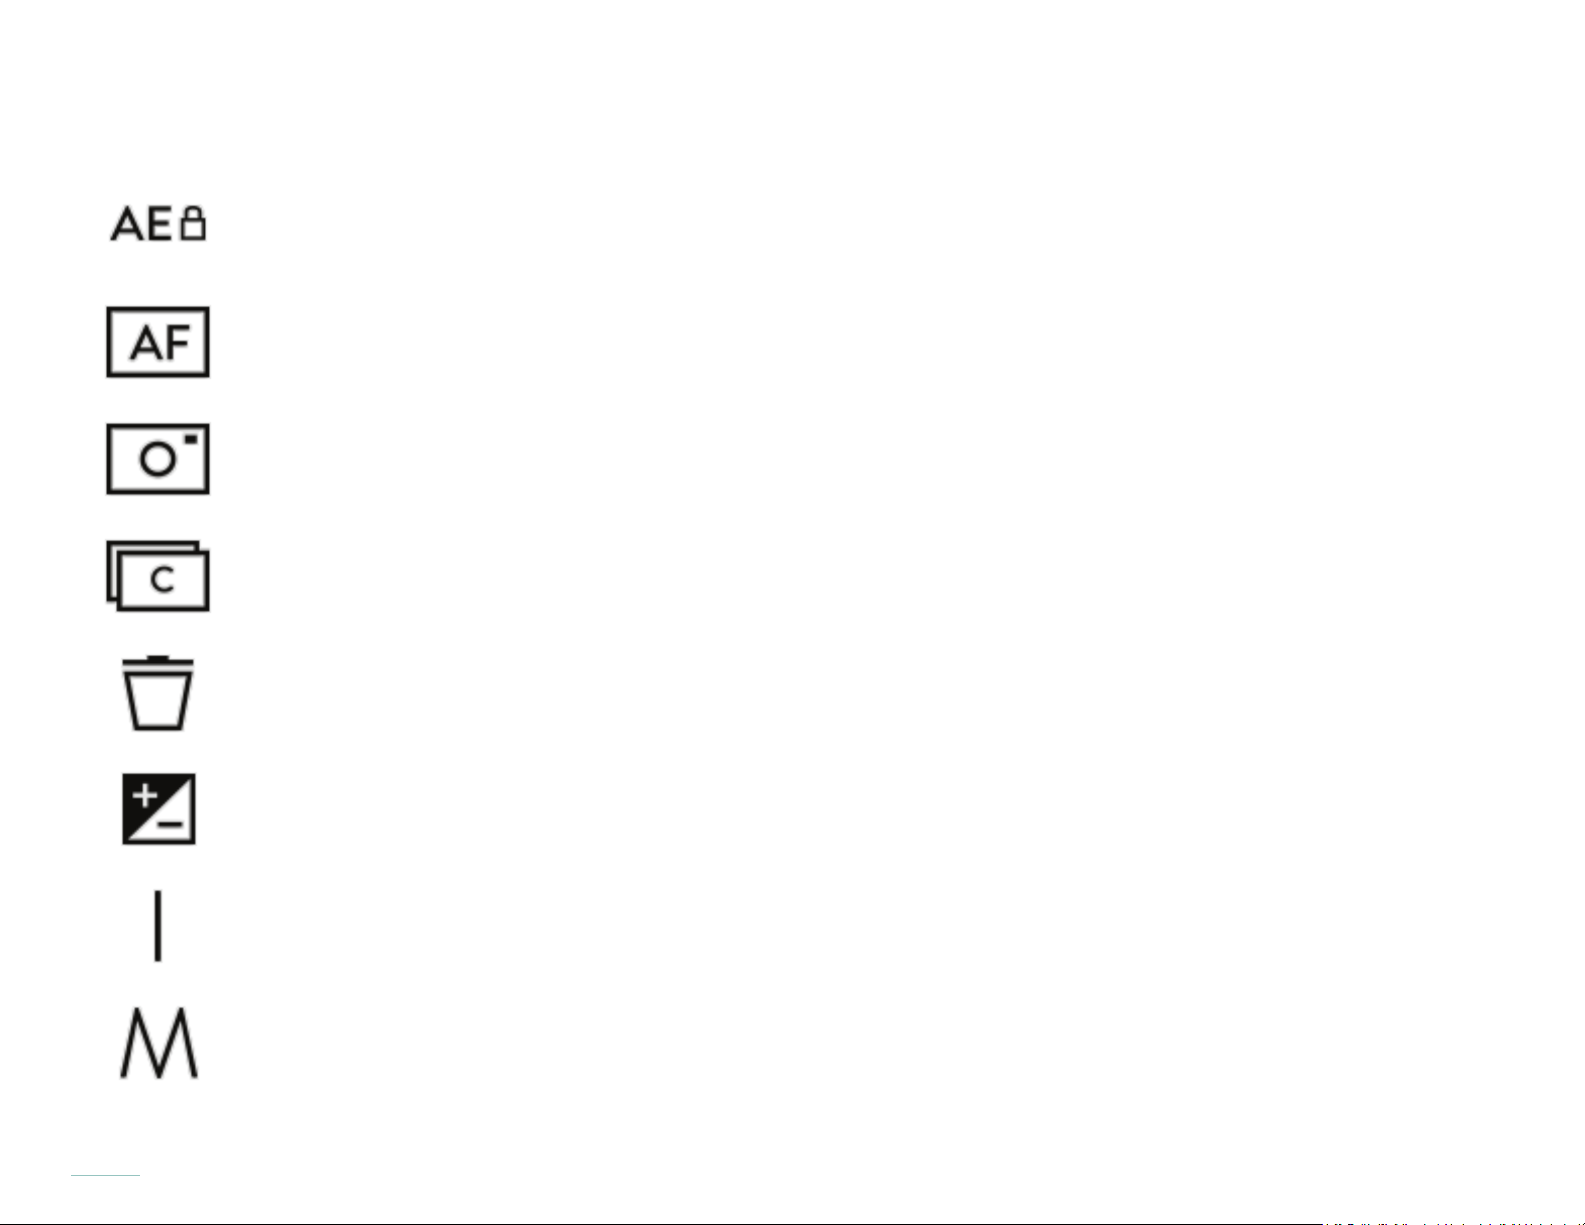
Icon Glossary
Auto-Exposure Lock
Auto Focus
Capture Mode
Continuous Shutter
90
Delete
EV Compensation
ISO Priority Exposure Mode
Manual Exposure Mode
Page 91
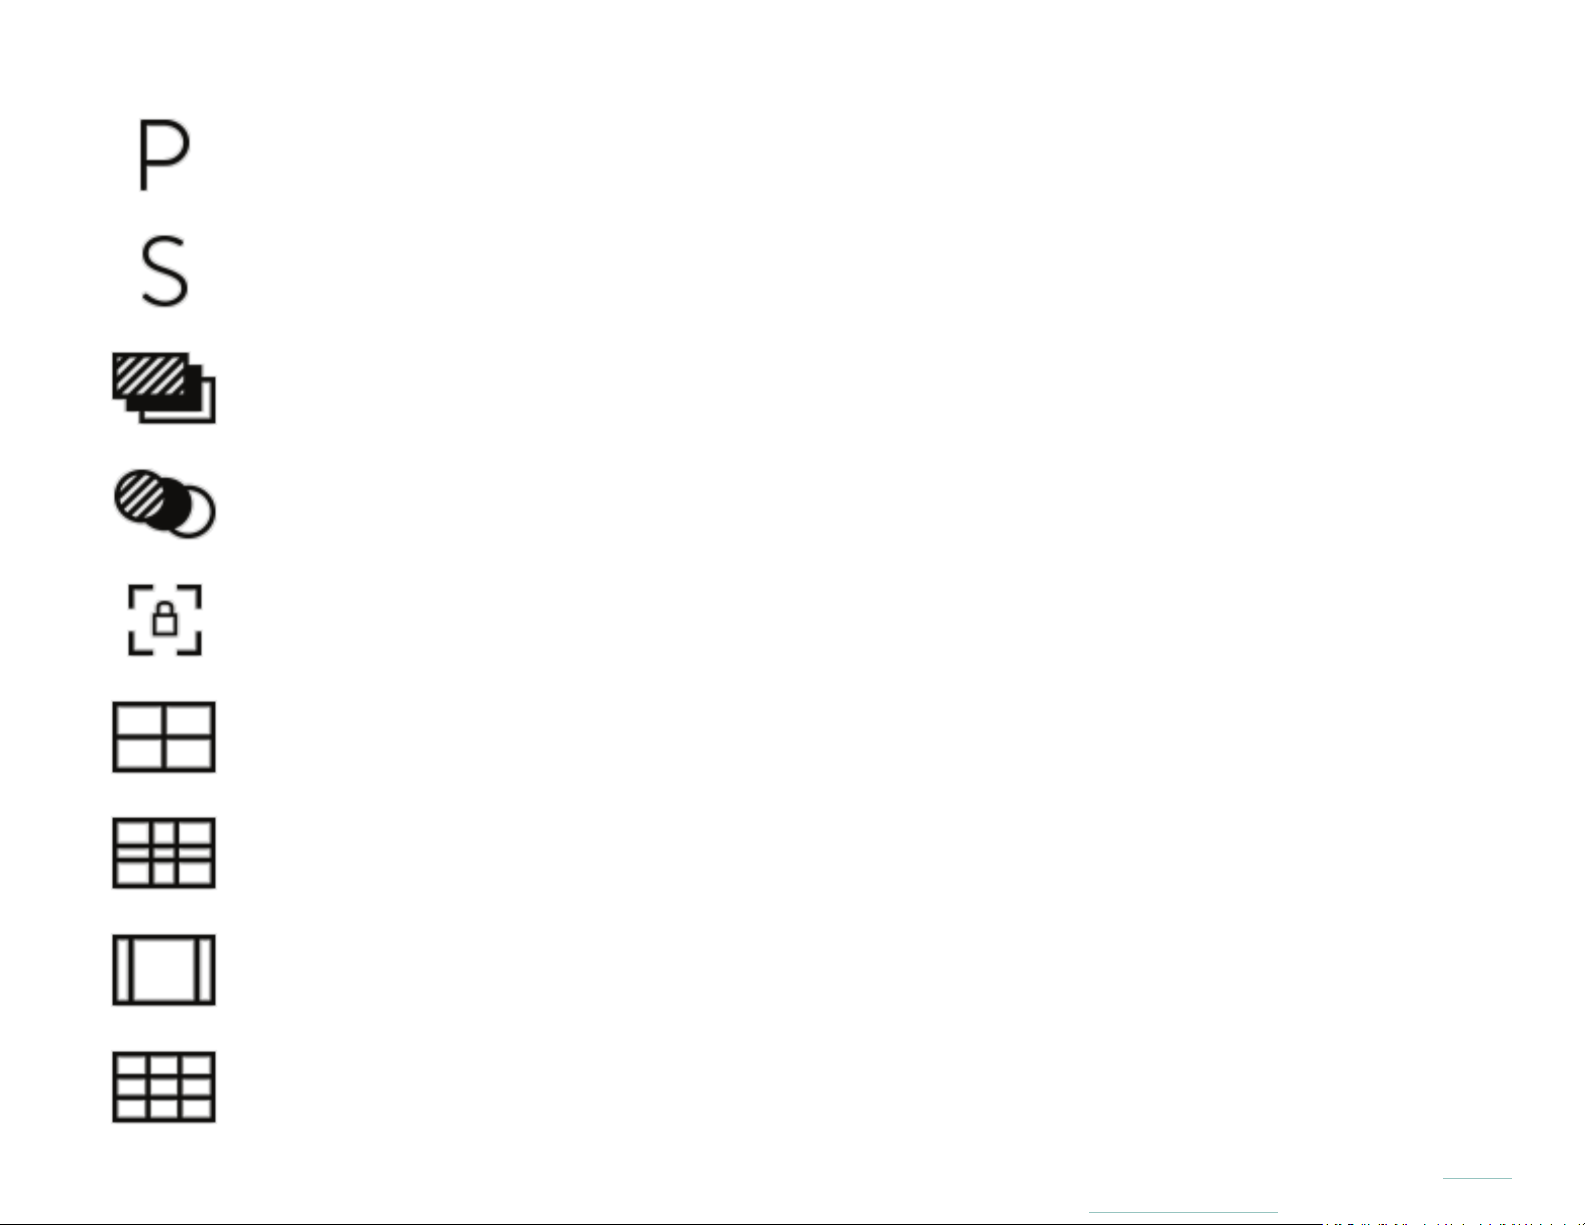
Program Exposure Mode
Shutter Speed Priority Mode
Exposure Bracketing
Focus Bracketing
Focus Lock
Center Cross Grid Overlay
Golden Ratio Grid Overlay
Square Grid Overlay
Rule of Thirds Grid Overlay
91
Page 92
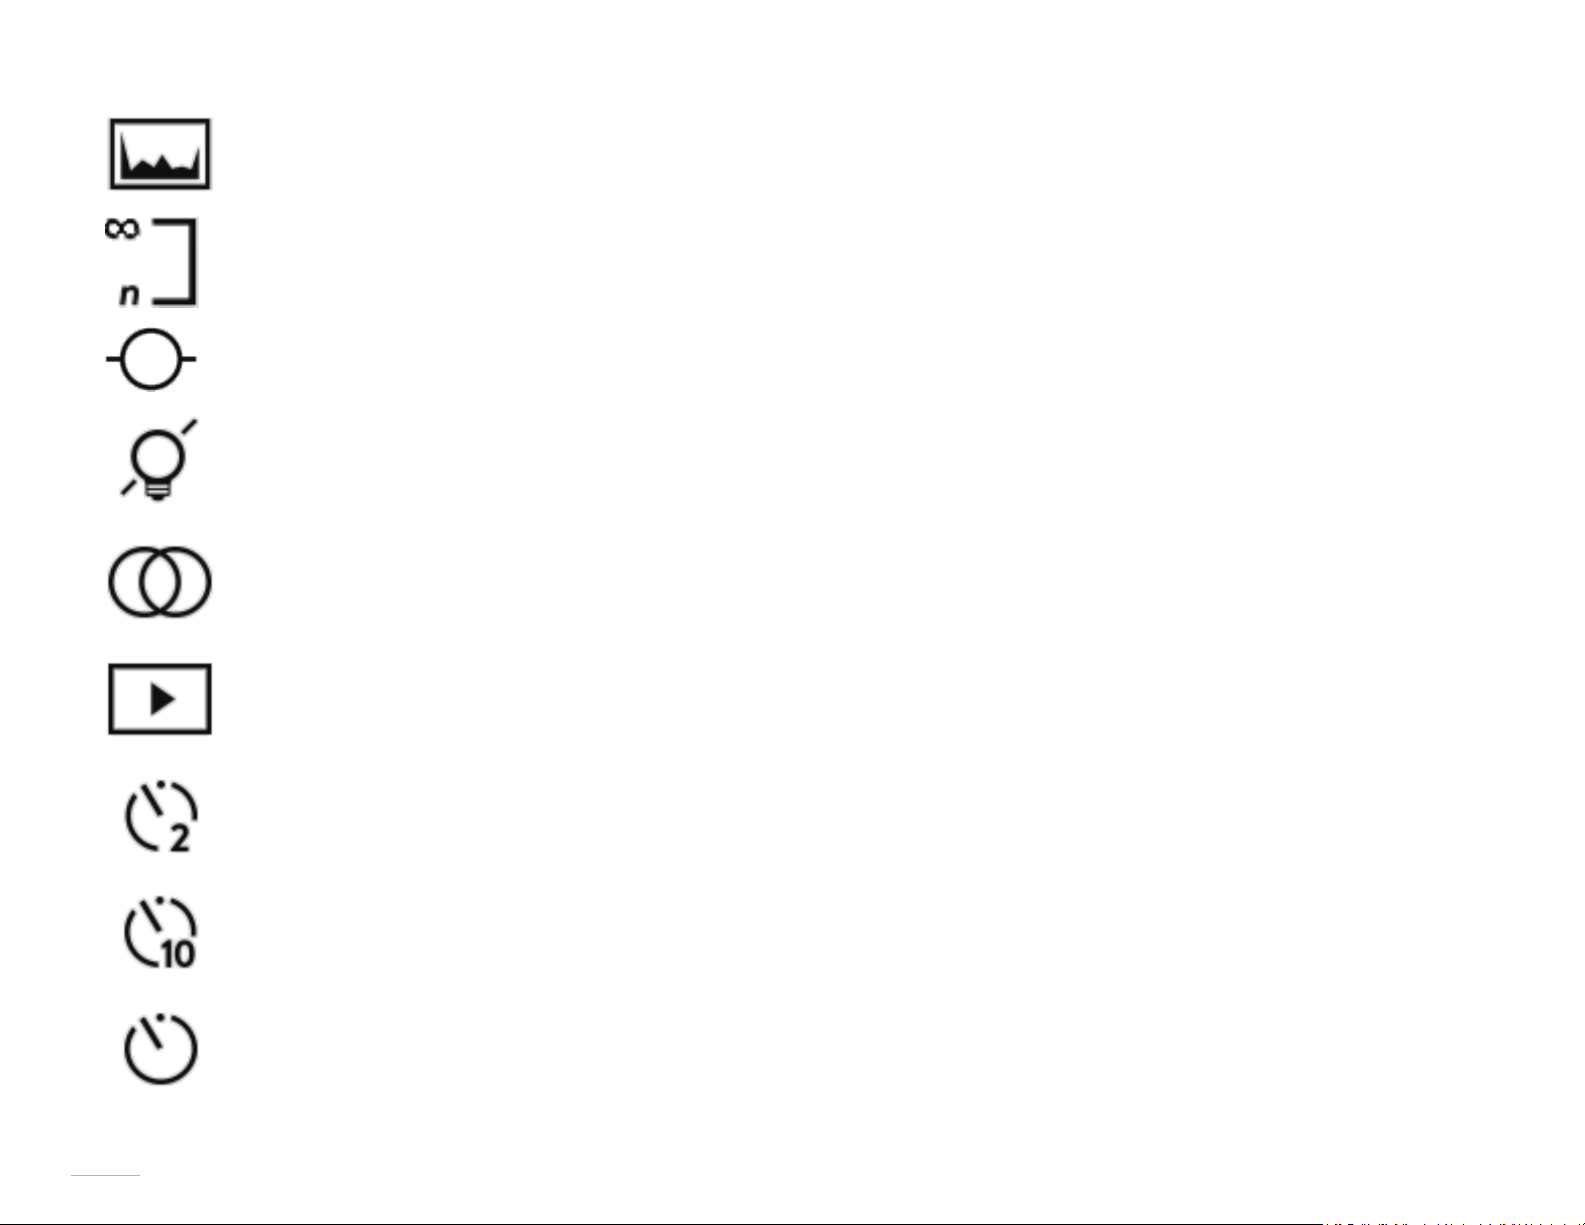
Histogram
Hyperfocal Mode
Level Guide
Lights Out Mode
Optical Offset
Playback Mode
92
Self-Timer: 2 Seconds
Self-Timer: 10 Seconds
Self-Timer
Page 93

Settings
Auto White Balance
Cloudy White Balance
Daylight White Balance
Flash White Balance
Flourescent White Balance
Manual White Balance
Shade White Balance
Tungsten White Balance
93
Page 94

Zoom Lock
Resources
• Lytro website — www.Lytro.com
• Training — training.Lytro.com
• Lytro Desktop — www.Lytro.com/downloads
• Lytro Support — support.Lytro.com
Legal
© 2015 Lytro, Inc. All rights reserved. Lytro, Illum and the Lytro logo are trademarks of Lytro, Inc. Mac OS X is a trademark of Apple
Inc., registered in the U.S. and other countries. Windows and DirectX are trademarks of Microsoft Corporation in the United States
and/or other countries. Intel is a trademark of Intel Corporation in the U.S. and/or other countries. AMD Radeon is a trademark of
Advanced Micro Devices, Inc. NVIDIA and GeForce are are trademarks and/or registered trademarks of NVIDIA Corporation in the
U.S. and other countries. SD, SDHC, and SDXC Logos are trademarks of SD-3C, LLC. Other company and product names may be
trademarks of the respective companies with which they are associated.
94
Page 95

95
 Loading...