


ILLUM
Table of contents
 Loading...
1
Lytro ILLUM User Manual
Documentation Version 2.0 –July 8th, 2015
©
2015 Lytro, Inc. All rights reserved.

2
Table of Contents
Introducing the Lytro ILLUM 6
Benets of the Light Field 6
Learning to use Lytro ILLUM 6
Quick Reference Guide 8
In the box 9
Product Requirements 9
Touchscreen Capture Mode 10
Image View Area 11
Information Bar 12
Menu Bar Page 1 13
Menu Bar Page 2 14
Menu Bar Page 3 15
Playback Mode, Menu Bar Page 1 16
Playback Mode, Menu Bar Page 2 17
Getting Started 18
Charging the battery 18
Inserting the charged battery 18
Inserting the strap rings 18
Inserting an SD card 19
Using the set-up assistant 19
Transferring the Pairing data 19
Powering on and off 19
Capture Mode 20
Camera Control Behaviors 21
Touchscreen layout in Capture Mode 22
Capture Mode, Image View Area 24
Capture Mode, Information Bar 26
Capture Mode, Menu Bar Page 1 28
Capture Mode, Menu Bar Page 2 30
Additional touch control icons 32
Tapping the screen to focus 33
Hiding /displaying the Menu / Information Bar 34
Choosing an exposure mode 35
Setting the ISO 38

3
Setting the shutter speed 40
Setting the EV compensation 42
Setting the white balance 44
Manually setting the white balance 45
Shooting with continuous shutter 48
Using the self timer 48
Applying a grid overlay 48
Using the live exposure histogram 50
Adjusting the optical offset 51
Adjusting the Settings Menu 51
Opening the Rearrange Menu 52
Rearrange Menu features 53
Using Lights-Out 53
Using Manual Focus 53
Applying Focus Bracketing 54
Applying Exposure Bracketing 56
Using Focus Lock 58
Using Zoom Lock 58
Using Hyperfocal mode 58
Using a ash 59
Using the Level Gauge 60
Calibrating the Level Gauge 61
Playback Mode 62
Touchscreen layout in Playback Mode 63
Information Bar 64
Menu Bar 64
Depth Assist Bar 64
Processing a Living Picture for refocusing 65
Refocusing a Living Picture 66
Virtual Aperture in a Living Picture 67
Interactive Perspective Shift in a Living Picture 68
Using grid view 69
Using the review exposure histogram 70
Deleting a picture 70
Deleting one or more pictures in Grid View 70
Opening the Settings menu 71

4
Depth Composition Features 72
The refocusable range 72
Depth Assist Bar 75
Light eld Hyperfocal position 76
Optical Offset 77
Adjusting Optical Offset 80
Depth Histogram and Depth Overlay 81
Focus bracketing 83
Settings 84
Format SD card 84
Brightness 84
Sounds 84
Exposure simulation 84
Clipping warning 85
Instant preview 85
File format 85
iOS Connect 85
Long exposure noise reduction 85
Camera controls 86
Shutter Half-press 86
Exposure Dials 86
Exposure Dial Assignments 86
Lens Rings 87
Rearrange Menu 87
Remap Buttons 87
AEL 87
General 87
Date & Time 87
Time Zone 88
Language 88
Distance Measurements 88
About 88
Update Firmware 88
Transfer Pairing Data to SD Card 88
Help 89
Reset 89
Icon Glossary 90
Resources 94
Legal 94

5

6
Introducing the Lytro ILLUM
Lytro ILLUM is a light eld camera and software platform designed to redene the way we portray the
world around us. Harnessing the full power of the light eld, the Lytro ILLUM gives photographers a
unique way of capturing visual experiences — not as a static cross-section of reality but an interactive win-
dow into their world through Light Field Photography.
Benets of the Light Field
Unlike a conventional digital camera, the Lytro ILLUM captures the light eld, which includes the direction
of light. Most recently, light eld cameras lived only in academic labs – via a roomful of cameras tethered
to a super computer. Lytro’s scientists and engineers have optimized this technology so that the power of
the light eld can t right in your hands.
Capturing this fundamentally new data gives consumers unprecedented capabilities, including the ability
to focus, change the perspective, change the aperture, and view in 3D - all after a picture is taken. Photog-
raphers using the Lytro ILLUM have new creative opportunities to tell stories and capture moments, deliv-
ering Living Pictures to friends, family, and clients.
Learning to use Lytro ILLUM
This User Manual is a technical reference for using the Lytro ILLUM. It explains how to operate the camera,
and the behavior of each of the modes, settings, and buttons.
For many photographers, getting the most out of a light eld camera may require additional education
and thought on how to best compose and capture images with depth.

7
Lytro has developed a series of educational and training materials, including videos, online help,
and transformational galleries. Visit training.Lytro.com to get in-depth information in the
following categories:
- Orientation & Setup
- Light Field 101
- Light Field in the Field
- Workow
The educational material covers the Lytro ILLUM ecosystem including camera, desktop software,
publishing to web and mobile devices.
Watch education and training videos at training.Lytro.com
8
Quick Reference Guide
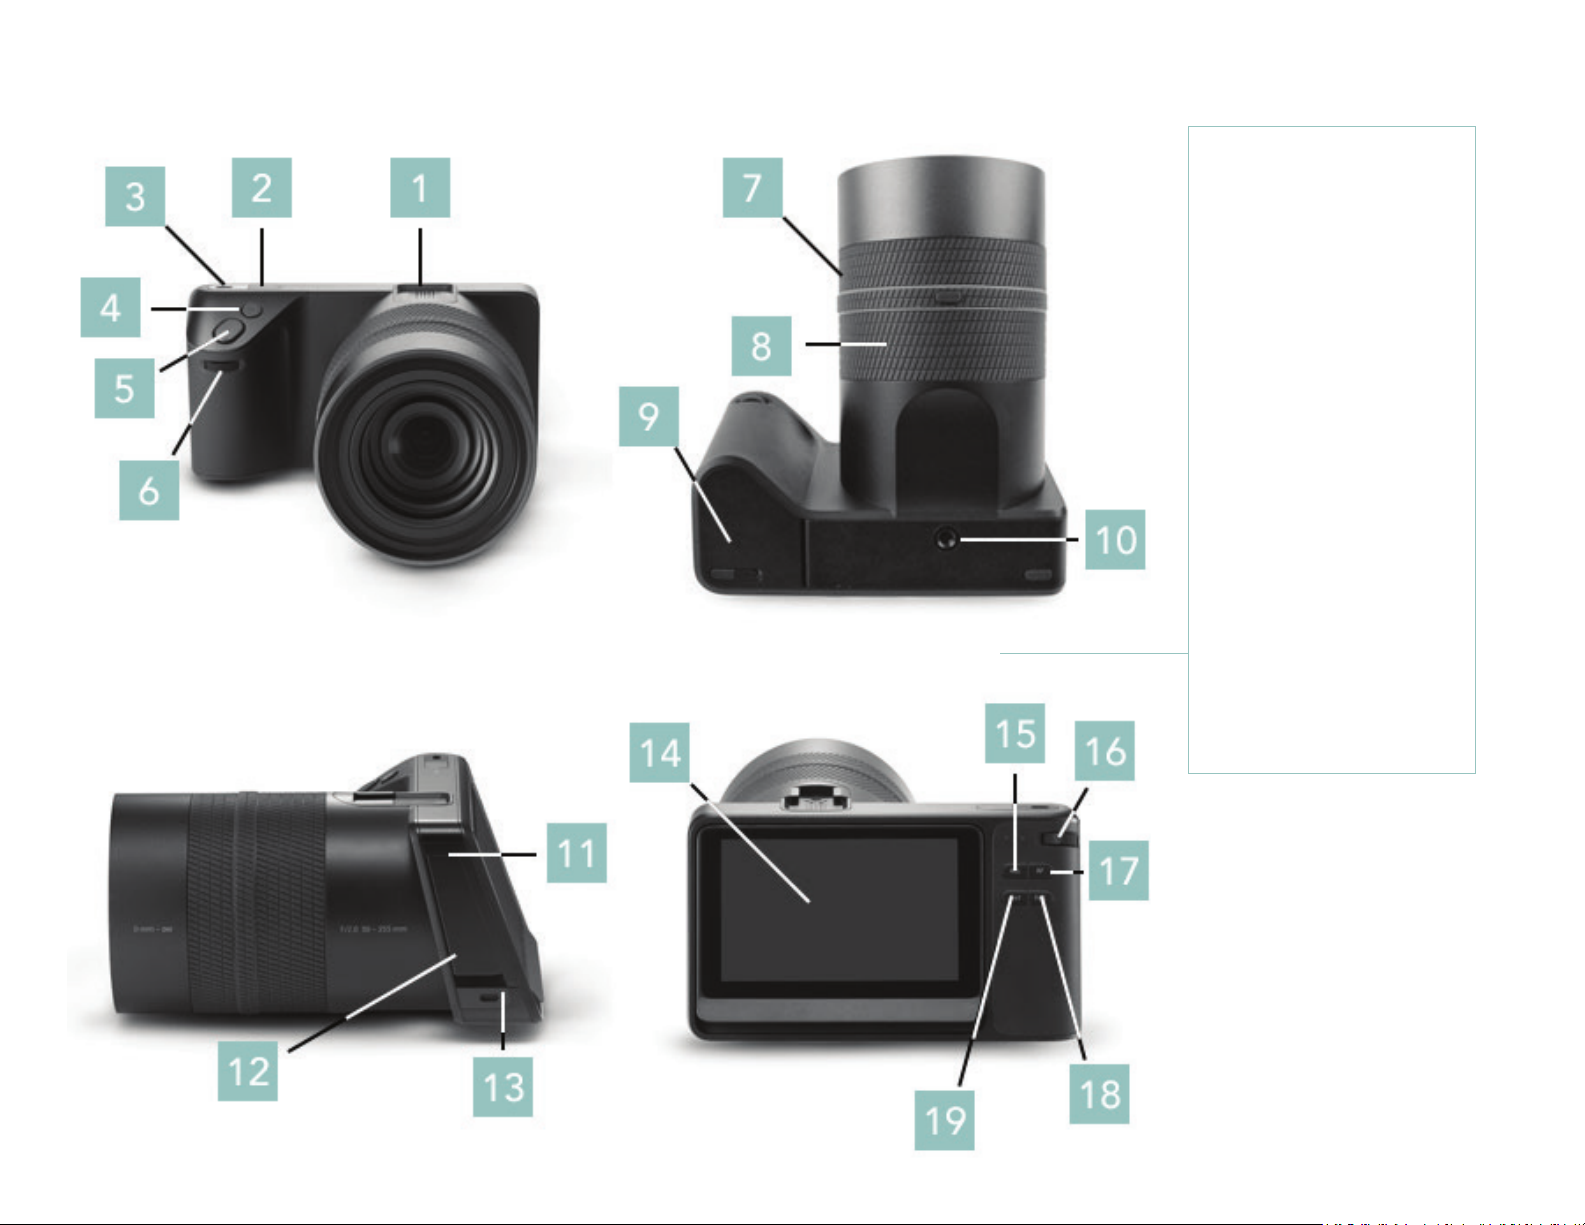
Camera Exterior
1. Hot shoe
2. Power button
3. Strap point
4. Lytro button*
5. Shutter button
6. Front dial
7. Focus ring
8. Zoom ring
9. Battery door
10. Tripod mount
11. Micro-USB 3.0
12. Port cover
13. Strap point
14. Touchscreen
15. AF button*
16. Rear dial
17. AEL button*
18. Fn button
19. Hyperfocal button

9
In the box
• Lytro ILLUM Camera
• Lytro ILLUM Quick Start Guide
• Lytro ILLUM Quick Charger
• Lytro ILLUM Rechargeable Li-ion Battery
• Lytro ILLUM Lens Cap
• Lytro ILLUM Lens Hood
• Shoulder/neck strap
• Strap anchors (2)
• Neutral density lter (ND8) – 72mm
• Micro-USB 3.0 cable
• Lens cloth
Product Requirements
SD card required (not included) Recommended: Class 10, 95 MB/second
Minimum:
Mac OS® X 10.9 or higher (min: 4GB RAM, Intel® Core™ 2 Duo or newer)
- or -
64-bit Windows® 7 or 64-bit Windows 8 (min: 4GB RAM, DirectX® 10.0 and dual-processor CPU)
Recommended:
Mac OS X 10.9 or higher (8GB RAM, Intel i5 or better)
- or -
64-bit Windows 7 or 64-bit Windows 8 (8GB RAM, Intel i5 or equivalent or better) Graphics card:
Intel HD 4600 or better
AMD Radeon™ HD 6750 or better
NVIDIA® GeForce® GTS 450 or better

10
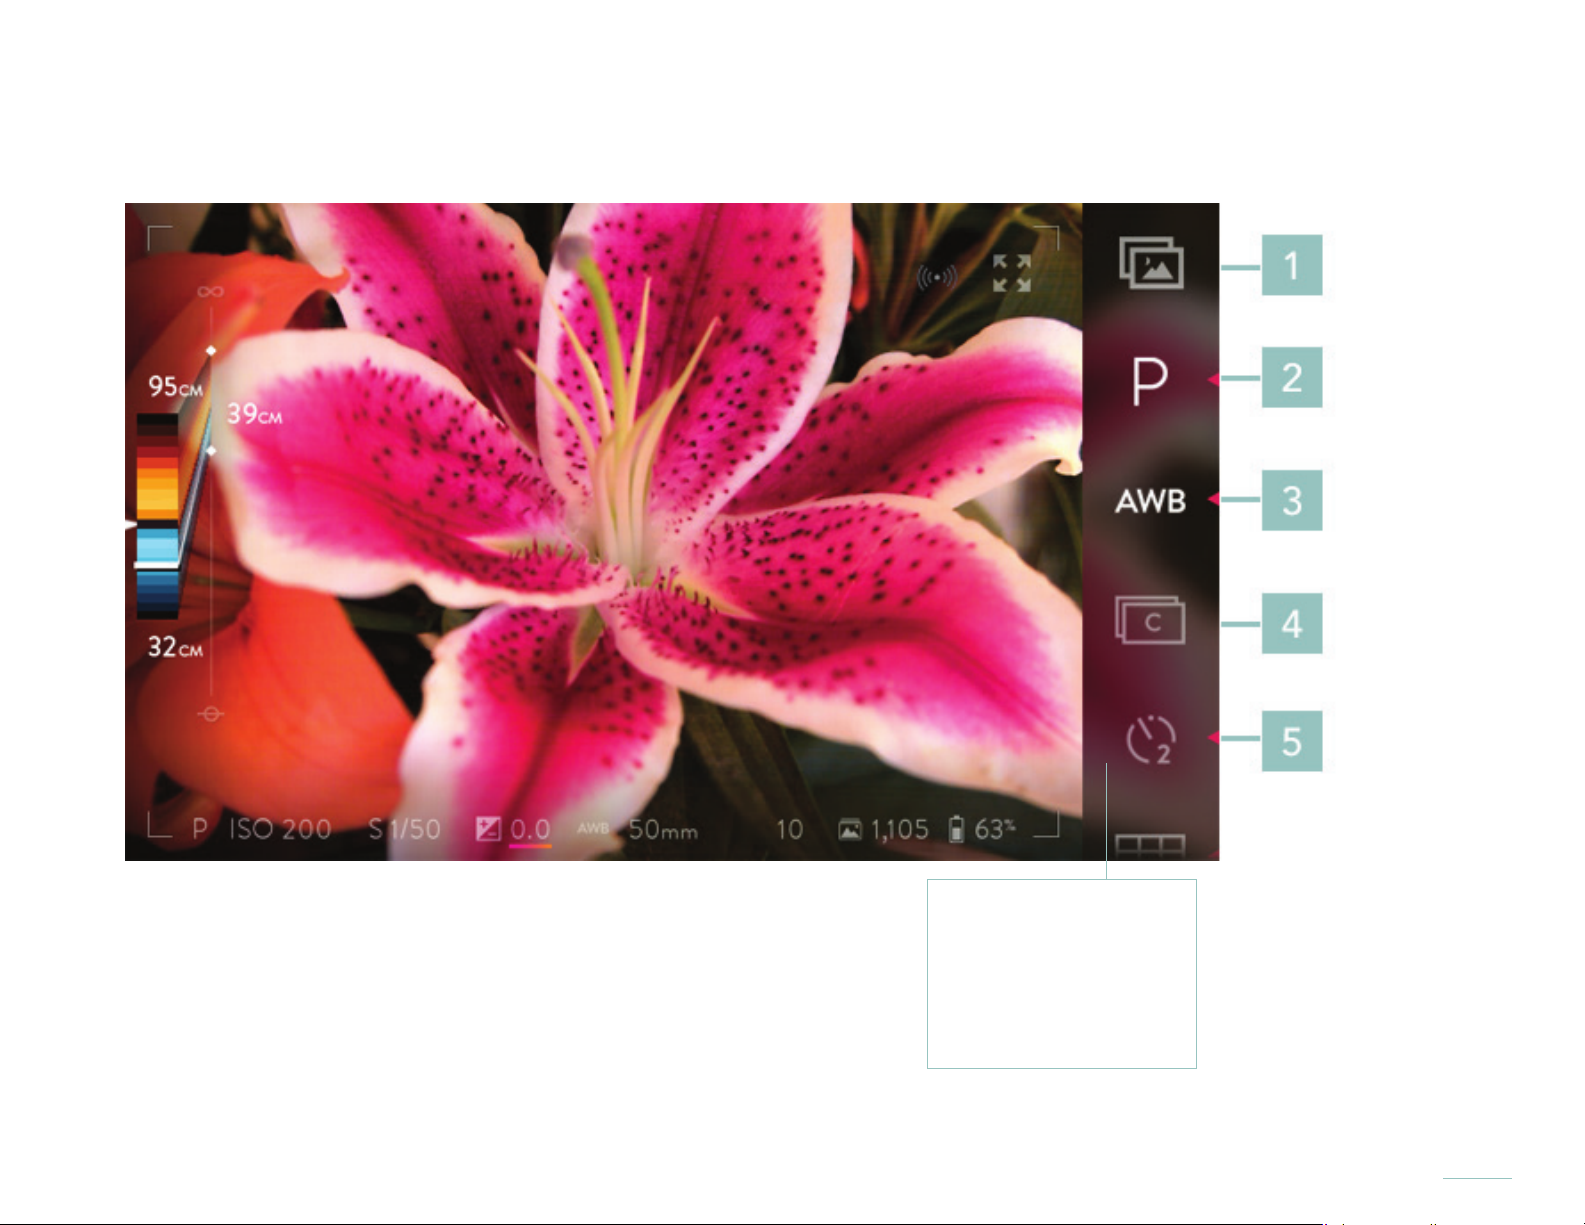
Touchscreen layout in Capture Mode
1. Image View Area
2. Depth Assist Bar
3. Menu Bar
4. Information Bar

11
Image View Area
1. Sensor crop region
2. Live view area

12
Information Bar
1. Exposure mode
2. ISO
3. Shutter speed
4. EV compensation
5. White balance
6. Focal length (35mm
equiv.)
7. Shot buffer
8. Shutter mode
9. Shots remaining
10. Battery remaining
11. Wi (iOS connect)
12. Full screen preview
13
Menu Bar Page 1
1. Playback Mode
2. Exposure mode
3. White balance
4. Continuous shutter
5. Self timer

14
Menu Bar Page 2
1. Grid overlay
2. Exposure histogram
3. Exposure bracketing
4. Exposure metering
mode
5. Rearrange menu

15
Menu Bar Page 3
1. Settings

16
Touchscreen layout in Playback Mode, Menu Bar Page 1
1. ISO
2. Shutter mode
3. Shutter speed
4. White balance
5. Focal length
(35mm eq.)
6. Picture number /
total pictures
7. Battery charge
8. Capture Mode
9. Grid view
10. Exposure histogram
11. Delete
12. Rotate image
13. Full screen preview

17
Playback Mode, Menu Bar Page 2
1. Favorites
2. Settings
18
Getting Started
Charging the battery
Before using the camera for the rst time, charge the lithium-ion battery. Place the battery into the includ-
ed quick charger, and plug the charger into a standard 110- or 220-volt, 50-60 Hz electrical outlet. When
taking the battery out of the box, it may be partially charged; a fully discharged battery may take four
hours or more to charge completely.
During charging, the LED on the charger will illuminate. When charging is complete, the LED will turn off.
A blinking LED indicates a power or connection problem, such as the battery not being inserted properly.
Inserting the charged battery
The battery compartment is on the underside of the camera. Hold the camera upside down and slide the
thumb-latch to one side to open the door. Insert the charged battery, hold the door fully closed, and slide
the latch back to the locked position.
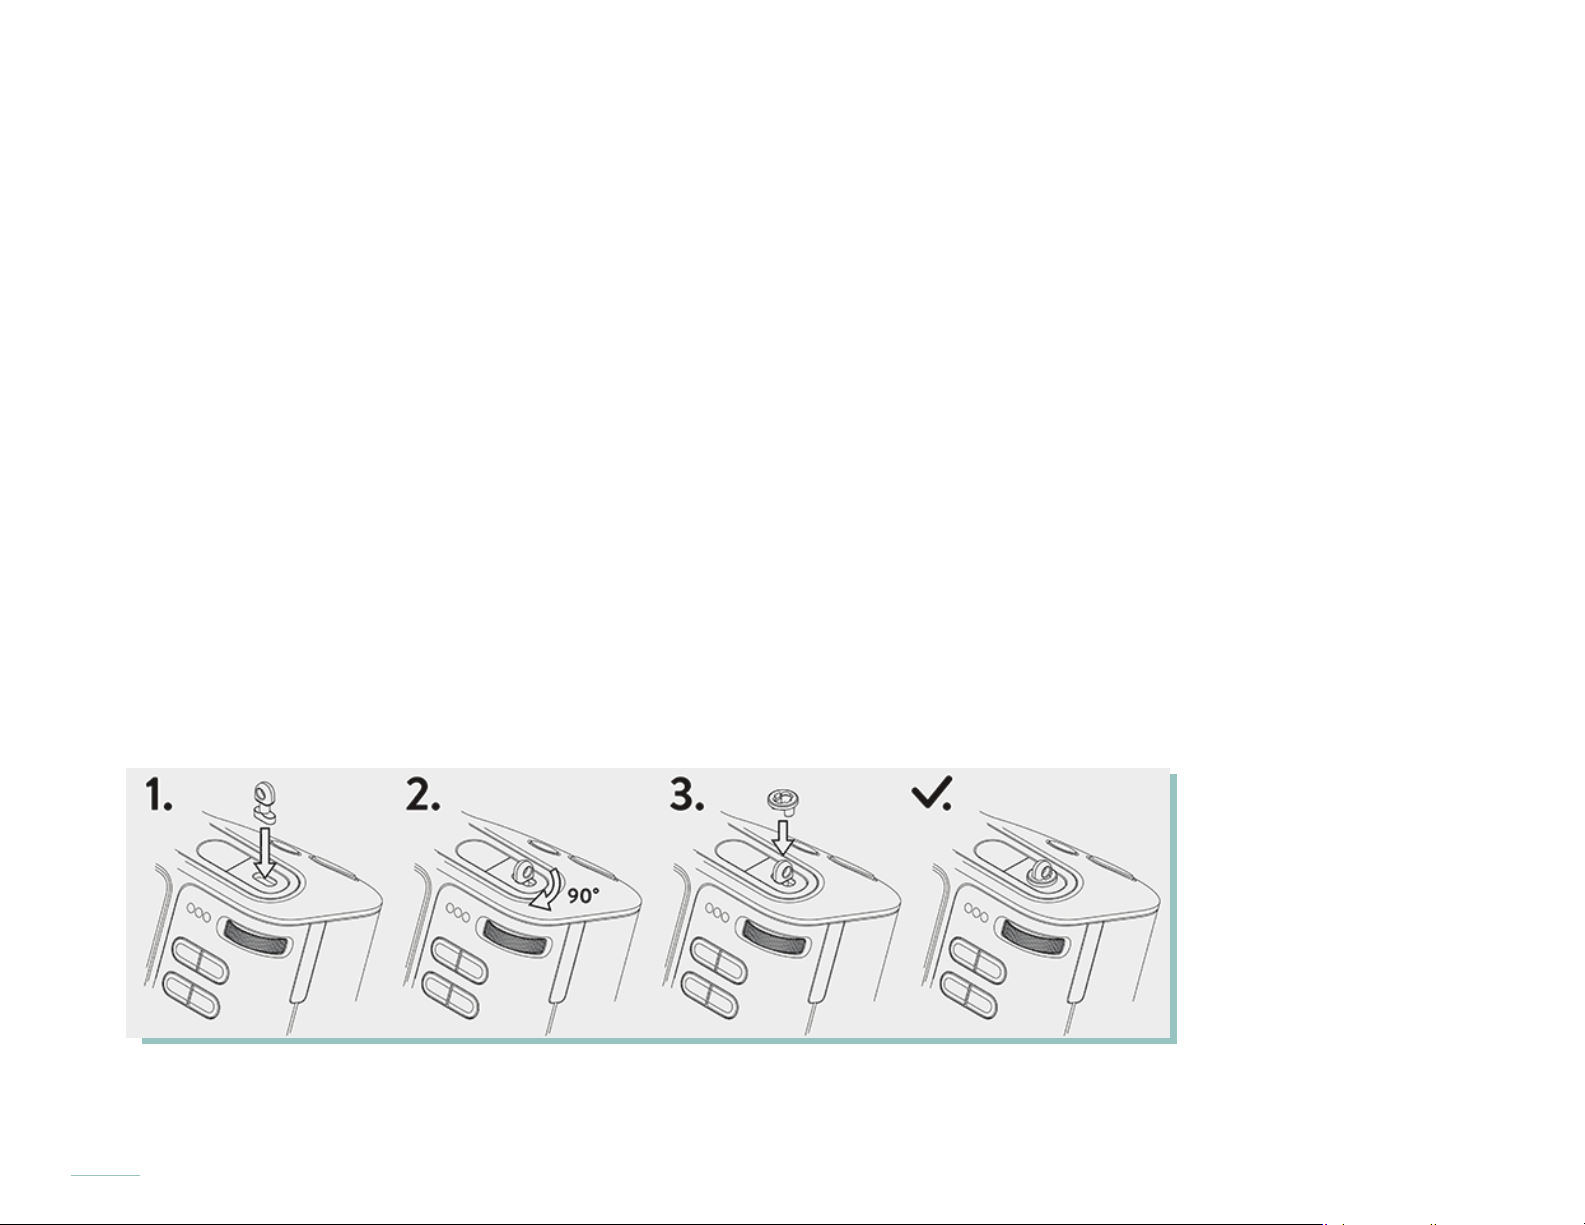
Inserting the strap rings
To prepare camera for use with a strap, install the included strap anchors. Insert an anchor into the strap
point on the top of the camera beside the power button. Turn it 90 degrees to position it. Then place one
of the included collars over the strap anchor and press down until it snaps into place. Repeat these steps
for the strap point on the side of the camera, below the port cover.
Once strap anchors are installed, attach the strap using the split-rings.

19
Inserting an SD card
Open the port cover and insert a SD, SDHC, or SDXC card into the SD card slot. For the rst time use of
the camera, 2GB of free space is required on the SD card. This free space is required for the Pairing data
(see Transferring the Pairing data in this section). Close the port cover.
Using the set-up assistant
The rst time the camera is turned on, there is a walk through to set-up the camera, where you select the
language for the camera to use, select time zone, set the date and time, and transfer the Pairing data (see
next section). The camera will then give a very brief overview of its most unique controls and features.
Transferring the Pairing data
As part of the walk-through to set up the camera, Pairing data is transferred to the SD card. The Pairing
data is required by the Lytro Desktop to optimally process pictures, and will be automatically copied off of
the SD card by the Lytro Desktop the rst time pictures are imported from that card.
The Pairing data requires approximately 2GB of free space on the SD card. Do not reformat or delete the
contents of the SD card until the Pairing data has been transferred to the Lytro Desktop.
The Pairing data may be manually transferred at a later time (see Transfer Pairing Data to SD Card).
Powering on and off
Briey press the power button to turn the camera on. To power off, briey press the power button again.

20
Capture Mode
When the camera is rst powered on, it will start up in Capture Mode. If there’s a compatible SD card in place, and the
card is not full, the camera is ready to capture a Living Picture. Compose the shot by looking at the live view displayed on
the screen. When ready to capture a picture, press the shutter button all the way down and release.
To operate the camera in Capture Mode, use a combination of physical controls and on-screen controls.
Note that these are the default behaviors of the controls. Many can be customized in Settings
(see Camera controls).
Camera Controls
1. Power button
2. Lytro button
3. Shutter button
4. Front dial
5. Zoom ring
6. Focus ring
7. Touchscreen
8. AF button
9. Rear dial
10. AEL button
11. Fn button
12. Hyperfocal button

21
Camera Control Behaviors
1. Power button — when the camera is off, a brief press turns it on; when the camera is on, a brief
press turns it off
2. Lytro button — a half-press displays depth feedback for the object at the center of the frame; a
full-press displays a live depth histogram and depth overlay
3. Shutter button — a half-press engages auto exposure lock (AEL); a full-press releases the shutter
4. Front dial — sets the ISO (in ISO Priority Mode); sets Shutter Speed (in Shutter Speed Priority
Mode and Manual Mode)
5. Zoom ring — adjusts the focal length of the lens
6. Focus ring — adjusts the focus of the lens
7. Touchscreen — Provides view of scene through the lens, plus touch screen menus and informa-
tion
8. Rear dial — sets the EV compensation in Program, ISO Priority, and Shutter Speed Priority
Modes; sets the ISO in Manual Mode
9. AF button — activates autofocus when pressed
10. AEL button — locks the exposure at the current setting while held down
11. Fn — toggles between Capture Mode and Playback Mode
12. Hyperfocal button — sets the focus of the lens to the light eld hyperfocal position (moves the
far end of the refocusable range to innity)

22
Touchscreen layout in Capture Mode
1. Image View Area
2. Depth Assist Bar
3. Menu Bar
4. Information Bar

23
Touchscreen layout in Capture Mode
1. Image View Area — displays the live view; sensor crop region is indicated by the thin gray frame
2. Depth Assist Bar —
displays the refocusable range (indicated by the colored bands) for a Living Picture captured at the current settings
3. Menu Bar —
displays touch control icons (swipe up to scroll to additional pages)
4. Information Bar —
displays current capture settings, as well as SD card and battery status

24
Capture Mode, Image View Area
1. Sensor crop region
2. Live view area

25
Capture Mode, Image View Area
1. Sensor crop region – displays where the image is cropped after capture by viewing applications; portions of the picture outside
of the sensor crop region are displayed only when the perspective is changed in a viewing application
2. Live view area –
displays the live view of the camera

26
Capture Mode, Information Bar
1. Exposure mode
2. ISO
3. Shutter speed
4. EV compensation
5. White balance
6. Focal length (35mm
equiv.)
7. Shot buffer
8. Picture count
9. Shots remaining
10. Battery remaining
11. Wi-Fi (iOS Connect)
12. Full screen preview

27
Capture Mode, Information Bar
1. ISO indicator — displays the current ISO; tap to set ISO in ISO Priority Mode and Manual Mode
2. Shutter speed indicator — displays the current shutter speed; tap to set speed in Shutter Priority Mode and Manual Mode
3. EV compensation indicator — displays the compensation currently selected; tap to set compensation (not available in Manual
Mode)
4. Exposure mode indicator — P for Program, I for ISO Priority, S for Shutter Speed Priority, M for Manual; replaced by a lock sym-
bol when AE is locked
5. White balance indicator — displays the current white balance setting
6. Focal length indicator — displays the current focal length (35mm equivalent)
7. Shot buffer indicator — displays the number of shots remaining in the internal buffer used for burst capture; when the indicator
reaches zero, the maximum continuous frame rate is limited by the write speed of the SD card
8. Shots remaining indicator — displays how many additional Living Pictures the SD card can hold; when no SD card is inserted, the
no SD card indicator will appear here
9. Battery remaining indicator — displays the battery’s remaining charge
10. Wi-Fi (iOS Connect) indicator — visible only when the camera is enabled as an access point in Settings, iOS Connect
11. Full screen mode -- Hides all extraneous data for simple composition.

28
Capture Mode, Menu Bar Page 1
1. Playback Mode
2. Exposure mode
3. White balance
4. Continuous shutter
5. Self timer
Note that the order of the icons in the Menu Bar may be customized and additional icons
may be added (see Rearrange Menu). The default order is referenced here.

29
Capture Mode, Menu Bar Page 1
1. Playback Mode icon — tap to open Playback Mode, displaying the most recent Living Picture
2. Exposure Mode icon — tap to open the submenu for setting the mode; icon changes to reect the current mode
3. White Balance icon — tap to open the submenu for setting the white balance; icon changes to reect the current setting
4. Continuous Shutter icon — activates continuous shutter when tapped/illuminated
5. Self-Timer icon — tap to activate the self-timer; tap and hold opens the submenu to set the countdown at 2 or 10 seconds; icon
changes to reect the current setting
Loading...