

Page 1
Mastering Analog to Digital / Digital to Analog Converter
User Manual Addendum
November 2012 Version 5
Firmware and Feature Update
Lynx Studio Technology, Inc.
www.lynxstudio.com
support@lynxstudio.com
Updated: December 1, 2012
Page 2
1 Hilo Firmware 5 Features
1.1 Meters
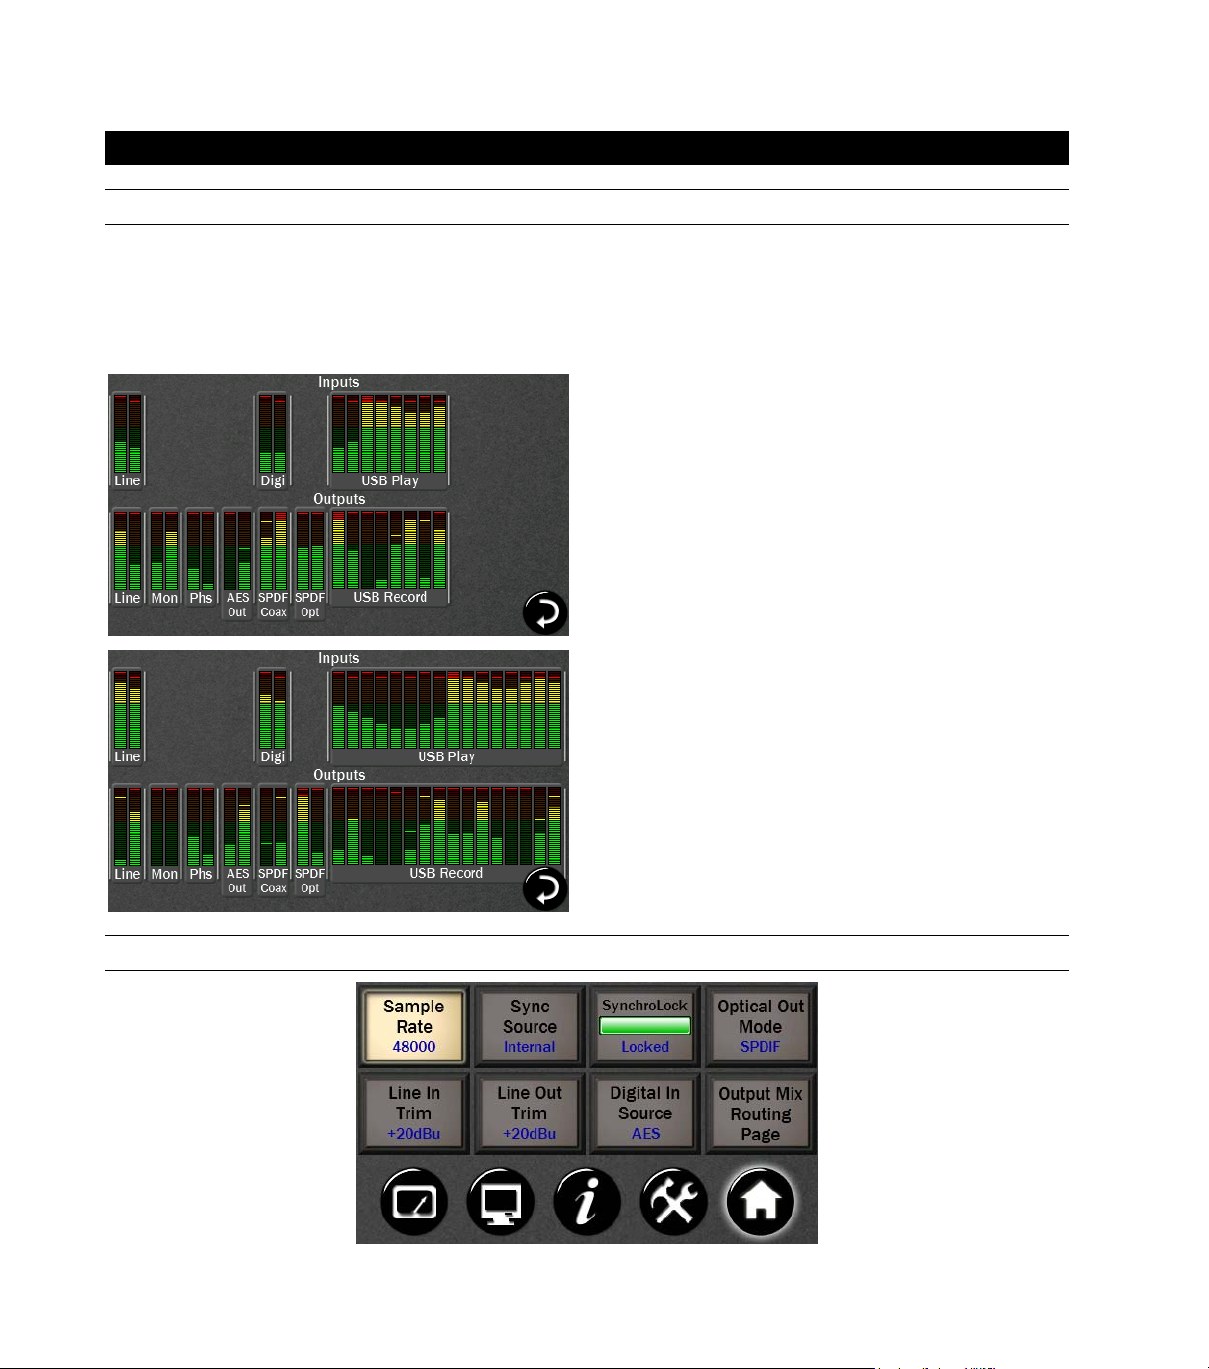
The “All I/O” Meter Screen now shows the active USB channels. Hilo can be toggled between USB 8-channel mode
(the default) or 16-channel mode. 8-channel mode is appropriate for most users, supports sample rates up to 192 kHz
and also DSD operation. 16-channel mode is most beneficial for users requiring more USB channels particularly when
using Hilo’s ADAT I/O. In 16-cha nnel m od e , the hig hest sup p orted sample rate is 96 kHz. 8-channel and 16-channel
mode can be toggled from the Tools menu.
USB 8-Channel Mode (Hilo Default)
For use with USB at sample rates up to 192 kHz and for
DSD playback.
USB 16-Channel Mode
For 16 USB input and output channels at sample rates up
to 96 kHz. Ideal for using the ADAT optical I/O on Hilo.
Note: If you are in 16-channel mode and turn DSD
playback on, Hilo will automatically prompt you to
switch to 8-channel mode to access the high sample rates
required for DSD playback
1.2 Home Menu
Page 3
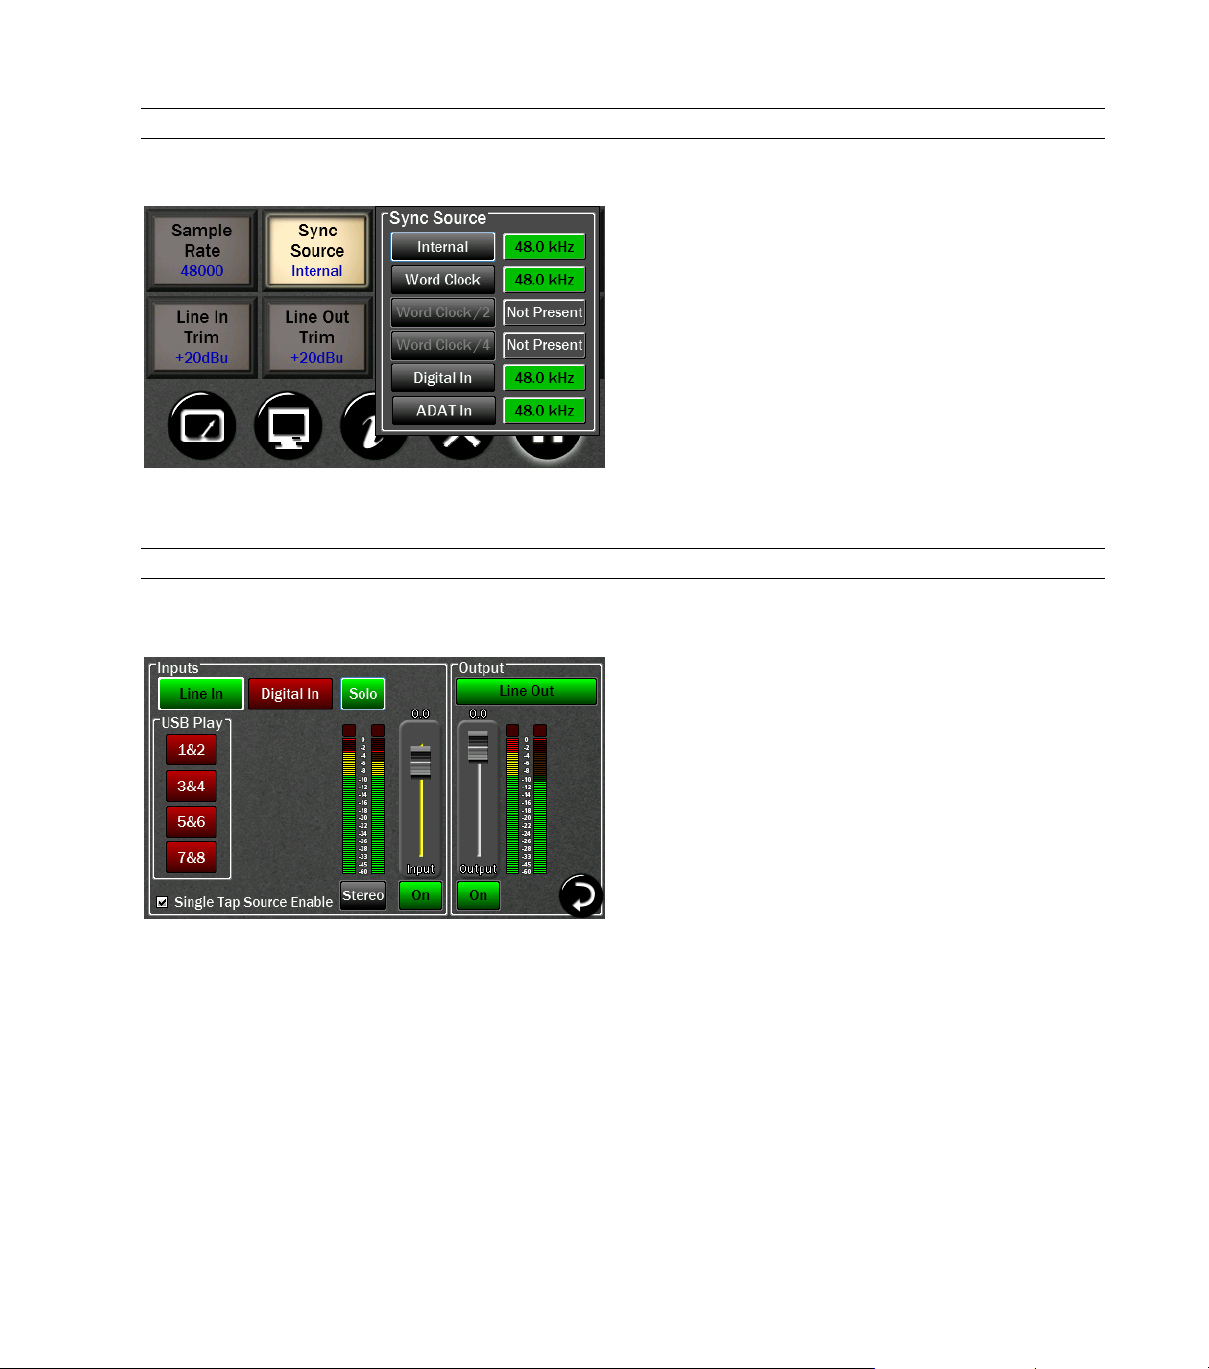
1.2.1 Sync Source
1.2.2 Output Mix Routing Page
1.2.2.1 Solo Button
When the LT-USB is NOT connected to the computer,
the Sync Source may be changed to one of the following
four choices:
• Internal: Clock driven by the Hilo’s crystal oscillator
• Word Clock: Clock derived from the WORD
CLOCK input
• Digital: Clock derived from the active digital input
• ADAT In: Clock derived from the ADAT input.
Once an ADAT signal is detected on the Optical
Input, Hilo automatically switches the Optical input
from S/PDIF to ADAT. In this mode, the additional
ADAT inputs will appear as available channels on
the output mix routing page; meter source selection
and the test tone page.
Please note that Word Clock/2 and Word Clock/4 are not
available in version 5 firmware.
The new Solo button allows any active input channel to
be isolated. This allows very rapid comparison of sources,
A/B switching, and a convenient way for troubleshooting
audio anomalies.
Simply press the Solo button and it will engage and turn
green with the word “Solo” blinking.
In this state, press any input source button and you will
hear that audio exclusively. Pressing any other input
source will instantly switch to the alternate source.
When done, tapping the Solo button returns Hilo to the
previous state, where multiple input sources can stream to
an output simultaneously.
Page 4
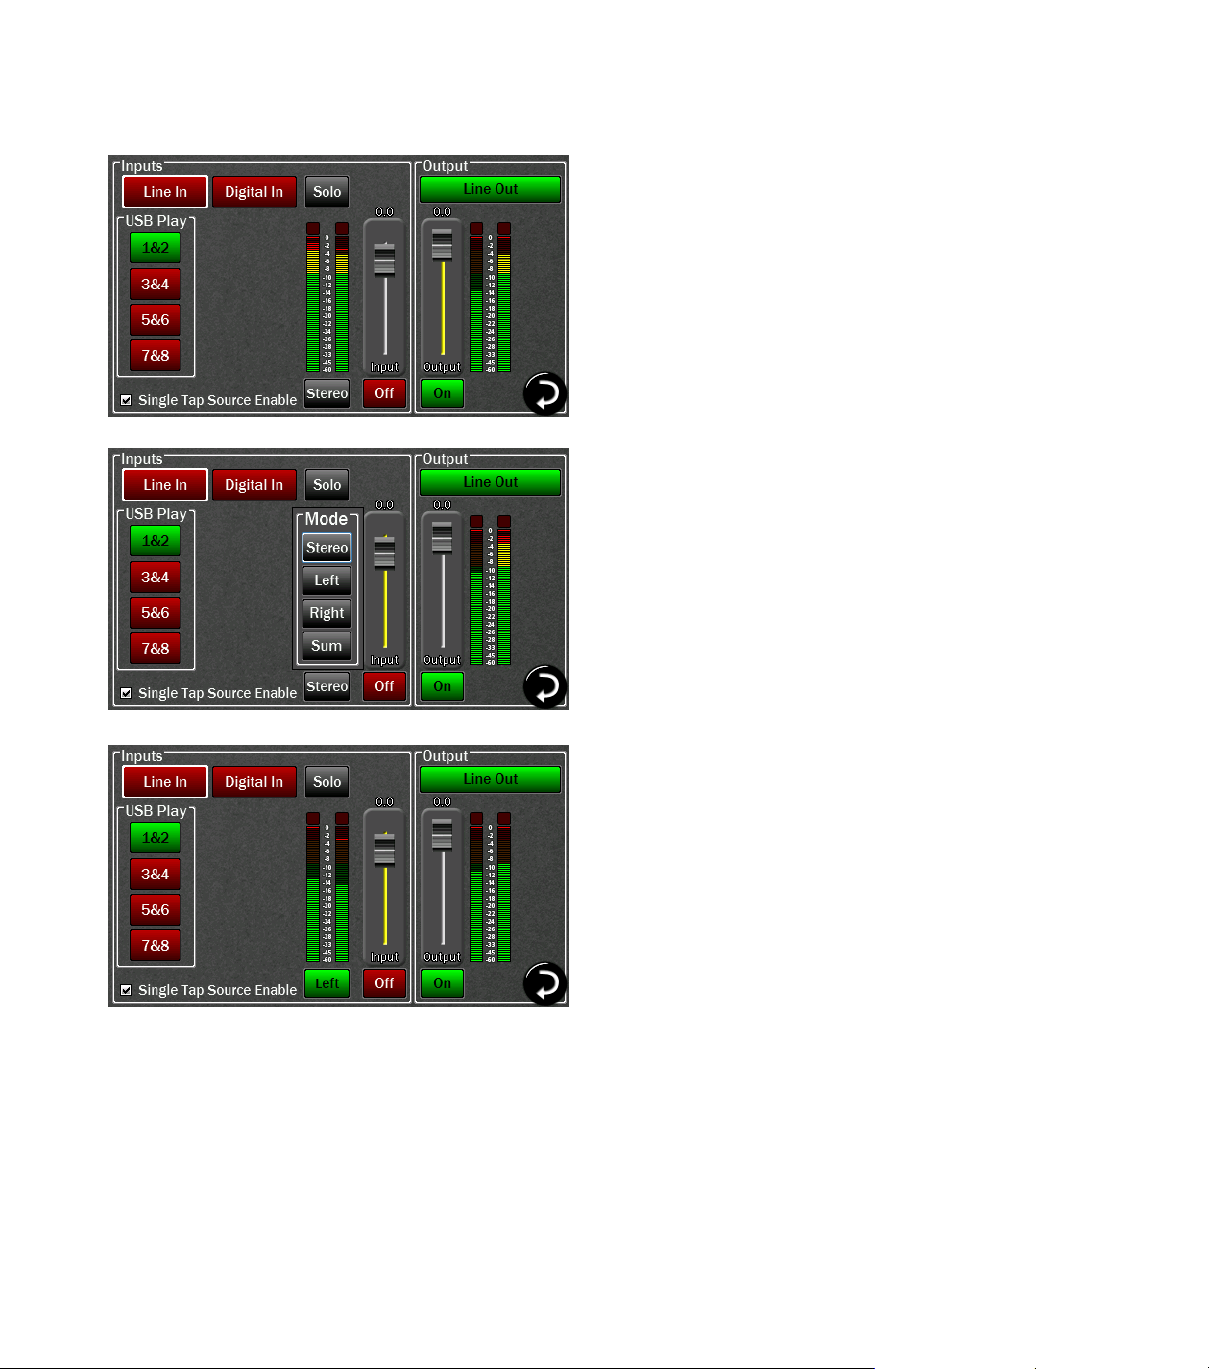
1.2.2.2 Stereo / Mono Options for Input Channels
In the Output Mix Routing Page. The default state for
each input source is stereo, with two channels of input,
streaming through a two-channel output.
There are 4 different options for routing an input signal to
an output. These selections pertain to the operation of a
specific input source routed to a specific output. The
setting is not global, and must be set for each output that
is being used.
Select the Output channel that you wish to listen to, then
press the desired input source (in this example, Line In).
Then tap the Stereo button under the input meters. You
can now choose between:
• Stereo (default)
• Left –audio from the Left input channel (in this case
Line In Left) streaming to both output channels
• Right –the Right input channel streaming to both
output channels
• Sum – combining both the Left and Right inputs into
one Mono stream which is sent to both the Left and
Right outputs equally. The summed signal is
automatically attenuated by 3dB in order to reduce
the possibility of digital clipping.
The chosen option is shown on the button at the bottom of
the Input meters any time that input channel is selected.
Each input channel can be controlled and assigned
independently for each output.
For example, you can have Line In “Summed” sent to the
Monitor Output, while having Line In “Stereo” assigned
to the Headphone Output. This flexibility allows complex
routing to be achieved very easily.
Page 5

1.2.2.3 Active Channels Shown on Output Mix Routing Page
Improvements have been made that allow this page to accurately show the active inputs and outputs available in real
time.
When Hilo is in 8-channel LT-USB Mode, USB channels
1-8 are visible and available.
When the Optical Out Mode is set to ADAT, Out 1-8 are
available. Note - when one wishes to use ADAT I/O, it
would be more typical to select 16-channel mode, so that
the ADAT channels can be independent from the other
Hilo outputs.
Also Note – when the Optical Out Mode is set to ADAT,
the S/PDIF Optical Output is grayed out and not
available. However the SPDIF Coax Output is still
available for use.
When the 16-channel USB Mode is engaged, all 16 USB
input and output channels are visible and available.
If ADAT is detected on the optical input, the ADAT
inputs are visible and available.
Page 6

1.3 Tools Menu
1.3.1 Save & Recall Scene Buttons
Hilo scenes store routing, clocking settings, level controls,
sample rate conversion settings and more into an instantly
recall-able “scene”. The “Save Scene” button on the
Tools page is where this occurs. Now you have the ability
to name the scenes.
Once you have a set up that you want to save, press the
SAVE SCENE button
Select Scene 1 to 6 for storage.
The new QWERTY keyboard screen will come up and
you can name the scene using up to 13 characters
Page 7

Input the Scene name using your fingers (or some
pointed, non-abrasive pointer such as pencil eraser, pen
end or even a chop stick ). To clear the entire name, tap
the Clear button. To backspace and clear one letter at a
time, tap the Back button. Tapping the Cap button will
capitalize the letters but keep the row of numbers.
Tapping Shift capitalizes the letters and changes the
numbers to commonly used symbols. Tap the Save button
when finished.
You have now stored your scene name, routing, level,
meter, sample rate, sync source, trim, digital source, audio
settings, UI options and optical mode information.
If you do not want to Save a scene, push the Cancel
button at the bottom of the Pop up.
Now tap the Recall button. The Scenes that you have
named and stored will appear in the pop up window.
Any Scenes that have not been used will be grayed out..
1.3.2 DSD Mode
Firmware 5 enables DSD Playback.
This allows Hilo to play DSD audio files received via USB, AES-3 or S/PDIF. Hilo supports the recently adopted DoP
V1.1 standard which is a method for transferring DSD audio over PCM frames. Playback of DSD using this method is
provided by a growing number of software vendors including Channel D and Audir vana for Macintosh, and JRiver
Media Player for Windows.
Page 8

Using the DSD application of your choice, connect your computer using the USB or Digital Input (AES IN; S/PDIF
COAX IN or S/PDIF OPT IN). Before playing, make sure the DSD Mode button is set to Auto. In this mode DSD
audio in DoP V1.1 is automatically detected on either USB input 1 & 2 or the selected Digital In Source. If DSD is
detected on both of these sources, priority is given to USB input 1 & 2.
NOTE: When the DSD Mode is set to Off, incoming data will be processed as standard linear PCM data always. If
DSD audio is received in this mode, low volume noise will be played.
DSD Routing: Upon detection of incoming DSD audio, the signal is automatically routed to the Line Outputs, Monitor
Outputs, and Headphone Output. Routing to the remaining outputs of Hilo is not affected.
When switching into DSD Mode to “Auto”, if Hilo is in
16-channel LT-USB mode, then a warning screen will
appear. As DSD requires a sample rate of 176.4kHz
available only in USB 8-channel mode, this screen will
prompt you to switch to 8-channel LT-USB mode.
Tap Yes and Hilo will automatically reset to LT-USB 8channel mode and be ready for DSD playback.
While DSD is playing, any page that has level meters will
show a DSD logo instead of the meters. As soon as DSD
playback is stopped, the level meter page will return.
1.3.3 Test Tone function
Intended for system testing and calibration, Hilo’s new Test Tone provides a 1 kHz audio signal which can be sent to
any output or combination of outputs. The tone level can be controlled in 0.5 dB increments from a new dedicated
screen. For reference, the same screen also shows the input levels coming into Hilo.
Page 9

1.4 Display Menu
Using the menu button on the Output side (here selected
as Line Out), choose the output to which you want to send
the test tone.
Use the On/Off button to engage/disengage the test tone.
The initial level is set at -40 dBu. The fader and front
panel rotary control allow you to adjust the level in 0.5 dB
increments.
Multiple outputs can receive the test tone simultaneously.
Inputs Meters are shown to allow monitoring of any
signal being received by the Hilo.
1.4.1 Backlight
The new Backlight button allows the user to adjust Hilo’s
appearance by using the onscreen faders or Rotary
control. You can now:
• Adjust Hilo’s brightness intensity in a range of 5%
to 100% in 1% increments - ideal for adapting to a
variety of ambient light conditions.
• Enable and adjust the new Screen Dim function.
Auto-Dim can be activated between 15 seconds to 5
minutes, or set to Never.
• The Dim Intensity determines the brightness level
If the screen goes completely dark, Hilo will return to the established Brightness Intensity by touching the screen,
moving or pressing the Rotary Control o r pressing the front panel Power Switch.
when Dim is active. It can be set for as low as 0%
(screen off) up to the default state of full brightness.
Page 10

1.4.2 Analog VU Reference
Now you can calibrate the Analog meters to set the 0 VU
level.
Using the fader on-screen or the Rotary Knob, the
0 VU mark on the meters can be calibrated between
-3dBFS and -24dBFS.
1.4.3 Calibrate Touchscreen Warning Page
With a touch screen it is easy to engage the wrong
function by mistake. This screen allows you to back out
of this command if you wish.
There are times when calibrating the touchscreen is
necessary for optimum performance. However if this
setting was selected unintentionally, now you can
overrule the request and return to the Display Menu page.
1.5 Firmware Updates
Hilo contains firmware that is field-programmable via the USB bus. These updates improve performance and enhance
functionality of Hilo. In some cases, the touch screen functions and appearance may change dramatically from
firmware updates.
Additionally, the LT-USB card installed into Hilo has its own firmware. There are also updates for this card available
that, similarly, can improve functionality and expand the feature set. Fortunately, both can be updated from the same
downloadable application for Windows or Mac OS X. Here are the steps to insure that your Hilo is up to date and in
top form:
1. Make sure that your Hilo has a valid USB connection to the computer. Windows users will need to make sure
that current drivers are installed.
2. Visit www.lynxstudio.com
3. Select your OPERATING SYSTEM from the list, “Hilo” as the PRODUCT, and “All Types” for FILE TYPE.
Click “Search”
4. Download the Hilo Firmware Updater. Double Click to launch it.
5. Follow the prompts (Windows Users need to accept the EULA) until you reach the Hilo Firmware Update
screen. Verify that the “New Firmware Version” is higher than the “Current Firmware Version”. If so, click
“Update”
and click Support > Downloads.
Page 11

6. The Hilo LCD screen will display a warning screen that reads “Do not turn off the computer or the Hilo
during the firmware updater process”. There is also a progress bar.
7. When the Update is complete, you will be instructed to power down Hilo. Turn off the front panel standby
switch. Then turn off the rear panel power switch. Wait three seconds, then power Hilo back up.
8. Now we need to update the LT-USB card inside of Hilo. Launch the Hilo Update application again. This time
from the “Select Unit to Update” drop-down menu, choose “LT-USB”
9. Verify that the New Firmware Version is higher than the Current Firmware Version. If so, click “Update”
10. When the updater is complete, close the pop-up window in your computer. Again, power cycle Hilo using the
front panel standby switch, the rear panel power switch, wait three seconds, then turn the unit back on.
Page 12

11. After programming, the computer may need to reload the driver. If you are prompted to do so, perform an
automatic driver installation when prompted.
Also after programming, the settings you had on the unit previously, including saved scenes, may need to be reestablished. This depends on the number and type of differences between the older firmware and the newer.
Page 13

www.lynxstudio.com
support@lynxstudio.com
Updated: December 1, 2012
Copyright © 2012, Lynx Studio Technology Inc.
 Loading...