

Page 1

Page 2

Contents
1 Introduction/Features ......................................................................................................... 3
1.1 System requirements .......................................................................................................... 3
1.1.1 Compatible Equipment..................................................................................................... 3
1.1.2 Windows ......................................................................................................................... 3
1.1.3 Macintosh ....................................................................................................................... 3
2 Installation Procedures ....................................................................................................... 4
2.1 RJ-45 Bracket .................................................................................................................... 4
Windows Driver Installation (Windows XP, Windows Vista, Windows 7) ............................................ 4
2.1.1 Installation Files .............................................................................................................. 4
2.1.2 Installing the Windows Driver Package in Windows XP/Vista/Win7 .................................. 4
2.1.3 Uninstalling the Windows Driver Package in Windows ..................................................... 6
2.1.4 Updating an existing driver in Windows ........................................................................... 6
2.2 Macintosh OS X ................................................................................................................ 7
2.2.1 OS X Installation Files ..................................................................................................... 7
2.2.2 Installing the AES16e-50 Device Driver and Mixer Application. ........................................ 7
2.2.3 Uninstalling the AES16e-50 Device Driver and Mixer ....................................................... 9
2.2.4 Updating the AES16e-50 Device Driver and Mixer ........................................................... 9
3 Hardware Connections .................................................................................................... 10
3.1 Cables/Routers ................................................................................................................. 10
3.2 AES50 Cable Connections ............................................................................................... 10
3.3 Computer to Computer connections .................................................................................. 10
3.4 Verifying connections ...................................................................................................... 10
4 Routing in the Lynx Mixer .............................................................................................. 12
4.1 Input Routing .................................................................................................................. 12
4.2 Output Routing ................................................................................................................ 14
4.3 Input Monitoring .............................................................................................................. 14
5 Clocking ......................................................................................................................... 17
5.1 AES50 ............................................................................................................................ 17
5.2 Other Clock Choices ........................................................................................................ 17
Page 3

1 Introduction/Features
The Lynx AES16e-50™ PCI-Express audio interface is the first widely available computer audio product to support
the emerging AES50 standard (also referred to as SuperMac™). This product represents the union of Lynx
Technology’s industry respected digital interface experience, and the high-channel count, low-jitter performance of
AES50.
AES50 is capable of carrying up to 48-channels of audio from point to destination over a single Cat5 or Cat 6 data
cable. With this single-cable solution and support for cable runs up to 100 meters, this is an ideal format for live
sound venues, permanent installations, or any high channel-count recording studios. Currently, recording devices
and mixing boards that support AES50 are being manufactured by Midas
manufacturers certain to release compatible products in the near future.
The AES16e-50 includes all of the features of the popular Lynx AES16e-SRC audio interface, in addition to AES50
support. AES/EBU I/O can be combined with AES50 I/O, providing for a versatile audio solution.
Since the AES16e-50 is a variant of the AES16e card, this addendum will only address considerations specific to
AES50 operation. For correct operation, it is important to also refer to the AES16e manual which is included in the
Lynx Installation CD, as well as online at www.lynxstudio.com.
1.1 System requirements
®
and Klark Teknik®, with more
The AES16e-50 has the same computer system requirements as the AES16e (see page 6 of the AES16e manual). The
requirements here are specific to the AES16e-50.
1.1.1 Compatible Equipment
The AES16e-50 will interface with any audio device that supports the AES50 standard.
1.1.2 Windows
Windows compatible computer with PCI
Express support
256 MB RAM
One empty PCI Express slot (1X – 16X)
Video display with 1024 x 768 m i nimum
resolution
Windows XP, Vista 32 or 64-bit, Windows 7 32
or 64-bit, Windows Server 2003
Version 2 Driver, Build 17 or above
Firmware Revision 10 or above
NOTE: The AES16e-50 is not supported under
Windows 2000, 95, 98 or ME.
1.1.3 Macintosh
Apple Mac Pro (not compatible with PPC-based
Macs)
256 MB RAM
One empty PCI Express slot (1X – 16X)
Video display with 1024 x 768 m i nimum
resolution
Macintosh OS X (10.6 or higher)
Lynx OSX driver Build 49 or above
Firmware Revision 10 or above
AES16e-50 User Manual Addendum 3
Page 4
2 Installation Procedures
The procedure for installing the AES16e-50 only diffe rs fr o m the AES16e installation in that there is an optional
RJ45 bracket to install, and it requires somewhat more recent drivers.
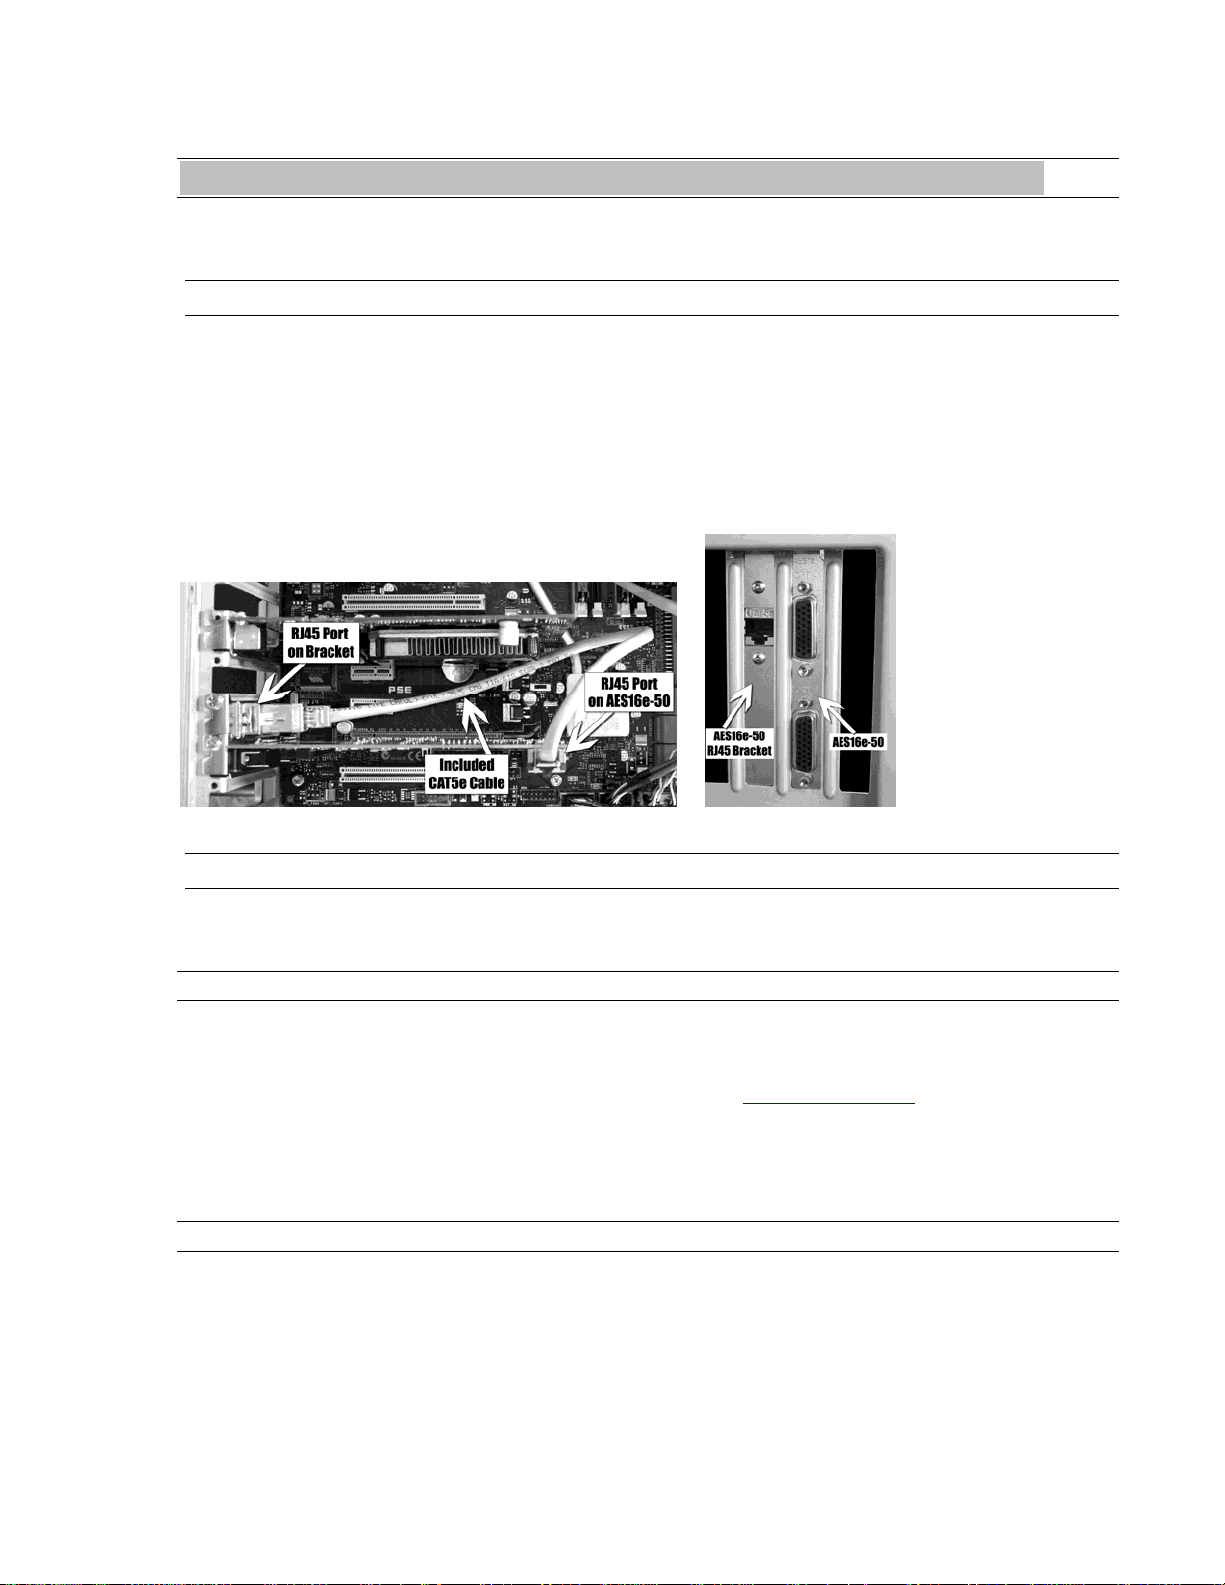
2.1 RJ-45 Bracket
The RJ-45 bracket that is optional for the AES16e-50 card provides an external connection for AES50 devices. The
bracket requires a slot window in the computer, but does NOT require a free PCI or PCIe slot. If your computer has
a slot window that is not associated with a PCI/PCIe slot than that would be an ideal choice.
1. Simply install the RJ45 bracket with a standard mounting screw into the selected slot window adjacent to
the slot occupied by the AES16e-50 card.
2. Use the included CAT5e 14” cable to connect the RJ45 port on the rear of the AES16e-50 to the port on the
inside of the RJ45 bracket.
Windows Driver Installation (Windows XP, Windows Vista, Windows 7)
The Windows driver installers that are compatible with the AES16e-50 utilize a simplified installation procedure
than what is described in the AES16e manual. For best results, follow these steps.
2.1.1 Installation Files
Although there are driver files located on the Lynx Installation CD that came with your AES16e-50, we recommend
downloading the latest drivers from the Lynx website to insure that you are using the most current drivers available.
To download drivers from our website, point your Internet browser to www.lynxstudio.com. After the home page
loads, click Support > Downloads. Select “Windows” as the Operating System, and the “AES16e” as the Product,
then click “Search”.
Download the current drivers to your computer’s download directory or any convenient location.
2.1.2 Installing the Windows Driver Package in Windows XP/Vista/Win7
1. Double-click the driver installer that was downloaded from the website and click “Run” when prompted.
AES16e-50 User Manual Addendum 4
Page 5
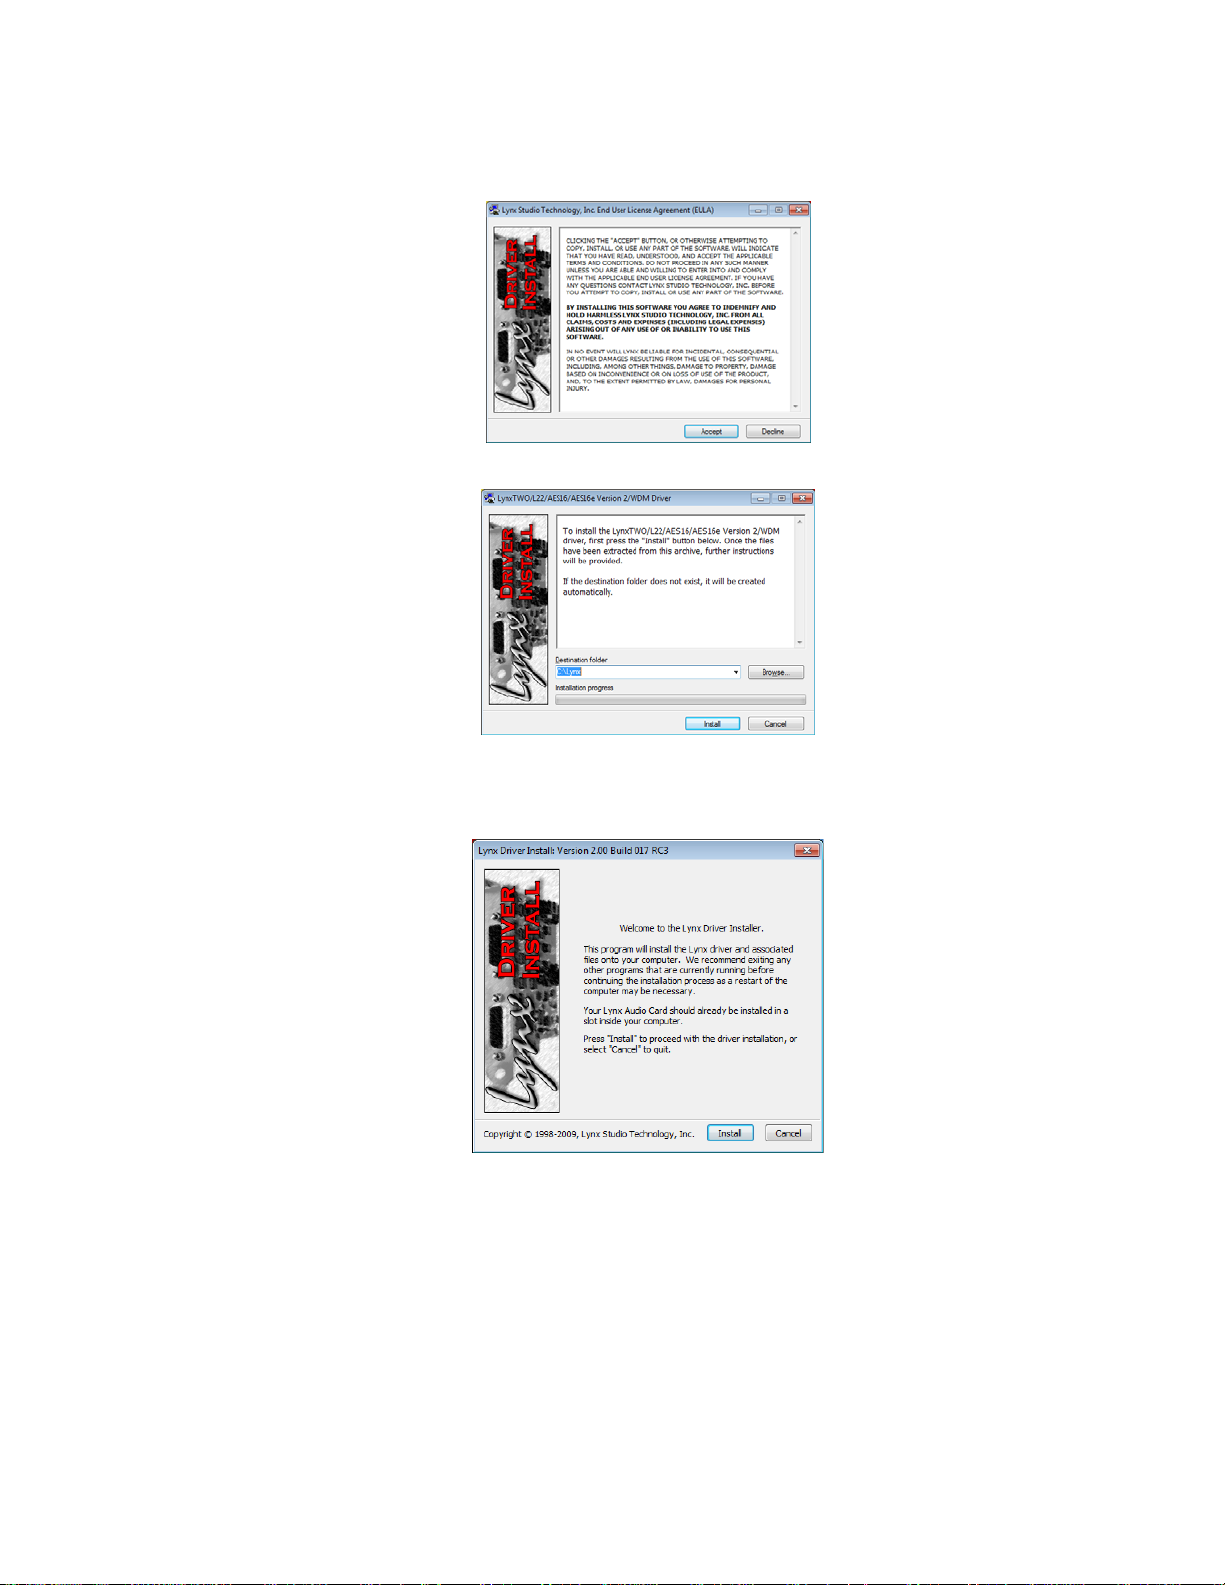
2. The Lynx End User License Agreement will appear onscreen. After reading it, click “Accept” in order to
proceed with the installation.
3. From the next window, accept C:\Lynx as the Destination Folder for the driver files by clicking “Install”.
4. In Windows Vista or Windows 7 you may be prompted to allow the Lynx Driver Installer to make changes
to your computer. If so, click “Yes” to proceed.
5. When the Lynx Driver Installer screen appears, read the associated text, then click “Install”
AES16e-50 User Manual Addendum 5
Page 6
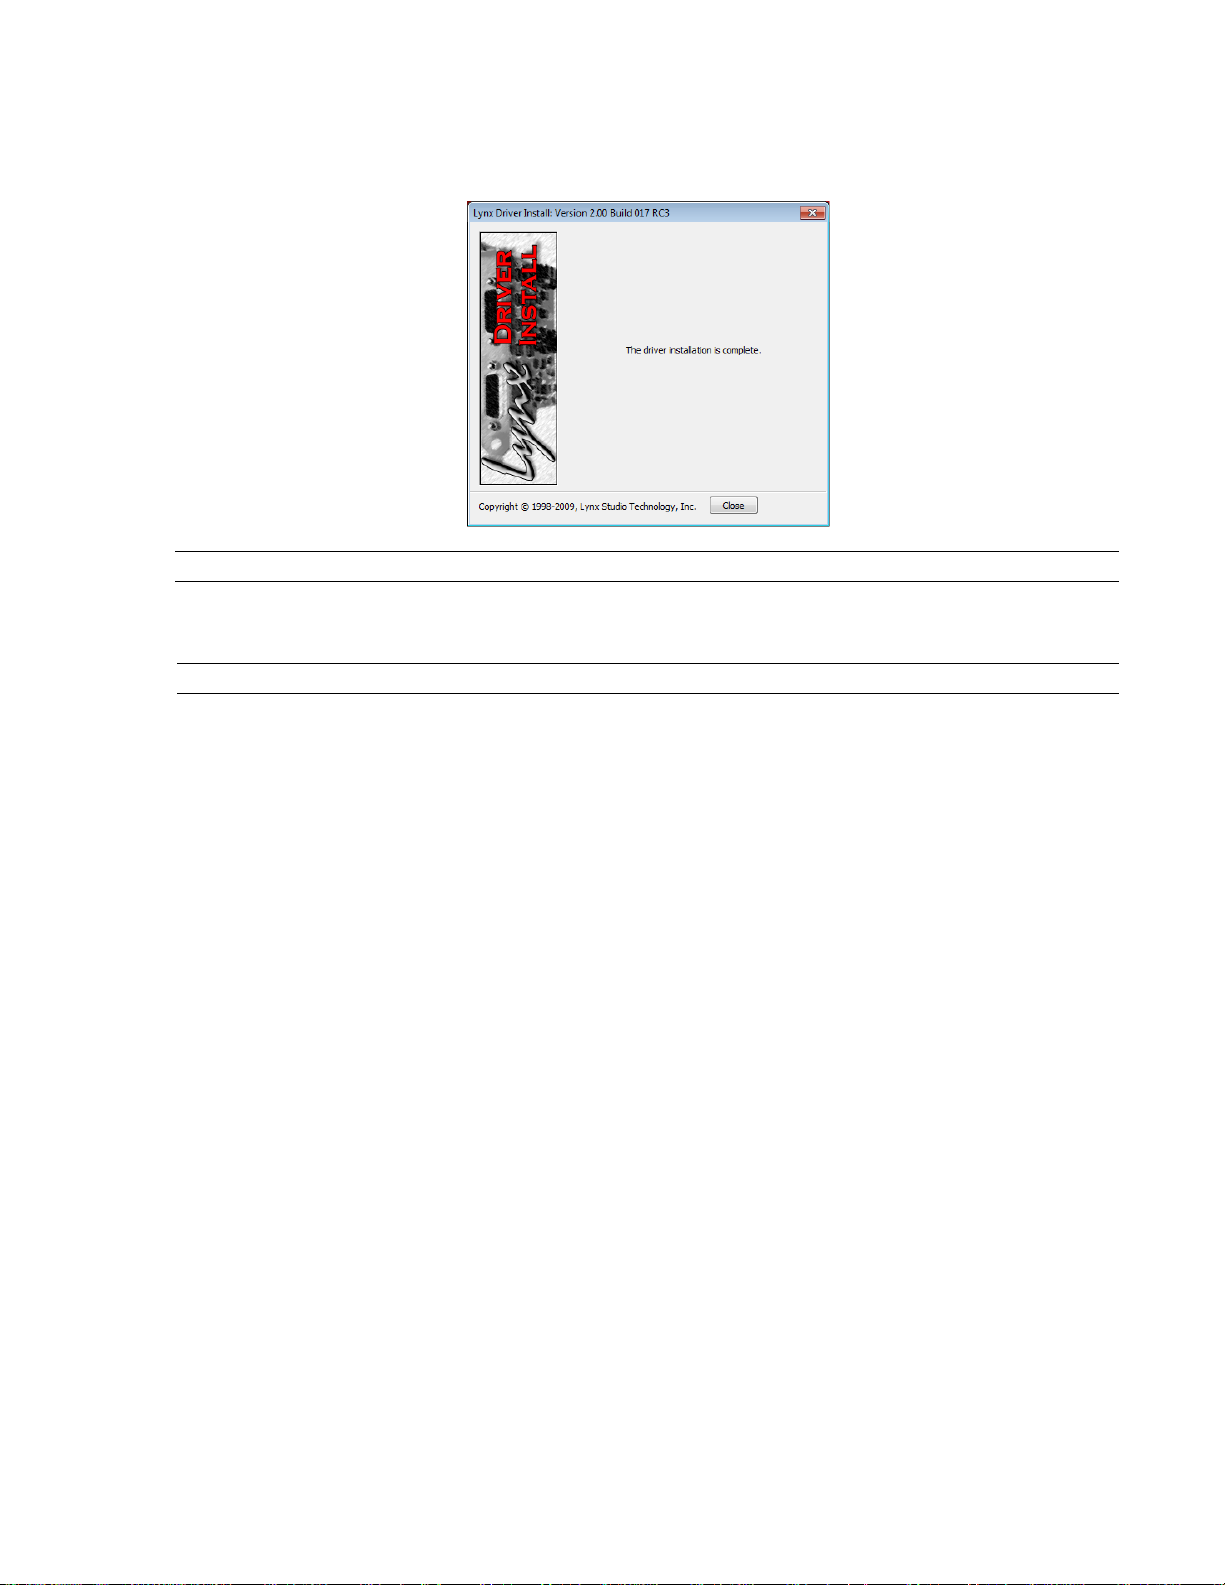
6. The driver installation may take several minutes. The final dialog box will indicate that the driver
installation is complete. Click “close”, and the driver and Mixer application will be ready to use.
2.1.3 Uninstalling the Windows Driver Package in Windows
From the start menu, click All Programs > Lynx Studio Technology > “Uninstall Lynx Driver”. Follow the prompts
and reboot when prompted.
2.1.4 Updating an existing driver in Windows
Simply follow the same instructions for the driver installation. The installer will remove the old driver automatically
during the installation process.
AES16e-50 User Manual Addendum 6
Page 7

2.2 Macintosh OS X
There are a few differences between the installation instructions we recommend for the AES16e-50 and the
instructions in the AES16e manual. Please follow these steps for the best results.
2.2.1 OS X Installation Files
Although there are driver files located on the Lynx Installation CD that came with your AES16e-50, we recommend
downloading the latest drivers from the Lynx website to insure that you are using the most current drivers available.
To download drivers from the Lynx website, point your Internet browser to www.lynxstudio.com. After the home
page loads, click Support > Downloads. Select “OS X” as the Operating System, and the “AES16e” as the Product,
then click “Search”.
Download the current drivers to your computer’s download directory or any convenient location.
2.2.2 Installing the AES16e-50 Device Driver and Mixer Application.
1. Double-click “Lynx_OSX.pkg”. This will start the driver installation.
2. Click “Continue” at the “Install LynxTWO/L22/AES16 Audio Driver” dialog box.
3. When prompted to select a destination for the audio driver, click on “Macintosh HD” and then click
“Continue”.
AES16e-50 User Manual Addendum 7
Page 8

4. Click “Install” on the next dialog box that appears.
5. Enter your password in the Authenticate dialog box and click OK.
6. Click “Continue Installation” in the next dialog box that appears.
7. When the install is complete, you will be prompted to restart the computer.
NOTE: The OS X installation process installs both the Core Audio driver and the Lynx Mixer application. The Lynx
Mixer application is installed in the “Applications” folder.
AES16e-50 User Manual Addendum 8
Page 9

2.2.3 Uninstalling the AES16e-50 Device Driver and Mixer
To uninstall the driver, you will have to use the Lynx Uninstaller application. This is available for download off of
the Lynx website. Point your Internet browser to www.lynxstudio.com. After the home page loads, click Support >
Downloads. Select “OS X” as the Operating System, and the “AES16e” as the Product, then click “Search”. Select
the Lynx Uninstaller. After downloading, simply run the application and follow the prompts.
2.2.4 Updating the AES16e-50 Device Driver and Mixer
To update the AES16e-50 driver with a newer version, simply follow the instructions for uninstalling the driver and
then install the newer version per the installation instructions. You may need to reconfigure the Lynx Mixer and
your recording application(s) after updating the driver.
AES16e-50 User Manual Addendum 9
Page 10

3 Hardware Connections
The AES16e-50 has been designed for simplicity of set up. In m ost cases, integ rati ng the AES16 e- 50 wit h your
equipment will require only a few minutes time.
3.1 Cables/Routers
The AES16e-50 adheres completely to the AES50 specification, including compatible cable types and leng ths.
Cat 5e or Cat 6 networking cables can both be used with AES50, but Cat 6 is recommended whenever possible,
especially for longer cable runs. Maximum supported cable length for Cat 5e or for Cat 6 is 100 meters
AES50 is not compatible with existing networking protocols. This means that off-the-shelf Ethernet routers cannot
be used with AES50 signals.
3.2 AES50 Cable Connections
Each AES50 port is bi-directional, with input and output streams both carried by the same connection. To connect
an AES16e-50 to other AES50 gear, simply connect a Cat 5e/Cat 6 cable from the RJ45 port on the AES16e-50 to
the AES50 port on the other gear.
Refer to section 5: Clocking; for information about correctly clocking AES50 devices to each other.
3.3 Computer to Computer connections
One intriguing use of an AES16e-50 is to send up to 32-channels of audio at a time between two computers. This
can be an ideal solution for a composer needing to transfer stems from a virtual instrument computer into a
recording computer, or for sending a confidence mix to a second machine while doing live event recording.
This is just a matter of installing an AES16e-50 into each computer, and connecting them via Cat 5e or Cat 6 cable.
Clock relationships must be established, please refer to section 5: Clocking; for more information.
3.4 Verifying connections
After connecting the AES16e-50 to a signal source, it is important to verify that a valid AES50 signal is detected by
the driver. There are two means to achieve this:
1. Open the Lynx Mixer.
• On a Windows computer, the Lynx Mixer is launched from Start > All Programs > Lynx Studio
Technology > Lynx Mixer.
• On an OS X computer, the Lynx Mixer is launched from Applications > Lynx Mixer.
2. Open the Adapter page, and check the section in the lower left labeled “Preferred Clock Source”. The
lowest available clock source to select here is “AES50”. Next to this AES50 selection is a rectangular box.
If the box contains a valid Sample Rate (i.e. 44.1kHz, 48kHz, 88.2kHz. 96kHz, 176.4kHz or 192 kHz) and
the sample rate text has a GREEN background, then the AES50 connection is valid.
AES16e-50 User Manual Addendum 10
Page 11

If the Sample Rate listed has a RED background, or the box displays “Not Present”, then there is a problem
with the AES50 connection. Double-check cable connections and device settings.
3. You can also check for a valid AES50 connection by looking at the AES16e-50 card installed into the
computer. When a valid AES50 signal is detected, an GREEN LED on the RJ45 connector located on the
card’s back edge will pulsate. If the ORANGE LED is illuminated, then there is a problem with the AES50
connection. Double-check cable connections and device settings.
AES16e-50 User Manual Addendum 11
Page 12

4 Routing in the Lynx Mixer
It is important to note that the AES16e-50 supports 16-channels of AES/EBU I/O as well as up to 32-channels of
AES50 I/O, but there is a hardware limitation of 32-independent input sources at a time. Also, consider that the
number of available AES50 channels scales with sample rate: 32 at 44.1/48kHz, 24 at 88.2/96kHz, and 12 at
176.4/192kHz.
With these variations to channel count, it is quite important to have a clear grasp on how to correctly route signals
using the Lynx Mixer application. Also, in the Lynx Mixer’s default state, AES50 input sign a ls will not be available
to record until proper routing is established.
On a Windows computer, the Lynx Mixer is launched from Start > All Programs > Lynx Studio Technology > Lynx
Mixer. On an OS X computer, the Lynx Mixer is launched from Applications > Lynx Mixer.
4.1 Input Routing
The AES16e-50 is capable of recording 32 unique input sources at a time. These sources are presented to recording
software as 16 stereo record devices.
Input sources are assigned to record devices in the Record/Play page of the Lynx Mixer. Input source selection
buttons appear directly above input meters. By default, the first 16-channels are pre-assigned to the 16 on-board
AES/EBU inputs, and channels 17-32 are pre-assigned to LStream – the Lynx expansion device protocol, used by
the LS-ADAT and LS-AES cards.
The input source selection buttons allow the user to select between Digital 1-8 Left/Right (AES/EBU), LStream 116 and AES50 1-48. Any combination of AES/EBU, LStream and AES50 devices can be selected for the 32 input
sources.
If you wish to set the card up for AES50 recording, it would generally be simplest to assign all of the input sources
to AES50 1-32 in order. This way, when selecting input sources from your recording software, Lynx AES16e
Record 5+6 would receive signals from AES50 inputs 5+6, Lynx AES16e Record 13+14 would received signals
from AES50 inputs 13+14, etc. The quickest way to switch input sources over to AES50 is to click the first available
source, and hold down the CTRL key on the keyboard while selecting AES50 In 1. This will switch all 32 inputs to
AES50 1-32 in order.
AES16e-50 User Manual Addendum 12
Page 13

If one follows this scheme, then the Record/Play Mixer would look like this:
AES50, as a standard, scales the number of active devices that each connection is capable of based on sample rate.
Each connection supports up to 48 channels of I/O at 1X sample rates (44.1kHz/48kHz), up to 24 channels at 2X
sample rates (88.2kHz/96kHz), and 12 channels at 4X sample rates (176.4kHz/192kHz). Keep in mind, however,
that the AES16e-50 supports a maximum of 32-channels of I/O at one time, even at 1X sample rates.
This means that, when operating at 2X or 4X sample rates, 24 or 12 channels respectively will be available for use,
even though one can technically still select up to 32 AES50 input devices. At 88.2kHz/96kHz, AES50 channels 2532 will have no signal, and at 176.4kHz/192kHz AES50 channels 13-32 will have no signal.
As stated earlier, it is possible to mix AES-EBU, LStream and AES50 devices at any one time. This is achieved by
selecting the appropriate input types from the Record/Play page. In the example below, Record Devices 1-16 use
AES50 channels 1-16, and Record Device 17-32 use AES/EBU channels 1-16. Again, when changing a number of
sources in sequential order, hold the CTRL key while selecting an input source and all subsequent sources will
change in order. For Instance, in this example, hold down CTRL while changing input source 1 to AES50 In 1, and
then hold CTRL while selecting Input 17 to Digital In 1.
AES16e-50 User Manual Addendum 13
Page 14

4.2 Output Routing
Output routing is handled quite differently than Input routing. Signals sent to the AES16e-50 outputs will be
mirrored to both AES50 AND AES-EBU/LStr eam Outputs. LStream is the protocol for Lynx I/O expansion
products, the LS-ADAT and LS-AES.
Lynx Output devices are referred to as “Play” devices, which is how they would typically appear in an audio
software application, i.e. Play 1+2, Play 9+10, etc. The first 16 Play devices are sent to AES/EBU Outs 1-16 AND
AES50 Outs 1-16. Play devices 17-32 are sent to LStream Outs 1-16 AND AES50 Outs 17-32.
In cases where AES50 outputs are used exclusively, this arrangement will be very simple in principle. Play devices
1-32 will route to AES50 outputs 1-32. If one uses AES/EBU outputs exclusively, Play 1-16 should be selected. If
one uses LStream outputs exclusively, then Play 17-32 should be selected.
In cases where output types are mixed, for instance 16 AES50 outputs, 8 AES outputs and 8 LStream outputs, one
must take care to route signals appropriately to avoid signals being duplicated to parallel outputs. For instance,
signals sent to Play 3+4 will go to AES Out 3+4, as well as AES50 Out 3+4. If one only wants to hear signals from
the AES 50 stream, take care to not connect monitoring equipment to AES Out 3+4.
Levels for output channels can be managed from the Lynx Mixer Outputs Page.
4.3 Input Monitoring
The AES16e-50 is capable of hardware-based, zero latency input monitoring. The Lynx Mixer Outputs page is
where input sources can be assigned to outputs. Up to 32 play and record sources can be assigned to every output.
The Lynx Mixer Outputs page displays all outputs on the bottom of the screen, labeled as Digital Out 1 – 16, Left
and Right. The reason for this orientation is because AES/EBU carries two-channels of audio on each cable
connection. When using AES50 or LStream output devices, one must do a bit of translation. For instance, Digital
Out 5 Left will also send signal to AES50 Out 9. Digital Out 13 Right will also send signal to AES50 Out 26, etc.
On the left side of the screen all of the inputs are displayed (Record 1-32, in stereo pairs), as well as the 16 stereo
play devices that represent playback streams from software.
By default play devices are pre-assigned to corresponding outputs. For instance Play 01+02 is assigned to Digital
Out 1 L/R, Play 05+06 is assigned to Digital Out 3 L/R, etc.
There are no input sources pre-assigned to outputs in the Mixer’s default state.
AES16e-50 User Manual Addendum 14
Page 15

In order to assign an input source to an output for monitoring, follow these steps:
1. In the column of sources above the output that you will be monitoring from, click the 4-segment,
rectangular box that corresponds to the input source that you would like to monitor through that output. For
instance, in the example below, Record 3+4 is selected as the source for Digital Out 1.
2. When a monitor source has been selected it turns yellow and in the bottom left corner of the screen a pair of
faders appear. These faders control the level and pan settings for the signal source selected.
3. By default Record sources are muted. To un-mute the source, click the Mute buttons at the bottom of the
fader pair.
4. In this state, AES50 in 3 is monitored through Digital Out 1 Left, and AES50 In 4 is monitored through
Digital Out 1 Right. If your input sources are mono, and you with to adjust their pan positions in the stereo
field for Digital Out Left and Right, you can do so with the panner slider directly above the volume faders.
Note: the signal level feeding each output will be reflected in the source selection rectangle.
AES16e-50 User Manual Addendum 15
Page 16

5. You can also adjust the level of the source feeding the outpu t with the volu me faders. The resulting level
change will also be reflected in the source selection rectangle.
Since multiple input and play sources can be assigned to any given output, it is quite important to manage the levels
of each source to avoid overloading the output.
To cease monitoring an input source, simply click the applicable source selection rectangle, and mute the source
with the associated fader group.
AES16e-50 User Manual Addendum 16
Page 17

5 Clocking
In any system with more than one digital device, there can be only one master clock providing synchronization.
Whether you designate the AES16e as the clock master (slaving all other devices to it) or slave the AES16e to
another clock master, it is important that only a single device act as clock master, to prevent the occurrence of
audible digital errors.
AES16e clocking options are discussed at length in Section 5.2 of the AES16e manual. However, the AES16e-50
does have one unique clocking option not available on a standard AES16e.
5.1 AES50
The AES50 specification defines a separate “lane” for clock signals independent of audio signals. The AES16e-50 is
capable of slaving to this incoming clock signal.
To select AES50 as the clock source, open the “Adapter” page of the Lynx Mixer. Under
preferred clock source, there is an option for AES50.
If a valid AES50 connection has been made to a compatible device, next to the AES50
selection there should be a sample rate present. Additionally, the sample rate should have a
green background (as pictured). If instead it has a Red background, then the AES50
connection is not valid – double check cable and device settings before proceeding. Make
sure that the AES50 device that is connected to the AES16e-50 is not slaving to AES50. A
valid AES50 connection requires one AES50 master and one AES50 slave.
If the Sample Rate is displayed with a green background then AES50 can be selected as the
preferred clock source. If no audio applications are open that are mounting the Lynx Driver
when you make this selection, then AES50 should appear at the top of this page as the
“Current Source”. When AES50 is selected as the Clo ck Source, SynchroLock will appear as
“disabled”. This is normal, as AES50 clocking is not compatible with the AES16e
SynchroLock circuitry.
This clocking method tends to be reliable and low jitter. It has the added advantage of using existing cabling,
particularly important when long cable runs are involved. We recommend this clocking method when it is necessary
for the AES16e-50 to be a clock slave.
5.2 Other Clock Choices
When passing signals between AES50 devices, the clock slave should be set to receive clock via AES50, as
AES50 is designed for device to device clock transmi ssion. The Master device should either be set to Internal, or set
to slave to some other valid clock source.
Specifically, when an AES16e-50 is configured as an AES50 master, its SYNC SOURCE could be set to “Internal”,
or to any valid source except AES50. For instance, External (Word Clock), Digital In (AES In) or Header are
alternative choices. For thorough descriptions of these clock sources, please see section 2.6 of the AES16e manual.
AES16e-50 User Manual Addendum 17
Page 18

Lynx Studio Technology, AES16e, AES16e-50, Aurora and the Aurora Logo are trademarks of Lynx Studio
Technology, Inc. All other product or company names are the trademarks or registered trademarks of their
respective owners.
AES16e-50™ User Manual Addendum
Copyright © 1998-2013, Lynx Studio Technology, Inc. All rights reserved.
AES16e-50 User Manual Addendum 18
 Loading...