

Page 1
Installation, Care and Use of
Your Lynx Beverage Tower
Kits
Lynx Beverage Kits
Model L24TWS Single Tower and L24TWD Double Tower
Introduction:
Your Lynx Beverage Kits comes with all of the components necessary to install a
keg tap and tray to an outdoor island or to the Lynx model L24BF outdoor
refrigerator. An optional Tower Base (L24TWB) and caster kit (L24CST) is
available to set this kit up as a mobile beverage station as shown, when used
with the L24BF.
The Lynx model L24BF outdoor refrigerator has been designed specifically to
work with the Beverage Kits. The volume is designed to accommodate two 1/6
kegs, or all single standard keg sizes except a ½ keg or larger (not provided), the
CO2 tank and required connections.
WARNINGS:
CO2 cylinders contain high pressure gas which can be hazardous if not handled
properly. Make sure you READ and UNDERSTAND the procedures included with
the CO2 cylinders BEFORE installation.
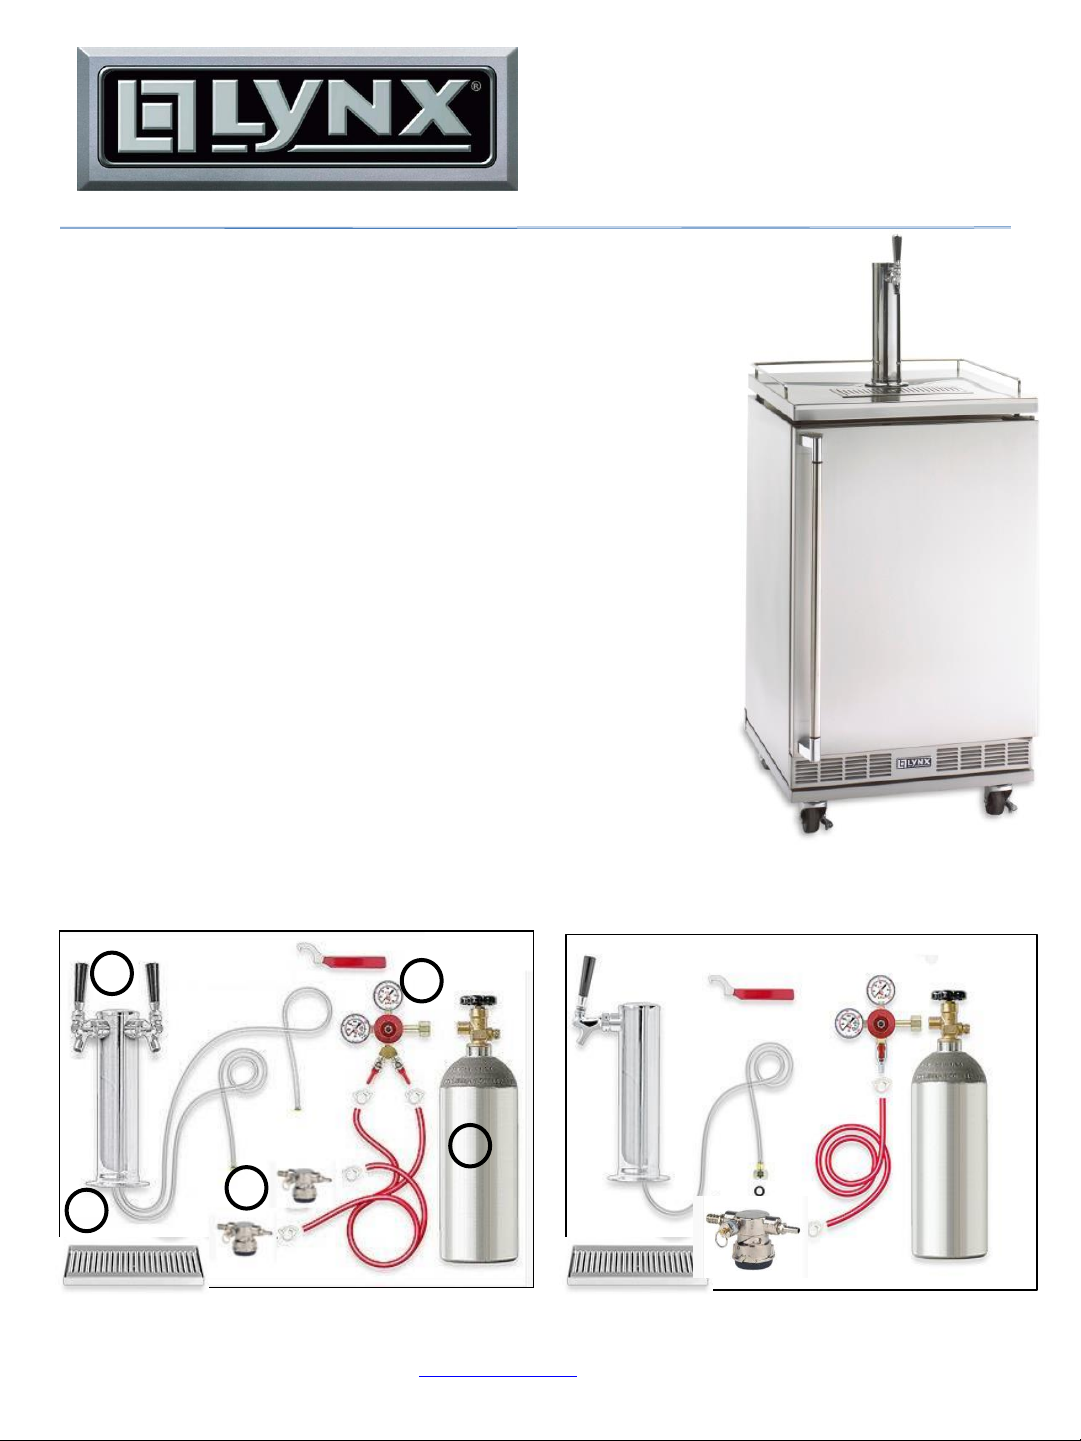
Beverage Tower Kit Components
A) Single or Double Keg Tower
B) Low Profile Keg Coupler (D System for North American Beers)
C) Regulator, Dual Gauge CO2 (Kit contains all hoses and fittings, Sleeve
D) CO2 Gas Cylinder connectors, bushing and insulator sleeves)
E) Spill Tray L24TWD L24TWS
A
B
E
Lynx Professional Grills, Inc.
7300 Flores St., Downey, CA 90242
Phone: (562)299‐6900 Fax: (562)299‐6978 | www.lynxgrills.com P/N 33913 Rev. C 1/14
C
D
Page 2
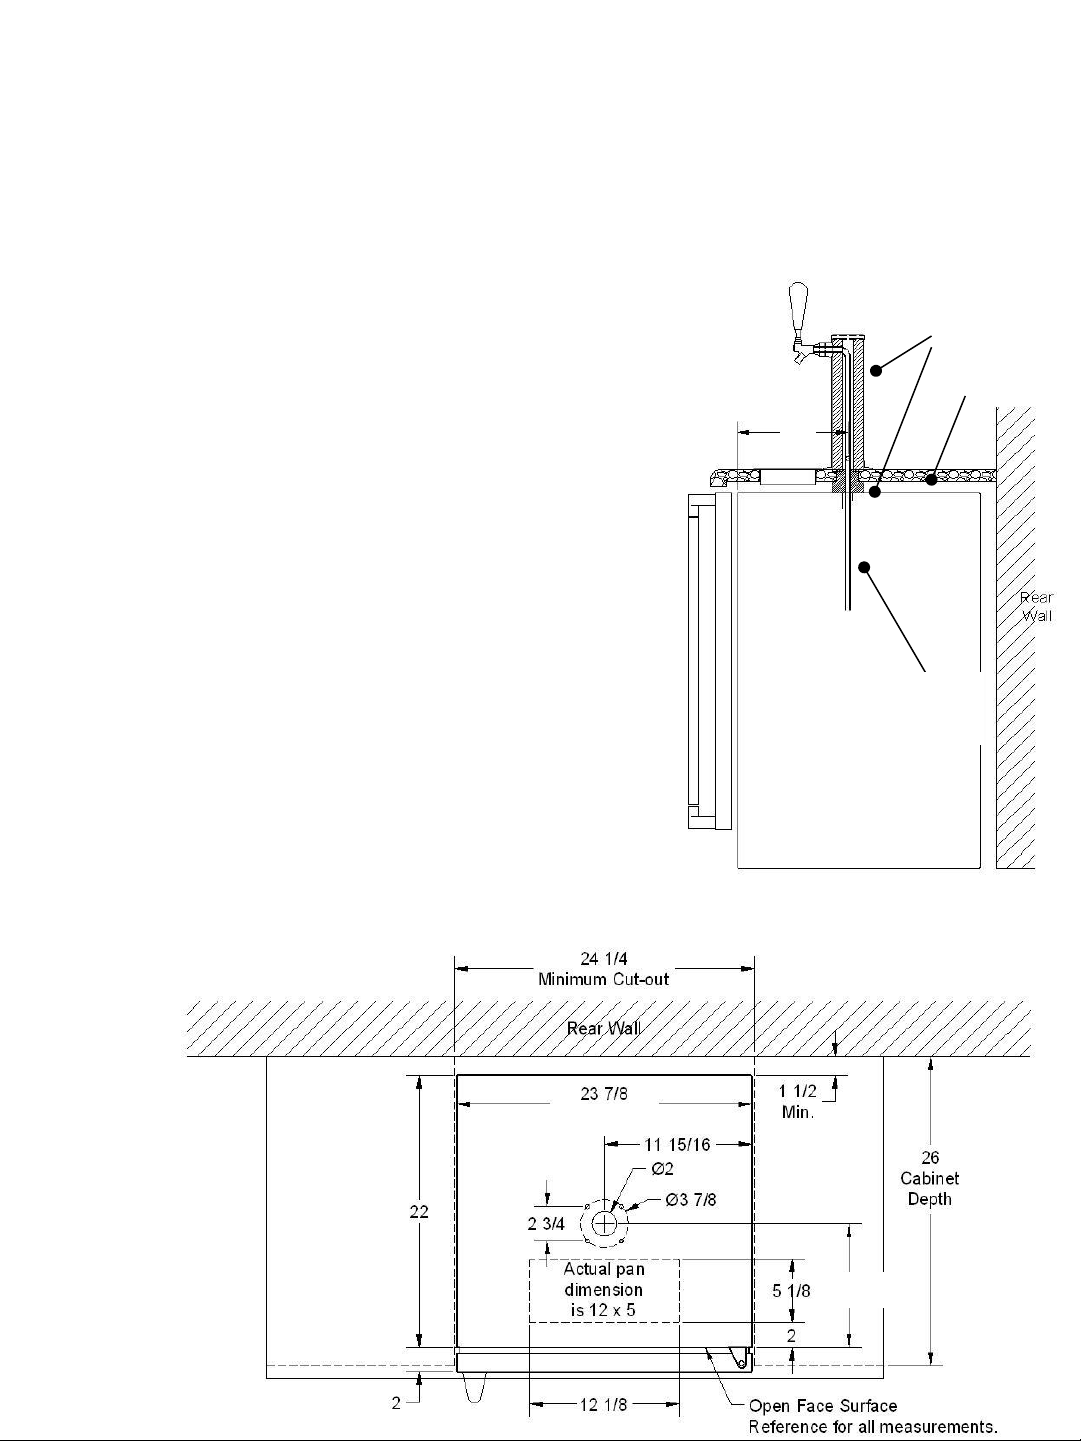
L24TWR Tower Kit - Mounting your kit directly to an island.
1) Determine the location of the refrigerator in the island installation. It should be positioned nearly flush to the face
surface of the island for easy access and alignment with the tower. The refrigerator cavity should be 35” high x 241/2” wide x 26” deep.
2) Position the refrigerator in the island opening at the exact position. Open the door and make a reference mark on the
underside of the countertop at the face of the open refrigerator. This surface represents the best guide for locating the
hole in the countertop. Each refrigerator door is custom set at the factory for the best seal. The face of the closed door
varies slightly from unit to unit. DO NOT use the closed door surface as a reference.
3) Remove the refrigerator from the cabinet while drilling the holes for mounting. Using the diagram at the bottom of this
page as a guide, mark the center of a 2” diameter hole and drill through the countertop for the beverage line.
4) Locate and drill the 4 mounting holes to secure the keg tower.* Four
#12 screws have been provided. A ¼” diameter hole is sufficient for
these bolts. If another securement method (i.e. lead anchors) are used,
follow the manufacturers recommendations.
5) A flush mount drip tray is provided as an option. Refer to the diagram
below and cut the opening required if this option is to be installed.
6) Prepare the tower assembly for installation. A 14 inch length of
insulating foam has been provided to install inside the tower base. The
installation of this foam is critical to the proper operation of the
beverage tower kit. Failure to properly insulate the tower base could
cause excessive foam and incorrect temperature control. Insert the
foam around the beverage line and insert it into the beverage tower
with about 2” protruding from the base.
7) Place the large flat rubber gasket over the hole in the countertop.
8) Feed the beverage tube into the hole in the countertop
9) Align the gasket and secure the tower to the countertop with the 4
screws provided. From the underside insert the washers and nuts.
Tighten the screws completely.
10) Remove the black plastic plug from the top center of the refrigerator.
Keep in a safe place for future use.
11) Bring the beverage tube out to the front of the opening designed for
the refrigerator. Begin to slide the L24BF refrigerator into the opening.
Before the refrigerator is halfway into position, feed the beverage tube
through the hole in the top. Alternately slide the refrigerator back and
draw the tube into the refrigerator to remove any kinks in the hose.
When finished, the hose should align like the illustration on the right.
12) Add the tap and handle with the wrench provided.
13) Insert the spill tray into the countertop.
13 11/16
Beverage
Tube
insulation
counter
* Before drilling
mounting holes,
position the tower on
the counter top to
ensure proper tap
alignment. Holes may
be drilled out to ½” to
provide additional
adjustment.
L24BF Width
13 11/16
Page 3

Connecting the Keg to the Beverage Tower.
1) Attach the clear hose from the beverage tower to the
barbed fitting with the hose clamp provided. Insert the
rubber washer provided into the fitting.
2) An elbow is included to provide additional space above the
keg coupler. Secure the elbow to the top outlet of the keg
coupler with a washer between. Attach the clear hose
fitting, with washer, to the elbow. Use a wrench to tighten
the connections.
3) The colored hose line is installed onto the side barbed
fitting of the keg coupler and the barbed fitting below the
CO2 regulator. Press the tube onto the fittings and secure
with the two hose clamps.
Refer to the instructions provided with the CO2 tank before
attaching the tank to the regulator.
4) With the regulator and tank in the OFF position, attach the
regulator securely to the CO2 tank with a wrench.
The Kit is Ready to Attach a Keg.
The Beverage Tower Kit is provided with a standard D Style coupler.
This style is appropriate for most domestic beers. Additional styles
are available from restaurant supply or beverage companies.
1. Align lug locks on
coupler with lug housing in
top of keg; insert coupler.
2. Turn coupler 1/4 turn
clockwise; the coupler is
now secured to keg.
Operating the Beverage Tap:
1) Insert the CO2 canister in the rear left shelf inside the refrigerator.
2) Place the beer keg inside the refrigerator and arrange all hoses such
that none are pinched.
3) Slowly open the main valve on the CO2 canister. Check for leaks.
4) Slowly open the regulator ball valve to pressurize the keg.
5) Toggle the tap handle on the tower to dispense a small amount of
liquid. This will “charge the system”.
6) Adjust the T-handle on the regulator to between 8 and 14 PSI. The
pressure setting will vary for beer type and keg style. Refer to the
troubleshooting guide and experimentation to set the pressure
accordingly.
7) Allow the system to rest for several hours before use. Temperature
and pressure are critical to satisfactory results.
3. Push down on the
coupler and give another ¼
turn, to open beer and CO2
ports in keg. The keg is now
tapped.
CO2 Tank level
Main Valve
8-14 PSI
T-Handle
Ball Valve
Page 4

When not in use:
Part No.
Qty
Part No.
Qty
1
32413
33845
Single Tap, or
9
32404
2 80411
Beverage Center Deck Assembly
10
33029
33847
3
32414
11
32403
Keg Coupler, Domestic (Style D)
4
32399
12
33030
5
L24TWB
13
33027
6
33010
14
33028
7
33011
15
33022
8
33031
16
33023
We recommend that the CO2 canister be shutoff and the ball valve closed if the Beverage kit will not be used for an
extended period of time. Keep the CO2 tank inside the refrigerator and all connections intact.
The CO2 tank should be replaced or refilled when the CO2 Tank level indicator falls into the red indicator zone (below 300
PSI). Check with your beverage provider for local sources of CO2.
Storage:
For seasonal storage of the Beverage Kit we recommend that the CO2 tank be stored upright in a cool place. The Tower
Base may be disconnected from the keg coupler and removed from the island installation. To help prevent heat loss
replace the black plastic cap into the top of the refrigerator (see page 2 step 1) . The cap may be installed into the top or
from the inside if more convenient. Seal all hoses and connectors in an air tight plastic bag to avoid dirt and insects during
storage. We recommend that you obtain a cleaning kit and purge the fluid lines seasonally. These may be obtained from
your beverage supplier or on line.
Wild Beer Description
Beer, when drawn, is all foam, or too much foam and
not enough liquid beer.
Causes
Beer drawn improperly
Creeping regulator
Applied pressure is set too high
Hot spots in line
Use of non-insulated beer line
Beer runs are too long for proper cooling
Tapped into a warm keg (Should be 34°- 38°
Cooler malfunctioning
Kinks, dents, twists or other
obstructions in line
Faucets in bad, dirty or worn condition
Flat Beer Description
Foamy head disappears quickly;
beer lacks usual zestful brewery fresh flavor
Causes
Dirty glasses (not beer clean)
Sluggish regulator
Applied pressure is set too low
CO2 is turned off at night
Contaminated air source
(associated with compressed air)
Moisture in air system
Beer too cold
Loose tap or vent connections
Cloudy Beer Description
When beer in glass appears hazy, not clear
Causes
Frozen or nearly frozen beer
Old beer
Beer that has been unrefrigerated for
long periods of time
Dirty glass
Dirty faucet
Unrefrigerated foods placed on top of cold keg
Contaminated air source
False Head Description
Large soap-like bubbles, head dissolves very quickly
Causes
Applied pressure required does not correspond to
beer temperature
Small beer line into a large faucet shank
Beer lines warmer than beer in keg
Dry glasses
Improper pour
Unpalatable Beer Description
Off-Taste
Causes
Dirty or old beer lines
Dirty faucet
Contaminated air source, or unfiltered
Unsanitary bar conditions
Description
Tower Assembly
Tower Assembly Double Tap 1
Tubing, 7/8 OD, x 12 1
Insulation, Tower Armaflex 1
Tower Base w/Leveling Feet 4
Base, Spill Tray Insert 1
Grate, Spill Tray Insert 1
Faucet Wrench 1
Description
C02 Cylinder, 5 Pounds, Alum 1
Regulator, Single Tap, CO2, or
1
Regulator Double Tap, CO2 1
Rubber Washer (Coupler) 2
Hose, CO2 to Coupler 1
Hose Clamps, CO
Hose, Coupler to Tower 1
Hose Clamps, Tower 1
2
1
2
 Loading...