

Page 1
MOM FRIENDLY. DAD READY.
™
THE DOWNTOWN ELECTRIC GRILL
CARE & USE MANUAL
Page 2

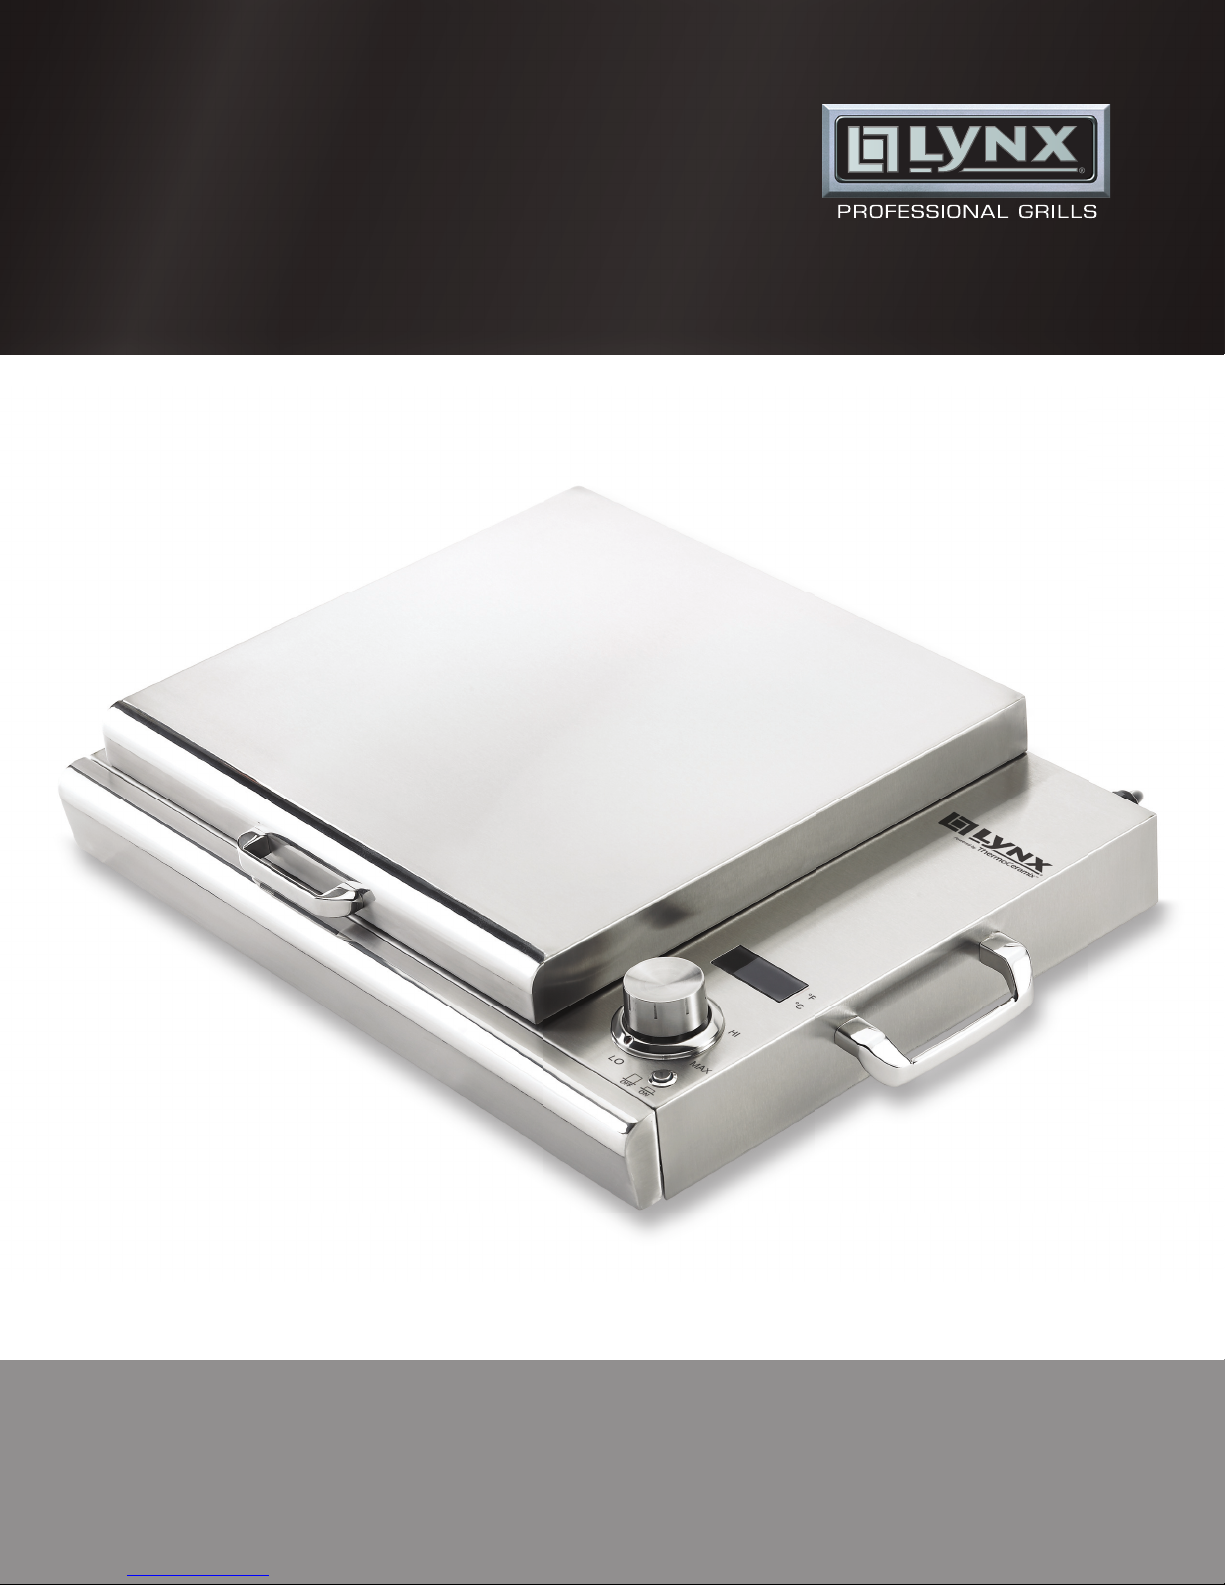
LYNX DOWNTOWN ELECTRIC GRILL - powered by THERMOCERAMIX
SAFETY INSTRUCTIONS & CHEF’S GRILLING MANUAL
IMPORTANT MESSAGE
™
Congratulations on your purchase of the Lynx Downtown
Electric Grill. The Lynx Downtown Electric Grill uses the
most advanced electric grill technology available. The
combined cooking/searing element uses robust, energy
effi cient, proprietary fi lm technology to replace the
traditional wire heating elements used in competitive
electric grills. A specially formulated, resistive heating fi lm
which is applied directly to the underside of the grilling
surface, results in quicker warm up, uniform temperature
profi les and enhanced effi ciency.
The Lynx Downtown Electric Grill is certifi ed to meet the
requirements of both CSA 22.2 No. 64-10 and UL 1026.
The grill must be powered in accordance with local codes,
or in the absence of local codes, shall comply with the
National Electric Code (ANSI/NFPA 70) in the US, and the
Canadian Electrical Code (CSA C22.1) in Canada.
Please read these instructions carefully, understand
them and follow these instructions before using the Lynx
Downtown Electric Grill. Retain this manual for future
reference. Failure to comply with these safety instructions
may cause injury or property damage and will void the
manufacturers warranty.
TABLE OF CONTENTS
IMPORTANT MESSAGE 2
TABLE OF CONTENTS 2
IMPORTANT SAFETY INSTRUCTIONS 3
Important Safeguards 3
GRILLING MANUAL 4
Reading and Understanding the Safety Instructions / Understanding the Controls 4
The Drip Tray 5
The Removable Lid 5
Powering Up for the First Time 6
General Grilling Guidelines 7
Grilling your First Meal 8
Care and Cleaning 9
TROUBLESHOOTING 9
CONTACTING LYNX CUSTOMER CARE 9
WARRANTY 10
SPECIFICATIONS 11
2
LYNX DOWNTOWN ELECTRIC GRILL CARE & USE MANUAL
|
PART 34400 REV. A 4/13
Page 3

IMPORTANT SAFETY PRECAUTIONS
WARNING
The following are common sense basic safety precautions that must be followed when using the Lynx Downtown
Electric Grill: Carefully read all of these instructions before using the grill. Save these instructions for future
reference.
1. Read and follow all instructions.
2. Do not grill in the open rain or while standing in water.
As with any electrical appliance, there is always an electrical shock hazard if used improperly.
3. To protect against possible electric shock don’t immerse the cord, plug or grill in water or other liquids.
4. Unplug the grill from the power outlet when not in use
and before cleaning or servicing. Turn OFF all grill controls before unplugging the grill from the power outlet.
5. Allow the grill to fully cool before cleaning, servicing
or transporting. Do not attempt to move or carry a hot
grill. If the drip tray needs to be emptied during grilling, use extreme care as the drip tray and its contents
are very hot. Use appropriate barbeque gloves or oven
mitts and support both ends of the drip tray to prevent
spilling.
6. Do not operate the grill with a damaged power cord or
plug.
7. If the grill should malfunction or if it has been damaged
in any way, do not operate it until after it has been examined, adjusted or repaired by an authorized service
provider.
8. Be careful with the electrical power cord. Do not let it
come in contact with hot surfaces or sharp edges. Do
not let it hang over sharp tabletop or counter edges.
9. Do not use the grill for any applications for which the
grill is not designed. Do not attempt to use any solid
fuels such as charcoal or wood chips with the grill.
10. Do not use any attachments with the grill other than
those approved by the manufacturer.
11. Do not plug the grill into an ungrounded outlet. Use
only with a three-pronged grounded outlet with GFI
protection.
13. The grill does not have an internal fuse or surge protector. It is protected by the breaker in the electric power
circuit and the GFI in the circuit breaker or in the power
outlet. Although a dedicated circuit for the grill would
be desirable, if other appliances are on the same power
circuit they will need to be powered off while grilling.
14. Maintain close and vigilant supervision when grilling in
the presence of children. Do not leave children unattended while grilling.
15. Do not touch hot surfaces. Use handles or knobs.
16. Always grill in an area free and clear from combustible
materials and vapors. Maintain ample clearances as
detailed on the specifi cation page.
17. Always use the grill on a fl at level surface such as a
wood, Formica or metal table top. Do not block the
space between the bottom of the grill and the table
top with any foreign objects that could reduce or re-
strict air fl ow. The grill must be used on a level surface
to enable unrestricted drainage of cooking oils and fats
into the drip tray.
18. When grilling outdoors on a deck or patio, ensure
that there is suffi cient air circulation to remove smoke
and vapors. When grilling indoors ensure that there
is ample natural or forced exhaust to remove cooking
odors and smoke.
19. Do not place the grill on or near a hot gas or electric
burner or on a heated oven because of the danger of
fi re and severe damage to the Lynx Downtown Grill.
20. The grill lid is removable with quick disconnect hinges
enabling the grill to be placed in the center of a balcony table and accessed from all sides while grilling. It
is important to keep the grill lid in place on its hinges
when grilling greasy foods. This will allow the lid to be
closed quickly in the event of a grease fi re. DO NOT
REMOVE THE COVER WHILE HOT.
12. Do not use an extension cord with this grill. Use only
the existing power cord. The grill is supplied with a 6
foot long 12 gauge power cord.
3
LYNX DOWNTOWN ELECTRIC GRILL CARE & USE MANUAL
|
21. Save these instructions.
Page 4
WARNING
Before grilling on the Lynx Downtown Electric Grill be sure you have read and understand the Safety Instructions
and Electrical requirement in this manual.
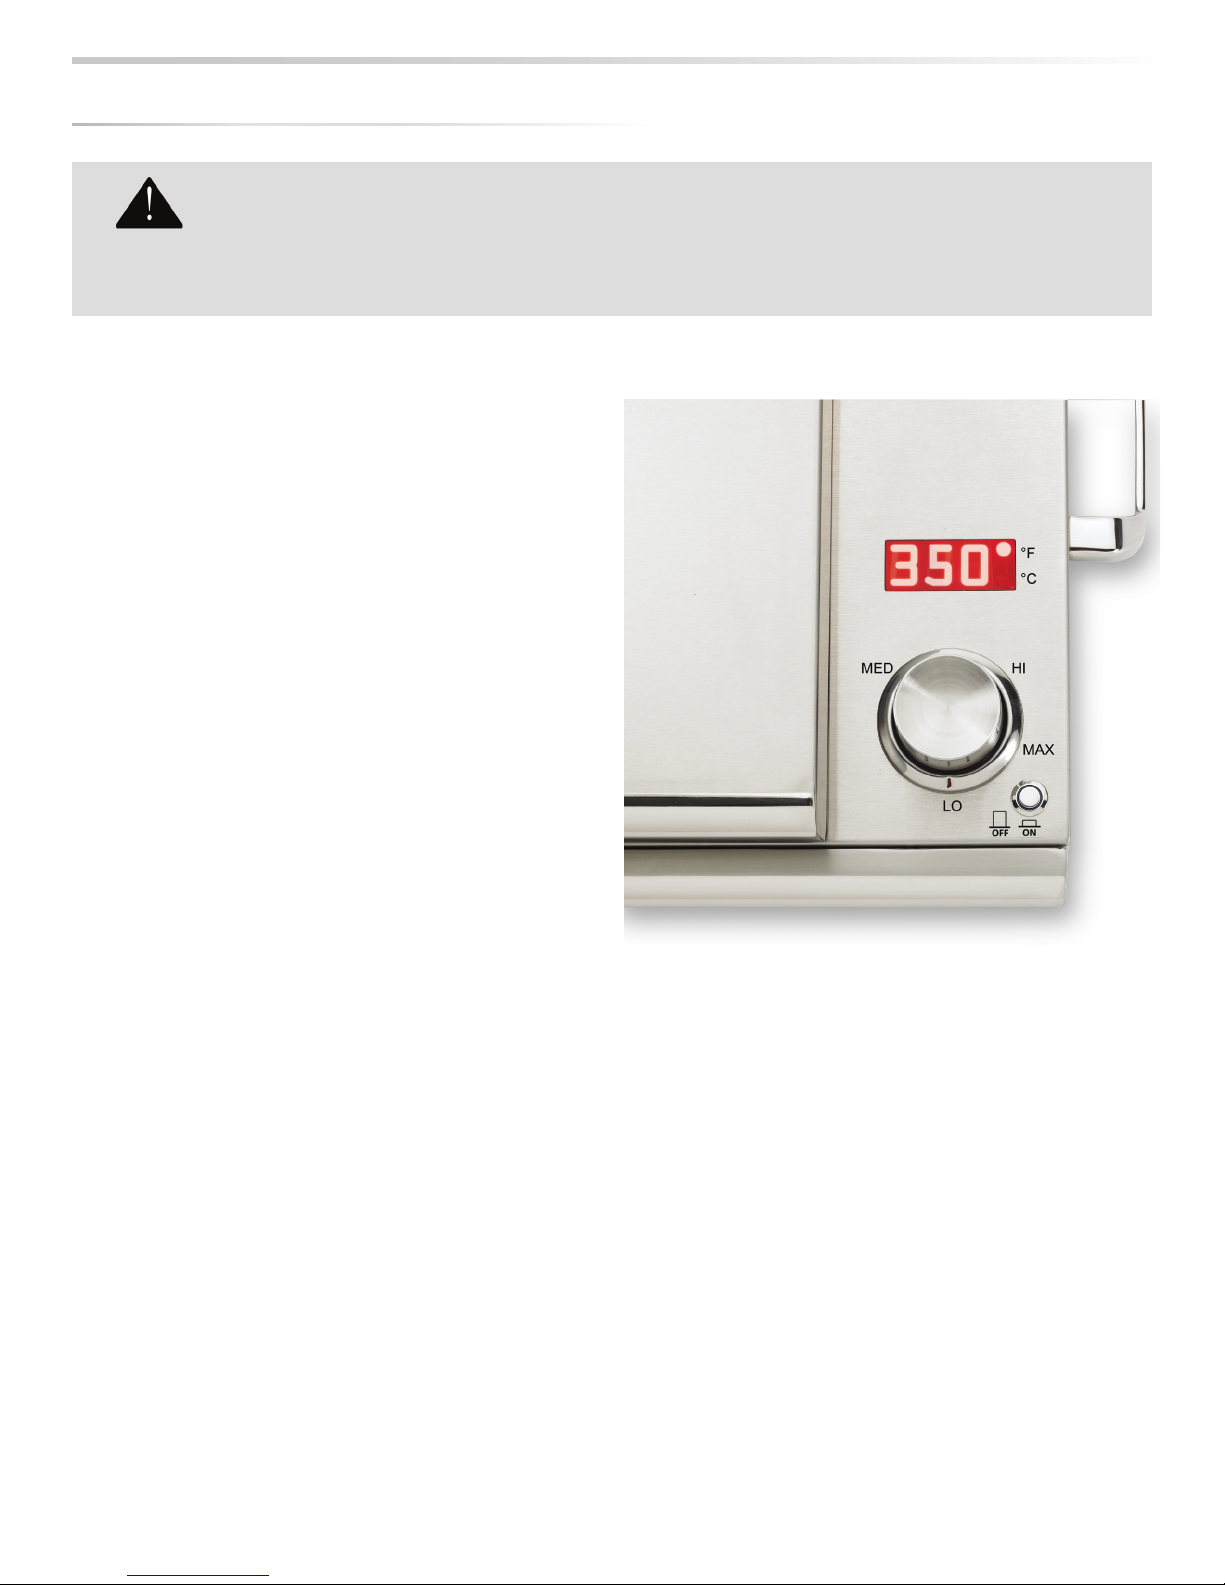
The control panel is shown on the right. The panel has
an ON/OFF push button, a rotary temperature control, a
digital temperature indicator and an indicator for °F/°C.
The power button is pressed to turn on the grill. This
illuminates the button as well as the temperature indicator.
The temperature control knob is used to set the
temperature of the grill. The temperature can be
adjusted between 170°F and 700°F (80°C and 370°C).
The temperature control is turned clockwise to raise
the temperature and counter-clockwise to lower the
temperature.
The temperature shown on the display panel is in degrees
Fahrenheit (ºF). A selector switch is placed under the grill
to toggle between °F and °C. The switch on the underside
is located opposite the temperature display.
The Lynx Downtown Electric Grill uses an internal cutoff
switch as a safety feature. It prevents the grill from overheating in the event of an unforeseen circumstance by
cutting off the power before any damage can occur.
The switch resets automatically once the grill has cooled.
4
LYNX DOWNTOWN ELECTRIC GRILL CARE & USE MANUAL
|
Page 5

CAUTION
Never attempt to move or carry a hot grill. Whenever possible allow the grill to fully cool before cleaning grease
from the drip tray. If the drip tray needs to be emptied during grilling, use extreme care as the tray and its
contents will be very hot. Use appropriate barbeque gloves or oven mitts and support both ends of the drip tray
from below to prevent spilling.
Remove and clean the drip tray after every use of the grill.
The drip tray may be cleaned in the dishwasher.
The drip tray is designed to collect grease and cooking
residue from the Lynx Downtown Electric Grill and is shown
above. When the grill is operated on a fl at, level surface,
grease and cooking residue will drain forward in the cooking
surface channels and get deposited in the drip tray. The drip
tray is removed for emptying by sliding it to the right and
pulling out of the grill assembly.
The drip tray has a 2 cup capacity. It is important to monitor
the drip tray level while cooking to avoid overfl ow conditions
which may occur during long grilling operations.
THE REMOVABLE LID
The lid on the grill is removable using quick action disconnect hinge pins.
Removing the lid allows the grill to be accessed from all sides for family
style cooking.
To remove the lid, open the lid fully. Pull the quick disconnect hinge pins
in toward the center, and lift the lid off.
CAUTION: Do Not remove the lid while hot.
CAUTION
It is important to keep the lid in place on its hinges
when grilling greasy foods. This ensures that the lid
can be closed quickly should there be a fl are-up or
grease fi re. Even when doing special grilling with
the lid removed you should keep the lid in a readily
accessible location so it can be quickly dropped in
place should there be a need to extinguish a fl are-up.
The top surface of the lid will become very hot during
cooking operations while the lid is attached. This is
normal. Use care when opening or closing a hot lid.
Use appropriate barbeque gloves or oven mitts when
handling the hot lid.
5
LYNX DOWNTOWN ELECTRIC GRILL CARE & USE MANUAL
|
Page 6

Now that you have read and understood all of the safety cautions and electrical requirements and have familiarized
yourself with the controls and special attributes of the Lynx Downtown Electric Grill, it is time to power up the grill.
Please follow these important steps:
1. Check for and remove any tape or packing material that may have been left over
from packing and shipping.
2. Set the grill on a level surface leaving ample clearance on all sides and back of the
grill. Leave adequate space above the grill to allow the lid to be opened easily.
3. Plug the power cord into a grounded three-wire outlet provided with GFI protection.
4. Press the power switch ON and check that the indicator lights and temperature
indicator is illuminated.
5. Turn the temperature knob to the full ON position by turning it clockwise to the
maximum setting.
6. Leave the grill ON for 30 minutes with the lid open to burn off any residual oils
from the manufacturing process.
7. Check that the grill continues to maintain the temperature set point.
You are now ready to grill your fi rst meal on the Lynx Downtown Electric Grill
If you are a grilling afi cionado you will immediately recognize the Lynx Downtown Electric Grill heating technology makes
this the best electric grill on the market and the only grill for outdoor balcony use that can truly compete with backyard
gas fi red grills. If you are a novice griller, then follow along.
Most electric grills do not provide adequate surface temperatures to enable searing. As a result, they require extended
cooking times normally resulting in overdone and tasteless results.
6
LYNX DOWNTOWN ELECTRIC GRILL CARE & USE MANUAL
|
Page 7

Pre-heat the grill to 700ºF (370°C) for searing steaks. For
quicker heat-up time you can close the lid until the grill
reaches the cooking temperature. Once reached, you are
ready to grill with the lid open.
Bacon is very nice on this grill as it lays across the grates
and is suspended above the surface, keeping it out of its
own grease. When cooking bacon, keep a close eye on the
drip tray levels.
• The steak will stick to the grates initially, once it
‘releases’, rotate the steaks 90 degrees.
• Once moisture appears on the surface it is ready to
be fl ipped.
• Depending on your personal preference, seasoning
may be applied to your steaks before, during, or when
grilling is completed.
In windy conditions shelter the grill from the prevailing
breeze.
Avoid cooking with the lid down, it captures moisture
and slows down the cooking process.
When cooking boneless chicken breasts consider
butterfl ying the meat. This allows the center to cook
quicker and retain the juiciness of the meat.
Since the temperature can be held at a steady level the
grill is good for slow cooking. Baby back ribs can be slow
cooked with the lid down for several hours. Once the meat
is ready to fall off the bones, increase the temperature to
500ºF (260°C) to fi nish off the ribs and give them a nice
color. Apply sauces at this time.
You can cook sliced potatoes, grill mushrooms or peppers
on the grill. In some cases, you may want to fi rst cook
these items with the lid down and then lift the lid and raise
the temperature to ‘fi nish them off’.
A grill stone works well for cleaning the grates. Rubbing
it back and forth will cause the stone to take on the
contour of the grates. After several uses, the grill stone
will accumulate grease and become smooth - simply put it
under water and the abrasiveness will return.
The actual cooking styles that you select will depend
on your preferences and the results that you obtain
through simple experimentation. You will fi nd that the fi lm
heater technology used in the Lynx Downtown Electric
Grill makes it much more versatile than typical electric
grills and enables you to produce a tastier meal. Since
the temperature display indicates the actual uniform
temperature of the grilling surface, it is possible to quickly
sear the outside of a food product to seal in its juices,
reduce the grilling temperature, then cook to your desired
level of ‘doneness’.
Some foods are easier to grill with the lid open, while
others should be cooked with the lid closed. Don’t leave
the grill unattended while cooking with the lid open in
case of a fl are-up.
Normally, food should be conditioned at room temperature
for several hours before grilling. Taking a food product
directly from the refrigerator to the grill may not produce
your desired results.
7
LYNX DOWNTOWN ELECTRIC GRILL CARE & USE MANUAL
|
Page 8

Good Quality Marbled Rib Eye Steak, 1-1/4” thick
When it appears ready, fl ake off a piece to check that it is
Vegetable Dishes
Condition the steak to room temperature before grilling by
removing from the refrigerator no more than I hour before
cooking. Insert fresh garlic cloves as desired. Season with
pepper, salt, and steak spice (if desired).
Set the grill on HI 500°F (260°C) to 550°F (290°C), Place
steak on grill to sear one side for 1 ½ to 3 minutes, until
you have sear marks on the steak. (Check for sear marks by
raising one corner of the meat with tongs and looking at
the underside).
Once you achieve sear marks turn the steak over for a
similar period watching for sear marks. Steak is ready for
fl ipping when it ‘releases’ from the grate.
Check the internal temperature with a digital thermometer
using the guidelines below. Continue to cook until you
reach your desired level of doneness.
For Medium Well and Well Done steaks, once you have
the sear marks reduce grill temperature to MED. and
continue to monitor internal temperatures until they reach
the desired level.
Turn the steak over every two minutes or so to prevent the
surfaces from overcooking.
Rare: 120 – 130°F 49 – 54°C Bright purple-red, warm, tender, juicy
Medium: 135 – 145°F 57 – 63°C Rich pink, yielding, slightly juicy
Medium Well: 145 – 155°F 63 – 68°C Tan with slight pink, fi rm, slightly fi brous,
some juice
Well Done: 155 plus°F 68°C plus Tan to brown, no pink, chewy, little juice
Once you remove the meat from the grill allow it to rest for
about 5 minutes and bear in mind it will continue to cook
and gain an additional 5°F internal temperature. Resting
the meat ensures it will retain its juices when it is sliced.
Serve with freshly grated ginger and soy sauce.
8
LYNX DOWNTOWN ELECTRIC GRILL CARE & USE MANUAL
|
Page 9

CARE AND CLEANING
Your satisfaction is of the utmost importance to us. If a problem cannot be resolved to your satisfaction, please write, call,
CAUTION
Do Not submerge the Lynx Downtown Electric Grill in water! Do not place the grill under running water, or in a
dishwasher. Failure to follow these instructions will damage your grill and may create an electrical shock hazard.
When not in use the grill should be stored in a clean dry location and always use the included cover.
1. The Lynx Downtown Electric Grill should be cleaned
after each use.
2. Before cleaning the grill it should be allowed to cool,
the power turned OFF, and the cord unplugged.
3. Remove any grease or food residue from the cooking
grill surface. A soft bristle brush or a soft wire brass
brush may be used. Do not use a steel wire brush as
damage to the cooking surface will occur.
TROUBLESHOOTING
4. Finish the clean-up using a soft scouring pad and warm
soapy water, let excess water fl ow into the drip tray.
5. Empty and clean the drip tray. The drip tray may be
cleaned in the dishwasher.
CONTACTING LYNX CUSTOMER CARE
9
LYNX DOWNTOWN ELECTRIC GRILL CARE & USE MANUAL
|
Page 10

LYNX LIMITED WARRANTY
I. Limited Lifetime Warranty
The stainless steel body housings, is warranted to be free
from defects in material and workmanship when subjected
to normal domestic use and service for the lifetime of the
original purchaser. This warranty excludes surface corrosion,
scratches, and discoloration which may occur during
regular use. This warranty is limited to the replacement of
the defective parts, with the owner paying all other costs
including labor.
II. Limited Two-Year Warranty
All electronic components including the heating element
are warranted to be free from defects in material and
workmanship for a period of two years from the original
date of purchase. Lynx will replace or repair parts found to
be defective at no cost to the original purchaser.
III. Limitations & Exclusions
1. This Warranty shall apply to products purchased and
located in the United States and Canada. Products must
be purchased in the country where service is requested.
2. Warranty applies only to the original purchaser and may
not be transferred.
3. Warranty is in lieu of all other warranties expressed or
implied and all other obligations or liabilities related to the
sale or use of its grill products.
4. Warranty shall not apply and Lynx is not responsible
for damage resulting from misuse, abuse, alteration
of or tampering with the appliance, accident, hostile
environment, fl are-up fi res, improper installation, or
installation not in accordance with the instructions
contained in this manual, or the local codes.
5. Lynx shall not be liable for incidental, consequential,
special or contingent damages resulting from its breach of
this written warranty or any implied warranty.
6. Some states do not allow limitations on how long an
implied warranty lasts, or the exclusions of or limitations
on consequential damages. This warranty gives you
specifi c legal rights and you may have other rights which
vary from state to state.
7. No one has the authority to add to or vary Lynx’s warranty,
or to create for Lynx any other obligation or liability in
connection with the sale or use of its products.
8. Limited to the replacement of defective parts with the
owner paying all other costs including labor.
IV. What is not covered: Lynx shall not be responsible for
and shall not pay for the following:
1. Service by an unauthorized service provider;
2. Damage or repair due to service by an unauthorized
service provider or use of unauthorized parts;
3. Warranty does not apply to this product installed in any
commercial or non-residential application. Examples of
excluded applications include, but are not limited to day
care centers, schools, bed and breakfast centers, churches,
private clubs, fi re stations, club houses, common areas in
multi-family dwellings, restaurants, hotels, nursing homes,
food service locations and institutional food service
locations.
4. Shipping and handling costs, export duties, installation,
removal, or re-installation cost.
5. Display models are generally sold “as is.” If you have
purchased a display model, please be advised that
it is sold “as is” and that it is subject to the following
warranty exclusions: any exterior or cosmetic damage is
nonwarrantable; any missing components will be replaced
at consumers expense; all other warranty’s (standard
warranty) will remain in effect.
6. The cost of a service call to diagnose trouble.
10
LYNX DOWNTOWN ELECTRIC GRILL CARE & USE MANUAL
|
Page 11

SPECIFICATIONS
Width 27.00” (686 mm)
Weight 42 LBS (19 Kg)
Above Top with Lid Open 8.00” (203 mm)
11
LYNX DOWNTOWN ELECTRIC GRILL CARE & USE MANUAL
|
Page 12

Lynx Professional Grills
5895 Rickenbacker Rd.
Commerce, CA 90040
Service: (888) Buy-Lynx (888-289-5969)
Fax: (323) 838-1778
www.Lynxgrills.com
 Loading...