

Page 1
LYNX SYSTEM DEVELOPERS, INC.
QUICK START GUIDE
IdentiLynx PRO (XS and XR) – Full Frame Video Capture
Quick Start Guide
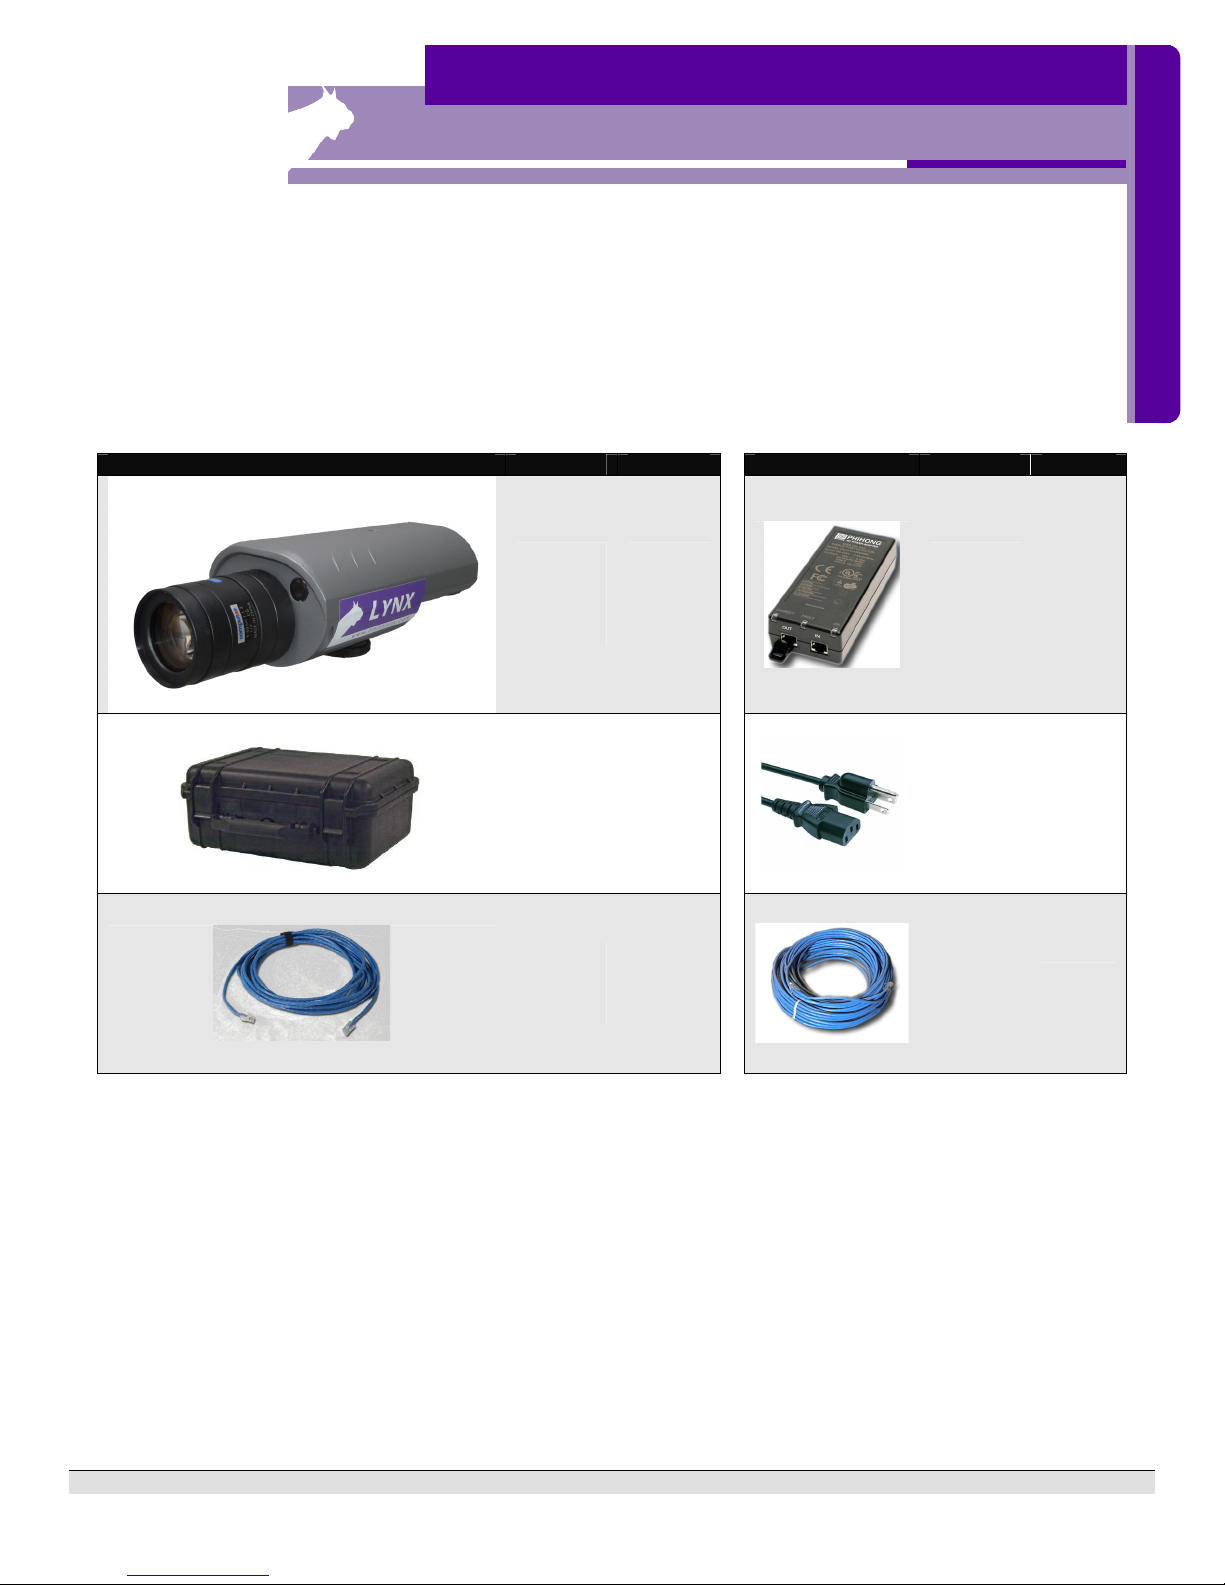
Verify that your IdentiLynx – Full Frame Video system contains the components pictured here. If not, or if you need help,
call: USA 978 556 9780
Item Description ID Item Description ID
IdentiLynx
Camera
(shown
with lens
mounted)
Protective
Case
IdentiLynx
PRO XS
or
IdentiLynx
PRO XR
CP102
Power
Injector for
Connector
Power
Over
Ethernet
Power
Over
Ethernet
Power
Supply
IDL-PoE
(Included
with IDL-
PoE)
IDENTILYNX
10’ (3
meter)
Ethernet
Cable
C10BT-10
100’ (33
meter)
Ethernet
Cable
C10BT-
100
Items not included
• Computer (laptop recommended) running Microsoft Windows. Your computer needs:
one available serial port, or USB port, one available Ethernet port (Recommended 100
mbs network card or higher), and a DVD/CD drive.
• (Recommended)Gigabyte Hub/Switch
• UPS Battery Backup
IdentiLynx Quick Start Guide Side 1 of 4
Rev 1.1 - 12/13/2013 3:38 PM
Page 2

Introduction
In this quick start guide, you will learn how to set up
and configure the IdentiLynx camera with your
FinishLynx Timing system and playback full frame
video captured at the finish line.
IMPORTANT NOTE: Lynx recommends a
Gigabyte hub/switch and Gigabyte network card
as a minimum when adding the IdentiLynx
camera to your timing system.
Step 1: Install the Software
a) IdentiLynx requires FinishLynx version 8.23 or above
b) Open FinishLynx on your computer – go to Help | About
and write down your FinishLynx Serial Number if you do
not have it stored somewhere. Also record the serial
numbers for any FinishLynx Software Plug-Ins
c) Insert the supplied Lynx Resource CD into your
computer’s DVD/CD drive.
d) Follow the instructions on your screen to install FinishLynx
8.23 or above for IdentiLynx, or download and install the
latest version from the website. Enter the serial number
found on the back of your Lynx Resource CD jewel case
or from your Help|About information.
e) Open FinishLynx, click Help|About and verify a serial
number is listed next to FinishLynx (this verifies installation
was successful)
Step 2: Set-Up IdentiLynx Camera
a) Place the camera on the tripod, about chest high and in a
safe location aimed at the finish line facing in the direction
of the oncoming runners.
b) Plug the Power over Ethernet power supply into the power
source or UPS battery backup.
c) Connect the first Ethernet cable (10’) from the Hub/Switch
to the “In” port of the IdentiLynx power supply.
d) Connect a second Ethernet cable (100’) to the “Out” port
on the IdentiLynx power supply
e) Do not connect the other end of the second Ethernet cable
to the RG45 port on the back of the IdentiLynx Camera
until FinishLynx is ready to boot the cameras.
NOTE: The IdentiLynx camera gets Power over Ethernet
(POE)
IdentiLynx PRO (XS & XR) Quick Start Guide Side 1 of 4
Page 3

Step 3: Boot Cameras
a) Open up the FinishLynx program.
b) Power on the FinishLynx cameras first, before the
IdentiLynx camera, a single camera at a time.
c) After ALL your regular FinishLynx cameras have started
and appeared in the camera listing in the FinishLynx
Hardware Control window, plug in the Ethernet cable from
the “Connect” port on the power injector to the RG45 port
on the back of the IdentiLynx camera.
d) Verify that the IdentiLynx camera boots with the default
settings:
XS: Rate - 5 fps, Density - 480, and Mode - 100%
XR: Rate - 5 fps, Density - 720, and Mode - 100%
NOTE: If the IdentiLynx camera goes off-line due to loss of
power or network connection the camera name does not turn
RED as the FinishLynx camera. The software does not do a
check to see if the IdentiLynx camera is connected.
NOTE: Booting the IdentiLynx camera at the end of the order
will eliminate any interruption in camera communication if you
turn off or lose connection with the IdentiLynx camera at some
point and require re-booting the FinishLynx cameras (IP order
of assigning).
Step 5: Camera Settings
NOTE: Only the Setup, Parameters and Capture tabs will
apply to settings for the IdentiLynx camera. The other settings
are grayed out as they do not apply to the IdentiLynx functions.
a) Click on the Camera Settings Icon (blue circle with white
“I”)
b) Click on the Setup Tab and Name the camera based on
location or function
c) Click on the Parameters tab and set the Frame Rate and
Density to your desired need. If you see any problems with
image capture, lower the frame rate, and/or return the
Pixel Mode to Wide 50%.
Step 4: Align Identilynx Camera
The IdentiLynx camera is a Full Frame Video so the image
during alignment mode will be a normal two dimensional video
in the Image Zone.
a. Follow Steps 1, 2, and 3 above.
b. Confirm that the IdentiLynx camera has booted-appears in
the listing in the Hardware Control window.
c. Have someone stand on the finish line to determine the
focus point.
d. Select the IdentiLynx camera in the Hardware Control
window and click on the Red Stop sign to put the
IdentiLynx camera into Alignment mode
e. Adjust the IdentiLynx camera to the desired zoom and
focus to capture video at the Finish Line.
d) Click on the Capture Tab and make sure Manual is
selected. Make sure that the Capture Button is configured
correctly in File|Options|General if you are using ACM on
the FinishLynx cameras
e) In File | Options | Image, make sure that Time Tracking is
set to “All Cameras”
IdentiLynx PRO (XS & XR) Quick Start Guide Side 1 of 4
Page 4

Step 6: IdentiLynx Image Tool
a) Open a New Blank Event in FinishLynx
b) Get a start for the system and have someone run through
the Finish Line as you capture (All Cameras)
c) Click on the “+” and “-“icons on the Image Tool Bar and
zoom in and out of the image
d) Click on the Full Screen icon to show the image full screen
e) The Cropping tools and Find Next Object are not
applicable to the IdentiLynx image
f) Right click and hold in the IdentiLynx image and drag to
draw a small box and choose enhance from the menu
when the mouse is released. Click on the Restore Image
icon to bring it back to the original state
g) Click on the Play icon and see the images change (you
should see the time advance to the left of the play icon).
Click it again to stop playback
h) Click on the Forward or Reverse icons to move one frame
at a time in either direction (you should see the time
advance with each frame)
i) Hitting the rewind button at full speed forward playback
goes to ½ speed playback. Hitting it again goes to ½
speed reverse playback, and again goes to full speed
reverse. It works the same going forward in playback.
j) You can control the number of “slow modes” there are with
the Hidden Setting \Event\Image\FrameMaxSlow. This
defaults to 2, which means you get half speed. If set to 1
you get no “slow modes”, if set to 4 you would get ½
speed and ¼ speed. There is also
\Event\Image\FrameMaxFast, which controls how fast. It
defaults to 16, giving up to 16 times playback.
k) Clicking the Play button in slow or fast modes brings the
play back to full speed and clicking it again will stop
playback.
l) Images can be printed from the Image Tool Bar or they
can be cropped and saved as a .jpg, similar to FinishLynx
images.
NOTE: The Play speeds are not displayed in the Image Tool
Bar.
Step 7: Time Tracking With IdentiLynx
NOTE: The Red hash line does not appear on the IdentiLynx
image unless you click on the image frame. Time can NOT be
read from the IdentiLynx image
a) Using the same Blank Event, investigate the time tracking
between the FinishLynx camera and IdentiLynx.
b) Click on a competitor in the Finish Lynx image and the
IdentiLynx image should jump to that Frame (time
reference) in the sequence
c) Click on the Play button for the IdentiLynx images and
then click in the FinishLynx image. The IdentiLynx image
will jump to that location and continue to play from that
point forward.
Step 8: Remote Focus Fine Tuning
The remote focus adjustment on the IdentiLynx PRO cameras
is for FINE TUNING ONLY. You will need to get the image
approximately in focus manually, and then use the controls in
the Hardware Control window to bring the image into precise
focus.
Major adjustments in focus are NOT possible from within the
FinishLynx software.
Note (a): When adding IdentiLynx PRO cameras to your
network, be sure to monitor Ethernet traffic and watch for
congestion. Add one camera at a time, and increase the
resolution, or frame rate in increments. We recommend the
use of a Gigabyte Network Switch. Use the same methodology
when adding a second IdentiLynx camera to your FinishLynx
network. From a results production standpoint, it is seldom
necessary to go over 10fps in Cross Country or Road Races
NOTE (b): The Play speeds are not displayed in the image tool
bar. If you “Ctrl click” the buttons you’ll go to the first or last
frame. If you “Shift click” the play button, the image playback
will loop back to the beginning when the end is reached.
This completes the FinishLynx “I
Video Capture System - Quick Start Guide.
179 Ward Hill Ave. Haverhill MA 01835
DENTILYNX PRO” Full Frame
Tel: 978.556.9780 Toll Free: 800.989.5969
www.finishlynx.com info@finishlynx.com
LYNX SYSTEM DEVELOPERS, INC.
IdentiLynx PRO (XS & XR) Quick Start Guide Side 1 of 4
 Loading...