

Page 1
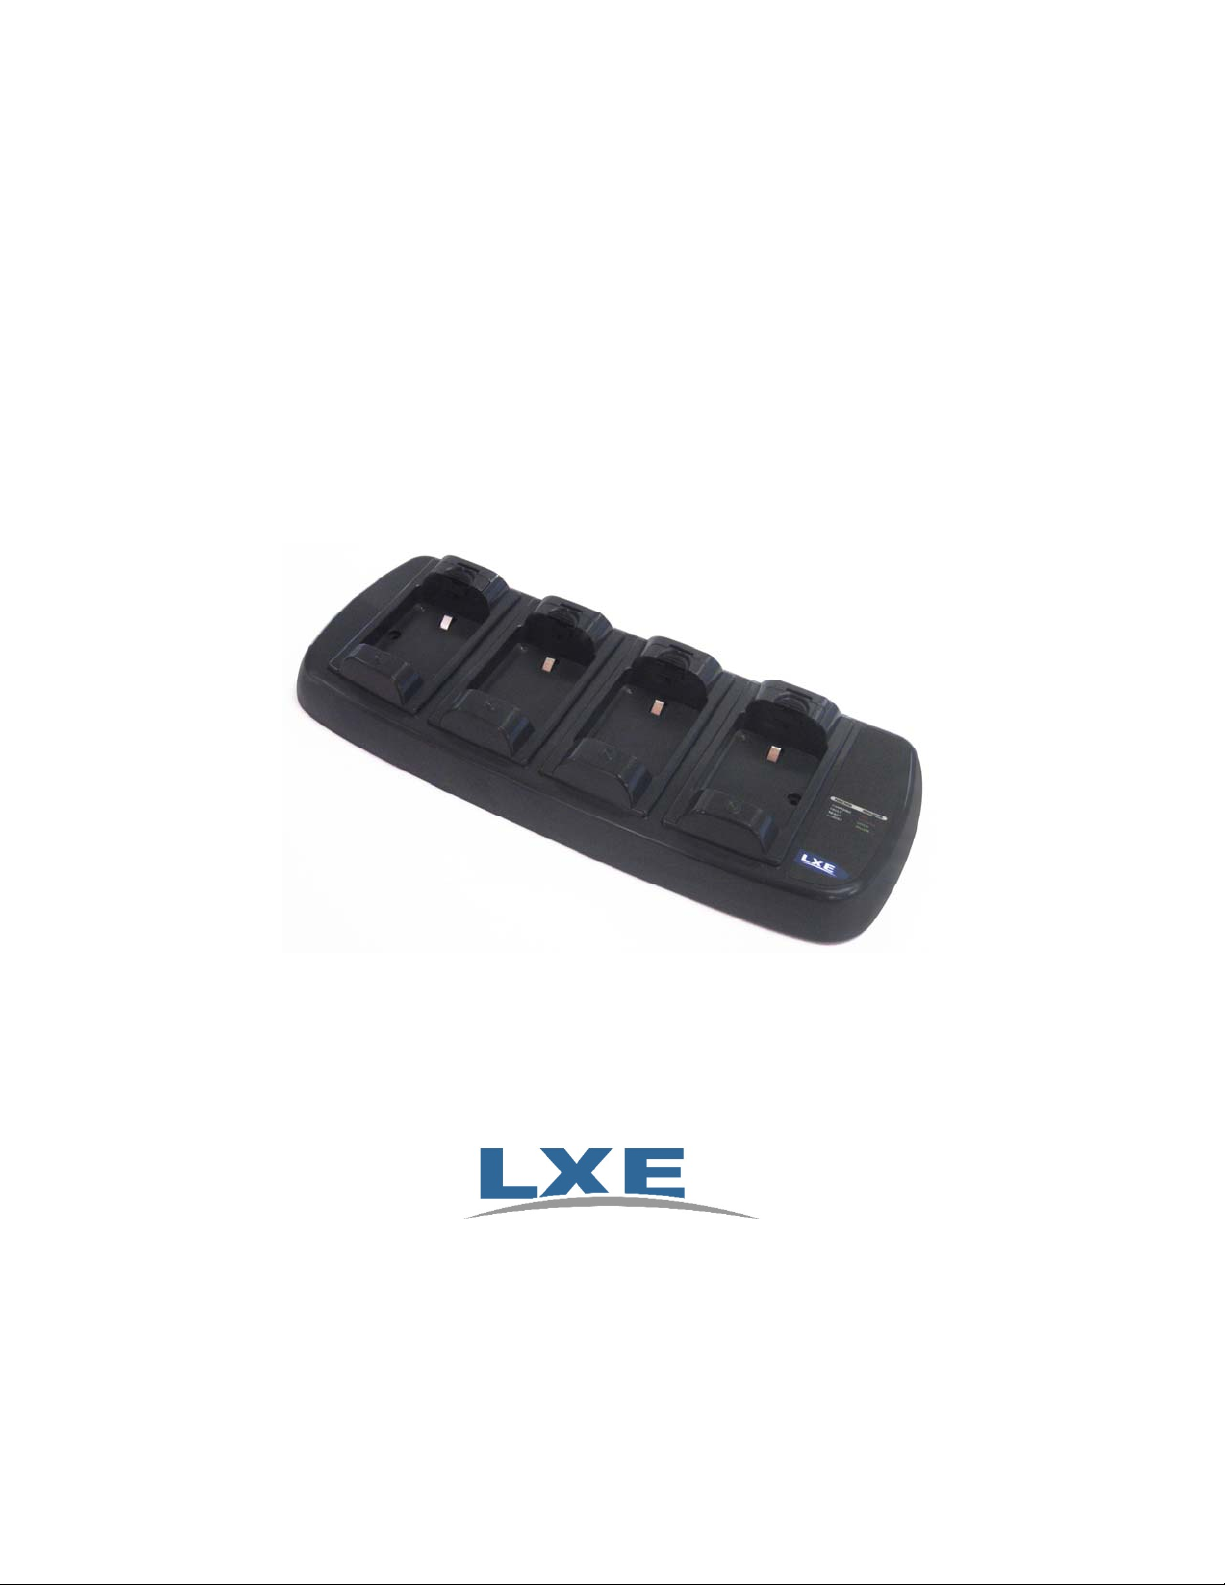
MX8 Multi-Charger User’s Guide
Models MX8A385CHGR4US and MX8A386CHGR4WW
For Use with LXE (Part number 161376-0001) Lithium Ion Battery Packs
Copyright © 2007 by LXE, Inc.
All Rights Reserved
E-EQ-MX8CHGROG-A
Page 2
Notices
LXE Inc. reserves the right to make improvements or changes in the products described in this manual at any time without notice.
While reasonable efforts have been made in the preparation of this document to assure its accuracy, LXE assumes no liability
resulting from any errors or omissions in this document, or from the use of the information contained herein. Further, LXE
Incorporated, reserves the right to revise this publication and to make changes to it from time to time without any obligation to
notify any person or organization of such revision or changes.
Copyright Notice:
This manual is copyrighted. All rights are reserved. This document may not, in whole or in part, be copied, photocopied,
reproduced, translated or reduced to any electronic medium or machine-readable form without prior consent, in writing, from
LXE Inc. Further, LXE Incorporated, reserves the right to revise this publication and to make changes to it from time to time
without any obligation to notify any person or organization of such revision or changes.
Copyright © 2007 by LXE Inc. , An EMS Technologies Company
125 Technology Parkway, Norcross, GA 30092, U.S.A. (770) 447-4224
LXE is a registered trademark of LXE Inc. All other brand or product names are trademarks or registered trademarks of their
respective companies or organizations. When manual is in PDF format: "Acrobat ® Reader Copyright © 1987-2007 Adobe
Systems Incorporated. All rights reserved. Adobe, the Adobe logo, Acrobat, and the Acrobat logo are trademarks of Adobe
Systems Incorporated." applies.
FCC Information:
This device complies with FCC Rules, part 15. Operation is subject to the following conditions:
1. This device may not cause harmful interference
and
2. This device must accept any interference that may be received, including interference that may cause undesired
operation.
Warning!
This equipment has been tested and found to comply with the limits for a Class A digital device, pursuant to
part 15 of the FCC rules. These limits are designed to provide reasonable protection against harmful
interference when the equipment is operated in a commercial environment. This equipment generates, uses,
and can radiate radio frequency energy and, if not installed and used in accordance with the instruction
manual, may cause harmful interference to radio communications. Operation of this equipment in a residential
area is likely to cause harmful interference in which case the user will be required to correct the interference at
his own expense.
Changes or modifications to this device not expressly approved by LXE Inc., could void the user’s authority to operate this
equipment.
EMC Directive Requirements:
This is a Class A product. In a domestic environment this product may cause radio interference in which case the user may be
required to take adequate measures.
Industry Canada:
This Class A digital apparatus meets all requirements of the Canadian Interference Causing Equipment Regulations. Operation is
subject to the following two conditions: (1) this device may not cause harmful interference, and (2) this device must accept any
interference received, including interference that may cause undesired operation.
Cet appareil numérique de la classe A respecte toutes les exigences du Règlement sur le matériel brouiller du Canada.
Le present appareil numérique n’emet pas de bruits radioélectriques dépassant les limites applicables aux appareils numeriques
de le Classe A préscrites dans le Reglement sur le brouillage radioélectrique édits par le ministere des Communications du
Canada.
Important: This symbol is placed on the product to remind users to dispose of Waste Electrical and Electronic
Equipment (WEEE) appropriately, per Directive 2002-96-EC. In most areas, this product can be recycled,
reclaimed and re-used when properly discarded. Do not discard labeled units with trash. For information about
proper disposal, contact LXE through your local sales representative, or visit www.lxe.com.
Page 3

Table of Contents
INTRODUCTION 1
Purpose of this Manual .........................................................................................................................1
Quick Start.............................................................................................................................................. 1
Intended Use .......................................................................................................................................... 1
Controls and Connectors...................................................................................................................... 2
MX8 Multi-Charger ..............................................................................................................................................2
MX8 Rechargeable Lithium Ion Battery Pack......................................................................................................2
Specifications......................................................................................................................................... 4
Electrical Specifications........................................................................................................................................4
Operating Temperature Ranges.............................................................................................................................4
Dimensions ...........................................................................................................................................................4
INSTALLATION AND OPERATION 5
Introduction ............................................................................................................................................ 5
Normal Operations................................................................................................................................. 5
Caring for Batteries ............................................................................................................................... 5
Setup / Installation ................................................................................................................................. 6
Multi-Charger Dimensions....................................................................................................................................7
LEDs ..................................................................................................................................................................... 8
Orienting the Battery Pack....................................................................................................................................8
Inserting the Battery Pack.....................................................................................................................................9
Progress Monitoring.............................................................................................................................. 9
Charge Timer ........................................................................................................................................................ 9
Interpreting the LEDs..........................................................................................................................................10
RED - on any pocket ........................................................................................................................10
GREEN - on any pocket ................................................................................................................... 10
YELLOW - on any pocket ............................................................................................................... 10
NO LIGHT - on a pocket.................................................................................................................. 10
NO LIGHT - on every pocket........................................................................................................... 10
Maintenance ......................................................................................................................................... 11
Storage.................................................................................................................................................. 11
Service ..................................................................................................................................................11
Troubleshooting................................................................................................................................... 11
Getting Help.......................................................................................................................................... 13
Accessories.......................................................................................................................................... 13
E-EQ-MX8CHGROG-A MX8 Multi-Charger User’s Guide
Page 4

ii Table of Contents
Illustrations
Figure 1 MX8 Multi-Charger............................................................................................................................ 2
Figure 2 Lithium Ion Battery Pack.................................................................................................................... 2
Figure 3 Battery Well........................................................................................................................................ 3
Figure 4 AC Power Supply ............................................................................................................................... 6
Figure 5 Multi-Charger Footprint .....................................................................................................................7
Figure 6 LED Location .....................................................................................................................................8
MX8 Multi-Charger User’s Guide E-EQ-MX8CHGROG-A
Page 5
Purpose of this Manual
This user’s guide is intended to familiarize the user with the safety and operating instructions
necessary to use the MX8 Multi-Charger (LXE Model MX8A385CHGR4US /
MX8A386CHGR4WW) to simultaneously charge up to four LXE Rechargeable MX8 Lithium Ion
Battery Packs (LXE Part No. 161376-0001).
This manual should be readily available to all users and maintenance personnel using this multi-
charger.
Quick Start
This manual provides the following instructions for operating the MX8 Multi-Charger.
• Setting Up the multi-charger
Introduction
Intended Use
Caution!
• Inserting the Battery Pack
• Interpreting the LEDs
The LXE MX8 Multi-Charger is designed to simultaneously charge up to four MX8 Rechargeable
Lithium Ion Battery Packs in less than five hours, depending upon battery pack temperature and
conditions
The multi-charger should be located in an area where it:
Note: Store the multi-charger in a cool, dry place.
.
• Is not in high traffic areas.
• Has enough clearance to allow easy access to the power jack on the back of the device.
• Is protected from rain, dust or inclement weather. This device is intended for indoor use
only.
RISK OF EXPLOSION IF BATTERY IS REPLACED BY AN INCORRECT
TYPE.
DISPOSE OF USED BATTERIES ACCORDING TO THE INSTRUCTIONS.
DO NOT INSERT ANY OTHER TYPE OF BATTERY IN THE MX8 MULTICHARGER BATTERY CHARGING WELL.
E-EQ-MX8CHGROG-A MX8 Multi-Charger User’s Guide
Page 6
2 Controls and Connectors
Controls and Connectors
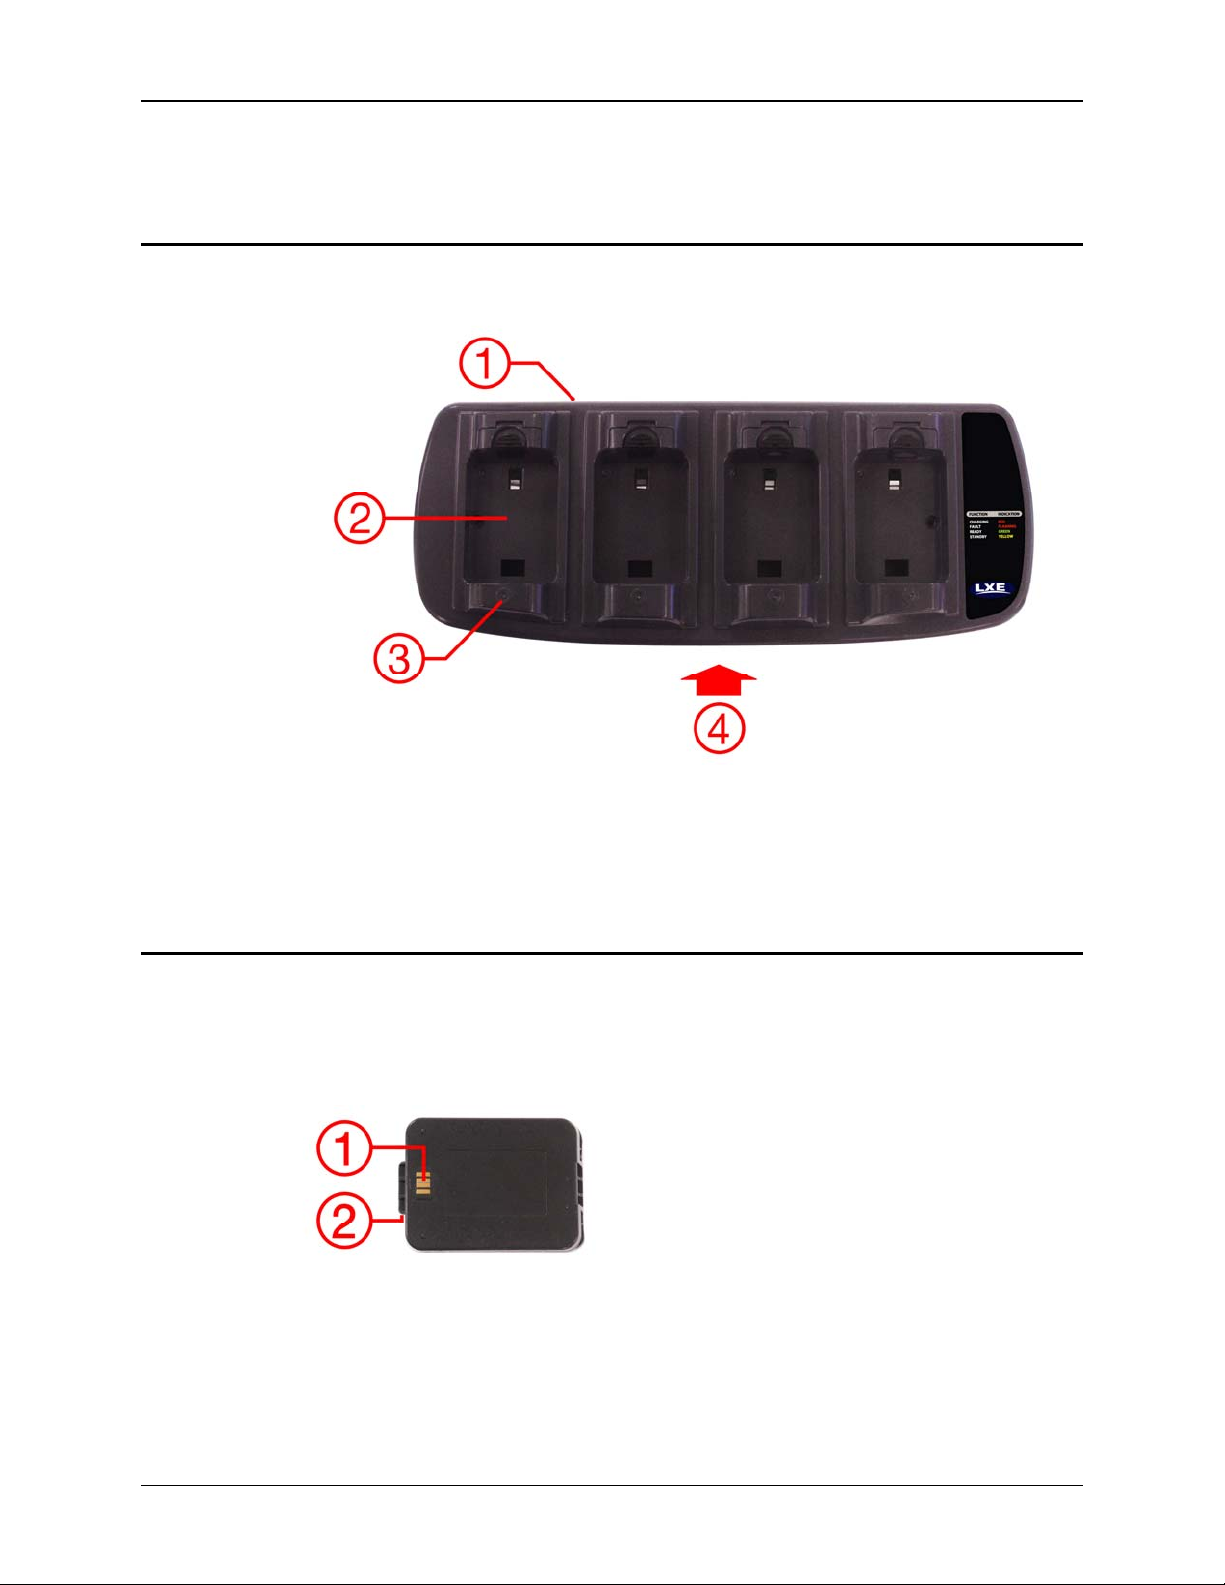
MX8 Multi-Charger
Figure 1 MX8 Multi-Charger
1 Power Jack Location 3 LED Indicators
2 Battery Charging Well 4 Front
MX8 Rechargeable Lithium Ion Battery Pack
Battery Pack Model Number – 161376-0001 / MX8A380BATT
Figure 2 Lithium Ion Battery Pack
1. Contacts, Battery Charging
2. Retaining Clip
Note: When not in use, lay the battery pack contact-side up in a protected environment.
MX8 Multi-Charger User’s Guide E-EQ-MX8CHGROG-A
Page 7
Controls and Connectors 3
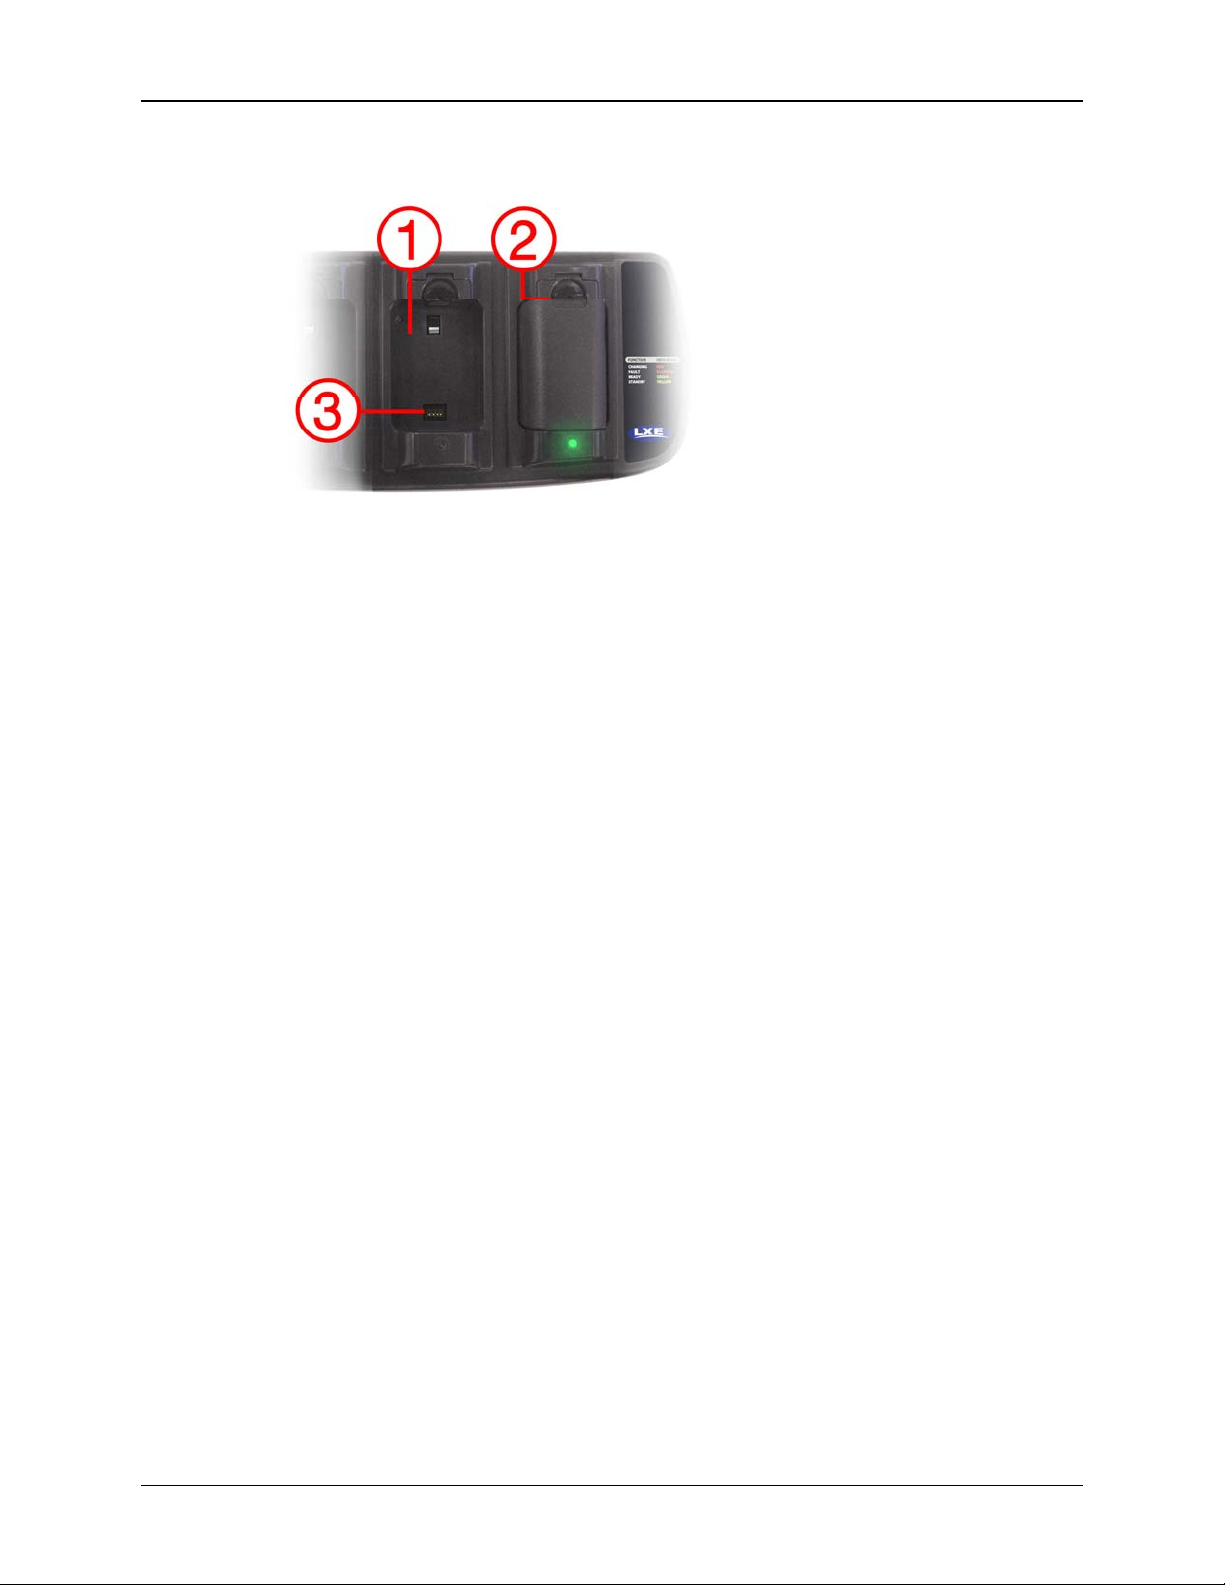
1. Battery Charging Well
2. Retaining Clip
3. Battery Charging
Contacts
Figure 3 Battery Well
Note: Do not allow cleaning agents of any kind to contact the battery charging contacts; they
may be damaged. If necessary, clean them with a soft-bristle, dry brush or compressed
air.
E-EQ-MX8CHGROG-A MX8 Multi-Charger User’s Guide
Page 8
4 Specifications
Specifications
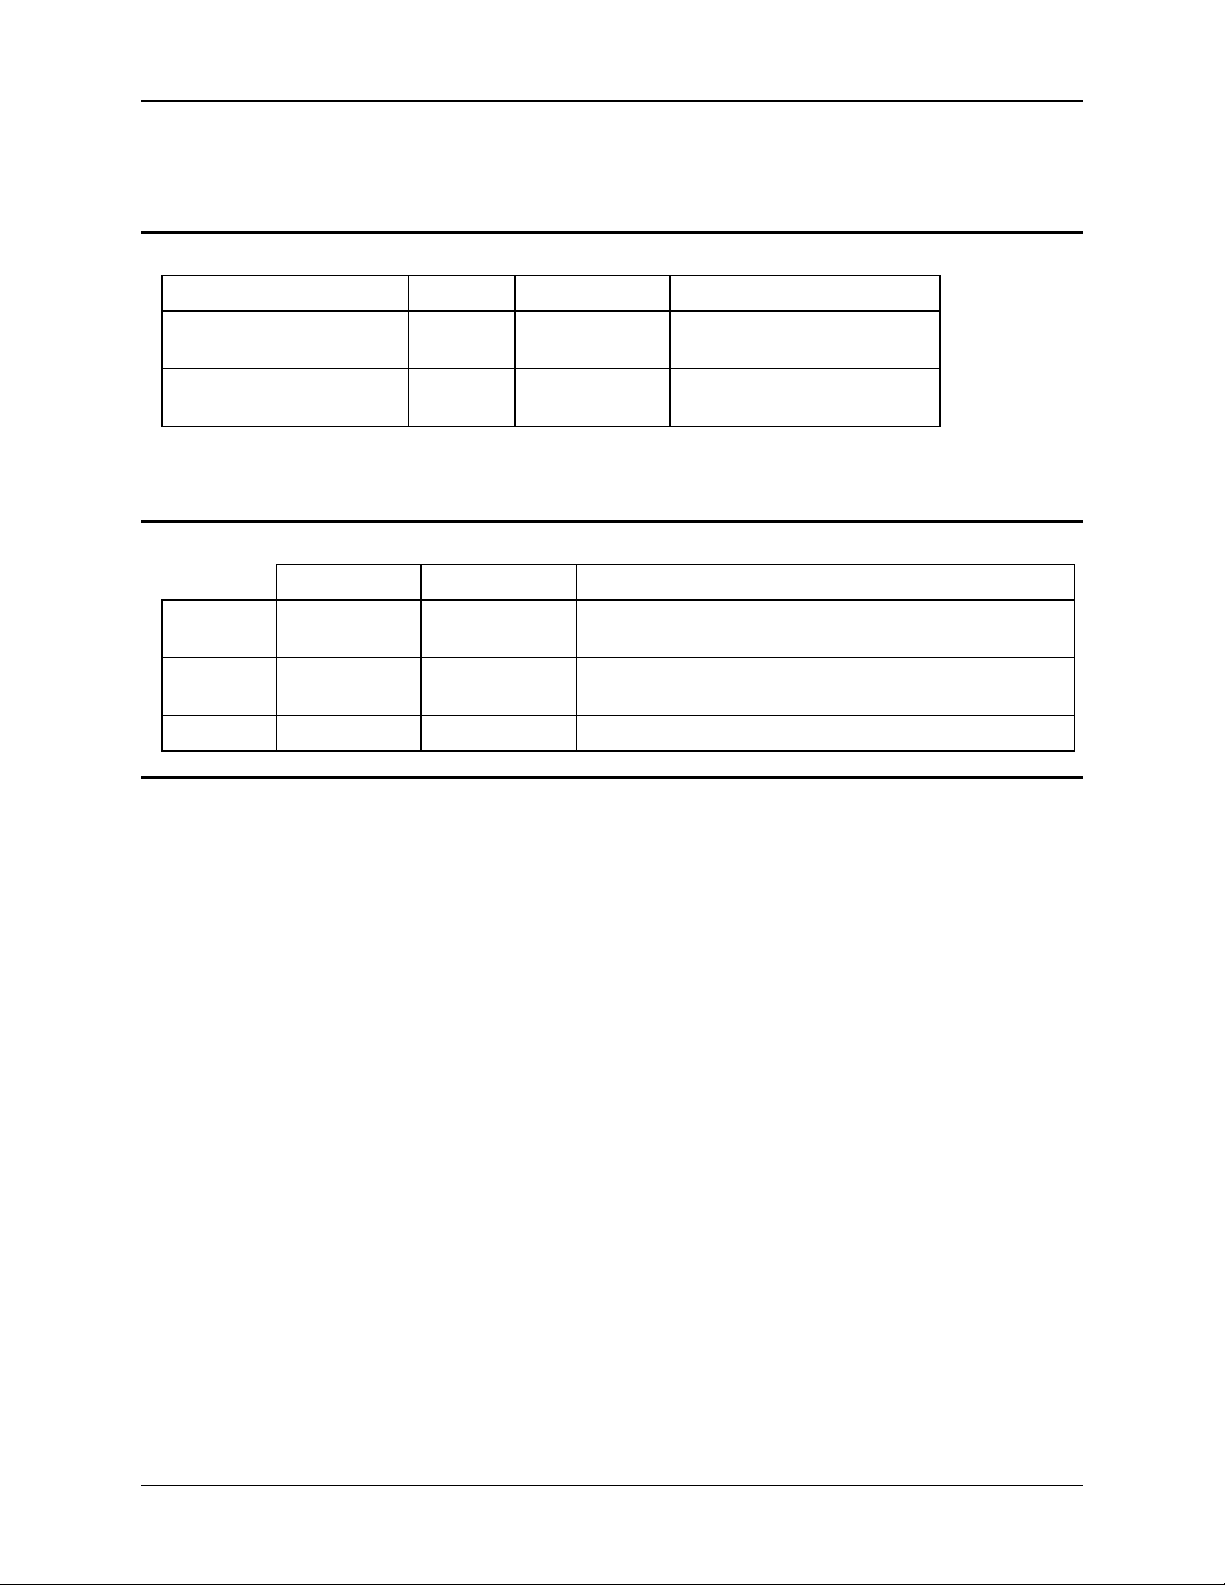
Electrical Specifications
Parameter Min Max. Comment
Power Supply Input
Voltage (V
Power Supply Input
Frequency (freq)
)
AC-IN
Note: Battery packs may leak up to 1mA current through the battery contacts when left in an
100 VAC 240VAC Auto-switching
47Hz 63Hz
unpowered multi-charger battery well.
Operating Temperature Ranges
Minimum Maximum Comment
Operating 0°C (32°F) +50°C (120°F) Battery packs will only be charged when their temperature
is between 10°C (50°F) and 40°C (100°F).
Charging 10°C (50°F) +40°C (100°F) Battery packs will not charge if their temperature is outside
this range.
Storage -20°C (-4°F) +70°C (160°F) Unit is off.
Dimensions
Weight 1.1 lbs / .50 kg (no batteries)
2.5 lbs / 1.13 kg (with a battery in each charging bay)
Length 13.5 in / 34.3 cm
Width 5.3 in / 13.5 cm
Height 1.75 in / 4.44 cm
MX8 Multi-Charger User’s Guide E-EQ-MX8CHGROG-A
Page 9

Introduction 5
Installation and Operation
Introduction
The life and capacity of a Lithium Ion battery can vary significantly depending on the discharge
current and the environment in which it is used. As with all batteries, expect to see a reduction in
the total number of operations a fully charged battery pack can deliver as it ages.
Charging times may increase but will not exceed five hours. Battery packs do not need to be fully
discharged between charge cycles.
Normal Operations
The optimal operating temperature range for the MX8 Multi-Charger is between 50°F and 100°F
(10°C and 40°C). While charging, the multi-charger and battery pack will generate enough heat to
feel warm. This is normal and does not indicate a problem. Do not store the battery pack in direct
sunlight or anywhere the battery pack cannot cool down. If the battery pack is hot after removal
from the mobile device, allow it to cool at room temperature before placing it in the multi-charger.
Charge times may increase significantly if the battery is warm or hot, since it takes the battery
pack longer to cool down while in the charging bay. If the battery pack is hot from severe
environmental use and immediate recharging is necessary, place the battery pack in a cool air
stream or in a cool location until it is no longer warm to the touch before charging.
Do not use, place or store the MX8 Multi-Charger in hazardous locations.
Caring for Batteries
• Do not dispose of batteries into a fire. Burning will generate hazardous vapors and may
cause the battery to explode. Failure to observe this warning may result in injury from
inhalation of vapors or burns from flying debris.
• Do not immerse batteries in water or any other liquid. If batteries are immersed, contact
LXE.
• Do not disassemble or perform modifications to the battery. There are no user serviceable
components in the battery.
• Do not place battery into pocket or toolbox with conductive objects (coins, keys, tools,
etc.).
• A battery placed on damp ground or grass could be electrically shorted. Lay the battery
on its side when not in use.
• Do not store batteries above 140°F (60°C) for extended periods.
• Failure to observe these warnings could result in injury or damage to the battery from
rapid discharge of energy or overheating of the battery.
E-EQ-MX8CHGROG-A MX8 Multi-Charger User’s Guide
Page 10
6 Setup / Installation
Setup / Installation
• Ensure that the location you choose for the battery multi-charger is well ventilated.
• Is not in high traffic areas.
• Has enough clearance to allow easy access to the power and ports on the back of the
device.
• Is protected from rain, dust or inclement weather.
1. Place the multi-charger on a horizontal, hard surface or fasten securely to a wall using the
keyhole openings on the bottom of the unit.
2. Plug the power cord into a properly grounded outlet. Locate or orient the AC cord so that it
will not be stepped on, tripped over or subjected to damage or stress.
3. On initial power-up, multi-charger LEDs light up for a few seconds.
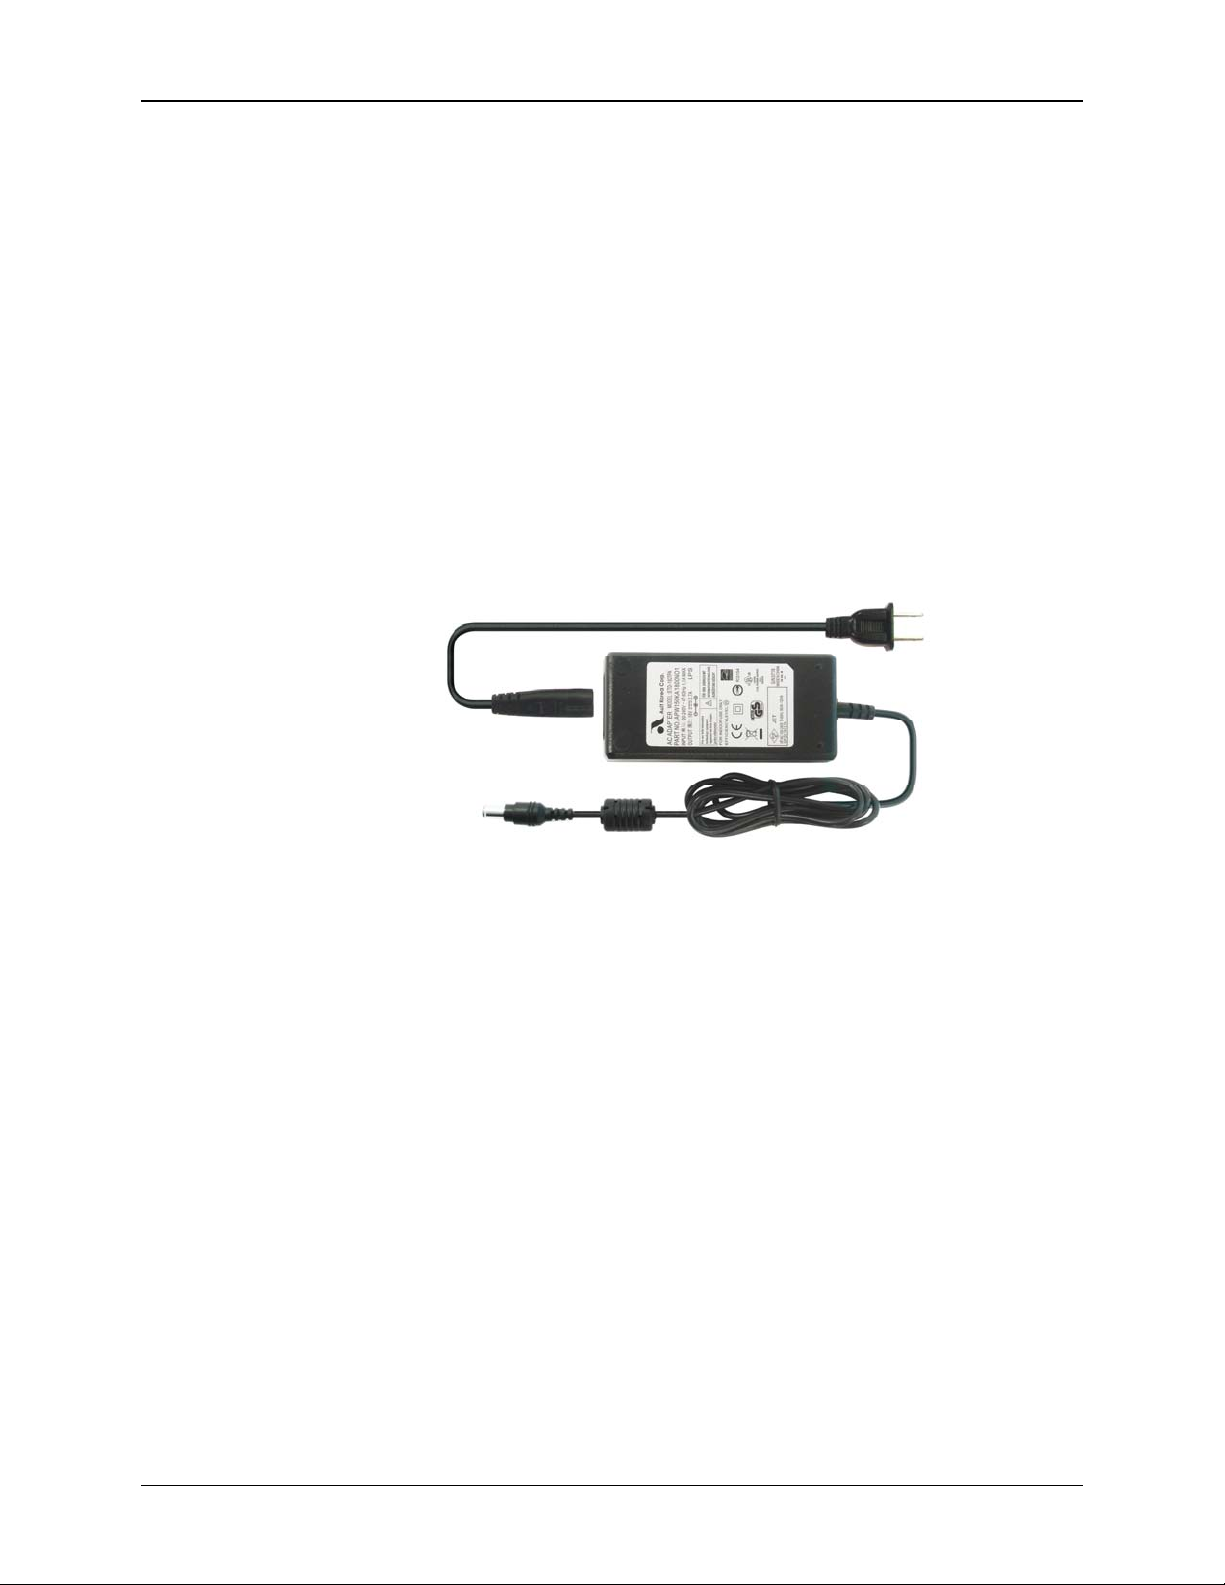
Figure 4 AC Power Supply
The external Power Supply for the multi-charger is shipped with the multi-charger. If there is no
AC cable, please contact your LXE representative. The multi-charger power supply is intended for
use with the MX8 Multi-Charger only.
MX8 Multi-Charger User’s Guide E-EQ-MX8CHGROG-A
Page 11
Setup / Installation 7
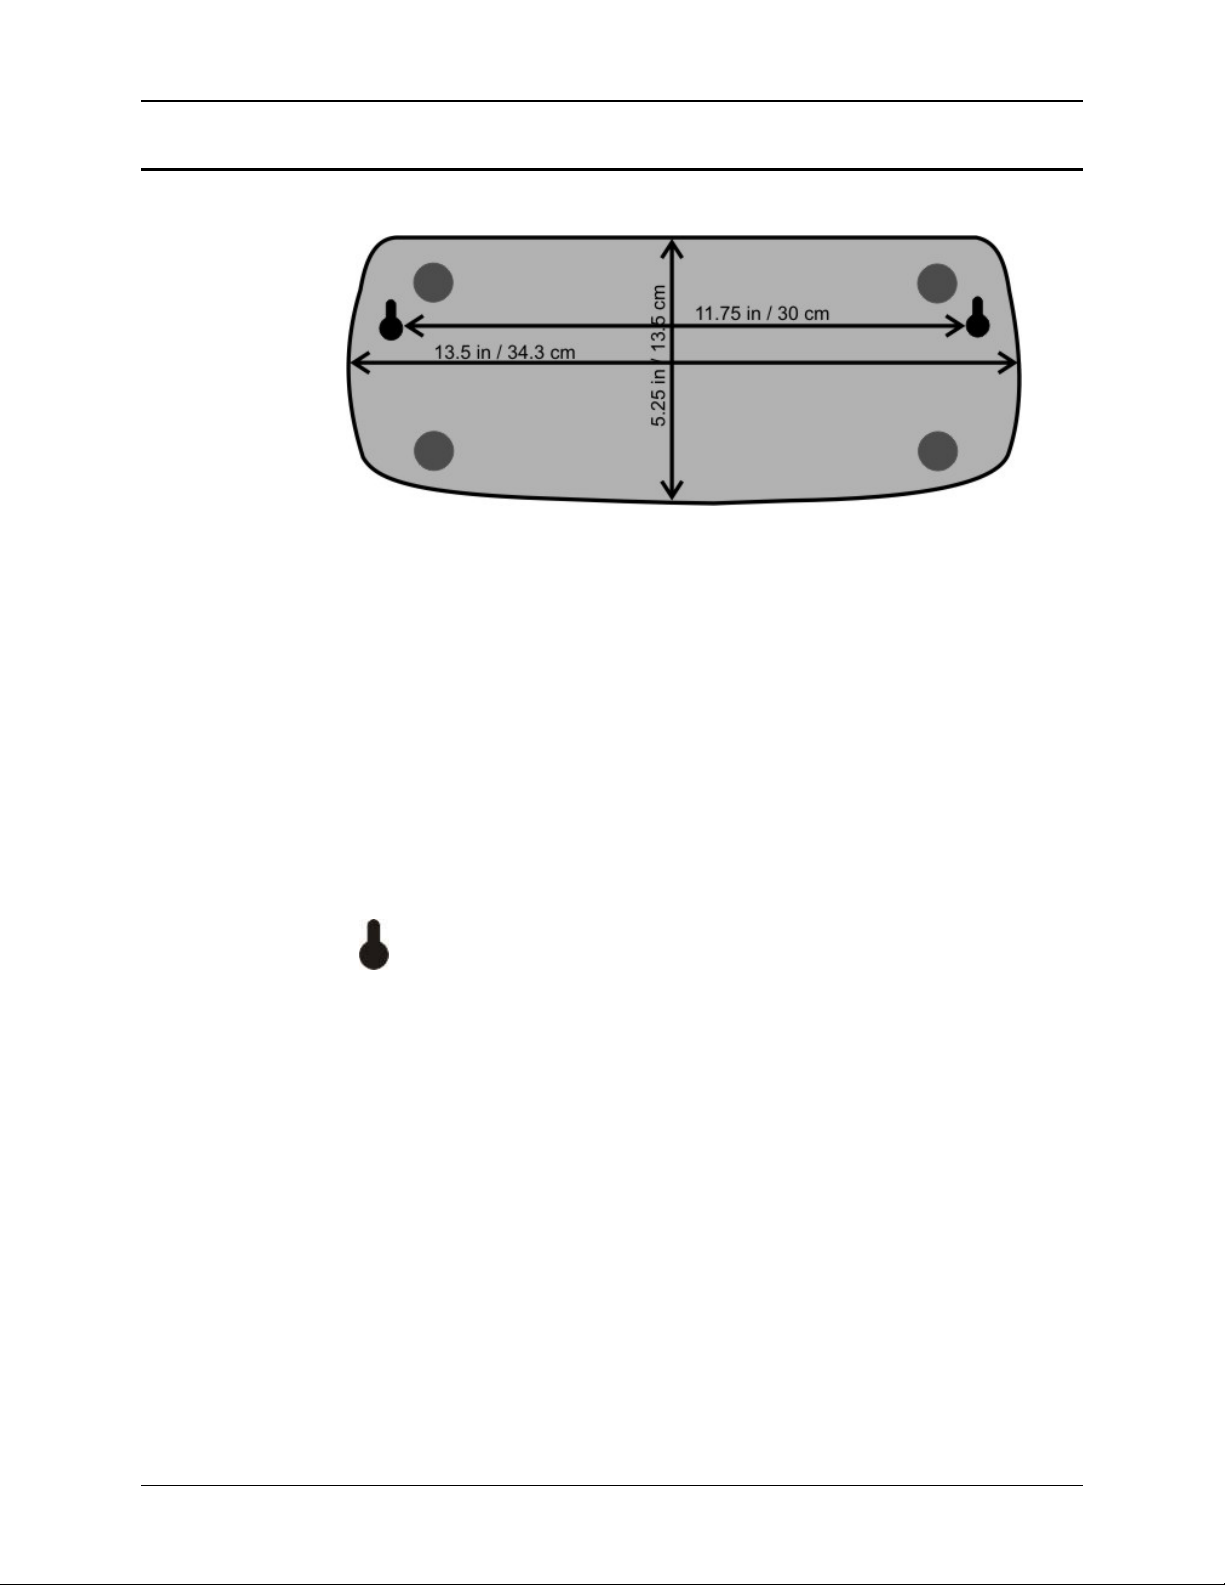
Multi-Charger Dimensions
Not To Scale
Figure 5 Multi-Charger Footprint
Note: LXE does not supply the hardware needed when mounting the multi-charger to a wall or
other flat, stable surface.
Weight 1.1 lbs / .50 kg (no batteries)
2.5 lbs / 1.13 kg (with a battery in each charging bay)
Length 13.5 in / 34.3 cm
Width 5.3 in / 13.5 cm
Height 1.75 in / 4.44 cm
The multi-charger should be mounted in an area close to a dependable AC power source.
The multi-charger can be mounted to a wall using the two mounting
keyholes on the base of the unit.
Mounting keyhole diameter is 3/8 in or 0.95 cm.
E-EQ-MX8CHGROG-A MX8 Multi-Charger User’s Guide
Page 12
8 Setup / Installation
LEDs
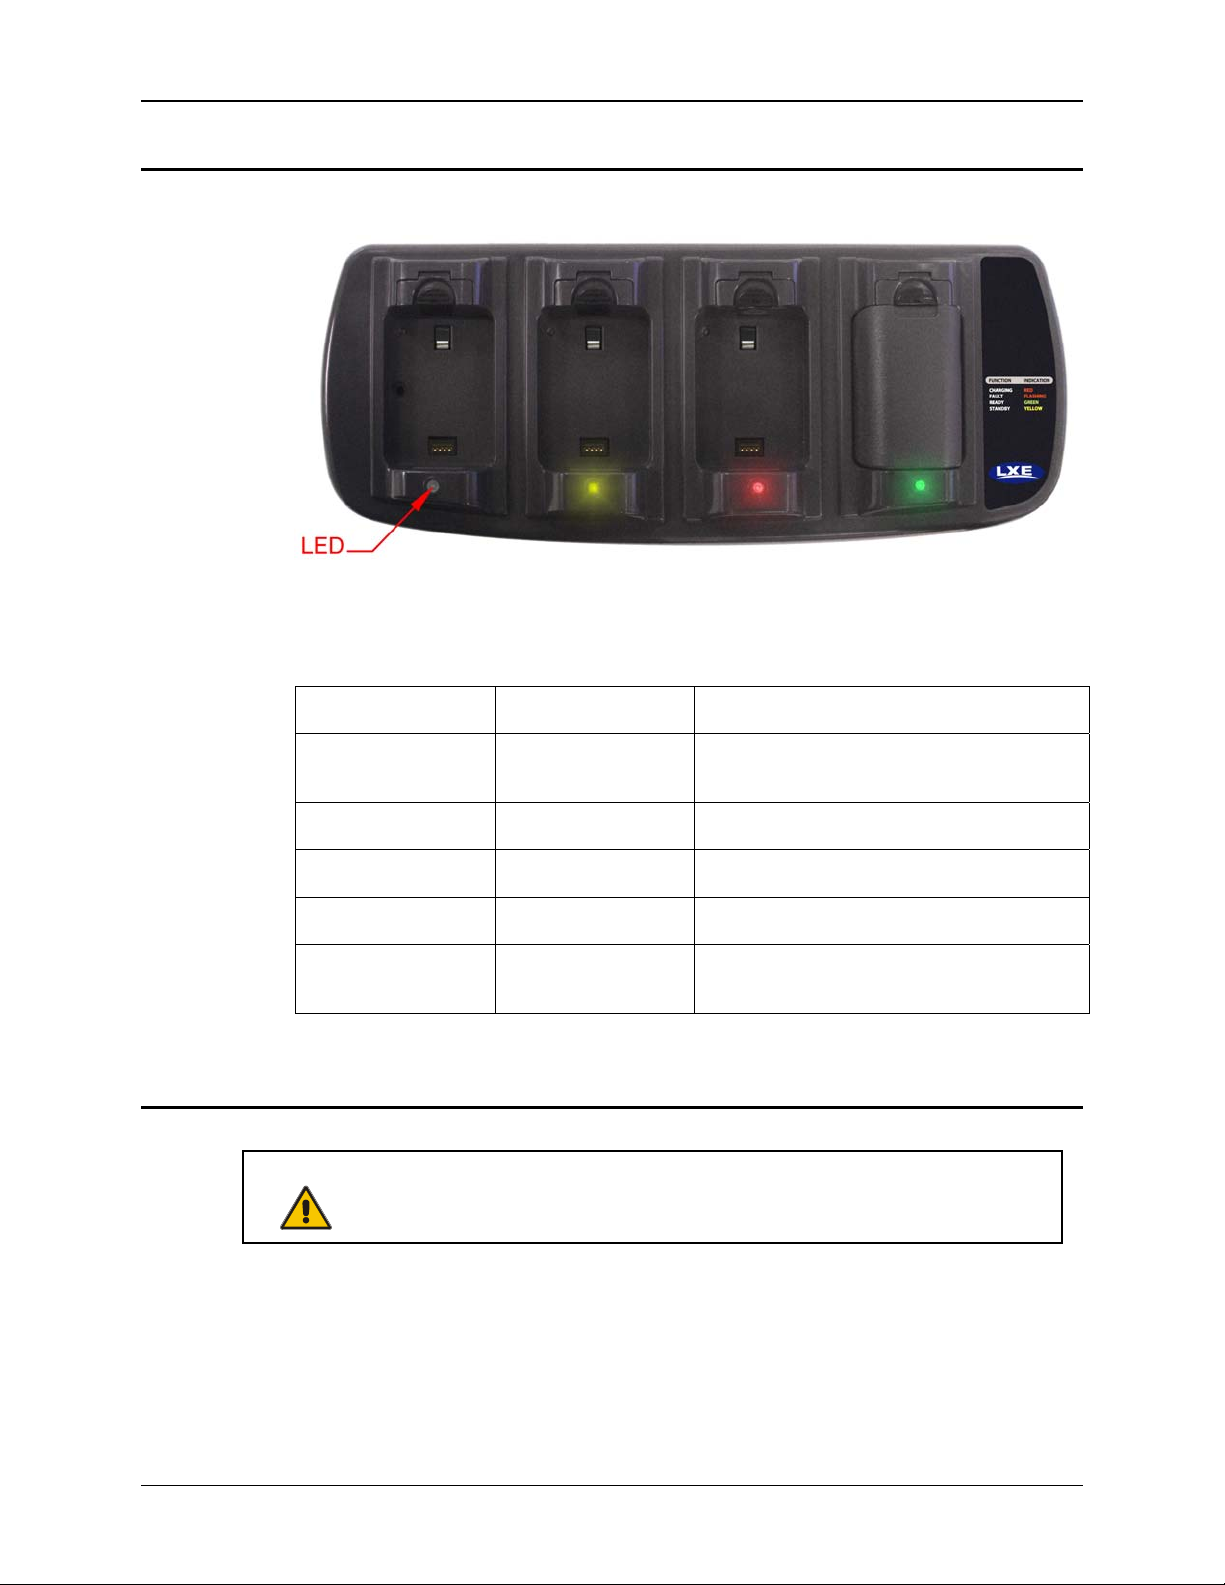
Figure 6 LED Location
The status of the charge operation is communicated by the LED located at the base of each
charging well.
LED Indication Description
Off No Battery/power Battery pack not plugged in or no power
Green Charged Battery pack fully charged.
Red Charging Battery pack charging.
Yellow Standby Battery pack temperature out of range.
Flashing Red on any
station
See Interpreting the LEDs later in this guide.
Orienting the Battery Pack
Caution!
When preparing the battery pack for insertion into the multi-charger well, hold the battery with its
four charging contacts in line with the charging contacts in the battery well. Aim the retaining
catch towards the back of the multi-charger.
It is important that battery packs are inserted into the charging well correctly.
Inserting the battery incorrectly could result in damage to the battery pack or the
multi-charger.
applied.
Fault Battery pack fault or failure.
MX8 Multi-Charger User’s Guide E-EQ-MX8CHGROG-A
Page 13
Progress Monitoring 9
Inserting the Battery Pack
Push the locking tab towards the back of the battery well until it stays in place. Place the battery in
the battery well, making sure the tab at the top of the battery pack fits into the slot at the top end of
the battery well. With a hinging motion, slip the battery down into the battery well until the
locking tab clicks into place and the battery pack is secure in the battery well.
Failure to follow these instructions can result in damage to the main battery or the multi-charger.
Caution!
Do not "slam" or slide the battery pack into the battery well. Damage may result.
Progress Monitoring
The MX8 Multi-Charger indicates the status of a battery pack with an LED located below each
charging well.
Charge Timer
The charge timer is based upon the capacity of the battery pack. There are two ranges and two
different timeouts. The charging bay LED flashes red to indicate a fault when the multi-charger’s
timeout period has expired. The LED also indicates a fault if the battery voltage does not rise
above 2.5V after 60 minutes.
E-EQ-MX8CHGROG-A MX8 Multi-Charger User’s Guide
Page 14

10 Progress Monitoring
Interpreting the LEDs
Each charging bay on the multi-charger has an LED. The LED located at the base of each pocket
communicates the status of the charge operation.
Note: On initial power-up, all four charging LEDs will light red, yellow, green for 1 second
before turning off.
RED - on any pocket
Continuous Battery pack is charging.
Flashing Battery pack fault or failure.
Battery multi-charger timeout period expiration.
GREEN - on any pocket
Continuous Battery pack charge complete - Ready.
YELLOW - on any pocket
Continuous Battery pack temperature is out of range - Standby.
NO LIGHT - on a pocket
No battery pack installed.
Defective or damaged battery pack or multi-charger. Refer to Troubleshooting.
NO LIGHT - on every pocket
No battery packs installed.
No power applied to the multi-charger.
MX8 Multi-Charger User’s Guide E-EQ-MX8CHGROG-A
Page 15
Maintenance 11
Maintenance
Use a clean soft cloth to wipe any dirt, moisture or grease from the battery pack, contacts or the
multi-charger. Do not use any liquid to clean the battery charging well or multi-charger contacts.
Unplug the multi-charger from power source before cleaning. Do not operate the multi-charger
with a damaged AC cord or plug.
Storage
Battery packs should be kept in a cool, dry place whenever possible. Do not store battery packs in
direct sunlight, on a metal surface, or anywhere the battery pack cannot cool down. Do not leave
the battery pack in a non-operating multi-charger. The battery pack may discharge through the
multi-charger rather than hold its charge.
Service
There are no user serviceable parts in the Rechargeable Lithium Ion Battery Pack or the MX8
Multi-Charger. Should your multi-charger require service, contact your LXE representative.
Do not operate the multi-charger if it has been dropped or damaged in any way. Return the multicharger to LXE.
Troubleshooting
The following is intended as an aid in determining whether the battery pack or the multi-charger may be
malfunctioning.
Problem Cause Solution
Battery pack does not fit in
battery well.
No battery pack in multicharger, but any of the LEDs are
on.
Charger is plugged into a live
outlet, battery pack is inserted,
but RED LED is OFF and no
other LEDs are on, or all LEDs
are off.
Different manufacturer's battery
pack, or there is an object in the
battery well.
Dirt or foreign objects are in the
battery well.
• Battery pack is not making
contact with charging
terminals in the battery
well.
• Faulty battery pack.
• New battery pack, same
result.
Check if the battery pack is LXE part
number 161376-0001. If not, do not use.
Remove the object from the battery well.
Unplug multi-charger from outlet.
Remove any dirt or foreign objects from
battery wells. If the LEDs continue to
remain ON, the multi-charger may be
defective. Return multi-charger to an
authorized LXE service center.
• Push battery pack in firmly. Do not
"slam" the battery pack into the
battery well.
• Replace battery pack.
• Contact LXE for replacement
options.
E-EQ-MX8CHGROG-A MX8 Multi-Charger User’s Guide
Page 16
12 Troubleshooting
Problem Cause Solution
When you first put a fully
charged battery pack in the
battery well, the RED LED
comes on, indicating the battery
pack is charging.
LED is flashing RED at any
station.
During the first few minutes, the
multi-charger checks the battery
pack for correct voltage and
charge state. During this time
the LED is RED and is
continuously ON. After
charging is complete, the LED
is GREEN.
Current could not be sourced
through the battery pack due to
age, exhaustion or damage to
the cell(s). The battery pack
does not communicate with the
multi-charger.
OR
The battery pack voltage has not
reached 2.5V within 60 minutes
and the multi-charger has timed
out.
OR
The multi-charger’s timeout
period has expired.
There is nothing wrong with the battery
pack or multi-charger.
Contact LXE for battery pack
replacement options.
Contact LXE for battery pack
replacement options.
Make sure that the battery pack
temperature is within specification and
retry charging. If problem repeats,
contact LXE for battery pack replacement
options.
Solid YELLOW LED when
battery pack is inserted in the
multi-charger.
The battery pack is too hot or
too cold to charge.
Remove battery pack from the multicharger and allow it to adjust to room
temperature.
Note: If the battery pack is left in the
multi-charger, it will cool down or warm
to a temperature upon which the multicharger will begin the charge cycle.
However, depending on the temperature
of the battery, it may take 2-3 hours to
adjust. The cool-down of a battery pack
is much quicker if the battery is not in the
battery well.
MX8 Multi-Charger User’s Guide E-EQ-MX8CHGROG-A
Page 17
Getting Help 13
Getting Help
LXE manuals are now available on one CD and they can also be viewed/downloaded from the
LXE ServicePass website. Contact your LXE representative to obtain the LXE Manuals CD. You
can also check the LXE ServicePass website for the latest releases of LXE manuals.
You can get help from LXE by calling the telephone numbers listed on the LXE Manuals CD, in
the file titled Contacting LXE. This information is available on the LXE ServicePass website.
Explanations of terms and acronyms used in this manual are located in the file titled LXE
Technical Glossary on the LXE Manuals CD and on the LXE ServicePass website.
Accessories
MX8 Multi-Charger (4 bay), main battery charger with power
supply, with US power cord
MX8 Multi-Charger (4 bay), main battery charger with power
supply, no power cord
Lithium Ion Battery (Li-Ion), MX8 MX8A380BATT
MX8A385CHGR4US
MX8A386CHGR4WW
E-EQ-MX8CHGROG-A MX8 Multi-Charger User’s Guide
Page 18

14 Accessories
MX8 Multi-Charger User’s Guide E-EQ-MX8CHGROG-A
 Loading...